

Panasonic NV-VZ1PNA, NV-VZ1PN User Manual

Model No.
NV-VZ1PN/PNA
VHS-C Movie Camera
NV-RZ3PN/PNA
NV-VZ1PN/PNA NV-RZ3PN/PNA
Operating Instructions
Before use, please read these instructions completely.
VQT8947
1234
CAMERA
5
6, 7
V C R
INFO-
WINDOW
17
8
10
9
11
1312
14 15 16
Controls and Components
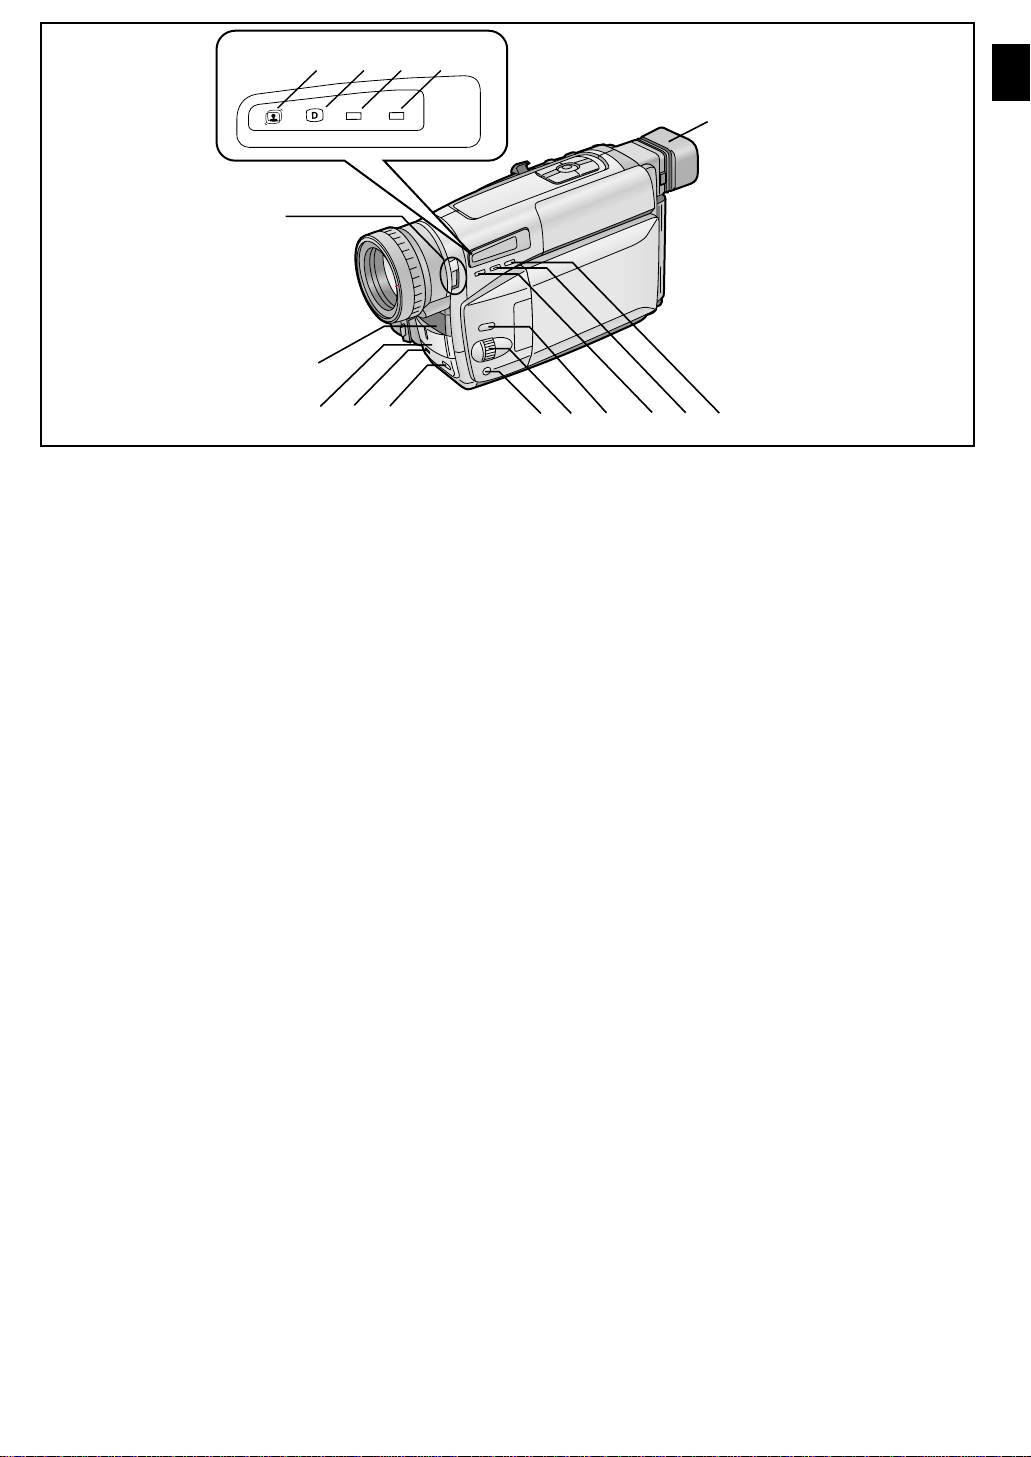
1 Super Image Stabilizer Indication Lamp [[]
(m 44, 47)
2 Digital Effect Indication Lamp [´] (m 44, 48)
3 Camera Mode Lamp [CAMERA] (m 30)
4 VCR Mode Lamp [VCR] (m 35, 37)
5 0-Lux Recording Switch [0 LUX OFF/ON] (m 51)
6 White Balance Sensor (m 72)
7 Built-in Infra-red Beam Emitters (m 51)
8 Microphone
9 Tally Lamp (m 31)
10 Fade Button [FADE] (m 42)
11 Focus Button [FOCUS] (m 56)
Item Set Button [SET] (m 16)
Tracking Button (m 39)
12 Multi-Function Dial [
(m 16, 39, 56)
13 Menu Button [MENU] (m 16)
14 Auto Exposure Selector Button [PROG. AE]
(m 30, 54, 56, 57)
15 Fade Mode Selector Button [FADE MODE] (m 43)
16 Color Selector Button for Fade [COLOR] (m 43)
17 Eyecup
3434
34/MF/TRACKING]
3434
18
19
s SEARCH SEARCH r
S
65
;W.B
∫1
BLC
20
21
22
23 24
26 27
25
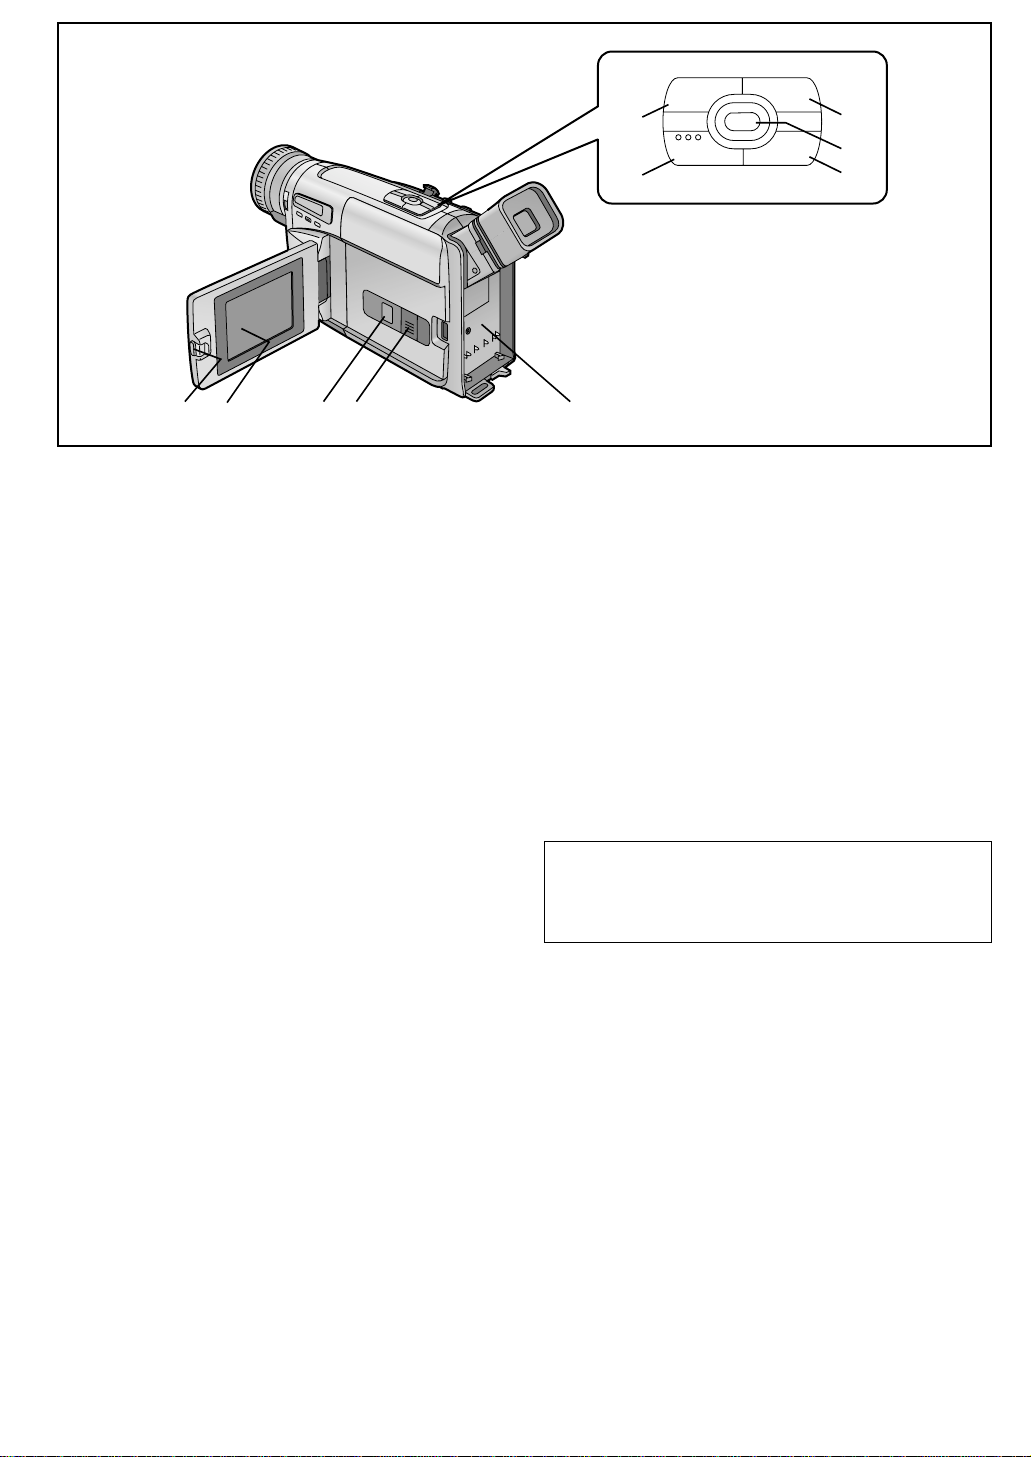
18 Reverse Search Button [
ss
sSEARCH] (m 32)
ss
Rewind/Review/High-Speed Rewind Button [C]
(m 35, 39, 40)
Recording Check Button [S] (m 32)
19 Stop Button [∫] (m 35)
20 Forward Search Button [SEARCH
rr
r] (m 32)
rr
Fast Forward/Cue Button [D] (m 40)
21 White Balance Button [
W.B
] (m 54)
Pause Button [;] (m 40)
22 Playback Button [
11
1] (m 35)
11
Backlight Button [BLC] (m 59)
23 LCD Monitor Open Lever [LOPEN] (m 15)
(NV-VZ1 only)
24 LCD Monitor (m 15, 21, 41) (NV-VZ1 only)
Due to limitations in LCD production technology, there
may be some tiny bright or dark spots on the LCD
Monitor screen. However, this is not a malfunction and
does not affect the recorded picture.
25 Cassette Compartment Window (m 22)
26 Cassette Compartment Lock Button [LOCK] (m 22)
27 Battery Holder (m 13)
28
29
V
A
30
38
39
34
40
NV-VZ1 NV-RZ3
41
31
32
33
34
35
36
37
42
43
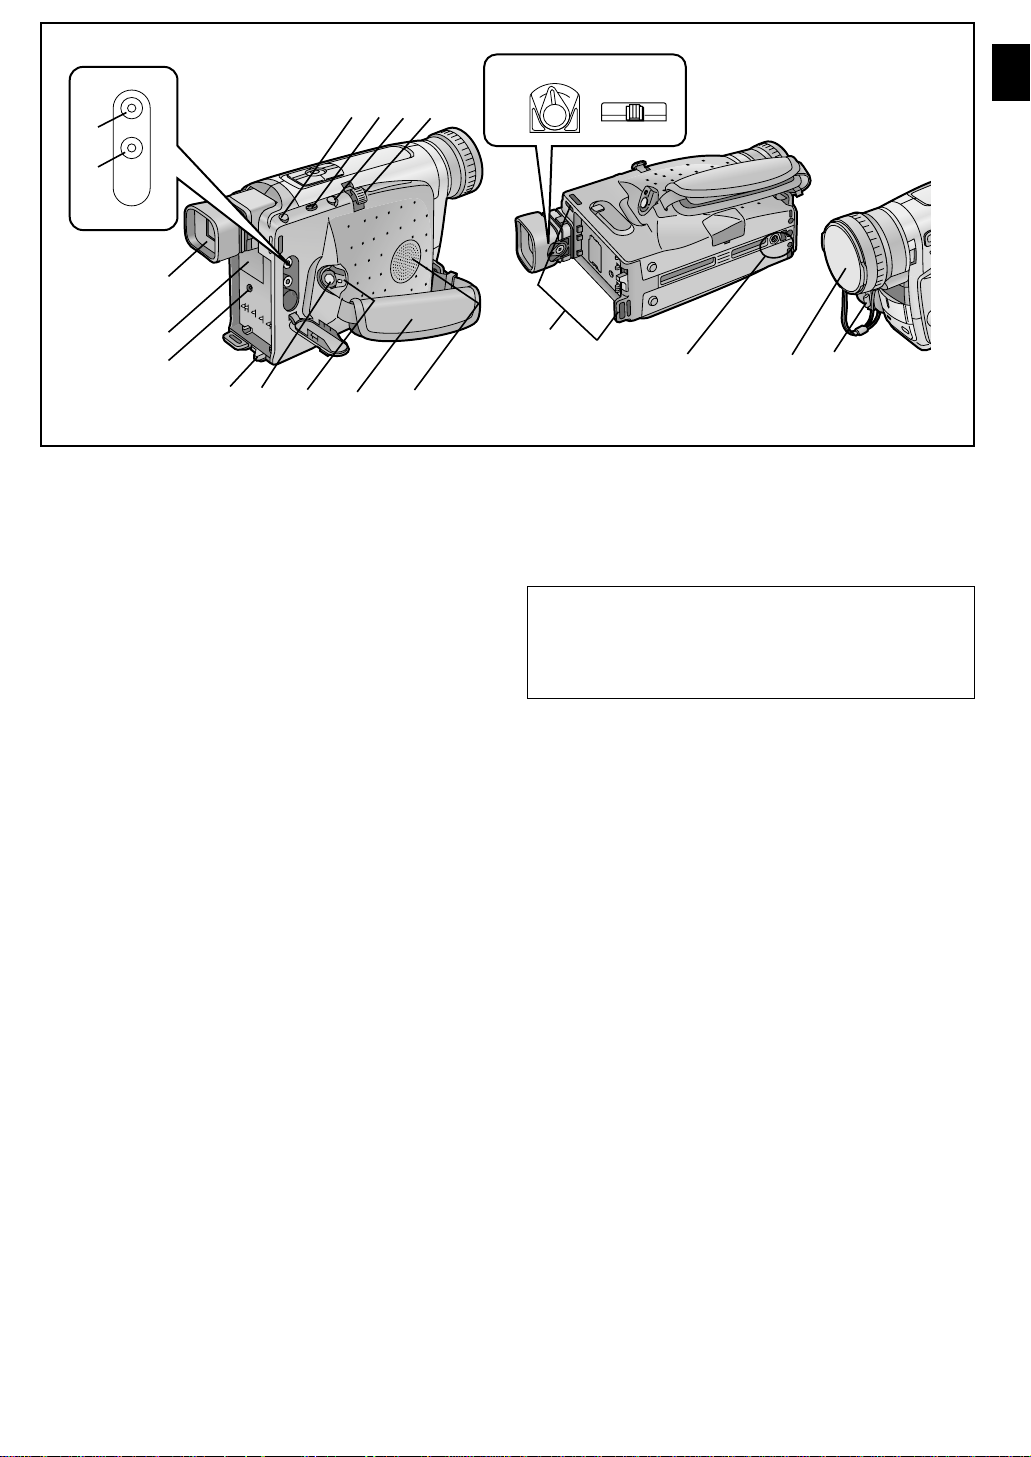
28 Video Output Jack [V] (m 37, 68)
29 Audio Output Jack [A] (m 37, 68)
30 Finder (l 25, 41)
Due to limitations in LCD production technology, there
may be some tiny bright or dark spots on the Finder
screen, the whole screen may have a slight color cast,
and flickering may occur. However, this is not a
malfunction and does not affect the recorded picture.
31 Cover of the Button-type Battery’s Compartment
[BACKUP BATTERY] (l 27)
32 DC Input Jack [DC IN] (l 10)
33 Battery Eject Lever [
34 Recording Start/Stop Buttons (l 29, 30)
Use either of these buttons depending on the recording
angle.
35 Off/On Mode Selector Switch [CAMERA/OFF/VCR]
(l 13, 30, 35, 41)
36 Grip Belt (l 25)
37 Speaker (m 35) (NV-VZ1 only)
38 Cassette Eject Button [< EJECT] (l 22)
39 Date/Time/Title Button [DATE/TITLE] (m 29, 64)
40 Zoom Lever [W/T] (l 33, 48)
Volume Adjustment Lever [
(NV-VZ1 only)
41 Eyepiece Corrector Lever (l 25)
42 Shoulder Strap Holders (l 26)
43 Tripod Receptacle
44 Lens Cap (l 25, 54)
45 Lens Cap Holder (l 25)
""
"BATTERY EJECT] (l 13)
""
44 45
ss
sVOL
ss
rr
r] (l 35)
rr
2 3
1
1
2
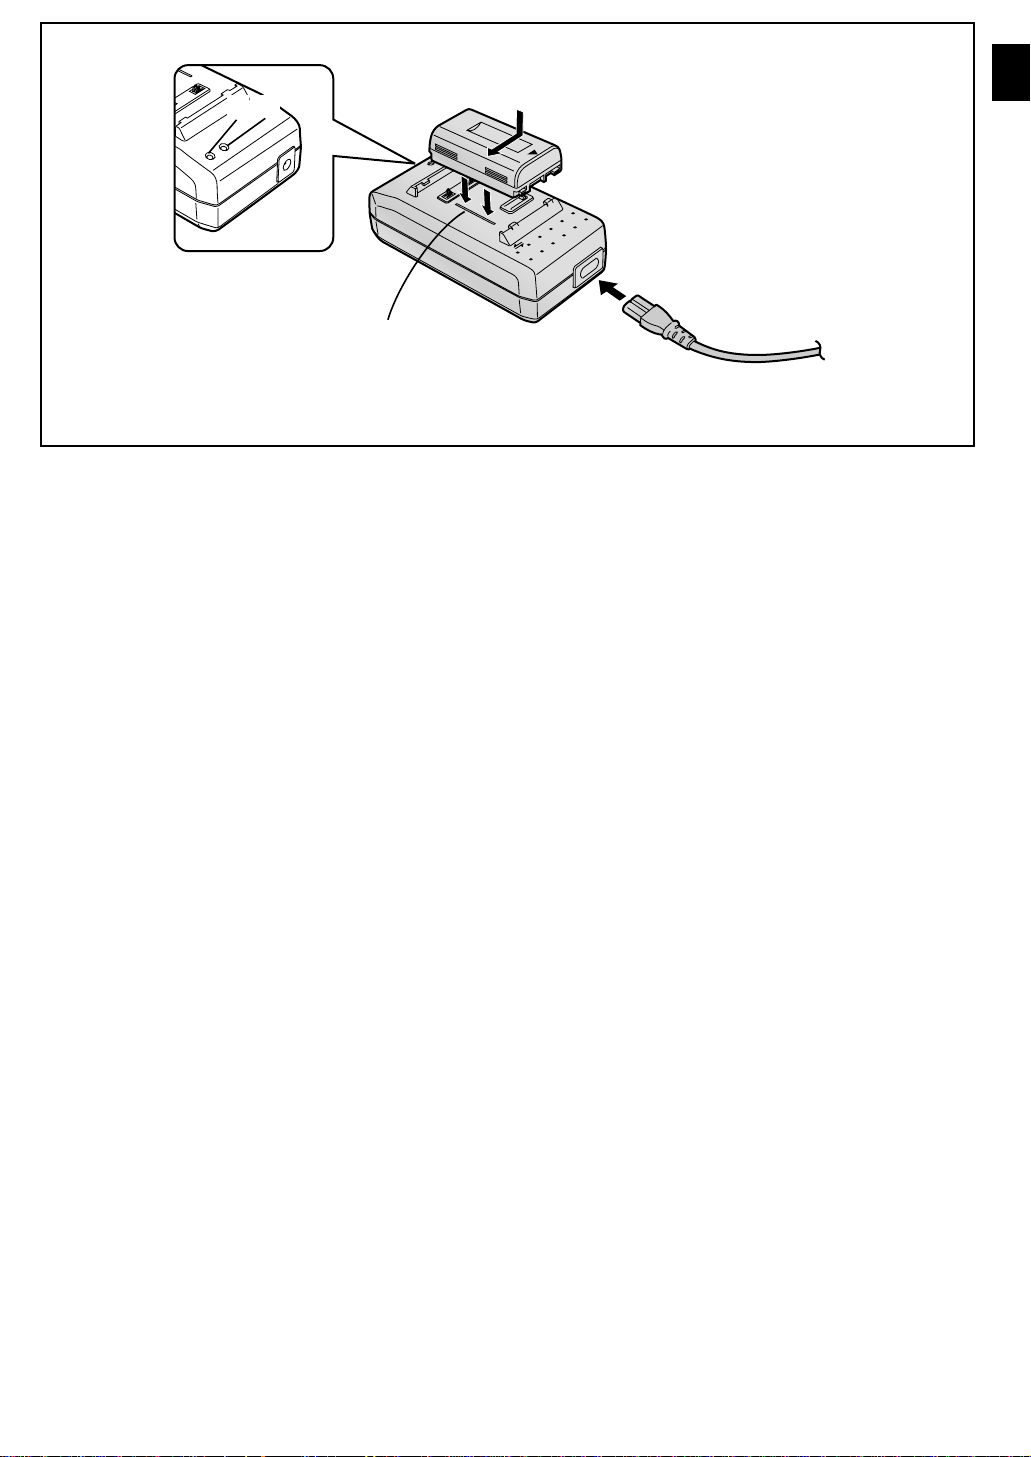
Charging the Battery
Charge the Battery before using it.
1 Attach the Battery.
≥Align the Battery with line 1 and push it in the direction
of the arrow while holding it down.
2 Securely connect the AC Power Cord to the AC
Adaptor and an AC mains jack.
≥The [POWER] Lamp 2 lights and then the [CHARGE]
Lamp 3 flashes and charging starts.
≥If the [CHARGE] Lamp 3 does not flash even though
the Battery is attached, remove the Battery and then reattach it.
∫∫
∫ Charging Lamp [CHARGE]
∫∫
Flashing: During charging
Lit: The Battery can already be used to
operate the Movie Camera but it is not
yet fully charged.
(Approx. 30-minute battery charge)
Off: The Battery is fully charged.
∫∫
∫ Removing the Battery
∫∫
Slide it in the opposite direction of that indicated in step 1
above.
≥Charge the Battery at a room temperature between 10xC and
30xC.
≥When charging, do not connect the DC Input Lead to the AC
Adaptor.
≥During recording or charging, the Battery becomes warm.
However, this is normal.
≥If you charge the Battery when it is not yet discharged, the
[CHARGE] Lamp 3 may flash briefly and then go out. This
indicates that the Battery is fully charged. Therefore, this is
not an indication of a malfunction.
CGR-V610
CGR-V620
CGR-V816
A
B
C
A
B
C
A
B
C
NV-VZ1
80 min.
90 min. (70 min.)
40 min. (30 min.)
145 min.
190 min. (140 min.)
40 min. (30 min.)
310 min.
380 min. (280 min.)
40 min. (30 min.)
NV-RZ3
80 min.
90 min.
40 min.
145 min.
180 min.
40 min.
310 min.
360 min.
40 min.
∫∫
∫ Charging Time and Maximum Continuous
∫∫
Recording Time in the Manual Recording Mode
A Charging Time for a Full Charge
B Maximum Continuous Recording Time
C Maximum Continuous Recording Time for an Approx.
30-Minute Charge
≥“70 min.” stands for “70 minutes”.
≥The Battery Model CGR-V610 is supplied.
≥The times shown in the above chart are approximations. The
figures in parentheses show the recording time when using
the °LCD Monitor.
°LCD Monitor: NV-VZ1 only
Maximum Continuous Recording Time means the duration of
continuous recording performed at an ambient temperature of
25xC and 60% relative humidity. In actual recording, however,
the use of the zoom and other functions increases the power
consumption, and higher or lower temperatures reduce the
Battery’s ability to generate electricity. Therefore, the actual
recording time per Battery may be approximately 30%–50%
shorter than listed above.
 Loading...