

Panasonic NVS7EG User Manual [en, de, fr]
Panasonic
S-VHS Compact Movie
NV-S7Series
Operating Instructions
Bedienungsanleitung
Mode d’emploi
■ II
• *0
\-
SvusB
625
Before attempting to connect, operate or adjust this product, please read these instructions completely.
VQT4499

ENGLISH
DEUTSCH
FRANÇAIS
Please read these Operating Instructions
carefully—especially the cautions on page 101 and
thereafter—before using the Movie Camera for the
first time. Keep these Operating Instructions handy
for later reference, in case you want to look up
something in the future.
Cautions:
Injury or material damage resulting from any kind of
use that is not in accordance with the operating
procedures explained in the Operating Instructions
are the sole responsibility of the user.
Lesen Sie diese Bedienungsanleitung vor der
Inbetriebnahme des Kamerarecorders und seines
Zubehörs bitte sorgfältig durch, insbesondere auch
die Vorsichtsmaßnahmen ab Seite 103.
Bewahren Sie die Bedienungsanleitung bitte auf für
den Fall, daß Sie später wieder einmal etwas
nachsehen möchten.
Achtung;
Für Verletzungen oder materielle Schäden, die durch
unsachgemäße Benutzung entsteht, welcheinicht
den Anweisungen in der Bedienungsanleitung
entspricht, ist der Benutzer allein verantwortlich.
Information for Your Safety
Informationen für Ihre Sicherheit
Informations relatives à votre sécurité
IMPORTANT
Your attention is drawn to the fact
that recording of pre-recorded
tapes or discs or other published
or broadcast material may infringe
copyright laws.
WARNING
TO REDUCE THE RISK OF FIRE OR
SHOCK HAZARD, DO NOT
EXPOSE THIS EQUIPMENT TO
RAIN OR MOISTURE.
S-VHS-C Movie NV-S7
•The rating plate is on the bottom
side of the Movie Camera.
AC Adaptor VW-AS1
•The rating plate is on the bottom
side of the unit.
•This model conforms to the EC
directive (for radio interference)
87/308/EEC.
FOR YOUR SAFETY
■ DO NOT REMOVE THE OUTER
COVER.
To prevent electric shock, do not remove
the cover. There are no user serviceable
parts inside. Refer servicing to qualified
service personnel.
CAUTION
Danger of explosion if battery is
incorrectly replaced. Replace only
with the same or equivalent type
recommended by the equipment
manufacturer. Discard used batteries
according to manufacturer’s
instructions.
Video cassettes recorded in the S-VHS
mode can be played back on this Movie
Camera and on other S-VHS VTRs
(Video Tape Recorders),
However, they cannot be played back on
VHS VTRs.
For more details, see page 16.
WICHTIG
Beachten Sie bitte, daß das
Aufnehmen von bespielten
Bändern oder Schallplatten bzw.
von anderem veröffentlichten oder
gesendeten Material
Urheberrechte verletzen kann.
WICHTIGER HINWEIS
UM DIE GEFAHR VON FEUER
ODER ELEKTRISCHEM SCHLAG
ZU VERRINGERN, DARF DIESES
GERÄT WEDER REGEN NOCH
FEUCHTIGKEIT AUSGESETZT
WERDEN.
S-VHS-C Kamerarecorder NV-S7
•Das Typenschild befindet sich an
der Unterseite des Gerätes.
Netzadapter VW-AS1
•Das Typenschild befindet sich ah
der Unterseite des Gerätes.
• Dieses Modell entspricht der
EC-Richtlinie 87/308/EEC (für
Radiointerferenz).
FÜR IHRE SICHERHEIT
■ DAS GEHÄUSE NICHT ÖFFNEN.
Im Gehäuse befinden sich Baugruppien,
die Hochspannung führen. Um die ■
Gefahr eines elektrischen Schlages ¡zu
vermeiden, das Gehäuse nie öffnen. Im
Geräteinneren gibt es keine Teile, die
von Laien gewartet werden können.
Wenden Sie sich für Reparaturarbeiten
bitte an das Fachpersonal.
VORSICHT
Bei falsch eingesetzter Batterie
besteht Explosionsgefahr. Nur mit
einer vom Hersteller empfohlenen
Batterie vom gleichen Typ ersetzen.
Verbrauchte Batterien beim |
Fachhändler oder einer Sammels^lle
für Sonderstoffe abliefern.
Videocassetten, die mit diesem
Kamerarecorder in der S-VHSBetriebsart aufgezeichnet worden sind,
können auf diesem Kamerarecorder
sowie auch auf anderen S-VHSVideorecordern wiedergegeben werden.
Für nähere Einzelheiten, siehe Seite 17.
Veuillez lire avec soin ce mode d’emploi avant
d’utiiiser cet appareil pour la première fois,
particulièrement les précautions indiquées page 105
et suivantes. Veuillez garder ce mode d’emploi à
portée de main pour vous y référer ultérieurement,
au cas où plus tard vous désireriez retrouver un
renseignement.
Précautions;
Tout dommage ou dégât matériel résultant d’un
usage non conforme aux instructions données dans
le mode d’emploi sont sous l’entière responsabilité
de l’utilisateur.
Information for your safety.
Information für Ihre Sicherheit.
Informations relatives à votre sécurité.
IMPORTANT
Nous attirons votre attention sur le
fait que l’enregistrement de
bandes pré-enregistrées ou de
disques ainsi que d’informations
publiées ou transmises sur les
ondes peut constituer une
violation des lois sur les droits
d’auteur.
AVERTISSEMENT
AFIN D’EVITER TOUT RISQUE
D’INCENDIE OU
D’ELECTROCUTION, NE PAS
EXPOSER CET APPAREIL A LA
I
PLUIE OU A L’HUMIDITE.
Caméscope S-VHS-C NV-S7
• La plaque signalétique se trouve en-
dessous du caméscope.
Adaptateur CA VW-AS1
•La plaque signalétique se trouve en-
dessous de l’appareil.
•Ce modèle est conforme à la
directive de la EC (relative aux
interférences radio) 87/308/EEC.
POUR VOTRE SECURITE
■ NE JAMAIS ENLEVER LE BOITIER
DE L’APPAREIL.
Afin d’éviter tout risque d’électrocution,
ne pas enlever le bottier. Le caméscope
ne contient aucune pièce pouvant être
réparée par l’utilisateur. Confier toute
réparation à un technicien compétent.
PRECAUTION
Si l’on remplace incorrectement la
pile, cela peut présenter des risques
d’explosion. Remplacer uniquement
la plie avec une identique ou de type
équivalent recommandée par le
fabriquant. Se débarrasser des piles
usagées en tenant compte des
instructions du fabriquant.
Les cassettes vidéo enregistrées en
S-VHS peuvent être lues sur ce
caméscope ainsi que sur tout autre
magnétoscope S-VHS. Mais elles ne
peuvent pas être lues sur un
magnétoscope VHS. Pour plus *'
détails, se reporter à la page 1
-2-

Checklist for the Standard Accessories
Prüf liste für das mitgelieferte Zubehör
Liste des accessoires
1. VW-ASIE
§||1|||||||Д 9. VW-TCA7E
ENGLISH
1. AC Adaptor
For supplying power to the Movie
Camera or for charging the Battery Pack
2. DC Input Cable
For connection to the AC Adaptor
3. Battery Pack
For supplying power to the Movie
Camera
4. Button Type Battery
For storing the date and time in
memory.
5. Shoulder Strap
2. VJA0669
3. VW-VBS1E
DEUTSCH
1. Netzadapter
Für die Versorgung des
Kamerarecorders mit Strom oder zum
Wiederaufladen des Akkus.
2. Gleichstrom-Anschlußkabel
Zum Anschließen des Kamerarecorders
an den Netzadapter.
3. Akku
Für die Versorgung des
Kamerarecorders mit Strom.
4. Knopfzelle
Für die Aufrechterhaltung des Datums
und der Uhrzeit im Speicher.
4. CR2032
fcSSÿ'CT.
FRANÇAIS
1. Adaptateur CA
Pour alimenter le caméscope ou pour
recharger la batterie.
2. Câble d’entrée CC
Pour brancher l'adaptateur CA
3. Bloc-batterie
Pour alimenter le caméscope.
4. Piie-bouton pour ie fonctionnement
de l’horioge
Pour stocker la date et l'heure dans la
mémoire.
5. Bandoulière
5. VFC0974
10. R6
6. AV Output Cable
For connection to a TV set.
7. Audio Cable
For connection to a TV set
8. S-Video Cable
For connection to a TV set
9. Cassette Adaptor
For piayback via a VTR
10. Battery
For the Cassette Adaptor
CAUTION:
TO REDUCE THE RISK OF FIRE OR
SHOCK HAZARD AND ANNOYING
INTERFERENCE, USE ONLY THE
RECOMMENDED ACCESSORIES.
Information for your safety.
5. Schultertrageriemen
6. AV-Ausgangskabel
Zum Anschließen des Kamerarecorders
an ein Fernsehgerät.
7. Audio-Anschiußkabei
Zum Anschließen des Kamerarecorders
an ein Fernsehgerät.
8. S-Video-Anschiußkabel
Zum Anschließen des Kamerarecorders
an ein Fernsehgerät.
9. Cassettenadapter
Für die Wiedergabe auf einem
Videorecorder.
10. Batterie
Für den Cassettenadapter.
ACHTUNG:
UM DiE GEFAHR VON FEUER,
ELEKTRISCHEM SCHLAG UND
FUNKTIONSSTÖRUNG MÖGLICHST
ZU VERMEIDEN, SOLLTE
AUSSCHLIESSLICH DAS
EMPFOHLENE ZUBEHÖR
VERWENDET WERDEN.
6. Câble de sortie AV
Pour le raccordement à un téléviseur
7. Câble audio
Pour le raccordement à un téléviseur.
8. Câble S-Vidéo
Pour le raccordement à un téléviseur.
9. Adaptateur de cassette
Pour la lecture sur magnétoscope.
10. Pile
Pour le fonctionnement de l'adaptateur
de cassette.
AVERTISSEMENT
NE PAS EXPOSER CET APPAREIL A
LA PLUIE OU A L’HUMIDITE AFIN
D’ECARTER TOUT RISQUE
D’INCENDIE OU D’ELECTROCUTION.
Informations relatives à votre sécurité.
Information für Ihre Sicherheit.
-3-
ENGLISH
Contents
Controls and Functions.......................................................... 6
S-VHS Format
Compatibility of VTRs and Tapes
Using the Battery Pack........................................................ 18
Using the AC Adaptor or the Car Battery Cord (optional). 22
Setting the Clock
Recording the Date and Time during Shooting
Extending the Viewfinder/Adjusting the Eyepiece
Corrector
Adjusting the Grip Belt/Removing the Lens Cap
Attaching the Shoulder Strap
Adjusting the Angle of the Viewfinder................................ 32
Inserting the Video Cassette
Preventing Accidental Erasure of Recordings .................. 34
Confirming the Remaining Tape Time .............................. 36
Using the Tape Counter Indication...................................... 38
Using the On-Screen Display Function
Index Signals (VISS)
Holding the Movie Camera for Shooting
...................................................................
.....................................
................................................................
.................
..........................................................................
..............
.............................................
..............................................
..............................
...........................................................
.............................
16
16
24
28
28
30
32
34
40
40
42
ILLUSTRATION
Shooting............................................................................. 46
Checking the Recorded Scene
Shooting with Clean Edits.................................................. 48
Searching for a Previously Shot Scene
Shooting with the Digital Image Stabilizer Function
Taking a Snapshot............................................................. 54
Shooting a Still Picture....................................................... 56
Shooting with Strobe Effect
Shooting with the Zoom Function
Shooting with the Fade Function
Shooting Landscapes at Dusk or Other Evening Scenes — 64
Shooting Backlit Scenes ................................................... 64
Shooting in the Dark
Shooting with the Macro Function
Shooting Fast-Moving Subjects
Automatic White Balance Adjustment ............................... 72
Manual White Balance Adjustment.................................... 74
Focusing............................................................................ 78
Inserting a Still Picture with Wipe Editing
Fading Over or Superimposing a Still Picture onto the Moving
Picture............................................................................. 84
Playbac
Playback via a TV Set (Connections)
Playback on a Video Tape Recorder (VTR)
Playback
Copying (Dubbing) ............................................................ 96
............................................................................
..........................................................
.........................................
............................
..........
...............................................
.....................................
.......................................
....................................
........................................
.........................
..............................
.....................
48
50
52
58
60
62
66
68
70
82
86
90
92
After Use
Cleaning............................................................................. 98
ViTCSignais .......................................................................100
Cautions............................................................................ 101
Before Requesting Service ..............................................
Quick Reference Guide to the Indications in the
Viewfinder ......................................................................110
Specifications.....................................................................114
Optional Accessories
Warning/Alarm indications in the Viewfinder......................118
..............
............................................................
........................................................
98
107
117
-4-

DEUTSCH
FRANÇAIS
Inhalt
Bedienungselemente und ihre Funktionen ......................... 7
Das S-VHS Videoformat ................................................... 17
Kompatibilität von Videorecordern und Cassetten
Verwendung des Akkus .................................................... 19
Verwendung des Netzadapters oder des Auto-/Boots-Akku-
Anschlußkabels (Sonderzubehör) ................................. 23
Einstellen der Uhrzeit
Einblenden der Uhrzeit- und/oder Datum-Anzeige beim
Aufnehmen..................................................................... 29
Herausziehen des Suchermonitors/Okularkorrektur
Verstellen des Handgriff-Riemens/Abnehmen des
Objektivdeckels
Befestigen des Schultertrageriemens
Einstellen des Sucherwinkels ........................................... 33
Einsetzen einer Videocassette ......................................... 35
Schutz einer Aufnahme vor unbeabsichtigtem
Löschen ......................................................................... 35
Kontrollieren der Bandrestzeit
Benutzung der Bandzählwerk-Anzeige
Benutzung der Anzeigen-Einblendfunktion im Sucher
Index-Signale (VISS)
Halten des Kamerarecorders beim Aufnehmen
.......................................................
.............................................................
..............................
...........................................
.............................
.......................................................
...........
........
.....
...............
17
25
29
31
33
37
39
41
41
43
Table des matières
Commandes et éléments constitutifs
Le format S-VHS .............................................................. 17
Compatibilité des magnétoscopes et des cassettes
Le bloc-batterie
L’adaptateur CA et le cordon pour batterie de voiture
(en option) ..................................................................... 23
Réglage de l’horloge......................................................... 25
Enregistrement de la date et de l’heure pendant
la prise de vue
Déploiement du viseur électronique/
Réglage du correcteur d’oculaire .................................. 29
Réglage de la courroie de poignée/Comment enlever le
capuchon de l’objectif ................................................... 31
Comment fixer la bandoulière
Réglage de l’angle du viseur électronique........................ 33
Comment introduire la cassette vidéo .............................. 35
Comment éviter que des enregistrements ne soient
effacés accidentellement
Confirmation du temps restant sur la bande
Indication du compteur de bande ..................................... 39
Fonction d’affichage sur l’écran ....................................... 41
Les signaux d'index (VISS)
Comment tenir le caméscope
................................................................
..............................................................
...............................................
....... .....................................
................................
.........
...........................................
....................
..........................................
7
17
19
29
33
35
37
41
43
Aufnehmen
Überprüfen einer aufgenommenen Szene
Aufnehmen mit sauberen Szenenübergängen
Wiederauffinden früher aufgenommener Szenen
Aufnehmen mit der Bildstabilisator-Funktion
Aufnehmen einer Schnappschuß-Aufnahme
Aufnehmen einer Standbild-Aufnahme ............................. 57
Aufnehmen mit Stroboskop-Effekt .................................... 59
Aufnehmen mit Zoomen ................................................... 61
Autnehmen mit Ein- und Ausblenden
Aufnehmen von Landschaften bei Sonnenuntergang oder
von anderen Abendszenen
Aufnehmen von Szenen mit Gegenlicht
Aufnehmen im Dunkeln
Aufnehmen mit der Makro-Funktion
Aufnehmen von Motiven mit schneller Bewegung
Automatischer Weißabgleich ............................................ 73
Manueller Weißabgleich ................................................... 75
Scharfeinstellung .............................................................. 79
Einfügen eines Standbildes mit der Funktion ,,Wipe“ in eine
laufende Aufnahme ....................................................... 83
Überblenden oder Einblenden eines Standbildes in eine
laufende Aufnahme ....................................................... 85
Wiedergabe über ein Fernsehgerät
(Anschlußverbindungen)
Wiedergabe auf einem Heimvideorecorder
Wiedergabe
Überspielen (Kopieren)
........................................................................
........................
..................
.............
.....................
...................
................................
...........................................
............................
....................................................
.................................
...........
...............................................
.....................
......................................................................
.....................................................
47
49
49
51
53
55
63
65
65
67
69
71
87
91
93
97
Comment filmer une séquence
Comment vérifier les séquences enregistrées ................. 49
Comment faire des reprises naturelles
Comment retrouver une séquence déjà enregistrée
La fonction de stabilisation numérique de l’image
Enregistrement d’instantanés
Enregistrement d’images fixes ......................................... 57
L’effet stroboscopique ...................................................... 59
Prise de vues en zoom..................................................... 61
La fonction d'ouverture et fermeture en fondu
Prise de vues de paysages au crépuscule ou
de toute autre scène le soir
Prise de vues en contre-jour ............................................ 65
Prise de vues dans l’obscurité
La fonction macro ............................................................. 69
Comment filmer des sujets se déplaçant rapidement
Réglage automatique de la balance des blancs
Réglage manuel de la balance des blancs
Mise au point..................................................................... 79
Comment insérer une image fixe en fondu effacé
Comment faire un fondu enchaîné ou surimposer
une image fixe sur une image en cours ........................ 85
Lecture sur téléviseur (branchements)
Lecture sur magnétoscope .............................................. 91
Lecture
Repiquage (copie de bande à bande)
.............................................................................
........................................
............................
.......
...........
...........................................
.................
..........................................
..........................................
......
..............
.......................
............
............................
..............................
47
49
51
53
55
63
65
67
71
73
75
83
87
93
97
Nach dem Gebrauch
Reinigung
VITC-'signale
Vorsichtsmaßnahmen ..................................................... 103
Vor Inanspruchnahme des Kundendienstes
Übersicht über die Anzeigen im Suchermonitor
Technische Daten............................................................ 115
Sonderzubehör-Sortiment
Warn-und Alarm-Anzeigen im Suchermonitor
.........................................................................
.........................................................
...................................................................
...................
............
..............................................
.................
99
99
100
108
111
117
118
Après la prise de vues .............................................................................. 99
Nettoyage du viseur électronique
Les signaux VITC ........................................................... 100
Précautions .................................................................... 105
Avant de faire appel à un technicien
Indications dans le viseur électronique
Spécifications.................................................................. 116
Accessoires en option
Indications d’avertissement/alarme dans le viseur
....................................................
....................................
..............................
.........................
-5-
........
99
109
111
117
118
ENGLISH
Controls and Functions
1 Rewind/Review Button [REW/Q] (P- 38,48,50,92,94)
Use this button for the following operations:
1) With the [OPERATE] Switch set to “CAMERA”.
Press it briefly after shooting a scene in order to play back
the last few seconds of the recording for quick confirmation
that the recording is okay. When this button is kept
pressed, the recorded scene is played back at high speed
in reverse direction.
2) With the [OPERATE] Switch set to “VTR”.
Press it to rewind the tape from the stop mode.
Keep it pressed during playback for high-speed playback
in reverse direction.
2 Play Button [PLAY] (p. 48,92)
Press this button to start the playback.
3 Fast Forward/Cue Button [Q^FF] (p. 38,50,94)
1) With the [OPERATE] Switch set to “CAMERA”.
When this button is kept pressed, the recorded scene is
played back at normal speed in forward direction.
2) With the [ OPERATE] Switch set to “VTR”.
Press this button to wind the tape forward at high speed
from the stop mode.
Keep it pressed during playback for high-speed playback
in forward direction.
ILLUSTRATION
W/OPLAYe/FF STOP PAUSE SHIFT SET TAPE
RE'
B 0 0 0 □ □
® '
spEnrHUT \ \ ^T fACKIf
------
SE \RCH'
DATE/TIME
4 Stop Button [STOP] (p. 92)
Press this button to stop the playback.
5 Pause Button [PAUSE] (p. 48,94)
Press this button during playback to be able to watch a still
picture; press it again to resume normal playback.
6 Tracking/Date/Time Shift Button
[DATE/TIME SHIFT. TRACKING] (p. 26,92)
Use this button for the following operations:
1) Press it to advance to the next item during the setting of
the time and date.
2) Press it when you want to adjust the tracking manually.
7 Tracking/Date/Time Set Button
[DATE/TIME SET.TRACKING] (p. 26, 92)
Use this button for the following operations:
1) Press it to start the operation of the clock after setting the
time and date.
2) Press it when you want to adjust the tracking manually.
8 Remaining Tape Time Button [TAPE] (p. 36)
Press this button to select the length of the cassette tape that
is used for shooting or playback.

DEUTSCH
FRANÇAIS
Bedienungselemente und ihre
Funktionen
1 Rückspul-/Review-Taste [REW/Q] (S. 39, 49, 51,93, 95)
Diese Taste für die folgenden Funktionen betätigen:
1) Wenn der Schalter [OPERATE] auf,,CAMERA“ steht.
Nach dem Aufnehmen einer Szene diese Taste kurz
drücken, um die letzten paar Sekunden der Aufnahme
wiederzugeben und so zu prüfen, ob die Aufnahme
einwandfrei gemacht wurde.
Wenn diese Taste gedrückt und gehalten wird, kann die
aufgenommene Szene mit hoher Geschwindigkeit
rückwärts wiedergegeben werden.
2) Wenn der Schalter [OPERATE] auf „VTR“ steht.
Diese Taste drücken, um das Band aus der Betriebsart
Stop zurückzuspulen.
Während der Wiedergabe gedrückt halten, um das Band
mit hoher Geschwindigkeit in Rückwärtsrichtung
wiederzugeben.
2 Wiedergabe-Taste [PLAY] (S. 49, 93)
Diese Taste drücken, um die Wiedergabe zu starten.
3 Schnellvorlauf-/Cue-Taste [[El/FF] (S. 39,51,95)
1) Wenn der Schalter [OPERATE] auf „ CAMERA“ steht.
Wenn diese Taste gedrückt gehalten wird, kann die
aufgenommene Szene mit normaler Geschwindigkeit in
Vorwärtsrichtung wiedergegeben werden.
2) Wenn der Schalter [OPERATE] auf ,,VTR“ steht.
Diese Taste drücken, um das Band aus der Betriebsart
Stop mit hoher Geschwindigkeit vorzuspulen.
Während der Wiedergabe gedrückt halten, um das Band
mit hoher Geschwindigkeit in Vorwärtsrichtung
wiederzugeben.
4 Stop-Taste [STOP] (S. 93)
Diese Taste drücken, um die Wiedergabe zu beenden.
5 Pausentaste [PAUSE] (S. 49,95)
Diese Taste während der Wiedergabe drücken, um ein
Standbild betrachten zu können; erneut drücken, um auf
normale Wiedergabe zurückzuschalten.
6 Spurlage-Reglertaste und Weiterschalt-Taste für Datum-/
Uhrzelt-Einstellung [DATE/TIME SHIFT-TRACKING]
(S. 27, 93)
Diese Tasten für die folgenden Funktionen betätigen:
1) Drücken, um beim Einstellen von Uhrzeit und Datum zum
nächsten Anzeigesegment vorzurücken.
2) Drücken, wenn die Spurlage des Bandes manuell geregelt
werden soll.
7 Einstelltaste für Datum/Uhrzeit
[DATE/TIME SET-TRACKING] (S. 27,93)
Diese Taste für die folgenden Funktionen betätigen:
1) Drücken, um die Uhr nach Einstellen von Uhrzeit und
Datum in Gang zu setzen.
2) Drücken, wenn die Spurlage des Bandes manuell geregelt
werden soll.
Commandes et éléments
constitutifs
1 Touche de rebobinage/repérage arrière [REW/@]
(p. 39, 49,51,93,95)
Utiliser cette touche pour les opérations suivantes:
1 ) Avec l’interrupteur [OPERATE] sur “CAMERA”.
Appuyer brièvement sur cette touche après
l’enregistrement d'une séquence pour revenir en arrière
de quelques secondes afin de savoir si l’enregistrement
est satisfaisant.
Si l’on maintient cette touche enfoncée, on obtiendra une
lecture rapide en sens inverse de la séquence
précédemment enregistrée.
2) Avec l’interrupteur [OPERATE] sur “VTR”:
Appuyer pour rebobiner la bande à partir du mode arrêt.
Maintenir cette touche enfoncée pendant la lecture pour
faire une lecture en sens inverse à grande vitesse.
2 Touche de lecture [PLAY] (p. 49, 93)
Appuyer sur cette touche pour commencer la lecture.
3 Touche d’avance rapide/repérage avant [(EEYFF]
(p. 39,51,95)
1 ) Avec l’interrupteur [OPERATE] sur “CAMERA”.
Si l’on maintient cette touche enfoncée, la scène
enregistrée défile en lecture avant à vitesse normale.
2) Avec l’interrupteur [OPERATE] sur “VTR”.
Appuyer sur cette touche pour faire avancer la bande à
grande vitesse à partir du mode arrêt.
Maintenir cette touche enfoncée pendant la lecture pour
une lecture avant à grande vitesse.
4 Touche d’arrêt [STOP] (p. 93)
Appuyer sur cette touche pour interrompre la lecture.
5 Touche de pause [PAUSE] (p. 49,95)
Au cours de la lecture, appuyer sur cette touche pour obtenir
un arrêt sur image. Appuyer à nouveau pour retourner en
lecture normale.
6 Touche de déplacement de l’alignement de la date et de
l’heure [DATE/TIME SHIFT-TRACKING] (p. 27, 93)
Utiliser cette touche pour les opérations suivantes:
1 ) Pour le réglage de l’heure et de la date, afin de passer
d’une indication à l’autre.
2) Pour le réglage manuel de l’alignement.
7 Touche de réglage de l’alignement date/heure
[DATBTIME SET.TRACKING] (p. 27, 93)
Utiliser cette touche pour les opérations suivantes:
1 ) Pour démarrer le fonctionnement de l’horloge après
réglage de la date et de l’heure.
2) Pour le réglage manuel de l’alignement.
8 Touche de temps restant sur la bande [TAPE] (p. 37)
Appuyer sur cette touche pour vérifier le temps
d’enregistrement ou de lecture restant sur la bande.
8 Bandrestzeit-Anzeigetaste [TAPE] (S. 37)
Diese Taste drücken, um die Länge des Bandes zu wählen,
das zum Aufnehmen oder Wiedergeben verwendet wird.
ENGLISH
Controls and Functions (conVd)
9 Operation Switch [OPERATE]
(p. 22, 26, 28,36,46,48, 50,54, 56,58,92,98)
Set this switch to “CAMERA” for shooting.
Set it to “VTR” for playback.
To turn the Movie Camera off, set it back to the centre “OFF”
position,
(“VTR” means Video Tape Recorder.)
10 Snapshot Button [SNAPSHOT REC] (p. 54)
Press this button for shooting a still picture for approx.
5 seconds.
To be able to press this button, the Movie Camera must be in
the shooting pause mode ([OPERATE] Switch is set to
“CAMERA”).
11 Zoom Buttons [W]/[T] (p. 60,68,74,76,80)
Press the [W] Button to gradually zoom out to the wide-angle
position for panoramic shots; press the [T] Button to gradually
zoom in to the telephoto position for close-up shots of distant
subjects.
12 Shoulder Strap Holders (p. 32)
Attach the Shoulder Strap to these two holders.
ILLUSTRATION
13 Lens Cap (p. 30,46,74,76,98)
The Lens Cap protects the Lens,
Be sure to remove the Lens Cap before starting to shoot.
14 Stereo Microphone
On the Hi-Fi sound track, stereo sound will be recorded.
The two-way microphone is highly effective for recording
interviews with the local ambience as well as narrations and
music.
15 Fade Button [FADE] (p. 62)
Press this button to fade out a scene and to fade in the
following scene for a soft scene-to-scene transition.
16 Date/Time Button [DATE/TIME] (p. 26,28)
Press this button to make the time and/or date appear in the
Viewfinder and superimpose them onto the picture during
shooting.
17 Focus +1- Buttons [FOCUS -t-/—] (p. 80)
After selecting the manual focusing mode with the [FOCUS]
Button, adjust the focus to the desired subject by pressing
these buttons.
13 14 15 16
17-
focus
i-p
o

DEUTSCH
FRANÇAIS
Bedienungselemente und ihre
Funktionen (Fortsetzung)
9 Betriebs-Ein-/Aus-Schalter [OPERATE]
(S. 23, 27,29, 37,47,49,51,55, 57, 59, 93, 99)
Diesen Schalter zum Aufnehmen auf,,CAMERA“ sfellen.
Zum Wiedergeben auf ,,VTR“ stellen.
Um den Kamerarecorder auszuschalten, diesen Schalter in
seine Mittelstellung ,,OFF“ zurückstellen.
(VTR ist die Abkürzung für Video Tape Recorder.)
10 Schnappschuß-Aufnahmetaste [SNAPSHOT REC] (S. 55)
Diese Taste drücken, um ein Standbild ca. 5 Sekunden lang
aufzunehmen.
Damit diese Taste gedrückt werden kann, muß der
Kamerarecorder in der Betriebsart Aufnahmepause (Schalter
[OPERATE] steht auf „CAMERA“) sein.
11 Zoom-Tasten [W] und [T] (S. 61,69,75,77, 81)
Die Taste [W] drücken, um allmählich auf die WeitwinkelEinstellung zu zoomen, beispielsweise für eine PanoramaAufnahme.
Die Taste [T] drücken, um allmählich auf dieTele-Einstellung
zu zoomen, beispielsweise für Großaufnahmen weit
entfernter Motive.
12 Halterungen für Schultertrageriemen (S. 33)
Den Schultertrageriemen an diesen beiden Halterungen
befestigen.
13 Objektivdeckel (S. 31,47,75, 77, 99)
Der Objektivdeckel schützt die Objektivlinse.
Diesen Deckel unbedingt abnehmen, bevor mit dem
Aufnehmen begonnen wird.
14 Stereo-Mikrofon
Auf der HiFi-Tonspur wird der Ton in Stereo aufgezeichnet.
Dieses Zweiweg-Mikrofon isf sehr leisfungsfähig für das
Aufnehmen von Interviews mit umgebender Tonkulisse sowie
für Kommentar und Musik.
15 Ein-/Ausblendtaste [FADE] (S. 63)
Diese Taste drücken, um eine Szene langsam auf Schwarz
auszublenden und die folgende Szene langsam von Schwarz
wieder einzublenden, um so weiche Szenenübergänge zu
schaffen.
Commandes et éléments
constitutifs (suite)
9 Interrupteur de mode de fonctionnement [OPERATE]
(p. 23,27, 29, 37,47,49, 51, 55, 57,59, 93, 99)
Pour filmer, mettre cet interrupteur sur la position “CAMERA”.
Pour la lecture, mettre cet interrupteur sur “VTR”.
Pour mettre le caméscope hors-tension, revenir à la position
centrale d'arrêt.
(“VTR” signifie magnétoscope)
10 Touche d'instantané [SNAPSHOT REC] (p. 55)
Appuyer sur cette touche pour enregistrer une image fixe
pendant environ 5 secondes.
Pour pouvoir utiliser cette touche le caméscope doit être sur
le mode pause d’enregistrement, l’interrupteur [OPERATE]
doit être sur “CAMERA”.
11 Touches de zoom [W]/[T] (P. 61,69,75,77,81 )
Appuyer sur la touche de zoom [W] pour obtenir la position de
grand angle permettant les vues panoramiques; appuyer sur
la touche [T] pour arriver graduellement à la position téléphoto
permettant des vues rapprochées des sujets lointains.
12 Pattes d’attache de la bandoulière (p. 33)
Fixer la bandoulière aux pattes d’attache.
13 Capuchon d'objectif (p. 31,47, 75, 77, 99)
Le capuchon protège l'objectif.
Ne pas oublier de retirer le capuchon avant de commencer à
filmer,
14 Microphone stéréo
Sur la bande HiFi, un son stéréophonique sera enregistré.
Ce microphone bidirectionnel est très efficace pour
enregistrer des dialogues avec des bruits de fond, ou un
discours avec une musique d’ambiance.
15 Touche de fondu [FADE] (p. 63)
Appuyer sur cette touche pour passer progressivement d’une
séquence à une autre.
16 Touche de la date et de l’heure [DATE/TIME] (p. 27,29)
Lorsque l’on appuie sur la touche [САТЕЯ1МЕ], l’indication
de l’heure et de la date apparaît dans le viseur électronique et
est superposée à l’image pendant la prise de vues.
16 Datum-/Uhrzeit-Einblendtaste [DATE/TIME] (S. 27, 29)
Diese Taste drücken, um die Uhrzeit und/oder das Datum im
Sucher sichtbar zu machen und beim Aufnehmen in das Bild
einzublenden.
17 Scharfeinstell (+)/(-)-Tasten [FOCUS +!-] (S. 81)
Nach Wahl der manuellen Scharfeinstell-Betriebsart durch
Drücken der Taste [FOCUS], kann durch Drücken dieser
beiden Tasten das gewünschte Motiv scharf eingestellt
werden.
17 Touches de mise au point (-F)/(-) [FOCUS +/-] (p. 81)
Après sélection de la mise au point manuelle à l’aide de la
touche de mise au point [FOCUS], faire la mise au point sur le
sujet choisi en appuyant sur les touches [-F] ou [-].
-9-
ENGLISH
Controls and Functions (cont’d)
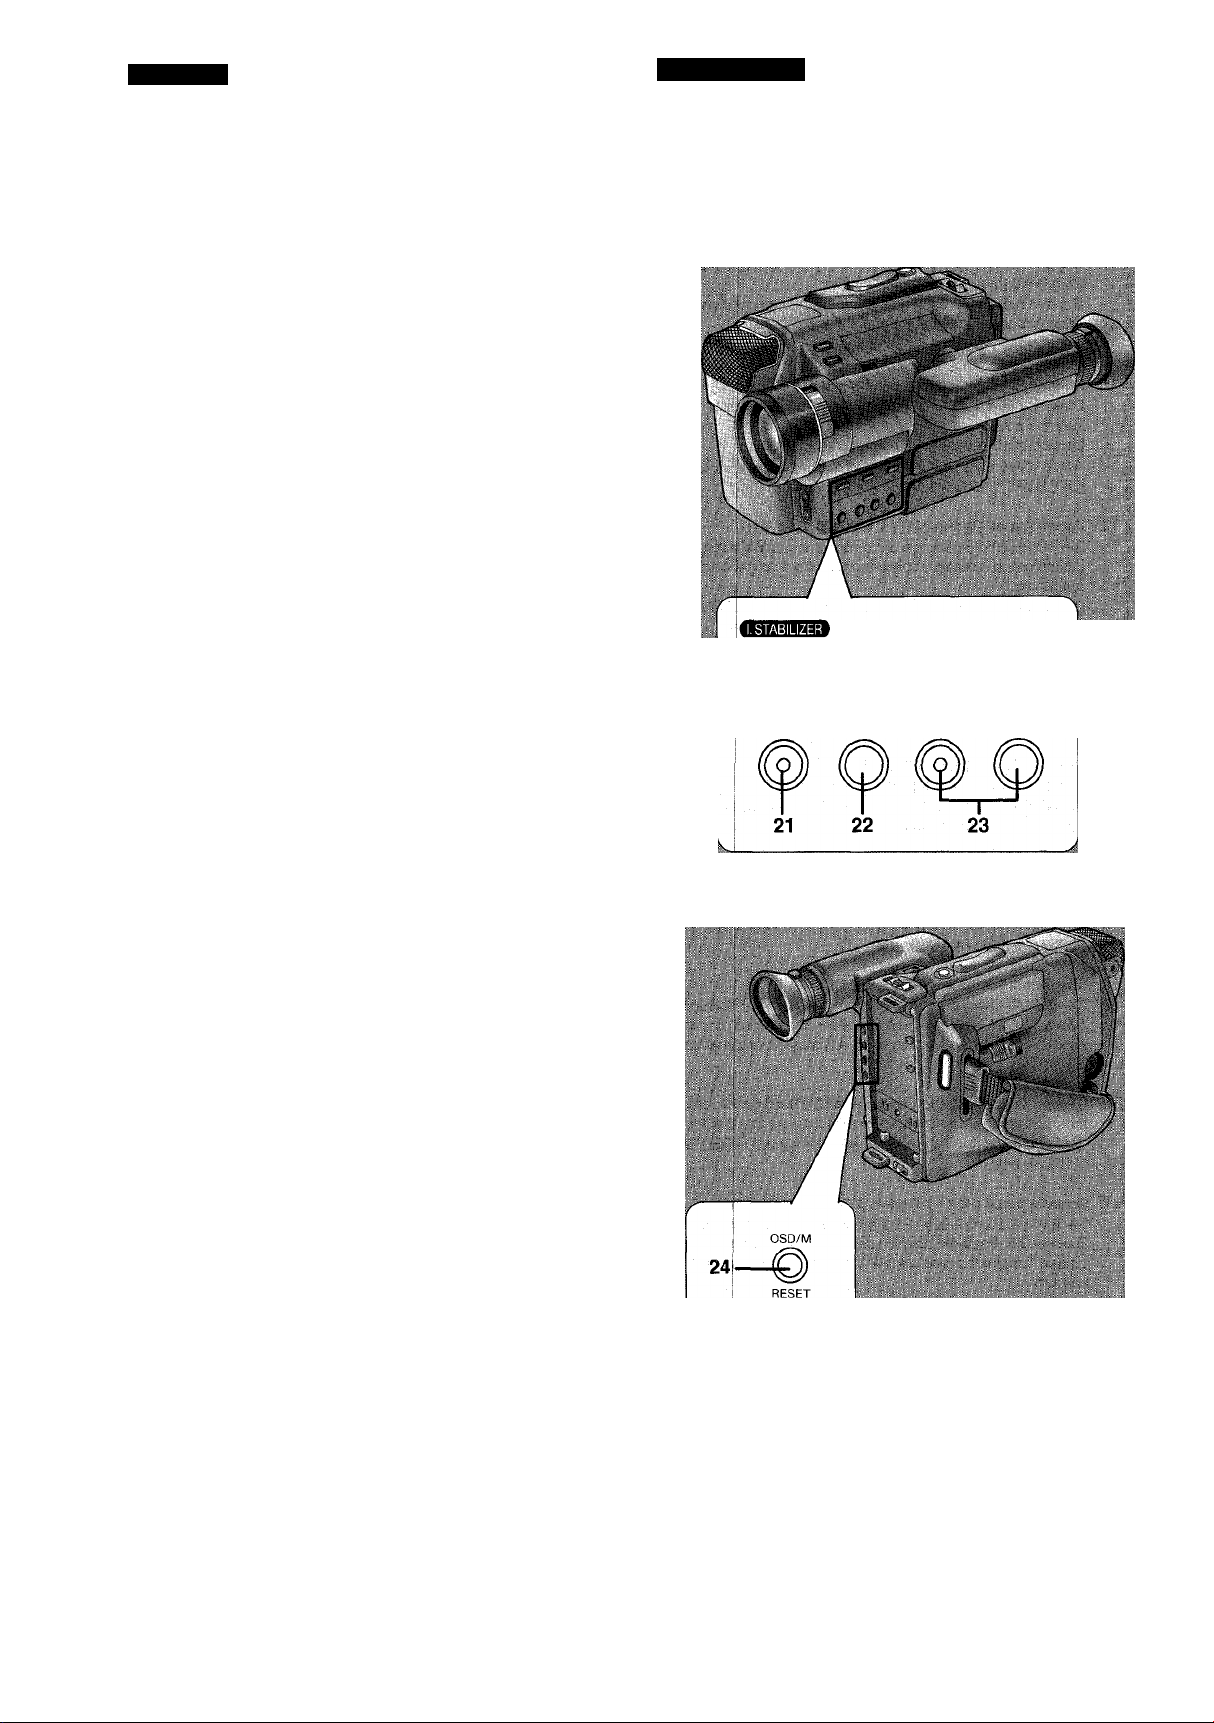
18 Digital Image Stabilizer Button [I. STABILIZER] (p. 42,52)
Press this button when you are shooting on the move, from a
vehicle for example.
19 Digital Zoom Button [DIGITAL ZOOM] (p. 60)
Press this button to increase the power of the Zoom Function
from the normal 8 times to 16 times (in the maximum
telephoto setting, the subject will be enlarged 16 times
compared with the maximum wide-angle setting).
20 Still/Strobe Button [STILUSTROBE] (p. 56,58)
Use this button for the following 2 operations.
(At every push of this button, the operation mode changes.)
1) For still picture shooting: Pressonce.
2) For strobe picture shooting; Press twice.
3) Return to the normal shooting: Press three times.
21 Focus Button [FOCUS] (p. 78,80)
Press this button to select manual focus adjustment for
shooting.
22 White Balance Button [W.B] (p. 72,74,76)
Press this button to select manual white balance adjustment
for shooting.
23 Iris Close/Open Buttons [IRIS CLOSE]/[IRIS OPEN] (p. 64)
By pressing the [IRIS OPEN] or [IRIS CLOSE] Button, the iris
can be adjusted as follows:
OPEN: The subject becomes brighter.
CLOSE: The subject becomes darker.
ILLUSTRATION
DIGITAL ZOOM STILL/STROBE
(^ cp
18 19 20
rocus W.B CLOSE IRIS OPEN
24 On-Screen Display/Memory Button [OSD/M] (p. 38,40)
Press this button to make the indications in the Viewfinder
disappear. (Some indications such as “DEW" cannot be
canceled.)
Press this button also to activate the Tape Counter Memory
Function so that the tape position corresponding to the Tape
Counter Indication “M0;00.00" can be found easily during
fast-forwarding or rewinding of the tape.
25 Reset Button [RESET] (p. 38)
Press this button to reset the tape counter to “0:00.00”.
26 S-VHS/Tape Speed Selector Button [S-VHS/SP • LP]
(p. 16,36,46)
At every press of the [S-VHS/SP • LP] Button, the recording
system and the tape speed can be changed. (See pages 36,
112.)
27 Shutter Speed Select Button [SHUTTER] (p. 70)
Press this button to select a higher shutter speed when
shooting scenes with fast movements.
25-
26-
S-VHS/
SP LP
-10-
27-

DEUTSCH
FRANÇAIS
Bedienungselemente und ihre
Funktionen (Fortsetzung)
18 Digital-Bildstabilisator-Taste [I. STABILIZER] (S. 43, 53)
Beim Aufnehmen aus dem Gehen oder aus einem Fahrzeug
diese Taste drücken um eine ruhige Aufnahme zu erzielen.
19 Digital-Zoom-Taste [DIGITAL ZOOM] (S. 61)
Diese Taste drücken, um die Leistung der Zoom-Funktion von
normaler Sfacher auf 16fache Vergrößerung (in der
maximalen Tele-Einstellung) zu steigern. Der Bildgegenstand
gegenüber der Weitwinkel-Einstellung um 16 fache
vergrößert werden.
20 Standbild-ZStroboskop-Aufnahmetaste [STILL/STROBE]
(S. 57, 59)
Diese Taste kann für die folgenden beiden Funktionen
benutzt werden:
(Die ßetriebsart ändert sich nach jedem Tastendruck.)
1) Für Standbild-Aufnahme: Einmal drücken.
2) Für Stroboskop-Aufnahme: Zweimal drücken.
3) Zum Zurückstellen auf normale
Aufnahme: Dreimal drücken.
21 Scharfeinstell-Taste [FOCUS] (S. 79, 81)
Diese Taste drücken, um beim Aufnehmen manuelle
Scharfeinstellung zu wählen.
22 Weißabgleich-Taste [W.B.] (S. 73, 75, 77)
Diese Taste drücken, um beim Aufnehmen manuellen
Weißabgleich zu wählen.
23 Blendenregler-Tasten [IRIS CLOSE]/[IRIS OPEN] (S. 65)
Durch Drücken der [IRIS OPEN]- oder [IRIS CLOSE]-Taste
kann die Blende auf folgende Weise geregelt werden:
OPEN: Das Motiv wird heller.
CLOSE: Das Motiv wird dunkler.
24 Anzeigeneinblend-ZSpeicher-Taste (OSDZM) (S. 39, 41)
Diese Taste drücken, um die Anzeigen im Sucher
auszublenden. (Gewisse Anzeigen wiez. B. ,,DEW“ können
nicht ausgeblendet werden.)
Diese Tasten ebenfalls drücken, um die BandzählwerkSpeicherfunktion einzuschalten, damit die der BandzählwerkAnzeige ,,MO:00.00“ entsprechende Bandstelie beim Vor
oder Zurückspulen des Bandes bequem aufgefunden werden
kann.
25 Bandzählwerk-Rückstelltaste [RESET] (S. 39)
Diese Taste drücken, um das Bandzählwerk auf ,,0:00.00“
zurückzustellen.
26 S-VHS-ZBandgeschwIndigkeits-Wahltaste
[S-VHSZSP • LP] (S. 17, 37,47)
Durch wiederholtes Drücken dieser Taste können das
Videoaufnahmesystem und die Bandgeschwindigkeit
geändert werden. (Siehe Seite 37 und 113.)
27 Wahltaste für den Hochgeschwindigkeits-Verschluß
[SHUTTER] (S. 71)
Diese Taste drücken, um beim Aufnehmen von Motiven mit
schneller Bewegung eine höhere Verschlußgeschwindigkeit
zu wählen.
Commandes et éiéments
constitutifs (suite)
18 Touche de stabilisation numérique de l'image
[I. STABILIZER] (p. 43,53)
Appuyer sur cette touche si le caméscope risque de trembler,
lorsqu’on filme de l’intérieur d’un véhicule en mouvement, par
exemple,
19 Touche numérique du zoom [DIGITAL ZOOM] (p. 61)
Appuyer sur cette touche pour augmenter la puissance
normale du zoom de 8 à 16 fois (position maximale des prises
de vues en téléphoto). Par rapport à la position du grand
angle, le sujet sera agrandi 16 fois.
20 Touche d’image fixeZeffet stroboscopique
[STILL/STROBE] (p. 57, 59)
Utiliser cette touche pour les deux opérations suivantes:
(à chaque pression, le mode change)
1) Pour enregistrer une image fixe:
2) Pour enregistrer avec effet
stroboscopique:
3) Pour revenir en prise de
vue normale:
21
Touche de mise au point [FOCUS] (p. 79,81 )
Appuyer sur cette touche pour obtenir le mode mise au point
manuelle.
22
Touche de la balance des blancs [W.B] (p. 73,75,77)
Appuyer sur cette touche pour obtenir le réglage manuel de la
balance des blancs.
23 Touches d’ouvertureZfermeture du diaphragme
[IRIS CLOSE]Z[IRIS OPEN] (p. 65)
En appuyant sur les touches [IRIS OPEN] ou [IRIS CLOSE],
on peut régler le diaphragme de ia manière suivante:
OPEN: le sujet devient plus clair;
CLOSE: le sujet devient plus sombre.
24 Touche d’affichage sur l’écranZmémoire du compteur
[OSD/M](p.39,41)
Appuyer sur cette touche pour faire disparaître les indications
dans le viseur électronique (quelques indications telles que
“DEW” ne peuvent être annulées de cette façon).
Appuyer également sur cette touche pour faire démarrer la
fonction de mémoire du compteur, de manière à ce que
l’endroit sur la bande correspondant à l’indication “M0:00.00”
puisse être retrouvé facilement en avance rapide ou en
rebobinage de la bande.
25 Touche de remise à zéro [RESET] (p. 39)
Appuyer sur cette touche pour remettre le compteur de bande
à “0:00,00”.
26 Sélecteur S-VHSZvitesse de bande [S-VHSZSP • LP]
(p. 17,37,47)
A chaque pression sur la touche [S-VHSZSP • LP], le système
d’enregistrement et la vitesse de la bande seront modifiés
(voir p. 37,113).
27 Touche de l’obturateur ultra-rapide [SHUTTER] (p. 71)
Appuyer sur cette touche pour sélectionner une plus grande
vitesse d’obturation pour filmer des scènes très rapides.
Appuyer une fois.
Appuyer deux fois.
Appuyer trois fois.
-11-
ENGLISH
Controls and Functions (cont’d)
28 DC Input Socket (p. 22)
When using the AC Adaptor or the Car Battery Cord (optional)
as power supply instead of the Battery Pack, connect the DC
Input Cable to this socket.
29 Start/Stop Button (p. 46,48,52, 56,58,62,68,82,84)
Press this button to start shooting a scene. (It is not necessary
to keep it pressed during shooting.) Press it again to finish
shooting the scene and change the Movie Camera back to the
shooting pause mode
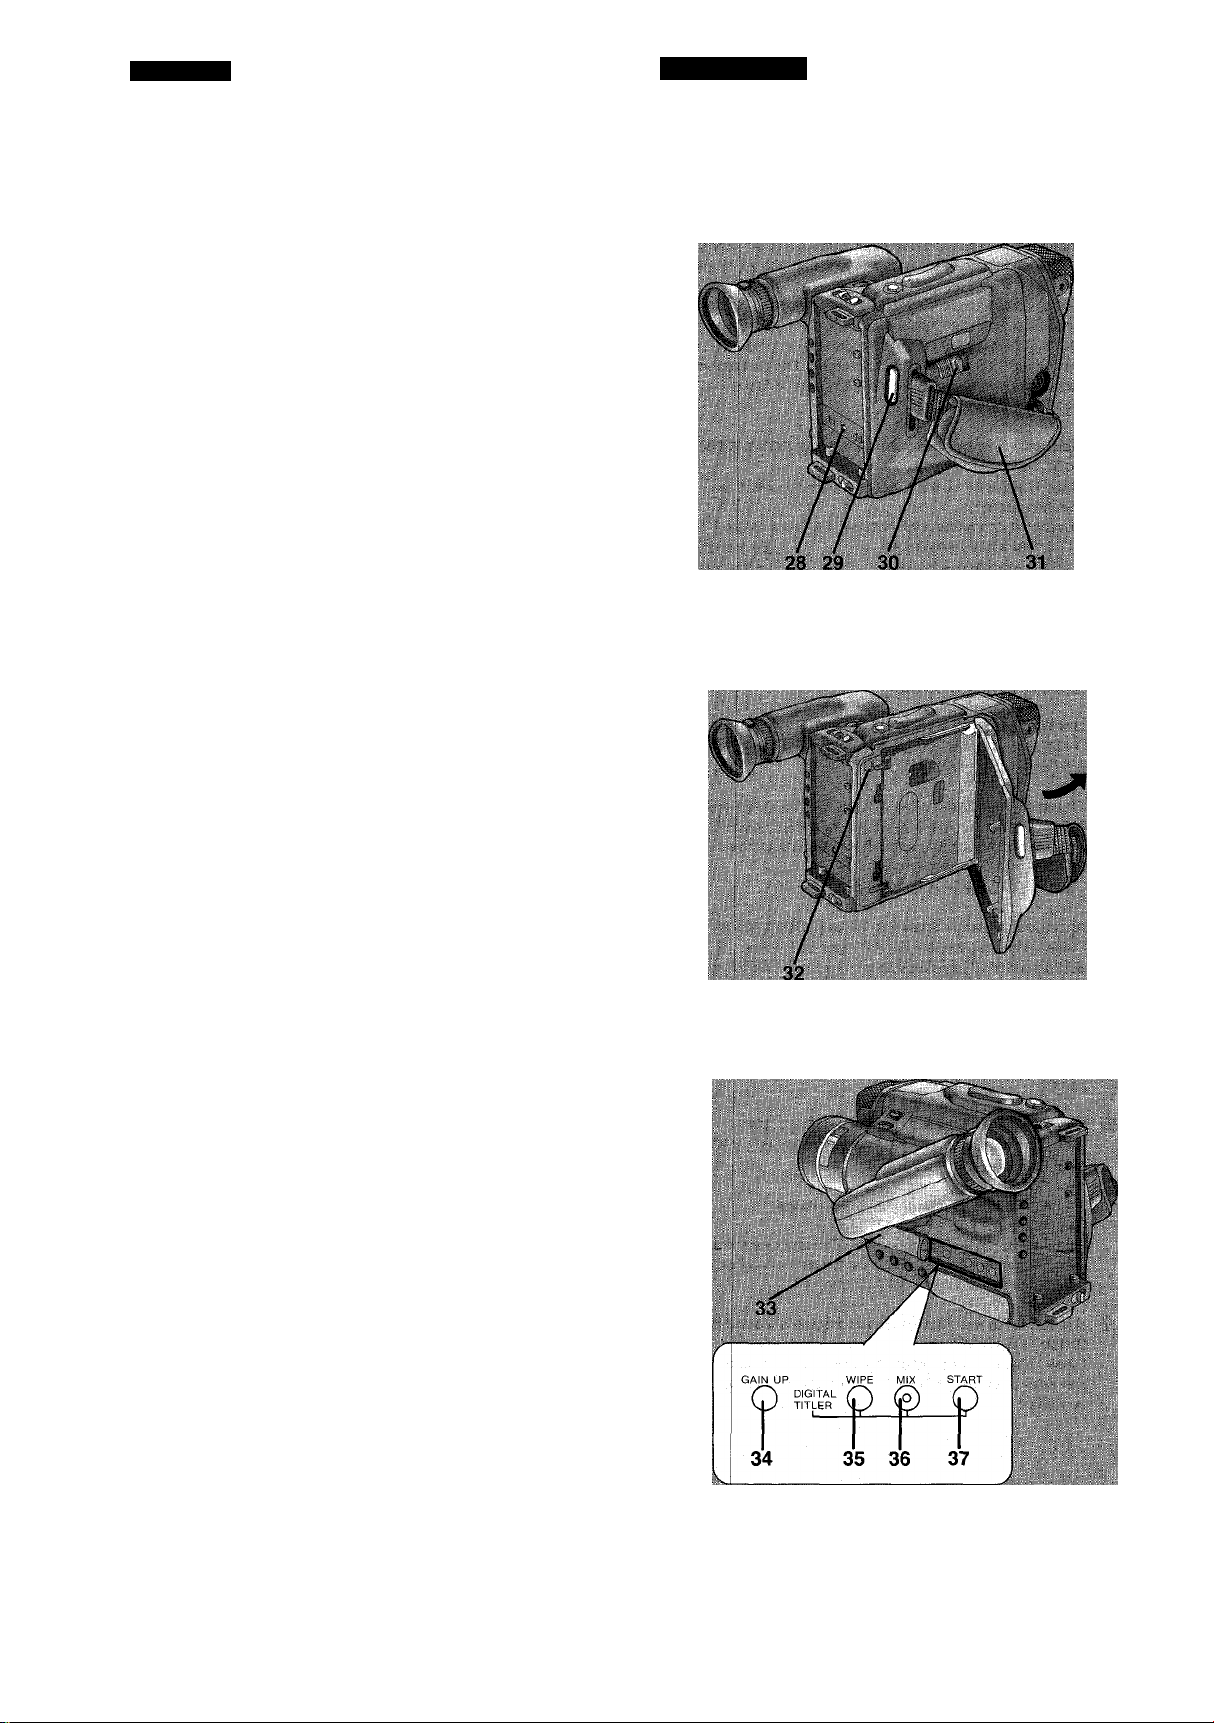
30 Cassette Compartment Opening Knob
(p. 34,46,48,92, 98)
Slide the Cassette Compartment Opening Knob to the right
side to open the Cassette Compartment.
31 Grip Belt (p. 30)
The height of the Grip can be adjusted in 4 steps to match the
size of your hand. Adjust it so that the Start/Stop Button and
the [W] and [T] Zoom Buttons can easily de pressed with the
fingertips.
ILLUSTRATION
32 Cassette Eject Button [EJECT] (p. 34)
To insert or take out a video cassette, press this button.
33 Digital Mode Cover (p. 54, 66,82, 84)
34 Gain Button [GAIN UP](p.66)
When shooting in the dark, the sensitivity can be increased in
steps by pressing this button.
35 Digital Wipe Button [WIPE] (p. 82)
To perform Wipe Recording of a still picture, press this button.
36 Digital Mix Button [MIX] (p. 84)
To combine a still picture with the moving picture, press this
button.
37 Digital Start Button [START] (p. 82,84)
To start the Digital Wipe Function or the Digital Mix Function,
press this button.
-12-

DEUTSCH
FRANÇAIS
Bedienungselemente und ihre
Funktionen (Fortsetzung)
28 Gleichstrom-Eingangsbuchse (S. 23)
Bei Verwendung des Netzadapters oder des Auto-/BootsAkku-Anschlußkabels (Sonderzubehör) als
Stromversorgungseinheit anstelle des Akkus, ist das
Gleichstrom-Anschlußkabel an diese Buchse anzuschließen.
29 Aufnahme-Start-ZStop-Taste
(S. 47,49,53, 57, 59,63,69, 83, 85)
Diese Taste drücken, um mit dem Aufnehmen einer Szene zu
beginnen. (Sie muß während des Aufnehmens nicht gedrückt
gehalten werden.) Diese Taste nochmals drücken, um das
Aufnehmen der Szene zu beenden und den
Kamerarecorder wieder auf Aufnahmepause umzuschalten.
30 Cassettenfach-Öffnungsknopf (S. 35,47,49, 93, 99)
Den Cassettenfach-Öffnungsknopf nach rechts schieben, um
das Cassettenfach zu öffnen.
31 Handgriff-Riemen (S. 31)
Die Höhe der hinteren Handgriffriemen-Halterung kann in
4 Stufen verstellt und auf die Größe der Hand abgestimmt
werden. So einsteilen, daß die Aufnahme-Start-ZStop-Taste
und die Zoom-Tasten [W] und [T] bequem mit den
Fingerspitzen betätigt werden können.
32 Cassettenauswurftaste [EJECT] (S. 35)
Diese Taste drücken, um eine Videocassette einzusetzen
oder herauszunehmen.
Commandes et éléments
constitutifs (suite)
28 Prise d’entrée CC(p. 23)
Lorsqu'on utilise l’adaptateur CA ou le cordon pour batterie de
voiture (en option) pour alimenter le caméscope au lieu du
bloc-batterie, brancher le câble d’entrée CC à cette prise.
29 Touche marcheZarrêt (p. 47,49, 53, 57, 59, 63, 69, 83,85)
Appuyer sur cette touche pour commencer à filmer une
séquence (il n’est pas nécessaire de garder le doigt appuyé
sur cette touche pendant la prise de vue). Pour terminer la
séquence, réappuyer sur la touche de marcheZarrêt et le
caméscope reviendra en mode pause.
30 Bouton d’ouverture du logement de la cassette
(p. 35,47,49, 93, 99)
Faire glisser le bouton vers la droite pour ouvrir le logement
de la cassette.
31 Courroie de poignée (p. 31 )
Il y a quatre degrés d'ouverture pour régler la courroie de
poignée, en fonction de la taille de la main. La régler de telle
sorte que l’on puisse facilement appuyer sur les touches de
marcheZarrêt et [T] ou [W] de zoom avec le Peut des doigts.
32 Touche d’éjection de la cassette [EJECT] (p. 35)
Pour introduire ou sortir une cassette vidéo, appuyer sur cette
touche.
33 Cache du mode numérique (p. 55,67,83,85)
33 Digital-Betriebsart-Schieber (S. 55, 67, 83, 85)
34 Aufhellungs-Taste [GAIN UP] (S. 67)
Beim Aufnehmen im Dunkeln kann die Empfindlichkeit durch
wiederholtes Drücken dieser Taste stufenweise verbessert
werden.
35 Digital-Rollschnitt-Taste [WIPE] (S. 83)
Diese Taste drücken, um ein Standbild mit rollendem Schnitt
in ein lautendes Bild ein-bzw. auszublenden.
36 Digital-Misch-Taste [MIX] (S. 85)
Diese Taste drücken, um ein Standbild mit einem laufenden
Bild zu kombinieren.
37 Digital-Start-Taste [START] (S. 83, 85)
Diese Taste drücken, um die digitale Rollschnitt-Funktion
oder die digitale Misch-Funktion zu starten.
34 Touche de gain [GAIN UP] (p. 67)
Lorsqu’on filme dans l’obscurité, on peut augmenter
progressivement la sensibilité en pressant cette touche.
35 Touche numérique de fondu effacé [WIPE] (p. 83)
Appuyer sur cette touche pour réaliser le fondu effacé d'une
image fixe.
36 Touche de mixage numérique [MIX] (p. 85)
Appuyer sur cette touche pour surimposer une image fixe
avec une autre image.
37 Touche de mise en circuit de la fonction numérique
[START] (p. 83,85)
Appuyer sur cette touche pour avoir mettre en route le fondu
effacé ou le mixage numérique.
-13-
ENGLISH
Controls and Functions (cont’d)
38 Mode Selector Switch (p. 64,70,74,76,78,80)
AUTO: This setting provides automatically focussed
pictures with natural colours and brightness
for almost any shooting condition.
MANUAL: When automatic focusing is not possible or
when you want to adjust the White Balance dr
the focus manually.
LOW LIGHT: When shooting evening scenes and under
other lowlight conditions.
39 Video Output Socket (p. 86,88,96)
Connect this socket via Video output cable to the video input
socket df the TV-set (or the RF Adaptor) for playback directly
from the Movie Camera.
40 RF DC Output Socket (p. 88)
Connect this socket with the RF Adaptor to supply it with
power for playback directly from the Movie Camera.
41 Audio Output Socket (p. 86,88,96)
Connect this socket via audio cable with the audio input
socket of the TV set (or the RF Adaptor) for playback directly
from the Movie Camera.
ILLUSTRATION
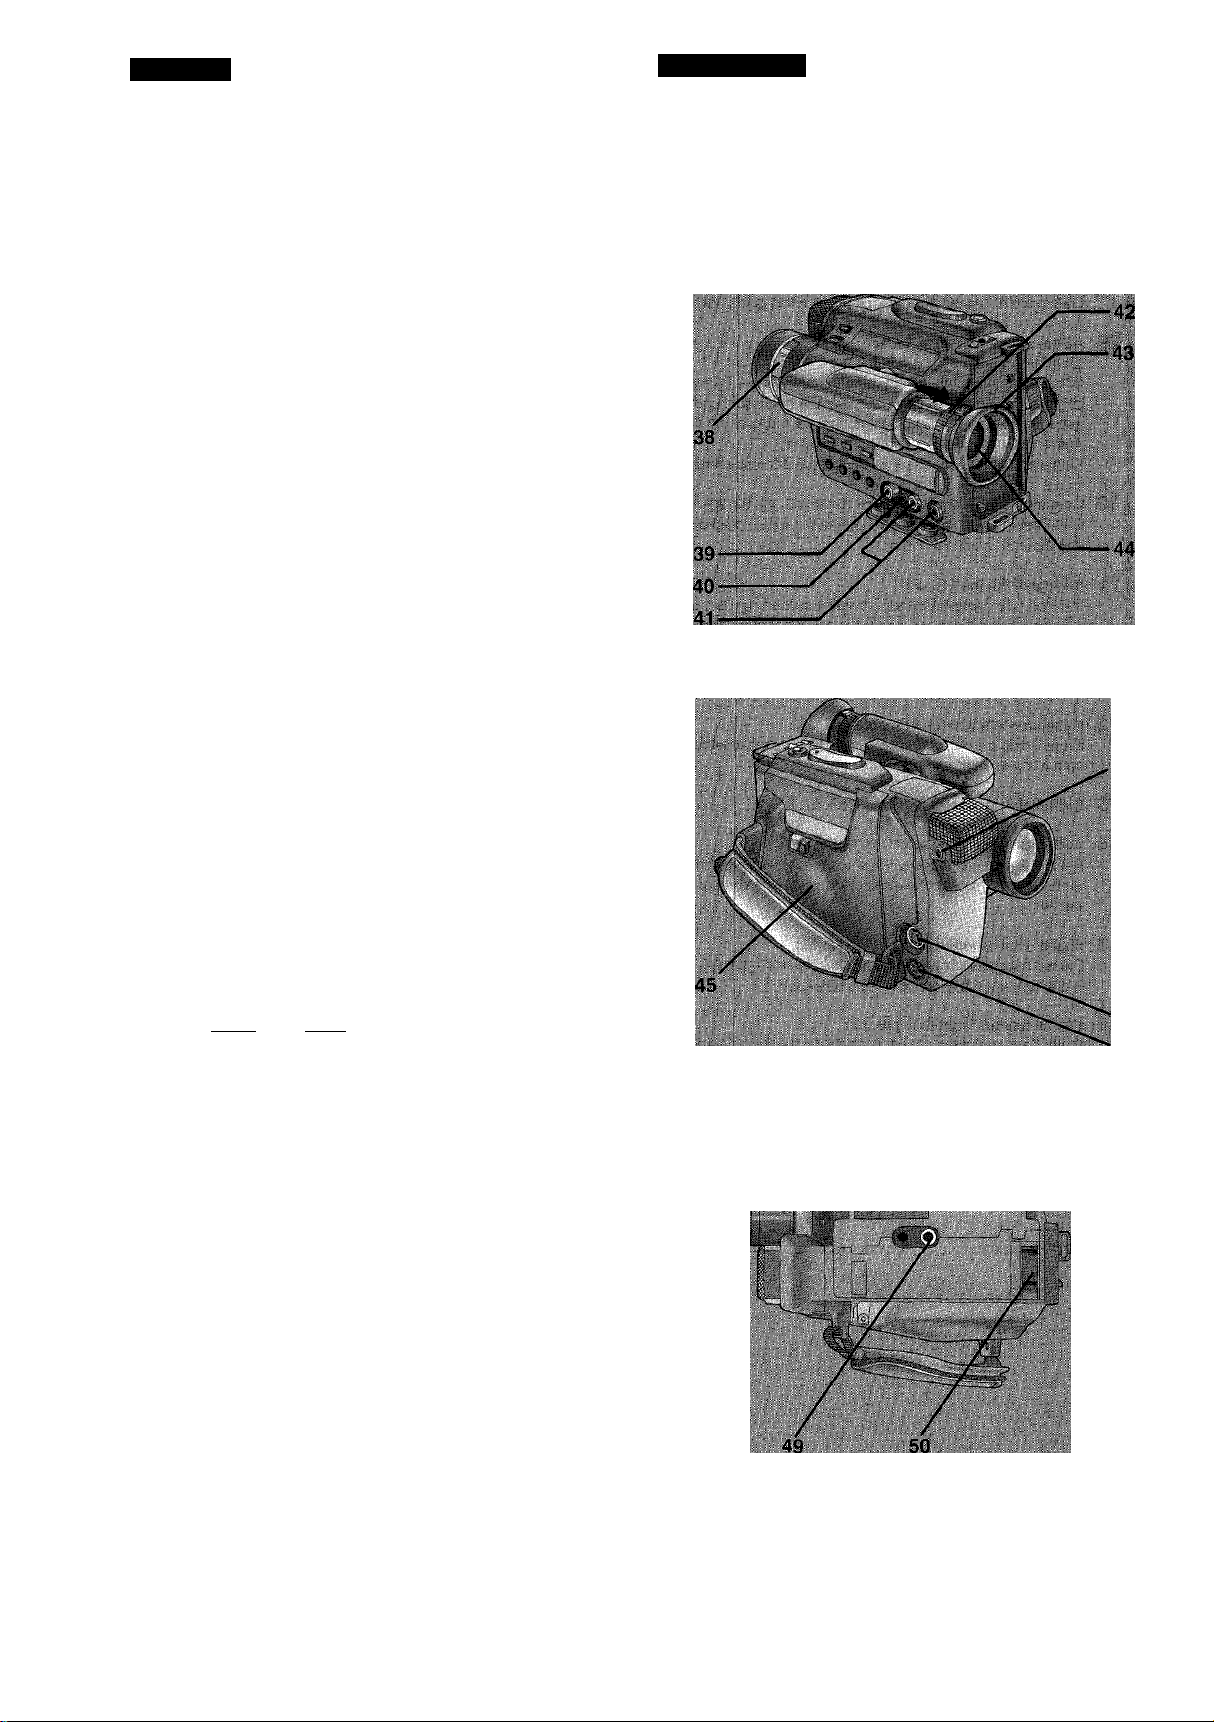
42 Eyepiece Corrector Ring (p. 28)
Turn it clockwise or counterclockwise so that the indications in
the Viewfinder are clearly focused.
43 Eyecup (p. 28,98)
44 Viewfinder (p. 28,46,98)
The subject in front of the camera can be seen on the
viewfinder screen. Superimposed on the picture are
indications about the operation and condition of the Movie
Camera.
To be able to see the picture on the viewfinder screen with
maximum magnification during shooting and playback, pull on
the plastic ring behind the Eyecup to extend the Viewfinder.
45 Cassette Compartment (p. 34)
Insert a ivtisiH or S vtisiH compact video cassette into this
compartment.
46 External Microphone Socket
If you want to use an external microphone, connect It to this
socket (in this case, the built-in microphone will be
deactivated).
47 S-Video Output Socket (p. 86,96)
Connect the S-Video Cable to this socket if the TV set is
equipped with an S-Video Input Socket.
48 New Edit Socket (p. 96)
Connect an Editing Controller, etc. to this socket.
46
47
48
■
I
i
49 Tripod Receptacle
When using a tripod for stable shooting, attach the screw of
the tripod to this receptacle.
50 Button Type Battery Holder (p. 24)
It holds the Button Type Battery (CR2032) that maintains the
clock operation while the Movie Camera is turned off.
-14-

DEUTSCH
FRANÇAIS
Bedienungselemente und ihre
Funktionen (Fortsetzung)
38 Betriebsart-Wahlschalter (S. 65,71,75, 77, 79,81)
AUTO: Diese Einstellung liefert automatisch
scharfgestellte Bilder mit natürlichen Farben
und Helligkeit bei fast allen
MANUAL: Wenn automatische Scharfeinstellung nicht
LOW LIGHT: Zum Aufnehmen von Abendszenen und bei
39
Video-Ausgangsbuchse (S. 87,89,97)
Für die Wiedergabe direkt vom Kamerarecorder, diese
Buchse über das AV-Ausgangskabel mit der Video-
Eingangsbuchse am Fernseher (eder am HF-Adapter)
verbinden.
40
HF-Gleichstrom-Ausgangsbuchse (S. 89)
Diese Buchse mit dem HF-Adapter verbinden, um ihn mit
Strom zu versorgen, wenn für die Wiedergabe direkt vom
Kamerarecorder ein HF-Adapter verwendet wird.
41
Audio-Ausgangsbuchse (S. 87,89,97)
Für die Wiedergabe direkt vom Kamerarecorder, diese
Buchse über das Audio-Anschlußkabel mit der AudioEingangsbuchse am Fernseher (oder am HF-Adapter)
verbinden.
42
Okularkorrektur-Regler (S. 29)
Diesen Ring im oder entgegen dem Uhrzeigersinn drehen, bis
die Anzeigen im Sucher optimal sichtbar sind.
Augenmuschel (S. 29, 99)
43
44
Suchermonitor (S. 29,47,99)
Das Motiv vor der Kamera ist auf dem Sucherbildschirm
sichtbar. Im Bild eingeblendet sind Anzeigen über den
Betriebszustand des Kamerarecorders.
Um das Bild im Sucher bei der Aufnahme und Wiedergabe mit
maximaler Vergrößerung sehen zu können, den
Kunststoffring hinter der Augenmuschel fassen und den
Sucher herausziehen.
Cassettenfach (S. 35)
45
Eine IVHSIH oder SIVUSQ Kompakt-Videocassette in dieses
Cassettenfach einsetzen.
46
Mikrofon-Anschlußbuchse
Wenn ein externes Mikrofon verwendet werden soll, dieses
an diese Buchse anschließen. (Dadurch wird das eingebaute
Mikrofon abgeschaltet.)
47
S-Vldeo-Ausgangsbuchse (S. 87,97)
Für die Wiedergabe das S-Video-Anschlußkabel an diese
Buchse und an die S-Video-Eingangsbuchse am Fernseher
anschließen.
Neue Editierbuchse (S. 97)
48
An diese Buchse kann eine Schnittsteuereinheit usw.
angeschlossen werden.
49
Stativanschluß
Bei der Verwendung eines Stativs, um stabile Aufnahmen
sicherzustellen, wird das Gewinde am Stativkopf in diese
Fassung eingeschraubt.
Knopfzellen-Halterung (S. 25)
50
Sie nimmt die Knopfzelle (CR-2032) auf, welche den Betrieb
der Uhr aufrechterhält, wenn der Kamerarecorder
ausgeschaltet wird.
Aufnahmebedingungen.
möglich ist, oder wenn der Weißabgleich
manuell vorgenommen werden soll.
anderen Aufnahmebedingungen mit
schwacher Beleuchtung.
Commandes et éléments
constitutifs (suite)
38 Sélecteur de mode (p. 65, 71, 75, 77, 79, 81 )
AUTO: cette position permet une mise au point
automatique de l’image avec un rendu de
couleurs naturel et lumineux dans
pratiquement n’importe quelles conditions de
prise de vues.
MANUAL: lorsque la mise au point automatique est
LOW LIGHT : pour filmer à la tombée de la nuit ou dans des
39 Prise de sortie vidéo (p. 87, 89, 97)
A l’aide du cable de sortie AV, relier cette prise à la prise
d’entrée d’un téléviseur (ou de l'adaptateur HF) pour faire une
lecture directe à partir du caméscope.
40 Prise de sortie HF CC (p. 89)
Relier cette prise à l’adaptateur HF pour faire une lecture
directe à partir du caméscope.
41 Prise de sortie audio (p. 87, 89, 97)
A l’aide d’un câble audio, relier cette prise à la prise d’entrée
audio du téléviseur (ou de l’adaptateur HF) pour une lecture
directe à partir du caméscope.
42 Bague de réglage de l’oculaire (p. 29)
Avec cette bague, l’utilisateur peut régler l’oculaire à sa
propre vue.
Régler le correcteur de l’oculaire de manière à ce que les
indications dans le viseur soient bien visibles.
43 Oeilleton (p. 29, 99)
44
Viseur électronique (p. 29,47, 99)
Le sujet qui se trouve devant le caméscope peut être vu sur
l’écran du viseur. En surimposition sur l'image, on peut lire les
indications des différentes opérations concernant la marche
du caméscope.
Pour que l’image apparaisse sur l’écran du viseur avec un
maximum de netteté pendant la prise de vues ou la lecture,
tirer la bague en plastique derrière l’oeilleton pour déployer le
Logement de la cassette (p. 35)
45
Introduire une cassette vidéo lynSW ou j
logement.
46
Prise de micro extérieur
Si l’on désire utiliser un micro extérieur, le relier à cette prise
(dans ce cas, le micro incorporé sera désactivé).
47
Prise de sortie S-Vidéo (p. 87,97)
Relier le câble S-Vidéo à cette prise si le téléviseur est équipé
d’une prise de sortie S-Vidéo.
48
Prise de post-synchronisation (p. 97)
Relier une unité de commande de post-synchronisation ou
autre à cette prise.
49 Fixation pour trépied
Quand on utilise un trépied pour une prise de vues stable,
serrer la vis du trépied dans cet orifice.
impossible ou lorsque l'on veut régler
manuellement la balance des blancs.
conditions de faible luminosité.
î VHSB dans ce
-15-
50 Support de pile-bouton (p. 25)
Il contient la pile-bouton (“CR2032” qui garde les données de
l’horloge lorsque le caméscope est hors tension).
ENGLISH
S-VHS Format
About the S-VHS Format
The S-VHS video format is the new video system that fuifiils the
exceedingiy high demands and expectations of today’s video-
information age. It is newly developed based on the VHS video
format established throughout the worid for home use, and it
employs a wealth of latest technology to provide higher resolution
and picture quality. The newly developed,i high-performance SVHS-C video cassette tapes enable the S-VHS format to realize
truly epoch-making improvements in overall picture quality and
clarity. i
This S-VHS-C Movie Camera allows high picture quality recording
and playback by using the video cassettes carrying the S-VHS-C
logo as well as conventional VHS recording and playback on the
video cassettes bearing the VHS-C logo.
Compatibility of VTRs and Tapes
ILLUSTRATION
s
VHS
PAL
625
When recording
When using an S-VHS-C video cassettefor recording, the
recording format (S-VHS or VHS) can be selected asfollbws by
pressing the [S-VHS/SP • LP] Button.
S-SP, S-LP: S-VHS format
SP, LP: VHS format
•The Indications “S-SP", “LP”, etc. are displayed in the
Viewfinder.
When using a VHS-C video cassette for recording, it is not possible
to select “S-SP” or “S-LP” with the [S-VHS/SP* LP] Button.
When Playing Back
•Tapes recorded in the S-VHS format can be played back on this
Movie Camera or on other S-VHS VTRs.
(However, they cannot be played back on VHS VTRs.)
•Tapes recorded in the VHS format can be played back On VHS
VTRs as well as on this Movie Camera and on other S-VHS
VTRs.
•The video format in which the video cassette was recorded will
automatically be detected and selected for playback.
• If the setting of the [S-VHS/SP * LP] Button is changed during
shooting, some picture distortion will occur at that tape position
during playback.
S-VHS-C
VHS-C
(S-VHS)
(VHS)
(S-VHS)
S-VHS
SP LP
\
S-VHS
SP LP
\ SP/LP
(VHS)
rrrr
IVHS
SViLSS
1
vus
-16-

DEUTSCH
FRANÇAIS
Das S-VHS Videoformat
Hinweise zum S-VHS-Format
Das S-VHS-Videoformat ist das neue Video-System, das die stark
gesteigerten Quaiitätsansprüche und Erwartungen erfüiit, die das
heutige Zeitaiter der Videoinformation stellt.
S-VHS ist eine Neuentwicklung, die auf dem VHS-Videoformat,
dem weltverbreiteten Videosystem für den Heimgebrauch, basiert,
und es verwendet eine Fülle neuer Techniken zur Realisierung
hoher Auflösung und überlegener Biidquaiität. Die neuentwickelten
Hochleistungs-S-VHS-Videocassetten ermöglichen es dem
S-VHS-Format, ein neues Leistungsniveau in bezug auf die
Bildqualität und Bildschärfe zu erzielen.
Dieser S-VHS-C-Kamerarecorder ermöglicht das Aufnehmen und
Wiedergeben mit hoher Bildqualität bei Verwendung von
Videocassetten, die mit dem S-VHS-C-Schriftzug gekennzeichnet
sind, sowie auch konventionelle VHS-Aufnahme und -Wiedergabe
auf Videocassetten, die den VHS-C-Schriftzug tragen.
Kompatibilität von Videorecordern und Cassetten
Bei der Aufnahme
Beim Verwenden einer S-VHS-C Videocassette für die Aufnahme
kann das Aufnahmeformat (S-VHS oder VHS) durch Drücken der
Taste [S-VHS/SP« LP] wie folgt gewählt werden:
S-SP, S-LP: S-VHS-Format
SP, LP: VHS-Format
•Die Anzeigen ,,S-SP“, ,,LP“ usw. werden im Sucher angezeigt.
Bei der Verwendung einer VHS-C Videocassette für die Aufnahme,
ist es nicht möglich, mit der Taste [S-VHS/SP • LP] die Betriebsart
,,S-SP“ oder ,,S-LP“ zu wählen.
Le format S-VHS
Qu’est-ce que le format S-VHS?
Le format vidéo S-VHS est le nouveau système vidéo développé
pour élever la qualité de la vidéo au niveau demandé aujourd'hui, à
l’époque de l’information vidéo. Ce système a été tout
nouvellement développé en partant du format vidéo VHS utilisé
dans le monde entier pour les équipements vidéo personnels et il
emploie les toutes dernières techniques à la pointe du progrès
dans ce domaine pour offrir une définition et une qualité d’image
supérieures. La cassette vidéo S-VHS-C à hautes performances a
été développée spécialement pour permettre au format S-VHS de
révolutionner la qualité et la netteté de l’image.
Cette caméra vidéo S-VHS-C offre une qualité d’image supérieure
en enregistrement et en lecture avec les cassettes vidéo portant
l’indication S-VHS-C. Elle permet aussi l'enregistrement et la
lecture avec les cassettes vidéo de format VHS conventionnel
portant l’indication VHS-C.
Compatibilité des magnétoscopes et des cassettes
Enregistrement
Si l’on utilise une cassette vidéo S-VHS-C pour enregistrer une
séquence, on peut sélectionner le format d’enregistrement (S-VHS
ou VHS) en appuyant sur la touche [S-VHS/SP • LP] comme
indiqué ci-dessous:
S-SP, S-LP; format S-VHS
SP, LP: format VHS
•Les indications “S-SP”
électronique.
Lorsque l’on utilise une cassette vidéo VHS-C pour
l’enregistrement, on ne peut pas sélectionner le mode “S-SP” ou
“S-LP” avec la touche [S-VHS/SP • LP].
“LP”, etc. apparaissent dans le viseur
Bei der Wiedergabe
• Im S-VHS-Format aufgezeichnete Videocassetten können auf
diesem Kamerarecorder oder auf einem anderen S-VHSVideorecorder wiedergegeben werden.
(Sie können jedoch nicht auf einem VHS-Videorecorder
wiedergegeben werden.)
• Im VHS-Format aufgezeichnete Videocassetten können auf
VHS-Videorecordern sowie auch auf diesem Kamerarecorder
und auf anderen S-VHS-Videorecordern wiedergegeben werden.
• Das Video-Format, in welchem die Videocassette aufgezeichnet
wurde, wird erfaßt und automatisch für die Wiedergabe gewählt.
•Wenn die Einstellung der Taste [S-VHS/SP • LP] während des
Aufnehmens verändert wird, treten bei der Wiedergabe
Bildstörungen an der betreffenden Stelle auf.
Lecture
• Les bandes enregistrées en format S-VHS peuvent être lues sur
ce caméscope ou sur tout magnétoscope S-VHS.
(Mais elles ne peuvent pas être lues sur un magnétoscope VHS.)
• Les bandes enregistrées en format VHS peuvent être lues sur un
magnétoscope VHS, mais également sur ce caméscope et sur
tout magnétoscope S-VHS.
•Le format vidéo dans lequel la cassette a été enregistrée sera
automatiquement détecté et sélectionné pour la lecture.
•Si, pendant les prises de vues, l’on change la position de la
touche [S-VHS/SP - LP], cela entraîne des distorsions d’image
pendant la lecture.
-17-
ENGLISH
Using the Battery Pack
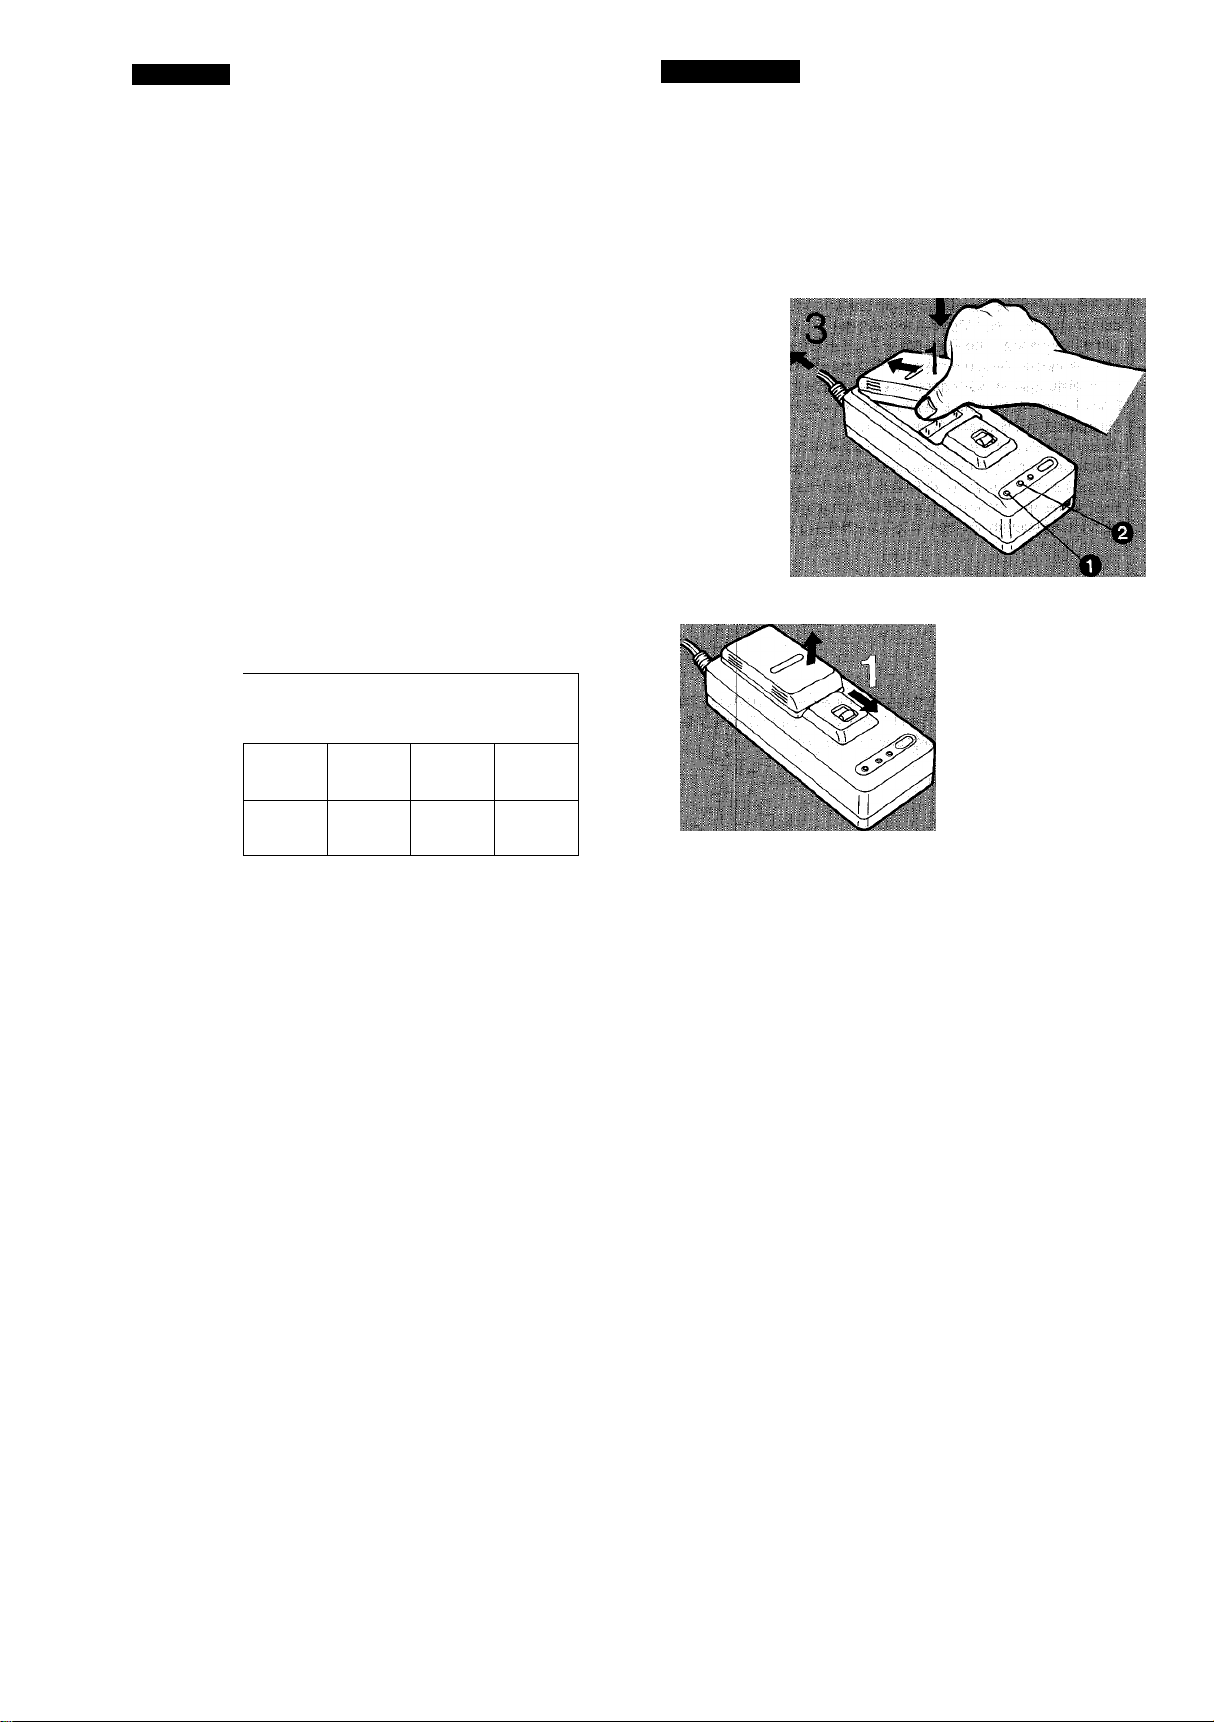
1) Charge the Battery Pack
Insert the upper end 6f the Battery Pack into the
1
connector on the AC Adaptor as shown in the illustration.
Press the rear portion down until it iocks with a click.
O Connect the Power Cable of the AC Adaptor to the mains.
•The Power Lamp Q up ^nd several seconds later the
Charging Lamp 0 lights up, too.
•When the charging is completed, the Charging Lamp 0
goes out.
Note:
When charging the Battery Pack, disconnect the DC Input Cable
from the AC Adaptor.
■ Charging Time and Maximum Time for Continuous
Shooting
ILLUSTRATION
Battery
Charging time in
minutes
Max shooting
•Continuous shooting using a fully charged Battery Pack at 25°C. In
actual use, depending on the charging condition of the Battery
Pack, the temperature, the actual operation during recording, etc.,
the possible recording time may be shorter.
Therefore, it is recommended to'take along a charged spare
Battery Pack.
•The Battery Pack is charged after the time indicated in the table.
However, the charging should be continued for a further 2 hours
to achieve maximum operation time.
■ To Eject the Battery Pack...
Slide the Battery Eject Lever in the direction of the arrow and...
Remove the Battery Pack.
Notes:
The Battery Pack is Shipped in discharged Condition and must be
charged before it can be used.
•Charge the Baittery Pack viithin a temperature range of
10°C-35'>C.
VVif-VBS1E vw VBbab
bupplicd
60
50 100 ’50 100
Optional Optional Optional
VW-VBR1E VW-VBR2E
120
60
120
-18-

DEUTSCH
FRANÇAIS
Verwendung des Akkus
1) Den Akku auf laden
1
Das obere Ende des Akkus in die Haiterung am
Netzadapter einsetzen, wie in der Abbiidung gezeigt.
2
Das untere Ende des Akkus nach unten drücken, bis es
mit einem Kiickgeräusch einrastet.
3
Das Netzkabel des Netzadapters an eine Netzsteckdose
anschließen.
• Die Stromanzeigelampe Q leuchtet auf, und einige
Sekunden später leuchtet auch die Ladeanzeigelampe @
auf.
•Wenn das Aufladen beendet ist. erlischt die
Ladeanzeigelampe
Hinweis:
Vor dem Aufladen des Akkus mu ß das Gleichstrom-Anschlu ßkabel
vom Netzadapter getrennt werden.
■ Aufladedauer und maximale Dauer für ununterbrochenes
Aufnehmen
Akku-
Modoll- VW-VBSIE
.. Nr. mitgeliefert
Autladedauer in
Minuten
Max.
Aufnahmedauer
in Minuten'
•Beim ununterbrochenen Aufnehmen mit einem vollständig
aufgeladenen Akku bei einer Umgebungstemperatur von 25°C.
Beim praktischen Einsatz kann die maximale Aufnahmedauer, je
nach Ladezustand des Akkus, der Umgebungstemperatur und
den eingesetzten Funktionen, kürzer sein.
Es empfiehlt sich daher, immer einen aufgeladenen ReserveAkku mitzunehmen.
• Nach Ablauf der in der obigen Tabelle aufgeführten Aufladedauer
ist der Akku aufgeladen. Um jedoch maximale Betriebsdauer zu
erzielen, sollte das Aufladen für zwei weitere Stunden fortgesetzt
werden.
0
.
[
.....
VW-VBS2E VW-VBH1E VW-VBR2E
(Sonder- (Sonder- (Sonder-
zubchor) Zubehör) Zubehör)
П ■■■■
Le bloc-batterie
1) Recharge du bloc-batterie
1
Insérer l’extrémité avant du bloc-batterie dans le
connecteur situé sur l’adaptateur CA, comme indiqué sur
l’Illustration.
2
Rabattre la partie arrière jusqu’à ce qu’elle se verrouille
(on entend alors un déclic).
Brancher le câble de l’adaptateur CA sur le secteur.
3
•Le témoin d’alimentation 0 s'allume; quelques secondes
après, le témoin de recharge 0 s’allume également.
• Lorsque le bloc-batterie est rechargé, le témoin de recharge
0
s’éteint.
Remarque:
Lorsque l’on recharge le bloc-batterie, débrancher le câble
d'entrée CC de l’adaptateur CA.
■ Durée de recharge et durée maximale d’enregistrement
X I f
' .N" de reference
' . du bloc- VW-VBSIE , VW-VBS2E
'batterie ’ fourni ' en option
Duree de
recharge en
minutes
Duree maximale
d'enregistrement
en minutes'
•En enregistrement continu, avec un bloc-batterie chargé, par une
température de 25°C. En réalité, la durée maximale
d’enregistrement peut être écourtée, en fonction des conditions de
recharge du bloc-batterie, de la température, des différentes
opérations effectuées en cours d’enregistrement, etc.
C’est pourquoi il est recommandé de préparer un bloc-batterie en
réserve.
• A l’issue de la durée indiquée sur le tableau, le bloc-batterie est
rechargé. Cependant, pour atteindre son efficacité maximale, il
doit rester en charge deux heures supplémentaires.
■ Ejection du bloc-batterie...
60
50 100 50
VW-VBR1E
en option
120 60 120
VW-VBR2E
en option
100
Abnehmen des Akkus...
Den Batterie-Entriegelungshebel in Pfeilrichtung
schieben, und...
Ä Den Akku abnehmen.
Hinweis:
Der Akku wird in entladenem Zustand geliefert und mu ß vor dem
Einsatz aufgeladen werden.
• Der Akku sollte bei einer Temperatur zwischen 10°C und 35°C
aufgeladen werden.
Déplacer le levier d’éjection du bloc-batterie dans le sens
de la flèche, et...
Enlever le bloc-batterie.
Remarques:
Le bloc-batterie est fourni déchargé et doit être chargé avant
utilisation.
•Charger le bloc-batterie à une température comprise entre 10°C
et35°C.
-19-
ENGLISH
Using the Battery Pack (cont’d)
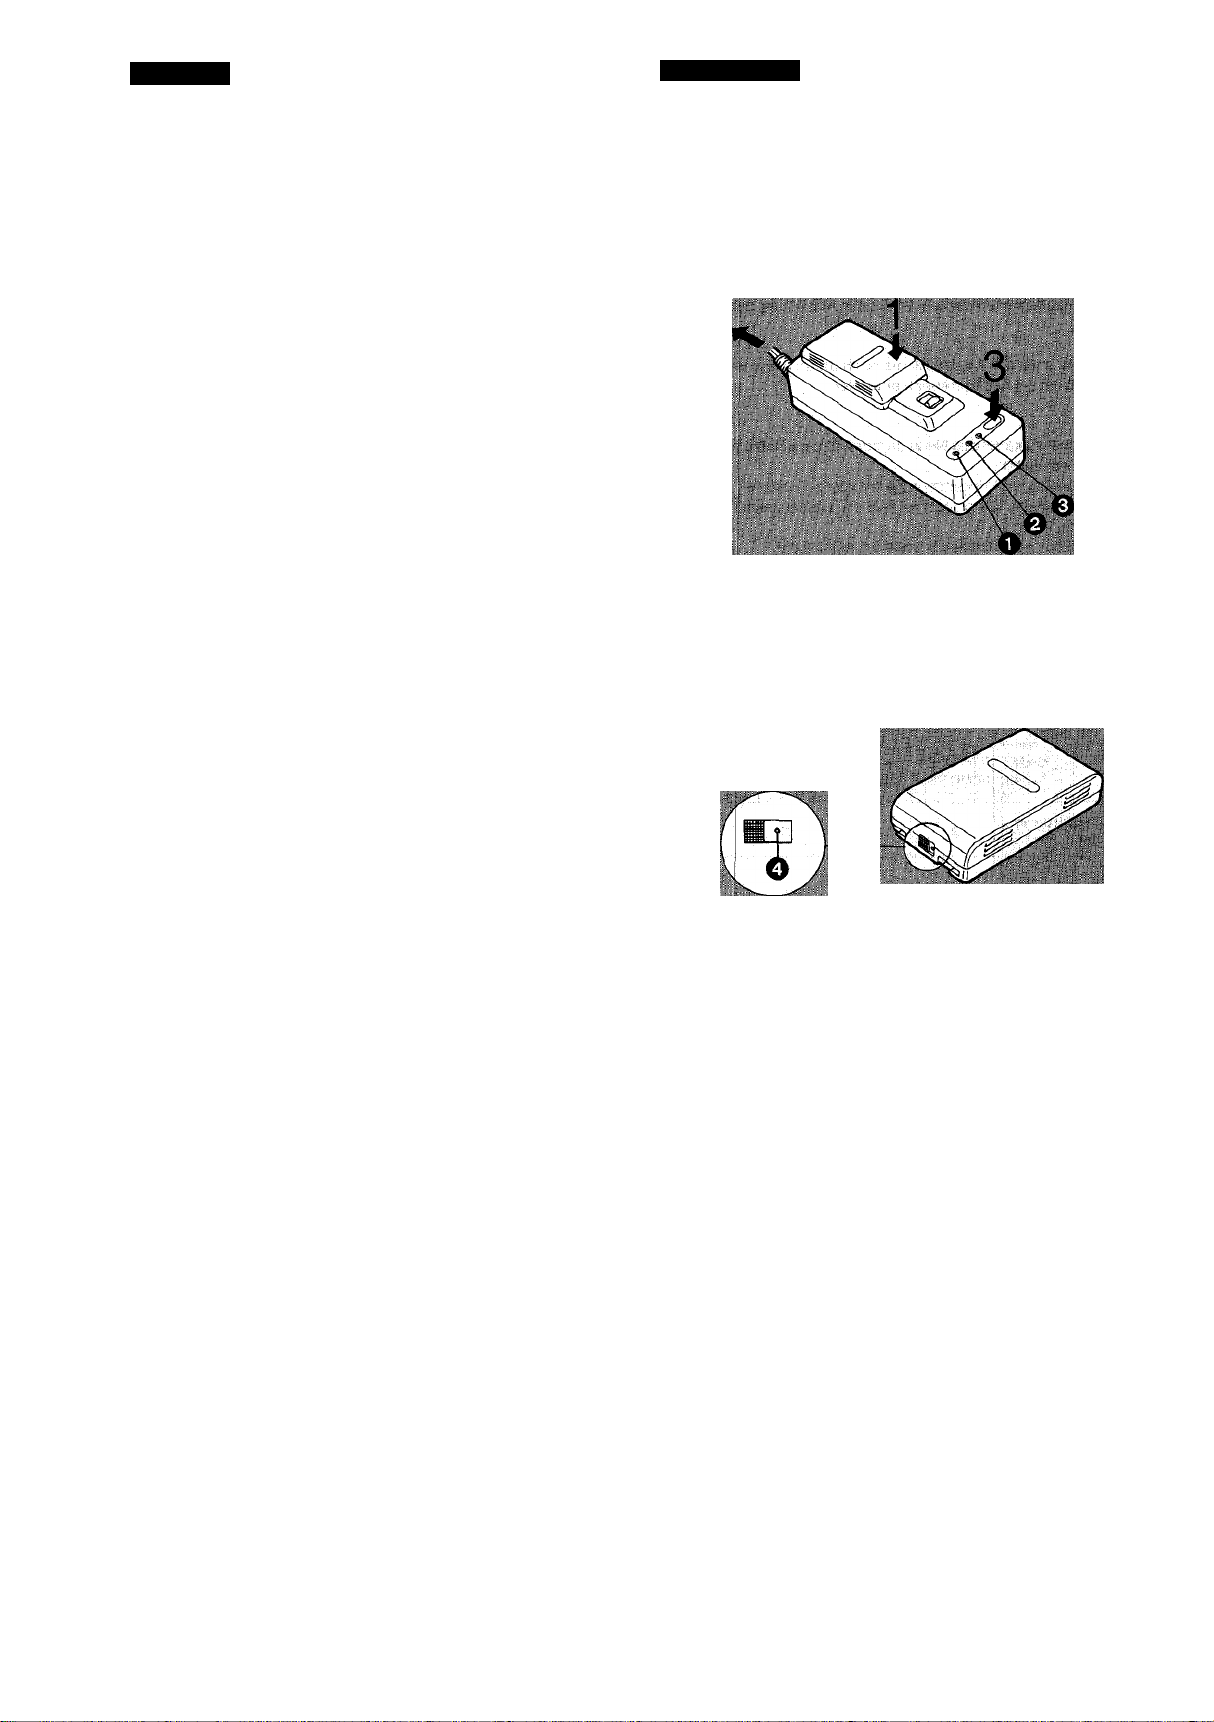
■ Howto Use the Convenient Discharges Charge Function
If a Battery Pack is recharged repeatedly in not completely
discharged condition, the so-called “memory effect” will occur, and
the operation lime of theirecharged Battery Pack will gradually
become shorter . Therefore, it is recommended to regenerate the
Battery Pack after approx, every fifth recharging by using the
convenient Discharges Charge Function.
Attach the Battery Pack to the AC Adaptor.
1
Connect the Power Cable of the AC Adaptor to the mains.
2
•The Power Lamp O'lights gp, and soon after, the Charging
Lamp lights up.
vJ Press the Discharges Charge Button for more than
1 second.
•The Discharge Lamp © lights upv and the Charge Lamp:@
goes out.
ILLUSTRATION
■ When the discharging is finished. the Charge Lamp © lights
up instead, and the charging starts.
■ When the charging is completed, the Charging Lamp ©
goes out.
•When usirig the Discharges Charge Function, the charging takes
five or six times as long as normal chargihg.
■ How to Use the Charging Confirmation Marker
This marker makes it convenient to distinguish betvyeen charged
and discharged Battery Packs. For example, slide the kriob so that
the dot © is visible to mark a charged Battery Pack, and slide it so
that the dot iis not visible for a partially or-fully discharged Battery
Pack.
20-

DEUTSCH
Verwendung des Akkus
(Fortsetzung)
FRANÇAIS
Le bloc-batterie (suite)
■ Verwendung der Entlade^ Lade-Funktion
Wenn der Akku wiederholt in nicht vollständig entladenem Zustand
aufgeladen wird, so tritt der sogenannte „Memory“-Effekt auf, und
die Ladekapazität des Akkus verringert sich allmählich. Daher
empfiehlt es sich, den Akku bei ca. jedem fünften Nachladen mit
Hilfe der Entlade^ Lade-Funktion zu regenerieren.
"\ Den Akku am Netzadapter anbringen.
Das Netzkabei des Netzadapters ans Netz anschiießen.
• Die Stromanzeigelampe Q leuchtet auf, und kurz danach
leuchtet auch die Ladeanzeigelampe © auf.
O Die Entlade-» Lade-Taste länger als 1 Sekunde gedrückt
halten.
• Die Entlade-Anzeigelampe © leuchtet auf, und die
Ladeanzeigelampe © erlischt.
■ Sobald der Entladevorgang beendet ist, leuchtet die
Ladeanzeigelampe © auf, und der Aufladevorgang beginnt.
■ Wenn der Aufladevorgang beendet ist. erlischt die Ladeanzeigelampe ©.
• Bei Benutzung der Entlade^Lade-Funktion dauert das Aufladen
ca. fünf- bis sechsmal so lange wie das normale Aufladen.
■ Verwendung der Ladezustand-Markierung
Mit Hilfe dieser Markierung lassen sich vollständig aufgeladene
Akkus problemlos von entladenen Akkus unterscheiden. Dazu so
verschieben, daß für vollständige Akkus der Punkt © sichtbar ist
und für teilweise oder vollständig entladene Akkus nicht sichtbar
ist.
■ Fonction de décharge^ recharge
Si un bloc-batterie est rechargé plusieurs fois lorsqu’il n'est pas
complètement déchargé, l’effet dit “de mémoire” se produira et
l’autonomie du bloc-batterie rechargé diminuera progressivement.
C’est pourquoi il est recommandé de régénérer le bloc-batterie
toutes les 5 recharges en utilisant la fonction de
décharge^ recharge.
Fixer ie bioc-batterie à i’adaptateur CA.
Brancher le câble de l’adaptateur sur le secteur.
• Le témoin d’alimentation © s’allume et peu de temps après,
le témoin de recharge @ s'allume aussi.
vJ Appuyer sur la touche de décharge^ recharge pendant
plus d’une seconde.
•Le témoin de décharge^recharge © s’allume et le témoin
de recharge © s’éteint.
■ Lorsque la décharge est terminée, le témoin de recharge ©
s’allume à son tour et la recharge commence.
■ Lorsque la recharge est terminée, le témoin de recharge © s'éteint.
•Lorsque l’on utilise la fonction déchargea recharge, le temps de
recharge est cinq à six fois plus important qu’en temps normal.
■ Repère de confirmation de recharge
Ce repère permet de déterminer facilement si le bloc-batterie est
chargé ou déchargé. Par exemple: pour signaler que le blocbatterie est entièrement chargé, placer la commande de façon à
faire apparaître le point ©; lorsque le bloc-batterie est
partiellement ou complètement déchargé, déplacer la commande
pour que le point ne soit pas visible.
-21-
ENGLISH
Using the Battery Pack (cant'd)
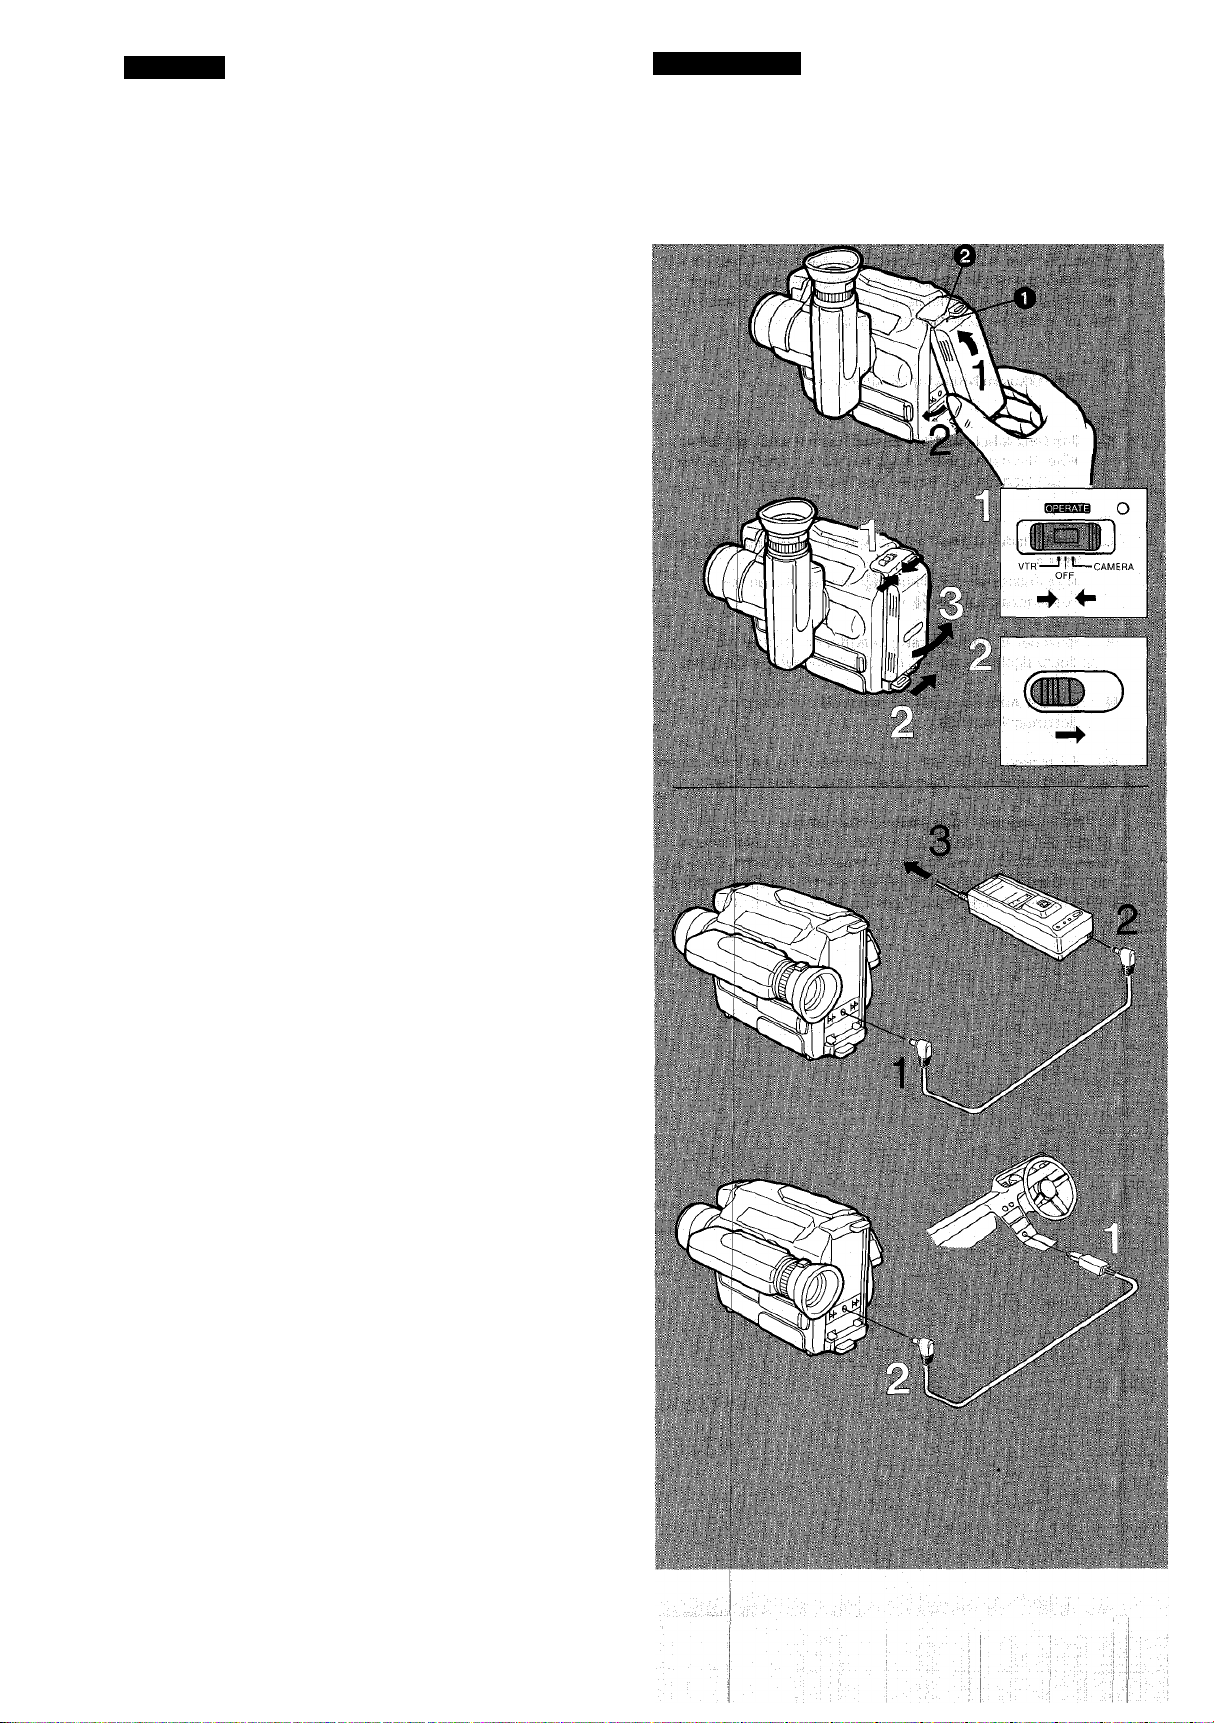
2) Attach the Battery Pack to the Movie Camera.
■ How to Attach the Battery Pack
*1 Align the mark Q ^^^he top of the Battery Pack with that
on the Movie Camera 0 and insert the Battery Pack with
its upper part first.
2 Attach the Battery Pack until it locks with a click.
■ How to Remove the Battery Pack
Press and slide to “OFF”
After the image in the Viewfinder disappears, slide to the
right and...
ILLUSTRATION
Pull off the Battery Pack.
Caution:
•If:the Battery Pack is reraovecf during recording or playback; the
tape remains wound around the video head cylinder and could
become damaged.
This is alsb the caseiduring the ioadingiand unloading of the tape.
Using the AC Adaptor or the Car
Battery Cord (optional)
How to Use the AC Adaptor
1
Connect the DC Input Cable to the DC Input Socket on the
Movie Camera.
Connect the other end of the cable to the DC Output
2
Socket on the AC Adaptor.
O Connect the Mains Cable of the AC Adaptor to the mains.
Note:
When the AC Adaptor is used to supply the Movie Camera with
power, remove the Battery Pack from the AC Adaptor.
How to Use the Car Battery Cord (optional)
Start the engine and then plug the Car Battery Cord into
1
the Cigarette Lighter Socket.
Connect the other end of the cord to the DC Input Socket
on the Movie Camera.
Notes:
•The Car Battery Cord can only be used with 12 V DC negativegrounded vehicles.
•Do not start the car engine while the Movie Camera is powered by
the car battery.
-22-

DEUTSCH
Verwendung des Akkus
(Fortsetzung)
FRANÇAIS
Le bloc-batterie (suite)
2) Den Akku am Kamerarecorder anbringen.
■ Anbringen des Akkus
*1 Die Markierung O oben am Akku auf die Markierung am
Kamerarecorder Q ausrichten und den Akku mit seinem
oberen Teil voran einsetzen.
_ Am unteren Teil hineindrücken, bis er hörbar einrastet.
Abnehmen des Akkus
Drücken und auf „OFF“ schieben.
Nachdem das Bild im Sucher verschwindet, nach rechts
schieben und...
^ Den Akku abziehen.
Vorsicht:
• Falls der Akku während des Aufnahme- oder
Wiedergabevorgangs abgenommen wird, bleibt das Band um die
Kopftrommel geschlungen und könnte beschädigt werden.
Das gilt auch während des Ein- oder Ausfädelvorgangs.
Verwendung des Netzadapters oder
des Auto-/Boots-Akku-
Anschlußkabels (Sonderzubehör)
Verwendung des Netzadapters
1
Das Gleichstrom-Eingangskabel an die GleichstromEingangsbuchse am Kamerarecorder anschließen.
Das andere Ende des Kabels an die GlelchstromAusgangsbuchse am Netzadapter anschließen.
O Den Netzadapter ans Netz anschließen.
2) Comment fixer le bloc-batterie sur le
caméscope
Comment mettre le bloc-batterie
1
Aligner le repère Q situé sur le dessus du bloc-batterie
avec celui du caméscope 0 et introduire le bloc-batterie,
sa partie supérieure étant dirigée en avant.
- Enfoncer le bloc-batterie jusqu’à ce qu’il se verrouille
avec un déclic.
Comment retirer le bloc-batterie
Appuyer et déplacer sur “OFF”.
Attendre que l’image ait disparu dans le viseur
électronique puis actionner vers la droite et...
^3
Retirer le bloc-batterie.
Attention:
•Si l’on retire le bloc-batterie pendant l’enregistrement ou la
lecture, la bande reste enroulée sur le tambour des têtes et elle
risque d’être endommagée.
C’est également le cas lorsque l’on met ou que l’on retire la
cassette de l'appareil.
Uadaptateur CA et le cordon pour batterie de voiture (en option)
Comment utiliser l’adaptateur CA
1
Brancher le câble d’entrée CC à la prise d’entrée CC du
caméscope.
2
Brancher l’autre extrémité du câble â la prise de sortie de
l’adaptateur CA.
Hinweis:
Wenn der Netzadapter als Stromversorgungseinheit für den
Kamerarecorder verwendet wird, muß der Akku vom Netzadapter
abgenommen werden.
■ Verwendung des Auto-/Boots-Akku-Anschlußkabels
(Sonderzubehör)
Den Motor des Fahrzeugs antassen, und erst dann den
Stecker des Auto-/Boots-Akku-Anschlußkabels in die
Zigarettenanzünderbuchse einstecken.
Das andere Ende des Kabels an die GleichstromEingangsbuchse des Kamerarecorders anschließen.
Hinweis:
• Das Auto-/Boots-Akku-Anschlußkabel funktioniert nur an 12 V
Gleichstrom mit negativem Pol am Chassis.
• Den Motor nicht anlassen, während die Stromversorgung vom
Fahrzeug aus erfolgt.
-23-
Brancher le câble électrique de l’adaptateur CA au
3
secteur.
Remarque:
Lorsque l’on utilise l’adaptateur CA pour alimenter le caméscope,
enlever le bloc-batterie de l’adaptateur,
■ Comment utiliser le cordon pour batterie de voiture
(en option)
Faire démarrer le moteur et introduire la fiche dans la
prise de l’allume-cigare.
Brancher l’autre extrémité du cordon à la prise d’entrée
CC du caméscope.
Remarques:
• Le cordon pour batterie de voiture ne peut être utilisé qu’avec des
véhicules à masse négative de 12 V CC.
• Ne pas faire démarrer le moteur lorsque le caméscope est
alimenté par la batterie du véhicule.
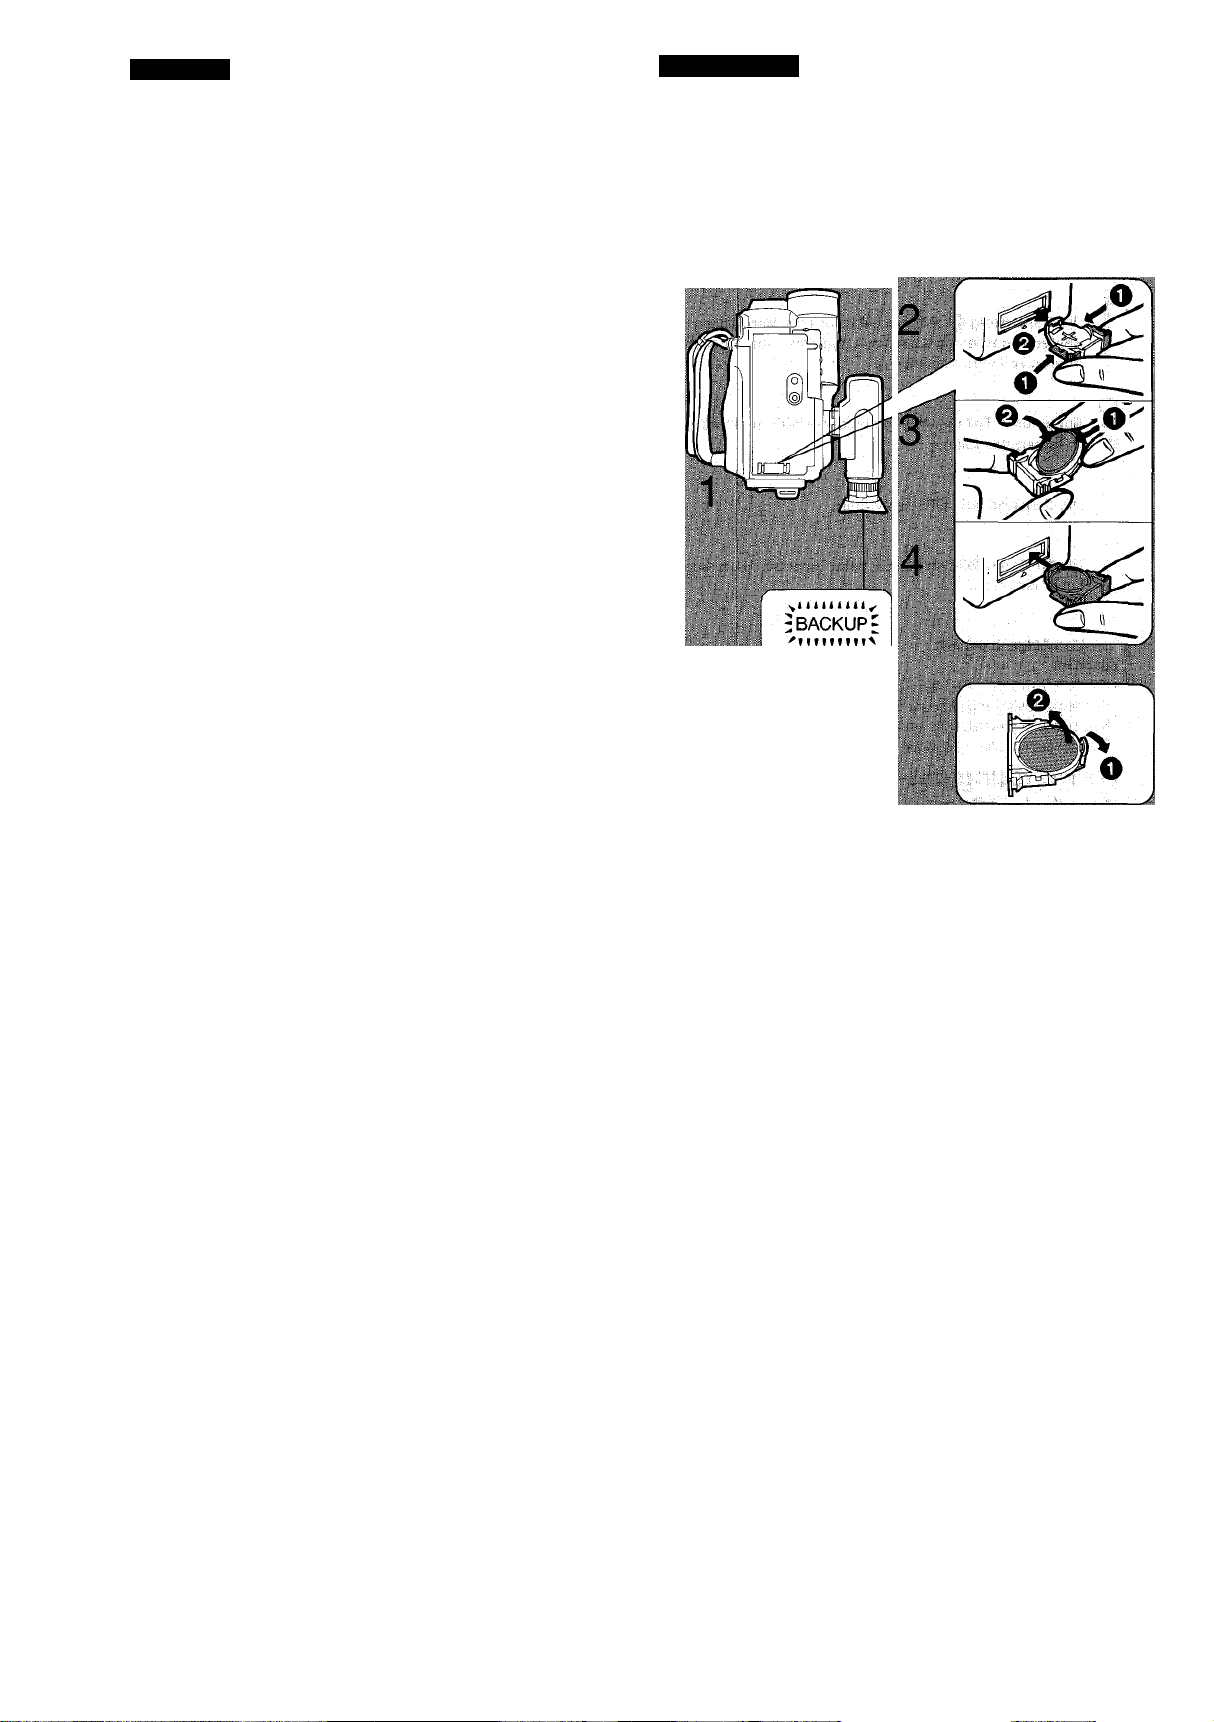
ENGLISH
Setting the Clock
1) Insert the Buttbn Type Battery
■ How to Insert the Button Type Battery
The “CR2032” size Button Type Battery is necessary for storing
the date, time and seiected tape speed in the memory, when the
Movie Camera is turned off.
1 Turn the Movie Camera upside down.
2 Push the two stoppers O toward each
other and pull out the Battery Holder
O Install the Battery with the (+) mark
facing downward until it locks with a
click.
ILLUSTRATION
4 Insert the Battery Holder back into the
Movie Camera until it locks.
• If the Button Type Battery is not inserted or if it is exhausted, the
Indication “BACKUP” in the Viewfinder fiashes for approx. 10
seconds when turning the Movie Camera on.
■ How to Exchange the Button Type Battery
•Use only a “CR2032” size Button Type Battery.
•The CR2032 is manufactured by Panasonic only.
Note:
•If the Date and Time Indications in the Viewfinder are no longer
correct after replacing the Button Type Battery, set the date and
time as expiained on page 26.
CAUTIONS FOR BATTERY REPLACEMENT
•The life of the battery is about one year. Inspect, and if necessary,
replace the Battery once a year.
• Load the hew battefy with its polarities (+ and -) correctly
aligned.
• Remove the spent battery immediately and dispose of it.
•Do not try to short-circuit, recharge or heat the battery and do not
throw it into a fire.
• Keep the button-type battery out of reach of children.
If a battery has been swallowed, consult a doctor immediately.
•Do not graspthe button-type battery with metallic tweezers
because this could short-circuit it.
-24-

DEUTSCH
FRANÇAIS
Einstellen der Uhrzeit
1) Einsetzen der Knopfzelle für den Uhrbetrieb
■ Einsetzen der Knopfzelle
Die Knopfzelle vom Typ „CR2032“ sorgt dafür, daß Datum,
Uhrzeit und gewählte Bandgeschwindigkeit vom Kamerarecorder
gespeichert werden, wenn dieser ausgeschaltet wird.
1 Die Unterseite des Kamerarecorders
nach oben drehen.
2 Die Sperren O auf beiden Seiten der
Knopfzelien-Halterung gegeneinander
drücken und die Knopfzelien-
Halterung 0 herausziehen.
3 Die Knopfzelle mit der (+)-Markierung
nach unten gerichtet in die
Knopfzelien-Halterung einsetzen, so
daß sie mit einem Klickgeräusch
einrastet.
4 Die Knopfzelien-Halterung in den
Kamerarecorder einsetzen, bis sie
hörbar verriegelt.
• Falls die Knopfzelle nicht eingesetzt ist, oder wenn sie erschöpft
ist, blinkt die Anzeige ,,BACKUP“ im Sucher ca. 10 Sekunden,
wenn der Kamerarecorder eingeschaltet wird.
■ Auswechseln der Knopfzelle
• Nur eine Knopfzelle vom Typ ,,CR2032“ verwenden.
•Die Knoptzelle vom Typ ,,CR2032“ wird nur von Panasonic
hergestellt.
Hinweis:
•Wenn die Datum- und Uhrzeit-Anzeigen im Sucher nach dem
Auswechseln der Knopfzelle nicht mehr korrekt sind, müssen
Datum und Uhrzeit neu eingestellt werden, wie auf Seite 27
beschrieben.
WICHTIGE HINWEISE ZUM AUSWECHSELN DER BATTERIE
• Die Lebensdauer der Batterie beträgt etwa ein Jahr. Die Batterie
sollte einmal pro Jahr geprüft und gegebenenfalls ausgetauscht
werden.
•Beim Einsetzen der Batterie auf korrekte Polarität (-(- und -)
achten.
• Die erschöpfte Batterie sofort auswechseln und beim
Fachhändler oder einer Sammelstelle für Sonderstoffe abliefern.
• Die Batterie nicht kurzschließen, aufladen oder erhitzen und nie
in ein Feuer werfen.
• Die Batterie außerhalb der Reichweite von Kindern aufbewahren.
Falls eine Batterie verschluckt wird, sofort einen Arzt aufsuchen.
• Die Batterie nicht mit einer metallenen Pinzette fassen, denn
diese könnte die Batterie kurzschließen.
Réglage de l’horloge
1 ) Installation de la pile pour le fonctionnement
de i’horloge
■ Comment mettre la pile pour le fonctionnement de
l’horloge
La pile bouton “CR2032” est indispensable pour mettre en
mémoire la date et l’heure ainsi que la vitesse de la bande, lorsque
le caméscope est hors tension.
1
Retourner le caméscope.
Pousser les deux butées O du
support de pile vers l’intérieur et
enlever le support de pile 0.
Placer la pile dans le support avec le
repère (+) orienté vers le bas. Un
déclic doit se produire quand elle est
verrouillée.
Réintroduire le support de pile dans
son logement jusqu’à ce qu’il se
verrouille.
•S’il n’y a pas de pile ou si la pile est épuisée, l’indication
“BACKUP” clignote dans le viseur électronique pendant
10 secondes environ lorsque l’on met le caméscope sous
tension.
■ Comment changer la pile pour le fonctionnement de
l'horloge
• Utiliser uniquement une pile de type “CR2032”.
•La pile “CR2032” est fabriquée exclusivement par Panasonic.
Remarque:
•Si les indications de la date et de l’heure dans le viseur
électronique ne sont plus correctes après le remplacement de la
pile, régler la date et l’heure comme expliqué à la page 27.
PRECAUTIONS CONCERNANT LE REMPLACEMENT DE LA
PILE
• L'autonomie de la pile est d'un an environ. La vérifier ef, si
nécessaire, remplacer la pile une fois par an.
• Mettre la pile neuve avec ses polarités {+ et -) correctement
alignées.
• Enlever immédiatement toute pile épuisée et s’en défaire.
• Ne pas tenter de court-circuiter, de recharger ou de chauffer la
pile et ne pas la jeter dans le feu.
•Maintenir la pile bouton hors de portée des enfants.
Si quelqu’un a avalé une pile, consulter immédiatement un
médecin.
•Ne pas saisir la pile bouton avec des pinces métalliques car cela
pourrait la court-circuiter.
-25-
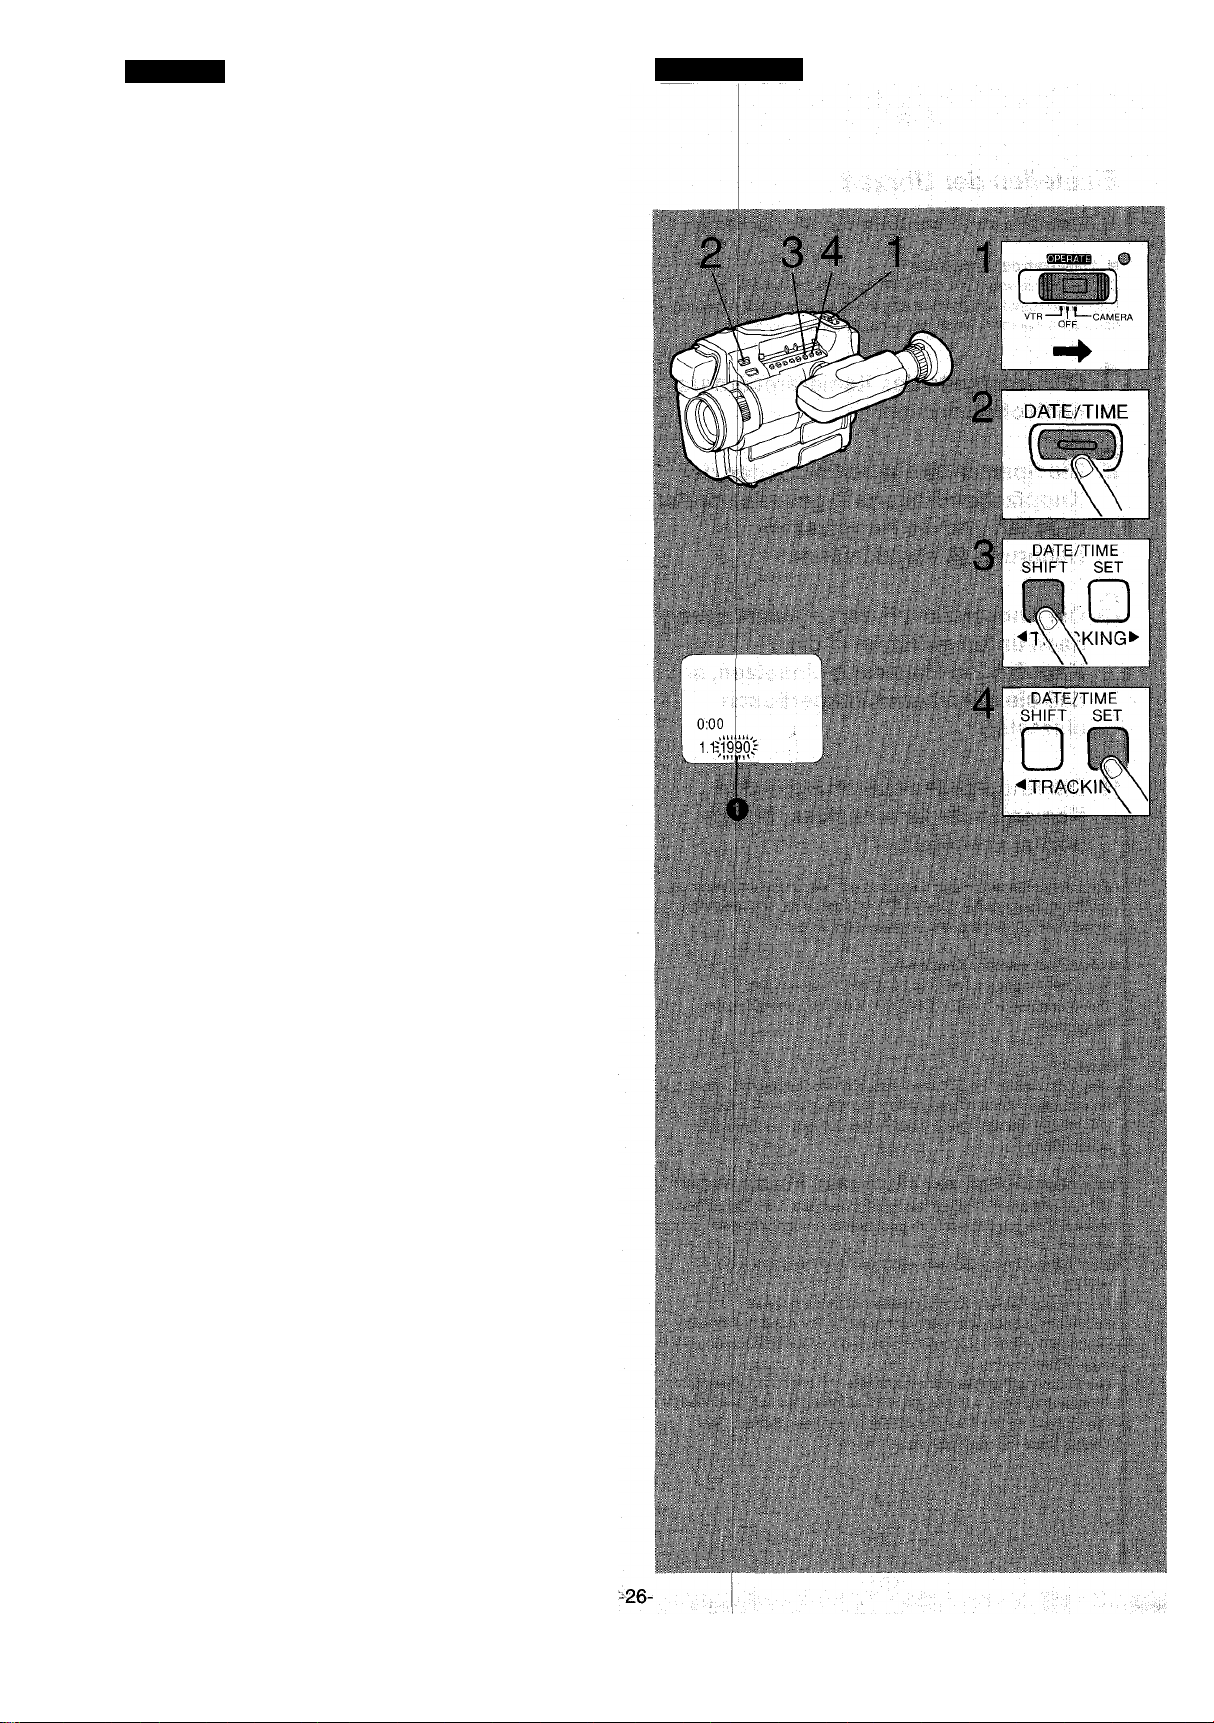
ENGLISH
Setting the Clock (conVd)
2) Set the Date and Time
■ How to Set the Date and Time
1 Press and slide to “CAMERA”.
2 Press.
3 Keep pressed for more than
2 seconds.
•The year portion O of the Date/Time Indication starts to
flaSh;i hL ' . : Si'.
•Theflashing:portiori pf the Date/Time Indication can be
changed with the [SHIFT] Buttorr in the following order:
Year^ Month-^ Day^ Hour-^ Minute-
ILLUSTRATION
A- Press to change the figures.
Year: 1990^ 1991-^ ......................
Month: 1-^2^................................................^12^1-^
pay: 1^2-^................................................^31^1-^
Hour OO^fU ...
Minute: 00-^01 ^ ^59^00->
• Repeat procedures 3 and 4 until all items have been set
correctly.
•Once the date and tirpe are set, press the [SHIFT] Button in
response to an accurate time source so that the clock begins
to function.
.......
^2089^ 1990^
........
... .^23-^0-^

DEUTSCH
FRANÇAIS
Einstellen der Uhrzeit (Fortsetzung)
2) Einstellen von Datum und Uhrzeit
■ Einstellen von Datum und Uhrzeit
1
Drücken und auf „CAMERA“ schieben.
Drücken.
Länger als 2 Sekunden gedrückt halten.
• Der Anzeigeteil Q der Datum-/Uhrzeit-Anzeige, der für das
Kalenderjahr bestimmt ist, beginnt zu blinken.
• Der blinkende Anzeigeteil der Datum-ZUhrzeit-Anzeige kann
mit der Taste [SHIFT] in folgender Reihenfolge geändert
werden:
»Jahr^Monat-^Tag^Stunde^ Minute^,,
Drücken, um die Zahlen zu ändern.
Jahr: 1990^1991-^
Monat: 1^2^
Tag: 1^2^
Stunde: 00^1^ ..............................................-^23-i>1^..
Minute: 00-^01-^
• Die Schritte 3 und 4 wiederholen, bis alle Teile der
Anzeige korrekt eingestellt sind.
• Es empfiehlt sich, auf eine Zeit einige Minuten nach der
aktuellen Uhrzeit einzustellen. Sobald dann die aktuelle
Uhrzeit, die sich durch den telefonischen Zeitansagedienst
erfahren läßt, genau mit der eingestellten Uhrzeit
übereinstimmt, die Taste [SHIFT] drücken, um die Uhr in
Gang zu setzen.
...................................................
...................................................
............................
..........................................
^2089^1990^..
^12-^1^..
-^31^1^.,
^59^00-^..
Réglage de l’horloge (suite)
2) Réglage de la date et de l’heure
■ Comment régler la date et l’heure
1 Appuyer et déplacer sur “CAMERA”.
2 Appuyer.
3 Appuyer pendant plus deux secondes
environ.
• La partie “année” O de l’indication de date/heure
commence à clignoter.
•Ensuite, à chaque nouvelle pression sur la touche [SHIFT],
les indications clignoteront dans l’ordre suivant:
Année.^ mois^jour-,. heure^minute-
c
Appuyer pour modifier les chiffres.
ANNEE: 1990^1991^
MOIS: 1-^2->
JOUR: 1^2->................................................^31^1-
HEURE: 0^1-»
MINUTE: 00^01-^
• Répéter les procédures 3 et 4 jusqu’à ce que tous les
points aient été réglés correctement.
• Une fois que la date et l'heure ont été réglées, appuyer sur
la touche [SHIFT] au moment d’un signal horaire précis, afin
que l’horloge puisse commencer à fonctionner.
..........................
.............................................
...............................................
.......................................
^2089-^1990-
-^12^1^23-^0-
-^59^00-
-27-

ENGLISH
Recording the Date and Time during Shooting
During shooting, the DateMiiMe IndiGatioh'disp^
Viewfinder will also be recorded.
1
Press.
•At each press of the [DATE/TIME] Button, the Date/Time
Indication @ in the Viewfinder can be changed in the following
order:
ILLUSTRATION
1
DATE TIME
o @
15:38 ^
- No indications20.10.1993-^ 20.10.1993date ;: date,
and time only .. .
•Press the [DATfe/tlMEj Button to select the desired indication.
e
Extending the Viewfinder/Adjustihg the Eyepiece Corrector
1 Before shooting, extend the
Viewfinder to its fuiiy extended
position O (about 3 cm).
Noter i
•Do not hold it by the Eyecup because the Eyecup cbuld become
detached from the Viewfinder.
© Wrong
(2) Correct
o
_ ^ _
^______
0
15 38
20 10 199 3
‘ lI:'.
..............
___________________________________
o
------------
_______
--
20 10 199 3
■■
2 Press and slide to “CAMERA”.
3 Turn the Ring until the indications in
the Viewfinder can be seen clearly.
•With the Eyepiece Corrector Control, the Eyepiece can be
adjusted to your eyesight.
Notes:
•Do not apply any pressure to the Viewfinder except when folding
it up, extending, raising, lowering, retracting and folding down.
•When not in use, the Viewfinder should be retracted and folded
down to make the Movie Camera as compact as possible for
carrying and storing it.
-28-

DEUTSCH
FRANÇAIS
Einblenden der Uhrzeit- und!oder
Datum-Anzeige beim Auf nehmen
Während des Aufnehmens wird die im Sucher eingeblendete
Uhrzeit- und/oder Datum-Anzeige ebenfalls mit aufgezeichnet.
I Drücken.
• Durch wiederholtes Drücken der Taste [DATE/TIME] kann die
Uhrzeit- und/oder Datum-Anzeige Q in der links gezeigten
Reihenfolge ein- und wieder ausgeblendet werden:
e
15:38
r> Keine Anzeige-^- 20.10.1993-^ 20.10.1993--------------
Datum nur Datum
und Uhrzeit
»Durch Drücken der Taste [DATE/TIME] die gewünschte Anzeige
wählen.
Herausziehen des Suchermonitors/
Okularkorrektur
©
Enregistrement de la date et de
l’heure pendant la prise de vue
Pendant la prise de vues, l’indication de la date/heure affichée
dans le viseur électronique sera également enregistrée.
I Appuyer.
•A chaque nouvelle pression sur cette touche, l'indication de la
date/heure © dans le viseur peut être modifiée dans l'ordre
suivant:
©
15:38
Date et heure Date seulement
•Appuyer sur la touche [DATE/TIME] pour sélectionner
l’indication recherchée.
Déploiement du viseur
électronique/Réglage du
correcteur d’oculaire
©
1 Vordem Aufnehmen muß der Sucher
in seine voiiständig ausgefahrene
Stellung O herausgezogen werden
(ca. 3 cm).
Hinweis:
•Beim Herausziehen nicht an der Augenmuschel fassen, denn
diese könnte sich vom Sucher lösen.
© Falsch
@ Richtig
2 Drücken und auf „CAMERA“
schieben.
3 Den Ring drehen, bis die Anzeigen im
Sucher klar und deutlich lesbar sind.
• Mit dem Okularkorrektur-Regler können Sie das Okular auf
die Sehkraft Ihrer Augen einstellen.
Hinweise;
• Nie irgendwelchen Druck auf den Sucher ausüben, außer wenn
er hochgeklappt, herausgezogen, hochgeschwenkt,
herabgeschwenkt, wieder zusammengeschoben und wieder
herabgeklappt wird.
•Wenn der Kamerarecorder nicht im Einsatz ist, sollte der Sucher
in seine eingefahrene Stellung zurückgeschoben und
herabgeklappt werden, um den Kamerarecorder für den
Transport und die Aufbewahrung so kompakt wie möglich zu
machen.
1 Avant de commencer à filmer,
déployer le viseur électronique au
maximum O (d’environ 3 cm).
Remarque:
• Ne pas saisir l’oeilleton car cela pourrait le détacher du viseur
électronique.
© Incorrect
@ Correct
2
Appuyer et déplacer sur “CAMERA”.
Tourner la bague jusqu’à ce que les
3
indications dans le viseur
électronique soient bien visibles.
•Avec cette bague, l’utilisateur peut régler l’oculaire à sa
propre vue.
Remarques:
• Ne pas appliquer de pression sur le viseur électronique si ce n’est
pour le déplier, le déployer, le lever, le baisser, le rétracter ou
bien le replier.
• Lorsqu’il n’est pas en service, le viseur électronique doit être
replié et en position rétractée, pour que le caméscope soit plus
compact, ce qui facilite le transport et le rangement.
-29-
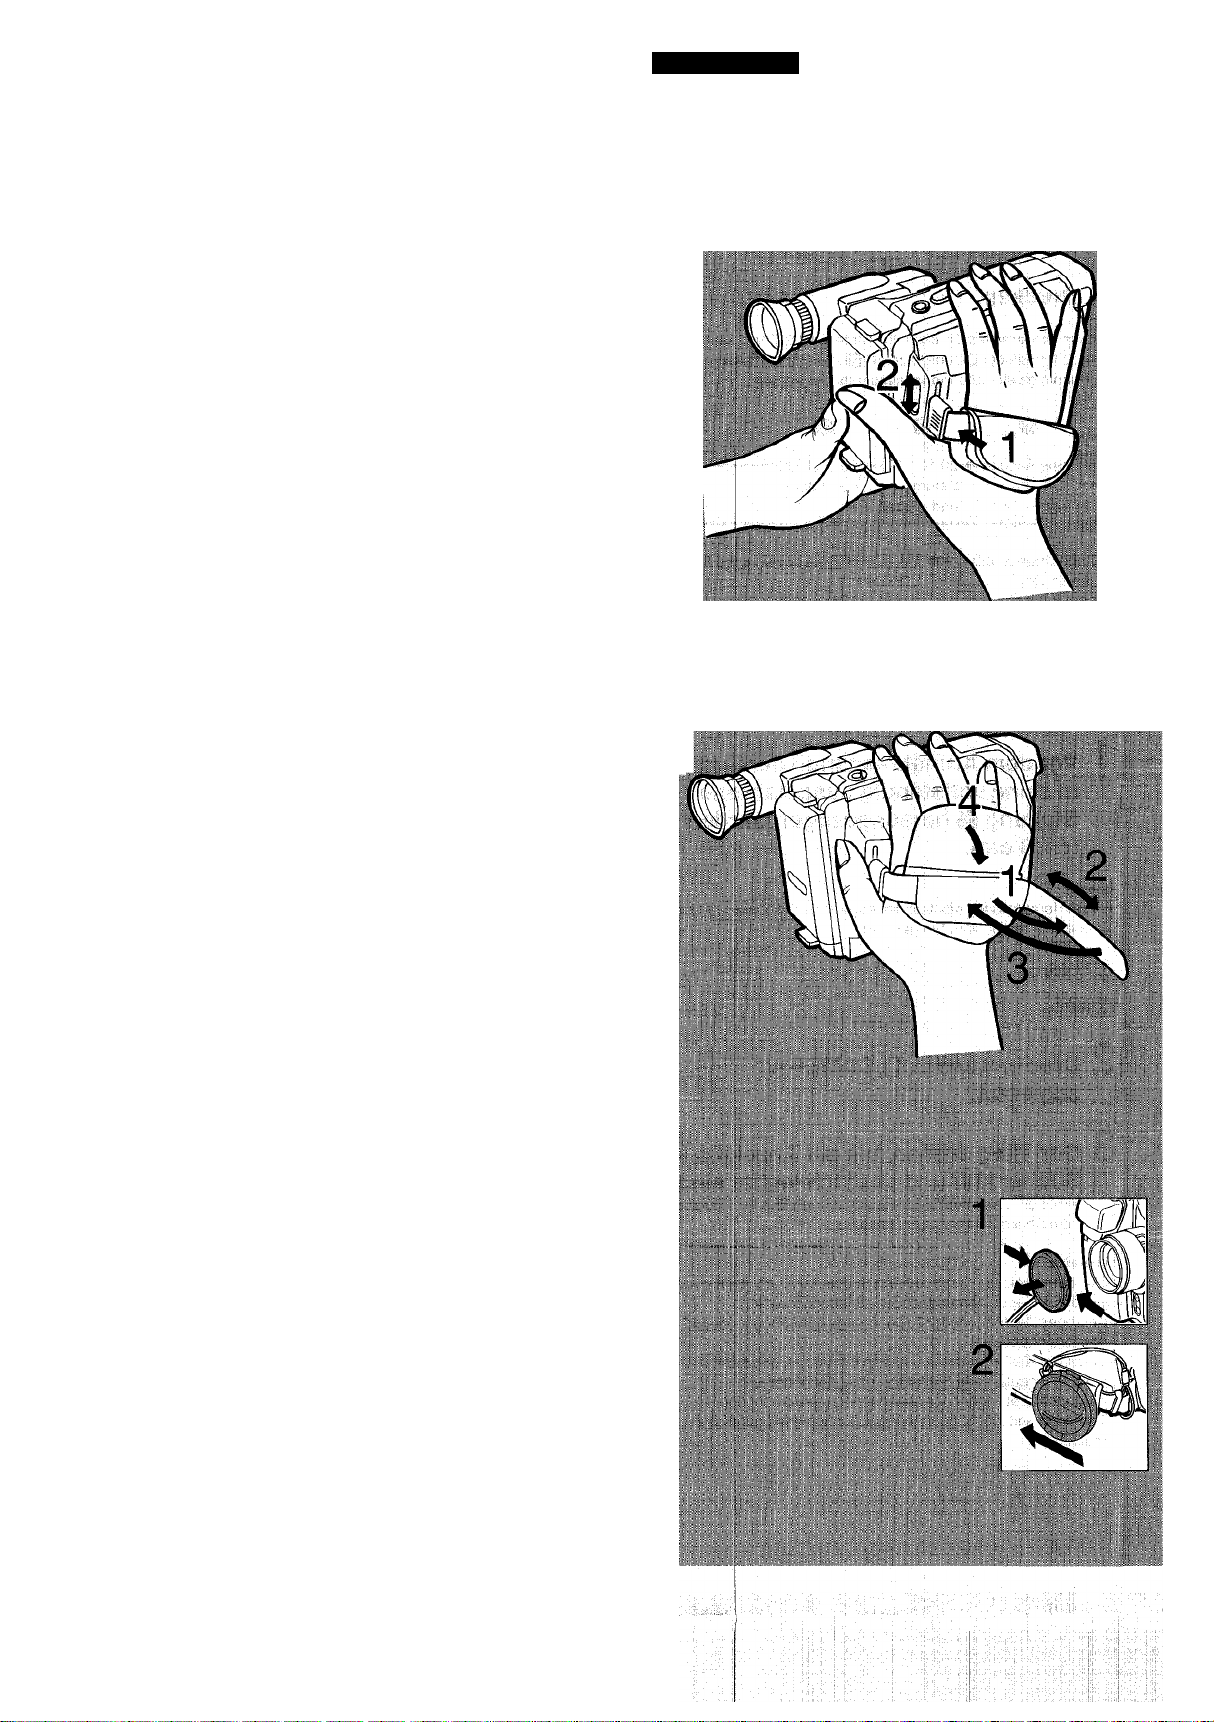
Adjusting the Grip Beit/Removing
the Lens Cap
Ш Adjusting the Angle of the Grip Belt
The angle of the Grip Belt can be adjusted in 4 steps to match the
size of your hand. Adjust it sb that thè Start/Siop Button and the [W]
and [T] Zoom Buttons can easily be pressed with the fingertips.
1 Press in the Grip Belt Holder in the
direction of the arrow and,..
2 Move the Grip Belt Holder up or down
to the position that provides most
comfortable handling and operating.
■ Adjusting the Length of the Grip Belt
The length of the Grip Belt should be adjusted so that the Grip fits
comfortably into the palm ofiyour hand and the Start/Stop Button
and the [W] and [t] Zoom Buttons can easily be pressed with the
fingertips.
ILLUSTRATION
1Unfasten the velcro tape closure.
2 Adjust the length to the size of your
hand.
3 Fasten the velcro tape closure.
4 Fold the cover down over the Grip
Belt.
■ Removing the Lens Cap
1 Press the Stoppers and pull it off.
2 Hook the Lens Caps onto the Grip Belt
to prevent it from getting in front of
the Lens.
-30-
 Loading...