

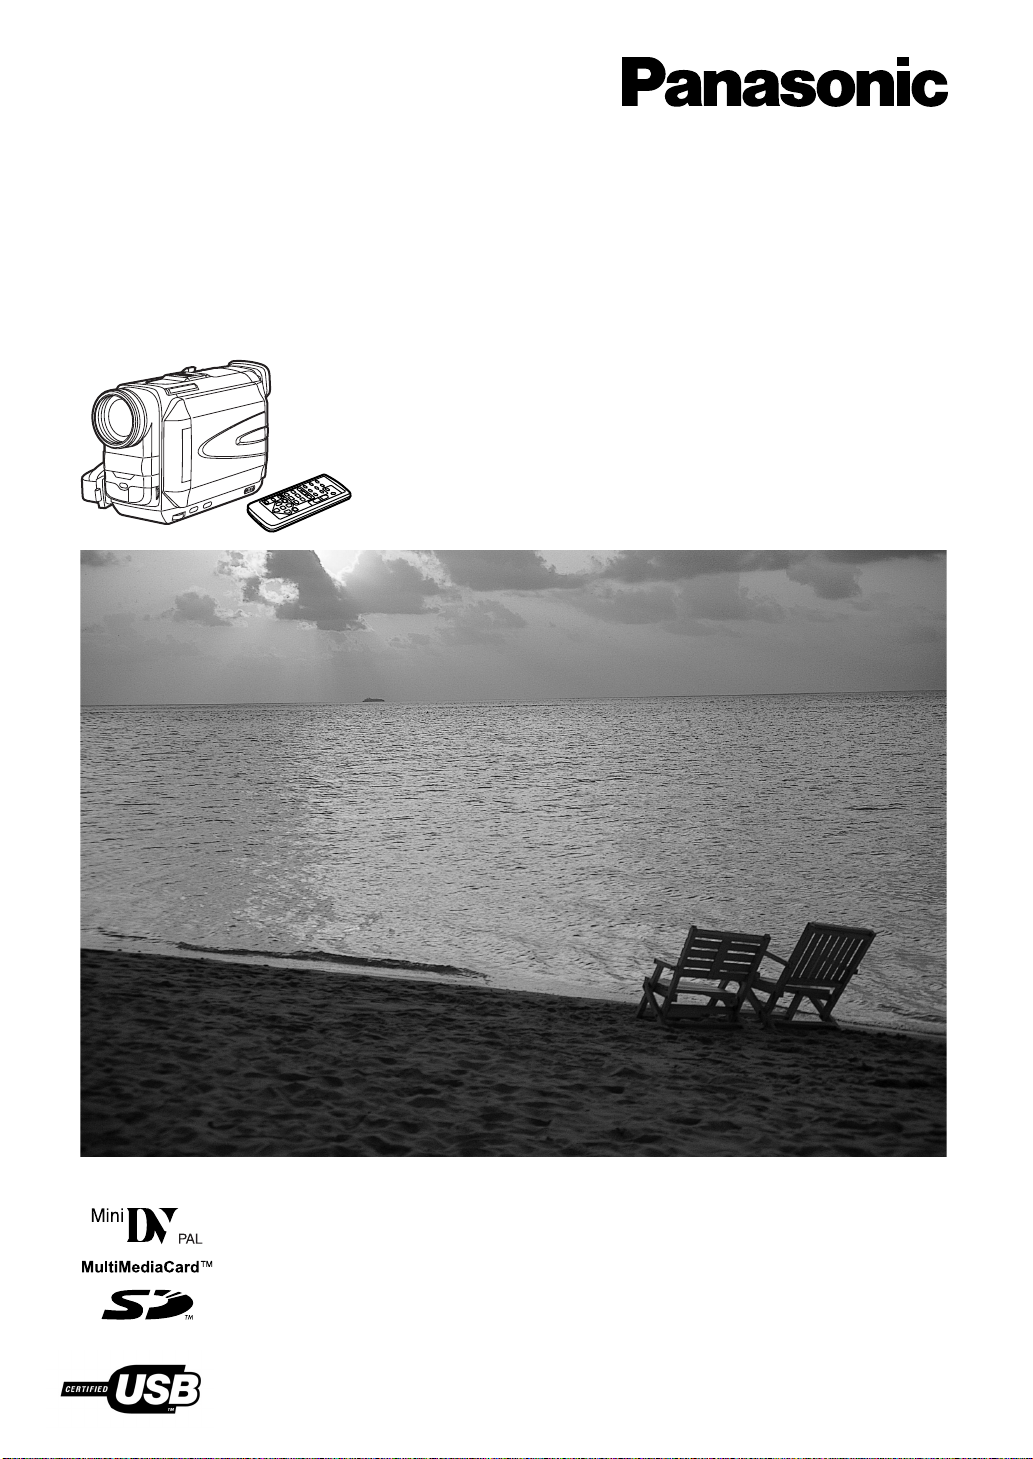
Panasonic NV-DS88EN User Manual
Model No.
NV-DS88EN
Digital Video Camera
疇旧驕茉獨纓
Operating Instructions
肱確漾字菟
Before use, please read these instructions completely.
肱確焼、穉捏羊篏鶫鎧漾字菟,
VQT9359

Before Use
Information for Your Safety
Movie Camera
≥The rating plate is on the underside of the Movie
Camera.
AC Adaptor
≥The rating plate is on the underside of the AC Adaptor.
≥As this equipment gets hot during use, operate it in a
well-ventilated place; do not install this equipment in a
confined space such as a bookcase or similar unit.
ª Carefully read the Operating Instructions
and use the Movie Camera correctly.
≥Injury or material damage resulting from any kind of
use that is not in accordance with the operating
procedures explained in these Operating Instructions
are the sole responsibility of the user.
Try out the Movie Camera.
Be sure to try out the Movie Camera before recording your
first important event and check that it records properly and
functions correctly.
The manufacturer is not liable for loss of recorded
contents.
The manufacturer shall in no event be liable for the loss of
recordings due to malfunction or defect of this Movie
Camera, its accessories or cassettes.
ª WARNING
To reduce the risk of fire or shock hazard and annoying
interference, use only the recommended accessories
and do not expose this equipment to rain or moisture.
Do not remove the cover (or back); there are no user
serviceable parts inside.
Refer servicing to qualified service personnel.
Carefully observe copyright laws.
Recording of pre-recorded tapes or discs or other published
or broadcast material for purposes other than your own
private use may infringe copyright laws. Even for the
purpose of private use, recording of certain material may be
restricted.
≥Windows is a trademark or registered trademark of
Microsoft Corporation U.S.A.
≥SD Logo is a trademark.
≥All other company and product names in the operating
instructions are trademarks or registered trademarks of
their respective corporations.
Still pictures recorded on a MultiMediaCard or SD
Memory Card
It may not be possible to play back the pictures on this Movie
Camera recorded on and created by other equipment or vice
versa. For this reason, check the compatibility of the
equipment in advance.
Pages for reference
Pages for reference are indicated with an arrow, for
example:
(l 00)
52

Contents
Before Use
Information for Your Safety ............................................... 52
Contents............................................................................ 53
Standard Accessories ....................................................... 54
Optional Accessories......................................................... 54
Getting Started.................................................................. 55
Viewing What Has Been Recorded ................................... 55
Controls and Components................................................. 56
Remote Controller............................................................. 58
Power Supply .................................................................... 60
Charging Time and Available Recording Time.................. 60
Lens Cap and Grip Belt ..................................................... 61
Attaching the Shoulder Strap ............................................ 61
Inserting a Cassette .......................................................... 61
Turning on the Movie Camera and Selecting Modes ........ 62
Using the Viewfinder/LCD Monitor .................................... 62
Using the Menu Screen..................................................... 63
List of Menus..................................................................... 64
Setting Date and Time....................................................... 67
Internal Lithium Battery Recharge..................................... 67
LP Mode............................................................................ 67
Audio Recording Mode...................................................... 67
CAMERA Mode
Recording.......................................................................... 68
Photoshot .......................................................................... 69
Zoom In/Out Functions...................................................... 69
Digital Zoom Function ....................................................... 70
Image Stabilizer Function.................................................. 70
Fade In/Out Functions....................................................... 70
Cinema Function............................................................... 71
Backlight Compensation Function..................................... 71
Wind Noise Reduction Function ........................................ 71
Recording in Special Situations......................................... 72
Recording in Natural Colours ............................................ 72
Adjusting White Balance Manually .................................... 73
Manual Shutter Speed Adjustment.................................... 74
Manual Iris Adjustment...................................................... 74
Manual Focus Adjustment................................................. 74
Digital Effect Functions...................................................... 75
CARD Mode
Using a Card......................................................................84
Recording on a Card..........................................................84
Recording Pictures on a Card to a Tape ........................... 85
Playing Back a Card ..........................................................86
Slide Show.........................................................................86
Editing a Slide Show..........................................................87
Creating a Title ..................................................................88
Adding a Title.....................................................................88
Protecting the Pictures on a Card......................................89
Deleting the Pictures Recorded on a Card ........................89
Formatting a Card..............................................................90
Writing Printing Data on a Card.........................................90
Others
Indications..........................................................................91
Warning/Alarm Indications.................................................92
Notes and Hints .................................................................92
Cautions for Use................................................................96
Before Requesting Repair (Problems and Solutions) ........ 99
Explanation of Terms.......................................................101
Specifications...................................................................102
VCR Mode
Playing Back...................................................................... 76
Finding a Scene You Want to Play Back........................... 76
Slow Motion Playback ....................................................... 77
Still Playback/Still Advance Playback................................ 77
Finding the End of Recording............................................ 77
Index Search Functions..................................................... 78
Playback Digital Effect Functions...................................... 79
Playback Zoom Function................................................... 79
Playing Back on Your TV .................................................. 80
Audio Dubbing................................................................... 80
Copying on an S-VHS (or a VHS) Cassette...................... 81
Recording the Contents of Other Equipment .................... 81
Using the DV Cable for Recording .................................... 82
Using the Automatic Printing Function .............................. 82
Personal Computer Connection Kit ................................... 83
USB Connection Kit........................................................... 83
53
1)
2)
3)
5)
6)
7)
8)
4)
AB
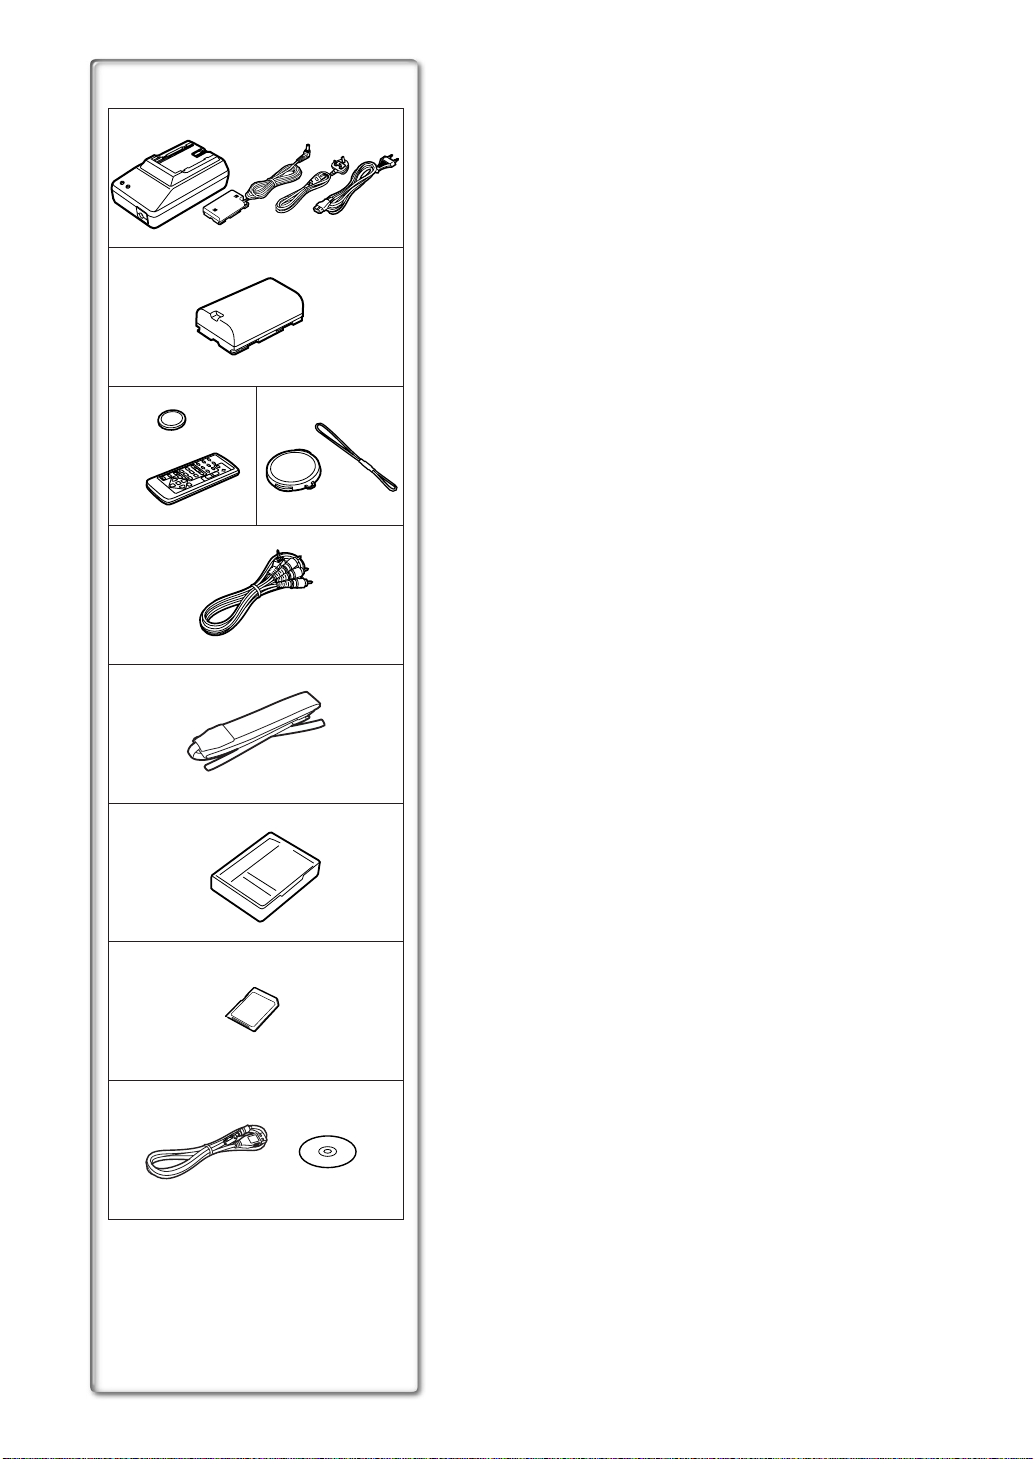
Standard Accessories
Illustrated on the left are accessories supplied with the Movie Camera.
1) AC Adaptor, DC Input Lead and AC Mains Lead (l 60)
Hong Kong Special Administrative Region of China
≥
A
Areas Other than Hong Kong Special Administrative Rigion of China
B
2) Battery Pack (l 60)
3) Remote Controller and Button-Type Battery (l 58, 59)
4) Lens Cap (l 61)
5) AV Cable (l 80, 81)
6) Shoulder Strap (l 61)
7) Digital Video Head Cleaner (l 97)
8) SD Memory Card (l 84)
9) USB Connection Kit (l 83)
Optional Accessories
1) AC Adaptor (VW-AD9E/B)
2) Battery Pack (Lithium/CGR-D08S/CGR-D120/800mAh)
3) Battery Pack (Lithium/CGP-D14S/CGP-D210/1400mAh)
4) Battery Pack (Lithium/CGR-D16S/CGR-D220/1600mAh)
5) Battery Pack (Lithium/CGP-D28S/CGP-D320/2800mAh)
6) Battery Pack (Lithium/CGR-D53S/CGR-D815/5300mAh)
7) Car Battery Charger (VW-KBD2E)
8) Wide Conversion Lens (VW-LW3007E)
9) Tele Conversion Lens (VW-LT3014E)
10) ND Filter (VW-LND30E)
11) MC Protector (VW-LMC30E)
12) Stereo Zoom Microphone (VW-VMS1E)
13) Stereo Microphone (VW-VMS2E)
14) Shoe Adaptor (VW-SK11E)
15) Tripod (VZ-CT55E)
16) Tripod with Remote Controller (VZ-CTR1E)
17) Editing Controller (VW-EC500E/VW-EC1E)
18) Personal Computer Connection Kit (VW-DTA10E/B/VW-DTA9E)
19) Edit Cable (VW-K8E)
20) Edit Terminal Conversion Adaptor (VW-CE1E)
21) DV Cable (VW-CD1E)
22) SD Memory Card Application Software (VW-SWA1E)
≥“TitleStudio” software for title creation, and “SD-Jukebox” software for
recording music are included. (However, this Movie Camera cannot
play back music.)
23) MultiMediaCard (VW-MMC8E/VW-MMC16E)
24) SD Memory Card (RP-SD008/RP-SD016/RP-SD032/RP-SD064)
25) PC Card Adaptor for SD Memory Card (BN-SDABPE)
26) USB Reader Writer for SD Memory Card (BN-SDCAPE)
27) DV Editing Software with DV Interface Board (VW-DTM21E)
28) DV Editing Software with DV Interface Card (VW-DTM22E)
29) DV Editing Software (VW-DTM20E)
≥Some optional accessories may not be available in some countries.
54
9)
Getting Started
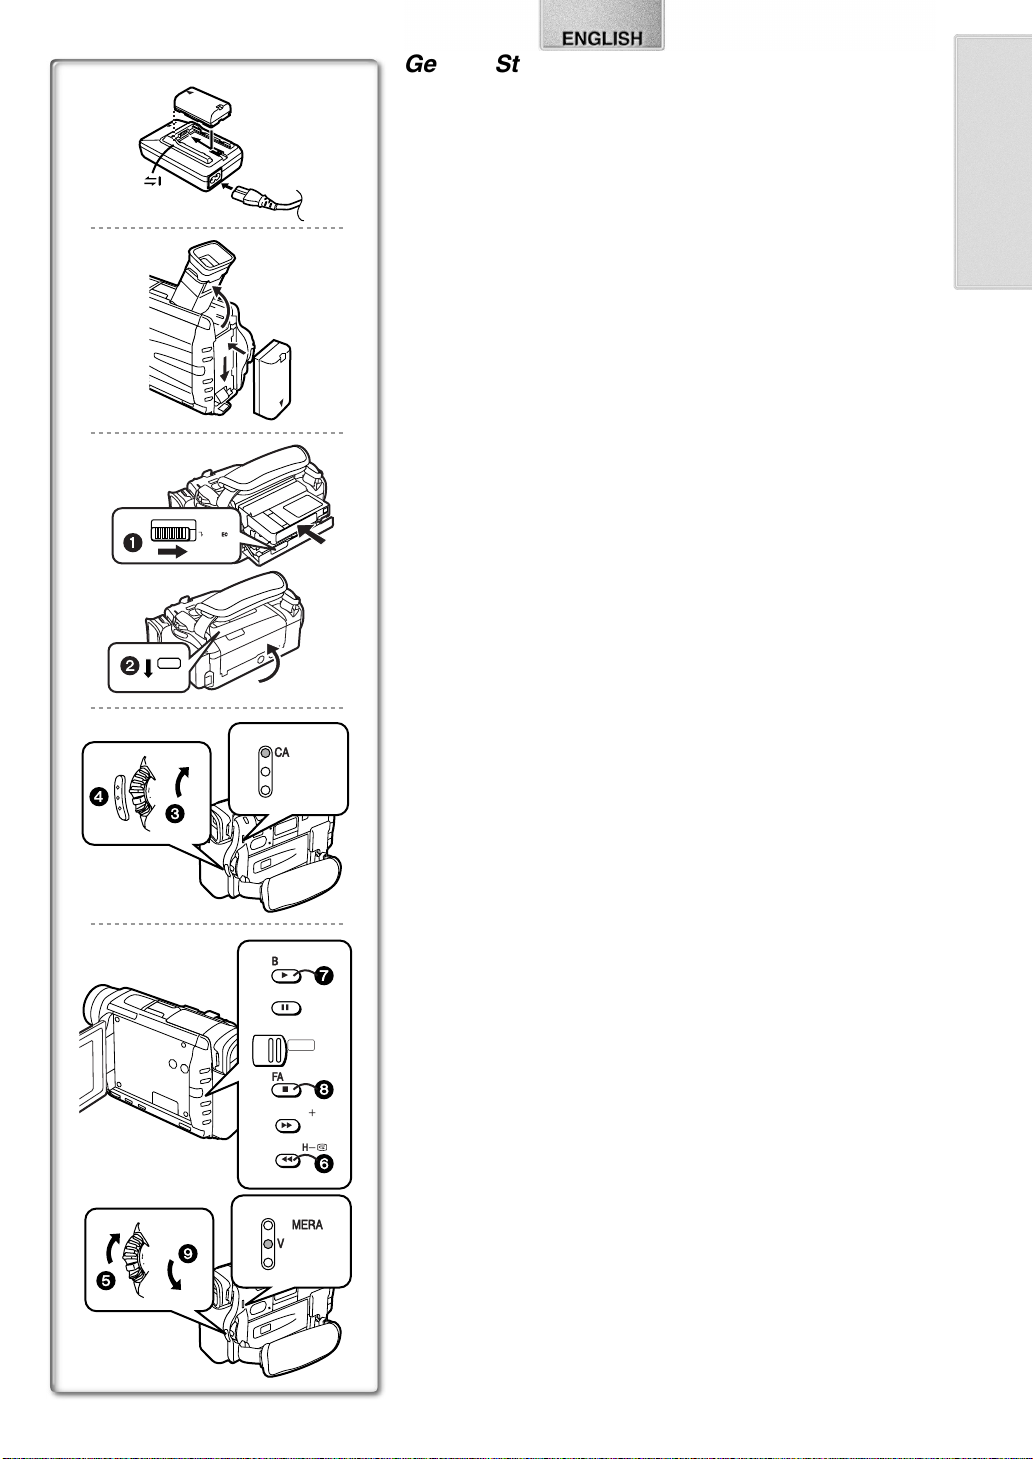
Charge the Battery. (l
1
1
≥Attach the Battery to the AC Adaptor.
60)
≥Connect the AC Mains Lead. (Charging starts.)
≥When the Charge Lamp [CHARGE] goes off, the Battery is fully
charged.
Attach the Charged Battery to the Movie Camera. (l
2
60)
2
Insert the Cassette. (l
3
≥Slide the
3
Compartment Cover.
≥Insert the Cassette.
≥Press the [PUSH CLOSE]
≥Close the Lower Compartment Cover.
1
OPEN/EJECT
Lever to the right and pull down to open the Cassette
1
61)
to load the Cassette.
2
4
4
5, 6
5
2
CLOSE
MODE
ON
OFF
MODE
ON
OFF
PUSH
3
9
CAMERA
VCR
CARD P.B
BLC
1
STILL
;
PUSH
OPEN
FADE
º
SERACH
5
SERACH
6
CAMERA
VCR
CARD P.B
Turn the Movie Camera on and start recording. (l
4
≥Slide the
≥Press the
≥Press the
Switch to [ON]. (The [CAMERA] Lamp lights up.)
3
Button. (Recording starts.)
4
Button again to pause the recording.
4
62, 68)
Viewing What Has Been Recorded
Switch to the VCR Mode, rewind the tape, and play the tape
7
8
i
S
j
6
5
back.
≥Slide the 5 Switch. (The [VCR] Lamp lights up.)
≥Press the
≥Press the
≥Press the
Turn the Movie Camera off. (l
6
≥Set the
(l76)
Button. (Rewind the tape.)
6
Button. (Playback starts.)
7
Button. (Playback stops.)
8
Switch to [OFF].
9
62)
55
1) 2) 3)
10) 11) 12) 13)
PUSH
W.B/SHUTTER/IRIS/VOL/JOG
TITLE CARD MULTI
MENU FOCUS
AUTO MNL
14)
15)
16)
17)
18)
19)
BLC
1
STILL
;
PUSH
OPEN
FADE
º
SERACH
5
SERACH
6
i
S
j
20)
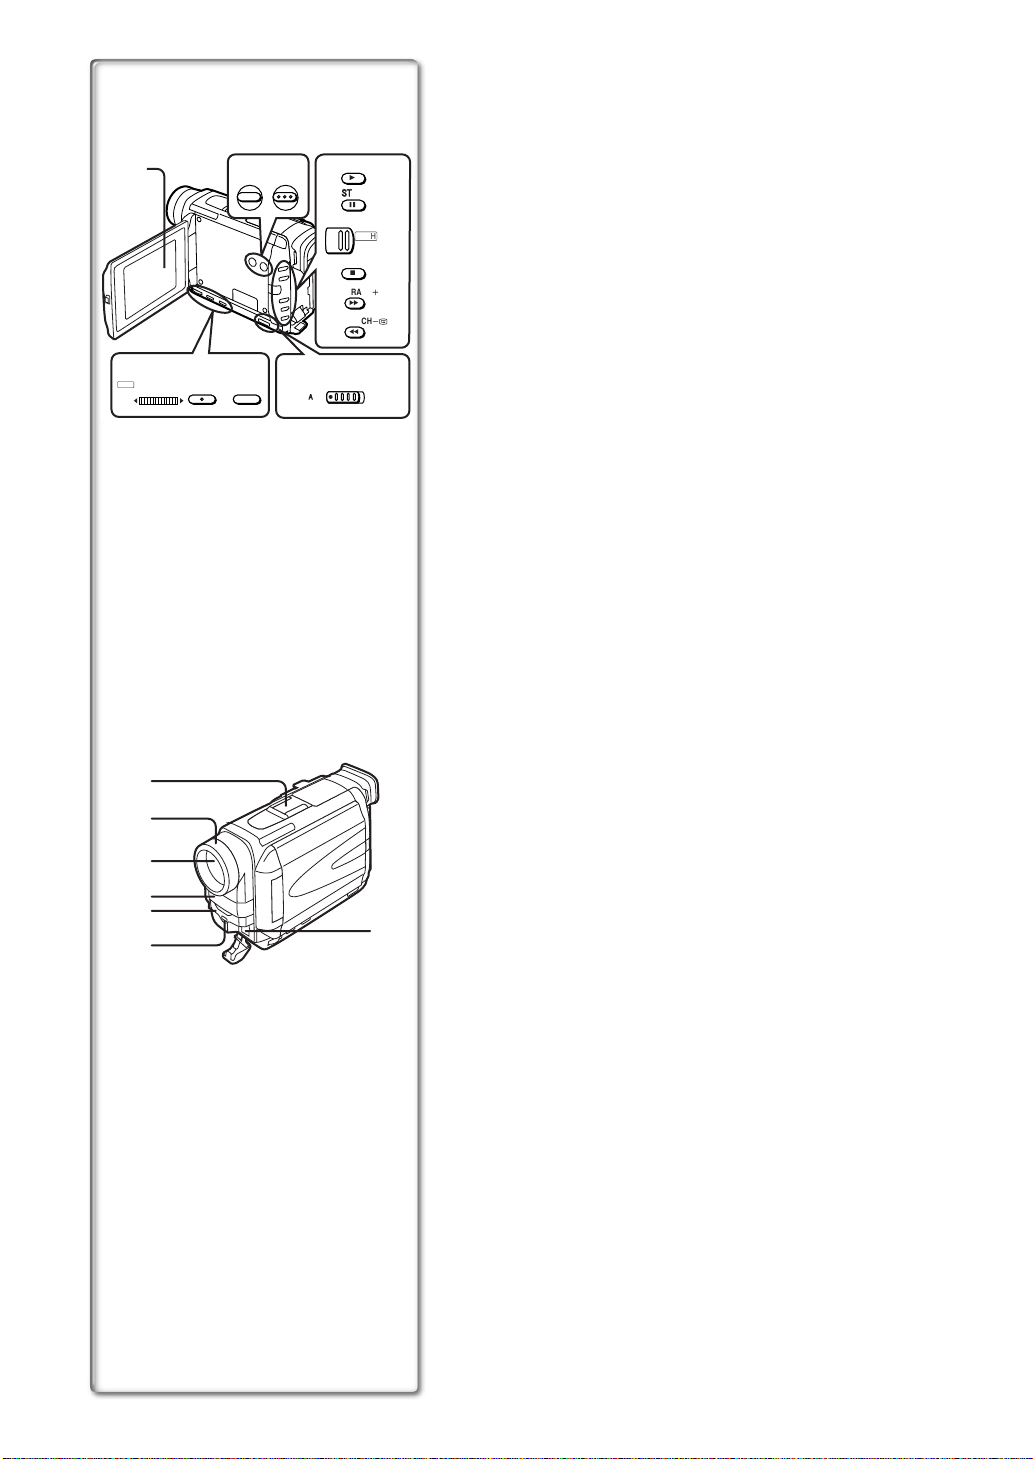
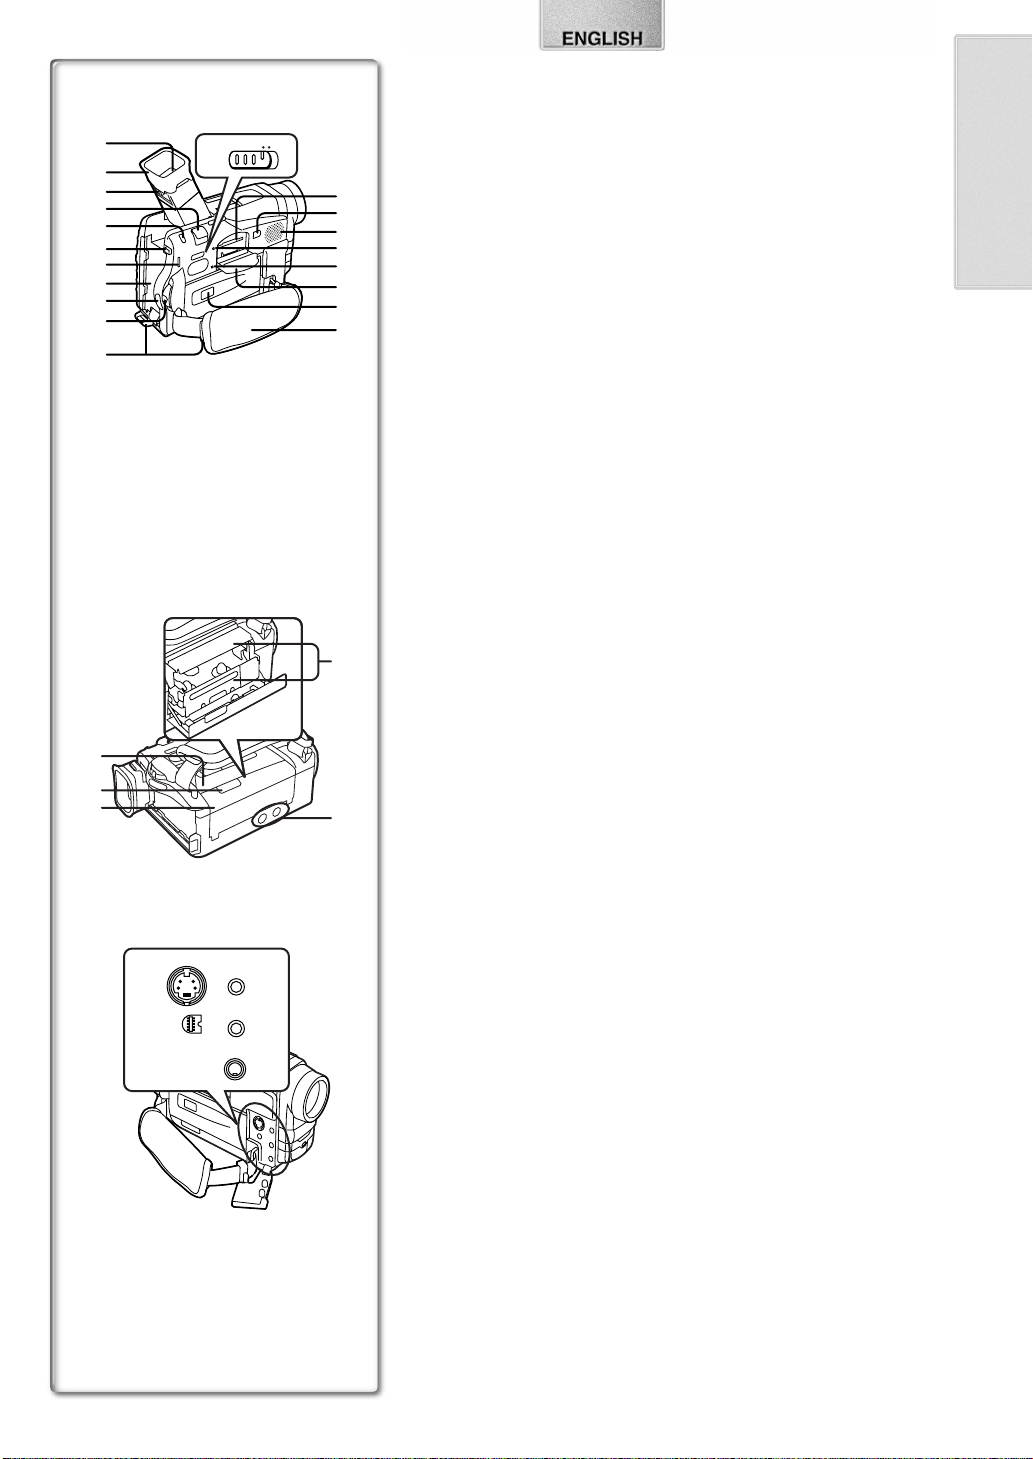
Controls and Components
1) LCD Monitor (l 62, 98)
.........................................................................................................................
≥Due to limitations in LCD production technology, there may be some
4)
5)
6)
7)
8)
9)
tiny bright or dark spots on the LCD Monitor screen. However, this is
not a malfunction and does not affect the recorded picture.
.........................................................................................................................
2) Title Button [TITLE] (l 88)
3) Card Multi-Picture Button [CARD MULTI] (l 86)
4) Backlight Button [BLC] (l 71)
Play Button [1] (l 76, 86)
5) Still Button [STILL] (l 69)
Pause Button [;] (l 77, 86)
6) LCD Monitor Open Button [PUSH OPEN] (l 62)
7) Fade Button [FADE] (l 70)
Stop Button [∫] (l 76, 86)
8) Forward Search Button [SEARCHi] (l 68)
Fast Forward/Cue Button [5] (l 76)
9) Reverse Search Button [SEARCHj] (l 68)
Rewind/Review Button [6] (l 76)
Recording Check Button [S] (l 68)
10) Multi-Function Dial [PUSH] (l 63, 72, 74, 76)
11) Menu Button [MENU] (l 63)
12) Focus Button [FOCUS] (l 74)
13) Mode Selector Switch [AUTO/MNL] (l 68, 72, 73, 74)
14) Accessory Shoe
≥Accessories, such as a stereo microphone (VW-VMS2E; optional), are
attached here.
15) Lens Hood (l 99)
16) Lens
17) Microphone (built-in, stereo) (l 69)
18) White Balance Sensor (l 101)
Remote Control Sensor (l 59)
19) Recording Lamp (l 68)
20) DV Terminal (i.LINK) [¥] (l 82)
≥Connect this to the digital video equipment.
≥“i.LINK” is the name of connectors in accordance with IEEE1394-1995.
“¥” is a logo marked on products comforming with the “i.LINK”
specifications.
56
21)
39)
TAPE CARD
22)
23)
24)
25)
26)
27)
28)
29)
30)
31)
42)
43)
44)
46)
47)
32)
S-VIDEO IN/OUT
DIGITAL(to USB) /
EDIT
D
(MINI)
TAPE CARD
MIC
AV IN/OUT
PHONES
D.STILL
PICTURE
48)
49)
50)
33)
34)
35)
36)
37)
38)
39)
40)
41)
45)
21) Viewfinder (l 62, 98)
.........................................................................................................................
≥Due to limitations in LCD production technology, there may be some
tiny bright or dark spots on the Viewfinder screen. However, this is not
a malfunction and does not affect the recorded picture.
.........................................................................................................................
22) Eyecup
23) Eyepiece Corrector Knob (l 62)
24) Zoom Lever [W/T] (l 69)
25) Photoshot Button [PHOTO SHOT] (l 69, 84, 85, 88)
26) Battery Eject Button [PUSH BATT] (l 60)
27) Operation Mode Lamps [CAMERA/VCR/CARD P.B] (l 62, 68, 76, 86)
28) Battery Holder
29) Recording Start/Stop Button (l 68)
30) Off/On Mode Selector Switch [OFF/ON/MODE] (l 62, 68, 96)
31) Shoulder Strap Holders (l 61)
32) Tape/Card Photoshot Selector [TAPE/CARD] (l 84)
33) Card Slot (l 84)
34) Card Slot Cover Open Lever [OPEN] (l 84)
35) Speaker (l 76)
36) Card Access Lamp [ACCESS] (l 84)
37) Reset Button [RESET] (l 92)
38) Card Slot Cover (l 84)
39) Cassette Compartment Window
40) Grip Belt (l 61)
41) Cassette Holder (l 61)
42) Upper Cassette Compartment Cover (l 61)
43) Cassette Eject Lever [OPEN/EJECT] (l 61)
44) Lower Cassette Compartment Cover
45) Tripod Receptacle
≥Used for mounting the Movie Camera on an optional tripod.
46) S-Video Input/Output Socket [S-VIDEO IN/OUT] (l 80, 81, 82)
47) Edit Socket [EDITD (MINI)] (l 82)
USB Socket [DIGITAL (to USB)] (l 83)
48) Microphone Socket [MIC]
≥Connect with an external microphone or audio equipment. (When this
socket is in use, the built-in microphone does not operate.)
49) Audio-Video Input/Output Socket [AV IN/OUT] (l 80, 81)
Headphone Socket [PHONES] (l 94)
≥Connecting an AV Cable to this socket activates the Movie Camera’s
built-in speaker, but connecting a headphone, etc. deactivates it.
50) Digital Still Picture Terminal [D.STILL PICTURE] (l 83)
57
1)
2)
3)
4)
8)
9)
10)
11)
12)
DATE/
OSD
TIME
COUNTER
RESET
MULTI/
´
REC
P-IN-P
V
/REW
PLAY
615
STILL ADV
PAUSE
;
ED
INDEX INDEX
STOP
KL
º
SELECT
VAR.
SEARCH
STORE
OFF/ON
P.B.DIGITAL
DATE/
OSD
TIME
COUNTER
RESET
MULTI/
´
REC
P-IN-P
V
PLAY
/REW
615
STILL ADV
PAUSE
;
ED
STOP
INDEX INDEX
KL
º
SELECT
VAR.
SEARCH
STORE
OFF/ON
P.B.DIGITAL
SHOT
TITLE
A.DUB
W
FF/
STILL ADV
MENU
PHOTO
SHOT
TITLE
A.DUB
W
FF/
STILL ADV
MENU
r
VOL
s
ITEM
START/
r
VOL
s
ITEM
STOP
ZOOM
STOP
ZOOM
START/
PHOTO
T
W
P.B.
ZOOM
T
W
P.B.
ZOOM
SET
SET
5)
6)
7)
13)
14)
15)
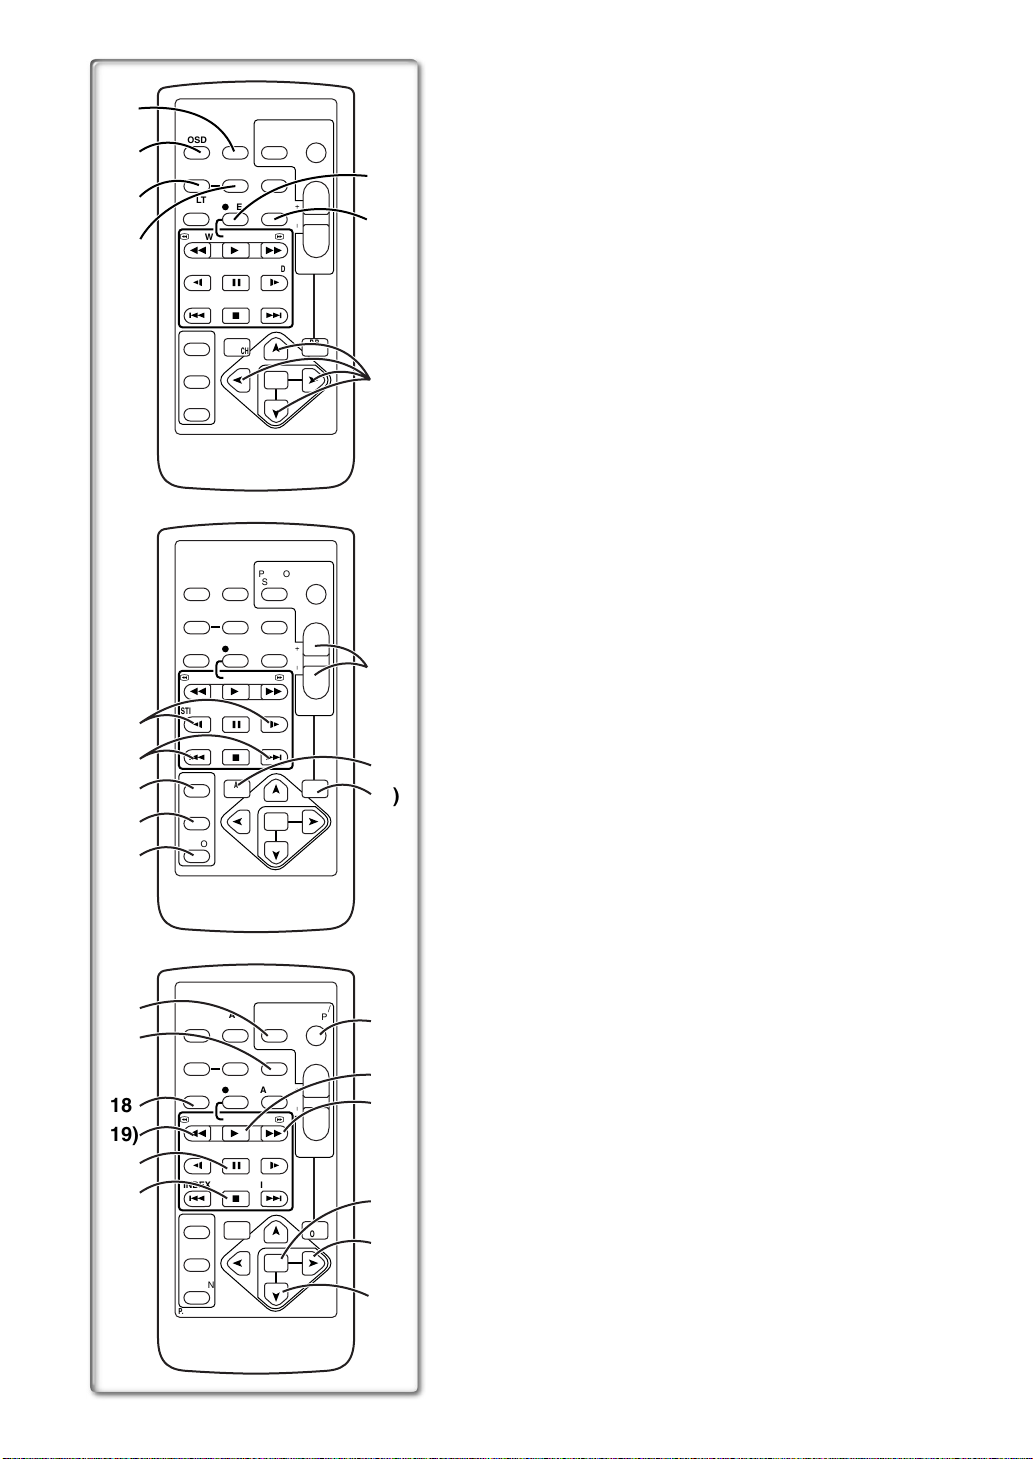
Remote Controller
Using the wireless Remote Controller that is supplied with the Movie Camera,
most of the Movie Camera functions can be operated from a distance.
Buttons on the Remote Controller
1) Date/Time Button [DATE/TIME] (l 91)
2) Indication Output Button [OSD] (l 80)
3) Counter Indication Shift Button [COUNTER] (l 91)
4) Reset Button [RESET] (l 101)
5) Recording Button [REC] (l 81, 82)
6) Audio Dubbing Button [A.DUB] (l 80)
7) Cursor Buttons for Variable Speed Search Function [π, ∫] (l 76)
Direction Buttons for Playback Zoom Function [π, ∫, ∑, ∏] (l 79)
8) Slow Motion/Still Advance Buttons [E, D] (E: reverse, D: forward)
(l 77)
9) Index Search Buttons [:, 9] (:: reverse, 9: forward)
(l 78)
10) Selection Button [SELECT] (l 79)
11) Store Button [STORE] (l 79)
12) Off/On Button [OFF/ON] (l 79)
13) Zoom/Volume Button [ZOOM/VOL] (l 69, 76, 79)
14) Variable Speed Search Button [VAR. SEARCH] (l 76)
15) Playback Zoom Button [P.B. ZOOM] (l 79)
The following buttons function in the same manner as the corresponding
buttons on the Movie Camera.
16) Photoshot Button [PHOTO SHOT] (l 69, 84, 85, 88)
17) Title Button [TITLE] (l 88)
18) Card Multi-Picture Button [MULTI/P-IN-P] (l 86)
≥This functions in the same manner as the [CARD MULTI] Button on the
Movie Camera.
19) Rewind/Review Button [6] (l 68, 76)
20) Pause Button [;] (l 77, 86)
21) Stop Button [∫] (l 76, 86)
22) Recording Start/Stop Button [START/STOP] (l 68)
23) Play Button [1] (l 76, 86)
24) Fast-forward/Cue Button [5] (l 68, 76)
25) Menu Button [MENU] (l 63)
26) Set Button [SET] (l 63)
27) Item Button [ITEM] (l 63)
58
16)
17)
18)
19)
20)
21)
DATE/
OSD
TIME
COUNTER
RESET
MULTI/
´
REC
P-IN-P
V
PLAY
/REW
615
STILL ADV
PAUSE
;
ED
STOP
INDEX INDEX
KL
º
SELECT
VAR.
SEARCH
STORE
OFF/ON
P.B.DIGITAL
SHOT
TITLE
A.DUB
W
FF/
STILL ADV
MENU
ITEM
STOP
ZOOM
r
VOL
s
START/
PHOTO
T
W
P.B.
ZOOM
22)
23)
24)
25)
26)
SET
27)
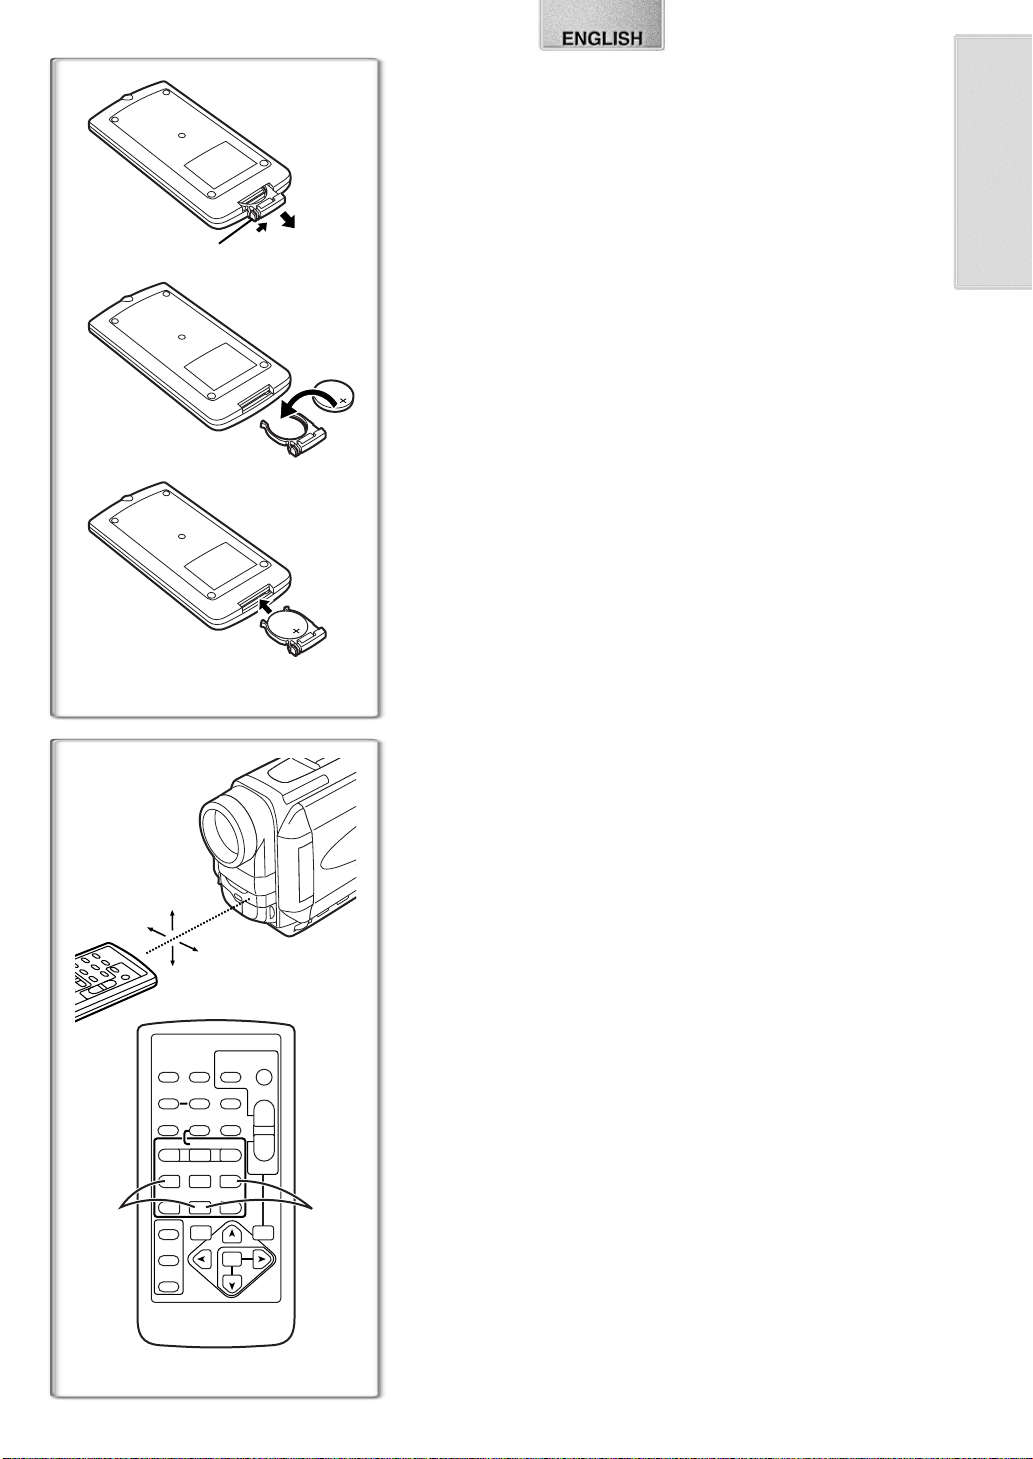
ª Inserting a Button-type Battery
1
1
2
3
Before using the Remote Controller, insert the supplied button-type battery.
1
While pressing the Stopper 1, pull out the Battery Holder.
2
Insert the button-type battery with the imprint (i) facing
upward.
3
Insert the Battery Holder into the Remote Controller.
≥When the button-type battery is exhausted, replace it with a new CR2025
battery. (A battery is normally expected to last about 1 year. However, it
depends on operation frequency.)
≥Make sure to match the poles correctly when inserting the battery.
.........................................................................................................................
CAUTION
Danger of explosion if battery is incorrectly replaced. Replace only with
the same or equivalent type recommended by the equipment
manufacturer. Discard used batteries according to manufacturer’s
instructions.
.........................................................................................................................
WARNING
Risk of fire, explosion and burns. Do not recharge, disassemble, heat
above 100xC or incinerate. Keep the Button-Type battery out of the
reach of children. Never put Button-Type battery in mouth. If swallowed
call your doctor.
.........................................................................................................................
~~~~~~~~~~~~~~~~~~~~~~~~~
ª Using the Remote Controller
1
Direct the Remote Controller to the Remote Control Sensor
of the Movie Camera and press an appropriate button.
≥Distance from the Movie Camera: Within approximately 5 metres
≥Angle: Within approximately 15o in the vertical and horizontal directions
from the central axis
≥The above operative ranges are for indoor use. Outdoors or under strong
1
15˚
15˚
15˚
15˚
START/
PHOTO
DATE/
OSD
TIME
RESET
COUNTER
MULTI/
¥REC
P-IN-P
V
/REW
PLAY
615
STILL ADV
PAUSE
ED
INDEX INDEX
STOP
21
KL
SELECT
SEARCH
STORE
OFF/ON
P.B.DIGITAL
STOP
SHOT
TITLE
ZOOM
T
A.DUB
sVOLr
W
FF/
W
STILL ADV
;
∫
VAR.
MENU
ITEM
P.B.
ZOOM
SET
light, the Movie Camera may not operate properly even within the above
ranges.
≥Within a 1-metre range, you can also use the Remote Controller on the side
(the [MENU] Button side) of the Movie Camera.
Selecting Remote Controller Modes
When 2 Movie Cameras are used simultaneously, they can be operated
individually by selecting different Remote Controller Modes.
≥If the Remote Controller Mode of the Movie Camera and that of the Remote
Controller do not match, [REMOTE] Indication is displayed.
Setup on the Movie Camera:
Set [REMOTE] on the [OTHER FUNCTIONS] Sub-Menu to the desired
Remote Controller Mode. (l 63)
Setup on the Remote Controller:
[VCR1]: Press the [D] Button and [∫] Button simultaneously.
[VCR2]: Press the [E] Button and [∫] Button simultaneously.
≥When the battery in the Remote Controller is replaced, the mode is
automatically reset to [VCR1] Mode.
1
2
59
MODE
ON
OFF
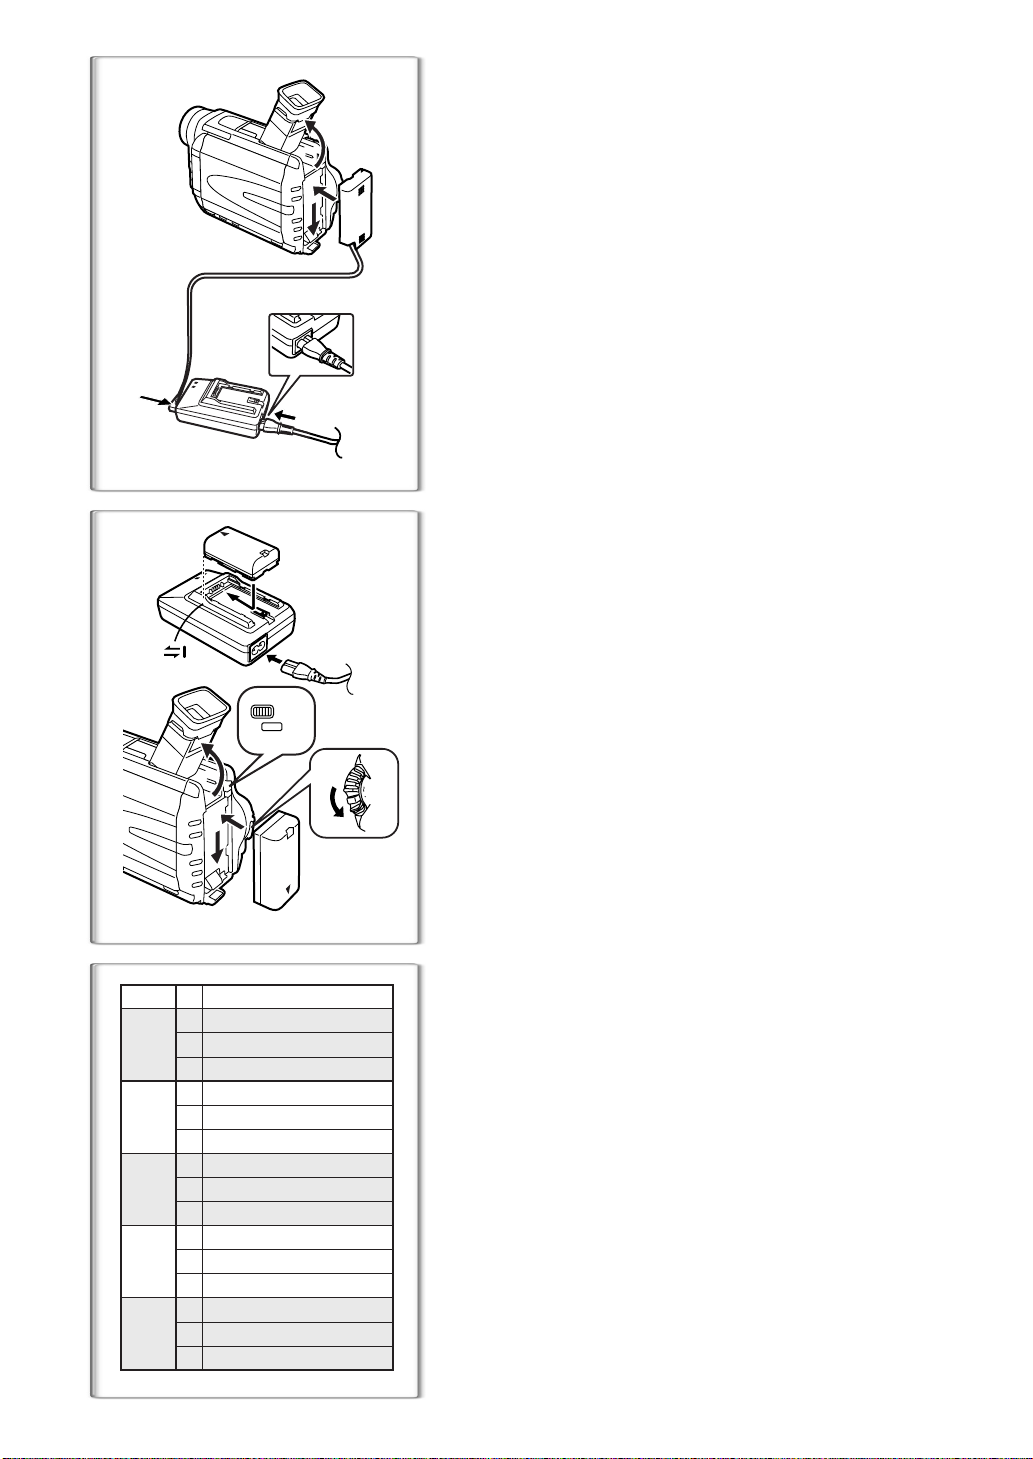
Power Supply
ª Using the AC Adaptor
1
Connect the DC Input Lead to the Movie Camera.
Connect the DC Input Lead to the AC Adaptor.
1
2
Connect the AC Mains Lead to the AC Adaptor and the AC
3
mains socket.
≥The AC Mains Lead’s outlet plug cannot be pushed fully into the AC
Adaptor socket. A gap will remain as shown
≥Before disconnecting the power supply, set the [OFF/ON/MODE]
Switch on the Movie Camera to [OFF].
1
.
1
2
3
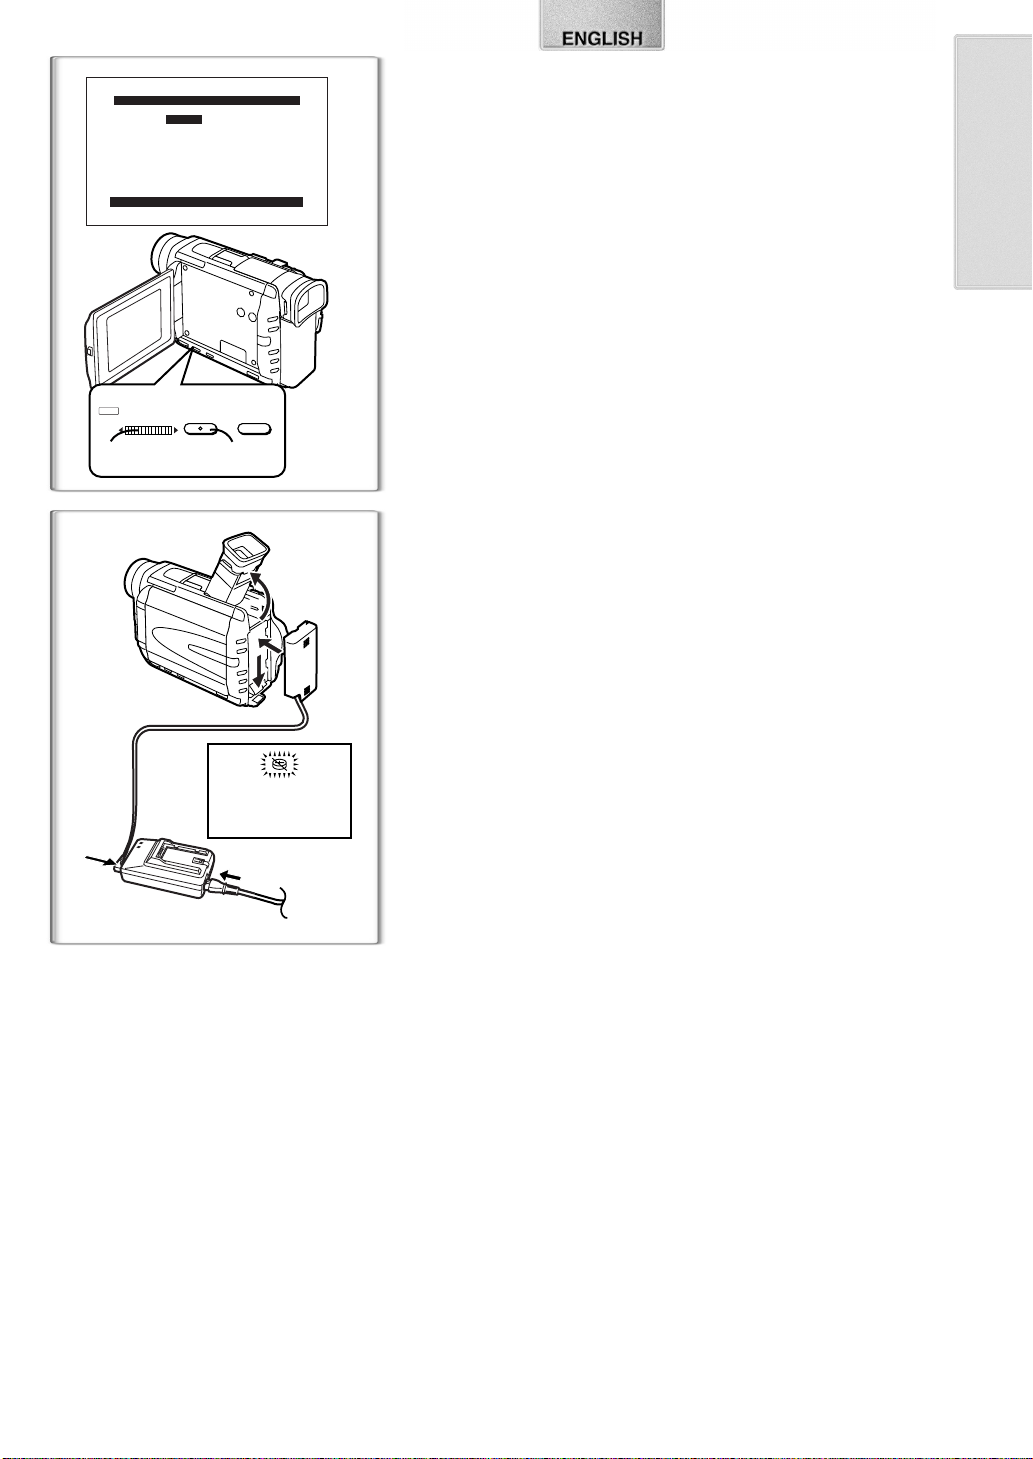
ª Using the Battery
1
2
2
PUSH
BATT
1
MODE
ON
OFF
Before use, fully charge the Battery.
Attach the Battery to AC Adaptor and charge it.
1
≥Since the Battery will not be charged when the DC Input Lead is
connected to the AC Adaptor, disconnect them.
≥The [POWER] Lamp and [CHARGE] Lamp lights up, and charging
starts.
≥When the [CHARGE] Lamp goes off, charging is completed.
Attach the charged Battery to the Movie Camera.
2
Disconnecting the Power Source
Set the [OFF/ON/MODE] Switch 1 to [OFF] and, while pressing the
[PUSH BATT] Button
it.
, slide the Battery or DC Cable upward to disconnect
2
ª Using the Car Battery Charger
If you use the Car Battery Charger (VW-KBD2E; optional), you can supply
power to the Movie Camera and charge the battery inside your car. For
further information, refer to the instruction manual of the Car Battery Charger.
≥Be sure to start the car engine before you connect the Car Adaptor Cord,
otherwise the fuse may blow.
60
A
B
C
CGR-D08R
CGR-D08S
CGR-D120
A
B
C
CGP-D14S
CGP-D210
A
B
C
CGR-D16S
CGR-D220
A
B
C
CGP-D28S
CGP-D320
A
B
C
CGR-D53S
CGR-D815
NV-DS88
1 h.
1 h 40 min. (1 h 20 min.)
50 min. (40 min.)
1 h 50 min.
2 h 55 min. (2 h 25 min.)
1 h 30 min. (1 h 15 min.)
2 h.
3 h 30 min. (2 h 50 min.)
1 h 45 min. (1 h 25 min.)
3 h 15 min.
6 h 05 min. (5 h.)
3 h 05 min. (2 h 30 min.)
5 h 20 min.
11 h 30 min. (9 h 25 min.)
5 h 45 min. (4 h 45 min.)
≥For other notes concerning this item, see page 92.
~~~~~~~~~~~~~~~~~~~~~~~~
Charging Time and Available Recording Time
Charging Time
A
Maximum Continuous Recording Time
B
Intermittent Recording Time
C
(Intermittent Recording Time is the available recording time with repeated
recording and stopping actions.)
≥“1h10min.” indicates 1 hour and 10 minutes.
≥Battery CGR-D08R is supplied.
≥The times shown in the table are approximate times. The numbers in
parentheses indicate the recording time when the LCD Monitor is used. In
actual use, the available recording time may be shorter.
≥The times shown in the table are for continuous recording at a temperature
of 20oC and humidity of 60%. If the Battery is charged at a higher or lower
temperature, the charging time may be longer.
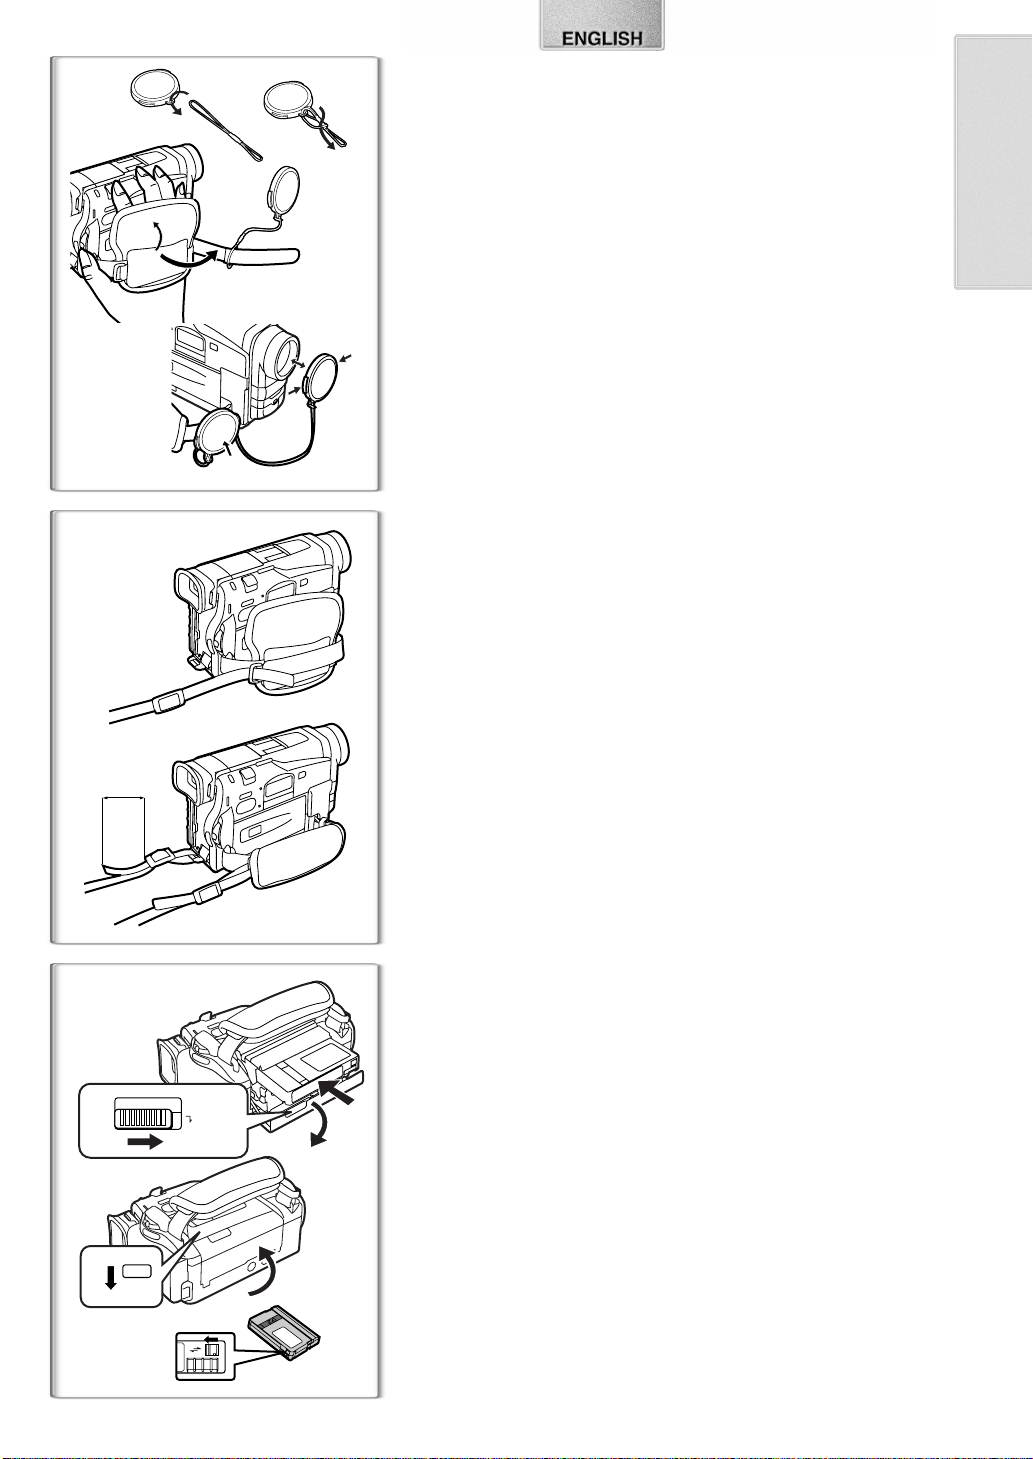
Lens Cap and Grip Belt
12
3
4
1
To protect the Lens surface, attach the Lens Cap. Adjust the length of the
Grip Belt to the size of your hand.
Pass the longer loop of the Lens Cap Cord through the
1
attached eye on the Lens Cap.
Then pass the shorter loop of the Lens Cap Cord through
2
the centre of the longer loop and pull tight.
Attach the Lens Cap to the Grip Belt.
3
Put your hand through the Grip Belt and adjust the length.
4
≥The removed Lens Cap can be hooked onto the Grip Belt 1. (When you
are not recording, be sure to keep the Lens Cap attached to the Lens for
protection.)
~~~~~~~~~~~~~~~~~~~~~~~~~
Attaching the Shoulder Strap
1
We recommend that you attach the Shoulder Strap before going out of doors
to record so as to avoid dropping the Movie Camera.
Pull the end of the Shoulder Strap through the Shoulder
1
Strap Holder on the Movie Camera.
Fold the tip of the Shoulder Strap, run it through the
2
Shoulder Strap Length Adjuster, and pull it.
≥Pull it out more than 2 cm 1 from the Shoulder Strap Length Adjuster
so that it cannot slip off.
2
1
~~~~~~~~~~~~~~~~~~~~~~~~~
Inserting a Cassette
When power is supplied to the Movie Camera, the Cassette can be taken out
without turning the Movie Camera [ON].
Slide the [OPEN/EJECT] Lever to the right and pull down to
1
open the Cassette Compartment.
Insert a Cassette.
OPEN/EJECT
1
PUSH
3
CLOSE
1
4
1
R E C
SAVE
2
2
Close the Cassette Compartment and lock the Cassette
3
Compartment by pressing the [PUSH CLOSE] mark.
Close the Lower Cassette Compartment Cover.
4
ª Accidental Erasure Prevention
Opening the accidental erasure prevention slider 1 on the cassette (by
sliding it in the [SAVE] arrow direction) prevents recording. To enable
recording, close the accidental erasure prevention slider (by sliding it in the
[REC] arrow direction).
≥For other notes concerning this item, see page 92.
61
CAMERA
VCR
CARD P.B
1, 2
3
12:30:45
12:30:45
12:30:45
15.10.2001
15.10.2001
15.10.2001
1
12:30:45
15.10.2001
2
2
1
23
2
180
x
LCD/EVF SET
LCD BRIGHTNESS
[-]||||----[+]
LCD COLOUR LEVEL
[-]||||----[+]
EVF BRIGHTNESS
[-]||||----[+]
PRESS MENU TO RETURN
MODE
ON
OFF
PUSH
OPEN
90
1
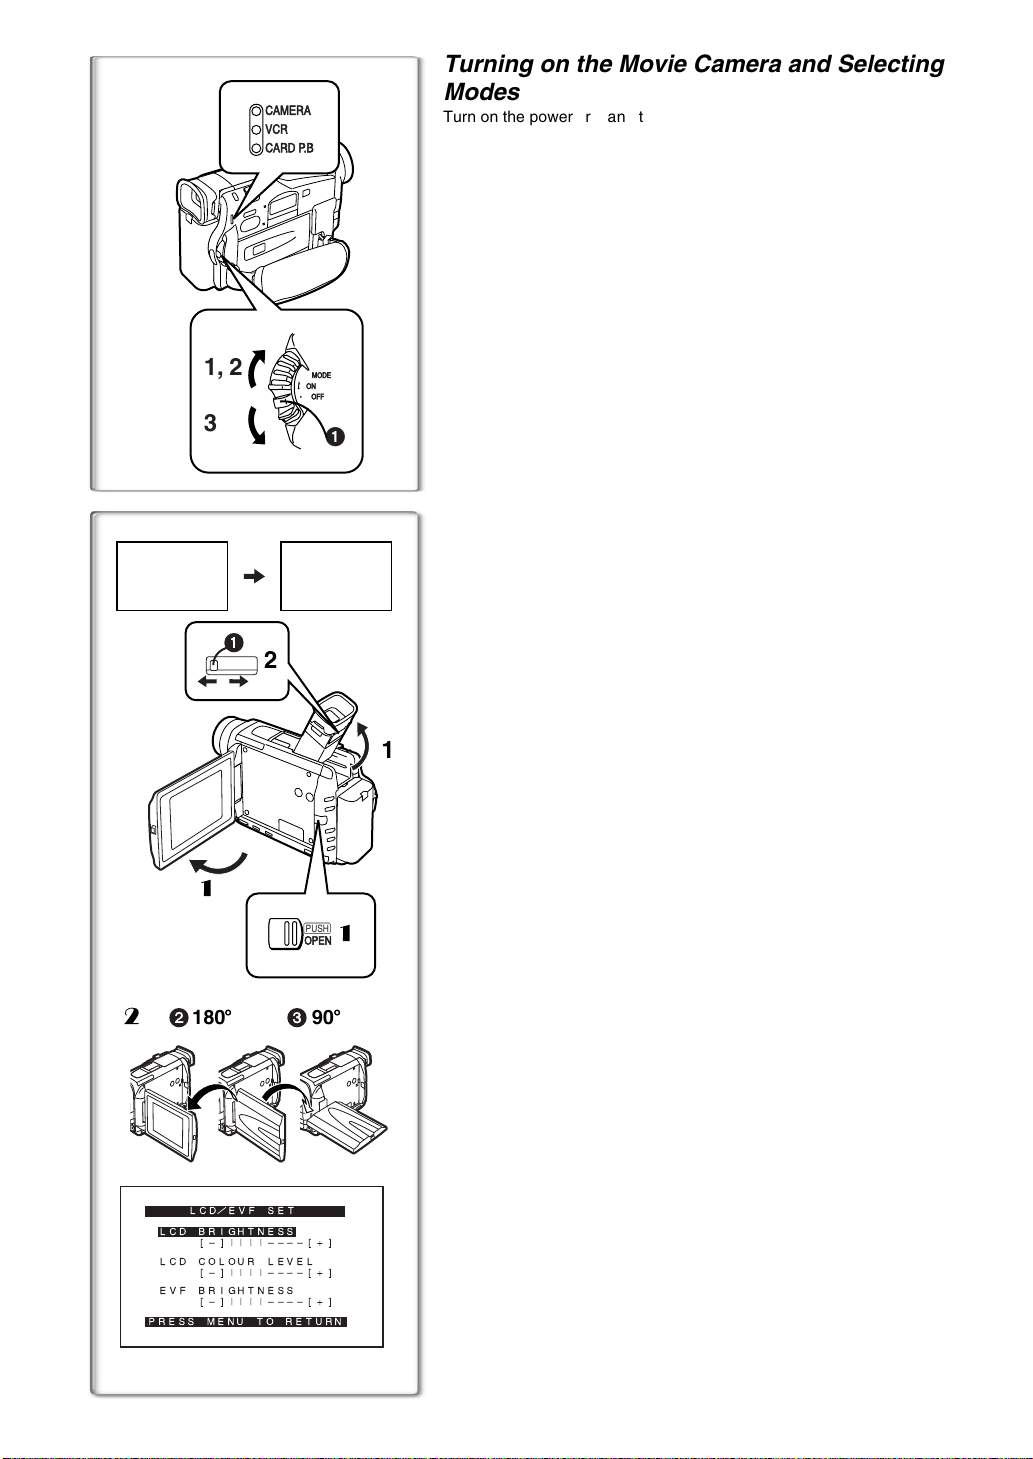
Turning on the Movie Camera and Selecting
Modes
Turn on the power first and then select modes.
ª How to Turn on the Power
1
Set the [OFF/ON/MODE] Switch to [ON] while pressing the
.
centre button
≥The [CAMERA] Lamp lights up.
1
ª How to Switch Modes
2
Slide the [OFF/ON/MODE] Switch.
≥With each slide, the Mode changes.
≥The appropriate Mode Lamp lights up.
ª How to Turn off the Power
3
Set the [OFF/ON/MODE] Switch to [OFF] while pressing the
.
centre button
1
~~~~~~~~~~~~~~~~~~~~~~~~
Using the Viewfinder/LCD Monitor
ª Using the Viewfinder
Before using the Viewfinder, adjust the field of view so that the displays inside
the Viewfinder become clear and easy to read.
Tilt the Viewfinder upward.
1
≥The Viewfinder can also be pulled out for use.
≥Do not pull on the Eyecup to extend the Viewfinder.
Adjust by sliding the Eyepiece Corrector Knob 1.
2
ª Using the LCD Monitor
With the LCD Monitor open, you can also record the picture while watching it.
Press the [PUSH OPEN] Button and, at the same time, bring
1
1
x
1111
the LCD Monitor out about 90o in the direction of the arrow.
≥The Viewfinder goes off.
Adjust the LCD Monitor angle according to the desired
2222
recording angle.
≥The LCD Monitor can rotate a maximum of 180o 2 from the vertical
position to the upward direction and a maximum of 90o
downward direction. Forcefully rotating the LCD Monitor beyond these
ranges will damage the Movie Camera.
Closing the LCD Monitor
Push the LCD Monitor until the [PUSH OPEN] Button is securely locked.
3
to the
ª Adjusting Brightness and Colour Level
When [LCD/EVF SET] on the [DISPLAY SETUP] Sub-Menu is set to [YES],
the following items are displayed. (l 63)
LCD Brightness [LCD BRIGHTNESS]
It adjusts the brightness of the image on the LCD screen.
LCD Colour Level [LCD COLOUR LEVEL]
It adjusts the colour saturation of the image on the LCD screen.
Brightness of the Viewfinder [EVF BRIGHTNESS]
It adjusts the brightness of the image in the Viewfinder.
To Adjust
Press the [PUSH] Dial and select the item to be adjusted, and then turn the
[PUSH] Dial to raise or lower the number of vertical bars in the Bar Indication.
≥A larger number of vertical bars indicates stronger brightness or colour
saturation.
Increasing the Brightness of the Entire LCD Monitor
Set the [LCD MODE] on the [DISPLAY SETUP] Sub-Menu to [BRIGHT].
≥These adjustments do not affect the recorded images.
≥For other notes concerning this item, see page 98.
62
MODE
PUSH
W.B/SHUTTER/IRIS/MF/VOL/JOG
MENU FOCUS
2, 3, 4, 5 1
MODE
1
ON
OFF
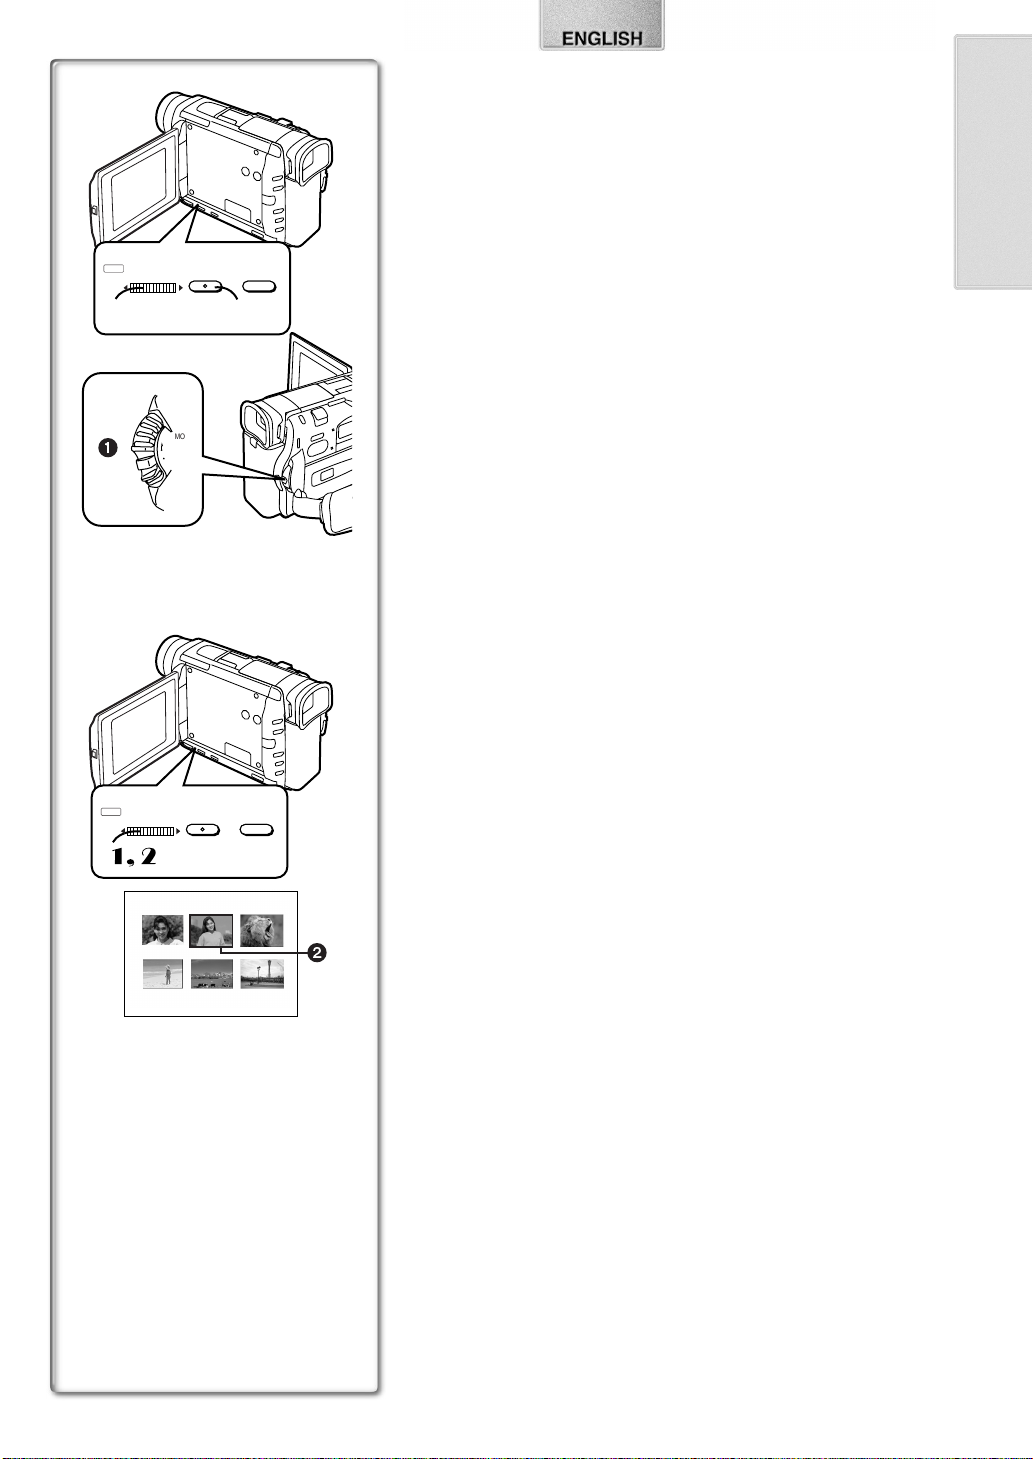
Using the Menu Screen
To facilitate the selection of a desired function or setup, this Movie Camera
displays various function setups on Menus.
Press the [MENU] Button.
1
≥The Menu corresponding to the Mode selected by using the [OFF/ON/
MODE] Switch
Turn the [PUSH] Dial to select a desired Sub-Menu.
2
≥Turn the [PUSH] Dial to display the highlightened item.
Press the [PUSH] Dial to display the selected Sub-Menu.
3
Turn the [PUSH] Dial to select the item to be set.
4
Press the [PUSH] Dial to set the selected item to a desired
5
mode.
≥With each press of the [PUSH] Dial, the cursor [1] moves to the next
mode. Menu items that cannot be used in combination with the selected
item are displayed in dark blue.
≥While a Menu is displayed, you cannot record or play back. Menus can be
displayed during playback but not during recording. The above operations
can be done using the [MENU] Button, [SET] Button and [ITEM] Button on
the Remote Controller. (l 58)
To Exit the Menu Screen
Press the [MENU] Button again.
About the Menu Mode Setting
The setting selected on the Menu will be retained even when the Movie
Camera is turned off. However, if the Battery or AC Adaptor is disconnected
before turning off the Movie Camera, the selected setup may not be retained.
(But, the setups of [EFFECT2] (l 75) are not retained.)
≥Menu operation flow is shown in this text by >>.
is displayed.
1
PUSH
W.B/SHUTTER/IRIS/MF/VOL/JOG
1
,2
MENU FOCUS
PICTURE
No.25 IMGA0012.JPG
2
ª Picture Selection
A Picture Selection Operation may be necessary during Menu Operations. In
this case, carry out the following procedure.
Turn the [PUSH] Dial and select a picture.
1111
≥The selected picture is marked by a frame 2.
Press the [PUSH] Dial to confirm the selection of the picture.
2222
≥After the above Picture Selectioin Procedure, carry out the various Menu
Operations. (The above procedure will not be repeated in the following
instructions.)
63
CAMERA FUNCTIONS
1.
CAMERA SETUP
2.
DIGITAL EFFECT
3.
CARD SETUP
4.
RECORDING SETUP
5.
DISPLAY SETUP
6.
OTHER FUNCTIONS
7.
DEMO MODE
PRESS MENU TO EXIT
1)
2)
3)
4)
5)
6)
7)
8)
PICTURE QUALITY
9)
FINE NORMAL ECONOMY
CREATE TITLE
10)
RETURN ---- YES
11)
12)
13)
14)
15)
16)
17)
18)
19)
20)
21)
22)
23)
24)
25)
26)
27)
CAMERA SETUP
PROG.AE OFF 5 7
PROGRESSIVE OFF ON AUTO
SIS
D.ZOOM
CINEMA OFF ON
RETURN
RETURN ---- YES
EFFECT1
EFFECT2 OFF NEGA SEPIA
RETURN ---- YES
REC SPEED
AUDIO REC 12bit
SCENEINDEX 2HOUR DAY
WIND CUT OFF ON
ZOOM MIC OFF ON
RETURN ---- YES
DATE/TIME
C.DISPLAY COUNTER MEMORY
C.RESET ---- YES
DISPLAY ALL PARTIAL OFF
LCD MODE NORMAL BRIGHT
LCD/EVF SET ---- YES
RETURN ---- YES
REMOTE
REC LAMP OFF ON
BEEP SOUND OFF ON
SHTR EFFECT OFF ON
CLOCK SET ---- YES
SELFSHOOT NORMAL MIRROR
RETURN ---- YES
4 Ω º
OFF ON
OFF 25 600
PRESS MENU TO EXIT
DIGITAL EFFECT
OFF WIPE MIX
STROBE GAINUP
TRACER MOSAIC
MIRROR
B/W SOLARI
PRESS MENU TO EXIT
CARD SETUP
PRESS MENU TO EXIT
RECORDING SETUP
SP LP
PRESS MENU TO EXIT
DISPLAY SETUP
OFF TIME DATE
TIMECODE
PRESS MENU TO EXIT
OTHER FUNCTIONS
VCR1 VCR2 OFF
PRESS MENU TO EXIT
---- YES
16bit
List of Menus
The figures of the Menus are for explanation purposes only, and they are
different from the actual Menus.
Camera Mode Main-Menu [CAMERA FUNCTIONS]
[CAMERA SETUP] Sub-Menu
1) Auto Exposure Mode [PROG.AE] (l 72)
2) Progressive Photoshot Mode [PROGRESSIVE] (l 69)
3) Image Stabilizer [SIS] (l 70)
4) Digital Zoom [D.ZOOM] (l 70)
5) Cinema-like Format Recording [CINEMA] (l 71)
6) Returning to the Main-Menu [RETURN]
≥If you set [RETURN] to [YES], the menu changes back to the
Main-Menu.
[DIGITAL EFFECT] Sub-Menu
7) Digital Effects 1 [EFFECT1] (l 75)
8) Digital Effects 2 [EFFECT2] (l 75)
[CARD SETUP] Sub-Menu
9) Picture Quality [PICTURE QUALITY] (l 84)
10) Title Creation [CREATE TITLE] (l 88)
[RECORDING SETUP] Sub-Menu
11) Recording Speed Mode [REC SPEED] (l 67)
12) Audio Recording Mode [AUDIO REC] (l 67)
13) Scene Index Mode [SCENEINDEX] (l 78)
14) Wind Noise Reduction [WIND CUT] (l 71)
15) Zoom Microphone [ZOOM MIC] (l 69)
[DISPLAY SETUP] Sub-Menu
16) Date and Time Indication [DATE/TIME] (l 91)
17) Counter Display Mode [C.DISPLAY] (l 91)
18) Counter Reset [C.RESET] (l 101)
≥It resets the counter to zero. However, it cannot reset the Time Code.
19) Display Mode [DISPLAY] (l 92)
20) LCD Lighting Mode [LCD MODE] (l 62)
21) LCD and Viewfinder Adjustment [LCD/EVF SET] (l 62)
[OTHER FUNCTIONS] Sub-Menu
22) Remote Controller Mode [REMOTE] (l 59)
23) Recording Lamp [REC LAMP] (l 68)
24) Beep Sound [BEEP SOUND] (l 92)
25) Shutter Effect [SHTR EFFECT] (l 69)
26) Date and Time Setting [CLOCK SET] (l 67)
27) Self-Recording [SELFSHOOT] (l 68)
[DEMO MODE] Sub-Menu
28) Demonstration Mode [DEMO MODE]
≥If no operation takes place for approximately 10 minutes after the AC
Adaptor was connected to the Movie Camera and the [OFF/ON/MODE]
Switch was turned to [ON] without inserting a Cassette, the Movie
Camera is automatically set to Demonstration Mode for introducing its
functions. If any button is pressed or operated, the Demonstration Mode
is cancelled. The Demonstration Mode can be started by setting
[DEMO MODE] to [ON] and by exiting the Menu. To terminate the
Demonstration Mode, insert a Cassette or set the [DEMO MODE] to
[OFF].
64
DEMO MODE
28)
RETURN ---- YES
DEMO MODE
PRESS MENU TO EXIT
OFF ON
VCR FUNCTIONS
1.
PLAYBACK FUNCTIONS
2.
DIGITAL EFFECT
3.
CARD SETUP
4.
RECORDING SETUP
5.
AV IN/OUT SETUP
6.
DISPLAY SETUP
7.
OTHER FUNCTIONS
PRESS MENU TO EXIT
1)
2)
3)
4)
5)
6)
7)
8)
9)
10)
11)
PLAYBACK FUNCTIONS
BLANK SEARCH ---- YES
RECORD TO CARD ---- YES
AUTO PRINT ---- YES
SEARCH PHOTO SCENE
12bit AUDIO ST1 ST2 MIX
AUDIO OUT
RETURN ---- YES
PRESS MENU TO EXIT
DIGITAL EFFECT
EFFECT OFF ON
EFFECT SELECT
OFF WIPE MIX
STROBE NEGA SEPIA
B/W TRACER SOLARI
MOSAIC MIRROR
RETURN ---- YES
PRESS MENU TO EXIT
PICTURE QUALITY
FINE NORMAL ECONOMY
CREATE TITLE
CARD SETUP
STEREO L R
---- YES
VCR Mode Main-Menu [VCR FUNCTIONS]
[PLAYBACK FUNCTIONS] Sub-Menu
1) Blank Search [BLANK SEARCH] (l 77)
2) Recording to Card [RECORD TO CARD] (l 85)
3) Automatic Printing [AUTO PRINT] (l 82)
4) Index Search Mode [SEARCH] (l 78)
5) Audio Selector [12bit AUDIO] (l 80)
6) Audio Output Mode [AUDIO OUT] (l 94)
7) Returning to the Main-Menu [RETURN]
[DIGITAL EFFECT] Sub-Menu
8) Digital Effect On/Off [EFFECT] (l 79)
9) Digital Effect Selection [EFFECT SELECT] (l 79)
[CARD SETUP] Sub-Menu
10) Picture Quality [PICTURE QUALITY] (l 84)
11) Title Creation [CREATE TITLE] (l 88)
[RECORDING SETUP] Sub-Menu
12) Recording Speed Mode [REC SPEED] (l 67)
13) Audio Recording Mode [AUDIO REC] (l 80)
[AV IN/OUT SETUP] Sub-Menu
14) AV Socket [AV JACK] (l 80, 81)
15) Audio Dubbing Input [A.DUB INPUT] (l 80)
16) Analog-Digital Conversion Output [DV OUT] (l 94)
[DISPLAY SETUP] Sub-Menu
All of the items on the [DISPLAY SETUP] Sub-Menu are the same as those
on the [DISPLAY SETUP] Sub-Menu of the [CAMERA FUNCTIONS]
Main-Menu.
[OTHER FUNCTIONS] Sub-Menu
All of the items on the [OTHER FUNCTIONS] Sub-Menu are the same as
those on the [OTHER FUNCTIONS] Sub-Menu of the
[CAMERA FUNCTIONS] Main-Menu.
RETURN ---- YES
PRESS MENU TO EXIT
12)
13)
14)
15)
16)
RECORDING SETUP
REC SPEED SP LP
AUDIO REC 12bit
RETURN ---- YES
PRESS MENU TO EXIT
AV IN/OUT SETUP
AV JACK
A.DUB INPUT
DV OUT
RETURN ---- YES
DATE/TIME OFF TIME DATE
C.DISPLAY COUNTER MEMORY
TIMECODE
C.RESET ---- YES
DISPLAY ALL PARTIAL OFF
LCD MODE NORMAL BRIGHT
LCD/EVF SET ---- YES
RETURN ---- YES
REMOTE VCR1 VCR2 OFF
CLOCK SET ---- YES
IN/OUT OUT/PHONES
PRESS MENU TO EXIT
DISPLAY SETUP
PRESS MENU TO EXIT
OTHER FUNCTIONS
16bit
MIC AV IN
OFF ON
RETURN ---- YES
PRESS MENU TO EXIT
65
CARD FUNCTIONS
1.
ERASE PICTURE/TITLE
2.
CARD EDITING
3.
DISPLAY SETUP
4.
OTHER FUNCTIONS
PRESS MENU TO EXIT
1)
2)
3)
4)
5)
6)
7)
8)
9)
10)
ERASE PICTURE/TITLE
1.
ERASE PICTURE
2.
3.
DATE/TIME OFF TIME DATE
C.DISPLAY COUNTER MEMORY
TIMECODE
C.RESET ---- YES
DISPLAY ALL PARTIAL OFF
LCD MODE NORMAL BRIGHT
LCD/EVF SET ---- YES
RETURN ---- YES
BY SELECTION
ERASE ALL PICTURES
ERASE TITLE
BY SELECTION
RETURN ---- YES
PRESS MENU TO EXIT
CARD EDITING
RECORD TO TAPE ---- YES
AUTO PRINT ---- YES
PICTURE SEARCH ---- YES
FILE LOCK ---- YES
SLIDE SHOW ---- YES
DPOF SETTING ---- YES
CARD FORMAT ---- YES
RETURN ---- YES
PRESS MENU TO EXIT
DISPLAY SETUP
PRESS MENU TO EXIT
Card Playback Mode Main-Menu [CARD FUNCTIONS]
[ERASE PICTURE/TITLE] Sub-Menu
1) Selecting and Erasing a Picture [ERASE PICTURE BY SELECTION]
(l 89)
2) Erasing All Pictures [ERASE ALL PICTURES] (l 89)
3) Selecting and Erasing a Title [ERASE TITLE BY SELECTION] (l 89)
[CARD EDITING] Sub-Menu
4) Recording to Tape [RECORD TO TAPE] (l 85)
5) Automatic Printing [AUTO PRINT] (l 82)
6) Searching a Picture [PICTURE SEARCH] (l 86)
7) Setting the Lock [FILE LOCK] (l 89)
8) Setting a Slide Show [SLIDE SHOW] (l 86)
9) Setting DPOF [DPOF SETTING] (l 90)
10) Formatting a Card [CARD FORMAT] (l 90)
[DISPLAY SETUP] Sub-Menu
All of the items on the [DISPLAY SETUP] Sub-Menu are the same as those
on the [DISPLAY SETUP] Sub-Menu of the [CAMERA FUNCTIONS]
Main-Menu.
[OTHER FUNCTIONS] Sub-Menu
All of the items on the [OTHER FUNCTIONS] Sub-Menu are the same as
those on the [OTHER FUNCTIONS] Sub-Menu of the
[CAMERA FUNCTIONS] Main-Menu.
OTHER FUNCTIONS
REMOTE VCR1 VCR2 OFF
CLOCK SET ---- YES
RETURN ---- YES
PRESS MENU TO EXIT
A
11)
PICTURE SEARCH
12)
ERASE PICTURE
FILE LOCK
13)
DPOF SETTING
14)
EXIT
15)
Short-Cut Menus of the Card Playback Mode
A
If you use the Short-Cut Menu, the Card Playback Mode Menu can be called
up quickly. Press the [PUSH] Dial to display the Short-Cut Menu, and turn the
[PUSH] Dial to select the desired Menu.
11) [PICTURE SEARCH]:
The [PICTURE SEARCH] Menu for finding pictures by number appears.
(l 86)
12) [ERASE PICTURE]:
The [ERASE PICTURE] Menu for erasing the picture being displayed
appears. (l 89) Use this Menu after the picture to be erased appears.
13) [FILE LOCK]:
The [FILE LOCK] Menu for avoiding accidental erasure of pictures (Lock
Setting) being displayed appears. (l 89) Use this Menu after the picture
to be locked appears.
14) [DPOF SETTING]:
The [DPOF SETTING] Menu for setting DPOF to the picture displayed
appears. (l 90) Use this Menu after the picture for DPOF Setting
appears.
15) [EXIT]:
It is for terminating the Short-Cut Menu.
66
CLOCK SET
YEAR 2002
MONTH 10
DAY 08
HOUR 14
MIN. 30
PRESS MENU TO RETURN
PUSH
W.B/SHUTTER/IRIS/VOL/JOG
MENU FOCUS
1, 2 1, 3
Setting Date and Time
Since the internal clock of the Movie Camera has a slight imprecision, make
sure to check the time before recording.
1
Set [OTHER FUNCTIONS] >> [CLOCK SET] >> [YES].
2
Press the [PUSH] Dial to select [YEAR]/[MONTH]/[DAY]/
[HOUR]/[MIN.] and turn to set it to a desired value.
≥Year will cycle in the order shown below.
2000, 2001, ..., 2089, 2000, ...
3
Press the [MENU] Button to finish setting the date and time.
≥The clock operation starts from [00] second.
≥The Menu will disappear when the [MENU] Button is pressed again.
≥If the built-in battery is weak, the [0] Indication
charge the built-in battery.
≥The clock employs the 24-hour system.
flashes. In this case,
1
~~~~~~~~~~~~~~~~~~~~~~~~~
Internal Lithium Battery Recharge
The internal lithium battery sustains the operation of the clock. When the
[0] Indication flashes, the internal lithium battery is near exhaustion.
1
1
Connect the AC Adaptor to the Movie Camera with the power
turned off and then connect to the AC Mains socket.
≥After charging for 4 hours, the built-in lithium battery can power the
clock for approximately 3 months.
1
~~~~~~~~~~~~~~~~~~~~~~~~~
LP Mode
A desired recording speed can be selected with [REC SPEED] on the
[RECORDING SETUP] Sub-Menu.
If LP Mode is selected, the recording time becomes 1.5 times longer
than that of SP Mode.
Although the image quality does not decrease with the LP Mode recording,
mosaic-pattern noise may appear on a playback image, or some normal
functions may be restricted.
≥The contents that are recorded in LP Mode are not completely compatible
with other equipment.
≥Audio dubbing is not possible with LP Mode. (l 80)
~~~~~~~~~~~~~~~~~~~~~~~~~
Audio Recording Mode
The sound quality of the recorded sound can be selected with [AUDIO REC]
on the [RECORDING SETUP] Sub-Menu.
High sound-quality recording is possible with “16 bit 48 kHz 2 track” Mode.
With the “12 bit 32 kHz 4 track” Mode, the original sound can be recorded on
2 tracks in stereo, while the other 2 tracks can be used for Audio Dubbing.
67
 Loading...