

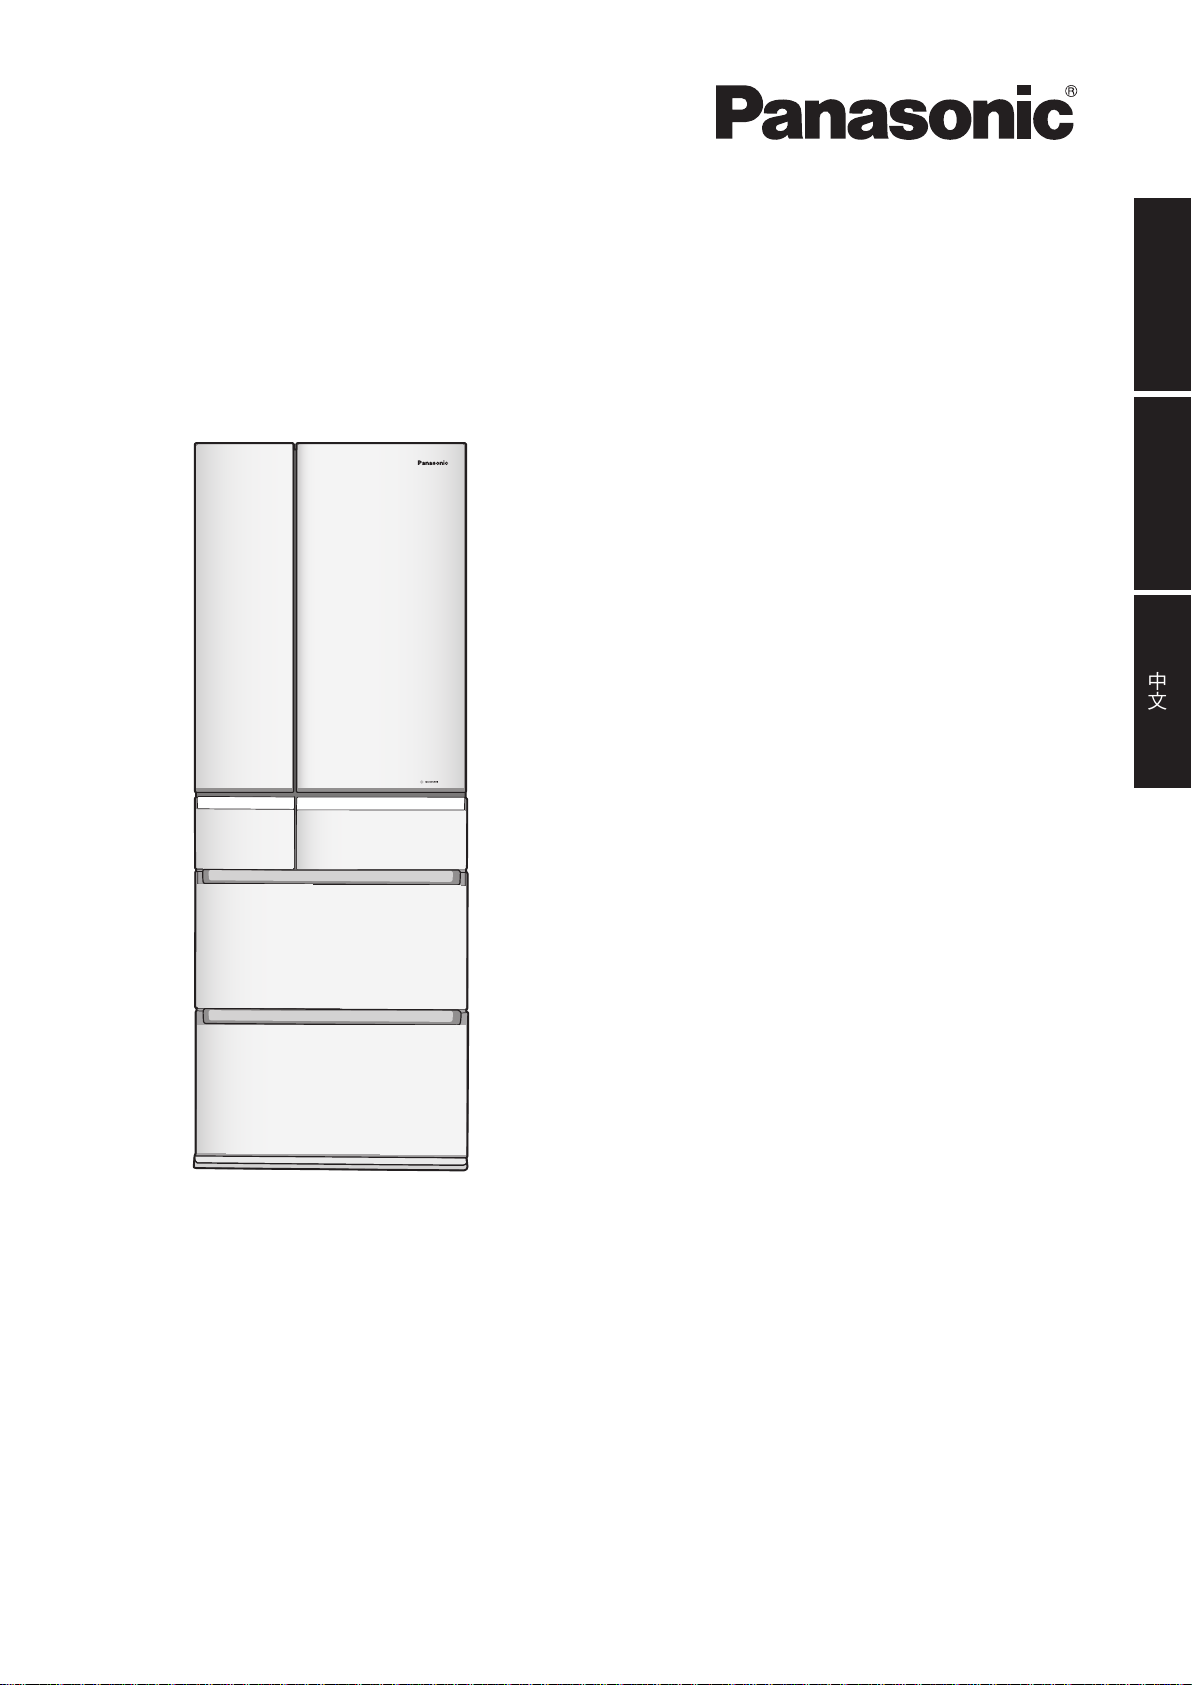
Panasonic NR-F510GT-W7, NR-F510GT-XP, NR-F510GT-X6, NR-F510GT-X3, NR-F510GT-W3 User Manual
...Page 1
Operating Instructions
Refrigerator
(Household use)
Manual Penggunaan
English
Peti sejuk
Model No./
No. Model/
型號
(Untuk kegunaan rumah)
使用說明書
雪櫃
NR-F510GT-N3
NR-F510GT-W3
NR-F510GT-X3
NR-F510GT-W7
NR-F510GT-X7
NR-F510GT-N6
NR-F510GT-W6
(家用)
Bahasa Melayu
中文
Thank you for purchasing this Panasonic product.
Please read these instructions carefully before using this product.
Please keep this manual for future reference.
Terima kasih kerana membeli produk Panasonic.
Sila baca arahan dengan teliti sebelum menggunakan produk ini.
Sila simpan manual ini untuk rujukan.
NR-F510GT-X6
NR-F510GT-NP
NR-F510GT-XP
感謝您購買 Panasonic 的產品。
在使用本產品前,請仔細閱讀本說明書。
請妥善保存本手冊以備將來參考。
Page 2
Introduction
Contents
Introduction
Installation
Operation
Appendix
Safety instructions ..................................................................................................... 3
Installation ................................................................................................................... 6
Choosing the right location ................................................................... 6
To use all features ...................................................................................................... 8
Control panel ........................................................................................ 8
Foods stored ........................................................................................9
ECO NAVI Operation ............................................................................ 9
Refrigerator compartment ..................................................................10
Prime Fresh/Chilled select room ........................................................12
Fresh Freezing compartment .............................................................13
Ice compartment.................................................................................14
Freezer compartment .........................................................................16
Vegetable compartment .....................................................................16
Cleaning and removing and re-installing ............................................................... 17
Cleaning .............................................................................................17
In these cases? ......................................................................................................... 20
Setting to suit your preferences ............................................................................. 22
Troubleshooting ....................................................................................................... 23
ECO NAVI Q&A .......................................................................................................... 26
Specifications ........................................................................................................... 27
Separately sold parts ............................................................................................... 27
This appliance is intended to be used in household and similar applications such as
●
- staff kitchen areas in shops, offices and other working environments;
- farm houses and by clients in hotels, motels and other residential type environments;
- bed and breakfast type environments;
- catering and similar non-retail applications.
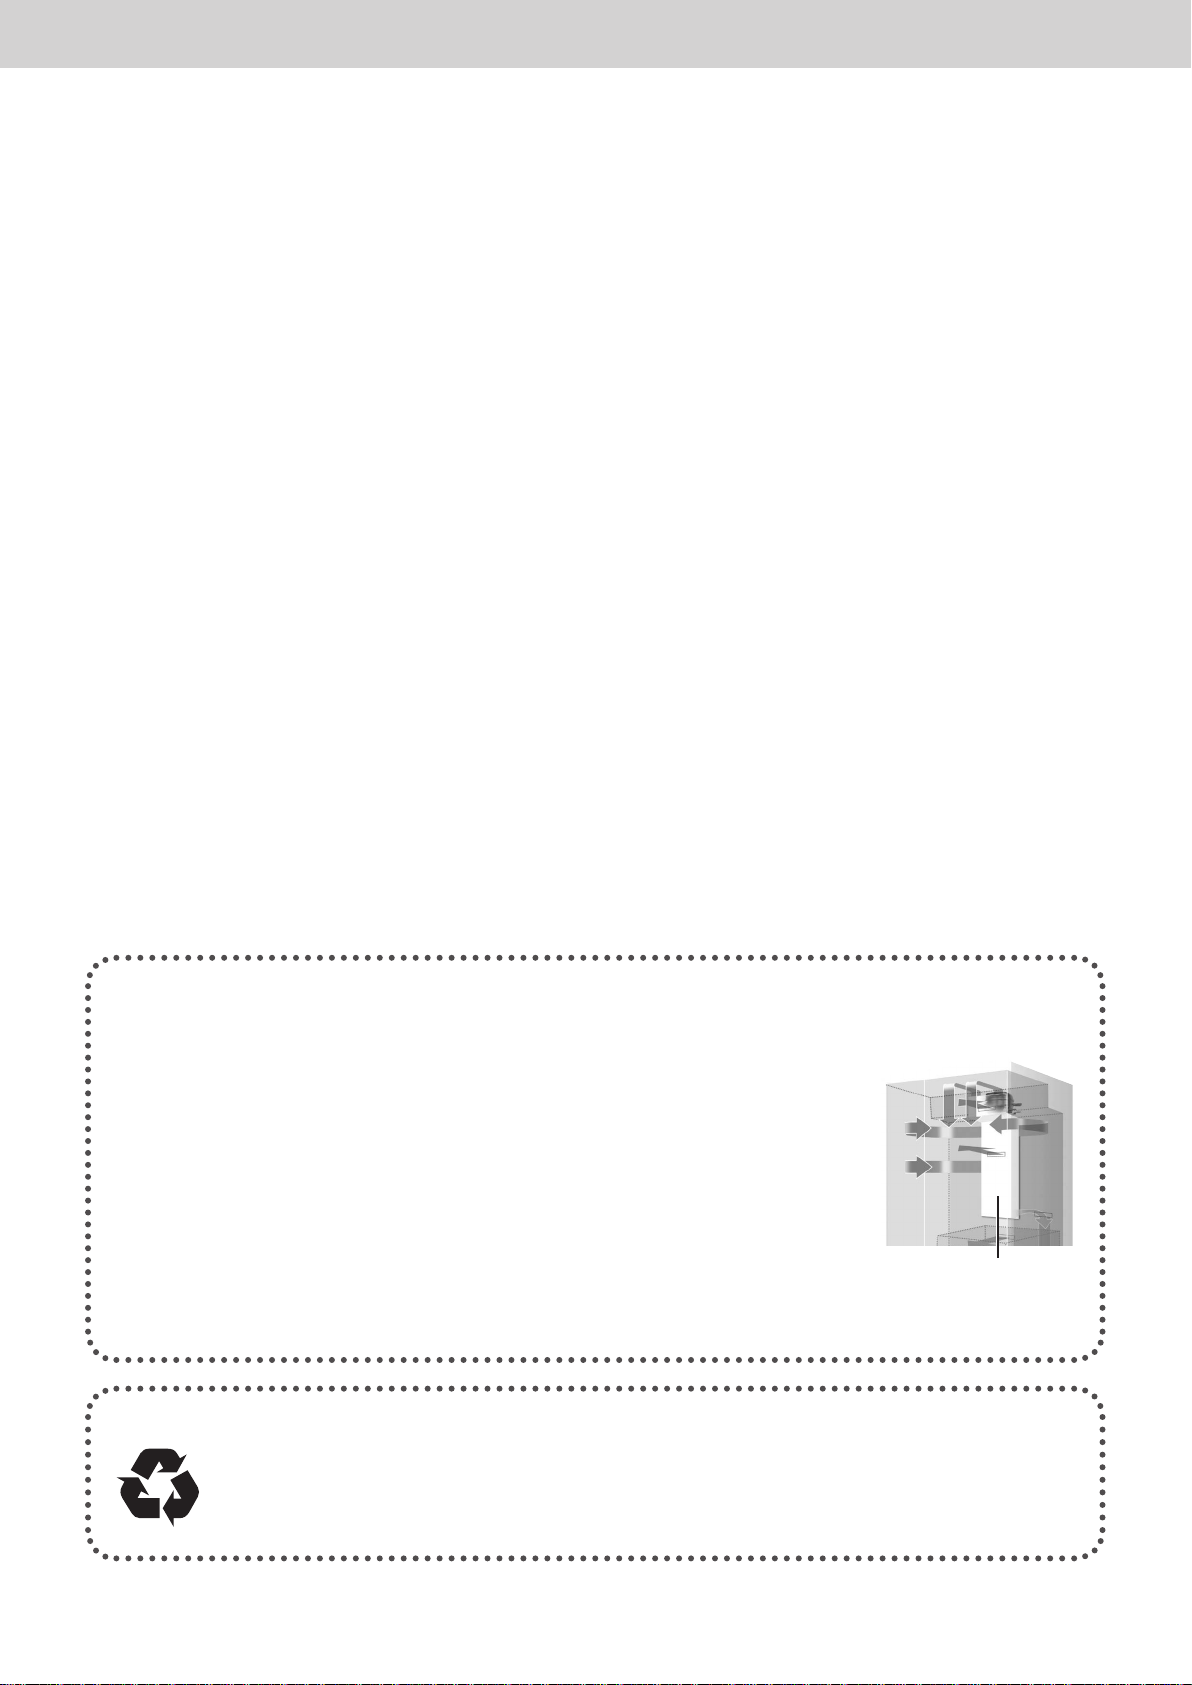
■
For saving energy
• Do not stuff food into the compartments.
That may interfere with the cold air flow. Provide sufficient space between
foods.
• Open/close the doors minimum times.
Minimizing the number of times the door is opened/closed prevents cool air
from escaping and reduces the amount of wasted electricity.
• Do not block the cold air outlet with food items.
If cool air does not spread into every corner of compartments, then the interior
will not be sufficiently cooled and more electricity will be consumed.
• The cold air discharges out of the outlet of the duct at the back (P. 10).
• Store warm food and drinks after they have cooled.
Otherwise, they will not only raise the interior temperature, but also affect the
freshness of other foods.
Duct
■
Disposing of the packaging
Please recycle where possible (e.g. cardboard, plastic bags, adhesive tape and polystyrene) and
make sure you dispose of all other packing materials safely.
Keep the packaging out of the reach of babies and young children, to avoid injury or suffocation.
2
Page 3
Safety instructions
What the symbols mean.
Introduction
Do not
Make sure you do this Do not take apart
Indicates risk of death or serious injury.
This appliance is not intended for use by persons (including children) with reduced physical,
sensory or mental capabilities, or lack of experience and knowledge, unless they have been given
WARNING
For power plugs and cords...
supervision or instruction concerning use of the appliance by a person responsible for their safety.
Children should be supervised to ensure that they do not play with the appliance.
Periodically remove dirt such as dust from the power plug.
●
Plug into a wall outlet of the rated voltage on its own with the rated current and insert plug fully.
●
When removing the power plug, hold the plug itself and not the cord.
●
Remove the plug when cleaning the refrigerator.
●
If you do not intend to use the refrigerator for an extended period of time, then disconnect it.
●
(Otherwise it may cause a fire or electrical shock)
If the Power cord or plug of the appliance is damaged, it must be replaced by the manufacturer of
●
its service agent or similarly qualified person in order to avoid a hazard.
Indicates the appliance must be
earthed to prevent electric shock
English
iso-butane
異丁烷
Do not insert or disconnect the power plug into/from the wall socket with wet hands.
●
Do not damage the power plug or cord. Do not cut or process the plug or cord; do not expose
●
them to high temperatures; do not excessively bend, twist or pull them; do not place heavy
objects onto them; and do not arrange them in bunches.
→ Contact your dealer for repairs to the plug or cord.
Do not push the rear of the refrigerator against the power plug.
●
Do not use while the cord or power plug is damaged, or while the plug is not fully inserted into the
●
outlet.
Stop using the refrigerator immediately and pull out the plug,
if there is an abnormality or failure.
(Otherwise it may cause smoke, a fire or electrical shock.)
Abnormality and failure examples
Power cord or plug is abnormally hot
●
Power cord is deeply cut or deformed
●
There is a burning smell
●
You can feel tingly electricity
●
Contact the dealer immediately for inspection and repair.
On top of the refrigerator...
Do not put anything.
●
Otherwise, it may fall due to vibration.
Do not put anything on the top cover.
●
(Otherwise parts may be deformed and may cause electrical shock.)
3
Page 4
Introduction
When using...
Do not hang or ride on the door.
●
Do not apply water on the body or interior.
●
(Electrical insulation deteriorates and may cause shocks or fire.)
Do not damage the refrigerant circuit.
●
(The flammable refrigerant may catch fire and lead to an explosion.)
Do not touch the mechanisms above the ice-making tray.
●
Do not remove the ice-making tray when the ice making function is operating.
●
Do not store flammable items in the refrigerator.
●
Do not store explosive substances such as aerosol cans with a flammable propellant in this
●
appliance.
Do not store chemicals or scientific specimens.
●
Do not spray combustible chemicals near the refrigerator.
●
Do not use electrical appliances such as a deodorizer in the refrigerator.
●
(If the refrigerant leaks, then it may catch fire due to sparks on the contacts.)
Do not use the mechanical devices or other means to accelerate the defrosting process, other
●
than those recommended by the manufacturer.
Do not add a high impact on glass doors.
●
(Otherwise glass may be broken and cause injury.)
→ If you find a crack, do not touch the glass and consult your dealer immediately.
Fill with potable water only.
●
Children should be supervised to ensure that the refrigerator should be used properly.
●
When installing...
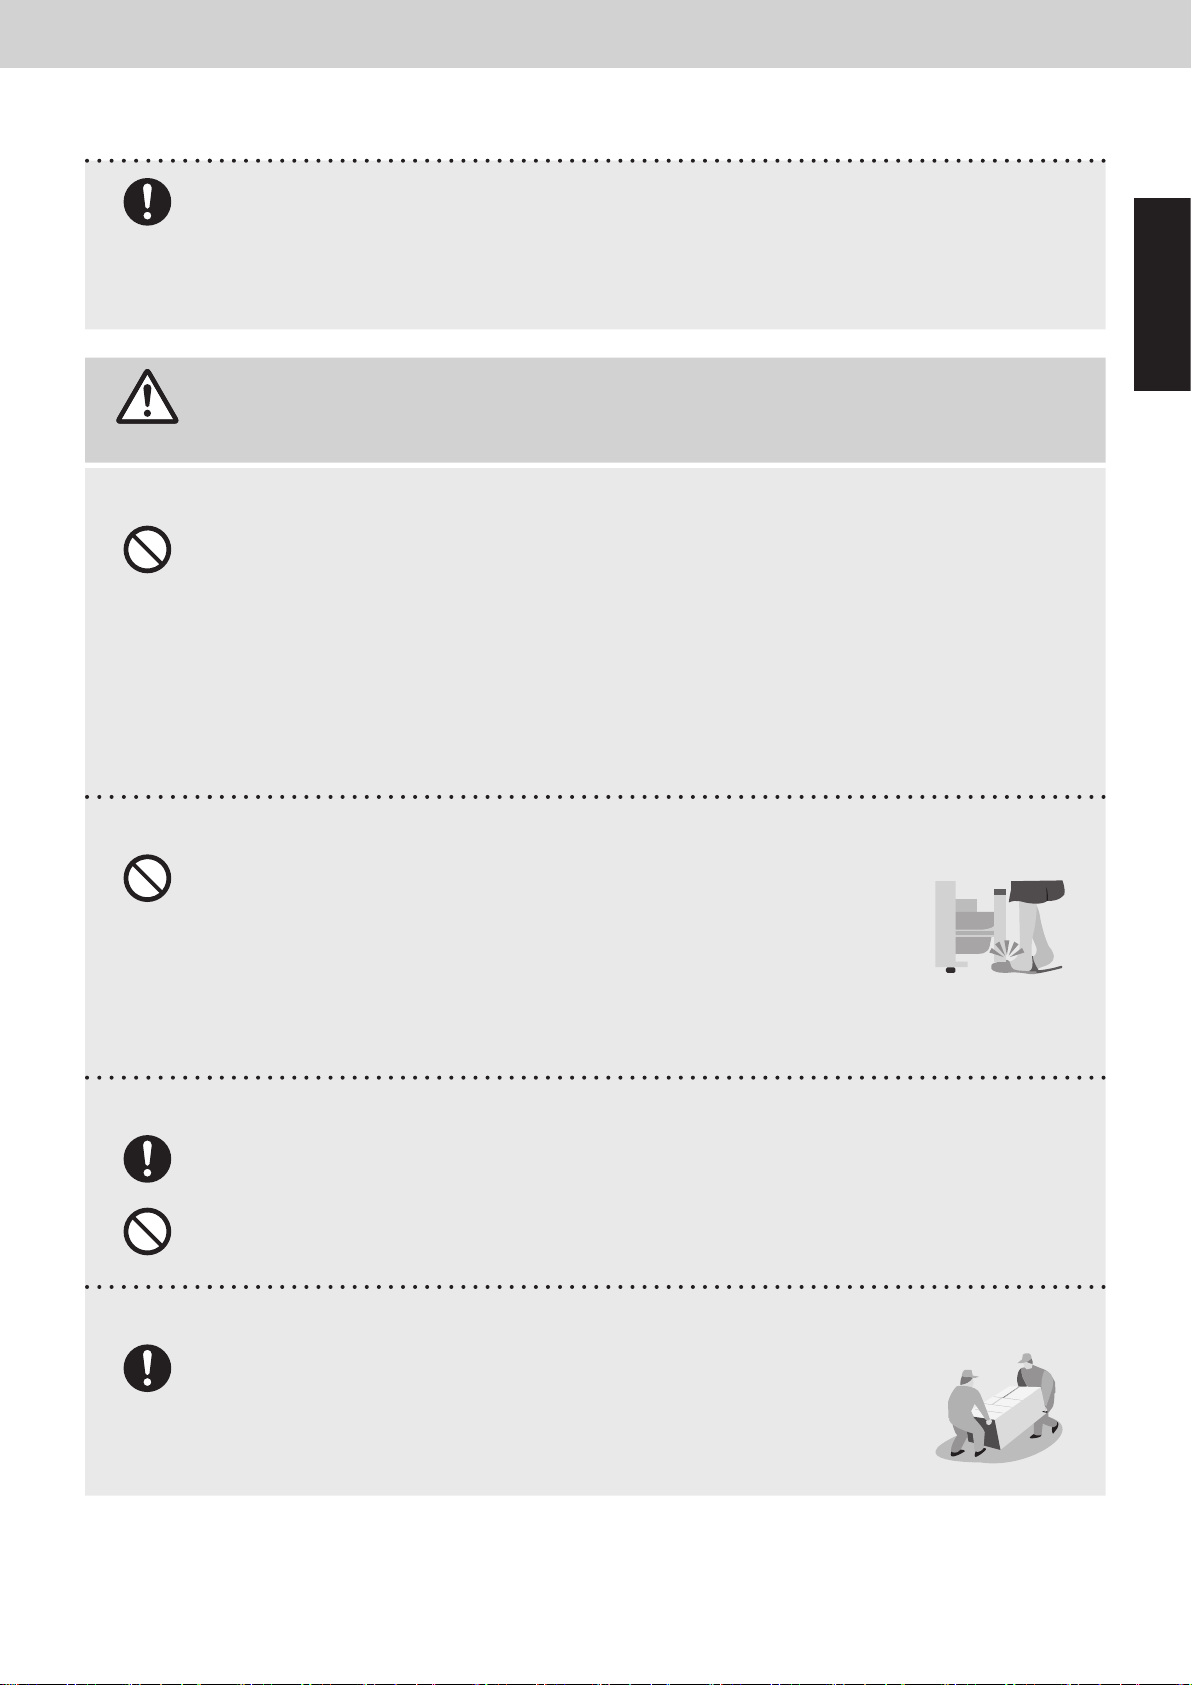
Provide safety measures against overturning caused by earthquakes (P. 6)
●
WARNING - Keep ventilation openings, in the appliance enclosure or in the built-in structure, clear
●
of obstruction.
Ensure that the refrigerator is plugged into an earthed mains socket.
●
Do not plug into an unearthed mains socket. (3-pin plug)
Do not install the product in locations exposed to water.
●
Do not fill the gaps around the refrigerator.
●
(If the refrigerant leaks, then it may catch fire.)
When dispose and recycling the product...
When a concern exists for possible entry of a child during recycling, remove the door packing.
●
Flammable gas is used for refrigerant.
●
And Cyclo-Pentane is used for insulation of this refrigerator.
When you throw away this unit, please discard it by proper method.
The warning labels mentioned above should be kept throughout the life of the refrigerator.
●
The user manual should be handed over to any person who would use or handle the refrigerator
whenever the refrigerator would be transferred to another location and delivered to a recycling
plant.
In case of emergency...
Absolutely do not open the top cover and the back cover.
●
Do not absolutely disassemble, repair or modify the refrigerator.
●
(May cause injury, burn, or electrical shock.)
4
Page 5
If you detect a gas (such as city gas) leak, do not touch the refrigerator and open the windows to
●
ventilate the kitchen.
A flammable refrigerant is used. If you have damaged the cooling circuit (piping), open the
●
windows to ventilate the kitchen and contact your dealer.
Maintenance work must only be carried out at workshop by well-trained maintenance worker.
●
(Otherwise it may cause an electrical shock, ignition or explosion.)
Indicates risk of injury or damage to property.
CAUTION
When storing food...
Do not add a high impact on glass trays.
●
(Otherwise, those glass trays may break and you may be injured.)
Do not allow foods to protrude from the glass tray.
●
Do not store food containers on the door shelves if they do not reach the bottom of the shelves.
●
(Food may fall and cause an injury.)
Do not freeze bottles.
●
(If the liquid in a glass bottle is frozen, then the bottle may break and the liquid may leak out.)
Do not touch frozen food or containers (especially metal), aluminum plate with wet hands.
●
(Otherwise, you may get frostbite.)
Do not eat food that has an unusual odor or is discolored.
●
(Rotten food may cause illness.)
Introduction
English
When opening/closing the doors...
Do not open/close it if others come into contact with the refrigerator.
●
Do not put your fingers in the gap on the side of the refrigerator compartment
●
door when opening/closing the door.
Do not open/close the Ice compartment and the Fresh Freezing compartment
●
with holding the top side of the drawer.
Do not place your feet under the bottom drawer.
●
(Otherwise, your fingers may get caught.)
Do not open or close the door with excessive force.
●
(Food may fall and cause an injury.)
When cleaning...
Please be careful when you fit or remove a glass tray.
●
(Dropping glass shelves may cause shelf damage or an injury due to bruising.)
Do not touch a metal rail directly.
●
Do not place your hands or feet beneath the bottom of the refrigerator.
●
(The edges of the metal panel may cause an injury.)
When moving or transporting the refrigerator...
Fix the refrigerator with adjustable legs on the flat and stout floor.
●
(Otherwise the refrigerator moves or overturns and may cause an injury.)
Apply protective covering, etc. to floors with a fragile surface.
●
Hold the carrying handles when transporting the refrigerator.
●
(Otherwise your hands may slip and cause an injury.)
5
Page 6
Installation
Installation
Choosing the right location
1.Place the refrigerator in the following locations.
Locations free from heat and direct sunlight
●
Minimize reduction of cooling power, and prevent
electricity waste.
Well-ventilated locations with low humidity
●
Minimize rust and generation of condensation.
Sturdy and flat floors
●
With carpet, tatami mats, or vinyl floors,
deformation or discoloration may occur, so place a
board underneath the refrigerator.
Place the refrigerator away from other devices
●
Prevent noise and incorrect image display on TVs
and other devices.
Locations allowing the power plug to be cleaned
●
easily
Clean dust regularly.
(To prevent fire caused by dust.)
Locations that allow a heat to dissipate
●
The back surface may be fitted to the wall.
(Leave a space when vibration noise or discoloration
dirt of wall occurs.)
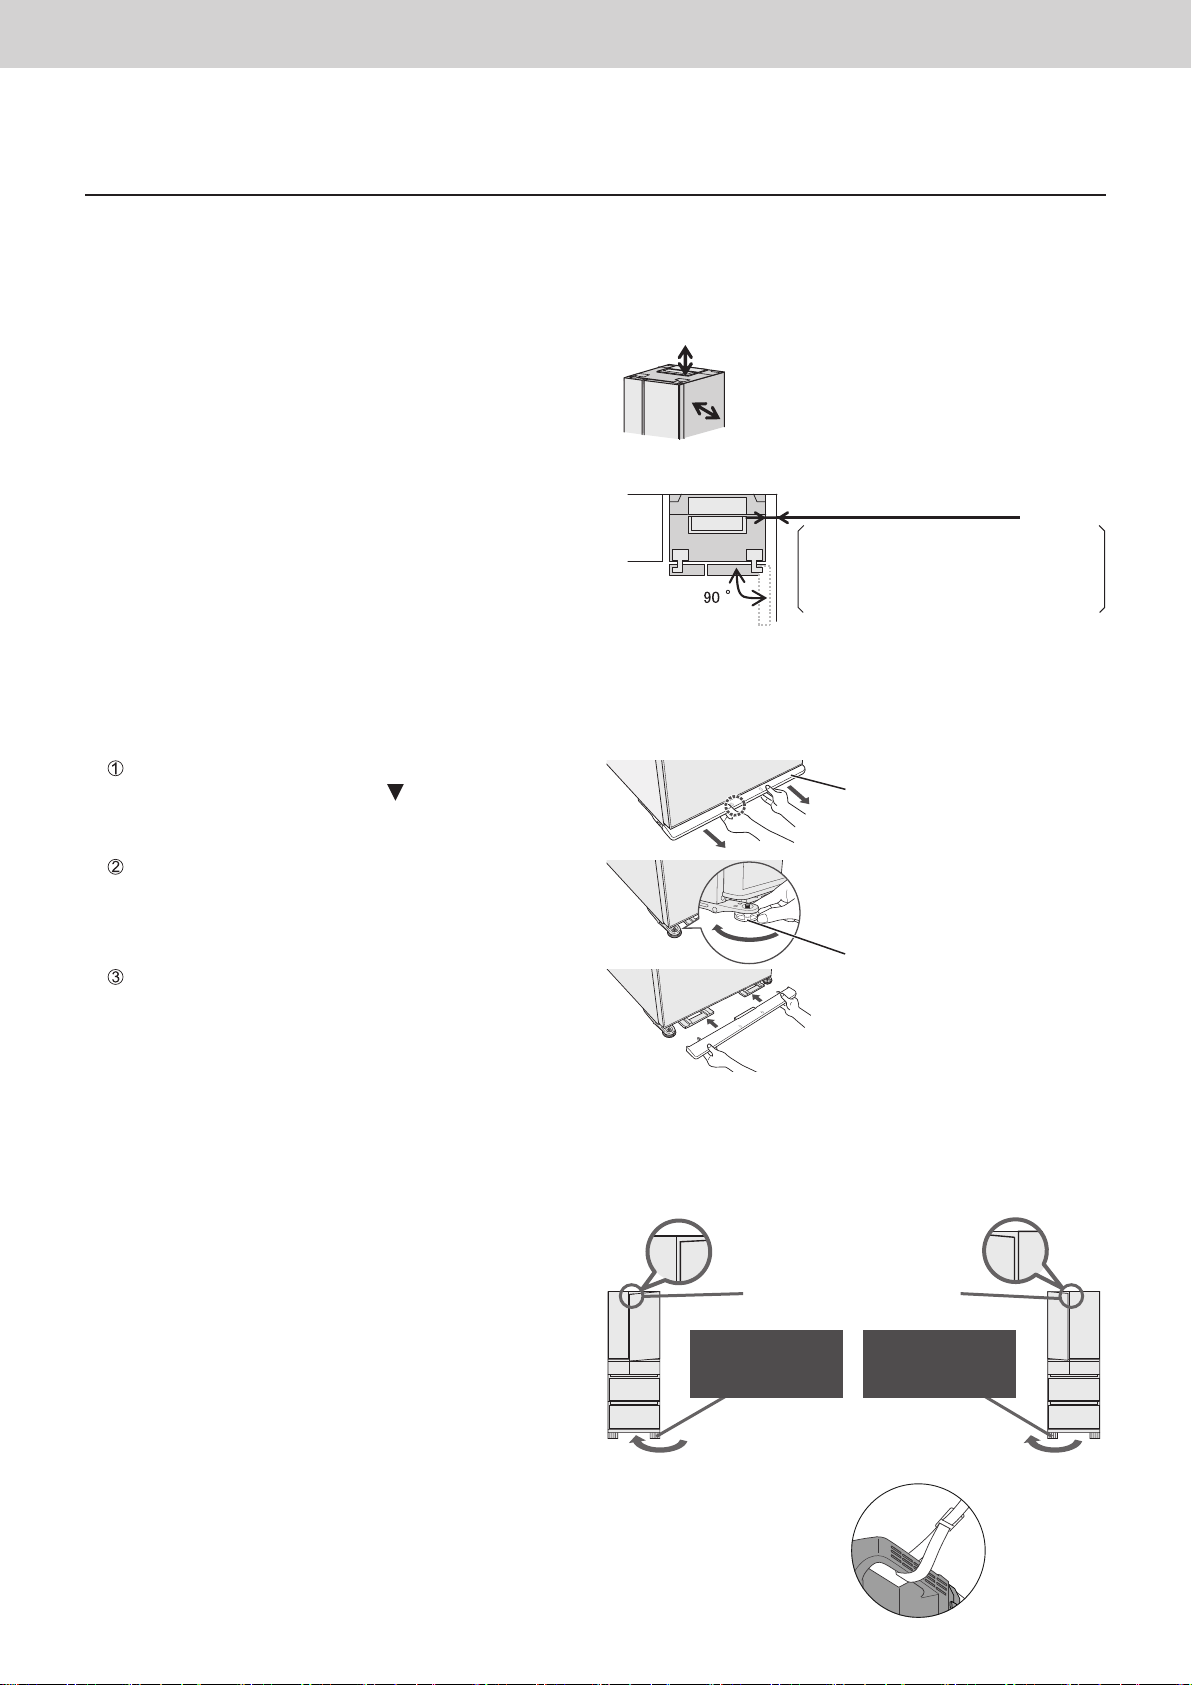
40 mm or more above the refrigerator
5 mm or more left and right
*
In case of installing by the wall.
(Figure as viewed from above.)
15 mm or more from the wall
If the clearance is less than 15 mm,
the door can not be opened at more
than 90 ° and glass trays, etc. may
not be removed.
*
■
Before using the refrigerator for the first time. (P. 17 ~ P. 19)
• Wipe the inside of the refrigerator with a wet, soft cloth.
• Rinse the water supply tank, purification filter, and ice-making tray.
2. Fix the refrigerator.
Remove the leg cover.
Insert hands underneath the “ ” on both sides of
the leg cover and pull it out.
Turn the adjustable legs (right and left) until they
reach the floor to stabilize the refrigerator.
Reattach the leg cover.
If the refrigerator has not been stabilized completely, then you may hear knocking noises when the door is
●
opened/closed. (This will not affect the performance.)
Install the refrigerator on sturdy and flat floors.
■
If the door is slanted downwards.
Turn the adjustable leg on the lower side, as
shown in the diagram on the left, in order to adjust
the level.
• The freezer/refrigerator doors may tilt within four
to five days after installation due to the load of
the food or adaptation to the floor surface. In this
case turn the adjustable legs again to restore.
• If it does not help, then use an adjustment plates
(separately sold parts). (P. 27)
When the door is lowered.
Lower the right
adjustable leg for
the right door.
Leg cover
Adjustable legs
Lower the left
adjustable leg for
the left door.
■
Have any measures taken against tipping due to earthquakes?
In order to prevent the refrigerator from tipping, permanently fix it by
using belts, etc.
6
Page 7
3. Plug into a wall outlet.
Plug into a wall outlet of the rated voltage on its own with the rated current and insert plug fully.
The power plug can be plugged into an outlet immediately after installation.
●
The surroundings and surfaces (side surfaces) of the refrigerator may become hot
●
(approximately 50 °C to 60 °C when the ambient temperature is 30 °C) when the power is turned on, but this
is not abnormal. (P. 24)
If the power plug is removed, wait at least 7 minutes before plugging it back in. (P. 20)
●
If there is no grounding wiring plug in refrigerator, it should be connected with grounding connection or
●
prevent electrical hazard from electric leakage.
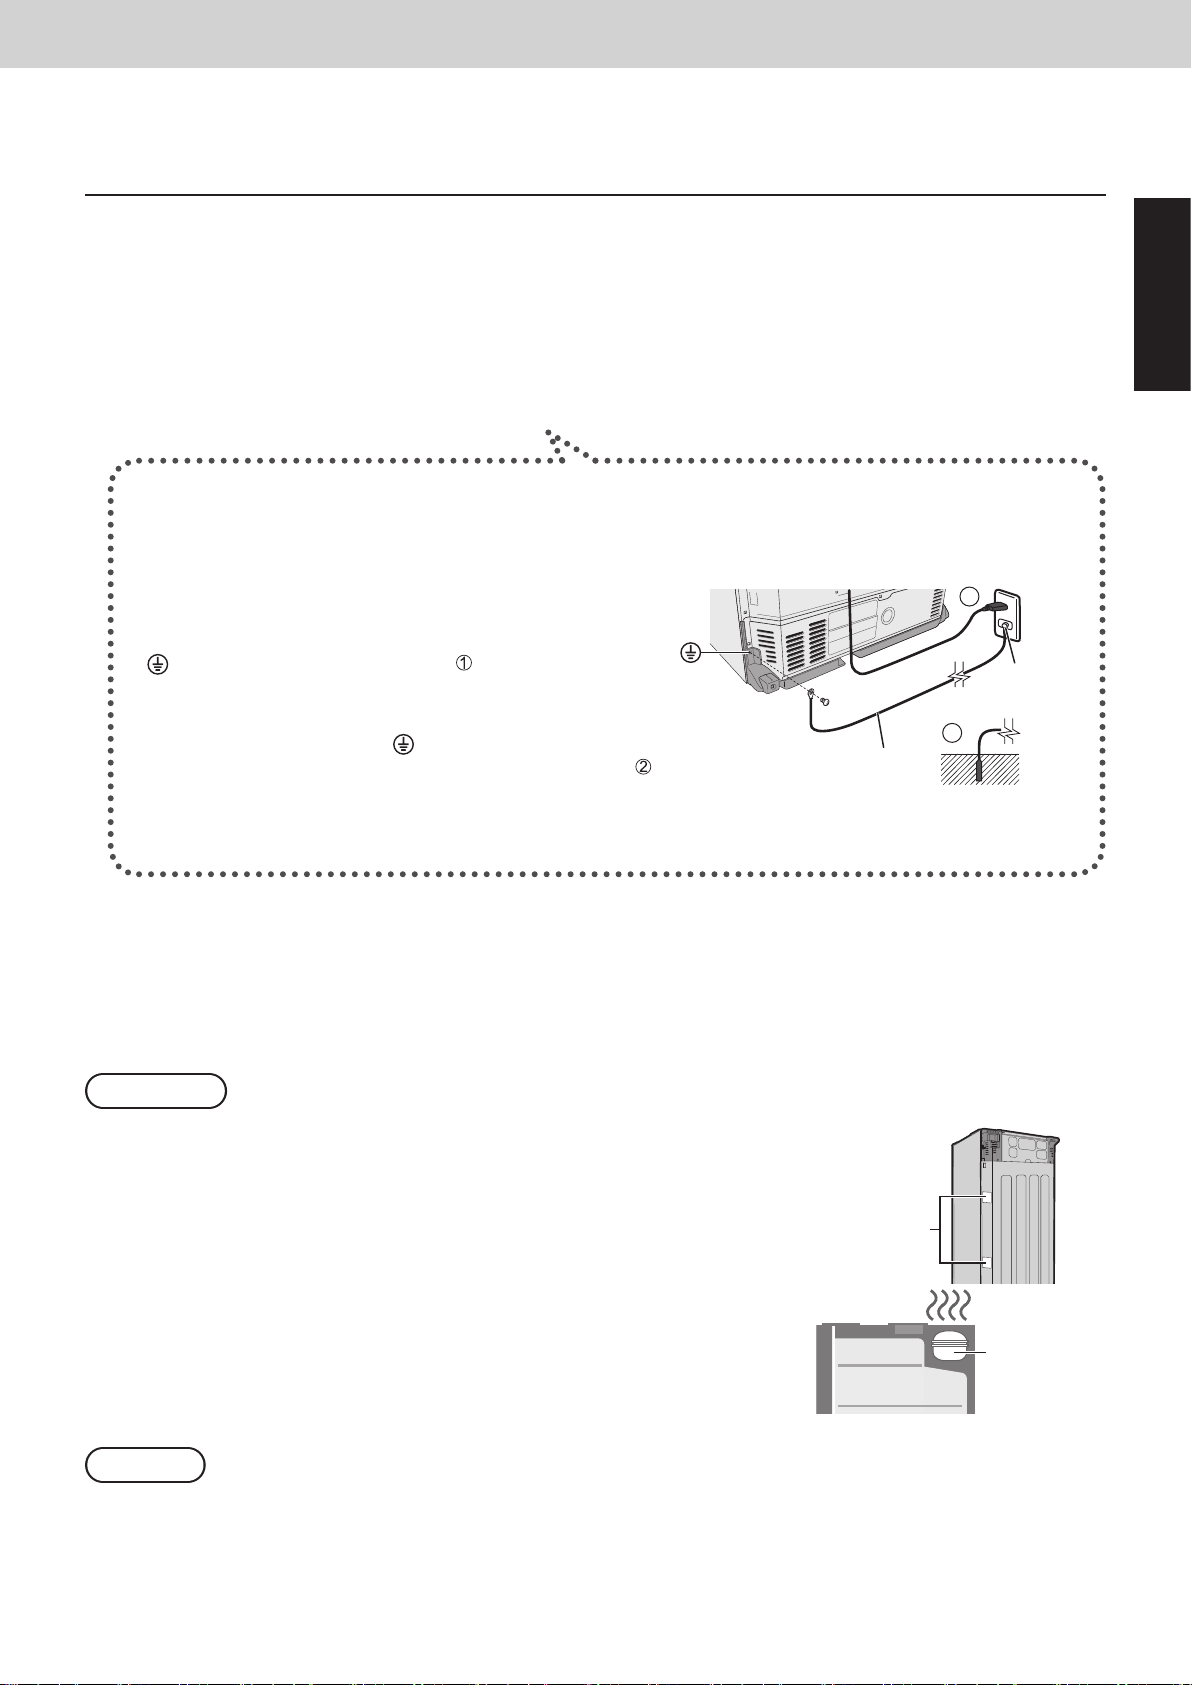
For safety, the refrigerator should be grounded
(For refrigerators with ungrounded 2-pin plugs)
A ground connection will prevent danger from electric shock.
A ground connection can be made in either of the two following ways:
1. When using a socket with a grounding receptacle,
connect the ground wire to it and the screw for the ground
connection on the rear of the refrigerator (please find the
symbol) as shown in illustration .
2. When using a socket without a grounding receptacle,
connect the ground wire to the screw on the rear of the
refrigerator (please find the symbol), and then connect
the other end to the ground rod as shown in illustration .
Grounding wire
1
Grounding
receptacle
2
Installation
English
Ground connections must not be made with the following
Gas pipes and water supply pipes (risk of electric shock or explosion)
●
Ground wires of telephone cords and lightning rods (risk of lighting strike)
●
4. Cool the refrigerator interior.
It may take approximately four hours to cool down the interior.
●
It may take 24 hours or more to cool down the interior and achieve equilibrium in the summer, etc.
●
Ice-making starts only after the interior has been cooled down sufficiently.
●
Do not open/close the doors until the interior has cooled down sufficiently.
●
(Warm air flowing into the interior will block the cooling function.)
Requests
■
Do not peel the seal on the back.
They fill the openings of a thermal insulation material.
Peeling them off causes a decrease in chilling.
If you have peeled it, then cut a cloth packing tape into a square and paste it.
Seal
■
Do not place objects on the top of the refrigerator.
It may become hot due to heat generated by the compressor at the top of the
refrigerator.
If it is difficult to release heat, the cooling capacity may be lowered.
Compressor
Notices
Immediately after the installation, the noise becomes larger a little because the interior of the refrigerator is not
●
cooled yet and the compressor or the fan is operated with high-speed rotation, but it is not abnormal.
(Once the interior of the refrigerator is cooled, the noise becomes smaller.)
7
Page 8
Operation
To use all features
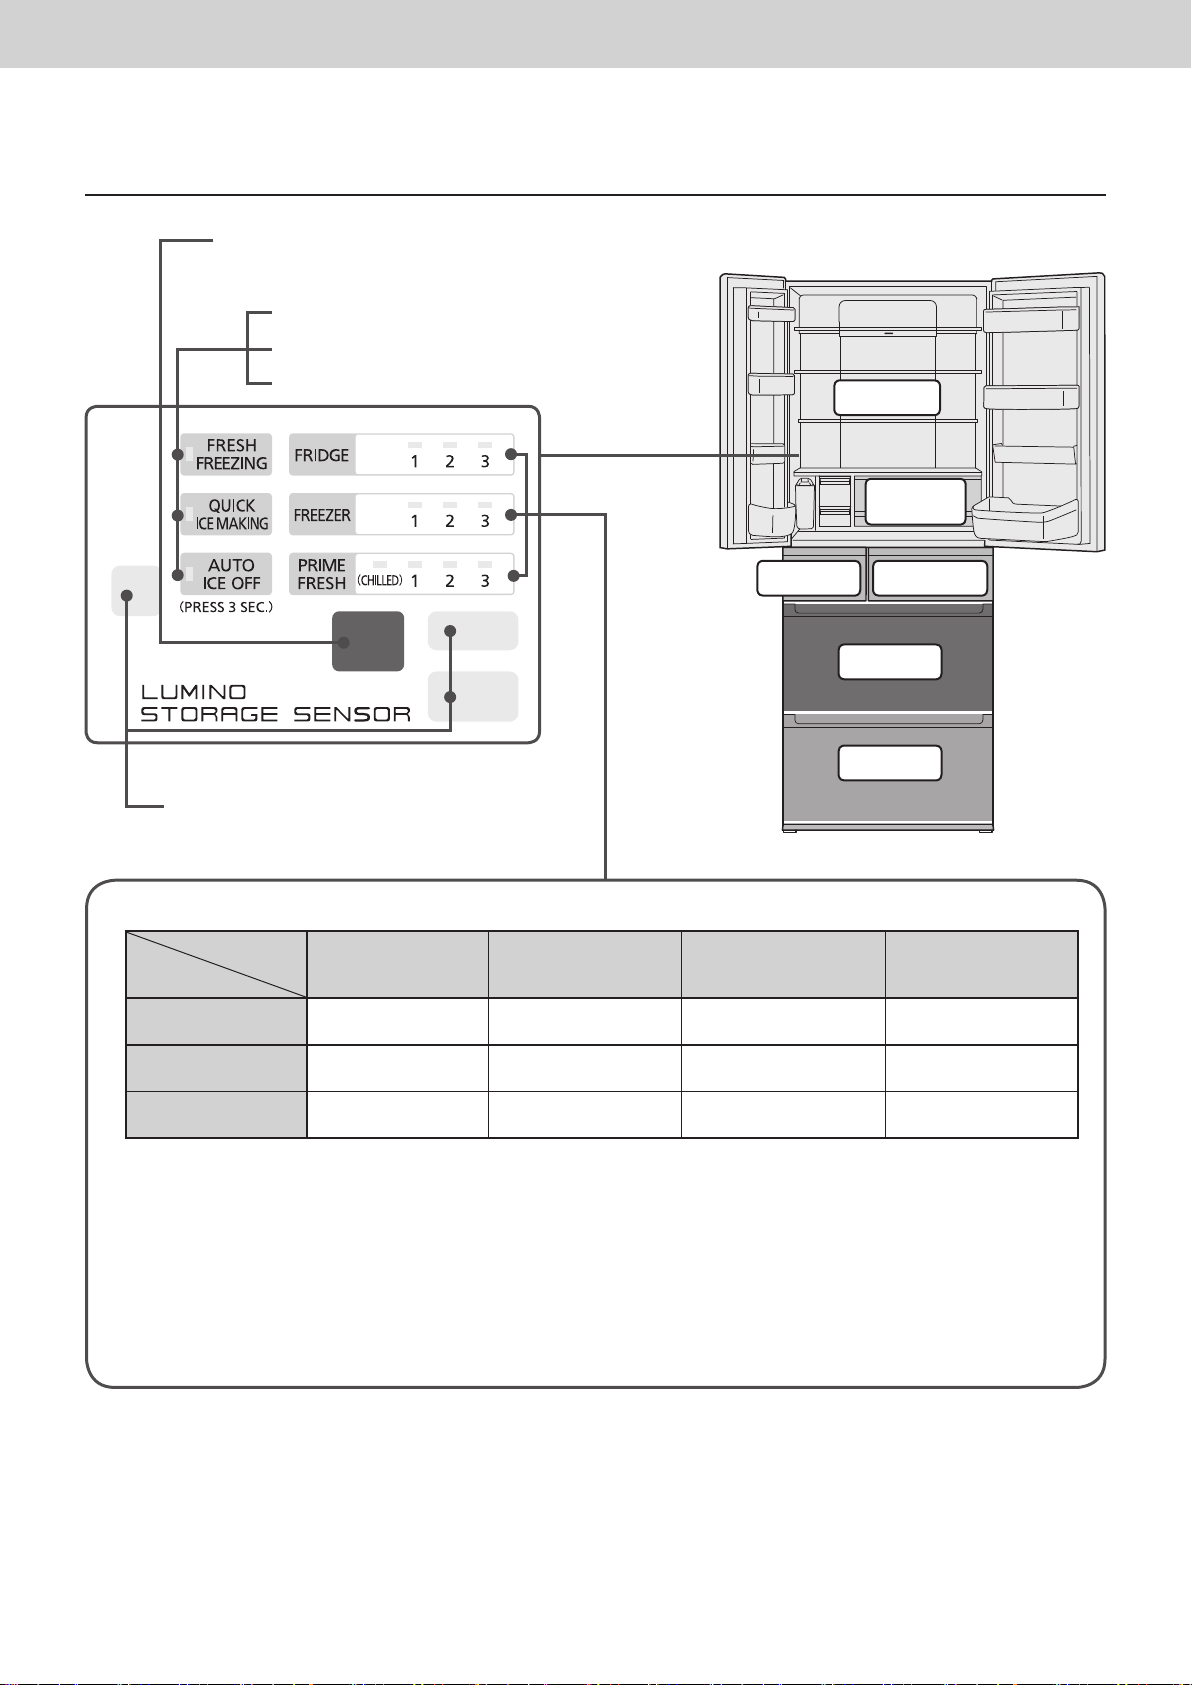
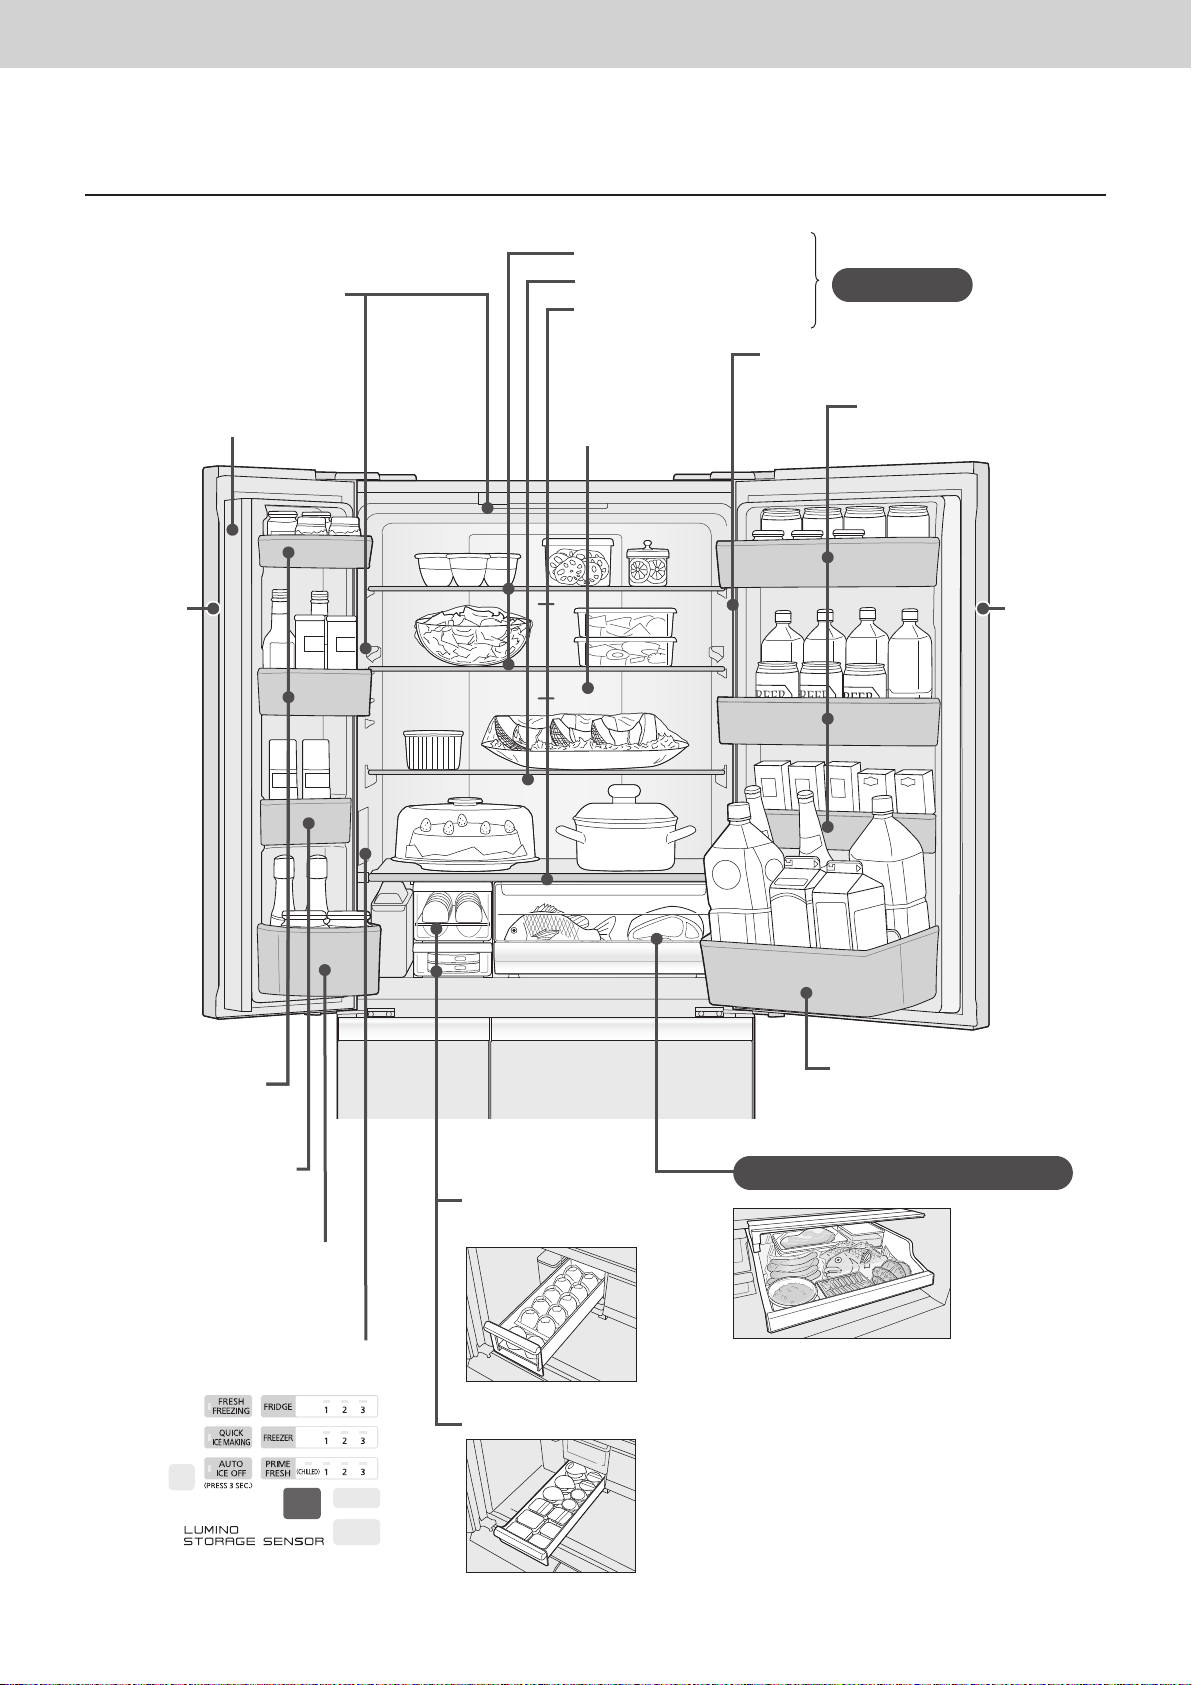
Control panel
Notice indicator (P. 21)
• Occurrence of abnormality, demo mode.
FRESH FREEZING (P. 13)
QUICK ICE MAKING (P. 15)
AUTO ICE OFF (P. 15)
Settings at time of purchase.
●
compartment
Ice
Refrigerator
compartment
Prime Fresh/
Chilled
select room
Fresh Freezing
compartment
Freezer
compartment
Vegetable
compartment
Storage sensor (P. 9, P. 26)
• The sensor automatically detects the change
in the volume of storage.
■
Temperature setting and a guide of temperature
Temperature
setting
Button
FRIDGE
FREEZER
PRIME FRESH
(These are rough indications for when the ambient temperature is 30 °C, there is no food in the refrigerator, and the
interior temperatures have stabilized. The temperatures may differ depending on the ambient temperature, food storage
state, door opening/closing, and other usage conditions.)
CHILLED 1 2
Approx. 2 °C ~ 3 °C
higher than “ 2 ”
Approx. 2 °C ~ 3 °C
higher than “ 2 ”
Approx. 0 °C ~ 2 °C
Approx. 1 °C ~ 2 °C
higher than “ 2 ”
Approx. 3 °C ~ 6 °C
Approx. -18 °C ~ -20 °C
Approx. -1 °C ~ -3 °C
3
Approx. 2 °C ~ 3 °C
lower than “ 2 ”
Approx. 2 °C ~ 3 °C
lower than “ 2 ”
Approx. 1 °C ~ 2 °C
lower than “ 2 ”
Normally, use the refrigerator with the temperature set to “ 2 ”.
(If the temperature control of the freezer compartment or refrigerator compartment is set to other than “ 2 ”
during ECO NAVI operation stops.)
Please see page 26 when the temperature setting lamp is flashing.
●
*
The Prime Fresh/Chilled select room is set to [CHILLED] at the time of purchase.
Do not subject the control panel to a strong impact, or hit it with a hard object.
●
(The surface may be cracked or scratched.)
8
Page 9
Foods stored
Operation
Approx. 3 °C ~ 6 °C
Approx. 0 °C ~ 2 °C
Refrigerator
compartment
Prime Fresh/
For regular storage of food and drinks or
temporary storage of those to be served soon.
[Chilled]
For processed food or dairy products.
Chilled select
Approx. -3 °C ~ -1 °C
Approx. -19 °C ~ -17 °C
Approx. -20 °C ~ -18 °C
Approx. 3 °C ~ 8 °C
The temperatures above are when “ 2 ” is selected for the setting. The temperature may differ slightly depending
●
on how the refrigerator is used.
room
Fresh Freezing
compartment
Freezer
compartment
Vegetable
compartment
[Prime Fresh]
For storage of fresh food such as meat or fish.
For freezing ingredients or heated food such as
hot rice instantly to keep the freshness of the
food.
For storage of frozen foods.
High humidity keeps fruits and vegetables
fresh and juicy.
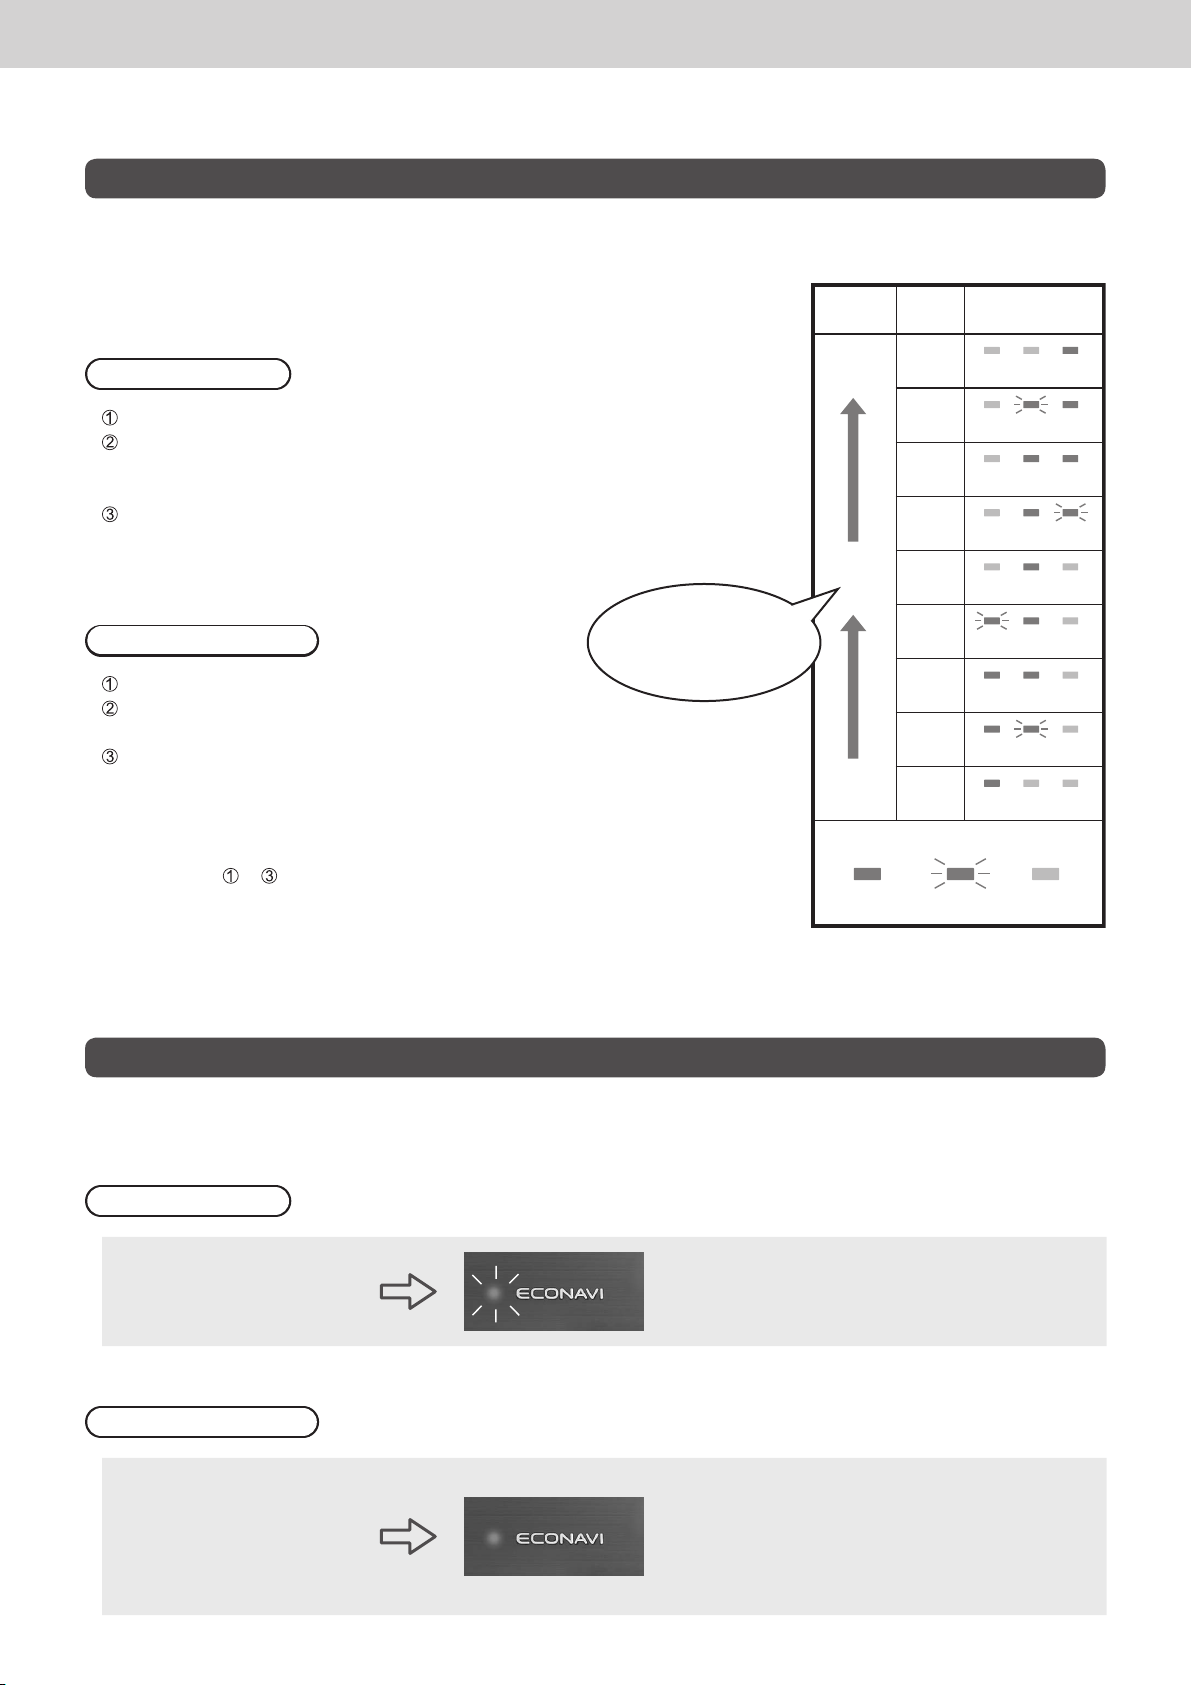
ECO NAVI Operation
English
■
3 ECO functions detect the volume of storage and the lifestyle.
Energy is effectively and automatically saved.
ECO NAVI lamp is on during ECO NAVI operation.
ECO NAVI operates only when the temperature setting is “ 2 ” for both the freezer and refrigerator compartments.
Storage Eco
Smart Eco
Night Eco
The ON/OFF pattern of the lamp may change after 4th week in which the
●
learning function becomes effective.
The brightness of the lamp is lowered approximately 5 minutes after the lamp
●
turns on. (The lamp can be turned off if it bothers you. (P. 22))
During detecting the change in the volume of storage, ECO NAVI lamp flashes
●
slowly. (Approximately 15 seconds after closing the door of the refrigerator
compartment.)
When the temperature setting of the refrigerator compartment and the freezer
compartment is other than “ 2 ”, the lamp does not flash but is detecting the
volume of storage.
ECO NAVI operation may not be performed depending on the usage state of
●
the refrigerator.
The storage sensor (P. 8) detects the change in the
volume of storage in the refrigerator compartment.
3 weeks' worth of the number of door opening/
closing and the change in the volume of storage
for each day of the week and every hour are
memorized, analyzed and estimated.
The light intensity sensor
of the room.
1
*
2
*
detects the brightness
Memory of 3 weeks’
worth of life pattern
Period for learning
Learning function
Reflected after 4th week
ECO NAVI lamp
Light intensity sensor
(Underside of the door)
ECO NAVI Q&A P. 26
*1
Effectiveness differs depending on the ambient temperature, ambient brightness, number of times and when doors are
opened and closed, and state in which food is stored.
2
*
Darkness is detected by the light intensity sensor at approximately 3 to 10 lux or less.
9
Page 10
Operation
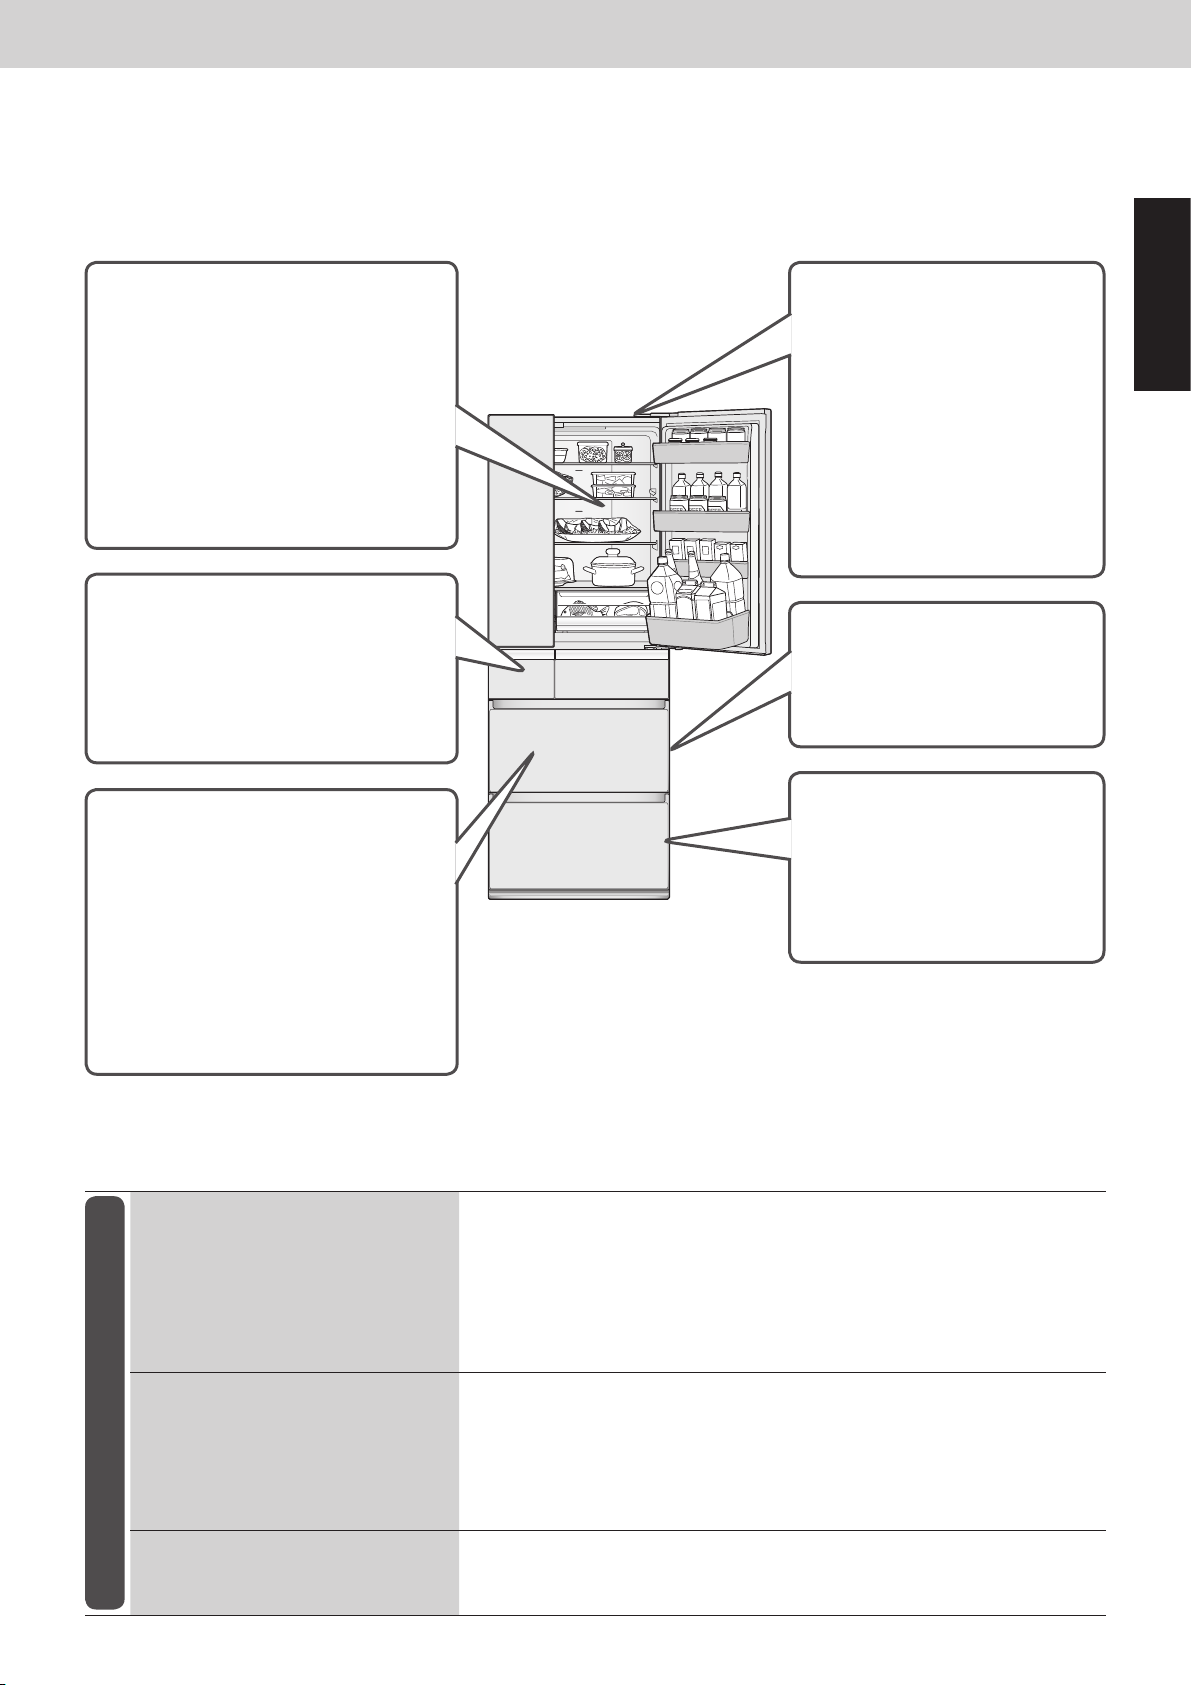
Refrigerator compartment
Room lamp (LED)
Tray (Two)
1-2 convenient shelf
Partition shelf
Room lamp (LED)
Glass shelf
Rotary partition (P. 11)
Left door
Door shelf (Three)
Duct
Right
door
10
Door shelf
(Two)
Mini-door shelf
Bottle shelf
Control panel
(P. 8)
Egg case
(for 12 eggs)
Small-item case
Bottle shelf
Prime Fresh/Chilled select room
Temperature zone can be chosen
●
between Prime fresh or Chilled to
fit the type of food. (P. 12)
Page 11
Operation
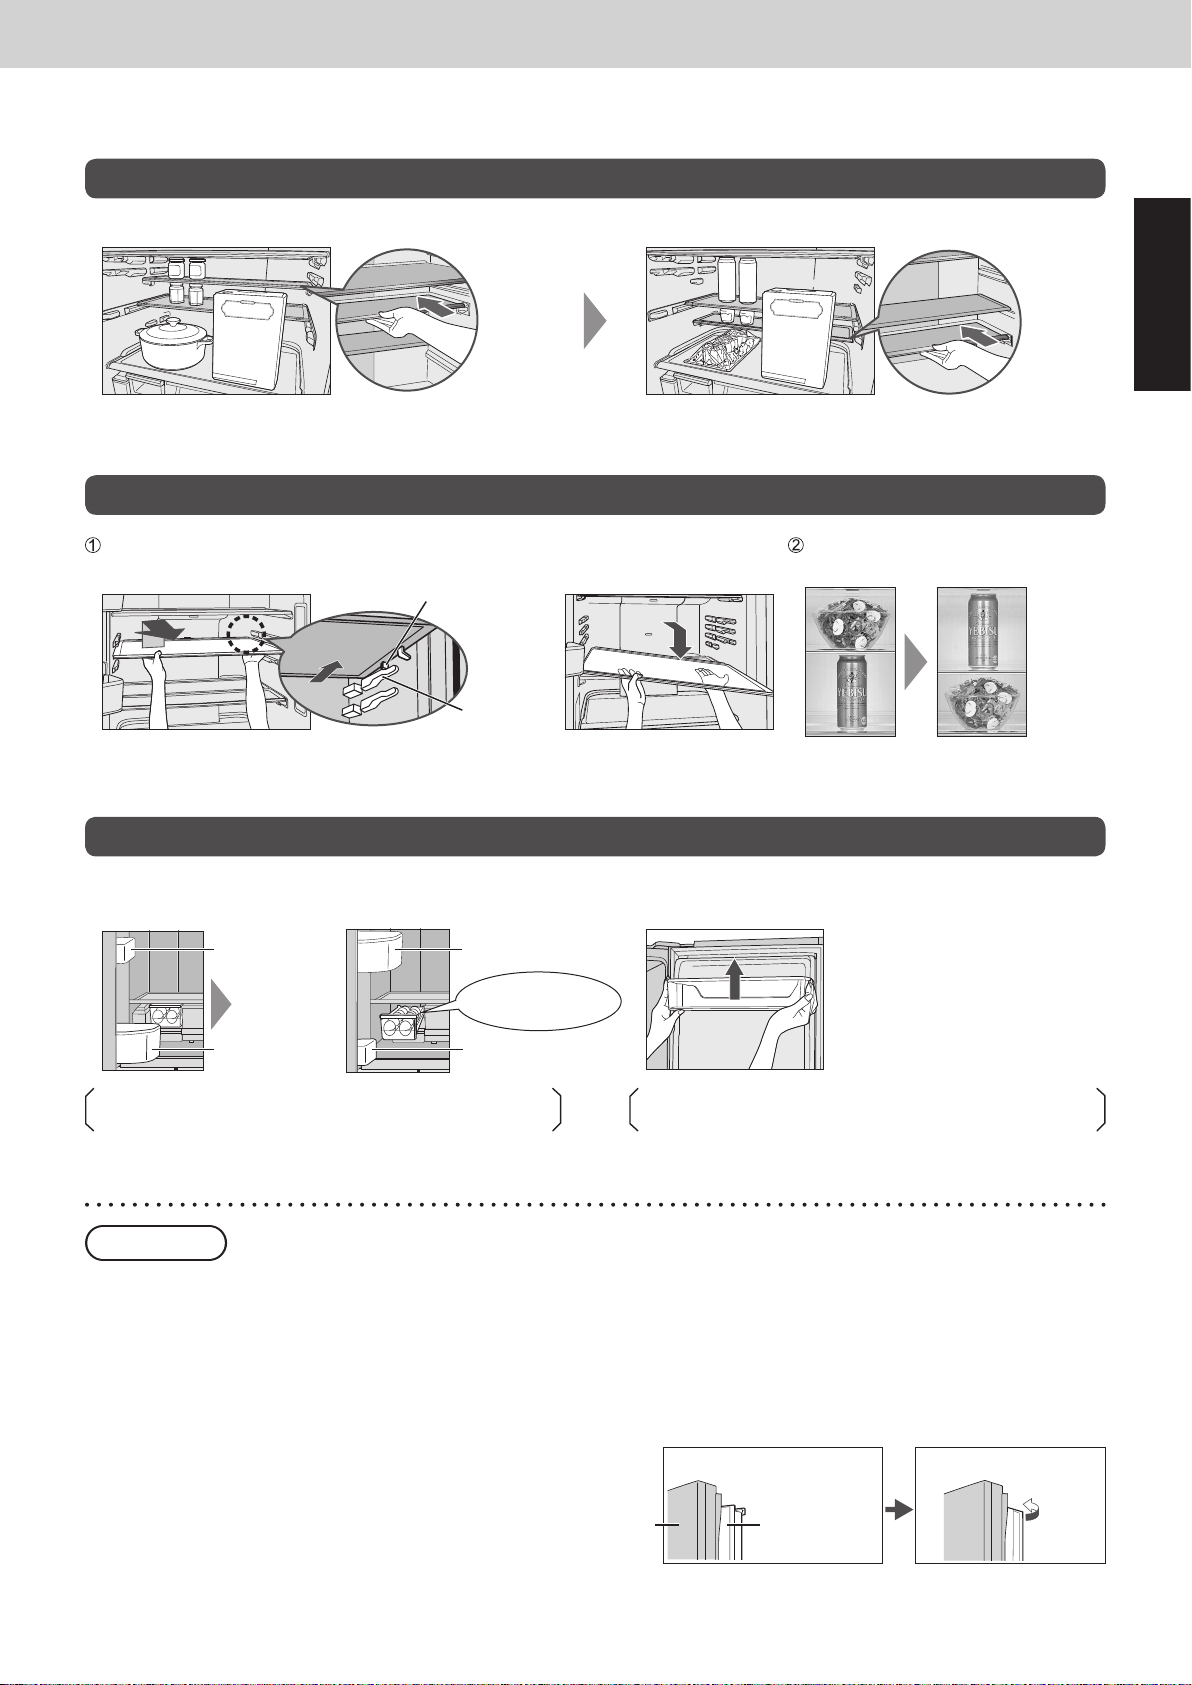
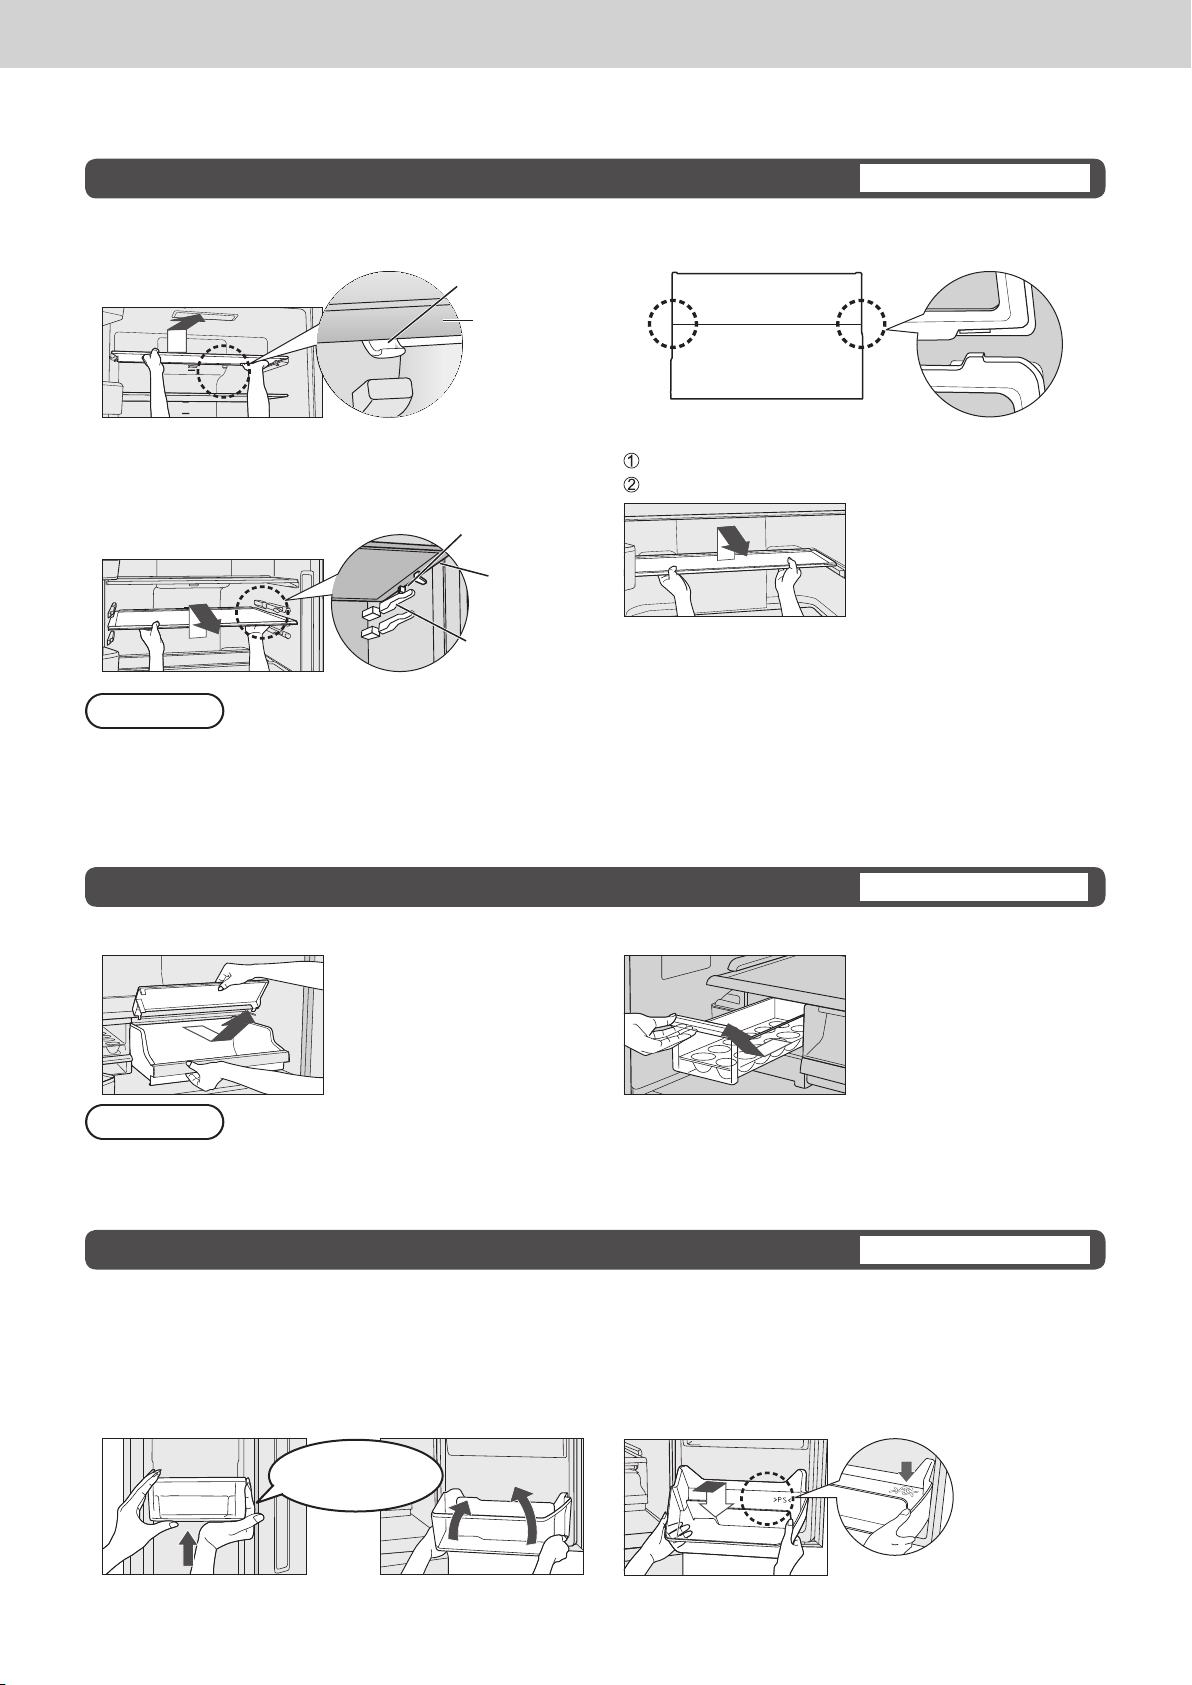
The “1-2 convenient shelf (the third shelf from the top)” can be split into front and rear parts.
■
Remove the front part and set it above.
You can easily place large pots or a small keg of
●
beer.
■
Remove the front part and set it below.
You can store a lot of small food.
●
Only the height of the second tray from the top can be changed.
Lift up the back of the tray and pull it forward. Once the protrusions of the
tray are unhooked from the rails, tilt the tray and remove it.
Protrusion
Rail
The position of the tray can be changed even when the door is not fully opened.
●
→ Remove the front half of the 1-2 convenient shelf, then change the position by following the above steps.
Insert the tray in the desired
position by reversing the steps.
English
The “door shelves” can be moved.
■
Replace the mini-door shelf with the bottle
shelf.
Mini-door
shelf
Bottle shelf Mini-door shelf
When the left door can be opened by 90 ° only,
the egg cases, etc. can be easily taken out.
If the mini-door shelf is replaced with the bottle shelf, the storage sensor is hidden behind the food in the bottle
●
shelf and the sensor may not work properly.
Bottle shelf
Egg tray can be
pulled out fully!
■
Move the door shelf to your favorite position.
• For the right door, only the
first shelf from the top.
• For the left door, only the
second shelf from the top.
While holding one end of the shelf with one hand,
lightly tap the other end to raise it.
Requests
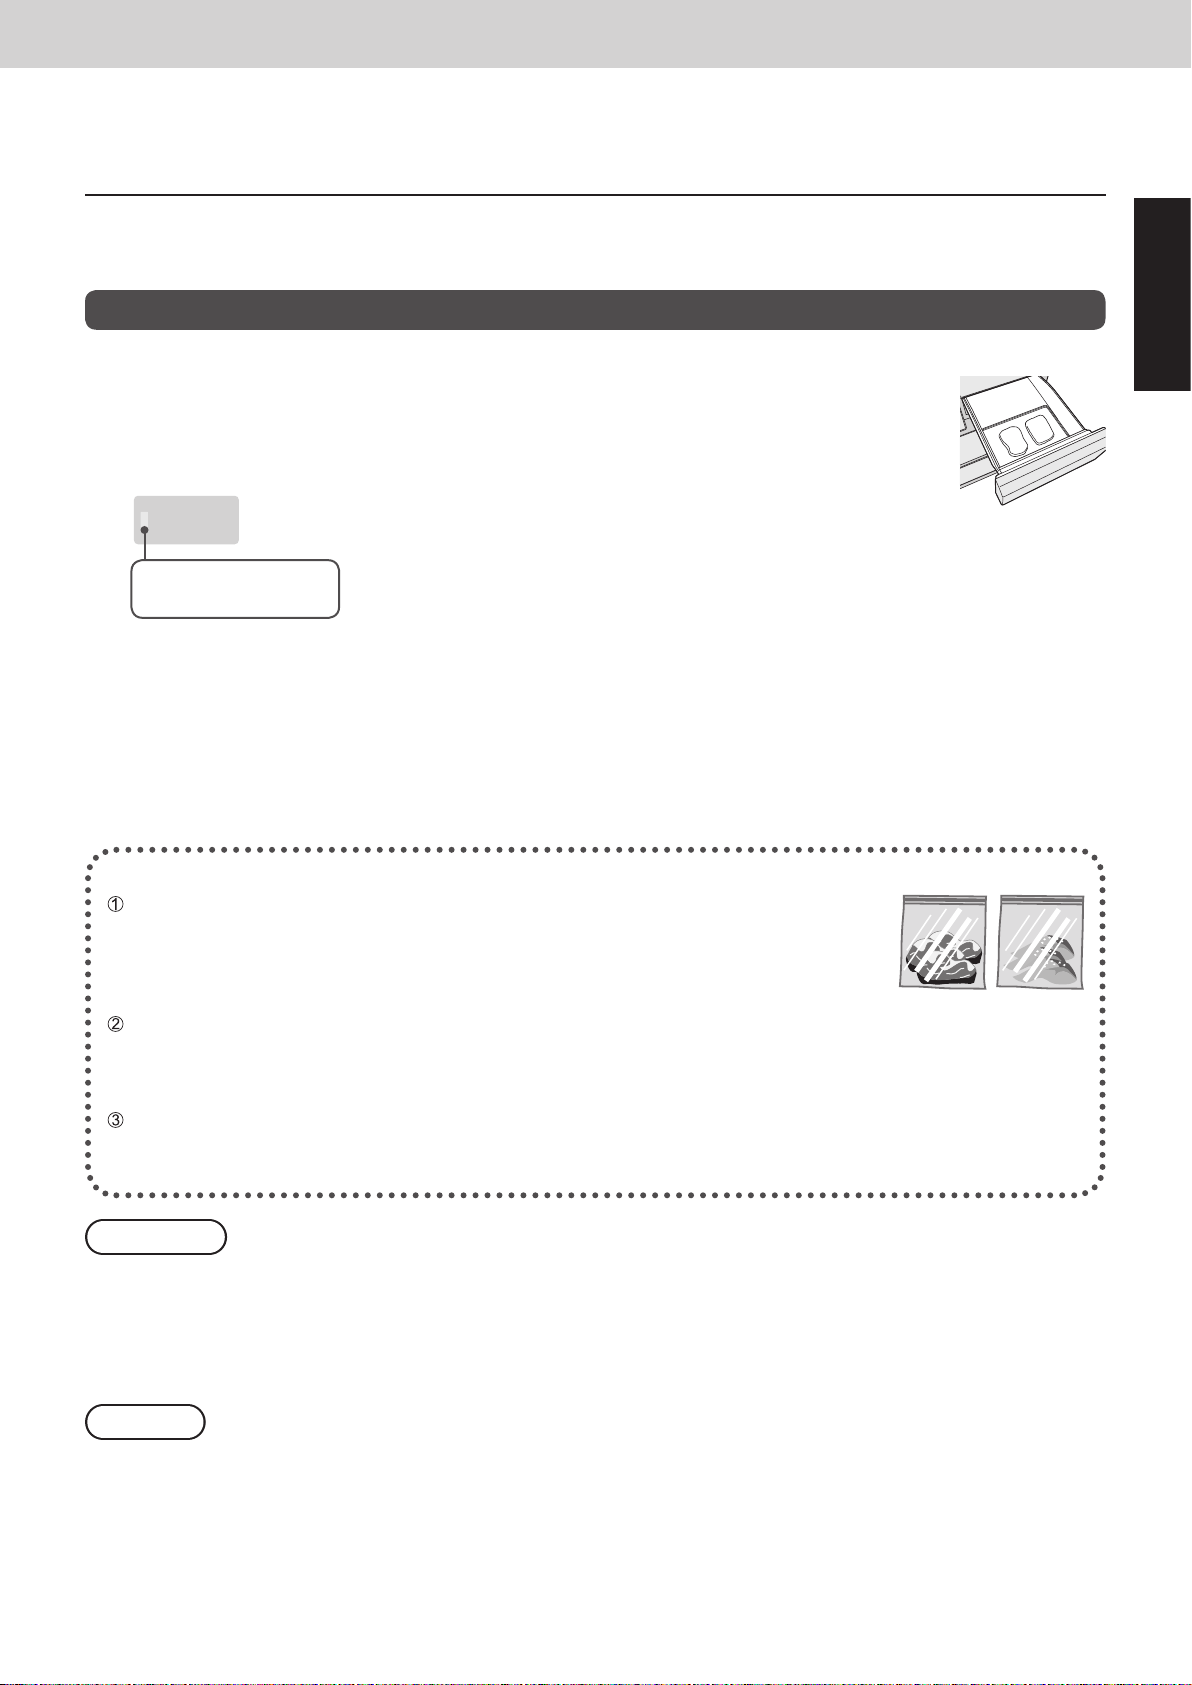
If any food with a high water content is placed in front of the air outlet, then it may be cooled excessively or
●
frozen. (P. 7)
(There is a risk of burst especially when canned beers, non-alcoholic beverages and sodas are frozen.)
The food shown below must be put into a hermetically sealed container or wrapped for storage in a refrigerator.
●
• Green onions or other strong smelling vegetables.
(→ Odors will spread to other nearby food)
• Cut citrus fruits.
(→ The plastic will be discolored white)
When the rotary partition is opened forward, put it back
●
into place.
(The doors can not be closed and it may cause
damage.)
Left door
Opened forward.
Rotary
partition
Put it back into place.
11
Page 12
Operation
Prime Fresh/Chilled select room
The selectable room is set to [CHILLED] at the time of purchase.
Please set to fit the intended purpose of food.
Using as the Prime Fresh room
■
When you want to extend the life of food with partially-freezing it.
This room is suitable for storing fresh food such as meat or fish.
●
• Compared to storing in the Chilled room or the refrigerator compartment, the
storage life of meat or fish becomes longer.
• Temperature can be set to either “ 1 ”, “ 2 ” or “ 3 ” to fit the volume and type of
food. (P. 8)
[Example of food to store]
• Meat •Fish
When food is frozen too much ......... Sliced raw fish or sliced meat may be frozen too much.
●
Set the temperature setting to “ 1 ” to prevent food from over frozen.
When food is not partially-frozen ..... Depending on the type of food such as a block of meat or a large fish, the
●
storage conditions and the ambient temperature, food may not be partiallyfrozen as it intended. Set the temperature setting to “ 3 ”.
Approx. -3 °C ~ -1 °C
Easy to cut.
The partially-frozen food is easy to cut!
When you want to slice raw fish or a block of meat, freeze food a little in the
prime fresh room. It comes in handy.
Using as the Chilled room
Approx. 0 °C ~ 2 °C
■
When you do not want to freeze food.
This room is suitable for storing chilled food or dairy products.
●
[Example of food to store]
• Chilled food
• Fresh cream
Depending on food, it may be frozen partly.
●
Change the position of food or set the temperature setting
of the refrigerator compartment to “ 1 ”.
• Boiled noodle
• Cheese
• Yogurt
Tips for storing
■
What is the unsuitable food for the Prime Fresh/Chilled?
●Egg ●Milk ●Water ●Juice ●Tofu
●Vegetable • Fruit
●Ice ●Ice cream ●Frozen food
In the refrigerator
compartment
In the vegetable
compartment
In the freezer
compartment
■
What is the duration of storing without
plastic wrap?
(The selectable room is set to the [CHILLED].)
Example of food Time guidelines
Sandwich Approx. 3 hours
Sashimi (raw fish) Approx. 6 hours
Salad Approx. 6 hours
Omelet Approx. 9 hours
Requests
Change the temperature setting of the selectable room to fit the purpose of storage or the type of food.
●
When you change the temperature setting, surely replace food to fit the set temperature.
●
Notices
The setting of prime fresh “ 1 ”, “ 2 ” and “ 3 ” consumes 10% more energy than the setting of [CHILLED].
●
12
Page 13
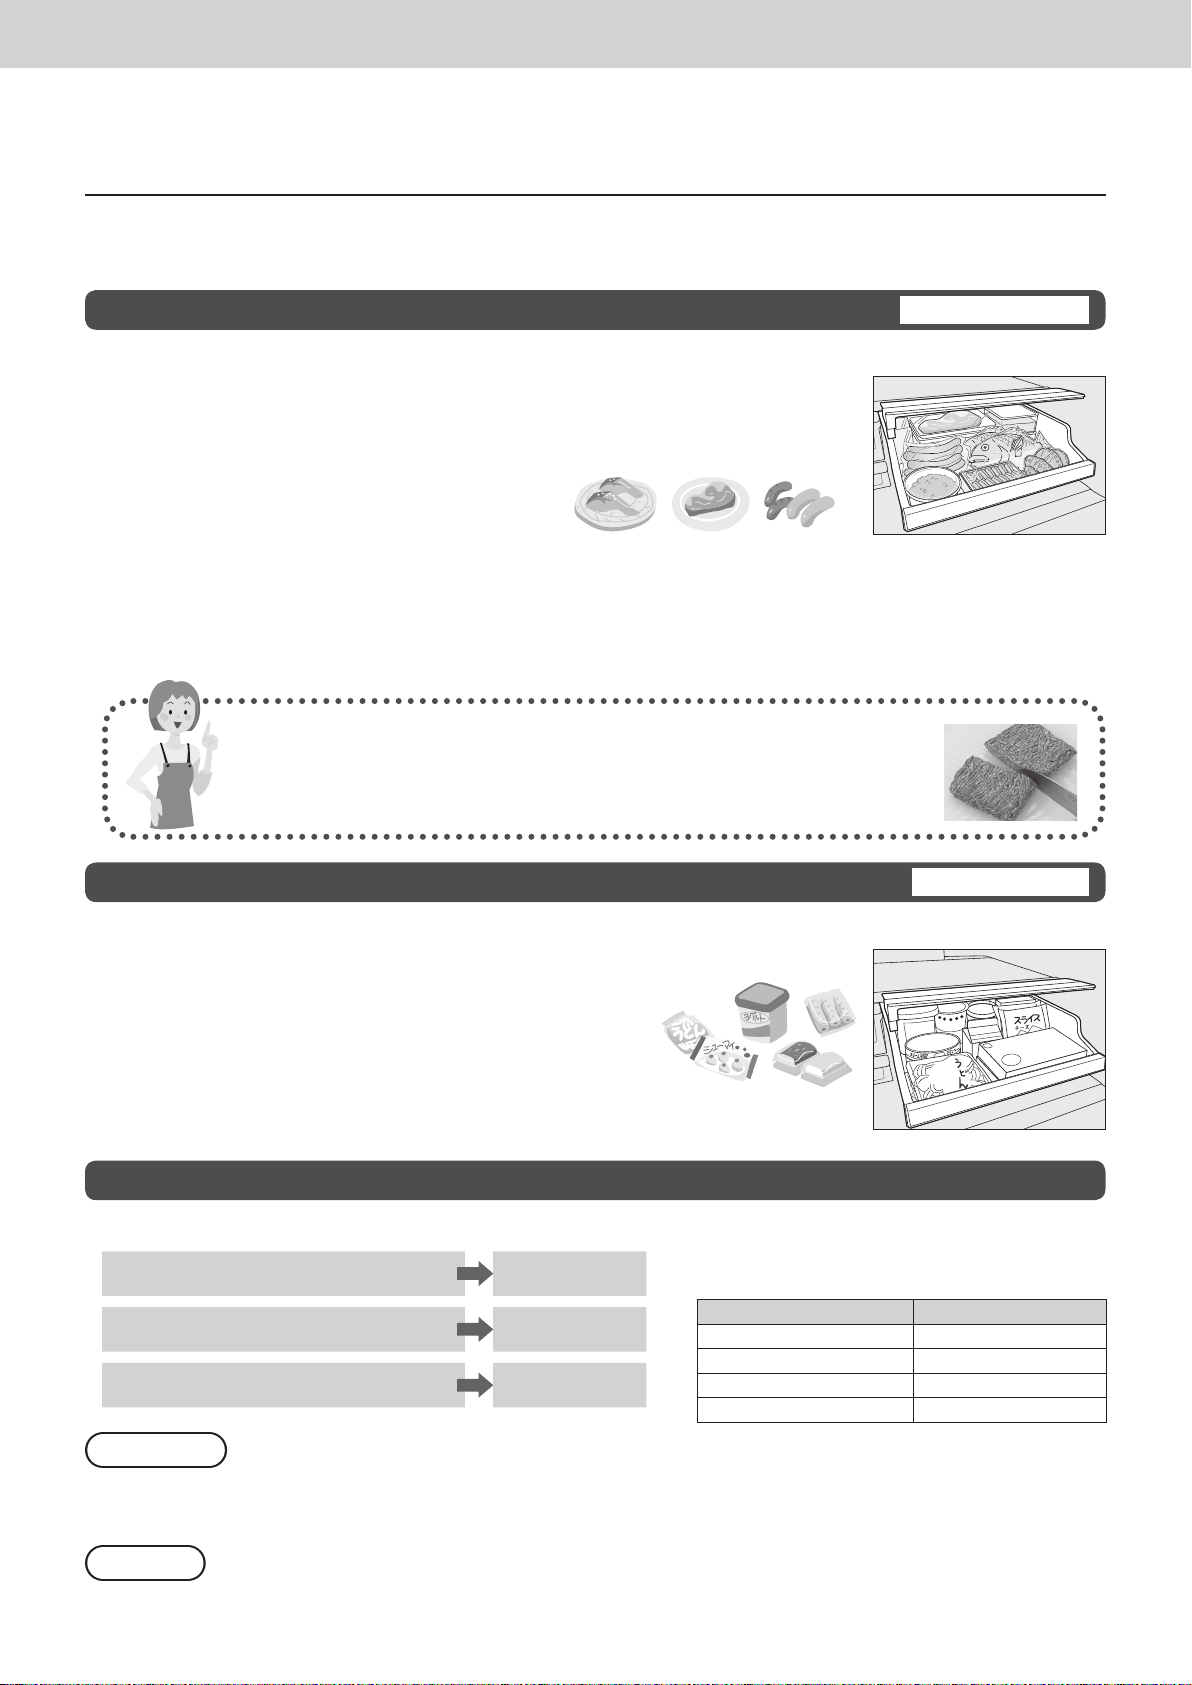
Fresh Freezing compartment
With Fresh Freezing, food is quickly frozen by the blowing of cold air and the aluminum plate.
(You can use as a freezer compartment when the Fresh Freezing does not operate.)
Using “FRESH FREEZING”
■
Freeze ingredients or heated food such as hot rice instantly to keep the freshness of them.
Wrap the food in plastic wrap or place it in freezer storage packs,
1
and put it on the aluminum plate.
Press [FRESH FREEZING] button and start the Fresh Freezing operation.
2
(The lamp turns on.)
Fresh Freezing ends automatically after approximately
FRESH
FREEZING
Lamp is on: Operating
Lamp is off: Stopping
●
150 minutes.
(If the food is not frozen adequately, run “FRESH FREEZING” again)
Operation
English
When food is stored for long periods after Fresh Freezing, store it in the freezer compartment.
3
When you want to stop Fresh Freezing in the middle, press [FRESH FREEZING] button again.
●
(The lamp turns off.)
During Fresh Freezing, energy consumption increases more than usual.
●
If QUICK ICE MAKING is set during the Fresh Freezing operation, the Fresh Freezing operation will be
●
stopped.
If Fresh Freezing is started during defrosting, the end time will be later because the Fresh Freezing
●
operation will start after defrosting ends.
Three conditions of delicious Fresh Freezing
Tightly wrap the food.
• Wrap the food in plastic wrap, removing any air from inside.
• Divide the food into small packs with a thickness of about 2 cm.
• If, for example, polystyrene trays or sealed containers are used, temperature
transmission will be poor, making the food difficult to freeze.
Position the food flat and even on the aluminum plate.
• Keep a gap between the food. (Keep at least 5 mm space between food)
• Position the food packages flat and even on the aluminum plate and do not stack them on top of each
other.
Wrap hot food too.
• Tightly wrap hot food too.
• Using rice as an example, Fresh Freezing can be performed for about 2 rice bowls at one time.
Requests
Store ice creams which contain much milk fat etc. in the freezer compartment.
●
Do not insert bottles or cans. (They may split or burst.)
●
Do not insert food that is taller than the case.
●
(It will prevent the door from being closed properly, resulting in frost.)
Notices
Freezing may not be enough depending on types of food stored, packing conditions, amount stored and the
●
frequency of door opening. In that case, run the “FRESH FREEZING” again.
The sound becomes slightly louder during the Fresh Freezing operation but this is not an indication of a
●
malfunction.
ECO NAVI does not operate during the Fresh Freezing operation.
●
13
Page 14
Operation
Ice compartment
Ice-making tray
Ice storage box
Water supply tank
approx. 1.2 liters
Purification filter
Automatic ice maker
Ice shovel
(Provided in front of the case.)
To use the automatic ice maker in comfort
Please use only the drinking water for auto ice making.
If you use water other than tap water, bacteria may occur.
Clean the water supply tank and the ice-making tray with water frequently. (P. 19)
When the following water is
used, wash the water supply tank
frequently! (P. 19)
The hardness of
water must be
100 mg/L or less.
Do not slam the ice compartment door open/close.
Requests
●
(Ice may drop to the freezer compartment case or into other places.)
Do not pour water directly into the ice-making tray to make ice.
●
(This may cause damage to the ice maker or ice cubes may stick together.)
Do not pour water directly into the ice storage box to make ice.
●
(Otherwise, the ice storage box may break.)
Hardness of water must be 100 mg/L or less.
●
The minerals may appear as white floating particles. They are not harmful.
Do not put food or other items into the ice compartment.
●
(Otherwise, the amount of ice cannot be correctly detected and auto ice making may be
stopped.)
When you first use the ice compartment, odor or dust may be on the ice-making tray etc.
●
Please throw away the first lot of ice.
Drinking water
Do not put liquids such as the following
into the water supply tank.
(These may damage the ice compartment or cause ice
cubes stick to each other.)
Juice, etc.
Sports drinks Carbonated
Sound-proof mat
(Do not remove it.)
Hot water
drink
14
Notice
Auto ice making operation stops automatically when the box is filled with ice cubes.
This condition cannot be detected in the following cases.
The ice shovel left in the
ice storage box hits the ice
detection lever.
Ice detection lever
(When pressed, stops the auto ice making function.)
Ice cubes forming a
mound hit the ice detection
lever.
Page 15
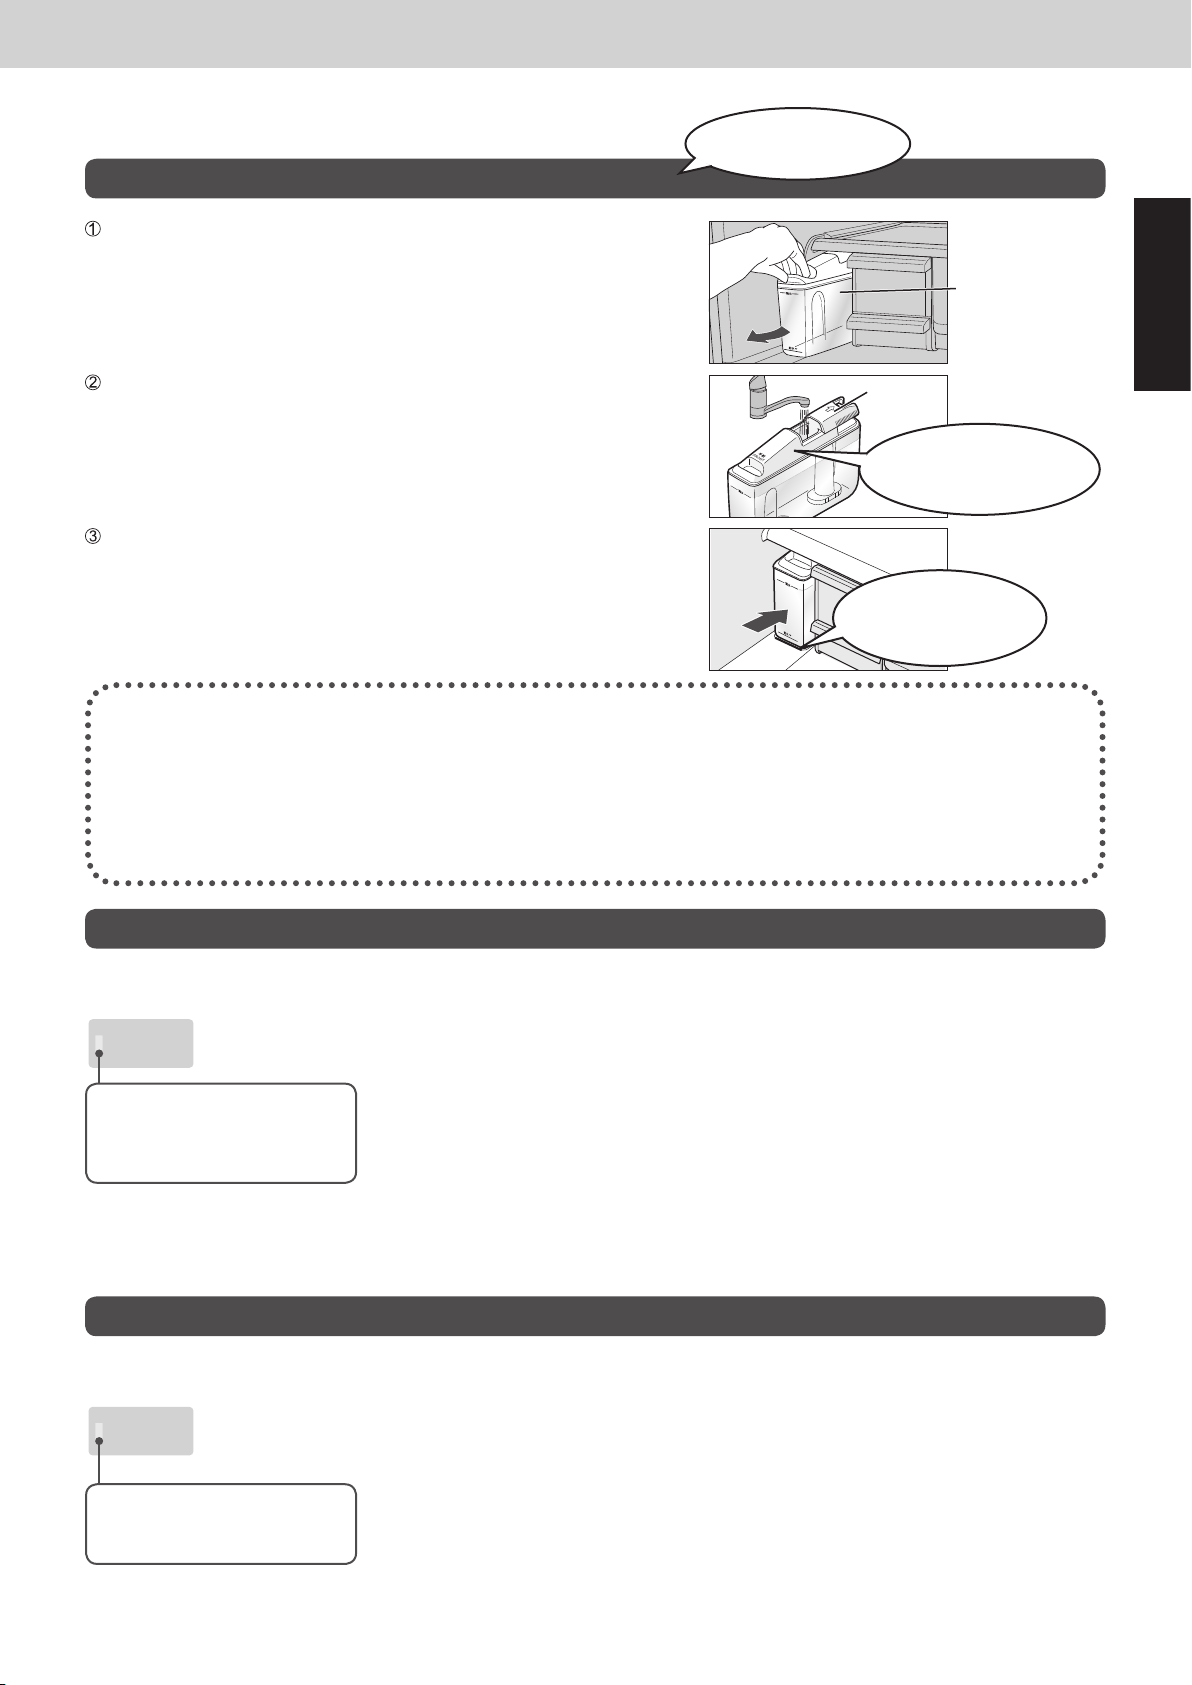
To make ice
Take out the water supply tank
Add water if the level is below the “給水” line.
(Replace the water in the water supply tank at least once a week.)
Operation
Ice can be made in
approx. two hours!
English
Water supply tank
Fill with water
Add water up to the “満水” line.
Install the water supply tank
Push in the tank until this line is crossed.
(If it is not securely set, then water will not be supplied and ice will
not be made.)
However, it will take longer in the following cases.
When the refrigerator is used for the first time.
●
(It may take 24 hours or more because the auto ice
making function will start only after the interior has
cooled down sufficiently.)
When the doors are opened frequently.
●
When the door is ajar.
●
When a large quantity of food is stored at once.
●
When the ambient temperature is low in winter, or it
●
is high in summer.
When a power failure occurs.
●
When the washable ice-making tray has been
●
cleaned. (P. 19)
To make ice quickly
Lid
Do not add water over
the line.
Put the lid back tightly.
Make sure that the
tank is completely set
across the line.
■
When [QUICK ICE MAKING] is set, the speed of ice making is increased.
Ice can be made within 80 minutes* at the quickest.
After approximately 6 hours, it returns to normal auto ice making.
QUICK
ICE MAKING
Lamp is on: Quick ice making
Lamp is off: Normal ice
*
Ambient temperature of 20 °C, temperature in each compartment set to “ 2 ”, doors not opened or closed.
is on
making is on
●
When you want to stop quick ice making in the middle, press
●
[QUICK ICE MAKING] button again. (The lamp turns off.)
When defrosting is on, the lamp flashes.
●
[QUICK ICE MAKING] re-starts automatically when defrost is completed.
During quick ice making, energy consumption increases more than usual.
●
If manual Fresh Freezing is performed during [QUICK ICE MAKING] , QUICK
●
ICE MAKING is canceled.
ECO NAVI does not operate while QUICK ICE MAKING has been set.
●
To stop auto ice making off
■
Press [AUTO ICE OFF] button for 3 seconds if you do not want to make ice and before cleaning the icemaking tray.
There is a beep sound, then the lamp changes from flashing to lighting.
AUTO
ICE OFF
(PRESS 3 SEC.)
Lamp is on: Ice making is off
Lamp is off: Auto ice making
is on
●
(Do not open the ice compartment drawer when the lamp is flashing.
Ice making can not be stopped.)
Press [AUTO ICE OFF] button again for 3 seconds when you cancel AUTO ICE
●
OFF.
Ice in the middle of making is released after AUTO ICE OFF is canceled.
●
When you stop the auto ice making for a long term, empty the water supply tank
●
and clean it. (P. 19)
15
Page 16
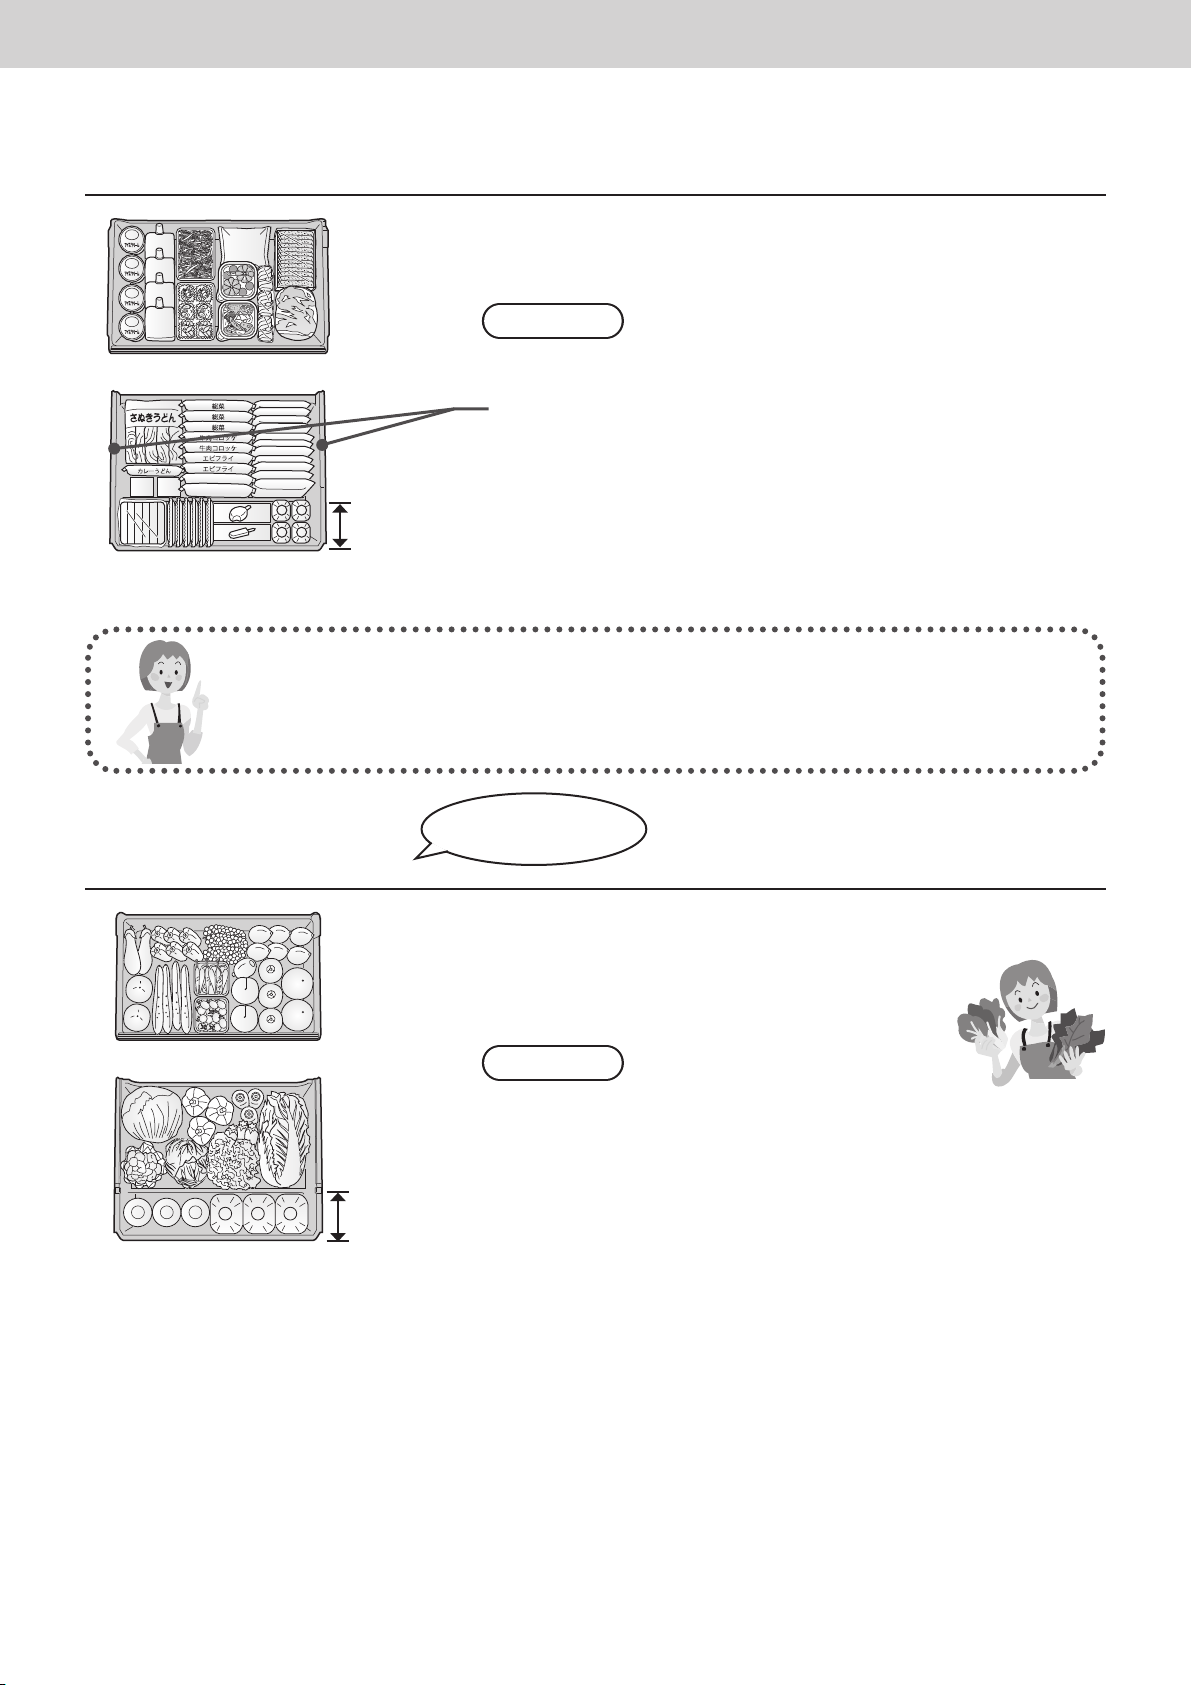
Operation
Freezer compartment
Freezer case (Upper)
Freezer case (Lower)
[This is a storage example.]
Vertical
space
A lot of frozen food and cooked meal can be stored.
●
Requests
For the upper case of the freezer, put your food within the height of
●
the case.
For the lower case of the freezer, put your food below the upper limit
●
line (↓食品はここまで↓) marked inside the case.
(The door may not close completely and frost may occur.)
Three conditions of delicious freezing
1. Quickly freeze food in thin and small portions!
2. Tightly wrap!
3. Do not re-freeze!
Vegetable compartment
Small-item vegetable case
Bottle corner
Vegetable case
[This is a storage example.]
Food can be stored
without plastic wrap.
Put tomatoes and green peppers in the small vegetable case.
●
The main case (section excluding the bottle corner)
of the vegetable compartment where food hardly
dries out is recommended for leafy vegetables.
*
Requests
*
Cut vegetables or those to be stored for a long time may require
wrapping.
Tightly seal rice before storing it.
●
The humidity in the vegetable compartment is high and
●
condensation may occur. Just wipe off the water drops.
Put vegetables and fruits within the height of the case.
●
16
Page 17

Appendix
Cleaning and removing and re-installing
Conduct periodic cleaning and maintenance to ensure that the refrigerator will be kept clean and that it will continue
to operate for a long time to come.
Before cleaning or conducting maintenance, be absolutely sure to disconnect the power plug from the power outlet.
Do not connect or disconnect the power plug with wet hands. Doing so may result in an electric shock or injury.
Cleaning
Clean the refrigerator immediately after it is stained.
Wipe off easily removable dirt using a cloth dipped in lukewarm water.
Wipe off stubborn dirt using a cloth dipped in some diluted neutral detergent used in the kitchen.
Then take up the remaining detergent using a cloth dipped in lukewarm water.
To complete the cleaning, be absolutely sure to wipe the surfaces dry to take up the remaining moisture.
Clean hidden parts at least once a year.
Accumulated dust may lead to waste of electricity.
Remove dust accumulated on the wall outlet and in gaps around the refrigerator.
For the door packing, wipe with a wet soft cloth,
then wipe with a dry cloth to finish up.
(Dirty packing gets damaged easily and it may
cause leakage of cold air.)
English
When finger prints and stains can not
be removed easily, wipe them with a
cloth lightly soaked in neutral kitchen
detergent and then with a wet cloth.
Wipe again with a dry cloth to finish up.
The fulcrum part of the rotation of the
refrigerator compartment door has been
coated with lubricant. Do not wipe it off.
→ If you wiped it off, consult your dealer.
Attention
Wipe immediately!
If liquid trickles at the edge of
the door, quickly press a dry
cloth and wipe it.
Doors are made of glass. Do not add a impact on the surface and the edge when you clean them.
●
Do not use tools whose head is pointed (especially metal tools). (They may cause damage.)
●
Do not use the following items for cleaning.
●
Alkaline or
faintly alkaline
Kitchen detergents,
Glass detergents
(They crack plastic.)
Scrubber,
Polishing
sponger
Cleanser,
Soap powder
Benzine, Thinner,
Alcohol, Acid,
Petroleum
Hot water
17
Page 18
Appendix
Trays / 1-2 convenient shelf (made of glass)
■
Tray (Upper shelf in the refrigerator)
Unhook the protrusion at the back of the tray and pull it.
Hook
Tray
■
Tray (2nd shelf from the top in the refrigerator)
Lift up the back of the tray and pull it forward.
Once the protrusions of the tray are unhooked from
the rails, tilt the tray and remove it.
Hook
Tray
Rail
■
Unhook the protrusion at the front of the 1-2
convenient shelf and pull it.
Rear part
Front part
■
Rear part of the 1-2 convenient shelf
Remove the front part (refer to the upper figure).
Slightly lift the rear part and pull it.
Attention
The partition shelf is not removable. Do not remove the partition shelf when you clean it.
●
Trays, the 1-2 convenient shelf and the partition shelf are made of glass and heavy.
●
Please handle them with care so that they do not fall and cause any damage or injury.
For attaching trays, hold them with the protrusion side down and firmly insert.
Once every three months
Fit the rear part of the 1-2
convenient shelf so that the
hole on it is towards you.
Case (Prime Fresh/Chilled select room)/Egg case/Small-item case
■
Case (Prime Fresh/Chilled select room)
Pull out the case as far as
possible, lifting up the front
and pull it out at angle with
holding the flap above the
case.
■
Egg case/Small-item case
Once every three months
Pull out the case as far as
possible, and pull out at an
angle while lifting up the front.
Attention
The partitions set to both side of the egg case and the small-item case are not removable.
●
Do not remove the partitions when you clean them.
Door shelf/Bottle shelf
■
Remove
Tap the bottom of the small racks upward
or slide alternately the left and right of the
big racks upward, and raise them slowly.
(Tightly attached)
• Remove the free rack before the bottle rack.
■
Re-installing
Set each rack horizontally, with the
mark [>PS<] on the right, and push it
down to its proper position.
• Remove the free rack before the bottle rack.
Once every three months
18
Slide the racks
upward.
Page 19
Appendix
Water supply tank / Purification filter
Remove the lid and clean
the water supply tank with
water.
Lid
Fit the water purification filter and packing.
As a guide, replace the purification filter every three years.
●
(Separately sold parts: CNR MJ-108850) (P. 27)
If there is water scale on the purification filter, ice may not be properly made.
●
Turn the water purification
filter to unhook and
remove it.
Hook
Gently rinse the water
purification filter.
Washable ice-making tray (Inside of the ice compartment)
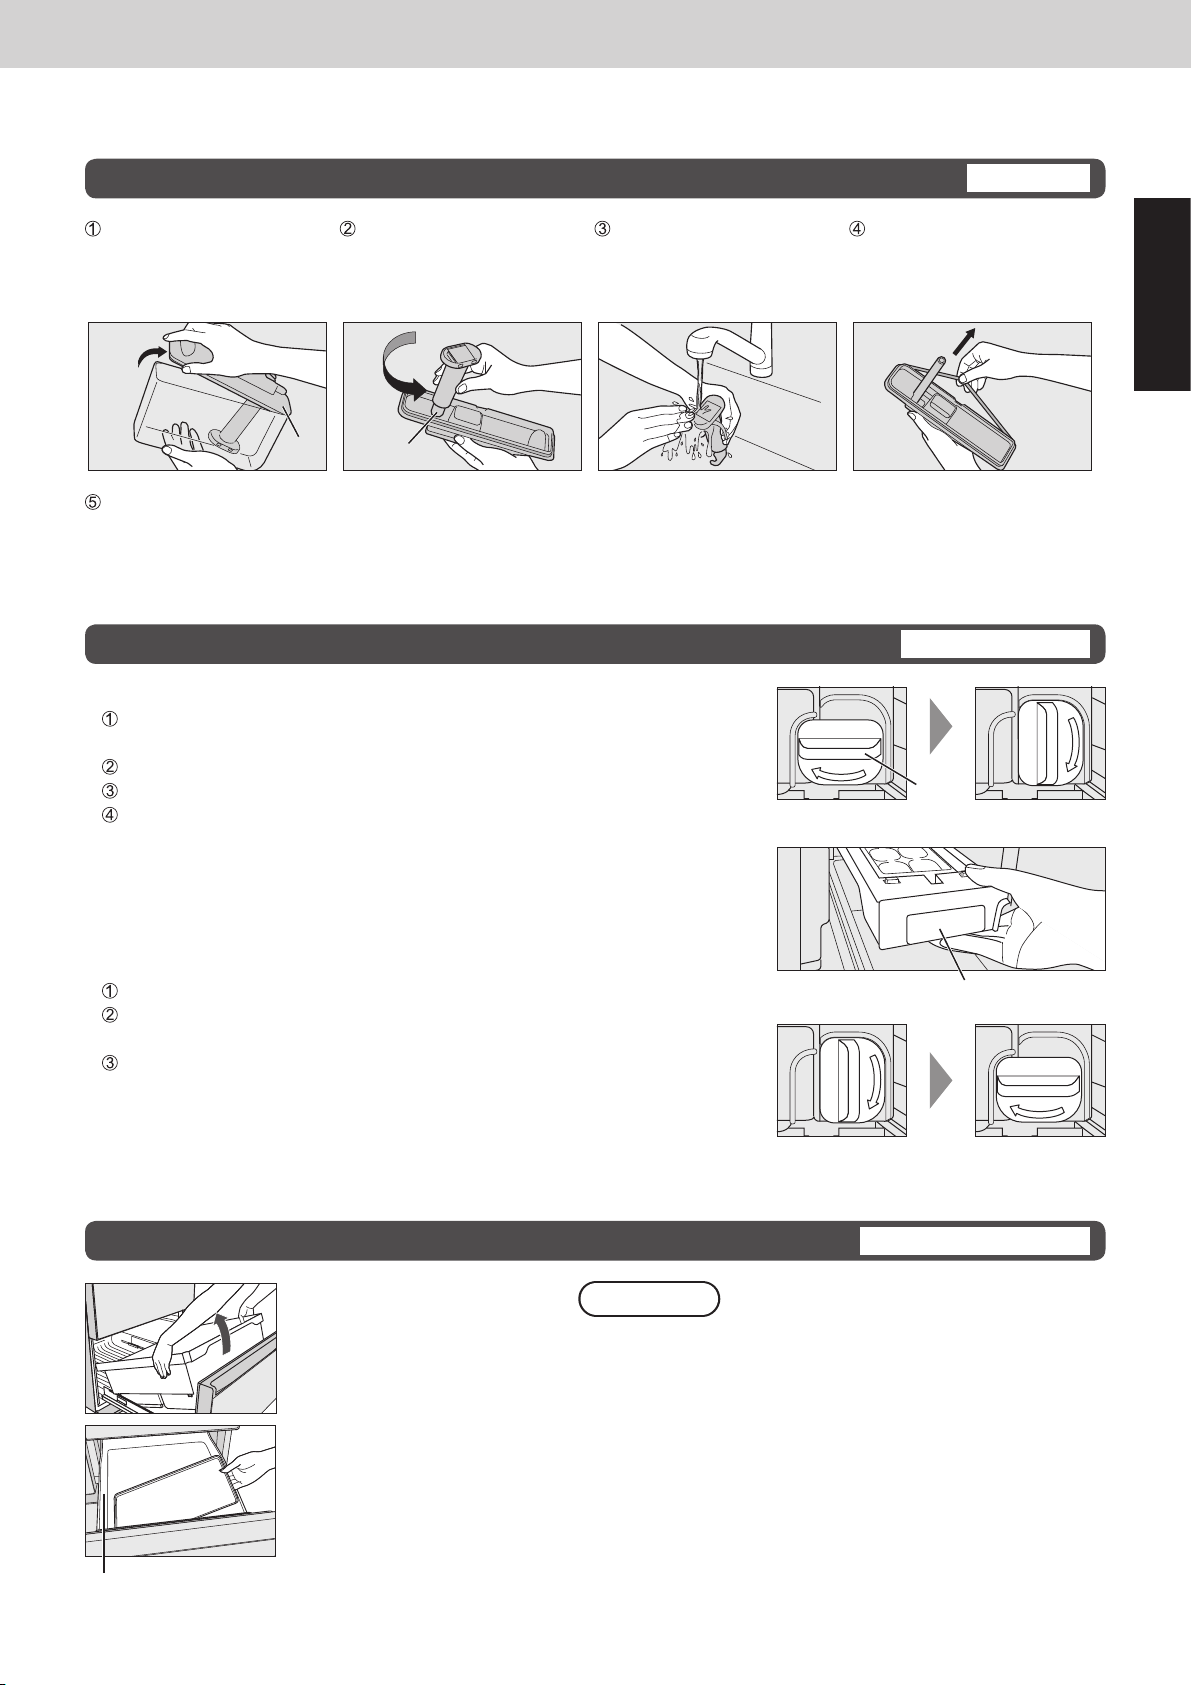
■
Remove the ice-making tray and rinse it.
Press [AUTO ICE OFF] button for 3 seconds and stop ice making.
(The lamp turns on. P. 15)
Turn the knob in the ice-making compartment to the unlock position.
Pull forward the lever to pull out the ice-making tray.
Clean it with water. Do not rub the surface with a sponge etc.
(If the ice-making tray is scratched, ice may not be properly released,
leading to a malfunction.)
The ice-making tray and its frame can not be separated.
●
Do not use a dishwasher-dryer.
●
Once a week
Remove the packing
running on the edges from
the back. Clean it with
water.
Once or twice a year
Knob
Lock position Unlock position
English
■
Installation
Push in until it makes a locking sound.
Turn the knob to the lock position.
Ice may not be made if the ice-making tray is not locked.
Press [AUTO ICE OFF] button for 3 seconds and re-start ice making.
(The lamp turns off. P. 15)
Ice is not made until [AUTO ICE OFF] is canceled.
●
Do not directly put water in the ice-making tray after cleaning.
●
(That may cause ice cubes sticking together or a malfunction.)
CaseIce (Ice/Fresh Freezing/Freezer/Vegetable compartment)
Pull out at an angle
Pull out the door as far as
possible, and pull out at an
angle while lifting up the front.
Remove the aluminum plate
When the plate is installed,
set it in front side of the
protrusion.
Protrusion
Requests
The contact sections of the drawer rails have been
●
coated with lubricant. Do not wipe it off.
When the top case in the freezer compartment or the
●
small-item vegetable case has been removed, install by
positioning “手前 FRONT” that is written on the bottom of
the case on the front side.
Do not touch the Fresh Freezing plate with wet hands, for
●
example when cleaning the plate.
(It may cause a freezing injury)
When the case and the aluminum plate are washed,
●
install them after draining water and wiping the remaining
droplets.
Lever
Unlock position Lock position
Once every three months
19
Page 20
Appendix
In these cases?
The power failed.
The power plug was
disconnected.
The refrigerator is not
used for a long time.
The room lamp does not
turn on. The lamp cover
was broken.
Glass was broken.
(Glass trays • doors)
Moving the refrigerator
forward or backward.
Keep the doors closed and do not store additional food.
●
[FRESH FREEZING] and [QUICK ICE MAKING] stop. Reset these functions to
●
use them.
Wait at least 7 minutes, and then plug in the power plug.
●
(If it is plugged in immediately, the compressor will be overloaded, which may
cause a malfunction.)
Remove all foods and drinks and clean the refrigerator.
●
Disconnect the power plug.
Clean the compartments and the ice-making tray. (P. 18 to P. 19)
Keep the doors opened for two to three days to dry the compartments.
(When drying is insufficient, the compartment may get moldy or have a foul
smell.)
When replace room lamp, please contact with your authorized dealer or service
●
center.
When glass trays and glass doors were broken, do not touch the broken glass
●
and contact with your authorized dealer or service center immediately.
Remove the leg cover, and then raise the adjustment legs. (P. 6)
Remove the tipping protective devices. (P. 6)
Disconnect the power plug.
Move the refrigerator in the forward or backward direction.
(Using excessive force to move the refrigerator or moving it in other than a
forward or backward direction may damage the floor, so place a board or the like
on the floor.)
When you move or
transport the refrigerator.
Do not transport refrigerators in a horizontal position.
●
(Doing so causes a failure of pipes around the compressor possible to be
broken.)
Remove the food and drinks in all compartments and discard the remaining
●
water and ice. Then, move the refrigerator with at least two people.
Remove the food and drinks and discard water in the water supply tank.
Stop the auto ice making function. (P. 15)
Clean the ice-making tray. (P. 19)
Remove the leg cover screw in the adjustable
legs. (P. 6) (Remove the leg cover before
transporting the refrigerator.)
Remove the tipping protective devices.
Disconnect the power plug.
Place a vessel underneath the drainage hole.
Water may spill. Place a cloth, etc. below and in the
vicinity of the vessel.
Tilt the refrigerator backward to drain water from the
drainage hole. (To prevent water from leaking out,
tilt back the refrigerator slowly.)
When moving the refrigerator, place a protective sheet, etc. on the passage
because water may remain in the evaporating dish.
( Container whose height is
2 cm or less)
Attention
20
If frost remains on the cooling unit (not visible from the outside) in the
●
refrigerator, then water may spill when it is moved.
(It takes approximately 15 hours for the frost on the cooling unit to melt after
the refrigerator power plug is disconnected.)
Page 21
Appendix
The automatic ice maker
is not used for a long time.
→ When starting to use
the automatic ice
maker again, switch off
the “AUTO ICE OFF”
function. (P. 15)
If the following sounds or indications are generated
Alarm makes beep
sound and the room
lamp (LED) flashes,
and the letter "U" and
"10" are alternately
indicated on the notice
indicator area.
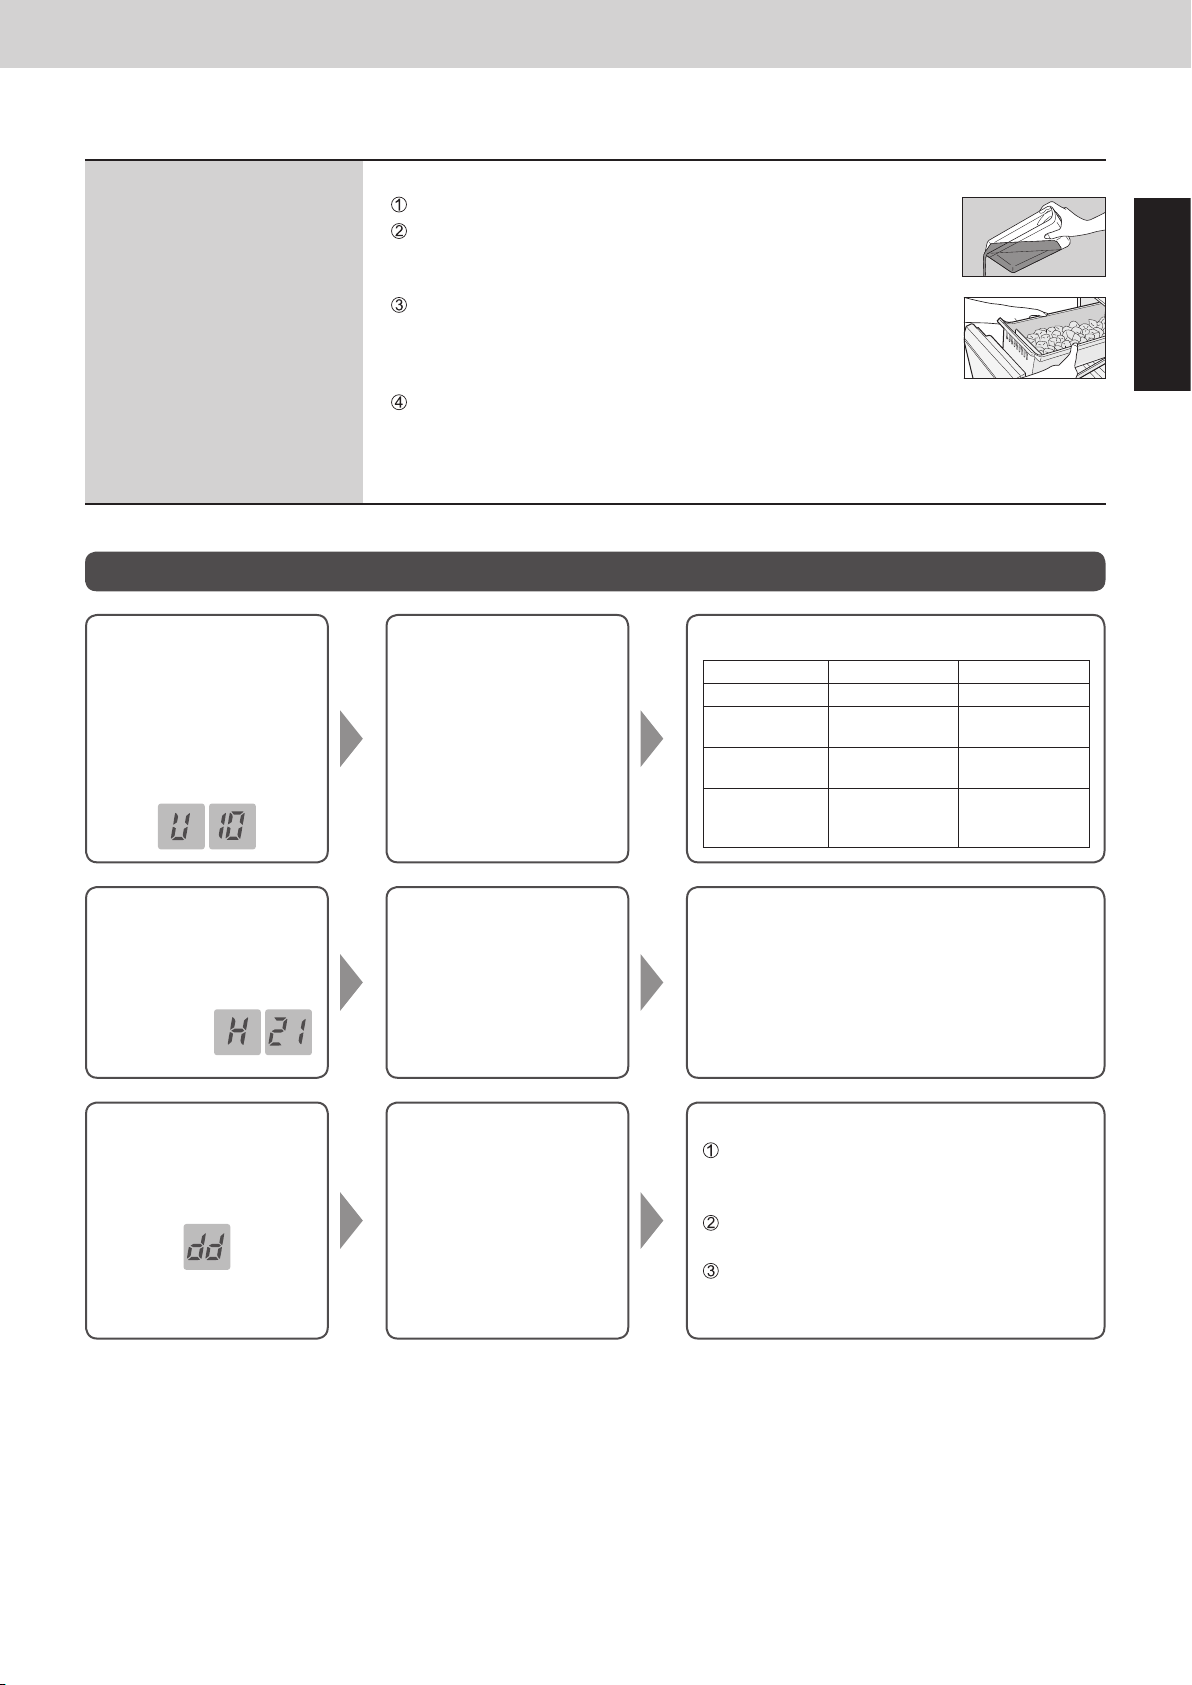
Stop ice making, with the water supply tank empty, and clean the ice maker.
●
Discard water in the water supply tank.
Press [AUTO ICE OFF] button for 3 seconds and stop ice
making. (P. 15)
(The lamp turns on.)
Discard the stored ice in the ice-making tray and the ice
storage box.
• When the ice is stored for a long time, ice cubes get
round or connected by sublimation.
Rinse the ice storage box, ice shovel, and water supply tank.
Wipe off the water and return them to their original positions.
• The water purification filter in the water tank contains water.
Dry it properly.
Close the open door.
The refrigerator
compartment, ice
compartment, or
freezer compartment
door is open.
Alarm
1 minute later Double-beep Flashes once
3 minutes later
5 minutes later
More than
5 minutes later
Two doublebeep
Continuous
double-beep
Continuous
double-beep
Room lamp (LED)
Flashes twice
Flashes three
times
Flashes three
times every
2 minutes
English
The letter “H” and a
number are alternately
indicated on the notice
indicator area.
Example”
“
“dd” is displayed on the
notice indicator area.
An abnormality may
have occurred.
The refrigerator is in
demo mode.
• The cooling operation
is stopped.
• The lights inside the
refrigerator flash turn
on for 5 seconds and
turn off for 1 second.
If the indicator does appear, contact and
consult your dealer.
Cancel the demo mode.
Open the refrigerator compartment, ice
compartment, and freezer compartment
doors.
Press [FREEZER] button in the control
panel for at least 10 seconds.
Close the refrigerator compartment, ice
compartment, and freezer compartment
doors.
21
Page 22
Appendix
Setting to suit your preferences
To adjust the temperature in more detail
■
The temperature for refrigerator compartment and freezer compartment can be set in 9 stages,
more detailed than as “ 1 ”, “ 2 ” and “ 3 ”.
(ECO NAVI does not operate when the temperature is adjusted in detail.)
For the refrigerator compartment
Setting Procedure
Set the temperature of the refrigerator to setting “ 1 ”.
Press [FRIDGE] button for at least 10 seconds.
(There is a beep sound and [2] lamp turns on, then [1] lamp (1st stage)
turns on after 10 seconds.)
Press [FRIDGE] button and select the stage of your choice.
(The stage goes higher every one press of [FRIDGE] button.)
If [FRIDGE] button is pressed when the 9th stage is set ([3] lamp is on),
the setting goes back to “ 1 ” ([1] lamp is on).
ECO NAVI does not
Canceling Procedure
Set the temperature of the refrigerator to setting “ 1 ”.
Press [FRIDGE] button for at least 10 seconds.
(There is a beep sound, then [1] lamp turns on and [2] lamp flashes.)
The cancellation of the detailed temperature setting is completed.
Set the temperature to fit your usual use.
operate even when
the temperature
setting is “ 2 ”.
For the freezer compartment
Operate above ~ steps with pressing [FREEZER] button instead of
[FRIDGE] button.
Setting Stage Lamp
“ 3 ” 9
8
7
6
“ 2 ”
5
4
3
2
“ 1 ”
On Flashing Off
1
Lamp status
1 2 3
1 2 3
1 2 3
1 2 3
1 2 3
1 2 3
1 2 3
1 2 3
1 2 3
The temperature of the Prime Fresh/Chilled select room can not be adjusted in detail.
●
Set this when there is no indication on the notice indicator area.
●
To turn off the ECO NAVI lamp
■
The ECO NAVI lamp can be turned off during ECO NAVI operation.
( Set this when there is no indication on the notice indicator area and the freezer compartment and refrigerator
compartment are set to “ 2 ”.)
Setting Procedure
Open the left door of the
refrigerator compartment
and press [FRIDGE] button
for at least 3 seconds.
ECO NAVI operation is performed even if the above setting is set.
●
Canceling Procedure
Open the left door of the
refrigerator compartment
and press [FRIDGE] button
for at least 3 seconds.
A beep sounds, the ECO NAVI lamp flashes,
and the setting is completed.
(After a short time, the ECO NAVI lamp turns
off.)
There is a beep sound, then the ECO NAVI
lamp is on for 3 seconds, and the cancellation is
completed.
(After a short time, the ECO NAVI lamp turns
off. However, it will remain on during ECO NAVI
operation.)
22
Page 23
Troubleshooting
If you feel that the refrigerator is not working properly, check out the following points first.
If the trouble persists, disconnect the power plug and contact your dealer or an authorized service center.
Appendix
The following sounds are not abnormal.
From inside the refrigerator.
Snapping sound
●
The sound of parts expanding
and contracting as a result of
temperature changes.
Zooming sound
●
The sound of the fan operating.
Clattering sound
●
The sound of bottles in the door
shelf being vibrating by operation
of the compressor.
From the ice compartment and
water supply tank.
Whirring, rattling, and bubbling
●
sounds
The sounds produced when ice is
released by the automatic ice maker
and water is supplied.
When the freezer compartment
door is opened.
Hissing sound
●
The sound of water being
evaporated by the heater during
defrosting.
Rapping sound
●
Thudding sound
●
The sound produced from the
drawer rails when the drawers are
opened/closed.
From upper part of back.
Clicking sound
●
The sound produced when
the electrical components and
compressor are operating.
Zooming sound
●
The sound of the compressor
operating. The sound pitch
rises and falls because highspeed operation is performed
to match the variations in
temperature.
From back.
Bubbling, hissing, and flowing
●
sounds
The sounds of refrigerant
(gas) flowing.
When the vegetable
compartment door is opened.
Rapping sound
●
Thudding sound
●
The sound produced from the
drawer rails when the drawers
are opened/closed.
English
Rattling noise
Noise bothers me
Sound
Rapping sound can be heard
Is the floor tough and horizontal? (P. 6)
●
Do both the legs reach the floor and is the refrigerator properly
●
fixed? (P. 6)
Do the sides of the refrigerator not touch the walls or furniture
●
around the refrigerator? (P. 6)
Does the power cord of the refrigerator not touch the walls or
●
furniture around the refrigerator? (P. 6)
The compressor or the fan may make loud noise when the
●
refrigerator is being cooled, such as when the refrigerator is not still
cooled soon after installation, the doors are frequently opened and
closed, the temperature around the refrigerator is high, or Fresh
Freezing is set ON. This is not abnormal.
→ When the refrigerator has been cooled, the noise becomes small.
When the door is closed with a force or the floor is uneven, the
●
refrigerator shakes and generates noise. Place a plate under the
refrigerator to prevent it from shaking. (P. 6)
23
Page 24
Appendix
The top of the refrigerator is hot
Front (or side) panel is hot
Hot
Temperature setting on the
operation panel is flashing.
Display
The door is heavy when
opening it immediately after
closing.
Door
Magnets do not stick to the
doors.
Ice cannot be made
The mechanical section releases heat. (P. 6)
●
The left and right side surfaces may become hot to let out heat
●
generated when the refrigeration system operates. The temperature
may become 50 °C to 60 °C (when the ambient temperature is
30 °C) after installation or in the summer, but this is not abnormal.
Has the temperature of the refrigerator compartment or the freezer
●
compartment been adjusted in detail? (P. 22)
Air taken into the interior is suddenly cooled. The inner pressure
●
becomes lower than the external air momentarily. The items in the
compartments seem to have been “sucked”.
The doors are made of glass. Magnets do not stick.
●
When you use this refrigerator for the first time, ice will be made
●
after the interior has cooled down sufficiently.
(24 hours or more may be required.)
Is the ice making function set to [AUTO ICE OFF] ?
●
Are the water supply tank (P. 15) and ice-making tray (P. 19) set
●
correctly?
Is there any food etc. in the ice storage box?
●
Do you frequently take in and out the ice-making tray?
●
To confirm whether the ice maker is operating, press [AUTO ICE
●
OFF] button for at least 10 seconds. If the water in the water supply
tank decreases, the ice maker is operating.
(If water has spilled into the ice storage box, wipe it off.)
Ice cubes are not frozen inside
Ice making
The shape of ice is not “cubic”
Ice smells
Smell
The interior smells
Has the freezer compartment temperature control been set to “ 1 ” ?
●
→ Set it to “ 2 ” or “ 3 ”. (P. 8)
There are projections.
●
→ They are the connecting parts frozen in the ice-making tray.
The ice cubes are round or connected to other ice cubes.
●
→ Is the ice stored for a long time?
(Ice cubes get round or connected by sublimation.)
The ice is small.
●
→ Small ice cubes sometimes produced when water in the tank is
exhausted.
Do you clean the water supply tank and purification filter once a
●
week? (P. 19)
Is any cleaning agent, benzine, bleach used for caring? (P. 19)
●
Is the water purification filter deteriorated? (P. 19)
●
Have you put strong smelling foods into the other compartments?
●
Are strong smelling foods hermetically sealed?
●
Odor often attaches to the interior walls.
●
→ Dip a soft cloth in lukewarm water and squeeze it.
Wipe it with this cloth.
24
Page 25

Appendix
Does not get cold at all
Does not get cold enough
Frost and dew Freezer compartment/Refrigerator compartment
Cooling
Is it indicated in the notice indicator area of the control panel?
●
(P. 21)
When you use this refrigerator for the first time, from four to
●
24 hours or even more are required until the refrigerator begins to
cool.
Has the power supply failed?
●
Is the temperature control set to “ 1 ” ? → Set to “ 2 ”. (P. 8)
●
Is a food item blocking the cold air outlet? (P. 7)
●
Is the refrigerator subject to direct sunlight or are there any heating
●
devices in its vicinity? (P. 6)
Is sufficient spaces secured around the refrigerator? (P. 6)
●
Is a hot item stored, doors opened frequently, or too much food
●
stored?
This condition occurs when humidity is high, door was kept open for
●
a long time, or opened frequently.
Is a door slightly open due to a commercially available tube stand
●
or the like being caught in it or too much food being put in the
refrigerator?
Outside of the refrigerator
May occur when using [FRESH FREEZING] in succession when
●
there is high humidity.
→ Simply wipe with a piece of dry cloth.
English
The food is frozen
Has the temperature control been set to “ 3 ” ? → Set it to “ 2 ”. (P. 8)
●
Is the ambient temperature 5 °C or below? → Set it to “ 1 ”. (P. 8)
●
Did you put food with high water content near the cold air outlet in
●
the refrigerator (P. 7) or in the Prime Fresh/Chilled select room?
25
Page 26

Appendix
ECO NAVI Q&A
ECO NAVI by itself operates depending on the brightness around the
When does ECO NAVI
operate?
ECO NAVI lamp is flashing
slowly
ECO NAVI lamp does not
light (ECO NAVI does not
operate)
●
refrigerator, the change in the compartment temperature, frequency of door
opening and closing and the change in the volume of storage.
(ECO NAVI lamp lights up during ECO NAVI operation.)
It indicates ECO NAVI is detecting the change in the volume of storage after
●
closing the door of the refrigerator compartment.
(For approximately 15 seconds.)
ECO NAVI operates only when the temperature setting is “ 2 ” for both the
●
freezer and refrigerator compartments.
(The temperature setting of the Prime Fresh/Chilled select room has no
connection with ECO NAVI operation.)
When the temperatures are adjusted, ECO NAVI does not operate. (P. 22)
●
During FRESH FREEZING operation and QUICK ICE MAKING operation,
●
ECO NAVI does not operate.
If “U” or “H” is displayed on the notice indicator, ECO NAVI does not operate.
●
ECO NAVI does not operate until the refrigerator has been sufficiently cooled.
●
You can not force ECO NAVI to operate even when you want.
●
When you set the ECO NAVI lamp OFF, the lamp does not light up.
●
Cancel the ECO NAVI lamp OFF setting.
ECO NAVI does not operate if you store hot food or you frequently open and
●
close the doors.
The learning function may disable ECO NAVI operation in times of day when
●
the doors are frequently opened and closed, in order to cool the refrigerator
well.
If a power failure occurs, the collected learning function data will be lost.
●
ECO NAVI rarely operates until the learning function has collected sufficient
data.
ECO NAVI lamp does not
turn off.
ECO NAVI lamp turns off
when the doors are not
opened and closed.
ECO NAVI lamp does not
turn off despite storing a lot
of food.
ECO NAVI lamp turns off
despite storing a small
amount of food.
When the light intensity sensor (P. 9) is hidden behind something or the panel
●
is dirty or scratched, the sensor may not work properly.
ECO NAVI may continuously operate depending on the temperature inside
●
the refrigerator compartment or the volume of storage even if the doors are
opened or closed, but the cooling capacity is maintained.
When (automatic) defrosting starts during ECO NAVI operation, for example,
●
ECO NAVI is stopped in order to perform normal cooling operation after the
defrosting.
The learning function may switch ECO NAVI operation back to normal cooling
●
operation.
The storage sensor (P. 8) works only in the refrigerator compartment.
●
The volume of stored food in other than the refrigerator compartment can not
be detected.
When food is stuffed in the compartments, the sensor may not detect the
●
change in the volume of storage properly and the lamp may not turn off.
(Especially when a lot of food is stored on the upper glass tray.)
When the storage sensor (P. 8) is hidden behind the food stored in the
●
compartments, the sensor may not detect the change in the volume of storage
properly and the lamp may not turn off.
When food is stored near the storage sensor (P. 8), such as on the glass
●
tray or in the door shelf, the sensor may mistakenly detect the change in the
volume of storage is large and the lamp may turn off.
When the doors are opened/closed frequently or the doors are left open for a
●
long time, the lamp may turn off.
26
Page 27

Specifications
NR-F510GT-N3 / NR-F510GT-W3 / NR-F510GT-X3
MODEL
TOTAL GROSS VOLUME 530 L
TOTAL STORAGE VOLUME 410 L
STORAGE FRIDGE VOLUME 249 L
STORAGE ICE VOLUME 5 L
STORAGE FRESH FREEZING VOLUME 16 L
STORAGE FREEZER VOLUME 64 L
STORAGE VEGETABLE VOLUME 76 L
NR-F510GT-N6 / NR-F510GT-W6 / NR-F510GT-X6
NR-F510GT-W7 / NR-F510GT-X7
NR-F510GT-NP / NR-F510GT-XP
Appendix
English
OUTSIDE DIMENSIONS
WIDTH×DEPTH×HEIGHT
WEIGHT 101 k
RATED VOLTAGE
RATED FREQUENCY
This refrigerator’s volume is based on IEC 62552.
Indicated on the quality indication label on the inside of the
refrigerator compartment door.
685 mm × 683 mm × 1 828 mm
Separately sold parts
Water purification filter for water
supply tank (P. 19)
CNR MJ-108850
A set of adjustment plates (P. 6)
CNR 79-338120
/ 223 lb
27
Page 28

Pengenalan
Kandungan
Pengenalan
Pemasangan
Operasi
Lampiran
Arahan keselamatan................................................................................................. 29
Pemasangan ............................................................................................................. 32
Memilih lokasi yang betul ...................................................................32
Untuk menggunakan semua ciri ............................................................................. 34
Panel kawalan .................................................................................... 34
Makanan disimpan .............................................................................35
Operasi ECO NAVI ............................................................................. 35
Petak Peti Sejuk ................................................................................. 36
Ruang pilih Segar Asli/Dingin ............................................................. 38
Petak Pembekuan Segar ................................................................... 39
Petak Ais ............................................................................................40
Petak Pembeku .................................................................................. 42
Petak Sayuran .................................................................................... 42
Mencuci dan menanggalkan serta memasang semula ......................................... 43
Pembersihan ......................................................................................43
Dalam kes-kes sebegini? ......................................................................................... 46
Penetapan yang sesuai dengan kehendak anda ................................................... 48
Menyelesaikan masalah ........................................................................................... 49
SOALAN & JAWAPAN ECO NAVI ............................................................................ 52
Spesifikasi ................................................................................................................. 53
Bahagian yang dijual berasingan ........................................................................... 53
Produk ini sesuai untuk digunakan dalam kelengkapan rumah dan kegunaan yang sama seperti
●
- kawasan dapur kakitangan di kedai, pejabat dan persekitaran kerja yang lain;
- rumah ternakan dan kegunaan oleh pelanggan di hotel, motel dan persekitaran tempat tinggal yang lain;
- persekitaran penginapan dan sarapan pagi;
- katering dan kegunaan bukan perniagaan yang seumpamanya.
■
Untuk menjimatkan tenaga
• Jangan penuhkan makanan ke dalam petak.
Ia boleh mengganggu aliran udara sejuk. Sediakan ruang mencukupi di antara
makanan.
• Kurangkan membuka/menutup pintu.
Meminimumkan bilangan pintu dibuka/ditutup bagi menghalang udara sejuk
daripada keluar dan mengurangkan pembaziran elektrik.
• Jangan menghalang lubang udara sejuk dengan makanan.
Jika udara sejuk tidak merebak ke setiap sudut petak, bahagian dalam tidak
akan cukup sejuk dan lebih banyak elektrik akan digunakan.
• Udara sejuk dilepaskan dari lubang salur di bahagian belakang (Hal. 36).
• Simpan makanan dan minuman panas setelah ia menjadi sejuk.
Jika tidak, ia bukan sahaja akan meningkatkan suhu bahagian dalam, tetapi
juga memberi kesan pada kesegaran makanan lain.
Salur
28
■
Melupuskan pembungkusan
Harap kitar semula jika boleh (contoh: kadbod, beg plastik, pita pelekat dan polistirena) dan
pastikan anda melupuskan semua bahan pembungkusan lain dengan selamat.
Pastikan pembungkusan jauh daripada capaian bayi dan kanak-kanak, untuk mengelakkan
kecederaan atau kejadian lemas.
Page 29

Arahan keselamatan
Maksud simbol.
Jangan
Pastikan anda lakukan ini Jangan tanggalkan
Pengenalan
Menunjukkan alat mestilah dialirkan
ke bumi untuk mencegah kejutan
elektrik
iso-butane
Menunjukkan risiko kematian atau kecederaan serius.
Alat ini bukan disasarkan untuk digunakan oleh orang (termasuk kanak-kanak) dengan kecacatan
fizikal, deria atau mental, atau yang kurang pengalaman dan pengetahuan, kecuali jika mereka
AMARAN
Untuk plag kuasa dan kord...
telah diberikan pengawasan atau arahan mengenai penggunaan alat ini oleh orang yang
bertanggungjawab atas keselamatan mereka.
Kanak-kanak harus diawasi bagi memastikan mereka tidak bermain dengan alat ini.
Dari semasa ke semasa buang kotoran seperti habuk dari plag kuasa.
●
Pasangkan plag ke dalam soket dinding yang sama voltan dengan arus dan masukkan plag
●
sepenuhnya.
Apabila mencabut plag kuasa, pegang pada plag bukan pada kordnya.
●
Cabut plag ketika membersihkan peti sejuk.
●
Jika anda tidak bercadang untuk menggunakan peti sejuk bagi tempoh yang panjang, cabut
●
plagnya.
(Jika tidak, ia boleh menyebabkan kebakaran atau kejutan elektrik)
Jika kord atau plag kuasa rosak, ia mesti digantikan oleh pengilang ejen perkhidmatannya atau
●
orang yang mempunyai kelayakan seumpamanya untuk mengelakkan bahaya.
Jangan memasukkan atau mencabut plag kuasa ke dalam/dari soket dinding dengan tangan yang
●
basah.
Jangan merosakkan plag kuasa atau kord. Jangan memotong atau memproses plag atau
●
kord; jangan didedahkan kepada suhu yang tinggi; jangan melentur, memutar atau menarik
secara berlebihan; jangan meletakkan objek berat di atasnya; dan jangan menyusunnya dalam
longgokan.
→ Hubungi wakil pengedar anda untuk membaiki plag atau kord.
Tidak menolak belakang peti sejuk rapat ke plag kuasa.
●
Jangan gunakan ketika kord atau plag kuasa rosak, atau ketika plag tidak dimasukkan
●
sepenuhnya ke dalam soket.
Bahasa Melayu
Berhenti menggunakan peti sejuk serta merta dan cabut plag,
jika terdapat keabnormalan atau kegagalan.
(Jika tidak ia boleh menyebabkan asap, kebakaran atau kejutan elektrik.)
Contoh-contoh keabnormalan dan kegagalan
Kord atau plag kuasa menjadi terlalu panas
●
Kord kuasa terpotong atau cacat
●
Terdapat bau terbakar
●
Anda boleh merasakan getaran elektrik
●
Hubungi wakil pengedar dengan segera untuk pemeriksaan atau pembaikan.
Di atas peti sejuk...
Jangan meletakkan apa-apa pun.
●
Jika tidak, ia mungkin jatuh kerana getaran.
Jangan meletakkan apa-apa pun pada penutup atas.
●
(Jika tidak bahagian tersebut boleh menjadi cacat dan boleh menyebabkan
kejutan elektrik.)
29
Page 30

Pengenalan
Ketika menggunakan...
Jangan bergayut atau menaiki pintunya.
●
Jangan sapukan air pada badan atau bahagian dalam.
●
(Penebat elektrik menjadi lusuh dan boleh menyebabkan kejutan atau kebakaran.)
Jangan merosakkan litar pendingin.
●
(Bahan pendingin mudah terbakar boleh terbakar dan membawa kepada letupan.)
Jangan menyentuh perkakasan di atas dulang membuat ais.
●
Jangan mengeluarkan dulang membuat ais ketika fungsi membuat ais beroperasi.
●
Jangan menyimpan bahan mudah terbakar di dalam peti sejuk.
●
Jangan menyimpan bahan mudah meletup seperti tin aerosol dengan bahan dorongan mudah
●
terbakar di dalam peti sejuk.
Jangan menyimpan bahan kimia atau spesimen sains.
●
Jangan menyembur bahan kimia mudah terbakar berhampiran peti sejuk.
●
Jangan menggunakan alat elektrik seperti penghilang bau di dalam peti sejuk.
●
(Jika pendingin bocor, ia boleh terbakar akibat percikan api daripada sentuhan.)
Jangan menggunakan peralatan mekanikal atau cara lain untuk mempercepatkan proses
●
nyahfros, selain daripada cara yang disyorkan oleh pengilang.
Jangan mengenakan impak tinggi pada pintu kaca.
●
(Jika tidak kaca boleh pecah dan menyebabkan kecederaan.)
→ Jika ia didapati retak, jangan sentuh kaca dan rujuk kepada wakil pengedar anda dengan
segera.
Isi dengan air minuman sahaja.
●
Kanak-kanak harus diawasi bagi memastikan peti sejuk digunakan dengan cara yang betul.
●
Ketika memasang...
Sediakan langkah keselamatan bagi mengelakkan terbalik akibat gempa bumi. (Hal. 32)
●
AMARAN - Pastikan injap pengudaraan, di dalam ruangan peti sejuk atau di dalam struktur
●
kabinet, tidak dihalang.
Pastikan plag peti sejuk dipasangkan ke dalam soket utama yang dialirkan ke bumi.
●
Jangan memasang plag ke dalam soket utama yang tidak dialirkan ke bumi. (Plag 3 pin)
Jangan memasang produk di lokasi yang terdedah kepada air.
●
Jangan mengisi rongga di sekeliling peti sejuk.
●
(Jika pendingin bocor, ia boleh terbakar.)
Ketika membuang dan mengitar semula produk...
Sekiranya anda bimbang kanak-kanak mungkin masuk semasa mengitar semula produk, buang
●
pembungkus pintu.
Pendingin menggunakan gas mudah terbakar.
●
Dan Cyclo-Pentana digunakan sebagai penebat untuk peti sejuk ini.
Apabila anda membuang unit ini, sila buang dengan cara yang betul.
Label amaran yang dinyatakan di atas mesti disimpan sepanjang penggunaan peti sejuk ini.
●
Manual pengguna ini harus diserahkan kepada sesiapa yang menggunakan atau mengendalikan
peti sejuk apabila peti sejuk ini dipindahkan ke lokasi lain dan dihantar ke loji kitar semula.
Dalam keadaan kecemasan...
Jangan sesekali membuka penutup atas dan penutup belakang.
●
Jangan sesekali memisahkan, membaiki atau mengubah suai peti sejuk.
●
(Boleh menyebabkan kecederaan, lecur atau kejutan elektrik.)
30
Page 31

Jika anda mengesan kebocoran gas (seperti gas rumah), jangan sentuh peti sejuk dan buka
●
tingkap untuk pengudaraan di dapur.
Bahan pendingin mudah terbakar digunakan. Jika anda telah merosakkan litar penyejukan
●
(perpaipan), buka tingkap untuk pengudaraan di dapur dan hubungi wakil pengedar.
Kerja penyenggaraan hanya boleh dilakukan di bengkel oleh kakitangan penyenggaraan yang
●
terlatih.
(Jika tidak ia boleh menyebabkan kejutan elektrik, nyalaan api dan letupan.)
Menunjukkan risiko kecederaan atau kerosakan harta benda.
PERINGATAN
Ketika menyimpan makanan...
Jangan mengenakan impak tinggi pada dulang kaca.
●
(Jika tidak, dulang kaca tersebut boleh pecah dan mencederakan anda.)
Jangan membiarkan makanan terjulur dari dulang kaca.
●
Jangan simpan bekas makanan di rak pintu jika ia tidak menyentuh bahagian bawah rak.
●
(Makanan mungkin terjatuh dan menyebabkan kecederaan.)
Jangan membekukan botol.
●
(Jika cecair dalam botol kaca membeku, botol mungkin pecah dan cecair boleh keluar.)
Jangan menyentuh makanan beku atau bekas (terutama logam), plat aluminium dengan tangan
●
yang basah.
(Jika tidak, anda boleh mengalami luka beku.)
Jangan makan makanan yang mempunyai bau pelik atau berubah warna.
●
(Makanan busuk boleh menyebabkan penyakit.)
Pengenalan
Bahasa Melayu
Ketika membuka/menutup pintu...
Jangan buka/tutup pintu jika sesuatu tersentuh dengan peti sejuk.
●
Jangan masukkan jari anda pada rongga di bahagian sisi pintu petak peti
●
sejuk ketika membuka/menutup pintu.
Jangan buka/tutup petak Ais dan petak Pembekuan Segar (Fresh Freezing)
●
dengan memegang bahagian atas laci.
Jangan meletakkan kaki anda di bawah laci sebelah bawah.
●
(Jika tidak, jari-jari anda mungkin tersepit.)
Jangan membuka atau menutup pintu dengan kuat.
●
(Makanan mungkin terjatuh dan menyebabkan kecederaan.)
Ketika membersihkan...
Berhati-hati ketika anda memasukkan atau mengeluarkan dulang kaca.
●
(Menjatuhkan dulang kaca boleh menyebabkan kerosakan dulang atau kecederaan akibat
lebam.)
Jangan menyentuh rel logam.
●
Jangan meletak tangan atau kaki di bawah bahagian bawah peti sejuk.
●
(Sisi panel logam boleh menyebabkan kecederaan.)
Ketika memindah atau mengangkut peti sejuk...
Betulkan kedudukan peti sejuk pada kaki boleh laras di atas lantai rata dan kuat.
●
(Jika tidak peti sejuk boleh bergoyang atau terbalik dan boleh menyebabkan
kecederaan.)
Guna lapik perlindungan, dll. untuk permukaan lantai yang mudah rosak.
●
Pegang pada pemegang ketika mengangkut peti sejuk.
●
(Jika tidak, tangan anda mungkin terlepas dan menyebabkan kecederaan.)
31
Page 32

Pemasangan
Pemasangan
Memilih lokasi yang betul
1.Letakkan peti sejuk di lokasi-lokasi berikut.
Lokasi yang tidak panas dan tidak kena cahaya matahari
●
Meminimumkan pengurangan kuasa penyejukan, dan
mengelakkan pembaziran elektrik.
Lokasi dengan pengudaraan yang baik serta
●
kelembapan rendah
Mengurangkan karat dan penghasilan pemeluwapan.
Lantai yang kukuh dan rata
●
Dengan karpet, tikar tatami atau lantai vinil,
perubahan bentuk atau warna boleh berlaku, jadi
letakkan papan di bawah peti sejuk.
Letakkan peti sejuk jauh dari peralatan lain
●
Mencegah gangguan bunyi dan paparan gambar
pada TV dan peralatan lain.
Lokasi yang membolehkan plag kuasa dibersihkan
●
dengan mudah
Kerap bersihkan habuk.
(Untuk mengelakkan kebakaran disebabkan habuk.)
Lokasi yang membenarkan haba menghilang
●
Permukaan belakang boleh dipasang pada dinding.
(Sediakan ruang apabila terdapat bunyi getaran atau
kotoran pada dinding.)
40 mm atau lebih di atas peti sejuk
5 mm atau lebih di kiri dan kanan
*
Sekiranya memasang di sebelah dinding.
(Gambar pandangan dari atas.)
15 mm atau lebih dari dinding
Jika jarak adalah kurang daripada
15 mm, pintu tidak boleh dibuka
melebihi 90° dan dulang kaca dll.
mungkin tidak dapat dikeluarkan.
*
■
Sebelum menggunakan peti sejuk buat pertama kali. (Hal. 43 ~ Hal. 45)
• Lap bahagian dalam peti sejuk dengan kain basah yang lembut.
• Bilas tangki bekalan air, penapis penulenan, dan dulang membuat ais.
2. Betulkan kedudukan peti sejuk.
Keluarkan penutup kaki.
Letakkan tangan di bawah “ ” pada kedua-dua
belah penutup kaki dan tarik keluar.
Putarkan kaki boleh laras (kanan dan kiri)
sehingga ia menyentuh lantai bagi menstabilkan
peti sejuk.
Pasangkan semula penutup kaki.
Jika peti sejuk tidak distabilkan sepenuhnya, anda akan mendengar bunyi ketukan apabila pintu dibuka/
●
ditutup. (Ini tidak menjejaskan prestasi.)
Letakkan peti sejuk di lantai yang kuat dan rata.
■
Jika pintu condong ke bawah.
Putarkan kaki boleh laras pada sisi yang lebih
rendah, seperti yang ditunjukkan di dalam diagram
di sebelah kiri, untuk melaraskan paras.
Pintu pembeku/peti sejuk mungkin condong dalam
•
empat hingga lima hari selepas dipasang disebabkan
berat makanan atau penyesuaian dengan
permukaan lantai. Dalam kes sebegini, putarkan lagi
kaki boleh laras untuk membetulkannya.
• Jika ia tidak membantu, gunakan plat pelarasan
(dijual berasingan). (Hal. 53)
Apabila pintu direndahkan.
Rendahkan
kaki boleh laras
sebelah kanan
untuk pintu kanan.
Penutup kaki
Kaki boleh laras
Rendahkan
kaki boleh laras
sebelah kiri untuk
pintu kiri.
32
■
Apakah langkah-langkah yang diambil untuk mengelak kejatuhan akibat gempa
bumi?
Untuk mengelakkan peti sejuk daripada jatuh, ikat dengan tali pemegang, dll.
Page 33

Pemasangan
3. Pasang plag ke dalam soket dinding.
Pasangkan plag ke dalam soket dinding yang sama voltan dengan arus dan masukkan plag sepenuhnya.
Plag kuasa boleh dipasang ke dalam soket sejurus selepas pemasangan.
●
Persekitaran dan permukaan (permukaan sisi) peti sejuk boleh menjadi panas
●
(kira-kira 50 °C hingga 60 °C ketika suhu sekeliling adalah 30 °C) ketika kuasa dihidupkan, tetapi ini
bukannya abnormal. (Hal. 50)
Jika plag kuasa dicabut, tunggu sekurang-kurangnya 7 minit sebelum memasang semula plag. (Hal. 46)
●
Jika tiada plag pendawaian pembumian di dalam peti sejuk, ia perlu disambungkan dengan sambungan
●
pembumian atau mencegah bahaya elektrik daripada kebocoran elektrik.
Untuk keselamatan, peti sejuk harus dibumikan
(Untuk peti sejuk dengan plag 2 pin tanpa dawai bumi)
Sambungan bumi akan mencegah bahaya daripada kejutan elektrik.
Sambungan bumi boleh dibuat dengan salah satu dari dua cara berikut:
1. Apabila menggunakan soket dengan peranti pembumian,
sambung wayar bumi kepadanya dan skru untuk
sambungan bumi di belakang peti sejuk (sila cari simbol
) seperti ditunjukkan dalam ilustrasi .
2. Apabila menggunakan soket dengan tanpa peranti
pembumian, sambung wayar bumi pada skru untuk
sambungan bumi di belakang peti sejuk (sila cari simbol
), kemudian sambungkan hujung satu lagi kepada rod
bumi seperti ditunjukkan dalam ilustrasi .
Sambungan bumi tidak boleh dibuat dengan yang berikut
Paip gas dan paip bekalan air (risiko kejutan elektrik atau letupan)
●
Wayar bumi kord telefon dan rod kilat (risiko panahan petir)
●
Wayar pembumian
1
2
Bahasa Melayu
Peranti
pembumian
4. Sejukkan bahagian dalam peti sejuk.
Ia mungkin mengambil masa sekitar empat jam untuk menyejukkan bahagian dalam.
●
Ia mungkin mengambil masa 24 jam atau lebih untuk menyejukkan bahagian dalam dan mencapai
●
keseimbangan pada musim panas, dll.
Mula membuat ais hanya selepas bahagian dalam telah cukup sejuk.
●
Jangan buka/tutup pintu sehingga bahagian dalam cukup sejuk.
●
(Udara hangat yang masuk ke bahagian dalam akan menghalang fungsi penyejukan.)
Permintaan
■
Jangan menanggalkan penutup di bahagian belakang.
Bukaan isian bahan penebatan haba.
Menanggalkannya akan menyebabkan pendinginan merosot.
Jika anda telah menanggalkannya, potong pita pembungkus kain menjadi empat
segi dan tampal.
■
Jangan letakkan barang di atas peti sejuk.
Ini mungkin menjadi panas disebabkan kepanasan yang dihasilkan oleh
pemampat di bahagian atas peti sejuk.
Jika ia sukar melepaskan haba, kapasiti penyejukan boleh diturunkan.
Penutup
Notis
Pemampat
Sejurus selepas pemasangan, bunyi yang menjadi lebih kuat sedikit kerana bahagian dalam peti sejuk masih
●
belum sejuk dan pemampat atau kipas beroperasi pada putaran kelajuan tinggi, tetapi ia bukannya abnormal.
(Setelah bahagian dalam peti sejuk menjadi sejuk, bunyi akan berkurangan.)
33
Page 34

Operasi
Untuk menggunakan semua ciri
Panel kawalan
Penunjuk notis (Hal. 47)
• Kejadian keabnormalan, mod demo.
FRESH FREEZING (Pembekuan Segar) (Hal. 39)
QUICK ICE MAKING (Pembuatan Ais Cepat) (Hal. 41)
AUTO ICE OFF (Matikan Ais Auto) (Hal. 41)
Tetapan ketika pembelian.
●
Petak
Ais
Petak Peti
Sejuk
Ruang pilih
Segar Asli/
Dingin
Petak Pembekuan
Segar
Petak
Pembeku
Petak
Sayuran
Sensor penyimpanan (Hal. 35, Hal. 52)
• Sensor mengesan perubahan isi padu
penyimpanan secara automatik.
■
Tetapan suhu dan panduan suhu
Tetapan
Butang
suhu
FRIDGE
FREEZER
PRIME FRESH Anggaran 0 °C ~ 2 °C
(Ini ialah penunjuk secara kasar ketika suhu sekeliling sekitar 30 °C, tiada makanan yang disimpan di dalam peti
sejuk dan suhu bahagian dalam telah stabil. Suhu mungkin berbeza bergantung kepada suhu sekeliling, keadaan
penyimpanan makanan, membuka/menutup pintu dan keadaan penggunaan yang lain.)
CHILLED 1 2 3
Anggaran 2 °C ~ 3 °C
lebih tinggi daripada
“ 2 ”
Anggaran 2 °C ~ 3 °C
lebih tinggi daripada
“ 2 ”
Anggaran 1 °C ~ 2 °C
lebih tinggi daripada
“ 2 ”
Anggaran 3 °C ~ 6 °C
Anggaran -18 °C ~ -20 °C
Anggaran -1 °C ~ -3 °C
Anggaran 2 °C ~ 3 °C
lebih rendah daripada
“ 2 ”
Anggaran 2 °C ~ 3 °C
lebih rendah daripada
“ 2 ”
Anggaran 1 °C ~ 2 °C
lebih rendah daripada
“ 2 ”
Biasanya, gunakan peti sejuk dengan suhu ditetapkan kepada “ 2 ”.
(Jika kawalan suhu petak pembeku atau petak peti sejuk ditetapkan selain daripada “ 2 ” semasa operasi
ECO NAVI berhenti.)
Sila lihat halaman 52 apabila lampu tetapan suhu berkelip.
●
*
Ruang pilih Segar Asli/Dingin ditetapkan kepada [CHILLED] ketika pembelian.
Jangan menekan pada panel kawalan dengan kuat, atau mengetuk dengan benda keras.
●
(Permukaan mungkin retak atau tercalar.)
34
Page 35

Makanan disimpan
Anggaran 3 °C ~ 6 °C
Petak Peti Sejuk
Operasi
Untuk penyimpanan biasa bagi makanan dan
minuman atau penyimpanan sementara bagi
makanan yang akan dihidangkan segera.
Anggaran 0 °C ~ 2 °C
[Dingin]
Untuk makanan diproses atau produk tenusu.
Ruang pilih
Anggaran -3 °C ~ -1 °C
Segar Asli/Dingin
Anggaran -19 °C ~ -17 °C
Anggaran -20 °C ~ -18 °C
Anggaran 3 °C ~ 8 °C
Suhu di atas adalah ketika “ 2 ” dipilih sebagai tetapan. Suhu mungkin berbeza sedikit bergantung kepada cara
●
peti sejuk digunakan.
Petak Pembekuan
Segar
Petak Pembeku
Petak Sayuran
[Segar Asli]
Untuk penyimpanan makanan segar seperti
daging atau ikan.
Untuk pembekuan bahan atau makanan
dipanaskan seperti nasi panas segera bagi
mengekalkan kesegarannya.
Untuk penyimpanan makanan beku.
Kelembapan yang agak tinggi mengekalkan
buah-buahan dan sayur-sayuran agar segar
dan enak.
Operasi ECO NAVI
■
3 fungsi ECO mengesan isi padu penyimpanan dan corak kehidupan.
Tenaga dijimatkan secara berkesan dan automatik.
1
*
Bahasa Melayu
Lampu ECO NAVI menyala semasa operasi ECO NAVI.
ECO NAVI beroperasi hanya apabila tetapan suhu adalah “ 2 ” pada kedua-dua petak pembeku dan peti sejuk.
Storage Eco
Smart Eco
Night Eco
Pola ON/OFF lampu mungkin berubah selepas minggu ke-4 di mana fungsi
●
belajar menjadi berkesan.
Kecerahan lampu dikurangkan kira-kira 5 minit selepas lampu menyala.
●
(Lampu boleh dipadamkan jika ia mengganggu anda. (Hal. 48))
Semasa mengesan perubahan isi padu penyimpanan, lampu ECO NAVI
●
berkelip perlahan. (Kira-kira 15 saat selepas menutup pintu petak peti sejuk.)
Apabila tetapan suhu petak peti sejuk dan petak pembeku adalah selain
daripada “ 2 ”, lampu tidak berkelip tetapi mengesan isi padu penyimpanan.
Operasi ECO NAVI mungkin tidak dilaksanakan bergantung kepada keadaan
●
penggunaan peti sejuk.
Sensor penyimpanan (Hal. 34) mengesan
perubahan isi padu penyimpanan di petak peti
sejuk.
Bilangan membuka/menutup pintu selama 3
minggu dan perubahan isi padu penyimpanan
bagi setiap hari dalam seminggu dan setiap
jam disimpan dalam memori, dianalisis dan
dianggarkan.
2
Sensor keamatan cahaya
ruang.
*
mengesan kecerahan
Ingatan pola gaya
hidup selama 3 minggu
Tempoh belajar
Fungsi belajar
Ditunjukkan selepas minggu ke-4
Lampu ECO NAVI
Sensor keamatan cahaya
(Di sebelah bawah pintu)
SOALAN & JAWAPAN ECO NAVI Hal. 52
*1
Keberkesanan berbeza bergantung kepada suhu sekeliling, kecerahan sekeliling, bilangan dan waktu pintu dibuka dan
ditutup, dan keadaan makanan yang disimpan.
2
*
Kegelapan dikesan oleh sensor keamatan cahaya kira-kira 3 hingga 10 lux atau kurang.
35
Page 36

Operasi
Petak Peti Sejuk
Lampu ruang (LED)
Dulang (Dua)
Rak serbaneka 1-2
Rak pembahagi
Rak kaca
Lampu ruang (LED)
Pembahagi berputar
(Hal. 37)
Pintu kiri
Rak pintu (Tiga)
Salur
Pintu
kanan
Rak pintu (Dua)
Rak mini pintu
Panel kawalan
36
Rak botol
(Hal. 34)
Bekas telur
(untuk 12 biji telur)
Bekas item kecil
Rak botol
Ruang pilih Segar Asli/Dingin
Zon suhu boleh dipilih antara Segar asli
●
atau Dingin untuk sesuaikan dengan
jenis makanan. (Hal. 38)
Page 37

Operasi
“Rak serbaneka 1-2 (rak ketiga dari atas)” boleh dipisahkan kepada bahagian depan dan belakang.
■
Keluarkan bahagian depan dan pasang di atas.
Anda boleh meletakkan bekas besar atau tong kecil bir.
●
■
Keluarkan bahagian depan dan pasang di bawah.
Anda boleh menyimpan banyak makanan kecil.
●
Hanya ketinggian dulang kedua dari atas boleh diubah.
Angkat sisi belakang dulang dan tarik ke arah anda. Sebaik sahaja tonjolan
pada dulang terlepas daripada rel, condongkan dulang dan keluarkannya.
Tonjolan
Rel
Kedudukan dulang boleh diubah walaupun pintu tidak dibuka sepenuhnya.
●
→
Keluarkan separuh bahagian depan rak serbaneka 1-2, kemudian ubah kedudukannya dengan mengikuti langkah di atas.
Masukkan dulang pada kedudukan
yang dikehendaki dengan
menterbalikkan langkah tadi.
Bahasa Melayu
“Rak-rak pintu” boleh dipindahkan.
■
Menggantikan rak mini pintu dengan rak botol.
Rak mini
pintu
Rak botol Rak mini pintu
Apabila pintu kiri hanya boleh dibuka 90 °, bekas
telur, dll. boleh dikeluarkan dengan mudah.
Jika rak mini pintu digantikan dengan rak botol, sensor penyimpanan akan tersorok di belakang makanan dalam
●
rak botol dan sensor mungkin tidak berfungsi dengan betul.
Rak botol
Dulang telur
boleh ditarik keluar
sepenuhnya!
■
Memindahkan rak pintu pada kedudukan yang
anda gemari.
• Untuk pintu kanan, hanya
dulang pertama dari atas.
• Untuk pintu kiri, hanya
dulang kedua dari atas.
Sambil memegang satu hujung rak dengan
sebelah tangan, tolak hujung yang lain dengan
perlahan untuk menaikkannya.
Permintaan
Jika sebarang makanan dengan kandungan air yang tinggi diletak di depan lubang udara, ia mungkin disejukkan
●
secara berlebihan atau membeku. (Hal. 33)
(Risiko pecah boleh berlaku terutamanya jika bir dalam tin, minuman bukan alkohol dan soda membeku.)
Makanan yang ditunjukkan di bawah ini mesti dimasukkan ke dalam bekas kedap udara atau dibungkus untuk
●
disimpan di dalam peti sejuk.
•
Bawang hijau atau lain-lain sayuran yang berbau kuat.
(→ Bau akan merebak ke makanan berdekatan)
• Hirisan buah limau.
(→ Plastik akan berubah warna putih)
Jika pembahagi berputar terbuka ke arah anda,
●
kembalikannya ke kedudukan asal.
(Pintu tidak boleh ditutup dan ia boleh menyebabkan
kerosakan.)
Pintu kiri
Terbuka ke arah anda.
Pembahagi
berputar
Kembalikannya ke kedudukan asal.
37
Page 38

Operasi
Ruang pilih Segar Asli/Dingin
Ruang boleh pilih ditetapkan kepada [CHILLED] ketika pembelian.
Sila tetapkan untuk menyesuaikan tujuan penyimpanan makanan.
Menggunakan ruang Segar Asli (Prime Fresh)
■
Apabila anda ingin memanjangkan jangka hayat makanan dengan membuatkannya separa beku.
Ruang ini sesuai untuk menyimpan makanan segar seperti daging atau ikan.
●
• Jika dibandingkan dengan menyimpan di dalam ruang Dingin atau petak peti
sejuk, jangka hayat penyimpanan daging atau ikan menjadi lebih lama.
• Suhu boleh ditetapkan kepada “ 1 ”, “ 2 ” atau “ 3 ” untuk disesuaikan dengan isi
padu dan jenis makanan. (Hal. 34)
[Contoh makanan untuk disimpan]
• Daging •Ikan
Apabila makanan terlalu beku ............. Hirisan ikan mentah atau hirisan daging mungkin menjadi terlalu beku.
●
Tetapkan suhu kepada “ 1 ” untuk mengelakkan makanan terlebih beku.
Apabila makanan tidak separa beku ... Bergantung kepada jenis makanan seperti daging ketul atau ikan besar,
●
keadaan penyimpanan dan suhu sekeliling, makanan mungkin tidak
separa beku seperti dikehendaki. Tetapkan suhu kepada “ 3 ”.
Anggaran -3 °C ~ -1 °C
Mudah dipotong.
Makanan yang separa beku mudah dipotong!
Jika anda ingin menghiris ikan mentah atau daging ketul, bekukan sebentar
makanan di dalam ruang segar asli. Ia amat membantu.
Menggunakan ruang Dingin
Anggaran 0 °C ~ 2 °C
■
Apabila anda tidak mahu membekukan makanan.
Ruang ini sesuai untuk menyimpan makanan dingin atau produk tenusu.
●
[Contoh makanan untuk disimpan]
• Makanan dingin • Mi rebus • Yogurt
• Krim segar • Keju
Bergantung kepada makanan, ia mungkin dibekukan
●
sebahagian.
Ubah kedudukan makanan atau tetapkan suhu petak peti sejuk kepada “ 1 ”.
Petua menyimpan
■
Apakah makanan itu tidak sesuai untuk Segar Asli/Dingin?
●Telur ●Susu ●Air ●Jus ●Tauhu
●Sayur • Buah
●Ais ●Ais krim ●Makanan beku
Dalam petak peti
sejuk
Dalam petak
sayuran
Dalam petak
pembeku
■
Apakah tempoh menyimpan tanpa
bungkusan plastik?
(Ruang boleh pilih ditetapkan kepada
[CHILLED].)
Contoh makanan Garis panduan masa
Sandwic Anggaran 3 jam
Sashimi (ikan mentah) Anggaran 6 jam
Salad Anggaran 6 jam
Telur dadar Anggaran 9 jam
Permintaan
Tukar tetapan suhu ruang boleh pilih agar sesuai dengan tujuan penyimpanan atau jenis makanan.
●
Apabila anda menukar tetapan suhu, pastikan untuk menggantikan makanan agar sesuai dengan suhu yang ditetapkan.
●
Notis
Tetapan untuk segar asli “ 1 ”, “ 2 ” dan “ 3 ” menggunakan lebih 10% tenaga berbanding dengan tetapan [CHILLED].
●
38
Page 39

Petak Pembekuan Segar
Dengan Pembekuan Segar, makanan menjadi beku dengan cepat kerana udara sejuk dan plat aluminium.
(Anda boleh menggunakan petak pembeku semasa Pembekuan Segar tidak beroperasi.)
Menggunakan “FRESH FREEZING”
■
Bekukan bahan atau makanan dipanaskan seperti nasi panas segera bagi mengekalkan kesegarannya.
Bungkus makanan di dalam bungkusan plastik atau letakkan di dalam pek
1
penyimpanan pembeku, dan letakkan di plat aluminium.
Tekan butang [FRESH FREEZING] dan mula operasi Pembekuan Segar.
2
(Lampu menyala.)
Pembekuan Segar tamat secara automatik selepas
FRESH
FREEZING
Lampu menyala:
Beroperasi
Lampu padam: Berhenti
●
kira-kira 150 minit.
(Jika makanan tidak cukup beku, mulakan “FRESH FREEZING” sekali lagi)
Operasi
Bahasa Melayu
Apabila makanan disimpan untuk tempoh yang lama selepas Pembekuan Segar, simpan makanan di
3
dalam petak pembeku.
Jika anda ingin menghentikan Pembekuan Segar separuh jalan, tekan butang [FRESH FREEZING] sekali lagi.
●
(Lampu padam.)
Semasa Pembekuan Segar, penggunaan tenaga meningkat lebih dari biasa.
●
Jika QUICK ICE MAKING ditetapkan semasa operasi Pembekuan Segar, operasi Pembekuan Segar akan
●
dihentikan.
Jika Pembekuan Segar dimulakan semasa proses nyahfros, masa tamat akan dilewatkan kerana operasi
●
Pembekuan Segar akan bermula selepas proses nyahfros tamat.
Tiga syarat Pembekuan Segar yang lazat
Bungkus makanan dengan ketat.
• Bungkus makanan di dalam bungkusan plastik, buang semua udara dari dalam.
• Bahagikan makanan dalam pek kecil dengan ketebalan kira-kira 2 cm.
• Contohnya, jika dulang polistrin atau bekas kedap digunakan, pemindahan suhu
akan kurang berkesan, membuatkan makanan sukar membeku.
Letakkan makanan mendatar dan sekata pada plat aluminium.
• Beri ruang antara makanan. (Sekurang-kurangnya jarak 5 mm antara makanan)
• Letakkan bungkusan makanan mendatar dan sekata pada plat aluminium dan jangan ditindih antara satu
sama lain.
Bungkus makanan panas juga.
• Bungkus makanan panas dengan ketat juga.
• Contohnya nasi, Pembekuan Segar boleh dilakukan untuk lebih kurang 2 mangkuk nasi pada satu masa.
Permintaan
Simpan ais krim yang mengandungi lebih lemak susu dll. di dalam petak pembeku.
●
Jangan memasukkan botol atau tin. (Ia mungkin retak atau pecah.)
●
Jangan memasukkan makanan yang lebih tinggi daripada bekas.
●
(Ia akan menghalang pintu ditutup dengan betul, menyebabkan fros.)
Notis
Pembekuan mungkin tidak mencukupi bergantung kepada jenis makanan yang disimpan, keadaan
●
pembungkusan, jumlah disimpan dan kekerapan pintu dibuka. Jika ia berlaku, mulakan “FRESH FREEZING”
sekali lagi.
Bunyi kedengaran lebih kuat sedikit semasa operasi Pembekuan Segar tetapi ini bukan menunjukkan pincang tugas.
●
ECO NAVI tidak beroperasi semasa operasi Pembekuan Segar.
●
39
Page 40

Operasi
Petak Ais
Dulang pembuatan ais
Kotak penyimpanan ais
Tangki bekalan air
anggaran 1.2 liter
Penapis penulenan
Pembuat ais automatik
Penyodok ais
(Disediakan di depan bekas.)
Untuk menggunakan pembuat ais automatik dengan selesa
Hanya gunakan air minuman untuk pembuatan ais auto.
Jika anda menggunakan air selain daripada air paip, bakteria mungkin wujud.
Kerap mencuci tangki bekalan air dan dulang pembuatan ais dengan air. (Hal. 45)
Apabila air yang berikut digunakan,
cuci tangki bekalan air dengan kerap!
(Hal. 45)
Kelikatan air
mestilah 100 mg/L
atau kurang.
Air minuman
Jangan menghempas ketika membuka/menutup pintu petak ais.
Permintaan
Notis
●
(Ais boleh jatuh ke bekas petak pembeku atau ke tempat lain.)
Jangan tuang air terus ke dalam dulang membuat ais untuk buat ais.
●
(Ia boleh menyebabkan kerosakan pada pembuat ais atau kiub ais boleh melekat.)
Jangan tuang air terus ke dalam kotak penyimpanan ais untuk membuat ais.
●
(Jika tidak, kotak penyimpanan ais boleh pecah.)
Kelikatan air mestilah 100 mg/L atau kurang.
●
Mineral mungkin kelihatan seperti zarah putih yang terapung. Ia tidak berbahaya.
Jangan isi makanan atau item lain ke dalam petak ais.
●
(Jika tidak, jumlah ais tidak dapat dikesan dengan betul dan membuat ais auto mungkin akan terhenti.)
Ketika pertama kali anda menggunakan petak ais, bau atau debu mungkin terdapat dalam
●
dulang membuat ais.
Buang satu atau dua lot pertama ais.
Operasi membuat ais auto berhenti secara automatik apabila kotak telah dipenuhi dengan kiub ais.
Keadaan ini tidak boleh dikesan dalam situasi berikut.
Penyodok ais yang
tertinggal dalam kotak
penyimpanan ais terkena
tuil pengesan ais.
Jangan isi cecair seperti berikut
ke dalam tangki bekalan air.
(Ia mungkin akan merosakkan petak ais atau
menyebabkan kiub ais melekat antara satu sama lain.)
Jus dll. Minuman sukan Minuman
Tikar kalis bunyi
(Jangan dibuang.)
Air panas
berkarbonat
Kiub ais yang menimbun
terkena tuil pengesan ais.
40
Tuil pengesan ais
(Apabila ditekan, memberhentikan fungsi membuat
ais auto.)
Page 41

Untuk membuat ais
Keluarkan tangki bekalan air
Tambah air jika parasnya di bawah garisan “給水”.
(Gantikan air di dalam tangki bekalan air sekurang-kurangnya sekali
seminggu.)
Operasi
Ais boleh dibuat dalam
kira-kira dua jam!
Tangki bekalan air
Isi dengan air
Tambah air sehingga garisan “満水”.
Pasang tangki bekalan air
Tolak tangki hingga melepasi garisan ini.
(Jika tidak dipasang dengan betul, air tidak akan dibekalkan dan ais
tidak akan dibuat.)
Tudung
Jangan tambah air
melebihi garisan.
Tutup tudung dengan
ketat.
Pastikan tangki
melepasi garisan
yang ditandakan.
Namun, ia akan mengambil masa yang lebih lama dalam keadaan berikut.
Apabila peti sejuk digunakan untuk kali pertama.
●
(Ia akan mengambil masa 24 jam atau lebih kerana
fungsi pembuatan ais auto akan bermula hanya
selepas bahagian dalam cukup sejuk.)
Apabila pintu kerap dibuka.
●
Apabila pintu tidak rapat.
●
Apabila banyak makanan disimpan sekaligus.
●
Apabila suhu sekeliling rendah pada musim sejuk
●
atau tinggi pada musim panas.
Apabila kegagalan kuasa berlaku.
●
Apabila dulang membuat ais telah dibersihkan.
●
(Hal. 45)
Untuk membuat ais dengan cepat
Bahasa Melayu
■
Apabila [QUICK ICE MAKING] ditetapkan, kepantasan membuat ais meningkat.
Ais boleh dibuat dalam masa 80 minit* paling cepat.
Selepas lebih kurang 6 jam, ia kembali ke pembuatan ais auto yang normal.
QUICK
ICE MAKING
Lampu menyala:
Pembuatan ais cepat dihidupkan
Lampu padam:
Pembuatan ais normal dihidupkan
*
Suhu sekeliling 20 °C, suhu di dalam setiap petak ditetapkan kepada “2”, pintu tidak dibuka atau ditutup.
●
Jika anda ingin menghentikan pembuatan ais cepat separuh jalan, tekan butang
●
[QUICK ICE MAKING] sekali lagi. (Lampu padam.)
Apabila proses nyahfros dihidupkan, lampu akan berkelip.
●
[QUICK ICE MAKING] bermula semula secara automatik bila nyahfros selesai.
Semasa pembuatan ais cepat, penggunaan tenaga meningkat lebih dari biasa.
●
Jika Pembekuan Segar dilakukan secara manual semasa [QUICK ICE
●
MAKING], QUICK ICE MAKING dibatalkan.
ECO NAVI tidak beroperasi ketika QUICK ICE MAKING telah ditetapkan.
●
Untuk menghentikan pembuatan ais auto dimatikan
■
Tekan butang [AUTO ICE OFF] selama 3 saat jika anda tidak mahu membuat ais dan sebelum mencuci
dulang membuat ais.
Terdapat bunyi bip, kemudian lampu bertukar daripada berkelip kepada
AUTO
ICE OFF
(PRESS 3 SEC.)
Lampu menyala:
Pembuatan ais dimatikan
Lampu padam:
Pembuatan ais auto dihidupkan
●
menyala.
(Jangan membuka laci petak ais semasa lampu berkelip.
Pembuatan ais tidak boleh dihentikan.)
Tekan butang [AUTO ICE OFF] sekali lagi selama 3 saat bila anda membatalkan
●
AUTO ICE OFF.
Ais yang sedang dibuat dilepaskan selepas AUTO ICE OFF dibatalkan.
●
Apabila anda menghentikan pembuatan ais auto untuk tempoh yang lama,
●
kosongkan tangki bekalan air dan bersihkannya. (Hal. 45)
41
Page 42

Operasi
Petak Pembeku
Bekas Pembeku (Bahagian atas)
Bekas Pembeku (Bahagian bawah)
[Ini adalah contoh penyimpanan.]
Ruang
menegak
Banyak makanan beku dan makanan masak boleh disimpan.
●
Permintaan
Bagi bekas pembeku sebelah atas, letakkan makanan mengikut
●
ketinggian bekas.
Bagi bekas pembeku sebelah bawah, letakkan makanan di bawah
●
garisan had atas (↓食品はここまで↓) yang ditandakan di sebelah
dalam bekas.
(Pintu mungkin tidak tertutup rapat dan fros mungkin berlaku.)
Tiga syarat pembekuan yang lazat
1. Bekukan makanan dengan cepat dalam bahagian yang tipis dan kecil!
2. Balut dengan ketat!
3. Jangan bekukan semula!
Petak Sayuran
Bekas item sayuran yang kecil
Bekas sayuran
[Ini adalah contoh penyimpanan.]
Makanan boleh
disimpan tanpa
bungkusan plastik.
Sudut botol
*
Letakkan tomato dan cili hijau di dalam bekas sayuran kecil.
●
Bekas utama (tidak termasuk bahagian sudut
botol) petak sayuran di mana makanan jarang
mengering disyorkan untuk sayuran berdaun.
Permintaan
*
Sayuran berpotong atau yang disimpan untuk tempoh yang lama
mungkin perlu dibungkus.
Tutup nasi dengan rapat sebelum menyimpannya.
●
Kelembapan di dalam petak sayur adalah tinggi dan pemeluwapan
●
boleh berlaku. Cuma lap titisan air.
Letakkan sayuran dan buah-buahan mengikut ketinggian bekas.
●
42
Page 43

Lampiran
Mencuci dan menanggalkan serta memasang semula
Lakukan pembersihan dan penyelenggaraan berkala bagi memastikan peti sejuk sentiasa bersih dan ini akan
membantu memanjangkan tempoh operasi.
Sebelum membersihkan atau menyelenggara, pastikan plag kuasa dicabut terlebih dahulu.
Jangan memasang atau mencabut plag kuasa jika tangan anda basah. Jika tidak ia boleh menyebabkan kejutan
elektrik atau kecederaan.
Pembersihan
Bersihkan peti sejuk serta merta selepas dikotori.
Lap kotoran mudah tanggal dengan kain yang dicelup dalam air suam.
Lap kotoran degil menggunakan kain yang dicelup dalam sabun dapur neutral.
Kemudian lap lebihan sabun dengan kain yang dicelup dalam air suam.
Untuk menyudahkan pembersihan, pastikan anda mengelap permukaan untuk mengeringkan lebihan
kelembapan.
Bersihkan bahagian tersorok sekurang-kurangnya sekali setahun.
Habuk terkumpul boleh menyebabkan pembaziran elektrik.
Buang habuk terkumpul pada soket dinding dan di celah-celah peti sejuk.
Bagi pelekat pintu, lap dengan kain lembut
yang basah, kemudian lap dengan kain kering.
(Pelekat yang kotor mudah rosak dan boleh
menyebabkan kebocoran udara sejuk.)
Bahasa Melayu
Jika cap jari atau kotoran tidak boleh
dihilangkan dengan mudah, lap dengan
kain yang direndam sedikit dalam
sabun dapur neutral kemudian dengan
kain basah. Lap sekali lagi dengan kain
kering.
Bahagian sangga untuk pintu petak
peti sejuk berputar telah disalut dengan
pelincir. Jangan lap bahagian ini.
→ Jika anda telah mengelapnya,
hubungi pengedar anda.
Perhatian
Lap serta-merta!
Jika cecair meleleh pada tepi
pintu, dengan cepat tekup
dan lap dengan kain kering.
Pintu dibuat daripada kaca. Jangan mengenakan impak pada permukaan dan tepi pintu semasa membersihkan.
●
Jangan menggunakan alat yang tajam (terutama alat logam). (Ia boleh menyebabkan kerosakan.)
●
Jangan menggunakan bahan berikut untuk mencuci.
●
Beralkali atau
sedikit beralkali
Sabun dapur,
Pencuci kaca
(Ia meretakkan plastik.)
Penyental,
Span pengilat
Pencuci,
Sabun serbuk
Benzin, Pencair,
Alkohol, Asid,
Petrol
Air panas
43
Page 44

Lampiran
Dulang / Rak serbaneka 1-2 (dibuat dari kaca)
■
Dulang (Rak atas dalam peti sejuk)
Lepaskan tonjolan pada cangkuk di belakang dulang
dan tarik.
Cangkuk
Dulang
■
Dulang (rak ke-2 dari atas dalam peti sejuk)
Angkat sisi belakang dulang dan tarik ke arah anda.
Sebaik sahaja tonjolan pada dulang terlepas daripada
rel, condongkan dulang dan keluarkannya.
Cangkuk
Dulang
Rel
Perhatian
Sekali setiap tiga bulan
■
Lepaskan tonjolan pada cangkuk di depan rak
serbaneka 1-2 dan tarik keluar.
Bahagian belakang
Bahagian depan
■
Bahagian belakang rak serbaneka 1-2
Keluarkan bahagian depan (rujuk rajah di atas).
Angkat sedikit bahagian belakang dan tarik.
Masukkan bahagian
belakang rak
serbaneka 1-2 agar lubang
di atasnya menghala ke arah
anda.
Rak pembahagi tidak boleh dikeluarkan. Jangan keluarkan rak pembahagi semasa membersihkannya.
●
Dulang, rak serbaneka 1-2 dan rak pembahagi dibuat daripada kaca dan berat.
●
Berhati-hati semasa memegangnya supaya tidak jatuh dan menyebabkan kerosakan atau kecederaan.
Untuk memasang dulang, pegang dulang dengan sisi tonjolan ke bawah dan masukkan.
Bekas (Ruang pilih Segar Asli/Dingin)/Bekas telur/Bekas item kecil
■
Bekas (Ruang pilih Segar Asli/Dingin)
Tarik bekas sejauh yang
boleh, angkat bahagian
depan dan tarik ia keluar
secara condong dengan
memegang penutup di atas
bekas.
■
Bekas telur/Bekas item kecil
Sekali setiap tiga bulan
Tarik bekas sejauh yang
boleh, dan tarik keluar secara
condong sambil mengangkat
bahagian depan.
Perhatian
Pembahagi yang dipasang pada kedua-dua sisi bekas telur dan bekas item kecil tidak boleh dikeluarkan.
●
Jangan keluarkan pembahagi semasa membersihkannya.
Rak pintu/Rak botol
■
Tanggalkan
Tekan bahagian bawah rak kecil ke atas
atau tolak ke atas berselang-seli di kiri dan kanan
rak besar, dan angkat perlahan-lahan.
(Dipasang dengan ketat)
• Keluarkan rak yang ditanggalkan sebelum rak botol.
■
Memasang semula
Letakkan setiap rak secara mendatar, dengan
tanda [>PS<] di sebelah kanan, dan tekan
ke bawah supaya masuk ke tempat asal.
• Keluarkan rak yang ditanggalkan sebelum rak botol.
Sekali setiap tiga bulan
44
Tolak rak ke
atas.
Page 45

Lampiran
Tangki bekalan air / Penapis penulenan
Tanggalkan tudung dan
cuci tangki bekalan air
dengan air.
Tudung
Pasang penapis penulenan air dan penyendal.
Sebagai panduan, ganti penapis penulenan setiap tiga tahun.
●
(Bahagian yang dijual berasingan: CNR MJ-108850) (Hal. 53)
Jika ada karat air pada penapis penulenan, ais tidak menjadi dengan betul.
●
Pusingkan penapis
penulenan air untuk
menanggalkan dan
mengeluarkannya.
Cangkuk
Bilas dengan lembut
penapis penulenan air.
Dulang membuat ais boleh basuh (Di dalam petak ais)
■
Keluarkan dulang membuat ais dan bilas.
Tekan butang [AUTO ICE OFF] selama 3 saat dan berhenti membuat ais.
(Lampu menyala. Hal. 41)
Putar tombol dalam petak membuat ais kepada kedudukan buka.
Tarik tuil ke depan untuk menarik keluar dulang pembuat ais.
Cuci ia dengan air. Jangan menggosok permukaan dengan span dll.
(Jika dulang membuat ais calar, ia mungkin tidak boleh dikeluarkan
dengan betul dan mengakibatkan pincang tugas.)
Dulang membuat ais dan bingkai tidak boleh dipisahkan.
●
Jangan menggunakan pengering pinggan mangkuk.
●
Sekali seminggu
Keluarkan penyendal
di sekeliling tepi dari
belakang. Cuci ia dengan
air.
Sekali atau dua kali setahun
Tombol
Kedudukan
kunci
Kedudukan
Bahasa Melayu
buka
■
Pemasangan
Tolak hingga terdengar bunyi terkunci.
Putar tombol kepada kedudukan kunci.
Ais mungkin tidak dibuat jika dulang pembuat ais tidak dikunci.
Tekan butang [AUTO ICE OFF] selama 3 saat dan mula membuat ais
semula. (Lampu padam. Hal. 41)
Ais tidak dibuat sehingga [AUTO ICE OFF] dibatalkan.
●
Jangan letakkan air terus ke dalam dulang membuat ais selepas mencuci.
●
(Ia akan menyebabkan kiub ais melekat atau pincang tugas.)
Bekas (Petak Ais/Pembekuan Segar/Pembeku/Sayuran)
Tarik keluar secara
condong
Tarik pintu seluas yang
boleh, dan tarik keluar secara
condong sambil mengangkat
bahagian depan.
Keluarkan plat aluminium
Apabila plat dimasukkan,
letakkannya di bahagian
depan tonjolan.
Tonjolan
Permintaan
Bahagian sentuh rel laci telah disalut dengan pelincir.
●
Jangan lap bahagian ini.
Apabila bekas atas di dalam petak pembeku atau
●
bekas sayuran kecil telah dikeluarkan, pasang dengan
meletakkan “手前 FRONT” yang tertulis di bahagian
bawah bekas pada bahagian depan.
Jangan sentuh plat Pembekuan Segar dengan tangan
●
basah, contohnya apabila mencuci plat.
(Ia boleh menyebabkan kecederaan sejuk beku)
Apabila bekas dan plat aluminium dicuci, pastikan ia
●
betul-betul kering dan mengelap baki titisan air sebelum
memasangnya.
Kedudukan
buka
Sekali setiap tiga bulan
Tuil
Kedudukan
kunci
45
Page 46

Lampiran
Dalam kes-kes sebegini?
Kegagalan kuasa.
Plag kuasa telah tercabut.
Peti sejuk tidak digunakan
untuk waktu yang lama.
Lampu ruang tidak
menyala. Tutup lampu
telah pecah.
Kaca telah pecah.
(Dulang • pintu kaca)
Memindahkan peti sejuk
ke depan dan belakang.
Biarkan pintu tertutup dan jangan simpan makanan tambahan.
●
[FRESH FREEZING] dan [QUICK ICE MAKING] berhenti. Set semula fungsi-
●
fungsi ini untuk menggunakannya.
Tunggu sekurang-kurangnya 7 minit, kemudian pasang plag kuasa.
●
(Jika plag dipasang serta-merta, pemampat akan terlebih beban, yang boleh
menyebabkan pincang tugas.)
Keluarkan semua makanan dan minuman dan bersihkan peti sejuk.
●
Cabut plag kuasa.
Bersihkan petak dan dulang membuat ais. (Hal. 44 hingga Hal. 45)
Biarkan pintu terbuka selama dua hingga tiga hari untuk mengeringkan
petak.
(Bila pengeringan tidak mencukupi, petak mungkin hapak atau berbau busuk.)
Apabila menggantikan lampu ruang, sila hubungi pengedar anda yang sah
●
atau pusat servis.
Apabila dulang kaca atau pintu kaca telah pecah, jangan sentuh kaca yang
●
pecah dan hubungi segera pengedar anda yang sah atau pusat servis.
Keluarkan penutup kaki, kemudian naikkan kaki pelarasan. (Hal. 32)
Keluarkan alat pelindung menjongket. (Hal. 32)
Cabut plag kuasa.
Gerakkan peti sejuk ke depan atau belakang.
(Menggerakkan peti sejuk secara paksa yang berlebihan atau menggerakkannya
ke arah lain selain ke depan atau ke belakang boleh merosakkan lantai, jadi
letakkan papan atau yang serupa di atas lantai.)
Apabila anda memindah
atau mengangkut peti
sejuk.
Jangan mengangkut peti sejuk dalam keadaan mendatar.
●
(Berbuat demikian menyebabkan kegagalan paip di sekeliling pemampat dan
mungkin patah.)
Keluarkan makanan dan minuman dalam semua petak dan buang sisa air dan
●
ais. Kemudian, pindahkan peti sejuk dengan bantuan sekurang-kurangnya dua
orang.
Keluarkan makanan dan minuman dan buang air di dalam tangki bekalan air.
Hentikan fungsi membuat ais auto. (Hal. 41)
Bersihkan dulang membuat ais. (Hal. 45)
Tanggalkan skru penutup kaki pada kaki boleh
laras. (Hal. 32) (Tanggalkan penutup kaki sebelum
mengangkut peti sejuk.)
Keluarkan alat pelindung menjongket.
Cabut plag kuasa.
Letakkan vesel di bawah lubang saliran.
Air mungkin melimpah. Letakkan kain dll. di bawah
dan di sekitar vesel.
Condongkan peti sejuk ke belakang untuk
mengalirkan air dari lubang saliran. (Untuk
mengelakkan air keluar, condongkan peti sejuk ke belakang secara perlahanlahan.)
Ketika memindahkan peti sejuk, letakkan lembaran pelindung dll. di atas
laluan kerana air mungkin ada dalam tempat pengewapan.
( Bekas yang tingginya 2 cm
atau kurang)
46
Perhatian
Jika fros masih ada pada unit penyejukan (tidak terlihat dari luar) di dalam peti
●
sejuk, air mungkin tumpah apabila ia dipindahkan.
(Ia mengambil sekitar 15 jam untuk fros di dalam unit penyejukan menjadi cair
selepas plag kuasa peti ais dicabut.)
Page 47

Lampiran
Pembuat ais automatik
tidak digunakan untuk
waktu yang lama.
→ Ketika mula
menggunakan semula
pembuat ais automatik,
matikan fungsi “AUTO
ICE OFF”. (Hal. 41)
Penggera menghasilkan
bunyi bip dan lampu
ruang (LED) berkelip,
dan huruf "U" serta
angka "10" ditunjukkan
berselang-seli pada
kawasan penunjuk notis.
Berhenti membuat ais, dengan tangki bekalan air kosong dan bersihkan
●
pembuat ais.
Buang air di dalam tangki bekalan air.
Tekan butang [AUTO ICE OFF] selama 3 saat dan berhenti
membuat ais. (Hal. 41)
(Lampu menyala.)
Buang ais yang disimpan di dalam dulang membuat ais
dan kotak penyimpanan ais.
• Apabila ais disimpan terlalu lama, kiub ais menjadi bulat
atau bercantum oleh pemejalwapan.
Bilas kotak penyimpanan ais, penyodok ais dan tangki bekalan air.
Lap air dan kembalikan kepada kedudukan asal.
• Penapis penulenan air di dalam tangki air berisi air.
Keringkan dengan betul.
Jika bunyi atau penunjuk yang berikut dihasilkan
Tutup pintu yang terbuka.
Penggera
Pintu petak peti sejuk,
petak ais atau petak
pembeku terbuka.
1 minit
kemudian
3 minit
kemudian
5 minit
kemudian
Lebih daripada
5 minit
Bip dua kali Berkelip sekali
Dua bip dua
kali
Bip dua kali
berterusan
Bip dua kali
berterusan
Bahasa Melayu
Lampu ruang (LED)
Berkelip dua kali
Berkelip tiga kali
Berkelip tiga kali
setiap 2 minit
selepas itu
Huruf “H” dan satu
nombor bergilir-gilir
ditunjukkan di kawasan
penunjuk notis.
Contoh”
“
“dd” dipaparkan di
kawasan penunjuk
notis.
Keabnormalan
mungkin telah berlaku.
Peti sejuk dalam mod
demo.
• Operasi penyejukan
dihentikan.
• Lampu di dalam
peti sejuk berkelip
menyala selama
5 saat dan padam
selama 1 saat.
Jika penunjuk muncul, hubungi wakil
pengedar anda.
Batalkan mod demo.
Buka pintu petak peti sejuk, petak ais
dan petak pembeku.
Tekan butang [FREEZER] dalam panel
kawalan sekurang-kurangnya 10 saat.
Tutup pintu petak peti sejuk, petak ais
dan petak pembeku.
47
Page 48

Lampiran
Penetapan yang sesuai dengan kehendak anda
Untuk melaras suhu lebih terperinci
■
Suhu petak peti sejuk dan petak pembeku boleh ditetapkan dalam 9 peringkat, lebih terperinci daripada
“1”, “2” dan “3”.
(ECO NAVI tidak beroperasi apabila suhu diselaraskan secara terperinci.)
Bagi petak peti sejuk
Prosedur Penetapan
Tetapkan suhu peti sejuk kepada tetapan “ 1 ”.
Tekan butang [FRIDGE] sekurang-kurangnya 10 saat.
(Terdapat bunyi bip dan lampu [2] menyala, kemudian lampu [1]
(peringkat 1) menyala selepas 10 saat.)
Tekan butang [FRIDGE] dan pilih peringkat pilihan anda.
(Peringkat naik lebih tinggi bagi setiap kali butang [FRIDGE] ditekan.)
Jika [FRIDGE] butang ditekan apabila peringkat ke-9 ditetapkan (lampu
[3] menyala), tetapan kembali kepada “ 1 ” (lampu [1] menyala).
Prosedur Pembatalan
Tetapkan suhu peti sejuk kepada tetapan “ 1 ”.
Tekan butang [FRIDGE] sekurang-kurangnya 10 saat.
(Terdapat bunyi bip, kemudian lampu [1] menyala dan lampu [2]
berkelip.)
Pembatalan tetapan suhu terperinci selesai.
Tetapkan suhu agar sesuai dengan penggunaan biasa anda.
ECO NAVI tidak
beroperasi walaupun
semasa tetapan
suhu adalah “ 2 ”.
Bagi petak pembeku
Lakukan langkah ~ di atas dengan menekan butang [FREEZER] dan
bukan butang [FRIDGE].
Tetapan
Peringkat
“ 3 ” 9
8
7
6
“ 2 ”
5
4
3
2
“ 1 ”
Menyala Berkelip Padam
1
Status lampu
Lampu
1 2 3
1 2 3
1 2 3
1 2 3
1 2 3
1 2 3
1 2 3
1 2 3
1 2 3
Suhu ruang pilih Segar Asli/Dingin tidak boleh dilaraskan secara terperinci.
●
Tetapkan ini apabila tiada penunjuk di kawasan penunjuk notis.
●
Untuk mematikan lampu ECO NAVI
■
Lampu ECO NAVI boleh dimatikan ketika operasi ECO NAVI.
( Tetapkan ini apabila tiada penunjuk di kawasan penunjuk notis dan petak pendingin dan petak peti sejuk
ditetapkan kepada “ 2 ”.)
Prosedur Penetapan
Buka pintu kiri petak peti
sejuk dan tekan butang
[FRIDGE] sekurangkurangnya 3 saat.
Operasi ECO NAVI dilakukan meskipun penetapan di atas dibuat.
●
Prosedur Pembatalan
Buka pintu kiri petak peti
sejuk dan tekan butang
[FRIDGE] sekurangkurangnya 3 saat.
Bip berbunyi, lampu ECO NAVI berkelip,
dan penetapan ini selesai.
(Selepas seketika, lampu ECO NAVI padam.)
Bip berbunyi, kemudian lampu ECO NAVI
menyala selama 3 saat dan pembatalan selesai.
(Selepas seketika, lampu ECO NAVI padam.
Namun, ia akan terus menyala semasa operasi
ECO NAVI.)
48
Page 49

Menyelesaikan masalah
Jika anda berasa bahawa peti sejuk tidak berfungsi dengan betul, periksa perkara berikut terlebih dahulu.
Jika masalah berterusan, cabut plag kuasa dan hubungi pengedar anda atau pusat servis yang sah.
Bunyi-bunyi berikut bukan abnormal.
Lampiran
Dari dalam peti sejuk.
Bunyi gertakan
●
Bunyi bahagian mengembang dan
mengecut akibat perubahan
suhu.
Bunyi pengezuman
●
Bunyi kipas beroperasi.
Bunyi berdentingan
●
Bunyi botol di rak pintu bergetar
disebabkan operasi pemampat.
Dari petak ais dan tangki bekalan
air.
Bunyi deruan, berdesir dan
●
membobok
Bunyi dihasilkan apabila ais
dilepaskan oleh pembuat ais
automatik dan air dibekalkan.
Apabila petak pembeku dibuka.
Bunyi mendesis
●
Bunyi air yang menyejat oleh
pemanas semasa proses nyahfros.
Bunyi membalut
●
Bunyi berdebap
●
Bunyi dihasilkan dari rel laci apabila
laci dibuka/ditutup.
Dari bahagian atas atau
belakang.
Bunyi klik
●
Bunyi dihasilkan apabila
komponen elektrik dan
pemampat beroperasi.
Bunyi pengezuman
●
Bunyi pemampat beroperasi.
Bunyi pic naik dan turun
kerana operasi berkelajuan
tinggi dilakukan untuk
memadankan variasi suhu.
Dari belakang.
Bunyi membobok, mendesis
●
dan mengalir
Bunyi gas pendingin mengalir.
Apabila petak sayuran
dibuka.
Bunyi membalut
●
Bunyi berdebap
●
Bunyi dihasilkan dari rel laci
apabila laci dibuka/ditutup.
Bahasa Melayu
Bunyi berdesir
Bunyi bising mengganggu saya
Bunyi
Bunyi membungkus boleh
didengari
Adakah lantai keras dan mendatar? (Hal. 32)
●
Adakah kedua-dua kaki mencecah lantai dan peti sejuk dipasang
●
dengan betul? (Hal. 32)
Adakah bahagian tepi peti sejuk tidak menyentuh dinding atau
●
perabot di sekitar peti sejuk? (Hal. 32)
Adakah kord kuasa peti sejuk tidak menyentuh dinding atau perabot
●
di sekitar peti sejuk? (Hal. 32)
Pemampat atau kipas boleh menghasilkan bunyi yang kuat apabila
●
peti sejuk menjadi sejuk, seperti apabila peti sejuk masih belum
sejuk sejurus selepas pemasangan, pintu sering dibuka dan
ditutup, suhu di sekeliling peti sejuk tinggi atau Pembekuan Segar
ditetapkan kepada ON. Ini bukannya abnormal.
→ Apabila peti sejuk telah disejukkan, bunyi yang menjadi perlahan.
Apabila pintu ditutup dengan menghempas atau lantai tidak sekata,
●
peti sejuk bergetar dan menghasilkan bunyi. Letakkan plat di bawah
peti sejuk untuk mencegah daripada bergetar. (Hal. 32)
49
Page 50

Lampiran
Bahagian atas peti sejuk panas
Panel depan (atau tepi) panas
Panas
Tetapan suhu di panel operasi
berkelip.
Paparan
Pintu berat apabila
membukanya sejurus selepas
menutup.
Pintu
Magnet tidak melekat pada
pintu.
Ais tidak dapat dibuat
Membuat ais
Kiub ais tidak membeku di
dalam
Bahagian mekanikal mengalirkan haba. (Hal. 32)
●
Permukaan tepi kiri dan kanan akan menjadi panas untuk
●
mengeluarkan haba yang dihasilkan ketika sistem pendingin
beroperasi. Suhu boleh mencapai 50 °C hingga 60 °C (ketika suhu
sekeliling adalah 30 °C) selepas pemasangan atau pada musim
panas, tetapi ini bukanya abnormal.
Adakah suhu petak peti sejuk atau petak pembeku telah dilaraskan
●
secara terperinci? (Hal. 48)
Udara masuk ke bahagian dalam sejuk secara tiba-tiba. Tekanan
●
dalaman menjadi lebih rendah dari udara luar seketika. Item dalam
petak seolah-olah telah “disedut”.
Pintu dibuat daripada kaca. Magnet tidak melekat.
●
Apabila anda menggunakan peti sejuk untuk kali pertama, ais akan
●
dibuat selepas bahagian dalam cukup sejuk.
(24 jam atau lebih mungkin diperlukan.)
Adakah fungsi membuat ais ditetapkan kepada [AUTO ICE OFF] ?
●
Adakah tangki bekalan air (Hal. 41) dan dulang membuat ais
●
(Hal. 45) ditetapkan dengan betul?
Adakah makanan dll. diletak dalam kotak penyimpanan ais?
●
Adakah anda sering memasukkan dan mengeluarkan dulang
●
membuat ais?
Untuk mengesahkan sama ada pembuat ais beroperasi, tekan
●
butang [AUTO ICE OFF] sekurang-kurangnya 10 saat. Jika air
dalam tangki bekalan air berkurangan, pembuat ais sedang
beroperasi.
(Jika air tertumpah ke dalam kotak penyimpanan ais, lap air
tersebut.)
Sudahkan kawalan suhu petak pembeku ditetapkan kepada “ 1 ” ?
●
→ Tetapkan kepada “ 2 ” atau “ 3 ”. (Hal. 34)
Bentuk ais tidak “kubik”
Ais berbau
Bau
Bahagian dalam berbau
Terdapat projeksi.
●
→ Ia menyambung bahagian beku dalam dulang membuat ais.
Kiub ais adalah bulat atau bercantum dengan kiub ais yang lain.
●
→ Adakah ais disimpan untuk tempoh yang lama?
(Kiub ais menjadi bulat atau bercantum oleh pemejalwapan.)
Ais kecil.
●
→ Kiub ais kecil kadang-kadang dihasilkan apabila air di dalam
tangki habis.
Adakah anda membersihkan tangki bekalan air dan penapis
●
penulenan sekali seminggu? (Hal. 45)
Adakah bahan pencuci, benzin, peluntur digunakan untuk
●
penjagaan? (Hal. 45)
Adakah penapis penulenan air merosot? (Hal. 45)
●
Sudahkah anda meletakkan makanan berbau kuat dalam petak
●
lain?
Apakah makanan yang berbau kuat ditutup rapat?
●
Bau sering melekat pada dinding bahagian dalam.
●
→ Celupkan kain lembut dalam air suam dan perah.
Lap dengan kain ini.
50
Page 51

Lampiran
Tidak sejuk langsung
Tidak cukup sejuk
Fros dan embun Petak pembeku/Petak peti sejuk
Menyejuk
Adakah ditunjukkan dalam kawasan penunjuk notis panel
●
kawalan? (Hal. 47)
Apabila anda menggunakan peti sejuk untuk kali pertama, dari
●
empat hingga 24 jam atau lebih diperlukan sehingga peti sejuk mula
sejuk.
Adakah bekalan kuasa terputus?
●
Adakah kawalan suhu ditetapkan kepada “ 1 ” ? → Tetapkan kepada
●
“ 2 ”. (Hal. 34)
Adakah makanan menghalang lubang udara sejuk? (Hal. 33)
●
Adakah peti sejuk berada tepat di bawah sinar matahari atau ada
●
alat pemanas di sekitarnya? (Hal. 32)
Adakah ruang di sekitar peti sejuk mencukupi? (Hal. 32)
●
Adakah barang panas disimpan, pintu kerap dibuka atau terlalu
●
banyak makanan disimpan?
Keadaan ini terjadi ketika kelembapan tinggi, pintu terbuka untuk
●
waktu yang lama, atau kerap dibuka.
Apakah pintu tidak rapat kerana terdapat dirian tiub komersil atau
●
sejenisnya yang terperangkap di dalamnya atau makanan terlalu
banyak dimasukkan ke dalam peti sejuk?
Di luar peti sejuk
Mungkin terjadi apabila menggunakan [FRESH FREEZING]
●
berturutan apabila ada kelembapan tinggi.
→ Cuma lap dengan kain kering.
Bahasa Melayu
Makanan membeku
Sudahkan kawalan suhu ditetapkan kepada “ 3 ” ? → Tetapkan
●
kepada “ 2 ”. (Hal. 34)
Adakah suhu sekeliling 5 °C atau kurang? → Tetapkan kepada “ 1 ”.
●
(Hal. 34)
Adakah anda meletak makanan dengan kandungan air yang tinggi
●
berdekatan lubang udara sejuk di dalam peti sejuk (Hal. 33) atau
dalam ruang pilih Segar Asli/Dingin?
51
Page 52

Lampiran
SOALAN & JAWAPAN ECO NAVI
Bilakah ECO NAVI
beroperasi?
Lampu ECO NAVI berkelip
perlahan
Lampu ECO NAVI tidak
menyala (ECO NAVI tidak
beroperasi)
ECO NAVI beroperasi dengan sendirinya bergantung kepada kecerahan di
●
sekitar peti sejuk, perubahan suhu petak, kekerapan membuka dan menutup
pintu dan perubahan dalam isi padu penyimpanan.
(Lampu ECO NAVI menyala semasa operasi ECO NAVI.)
Ia menunjukkan ECO NAVI sedang mengesan perubahan dalam isi padu
●
penyimpanan selepas menutup pintu petak peti sejuk.
(Kira-kira 15 saat.)
ECO NAVI beroperasi hanya apabila tetapan suhu adalah “ 2 ” pada kedua-
●
dua petak pembeku dan peti sejuk.
(Tetapan suhu ruang pilih Segar Asli/Dingin tidak mempunyai kaitan dengan
operasi ECO NAVI.)
Apabila suhu diselaraskan, ECO NAVI tidak beroperasi. (Hal. 48)
●
Semasa operasi FRESH FREEZING dan operasi QUICK ICE MAKING, ECO
●
NAVI tidak beroperasi.
Jika “U” atau “H” dipaparkan pada penunjuk notis itu, ECO NAVI tidak
●
beroperasi.
ECO NAVI tidak beroperasi sehingga peti sejuk telah cukup sejuk.
●
Anda tidak boleh memaksa ECO NAVI beroperasi walaupun anda mahu.
●
Apabila menetapkan lampu ECO NAVI kepada OFF, lampu tidak menyala.
●
Batalkan tetapan OFF lampu ECO NAVI.
ECO NAVI tidak beroperasi jika anda menyimpan makanan panas atau anda
●
kerap membuka dan menutup pintu.
Fungsi belajar mungkin menyahdayakan operasi ECO NAVI pada sesuatu
●
masa apabila pintu kerap dibuka dan ditutup, untuk menyejukkan peti sejuk
juga.
Jika kegagalan kuasa berlaku, data fungsi belajar yang dikumpulkan akan
●
hilang.
ECO NAVI jarang beroperasi sehingga fungsi belajar telah mengumpul data
yang mencukupi.
Lampu ECO NAVI tidak
padam.
Lampu ECO NAVI padam
apabila pintu tidak dibuka
dan ditutup.
Lampu ECO NAVI tidak
padam walaupun menyimpan
banyak makanan.
Lampu ECO NAVI padam
walaupun menyimpan sedikit
makanan.
Apabila sensor keamatan cahaya (Hal. 35) tersorok di belakang sesuatu atau
●
panel kotor atau tercalar, sensor tidak boleh berfungsi dengan betul.
ECO NAVI boleh terus beroperasi bergantung kepada suhu di dalam petak
●
peti sejuk atau isi padu penyimpanan walaupun pintu dibuka atau ditutup,
tetapi kapasiti penyejukan dikekalkan.
Apabila proses nyahfros (automatik) bermula semasa operasi ECO NAVI,
●
sebagai contoh, ECO NAVI berhenti untuk melakukan operasi penyejukan
biasa selepas proses nyahfros.
Fungsi belajar boleh menukar operasi ECO NAVI kembali kepada operasi
●
penyejukan biasa.
Sensor penyimpanan (Hal. 34) hanya berfungsi di dalam petak peti sejuk.
●
Isi padu makanan yang disimpan dalam petak selain daripada petak peti sejuk
tidak dapat dikesan.
Apabila makanan disumbat dalam petak, sensor tidak boleh mengesan
●
perubahan dalam jumlah penyimpanan dengan baik dan lampu tidak boleh
mematikan.
(Terutamanya apabila banyak makanan disimpan pada dulang kaca atas.)
Apabila sensor penyimpanan (Hal. 34) tersorok di belakang makanan yang
●
disimpan di dalam petak, sensor tidak boleh mengesan perubahan dalam isi
padu penyimpanan dengan betul dan lampu tidak boleh padam.
Apabila makanan disimpan berdekatan sensor penyimpanan (Hal. 34) seperti
●
di atas dulang kaca atau dalam rak pintu, sensor mungkin tersilap mengesan
perubahan besar dalam isi padu penyimpanan dan lampu mungkin padam.
Apabila pintu kerap dibuka/ditutup atau dibiarkan terbuka untuk tempoh yang
●
lama, lampu mungkin padam.
52
Page 53

Spesifikasi
MODEL NR-F510GT
JUMLAH ISI PADU KASAR 530 L
JUMLAH ISI PADU PENYIMPANAN 410 L
ISI PADU PENYIMPANAN PETI SEJUK 249 L
ISI PADU PENYIMPANAN AIS 5 L
Lampiran
ISI PADU PENYIMPANAN PEMBEKUAN
SEGAR
ISI PADU PENYIMPANAN PEMBEKU 64 L
ISI PADU PENYIMPANAN SAYURAN 76 L
DIMENSI LUARAN
LEBAR×KEDALAMAN×TINGGI
BERAT 101 k
KADAR VOLTAN
KADAR FREKUENSI
Isi padu peti sejuk ini adalah berdasarkan IEC 62552.
Ditunjukkan pada label penunjuk kualiti di bahagian dalam pintu
petak peti sejuk.
685 mm × 683 mm × 1 828 mm
16 L
/ 223 lb
Bahagian yang dijual berasingan
Bahasa Melayu
Penapis penulenan air untuk
tangki bekalan air (Hal.45)
CNR MJ-108850
Set plat pelarasan (Hal. 32)
CNR 79-338120
53
Page 54

簡介
目錄
簡介
安裝
操作
附錄
安全須知 ..................................................................................................................... 55
安裝 ............................................................................................................................ 58
選擇正確的位置 ............................................................................................58
所有功能使用 .............................................................................................................. 60
操作面板 ........................................................................................................60
食物儲存 ........................................................................................................61
ECO NAVI 運作模式 ................................................................................
冷藏箱 ............................................................................................................62
微凍結/冰鮮選擇廂 ....................................................................................64
新鮮冷凍箱 ....................................................................................................65
製冰箱 ............................................................................................................66
急凍箱 ............................................................................................................68
蔬果格 ............................................................................................................68
清洗、取出並重新安裝 ................................................................................................ 69
清理 ...................
在這些情況下? .......................................................................................................... 72
依據自己偏好設置 ....................................................................................................... 74
故障排除 ......................................................................
ECO NAVI 常見問答 ................................................................................................... 78
規格 ............................................................................................................................ 79
另售零件 ......................................................................................................
.............................................................................................69
............................................... 75
.....61
............... 79
該產品主要適用於家用電器及其相關應用,例如
●
- 商店﹑辦公室和其它工作環境的員工食堂;
- 農舍和住有旅客的酒店﹑旅館以及其他居住環境;
- 放置床和吃早餐的環境;
- 餐飲和相關非零售應用。
為了節約能源
■
•不要把食物塞滿夾層裡。
否則可能阻礙冷氣進入。食物之間要保持足夠的空隙。
•減少開 / 關門的次數。
降低門開著 / 關著的次數阻止冷氣溢出並且降低耗電量。
•不要讓食品阻塞冷氣出口。
如果冷氣不能擴散到夾層的各個角落,內部就不能達到冷藏效果而且會消耗更
多的電量。
•冷氣從後面的排放管中排放出去(第 62 頁)。
•等待熱的食物和飲品自然冷卻以後再進行儲存。
否則,它們不僅會提高內部的溫度,而且會影響其他食品的保鮮。
處理包裝袋
■
通風管
54
請盡可能回收可再利用的物料(例如紙板﹑塑膠袋﹑膠帶和泡沫)並且確保你穩妥地處理了其它包
裝材料。
包裝袋應該放置在兒童不能觸及的位置,避免兒童受到傷害或導致窒息。
Page 55

安全須知
安全標誌含義
請勿 表示該設備必須接地,以防觸電
簡介
請務必遵守 請勿拆開
表示有死亡或嚴重傷害的風險。
除非有負責其安全的人員指導和監督,否則兒童、身體行動不便或缺乏經驗和常識的人不得使用該設
警告
關於電源插頭和電線……
備。
不容許小孩以雪櫃做遊戲。
定期清理電源插頭上的污垢,如灰塵。
●
將插頭插入與其相配的額定電壓和電流的璧裝電源插座。
●
切勿以拉扯電源線的方式拔出雪櫃的插頭,一定要緊緊握住插頭,從插座中直接拔出。
●
清潔雪櫃前,請拔下插頭。
●
當雪櫃長時間不用,請拔下電源插頭。
●
(否則會引起火災或觸電)
如電源線或雪櫃插頭損壞,必須由其服務代理商或同種資格的專職人員來更換以避免造成危害。
●
不要用濕手插拔電源插頭。
●
不得損壞電源插頭或電線。不要切斷或處理插頭或電線;不得將插頭或電線暴露於高溫下;不得過
●
分彎折、扭曲或拉扯插頭或電線;不得在插頭或電線上放置重物;不得將插頭或電線成束排列。
→ 聯繫經銷商修理插座或電線。
不得將雪櫃後部對著電源插座。
●
禁止使用損壞的電線或電源插頭或沒有完全插入插座的插頭。
●
iso-butane
異丁烷
中文
如果出現異常或故障,應立即停止使用雪櫃並拔出插頭。
(否則,可能會引起煙霧、火災或觸電。)
異常和故障舉例
電源線或插座異常熱
●
電源線有深的切口或明顯變形
●
有燒焦氣味
●
你可以強烈地感覺到電流
●
立即聯繫經銷商進行檢查和修理。
雪櫃頂部……
不得放置任何東西。
●
否則,雪櫃震動可能會引起東西掉落。
不得在頂蓋上放置任何東西。
●
(否則,部件可能會變形,引起觸電。)
55
Page 56

簡介
使用……
不得吊在或依靠在門上。
●
雪櫃外殼或內部不得用水。
●
電絕緣劣化並可能引起觸電或火災。)
(
不得損壞製冷劑回路。
●
(可燃性製冷劑可能會著火並引起爆炸。)
請勿觸摸製冰盤上的機制裝置。
●
當製冰功能開啟時,不得移動製冰盤。
●
不得在雪櫃中儲存可燃物品。
●
不得在雪櫃中儲存易爆物,比如帶有可燃推進劑的氣霧罐。
●
不得儲存化學物品或科學標本。
●
在雪櫃附近,切勿使用易燃化學物品。
●
在雪櫃內,切勿使用電器,比如除臭器。
●
(如果製冷劑洩漏,可能會因對接點火花而引起火災。)
除生產商推薦的設備外,否則不得使用機械設備或其他設備加速除霜過程。
●
不得對玻璃門施加高衝擊力。
●
(否則,玻璃可能會破裂並造成傷害。)
→ 如發現玻璃上出現裂縫,不要觸摸玻璃,請立即諮詢經銷商。
只裝飲用水。
●
應照看好兒童以確保雪櫃正確使用。
●
安裝……
提供地震時的安全措施(第 58 頁)
●
警告 — 確保雪櫃外殼或內置結構的通風口無阻塞。
●
確保雪櫃插頭接入接地電源插座。
●
不得插入未接地電源插座。(3 腳插頭)
不得將雪櫃安裝在碰到水的位置。
●
不得在雪櫃周圍空隙填塞其他物品。
●
(如製冷劑洩漏,可能會引起火災。)
雪櫃的處置和回收……
當棄置雪櫃時,以防有小童擅自藏身櫃內,發生意外。
●
可燃氣體用於製冷劑。
●
以及環戊烷用於雪櫃保溫。
廢棄雪櫃時,請以妥善的方法加以丟棄。
在雪櫃的整個使用壽命期間,需保持上述警告標誌完好無損。
●
當雪櫃被轉移到另一個位置以及送到回收廠時,請將用戶手冊轉交至使用或處理該雪櫃的人。
緊急情況……
56
請勿打開頂蓋和後蓋。
●
請勿拆卸、修理或改裝雪櫃。
●
(以免造成人身傷害、燒傷或觸電。)
如果發現氣體(如城市煤氣)洩漏,請勿碰觸雪櫃,並打開窗戶使廚房通風。
●
該雪櫃的製冷劑為易燃。如果冷卻回路(管道)損壞,請打開窗戶使廚房通風並與經銷商聯繫。
●
維修工作必須由受過良好培訓的維修專業人員在車間進行維修。
●
(否則,可能會引起電擊、著火或爆炸。)
Page 57

表示有人身傷害或財產損失風險。
注意
儲存食物……
●
(否則,這些玻璃置物架可能會破碎,引起受傷。)
●
●
(以免食物掉落造成傷害。)
●
(如果玻璃瓶中的液體結冰,玻璃瓶可能會破裂,液體將會從玻璃瓶中流出。)
●
(否則,你可能會凍傷手。)
●
(腐爛食物可能會引發疾病。)
不得對玻璃置物架施加高衝擊力。
不得使食物從玻璃置物架中突出出來。
如果食品容器不能達到擱架底部,請勿將其放在門架上。
不得冷凍瓶子。
切勿用濕手觸摸冰凍的食品或容器(特別是金屬容器)和鋁板。
切勿吃已變質或變色的食物。
簡介
開 / 關雪櫃門……
當其他人在接觸到雪櫃時不得開 / 關雪櫃門。
●
開 / 關門時,切勿將手指放在冷藏箱縫處。
●
切勿握住抽屜上部開 / 關製冰箱和新鮮冷凍箱。
●
切勿將腳放在底層抽屜下。
●
(否則,可能會夾住你的腳趾。)
切勿過度用力開 / 關雪櫃門。
●
(以免食物掉落造成傷害。)
清潔……
安裝或取下玻璃置物架時,請小心。
●
(以免玻璃擱架掉落引起損壞或刮傷。)
切勿直接觸碰金屬軌。
●
請勿將手或腳放入雪櫃底部下方。
●
(金屬板邊緣可能會造成人身傷害。)
移動或搬運雪櫃……
將配有可調校的雪櫃腳的雪櫃安裝在平坦堅實的地板上。
●
(否則,雪櫃可能會移動或傾倒,造成人身傷害。)
為脆弱的地板表面鋪上防護層等。
●
請握住手提把手搬運雪櫃。
●
(以免滑手造成傷害。)
中文
57
Page 58

安裝
安裝
選擇正確的位置
1.雪櫃放置環境。
遠離熱源並避免陽光直射以盡可能減少製冷能力並
●
防止電力浪費。
濕度較低的良好通風位置以免生銹或冷凝。
●
結實平整的地面
●
當放置於鋪有地毯、榻榻米墊子或乙烯基地板上時,
請在雪櫃下面鋪墊結實的墊板以防止地毯變形或變
色。
將雪櫃遠離其他設備放置以防止噪音干擾和不正確
●
的圖像顯示在電視和其他設備上。
放置於便於清潔電源插座的地方。
●
定期清潔灰塵。
(以免引起火災。)
利於散熱的地方
●
背面可以靠著牆。
(要留一定的間隙以防出現震動噪音或牆壁出現污點和
灰塵。)
雪櫃上方至少 40 毫米
*
如果間隙小於 15 毫米,門打開角度
不超過 90 度,玻璃置物架等不能取
出。
*
如靠牆安裝。
(俯視圖。)
左右至少 5 毫米
離牆至少 15 毫米
首次使用雪櫃前 ( 第 69 頁 ~ 第 71 頁 )
■
•請使用濕的軟布擦拭雪櫃內部。
•請沖洗供水器、淨水過濾器和製冰盤。
2. 雪櫃安裝。
拆下腳蓋。
雙手插入腳蓋兩側上的“ "下方,將其拉出。
旋轉可調校的雪櫃腳(右和左),使雪櫃保持平穩。
重新安上腳蓋。
如果雪櫃安放不平穩,開 / 關雪櫃門時會出現敲擊聲。(這會影響雪櫃的工作性能。)
●
請將雪櫃安裝在結實平整的地面上。
雪櫃門向下傾斜
■
旋轉較低側的可調校的雪櫃腳以調整平穩,如左圖
所示。
•由於食品負載或地面的適應性,在安裝四至五天
內雪櫃門也可能會傾斜。在這種情況下,重新調
整可調校的雪櫃腳以調節平穩。
•如果上述方法無效,採用調節墊板(另售零件)。
(第 79 頁)
調低右門的右可
調校的雪櫃腳。
腳蓋
可調校的雪櫃腳
當門降低時。
調低左門的左可
調校的雪櫃腳。
58
有一些防止因地震而引起傾翻的措施嗎?
■
請用皮帶等固件牢固雪櫃以防止雪櫃傾翻。
Page 59

3. 插頭插入璧裝電源插座。
將插頭插入與其相配的額定電壓和電流的璧裝電源插座。
安裝後電源插頭可以立即插入插座。
●
當接通電源時,雪櫃周圍及表面(側面)可能會非常熱
●
(當環境溫度為 30℃ ,其溫度約 50℃ 至 60℃),這是正常現象。(第 76 頁)
拔掉電源插頭後,至少保持間隔 7 分鐘。才能再次插電。(第 72 頁)
●
如果雪櫃沒有接地線插頭,應將其與接地裝置連接以防止因電洩漏而觸電。
●
為安全起見,雪櫃應進行接地連接
(帶有不接地 2 腳插頭的雪櫃)
進行接地連接是以防觸電。
請使用以下兩種方式的任意一種進行接地連接:
安裝
1. 當使用帶接地插孔的插座時,將接地線與插座和雪櫃背面
的接地線螺絲相連(請見
2. 當使用未帶接地插孔的插座時,將接地線連接到雪櫃後方
的螺絲上(請見 標誌),然後將另一端連接到接地棒,
如圖所示
切勿使用以下器件進行接地連接
煤氣管道和供水管道(有觸電或爆炸危險)
●
電話線和避雷針的接地線(有雷擊風險)
●
。
標誌),如圖示 。
4. 雪櫃內部冷卻。
內部冷卻大約需要四個小時。
●
夏天雪櫃內部均勻冷卻需要 24 個小時或更長時間。
●
雪櫃內部完全冷卻後,方可製冰。
●
雪櫃內部完全冷卻前,切勿開 / 關雪櫃門。
●
(暖空氣流會進入內部阻礙冷卻功能。)
須知事項
切勿拆下背部密封。
■
隔熱材料的填充孔。
將其拆下會降低冷凍效果。
如果你已經拆下了它,請用剪成四方形的布包紮帶將其粘住。
1
接地插座
中文
2
接地線
密封
請勿將物品放置於雪櫃頂部。
■
雪櫃頂部的壓縮器運行產熱,也會使其變熱。
如果熱量難以釋放,可能會降低雪櫃的冷卻能力。
壓縮器
備註
在安裝後,噪音變大,這是因為雪櫃內部還沒有降溫,壓縮器或風機以高速旋轉運行,但是這種現象是正常的。
●
(雪櫃內部冷卻後,噪音會變小。)
59
Page 60

操作
所有功能使用
操作面板
通知顯示器
•出現異常、演示模式。
(第 73 頁)
FRESH FREEZING(新鮮冷凍)
QUICK ICE MAKING(快速製冰)
AUTO ICE OFF(關閉自動製冰)
購買時設置。
●
儲存感應器
•感測器自動檢測存儲容量變化。
(第 61 頁和第 78 頁)
(第 65 頁)
(第 67 頁)
(第 67 頁)
冷藏箱
微凍結/
冰鮮選擇廂
新鮮冷凍箱製冰箱
急凍箱
蔬果格
溫度設定和指南
■
溫度
按鈕
設定
FRIDGE
FREEZER
PRIME FRESH
(這些只是在環境溫度為 30 ℃,雪櫃中沒有存放食品且內部溫度已經穩定的情況下的粗略指示說明。由於環境溫度、食物
儲存狀態、門開關次數以及其他使用情況的不同,該溫度可能會不同。)
CHILLED 1 2
約比 “ 2 "高 2℃~ 3℃ 約為 3℃~ 6℃
約比 “ 2 "高 2℃~ 3℃ 約為 -18℃~ -20℃
約為 0℃ ~ 2 ℃ 約比“ 2 "高 1℃~ 2℃ 約為 -1℃~ -3℃
約比“ 2 "低 2℃~ 3℃
約比“ 2 "低 2℃~ 3℃
約比“ 2 "低 1℃~ 2℃
3
通常情況下,使用的雪櫃溫度設置為“2"。
(在 ECO NAVI 運作模式停止期間 , 急凍箱或冷藏箱的溫度控制設置不是“2"。)
設定溫度指示燈閃爍時,請參見第 78 頁。
●
*
在購買時,微凍結/冰鮮選擇廂設置為 [CHILLED] 模式。
不要對操作面板施加強烈的衝擊力或用堅硬物體撞擊操作面板。
●
(否則,可能會造成表面破裂或劃傷。)
60
Page 61

食物儲存
操作
溫度約為 3 ℃ ~ 6 ℃
冷藏箱
溫度約為 0 ℃ ~ 2 ℃
微凍結/
冰鮮選擇廂
溫度約為 -3 ℃ ~ -1 ℃
溫度約為 -19 ℃ ~ -17 ℃
溫度約為 -20 ℃ ~ -18 ℃
溫度約為 3 ℃ ~ 8 ℃
上述溫度可以通過選擇“ 2 " 進行設置。由於雪櫃的使用方式不同,溫度可能會略有不同。
●
新鮮冷凍箱
急凍箱
蔬果格
可以長期或臨時儲存食物和飲料。
[ 冷凍 ]
加工食品或乳製品。
[ 微凍結 ]
新鮮食品的保鮮,如肉或魚。
冰凍原料或加熱食品的保鮮,例如熱飯。
冷凍食品的保鮮。
較高的濕度可以保持蔬菜和水果新鮮多汁。
ECO NAVI 運作模式
中文
3 個 ECO 功能檢測儲存容量和生活模式。
■
可有效自動節省能量。
在 ECO NAVI 運作模式運行過程中,ECO NAVI 指示燈亮。
只有當冷凍室和冷藏箱的溫度設置為“2"時,ECO NAVI 才會運作。
儲存 Eco
智能 Eco
夜間 Eco
在記憶功能生效後的第四周,可以更改燈的開 / 關模式。
●
在燈亮起約為 5 分鐘後,亮度減弱。(如果你不喜歡,可以關閉該指示燈。(第 74 頁)
●
在檢測存儲容量變化的過程,ECO NAVI 指示燈緩慢閃爍。(關閉冷藏箱門後約
●
15 秒鐘。)
當冷藏箱和急凍箱的溫度設定不是“2"時,指示燈不閃爍,但可檢測儲存容量。
雪櫃的使用狀態決定是否執行 ECO NAVI 運作模式。
●
1
*
儲存感應器(第 60 頁)檢測冷藏箱內的儲存容量變化。
3 周開 / 關門次數、每天或每小時儲存容量變化的記
憶、分析和評價。
2
光度感應器
*
檢測雪櫃室內的亮度。
生活模式需要三周時
間記憶
學習期
記憶功能
4 周後體現
ECO NAVI 指示燈
ECO NAVI 常見問答(第 78 頁)
*1
效率的大小取決於環境溫度、環境亮度、門開關次數以及食品存儲狀態。
2
*
在約 3 ~ 10 更低的光照下,光度感應器可檢測出黑暗度。
光度感應器
(門的下方)
61
Page 62

操作
冷藏箱
雪櫃燈 (LED)
置物架(兩個)
1、2 便利架
隔架
玻璃擱架
雪櫃燈 (LED)
旋轉隔板
左門
(第 63 頁)
門架(三個)
導管
右門
門架(兩個)
迷你門架
操作面板
置瓶架
(第 60 頁)
蛋格
(可以裝 12 個雞蛋)
小型雜物儲存格
置瓶架
微凍結/冰鮮選擇廂
可根據食品類型選擇微凍結或冷凍之間
●
的溫度區。(第 64 頁)
62
Page 63

“1、2 便利架(最頂部為第三個擱架)"可以分成前後兩部分。
操作
取下前端,將其放置在上方。
■
可以很方便地放置大的器皿或小桶蜂蜜。
●
取下前端,將其放置在下方。
■
你可以儲存大量的小食品。
●
只有頂部第二個置物架高度可以改變。
向上托起置物架後部朝前拉。置物架的突起脫離軌後,將置物架傾斜著取出。 以上述方式相反的方式便可將置物
架推入到所需位置。
突起
軌
甚至當門沒有完全打開,也可改變置物架位置。
●
→ 取下 1、2 便利架的前半部分,然後依據上述步驟改變位置。
中文
“門架"可以移動。
用置瓶架更換迷你門架。
■
迷你門架 置瓶架
蛋置物架可以完
全拉出!
置瓶架 迷你門架
將左側門打開 90 °,便可很容易地取出蛋格等。
如果用置瓶架更換迷你門架,儲存感應器將會被置瓶架上的食品擋住,可能無法正常工作。
●
移動門架到你喜歡的位置。
■
•對右側門,只能移動頂部第一
個擱架。
•對左側門,只能移動頂部第二
個擱架。
用一隻手握住擱架的一端,另一隻手輕輕滴敲擊擱
架另一端便可抬起擱架。
須知事項
放在出風口前的任何高水分食品可能會過度冷卻或凍結。(第 59 頁)
●
(有爆炸風險,特別是灌裝罐裝啤酒、非酒精飲料和蘇打水凍結時。)
如下所示食品需放置在一個密閉容器或經過密封包裝後貯存在雪櫃中。
●
•大蔥或其他強烈氣味的蔬菜。
( → 異味會竄到其他附近的食物上)
旋轉隔板向前打開時,需將其放回原位。
●
(切勿關閉門以免造成損壞。)
•鮮切柑橘類水果。
( → 塑膠會變白)
向前開。
放回原處。
旋轉隔板左門
63
Page 64

操作
微凍結/冰鮮選擇廂
購買時切換室設置為 [CHILLED] 模式。
請根據食品的不同預期使用目的進行設置。
用作微凍結室
當你想要延長微凍食品的保存期限時。
■
該室適用於儲存新鮮食品,比如肉或魚。
●
•與儲存在冷凍室或冷藏箱相比,肉或魚的保存期限會更長。
•溫度可以設定為“1"、“2"或“3",以適應不同類型或不同量的食品。(第 60 頁)
[ 儲存食品舉例 ]
•肉 • 魚
食品過度凍結 ............... 生魚片或肉片可能會過度凍結。
●
將溫度設定為“1",以防止食物過度冷凍。
食品不是微凍 ............... 由於食品類型(如肉塊或大魚)、貯藏條件和環境溫度不同,可能食物並沒有微凍。設定
●
溫度為“3"。
約為 -3℃ ~ -1℃
易切割。
微凍食品易切割!
當你想將微凍結室中的生魚或肉塊或冷凍食品切成片時。它就派上用場了!
用作冷凍室
約為 0℃ ~ 2℃
當你不想凍結食品時。
■
該室適於儲存冷藏食品或乳製品。
●
[ 儲存食品舉例 ]
•冷藏食品 •熟麵條 •優酪乳
•鮮奶油 •乳酪
取決於食品,可能會微凍結。
●
改變食品位置或將冷藏箱溫度設定為“1"。
儲存小貼士
什麼食品不適用微凍結 / 冷凍?
■
●蛋 ●牛奶 ●水 ●橙汁 ●豆腐 冷藏箱內
●蔬菜 • 水果 蔬果格內
●冰 ●霜淇淋 ●冷凍食品 急凍箱內
須知事項
改變切換室的溫度設定以適合保鮮目的或食品類型。
●
當改變溫度設定時,確保更換適合該設定溫度的食品。
●
無保鮮膜的儲存時間是多長?
■
(切換室設定為 [CHILLED] 模式。)
食品舉例 時間指南
三明治 約為 3 個小時
刺身(生魚片) 約為 6 個小時
沙拉 約為 6 個小時
煎蛋捲 約為 9 個小時
備註
微凍結“1"、“2" 、“3"的設定要比 [CHILLED] 設定消耗多於 10% 的能量。
●
64
Page 65

新鮮冷凍箱
使用新鮮冷凍箱,食品可通過冷空氣吹送和鋁板迅速凍結。
(當新鮮冷凍箱不工作時,你可以使用急凍箱。)
使用“FRESH FREEZING"
立即冷凍原料或加熱食品(如熱飯)以保持新鮮度。
■
用保鮮膜包裹食品或將其放在冷藏包中,
1
並將其放置在鋁板上。
按下 [FRESH FREEZING] 按鈕,啟動新鮮冷凍操作。
2
(指示燈亮起。)
在大約 150 分鐘後新鮮冷凍自動停止。
FRESH
FREEZING
指示燈亮: 運行
指示燈關閉: 停止
●
(如果食品未得到充分凍結,再次啟動“FRESH FREEZING"功能)
操作
當新鮮冷凍後的食品需要長時間儲存時,請將其儲存在急凍箱裏。
3
當在新鮮冷凍期間想要停止新鮮冷凍,請再次按下 [FRESH FREEZING] 按鈕。
●
(指示燈關閉。)
在新鮮冷凍期間,能源消耗比平常多。
●
如果在新鮮冷凍操作期間設定 QUICK ICE MAKING 操作,新鮮冷凍操作將會停止。
●
如果在除霜期間啟動新鮮冷凍操作,結束時間將會更長,這是因為在除霜結束後新鮮冷凍操作將會啟動。
●
美味新鮮冷凍的三個步驟
緊緊包裹食品。
•用保鮮膜包住食品並趕走內部空氣。
•將食品分成厚度約為 2 釐米的小段。
•例如,如果使用聚苯乙烯置物架或密封容器,溫度傳輸變差導致食品難以凍結。
將食品平整均勻地放置在鋁板上。
•食品之間應保留間隙。(至少保留 5 毫米的間隙。)
•將食品包平整均勻第放置在鋁板上,不要將它們堆疊在一起。
熱食也要包裹。
•也要緊緊包住熱食。
•以米飯為例,一次可新鮮冷凍兩碗米飯。
須知事項
將高乳脂的冰淇淋等儲存在急凍箱中。
●
不要放置瓶或罐。(它們可能會破裂或爆炸。)
●
不要儲存高於該盒的食品。
●
(這可能造成門無法正常關閉,進而導致霜凍。)
中文
備註
依據存儲食品的類型、包裝情況、儲存量和開門頻率,冷凍可能會不充分。在這種情況下,再次啟動“FRESH
●
FREEZING"操作。
在新鮮冷凍期間,聲音會稍大,但這並不是表示雪櫃出現故障了。
●
在新鮮冷凍期間,ECO NAVI 將不會運作。
●
65
Page 66

操作
製冰箱
製冰盤
儲冰盒
供水器
約 1.2 升
淨水過濾器
自動製冰器
冰鏟
(在盒前提供。)
自動製冰,請使用飲用水。
如果使用水非飲用水,可能會滋生細菌。
用水經常清洗供水器和製冰盤。(第 71 頁)
當使用以下水時,要經常沖洗供水器 !
(第 71 頁)
水質硬度必須為
100 毫克 / 升或更低。
飲用水
切勿猛開或猛關製冰箱。
須知事項
●
( 冰可能會掉落到雪櫃急凍箱或其他地方。)
切勿將水直接倒入製冰盤中製冰。
●
(這也許會損壞製冰機或冰塊會粘在一起。)
切勿將水直接倒入儲冰盒製冰。
●
(否則,可能會損壞儲冰盒。)
水質硬度必須為 100 毫克 / 升或更低。
●
礦物質可能會出現白色漂浮顆粒。它們對人體沒有害。
不要將食物或其他食品放入製冰箱。
●
(否則,無法正確檢測冰量,自動製冰也將停止。)
首次使用製冰箱時,製冰盤等可能會有異味或灰塵。
●
請將前幾塊冰丟棄。
舒適地使用自動製冰器
供水器中不得存放以下液體。
(這些液體可能會損壞製冰箱或引起冰塊互相粘接。)
橙汁等
隔音墊
(不可移動。)
運動飲料 碳酸飲料
熱水
66
備註
當儲冰盒裝滿冰塊時,自動製冰操作會自動停止。
在以下情況下,無法檢測該情況。
留在儲冰盒中的冰鏟撞擊到
冰檢測杆。
冰塊堆過高觸碰到冰檢測
杆。
冰檢測杆
(按下冰檢測杆,自動製冰功能停止。)
Page 67

取出供水器
如果供水器水位在“
(至少每週更換一次供水器水。)
"線下,要向供水器中加水。
給水
操作
製冰約需兩個小時!
製冰
供水器
加滿水
加水至“
安裝供水器
推入供水器至線內。
(如果供水器未安全設置,就無法供水和製冰。)
満水
"線。
然而,以下情況將需要更長時間。
首次使用雪櫃。
●
(可能需要 24 小時或者更長時間,因為只有在雪櫃內
部溫度足夠低時自動製冰功能才會啟動。)
經常開門。
●
門半開。
●
在設置 [QUICK ICE MAKING] 時,製冰速度增加。
■
最快可以在 80 分鐘內完成製冰*。
在大約 6 個小時後,回到正常的製冰模式。
QUICK
ICE MAKING
指示燈亮: 快速製冰開啟
指示燈關閉: 普通製冰開啟
*
室溫 20℃、每室溫度設置為“2",關閉門。
●
當你想在製冰過程中停止快速製冰,再次按下
●
[QUICK ICE MAKING] 按鈕。(指示燈關閉。)
除霜開啟後,指示燈會閃爍。
●
除霜完成,[QUICK ICE MAKING] 自動重新啟動。
在快速製冰過程中,能量消耗比平常多。
●
如果在 [QUICK ICE MAKING] 過程中進行手動新鮮冷凍,QUICK ICE MAKING
●
取消。
QUICK ICE MAKING 設置後,ECO NAVI 不工作。
●
同時儲存大量食品。
●
冬天室溫過低或夏天室溫過高。
●
出現電源故障。
●
可洗製冰盤已經被清洗。(第 71 頁)
●
快速製冰
蓋子
請勿加水過線。
把蓋子蓋緊。
確保供水器完全
線上內。
中文
自動製冰停止
如不想製冰,在清洗製冰盤前,按 [AUTO ICE OFF] 按鈕三秒鐘。
■
有嘟嘟聲,指示燈將從閃爍狀態轉亮。
AUTO
ICE OFF
(PRESS 3 SEC.)
指示燈亮: 製冰停止
指示燈關閉: 自動製冰開啟
●
(當指示燈閃爍時,不得打開製冰箱抽屜。
製冰不能停止。)
按 [AUTO ICE OFF] 按鈕三秒鐘,取消 AUTO ICE OFF。
●
在取消 AUTO ICE OFF 後,所制的冰釋放出來。
●
當長時間不自動製冰時,清空並清洗供水器。(第 71 頁)
●
67
Page 68

操作
急凍箱
冷凍盒(上部)
冷凍盒(下部)
[ 儲存例子。]
垂直空間
可以儲存許多冷凍食品和熟食。
●
須知事項
對於冷凍盒上部,將食品放在冷凍盒高度範圍內。
●
對於冷凍盒下部,食品放置應在最高上限以下(↓
●
(門不能完全關閉,可能會結霜。)
食品はここまで
↓)。
蔬果格
美味凍結的三個步驟
1. 將食物切成薄的小塊迅速冷凍!
2. 緊緊包裹!
3. 切勿再凍結!
無保鮮膜,便可儲存
食品。
小型蔬菜儲存格
*
將番茄和青椒放在小型蔬菜儲存格中。
●
建議將葉菜類蔬菜儲存在蔬果格的主盒中(不包括
酒瓶拐角部分),在此處食物不易變壞。
須知事項
*
切好的蔬菜或需要長時間儲存的食品需要包裹儲存。
存放前,緊封大米口袋。
●
蔬果格濕度過高,可能會出現冷凝。只需擦去水珠。
●
將蔬菜和水果放在果蔬格高度以內。
●
酒瓶角落
68
蔬菜格
[ 儲存例子。]
Page 69

清洗、取出並重新安裝
定期清理和維護以確保雪櫃清潔,延長雪櫃使用壽命。
清理或維護前,務必將電源插頭從插座中拔出。
切勿用濕手插拔電源插頭。否則,可能引起觸電或受傷。
清理
請及時清潔骯髒雪櫃。
用一塊布蘸點溫水可以很容易地清除污漬。
用一塊布蘸點稀釋的廚房中性洗滌劑清除頑固污漬。
然後再用蘸有溫水的布清洗殘留洗滌劑。
為徹底清潔,請務必將雪櫃表面的殘留水分擦乾。
至少一年清洗一次雪櫃隱藏部位。
積聚灰塵可能會造成電能浪費。
清除雪櫃周圍璧裝電源插座上或其縫隙間的灰塵。
對於雪櫃門封清潔,首先使用一塊濕布
擦拭,然後再用一塊乾布擦拭。
(骯髒的門封很容易損壞並且可能會導致
冷空氣洩露。)
附錄
中文
當手指印和汙跡不易清除時,首先用輕
輕浸泡過廚房中性洗滌液的布擦拭,然
後再用濕布擦拭。最後再用乾布擦拭乾
淨。
冷藏箱門的旋轉支點部位已經塗抹 了潤
滑油脂。不要擦掉!
→ 如果你要擦拭它,請諮詢經銷商。
注意事項
立即擦洗!
如果有液體滴到雪櫃門邊緣,
請立刻用乾布稍微用力將其擦
去。
門是由玻璃製作的。當對它們進行清潔時,不要與表面和邊緣發生碰撞。
●
請勿使用帶有尖銳端頭的工具(尤其是金屬工具)。(這些工具可能會損壞門的表面和邊緣。)
●
請勿使用以下物品清潔。
●
鹼性或弱鹼性
廚房清潔劑、
玻璃清潔劑
(它們會破解塑膠。)
清洗器、
拋光海綿
清潔劑、
肥皂粉
汽油、稀釋劑、
酒精、酸和石油
熱水
69
Page 70

附錄
置物架 /1、2 便利架(玻璃的)
置物架(雪櫃內的上部擱架)
■
解開置物架後托起拉出。
卡爪
置物架
置物架(雪櫃上部的第二個擱架)
■
向上托起置物架後部朝前拉。
置物架托起脫離軌後,將置物架傾斜著取出。
卡爪
置物架
軌
注意事項
隔架不可移動。清潔隔架時不可將其移出。
●
置物架,1、2 便利架和隔架是由玻璃製作的,很重。
●
請小心輕放以避免它們掉落,造成任何損害或傷害。
放置置物架時將托起朝下,牢固地插入。
解開 1、2 便利架後托起拉出。
■
後部
前部
1、2 便利架後部
■
取出前部(參見上圖)。
輕輕地抬起後部拉出。
三個月一次
安裝 1、2 便利架的後端,使
擱架孔朝向你。
格(微凍結/冰鮮選擇廂)/蛋格/小型雜物儲存格
格(微凍結/冰鮮選擇廂)
■
快速拉出格,抬起前端,然後
握住格的上邊緣傾斜拉出。
注意事項
蛋格和小型雜物儲存格兩側的隔板不可移動的。
●
清洗時切勿取出隔板。
門架/置瓶架
取出
■
使小擱架的底部朝上
或交替活動大擱架的左右兩側
並緩慢抬起。
(緊緊附著)
•取出置瓶架前的空閒支架。
蛋格或小型雜物儲存格
■
抬起格的前端傾斜著快速拉
出。
重新安裝
■
依據右側標誌 [>PS<],平行安裝每個支架
並向下推至適當的位置。
•取出置瓶架前的空閒支架。
三個月一次
每三個月一次
70
向上滑動擱架。
Page 71

附錄
供水器 / 淨水過濾器
取下蓋子並用水清洗供水
器。
蓋子
安裝淨水過慮器並填料。
建議每三年更換一次淨水過濾器。
●
(另售零件:CNR MJ-108850)(第 79 頁)
如果在淨水過濾器上有水垢,可能無法正確製冰。
●
旋轉淨水過慮器以使其脫
鉤取出。
卡爪
可清洗製冰盤(製冰箱內部)
移出製冰盤並沖洗。
■
按在 [AUTO ICE OFF] 按鈕三秒鐘,製冰停止。
(指示燈開啟。第 67 頁)
將製冰箱中的旋鈕轉動至解鎖位置。
向前拉拉桿以取出製冰盤。
用水清洗。不要用海綿等擦拭表面。
(如果製冰盤被劃花,冰可能無法正確釋放,進而導致故障。)
製冰盤及其框架不能拆分。
●
不得使用洗碗烘乾機。
●
一週一次
輕輕沖洗淨水過慮器。 取下後面邊緣運行的填充
物。用水清洗。
一年一次或兩次
中文
旋鈕
鎖定位置 解鎖位置
安裝
■
推入,直到出現鎖上的聲音。
將旋鈕轉動至鎖定位置。
如果製冰盤未鎖定,機器不會製冰。
按 [AUTO ICE OFF] 按鈕三秒鐘,重新啟動製冰。
(指示燈熄滅。第 67 頁)
直至 [AUTO ICE OFF] 取消,冰才可製取。
●
在清洗後不要直接將水放入製冰盤。
●
(否則,會引起冰塊粘接或故障。)
冰盒(冰 / 新鮮冷凍 / 冷凍箱 / 蔬果格)
拉出一個傾斜角
迅速拉出門並抬起前端拉出一
個傾斜角。
取出鋁板
安裝鋁板時,將其放置在托起
前端位置。
拉桿
解鎖位置 鎖定位置
三個月一次
須知事項
抽屜導軌的接觸部位塗有潤滑劑。不要擦掉!
●
取出急凍箱的頂部格或小型蔬菜儲存格時,通過定位前端
●
格底部上的“
切勿用濕手碰新鮮冷凍板,比如在清潔冷凍板時。
●
(這可能會引致凍傷手。)
清洗格和鋁板時,要在排乾水並擦拭殘留水滴後方可安裝。
●
FRONT"進行安裝。
手前
突起
71
Page 72

附錄
在這些情況下?
電源出現故障。
斷開電源插頭。
長時間不用雪櫃。
雪櫃燈明燈不亮。燈罩破裂。
玻璃破碎。
(玻璃置物架 • 門)
保持門關閉,並且不要再存儲其他食品。
●
停止 [FRESH FREEZING] 和 [QUICK ICE MAKING] 功能。重新設置這些功能便
●
可使用。
至少要等待 7 分鐘,方可插入電源插頭。
●
(如果立即插入電源插頭,壓縮器會超載引起故障。)
取出所有食品和飲料,清洗雪櫃。
●
(雪櫃室潮濕,可能發黴或出現臭味。)
請聯繫授權經銷商或服務中心,更換雪櫃燈明燈。
●
玻璃置物架和玻璃門破裂時,請不要碰破碎的玻璃,並立即聯繫授權經銷商或服
●
務中心。
拔掉電源插頭。
清洗雪櫃室和製冰盤。(第 70 頁和 71 頁)
保持雪櫃門開至兩至三天,晾乾雪櫃室。
向前或向後移動雪櫃。
移動或搬運雪櫃時。
取下腳蓋,然後調高可調校的雪櫃腳。(第 58 頁)
取下傾翻保護裝置。(第 58 頁)
拔掉電源插頭。
向前或向後移動雪櫃。
(移動雪櫃用力過猛或不是向前或向後移動雪櫃都可能損壞雪櫃門,因此要在地板
放置一塊墊板等。)
不要橫放著搬運雪櫃。
●
(否則,會使壓縮器周圍的管道損壞破裂。)
取出所有室中的食品和飲料,排出室內的殘留水和冰。然後,至少兩人移動雪櫃。
●
取出食品和飲料並排出供水器中的水。
停止自動製冰功能。(第 67 頁)
清洗製冰盤。(第 71 頁)
取下可調校的雪櫃腳的腳蓋螺絲。(第 58 頁)(在搬
運雪櫃前應取下腳蓋。)
取下傾翻保護裝置。
拔掉電源插頭。
在排水孔下面放置一個容器。
水可能會濺出。在容器附近或下面放置一塊布等。
向後傾斜雪櫃以使水從排水孔中排出。(為防止水洩
漏,應緩慢向後傾斜雪櫃。)
在移動雪櫃時,應在通道上放一個保護板等以防止殘
留在蒸發器皿中的水。
( 容器高度最高為 2 釐米)
自動製冰器長時間不使用。
→ 當再次開始使用自動製冰
器時,應關閉“AUTO ICE
OFF"功能。(第 67 頁)
72
注意事項
如果雪櫃內的冷卻設備上有霜(從外面看不到),移動雪櫃時水可能會濺出。
●
(在斷開雪櫃電源插座後,冷卻設備上的霜大約需要 15 個小時才融化。)
停止製冰、清空供水器並清潔製冰機。
●
倒掉供水器中的水。
按在 [AUTO ICE OFF] 按鈕三秒鐘,製冰停止。(第 67 頁)
(照明燈熄滅。)
倒掉製冰盤和儲冰盒中儲存的冰。
•當冰儲存時間久的話,冰塊會變圓或會粘接。
沖洗儲冰盒、冰鏟和供水器。
擦乾水並將它們放回原位。
•積水箱中的淨水過慮器會存有水。
Page 73

如果出現以下聲音或現象
附錄
警報器發出嘟嘟聲且房
間燈 (LED) 閃爍,同時
字母“U"和“10"在
通知指示器區域交替提
示。
字母“H"和一個數位
在通知顯示區交替顯
示。
例子
"
“
通知顯示區顯示“dd"。
冷藏箱、製冰箱或急凍
箱的門是打開的。
可能出現了異常。
雪櫃處於演示模式狀
態。
•製冷操作停止。
•雪櫃內的燈閃爍亮起
5 秒鐘,關閉 1 秒鐘。
關閉門。
警報器
1 分鐘後 “嘟嘟"聲 閃爍一次
3 分鐘後 兩聲“嘟嘟"聲 閃爍兩次
5 分鐘後 連續的“嘟嘟"聲 閃爍三次
超過 5 分鐘 連續的“嘟嘟"聲
雪櫃燈 (LED)
之後每 2 分鐘閃
爍三次
如指示器顯示,請聯繫並諮詢經銷商。
取消演示模式。
打開雪櫃室、製冰箱和急凍箱的門。
按操作面板 [FREEZER] 按鈕至少 10 秒
鐘。
關閉雪櫃室、製冰箱和急凍箱的門。
中文
73
Page 74

附錄
依據自己偏好設置
更詳細地調整溫度
冷藏箱和急凍箱的溫度有設定更詳細,有 9 個檔位,如“ 1 ", “ 2 " 和 “ 3 "。
■
(當詳細調整溫度時 ECO NAVI 將不會運作。)
冷藏箱
設置步驟
將冷藏箱的溫度設置為“1"。
按 [FRIDGE] 按鈕至少 10 秒鐘。
(有嘟嘟聲,[2] 指示燈亮起,10 秒鐘後 [1] 指示燈(第 1 檔)亮起。)
按 [FRIDGE] 按鈕並選擇你選擇的檔位。
(每按一下 [FRIDGE] 按鈕,檔位元就會變高。)
如果當設置為第 9 檔([3] 指示燈亮起)時,按 [FRIDGE] 按鈕,設置
回到“1"([1] 指示燈亮起)。
取消步驟
將冷藏箱的溫度設置為“1"。
按 [FRIDGE] 按鈕至少 10 秒鐘。
(有嘟嘟聲,然後 [1] 指示燈亮起,[2] 指示燈閃爍。)
詳細的溫度設定取消已完成。
依據通常使用設定溫度。
即使溫度設定為“2",
ECO NAVI 也不工作。
急凍箱
在上述 ~ 步驟基礎上按 [FREEZER] 按鈕而不是 [FRIDGE] 按鈕執行操作。
設定 檔位 指示燈
“ 3 ” 9
“ 2 ”
“ 1 ”
指示燈狀態
8
7
6
5
4
3
2
1
1 2 3
1 2 3
1 2 3
1 2 3
1 2 3
1 2 3
1 2 3
1 2 3
1 2 3
微凍結/冰鮮選擇廂的溫度不可進行詳細調節。
●
在通知顯示區沒有顯示時設定。
●
關閉 ECO NAVI 指示燈
在 ECO NAVI 運作模式期間 , ECO NAVI 指示燈不會亮著。
■
( 在通知顯示區沒有顯示時設定,急凍箱和冷藏箱設置為“2"。)
設置步驟
打開冷藏箱的左門,按
[FRIDGE] 按鈕至少 3 秒鐘。
即使在設定上述設置時,ECO NAVI 運作模式仍運行。
●
取消步驟
打開冷藏箱的左門,按
[FRIDGE] 按鈕至少 3 秒鐘。
開啟 閃爍 關閉
出現嘟嘟聲,ECO NAVI 指示燈閃爍。
設定完成。
(在一小段時間後,ECO NAVI 指示燈熄滅。)
有嘟嘟聲,然後 ECO NAVI 亮 3 秒鐘,完成取消
設置。
(在一小段時間後, ECO NAVI 指示燈熄滅。然而,
在 ECO NAVI 運作模式期間,指示燈仍然亮起。)
74
Page 75

故障排除
如果雪櫃不能正常工作,請首先檢查以下幾點。
如果故障仍然存在,請斷開電源插頭,並與經銷商或授權服務中心聯繫。
以下聲音是正常的。
附錄
來自雪櫃內部。
劈劈啪啪的聲音
●
由於溫度改變,部件膨脹收縮的聲音。
嗡嗡聲
●
風扇運轉的聲音。
叮噹聲
●
由於壓縮器運行門架中的酒瓶震動的
聲音。
製冰箱和供水器產生的聲音。
呼呼、哢嗒和冒泡的聲音
●
自動製冰器釋放冰或供應水時產生的
聲音。
當打開急凍箱的門時。
嘶嘶聲
●
在除霜過程中由於加熱器加熱水蒸發
而產生該聲音。
敲擊聲
●
砰砰聲
●
當開關抽屜時會發出該聲音。
背部上部分。
滴答聲
●
當電子元件和壓縮器運行時產
生的聲音。
嗡嗡聲
●
壓縮器運行的聲音。由於適用
溫度變化進行不同的高速運
行,聲音時高時低。
後部產生的聲音。
冒泡、嘶嘶和流動的聲音
●
製冷劑(氣體)流動的聲音。
當打開蔬果箱的門時。
敲擊聲
●
砰砰聲
●
當開關抽屜時會發出該聲音。
中文
卡嗒聲
聲音
噪音困擾
聽到敲擊聲
地面結實平穩嗎?(第 58 頁)
●
雪櫃兩腳有觸地和妥善固定了嗎 ? (第 58 頁)
●
雪櫃側面是否觸碰到雪櫃周圍的牆壁或傢俱?(第 58 頁)
●
雪櫃電源線是否觸碰雪櫃周圍的牆壁或傢俱嗎?(第 58 頁)
●
當雪櫃進行冷卻時,壓縮器或風機可能發出大的噪音,比如雪櫃剛安
●
裝,還沒有冷卻過;頻繁開關雪櫃門;雪櫃周圍的溫度過高或新鮮冷
凍設置為開啟狀態。這是正常現象。
→ 雪櫃冷卻後,噪音變小。
當用力關閉雪櫃門或地面不平時,雪櫃將會晃動並產生噪音。在雪櫃
●
下方放置一個墊板以防止晃動。(第 58 頁)
75
Page 76

附錄
雪櫃頂部發熱
熱
上部(或側)墊板發熱
機械部件釋放熱量。(第 58 頁)
●
製冷系統運行時左右墊板表面可能會發熱釋放產生的熱量。安裝後或
●
夏天,溫度可能變為 50℃ 至 60℃(當環境溫度為 30℃),這是正常
現象。
顯示
操作板上的溫度設定在閃爍。
關閉後立即打開,門很重。
門
磁鐵不會粘到門上。
不能製冰
製冰
冰塊內部未凍結
冰的形狀不是“立方體"
冷藏箱或急凍箱的溫度已經進行細緻地調整了嗎?(第 74 頁)
●
進入雪櫃內的空氣急劇冷卻。內部壓力瞬間低於外部氣壓。雪櫃室中
●
的食品看起來很乾癟。
門是玻璃的。磁鐵不沾。
●
當首次使用該雪櫃時,要等到內部充分冷卻後方可製冰。
●
(可能需要 24 個小時或更長時間。)
製冰功能設置為 [AUTO ICE OFF] 模式了嗎?
●
供水器(第 67 頁)和製冰盤(第 71 頁)設置正確嗎?
●
儲冰盒中有一些其他的食物嗎?
●
製冰盤頻繁取出嗎?
●
為了確認製冰機是否運行,請按 [AUTO ICE OFF] 按鈕至少 10 秒鐘。
●
如果供水器中的水減少,說明製冰機在運轉。
(如果有水濺入儲冰盒,應將它擦掉。)
急凍箱的溫控設置為“1"了嗎?
●
→ 將其設置為“2"或“3"。(第 60 頁)
有突出物。
●
→ 製冰盤內的連接件凍結。
冰塊是圓形或與其他冰塊相粘接。
●
→ 冰儲存很長時間了嗎?
(冰塊成圓形或粘接在一起。)
冰塊小。
●
→ 當供水器中的水用完時也會產生小冰塊。
冰塊有異味
氣味
雪櫃室內有氣味
你每週清洗供水器和淨水過濾器了嗎?(第 71 頁)
●
使用任何清潔劑、汽油和漂白劑清洗了嗎?(第 71 頁)
●
淨水過濾器劣化了嗎?(第 71 頁)
●
你有麼有將帶有強烈氣味的食物放入其他室?
●
具有強烈氣味的食物是被完全密封了?
●
異味通常附著在內壁。
●
→ 向布上滴入溫水並擰乾。
用該布擦拭它。
76
Page 77

附錄
根本不變冷
不足夠冷
冷卻
霜露
食物凍結
在操作面板的通知顯示區內, 它被指示嗎?
●
(第 73 頁)
當首次使用該雪櫃時,可能需要 4 至 24 個小時甚至更長時間雪櫃才
●
開始冷卻。
電源出現故障了嗎?
●
溫度控制設置為“1"?→設置為“2"。(第 60 頁)
●
食品阻塞冷風出口?(第 59 頁)
●
雪櫃受陽光直照或附近有一些加熱裝置嗎?(第 58 頁)
●
確保雪櫃周圍有足夠的空間嗎?(第 58 頁)
●
儲存加熱食品、頻繁開門或食物儲存太多了嗎?
●
急凍箱 / 冷藏箱
當濕度過大、開雪櫃門時間過長或頻繁會出現這種情況。
●
由於層架等卡著或雪櫃中放置太多食品,門無法關緊嗎?
●
雪櫃外部
在濕度較高的情況下連續使用 [FRESH FREEZING] 也會出現這種情
●
況。
→ 用一塊乾布擦拭。
溫度控制已經設置為“3"了嗎?→將其設置為“2"。(第 60 頁)
●
室溫為 5℃攝氏度或以下?→將其設置為“1"。(第 60 頁)
●
你將含水量高的食物放在雪櫃冷風出口處(第 59 頁)或微凍結/冰
●
鮮選擇廂嗎?
中文
77
Page 78

附錄
ECO NAVI 常見問答
ECO NAVI 何時工作?
ECO NAVI 指示燈緩慢閃爍
ECO NAVI 指示燈不亮(ECO
NAVI 不工作)
ECO NAVI 指示燈不熄滅。
依據雪櫃周圍的亮度、雪櫃室溫度變化、雪櫃門的開關次數以及儲存量的變化,
●
ECO NAVI 將自行運作。
(在 ECO NAVI 運作模式期間,ECO NAVI 指示燈亮。)
這表示在關閉冷藏箱後 ECO NAVI 正在檢測儲存量的變化。
●
(大約 15 秒。)
只有當冷凍室和冷藏箱的溫度設置為“2"時,ECO NAVI 才會運作。
●
(微凍結/冰鮮選擇廂的溫度設置於 ECO NAVI 運作模式無關。)
當溫度調節,ECO NAVI 不工作。(第 74 頁)
●
在 FRESH FREEZING 和 QUICK ICE MAKING 期間,ECO NAVI 不工作。
●
如果通知顯示區顯示“U"或“H",ECO NAVI 不工作。
●
直到雪櫃充分冷卻後,ECO NAVI 才開始工作。
●
請勿強使 ECO NAVI 運作。
●
ECO NAVI 指示燈為關閉狀態時,指示燈不亮。
●
取消 ECO NAVI 指示燈的關閉設置。
存儲加熱食品或頻繁開關雪櫃門時,ECO NAVI 不工作。
●
為了更好地使雪櫃冷卻,當在頻繁開關雪櫃門時間內,記憶功能將禁止 ECO
●
NAVI 運作模式。
如電源出現故障,收集的記憶功能資料將會丟失。
●
記憶功能已收集到充分的資料前,ECO NAVI 幾乎不工作。
光度感應器(第 61 頁)被一些東西所遮掩或面板骯髒或有劃花,感測器可能無
●
法正常工作。
無論雪櫃門是打開或是關閉,ECO NAVI 將會依據冷藏箱內的溫度或儲藏量決定
●
是否連續運轉,但冷卻能力始終得以維持。
當雪櫃門關閉時,ECO NAVI
指示燈不亮。
儘管存儲了大量食品,ECO
NAVI 燈不會關閉。
儘管存儲少量食品,ECO
NAVI 指示燈不亮。
在 ECO NAVI 運作模式期間(自動)除霜啟動,比如,在除霜後,為執行正常
●
的冷卻操作,ECO NAVI 將停止運行。
記憶功能可以將 ECO NAVI 運作模式切回到正常的冷卻操作。
●
儲存感應器(第 60 頁)只在冷藏箱內工作。
●
無法檢測儲存在非冷藏箱的食物儲存量。
當食物是塞在冷藏箱內時,感測器可能無法檢測到儲存量的變化,指示燈將可
●
能不會關閉。
(尤其大量食品存儲在上部玻璃置物架上時。)
當儲存感應器(第 60 頁)被冷藏箱的食品覆蓋時,它可能也無法檢測到存儲量
●
的變化,指示燈也不會關閉。
當食品儲存在儲存感應器(第 60 頁)附近時,如玻璃置物架上或者雪櫃門架,
●
感測器可能會誤測存儲量變化很大,指示燈將不亮。
當頻繁開關雪櫃門或門打開時間過長,指示燈也會不亮。
●
78
Page 79

規格
型號 NR-F510GT
總容量 530 L
總淨容量 410 L
冷藏箱淨容量 249 L
製冰箱淨容量 5 L
新鮮冷凍箱淨容量 16 L
冷凍室淨容量 64 L
蔬菜格淨容量 76 L
附錄
外型尺寸
寬 × 深 × 高
重量 101 kg / 223 lb
額定電壓
額定頻率
該款雪櫃的容量是依據 IEC 62552 標準進行設計的。
冷藏箱門內側的品質指示標籤標定。
685 mm × 683 mm × 1 828 mm
另售零件
供水器淨水過濾器(第 71 頁)
CNR MJ-108850
一套調節墊板(第 58 頁)
CNR 79-338120
中文
79
Page 80

Web site: http://panasonic.net
© Panasonic Corporation 2014
M0714-0
ARAH0A100410
Printed in Japan
 Loading...