

Page 1
Panasonic 9
Cookbook and
Operating Instructions
Microwave Oven
Model NN-T687 / NN-R687
/As ^e/uaj
Befof* opsrating this ovan, plaasa mad t^ata Instructions oompiataly.
Amas da oparar asia produdo. taa aata mstmoiivo an su totaUdad.
B manual da rueruocionas an aapaAd puada aar ancontmds an la pdginaa 42'S3.
Spaniah Oparabng inatrucliona can ba found on pagsa 42-S3w
To onfar Parts & Accaaaonaa. saa papa 41
Page 2

Thank you for purchasing a Panasonic Microwave Oven.
Let's Start to Use Your Oven! -- page 8
PRECAUTIONS TO AVOID POSSIBLE
EXPOSURE TO EXCESSIVE
MICROWAVE ENERGY
(a) Do not attempt to operate this oven with the door open since open-door operation can result in harmfui
exposure to microwave energy. It is important not to defeat or tamper with the safety interiocks.
(b) Do not place any object between the oven front face and the door, or allow soil or cleaner residue to
accumulate on sealing surfaces.
(c) Do not operate the oven if it is damaged. It is particularly important that the oven door close properly
and that there is no damage to the:
{1) door (bent)
(2) hinges and latches (broken or loosened)
(3) door seals and sealing surfaces.
(d) The oven should not be adjusted or repaired by anyone except properly qualified service personnel.
The serial number of this product may be
found on the right side of the oven door
opening. You should note the model number
and the serial number of this oven in the space
provided and retain this book as a permanent
record of your purchase for future reference.
TECHNICAL SPECIFICATIONS
Power Source 120V, 60 Hz
Power Consumption:
Output:* 1000 W
Outside Dimensions 12” X 2178” X 16V/
(H X W X D):
Oven Cavity Dimensions 9Vb”x 14’Vi6"x 15'Vi6”
(HxWxD):
Operating Frequency:
Uncrated Weight (Approx):
Stainless Trim Kit for NN-T687: NN-TK 608.SA: L=27" (68.6 cm)
Model No.
Serial No.
Date of Purchase
NN-T687/NN-R687
13.5 A, 1550 W
306 X 555 X 425mm
232 X 380 X 402mm
2,450 MHz
38 lbs. (17.2 kg)
NN-TK 618.SA: L=30" (76.2 cm)
"lEC 705-88 Test Procedure used
Specifications subject to change without notice.
® Copyrighted by Matsushita Electric Industrial Co., Ltd. 1997.
Page 3

Contents
Before Operating____________________________________________________________________
Safety Instructions...........................................................................................................................................................2
Installation Instructions....................................................................................................................................................3
Grounding Instructions ...................................................................................................................................................3
Practical Hints..................................................................................................................................................................4
Cookware and Utensil Guide ..........................................................................................................................................5
Feature Diagram.............................................................................................................................................................6
Control Panel ..................................................................................................................................................................7
Parts & Accessories Order...........................................................................................................................................41
Operation & Hints
Let's Start to Use Your OvenI .........................................................................................................................................8
Quick Guide to Operation ...........................................................................................................................Back Cover
To Use Function Pad................................................................................................................................................9-10
To Set Clock..................................................................................................................................................................11
Quick Min Function........................................................................................................................................................10
To Reheat using Power and Time Setting...................................................................................................10
To Defrost using Power and Time Setting...................................................................................................10
To Cook using Power and Time Setting...................................................................................................10
To Set Timer (Stand Time/Delay Start).........................................................................................................................16
Cookbook
Food Characteristics......................................................................................................................................................18
Cooking Techniques ............................................................................................................................................ 18-19
Appetizers......................................................................................................................................................................20
Meats......................................................................................................................................................................21-24
Poultry
...............
Fish and Seafood...................................................................................................................................................28-29
Casseroles ....................................................................................................................................................................30
Eggs and Cheese......................................................................................................................................................... 31
Vegetables............................................................................................................................................................. 32-33
Pasta, Rice and Cereal .........................................................................................................................................34-35
Quick Breads and Cakes.......................................................................................................................................36-37
Pies................................................................................................................................................................................38
Microwave Shortcuts.....................................................................................................................................................39
_______________________________
Sensor Reheat Pad..............................................................................................................13
Auto Defrost Pad..................................................................................................................11
Sensor Cooking Pads ................................................................................................. 13-14
Popcorn Pad.........................................................................................................................15
Bacon Pad ...........................................................................................................................15
....................................................................................................................................................25-27
______
_____________________________
Maintenance________________________________________________________________________
Before Requesting Service............................................................................................................................................40
Care of Your Microwave Oven .....................................................................................................................................41
Technical Specifications .................................................................................................................Inside Front Cover
Manual de instrucciones (Spanish Operating Instructions) _________________________________
Instrucciones de Seguridad...........................................................................................................................................42
Instrucciones para Conexión a Tierra............................................................................................................................43
Instrucciones de Instalación..........................................................................................................................................44
Sugerencias Utiles ........................................................................................................................................................45
Panel de Controles........................................................................................................................................................46
Procedimientos de Operación................................................................................................................................47-52
Cuidados de Su Homo de Microondas......................................................................................................................... 53
Antes de Acudir a Servicio.............................................................................................................................................53
-1 -
Page 4

IMPORTANT SAFETY INSTRUCTIONS
Your microwave oven is a cooking device and you should use as much care as you use with a stove or any other cooking device.
When using this electric appliance, basic safety precautions should be followed, including the following:
WARNING—To reduce the risk of bums, electric
shock, fire, injury to persons or exposure to excessive
microwave energy:
1. Read all instructions before using the appliance.
2. Read and follow the specific “PRECAUTIONS TO AVOID
POSSIBLE EXPOSURE TO EXCESSIVE MICROWAVE
ENERGY,” found on back of the front cover.
3. This appliance must be grounded. Connect only to properly
grounded outlet. See “GROUNDING INSTRUCTIONS”
found on page 3.
4. Install or locate this appliance only in accordance with the
installation instructions found on page 3.
5. Do not cover or block any openir^gs on this appliance.
6. Do not store or use this appliance outdoors.
Do not use this product near water—for example, near a
kitchen sink, in a wet basement, or near a swimming pool,
and the like.
7. Use this appliance only for its intended use as described in this
manual. Do not use corrosive chemicals or vapors in this
appliarrce. This type of oven is specifically designed to heat or
cook. It is not designed for industrial or laboratory use.
8. When cleaning surfaces of door and oven that come
together on closing the door, use only mild, non-abrasive
soaps or detergents applied with a sponge or soft cloth.
9. As with any appliance, close supervision is necessary
when used by children.
10. Do not operate this appliance if it has a damaged cord or
plug, if it is not working properly, or if it has been damaged
or dropped.
11. Do not immerse cord or plug in water.
12. Keep cord away from heated surfaces.
13. Do not let cord hang over edge of table or counter.
14. This appliance should be serviced only by qualified service
personnel. Contact the nearest authorized service facility for
examination, repair or adjustment.
15. Some products such as whole eggs and sealed containers—
for example, closed glass jars—may explode and should not
be heated in this oven.
16. To reduce the risk of fire in the oven cavity:
(a) Do not overcook food. Carefully attend appliance if paper,
plastic, or other combustible materials are placed inside the
oven to facilitate cooking.
(b) Remove wire twist-ties from paper or plastic bags before
placing bag in oven.
(c) If materials inside the oven should ignite, keep oven door
closed, turn oven off, and disconnect the power cord, or
shut off power at the fuse or circuit breaker panel.
(d) Do not use the cavity for storage purposes.
Do not leave paper products, cooking utensils, or food in
the cavity when not in use.
General Use
1. DO NOT tamper with or make any adjustments or repairs to
door, control panel housing, safety interlock switches or any
other part of the oven. DO NOT remove outer panel from
oven. Repairs should only be done by a qualified service
person.
2.
DO NOT operate the oven empty. The microwave energy wll
reflect continuously throughout the oven if food or water is not
present to 2ibsorb energy. This could damage the oven and
result in the danger of a fire.
3. DO NOT use this oven to heat chemicals or any other non-food
products. Do NOT clean this oven with any product that is
labeled as containing corrosive chemicals. The heating of
corrosive chemicals In this oven can cause radiation leaks.
4. DO NOT dry clothes, newspapers or other materials in oven.
They may catch fire.
5. DO NOT use recycled paper products unless the paper product
is labeled as safe for microwave oven use. Recycled paper
products may contain impurities which may cause sparks and/or
fires when used.
6. DO NOT use newspapers or paper bags for cooking. Fire
can result.
7. DO NOT hit or strike control panel. Damage to controls may
occur. Fire can result,
8. POT HOLDERS should always be used when removing
items from the oven. Heat is transferred from the HOT food
to the cooking container and from the cooking container to
the Glass Tray. Glass Tray can be very HOT after removing
cooking container from oven.
9. DO NOT store flammable materials next to, on top of, or in the
oven. These could be fire hazards.
SAVE THESE INSTRUCTIONS
For proper use of your oven read remaining safety cautions and operating instructions.
-2-
Page 5

Installation and Grounding Instructions
Examine Your Oven
Unpack oven, remove ail packing material, eind examine the oven
for any damage such as dents, broken door latches or cracks in the
door. Notify dealer immediately if oven is damaged. Do NOT install
if oven is c^aged.
Placement of Oven
1. Oven must be placed on a flat, stable surface. For proper
operation, the oven must have sufficient air flow. Allow 3 inches
(8 cm) of space on both sides of the oven and 1 inch (2.5 cm) of
space on top of oven.
a. Do NOT block air vents.
If they are blocked during operation, the oven may
overheat. If the oven overheats, a thermal safety device
will turn the oven off. The oven will remain inoperable until
it has cooled.
b. Do NOT place oven near a hot damp surface such as a
gas or electric range.
c. Do NOT operate oven when room humidity is too high.
2. This oven was manufactured for household use only.
3. Model NN-T687 is designed exclusiveiy to be built-in. Use the
appropriate manufacturers' trim kit (see Technical Specs for the
part number). Call Panasonic Customer Service for the nearest
dealer [1 -800-211 -PANA(7262), 9 am to 9 pm EST, Toll Free].
Grounding Instructions
This appliance must be grounded. In the event of an electrical
short circuit, grounding reduces the risk of electric shock by
providing an escape wire for the electric current. This
appliance is equipped with a cord having a grounding wire
with a grounding plug. The plug must be plugged into an outlet
that is properly installed and grounded.
WARNING—Improper use of the grounding plug can result in
a risk of electric shock.
Consult a qualified electrician or service person if the
grounding instructions are not completely understood, or if
doubt exists as to whether the appliance is property grounded.
If it is necessary to use an extension cord, use only a three
wire extension cord that has a three blade grounding plug, and
a three slot receptacle that will accept the plug on the
appliance. The marked rating of the extension cord should be
equal to or greater than the electrical rating of the appliance.
Wiring Requirements
1. The oven must be on a SEPARATE CIRCUIT. No other
appliance should share the circuit with the microwave oven.
If it does, the branch circuit fuse may blow, or the circuit
breaker may trip or the food may cook slower than the times
recommended in this manual.
2. The VOLTAGE used must be the same as specified on this
microwave oven (120V). Using a higher voltage is
dangerous and may result in a fire or other accident causing
oven damage. Using a lower voltage will cause slow
cooking. Panasonic is NOT responsible for damage
resulting from the use of the oven with other than specified
voltage.
3. The oven must be plugged into at least a 20 AMP 120
VOLT, 60 Hz GROUNDED OUTLET.
Where a standard two-prong outlet is encountered, it is the
personal responsibility and
obiigation of the consumer to
have it replaced with a
properly grounded threeprong outlet.
4. A TEMPORARY CONNECTION with a two-prong adapter
may be made where LOCAL CODES PERMIT. Unless the
cover screw is grounded through the house wiring,
attaching the adapter grounding plate to the cover screw
will not ground the oven. If
there is any doubt that the
cover screw is grounded, ^
have it checked by an eiectrician.
Radio Interference
1. Operation of the microwave oven may cause interference to
your radio, TV or similar equipment.
2. When there is interference, it may be reduced or eliminated
by taking the following measures:
a. Clean door and sealing surfaces of the oven. (See Care
of Your Microwave Oven found on page 41)
b. Place the radio, TV, etc. away from the microwave oven
as far as possible.
c. Use a properly installed antenna to obtain stronger signal
reception.
Power Supply
1. A short power-supply cord is provided to reduce the risks
resulting from becoming entangled in or tripping over a
longer cord.
2. Longer cord sets or extension cords are available and may
be used if care is exercised in their use.
3. If a long cord or extension cord is used, (1 ) the marked
electrical rating of the cord set or extension cord should be at
least as great as №e electrical rating of the appliance, (
extension cord must be a grounding-type 3-wire cord, and (3)
the longer cord should be arranged so that it will not drape
over the countertop or tabletop where it can be pulled on by
children or tripped over accidentally.
2) the
-3-
Page 6

Practical Hints
Follow These Safety Precautions When Cooking in Your Oven
1) HOME CANNING / DRYING FOODS / SMALL
QUANTITIES OF FOODS
i Do not use your oven for home canning or the heating of
any closed jar. Pressure will build up and the jar may
explode. Your oven cannot maintain the food at the proper
canning temperature. Improperly canned food may spoil
and be dangerous to consume.
• Small quantities of food or foods with low moisture content
can dry out, bum or catch on fire.
• Do not dry meats, herbs, fruits or vegetables in your oven.
IMPORTANT
Proper cooking depends on time set and weight of food. If
you use a smaller portion than recommended and cook at
the time for the recommended portion, fire can result.
If a fire occurs, turn oven off and leave oven door closed.
Disconnect the power cord or shut off power at the fuse
or circuit breaker panel.
2) POPCORN
Popcorn must be popped in a microwave oven com popper.
Microwave popcorn which pops in its own package is also
avaiiabie. Follow popcorn manufacturers’ directions and use a
brand suitable for the wattage of your microwave oven. Never
leave oven unattended when popping popcorn. Allow the
popcorn bag to cool before opening it. To prevent steam
bums, always open the bag away from your face and body.
CAUTION:
When using pre-packaged microwave popcorn, follow
recommended package instructions. Check package
weight before using the Popcorn pad. Set the oven for
the weight of the popcorn package, (see page 15)
If these instructions are not followed, the popcorn may
not pop adequately or may ignite and cause a fire.
3) DEEP FAT FRYiNG
• Do not attempt to deep fat fry in your microwave oven.
Cooking oils may burst into flames and may cause damage
to the oven and perhaps result in bums. Microwave utensils
may not be able to withstand the temperature of the hot oil,
and could shatter or distort.
4) EGGS
• Do not heat eggs in their shell in a microwave oven.
Pressure will build up and the eggs will explode.
5) FOODS WITH NONPOROUS SKINS
• Potatoes, apples, egg yolks, whole squash and
sausages are examples of foods with nonporous skins.
These types of foods must be pierced before microwave
cooking to prevent their bursting.
• Use fresh potatoes for baking and cook untii just done.
Overcooking causes dehydration and may cause afire. Use
recommended weights or fire may occur.
6) LIQUIDS
• Heated liquids can erupt if not mixed with air. Do not heat
liquids in your microwave oven without first stirring.
7) GLASS TRAY / COOKING UTENSILS / FOIL
• Cooking utensils get hot during microwaving. Use
potholders when removing utensils from the oven or when
removing lids or plastic wrap covers from cooking utensils
to avoid burns.
• The glass tray will get hot during cooking. It should be
allowed to cool before handling or before paper products,
such as paper plates or microwave popcorn bags, are
placed in the oven for microwave cooking.
• When using foil, skewers, warming rack or utensils made of
metal in the oven, allow at least 1 -Inch (2.5 cm) of space
between metal material and interior oven walls. If arcing
occurs (sparking) remove metal material (skewers etc.)
and/or transfer to a non-metallic container.
• Dishes with metaliic trim should not be used, as arcing may
occur.
8) PAPER TOWELS / CLOTHS
• Do not use paper towels or cloths which contain a synthetic
fiber woven into them. The synthetic fiber may cause the
towel to Ignite.
» Do not use paper bags or recycled paper products in the
microwave oven.
9) BROWNING DISHES / OVEN COOKING BAGS
• Browning dishes or grills are designed for microwave
cooking only. Always follow instructions provided by the
manufacturer. Do not preheat browning dish more than 8
minutes.
• If an oven cooking bag is used for microwave cooking,
prepare according to package directions. Do not use a wire
twist-tie to close bag.
10) THERMOMETERS
• Do not use a conventional meat thermometer in your oven.
Arcing may occur.
11) BABY FORMULA / FOOD
• Do not heat baby formula or food in the microwave oven.
The glass jar or surface of the food may appear warm while
the interior can bum the infant’s mouth and esophagus.
12) REHEATING PASTRY PRODUCTS
• When reheating pastry products, check temperature of any
fillings before eating. Some foods have fillings which heat
faster and can be extremely hot while the surface remains
warm to the touch (ex. Jelly Donuts).
13) GENERAL OVEN USAGE GUIDELINES / OVEN DOOR
• Do not use the oven for any reason other than the
preparation of food.
> Do not leave oven unattended while in use.
-4-
Page 7

Cookware and Utensil Guide
ITEM MICROWAVE COMMENTS
Aluminum Foil
Browning Dish
Brown paper bags No May cause a fire in the oven.
Dinnerware
Microwave-Safe, only
Disposable polyester
Paperboard Dishes
Fast Food Carton
with Metal Handle
Frozen Dinner Tray
Metal
Microwave-safe
Glass Jars Yes Remove lid. Heat food until just warm. Most glass jars are not heat
Glassware
Heat Resistant Oven
Glassware and
Ceramic, only
Metal Twist Ties No
Oven Cooking Bag
Paper Plates & Cups
Paper Towels & Napkins
Plastic
Microwave-Safe, onty
Cookware and
Storage Dishes
Plastic Foam Cups
Plastic Wrap Yes
Straw, Wicker, Wood
Thermometers
Microwave-safe, onty
Conventional
Wax paper
Yes
for
Shielding Only
Yes
Yes
Yes
No May cause arcing.
Yes
Yes
Yes Ideal for microwave cooking and browning, (see Container Test below)
Yes
Yes
Yes Use to warm rolls and sandwiches by microwave.
Yes
Yes
Yes Use only for short term reheating.
Yes
No
Yes Use as a cover to prevent spattering and to retain
Small strips of foil can be molded around thin parts of meat or
poultry to prevent overcooking. Arcing can occur if foil is too close
to oven wall or if too much foil is used.
Browning dishes are designed for microwave cooking only. Check
browning dish information for instructions and heating chart. Do not
preheat for more than 8 minutes.
Check manufacturers' use and care directions for suitability for
microwave heating. Some dinnerware may state on the back of the
dish, "Oven-Microwave Proof."
Some frozen foods are packaged in these dishes. Can be
purchased in grocery stores.
Frozen dinners may be heated in foil tray, if tray is less than %-inch
(2 cm) high. Place foil tray in center of oven. Leave at least 1 -inch
(2.5 cm) space between foil tray and oven walls. Heat only 1 foil
tray in the oven at time. For containers more tfian V4-inch (2 cm) deep,
remove food and place in a similar size microwave-safe container.
resistant.
They may cause arcing which could cause a fire in the oven.
Follow manufacturers' directions. Close bag with the nylon tie
pro\nded, a strip cut from the end of the bag, or a piece of cotton
string. Do not close with metat twist tie. Make six Vi-inch (1 cm) slits by
closure.
Use to warm cooked foods, and to cook foods that require short
cooking times such as hot dogs.
Should be labeled, "Suitable for microwave heating." Check
manufacturers' directions for recommended uses. Some
mtcmwave-safe plastic dishes are not suitable for cooking foods with
high fat content.
Plastic foam will melt if foods reach a high temperature.
Use to bring foods to a low serving temperature.
Use to cover food during cooking to retain moisture.
Use to bring food during cooking to retain moisture.
Use only microwave-safe meat and candy thermometers.
Not suitable for use in microwave oven.
moisture.
Container Test
TO TEST A CONTAINER FOR SAFE MICROWAVE OVEN USE: Fill a 1-cup glass measure with water and place it in the
microwave oven along with the container to.be tested; heat one minute at HIGH. If the empty container is microwave oven-safe,
it should remain comfortably cool and the water should be hot. If the container is hot, it has cibsorbed some microwave energy
and should not be used. This test cannot be used for plгlstic containers.
-5-
Page 8
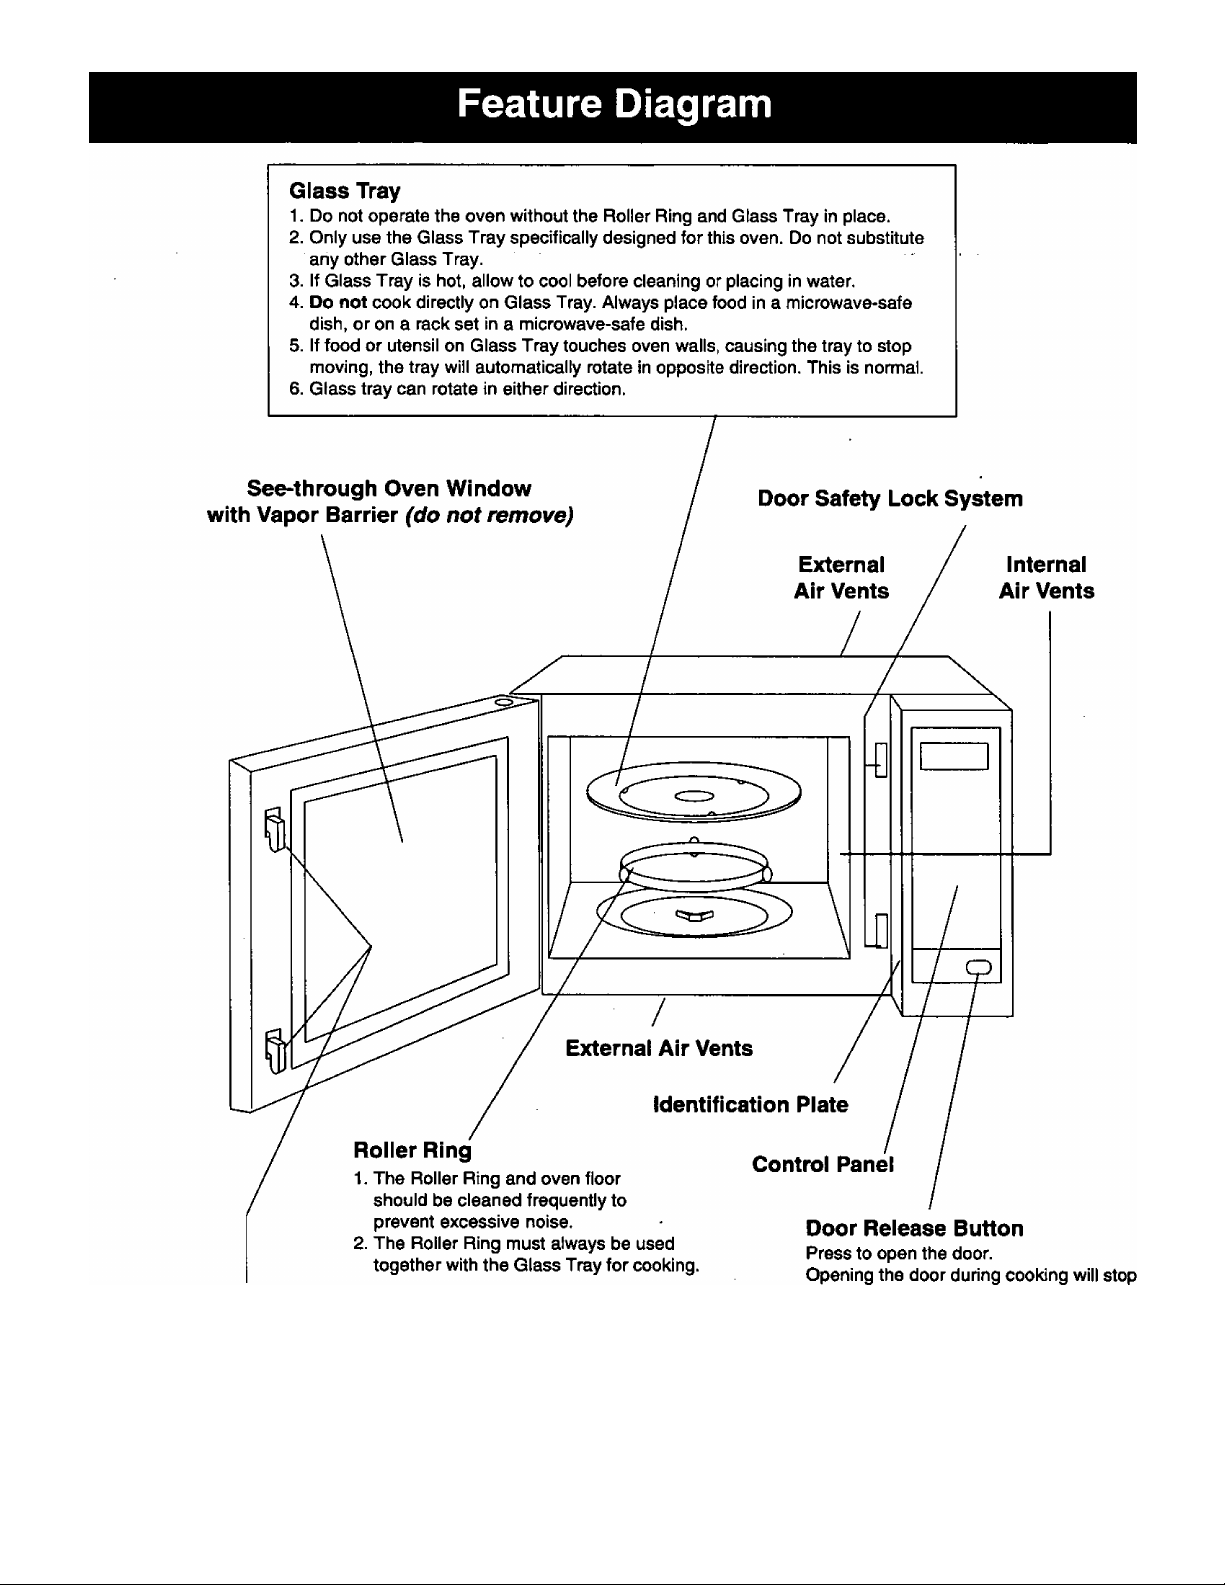
Door Safety Lock System
the cooking process without canceling
the program. Cooking resumes as soon
as the door is closed and Start Pad is
pressed. The oven light will stay on or
turn on whenever the door is opened.
-6-
Page 9

(1)
(2)
(3)
(4)
(5)
<6)
(7)
(8)
(14)
(13)
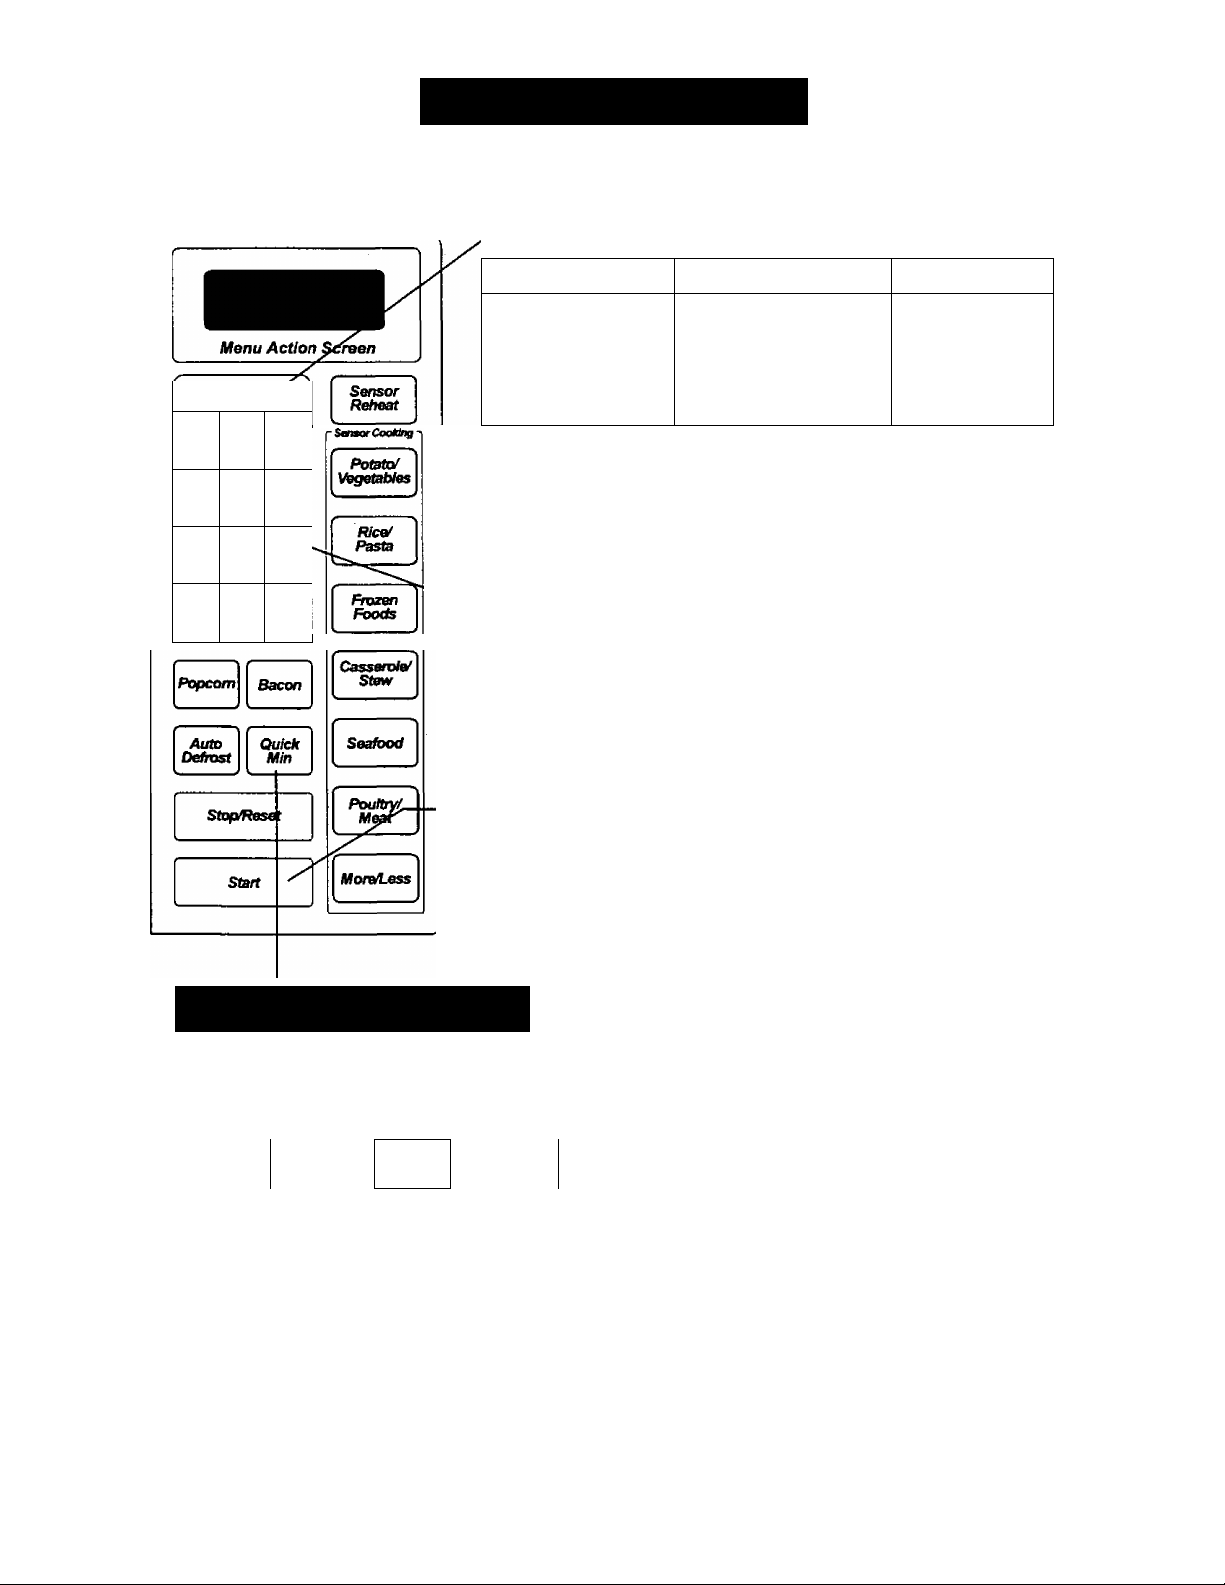
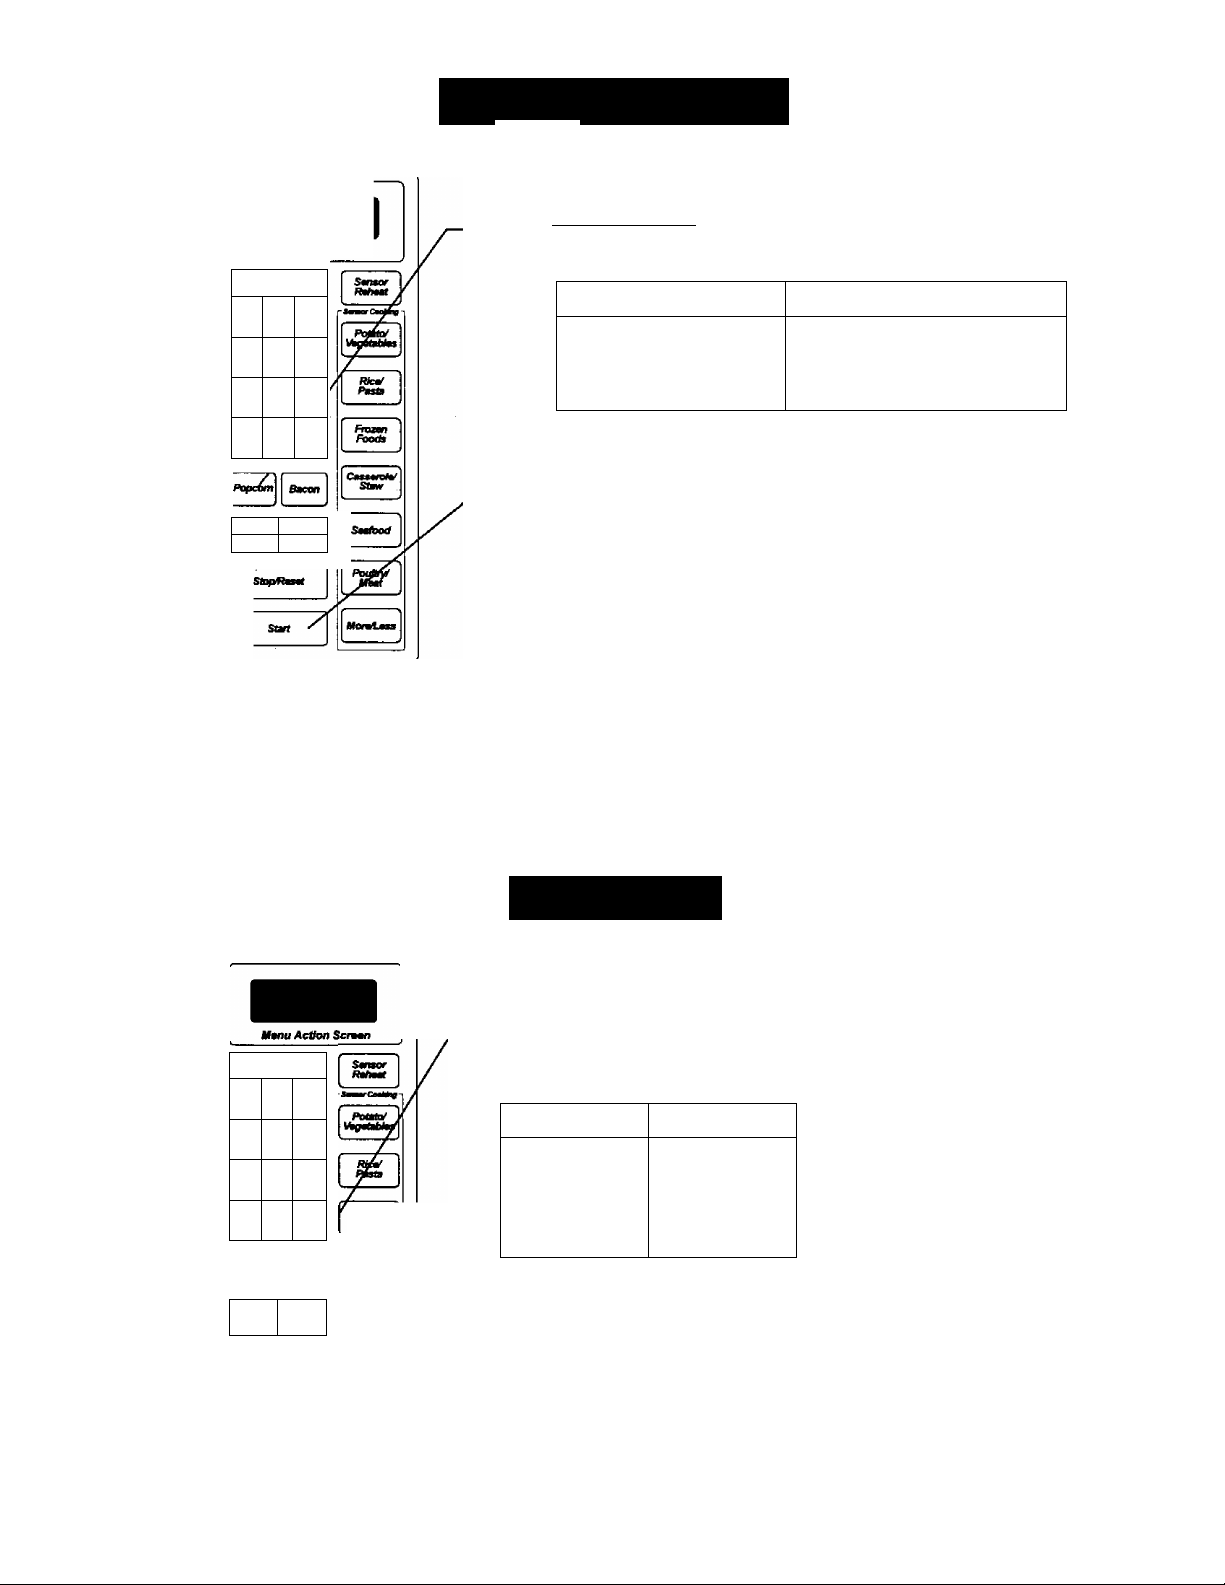
Control Panel
(1) Menu Action Screen
(2) Power Level Pad («‘page 10)
(3) Number Pads
(4) Timer/Clock Pad (•‘pages 11, 16)
(5) Function Pad (•‘pages 8-9)
(10)
(11)
(9)
(12)
(6) Popcorn Pad («page,15)
(7) Auto Defrost Pad (•‘page 11)
(8) Quick Min Pad (•‘page 10)
(9) Bacon Pad (•‘page 15)
(10) Sensor Reheat Pad («page 13)
(11) Sensor Cooking Pads («pages 13-14)
(12) More/Less Pad
(13) Start Pad:
(14) Stop/Reset Pad;
Prompters (Normal Operation):
When pads are pressed, a beep sound is heard and
the corresponding letter or word(s) appear and scrolls
across the screen. If a pad is pressed and no beep is
heard, the unit has not or cannot accept the instruction.
As each pad is pressed the corresponding word(s)
scroll across the screen. Words will automatically
appear to prompt user to perform the next step. It is not
necessary to watt for the words to appear before
pressing pads for the next step. A two beep sound is
heard between stages. At the end of any complete
program, the oven will beep five times and "ENJOY
YOUR MEAL" will appear on the screen.
Step by step instructions scroll for easy operation.
One tap allows oven to begin functioning. If door is
opened or Stop/Reset Pad is pressed once during
oven operation, Start Pad must be pressed again
to restart oven.
Before cooking: One tap clears your instruction.
During cooking: One tap temporarily stops the
cooking process. Another tap cancels all your
instructions and time of day appears on the
display screen.
-7-
Page 10

Let's Start to Use Your Oven!
Plug in
1
Plug into a properly grounded
electrical outlet.
Conversion:
The display automatically appears in
English with weight measurement in
Imperial. If you wish to use Spanish
or French and/or the Metric System,
use Function Pad (below). The
conversion should be programmed
directly after plugging the oven in. It
can be changed at any time using
Function Pad.
Select Power Level
3
e.g. MEDIUM Power — Press Power Level Pad four times
(see page 10 for chart)
Set Cooking Time
using number pads
e.g. 1 minute 30 seconds
f
-------
___
>1
> L
f
-------
>
1 3 0
____
J s
Press Start
r \
___
/
2
Place a cup of water in
the oven
open the door and place a cup of
water on the Glass Tray in the
oven. Then close the door.
1)
2)
m
ftneUan
> The time in the Menu Action
Screen will count down.
To Use Function Pad
Press "Select Function".
Select choice
Menu Action Screen displays all options available
3) Q]®®
Select option [T]. or
Menu Action Screen displays all options available.
-8-
Page 11

Functions
This unique feature of your PANASONIC microwave oven allows you to establish the initial non-cooking features of your oven such
as CHILD LOCK, WORD SPEED, LANGUAGE CHOICE (ENGLISH, SPANISH OR FRENCH), plus many more. See below.
IQI
LANGUAGE CHOICE
The oven has English, French and Spanish display. The display appears in English when you plug-in.
1 ENGLISH -» Display appears in English.
2 FRANÇAIS -» Display appears in French.
3 ESPAÑOL -* Display appears in Spanish.
Lb/KG CHOICE
The oven has both imperial and metric weight measurements. The oven displays the weight in imperial when
you plug it in. . . .
1 Lb -► Weight can be set in Ib/oz, (Imperial).
2 KG “♦ Weight can be set in kg/g, (Metric).
WORD SPEED
The speed of word scrolling in the Display Window can be quickened or slowed down.
1 QUICK Words scroll quickly.
2 MEDIUM Scrolling speed reverts to initial setting.
3SLOW
MENU ACTION ON/OFF
MENU ACTION SCREEN helps you to program your oven by prompting the next step to be taken. When you
become familiar with your oven, the prompting can be turned off.
1 ON Prompting Guide will reappear.
2 OFF -» Prompting Guide will not appear.
CHILD LOCK ON/OFF
The oven has Child Safety Lock feature which prevents use by children. It does not lock the door.
1 ON -» Child Lock has been set and operation will not be accepted.
2 OFF
Words scroll slowly.
Child Lock has been cancelled.
BEEP ON/OFF
If you wish to have the oven operate with no beep, it can be eliminated.
1 ON Beep sound will reactivate.
2 OFF
REMINDER BEEP ON/OFF
A reminder beep works to remind you to remove the food from the oven after the completion of cooking. It will
occur every few seconds.
1 ON Reminder beep will work.
2 OFF -*■ Reminder beep will not work.
DAYLIGHT SAVING ON/OFF
8
1 ON -* Time of day will advance one hour.
t
2 OFF -* Time of day revert to original setting.
CLOCK ON/OFF
Clock display can be turned off.
1 ON -»> Clock display will appear in the Display Window.
2 OFF Clock display will not appear in the Display Window.
Time of day will not be lost while the display is off.
DEMO MODE ON/OFF
Demo mode is designed for retail store display. In this mode, the oven can be demonstrated with no power in the
oven.
1 ON The oven will be in demo mode.
2 OFF -*■ The oven will be out of demo mode.
Beep sound will not be heard.
-9-
Page 12
Power & Time Setting
1
Select Power Level
Power Lover
1 2
4
7
V
5 6
8 9
m
0
FoKÚon
Press
once
twice
3 times
4 times MEDIUM
5 times
6 times
3
When selecting HIGH Power, you can start from step 2.
To reheat, select MEDIUM-HIGH or MEDIUM.
Power Level
HIGH
DEFROST
MEDIUM-HIGH
MEDIUM-LOW
LOW
% Power
100%
30%
70%
55%
30%
10%
2Set Cooking Time
J
(Up to 99 minutes and 99 seconds) e.g. 12 minutes
START
3
> Cooking will start.
The time in the Display Window will begin to count down.
To recall the selected power level during cooking, press Power
Level Pad.
For 2 or 3 stage cooking, repeat above steps 1 and 2 before
pressing Start Pad.
Quick Min Function
This function 1) helps you in programming cooking time easily and 2) allows you to add extra cooking time,
1) To Set Cooking Time:
■>
Power Level
Press to set cooking time (up to 10 taps/minutes) after selecting the desired power level, and then press Start. If you set cooking
time without selecting power level, oven automatically selects High Power.
NOTE: After setting the time by Quick Min Pad, you cannot use Number Pads, and vice versa.
2) To Add Extra Cooking Time:
Quick
Min
Press to add extra cooking time (up to 10 taps) during cooking.
>■ Cooking time changes to include extra time and continues to count down in the display window.
Quick]
Min
^
____
^
r
Start
-10-
Page 13
Conversion Chart
Follow this chart to convert tenths of a pound into
ounces. If a piece of meat weighs 1.9 pounds,
program 1 pound 14 ounces.
Tenths of a Pound Ounces
0.0 0
0.1 1 -2
0.2 3-4
0.3 5
0.4 6-7
0.5
0.6 9-10
0.7
0.8 13
0.9 14-15
8
11 -12
NOTE:
1. The shape and size of the food will determine the maximum
weight the oven can accorhmodate. The recommended
maximum weight of meat is 4 ib (1.8 kg); pouitry, 6 lb
(2.7 kg) and seafood, 3 ib (1.4 kg).
2. The oven beeps once during the defrosting cycle to signal
that the food needs to be turned or rearranged. To prevent
overdefrosting, thin areas of edges can be shielded with strips
of aluminum foil.
3. For best results, the minimum recommended weight 8 oz.
(220 g).
4. Stand time or power level may be programmed after Auto
Defrost.
Clock Setting
Timer
Clock
Press twice.
NOTE:
1. You can use the oven without setting the clock.
2. There is no a.m. or p.m. settings. Clock is a 12 hour display.
3. To reset time of day, repeat the steps above.
4. The clock will retain time setting only when plugged into power source.
Enter time of day. (e.g. 11:25)
-11 -
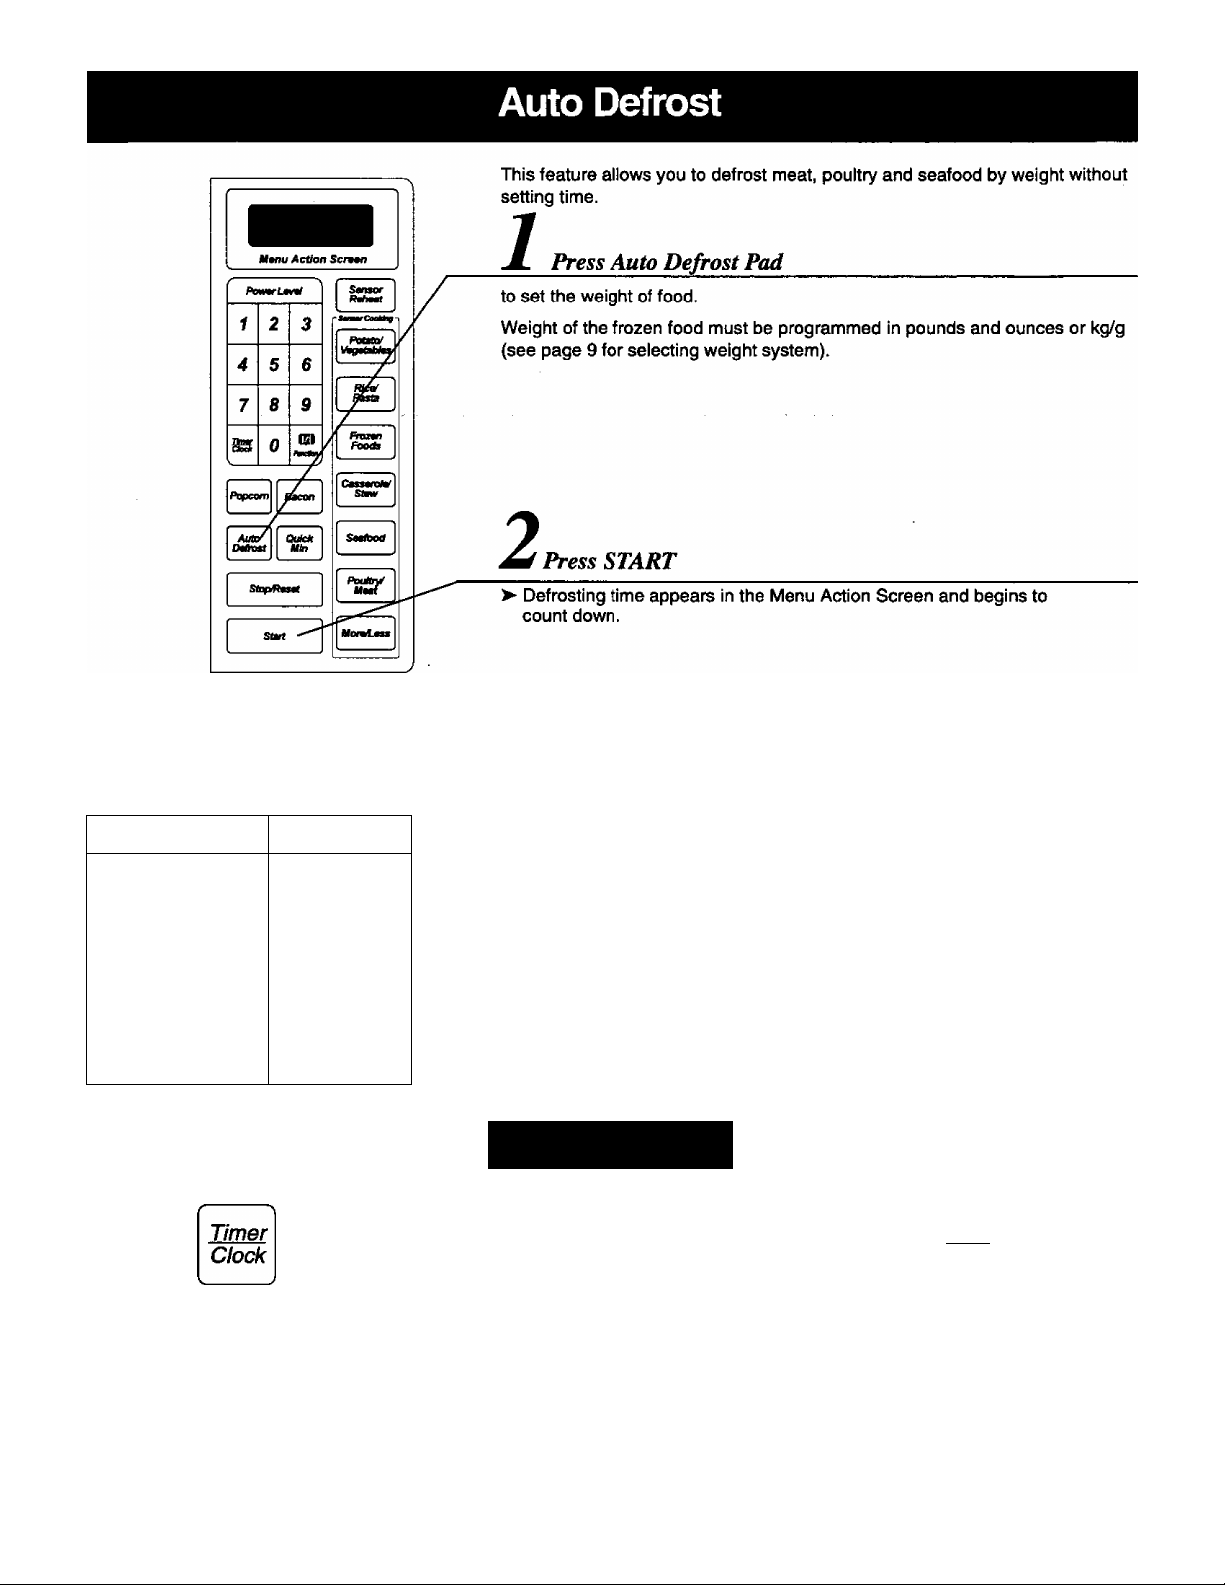
Press once to set
Page 14

Defrosting Tips & Techniques
1. Freeze meats, poultry and fish in packages with only 1 or 2 layers of food. Place wax paper between layers.
2. Package in heavy-duty plastic wraps, bags or freezer paper.
3. Remove as much air as possible.
4. Wrap should be snug against food, sealed securely and labeled.
5. Remove virrapper to prevent holding steam and juice. Juice of food can get hot and cause the outer surface or bottom of the food to
cook; set the food on a microwave roasting rack and drain liquid during defrosting.
6. Place meat in an appropriate size dish.
7. Place roast fat-side down and whole poultry breast-side down on a microwave roasting rack in a dish.
8. Place small items on a microwave roasting rack in a dish.
9. Large roasts and whole poultry may still be icy in center after defrosting, allow to stand in the refrigerator covered with plastic wrap
(see chart below).
10. Fish Eind seafood should be slightly icy after defrosting, allow to stand and rinse under cold water for 2-3 minutes.
11. Defrosted items in 2 layers should be rinsed separately or have a longer stand time.
FOOD
DEFROST TIME
(min. per pound)
DURING DEFROSTING
Fish and Seafood
[up to 3 lb. (1.5 kg)]
Crabmeat
Fish Steaks
Fish Fillets
Sea Scallops 14 to 16 Break apart/Remove defrosted pieces
Shrimp medium
Whole fish
12 to 14 Break apart
6 to 10
6 to 8
Turn over
Turn over/Rearrange
etolo Break apart/Remove defrosted pieces
10 to 12 Turn over
Meat
Ground Meat
Roasts
[2Vi-4lb. (1.2-2kg)j
Chops/Steak
Ribs/T-bone
Stew Meat
Liver (thin sliced)
Baoon
8 to 10
8 to 12
8 to 10
8 to 10
10 to 12
8 to 10
4 to 6
Turn over/Remove defrosted portion/Shield edges 10 min.
Turn over/Shield ends and defrosted surface
Separate/Tum over/Rearrange
Turn over/Shield
Break apart/Shield
Drain liquid/Tum over/Separate pieces
Turn over
Poultry
Chicken, Whole
[up to 3 ib. (1.5 kg)]
Cutlets
Pieces
Cornish Hens
Turkey Breast
[5 - 6 lbs. (2.5 - 3 kg)]
6 to 10 Turn over 2 or 3 times/Shield defrosted parts 30 min. in refrig
6 to 8 Turn over 5 min.
8 to 10
8 to 12
8 to 12 Turn over 2 to 3 times 30 min. in refrig
Separate
Turn over/Rearrange
AFTER DEFROSTING
Stand Time Rinse
NO
5 min.
YES
30 min. in refrig
NO
5 min.
YES
NO
10 min.
YES
-12-
Page 15

f
---------------
1 2 3
5
4
8 9
7
0
m
s
__
6
fSI
Sensor Reheat / Sensor Cooking
The GENIUS feature allows you to reheat/cook most of your favorite foods
without having to select reheat!ng/cooking times and power levels. The oven
does it all automatically.
Select Category
Sensor Cooking Pads each have several categories. See next page.
More/Less Pad:
Preferences for food doneness vary with each individual. After having used
Sensor Cooking a few times, you may decide you would prefer your food
cooked to a different doneness. By using the More/Less Pad, the programs
can be adjusted to cook food for a longer or shorter time.
1 tap: More cooking
2 taps: Less cooking
Press More/Less Pad before pressing
Press START
> Cooking will start.
After the burst of steam is detected by the SENSOR, the remaining cooking
time appears in the Menu Action Screen and begins to count down. Do not
open door until time appears in the Menu Action Screen.
To recall the selected category during cooking, press any Sensor Cooking
Pad. The category will appear in the display.
NOTES ON SENSOR REHEAT:
Follow the recommendations on page 14, in addition to the
following:
DO NOT:
1. Reheat bread and pastry products. Use manual power and
time.
2. Reheat raw or uncooked food.
3. Use if oven cavity is warm.
4. Use for frozen beverages.
5. Use for frozen foods.
Casseroles - Add 2 to 4 tablespoons of liquid; cover with lid or
plastic wrap. Stir when time appears in the Display Window.
Canned foods - Empty contents into casserole dish or serving
bowl; cover dish with lid or plastic wrap. After reheating, release
plastic wrap and stand.
Plate of food - Arrange food on plate; top with butter, gravy, etc.
After reheating, release plastic wrap and stEind.
Food
Plate of
Food
Meat,
Poultry
Casseroles
Side dishes
Soups,
Sauces,
Gravies
Average
Starting
Temp.
Ref rig.
Refrig. 4 - 6 oz.
Refrig.
Refrig, or
Room
Refrig, or
Room
Weight per
Serving
12-16 0Z.
8 oz. any size
4 - 6 oz. any size
6 - 8 02.
Number of
Servings
any size
any size
any size
-13-
Page 16

Sensor Cooking
Potato/
Vegetables
Rice^asta
Frozen
Foods
Casserole/
Stew
Seafood
CATEGORY
1 X Potato
2x
Fresh Vegetables
3x
Frozen
Vegetables
1 x Rice
2x
Pasta 4 - 8 oz.
1 X
Frozen Entrees
2x
Frozen Dinners
1 X
Casserole 1 -4qt.
l2x
Stew
1 X
Fish Rllets
2x
Shellfish
WEIGHT RANGE
1 - 4 potatoes
any size
any quantity
any quantity
Rice
Yîcup
1 cup
1 Yz cup
2 cups
Cold water
1 cup
2 cups
3cups
3Yz cups
(120 - 230 g)
any size
any size
1 -4qt.
min. Yz Ib.
min. Yz Ib.
INSTRUCTIONS
Pierce several times and place on a microwave safe
dish. Do not cover. After beep, turn over.
Add small amount of water. Cover loosely with a lid or plastic wrap.
After beep, stir or rearrange.
Add 2 tbsp of water. Do not cook with butter or
sauce. Cover with F^astic wrap. After beep, stir or
rearrange.__________________________________
Place rice and cold water 'h to 1 teaspoon salt
Cover with lid or plastic wrap. After beep, stir several
times. After cooking, stir and let stand 5 to 10 mins.
Place 1 Yz-quarts of hot water, pasta, 1 tbsp. oil and
1 tsp. salt in a 4-qt. casserole. Cover with lid. After beep, stir
occasionally. After cooking, rinse pasta with cold vrater.
Follow manufacturers’ directions for covering or
removing covers. For best results, do not use frozen
foods packaged in foil tray.
After beep, stir if possible or ladle gravy or sauce
over.
Use appropriate amount of liquid. Cover with
casserole lid. Stir occasionally or rearrange after
beep. Use redpes in the Cooking Guide section.
Anange in a single layer in dish. Cover with lid or
plastic wrap. Stir or rearrange after beep.
1 X
Pouttry/Meat
Chicken Pieces
2x
Whole Chicken up to 6 Ib. (3 kg)
3x
Pork (roast)
min. Yz Ib.
2 - 4 Ib.
0*2 kg)
4x
Beef-medium
2-41b.
0-2kg)
For best results by Sensor, follow these recommendations.
BEFORE Reheating/Cooking:
1. The room temperature surrounding the oven should be below
95“F (35X).
2. Food weight should be between 4 oz (120 g) and
24 oz (680 g).
3. Glass Tray and outside of container should be dry.
4. Cover foods loosely, but completely, with plastic wrap or place foods
in a casserole dish with a proper fitting lid.
5. All foods should be taken from their normal storage place.
Place skin-side up. Cover wth plastic wrap.
Rearrange after beep.
Place breast-eide down. Cover completely with
plastic wrap. After beep, turn breast-side up, recover.
Place fat-side down. Cover with plastic wrap. After
beep, turn over, recover, shield ends of roast with foil if necessary.
Pork must reach 170°F (77”C) before serving.
Place fat-side up. Cover with plastic wrap.
___________________
___________________
DURING Reheating/Cooking:
While “AUTO” is displayed in the Display Window, DO NOT open door.
This causes inaccurate cooking results.
Once the timer begins to count down, ttie oven door may be opened to
stir, turn, shield or add foods.
AFTER Reheating/Cooking:
All foods should have a covered stand time.
-14-
Page 17
W«nw>lc№>n 5cr««n
Powm'Lmnl ^
Í 2
4
5 6
8
7
ass-Oy
Auto
Oufcft
3
/IBI
fmitan
___
¥ki
Popcorn Function
1Select the Weight
of prepackaged microwave popcorn.
Press
once 3.5 02.
twice 3.0 oz.
three times
y
2
Press START
> Cooking time appears and begins to count down.
NOTE:
1 .Use prepackaged room temperature microwave popcorn. Read
manufacturers' instructions.
2. Place bag in oven according to manufacturers' directions.
3. Pop only one bag at a time.
4. After popping, allow the contents of the bag to cool for a few minutes before
opening. Open bag carefully away from face and body because popcorn and
steam are extremely hot.
5. Do not reheat unpopped kernels or reuse bag.
6. Never leave oven unattended when popping popcorn.
CAUTION: If pre-packaged popcorn is of a different weight than the
recommended weight, do not use the popcorn setting, or inadequate popping or
a fire may occur. Follow the manufacturers' instructions.
1.75 02.
Weight
(99 g)
{90 g)
(50 g)
/
--------------
1 2 3
4 5
7 8 9
ss
0
'
__
Auto
IMh»t
StofMMWt
(Mdr
Bacon Pad
Select the Number of Slices
N
€
m
PtNjMW
mmT
Place slices on a microwave safe dish. Cover with paper towel to absorb
grease spatters.
PRESS AMOUNT
once
twice 3 slices
3 times
4 times
Press START
2
> Cooking time appears and begins to count down.
2 slices
4 slices
6 slices
-15-
Page 18

Timer Function
This feature allows you to program a standing time after cooking is completed and to program the oven as a minute
timer and/or to program delay start.
> Time will count down without oven operating.
To Set Stand Time
Set Desired
Cooking
Program
e.g. High 10 min.
(See page 10)
Timer
Clock
Press
once.
THRU
Set desired
amount of stand
time.
Start
Press,
Cooking will start. After
cooking, stand time will
count down without oven
operating.
To Set Delay Time
THRU
Set desired
amount of stand
time.
NOTE:
1. When the first/second stage has finished, a two beep signal is heard. After all the stages have been completed, the oven will beep five times.
2. If oven door is opened during the Stand Time of Kitchen Timer, the time in the Display Window will continue to count down.
3. Delay Start cannot be programmed before any Auto Control Function. This is to prevent the starting temperature of ftie food from rising before
defrosting or cooking begins. A change in the starting temperature could cause inaccurate cooking results.
4. Timer can be set up to 99 minutes and 99 seconds.
Set Desired
Cooking
Program
e.g. High 10 min.
(See page 10)
Start
Press.
After completed
delayed time, cooking
will start
-16-
Page 19

-17-
Page 20

Food Characteristics Cooking Techniques
Bone and Fat
Both bone and fat affect cooking. Bones may cause irregular
cooking. Meat next to the tips of bones may overcook while
meat positioned under a large bone, such as a ham bone,
may be undercooked. Large amounts of fat absorb microwave
energy and the meat next to these areas may overcook.
Density
Porous, airy foods such as breads, cakes or rolls take less
time to cook than heavy, dense foods such as potatoes and
roasts. When reheating donuts or other foods with different
centers be very careful. Certain foods have centers made with
sugar, water or fat and these centers attract microwaves (For
ex., jelly donuts). When a jelly donut is heated, the jelly can
become extremely hot while the exterior remains warm to the
touch. This could result in a bum if the food is not allowed to
cool properly in the center.
Quantity
Two potatoes take longer to cook than one potato. As the
quantity of the food increases so does the cooking time.
When cooking small amounts of food such as one or two
potatoes, do not leave oven unattended. The moisture
content in the food may decrease and a fire could result.
Piercing
Foods with skins or membranes must be pierced, scored or
have a strip of skin peeled before cooking to allow steam to
escape. Pierce whole egg yolks and whites, clams, oysters,
chicken livers, whole potatoes and whole vegetables. Whole
apples or new potatoes should have a
before cooking. Score sausage and frankfurters.
1-inch strip of skin peeled
Browning
Shape
Uniform sizes heat more evenly. The thin end of a drumstick
will cook more quickly than the meaty end. To compensate for
irregular shapes, place thin parts toward the center of the dish
and thick pieces toward the edge.
Size
Thin pieces cook more quickly than thick pieces.
Starting Temperature
Foods that are room temperature take less time to cook than if
they are chilled or refrigerated or frozen.
Foods will not have the same brown appearance as
conventionally cooked foods or these foods which are
cooked utilizing the browning feature. Meats and poultry may
be coated with browning sauce, Worcestershire sauce,
barbecue sauce or shake-on browning sauce. To use,
combine browning sauce with melted butter or margarine;
brush on before cooking.
For quick breads or muffins brown sugar can be used in the
recipe in place of granulated sugar, or the surface can be
sprinkled with dark spices before baking.
-18-
Page 21

Cooking Techniques
Spacing
Individual foods, such as baked potatoes, cupcakes and
appetizers, will cook more evenly if placed in the oven equal
distances apart. When possible, arrange foods in a circular
pattern.
Covering
Shielding
Thin areas of meat and poultry cook more quickly than meaty
portions. To prevent overcooking, these thin areas can be shielded
with strips of aluminum foil. Wooden toothpicks may be used to hold
the foil in place.
Timing
A range in cooking time is given in each recipe. The time range
compensates for the uncontrollable differences in food shapes,
starting temperature and regional preferences. Always cook food
for the minimum cooking time given in the recipe and check for
doneness. If Une food is undercooked, continue cooking. It is easier
to add time to an undercooked product Once the food is
overcooked, nothing can be done.
Stirring
Stirring is usually necessary during microwave cooking. We
have noted when stirring is helpful, using the words once,
twice, frequently or occasionally to describe the amount of
stirring necessary. Always bring the cooked outside edges
toward the center and the less cooked center portions toward
the outside of the dish.
Rearranging
Rearrange small items such as chicken pieces, shrimp,
hamburger patties or pork chops. Rearrange pieces from the
edge to the center and pieces from the center to the edge of
the dish.
As with conventional cooking, moisture evaporates during
microwave cooking. Casserole lids or plastic wrap are used
for a tighter seal. When using plastic wrap, vent the plastic
wrap by folding back part of the plastic wrap from the edge of
the dish to allow steam to escape. Loosen or remove plastic
wrap as recipe directs for stand time. When removing plastic
wrap covers, as well as any glass lids, be careful to remove
them away from you to avoid steam burns. Various degrees
of moisture retention are also obtained by using wax paper or
paper towels. However, unless specified, a recipe is cooked
uncovered.
Turning
It is not possible to stir some foods to redistribute the heat. At
times microwave energy will concentrate in one area of a food.
To help insure even cooking, these foods need to be turned.
Turn over large foods, such as roasts or turkeys, halfway
through cooking.
Stand Time
Most foods will continue to cook by conduction after the
microwave oven is turned off. In meat cookery, the internal
temperature will rise S^F to 15®F (3°C to 8“C) if allowed to
stand, tented with foil, for 10 to 15 minutes. Casseroles and
vegetables need a shorter amount of standing time, but this
standing time is necessary to allow foods to complete cooking
in the center without overcooking on the edges.
Testing for Doneness
The same tests for doneness used in corrventional cooking may be
used for microwave cooldng. Meat is done when fork-tender or
spirts at fibers. Chicken is done when juices are dear yellow and
drumstick moves freely. Rsh is done when it flakes and is opaque.
-19-
Page 22

Appetizers
ORIENTAL DUMPLINGS
Filling:
Va pound cooked pork, finely chopped
Va pound shrimp, cleaned and finely chopped
'/4 cup finely chopped green onions
1 tablespoon chopped parsley
1 Jalaperto pepper, finely chopped
1 teaspoon salt
Va teaspoon pepper
1 egg white
Wonton wrappers, (Approximately 1 lb.)
Water
Yield: Approximately 45 Dumplings
In medium bowl combine all filling ingredients. Place a
teaspoon of filling mixture in center of a wonton wrapper.
Wet inside edges of wrapper with small amount of water.
Fold top left and bottom right comer of wrapper over filling
and press together to seal.
Place 11 dumplings on microwave safe rack. Heat Vk cups
water in 2-cup glass measure at HIGH 2'A to 3 minutes.
Pour water into bottom of 4-quart casserole. Set rack with
dumplings in casserole dish. (Rack should be high enough
so water does not reach bottom of dumplings.) Brush
dumplings with water. Cover with lid. Heat at HIGH
minutes. Turn dumplings over; brush with water. Recover.
Heat at HIGH 2}k to 3 minutes. Repeat with remaining
dumplings. Serve with plum sauce or other dipping sauces.
Tk to 3
STUFFED ZUCCHINI
3 zucchini
1 tablespoon olive oil 2 cloves garlic, chopped
Va onion, chopped
1 tomato, chopped
Va teaspoon pepper
V4 teaspoon oregano
V4 teaspoon basil
V4 teaspoon parsley
Yield: 16 to 20 Appetizers
Halve zucchini lengthwise. Scoop out pulp and set aside.
In a small bowl, combine olive oil, garlic and onion. Cook at
HIGH IV2 minutes. Add zucchini pulp, tomato, pepper,
oregano, basil and parsley. Cook at HIGH 2 minutes. Stir
once. Drain mixture and set aside. Pat zucchini shells dry.
Place tomato mixture in each shell. Cut into bite-size
pieces. Place on a microwave- and heat-safe serving plate.
ORIENTAL SPARERIBS
2 pounds pork sparerlbs, cut in 1 rib portions
Va cup soy sauce
Va cup honey
V4 cup green onion, finely chopped
1 tablespoon rice wine vinegar
Va to 1 tablespoon fresh ginger, finely chopped
V4 teaspoon crushed red pepper
2 cloves garlic, finely chopped
Yield: 20 Appetizers
Arrange ribs meat-side down in a 2Va-quart shallow oval
casserole dish. Combine remaining ingredients. Brush ribs
with marinade.
Cook at HIGH 7 to 8 minutes. Turn ribs over and baste with
marinade. Cook at MEDIUM 7 to 8 minutes, or until ribs are
tender.
STUFFED MUSHROOMS
1 pound medium mushrooms (about 24), cleaned
4 slices bacon, chopped
1 small onion, finely chopped
Va cup dry bread crumbs
Vs cup white wine or water
'/4 cup grated Parmesan cheese
Vs teaspoon pepper
Yield: 24 Mushrooms (about 6 Servings)
Rennove stems from mushrooms. Finely chop enough
stems to equal 1 cup; set aside. Place bacon and onion in
bowl. Cook at HIGH 5 to 6V2 minutes, or until bacon is crisp
and onion is tender; stir once. Drain. Stir in chopped
mushroom stems, bread crumbs, wine, cheese and pepper.
Stuff mushroom caps with bread crumb mixture. Arrange
half of mushrooms in a circular pattern in a 9-inch
microwave-safe pie plate.
Cover with weix paper. Cook at HIGH 5 to 5Vz minutes. Let
stand, uncovered, 2 minutes before senring. Repeat
procedure with remaining mushrooms.
Cook at HIGH 6 to 7 minutes. Let stand, uncovered, 2
minutes before serving.
-20-
Page 23

Directions for Roasting Meats
Tender cuts, such as beef and lamb roasts should be
covered with wax paper to prevent spatter. For pork
roasts or hams, cover with plastic wrap or place in an
oven cooking bag.
Less tender cuts, such as pot roasts, should be cooked
in liquid. Use 1 cup of liquid such as soup or broth per
pound of meat. Use an oven cooking bag or covered
casserole. Select a covered casserole deep enough so
that the meat does not touch the lid.
TO COOK BY TIME:
Multiply the weight of the roast by the minimum
recommended minutes per pound. Program Power and
Time.
Meat Roasting Chart for Sensor & Time Cooking
TO COOK BY SENSOR COOKING:
Place meat according to “Special Instructions” below.
Cover with plastic wrap. Turn Pork Roast fat-side up
halfway through cooking time.
Press
Poultry/
Meat
three times for “PORK",
four times for "BEEF-MEDIUM".
If you want roast slightly over or under cooked, use
MORE/LESS Pad. The sensor will make the adjustment.
MEAT
BEEF ROASTS
[2V2to4Lb. (1.2 to 2 kg)]
Rib/Boneless Rib/Top Sirloin
Rare
Medium
Well
Rump, Eye of round
(High Quality)
Rare
Medium
Well
BEEF POT ROAST
[2V2 to 3V2 Lb. (1.2 to 1.7 kg)]
Chuck, Rump
PORK ROASTS
[2V2to4Lb. (1.2 to 2 kg)]
Bone-in
Boneless
HAM (fully cooked)*
Canned [3 Lb. (1.5 kg)]
Butt [8 Lb. (4 kg)]
Shank [8 Lb. (4 kg)]
Slice, 1-inch (2.5 cm) thick
[ILb (500 g)]
LAMB ROASTS
[2Vito4lb. (1.2 to 2 kg)]
Bone-in
Medium
Well
Boneless
Medium
Well
SENSOR
COOKING
CATEGORY
BEEF-MEDIUM
BEEF-MEDIUM
PORK
PORK
POWER & TIME
COOKING
[time in min/lb. (450 g)]
MEDIUM
MEDIUM
MEDIUM
MEDIUM
MEDIUM
MEDIUM
MEDIUM
LOW
MEDIUM
MEDIUM
MEDIUM
MEDIUM
MEDIUM
HIGH
MEDIUM
MEDIUM
MEDIUM
MEDIUM
9 to 11
12 to 14
14УПо I6V2
9 to 12
11 to 13
14 to 17
30 to 35
15to 18
15to18
8 to 12
13 to 15
13 to 15
5 to 8
SYito 13
11 to 16
8 to 11
lOto 15
TEMP.
AFTER
COOKING
ISO-F (55“C)
UOT (60“C)
leOT (70“C)
130“F (55“C)
140“F (60“C)
160“F (70“C)
170“F (77“C)
170Т (77“C)
140T (60X)
140Т (60“C)
140T (60“C)
140“F (бО^С)
leOT (70°C)
140"F (бОХ)
160^ (70°C)
SPECIAL
INSTRUCTIONS
Place roast fat-side
up. Cover roast
with plastic wrap.
Cover meat with
Bquid. Turn meat ever
half of cooking time.
Place roast fat-side
down. Cover pork with
plastic wrap. Turn
over halfway through
cooking time.
Place ham fat-side up.
Cover ham with
plastic wrap, except
slice.
Place fat-side up.
Cover with wax
paper.
The recommended maximum weight win vary according to fhe cavity size of your microwave oven model and the s/i^pe of meat.
-21 -
Page 24

Directions for Convenience Meats
Pierce sausage links with fork and score frankfurters before cooking.
Arrange food in a single layer in dish. Cover with wax paper to prevent spatter. Bacon may be placed on a microwave-safe dish. Cook according to time given in chart.
Let stand according to recommended time in chart.
Convenience Meats Chart
MEAT AMOUNT
Bacon, Slices
Canadian Bacon, Slices [1 oz. (30 g)]
Frankfurters, scored
Ham, Slices [about 2 oz. (60 g) ea.] 2
Hamburgers, well [4 oz. (120 g) ea.] 1
Lamb Chops, shoulder,
3/4-inch (2 cm) thick
Pork Chops, rib or loin,
1/2-inch (1 cm) thick
Sausage Links, frozen
[precooked, brown and sen^e]
2 (about 1/2 lb.)
4 (about 1 lb.)
2 (about 1/2 lb.)
4 (about 1 lb.)
MANUAL
POWER COOKING TIME
SETTING (in minutes)
2
3 HIGH
4
2
4 MEDIUM-HIGH
APPROX.
1 to 2
2 to 2% 1
2% to 3
Vi to Va
1 to 2 1
6 3to4
2
4
4
2
4
HIGH
HIGH
HIGH 3to4
MEDIUM-HIGH
MEDIUM-HIGH
2
4 HIGH
2to3
3to4
IVito 2Vi
2Vi to 3Vi
2to3
4Vi to 5Vi
5Vi to 7
10Vito12
4Vi to 5Vi
8 to 10
1 to 2Vi
IVito 2Vi
8 3to4
STAND TIME
(in minutes)
3
2
2
Q
o
3
2
Sausage Links, fresh
[2 to 3 oz. (60 to 90 g) ea.]
2
4 HIGH
8
-22-
4 to 6
6 to 8
8 to 10
3
Page 25

CURRY LAMB VEAL CUTLETS CORDON BLEU
1 small onion, finely chopped
'/4 cup butter or margarine
3 tablespoons flour
1 pound boneless lamb, cut into 1V2-inch cubes
1 can (IOV4 oz.) chicken broth
'h cup raisins
'h cup peanuts
3 tablespoons lemon juice
1 tablespoon curry powder
Vi teaspoon ginger
Vi teaspoon salt
Vi cup flaked coconut
2 cups cooked rice (see page 34)
Yield: 4 Servings
Cook onion and butter in 2-quart casserole at HIGH 5 to 6
minutes: stir once. Stir in flour, lamb, broth, raisins,
peanuts, lemon juice, curry powder, ginger and salt. Cover
with lid. Cook at HIGH 5 minutes and at MEDIUM-LOW 20
to 25 minutes or until lamb is tender; stir twice. Sprinkle
with coconut. Let stand, covered, 5 minutes. Serve over
hot rice.
4 veal cutlets (about 1 lb.), pounded thin*
2 thin slices cooked ham, halved
2 thin slices Swiss cheese halved
1 cup seasoned dry bread crumbs
Va teaspoon salt
Vi teaspoon pepper
Dash allspice
1 egg, beaten with Vi cup water
3 tablespoons oil
Yield: 4 Servings
On one side of each cutlet, place ham and cheese; fold
cutlet in half. Pound edges together to seal or secure with
wooden toothpicks. Dip cutlets in egg and then in bread
crumbs mixed with salt, pepper and allspice. Coat bottom of
2Va-quart shallow oval casserole dish with half of oil; place
cutlets in dish. Sprinkle remaining oil on cutlets.
Cook at HIGH 3V2 minutes. Turn cutlets over. Cook at
MEDIUM 4Vi minutes. Let stand, covered with wax paper, 5
minutes before serving.
*Variation: Substitute chicken cutlets for veal.
BEEF WITH BROCCOLI
1 tablespoon oil
V* pound boneless steak, cut into thin strips
1 clove garlic, finely chopped
V* teaspoon ginger
IV2 cups broccoli flowerets
1 tablespoon cornstarch
Va cup beef broth
1 tablespoon sherry
1 tablespoon soy sauce
Toasted sesame seeds (see page 39)
Yield: 4 Servings
Heat oii in 11 X 7-inch dish at HIGH 2 minutes. Stir in beef,
garlic and ginger. Cook at HIGH 3% to 4% minutes. Stir
twice. Stir in broccoli. Cover with plastic wrap. Cook at
HIGH 3 to 5 minutes, or until broccoli is tender-crisp; stir
once. Blend cornstarch with broth, sherry, and soy sauce
until smooth. Stir into beef mixture. Cook at HIGH 3 to 4
minutes, or until sauce is thickened. Stir once. Top with
sesame seeds.
BASIC MEAT LOAF
IV2 pounds lean ground beef
1 cup soft bread crumbs
'/* cup toasted wheat germ
V2 cup milk
1 medium onion, chopped
2 eggs, slightly beaten
IV2 teaspoons salt
'/a teaspoon pepper
1 can (8 oz.) tomato sauce, optional
Yield: 6 Servings
In a targe bowl, stir all ingredients except tomato sauce until
smooth. Pat mixture in oval shape into 11 x 7-inch dish.
TO COOK: Cook at MEDIUM 20 to 24 minutes.
TO COMPLETE: Let stand, covered, 5 minutes. Drain off
excess juice. Invert meat loaf onto serving platter. If
desired, spread tomato sauce over meat loaf.
-23-
Page 26

APPLE-STUFFED PORK CHOPS
SWEET'N SOUR PORK
4 pork chops, 1-inch thick V4 cup butter or margarine, meited V2 cup chopped appiè V2 cup herb-seasoned stuffing mix
V« cup (1 oz.) shredded Cheddar cheese
2 tabiespoons chopped celery 1 tabiespoon chopped onion 1 tabiespoon chopped raisins 2 tabiespoons orange juice
*/4 teaspoon Worcestershire sauce
1 tabiespoon water
Yieid: 4 Servings
Cut a horizontal slit in each pork chop to form pocket. In
small mixing bowl, combine butter, apple, stuffing mix,
cheese, celery, onion, raisins and orange juice; mix well.
Fill each pocket with stuffing mix; secure opening with
wooden toothpicks. Arrange pork chops in 11 x 7-inch dish.
Mix Worcestershire with water and brush on pork chops.
TO COOK; Cook at HIGH 17 to 19 minutes.
TO COMPLETE: Let stand, covered, 5 minutes.
Meanwhiie, place remainder of stuffing in a small
microwave-safe bowl. Cover with plastic wrap. Cook at
MEDIUM 2 to 3 minutes, or until hot.
1 can (8V4 oz.) chunk pineapple in heavy syrup,
drained; reserve cup syrup
V4 cup cider vinegar 1 tablespoon cornstarch
2 tablespoons oil
1 pound boneless pork, cut into V4 inch cubes
V4 cup soy sauce
1 bunch green onions, thinly sliced (about 3 tbsp.)
1 green pepper, cut into small chunks
Yield: 4 Servings
In small glass bowl, combine reserved syrup, vinegar and
cornstarch. Cook at HIGH 1 Va to 2 minutes, or until
thickened; stir once.
Heat oil in 8-inch square dish at HIGH 2 minutes. Stir in
pork, soy sauce and onion. Cook at HIGH 7 to 9 minutes;
stir twice. Add green pepper and pineapple. Cook, covered
with plastic wrap, at HIGH 4 to 5 minutes, or until pork is
done. Stir in sauce and let stand, covered, 5 minutes before
serving.
SPICY SAUSAGE STEW
1 pound Italian sausage links, cut into 1V2-inch pieces
1 pound boneless pork, cut into 1-inch cubes
1 can (28 oz.) whole tomatoes, chopped
1 can (8 oz.) tomato sauce
1 green pepper, cut into chunks
1 teaspoon basil
1 teaspoon oregano
V2 teaspoon garlic powder
Yield: 6 Servings
In 3-quart casserole dish, heat sausage at HIGH 5 to 6
minutes; stir once. Drain. Stir in remaining ingredients.
Cover with glass lid.
TO COOK BY SENSOR COOKING: Cook on Stew,
time appears in Display Window, stir occasionally.
TO COOK BY TIME: Heat at HIGH for 5 to 6 minutes then
at LOW for 55 to 58 minutes, or until pork is tender. Stir
occasionally.
TO COMPLETE: Skim off fat from liquid. Serve, it desired,
with rice or pasta.
After
IRISH STEW
2 pounds boneless lamb, cut into 1-inch cubes
2 medium carrots, sliced into V4-lnch pieces
2 potatoes (about 6 oz. ea.), peeled and cubed
2V2 cups water, divided
1 envelope (1 oz.) onion-mushroom soup mix
1 bay leaf
V4 cup flour
Yield: 6 Servings
In 4-quart casserole dish, arrange lamb, carrots and
potatoes forming three separate layers. In bowl, combine 2
cups hot water, onion-mushroom mix and bay leaf. Stir
together until well blended. Pour mixture over potatoes.
Cover with glass lid.
TO COOK BY SENSOR COOKING: Cook on Stew. After
time appears in Display Window, stir twice.
TO COOK BY TIME: Heat at HIGH 7 to 8 minutes and at
LOW 70 to 75 minutes. Stir twice.
TO COMPLETE: Blend flour with remaining V2 cup water.
Stir into dish*. Heat at HIGH 4 to 5 minutes, or until stew is
thickened.
*lf desired, add 'U teaspoon browning sauce.
-24-
Page 27

Poultry
Directions for Roasting Poultry
Season as desired, but salt only after cooking. Browning
sauce mixed with equal parts of butter will enhance
appearance.
Poultry may be stuffed or unstuffed. Tie legs together with
cotton string. Whole chicken should be placed breast-side
down on a microwave roasting rack set in an 8-to 10-inch
square dish or 2V2-quart shallow oval casserole dish.
Cover with wax paper to prevent spattering.
During cooking it may be necessary to shield legs, wings and
breast bone to prevent overcooking. Wooden toothpicks can
be used to hold foil in place.
If a large amount of juice accumulates in the bottom of
the baking dish, occasionally drain it. If desired, reserve
for making gravy.
To Cook Whole Poultry:
Multiply the weight of the poultry by the minimum
recommended minutes per pound. Program Power and
Time.
To Cook Chicken Parts:
Arrange pieces skin-side up, with meatier portions toward
edge of dish. Cover with wax paper. Poultry is cooked
when juices are clear. If there is a slight pink color in the
juice, return poultry parts to the oven and cook one or two
minutes longer.
TO COOK BY SENSOR COOKING;
Arrange pieces skin-side up, whole poultry breast-side up,
v«th meatier portions towards edge of dish. Cover
completely with plastic wrap. Cook on Sensor Cooking
Category.
Press
Poultry/
Meat
once for "CHICKEN PIECES",
twice for "WHOLE CHICKEN".
After Cooking, check the temperature of large chickens
and turkeys with a meat thermometer. Check the
temperature In both thigh muscles. If the thermometer
touches bone, the reading may be inaccurate.
DO NOT use a conventional thermometer in the oven
when cooking by microwave. Use only a microwave-safe
thermometer.
Let stand, covered, 5 minutes before serving.
Poultry Chart for Sensor & Time Cooking
SENSOR
POULTRY
Cornish Hens, whole
COOKING
CATEGORY
[1 to 1’/2 lb. (500 to 750 g) ea.;
Chicken parts CHICKEN
PIECES
Chickens [up to 4 lb. (2kg)]
WHOLE
CHICKEN
Chickens [4 to 6 lb. (2 to 3 kg)]
Turkey Breast
[5 to 7 lb. (2.5 to 3.5 kg)]
Duck [3 to 5 lb. (1.5 to 2.5 kg)] 8 to 10
Turkey* [8 to 12 lb. (4 to 6 kg)]
POWER & TIME
COOKING
[time in min/lb. (450 g)]
HIGH
MEDIUM-
HIGH
MEDIUM
MEDIUM-
HIGH
aVito 117*
14 to 16
15to 17
12 to 14
TEMP.
AFTER
COOKING
7 to 9
7 to 8
180“F-190"F
(SO^C-^-C)
ISO^F-ISOT
(SO^C-^-C)
180“F-190°F
(80"C-90°C)
180°F
(80X)
The recommended maximum weight of turkey will vary according to the cavity size of your microwave oven model.
SPECIAL
INSTRUCTIONS
Place breast-side
up.
Place skin-side up.
Cover with plastic
wrap
Place breast-side
down. Turn breastside up after half of
cooking time. Cover
with plastic wrap.
Place breast-side
up.
-25-
Page 28

Poultry
CALIFORNIA CHICKEN
2 chicken breasts, split (VA to 2 ib.)
2 teaspoons lemon Juice
1 teaspoon dried onion flakes
Basil
Pepper
Vs cup (3V> oz.) shredded Cheddar cheese, divided
Vs small avocado, thinly sliced
4 thin slices tomato
Yield: 4 Servings
Arrange chicken in 8-inch square dish with meatier portions
toward edge of dish. Sprinkie with lemon juice, onion flakes,
basil and pepper.
TO COOK BY SENSOR COOKING: Cover completely with
plastic wrap. Cook on CHICKEN PIECES.
TO COOK BY TIME: Cover completely with wax paper.
Cook at HIGH 12 to 15 minutes, or until chicken is tender.
TO COMPLETE: Top chicken with Va cup cheese, avocado,
tomato and remaining cheese. Cover with wax paper.
Cook at HIGH 2 minutes. Let stand, covered, 5 minutes
before serving.
CHICKEN PARMIGIANA
1 egg
*/4 cup water
2 boneless chicken breasts, halved
1 cup seasoned dry bread crumbs
Va cup grated Parmesan cheese
U* teaspoon paprika
2 tablespoons oil
1 can (8 oz.) tomato sauce or 1 cup spaghetti sauce
Oregano
1 cup (4 oz.) shredded mozzarella cheese
Yield: 4 Servings
Beat egg with water. Dip chicken in bread crumbs mixed
with Parmesan cheese and paprika, then in egg and again
in bread crumb mixture. Coat bottom of 8-inch square dish
with 1 tablespoon oil. Place chicken in dish; sprinkle with
remaining oil. Cook at HIGH 3 to 4 minutes; turn chicken.
Cook at HIGH 3 to 4 minutes. Top with tomato sauce,
oregano and cheese.
Cover with wax paper. Cook at HIGH 12 to 14 minutes, or
until sauce is hot. Sprinkle with mozzarella cheese and let
stand, covered, 5 minutes, or until cheese is melted.
STUFFED CORNISH HENS WITH ORANGE SAUCE
2V2 cups hot water
1 can (6 oz.) frozen orange Juice concentrate, defrosted
and divided
1 package (6 oz.) long grain and wild rice mix
4 slices bacon, cooked and crumbled
4 Cornish hens (1 Ib. ea.)
V4 cup honey
V4 to V2 teaspoon browning sauce
Yield: 4 Servings
In 2-quart casserole, combine water, 'U cup orange juice
concentrate and rice. Cover with lid. Cook at HIGH 8
minutes and at MEDIUM-HIGH 20 minutes, or until rice is
tender; stir in bacon. Stuff hens with rice mixture; tie legs
together with cotton string. Place hens in a 2'A-quart
shallow oval casserole dish. Cover with wax paper. Cook
at HIGH 20 to 25 minutes, or until hens are tender.
Meanwhile, combine remaining orange juice concentrate,
honey and browning sauce; brush hens every 10 minutes.
Let stand, covered, 10 minutes before serving. Cornish
hens may be cut in half before serving, if desired.
CHICKEN TERIYAKI
2 pounds chicken pieces
1 can (8 oz.) chunk pineapple In pineapple Juice
1 clove garlic, finely chopped
'/4 cup soy sauce
2 tablespoons packed brown sugar
'/2 teaspoon salt
V4 teaspoon ginger
Yield: 4 Servings
Arrange chicken skin-side down in 2V2-quart shallow oval
casserole dish with meatier portions toward edge of dish. In
small bowl, combine remaining ingredients; stir well. Pour
sauce over chicken.
TO COOK BY SENSOR COOKING: Cover completely with
plastic wrap. Cook on CHICKEN PIECES. After cooldng,
remove plastic wrap.
TO COOK BY TIME: Cover dish with wax paper. Cook at
HIGH 8 minutes. Turn chicken skin-side up. Cook at
MEDIUM 12 to 13 minutes.
TO COMPLETE: Chicken should be tender. Let stand,
covered, 5 minutes. To serve, spoon pineapple sauce over
chicken.
-26-
Page 29

Poultry
CHICKEN ENCHILADAS
1 large onion, chopped
V2 cup chopped green pepper
2 cups finely chopped cooked chicken or turkey
V2 cup chopped ripe olives
2 cans (10 oz, ea.) mild enchiiada sauce, divided
1V2 cups (6 oz.) shredded Cheddar cheese, divided
8 corn tortiiias
Shredded iettuce, optional
'/2 cup sour cream, optional
Yieid: 4 Servings
In medium glass bowl, combine onion and green pepper.
Cover with plastic wrap. Cook at HIGH 3 minutes; stir once.
Stir in chicken, olives and Vz cup enchilada sauce. Cover
with plastic wrap. Cook at HIGH 2 minutes, or until hot. Stir
in Va cup cheese. Let stand, covered. Arrange two tortillas
side-by-side, on paper towel. Cover with another paper
towel. Repeat with remaining tortillas, stacking one layer on
top of the other. Heat at HIGH 1 minute. (This softens
tortillas and makes them easier to roll.) Spoon about Vs cup
chicken filling down center of each tortilla. Roll up tortilla
and place seam-side down in SVz-inch square dish. Pour
remaining sauce over tortillas. Cover with wax paper. Cook
at HIGH 9 to 10 minutes. Top enchiladas with remaining
cheese. Cook at HIGH 3 minutes. Let stand 3 minutes
before serving. Serve garnished with lettuce and sour
cream.
MEXICAN CHICKEN
1 can (15 oz.) tomato sauce
2 to 3 tablespoons Jalapeho peppers, finely chopped
2 tablespoons chopped onion
V4 teaspoon chili powder
'U teaspoon cumin
V« teaspoon red pepper
2 ounces Monterey Jack cheese, shredded, optional
272 to 3 pounds chicken pieces, skinned
Yield: 4 Servings
In small bowl, combine tomato sauce, peppers, onion, chili
powder, cumin and red pepper.
Arrange chicken skin-side up in 2'/2-quart shallow oval
casserole dish, with meatier portions toward edge of dish.
Spread sauce evenly over chicken. Cover with wax paper.
Cook at HIGH 5Vz to 6 minutes. Baste chicken with sauce.
Cook, uncovered, at MEDIUM SVz to 10 minutes, or until
chicken is tender. Sprinkle with cheese. Let stand,
covered, 5 minutes before serving.
VEGETABLE-STUFFED CHICKEN
BREASTS
4 large boneless chicken breasts, skinned, split and
and pounded thin (about 2 lb.)
Salt
Pepper
1 cup frozen mixed broccoli, carrots and onions,
defrosted, finely chopped
2 tablespoons butter or margarine
V2 cup flour
1 egg, beaten with 2 tablespoons water
1 cup seasoned dry bread crumbs
Yield; 4 Servings
Season breasts with salt and pepper. Spoon 'h cup of
vegetables onto each breast. Top with % tablespoon butter,
then fold edges over to enclose the filling. Secure with
toothpicks. Coat chicken breasts with flour, dip in egg, then
in bread crumbs.
Arrange chicken in 8-inch square dish, cover with wax
paper. Cook at MEDIUM 10 to 12 minutes, or until chicken
is done.
CHICKEN CACCIATORE
2V2 to 3 pound chicken, cut into serving pieces
1 can (15 oz.) tomato sauce
1 )ar (4V2 oz.) sliced mushrooms, drained
Vz cup chopped onion
1 tablespoon sugar (optional)
1 teaspoon oregano
1 teaspoon salt
1 clove garlic, finely chopped
V« teaspoon pepper
Yield: 4 Servings
In 2-quart rectangular baking dish, arrange chicken, meatier
portions toward edge of dish. In medium bowl, combine
remaining ingredients, pour over chicken.
TO COOK BY SENSOR COOKING: Cover completely with
plastic wrap. Cook on STEW. After time appears in Display
Window, rearrange chicken; re-cover. After heating, remove
plastic wrap.
TO COOK BY TIME: Cover with wax paper. Heat at HIGH
18 to 20 minutes. Rearrange chicken pieces once.
TO COMPLETE; Chicken should be tender. Let stand,
covered, 7 minutes; if desired, serve with spaghetti.
-27-
Page 30

Fish and Seafood
Directions for Preparing Fish and Seafood
Use fresh or defrosted clean fish. Arrange fish in a single layer
in dish. For best results, avoid overlapping edges as this will
prevent fish from cooking evenly.Place thicker sections toward edge of the dish, (i.e., tail
sections toward center).
Ckwer dish loosely, but completely with plastic wrap.
TO COOK BY SENSOR COOKING: Stir shrimp or
scallops when time appears on the screen. Let stand,
covered, 5 minutes.
Press
Seafood
once for “FISH FILLETS",
twice for "SHELLFISH".
Fish and Seafood Chart for Sensor & Time Cooking
TO COOK BY TIME: Arrange shrimp and scallops in
single layer in dish. Cook on the recommended power
^level and minimum time in the chart. Rearrange or stir
shrimp or scallops halfway through cooking.
Test for doneness before adding extra cooking time.
The color of seafood and fish should be opaque and the
fish should flake easily when tested with a fork. If
undercooked, return to oven and cook 15 to 30 seconds
longer at recommended power level.
After cooking, let stand, covered, 3 to 5 minutes before
serving. Stand time allows the internal temperature to
equalize throughout the food and thereby completes the
cooking process.
SENSOR COOKING
RSH OR SEAFOOD
Fish Fillets
Fish Steaks
[1-inch (2.5 cm) thick]
Scallops (sea) % to 2 lb.
Shrimp, medium size
(shelled and cleaned).
Whole fish, cleaned
(stuffed or unstuffed)
AMOUNT CATEGORY AMOUNT POWER
% to 2 lb.
(250 g to 1kg)
(250 g to 1 kg)
Va to 2 lb.
(250 g to 1 kg)
TARRAGON HALIBUT STEAKS
3 tablespoons lemon Juice
2 tablespoons oil
1 teaspoon salt
72 teaspoon paprika
71 teaspoon onion powder
72 teaspoon tarragon
4 halibut steaks, 1-inch thick (about 8 oz. ea.)
Yield: 4 Servings
In small bowl, mix lemon Juice, oil, salt, paprika, onion
powder and tarragon until blended. Arrange halibut steaks
in 2V2-quart shallow oval casserole dish. Pour marinade
over steaks. Cover and marinate 1 hour. Cook at HIGH 7
to 9 minutes, or until fish flakes easily. Let stand, covered, 3
minutes before serving.
TIME COOKING
APPROX.
COOKING TIME
(in minutes)
. FISH
FILLETS
SHELLFISH 1 lb. (500 g) MEDIUM-HIGH
SHELLFISH 1 lb. (500 g) MEDIUM-HIGH 5 to 6
1 lb. (500 g) HIGH 5 to 7V2
1 lb. (500 g)
1 to IVilb.
(500g-750g)
MEDIUM-HIGH
HIGH 5 to 7
5Vî to 7
5 to 6
FILLET ALMANDINE
3 tablespoons butter or margarine
3 tablespoons slivered almonds
V2 pound fish fillets
Salt and pepper to taste
2 teaspoons lemon Juice
2 teaspoons parsley
Yield: 2 Servings
Place butter and almonds in 8-inch square dish. Cook at
HIGH 3 to 4 minutes; stir once. Cover fillets with butter.
Sprinkle with lemon Juice. Cover with plastic wrap. Cook at
HIGH 4 to 5 minutes, or until fish flakes when tested with a
fork. Let stand, covered for 3 minutes. Before serving,
season with salt and pepper and sprinkle with parsley.
-28-
Page 31

Fish and Seafood
MARYLAND CRAB BAKE
1 cup each chopped celery, green pepper and onion
3 tablespoons butter or margarine
2 packages (6 oz. ea.) crabmeat, drained and flaked,
canned or frozen, defrosted (see page 12)
1 teaspoon Worcestershire sauce
Vi teaspoon pepper
Va teaspoon salt
7a cup buttery cracker crumbs
1 tablespoon butter or margarine, melted
Dash paprika
Yield: 4 to 6 Servings
In 2-quart casserole, combine celery, green pepper, onion
and 3 tablespoons butter. Cover with lid. Cook at HIGH 3 to
4 minutes, or until vegetables are tender; stir once. Stir in
crab, Worcestershire, pepper and salt. Combine cracker
crumbs, melted butter and paprika; sprinkle over casserole.
Cook at MEDIUM-HIGH 6 to 7 minutes, or until heated
through. Stir twice. Let stand 5 minutes before serving.
BAKED STUFFED CLAMS
18 small (Itttleneck) clams, scrubbed and opened
Va to Va cup seasoned dry bread crumbs
2Va to 3 tablespoons oil
74 teaspoon garlic powder
74 teaspoon paprika
Vt teaspoon pepper
3 slices bacon, crisp-cooked and crumbled
(see page 22)
Yield: 18 Clams
Arrange clams on the half shell in two 8-inch square dishes.
Pierce each clam several times with toothpick. Combine
bread crumbs, oil, garlic, paprika and pepper. Sprinkle
crumbs on clams. Top with bacon.
Cook on MEDIUM-HIGH 2 to 3 minutes, or until clams are
tender.
COQUILLE ST. JACQUES
SCALLOPS WITH HERB LEMON BUTTER
74 cup butter or margarine
Vs teaspoon basil
Va teaspoon crushed rosemary
74 teaspoon salt
1 pound sea scallops
Juice from 1 lemon (about 2 tablespoons)
Paprika
Yield: 4 Servings
TO COOK BY SENSOR COOKING: In 8-inch square dish,
combine all of the above ingredients except paprika. Cover
with plastic wrap. Cook on SHELLFISH. After time appears
on the screen, stir scallops, re-cover and continue cooking.
TO COOK BY TIME: In 8-inch square dish, combine butter,
basil, rosemary and salt. Cook at HIGH 1 'h minutes, or until
melted. Stir in scallops and sprinkle with lemon juice; spoon
butter mixture over scallops. Cover with plastic wrap. Cook
at MEDIUM-HIGH 672 to 8V2 minutes.
TO COMPLETE: Scallops should be tender. Sprinkle with
paprika; let stand, covered, 5 minutes before serving.
2 tablespoons butter or margarine
1 small onion, finely chopped
2 tablespoons flour
Dash white pepper
*/4 cup milk or half'n half
1 Jar (272 oz.) sliced mushrooms, drained
Va cup (1 Va oz.) Shredded Swiss cheese
1 pound sea scallops
74 cup white wine
74 cup buttered bread crumbs
Parsley flakes
Yield: 4 Servings
Place butter and onions in medium glass bowl. Cook at
MEDIUM-HIGH V4 to 1 minute; stir in flour and pepper.
Gradually add milk, stirring until smooth. Cook at MEDIUM-
HIGH for 3 to 372 minutes or until thickened; stir twice. Stir
in mushrooms, cheese, scallops and wine. Spoon mixture
into 2'/2-quart shallow oval casserole dish. Top with bread
crumbs and parsley. Place dish on rack. Cook at MEDIUM-
HIGH 5 to 6 minutes.
-29-
Page 32

Directions for Preparing Casseroies
Prepare casseroles and stews according to recipe
directions. Stew meats are not browned before cooking.
Omit any oil or fat and flour used for browning. Fresh and
firm vegetables such as potatoes, carrots, rutabagas and
beans are added at the beginning of cooking. Frozen
vegetables and fresh vegetables with soft texture such as
zucchini, tomatoes or mushrooms are added during the last
30 minutes of cooking. Defrosted frozen vegetables are
canned vegetables are added with the thickener. Place
covered microwave-safe dish in oven.
Casseroles
TO COOK BY SENSOR COOKING:
Combine ingredients. Cover dish. Select Sensor
Category “Casseroled" and press Start Pad.
TO COOK BY TIME:
Prepare casseroles or stew by microwaving at lower power
levels. MEDIUM and MEDIUM-LOW power levels allow
flavors to blend and less tender cuts erf meat to become tender.
Use our recipes as a guideline for adapting your favorite
recipes.
EASY LASAGNA
V2 pound ground beef
1 Jar (30 oz.) spaghetti sauce
Vs cup water
1 container (15 oz.) ricotta or cottage cheese
1 egg, slightly beaten
Va teaspoon salt
1 teaspoon pepper
9 lasagna noodles (cooked)
V2 pound mozzarella cheese thinly sliced
V2 cup grated Parmesan cheese
Yield: 6 Servings
In large glass bowl, crumble ground beef. Heat at HIGH 1V2 to
2'/i minutes, or until beef is browned; stir once. Drain. Stir in
spaghetti sauce and water. Heat at HIGH 3V2 to 4V2 minutes
or until bubbly. Meanwhile, combine ricotta cheese, egg, salt
and pepper. In rectangular baking dish, spoon '/2 cup sauce;
alternately layer noodles, ricotta cheese mixture, mozzarella
cheese and sauce, forming 3 layers.
TO COOK BY SENSOR COOKING: Cover dish with plastic
wrap. Cook on CASSEROLE. After time appears in Display
Window, shield ends of dish with foil.
TO COOK BY TIME: Cook, covered with plastic wrap, at
HIGH 8 minutes and at MEDIUM-LOW 35 to 38 minutes, or
until noodles are tender. If necessary, shield ends of dish with
foil, during the last 10 minutes of cooking time.
TO COMPLETE: Sprinkle with Parmesan cheese: let stand,
covered, 5 minutes before serving.
BAKED ZITI
1 package (6 oz.) ziti macaroni, cooked (see page 34)
1 jar (I5V2 oz.) spaghetti sauce
V2 cup (2 oz.) shredded mozzarella cheese
Yield: 4 Servings
Combine ziti and spaghetti sauce in 2-quart casserole. Cover
with lid.
TO COOK BY SENSOR COOKING: Cook on CASSEROLE.
After time appears in Display Window, stir occasionally.
TO COOK BY TIME; Cook at HIGH 7 to 9 minutes; stir twice.
TO COMPLETE: Sprinkle with cheese. Let stand, covered, 10
minutes before serving.
MACARONI AND CHEESE
1 package (8 oz.) elbow macaroni, cooked and
drained (see page 34)
Va pound pasteurized process cheese spread, cut Into
cubes
Va to 1 cup milk
V2 to teaspoon salt
V4 teaspoon onion powder
V* teaspoon pepper
Vt teaspoon dry mustard, optional
Buttered bread crumbs
Yield: 4 Servings
In 3-quart casserole, combine macaroni, cheese, milk, salt,
onion, pepper and mustard. Cover with lid.
TO COOK BY SENSOR COOKING: Cook on CASSEROLE.
After time appears in Display Window, stir occasionally.
TO COOK BY TIME: Cook at MEDIUM-HIGH 12 to 15
minutes; stir twice.
TO COMPLETE: Top with bread crumbs. Cook, uncovered,
at MEDIUM-HIGH 3 minutes. Let stand, covered, 10 minutes
before serving.
-30-
Page 33

Eggs and Cheese
SCRAMBLED EGGS
Beat eggs, 1 tablespoon milk and dash of salt for each egg.
Pour into greased glass container. Cook at MEDIUM-HIGH
according to time in the chart. Stir two-thirds of the way
through the cooking time. Stir and let stand. Eggs will
continue to cook during stand time and should be slightly
undercooked after cooking.
Eggs
1. 1 -cup glass
2 1 -cup glass
4
6
Container
measure
measure
1 -quart bowl
1 Yz-quart bowl 4V4 - 5Yz
Cooking
Time
(in min.)
% -1Y4
1Yz-2 1Yz
3Y4 - 3Y4 lYz
Stand
Time
(in min.)
1
2
POACHED EGGS
Place 1 Yz cups hot water and a dash of vinegar and salt
in 2-quart casserole and heat at HIGH 5 to 7 minutes, or
until water boils. Break egg(s) into boiling water and with
toothpick pierce egg yolk twice and egg white several
times. Cook at
in the chart. Let stand. Eggs will continue to cook during
stand time and should be slightly undercooked after
cooking.
MEDIUM-HIGH according to the time given
BASIC OMELET
1 tablespoon butter or margarine
2 eggs
2 tablespoons milk
V> teaspoon salt
Dash pepper
Yield: 1 Serving
Melt butter in 9-inch pie plate at HIGH 1 minute; turn plate to
coat bottom with butter. Combine remaining ingredients, pour
into pie plate. Cook, covered with plastic wrap, at MEDIUM- '
HIGH 2 to 3Vz minutes, or until omelet is almost set; stir after 1
minute. Let stand, covered, 2 minutes. Loosen edges of
omelet from plate with spatula; fold into thirds to serve.
Variations: Try one of these easy variations:
For CHEESE Omelet, before folding, sprinkle 'Л cup shredded
cheese down center of omelet.
For HAM Omelet, before folding, sprinkle 'Л cup finely
chopped cooked ham down center of omelet
For HERB Omelet, blend Va teaspoon basil, thyme or crushed
rosemary with eggs and milk.
For JELLY Omelet, before folding, spoon 'Л cup jeily down
center of omelet
Cooking Time
Eggs
1
2
4 IY4-2 2
(in minutes)
Yz - V4
1 - IV4 2
Stand Time
(in minutes)
1
Eggs cannot be hard-cooked in their shells in a
microwave oven. Pressure will build up and the egg will
explode.
SPINACH CHEESE RING
2 packages (10 oz. ea.) frozen chopped spinach,
cooked and drained
1 cup (Vz pint) cottage cheese
2 eggs
Vz cup heavy cream
2 tablespoons melted butter
V4 cup finely chopped green onions
'/4 cup plain dry bread crumbs
3 tablespoons grated Parmesan cheese
V4 teaspoon paprika
'/4 teaspoon dill weed
Dash pepper
Yield: 4 Servings
CAULIFLOWER AND CARROT QUICHE
1 Vz cups coarsely chopped cauliflower
1 carrot, shredded
1 tablespoon water
9-inch pie shell, baked (see page 38)
1 cup (4 oz.) shredded Swiss cheese
V4 cup grated Parmesan cheese
3eggs
1 cup (Yz pt.) heavy cream
Vi teaspoon pepper
Yield: 10 Servings
In 1-quart bowl, combine cauliflower, carrot and water. Cover
with plastic wrap. Cook at HIGH 5 to 6 minutes. Stir once.
Sprinkle vegetables into pie shell. Sprinkle cheeses over
vegetables. Pour cream into 2-cup measure. Cook at
MEDIUM-HIGH 2 to 2Y4 minutes. Meanwhile, beat eggs in
small bowl. Stir a little hot cream into eggs. Blend eggs back
into cream. Add pepper. Pour mixture over ingredients in pie
sheli.
Cook at MEDIUM 10 to 12 minutes.
In medium bowl, combine all ingredients; mix well. Spoon into
well greased 1-quart glass ring mold. Cover with plastic wrap.
Cook at MEDIUM-HIGH 8 to 12 minutes, or untii almost set.
Let stand, uncovered, 5 minutes.
-31 -
Page 34

Vegetables
To Cook Fresh Vegetables
Weights given in the chart are purchase weights before
peeling, trimming, etc. Prepare vegetables for cooking; cut
slice or trim as directed in chart. Cook vegetables in
covered casserole, except for whole, unpeeled vegetables.
Whole, unpeeled vegetables, such as potatoes or
eggplant, should be pierced before cooking and arranged on
microwave-safe dish in the oven. Arrange potatoes in a
circular pattern on dish.
TO COOK BY TIME: Cook according to the time
recommended in the chart. Two-thirds of the way through
cooking, stir, rearrange, and/or turn vegetables over.
TO COOK BY SENSOR COOKING: When time appears
on the screen, stir vegetables.
^
Press
Potato/
Vegetables
once for "POTATO",
twice for “FRESH VEGETABLES".
After cooking, stir vegetables. Let stand, covered, before
serving. Vegetables that are cut into pieces should stand 3
minutes. Whole vegetables should stand 5 minutes.
To Cook Frozen Vegetables
TO COOK BY SENSOR COOKING:
Empty 10-28 oz. package of frozen vegetables into glass
container. Add 2 tablespoons water. Cover dish with lid, or
loosely but completely, with plastic wrap. Cook on Frozen
Vegetables.
For frozen vegetables in the pouch, pierce a hole in the
pouch, place on a dish and cook on Frozen Vegetables.
After cooking, stir and let stand, covered, 3 minutes before
serving. DO NOT cook frozen vegetables which contain
any type of butter or sauce by Sensor Cooking Pad.
Press
Potato/
Vegetables
_
_______
three times for " FROZEN VEGETABLES".
^
Never leave oven unattended when heating small amounts
of foods such as one or two potatoes. Potatoes may catch
fire if overcooked and cause severe damage to tfre oven
and surroundings.
Fresh Vegetable Chart for Sensor & Time Cooking
VEGETABLE
Artichokes, 6 to 8 oz. ea.
Asparagus. 6-in spears
Beans, green/wax, cut into 1Va-in. pieces
Broccoli, cut into spears
Brussels Sprouts
Cabbage, shredded
Carrots, sliced Va-in. thick
Corn, fresh on the Cob
Eggplant, fresh cubed
Whole (pierce skin several times)
Onions, small whole
Peas, green, shelled
Potatoes, 8 to 9 oz. ea.
Cook uncovered, turn over halfway
through cooking time. Pierce skin
several times before cooking.
Spinach, leaf
Squash. Summer, sliced 72-in. thick
Squash, Winter, Cut in half, scoop out
seeds, place cut-side down.
________
AMOUNT
WATER
2 tablespoons
V* cup
Va cup
1 lb. (500 g)
1 lb. (500 g)
1 lb. (500 g)
1 tub
fio oz. (300 g)1
1 lb. (500 g)
1 lb. (500 g)
1 ear
2 ears
4 ears
1 lb. (500 g)
2 tablespoons
V< cup
Va cup
2 tablespoons
Va cup
Va cup
2 tablespoons
2 tablespoons
Va cup
Va cup
1 to VU\b.
(500 to 600 g)
8 to 10
n lb. (500 Q)]
21b. (1kg)
1 lb. (500 g)
1 lb. (500 g)
1 lb. (500 g) Va cup
Va cup
Va cup FRESHVEG.
2 tablespoons
2 tablespoons FRESH VEG.
SENSOR
COOKING
CATEGORY
FRESH VEG.
FRESH VEG.
POTATO
APPROX. COOKING
TIME at HIGH Power
(In minutes)
6 to 7
9 to 11
14to 16
7 to 8
7 to 9
7 to 10
7 to 9
7 to 9
7 to 9
6 to 7
7 to 9
12to14
7 to 8V2
472 to 7
672 to 772
6 to 8
5 to 7
8 to 10
13 to 1572
572 to 7
6 to 8
672 to 772
-32-
Page 35

Vegetables
SCALLOPED POTATOES
V4 cup butter or margarine
1 tablespoon dried onion flakes
1 teaspoon salt
teaspoon pepper
V4 cup flour
2 cups milk
6 medium potatoes (about 6 oz. ea.), peeled and
thinly sliced
Yield: 6 Servings
In 4-cup glass measure, combine butter, onion, salt and
pepper. Cook at HIGH 1 to IV2 minutes, or until butter is
melted. Stir in flour, gradually add milk, stirring until smooth.
Cook at
MEDIUM-HIGH 8 to 9 minutes, or until sauce is
thickened; stir twice. In 2-quart casserole, alternately layer
potatoes and sauce, forming three layers.
Cover with lid. Cook at MEDIUM-HIGH 27 minutes or until
potatoes are tender. Let stand, covered, 5 minutes before
serving.
BAKED STUFFED POTATOES
4 medium potatoes, baked (see page 32)
V2 cup (2 oz.) shredded Cheddar cheese
Vs to Vacup milk
2 tablespoons butter or margarine, softened
(see page 39)
1 egg
Salt and pepper to taste
Paprika
Yield: 4 Servings
Cut a thin slice (lengthwise) from each potato. Scoop out
potato, leaving a thin shell. In small bowl, combine potato,
cheese, milk, butter, egg, salt and pepper; mash until
smooth. Spoon potato mixture into shell; sprinkle with
paprika. In 2'/2-quart shallow oval casserole dish, arrange
potatoes in a circle.
TO COOK BY SENSOR COOKING: Cover loosely, but
completely with plastic wrap. Cook on POTATO.
TO COOK BY TIME: Cover with wax paper. Cook at
MEDIUM-HIGH 4 to 6 minutes.
TO COMPLETE: Let stand, uncovered, 3 minutes before
serving.
SWISS SCALLOPED CORN
3 slices bacon, crisp-cooked and crumbled
2 cans (17 oz. ea.) whole kernel corn, drained
1 cup (4 oz.) shredded Swiss cheese
1 egg
1 can (5Vs oz.) evaporated milk
V2 teaspoon onion powder
Vi teaspoon pepper
IVa tablespoons flour
Vi cup dry bread crumbs
1 tablespoon butter or margarine, melted
Paprika
Yield: 6 Senrings
In 2V2-quart shallow oval casserole dish, combine bacon,
com and cheese. Blend in egg, milk, onion powder, pepper
and flour.
Cook at HIGH 5 to 6 minutes; stir once. Combine bread
crumbs, butter and paprika. Sprinkle over com. Cover with
plastic wrap. Cook at HIGH 4 to 5 minutes. Let stand,
covered, 5 minutes before serving.
RATATOUILLE
2 medium onions, sliced
1 medium green pepper, cut into Vz-inch slices
Vi cup oil
2 cloves garlic, finely chopped
1 medium eggplant (about IV2 lb.), peeled and
cut into Vi-inch pieces
3 medium tomatoes, cut into eighths
2 medium zucchini (about 1 lb.), cut into V2-inch slices
V« cup vegetable Juice cocktail or tomato juice
2 teaspoons each basil and parsley flakes
1 teaspoon salt
'/4 teaspoons pepper
Yield: 6 Servings
In 3-quart casserole, combine onions, green pepper, oil and
garlic. Cover with lid. Cook at HIGH 4 to 5 minutes; stir
once. Stir in remaining ingredients; cover.
TO COOK BY SENSOR COOKING: Cook on FRESH
VEGETABLES. When time appears on the screen, stir
twice.
TO COOK BY TIME: Cook at HIGH 18 to 20 minutes; stir
twice.
TO COMPLETE: Let stand, covered, 5 minutes before
serving.
-33-
Page 36

Pasta, Rice and Cereal
APPROX.
COOKING
(in min.)
ITEM
PASTA
Egg Noodles
medium width casserole
CONTAINER
3-qt.
AMOUNT
OF HOT
WATER
1 Va quarts
POWER
HIGH
(8 02.)
Specialty Noodle
{8 02.)
Spaghetti
or Fusilli
3-qt.
casserole
3-qt.
casserole
1 Va quarts
2 quarts
HIGH
HIGH
12-14
(8 02. broken)
Fro2en Tortellini
(16 02.) casserole
RICE
Flavored 2-qt. as pkg.
Rice Mix casserole
(4.4 to 7.5 02.) directs
Long Grain
(1 cup)
Short Grain 2-qt.
3-qt.
2-qt.
casserole
1 Va quarts HIGH 7-9 3
MEDIUM
directs
or as pkg.
2 cups MEDIUM
-LOW
2 cups MEDIUM 10-12 10
(1 cup) casserole -LOW
STAND
TIME
7-9
8-12
15-30
13-16 10
TIME
(in min.)
3
3
10
SPECIAL
INSTRUCTIONS
3
Add 1 teaspoon oil and 1 teaspoon
salt to water. Cover and bring hot
water to boil at HIGH (approx. 13 -
18 minutes). Stir in pasta. Cook,
covered; stirring occasionally. Let
stand, covered. Pasta that is to be
added to a casserole should be
slightly undercooked.
Cover & heat hot water to a boil at
HIGH (approx. 4 - 7 min.). Add rice,
salt & butter (amount of salt & butter
as package directs). Cook covered;
stir. Let stand, covered.
CEREAL
Cream of Wheat
(Reg.) 1 serving 1-qt.
(27a tbsp.)
2 servings
(Va cup)
Faring
glass bowl
1Va-qt. 1 Va cups HIGH 3-5 1
glass bowl
1 serving
(3 tbsp.)
glass bowl
1-qt.
V* cup HIGH
1 cup HIGH 2-3 1
2 servings 1 Va-qt. 2 cups HIGH 2-4 1
(6 tbsp.)
Oatmeal (Quick)
1 serving
(Va cup)
2 servings 2 individual
(Vs cup)
4 servings
(1 Vs cups)
Wheat Bran Cereal
1 serving
(Vs cup)
2 servings
(Va cup)
4 servings
(1 cup)
glass bowl
individual
serving dish
serving dishes
2-qt.
glass bowl
VaCUp HIGH
IVa cups
3 cups HIGH 5-6 2
HIGH
1-qt. V4 C UP HIGH 3-4 1
glass bowl
1 Va-qt. 1 Va cups HIGH 6 - 7Va 1
glass bowl
2-qt. 3 cups HIGH 7-8
glass bowl
2-4
1 -2
3-4
1
Stir cereal into water.
Stir frequently.
Cook uncovered.
Stir once before stand time.
Cover and heat hot water to a
boil at HIGH (approx. 3 to 6
min.) Slowly add cereal; stirring
frequently. Cook uncovered. Stir
once before stand time.
1
1
Combine water and cereal.
Cook uncovered.
Stir once before stand time.
2
To prepare Instant Rice: Combine 1 cup water, 1 teaspoon butter and dash salt in 1-quart casserole. Cover with lid. Cook at
HIGH 2 to 3 minutes or until water boils. Stir in 1 cup rice. Let stand, covered, 5 minutes. Fluff lightly wth fork before serving.
-34-
Page 37

Pasta, Rice and Cereal
NOODLE PUDDING
1 package (8 oz.) medium egg noodles
V2 cup butter or margarine
4 eggs, beaten
1 cup cottage cheese
1 cup sour cream
V« cup raisins
Vs cup sugar
1 teaspoon cinnamon
V« teaspoon nutmeg
Yield: 8 Servings
Cook noodles according to chart on page 34. Heat butter in
targe glass bowl at MEDIUM-HIGH 1 minute, or until melted.
Combine remaining ingredients and drained noodles; pour
into 2-quart ring mold. Sprinkle, if desired, with additional
cinnamon. Cook at MEDIUM-HIGH 18 to 20 minutes, or
until pudding is set. Let stand, covered with wax paper.
Serve warm or chilled.
PASTA PRIMAVERA
1 package (8 oz.), rotelle pasta or spaghetti, broken
2 cups broccoli flowerets
2 cups cauliflower
3 carrots, cut into sticks
2 cloves garlic, finely chopped
V4 cup chopped fresh parsley
2 tablespoons oil
1 teaspoon basil
3 tablespoon butter or margarine
% cup grated Parmesan cheese
Pepper to taste
Yield: 4 Servings
TO COOK BY SENSOR COOKING: Cook pasta according
to chart on page 33. In 3-quart casserole, combine broccoli,
cauliflower, carrots, garlic, parsley, oil, basil and butter.
Cook covered on PASTA. Add Parmesan cheese. Season
with pepper.
TO COOK BY TIME: Cook pasta according to chart on
page 33. In 3-quart casserole, combine broccoli,
cauliflower, carrots, garlic, parsley, oil, and basil. Cover with
lid. Cook at HIGH 7 to 9 minutes. Let stand, covered, 3
minutes. Meanwhile, in medium glass bowl, heat butter at
HIGH
1 to IV2 minutes, or until melted; stir in drained pasta.
Add vegetables and cheese; toss well. Season with pepper.
GRANOLA CEREAL
2 cups quick or old fashioned oats
Vs cup slivered almonds or chopped nuts
Vs cup wheat germ
Vs cup flaked coconut
V« cup raisins (presoaked in % cup hot water and
drained)
1 tablespoon packed brown sugar
3 tablespoons vegetable oil
3 tablespoons honey
1 tablespoon butter
1 teaspoon vanilla
Yield: 3 cups
Infix 7-inch dish, combine oats, almonds, wheat germ,
coconut, raisins and brown sugar; mix well. Set aside. In a
1-cup glass measuring cup combine oil, honey and butter.
Cook at HIGH V2 to 1 minute or until butter is melted. Cool 5
minutes. Stir in vanilla and pour over oats. Blend
thoroughly. Cook on HIGH 7 to 9 minutes, stirring
occasionally. Coo). Store in airtight container.
PEPPERED SESAME NOODLES
8 ounces vermicelli
3 tablespoons sesame oil
2 tablespoons peanut oil
6 to 8 fresh chili or jalapeho peppers, sliced, seeds
removed, if desired
3 tablespoons Worcestershire sauce
2 tablespoons soy sauce
4 to 5 green onions, cut diagonaiiy into Vs-inch pieces.
2 tablespoons sesame seeds, toasted
Yield: 6 to 8 Servings
Cook vermicelli according to chart on page 34. Drain, rinse
and set aside. In 2-cup glass measure blend sesame and
peanut oils. Cook at HIGH 1 minute. Add chili peppers.
Cook at HIGH 15 seconds. Add Worcestershire sauce and
soy sauce. Pour over cooked vermicelli. Toss to coat.
Cook at HIGH 3 minutes. Add green onions and sesame
seeds. Mix well.
-35-
Page 38

Quick Breads and Cakes
Layer cakes must be baked one layer at a time, or the
entire cake mix may be baked in a 16-cup fluted tube
dish. Prepare batter according to package, chart or recipe
directions.
Use dishes recommended iri chart or in recipes. Glass
dishes allow the bottom of the cakes to be checked for
doneness. When the product is removed from the oven,
visually check bottom.
If cake is to be inverted or removed from dish, such as
layer cakes or upside-down cake, grease sides of dish
and line bottom of 8" or 9" round or square dish with wax
paper.
If cake is to be served directly from the dish, grease
bottom of dish. Never flour cake dishes, fluted tube
dishes or muffin pans.
Cook second layer of 8" or 9” round or square cake
immediately after the first. The remaining batter can be
used for cupcakes.
ITEM
Quick Bread
(14 to 17 oz.) All batter
Com bread
(7 or 8 oz.)
Gingerbread
(14 OZ. )
Muffins
(Cook 6
at a time)
Cake Mix
(18 to
AMOUNT
OF BATTER
All batter
Alt batter 8" square dish
Fill V2 full
2Y4 cups
2OV4 oz.)
Cake Mix
(18 to
20V4 oz.)
Cupcakes
Prepare batter
according to
package
directions.
Pour all batter
into pan.
Fill Vi full
PREPARATION/
DISH SIZE
Line bottom of
B'k" x4Va‘‘x2’/2"
loaf dish with
wax paper.
Grease 8" or 9"
round or square
dish.
6-cup muffin pan
lined with paper
baking cups
Wax paper-lined
8" or 9" round or
square glass
baking dish
Generously
grease 16-cup
fluted tube pan
Line microwave
muffin pan with
paper toking cups.
2
4
6
Check during cooking. Different brands vary in
ingredients and density of batter; cooking times may be
slightly different than those given in chart.
After cooking;
Test for doneness. Check to rftake sure edges of cake
are dry and have begun to pull away from sides of dish,
and toothpick inserted near center comes out clean.
Let stand, uncovered, on a flat surface for 10 to 15
minutes. Stand time is important to allow cakes and
cupcakes to finish baking. Cakes and breads that are to
be inverted should be loosened from the sides of the dish.
Carefully turn out of dish. Remove wax paper from bottom
of cake. Store, covered, until ready to serve.
For best results, it is recommended to follow microwave
cooking instructions issued by the individual cake mix
manufacturers.
FIRST
STAGE
MEDIUM-LOW
8 - 9 min.
MEDIUM-HIGH
4Vi - 6 min. Cover with
HIGH
10-12 min.
MEDIUM
3V! - 5 min.
MEDIUM-LOW
8 min.
MEDIUM-LOW
9 -10 min.
MEDIUM
(in minutes)
IY4-2
2 - 2%
37a - 4Va
SECOND
STAGE
HIGH
4Va - 5Va
min.
— —
HIGH
3 - 4Va
min,
HIGH
6-11
min,
INSTRUCTIONS
Shield each end
with a 3" strip of
foil. Mold foil
around handle.
wax paper.
Shield each comer
with a piece of foil.
Place dish on a
microwave-safe
inverted pie plate.
Place dish on
microwave-safe
inverted pie plate
Cover with wax
paper.
Cover pan with
wax paper.
Cover with wax
paper.
SPECIAL
STAND
TIME
15 min.
uncovered
10 min.
uncovered
15 min.
uncovered
5 min.
uncovered
10 min.
uncovered
5 min.
uncovered
-36-
Page 39

Quick Breads and Cakes
SOUR CREAM COFFEE CAKE
Va cup sugar
V4 cup butter
IVaCUpS flour
1 cup sour cream
2 eggs
1 Va teaspoons vanilla extract
1 teaspoon baking powder
1 teaspoon baking soda
’/a teaspoon salt
Topping;
Vs cup chopped walnuts
V« cup sugar
Va teaspoon cinnamon
Yield: 8 Servings
In large bowl, cream sugar and butter. Add remaining
ingredients and beat with electric mixer at low speed for 30
seconds and then medium speed for 2 minutes. Pour into
greased 8-inch square baking dish. In separate bowl,
combine topping ingredients; sprinkle over batter.
TO COOK: Cover with wax paper. Elevate dish on inverted
glass pie plate. Cook at MEDIUM-HIGH 5'/a minutes and at
MEDIUM 5 to 5Va minutes, or until edges are dry and
toothpick inserted near center comes out clean.
TO COMPLETE: Let stand, uncovered for 10 minutes.
Serve immediately.
BANANA NUT COFFEE CAKE
'/4 cup oil
'/4 cup milk
1 egg
1 mashed ripe banana
% cup packed brown sugar
V4 cup flour
Vi cup chopped nuts
V4 teaspoon baking powder
V4 teaspoon salt
V4 teaspoon baking soda
Nut Topping:
'/4 cup packed brown sugar
'/4 cup chopped nuts
2 tablespoons flour
'/•teaspoon cinnamon
1 tablespoon butter or margarine, softened
Yield: 8 Servings
In medium bowl, combine oil, milk, egg, banana, and sugar.
Add flour, nuts, baking powder, salt and baking soda; stir
just until flour is moistened. Pour into greased 8- or 9-inch
round dish. In small bowl, prepare Nut Topping. Combine
brown sugar, nuts, flour, and cinnamon; cut in butter.
Sprinkle over batter.
TO COOK: Cover with wax paper. Cook on MEDIUM-HIGH
5Vi to 6 minutes. Cook at MEDIUM 5Vi to 6 minutes, or until
toothpick inserted near center comes out clean.
CHERRY BRUNCH ROLLS
V> cup packed brown sugar
V> cup chopped maraschino cherries
'/4 cup flaked coconut
1 tablespoon water
'/4 teaspoon cinnamon
1 can (7.5 oz.) refrigerated biscuits
3 tablespoons butter or margarine, melted
Yield: 10 rolls
In small glass bowl, combine brown sugar, cherries,
coconut, water and cinnamon; stir. Cook at HIGH 2 to 2Vi
minutes until boiling. Pour into a greased 5-cup ring mold.
Dip each biscuit into melted butter; arrange on top of
cherries. Cook at MEDIUM-HIGH 6 to 8 minutes.
Cook at MEDIUM-HIGH 3 to 4 minutes. Let stand, covered
for 5 minutes. Invert onto serving plate. Store covered.
TO COMPLETE: Let stand, uncovered, 10 minutes. Store,
covered, until ready to serve.
SOUTHERN CHEESE SPOON BREAD
Va cup yellow cornmeal
2 cups milk
Va teaspoon salt
2 eggs, beaten
1 cup (4 oz.) diced American cheese
2 tablespoons butter or margarine
Yield: 6 Servings
In medium glass bowl, combine cornmeal, milk and salt.
Cook at HIGH for 3 minutes and then at MEDIUM-HIGH for
3 to 4 minutes, or until cornmeal is thickened; stir until
smooth. Add eggs, cheese and butter, stir until cheese and
butter are almost metted. Pour into greased 8-inch round
dish. Cover with wax paper. Cook at MEDIUM 12 to 14
minutes, or until center is almost set. Let stand 10 minutes
before serving.
-37-
Page 40

Prepare pastry according to recipe or package
directions.
if desired, for a single crust homemade pastry recipe,
substitute V2 cup whole wheat flour for Va cup all-purpose
flour.
Microwave pie crusts are light in color. A few drops of
yellow food coloring may be mixed with the liquid before
adding liquid to the flour mixture. This will give the crust a
pale yellow color.
Roll dough out and gently place in pie plate.
Trim edge so a V4-inch overhang remains. Roll overhang
down to rim of pie plate. Flute edge.
Prick bottom and sides of pastry with fork.
Let pie crust rest 10 minutes. This rest time helps reduce
shrinkage.
If desired, brush with dark com syrup or molasses for
sweet fillings, or brush with Worcestershire or soy sauce
for savory fillings.
For frozen crust, thaw and remove from foil pie plate and
place in an 8- or 9-inch glass pie plate. Place on an
inverted pie plate. Heat Vi minute, then prick crust and, if
desired, brush with dark com syrup, molasses,
Worcestershire or soy sauce.
For crumb crusts, combine Vs cup butter and ’A cup sugar in
medium bowl. Heat at HIGH 1 'A to 2 minutes, or until butter
is melted. Stir in 1V4 cups crumbs (graham crackers,
chocolate or vanilla wafers). Firmly pat into greased 9-inch
pie plate.
Cook according to directions given in chart.
Visually check for doneness. Pastry crusts should be
opaque. If crust is undercooked, add cooking time in 15
second increments.
Let stand until cool. Chill crumb crusts.
PIE CRUST CHART
ITEM
Homemade or
Mix
Refrigerated MEDIUM-HIGH
Frozen
GrEih2im Cracker
or Cookie Crumb
POWER
HIGH
HIGH 2to2V2
MEDIUM-HIGH
APPROX.
COOKING TIME
(in minutes)
3to4
4V2to5
2to2V2
COCONUT LEMON MERINGUE PIE
IVaCups sugar
Vi cup cornstarch
'/4 teaspoon salt
lYa cups boiling water
3 eggs separated
Va cup lemon juice
3 tablespoons butter or margarine
Grated peel of 1 lemon
9-inch pie shell, baked (see chart this page)
Vi cup sugar
V4 cup coconut
Yield: 8 Servings
In 3-quart casserole, combine IVa cups sugar, cornstarch and
salt, stir in boiling water and cover with lid. Cook at HIGH for 6
to 7Vz minutes or until thickened. Halfway through cooking, stir
twice. Stir small amount of hot mixture into egg yolks; return
to hot mixture, beating until well blended. Add lemon juice,
butter and lemon peel. Pour into pie shell; set aside.
Meanwhile, beat egg whites until soft peaks form; gradually
add remaining sugar and beat until stiff. Spread meringue
over filling, making sure it touches crust all around the pie
edge. Sprinkle with coconut.
Cook at HIGH for 4 to 6 minutes, or until meringue is set. Cool
completely.
CHOCOLATE ROCKY ROAD PIE
1 package (3Vt oz.) chocolate pudding and pie filling mix
I’Acups milk
1 to 1'/2 cups miniature marshmallows
'/2 to 1 cup coarsely chopped walnuts
9-inch chocolate cookie crumb crust, baked
(see chart this page)
Yield: 8 Servings
Combine pudding mix and milk in 4-cup glass measure. Cook
at MEDIUM-HIGH for 6 to 8 minutes or until pudding is
thickened, stir until smooth. Cook 5 minutes then fold in
marshmallows and nuts. Turn into prepared crust; chill until
firm. Garnish with toasted coconut or chopped nuts.
-38-
Page 41

Microwave Shortcuts
FOOD
To Melt Butter, 'A pound
To Soften Butter, 'U pound
To Melt Chocolate,
1 square (1 oz.)
To Melt Chocolate,
Vi cup chips
To Separate Bacon,
1 lb.
To Soften
Cream Cheese, 3 oz.
Cup of Water
1 cup (8 oz.) HIGH 4
2 cups (16 oz.)
Cup of Milk
1 cup (8 oz.)
2 cups (16 oz.) MEDIUM-HIGH
POWER
MEDIUM
MEDIUM-LOW ’/
MEDIUM 2-3
MEDIUM 2-3
HIGH Vz-
MEDIUM-LOW Vz- 1
HIGH
MEDIUM-HIGH 3Vz - 4Vz
(in minutes)
TIME
1 -2
2-1
6V2
7-8
DIRECTIONS
Remove wrapper and place
butter in a microwave-safe dish.
Remove wrapper and place
chocolate in dish. Stir before
adding more time. Chocolate
holds its shape even when
softened.
1
Remove wrapper. After heating, use
a plastic spatula to separate slices.
Remove wrapper and place in
a bowl.
Heated liquids can erupt if not
mixed with air. Do not heat
liquids in your microwave oven
without stirring first.
To Toast Coconut, HIGH
Va cup
To Brown Ground Beef,
1 lb.
To Soften Ice Cream,
Vs gallon
To Roast Nuts, HIGH 3-5
1 Vz cups
To Toast Sesame Seeds, HIGH
V4 cup
To Soften Brown sugar
To Remove Oven Odors
HIGH 3-5
MEDIUM-LOW 3-4
HIGH
HIGH 5
1 -3 Place in a pie plate or bowl.
2Vz - 4 Place in a small bowl. Stir twice.
V» -
>/4
Stir every 30 seconds.
Crumble in microwave-safe
colander set in another dish.
Stir twice.
Spread nuts in 9-inch pie plate.
Stir twice.
Place 1 cup hard brown sugar in dish
with a slice of bread or a wedge of
apple. Cover with plastic wrap.
Combine 1 to 1 Vz cups of water with the
juice and peel of one lemon in a small
bowl. After heating, wipe interior of oven
with damp cloth.
-39-
Page 42

Before Requesting Service
^All these things are normal:
The oven causes
interference with my TV.
The oven lights dim. When cooking with a power other than HIGH, the oven must cycle to
Steam accumulates
on the oven door and warm
air comes from the oven
vents.
I accidentally ran my
microwave oven without
\^ny food in it.
PROBLEM
-
Oven will not turn on.
Some radio and TV interference might occur when you cook with the
microwave oven. This interference is similar to the interference caused by
small appliances such as mixers, vacuums, blow dryers, etc. It does not
indicate a problem with your oven.
obtain the lower power levels. The oven light will dim and clicking noises
can be heard when the oven cycles.
During cooking, steam and warm air are given off from the food. Most of
the steam and warm air are removed from the oven by the air which
circulates in the oven cavity. However, some steam will condense on
cooler surfaces such as the oven door. This is normal.
Running the oven empty for a short time will not damage the oven.
However, we do not recommend operating the microwave oven
without any food in it
POSSIBLE CAUSE
The oven is not plugged in
securely.
Circuit breaker or fuse is
tripped or blown.
There is a problem with №e
outlet.
Remove plug from outlet, wait
10 seconds and reinsert.
Reset circuit breaker or replace
fuse.
Plug another appliance into the
outlet to check if it is working. ,
REMEDY
.
___________
)
-
The words “DEMO MODE”
appear on the screen.
When the oven is turning
on, there is noise coming
from the glass tray.
The door is not closed completely.
Start Pad was not pressed after
^ programming.
Another program entered
already in the oven.
The program is not correct.
Sfop/Reset Pad has been pressed
. accidentally.
Clock pad has been pressed three
times, or Function “6" was pressed.
- ' '
The roller ring and oven bottom
are dirty.
-
If you have any questions or it seems there Is a problem with the oven,
contact PANASONIC CUSTOMER SERVICE for assistance.
1-800-211-PANA (7262) (9 a.m. - 9 p.m., E.S.T, Toll Free)
Close the oven door securely.
Press Start Pad.
Press Stop/Reset Pad to
cancel the previous program
and program again.
Program again according to the
Operating Instructions.
Program oven again.
Deactivate mode by pressing Clock Pad
three times, or clear Function.
Clean these parts according to
Care of Your Oven (next page).
-40-
Page 43

Care of Your Microwave Oven
BEFORE CLEANING:
Unplug at socket of the oven. If impossible, leave
oven door open to prevent oven from accidentally
turning on.
Inside of the oven:
Wipe with a damp cloth. Mild detergent
may be used if the oven gets very
dirty. The use of harsh detergent or
abrasives is not recommended.
Oven Door:
Wipe with a soft cloth when steam accumulates
inside or around the outside of the oven door.
During cooking, especially under high humidity
conditions, steam is given off from the food. (Some
steam will condense on cooler surfaces, such as
the oven door.) This is normal.
AFTER CLEANING:
Be sure to replace the Roller Ring and Glass Tray
in the proper position and press Stop/Reset Pad to
clear the screen.
Glass Tray:
Remove and wash in warm
sudsy water or in a dishwasher.
Roller Ring and oven
cavity floor:
Wipe the bottom surface of
the oven with mild
detergent water or window
cleaner and dry. Roller
Ring may be washed in
mild sudsy water or
dishwasher. These areas
should be kept clean to
avoid excessive noise.
Outside oven surfaces.
Clean with a damp cloth. To
prevent damage to the operating
parts inside the oven water
should not be allowed to seep
into ventilation openings.
Control Panel:
*Covered with a
removable protective film
to prevent scrathes
during shipping. Small
bubbles may appear
under this film. When
this happens, remove
film carefully. (Hint -
apply masking or clear
tape to an exposed
corner and pull gently to
remove).
*lf it becomes wet, ciean
with a soft, dry cloth. Do
not use harsh detergents
or abrasives on the
control panel.
For more information regarding microwave cooking, order our new COOKING GUIDE.
DESCRIPTION PART NUMBER PRICE
Instruction/Operating Manual (this book) B0003957AAP
Cooking Guide (Recipes & Cooking Charts) B000B8250AP
Giass Tray (see diagram on page 6) A06014000AP (NN-T687 / NN-R687) $24.31
Roiler Ring Assembiy (see diagram on page 6) B290D9330AP (NN-T687 / NN-R687)
® For pricing quotes, call or write the Parts & Literature Department at the phone or address listed beiow. Piease have your
credit card information readily available.
Shipping & handiing are not included. Price & availability subject to change. Sorry, no COD’s.
PANASONIC SERVICES COMPANY
20421 84th Avenue South
Kent, WA 98032
(800) 833-9626 - Phone
(800) 237-9080 - FAX
$ 13.16
-41 -
(D
Page 44

Instrucciones de Seguridad
Su homo de microondas es un aparato para cocinar y debe usarlo con mucho cuidado at igual que cuando usted usa estufa o cualquier
otro aparato para cocinar.
Cuando se usan aparatos eléctricos, se deben seguir precauciones básicas de seguridad, incluyendo las siguientes:
PRECAUCION - Para reducir el riesgo de
quemaduras, descarga eléctrica, incendio, heridas a personas
o exposición excesiva a energía de microondas:
1. Lea todas las instrucciones antes de usar el aparato.
2. Lea y siga las “PRECAUCIONES PARA EVITAR
POSIBLE EXPOSICION EXCESIVA A ENERGIA DE
MICROONDAS” especificas, que se encuentran abajo.
3. Este aparato debe ser conectado a tierra. Conecte
solamente a la toma eléctrica debidamente conectada a
tierra. Vea las “INSTRUCCIONES PARA CONEXIÓN A
TIERRA" que se encuentran en la página 43.
4. Instale o ubique este aparato solamente de acuerdo con
las instrucciones de instalación que se encuentran en la
página 44.
5. No cubra ni tape ninguna de las rendijas de este aparato.
6. No almacene o use este aparato en exteriores. No use
este aparato cerca del agua - por ejemplo, cerca del
fregadero de la cocina, en una base mojada, o cerca de
una alberca, y similares.
7. Use este aparato sólo para los fines para los que fué
hecho, tal como se describen en este manual. No use
químicos o vapores corrosivos en este aparato. Este tipo
de homo está específicamente diseñado para calentar o
cocinar alimentos. No fué diseñado para uso industrial o
de laboratorio.
8. Cuando limpie las superficies de la puerta y el homo que
. vienen juntas al cenar la puerta, use solamente jabones no
eibrasivos o detergentes suaves aplicados con una esponja o
con tela suave.
9. No permíta a los niños usar este aparato, a menos que sean
super\risados muy de cerca por un adulto.
10. No use este aparato si tiene dañado el cordón o la clavija,
si no está trabajando adecuadamente, o si ha sido dañado
o se ha dejado caer.
11. No sumergir en agua el cable o la clavija.
12. Mantenga el cordón lejos de superficies calientes.
13. No deje el cordón colgando en el borde de la mesa o
mostrador.
14. Este aparato debe recibir mantenimiento sólo de personal
calificado. Contacte las instalaciones de servicio
autorizadas más cercanas para revisión, reparación o
ajuste.
15. Algunos productos, tales como los huevos completos y
contenedores sellados - por ejemplo frascos de vidrio
cerrados - pueden explotar y no deben ser calentados en
este homo.
16. Para reducir el riesgo de incendio en la cavidad del homo:
(a) No sobrecocine los alimentos. Preste atención
cuidadosamente al aparato. El papel, plástico u otros
materiales combustibles son colocados dentro del homo
para facilitar la cocción pero si no se utilizan
adecuadamente esto puede producir incendio en su
homo.
(b) Quite los sujetadores de alambre de las bolsas de papel
o plástico antes de colocar la bolsa en el homo.
(c) Sí los materiales dentro del homo se incendiaran,
mantenga cerrada la puerta del homo, póngalo en
posición de apagado, y desconecte la energía eléctrica,
o corte el suministro eléctrico en la caja de fusibles o en
el panel de control.
(d) No use la cavidad con propósitos de almacenaje. No
deje productos de papel, utensilios de cocina o
alimentos en la cavidad cuando no esté en uso.
PRECAUCiONES PARA EViTAR POSiBLE
EXPOSiCiON EXCESiVA A ENERGÍA DE
MiCROONDAS
(a) No intente hacer funcionar este homo con la puerta abierta
ya que esto puede resultar peligroso. Es importante no
anular o bioqear los mecanismos de seguridad.
(b) No coloque ningún objeto entre el panel frontal del homo y
la puerta, ni permíta que se acumule basura o residuos de
limpiadores en las superficies de sellado.
Guarde estas instrucciones
(c) No haga funcionar el homo sí está dañado, es importante
que la puerta del homo abra y cierre apropiadamente:
( 1 ) la puerta (combada)
(2) bisagras y seguro de la puerta (rotos o sueltos)
(3) sellos de las puertas y superficies de sellado
(d) El homo o deberá ser ajustado o reparado por ninguna
persona, excepto el personal de servicio debidamente
calificado.
-42-
Page 45

Instrucciones de Seguridad
Uso General
1. NO altere o haga ningún ajuste o reparación a la
puerta, al alojamiento del panel de control,
interruptores entrecruzados de seguridad o a cualquier
otra parte del horno. NO quite el panel exterior del
horno. Las reparaciones deben ser hechas solamente
por personal de servicio calificado.
2. NO opere e! homo vacío. La energía de microondas se
reflejara en el interior del homo si no hay alimentos o
agua para absorber la energía.
3. NO utilice este horno para calentar químicos o
cualquier otros productos no alimenticios. NO limpie
este horno con cualquier producto etiquetado con
contenido químico corrosivo. El calentamiento de
químicos corrosivos en este horno puede causar fugas
de radiación.
4. NO seque telas, periódicos u otros materiales en el
horno. Pueden incendiarse.
5. NO use productos de papel reciclado, ya que pueden
contener impurezas que pueden causar chispas y/o
incendios cuando se usen.
6. NO use periódicos o bolsas de papel para cocinar.
Puede causar un incendio.
7. NO pegue, NO golpee el panel de control. Pueden
causarse daños a los controles. Puede causar un
incendio.
8. Las manoplas para tomar cosas calientes siempre
deben ser utilizados cuando se retiren cosas de el
homo. El calor se transfiere de los alimentos calientes a
los contenedores para cocinar y de los contenedores a
la Bandeja de Cristal. La Bandeja de Cristal puede
estar muy caliente después de sacar los contenedores
para cocinar del homo.
9. NO almacene materiales flamables cerca, arriba, o
dentro del horno. Pueden ser riesgos de incendio.
Instrucciones Para Conexión a Tierra
Este aparato debe ser conectado a tierra. En el caso de un
corto circuito, la conexión a tierra reduce el riesgo de una
descarga etétríca proporcionando una línea de escape para
la corriente elétríca. Este aparato está equipado con un
cable y clavija para conexión a tierra. La clavija debe ser
conectada en un tomacorriente que esté instalado
adecuadamente y conectado a tierra.
PRECAUCION - El uso inapropiado de la clavija para
conexión a tierra puede resultar en riesgo de descarga
eléctrica.
Consulte a un electricista o a personal de servicio
calificados, si las instrucciones para conectar a tierra no son
completamente comprendidas o si existe duda de que el
aparato está correctamente conectado a tierra. Si es
necesario usar un cable de extensión, use solamente cable
de extensión de tres hilos que tenga una clavija de tres
entradas para conectar a tierra, y un tomacorriente de tres
ranuras que acepte la clavija del aparato. El calibre marcado
en el cable de eidensión debe ser igual o mayor ^ calibre
eléctrico del aparato.
Suministro Eléctrico
1. Se proveer un cable de suministro eléctrico corto para
reducir los riesgos resultantes de enredarse o tropezarse
con un cable más largo.
2. Juegos de cable más largos o extensiones están
disponibles y pueden utilizarse si se usan con
cuidado.
3. Si se usa un cable más largo o extensión, (1) el calibre
eléctrico marcado en el juego de cordón o extensión
debe ser al menos tan grande como el calibre eléctrico
del aparato, (2) el cable de extensión debe ser de tres
hilos del tipo de conexión a tierra, y (3) el cordón más
largo debe ser arreglado de tal forma que no caiga
sobre la cubierta del mostrador o de la mesa donde
pueda ser jalado por niños o tropezarse
accidentalmente.
-43-
Page 46

Instrucciones de Instalación
Examine Su Horno
Desempaque el homo, quite todo el material de empaque y
examine que su homo no tenga ningún daño, tales como ,
abolladuras, seguros de la puerta rotos o resquebrajaduras
en la puerta. Notifique inmediatamente a su distribuidor si el
homo está dañado.
Ubicación del Horno
1. El homo debe ser colocado en una superficie plana y
estable. Para su operación apropiada, el homo debe tener
suficiente corriente de aíre. Deje 8 cm de espacio de ambos
lados del homo y 2.5 cm de espacio en la parte superior del
homo.
a. NO tape las ventilias de aire. Si están tapadas durante su
operación, el homo puede sobrecalentarse. Si se
sobrecalienta, un dispositivo térmico de seguridad
apagará el homo. El homo no operará hasta que se haya
enfriado.
b. NO coloque el homo cerca de una superficie húmeda
caliente, tal como un registro de gas o elétrico.
c. NO opere el homo cuando la humedad del cuarto sea
muy alta.
2. Este homo ha sido fabricado para uso en el hogar
solamente.
3.0 modelo NN-T687 está diseñado exclusivamente para per
armado. Utilice el kit de entienamiento apropiado. (Vea las
especificaciones técnicas, en la cubierta frontal.)
Interferencia de Radio
1. La operación de su homo de microondas puede causar
interferencia en su radio, TV o equipo similar.
Requerimientos de cableado
1. El homo debe estar en un circuito separado. Ningún otro
. aparato debe compartir el circuito con el homo. Si lo hace
el fusible del circuito puede estallar, el bloqueador del
circuito trabarse o la comida cocinarse más lento que en
los tiempos recomendados en este manual.
2. El voltaje usado debe ser el mismo al especificado en el
homo de microondas (120 V.). Usar un voltaje más alto es
peligroso y puede resultar en fuego u otro accidente
causando daño al homo. Usar un bajo voltaje dará como
resultado una cocción más lenta. PANASONIC no se hace
responsable por daños resultantes del uso del homo con
otros voltajes que no sea el especificado.
3. El homo debe ser conectado en un enchufe a tierra de al
menos 20 amp 120 volt, 60 Hz. Donde se encuentre un
enchufe estándar de 2 entradas es responsabilidad y
obligación del consumidor
reemplazarlo por un enchufe a tierra
de 3 entradas.
4. Una conecdón temporal con un
adaptador de 2 entradas puede ser hecha donde los
CODIGOS LOCALES LO PERMITAN. A menos que el
tomillo de la cubierta del enchufe esté conectado a tierra
mediante el cableado de la casa,.atomillar el adaptador a la
tapa del enchufe NO pondrá a tierra el homo. Si hay alguna
duda de si el tomillo de la tapa del
enchufe está a tierra haga que lo rS
cheque un electricista. . brI
2. Cuando hay interferencia, se puede reducir o eliminar
tomando las siguientes medidas:
a. Limpie la puerta y las superficies senadoras del homo.
(Vea Cuidados de Su Homo de Microondas que se
encuentran en la página 53).
b. Ponga el radio, TV, etc. lo más lejos posible del homo de
microondas.
c. Use una antena instalada adecuadamente para obtener
una recepción de señal más fuerte.
-44-
Page 47

Sugerencias Utiles
Siga Esta Precauciones de Seguridad Cuando Cocine en Su Horno
1 ) ENLATADO CASERO / ALIMENTOS
DESHIDRATADOS / PEQUEÑAS CANTIDADES DE
AUMENTOS
• No use su homo para el enlatado casero o para calentar
cualquier frasco cerrado. La presión aumentará y el frasco
puede explotar. Su homo no puede mantener los alimentos a la
temperatura apropiada de enlatado.
• Pequeñas cantidades de alimento o alimentos con bajo
contenido de humedad se pueden secar, quemar o incendiarse.
• No seque alimentos, hierbas, frutas o vegetales en su homo.
IMPORTANTE
La cocción adecuada depende del tiempo designado y del
peso de los alimentos. Si usa una porción menor de la
recomendada y cocina por ei tiempo para ia porción
recomendada, puede resuiatar un incendio. Si ocurre un
incendio, ponga el homo en posición de apagado y
mantengalo cerrado. Desconecte la energía elétrica o
desconecte la caja de fusibles o el panel de control.
2) PALOMITAS DE MAÍZ Las palomitas de maíz deben prepararse en un recipiente para palomitas de maíz adecuado para homo de microondas.
Palomitas de maíz para homo de microondas que se preparan
en su propio paquete también están disponibles. Siga las
instrucciones del fabricante de palomitas de maíz y use una
marca adecuada para la potencia de su homo de microondas.
Nunca deje desatendido el homo cuando prepare palomitas de
maíz.
PRECAUCIÓN
Cuando use palomitas de maíz para microondas
previamente empacado siga las instrucciones
recomendadas en el paquete. Revise el peso del paquete
antes de usar la tecla de palomitas de maíz. Prepare el
homo para el peso del paquete de palomitas de maíz (vea
página 47). Si no se siguen estas instrucciones, las
palomitas de maíz pueden no reventar adecuadamente o
pueden encenderse y causar un incendio.
3) FREIR CON MUCHA GRASA
• No trate de freir con mucha grasa en su homo de microondas.
Cocinar aceites puede estallar en flamas y puede causar daño
al homo y quiza acabar en quemaduras. Los utensilios de
microondas pueden no ser útiles para soportar la temperatura
del aceite caliente, y podrían romperse.
4) HUEVOS
• No caliente huevos en su cascaron en el homo de microondas.
La presión subirá y ei huevo explotará.
5) AUMENTOS CON PIELES NO POROSAS
• Papas, manzanas, yemas de huevo, calabazas completas y
salchichas son ejemplos de alimentos con pieles no porosas.
Estos tipos de alimentos deben ser perforados antes de
cocinarios en microondas para evitar que estallen.
• Use papas frescas para hornear y cocínelas hasta que esten
listas. Cocinar demasiado causa deshidratación y puede
producir un incendio. Use los pesos recomendados o puede
ocurrir un incendio.
6) LIQUIDOS
• Los líquidos calientes pueden hacer enjpción si no se mezclan
con el aire. No caliente líquidos en su homo de microondas sin
agitarlos antes.
7) BANDEJA DE CRISTAL / UTENSILIOS DE COCINA/
PAPEL ALUMINIO
• Los utensilios para cocinar se calientan durante la cocción en
microondas. Use soportes para lo caliente, cuando saque los
utensilios del homo o cuando quite tapas o cubiertas de
envoltura de plástico de los utensilios de cocina, para evitar
quemaduras.
• La bandeja de cristal se calentará durante la cocción. Debe
permitirse que se enfrie antes de manejarla o antes de colocar
productos de papel, tales como platos de papel o bolsas de
palomitas de maíz para microondas, para cocinar.
• Cuando se use papel aluminio, brochetas, rejillas para calentar
o utensilios hechos de metal en el homo, deje por lo menos 2,5
cm de espacio entre el material de metal y las paredes
interiores del homo. Si arquea (chispea) quite el material de
metal (brochetas etc.) y/o cambíelo a un contenedor no
metálico.
• Platos con adornos metálicos no deberán ser usados, ya que
puede producirse arco eléctrico.
8) TOALLAS DE PAPEL/TELAS
• No use toallas de papel o telas que contengan fibras sintéticas
en su tejido. La fibra sintética puede causar que la toalla se
incendie.
• No use bolsas de papel o productos de papel recilado en el
homo de microondas.
9) BANDEJA DORADORA / BOLSAS PARA COCINAR EN
HORNO
• Los bandeja doradora o asados son diseñados para cocinar en
microondas solamente. Siempre siga tas instrucciones dadas
por el fabricante. No precaliente la bandeja doradora mas de 8
minutos.
« Si se usa una bolsa para cocinar para el microondas, prepare
de acuerdo a las instrucciones del paquete. No use sujetadores
de alambre para cenar la bolsa.
10) TERMÓMETROS
• No use termómetros convencionales para alimentos en su
homo. Puede producir arco.
11) GUÍA DE USO GENERAL DEL HORNO/PUERTA DEL HORNO
• No use el homo por cualquier razón que no sea la preparación
de alimentos.
• No deje sin atención el homo mientras esté en uso.
-45-
Page 48

(1)
(2)
(3)
Diagrama de Caractéristicas
Pulsador para abrir la puerta
@ Ventana del horno
Sistema de seguridad de la puerta
Orificios de ventilación del homo
Panel de conroles
Placa de Indentlficactón
Q Bandeja de cristal
Anillo de rodillo
Panel de Controles
(1) Ventanilla Indicadora
(2) Pulsador de potencia
(3) Pulsadores numéricos
(4) Pulsador de tiempo/reloj
(5) Pulsador de funcionnes
(6) Pulsador de palomitas
(7) Pulsador de descongelam lento
automático por peso
(10)
(8) Pulsador de rápido en minutos
(9) Pulsador de tocino
(10) Sensor de recalentam lento automático
(11) Sensor de cocción automática
(12) Pulsador de Más/Menos
(13) Pulsador Para Comenzar
(14) Pulsador Parar/Cancelar
(4)
(5)
(6)
(7)
(8)
(14)
(13)
(11)
(9)
(12)
-46-
Page 49

Para Seleccionar
Función Rápido en
Potencia y Tiempo
Ejem.: Niwl de potencia MEDIO por 5 minutos
1
Power
Level
4 X = medio
Start
NOTA:
1. Al seleccionar el nivel de potencia ALTO en la
primera etapa, no es necesario presionar el
pulsador Power Level. Simplemente fije e! tiempo
de cocción presionanado los pulsadores de Tiempo
y Start
2. Para cocción en 2 o 3 etapas, repetir los pasos
arriba citados, antes de apretar el pulsador Start.
3. Pulsador Start.
Pulse
1 vez
2 veces
3 veces MEDIO-ALTO
4 veces
5 veces
6 veces BAJO 10%
Seleccione el nivel de potencia.
Seleccione el tiempo de cocción
(hasta 99 min y 99 seg).
Presione el pulsador Start.
Nivei de Potencia
ALTO
DESCONGEUCION
MEDIO 55%
MEDIO-BAJO
% Potencia
100%
30%
70%
30%
Minutos
Esta característica le permite ajustar el tiempo de
cocción fácilmente en vez de usar los pulsadores
numéricos o agregar tiempo de cocción extra.
Para seleccionar el tiempo de cocción:
Ejem.: Nivel de potencia ALTO por 1 minuto
1
Quick
Min
1 vez
2
Start
-
NOTA:
1. Se puede usar otro nivel de potencia, selecciónelos
antes de ajustar el tiempo.
2, Después de haber ajustado el tiempo por medio del
pulsador Quick Min no podrá usar los pulsadores
numéricos o vice versa.
Para Agregar Tiempo Extra:
NOTA:
Usted puede añadir tiempo de cocción para todos los
platillos con las funciones de poder y tiempo.
• Seleccione el tiempo de cocción
(hasta 10 min).
• Presione el pulsador Start.
oprima para agregar tiempo de
cocción (hasta 10 min) durante el
cocinado.
>EI tiempo de cocinado cambia para
incluir el tiempo extra y continúa la
cuenta regresiva en la pantalla.
Pulsador de
Palomitas de Maíz
Ejem.: Para recalentar 99 g (3,5 oz.) de
palomitas de maá en bolsas especiales
para microondas
1
Popcorn
1 vez
Start
NOTA:
Ponga lo bolsa en el interior del horno de acuerdo con
las instrucciones del fabricante.
Seleccione el peso que se índica
en la bolsa de palomitos.
Presionar Peso
1 vez
2 veces
3 veces
Presione.
>EI tiempo de cocinado aparece
y empieza la cuenta regresiva.
99 g (3,5 oz.)
90 g (3,0 oz.)
50 g (1,75 oz.)
-47-
Para Ajustar el Reloj
Ejem.: Para fijar 11:25
1.
2.
3.
Tjimer
C/oCTf
tmer
• Presione el pulsador.
Timer/Clock dos veces.
►Los dos puntos parpadearán
Fíje la hora correcta del día.
* Presione el pulsador.
Tlmer/Clock una vez.
►Los dos puntos dejarán de
parpadear. La hora está
ingresada y ubicada en la
ventanilla indicadora.
Page 50

Descongelamiento
Consejos Para
Automático
Ejem.: Para descongelar 1,5 kg. de carne
Auto
Defrost
Fije el peso.
□ H
3 ^
Ste/T
NOTA:
La forma y el tamaño de los alimentos determinará el
peso máximo que el horno puede acomodar. El peso
máximo para carnes es de 1,8 kg (4 Ib), aves 2,7 kg
(6 Ib) y pescados y mariscos 1,4 kg (3 Ib).
Presione el pulsador Start.
Tocino
Descongelar
Preparando alimentos para congelar:
1. Congele carne aves y pescado en paquetes de 1 o
2 rebanadas.' Para ayudar a separar las rebanadas,
coloque papel encerado entre rebanadas.
2. Envuelva en plástico resistente, bolsas o papel para
congelar.
3. Remueva todo el aire posible.
4. La envoltura debe quedar justa.
5. Selle bien.
Tabla de Conversión
Siga esta tabla para convertir décimas de libra en
onzas. Si un trozo de carne pesa 1.9 libras, programe
1 libra 14 onzas.
Décimas por una Libra
0.0
0.1
0.2
0.3
0.4
0.5
0.6
0.7
0.8
0.9
Onzas
0
1 -2
3-4
5
6-7
8
9-10
11 -12
13
14-15
1
1
Bacon
^.
Start
^
..............
• Presione el pulsador
Presione
una vez
dos veces
tres veces
quatro veces
• Presione el pulsador Start
^
"Bacon“ (tocino)
2 rebanadas
3 rebanadas
4 rebanadas
6 rebanadas
-48-
Page 51

Técnicas Para Descongelar
1. Remueva la envoltura para prevenir retener vapor y
jugo. El jugo del alimento se calentará y puede causar
que la superficie o el fondo del alimento se cueza;
coloque el alimento en la rejilla de el horno de
microondas y deje drenar el liquido durante el
descongelado.
2. Coloque la carne en un plato de tamaño apropiado. El
tocino puede ser descongelado en su envoltura
original.
3. Coloque la carne blanda y la pechuga hacia abajo en
un plato sobre la rejilla para descongelar del horno de
microondas.
4. Coloque pequeñas piezas como trozos de carne,
piezas de pollo, camarones, escalopes o pescado en
un plato sobre la rejilla para descongelar del horno de
microondas.
ALIMENTO
Pescado y mariscos
[arriba de 3 Ib (1.5 kg)]
Cangrejo
Steaks de pescado
Filetes de pescado
Escalopas de pescado
Camarón mediano
Pescado entero
TIEMPO DE
DESCONGELADO
12a14
8a10
6a8
14a16
Saio Rompa / Remueva tas piezas congeladas
10a12
5. Carnes grandes y aves enteras pueden quedar
congeladas en el centro después de descongelar, deje
reposar envueltos en plástico en el refrigerador (ver
tabla abajo).
6. Pescados y mariscos deben quedar ligeramente
congelados después de descongelar, deje reposar y
remoje en agua fría por 2 o 3 minutos.
7. Piezas congeladas en rebanadas deben remojarse
separadamente o dejar reposar por más tiempo.
DURANTE EL DESCONGELADO
Rompa
Voltee
Voltee / Arregle
Rompa / Remueva las piezas congeladas
Voltee
Carne
Asado
2V2-4lb. (1.2-2kg)
Chuletas / Steak
Costillas/T-bone
Hígado (rebanadas finas) Saio
Puerco
Aves
Pollo entero
[más de 3 Ib. (1,5 kg)]
Chuletas
Piezas
Codorniz
Pechuga de pavo
Saio
Saio Separa / Voltee / Arregle
Saio
Saio Voltee 2 0 3 veces / Cubra partes descongeladas
Saio
8a12 Voltee / Arregle
8a12
4а6
6aS
Voltee / cubra las orillas y la superficie congelada
Voltee / Cubra
Deje escurrir / Voltee / Separe las piezas
Voltee
Voltee
Separe
Voltee 2 or 3 veces
-49-
Page 52

Sensor de Recalentamiento/Cocción Automática
RECALENTAMIENTO
Sensor
fíeheat
Start
Para obtener mejores resultados del Sensor de
Recalentamlento, siga estas recomendaciones:
1. Todos los alimentos deben ser cocidos previamente y
deben estar a temperatura o temperatura de refrigerador.
2. Los alimentos que pesen menos de 100 g y más de 700 g
se deben recalentar sólo por tiempo y potencia.
NO HACER
1. Recalentar pan y productos de pastelería. Use el tiempo y
potencia manual.
2. Recalentar alimentos crudos o sin cocer.
3. Usar la función de recalentamiento sí el interior del homo
está caliente.
4. Usar la función de recalentamiento para bebidas.
5. Usar la función de recalentamiento para alimentos
congelados.
Presione el pulsador de Sensor
Reheat.
Presione el pulsador START.
COCCION:
1 Ej.
Potato/
Vegetables
Start
Presione el pulsador de la categoría
deseada hasta que aparezca el
número e item deseado en la
ventanilla indicadora.
Presione el pulsador START.
El sistema de SENSOR AUTOMATICO (“AUTO SENSOR”)
Trabaja detectando el vapor acumulado que despiden los
alimentos en la cavidad del homo. Usted podrá cocinar y
recalentar muchos de sus alimentos favoritos sin tener que
seleccionar temperaturas y niveles de potencia.
ANTES de cocinar / recalentar:
(para mejores resultados por sensor, ver№que lo
siguiente)
1. La temperatura ambiente que rodea al homo debe ser
menor de (QS^F).
2. El peso de los alimentos no deberá ser menor a 100 g (4
onzas) aprox.
3. El plato giratorio de cristal y el contenedor que se va a
utilizar deben estar secos.
4. Cubra los alimentos por completo con papel plástico
procurando que este no quede muy adherido, o bien,
colocarlo en una cacerola con tapa.
DURANTE la cocción/recalentado:
Mientras la palabra “AUTO” se muestre en la ventanilla
indicadora, no deberá abrirse la puerta det homo por más de
1 minuto, esto causaría resultados inadecuados en la cocción.
El tiempo restante de cocción aparecerá inmediatamente en
la ventanilla indicadora y comenzará a contar en forma
descendente. El homo puede ser abierto durante este tiempo
restante para voltear, batir o añadir ingredientes.
DESPUES de la cocción / recalentado:
Todos los alimentos deben estar cubiertos durante un tiempo
de 3 a 5 minutos.
Control de grado de cocción más / menos (More/Less):
Las preferencias en el grado de cocción de los alimentos
varian en cada individuo, con este pulsador usted podrá
decidir qué tipo de grado de cocción prefiere en sus
alimentos.
Usando este pulsador el Sensor automatico puede ser
ajustado para cocinar el alimento por más o menos tiempo. Si
usted esta satisfecho con los resultados de cocción del
programa “auto sensor”, no necesitará usar el control
más/menos.
Un toque: más cocido con indicador “MAS"
Dos toques: menos cocido con indicador “MENOS"
Tres toques: cocido inicial
-50-
Page 53

Sensor de Cocción Automática
Potato/
Vegetales
Rice/Pasta
Frozen
Foods
Casserole/
Stew
Seafood
*outtTy/Meat
CATEGORIA PESO
1 X
Papas 1 -4 Papas
cualquier
cantidad
2x3xVegetales
Frescos
Vegetales
Congelados
1 X Arroz Arroz
2x Pasta 120-2X
1 X
Entradas
Congeladas
2x
Platos Fuertes
Congelados
1 x Plato al Homo
2x Guisados Use la cantidad apropiada de liquido. Cubra con la tapa de la
1 X
Filete de Pescado 230 - 680 g
2x Marisco 230 - 680g
1 X
Piezas de Pollo
2x
Pollo Entero hasta 3 kg (6 Ib.)
3x
Cerdo 1-2kg.
4x
Res Termino
Medio
cualquier cantidad
peso antes de
pelar, rebanar, etc.
cualquier
cantidad
Vi taza
1 taza
1 '/2 taza
2 tazas
(4 - 8 oz.)
200 - 900g
(7 - 32 oz.)
260 - 510 g
(9-I 80 Z .)
('/2-1 Vi Ib.)
(V2-1'/2lb.)
230-1 kg
(V2 - 2 Ib.)
(2--^ Ib)
(1-2kg)
(2 - 4 Ib.)
Agua
1 taza
2 tazas
3 tazas
3V2 tazas
Abra la piel varías veces y coloque en un molde a
pmba de microondas. NO cubra. De la vuelta
después del sonido.___________________________
Agregue agua. Cubra con la tapa o cubierta de
plástico. Revuelva o reacomode después del sonido.
pregue 2 cucharadas soperas cte agua. No cocine con
mantequilla o salsa. Cubra con la tapa o cubierta de
plástico. Revuelva o reacomode después del sonido.
Ponga arroz y agua caliente con 1/4 de cucharadita
de sal. Cubra con la cubierta de plástico. Después
del “beep”, bata muchas veces. Después de cocinar
bata y deje reposar de 5 a 10 minutos.
Ponga 1 '/2 cuartos de agua, pasta, 1 cucharada de
aceite y 1 cucharadita de sal en una cacerola de 4 qt. Cubra.
Después del “beep" bata ocasionalmente.
No use aiímerTtos congelados en charolas selladas.
Siga las instrucciones del fabricante para cubrir.
Revuelvei, bañe con la salsa o con el jugo después
del sonido.
No use alimentos congelados en charolas selladas.
Siga las instrucciones del fabricante para cubrir.
Revuelva, si es posible, después del sonido.
Use la cantidad apropiada de liquido. Cubra con el la
tapa de la cacerola. Revuelva ocasionalmente
después det sónico
cacerola. Agite ocasionalmente o arregle después del "beep".
Acomode en una sola capa en el molde. Cubra con
tapa o cubierta de plástico. Reacomode después del
sonido.
Acomode en una sola capa en el molde. Cubra con
tapa o cubierta de plástico. Revuelva los camarones
u ostras después del sonido.
Coloque el lado de la piel hada arriba. Cúbralo con
cubierta de plástico. Después del sonido, reaoomódeto.
Coloque el lado de la pechuga hacia abajo. Cúbralo con
cubierta de plástico. Voltee el lado de la pechuga hada arriba
después del sonido._____________________________________
Coloque la parte de grasa hada arriba. Cúbralo con
cubierta de plástico. Voltéelo, después del sonido.
Coloque la parte de grasa hada arriba. Cúbralo con
cubierta de plástico.
INSTRUCCIONES
__________________
________
______________________________
______________________
-51 -
Page 54

Temporizador (Timer)
Рага usar como temporizador en la cocina:
Ejem.: Para contar 5 minutos
1
------------------
1,
Vlock
,
• Presione el pulsador
Timer/Clock una vez.
• Indique la cantidad de tiempo
(hasta 99 min y 99 segundos).
000
3.,
Start
Para fijar un tiempo de espera o tiempo
de reposo:
EJem.: Después de la cocción dejar reposar el
alimento durante 5 minutos.
1, Ej.
Power
Level
0H0
2.
3.
imer
• Presione el pulsador Start.
>
►El tiempo comenzará a contar
>
en forma descendente sin que
el homo esté funcionando.
Seleccione el programa de cocción
(ver p. 47 para instrucciones).
Presione el pulsador de
Timer/Ctock una vez.
Indique la cantidad de tiempo
(hasta 99 min y 99 segundos).
000
Para programar un comienzo tardío:
Ejem.: Para empezar a cocinar 5 minutos después
1.
Tjrner
Clock
2.
000
3, Ej-
Power
Level
Presione el pulsador
Timer/Cfock una vez.
Inidique la cantidad de tiempo
que tardará en empezar el
programa (hasta 99 min y 99
seg).
Seleccione el programa de cocción
(ver p.47 para instrucciones)
000
4.
Start
Notas:
1. Si la puerta del homo es abierta durante el tiempo de espera o
cuгlndo se usa como temporizador, el tiempo que se índica en
la ventanilla continuará contando en forma regresiva
2, El comienzo tardío no puede ser programado antes de
ninguna función automática.
Esto es para prevenir que el inicio de la temperatura de
los alimentos se incremente antes dei descongelamiento
o inicio de la cocción. Un cambio en el inicio de la
temperatura podría causar resultados inadecuados.
Presione el pulsador de Start.
►Cuando el tiempo demorado
comience la cuenta regresiva y
este haya finalizado, la cocción
iniciará.
4.
start
Presione el pulsador de Start,
>Despues de la cocción el tiempo
de reposo empezará a contar en
forma descendente sin que el
homo esté funcionando.
-52-
Page 55

Cuidados de Su Horno de Microondas
ANTES DE LIMPIAR: Apague el homo y desconecte el cable de
alimentación para prevenir un encendido accidental.
Interior del horno: Limpie su homo con un paño húmedo.
Puede utilizar un detergente suave si el homo esta muy sucio. El
uso de limpiadores abrasivos no es recomendable.
Puerta del homo: Si el vapor se acumula en el interior o
alrededor de la puerta del homo, limpie con un paño suave.
Esto puede suceder cuando el homo se opera en condiciones
demasiado húmedas y no indica mal funcionamiento de la
unidad.
Panel de controles: Limpie su panel con un paño suave, no use
detergentes fuertes ni abrasivos.
Antes de Acudir al Servicio
Todas estas cosas son normales:
Mi horno de micro ondas
causa interferencia con
mi televisor.
En algunos radios y televisores puede ocurrir interferencia cuando usted
cocine con su horno de micro ondas. Esta interferencia es similar a la
interferencia causada por pequeños aparatos eléctricos como batidoras,
aspiradoras, secadoras de aire, esto no indica ningún problema.
Plato giratorio de cristal: Remueva el plato de cristal. Cuando
este frío y lave con agua tibia y jabonosa o en su lavadora de
platos.
El anillo giratorio: Limpie el soporte del plato giratorio que se
encuentra en el homo con agua jabonosa. El anillo giratorio debe
ser limpiado en agua jabonosa o en su lavadora de platos. Estas
partes deben estar limpias para evitar un excesivo ruido.
DESPUES DE LIMPIAR: Esté seguro de colocar el anillo
giratorio y el plato de cristal en la posición correcta y presione
Sto/i^esetpara limpiar la ventanilla indicadora.
La luz del homo se atenúa.
Se acumula vapor en la
puerta del homo y aire
caliente sale de las rejillas
de ventilación.
Accidentalmente encendió
su homo de micro ondas sin
ningún alimento dentro.
PROBLEMA
V
____________
El homo no acepta mi programa.
,
Cuando se está cocinado con una temperatura diferente a temperatura alta
(HIGH) el homo tiene que recorrer un ciclo para obtener niveles de potencia
más bajos. La luz del homo se atenúa y podrá oir ruidos de “click“ cuando el
homo realiza su ciclo.
Durante la cocción los alimentos despiden vapor. La mayoría de este vapor es
removido por el aire que circula en la cavidad del homo, sin embargo, algo de
vapor se condensará en las superficies frias tales como la puerta del homo.
Esto es normal.
Operar el homo vacio por un corto tiempo no dañará el homo sin embargo no
lo recomendamos.
POSIBLE CAUSA
.
___________________
¿Esta el horno conectado en
forma segura?
El circuito general de luz o el
fusible están fuera de servicio o
tienen algún problema interno.
Hay un problema en la toma de
corriente.
*
________________________
'
La puerta del homo no está
bien cerrada.
Otro programa se encuentra
registrado en su horno.
_
Remueva la clavija de contacto
de la toma de corriente. Espere
10 seg. Vuelva a conectar.
Encienda de nuevo su circuito
general de luz (brake) o
reemplace el fusible.
Conecte otro aparato eléctrico
para verificar su toma de
corriente.
Cierre la puerta firmemente.
Presione Stop^eBot (parar/
borrar) para cancelar el programa
anterior y programe de nuevo.
SOLUCION
'
Si al parecer el problema se encuentra en su horno, consulte al centro de servicio más cercano.
- 53 -
Page 56

Quick Guide to Operation
Feature How to Operate
To Set Clock
Power and Time
Setting
To Defrost using
Manual Defrost
"Auto Defrost"
To Reheat using
"Sensor Reheat"
To Cook using
"Sensor Cooking”
(w page 13-14)
To Cook using
"Popcorn"
To use as a Timer
To use to set
Stand Time
(*^ page 16)
To set Delay Start
(iw page 16)
K pagel 1)
K page 10)
(i^ page 10)
K page 11)
page 13)
K page 15)
K page 16)
Timer
'Clock
Press twice
-
---------------------
Power Level
Select power. Set cooldng time.
f
---------------------
N
\
Power Level
Select defrost. (2 x’s)
Auto
Dofrost
Sonsor
Rehoat
f
- - - - - - - - - - - - -
e.g.
Pomo/
Vagotablos
Select desired category
Popcom
Select weight.
---
(
- - - - -
►
►
Enter time of day.
0
0
0
f
-----____
f
V.
'
-----------------
\
^
0
Press once.
' ■ ■ -
^Cooking Program.^
Input 1
-
---------------
Timer
73oSSr
.
Press once.
___
___
^
Timer
^
ci^
-
Press once.
THRU
0
Enter Delay Time.
THRU
THRU
THRU
Set time.
THRU
Enter weight
Stan
Stan
SìBTì
THRU
Enter time.
___
9
Timer
'dim
Press once.
9
—
start
1
__________
J
--------------\
- - - - - - - - - - - - - - - - - - - - \
-
,
----------------
.
_________
THRU
Start
Start
Start
9
,
;
___^
^ \ w
'
--------
---------
Start
------------------
Start
L
___________
^
J
Ì
J
9
9
J
9
^
0
Enter Stand Time.
\Cooking Program.j
To Cook using
"Bacon"
(W* page 15)
To Cook using
"Quick Min"
K page 10)
Panasonic Consumer Electronics
Company, Division of Matsushita
Electric Corporation of America
One Panasonic Way
Secaucus, New Jersey 07094
—
Bacon
1
Select number of slices.
Outck
Utn
Tap desired number
of times (up to 9).
Panasonic Sales Company, Division
of Matsushita Electric of Puerto Rico,
Inc. ("PSC")
Ave. 65 de Infanteria, Km. 9.5
San Gabriel Industrial Park,
Carolina, Puerto Rico 00985
—►
/
-_
______
Start
/
Sta/T
B0003957AAP
D0997-0
Printed in U.S.A.
 Loading...