

Page 1

Operating Instructions
Bedienungsanleitung
Gebruiksaanwijzing
Mode d’emploi
Instrucciones de funcionamiento
Manual de instru9öes
OÓ11YÍC5 zpfimig
Microwave/Grill Oven
Mikrowellengeràte mit Grill
De Panasonic Magnetron/GriI Oven
Panasonic Four à Micro-ondes-Gril
Horno Microondas/Grill
Forno Micro-ondas/Grelhador
4>ovqvo5 MixQoxv^àtwv ц£ FxpiX
m
3
<Q
O
(T>
c
v>
o
3"
z
CD
a
<D
0)
3
a
w
0>
3
l!
&)
w'
NN-K557
Panasonic
Before operating this oven, please read these instructions completely.
Vor Gebrauch des Mikrowellengerätes bitte diese Bedienungsanleitung sorgfältig durchlesen.
Alvorens de Magnetron-oven in gebruikte nemen, dient u de gebruiksaanwijzing zorgvuldig doorte lezen.
Avant d’utiliser le four à micro-ondes, lire très attentivement son mode d’emploi.
Antes de comenzar a utilizar su horno microondas, lea cuidadosamente las siguientes instrucciones.
Antes de utilizar o forno Micro-ondas, lela atentamente este manual de Instruçôes.
riQÍv xeriOLnoJcoifiaeTE xtiv odoxevt), braßaaTe jxQooExxixá xiç oôtîyîeç xerjaiig.
m
OT
T3
Q}
31
o
c
(Q
C
(D>
W
-i
X
S'
Page 2

Installation and connection
Examine your microwave oven
Unpack the oven, remove all packing material,
and examine the oven for any damage such as
dents, broken door latches or cracks in the
door. If you find any damage, notify your dealer
immediately. Do not install a damaged
microwave oven.
Earthing instructions
IMPORTANT: THIS UNIT HAS TO BE
PROPERLY EARTHED FOR PERSONAL
SAFETY.
If your AC outlet is not grounded, it is the
personal responsibility of the customer to have
it replaced with a properly grounded wall
socket.
Operation voltage
The voltage has to be the same as specified on
the label on the oven. If a higher voltage than
specified is used, it may cause a fire or other
damages.
Warning
1 .The door seals and door seal areas should
be cleaned with a damp cloth.
The appliance should be inspected for
damage to the door seals and door seal
areas and if these areas are damaged the
appliance should not be operated until It has
been repaired by a service technician trained
by the manufacturer.
2. It is dangerous for anyone other than a
service technician trained by the
manufacturer to perform repair service.
3. If the supply cord of this appliance is
damaged, it must be replaced by the special
cord available from the manufacturer.
4. Before use, the user should check that
utensils are suitable for use in microwave
ovens.
Oven Light
When it becomes necessary to replace the
oven light, please consult your dealer.
Placement of the Oven
1. Place the oven on a flat and stable surface,
more than 85 cm above the floor.
2. For proper operation, ehsure a sufficient air
circulation for the oven.
Counter-top use:
a. Allow 15 cm of space on the top of the
oven, 10 cm at back and 5 cm on both sides.
b. lf one side of the oven is placed flush to a
wall, the other side or top must not be
blocked.
Built-in:
This oven may be built into a wall cabinet by
using the proper trim kit, white NN-TKK55,
black NN-TKK15, which may be purchased
from a local Panasonic dealer,
3. Do not place this oven near an electric or gas
cooker range.
4. The feet should not be removed.
5. This oven is only for household usage. Do
not use outdoors.
6. Avoid using the microwave oven in high
humidity.
7. The power cord should not touch the outside
of the oven. Keep cord away from hot
surfaces. Do not let cord hang over the edge
of table or work top. Do not immerse cord,
plug or oven in water.
8. Do not block the air vents on the top and
back of the oven. If these openings are
blocked during operation the oven rnay
overheat. In this case the oven is protected
by a thermal safety device and resumes
operation only after cooling down.
Fan Motor Operation
If the oven gets hot after use, the fan rotates
for 1 minute to cool the electric components.
This is perfectly normal, and you can take out
the food from the oven while the fan
operates.
-2-
Page 3

Safety Instructions
1. Before using COMBINATION or GRILL
function for the first time, operate the
oven without food and accessories on
GRILL 1, for 5 minutes. This will allow
the oil that is used for rust protection to
be burned off.
2. Exterior oven surfaces, including air
vents on the cabinet and the oven door
will get hot during COMBINATION and'
GRILLING, take care when opening or
closing door and when inserting or
removing food and accessories.
3. The oven has two heaters situated in the top
of the oven. After using the COMBINATION
and GRILL functions, these surfaces wili be
very hot.
N.B. After cooking by GRILL, the wire rack
will be very hot.
4. Do not operate this appliance if it has a
damaged CORD OR PLUG, if it is not
working properly, or if it has been damaged
or dropped.
5. This appliance, including the oven lamps,
should be serviced only by a service
technician trained by the manufacturer.
Glass Tray
1. Do not operate the oven without the roller
ring and the glass tray in place.
2. Never use another type of glass tray than
the one specially designed for this oven.
3. If the glass tray is hot, let it to cool before
cleaning or placing in water.
4. The glass tray can turn in either direction.
5. If the food or cooking vessel on the glass
tray touches the oven walls and make the
tray stop rotating, the tray will automatically
rotate in the opposite direction. This is
normal.
6. Do not cook foods directly on the glass tray.
Roller Ring
1. The roller ring and the oven floor should be
cleaned frequently to prevent noise and
build-up of remaining food.
2. The roller ring must always be used for
cooking together with the glass tray.
6. Do not attempt to tamper with or make any
adjustments or repairs to door, control
panel housing, safety interlock switches or
any other part of the oven. Do not remove
outer panel from oven. Repairs should only
be done by a qualified service person.
7. The appliance shall not be operated by
MICROWAVE or COMBINATION
WITHOUT FOOD IN THE OVEN, operation
in this manner may damage the appliance.
8. Do not attempt to use this microwave oven
to dry newspaper, clothing or any other
materials.
9. Do not use the oven for any reason other
than the preparation of food.
10. During grill operation, the top of the
appliance becomes hot. This appliance is
type B appliance.
11 .The accessible parts may become hot when
the grill is in use. Children should be kept
away.
Wire Rack
1. A wire rack is included with the oven in order
to facilitate browning of small dishes.
2. This rack should be cleaned regularly.
3. When using the rack in the manual Grill or
Combination cooking modes, be careful to
choose heat-proof containers; containers
made of plastic or paper may melt or burn
when exposed to the heat radiating from the
grill.
4. When using the COMBINATION mode,
never place any aluminium or metal
container directly on the wire rack. Always
insert a glass plate or dish between the wire
rack and the aluminum container. This will
prevent sparking that may damage the oven.
5. It is recommended not to use the wire rack
when cooking in the MICROWAVE mode
only.
-3-
Page 4
Important Information
1) Cooking Times
• Cooking times given in the cookbook are
approximate. The cooking time depends on
the condition, temperature and amount of
food and on the type of cooking ware.
• Begin with the minimum cooking time to heip
prevent overcooking, if the food is not
sufficientiy cooked you can aiways cook it for
a iittie ionger.
N.B.: If the recommended cooking times
are exceeded the food will be spoiled and
in extreme circumstances could catch fire
and possibiy damage the interior of the
oven.
2) Small Quantities of Foods
• Smaii quantities of food or
foods with iow moisture
content can burn, dry out
or catch on fire if cooked
too iong. if materials
inside the oven should
ignite, keep oven door closed, turn oven
off and remove plug from socket.
3) Eggs
• Do not cook eggs in their
shells by MICROWAVE.
Pressure may build up
and the eggs will explode.
4) Piercing Skin
• Food with non porous
skins, such as potatoes,
egg yolks and sausages
must be pierced before
cooking by MICROWAVE
to prevent bursting.
6) Liquids
• When heating liquids,
e.g. soup, sauces and;
beverages in your
microwave oven,
overheating the liquid
beyond boiling point
can occur without evidence of bubbling. This ;
could result in a sudden boil over of the hot
liquid. To prevent this possibility the following
steps should be taken:
a) Avoid using straight-sided containers with
narrow necks.
b) Do not overheat.
c) Stir the liquid before placing the container
in the oven and again halfway through
cooking time.
d) After heating, allow to stand in the oven for
a short time, stirring again before carefully
removing the container.
7) Paper/Plastic
• Carefully attend the appliance if paper, plastic
or other combustible materials are placed
inside the oven to facilitate cooking.
• Remove wire twist-ties from roasting bags
before placing bags in oven.
8) Utensils/Foil
• Do not heat any closed cans or bottles
because they might explode.
• Metal containers or dishes with metallic trim
should not be used during Microwave or
Combination cooking. Sparking will occur.
• If you use any aluminium foil, meat spikes or
metal ware the distance between them and
the oven walls and door should be at least
2 cm to prevent sparking.
5) Meat Thermometer
• Use a meat thermometer to check the degree
of cooking of roasts and poultry only when
meat has been removed from oven. Do not
use a conventional meat thermometer when
using MICROWAVE or COMBINATION
mode because they may cause sparking.
9) Feeding Bottles/Baby Food Jars
• The contents of feeding bottles and baby
food jars are to be stirred or shaken.
• The temperature has to be checked before
consumption to avoid burns.
• 4-
Page 5
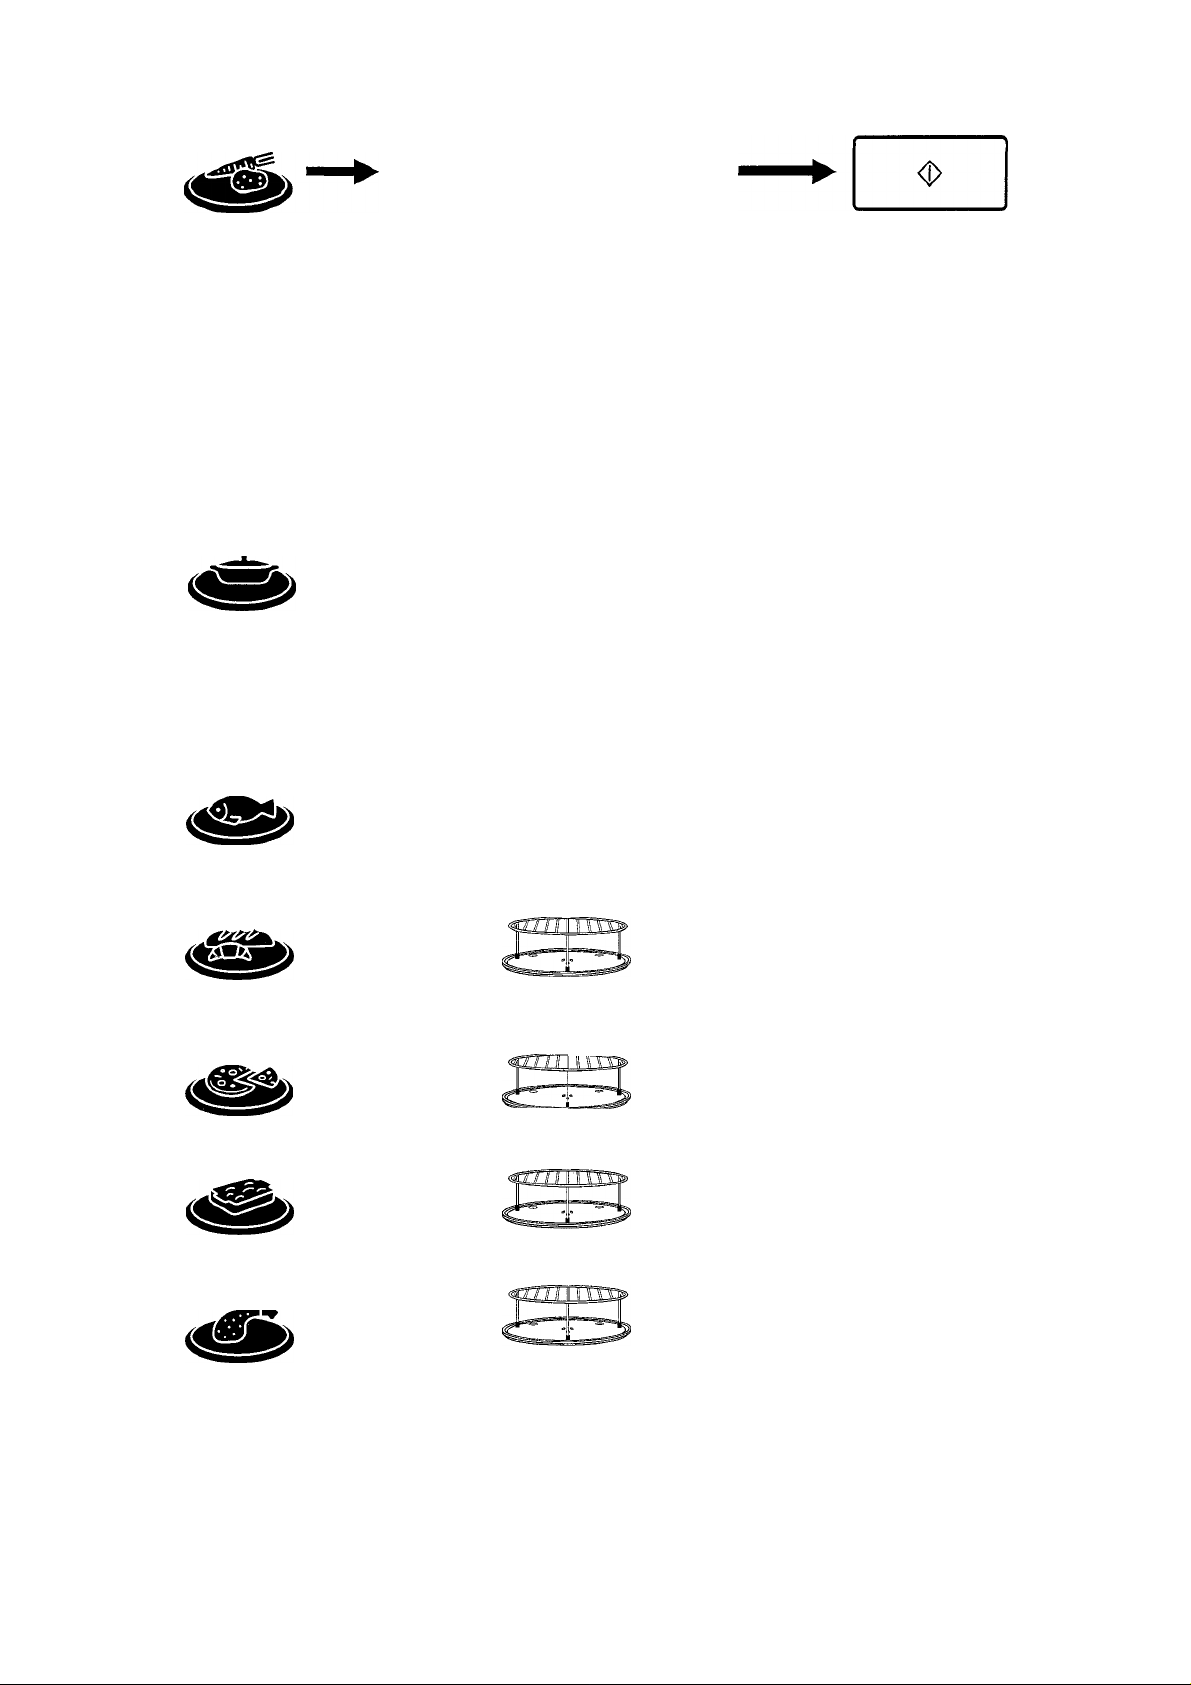
Outline Diagram
Control Panel
Display Window
® Pull Door Handle
Pull to open the door. When you open the oven
door during cooking, the cooking is stopped
temporarily without clearing earlier made
setteings. The cooking is resumed as soon as the
door has been closed again and the start pad
pressed. The oven lamp lights as soon as the
oven door is opened.
® Oven Window
® Door Safety Lock System
® Oven Air Vent
(D Control Panel
©Glass Tray
® Roller Ring
© External Oven Air Vents
© Wire Rack
Panasonic
Mo SI □ fig IhQ <!>
1
Time Pads
10
min min
10 1
s s
Micro Power Pad
Grill Pad
Combination Pad
Memory Pad
Auto Defrost Pads
Delay/Stand Pad
Clock Pad
Stop/Cancel Pad:
Before cooking: one press
clears your instructions.
During cooking: one press temporarily stops the
cooking program. Another press cancels all your
instructions and the time of day will appear in the display.
---------------------
Beep Sound:
A beep sounds when a pad is pressed. If this beep is not
heard, the setting is incorrect. When the oven changes
from one function to another, two beeps are heard. After
completion of cooking, five beeps are heard.
Auto Weight Reheat/Cook
Pads (Microwave)
Auto Weight Reheat/Cook
Pads (Combination)
Weight Select Pad (100 g)
Weight Adjust Pads (10 g)
Start Pad:
Press fo start operating oven.
If during cooking the door is
opened or the Stop/Cancel Pad
is pressed once, the Start Pad
has to be pressed again to
continue cooking.
-5-
Page 6
IMPORTANT CUSTOMER INFORMATION
Please read this before plugging in your microwave oven
This model has a unique function ‘Word Prompting’ which guides you through the operation of your microwave.
After plugging in press the start pad until you locate your language (languages available: English, German,
Dutch, French, Italian, Spanish, Portugese). As you press the pads, the L.E.D. display will scroll the next
instruction eliminating the opportunities for mistakes. If for any reason you wish to change the language
displayed, unplug the unit and repeat the procedure outlined above.
Controls and Operation Procedure
To Set Clock:
When the oven is connected, 88:88 lights in the display window.
Example: To set 14:25
once 4 times
i'
10
min
min
10 1
|S S\
twice 5 times
' Press Clock Pad.
► The colon starts to blink.
NOTE:
1. To reset the time of day repeat steps 1 through 3.
2. The time of day is displayed, unless the power supply is interrupted.
3. This clock has a 24 hour display.
• Enter the time by pressing the
appropriate Time Pads.
► The time appears in the display and the
colon blinks.
Display
! i-i-pc,
I I • I
___
I
• Press Clock Pad.
► The colon stops blinking
and the time of day is
entered.
Step by Step Display:
To assist you in programming the oven easily, the next operation for you to press is indicated by blinking in the
display window.
fla
\ 1 /
\l/
4>
Set the cooking time by
pressing Time Pads.
e.g. After selecting micro power
level.
Set the weight of fpod by
Weight Select Pads.
e.g. After selecting the auto
weight category.
Press Start Pad.
e.g. After selecting micro power
level and time.
✓ 1
______________
Select desired grill setting by
pressing Grill Pad.
e.g. After pressing Combination
Pad.
Select desired micro power
level by pressing Micro
Power Pad.
e.g. After selecting Grill setting
in Combination cooking.
Page 7
To Use Child Safety Lock:
Using this system will make the oven controls inoperable; however, the door will open.
Child Lock can be set when the display shows a colon or time of day.
To Set:
’ Press Start Pad three times.
► Time of day will disappear.
Actual time will not be lost.
To Cancel:
I I • nr
I I -CJD
Press Stop/Cancel Pad three times.
► Time of day will reappear in the display.
Reheat/Defrost/Cook with Time and Power
Selection---------------------------------------------------
MICROWAVE
1
min
s
• Press Start Pad.
• Select the desired micro
power level (see below).
10
min
10 1
S
Set cooking time.
Press Micro Power Level
once
twice
3 times
4 times
5 times
6 times
MAX 900 W HIGH
¡1 270 W DEFROST
600 W MEDIUM
440 W LOW
250 W SIMMER
100W WARM
GRILL
• Select the desired grill
setting (see below).
Press
once
twice
3 times
Grill Setting
1 HIGH 1200 W
2 MEDIUM 950 W
3 LOW 700 W
NOTE:
1. The oven can be programmed for 3 stages.
Repeat steps 1 and 2, then press start.
Example: High Power 5 minutes -* Stand 5 minutes
-* High Power 2 minutes
2. Timer can be programmed before/after the micro power and time
setting.
3. To recall the selected power level during cooking, press Micro
Power Pad.
4. To add extra cooking time during cooking, press 1 min pad.
10
10
Set cooking time.
NOTE:
1. The oven can be programmed for 3 stages.
Example: High Power 5 minutes -> Grill-1 5 minutes
-* Stand 3 minutes
2. Timer can be programmed before/after the grill power and time setting.
3. To recall the selected grill setting during cooking, press Grill Pad.
4. To add extra cooking time during cooking, press 1 min pad.
5. Grill must not be preheated.
6. Use heat-proof dish on grill mode.
- 7-
• Press Start Pad.
Page 8
Reheat/Defrost/Cook with Time and Power
Seiection---------------------
----------------------------
COMBINATION
r
■ ■■
NOTE:
1. The oven can be programmed for 3 stages.
2. Timer can be programmed before/after the manual combination setting.
3. To recall the selected power settings during cooking, press Combination Pad.
4. To add extra cooking time during cooking, press 1 min pad.
5. Use microwave-safe and heat-proof dish on Combination mode.
-a
Press Combination Pad.
10
min
10 1
Set cook ng time.
Example: Combination (Grill 1200 W + Micro 600 W) 12 minutes ->Stand 5 minutes ^Grill-1 8 minutes
1
min
s s
Q
1-2-3
• Seiect the desired Grili
Setting, (see beiow)
Pressp^
once
twice
3 times
Press Start Pad.
Grill Power
1200 W
950 W
700 W
• Select the desired micro
power level, (see below)
Press
once
twice
3 times
4 times
Micro Power
-
600 w
440 W
250 W
100W
Auto Weight Defrost
With this feature, food can be defrosted according to the food weight. The weight has to be entered in grams.
g-
ifl-r ^
Press the desired
defrost program
pad (see the chart
beiow).
NOTE:
1. Stand time or manual power and time can be programmed after Auto Defrost.
2. Recommended weight range and suitable foods can be found in the chart below.
Program
ÍÜ-I ^
íñ-2
______________
MinVMax. Weight
100-1500g
400 - 2500 g
fig
• Set the weight.
Weight counts up in
100g increments
and appears in the
dispiay.
Small pieces of meat, escallop, sausages, minced meat, fish fillets,
steaks, chops (each 100 g to 400 g)
Big pieces of meat, roast, whole chicken, big piece of fish
A T
• Adjust the weight,
if you need.
Weight counts
up/down in 10 g
increments.
Suitable Foods
o
• Press Start Pad.
Page 9
Auto Weight Cook/Reheat Program
With this feature food can be cooked according to the weight. The weight has to be entered in grams,
e.g.
Û
---------------
• Select desired
category (1 - 7).
NOTE:
1. There are 7 programs with different minimum / maximum weights.
2. Stand time or manual power and time can be programmed after Auto Weight Programs.
3. Programs 4, 5, 6 and 7 are cooked by Combination.
Do not cover on these settings (heater could melt the cover).
Program Min. - Max. Weight Accessory Hints
1 Reheat Casserole
2 Cook Vegetables
3 Cook Fish
4 Reheat Bread
5 Reheat Pizza
Set the weight.
Weight counts up
in 100 g increments
in the display
window.
200 g - 1500 g
200 g - 1500 g
100 g - 1000 g
30 g - 600 g
100 g - 900 g
• Adjust the weight,
• Press Start Pad.
if you need.
Weight counts-up/
down in 10 g
increments.
For reheating piated meai, casseroie.
All foods should be at room or refrigerated
temperatures. Allow a few minutes standing
time.
For cooking fresh vegetabies.
Place prepared vegetables into a suitable sized
container. Sprinkle with 6 tbsp (90 ml) of water.
Cover lightly with pierced cling film or a lid.
Large quantities will require stirring halfway.
For cooking fresh fish (whole fillets, steaks).
Shield the thinner portions and place in suitable
sized container. Add 2 tbsp (30 ml) liquid. Cover
with pierced cling film or a lid. Large quantities
will require turning halfway during cooking.
For reheating frozen breads, whoie or sliced,
croissants, Chelsea buns.
Place on wire rack on glass tray. Turn at beeps.
Stand after cooking. These programs are not for
toasting bread slices. In all cases check the
temperature before eating and finish cooking in
a conventional oven if necessary.
For reheating and browning the top of frozen
purchased pizza.
Remove all packaging and place on wire rack
on glass tray.
6 Reheat Gratin
7 Cook Chicken
Pieces
200 g - 1000 g
100 g - 1500 g
For reheating and browning frozen gratin.
Remove all packaging and place on wire rack
on glass tray.
For cooking chicken pieces.
Place on a heatproof upturned saucer and place
on wire rack on glass tray. Turn over halfway
through cooking.
- 9-
Page 10

Stand Time
This feature allows you to program a Stand time after cooking is completed and to program the oven as a
minute timer and/or delay start. The time pads operate as HOUR pad and MINUTE pads on this feature.
e.g.
(M)
I'j',
inoperable
1
w
10
1
Set desired
cooking program
according to
directions aiready
Press
Delay/Stand Pad.
• Set desired
amount of time by
pressing Time
Pads.
Press Start Pad.
given in this
manuai.
NOTE:
1. With this feature, the oven may be programmed to stand for up to 9 hours and 99 minutes.
2. Stand Time can only be programmed during the two or three stage cooking.
3. If the oven is programmed, the feature may also be used as a timer. In this case eliminate the first step.
4. If the door is opened, the time in display window will continue to count down.
5. If the time exceeds one hour the time is counted back in units of minutes, if it is less than one hour the time is
counted back in units of seconds.
Delay Start
This feature allows you to program a Delay Start. The time pads operate as HOUR pad and MINUTE pads on
this feature.
inoperable
e.g.
<I>
id',
io
min1min
10
1
s
• Press
Delay/Stand Pad.
• Set the time you
want to delay the
oven to begin
cooking by
pressing Time
Pads.
• Set desired
cooking program
according to
directions already
given in this
manual.
• Press Start Pad.
NOTE:
1. With this feature, the oven may be programmed to delay cooking up to 9 hours and 99 minutes.
2. Delay Start can only be entered for the two or three stage operation.
3. If Delay Start exceeds one hour the time is counted back in units of minutes, if it is less than one hour the
time is counted back in units of seconds.
10-
Page 11
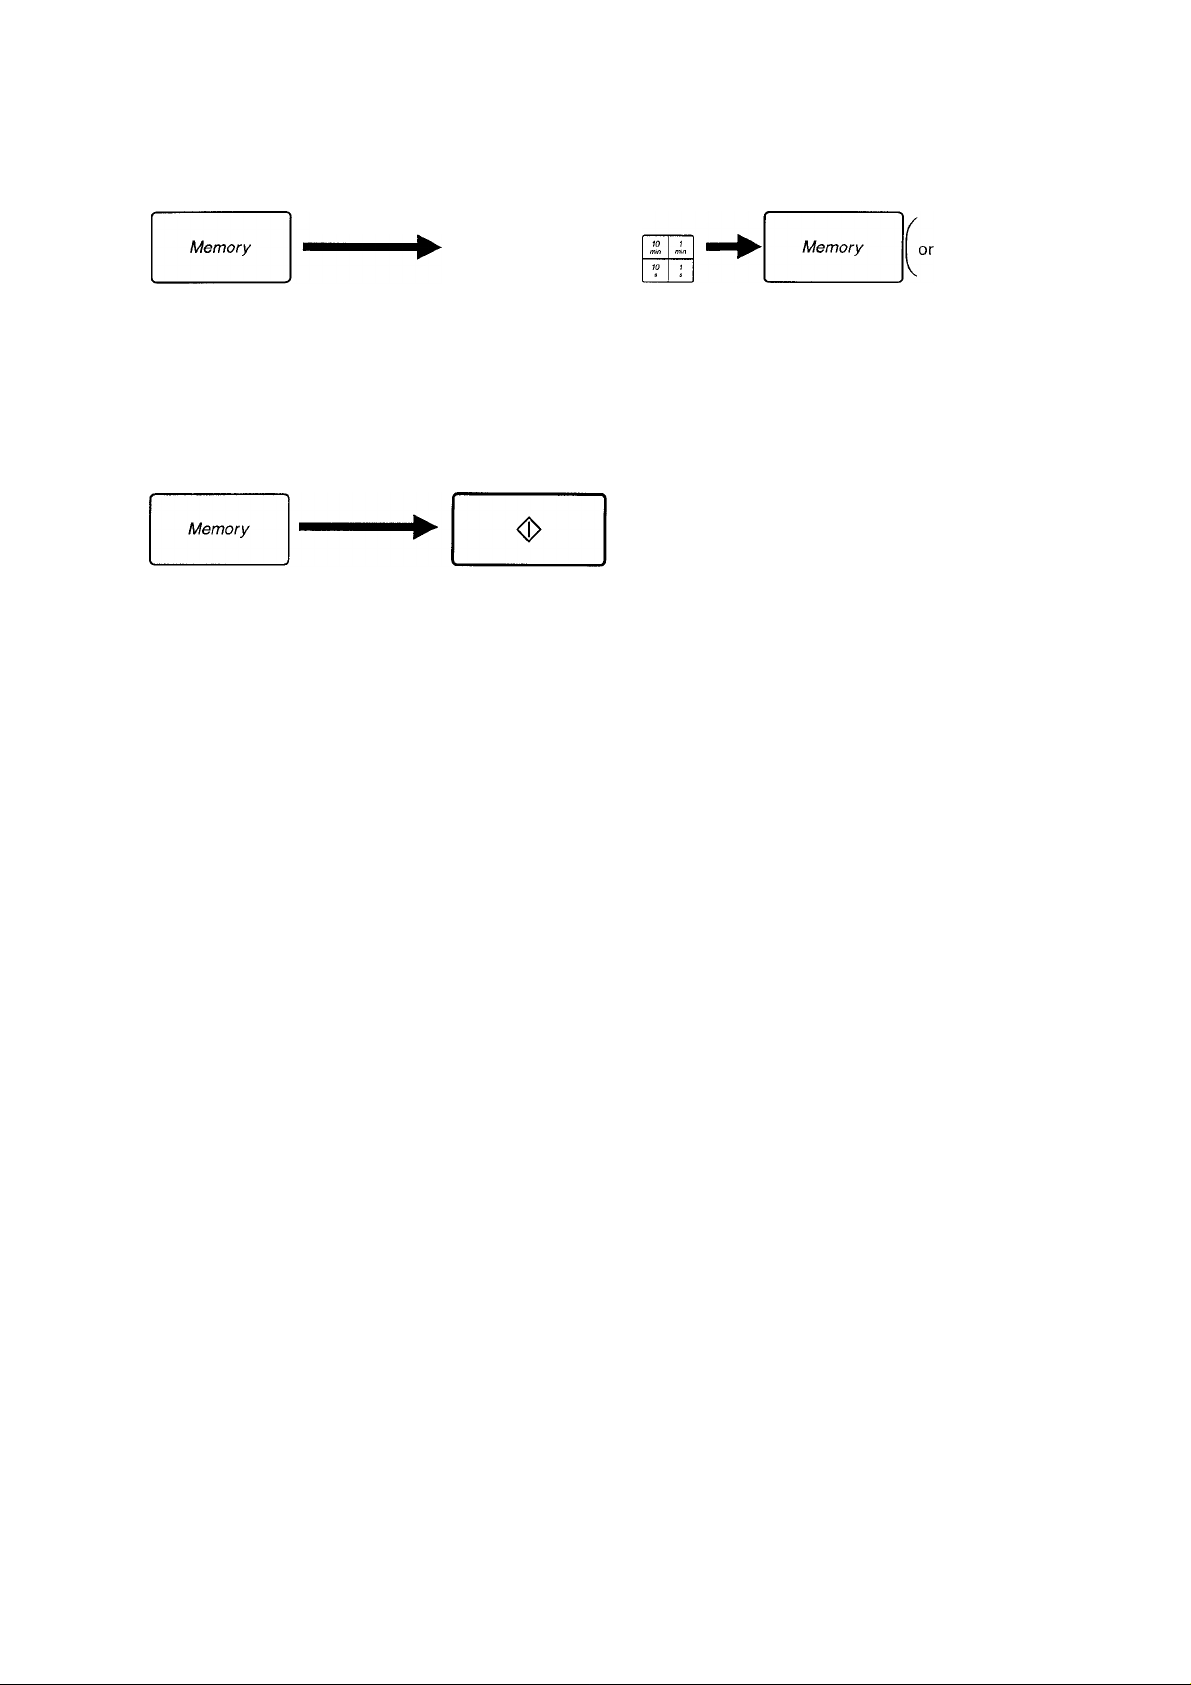
Memory
To assist you in using your oven for regular reheating tasks, you are able to preprogram your oven for a
specific power level and time that is convenient for you.
To Set Memory Recipe Program:
__________
Press Memory Pad.
Set desired cooking
program.
Press Memory Pad.
If you press Start Pad
instead of Memory Pad,
cooking will start and
cooking program is set.
To Use Memory Recipe Program:
Press Memory Pad.
NOTE:
1. Auto Program cannot be programmed into memory.
2. Memory Pad can be programmed one stage.
3. Memory program will be cancelled if power supply is off or plug gets disconnected.
• Press Start Pad.
Care of Your Microwave Oven
1. Turn the oven off before cleaning.
2. Keep the inside of the oven, door seals and door
seal areas clean. When food spatters of spilled
liquids adhere to oven walls and door seals and
door seal areas wipe off with a damp cloth. Mild
detergent may be used if they get very dirty. The
use of harsh detergent or abrasive is not
recommended.
DO NOT USE COMMERCIAL OVEN CLEANERS.
3. The outside oven surface should be cleaned with
a damp cloth. To prevent damage to the operating
parts inside the oven, water should not be allowed
to seep into the ventilation openings.
4. If the Control Panel becomes dirty, clean with a
soft, dry cloth. Do not use harsh detergents or
abrasives on the Control Panel. When cleaning
the Control Panel, leave the oven door open to
prevent the oven from accidentally turning on.
After cleaning touch STOP/CANCEL Pad to clear
display window.
5. If steam accumulates inside or around the outside
of the oven door, wipe with a soft cloth. This may
occur when the microwave oven is operated
under high humidity conditions and in no way
indicates a malfunction of the unit.
6. It is occasionally necessary to remove the glass
tray for cleaning. Wash the tray in warm soapy
water or in a dishwasher.
7. The roller ring and oven cavity floor should be
cleaned regularly to avoid excessive noise.
Simply wipe the bottom surface of the oven with
mild detergent and hot water then dry with a clean
cloth. The roller ring may be washed in mild
soapy water. Cooking vapours collect during
repeated use but in no way affects the bottom
surface or roller ring wheels.
After removing the roller ring from cavity floor for
cleaning, be sure to replace it in the proper
position.
8. When using the GRILL or cooking in the
COMBINATION mode, some foods may
inevitably splatter grease on to the oven walls. If
the oven is not cleaned occasionally, it may start
to "smoke" during use.
9. This oven should only be serviced by qualified
personnel. For maintenance and repair of the
oven contact the nearest authorized dealer.
-11 -
Page 12

Questions and Answers
Ql I accidentally ran my
microwave oven without any
food in it. Is it damaged?
Qi Why won’t my oven turn on? A; When the oven does not turn on, check the foliowing:
Ql When I turn on my oven, there
is noise coming from the
glass tray.
Q: My microwave oven causes
interference with my TV. Is
this normal?
A: We do not recommend operating the microwave oven without
any food. However, running the oven empty for a short time wiil
not damage the oven.
1. Is the oven plugged in securely? Remove plug from outlet,
wait 10 seconds and reinsert.
2. Check circuit breaker or fuse. Reset circuit breaker or replace
fuse if it is tripped or blown.
3. If the circuit breaker or fuse is all right, plug another
appliance into the outlet. If the other appliance works, there
probably is a problem with the oven. If the other appliance does
not work, there probably is a problem with the outlet.
If it seems there is a problem with the oven, contact an
authorized Service Center.
Al This noise occurs when the roller ring and oven bottom are dirty.
Frequent cleaning of these parts should eliminate or reduce the
noise.
A; Some radio and TV interference might occur when you cook with
the microwave oven. This interference is similar to the
interference caused by small appliances such as mixers,
vacuums, blow dryers, etc. It does not indicate a problem with
your oven.
Q: The oven won’t accept my
program. Why?
Qi Why does my oven light dim?
Q: Sometimes warm air comes
from the oven vents. Why?
Ql "D" appears in the dispiay and
the oven does not cook. Why?
Qi Can I use conventional oven
thermometer in the oven?
Q: My oven has an odour and
generates smoke when using
the COMBINATION and GRILL
function. Why?
A; The oven is designed not to accept an incorrect program. For
example, the oven will not accept a fourth stage, and will not
accept Auto Weight Program after Delay Start.
Al When cooking with a power other than HIGH, the oven must
cycle to obtain the lower power levels. The oven light dims and
clicking noises can be heard when the oven cycles.
A; The heat given off from the cooking food warms the air in the
oven cavity. This warmed air is carried out of the oven by the
air flow pattern in the oven. There are no microwaves in the air.
The oven vents should never be blocked during cooking.
A: The oven has programmed DEMO MODE. This mode is
designed for retail store display.
Deactivate mode by pressing Clock Pad three times.
A; Only when you are using Grill cooking mode. The metal in some
thermometers may cause arcing in your oven and should not
be used on Microwave and Combination cooking modes.
Ai After repeated use, it is recommended to clean oven and then
run the oven without food on GRILL-1 for 5 minutes. This will
burn off any food or residue or oil which may cause and odour
and/or smoking.
Ql After completion of cooking,
sometimes there is fan noise
coming from the oven even if
oven door is open. Is this
normai?
A; This is normal. The oven is so designed that only fan motor
rotates for 1 minute after completion of cooking in order to cool
electric parts.
12-
Page 13
Aufstellen und Anschlleßen
Überprüfung Ihres Mikrowellengerätes
Das Gerät auspacken, alles Verpackungsmaterial
entfernen und auf Beschädigungen wie z.B.
Stoßstellen, gebrochene Türverriegelungen oder
Risse in der Tür überprüfen. Sofort den Händler
benachrichtigen, wenn das Gerät beschädigt ist.
Kein beschädigtes Mikrowellengerät installieren.
Garantiekarte
Bitte ausfüllen und absenden.
Erdungsvorschriften
WICHTIG; ZUR SICHERHEIT VON PERSONEN
MUSS DIESES GERÄT GEERDET SEINI
Ist die Steckdose nicht geerdet, muß der Kunde die
Steckdose durch eine ordnungsgemäße
Schutz-Kontaktsteckdose ersetzen lassen.
Betriebsspannung
Die Netzspannung muß der auf dem Typenschild
des Gerätes angegebenen Spannung entsprechen
Wird eine höhere Netzspannung als angegeben
verwendet, so kann ein Brand entstehen oder sonst
ein Unfall die Folge sein.
Warnung
1. Die Reinigung der Türdichtungen und
Türdichtungsflächen sollte mit milden
Reinigungsmitteln vorgenommen werden. Das
Gerät ist vom Verwender auf mögliche
Beschädigungen an den Türdichtungsflächen zu
prüfen und falls ein solcher Schaden aufgetreten
ist, darf das Gerät nicht betrieben werden, bevor
es vom Panasonic-Kundendienst repariert worden
ist.
2. Das Mikrowellengerät darf nur vom
Panasonic-Kundendienst geprüft oder repariert
werden. Die Verwendung eines nicht besonders
geschulten Kundendienst-Technikers könnte
gefährlich sein.
3. Die zum Anschluß dieses Gerätes verwendete
Spezial-Anschlußleitung darf nur durch einen
qualifizierten Kundendienst unter Verwendung
einer Spezialleitung, die nur beim
Panasonic-Kundendienst erhältlich ist, ersetzt
werden.
4. Vor Gebrauch ist vom Benutzer zu prüfen, ob
Geschirr und Gefäße für den Gebrauch in
Mikrowellengeräten geeignet sind.
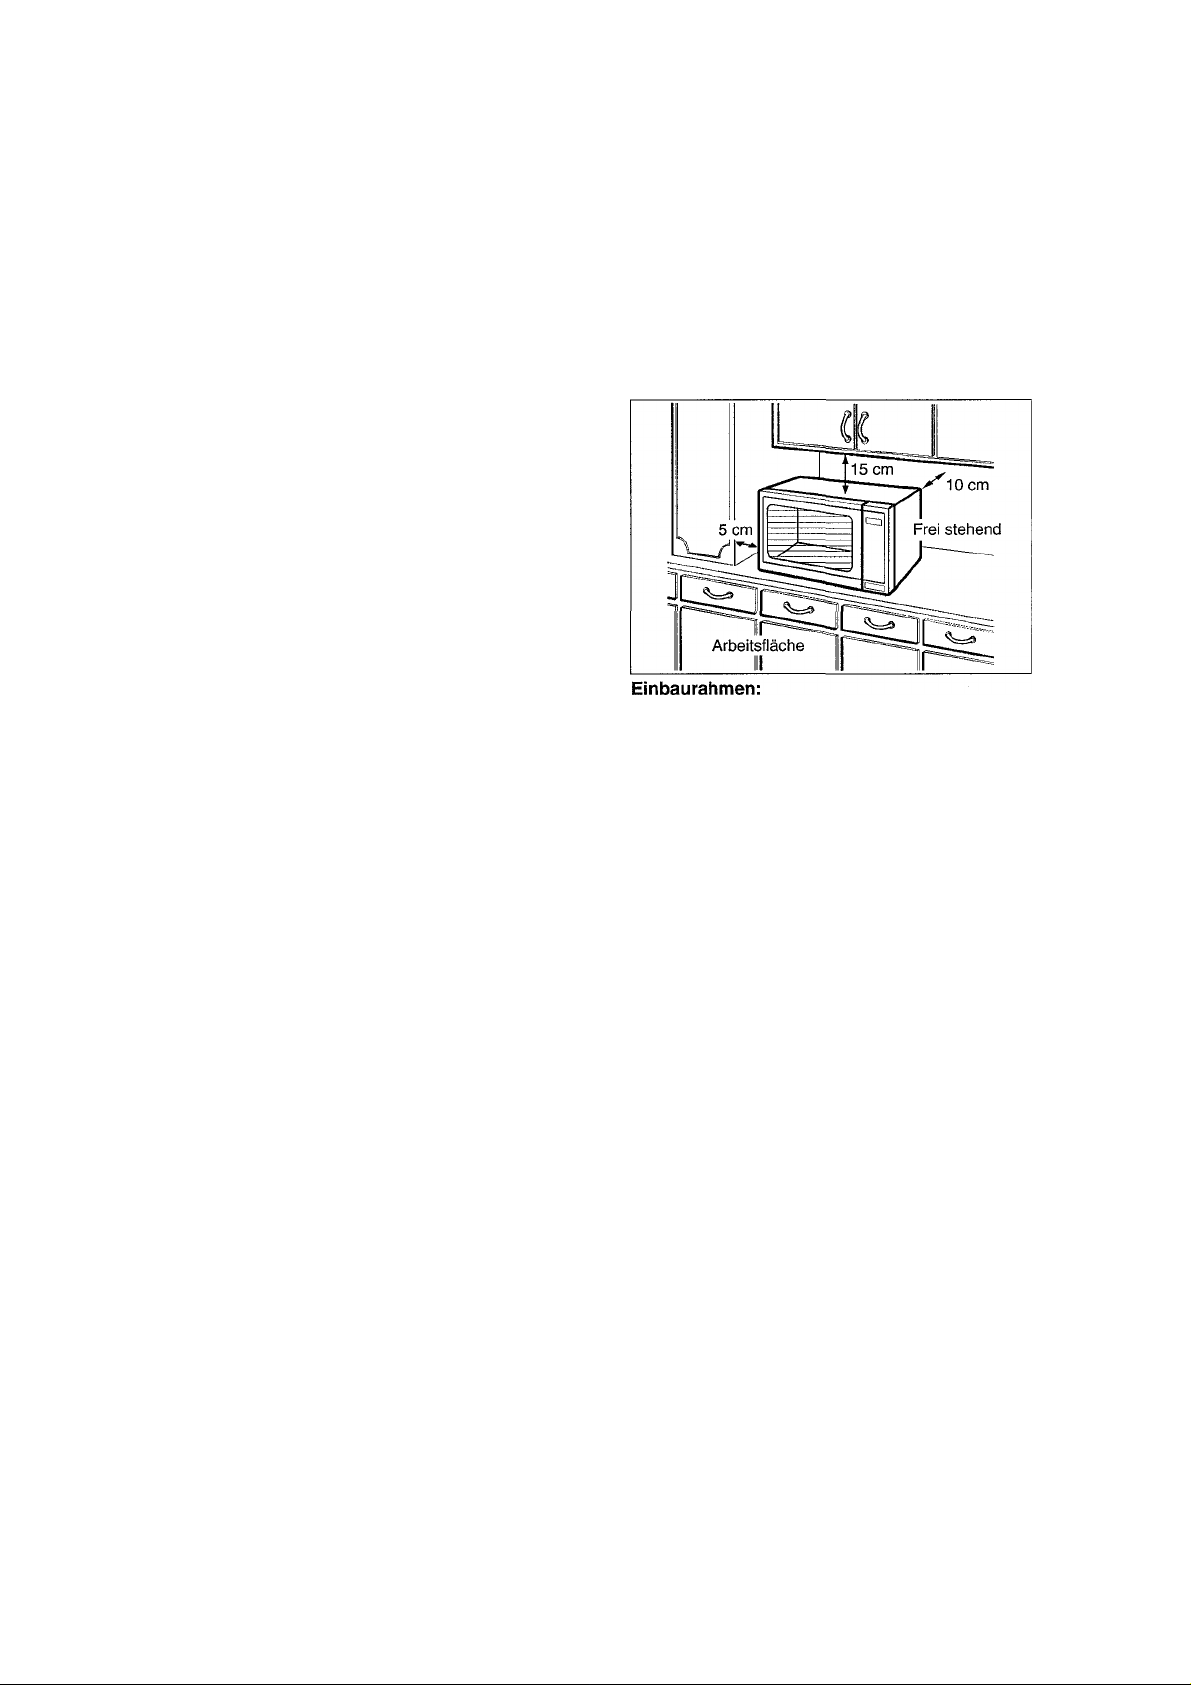
Aufstellen des Gerätes
1. Stellen Sie das Mikrowellengerät auf eine feste,
ebene Stellfläche, die mindestens 850 mm hoch
ist (gemessen vom Fußboden).
2. Das Gerät arbeitet ordnungsgemäß, wenn eine
ausreichende Luftzirkulation stattfinden kann.
Aufstellen auf der Arbeitsfläche:
a. Lassen Sie bitte 15 cm Platz über dem Gerät,
sowie 10 cm an der Rückseite und 5 cm an
beiden Seiten.
b. Sollte das Gerät an einer Seite direkt an der
Wand stehen, müssen die anderen Seiten frei
bleiben.
Mit dem als Sonderzubehör erhältlichen Einbauset ist
Modell NN-K557 (Einbaurahmen weiß NN-TKK55,
schwarz NN-TKK15) in jede moderne Küche einbaufähig.
3. Das Gerät nicht in unmittelbarer Nähe eines
Gas-oder Elektroherdes (mindestens 25 cm
Abstand) aufstellen.
4. Die Stellfüße dürfen nicht entfernt werden.
5. Dieses Gerät ist nur für den Haushaltsgebrauch
konzipiert. Nicht im Freien benutzen.
6. Das Mikrowellengerät nicht bei zu hoher
Luftfeuchtigkeit benutzen.
7. Mit dem Anschlußkabel nicht die warme
Gehäuseoberfläche berühren. Das Kabel nicht mit
heißen Oberflächen in Berührung bringen. Das
Kabel nicht über Tisch- oder Thekenkanten
hängen lassen. Das Kabel oder den Stecker nicht
in Wasser tauchen.
8. Die Lüftungsöffnungen auf der Ober- und
Rückseite des Gehäuses nicht verdecken. Sind
diese Öffnungen blockiert, während das Gerät
arbeitet, kann es überhitzen. In diesem Fall wird
das Gerät durch den Überhitzungsschutz
ausgeschaltet und kann erst wieder in Betrieb
gesetzt werden, wenn es abgekühlt ist.
Garraumlampe
Die eingebaute Garraumlampe darf nur vom
Panasonic-Kundendienst Personal ausgerauscht
werden.
Automatischer Entlüftungsbetrieb
Nach Gebrauch des Grills bzw. der Kombination
setzt automatisch für ca. 1 Minute, nach Gebrauch
der Mikrowelle über 9 Minuten für ca. 1 Minute der
Entlüftungsbetrieb ein. Dies stellt keine Fehlfunktion
dar und dient lediglich zum Abkühlen des Gerätes.
Das Gerät schaltet sich automatisch wieder ab.
-13-
Page 14

Wichtige Hinweise
1. Bevor Sie das Gerät das erste Mal benutzen, bitte
ohne Zubehör und Gargut für 5 Minuten mit
Grillstufe 1 und ohne Mikrowellenfunktion in
Betrieb setzen. Damit ist sichergestellt, daß
konservierende Ölreste im Garraum vollständig
verbrennen und das Gargut geschmacklich nicht
beeinträchtigen.
2. Während des Grill- und Kombinationsbetriebes
wird die Oberfläche des Mikrowellengerätes
heiß. Bei Benutzung ist somit Vorsicht geboten,
und Kinder müssen ferngehalten werden.
3. Die Rückwand des Gerätes wird heiß. Das
Netzkabel darf nicht in Kontakt mit der
Rückwand geraten.
4. Das Gerät muß an das Netz über eine
mindestens 16-A-(T) Installationssicherung
angeschlossen werden.
5. Das Gerät nicht in Betrieb setzen, wenn das
Kabel oder der Stecker beschädigt ist bzw. wenn
es nicht ordnungsgemäß arbeitet oder eine
sichtbare Beschädigung aufweist.
6. Dieses Gerät sollte nur durch einen qualifizierten
Kundendienst gewartet werden. Setzen Sie sich
mit dem nächsten autorisierten Kundendienst in
Verbindung, um das Gerät überprüfen,
reparieren oder einstellen zu lassen. Die
Lüftungsöffnungen nicht verdecken bzw.
blockieren.
7. Im Garraum dürfen während der Nichtbenutzung
des Gerätes keine Gegenstände aufbewahrt
werden, die bei unbeabsichtigtem Einschalten
eine Gefahr für die Umgebung darstellen
können. Im Falle des Versagens eines
elektronischen Bauelementes kann das Gerät
nur durch Ziehen des Netzsteckers oder durch
die installationsseitig vorhandene
Trennvorrichtung, z.B. vorgeschaltete
Sicherung/Sicherungsautomatik ausgeschaltet
werden.
8. Vermeiden Sie jegliche Gewalteinwirkung oder
Manipulation an der Tür, an den
Kontrolleinrichtungen und den \
Sicherheitsvorrichtungen. Reparaturen dürfen
ausschließlich vom Fachmann durchgeführt
werden!
9. Nicht versuchen Kleidungsstücke, Zeitungen
oder anderes Material im Mikrowellengerät zu
trocknen. Diese Gegenstände können sich
entzünden.
10. Bitte den Ofen nur zur Nahrungsmittel
zubereitung benutzen.
11. Nehmen Sie das Mikrowellengerät nie ohne
Lebensmittel in Betrieb. Dies kann zu
Beschädigungen des Gerätes führen. Eine
Ausnahme gilt für das Ausbrennen des Gerätes
mit Grill vor der ersten Inbetriebnahme.
12. Falls während des Mikrowellenbetriebs Rauch
aus dem Gerät tritt, ist die Gerätetür
geschlossen zu halten und das Gerät ist
abzuschalten sowie der Netzstecker zu ziehen.
Glasdrehteller
1. Das Mikrowellengerät nicht ohne den
Glasdrehteller in Betrieb setzen.
2. Keine anderen Drehteller in diesem
Mikrowellengerät benutzen.
3. Den evtl, heißen Glasdrehteller bitte abkühlen
lassen, bevor Sie diesen reinigen bzw. mit
Wasser abspülen.
4. Das Gargut nicht direkt auf dem Drehteller garen.
5. Keine heißen Speisen oder Behälter auf den
kalten Glasdrehtellerstellen. Umgekehrt sollten
Sie auch keine gefrorenen Speisen oder
Behälter auf den heißen Glasdrehteller stellen.
6. Der Drehteller kann links- oder rechtsherum
laufen. Dies stellt keine Fehlfunktion dar.
Rollenring
1. Der Rollenring und die Vertiefung im
Garraumboden müssen regelmäßig gereinigt
werden, um zu verhindern, daß Geräusche
entstehen und sich Nahrungsmittelreste
ansammeln.
2. Den Rollenring immer zusammen mit dem
Glasdrehteller benutzen.
Gitterrost
1. Der Gitterrost werden im Gerät mitgeliefert.
2. Der Rost sollten regelmäßig gereinigt werden.
3. Bitte beachten Sie, daß bei Gebrauch eines
Gitterrostes bei den Funktionen Kombination und
Grill nur hitzebeständiges Geschirr verwendet
wird.
4. Bei der Funktion Kombination nie Alu- oder
Metallspieße direkt auf den Gitterrost legen.
Immer einen Teller oder ein Geschirr
dazwischenlegen. Dies, um eventuelle Funken
zu vermeiden, die Ihr Gerät beschädigen
könnten.
5. Bei der Funktion Mikrowelle ist die Verwendung
eines Gitterrostes nicht empfehlenswert.
-14-
Page 15

Wichtige Information
1) Kochzeiten
• Die im Kochbuch angegebenen Kochzeiten sind
Richtzeiten. Die Kochzeit ist abhängig von
Beschaffenheit, Ausgangstemperatur und Menge
des Lebensmittels sowie von der Art des
verwendeten Geschirrs. Sie sollten von den
kürzeren Kochzeiten ausgehen, um ein
Übergaren der Speisen zu vermeiden. Hat das
Lebensmittel noch nicht den gewünschten
Garzustand erreicht, haben Sie immer noch die
Möglichkeit, einige Minuten dazuzugeben.
2) Kleine Mengen
• Sehr kleine Mengen oder
Speisen mit wenig
Feuchtigkeit könnten
austrocknen und verbrennen,
wenn sie zu lange gegart
werden. Tritt ein Brand auf,
die Tür des Mikrowellengerätes geschlossen
halten und den Netzstecker aus der Steckdose
ziehen.
3) Eier
• Weder rohe oder gekochte
Eier in der Schale, noch
gepellte, hartgekochte Eier
mit Mikrowelle erhitzen
oder kochen. Durch den
enstehenden Druck platzen sie.
6) Flüssigkeiten
• Beim Erhitzen von Flüssigkeiten decken Sie bitte
die Gefäße ab, um ein
Verspritzen zu vermeiden.
Es kann ggf. sehr kurzfristig
zum Kochen der Flüssigkeit
kommen (Siedeverzug), daß
diese aus offenen Behältern
in den Garraum spritzt.
Verwenden Sie daher stets
abgedeckte Gefäße, um eine Verbrennungsgefahr
zu vermeiden. Zusätzlich sollten Sie folgende
Punkte beachten:
a) Vermeiden Sie die Verwendung von geraden
Gefäßeb mit engem Ausguß.
b) Nicht überhitzen.
c) Rühren Sie einmal um, bevor Sie das Gefäß ins
Gerät stellen. Rühren Sie nochmals nach halber
Kochzeit um.
d) Nach Ablauf der Kochzeit lassen Sie das Gefäß
kurze Zeit im Gerät stehen, rühren Sie noch
einmal um und nehmen Sie dann das Gefäß aus
dem Gerät.
7) Papier, Plastik
• Keine geschlossenen Konserven oder Flaschen
zum Garen oder Aufwärmen benutzen. Sie
könnten platzen. Plastiktüten entfernen, bevor Sie
garen oder auftauen. Evtl, vorhandene
Drahtverschlüße von den Lebensmitteln entfernen,
bevor Sie in das Mikrowellengerät gestellt werden.
4) Lebensmittel mit Schale oder Haut
• Bei Lebensmitteln, wie z.B.
Kartoffeln und Würstchen
empfiehlt es sich, sie vorher
anzustechen, um ein evtl.
Platzen zu vermeiden.
5) Fleischthermometer
• Falls Sie den Garzustand der Lebensmittel mit
dem Fleischthermometer überprüfen wollen,
verwenden Sie bitte keine herkömmlichen
Thermometer im Mikrowellengerät. Diese können
Funken verursachen. Benutzen Sie diese
Fleischthermometer nur außerhalb des
Mikrowellengerätes.
8) Hilfsmittel, Folien
• Falls Sie Aluminiumfolie, Fleischspieße oder
Geschirr aus Metall im Mikrowellengerät benutzen,
halten Sie einen Abstand von mindestens 2 cm
zwischen dem Metall und den Garraumwänden
bzw.der Garraumtür ein, um Funkenbildung zu
vermeiden. Wenn Behälter aus Kunststoff, Papier
oder anderen leicht entflammbaren Materialien
zum Erwärmen verwendet werden, darf das Gerät
nicht unbeaufsichtigt betrieben werden.
9) Babynahrung
• Rühren oder schütteln Sie Babynahrung in
Fläschen oder Gläsern nach dem Erhitzen gut
durch, damit ein Temperaturausgleich stattfinden
kann.
• Überprüfen Sie die Temperatur vor dem Verzehr,
um Verbrennungen zu vermeiden.
-15-
Page 16

Schematische Ansicht
Bedienungsfeld
Digitalanzeige
Zeiteingabetasten
Leistungswahltaste
(D Türgriff
Durch Öffnen der Tür während des Garvorgangs
wird der Betrieb unterbrochen, das Programm
bleibt erhalten. Wird die Tür wieder geschlossen
und die Starttaste gedrückt, läuft der Garvorgang
weiter ab. Die Garraumbeleuchtung schaltet sich
ein, wenn die Tür geöffnet wird.
(D Sichtfenster
® Türsicherheitsverriegelungen
® Garraumbeleuchtung
® Bedienungsfeld
(D Glasdrehteller
® Rollenring
(D Äußere Entlüftungsschlitze
® Rost
Panasonic
Auto (Ml B Üg ffl
1
10
min min
10
s s
1
Tasten für die Gewichts
automatik zum Erwärmen/
Garen (Mikrowelle)
Taste für Grillbetrieb
Taste für
Kombinationsbetrieb
Speichertaste
Tasten für die Gewichts
automatik zum Auftauen
Taste für Zeitvorwahl,
Signalweckerund
Ausgleichszeit
Stop-/Löschtaste:
Eine Betätigung der
Stop-/Löschtaste vor dem
Betrieb iöscht aiie eingegebenen Daten.
Durch einmaiiges Drücken der Stop-/Löschtaste während des
Kochvorganges wird der Betrieb des Gerätes unterbrochen. Durch
-----------------------
—
2weimaliges Drücken während des Kochvorganges werden alle Eingaben
gelöscht und In der Digitalanzeige erscheint wieder die Uhrzeit.
Akustisches Signal:
Bei richtiger Bedienung, d.h. Druck auf die Funktionstasten, ertönt
ein Signal. Wenn dieses Signal nicht ertönt, wurde die Taste nicht
richtig gedrückt. Das Mikrowellengerät hat die Eingabe nicht
angenommen! Zwischen den einzelnen Phasen, z.B. Ankochen und
Fortkochen, ist das Signal 2 mal und nach Beendigung des
Programms 5 mal zu hören.
. 16-
Tasten für die Gewichts
automatik zum Erwärmen/
Garen (Kombination)
Gewichtseingabetasten
Uhrtaste
Starttaste:
Durch Druck auf die Starttaste
beginnt das Mikrowellengerät
zu arbeiten. Wird die Tür
geöffnet, bzw. die
Stop-/Löschtaste während des
Betriebes 1 mal betätigt, muß die
Starttaste erneut gedrückt
werden, damit das
Mikrowellengerät wieder arbeitet.
Page 17

WICHTIGER BENUTZERHINWEIS
Bitte lesen Sie diese Anweisung, bevor das Mikroweliengerät an die
Schutzkontaktsteckdose angeschlossen wird.
Um Ihnen die Bedienung ihres Mikrowellengerätes zu erleichtern, ist dieses Gerät mit einer besonderen
Funktion ausgestattet: „Digitale Laufschrift“.
Betätigen Sie nach dem Anschiuß in die Steckdose die Starttaste fortiaufend bis ihre Sprache Im Bedienfeld
erscheint. Folgende Sprachen sind verfügbar: Englisch, Deutsch, Holländisch, Französisch, Italienisch, Spanisch
oder Portugiesisch.
Möchten Sie die Sprache verändern, so ziehen Sie den Netzstecker und verfahren Sie anschließend erneut wie
oben beschrieben.
Wird das Mikrowellengerät vom Netzanschluß getrennt (auch bei Stromausfall), wiederholen Sie ebenfalls die
oben aufgeführte Bedienung.
Tastatur und Bedienung
---------------------------
Einsteilen der Uhr:
Wird der Netzstecker des Mikrowellengerätes in die Steckdose gesteckt, erscheint „88:88” in der
Digitalanzeige.
Beispiel; Wenn Sie auf 14:25 Uhr einstellen wollen
1 mal 4 mal
}
10
min
min
10 1
|S S|
2 mal
• Drücken Sie die
Uhrtaste.
► Der Doppelpunkt fängt
an zu blinken.
Anmerkungen:
1. Um erneut die Uhrzeit einzustellen, bitte Schritt 1 bis 3 wiederholen.
2. Die eingestellte Uhrzeit bleibt erhalten, es sei denn, die Stromzufuhr wurde unterbrochen.
3. Die ist eine 24-Stunden Uhr.
• Steiien Sie durch Drücken der
Zeiteingabetasten die korrekte
Uhrzeit ein.
► Die Uhrzeit erscheint in der
5 mal
Digitalanzeige, der Doppelpunkt blinkt.
I ü • pc
I I • I
-----
1
• Drücken Sie die
Uhrtaste.
► Der Doppelpunkt hört auf
zu blinken und die
Uhrzeit ist fest eingestellt.
Bedienungshinweise in der Digitalanzeige:
Der jeweils nächste Bedienungsschritt wird automatisch im Display des Gerätes angezeigt.
Die Zeichen in der Digitalanzeige bedeuten wie folgt:
► Stellen Sie die Zeit durch
Drücken der entsprechenden
Zeiteingabetasten ein.
► Geben Sie das Gewicht ein.
► Drücken Sie die Starttaste.
► Wählen Sie durch
fortlaufendes Drücken die
gewünschte Grillstufe.
► Geben Sie die gewünschte
Leistungsstufe durch
fortlaufendes Drücken der
Leistungswahltaste ein.
-17-
Page 18

Bei Gebrauch der Kindersicherung:
Bei Gebrauch der Kindersicherung kann keine Leistungseingabe über das Bedienfeld erfolgen. Das Gerät
arbeitet nicht, dennoch kann dir Tür geöffnet werden.
Eingabe: Löschen:
I I
I • C-“I
Drücken Sie 3x die Starttaste.
► Dir Uhrzeit erscheint nicht mehr in der
Digitalanzeige, ist aber nicht gelöscht.
MIKROWELLE
Geben Sie die gewünschte
Leistungsstufe durch
fortiaufendes Drücken der
Leistungswahitaste ein.
Drücken
1 mal
2 mal
3 mal
4 mal
5 mal
6 mal
MAX 900 W GAREN
Mikrowelle
270 W AUFTAUEN
600 w ERWÄRMEN
440 W SCHMOREN
250 W FORTKOCHEN
100W AUSQUELLEN
• Steiien Sie die Zeit durch
• Drücken Sie 3x die Stop/Löschtaste.
► Die Uhrzeit erscheint wieder in der
Digitalanzeige.
10
min
10
s
1
min
1
s
Drücken der
entsprechenden
Zeiteingabetasten ein.
Anmerkungen:
1. Für den Zwei-Phasen-bzw.Drei-Phasen-Betrieb wiederholen
Sie die oben genannten Bedienungsschritte wie folgt:
Bsp.: Garen 10 Min.-> Schmoren 20 Min.
-♦ Ausquellen 10 Min.
2. Nach dem manuellen Auftauen bzw. Garen kann als 3.
• Phase eine Ausgleichszeit eingegeben werden.
3. Die max. Zeiteingabe beträgt 99 Minuten und 99 Sekunden.
<J>
• Drücken Sie die Starttaste.
GRILLBETRIEB
10
B
1-2-3
• Drücken Sie die Taste für • Geben Sie, gemäß • Drücken Sie die Starttaste,
deii Grilibetrieb. Wählen Sie
durch fortlaufendes
min
10
s
Geben Sie, gemäß
Angabe im Rezept, die
gewünschte Griiizeit ein.
Drücken die gewünschte
Grillstufe 1 (stark -1200 W),
Grillstufe 2 (mittel - 950 W) und
Grillstufe 3 (schwach - 700 W)
Anmerkungen:
1. Für den Zewi-Phasen-bzw. Drei-Phasen-Betrieb wiederholen Sie die Bedienschritte 1 und 2 wie oben
beschrieben und betätigen anschließend die Starttaste.
2. Nach dem Grillen kann als 3. Phase eine Ausgleichszeit eingegeben werden.
3. Die max. Zeiteingabe beträgt 99 Minuten und 99 Sekunden.
1
min
1
s
-18-
Page 19

KOMBINATIONSBETRIEB
B
1-2-3
• Drücken Sie die Taste für
den manuellen
Kombinationsbetrieb.
10
min
10
s s
1
min
1
• Geben Sie mit den
• Wählen Sie durch
fortlaufendes Drücken die
gewünschte Grilistufe
(1-3).
Drücken Sie die Starttaste.
Zeiteingabetasten
die erforderliche
Garzeit ein.
Automatisches Gewichtsauftauen
z.B.
ifl-/ ^
Ü<
Geben Sie die
gewünschte
Leistungsstufe durch
fortlaufendes Drücken der
Leistungswahltaste ein
(600, 440, 250,100 W).
Drücken Sie Taste
für die Gewichts
automatik zum
Auftauen. Wählen
Sie durch
fortlaufendes
Drücken zwischen
Programm 1 und 2.
Programme
ÌÒ-2
Betätigen Sie die
Gewichtseingabetaste.
Durch fortlaufendes
Drücken wird das
Gewicht in 100 gSchritten aufwärts
eingegeben und
erscheint in der
Digitalanzeige.
M Ì ndest-Höchstgewicht
100- 1500 g
400 - 2500 g
- 19-
Falls erforderlich
kann das Gewicht
in 10 g-Schritten
auf (A) bzw.
abwärts (▼)
verändert werden.
• Drücken Sie die
Starttaste.
Page 20

Gewichtautomatik
i
i':
fi'v
/iS
<!>
' Drücken Sie die
gewünschte Taste
für die
Gewichtsautomatik.
Üg
Betätigen Sie die
Gewichtsei ngabetaste. Durch
fortiaufendes
Drücken wird das
Gewicht in 100 g-
T
A '
Fails erforderlich
kann das Gewicht
in 10 g-Schritten
auf (▲) bzw.
abwärts (T)
verändert werden.
Drücken Sie die
Starttaste.
Schritten aufwärts
eingegeben und
erscheint in der
Digitaianzeige.
Hinweise zur Gewichtsautomatik Auftauen/Erwärmen und Garen:
1. Gemäß nachstehender Tabelle beinhaltet die Gewichtsautomatik 7 Programme mit den mögiichen
Mindest-und Höchstgewichten.
2. Programmierbar bis zu 3 Phasen, inkl. automatisches Gewichtsgaren.
Programm
1 Erwärmen
Tellergericht
2 Gemüse
Mindest-/
Höchstgewicht
200 g- 1500 g
200 g-1500 g
Zubehör
Hinweis/Tips
Zum Erhitzen von Teliergerichten und Eintöpfen.
Die Lebensmittel sollten Kühlschrank- oder Zimmertemperatur
haben, keine tiefgekühlten Speisen mit diesem Programm
erwärmen. Decken Sie die Lebensmittel zum Erhitzen ab.
Beachten Sie anschließend eine Standzeit.
Zum Garen von frischem Gemüse.
Geben Sie das vorbereitete Gemüse mit 6 EL (90 ml) Wasser in
eine entsprechend große Form mit Deckel. Größere Mengen
Gemüse nach der Hälfte der Garzeit umrühren.
3 Fisch
4 Erwärmen
TK-Brot
5 Erwärmen
TK-Pizza
6 Erwärmen
TK-Gratin
7 Geflügel
100 g-1000 g
30 g - 600 g
100 g - 900 g
200 g- 1000 g
100 g- 1500 g
Zum Garen von frischem Fisch (Filets oder Steaks).
Geben Sie den Fisch mit 2 EL (30ml) Flüssigkeit (Wasser, Brühe,
Zitronensaft oder Wein) in eine entsprechend große Form mit
Deckel. Größere Mengen Fisch nach der Hälfte der Garzeit
wenden.
Zum Erhitzen von tiefgekühltem Brot, ganz oder in Scheiben,
^TTTTTTTTTT^
I I 1 Erhitzen Sie die Backwaren auf dem Rost, der auf den
1 I
i" °
tiefgekühlten Brötchen oder Croissants.
Glasdrehteller gestellt wird. Wenden Sie die Lebensmittel beim
Signalton und beachten Sie nach der Zubereitung eine Standzeit.
Dieses Programm ist nicht zum Rösten von Brotscheiben
geeignet.
Überprüfen Sie vor dem Verzehr in jedem Fall die Temperatur der
Lebensmittel und backen Sie diese ggf. in einem herkömmlichen
Ofen zu Ende.
Zum Erhitzen und Bräunen von industriell vorgefertigter,
tiefgekühlter Pizza.
Entfernen Sie sämtliches Verpackungsmaterial und erhitzen Sie
die Pizza auf dem Rost, der auf den Glasdrehteiler gestellt wird.
Zum Erhitzen und Bräunen von industriell vorgefertigtem,
tiefgekühltem Auflauf.
Den Auflauf aus der Verpackung nehmen und in eine geeignete
Auflaufform geben. Erhitzen und bräunen Sie den Auflauf auf dem
Rost, der auf den Glasdrehteller gestellt wird.
Zum Garen von frischen Hähnchenteilen.
Legen Sie das Geflügel auf eine hitzebeständige, umgedrehte
Untertasse und plazieren Sie diese auf den Rost, der auf den
Glasdrehteller gestellt wird. Wenden Sie die Hähnchenteile nach
der Hälfte der Garzeit.
-20-
Page 21

Gebrauch des Gerätes mit Ausgleichszeit
Diese Ausstattung ermöglicht die Eingabe einer Ausgleichszeit.
z.B.
(S
ohne Funktion
io 1
10s1
s
o
• Geben Sie, wie
vorher
beschrieben, die
Leistungen und
Zeiten z. B. zum
Auftauen bzw.
Drücken Sie die
Taste für die
Ausgleichszeit.
Geben Sie die
entsprechende
Ausgleichszeit durch
Drücken der
Zeiteingabetasten
ein.
• Drücken Sie die
Starttaste.
Garen ein.
Hinweise:
1. Diese Ausstattung ermöglicht die Eingabe einer Ausgleichszeit von bis zu 9 Stunden 99 Minuten.
2. Bei Eingabe einer Ausgleichszeit ist nur der Ein- oder Zwei-Phasen Betrieb möglich.
3. Wird die Garraumtür während der Ausgleichszeit geöffnet, läuft die eingegebene Zeit weiter ab.
4. Wird auf Ausgleichszeit eingestellt, so erscheint in der Digitalanzeige ein "H" für Stunde. Die Zeit kann nur in
Stunden und Minuten eingegeben werden.
5. Beträgt die Zeit mehr als eine Stunde, wird minutenweise zurückgezählt; wenn die Zeit weniger als 60
Minuten beträgt, wird sekundenweise zurückgezählt.
Gebrauch des Gerätes mit Zeltvorwahl
Diese Ausstattung ermöglicht einerseits den späteren Betrieb des Gerätes und kann andererseits als
Signalwecker benutzt werden.
r-f'i
ohne Funktion
io 1
10
1
Z.B.
(S
10
10
l
' Drücken Sie die
Taste für die
Zeitvorwahl.
Geben Sie die
entsprechende
Vorwahizeit durch
Drücken der
Geben Sie die
gewünschte
Leistung und Zeit
ein.
Drücken Sie die
Starttaste.
Zeiteingabetasten
ein.
Anmerkungen:
1. Mit dieser Ausstattung kann das Gerät bis zu 9 Stunden 99 Minuten vorprogrammiert werden.
2. Wurde das Gerät vorprogrammiert, kann diese Einrichtung auch als Signalwecker benutzt werden. In diesem
Fall bitte Schritt 3 weglassen.
3. Bei Zeitvorwahl ist nur der Ein- oder Zwei-Phasen Betrieb möglich.
4. Wird auf Zeitvorwahl eingestellt, so erscheint in der Digitalanzeige ein "H" für Stunde. Die Zeit kann nur in
Stunden und Minuten eingegeben werden.
5. Beträgt die Zeitvorwahl mehr als eine Stunde, wird minutenweise zurückgezählt; wenn die Zeit weniger als
60 Minuten beträgt, wird sekundenweise zurückgezählt.
-21 -
Page 22

Speichertaste
Mit dieser Ausstattung können Sie Ihr individueiles Programm (Zeit und Leistung) fest programmieren.
Programmierung:
z.B.
• Drücken Sie die
Speichertaste.
•Geben Sie die
gewünschte Leistung und
• Drücken Sie die
Speichertaste.
Zeit ein.
Gebrauch der Programmteste:
• Drücken Sie die • Drücken Sie die Starttaste.
Speichertaste. (Zeit und
Leistung sind fest
eingegeben.)
Anmerkungen:
1. Automatik-Programme können nicht gespeichert werden.
2. Es kann nur eine Leistung und Zeit gespeichert werden.
3. Das Programm wird bei Stromausfail oder wenn der Netzstecker gezogen wird, gelöscht.
Pflege des Mikrowellengerätes
1. Halten Sie stets den Garraum und den
Giasdrehteller des Mikrowellengerätes sauber
und trocken. Spritzer von Speisen oder
Flüssigkeiten, die an den Garraumwänden haften,
werden mit einem feuchten Tuch entfernt. Sollte
das Gerät sehr verschmutzt sein, bedienen Sie
sich eines milden Reinigungsmittels. Vor dem
Reinigen des Garraums den Grill abkühlen lassen.
2. Die Benutzung eines starken Reinigungs- oder
Scheuermittels ist zu vermeiden. Das Gehäuse
des Gerätes sollte feucht abgewischt und mit
einem weichen Tuch getrocknet werden. Achten
Sie darauf, daß kein Wasser durch die
Entiüftungsöffnungen fns Geräteinnere gelangt,
da das Gerät sonst Schaden nehmen könnte. Das
Edelstahlblech im Bereich des Grills mit einem
milden Putzmittel reinigen.
3. Soilte das Mikrowellengerät innen oder außen im
Bereich der Gerätetür beschiagen, wischen Sie
es bitte mit einem weichen Tuch ab. Ist das
Bedienungsfeld verschmutzt, säubern Sie dieses
mit einem feuchten, weichen Tuch. Benutzen Sie
keine starken Reinigungs- oder Scheuermittel.
Damit es nicht zu einem unvorhergesehenen
Betrieb des Gerätes kommt, lassen Sie die Tür
des Mikrowellengerätes beim Säubern geöffnet.
Drücken Sie nach dem Säubern die
Stop/Löschtaste. Die Displayanzeige leuchtet
anschließend wieder.
4. Wasserdampf kann auftreten, wenn das Gerät in
Räumen mit hoher Luftfeuchtigkeit betrieben wird.
Die Bildung von Kondenswasser stellt keine
Fehlfunktion dar.
5. Nehmen Sie den Drehtelier heraus und reinigen
Sie ihn in lauwarmem Seifenwasser oder in der
Spülmaschine.
6. Der Rollenring und die Vertiefung im Geräteboden
sollten regelmäßig gereinigt werden, um unnötige
Betriebsgeräusche zu vermeiden. Einfach den
Boden mit einem feuchten Tuch auswischen und
trocknen. Der Roilenring kann in müdem
Seifenwasser oder in der Spülmaschine gereinigt
werden. Bei normalem Gebrauch kann sich
Kondenswasser bilden, das jedoch weder die
Bodenoberfläche noch den Rollenring angreift.
Achten Sie darauf, daß Sie den Rollenring nach
dem Reinigen wieder richtig einsetzen.
7. Dieses Gerät solite nur durch einen qualifizierten
Kundendienst gewartet werden. Setzen Sie sich
mit dem nächsten autorisierten Kundendienst in
Verbindung, um das Gerät überprüfen und
reparieren zu lassen.
-22-
Page 23

Fragen und Antworten
F.' Das Mikroweilengerät wurde ohne
Lebensmittel eingeschaltet. Ist
das Gerät jetzt beschädigt?
Fl Warum läßt sich das
Mikrowellengerät nicht
einschalten?
F; Warum ertönt beim Einschalten des
Mikrowellengerätes ein
Kratzgeräusch vom Glasdrehteller?
Das Mikrowellengerät verursacht
F:
Fernsehstörungen. Ist das normal?
Al Wir empfehlen Ihnen, das Mikrowellengerät nicht ohne
Lebensmittel in Betrieb zu setzen. Wird es jedoch nur
für kurze Zeit leer eingeschaltet, bleibt das Gerät
unbeschädigt.
A‘. Wenn sich Ihr Mikrowellengerät nicht einschalten läßt,
überprüfen Sie bitte Folgendes:
1. Steckt der Netzstecker fest in der Steckdose. Ziehen
Sie den Stecker aus der Steckdose und warten Sie 10
Sekunden, bis Sie ihn wieder hineinstecken.
2. Überprüfen Sie die Netzsicherung im Sicherungskasten
und ersetzen Sie diese ggf.
3. Ist die Netzsicherung in Ordnung, stecken Sie den
Stecker eines anderen Elektrogerätes in die gleiche
Steckdose. Arbeitet das andere Elektrogerät
ordnunsgemäß, ist Ihr Mikrowellengerät defekt. Arbeitet
das andere Gerät auch nicht, ist Ihre Steckdose defekt.
Sollte das Gerät nicht in Ordnung sein, setzen Sie sich
bitte mit einem autorisierten Kundendienst in Verbindung.
Ai Dieses Geräusch tritt auf, wenn der Rollenring und der
Boden des Garraums verschmutzt sind. Regelmäßiges
Reinigen dieser Teile ist daher erforderlich.
Al Beim Betrieb des Mikrowellengerätes können Fernseh-
und Radiostörungen auftreten. Es handelt sich um
ähnliche Störungen wie sie durch kleine Elektrogeräte
wie Mixer, Staubsauger und Haartrockner usw.
verursacht werden können. Dies bedeutet nicht, daß Ihr
Mikrowellengerät defekt ist.
F:
Die Eingabe von Daten ist nicht
möglich. Woran liegt das?
F:
Warum wird die
Garraumbeleuchtung dunkler?
Warme Luft strömt manchmal aus
dem Mikrowellengerät. Warum?
F; Kann man im Mikrowellengerät ein
Fleischthermometer gebrauchen?
A; Das Mikrowellengerät funktioniert nur, wenn die Eingabe
richtig erfolgte: z.B. ist es nicht möglich, 4 Zeiten und
Leistungsstufen einzugeben.
A: Arbeitet das Mikrowellengerät mit verringerter
Leistungsstufe, wird ggf. die Garraumbeleuchtung
dunkler und Sie hören ein Klickgeräusch.
Ai Die Hitze, die aus dem Lebensmittel austritt, erwärmt die
Luft im Garraum. Die erwärmte Luft wird durch die im
Gerät zirkulierende Luftströmung aus dem Gerät nach
außen befördert. In dieser erwärmten Luft sind keine
Mikrowellen enthalten. Die Lüftungsöffnungen des
Mikrowellengerätes dürfen auf keinen Fall während des
Betriebes abgedeckt werden.
Nur wenn die Grillfunktion benutzt wird. Das Metall im
Thermometer kann Funken verursachen und sollte somit
nicht bei der Mikrowellen- oder Kombinationsfunktion
benutzt werden.
-23-
Page 24

Installeren
De magnetron-oven inspecteren
Pak de magnetron-oven uit en verwijder alle
verpakkingsmaterialen. Controleer of alle juiste
onderdelen aanwezig zijn. Controleer of de
magnetron-oven beschadigd is. Waarschuw
onmiddellijk uw dealer wanneer schade wordt
geconstateerd. Gebruik het apparaat niet als dit
beschadigd is.
Dit toestel rhoet op een geaard
stopcontact worden aangesloten.
Belangrijk
veiligheld: dit toestel mag uitsluitend worden
aangesloten op een geaard stopcontact. Het
aanslulten van dit toestel op een niet geaard
stopcontact is dan voor de persoonlljke
verantwoordelijkheid van de gebruiker.
------
in het belang van uw eigen
Voltage
Let erop, dat netspanning als vermeld op deze
magnetron-oven overeenkomt met de netspanning
op uw stopcontact dus.
Gebruik geen andere netspanning.
Waarschuwing
1. De deurafdichtingen en de plaatsen hieromheen
moeten worden schoongemaakt met een vochtige
doek.
Voor aflevering is dit toestel nagekeken op
beschadigingen aan de deurafdichtingen en de
plaatsen rondom deze afdichtingen—mochten
zieh hiertoch beschadigingen voordoen, dan mag
het toestel pas in gebruik worden genomen, nadat
de magnetron-oven is gerepareerd of nagekeken
door hiervoor gekwalificeerd servicepersoneel.
Raadpleeg altijd uw dealer of Panasonic Centre.
2. Het is gevaarlijk voor iedereen om onderhoud
en reparaties uit te voeren aan de oven, behalve
door een geschoolde onderhoudsmonteur die is
getraind door de fabrikant.
3. Indien de aansluitleiding van dit toestel
beschadigd iS; moet deze Vervengen worden
door de specials leiding die verkrijgbaar is via
de fabrikant.
4. Voor gebruik dient u er zich\van te verzekeren dat
alle te gebruiken hulpmiddelen
(schalen/bakvormen enz.) geschikt zijn voor
gebruik in de magnetronoven.
DIT APPARAAT IS ONTSTOORD VOLGENS DE
RICHTLIJN KB 88,544.
Het plaateen van de magnetron-oven
1. De magnetron oven moet worden geplaatst op
een vlakke, stevige ondergrond hoger dan 85 cm
vandegrond.
2. De magnetron-oven kan alleen dan op de juiste
wijze functioneren, indien er voldoende ventilatie
is.
Plaatsing op een meubel:
a) Bovenaan de oven moet een ruimte gelaten
worden van 15 cm, achteraan 10 cm en aan de
zijkanten 5 cm.
b) De bovenkant of een van de ovenzjiden mag
niet tegen de wand staan.
Inbouwen:
Deze oven kan ingebouwd worden met het
inbouwraam, wit NN-TKK55, zwart NN-TKK15.
Dit inbouwraam kan verkregen worden bij een
Panasonic Dealer.
3. Plaats de oven niet naast andere electrische
apparatuur.
4. Verwijder de voetjes van de oven niet.
5. Gebruik deze magnetron-oven uitsluitend
binnenshuis.
6. Het is af te raden de oven in een heel vochtige
omgeving te plaatsen.
7. Houdt het snoer uit de buurt van warme of hete
oppervlaktes enz. En zorg ervoor dat het snoer
altijd in de geleidingsklem aan de achterzijde
geplaatst Is.
Laat het snoer of the stekker nooit in het water
hangen.
8. De ventilatie openingen van de magnetron-oven
moeten zrij bijjven en dus niet geblokkeerd
worden. Plaats geen voorwerpen bovenop de
magnetron-oven indien de ventilatie opkningen
toch geblokkeerd zijn. Kan de magnetron-oven
pas weer in gebruik worden genomen, nadat deze
voldoende is afgekoeld.
De ovenlamp
Indien het noodzakelijk mocht zijn de ovenlamp te
vervangen, neem dan contact op met uw Panasonic
dealer.
Voor eventuele vragen na het lezen van deze
gebruiksaanwijzing kunt u contact opnemen met uw
Panasonic dealer of Panasonic Center.
Werking van de ventiiatormotor
Nadat de oven uitgeschakeld werd, draait de
ventilator nog 1 minuut door om de elektrische
onderdelen te laten afkoelen. Dit is voliedig normaal.
U kan het voedsel gerust uit de magnetron-oven
nemen, ook al draait de motor van de ventilator nog
even verder.
•24-
Page 25

PUNTEN, WAAROP U MOET LETTEN! Met draaiplateau
1. Voordat u de eerste keer gebruik gaat maken van
de COMBINATIE- of GRILL functies, dient u de
grill in te schakelen zonder voedsel, en dit
gedurende 5 minuten. Op deze manier wordt de
oiie, welke gebruikt wordt als een
beschermingslaagje tegen het roesten eraf
gebrand.
2. De buitenwanden van de magnetron-oven, met
inbegrip van de ventilatie openingen en de
ovendeur worden tijdens de COMBINATIE-EN
GRILL functies heet. Pas dus op bij het openen
of sluiten van de ovendeur en bij het inbrengen
of eruit halen van voedsel en accessoires.
Houdt kinderen buiten bereik van de magnetron.
3. De magnetron-oven is uitgerust met twee
verwarmingselementen. Na het gebruik van de
COMBINATIE-, en GRILL funkties zijn deze
elementen dan ook heet.
4. Gebruik dit toestel niet, Indien het NETSNOER
en/of de STEKKER beschadigd zijn. Gebruik de
magnetron-oven niet Indien deze niet goed
werkt, beschadigd werd of nadat men het toestel
heeft laten vallen.
5. Trächt niet zeit reparaties uit te voeren aan de
ovendeur, het bedieningspaneel, de veiligheidsen vergrendelingsschakelaar of welk ander deel
van de magnetron-oven dan ook. Reparaties
mögen uitsluitend en alleen worden uitgevoerd
door daartoe gekwalificeerd service personeel.
6. De deurafdichting en de ruimte rondom de
deuropening moeten ten alle tijde goed schoon
worden gehouden. Maak bij het reinigen gebruik
van een zachte, vochtige doek.
7. Het gebruik van de magnetron-oven in de
standen MAGNETRON (MICROGOLVEN)/
COMBINATIE mag NIET gebeuren zonder
voedsel in de magnetron-oven. Indien u dit toch
doet, wordt de magnetronbuis beschadigd
hetgeen de levensduur verkort.
8. Gebruik de oven niet om krantenpapier, klederen
of ander materiaal te drogen.
9. Gebruik de oven enkel en alleen om voedsel te
bereiden.
10. Tijdens het grillen wordt de bovenkant van dit
toestel warm. Dit toestel is een Type B toestel.
11. De buitenkant van de oven kan warm worden
tijdens het grillen. Kinderen buiten bereik van de
oven houden.
1. Gebruik de magnetron-oven nooit zonder het
draaiplateau.
2. Gebruik nooit een andere glazen draaiplateau
dan deze die bij het toestel geleverd werd.
3. Als het draaiplateau warm is, moet deze eerst
afkoelen voordat u hem reinigt of in water
dompelt.
4. Het draaiplateau kan zowel naar links als naar
rechts draaien. (geldt niet voor alle modellen)
5. Indien het voedsel of schaal de wanden van de
oven raakt, en zo het röteren stopt, zal het
draaiplateau automatisch in de tegengestelde
richting draaien.
6. Plaats geen voedsel rechtstreeks op het
draaiplateau. Maak altijd gebruik van een schaal
die u dan op het draaiplateau plaatst.
Reinigen
1. De loopring, de ovenbodem en de ovendeur
moeten regelmatig worden gereinigd om te
voorkomen, dat daar overmatig vuil en
voedselresten achterblijven.
2. Tijdens het koken moet de loopring samen met
het draaiplateau worden gebruikt.
3. Na het koken dient u altijd de ovendeur droog te
wrijven met een zachte doek (ter voorkoming
van roestvorming).
Rooster
1. Er wordt een rooster met de oven meegeleverd
om kleinere gerechten gemakkelijkerte kunnen
grillen.
2. Dit rooster moet regelmatig schoongemaakt
worden.
3. Wanneer het rooster wordt gebruikt bij het grillen
of bij de combinatieprogramma’s, dat er
magnetron schalen gebruikt worden. Normale
kunststof schalen zullen door de wärmte gaan
smelten.
4. Bij gebruik van een combinatieprogramma mag
nooit een aluminium of metalen schaal direct op
het rooster geplaatst worden. Plaats dan altijd
een glazen schaaltje of bordje tussen het rooster
en de aluminium vorm. Dit voorkomt eventueel
vonken hetgeen de oven kan beschädigen.
5. Het is aan te raden het rooster niet te gebruiken
bij gebruik van alleen magnetron.
-25-
Page 26

Belangrijke informatie
1) Kooktijden
• De in het kookboek vermelde kooktijden zijn bij
benadering gegeven. Faktoren, die invfoed
hebben op de kookduur, zijn: de
begintemperatuur, de hoeveelheid, grootte,
afmetingen en vorm van het voedsel en van de
materialen die voor het koken worden gebruikt.
Naarmate u beter vertrouwd raakt met de
magnetron-oven, leert u ook al deze faktoren in te
schatten.
• Het iS beter om te kort dan te lang te koken. Als
voedsel te kort wordt gekookt, kan het altijd nog
een keer in de magnetron oven worden geplaatst.
Als te lang wordt doorgekookt, is dat
onherstelbaar. Begin dus altijd met de kortste
kooktijd. Let vooral op bij het verwarmen van
voedsel met vetten/olie, omdat dit erg snel warm
wordt.
2) Kleine hoeveelheden voedsel
• Kleine hoeveelheden eten of voedsel met een
gering vochtgehalte können uitdrogen,
aanbranden of zelfs
verbranden als te lang wordt
doorgekookt. Als daardoor
brand ontstaat, de stekker
uittrekken en de ovendeur
gesloten laten.
3) Eieren
• Kook geen ongepelde eieren
in de microgolfoven. Er kan
een te höge druk binnen de
schaal ontstaan, waardoor
ze uiteen können spatten.
6) Vioeistoffen
• Indien vioeistoffen, zoals
soep, saozen en drank
opgewarmd worden in ow
microgolfoven, können deze
bij het bereiken van het
kookpont gaan overkoken.
Om dit te voorkomen, moet
men het volgende doen:
a) Roer de vloeistof voordat o ze in de schotet
schenken nog een keer op halve kooktijd.
b) gebroik geen Vierkante schoteis met smalle
randen
c) niet teveel verwarmen
d) wanneer de vloeistof op de joiste temperatoor is,
laat deze nog even in de oven staan en roer goed
voordat 0 de schotel oit de oven haalt.
7) Verpakkingsmateriaal
• Verwijder eerst alle metaalhoodende materialen,
zoals nietjes, ijzerdraadjes etc. oit het
verpakkingsmateriaal, voordat o de verpakking in
de magnetron-oven plaatst.
8) Hulpmiddelen/alu foiie
• Verwarm nooit gesloten blikjes of flessen omdat
deze zoüden können ontploffen.
• Gebroik het liefst geen metalen schoteis. Dit
voorkomt eventoeel vonken hetgeen de oven kan
beschädigen.
• Als ü alo folie of metalen schoteis gebroikt, moet
er een minimom afstand van 2 cm bestaah tossen
deze en de ovenwanden om de vonken te
vermijden.
4) Niet poreuze schil
• Aardappelen, appels,
eierdooiers, worstjes e.d.
hebben geen poreoze schil.
Die moet eerst worden
ingeprikt met b.v. een vork
voordat o ze gaat koken. Zo
voorkomt 0 eventoeel het oit
elkaar spatten.
5) Vleesthermometer
• Indien U gebroik maakt van een vleesthermometer
voor braadstokken en gevogelte, gebroik die dan
alleen wanneer het voedsel holten de
microgolfoven is. Maak geen gebroik van een
normale vleesthermometer bij het microgolven of
een combinatie ervan, want die können vonken
veroorzaken.
Er zijn speciale magnetron thermometers te koop.
9) Zuigflessen/potjes babyvoeding
• Schod zoigflessen goed en roer een paar maal
door de potjes met babyvoeding.
• Controleer de temperatoor van het voedsel voor
gebroik.
-26-
Page 27

De magnetron-oven
Het bedieningspaneel
Uitieesvenster
Tijdtoetsen
Ontdooi-ZKooktoets
® Trek aan de deur ontgrendeling
Indien u de ovendeurtijdens het bereidingsproces
opent, stopt de magnetron met koken zonder het
ingestelde programma te wissen.
Het bereidingsproces gaat weer normaal door,
zodra de deur wordt gesloten. Het lampje in de
magnetron-oven gaat aan, zodra u de ovendeur
opent.
® Doorkijkvenster
<D Veiligheidsschakelaars
® Ventilatie openingen
® Bedieningspaneel
(D Draaiplateau
(Z) Loopring
(D Lucht-openingen voor ventilatie van de oven
Rooster
Panasonic
Auto O n Ûg SB
1
10
min min
1
10
5
s
Automatisch verwarmenZ
koken op gewicht-toets
(Magnetron)
GRILL toets
COMBINATIEtoets
Automatisch verwarmenZ
Geheugen toets
koken op gewicht-toets
(Combinatie)
Automatisch ontdooien op
gewicht-toets
ProgrammeerZ
Standaardtijdtoets
Kloktoets
Stop/wistoets:
Voor het koken: Èén keer de toets
aanraken en het gehele ingestelde
programma wordt gewist.
Tijdens het koken; Één keer de toets aanraken en het
kookproces wordt tijdelijk stopgezet. Indien u dan de
betreffende toets nog een keer aanraakt is het complete
programma gewist en in het uitieesvenster verschijnt dan
de juiste tijd.
Gewichts-instelling (100 g)
Vermeerderingstoets (10 g)
Verminderingstoets (10 g)
De starttoets:
Met een druk op deze toets stelt
u de magnetron-oven in working.
Indien u nu (tussentijds) de
ovendeur opent of de STOPAVIS
toets aanraakt tijdens het koken,
dan meet de starttoets nogmaals
worden aangeraakt (tiptoets) om
de magnetron-oven opnieuw in
working te stellen.
Piepgeluid:
Indien u de juiste toets aanraakt, hoort u een piepgeluid. Indien u een toets aanraakt en u hoort géén
piepgeluid, dan is de instructie niet goed doorgekomen of kan het systeem de instructie niet
accepteren. Tussen twee geprogrammeerde fases in, hoort u twee piepjes. Nadat welk programma dan
ook is beëindigd, hoort u vijf maal achtereen het piepgeluid. Bij het einde van de voorverwarmings tijd
laat de magnetron-oven 3 maal een pieptoontje hören.
-27-
Page 28

BELANGRUKECONSUMENTENINFORMATIE
Gelieve deze tekst te lezen voordat u de microgolfoven aansluit op het stopcontact
Dit model beschikt over een unieke functie: “Een gebruiks-leidraad afgebeeld op de display”. Deze functie helpt
u als het ware door de bediening van uw microgolfoven. Gelieve na aansluiting van het toestel op het
stroomnet, opeenvolgend op de starttoets te drukken totdat de gewenste taalkeuze op de display verschijnt
(beschikbare talen: Engels, Quits, Frans, Italiaans, Nederlands, Spaans en Portugeesj. Eenmaal ingésteid,
wordt u stap na stap de te volgen procedure op de display weergeven om alzo verkeerde handelingen tot een
minimum te herleiden. Indien u de oorspronkelijk gekozen taal wenst te wijzigen, gelieve de stekker uit het
stopkontakt te halen en de hierboven vermelde richtlinjen te herhalen.
Bediening en gebruiksprocedure
Om de klok in te steilen:
Wanneer de magnetron-oven voor het eerst wordt ingeschakeld, verschijnt er ''88:88'' in het uitleesvenfeter.
Voorbeeld: Voor het instellen van 14:25
eenmaal viermaal
1—
l\
10
min
min
©
• Druk de kioktoets in.
► De dubbele punt gaat
nu knipperen.
OPMERKINGEN:
1. Om de juiste tijd opnieuw in te stellen, moetu stap 1 t/m stap 3 herhalen.
2. De klok geeft de juiste tijd aan zolang de stekker op het lichtnet is aangesloten. Wanneer de netspanning
uitgeschakeld geweest is, dient u de klok opnieuw in te stellen.
10
tweemaal vijfmaal
1
\S
_1_
• Toets de juiste tijd in door de betreffende tijdtoetsen aan te raken.
► De tijd verschijnt op het
uitleesvenster en de dubbele punt
knippert.
N.B.: Dit is een 24-uurs kiok.
Display
I Ü
I I'
.nc:
I__I
• Druk nogmaais de
kioktoets in.
► De dubbele punt houdt op
met knipperen en de tijd is in
het geheugen opgenomen
en wordt op het
uitleesvenster getoond.
Stap voor Stap uitleesvenster:
uitleesvenster, is uw volgende handeling:
0Í1 :
—^ ^
----
öa ■
'OjT
\ 1 /
./7\
-----
4>
► Stel de gewenste kooktijd in,
na het bepalen van het
vereiste vermögen.
► Gewicht intoetsen.
---I ► Druk nu op de starttoets.
/IX
•28-
-------
✓ 1 '•
Iwvl
-----------
~
► Druk de grill-toets in.
► Druk de combinatie^oets in.
Page 29

Gebruik Van Het Kinderslot:
Door gebruik te maken van dit systeem, wordt het onmogelijk om de oven te bedienen: de deur opent echter
wel. Het kinderslot kan ingesteld worden wanneer de display een dubbel punt of een tijd vertoont.
Hoelnschakelen:
OmTe Annuleren:
I I
> Druk 3 keer op de start-knop.
► De tijdsaanduiding verdwijnt maar de tijd blijft in
het geheugen.
Druk 3 keer op de stop/annulatie toets.
► De tijdsindikatie verschijnt opnieuw in de display.
Verwarmen / Ontdooien / Koken
MAGNETRON
1
1
OPMERKINGEN:
1. Wenst u in 2 of 3 fasen te koken, herhaal dan
stappen 1 en 2 voor U de starttoets indrukt.
Voorbeeld:
2. De wachttijd kan of voor of na het stap-voor-stap
ontdooien/automatisch koken ingesteld worden.
3. Druk op de ontdooi-/kooktoets om het gekozen
vermögen tijdens het koken op te roepen.
4. Om tijdens het kookproces de kooktijd te verlengen,
druk dan op de "1 min"-toets.
Bepaal het gewenste
vermögen en toets
overeenkomstig enkele
malen de vermogenstoets
in.
Indrukken Magnetron
1 MAX 900 W Maximaal vermögen
2 1 270 W Ontdooi vermögen
3 600 W Middelmatig vermögen
4 440 W Half vermögen
5
6 100 W Warmhoud vermögen
250 W Suddervermögen
GRILLEN
10
min min
10
S s
Stel de kookduur in door
de tijdkeuze toetsen in te
drukken.
• Druk de starttoets in.
maximaal vermögen (900 W) 5 minuten
STAND 5 minuten
maximaal vermögen (900 W) 2 minuten
Q
1-2-3
Druk de grilltoets in voor
de gewenste grill-stand
1 (Maximaal) tot
3 (Minimaal).
Indrukken Grill
1
2 2 Middelmatig 950 W
3 3 Minimaal 700 W
1 Maximaal 1200W
10
min
10 1
s s
Stel de grilltijd in via de
1
min
• Druk de starttoets in.
tijdtoetsen.
OPMERKINGEN:
1. Wenst u in 2 of 3 fasen te koken, herhaal dan stappen 1 en 2
voor u de starttoets indrukt.
Voorbeeld: maximaal vermögen (900 W) 5 minuten
^ Grill 1 5 minuten -> STAND 3 minuten
2. De wachttijd kan of voor of na het stap-voor-stap
ontdooien/automatisch koken ingesteld worden.
3. Om tijden het koken de gekozen grill-stand na te gaan, druk op
de "grill"-toets.
4. Om tiijdens het kookproces de kooktijd te verlengen, druk dan op
de "1 min"-toets.
5. De grill moet niet voorverwarmd worden.
6. Gebruik een hittebestendige schotel bij het grillen.
-29-
Page 30

Verwarmen / Ontdooien / Koken
COMBINATIE
• Druk op de
combinatie-toets.
min
10
10
s s
min
Q
1-2 -3
Kies de gewenste
grill-stand (zie
onderstaande tabel).
IndrukkenQ
1 1200W
2 950 W
3
1
1
Grill
vermögen
700 W
I ñy. I
• Kies bet gewenste
kook-programma (zie
onderstaande tabel)
Indrukkenj^
1 600 w
2
3 250 W
4 100W
Magnetron
vermögen
440 W
• Stel de kooktijd in door • Druk op de starttoets.
op de tijdtoetsen te
drukken.
OPMERklNGEN:
1. WenstU in 2 of 3 fases te koken, herhaal dan déstappen 1 en 2 vóór u de starttoets indrukt.
Voorbeeld: COMBINATIE (grill 1200 W -t- Micro 600 W) 12 minuten STAND 5 minuten Grill-1 8 minuten
2. De wachttijd kan of voor of na het stap-voor-stap ontdooien/automatisch koken ingesteld worden.
3. Ü kunt desgewenst het ingestelde vermögen wijzigen. Druk op de toets combinatie-toets nadat u de
combinatie-instelling heeft gekozen.
4. Om tijdens het kookproces de kooktijd te verlengen drukt u op de toets 1 min.
5. Maak gebruik van hittebestendige schoteis.
Automatisch ontdooien met gewicht
Met deze mogelijkheid kan het voedsel gekookt worden overeenkomstig het gewicht. Het gewicht dient
ingesteld te worden in grammen.
V.
iü-r ^
• Toets de
gewenste
categorie in.
(zie onderstaande
tabel)
üg
.
Stel het gewicht in. • Het insteilen van • Druk de
De instelling het gewicht met starttoets in.
vermeerderd met
100 gramen
verschijnt in de
dispiay.
OPMERKINGEN:
1. Rusttijd of vermögen künnen na het automatische ontdooien met gewicht worden ingesteld.
2. Aan te raden gewibht worden in onderstaande tabel vermeld.
Categorie Laagste-ZHoogste-gewicht
•ñ-> (^’
*Ö-2
100-1500g
400-2500 g
Voor het ontdooien van kleine stukken viees, kalfsiapjes, worsten,
visfilets, steaks, koteletten van 100 g tot 400 g elk.
Voor het ontdooien van grote stukken viees, braadstukken,
volledige kippen, grote stukken vis.
-30-
Á T
Het instellen van
het gewicht met
10 gram is
mogeiijk d.m.v.
de plus-en min
instellingstoets.
----------------
<P
Tips
—
Page 31

Automatisch programma volgens gewicht —
Het automatisch koken volgens gewicht stelt u in Staat om bepaalde gerechten te bereiden, zonder dat u
vermögen of tijd hoeft in te stellen. De magnetron-oven doet dit automatisch nadat u het gewicht heeft
ingesteld.
b.v.
ö<
Kies de gewenste
categorie.
OPMERKING:
1. Er zijn 7 programme’s met verschillende minimum/maximum gewichten.
2. Bij de programma’s 4, 5, 6 en 7 wordt er gekookt door combinatie.
Programma
1 Opwarmen
Casserole
2 Koken Groenten
3 Koken Vis
4 Opwarmen
Diepvries Brood
5 Opwarmen
Diepvries Pizza
• Stel het gewicht
in. De insteiiing
vermeerderd met
100 gram en
verschijnt in de
dispiay.
MinVIVIax.
gewicht
200 g- 1500 g
200 g-1500 g
100 g- 1000 g
30 g - 600 g
100 g - 900 g
Bijsteiiing van het
gewicht met 10
gram is mogeiijk
middeis de
pius-en min
insteiiingstoets.
Toebehoren
AI het voedsel moet voorgekookt zijn.
Het voedsel moet op kamer — of frigotemperatuur
zijn.
Nagaartijd gedurende enkele minuten respekteren
Voor het bereiden van verse groenten.
Leg de groenten in een voldoende grote schaal.
Besprenkel met 90 ml. water, Dek de kom af met
een magnetron folle of een deksel. Grotere
hoeveelheden moeten halverwege het
kookproces omgeroerd worden.
Verse Vis. B.v. volledige filets, steaks
Afgedekt, met 2 eetlepels water koken.
Bij grote hoeveelheden, halverwege de kooktijd
omdraaien.
Voor het opwarmen van diepgevroren brood,
al dan niet gesneden. croissants, krentebollen.
Plaats het voedsel op een rooster op het glazen
plateau. Draai ze om als de oven piept. Laten
afkoelen na het kookproces. Deze programma’s
zijn niet geschikt om toast te maken.
Om diepgevroren pizza’s op te warmen.
Verwijder de volledige verpakking en plaats de
pizza op een rooster op het glazen plateau.
Druk op de start
toets.
Tips
6 Opwarmen
Diepvries Gratin
7 Koken Kip
in Stukken
200 g- 1000 g
100 g- 1500 g
Opwarmen en gratineren van diepgevrozen
gratin.
Verwijder alle verpakking en plaats de gratin op
het läge rooster op het draaiplateau.
Bereiden van stukken kip.
Plaats de stukken kip in een hittebestendige
keramisch schotel op het draaiplateau.
Draai de stukken kip halverwege de kooktijd.
-31 -
Page 32

Wachttijd
U kunt de wachttijd-funktie vooraf programmeren, ook nadat eerst het kookprogramma Is geprogrammeerd.
Tijdens deze funciie krijgt het voedsel een rustperiode. Tijdens deze période is de magnetron-oven
uitgeschakeld.
b.v.
1
W
'
10
1
niet operationeel
1
10
min
min
10
1
8
<:>
• Programmeer het
gewenste kook
programma op
basis van de
richtlijnen, die
reeds eerder in
• Druk de
programmeer/
standaardtijdtoets
in.
' Stel de gewenste
tijdsduur in door de
tijdtoetsen in te
drukken (maximaal
9 uur en
99 minuten).
Druk de starttoets
in.
deze handleiding
vermeld staan.
OPMERKING:
Wanneer de ovendeur tijdens de voorgeprogrammeerde tijd geopend wordt, biijft de tijd in het uitieesvpnster
verder afteiien.
Voorgeprogrammeerde start -—
---------
—
Deze functie maakt het mogelijk, de uitgesteide begintijd van het koken vooraf in te steiien.
met operationeel
b.v.
[%1
Stel het gewenste
kookprogramma in,
volgens de elders in
deze
gebruiksaanwijzing
opgenomen
instrukties.
<î>
• Druk de starttoets
in.
• Druk op de
programmeer/
standaardtijdtoets.
1
.10.
10
si■8
• Stel het aantal
uren/minuten in
waarnade
magnetron-oven
met koken moet
beginnen door op
de tijdtoetsen te
drukken (maximaal
9uuren
99 minuten).
OPMERKINGEN:
1. De automatische programme’s voor ontdooien, koken en opwarmen kunnen niet worden
voorgeprogrammeerd.
2. Seconden worden minuten/minuten worden uren bi] de voorgeprogrammeerde start functie.
-32-
Page 33

Recept geheugen
Deze functie biedt u de mogelijkheid om op een eenvoudige manier een recept te programmeren in het
geheugen.
Om het recept te programmeren in het geheugen:
b.v.
of <¡>
Toets de geheugentoets
in.
Programmeer het
gewenste kookprogramma op basis van
de richtlijnen.
Druk de geheugentoets
in. Als u de Starttoets
indrukt, dan start de oven
en Staat het kookprogramma ingesteld.
Starten van geheugentoets:
• Toets de geheugentoets in. • Druk de starttoets in.
Opmerkingen:
1. Automatische Programme’s kunnen niet in het geheugen worden opgeslagen.
2. Verschillende kookfases kunnen in een keer worden geprogrammeerd.
3. Alle geprogrammeerde kookfases worden geannuleerd wanneer de stroomtoevoer wordt afgesloten of
wanneer de stekker uit het stopcontact wordt genomen.
Onderhoud van uw magnetron-oven
1. Neem de stekker uit het stopcontact voordat u de
magnetron-oven gaat schoonmaken.
2. Houd de binnenkant van de magnetron-oven, de
deurafdichting en de plaatsen rondom deze
afdichtingen schoon. Wanneer er voedseldelen of
gemorste vioeistoffen aan de wanden van de
magnetron-oven, deurafdichtingen en plaatsen
rondom deze afdichtingen kleven, neem deze dan
weg met een vochtige doek. Indien deze plekken
erg vuil zijn geworden, kunt u gebruik maken van
een zachtwerkend schoonmaakmiddel. Het
gebruik van scherpe reinigingsmiddelen of
schuurmiddelen wordt afgeraden.
3. De buitenkant van de magnetron-oven meet
worden schoongemaakt met een opiossing van
zeep en water— spoel het daarna schoon en
droog de buitenwanden met een zachte doek.
Om te voorkomen, dat de mechanische delen
binnenin de magnetron-oven worden beschadigd
door binnensijpelend water, moet men er goed op
letten, dat er geen water door de ventilatieopeningen naar binnen kan dringen.
4. Indien het bedieningspaneel vochtig wordt, droog
dit dan af met een zachte, droge doek. Gebruik
voor het bedieningspaneel geen scherpe
reinigingsmiddelen of schuurmiddelen.
Bij het schoonmaken van het bedieningspaneel
moet de deur van de magnetron-oven geopend
blijven, om zodoende te voorkomen, dat de
magnetron-oven per ongeluk wordt ingeschakeld.
Na het schoonmaken moet de STOP/wistoets
worden aangetipt om het uitleesvenster weer op
de kloktijd te stellen.
5. Indien er aan de binnenkant van de ovendeur of
rondom de buitenkant hiervan stoomvorming
plaatsvindt, veeg deze dan weg met een zachte
doek. Dit zou nl. het geval kunnen zijn, wanneer
de Magnetron-oven wordt gebruikt in een ruimte
met een hoge vochtigheidsgraad — deze
stoomvorming heeft niets te maken met het siecht
of foutief functioneren van het apparaat.
6. Het is af en toe noodzakelijk, om het draaiplateau
te verwilderen teneinde dit schoon te maken. Was
het plateau in warm water met een afwasmiddel
of in een vaatwasmachibe.
7. De loopring en de holle ruimte in de ovenbodem
moeten ook regelmatig worden schoongemaakt
om geruis tijdens het werken te voorkomen.
Verwijder het vuil op de bodem van de
magnetron-oven met een zacht
schoonmaakmiddel en maak deze daarna droog.
De loopring moet worden afgewassen in een
zacht zeepsopje. Bij een regelmatig gebruik
zetten zieh kookdampen vast op de bodem en/of
de Wielen van de loopring, maar tasten deze op
geen enkele wijze aan. Wanneer u de loopring uit
de uitsparing op de grondplaat haalt, om deze
schoon te maken, let er dan goed op, deze weer
in de juiste positie terug te plaatsen.
8. Vetspatten kunnen bij het grillen of combinatie
koken van sommige voedselsoorten op de
ovenwanden blijven kleven. Maak de
ovenwanden dan ook regelmatig schoon omdat
dit vet zieh anders opeenhoopt als gevolg
waarvan de oven kan gaan "roken" tijdens het
gebruik en u luchtjes ruikt.
----------------
33-
Page 34

Vraag en antwoord
Vraag:
De oven werd per ongeluk inschakeld
zonder voedsel, is deze nu
beschadigd?
Vraag:
Waarom kan de oven niet worden
ingeschakeld?
Vraag:
Hoeveel kookfases kan ik
programmeren in de magnetron-oven?
Vraag:
Kan de oven gebruikt worden terwiji
het draaiplateau en loopring verwijderd
zijn?
Mijn magnetron-oven stoort de TV.
Is dat normaal?
Antwoord:
Wij raden af om de ovep in te schakelen zonder voedsel.
Wanneer dit echter gedurende slechts zeer körte tijd gebeurd
is, zai dit geen Problemen veroorzaken.
Antwoord:
Controleer het volgende wanneer de oven niet kan worden
ingeschakeld:
1. Is de stekker goed aangesloten? Neem de stekker uit het
stopcontact, wacht tien seconden en stop de stekker weer in
het stopcontact.
2. Heeft u de kiok op de juiste wijze ingesteid?
Antwoord:
De magnetron-oven kan geprogrammeerd: worden vobrdrie
fases, die achtereenvolgens door de magnetron-oven worden
afgewerkt.
Antwoord:
Neen, zowel het draaiplateau als de loopring dienen op de
juiste manier in de magnetron-oven te zijn geplaatst.
Antwoord:
Een geringe mate van storing op de radio en TV kan optreden
wanneer de magnetron-oven wordt gebruikt.
Dit duidt niet op een storing in de magnetron-oven.
Vraag:
Waarom dimt mijn ovenlamp?
Waarom beslaat de ovendeur?
Vraag:
Tijdens het combinatie koken hoor ik
zoemende en klikkende geluiden in de
oven. Wat is de oorzaak van deze
geluiden?
Vraag:
Tijdens het combinatie koken of grillen
komt er een onaangenaam luchtje uit
mijn oven en er ontstaat rook.
Hoe komt dat?
Antwoord:
Wanneer u de magnetron-oven anders gebruikt dan op
"volvermogen" gaat dit gepaard met klikgeluiden en het
dimmen van de ovenlamp.
Antwoord:
Tijdens het koken geeft het voedsel stoom af. De meeste
stoom wordt via de ventilatieopeningen afgevoerd. Echter,
achterblijvende stoom condenseert op de koele oppervlakken
zoals de ovendeur. Dit is normaal.
Antwoord:
Deze geluiden worden veroorzaakt door het automatisch
overschakelen van de oven van microgolven op
convectiewarmte voor het realiseren van de juiste
combinatie-afstellingen.
Antwoord:
Na herhaaldelijk gebruik is het aan te bevelen de
magnetron-oven zonder voedsel op GRILL-1 te zetten en dit
gedurende 5 minuten. Op deze manier worden alle
voedselrestjes, vetaanslag etc., die de luchtjes en/of rook
veroorzaken, weggebrand.
•34-
Page 35

Installation et connexion
Vérifier l’état du four
Vérifiez l’appareil et retirez tout le matériel
d’emballage. Examinez soigneusement l’appareil
afin de détecter toute déformation, défectuosité du
système de sécurité ou défaut de la porte. Prévenez
immédiatement votre détaillant si l’appareil est
endommagé. N’installez pas un four endommagé.
Carte de garantie
Remplir la carte de garantie, et la renvoyer à
l’adresse indiquée.
instructions pour la mise à la terre
IMPORTANT: POUR VOTRE SECURITE, IL EST
TRES IMPORTANT QUE CET APPAREIL SOIT
CORRECTEMENT MIS À LA TERRE.
Si la prise murale n’est pas mise à la terre, il
incombe au client de la faire remplacer par une prise
murale correctement mise à la terre.
Précaution concernant la tension et l’alimentation
utiliser une tension identique à celle spécifiée sur le
four à micro-ondes. Si on utilise une tension
supérieure à la tension spécifiée, l’appareil risque de
prendre feu ou d’être endommagé d’une autre
manière.
Sécurité
1. Les surfaces de la porte et des aérations doivent
être nettoyées à l’aide d’un chiffon humide. Si
l’appareil présente des défauts sur la porte ou les
aérations, vous ne devez pas l’utiliser avant qu’il
n’ait été vérifié par un spécialiste.
2. Ne confier la réparation ou le réglage de ce four
qu’à un spécialiste compétent et qualifié.
3. Si le câble d’alimentation de cet appareil est
endommagé, il doit être remplacé par le câble
spécial fourni exclusivement par le fabricant.
4. Avant utilisation, l’utilisateur devrait vérifier si ses
ustensiles conviennent pour l’usage au feur à
micro-ondes.
Cet appareil est bien conforme à la Directive N"
87/308/CEE.
Lampe du four
Si vous devez remplacer la lampe du four, veuillez
vous adresser à votre revendeur.
Placement du four
1. Placer le four sur une surface plate et stable
disposée à plus de 85 cm du sol.
2. Pour un fonctionnement adéquat, assurez vous
d’une circulation d’air suffisante autour du four.
Utilisation sur surface de travail:
a) Assurez 15 cm d’espace au-dessus du four,
10 cm a l’arrière et 5 cm sur les côtés.
b) Le dessus ou les côtés ne devraient pas être
obstrué par un mur.
Le four peut être encastré dans un mur en
utilisant le kit d’encastrement, blanc NN-TKK55,
noir NN-TKK15, qui et fourni par votre revendeur
Panasonic local.
3. Ne placez pas ce four près d’une cuisinière
électrique ou à gaz.
4. Le pieds ne doivent pas être enlevés.
5. Le four est uniquement d’utilisation domestique.
Ne l’utilisez pas à l’extérieur.
6. Evitez d’utiliser le four a micro-ondes dan un
evironnement de grande humidité.
7. Le cable d’alimentation ne devrait pas toucher
l’extérieur du four. Eloignez ce cable des surfaces
chaudes. Ne laissez pas pendre ce cable sur le
bord de votre table ou de votre surface de travail.
Ne plongez pas ce cable, la prise ou même le
four dan l’eau.
8. N’obstruez pas les grilles de ventilation sur les
dessus ou les côtés du four. Si ces ouvertures
étaient bloquées durant le functionnement du
four, le four risquerait de surchauffer dans ce cas,
le four est protégé par un système de securité
thermique et reprendra son fonctionnement après
refroidissement.
Fonctionnement du ventilateur
Si le four devient chaud après utilisation, le moteur
du ventilateur s’enclenche pendant 1 minute pour
refroidir les composants électriques. Cela est
parfaitement normal et vous pouvez enlever les
mets cuisinés pendant que le ventilateur tourne.
-35-
Page 36

Consignes de sécurité
1. Avant d’utilisër les fonctions, Combiné ou Gril
pour la première fois, faites chauffer le four en
fonction gril 1 pendant 5 minutes, ceci afin de
brûler l’huile de protection.
2. Les surfaces extérieures du four, les grilles
d’aération et la porte du four chauffent lorsque
vous utilisez les fonctions. Combiné ou Gril.
Prenez garde de ne pas vous brûler en ouvrant
ou en refermant la porte et en disposant les
aliments.
3. Ce four dispose de deux résistances à quartz
chauffantes situées sous la voûte. Après
l’utilisation des fonctions Combiné ou Gril, cette
voûte sera brûlante.
NB: Le trépied métallique sera brûlant après
l’utilisation du Gril.
4. Ne pas utiliser cet appareil avec un câble ou une
prise endommagée, s’il né fonctionne pas
correctement ou s’il est tombé au sol.
5. Cet appareil ne doit être révisé ou réparé que par
un technicien formé par le fabricant (même pour
le changement de l’ampoule d’éclairage).
6. Ne cherchez pas à effectuer vous-même des
réparations, des ajustements ou des
modifications sur aucune partie du four. Toutes
les réparations doivent être faites par un
technicien agréé.
7. Les joints de la porte doivent être maintenus
propres et nettoyés régulièrement avec un
chiffon humide. En aucun cas, le four ne doit
fonctionner si les joints sont endommagés.
Consultez un technicien agréé.
8. N’utilisez pas ce four a micro-ondes pour secher
des journaux, vetements ou tout autre materiel.
9. Utilisez ce four seulement pour préparer de la
nouriture.
10. Durant les opérations de gril, le dessus de
l’appareil peut être chaud. Cet appareil est du
type B.
11. Les parties accessibles peuvent devenir chaudes
quand le gril est en utilisation. Prière de
maintenir les enfants éloignés.
Plateau de verre
1. Ne pas faire marcher ie four sans le plat^u de
verre.
2. Ne pas utiliser un autre plateau de verre que celui
inclus dans ce four.
3. Si le plateau de verre est chaud, attendre qu’il
refroidisse pour le nettoyer ou lè plonger dans
l’eau.
4. Le plateau tournant peut tourner dans les deux
sens.
5. Ne pas cuire d’aliments directement sur le plateau
de verre.
6. Ne pas placer de nourriture ou de récipient chaud
sur un plateau froid. Inversement, ne pas placer
de nourriture gelée ou de récipient très froid sur
un plateau chaud.
Anneau à roulettes
1. Nettoyer souvent l’anneau à roulettes.ainsi que le
plancher du four afin d’empêcher la production
excessive de bruits de fonctionnement et
l’accumulation de particules de nourriture.
2. Toujours utiliser l’anneau à roulettes avec le
plateau de verre pour la cuisson des aliments.
Trépied métallique
1. Un trépied métallique est livré avec le four afin de
faciliter le dorage des petits aliments.
2. Ce trépied doit être nettoyé régulièrement.
3. Si vous utilisez ce trépied en fonction Gril manuel
ou Cuisson combinée, pensez à utiliser des
récipients résistant à la chaleur; le plastique ou
le papier risquant de fondre ou de prendre feu
avec la chaleur irradiant du gril.
4. En cuisson combinée, ne mettez jamais de
barquette aluminium ou métallique en contact
direct avec le trépied métallique. Intercalez
toujours une assiette ou un plat en verre entre le
trépied métallique et la barquette aluminium.
Ceci afin d’éviter d’éventuelles étincelles
pouvant endommager votre four.
5. Lorsque vous utilisez votre four en fonction
micro-ondes pures l’usage du trépied métallique
est déconseillé.
■36-
Page 37

Informations Importantes
------------
1) Temps de cuisson 6) Liquides
• Les temps de cuisson donnés dans le livre
recettes sont approximatifs. Les temps de cuisson
dépendent de la température, de la quantité de
nourriture et du type de récipient utilisé.
• Commencez toujours par les temps de cuisson
minima. En effet, si un plat n’est pas assez cuit, on
pourra toujours le remettre dans le four pour
terminer sa cuisson.
NB.: Si le temps de cuisson recommandé est
dépassé, la nourriture peut prendre feu et
endommager l’intérieur du four.
2) Petites quantités de nourriture
Si on cuit trop longtemps de
la nourriture en petite
quantité ou dont les
éléments contiennent peu
d’eau, celle-ci peut brûler,
prendre feu ou se dessécher.
En cas de début de feu,
laisser la porte du four fermée et appuyer sur
la touche d’arrêt/annulation.
3) Œufs
Si on chauffe un liquide
épais ou une sauce, il se
peut que ce liquide
déborde et envoie des
projections sur les parois
internes du four.
• Pour éviter cet inconvénient, les mesures
suivantes devraient être prises:
a) éviter d’utiliser des récipients carrés à bords
lisses.
b) ne pas surchauffer
c) remuer le liquide avant de le verser dans le
récipient et à mi-cuisson
d) après réchauffage, laisser reposer le liquide un
court instant dans le four et remuer
soigneusement avant de retirer le récipient du
four.
7) Papier/plastique
• Surveillez soigneusement la cuisson si du papier,
du plastique ou un autre matériau combustible
enveloppe les aliments pour faciliter leur cuisson.
Avant de placer un sac dans le four, retirer les fils
de fer qui pourraient fermer son ouverture.
Ne pas cuire des œufs dans
leur coquille aux micro-ondes.
La pression peut monter à
l’intérieur de l’œuf et le faire
éclater.
4) Enveloppe imperméable
Les aliments à peau ou
enveloppe imperméable
tels que les pommes de
terre, les jaunes d’œufs
et les saucisses doivent
être percés avant la cuisson
aux micro-ondes afin d’éviter
qu’ils n’éclatent.
5) Thermomètre à viande
• utilisez un thermomètre à viande pour vérifier le
degré de cuisson des rôtis et des volailles
uniquement lorsque ceux-ci ont été retirés du four.
Il est déconseillé d’utiliser un thermomètre à
viande conventionnel lorsque vous utilisez les
modes MICRO-ONDES et COMBINE afin d’éviter
les étincelles.
8) Ustensiles/Papier aluminium
• Ne pas réchauffer des cannettes ou des bouteilles
fermées, celles-ci pourraient exploser.
• Evitez d’utiliser des récipients et des plats
métalliques, ceux-ci provoquent des étincelles.
• Si vous utilisez du papier aluminium, des broches
ou des barquettes métalliques, la distance entre
ces matériaux et les parois du four devrait être au
minimum de 2 cm afin d’éviter les étincelles.
9) Biberons et petits pots pour bébés
• N’oubliez jamais de remuer ou de mélanger le
contenu des biberons et des petits pots pour
bébés.
• Vérifiez toujours la température des aliments avant
de les donner à l’enfant afin d’éviter qu’il se brûle.
-37-
Page 38

Schéma descriptif
Tableau de commande
Affichaigé digital
(D Tirez sur ie dévérouiliage de ia porte
Si on ouvre la porte du four pendant qu’il est en
marche, il s’arrête de fonctionner sans toutefois
que les instructions de programmation soient
annulées. La cuisson reprendra dès qu’on
refermera la porte et qu’on appuiera sur la touche
de mise en marche. Lorsqu’on ouvre la porte,
l’intérieur du four reste éclairé
<D Fenêtre transparente du four
<D Système de verrouiliàge de sécurité de la porte
® Ouvertures d’aération du four
(D Panneau de commandes
® Plateau de verre
® Anneau à roulettes
® Ventilation externe du four
® Trépied métallique
Touches de durée
Touche de puissance
Touche de gril
Touche de cuisson
combinée
Touche de mémoire
Touches de décongélation
automatique selon le poids
Touche repos/retardement
Touche d’horloge
Touches d’arrêt/annuiation:
Avant la mise en marche du four:
appuyer üne fois sur cette touche polir effacer toutes les
instructions de programmation qu’on vient de faire.
Pendant la cuisson:
appuyer une fois sur cette touche pour arrêter le four.
Appuyer encore une fois pour effacer toutes les instructions
de programmation de la cuisson en cours. L’heure actuelle
de la journée apparaît alors dans la fenêtre d’affichage.
Touches de réchauffage/
cuisson automatique éélon
le poids (Micro-ondes)
Touches de réchauffage/
cuisson automatique selon
le poids (Combiné)
Touche de sélection de
poids (100 g)
Touches d’ajustement du
poids (10 g)
Touche de mise en marche:
Une pression suffit pour mettre
le four en marche. Si la porte est
ouverte, ou si une pression est
exercée sur la touche
arrêt/annulation pendant lé
fonctionnement, vous devez à
nouveau presser la touche de
mise en marche pour que le four
se remette en marche.
Bips sonores:
Lorsqu’on appuie sur une touche pour transmettre une instruction au four, un bip sonore est émis si
l’instruction est acceptée (conforme au mode de fonctionnement du four). Aucun bip ne sera émis si
l’instruction est refusée (touche mal enclenchée, programmation au-delà des limites, etc.). Deux bips
sonores seront émis entre chaque étape de programmation et 5 bips une fois que toute ia
programmation, aura été exécutée par le four.
- 38 -
Page 39

IMPORTANTE INFORMATION DESTINÉE AU CONSOMMATEUR Veuillez lire attentivement cette notice avant de brancher votre four à micro-ondes à la prise de courant
Ce modèle dispose d’une fonction unique d’affichage d’instructions à l’écran qui vous guide au travers des
opérations à effectuer sur le micro-ondes. Après raccordement à l’alimentation secteur, pressez la touche start
plusieurs fois jusqu’au moment où vous avez localisé votre langue (les langues disponibles sont l’anglais,
¡’allemand, le français, l’italien, le néerlandais, l’espagnol et le portuguais). Quand vous pressez les touches du
clavier, l’affichage indiquera les instructions à suivre afin d’éliminer les possibilités d’erreur. Si pour une raison
particulière vous désirez modifier la langue affichée, déconnectez l’appareil de l’alimentation secteur et répétez
la procédure décrite ci-dessus.
Commandes
Réglage de l’horloge:
Lorsque le four est branché au secteur, "88:88" apparaît dans la fenêtre d’affichage.
4 fois
1 fois
min
.s S\
}
I IJ-
I I*
Appuyer sur la touche
d’horloge.
► Les 2 points s’arrêtent de clignoter
pour signifier que l’heure qu’on
vient de régler à été mémorisée par
les circuits de l’horloge et que
celle-ci s’est mise à fonctionner à
partir de cette heure.
10
min
10 1
2 fois 5 fois
En pressant la
touche horloge.
► Les 2 points
lumineux se mettent
à clignoter.
REMARQUES:
1. Pour régler à nouveau l’horloge, appuyer deux fois sur la touche horloge afin d’effacer l’heure qu’elle Indique.
Les 2 points se mettront à clignoter dans la fenêtre. Régler sur l’heure correcte selon la méthode décrite
dans le Paragraphe ci-dessus.
2. L’horloge fonctionnera tant que le four sera branché et tant qu’il sera alimenté en électricité.
Régler l’affichage sur l’heure
correcte de la journée en
appuyant sur les touches de
durée.
► L’heure sur laquelle on vient de
régler l’horloge du four apparaît
dans la fenêtre d’affichage et les 2
points clignotent.
Affichage de progression:
Les étapes successives d’une programmation apparaissent successivement dans la fenêtre d’affichage, il
vous faut:
► Afficher le temps de
cuisson.
► Choisir la catégorie de gril.
► Afficher le poids.
► Appuyer sur la touche de
mise en marche.
► Choisir la puissance de
micro-ondes.
-39-
Page 40

utilisation de verrouillage:
En utilisant ce système, les fonctions du four seront inopérationnelles.
Le verrouillage pour enfant peut être installé quand l’affichage indique un double point ou l’heure.
Mise en marche:
Pour annuler:
I I
I I
Dc:
c:"i
• Presser la touche de mise en marche trois
fois, i’heure disparaitra mais ne sera pas
• Presser la touche d’arrêt/annulation trois
fois, i’heure réapparaitra à i’écran.
effacée.
Réchauffage / décongéiation / cuisson
par ia durée-----------———-—^—
MICRO-ONDES
1
min
1
REMARQUES:
1. Vous pouvez enchaîner jusqu à 3 étapes. Dans ce cas,
répétez une ou deux fois les opérations 1 et 2 avant
d’appuyer sur fa touche de mise en marche,
exemple:
FORT 5 minutes Temps de repos 5 minutes
^ FORT 2 minutes
2. La minuterie peut être programmée avant/après le
réglage de la puissance et la durée.
3. Pour rappeler la puissance sélectionnée durant la
cuisson, poussez sur la touche puissance micro.
4. Pour ajouter un temps suppléhientaire de cuisson
pendant la cuisson pressez la touche 1 min.
Sélectionner ie niveau de
puissance en appuyant
sur la touche puissance.
Touche Puissance
1 fois
2 fois
3 fois
4 fois
5 fois
6 fois
MAX 900 W FORT
r. 270 W DECONGELATION
600 W MOYEN
440 W DOUX
250W MIJOTAGE
100 W MAINTIEN AU CHAUD
GRIL
10
min
10
s s
Régler le temps de
cuisson au moyen des
touches de durée.
-------------
Appuyer sur la touche de
mise en marche.
B,
1-2-3
• Choisir ta catégorie de
grii désirée 1 (FORT) à 3
(DOUX).
Touche Catégorie de grii
1 fois
2 fois
3 fois
1 FORT 1200 W
2 MOYEN 950 W
3 DOUX 700 W
10
min
10
s
Afficher te temps de
gratinage.
REMARQUES:
1. Prenez garde d’employer des récipients résistant à la chaleur lorsque
vous utilisez le gril.
2. Ce gril à quartz est particulièrement rapide pour colorer des aliments
déjà chauds et ne nécessite pas de préchauffage.
3. Le four peut être programmé en 3 étapes:
exemple: micro-ondes FORTS min.gril-1 15 min.
-♦ micro-ondes DOUX 3 min.
4. La minuterie peut être programmée avant/après le réglage de la
puissance du gril et la durée.
5. Pour rappeler la sélection du gril durant la cuisson, pressez la touche
gril.
6. Pour ajouter un temps de cuisson supplémentaire durant la cuisson,
pressez sur la touche 1 min.
1
min
1
s
Appuyer sur la touche de
mise en marche.
- 40 -
Page 41

Réchauffage / décongélation / cuisson
par la durée
-----------------------------------------
CUISSON COMBINEE
-H
• Appuyer sur la touche de
cuisson combinée.
10
min
10 1
s s
Afficher le temps
de cuisson.
REMARQUES:
1. Le four peut être programmé en 3 étapes:
exemple; CUISSON COMBINÉE (gril 1200 W + micro-ondes 600 W) 12 min.
temps de repos 5 min. Gril-1 8 min.
2. La minuterie peut être programmée avant/après l’installation manuelle de la combinaison.
3. Si vous le souhaitez, vous pouvez modifier le niveau de puissance des micro-ondes en appuyant sur la
touche de puissance des micro-ondes après avoir sélectionné le programme de cuisson combinée.
4. Pour augmenter le temps de cuisson pendant la cuisson, appuyez sur la touche 1 min.
1
min
D
1-2 -3
• Choisir la catégorie de
gril désirée.
Touche 0 Puissance de Gril
1 fois 1200 W
2 fois 950 W
3 fois 700 W
O
Appuyer sur la touche de
mise en marche.
Choisir la puissance des
micro-ondes.
Touche
1 fois 600 W
2 fois
3 fois
4 fois
Puissance des
Micro-ondes
440 w
250 W
100 W
Décongélation automatique en fonction du poids
Cette touche vous permet de cuire les aliments en fonction de leur poids. Choisir un programme de
décongélation et programmer le poids de la nourriture.
T
ÏÛ-i ^
Appuyer sur la
touche
correspondant à
l’aliment que
vous désirez
cuire.
Remarques:
1. Vérifier d’abord les minima et maxima de poids conseillé dans le mode d’emploi.
2. Temps de repos ou micro-ondes peuvent être programmé après une décongélation automatique en fonction
du poids.
Catégorie Poids min./max.
îû-/ ^
ïû-2
100- 1500 g
400 - 2500 g
ûg
• Presser la touche
d’affichage de
poids, le poids
s’affiche et défilera
automatiquement,
de 100 g en 100 g.
Pour décongeler des petits morceaux de viande, escalopes, saucisses,
viande hachée, filets de poisson, steaks, côtelettes, entre 100 - 400 g pièce.
Pour décongeler des grands morceaux de viande, rôtis poulets entiers,
grand morceaux de poisson.
• Presser aussi longtemps
-41 -
▲
que nécessaire la flèche
(montante/descendante):
le poids défilera
automatiquement,
de 10 g et 10 g.
Conseils
Appuyer sur la
touche de mise
en marche.
/K
<î>
Page 42

Programme de cuisson automatique en
fonction du poids
Cette fonction vous permet de cuire les aliments en fonction de leur poids. Entrez le poids en grammes,
ex.
Sélectionnez la
catégorie
désirée.
Presser la touche
d’affichage de
poids, le poids
s’affiche et défilera
automatiquement,
de 100 g en 100 g^
-----------------------------------
Presser aussi longtemps
que nécessaire la flèche
(montante/descendante):
le poids défilera
automatiquement,
de 10 g en 10 g.
Appuyer sur la
touche de mise
en marche.
REMARQUES:
1. Vous avez ie choix entre 7 programmes avec des poids minimum/maximum différents.
2. Vous pouvez programmer le temps de repos ou la puissance manuelle et la durée de cuisson après les
programmes de cuisson automatique en fonction du poids.
3. Les programmes 4, 5, 6 et 7 utilisent la cuisson combinée.
Programme
1 Réchauffage
Plat Frais
2 Cuisson
Légumes
3 Cuisson
Poisson
4 Réchauffage
Pain congelé
5 Réchauffage
Pizza congelée
Poids minVmax.Accessoires
200 g- 1500 g
200 g- 1500 g
100 g 1000 g
30 g^ 600 g
100 g-900 g
Pour réchauffer, casserole.
Tous les aliments doivent être précuits et doivent être
à température ambiante ou réfrigérée.
Laissez quelques minutes de repos.
Pour cuire des légumes frais:
Placez les légumes préparés dans un récipient de
taille adéquate. Ajoutez 90 ml d’eau, couvrez
légèrement à l’aide d’un couvercle ou de film
alimentaire préalablement percé. Remuez les grandes
quantités à mi-cuisson.
Cuire du poisson frais. P.ex. filets, steaks (couvrir les
morceaux les plus fins)
Placez-ie dans un récipient adéquat. Ajoutez 30 ml
d’eau. Couvrez légèrement d’un film percé ou d’un
couvercle. De grandes quantités doivent être
mélangées à mi-cuisson.
Pour réchauffer les pains congelés, entiers ou en
tranches, les croissants et les petits pains. Placez
le trépied métallique sur le plateau de verre. Retournëz
au signal sonore. En fin de cuisson, laissez reposer.
Ces programmes ne permettent pas de rôtir des
tranches de pain. Vérifiez toujours la température des
aliments avant de les consommer et, si nécessaire,
terminez la cuisson dans un four traditionnel.
Pour réchauffer et brunir le dessus des pizzas
congelées. Retirez tous les emballages et placez le
trépied métallique sur le plat en verre.
Conseils
6 Réchauffage
Gratin congelé
7 Cuisson Pièces
de Volaille
200 g -1000 g
100 g - 1500 g
Pour réchauffer un gratin surgelé.
Enlevez tout emballage et placez le gratin directement
sur le trépied métallique.
Pour cuire et rôtir des pièces de volaille.
Placez les pièces de volaille sur le trépied métallique
et le tout su r le plateau de verre.
Tournez les pièces de volaille au milieu du temps de
cuisson.
-42-
Page 43

Temps de Repos/Retardement
Pour tous les modes de cuisson, excepté le gril et les programmes automatiques cette touche vous permet de
programmer un temps de repos après cuisson ou un temps d’attente avant le démarrage de la cuisson.
Si cette touche est actionnée après la programmation de cuisson et la durée, elle aura pour effet d’assurer un
temps de repos à l’aliment une fois la cuisson ou la décongélation de l’aliment terminée.
ex.
10
—►
S
L
's
(■^)
ne servant pas
---------------------------
-I-
Programmer la
cuisson désirée en
correspondance
avec les
instructions déjà
données dans ce
manuel.
REMARQUES:
1. Grâce à la fonction de temps de repos, vous pouvez programmer un repos de votre aliment pour une durée
allant jusqu’à 9 heures et 99 minutes.
2. Après la programmation d’un temps de repos, vous ne pouvez programmer l’enchaînement que de deux
cuissons successives seulement.
3. Si la porte du four est ouverte durant le temps de repos, le compte à rebours continue à défiler dans la
fenêtre d’affichage.
Appuyer sur la
touche Repos/
Retardement.
Régler la durée
désirée à l’aide des
touches de la
minuterie.
Appuyer sur la
touche de mise en
marche.
Retardement/Cuisson différée
ne servant pas
lO"',
H)
Appuyer sur la
touche Repos/
Retardement.
REMARQUES:
1. Avec la caractéristique du retardement, le four peut être programmé pour retarder la cuisson jusqu’à
9 heures et 99 minutes avant que la cuisson soit activée.
2. Si le four est programmé en fonction de la procédure ci-dessus, à l’exception de la Sème étape, vous pouvez
l’utiliser comme une minuterie.
3. Une ou deux phases de cuisson seulement peuvent être programmées après Repos/Retardement.
Régler le temps
désiré pour
retarder le
démarrage de la
cuisson en
appuyant sur les
touches de la
minuterie.
Programmer la
cuisson désirée en
correspondance
avec les
instructions déjà
données dans ce
manuel.
-43-
Appuyer sur la
touche de mise en
marche.
Page 44

Mémoire
La touche mémoire vous permet de programmer le réchauffage ou la cuisson du plat de votre choix.
Pour la mise en mémoire:
Memory
Appuyer sur la touche de
mémoire.
ex.
w
Programmer la cuisson
désirée en
10 ,
10.,
Memory
y 1
Appuyer sur la touche de
mémoire.
--------------Л
OU
-------------
<!>
correspondance avec les
instructions données
dans ce manuel.
Pour l’utilisation une fois le programme mémorisé:
Appuyer sur la touche
mémoire.
Remarques:
1. Les fonctions automatiques ne peuvent pas être mises en mémoire.
2. La touche de mémoire permet de programmer 1 étape de cuisson à la fois.
3. Si une panne de courant intervient ou si le four est débranché, les données en mémoire seront effacées.
Appuyer sur la touche de
mise en marche.
!/
Entretien de l’appareil
1. Débrancher l’appareil avant de le nêttoyer.
2. Toujours garder l’intérieur du four et les surfaces
de fermeture de la porte propres. Enlever les
projections d’aliments ou de liquides sur les
parois intérieures du four et sur la porte avec un
chiffon humide. Si le four est très sale, utiliser un
produit de nettoyage doux. L’utilisation dé
détergents puissants ou abrasifs est vivement
déconseillée.
3. Nettoyer les surfaces extérieures du four avec une
solution d’eau et de savon, rincer et sécher avec
un chiffon doux. Veiller à ne pas laisser l’eau
pénétrer par les ouvertures d’aération à l’intérieur
du four car cela pourrait endommager ses pièces
internes de fonctionnement.
4. Si de la condensation se forme à l’intérieur ou à
l’extérieur de la porte du four à micro-ondes,
l’essuyer au moyen d’un chiffon doux. De la
condensation peut se former lorsque le four
fonctionne dans une pièce très humide. Cette eau
de condensation n’est pas dûe à un mauvais
fonctionnement de l’appareil.
5. Nettoyer le tableau de commande avec un chiffon
doux humide. Ne pas utiliser de tampons abrasifs
ou de détergents puissants. Lorsque vous
nettoyez le tableau de commande, laisser la porte
du four ouverte afin d’éviter tout déclenchement
inopiné. Après le nettoyage, presser la touche
Arrêt-Annulation pour afficher de nouveau l’heure
du jour.
6. Il est parfois nécessaire de retirer le plateau
tournant pour le nettoyer. Laver le plateau à l’eau
savonneuse chaude ou dans un lave-vaisselle.
Attendre que le plateau refroidisse pour le
nettoyer. Si la graisse s’est accumulée ou si elle
est difficile à enlever, on doit nettoyer le plateau
avec un tampon à récurer en nylon non abrasif.
7. Quand vous utilisez une cuisson au gril ou
combinée; des aliments peuvent éclabousser de
graisse les parois du four. Si l’on ne nettoie pas le
four de temps en temps pour enlever la graisse,
celle-ci peut s’accumuler et faire "FUMER" le four
pendant son utilisation.
8. Après des Cuissons au Gril ou des cuissons
Combinées, veiller à nettoyer fréquemment la
voûte du four (attendre qu’elle refroidisse).
-44-
Page 45

Questions & Réponses
Q:
J’ai par inadvertance fait
fonctionner mon four à
micro-ondes à vide. Est-ii
endommagé?
Pourquoi mon four ne se met-ii
Q:
pas en fonctionnement?
Lorsque je mets mon four en
Q:
marche, un bruit se produit au
niveau du piateau de verre?
Mon four à micro-ondes
Q:
produit des interférences sur
mon récepteur de téiévision,
est-ce normai?
R: Il n’est pas recommandé de faire fonctionner un four à micro-ondes
à vide. Toutefois, si le four produit des micro-ondes pendant un
court instant sans qu’aucune nourriture ne se trouve à l’intérieur, il
ne sera pas endommagé.
R : SI le four refuse de se mettre en fonctionnement, vérifier les points
suivants:
1. Le four est-il correctement branché au secteur?
Débrancher le cordon d’alimentation du four, attendre
10 secondes et le rebrancher.
2. Vérifier le disjoncteur ou le fusible. Régler le disjoncteur ou
remplacer le fusible s’il s’est déclenché ou s’il a sauté.
3. Si le disjoncteur ou le fusible est normal, vérifier le bon état de
la prise murale en y branchant un autre appareil électrique. Si cet
appareil marche, c’est que le problème se situe au niveau du four
à micro-ondes. Si l’appareil ne fonctionne pas, c’est que la prise
murale est défectueuse.
Si le four à micro-ondes est défectueux, contacter un service
d’entretien et de réparation autorisé.
R: Ce bruit se produit lorsque l’anneau à roulettes et le plancher du
four sont sales. Un nettoyage fréquent de ces pièces permettra de
réduire ou d’éliminer ces bruits.
R: Des interférences radio ou TV peuvent se produire lorsqu’on fait
fonctionner un four à micro-ondes à proximité. Ce même type
d’interférence se produit lorsqu’on actionne de petits appareils
électriques tels un mixeur, un aspirateur, un sèche-cheveux, etc.
La production d’interférence n’est donc pas un signe de problème
de fonctionnement du four à micro-ondes.
Le four n’accepte pas mon
Q:
instruction de
programmation. Pourquoi?
Q: Pourquoi l’éciairage intérieur
de mon four faibiit-ii?
Q: Queiquefois de l’air chaud se
dégage par les aérations du
four. Pourquoi?
Il y a des ronflements et des
cliquetis dans mon four lors
d’une cuisson combinée. Par
quoi ces bruits sont-iis
causés?
Q: Mon four a une odeur et fume
quand on utilise les fonctions
cuisson en combiné et gril.
Pourquoi?
Q: A la fin d’une cuisson par
micro-ondes, gril ou combiné,
un bruit de ventilation
provient du four, même avec
la porte ouverte. Est ce
normal?
R: Le four à micro-ondes est conçu pour refuser toute instruction de
programmation qui n’est pas correcte. Par exemple, il n’acceptera
pas la programmation d’une quatrième étape de cuisson.
R: Lorsque le four fonctionne sur un niveau de puissance autre que
FORT, il doit moduler le courant en Impulsions pour régler la
puissance sur les niveaux les plus bas. Il en résulte un
affaiblissement de l’éclairage intérieur du four ainsi que la
production de petits bruits secs.
R : La chaleur dégagée par la cuisson des aliments chauffe l’air
contenu dans l’enceinte du four. Cet air chaud est évacué du four
par ventilation. Il n’y a pas de micro-ondes dans ce dégagement
d’air. Il ne faut jamais obstruer ces aérations pendant une cuisson.
Les bruits surviennent quand le gril s’enclenche automatiquement
pour passer de la puissance micro-ondes à la chaleur rayonnante
pour la cuisson combinée. C’est normal.
R: Après plusieurs utilisations, il est recommandé de faire marcher le
four sans y mettre de nourriture, en fonction GRIL 1 pendant
5 minutes. Ceci brûlera toute nourriture ou résidu de nourriture qui
occasionne une odeur ou de la fumée.
R:
C’est normal. La ventilation est programmée pour se poursuivre 1
minute après la fin d’une cuisson, ceci afin de refroidir les circuits
électriques.
-45-
Page 46

Instalación
Verifique ei estado del horno
Desembálelo, retire todos los materiales de
embalaje y compruebe que el horno no haya sufrido
ningún rasguño, que los pestillos de la puerta no se
hayari deteriorado y que la puerta propiamente
dicha no presenta grietas. Si el horno hubiera
sufrido daños, informe de ello inmediatamente a su
proveedor. Un horno que no esté en perfectas
condiciones, no debe instalarse.
instrucciones para conexión a tierra
IMPORTANTE: PARA SU SEGURIDAD, ES MUY
IMPORTANTE QUE ESTE APARATO SEA
DEBIDAMENTE CONECTADO A TIERRA.
Si la base del enchufe no está conectada a tierra, el
cliente debe hacerla cambiar por otra base de
enchufe provista de la correcta conexión a tierra.
Precaución reiativa ai voltaje de alimentación
utilice un voltaje idéntico al que se especifica en el
horno microondas. Si se utilizara un voltaje superior
al indicado, el aparato podría incendiarse o süfrir
otro tipo de daño.
Consejos
1. Las áreas de cierre hermético de la puerta deben
ser limpiadas, con un trapo húmedo. La unidad es
examinada para ver si se han producido daños en
las áreas de cierre hermético de la puerta y si han
sufrido daños no deben hacerse funcionar hasta
que haya sido reparado por el Servició Técnico
entrenado por el fabricante.
2. Es peligroso que ejecute el servicio de reparación
una persona que no haya recibido entrenamiento
por el Servicio Técnico.
3. Si el cable suministrado con este aparato sufriera
algún daño, debe ser reemplazado por otro
disponible solo por el fabricante.
4. Antes de usar, comprobar que los recipientes
sean adecuados para su uso en microondas.
Este aparato está construido de acuerdo al Real
Decreto 138/89 (Directiva 87/308/CEE) sobré
Radiointerferencias y la memoria vigente (BOE n®
del 1-Marzo-1989).
Luz del horno
Cuando sea necesario cambiar la botnbilla, por
favor consulte a su Servicio Técnico.
Motor de ventilación
Después de utilizar el horno, el ventilador funcionará
1 minuto para enfriar los componentes eléctricos.
Esto es normal, incluso cuando se haya sacado el
alimento, o con el horno apagado.
Colocación del microondas
1. Coloque el microondas sobre una superficie plana
y estable. El horno deberá situarse a una altura
mínima de 85 cm. desde el suelo.
2. Para obtener un correcto funcionamiento,
asegúrese que el horno está perfectamente
ventilado.
Sobre una superficie:
a. Deberá dejar 15 cm. de espacio en la parte
superior, 10 cm. en la parte posterior y 5 Cm. a
ambos lados del microondas.
b. No bloquee la parte superior del microondas ó
uno de los dos laterales.
Empotrado:
En el caso de querer empotrar su horno
Microondas, deberá utilizar el accesorio de
Panasonic correspondiente, blanco NN-TKK55,
negro NN-TKK15.
3. No coloque su microondas cerca de una superficie
caliente como por ejemplo una cocina de gas o
eléctrica.
4. No retire los apoyos inferiores del microondas.
5. Este horno solo es conveniente para uso
doméstico. No lo utilice al aire libre:
6. No hága funcionar el horno cuando la habitación
dohdé se encuentre tenga un grado de humedad
derriásiado elevado.
7. Mantenga el cable lejos de las superficies
calientes. No permita que este toque la superficie
exterior del aparato, ó que cuelgue por el borde
de la mesa o mostrador. No introduzca la clavija,
el cable o el horno en el agua.
8. No bloquee los orificios de ventilación situados en
la caja del horno. Si estos son bloqueados
durante el funcionamiento del aparato, el
micoondas puede sobrecalentarse. En ese caso
se podrá en marcha un dispositivo de seguridad
que parará el funcionamiento del aparato: Su
horno solo podrá funcionar de nuevo, una vez
enfriado.
-46-
 Loading...