

Page 1
Bedienungsanleitung
Mikrowellengerät mit Grill
NN-GT469M
Nur für den Privatgebrauch
Vor Gebrauch des Mikrowellengerätes bitte diese Bedienungsanleitung sorgfältig durchlesen und
aufbewahren.
WICHTIGE SICHERHEITSANWEISUNGEN.
Page 2
Examine your microwave oven
Unpack the oven, remove all packing material,
and examine the oven for any damage such as
dents, broken door latches or cracks in the
door. If you find any damage, notify your dealer
immediately. Do not install a damaged
microwave oven.
Earthing instructions
IMPORTANT: THIS UNIT HAS TO BE
PROPERLY EARTHED FOR PERSONAL
SAFETY.
If your AC outlet is not grounded, it is the
personal responsibility of the customer to have
it replaced with a properly grounded wall
socket.
Operation voltage
The voltage has to be the same as specified on
the label on the oven. If a higher voltage than
specified is used, it may cause a fire or other
damages.
Placement of the Oven
This oven is intended for counter-top use only.
It is not intended for built-in use or for use
inside a cupboard.
1. Place the oven on a flat and stable surface,
more than 85 cm above the floor.
2. When this oven is installed, it should be
easy to isolate the appliance from the
electricity supply by pulling out the plug or
operating a circuit breaker.
3. For proper operation, ensure a sufficient air
circulation for the oven.
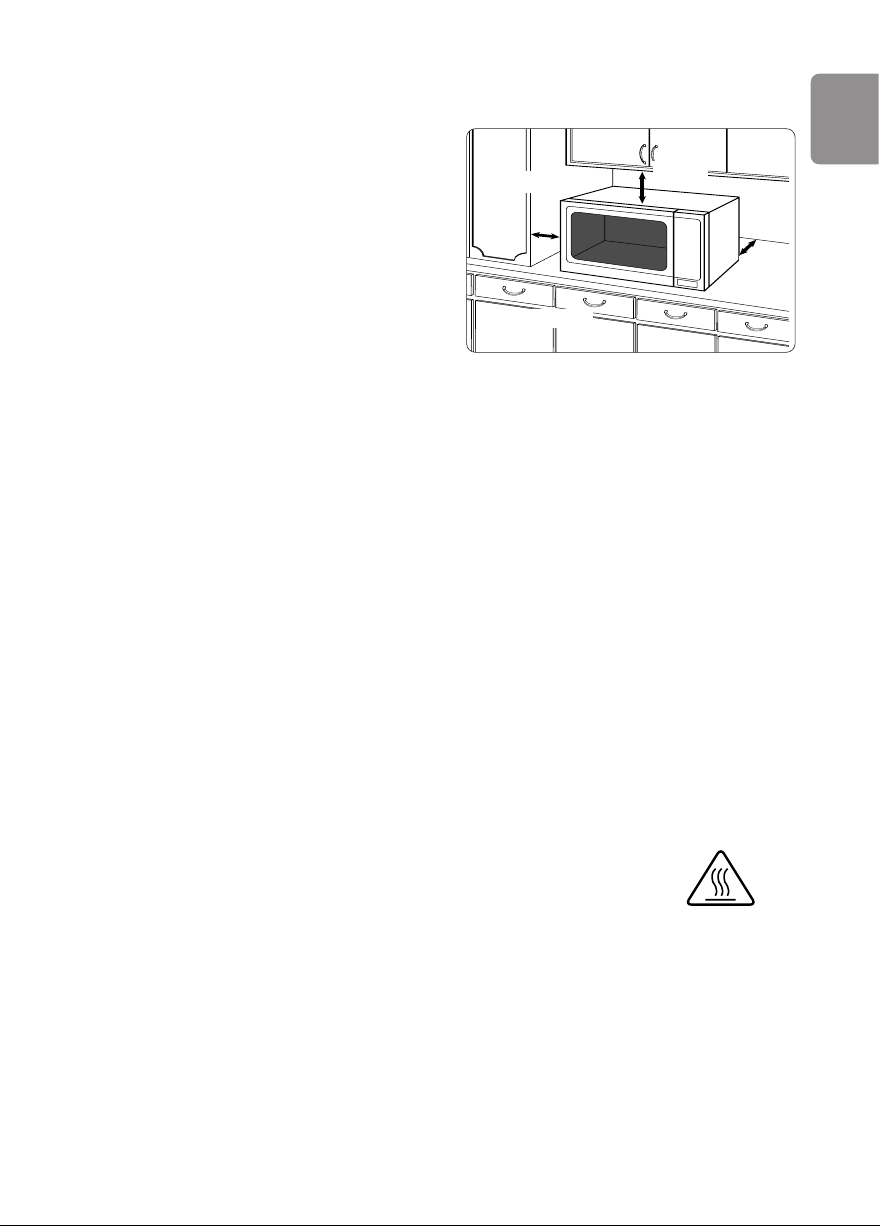
Counter-top use:
a. Allow 15 cm of space on the top of the
oven, 10 cm at the back, 5 cm on one side,
and the other side must be opened more
than 40 cm.
b. If one side of the oven is placed flush to a
wall, the other side or top must not be
blocked.
4. Do not place this oven near an electric or
gas cooker range.
5. The feet should not be removed.
6. This oven is only for household usage.
Do not use outdoors.
7. Avoid using the microwave oven in high
humidity.
8. The power cord should not touch the
outside of the oven. Keep the cord away
from hot surfaces. Do not let the cord hang
over the edge of a table or work top. Do not
immerse the cord, plug or oven in water.
9. Do not block the air vents on the top and
back of the oven. If these openings are
blocked during operation the oven may
overheat. In this case the oven is protected
by a thermal safety device and resumes
operation only after cooling down.
10. This appliance is not intended to be
operated by means of an external timer or
separate remote control system.
En-1
English
Installation and Connection
Counter-top
Open
10cm
15cm
5cm
Attention: Hot Surfaces
Page 3

En-2
Safety Instructions
WARNING
1. The door seals and door seal areas should
be cleaned with a damp cloth.
The appliance should be inspected for
damage to the door seals and door seal
areas and if these areas are damaged the
appliance should not be operated until it has
been repaired by a service technician
trained by the manufacturer.
2. Do not attempt to tamper with or make any
adjustments or repairs to the door, control
panel housing, safety interlock switches or
any other part of the oven. Do not remove
the outer panel from the oven which gives
protection against exposure to microwave
energy.
Repairs should only be done by a
qualified service person.
3. Do not operate this appliance if it has a
damaged CORD OR PLUG, if it is not
working properly, or if it has been damaged
or dropped. It is dangerous for anyone other
than a service technician trained by the
manufacturer to perform repair service.
4. If the supply cord of this appliance is
damaged, it must be replaced with the
special cord available from the
manufacturer.
5. Only allow children to use the oven without
supervision when adequate instructions
have been given so that the child is able to
use the oven in a safe way and understands
the hazards of improper use.
6. Liquids and other foods must not be heated
in sealed containers since they are liable to
explode.
Use of your oven
1. Do not use the oven for any reason other
than the preparation of food. This oven is
specifically designed to heat or cook food.
Do not use this oven to heat chemicals or
other non-food products.
2. Before use, check that utensils/containers
are suitable for use in microwave ovens.
3. Do not attempt to use this microwave oven
to dry newspaper, clothing or any other
materials. They may catch on fire.
4. When the oven is not being used, do not
store any objects other than oven
accessories inside the oven in case it is
accidentally turned on.
5. The appliance shall not be operated by
MICROWAVE or COMBINATION WITHOUT
FOOD IN THE OVEN. Operation in this
manner may damage the appliance.
Exception to this is point 1 under heater
operation.
6. If smoke or a fire occurs in the oven, press
Stop/Cancel Pad and leave the door closed
in order to stifle any flames. Disconnect the
power cord, or shut off power at the fuse or
the circuit breaker panel.
7. This appliance is not intended for use by
persons (including children) with reduced
physical, sensory or mental capabilities, or
lack of experience and knowledge unless
they have been given supervision or
instruction concerning use of the appliance
by a person responsible for their safety.
Children should be supervised to ensure
that they do not play with the appliance.
Page 4

En-3
English
Heater Operation
1. Before using COMBINATION or GRILL
function for the first time, wipe excessive
oil off in the oven cavity and operate the
oven without food and accessories on
Grill, for 10 minutes. This will allow the oil
that is used for rust protection to be
burned off. This is the only time the oven
is used empty.
2. Exterior oven surfaces, including air vents
on the cabinet and the oven door will get
hot during COMBINATION and GRILLING,
take care when opening or closing the
door and when inserting or removing food
and accessories.
3. The oven has two heaters situated in the
top of the oven. After using the
COMBINATION and GRILL function, these
surfaces will be very hot.
N.B. After cooking by these modes, the
oven accessories will be very hot.
4. The accessible parts may become hot
in combination use. Young children
should be kept away, and children
should only use the oven under adult
supervision due to the temperatures
generated.
Fan Motor Operation
If the oven gets hot after use, the fan may
rotate for a few minutes to cool the electric
components. This is perfectly normal, and you
can take out the food from the oven while the
fan is still in operation.
Oven Light
When it becomes necessary to replace the
oven light, please consult your dealer.
Accessories
The oven comes equipped with a variety of
accessories. Always follow the directions given
for use of the accessories.
Glass Tray
1. Do not operate the oven without the roller
ring and the glass tray in place.
2. Never use another type of glass tray than
the one specially designed for this oven.
3. If the glass tray is hot, let it cool before
cleaning or placing in water.
4. The glass tray can turn in either direction.
5. If the food or cooking vessel on the glass
tray touches the oven walls and stops the
tray rotating, the tray will automatically
rotate in the opposite direction. This is
normal.
6. Do not cook foods directly on the glass tray.
Roller Ring
1. The roller ring and the oven floor should be
cleaned frequently to prevent noise and
build-up of remaining food.
2. The roller ring must always be used for
cooking together with the glass tray.
Wire Rack
1. The wire rack is used to facilitate
browning of small dishes and help with the
good circulation of the heat.
2. Do not use any metal container directly on
the wire rack in COMBINATION with
MICROWAVE.
3. Do not use the wire rack in MICROWAVE
mode only.
Safety Instructions
Page 5

En-4
Important Information
1) Cooking Times
• Cooking times given in the cookbook are
approximate. The cooking time depends on
the condition, temperature, amount of food
and on the type of cookware.
• Begin with the minimum cooking time to
help prevent overcooking. If the food is not
sufficiently cooked you can always cook it
for a little longer.
N.B.: If the recommended cooking times
are exceeded the food will be spoiled
and in extreme circumstances could
catch fire and possibly damage the
interior of the oven.
2) Small Quantities of Foods
• Small quantities of food or foods with low
moisture content can burn, dry out or catch
on fire if cooked too long. If materials inside
the oven should ignite, keep the oven door
closed, turn the oven off and remove the
plug from the socket.
3) Eggs
• Do not cook eggs in their shells and whole
hard-boiled eggs by MICROWAVE.
Pressure may build up and the eggs will
explode, even after microwave heating has
ended.
4) Piercing Skin
• Food with non porous skins, such as
potatoes, egg yolks and sausages must be
pierced before cooking by MICROWAVE to
prevent bursting.
5) Meat Thermometer
• Use a meat thermometer to check the
degree of cooking of roasts and poultry only
when the meat has been removed from the
oven. Do not use a conventional meat
thermometer when using MICROWAVE or
COMBINATION because it may cause
sparking.
6) Liquids
• When heating liquids, e.g. soup, sauces and
beverages in your microwave oven,
overheating the liquid beyond boiling point
can occur without evidence of bubbling.
This could result in a sudden boil over of the
hot liquid. To prevent this possibility the
following steps should be taken:
a) Avoid using straight-sided containers with
narrow necks.
b) Do not overheat.
c) Stir the liquid before placing the
container in the oven and again halfway
through the cooking time.
d) After heating, allow it to stand in the oven
for a short time, stir again before carefully
removing the container.
7) Paper/Plastic
• When heating food in plastic or paper
containers, check the oven frequently as
these types of containers ignite if
overheated.
• Do not use recycled paper products (e.g.
Kitchen Roll) unless the paper product is
labelled as safe for microwave oven use.
Recycled paper products may contain
impurities which may cause sparks and/or
fires during use.
• Remove wire twist-ties from roasting bags
before placing the bags in the oven.
8) Utensils/Foil
• Do not heat any closed cans or bottles
because they might explode.
• Metal containers or dishes with metallic trim
should not be used during Microwave
cooking. Sparking will occur.
• If you use any aluminium foil, meat spikes
or metalware the distance between them
and the oven walls and door should be at
least 2 cm to prevent sparking.
9) Feeding Bottles/Baby Food Jars
• The top and teat or lid must be removed
from feeding bottles or baby food jars before
placing in the oven.
• The contents of feeding bottles and baby
food jars are to be stirred or shaken.
• The temperature has to be checked before
consumption to avoid burns.
Page 6
En-5
English
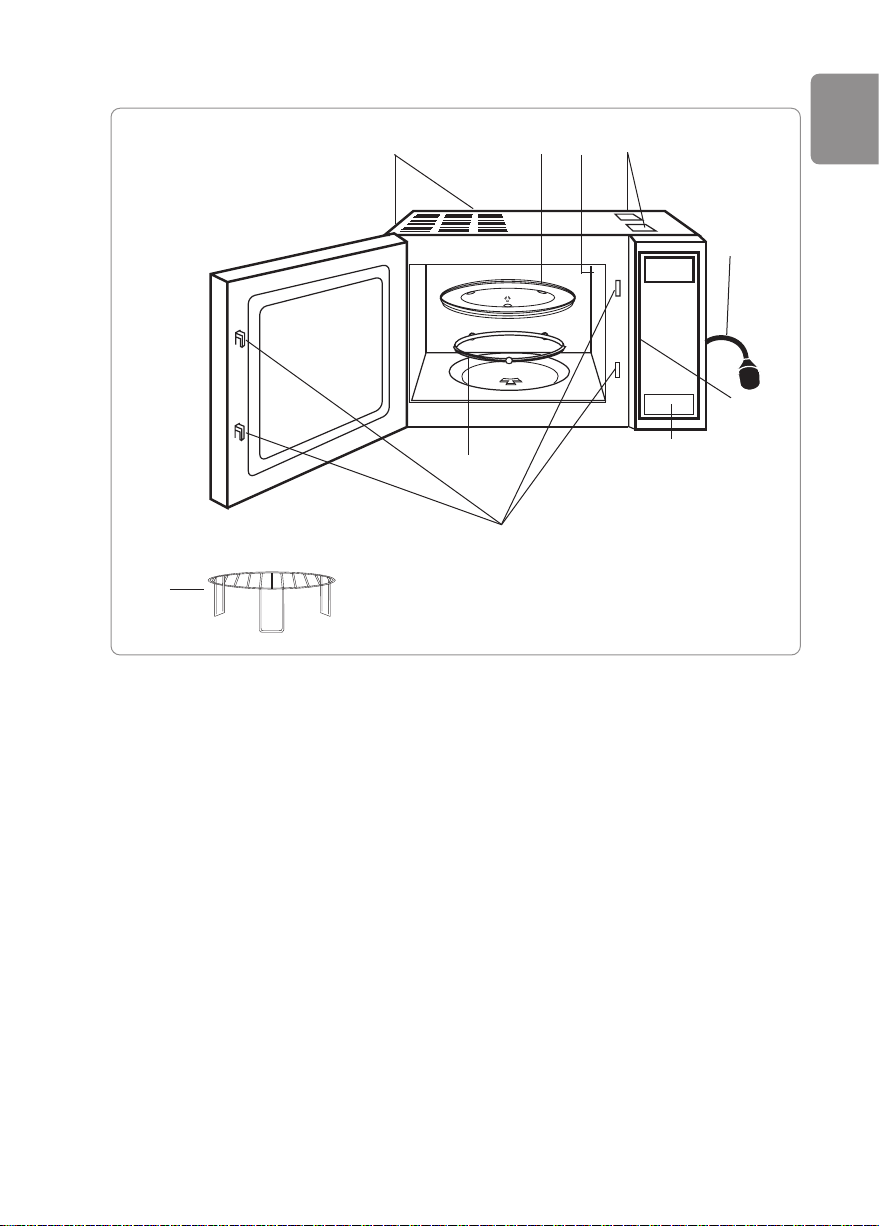
Outline Diagram
(1) Door release button
Press to open the door. When you open the oven door during cooking, the cooking is
stopped temporarily without clearing earlier made settings. The cooking is resumed as
soon as the door is closed and the Start Button pressed. The oven lamp lights as soon as
the oven door is opened.
(2) Oven Window
(3) Door Safety Lock System
(4) Oven Air Vent
(5) Control Panel
(6) Glass Tray
(7) Roller Ring
(8) External Oven Air Vents
(9) Wire Rack
(10) Power Cord
(11) Caution Label
(12) Identification label
(8)
(1)
(2)
(3)
(4)
(5)
(7)
(9)
(6)
(10)
(11)
(12)
Page 7
En-6
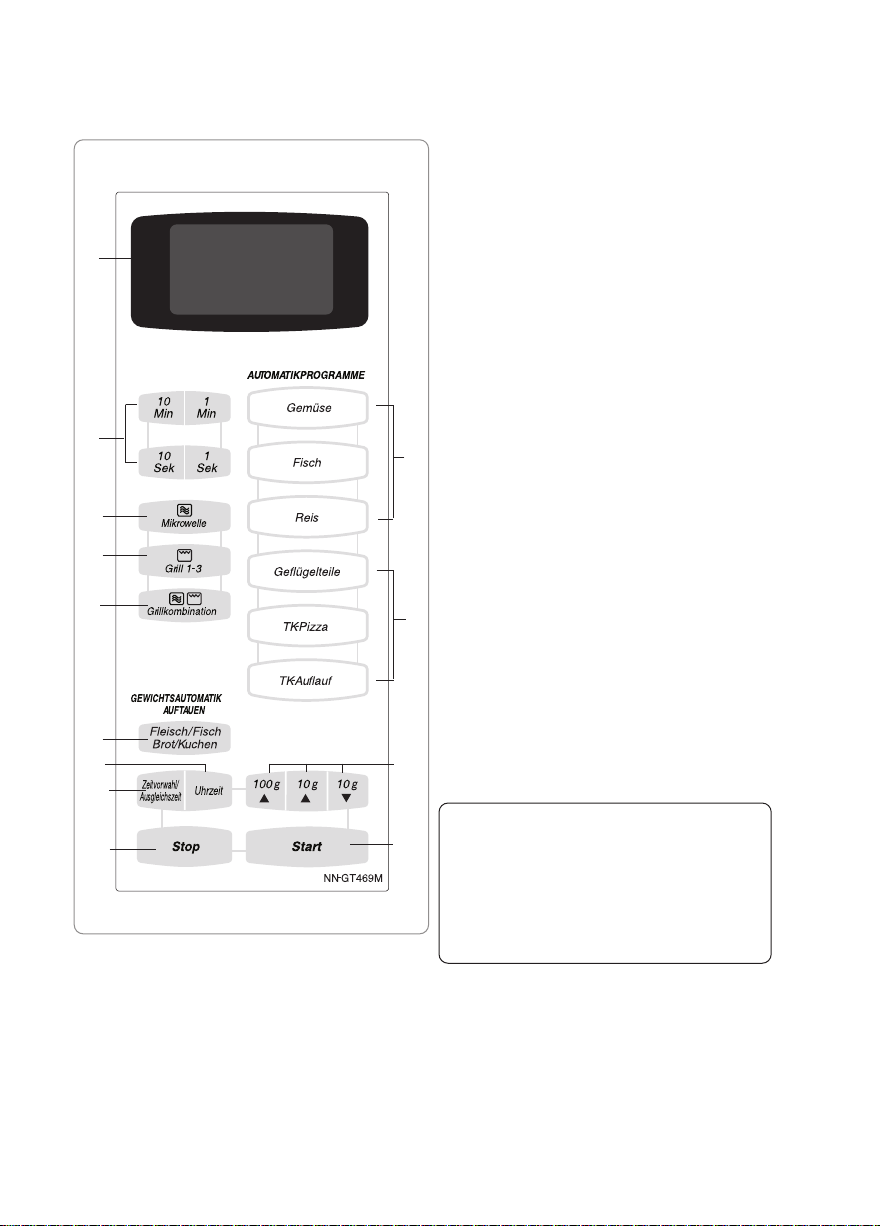
NN-GT469M
(1) Display Window
(2) Auto Weight Microwave Programs Pad
(3) Auto Weight Combination Program Pad
(4) Time Pads
(5) Microwave Power Pad
(6) Grill Power Pad
(7) Combination power pad
(8) Auto Weight Defrost
Programs Pad
(9) Clock Pad
(10) Delay/Stand Pad
(11) Weight selection pads
(12) Stop/Cancel Pad:
Before cooking: one press clears your
instructions.
During cooking: one press temporarily
stops the cooking program. Another press
cancels all your instructions and the time
of day will appear in the display.
(13) Start Pad:
Press to start operating the oven. If during
cooking the door is opened or Stop/
Cancel Pad is pressed once, Start Pad
has to be pressed again to continue
cooking.
Beep Sound:
A beep sounds when a Pad is pressed. If
this beep does not sound, the setting is
incorrect. When the oven changes from
one function to another, two beeps sound.
After completion of cooking, five beeps
sound.
NOTE:
If an operation is set and Start Pad is not
pressed, after 6 minutes, the oven will
automatically cancel the operation. This
display will revert back to clock mode.
This oven is equipped with an energy saving function.
NOTE:
1. When in stand-by mode the brightness of the display will be reduced.
2. The oven will enter stand-by mode, when first plugged in and immediately after the last
operation has completed.
(1)
(2)
(3)
(11)
(12)
(13)
(10)
(4)
(5)
(6)
(7)
(8)
(9)
Control Panel
Page 8
En-7
English
Controls and Operation Procedure
Operation guide
If the delay/stand pad is pressed 4 times, this will turn off the operation guide. To turn the
operation guide back on, press the delay/stand pad 4 times.
Clock Setting: Example: To set 12:10
• Press Clock Pad once.
The colon starts to blink.
• Enter the time by using the
Time Pads.
The time appears in the
display and the colon blinks.
• Press Clock Pad.
The colon stops blinking and
the time of day is entered.
NOTE:
1. To reset the time of day repeat all the above steps.
2. The time of day is displayed, unless the power supply is interrupted.
3. This clock has a 24 hour display.
Page 9

En-8
Controls and Operation Procedure
Child Safety Lock:
Using this system will make the oven controls inoperable; however, the door can be
opened. Child Lock can be set when the display shows a colon or the time.
To Set:
To Cancel:
• Press Start Pad three times.
The time of day will disappear. Actual time
will not be lost. A “.” is indicated in the
display.
• Press Stop/Cancel Pad three times.
The time of day will reappear in the
display.
Microwave Cooking and Defrost
There are 6 different microwave power levels available. The chart below shows the approximate
wattage for each power level.
Use of accessory:
• Press this pad until the power
you require appears in the
display window. Select the
desired microwave power level.
• Set the cooking time using
the Time Pads (HIGH power:
up to 30 minutes
Other powers: up to 90
minutes).
• Press Start Pad.
Press
Power Level
Wattage
Once Max (High) 1000 W
Twice Min (Defrost) 270 W
3 Times Medium 600 W
4 Times Low 440 W
5 Times Simmer 250 W
6 Times Warm 100 W
Glass Tray
NOTE:
To activate child lock, start pad must be pressed 3 times within a 10 second period.
Page 10
En-9
English
Microwave Cooking and Defrost
NOTE:
1. For 2 or 3 stage cooking, before pressing Start Pad, repeat setting the Microwave power
level and cooking time.
e.g. Casserole –– High 10 minutes to bring the casserole to boil. Simmer 60 minutes to
cook. Warm 10 minutes to allow flavours to develop.
2. Stand time can be programmed after the Microwave power and time setting.
3. You can increase the cooking time during cooking, if required. Time can be increased by
using the 1 minute time pad up to 10 minutes.
4. The oven will automatically work on High microwave power if a cooking time is entered
without the power level previously being selected.
Grilling
The Grill provides 3 Grill settings.
1 Press GRILL 1 1100 W
2 Presses GRILL 2 800 W
3 Presses GRILL 3 600 W
• Select Grill Power. Press
once for Grill 1 (High),
twice for Grill 2 (Medium)
or 3 times for Grill 3 (Low).
• Set the cooking time using
the Time pad (up to 90
minutes).
• Press Start Pad.
NOTE:
1. The Grill will only operate with the oven door closed.
2. You can increase the cooking time during cooking, if required. Time can be increased by using
the 1 minute time pad, up to 10 minutes.
Wire Rack
Glass Tray
Use of accessory:
Page 11

En-10
NOTE:
1. The Combination mode will only operate with the oven door closed.
2. You can increase the cooking time during cooking, if required.
Time can be increased by using the 1 minute time pad, up to 10 minutes.
Combination Cooking
Wire Rack
Glass Tray
Use of accessory:
Once Medium 600 W
Twice Low 440 W
3 Times Simmer 250 W
4 Times Warm 100 W
Glass Tray
• Set the cooking time using
the Time Pads (up to 90
minutes).
• Press Start Pad.
• Press this pad until the power
you require appears in the
display window.
N.B. It is not possible to set
1000W / 270W
in combination mode.
• Select Grill Power.
Press once for Grill
1 (High), twice for
Grill 2 (Medium) or
3 times for Grill 3
(Low).
• Press
combination pad
Page 12
En-11
English
Auto Weight Defrosting
With this feature you can defrost frozen foods according to the weight. Select the category and set the
weight of the food. The weight is programmed in grams. For quick selection, the weight starts from the
most commonly used weight for each category.
• Press Start
Pad.
NOTE:
1. When defrosting time is over 60 minutes the time will appear as Hours and Minutes.
2. The shape and size of the food will determine the maximum weight the oven can accommodate.
3. For further information see defrosting guidelines in cook book.
• Set the weight of the frozen food by
using the Time Pads.
100 g pad counts up in 100 g steps.
10 g pads count up / down in 10 g
steps.
• Select the desired Auto
Defrost Program.
1 press for Meat/Fish
2 presses for Bread/Cake
The food should ideally be frozen and stored flat and evenly arranged at a minimum of -18C. Pay
attention to freezing in suitable portions and shapes, so that the food fits into the appliance for
defrosting. Generally, remove all packaging material. If it is difficult to remove the food from the packing,
start defrosting it at 1000W for 1-2 minutes. Place the food onto a plate to defrost.
With the program meat/fish put food on an up turned saucer, so that the meat juices can drip off. Under
no circumstance must this meat juice be re-used or come into contact with other foods. When defrosting
with the auto-weight programs standing times are necessary, until the food is defrosted completely or
can be processed further. Depending upon weight and kind of the food up to 90 minutes have to be
allowed.
Program Food
Min/max
weight
Accessories Notes/Tips
Meat/Fish
Start weight
800g
Flat pieces of
meat, eg steak
roulade, goulash,
mince
200-1000 g
up turned
saucer on a
flat plate
Wrap the ends of the legs of
whole chicken and duck in
aluminium foil before you thaw
these out. Turn food above 500 g
at beep. Break up small meat
pieces after defrosting; in case of
minced meat break up the
remaining ice core apart.
Poultry and game 200-2500 g
Roast 500-2500 g
Fish 200-1000 g
Bread/Cake
Start weight:
500g
Bread, whole or
sliced
100-1000 g Flat plate
Turn Bread above 310 g at beep
Shortcrust pastry with fruit needs
a longer standing time to
complete defrosting. Cream
cakes and cakes with chocolate
icing are not suitable on this
program
.
Yeast cake,
biscuit, pastry
Shortcrust pastry
with fruit
100-1500 g
Page 13

En-12
e.g.
Auto Weight Programs
This feature allows you to cook most of your favourite foods by setting the weight only. The oven
determines Microwave power level, Grill power and cooking time automatically. Select the
category and set the weight of the food. The weight is programmed in grams. For quick selection,
the weight starts from the most commonly used weight for each category.
• Set the weight of the food by
using the Time Pads.
100 g pad counts up in 100 g steps.
10 g pads count up / down in 10 g
steps.
• Press Start
Pad.
NOTE:
1. When cooking time is over 60 minutes, the time will appear as Hours and Minutes.
2. Follow the charts overleaf for the recommended weight and accessories to be used.
• Select the desired Auto weight
program by pressing the Auto
Weight program pads.
or
Page 14

En-13
English
Auto Weight Programs
Program Food Min/max weight Accessories
Vegetables
(fresh)
start weight
500g
Cauliflower, Broccoli,
Chicorée, China Kohl,
peas, Fennel,
cabbage turnip,
carrots, peppers, leek,
brussel sprouts,
celery, white cabbage,
savoy cabbage and
Zucchini.
200 – 1000 g
(net, cleaned)
Cook Vegetables in
a dish with cover.
Add 1 table spoon
of water and some
salt per 100 g. Stir
Vegetables during
the cooking time at
beep and before
the standing time.
Fish (fresh)
Start weight
500g
Fish filet, e.g. plaice,
cod, sea-salmon,
redfish, wolf fish.
No salmon filet
200 – 1000 g Cook filet in a dish
with lid. Add 1 – 3
table spoons of
liquid (water, lemon
or wine) After
cooking allow to
stand covered
for 5-10 minutes.
Rice
Start weight
200g
Par-boiled long grain
rice, whole grain and
natural rice, wild rice
mixture, Ketan or
Jasmin rice
100 – 300 g Add water
according to
manufacturers’
information on the
back of pack
usually two to three
times the amount of
water to rice) and
cover. Stir at beep
approximately 18
minutes before end
of the cooking time
and before the end
of the standing
time.
Notes:
1. The liquid additions are not included when inputting the weight.
2. During the Vegetables auto program a beep sounds after half the time; stir the food at this
time. With rice approximately 18 minutes before end of the cooking time a beep sound
indicates that the food sould be stirred.
3. Absolutely adhere to the minimum and maximum weight for the programs for suitable food.
Weights outside of this range should not be cooked with the above auto weight programs.
4. Please note that the results depend on the food quality, their condition or the ingredients and
therefore can vary.
There are three programs for cooking different foods. Use the programs vegetables and fish only
for fresh food. Prepare the food as usual, i.e. deseed vegetables and cut into small pieces, clean
fish etc. Cook the food only in a microwave-suitable dish with cover. Take note of the
recommendation for adding liquid and stir or turn when necessary. Allow a standing time of 5-10
minutes, to ensure even temperatures. This is particularly important for fish.
Instructions
Page 15

En-14
Program Food
Min/max
weight
Accessories
Poultry pieces
Start weight
800g
Fresh poultry pieces,
eg, drum sticks,
wings, quarters
200 – 1000 g wire rack Place chicken pieces
with the skin side
down into a
microwave-suitable,
heatproof dish and
place it on the wire
rack. Turn poultry
during cooking at the
beep.
Frozen pizza
(-18 ºC )
Start weight
200 g
Frozen pizza,
industrially prepared,
eg from Dr Oetker
200- 500 g wire rack For heating up and
browning of
industrially prepared
frozen Pizza. Remove
the packing and heat
up the Pizza directly
on the wire rack.
Frozen gratin
(-18 ºC )
Start weight
350 g
Frozen gratin ( pasta
gratin, vegetable
gratin, )
300 – 600 g Microwave
suitable and
heat resistant
casserole dish
Remove from
packaging and place
in a dish suitable for
the size/shape of the
food.
Notes:
1. With the program Geflugelteile a beep sounds after approximately 2/3 during cooking time. At
this time turn the food.
2. Please note that the results depend on the food quality, their condition or the ingredients and
therefore can vary, especially for ready prepared frozen (TK) products.
3. Adhere to the minimum and maximum weight for the programs for suitable food.
Weights outside of this range should not be cooked with the above auto weight programs.
For cooking food with simultaneous browning three different programs are available. Use the
program Geflugelteile only for fresh food. Season the food before cooking as usual. In order to
achieve browning on both sides it is necessary to turn the food. Cook poultry first with the skin or
breast side down before turning the food and continue cooking. Please rest meat before serving
for approx. 10 minutes to ensure even temperatures. Frozen (TK) products are industrially
prepared frozen goods, which can be bought in a food store. Always remove the food from the
packaging before preparation. Please adhere to the recommended accessories and use only
microwave-suitable and heatproof dishes if required.
Under no circumstances cover the food for the following programs.
Auto Weight Programs
Instructions
Page 16

En-15
English
Delay Start Cooking
By using Delay/Stand Pad, you are able to program Delay Start cooking.
NOTE:
1. Three stage cooking can be programmed including Delay Start cooking.
e.g.
2. If the programmed delay time exceeds one hour, the time will count down in units of minutes.
If less than one hour, the time will count down in units of seconds.
3. Delay Start cannot be programmed before any Auto Programs.
• Press
Delay/Stand
Pad.
• Set the delay time by using
the Time Pads
(up to 9 hours).
• Set the desired cooking
program and cooking time.
• Press Start Pad.
e.g.
Delay Start: 1 hour
High Power: 10 min.
Simmer Power: 20 min.
5 times
Once
Page 17

En-16
Stand Time
By using Delay/Stand Pad, you can program Stand Time after cooking is completed or use to
program the oven as a minute timer.
• Set the desired cooking program and
cooking time.
• Press Delay/Stand
Pad.
• Set desired amount of time by
using the Time Pads (up to 9
hours).
• Press Start Pad.
NOTE:
1. Three stage cooking can be programmed including Stand Time.
e.g.
2. If the oven door is opened during the Stand Time or Minute Timer, the time in the display
window will continue to count down.
3. This feature may also be used as a timer. In this case press Delay/Stand Pad, set time and
press Start Pad.
e.g.
High Power: 4 min. Stand Time: 5 min.
High Power: 2 min.
Once
Once
Page 18

En-17
English
Questions and Answers
Q: Why won’t my oven turn on?
A: When the oven does not turn on, check the
following:
1. Is the oven plugged in securely?
Remove the plug from the outlet, wait 10
seconds and reinsert.
2. Check the circuit breaker and the fuse.
Reset the circuit breaker or replace the
fuse if it is tripped or blown.
3. If the circuit breaker or fuse is all right,
plug another appliance into the outlet. If
the other appliance works, there
probably is a problem with the oven. If
the other appliance does not work, there
probably is a problem with the outlet.
If it seems that there is a problem with
the oven, contact an authorized Service
Centre.
Q: My microwave oven causes
interference with my TV.
Is this normal?
A: Some radio and TV interference might occur
when you cook with the microwave oven.
This interference is similar to the
interference caused by small appliances
such as mixers, vacuums, blow dryers, etc.
It does not indicate a problem with your
oven.
Q: The oven won’t accept my program. Why?
A: The oven is designed not to accept an
incorrect program. For example, the oven
will not accept a fourth stage, and will not
accept an Auto Weight Program after Delay
Start
Q: Sometimes warm air comes from the oven
vents. Why?
A: The heat given off from the cooking food
warms the air in the oven cavity. This
warmed air is carried out of the oven by the
air flow pattern in the oven. There are no
microwaves in the air. The oven vents
should never be blocked during cooking.
Q: “D” appears in the display and the oven
does not cook. Why?
A: The oven has programmed DEMO MODE.
This mode is designed for retail store
display. Deactivate this mode by pressing
Micro Power once, and stop/cancel pad 4
times.
Q: Can I use a conventional oven
thermometer in the oven?
A: Only when you are using GRILL
cooking mode. The metal in some
thermometers may cause arcing in your
oven and should not be used on
MICROWAVE and COMBINATION
cooking modes.
Q: There are humming and clicking
noises from my oven when I cook by
COMBINATION. What is causing these
noises?
A: The noises occur as the oven
automatically switches from MICROWAVE
power to GRILL to create the combination
setting. This is normal.
Q: My oven has an odour and generates
smoke when using the COMBINATION and
GRILL function. Why?
A: After repeated use, it is recommended to
clean the oven and then run the oven
without food, glass tray, and roller ring on
Grill for 5 minutes. This will burn off any
food, residue or oil which may cause an
odour and/or smoking.
Q: The oven stops cooking by microwave and
‘H97’ or ‘H98’ appears in the display. Why?
A: This display indicates a problem with the
microwave generation system. Please
contact an authorised Service Centre.
Page 19

En-18
Care of Your Oven
1. Turn the oven off before cleaning.
2. Keep the inside of the oven, door seals
and door seal areas clean. When food
splatters or spilled liquids adhere to the
oven walls, door seals and door seal
areas wipe off with a damp cloth. Mild
detergent may be used if they get very
dirty. The use of harsh detergent or
abrasive is not recommended.
DO NOT USE COMMERCIAL OVEN
CLEANERS. Do not use harsh, abrasive
cleaners or sharp metal scrapers to clean
the oven door glass since they can scratch
the surface, which may result in shattering
the glass.
3. The outside oven surface should be
cleaned with a damp cloth. To prevent
damage to the operating parts inside the
oven, water should not be allowed to seep
into the ventilation openings.
4. If the Control Panel becomes dirty, clean it
with a soft, dry cloth. Do not use harsh
detergents or abrasives on the Control
Panel. When cleaning the Control Panel,
leave the oven door open to prevent the
oven from accidentally turning on. After
cleaning touch STOP/CANCEL Pad to
clear the display window.
5. If steam accumulates inside or around the
outside of the oven door, wipe with a soft
cloth. This may occur when the microwave
oven is operated under high humidity
conditions and in no way indicates a
malfunction of the unit.
6. It is occasionally necessary to remove the
glass tray for cleaning. Wash the tray in
warm soapy water or in a dishwasher.
7. The roller ring and oven cavity floor should
be cleaned regularly to avoid excessive
noise. Simply wipe the bottom surface of
the oven with mild detergent and hot water
then dry with a clean cloth. The roller ring
may be washed in mild soapy water.
Cooking vapours collect during repeated
use but in no way affects the bottom
surface or roller ring wheels. After
removing the roller ring from the cavity
floor for cleaning, be sure to replace it in
the proper position.
8. When using the GRILL or COMBINATION
mode, some foods may inevitably splatter
grease on to the oven walls. If the oven is
not cleaned occasionally, it may start to
“smoke” during use.
9. A steam cleaner is not to be used for
cleaning.
10. This oven should only be serviced by
qualified personnel. For maintenance and
repair of the oven contact the nearest
authorized dealer.
11. Keep air vents clear at all times. Check
that no dust or other material is blocking
any of the air vents on the top, bottom or
rear of the oven. If air vents become
blocked this could cause overheating
which would affect the operation of the
oven and possibly result in a hazardous
situation.
12. Failure to maintain the oven in a clean
condition could lead to deterioration of
surfaces that could affect the life of the
appliance and possibly result in a
hazardous situation.
Page 20

En-19
English
Technical Specifications
This product is an equipment that fulfills the European standard for EMC disturbances
(EMC = Electromagnetic Compatibility) EN 55011. According to this standard this product is an
equipment of group 2, class B and is within required limits. Group 2 means that radio-frequency
energy is intentionally generated in the form of electromagnetic radiation for warming up of foods.
Class B means that this product may be used in normal household areas.
Information on Disposal for Users of Waste Electrical & Electronic
Equipment (private households)
This symbol on the products and/or accompanying documents means that used
electrical and electronic products should not be mixed with general household waste.
For proper treatment, recovery and recycling, please take these products to
designated collection points, where they will be accepted on a free of charge basis.
Alternatively, in some countries you may be able to return your products to your local
retailer upon the purchase of an equivalent new product.
Disposing of this product correctly will help to save valuable resources and prevent any potential
negative effects on human health and the environment which could otherwise arise from
inappropriate waste handling. Please contact your local authority for further details of your
nearest designated collection point. Penalties may be applicable for incorrect disposal of this
waste, in accordance with national legislation.
For business users in the European Union
If you wish to discard electrical and electronic equipment, please contact your dealer or supplier
for further information.
Information on Disposal in other Countries outside the European Union
This symbol is only valid in the European Union.
If you wish to discard this product, please contact your local authorities or dealer and ask for the
correctmethod of disposal.
Pursuant to the directive 2004/108/EC, article 9(2), Panasonic Testing Centre
Panasonic Service Europe, a division of Panasonic Marketing Europe GmbH
Winsbergring 15,22525 Hamburg, F.R.Germany.
Manufactured by Panasonic Home Appliances Microwave Oven (Shanghai) Co.,Ltd, 898
Longdong Road, Pudong, Shanghai, 201203, China.
Power Source: 230 V, 50 Hz
Power Consumption: Maximum; 2150 W
Microwave; 1200 W
Grill; 1100 W
Output: Microwave; 1000 W (IEC-60705)
Grill Heater; 1100 W
Outside Dimensions: 510 (W) x 380 (D) x 304 (H) mm
Oven Cavity Dimensions: 359 (W) x 352 (D) x 217 (H) mm
Uncrated Weight: 13.5 kg
Noise: 50 dB
Specifications subject to change without notice.
Page 21

D-1
Deutsch
Aufstellen und Anschließen
Überprüfung Ihres Mikrowellengerätes
Das Gerät auspacken, Verpackungsmaterial
entfernen und auf Beschädigungen wie z.B.
Stoßstellen, gebrochene Türverriegelungen
oder Risse in der Tür überprüfen. Sofort den
Händler benachrichtigen, wenn das Gerät
beschädigt ist. Kein beschädigtes Mikrowellengerät installieren.
Erdungsvorschriften
WICHTIG: ZUR SICHERHEIT VON PERSONEN MUSS DIESES GERÄT GEERDET SEIN!
Ist die Steckdose nicht geerdet, muß der
Kunde die Steckdose durch eine ordnungsgemäße Schutzkontaktsteckdose ersetzen
lassen.
Betriebsspannung
Die Netzspannung muß der auf dem Typenschild des Gerätes angegebenen Spannung
entsprechen. Wird eine höhere Spannung als
angegeben verwendet, so kann ein Brand
entstehen oder sonst ein Unfall die Folge sein.
Aufstellen des Gerätes
Dieser Mikrowellenofen ist ein frei stehendes
Gerät zur Verwendung im Haushalt. Das Gerät
ist kein Einbaugerät und sollte nicht in einem
Schrank aufgestellt werden.
1. Stellen Sie das Mikrowellengerät auf eine
feste, ebene Stellfläche.
2. Achten Sie beim Aufstellen des Gerätes
darauf, daß bei Gefahr jederzeit der
Stecker gezogen oder die Sicherung am
Sicherungskasten ausgeschaltet werden
kann.
3. Das Gerät arbeitet ordnungsgemäß, wenn
eine ausreichende Luftzirkulation stattfind
en kann.
Aufstellen auf der Arbeitsfläche:
a. Sicherheitsrichtlinien empfehlen einen
Mindestabstand von 15 cm über dem
Gerät, 10 cm zur Rückwand sowie 5 cm zur
einen und frei zur anderen Seite.
b. Sollte das Gerät an einer Seite direkt an
der Wand stehen, müssen die anderen
Seiten frei bleiben.
4. Die Lüftungsöffnungen auf der Oberseite
des Gehäuses nicht verdecken. Sind diese
Öffnun gen blockiert, während das Gerät
arbeitet, kann es überhitzen. In diesem Fall
wird das Gerät durch den Überhitzungsschutz ausgeschaltet und kann erst wieder in
Betrieb gesetzt werden, wenn es abgekühlt
ist.
5. Das Gerät nicht in unmittelbarer Nähe eines
Gas- oder Elektroherdes aufstellen.
6. Die Stellfüße dürfen nicht entfernt werden.
7. Das Mikrowellengerät nicht bei zu hoher
Luftfeuchtigkeit benutzen.
8. Das Netzanschlußkabel darf die
Gerätegehäuseoberfläche nicht berühren,
da diese während des Betriebes heiß wird.
Das Kabel auch nicht mit anderen heißen
Oberflächen in Berührung bringen. Das
Netzanschlußkabel nicht über Tisch-oder
Thekenkanten hängen lassen. Das Kabel
oder den Netzstecker nicht in Wasser
tauchen.
9. Dieses Gerät ist nicht zur Bedienung mit
einer externen Zeitschaltuhr oder separaten
Fernbedienung gedacht.
Arbeitsfläche
Frei
stehend
10cm
15cm
5cm
Achtung: Heiße Oberflächen
Page 22

D-2
Wichtige Hinweise
Warnung
1. Das Gerät ist vom Benutzer auf mögliche
Beschädigungen an den Türdichtungsflächen zu prüfen, und falls ein solcher
Schaden aufgetreten ist, darf das Gerät
nicht betrieben werden, bevor es vom
Panasonic Kundendienst repariert worden
ist.
2. Führen Sie weder eine Manipulation noch
eine Reparatur an der Tür, an den
Kontrolleinrichtungen oder
Sicherheitsvorrichtungen sowie an irgendeinem anderen Teil des Gerätes durch. In
keinem Fall das Gehäuse, das den
Schutz gegen Strahlenbelastung durch
Mikrowellenenergie sicherstellt, abbauen.
Das Gerät darf nur von einem geschulten
Panasonic Kundendienst-Techniker geprüft
oder repariert werden.
3. Das Gerät nicht in Betrieb setzen, wenn das
Netzanschlußkabel oder der Netzstecker
beschädigt ist, bzw. wenn es nicht ordnungsgemäß arbeitet oder eine sichtbare
Beschädigung aufweist.
4. Die zum Anschluß dieses Gerätes verwendete Spezial-Anschlußleitung ist nur über
einen Panasonic Kundendienst erhältlich
und darf nur durch einen qualifizierten
Panasonic Kundendienst ersetzt werden.
Ebenso darf die eingebaute Garraumlampe
nur vom Panasonic Kundendienst ausgetauscht werden.
5. Kindern darf die Benutzung des Gerätes
ohne Aufsicht nur erlaubt werden, wenn
eine ausreichende Anweisung gegeben
wurde, die das Kind in die Lage versetzt,
das Gerät in sicherer Weise bedienen und
die Gefahr einer falschen Bedienung verstehen zu können.
6. Keine Flüssigkeiten und Nahrungsmittel in
versiegelten Behältern (z.B. Konserven)
erhitzen, da diese platzen können.
Inbetriebnahme des Gerätes
Vor der ersten Benutzung bitte den Garraum
mit einem Tuch auswischen und Ölflecke entfernen sowie das Gerät unbedingt ohne
Zubehör und Lebensmittel für 10 Minuten nur
mit dem Grill in Betrieb setzen. Damit ist
sichergestellt, daß konservierende Ölreste im
Garraum vollständig verbrennen und das
Lebensmittel geschmacklich nicht beeinträchtigen.
Gebrauch und Ausstattung des
Gerätes
1. Dieses Gerät ist nur für den Hausgebrauch
konzipiert. Nicht im Freien benutzen.
2. Das Mikrowellengerät nur zur
Nahrungsmittelzubereitung benutzen.
Dieses Gerät ist speziell zum Auftauen,
Erwärmen und Garen von Lebensmitteln
entsprechend der Bedienungs- und Kochanleitung konzipiert. Erhitzen Sie in keinem
Fall Chemikalien oder andere Produkte.
3. Nehmen Sie das Mikrowellengerät nie ohne
Lebensmittel in Betrieb. Dies kann zu
Beschädigungen des Gerätes führen. Eine
Ausnahme gilt für die erste Inbetriebnahme
und Reinigung (Ausbrennen) des Gerätes.
4. Das Gerät ist mit zwei Heizelementen an
der Garraumdecke ausgestattet. Während
des Grill- oder Kombinationsbetriebes
werden die Gehäuseoberflächen, die Tür
und ebenso das benutzte Zubehör und
Geschirr heiß. Bitte seien Sie vorsichtig
beim Öffnen bzw. Schließen der Tür sowie
beim Hineinstellen bzw. Herausnehmen von
Lebensmitteln und Geschirr. Bei Benutzung
ist somit Vorsicht geboten und Kinder
müssen ferngehalten werden.
5. Prüfen Sie vor der ersten Benutzung Ihres
Geschirrs, ob es für den Gebrauch im
Mikrowellengerät geeignet ist.
6. Nicht versuchen, Kleidungsstücke,
Zeitungen oder andere Materialien im
Mikrowellengerät zu trocknen. Diese
Gegenstände können sich entzünden.
7. Im Garraum des Mikrowellengerätes dürfen
keine Gegenstände aufbewahrt werden, die
bei unbeabsichtigtem Einschalten des
Gerätes eine Gefahr für die Umgebung darstellen.
8. Kommt es zu einem Brand oder tritt
während des Mikrowellenbetriebes Rauch
aus dem Gerät, ist die Gerätetür
geschlossen zu halten und das Gerät
abzuschalten sowie der Netzstecker zu
ziehen.
9. Dieses Gerät darf nicht von Personen (einschließlich Kinder) mit eingeschränkten körperlichen, sensorischen oder mentalen
Fähigkeiten benutzt werden. Gleiches gilt
für Personen, denen es an der nötigen
Erfahrung und dem nötigen Wissen mangelt, außer sie werden durch eine für sie
verantwortliche Person beaufsichtigt oder
im sicheren Gebrauch des Gerätes unterwiesen. Kinder müssen beaufsichtigt werden, damit sichergestellt ist, dass sie nicht
mit dem Gerät spielen.
Page 23

D-3
Deutsch
Wichtige Hinweise
Automatischer Entlüftungsbetrieb
Ist das Mikrowellengerät nach dem Betrieb
heiß, setzt automatisch der Entlüftungsbetrieb
für eine Minute ein. Dies ist keine Fehlfunktion,
sondern dient zum Abkühlen der elektronischen Bauteile. Sie können währenddessen die
Gerätetür öffnen und das Lebensmittel herausnehmen. Der Entlüftungsbetrieb schaltet sich
automatisch ab.
Garraumbeleuchtung
Zum Wechseln der Garraumbeleuchtung
wenden Sie sich bitte an Ihren Händler.
Zubehör
Das Mikrowellengerät ist mit unterschiedlichem
Zubehör ausgestattet. Verwenden Sie dieses
bitte laut Anweisung.
Glasdrehteller
1. Das Mikrowellengerät nicht ohne den
dazugehörigen Glasdrehteller und Rollenring in Betrieb setzen.
2. Benutzen Sie in keinem Fall einen anderen
Glasdrehteller als den speziell dafür konzipierten Drehteller.
3. Den evtl. heißen Glasdrehteller abkühlen
lassen, bevor Sie diesen reinigen bzw. mit
Wasser abspülen.
4. Der Drehteller kann rechts- oder linksherum
laufen. Dies stellt keine Fehlfunktion dar.
5. Berührt das Lebensmittel bzw. Kochgeschirr
die Garraumwände, läuft der Drehteller
nicht weiter, sondern stoppt und beginnt,
sich in die entgegengesetzte Richtung zu
drehen.
6. Das Lebensmittel nicht direkt auf dem Glasdrehteller auftauen, erwärmen oder garen.
Rollenring
1. Der Rollenring und die Vertiefung im Gar-
raumboden müssen regelmäßig gereinigt
werden, um zu verhindern, daß Geräusche
entstehen und sich Nahrungsmittelreste
ansammeln.
2. Den Rollenring immer zusammen mit dem
Glasdrehteller benutzen.
Runder Rost
1. Der runde Rost wird zum Bräunen von
kleineren Portionen benutzt und unterstützt
die gleichmäßige Hitzeverteilung.
2. Beim Kombinationsbetrieb mit Mikrowelle
weder Alu- oder Metallspieße noch irgendein Metallgeschirr direkt auf dem Rost
plazieren.
Page 24

D-4
Wichtige Informationen
1) Kochzeiten
• Die im Kochbuch angegebenen Kochzeiten
sind Richtzeiten. Die Kochzeit ist abhängig
von Beschaffenheit, Ausgangstemperatur und
Menge des Lebensmittels sowie von der Art
des verwendeten Geschirrs.
• Gehen Sie zunächst von den kürzeren
Kochzeiten aus, um ein Übergaren der
Speisen zu vermeiden. Hat das Lebensmittel
noch nicht den gewünschten Auftau-,
Erwärm- oder Garzustand erreicht, haben Sie
immer noch die Möglichkeit, die Garzeit zu
verlängern. Wird die empfohlene Kochzeit
überschrit- ten, kann das Lebensmittel leicht
verbrennen und ggf. einen Brand auslösen
und somit den Garraum zerstören.
2)
Geringe Lebensmittelmengen
• Sehr kleine Lebensmittelmengen oder
Speisen mit geringem Feuchtigkeitsgehalt
können schnell austrocknen und verbrennen,
wenn sie zu lange gegart werden. Kommt es
zu einem Brand, die Tür des
Mikrowellengerätes geschlossen halten, das
Gerät abschalten und den Netzstecker aus
der Steckdose ziehen.
3)
Eier
• Weder rohe oder gekochte Eier in der Schale
noch gepellte hartgekochte Eier mit
Mikrowellen erhitzen oder kochen. Nach
Ende des Mikrowellen-Kochvorgangs kann
sich noch weiterhin Druck bilden und die Eier
können explodieren.
4)
Lebensmittel mit Schale oder Haut
• Bei Lebensmitteln wie z.B. Kartoffeln und
Würstchen empfiehlt es sich, sie vorher
anzustechen, um ein evtl. Platzen zu vermeiden.
5)
Speisethermometer
• Falls Sie den Garzustand mit einem
Speisethermometer überprüfen wollen, verwenden Sie bitte keine herkömmlichen
Thermometer im Mikrowellengerät. Diese
können Funken verursachen. Benutzen Sie
diese Speisethermometer nur außerhalb des
Mikrowellengerätes.
6)
Tiere
• Keine Lebewesen im Mikrowellengerät
erwärmen oder trocken.
7)
Flüssigkeiten
• Beim Erhitzen von Flüssigkeiten im
Mikrowellengerät kann durch kurzfristiges
Aufkochen (Siedeverzug) die Flüssigkeit im
Gerät oder bei der Entnahme schlagartig
verdampfen und explosionsartig aus dem
Gefäß geschleudert werden. Dies kann zu
Verbrennungen führen.
a) Vermeiden Sie die Verwendung von
geraden Gefäßen mit engem Ausguß.
b) Überhitzen Sie die Flüssigkeit nicht.
c) Rühren Sie die Flüssigkeit einmal um, bevor
Sie das Gefäß ins Gerät stellen sowie
nochmals nach der halben Kochzeit.
d) Lassen Sie nach Ablauf der Kochzeit das
Gefäß kurze Zeit im Gerät stehen, bevor Sie
es herausnehmen. Rühren Sie die Flüssigkeit
anschließend noch einmal um.
8)
Papier und Plastik
• Wenn Behälter aus Papier, Kunststoff oder
anderen leicht entflammbaren Materialien
zum Erwärmen benutzt werden, darf das
Mikrowellengerät nicht unbeaufsichtigt
betrieben werden! Diese Behälter können
sich entzünden.
• Verwenden Sie keine recycelten
Papierprodukte (z.B. Küchenrollen), die
nicht ausschließlich für die Benutzung im
Mikrowellengerät geeignet sind. Im
Recycling-Papier können Bestandteile sein,
die Funkenbildung oder einen Brand verursachen.
• Entfernen Sie Metallverschlüsse von
Bratfolien, bevor Sie diese ins Gerät stellen.
9)
Hilfsmittel und Folien
• Erhitzen Sie keine geschlossenen Flaschen
oder Konserven im Mikrowellengerät, da
diese durch den Druck explodieren
können.
• Verwenden Sie während des
Mikrowellenbetriebes weder Geschirr aus
Metall noch Geschirr mit Metallrand.
• Falls Sie Aluminiumfolie oder evtl.
Fleischspieße aus Metall im Mikrowellengerät
benutzen, halten Sie einen Abstand von
mindestens 2 cm zu den Garraumwänden
bzw. zu der Garraumtür ein, um Funkenbildung zu vermeiden.
10)
Babynahrung
• Benutzen Sie nur Fläschchen oder
Glasformen aus hochwertigen hitzebeständigen Materialien und plazieren Sie
diese ohne Deckel in der Mitte des Drehtellers.
• Nach dem Erhitzen sollte die Babynahrung in
Fläschchen oder Gläsern gut geschüttelt bzw.
durchgerührt werden, damit ein
Temperaturausgleich stattfinden kann.
• Gläser mit Babynahrung dürfen auf keinen
Fall verschlossen sein.
• Überprüfen Sie die Temperatur vor dem
Verzehr, um Verbrennungen zu vermeiden.
Page 25

D-5
Deutsch
Schematische Ansicht
(1) Türöffner
Drücken Sie diese Taste, um die Tür zu öffnen. Wenn Sie die Tür des Mikrowellengeräts
während des Kochens öffnen, wird der Kochvorgang vorübergehend unterbrochen, ohne die
vorher gemachten Einstellungen zu löschen. Der Kochvorgang wird wieder aufgenommen,
sobald die Tür geschlossen und die Starttaste gedrückt wird. Die Lampe des Mikrowellengeräts leuchtet auf, sobald die Tür geöffnet wird.
(2) Sichtfenster
(3) Türsicherheitsverriegelungen
(4) Garraumbeleuchtung
(5) Bedienfeld
(6) Glasdrehteller
(7) Rollenring
(8) Äußere Entlüftungsschlitze
(9) Runder Grillrost
(10)
Stromkabel
(11)
Warnschild (Heiße Oberfläche)
(12) Kennzeichnungsaufkleber (Zuruck von der Mikrowelle)
(8)
(1)
(2)
(3)
(4)
(5)
(7)
(9)
(6)
(10)
(11)
(12)
Page 26

D-6
Bedienfeld
Akustisches Signal:
Wird auf eine Funktionstaste gedrückt, ertönt
ein Signal. Ist dies nicht der Fall, hat das
Gerät die Eingabe nicht angenommen bzw.
die Eingabe war inkorrekt. Beim Zwei-/DreiPhasen-Betrieb ertönt beim Wechsel der
Phasen der Signalton 2mal. Nach Ablauf
eines Kochvorganges ist das Signal 5mal zu
hören.
(1) Digitalanzeige
(2) Tasten für die Gewichtsautomatick zum
garen
(3) Tasten für die Gewichtsautomatik zum
kombinationsgaren
(4)
Zeiteingabetasten
(5) Leistungswahltaste für den
Mikrowellenbetrieb
(6) Taste für den Grillbetrieb
(7) Taste für den Grillkombinationsbetrieb
(8) Taste für die Gewichtsautomatik
zum Auftauen
(9) Taste für die Uhrzeit
(10) Taste für zeitvorwahl, Ausgleichs-bzw.
Nachgarzeit
(12) Stopp-/Löschtaste:
Eine Betätigung der Stopp-/Löschtaste
vor dem Betrieb löscht alle eingegebenen
Daten. Durch einmaliges Drücken der
Stopp-/ Löschtaste während des
Kochvorganges wird der Betrieb unter-
brochen, durch zweimaliges Drücken
werden alle Eingaben gelöscht und in der
Digitalanzeige erscheint wieder die
Uhrzeit.
(13) Starttaste: Durch Drücken der Starttaste
beginnt das Mikrowellengerät zu arbeit-
en. Wird die Tür geöffnet bzw. die Stopp-/
Löschtaste während des Betriebs einmal
betätigt, muß die Starttaste erneut
gedrückt werden, damit das Gerät wieder
arbeitet.
HINWEIS:
Wird ein Betriebsvorgang gewählt und
die Start-Taste nicht gedrückt, bricht das
Gerät den Vorgang nach 6 Minuten
automatisch ab. Das Display kehrt
zurück zum Zeitanzeige-Modus.
Dieses Gerät verfügt über eine Energiesparfunktion.
Bitte beachten:
1. Im Bereitschaftsmodus ist die Helligkeit des Displays reduziert.
2. Das Mikrowellengerät geht beim ersten Einschalten und sofort nach Abschluss des letzten
Betriebsvorgangs in den Bereitschaftsmodus über.
(1)
(2)
(3)
(11)
(12)
(13)
(10)
(4)
(5)
(6)
(7)
(8)
(9)
Page 27

D-7
Deutsch
Tastatur und Bedienung
Bei viermaligem Drücken der Vorwahlzeit/Standzeit-Taste wird die Laufschrift-Funktion ausgeschaltet. Zum erneuten Einschalten drücken Sie viermal die Vorwahlzeit/Standzeit-Taste.
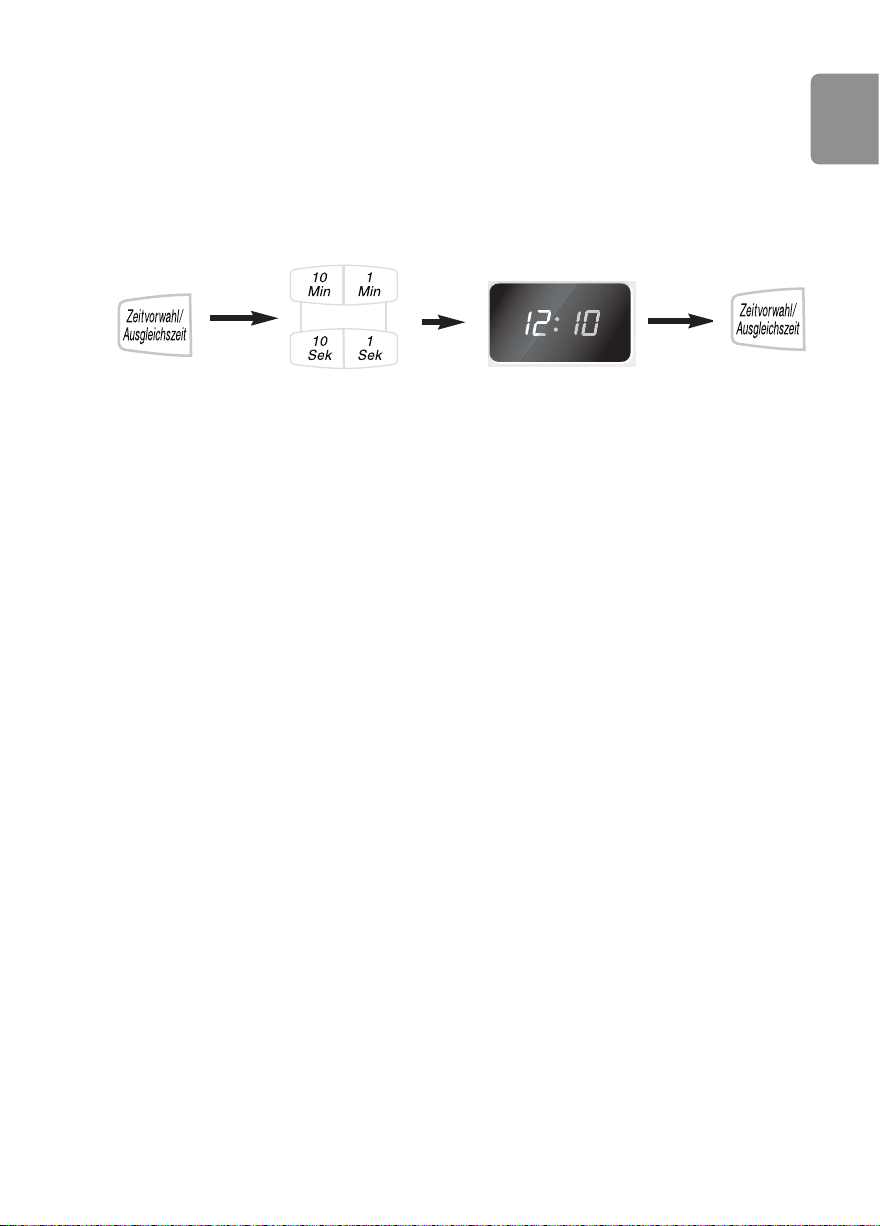
• Drücken Sie einmal
auf die Uhr-Taste.
Der Doppelpunkt
blinkt.
• Drücken Sie die entsprechenden
Uhrzeittasten zum Einstellen der
korrekten Uhrzeit.
Die Uhrzeit erscheint im Anzeigenfeld
und der Doppelpunkt blinkt.
• Drücken Sie auf die
Uhr-Taste.
Der Doppelpunkt hört auf
zu blinken und die Uhrzeit
ist eingestellt.
Anmerkungen:
1. Um die Uhrzeit zu verändern, wiederholen Sie die oben beschriebenen Schritte.
2. Die eingestellte Uhrzeit bleibt solange erhalten, bis die Stromzufuhr unterbrochen wird.
3. Diese Anzeige ist eine 24-Stunden Uhr.
Einstellen der Uhr: Beispiel: Wenn Sie 12:10 Uhr einstellen
wollen, verfahren Sie wie folgt:
Page 28

Drücken Sie Energie Niveau Wattage
Einmal Max (Hoch) 1000 W
Zweimal Min. (Auftauen) 270 W
3-mal Mittel 600W
4-mal Niedrig 440 W
5-mal auf kleiner Flamme kochen 250 W
6-mal Erwärmen 100 W
D-8
Tastatur und Bedienung
Mikrowellenbetrieb
Kindersicherung:
Die Kindersicherung kann aktiviert werden, wenn ein Doppelpunkt bzw. die Uhrzeit im Anzeigenfeld steht. Nach Aktivierung der Kindersicherung kann keine Eingabe über das Bedienfeld erfolgen. Die Funktionen des Gerätes sind blockiert, die Tür kann wie gewohnt geöffnet werden.
Eingabe:
Löschen:
• Drücken Sie 3mal die Starttaste.
Die Uhrzeit erscheint nicht mehr im
Anzeigenfeld, ist aber nicht gelöscht. Im
Anzeigenfeld erscheint ”E“ und die
Kindersicherung ist aktiviert.
• Drücken Sie 3mal die Stopp-/Löschtaste.
Die Uhrzeit erscheint wieder im
Anzeigenfeld, die Kindersicherung
ist gelöscht.
Es stehen 6 verschiedene Mikrowellen-Leistungsstufen zur Verfügung. Die Wattleistungen der
einzelnen Leistungsstufen entnehmen Sie bitte der nachfolgenden Tabelle.
Zubehör:
• Stellen Sie die MikrowellenLeistungswahltaste auf die
gewünschte
Mikrowellenleistungsstufe.
•
Stellen Sie mit dem Drehregler für
die Zeit-/ Gewichtseingabe die
gewünschte Zeit ein (Maximale
Leistung: maximal 30 Minuten, alle
anderen Leistungsstufen: maximal
90 Minuten).
Der nächste durchzuführende
Eingabeschritt “START” sowie die
eingegebene Leistung und Zeit
erscheinen abwechselnd im
Anzeigenfeld. Ebenso wird das
Mikrowellensymbol angezeigt.
Glasdrehteller
• Drücken Sie
die Starttaste.
HINWEIS:
Zum Aktivieren der Kindersicherung muss die Start-Taste dreimal innerhalb von 10 Sekunden
gedrückt werden.
Page 29

D-9
Deutsch
Mikrowellenbetrieb
Grillbetrieb
Anmerkungen:
1. Wiederholen Sie die Einstellung der Mikrowellen-Leistungsstufe und Kochzeit für 2- und 3-
Stufen-Kochvorgänge, bevor Sie das Start-Taste drücken. Beispiel: Kasserolle -- 10 Minuten
auf Einstellung Hoch, um die Kasserolle zum Kochen zu bringen. 60 Minuten auf kleiner
Flamme. Zum Garen 10 Minuten auf Einstellung Warm, damit der Geschmack sich entfalten
kann.
2. Die Standzeit kann nach Einstellung der Mikrowellenleistung und der Zeit programmiert
werden.
3. Die Garzeit kann während des Garens verlängert werden. Drücken Sie hierzu die
1-Min-Taste so oft, wie erforderlich. Die Garzeit wird hierdurch in Einminuten-Intervallen
verlängert (bis zu maximal 10 Minuten.
4. Das Mikrowellengerät läuft automatisch auf Leistungsstufe Hoch, wenn die Kochzeit
eingegeben wird, ohne dass vorher eine Leistungsstufe gewählt wurde.
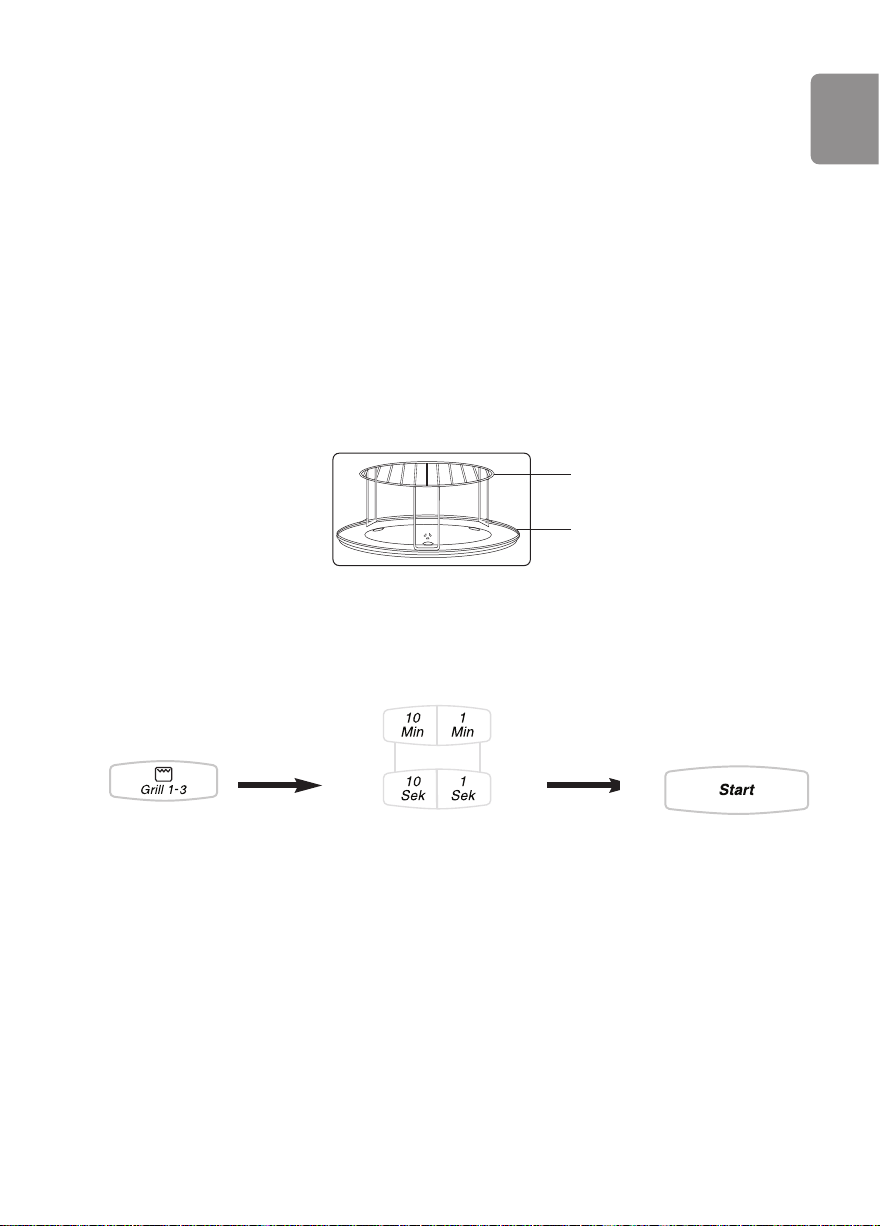
Der Grill verfügt über 3
Grilleinstellungen.
1-mal drücken - GRILL 1 1100 W
2-mal drücken - GRILL 2 800 W
3-mal drücken - GRILL 3 600 W
• Wählen Sie die
Grilleinstellung.
Drücken Sie einmal für
Grill 1 (Hoch), zweimal
für Grill 2 (Mittel) oder
3-mal für Grill 3 (Niedrig).
• Stellen Sie mit dem
Drehregler für die Zeit
/Gewichtseingabe die
gewünschte Zeit ein
(maximal 90 Minuten).
• Betätigen Sie
die Starttaste.
Anmerkungen:
1. Der Grillbetrieb startet nur, wenn die Gerätetür geschlossen ist.
2. Die Garzeit kann während des Garens verlängert werden. Drücken Sie hierzu die
1-Min-Taste so oft, wie erforderlich.
Die Garzeit wird hierdurch in Einminuten-Intervallen verlängert (bis zu maximal 10
Minuten).
Rost
Glasdrehteller
Zubehör:
Page 30

D-10
Grillkombinationsbetrieb
Rost
Glasdrehteller
Zubehör:
1-mal Mittel 600 W
2-mal Niedrig 440 W
3-mal
Niedrige
Garstufe
250 W
4-mal Aufwärmen 100 W
Glasdrehteller
•
Stellen Sie mit dem
Drehregler für die
Zeit-/Gewichtseingabe
die gewünschte Zeit
ein (maximal 90
Minuten).
•
Betätigen Sie die
Starttaste.
• Drücken Sie diese Taste, bis
die gewünschte Leistung im
Display-Fenster angezeigt
wird. Hinweis: Es ist nicht
möglich, im Kombinationsmodus 1000W / 270W
einzustellen.
•
Wählen Sie die Grillstufe.
Für Grillstufe 1 (Hoch)
1-mal drücken, für Grillstufe 2
(Mittel) 2-mal, für Grillstufe 3
(Niedrig) 3-mal.
• Drücken Sie die
Kombinationstaste.
Anmerkungen:
1. Der Grillkombinationsbetrieb startet nur, wenn die Gerätetür geschlossen ist.
2. Sie können die Kochzeit während des Gerätebetriebs verändern. Betätigen Sie den
Drehregler für die Zeiteingabe und verlängern bzw. verkürzen Sie die Zeit. Die
Verlängerung bzw. Verkürzung erfolgt in 1-Minuten-Schritten bis zu 10 Minuten.
Wird der Drehregler für die Zeiteingabe auf Null gestellt, ist der Kochvorgang beendet.
Page 31

D-11
Deutsch
Gewichtsautomatik zum Auftauen
Mit dieser Ausstattung können Sie Lebensmittel nach Gewicht auftauen. Wählen Sie das gewünschte
Programm und geben Sie das Gewicht des Lebensmittels auf 10g genau ein. Bei jedem Programm wird
nach Betätigen der Gewichtsautomatiktaste zum Auftauen zuerst ein Gewicht angezeigt, das aufgrund
haushalts- oder handelsüblicher Lebensmittelmengen festgelegt wurde (Erstgewicht).
•
Betätigen Sie die
Starttaste.
•
Wählen Sie das gewünschte
Programm durch ein- oder
zweimaliges Drücken der
Gewichtsautomatiktaste zum
Auftauen. Für tiefgekühltes
Brot 3-mal drücken.
•
Geben Sie mit dem Drehregler für die
Zeit- und Gewichtseingabe das
Gewicht des Lebensmittels ein.
Langsames Drehen des Reglers wird in
Schritten von 10 g gerechnet. Schnelles
Drehen des Reglers wird in Schritten
von 100 g gerechnet.
Fleisch/
Fisch
Erstgewicht:
800 g
Flache Fleischstücke
wie z.B. Steak,
Rouladen, Gulasch
und Hackfleisch
200-1000 g
Umgedrehte
Untertasse auf
einem flachen
Teller
Wickeln Sie die Enden der Beine
von ganzen Hähnchen und Enten
in Alufolie, bevor Sie diese
auftauen. Wenden Sie Lebensmittel ab 500 g während der
Auftauzeit (Signalton). Kleine
Fleischstücke nach dem Auftauen
auseinandernehmen, bei Hackfleisch den verbleibenden Eiskern
auseinanderbröseln.
Geflügel und Wild 200-2500 g
Braten 500-2500 g
Fisch 200-1000 g
Brot/
Kuchen
Erstgewicht:
500 g
Brot, ganz oder in
Scheiben
100-1000 g Flacher Teller
(wenn möglich
umgedreht)
Brot ab 310 g während der Auftauzeit (Signalton) wenden.
Mürbeteigkuchen mit Obst benötigt
bis zum vollständigen Auftauen
eine längere Stehzeit. Sahnetorten,
Crèmeschnitten und Kuchen mit
Schokoladenguß sind für diese
Automatik nicht geeignet. Angaben
zum Auftauen finden Sie hierfür in
der Tabelle auf der Seite 37.
Hefekuchen, Biskuit,
Rührkuchen,
Käsekuchen,
Blätterteig- oder
Hefegebäck,
Mürbeteigkuchen mit
Obst
100-1500 g
Die Lebensmittel sollten möglichst flach und gleichmäßig angeordnet bei mindestens -18°C eingefroren
und gelagert werden. Achten Sie auf p ortions- und formgerechtes Einfrieren, damit das Lebensmittel
zum Auftauen anschließend auch in Ihr Gerät passt. Entfernen Sie grundsätzlich sämtliches Verpackungsmaterial. Läßt sich das Lebensmittel schwer aus der Verpackung lösen, tauen Sie es bei 1000 Watt
in 1-2 Minuten an. Legen Sie das Lebensmittel zum Auftauen auf einen Teller; bei dem Programm
Fleisch/Fisch bitte zusätzlich auf eine umgedrehte Untertasse, damit der entstehende Fleischsaft
abtropfen kann. Dieser Fleischsaft darf in keinem Fall weiter verwendet werden oder mit anderen
Lebensmitteln in Berührung kommen. Beim Auftauen mit den Gewichtsautomatikprogrammen sind Ausgleichszeiten (Stehzeiten) erforderlich, bis das Lebensmittel vollständig aufgetaut ist oder weiterverarbeitet werden kann. Je nach Gewicht und Art des Lebensmittels sind bis zu 90 Minuten einzuplanen.
Programm Lebensmittel
Hinweise/Tips
Zubehör
Mindest-/
Höchstgewicht
Page 32

D-12
Anmerkungen:
1. Ist die Erwärm- oder Garzeit länger als 60 Minuten, wird die Zeit im Anzeigenfeld in Stunden
und Minuten angezeigt.
2. Auf den Seiten D-13 bis D-14 finden Sie die zur Verfügung stehenden
Gewichtsautomatikprogramme. Halten Sie sich unbedingt an die angegebenen
Gewichtsbegrenzungen und Zubehörangaben.
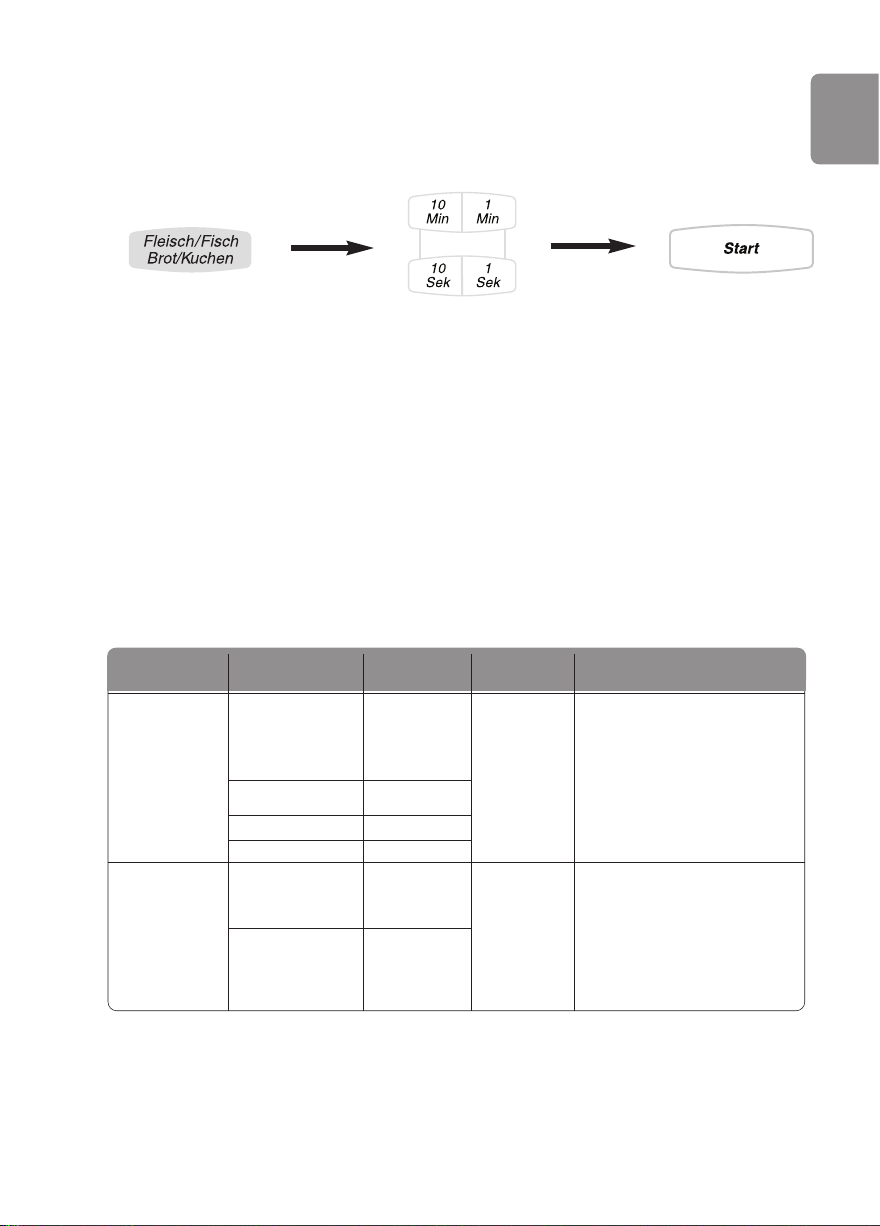
• Wählen Sie das gewünschte
Autogewichtprogramm,
indem Sie die
Auto-Programmtaste drücken.
Das Display blättert
dabei durch die Autogewicht
Kochprogramme.
• Geben Sie mit dem Drehregler für die Gewichtseingabe das Gewicht des
Lebensmittels ein.
Langsames Drehen des
Reglers wird in Schritten von
10 g gerechnet. Schnelles
Drehen des Reglers wird in
Schritten von 100 g
gerechnet.
Diese Ausstattung ermöglicht Ihnen die Zubereitung vieler Lebensmittel. Für jedes Programm
wurden unterschiedliche Mikrowellenleistungen und Grilleistungen sowie Zeiten in Abhängigkeit
vom Lebensmittelgewicht ermittelt. Wählen Sie das gewünschte Programm und geben Sie das
Gewicht des Lebensmittels auf 10g genau ein. Bei jedem Programm wird nach Betätigen der
entsprechenden Gewichtsautomatiktaste zuerst ein Gewicht angezeigt, das aufgrund haushaltsoder handelsüblicher Lebensmittelmengen festgelegt wurde.
Beispiel:
Gewichtsautomatik zum Erwärmen, Garen
oder Kombinationsgaren
• Betätigen Sie die
Starttaste
or
Page 33

D-13
Deutsch
Gemüse
(frisch)
Erstgewicht:
500 g
Blumenkohl, Brokkoli,
Chicorée, Chinakohl,
Erbsen, Fenchel,
Kohlrabi, Möhren,
Paprika, Lauch,
Rosenkohl, Sellerie,
Steckrüben, Weißkohl,
Wirsingkohl und
Zucchini.
200 – 1000 g
(net, cleaned)
Gemüse in einer Form
mit Deckel garen. Pro
100 g Gemüse 1 EL
Wasser und etwas
Salz zufügen.
Gemüse während der
Garzeit (Signalton)
und vor der Standzeit
umrühren.
Fisch
(frisch)
Erstgewicht:
500 g
Fischfilet, wie z.B.
Scholle, Kabeljau,
Seelachs, Rotbarsch,
Steinbeißer.
Kein Lachsfilet
200 – 1000 g Fischfilet in einer
Form mit Deckel
garen. 1 - 3 EL
Flüssigkeit (Wasser,
Zitrone, oder Wein)
zufügen. Nach
der Garzeit noch 5-10
Minuten geschlossen
stehen lassen.
Reis
Erstgewicht:
200 g
Parboiled Langkornreis, Vollkornund
Naturreis, Wildreismischung, Ketan- oder
Jasminreis.
100 – 300 g Wasser nach Her-
stellerangaben auf der
Verpackung zugeben
(normalerweise
zwei- bis dreimal die
Reismenge) und mit
Deckel garen. Rühren
Sie ungefähr 18
Minuten vor Ende der
Kochzeit (akustisches
Signal) und vor Ende
der Standzeit den
Reis einmal um.
Gewichtsautomatikprogramme
Die Gewichtsautomatik beinhaltet drei Programme zum Garen von verschiedenen Lebensmitteln.
Verwenden Sie für die Programme Gemüse und Fisch ausschließlich frische Ware. Bereiten Sie
die Lebensmittel wie gewohnt vor, d.h. Gemüse putzen und kleinschneiden, Fisch säubern etc.
Garen Sie die Lebensmittel ausschließlich in einer mikrowellengeeigneten Form mit Deckel.
Beachten Sie die Flüssigkeitszugabe und denken Sie daran, die Lebensmittel ggf. umzurühren
bzw. zu wenden. Planen Sie nach dem Garen eine Standzeit (Nachgarzeit) von 5-10 Minuten ein,
damit ein Temperaturausgleich stattfinden kann. Dies ist besonders wichtig für Fisch.
Hinweise:
1. Die Flüssigkeitszugaben werden bei der Gewichtseingabe nicht berücksichtigt.
2. Bei den Programm Gemüse ertönt nach Hälfte der Garzeit ein Signal; rühren Sie bitte die
Lebensmittel zu diesem Zeitpunkt um. Bei Reis wird ungefähr 18 Minuten vor Ende der Kochzeit
ein akustisches Signal abgegeben wenn das Lebensmittel umgerührt werden sollte.
3. Halten Sie sich unbedingt an das Mindest- und Höchstgewicht der für die Programme
geeigneten Lebensmittel. Gewichte außerhalb der Begrenzung in keinem Fall mit oben
genannten Gewichtsautomatikprogrammen garen.
4. Bitte beachten Sie, daß die Ergebnisse abhängig von der Lebensmittelqualität, der
Beschaffenheit oder den Zutaten unterschiedlich ausfallen können.
Programm Lebensmittel
Hinweise/Tips
Zubehör
Mindest-/
Höchstgewicht
Page 34

D-14
Geflugelteile
Erstgewicht:
800 g
Frischen
geflugelteile
z.B. Schenkeln
oder-flügel oder
vierteln
200 – 1000 g Mittlerer Rost Legen Sie Hähnchenteile
mit der Hautseite nach unter
in eine mikroellengeeignete,
hitzebeständigeForm und
stellen Sie diese auf den
Rost. Wenden Sie das
Geflügel während der
Garzeit beim Ertönen des
Signals.
TK-Pizza
(tiefgekühlt
bei
-18°C)
Erstgewicht:
200 g
Tiefgekühlte
Pizza, industriell
vorgefertigt,
z.B. von Dr.
Oetker,
Feinkost Käfer,
Iglo oder
Wagner
200- 500g Mittlerer Rost Zum Erhitzen und Bräunen
von tiefgekühlter Pizza,
industriell vorgefertigt. Entfernen Sie die Verpackung
und erhitzen Sie die
Pizza direkt auf dem Rost.
TK-Auflauf
(tiefgekühlt)
Erstgewicht:
350 g
Tiefgekühlte
Aufläufe
(Nudelauflauf,
Gemüseauflauf
oder süße
Aufläufe),
industriell
vorgefertigt,
z.B von Iglo
oder Dr. Oetker
300 – 600g Mikrow-
ellengeeignete
und
hitzebeständige
Auflaufform.
Den Auflauf aus der
Verpackungnehmen und in
einer portionsgerechten
Form zubereiten.
Gewichtsautomatikprogramme
Hinweise:
1. Bei dem Programm Geflugelteile ertönt nach ca. 2/3 der Garzeit ein Signal. Zu diesem
Zeitpunkt bitte das Lebensmittel wenden.
2. Bitte beachten Sie, daß die Ergebnisse abhängig von der Lebensmittelqualität, der Beschaffenheit
oder den Zutaten –vor allem bei den vorgefertigten Tiefkühl-Produkten – unterschiedlich ausfallen
können.
3. Halten Sie sich unbedingt an das Mindest- und Höchstgewicht der für die Programme geeigneten
Lebensmittel.
Gewichte außerhalb der Begrenzung in keinem Fall mit oben genannten Gewichtsautomatikprogrammen zubereiten.
Für das Garen von Lebensmitteln mit gleichzeitiger Bräunung stehen für die Gewichtsautomatik drei verschiedene Programme zur Auswahl. Verwenden Sie für das Programm Geflugelteile ausschließlich
frische Ware. Würzen Sie die Lebensmittel vor der Zubereitung wie gewohnt. Um eine Bräunung von
beiden Seiten zu gewährleisten, ist ein Wenden erforderlich. Geflügel zuerst
mit der Haut- oder Brustseite nach unten zubereiten, bevor Sie das Lebensmittel wenden und weitergaren. Lassen Sie Fleisch vor dem Servieren zum Temperaturausgleich
unbedingt noch ca. 10 Minuten ruhen (Standzeit). Bei den Tiefkühl (TK)-Produkten handelt es sich um
industriell vorgefertigte, tiefgekühlte Waren, die Sie im Lebensmittelhandel
kaufen können. Nehmen Sie die Produkte zur Zubereitung grundsätzlich aus der Verpackung.
Bitte halten Sie sich unbedingt an die Zubehörangaben und benutzen Sie ggf. nur mikrowellengeeignetes und hitzebeständiges Geschirr. Die Lebensmittel für diese Gewichtsautomatik
in keinem Fall abdecken.
Programm Lebensmittel
Hinweise/Tips
Zubehör
Mindest-/
Höchstgewicht
Page 35

D-15
Deutsch
Gebrauch des Gerätes mit Zeitvorwahl
2. Beträgt die programmierte Verzögerungszeit mehr als ein Stunde, erfolgt der Countdown in
Minuteneinheiten. Beträgt die programmierte Verzögerungszeit weniger als eine Stunde,
erfolgt der Countdown in Sekundeneinheiten.
3. Startverzögerung kann nicht vor den automatischen Programmen programmiert werden.
• Drücken Sie die
Verzögern/StehenTaste
• Stellen Sie die Verzögerungszeit ein, indem Sie den
Zeit/Gewichtsregler drehen. (Bis zu 9 Studen).
• Stellen Sie das gewünschte
Kochprogramm und die Kochzeit ein.
• Drücken Sie die Starttaste
Beispiel:
Start verzögern: 1 Stunde
Hohe Kochleistung: 10 Min.
Kochen auf kleiner Flamme: 20 Min.
5-mal
Einmal
Indem Sie die Verzögern/Stehen-Taste benutzen, können Sie den verzögerten Beginn des
Kochvorgangs programmieren.
HINWEIS:
1. Es können drei Kochstufen programmiert werden, einschließlich verzögertem
Kochbeginn.
Zum Beispiel:
Page 36

D-16
Standzeit
• Stellen Sie das gewünschte Kochprogramm und die Kochzeit ein.
• Drücken Sie auf die
Verzögern/Stehen-Taste
• Stellen Sie die gewünschte
Zeitspanne ein, indem Sie die
Zeit/Gewicht-den Zeit/GewichtRegler drehen (bis zu 9 Stunden.)
• Drücken Sie die
Starttaste.
HINWEIS:
1. Es können drei Kochstufen programmiert werden, einschließlich Standzeit.
2. Wird die Herdtür während der Standzeit oder der Minutenschaltuhr geöffnet, wird der
Countdown im Display-Fenster fortgesetzt.
3. Diese Funktion kann auch als Zeit-Schaltuhr benutzt werden. In diesem Fall drücken Sie das
Verzögern/Stehen-Taste, stellen die Zeit ein und drücken das Start-Taste.
Hohe Kochleistung: 4 Min.
Standzeit: 5 Min.
Hohe Kochleistung: 2 min.
Einmal
Beispiel:
Die Verzögern/Stehen-Taste können Sie dazu benutzen, die Standzeit nach Ablauf des
Kochvorgangs zu programmieren oder um den Herd als Minuten-Schaltuhr zu programmieren.
Einmal
Page 37

D-17
Deutsch
Fragen und Antworten
F: Warum läßt sich das Mikrowellengerät
nicht einschalten?
A: Läßt sich das Mikrowellengerät nicht ein-
schalten, überprüfen Sie bitte
folgendes:
1. Steckt der Netzstecker fest in der
Steckdose? Ziehen Sie den Stecker aus
der Steckdose und warten Sie 10
Sekunden, bevor Sie diesen wieder
hineinstecken.
2. Überprüfen Sie die Netzsicherung und
ersetzen Sie diese gegebenenfalls.
3. Ist die Netzsicherung in Ordnung? Stecken
Sie den Netzstecker eines anderen
Elektrogerätes in die gleiche Steckdose.
Arbeitet dieses Elektrogerät auch nicht, ist
die Steckdose defekt. Arbeitet das Gerät
jedoch ordnungsgemäß, ist Ihr
Mikrowellengerät defekt. Wenden Sie sich
in diesem Fall bitte unbedingt an einen
Panasonic Kundendienst.
F: Das Mikrowellengerät verursacht
Fernsehstörungen. Ist das normal?
A: Beim Betrieb des Mikrowellengerätes
können Fernseh- und Radiostörungen
auftreten. Es handelt sich um ähnliche Störungen, wie sie durch kleine Elektrogeräte wie
Mixer, Staubsauger, Haartrockner usw. verursacht werden
können. Dies bedeutet nicht, daß Ihr Mikrowellengerät defekt ist.
F: Warum nimmt das Mikrowellengerät das
gewünschte Programm nicht an?
A: Der Herd ist so ausgelegt, dass er kein
falsches Programm akzeptiert. Zum
Beispiel akzeptiert das Gerät keine vierte
Stufe oder ein Autogewicht-Programm nach
einem verzögerten Start.
F: Warum strömt manchmal warme Luft aus
dem Mikrowellengerät?
A: Die erhitzten Lebensmittel erwärmen den Gar-
raum. Diese warme Luft wird durch die
zirkulierende Luftströmung aus dem Gerät
nach außen befördert. In dieser
erwärmten Luft sind keine Mikrowellen enthalten. Die Lüftungsöffnungen dürfen während
des Kochens in keinem Fall abgedeckt werden.
F: “D” erscheint im Anzeigenfeld, was
bedeutet das?
A: Das Gerät ist mit einem Demonstrationspro-
gramm für den Fachhandel ausgestattet.
Sie löschen diese Funktion, indem Sie
einmal Mikrowelle und 4 Mal die Stopp/Abbrechen-Taste drücken.
F: Kann im Mikrowellengerät ein
herkömmliches Fleischthermometer
verwendet werden?
A: Nur für den reinen Grillbetrieb können Sie ein
Fleischthermometer verwenden. Benutzen Sie
für den Mikrowellenbetrieb bzw. für den Kombinationsbetrieb niemals ein herkömmliches
Fleischthermometer, denn das Metall des
Thermometers könnte Funkenbildung verursachen.
F: Warum sind während des
Kombinationsgarens brummende und
klickende Geräusche zu hören?
A: Diese Geräusche sind bedingt durch das
automatische Umschalten von Mikrowellenleistung auf Grilleistung während des Kombinationsbetriebes, dies ist normal.
F: Warum riecht das Mikrowellengerät
unangenehm und erzeugt Rauch nach
dem Grill- bzw. Kombinationsbetrieb?
A: Nach mehrfachem Gebrauch des Gerätes ist
es notwendig, das Gerät gründlich zu reinigen.
Sie können zusätzlich das Gerät ohne Lebensmittel, Glasdrehteller und Rollenring für 5
Minuten mit dem Grill in Betrieb setzen. Damit
ist sichergestellt, daß Lebensmittelrückstände
und konservierende Ölreste verbrennen, die
den Geruch und Rauch verursachen.
F: Das Gerät stoppt den Mikrowellen-Garvorgang
und die Meldung „H97“ oder „H98“ erscheint
auf dem Display.
A: Die Fehlermeldung weist auf ein Problem bei
der Mikrowellenerzeugung hin. Bitte wenden
Sie sich an einen autorisierten
Kundendienstvertreter.
Page 38

D-18
Pflege des Mikrowellengerätes
1. Vor dem Reinigen den Netzstecker aus
derSteckdose ziehen.
2. Halten Sie stets den Garraum, die Tür
und den Türrahmen sauber. Entfernen
Sie Spritzer von Speisen und Flüssigkeiten, die an den Garraumwänden und der
Tür haften, mit einem feuchten Tuch und
ggf. mildem Reinigungsmittel. Scharfe
Reinigungs- und Scheuermittel sind nicht
empfehlenswert. VERWENDEN SIE IN
KEINEM FALL BACKOFENREINIGUNGS-MITTEL. Verwenden Sie zur
Reinigung der gläsernen Mikrowellentür
keine Scheuermittel oder scharfe Metallschaber, da diese eine Beschädigung
der Oberfläche zur Folge haben und zum
Zerspringen des Glases führen könnte.
3. Das Gehäuse des Gerätes sollte feucht
abgewischt und mit einem weichen Tuch
getrocknet werden. Achten Sie darauf,
daß kein Wasser durch die Entlüftungsschlitze ins Geräteinnere gelangt, da das
Gerät sonst Schaden nehmen könnte.
4. Ist das Bedienfeld verschmutzt, säubern
Sie dieses mit einem feuchten, weichen
Tuch. Verwenden Sie in keinem Fall
scharfe Reinigungs- bzw. Scheuermittel.
Damit es nicht zu einem unvorhergesehen Betrieb des Gerätes kommt, lassen
Sie die Tür des Gerätes beim Säubern
geöffnet.
5. Während des Betriebes kann sich durch
Verdampfen von Feuchtigkeit innen oder
außen auf dem Sichtfenster des Gerätes
Kondenswasser niederschlagen und evtl.
unter der Tür abtropfen. Dieser Vorgang
ist normal und kann verstärkt bei niedrigen Raumtemperaturen und hoher
Luftfeuchtigkeit auftreten. Die Sicherheit
des Gerätes ist dadurch nicht beeinträchtigt. Bitte nach dem Betrieb das Kondenswasser mit einem weichen Tuch
abwischen.
6. Bitte den Glasdrehteller herausnehmen
und abkühlen lassen, bevor Sie diesen in
warmem Seifenwasser oder in der Spülmaschine reinigen.
7. Der Rollenring und die Vertiefung im
Geräteboden sollten regelmäßig gereinigt
werden. Damit werden unnötige Betriebsgeräusche vermieden und die Ansammlung von Lebensmittelresten verhindert.
Einfach den Boden mit einem feuchten
Tuch auswischen und anschließend
trocknen. Der Rollenring kann mit mildem
Seifenwasser gereinigt werden. Achten
Sie darauf, daß Sie den Rollenring und
Drehteller nach dem Reinigen wieder
richtig einsetzen.
8. Während des Grill- und Kombinationsbetriebes können Spritzer von Speisen und
Getränken an den Garraumwände haften
bleiben. Wird das Gerät nicht regelmäßig
gereinigt, kann es während des Betriebes
zur Rauchentwicklung kommen.
9. Ein Dampfreiniger darf nicht zur Reinigung benutzt werden.
10. Das Mikrowellengerät darf ausschließlich
vom qualifizierten Panasonic Kundendienst geprüft oder repariert werden.
11. Wird das Mikrowellengerät nicht in einem
sauberen Zustand gehalten, kann dies zu
einer Güteminderung der Oberflächen
führen, was wiederum eine Beeinträchtigung der Lebensdauer des Gerätes mit
sich bringen und eventuell eine Gefahr für
den Benutzer darstellen kann.
12. Die Luftabzüge immer freihalten.
Überprüfen Sie, dass die Luftabzüge an
der Ober-, Unter- und Rückseite des
Gerätes nicht durch Staub oder anderes
Material verstopft werden. Wenn die
Luftabzüge verstopft sind, kann dies zu
Überhitzung führen und die Funktionsfähigkeit des Gerätes
beeinträchtigen.
Page 39

D-19
Deutsch
Technische Daten
Netzspannung: 230 V, 50 Hz
Leistungsaufnahme: Maximum; 2150W
Mikrowelle; 1200 W
Grill; 1100 W
Ausgangsleistung: Mikrowelle; 1000 W (IEC-60705)
Grill; 1100 W
Äußere Abmessungen: 510 (B) x 380 (T) x 304 (H) mm
Garraumabmessungen: 359 (B) x 352 (T) x 217 (H) mm
Gewicht: 13.5 kg
Geräuschpegel: 50 dB
Benutzerinformationen zur Entsorgung von elektrischen und
elektronischen Geräten (private Haushalte)
Entsprechend der grundlegenden Firmengrundsätze der Panasonic-Gruppe wurde ihr
Produkt aus hochwertigen Materialien und Komponenten entwickelt und hergestellt,
die recycelbar und wieder verwendbar sind.
Dieses Symbol auf Produkten und/oder begleitenden Dokumenten bedeutet, dass
elektrische und elektronische Produkte am Ende ihrer Lebensdauer vom Hausmüll
getrennt entsorgt werden müssen.
Bringen Sie bitte diese Produkte für die Behandlung, Rohstoffrückgewinnung und Recycling zu
den eingerichteten kommunalen Sammelstellen bzw. Wertstoffsammelhöfen, die diese Geräte
kostenlos entgegennehmen.
Die ordnungsgemäße Entsorgung dieses Produktes dient dem Umweltschutz und verhindert
mögliche schädliche Auswirkungen auf Mensch und Umwelt, die sich aus einer unsachgemäßen
Handhabung der Geräte am Ende Ihrer Lebensdauer ergeben könnten.
Genauere Informationen zur nächstgelegenen Sammelstelle bzw. Recyclinghof erhalten Sie bei
Ihrer Gemeindeverwaltung.
Für Geschäftskunden in der Europäischen Union
Bitte treten Sie mit Ihrem Händler oder Lieferanten in Kontakt, wenn Sie elektrische und
elektronische Geräte entsorgen möchten. Er hält weitere Informationen für sie bereit.
Informationen zur Entsorgung in Ländern außerhalb der Europäischen Union
Dieses Symbol ist nur in der Europäischen Union gültig.
Bei diesem Produkt handelt es sich um ein Gerät, das die europäische Norm für
EMV-Funkstörungen (EMV = Elektromagnetische Verträglichkeit), EN 55011, erfüllt. Gemäß
dieser Norm ist dieses Produkt ein Gerät der Gruppe 2, Klasse B und hält alle Grenzwerte ein.
Gruppe 2 bedeutet, dass in diesem Gerät Hochfrequenz-Energie für das Erwärmen oder Garen
von Lebensmitteln absichtlich als elektromagnetische Strahlung erzeugt wird. Klasse B sagt aus,
dass dieses Produkt in einem normalen Wohnbereich betrieben werden darf.
Gemäß der Richtlinie 2004/108/EC, Artikel 9(2)
Panasonic Testing Centre
Panasonic Deutschland, eine Division der Panasonic Marketing Europe GmbH
Winsbergring 15,22525 Hamburg, Deutschland
Hergestellt von Panasonic Home Appliances Microwave Oven (Shanghai) Co., Ltd, 898 Longdong Road, Pudong, Shanghai, 201203, China.
Page 40

F00039G00GP
Panasonic Corporation
http://panasonic.com.net
© Panasonic Corporation 2009
Printed in China
 Loading...