

Page 1
Bedienungsanleitung und Mikrowellen-Kochbuch
Mode dʼemploi et livre de la cuisine aux micro-ondes
Manuale di
Istruzioni
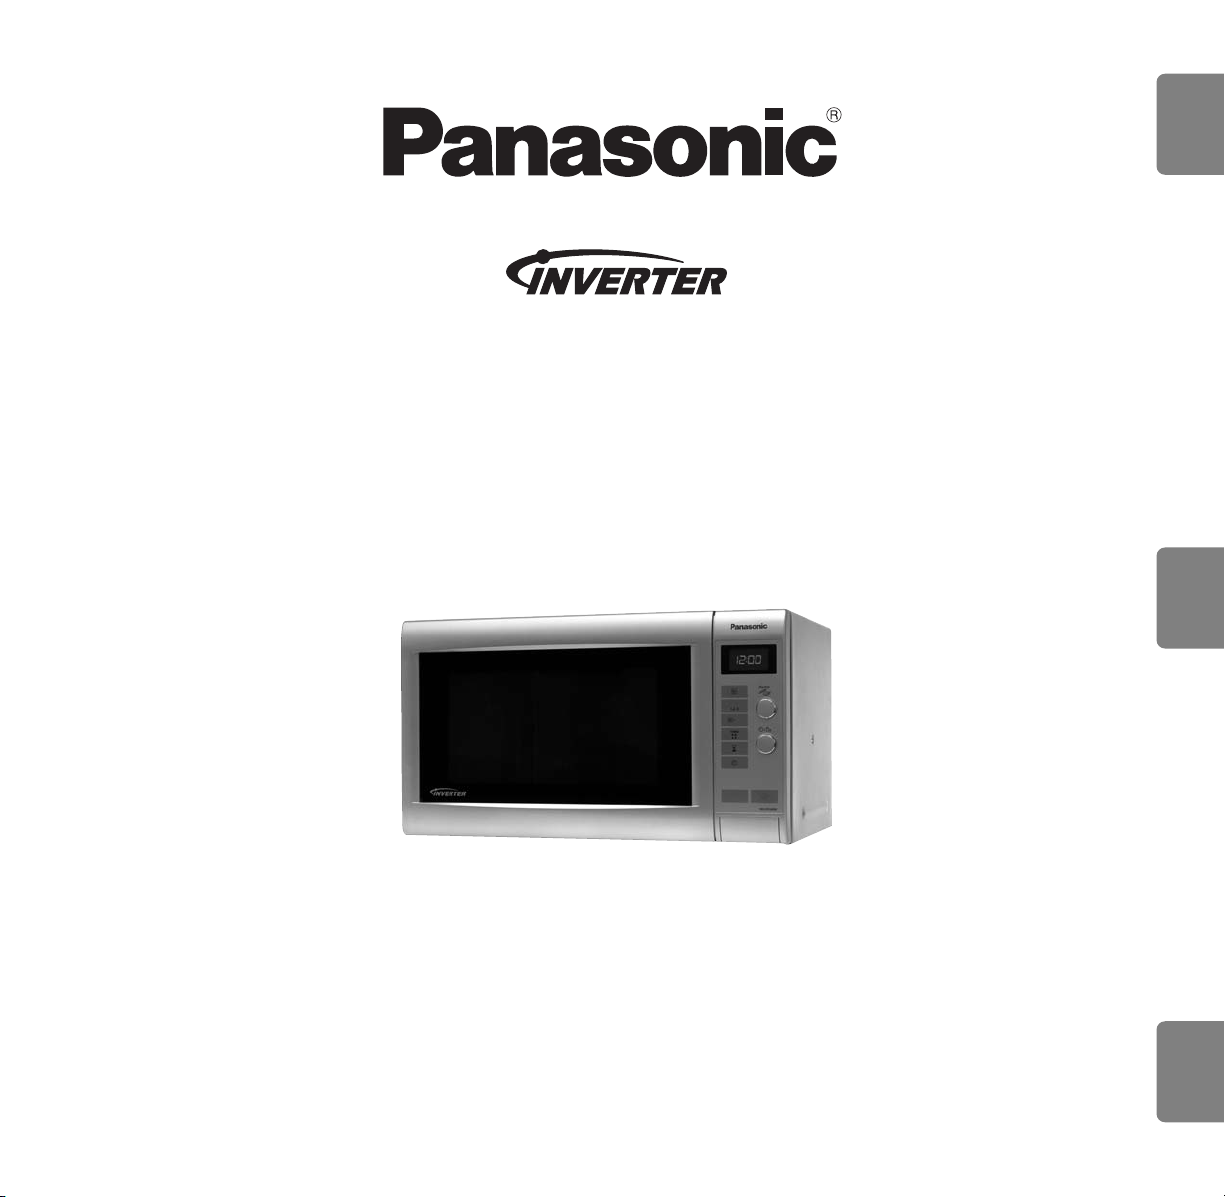
NN-GD569M
NN-GD559W
Deutsch
Français Italiano
WICHTIGE SICHERHEITSANWEISUNGEN
Bitte sorgfältig durchlesen und zur weiteren Bezugnahme aufbewahren
INSTRUCTIONS DE SÛRETÉ IMPORTANTES
lisez attentivement les recommandations dʼutilisation et conservez-les soigneusement
ISTRUZIONI IMPORTANTI PER LA SICUREZZA
Leggere attentamente queste note e conservarle per riferimento futuro
Page 2

En-1
Installation and Connection.................................................................2
Safety Instructions ..............................................................................3
Important Information..........................................................................4
Control Panel ......................................................................................5
Outline Diagram ..................................................................................6
Controls and Operation Procedure ..................................................6-7
Microwave Cooking and Defrost .........................................................8
Grilling.................................................................................................8
Combination Cooking..........................................................................9
Auto Defrost ........................................................................................9
Auto Weight Programs.................................................................10-12
Pizza Pan..........................................................................................13
Delay Start Cooking ..........................................................................14
Stand Time........................................................................................14
Questions and Answers ....................................................................15
Care of Your Oven ............................................................................16
Technical Specifications...............................................................16-17
Microwave cooking ...........................................................................18
General information .....................................................................18-19
What containers can be used in your oven?.....................................20
Microwave, grill, combination cooking ..............................................21
Reheating ....................................................................................22-23
Defrosting food ............................................................................24-25
Cooking and reheating tables ......................................................26-27
Meat and poultry ...............................................................................28
Fish ...................................................................................................29
Vegetables ........................................................................................30
Eggs, pasta, rice, hot beans, cereals................................................31
Pizza Pan..........................................................................................32
Solutions to common problems.........................................................33
Recipes........................................................................................34-37
Contents
Inverter technology is the key
Inverter technology for microwave ovens has been developed by a Panasonic initiative over a period of more than 10 years. It is the key
technology for making a very different type of microwave oven which has a number of special qualities:
• It makes possible the first oven in the industry which controls the amount of microwave energy linearly. This new distribution system allows
cooking and defrosting food without losing its flavour.
• It provides efficient conversion of electrical energy to microwave energy, resulting in minimizing power requirements without
sacrificing microwave output.
• It allows a dramatic enlargement of oven cavity size even in a compact oven body, due to the small size of the inverter circuit, which replaces
the currently used bulky transformer.
• Finally, at the end of the productʼs useful life, not using bulky transformers made of iron makes the process of recycling discarded ovens
environmentally friendly.
Page 3
En-2
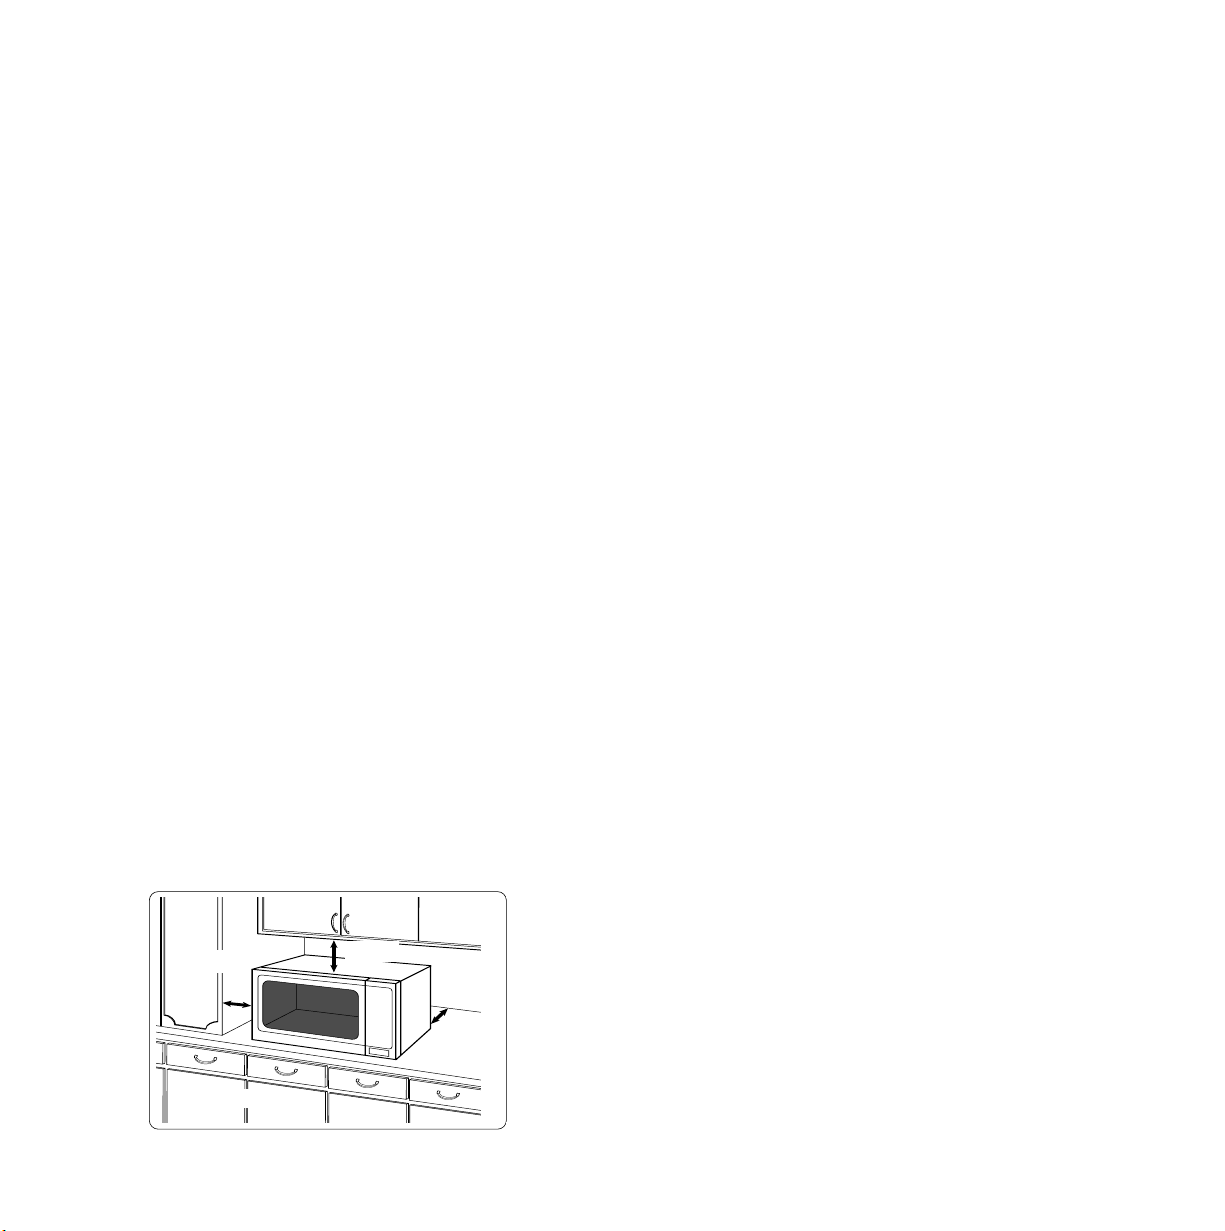
Counter-top
Installation and Connection
Open
10cm
15cm
5cm
Examine your microwave oven
Unpack the oven, remove all packing material, and examine the oven
for any damage such as dents, broken door latches or cracks in the
door. If you find any damage, notify your dealer immediately. Do not
install a damaged microwave oven.
Earthing instructions
IMPORTANT: THIS UNIT HAS TO BE PROPERLY EARTHED FOR
PERSONAL SAFETY.
If your AC outlet is not grounded, it is the personal responsibility of the
customer to have it replaced with a properly grounded wall socket.
Operation voltage
The voltage has to be the same as specified on the label on the oven. If
a higher voltage than specified is used, it may cause a fire or other
damages.
Placement of the Oven
This oven is intended for counter-top use only. It is not intended for
built-in use or for use inside a cupboard.
1. Place the oven on a flat and stable surface, more than 85 cm above
the floor.
2. When this oven is installed, it should be easy to isolate the appliance
from the electricity supply by pulling out the plug or operating a
circuit breaker.
3. For proper operation, ensure a sufficient air circulation for the oven.
Counter-top use:
a. Allow 15 cm of space on the top of the oven, 10 cm at the back, 5
cm on one side, and the other side must be opened more than 40
cm.
b. If one side of the oven is placed flush to a wall, the other side or top
must not be blocked.
4. Do not place this oven near an electric or gas cooker range.
5. The feet should not be removed.
6. This oven is only for household usage. Do not use outdoors.
7. Avoid using the microwave oven in high humidity.
8. The power cord should not touch the outside of the oven. Keep
the cord away from hot surfaces. Do not let the cord hang over
the edge of a table or work top. Do not immerse the cord, plug
or oven in water.
9. Do not block the air vents on the top and back of the oven. If these
openings are blocked during operation the oven may overheat. In
this case the oven is protected by a thermal safety device and
resumes operation only after cooling down.
10. This appliance is not intended to be operated by means of an
external timer or separate remote control system.
WARNING
1. The door seals and door seal areas should be cleaned with a damp
cloth. The appliance should be inspected for damage to the door
seals and door seal areas and if these areas are damaged the
appliance should not be operated until it has been repaired by a
service technician trained by the manufacturer.
2. Do not attempt to tamper with or make any adjustments or repairs
to the door, control panel housing, safety interlock switches or any
other part of the oven. Do not remove the outer panel from the oven
which gives protection against exposure to microwave energy.
Repairs should only be done by a qualified service person.
3. Do not operate this appliance if it has a damaged CORD OR PLUG,
if it is not working properly, or if it has been damaged or dropped. It
is dangerous for anyone other than a service technician trained by
the manufacturer to perform repair service.
4. If the supply cord of this appliance is damaged, it must be replaced
with the special cord available from the manufacturer.
5. Only allow children to use the oven without supervision when
adequate instructions have been given so that the child is able to
use the oven in a safe way and understands the hazards of improper
use.
6. Liquids and other foods must not be heated in sealed containers
since they are liable to explode.
Page 4

En-3
Safety Instructions
Use of your oven
1. Do not use the oven for any reason other than the preparation of
food. This oven is specifically designed to heat or cook food. Do not
use this oven to heat chemicals or other non-food products.
2. Before use, check that utensils/containers are suitable for use in
microwave ovens.
3. Do not attempt to use this microwave oven to dry newspaper,
clothing or any other materials. They may catch on fire.
4. When the oven is not being used, do not store any objects other
than oven accessories inside the oven in case it is accidentally
turned on.
5. The appliance shall not be operated by MICROWAVE or
COMBINATION WITHOUT FOOD IN THE OVEN. Operation in this
manner may damage the appliance. Exception to this is point 1
under heater operation and pre-heating the pizza pan.
6. If smoke or a fire occurs in the oven, press Stop/Cancel Pad and
leave the door closed in order to stifle any flames. Disconnect the
power cord, or shut off power at the fuse or the circuit breaker panel.
7. This appliance is not intended for use by persons (including children)
with reduced physical, sensory or mental capabilities, or lack of
experience and knowledge unless they have been given supervision
or instruction concerning use of the appliance by a person
responsible for their safety. Children should be supervised to ensure
that they do not play with the appliance.
Heater Operation
1. Before using COMBINATION or GRILL function for the first time,
wipe excessive oil off in the oven cavity and operate the oven
without food and accessories on Grill, for 10 minutes. This will allow
the oil that is used for rust protection to be burned off. This is the
only time the oven is used empty.
2. Exterior oven surfaces, including air vents on the cabinet and the
oven door will get hot during COMBINATION and GRILLING, take
care when opening or closing the door and when inserting or
removing food and accessories.
3. The oven has two heaters situated in the top of the oven. After using
the COMBINATION and GRILL function, these surfaces will be very
hot.
N.B. After cooking by these modes, the oven accessories will be
very hot.
4. The accessible parts may become hot when in grill and combination
use. Young children should be kept away, and children should only
use the oven under adult supervision due to the temperatures
generated.
Fan Motor Operation
If the oven gets hot after use, the fan may rotate for a few minutes to
cool the electric components. This is perfectly normal, and you can take
out the food from the oven while the fan is still in operation.
Oven Light
When it becomes necessary to replace the oven light, please consult
your dealer.
Accessories
The oven comes equipped with a variety of accessories. Always follow
the directions given for use of the accessories.
Glass Tray
1. Do not operate the oven without the roller ring and the glass tray in
place.
2. Never use another type of glass tray than the one specially designed
for this oven.
3. If the glass tray is hot, let it cool before cleaning or placing in water.
4. The glass tray can turn in either direction.
5. If the food or cooking vessel on the glass tray touches the oven
walls and stops the tray rotating, the tray will
automatically rotate in the opposite direction. This is normal.
6. Do not cook foods directly on the glass tray.
Roller Ring
1. The roller ring and the oven floor should be cleaned frequently to
prevent noise and build-up of remaining food.
2. The roller ring must always be used for cooking together with the
glass tray.
Wire Rack
1. The Wire Rack is used to facilitate browning of small dishes and
help with the good circulation of the heat.
2. Do not use any metal container directly on the Wire Rack in
COMBINATION with MICROWAVE.
3. Do not use the Wire Rack in MICROWAVE mode only.
Pizza Pan - See page En-13
Page 5

En-4
Important Information
1) Cooking Times
• Cooking times given in the cookbook are approximate. The cooking
time depends on the condition, temperature, amount of food and on
the type of cookware.
• Begin with the minimum cooking time to help prevent
overcooking. If the food is not sufficiently cooked you can always
cook it for a little longer.
N.B.: If the recommended cooking times are exceeded the food
will be spoiled and in extreme circumstances could catch fire
and possibly damage the interior of the oven.
2) Small Quantities of Foods
• Small quantities of food or foods with low moisture content can burn,
dry out or catch on fire if cooked too long. If materials inside the
oven should ignite, keep the oven door closed, turn the oven off and
remove the plug from the socket.
3) Eggs
• Do not cook eggs in their shells and whole hard-boiled eggs by
MICROWAVE. Pressure may build up and the eggs will explode,
even after microwave heating has ended.
4) Piercing Skin
• Food with non porous skins, such as potatoes, egg yolks and
sausages must be pierced before cooking by MICROWAVE to
prevent bursting.
5) Meat Thermometer
• Use a meat thermometer to check the degree of cooking of roasts
and poultry only when the meat has been removed from the oven.
Do not use a conventional meat thermometer when using
MICROWAVE or COMBINATION because it may cause sparking.
6) Liquids
• When heating liquids, e.g. soup, sauces and beverages in your
microwave oven, overheating the liquid beyond boiling point can
occur without evidence of bubbling. This could result in a sudden boil
over of the hot liquid. To prevent this possibility the following steps
should be taken:
a) Avoid using straight-sided containers with narrow necks.
b) Do not overheat.
c) Stir the liquid before placing the container in the oven and again
halfway through the cooking time.
d) After heating, allow it to stand in the oven for a short time, stir again
before carefully removing the container.
7) Paper/Plastic
• When heating food in plastic or paper containers, check the oven
frequently as these types of containers ignite if overheated.
• Do not use recycled paper products (e.g. Kitchen Roll) unless the
paper product is labelled as safe for microwave oven use. Recycled
paper products may contain impurities which may cause sparks
and/or fires during use.
• Remove wire twist-ties from roasting bags before placing the bags in
the oven.
8) Utensils/Foil
• Do not heat any closed cans or bottles because they might explode.
• Metal containers or dishes with metallic trim should not be used
during Microwave cooking. Sparking will occur.
• If you use any aluminium foil, meat spikes or metalware the distance
between them and the oven walls and door should be at least 2 cm
to prevent sparking.
9) Feeding Bottles/Baby Food Jars
• The top and teat or lid must be removed from feeding bottles
or baby food jars before placing in the oven.
• The contents of feeding bottles and baby food jars are to be stirred
or shaken.
• The temperature has to be checked before consumption to avoid
burns.
Page 6
En-5
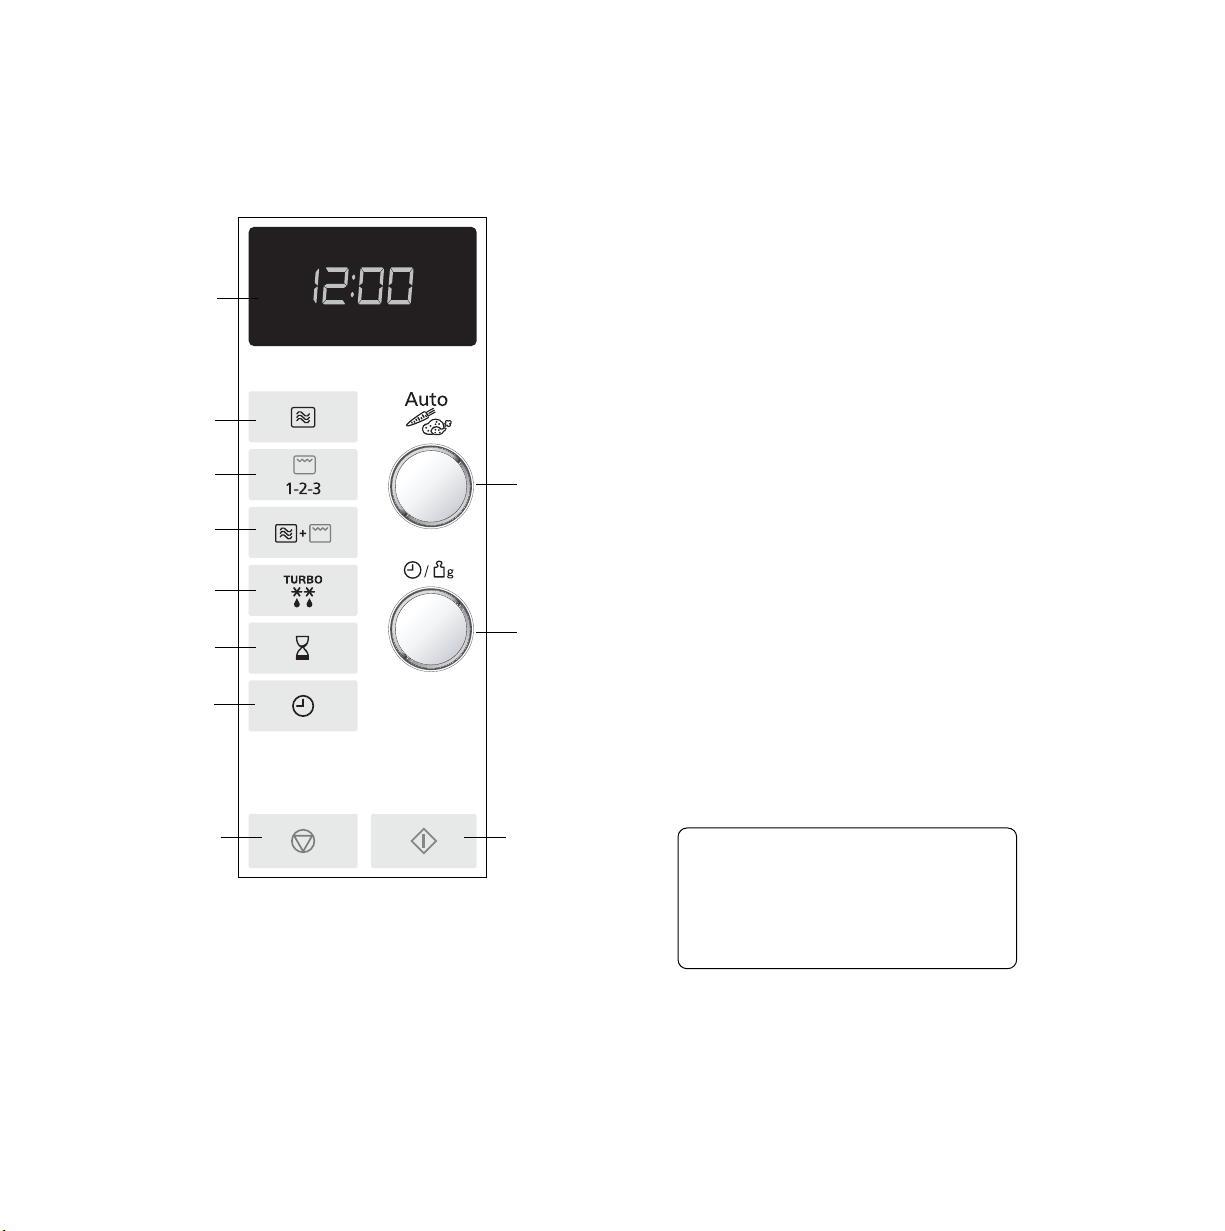
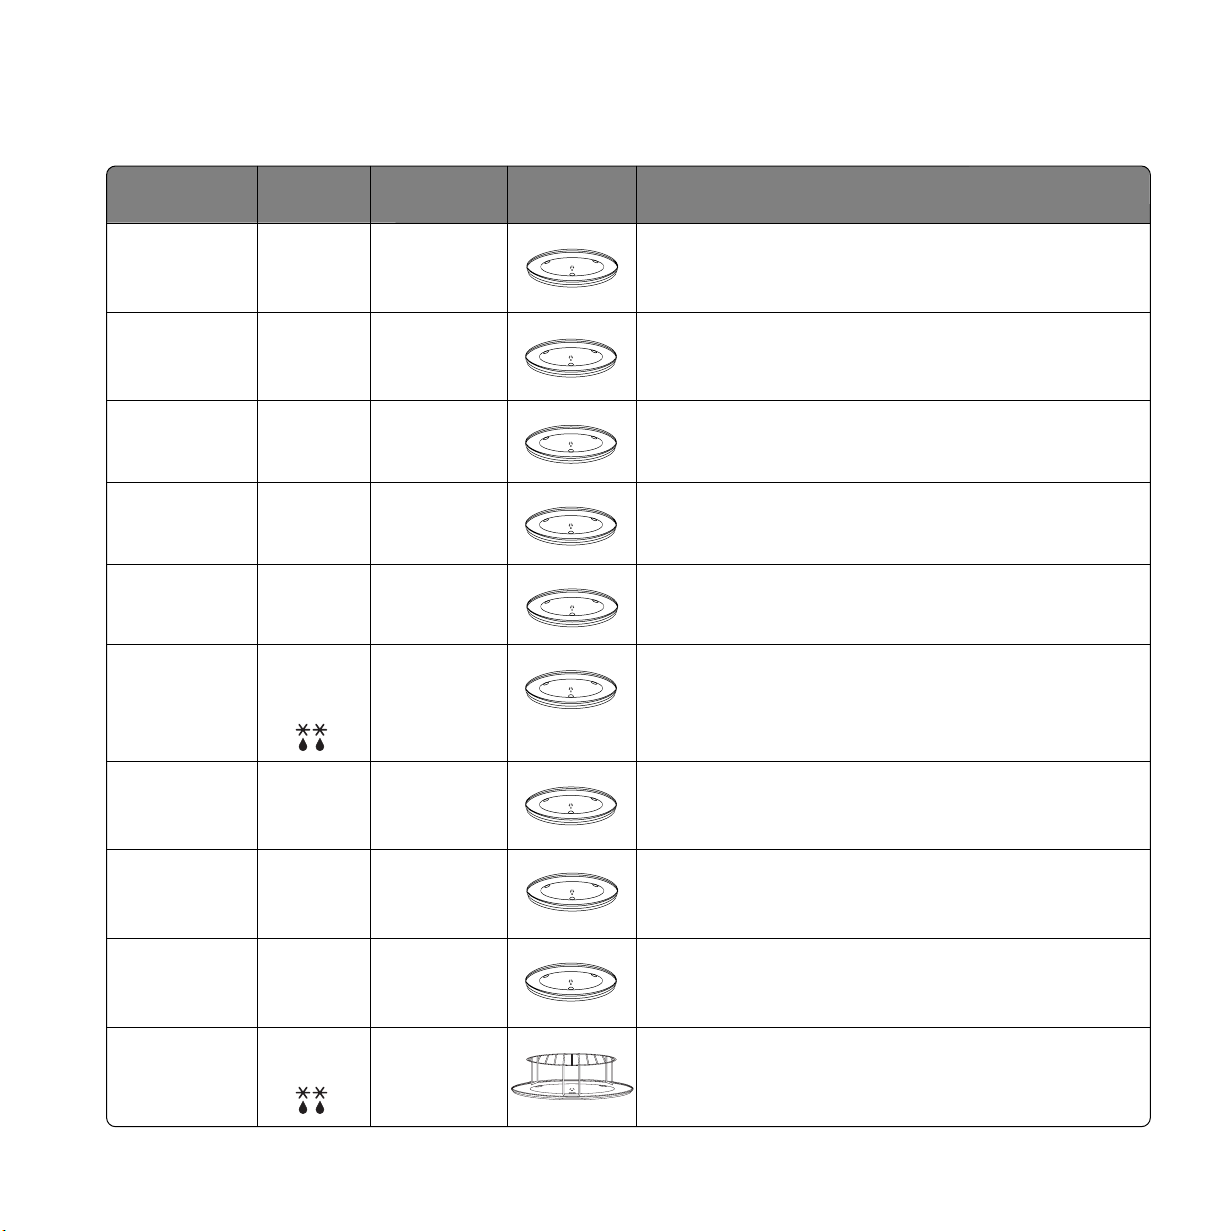
Control Panel
Beep Sound:
A beep sounds when a Pad is pressed. If this
beep does not sound, the setting is
incorrect. When the oven changes from one
function to another, two beeps sound. After
completion of cooking, five beeps sound.
(1)
(3)
(9)
(8)
(11)
NN-GD569M / NN-GD559W
(4)
(5)
(6)
(10)
(7)
(2)
(1) Display Window
(2) Microwave Power
(3) Grill Power
(4) Combination Power
(5) Auto Weight Tur bo Defrost
(6) Delay/Stand
(7) Clock Pad
(8) Auto Program Selector Dial
(9) Time/Weight Dial
(10) Stop/Cancel Pad:
Before cooking: one press clears your instructions.
During cooking: one press temporarily stops the
cooking program. Another press cancels all your
instructions and the time of day will appear in the
display.
(11) Start Pad:
Press to start operating the oven. If during cooking
the door is opened or Stop/ Cancel Pad is pressed
once, Start Pad has to be pressed again to continue
cooking.
This oven is equipped with an energy saving function.
Please Note
1. When in stand-by mode the brightness of the display will be reduced.
2. The oven will enter stand-by mode, when first plugged in and
immediately after the last operation has completed.
Page 7
En-6
Outline Diagram
(1) Door Release Button
Press to open the door. When you open
the oven door during cooking, the
cooking is stopped temporarily without
clearing earlier made settings. The
cooking is resumed as soon as the door
is closed and Start Pad pressed. The
oven lamp lights as soon as the oven
door is opened.
(2) Oven Window
(3) Door Safety Lock System
(4) Oven Air Vent
(5) Control Panel
(6) Glass Tray
(7) Roller Ring
(8) External Oven Air Vents
(9) Wire Rack
(10) Pizza Pan
(11) Pizza Pan Handle
(12) Power Cord
(13) Caution Labels
(14) Identification Label
(1)
(2)
(3)
(4)
(5)
(7)
(8)
(9)
(10)
(11)
Word Prompting:
Controls and Operation Procedure
These models have a unique function
“Word Prompting” which guides you through the operation of your
microwave. After plugging in the oven press the Start Pad until you
locate your language. As you press the Pads, the display will scroll the
next instruction eliminating the opportunities for mistakes. If for any
reason you wish to change the language displayed, unplug the oven
and repeat this procedure.
If the delay/stand pad is pressed 4 times, this will turn off the operation
guide. To turn the operation guide back on, press the delay/stand pad 4
times.
(6)
(12)
(13)
(14)
Plug-in “88:88”
Word
Prompting
Press “DANSK” In Danish
Press “SUOMI” In Finnish
Press “SVENSKA” In Swedish
Press “NORSK” In Norwegian
Press “DEUTSCH” In German
Press “FRANCAIS” In French
Press “ITALIANO” In Italian
Press “ENGLISH” In English
Page 8
En-7
Controls and Operation Procedure
Child Safety Lock:
Using this system will make the oven controls inoperable; however, the door can be opened. Child Lock can be set when the display shows a
colon or the time.
To Set:
To Cancel:
• Press Start Pad three times.
The time of day will disappear.
Actual time will not be lost.
A E is indicated in the display.
• Press Stop/Cancel Pad three times.
The time of day will reappear in the display.
Demonstration Mode:
This mode is used for retail store display.
To Set:
To Cancel:
• Press Microwave
Power Pad once.
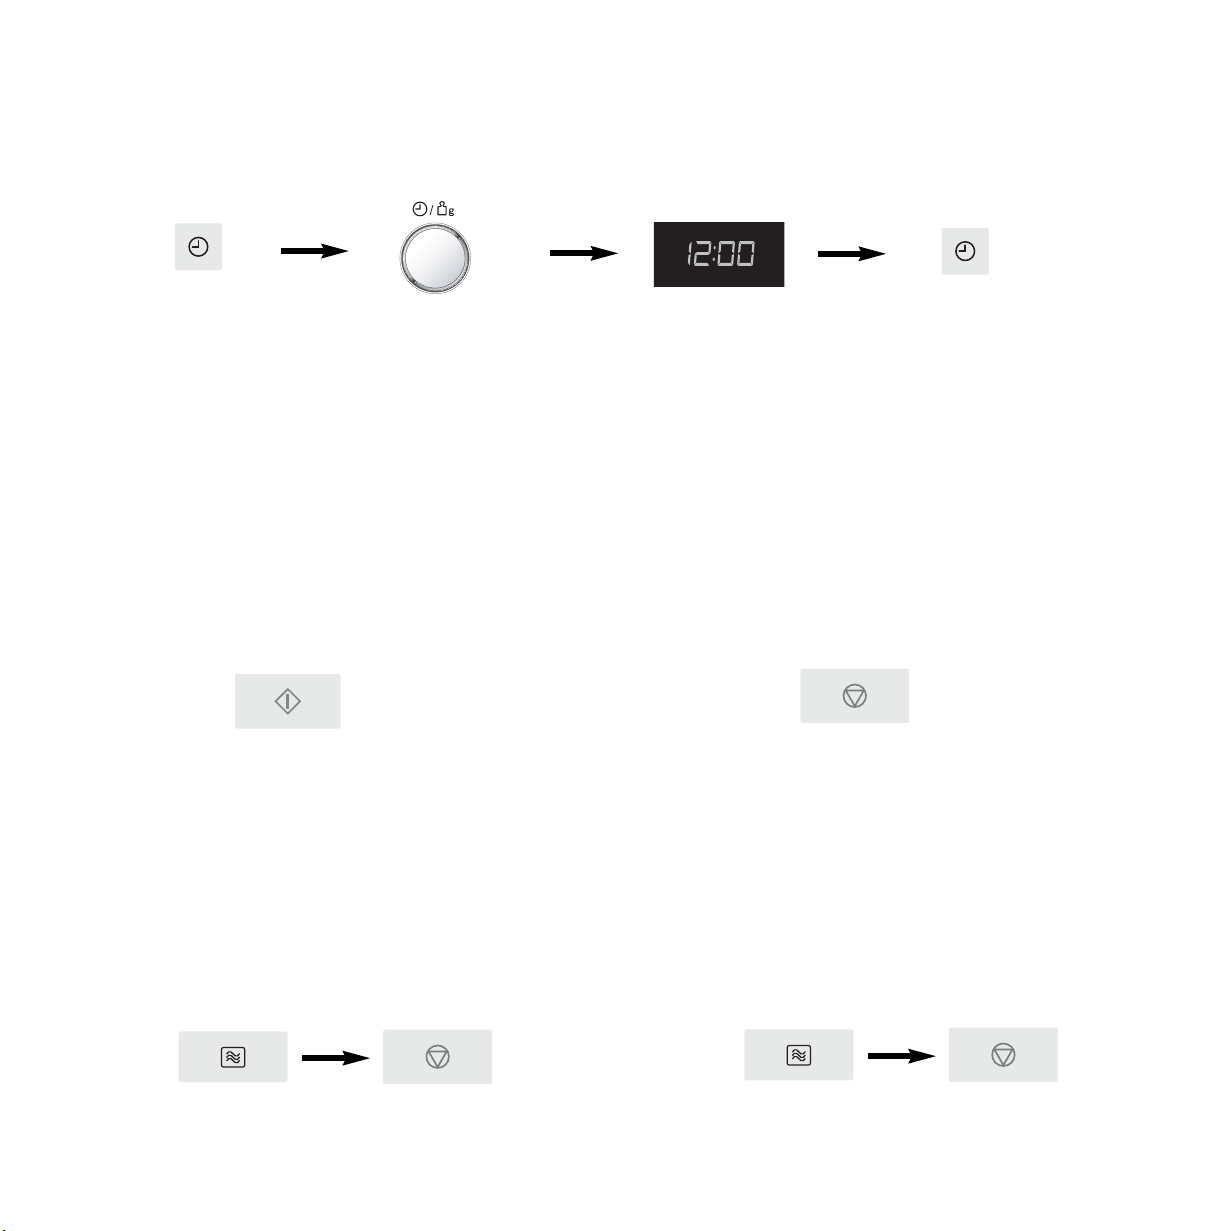
Clock Setting:
Example: To set 12:00
• Press Clock Pad once.
The colon starts to blink.
• Enter the time by turning the
Time/Weight Dial.
The time appears in the display and
the colon blinks.
• Press Clock Pad.
The colon stops blinking and the
time of day is entered.
NOTE:
1. To reset the time of day repeat all the above steps.
2. The time of day is displayed, unless the power supply is interrupted.
3. This clock has a 24 hour display.
NOTE:
To activate child lock, start pad must be pressed 3 times within a 10 second period.
• Press Stop/Cancel
Pad 4 times.
• Press Microwave
Power Pad once.
• Press Stop/Cancel
Pad 4 times.
Page 9
Press Power Level Wattage
Once Max (High) 1000 W
Twice Min (Defrost) 270 W
3 Times Medium 600 W
4 Times Low 440 W
5 Times Simmer 250 W
En-8
Microwave cooking and defrost
There are 5 different microwave power levels available. The chart below shows the approximate wattage for each power level.
Use of accessory:
* Minimum
power can also
be used for
warming food.
Glass Tray
Grilling
• Select Grill Power. Press once for Grill 1
(High), twice for Grill 2 (Medium) or 3
times for Grill 3 (Low).
• Press Start Pad.
NOTE:
1. The Grill will only operate with the oven door closed.
2. You can change the cooking time during cooking, if required. Turn Time/Weight Dial to increase/decrease the cooking time. Time can be
increased/decreased in 1 minute increments, up to 10 minutes. Turning the dial to zero will end cooking.
• Select the desired microwave power
level.
• Set the cooking time using the Time/Weight Dial (HIGH
power: up to 30 minutes
Other powers: up to 90 minutes).
• Press Start Pad.
Glass Tray
Wire Rack
Use of accessory:
• Set the cooking time using the Time/Weight
Dial (up to 90 minutes).
The Grill provides 3 Grill settings.
1 Press GRILL 1 1300 W
2 Presses GRILL 2 950 W
3 Presses GRILL 3 700 W
NOTE:
1. For 2 or 3 stage cooking, before pressing Start Pad, repeat setting the Microwave power level and cooking time.
2. Stand time can be programmed after the Microwave power and time setting.
3. You can change the cooking time during cooking, if required. Turn Time/Weight Dial to increase or decrease the cooking time. Time can be
increased/decreased in 1 minute increments, up to 10 minutes. Turning the dial to zero will end cooking.
4. The oven will automatically work on High microwave power if a cooking time is entered without the power level previously being selected.
Page 10
Program Word Prompt Weight Suitable Foods
1 Small
pieces
1 SMALL
PIECES
150 - 1000g
Mince, chops, chicken portions, fish. Arrange foods in a single layer. Place the
meat on an upturned saucer on plate. If required, shield during defrosting. Large
quantities will require turning at beep.
2 Big
piece
2 BIG
PIECE
500 - 1500g
Meat joints, whole chickens. Place the meat on an upturned saucer on plate. If
required, shield during defrosting. Turn at beep. It is recommended to allow
standing time corresponding to the total defrosting time.
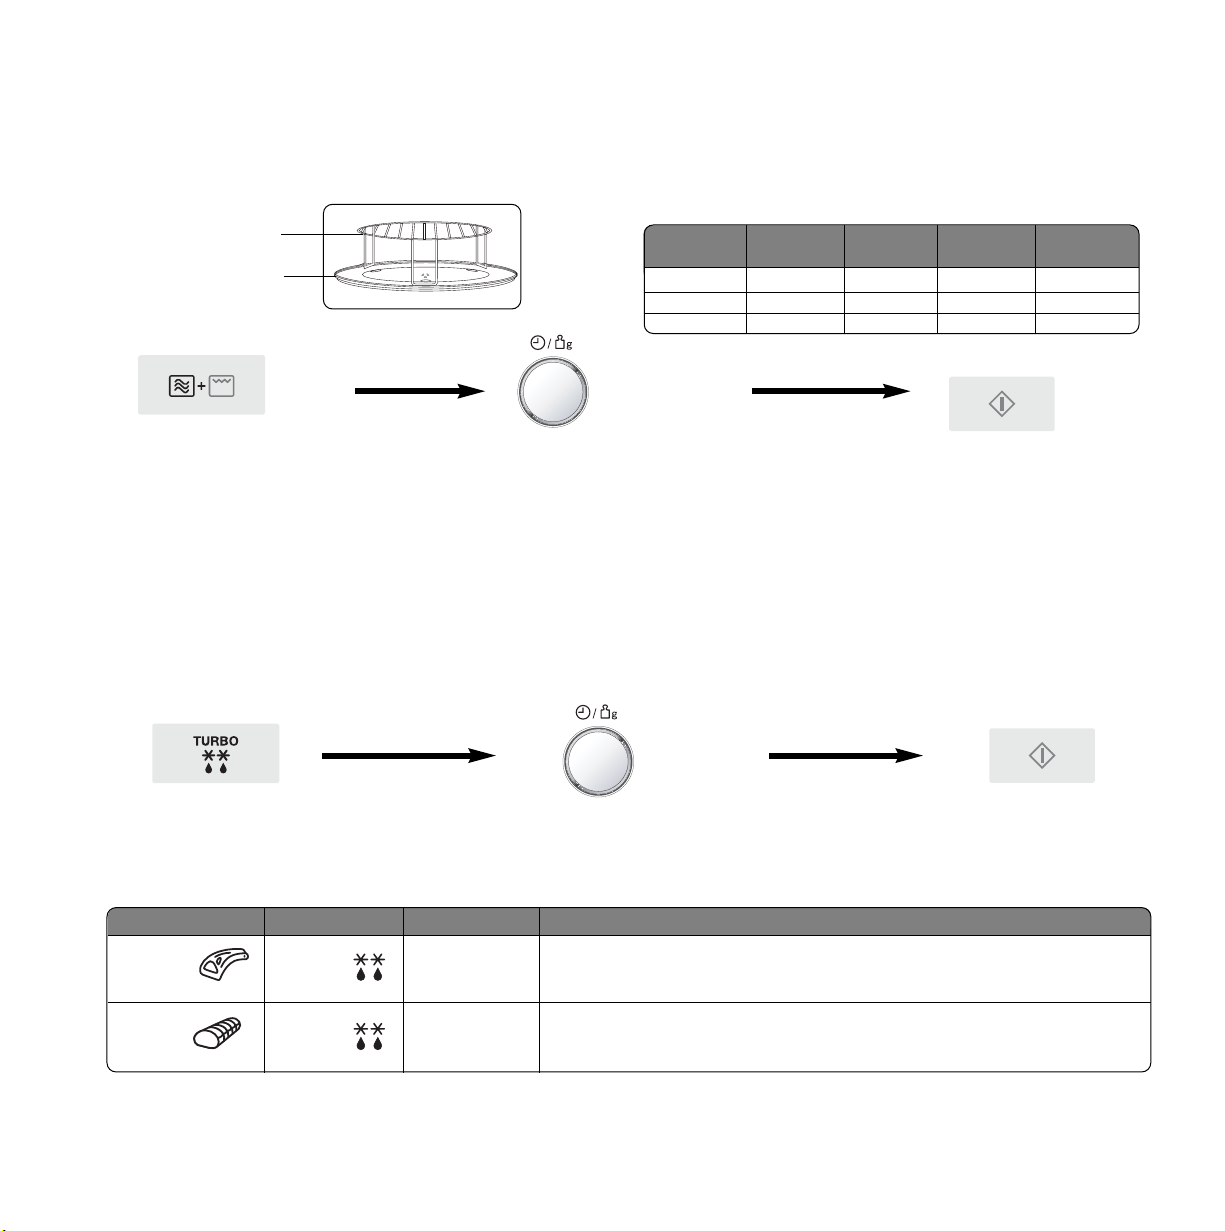
Combination
Setting
Presses Grill Microwave
Word
Promt
1 1 Press 1300W 100W G1-100 W
2 2 Presses 1300W 250W G1-250 W
3 3 Presses 1300W 440W G1-440 W
En-9
Combination cooking
Auto Defrost
With this feature you can defrost frozen foods according to the weight. Select the category and set the weight of the food. The weight is
programmed in grams. For quick selection, the weight starts from the most commonly used weight for each category.
• Select the desired Auto
Defrost Program.
1 press for small pieces
2 presses for big piece.
• Set the weight of the frozen food by using the Time/Weight dial.
Turning the dial slowly will count up in 10 g steps. Turning the dial
quickly will count up in 100 g steps.
• Press Start Pad.
NOTE:
1. When defrosting time is over 60 minutes the time will appear as Hours and Minutes.
2. The shape and size of the food will determine the maximum weight the oven can accommodate.
This feature allows you to cook by combining microwave and grill power. The microwave power cooks food quickly, while the grill gives traditional
browning and crisping.
• Select combination level
(See table).
• Set the cooking time using the Time/Weight Dial
(up to 90 minutes).
• Press Start Pad.
NOTE:
1. The Combination mode will only operate with the oven door closed.
2. You can change the cooking time during cooking, if required. Turn Time/Weight Dial to increase/decrease the cooking time.
Time can be increased/decreased in 1 minute increments, up to 10 minutes. Turning the dial to zero will end cooking.
Use of accessory:
Wire Rack
Glass Tray
There are 3 combination settings. The following chart shows
the approximate wattage for each power level.
Page 11
Category Word Prompt
Recommended
Weight
Accessories Instructions
1. Reheat Mug
11MUG
250g
For reheating a mug of hot drink from chilled.
(eg. tea, coffee, milk and soup).
Select reheat mug, enter weight (250g), press start Pad.
2. Reheat Cup
2 1CUP
150g
For reheating a cup of hot drink from chilled.
Select reheat cup, enter weight (150g), press start Pad.
3. Reheat
Meal
3 FRESH
MEAL
200 - 1000g
For reheating pre-cooked, room/refrigerator temperature foods.
Place foods in a suitable sized dish/containter. Cover with a lid or
microfilm, then place on Glass Tray. Stir after completion of cooking
and stand covered for 3 to 5 minutes.
4. Reheat Frozen
Meal
4 FROZEN
MEAL
200 - 1000g
For reheating a frozen pre-cooked meal (except soup).
All foods must be pre-cooked and frozen. Remove all packaging and
place in a suitable sized dish/container. Cover with a lid or microfilm,
then place on Glass Tray. At the completion of cooking, stir food and
stand for 2-3 minutes.
5. Cook
Vegetables
5 FRESH
VEGETABLES
200 - 1000g
For cooking fresh vegetables.
Place prepared vegetables into a suitable sized container. For fresh
vegetables, add 2 tbsp (30ml) of water.
6. Cook Fresh
Fish
6 FRESH
FISH
100 - 1000g
For cooking fresh fish (whole, fillets, steaks). Shield the
thinner portions and place fish in a suitable sized container. Cover with
microfilm or a lid. Large quantities will require turning at beep.
En-10
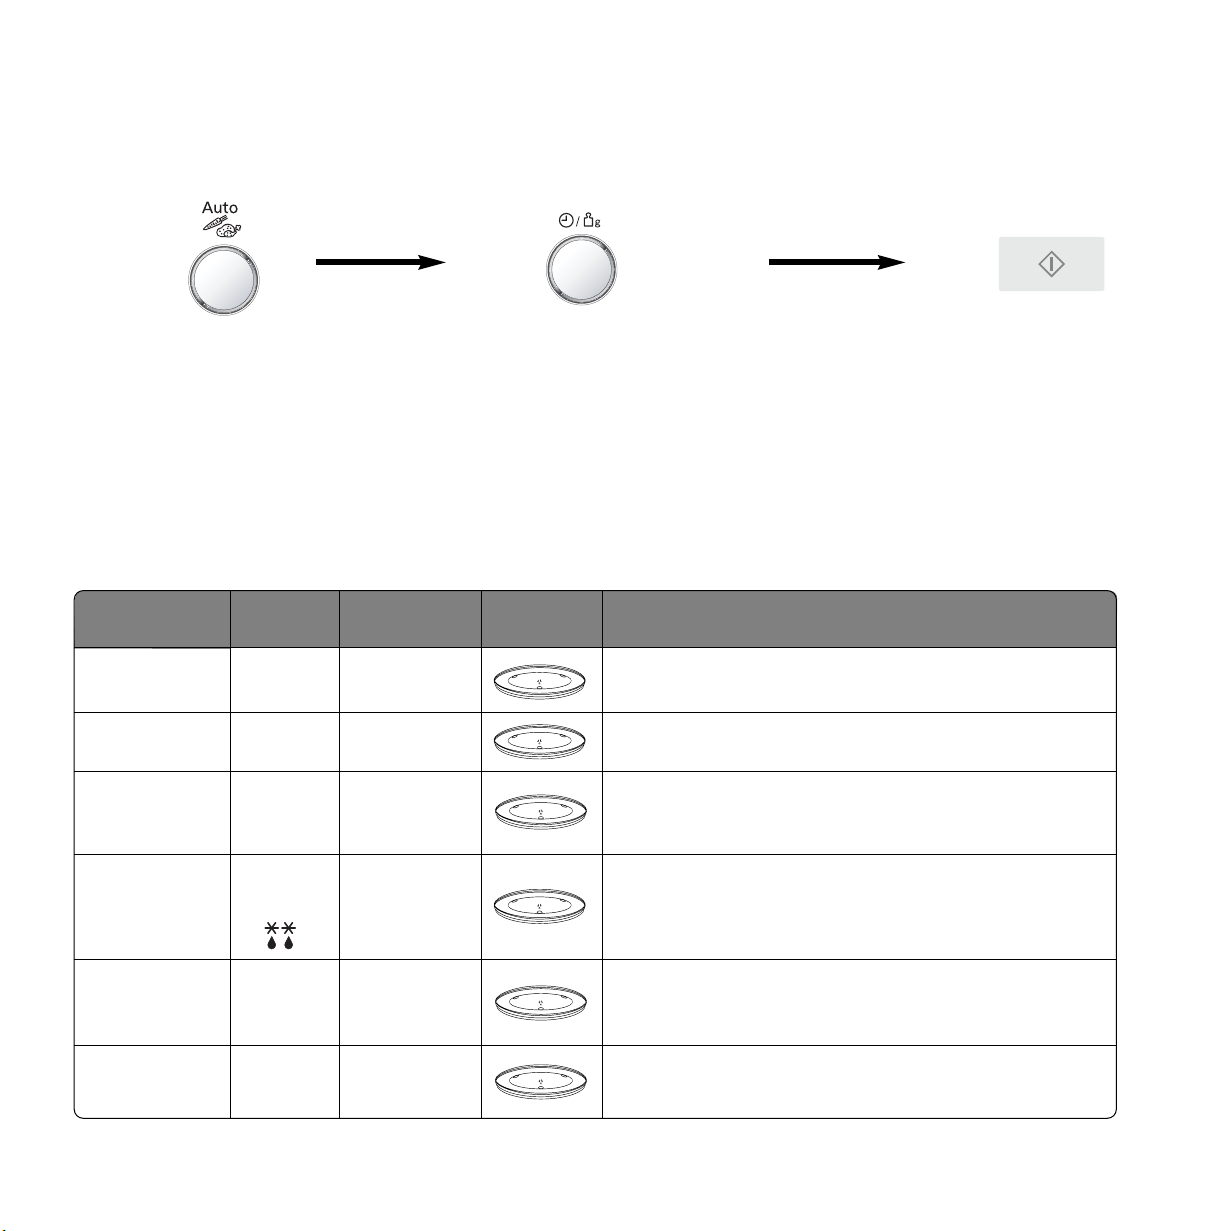
Auto Weight Programs
e.g.
This feature allows you to cook most of your favourite foods by setting the weight only. The oven determines Microwave power level, Grill power
and cooking time automatically. Select the category and set the weight of the food. The weight is programmed in grams. For quick selection, the
weight starts from the most commonly used weight for each category.
NOTE:
1. Do not use Auto Weight Programs for food which weighs out of the recommended weight range shown in the tables on pages
En-10 - En-12. Adjust the power and time manually.
2. When cooking time is over 1 hour, the time will appear as Hours and Minutes.
3. Further information can be found in the following charts.
• Select the desired Auto Weight Program by
turning the Auto Program selector dial. The
display will scroll through the Auto Weight
Cook Programs.
• Set the weight of the food by using the Time/Weight
Dial.
Turning the dial slowly will count up in 10 g steps. Turning
the dial quickly will count up in 100 g steps.
• Press Start
Pad.
Page 12
Category Word Prompt
Recommended
Weight
Accessories Instructions
7. Cook Boiled
Potatoes
7BOILED
POTATOES
200 - 1500g
For cooking potatoes.
Potatoes are cut in uniform pieces and put in a bowl
suitable for a microwave oven. Add 1 dl of water. Cover the bowl with a
lid or microfilm.
8. Cook Rice
8RICE
200 - 800g
For boiling rice. Add 3 parts water to 2 parts rice and 1/2tbsp of salt
and a little bit of oil or butter. Select the weight for the rice only. Cover
with a lid or microfilm.
9. Cook Rice
Pudding
9RICE
PUDDING
250 - 1000g
Cooking rice pudding. Select the total weight of the rice and milk.
Cook the rice pudding without a cover. Stir the rice when the oven
beeps.
10. Cook
Scrambled
eggs
10
SCRAMBLED
EGGS
100 - 500g
Scrambled egg.
Select the total weight of the egg and milk/water. Cover with a lid or
microfilm.
11. Fresh
Chicken
Pieces
11 CHICKEN
PIECES
200 - 1000g
For roasting fresh chicken pieces.
Place chicken in a dish on Glass Tray. For even cooking, spread out
chicken pieces. Stand for 5 minutes after cooking.
12. Frozen
Chicken
Pieces
12 FROZEN
CHICKEN
PIECES
200 - 1000g
For roasting frozen chicken pieces.
Place chicken in a dish on Glass Tray. For even cooking, spread out
chicken pieces. Stand for 5 minutes after cooking.
13. Beefsteaks
13 ROAST OX
800 - 1500g
Cooking steaks. The programme is well-suited for roasting beef, veal,
ham and lamb steaks. Place the steak with the greased side downwards in
an ovenproof dish. Add 1 dl of water. Place the dish on the glass turntable.
Select the weight of the steak. Turn the steak over when the oven beeps.
14. Cook Roast
Pork
14 ROAST
PORK
700 - 2000g
For roasting pork.
Place pork, fat-side down, in a dish, on Glass Tray, add 1dl water and
1 tbsp of salt. Turn over at beep. Stand for 10 to 15 minutes after
cooking.
15. Fresh
Gratin/
Lasagne
15 FRESH
GRATIN
500 - 1500g
For cooking pasta gratin.
Prepare the fresh or boiled pasta covered with a sauce and cheese.
For 100g pasta use 6-8 dl (600-800g) sauce/cream and cover with
grated cheese.
16. Frozen
Gratin/
Lasagne
16 FROZEN
GRATIN
300 - 1200g
For reheating and browning frozen gratin/lasagne.
Remove all packaging and place the gratin/lasagne in a heatproof dish
on Wire Rack on Glass Tray.
En-11
Auto Weight Programs
Page 13
Category
Word
Prompt
Recommended
Weight
Accessories Instructions
17. Frozen Bread
17 FROZEN
BREAD
30 - 300g
For reheating and browning frozen bread.
Place frozen bread directly on Wire Rack on Glass Tray. Turn the
bread at beep. Stand after cooking. This program is not for toasting
bread slices.
18. Jacket Potato
18 BAKED
POTATO
200 - 1500g
For cooking, browning and crisping jacket potatoes.
Pierce skin with fork and place on Wire Rack.
19. Frozen Pizza
19 FROZEN
PIZZA
100 - 500g
For reheating, crisping the base and browning the top of frozen
purchased pizza.
Remove all packaging and place the pizza in the preheated pizza pan.
20. Frozen Quiche
20 FROZEN
QUICHE
100 - 500g
For reheating, crisping the pastry base and browning the top of
frozen purchased quiche.
Remove all packaging and place the quiche in the preheated pizza
pan.
21. Frozen Potato
Product
21 FROZEN
CHIPS
200 - 500g
For reheating, crisping and browning frozen potato pro-ducts.
After preheating the pan, spread out potato products in the pan. For
best results cook in a single layer.
22. Fried Bacon
22 BACON
30 - 200g
Fried bacon. The programme is for frying thin slices of bacon. Place
the bacon slices individually in the pizza pan. If you wish to fry the
bacon more, frying can continue using the combination of grill + 440
watt microwaves until the desired crunchiness is obtained (1-4 min.).
Place the slices of fried bacon on grease absorbent paper.
En-12
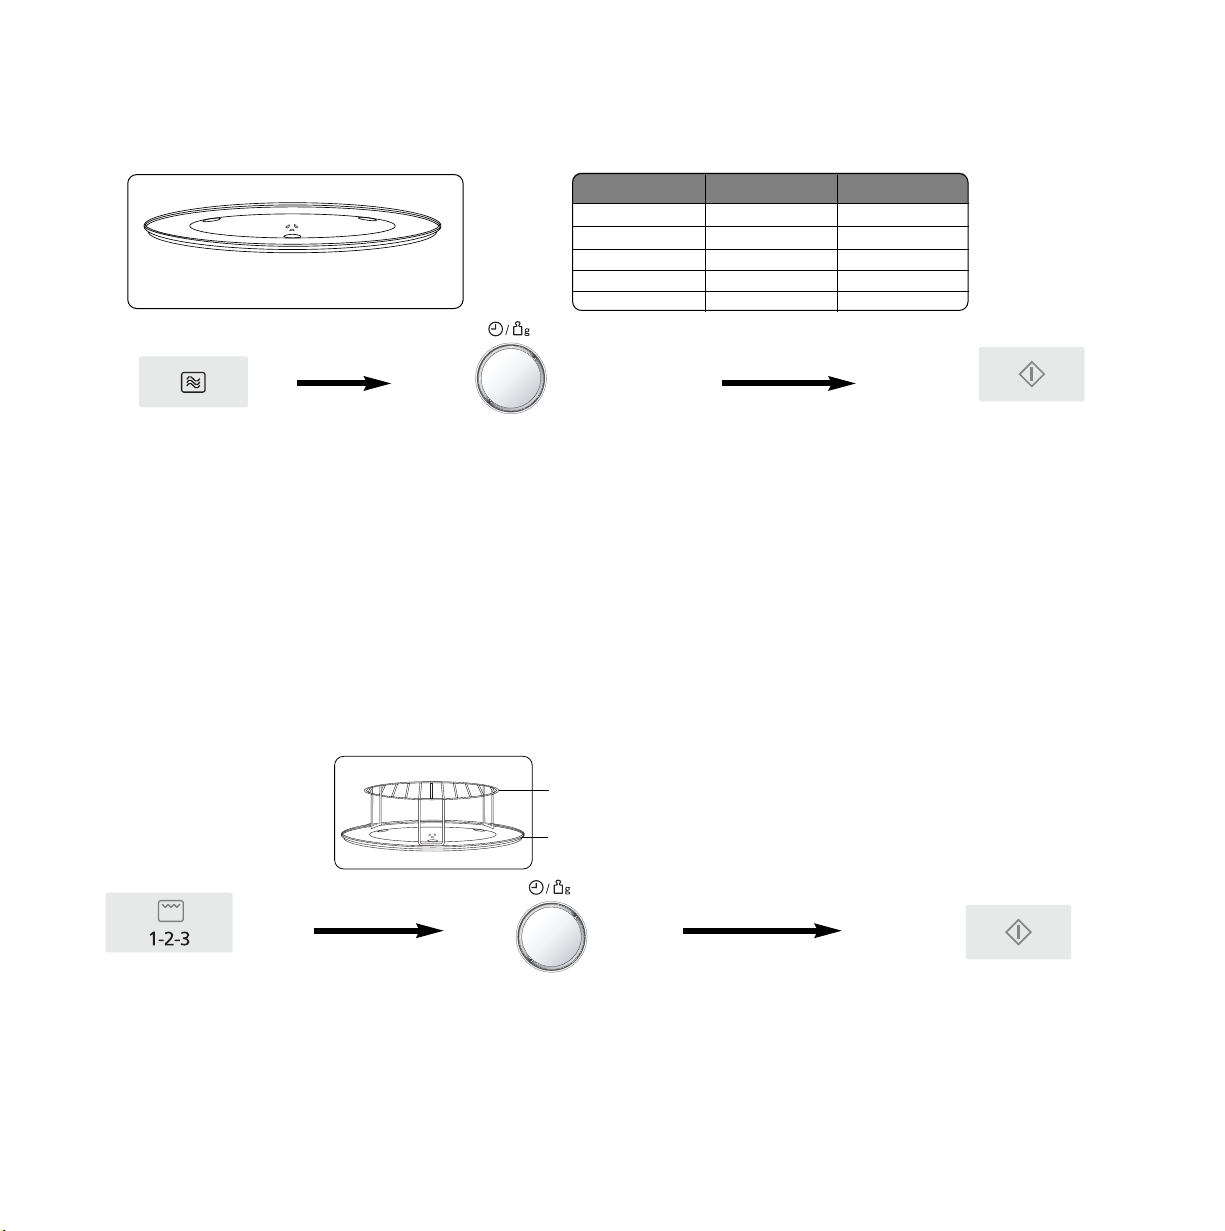
Auto Weight Panacrunch Programs
1. Select the desired program
and place the pizza pan in the
oven directly on the glass tray.
2. Press the start Pad to pre-heat
the pizza pan.
3. After pre-heating beeps sound.
Place the food in the pan, set
weight.
4. Press Start Pad.
Panacrunch Program
Page 14
En-13
Pizza Pan
THE ʻCONCEPTʼ
Some foods cooked by microwave can have soft and soggy crusts.
Your pizza pan accessory will brown and crisp pizzas, quiches, pies,
breaded products just as a conventional oven. Your Panasonic pizza
pan works in three ways: heating the pan by absorbing microwaves,
heating the food directly by microwaves and heating the food by the
grill. The base of the pan absorbs the microwaves and transfers them
into heat. Then the heat is conducted through the pan to the food. The
heating effect is maximised by the non-stick surface.
USING THE PIZZA PAN (Manual operation)
• For best results, pre-heat the pan before using. Place directly
on the glass turntable and pre-heat on 1000W (HIGH power
for 4 minutes). To assist browning, brush the pan with oil before
preheating for items such as sausages and beefburgers.
• Remove the pan from the oven and place the food in the pan.
Use the pizza pan handle or oven gloves as the pan will be
very hot. For best results, it is important that the food is placed
on the pan immediately after pre-heating. Performance
cannot be guaranteed with a time delay.
• Place the pan on the glass turntable and cook according to the
guidelines shown in the cooking chart in the cookbook.
NOTES:
1. Do not pre-heat the pan more than 8 minutes.
2. Always place the pan in the centre of the glass tray and ensure it
does not touch the wall of the oven cavity. Failure to do so, may
cause sparking which would damage the cavity.
3. Always use the pan on the glass turntable. Do not use with the
wire rack.
4. Always use the pizza pan handle or oven gloves when handling
the hot pan.
5. Ensure all food packaging is removed before cooking.
6. Do not place any heat-sensitive materials on the hot pan as this
may cause burning.
7. The pan can be used in a conventional oven.
8. For best results, use the pan in COMBINATION GRILL and
MICROWAVE.
CARE OF THE PAN
• Never use any sharp utensils on the pan as this will damage the
non-stick surface.
• After use, wash the pan in hot soapy water and rinse in hot water.
Do not use any abrasive cleaning substances or scouring pads as
this will damage the surface of the pan.
• The pan is dishwasher safe.
Page 15
En-14
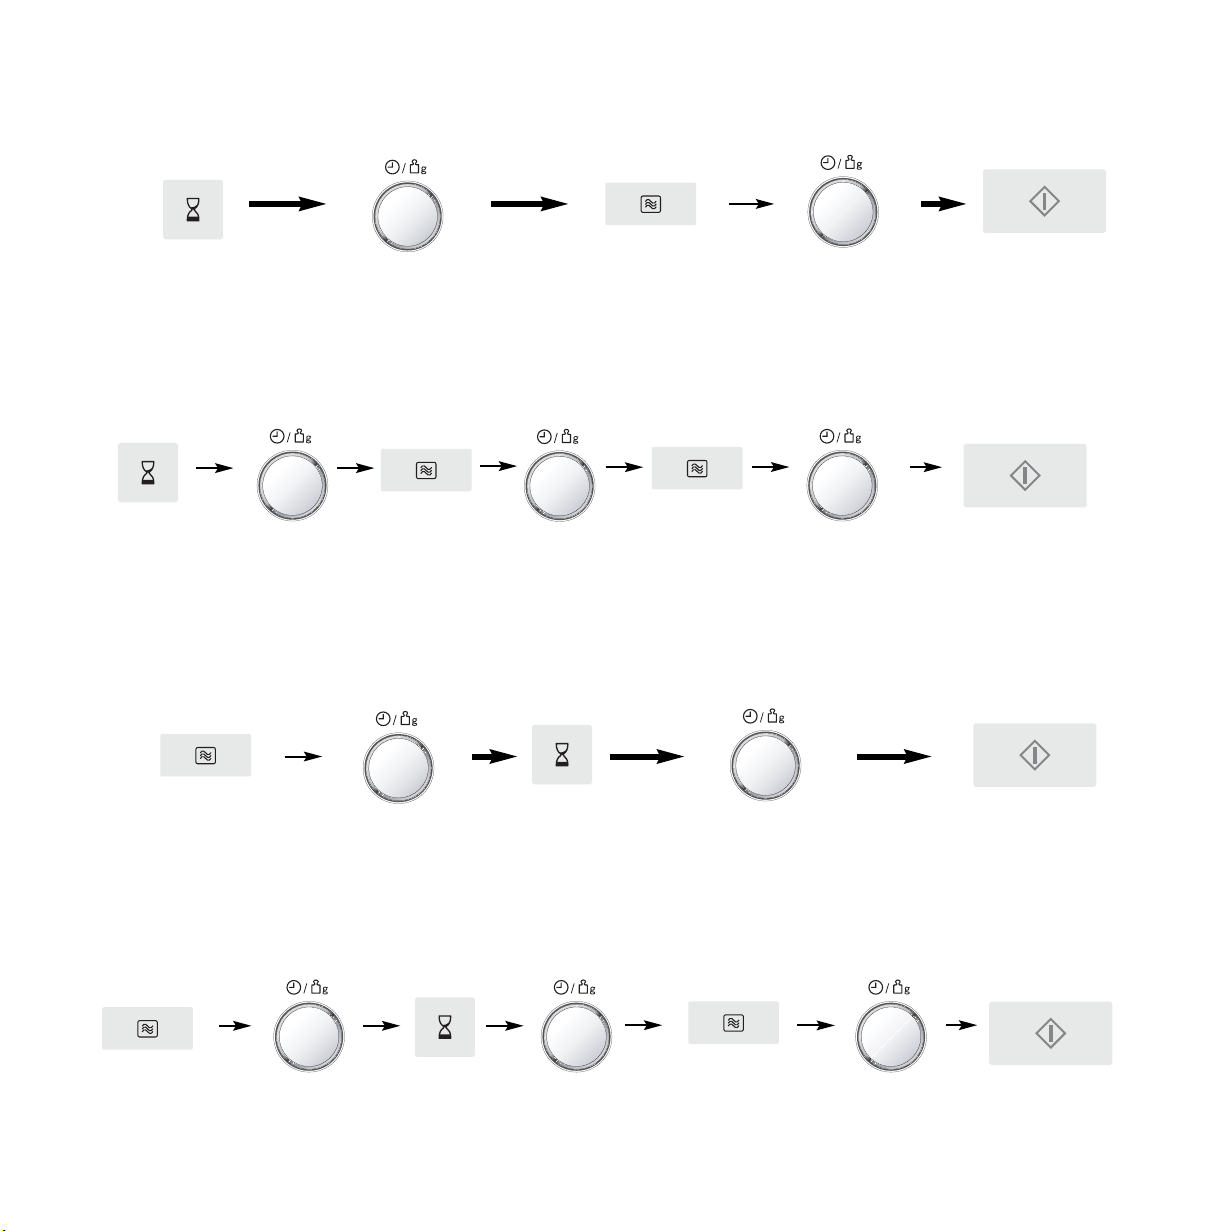
Delay Start Cooking
By using Delay/Stand Pad, you can program Stand Time after cooking is completed or use to program the oven as a minute timer.
By using Delay/Stand Pad, you are able to program Delay Start cooking.
NOTE:
1. Three stage cooking can be programmed including Delay Start cooking.
e.g.
2. If the programmed delay time exceeds one hour, the time will count down in units of minutes. If less than one hour, the time will count down in
units of seconds.
3. Delay Start cannot be programmed before any Auto Programs.
• Press
Delay/Stand
Pad.
• Set the delay time by turning the
Time/Weight Dial (up to 9 hours).
• Set the desired cooking program and
cooking time.
• Press Start Pad.
e.g.
Delay Start: 1 hour
High Power: 10 min. Simmer Power: 20 min.
• Set the desired cooking program and
cooking time.
• Press
Delay/Stand
Pad.
• Set desired amount of time by
turning the Time/Weight Dial (up to
9 hours.
• Press Start Pad.
NOTE:
1. Three stage cooking can be programmed including Stand Time.
e.g.
2. If the oven door is opened during the Stand Time or Minute Timer, the time in the display window will continue to count down.
3. This feature may also be used as a timer. In this case press Delay/Stand Pad, set time and press Start Pad.
e.g.
High Power: 4 min. Stand Time: 5 min. High Power: 2 min.
Stand Time
5 timesOnce
Once
Once
Page 16

En-15
Q: There are humming and clicking noises from
my oven when I cook by COMBINATION. What
is causing these noises?
Questions and Answers
Q: Why wonʼt my oven turn on?
A: When the oven does not turn on, check the following:
1. Is the oven plugged in securely? Remove the plug from the outlet, wait 10 seconds and
reinsert.
2. Check the circuit breaker and the fuse. Reset the circuit breaker or replace the fuse if it is
tripped or blown.
3. If the circuit breaker or fuse is all right, plug another appliance into the outlet. If the other
appliance works, there probably is a problem with the oven. If the other appliance does not
work, there probably is a problem with the outlet.
If it seems that there is a problem with the oven, contact an authorized Service Centre.
A: Some radio and TV interference might occur when you cook with the microwave oven.
This interference is similar to the interference caused by small appliances such as
mixers, vacuums, blow dryers, etc. It does not indicate a problem with your oven.
A: The oven is designed not to accept an incorrect program. For example, the oven will not
accept a fourth stage, and will not accept an Auto Weight Program after Delay Start.
A: The heat given off from the cooking food warms the air in the oven cavity. This warmed
air is carried out of the oven by the air flow pattern in the oven. There are no
microwaves in the air. The oven vents should never be blocked during cooking.
A: The oven has programmed DEMO MODE. This mode is designed for retail store
display. Deactivate this mode by pressing Microwave Power Pad once and Stop/Cancel
Pad 4 times.
A: Only when you are using GRILL cooking mode. The metal in some thermometers may
cause arcing in your oven and should not be used on MICROWAVE and
COMBINATION cooking modes.
A: The noises occur as the oven automatically switches from MICROWAVE power to
GRILL to create the combination setting. This is normal.
A: After repeated use, it is recommended to clean the oven and then run the oven without
food, glass tray, and roller ring on Grill for 5 minutes. This will burn off any food, residue
or oil which may cause an odour and/or smoking.
A: This display indicates a problem with the microwave generation system. Please contact
an authorised Service Centre.
A: There may have been a power failure, and the wordprompt is disabled. Unplug the oven
for a few seconds, then plug it again. When "88:88" is displayed, press the start pad
until your language is displayed. Then set the clock. Refer to page En-5.
Q: My microwave oven causes interference with
my TV. Is this normal?
Q: The oven wonʼt accept my program. Why?
Q: Sometimes warm air comes from the oven
vents. Why?
Q: “D” appears in the display and the oven does
not cook. Why?
Q: Can I use a conventional oven
thermometer in the oven?
Q: My oven has an odour and generates smoke
when using the COMBINATION and GRILL
function. Why?
Q: The oven stops cooking by microwave and
ʻH97ʼ or ʻH98ʼ appears in the display. Why?
Q: The worprompt has disappeared on my display,
I can only see numbers ?
Page 17

En-16
Care of Your Oven
Technical Specifications
1. Turn the oven off before cleaning.
2. Keep the inside of the oven, door seals and door seal areas clean.
When food splatters or spilled liquids adhere to the oven walls,
door seals and door seal areas wipe off with a damp cloth. Mild
detergent may be used if they get very dirty. The use of harsh
detergent or abrasive is not recommended.
DO NOT USE COMMERCIAL OVEN CLEANERS. Do not use
harsh, abrasive cleaners or sharp metal scrapers to clean the oven
door glass since they can scratch the surface, which may result in
shattering the glass.
3. The outside oven surface should be cleaned with a damp cloth. To
prevent damage to the operating parts inside the oven, water
should not be allowed to seep into the ventilation openings.
4. If the Control Panel becomes dirty, clean it with a soft, dry cloth. Do
not use harsh detergents or abrasives on the Control Panel. When
cleaning the Control Panel, leave the oven door open to prevent
the oven from accidentally turning on. After cleaning touch STOP/
CANCEL Pad to clear the display window.
5. If steam accumulates inside or around the outside of the oven
door, wipe with a soft cloth. This may occur when the microwave
oven is operated under high humidity conditions and in no way
indicates a malfunction of the unit.
6. It is occasionally necessary to remove the glass tray for cleaning.
Wash the tray in warm soapy water or in a dishwasher.
7. The roller ring and oven cavity floor should be cleaned regularly to
avoid excessive noise. Simply wipe the bottom surface of the oven
with mild detergent and hot water then dry with a clean cloth. The
roller ring may be washed in mild soapy water. Cooking vapours
collect during repeated use but in no way affects the bottom
surface or roller ring wheels. After removing the roller ring from the
cavity floor for cleaning, be sure to replace it in the proper position.
8. When using the GRILL or COMBINATION mode, some foods may
inevitably splatter grease on to the oven walls. If the oven is not
cleaned occasionally, it may start to “smoke” during use.
9. A steam cleaner is not to be used for cleaning.
10. This oven should only be serviced by qualified personnel. For
maintenance and repair of the oven contact the nearest authorized
dealer.
11. Keep air vents clear at all times. Check that no dust or other
material is blocking any of the air vents on the top, bottom or rear
of the oven. If air vents become blocked this could cause
overheating which would affect the operation of the oven and
possibly result in a hazardous situation.
12. Failure to maintain the oven in a clean condition could lead to
deterioration of surfaces that could affect the life of the appliance
and possibly result in a hazardous situation.
Power Source: 230 V, 50 Hz
Power Consumption: Maximum; 2050 W
Microwave; 1050W
Grill; 1350 W
Output: Microwave; 1000 W (IEC-60705)
Grill Heater; 1300 W
Outside Dimensions: 510 (W) x 380 (D) x 304 (H) mm
Oven Cavity Dimensions: 359 (W) x 352 (D) x 217 (H) mm
Uncrated Weight: 12.5 kg
Noise 50 dB
Specifications subject to change without notice.
Page 18

En-17
This product is an equipment that fulfills the European standard for EMC disturbances (EMC = Electromagnetic Compatibility) EN 55011. According
to this standard this product is an equipment of group 2, class B and is within required limits. Group 2 means that radio-frequency energy is
intentionally generated in the form of electromagnetic radiation for warming up of foods. Class B means that this product may be used in normal
household areas.
Information on Disposal for Users of Waste Electrical & Electronic Equipment (private
households)
This symbol on the products and/or accompanying documents means that used electrical and electronic products should not be mixed
with general household waste.
For proper treatment, recovery and recycling, please take these products to designated collection points, where they will be accepted
on a free of charge basis. Alternatively, in some countries you may be able to return your products to your local retailer upon the
purchase of an equivalent new product.
Disposing of this product correctly will help to save valuable resources and prevent any potential negative effects on human health and the
environment which could otherwise arise from inappropriate waste handling. Please contact your local authority for further details of your nearest
designated collection point.
Penalties may be applicable for incorrect disposal of this waste, in accordance with national legislation.
For business users in the European Union
If you wish to discard electrical and electronic equipment, please contact your dealer or supplier for further information.
Information on Disposal in other Countries outside the European Union
This symbol is only valid in the European Union.
If you wish to discard this product, please contact your local authorities or dealer and ask for the correct method of disposal.
Technical Specifications
Pursuant to the directive 2004/108/EC, article 9(2), Panasonic Testing Centre, Panasonic Service Europe, a division of Panasonic Marketing
Europe GmbH, Winsbergring 15,22525 Hamburg, F.R.Germany
Manufactured by Panasonic Home Appliances Microwave Oven (Shanghai) Co.,Ltd, 898 Longdong Road, Pudong, Shanghai, 201203, China.
Page 19
En-18
CONTAINERS
Use containers as specified in recipes, as this
affects the cooking and reheating time. In fact,
the bigger the container in which the food is
placed, the quicker the cooking and reheating.
QUANTITY
Small quantities cook faster than larger ones,
in the same way that smaller dishes reheat
quicker than larger ones.
DENSITY
Porous and airy foods cook faster than heavy
and dense foods.
Microwave cooking
General information
STANDING TIME
Once the STANDING TIME has elapsed, if the
food is not cooked, replace it in the oven and
cook it for a few extra seconds.
After cooking, with dense foods such as meat,
jacket potatoes and cakes, you must LEAVE
THEM TO STAND (inside or outside the oven)
until the heat conduction has finished and the
centre of the food is fully cooked.
ROASTS - Cover with aluminium foil and let
stand for 15 minutes.
JACKET POTATOES - Cover with aluminium
foil and let stand for 5 minutes.
LIGHT CAKES - Leave to stand for 5 minutes
after removing from oven.
RICH CAKES - Leave to stand for 15 - 20
minutes.
FISH - Leave to stand for 2 to 5 minutes.
EGG DISHES - Leave to stand for 2 to 3
minutes.
PRE-COOKED DISHES - Leave to stand for 2
to 5 minutes.
DISHES PREPARED AT HOME - Leave to
stand for 1 to 2 minutes.
VEGETABLES - With the exception of boiled
potatoes, it is recommended to stand for 1 to 2
minutes, the majority of vegetables may be
served immediately after cooking.
DEFROSTING - To finish the process, it is
essential to take into account the standing
time. This may vary between 5 minutes (for
raspberries in particular) and 1 hour for roasts.
Microwaves are high-frequency electromagnetic waves similar to those
used by radios. The magnetron converts the electric currant into
microwaves, which it sends to the interior of the oven where they are
reflected, transmitted or absorbed.
Reflection
The microwaves are reflected by the metal in the same way that a ball
bounces against a wall. However, most metal utensils and containers
are not suitable for microwave ovens as they do not allow even cooking.
Furthermore, when the metallic dish is too close to the inner wall of the
oven (which is also made of metal), it could cause the formation of an
arc (blue sparks), capable of damaging the oven and possibly even
causing a fire.
Transmission
Microwaves pass through certain materials such as paper, glass and
plastic, rather like rays of sunlight passing through a window.
Containers made of these materials are therefore perfectly suited to
microwave cooking, since they do not absorb or reflect microwaves.
However, as the heat of the food is transmitted to the containers, they
also heat up during cooking.
Absorption
Microwaves are absorbed by the food and penetrate to a depth of 2 to 4
cm. Microwaves stimulate the molecules of the food (in particular
water, fat and sugar molecules) and make them vibrate very quickly.
These vibrations cause a friction which generates heat. With
voluminous foods, heat generated by friction spreads to the centre of
the food after cooking.
Page 20
En-19
General information
TURNING AND STIRRING
Certain foods must be stirred whilst they are
being cooked. Meat and poultry must be
turned over halfway during cooking.
SHAPE
Regular shapes allow for more even cooking.
To improve cooking with microwaves, use
round containers rather than square ones.
ARRANGEMENT OF FOOD
When you arrange separate items of food
such as pieces of chicken or chops, place
the heaviest parts towards the outer edge
of the dish.
PIERCING
During cooking, steam may accumulate under
the skin or the wrapping which covers certain
foods. Therefore it is essential to pierce or
peel these foods before cooking so that the
steam may escape during cooking. Eggs,
potatoes, apples, sausages etc. must be
pierced before being cooked. NEVER TRY TO
MAKE BOILED EGGS.
MOISTURE LEVEL
As the moisture level of fruit and vegetables
various according to the season, sometimes
you will have to adjust the cooking time
depending on the time of year. This is
particularly true for jacket potatoes. Dry foods
such as rice and pasta may dry even more
during storage and the cooking time may
therefore vary in comparison with fresh foods.
CLING FILM
Cling film allows food to be kept moist while
the trapped steam accelerates cooking.
However, we recommend piercing the cling
film before cooking, so that the surplus steam
can escape. When you remove the cling film
covering a dish, be careful as the steam which
has accumulated is extremely hot. Only use
cling film suited for microwave ovens and only
use to cover a dish. Never put food on top of
cling film.
COVERING
Cover food with a suitable lid or cling film for
microwave ovens. Cover fish, vegetables,
stews and soups, but not cakes, sauces,
jacket potatoes and pastries.
INITIAL TEMPERATURE
The colder the food is, the longer it will take to
reheat. Food coming from a refrigerator must
be reheated for longer than those stored at
room temperature.
SEPARATING FOOD
Food cooks faster and more evenly when
separated. NEVER pile items of food on
top of each other.
Page 21
En-20
What containers can be used in your oven?
• NEVER ATTEMPT to cook food in
aluminium or metal containers, as you risk
damaging your oven.
• NEVER USE melamine dishes.
Only use plastic dishes which have been
especially designed for microwave ovens.
• NEVER COOK food which has a high fat or
sugar content or even food which needs a
long cooking time (in particular brown rice or
Christmas pudding) in a plastic container.
You may use wicker baskets only to reheat
food for a very short period of time, making
sure that these containers do not have any
hooks.
• ONLY USE fully varnished ceramics.
• NEVER COOK food in a wooden container,
as it may dry out and burn.
Microwaves
NO
Grill
Combinaton cooking
• NEVER ATTEMPT to cook food in
aluminium or in metal containers,
as you risk damaging your oven.
• Place food contained in aluminium
packaging into a dish of a similar size which
is resistant to heat.
• If the formation of an arc occurs in
combination cooking mode, press the stop
button twice to cancel the programme then
continue to cook in GRILL mode.
• NEVER USE dishes decorated with gold or
silver, as you risk causing the formation of
an arc and the decoration may come off.
YES
NO
YES
NO
YES
Page 22
Power Level Use
Max power 1000 W Reheating meat and sauces, cooked fish, canned foods and boiled vegetables.
600 W Roasting, cooking egg sauces and biscuits, heating milk.
440 W Delicate mixtures containing eggs, quiches, reheating baby food, stews.
270 W Defrosting
250 W Cooking stews, rice tarts, heavy fruit cakes and egg creams.
First side Second side
Steak (4 pieces, well done) Approx. 10 min. Approx. 10 min.
Sautéed pork Approx. 12 min. Approx. 10 min.
Sides of pork 12 - 14 min. Approx. 12 min.
Kebabs Approx. 12 min. Approx. 12 min.
Sausages 7 - 8 min. Approx. 7-8 min.
Chicken legs 15 - 20 min. 15 - 20 min.
Toast 3 - 4 min. 3 min.
Program Grill Microwave Word Prompt
1 1300 W 100 W G1-100W
2 1300 W 250 W G1-250W
3 1300 W 440 W G1-440W
En-21
Microwave power levels
Grill usage
Combination Cooking
NEVER PREHEAT THE GRILL.
Your oven's quartz grill allows fast and even cooking of a great variety
of food.
The grill only cooking mode comprises of three grill settings:
1 press Grill 1 1300W
2 presses Grill 2 950W
3 presses Grill 3 700W
Place the food to be grilled on the grill rack before placing it on the
glass tray.
Food to be grilled should in principle be turned mid-cooking.
Never cover food which you are grilling.
THE GRILL PROGRAMME ALONE DOES NOT USE MICROWAVES.
Combination cooking is perfectly suitable for most foods. In fact, while
the power of the microwaves cooks the food quickly, the grill browns the
food and makes it crispy.
You have the three following combination modes available
NOTE:
• Never cover food you are cooking with a combination programme.
• Do not use combination programmes to cook small quantities.
For perfect cooking, just use the grill or microwave only.
• In combination cooking mode, never preheat the oven.
Approximate grilling times (Grill 1)
+
-
Min
Page 23
Food
Weight
quantity
Reheating time
(approx.)
BABY BOTTLES - see below
TINNED BEANS, RICE & PASTA (Stir halfway)
Cooked beans 225 g 2 min.
Cooked beans and sausages 450 g 5 min.
Ravioli in sauce 215 g 2 min.
Rice 277 g 2 min.
Spaghetti bolognese 210 g 2 min.
Spaghetti with tomato sauce 213 g 2 min.
TINNED MEAT
Chili con carne 410 g 3 min. 30 sec.
Hot dogs (in brine) 415 g 2 min. 30 sec.
Meat balls 418 g 4 min. 30 sec.
Minced beef and onions 392 g 2 min. 30 sec.- 3 min.
Braised beef 405 g 3 min. 30 sec.
Food
Weight
quantity
Reheating time
(approx.)
Tinned soup
Cream of mushroom 425 g 4 min. 30 secs.
Cream of tomato 425 g 3 min.
Minestrone 300 g 3 min.
En-22
Your oven allows you to safely reheat ready-meals offered by
supermarkets as well as dishes you have cooked or your leftovers. All
you have to do is carefully check that the food is sufficiently hot before
serving, as you would with a normal oven. You must also take care to
store the cold food that is to be reheated correctly, preferably by
keeping them in a refrigerator beforehand.
Which mode should be used for reheating food?
The mode to be used, i.e. microwave or combination cooking, varies
depending on the type of food to be reheated. To reheat food which
does not need to brown, only use the microwave mode. To reheat food
which needs to be crisp, choose the combination cooking mode.
With a frozen tart or quiche, not only do you have to reheat the food but
you also have to cook the pastry. Since crispy pastry cannot be
achieved with microwaves and combination cooking, you should cook
this type of food in a traditional oven.
How long does it take to reheat food?
At the bottom of this page you will find reheating tables for microwave
and combination cooking modes. The lengths of time mentioned in
these tables are for REFERENCE ONLY. The exact lengths of time vary
depending on the weight of the food, the size of the container used and
the initial temperature.
What should I do if the food I need to reheat is not listed in
the tables?
Although it is not possible to list all the food available on the market in
these tables, we have tested a large range. By following our
recommendations, you can reheat your food perfectly and safely.
Turning and stirring
As far as possible, we recommend that you turn or stir the food during
reheating in order to even the temperature throughout the food.
Standing time
In most cases, you must LEAVE FOOD TO STAND after reheating in
order to allow the heat to spread to the centre of the food and to ensure
equal temperature throughout. If you have covered food during
reheating, leave the cover in place during the standing time. This is
vitally important when you are reheating thick foods such as lasagne or
shepherd's pie, or even food that you cannot stir during reheating.
When is the food reheated?
Reheated food should be served hot throughout, i.e. when it is piping
hot. As long as basic hygiene rules are followed during the preparation
and storage of the food, reheating using the microwave or combination
cooking mode does not pose any additional health risk. We recommend
that you cut food which cannot be stirred with a knife to ensure that it is
correctly reheated. In addition to following the manufacturer's
instructions and the lengths of time mentioned in the reheating tables at
the bottom of this page, we strongly recommend checking that the food
is hot throughout. If in doubt, place the food back into the oven and
reheat for a few further seconds.
Reheating
Reheating with microwaves
Use maximum power (1000 W)
BABY BOTTLES - PRECAUTIONS
The milk or the formula MUST be thoroughly mixed before and after
heating. It must also be carefully checked before being given to the
baby.
With a 60ml baby bottle of milk kept in the refrigerator, remove the cap
and the teat, heat the milk at 1000 W for around 10 seconds, then
CAREFULLY CHECK THE TEMPERATURE.
PLEASE NOTE:
Since the liquid at the top of the baby bottle is much hotter than that at
the bottom, you must mix the contents of the bottle thoroughly before
checking the temperature.
Page 24
Food
Weight
quantity
Reheating (approx.)
PORRIDGE
1 portion 1 min.
PUDDINGS and DESSERTS
Cooked apple- 1 175 g 30 sec.-1 min.
Bread and butter pudding 340 g 2-3 min.
Stewed fruit 200 g 1 min. 30 sec. - 2 min.
Fruit tart 286 g 1 min. 20 sec.
Milk pudding
for 1 person
50 sec.
Crepes, filled 1 40-50 sec.
Rice pudding 500 g 2 min. 30 sec.
RICE
Boiled rice 100 g 45 sec.
FROZEN READY MEALS
Boiled rice 450 g 4-5 min.
SAUCES
Custard 300 ml 2 min.
Salted sauce 300 ml 2 min.
VEGETABLES
Jacket potatoes 250 g 1 min. 30 sec.
Green vegetables 100 g 1 min. 30 sec.
Root vegetables 225 g 1 min. 30 sec.
Food
Weight
quantity
Reheating (approx.)
CANNED DESSERTS
Creamed rice 425 g 3 min.
Custard 425 g 2 min.
Pudding 300 g 1 min. - 1 min. 30 sec.
CANNED VEGETABLES - drain if necessary
Whole carrots 410 g 3 min.
Green beans 410 g 2 min. 30 sec.
Whole mushrooms 300 g 2 min.
Creamed mushrooms 213 g 2 min.
Pea purée 440 g 2 min.
Peas 550 g 2 min. 30 sec.
Marrow 300 g 2 min.
New potatoes 820 g 5 min.
Corn 198 g 1 min. 30 sec.
Whole tomatoes 400 g 3 min.
Chick peas 425 g 3 min.
FROZEN READY MEALS
Boil in the bag
Chicken & mushroom casserole
170 g 4 min.
Chicken & rice curry 340 g 7 min.
CHRISTMAS PUDDINGS
Slice 150 g 30 sec.
Small 450 g 2 min.
Medium 900 g 3 min.
Large 1,1 kg 3 min. 30 sec.
DRINKS- COFFEE
1 cup 235 ml 1 min. -1 min. 30 sec.
DRINKS- MILK
1 cup 235 ml 1 min 30 sec.
1 jug 600 ml 3 min. 30 sec.
HOME - MADE MEAT - BASED FOOD
Casserole for 2 people 500 g 3 min.
Shepards pie for 1 person 250 g 2-3 min.
Bolognese sauce 250 g 2-3 min.
PAS TA
Boiled spaghetti 100 g 1 min.
Macaroni cheese 225 g 2-3 min.
HOME MADE DISHES - COLD
Child portion 1 2-3 min.
Adult portion 1 4-5 min.
HOME MADE DISHES - FROZEN
Adult portion 1 6-7 min.
Deep-frozen lasagne (300-330g)
Transfer the food from its original packaging to a heat-resistant dish.
Plastic containers designed for microwaves and conventional ovens
may be used with caution.
Power Time Instructions
Defrost 270 W 8-10 min.
Place on the glass
tray.
Then 1000 W 8-10 min.
or Combination 2 20 min.
En-23
Use maximum power (1000 W)
CHECKS
After reheating food with the microwave, check that it is hot throughout.
If in doubt, place the food back in the oven for a few moments longer.
Pre-cooked food which you intend to reheat in the microwave mode
requires a STANDING TIME of 5 to 15 minutes. The thicker the food is,
the longer the STANDING TIME. This STANDING TIME is vitally
important for food which cannot be stirred.
Reheating with microwaves
Min
Page 25
Recommended
weight (Min.-Max.)
1. Small pieces 150 - 1000 g
2. Large pieces 500 - 1500 g
En-24
Defrosting instructions
This function allows you to enter the weight in
grams, then the oven selects the appropriate
defrosting time for the food. Do not use this
function to defrost ready meals. To select the
weight, refer to your oven's instructions.
During defrosting, it will be necessary to check
the food (and to turn, cover or separate it, as
described below). The automatic weight
defrosting mode allows you to defrost two
categories of food:
As far as possible, separate chops and small
pieces of food such as pieces of quiche, slices
of bread and large pieces of fruit.
Let large roasts and thick slices of bread stand
longer in order to be certain that the centre is
fully defrosted.
During defrosting, separate out small pieces of
food such as mince frequently.
Remove protective packaging and place the
food on a dish.
Before defrosting, protect the bones, the fat
side of the roast and the fine fish bones with
small pieces of SMOOTH aluminium foil in
order to prevent excessive defrosting.
Turn thick foods such as meat two or three
times during defrosting.
When you defrost food using the microwave mode, the food must be defrosted on the inside before the outside begins to cook.
Automatic weight defrosting
Defrosting advice
Page 26
Food Quantity Weight
Defrosting time
(approx.)
MARGARINE 250 g 2 min.
APPLE TART 1 100 g 1 min.
HOMEMADE DISHES
Average size 1 370 g 5 min.
*GIBLETS
275 g 6 min.
*CONCENTRATED
ORANGE
190 ml
PASTRY
Filo 300 g 2 min.
Sheet pastry 370 g 4 min.
Shortcrust 370 g 4-5 min.
TARTS
Cooked fruit 1 375 g 10 min.
Cooked meat 1 520 g 15 min.
PORK
*Cubed 450 g 12 min.
Roast 16 min. For 450 g
*Chops 4 450 g 10-12 min.
QUICHE
Quarter 1 65 g 3-4 min.
Whole 1 360 g 11 min.
*SAUSAGES
8 450 g 12 min.
*SAUSAGE MEAT 454 g 11 min.
*SOUP 1 litre 15-20 min. Use 900 W
#TURKEY 17 min. For 450 g
READY MEALS
Pizza 1 300 g 5 min.
#*Meat pie (cooked) 300 g 6-7 min. Use 440 W
Food Quantity Weight
Defrosting time
(approx.)
*BACON
Slices 10 525 g 9 min.
Steaks 2 225 g 7 min.
HAMBURGERS 4 465 g 7 min.
Beef
*Mince 450 g 12 min.
Chargrilled 450 g 12 min.
#Roast 450 g 16 min. per 450 g
BREAD
Bread, small 1 400 g 4 min.
Slice 1 30 g 1 min.
Petits pains 4 200 g 2-3 min.
Croissants 4 200 g 3 min.
BUTTER 250 g 2 min.
CAKE
Cheesecake 1 425 g 5 min.
Cake, small 1 375 g 3-4 min.
Scones 4 250 g 3 min.
CHEESE 450 g 3 min.
CHICKEN
#Drumsticks 450 g 12-15 min.
#Whole 1 for 450 g 13 - 15 min.
#Pieces 4 1 kg 23 min.
CREAM
Sticks 6 150 g 4-5 min.
#DUCK Whole 1 18 min. For 450 g
FISH
#Filets 4 450 g 12-14 min.
*Prawns 200 g 9 min.
Steaks 2 365 g 10 min.
#Whole 2 340 g 9 min.
*SOFT FRUIT 227 g 6-7 min.
MUTTON
*Chops 4 450 g 8 min.
#Leg 13 min. for 450 g
Lard 500 g 3 min.
En-25
Select the 270 W defrosting power, then the approximate time as below
The lengths of time listed below are for reference only. Always check the state of the food by opening the door, then continue with the programme.
With large quantities, correctly adapt the defrosting time. It is not necessary to cover foods while defrosting.
KEY
* As far as possible, stir or separate these foods during
defrosting.
# Protect the sides and the edges of these foods.
Defrosting common foods
Page 27

Food Weight/quantity Cooking method Time (min.) Instructions/advice
BREAD - precooked - fresh. Note: Bread reheated in a microwave has a soft crust.
Croissants
1
1000 W 20-25 sec. Place on a microwave oven dish on the glass tray. Do not cover.
or GRILL 1 1-2 Place on the grill rack on the glass tray.
4
1000 W 30-40 sec. Place on a microwave oven dish on the glass tray. Do not cover.
or GRILL 1 2-3 Place on the grill rack on the glass tray.
Petits pains
1
1000 W 15-20 sec. Place on a microwave oven dish on the glass tray. Do not cover.
or GRILL 1 3-4 Place on the grill rack on the glass tray.
4
1000 W 40-60 sec. Place on a microwave oven dish on the glass tray. Do not cover.
or GRILL 1 4-6 Place on the grill rack on the glass tray.
BREAD - Frozen
Partially cooked
Petit pains
340 g (6) Combination 1 6-8 Place on a heat resistant dish on the glass tray.
Partially cooked
Garlic baguette
325 g (2) Combination 1 8-10 Place in a heat resistant dish on the glass tray.
Raw chicken. ATTENTION: Be careful when removing the grill rack and the heat-resistant dish, as they are extremely hot. For detailed
instructions, consult the chapter relating to meat, P.28.
Breast 850 g (4)
1000 W 8-10 Place in a microwave oven dish on the glass tray. Cover.
or Combination 3 15-20 Place in the grill rack on the glass tray. Turn over halfway during cooking.
Drumsticks 900 g (8)
1000 W 10-12 Place in a microwave oven dish on the glass tray.
or GRILL 1 30-35
Place on the grill rack on the glass tray. Turn halfway during cooking
or Combination 3 20-25
Quarter 860 g (2)
1000 W 15-20 Place in a microwave oven dish on the glass tray.
or GRILL 1 30-35
Place on the grill rack on the glass tray.
or Combination 3 15-20
Whole 1 kg (1)
1000 W
then Combination
3
14-16
Breast side down, place the chicken on an upside down saucer, in a heat
resistant dish. Place on glass tray. Turn halfway during cooking. Remove fat
which is produced.
7-9
Fresh and raw FISH. For detailed instructions, consult the chapter relating to fish, p.29.
Breaded filets 300 g (2)
GRILL 1 12-14
Place on the grill rack on the glass tray. Turn over halfway during cooking.
or Combination 2 10-12
Fishcakes 200 g (2)
GRILL 1 15-18
or Combination 1 8-10
Filets 450 g (3) 1000 W 3-4 Place in a microwave oven dish. Add 30ml liquid.
Goujons 200 g
GRILL 1 12-14
Place on the grill rack on the glass tray. Turn over halfway during cooking.
or Combination 1 6-8
Steaks 350 g (2) 1000 W 3-4 Place in a microwave oven dish. Add 30ml liquid.
Whole 280 g (1)
1000 W 3-4 Place in a microwave oven dish.
or GRILL 1 8-10 Place on the grill rack on the glass tray. Turn over halfway during cooking.
Raw and frozen FISH. For detailed instructions, please refer to the section on fish, page 29.
Breaded filets 300 g (2) Combination 1 13-14
Place on the grill rack on the glass tray. Turn over halfway.
Fishcakes 400 g (4) Combination 1 20
En-26
Cooking and reheating tables
Page 28
Food
Weight/quantity
Cooking method Time (min.) Instructions/advice
Fish fingers 210 g (8)
1000 W 4-5 Place in a microwave oven dish. Do not cover.
or GRILL 1 12-14
Place on the grill rack on the glass tray.
Turn over halfway during cooking.
or Combination 1 8-10
Scampi 255 g
GRILL 1 10-12
or Combination 1 12-15
Whole 450 g (2) 1000 W 10-12 Place in a microwave oven dish. Add 30ml liquid.
PIZZAS - Fresh part cooked Use Panacrunch as per page 12/13
NOTE: Remove all packaging. The crust will be soft.
Chilli beef 400 g
1000 W 4-5 Place on the grill rack on the glass tray. Do not cover.
or GRILL 1 12-14
Place on the grill rack on the glass tray.
or Combination 1 8-10
Deep Pan, ham 475 g
1000 W 4-6 Place in a microwave oven dish on the glass tray. Do not cover.
or GRILL 1 13-15
Place on the grill rack on the glass tray.
or Combination 1 10-15
Chunks of meat 370 g
1000 W 4-5 Place in a microwave oven dish on a glass tray. Do not cover.
or GRILL 1 10-12
Place on the grill rack on the glass tray.
or Combination 1 8-10
FROZEN PIZZAS Use Panacrunch as per page 12/13
NOTE: Remove all packaging. The crust will be soft.
French bread 320 g (1)
GRILL 1 15-20
Place on the grill rack on the glass tray.
or Combination 1 6-8
Pepperoni 300 g Combination 1 15-20
RAW PORK
ATTENTION: Be careful when removing the grill rack and the heat-resistant dish, as they are extremely hot. For detailed instructions,
consult the chapter relating to meat, p.28.
Chops 800 g (4)
1000 W 10-13 Place on a microwave oven dish on the glass tray.
or GRILL 1 20-25 Place on the grill rack on the glass tray.
or Combination 3 18-20 Turn halfway during cooking.
Filets 250 g
1000 W 4-6 Place in a microwave oven dish on the glass tray.
or GRILL 1 25-30 Place on the grill rack on the glass tray.
or Combination 3 10-15 Turn halfway during cooking.
Roasts
1000 W 13-14 For 450 g
Place the roast on an upside down saucer in a heat resistant dish.
Place on the glass tray. Turn mid-cooking. During cooking, remove fat
which is produced.
Then Combination 1 5
PRE-COOKED FOODS
NOTE: Remove the aluminium container and place the food on a heat-resistant dish of a similar size. Plastic dishes specially designed for
microwave ovens and traditional ovens may be used with caution.
Cauliflower cheese 454 g
1000 W 5-6
Place on the glass tray.
or Combination 1 10
Cheese tart
190 g
1000 W 3-4
Place on the glass tray.
or Combination 3 10-15
595 g
1000 W 6-8
or Combination 3 18-20
Au gratin dishes 227 g (2)
GRILL 1 10-12
Place on the grill rack on the glass tray. Turn halfway during cooking.
or Combination 1 8-10
Stuffed
mushrooms
227 g
GRILL 1 8-10
Place on the grill rack on the glass tray.
or Combination 1 6-8
En-27
Cooking and reheating tables
Page 29
En-28
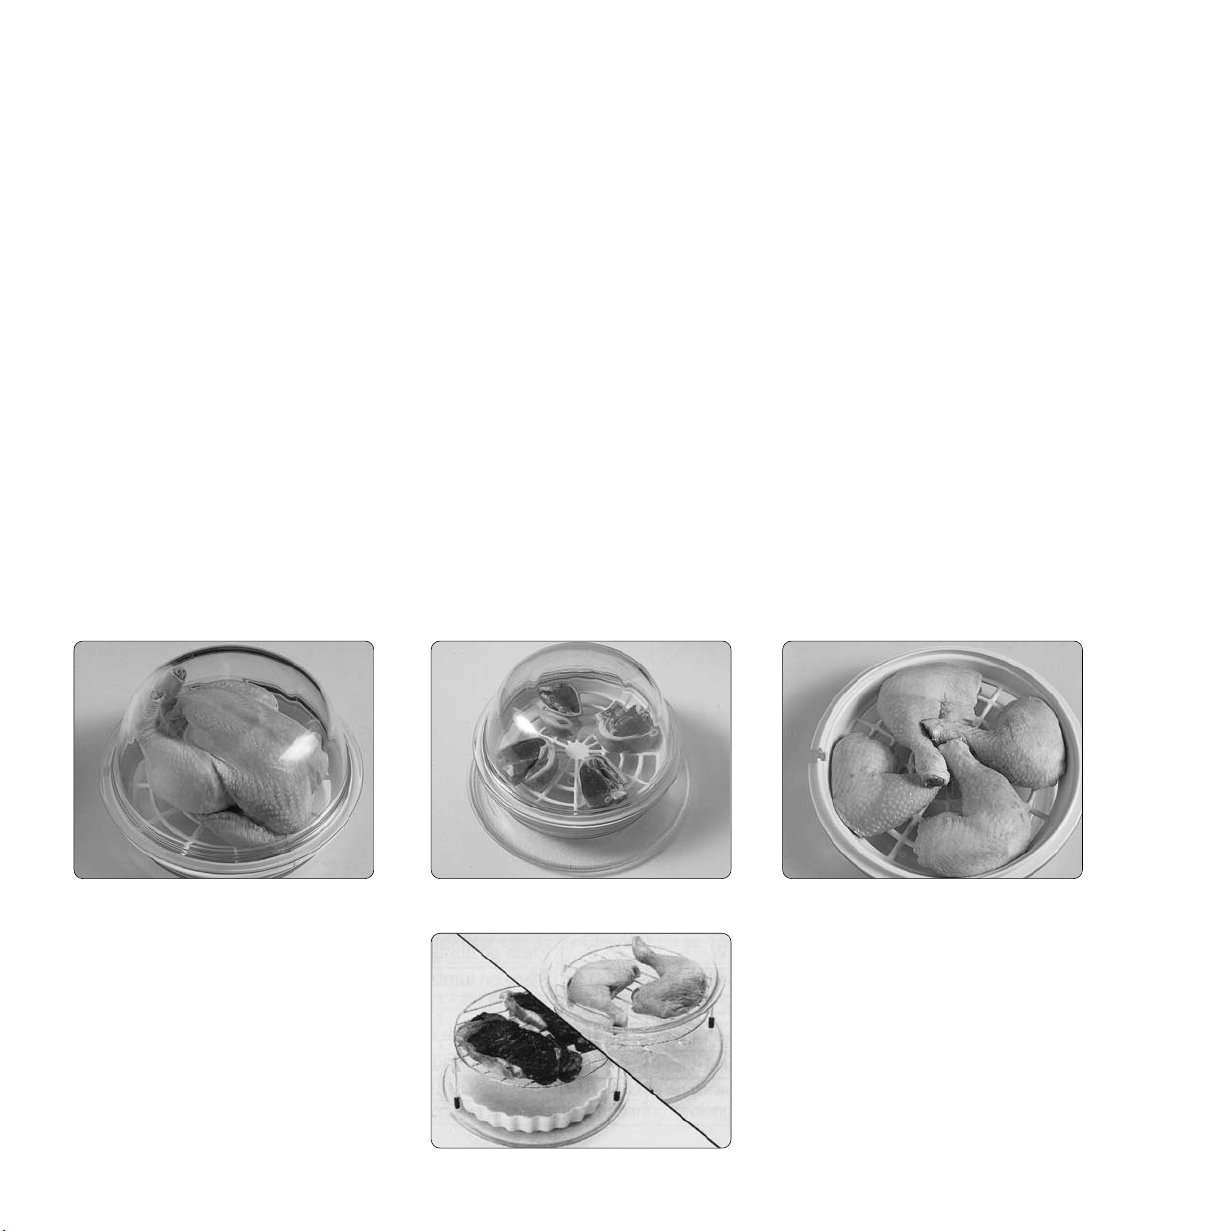
Meat and Poultry
Place the meat on the grill rack, which in turn
is placed on the glass tray. Use a heatresistant plate to collect the fat or juices which
may splatter.
How do I cook small pieces of meat with the grill or combination cooking?
DEFROSTED ROASTS
If the meat has been frozen, make sure that it
has been correctly defrosted before cooking
with a microwave oven. You should let the
defrosted roasts stand for 30 minutes
minimum before cooking, in order to be sure
that the core of the meat is completely
defrosted.
FAT
The surplus fat absorbs microwave energy and
may lead to overcooking of the meat
underneath. Always choose meats which are
not too fatty.
How do I cook a roast with a
microwave oven?
To cook an ordinary roast, you can simply
place it on the rack of a microwave roasting
unit and cover it with a dome-shaped cover.
You can also use a large hollow dish and place
the roast on an upside-down dish before
covering it with cling film or grease-proof
paper.
STANDING TIME
After cooking, you must cover the meat and
the poultry again with aluminium foil and
LEAVE TO STAND for at least 15 minutes.
Once left to stand, the roast meat may be cut
more easily. Furthermore, it continues to cook
during the STANDING TIME.
Bones
When you cook a roast or a leg of mutton in
your microwave oven, you must sometimes
cover the end of the bone in order to avoid it
cooking excessively.
How do I cook small pieces of meat in
a microwave oven?
Certain pieces of meat can be easily prepared
in a microwave oven, but the reduction in
cooking time and the absence of a source of
heat stops them from being crisp and brown.
You must always cook pieces of meat on a
microwave rack in order to avoid them soaking
in their juice.
TURNING
Roasts and poultry must be turned halfway
during cooking.
PROTECTION
Thick roasts must sometimes be re-covered
with a thin aluminium foil halfway during
cooking in order to avoid excessive cooking of
the edges. In the case of a turkey or a large
chicken, you must re-cover the breast, the legs
and the wings. Place the aluminium foil with
sticks and make sure it does not touch the
oven walls.
How do I cook large pieces of meat
with combination cooking?
Place the pieces on the heat-resistant plate.
In order to obtain perfect cooking, it is
preferable to cook the roast only using the
microwave mode, then using combination
cooking to brown and to make it crispy. DO
NOT COVER.
Recommendations
Page 30
En-29
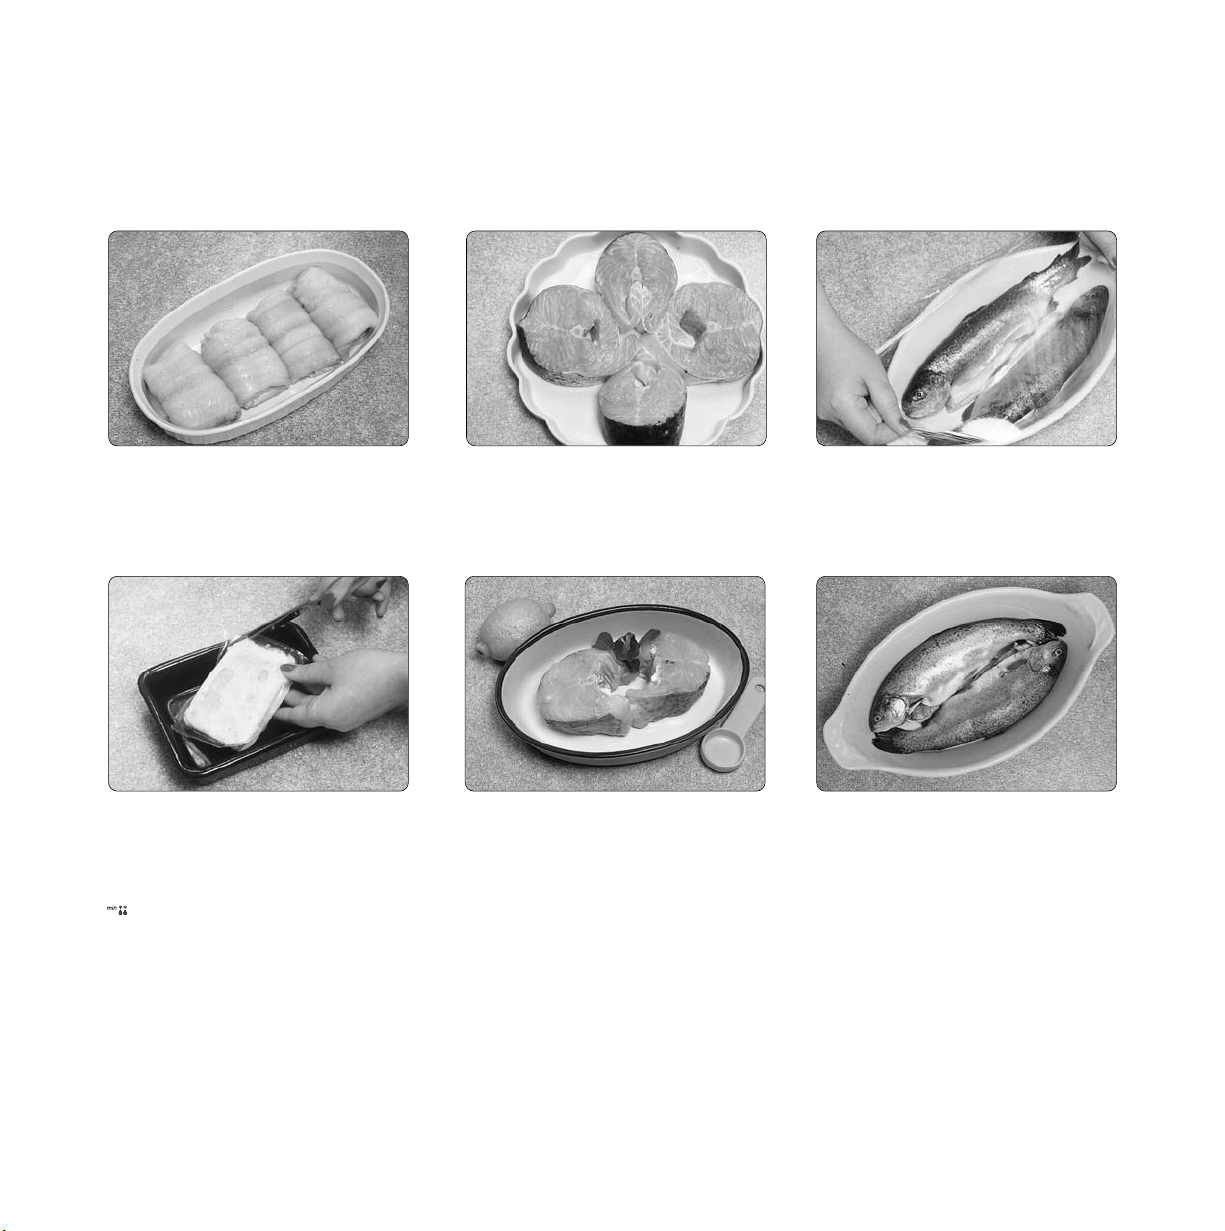
ARRANGEMENT
Thin filets of fish such as plaice filets must be
rolled beforehand in order to avoid the tail and
thinner outer edges being cooked excessively.
FISH STEAKS
We recommend that you arrange fish steaks in
a circle, but placing the thickest part towards
the exterior, in order to avoid the outer edges
disintegrating and being excessively cooked.
COVERING
Always cover fish with cling film for microwave
ovens or with the dish cover.
READY TO COOK FISH
The ready to cook fish and the sauce must be
cooked in two stages. For 150g to 170g, place
the sauce sachet on a plate, then cut the top of
the sachet with a knife. Cook the food on
270W DEFROSTING mode for 4 minutes,
allow to STAND for 2 minutes, then cook on
maximum power (1000 W) for 6 minutes or
until it is completely cooked.
LIQUID
Fresh fish must always be sprinkled with 30ml
(2 tablespoons) of lemon juice or white wine.
When the fish is frozen, add the same quantity
of liquid for even cooking.
SALT
DO NOT ADD SALT to the fish before cooking,
as this may dry it out.
WHOLE FISH
When you cook two whole fish at the same
time, place them in a staggered manner in
order to ensure even cooking.
In the case of a thicker whole fish, cover the
head and the tail mid-cooking with thin
aluminium foil fixed in place with cocktail
sticks.
How do I cook fish using the grill or
combination cooking?
Coat the fish with melted butter or oil to ensure
it does not dry out.
Place it on the oven's grill rack. DO NOT ADD
SALT. If necessary, add pepper or herbs.
For small quantities, you will get better results
by using the microwave or grill mode only.
STANDING TIME
After cooking, you must allow the fish to stand
for 2 to 3 minutes. If you want to use your oven
to cook other food, you may leave the fish to
stand outside the oven.
The microwave oven is an excellent way to
cook fish. In fact, not only does it cook the fish
without drying it, but it also eliminates the
odours which normally occur in a traditional
oven.
If the odours linger after cooking, allow to
simmer in 600ml of boiling water and a sliced
lemon in a large bowl for around 20 minutes.
Afterwards, wipe the walls of the oven with a
dry cloth.
WHEN IS THE FISH COOKED?
The fish is cooked when it flakes easily and
the flesh appears opaque.
Fish
Page 31

For 450 g of frozen
vegetables cooked in
45ml of water
cooking
time
(min.)
Asparagus 7-8
Broad beans 9-10
whole green beans 10-12
Runner beans, sliced 8-10
Broccoli 8-9
Brussel sprouts 9-10
Cabbage: grated 5-6
Carrots: whole 9
sliced 8
Cauliflowers 10
Mange tout 7-8
Mixed vegetables 7
Peas 7-8
Spinach, balls 8-9
Swede, diced 10
Corn 7
For 450 g of fresh
vegetables cooked in 90ml
of water
cooking
time
(min.)
* Corn on the cob 6-7
Courgettes: sliced 5
Leeks: sliced 7-8
Mange tout 4-5
Marrow, cubed 4-5
Mushrooms 4-5
Parsnip, sliced 6-7
Peas 4-6
* Potatoes: bolied 5-7
par boiled 5-6
new, whole 6-7
for mashing 8
* Spinach 7
* Swede, cubed 7-8
* Turnip 11-12
For 450 g of fresh
vegetables cooked in 90ml
of water
cooking
time
(min.)
*Asparagus 6-8
Aubergines 6-7
Broad beans 6
Runner beans 7-8
Green Beans 7-8
* Beetroot 15-17
Broccoli 6-7
* Brussels sprouts 6-8
* Cabbage: sliced 7-8
Carrots: sliced 7-8
Small whole carrots 9
Cauliflowers: florets 8-9
Celery 6-8
En-30
Vegetables
Certain varieties of potato are more suited to
microwave ovens than others. For microwave
cooking or combination cooking, the ideal
weight of the potato is 200g - 250g. Jacket
potatoes cook more quickly in the microwave
mode than in the combination cooking mode,
but they are softer. On the other hand,
combination cooking makes for a drier, crispier
texture. After cooking, if you want to brown
your potatoes further, use the GRILL mode
(see the table below)
Jacket potatoes
Before cooking
Wash the potatoes and pierce the skin in
several places. Place the potatoes on the
edges of the glass tray.
After cooking
Remove the potatoes from the oven and cover
them in aluminium foil to keep them hot. Allow
to stand for 5 minutes.
Jacket potatoes - manual cooking table
Manual cooking tables for fresh/frozen vegetables
Use maximum power (1000 W)
*For these vegetables, add more water for more even cooking.
Quantity
Cooking time in minutes at
maximum power (1000 W)
Cooking time in minutes in GRILL
mode for a crispier texture
1 4-5 8-10
2 6-8 10-12
4 10-13 11- 13
Page 32

POACHED EGGS
1. Place 100 ml of hot water and a dash of
vinegar and salt in a small bowl.
2. Heat for 1 minute at 1000 W for the water to
boil.
3. Break the egg. Pierce the yolk and the
white of the egg several times.
4. Cover with cling film or a dish, cook eggs at
600W for 30 seconds. (If you want to cook
more eggs, refer to the cooking table).
5. Allow the eggs to stand for 1 minute without
covering, then serve.
Number of eggs
Cooking time at 600 W
Standing time
1 40 sec. 1 min.
2 1 min. 1 min. 30 sec.
3 1 min. 30 sec. 2 min.
SCRAMBLED EGGS
1. Mix the eggs, milk, knob of butter and pinch
of pepper in a Pyrex dish.
2. Heat the mixture at 1000 W (in accordance
with the first cooking period mentioned in
the table).
3. Stir accordingly.
4. Heat the mixture for a second time at
1000 W (in accordance with the second
cooking period mentioned in the table).
5. Allow to stand until the soft eggs become
firmer.
Number of
eggs
Milk
1st cooking
period
Stir
2nd cooking
period
Standing time
1
1
tablespoon
30 sec. Yes 20 sec. 1 min.
2
2
tablespoon
40 sec. Yes 30 sec. 1 min.
3
3
tablespoon
1 min. Ye s 30 sec. 2 min.
Food Power
Cooking
time
(in min.)
Broad beans & dry vegetables- 225g & 600ml of boiling water, cover
Broad beans in brown butter
1000 W
440 W
15
then 30
Chick peas
1000 W
440 W
10
then 40
Marrow
1000 W
440 W
3
then 15
Red beans
1000 W
440 W
15
then 40
Food Power
Cooking
time
(in min.)
Pasta-225g & 1 litre of boiling water, cover
Macaroni 1000 W 12-14
Spagheti 1000 W 8
Lasagne 1000 W 8-10
Tortellini 1000 W 12
Tagliatelle 1000 W 8-9
Quick-cook pasta - 225 g + 1 litre of boiling water
Spaghetti 1000 W 5-7
Pasta shapes 1000 W 6-8
Rice - 300 g + 550 ml of water
White, quick-cook 1000 W 13-15
Brown, quick-cook 1000 W 20-25
White, long grain 1000 W 13-15
En-31
PIERCING
When you cook poached eggs or fried eggs in
a microwave oven, always pierce the yolk and
the white in order to avoid bursting.
BOILED EGGS
Never attempt to cook boiled eggs in a
microwave oven, as they may explode
MANUAL COOKING TABLE
POACHED EGGS
SCRAMBLED EGGS
Eggs, pasta, rice, hot beans and cereals
Stir mid-cooking.
Page 33

Food Weight Preparation
Pizza
Frozen, pre-cooked
Pizza bread
300 g
450 g
Remove packaging and place directly on preheated pizza pan.
Combination 1, approx 10-15 min.
Combination 2, approx 5 min.
Then 5-8 min. on grill 1.
Frozen cake
Cooked cake,
defrosted
300 g
300 g
Remove packaging and place directly on pizza pan.
Combination 2, approx 7 min.
Then around 2-3 min. on grill 3.
Combination 1, approx 5 min.
Then arpprox. 3 min. on grill 3.
Spring rolls
(2) 180 g
(4) 360 g
Remove packaging and place directly on preheated pizza pan.
Combination 1, approx 10 min.
Combination 2, approx 5 min.
Then approx. 7 min. on grill 1.
Turn mid-cooking.
Poultry
Chicken pieces
frozen
500 g
1 kg
Remove packaging and place directly on preheated pizza pan, fat skin side on top.
1000 W (microwave), 8 min., Combination 1, approx 15 min.
1000 W (microwave), 17 min., Combination 1, approx 15 min.
Turn mid-cooking.
Deep-frozen potato
dishes
Quarter pieces of potato
chips
200 g
400 g
Place potatoes on preheated pizza pan.
Combination 2, approx 10 min., then 10-15 min. on grill 1.
Combination 3, approx 10 min., then 10-15 min. on grill 1.
Deep-frozen croissants
40 g/pce.
4 peics.
Do not preheat the pizza pan.
Combination 2, approx 8 mins.
Possibly 2 min. on grill 1.
Petits gâteaux (Muffins)
40g/piece.
2 pieces.
10 pieces.
Do not preheat the pizza pan.
Combination 1, approx 3 min.,then approx 5 min. on grill 3.
Combination 2, approx. 5 min., then approx 5 min. on grill 3.
En-32
Place the pizza pan on the glass tray and pre-heat at 1000 W for 4 minutes. The cooking times below are for reference only, based on food frozen
at -18°C or refrigerated at 5°C.
Pizza Pan
Page 34

Problem Cause Solution
Food cooked in the microwave cools down too
quickly.
The food is not fully cooked. Place the food back in the oven for a few extra
seconds. Do not forget that food coming from
the fridge must cook for longer than food
stored at room temperature
The rice pudding or stew boils over during
microwave cooking.
The dish is too small. For liquid food, use a dish with twice the
volume of food.
The food cooks too slowly in the microwave
oven.
The food stored in the fridge is colder than that
stored at room temperature.
The colder the food, the longer the cooking
time should be.
Meat cooked with the microwave or
combination cooking mode is hard.
The cooking power is too high. You have
salted the food before cooking.
Never salt meat before cooking. If necessary,
salt after cooking.
In the microwave mode, the centre of the cake
is uncooked.
Insufficient cooking and/or standing time. Increase cooking and/or standing time.
Eggs scrambled or poached in the microwave
oven are hard and rubbery.
Cooking time is too long. Be careful when cooking small amounts of egg
as when they are over-cooked, you cannot
remedy the situation.
Quiche/filling is hard and rubbery when I use
combination cooking.
Power is set too high. Use the lowest power setting for these foods.
Cheese sauce is hard and stringy when
cooked in the microwave oven.
The cheese has cooked in the sauce. Add the cheese after cooking. The
temperature of the sauce will melt cheese.
Vegetables are dry when cooked in the
microwave oven.
You have cooked the vegetables without
covering them. The moisture level is low
(especially because the vegetables are not
fresh). You have salted the vegetables before
cooking.
Place a cover over them or cover with cling
film.
Add an extra 2 to 4 tablespoons of water.
If salting is necessary, only do so after
cooking.
Presence of condensation in the oven. This is quite normal and means that the speed
of cooking is greater than the speed of the
extraction of vapour inside the oven.
Wipe the walls with a soft cloth.
The revolving glass tray turns in both
directions.
This is quite normal.
Hot air seems to escape by the door. The oven door does not have a hermatic seal. This is quite normal and does not mean the
oven has a leak.
Blue sparks or arcs appear which I use metal
utensils.
In the microwave mode only, you may not use
metal utensils. In combination cooking mode,
check if the utensils are damaged.
Switch off the oven IMMEDIATELY. Never use
metal utensils in the microwave mode. Check
the minimum weight of the food or the
automatic programmes.
En-33
Solutions to common problems
Page 35

En-34
Recipes
Flounder filets with herb cream
Cut along the length of the flounder filets, season with salt and pepper. Place in layers on a
buttered gratin dish. Chop the basil and parsley and sprinkle over the fish. Place a cover over
the fish. Scatter with flakes of butter and cook on the “gratin” automatic programme.
400 - 500g flounder filets
30g butter
Basil
Parsley
2 tbsp white wine
1 cup of sauce cream
2-3 tbsp breadcrumbs
Salt, pepper
Kohlrabi salad
Wash the kohlrabi and cut into 5mm sticks. Place on a dish, cover and cook on the automatic
programme “vegetables”. Leave to stand covered.
Place 2 tbsp of oil and the onions in a pot, cover and braise for 2-3 min on full power. Add the
white wine or stock and cook on full power for 2 min. Add the remaining oil and the lemon juice
and season with salt and pepper. Add the kohlrabi, cover and cook at 600 W for 2 min. Serve the
salad warm on a plate and garnish with anchovies, olives and chives.
3 small kohlrabi
4 tbsp olive oil
1-2 onions, chopped
1 dl white wine or stock
3 tbsp lemon juice
1 tin of anchovies
Black olives
Salt, pepper
Chives
Tomato au gratin
Cut the tomatoes into 1cm slices and coat with mustard on one side. Place them on a gratin
buttered dish. Braise the bacon pieces and onions for 2 min. on full power. Next, add the herbs
and the mushrooms. Season with salt and pepper and cook for 3 min. on full power. Place the
mushrooms on the tomatoes. Mix the eggs and the cream, season with salt and pepper and
pour on the gratin. Spread the cheese and cook with the automatic programme “gratin” on the
grill rack.
4-6 tomatoes
200g mushrooms, cut thinly
100g bacon pieces
1 onion, chopped
Parsley, chopped
Basil, chopped
1-2 tbsp mustard
3 eggs
1 dl single cream
50g grated cheese
1 tbsp butter
Salt, pepper
Page 36

En-35
Kohlrabi au gratin with boletuses
Leave the boletuses to soak in water for 1 hour. Wash the kohlrabi and cut into 3mm strips.
Cook with the automatic programme “vegetables”. Put to one side. Cut the leek in two
lengthways and then into fine strips.
Braise the onions and the butter for 2 min. on full power. Next, add the leek and the drained
boletuses and cook again for 3 min. on full power. Add the Vermouth, the white wine, the cream
and the sauce paste. Season with salt and pepper and allow to cook uncovered for 5-6 min. on
full power until the sauce is ready. Place the drained kohlrabi on a buttered gratin dish and
spread the sauce on top. Sprinkle the cheese and cook with the automatic programme “gratin”
on the grill rack.
3-4 kohrabi
20g dry boletuses
1 leek
1 onion, chopped
1 tbsp butter
1
⁄2 dl dry vermouth
1 1⁄2 dl white wine
1 tbsp butter or white sauce
paste
30g grated cheese
Salt, pepper
Recipes
Stuffed courgettes
Wash the courgettes and remove the stems. Cut lengthways and remove the flesh with a coffee
spoon.
Place the butter and the onions in a dish, cover and braise for 2 min. on full power. Next, add the
finely chopped courgette flesh and braise again for 2 min on full power. Cut the ham into small
squares, chop the parsley finely and add to the courgette flesh together with the yoghurt. Add
the egg yolks and the Sbrinz cheese. Season well with salt and pepper. Place the mixture in the
courgettes and sprinkle with the remaining Sbrinz cheese. Place on a buttered gratin dish. Add
the stock and cook “au gratin” with the automatic programme “gratin”.
2-3 courgettes
1 onion, chopped
1 tbsp butter
150g ham
Parsley
250g half-fat yoghurt
2 egg yolks
Salt, pepper
50g Sbrinz cheese,
grated
French pear cake
Place the sugar and the water in a Pyrex cake dish. Caramelise for around 5 min. on full power.
Cut the pears into thin strips and place them in the dish. Cream together the butter, sugar and
lemon zest. Add the eggs and continue to beat until the mixture is smooth. Add the Epifin and
the baking powder and mix well and spread the mixture over the pears.
Cook the cake at 600 W for 9 min.
Place the cake on a plate and allow to cool.
80g sugar
3 tbsp water
2-3 pears
100g butter
100g sugar
2 eggs
Half a lemon, zest
100g Epifin
1
⁄2 tsp baking powder
Apple juice cream
Place the eggs, sugar, cornflour and apple juice in a container and beat well.
Cook on full power for 6-8 min. Stir halfway through cooking, finish cooking and stir once more.
Refrigerate. Before serving, mix with a few drops of lemon juice and add the cream.
3 eggs
60g sugar
2 heaped tbsp cornflour
1 lemon, juice and zest
6 dl of apple juice
1 dl whipped cream
Page 37

En-36
Stuffed breast of chicken
Cut a pocket in the chicken breasts. Season on the inside and outside with a pinch of salt,
pepper and paprika. Drain the spinach well and season with salt and pepper. Place over the 4
chicken breasts. Cut the gorgonzola into slices and place on the spinach.
Close the pockets and enclose them with 2 slices of lard.
Heat the roasting plate for 5 min. on full power. Roast each side of the breasts for 3 mins. on full
power. Leave to stand covered. Chop the onion and cook for 2 mins. with the Vermouth. Strain
off. Mix with the mustard, cream, saffron and cornflour. Cook on full power for 2 min. Season
with lemon juice, salt and pepper.
4 chicken breasts
Approx. 200g frozen
spinach
100g gorgonzola
8 slices of lard
Salt, pepper, paprika
Sauce:
1 onion
1
⁄2 dl dry Vermouth
1 tbsp large grain
mustard
1 1⁄2 dl single cream
Pinch of saffron
Pinch of cornflour
1 tbsp lemon juice
Salt, pepper
Recipes
Stuffed beetroot
Wash the beetroot leaves and cook covered on the automatic programme “vegetables”. Chop
the heart of the beetroot and place to one side. Drain the leaves well on paper and flatten the
leafstalks with a knife. Chop the onions, cook covered with the bacon pieces and the beetroot
heart for 3 min. on full power.
Break the egg and place in a cup and cook covered on 600 W for around 40-60 sec. then chop
finely. Mix the parsley and the chopped egg with the bacon pieces/onion mix. Season with salt,
pepper and nutmeg. Place 2-3 leaves together, put a little bit of stuffing on top and roll. Place
the beetroot parcels in a buttered dish. Place the cream and the cheese on top. Cook with the
automatic programme “gratin”.
1 large beetroot
1 large onion
150g bacon pieces
Chopped parsley
80g Sbrinz cheese,
grated
1 egg
1 1⁄2 dl cream
Salt, pepper, nutmeg
1 tbsp butter
Fennel au gratin
Wash the fennels, cut into 4-6 pieces of the same size. Cook covered with the automatic
programme “vegetables”. Butter the au gratin dish and place the fennels on it. Crack the egg and
cook in a cup at 600 W for 40-50 sec. Next, chop it into small pieces. Melt the butter in a dish at
600 W for 1 min. Mix with the egg, the breadcrumb dressing and the Sbrinz cheese. Season the
cream with salt and pepper, spread over the fennels and place the breadcrumb mixture on top.
Cook with the automatic programme “gratin”.
3 fennels
3 tbsp breadcrumbs
1 egg
1 dl cream
2 tbsp Sbrinz cheese, grated
30g butter
Salt, pepper
Vichyssois soup
Place the butter and the onions in a dish and braise for 1 min. on full power. Add the potatoes,
leek, water and stock and cook for 15 min. on full power.
Turn the vegetables into purée with a blender, then add salt, pepper and powdered spices to
taste. Allow to cool. Add the whipped cream to the soup with caution. Place into cups or bowls,
sprinkle with herbs and serve.
1 onion, finely chopped
2 diced potatoes
100g leek, finely chopped
5 dl water
1 tbsp butter
1 tbsp chicken stock
1 dl whipped cream
Salt, pepper, powdered
spices
Page 38

En-37
Recipes
“Dézaley” filets of fish
Add salt, pepper and sprinkle herbs onto the fish filets and leave to marinate for 30 min. Place
the butter, onion, fish and wine in a buttered dish, cover and braise with the automatic
programme “fish”.
Place the stock in a container. Next, add the cream, the tomato purée, the garlic and the sauce.
Bring to the boil, 3 min. on full heat. Add salt and pepper to taste. Pour the sauce on the fish.
Around 400g of fish filets
Salt, pepper
Parsley, dill and tarragon,
chopped
1 onion, chopped
1 dl Dézaley (white wine)
1 dl cream
1 tbsp tomato purée
1 clove of garlic,
chopped
1
⁄2 tbsp clear sauce
Potato and mushroom gratin
Wash the potatoes, peel and cut them into 2mm strips. Cut the mushrooms into similar sized
strips. Chop the leek into 2mm pieces. Butter a gratin dish and put half the potatoes inside.
Place the mushrooms and leek on top and cover with the other half of the potatoes. Season the
cream with salt and pepper and place everything on the vegetables. Sprinkle with cheese and
cook on the automatic programme “gratin”.
400 g potatoes
200 g mushrooms
1 leek
1 tbsp butter
1 1⁄2 dl cream
2-3 tbsp grated cheese
Chocolate cream pears
Peel the pears, cut in two, remove the cores and place in a dish, the cut side facing down. Add
the lemon juice, the wine and 2 tbsp of sugar, cover and cook with the automatic programme
“fish”. Allow the pears to cool, drain and place on a plate. Place 2 dl of milk, the chocolate and
the sugar in a dish. Cook uncovered for 3 min on full power. Place the cornflour in 1/2dl of milk,
pour into the hot milk and stir. Cook for 2 min. on full power. Once the cream has cooled, pour
over the pears.
2 large pears
1
⁄2 lemon, juice
2 tbsp white wine
3 tbsp sugar
2 1⁄2 dl milk
50g chocolate
1
⁄2 tbsp cornflour
Page 39

John Lay Electronics AG
Littauerboden 1
6014 Littau-Luzern
Telefon: 0900 809 809
http://www.panasonic.ch
John Lay Electronics SA
Littauerboden 1
6014 Littau-Lucerne
Téléphone: 0900 809 809
http://www.panasonic.ch
John Lay Electronics
Page 40

F00039G00WP
Page 41

D-1
Deutsch
Inverter-Technologie ist der Schlüssel
Die Inverter-Technologie für Mikrowellengeräte wurde durch eine Panasonic-Initiative über einen Zeitraum von 10 Jahren entwickelt. Sie ist die
Schlüsseltechnologie zur Herstellung eines gänzlich anderen Typs von Mikrowellenherd, der eine Anzahl von besonderen Qualitäten aufweist:
• Erstmalig wird die Mikrowellenenergie linear geregelt. Dadurch wird ein Geschmacksverlust beim Auftauen und Kochen von Nahrungsmitteln
vermieden.
• Durch eine wirkungsvolle Umwandlung von elektrischer Energie in Mikrowellenenergie wird der Leistungsverbrauch minimiert, ohne dabei
Verluste der eigentlichen Mikrowellenleistung in Kauf nehmen zu müssen.
• Durch die geringen Abmaße der Invertereinheit, die den bislang verwendeten sperrigen Transformer ersetzt, wird eine drastische Vergrößerung
des Garraums selbst in einem Kompaktgerät erreicht.
• Am Ende der Laufzeit des Produkts ist einfaches Recycling gewährleistet, da keine Transformer aus Eisen mehr verwendet werden.
Installation und Anschluß.................................................................. 2
Sicherheitshinweise .......................................................................... 3
Wichtige Informationen ..................................................................... 4
Bedienfeld ......................................................................................... 5
Schematische Darstellung ................................................................ 6
Betriebs- und Bedienungsanleitung .................................................. 6
Tastatur und Bedienung .................................................................... 7
Mikrowellenbetrieb ............................................................................ 8
Grillbetrieb......................................................................................... 8
Grillkombinationsbetrieb.................................................................... 9
Gewichtsautomatik zum Auftauen..................................................... 9
Gewichtsautomatik zum Erwärmen, Garen oder
Kombinationsgaren.....................................................................10-12
Panacrunch-Programme..................................................................12
Bräunungsteller............................................................................... 13
Gebrauch des Gerätes mit Zeitvorwahl........................................... 14
Standzeit ......................................................................................... 14
Fragen und Antworten..................................................................... 15
Pflege Ihres Mikrowellengerätes..................................................... 16
Technische Daten ...................................................................... 16-17
Kochen mit Mikrowellen .................................................................. 18
Generelles.................................................................................. 18-19
Das geeignete Geschirr .................................................................. 20
Mikrowellenleistungsstufen ............................................................. 21
Grill.................................................................................................. 21
Kombi-Betrieb ................................................................................. 21
Erwärmen........................................................................................ 22
Erwärmen mit Mikrowellen......................................................... 22-23
Auftauhinweise................................................................................ 24
Auftautabelle ................................................................................... 25
Koch- und Erwärmtabellen......................................................... 26-27
Fleisch & Geflügel........................................................................... 28
Fisch................................................................................................ 29
Gemüse........................................................................................... 30
Kartoffeln (gebackene Kartoffeln).................................................... 30
Eier, Teigwaren, Reis, Hülsenfrüchte & Getreide ............................ 31
Bräunungsteller............................................................................... 32
Fragen - Antworten.......................................................................... 33
Rezepte...................................................................................... 34-37
Inhalt
Das Kochbuch wurde für verschiedene Mikrowellengeräte verfaßt. Weitere Informationen entnehmen Sie bitte der beiliegenden
Bedienungsanleitung. Für einige Gerichte werden Sie in Ihrem Mikrowellengerät wahrscheinlich zuwenig Platz haben. Bereiten Sie in diesem Falle
kleinere Mengen zu und passen Sie Zeit und Leistung an.
Die Angaben in diesem Buch sind Richtwerte und sind jeweils von Ausgangstemperatur des Lebensmittels, seiner Beschaffenheit und dem
verwendeten Gefäß abhängig.
Bitte nachfolgende Bedienungsanleitung und Sicherheitshinweise sorgfältig durchlesen und aufbewahren.
Page 42

D-2
Deutsch
Installation und Anschluß
Prüfen des Mikrowellengerätes
Das Mikrowellengerät auspacken, gesamtes Verpackungsmaterial
entfernen und das Gerät auf mögliche Beschädigungen wie Dellen,
defekte Türriegel oder Sprünge in der Tür kontrollieren. Schäden
unverzüglich Ihrem Händler mitteilen. Kein beschädigtes Gerät
installieren.
Hinweise zur Erdung
WICHTIG: ZU IHRER PERSÖNLICHEN SICHERHEIT MUSS DER
HERD KORREKT GEERDET WERDEN.
Ist der Wechselstromanschluß nicht geerdet, so liegt es in der
persönlichen Verantwortung des Kunden, eine korrekt geerdete
Wandsteckdose installieren zu lassen.
Betriebsspannung
Die Spannung muß dem auf dem Gerät angegebenen Wert
entsprechen. Bei Verwendung einer höheren Spannung kann es zu
einem Brand oder anderen Schäden kommen.
Aufstellungsort
Diese Mikrowelle ist nur für Arbeitsplatten oder Einbau unter
Verwendung eines Einbaurahmens geeignet. Sie ist nicht für den
Betrieb in einem Schrank vorgesehen.
1. Das Gerät auf eine flache und stabile Oberfläche stellen, die
mindestens 85 cm hoch ist (gemessen vom Fußboden.)
2. Nach Installierung des Geräts sollte eine Unterbrechung der
Stromversorgung leicht zu bewerkstelligen sein (durch
Herausziehen des Steckers oder Betätigen eines Trennschalters).
3. Für einen sicheren Betrieb muß rund um das Gerät für
genügend Luftzirkulation gesorgt sein.
Aufstellung auf der Arbeitsfläche
a. Sicherheitsrichtlinien empfehlen, über dem Herd 15 cm Freiraum zu
lassen sowie 10 cm auf der Rückseite. Auf einer Seite sollten 5 cm
und auf der anderen Seite mehr als 40 cm Freiraum verbleiben.
b. Schließt eine Seite bündig mit der Wand ab, so darf die
andere Seite oder die Oberseite nicht blockiert sein.
4. Das Gerät nicht in der Nähe eines Elekto- oder Gasherds
installieren.
5. Füße nicht abmontieren.
6. Dieses Gerät ist nur für den Hausgebrauch konzipiert. Nicht im
Freien verwenden.
7. Das Mikrowellengerät nicht bei zu hoher Luftfeuchtigkeit benutzen.
8. Das Stromkabel sollte die Außenfläche des Gerätes nicht berühren
und nicht in Kontakt mit heißen Oberflächen kommen. Kabel nicht
über Tischkante oder Arbeitsflächen herunterhängen lassen.
Kabel, Stecker oder das Gerät selber nicht in Wasser tauchen.
9. Lüftungsventile auf der Ober- und Rückseite des Herds nicht
blockieren. Werden diese Öffnungen während des Gebrauchs
blockiert, so kann es zu einer Überhitzung des Gerätes kommen.
In diesem Fall ist das Gerät durch einen Überhitzungsschutz
gesichert und erst nach ausreichender Abkühlung wieder
betriebsbereit.
10. Dieses Gerät ist nicht zur Bedienung mit einer externen
Zeitschaltuhr oder separaten Fernbedienung gedacht.
ACHTUNG
1. Die Türdichtungen und der Bereich um die Dichtungen herum
sollten mit einem feuchten Tuch gereinigt werden. Die
Türdichtungen und der Türdichtungsbereich sollten auf
Beschädigungen kontrolliert werden. Im Falle eines Defekts das
Gerät nicht benutzen und den Schaden von einem durch den
Hersteller geschulten Servicetechniker reparieren lassen.
2. Versuchen Sie nicht, Veränderungen oder Reparaturen an
Tür, Bedienfeldgehäuse, Sicherheitsschaltern oder an
einem anderen Teil des Gerätes vorzunehmen. Die äußere
Verkleidung des Gerätes nicht entfernen: Sie verhindert das
Austreten von Mikrowellenenergie. Reparaturen sollten
ausschließlich durch eine qualifizierte Fachperson vorgenommen
werden.
3. Sind KABEL ODER STECKER des Gerätes beschädigt,
funktioniert es nicht richtig, ist es beschädigt oder
fallengelassen worden, so benutzen Sie es nicht. Reparaturarbeiten
sind unbedingt einem durch den Hersteller geschulten
Servicetechniker zu überlassen.
4. Aus Sicherheitsgründen muß ein beschädigtes Anschlußkabel durch
den Hersteller, seinen Kundendienst oder eine andere gleichwertig
qualifizierte Person ersetzt werden.
5. Kindern darf die Benutzung des Gerätes ohne Aufsicht nur erlaubt
werden, wenn eine ausreichende Einweisung gegeben wurde, die
das Kind in die Lage versetzt, das Gerät in sicherer Weise bedienen
und die Gefahr einer falschen Bedienung verstehen zu können.
6. Keine Flüssigkeiten und Nahrungsmittel in versiegelten Behältern
(z.B. Konserven) erhitzen, da diese platzen können.
freie Aufstellung
OFFEN
10cm
15cm
5cm
Achtung: Heiße Oberflächen
Page 43

D-3
Deutsch
Sicherheitshinweise
Gebrauch und Ausstattung des Gerätes
1. Das Mikrowellengerät nur zur Nahrungsmittelzubereitung benutzen.
Dieses Gerät ist speziell zum Auftauen, Erwärmen und Garen von
Lebensmitteln entsprechend der Bedienungs- und Kochanleitung
konzipiert. Erhitzen Sie in keinem Fall Chemikalien oder andere
Produkte.
2. Prüfen Sie vor der ersten Benutzung Ihres Geschirrs, ob es für den
Gebrauch im Mikrowellengerät geeignet ist.
3. Bitte versuchen Sie nicht, Kleidungsstücke, Zeitungen oder andere
Materialien im Mikrowellengerät zu trocknen. Diese Gegenstände
können sich entzünden.
4. Im Garraum des Mikrowellengerätes dürfen keine Gegenstände
aufbewahrt werden, die bei unbeabsichtigtem Einschalten des
Gerätes eine Gefahr für die Umgebung darstellen.
5. Nehmen Sie das MIKROWELLENGERÄT NIE OHNE
LEBENSMITTEL in Betrieb. Dies kann zu Beschädigungen des
Gerätes führen.
6. Kommt es zu einem Brand oder tritt während des
Mikrowellenbetriebs Rauch aus dem Gerät, dann halten Sie die
Gerätetür geschlossen. Schalten Sie das Mikrowellengerät ab,
indem Sie auf die STOPPTASTE drücken. Ziehen Sie den
Netzstecker aus der Steckdose oder schalten Sie die
Installationssicherung aus.
7. Dieses Gerät darf nicht von Personen (einschließlich Kinder) mit
eingeschränkten körperlichen, sensorischen oder mentalen
Fähigkeiten benutzt werden. Gleiches gilt für Personen, denen es
an der nötigen Erfahrung und dem nötigen Wissen mangelt, außer
sie werden durch eine für sie verantwortliche Person beaufsichtigt
oder im sicheren Gebrauch des Gerätes unterwiesen. Kinder
müssen beaufsichtigt werden, damit sichergestellt ist, dass sie nicht
mit dem Gerät spielen.
Grillbetrieb
1. Während des GRILL- ODER KOMBINATIONSBETRIEBS werden
Gehäuseoberfläche, Entlüftungsschlitze und die Tür heiß. Seien Sie
beim Öffnen/Schließen der Tür deshalb vorsichtig, ebenso beim
Herausnehmen/Hineinstellen von Lebensmitteln.
2. Des Gerät ist mit zwei Heizelementen an der Garraumdecke
ausgestattet. Nach dem Gebrauch des GRILL- ODER
KOMBINATIONSBETRIEBS sind diese Oberflächen sehr heiß,
ebenso das benutzte Zubehör und Geschirr. Achten Sie auch darauf,
daß Sie die beiden Heizelemente im Garraum nicht berühren.
3. Kinder müssen bei Benutzung des Grills ferngehalten werden, da
die Gehäuseoberflächen heiß werden.
4. Bei Verwendung des Geräts im Kombinationsmodus entstehen sehr
hohe Temperaturen. Kinder sind bei der Verwendung des Ofens
immer zu beaufsichtigen.
Automatischer Entlüftungsbetrieb
Ist das Mikrowellengerät nach dem Betrieb heiß, setzt
automatisch für eine Minute der Entlüftungsbetrieb ein. Dies ist keine
Fehlfunktion, sondern dient zum Abkühlen der
elektronischen Bauteile. Sie können währenddessen die Gerätetür
öffnen und das Lebensmittel herausnehmen. Der Entlüftungsbetrieb
schaltet sich automatisch ab.
Garraumlampe
Die Garraumlampe darf nur vom Panasonic-Kundendienst-Personal
ausgewechselt werden.
Zubehör
Das Mikrowellengerät ist mit unterschiedlichem Zubehör
ausgestattet. Verwenden Sie dieses bitte laut Anweisung.
Glasdrehteller
1. Das Mikrowellengerät nicht ohne den dazugehörigen Glasdrehteller
und Rollenring in Betrieb setzen.
2. Benutzen Sie in keinem Fall einen anderen als den speziell für das
Gerät konzipierten Glasdrehteller.
3. Den evtl. heißen Glasdrehteller abkühlen lassen, bevor Sie diesen
reinigen bzw. mit Wasser abspülen.
4. Der Drehteller kann rechts- oder linksherum laufen. Dies stellt keine
Fehlfunktion dar.
5. Berührt das Lebensmittel bzw. Kochgeschirr die Garraumwände,
läuft der Drehteller nicht weiter, sondern stoppt und beginnt, sich in
die entgegengesetzte Richtung zu drehen.
6. Das Lebensmittel nicht direkt auf dem Glasdrehteller auftauen,
erwärmen oder garen.
Rollenring
1. Der Rollenring und die Vertiefung im Garraumboden müssen
regelmäßig gereinigt werden, um Betriebsgeräusche und die
Ansammlung von Nahrungsmittelresten zu vermeiden.
2. Den Rollenring immer zusammen mit dem Glasdrehteller benutzen.
Runder Grillrost
1. Der runde Grillrost wird zum Bräunen von kleineren Portionen
benutzt und unterstützt die gleichmäßige Hitzeverteilung.
2. Beim Kombinationsbetrieb mit Mikrowelle weder Alu- oder
Metallspieße noch irgendein Metallgeschirr direkt auf dem Rost
plazieren.
Bräunungsteller
Siehe Seite D-13.
Page 44

D-4
Deutsch
Wichtige Informationen
1) Kochzeiten
• Die Kochzeit ist abhängig von Beschaffenheit, Ausgangstemperatur
und Menge des Lebensmittels sowie von der Art des verwendeten
Kochgeschirrs.
• Gehen Sie zunächst von einer kürzeren Kochzeit aus, um ein
Übergaren der Speisen zu vermeiden. Hat das Lebensmittel noch
nicht den gewünschten Auftau-, Erwärmungs- oder Garzustand
erreicht, haben Sie immer noch die Möglichkeit, die Garzeit zu
verlängern.
Wird die empfohlene Kochzeit überschritten, kann das
Lebensmittel leicht verbrennen und ggf. einen Brand auslösen
und somit den Garraum zerstören.
2) Geringe Lebensmittelmengen
• Sehr kleine Lebensmittelmengen oder Speisen mit geringem
Feuchtigkeitsgehalt können schnell austrocknen und verbrennen,
wenn sie zu lange gegart werden. Kommt es zu einem Brand, die
Tür des Mikrowellengerätes geschlossen halten, das Gerät
abschalten und den Netzstecker aus der Steckdose ziehen.
3) Eier
• Weder rohe oder gekochte Eier in der Schale noch gepellte
hartgekochte Eier mit Mikrowelle erhitzen oder kochen. Durch den
entstehenden Druck würden sie platzen, auch dann noch, wenn der
eigentliche Gar-/ Erwärmprozeß bereits beendet ist.
4) Lebensmittel mit Schale oder Haut
• Bei Lebensmitteln wie z.B. Kartoffeln und Würstchen empfiehlt es
sich, sie vorher anzustechen, um ein evtl. Platzen zu vermeiden.
5) Speisethermometer
• Falls Sie den Garzustand mit einem Speisethermometer überprüfen
wollen, verwenden Sie bitte keine herkömmlichen Thermometer im
Mikrowellengerät. Diese können Funken verursachen. Benutzen Sie
diese Speisethermometer nur außerhalb des Mikrowellengerätes.
6) Flüssigkeiten
• Beim Erhitzen von Flüssigkeiten im Mikrowellengerät kann durch
kurzfristiges Aufkochen (Siedeverzug) die Flüssigkeit im Gerät oder
bei der Entnahme schlagartig verdampfen und explosionsartig aus
dem Gefäß geschleudert werden. Dies kann zu Verbrennungen
führen.
Sie vermeiden einen Siedeverzug, indem Sie beim Erhitzen von
Flüssigkeiten in Gläsern oder Tassen immer ein hitzebeständiges
Glasstäbchen mithineinstellen oder größere Gefäße mit einem
Deckel bzw. Teller abdecken. Zusätzlich sollten Sie folgende Punkte
beachten:
a) Vermeiden Sie die Verwendung von geraden Gefäßen mit engem
Ausguß.
b) Überhitzen Sie die Flüssigkeit nicht.
c) Rühren Sie die Flüssigkeit einmal um, bevor Sie das Gefäß ins
Gerät stellen sowie nochmals nach der halben Kochzeit.
d) Lassen Sie nach Ablauf der Kochzeit das Gefäß kurze Zeit im Gerät
stehen, bevor Sie es herausnehmen. Rühren Sie die Flüssigkeit
anschließend noch einmal um.
7) Papier und Plastik
• Wenn Behälter aus Papier, Kunststoff oder anderen leicht
entflammbaren Materialien zum Erwärmen benutzt werden, darf das
Mikrowellengerät nicht unbeaufsichtigt betrieben werden! Diese
Behälter können sich entzünden.
• Verwenden Sie keine recycelten Papierprodukte (z.B. Küchenrollen),
die nicht ausschließlich für die Benutzung im Mikrowellengerät
geeignet sind. Im Recyclingpapier können Bestandteile sein, die
Funkenbildung oder einen Brand verursachen.
• Entfernen Sie Metallverschlüsse von Bratfolien, bevor Sie diese ins
Gerät stellen.
8) Hilfsmittel und Folien
• Erhitzen Sie keine geschlossenen Flaschen oder Konserven im
Mikrowellengerät, da diese durch den Druck explodieren können.
• Verwenden Sie während des Mikrowellenbetriebes weder Geschirr
aus Metall noch Geschirr mit Metallrand.
• Bei Benutzung von Alufolie, Metallspießen oder anderen
Metallwaren darauf achten, daß sie mindestens 2 cm von der
Gerätewand entfernt sind, um Funkenbildung zu vermeiden.
9) Babynahrung
• Benutzen Sie nur Fläschchen oder Glasformen aus hochwertigen
hitzebeständigen Materialien und plazieren Sie diese ohne Deckel in
der Mitte des Drehtellers.
• Nach dem Erhitzen sollte die Babynahrung in Fläschchen oder
Gläsern gut geschüttelt bzw. durchgerührt werden, damit ein
Temperaturausgleich stattfinden kann.
• Überprüfen Sie die Temperatur vor dem Verzehr, um Verbrennungen
zu vermeiden.
Page 45

D-5
Deutsch
(1) Digitalanzeige/Anzeigenfeld
(2) Mikrowellenbetrieb
(3) Grillbetrieb
(4) Grillkombinationsbetrieb
(5) Taste für die Gewichtsautomatik zum Auftauen
(6) Verzögern/Stehen
(7) Uhrzeiteinstellung
(8) Auto-Programmwählscheibe
(9) Drehschalter für die Zeit-oder Gewichtseingabe
(10) Stopp-/Löschtaste:
Eine Betätigung der Stopp-/Löschtaste vor dem
Betrieb löscht alle eingegebenen Daten. Durch
einmaliges Drücken der Stopp-/Löschtaste
während des Kochvorganges wird der Betrieb
unterbrochen, durch zweimaliges Drücken werden
alle Eingaben gelöscht und in der Digitalanzeige
erscheint wieder die Uhrzeit.
(11) Starttaste:
Durch Drücken der Starttaste beginnt das
Mikrowellengerät zu arbeiten. Wird die Tür
geöffnet bzw. die Stopp-/ Löschtaste während des
Betriebs einmal betätigt, muß die Starttaste erneut
gedrückt werden, damit das Gerät wieder arbeitet.
Bedienfeld
Akustisches Signal:
Wird auf eine Funktionstaste gedrückt, ertönt ein
akustisches Signal. Ist dies nicht der Fall, hat das
Gerät die Eingabe nicht angenommen bzw. die
Eingabe war inkorrekt. Beim Zwei-/Drei-PhasenBetrieb ertönt beim Wechsel der Phasen der
Signalton 2mal. Nach Ablauf eines Kochvorganges
ist das akustische Signal 5mal zu hören.
(1)
(3)
(9)
(8)
(11)
NN-GD569M / NN-GD559W
(4)
(5)
(6)
(10)
(7)
(2)
Dieses Gerät verfügt über eine Energiesparfunktion.
Bitte beachten:
1. Im Bereitschaftsmodus ist die Helligkeit des Displays reduziert.
2. Das Mikrowellengerät geht beim ersten Einschalten und sofort
nach Abschluss des letzten Betriebsvorgangs in den
Bereitschaftsmodus über.
Page 46

D-6
Deutsch
Betriebsanleitung:
Betriebs- und Bedienungsanleitung
Dieses Modell verfügt über eine einzigartige „Betriebsanleitungs“Funktion, die Sie durch die korrekte Benutzung Ihres Mikrowellengerätes führt. Drücken Sie nach dem Anschließen des Gerätes einfach
so oft die Starttaste, bis die Sprache Ihrer Wahl erscheint. Danach
werden auf dem Anzeigenfeld nach jedem Tastendruck die nächsten
Bedienschritte angezeigt. Auf diese Weise werden Fehlerquellen in der
Bedienung weitgehend ausgeschaltet. Wenn Sie die Sprache ändern
möchten, unterbrechen Sie für kurze Zeit die Stromzufuhr, indem Sie
den Netzstecker ziehen. Anschließend wiederholen Sie den oben
beschriebenen Vorgang.
Bei viermaligem Drücken der Vorwahlzeit/Standzeit-Taste wird die
Laufschrift-Funktion ausgeschaltet. Zum erneuten Einschalten drücken
Sie viermal die Vorwahlzeit/Standzeit-Taste.
Schematische Darstellung
(1) Garraumtür
Drücken Sie die Türöffnungstaste, um die
Tür zu öffnen. Wird während des
Garvorganges die Tür geöffnet, ist der
Gerätebetrieb unterbrochen, das
Programm bleibt aber erhalten. Wird die
Tür wieder geschlossen und die Starttaste
gedrückt, läuft der Garvorgang weiter ab.
Die Garraumbeleuchtung schaltet sich ein,
wenn die Tür geöffnet wird.
(2) Sichtfenster
(3) Türsicherheitsverriegelungen
(4) Garraumbeleuchtung
(5) Bedienfeld
(6) Glasdrehteller
(7) Rollenring
(8) Äußere Entlüftungsschlitze
(9) Grillrost
(10) Bräunungsteller
(11) Griff für den Bräunungsteller
(12) Stromkabel
(13) Warnschild (Heiße Oberfläche)
(14) Typenschild
Anschließen „88:88“
Betriebsanleitung
Press „DANSK“ in Dänisch
Press „SUOMI“ in Finnisch
Press „SVENSKA“ in Schwedisch
Press „NORSK“ in Norwegisch
Press „DEUTSCH“ in Deutsch
Press „FRANCAIS“ in Französisch
Press „ITALIANO“ in Italienisch
Press „ENGLISH“ in Englisch
(1)
(2)
(3)
(4)
(5)
(7)
(8)
(9)
(10)
(11)
(6)
(12)
(13)
(14)
Page 47

D-7
Deutsch
Kindersicherung:
Die Kindersicherung kann aktiviert werden, wenn ein Doppelpunkt bzw. die Uhrzeit im Anzeigenfeld steht. Nach Aktivierung der Kindersicherung
kann keine Eingabe über das Bedienfeld erfolgen. Die Funktionen des Gerätes sind blockiert, die Tür kann wie gewohnt geöffnet werden.
Vorführmodus:
Dieser Modus dient zu Vorführungszwecken im Fachhandel.
Eingabe:
Löschen:
• Drücken Sie 3mal die Starttaste.
Die Uhrzeit erscheint nicht mehr im Anzeigenfeld, ist
aber nicht gelöscht. Im Anzeigenfeld erscheint E .
• Drücken Sie 3mal die Stopp-/Löschtaste.
Die Uhrzeit erscheint wieder im Anzeigenfeld.
Einstellen:
Ausschalten:
Einstellen der Uhr:
Beispiel: Einstellen der Uhr auf 14:25
• Drücken Sie die Taste für die
Uhrzeit 1mal.
Der Doppelpunkt blinkt.
• Stellen Sie durch Drehen des Drehschalters für
die Zeit-/Gewichtseingabe die korrekte
Uhrzeit/Tageszeit ein.
Die Uhrzeit erscheint im Anzeigenfeld und
der Doppelpunkt blinkt.
• Drücken Sie erneut die
Taste für die Uhrzeit (1mal).
Der Doppelpunkt hört auf
zu blinken und die Uhrzeit
ist eingestellt.
Anmerkungen:
1. Um die Tagesuhrzeit zu verändern, wiederholen Sie die oben beschriebenen Schritte.
2. Die eingestellte Uhrzeit bleibt solange erhalten, bis die Stromzufuhr unterbrochen wird.
3. Die Anzeige der Uhrzeit erfolgt im 24-Stunden-Rhythmus.
Tastatur und Bedienung
HINWEIS: Zum Aktivieren der Kindersicherung muss die Start-Taste dreimal innerhalb von 10 Sekunden gedrückt werden.
• Drücken Sie einmal
die MikrowellenLeistungstaste.
• Drücken Sie viermal
die Stopp/AbbrechenTaste.
• Drücken Sie einmal
die MikrowellenLeistungstaste.
• Drücken Sie viermal
die Stopp/AbbrechenTaste.
Page 48

Ihr Mikrowellengerät besitzt fünf Mikrowellenleistungsstufen. Die Wattleistungen der einzelnen Leistungsstufen entnehmen Sie bitte der
nachfolgenden Tabelle.
Zubehör:
Drücken Mikrowellenleistungsstufe Wattleistung
1-mal drücken Max / GAREN 1000 W
2-mal drücken Min / AUFTAUEN* 270 W
3-mal drücken ERWÄRMEN 600 W
4-mal drücken KOCKELN 440 W
5-mal drücken AUSQUELLEN 250 W
D-8
Deutsch
Grillbetrieb
• Wählen Sie die Grilleinstellung.
Drücken Sie einmal für Grill 1 (Hoch), zweimal
für Grill 2 (Mittel) oder 3-mal für Grill 3 (Niedrig).
• Stellen Sie mit dem Drehschalter für die Zeit-/
Gewichtseingabe die gewünschte Zeit ein
(maximal 90 Minuten).
• Drücken Sie die
Starttaste.
Anmerkungen:
1. Der Grillbetrieb startet nur, wenn die Gerätetür geschlossen ist.
2. Sie können die Kochzeit während des Gerätebetriebs verändern. Betätigen Sie den Drehschalter für die Zeiteingabe und verlängern bzw.
verkürzen Sie die Zeit. Die Verlängerung bzw. Verkürzung erfolgt in 1-Minuten-Schritten bis zu 10 Minuten. Wird der Drehschalter für die
Zeiteingabe auf Null gestellt, ist der Kochvorgang beendet.
Rost
Glasdrehteller
Zubehör:
Mikrowellenbetrieb
*Die MIN-Einstellung
kann auch zum
Aufwärmen
verwendet werden.
• Stellen Sie den
Drehschalter zur Wahl der
Betriebsarten auf die gewünschte
Mikrowellenleistungsstufe.
• Stellen Sie mit dem Drehschalter für die Zeit-/Gewichtseingabe die
gewünschte Zeit ein (maximale Leistung: maximal 30 Minuten;
alle anderen Leistungstufen: maximal 90 Minuten).
• Drücken Sie
die Starttaste.
Anmerkungen:
1. Wiederholen Sie die Einstellung der Mikrowellen-Leistungsstufe und Kochzeit für 2- und 3-Stufen-Kochvorgänge, bevor Sie die starttaste
drücken.
2. Die Standzeit kann nach Einstellung der Mikrowellenleistung und der Zeit programmiert werden.
3. Sie können die Kochzeit während des Gerätebetriebs verändern. Betätigen Sie den Drehschalter für die Zeiteingabe und verlängern bzw.
verkürzen Sie die Zeit. Die Verlängerung bzw. Verkürzung erfolgt in 1-Minuten-Schritten bis zu 10 Minuten. Wird der Drehschalter für die
Zeiteingabe auf Null gestellt, ist der Kochvorgang beendet.
4. Der Herd läuft automatisch auf Leistungsstufe Hoch, wenn die Kochzeit eingegeben wird, ohne dass vorher eine Leistungsstufe gewählt wurde.
Der Grill verfügt über 3
Grilleinstellungen.
1-mal drücken - GRILL 1 1300 W
2-mal drücken - GRILL 2 950 W
3-mal drücken - GRILL 3 700 W
Glasdrehteller
Page 49

Programm
Digitale Laufschrift
Mindest-/Höchstgewicht
Lebensmittel
1 Kleine
Teile
1mal drücken
1KLEINE
TEILE
150 - 1000g
Flache, kleine Fleischstücke, z.B. Steaks, Schnitzel, Gulasch, Würstchen,
Hähnchenschenkel, Fischfilet (jedes Stück 100g bis 400g). Wenden Sie die
Lebensmittel während des Auftauens beim Ertönen des akustischen Signals.
2 Große
Stücke
2mal drücken
2 GROSSE
TEILE
500 - 1500g
Große Fleischstücke, z.B. Braten, ganze Hähnchen. Wenden Sie die
Lebensmittel während des Auftauens beim Ertönen des akustischen
Signals.
Drücken
Kombinations
- programm
Grilleistung
Mikrowellen-
leistung
Digitale
Laufschrift
1-mal drücken 1 1300W 100W G1-100 W
2-mal drücken 2 1300W 250W G1-250 W
3-mal drücken 3 1300W 440W G1-440 W
D-9
Deutsch
Gewichtsautomatik zum Auftauen
Mit dieser Ausstattung können Sie Lebensmittel nach Gewicht auftauen. Wählen Sie das gewünschte Programm und geben Sie das Gewicht des
Lebensmittels auf 10g genau ein. Bei jedem Programm wird bei Betätigen der Gewichtsautomatiktaste zum Auftauen zuerst ein Standardgewicht
angezeigt, das aufgrund haushalts- oder handelsüblicher Lebensmittelmengen festgelegt wurde (Erstgewicht).
• Drücken Sie die
Starttaste.
• Wählen Sie das gewünschte
Programm durch ein- oder
zweimaliges Drücken der
Gewichtsautomatiktaste zum
Auftauen.
• Geben Sie mit dem Drehschalter für die Zeit-/Gewichtseingabe das Gewicht
des Lebensmittels ein. Langsames Drehen der Wählscheibe wird in Schritten von
10g gerechnet. Schnelles Drehen der Wählscheibe wird in Schritten von 100g
gerechnet.
Anmerkungen:
1. Ist die Auftauzeit länger als 60 Minuten, dann wird die Zeit im Anzeigenfeld in Stunden und Minuten angezeigt.
2. Die maximale Gewichtsbegrenzung wird durch die Größe und Form des Lebensmittels bedingt.
3. Zubereitungsangaben für Lebensmittel, die nicht für diese Gewichtsautomatik geeignet sind, entnehmen Sie bitte den Angaben im Kochbuch.
Grillkombinationsbetrieb
Es stehen Ihnen 3 feste Grillkombinationsprogramme mit
folgenden Leistungsstufen zur Verfügung:
• Drücken Sie die
Starttaste.
Anmerkungen:
1. Der Grillbetrieb startet nur, wenn die Gerätetür geschlossen ist.
2. Sie können die Grillzeit während des Gerätebetriebs verändern. Betätigen Sie den Drehschalter für die Zeiteingabe und verlängern bzw.
verkürzen Sie die Zeit. Die Verlängerung bzw. Verkürzung erfolgt in 1-Minuten-Schritten bis zu 10 Minuten. Wird der Drehschalter für die
Zeiteingabe auf Null gestellt, ist der Grillvorgang beendet.
Rost
Glasdrehteller
Zubehör:
• Wählen Sie die
Kombinationsstufe
(siehe Tabelle).
• Stellen Sie mit dem Drehschalter für die Zeit-/
Gewichtseingabe die gewünschte Zeit ein
(maximal 90 Minuten).
Page 50

Programm
Digitale
Laufschrift
Mindest-/
Höchstgewicht
Zubehör Hinweise/Tips
1. Suppentasse
1 GROSSE
TASSE
250g
Zum Erhitzen von Getränken und Suppen. Wählen Sie das
Programm “Suppentasse erwärmen”, geben Sie das Gewicht ein
(250g) und drücken Sie anschließend die Starttaste.
2. Tasse
2 1TASSE
150g
Zum Erhitzen von Getränken oder Suppe in einer Tasse. Wählen
Sie das Programm “Tasse erwärmen”, geben Sie das Gewicht ein
(150g) und drücken Sie anschließend die Starttaste.
3. Eintöpfe und
Tellergerichte
3 FRISCHE
MAHLZEIT
200 - 1000g
Zum Erhitzen von vorgegarten, tiefgekühlten Tellergerichten und
Eintöpfen. Decken Sie die Lebensmittel zum Erwärmen grundsätzlich
ab. Beachten Sie eine Standzeit von 2-3 Minuten.
4. Tiefgefrorene
Eintöpfe und
Tellergerichte
4
GEFRORENE
MAHLZEIT
200 - 1000g
Zum Erhitzen von vorgegarten, tiefgekühlten Tellergerichten und
Eintöpfen. Decken Sie die Lebensmittel zum Erwärmen grundsätzlich
ab. Beachten Sie eine Standzeit von 2-3 Minuten.
5. Gemüse,
frisch
5 FRISCHES
GEMUESE
200 - 1000g
Zum Garen von frischem Gemüse. Geben Sie das vorbereitete
Gemüse mit nassem Haushaltpapier bedeckt in eine
mikrowellengeeignete Form mit Deckel. Standzeit beachten.
6. Fisch, frisch
6 FRISCHER
FISCH
100 - 1000g
Zum Garen von frischen Fischfilets oder -koteletts. Dünnere
Bereiche abdecken, Fische in eine geeignete Form legen. Fügen Sie 2
Eßlöffel (30 ml) Flüssigkeit zu. Mit einem Deckel oder eingestochener
Klarsichtfolie abdecken. Größere Gewichte sollten während der
Garzeit einmal gewendet werden (Signalton).
D-10
Deutsch
Gewichtsautomatik zum Erwärmen, Garen oder Kombinationsgaren
Anmerkungen:
1. Ist die Erwärm- oder Garzeit länger als 60 Minuten, dann wird die Zeit im Anzeigenfeld in Stunden und Minuten angezeigt.
2. Auf den Seiten D-10 bis D-12 finden Sie die zur Verfügung stehenden Gewichtsautomatikprogramme. Halten Sie sich unbedingt an die
angegebenen Gewichtsbegrenzungen und Zubehörangaben.
3. Zubereitungsangaben für Lebensmittel, die nicht für diese Gewichtsautomatikprogramme geeignet sind, entnehmen Sie bitte dem Kochbuch.
• Sélectionnez la cuisson de l'aliment
désiré en tournant le sélecteur de
cuissons Auto. Les cuissons automatiques
s'affichent successivement dans la fenêtre.
• Geben Sie mit dem Drehschalter für die Gewichtseingabe das
Gewicht des Lebensmittels ein. Langsames Drehen der
Wählscheibe wird in Schritten von 10g gerechnet. Schnelles Drehen
der Wählscheibe wird in Schritten von 100g gerechnet.
• Drücken Sie die
Starttaste.
Diese Ausstattung ermöglicht Ihnen die Zubereitung vieler Lebensmittel. Für jedes Programm wurden unterschiedliche Mikrowellenleistungen
und/oder Grilleistungen sowie Zeiten in Abhängigkeit vom Lebensmittelgewicht ermittelt. Wählen Sie das gewünschte Programm und geben Sie
das Gewicht des Lebensmittels auf 10g genau ein. Bei jedem Programm wird bei Betätigen der entsprechenden Gewichtsautomatiktaste zuerst
ein Standardgewicht angezeigt, das aufgrund haushalts- oder handelsüblicher Lebensmittelmengen festgelegt wurde.
Page 51

Programm
Digitale
Laufschrift
Mindest-/
Höchstgewicht
Zubehör Hinweise/Tips
7. Garen von
Kartoffeln
7 KARTOFFELN
200 - 1500g
Zum Garen von Kartoffeln.
Kartoffeln in gleichgroße Stücke schneiden, mit nassem
Haushaltpapier bedecken und Geschirr mit Deckel oder Klarsichtfolie
zudecken.
8. Garen von
Reis
8 REIS
200 - 800g
Zum Garen von Reis.
Auf 100 g Reis 2 dl Wasser und 1/2 Teelöffel Salz beifügen. Nur das
Gewicht des Reis eingeben. Mit Deckel oder Klarsichtfolie zudecken.
9. Milchreis/
Grieß
9 REIS PUDDING
250 - 1000g
Zum Garen von Milchreis oder Grieß.
Geben Sie das Gesamtgewicht von Getreide und Flüssigkeit ein.
Garen Sie den Milchreis ohne Deckel und rühren Sie ihn
zwischendurch um.
10. Rührei
10 RUEHREI
100 - 500g
Zur Zubereitung von Rührei.
Geben Sie das Gesamtgewicht von Ei und Flüssigkeit ein. Mit
Klarsichtfolie oder Deckel abdecken.
11. Frische
Hähnchenstücke
11
POULETSTUECKE
200 - 1000g
Zum Garen frischer Hähnchenteile.
Legen Sie die Hähnchenteille auf den Rost. Stellen Sie den Rost auf
den Glasdrehteller und geben Sie das Gewicht ein. Gleichmäßiges
Garen erreichen Sie durch gleichmäßiges Verteilen der Hähnchenteile.
12. Gefrorene
Hähnchenstücke
12 GEFRORENE
POULETTEILE
200 - 1000g
Zum Garen gefrorener Hähnchenteile.
Legen Sie die Hähnchenteile auf den Rost. Stellen Sie den Rost auf
den Glasdrehteller und geben Sie das Gewicht ein. Gleichmäßiges
Garen erreichen Sie durch gleichmäßiges Verteilen der Hähnchenteile.
13. Braten
13 RINDSSTEAK
800 - 1500g
Zur Zubereitung von Braten.
Legen Sie den Braten auf den Rost. Stellen Sie den Rost auf den
Glasteller und geben Sie das Gewicht ein. Nach der halben Garzeit
wenden (Signalton).
14. Schwein
14
SCHWEINSBRATEN
700 - 2000g
Zum Garen von Schweinefleisch
Schweinefleisch mit der fetten Seite nach unten in ein Geschirr legen
und auf die Glasplatte stellen. 1 dl Bouillon hinzufügen. Bei Signalton
wenden. Nach Ende der Kochzeit 10 bis 15 Minuten stehenlassen.
15. Frischer
Gratin/frische
Lasagne
15 GRATIN
500 - 1500g
Zur Zubereitung von Nudelgratins.
Die frischen oder gekochten Nudeln mit einer Sauce und Käse
zubereiten. Für 100g Nudeln nehmen Sie 6 - 8 dl (600 - 800g)
Sauce/Creme; mit geriebenem Käse bestreuen.
16. TK-Gratin/TKLasagne
16 GEFRORENER
GRATIN
300 - 1200g
Zum Erhitzen und Bräunen von tiefgekühlten Gratins und
Lasagne, industriell vorgefertigt.
Nehmen Sie den Auflauf aus der Verpackung und geben Sie ihn in
eine portionsgerechte, mikrowellengeeignete und hitzebeständige
Form, die auf den Rost gestellt wird. Dieses Programm kann auch für
rohe Gemüse-Gratins verwendet werden.
D-11
Deutsch
Gewichtsautomatik zum Erwärmen, Garen oder Kombinationsgaren
Page 52

Programm
Digitale
Laufschrift
Mindest-/
Höchstgewicht
Zubehör Hinweise/Tips
17. Gefrorenes
Brot
17 BROT
30 - 300g
Zum Aufwärmen und Bräunen von gefrorenem Brot
Das gefrorene Brot direkt auf den Rost, auf die Glasplatte legen. Das Brot
bei Signalton wenden. Nach dem Aufwärmen noch stehenlassen. Das
Programm ist nicht zum Toasten von Brotschnitten geeignet.
18. Ofenkartoffeln
18
BACKKARTO
FFELN
200 - 1500g
Zum Kochen, Bräunen und Knuspriggaren von Ofenkartoffeln.
Schale mit einer Gabel einstechen und auf den Rost legen.
19. TK-Pizza
19
GEFRORENE
PIZZA
100 - 500g
Zum Erhitzen und Bräunen von tiefgekühlter Pizza, industriell
vorgefertigt.
Entfernen Sie die Verpackung und legen Sie die Pizza in den
vorgeheizten Bräunungsteller.
20. Gefrorene
Quiche
20
GEFRORENE
QUICHE
100 - 500g
Zum Aufwärmen, Knuspriggaren des Bodens und Bräunen der
Oberseite einer gefrorenen Quiche, industriell vorgefertigt.
Verpackung entfernen und die Quiche in den vorgewärmten
Bräunungsteller legen.
21. Gefrorene
Kartoffelprodukte
21 POMMES
FRITES
200 - 500g
Zum Aufwärmen, Knuspriggaren und Bräunen gefrorener
Kartoffelprodukte.
Nach dem Aufwärmen des Bräunungstellers die Kartoffelprodukte darin
verteilen. Am besten in einer einfachen Schicht zubereiten.
22. Bratspeck
22 SPECK
GEBRATEN
30 - 200g
Zum Braten von Frühstücksspeck in Scheiben.
Die Scheiben in einfacher Schicht in die Pfanne legen. Wenn Sie den
Speck stärker rösten wollen, können Sie die Kombination G1 400 Watt
1 - 4 Min. einstellen. Auf Haushaltpapier entfetten.
D-12
1. Wählen Sie das gewünschte
Programm und stellen Sie den
Bräunungsteller direkt auf den
Glasdrehteller.
2. Drücken Sie die Starttaste, um
den Bräunungsteller
vorzuheizen.
3. Ist das Vorheizen beendet,
ertönt ein akustisches Signal.
Legen Sie daraufhin das
Lebensmittel auf den
Bräunungsteller und geben Sie
das Gewicht ein.
4. Drücken Sie die Starttaste.
Panacrunch-Programme
Gewichtsautomatik zum Erwärmen, Garen oder Kombinationsgaren
Deutsch
Page 53

Das Konzept
Werden bestimmte Lebensmittel wie z.B. Pizza oder Quiche im
Mikrowellengerät zubereitet, ist das Garergebnis oft nicht mit dem des
Backofens zu vergleichen: Der Teig ist meist weicher und der Boden
nicht so knusprig.
Mit dem Panasonic-Bräunungsteller als Zubehör ist das kein Problem
mehr. Pizza, Quiches oder auch andere Produkte können knusprig
gebräunt werden. Das Prinzip ist folgendermaßen: Der Boden des
Bräunungstellers absorbiert Mikrowellen und wandelt diese in Hitze um.
Diese Hitze wird von unten an das Lebensmittel abgegeben. Eine
Bräunung der Lebensmitteloberfläche wird durch den Grill erreicht.
Außerdem unterstützt die Anti-Haft-Beschichtung des Bräunungstellers
den Hitzeeffekt.
Anwendung des Bräunungstellers
• Um die besten Ergebnisse zu erzielen, ist es notwendig, dieses
Zubehör vorzuheizen: Direkt auf die Glassplatte stellen und bei
1000 W vier Minuten lang vorwärmen. Sollen Lebensmittel wie
z.B. Würstchen oder Frikadellen zubereitet werden, dann fetten Sie
den Bräunungsteller vor dem Vorheizen ein, um die Bräunung zu
optimieren.
• Nehmen Sie nach dem Vorheizen den Bräunungsteller mit
Topfhandschuhen oder den Handgriff aus dem Gerät. Legen Sie das
Lebensmittel unverzüglich auf den Bräunungsteller und stellen Sie
den Teller sofort wieder in das Mikrowellengerät. Jede
Zeitverzögerung kann das Garergebnis beeinflussen.
• Stellen Sie den Bräunungsteller auf den Glasdrehteller und halten
Sie sich unbedingt an die laut Tabelle vorgegebenen Leistungen
und Zeiten.
Wichtige Hinweise
1. Heizen Sie den Bräunungsteller maximal 8 Minuten vor.
2. Plazieren Sie den Bräunungsteller in der Mitte des Glasdrehtellers.
Stellen Sie sicher, daß der Bräunungsteller die Garraumwände nicht
berührt. Fehlerhaftes Plazieren kann Funkenbildung und damit eine
Beschädigung des Garraums verursachen.
3. Setzen Sie den Bräunungsteller immer direkt auf den Glasdrehteller.
Benutzen Sie in keinem Fall zusätzlich den Rost.
4. Wenn Sie mit dem heißen Bräunungsteller arbeiten, benutzen Sie
immer Topfhandschuhe oder den Handgriff, um Verbrennungen zu
vermeiden.
5. Entfernen Sie sämtliches Verpackungsmaterial des Lebensmittels,
bevor Sie dieses zubereiten.
6. Plazieren Sie niemals hitzeempfindliches Material auf dem heißen
Bräunungsteller. Dieses könnte sich entzünden.
7. Der Bräunungsteller kann auch im Backofen benutzt werden.
8. Benutzen Sie den Bräunungsteller in Kombination mit Mikrowelle
und Grill, um beste Ergebnisse zu erzielen.
Pflege des Bräunungstellers
• Benutzen Sie auf dem Bräunungsteller keine scharfkantigen
Gegenstände bzw. Messer, da dadurch die Beschichtung
beschädigt wird.
• Reinigen Sie den benutzten Bräunungsteller in heißem
Seifenwasser und spülen Sie mit klarem, heißen Wasser
nach. Verwenden Sie weder Scheuermittel noch Kratzschwämme,
da die Oberfläche sonst beschädigt werden kann.
• Der Bräunungsteller ist für die Geschirrspülmaschine geeignet.
Bräunungsteller
D-13
Deutsch
Page 54

D-14
Deutsch
Gebrauch des Gerätes mit Zeitvorwahl
2. Beträgt die programmierte Verzögerungszeit mehr als ein Stunde, erfolgt der Countdown in Minuteneinheiten. Beträgt die programmierte
Verzögerungszeit weniger als eine Stunde, erfolgt der Countdown in Sekundeneinheiten.
3. Startverzögerung kann nicht vor den automatischen Programmen programmiert werden.
• Drücken Sie die
Verzögern/StehenTaste.
• Stellen Sie die Verzögerungszeit ein,
indem Sie die Zeit/Gewicht-
Wählscheibe drehen (bis zu 9 Stunden).
• Stellen Sie das gewünschte
Kochprogramm und die Kochzeit ein.
• Drücken Sie die
Start-Taste.
Beispiel:
Start verzögern: 1 Stunde Hohe Kochleistung: 10 Min. Kochen auf kleiner Flamme: 20 Min.
• Stellen Sie das gewünschte
Kochprogramm und die Kochzeit ein.
• Drücken Sie auf die
Verzögern/StehenTaste.
• Stellen Sie die gewünschte
Zeitspanne ein, indem Sie die
Zeit/Gewicht-Wählscheibe drehen
(bis zu 9 Stunden).
• Drücken Sie die
Start-Taste.
HINWEIS:
1. Es können drei Kochstufen programmiert werden, einschließlich Standzeit.
2. Wird die Herdtür während der Standzeit oder der Minutenschaltuhr geöffnet, wird der Countdown im Display-Fenster fortgesetzt.
3. Diese Funktion kann auch als Zeit-Schaltuhr benutzt werden. In diesem Fall drücken Sie die Verzögern/Stehen-Taste, stellen die Zeit ein und
drücken die Start-Taste.
Hohe Kochleistung: 4 Min. Standzeit: 5 Min. Hohe Kochleistung: 2 Min.
5-malEinmal
Once
Einmal
Indem Sie die Verzögern/Stehen-Taste benutzen, können Sie den verzögerten Beginn des Kochvorgangs programmieren.
Beispiel:
HINWEIS:
1. Es können drei Kochstufen programmiert werden, einschließlich verzögertem Kochbeginn.
Zum Beispiel:
Die Verzögern/Stehen-Taste können Sie dazu benutzen, die Standzeit nach Ablauf des Kochvorgangs zu programmieren oder um den
Herd als Minuten-Schaltuhr zu programmieren.
Standzeit
Page 55

D-15
Deutsch
F: Warum sind während des Kombinationsgarens
brummende und klickende Geräusche zu
hören?
Fragen und Antworten
F: Warum läßt sich das Mikrowellengerät nicht
einschalten?
A: Läßt sich das Mikrowellengerät nicht einschalten, dann überprüfen Sie bitte folgendes:
1. Steckt der Netzstecker fest in der Steckdose? Ziehen Sie den Stecker aus der Steckdose
und warten Sie 10 Sekunden, bevor Sie diesen wieder hineinstecken.
2. Überprüfen Sie die Netzsicherung und ersetzen Sie diese gegebenenfalls.
3. Ist die Netzsicherung in Ordnung, stecken Sie den Netzstecker eines anderen
Elektrogerätes in die gleiche Steckdose. Arbeitet dieses Elektrogerät auch nicht, ist die
Steckdose defekt. Arbeitet das Gerät jedoch ordnungsgemäß, ist Ihr Mikrowellengerät
defekt. Wenden Sie sich in diesem Fall bitte unbedingt an einen Panasonic-Kundendienst.
A: Beim Betrieb des Mikrowellengerätes können Fernseh- und Radiostörungen auftreten. Es
handelt sich um ähnliche Störungen, wie sie durch kleine Elektrogeräte wie Mixer,
Staubsauger, Haartrockner usw. verursacht werden können. Dies bedeutet nicht, daß Ihr
Mikrowellengerät defekt ist.
A: Das Mikrowellengerät funktioniert nur, wenn die Eingabe richtig erfolgte. Es ist z.B. nicht
möglich, bei den Gewichtsautomatikprogrammen eine Zeitvorwahl zu
programmieren.
A: Die erhitzten Lebensmittel erwärmen den Garraum. Diese warme Luft wird durch die
zirkulierende Luftströmung aus dem Gerät nach außen befördert. In dieser erwärmten Luft
sind keine Mikrowellen enthalten. Die Lüftungsöffnungen dürfen während des Kochens in
keinem Fall abgedeckt werden.
A: Das Gerät ist für den Fachhandel mit einem Demonstrationsprogramm ausgestattet.
Betätigen Sie 4mal die Taste für die Uhrzeit, um diese Funktion zu löschen. Das Gerät ist
wieder betriebsbereit.
A: Nur für den reinen Grillbetrieb können Sie ein Fleischthermometer verwenden. Benutzen
Sie für den Mikrowellenbetrieb bzw. für den Kombinationsbetrieb niemals ein
herkömmliches Fleischthermometer, denn das Metall des Thermometers kann
Funkenbildung verursachen.
A: Diese Geräusche sind bedingt durch das automatische Umschalten von
Mikrowellenleistung auf Grilleistung während des Kombinationsbetriebs, dies ist normal.
A: Nach mehrfachem Gebrauch des Gerätes ist es notwendig, das Gerät gründlich zu
reinigen. Sie können zusätzlich das Gerät ohne Lebensmittel, Glasdrehteller und
Rollenring für 5 Minuten mit dem Grill in Betrieb setzen. Damit ist sichergestellt, daß
Lebensmittelrückstände und konservierende Ölreste verbrennen, die Geruch und Rauch
verursachen.
A: Die Fehlermeldung weist auf ein Problem bei der Mikrowellenerzeugung hin. Bitte wenden
Sie sich an einen autorisierten Kundendienstvertreter.
A: Möglicherweise gab es einen Stromausfall und die Laufschrift wurde deaktiviert. Trennen
Sie das Gerät einige Sekunden vom Netzstrom und schließen Sie es wieder an. Wenn
„88:88“ angezeigt wird, drücken Sie die Start-Taste, bis Ihre Sprache erscheint. Stellen Sie
dann die Uhrzeit ein. Siehe Seite D-6.
F: Das Mikrowellengerät verursacht
Fernsehstörungen. Ist das normal?
F: Warum nimmt das Mikrowellengerät das
gewünschte Programm nicht an?
F: Warum strömt manchmal warme Luft aus dem
Mikrowellengerät?
F: “D” erscheint im Anzeigenfeld, was
bedeutet das?
F: Kann im Mikrowellengerät ein
herkömmliches Fleischthermometer
verwendet werden?
F: Warum riecht das Mikrowellengerät
nach dem Grill- bzw. Kombinationsbetrieb
unangenehm und erzeugt Rauch?
F: Das Gerät stoppt den Mikrowellen-
Garvorgang und die Meldung „H97“ oder
„H98“ erscheint auf dem Display.
F: Die Laufschrift im Display ist verschwunden.
Warum kann ich nur Zahlen sehen?
Page 56

D-16
Deutsch
Pflege Ihres Mikrowellengerätes
Technische Daten
Netzspannung: 230 V, 50 Hz
Leistungsaufnahme: Maximum 2050 W
Mikrowelle 1050 W
Grill 1350 W
Ausgangsleistung: Mikrowelle 1000 W (IEC-60705)
Grill 1300 W
Äußere Abmessungen: 510 (B) x 380 (T) x 304 (H) mm
Garraumabmessungen: 359 (B) x 352 (T) x 217 (H) mm
Gewicht: ca. 12.5 kg
Geräuschpegel: 50 dB
Änderungen der technischen Daten ohne Vorankündigung vorbehalten.
1. Vor dem Reinigen den Netzstecker aus der Steckdose ziehen.
2. Halten Sie stets den Garraum, die Tür und den Türrahmen sauber.
Entfernen Sie Spritzer von Speisen und Flüssigkeiten, die an den
Garraumwänden und der Tür haften, mit einem feuchten Tuch und
ggf. mildem Reinigungsmittel. Scharfe Reinigungs- und
Scheuermittel sind nicht empfehlenswert. Verwenden Sie zur
Reinigung der gläsernen Mikrowellentür keine Scheuermittel oder
scharfe Metallschaber, da dies eine Beschädigung der Oberfläche
zur Folge haben und zum Zerspringen des Glases führen könnte.
3. Das Gehäuse des Gerätes sollte feucht abgewischt und mit einem
weichen Tuch getrocknet werden. Achten Sie darauf, daß kein
Wasser durch die Entlüftungsschlitze ins Geräteinnere gelangt, da
das Gerät dadurch Schaden nehmen könnte.
4. Ist das Bedienfeld verschmutzt, säubern Sie dieses mit einem
feuchten, weichen Tuch. Verwenden Sie in keinem Fall scharfe
Reinigungs- bzw. Scheuermittel. Damit es nicht zu einem
unvorhergesehenen Betrieb des Gerätes kommt, lassen Sie die
Tür des Gerätes beim Säubern geöffnet.
5. Während des Betriebes kann sich durch Verdampfen von
Feuchtigkeit innen oder außen auf dem Sichtfenster des Gerätes
Kondenswasser niederschlagen und evtl. unter der Tür abtropfen.
Dieser Vorgang ist normal und kann verstärkt bei niedrigen
Raumtemperaturen und hoher Luftfeuchtigkeit auftreten. Die
Sicherheit des Gerätes ist dadurch nicht beeinträchtigt. Bitte nach
dem Betrieb das Kondenswasser mit einem weichen Tuch
abwischen.
6. Bitte den Glasdrehteller herausnehmen und abkühlen lassen,
bevor Sie diesen in warmem Seifenwasser oder in der
Spülmaschine reinigen.
7. Der Rollenring und die Vertiefung im Geräteboden sollten
regelmäßig gereinigt werden. Damit werden unnötige
Betriebsgeräusche vermieden und die Ansammlung von
Lebensmittelresten verhindert. Einfach den Boden mit einem
feuchten Tuch auswischen und anschließend trocknen. Der
Rollenring kann mit mildem Seifenwasser gereinigt werden. Achten
Sie darauf, daß Sie den Rollenring und Drehteller nach dem
Reinigen wieder richtig einsetzen.
8. Während des Grill- und Kombinationsbetriebes können Spritzer
von Speisen und Getränken an den Garraumwänden haften
bleiben. Wird das Gerät nicht regelmäßig gereinigt, kann es
während des Betriebes zur Rauchentwicklung kommen.
9. Ein Dampfreiniger darf nicht zur Reinigung verwendet werden.
10. Das Mikrowellengerät darf ausschließlich vom qualifizierten
Panasonic-Kundendienst geprüft oder repariert werden.
11. Die Luftabzüge immer freihalten. Überprüfen Sie, dass die
Luftabzüge an der Ober-, Unter- und Rückseite des Geräts nicht
durch Staub oder anderes Material verstopft werden. Wenn die
Luftabzüge verstopft sind, kann dies zu Überhitzung führen und
die Funktionsfähigkeit des Geräts beeinträchtigen.
12. Wird der Herd nicht in einem sauberen Zustand gehalten, kann
dies zu einer Güteminderung der Oberflächen führen, was
wiederum eine Beeinträchtigung der Lebensdauer des Geräts mit
sich bringen und eventuell eine Gefahr für den Benutzer darstellen
kann.
Page 57

D-17
Deutsch
Benutzerinformationen zur Entsorgung von elektrischen und elektronischen Geräten (private Haushalte)
Entsprechend der grundlegenden Firmengrundsätze der Panasonic-Gruppe wurde ihr Produkt aus hochwertigen Materialien und
Komponenten entwickelt und hergestellt, die recycelbar und wieder verwendbar sind.
Dieses Symbol auf Produkten und/oder begleitenden Dokumenten bedeutet, dass elektrische und elektronische Produkte am Ende
ihrer Lebensdauer vom Hausmüll getrennt entsorgt werden müssen.
Bringen Sie bitte diese Produkte für die Behandlung, Rohstoffrückgewinnung und Recycling zu den eingerichteten kommunalen
Sammelstellen bzw. Wertstoffsammelhöfen, die diese Geräte kostenlos entgegennehmen.
Die ordnungsgemäße Entsorgung dieses Produktes dient dem Umweltschutz und verhindert mögliche schädliche Auswirkungen auf Mensch und
Umwelt, die sich aus einer unsachgemäßen Handhabung der Geräte am Ende Ihrer Lebensdauer ergeben könnten. Genauere Informationen zur
nächstgelegenen Sammelstelle bzw. Recyclinghof erhalten Sie bei Ihrer Gemeindeverwaltung.
Für Geschäftskunden in der Europäischen Union
Bitte treten Sie mit Ihrem Händler oder Lieferanten in Kontakt, wenn Sie elektrische und elektronische Geräte entsorgen möchten. Er hält weitere
Informationen für sie bereit.
Informationen zur Entsorgung in Ländern außerhalb der Europäischen Union
Dieses Symbol ist nur in der Europäischen Union gültig.
Bei diesem Produkt handelt es sich um ein Gerät, das die europäische Norm für EMV-Funkstörungen (EMV = Elektromagnetische Verträglichkeit),
EN 55011, erfüllt. Gemäß dieser Norm ist dieses Produkt ein Gerät der Gruppe 2, Klasse B und hält alle Grenzwerte ein. Gruppe 2 bedeutet, dass
in diesem Gerät Hochfrequenz-Energie für das Erwärmen oder Garen von Lebensmitteln absichtlich als elektromagnetische Strahlung erzeugt
wird. Klasse B sagt aus, dass dieses Produkt in einem normalen Wohnbereich betrieben werden darf.
Technische Daten
Gemäß der Richtlinie 2004/108/EC, Artikel 9(2), Panasonic Testing Centre, Panasonic Deutschland,
eine Division der Panasonic Marketing Europe GmbH, Winsbergring 15,22525 Hamburg, Deutschland
Hergestellt von Panasonic Home Appliances Microwave Oven (Shanghai) Co., Ltd. 898 Longdong Road, Pudong, Shanghai, 201203, China.
Page 58

D-18
Deutsch
Kochen mit Mikrowellen
Geschirrgröße
Verwenden Sie die im Rezept empfohlenen
Geschirrgrößen, da diese Auswirkungen auf
die Gar- bzw. Auftauzeit haben. Speisen
verteilt in einem größeren Geschirr erhitzen
schneller.
Menge
Kleinere Mengen kochen schneller als
größere.
Lebensmittelbeschaffenheit
Leichte Lebensmittel (z.B. Fisch) erhitzen
schneller als schwerere (z.B. Braten).
Ruhezeit
Eierspeisen: ca. 2-3 Min.
Vorgekochte Speisen: ca. 2-5 Min.
Tellergerichte: ca. 1-2 Min.
Gemüse: Gschwellti ca. 1-2 Min., die meisten
Gemüse können jedoch direkt serviert
werden.
Auftauen: Um den Auftauprozess zu
beenden brauchen die Speisen eine
Ruhezeit. Diese kann von 5 Min. (Himbeeren)
bis zu 1 Stunde (Braten) variieren.
Wenn die Speisen nach der Ruhezeit noch
nicht gar sind, stellen Sie sie nochmals ins
Mikrowellengerät und geben noch etwas
Garzeit hinzu.
Größere, schwerere Lebensmittel
benötigen nach dem Garen eine Ruhezeit (im
oder außerhalb des Gerätes). Somit kann
sich die Wärme gleichmäßig verteilen und
das Lebensmittel noch etwas nachgaren.
Fleischstücke: ca. 15 Min. in Folie
eingewickelt
Kartoffeln: ca. 5 Min.
Kuchen: ca. 15-20 Min.
Fisch: ca. 2-5 Min. ruhen lassen
Generelles
Mikrowellen sind elektromagnetische Wellen, ähnlich den Radar-,
Radio- oder Fernsehwellen. Elektrischer Strom wird vom Magnetron in
Mikrowellen umgewandelt. Die Mikrowellen werden vom Magnetron in
den Garraum gesendet, wo sie reflekiert oder absorbiert werden oder
Gegenstände (Geschirr und Lebensmittel) durchdringen (siehe
nachfolgende Erklärungen).
Reflexion
Mikrowellen werden von Metall reflektiert, also zurückgeworfen.
Geschirr oder Kochutensilien aus Metall sind für das Kochen mit
Mikrowellen nicht empfehlenswert, da sie ein ungleiches Kochresultat
ergeben können. Zudem kann es zu Funkenbildung kommen, wenn das
Metallgeschirr nah an die Garraumwand gestellt wird. Dies kann das
Gerät beschädigen oder einen Brand verursachen.
Durchdringen
Mikrowellen durchdringen Materialien wie Papier, Glas und Plastik
ähnlich wie Sonnenlicht durch ein Fenster scheint. Da diese Materialien
die Mikrowellen weder absorbieren noch reflektieren, eignen sie sich
ideal als Kochgeschirr. Sie werden jedoch durch das heiße Kochgut
erwärmt.
Absorption
Mikrowellen werden von Lebensmitteln absorbiert (aufgenommen). Sie
dringen von außen nach innen ca. 2-3 cm in das Lebensmittel ein. Im
Lebensmittel versetzen die Mikrowellen Wasserbestandteile (Moleküle)
in Schwingung. Dadurch entsteht Reibung und diese erzeugt Wärme.
über Wärmeleitung (wie beim herkömmlichen Garen) gelangt die
enstandene Reibungswärme dann ins Lebensmittelinnere, um die
Speisen aufzutauen, zu erhitzen oder zu garen.
Page 59

D-19
Einstechen
Unter der Haut/Schale einiger Speisen bildet
sich so viel Dampf, daß diese platzen kann.
Bevor Sie diese Speisen in die Mikrowelle
geben, stechen Sie die Haut/Schale einige
Male ein, damit der Dampf austreten kann
(Eier, Kartoffeln, Äpfel, Würstchen etc.).
KOCHEN SIE NIE EIER IN DER SCHALE.
Flüssigkeitsgehalt
Frische Lebensmittel wie Gemüse und Früchte
variieren in ihrem Flüssigkeitsgehalt. Kartoffeln
sind ein gutes Beispiel dafür. Deshalb muß die
Kochzeit dementsprechend angepaßt
werden. Trockene Lebensmittel wie Reis oder
Teigwaren trocknen während der Lagerung
aus, somit können die Garzeiten leicht
abweichen.
Klarsichtfolie
Die Klarsichtfolie bewahrt das Lebensmittel
vor dem Austrocknen und hält den Dampf im
Geschirr, was den Garprozeß beschleunigt.
Jedoch sollte die Folie vor dem Garen
mehrfach eingestochen werden, damit kein
Überdruck entsteht. Vorsicht beim Entfernen
der Folie, da der entweichende Dampf sehr
heiß ist.
Verwenden Sie nur Folie die mit “geeignet für
die Mikrowelle” bezeichnet ist (hohe
Temperaturen) und dies lediglich, um das
Gargut zu bedecken.
Abdecken
Bedecken Sie die Speisen mit Klarsichtfolie
oder direkt mit dem Deckel des Geschirrs
(Fisch, Gemüse, Eintöpfe). Keinen Deckel
benötigen Kuchen, Kartoffeln (gebackene
Kartoffeln), Backwaren.
Ausgangstemperatur
Je kälter das Lebensmittel umso länger die
Garzeit. Ein Lebensmittel aus dem
Kühlschrank braucht länger zum Erwärmen als
ein Lebensmittel mit Raumtemperatur.
Platz
Lebensmittel garen schneller wenn sie
gleichmäßig und mit etwas Zwischenraum
angeordnet sind.
Wenden und Rühren
Einige Speisen müssen während des
Kochens umgerührt werden. Wenden Sie
Fleisch- und Geflügelstücke einmal während
der Garzeit.
Form
Gleichmäßig geformte Lebensmittel eignen
sich besser zum Kochen im Mikrowellengerät.
Verwenden Sie außerdem rundes statt
eckiges Geschirr.
Anordnen
Einzelne Stücke (Geflügel, Fleisch etc.)
sollten mit der dickeren Seite nach außen auf
das Geschirr gelegt werden.
Generelles
Deutsch
Page 60

D-20
Deutsch
Das geeignete Geschirr
• Verwenden Sie kein Metallgeschirr. Dieses
könnte Ihr Gerät beschädigen.
• Kein Melamingeschirr. Verwenden Sie nur
Plastikgeschirr, das für Mikrowellen geeignet
ist.
• Garen Sie keine fett- und zuckerhaltigen
Speisen sowie Speisen mit langer Garzeit in
Plastikgeschirr.
• Weidekörbchen können nur für kurze
Garzeiten verwendet werden. Prüfen Sie sie
vorher auf Metallgegenstände.
• Vorsicht bei Töpfereiprodukten. Verwenden
Sie diese nur wenn sie vollständig glasiert
sind.
• Verwenden Sie kein Holzgeschirr - dieses
würde austrocknen und brennen.
Mikrowelle
Grill
Kombination
• Verwenden Sie kein Metallgeschirr. Dieses
könnte Ihr Gerät beschädigen.
• Gerichte in Alu-Schalen in gleichgroßes,
hitzebeständiges Geschirr geben.
• Sollte es beim Kombinationsbetrieb Funken
geben, drücken Sie die Stopptaste zweimal
um das Programm zu löschen und fahren
Sie nur mit Grillbetrieb fort.
• Verwenden Sie kein Geschirr mit Gold- oder
Silberverzierung. Es können Funken
entstehen, die die Verzierung beschädigen.
Nein
Ja
Nein
Ja
Nein
Ja
Page 61

Mikrowellenleistung Anwendung
Max. Leistung 1000 W Erwärmen von Mahlzeiten, Saucen, gekochtem Fisch, Gemüse, und Eingemachtem
600 W Schmoren, Kochen von Eiersaucen und Biskuitkuchen, Erhitzen von Milch
440 W Zarte Mischungen mit Eiern, Quiches, Aufwärmen von Babynahrung, Ragouts.
270 W Auftauen
250 W Köcheln von Eintöpfen, Reispuddings, schweren Früchtekuchen und Eiercrèmes
Programm Grill Mikrowelle Digitale Laufschrift
1 1300 W 100 W G1-100W
2 1300 W 250 W G1-250W
3 1300 W 440 W G1-440W
Erste Seite Zweite Seite
Steak (4 Stück, durchgebraten) ca. 10 Min. ca. 10 Min.
Schweinsplätzli (Nierstück) ca. 12 Min. ca. 10 Min.
Schweinskotelett 12 - 14 Min. ca. 12 Min.
Spiessli ca. 12 Min. ca. 12 Min.
Würste 7 - 8 Min. ca. 7-8 Min.
Hähnchenschenkel 15 - 20 Min. 15 - 20 Min.
Toast 3 - 4 Min. 3 Min.
D-21
Deutsch
Mikrowellenleistungsstufen
Grill
Kombi-Betrieb
GRILL NICHT VORHEIZEN
Der Quarz-Grill bräunt die Speisen schnell und gleichmäßig.
Legen Sie das Lebensmittel auf den Gitterrost und stellen Sie diesen
auf den Drehteller.
Nach der Hälfte der Grillzeit sollten Sie das Lebensmittel
wenden.
Bedecken Sie das Lebensmittel NIE während des Grillens.
DAS GRILLPROGRAMM ARBEITET OHNE MIKROWELLEN.
Die Kombination ist für viele Speisen ideal. Die Mikrowellen garen das
Lebensmittel schnell, gleichzeitig wird es durch den Grill gebräunt.
Es stehen 3 Kombi-Programme “Mikrowelle + Grill” zur Verfügung.
Hinweise:
• Speisen beim Kombi-Betrieb NIE zudecken.
• Kleine Mengen nicht im Kombi-Betrieb kochen. Wählen Sie hierfür
entweder nur Grill oder nur Mikrowelle um ein gutes Resultat zu
erzielen.
• Das Gerät für Kombi-Betrieb nicht vorheizen.
Ungefähre Grillzeiten
+
_
Der Grill verfügt über 3 Grilleinstellungen.
1-mal drücken - GRILL 1 1300 W
2-mal drücken - GRILL 2 950 W
3-mal drücken - GRILL 3 700 W
Min
Page 62

Gericht
Gewicht/
Menge
Zeit (ca.)
Babyfläschchen - siehe unten
Reis, Teigwaren
Ravioli 215 g 2 Min.
Reis 277 g 2 Min.
Spaghetti Bolognese 210 g 2 Min.
Tomaten-Spaghetti 213 g 2 Min.
Fleischkonserven
Chili con Carne 410 g 3 Min. 30 Sek.
Hot Dogs 415 g 2 Min. 30 Sek.
Fleischkugeln 418 g 4 Min. 30 Sek.
Hackfleisch 392 g 2 Min 30 Sek. - 3 Min.
Gulasch 405 g 3 Min. 30 Sek.
Food
Weight
quantity
Reheating time
(approx.)
Suppen aus der Dose
Pilzcrème 425 g 4 Min. 30 Sek.
To ma t en 425 g 3 Min.
Minestrone 300 g 3 Min.
D-22
Deutsch
Erwärmen mit Mikrowellen
Erwärmen
Wählen Sie die max. Leistung (1000 W)
Babyfläschchen - VORSICHT
Milch oder Brei müssen vor und nach dem Erwärmen gut geschüttelt
werden. Prüfen Sie vor dem Füttern die Temperatur.
Für 60 g/ml Milch aus dem Kühlschrank benötigen Sie ca. 10 Sek. bei
voller Leistung. SORGFÄLTIG PRÜFEN.
GUT SCHÜTTELN - TEMPERATURAUSGLEICH.
Verschiedenste Fertiggerichte sind im Handel erhältlich. Zudem
möchten Sie vorgekochte Gerichte oder Reste wiedererwärmen. Dies alles erledigt Ihre Mikrowelle problemlos.
Welche Methode?
Am besten wählen Sie nur Mikrowelle oder nur Kombination, je nach
Lebensmittel.
Für Speisen die nicht gebräunt werden müssen, wählen Sie nur
Mikrowelle. Für solche die gebräunt werden sollten, wählen Sie
Kombination.
Wie lange erwärmen?
Untenstehend finden Sie Erwärmtabellen für Mikrowelle und
Kombination. Diese Tabellen enthalten Richtzeiten, die jeweils abhängig
von Ausgangstemperatur und Beschaffenheit des Lebensmittels sind.
Tiefgekühlte Backwaren, Eierspeisen etc. (auf Teigbasis) benötigen
Erwärm- und Garzeit. Werden diese Lebensmittel mit Mikrowelle oder
Kombination gegart, so wird der Teig weich. Für diese Gerichte wählen
Sie am besten eine andere Garmethode (z.B. Backofen).
Was, wenn mein Lebensmittel nicht in der Tabelle
aufgeführt ist?
Leider konnten wir nicht jedes Lebensmittel für die Tabelle testen. Bei
Beachtung der folgenden Punkte können Sie jedoch alle anderen
Lebensmittel erfolgreich in der Mikrowelle erwärmen.
Umrühren und Wenden
Wenn immer möglich sollten Sie die Speisen während des Erwärmens
umrühren oder wenden. Dies sichert Ihnen gleichmäßiges Erwärmen.
Ruhezeit
Manche Lebensmittel benötigen nach dem Erwärmen eine Ruhezeit,
damit sich die Wärme gleichmäßig verteilen kann und das Lebensmittel
richtig erwärmt wird. Lassen Sie das Lebensmittel während der
Ruhezeit zugedeckt. Eine Ruhezeit ist vor allem wichtig für Speisen, die
während des Erwärmens weder umgerührt noch gewendet werden
können (Lasagne etc.).
Vollständig erwärmt?
Erwärmte Lebensmittel müssen heiß serviert werden, d.h. Dampf sollte
von allen Seiten austreten. Solange sämtliche Hygienevorschriften beim
Zubereiten und Aufbewahren des Lebensmittels beachtet wurden,
besteht keine Gefahr, dieses mit Mikrowellen oder Kombination
aufzuwärmen.
Lebensmittel, die nicht umgerührt oder gewendet werden
können, sollten vor dem Verzehr mit einem Messer durchgeschnitten
werden, um zu prüfen, ob sie vollständig erwärmt sind.
Die untenstehenden Zeiten sind nur Richtwerte und sind abhängig von
der Ausgangstemperatur sowie dem verwendeten Geschirr. Vor dem
Verzehr immer prüfen, ob das Lebensmittel durch und durch heiß ist.
Page 63

Gericht
Gewicht/
Menge
Zeit (ca.)
Desserts
Apfel im Schlafrock 175 g 30 Sek. - 1 Min.
Früchtetörtchen, klein 10 - 30 Sek.
Früchtetorte 280 g 1 Min. 20 Sek.
Pfannkuchen, gefüllt 1 40 - 50 Sek.
Milchreis 500 g 2 Min. 30 Sek.
Reis
Reis, gekocht 100 g 45 Sek.
Saucen
Bratensauce 3 dl 3 Min.
Rahmsauce 3 dl 2 Min.
Gemüse
Gebackene Kartoffeln 250 g 1 - 1 Min. 30 Sek.
Grünes Gemüse 100 g 1 Min. 30 Sek.
Wurzelgemüse 225 g 1 Min. 30 Sek.
Gericht
Gewicht/
Menge
Zeit (ca.)
Gemüsekonserven (abgetropft, wenn nötig)
Karotten, ganz 410 g 3 Min.
Grüne Bohnen 410 g 2 Min. 30 Sek.
Pilze, ganz 300 g 2 Min.
Pilze in Sauce 213 g 2 Min.
Gartenerbsen 550 g 2 Min. 30 Sek.
Kartoffeln, neu 820 g 5 Min.
Mais 198 g 1 Min. 30 Sek.
Tomaten, ganz 400 g 3 Min.
Fertiggerichte, tiefgekühlt
Gemüse, gekocht 400 g 8-10 Min.
Fertiggericht im Beutel 300 g 7 Min.
Getränke
Wasser 1 Tasse 1 Min. 30 Sek.
Milch 1 Tasse 1 Min. 30 Sek.
Milch 6 dl 3 Min. 30 Sek.
Selbstgemachte Gerichte
Eintopf für 2 500 g 3 Min.
Hackfleisch für 1 250 g 2-3 Min.
Bolognese Sauce 250 g 2-3 Min.
Teigwaren, gekocht
Spaghetti 100 g 1 Min.
Käse-Makkaroni 225 g 2-3 Min.
Tellergerichte, selbstgemacht
Kinderportion 1 2-3 Min.
Ganze Portion 1 4-5 Min.
Selbstgemachte Tellergerichte, tiefgekühlt
Ganze Portion 1 6-7 Min.
Porridge (Haferbrei)
1 Portion 1 Min.
Gefrorene Lasagne (300 - 330 g)
Lasagne aus Alu-Schale nehmen und in ein gleichgroßes,
hitzebeständiges Geschirr geben.
Leistung Zeit Anleitung
Zuerst 270 W 8-10 Min.
Geschirr auf
Drehteller stellen.
nachher 1000 W 8-10 Min.
oder Kombi 2 20 Min.
D-23
Hinweis
Prüfen Sie immer, ob das Lebensmittel nach dem Erwärmen in der
Mikrowelle wirklich heiß ist. Speisen, die kurz zuvor in der Mikrowelle
gekocht wurden und nochmals erwärmt werden, benötigen ebenfalls
eine Ruhezeit von 5-15 Min. Die Ruhezeit ist besonders wichtig für
Speisen, die nicht gerührt werden können.
Erwärmen mit Mikrowellen
Wählen Sie die max. Leistung (1000 W)
Deutsch
Min
Page 64

Min.-/Max. Gewicht
1. Kleine Stücke 150 - 1000 g
2. Große Stücke 500 - 1500 g
D-24
Deutsch
Auftauhinweise
Beim Gewichtsauftauen geben Sie dem Gerät
das Gewicht des aufzutauenden Lebensmittels
an (siehe Bedienungsanleitung). Aufgrund
dieser Angaben errechnet das Gerät die
erforderliche Auftauzeit selbst.
Diese Anwendung ist ungeeignet für
Fertiggerichte.
Das Auftauen sollte überwacht werden und die
Lebensmittel eventuell gewendet, umgerührt
oder auseinandergebröselt werden (siehe
unten).
Es gibt zwei Kategorien für das
Gewichtsauftauen:
Nehmen Sie die Stücke, z.B. Quicheschnitte,
Brotschnitte und große Früchtestücke
auseinander und legen Sie diese auf ein
Auftaugitter.
Große Fleischstücke und ganze Brote
benötigen eine Ruhezeit damit sie bis ins
Innere auftauen können.
Kleine Stücke (Hackfleisch) während des
Auftauens immer wieder auseinanderbröseln.
Entfernen Sie die Verpackung und legen Sie
die Stücke auf ein Auftaugitter oder einen
umgedrehten Teller.
Geflügelbeine sowie andere dünne Teile
(Fisch) oder fettere Partien dünn mit Folie
einpacken.
Große, feste Stücke 2-3mal umdrehen.
Das größte Problem beim Auftauen im Mikrowellengerät ist, daß die Innenseite häuftig noch gefroren ist, während die Außenseite bereits zu
kochen beginnt.
Gewichtsauftauen
Min
Tipps für das Auftauen
Page 65

Gericht Menge Gewicht Zeit
Brotwaren
Brot, geschnitten* 1 500 g 5 Min.
Brot, ganz 1 400 g 5 Min.
Schnitte 1 30 g 1 Min.
Brötchen 4 200 g 2 - 3 Min.
Buttergipfeli 4 200 g 2 Min.
Diverses
Butter 250 g 2 Min.
Margarine 250 g 2 Min.
Käse 450 g 3 Min.
Rahm 150 g 4 - 5 Min.
OrangensaftKonzentrat
190 ml 4 Min.
Würstchen* 8 450 g 12 Min.
Suppe* 1 Liter 15 - 20 Min.
Fertiggerichte
Lasagne 300 g 10 - 12 Min.
Pizza 1 300 g 5 Min.
Gericht Menge Gewicht Zeit
Schinken
Scheiben 10 250 g 7 Min.
Steaks 2 500 g 9 Min.
Rindfleisch
gehackt* 450 g 12 Min.
Voressen* 450 g 12 Min.
Stück** pro 450 g 16 Min.
Burger 4 465 g 7 Min.
Schweinefleisch
Voressen* 450 g 12 Min.
Stück pro 450 g 16 Min.
Steaks* 4 450 g 10 - 12 Min.
Lammfleisch
Chops* 4 450 g 8 Min.
Stück** 450 g 13 Min.
Huhn (Poulet)
Schenkel** 450 g 12 - 15 Min.
ganz** pro 450 g 13 - 15 Min.
in Teilen** 4 1 kg 23 Min.
D-25
Wählen Sie die Taste für Auftauen 270 W und geben Sie die unten angegebene Zeit ein.
Die untenstehenden Zeiten sind nur Richtwerte. Prüfen Sie jeweils während des Auftauens, um ein optimales Resultat zu erhalten. Die
Lebensmittel müssen nicht zugedeckt werden.
Hinweise
* Diese Nahrungsmittel sollten während des Auftauens
baldmöglichst umgerührt oder getrennt werden.
** Schützen Sie diese Nahrungsmittel an empfindlichen Stellen
(Knochen, dünne Partien) mit etwas Folie.
Auftautabelle
Deutsch
Page 66

Gericht Gewicht/Menge Zubereitung Zeit Anleitung
Brot: vorgebacken oder frisch (mit Mikrowelle erwärmtes Brot wird weich)
Buttergipfeli
1
1000 W 20 - 25 Sek.
nicht zudecken
direkt auf Grillrost legen
oder GRILL 1 1 - 2 Min.
4
1000 W 30 - 40 Sek.
nicht zudecken
direkt auf Grillrost legen
oder GRILL 1 2 - 3 Min.
Brötchen
1
1000 W 15 - 20 Sek.
nicht zudecken
direkt auf Grillrost legen
oder GRILL 1 3 - 4 Min.
4
1000 W 40 - 60 Sek.
nicht zudecken
direkt auf Grillrost legen
oder GRILL 1 4 - 6 Min.
Brot: tiefgekühlt
Brötchen,
vorgebacken
6 (340 g) Kombi 1 6 - 8 Min. direkt auf Grillrost legen
Knoblauchbrot,
vorgebacken
325 g (2) Kombi 1 8 - 10 Min. direkt auf Grillrost legen
Huhn (Poulet): Vorsicht beim Entfernen von Grillrost und Geschirr aus dem Gerät - heißes Fett!
(siehe Kapitel auf Seite D-28)
Brustfilets (ohne
Knochen)
4 (850 g)
1000 W 8 - 10 Min.
Geschirr auf Drehteller stellen
direkt auf Grillrost legen, wenden
oder Kombi 3 15 - 20 Min.
Schenkel 8 (900 g)
1000 W 10 - 12 Min.
Geschirr auf Drehteller stellen
direkt auf Grillrost legen, wenden
oder Grill 30 - 35 Min.
oder Kombi 3 20 - 25 Min.
Teile 2 (860 g)
1000 W 15 - 20 Min.
Geschirr auf Drehteller stellen
direkt auf Grillrost legen
oder Grill 30 - 35 Min.
oder Kombi 3 15 - 20 Min.
ganzes Huhn pro 450 g
1000 W
und Kombi 1
14 - 16 Min.
In ein hitzebeständiges Geschirr legen, mit der Brustseite nach unten.
Nach der Hälfte der Garzeit wenden.
7 - 9 Min.
Fisch: frisch (siehe Kapitel Seite D-29)
Fischstäbchen 300 g
Grill 12 - 14 Min.
direkt auf Grillrost legen, wenden
oder Kombi 3 10 - 12 Min.
Filets 450 g 1000 W 3 - 4 Min.
in Geschirr, Flüssigkeit zugeben direkt auf Grillrost legen, wenden
Fischsteaks 350 g 1000 W 3 - 4 Min.
ganzer Fisch 280 g
1000 W 3 - 4 Min.
oder Grill 8 - 10 Min.
Fisch: tiefgekühlt (siehe Kapitel Seite D-29)
Schellfischfilets 380 g Grill 10 - 15 Min.
direkt auf Grillrost legen, wenden
Scampi 255 g
Grill 10 - 12 Min.
oder Kombi 1 8 - 10 Min.
ganzer Fisch 450 g 1000 W 10 - 12 Min. in Geschirr, Flüssigkeit zugeben
D-26
Deutsch
Koch- und Erwärmtabellen
Page 67

Gericht Gewicht/Menge Zubereitung Zeit Anleitung
Pizza frisch, vorgebacken: sämtliche Verpackung entfernen. Mit reiner Mikrowelle zubereitet wird der Teig weich.
Pizza belegt 400 g
1000 W 4 - 5 Min.
nicht zudecken, hitzebeständiges Geschirr (siehe Panacrunch S. D12 + D-13)
direkt auf Grillrost legen
oder Grill 12 - 14 Min.
oder Kombi 1 8 - 10 Min.
Pizza, tiefgekühlt: sämtliche Verpackung entfernen. Mit reiner Mikrowelle zubereitet wird der Teig weich.
Pizza, belegt 400 g Kombi 1 15 - 20 Min. direkt auf Grillrost legen (siehe Panacrunch S. D-12 + D-13)
Baguette, belegt 320 g
Grill 15 - 20 Min.
direkt auf Grillrost legen
oder Kombi 1 6 - 8 Min.
Schweinefleisch: Vorsicht beim Entfernen von Gitterrost und Geschirr aus dem Gerät - heißes Fett!
(siehe Kapitel auf Seite D-28)
Steaks 800 g
1000 W 10 - 13 Min.
in Geschirr auf Drehteller stellen
direkt auf Grillrost legen, wenden
oder Grill 20 - 25 Min.
oder Kombi 3 18 - 20 Min.
Filet-Medaillons 250 g
1000 W 4 - 6 Min.
in Geschirr auf Drehteller stellen
direkt auf Grillrost legen, wenden
oder Grill 25 - 30 Min.
oder Kombi 3 10 - 15 Min.
Stück pro 450 g
1000 W 13 - 14 Min.
in hitzebeständigem Geschirr auf Drehteller stellen.
Nach der Hälfte der Kochzeit Fleisch wenden.
und Kombi 1 5 Min.
Fertiggerichte, gekühlt: Geben Sie das Gericht aus der Alu-Schale in ein geeignetes, gleichgroßes Geschirr.
Mikrowellengeschirr aus Kunststoff kann mit Vorsicht verwendet werden.
Blumenkohl mit
Sauce und Käse
450 g
1000 W 5 - 6 Min.
Geschirr auf Drehteller stellen
oder Kombi 1 10 Min.
gefüllte
Champignons
227 g
Grill 8 - 10 Min.
direkt auf Grillrost legen
oder Kombi 1 6 - 8 Min.
D-27
Koch- und Erwärmtabellen
Deutsch
Page 68

D-28
Deutsch
Fleisch & Geflügel
Legen Sie das Fleisch auf den Grillrost und
stellen Sie diesen auf den Drehteller.
Verwenden Sie hitzebeständiges Geschirr, um
das Fett aufzufangen.
Wissenswertes
Kleine Fleischstücke mit Grill oder Kombination zubereiten
Aufgetaute Stücke
Tiefgefrorenes Fleisch ganz auftauen lassen,
bevor Sie es in der Mikrowelle garen. Stücke
min. 30 Min. ruhen lassen, um sicher zu sein,
daß das Innere vollständig aufgetaut ist.
Fett
Fett absorbiert Mikrowellen, das Fleisch kann
zu stark garen. Wählen Sie jeweils magere
Stücke.
Ausgleichszeit
Fleisch und Geflügel benötigen eine
minimale Ausgleichszeit von 15 Min. Nach
dem Garen in Folie einpacken.
Knochen
Knochen wie Lammgigot, Geflügelbeine etc. in
Folie einwickeln.
Wenden
Fleischstücke und Geflügel sollten nach der
Hälfte der Kochzeit gewendet werden.
Schützen
Große Stücke müssen eventuell nach halber
Garzeit mit etwas Folie bedeckt werden, um
ein Übergaren (Austrocknen) zu vermeiden.
Einem Truthahn oder einem großen Huhn
sollten Sie Brust, Beine und Flügel mit Folie
bedecken. Die Folie können Sie mit
Zahnstochern fixieren. Die Folie darf nicht die
Garraumwand berühren.
Zubereitung eines Bratens mit
Mikrowellen
Um ein Stück Fleisch in der Mikrowelle zu
garen, legen Sie das Fleisch in ein Geschirr
und stellen Sie dieses auf den Drehteller.
Bedecken Sie das Fleisch mit Mikrowellenfolie.
Zubereitung von kleinen
Fleischstücken mit Mikrowellen
Obwohl kleine Fleischstücke sehr gut mit
Mikrowellen gegart werden können (kurze
Garzeit), werden sie nicht braun und knusprig.
Legen Sie die Stücke auf einen
umgedrehten, tiefen Teller, damit sie nicht im
Saft liegen.
Zubereitung von großen
Fleischstücken mit Kombination
Legen Sie die Stücke in ein hitzebeständiges
Geschirr. Fleischstücke werden zuerst mit
Mikrowelle gegart und danach mit Kombination
noch gebräunt und knusprig gebraten. NICHT
ZUDECKEN.
Page 69

D-29
Fisch mit Grill oder Kombination garen
Bepinseln Sie den Fisch mit Öl oder
geschmolzener Butter, um ihn saftig zu halten.
Legen Sie ihn auf den Gitterrost. NICHT
SALZEN. Würzen Sie ihn lediglich mit Pfeffer
und Kräutern, falls erwünscht.
Für kleine Mengen verwenden Sie am besten
nur Mikrowelle oder nur Grill um ein gutes
Resultat zu erhalten.
Ruhezeit
Fisch sollte nach dem Garen für ca. 2-3 Min.
ruhen.
Fisch eignet sich hervorragend für die
Mikrowelle, denn er bleibt bei dieser
Garmethode schön saftig.
Sollte der Fisch beim Garen einen starken
Geruch entwickeln so können Sie nachher ca.
6 dl Wasser mit einer in Scheiben geschnittene
Zitrone für 20 Min. bei halber Leistung ins
Gerät stellen. Danach mit einem trockenen
Lappen auswischen.
Wann ist der Fisch gar?
Der Fisch läßt sich gut teilen, seine Farbe ist
weiß oder rosa (je nach Sorte).
Fisch im Beutel (tiefgefroren)
Fisch im Beutel, mit Sauce, sollte in 2 Stufen
gegart werden. Für 150 -170 g legen Sie den
Beutel auf einen Teller, schneiden ihn oben
auf.
Starten Sie mit 270 W “Auftauen” für 4
Min.; 2 Min. Ruhezeit. Danach beenden Sie
den Vorgang mit 3 Min. bei voller Leistung
oder bis der Fisch gar ist.
Flüssigkeit
Frischer Fisch sollte immer mit ca.
2 Eßlöffeln Zitronensaft oder weißem Wein
beträufelt werden.
Bei gefrorenem Fisch empfiehlt es sich, die
gleiche Menge Flüssigkeit beizugeben, um ein
gleichmäßiges Garresultat zu erhalten.
Salz
Den Fisch vor dem Garen nicht salzen. Dies
könnte ihn austrocknen.
Ganzer Fisch
Wenn Sie 2 ganze Fische miteinander garen,
legen Sie sie gleichmäßig (Kopf an
Schwanzflosse) in das Geschir. Bei großen
Fischen sollte nach der Hälfte der Garzeit der
Kopf sowie der Schwanz mit Alufolie geschützt
werden.
Vorbereiten
Dünne Filets sollten gerollt werden, um ein
Übergaren der feineren Partien zu
vermeiden.
Fischsteaks
Fischsteaks sollten im Kreis angeordnet
werden - dickere Seite nach außen - um ein
Übergaren zu vermeiden.
Abdecken
Decken Sie den Fisch immer mit Klarsichtfolie
oder dem Geschirrdeckel ab.
Fisch
Deutsch
Min
Min
Page 70

Frisches Gemüse
per 450 g mit 6 EL Wasser
Kochzeit
(Min.)
Spargel* 6-8
Aubergine 6-7
Fenchel 7-8
Brokkoli 6-7
Chicoree 6-8
Weißkohl, in Streifen 7-8
Karotten, in Scheiben 7-8
Blumenkohl 8-9
Zucchetti 5
Lauch 8-9
Kefen 4-5
Pilze 4-5
Erbsen 4-6
Kartoffeln*, geschwellt 6-7
Kartoffeln*, neu 6-7
Spinat* 7
Sellerie* 6-8
Maiskolben* 6-7
Tiefgefrorenes Gemüse
per 450 g mit 2 EL Wasser
Kochzeit
(Min.)
Spargel 7-8
Bohnen, grün 10-12
Brokkoli 8-9
Chicoree* 9-10
Weißkohl, in Streifen 5-6
Karotten, in Scheiben 8
Blumenkohl 10
Gemüsemischung 7
Spinat, in Würfeln 8-9
Menge Min. volle Leistung (1000 W) Min. Grillstufe (Bräunung)
1 4-5 8-10
2 6-8 10-12
4 10-13 11- 13
D-30
Deutsch
Gemüse
Die Garzeiten können je nach Sorte
variieren. Die unten angegebenen Kochzeiten
sind nur Richtwerte. Die Idealgröße für
gebackene Kartoffeln, mit Mikrowelle oder
Kombination gegart, liegt zwischen 200-250 g.
Die per Mikrowellen gegarten Kartoffeln sind
schneller gar als die mit Kombination
zubereiteten, allerdings auch weicher. Mit der
Kombination gegart, werden sie knuspriger,
eventuell etwas trockener. Für eine stärkere
Bräunung der Kartoffeln verwenden Sie die
Grillstufe (siehe Tabelle unten).
Kartoffeln (gebackene Kartoffeln)
Nach dem Kochen
Nehmen Sie die Kartoffeln aus der
Mikrowelle und wickeln Sie sie in Folie.
Ca. 5 Min. ruhen lassen.
Kochtabelle für frische/tiefgefrorene Gemüse - Volle Leistung (1000 W)
* Für ein gleichmäßiges Garresultat sollten Sie etwas mehr
Wasser beigeben.
Vor dem Kochen
Die Kartoffeln waschen und mehrmals
einstechen.
Auf den äußeren Rand des Drehtellers legen.
Kartoffeln (gebackene Kartoffeln)
Page 71

Lebensmittel Leistung Zeit (Min.)
Teigwaren: 225 g + 1 Liter Wasser
Spiralen 1000 W 10-12
Makkaroni 1000 W 12-14
Spaghetti 1000 W 8
Lasagne 1000 W 8-10
Tortellini 1000 W 12
Tagliatelle 1000 W 8-9
Reis: 3 dl + 6 dl Wasser
Parboiled Reis 1000 W 13-15
Naturreis 1000 W 20-25
Langkornreis 1000 W 13-15
Pochierte Eier (für 1 Ei)
1. 1 dl Wasser mit einem Spritzer Essig sowie
1 Msp. Salz in ein Geschirr geben.
2. Bei 1000 W in 1 Min. erwärmen.
3. Das Ei ins Geschirr schlagen. Eigelb und
Eiweiß mehrere Male einstechen.
4. Mit Klarsichtfolie zudecken. Für 30 Sek. bei
600 W garen.
5. Für ca. 1 Min. ruhen lassen.
Weitere Angaben siehe Tabelle.
Anzahl Eier Kochzeit 600 W Ruhezeit
1 40 Sek. 1 Min.
2 1 Min. 1 Min. 30 Sek.
3
1 Min. 30 Sek. 2 Min.
Rühreier
1. Mischen Sie die Eier, Milch,
1 KL Butter und eine Msp. Pfeffer in einem
Pyrex-Glas.
2. Erwärmen bei 1000 W gemäß Angaben in
der Tabelle.
3. Gut durchrühren.
4. Wieder bei 1000 W erwärmen, gemäß
Angabe in der Tabelle.
5. Ruhezeit gemäß Angaben in der Tabelle.
Die Eier sind vor der Ruhezeit eher flüssig,
verfestigen sich jedoch noch.
Anzahl Eier Milch 1. Zeit Rühren 2. Zeit Ruhezeit
1 1 EL 30 Sek. Ja 20 Sek. 1 Min.
2 2 EL 40 Sek. Ja 30 Sek. 1 Min.
3 3 EL 1 Min. Ja 30 Sek. 2 Min.
Lebensmittel
Leistung Zeit (Min.)
Hülsenfrüchte 225 g + 6 dl Wasser
Augenbohnen
1000 W
440 W
15
+ 30
Kichererbsen
1000 W
440 W
10
+ 40
Rote Bohnen
1000 W
440 W
15
+ 40
Linsen (nicht eingeweicht) 1000 W 12-14
D-31
Eier - Kochzeittabelle
Rühreier - Kochtabelle
Einstechen
Eigelb und Eiweiß jeweils mit einem
Zahnstocher einstechen, um ein Explodieren
während des Garens zu vermeiden.
Eier in Schale gekocht
Kochen Sie NIEMALS Eier in der Schale.
Durch den Druck würden sie in jedem Fall
platzen.
Kochzeittabelle für manuelles Kochen
Eier, Teigwaren, Reis, Hülsenfrüchte & Getreide
Deutsch
Nach der Hälfte der Kochzeit gut durchrühren.
Page 72

Lebensmittel
Gewicht Zubereitung
Pizza
gefroren,
vorgebacken
Pizza-Brot
300 g
450 g
Verpackung entfernen und direkt auf den heißen vorgeheizten Bräunungsteller legen.
Kombination 1, ca. 10 - 15 Min.
Kombination 2, ca. 5 Min.
danach ca. 5 - 8 Min. Grill 1
Tiefgefrorene
Kuchen, Wähen
Gebackene
Kuchen, aufgetaut
300 g
300 g
Verpackung entfernen und direkt auf den heißen Bräunungsteller legen
Kombination 2, ca. 7 Min.
danach ca. 2 - 3 Min. Grill 3
Kombination 1, ca. 5 Min.
danach ca. 3 Min. Grill 3
Frühlingsrolle
2 Stk., 180 g
4 Stk., 360 g
Kombination 1, ca. 10 Min.
Kombination 2, ca. 5 Min.
danach ca. 7 Min. Grill 1
Nach der halben Garzeit wenden
Geflügel
Hähnchenstücke,
tiefgefroren
500 g
1 kg
Verpackung entfernen und direkt auf den heißen vorgeheizten Bräunungsteller legen, mit der
Hautseite nach oben
1000 W Mikrowelle, 8 Min., Kombination 1, ca. 15 Min.
1000 W Mikrowelle 17 Min., Kombination 1, ca. 15 Min.
Stücke nach der Hälfte der Zeit wenden .
Tiefgefrorene
Kartoffelprodukte
Kartoffelschnitze
Pommes Frites
200 g
400 g
Kartoffeln in vorgeheizten Bräunungsteller legen
Kombination 2, ca. 10 Min., danach ca. 10 - 15 Min. Grill 1
Kombination 3, ca. 10 Min., danach ca. 10 - 15 Min. Grill 1
Tiefgefrorene
Hörnchen
(Gipfeli) 40 g/Stk.
4 Stk.
Bräunungsteller nicht vorheizen
Kombination 2, ca. 8 Min.
evtl. 2 Min. Grill 1
Rührteigkuchen
(Muffins)
40 g/Stk.
2 Stk.
10 Stk.
Bräunungsteller nicht vorheizen
Kombination 1, ca. 3 Min., danach ca. 5 Min. Grill 3
Kombination 2, ca. 5 Min., danach ca. 5 Min. Grill 3
D-32
Deutsch
Bräunungsteller
Den Bräunungsteller auf den Glasdrehteller legen und bei 1000 W Mikrowellenleistung 4 Minuten vorheizen.
Die nachfolgenden Zeiten sind Richtwerte und beziehen sich auf tiefgefrorene (-18°C) oder direkt aus dem Kühlschrank kommende Speisen (+5°C).
Page 73

Problem Ursache Lösung
Das Nahrungsmittel kühlt schnell ab. Das Nahrungsmittel ist nicht
vollständig gegart.
Stellen Sie das Nahrungsmittel zurück ins
Gerät und geben Sie etwas Garzeit hinzu.
Beachten Sie, daß Lebensmittel direkt aus dem
Kühlschrank mehr Zeit benötigen als solche mit
Zimmertemperatur.
Milchreis oder Eintöpfe kochen während des
Garens mit Mikrowellen über.
Geschirr ist zu klein. Für flüssigere Nahrungsmittel empfiehlt es sich,
ein doppelt so großes Geschirr (als Menge) zu
wählen.
Das Nahrungsmittel gart mit Mikrowellen zu
langsam.
Das Gerät bekommt zu wenig Strom. Das Gerät sollte an einer mit 10A/230V
abgesicherten Steckdose angeschlossen sein.
Nahrungsmitteltemperatur aus Kühlschrank
kälter als Raumtemperatur.
Garzeit hinzufügen.
Das Fleisch ist nach dem Garen mit Mikrowelle
oder Kombination zäh.
Mit zu hoher Leistung gegart. Wählen Sie eine reduzierte Leistung,
z.B. halbe Leistung.
Nahrungsmitteltemperatur aus Kühlschrank
kälter als Raumtemperatur.
Garzeit hinzufügen.
Kuchen ist im Innern nicht gar. Koch- oder Ruhezeit zu kurz. Geben Sie Koch- oder Ruhezeit hinzu.
Rühreier oder gekochte Eier sind nach Garen
mit Mikrowelle zäh und gummiartig.
Kochzeit zu lang. Vorsicht beim Garen von kleinen Mengen von
Eiern.
Eierspeisen sind nach Garen mit Mikrowelle zäh
und gummiartig.
Leistung zu hoch. Wählen Sie für diese Nahrungsmittel eine
reduzierte Leistung.
Quiche/Eierkuchen sind nach Garen mit
Kombination zäh und gummiartig.
Kochzeit zu lang. Geschirr größer
als im Rezept angegeben.
Überwachen Sie den Kochvorgang jeweils
genau.
Käsesauce ist nach Garen mit Mikrowelle
zähflüssig.
Käse mit Sauce gekocht. Geben Sie den Käse am Ende des
Garvorgangs bei. Die Hitze der Sauce läßt den
Käse schmelzen.
Gemüse ist nach Garen mit Mikrowelle trocken. Nicht zugedeckt gegart. Mit Deckel oder Klarsichtfolie zudecken.
Zu kleiner Flüssigkeitsgehalt, z.B. 2-4 EL Wasser beigeben.
Gemüse vor dem Garen gesalzen. Erst nach dem Garen salzen.
Kondensation im Gerät. Dies ist normal. Einige Nahrungsmittel
produzieren beim Garen viel Dampf.
Wischen Sie den Ofen mit einem weichen Tuch
aus.
Der Drehteller dreht sich in beide Richtungen. Dies ist normal.
Warme Luft steigt um die Türdichtung herum
aus.
Das Gerät ist nicht luftdicht. Dies ist normal und bedeutet kein
Mikrowellenleck.
Funken sind zu sehen, wenn das Metallzubehör
benutzt wird.
Wenn Sie nur mit Mikrowellen garen, dürfen
Sie kein Metallzubehör benutzen. Bei der
Kombination sollten Sie das
Zubehör auf mögliche Defekte hin prüfen.
Schalten Sie das Gerät unverzüglich aus.
Verwenden Sie keine Metallgegenstände beim
reinen Mikrowellenbetrieb. Prüfen Sie das
Minimalgewicht bei den Automatikprogrammen.
Der Grill schaltet während Grillbetrieb oder
Kombination zeitweise ab.
Während des Garens schaltet sich der Grill
automatisch ein und aus, um ein
Verbrennen des Nahrungsmittels bevor es
gar ist zu vermeiden.
Dies ist normal.
D-33
Fragen - Antworten
Deutsch
Page 74

D-34
Deutsch
Rezepte
Flunderfilets im Kräuterrahm
Die Fischfilets längs halbieren, salzen und pfeffern. In einer ausgebutterten Gratinform ziegelartig
einschichten. Basilikum und Petersilie feinhacken und über den Fisch streuen. Den Wein darüber träufeln und
den Rahm dazugießen.
Alles mit Paniermehl bestreuen. Die Butter in kleinen Flocken darübergeben und mit dem Automatikprogramm
“Gratin” überbacken.
400-500 g Flunderfilets
30 g Butter
1 Bd. Basilikum
1 Bd. Petersilie
2 EL Weißwein
1 B. Saucenrahm
2-3 EL Paniermehl
Salz, Pfeffer
Kohlrabi-Salat
Kohlrabi schälen, halbieren, in 1⁄2 cm dicke Scheiben und diese in 1⁄2 cm dicke Stäbchen schneiden. Mit dem
Automatikprogramm “Gemüse” garen. Zugedeckt stehenlassen.
2 EL Öl und die Zwiebeln 2-3 Min. zugedeckt bei voller Leistung dünsten. Weißwein oder Bouillon dazugießen
und bei voller Leistung 2 Min. einkochen. Restliches Öl und Zitronensaft darunterrühren und mit Salz und Pfeffer
würzen. Kohlrabi beigeben und zugedeckt bei halber Leistung 2 Min. ziehen lassen.
Salat noch warm auf Teller verteilen und mit Sardellenfilets, Oliven und Schnittlauch garnieren.
3 kleine Kohlrabi
4 EL Olivenöl
1-2 Zwiebeln, gehackt
1 dl Weißwein oder Bouillon
3 EL Zitronensaft
1 Dose Sardellenfilets
einige Oliven, schwarz
Salz, Pfeffer
1 Bd. Schnittlauch
Tomatengratin
Die Tomaten in 1 cm dicke Scheiben schneiden und auf einer Seite mit Senf bestreichen. In eine gebutterte
Gratinform schichten. Den Speck mit den Zwiebeln in einem Geschirr zugedeckt bei voller Leistung ca. 2 Min.
dünsten, dann die Kräuter und Champignons dazugeben. Würzen mit Salz und Pfeffer, zudecken und nochmals
bei voller Leistung 3 Min. dämpfen. Die Champignonmischung über die Tomaten verteilen.
Aus den Eiern und dem Rahm einen Guß zubereiten, mit Salz und Pfeffer würzen und über den Gratin verteilen.
Mit dem Reibkäse bestreuen und mit dem Automatikprogramm “Gratin” auf dem hohen Rost überbacken.
4-6 Tomaten
200 g Champignons, in
Scheiben geschnitten
100 g Speckwürfel
1 Zwiebel, gehackt
je 1 Bd.
Petersilie und Basilikum,
gehackt
1-2 EL Senf
3 Eier
1 dl Halbrahm
50 g Reibkäse
1 EL Butter
Salz, Pfeffer
Page 75

D-35
Kohlrabigratin mit Steinpilzen
Die Steinpilze ca. 1 Stunde in Wasser einlegen. Die Kohlrabi schälen, halbieren und in 3 mm dünne Scheiben
schneiden. Mit dem Automatikprogramm “Gemüse” garen. Zur Seite stellen. Den Lauch längs halbieren und in
feine Streifen schneiden. Die Zwiebeln mit der Butter zugedeckt bei voller Leistung ca. 2 Min. dünsten. Dann
den Lauch und die abgetropften Steinpilze dazugeben und nochmals 3 Min. dämpfen.
Wermouth, Weißwein, Rahm und Saucenpaste beifügen. Mit Salz und Pfeffer würzen. Die Sauce offen bei voller
Leistung ca. 5-6 Min. einköcheln lassen bis sie gut bindet. Die Kohlrabi ohne Wasser in eine gefettete
Gratinform einschichten und die Steinpilz-Lauchsauce darüber verteilen. Mit dem Käse bestreuen und mit
Automatikprogramm “Gratin” auf dem hohen Rost überbacken.
3-4 Kohlrabi
20 g getrocknete Steinpilze
1 Lauchstengel
1 Zwiebel, gehackt
1 EL Butter
1
⁄2 dl trockener Wermouth
1 dl Weißwein
11⁄2 dl Halbrahm
1 EL Mehlbutter oder weiße
Saucenpaste
30 g Reibkäse
Salz, Pfeffer
Zucchetti mit Quarkfüllung
Butter, Zwiebeln und die Hälfte der Kräuter in eine weite Form geben, zudecken und bei voller Leistung 2 Min.
andämpfen. Zucchetti waschen, längs halbieren und die Kerne mit einem Kaffeelöffel herauslösen. Zucchetti mit
der Schnittseite nach unten auf die Zwiebeln legen, zudecken und bei voller Leistung 4 Min. dämpfen. Quark,
Eigelb, Gewürze, Rahm und restliche Kräuter gut vermischen. Eiweiß steif schlagen und unter die Masse
ziehen. Dann die Zucchetti wenden und füllen. Das Ganze mit dem Grill 5-8 Min. überbacken.
1 EL Butter
1 Zwiebel, fein gehackt
1
⁄2 Bd. Petersilie, fein gehackt
wenig Dill, fein gehackt
2-4 Zucchetti, je nach Größe
250 g Speisequark
2 Eigelb
Salz, Pfeffer, Streuwürze
2 EL Rahm
2 Eiweiß
Französischer Birnenkuchen
Zucker und Wasser in eine Pyrex®-Kuchenform geben. Bei voller Leistung 5 Min. karamellisieren.
Birnen in feine Schnitze schneiden und gleichmäßig in der Backform verteilen.
Butter, Zucker und Zitronenschale schaumig rühren. Eier dazugeben und weiterschlagen bis die Masse hell ist.
Epifin und Backpulver beigeben, gut miteinander vermischen und den Teig über die Birnenschnitze verteilen.
Kuchen bei halber Leistung 9 Min. und bei 600 W Leistung 2 Min. backen. Kuchen auf einen Teller stürzen und
auskühlen lassen.
80 g Zucker
3 EL Wasser
2-3 Birnen
100 g Butter
100 g Zucker
2 Eier
1
⁄2 Zitronenschale,
abgerieben
100 g Epifin
1
⁄2 KL Backpulver
Süßmostcrème
Eier, Zucker, Maizena, Zitronenschale und Süßmost in eine Schüssel geben und zusammen gut
verrühren.
Bei voller Leistung 6-8 Min. aufkochen. Nach der Hälfte der Kochzeit gut durchrühren, fertigkochen und wieder
umrühren, kalt stellen. Vor dem Servieren den Rahm und einige Tropfen Zitronensaft unter die Crème ziehen.
3 Eier
60 g Zucker
2 gehäufte KL Maizena
1 Zitrone, Saft und Schale
6 dl Süßmost
1 dl Rahm, geschlagen
Rezepte
Deutsch
Page 76

D-36
Deutsch
Französische Zwiebelsuppe
Zwiebeln und Butter zusammen in ein Geschirr geben, mit Salz und Pfeffer würzen, zudecken und bei voller
Leistung 4-5 Min. dämpfen. Weißwein und Bouillon beigeben. Suppe zudecken und bei voller Leistung 8-10 Min.
kochen. Brot leicht buttern, in Würfel schneiden, auf einen Teller verteilen und bei voller Leistung 1-2 Min.
rösten. Suppe abschmecken, in Tassen verteilen, Brotwürfeli und Käsescheiben darüber verteilen. Bei voller
Leistung 2-3 Min. verlaufen lassen.
300 g Zwiebeln, gerüstet in
feine Scheiben geschnitten
1 EL Butter
Salz, Pfeffer
11⁄2 dl Weißwein
41⁄2 dl Rindsbouillon
2 Scheiben Toastbrot
4 Scheiben Schmelzkäse
Gemüsetoast
Die Zucchetti und die Rüebli mit der Röstiraffal fein reiben. Toastbrot in 1 cm dicke Scheiben schneiden. Auf den
Rost legen und auf einer Seite 4 Min. bräunen.
Das Gemüse mit dem Käse, Rahm, Ei und den Gewürzen gut vermischen und auf die weiße Seite des Brotes
streichen. Auf den Rost legen und mit Grill ca. 7 Min. überbacken.
1 Vollkorntoastbrot
200 g Rüebli
200 g Zucchetti
200 g Greyerzer, gerieben
1 Ei
1
⁄2 dl Rahm
1 KL Curry
Salz, Pfeffer
Fischfilet “Dézaley”
Fischfilets mit Salz, Pfeffer und Kräutern bestreuen, kurz marinieren. Butter, Zwiebeln, Fische und Wein in eine
Form geben, zudecken und mit dem Automatikprogramm “Fisch” dämpfen.
Sud in eine kleine Schüssel gießen. Rahm, Tomatenpüree, Knoblauch und Saucenpaste zum Sud geben. Sauce
bei voller Leistung 2 Min. aufkochen und über die Fische geben.
400 g Fischfilets
Salz, weißer Pfeffer
Petersilie, Dill und Estragon
gehackt
1 Zwiebel, gehackt
1 dl Dézalay
1 dl Rahm
1 EL Tomatenpüree
1 Knoblauchzehe, gepreßt
1
⁄2 EL weiße Saucenpaste
Gefüllte Pouletbrüstchen
In die Pouletbrüstchen eine Tasche einschneiden. Mit Salz, Pfeffer und Paprika innen und außen leicht würzen.
Spinat gut ausdrücken und mit Salz und Pfeffer würzen. Auf die 4 Brüstchen verteilen. Den Gorgonzola in
Stengel schneiden und auf den Spinat legen. Die Tasche schließen und mit 2 Speckscheiben umwickeln.
Bräunungsteller 5 Min. bei voller Leistung erhitzen. Pouletbrüstchen auf beiden Seiten je 3 Min. offen bei voller
Leistung anbraten. Zugedeckt stehenlassen.
Zwiebel hacken und mit dem Wermouth 3 Min. bei voller Leistung aufkochen. Absieben und mit Senf, Halbrahm,
Safran und Maizena verrühren. Bei voller Leistung 2 Min. aufkochen. Mit Zitronensaft, Salz und Pfeffer
abschmecken. Sauce zu den Pouletbrüstchen geben und alles 2 Min. bei halber Leistung ziehen lassen.
4 Pouletbrüstchen
ca. 200 g Blattspinat,
tiefgefroren
100 g Gorgonzola
8 Scheiben
Frühstücksspeck
Salz, Pfeffer, Paprika
Sauce:
1 Zwiebel
1
⁄2 dl Wermouth, trocken
1 KL grobkörniger Senf
1
1
⁄2 dl Halbrahm
1 Msp. Safran
1 Msp. Maizena
1 KL Zitronensaft
Salz, Pfeffer
Rezepte
Page 77

D-37
Stangensellerie
Stangensellerie der Länge nach halbieren, eventuell die Stangen in Stücke schneiden, waschen.
Sellerie in eine Form geben, Bouillon darübergießen, mit dem Automatikprogramm “Gemüse” (+Taste) garen.
Kochflüssigkeit abgießen. Geriebener Sbrinz und Paniermehl über den Sellerie geben, Rahm darübergießen.
5-7 Min. mit dem Grill überbacken.
600 g Stangensellerie
1
⁄2 dl Bouillon
50 g Sbrinz, gerieben
3 EL Paniermehl
11⁄2 dl Rahm
Fenchelgratin
Den Fenchel waschen, rüsten und in 4-6 Teile schneiden. Zugedeckt mit dem Automatikprogramm “Gemüse”
garen.
Gratinform ausbuttern und den Fenchel einschichten. Das Ei in eine Tasse aufschlagen, bei 600 W Leistung 4050 Sek. zugedeckt hartkochen. Dann in kleine Würfel schneiden. Die Butter in eine Schüssel geben, offen bei
600 W Leistung 1 Min. schmelzen. Mit dem gehackten Ei, dem Paniermehl und dem Sbrinz mischen.
Den Rahm mit Salz und Pfeffer würzen und über den Fenchel gießen. Mit der Paniermehlmischung bestreuen.
Mit dem Automatikprogramm “Gratin” garen.
3 Fenchel
3 EL Paniermehl
1 Ei
1 dl Rahm
2 EL Sbrinz
30 g Butter
Salz, Pfeffer
Berner Kartoffelgratin
Die Eier aufschlagen und mit dem Sauerrahm verrühren. Die Kartoffeln schälen und an der Röstiraffel in die
Eiermischung reiben. Den Käse ebenfalls an der Röstiraffel in die Eiermischung reiben. Den Schinken unter die
Kartoffelmasse geben und mit Salz, Pfeffer und Muskat würzen.
Eine Gratinform einfetten, die Kartoffelmasse hineingeben und den Sbrinz darüberstreuen. Mit dem
Automatikprogramm “Gratin” überbacken.
500 g Kartoffeln
150 g Greyerzer am Stück
100 g Schinken in Würfel
geschnitten
1 B. Sauerrahm
2 Eier
2 EL Sbrinz, gerieben
1 EL Butter
Salz, Pfeffer, Muskat
Mousse au Chocolat
Eigelb, Kaffee, Zucker, Cognac und Kirsch zusammen schaumig schlagen. Schokolade und Butter in ein
Geschirr geben und bei 600 W 2 Min. schmelzen. Mit einer Gabel gut verrühren, etwas abkühlen lassen und zur
Eimasse geben, gut mischen. 2 Eiweiß sowie den Rahm separat steif schlagen. Mit einem Spachtel vorsichtig
unter die Schokoladenmasse ziehen. Vor dem Servieren mindestens einen halben Tag kühl stellen.
80 g Zartbitter-Schokolade
80 g Milchschokolade
1 EL Butter
3 Eier
1 KL sofortlöslicher Kaffee
80 g Zucker
1 EL Cognac
1 EL Kirsch
1 dl Rahm
Rezepte
Deutsch
Page 78

Fr-1
Français
La technologie à inverseur a la réponse
Une initiative Panasonic travaille depuis plus de 10 ans au développement de la technologie à inverseur pour fours à micro-ondes. Cette
technologie essentielle permet aujourd'hui de produire des fours à micro-ondes véritablement différents, offrant plusieurs fonctions uniques:
• Elle a ainsi permis de produire le premier four à micro-ondes capable de réguler linéairement la quantité d'énergie haute-fréquence utilisée. Ce
nouveau système de diffusion des ondes permet de cuire et de décongeler les aliments sans affecter leur goût.
• Elle assure la conversion efficace de l'énergie électrique en énergie haute-fréquence, réduisant ainsi la consommation d'énergie sans sacrifier
la puissance du four.
• Elle permet l'utilisation d'un volume considérablement plus important, même dans un four de dimensions compactes, grâce à la petite taille du
circuit inverseur qui remplace les transformateurs encombrants actuellement utilisés.
• L'élimination des encombrants transformateurs en fer facilite finalement un recyclage plus écologique des fours à micro-ondes à la fin de leur
vie utile.
Installation et raccordement . . . . . . . . . . . . . . . . . . . . . . . . . . . . . . . 2...
Consignes de sécurité . . . . . . . . . . . . . . . . . . . . . . . . . . . . . . . . . . . . 3
Informations importantes . . . . . . . . . . . . . . . . . . . . . . . . . . . . . . . . . . 4
Panneau de commandes . . . . . . . . . . . . . . . . . . . . . . . . . . . . . . . . . 5
Représentation schématique . . . . . . . . . . . . . . . . . . . . . . . . . . . . . . . 6
Mode dʼemploi . . . . . . . . . . . . . . . . . . . . . . . . . . . . . . . . . . . . . . . . 6-7
Cuisson et décongélation aux micro-ondes . . . . . . . . . . . . . . . . . . . 8
Cuisson au gril . . . . . . . . . . . . . . . . . . . . . . . . . . . . . . . . . . . . . . . . . 8
Cuisson combinée . . . . . . . . . . . . . . . . . . . . . . . . . . . . . . . . . . . . . . 9
Décongélation automatique . . . . . . . . . . . . . . . . . . . . . . . . . . . . . . . . 9
Programmes de cuisson automatique en fonction du poids . . . 10-12
Les programmes Panacrunch . . . . . . . . . . . . . . . . . . . . . . . . . . . . .12
Plateau à pizza . . . . . . . . . . . . . . . . . . . . . . . . . . . . . . . . . . . . . . . . 13
Mise en marche retardée . . . . . . . . . . . . . . . . . . . . . . . . . . . . . . . .14
Minuteur . . . . . . . . . . . . . . . . . . . . . . . . . . . . . . . . . . . . . . . . . . . . . 14
Questions et réponses . . . . . . . . . . . . . . . . . . . . . . . . . . . . . . . . . . 15
Lʼentretien de votre four à micro-ondes . . . . . . . . . . . . . . . . . . . . . . 16
Caractéristiques techniques . . . . . . . . . . . . . . . . . . . . . . . . . . . . 16-17
Cuisson aux micro-ondes . . . . . . . . . . . . . . . . . . . . . . . . . . . . . . . . 18
Généralités . . . . . . . . . . . . . . . . . . . . . . . . . . . . . . . . . . . . . . . . .18-19
Quels récipients utiliser dans votre four? . . . . . . . . . . . . . . . . . . . . 20
Niveaux de puissance des micro-ondes . . . . . . . . . . . . . . . . . . . . . 21
Utilisation du gril . . . . . . . . . . . . . . . . . . . . . . . . . . . . . . . . . . . . . . 21
Cuisson combinée . . . . . . . . . . . . . . . . . . . . . . . . . . . . . . . . . . . . . 21
Réchauffage . . . . . . . . . . . . . . . . . . . . . . . . . . . . . . . . . . . . . . . . . . 22
Réchauffage à lʼaide des micro-ondes . . . . . . . . . . . . . . . . . . . . 22-23
Instructions relatives à la décongélation . . . . . . . . . . . . . . . . . . . . . 24
Décongélation des aliments courants . . . . . . . . . . . . . . . . . . . . . . . 25
Tableaux de cuisson et de réchauffage . . . . . . . . . . . . . . . . . . . 26-27
Viandes et volailles . . . . . . . . . . . . . . . . . . . . . . . . . . . . . . . . . . . . .28
Poissons . . . . . . . . . . . . . . . . . . . . . . . . . . . . . . . . . . . . . . . . . . . . . 29
Légumes . . . . . . . . . . . . . . . . . . . . . . . . . . . . . . . . . . . . . . . . . . . . . 30
Pommes de terre en chemise . . . . . . . . . . . . . . . . . . . . . . . . . . . . . 30
Œufs, pâtes, riz, haricots chauds et céréales . . . . . . . . . . . . . . . . . 31
Le plateaux à pizza . . . . . . . . . . . . . . . . . . . . . . . . . . . . . . . . . . . . . 32
Solutions aux problèmes les plus fréquemment rencontrés . . . . . . .33
Recettes . . . . . . . . . . . . . . . . . . . . . . . . . . . . . . . . . . . . . . . . . . . 34-37
Contenu
Ce livre de cuisine peut être utilisé pour différents modèles. Pour plus dʼinformations veuillez vous référer à notre mode dʼemploi. Il se peut que
certains plats, mentionnés dans les recettes, soient trop grands pour votre four. Il vous suffira dʼadapter le plat en question à la grandeur réelle de
vos plats. Les durées ci-dessous sont fournies à titre dʼexemple uniquement. Les durées réelles varient en fonction de la température initiale des
aliments et du récipient utilisé. Vérifiez toujours si les aliments sont “tout chaud” avant de les consommer.
Lisez attentivement les recommandations dʼutilisation et conservez-les soigneusement.
Page 79

John Lay Electronics AG
Littauerboden 1
6014 Littau-Luzern
Telefon: 0900 809 809
http://www.panasonic.ch
John Lay Electronics SA
Littauerboden 1
6014 Littau-Lucerne
Téléphone: 0900 809 809
http://www.panasonic.ch
John Lay Electronics
Page 80

F00039G00WP
Page 81

Fr-2
Français
Installation et raccordement
Vérifiez lʼétat du four à micro-ondes
Déballez le four et débarrassez-le de lʼensemble du matériel
dʼemballage. Examinez soigneusement lʼappareil afin de détecter toute
déformation, défectuosité du système de fermeture de la porte ou
défaut au niveau de la porte elle-même. Prévenez immédiatement votre
revendeur si lʼappareil est endommagé. Nʼinstallez pas un four à microondes abîmé.
Instructions pour la mise à la terre
IMPORTANT : POUR VOTRE SECURITE, IL EST TRES
IMPORTANT QUE CET APPAREIL SOIT CORRECTEMENT MIS A LA
TERRE.
Si la prise murale nʼest pas mise à la terre, le client se doit de la faire
remplacer par une prise murale correctement mise à la terre.
Précaution concernant la tension dʼalimentation
Utilisez la tension indiquée sur le four à micro-ondes. Si on utilise une
tension supérieure à la tension spécifiée, lʼappareil risque de provoquer
un incendie ou dʼautres dégâts.
Emplacement du four
Ce four est conçu pour une utilisation sur plan de travail ou encastrée
uniquement, à l'aide du kit de réglage. Ce four n'est pas conçu pour une
utilisation dans un meuble ou un placard.
1. Placez le four sur une surface plane et stable à plus de 85 cm
au-dessus du sol.
2. Une fois le four installé, il suffit, pour isoler lʼappareil de la
source électrique, de retirer la fiche ou dʼutiliser un disjoncteur.
3. Afin de garantir une utilisation optimale du four, veillez à ce quʼil
soit suffisamment ventilé.
Si vous placez lʼappareil sur un plan de travail:
a. Laissez un espace de 15 cm en haut du four, de 10 cm à lʼarrière,
de 5 cm dʼun côté du four et dʼau moins 40 cm de lʼautre côté.
b. Si vous placez le four à ras du mur, veillez à ce que lʼautre
côté ou le dessus du four soit totalement libre.
4. Ne placez pas le four à proximité dʼune cuisinière au gaz ou
électrique.
5. Ne retirez pas les pieds du four.
6. Ce four est destiné uniquement à usage domestique. Ne lʼutilisez
pas à lʼextérieur.
7. Nʼutilisez pas le four dans une pièce dont le taux dʼhumidité est
très élevé.
8. Evitez tout contact entre le cordon dʼalimentation et lʼextérieur de
lʼappareil et éloignez-le de toute surface chaude. Ne le laissez pas
pendre sur le bord dʼune table ou dʼun plan de travail. Evitez de
mouiller le cordon dʼalimentation, la prise ou le four.
9. Nʼobstruez pas les ouvertures dʼaération situées en haut et à
lʼarrière du four de manière à éviter toute surchauffe du four.
Un dispositif thermique de sécurité protège le four en cas de
surchauffe. Sʼil sʼenclenche, le four ne pourra fonctionner à
nouveau quʼaprès refroidissement.
10. Ce four ne doit pas être commandé par un minuteur externe ni par
un système de télécommande distinct.
AVERTISSEMENT
1. Nettoyez les joints dʼétanchéité de la porte à lʼaide dʼun linge
humide. Vérifiez si lʼappareil ne présente pas de défauts au niveau
des joints dʼétanchéité. Si cʼest le cas, ne lʼutilisez plus avant que
ceux-ci aient été réparés par un technicien agréé par le fabricant.
2. Ne tentez jamais de modifier, dʼajuster ou de réparer la porte, le
boîtier du panneau de commandes, les commutateurs de
verrouillage de sécurité ou tout autre élément du four. Ne
retirez pas le panneau arrière du four, car il sert de protection
contre les micro-ondes émises par le four. Confiez exclusivement
les réparations à du personnel qualifié.
3. Nʼutilisez pas lʼappareil si la PRISE ou le CORDON
DʼALIMENTATION est endommagé, sʼil ne fonctionne pas
correctement, sʼil est abîmé ou sʼil est tombé. Il est dangereux de
confier la réparation de lʼappareil à une personne autre quʼun
technicien formé par le fabricant.
4. Si le cordon d'alimentation est endommagé, il doit impérativement
être remplacé par le fabricant ou un technicien formé par le
fabricant.
5. Nʼautorisez pas les enfants à se servir du four sans
surveillance, sauf si vous leur avez donné au préalable les
instructions adéquates leur permettant de lʼutiliser dans des
conditions de sécurité optimales et sʼils sont pas parfaitement
conscients des dangers quʼentraîneraient une mauvaise
utilisation de celui-ci.
6. Les aliments et les liquides ne doivent pas être chauffés dans des
récipients fermés hermétiquement car ceux-ci risquent dʼexploser.
Plan de travail
Côté libre
10cm
15cm
5cm
Attention : Surfaces brûlantes
Page 82

Fr-3
Consignes de sécurité
Français
Utilisation du four
1. Utilisez le four exclusivement à des fins culinaires. Ce four est
spécialement conçu pour réchauffer ou cuire des aliments. Ne
lʼutilisez pas pour réchauffer des produits chimiques ou tout autre
produit non alimentaire.
2. Vérifiez si les utensiles et les plats utilisés conviennent aux fours à
micro-ondes.
3. Ne tentez pas de sécher des journaux, des vêtements ou tout autre
matériau dans votre four à micro-ondes, car ceux-ci pourraient
sʼenflammer.
4. Ne placez dans le four aucun objet autre que ses accessoires et ce
même si vous ne lʼutilisez pas, car celui-ci pourrait être fortuitement
mis en route.
5. Nʼutilisez jamais le four en mode MICRO-ONDES ou COMBINE
SANS Y PLACER PREALABLEMENT DES ALIMENTS. Cette
interdiction ne sʼapplique pas au point 1 de la section Utilisation
des résistances ni au préchauffage du plateau à pizza.
6. Si vous constatez la présence de fumée ou de flammes dans le
four, appuyez sur la touche Arrêt/Annulation et laissez la porte
fermée de manière à étouffer les flammes.
Débranchez le cordon dʼalimentation ou coupez le courant au
niveau du fusible ou du disjoncteur.
7. Ce four ne sera pas utilisé par des personnes (y compris des
enfants) dont les capacités sensorielles ou mentales sont réduites,
ou bien qui nʼont pas lʼexpérience ni les connaissances requises, à moins dʼêtre surveillées par une personne chargée de leur
sécurité ou dʼavoir reçu de cette personne les instructions néces
saires pour lʼutilisation de lʼappareil.
Utilisation des résistances
Les surfaces extérieures du four, y compris les fentes d'aération du
meuble et la porte du four, peuvent être très chaudes en mode
COMBINE ou CUISSON SUR GRILL. Procédez avec soin lors de
l'ouverture ou fermeture de la porte et lors de l'insertion ou du retrait
des plats et accessoires. Le four est équipé de deux dispositifs de
chauffage situés en haut du four. Ces surfaces pourront être chaudes
en mode COMBINE et CUISSON SUR GRILL.
N.B. En cas d'utilisation de ces modes de cuisson, les accessoires du
four pourront être très chauds.
1. Avant dʼutiliser les modes COMBINE ou GRIL pour la première fois,
essuyez lʼhuile présente dans le four, puis faites chauffer lʼappareil
en mode Gril pendant 10 minutes, et ce sans aliment ni accessoire.
Cette opération permet de brûler lʼhuile de protection. Il sʼagit là du
seul cas où le four peut être utilisé à vide.
2. Les parois extérieures du four, les ouvertures dʼaération présentes
sur le boîtier et la porte du four sʼéchauffent lorsque vous utilisez les
modes COMBINE et GRIL. Prenez garde de ne pas vous brûler en
ouvrant et en refermant la porte ou en manipulant les aliments et les
accessoires.
3. En cas dʼutilisation des modes COMBINE et GRIL, les deux
résistances présentes dans la partie supérieure du four sont
brûlantes.
N.B. : Les différents accessoires du four sont également très
chauds.
4. Lorsque le four est utilisé en mode de cuisson combinée, les enfants
ne devront sʼen servir que sous surveillance en raison des hautes
températures qui sont produites.
Utilisation du ventilateur
Si le four est chaud après utilisation, le moteur du ventilateur
sʼenclenche pendant 1 minute afin de refroidir les composants
électriques. Cela est parfaitement normal et vous pouvez retirer les
mets cuisinés pendant que le ventilateur tourne.
Lampe du four
Si vous devez remplacer la lampe du four, adressez-vous à votre
revendeur.
Accessoires
Le four est fourni avec toute une série dʼaccessoires. Utilisez-les
toujours conformément aux instructions.
Plateau tournant en verre
1. Utilisez le four uniquement si lʼanneau à roulettes et le plateau
tournant en verre sont en place.
2. Nʼutilisez jamais un autre plateau tournant en verre que celui
spécialement conçu pour votre four.
3. Si le plateau tournant en verre est chaud, attendez quʼil refroidisse
pour le nettoyer ou le plonger dans lʼeau.
4. Le plateau tournant en verre peut pivoter dans les deux sens.
5. Si les aliments ou le plat disposés sur le plateau tournant en verre
touchent les parois du four et lʼempêchent de tourner, celui-ci pivote
automatiquement dans la direction inverse. Cʼest normal.
6. Ne cuisez pas dʼaliments à même le plateau tournant en verre.
Anneau à roulettes
1. Nettoyez régulièrement lʼanneau à roulettes et le plancher du four
afin de réduire les nuisances dues aux bruits ainsi que
lʼaccumulation de particules de nourriture.
2. Utilisez toujours lʼanneau à roulettes avec le plateau tournant en
verre pour la cuisson des aliments.
Trépied métallique
1. Le trépied métallique facilite le brunissement des petits plats
et favorise la circulation de la chaleur.
2. En mode COMBINE ou MICRO-ONDES, ne mettez jamais de
contenant métallique en contact direct avec le trépied
métallique.
Plateau à pizza - Voir page Fr-13
Page 83

Fr-4
Français
Informations importantes
1) Temps de cuisson
• Les temps de cuisson indiqués dans le livre de cuisine sont
des valeurs indicatives. Le temps de cuisson réel dépendra de
lʼétat, de la température, de la quantité et du type dʼaliment mis au
four.
• Pour éviter que les aliments soient trop cuits, commencez par
utiliser les temps de cuisson minimaux. Si vos aliments ne sont pas
assez cuits, vous pouvez toujours prolonger quelque peu le temps
de cuisson.
Remarque: si vous dépassez les temps de cuisson
recommandés, il se peut que les aliments ne soient plus
consommables et, dans des cas extrêmes, ils peuvent
même prendre feu et endommager éventuellement
lʼintérieur du four.
2) Limitez les quantités
• Si vous cuisez trop longtemps de petites quantités dʼaliments à
faible teneur en eau, ils peuvent se dessécher, brûler ou
carrément prendre feu. Si quelque chose se met à brûler dans le
four, gardez la porte fermée, coupez le four et débranchez le
cordon dʼalimentation.
3) Œufs
• Ne cherchez pas à cuire des œufs coques ou des œufs durs dans
votre four à micro-ondes. Ils risquent dʼexploser sous lʼeffet de la
pression, que ce soit pendant ou même après la cuisson ou le
réchauffage.
4) Perforer la peau
• Les produits alimentaires qui ont une peau lisse et non poreuse
comme les pommes de terre, les jaunes dʼoeuf et les saucisses
doivent être perforés avant cuisson, pour éviter quʼils nʼexplosent.
5) Thermomètre à viande
• Pour mesurer la température des rôtis ou des volailles, retirez
dʼabord la viande du four. Nʼutilisez surtout pas un
thermomètre à viande classique dans votre micro-ondes, car
cela pourrait produire des étincelles.
6) Liquides
• Quand vous réchauffez des liquides dans votre micro-ondes
(potages, sauces, boissons), cela peut provoquer une surchauffe audelà du point dʼébullition et ce, sans quʼun bouillonnement ou des
bulles ne lʼannoncent. Le liquide chaud pourrait soudain déborder.
Les mesures de précaution suivantes vous permettront dʼécarter
tout risque:
a) nʼutilisez aucun récipient à bords droits et pourvus dʼun orifice étroit;
b) évitez de surchauffer;
c) remuez le liquide avant de le mettre au four et remuez de nouveau à
mi-cuisson;
d) une fois le liquide réchauffé, laissez-le brièvement dans le four et
remuez encore une fois avec prudence avant de lʼenlever.
7) Papier/plastique
• Lorsque vous réchauffez des produits alimentaires emballés dans du
plastique ou du papier, vous devez régulièrement jeter un coup
dʼoeil dans le four, car plastiques et papiers peuvent prendre feu sʼils
sont portés à une température trop élevée.
• Nʼutilisez aucun produit en papier recyclé (de lʼessuie-tout p. ex.) si
ceux-ci ne conviennent pas expressément aux micro-ondes. Le
papier recyclé peut contenir des impuretés susceptibles de produire
des étincelles ou de mettre le feu au four.
• Enlevez les filets de maintien des rôtis avant de les mettre au four.
8) Accessoires/films
• Nʼutilisez en aucun cas des boîtes ou des flacons fermés car
ils pourraient exploser.
• Les récipients métalliques et la vaisselle à bord doré ne
peuvent pas être utilisés dans un micro-ondes, en raison du
risque de production dʼétincelles.
• Les feuilles dʼaluminium, les broches et les objets métalliques
doivent être éloignés dʼau moins 2 cm des parois et de la
porte du four pour éviter toute production dʼétincelles.
9) Biberons/petits pots dʼaliments pour bébé
• Enlevez les raccords, tétines ou couvercles des biberons et des pots
de nourriture pour bébé avant de les mettre au four.
• Le contenu des bouteilles et des petits pots de nourriture pour bébé
doit être remué ou secoué.
• Avant de consommer le moindre aliment, vérifiez sa température
pour éviter de vous brûler.
Page 84

Fr-5
Panneau de commandes
Français
(1) Fenêtre dʼaffichage
(2) Puissances Micro-ondes
(3) Puissances Gril
(4) Modes combinés
(5) Décongélation automatique en fonction du poids
(6) Touche Minuteur/Départ différé
(7) Touche Horloge
(8) Sélecteur de cuisson Automatique
(9) Sélecteur Durée/Poids
(10) Touche Arrêt/Annulation:
Avant la cuisson: Appuyez une fois sur cette
touche pour effacer les instructions.
Pendant la cuisson: Appuyez une fois sur cette
touche pour interrompre momentanément la cuisson.
Appuyez une nouvelle fois pour annuler toutes vos
instructions et afficher lʼheure.
(11) Touche Marche:
Appuyez une fois sur cette touche pour mettre en
marche le four. Si vous ouvrez la porte ou si vous
appuyez une seule fois sur la touche Arrêt/Annulation,
vous devez à nouveau appuyer sur la touche Marche
pour poursuivre la cuisson.
(1)
(3)
(9)
(8)
(11)
NN-GD569M / NN-GD559W
(4)
(5)
(6)
(10)
(7)
(2)
Signaux sonores
Un signal sonore retentit chaque fois que vous
appuyez sur un bouton. Si ce nʼest pas le cas, cela
signifie que lʼinstruction est refusée. Deux signaux
sonores sont émis entre chaque étape de cuisson et
cinq lorsque la cuisson est terminée.
Ce four est équipé dʼune fonction dʼéconomie dʼénergie.
N.B. :
1. Lorsquʼil est en mode veille, la luminosité de lʼaffichage
sera réduite.
2. Le four se mettra en mode veille au moment où il est
branché à lʼalimentation et après la dernière opération.
Page 85

Fr-6
Français
Mode dʼemploi
Ce modèle possède une fonction “mode dʼemploi” unique, qui vous
aide à utiliser correctement votre four à micro-ondes. Pour régler la
langue, il suffit dʼappuyer de manière répétée sur la touche Start après
branchement de lʼappareil, jusquʼà ce que la langue apparaisse. Les
étapes suivantes sʼaffichent après chaque actionnement dʼune touche,
ce qui permet dʼéviter dans une très large mesure les erreurs de
manipulation. Si vous souhaitez de nouveau modifier la langue, il suffit
de débrancher lʼappareil et de répéter lʼopération.
Si vous appuyez 4 fois sur la touche « Delay/Stand »
(Retardement/Veille), le guide de fonctionnement sera désactivé. Pour
réactiver le guide de fonctionnement, appuyez sur la touche
«Delay/Stand » 4 fois.
Représentation schématique
(1) Touche de la porte du four
Pressez sur la touche pour ouvrir le four.
Si vous ouvrez la porte du four en cours
de cuisson, celle-ci est momentanément
interrompue, sans toutefois que les
instructions de programmation soient
annulées. Pour poursuivre la cuisson,
refermez la porte, puis appuyez sur la
touche Marche. Lʼintérieur du four
sʼéclaire dès que vous ouvrez la porte.
(2) Fenêtre du four
(3) Système de verrouillage de sécurité
de la porte
(4) Ouverture dʼaération du four
(5) Panneau de commandes
(6) Plateau tournant en verre
(7) Anneau à roulettes
(8) Ouvertures dʼaération externes du four
(9) Trépied métallique
(10) Plateau à pizza
(11) Manche pour plaque à pizza
(12) Câble électrique
(13) Sticker dʼavertissement
(surfaces chaudes)
(14) Etiquette de type
Mode dʼemploi:
Plug-in “88:88”
Mode dʼemploi
Presser “DANSK” en danois
Presser “SUOMI” en finnois
Presser “SVENSKA” en suédois
Presser “NORSK” en norvégien
Presser “DEUTSCH” en allemand
Presser “FRANCAIS” en français
Presser “ITALIANO” en italien
Presser “ENGLISH” en anglais
(1)
(2)
(3)
(4)
(5)
(7)
(8)
(9)
(10)
(11)
(6)
(12)
(13)
(14)
Page 86

Fr-7
Français
Réglage de la montre:
Exemple: réglage sur 12:00
• Presser la touche
montre/chrono.
Les deux points se
mettent à clignoter.
• Presser trois fois la touche de mise
en marche.
Lʼheure disparaît, mais est conservée en
mémoire.
6 apparaît sur lʼaffichage.
• Presser trois fois la touche dʼ arrêt/
annulation.
Lʼheure réapparaît sur lʼaffichage.
• Entrée de lʼheure par rotation du
sélecteur de poids/temps de cuisson.
Lʼheure apparaît sur lʼafficheur et les deux
points clignotent.
• Presser la touche montre/chrono.
Les deux points cessent de clignoter.
Lʼheure est réglée.
REMARQUES:
1. Pour modifier lʼheure, répétez les opérations décrites ci-dessus.
2. Lʼheure est affichée en permanence, tant que lʼalimentation nʼest pas interrompue.
3. La montre dispose dʼun affichage 24 heures.
Mode dʼemploi
Mode démo:
Ce mode sert aux démonstrations dans le magasin.
Sécurité enfants
Ce système empêche toute utilisation du four, mais la porte peut être ouverte. La sécurité enfants peut être mise en fonction lorsque les deux
points ou lʼheure sont présents sur lʼaffichage.
Réglage:
Effacer:
Pour activer:
Pour désactiver:
NOTE: Pour activer le verrouillage de sécurité enfant, appuyez 3 fois sur la touche « Start » en lʼespace de 10 secondes.
• Pressez une fois la
touche Micro-ondes.
• Pressez 4 fois la touche
Arrêt/Annulation
• Pressez une fois la
touche Micro-ondes.
• Pressez 4 fois la touche
Arrêt/Annulation
Page 87

Votre four possède cinq niveaux de puissance de micro-ondes. Le tableau ci-dessous indique la puissance en watts approximative de chaque niveau.
Accessoire utilisé:
Pressez Niveau de puissance Watts
1 fois Puissance maximale 1000 W
2 fois Puissance minimale* 270 W
3 fois Puissance moyenne 600 W
4 fois Puissance doux 440 W
5 fois Puissance mijotage 250 W
Fr-8
Cuisson et décongélation aux micro-ondes
REMARQUES :
1. Vous pouvez éventuellement modifier la durée de cuisson pendant la cuisson proprement dite. Tournez alors le bouton Durée/Poids pour
augmenter ou diminuer la durée de cuisson. Vous pouvez augmenter/diminuer la durée par pas de 1 minute, jusquʼà 10 minutes maximum. Si
vous tournez le bouton sur la position zéro (0), vous mettez fin à la cuisson.
2. Si vous tournez directement le sélecteur de durée sans choisir au préalable le niveau de puissance, la puissance 1000 W sera
automatiquement sélectionnée.
3. Vous pouvez enchaîner jusqu'à 3 étapes de cuisson. Pour cela, avant de presser la touche Marche, choisissez une deuxième (troisième)
puissance et sa durée. Pour cuire par exemple un ragoût, cuire sur Max pendant 10 min pour porter à ébullition, puis cuire sur Mijotage
pendant 60 min.
4. Vous pouvez utiliser cette option d'enchaînement pour programmer avec la touche Minuteur un temps de repos après cuisson.
Plateau en verre
Cuisson au gril
• Appuyez sur la
touche Marche.
REMARQUES:
1. Le gril ne fonctionne que lorsque la porte du four est fermée.
2. Vous pouvez éventuellement modifier la durée de cuisson pendant la cuisson proprement dite. Tournez alors le bouton Durée/Poids pour
augmenter ou diminuer la durée de cuisson. Vous pouvez augmenter/diminuer la durée par pas de 1 minute, jusquʼà 10 minutes maximum.
Si vous tournez le bouton sur la position zéro (0), vous mettez fin à la cuisson.
Trépied métallique
Plateau en verre
Accessoires utilisés :
• Réglez la durée de cuisson à lʼaide du bouton
Durée/Poids (90 minutes maximum).
* La puissance minimum
est utilisable pour
réchauffer des aliments.
Français
Vous pouvez choisir 3 puissances de Gril.
1 pression Gril 1 1300 W
2 pressions Gril 2 950 W
3 pressions Gril 3 700 W
• Choisissez la puissance de Gril désirée.
Pressez 1 fois pour Gril Fort (1), 2 fois pour
Gril moyen (2) ou 3 fois pour Gril faible (3).
• Pressez la touche pour choisir la
puissance des micro-ondes.
• Réglez la durée de cuisson à lʼaide du bouton Durée/Poids
(Puissance maximale; 30 minutes maximum. Autres
puissances; 90 minutes maximum).
• Appuyez sur la
touche Marche.
Page 88

Programme
Mode assisté
Poids Aliments appropriés
1 morceaux
1 PETITES
PIECES
150 - 1000g
Petits morceaux de viande, escalopes, saucisses, viande hachée, filets de
poisson, steaks, côtelettes (de 100 à 400 grammes chacun). Après lʼémission du
signal sonore, retournez lʼaliment.
2 Grands
morceaux
2 GROSSE
PIECE
500 - 1500g
Gros morceaux de viande, rôti, poulet entier, gros morceaux de poisson.
Au signal sonore, retournez lʼaliment.
Réglage du mode de
cuisson combinée
Pressez Gril Micro-ondes Mode assisté
1 1 fois 1300W 100W G1-100 W
2 2 fois 1300W 250W G1-250 W
3 3 fois 1300W 440W G1-440 W
Cuisson combinée
Le mode de cuisson combinée comprend trois réglages. Le tableau ci-dessous
indique la puissance en watts approximative de chaque niveau de puissance.
• Choisir la cuisson combinée
desirée. (voir tableau)
REMARQUES:
1. Le gril ne fonctionne que lorsque la porte du four est fermée.
2. Vous pouvez éventuellement modifier la durée de cuisson pendant la cuisson proprement dite. Tournez alors le bouton Durée/Poids pour
augmenter ou diminuer la durée de cuisson. Vous pouvez augmenter/diminuer la durée par pas de 1 minute, jusquʼà 10 minutes maximum.
Si vous tournez le bouton sur la position zéro (0), vous mettez fin à la cuisson.
Trépied métallique
Plateau en verre
Accessoires utilisés :
• Réglez la durée de cuisson à lʼaide du bouton Durée/Poids
(90 minutes maximum).
• Appuyez sur la
touche Marche.
Décongélation automatique
• Sélectionnez le poids de lʼaliment congelé à lʼaide du bouton
Durée/Poids.
Une rotation lente du sélecteur fera défiler le poids par pas de 10 g.
Une rotation rapide le fera défiler par pas de 100 g.
• Appuyez sur la
touche Marche.
REMARQUES :
1. Quand la durée de décongélation est supérieure à 60 minutes, elle est affichée en heures et minutes.
2. La forme et la taille de lʼaliment déterminent le poids maximal que le four peut traiter.
Cette fonction vous permet de décongeler des aliments congelés en fonction de leur poids. Sélectionnez la catégorie dʼaliment et spécifiez son
poids. Le poids est programmé en grammes. Pour accélérer la sélection, lʼaffichage indique dʼabord le poids le plus fréquemment utilisé avec
chaque catégorie dʼaliment.
• Sélectionnez le programme de
décongélation automatique désiré.
Appuyez une fois pour les petites
quantités et deux fois pour les
quantités plus importantes.
Fr-9
Français
Page 89

Catégorie
Mode
assisté
Poids
recommandé
Accessoire Instructions
1. Réchauffage
dʼun bol
1 TASSE
GRANDE
250g
Pour réchauffer un bol de boisson chaude.
Sélectionnez le mode réchauffage dʼun bol, introduisez le poids (250 g)
et appuyez sur la touche de mise en marche.
2. Réchauffage
dʼune tasse
2 1TASSE
150g
Pour réchauffer une tasse de boisson chaude.
Sélectionnez le mode réchauffage dʼune tasse, introduisez le poids
(150 g) et appuyez sur la touche de mise en marche.
3. Réchauffage
dʼun plat frais
3PLAT
CUISINE
200 - 1000g
Pour réchauffer un plat frais ou une casserole.
Tous les aliments doivent être précuits et doivent être à
température ambiante ou réfrigérée.
Respectez quelques minutes de temps de repos à la fin de cuisson.
4. Réchauffage
dʼun plat
surgelé
4PLAT
SURGELEE
200 - 1000g
Pour réchauffer un plat surgelé ou une casserole.
Tous les aliments doivent être précuits et surgelés.
Remuez à la fin de cuisson et respectez quelques minutes de temps
de repos.
5. Cuisson des
légumes
5 LEGUMES
FRAIS
200 - 1000g
Pour cuire des légumes frais. Placez les légumes préparés dans un
récipient de taille adéquate. Mettez un papier de ménage mouillé
dessus et couvrez légèrement le tout à lʼaide dʼun couvercle ou de film
alimentaire préalablement percé.
6. Cuisson du
poisson
6 POISSON
FRAIS
100 - 1000g
Pour cuire des steaks et des filets de poisson frais. Protégez les
parties moins épaisses, mettez le poisson dans un récipient adapté.
Placez le poisson dans un récipient de taille adéquate et ajoutez 30 ml
de liquide. Couvrez à lʼaide dʼun couvercle ou de film alimentaire
préalablement percé. Retournez les grandes quantités après
lʼémission du signal sonore.
Fr-10
Français
Programmes de cuisson automatique en fonction du poids
Cette fonction vous permet de cuire la plupart de vos aliments préférés en spécifiant le poids uniquement. Le four détermine automatiquement le
niveau de puissance des micro-ondes, la puissance du gril et la durée de cuisson. Sélectionnez la catégorie et le poids de lʼaliment. Le poids est
programmé en grammes. Pour accélérer la sélection, lʼaffichage indique dʼabord le poids le plus fréquemment utilisé avec chaque catégorie dʼaliment.
REMARQUES:
1. Quand la durée de cuisson est supérieure à 60 minutes, elle est affichée en heures et minutes.
2. Pour plus dʼinformations sur le poids et les accessoires à utiliser, consultez les tableaux des pages suivantes.
• Spécifiez le poids de lʼaliment à lʼaide du
bouton Durée/Poids. Une rotation lente du sélecteur
fera défiler le poids par pas de 10 g. Une rotation
rapide le fera défiler par pas de 100 g.
• Appuyez sur la
touche Marche.
• Sélectionnez la cuisson de l'aliment désiré en
tournant le sélecteur de cuissons Auto. Les
cuissons automatiques s'affichent successivement
dans la fenêtre.
Page 90

Catégorie
Mode
assisté
Poids
recommandé
Accessoire Instructions
7. Pommes de
terre vapeur
7 POMMES
DE TERRE
200 - 1500g
Pour faire cuire les pommes de terre. Coupez les pommes de terre
en morceaux de taille égale et mettez les morceaux dans un plat creux
qui passe au micro-ondes. Couvrez le plat avec un papier de ménage
creux mouillé et un couvercle ou un film plastique.
8. Riz vapeur
8RIZ
200 - 800g
Pour faire cuire du riz. Ajoutez 2 dl dʼeau, pour 100 g de riz, 1/2
cuillerée à café de sel et un peu dʼhuile ou de beurre. Sélectionnez le
poids du riz seulement. Couvrez avec un couvercle ou un film
plastique.
9. Riz au lait
Semoule
9 RIZ FLAN
250 - 1000g
Pour faire cuire du riz au lait. Pesez le poids total du riz/semoule et
le liquide. Faites cuire sans le couvercle et remuer tout à mi-temps.
10. Oeufs
brouillés
10 OEUFS
BROUILLES
100 - 500g
Pour faire cuire des œufs brouillés. Pesez le poids total des œufs et
du liquide. Couvrez avec couvercle ou microfilm.
11. Poulet frais
morceaux
11 VOLAILLE
MORCEAUX
200 - 1000g
Pour rôtir des morceaux de poulet frais. Placez le poulet sur le
trépied métallique, lui-même posé sur le plateau en verre. Pour
assurer une cuisson uniforme, écarter les pièces de poulet.
12. Poulet
congelé
morceaux
12 PIECES
DE POULET
SURGELEE
200 - 1000g
Pour rôtir des morceaux de poulet congelés. Placez le poulet sur le
trépied métallique, lui-même posé sur le plateau en verre. Pour
assurer une cuisson uniforme, écarter les pièces de poulet.
13. Rôti
13 STEAK DE
BOEUF
800 - 1500g
Pour rôtir des morceaux de viande. Placez la viande sur la grille,
posée sur le plateau de verre. Retournez au signal sonore.
14. Porc
14 PORC
700 - 2000g
Pour un rôti de porc. Placez la pièce de porc dans un plat, côté gras
vers le bas, sur le plateau de verre. Ajouter 1 dl de bouillon. Retourner
au signal sonore. Laissez reposer durant 10 à 15 minutes après la
cuisson.
15. Lasagne/
gratin frais
15 GRATIN
FRAIS
500 - 1500g
Pour cuire un gratin de pâtes. Préparez les pâtes fraîches ou
bouillies couvertes de sauce et de fromage. Pour 1000 g de pâtes,
utilisez 6 - 8 dl (600 - 800 g) de sauce/crème et recouvrez de
fromage râpé.
16. Lasagne/
gratin
congelé
16 GRATIN
SURGELE
300 - 1200g
Pour réchauffer et brunir une lasagne ou un gratin congelé.
Retirez tous les emballages et posez lʼaliment sur un plat allant au four
sur le trépied métallique, lui-même posé sur le plateau en verre. Ce
programme est aussi utilisable pour des gratins aux légumes crus.
Fr-11
Programmes de cuisson automatique en fonction du poids
Français
Page 91

Catégorie
Mode
assisté
Poids
recommandé
Accessoire Instructions
17. Pain
surgelé
17 PAIN
30 - 300g
Pour réchauffer et dorer du pain surgelé
Placez le pain surgelé directement sur la grille posée sur le plateau de
verre. Retournez le pain au signal sonore, et laissez reposer après la
cuisson. Ce programme nʼest pas prévu pour toaster des tranches de
pain.
18. Pommes
de terre
soufflées
18
POMMES
DE TERRE
AU FOUR
200 - 1500g
Pour cuire, dorer et rendre croustillantes des pommes de terre en
robe des champs. Percez la peau avec une fourchette et placez sur la
grille.
19. Pizza
congelée
19 PIZZA
SURGELEE
100 - 500g
Pour réchauffer des pizzas congelées en rendant la base
croustillante et en brunissant le dessus. Retirez tous les emballages
et posez la pizza sur le plateau à pizza préchauffé.
20. Quiche
surgelée
20 QUICHE
SURGELEE
100 - 500g
Pour réchauffer, saisir la pâte ou dorer la garniture de quiches
surgelées.
Retirez tout lʼemballage et placez la quiche sur la plaque à pizza
préchauffée.
21. Surgelés à
base de
pomme de
terre
21 FRITES
AFOUR
200 - 500g
Pour réchauffer, saisir et dorer les surgelés à base de pomme de
terre.
Après avoir préchauffé la plaque, répartissez les produits sur la plaque.
Pour les meilleurs résultats cuisez sur une seule couche.
22. Lard à frire
22 LARD
ROTI
30 - 200g
Pour faire des tranches de lard.
Posez le tranches sur le plateau à pizza préchauffé. Si vous desirez frire
dʼavantage, continuez par la combinaison G1 400 W 1-4 minutes.
Dégraissez sur papier de ménage.
Fr-12
1. Sélectionnez le programme
désiré et placez le plateau à
pizza dans le four,
directement sur le plateau en
verre.
2. Appuyez sur la touche Marche
pour préchauffer le plateau à
pizza.
3. Une fois le préchauffage
terminé, le signal sonore
retentit. Posez les aliments sur
le plat, spécifiez le poids.
4. Appuyez sur la touche Marche.
Les Programmes Panacrunch
Programmes de cuisson automatique en fonction du poids
Français
Page 92

ENTRETIEN DU PLATEAU A PIZZA
• Nʼutilisez jamais dʼobjet pointu, car cela endommagerait la surface
antiadhésive du plateau à pizza.
• Après utilisation, nettoyez le plateau avec de lʼeau chaude et du
savon, puis rincez-le à lʼeau chaude. Nʼutilisez pas de substance de
nettoyage abrasive ou de tampon à récurer, car cela
endommagerait la surface du plateau.
• Le plateau peut être lavé en toute sécurité dans un lave-vaisselle.
REMARQUES:
1. Ne préchauffez pas le plateau pendant plus de 8 minutes.
2. Placez toujours le plateau à pizza au centre du plateau tournant en
verre et assurez-vous quʼil ne touche pas la paroi de la cavité du
four, car cela risquerait de provoquer des étincelles susceptibles
dʼendommager la cavité.
3. Utilisez toujours le plateau à pizza avec le plateau tournant en verre,
et non avec le trépied métallique.
4. Utilisez toujours des gants de protection ou la poignée du plateau à
pizza lorsque vous manipulez celui-ci quand il est chaud.
5. Avant de commencer la cuisson, assurez-vous que vous avez bien
retiré tous les emballages de lʼaliment.
6. Ne posez jamais dʼustensile sensible à la chaleur sur le plateau à
pizza, car il risquerait de brûler.
7. Vous pouvez utiliser le plateau à pizza dans un four traditionnel.
8. Pour un résultat optimal, utilisez le plateau à pizza en mode gril et
micro-ondes combinés.
CONCEPT
Si la cuisson aux micro-ondes donne parfois une croûte molle et
pâteuse, le plateau à pizza, lui, permet de faire brunir et croustiller les
pizzas, les quiches, les tartes et les pains de la même manière quʼun
four traditionnel. La cuisson à lʼaide du plateau à pizza de Panasonic
sʼeffectue en trois étapes, à savoir : le chauffage du plateau par
absorption des micro-ondes, le chauffage direct des aliments par les
micro-ondes, puis le chauffage par le gril. La base du plateau absorbe
les micro-ondes et les convertit en chaleur. Cette chaleur est ensuite
répartie sur lʼensemble du plateau, jusquʼaux aliments. Lʼeffet de
chaleur est optimisé par la surface antiadhésive du plateau.
UTILISATION DU PLATEAU A PIZZA (utilisation manuelle)
• Pour un résultat optimal, préchauffez le plateau avant de lʼutiliser.
Posez-le directement sur le plateau tournant en verre et préchauffez
à 1000 W (grande puissance) durant 4 minutes. Pour faciliter le
brunissement des aliments tels que les saucisses et les
hamburgers, versez un peu dʼhuile sur le plateau avant de le
préchauffer.
• Retirer le plateau du four et posez les aliments dessus. Comme le
plateau est extrêmement chaud, utiliser des gants de protection ou
la poignée du plateau à pizza. Pour un résultat optimal, il est
important de poser les aliments sur le plateau immédiatement après
lʼavoir préchauffé. En cas de retard, les performances ne sont pas
garanties.
• Posez le plateau à pizza sur le plateau tournant en verre et cuisez
lʼaliment conformément aux instructions du tableau de cuisson qui
figure dans le manuel de cuisson.
Plateau à pizza
Fr-13
Français
Page 93

Fr-14
Français
Mise en marche retardée
• Réglez le temps de
retardement souhaité
en tournant le
sélecteur Durée/Poids.
(Jusquʼà 9 heures)
• Appuyez sur
la touche
Marche.
Minuteur
• Choisissez la durée souhaitée à
lʼaide du sélecteur Durée/Poids
(jusquʼà 9 heures).
• Appuyez sur la
touche Marche.
REMARQUE:
1. Si le retardement programmé est supérieur à une heure, le compte à rebours s'affiche en minutes. Sʼil est inférieur à une heure,
il s'affiche en secondes.
2. Il est impossible de retarder le démarrage d'une cuisson automatique.
REMARQUE:
Si vous ouvrez la porte du four pendant le fonctionnement du minuteur, le compte à rebours continue à défiler dans la fenêtre.
• Pressez une
fois la touche
Minuteur.
• Choisir la cuisson
désirée.
• Affichez la durée de
cuisson à l'aide du
sélecteur
Durée/Poids.
Cette touche Minuteur peut fonctionner comme un simple minuteur de cuisine sans activer le four.
• Pressez une fois la
touche Minuteur.
Page 94

Fr-15
Q.:Des ronflements et des cliquetis sont émis par
le four lorsque je cuisine en mode combiné.
Dʼoù cela provient-il?
Questions et réponses
Q.: Pourquoi mon four ne fonctionne-t-il pas?
R.: Si le four ne fonctionne pas, vérifiez les points suivants :
1. Le four est-il correctement branché ? Débranchez le cordon dʼalimentation du four,
attendez 10 secondes, puis rebranchez-le.
2. Vérifiez le disjoncteur et le fusible. Réglez le disjoncteur ou remplacez le fusible sʼil
est déclenché ou sʼil a sauté.
3. Si tout est normal au niveau du disjoncteur ou du fusible, vérifiez le bon
fonctionnement de la prise murale en y branchant un autre appareil électrique. Si
cet appareil fonctionne, cela signifie que le problème se situe au niveau du four à
micro-ondes. Sʼil ne fonctionne pas, cela signifie que la prise murale est
défectueuse.
Si le four à micro-ondes est défectueux, contactez un service dʼentretien et de
réparation agréé.
R.: Des interférences radio ou TV peuvent se produire si un four à micro-ondes fonctionne
à proximité. Ce même type dʼinterférence se produit lorsquʼon utilise de petits
appareils électriques tels quʼun mixeur, un aspirateur, un sèche-cheveux, etc. La
présence dʼinterférences ne signifie donc pas que le four à micro-ondes est
défectueux.
R.: Le four à micro-ondes est conçu pour refuser toute instruction de programmation
incorrecte. Par exemple, il nʼaccepte quʼune seule étape de cuisson (en dehors de la
cuisson différée) et refuse une programmation automatique du poids après une
cuisson différée.
R.: La chaleur dégagée par la cuisson des aliments réchauffe lʼair contenu dans la cavité
du four. Cet air chaud est évacué du four par ventilation. Il nʼy a pas de micro-ondes
dans ce dégagement dʼair. Nʼobstruez jamais ces aérations en cours de cuisson.
R.: Le four sʼest programmé en MODE DEMO (Démonstration). Ce mode est prévu pour les
démonstrations en magasin. Désactivez ce mode en appuyant sur « Microwave Power »
(Alimentation micro-ondes) une fois et sur la touche Arrêt/Annulation 4 fois.
R.: Vous le pouvez uniquement si vous cuisinez en mode GRIL. Le métal contenu dans
certains thermomètres peut provoquer des étincelles dans votre four. Ne lʼutilisez pas
dans les modes de cuisson MICRO-ONDES et COMBINE.
R.: Ces bruits, qui surviennent lors du passage du mode MICRO-ONDES au mode GRIL,
sont tout à fait normaux.
R.: Après plusieurs utilisations, il est recommandé de nettoyer le four et de le faire
fonctionner sans nourriture pendant 5 minutes en mode GRIL, et ce après avoir retiré
le plateau tournant en verre et lʼanneau à roulettes. Cette opération brûlera tout résidu
de nourriture ou graisse susceptible de dégager des odeurs et/ou de la fumée.
R.: Lʼaffichage indique un problème avec le système de génération de micro-ondes.
Veuillez contacter un centre de service après-vente autorisé.
R : Une panne dʼalimentation sʼest peut-être produite, et les suggestions ont été
désactivées. Débranchez le four pendant quelques secondes puis branchez-le de
nouveau. Lorsque « 88:88 » sʼaffiche à lʼécran, appuyez sur la touche Start jusquʼà ce
que votre langue sʼaffiche. Réglez ensuite lʼhorloge. Référez-vous à la page Fr-6.
Q.: Est-il normal que mon four à micro-ondes
produise des interférences sur mon récepteur
de télévision?
Q.: Pourquoi le four refuse-t-il mes
instructions de programmation?
Q.: Il arrive parfois que de lʼair chaud se dégage
par les ouvertures dʼaération du four.
Pourquoi?
Q.: La lettre <D> apparaît sur lʼaffichage et
le four ne fonctionne pas. Pour quelle raison?
Q.: Puis-je utiliser un thermomètre traditionnel
dans le four à micro-ondes?
Q.: Pour quelle raison mon four dégage-t-il une
odeur et de la fumée lorsque je cuisine en
modes COMBINE et GRIL?
Français
Q: Mon four arrête de cuire par micro-ondes et « H97 »
et « H98 » sʼaffichent sur lʼécran dʼaffichage.
Q: Les suggestions ont disparu de lʼaffichage,
je ne vois que des numéros.
Page 95

Fr-16
Français
Caractéristiques techniques
Alimentation 230 V, 50 Hz
Puissance dʼentrée Maximale 2050 W
Micro-ondes 1050 W
Gril 1350 W
Puissance de sortie Micro-ondes 1000 W (IEC-60705)
Gril 1300 W
Dimensions extérieures 510 (L) x 380 (P) x 304 (H) mm
Dimensions intérieures 359 (L) x 352 (P) x 217 (H) mm
Poids 12.5 kg
Niveau sonore 50 dB
Sous réserve de modifications techniques sans préavis.
Lʼentretien de votre four à micro-ondes
1. Débranchez l'appareil avant de le nettoyer.
2. Etant donné que les ondes agissent sur les molécules des
aliments, il est important que votre four soit constamment propre.
Les parois en inox doivent être nettoyées avec une éponge
grattante en plastique. Si le four est très encrassé, pulvérisez de la
mousse décapante (pour fours traditionnels) sur une éponge et
appliquer sur les parois (éviter la porte et les éléments du gril).
Laisser agir et rincer selon les instructions du fabricant. Ne pas
utiliser de produits de nettoyage abrasifs ou durs ni de racloirs
métalliques pointus pour nettoyer la vitre de la porte du four afin de
ne pas rayer la surface et de ne pas briser la vitre.
3. Nettoyez les surfaces extérieures du four à l'aide d'un chiffon
humide. Veillez à ce que l'eau ne pénètre pas par les ouvertures
d'aération présentes à l'intérieur du four afin de ne pas
endommager ses pièces.
4. Nettoyez le panneau de commandes à l'aide d'un linge doux et
sec. N'utilisez pas de tampons abrasifs ou de détergents
puissants. Lorsque vous nettoyez le panneau de commandes,
laissez la porte du four ouverte afin d'éviter tout déclenchement
inopiné. Une fois l'opération de nettoyage terminée, appuyez sur la
touche ARRET/ANNULATION de manière à effacer l'affichage.
5. Si de la condensation se forme à l'intérieur ou à l'extérieur de la
porte du four, essuyez-la à l'aide d'un linge doux. De la
condensation peut se former lorsque le four fonctionne dans une
pièce très humide. Cela n'est, en aucun cas, dû à un mauvais
fonctionnement de l'appareil.
6. Il est parfois nécessaire de retirer le plateau tournant en verre et
de le nettoyer. Lavez-le à l'eau savonneuse chaude ou dans le
lave-vaisselle.
7. Nettoyez régulièrement l'anneau à roulettes et la sole du four pour
éviter que celui-ci ne produise trop de bruit. A cette fin, il suffit
d'essuyer la sole du four avec de l'eau chaude additionnée d'un
détergent non abrasif, puis de la sécher à l'aide d'un linge sec.
Lavez l'anneau à roulettes dans de l'eau légèrement savonneuse.
Les vapeurs grasses sʼaccumulent sur la sole à force dʼusage mais
ne risquent pas dʼendommager la sole ni les roulettes de lʼanneau.
Assurez-vous de placer correctement l'anneau à roulette après
l'avoir nettoyé.
8. Lorsque vous cuisinez en mode GRIL, CHALEUR TOURNANTE
ou COMBINE, il est inévitable que des éclaboussures de graisse
salissent les parois du four. Nettoyez régulièrement le four afin
d'éviter qu'il dégage de la fumée en cours d'utilisation.
9. Ne pas utiliser de nettoyeur-vapeur pour le nettoyage de votre four.
10. La maintenance du four ne peut être assurée que par du personnel
qualifié. Pour toute opération de maintenance ou de réparation,
adressez-vous à votre revendeur agréé.
11. Gardez toujours les orifices dʼaération sont dégagés. Vérifiez quʼil
nʼy a pas de poussière ou autre matière qui puisse boucher un
quelconque orifice dʼaération au haut, au bas ou à lʼarrière du four.
Si les orifices dʼaération se bouchent, ceci pourra entraîner le
surchauffage, ce qui affecterait le fonctionnement du four et
conduirait peut-être à une situation dangereuses.
12. Les ouvertures d'aération ne doivent jamais être obturées.
Vérifiez régulièrement qu'elles ne sont pas bouchées par des
poussières ou d'autres objets. Si cela se produisait, la sur chauffe
du four affecterait son fonctionnement.
Page 96

Fr-17
Français
Caractéristiques techniques
Informations relatives à l'évacuation des déchets, destinées aux utilisateurs d'appareils électriques et
électroniques (usage domestique)
Lorsque ce symbole figure sur les produits et/ou les documents qui les accompagnent, cela signifie que les appareils électriques et
électroniques ne doivent pas être jetés avec les ordures ménagères.
Pour que ces produits subissent un traitement, une récupération et un recyclage appropriés, envoyez-les dans les points de collecte
désignés, où ils peuvent être déposés gratuitement. Dans certains pays, il est possible de renvoyer les produits au revendeur local en
cas d'achat d'un produit équivalent.
En éliminant correctement ce produit, vous contribuerez à la conservation des ressources vitales et à la prévention des éventuels effets négatifs
sur l'environnement et la santé humaine qui pourraient survenir dans le cas contraire.
Afin de connaître le point de collecte le plus proche, veuillez contacter vos autorités locales. Des sanctions peuvent être appliquées en cas
d'élimination incorrecte de ces déchets, conformément à la législation en vigueur.
Utilisateurs professionnels de l'Union européenne
Pour en savoir plus sur l'élimination des appareils électriques et électroniques, contactez votre revendeur ou fournisseur.
Informations sur l'évacuation des déchets dans les pays ne faisant pas partie de l'Union européenne
Ce symbole n'est reconnu que dans l'Union européenne.
Pour vous débarrasser de ce produit, veuillez contacter les autorités locales ou votre revendeur afin de connaître la procédure d'élimination à
suivre.
Cet appareil répond aux normes européennes sur les perturbations éléctromagnétiques EMC (compatibilité électromagnétique) EN 55011. Selon
cette norme, cet appareil appartient au groupe 2, de classe B et dans le périmètre requis. L'appartenance au groupe 2 signifie que l'énergie de
fréquence radio est intentionnellemet émise sous forme d'onde électromagnétique afin de chauffer des aliments. Classe B signifie que ce produit
est conforme à une utilisation domestique.
Conformément à lʼarticle 9(2) de la directive 2004/108/CE
Panasonic Testing Centre
Panasonic Service Europe, une division de Panasonic Marketing Europe GmbH,
Winsbergring 15, 22525 Hambourg, Allemagne
Fabriqué par Panasonic Home Appliances Microwave Oven (Shanghai) Co., Ltd, 898 Longdong Road, Pudong, Shanghai 201203, Chine
Page 97

Fr-18
Français
TAILLE DE RECIPIENT
Utilisez des récipients de taille conforme à
celle spécifiée dans les recettes, car cela
affecte le temps de cuisson et de réchauffage.
En effet, plus le récipient dans lequel sont
répartis les aliments est grand, plus la cuisson
et le réchauffage sont rapides.
QUANTITE
Les petites quantités cuisent plus vite que les
grandes, de même que les petits plats se
réchauffent plus rapidement que les grands.
DENSITE
Les aliments poreux et aérés chauffent plus
vite que ceux qui sont lourds et denses.
Les micro-ondes sont des ondes électromagnétiques hautes
fréquences semblables à celles utilisées dans une radio. Le magnétron
convertit le courant électrique en micro-ondes, quʼil envoie à lʼintérieur
du four où elles sont réfléchies, transmises ou absorbées.
Réflexion
Les micro-ondes sont réfléchies par le métal, de la même manière
quʼun ballon rebondit contre un mur. Toutefois, la plupart des ustensiles
et récipients métalliques ne conviennent pas aux fours à micro-ondes,
car ils ne permettent pas une cuisson uniforme. En outre, lorsque le
récipient métallique est trop rapproché de la paroi du four (également
en métal), il peut provoquer la formation dʼun arc (étincelles bleuâtres),
susceptible dʼendommager le four, voire même dʼentraîner un incendie.
Transmission
Les micro-ondes passent à travers de certaines matières telles que le
papier, le verre et le plastique, un peu comme les rayons du soleil
traversent une fenêtre. Les récipients constitués de ces matières sont
donc parfaitement adaptés à la cuisson aux micro-ondes, puisquʼils
nʼabsorbent pas ou ne réfléchissent pas les micro-ondes. Néanmoins,
comme la chaleur des aliments se transmet aux récipients, ceux-ci
chauffent pendant la cuisson.
Absorption
Les micro-ondes sont absorbées par les aliments et pénètrent jusquʼà
une profondeur de 2 à 4 cm. Les micro-ondes stimulent les molécules
des aliments (en particulier les molécules dʼeau, de graisse et de sucre)
et les font vibrer très rapidement. Ces vibrations provoquent une friction
qui engendre la chaleur. Dans le cas dʼaliments volumineux, la chaleur
engendrée par la friction se propage jusquʼau centre de lʼaliment en fin
de cuisson.
Cuisson aux micro-ondes
Généralités
TEMPS DE REPOS
En fin de cuisson, vous devez LAISSER
REPOSER (à lʼlintérieur ou à lʼextérieur du
four) les aliments denses tels que la viande,
les pommes de terre en chemise et les
gâteaux jusquʼà ce que la conduction soit
terminée et que le centre des aliments soit
tout à fait cuit.
ROTIS - Recouvrez-les dʼune feuille
dʼaluminium et laissez-les reposer pendant 15
minutes.
POMMES DE TERRE EN CHEMISE -
Recouvrez-les dʼune feuille dʼaluminium et
laissez-les reposer pendant 5 minutes.
GATEAUX LEGERS - Laissez-les reposer
pendant 5 minutes avant de les retirer du four.
GATEAUX RICHES - Laissez-les reposer
pendant 15 à 20 minutes.
POISSONS - Laissez-les reposer pendant 2 à
5 minutes.
Une fois le TEMPS DE REPOS écoulé, si les
aliments ne sont pas cuits, replacez-les dans
le four et cuisez-les pendant quelques instants
supplémentaires.
PLATS AUX ŒUFS - Laissez-les reposer
pendant 2 à 3 minutes.
PLATS CUISINES PRECUITS - Laissez-les
reposer pendant 2 à 5 minutes.
PLATS PREPARES A LA MAISON -
Laissez-les reposer pendant 1 à 2 minutes.
LEGUMES - A lʼexception des pommes de
terre cuites à lʼeau, il est conseillé de laisser
reposer pendant 1 à 2 minutes, la plupart des
légumes peuvent être servis immédiatement
en fin de cuisson.
DECONGELATION - Pour boucler le procédé,
il est indispensable de tenir compte du temps
de repos. Celui-ci peut varier entre 5 minutes
(notamment pour les framboises) et 1 heure
dans le cas dʼun rôti.
Page 98

Fr-19
Généralités
PERÇAGE
Pendant la cuisson, la vapeur peut
sʼaccumuler sous la peau ou la membrane qui
recouvre certains aliments. Vous devez donc
percer ou peler ces aliments avant de les cuire
afin que la vapeur puisse sʼéchapper pendant
la cuisson. Les œufs, les pommes de terre, les
pommes, les saucisses, etc. doivent être
percés avant dʼêtre cuits. NʼESSAYEZ JAMAIS
DE CUIRE DES ŒUFS A LA COQUE.
TAUX DʼHUMIDITE
Comme le taux dʼhumidité des fruits et des
légumes frais varie selon la saison, vous
devrez parfois ajuster le temps de cuisson en
fonction de la période de lʼannée. Cela est
particulièrement vrai pour les pommes de terre
en chemise. Les aliments secs tels que le riz
et les pâtes peuvent sécher davantage encore
pendant lʼentreposage et le temps de cuisson
peut donc varier par rapport aux aliments frais.
FILM ALIMENTAIRE
Le film alimentaire permet de garder les
aliments humides tandis que la vapeur ainsi
emprisonnée accélère la cuisson. Nous vous
conseillons toutefois de percer le film
alimentare avant la cuisson, afin que le
surplus de vapeur puisse être libéré. Lorsque
vous retirez le film alimentaire qui recouvre un
plat, soyez prudent, car la vapeur qui sʼest
accumulée est extrêmement chaude.
Utilisez exclusivement du film alimentaire
adapté aux fours à micro-ondes et employezle uniquement pour couvrir un plat. Ne
tapissez jamais vos plats avec du film
alimentaire.
COUVERTURE
Couvrez les aliments à lʼaide dʼun couvercle
adapté ou de film alimentaire pour four à
micro-ondes. Couvrez le poisson, les légumes,
les ragoûts en cocotte et les potages, mais
pas les gâteaux, les sauces, les pommes de
terre en chemise et les pâtisseries.
TEMPERATURE INITIALE
Plus les aliments sont froids, plus il faut de
temps pour les réchauffer. Les aliments sortant
du réfrigérateur doivent être réchauffés plus
longtemps que ceux conservés à la
température ambiante.
SEPARATION DES ALIMENTS
Les aliments cuisent plus rapidement et de
manière plus uniforme lorsquʼils sont séparés.
NʼEMPILEZ JAMAIS les aliments les uns sur
les autres.
RETOURNER ET REMUER
Certains aliments doivent être remués pendant
quʼils cuisent. La viande et la volaille doivent
être retournées à mi-cuisson.
FORME
Les formes régulières permettent une cuisson
homogène. Pour améliorer la cuisson au four
à micro-ondes, utilisez des récipients ronds
plutôt que des récipients carrés.
DISPOSITION DES ALIMENTS
Lorsque vous disposez des aliments séparés
tels que des morceaux de poulet ou des
côtelettes, placez les parties les plus épaisses
vers lʼextérieur du plat.
Français
Page 99

Fr-20
Français
Quels récipients utiliser dans votre four?
• NʼESSAYEZ JAMAIS de cuire des aliments
dans de lʼaluminium ou dans des récipients
métalliques, car vous risqueriez
dʼendommager votre four.
• NʼUTILISEZ JAMAIS de plat en mélamine.
Nʼutilisez que les plats en plastique
spécialement conçus pour les fours à microondes.
• NE CUISEZ JAMAIS dans un récipient en
plastique des aliments dont la teneur en
graisse ou en sucre est élevée ou bien des
aliments qui nécessitent un temps de
cuisson long (notamment du riz brun ou du
Christmas Pudding).
• Vous pouvez utiliser des paniers en osier
uniquement pour réchauffer des aliments
pendant un temps très court et en vous
assurant préalablement que ces récipients
ne contiennent pas dʼagrafe.
• NʼUTILISEZ que les poteries complètement
recouvertes dʼun vernis.
• NE CUISEZ JAMAIS dʼaliments dans un
récipient en bois, car il peut sécher et brûler.
Micro-ondes
Gril
Cuisson combinée
• NʼESSAYEZ JAMAIS de cuire des aliments
dans de lʼaluminium ou dans des récipients
métalliques, car vous risqueriez
dʼendommager votre four.
• Versez les aliments contenus dans leur
emballage en aluminium dans un plat de
taille similaire résistant à la chaleur.
• Si la formation dʼun arc survient en mode de
cuisson combinée, appuyez deux fois sur la
touche dʼarrêt pour annuler le programme,
puis poursuivez la cuisson en mode de
GRIL uniquement.
• NʼUTILISEZ JAMAIS de plat décoré
dʼor/dʼargent, car vous risqueriez de
provoquer la formation dʼun arc, voire même
de décoller la décoration.
Non
Oui
Non
Oui
Non
Oui
Page 100

Niveau de puissance Utilisation
Puissance maximum 1000 W Réchauffage des viandes et des sauces, du poisson cuit, des conserves et des légumes cuisinés.
600 W Rôtir, cuire des sauces aux œufs et des biscuits, chauffer du lait.
440 W Mélanges délicats avec des œufs, quiches, réchauffage des aliments pour bébé, ragoûts.
270 W Décongeler.
250 W Cuire des cassoulets, flans aux riz, gâteaux aux fruits épais et crèmes aux œufs.
Programme Gril Micro-ondes Mode assisté
1 1300 W 100 W G1-100W
2 1300 W 250 W G1-250W
3 1300 W 440 W G1-440W
Premier côté Deuxième côté
Steak (4 morceaux, bien cuits) environ 10 min. environ 10 min.
Sautés de porc environ 12 min. environ 10 min.
Côtes de porc 12 - 14 min. environ 12 min.
Brochettes environ 12 min. environ 12 min.
Saucisses 7-8 min. environ 7-8 min.
Cuisses de poulet 15 - 20 min. 15 - 20 min.
Toast 3 - 4 min. 3 min.
Fr-21
Niveaux de puissance des micro-ondes
Utilisation du gril
Cuisson combinée
La cuisson combinée est parfaitement adaptée à la plupart des
aliments. En effet, pendant que la puissance des micro-ondes cuit
rapidement les aliments, le gril les dore et les rend plus croustillants.
Vous disposez des 3 modes combinés suivants:
REMARQUES:
• Ne couvrez jamais les aliments que vous cuisez à lʼaide dʼun
programme combiné.
• Nʼutilisez pas les programmes combinés pour cuire des petites
quantités. Pour une cuisson parfaite, utilisez plutôt le gril ou les
micro-ondes uniquement.
• En mode de cuisson combinée, ne préchauffez jamais le four.
Durées approximatives de certaines grillades
+
-
Français
NE PRECHAUFFEZ JAMAIS LE GRIL.
Le gril à énergie rayonnante de votre four permet de colorer
rapidement et uniformément une très grande variéte dʼaliments.
Posez les aliments à griller sur le trépied, lui-même posé sur le
plateau tournant.
Les aliments qui grillent doivent en principe être retournés à micuisson.
Ne couvrez jamais les aliments que vous grillez.
Il n' y a pas de micro-ondes émises en mode GRIL.
Vous pouvez choisir 3 puissances de Gril.
1 pression Gril 1 1300 W
2 pressions Gril 2 950 W
3 pressions Gril 3 700 W
Min
 Loading...