

Page 1

Bedienungsanleitung und Mikrowellen-Kochbuch
Mode dʼemploi et livre de la cuisine aux micro-ondes
Manuale di
Istruzioni
NN-GD569M
NN-GD559W
Deutsch
Français Italiano
WICHTIGE SICHERHEITSANWEISUNGEN
Bitte sorgfältig durchlesen und zur weiteren Bezugnahme aufbewahren
INSTRUCTIONS DE SÛRETÉ IMPORTANTES
lisez attentivement les recommandations dʼutilisation et conservez-les soigneusement
ISTRUZIONI IMPORTANTI PER LA SICUREZZA
Leggere attentamente queste note e conservarle per riferimento futuro
Page 2

En-1
Installation and Connection.................................................................2
Safety Instructions ..............................................................................3
Important Information..........................................................................4
Control Panel ......................................................................................5
Outline Diagram ..................................................................................6
Controls and Operation Procedure ..................................................6-7
Microwave Cooking and Defrost .........................................................8
Grilling.................................................................................................8
Combination Cooking..........................................................................9
Auto Defrost ........................................................................................9
Auto Weight Programs.................................................................10-12
Pizza Pan..........................................................................................13
Delay Start Cooking ..........................................................................14
Stand Time........................................................................................14
Questions and Answers ....................................................................15
Care of Your Oven ............................................................................16
Technical Specifications...............................................................16-17
Microwave cooking ...........................................................................18
General information .....................................................................18-19
What containers can be used in your oven?.....................................20
Microwave, grill, combination cooking ..............................................21
Reheating ....................................................................................22-23
Defrosting food ............................................................................24-25
Cooking and reheating tables ......................................................26-27
Meat and poultry ...............................................................................28
Fish ...................................................................................................29
Vegetables ........................................................................................30
Eggs, pasta, rice, hot beans, cereals................................................31
Pizza Pan..........................................................................................32
Solutions to common problems.........................................................33
Recipes........................................................................................34-37
Contents
Inverter technology is the key
Inverter technology for microwave ovens has been developed by a Panasonic initiative over a period of more than 10 years. It is the key
technology for making a very different type of microwave oven which has a number of special qualities:
• It makes possible the first oven in the industry which controls the amount of microwave energy linearly. This new distribution system allows
cooking and defrosting food without losing its flavour.
• It provides efficient conversion of electrical energy to microwave energy, resulting in minimizing power requirements without
sacrificing microwave output.
• It allows a dramatic enlargement of oven cavity size even in a compact oven body, due to the small size of the inverter circuit, which replaces
the currently used bulky transformer.
• Finally, at the end of the productʼs useful life, not using bulky transformers made of iron makes the process of recycling discarded ovens
environmentally friendly.
Page 3
En-2
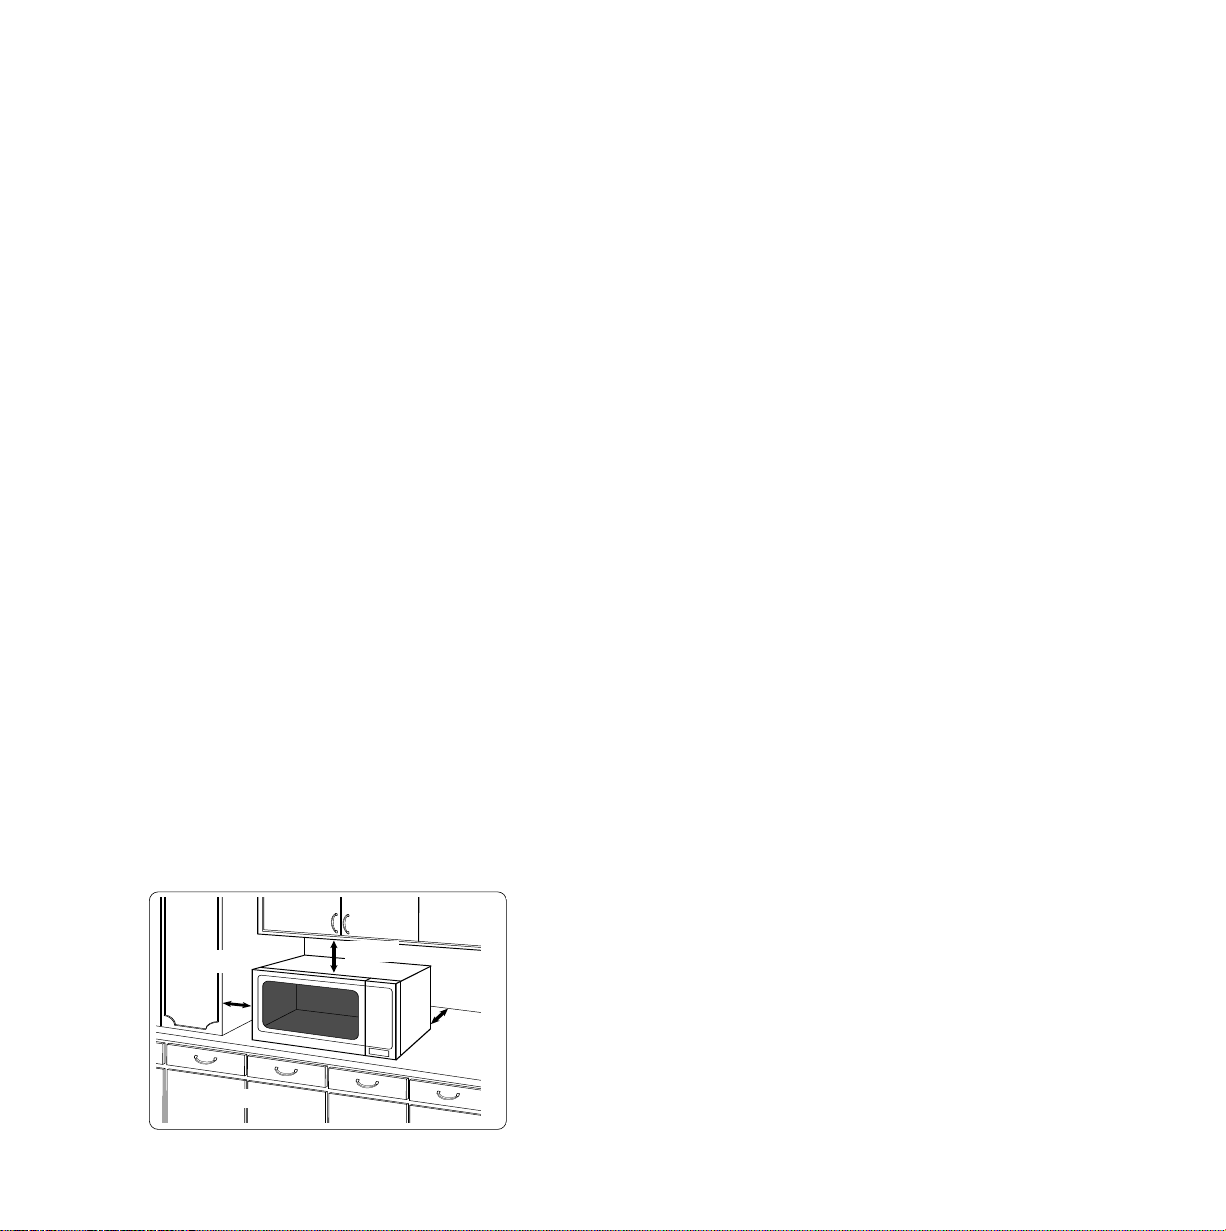
Counter-top
Installation and Connection
Open
10cm
15cm
5cm
Examine your microwave oven
Unpack the oven, remove all packing material, and examine the oven
for any damage such as dents, broken door latches or cracks in the
door. If you find any damage, notify your dealer immediately. Do not
install a damaged microwave oven.
Earthing instructions
IMPORTANT: THIS UNIT HAS TO BE PROPERLY EARTHED FOR
PERSONAL SAFETY.
If your AC outlet is not grounded, it is the personal responsibility of the
customer to have it replaced with a properly grounded wall socket.
Operation voltage
The voltage has to be the same as specified on the label on the oven. If
a higher voltage than specified is used, it may cause a fire or other
damages.
Placement of the Oven
This oven is intended for counter-top use only. It is not intended for
built-in use or for use inside a cupboard.
1. Place the oven on a flat and stable surface, more than 85 cm above
the floor.
2. When this oven is installed, it should be easy to isolate the appliance
from the electricity supply by pulling out the plug or operating a
circuit breaker.
3. For proper operation, ensure a sufficient air circulation for the oven.
Counter-top use:
a. Allow 15 cm of space on the top of the oven, 10 cm at the back, 5
cm on one side, and the other side must be opened more than 40
cm.
b. If one side of the oven is placed flush to a wall, the other side or top
must not be blocked.
4. Do not place this oven near an electric or gas cooker range.
5. The feet should not be removed.
6. This oven is only for household usage. Do not use outdoors.
7. Avoid using the microwave oven in high humidity.
8. The power cord should not touch the outside of the oven. Keep
the cord away from hot surfaces. Do not let the cord hang over
the edge of a table or work top. Do not immerse the cord, plug
or oven in water.
9. Do not block the air vents on the top and back of the oven. If these
openings are blocked during operation the oven may overheat. In
this case the oven is protected by a thermal safety device and
resumes operation only after cooling down.
10. This appliance is not intended to be operated by means of an
external timer or separate remote control system.
WARNING
1. The door seals and door seal areas should be cleaned with a damp
cloth. The appliance should be inspected for damage to the door
seals and door seal areas and if these areas are damaged the
appliance should not be operated until it has been repaired by a
service technician trained by the manufacturer.
2. Do not attempt to tamper with or make any adjustments or repairs
to the door, control panel housing, safety interlock switches or any
other part of the oven. Do not remove the outer panel from the oven
which gives protection against exposure to microwave energy.
Repairs should only be done by a qualified service person.
3. Do not operate this appliance if it has a damaged CORD OR PLUG,
if it is not working properly, or if it has been damaged or dropped. It
is dangerous for anyone other than a service technician trained by
the manufacturer to perform repair service.
4. If the supply cord of this appliance is damaged, it must be replaced
with the special cord available from the manufacturer.
5. Only allow children to use the oven without supervision when
adequate instructions have been given so that the child is able to
use the oven in a safe way and understands the hazards of improper
use.
6. Liquids and other foods must not be heated in sealed containers
since they are liable to explode.
Page 4

En-3
Safety Instructions
Use of your oven
1. Do not use the oven for any reason other than the preparation of
food. This oven is specifically designed to heat or cook food. Do not
use this oven to heat chemicals or other non-food products.
2. Before use, check that utensils/containers are suitable for use in
microwave ovens.
3. Do not attempt to use this microwave oven to dry newspaper,
clothing or any other materials. They may catch on fire.
4. When the oven is not being used, do not store any objects other
than oven accessories inside the oven in case it is accidentally
turned on.
5. The appliance shall not be operated by MICROWAVE or
COMBINATION WITHOUT FOOD IN THE OVEN. Operation in this
manner may damage the appliance. Exception to this is point 1
under heater operation and pre-heating the pizza pan.
6. If smoke or a fire occurs in the oven, press Stop/Cancel Pad and
leave the door closed in order to stifle any flames. Disconnect the
power cord, or shut off power at the fuse or the circuit breaker panel.
7. This appliance is not intended for use by persons (including children)
with reduced physical, sensory or mental capabilities, or lack of
experience and knowledge unless they have been given supervision
or instruction concerning use of the appliance by a person
responsible for their safety. Children should be supervised to ensure
that they do not play with the appliance.
Heater Operation
1. Before using COMBINATION or GRILL function for the first time,
wipe excessive oil off in the oven cavity and operate the oven
without food and accessories on Grill, for 10 minutes. This will allow
the oil that is used for rust protection to be burned off. This is the
only time the oven is used empty.
2. Exterior oven surfaces, including air vents on the cabinet and the
oven door will get hot during COMBINATION and GRILLING, take
care when opening or closing the door and when inserting or
removing food and accessories.
3. The oven has two heaters situated in the top of the oven. After using
the COMBINATION and GRILL function, these surfaces will be very
hot.
N.B. After cooking by these modes, the oven accessories will be
very hot.
4. The accessible parts may become hot when in grill and combination
use. Young children should be kept away, and children should only
use the oven under adult supervision due to the temperatures
generated.
Fan Motor Operation
If the oven gets hot after use, the fan may rotate for a few minutes to
cool the electric components. This is perfectly normal, and you can take
out the food from the oven while the fan is still in operation.
Oven Light
When it becomes necessary to replace the oven light, please consult
your dealer.
Accessories
The oven comes equipped with a variety of accessories. Always follow
the directions given for use of the accessories.
Glass Tray
1. Do not operate the oven without the roller ring and the glass tray in
place.
2. Never use another type of glass tray than the one specially designed
for this oven.
3. If the glass tray is hot, let it cool before cleaning or placing in water.
4. The glass tray can turn in either direction.
5. If the food or cooking vessel on the glass tray touches the oven
walls and stops the tray rotating, the tray will
automatically rotate in the opposite direction. This is normal.
6. Do not cook foods directly on the glass tray.
Roller Ring
1. The roller ring and the oven floor should be cleaned frequently to
prevent noise and build-up of remaining food.
2. The roller ring must always be used for cooking together with the
glass tray.
Wire Rack
1. The Wire Rack is used to facilitate browning of small dishes and
help with the good circulation of the heat.
2. Do not use any metal container directly on the Wire Rack in
COMBINATION with MICROWAVE.
3. Do not use the Wire Rack in MICROWAVE mode only.
Pizza Pan - See page En-13
Page 5

En-4
Important Information
1) Cooking Times
• Cooking times given in the cookbook are approximate. The cooking
time depends on the condition, temperature, amount of food and on
the type of cookware.
• Begin with the minimum cooking time to help prevent
overcooking. If the food is not sufficiently cooked you can always
cook it for a little longer.
N.B.: If the recommended cooking times are exceeded the food
will be spoiled and in extreme circumstances could catch fire
and possibly damage the interior of the oven.
2) Small Quantities of Foods
• Small quantities of food or foods with low moisture content can burn,
dry out or catch on fire if cooked too long. If materials inside the
oven should ignite, keep the oven door closed, turn the oven off and
remove the plug from the socket.
3) Eggs
• Do not cook eggs in their shells and whole hard-boiled eggs by
MICROWAVE. Pressure may build up and the eggs will explode,
even after microwave heating has ended.
4) Piercing Skin
• Food with non porous skins, such as potatoes, egg yolks and
sausages must be pierced before cooking by MICROWAVE to
prevent bursting.
5) Meat Thermometer
• Use a meat thermometer to check the degree of cooking of roasts
and poultry only when the meat has been removed from the oven.
Do not use a conventional meat thermometer when using
MICROWAVE or COMBINATION because it may cause sparking.
6) Liquids
• When heating liquids, e.g. soup, sauces and beverages in your
microwave oven, overheating the liquid beyond boiling point can
occur without evidence of bubbling. This could result in a sudden boil
over of the hot liquid. To prevent this possibility the following steps
should be taken:
a) Avoid using straight-sided containers with narrow necks.
b) Do not overheat.
c) Stir the liquid before placing the container in the oven and again
halfway through the cooking time.
d) After heating, allow it to stand in the oven for a short time, stir again
before carefully removing the container.
7) Paper/Plastic
• When heating food in plastic or paper containers, check the oven
frequently as these types of containers ignite if overheated.
• Do not use recycled paper products (e.g. Kitchen Roll) unless the
paper product is labelled as safe for microwave oven use. Recycled
paper products may contain impurities which may cause sparks
and/or fires during use.
• Remove wire twist-ties from roasting bags before placing the bags in
the oven.
8) Utensils/Foil
• Do not heat any closed cans or bottles because they might explode.
• Metal containers or dishes with metallic trim should not be used
during Microwave cooking. Sparking will occur.
• If you use any aluminium foil, meat spikes or metalware the distance
between them and the oven walls and door should be at least 2 cm
to prevent sparking.
9) Feeding Bottles/Baby Food Jars
• The top and teat or lid must be removed from feeding bottles
or baby food jars before placing in the oven.
• The contents of feeding bottles and baby food jars are to be stirred
or shaken.
• The temperature has to be checked before consumption to avoid
burns.
Page 6
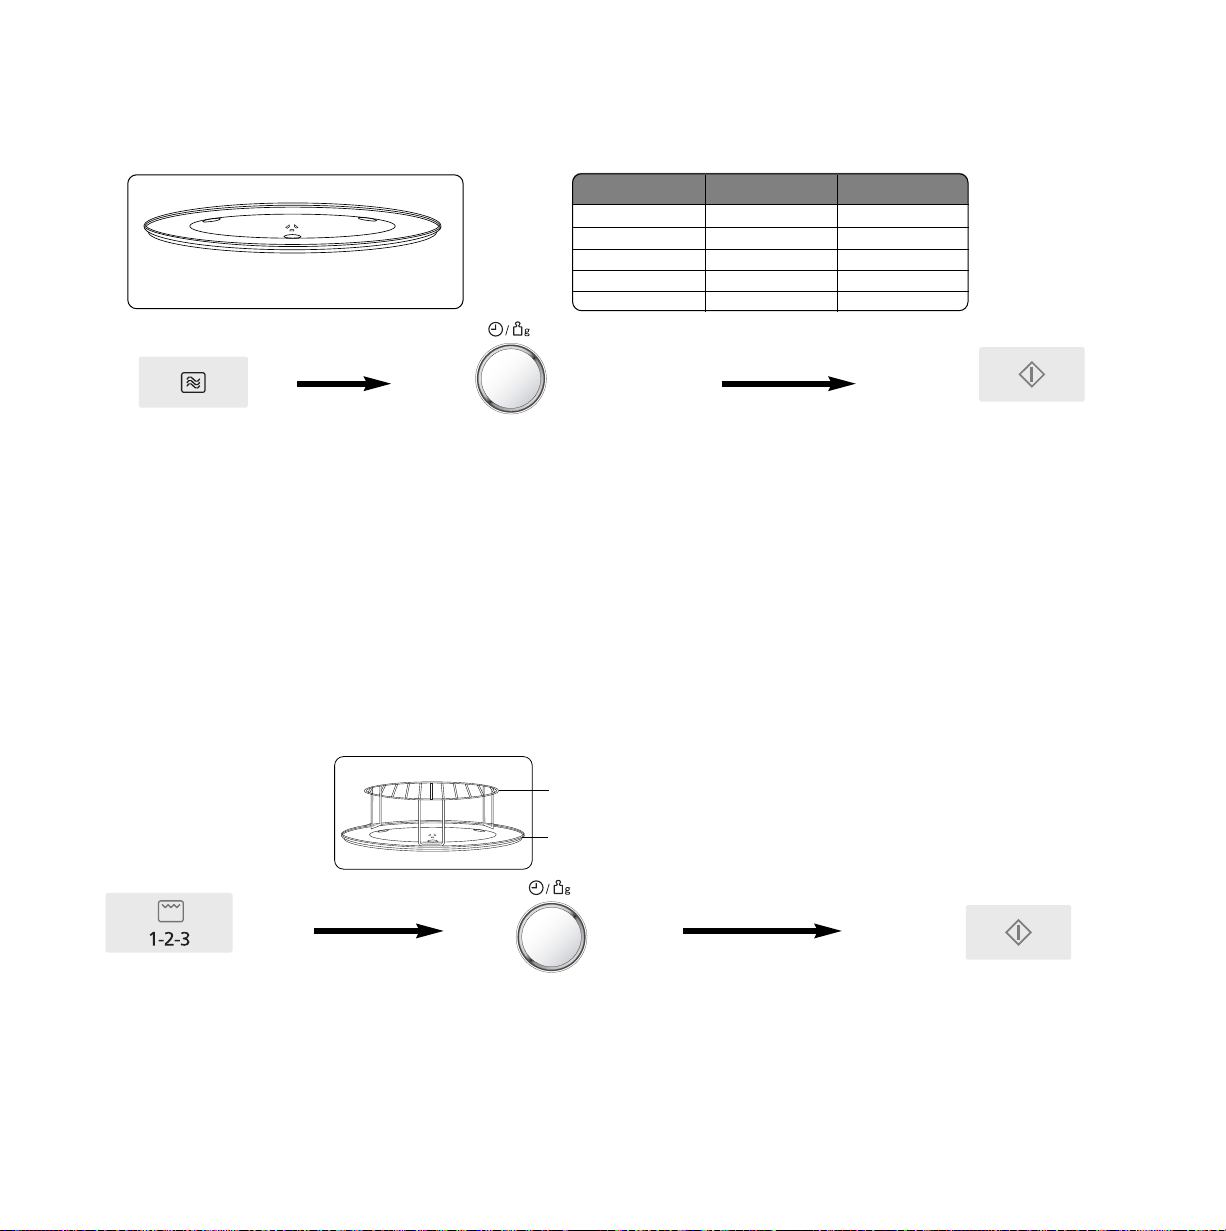
En-5
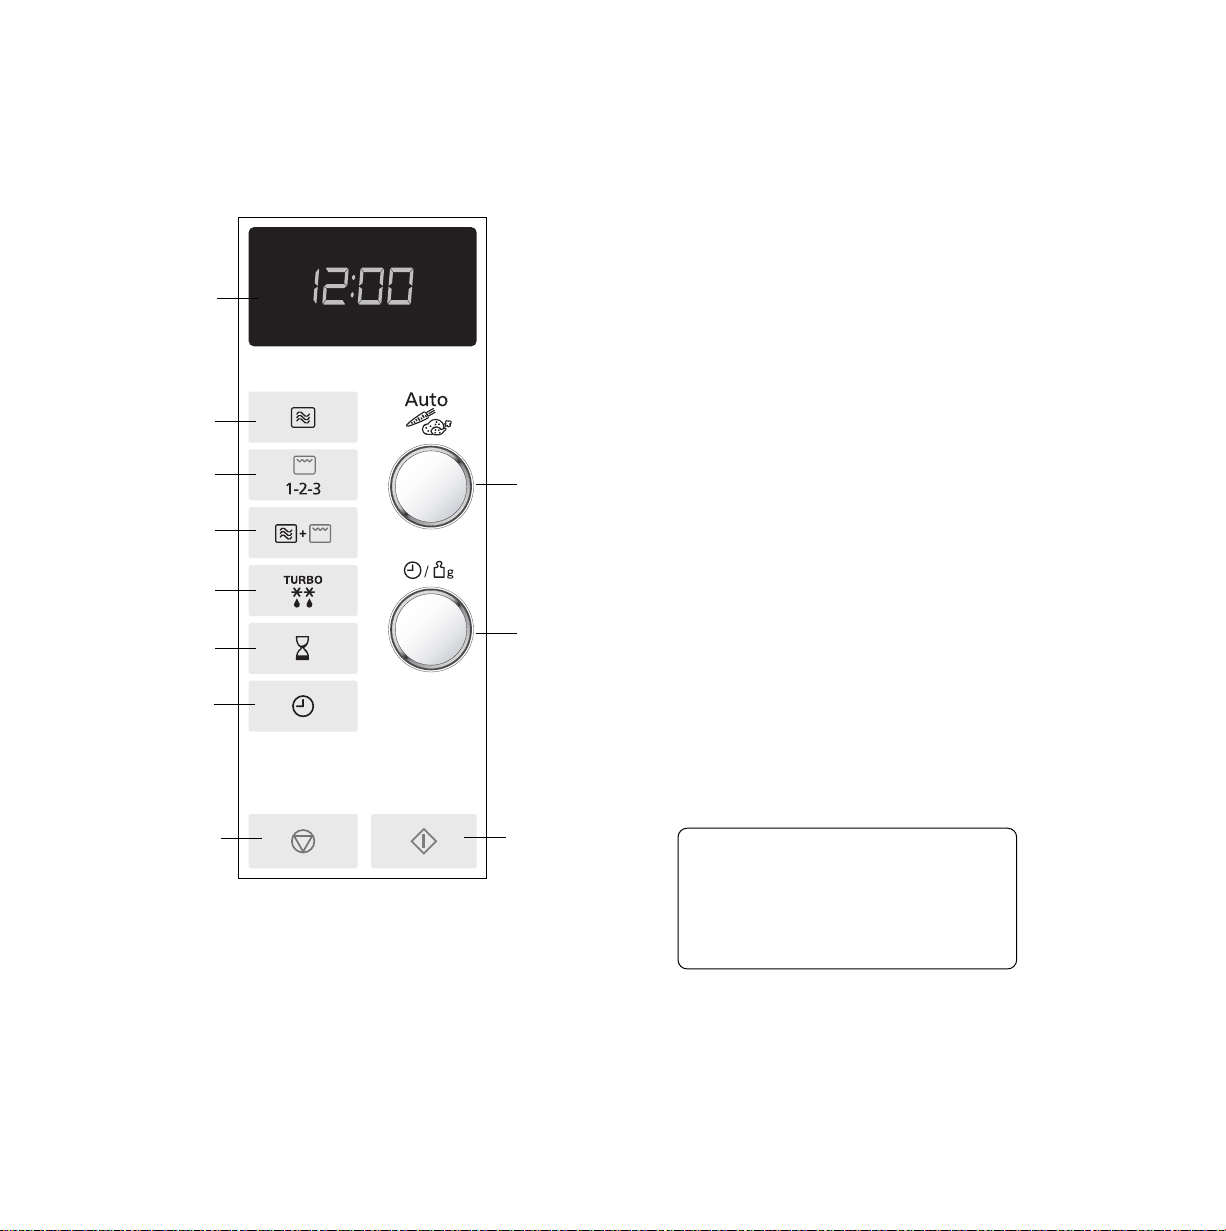
Control Panel
Beep Sound:
A beep sounds when a Pad is pressed. If this
beep does not sound, the setting is
incorrect. When the oven changes from one
function to another, two beeps sound. After
completion of cooking, five beeps sound.
(1)
(3)
(9)
(8)
(11)
NN-GD569M / NN-GD559W
(4)
(5)
(6)
(10)
(7)
(2)
(1) Display Window
(2) Microwave Power
(3) Grill Power
(4) Combination Power
(5) Auto Weight Tur bo Defrost
(6) Delay/Stand
(7) Clock Pad
(8) Auto Program Selector Dial
(9) Time/Weight Dial
(10) Stop/Cancel Pad:
Before cooking: one press clears your instructions.
During cooking: one press temporarily stops the
cooking program. Another press cancels all your
instructions and the time of day will appear in the
display.
(11) Start Pad:
Press to start operating the oven. If during cooking
the door is opened or Stop/ Cancel Pad is pressed
once, Start Pad has to be pressed again to continue
cooking.
This oven is equipped with an energy saving function.
Please Note
1. When in stand-by mode the brightness of the display will be reduced.
2. The oven will enter stand-by mode, when first plugged in and
immediately after the last operation has completed.
Page 7
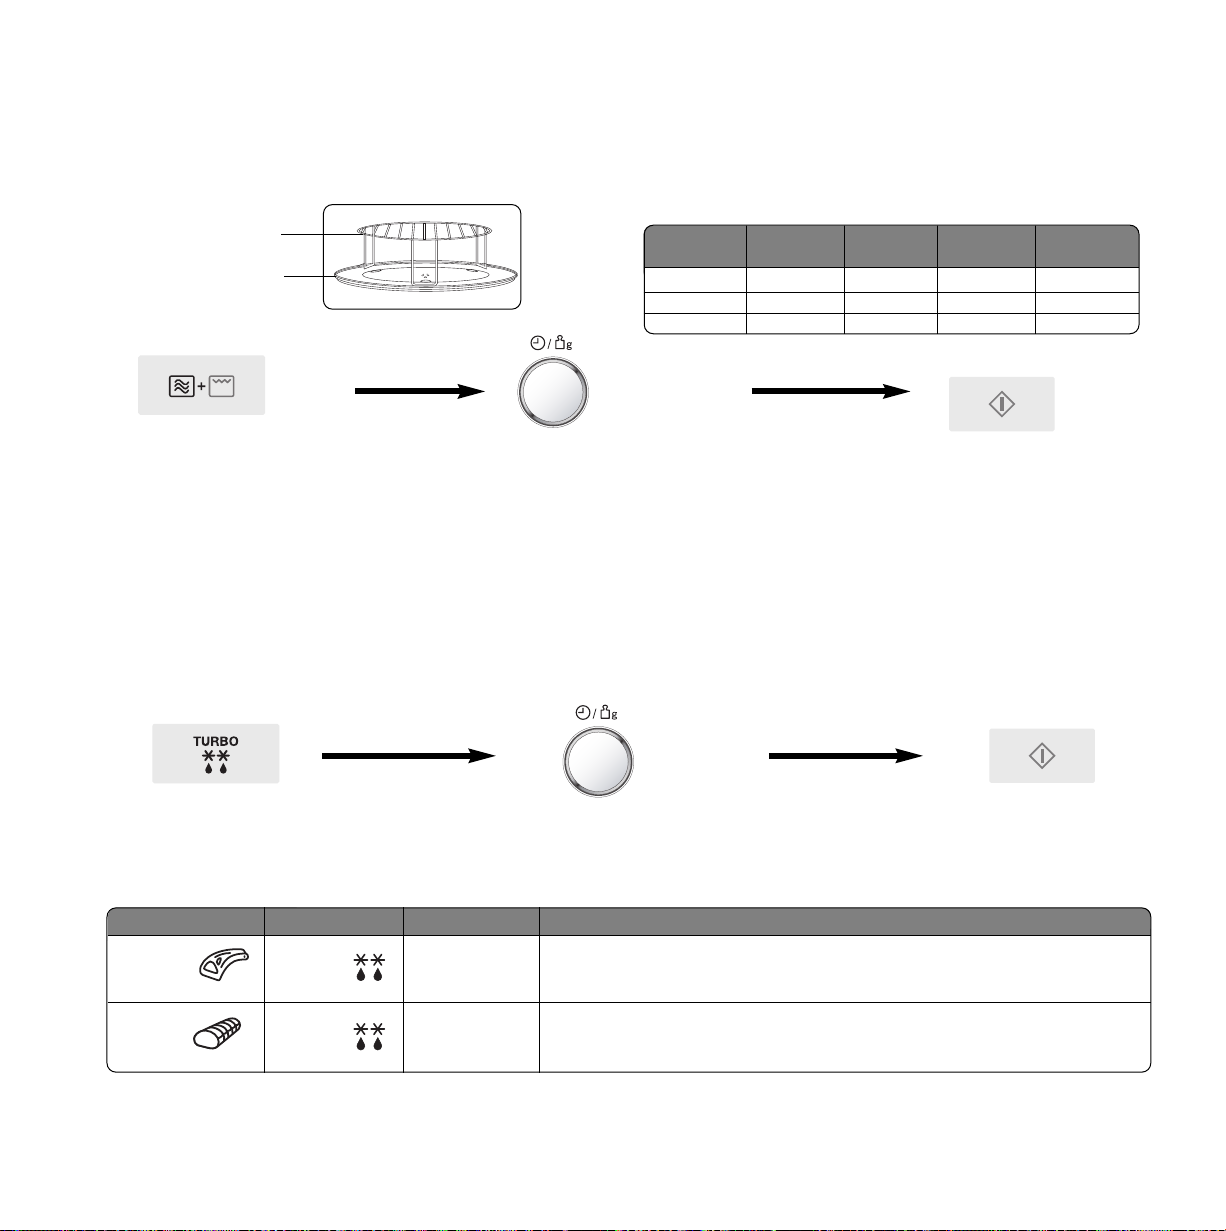
En-6
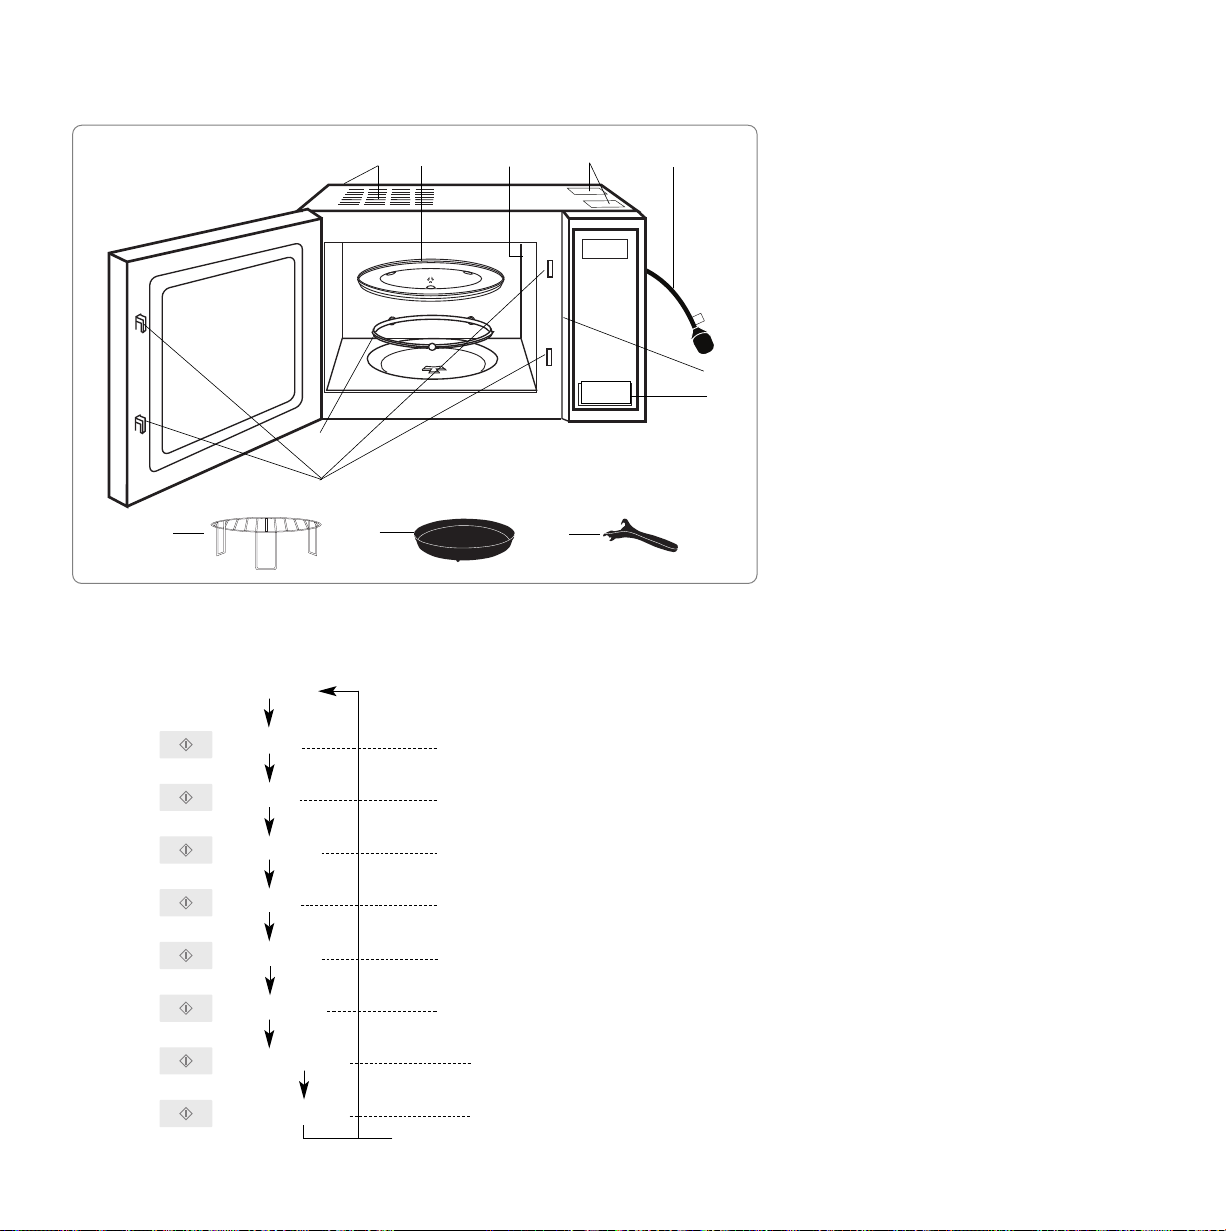
Outline Diagram
(1) Door Release Button
Press to open the door. When you open
the oven door during cooking, the
cooking is stopped temporarily without
clearing earlier made settings. The
cooking is resumed as soon as the door
is closed and Start Pad pressed. The
oven lamp lights as soon as the oven
door is opened.
(2) Oven Window
(3) Door Safety Lock System
(4) Oven Air Vent
(5) Control Panel
(6) Glass Tray
(7) Roller Ring
(8) External Oven Air Vents
(9) Wire Rack
(10) Pizza Pan
(11) Pizza Pan Handle
(12) Power Cord
(13) Caution Labels
(14) Identification Label
(1)
(2)
(3)
(4)
(5)
(7)
(8)
(9)
(10)
(11)
Word Prompting:
Controls and Operation Procedure
These models have a unique function
“Word Prompting” which guides you through the operation of your
microwave. After plugging in the oven press the Start Pad until you
locate your language. As you press the Pads, the display will scroll the
next instruction eliminating the opportunities for mistakes. If for any
reason you wish to change the language displayed, unplug the oven
and repeat this procedure.
If the delay/stand pad is pressed 4 times, this will turn off the operation
guide. To turn the operation guide back on, press the delay/stand pad 4
times.
(6)
(12)
(13)
(14)
Plug-in “88:88”
Word
Prompting
Press “DANSK” In Danish
Press “SUOMI” In Finnish
Press “SVENSKA” In Swedish
Press “NORSK” In Norwegian
Press “DEUTSCH” In German
Press “FRANCAIS” In French
Press “ITALIANO” In Italian
Press “ENGLISH” In English
Page 8
En-7
Controls and Operation Procedure
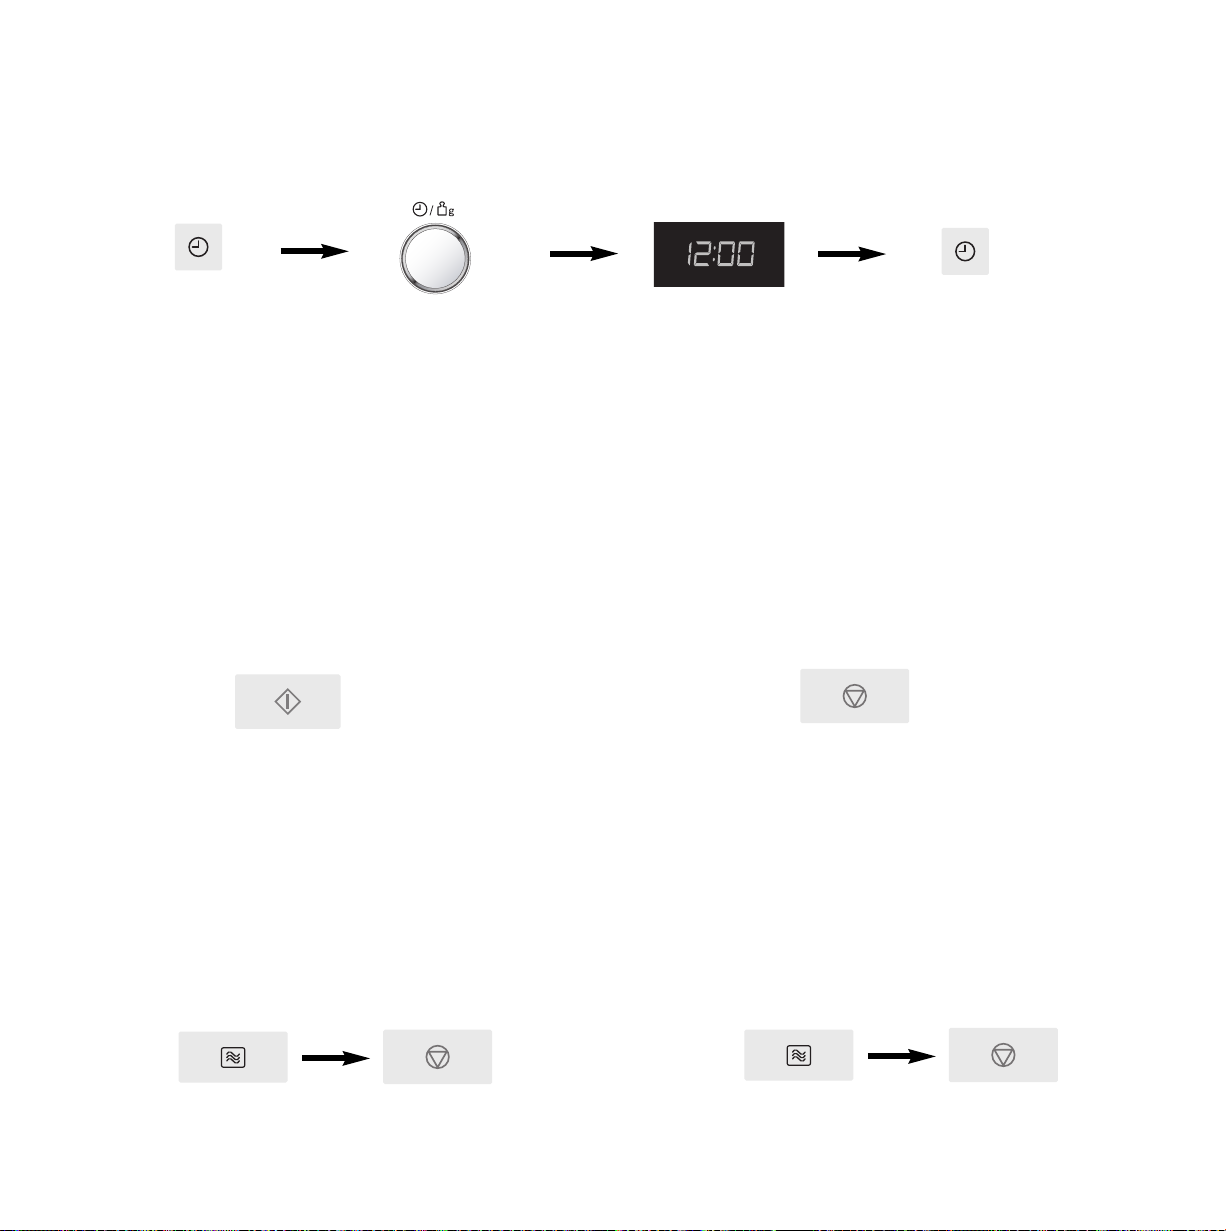
Child Safety Lock:
Using this system will make the oven controls inoperable; however, the door can be opened. Child Lock can be set when the display shows a
colon or the time.
To Set:
To Cancel:
• Press Start Pad three times.
The time of day will disappear.
Actual time will not be lost.
A E is indicated in the display.
• Press Stop/Cancel Pad three times.
The time of day will reappear in the display.
Demonstration Mode:
This mode is used for retail store display.
To Set:
To Cancel:
• Press Microwave
Power Pad once.
Clock Setting:
Example: To set 12:00
• Press Clock Pad once.
The colon starts to blink.
• Enter the time by turning the
Time/Weight Dial.
The time appears in the display and
the colon blinks.
• Press Clock Pad.
The colon stops blinking and the
time of day is entered.
NOTE:
1. To reset the time of day repeat all the above steps.
2. The time of day is displayed, unless the power supply is interrupted.
3. This clock has a 24 hour display.
NOTE:
To activate child lock, start pad must be pressed 3 times within a 10 second period.
• Press Stop/Cancel
Pad 4 times.
• Press Microwave
Power Pad once.
• Press Stop/Cancel
Pad 4 times.
Page 9
Press Power Level Wattage
Once Max (High) 1000 W
Twice Min (Defrost) 270 W
3 Times Medium 600 W
4 Times Low 440 W
5 Times Simmer 250 W
En-8
Microwave cooking and defrost
There are 5 different microwave power levels available. The chart below shows the approximate wattage for each power level.
Use of accessory:
* Minimum
power can also
be used for
warming food.
Glass Tray
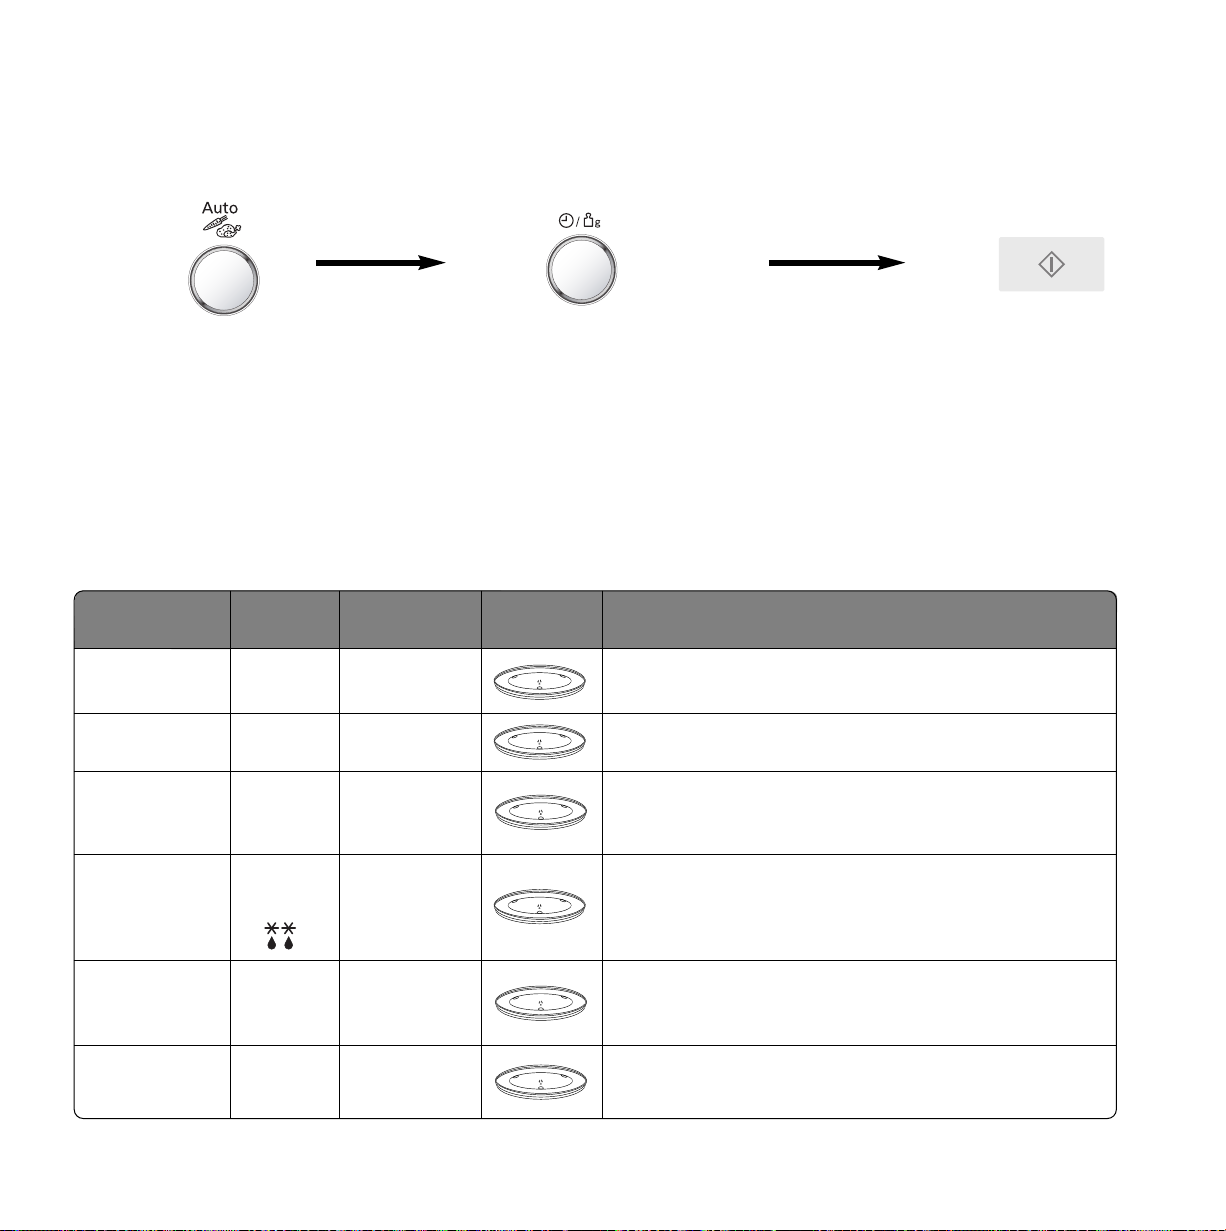
Grilling
• Select Grill Power. Press once for Grill 1
(High), twice for Grill 2 (Medium) or 3
times for Grill 3 (Low).
• Press Start Pad.
NOTE:
1. The Grill will only operate with the oven door closed.
2. You can change the cooking time during cooking, if required. Turn Time/Weight Dial to increase/decrease the cooking time. Time can be
increased/decreased in 1 minute increments, up to 10 minutes. Turning the dial to zero will end cooking.
• Select the desired microwave power
level.
• Set the cooking time using the Time/Weight Dial (HIGH
power: up to 30 minutes
Other powers: up to 90 minutes).
• Press Start Pad.
Glass Tray
Wire Rack
Use of accessory:
• Set the cooking time using the Time/Weight
Dial (up to 90 minutes).
The Grill provides 3 Grill settings.
1 Press GRILL 1 1300 W
2 Presses GRILL 2 950 W
3 Presses GRILL 3 700 W
NOTE:
1. For 2 or 3 stage cooking, before pressing Start Pad, repeat setting the Microwave power level and cooking time.
2. Stand time can be programmed after the Microwave power and time setting.
3. You can change the cooking time during cooking, if required. Turn Time/Weight Dial to increase or decrease the cooking time. Time can be
increased/decreased in 1 minute increments, up to 10 minutes. Turning the dial to zero will end cooking.
4. The oven will automatically work on High microwave power if a cooking time is entered without the power level previously being selected.
Page 10
Program Word Prompt Weight Suitable Foods
1 Small
pieces
1 SMALL
PIECES
150 - 1000g
Mince, chops, chicken portions, fish. Arrange foods in a single layer. Place the
meat on an upturned saucer on plate. If required, shield during defrosting. Large
quantities will require turning at beep.
2 Big
piece
2 BIG
PIECE
500 - 1500g
Meat joints, whole chickens. Place the meat on an upturned saucer on plate. If
required, shield during defrosting. Turn at beep. It is recommended to allow
standing time corresponding to the total defrosting time.
Combination
Setting
Presses Grill Microwave
Word
Promt
1 1 Press 1300W 100W G1-100 W
2 2 Presses 1300W 250W G1-250 W
3 3 Presses 1300W 440W G1-440 W
En-9
Combination cooking
Auto Defrost
With this feature you can defrost frozen foods according to the weight. Select the category and set the weight of the food. The weight is
programmed in grams. For quick selection, the weight starts from the most commonly used weight for each category.
• Select the desired Auto
Defrost Program.
1 press for small pieces
2 presses for big piece.
• Set the weight of the frozen food by using the Time/Weight dial.
Turning the dial slowly will count up in 10 g steps. Turning the dial
quickly will count up in 100 g steps.
• Press Start Pad.
NOTE:
1. When defrosting time is over 60 minutes the time will appear as Hours and Minutes.
2. The shape and size of the food will determine the maximum weight the oven can accommodate.
This feature allows you to cook by combining microwave and grill power. The microwave power cooks food quickly, while the grill gives traditional
browning and crisping.
• Select combination level
(See table).
• Set the cooking time using the Time/Weight Dial
(up to 90 minutes).
• Press Start Pad.
NOTE:
1. The Combination mode will only operate with the oven door closed.
2. You can change the cooking time during cooking, if required. Turn Time/Weight Dial to increase/decrease the cooking time.
Time can be increased/decreased in 1 minute increments, up to 10 minutes. Turning the dial to zero will end cooking.
Use of accessory:
Wire Rack
Glass Tray
There are 3 combination settings. The following chart shows
the approximate wattage for each power level.
Page 11
Category Word Prompt
Recommended
Weight
Accessories Instructions
1. Reheat Mug
1 1MUG
250g
For reheating a mug of hot drink from chilled.
(eg. tea, coffee, milk and soup).
Select reheat mug, enter weight (250g), press start Pad.
2. Reheat Cup
2 1CUP
150g
For reheating a cup of hot drink from chilled.
Select reheat cup, enter weight (150g), press start Pad.
3. Reheat
Meal
3 FRESH
MEAL
200 - 1000g
For reheating pre-cooked, room/refrigerator temperature foods.
Place foods in a suitable sized dish/containter. Cover with a lid or
microfilm, then place on Glass Tray. Stir after completion of cooking
and stand covered for 3 to 5 minutes.
4. Reheat Frozen
Meal
4 FROZEN
MEAL
200 - 1000g
For reheating a frozen pre-cooked meal (except soup).
All foods must be pre-cooked and frozen. Remove all packaging and
place in a suitable sized dish/container. Cover with a lid or microfilm,
then place on Glass Tray. At the completion of cooking, stir food and
stand for 2-3 minutes.
5. Cook
Vegetables
5 FRESH
VEGETABLES
200 - 1000g
For cooking fresh vegetables.
Place prepared vegetables into a suitable sized container. For fresh
vegetables, add 2 tbsp (30ml) of water.
6. Cook Fresh
Fish
6 FRESH
FISH
100 - 1000g
For cooking fresh fish (whole, fillets, steaks). Shield the
thinner portions and place fish in a suitable sized container. Cover with
microfilm or a lid. Large quantities will require turning at beep.
En-10
Auto Weight Programs
e.g.
This feature allows you to cook most of your favourite foods by setting the weight only. The oven determines Microwave power level, Grill power
and cooking time automatically. Select the category and set the weight of the food. The weight is programmed in grams. For quick selection, the
weight starts from the most commonly used weight for each category.
NOTE:
1. Do not use Auto Weight Programs for food which weighs out of the recommended weight range shown in the tables on pages
En-10 - En-12. Adjust the power and time manually.
2. When cooking time is over 1 hour, the time will appear as Hours and Minutes.
3. Further information can be found in the following charts.
• Select the desired Auto Weight Program by
turning the Auto Program selector dial. The
display will scroll through the Auto Weight
Cook Programs.
• Set the weight of the food by using the Time/Weight
Dial.
Turning the dial slowly will count up in 10 g steps. Turning
the dial quickly will count up in 100 g steps.
• Press Start
Pad.
Page 12
Category Word Prompt
Recommended
Weight
Accessories Instructions
7. Cook Boiled
Potatoes
7 BOILED
POTATOES
200 - 1500g
For cooking potatoes.
Potatoes are cut in uniform pieces and put in a bowl
suitable for a microwave oven. Add 1 dl of water. Cover the bowl with a
lid or microfilm.
8. Cook Rice
8 RICE
200 - 800g
For boiling rice. Add 3 parts water to 2 parts rice and 1/2tbsp of salt
and a little bit of oil or butter. Select the weight for the rice only. Cover
with a lid or microfilm.
9. Cook Rice
Pudding
9 RICE
PUDDING
250 - 1000g
Cooking rice pudding. Select the total weight of the rice and milk.
Cook the rice pudding without a cover. Stir the rice when the oven
beeps.
10. Cook
Scrambled
eggs
10
SCRAMBLED
EGGS
100 - 500g
Scrambled egg.
Select the total weight of the egg and milk/water. Cover with a lid or
microfilm.
11. Fresh
Chicken
Pieces
11 CHICKEN
PIECES
200 - 1000g
For roasting fresh chicken pieces.
Place chicken in a dish on Glass Tray. For even cooking, spread out
chicken pieces. Stand for 5 minutes after cooking.
12. Frozen
Chicken
Pieces
12 FROZEN
CHICKEN
PIECES
200 - 1000g
For roasting frozen chicken pieces.
Place chicken in a dish on Glass Tray. For even cooking, spread out
chicken pieces. Stand for 5 minutes after cooking.
13. Beefsteaks
13 ROAST OX
800 - 1500g
Cooking steaks. The programme is well-suited for roasting beef, veal,
ham and lamb steaks. Place the steak with the greased side downwards in
an ovenproof dish. Add 1 dl of water. Place the dish on the glass turntable.
Select the weight of the steak. Turn the steak over when the oven beeps.
14. Cook Roast
Pork
14 ROAST
PORK
700 - 2000g
For roasting pork.
Place pork, fat-side down, in a dish, on Glass Tray, add 1dl water and
1 tbsp of salt. Turn over at beep. Stand for 10 to 15 minutes after
cooking.
15. Fresh
Gratin/
Lasagne
15 FRESH
GRATIN
500 - 1500g
For cooking pasta gratin.
Prepare the fresh or boiled pasta covered with a sauce and cheese.
For 100g pasta use 6-8 dl (600-800g) sauce/cream and cover with
grated cheese.
16. Frozen
Gratin/
Lasagne
16 FROZEN
GRATIN
300 - 1200g
For reheating and browning frozen gratin/lasagne.
Remove all packaging and place the gratin/lasagne in a heatproof dish
on Wire Rack on Glass Tray.
En-11
Auto Weight Programs
Page 13

Category
Word
Prompt
Recommended
Weight
Accessories Instructions
17. Frozen Bread
17 FROZEN
BREAD
30 - 300g
For reheating and browning frozen bread.
Place frozen bread directly on Wire Rack on Glass Tray. Turn the
bread at beep. Stand after cooking. This program is not for toasting
bread slices.
18. Jacket Potato
18 BAKED
PO TATO
200 - 1500g
For cooking, browning and crisping jacket potatoes.
Pierce skin with fork and place on Wire Rack.
19. Frozen Pizza
19 FROZEN
PIZZA
100 - 500g
For reheating, crisping the base and browning the top of frozen
purchased pizza.
Remove all packaging and place the pizza in the preheated pizza pan.
20. Frozen Quiche
20 FROZEN
QUICHE
100 - 500g
For reheating, crisping the pastry base and browning the top of
frozen purchased quiche.
Remove all packaging and place the quiche in the preheated pizza
pan.
21. Frozen Potato
Product
21 FROZEN
CHIPS
200 - 500g
For reheating, crisping and browning frozen potato pro-ducts.
After preheating the pan, spread out potato products in the pan. For
best results cook in a single layer.
22. Fried Bacon
22 BACON
30 - 200g
Fried bacon. The programme is for frying thin slices of bacon. Place
the bacon slices individually in the pizza pan. If you wish to fry the
bacon more, frying can continue using the combination of grill + 440
watt microwaves until the desired crunchiness is obtained (1-4 min.).
Place the slices of fried bacon on grease absorbent paper.
En-12
Auto Weight Panacrunch Programs
1. Select the desired program
and place the pizza pan in the
oven directly on the glass tray.
2. Press the start Pad to pre-heat
the pizza pan.
3. After pre-heating beeps sound.
Place the food in the pan, set
weight.
4. Press Start Pad.
Panacrunch Program
Page 14

En-13
Pizza Pan
THE ʻCONCEPTʼ
Some foods cooked by microwave can have soft and soggy crusts.
Your pizza pan accessory will brown and crisp pizzas, quiches, pies,
breaded products just as a conventional oven. Your Panasonic pizza
pan works in three ways: heating the pan by absorbing microwaves,
heating the food directly by microwaves and heating the food by the
grill. The base of the pan absorbs the microwaves and transfers them
into heat. Then the heat is conducted through the pan to the food. The
heating effect is maximised by the non-stick surface.
USING THE PIZZA PAN (Manual operation)
• For best results, pre-heat the pan before using. Place directly
on the glass turntable and pre-heat on 1000W (HIGH power
for 4 minutes). To assist browning, brush the pan with oil before
preheating for items such as sausages and beefburgers.
• Remove the pan from the oven and place the food in the pan.
Use the pizza pan handle or oven gloves as the pan will be
very hot. For best results, it is important that the food is placed
on the pan immediately after pre-heating. Performance
cannot be guaranteed with a time delay.
• Place the pan on the glass turntable and cook according to the
guidelines shown in the cooking chart in the cookbook.
NOTES:
1. Do not pre-heat the pan more than 8 minutes.
2. Always place the pan in the centre of the glass tray and ensure it
does not touch the wall of the oven cavity. Failure to do so, may
cause sparking which would damage the cavity.
3. Always use the pan on the glass turntable. Do not use with the
wire rack.
4. Always use the pizza pan handle or oven gloves when handling
the hot pan.
5. Ensure all food packaging is removed before cooking.
6. Do not place any heat-sensitive materials on the hot pan as this
may cause burning.
7. The pan can be used in a conventional oven.
8. For best results, use the pan in COMBINATION GRILL and
MICROWAVE.
CARE OF THE PAN
• Never use any sharp utensils on the pan as this will damage the
non-stick surface.
• After use, wash the pan in hot soapy water and rinse in hot water.
Do not use any abrasive cleaning substances or scouring pads as
this will damage the surface of the pan.
• The pan is dishwasher safe.
Page 15

En-14
Delay Start Cooking
By using Delay/Stand Pad, you can program Stand Time after cooking is completed or use to program the oven as a minute timer.
By using Delay/Stand Pad, you are able to program Delay Start cooking.
NOTE:
1. Three stage cooking can be programmed including Delay Start cooking.
e.g.
2. If the programmed delay time exceeds one hour, the time will count down in units of minutes. If less than one hour, the time will count down in
units of seconds.
3. Delay Start cannot be programmed before any Auto Programs.
• Press
Delay/Stand
Pad.
• Set the delay time by turning the
Time/Weight Dial (up to 9 hours).
• Set the desired cooking program and
cooking time.
• Press Start Pad.
e.g.
Delay Start: 1 hour
High Power: 10 min. Simmer Power: 20 min.
• Set the desired cooking program and
cooking time.
• Press
Delay/Stand
Pad.
• Set desired amount of time by
turning the Time/Weight Dial (up to
9 hours.
• Press Start Pad.
NOTE:
1. Three stage cooking can be programmed including Stand Time.
e.g.
2. If the oven door is opened during the Stand Time or Minute Timer, the time in the display window will continue to count down.
3. This feature may also be used as a timer. In this case press Delay/Stand Pad, set time and press Start Pad.
e.g.
High Power: 4 min. Stand Time: 5 min. High Power: 2 min.
Stand Time
5 timesOnce
Once
Once
Page 16

En-15
Q: There are humming and clicking noises from
my oven when I cook by COMBINATION. What
is causing these noises?
Questions and Answers
Q: Why wonʼt my oven turn on?
A: When the oven does not turn on, check the following:
1. Is the oven plugged in securely? Remove the plug from the outlet, wait 10 seconds and
reinsert.
2. Check the circuit breaker and the fuse. Reset the circuit breaker or replace the fuse if it is
tripped or blown.
3. If the circuit breaker or fuse is all right, plug another appliance into the outlet. If the other
appliance works, there probably is a problem with the oven. If the other appliance does not
work, there probably is a problem with the outlet.
If it seems that there is a problem with the oven, contact an authorized Service Centre.
A: Some radio and TV interference might occur when you cook with the microwave oven.
This interference is similar to the interference caused by small appliances such as
mixers, vacuums, blow dryers, etc. It does not indicate a problem with your oven.
A: The oven is designed not to accept an incorrect program. For example, the oven will not
accept a fourth stage, and will not accept an Auto Weight Program after Delay Start.
A: The heat given off from the cooking food warms the air in the oven cavity. This warmed
air is carried out of the oven by the air flow pattern in the oven. There are no
microwaves in the air. The oven vents should never be blocked during cooking.
A: The oven has programmed DEMO MODE. This mode is designed for retail store
display. Deactivate this mode by pressing Microwave Power Pad once and Stop/Cancel
Pad 4 times.
A: Only when you are using GRILL cooking mode. The metal in some thermometers may
cause arcing in your oven and should not be used on MICROWAVE and
COMBINATION cooking modes.
A: The noises occur as the oven automatically switches from MICROWAVE power to
GRILL to create the combination setting. This is normal.
A: After repeated use, it is recommended to clean the oven and then run the oven without
food, glass tray, and roller ring on Grill for 5 minutes. This will burn off any food, residue
or oil which may cause an odour and/or smoking.
A: This display indicates a problem with the microwave generation system. Please contact
an authorised Service Centre.
A: There may have been a power failure, and the wordprompt is disabled. Unplug the oven
for a few seconds, then plug it again. When "88:88" is displayed, press the start pad
until your language is displayed. Then set the clock. Refer to page En-5.
Q: My microwave oven causes interference with
my TV. Is this normal?
Q: The oven wonʼt accept my program. Why?
Q: Sometimes warm air comes from the oven
vents. Why?
Q: “D” appears in the display and the oven does
not cook. Why?
Q: Can I use a conventional oven
thermometer in the oven?
Q: My oven has an odour and generates smoke
when using the COMBINATION and GRILL
function. Why?
Q: The oven stops cooking by microwave and
ʻH97ʼ or ʻH98ʼ appears in the display. Why?
Q: The worprompt has disappeared on my display,
I can only see numbers ?
Page 17

En-16
Care of Your Oven
Technical Specifications
1. Turn the oven off before cleaning.
2. Keep the inside of the oven, door seals and door seal areas clean.
When food splatters or spilled liquids adhere to the oven walls,
door seals and door seal areas wipe off with a damp cloth. Mild
detergent may be used if they get very dirty. The use of harsh
detergent or abrasive is not recommended.
DO NOT USE COMMERCIAL OVEN CLEANERS. Do not use
harsh, abrasive cleaners or sharp metal scrapers to clean the oven
door glass since they can scratch the surface, which may result in
shattering the glass.
3. The outside oven surface should be cleaned with a damp cloth. To
prevent damage to the operating parts inside the oven, water
should not be allowed to seep into the ventilation openings.
4. If the Control Panel becomes dirty, clean it with a soft, dry cloth. Do
not use harsh detergents or abrasives on the Control Panel. When
cleaning the Control Panel, leave the oven door open to prevent
the oven from accidentally turning on. After cleaning touch STOP/
CANCEL Pad to clear the display window.
5. If steam accumulates inside or around the outside of the oven
door, wipe with a soft cloth. This may occur when the microwave
oven is operated under high humidity conditions and in no way
indicates a malfunction of the unit.
6. It is occasionally necessary to remove the glass tray for cleaning.
Wash the tray in warm soapy water or in a dishwasher.
7. The roller ring and oven cavity floor should be cleaned regularly to
avoid excessive noise. Simply wipe the bottom surface of the oven
with mild detergent and hot water then dry with a clean cloth. The
roller ring may be washed in mild soapy water. Cooking vapours
collect during repeated use but in no way affects the bottom
surface or roller ring wheels. After removing the roller ring from the
cavity floor for cleaning, be sure to replace it in the proper position.
8. When using the GRILL or COMBINATION mode, some foods may
inevitably splatter grease on to the oven walls. If the oven is not
cleaned occasionally, it may start to “smoke” during use.
9. A steam cleaner is not to be used for cleaning.
10. This oven should only be serviced by qualified personnel. For
maintenance and repair of the oven contact the nearest authorized
dealer.
11. Keep air vents clear at all times. Check that no dust or other
material is blocking any of the air vents on the top, bottom or rear
of the oven. If air vents become blocked this could cause
overheating which would affect the operation of the oven and
possibly result in a hazardous situation.
12. Failure to maintain the oven in a clean condition could lead to
deterioration of surfaces that could affect the life of the appliance
and possibly result in a hazardous situation.
Power Source: 230 V, 50 Hz
Power Consumption: Maximum; 2050 W
Microwave; 1050W
Grill; 1350 W
Output: Microwave; 1000 W (IEC-60705)
Grill Heater; 1300 W
Outside Dimensions: 510 (W) x 380 (D) x 304 (H) mm
Oven Cavity Dimensions: 359 (W) x 352 (D) x 217 (H) mm
Uncrated Weight: 12.5 kg
Noise 50 dB
Specifications subject to change without notice.
Page 18

En-17
This product is an equipment that fulfills the European standard for EMC disturbances (EMC = Electromagnetic Compatibility) EN 55011. According
to this standard this product is an equipment of group 2, class B and is within required limits. Group 2 means that radio-frequency energy is
intentionally generated in the form of electromagnetic radiation for warming up of foods. Class B means that this product may be used in normal
household areas.
Information on Disposal for Users of Waste Electrical & Electronic Equipment (private
households)
This symbol on the products and/or accompanying documents means that used electrical and electronic products should not be mixed
with general household waste.
For proper treatment, recovery and recycling, please take these products to designated collection points, where they will be accepted
on a free of charge basis. Alternatively, in some countries you may be able to return your products to your local retailer upon the
purchase of an equivalent new product.
Disposing of this product correctly will help to save valuable resources and prevent any potential negative effects on human health and the
environment which could otherwise arise from inappropriate waste handling. Please contact your local authority for further details of your nearest
designated collection point.
Penalties may be applicable for incorrect disposal of this waste, in accordance with national legislation.
For business users in the European Union
If you wish to discard electrical and electronic equipment, please contact your dealer or supplier for further information.
Information on Disposal in other Countries outside the European Union
This symbol is only valid in the European Union.
If you wish to discard this product, please contact your local authorities or dealer and ask for the correct method of disposal.
Technical Specifications
Pursuant to the directive 2004/108/EC, article 9(2), Panasonic Testing Centre, Panasonic Service Europe, a division of Panasonic Marketing
Europe GmbH, Winsbergring 15,22525 Hamburg, F.R.Germany
Manufactured by Panasonic Home Appliances Microwave Oven (Shanghai) Co.,Ltd, 898 Longdong Road, Pudong, Shanghai, 201203, China.
Page 19

En-18
CONTAINERS
Use containers as specified in recipes, as this
affects the cooking and reheating time. In fact,
the bigger the container in which the food is
placed, the quicker the cooking and reheating.
QUANTITY
Small quantities cook faster than larger ones,
in the same way that smaller dishes reheat
quicker than larger ones.
DENSITY
Porous and airy foods cook faster than heavy
and dense foods.
Microwave cooking
General information
STANDING TIME
Once the STANDING TIME has elapsed, if the
food is not cooked, replace it in the oven and
cook it for a few extra seconds.
After cooking, with dense foods such as meat,
jacket potatoes and cakes, you must LEAVE
THEM TO STAND (inside or outside the oven)
until the heat conduction has finished and the
centre of the food is fully cooked.
ROASTS - Cover with aluminium foil and let
stand for 15 minutes.
JACKET POTATOES - Cover with aluminium
foil and let stand for 5 minutes.
LIGHT CAKES - Leave to stand for 5 minutes
after removing from oven.
RICH CAKES - Leave to stand for 15 - 20
minutes.
FISH - Leave to stand for 2 to 5 minutes.
EGG DISHES - Leave to stand for 2 to 3
minutes.
PRE-COOKED DISHES - Leave to stand for 2
to 5 minutes.
DISHES PREPARED AT HOME - Leave to
stand for 1 to 2 minutes.
VEGETABLES - With the exception of boiled
potatoes, it is recommended to stand for 1 to 2
minutes, the majority of vegetables may be
served immediately after cooking.
DEFROSTING - To finish the process, it is
essential to take into account the standing
time. This may vary between 5 minutes (for
raspberries in particular) and 1 hour for roasts.
Microwaves are high-frequency electromagnetic waves similar to those
used by radios. The magnetron converts the electric currant into
microwaves, which it sends to the interior of the oven where they are
reflected, transmitted or absorbed.
Reflection
The microwaves are reflected by the metal in the same way that a ball
bounces against a wall. However, most metal utensils and containers
are not suitable for microwave ovens as they do not allow even cooking.
Furthermore, when the metallic dish is too close to the inner wall of the
oven (which is also made of metal), it could cause the formation of an
arc (blue sparks), capable of damaging the oven and possibly even
causing a fire.
Transmission
Microwaves pass through certain materials such as paper, glass and
plastic, rather like rays of sunlight passing through a window.
Containers made of these materials are therefore perfectly suited to
microwave cooking, since they do not absorb or reflect microwaves.
However, as the heat of the food is transmitted to the containers, they
also heat up during cooking.
Absorption
Microwaves are absorbed by the food and penetrate to a depth of 2 to 4
cm. Microwaves stimulate the molecules of the food (in particular
water, fat and sugar molecules) and make them vibrate very quickly.
These vibrations cause a friction which generates heat. With
voluminous foods, heat generated by friction spreads to the centre of
the food after cooking.
Page 20

En-19
General information
TURNING AND STIRRING
Certain foods must be stirred whilst they are
being cooked. Meat and poultry must be
turned over halfway during cooking.
SHAPE
Regular shapes allow for more even cooking.
To improve cooking with microwaves, use
round containers rather than square ones.
ARRANGEMENT OF FOOD
When you arrange separate items of food
such as pieces of chicken or chops, place
the heaviest parts towards the outer edge
of the dish.
PIERCING
During cooking, steam may accumulate under
the skin or the wrapping which covers certain
foods. Therefore it is essential to pierce or
peel these foods before cooking so that the
steam may escape during cooking. Eggs,
potatoes, apples, sausages etc. must be
pierced before being cooked. NEVER TRY TO
MAKE BOILED EGGS.
MOISTURE LEVEL
As the moisture level of fruit and vegetables
various according to the season, sometimes
you will have to adjust the cooking time
depending on the time of year. This is
particularly true for jacket potatoes. Dry foods
such as rice and pasta may dry even more
during storage and the cooking time may
therefore vary in comparison with fresh foods.
CLING FILM
Cling film allows food to be kept moist while
the trapped steam accelerates cooking.
However, we recommend piercing the cling
film before cooking, so that the surplus steam
can escape. When you remove the cling film
covering a dish, be careful as the steam which
has accumulated is extremely hot. Only use
cling film suited for microwave ovens and only
use to cover a dish. Never put food on top of
cling film.
COVERING
Cover food with a suitable lid or cling film for
microwave ovens. Cover fish, vegetables,
stews and soups, but not cakes, sauces,
jacket potatoes and pastries.
INITIAL TEMPERATURE
The colder the food is, the longer it will take to
reheat. Food coming from a refrigerator must
be reheated for longer than those stored at
room temperature.
SEPARATING FOOD
Food cooks faster and more evenly when
separated. NEVER pile items of food on
top of each other.
Page 21

En-20
What containers can be used in your oven?
• NEVER ATTEMPT to cook food in
aluminium or metal containers, as you risk
damaging your oven.
• NEVER USE melamine dishes.
Only use plastic dishes which have been
especially designed for microwave ovens.
• NEVER COOK food which has a high fat or
sugar content or even food which needs a
long cooking time (in particular brown rice or
Christmas pudding) in a plastic container.
You may use wicker baskets only to reheat
food for a very short period of time, making
sure that these containers do not have any
hooks.
• ONLY USE fully varnished ceramics.
• NEVER COOK food in a wooden container,
as it may dry out and burn.
Microwaves
NO
Grill
Combinaton cooking
• NEVER ATTEMPT to cook food in
aluminium or in metal containers,
as you risk damaging your oven.
• Place food contained in aluminium
packaging into a dish of a similar size which
is resistant to heat.
• If the formation of an arc occurs in
combination cooking mode, press the stop
button twice to cancel the programme then
continue to cook in GRILL mode.
• NEVER USE dishes decorated with gold or
silver, as you risk causing the formation of
an arc and the decoration may come off.
YES
NO
YES
NO
YES
Page 22

Power Level Use
Max power 1000 W Reheating meat and sauces, cooked fish, canned foods and boiled vegetables.
600 W Roasting, cooking egg sauces and biscuits, heating milk.
440 W Delicate mixtures containing eggs, quiches, reheating baby food, stews.
270 W Defrosting
250 W Cooking stews, rice tarts, heavy fruit cakes and egg creams.
First side Second side
Steak (4 pieces, well done) Approx. 10 min. Approx. 10 min.
Sautéed pork Approx. 12 min. Approx. 10 min.
Sides of pork 12 - 14 min. Approx. 12 min.
Kebabs Approx. 12 min. Approx. 12 min.
Sausages 7 - 8 min. Approx. 7-8 min.
Chicken legs 15 - 20 min. 15 - 20 min.
Toast 3 - 4 min. 3 min.
Program Grill Microwave Word Prompt
1 1300 W 100 W G1-100W
2 1300 W 250 W G1-250W
3 1300 W 440 W G1-440W
En-21
Microwave power levels
Grill usage
Combination Cooking
NEVER PREHEAT THE GRILL.
Your oven's quartz grill allows fast and even cooking of a great variety
of food.
The grill only cooking mode comprises of three grill settings:
1 press Grill 1 1300W
2 presses Grill 2 950W
3 presses Grill 3 700W
Place the food to be grilled on the grill rack before placing it on the
glass tray.
Food to be grilled should in principle be turned mid-cooking.
Never cover food which you are grilling.
THE GRILL PROGRAMME ALONE DOES NOT USE MICROWAVES.
Combination cooking is perfectly suitable for most foods. In fact, while
the power of the microwaves cooks the food quickly, the grill browns the
food and makes it crispy.
You have the three following combination modes available
NOTE:
• Never cover food you are cooking with a combination programme.
• Do not use combination programmes to cook small quantities.
For perfect cooking, just use the grill or microwave only.
• In combination cooking mode, never preheat the oven.
Approximate grilling times (Grill 1)
+
-
Min
Page 23

Food
Weight
quantity
Reheating time
(approx.)
BABY BOTTLES - see below
TINNED BEANS, RICE & PASTA (Stir halfway)
Cooked beans 225 g 2 min.
Cooked beans and sausages 450 g 5 min.
Ravioli in sauce 215 g 2 min.
Rice 277 g 2 min.
Spaghetti bolognese 210 g 2 min.
Spaghetti with tomato sauce 213 g 2 min.
TINNED MEAT
Chili con carne 410 g 3 min. 30 sec.
Hot dogs (in brine) 415 g 2 min. 30 sec.
Meat balls 418 g 4 min. 30 sec.
Minced beef and onions 392 g 2 min. 30 sec.- 3 min.
Braised beef 405 g 3 min. 30 sec.
Food
Weight
quantity
Reheating time
(approx.)
Tinned soup
Cream of mushroom 425 g 4 min. 30 secs.
Cream of tomato 425 g 3 min.
Minestrone 300 g 3 min.
En-22
Your oven allows you to safely reheat ready-meals offered by
supermarkets as well as dishes you have cooked or your leftovers. All
you have to do is carefully check that the food is sufficiently hot before
serving, as you would with a normal oven. You must also take care to
store the cold food that is to be reheated correctly, preferably by
keeping them in a refrigerator beforehand.
Which mode should be used for reheating food?
The mode to be used, i.e. microwave or combination cooking, varies
depending on the type of food to be reheated. To reheat food which
does not need to brown, only use the microwave mode. To reheat food
which needs to be crisp, choose the combination cooking mode.
With a frozen tart or quiche, not only do you have to reheat the food but
you also have to cook the pastry. Since crispy pastry cannot be
achieved with microwaves and combination cooking, you should cook
this type of food in a traditional oven.
How long does it take to reheat food?
At the bottom of this page you will find reheating tables for microwave
and combination cooking modes. The lengths of time mentioned in
these tables are for REFERENCE ONLY. The exact lengths of time vary
depending on the weight of the food, the size of the container used and
the initial temperature.
What should I do if the food I need to reheat is not listed in
the tables?
Although it is not possible to list all the food available on the market in
these tables, we have tested a large range. By following our
recommendations, you can reheat your food perfectly and safely.
Turning and stirring
As far as possible, we recommend that you turn or stir the food during
reheating in order to even the temperature throughout the food.
Standing time
In most cases, you must LEAVE FOOD TO STAND after reheating in
order to allow the heat to spread to the centre of the food and to ensure
equal temperature throughout. If you have covered food during
reheating, leave the cover in place during the standing time. This is
vitally important when you are reheating thick foods such as lasagne or
shepherd's pie, or even food that you cannot stir during reheating.
When is the food reheated?
Reheated food should be served hot throughout, i.e. when it is piping
hot. As long as basic hygiene rules are followed during the preparation
and storage of the food, reheating using the microwave or combination
cooking mode does not pose any additional health risk. We recommend
that you cut food which cannot be stirred with a knife to ensure that it is
correctly reheated. In addition to following the manufacturer's
instructions and the lengths of time mentioned in the reheating tables at
the bottom of this page, we strongly recommend checking that the food
is hot throughout. If in doubt, place the food back into the oven and
reheat for a few further seconds.
Reheating
Reheating with microwaves
Use maximum power (1000 W)
BABY BOTTLES - PRECAUTIONS
The milk or the formula MUST be thoroughly mixed before and after
heating. It must also be carefully checked before being given to the
baby.
With a 60ml baby bottle of milk kept in the refrigerator, remove the cap
and the teat, heat the milk at 1000 W for around 10 seconds, then
CAREFULLY CHECK THE TEMPERATURE.
PLEASE NOTE:
Since the liquid at the top of the baby bottle is much hotter than that at
the bottom, you must mix the contents of the bottle thoroughly before
checking the temperature.
Page 24

Food
Weight
quantity
Reheating (approx.)
PORRIDGE
1 portion 1 min.
PUDDINGS and DESSERTS
Cooked apple- 1 175 g 30 sec.-1 min.
Bread and butter pudding 340 g 2-3 min.
Stewed fruit 200 g 1 min. 30 sec. - 2 min.
Fruit tart 286 g 1 min. 20 sec.
Milk pudding
for 1 person
50 sec.
Crepes, filled 1 40-50 sec.
Rice pudding 500 g 2 min. 30 sec.
RICE
Boiled rice 100 g 45 sec.
FROZEN READY MEALS
Boiled rice 450 g 4-5 min.
SAUCES
Custard 300 ml 2 min.
Salted sauce 300 ml 2 min.
VEGETABLES
Jacket potatoes 250 g 1 min. 30 sec.
Green vegetables 100 g 1 min. 30 sec.
Root vegetables 225 g 1 min. 30 sec.
Food
Weight
quantity
Reheating (approx.)
CANNED DESSERTS
Creamed rice 425 g 3 min.
Custard 425 g 2 min.
Pudding 300 g 1 min. - 1 min. 30 sec.
CANNED VEGETABLES - drain if necessary
Whole carrots 410 g 3 min.
Green beans 410 g 2 min. 30 sec.
Whole mushrooms 300 g 2 min.
Creamed mushrooms 213 g 2 min.
Pea purée 440 g 2 min.
Peas 550 g 2 min. 30 sec.
Marrow 300 g 2 min.
New potatoes 820 g 5 min.
Corn 198 g 1 min. 30 sec.
Whole tomatoes 400 g 3 min.
Chick peas 425 g 3 min.
FROZEN READY MEALS
Boil in the bag
Chicken & mushroom casserole
170 g 4 min.
Chicken & rice curry 340 g 7 min.
CHRISTMAS PUDDINGS
Slice 150 g 30 sec.
Small 450 g 2 min.
Medium 900 g 3 min.
Large 1,1 kg 3 min. 30 sec.
DRINKS- COFFEE
1 cup 235 ml 1 min. -1 min. 30 sec.
DRINKS- MILK
1 cup 235 ml 1 min 30 sec.
1 jug 600 ml 3 min. 30 sec.
HOME - MADE MEAT - BASED FOOD
Casserole for 2 people 500 g 3 min.
Shepards pie for 1 person 250 g 2-3 min.
Bolognese sauce 250 g 2-3 min.
PASTA
Boiled spaghetti 100 g 1 min.
Macaroni cheese 225 g 2-3 min.
HOME MADE DISHES - COLD
Child portion 1 2-3 min.
Adult portion 1 4-5 min.
HOME MADE DISHES - FROZEN
Adult portion 1 6-7 min.
Deep-frozen lasagne (300-330g)
Transfer the food from its original packaging to a heat-resistant dish.
Plastic containers designed for microwaves and conventional ovens
may be used with caution.
Power Time Instructions
Defrost 270 W 8-10 min.
Place on the glass
tray.
Then 1000 W 8-10 min.
or Combination 2 20 min.
En-23
Use maximum power (1000 W)
CHECKS
After reheating food with the microwave, check that it is hot throughout.
If in doubt, place the food back in the oven for a few moments longer.
Pre-cooked food which you intend to reheat in the microwave mode
requires a STANDING TIME of 5 to 15 minutes. The thicker the food is,
the longer the STANDING TIME. This STANDING TIME is vitally
important for food which cannot be stirred.
Min
Reheating with microwaves
Page 25

Recommended
weight (Min.-Max.)
1. Small pieces 150 - 1000 g
2. Large pieces 500 - 1500 g
En-24
Defrosting instructions
This function allows you to enter the weight in
grams, then the oven selects the appropriate
defrosting time for the food. Do not use this
function to defrost ready meals. To select the
weight, refer to your oven's instructions.
During defrosting, it will be necessary to check
the food (and to turn, cover or separate it, as
described below). The automatic weight
defrosting mode allows you to defrost two
categories of food:
As far as possible, separate chops and small
pieces of food such as pieces of quiche, slices
of bread and large pieces of fruit.
Let large roasts and thick slices of bread stand
longer in order to be certain that the centre is
fully defrosted.
During defrosting, separate out small pieces of
food such as mince frequently.
Remove protective packaging and place the
food on a dish.
Before defrosting, protect the bones, the fat
side of the roast and the fine fish bones with
small pieces of SMOOTH aluminium foil in
order to prevent excessive defrosting.
Turn thick foods such as meat two or three
times during defrosting.
When you defrost food using the microwave mode, the food must be defrosted on the inside before the outside begins to cook.
Automatic weight defrosting
Defrosting advice
Page 26

Food Quantity Weight
Defrosting time
(approx.)
MARGARINE 250 g 2 min.
APPLE TART 1 100 g 1 min.
HOMEMADE DISHES
Average size 1 370 g 5 min.
*GIBLETS
275 g 6 min.
*CONCENTRATED
ORANGE
190 ml
PASTRY
Filo 300 g 2 min.
Sheet pastry 370 g 4 min.
Shortcrust 370 g 4-5 min.
TARTS
Cooked fruit 1 375 g 10 min.
Cooked meat 1 520 g 15 min.
PORK
*Cubed 450 g 12 min.
Roast 16 min. For 450 g
*Chops 4 450 g 10-12 min.
QUICHE
Quarter 1 65 g 3-4 min.
Whole 1 360 g 11 min.
*SAUSAGES
8 450 g 12 min.
*SAUSAGE MEAT 454 g 11 min.
*SOUP 1 litre 15-20 min. Use 900 W
#TURKEY 17 min. For 450 g
READY MEALS
Pizza 1 300 g 5 min.
#*Meat pie (cooked) 300 g 6-7 min. Use 440 W
Food Quantity Weight
Defrosting time
(approx.)
*BACON
Slices 10 525 g 9 min.
Steaks 2 225 g 7 min.
HAMBURGERS 4 465 g 7 min.
Beef
*Mince 450 g 12 min.
Chargrilled 450 g 12 min.
#Roast 450 g 16 min. per 450 g
BREAD
Bread, small 1 400 g 4 min.
Slice 1 30 g 1 min.
Petits pains 4 200 g 2-3 min.
Croissants 4 200 g 3 min.
BUTTER 250 g 2 min.
CAKE
Cheesecake 1 425 g 5 min.
Cake, small 1 375 g 3-4 min.
Scones 4 250 g 3 min.
CHEESE 450 g 3 min.
CHICKEN
#Drumsticks 450 g 12-15 min.
#Whole 1 for 450 g 13 - 15 min.
#Pieces 4 1 kg 23 min.
CREAM
Sticks 6 150 g 4-5 min.
#DUCK Whole 1 18 min. For 450 g
FISH
#Filets 4 450 g 12-14 min.
*Prawns 200 g 9 min.
Steaks 2 365 g 10 min.
#Whole 2 340 g 9 min.
*SOFT FRUIT 227 g 6-7 min.
MUTTON
*Chops 4 450 g 8 min.
#Leg 13 min. for 450 g
Lard 500 g 3 min.
En-25
Select the 270 W defrosting power, then the approximate time as below
The lengths of time listed below are for reference only. Always check the state of the food by opening the door, then continue with the programme.
With large quantities, correctly adapt the defrosting time. It is not necessary to cover foods while defrosting.
KEY
* As far as possible, stir or separate these foods during
defrosting.
# Protect the sides and the edges of these foods.
Defrosting common foods
Page 27

Food Weight/quantity Cooking method Time (min.) Instructions/advice
BREAD - precooked - fresh. Note: Bread reheated in a microwave has a soft crust.
Croissants
1
1000 W 20-25 sec. Place on a microwave oven dish on the glass tray. Do not cover.
or GRILL 1 1-2 Place on the grill rack on the glass tray.
4
1000 W 30-40 sec. Place on a microwave oven dish on the glass tray. Do not cover.
or GRILL 1 2-3 Place on the grill rack on the glass tray.
Petits pains
1
1000 W 15-20 sec. Place on a microwave oven dish on the glass tray. Do not cover.
or GRILL 1 3-4 Place on the grill rack on the glass tray.
4
1000 W 40-60 sec. Place on a microwave oven dish on the glass tray. Do not cover.
or GRILL 1 4-6 Place on the grill rack on the glass tray.
BREAD - Frozen
Partially cooked
Petit pains
340 g (6) Combination 1 6-8 Place on a heat resistant dish on the glass tray.
Partially cooked
Garlic baguette
325 g (2) Combination 1 8-10 Place in a heat resistant dish on the glass tray.
Raw chicken. ATTENTION: Be careful when removing the grill rack and the heat-resistant dish, as they are extremely hot. For detailed
instructions, consult the chapter relating to meat, P.28.
Breast 850 g (4)
1000 W 8-10 Place in a microwave oven dish on the glass tray. Cover.
or Combination 3 15-20 Place in the grill rack on the glass tray. Turn over halfway during cooking.
Drumsticks 900 g (8)
1000 W 10-12 Place in a microwave oven dish on the glass tray.
or GRILL 1 30-35
Place on the grill rack on the glass tray. Turn halfway during cooking
or Combination 3 20-25
Quarter 860 g (2)
1000 W 15-20 Place in a microwave oven dish on the glass tray.
or GRILL 1 30-35
Place on the grill rack on the glass tray.
or Combination 3 15-20
Whole 1 kg (1)
1000 W
then Combination
3
14-16
Breast side down, place the chicken on an upside down saucer, in a heat
resistant dish. Place on glass tray. Turn halfway during cooking. Remove fat
which is produced.
7-9
Fresh and raw FISH. For detailed instructions, consult the chapter relating to fish, p.29.
Breaded filets 300 g (2)
GRILL 1 12-14
Place on the grill rack on the glass tray. Turn over halfway during cooking.
or Combination 2 10-12
Fishcakes 200 g (2)
GRILL 1 15-18
or Combination 1 8-10
Filets 450 g (3) 1000 W 3-4 Place in a microwave oven dish. Add 30ml liquid.
Goujons 200 g
GRILL 1 12-14
Place on the grill rack on the glass tray. Turn over halfway during cooking.
or Combination 1 6-8
Steaks 350 g (2) 1000 W 3-4 Place in a microwave oven dish. Add 30ml liquid.
Whole 280 g (1)
1000 W 3-4 Place in a microwave oven dish.
or GRILL 1 8-10 Place on the grill rack on the glass tray. Turn over halfway during cooking.
Raw and frozen FISH. For detailed instructions, please refer to the section on fish, page 29.
Breaded filets 300 g (2) Combination 1 13-14
Place on the grill rack on the glass tray. Turn over halfway.
Fishcakes 400 g (4) Combination 1 20
En-26
Cooking and reheating tables
Page 28

Food
Weight/quantity
Cooking method Time (min.) Instructions/advice
Fish fingers 210 g (8)
1000 W 4-5 Place in a microwave oven dish. Do not cover.
or GRILL 1 12-14
Place on the grill rack on the glass tray.
Turn over halfway during cooking.
or Combination 1 8-10
Scampi 255 g
GRILL 1 10-12
or Combination 1 12-15
Whole 450 g (2) 1000 W 10-12 Place in a microwave oven dish. Add 30ml liquid.
PIZZAS - Fresh part cooked Use Panacrunch as per page 12/13
NOTE: Remove all packaging. The crust will be soft.
Chilli beef 400 g
1000 W 4-5 Place on the grill rack on the glass tray. Do not cover.
or GRILL 1 12-14
Place on the grill rack on the glass tray.
or Combination 1 8-10
Deep Pan, ham 475 g
1000 W 4-6 Place in a microwave oven dish on the glass tray. Do not cover.
or GRILL 1 13-15
Place on the grill rack on the glass tray.
or Combination 1 10-15
Chunks of meat 370 g
1000 W 4-5 Place in a microwave oven dish on a glass tray. Do not cover.
or GRILL 1 10-12
Place on the grill rack on the glass tray.
or Combination 1 8-10
FROZEN PIZZAS Use Panacrunch as per page 12/13
NOTE: Remove all packaging. The crust will be soft.
French bread 320 g (1)
GRILL 1 15-20
Place on the grill rack on the glass tray.
or Combination 1 6-8
Pepperoni 300 g Combination 1 15-20
RAW PORK
ATTENTION: Be careful when removing the grill rack and the heat-resistant dish, as they are extremely hot. For detailed instructions,
consult the chapter relating to meat, p.28.
Chops 800 g (4)
1000 W 10-13 Place on a microwave oven dish on the glass tray.
or GRILL 1 20-25 Place on the grill rack on the glass tray.
or Combination 3 18-20 Turn halfway during cooking.
Filets 250 g
1000 W 4-6 Place in a microwave oven dish on the glass tray.
or GRILL 1 25-30 Place on the grill rack on the glass tray.
or Combination 3 10-15 Turn halfway during cooking.
Roasts
1000 W 13-14 For 450 g
Place the roast on an upside down saucer in a heat resistant dish.
Place on the glass tray. Turn mid-cooking. During cooking, remove fat
which is produced.
Then Combination 1 5
PRE-COOKED FOODS
NOTE: Remove the aluminium container and place the food on a heat-resistant dish of a similar size. Plastic dishes specially designed for
microwave ovens and traditional ovens may be used with caution.
Cauliflower cheese 454 g
1000 W 5-6
Place on the glass tray.
or Combination 1 10
Cheese tart
190 g
1000 W 3-4
Place on the glass tray.
or Combination 3 10-15
595 g
1000 W 6-8
or Combination 3 18-20
Au gratin dishes 227 g (2)
GRILL 1 10-12
Place on the grill rack on the glass tray. Turn halfway during cooking.
or Combination 1 8-10
Stuffed
mushrooms
227 g
GRILL 1 8-10
Place on the grill rack on the glass tray.
or Combination 1 6-8
En-27
Cooking and reheating tables
Page 29

En-28
Meat and Poultry
Place the meat on the grill rack, which in turn
is placed on the glass tray. Use a heatresistant plate to collect the fat or juices which
may splatter.
How do I cook small pieces of meat with the grill or combination cooking?
DEFROSTED ROASTS
If the meat has been frozen, make sure that it
has been correctly defrosted before cooking
with a microwave oven. You should let the
defrosted roasts stand for 30 minutes
minimum before cooking, in order to be sure
that the core of the meat is completely
defrosted.
FAT
The surplus fat absorbs microwave energy and
may lead to overcooking of the meat
underneath. Always choose meats which are
not too fatty.
How do I cook a roast with a
microwave oven?
To cook an ordinary roast, you can simply
place it on the rack of a microwave roasting
unit and cover it with a dome-shaped cover.
You can also use a large hollow dish and place
the roast on an upside-down dish before
covering it with cling film or grease-proof
paper.
STANDING TIME
After cooking, you must cover the meat and
the poultry again with aluminium foil and
LEAVE TO STAND for at least 15 minutes.
Once left to stand, the roast meat may be cut
more easily. Furthermore, it continues to cook
during the STANDING TIME.
Bones
When you cook a roast or a leg of mutton in
your microwave oven, you must sometimes
cover the end of the bone in order to avoid it
cooking excessively.
How do I cook small pieces of meat in
a microwave oven?
Certain pieces of meat can be easily prepared
in a microwave oven, but the reduction in
cooking time and the absence of a source of
heat stops them from being crisp and brown.
You must always cook pieces of meat on a
microwave rack in order to avoid them soaking
in their juice.
TURNING
Roasts and poultry must be turned halfway
during cooking.
PROTECTION
Thick roasts must sometimes be re-covered
with a thin aluminium foil halfway during
cooking in order to avoid excessive cooking of
the edges. In the case of a turkey or a large
chicken, you must re-cover the breast, the legs
and the wings. Place the aluminium foil with
sticks and make sure it does not touch the
oven walls.
How do I cook large pieces of meat
with combination cooking?
Place the pieces on the heat-resistant plate.
In order to obtain perfect cooking, it is
preferable to cook the roast only using the
microwave mode, then using combination
cooking to brown and to make it crispy. DO
NOT COVER.
Recommendations
Page 30

En-29
ARRANGEMENT
Thin filets of fish such as plaice filets must be
rolled beforehand in order to avoid the tail and
thinner outer edges being cooked excessively.
FISH STEAKS
We recommend that you arrange fish steaks in
a circle, but placing the thickest part towards
the exterior, in order to avoid the outer edges
disintegrating and being excessively cooked.
COVERING
Always cover fish with cling film for microwave
ovens or with the dish cover.
READY TO COOK FISH
The ready to cook fish and the sauce must be
cooked in two stages. For 150g to 170g, place
the sauce sachet on a plate, then cut the top of
the sachet with a knife. Cook the food on
270W DEFROSTING mode for 4 minutes,
allow to STAND for 2 minutes, then cook on
maximum power (1000 W) for 6 minutes or
until it is completely cooked.
LIQUID
Fresh fish must always be sprinkled with 30ml
(2 tablespoons) of lemon juice or white wine.
When the fish is frozen, add the same quantity
of liquid for even cooking.
SALT
DO NOT ADD SALT to the fish before cooking,
as this may dry it out.
WHOLE FISH
When you cook two whole fish at the same
time, place them in a staggered manner in
order to ensure even cooking.
In the case of a thicker whole fish, cover the
head and the tail mid-cooking with thin
aluminium foil fixed in place with cocktail
sticks.
How do I cook fish using the grill or
combination cooking?
Coat the fish with melted butter or oil to ensure
it does not dry out.
Place it on the oven's grill rack. DO NOT ADD
SALT. If necessary, add pepper or herbs.
For small quantities, you will get better results
by using the microwave or grill mode only.
STANDING TIME
After cooking, you must allow the fish to stand
for 2 to 3 minutes. If you want to use your oven
to cook other food, you may leave the fish to
stand outside the oven.
The microwave oven is an excellent way to
cook fish. In fact, not only does it cook the fish
without drying it, but it also eliminates the
odours which normally occur in a traditional
oven.
If the odours linger after cooking, allow to
simmer in 600ml of boiling water and a sliced
lemon in a large bowl for around 20 minutes.
Afterwards, wipe the walls of the oven with a
dry cloth.
WHEN IS THE FISH COOKED?
The fish is cooked when it flakes easily and
the flesh appears opaque.
Fish
Page 31

For 450 g of frozen
vegetables cooked in
45ml of water
cooking
time
(min.)
Asparagus 7-8
Broad beans 9-10
whole green beans 10-12
Runner beans, sliced 8-10
Broccoli 8-9
Brussel sprouts 9-10
Cabbage: grated 5-6
Carrots: whole 9
sliced 8
Cauliflowers 10
Mange tout 7-8
Mixed vegetables 7
Peas 7-8
Spinach, balls 8-9
Swede, diced 10
Corn 7
For 450 g of fresh
vegetables cooked in 90ml
of water
cooking
time
(min.)
* Corn on the cob 6-7
Courgettes: sliced 5
Leeks: sliced 7-8
Mange tout 4-5
Marrow, cubed 4-5
Mushrooms 4-5
Parsnip, sliced 6-7
Peas 4-6
* Potatoes: bolied 5-7
par boiled 5-6
new, whole 6-7
for mashing 8
* Spinach 7
* Swede, cubed 7-8
* Turnip 11-12
For 450 g of fresh
vegetables cooked in 90ml
of water
cooking
time
(min.)
*Asparagus 6-8
Aubergines 6-7
Broad beans 6
Runner beans 7-8
Green Beans 7-8
* Beetroot 15-17
Broccoli 6-7
* Brussels sprouts 6-8
* Cabbage: sliced 7-8
Carrots: sliced 7-8
Small whole carrots 9
Cauliflowers: florets 8-9
Celery 6-8
En-30
Vegetables
Certain varieties of potato are more suited to
microwave ovens than others. For microwave
cooking or combination cooking, the ideal
weight of the potato is 200g - 250g. Jacket
potatoes cook more quickly in the microwave
mode than in the combination cooking mode,
but they are softer. On the other hand,
combination cooking makes for a drier, crispier
texture. After cooking, if you want to brown
your potatoes further, use the GRILL mode
(see the table below)
Jacket potatoes
Before cooking
Wash the potatoes and pierce the skin in
several places. Place the potatoes on the
edges of the glass tray.
After cooking
Remove the potatoes from the oven and cover
them in aluminium foil to keep them hot. Allow
to stand for 5 minutes.
Jacket potatoes - manual cooking table
Manual cooking tables for fresh/frozen vegetables
Use maximum power (1000 W)
*For these vegetables, add more water for more even cooking.
Quantity
Cooking time in minutes at
maximum power (1000 W)
Cooking time in minutes in GRILL
mode for a crispier texture
1 4-5 8-10
2 6-8 10-12
4 10-13 11-13
Page 32

POACHED EGGS
1. Place 100 ml of hot water and a dash of
vinegar and salt in a small bowl.
2. Heat for 1 minute at 1000 W for the water to
boil.
3. Break the egg. Pierce the yolk and the
white of the egg several times.
4. Cover with cling film or a dish, cook eggs at
600W for 30 seconds. (If you want to cook
more eggs, refer to the cooking table).
5. Allow the eggs to stand for 1 minute without
covering, then serve.
Number of eggs
Cooking time at 600 W
Standing time
1 40 sec. 1 min.
2 1 min. 1 min. 30 sec.
3 1 min. 30 sec. 2 min.
SCRAMBLED EGGS
1. Mix the eggs, milk, knob of butter and pinch
of pepper in a Pyrex dish.
2. Heat the mixture at 1000 W (in accordance
with the first cooking period mentioned in
the table).
3. Stir accordingly.
4. Heat the mixture for a second time at
1000 W (in accordance with the second
cooking period mentioned in the table).
5. Allow to stand until the soft eggs become
firmer.
Number of
eggs
Milk
1st cooking
period
Stir
2nd cooking
period
Standing time
1
1
tablespoon
30 sec. Yes 20 sec. 1 min.
2
2
tablespoon
40 sec. Yes 30 sec. 1 min.
3
3
tablespoon
1 min. Ye s 30 sec. 2 min.
Food Power
Cooking
time
(in min.)
Broad beans & dry vegetables- 225g & 600ml of boiling water, cover
Broad beans in brown butter
1000 W
440 W
15
then 30
Chick peas
1000 W
440 W
10
then 40
Marrow
1000 W
440 W
3
then 15
Red beans
1000 W
440 W
15
then 40
Food Power
Cooking
time
(in min.)
Pasta-225g & 1 litre of boiling water, cover
Macaroni 1000 W 12-14
Spagheti 1000 W 8
Lasagne 1000 W 8-10
Tortellini 1000 W 12
Tagliatelle 1000 W 8-9
Quick-cook pasta - 225 g + 1 litre of boiling water
Spaghetti 1000 W 5-7
Pasta shapes 1000 W 6-8
Rice - 300 g + 550 ml of water
White, quick-cook 1000 W 13-15
Brown, quick-cook 1000 W 20-25
White, long grain 1000 W 13-15
En-31
PIERCING
When you cook poached eggs or fried eggs in
a microwave oven, always pierce the yolk and
the white in order to avoid bursting.
BOILED EGGS
Never attempt to cook boiled eggs in a
microwave oven, as they may explode
MANUAL COOKING TABLE
POACHED EGGS
SCRAMBLED EGGS
Eggs, pasta, rice, hot beans and cereals
Stir mid-cooking.
Page 33

Food Weight Preparation
Pizza
Frozen, pre-cooked
Pizza bread
300 g
450 g
Remove packaging and place directly on preheated pizza pan.
Combination 1, approx 10-15 min.
Combination 2, approx 5 min.
Then 5-8 min. on grill 1.
Frozen cake
Cooked cake,
defrosted
300 g
300 g
Remove packaging and place directly on pizza pan.
Combination 2, approx 7 min.
Then around 2-3 min. on grill 3.
Combination 1, approx 5 min.
Then arpprox. 3 min. on grill 3.
Spring rolls
(2) 180 g
(4) 360 g
Remove packaging and place directly on preheated pizza pan.
Combination 1, approx 10 min.
Combination 2, approx 5 min.
Then approx. 7 min. on grill 1.
Turn mid-cooking.
Poultry
Chicken pieces
frozen
500 g
1 kg
Remove packaging and place directly on preheated pizza pan, fat skin side on top.
1000 W (microwave), 8 min., Combination 1, approx 15 min.
1000 W (microwave), 17 min., Combination 1, approx 15 min.
Turn mid-cooking.
Deep-frozen potato
dishes
Quarter pieces of potato
chips
200 g
400 g
Place potatoes on preheated pizza pan.
Combination 2, approx 10 min., then 10-15 min. on grill 1.
Combination 3, approx 10 min., then 10-15 min. on grill 1.
Deep-frozen croissants
40 g/pce.
4 peics.
Do not preheat the pizza pan.
Combination 2, approx 8 mins.
Possibly 2 min. on grill 1.
Petits gâteaux (Muffins)
40g/piece.
2 pieces.
10 pieces.
Do not preheat the pizza pan.
Combination 1, approx 3 min.,then approx 5 min. on grill 3.
Combination 2, approx. 5 min., then approx 5 min. on grill 3.
En-32
Place the pizza pan on the glass tray and pre-heat at 1000 W for 4 minutes. The cooking times below are for reference only, based on food frozen
at -18°C or refrigerated at 5°C.
Pizza Pan
Page 34

Problem Cause Solution
Food cooked in the microwave cools down too
quickly.
The food is not fully cooked. Place the food back in the oven for a few extra
seconds. Do not forget that food coming from
the fridge must cook for longer than food
stored at room temperature
The rice pudding or stew boils over during
microwave cooking.
The dish is too small. For liquid food, use a dish with twice the
volume of food.
The food cooks too slowly in the microwave
oven.
The food stored in the fridge is colder than that
stored at room temperature.
The colder the food, the longer the cooking
time should be.
Meat cooked with the microwave or
combination cooking mode is hard.
The cooking power is too high. You have
salted the food before cooking.
Never salt meat before cooking. If necessary,
salt after cooking.
In the microwave mode, the centre of the cake
is uncooked.
Insufficient cooking and/or standing time. Increase cooking and/or standing time.
Eggs scrambled or poached in the microwave
oven are hard and rubbery.
Cooking time is too long. Be careful when cooking small amounts of egg
as when they are over-cooked, you cannot
remedy the situation.
Quiche/filling is hard and rubbery when I use
combination cooking.
Power is set too high. Use the lowest power setting for these foods.
Cheese sauce is hard and stringy when
cooked in the microwave oven.
The cheese has cooked in the sauce. Add the cheese after cooking. The
temperature of the sauce will melt cheese.
Vegetables are dry when cooked in the
microwave oven.
You have cooked the vegetables without
covering them. The moisture level is low
(especially because the vegetables are not
fresh). You have salted the vegetables before
cooking.
Place a cover over them or cover with cling
film.
Add an extra 2 to 4 tablespoons of water.
If salting is necessary, only do so after
cooking.
Presence of condensation in the oven. This is quite normal and means that the speed
of cooking is greater than the speed of the
extraction of vapour inside the oven.
Wipe the walls with a soft cloth.
The revolving glass tray turns in both
directions.
This is quite normal.
Hot air seems to escape by the door. The oven door does not have a hermatic seal. This is quite normal and does not mean the
oven has a leak.
Blue sparks or arcs appear which I use metal
utensils.
In the microwave mode only, you may not use
metal utensils. In combination cooking mode,
check if the utensils are damaged.
Switch off the oven IMMEDIATELY. Never use
metal utensils in the microwave mode. Check
the minimum weight of the food or the
automatic programmes.
En-33
Solutions to common problems
Page 35

En-34
Recipes
Flounder filets with herb cream
Cut along the length of the flounder filets, season with salt and pepper. Place in layers on a
buttered gratin dish. Chop the basil and parsley and sprinkle over the fish. Place a cover over
the fish. Scatter with flakes of butter and cook on the “gratin” automatic programme.
400 - 500g flounder filets
30g butter
Basil
Parsley
2 tbsp white wine
1 cup of sauce cream
2-3 tbsp breadcrumbs
Salt, pepper
Kohlrabi salad
Wash the kohlrabi and cut into 5mm sticks. Place on a dish, cover and cook on the automatic
programme “vegetables”. Leave to stand covered.
Place 2 tbsp of oil and the onions in a pot, cover and braise for 2-3 min on full power. Add the
white wine or stock and cook on full power for 2 min. Add the remaining oil and the lemon juice
and season with salt and pepper. Add the kohlrabi, cover and cook at 600 W for 2 min. Serve the
salad warm on a plate and garnish with anchovies, olives and chives.
3 small kohlrabi
4 tbsp olive oil
1-2 onions, chopped
1 dl white wine or stock
3 tbsp lemon juice
1 tin of anchovies
Black olives
Salt, pepper
Chives
Tomato au gratin
Cut the tomatoes into 1cm slices and coat with mustard on one side. Place them on a gratin
buttered dish. Braise the bacon pieces and onions for 2 min. on full power. Next, add the herbs
and the mushrooms. Season with salt and pepper and cook for 3 min. on full power. Place the
mushrooms on the tomatoes. Mix the eggs and the cream, season with salt and pepper and
pour on the gratin. Spread the cheese and cook with the automatic programme “gratin” on the
grill rack.
4-6 tomatoes
200g mushrooms, cut thinly
100g bacon pieces
1 onion, chopped
Parsley, chopped
Basil, chopped
1-2 tbsp mustard
3 eggs
1 dl single cream
50g grated cheese
1 tbsp butter
Salt, pepper
Page 36

En-35
Kohlrabi au gratin with boletuses
Leave the boletuses to soak in water for 1 hour. Wash the kohlrabi and cut into 3mm strips.
Cook with the automatic programme “vegetables”. Put to one side. Cut the leek in two
lengthways and then into fine strips.
Braise the onions and the butter for 2 min. on full power. Next, add the leek and the drained
boletuses and cook again for 3 min. on full power. Add the Vermouth, the white wine, the cream
and the sauce paste. Season with salt and pepper and allow to cook uncovered for 5-6 min. on
full power until the sauce is ready. Place the drained kohlrabi on a buttered gratin dish and
spread the sauce on top. Sprinkle the cheese and cook with the automatic programme “gratin”
on the grill rack.
3-4 kohrabi
20g dry boletuses
1 leek
1 onion, chopped
1 tbsp butter
1
⁄2 dl dry vermouth
1 1⁄2 dl white wine
1 tbsp butter or white sauce
paste
30g grated cheese
Salt, pepper
Recipes
Stuffed courgettes
Wash the courgettes and remove the stems. Cut lengthways and remove the flesh with a coffee
spoon.
Place the butter and the onions in a dish, cover and braise for 2 min. on full power. Next, add the
finely chopped courgette flesh and braise again for 2 min on full power. Cut the ham into small
squares, chop the parsley finely and add to the courgette flesh together with the yoghurt. Add
the egg yolks and the Sbrinz cheese. Season well with salt and pepper. Place the mixture in the
courgettes and sprinkle with the remaining Sbrinz cheese. Place on a buttered gratin dish. Add
the stock and cook “au gratin” with the automatic programme “gratin”.
2-3 courgettes
1 onion, chopped
1 tbsp butter
150g ham
Parsley
250g half-fat yoghurt
2 egg yolks
Salt, pepper
50g Sbrinz cheese,
grated
French pear cake
Place the sugar and the water in a Pyrex cake dish. Caramelise for around 5 min. on full power.
Cut the pears into thin strips and place them in the dish. Cream together the butter, sugar and
lemon zest. Add the eggs and continue to beat until the mixture is smooth. Add the Epifin and
the baking powder and mix well and spread the mixture over the pears.
Cook the cake at 600 W for 9 min.
Place the cake on a plate and allow to cool.
80g sugar
3 tbsp water
2-3 pears
100g butter
100g sugar
2 eggs
Half a lemon, zest
100g Epifin
1
⁄2 tsp baking powder
Apple juice cream
Place the eggs, sugar, cornflour and apple juice in a container and beat well.
Cook on full power for 6-8 min. Stir halfway through cooking, finish cooking and stir once more.
Refrigerate. Before serving, mix with a few drops of lemon juice and add the cream.
3 eggs
60g sugar
2 heaped tbsp cornflour
1 lemon, juice and zest
6 dl of apple juice
1 dl whipped cream
Page 37

En-36
Stuffed breast of chicken
Cut a pocket in the chicken breasts. Season on the inside and outside with a pinch of salt,
pepper and paprika. Drain the spinach well and season with salt and pepper. Place over the 4
chicken breasts. Cut the gorgonzola into slices and place on the spinach.
Close the pockets and enclose them with 2 slices of lard.
Heat the roasting plate for 5 min. on full power. Roast each side of the breasts for 3 mins. on full
power. Leave to stand covered. Chop the onion and cook for 2 mins. with the Vermouth. Strain
off. Mix with the mustard, cream, saffron and cornflour. Cook on full power for 2 min. Season
with lemon juice, salt and pepper.
4 chicken breasts
Approx. 200g frozen
spinach
100g gorgonzola
8 slices of lard
Salt, pepper, paprika
Sauce:
1 onion
1
⁄2 dl dry Vermouth
1 tbsp large grain
mustard
1 1⁄2 dl single cream
Pinch of saffron
Pinch of cornflour
1 tbsp lemon juice
Salt, pepper
Recipes
Stuffed beetroot
Wash the beetroot leaves and cook covered on the automatic programme “vegetables”. Chop
the heart of the beetroot and place to one side. Drain the leaves well on paper and flatten the
leafstalks with a knife. Chop the onions, cook covered with the bacon pieces and the beetroot
heart for 3 min. on full power.
Break the egg and place in a cup and cook covered on 600 W for around 40-60 sec. then chop
finely. Mix the parsley and the chopped egg with the bacon pieces/onion mix. Season with salt,
pepper and nutmeg. Place 2-3 leaves together, put a little bit of stuffing on top and roll. Place
the beetroot parcels in a buttered dish. Place the cream and the cheese on top. Cook with the
automatic programme “gratin”.
1 large beetroot
1 large onion
150g bacon pieces
Chopped parsley
80g Sbrinz cheese,
grated
1 egg
1 1⁄2 dl cream
Salt, pepper, nutmeg
1 tbsp butter
Fennel au gratin
Wash the fennels, cut into 4-6 pieces of the same size. Cook covered with the automatic
programme “vegetables”. Butter the au gratin dish and place the fennels on it. Crack the egg and
cook in a cup at 600 W for 40-50 sec. Next, chop it into small pieces. Melt the butter in a dish at
600 W for 1 min. Mix with the egg, the breadcrumb dressing and the Sbrinz cheese. Season the
cream with salt and pepper, spread over the fennels and place the breadcrumb mixture on top.
Cook with the automatic programme “gratin”.
3 fennels
3 tbsp breadcrumbs
1 egg
1 dl cream
2 tbsp Sbrinz cheese, grated
30g butter
Salt, pepper
Vichyssois soup
Place the butter and the onions in a dish and braise for 1 min. on full power. Add the potatoes,
leek, water and stock and cook for 15 min. on full power.
Turn the vegetables into purée with a blender, then add salt, pepper and powdered spices to
taste. Allow to cool. Add the whipped cream to the soup with caution. Place into cups or bowls,
sprinkle with herbs and serve.
1 onion, finely chopped
2 diced potatoes
100g leek, finely chopped
5 dl water
1 tbsp butter
1 tbsp chicken stock
1 dl whipped cream
Salt, pepper, powdered
spices
Page 38

En-37
Recipes
“Dézaley” filets of fish
Add salt, pepper and sprinkle herbs onto the fish filets and leave to marinate for 30 min. Place
the butter, onion, fish and wine in a buttered dish, cover and braise with the automatic
programme “fish”.
Place the stock in a container. Next, add the cream, the tomato purée, the garlic and the sauce.
Bring to the boil, 3 min. on full heat. Add salt and pepper to taste. Pour the sauce on the fish.
Around 400g of fish filets
Salt, pepper
Parsley, dill and tarragon,
chopped
1 onion, chopped
1 dl Dézaley (white wine)
1 dl cream
1 tbsp tomato purée
1 clove of garlic,
chopped
1
⁄2 tbsp clear sauce
Potato and mushroom gratin
Wash the potatoes, peel and cut them into 2mm strips. Cut the mushrooms into similar sized
strips. Chop the leek into 2mm pieces. Butter a gratin dish and put half the potatoes inside.
Place the mushrooms and leek on top and cover with the other half of the potatoes. Season the
cream with salt and pepper and place everything on the vegetables. Sprinkle with cheese and
cook on the automatic programme “gratin”.
400 g potatoes
200 g mushrooms
1 leek
1 tbsp butter
1 1⁄2 dl cream
2-3 tbsp grated cheese
Chocolate cream pears
Peel the pears, cut in two, remove the cores and place in a dish, the cut side facing down. Add
the lemon juice, the wine and 2 tbsp of sugar, cover and cook with the automatic programme
“fish”. Allow the pears to cool, drain and place on a plate. Place 2 dl of milk, the chocolate and
the sugar in a dish. Cook uncovered for 3 min on full power. Place the cornflour in 1/2dl of milk,
pour into the hot milk and stir. Cook for 2 min. on full power. Once the cream has cooled, pour
over the pears.
2 large pears
1
⁄2 lemon, juice
2 tbsp white wine
3 tbsp sugar
2 1⁄2 dl milk
50g chocolate
1
⁄2 tbsp cornflour
Page 39

John Lay Electronics AG
Littauerboden 1
6014 Littau-Luzern
Telefon: 0900 809 809
http://www.panasonic.ch
John Lay Electronics SA
Littauerboden 1
6014 Littau-Lucerne
Téléphone: 0900 809 809
http://www.panasonic.ch
John Lay Electronics
Page 40

F00039G00WP
 Loading...