

Page 1
For models
Microwave Cookery Book
Mikrowellen Kochbuch
Magnetron Kookboek
Livre de recettes pour micro-ondes
Ricettario per forno a microonde
Recetario para Microondas
Livro de Cozedura de Microondas
Ksiqżka kucharska dla kuchni mikrofalowej
√‰ËÁfi˜ ª·БВИЪИО‹˜ ªИОЪФО˘Ì¿ÙˆÓ
NN
F623
NN
F663
NN
Q653
NN
Q623
NN
Q653
NN
F653
Page 2

For further information, please also refer to the operating instructions.
Weitere Informationen entnehmen Sie bitte der beigelegten Bedienungsanleitung.
Voor meer informatie verwijzen wij U naar de gebruiksaanwijzing.
Pour plus d’informations veuillez vous référer à notre mode d’emploi.
Per ulteriori informazioni, si prega di consultare anche le istruzioni d’uso.
Para más información, consulte el manual de instrucciones.
Para mais informações, consulte o manual de instruções.
Bliższc szczegóły dotyczące danego
modelu podane są w fabrycznej instrukcji obsługi.
°È· Û˘ÌÏËڈ̷ÙÈΤ˜ ПЛЪФКФЪ›В˜ Ы˘Ì‚Ô˘Ï¢ı›ÙÂ Î·È ÙÔ ‚È‚ÏÈ¿ÚÈÔ Ì ÙȘ Ô‰ËÁ›Â˜ ¯Ú‹Ûˆ˜.
© Copyrighted by Matsushita Electric UK, Ltd 2003
Page 3
En-1
English
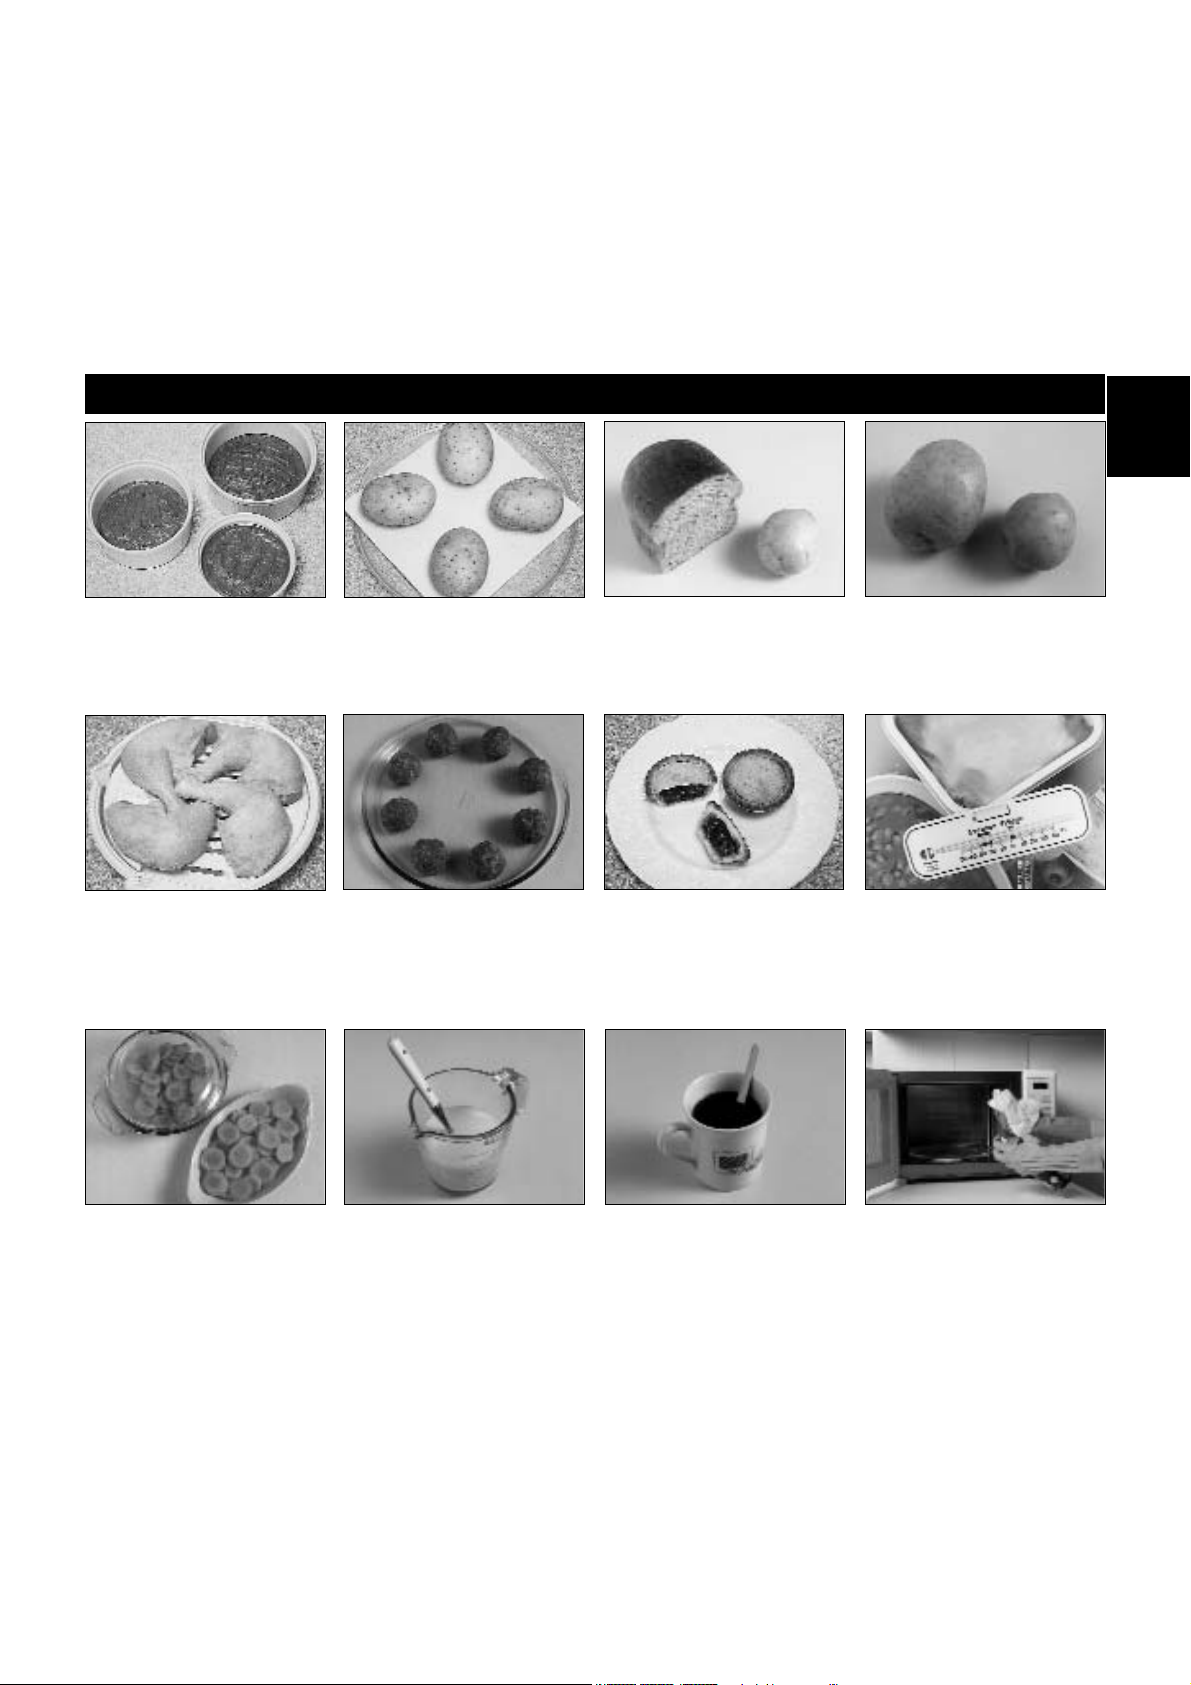
The items in this book are guidelines only. The total time will vary depending on the starting temperature of the food and the container used.
Always check if the food is piping hot before consumption.
Inverter technology is the key
Inverter technology for microwave ovens has been developed by a Panasonic initiative over a period of more than 10 years. It is the key
technology for making a very different type of microwave oven which has a number of special qualities:
• It makes possible the first oven in the industry which controls the amount of microwave energy linearly. This new distribution system allows
cooking and defrosting food without losing its flavour.
• It provides efficient conversion of electrical energy to microwave energy, resulting in minimizing power requirements without sacrificing
microwave output.
• It allows a dramatic enlargement of oven cavity size even in a compact oven body, due to the small size of the inverter circuit, which
replaces the currently used bulky transformer.
• Finally, at the end of the product’s useful life, not using bulky transformers made of iron makes the process of recycling discarded ovens
environmentally friendly.
Cooking with Microwave Energy . . . . . . . . . . . . . . . . . . . . . . . . . . . .2
General Guidelines . . . . . . . . . . . . . . . . . . . . . . . . . . . . . . . . . . . . .2-3
Quick Check Guide to Cooking Utensils . . . . . . . . . . . . . . . . . . . . . .4
Microwave Power Levels . . . . . . . . . . . . . . . . . . . . . . . . . . . . . . . . . .5
Grilling . . . . . . . . . . . . . . . . . . . . . . . . . . . . . . . . . . . . . . . . . . . . . . . .5
Combination Cooking . . . . . . . . . . . . . . . . . . . . . . . . . . . . . . . . . . . . .5
Accessories to Use . . . . . . . . . . . . . . . . . . . . . . . . . . . . . . . . . . . . . .5
Reheating . . . . . . . . . . . . . . . . . . . . . . . . . . . . . . . . . . . . . . . . . . . . . .6
Reheating by Microwave . . . . . . . . . . . . . . . . . . . . . . . . . . . . . . . . .6-7
Microwaving Cooking Tips . . . . . . . . . . . . . . . . . . . . . . . . . . . . . . . . .8
Defrosting Guidelines . . . . . . . . . . . . . . . . . . . . . . . . . . . . . . . . . . . . .9
Defrosting Common Foods . . . . . . . . . . . . . . . . . . . . . . . . . . . . . . .10
Combination Cooking and Reheating Charts . . . . . . . . . . . . . . .11-13
Meat & Poultry . . . . . . . . . . . . . . . . . . . . . . . . . . . . . . . . . . . . . .14-15
Fish . . . . . . . . . . . . . . . . . . . . . . . . . . . . . . . . . . . . . . . . . . . . . . . . .16
Vegetables . . . . . . . . . . . . . . . . . . . . . . . . . . . . . . . . . . . . . . . . . . . .17
Eggs & Cheese . . . . . . . . . . . . . . . . . . . . . . . . . . . . . . . . . . . . . . . .18
Rice, Pasta, Dried Vegetables & Jacket Potatoes . . . . . . . . . . . . . .18
Common Queries Answered . . . . . . . . . . . . . . . . . . . . . . . . . . . . . .19
Contents
Page 4

En-2
General Guidelines
PIERCING
The skin or
membrane on
some foods
will cause
steam to build
up during
cooking.
These foods
must be
pierced or a
strip of skin
should be peeled off before cooking to allow
the steam to escape. Eggs, potatoes, apples,
sausages etc, will all need to be pierced
before cooking. DO NOT ATTEMPT TO BOIL
EGGS IN THEIR SHELLS.
MOISTURE
CONTENT
Many fresh
foods e.g.
vegetables
and fruit, vary
in moisture
content
throughout the
season.
Jacket
potatoes are a
particular example of this. For this reason
cooking times may have to be adjusted
throughout the year. Dry ingredients e.g. rice,
pasta, can dry out further during storage and
cooking times may differ from ingredients
freshly purchased.
CLING FILM
Cling film
helps keep the
food moist
and the
trapped steam
assists in
speeding up
cooking times.
However it
should be
pierced before
cooking, to allow excess steam to escape.
Always take care when removing cling film
from a dish as the build-up of steam will be
very hot. Always purchase cling film that
states on the packet “suitable for microwave
cooking” and use as a covering only. Do not
line dishes with cling film.
VEGETABLES - Boiled potatoes benefit
from standing for 1-2 mins., however most
other types of vegetables can be served
immediately.
DEFROSTING - It is essential to allow
standing time to complete the process. This
can vary from 5 mins. e.g. raspberries, to
up to 1 hour for a joint of meat.
If food is not cooked after
STANDING
TIME, return to oven and cook for
additional time.
Dense foods e.g. meat, jacket potatoes and
cakes, require a STANDING TIME (inside or
outside of the oven) after cooking, to allow
heat to finish conducting to cook the centre
completely.
STANDING TIME
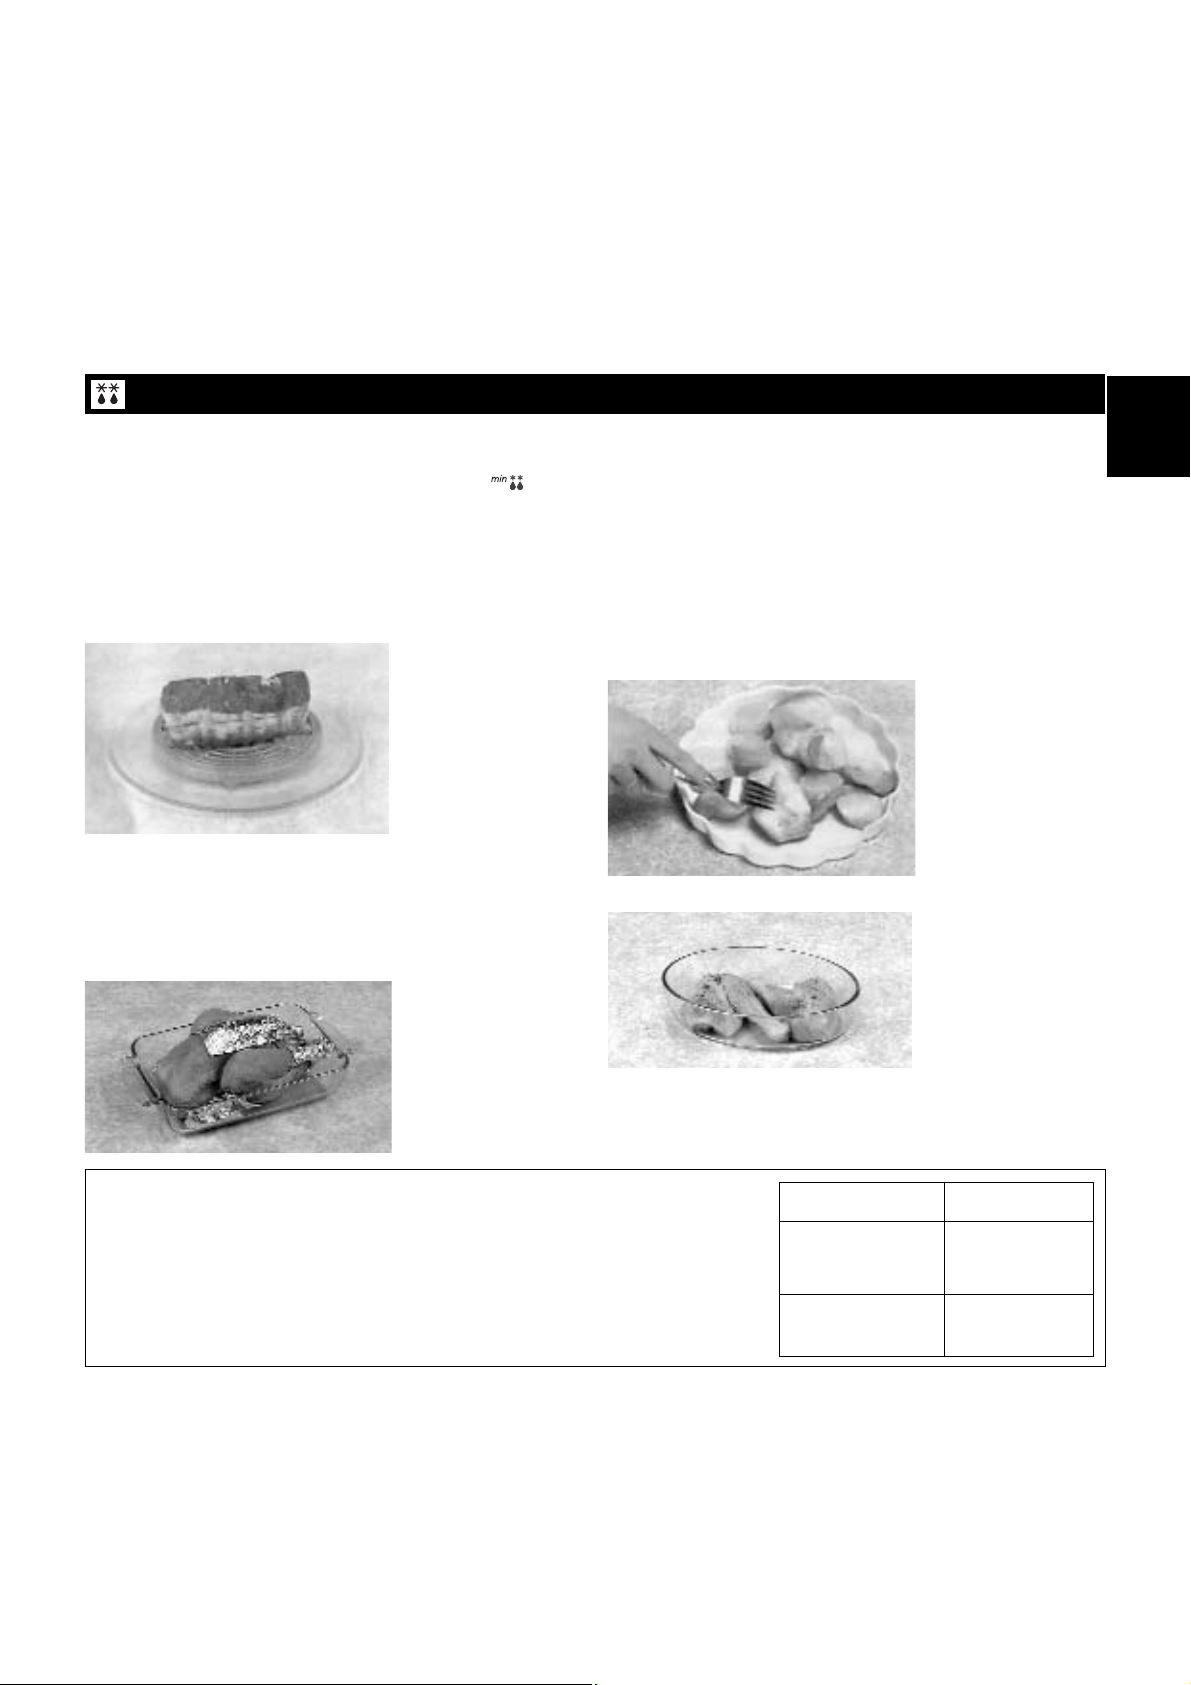
MEAT JOINTS -
Stand 8 - 10 mins. wrapped in tin foil.
JACKET POTATOES -
Stand 5 mins. wrapped in tin foil.
LIGHT CAKES - Stand 5 mins. before
removing from dish.
RICH DENSE CAKES - Stand 15-20 mins.
FISH - Stand 2-5 mins.
EGG DISHES - Stand 2-3 mins.
PRECOOKED CONVENIENCE
FOODS - Stand for 5 mins.
PLATE MEALS - Stand for 2-5 mins.
Microwaves are a form of high frequency electromagnetic waves
similar to those used in radios. Electricity is converted into microwave
energy by a magnetron tube. The microwaves travel from a
magnetron tube to the oven cavity where they are reflected,
transmitted or absorbed.
Reflection
Microwaves are reflected by metal similar to the way a ball would
bounce off a wall. Most metal cookware and utensils are not
recommended for microwave cooking, since they would produce
uneven cooking. Also, if a metal dish is placed close to the oven wall
(which is also metal), arcing (bluish sparks) could occur. Arcing can
damage an oven or cause a fire.
Transmission
Microwaves pass through some materials such as paper, glass and
plastic much like sunlight shining through a window. Because these
substances do not absorb or reflect the microwave energy, they are
ideal materials for microwave cooking containers. However, they will
get hot during cooking, because as food cooks, heat is conducted
from the food to the dish.
Absorption
Microwaves are absorbed by food. They penetrate to a depth of
about 2-4 cm. Microwave energy excites the molecules in the food
(especially water, fat and sugar molecules), and causes them to
vibrate very quickly. The vibration causes friction and heat is
produced. In large foods, the heat which is produced is conducted to
the centre to finish cooking the food.
Cooking with Microwave Energy
Page 5
En-3
English
DISH SIZE
Follow the dish sizes given in the
recipes, as these affect the cooking
and reheating times. A quantity of
food spread in a bigger dish
cooks and reheats more quickly.
QUANTITY
Small quantities cook faster than
large quantities, also small meals
will reheat more quickly than
large portions.
DENSITY
Porous airy foods heat more
quickly than dense heavy foods.
SHAPE
Even shapes cook evenly. Food
cooks better by microwave when
in a round container rather than
square.
ARRANGING
Individual foods e.g. chicken
portions or chops, should be
placed on a dish so that the
thicker parts are to the outside.
SPACING
Foods cook more quickly and
evenly if spaced apart. NEVER
pile foods on top of each other.
INGREDIENTS
Foods containing fat, sugar or salt
heat up very quickly. The filling
may be much hotter than the
pastry. Take care when eating. Do
not overheat even if the pastry
does not appear to be very hot.
STARTING TEMPERATURE
The colder the food, the longer it
takes to heat up. Food from a
fridge takes longer to reheat than
food at room temperature.
General Guidelines
COVERING
Cover foods with microwave cling
film or a self-fitting lid. Cover fish,
vegetables, casseroles, soups.
Do not cover cakes, sauces,
jacket potatoes, pastry items.
TURNING AND STIRRING
Some foods require stirring
during cooking. Meat and poultry
should be turned after half the
cooking time.
LIQUIDS
All liquids must be stirred before
and during heating. Water
especially must be stirred before
and during heating, to avoid
eruption. Do not heat liquids that
have previously been boiled. DO
NOT OVERHEAT.
CLEANING
As microwaves work on food
particles, keep your oven clean at
all times. Stubborn spots of food
can be removed by using a
branded oven cleaner, sprayed
onto a soft cloth, always wipe the
oven dry after cleaning. Avoid any
plastic parts and door area.
Page 6

En-4
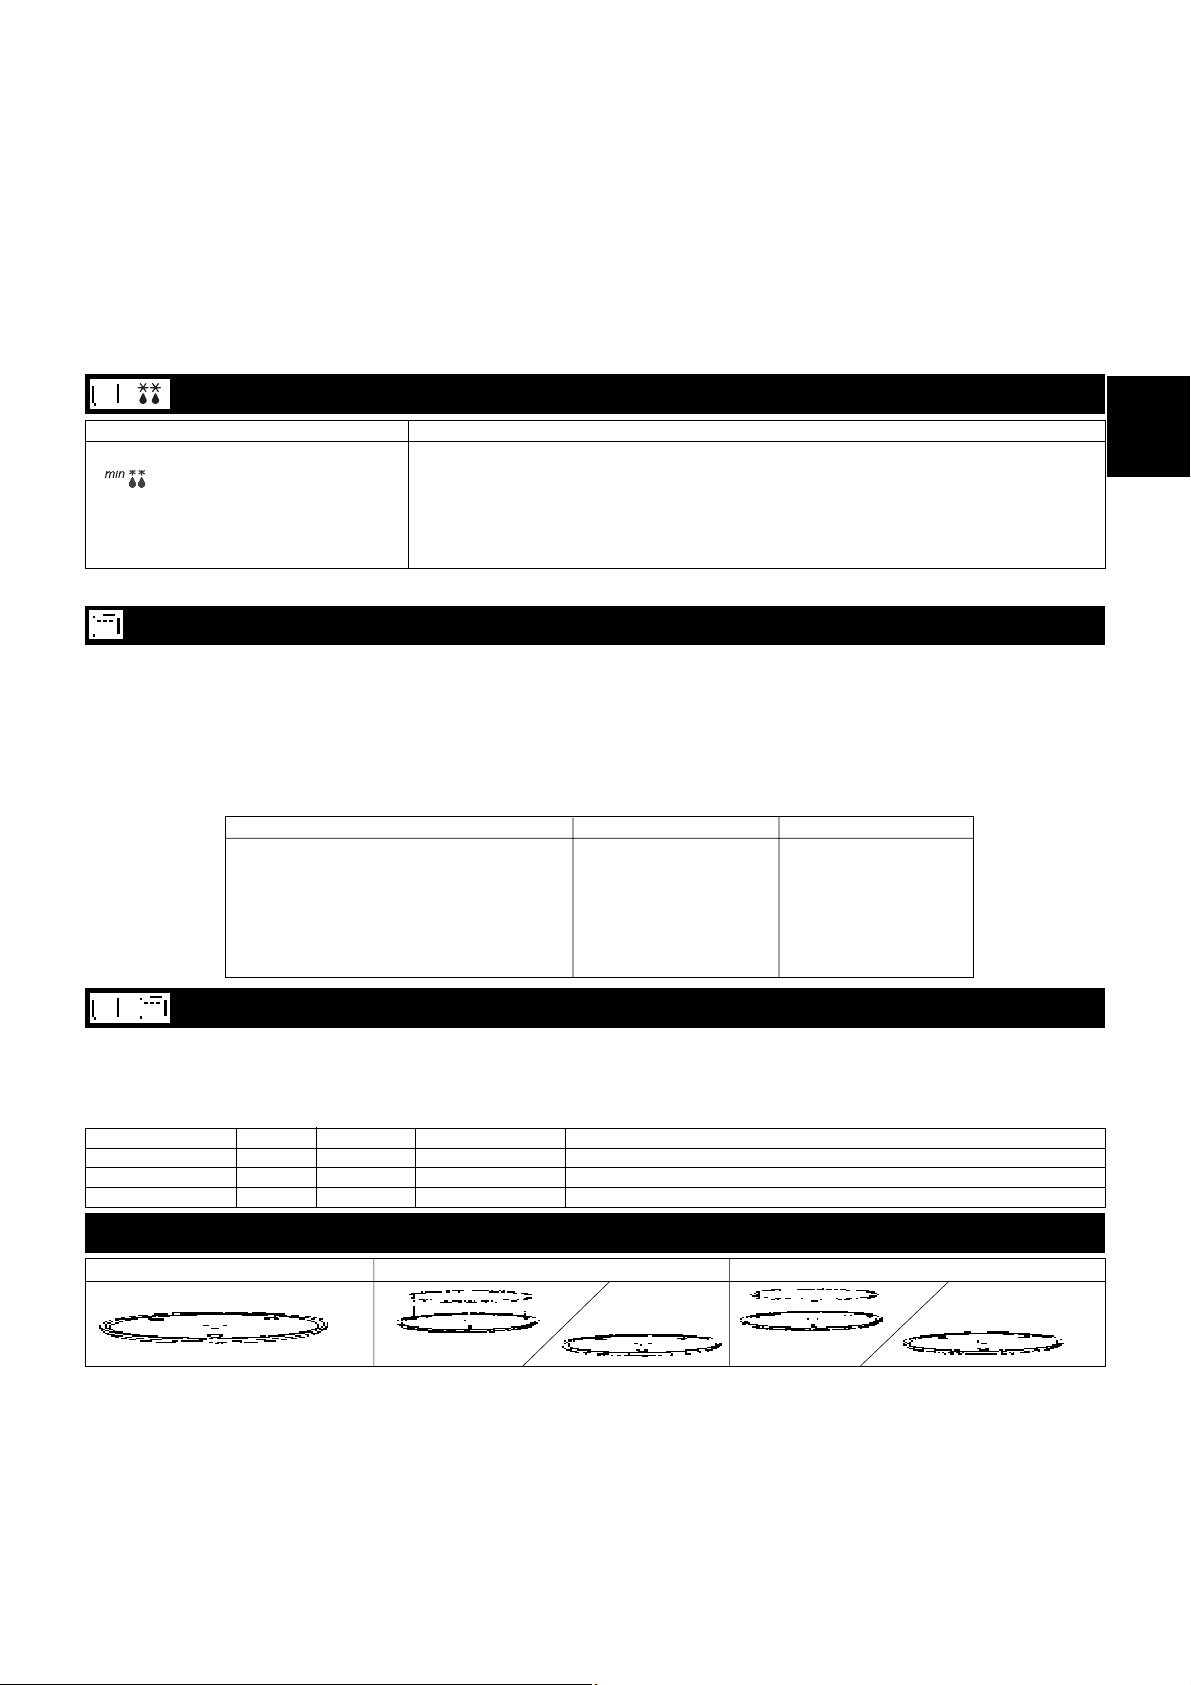
Quick Check Guide to Cooking Utensils
Heat resistant china and
ceramics
Pottery, Earthenware,
Stoneware
Aluminium foil
Cling film
Wicker, Wood, Straw
baskets
Foil/Metal containers
Heat resistant
glass
Microwave-safe plastic
cookware
Cookware For Microwave For Grill For Combination
✔
✔✔
✔
✔
✔
✔
✔
✘
✘
✘
✘
✘
✘
✘
✘
✘
✘
✘
✘
✔
✔
✔
✔
Do not use dishes with a metal
rim or pattern; or jugs or mugs
with glued handles.
Small amounts of aluminium foil can
be used to SHIELD and prevent food
from overheating when cooking or
defrosting. Take care that the foil
does not touch the sides or top of the
oven.
Page 7
En-5
English
Grilling
Combination Cooking
Power Level Use
Max. Power: 1000 W Reheating meals and sauces; Cooking fish, vegetables, sauces, and preserves
270 W (*) Defrosting frozen foods
600 W Roasting; Cooking egg sauces and sponge cakes; Heating milk
440 W
(NN-Q543/NN-Q523/NN-Q553) Cooking and reheating chicken casseroles and quiches
250 W Cooking stews, casseroles, rice puddings, rich fruit cakes, and egg custards
Note: (*) CYCLIC DEFROST with automatic standing time (see page 9).
DO NOT ATTEMPT TO PREHEAT THE GRILL.
The quartz Grill on your oven gives fast, even cooking for a wide
variety of foods.
There is 1 Grill setting of 1300 W.
Place food to be grilled on the wire rack or in a shallow dish on wire
rack. Place this on the turntable. For large weight foods, place the
dish directly on the turntable.
The food being grilled should normally be turned over after half the
grilling time.
Never cover foods when grilling.
There is NO MICROWAVE POWER ON THE GRILL ONLY
PROGRAM.
First side Second side
Steak (4 pieces, well done) approx. 10 mins. approx. 10 mins.
Loin of pork (slices) approx. 12 mins. approx. 10 mins.
Porkchops 12-14 mins. approx. 12 mins.
Kebabs approx. 12 mins. approx. 12 mins.
Sausages 6-7 mins. approx. 6 mins.
Chicken legs 15-20 mins. 15-20 mins.
Toast 3-4 mins. 3 mins.
Combination cooking is ideal for many foods. The Microwave power
cooks them quickly, while the Grill provides traditional browning and
crisping; all of this happening simultaneously.
The following 3 combination modes are available:
NOTE:
• Never cover foods when cooking on a Combination program.
• For small quantities do not cook by Combination, cook by Grill or
Microwave only for best results.
• Do not preheat the oven on Combination.
Microwave Power Levels
Accessories to Use
Approximate Times for Grilling
Microwave Grill Combination
+
_
Combination mode Display Grill power Microwave power Uses
1 G1-600 W 1300 W 600 W White meat, lamb, whole poultry, gratin dishes. Preheating of pizza pan.
2 G1-440 W 1300 W 440 W Sausages, red meat, pieces of poultry, fish.
3 G1-250 W 1300 W 250 W 4/4 style cakes, quiches, pork chops, gratin dishes with eggs.
Page 8

En-6
Many convenience foods are readily available in supermarkets. You
may also wish to reheat homecooked food or leftovers. This can all
be done safely in your oven, however you must check the food
carefully to see if it is piping hot before serving, just as you would in
a conventional oven.
Chilled foods to be reheated must also be stored correctly.
How do I choose which method to reheat by?
The heat method i.e. Microwave only or Combination, depends on
the type of food to be reheated. For foods that do not require
browning, reheat by microwave only. For foods that do require
browning, reheat by Combination.
How long do I reheat foods for?
There are reheating charts for Microwave and Combination: these
charts give timings that are a guideline ONLY, as the exact time will
depend on the weight of the food, size of the dish used and start
temperature.
What should I do if the food I am reheating does not
appear in the charts?
It is not possible to test every food available for the following charts,
however we have selected a great variety of foods, and suggest that
by following the guidelines given, you can reheat safely and
successfully.
Stirring and Turning
Whenever possible, foods should be stirred or turned over during
reheating. This helps ensure that the food reheats evenly on the
outside and in the centre.
Standing Time
Many foods require a STANDING TIME after reheating. Standing
time is a rest time which allows the heat in the food to continue to
transfer to the centre, thus eliminating cold spots. If the food has
been covered during the reheating time, then leave the covering on
during the standing time. Stand time is particularly important for
dense foods e.g. Lasagnes, Gratins, etc and those foods that cannot
be stirred during reheating.
When is food reheated?
Reheated food should be served “piping hot” i.e. steam should be
visibly emitted from all parts. As long as good hygiene practices have
been followed during the preparation and storage of the food, then
reheating by microwave or Combination present no added safety
risks.
Foods that cannot be stirred should be cut with a knife to test that
they are well heated through.
Even if manufacturer’s instructions or the times in the reheating
charts have been followed, it is still important to check that the food
is piping hot. If in doubt, always return the food to your oven for
further reheating.
Reheating by Microwave
Reheating
Food Weight/quantity Fresh Frozen
DELICATESSEN STARTERS
- croque monsieur 1 piece (170 g) MAX 1 min MAX 2 mins 30 secs to 3 mins
2 pieces (320 g) MAX 2 mins MAX 5 mins
- shellfish (4) 1 piece (170 g) MAX 2 mins MAX 3 mins
2 pieces (220 g) – MAX 6 to 7 mins
- unfilled pancake (2) 1 piece MAX 30 secs –
- stuffed pancake (2) (3) 1 piece (150 g) – MAX 3 to 4 mins
2 pieces (300 g) – MAX 5 mins
- soup (2) 400 g MAX 4 mins –
1 litre MAX 6 to 7 mins MAX 11 to 12 mins
- small pizza (1) 1 piece (160 g) MAX 1 min MAX 2 mins 30 secs to 3 mins
- American pizza 1 piece (400 g) MAX 4 to 5 mins MAX 7 to 8 mins
- small quiche (1) 1 piece (130 g) 600 W 1 min 10 secs MAX 3 mins
- large quiche 1 piece (400 g) 600 W 3 mins 600 W 7 to 8 mins
- Nem, Samosa (3) 2 pieces (100 g) MAX 15 to 20 secs –
READY-COOKED DISHES
- stuffed tomatoes 1 piece (170 g) MAX 2 mins MAX 6 to 7 mins
- Chilli con Carne (2) (3) 400 g MAX 3 mins 40 secs –
- Chicken Korma with rice (2) (3) 350 g – MAX 6 mins
- Quenelles (2) (3) 6 pieces (240 g) – 600 W 6 mins
- Snails (2) (3) 12 pieces (100 g) 440 W 2 mins 600 W 2 mins - 2 mins 30 secs
- Gratin dishes (starchy with meat) (4) 300 - 400 g MAX 3 mins MAX 8 to 10 mins
600 g MAX 6 to 8 mins MAX 13 to 14 mins
1 kg MAX 10 to 11 mins MAX 16 to 18 mins
Page 9

English
Reheating by Microwave
BABY BOTTLES and FOOD JARS - CAUTION
Milk or formula MUST be stirred or shaken thoroughly before
heating and again at the end, and tested carefully before feeding
a baby.
For 210-240 ml of milk at fridge temperature, remove top and teat.
Heat on 1000 W for 25-30 secs.
CHECK CAREFULLY.
For 90 ml of milk at fridge temperature, remove top and teat. Heat on
1000 W for 10-15 secs. CHECK CAREFULLY.
N.B. Liquid at the top of the bottle will be much hotter than at the
bottom of the bottle and must be shaken thoroughly before checking
the temperature.
(1) Remove packaging and wrap in absorbent paper. (2) Cover. (3) Stir halfway through cooking time. (4) Remove the aluminium tray and put
the gratin in a heat-resistant microwaveable dish.
Food Weight/quantity Fresh Frozen
READY-COOKED DISHES (cont.)
- vegetable gratin (with/without meat) (4) 300 - 400 g MAX 6 mins MAX 11 to 13 mins
1 kg MAX 12 mins MAX 18 mins + 600 W 6 mins
- fish gratin (4) 450 g – 600 W 12 to 15 mins
1 kg – MAX 18 mins + 250 W 5 mins
- fish in sauce (2) (3) 225 g – MAX 6 to 7 mins
FILLINGS
- starchy (2) 300 g MAX 2 to 3 mins MAX 4 to 5 mins
- vegetables (2) 100 g MAX 1 min to 1 min 30 secs –
200 g MAX 1 min 30 secs to 2 mins –
- purée (2) (3)
of potato 200 g MAX 1 min 30 secs MAX 4 mins 30 secs
of vegetables 200 g MAX 1 to 2 mins MAX 5 mins
400 g MAX 3 mins 30 secs MAX 8 mins
- spaghetti in sauce (2) 210 g MAX 2 mins –
450 g MAX 4 mins –
- rice (2) 150 g MAX 1 min MAX 2 mins 30 secs
300 g MAX 2 mins 30 secs MAX 4 mins 30 secs
MEAT AND FISH
- hamburger (raw) (2) 1 piece (150 g) – MAX 1 min 30 secs
- cocktail sausages (2) (3) 120 g 250 W 2 to 3 mins –
- pieces of cooked meat
minced steak (2) 100 g 600 W 40 to 50 secs –
pork 2 pieces (2) 130 g 600 W 1 min 30 secs –
lamb 2 pieces (2) 160 g 600 W 1 min –
beef 2 pieces (2) 120 g 600 W 50 secs –
chicken leg (2) 205 g MAX 1 min 40 secs –
chicken nuggets 10 pieces (200 g) – MAX 2 mins 30 secs
cordon bleu 1 piece (100 g) – MAX 2 mins
MISCELLANEOUS
- baby food 30 g 600 W 15 secs Test –
(small pot at room temperature) 120 g 600 W 25 secs Test –
200 g 600 W 40 secs Test –
- breakfast pastries (1) 2 x 50 g – MAX 30 to 40 secs or 3 mins
- bread (1)
- sliced sandwich bread 800 g – 8 mins
- slice 60 g – MAX 40 secs
- baguette 150 g – MAX 30 to 40 secs
- 1 wholemeal loaf 500 g – MAX 2 mins 30 secs + 1/2 hr stand
- rye bread roll 1 piece (85 g) – MAX 40 secs
3 x 85 g – MAX 1 min 10 secs
En-7
Page 10

En-8
To soften butter for easy spreading on removal from the fridge
Soften for 35-40 seconds on (for 150g). Remove any foil
beforehand.
Swelling dried fruit
Add 4 tablespoons of water to 200 g of raisins or prunes, (they can
be swollen with rum for cakes). Stir and heat on 1000 W for 2 to 3
minutes. Allow to stand for 10 minutes.
Restoring cheese to room temperature
Cheese removed from the refrigerator must be placed in the oven
and "warmed" for 30 seconds -1 minute (depending on the size of the
cheese) at 250 W.
Blanching almonds or hazelnuts
Cover with hot water and cook for 3-6 minutes on 1000 W (return to
boil). Cool, drain and the skin is then easy to remove.
Drying herbs
Place absorbent paper on the turntable. Carefully spread out the
finely chopped, fresh herbs on the paper. Repeat several times if
necessary. Heat on 1000 W for a few minutes, checking them every
30 seconds until the herbs begin to dry. Extreme care must be taken
to ensure that the herbs do not remain in the oven too long;
otherwise, they will disintegrate, and possibly catch fire. Leave the
herbs on the absorbent paper for a further 2 hours at room
temperature, then store in air-tight containers.
Making caramel
Cook 100 g of sugar with 2 tablespoons of water in a bowl for 23 minutes on 1000 W, checking halfway-through cooking time.
Remove caramel before it becomes darkened since it will continue to
cook outside. You can stop the cooking with 2 tablespoons of very
hot water (beware of sharp edges).
Liquifying hardened honey
Remove the lid to the pot, place in oven and heat on 250 W for 3050 seconds, depending on the quantity. Stir and repeat if necessary.
Croutons in minutes
Cut two slices of white bread into small cubes. Spread out these
cubes on a plate. Heat on 1000 W for 2 minutes then allow to stand
for 5 minutes. You can rub a clove of garlic on the slices of bread
before cutting them or drizzle with a few drops of olive oil.
How to obtain more juice from an orange or a lemon
Before squeezing, place orange or lemon in microwave for 30-40
seconds on 1000 W, then squeeze immediately; this will produce
more juice.
Melting butter
100g of butter in a ramekin dish covered with a saucer will melt in
around 1 minute at 600 W.
Melting chocolate
Break 100 g chocolate into little pieces into a bowl and heat at 600 W
for 2-2
1
/2 minutes (the time may vary depending on the cocoa and
sugar content). Stir at least once during cooking.
Leaving dough to prove
Place the covered dough in the oven and heat for around 5 minutes
on (for 500 g of dough). Leave the dough in the oven (away
from air currents) until it has doubled in volume.
Making mulled wine
In an ovenproof glass (or mug), mix together 20 CL of red wine, the
zest of a lemon, a pinch of cinnamon, one clove and 2-4 teaspoons
of sugar according to taste. Heat on 1000 W for 1-1
1
/
2 minutes.
"Deodorise" your oven
To rid your oven of that "fishy" smell, place a bowl of white wine
vinegar or water with the juice of a lemon inside the oven. Heat on
1000 W for 5 minutes. Wipe off the steam that collects on the oven
walls.
Preparing a hot compress
Heat a clean, damp, folded cloth on a plate for 1-2 minutes on
1000 W. Check temperature before applying the cloth.
Microwave Cooking Tips
Page 11
En-9
English
This feature allows you to enter the weight
in grams and the oven will select the
correct defrosting time for the foods
described. Do not use for porous foods e.g.
bread, cakes and convenience foods etc.
See Operating Instructions for selection of
the grams. During the defrosting process,
the oven will beep to remind you to check
the food i.e. turn, shield or break the food
apart, as shown above.
There are two categories for Auto Weight
Defrost:
Defrosting Guidelines
The biggest problem when defrosting food in a microwave is to get
the inside defrosted before the outside starts to cook.
For this reason Panasonic have made the defrosting on your oven
CYCLIC DEFROST, just select the 270 watts DEFROST pad
and set the required time. The oven then divides this time into 8
stages. These stages alternate between defrosting (total of 4) and
standing (total of 4).
During the standing stages there is no microwave power in the oven,
although the light will remain on and the turnatable will turn. The
automatic stand times ensure a more even defrost and for small
items the usual stand time can be eliminated.
Recommended
Weight (Min.- Max.)
1. Small pieces
e.g. Fish/Chops, 100 - 1200 g
Sausages,
Chicken Portions
2. Big pieces
e.g. Meat Joints, 400 - 2000 g
Whole Chicken
Tips for Defrosting
Auto Weight Defrost
Check the defrosting several times, even if you use the automatic
buttons. Observe the standing times.
STANDING TIMES
Individual portions of
food may be cooked
almost immediately
after defrosting (5
minutes standing time
for steaks, 15 minutes
for fruit and pastry). It
is normal for large
portions of food to be
frozen in the centre.
Before cooking, allow
to stand for a minimum of one hour. During this standing time, the
temperature becomes evenly distributed and the food is defrosted by
conduction. NB If the food is not going to be cooked immediately,
store it in the refrigerator. Never refreeze defrosted food without first
cooking it.
JOINTS AND POULTRY
It is preferable to
place the joints on an
upturned plate or
plastic rack so that
they are not resting in
the juices. It is
essential to protect
delicate or projecting
parts of this food with
small pieces of foil to prevent these parts from cooking. It is not
dangerous to use small pieces of foil in your oven, provided they do
not come into contact with the oven walls.
MINCED MEAT OR CUBES OF MEAT AND SEAFOOD
Since the outside of
these foods quickly
defrosts, it is
necessary to separate
them, break the
blocks into pieces
frequently while
defrosting and remove
them when they have
defrosted.
SMALL PORTIONS OF FOOD
Chops and chicken
pieces must be
separated as soon as
possible so that they
defrost evenly
throughout. Fatty parts
and the ends defrost
more quickly. Place
them near the centre
of the turntable or
protect them.
Page 12

En-10
Defrosting Common Foods
NOTES
# turn this food halfway through defrosting and protect ends and
projecting parts with foil.
* stir, turn or separate several times during defrosting.
Select Defrost Power 270 W then the approximate time given below.
The times given below are guidelines only. Always check the progress of the food by opening the oven door and then
re-starting. For larger quantities adjust times accordingly. It is not essential to cover food during defrosting.
Food Weight/quantity Time in minutes Standing times (minimum)
MEAT
- joints with bone# 500 g 18 - 20 60
- roast filleted# 500 g 20 - 22 70
- chops# 500 g 8 - 12 15
- cutlets# 250 g 6 - 7 10
- kidneys* 250 g 7 - 8 10
- lean beef* 430 g (2) 11 - 12 10
- entrecôte* 150 g 4 - 6 10
- minced beef, sausage meat, pork mince* 500 g 10 - 12 10
- hamburger* 200 g (2) 6 - 7 10
400 g (4) 10 - 12 10
- meat for stewing/braising* 500 g 12 - 14 15
- whole poultry# 500 g 12 - 13 60
- poultry pieces# 1 kg (4) 22 - 24 30
- poussin# 400 g 15 30
- rabbit# 500 g 14 - 15 30
- pork sausages* 300 g (2) 10 - 11 15
BUTTER 250 g 2 10
FRUIT COULIS 200 g 3 - 4 10
CHEESE* 450 g 3 10
RED FRUIT* 200 g 5 - 6 10
300 g 9 10
500 g 12 10
CAKES AND PUDDINGS
- Victoria Sandwich Cake 400 g (1) 7 10
- Black Forest 550 g (1) 4 - 5 15
- Bavarois 110 g (1 portion) 8 seconds 15
- raspberry tart 470 g (1) 10 15
CONCENTRATED FRUIT JUICE 200 ml 4 4
PASTRY
- sweet flan or shortcrust* 370 g (block) 4 - 5 5
- puff* 300 g (block) 3 - 4 5
FISH
- whole# 400 g (2) 10 - 12 15
- fillets# 500 g (4) 13 - 14 15
- fish steak with bone* 380 g (2) 10 15
- thick steaks without bone* 200 g (2) (4) 9 15
- shrimps/prawns* 200 g 7 10
Page 13

En-11
Combination Cooking and Reheating Charts (NN-F663/NN-F623/NN-F653)
(1) Put in a heat-resistant microwaveable dish (or a piece of greaseproof paper) on the wire rack. (2) Remove packaging and place directly on
the wire rack. (3) Turn or stir halfway through cooking time.
English
Food Weight/quantity Time required - fresh Time required - frozen
ENTREES
- croque monsieur (2) (3) 1 piece (100 g) 1 min 30 secs Combi 1 + 3 mins grill 3 mins Combi 1
2 pieces (300 g) 5 mins Combi 2 3 mins 30 Combi 1
1 piece (150 g) 3 to 4 mins Combi 1 + 1 min grill 3 to 4 mins Combi 2
- shellfish (1) 1 piece (100 g) – 5 mins Combi 2
(remove croissant halfway through) 1 piece (170 g) 2 mins 30 secs Combi 1 + 2 mins grill 5 to 7 mins Combi 2
2 pieces (2 x150 g) 4 to 5 mins Combi 1 7 mins 30 secs Combi 1
- cheese croissant, gnocchi (1) 1 piece (160 g) 3 to 4 mins Combi 1 3 mins 30 secs Combi 2
2 pieces (300 g) 4 to 5 mins Combi 1 –
- roulé au fromage (1) (3) 1 piece (130 g) 3 mins Combi 1 3 mins Combi 2
- large sausage roll (2) (3) 1 piece (130 g) 1 min 40 secs Combi 3 3 mins Combi 1
- stuffed pancakes (1) (3) 1 piece (150 g) – 4 mins 30 secs Combi 1
1 piece (190 g) 3 mins Combi 1 –
2 pieces (2 x 130g) 3 mins 30 secs to 4 mins Combi 2 7 mins Combi 1
- mini-quiches (1) 12 pieces (180 g) MAX 50 secs + 2 mins grill MAX 2 mins + 3 mins grill
- American pizza (2)
small 1 piece (200 g) 2 mins Combi 3 + 2 mins grill MAX 3 mins + 3 mins grill
big 1 piece (450 g) – 5 to 6 mins Combi 1
1 piece (750 g) – 8 mins Combi 1 + 2 min grill
- pizza (2)
small 1 piece (200 g)
4 mins Combi 2
MAX 2 mins 10 secs + 3 to 4 mins grill
1 piece (300 g) 3 mins Combi 1 + 1 min 30 secs grill –
big 1 piece (400 g) 3 mins 30 secs Combi 1 + 1 min 30 secs grill Autopizza***
1 piece (600 g) 5 mins Combi 1 + 1 min 30 secs grill Autopizza***
thin crust 1 piece (500 g) 4 mins Combi 1 + 1 min 30 secs grill –
calzone (3) 1 piece (420 g) 3 mins Combi 1 + 2 mins grill –
- small quiche (2) 1 piece (130 g) 2 mins Combi 3 –
1 piece (200 g) 4 mins Combi 2 –
2 pieces (300 g) 4 mins Combi 3 Autoquiche***
- large quiche 1 piece (400 g) 3 mins 30 secs Combi 1 –
1 piece (500 g) 4 mins 30 secs Combi 1 + 1 min 30 secs grill Autoquiche***
1 piece (600 g) 5 mins Combi 1 Autoquiche***
- double crust pastry pie with cheese, 1 piece (300 g) 4 to 5 mins Combi 1 –
- ham or bacon filling (2) (3) 1 piece (500 g) 6 to 7 mins Combi 1 –
- double crust mushroom pie 1 piece (450 g) 8 mins Combi 1 –
COOKED DISHES
- Lasagne Bolognaise (1) 130 g 2 mins Combi 1 + 3 mins grill –
300 g 6 to 8 mins Combi 2 AutoGratin***
1 kg Combi 1 10 to 12 mins AutoGratin***
- fish gratin (1) 450 g – AutoGratin***
800 g – AutoGratin***
- vegetable gratin (1) 450 g 5 - 7 mins Combi 1 AutoGratin***
1 kg 12 - 14 mins Combi 1 AutoGratin***
SIDE DISHES
- Dauphine potato (1) (3) 200 g – 4 mins 30 secs Combi 1
- noisettes potato (1) (3) 350 g – 4 mins Combi 1 + 3 mins grill
- Duchesse potato (1) 500 g – 7 mins Combi 1 + 7 mins grill
- oven chips (1) (3) 400 g – 8 to 10 mins Combi 1
MEAT AND FISH
- Confit of duck (1) (3) 2 pieces (400 g)
4 mins Combi 1 + 3 mins grill
–
- Cordon bleu (1) (3) 1 piece (120 g) 4 mins Combi 1 3 mins 30 secs Combi 1
- Chicken nuggets (1) (3) 10 pieces (200 g) 3 mins Combi 1 + 2 mins
grill
6 mins Combi 2
MISCELLANEOUS
- ready-cooked double crust almond pie (2) (3)
1 piece (400 g) 3 mins to 3 min 30 secs Combi 3 4 to 5 mins Combi 2
- apricot crumble (1) 1 piece (300 g) – 5 to 6 mins Combi 1
- croissants & other types of sweet rolls (2) (3)
1 piece (60 g) Grill 2 mins MAX 12 secs + 2 mins grill (or Auto)
Page 14

En-12
Cooking Chart For Your Pizza Pan (NN-F663/NN-F623)
Food Weight/quantity Fresh Frozen
- appetisers - tartlets 12 pieces (160 g) – 2 mins 30 secs Combi 1
- appetisers - vol-au-vents (for cooking) 15 pieces (210 g) – 7 mins 30 secs Combi 2**
- choux pastry 20 pieces (150 g) – 1 min 30 secs Combi 1**
- crique lardons-fromage 1 x 170 g 4 mins Combi 2 3 mins Combi 1 + 2 mins grill
- tarte alsacienne 1 x 120 g 4 mins Combi 3 3 mins 30 secs Combi 1
PIZZA
- standard crust 2 x 140 g 4 mins 30 secs Combi 2 –
200 g – 3 mins Combi 1
300 g 6 mins Combi 1 7 mins Combi 1
500 g 5 mins Combi 3 6 mins Combi 1
- thin crust 200 g 4 mins Combi 3 3 mins Combi 1
250 g 2 mins Combi 1 + 2 mins grill** 3 mins Combi 1
- American style 500 g – 6 mins Combi 1
- McCain rise and up 500 g – 10 mins 30 secs Combi 1
QUICHES & PIES
- quiche lorraine 1 x 100 g – 2 mins 30 secs to 3 mins Combi 1
2 x 150 g 3 mins Combi 2 –
150 g – 2 mins 30 secs to 3 mins Combi 1
400 g – 5 to 6 mins Combi 1
- leek quiche 2 x 120 g – 5 mins Combi 1
400 g – 6 mins 30 secs Combi 1**
- Savoie pie 450 g 4 mins 30 secs to 5 mins Combi 1** 10 min Combi 1* + **
- double crust mushroom pie 450 g 6 to 7 mins Combi 1** –
- seafood quiche 350 g 4 mins Combi 2** –
- quiche with onion and anchovy filling 1 x 150 g – 2 mins 40 secs Combi 1
- stuffed crepes 4 pieces (200 g) – 3 mins Combi 1
2 pieces (100 g) – 1 min 40 secs Combi 1*
- stuffed pancakes 2 pieces (140 g) 3 mins Combi 2 5 mins Combi 1
- roulé au fromage, large sausage roll 130 g 2 mins Combi 3 2 mins 20 secs to 3 mins (roulé) Combi 3
2 x 130 g 2 mins 30 secs Combi 1 3 mins Combi 1**
- chicken vol-au-vents 1 piece (150 g) 2 mins 20 secs Combi 1 4 mins Combi 1 (remove the lid)
2 x 150 g 3 mins Combi 1 6 mins 30 secs to 7 mins Combi 1
(remove the lid)
- gnocchis 2 x 130 g – 6 mins Combi 1
- croque-monsieur 1 x 100 g 3 mins Combi 3* –
2 x 100 g 4 mins Combi 3 + 1 min grill –
1 x 160 g 3 mins 30 secs to 4 mins Combi 3 3 mins Combi 1
2 x 160 g 5 to 6 mins Combi 3 5 mins Combi 1
- croque-bacon/tomato 1 x 140 g 2 mins 30 secs Combi 2 3 mins 30 secs Combi 1
POTATOES
- oven chips 200 g – 5 mins Combi 1 + 3 to 5 mins grill*
400 g – 6 mins Combi 1 + 5 to 7 mins grill*
- potato wedges 300 g – 4 mins Combi 1 + 5 mins grill*
- Duchesse potato 400 g – 9 mins Combi 1 + 4 mins grill
- Dauphine potato 200 g – 4 to 5 mins Combi 1*
- roast potatoes 9 pieces (600 g) – 10 mins Combi 1*
- noisettes potato 450 g – 8 mins Combi 1 + 3 mins grill*
- pieces/quarters (raw) 500 g to 1 kg 15 to 20 min Combi 1* –
SAUSAGES 2 pieces (120 g) 2 mins Combi 1* 3 mins 30 secs Combi 1*
3 pieces (180 g) 3 mins Combi 1* 4 mins Combi 1*
- Toulouse sausage 1 piece (150 g) 3 mins 30 secs to 4 mins Combi 2* 4 mins 30 secs Combi 1*
- pork sausages* 1 piece (150 g) 5 mins Combi 2* 7 mins Combi 1*
(*) Turn or stir halfway through cooking. (**) Allow to stand for 5 minutes after heating.
Unless otherwise indicated, the pizza pan is always preheated for 4 minutes on Combination N°1.
Page 15
En-13
English
Cooking Chart For Your Pizza Pan (NN-F663/NN-F623)
Food Weight/quantity Fresh Frozen
- pork chop* 180 g 3 to 4 mins Combi 2* 6 mins Combi 1*
- duck fillet* 1 piece (350 g) 4 mins Combi 3 + 5 mins grill* –
- chicken legs 2 pieces (670 g) 10 mins Combi 1 + 4 mins grill* 18 mins Combi 1 + 4 mins grill*
- hamburgers*
standard 1 piece (100 g) 1 min 50 secs to 2 mins Combi 3* 3 mins 30 secs to 4 mins Combi 3*
1 piece (140 g) 2 mins 30 secs to 3 mins Combi 3* –
2 pieces (200 g) – 4 mins 20 secs Combi 3*
4 pieces (400 g) – 3 mins 30 secs to 4 mins Combi 3
- breaded fish* 2 pieces (200 g) 3 mins 40 secs Combi 2* 5 mins Combi 1*
- fish sticks 5 pieces (150 g) – 4 mins Combi 1*
10 pieces (300 g) – 5 mins Combi 1*
- cordon bleu 1 piece (100 g) 3 mins 30 secs Combi 3* 3 mins Combi 1*
2 pieces (200 g) 3 mins 30 secs Combi 2* 5 mins Combi 1*
- chicken nuggets 10 pieces (200 g) 4 mins Combi 2* 4 mins Combi 1*
5 pieces (100 g) 3 mins Combi 2* 3 mins Combi 1*
- omelette 4 beaten eggs 1 to 2 mins Combi 1* –
8 beaten eggs 2 mins to 2 mins 30 secs Combi 1* –
- apple strudel (pre-cooked)* 300 g – 4 mins 30 secs to 5 mins Combi 1* and **
- double crust almond pie (pre-cooked) 400 g – 2 mins 30 secs Combi 1**
- apple fritters (pre-cooked) 7 pieces (220 g) – 6 mins Combi 3*
- waffles (pre-cooked) 1 piece (70 g) – 2 mins 30 secs Combi 3*
- croustade aux pommes (pre-cooked) 400 g – 5 mins Combi 1**
- kouing aman aux pommes (pre-cooked) 550 g – 3 mins Combi 1**
- Tarte Tatin 1 piece (600 g) – 7 mins Combi 1** /stand apple side down
1 piece (150 g) – 2 mins Combi 2** /stand apple side down
- nut brownies (pre-cooked) 2 pieces (150 g) – 1 min 30 secs Combi 3 * and **
Unless otherwise indicated, the pizza pan is always preheated for 4 minutes on Combination N°1.
(*) Turn or stir halfway through cooking.
(**) Allow to stand for 5 minutes after heating.
Page 16

En-14
DEFROSTED JOINTS
If the meat has previously been frozen, ensure it is properly thawed
before cooking by microwave. Defrosted joints of meat must be
allowed to STAND for a minimum of 1 hour before cooking to
ensure the centre is fully defrosted.
FAT
Large amounts of fat absorb microwave energy and can cause the
meat next to it to overcook. Always choose joints that aren’t
excessively fatty.
Cooking with microwave only
Place joints on an
upturned plate in a
microwaveable dish
and on the turntable.
It is important that the
joint should not soak
in its juice. The
upturned plate is not
needed for pieces of
meat or poultry if
fricasseed or cooked
with an accompaniment.
It is advisable to cover the meat with a lid or cling-film to speed up
cooking and prevent splashes.
STANDING TIME
Meat and poultry require a minimum of 15 mins. STANDING TIME
wrapped in tin foil after cooking by microwave. Roast meat is always
easier to carve after STANDING and the meat will continue to cook
during the STAND TIME.
BONE
Bone tips on legs of lamb and crown roasts may need shielding when
cooked by microwave, to prevent overcooking.
How to cook small cuts of meat by microwave
Some cuts of meat can be cooked by microwave although due to
their short cooking times and no heat source, they will not crisp and
brown.
They should always be cooked on a microwave rack to lift them out
of their juices.
Arrange drumsticks so the fleshiest part is towards the outside.
TURNING
Joints and poultry should be turned over halfway through cooking.
SHIELDING
Large joints may need shielding with pieces of smooth aluminium foil
after half the cooking time to avoid overcooking on the outside
edges. Turkeys and large chickens should have their breast meat,
legs and wings protected. Secure foil with toothpicks and do not
allow foil to touch the walls of the oven.
How to roast a joint by Combination
Place the joint on an
upturned saucer on
heatproof dish. Joints
are best cooked by
microwave only then
browned and crisped
by a final
Combination stage.
DO NOT cover.
Tips for stews and ragouts
BEFORE: the accompanying vegetables must be cut into regular
pieces and pre-cooked, otherwise they may stay crunchy when
cooking is completed. Lightly cover the pieces of meat with flour, to
ensure the sauce cooks properly.
DURING cooking, it is essential to keep the pieces of meat covered
by the liquid using an upturned saucer or plate (to prevent the meat
from drying out). Since cooking stews takes a long time and
sometimes there is a lot of evaporation, do not hesitate to add liquid
while cooking if necessary. Cover the vessel with a lid to restrict
evaporation. Bring to the boil on 1000 W for 10 to 12 mins. then
continue cooking for the desired length of time at 250 W.
Cooking small cuts of meat by Grill or Combination
Place food on the wire
rack. Place the wire
rack on the turntable.
Use a heatproof dish
to catch grease/drips.
For larger pieces or
pieces of meat that will
not fit without touching
the roof or catching on
the grill, place in a
heatproof dish on
turntable. The grilling
action will still brown
the food, but may take
slightly longer.
Meat & Poultry
Guidelines
Page 17

En-15
English
Meat & Poultry
Type of meat Microwave only***
Cooking time
Combination or grill
Cooking time
in minutes in minutes
BEEF
- rib* Grill 25 -30**
- roast* 600 W 5 Combi 3 7 - 8
- stew MAX then 250 W 10 then 60 - 75** – –
LAMB
- roast on the bone* 600 W 6 - 7 Combi 1 7 - 8
- rolled shoulder* 600 W 8 Combi 1 8 - 9
- stew* MAX then 250 W 10 then 40 - 50** – –
VEAL
- roast shoulder* 600 W 14 - 15 Combi 1 10 - 11
- stew MAX then 250 W 10 then 50 - 60 ** – –
PORK
- roast fillet* 600 W 15 - 17*** Combi 1 11 - 12
- roast spare rib* 600 W 15 - 17*** Combi 1 12 - 13
- stew MAX then 250 W 10 then 50 - 60** – –
- ribs* – – Grill 20
CHICKEN - GUINEA FOWL - TURKEY
- roast whole – – Combi 1 8 - 9
- pieces* 600 W 7 - 8 Combi 2 12 - 14
or Grill 25**
- turkey drumstick* – – Combi 1 8 - 9
- turkey pieces 600 W 12 Combi 1 10 - 11
DUCK
- roast whole – – Combi 1 then grill 9 - 10 then 4**
- pieces* – – Combi 1 then grill 7 - 8 then 6**
- stew MAX then 250 W 10 then 70** – –
RABBIT MAX 7 - 8 – –
GAME
- roast* MAX 5 - 6*** Combi 3 9 - 11
- stew MAX then 250 W 10 then 70** – –
CHIPOLATAS, MERGUEZ* MAX 3 - 4 Grill 12 - 14**
PORK SAUSAGE (1 pce)* – – Combi 2 8**
Toulouse Sausage (2 pces)* – – Combi 2 10
or Grill 15**
Note: For boned or stuffed meat, increase cooking time by at least 5 mins. (depending on weight).
* dish placed on the wire rack for grill or combination cooking, if the thickness of the meat allows; otherwise, on the turntable.
** Regardless of the weight.
*** with microwave-only cooking, the cooking times of joints (pork, veal, lamb, beef) apply to joints that have previously been browned on all
sides in a pan (for a few minutes).
For 500 g (time in minutes)
Page 18
En-16
Fish cooks very well by microwave as it stays moist and the lingering
fish smells left in conventional ovens are avoided.
WHEN IS FISH COOKED?
Fish is cooked when it flakes easily and becomes opaque.
Fish
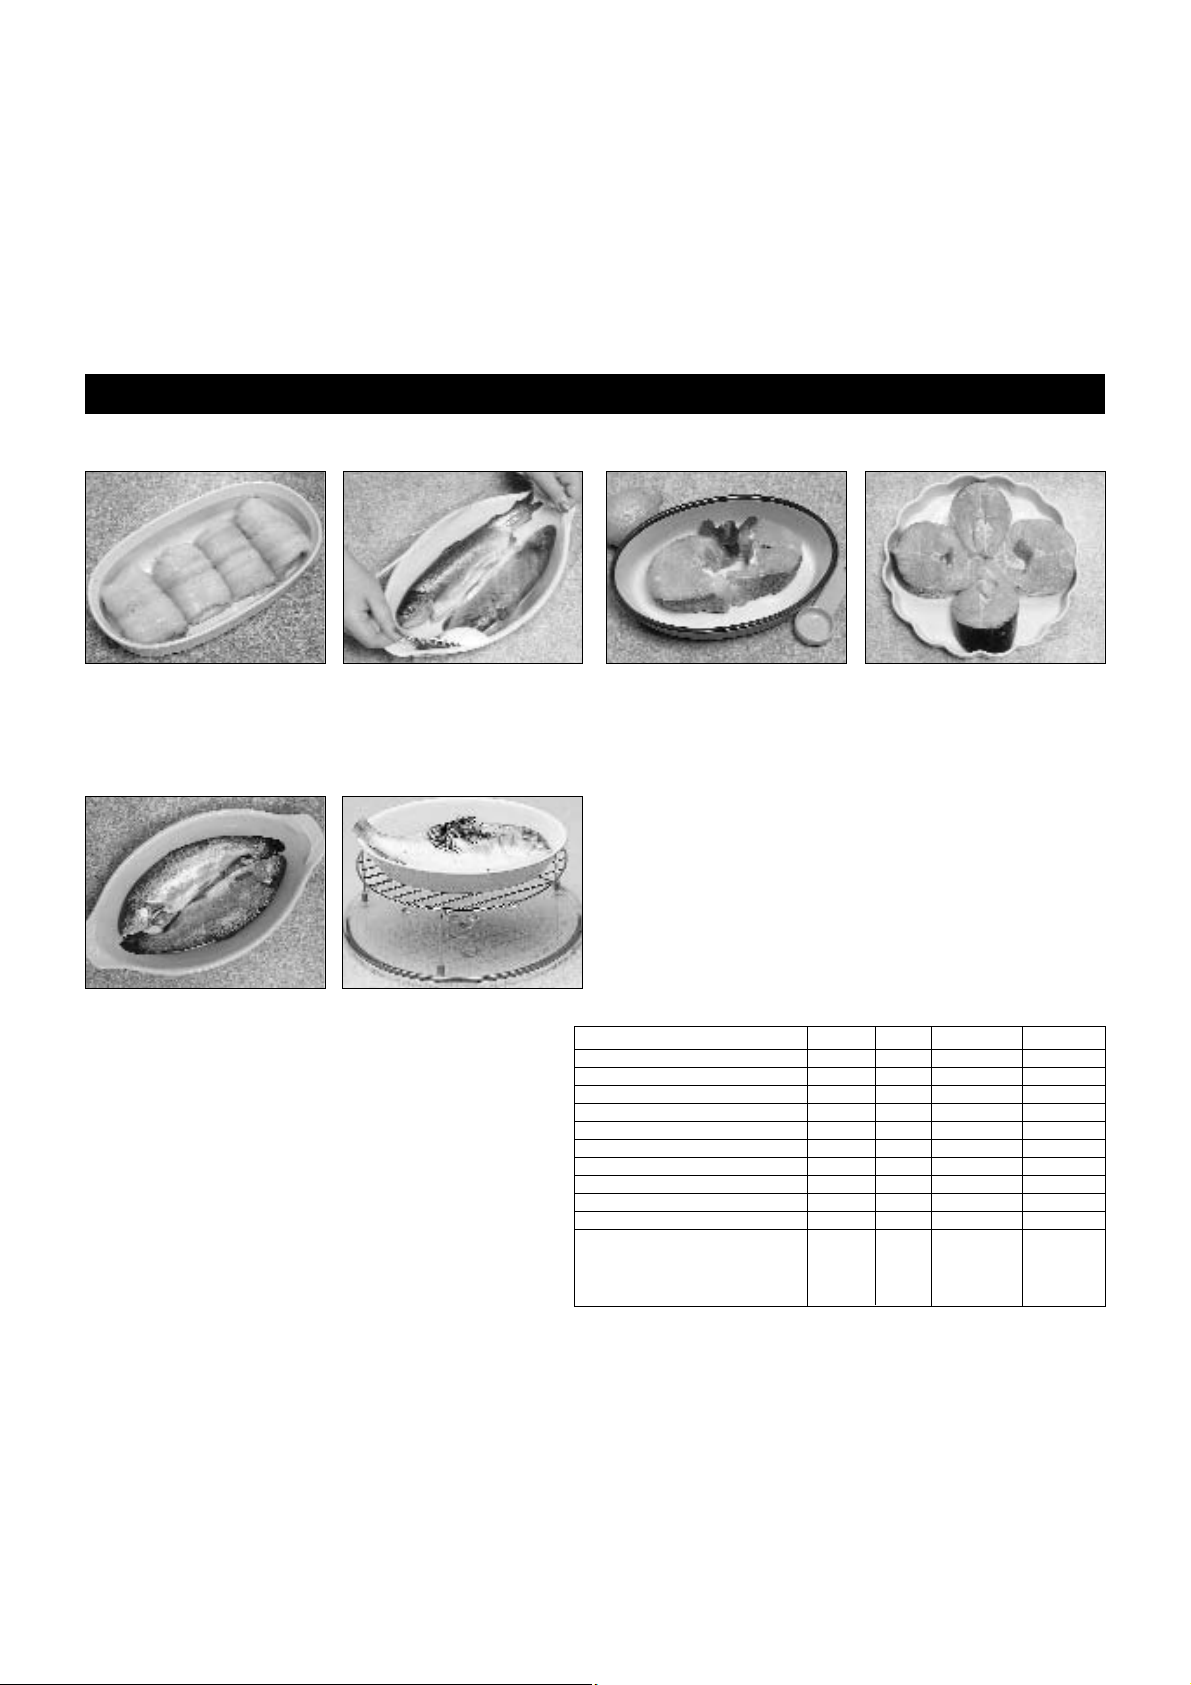
ARRANGING
Thin fillets of fish i.e. plaice,
should be rolled up prior to
cooking to avoid overcooking on
the thinner outside edge and tail.
COVERING
Always cover fish with either
microwave cling film or use a
dish with a self-fitting lid.
LIQUID
Fresh fish should always be
sprinkled with 30 ml (2 tbsp) of
lemon juice or white wine. When
cooking Frozen fish, add liquid
as above for even cooking.
FISH STEAKS
Fish steaks should be arranged
in a circle - thicker part to the
outside - to avoid overcooking
and disintegration of the tail
ends.
WHOLE FISH
If cooking 2 whole fish together,
they should be arranged head to
tail for even cooking.
Large whole fish must have the
tail and head shielded halfway
through cooking with smooth
pieces of tin foil secured with
toothpicks.
SALT
DO NOT sprinkle salt onto fish
before cooking as this may make
the fish dry.
COOKING FISH BY GRILL
OR COMBINATION
Brush fish with melted butter or
oil to keep fish moist. Place on
wire rack. DO NOT add salt,
however sprinkle with pepper
or herbs if required.
Big fish (more than 400 g)
You are recommended to turn
them over halfway through
cooking time and to protect the
head and tail with a small piece
of aluminium foil to avoid
overcooking. (Attention: the
aluminium must not touch
the walls of the oven).
Stand time
Fish should STAND after
cooking for 2-3 mins. This can
be outside the oven to enable
the oven to be used for futher
cooking.
Fish en papillote
You can make papillotes of fish
by replacing the aluminium foil
by microwaveable greaseproof
paper (or parchment paper).
Food FRESH FROZEN
Power Time Power Time
Fish in thin fillets 600 W 4 - 5 MAX 10
Fish in thick fillets 600 W 5 - 6 MAX 11 - 12
Fish steaks 600 W 5 - 7 MAX 11 - 13
Whole fish 600 W 5 MAX 12
Shrimp* 600 W 4 - 5
Mussels* 600 W 5 - 6
Scallops* 600 W 6 - 7
Squid* 600 W 5 - 6 MAX 11
Crab* 600 W 5 - 6
Fish croquettes (1 piece=50 g)* MAX 3 min 30
(2 pieces)
or 5 min
(4 pieces)
*We do not recommend cooking with the Auto menu for these fish.
Cooking Time for 500g in minutes
Page 19

En-17
English
Vegetables
*We do not recommend cooking with the Auto menu for these vegetables.
Fresh/Frozen Vegetables Manual Cooking Charts - Use Max Power (1000 W)
For 500g (time in minutes)
ADDED WATER
Very water-rich vegetables such as tomatoes, courgettes,
aubergines, frozen vegetables for ratatouille, mushrooms, spinach,
endives, lettuce, onions, most fruits, etc., to which little or no water
should be added, since microwave cooking uses the water contained
in the foods naturally.
Fairly water-rich vegetables, to which 4 to 5 tablespoons of water
should be added for 500g, to create the steam which cooks the
vegetables and prevents dehydration: cauliflower, leeks, broccoli,
Brussels sprouts, fennel, carrots, celeriac, asparagus, dwarf beans,
potatoes, cabbages, turnips, artichokes, etc.
Vegetables containing relatively little water, to which 8 to 10
tablespoons of water should be added per 500 g to encourage
hydration: peas, broad beans, runner beans, French beans.
In all cases: vegetables must be cooked on 1000 W power (except
for whole cauliflowers) and must not be salted before cooking, but
after. This is because the salt absorbs the natural moisture of the
vegetable and encourages dehydration.
VEGETABLES FRESH FROZEN
Artichokes:
- whole 11 - 12 –
- hearts 10 - 12 13 - 16
Asparagus* 10 - 12 14 - 15
Aubergines 9 - 11 –
Beetroot* 18 - 20 –
Chinese Leaves 8 - 10 14 - 15
Broccoli 8 - 10 13 - 15
Mushrooms 9 - 10 13 - 15
Carrots:
- round slices 10 - 12 13 - 15
- strips 12 - 14 –
Cabbage* 12 - 14 –
Cauliflower 10 - 12 13 - 15
Brussels sprouts 10 - 12 13 - 15
Boule celery 9 - 11 –
Celery* 15 - 17 –
Courgettes 8 - 10 13 - 15
Endives 12 - 14 18 - 20
Spinach:
- chopped – 12
- leaves 9 - 10 13
VEGETABLES FRESH FROZEN
Broad beans* 16 - 19 18 - 20
Fennel:
- whole cut in half 12 - 14 –
- thin cut 17 - 20 –
Green beans* 12 - 13 12 - 13
Dwarf beans 10 - 13 –
Mixed spring vegetables* – 15 - 16
Corn on cob (2 cobs)* 12 - 14 14 - 17
Turnips 10 - 12 18 - 20
Onions 9 - 12 15 - 18
Peas* 20 16 - 18
Mange-tout peas 10 - 12 –
Thin sliced leeks 12 - 14 15 - 16
Leek stalks 12 - 14 15 - 16
Squash 10 - 12 –
Capsicums 12 - 14 14 - 16
Whole potatoes (<220 g) 9 - 12 –
Cut potatoes 10 - 12 –
Ratatouille 16 - 18 14 - 16
Salsify 12 - 14 14 - 16
Tomatoes* 4 - 5 –
A whole cauliflower must be cooked head down,
on 600 W power, for 12 to 15 mins. (according to
size of cauliflower) with 6 tablespoons of water.
Page 20

En-18
Eggs are delicate
products which
require special
attention. This is
because if they
are placed straight
into the oven, they
explode because
of the pressure
created inside the
shell. Being
broken, the yolk
also explodes if
the film covering it is not pierced. So push the tip of a toothpick into
the centre of the yolk; if the egg is fresh, it will not spill out. The yolk
and the white react differently to the microwaves and unfortunately
the yolk cooks more quickly. When eggs are beaten (omelette), the
edges should be taken into the centre halfway through cooking time.
Poached eggs
Heat 50 ml of water with salt and a dash of vinegar for 1 min on
1000 W. Break the egg into the boiling water and carefully pierce the
yolk and the white with a toothpick; cook on 600 W for 30 to 40
seconds (depending on the size of the egg). Leave to stand for 1
minute, then drain and serve.
Scrambled eggs
Mix 2 raw eggs in a bowl with a little cream or milk, a knob of
butter, salt and pepper. Cook for 40 seconds on 1000 W. Remove
and beat briskly with a fork. Resume cooking on 1000 W for a further
30 to 40 seconds. The eggs should remain creamy.
Oeufs cocotte
Break the egg into a buttered ramekin, season with salt and pepper,
pierce the yolk and the white with a toothpick. Add the desired
ingredients (cream, mushrooms, lumpfish roe, etc.). Cook for 1 min
30 sec to 2 min per egg at 250 W, depending on the size of the egg
and the quantity of garnish.
Cheeses react differently depending what type they are: the fattier
they are the quicker they melt. If they are cooked for too long a time,
they harden. When possible, it is preferable to add grated cheese at
the last moment (for pasta, gratins, etc.).
The cooking times for dried vegetables in the microwave are much
the same as with traditional cooking. On the other hand, these
foodstuffs heat up very quickly, without taking on a reheated flavour,
so long as they are in a closed vessel, with butter or sauce mixed in.
For the cooking, use a big vessel (to avoid any overspill). Fully cover
with water or stock. Leave to stand for at least 5 to 8 minutes after
cooking.
Rice
Once the liquid reaches boiling point, cook for approx. 20 minutes at
250 W, regardless of the quantity of rice.
Semolina
Semolina cooks perfectly in a microwave oven, with no risk of
burning. Simply add a volume of water equal to that of the semolina,
bring to the boil covered on 1000 W for 2 min 30 sec (for 200 g of
medium-grain semolina with 0.2 l of water), then cook on 250 W for
about 3 min while it swells.
Pasta
Remember to salt the cooking water and stir once during cooking.
When the liquid is bubbling, cook for 7 or 8 minutes on 1000 W for
250 g of pasta (for 1 litre of water) and 10 minutes for 250 g of
ravioli.
Dried vegetables
Fully cover with water and leave to soak for one night. The next day,
rinse and drain. Cover with water. Do not salt before cooking (this
hardens the dried vegetables). Cook for 10 minutes on 1000 W then
15 to 30 minutes on 250 W. Monitor the cooking and add water if
necessary: the dried vegetables must always be covered with liquid.
Jacket potatoes
Varieties of potatoes vary in their suitability for cooking by microwave.
The ideal size of potato to be cooked by microwave or Combination
is 200 g -250 g. Microwaving jacket potatoes is quicker than
Combination, but will produce a soft result. Combination cooking will
produce a drier, crisper texture. If you wish to further enhance the
browning at the end of cooking, use the GRILL (see chart below).
Before Cooking wash potatoes and prick skins several times. Spread
around edge of turntable.
After Cooking remove from oven and wrap in tin foil to retain the
heat. Leave to stand for 5 mins.
Eggs & Cheese
Rice, Pasta, Dried Vegetables & Jacket Potatoes
Jacket Potatoes - Manual Cooking Chart
Qty
1
2
4
Mins. on 1000 W
4-7
7-10
11-15
Mins. on Grill to crisp
8-10
10-12
11-13
Page 21

En-19
English
Common Queries Answered
Problem Cause Solution
Food cools quickly after being Food not cooked through. Put back in oven for extra time.
MICROWAVED. Remember foods at fridge temperature
require more cooking time than food at
room temperature.
Rice pudding or casserole boils Container too small. For liquid foods, use container twice
over during cooking by MICROWAVE. the volume of food.
Food cooks too slowly when cooked Oven not receiving correct power. Oven should be on an independent
by MICROWAVE. outlet.
Food temperature from fridge colder Extra time required for cooking colder
than room temperature. foods.
Meat is tough when cooked by Power setting too high. Use reduced power level for meats.
MICROWAVE or
Combination. Meat salted before cooking. Do not salt before cooking. Add salt
if necessary, after cooking.
Cake remains uncooked in centre Too short a cooking and/or standing Add extra cooking time/standing time.
when cooked by MICROWAVE. time.
Scrambled or poached eggs tough Cooking time too long. Take care when cooking small
and rubbery when cooked by quantities of eggs, once spoiled they
MICROWAVE. cannot be saved.
Quiche/Egg Custards are tough and Power level too high. Use reduced power levels for these
rubbery when cooked by MICROWAVE. items.
Quiche/Egg Custards are tough and Cooked too long. Dish size larger than Always check progress of food as it
rubbery when cooked by
Combination. stated in recipe. cooks.
Cheese sauce is tough and stringy Cheese cooked with sauce. Add cheese at the end of cooking time.
when cooked by MICROWAVE. The heat of the sauce will melt the
cheese.
Vegetables are dry when cooked by Cooked uncovered. Cover with a lid or cling film.
MICROWAVE. Low moisture content, e.g. old root Add extra 2-4 tbsp. of water.
vegetables.
Salt added before cooking. Salt after cooking if necessary.
Condensation appears in the oven. This is normal and means the food is Wipe off with a soft cloth.
cooking faster then the moisture can be
expelled from the oven.
Turntable rotates in both directions. This is normal.
Warm air is felt coming from the door The oven door is not an air-tight seal. This is normal and does not indicate
seal area. any microwave leakage.
Blue sparks or arcing is seen when Using metal accessories on MICROWAVE Stop the oven IMMEDIATELY. Do not
using the metal accessories. only is incorrect. If using a
Combination use the metal accessories on
program check accessories for any MICROWAVE only. Check minimum
damage. weight of food on Auto Programs.
The GRILL periodically turns off during During cooking the GRILL will cycle on This is normal.
GRILLING or Combination. and off so that the food does not burn
before it is cooked through in the centre.
Page 22
Kochen mit Mikrowellen . . . . . . . . . . . . . . . . . . . . . . . . . . . . .2
Generelles . . . . . . . . . . . . . . . . . . . . . . . . . . . . . . . . . . . . . .2-3
Kurze Einführung in die Kochutensilien . . . . . . . . . . . . . . . . .4
Mikrowellenleistungsstufen . . . . . . . . . . . . . . . . . . . . . . . . . .5
Grill . . . . . . . . . . . . . . . . . . . . . . . . . . . . . . . . . . . . . . . . . . . . .5
Kombi-Betrieb . . . . . . . . . . . . . . . . . . . . . . . . . . . . . . . . . . . .5
Zusätzliche Kochutensilien . . . . . . . . . . . . . . . . . . . . . . . . . .5
Erwärmen . . . . . . . . . . . . . . . . . . . . . . . . . . . . . . . . . . . . . . . .6
Erwärmen mit Mikrowellen . . . . . . . . . . . . . . . . . . . . . . . . .6-7
Tips zum Kochen mit Mikrowelle . . . . . . . . . . . . . . . . . . . . . 7
Auftauhinweise . . . . . . . . . . . . . . . . . . . . . . . . . . . . . . . . . . . .9
Auftautabelle . . . . . . . . . . . . . . . . . . . . . . . . . . . . . . . . . . . .10
Grillkombinations- und Erwärmtabellen . . . . . . . . . . . . .11-13
Fleisch & Geflügel . . . . . . . . . . . . . . . . . . . . . . . . . . . . . .14-15
Fisch . . . . . . . . . . . . . . . . . . . . . . . . . . . . . . . . . . . . . . . . . . .16
Gemüse . . . . . . . . . . . . . . . . . . . . . . . . . . . . . . . . . . . . . . . .17
Eier und Käse . . . . . . . . . . . . . . . . . . . . . . . . . . . . . . . . . . .18
Reis, Teigwaren, Getrocknetes Gemüse
und Gebackene Kartoffeln . . . . . . . . . . . . . . . . . . . . . . . . . .18
Fragen - Antworten . . . . . . . . . . . . . . . . . . . . . . . . . . . . . . .19
Inhalt
Die Angaben in diesem Buch sind Richtwerte und sind jeweils von Ausgangstemperatur des Lebensmittels, seiner
Beschaffenheit und dem verwendeten Gefäß abhängig.
Prüfen Sie vor dem Verzehr immer, ob das Lebensmittel auch durch und durch heiß ist.
D-1
Inverter Technologie ist der Schlüssel
Die Inverter-Technologie für Mikrowellengeräte wurde durch eine Panasonic-Initiative über einen Zeitraum von 10 Jahren
entwickelt. Sie ist die Schlüsseltechnologie zur Herstellung eines gänzlich anderen Typs von Mikrowellenhgerät, das eine
Anzahl von besonderen Qualitäten aufweist:
• Erstmalig wird die Mikrowellenenergie linear geregelt. Dadurch wird ein Geschmacksverlust beim Auftauen und Kochen von
Nahrungsmitteln vermieden.
• Durch die wirkungsvolle Umwandlung von elektrischer Energie in Mikrowellenenergie wird der Leistungsverbrauch
minimiert, ohne dabei Verluste der eigentlichen Mikrowellenleistung in Kauf nehmen zu müssen.
• Durch die geringen Abmaße der Invertereinheit, die den bislang verwendeten sperrigen Transformer ersetzt, wird eine
drastische Vergrößerung des Garraums selbst in einem Kompaktgerät erreicht.
• Am Ende der Laufzeit des Produkts ist einfaches Receycling gewährleistet, da kein Transformator aus Eisen mehr
verwendet wird.
Deutsch
Page 23

Mikrowellen sind elektromagnetische Wellen, ähnlich den Radar-,
Radio- oder Fernsehwellen. Elektrischer Strom wird vom Magnetron
in Mikrowellen umgewandelt. Die Mikrowellen werden vom
Magnetron in den Garraum gesendet, wo sie reflekiert bzw.
absorbiert werden oder Gegenstände (Geschirr und Lebensmittel)
durchdringen (siehe nachfolgende Erklärungen).
Reflektion
Mikrowellen werden von Metall reflektiert, also zurückgeworfen.
Geschirr oder Kochutensilien aus Metall sind für das Kochen mit
Mikrowellen nicht empfehlenswert, da sie ein ungleiches Kochresultat
ergeben können. Zudem kann es zu Funkenbildung kommen, wenn
das Metall-Geschirr nah an die Garraumwand gestellt wird. Dies
könnte das Gerät beschädigen oder einen Brand verursachen.
Durchdringen
Mikrowellen durchdringen Materialien wie Papier, Glas und Plastik
ähnlich wie Sonnenlicht durch ein Fenster scheint. Da diese
Materialen die Mikrowellen weder absorbieren noch reflektieren,
eignen sie sich ideal als Kochgeschirr. Sie werden jedoch durch das
heiße Kochgut erwärmt.
Absorbation
Mikrowellen werden von Lebensmitteln absorbiert. Sie dringen von
außen nach innen ca. 2-3 cm in das Lebensmittel ein, d.h. sie
werden vom Lebensmittel aufgenommen bzw. absorbiert. Im
Lebensmittel versetzen die Mikrowellen Wasserbestandteile
(Moleküle) in Bewegung. Dadurch entsteht Reibung und diese
erzeugt Wärme. Über Wärmeleitung (wie beim herkömmlichen
Garen) gelangt die enstandene Reibungswärme dann ins
Lebensmittelinnere, um die Speisen aufzutauen, zu erhitzen oder zu
garen.
Kochen mit Mikrowellen
D-2
Ruhezeit
Fleischstücke: ca. 15 Min. in Folie
eingewickelt
Kartoffeln: ca. 5 Min.
Kuchen: ca. 15-20 Min.
Fisch: ca. 2-5 Min. ruhen lassen
Eierspeisen: ca. 2-3 Min.
Vorgekochte Speisen: ca. 5 Min.
Tellergerichte: ca. 2-5 Min.
Gemüse: Kartoffeln ca. 1-2 Min., die
meisten Gemüse können jedoch direkt
serviert werden.
Auftauen: Um den Auftauprozeß zu
beenden brauchen die Speisen eine
Ruhezeit. Diese kann von 5 Min.
(Himbeeren) bis zu 1 Stunde (Braten)
variieren.
Wenn die Speisen nach der Ruhezeit noch
nicht aufgetaut sind, stellen Sie sie
nochmals ins Mikrowellengerät und geben
noch etwas Auftauzeit hinzu.
Größere, schwerere Lebensmittel benötigen
nach dem Garen eine Ruhezeit (im oder
außerhalb des Gerätes). Somit kann sich
die Wärme gleichmäßig verteilen und das
Lebensmittel noch etwas nachgaren.
Generelles
Einstechen
Unter der
Haut/Schale
einiger
Speisen bildet
sich so viel
Dampf, daß
diese platzen
kann. Bevor
Sie diese
Speisen in die
Mikrowelle
geben, stechen Sie die Haut/Schale einige
Male ein, damit der Dampf austreten kann
(Eier, Kartoffeln, Äpfel, Würstchen etc.).
KOCHEN SIE NIE EIER IN DER SCHALE.
Flüssigkeitsgehalt
Frische
Lebensmittel
wie Gemüse
und Früchte
variieren in
ihrem
Flüssigkeitsgehalt.
Kartoffeln sind
ein gutes
Beispiel dafür. Deshalb muß die Kochzeit
dementsprechend angepaßt werden.
Trockene Lebensmittel wie Reis oder
Teigwaren trocknen während der Lagerung
aus, somit können die Garzeiten leicht
abweichen.
KlarsichtFolie
Die KlarsichtFolie bewahrt
das Lebensmittel vor dem
Austrocknen
und hält den
Dampf im
Geschirr, was
die Garzeit
verkürzt.
Jedoch sollte die Folie vor dem Garen leicht
eingestochen werden, damit kein Überdruck
entsteht. Vorsicht beim Entfernen der Folie,
da der entweichende Dampf sehr heiß ist.
Verwenden Sie nur Folie die mit “Geeignet
für die Mikrowelle” bezeichnet ist (hohe
Temperaturen) und dies lediglich, um das
Gargut zu bedecken.
Page 24
Generelles
ANORDNEN
Einzelne Stücke (Geflügel,
Fleisch etc.) sollten mit der
dickeren Seite nach außen auf
das Geschirr gelegt werden.
PLATZ
Lebensmittel garen schneller
wenn sie gleichmäßig und mit
etwas Zwischenraum angeordnet
sind.
ZUTATEN
Nahrungsmittel die Fett, Zucker
oder Salz enthalten erhitzen
sehr schnell. Die Füllung kann
erheblich heißer sein als der Teig.
Deshalb Vorsicht beim Essen.
Überhitzen Sie es nicht, selbst
wenn der Teig scheinbar nicht
sehr heiß ist.
AUSGANGSTEMPERATUR
Je kälter das Lebensmittel umso
länger die Garzeit. Ein
Lebensmittel aus dem
Kühlschrank braucht länger zum
Erwärmen als ein Lebensmittel
mit Raumtemperatur.
ZUDECKEN
Bedecken Sie die Speisen mit
Klarsichtfolie oder direkt mit dem
Deckel des Geschirrs (Fisch,
Gemüse, Eintöpfe). Keinen
Deckel benötigen Kuchen,
Kartoffeln (Gebackene
Kartoffeln), Backwaren.
WENDEN UND RÜHREN
Einige Speisen müssen während
des Kochens umgerührt werden.
Wenden Sie Fleisch- und
Geflügelstücke einmal während
der Garzeit.
FLÜSSIGKEITEN
Alle Flüssigkeiten müssen vor
und während des Kochvorgangs
umgerührt werden. Vor allem
Wasser muß vor und während
des Kochens umgerührt werden,
um Siedeverzug zu vermeiden.
Erhitzen Sie bitte keine
Flüssigkeiten, die zuvor schon
einmal zum Kochen gebracht
wurden. NICHT ÜBERHITZEN.
REINIGUNG Da die Mikrowellen
in die Nahrungsmittel eindringen
halten Sie den Ofen bitte immer
sauber. Hartnäckige Essensreste
können mit einem MarkenOfenreiniger und einem weichen
Tuch entfernt werden. Den Ofen
nach dem Reinigen immer
trockenwischen. Vermeiden Sie
Plastikteile und den Türbereich.
GESCHIRRGRÖSSE
Verwenden Sie die im Rezept
empfohlenen Geschirrgrößen, da
diese Auswirkungen auf die Garbzw. Auftauzeit hat. Speisen
verteilt in einem größeren
Geschirr erhitzen schneller.
MENGE
Kleinere Mengen kochen
schneller als größere.
LEBENSMITTELBESCHAFFENHEIT
Leichte Lebensmittel (z.B. Fisch)
erhitzen schneller als schwerere
(z.B. Braten).
FORM
Lebensmittel in einem runden
Geschirr kochen besser als in
einem eckigen.
D-3
Deutsch
Page 25

Kurze Einführung in die Kochutensilien
Hitzebeständiges Porzellan
oder Keramik
Töpferware oder Steingut
Aluminiumfolie
Frischhaltefolie
Holz; Korbwaren
Folien/Metall-Behälter
Hitzebeständiges
Glas
Mikrowellengeeignete
Kunststoffbehälter
D-4
Kochgeschirr Für Mikrowelle Für Grill Für Kombination
✔
✔✔
✔
✔
✔
✔
✔
✘
✘
✘
✘
✘
✘
✘
✘
✘
✘
✘
✘
✔
✔
✔
✔
Kein Geschirr mit Metallring
oder -muster, Krüge oder
Tassen mit geklebten Henkeln
benutzen.
Kleine Mengen Alufolie können
während des Kochens oder
Auftauens verwendet werden, um
die Lebensmittel vor dem
Überhitzen zu schützen: bitte
beachten, daß die Alufolie nicht mit
den Seitenwänden oder der Decke
der Mikrowelle in Berührung kommt.
Page 26
Grill
Kombi-Betrieb
Mikrowellenleistung Anwendung
Max. Leistung 1000 W Erwärmen von Mahlzeiten, Saucen, gekochtem Fisch, Gemüse, und Eingemachtem
270 W (*) Auftauen
600 W Rösten; Eiersoßen; Erhitzen von Milch; Backen von Wienerböden
440 W
(NN-Q543/NN-Q523/NN-Q553) Geflügel-Eintöpfe Quiches
250 W Kochen von Eintöpfen und Aufläufen; Milchreis; schwere Früchtekuchen; Puddings
Hinweis: (*) Zyklisches Auftauen mit automatischer Ruhezeit (siehe Seite 9).
GRILL NICHT VORHEIZEN
Der Quarz-Grill bräunt die Speisen schnell und gleichmäßig.
Das Gerät ist mit einer Grilleistung von 1300 Watt ausge-
stattet.
Legen Sie das Lebensmittel auf den Gitterrost und stellen Sie
diesen auf den Drehteller.
Nach der Hälfte der Grillzeit sollten Sie das Lebensmittel
wenden.
Bedecken Sie das Lebensmittel NIE während des Grillens.
DAS GRILLPROGRAMM ARBEITET OHNE MIKROWELLEN.
Erste Seite Zweite Seite
Steak (4 Stück, durchgebraten) ca. 10 Min. ca. 10 Min.
Schweinsplätzli (Nierstück) ca. 12 Min. ca. 10 Min.
Schweinskotelett 12 - 14 Min. ca. 12 Min.
Spieße ca. 12 Min. ca. 12 Min.
Würste 6 - 7 Min. ca. 6 Min.
Pouletschenkel 15 - 20 Min. 15 - 20 Min.
Toast 3 - 4 Min. 3 Min.
Die Kombination ist ideal für viele Speisen. Die Mikrowellen
garen das Lebensmittel schnell, gleichzeitig wird es vom Grill
gebräunt.
Es stehen 3 Kombi-Programme “Mikrowelle + Grill” zur
Verfügung.
Hinweis:
• Speisen beim Kombi-Betrieb NIE zudecken.
• Kleine Mengen nicht im Kombi-Betrieb kochen. Wählen Sie
hierfür entweder Grill oder Mikrowelle um ein gutes Resultat
zu erzielen.
• Das Gerät für Kombi-Betrieb nicht vorheizen.
Mikrowellenleistungsstufen
Zusätzliche Kochutensilien
D-5
Ungefähre Grillzeiten
Mikrowelle Grill Kombination
+
_
Kombi-Betrieb
Digitale
Grilleistung Mikrowellenleistung Anwendung
Laufschrift
1 G1-600 W 1300 W 600 W Weißes Fleisch, Lamm, ganzes Gefügel, Gratin-Gerichte. Vorheizen des Pizzatellers.
2 G1-440 W 1300 W 440 W Würstchen, rotes Fleisch, Geflügelteile, Fisch.
3 G1-250 W 1300 W 250 W 4/4 Kuchen, Quiches, Schweinekotelett, Gratin-Gerichte mit Eiern.
Deutsch
Page 27

Verschiedenste Fertiggerichte sind im Handel erhältlich. Zudem
möchten Sie vorgekochte Gerichte oder Reste wieder erwärmen.
Kein Problem, dies alles können Sie mit Ihrer Mikrowelle
machen.
Welche Methode?
Am besten wählen Sie nur Mikrowelle oder nur Kombination, je
nach Lebensmittel.
Für Speisen, die nicht gebräunt werden müssen, wählen Sie nur
Mikrowelle. Für solche die gebräunt werden sollten, wählen Sie
Kombination.
Wie lange erwärmen?
Untenstehend finden Sie Erwärmtabellen für Mikrowelle und
Kombination. Diese Tabellen enthalten Richtzeiten, die jeweils
abhängig sind von Ausgangstemperatur und Beschaffenheit des
Lebensmittels.
Tiefgekühlte Backwaren, Quiches etc. (auf Teigbasis) benötigen
Erwärm-und Garzeit. Werden diese Lebensmittel mit Mikrowelle
oder Kombination gegart, so wird der Teig weich. Für diese
Gerichte wählen Sie am besten eine andere Garmethode (z.B.
Backofen).
Was, wenn mein Lebensmittel nicht in der Tabelle aufgeführt ist?
Leider konnten wir nicht jedes Lebensmittel für die Tabelle testen.
Bei Beachtung der folgenden Punkte können Sie jedoch alle
anderen Lebensmittel erfolgreich in der Mikrowelle erwärmen.
Umrühren und Wenden
Wenn immer möglich sollten Sie die Speisen während des
Erwärmens umrühren oder wenden. Dies sichert Ihnen
gleichmäßiges Erwärmen.
Ruhezeit
Manche Lebensmittel benötigen nach dem Erwärmen eine
Ruhezeit, damit sich die Wärme gleichmäßig verteilen kann und
das Lebensmittel durch und durch erwärmt wird. Lassen Sie das
Lebensmittel während der Ruhezeit zugedeckt. Eine Ruhezeit ist
vor allem wichtig für Speisen, die während des Erwärmens
weder umgerührt noch gewendet werden können (Lasagne etc.).
Vollständig erwärmt?
Erwärmte Lebensmittel müssen heiß serviert werden, d.h. Dampf
sollte von allen Seiten austreten. Solange sämtliche
Hygienevorschriften beim Zubereiten und Aufbewahren des
Lebensmittels beachtet wurden, besteht keine Gefahr, dieses mit
Mikrowellen oder Kombination aufzuwärmen.
Lebensmittel, die nicht umgerührt oder gewendet werden
können, sollten vor dem Verzehr mit einem Messer
durchgeschnitten werden, um zu prüfen, ob sie vollständig
erwärmt sind.
Die untenstehenden Zeiten sind nur Richtwerte und sind
abhängig von der Ausgangstemperatur sowie dem verwendeten
Geschirr. Vor dem Verzehr immer prüfen, ob das Lebensmittel
ganz heiß ist.
Erwärmen mit Mikrowellen
Erwärmen
D-6
Nahrungsmittel Gewicht/Menge Frisch Tiefgefroren
DELIKATESSEN / VORSPEISEN
- Schinken und Käse Sandwich 1 Stück (170 g) MAX 1 Min. MAX 2 Min.. 30 sek - 3 Min.
2 Stück (320 g) MAX 2 Min. MAX 5 Min.
- Meeresfrüchte (4) 1 Stück (170 g) MAX 2 Min. MAX 3 Min.
2 Stück (220 g) – MAX 6 - 7 Min.
- Ungefüllter Pfannkuchen (2) 1 Stück MAX 30 sek –
- Gefüllter Pfannkuchen (2) (3) 1 Stück (150 g) – MAX 3 - 4 Min.
2 Stück (300 g) – MAX 5 Min.
- Suppe (2) 400 g MAX 4 Min. –
1 litre MAX 6 - 7 Min. MAX 11 - 12 Min.
- Kleine Pizza (1) 1 Stück (160 g) MAX 1 Min. MAX 2 Min. 30 sek - 3 Min.
- Amerikanische Pizza 1 Stück (400 g) MAX 4 - 5 Min. MAX 7 - 8 Min.
- Kleine Quiche (1) 1 Stück (130 g) 600 W 1 Min. 10 sek MAX 3 Min.
- Grosse Quiche 1 Stück (400 g) 600 W 3 Min. 600 W 7 - 8 Min.
- Samosa (3) 2 Stück (100 g) MAX 15 - 20 sek –
VORGEKOCHTE SPEISEN
- Gefüllte Tomaten 1 Stück (170 g) MAX 2 Min. MAX 6 - 7 Min.
- Chilli con Carne (2) (3) 400 g MAX 3 Min. 40 sek –
- Hühnchen Korma mit Reis (2) (3) 350 g – MAX 6 Min.
- Quenelles (2) (3) 6 Stück (240 g) – 600 W 6 Min.
- Schnecken (2) (3) 12 Stück (100 g) 440 W 2 Min. 600 W 2 Min. - 2 Min. 30 sek
- Gratin-Gerichte (fest, mit Fleisch) (4) 300 - 400 g MAX 3 Min. MAX 8 - 10 Min.
600 g MAX 6 - 8 Min. MAX 13 - 14 Min.
1 kg MAX 10 - 11 Min. MAX 16 - 18 Min.
Page 28

Erwärmen mit Mikrowellen
Baby-Fläschchen - VORSICHT
Milch oder Brei müssen vor und nach dem Erwärmen gut
geschüttelt werden. Prüfen Sie vor dem Füttern die
Temperatur.
Für 210-240 ml Milch aus dem Kühlschrank benötigen Sie ca.
25-30 Sek. bei voller Leistung. SORGFÄLTIG PRÜFEN.
Für 90 ml Milch aus dem Kühlschrank benötigen Sie ca.
10-20 Sek. bei voller Leistung. SORGFÄLTIG PRÜFEN.
GUT SCHÜTTELN - TEMPERATURAUSGLEICH.
D-7
(1) Verpackung entfernen und in absorbierendes Papier wickeln. (2) Abdecken. (3) Nach Hälfte der Kochzeit umrühren. (4) Aluminiumform
entfernen und Gratin in eine hitzebeständige Mikrowellenform geben.
Deutsch
Nahrungsmittel Gewicht/Menge Frisch Tiefgefroren
VORGEKOCHTE SPEISEN
(FORTGESETZT)
- Gemüsegratin (mit/ohne Fleisch) (4) 300 - 400 g MAX 6 Min. MAX 11 - 13 Min.
1 kg MAX 12 Min. MAX 18 Min. + 600 W 6 Min.
- Fischgratin (4) 450 g – 600 W 12 - 15 Min.
1 kg – MAX 18 Min. + 250 W 5 Min.
- Fisch mit Sauce (2) (3) 225 g – MAX 6 - 7 Min.
FÜLLUNGEN
- stärkehaltig (2) 300 g MAX 2 - 3 Min. MAX 4 - 5 Min.
- Gemüse (2) 100 g MAX 1 Min. - 1 Min. 30 Sek. –
200 g MAX 1 Min. 30 Sek. - 2 Min. –
- Püree (2) (3)
Kartoffelpüree 200 g MAX 1 Min. 30 Sek. MAX 4 Min. 30 Sek.
Gemüsepüree 200 g MAX 1 - 2 Min. MAX 5 Min.
400 g MAX 3 Min. 30 Sek. MAX 8 Min.
- Spaghetti mit Sauce (2) 210 g MAX 2 Min. –
450 g MAX 4 Min. –
- Reis (2) 150 g MAX 1 Min. MAX 2 Min. 30 Sek.
300 g MAX 2 Min. 30 Sek. MAX 4 Min. 30 Sek.
FLEISCH UND FISCH
- Hamburger (roh) (2) 1 Stück (150 g) – MAX 1 Min. 30 Sek.
- Cocktailwürstchen (2) (3) 120 g 250 W 2 - 3 Min. –
- Gekochte Fleischstücke
Hackfleisch (2) 100 g 600 W 40 - 50 Sek. –
Schwein, 2 Stück (2) 130 g 600 W 1 Min. 30 Sek. –
Lamm, 2 Stück (2) 160 g 600 W 1 Min. –
Rind, 2 Stück (2) 120 g 600 W 50 Sek. –
Hühnchenkeule (2) 205 g MAX 1 Min. 40 Sek. –
Hühnchen-Nuggets 10 Stück (200 g) – MAX 2 Min. 30 Sek.
Cordon Bleu 1 Stück (100 g) – MAX 2 Min.
VERSCHIEDENES
- Babynahrung 30 g 600 W 15 Sek. Prüfen –
(kleiner Behälter bei Zimmertemperatur) 120 g 600 W 25 Sek. Prüfen –
200 g 600 W 40 Sek. Prüfen –
- Frühstücksgebäck (1) 2 x 50 g – MAX 30 - 40 Sek. oder 3 Min.
- Brot (1)
- Scheibe Toastbrot 800 g – 8 Min.
- Scheibenbrot 60 g – MAX 40 Sek.
- Baguette 150 g – MAX 30 - 40 Sek.
- 1 Laib Vollkornbrot 500 g – MAX 2 Min. 30 Sek. + 1/2 Stunde Standzeit
- Roggenbrotsemmel 1 Stück (85 g) – MAX 40 Sek.
3 x 85 g – MAX 1 Min. 10 Sek.
Page 29

D-8
Aufweichen von Butter direkt aus dem Kühlschrank
Aufweichen für 35-40 Sekunden auf (für 150g). Vorhandene
Folie zuvor entfernen.
Aufqellen von getrockneten Früchten
200g Rosinen oder Pflaumen vier Eßlöffel Wasser zugeben (zur
Verwendung in Kuchen kann auch Rum zugegeben werden).
Umrühren und bei 1000 W 2 bis 3 Minuten erhitzen.
10 Minuten stehen lassen.
Käse auf Zimmertemperatur erwärmen
Käse aus dem Kühlschrank in die Mikrowelle geben und in 30
Sekunden bis 1 Minute (abhängig von der Größe des Käses) bei
250 W erwärmen.
Blanchieren von Mandeln und Haselnüssen
Mit heißem Wasser bedecken und in 3-6 Minuten bei 1000 W
aufkochen (zum Kochen bringen). Abkühlen und abgießen; die Haut
kann einfach entfernt werden.
Trocknen von Kräutern
Absorbierendes Papier auf den Drehteller legen. Die feingehackten,
frischen Kräuter vorsichtig auf dem Papier verteilen. Falls nötig,
mehrmals wiederholen. Bei 1000 W ein paar Minuten erwärmen,
wobei alle 30 Sekunden überprüft werden sollte ob die Kräuter zu
trocknen beginnen. Äußerste Vorsicht ist geboten, daß die Kräuter
nicht zu lange im Gerät bleiben; ansonsten können sie sich auflösen
oder zu brennen beginnen. Die Kräuter für weitere 2 Stunden bei
Raumtemperatur auf dem absorbierenden Papier liegen lassen und
dann in einem luftdichten Behälter aufbewahren.
Karamell herstellen
100 g Zucker mit 2 Eßlöffel Wasser in einer Schüssel in 2-3 Minuten
bei 1000 W kochen; nach Hälfte der Kochzeit überprüfen. Karamell
entnehmen bevor es dunkel wird, da es außerhalb des Gerätes
weiterkocht. Der Kochvorgang kann mittels 2 Eßlöffel sehr heißem
Wassers gestoppt werden.
Harten Honig verflüssigen
Den Behälterdeckel entfernen, Behälter in den Ofen stellen und bei
250W in 30-50 Sekunden (abhängig von der Menge) erhitzen.
Umrühren und gegebenenfalls wiederholen.
Croutons in Minuten
Zwei Scheiben Weißbrot in Würfel schneiden und diese auf einem
Teller verteilen. Bei 1000 W in 2 Minuten erhitzen und dann für 5
Minuten stehen lassen. Die Brotscheiben können mit einer Zehe
Knoblauch eingerieben oder mit etwas Olivenöl beträufelt werden,
bevor sie kleingeschnitten werden.
Wie von einer Orange oder Zitrone mehr Saft gewonnen werden
kann
Vor dem Auspressen die Orange oder Zitrone für 30-40 Sekunden
bei 1000 W in die Mikrowelle geben und dann sofort auspressen;
dies erzeugt mehr Saft.
Butter schmelzen
100g Butter in einem zugedeckten Porzellantöpfchen schmilzt in etwa
1 Minute bei 600W.
Schokolade schmelzen
100g Schokolade in kleine Stücke brechen und bei 600W in 2 bis
2.5 Minuten in einer Schüssel erwärmen (die Zeit hängt vom Kakaound Zuckergehalt ab). Mindestens einmal während des
Kochvorgangs umrühren.
Teig gehen lassen
Den zugedeckten Teig in den Ofen stellen und in etwa 5 Minuten bei
(für 500g Teig) erwärmen. Den Teig im Ofen lassen (weg vom
Luftstrom) bis er sein Volumen verdoppelt hat.
Glühwein zubereiten
20cl Rotwein, geriebene Zitronenschale, eine Prise Zimt, eine
Gewürznelke und 2-4 Eßlöffel Zucker nach Geschmack in einem
ofenfesten Glass (oder einer Tasse) vermischen. Bei 1000 W für 1-
1.5 Minuten erhitzen.
Geruchsneutralisierung des Ofens
Um Fischgeruch des Ofens zu beseitigen, eine Schüssel weißen
Weinessig oder Wasser mit dem Saft einer Zitrone in den Ofen
stellen. Bei 1000 W für 5 Minuten erhitzen. Den Dampf, der sich auf
den Wänden des Garraumes gesammelt hat, abwischen.
Heiße Kompressen vorbereiten
Ein sauberes, gefaltetes Tuch auf einem Teller für 1-2 Minuten bei
1000 W erhitzen. Temperatur überprüfen bevor das Tuch aufgelegt
wird.
Tips zum Kochen mit der Mikrowelle
Page 30
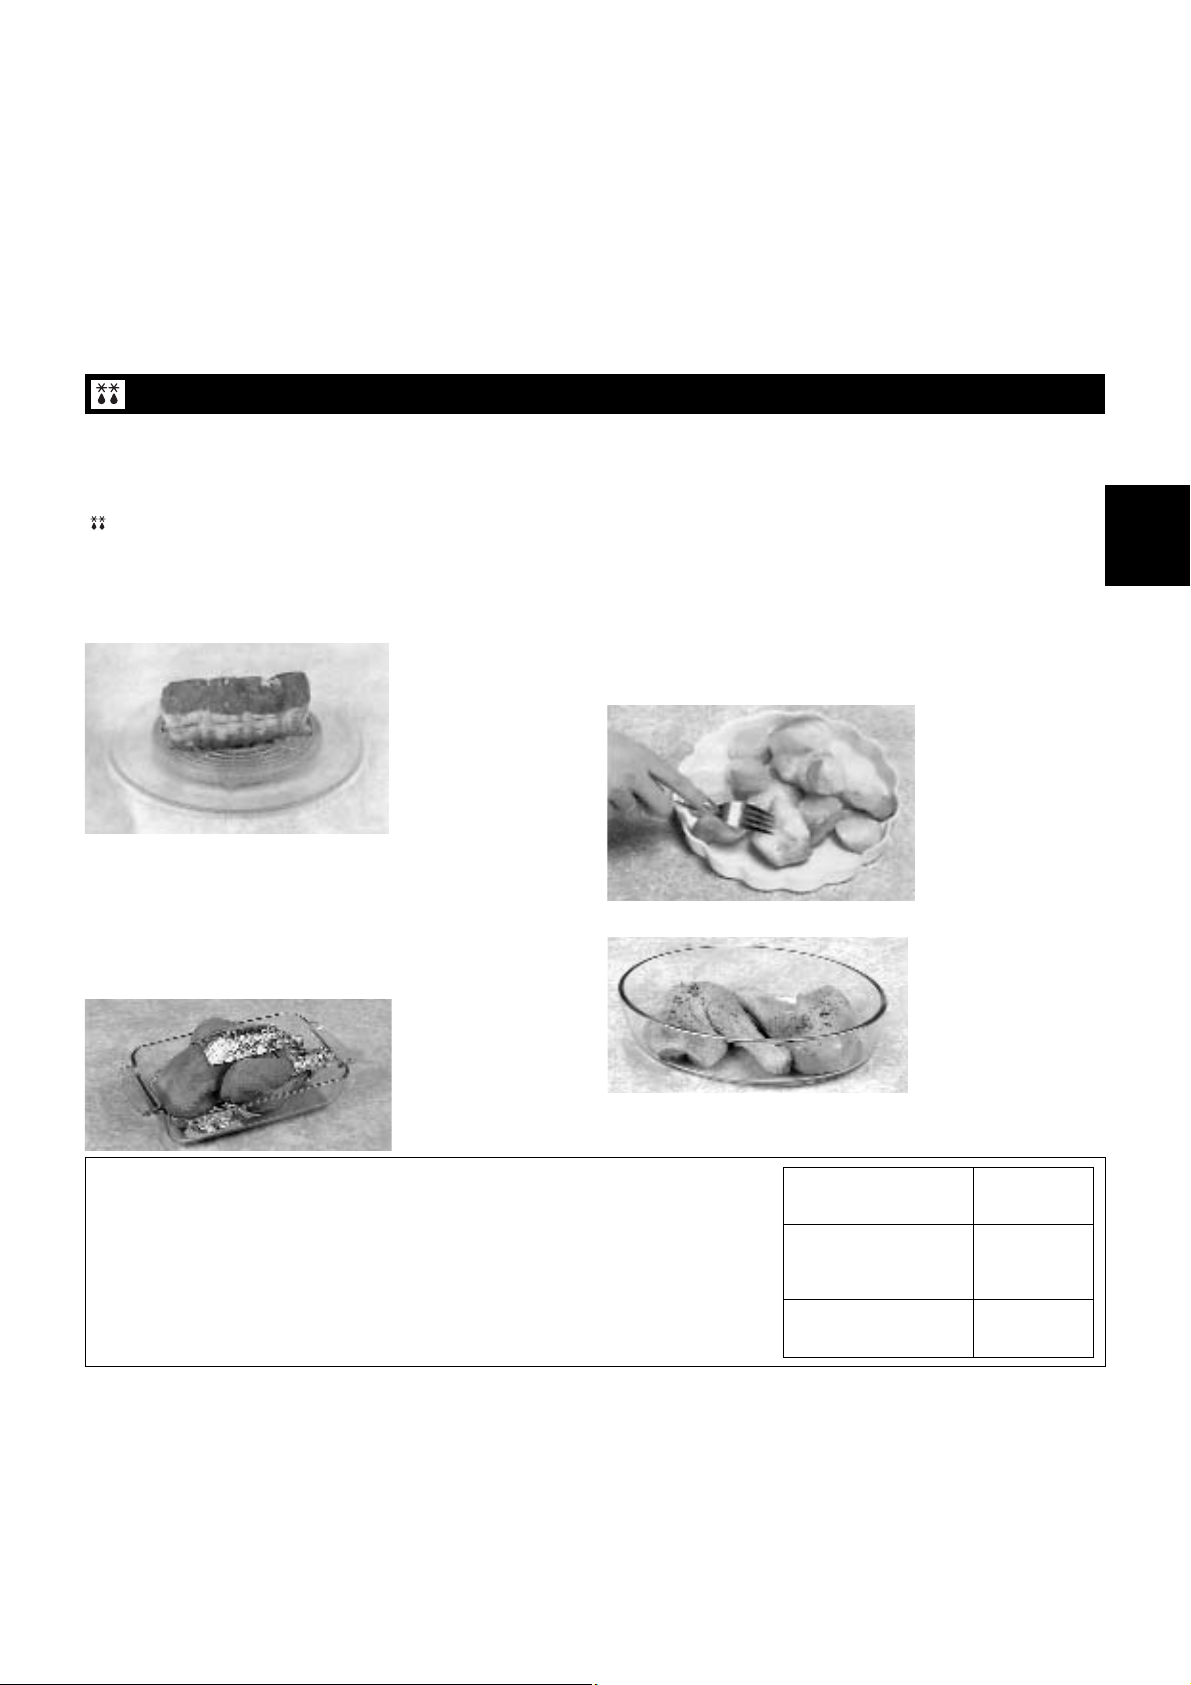
D-9
Beim Gewichtsauftauen geben Sie dem
Gerät das Gewicht des aufzutauenden
Lebensmittels an (siehe
Bedienungsanleitung). Aufgrund dieser
Angaben errechnet das Gerät die
erforderliche Auftauzeit selbst.
Diese Anwendung ist ungeeignet für
Lebensmittel wie Brot, Kuchen,
Fertiggerichte etc.
Das Auftauen sollte überwacht werden
und die Lebensmittel eventuell
gewendet, umgerührt oder
auseinandergebröselt werden (siehe
oben).
Es gibt zwei Kategorien für das
Gewichtsauftauen:
Auftau-Hinweise
Das größte Problem beim Auftauen im Mikrowellengerät ist,
daß die Innenseite des Lebensmittels häufig noch gefroren
ist, während die Außenseite bereits zu kochen beginnt.
Aus diesem Grunde beinhaltet Ihr Panasonic-Gerät das
“zyklische Auftauen”. Das heißt, Sie wählen 270 W Auftauen
und geben die erforderliche Zeit ein (siehe Tabelle). Das
Gerät teilt diese Zeit nun in 8 Stufen ein, die abwechselnd
zwischen Auftauen und Ruhen arbeiten.
Während den Ruhephasen wirken keine Mikrowellen auf das
Lebensmittel ein, obwohl das Licht an ist und der Drehteller
sich dreht. Die automatischen Ruhezeiten erlauben, daß das
Lebensmittel gleichmäßig auftaut und somit eine Ruhezeit für
kleine Mengen nicht mehr nötig ist.
Gewichtsauftauen
Empfohlenes
Gewicht
(Min..-Max.)
1. Kleine Stücke
z.B. Fisch/Kotelett
100-1200 g
Würstchen
Geflügel-Teile
2. Große Stücke
z.B. Braten, 400-2000 g
Huhn ganz
Tips für das Auftauen
Den Auftauvorgang mehrmals überprüfen, auch wenn Sie die
Automatikprogramme verwenden. Beachten Sie die Standzeiten.
STANDZEIT
Einzelne
Nahrungsmittelportionen können fast
unverzüglich nach
dem Auftauen (5
Minuten Standzeit für
Steaks, 15 Minuten für
Früchte und
Backwaren) gekockt
werden. Es ist normal
das größere Portionen
in der Mitte gefroren
sind. Vor dem Kochen
bitte mindestens eine Stunde stehen lassen. Während dieser
Standzeit verteilt sich die Temperatur gleichmäßig und das
Nahrungsmittel wird durch Wärmeleitung aufgetaut. Falls das
Nahrungsmittel nicht sofort gekocht wird, sollten Sie es im
Kühlschrank aufbewahren. Niemals aufgetaute Lebensmittel wieder
einfrieren bevor sie nicht gekocht wurden.
BRATEN UND GEFLÜGEL
Vorzugsweise sollte
Braten auf einen
umgedrehten Teller
oder ein Kunststoff-
gestell gelegt werden,
so daß er nicht im
Saft liegt. Es ist
äußerst wichtig, daß
empfindliche oder
herausstehende Teile der Lebensmittel mit kleinen Stücken Alufolie
geschützt werden damit sie nicht kochen. Es ist ungerfährlich, kleine
Stücke Alufolie in Ofen zu verwenden, vorausgesetzt sie kommen
nicht mit den Garraumwänden in Kontakt.
HACKFLEISCH ODER GEWÜRFELTE STÜCKE
FLEISCH ODER FISCH
Da die Außenseiten
dieser Lebensmittel
schnell auftauen, ist
es notwendig, die
Teile während des
Auftauvorgangs
regelmäßig auseinanderzubrechen und
aufgetaute Stücke aus
der Mikrowelle zu
entfernen.
KLEINE LEBENSMITTELPORTIONEN
Koteletts und
Hühnchenteile müssen
sobald wie möglich
getrennt werden damit
sie gleichmäßig und
komplett auftauen.
Fettige Stücke und
Enden tauen schneller
auf. Legen sie diese in
die Mitte des
Drehtellers oder
schützen Sie sie.
Deutsch
Page 31

D-10
Wählen Sie die Taste für Auftauen 270 W und geben Sie die unten angegebene Zeit ein.
Die unten stehenden Zeiten sind nur Richtwerte. Prüfen Sie jeweils während des Auftauens, um ein optimales Resultat zu
erhalten. Die Lebensmittel müssen nicht zugedeckt werden.
Hinweis
# Diese Nahrungsmittel sollten während des Auftauens baldmöglichst umgerührt oder auseinandergenommen werden.
* Schützen Sie diese Nahrungsmittel an empfindlichen Stellen (Knochen, dünne Partien) mit etwas Folie.
Auftautabelle
Lebensmittel Gewicht/Menge Zeit in Minuten Standzeit (Minimum)
FLEISCH
- Braten mit Knochen# 500 g 18 - 20 60
- Filetierter Braten# 500 g 20 - 22 70
- Koteletts# 500 g 8 - 12 15
- Schnitzel# 250 g 6 - 7 10
- Nieren* 250 g 7 - 8 10
- Mageres Rindfleisch* 430 g (2) 11 - 12 10
- Entrecote* 150 g 4 - 6 10
- Hackfleisch, Wurstfleisch* 500 g 10 - 12 10
- Frikadelle* 200 g (2) 6 - 7 10
400 g (4) 10 - 12 10
- Fleisch für Eintöpfe/zum Schmoren* 500 g 12 - 14 15
- Geflügel (ganz)# 500 g 12 - 13 60
- Geflügel (Teile)# 1 kg (4) 22 - 24 30
- Hase# 500 g 14 - 15 30
- Würste vom Schwein* 300 g (2) 10 - 11 15
BUTTER 250 g 2 10
FRUCHTPÜREE 200 g 3 - 4 10
KÄSE* 450 g 3 10
ROTE FRÜCHTE* 200 g 5 - 6 10
300 g 9 10
500 g 12 10
KUCHEN UND NACHSPEISEN
- Victoria Sandwich Kuchen 400 g (1) 7 10
- Schwarzwälderkirschtorte 550 g (1) 4 - 5 15
- Bavarois 110 g (1 Portion) 8 Sek. 15
- Himbeertorte 470 g (1) 10 15
KONZENTRIERTER FRUCHTSAFT 200 ml 4 4
TEIGWAREN
- Süßer oder Mürbeteigkuchen* 370 g (Block) 4 - 5 5
- Blätterteig* 300 g (Block) 3 - 4 5
FISCH
- ganz# 400 g (2) 10 - 12 15
- Filet# 500 g (4) 13 - 14 15
- Fischsteak mit Gräten* 380 g (2) 10 15
- Dicke Steaks ohne Gräten* 200 g (2) (4) 9 15
- Garnelen/Krabben* 200 g 7 10
Page 32

Grillkombinations - und Erwärmtabellen (NN-F663/NN-F623/NN-F653)
(1) In eine hitzefeste, mikrowellengeeignete Form (oder auf ein Stück Butterbrotpapier) legen und auf den Rost stellen. (2) Verpackung
entfernen und direkt auf den Rost legen. (3) Nach Hälfte der Kochzeit umdrehen oder umrühren.
D-11
Deutsch
Lebensmittel Gewicht/Menge Benötigte Zeit - Frisch Benötigte Zeit - Gefroren
VORSPEISEN
- Schinken und Käse Sandwich (2) (3) 1 Stück (100 g) 1 min 30 Sek. Kombi 1 + 3 Min. Grill 3 Min. Kombi 1
2 Stück (300 g) 5 Min. Kombi 2 3 Min. 30 Kombi 1
1 Stück (150 g) 3 - 4 Min. Kombi 1 + 1 Min Grill 3 - 4 Min. Kombi 2
- Meeresfrüchte (1) 1 Stück (100 g) – 5 Min. Kombi 2
(Nach der Hälfte der Garzeit das 1 Stück (170 g) 2 Min. 30 Sek. Kombi 1 + 2 Min. Grill 5 - 7 Min. Kombi 2
Croissant herausnehmen) 2 Stück (2 x150 g) 4 - 5 Min. Kombi 1 7 Min. 30 Sek. Kombi 1
- Käsecroissant, Gnocchi (1) 1 Stück (160 g) 3 - 4 Min. Kombi 1 3 Min. 30 Sek. Kombi 2
2 Stück (300 g) 4 - 5 Min. Kombi 1 –
- Käserolle (1) (3) 1 Stück (130 g) 3 Min. Kombi 1 3 Min. Kombi 2
- große Wurstrolle (2) (3) 1 Stück (130 g) 1 min 40 Sek. Kombi 3 3 Min. Kombi 1
- gefüllte Pfannkuchen (1) (3) 1 Stück (150 g) – 4 Min. 30 Sek. Kombi 1
1 Stück (190 g) 3 Min. Kombi 1 –
2 Stück (2 x 130 g) 3 Min. 30 Sek. - 4 Min. Kombi 2 7 Min. Kombi 1
- Mini-Quiches (1) 12 Stück (180 g) MAX 50 Sek. + 2 Min. Grill MAX 2 Min. + 3 Min. Grill
- amerikanische Pizza (2)
klein 1 Stück (200 g) 2 Min. Kombi 3 + 2 Min. Grill MAX 3 Min. + 3 Min. Grill
groß 1 Stück (450 g) – 5 - 6 Min. Kombi 1
1 Stück (750 g) – 8 Min. Kombi 1 + 2 Min. Grill
- Pizza (2)
klein 1 Stück (200 g)
4 Min. Kombi 2
MAX 2 Min. 10 Sek. + 3 - 4 Min. Grill
1 Stück (300 g) 3 Min. Kombi 1 + 1 Min 30 Sek. Grill –
groß 1 Stück (400 g) 3 Min. 30 Sek. Kombi 1 + 1 Min 30 Sek. Grill Autopizza***
1 Stück (600 g) 5 Min. Kombi 1 + 1 Min 30 Sek. Grill Autopizza***
dünne Kruste 1 Stück (500 g) 4 Min. Kombi 1 + 1 Min 30 Sek. Grill –
kalorienarm (3) 1 Stück (420 g) 3 Min. Kombi 1 + 2 Min. Grill –
- kleine Quiche (2) 1 Stück (130 g) 2 Min. Kombi 3 –
1 Stück (200 g) 4 Min. Kombi 2 –
2 Stück (300 g) 4 Min. Kombi 3 Autoquiche***
- große Quiche 1 Stück (400 g) 3 Min. 30 Sek. Kombi 1 –
1 Stück (500 g) 4 Min. 30 Sek. Kombi 1 + 1 Min 30 Sek. Grill Autoquiche***
1 Stück (600 g) 5 Min. Kombi 1 Autoquiche***
- Blätterteiggebäck mit Käse-, 1 Stück (300 g) 4 - 5 Min. Kombi 1 –
Schinken- oder Speckfüllung (2) (3) 1 Stück (500 g) 6 - 7 Min. Kombi 1 –
- Blätterteiggebäck mit Pilzen 1 Stück (450 g) 8 Min. Kombi 1 –
GEKOCHTE GERICHTE
- Lasagne Bolognaise (1) 130 g 2 Min. Kombi 1 + 3 Min. Grill –
300 g 6 - 8 Min. Kombi 2 AutoGratin***
1 kg Kombi 1 10 - 12 Min. AutoGratin***
- Fischgratin (1) 450 g – AutoGratin***
800 g – AutoGratin***
- Gemüsegratin (1) 450 g 5 - 7 Min. Kombi 1 AutoGratin***
1 kg 12 - 14 Min. Kombi 1 AutoGratin***
BEILAGEN
- Pommes Dauphine (1) (3) 200 g – 4 Min. 30 Sek. Kombi 1
- Pommes Noisettes (1) (3) 350 g – 4 Min. Kombi 1 + 3 Min. Grill
- Pommes Duchesse (1) 500 g – 7 Min. Kombi 1 + 7 Min. Grill
- Ofen-Pommes frites (1) (3) 400 g – 8 - 10 Min. Kombi 1
FLEISCH UND FISCH
- Entenconfit (1) (3) 2 Stück (400 g)
4 Min. Kombi 1 + 3 Min. Grill
–
- Cordon bleu (1) (3) 1 Stück (120 g) 4 Min. Kombi 1 3 Min. 30 Sek. Kombi 1
- Hühnchen Nuggets (1) (3) 10 Stück (200 g) 3 Min. Kombi 1 + 2 Min.
Grill
6 Min. Kombi 2
VERSCHIEDENES
- vorgebackenes Mandelblätterteiggebäck (2) (3)
1 Stück (400 g) 3 Min. - 3 Min 30 Sek. Kombi 3 4 - 5 Min. Kombi 2
- Aprikosenstreuselkuchen (1) 1 Stück (300 g) – 5 - 6 Min. Kombi 1
- Croissants und andere Süßspeisen (2) (3)
1 Stück (60 g) Grill 2 Min. MAX 12 Sek. + 2 Min. Grill (oder Auto)
Page 33

D-12
Tabelle für die Zubereitung von Lebensmitteln mit den Bräunungsteller (NN-F663/NN-F623)
(*) Nach Hälfte der Kochzeit umdrehen oder durchmischen.
(**) Nach dem Erhitzen 5 Minuten stehen lassen.
Lebensmittel Gewicht/Menge Frisch Gefroren
- Appetitanreger - Törtchen 12 Stück (160 g) – 2 Min. 30 Sek Kombi 1
- Schokoladengebäck 20 Stück (150 g) – 1 Min 30 Sek Kombi 1**
- Elsaßtorte 1 x 120 g 4 Min. Kombi 3 3 Min. 30 Sek Kombi 1
PIZZA
- normale Kruste 2 x 140 g 4 Min. 30 Sek Kombi 2 –
200 g – 3 Min. Kombi 1
300 g 6 Min. Kombi 1 7 Min. Kombi 1
500 g 5 Min. Kombi 3 6 Min. Kombi 1
- dünne Kruste 200 g 4 Min. Kombi 3 3 Min. Kombi 1
250 g 2 Min. Kombi 1 + 2 Min. Grill** 3 Min. Kombi 1
- amerikanische Art 500 g – 6 Min. Kombi 1
- McCain rise and up 500 g – 10 Min. 30 Sek Kombi 1
QUICHES & GEBÄCK
- Quiche Lorraine 1 x 100 g – 2 Min. 30 Sek - 3 Min. Kombi 1
2 x 150 g 3 Min. Kombi 2 –
150 g – 2 Min. 30 Sek - 3 Min. Kombi 1
400 g – 5 - 6 Min. Kombi 1
- Quiche mit Lauch 2 x 120 g – 5 Min. Kombi 1
400 g – 6 Min. 30 Sek Kombi 1**
- pikantes Gebäck 450 g 4 Min. 30 Sek - 5 Min. Kombi 1** 10 Min. Kombi 1* und **
- Blätterteiggebäck mit Pilzen 450 g 6 - 7 Min. Kombi 1** –
- Quiches mit Meeresfrüchten 350 g 4 Min. Kombi 2** –
- Quiche mit Zwiebel- und Anchovisfüllung 1 x 150 g – 2 Min. 40 Sek Kombi 1
- gefüllte Crepes 4 Stück (200 g) – 3 Min. Kombi 1
2 Stück (100 g) – 1 Min. 40 Sek Kombi 1*
- gefüllte Pfannkuchen 2 Stück (140 g) 3 Min. Kombi 2 5 Min. Kombi 1
- Käserolle, große Wurstrolle 130 g 2 Min. Kombi 3 2 Min. 20 Sek - 3 Min. (Roule) Kombi 3
2 x 130 g 2 Min. 30 Sek Kombi 1 3 Min. Kombi 1**
- Gnocchis 2 x 130 g – 6 Min. Kombi 1
- Schinken und Käse Sandwich 1 x 100 g 3 Min. Kombi 3* –
2 x 100 g 4 Min. Kombi 3 + 1 Min Grill –
1 x 160 g 3 Min. 30 Sek - 4 Min. Kombi 3 3 Min. Kombi 1
2 x 160 g 5 - 6 Min. Kombi 3 5 Min. Kombi 1
- Croque mit Speck/Tomaten 1 x 140 g 2 Min. 30 Sek Kombi 2 3 Min. 30 Sek Kombi 1
KARTOFFELN
- Ofen-Pommes frites 200 g – 5 Min. Kombi 1 + 3 - 5 Min. Grill*
400 g – 6 Min. Kombi 1 + 5 - 7 Min. Grill*
- Kartoffelecken 300 g – 4 Min. Kombi 1 + 5 Min. Grill*
- Pommes Duchesse 400 g – 9 Min. Kombi 1 + 4 Min. Grill
- Pommes Dauphine 200 g – 4 - 5 Min. Kombi 1*
- Bratkartoffeln 9 Stück (600 g) – 10 Min. Kombi 1*
- Pommes Noisettes 450 g – 8 Min. Kombi 1 + 3 Min. Grill*
- Stücke/Viertel (roh) 500 g - 1 kg 15 - 20 Min. Kombi 1* –
WÜRSTE 2 Stück (120 g) 2 Min. Kombi 1* 3 Min. 30 Sek Kombi 1*
3 Stück (180 g) 3 Min. Kombi 1* 4 Min. Kombi 1*
- Toulouser Wurst 1 Stück (150 g) 3 Min. 30 Sek - 4 Min. Kombi 2* 4 Min. 30 Sek Kombi 1*
- Schweinewürste* 1 Stück (150 g) 5 Min. Kombi 2* 7 Min. Kombi 1*
Page 34

D-13
Tabelle für die Zubereitung von Lebensmitteln mit den Bräunungsteller (NN-F663/NN-F623)
Falls nicht anders angegeben, wird die Form stets 4 Minuten auf Stufe Kombi 1 vorgeheizt.
(*) Nach Hälfte der Kochzeit umdrehen oder durchmischen
(**) Nach dem Kochen 5 Minuten stehen lassen.
Deutsch
Lebensmittel Gewicht/Menge Frisch Gefroren
- Schweineschnitzel* 180 g 3 - 4 Min. Combi 2* 6 Min. Combi 1*
- Entenfilet* 1 Stück (350 g) 4 Min. Kombi 3 + 5 Min. Grill* –
- Hühnchenbein 2 Stück (670 g) 10 Min. Kombi 1 + 4 Min. Grill* 18 Min. Kombi 1 + 4 Min. Grill*
- Frikadellen*
Standard 1 Stück (100 g) 1 Min. 50 Sek. - 2 Min. Kombi 3* 3 Min. 30 Sek. - 4 Min. Kombi 3*
1 Stück (140 g) 2 Min. 30 Sek. - 3 Min. Kombi 3* –
2 Stück (200 g) – 4 Min. 20 Sek. Kombi 3*
4 Stück (400 g) – 3 Min. 30 Sek. - 4 Min. Kombi 3
- panierter Fisch* 2 Stück (200 g) 3 Min. 40 Sek. Kombi 2* 5 Min. Kombi 1*
- Fischstäbchen 5 Stück (150 g) – 4 Min. Kombi 1*
10 Stück (300 g) – 5 Min. Kombi 1*
- Cordon Bleu 1 Stück (100 g) 3 Min. 30 Sek. Kombi 3* 3 Min. Kombi 1*
2 Stück (200 g) 3 Min. 30 Sek. Kombi 2* 5 Min. Kombi 1*
- Hühnchen Nuggets 10 Stück (200 g) 4 Min. Kombi 2* 4 Min. Kombi 1*
5 Stück (100 g) 3 Min. Kombi 2* 3 Min. Kombi 1*
- Omelett 4 geschlagene Eier 1 - 2 Min. Kombi 1* –
8 geschlagene Eier 2 Min. - 2 Min. 30 Sek. Kombi 1* –
- Apfelstrudel (vorgekocht)* 300 g – 4 Min. 30 Sek. - 5 Min. Kombi 1* und **
- Mandelblätterteiggebäck (vorgebacken) 400 g – 2 Min. 30 Sek. Kombi 1**
- Schmalzgebäck mit Apfelfüllung (gekocht) 7 Stück (220 g) – 6 Min. Kombi 3*
- Waffeln (gekocht) 1 Stück (70 g) – 2 Min. 30 Sek. Kombi 3*
- Tarte Tatin 1 Stück (600 g) – 7 Min. Kombi 1** /Apfelseite unten
1 Stück (150 g) – 2 Min. Kombi 2** /Apfelseite unten
- kleiner Nuß- und Schokoladenkuchen 2 Stück (150 g) – 1 Min. 30 Sek. Kombi 3 * und **
Page 35

D-14
Fleisch & Geflügel
Aufgetaute Stücke
Tiefgefrorenes Fleisch ganz auftauen lassen, bevor Sie es in der
Mikrowelle garen. Stücke mind. 30 Min. ruhen lassen, um sicher
zu sein, daß das Innere vollständig aufgetaut ist.
Fett
Fett absorbiert Mikrowellen, die das Fleisch zu stark garen.
Wählen Sie jeweils magere Stücke.
Kochen mit Mikrowellenbetrieb
Den Braten auf einen
umgedrehten Teller
in eine Mikrowellengeeignete Form
legen und dann auf
den Glasdrehteller
stellen. Es ist wichtig
das der Braten nicht
im eigenen Saft liegt.
Der umgedrehte
Teller ist für einzelne
Fleisch- oder Geflügelstücke nicht notwendig, falls dieses
frikassiert oder mit einer Beilage zubereitet wurde.
Es ist ratsam, das Fleisch mit einem Deckel oder Folie
abzudecken, um den Kochvorgang zu beschleuigen und um
Spritzen zu vermeiden.
Ausgleichszeit
Fleisch und Geflügel benötigen eine minimale Ausgleichszeit von
15 Min. Nach dem Garen in Folie einpacken.
Knochen
Knochen wie Lammkeule, Geflügelbeine etc. in Folie einwickeln.
Zubereitung von kleinen Fleischstücken mit Mikrowellen
Obwohl kleine Fleischstücke sehr gut mit Mikrowellen gegart
werden können (kurze Garzeit), werden sie nicht braun und
knusprig.
Legen Sie die Stücke auf einen umgedrehten, tiefen Teller, damit
sie nicht im Saft liegen.
Wenden
Fleischstücke und Geflügel sollten nach der Hälfte der Kochzeit
gewendet werden.
Schützen
Große Stücke müssen eventuell nach halber Garzeit mit etwas
Folie bedeckt werden, um ein Übergaren (Austrocknen) zu
vermeiden. Einem Truthahn oder einem großes Huhn sollten Sie
Brust, Beine und Flügel mit Folie bedecken. Die Folie können Sie
mit Zahnstochern fixieren. Die Folie darf nicht die Garraumwand
berühren.
Zubereitung eines Bratens mit Kombination
Legen Sie das
Fleischstück auf
einen umgedrehten
tiefen Teller, der auf
einem
hitzebeständigen
Geschirr steht.
Fleischstücke
werden zuerst mit
Mikrowelle gegart
und danach mit
Kombination noch gebräunt und knusprig gebraten.
NICHT ZUDECKEN.
Tips für Eintöpfe und Ragouts
Vor dem Kochen muß das Gemüse in gleichgroße Stücke
geschnitten und vorgekocht werden, ansonsten ist es am Ende
des Kochvorganges zu hart. Die Fleischstücke mit Mehl
bestreuen um sicherzustellen, daß die Sauce richtig kocht.
Während des Kochens ist es wichtig, daß das Fleisch mit
Flüssigkeit bedeckt bleibt; dazu die Lebensmittel mit einer
umgedrehten Untertasse oder einem Teller abdecken (um das
Fleisch vor dem Austrocknen zu schützen). Da das Zubereiten
von Eintöpfen eine lange Zeit benötigt und manchmal viel
Flüssigkeit verdampfen kann, bitte wenn nötig Flüssigkeit
zufügen. Das Gefäß mit einem Deckel zudecken, um
Verdampfen zu verhindern. Auf maximaler Leistung in 10 bis 12
Minuten zum Kochen bringen und dann für den gewünschten
Zeitraum auf 250 W fertigkochen.
Kleine Fleischstücke mit Grill oder Kombination zubereiten
Legen Sie das Fleisch
auf den Gitterrost und
stellen Sie diesen auf
den Drehteller. Benützen
Sie hitzebeständiges
Geschirr, um das Fett
aufzufangen.
Für grössere Stücke, die
die Garraumdecke
berühren würden,
verwenden Sie ein
hitzebeständiges
Geschirr und stellen
dieses auf den Drehteller.
Die Grillzeit wird durch
den größeren Abstand
zum Grill eventuell etwas
verlängert.
Wissenswertes
Page 36

D-15
Fleisch & Geflügel
Fleischart Reine Mikrowelle***
Kochzeit
Kombination oder Grill
Kochzeit
in Minuten in Minuten
RIND
- Rippchen* Grill 25 - 30**
- Braten* 600 W 5 Kombi 3 7 - 8
- für Eintöpfe MAX dann 250 W 10 dann 60 - 75** – –
LAMM
- Braten mit Knochen* 600 W 6 - 7 Kombi 1 7 - 8
- Schulter* 600 W 8 Kombi 1 8 - 9
- für Eintöpfe* MAX dann 250 W 10 dann 40 - 50** – –
KALB
- Schulterbraten* 600 W 14 - 15 Kombi 1 10 - 11
- für Eintöpfe MAX dann 250 W 10 dann 50 - 60 ** – –
SCHWEIN
- Filetbraten* 600 W 15 - 17*** Kombi 1 11 - 12
- Spare rib* 600 W 15 - 17*** Kombi 1 12 - 13
- für Eintöpfe MAX dann 250 W 10 dann 50 - 60** – –
- Rippchen* – – Grill 20
HÜHNCHEN - TRUTHAHN - PERLHUHN
- ganzer Braten – – Kombi 1 8 - 9
- Stücke* 600 W 7 - 8 Kombi 2 12 - 14
oder Grill 25**
- Truthahnkeule* – – Kombi 1 8 - 9
- Truthahnteile 600 W 12 Kombi 1 10 - 11
ENTE
- ganzer Braten – – Kombi 1 dann Grill 9 - 10 + 4**
- Teile* – – Kombi 1 dann Grill 7 - 8 + 6**
- für Eintopf MAX dann 250 W 10 dann 70** – –
HASE MAX 7 - 8 – –
WILD
- Braten* MAX 5 - 6*** Kombi 3 9 - 11
- für Eintöpfe MAX dann 250 W 10 dann 70** – –
CHIPOLATAS* MAX 3 - 4 Grill 12 - 14**
Schweinewurst (1 Stück)* – – Kombi 2 8**
Toulouser Wurst (2 Stücke)* – – Kombi 2 10
oder Grill 15**
Anmerkung: Für Fleisch am Knochen oder gefülltes Fleisch sollte die Kochzeit um mindestens 5 Minuten verlängert werden (abhängig vom
Gewicht).
* Für den Grill- oder Kombinationsbetrieb das Geschir auf den Rost legen, falls es die Fleischdicke zuläßt; ansonsten auf den
Glasdrehteller stellen.
** Unabhängig vom Gewicht.
*** Für den reinen Mikrowellenbetrieb sind die Kochzeiten für Braten (Schwein, Kalb, Lamm, Rind) zutreffend, der vorher in der Pfanne (für
ein paar Minuten) angebraten wurde.
Für 500g (Zeit in Minuten)
Deutsch
Page 37

D-16
Fisch eignet sich hervorragend für die Mikrowelle und bleibt
schön saftig.
Wann ist der Fisch gar?
Der Fisch läßt sich gut teilen und seine Farbe ist weiß oder
rosa (je nach Sorte).
Fisch
VORBEREITEN
Dünne Filets sollten gerollt
werden, um ein Übergaren der
feineren Partien zu vermeiden.
Zudecken
Decken Sie den Fisch immer mit
Klarsichtfolie oder dem
Geschirrdeckel zu.
FLÜSSIGKEIT
Frischer Fisch sollte immer mit
ca. 2 Eßlöffeln Zitronensaft oder
weißem Wein beträufelt werden.
Bei gefrorenem Fisch empfiehlt
es sich, die gleiche Menge
Flüssigkeit beizugeben, um ein
gleichmäßiges Garresultat zu
erhalten.
FISCHSTEAKS
Fischsteaks sollten im Kreis
angeordnet werden - dickere
Seite nach außen - um ein
Übergaren zu vermeiden.
GANZER FISCH
Wenn Sie 2 ganze Fische
miteinander garen, legen Sie sie
gleichmäßig auf den Teller. Bei
großen Fischen sollte nach der
Hälfte der Garzeit der Kopf
sowie der Schwanz mit Alufolie
geschützt werden.
SALZ
Den Fisch vor dem Garen nicht
salzen. Dies könnte ihn
austrocknen.
FISCH MIT GRILL ODER
KOMBINATION GAREN
Bepinseln Sie den Fisch mit Öl
oder geschmolzener Butter,
um ihn saftig zu halten. Legen
Sie ihn auf den Gitterrost.
NICHT SALZEN. Würzen Sie
ihn lediglich mit Pfeffer und
Kräutern, falls erwünscht.
Ruhezeit
Fisch sollte nach dem Garen
ca. 2-3 Min. ruhen.
Großer Fisch (mehr als 400g)
Es ist empfehlendswert, größere
Fische nach Hälfte der Kochzeit
umzudrehen und den Kopf und
Schwanz mit kleinen Stücken
Alufolie abzudecken um ein
Überkochen zu vermeiden.
(Achtung: die Folie darf auf
keinen Fall die Wände des
Garraums berühren.)
Fisch en papillote
Sie können Fischpapillotes
herstellen indem Sie die Alufolie
mit Butterbrotpapier ersetzen.
Lebensmittel
FRISCH GEFROREN
Power Zeit Power Zeit
Dünne Fischfilets
600 W 4 - 5 MAX 10
Dicke Fischfilets
600 W 5 - 6 MAX 11 - 12
Fischsteaks
600 W 5 - 7 MAX 11 - 13
Ganzer Fisch
600 W 5 MAX 12
Garnelen
* 600 W 4 - 5
Muscheln
* 600 W 5 - 6
Kammuscheln
* 600 W 6 - 7
Tintenfisch
* 600 W 5 - 6 MAX 11
Krabben
* 600 W 5 - 6
Fischcroquetten (1 Stück=50 g)* MAX 3 Min. 30
(2 Stück)
oder 5 Min.
(4 Stück)
* Für diese Fische empfehlen wir, nicht die Automenüs zu verwenden.
Kochzeit für 500g in Minuten
Page 38

D-17
Gemüse
* Für dieses Gemüse empfehlen wir, nicht die Automenüs zu verwenden.
ZUGABE VON WASSER
Sehr wasserreichem Gemüse wie Tomaten, Zucchini, Auberginen,
gefrorenem Gemüse für Ratatouille, Pilzen, Spinat, Endiviensalat,
Salat, Zwiebeln, fast allen Früchten usw. sollte kein Wasser zugefügt
werden, da beim Mikrowellenkochen das vorhandene Wasser
verwendet wird.
Relativ wasserhaltigem Gemüse sollten 4 bis 5 Eßlöffel Wasser für
jeweils 500g zugefügt werden, um den Dampf zu entwickeln der das
Gemüse kocht und Austrocknen vermeidet: Blumenkohl, Lauch,
Brokkoli, Karotten, Sellerie, Spargel, Kartoffeln, Artischoken,
Rosenkohl, Fenchel, Weißkohl, Rüben usw.
Gemüse mit geringem Wassergehalt sollten etwa 8 bis 10 Eßlöffel
Wasser pro 500g zugefügt werden: Erbsen, Französischen Bohnen,
Saubohnen, Stangenbohnen usw.
In jedem Fall: Gemüse muß bei 1000 W gekocht werden (mit
Ausnahme von ganzem Blumenkohl) und darf vor dem Kochen
nicht gesalzen werden, sondern erst danach. Dies ist erforderlich
da das Salz die natürliche Feuchtigkeit des Gemüses aufnimmt und
damit das Austrocknen fördert.
GEMÜSE FRISCH GEFROREN
Artischoken:
- ganz 11 - 12 –
- Herz 10 - 12 13 - 16
Spargel* 10 - 12 14 - 15
Auberginen 9 - 11 –
Rote Rüben* 18 - 20 –
Chinakohl 8 - 10 14 - 15
Brokkoli 8 - 10 13 - 15
Pilze 9 - 10 13 - 15
Karotten:
- runde Scheiben 10 - 12 13 - 15
- Streifen 12 - 14 –
Weißkohl* 12 - 14 –
Blumenkohl 10 - 12 13 - 15
Rosenkohl 10 - 12 13 - 15
Sellerie 9 - 11 –
Stangensellerie* 15 - 17 –
Zucchini 8 - 10 13 - 15
Endiviensalat 12 - 14 18 - 20
Spinat:
- gehackt – 12
GEMÜSE FRISCH GEFROREN
- Blätter 9 - 10 13
Saubohnen* 16 - 19 18 - 20
Fenchel:
- halbiert 12 - 14 –
- dünn hergeschnitten 17 - 20 –
Grüne Bohnen* 12 - 13 12 - 13
Zwergbohnen 10 - 13 –
gemischtes Frühlingsgemüse* – 15 - 16
Maiskolben (2 Kolben)* 12 - 14 14 - 17
Rüben 10 - 12 18 - 20
Zwiebel 9 - 12 15 - 18
Erbsen* 20 16 - 18
dünn geschnittener Lauch 12 - 14 15 - 16
Lauch 12 - 14 15 - 16
Kürbis 10 - 12 –
ganze Kartoffeln (<220g) 9 - 12 –
kleingeschnittene Kartoffeln 10 - 12 –
Ratatouille 16 - 18 14 - 16
Tomaten* 4 - 5 –
Kochtabelle für frische/tiefgefrorene Gemüse - Volle Leistung (1000 W)
Kochzeit für 500g in Minuten
Ein ganzer Blumenkohl muß mit dem Kopf nach unten bei
600 W in 12 bis 15 Minuten mit 6 Eßlöffeln Wasser gekocht
werden (abhängig von der Größe des Blumenkohls).
Deutsch
Page 39

D-18
Eier sind
empfindliche
Lebensmittel die
genaue
Aufmerksamkeit
erfordern. Werden
sie nämlich direkt
in den Ofen
gelegt, explodieren
sie aufgrund des
Drucks, der
innerhalb der
Schale entsteht.
Bei gebrochener
Eierschale
explodiert das herauslaufende Eigelb, falls die zur Abdeckung
verwendete Folie nicht eingestochen wurde. Deshalb das Eigelb mit
der Spitze eines Zahnstochers einstechen; frische Eier sollten dabei
nicht auslaufen. Eigelb und Eiweiß reagieren unterschiedlich auf
Mikrowellen; leider kocht das Eigelb schneller. Beim Kochen von
geschlagenen Eiern (Omelette) sollten die Eier am Rand nach Hälfte
der Kochzeit in die Mitte gebracht werden.
Verlorene Eier
50ml Wasser mit Salz und einem Spritzer Essig für 1 Minute bei
1000 W erhitzen. Das Ei in das kochende Wasser schlagen und
vorsichtig das Eigelb mit einem Zahnstocher einstechen; bei 600W
30 bis 40 Sekunden kochen (abhängig von der Eiergröße). Für 1
Minute stehen lassen, dann abtropfen und servieren.
Rühreier
Zwei rohe Eier in einer Schüssel mit etwas Milch, Salz, Pfeffer und
einem Stück Butter vermischen. In 40 Sekunden bei 1000 W kochen.
Aus dem Ofen nehmen und mit einer Gabel kräftig durchrühren. Bei
1000 W für 30 bis 40 Sekunden weiterkochen. Die Eier sollten
cremig bleiben.
Eierauflauf
Die Eier in eine mit Butter eingeriebene Schale geben, mit Salz und
Pfeffer würzen und das Eigelb und Eiweiß mit einem Zahnstocher
einstechen. Die gewünschte Füllung (Pilze, Sahne, etc.) dazugeben.
Für 1 Minute 30 Sekunden bis 2 Minuten bei 250 W kochen,
abhängig von der Größe der Eier und der Menge der Garnierung.
Käse reagiert unterschiedlich, abhängig von der Art des Käses: je
fetter, desto schneller schmilzt der Käse. Wird er zu lange gekocht,
wird er hart. Wenn möglich ist es vorzuziehen, geriebenen Käse im
letzten Augenblick zuzufügen (für Nudelgericht, Aufläufe, etc).
Die Kochzeit für getrocknetes Gemüse in der Mikrowelle ist ziemlich
die gleiche wie beim herkömmlichen Kochen. Auf der anderen Seite
jedoch erhitzen sich diese Lebensmittel sehr schnell ohne einen
“Wiedererwärmungsgeschmack” anzunehmen - vorausgesetzt sie
befinden sich in einem geschlossenen Gefäß und sind mit Sauce
oder Butter vermischt.
Zum Kochen ein großes Gefäß verwenden (um Überlaufen zu
vermeiden). Komplett mit Wasser oder Brühe bedecken. Nach dem
Kochen für mindestens 5 bis 8 Minuten stehen lassen.
Reis
Wenn die Flüssigkeit den Siedepunkt erreicht für etwa 20 Minuten bei
250 W kochen, unabhängig von der Reismenge.
Gries
Gries kocht hervorragend in der Mikrowelle, ohne Gefahr
anzubrennen. Einfach Wasser in der gleichen Menge wie Gries
zugeben, zugedeckt bei 1000 W in 2 Minuten 30 Sekunden (für
200 g Gries mittlerer Größe mit 0.2l Wasser) kochen und dann bei
250 W für etwa 3 Minuten weiterkochen während der Gries aufquillt.
Nudeln
Das Kochwasser salzen und und während des Kochens einmal
umrühren. Wenn sich Blasen in der Flüssigkeit bilden 250 g Nudeln
in 7 oder 8 Minuten bei 1000 W und 10 Minuten für 250 g Ravioli
kochen (1 Liter Wasser).
Getrocknetes Gemüse
Komplett mit Wasser bedecken und über Nacht einweichen. Am
nächsten Tag abtropfen und wieder mit Wasser abdecken. Nicht vor
dem Kochen salzen (dies macht das Gemüse hart). In 10 Minuten
bei 1000 W kochen, dann für 15 bis 30 Minuten bei 250 W köcheln
lassen. Den Kochvorgang ständig beobachten und wenn nötig
Wasser zufügen: Das getrocknete Gemüse muß ständig mit Wasser
bedeckt sein.
Vor dem Kochen die Kartoffeln waschen und mehrere Male
einstechen. Auf die äußere Seite des Drehtellers legen.
Die Garzeiten können je nach Sorte variieren. Die unten
angegebenen Kochzeiten sind nur Richtwerte. Die Idealgröße für
Gebackene Kartoffeln, mit Mikrowelle oder Kombination gegart, liegt
zwischen 200 - 250 g. Die mit Mikrowellen gegarten Kartoffeln sind
schneller fertig als mit Kombination, allerdings auch weicher. Mit der
Kombination werden sie knuspriger, eventuell etwas trockener. Für
eine stärkere Bräunung der Kartoffeln verwenden Sie die Grillstufe 1
(siehe Tabelle unten).
Nach dem Kochen nehmen Sie die Kartoffeln aus der Mikrowelle und
wickeln Sie sie in Folie. Ca. 5 Min. ruhen lassen.
Eier und Käse
Reis, Nudelgerichte, Getrocknetes Gemüse und Kartoffeln
Kartoffeln
Menge
1
2
4
Min. volle Leistung (1000 W)
4-7
7-10
11-15
Min. Grillstufe 1 (Bräunung)
8-10
10-12
11-13
Page 40

D-19
Fragen - Antworten
Problem Ursache Lösung
Das Nahrungsmittel kühlt schnell ab. Das Nahrungsmittel ist nicht Stellen Sie das Nahrungsmittel zurück
vollständig gegart. ins Gerät und geben Sie etwas Garzeit
hinzu. Beachten Sie, daß Lebensmittel
direkt aus dem Kühlschrank mehr Zeit
benötigen als solche mit
Zimmertemperatur.
Milchreis oder Eintöpfe kochen Geschirr ist zu klein. Für flüssigere Nahrungsmittel empfiehlt
während des Garens mit Mikrowellen es sich, ein doppelt so großes Geschirr
über. (als Menge) zu wählen.
Das Nahrungsmittel gart mit Mikrowellen Das Gerät sollte an einer mit 16A/230V
zu langsam. Das Gerät bekommt zu wenig Strom. abgesicherten Steckdose
angeschlossen sein.
Nahrungsmittel-Temperatur aus Garzeit hinzufügen.
Kühlschrank kälter als Raumtemperatur.
Das Fleisch ist nach dem Garen mit Mit zu hoher Leistung gegart. Wählen Sie eine reduzierte Leistung,
Mikrowelle oder Kombination zäh. z.B. halbe Leistung.
Das Fleisch wurde vor dem Garen Salzen Sie das Fleisch erst nach dem
gesalzen. Garen, falls erwünscht.
Kuchen ist im Innern nicht gar. Koch- oder Ruhezeit zu kurz. Geben Sie Koch- oder Ruhezeit hinzu.
Rühreier und gekochte Eier sind nach Kochzeit zu lang. Vorsicht beim Garen von kleinen
Garen mit Mikrowelle zäh und Mengen von Eiern.
gummiartig
Quiche/Eierkuchen sind nach Garen mit Leistung zu hoch. Wählen Sie für diese Nahrungsmittel
Mikrowelle zäh und gummiartig. eine reduzierte Leistung.
Quiche/Eierkuchen sind nach Garen mit Kochzeit zu lang. Geschirr größer Überwachen Sie den Kochvorgang
Kombination zäh und gummiartig. als im Rezept angegeben. jeweils genau.
Käsesauce ist nach Garen Käse mit Sauce gekocht. Geben Sie den Käse am Ende des
mit Mikrowelle zähflüssig. Garvorgangs bei. Die Hitze der Sauce
wird den Käse schmelzen lassen.
Gemüse ist nach Garen mit Nicht zugedeckt gegart. Mit Deckel oder Klarsichtfolie zudecken.
Mikrowelle trocken.
Zu geringer Flüssigkeitsgehalt, z.B. 2-4 EL Wasser beigeben.
Wurzelgemüse.
Gemüse vor dem Garen gesalzen. Erst nach dem Garen salzen.
Kondensation im Gerät. Dies ist normal. Einige Nahrungsmittel Wischen Sie den Ofen mit einem
produzieren beim Garen viel Dampf. weichen Tuch aus.
Der Drehteller dreht sich in beide Dies ist normal.
Richtungen.
Warme Luft steigt um die Türdichtung Das Gerät ist nicht luftdicht. Dies ist normal und bedeutet kein
herum aus. Mikrowellenleck.
Funken sind zu sehen, wenn das Wenn Sie nur mit Mikrowellen garen, Schalten Sie das Gerät unverzüglich
Metallzubehör benutzt wird. dürfen Sie kein Metallzubehör benutzen. aus. Verwenden Sie keine
Bei der Kombination sollten Sie das Metallgegenstände beim reinen
Zubehör auf mögliche Defekte hin prüfen. Mikrowellenbetrieb. Prüfen Sie das
Minimalgewicht bei den
Automatikprogrammen.
Der Grill schaltet während Grillbetrieb Während des Garens schaltet sich der Dies ist normal.
oder Kombination zeitweise ab. Grill automatisch ein und aus, um ein
Verbrennen des Nahrungsmittels vor dem
Garen zu vermeiden.
Deutsch
Page 41

Wat zijn microgolven . . . . . . . . . . . . . . . . . . . . . . . . . . . . . . . . . . . . . 2
Algemene richtlijnen . . . . . . . . . . . . . . . . . . . . . . . . . . . . . . . . . . . . 2-3
Aanbevolen Kookgerei . . . . . . . . . . . . . . . . . . . . . . . . . . . . . . . . . . . 4
Magnetron vermogensstanden . . . . . . . . . . . . . . . . . . . . . . . . . . . . . 5
Grill . . . . . . . . . . . . . . . . . . . . . . . . . . . . . . . . . . . . . . . . . . . . . . . . . . 5
Combinatie koken . . . . . . . . . . . . . . . . . . . . . . . . . . . . . . . . . . . . . . . 5
Te Gebruiken Accessoires . . . . . . . . . . . . . . . . . . . . . . . . . . . . . . . . 5
Opwarmen . . . . . . . . . . . . . . . . . . . . . . . . . . . . . . . . . . . . . . . . . . . . . 6
Opwarmen met de magnetron . . . . . . . . . . . . . . . . . . . . . . . . . . . . 6-7
Tips Voor Magnetronbereiding . . . . . . . . . . . . . . . . . . . . . . . . . . . . . 8
Ontdooien . . . . . . . . . . . . . . . . . . . . . . . . . . . . . . . . . . . . . . . . . . . . . 9
Ontdooien met de magnetron . . . . . . . . . . . . . . . . . . . . . . . . . . . . . 10
Tabellen . . . . . . . . . . . . . . . . . . . . . . . . . . . . . . . . . . . . . . . . . . . 11-13
Vlees . . . . . . . . . . . . . . . . . . . . . . . . . . . . . . . . . . . . . . . . . . . . . 14-15
Vis . . . . . . . . . . . . . . . . . . . . . . . . . . . . . . . . . . . . . . . . . . . . . . . . . 16
Groenten . . . . . . . . . . . . . . . . . . . . . . . . . . . . . . . . . . . . . . . . . . . . . 17
Eieren & Kaas . . . . . . . . . . . . . . . . . . . . . . . . . . . . . . . . . . . . . . . . . 18
Rijst, Pasta, Gedroogde groenten & Aardappelen-in-de-schil . . . . 18
Vraag en antwoord . . . . . . . . . . . . . . . . . . . . . . . . . . . . . . . . . . . . . .19
Inhoudsopgave
De vermelde tijden in dit kookboek zijn slechts een richtlijn. De werkelijke bereidingstijd is afhankelijk van de begintemperatuur van het
voedsel en de schalen die u gebruikt.
Controleer altijd of het voedsel voldoende warm is, voordat u het serveert.
Nl-1
Inverter-technologie is de sleutel
Inverter-technologie voor magnetron-ovens is gedurende een periode van meer dan 10 jaar ontwikkeld als resultaat van een initiatief van
National/Panasonic. Dit is de belangrijkste technologie voor het maken van een geheel ander type magnetron, die beschikt over een aantal
speciale kwaliteiten.
• Inverter-technologie maakt het mogelijk om voor het eerst een magnetron te vervaardigen waarbij de hoeveelheid magnetronenergie lineair
geregeld kan worden. Met dit nieuwe distributiesysteem kan voedsel ontdooid en bereid worden zonder dat het zijn smaak verliest.
• Inverter-technologie zorgt voor een efficiënte omzetting van elektrische energie in magnetron-energie, met als gevolg dat minder stroom
nodig is om hetzelfde magnetronvermogen te realiseren.
• Inverter-technologie maakt aanzienlijk meer nuttige magnetronruimte mogelijk, zelfs bij compacte modellen. Dit komt doordat het inverter-
circuit, dat de momenteel in gebruik zijnde omvangrijke transformator vervangt, klein van omvang is.
• Tenslotte zorgt Inverter-technologie er voor dat magnetrons, wanneer ze versleten zijn, door de afwezigheid van grote, met metaal
vervaardigde transformatoren, millieuvriendelijk voor hergebruik gedemonteerd en verwerkt kunnen worden.
Nederlands
Page 42

SCHIL
Aardappelen,
appels,
eierdooiers,
worstjes e.d.
hebben een
niet poreuze
schil. Die moet
eerst worden
ingeprikt met
bijvoorbeeld
een vork
voordat u ze gaat koken om eventueel uit
elkaar spatten te voorkomen.
Kook geen ongepelde eieren. Er kan een te
hoge druk ontstaan binnen de eierschaal,
waardoor ze uiteen kunnen spatten.
VOCHTIGHEID
In de verschillende jaarseizoenen kan de
bereidingstijd variëren als gevolg van een
veranderde vochtigheid in het voedsel,
bijvoorbeeld bij aardappelen en verse
groenten.
MAGNETRONFOLIE
Gerechten dienen zoveel mogelijk afgedekt
te worden, bv. met behulp van een deksel,
magnetronfolie of een bord. Hierdoor wordt
de warmte ‘vastgehouden’ waardoor de
bereidingstijd wat korter wordt en het
resultaat verbeterd.
Microgolven zijn elektromagnetische golven, zoals radio of
televisiegolven. Ze verschillen alleen maar in hun frequentie, dat wil
zeggen in het aantal trillingen per seconde. De trilling van
microgolven is 2.45 miljard maal per seconde. In de magnetron
worden microgolven voor ontdooien, garen (koken) en verwarmen
van levensmiddelen gebruikt.
Terwijl bij traditioneel garen eerst de kookplaat, de oven of grill moet
worden verwarmd en daarna het kookmateriaal, voordat de warmte
bij het levensmiddel komt, werken microgolven direct en zonder
omweg op het levensmiddel in. De microgolven dringen van buiten
naar binnen ca 2-3 cm diep in het levensmiddel, dat wil zeggen ze
worden door het levensmiddel geabsorbeerd.
In het levensmiddel zetten de microgolven de bestandsdselen
(positieve en negatieve moleculen) in beweging. Hierdoor ontstaat
wrijving en daardoor warmte. Door de warmtegeleiding (zoals bij het
gebruikelijke garen) komt de ontstane wrijvingswarmte in het
binnenste van het voedsel, om de gerechten te ontdooien, op te
warmen of te garen.
Na het garen of opwarmen moeten de gerechten nog enkele minuten
voor het opdienen buiten de magnetron rusten. In deze tijd
vermindert de temperatuur en het levensmiddel gaart nog wat na,
omdat de door de microgolven opgewekte molecuulbewegingen
beetje bij beetje stoppen. Dit wordt nagaartijd genoemd.
Magnetronbestendig servies neemt maar zeer weinig energie op en
blijft koel. Microgolven gaan dus door materialen als glas, porcelein,
kunststof en keramiek heen. Microgolven kunnen niet in metaal
doordringen, dat wil zeggen ze worden weerkaatst.
* Microgolven worden door metaal gereflecteerd.
* Microgolven dringen door glas, porcelein en keramiek heen.
* Microgolven worden door levensmiddelen en water
geabsorbeerd.
Gaartijd
Na het opwarmen dient het gerecht nog enkele minuten in of buiten de magnetron te
blijven staan, voordat u het gaat opdienen. (nagaartijd)
Nagaartijden: Groenten ongeveer 3-5 minuten
Vlees ongeveer 5-10 minuten
Aardappelen ongeveer 3-5 minuten
Vis ongeveer 1-2 minuten
Opwarmen ongeveer 2-4 minuten
Wat Zijn Microgolven?
Nl-2
Algemene Richtlijnen
Page 43

Algemene Richtlijnen
MATERIAAL
Als u een grotere schaal gebruikt en
het gerecht beter kan verspreiden;
wordt het gerecht sneller verwarmd.
HOEVEELHEID
Kleinere hoeveelheden worden,
sneller verwarmd dan grotere
hoeveelheden.
DICHTHEID
Naarmate de dichtheid (moleculenhomogeniteit) van voedsel hoger is
zal de bereidingstijd langer worden.
VORM
Voedsel met ronde vormen zal altijd
beter te verwarmen zijn in de
magnetron dan voedsel met hoekige
vormen.
RANGSCHIKKEN
Het voedsel dient als volgt te worden
gerangschikt voor het beste resultaat:
de grotere delen van het voedsel aan
de buitenkant van de schaal of het
bord en de kleinere delen van het
voedsel aan de binnenkant van de
schaal of het bord.
RUIMTE
Het is aan te raden om het voedsel
niet op elkaar te leggen. Het is beter
om het voedsel naast elkaar te
leggen.
INGREDIËNTEN
Voedsel dat vet, suiker of zout bevat
wordt zeer snel warm. De vulling kan
veel heter worden dan het deeg.
Oppassen bij het eten. Niet oververhitten, zelfs niet indien het korstdeeg
niet zeer heet lijkt te zijn.
BEGIN TEMPERATUUR
Hoe kouder het voedsel hoe langer
de bereidingstijd. Voedsel dat uit de
koelkast komt heeft meer tijd nodig
om te verwarmen dan voedsel dat op
kamertemperatuur is.
BEDEKKEN
Sausjes en dergelijke behoeven niet
afgedekt te worden.
ROEREN EN OMDRAAIEN
Halverwege de bereidingstijd dient u
het gerecht door te roeren of om te
draaien (bijv. bij het bereiden van
vlees).
VLOEISTOFFEN
Alle vloeistoffen moeten voor en
tijdens het opwarmen geroerd
worden. Met name water moet voor
en tijdens het opwarmen geroerd
worden, dit om te voorkomen dat het
plotsklaps omhoog bruist. Geen
vloeistoffen verhitten die eerder
gekookt zijn. NIET OVERVERHITTEN.
SCHOONMAKEN Omdat
microgolven op voedseldeeltjes
inwerken moet u uw magnetron ten
allen tijde schoon houden. Moeilijk te
verwijderen voedselresten kunnen
met behulp van een oven-reinigingsmiddel, dat op een schone doek
gespoten wordt; veeg de magnetron
altijd droog na het schoonmaken.
Plastic delen en het gedeelte rond de
deur mogen hiermee niet behandeld
worden.
Nl-3
Nederlands
Page 44

Aanbevolen Kookgerei
Hittebestendig porselein en
keramiek
Aardewerk
Aluminium folie
Plastic huisfolie
Houten, stro en
rietmandjes
Folie/metalen pannen
Hitte bestendig
glasservies
Plastic schalen geschikt
voor microgolven
Nl-4
Kookgerei Magnetron Grill Combi
✔
✔✔
✔
✔
✔
✔
✔
✘
✘
✘
✘
✘
✘
✘
✘
✘
✘
✘
✘
✔
✔
✔
✔
Gebruik geen borden met een
metaalring; noch kopjes waarop
de handvaten gelijmd zijn.
Aluminium folie kan gebruikt
worden om uitdroging te
voorkomen. Zorg dat de
aluminium folie de ovenwanden
niet raakt.
Page 45

Vermogensstanden Te gebruiken bij
Max. Vermogen 1000 W Opwarmen van maaltijden en sauzen: bereiden van vis, groenten, sauzen en conserven.
270 W (*) Ontdooien van voedsel.
600 W Braden en opwarmen van kip, stoofvlees en quiche.
440 W Gerechten verder gaar laten worden, babyvoedsel opwarmen, chocolade smelten.
(NN-Q543/NN-Q523/NN-Q553)
250 W Bereiden van hutspot, stoofvlees, rijstpudding, vruchtenvla en eiervla.
Grill
Combinatie Koken
Te Gebruiken Accessories
(*) Bij het ontdooien wisselt de magnetron automatisch met rustpauzes af om het gerecht optimaal te ontdooien.
Het is niet nodig de grill voor te verwarmen.
De Grill heeft een continu vermogen van 1300 W.
Plaats het voedsel altijd op het rooster, dit rooster plaatst u
op het draaiplateau.
Het voedsel halverwege de bereidingstijd even omdraaien.
Tijdens het grillen moet u nooit het voedsel afdekken.
Levensmiddel
Tijd in minuten
Kant 1 Kant 2
Steak ongeveer 10 ongeveer 10
Schouderkarbonade ongeveer 12 ongeveer 10
Brochette 12 - 14 ongeveer 12
Frikandel ongeveer 12 ongeveer 12
Worstjes 6 - 7 ongeveer 6
Kippebouten 15 - 20 15 - 20
Halve kip 3 - 4 3
Het combinatie koken is voor vele soorten voedsel uitermate
geschikt. Het koken van voedsel gaat snel; tegelijkertijd zorgt
de grill voor een bruin en knapperig korstje. Combineren is
mogelijk.
De volgende 3 combinatie-modi zijn beschikbaar:
Opmerkingen:
• Bij combinatie koken hoeft u het voedsel nooit af te dekken.
• Voor het beste resultaat bij kleine hoeveelheden kunt u
beter niet combinatie koken maar gebruik maken van ofwel
magnetron ofwel grill.
• Bij combinatie koken hoeft u de magnetron niet voor te
verwarmen.
Magnetron Vermogensstanden
+
GRILL TABEL
-
Magnetron Grill Combinatie
Nl-5
Programma Stap-voor-stap Grill-niveau Magnetronvermogen Te gebruiken bij
1 G1-600 W 1300 W 600 W
Wit vlees, lam, gevogelte (heel), gegratineerde gerechten. Voorverwarmen van pizza pan.
2 G1-440 W 1300 W 440 W
Worstjes, rood vlees, stukken gevogelte, vis.
3 G1-250 W 1300 W 250 W
4/4 gebak, quiches, varkenskoteletten, gegratineerde gerechten met eieren.
Nederlands
Page 46

Bij vele supermarkten zijn Kant-en-Klaar maaltijden te koop,
die u alleen hoeft op te warmen in de magnetron. Ook restjes
van de vorige dag (al dan niet ingevroren) kunt u prima in de
magnetron bereiden.
Welke kookmethode gebruikt u hiervoor?
Meestal zult u hiervoor alleen de magnetron instellen. Als u
ook een bruine of gebruinde bovenkant wil bereiken kunt u
beter combinatie koken instellen.
Wat is de bereidingstijd?
Onderstaand vindt u enkele tijdsindicaties voor het opwarmen
van voedsel. Deze tijden zijn slechts richtlijnen omdat vele
faktoren een rol spelen bij het bepalen van de bereidingstijd
(zoals eerder besproken).
Wat te doen als de bereidingstijd niet staat aangegeven
voor het voedsel dat ik wil opwarmen?
Het is natuurlijk niet mogelijk alle levensmiddelen in de
onderstaande tabellen weer te geven. Wij denken dat wij U
met deze indicaties in staat zullen stellen zelf een
tijdsindicatie in te schatten voor levensmiddelen die niet in de
tabellen voorkomen.
Doorroeren en omdraaien
Om ervoor te zorgen dat het voedsel gelijkmatig wordt
verwarmd, adviseren wij u het voedsel minimaal 1 keer door
te roeren of 1 keer om te draaien tijdens het programma.
Nagaren
Nadat het programma is afgelopen, dient u het voedsel in of
buiten de magnetron te laten staan. In het voedsel gaat op
dat moment het verwarmingsproces nog even door. Is het
voedsel tijdens het bereiden bedekt met magnetronfolie of
een bord of deksel, dan dient tijdens het nagaren het voedsel
ook bedekt te zijn. Het nagaren is extra belangrijk bij voedsel
dat u niet heeft kunnen doorroeren of omdraaien, zoals
bijvoorbeeld bij lasagne.
Wanneer is het voedsel warm?
Bij bijvoorbeeld lasagne zult u even met een mes moeten
controleren of het gerecht warm genoeg is.
Opmerking
De nu volgende tabellen zijn slechts een indicatie voor de
totale bereidingstijd. Zoals eerder opgemerkt, is de totale
bereidingstijd afhankelijk van vele faktoren, waaronder de
begintemperatuur van het voedsel en de bereidingsschaal die
wordt gebruikt.
Opwarmen
Opwarmen met de magnetron
Nl-6
Voedsel Gewicht/hoeveelheid Vers Diepvries
VOORGERECHTEN
- tosti 1 stuk (170 g) MAX 1 min. MAX 2 min. 30 sec. - 3 min.
2 stuks (320 g) MAX 2 min. MAX 5 min.
- schaaldieren (4) 1 stuk (170 g) MAX 2 min. MAX 3 min.
2 stuks (220 g) – MAX 6 - 7 min.
- pannenkoek (ongevuld) (2) 1 stuk MAX 30 sec. –
- pannenkoek (gevuld) (2) (3) 1 stuk (150 g) – MAX 3 - 4 min.
2 stuks (300 g) – MAX 5 min.
- soep (2) 400 g MAX 4 min. –
1 litre MAX 6 - 7 min. MAX 11 - 12 min.
- kleine pizza (1) 1 stuk (160 g) MAX 1 min. MAX 2 min. 30 sec. - 3 min
- American pizza 1 stuk (400 g) MAX 4 - 5 min. MAX 7 - 8 min.
- kleine quiche (1) 1 stuk (130 g) 600 W 1 min. 10 sec. MAX 3 min.
- grote quiche 1 stuk (400 g) 600 W 3 min. 600 W 7 - 8 min.
- samosa (3) 2 stuks (100 g) MAX 15 - 20 sec. –
KANT-EN-KLAAR MAALTIJDEN
- gevulde tomaten 1 stuk (170 g) MAX 2 min. MAX 6 - 7 min.
- Chili con carne (2) (3) 400 g MAX 3 min. 40 sec. –
- kip korma met rijst (2) (3) 350 g – MAX 6 min.
- Quenelles (2) (3) 6 stuks (240 g) – 600 W 6 min.
- slakken (2) (3) 12 stuks (100 g) 440 W 2 min 600 W 2 min. - 2 min. 30 sec.
- gegratineerde gerechten 300 - 400 g MAX 3 min. MAX 8 -10 min.
(meelkost met vlees) (4) 600 g MAX 6 - 8 min. MAX 13 - 14 min.
1 kg MAX 10 - 11 min. MAX 16 - 18 min.
Page 47

Opwarmen met de magnetron
Nl-7
Ook babyvoeding is met de magnetron gemakkelijk op te warmen. Gebruik uitsluitend glas of flessen van hoogwaardig en hittebestendig
materiaal en plaats deze in het midden van het apparaat. Bij potjes altijd de deksel eraf halen. Na het verwarmen moet de babyvoeding altijd
goed doorgeroerd of geschud worden zodat de temperatuur gelijkmatig verdeeld wordt. Controleer de temperatuur voor het voeden.
(1) verwijder verpakking en wikkel in absorberend papier. (2) Afdekken. (3) Halverwege de bereidingstijd omscheppen. (4) Het aluminium
bakje verwijderen en het gegratineerde gerecht in een hittebestendige magnetronschotel leggen.
Levensmiddel Hoeveelheid Vers Diepvries
KANT-EN-KLAAR MAALTIJDEN (vervolg)
- gegratineerde groentegerechten 300 - 400 g MAX 6 min. MAX 11 - 13 min.
(met/zonder vlees) (4) 1 kg MAX 12 min. MAX 18 min. + 600 W 6 min.
- gegratineerde vis (4) 450 g – 600 W 12 - 15 min.
1 kg – MAX 18 min. + 250 W 5 min.
- vis in saus (2) (3) 225 g – MAX 6 - 7 min.
VULLINGEN
- zetmeel (2) 300 g MAX 2 - 3 min. MAX 4 - 5 min.
- groenten (2) 100 g MAX 1 min. - 1 min. 30 sec. –
200 g MAX 1 min. 30 sec. - 2 min. –
- puree (2) (3)
van aardappelen 200 g MAX 1 min. 30 sec. MAX 4 min. 30 sec.
van groenten 200 g MAX 1 - 2 min. MAX 5 min.
400 g MAX 3 min. 30 sec. MAX 8 min.
- spaghetti in saus (2) 210 g MAX 2 min. –
450 g MAX 4 min. –
- rijst (2) 150 g MAX 1 min. MAX 2 min. 30 sec.
300 g MAX 2 min. 30 sec. MAX 4 min. 30 sec.
VLEES EN VIS
- hamburger (rauw) (2) 1 (150 g) – MAX 1 min. 30 sec.
- cocktailworstjes (2) (3) 120 g 250 W 2 - 3 min. –
- stukken bereid vlees
Duitse biefstuk (2) 100 g 600 W 40 - 50 sec. –
varkensvlees 2 stukken (2) 130 g 600 W 1 min. 30 sec. –
lam 2 stukken (2) 160 g 600 W 1 min. –
rundvlees 2 stukken (2) 120 g 600 W 50 sec. –
kippenpoot (2) 205 g MAX 1 min. 40 sec. –
Kipnuggets 10 stuks (200 g) – MAX 2 min. 30 sec.
Cordon bleu 1 stuk (100 g) – MAX 2 min
DIVERSEN
- babyvoedsel 30 g 600 W 15 sec. Test –
(klein potje op kamertemperatuur) 120 g 600 W 25 sec. Test –
200 g 600 W 40 sec. Test –
- gebak (1) 2 x 50 g MAX 30 - 40 sec. or 3 min.
- brood (1)
- gesneden sandwich-brood 800 g 8 min.
- boterham 60 g MAX 40 sec.
- baguette 150 g MAX 30 to 40 sec.
- volkorenbrood 500 g MAX 2 min. 30 sec. vervolgens
1
/2uur laten nagaren
- roggebroodje 1 stuk (85 g) MAX 40 sec.
3 x 85 g MAX 1 min. 10 sec.
Nederlands
Page 48

Nl-8
Boter zacht maken nadat deze uit de koelkast gehaald is.
Gedurende 35 – 40 seconden op zacht laten worden (voor
150 g). Eventuele folie eerst verwijderen.
Wellen van gedroogd fruit
Voeg 4 eetlepels water toe aan 200 g rozijnen of gedroogde pruimen,
(voor cake kunnen zij in rum geweld worden). Omroeren en op
1000 W verhitten gedurende 2 tot 3 minuten. Nog 10 minuten laten
staan.
Kaas op kamertemperatuur brengen
Kaas uit de koelkast moet gedurende 30 seconden tot 1 minuut in de
magnetron "verwarmd" worden (afhankelijk van de grootte van de
kaas) op 250 W.
Pellen van amandelen of hazelnoten
Bedekken met heet water en gedurende 3 – 6 minuten op 1000 W
laten koken (eerst aan de kook laten komen). Afkoelen, afgieten,
waarna de pel gemakkelijk verwijderd kan worden.
Kruiden drogen
Leg vocht absorberend papier op het draaiplateau. Spreid de
fijngehakte, verse kruiden zorgvuldig uit op het papier. Zo nodig een
aantal malen herhalen. Gedurende enkele minuten verwarmen op
1000 W, om de 30 seconden controleren, totdat de kruiden beginnen
te drogen. Pas goed op dat de kruiden niet te lang in de magnetron
blijven; anders vergaan ze en kunnen ze vlam vatten. Laat de
kruiden nog 2 uur bij kamertemperatuur op het absorberend papier
liggen en bewaar ze daarna in luchtdichte bussen.
Caramel maken
Kook 100 g suiker met 2 eetlepels water in een kom gedurende
2 – 3 minuten op 1000 W, en controleer halverwege de bereidingstijd. Verwijder de caramel voordat hij donker wordt, omdat het
koken buiten de magnetron nog enige tijd verder gaat. U kunt het
koken onderbreken met 2 eetlepels zeer heet water (pas op voor
scherpe randen).
Gestolde honing vloeibaar maken
Verwijder de deksel van de pot, zet de pot in de magnetron en
verwarm gedurende 30 – 50 seconden op 250 W, afhankelijk van de
hoeveelheid. Omroeren en zo nodig herhalen.
Croutons in een handomdraai
Snij twee plakken wit brood in dobbelsteentjes. Spreid deze uit op
een bord. Gedurende 2 minuten verwarmen op 1000 W, vervolgens
nog 5 minuten laten liggen. U kunt een teentje knoflook over de
plakken brood wrijven alvorens ze in dobbelsteentjes te snijden, of er
een klein beetje olijfolie op te sprenkelen.
Meer sap uit een sinaasappel of citroen halen
Leg de sinaasappel of de citroen voor het persen gedurende
30 - 40 seconden in de magnetron, op 1000 W; daarna onmiddellijk
persen; dit levert meer sap op.
Boter smelten
100 g boter in een bakje, afgedekt met een schotel, smelt bij 600 W
in 1 minuut.
Chocolade smelten
Breek 100 g chocolade in kleine stukjes in een kom en verwarm
gedurende 2 tot 2
1
/2minuut bij 600 W. (de tijd kan variëren,
afhankelijk van het cacao- en suikergehalte). Tijdens de bereiding
tenminste eenmaal omroeren.
Deeg laten rijzen
Zet het afgedekte deeg in de magnetron en verwarm deze
gedurende ongeveer 5 minuten op (voor 500 g deeg). Laat het
deeg in de magnetron (uit de tocht) totdat het volume verdubbeld is.
Bisschopswijn (warme wijn) maken
Meng in een ovenbestendig glas (of mok), 20 cl rode wijn, wat
citroenschil, een snufje kaneel, een kruidnagel en 2 – 4 theelepels
suiker naar smaak. Gedurende 1 tot 1
1
/2 minuut verwarmen bij
1000 W.
Uw oven "opfrissen"
Om uw oven te ontdoen van nare geurtjes, plaatst u een kom met
wijnazijn of water met citroensap in de oven. Gedurende 5 minuten
verwarmen op 1000 W. Veeg de condens, die neerslaat op de
ovenwanden, weg.
Een heet compres maken
Verwarm een schone, vochtige, opgevouwen doek op een bord
gedurende 1 – 2 minuten op 1000 W. Controleer de temperatuur
alvorens de doek op te brengen.
Tips voor Magnetronbereiding
Page 49

Aanbevolen
Gewicht
(min-max)
1. kleine stukken 100-1200 gr.
b.v. vis, kipfilet
2. grote stukken 400-2000 gr.
b.v. hele kip
Als u het gewicht ingeeft van het te
ontdooien voedsel, berekent uw
magnetron zelf de tijd die nodig is om
dit voedsel goed te ontdooien.
Er zijn twee automatische
programma’s voor automatisch
ontdooien op gewicht:
Ontdooien
Wie diepvriesvoedsel wil ontdooien, wordt
door de magnetron optimaal bediend. U
kunt hierin gelijkmatig en snel ontdooien.
Vermogensstand, ontdooi- en nagaartijden
zijn afhankelijk van de kwaliteit en
hoeveelheid van de levensmiddelen.
Aangezien microgolven altijd van buiten
naar binnen in de levensmiddelen dringen,
kunnen grotere stukken niet tot in de kern
worden ontdooid omdat de buitenste
delen dan al gaar worden. In de tabellen
vindt u ook de tijdsaanduidingen voor de
nagaarperiode. Deze nagaarperiode is
nodig om een gelijkmatige
temperatuurverdeling te krijgen door de
warmte door te geven van buiten
(ontdooid) naar binnen (bevroren).
Tijdens de nagaarperiode kunt u het
levensmiddel zowel binnen als buiten het
uitgeschakelde apparaat laten staan.
Indien het bevroren levensmiddel moeilijk
uit de verpaking te krijgen is, verwarmt u
voorafgaand aan het ontdooien,
gedurende 2 minuten op 440 Watt.
Doordacht invriezen garandeert ook
eenvoudig ontdooien: let er op dat er voor
uw huishouden geschikte porties worden
ingevroren. Vlakke en naar bordgrootte
aangepaste porties. De in de volgende
tabellen aangegeven ontdooitijden zijn
richttijden. Er kunnen wijzigingen
voorkomen, die van hoeveelheid, kwaliteit,
vorm en uitgangs-temperatuur afhankelijk
zijn.
Tips Voor Het Ontdooien
Automatisch Ontdooien op Gewicht
Controleer het ontdooien een aantal malen, zelfs indien u de automatische toetsen gebruikt. Houd rekening met de nagaarperiode.
NAGAARTIJDEN
Afzonderlijke porties
voedsel kunnen vrijwel
onmiddellijk na het
ontdooien bereid
worden (5 minuten
rusttijd voor steaks,
15 minuten voor fruit
en korstdeeg). Het is
normaal dat grotere
porties voedsel in het
midden nog bevroren
zijn. Alvorens het te gaan bereiden minimaal een uur laten staan.
Tijdens de rusttijd, wordt de temperatuur gelijkmatig verdeeld en
wordt het voedsel door geleiding ontdooid.
N.B.: Indien het voedsel niet onmiddellijk bereid wordt, moet het in
de koelkast bewaard worden. Ontdooid voedsel mag nooit opnieuw
ingevroren worden zonder dat het eerst gekookt is.
BRAADSTUK EN GEVOGELTE
Plaats de
braadstukken bij
voorkeur op een
omgekeerd bord of
plastic rooster, zodat
ze niet in hun sappen
komen te liggen. Het
is van essentieel
belang om delicate of
uitstekende delen van dit vlees af te dekken met kleine stukjes folie,
om te voorkomen dat deze delen gaan koken. Het is niet gevaarlijk
om kleine stukjes folie in uw magnetron te gebruiken, mits zij niet in
contact komen met de wanden van de magnetron.
GEHAKT OF DOBBELSTEENTJES VLEES EN VIS
Omdat de buitenkant
van dit soort voedsel
snel ontdooit, moeten
zij van elkaar
gescheiden worden;
breek het blok in
regelmatige stukken
tijdens het ontdooien
en verwijder de
stukjes die reeds
ontdooid zijn.
KLEINE PORTIES VOEDSEL
Koteletten en stukken
kip moeten zo snel
mogelijk van elkaar
gescheiden worden,
zodat zij gelijkmatig en
volledig ontdooien.
Vettige delen en de
uiteinden ontdooien
sneller. Leg deze in de
buurt van het midden
van het draaiplateau of
dek ze af.
Nl-9
Nederlands
Page 50

Nl-10
Ontdooien met de Magnetron
OPMERKINGEN
# keer dit voedsel halverwege het ontdooien en bescherm
uiteinden en uitstekende delen met folie
* tijdens het ontdooien een aantal malen omscheppen, keren of
scheiden
Kies Ontdooivermogen 270 W, en vervolgens de onderstaande, bij benadering aangegeven tijd.
De onderstaande tijden zijn slechts richtlijnen. Controleer altijd hoe het met het ontdooien staat door de magnetron te openen en het
ontdooien vervolgens opnieuw te starten. Voor grotere hoeveelheden moeten overeenkomstige langere tijden ingesteld worden. Het voedsel
hoeft tijdens het ontdooien niet afgedekt te worden.
Voedsel Gewicht/hoeveelheid Tijd in minuten NAGAARTIJDEN (minimum)
VLEES
- braadstukken met bot# 500 g 18 - 20 60
- braadstuk zonder bot# 500 g 20 - 22 70
- koteletten# 500 g 8 - 12 15
- lamskoteletjes# 250 g 6 - 7 10
- niertjes* 250 g 7 - 8 10
- mager rundvlees* 430 g (2) 11 - 12 10
- entrecote* 150 g 4 - 6 10
- gehakt rundvlees, worstvlees* 500 g 10 - 12 10
- hamburger* 200 g (2) 6 - 7 10
400 g (4) 10 - 12 10
- vlees voor stoofschotel/smoorvlees* 500 g 12 - 14 15
- Gevogelte, heel# 500 g 12 - 13 60
- gevogelte, stukken# 1 kg (4) 22 - 24 30
- piepkuiken# 400 g 15 30
- konijn# 500 g 14 - 15 30
- varkensworstjes* 300 g (2) 10 - 11 15
BOTER 250 g 2 10
FRUITPUREE 200 g 3 - 4 10
KAAS* 450 g 3 10
ROOD FRUIT* 200 g 5 - 6 10
300 g 9 10
500 g 12 10
CAKES EN PUDDING
- Victoria Sandwich Cake 400 g (1) 7 10
- Schwarzwalder Kirschtaart 550 g (1) 4 - 5 15
- Bavarois 110 g (1 portie) 8 seconden 15
- Frambozentaart 470 g (1) 10 15
GECONCENTREERD VRUCHTENSAP 200 ml 4 4
GEBAK
- vlaai of zandgebak* 370 g (blok) 4 - 5 5
- Gebak van bladerdeeg* 300 g (blok) 3 - 4 5
VIS
- Hele vis# 400 g (2) 10 - 12 15
- Filets# 500 g (4) 13 - 14 15
- vissteak met graat* 380 g (2) 10 15
- dikke steak zonder graat* 200 g (2) (4) 9 15
- garnalen* 200 g 7 10
Page 51

Tabellen (NN-F663/NN-F623/NN-F653)
Nl-11
(1) Plaats in hittebestendige magnetronschotel (of op vetvrijpapier) op het metalen rooster. (2) Verwijder verpakking en leg direct op het
metalen rooster. (3) Halverwege de bereidingstijd keren of omscheppen.
Nederlands
Voedsel Gewicht/hoeveelheid Tijd - vers Tijd - Diepvries
VOORGERECHTEN
- tosti (2) (3) 1 stuk (100 g) 1 min. 30 sec. Combi 1 + 3 min. grill 3 min. Combi 1
2 stuks (300 g) 5 min. Combi 2 3 min. 30 Combi 1
1 stuk (150 g) 3 - 4 min. Combi 1 + 1 min. grill 3 - 4 min. Combi 2
- schelpdieren (1) 1 stuk (100 g) – 5 min. Combi 2
(Verwijder de croissant halverwege de 1 stuk (170 g) 2 min. 30 sec. Combi 1 + 2 min. grill 5 - 7 min. Combi 2
bereidingstijd) 2 stuks (2 x150 g) 4 - 5 min. Combi 1 7 min. 30 sec. Combi 1
- kaascroissant, gnocchi (1) 1 stuk (160 g) 3 - 4 min. Combi 1 3 min. 30 sec. Combi 2
2 stuks (300 g) 4 - 5 min. Combi 1 –
- roulé au fromage (1) (3) 1 stuk (130 g) 3 min. Combi 1 3 min. Combi 2
- worstbrood, groot (2) (3) 1 stuk (130 g) 1 min. 40 sec. Combi 3 3 min. Combi 1
- gevulde flensjes (1) (3) 1 stuk (150 g) – 4 min. 30 sec. Combi 1
1 stuk (190 g) 3 min. Combi 1 –
2 stuks (2 x 130 g) 3 min. 30 sec. - 4 min. Combi 2 7 min. Combi 1
- mini-quiches (1) 12 stuks (180 g) MAX 50 sec. + 2 min. grill MAX 2 min. + 3 min. grill
- American pizza (2)
klein 1 stuk (200 g) 2 min. Combi 3 + 2 min. grill MAX 3 min. + 3 min. grill
groot 1 stuk (450 g) – 5 - 6 min. Combi 1
1 stuk (750 g) – 8 min. Combi 1 + 2 min grill
- pizza (2)
klein 1 stuk (200 g)
4 min. Combi 2
MAX 2 min. 10 sec. + 3 - 4 min. grill
1 stuk (300 g) 3 min. Combi 1 + 1 min. 30 sec. grill –
groot 1 stuk (400 g) 3 min. 30 sec. Combi 1 + 1 min. 30 sec. grill Autopizza***
1 stuk (600 g) 5 min. Combi 1 + 1 min. 30 sec. grill Autopizza***
dunne bodem 1 stuk (500 g) 4 min. Combi 1 + 1 min. 30 sec. grill –
calzone (3) 1 stuk (420 g) 3 min. Combi 1 + 2 min. grill –
- kleine quiche (2) 1 stuk (130 g) 2 min. Combi 3 –
1 stuk (200 g) 4 min. Combi 2 –
2 stuks (300 g) 4 min. Combi 3 Autoquiche***
- grote quiche 1 stuk (400 g) 3 min. 30 sec. Combi 1 –
1 stuk (500 g) 4 min. 30 sec. Combi 1 + 1 min. 30 sec. grill Autoquiche***
1 stuk (600 g) 5 min. Combi 1 Autoquiche***
- kaas-, ham- of bacontaart (2) (3) 1 stuk (300 g) 4 - 5 min. Combi 1 –
1 stuk (500 g) 6 - 7 min. Combi 1 –
- champignontaart 1 stuk (450 g) 8 min. Combi 1 –
KANT-EN-KLARE GERECHTEN
- lasagne bolognese (1) 130 g 2 min. Combi 1 + 3 min. grill –
300 g 6 - 8 min. Combi 2 AutoGratin***
1 kg Combi 1 10 - 12 mins. AutoGratin***
- gegratineerde vis (1) 450 g – AutoGratin***
800 g – AutoGratin***
- gegratineerde groenteschotel (1) 450 g 5 - 7 mins. Combi 1 AutoGratin***
1 kg 12 - 14mins. Combi 1 AutoGratin***
BIJGERECHTEN
- Pommes Dauphine (1) (3) 200 g – 4 min. 30 sec. Combi 1
- Pommes noisettes (1) (3) 350 g – 4 min. Combi 1 + 3 min. grill
- Pomme Duchesse (1) 500 g – 7 min. Combi 1 + 7 min. grill
- ovenfrietjes (1) (3) 400 g – 8 - 10 min. Combi 1
VLEES EN VIS
- Confijt van eend (1) (3) 2 stuks (400 g)
4 min. Combi 1 + 3 min. grill
–
- Cordon bleu (1) (3) 1 stuk (120 g) 4 min. Combi 1 3 min. 30 sec. Combi 1
- Kipnuggets (1) (3) 10 stuks (200 g) 3 min. Combi 1 + 2 min.
grill
6 min. Combi 2
DIVERSEN
-
kant-en-klare amandeltaart
(2) (3)
1 stuk (400 g) 3 min. - 3 min. 30 sec. Combi 3 4 - 5 min. Combi 2
- abrikozen kruimeltaart (1) 1 stuk (300 g) – 5 - 6 min. Combi 1
-
croissants & andere soorten zoete broodjes
(2) (3)
1 stuk (60 g) Grill 2 min. MAX 12 sec. + 2 min. grill (of Auto)
Page 52

Nl-12
Gerechtenkaart voor de Pizzapan (NN-F663/NN-F623)
(*) Halverwege de bereidingstijd keren of omscheppen (**) Na opwarmen nog 5 minuten laten staan.
Tenzij anders aangegeven, moet de pizza pan altijd gedurende 4 minuten voorverwarmd worden Combinatie Nr. 1
Voedsel Gewicht/hoeveelheid Vers
Diepvries
- voorgerechtjes – taartjes 12 stuks (160 g) – 2 min. 30 sec. Combi 1
- voorgerechtjes 15 stuks (210 g) – 7 min. 30 sec. Combi 2**
- pasteitjes soesjes 20 stuks (150 g) – 1 min. 30 sec. Combi 1**
- hapjes met spek & hesp 1 x 170 g 4 min. Combi 2 3 min. Combi 1 + 2 min. grill
- taart Alsacienne 1 x 120 g 4 min. Combi 3 3 min. 30 sec. Combi 1
PIZZA
- standaard bodem 2 x 140 g 4 min. 30 sec. Combi 2 –
200 g – 3 min. Combi 1
300 g 6 min. Combi 1 7 min. Combi 1
500 g 5 min. Combi 3 6 min. Combi 1
- dunne bodem 200 g 4 min. Combi 3 3 min. Combi 1
250 g 2 min. Combi 1 + 2 min. grill** 3 min. Combi 1
- American style 500 g – 6 min. Combi 1
- McCain rise and up 500 g – 10 min. 30 sec. Combi 1
QUICHES EN TAARTEN
- quiche lorraine 1 x 100 g – 2 min. 30 sec. - 3 min. Combi 1
2 x 150 g 3 min. Combi 2 –
150 g – 2 min. 30 sec. - 3 min. Combi 1
400 g – 5 - 6 min. Combi 1
- prei-quiche 2 x 120 g – 5 min. Combi 1
400 g – 6 min. 30 sec. Combi 1**
- Savoie taart 450 g 4 min. 30 sec. - 5 min. Combi 1** 10 min Combi 1* + **
- champignontaart 450 g 6 - 7 min. Combi 1** –
- quiche met zeevruchten 350 g 4 min. Combi 2** –
- quiche met uien en ansjovis-vulling 1 x 150 g – 2 min. 40 sec. Combi 1
- gevulde pannenkoekjes 4 stuks (200 g) – 3 min. Combi 1
2 stuks (100 g) – 1 min. 40 sec. Combi 1*
- gevulde flensjes 2 stuks (140 g) 3 min. Combi 2 5 min. Combi 1
- rollade met kaas, worstenbrood, groot 130 g 2 min. Combi 3 2 min. 20 sec. - 3 min. (rollade) Combi 3
2 x 130 g 2 min. 30 sec. Combi 1 3 min. Combi 1**
- kippenpastei 1 stuk (150 g) 2 min. 20 sec. Combi 1 4 min. Combi 1 (verwijder het deksel)
2 x 150 g 3 min. Combi 1 6 min. 30 sec. - 7 min. Combi 1
(verwijder het deksel)
- gnocchis 2 x 130 g – 6 min. Combi 1
- tosti 1 x 100 g 3 min. Combi 3* –
2 x 100 g 4 min. Combi 3 + 1 min. grill –
1 x 160 g 3 min. 30 sec. - 4 min. Combi 3 3 min. Combi 1
2 x 160 g 5 - 6 min. Combi 3 5 min. Combi 1
- croque-bacon-tomaat 1 x 140 g 2 min. 30 sec. Combi 2 3 min. 30 sec. Combi 1
AARDAPPELEN
- ovenfrietjes 200 g – 5 min. Combi 1 + 3 - 5 min. grill*
400 g – 6 min. Combi 1 + 5 - 7 min. grill*
- aardappelblokjes 300 g – 4 min. Combi 1 + 5 min. grill*
- Pommes Duchesse 400 g – 9 min. Combi 1 + 4 min. grill
- Pommes Dauphine 200 g – 4 - 5 min. Combi 1*
- Gepofte aardappelen 9 stuks (600 g) – 10 min. Combi 1*
- pommes noisettes 450 g – 8 min. Combi 1 + 3 min. grill*
- sstukken/kwarten (rauw) 500 g - 1 kg 15 - 20 min Combi 1* –
WORSTJES 2 stuks (120 g) 2 min. Combi 1* 3 min. 30 sec. Combi 1*
3 stuks (180 g) 3 min. Combi 1* 4 min. Combi 1*
- Toulouse-worst 1 stuk (150 g) 3 min. 30 sec. - 4 min. Combi 2* 4 min. 30 sec. Combi 1*
- Varkensworstjes* 1 stuk (150 g) 5 min. Combi 2* 7 min. Combi 1*
Page 53

Nl-13
Gerechtenkaart voor de Pizzapan (NN-F663/NN-F623)
Tenzij anders aangegeven, moet de pizza pan altijd gedurende 4 minuten voorverwarmd worden Combinatie Nr. 1
(*) Halverwege de bereidingstijd keren of omscheppen
(**) Na opwarmen nog 5 minuten laten staan.
Nederlands
Voedsel Gewicht/hoeveelheid Vers
Diepvries
- varkenskarbonade* 180 g 3 to 4 min. Combi 2* 6 min. Combi 1*
- eendenfilet* 1 stuk (350 g) 4 min. Combi 3 + 5 min. grill* –
- kippenpootjes 2 stuks (670 g) 10 min. Combi 1 + 4 min. grill* 18 min. Combi 1 + 4 min. grill*
- hamburgers*
standaard 1 stuk (100 g) 1 min. 50 sec. - 2 min. Combi 3* 3 min. 30 sec. - 4 min. Combi 3*
1 stuk (140 g) 2 min. 30 sec. - 3 min. Combi 3* –
2 stuks (200 g) – 4 min. 20 sec. Combi 3*
4 stuks (400 g) – 3 min. 30 sec. - 4 min. Combi 3
- gepaneerde vis* 2 stuks (200 g) 3 min. 40 sec. Combi 2* 5 min. Combi 1*
- vissticks 5 stuks (150 g) – 4 min. Combi 1*
10 stuks (300 g) – 5 min. Combi 1*
- cordon bleu 1 stuk (100 g) 3 min. 30 sec. Combi 3* 3 min. Combi 1*
2 stuks (200 g) 3 min. 30 sec. Combi 2* 5 min. Combi 1*
- kipnuggets 10 stuks (200 g) 4 min. Combi 2* 4 min. Combi 1*
5 stuks (100 g) 3 min. Combi 2* 3 min. Combi 1*
- omelet 4 Geklopte eiëren 1 - 2 min. Combi 1* –
8 Geklopte eiëren 2 min. - 2 min. 30 sec. Combi 1* –
- appelstrudel (voorgebakken)* 300 g – 4 min. 30 sec. - 5 min. Combi 1* + **
- kant-en-klare amandeltaart 400 g – 2 min. 30 sec. Combi 1**
- appelbeignets (gebakken) 7 stuks (220 g) – 6 min. Combi 3*
- wafels (gebakken) 1 stuk (70 g) – 2 min. 30 sec. Combi 3*
- appelcroustade (gebakken) 400 g – 5 min. Combi 1**
- kouing aman met appelen (gebakken) 550 g – 3 min. Combi 1**
- Tarte Tatin (Diepvries - plaats hem met 1 stuk (600 g) – 7 min. Combi 1**
de appel-zijde omlaag) 1 stuk (150 g) – 2 min. Combi 2**
- noten-chocoladecakejes (gebakken) 2 stuks (150 g) – 1 min. 30 sec. Combi 3 * + **
Page 54

Nl-14
Ontdooien
Verzeker uzelf ervan dat het vlees goed ontdooid is, voordat u het
in de magnetron gaat bereiden.
Vet
Bij vlees waar veel vet in zit, zal de bereidingstijd veel korter zijn
dan bij vlees waar weinig vet in zit. Houd hier rekening mee.
Alleen voor koken in de magnetron
Plaats de stukken
vlees op een
omgekeerd bord in
een schotel die
geschikt is voor de
magnetron en
vervolgens op de
draaischijf. Het is
belangrijk dat het vlees
niet niet in zijn eigen
jus komt te liggen. Het
omgekeerde bord is
niet nodig voor vlees of gevogelte wanneer hier een fricassee van
wordt gemaakt of wanneer dit gekookt wordt met een bijgerecht. U
wordt geadviseerd om het vlees af te dekken met een deksel of
huishoudfolie om het koken te versnellen en spatten te voorkomen.
Nagaartijd
Bij vlees is de nagaartijd uitermate belangrijk. Tijdens het nagaren gaat
het verwarmingsproces nog door, waardoor, eventuele, kleine koude
stukjes nog warm worden.
Kleine uiteinden
Het is raadzaam om de kleinere uiteinden van het vlees, tijdelijk te
bedekken met een klein stukje magnetronfolie, zodat deze uiteinden
niet veel sneller klaar zijn dan het overige vlees.
Omdraaien
Vlees dient altijd minimaal 1 keer omgedraaid te worden tijdens de
bereiding.
Bedekken
De kleinere gedeelten van het vlees met folie bedekken om deze te
beschermen voor te snel warm worden in verhouding tot de rest van
het vlees. Echter let er heel goed op dat deze stukjes aluminiumfolie
niet de wanden van de magnetron-oven raken.
Vlees bereiden met de combinatie functie
Het vlees hoeft u nu
niet af te dekken.
Gebruik altijd het
rooster waarop u het
vlees legt. U kunt er
natuurlijk ook voor
kiezen om eerst het
vlees met magnetron
te verwarmen en
daarna met grill te
bruinen.
Tips voor stoofschotels en ragoûts
VOORBEREIDING:
De bijbehorende groenten moeten in gelijkmatige grote stukken
gesneden en voorgekookt worden, anders bestaat het gevaar dat
ze niet gaar zijn wanneer de bereiding voltooid is. Bestrooi de
stukken vlees lichtjes met meel om er zeker van te zijn dat de saus
juist bereid wordt.
TIJDENS de bereiding is het van essentieël belang om de stukken
vlees ondergedompeld te houden in het vocht; dit kan gebeuren
met behulp van een omgekeerde schotel of bord (om te voorkomen
dat het uitdroogt). Omdat de bereiding van stoofschotels veel tijd in
beslag neemt en er soms veel verdamping optreedt, kunt u zo
nodig vocht toevoegen. Dek de schaal af met een deksel om
verdamping tegen te gaan. Breng het aan de kook op stand Max en
laat 10 tot 12 minuten koken; ga vervolgens op 250 W gedurende
de gewenste periode verder met de bereiding.
Kleinere stukjes vlees bereiden met alleen grill of combinatie.
Leg de kleinere stukjes
vlees op het rooster en
plaats het rooster op
het draaiplateau. Plaats
eventueel een
magnetron bestendige
schaal op het
draaiplateau onder het
rooster, zodat daarin
het vocht/vet kan
worden opgevangen.
Als het vlees zo groot
is, dat het vlees de
bovenwand of grill
raakt gebruik dan niet
het rooster maar een
magnetron bestendige
schaal die u op het
draaiplateau plaatst.
Het resultaat is
hetzelfde, maar de
bereidingstijd zal in dit
geval wat langer zijn.
Vlees
Opmerkingen
Page 55

Nl-15
Vlees en gevogelte
Type vlees Alleen magnetron***
Bereidingstijd
Combinatie of grill
Bereidingstijd
in minuten in minuten
RUNDVLEES
- riblap* – – Grill 25 - 30**
- braadstuk* 600 W 5 Combi 3 7 - 8
- stoofschotel MAX + 250 W 10 + 60 - 75** – –
LAM
- lamsbout* 600 W 6 - 7 Combi 1 7 - 8
- schouderstuk* 600 W 8 Combi 1 8 - 9
- stoofschotel* MAX + 250 W 10 + 40 - 50** – –
KALFSVLEES
- schouderstuk* 600 W 14 - 15 Combi 1 10 - 11
- stoofschotel MAX + 250 W 10 + 50 - 60 ** – –
VARKENSVLEES
- lendestuk* 600 W 15 - 17*** Combi 1 11 - 12
- spare ribs* 600 W 15 - 17*** Combi 1 12 - 13
- stoofschotel MAX + 250 W 10 + 50 - 60** – –
- ribstuk* – – Grill 20
KIP – PARELHOEN – KALKOEN
- geroosterd (heel) – – Combi 1 8 - 9
- stukken* 600 W 7 - 8 Combi 2 12 - 14
of Grill 25**
- kalkoen-drumstick* – – Combi 1 8 - 9
- kalkoenstukken 600 W 12 Combi 1 10 - 11
EEND
- geroosterd (heel) – – Combi 1 + grill 9 - 10 + 4**
- stukken* – – Combi 1 + grill 7 - 8 + 6
- stoofschotel MAX + 250 W 10 + 70** – –
KONIJN MAX 7 - 8 – –
WILD
- braadstuk* MAX 5 - 6*** Combi 3 9 - 11
- stoofschotel MAX + 250 W 10 + 70** – –
PITTIG WORSTJE, MERGUEZ* MAX 3 - 4 Grill 12 - 14**
VARKENSWORST (1 stuk)* – – Combi 2 8**
Toulouse-worstjes (2 stuks)* – – Combi 2 10
of Grill 15**
Opmerking:
Voor vlees met been of vulling moet de bereidingstijd minimaal 5 minuten verlengd worden. (afhankelijk van gewicht).
* bord op het metalen rooster voor grill- of combinatiebereiding, indien de dikte van het vlees dit toelaat; anders op het draaiplateau
** Ongeacht het gewicht.
*** bij alleen magnetronbereiding hebben de bereidingstijden van braadstukken (varkensvlees, kalfsvlees, lam, rundvlees) betrekking op
vlees dat vooraf aan alle zijde in een pan van een bruin randje voorzien is (enkele minuten).
Voor 500 g (tijd in minuten)
Nederlands
Page 56

Nl-16
Het bereiden van vis gaat perfect in de magnetron. De vis is helemaal klaar als de vis ‘wit’ is geworden en het
‘doorschijnende’ dus helemaal weg is.
Wat dunnere plakjes vis kunt
u beter oprollen om zo te
voorkomen dat de vis
ongelijk verwarmd wordt.
Vis dient tijdens het bereiden
altijd met magnetronfolie of
een deksel te worden
afgedekt.
Verse vis dient altijd te
worden besprenkeld met wat
citroensap of wat witte wijn.
Vismoten dient u in een
cirkel te plaatsen. Let erop
de grotere uiteinden naar
buiten toe te leggen.
Bij grotere stukken vis kunt u
de eerste minuten de
kleinere uiteinden met wat
folie bedekken om ervoor te
zorgen dat de hele vis
gelijkmatig wordt verwarmd.
Gebruik alleen zout, indien
nodig, nadat de vis bereid is.
Nooit vooraf, omdat de vis te
droog kan worden.
Het bereiden van vis met
de grill of combinatie
functie. U kunt de vis met
wat boter of olie inwrijven.
Gebruik vooraf geen zout,
eventueel wat peper is
geen probleem. Maak
gebruik van het
bijgeleverde rooster om
daarop de vis te plaatsen.
De gemiddelde nagaartijd
voor vis is 2-3 minuten.
Grote vis (meer dan 400 g)
Wij adviseren halverwege de
bereidingstijd te keren en de
kop en de staart te
beschermen met een klein
stukje aluminiumfolie om te
voorkomen dat deze delen te
gaar worden. (Let op: het
aluminium mag niet in
contact komen met de
wanden van de magnetron).
Vispapillotten
U kunt vis-papillotten maken
door het aluminiumfolie te
vervangen door magnetrongeschikt vetvrijpapier (of
perkamentpapier).
Voedsel VERS DIEPVRIES
Vermogen
Tijd Vermogen Tijd
Dunne visfilets
600 W 4 - 5 MAX 10
Dikke visfilets
600 W 5 - 6 MAX 11 - 12
Vis-moten
600 W 5 - 7 MAX 11 - 13
Hele vis
600 W 5 MAX 12
Garnalen
* 600 W 4 - 5
Mosselen
* 600 W 5 - 6
Sint-jakobsschelpen
* 600 W 6 - 7
Inktvis
* 600 W 5 - 6 MAX 11
Kreeft
* 600 W 5 - 6
Viskroketten (1 ex. = 50 g)
* MAX 3 min 30
(2 stuks)
of 5 min
(4 stuks)
*Wij raden af om dit soort vis te bereiden met behulp van de Auto-functie
Bereidingstijd voor 500 g in minuten
Vis
Page 57

Nl-17
Wij adviseren deze groenten niet met behulp van het Auto-menu te bereiden.
Bereidingstijd verse groenten - HOOG vermogen (1000 W)
voor 500 g in minuten
WATER TOEVOEGEN
Vele waterrijke groenten zoals tomaten, courgettes, aubergines,
diepvriesgroenten voor ratatouille, champignons, spinazie, andijvie,
sla, uien en het meeste fruit, etc., hebben voor de bereiding weinig of
geen water nodig, omdat magnetronbereiding gebruik maakt van het
reeds in het voedsel aanwezige water.
Aan tamelijk waterrijke groenten dienen 4 tot 5 eetlepels water
toegevoegd te worden per 500 g. Dit om de stoom te creëren waarin
groenten gaar worden en ter voorkoming van uitdroging. Toe te passen
bij de bereiding van: bloemkool, prei, broccoli, spruitjes, venkel, peen,
knolselderie, asperges, stambomen, bonen, peultjes, aardappelen,
kool, koolraap, artisjokken, etc.
Groenten met relatief weinig water, waaraan 8 tot 10 eetlepels water
toegevoegd moeten worden per 500 g ter bevordering van de
hydratering; erwten, tuinbonen, prinsessenbonen.
In alle gevallen: groenten moeten bereid worden op een vermogen
van 1000 W (met uitzondering van hele bloemkool) en mogen pas na
de bereiding gezouten worden. Dit is omdat het zout het natuurlijke
vocht van de groente absorbeert en uitdroging bevordert.
GROENTEN VERSE BEVROREN
Artisjokken:
- heel 11 - 12 –
- harten 10 - 12 13 - 16
Asperges* 10 - 12 14 - 15
Aubergines 9 - 11 –
Rode biet* 18 - 20 –
Chinese kool 8 - 10 14 - 15
Broccoli 8 - 10 13 - 15
Champignons 9 - 10 13 - 15
Peen:
- ronde plakjes 10 - 12 13 - 15
- strips 12 - 14 –
Kool* 12 - 14 –
Bloemkool 10 - 12 13 - 15
Spruitjes 10 - 12 13 - 15
Knolselderie 9 - 11 –
Selderie* 15 - 17 –
Courgettes 8 - 10 13 - 15
Andijvie 12 - 14 18 - 20
Spinazie:
- gehakt – 12
- ongehakt 9 - 10 13
GROENTEN VERSE BEVROREN
Tuinbonen* 16 - 19 18 - 20
Venkel:
- hele in tweeën 12 - 14 –
- dun gesneden 17 - 20 –
Groene bonen* 12 - 13 12 - 13
Stambonen 10 - 13 –
Gemengde lentegroenten* – 15 - 16
Maiskolf (2 stuks)* 12 - 14 14 - 17
Koolraap 10 - 12 18 - 20
Uien 9 - 12 15 - 18
Erwten* 20 16 - 18
Peultjes 10 - 12 –
Dun gesneden prei 12 - 14 15 - 16
Hele prei 12 - 14 15 - 16
Pompoen 10 - 12 –
Spaanse peper 12 - 14 14 - 16
Hele aardappelen (<220 g) 9 - 12 –
Gesneden aardappelen 10 - 12 –
Ratatouille 16 - 18 14 - 16
Schorseneer 12 - 14 14 - 16
Tomaten* 4 - 5 –
Groenten
Een hele bloemkool moet gedurende 12 – 15 minuten
(afhankelijk van de grootte van de bloemkool) op zijn
kop gekookt worden op 600 W, met 6 eetlepels water.
Nederlands
Page 58

Nl-18
Eieren zijn zeer
delicate producten,
die speciale
aandacht vereisen.
Wanneer eieren
direct in de
magnetron gelegd
worden,
exploderen ze door
de druk die binnen
in de schil ontstaat.
Wanneer de dop
breekt, explodeert
het eigeel eveneens, indien dit niet geperforeerd is. Steek dus de punt
van bijvoorbeeld een tandenstoker in het midden van het eigeel; als
het ei vers is, loopt het niet uit. Het eigeel en het eiwit reageren
verschillend op de microgolven en helaas kookt het eigeel sneller. Bij
geslagen eieren (omelet) moeten de randen halverwege de bereidingstijd naar het midden verplaatst worden.
Gepocheerde eieren
Verwarm 50 ml water met zout en een scheutje azijn gedurende
1 min op 1000 W. Breek het ei in het kokende water en doorboor het
eigeel en het eiwit voorzichtig met een tandenstoker; kook gedurende
30 tot 40 seconden op 800 W (afhankelijk van de grootte van het ei).
Laat nog 1 minuut nagaren, vervolgens afgieten en serveren.
Roerei
Meng 2 rauwe eieren in een kom met wat room of melk, een klontje
boter, zout en peper. Gedurende 40 seconden koken op 1000 W.
Uit de magnetron halen en stevig opkloppen met een vork. Daarna
gedurende nog een 30 tot 40 seconden koken op 1000 W. De eieren
moeten romig blijven.
Oeufs cocotte
Breek het ei in een beboterde schaal, zout en peper toevoegen, het
eigeel en het eiwit met een tandenstoker perforeren. Voeg de
gewenste ingrediënten (room, champignons, lompviseieren, etc.) toe.
Gedurende 1 min. 30 sec. tot 2 min. per ei op 250 W, afhankelijk van
de grootte van het ei en de hoeveelheid garnering.
Kaas
De ene soort kaas reageert anders dan de andere: hoe vetter de kaas,
hoe sneller hij smelt. Als ze te lang verwarmd worden, worden ze hard.
Het is aan te bevelen om desgewenst op het laatste moment geraspte
kaas (voor pasta, gegratineerde gerechten, etc.) toe te voegen.
De bereidingstijd voor gedroogde groenten in de magnetron komen
in grote lijnen overeen met de normale bereiding. Aan de andere kant
worden deze levensmiddelen zeer snel warm, zonder de smaak van
opwarmen aan te nemen, mits zij in een afgesloten schaal, met boter
of saus bereid worden.
Gebruik voor de bereiding een grote schaal (ter voorkoming van
morsen). Volledig bedekken met water of bouillon. Na de bereiding
nog minimaal 5 tot 8 minuten laten nagaren.
Rijst
Nadat de vloeistof het kookpunt bereikt, nog circa 20 minuten op
250 W laten koken, ongeacht de hoeveelheid rijst.
Griesmeel
Griesmeel kan perfect bereid worden in een magnetron, zonder risico
van verbranding. Voeg eenvoudig een hoeveelheid water gelijk aan
het volume griesmeel toe, breng aan de kook en laat 2 min. 30 sec.
op 1000 W koken (voor 200 g middelgrote korrel-griesmeel met 0,2 l
water), vervolgens op 250 W gedurende 3 min. laten koken terwijl de
griesmeel zwelt.
Pasta
Niet vergeten het kookwater te zouten en tijdens de bereiding een
maal om te roeren. Wanneer de bellen in de vloeistof zichtbaar
worden nog 7 of 5 minuten laten koken op 1000 W voor 250 g pasta
(voor 1 liter water) en 10 minuten voor 250 g ravioli.
Gedroogde groenten
Volledig bedekken met water en een nacht laten wellen. De volgende
dag afspoelen en afgieten. Onder water zetten. Niet zouten voor het
koken (hierdoor worden de gedroogde groenten hard). 10 minuten op
1000 W laten koken, en vervolgens 15 tot 30 minuten op 250 W.
Houd het bereidingsproces goed in de gaten en voeg zo nodig water
toe: de gedroogde groenten moeten altijd bedekt zijn met water.
Aardappelen
Voor het koken: Veeg met een borsteltje het zand van de
aardappelen af (u hoeft de aardappelen dus niet te schillen), en prik
enige keren met bijv. een sateprikker of vork in de aardappelen.
Verdeel de aardappelen nu gelijkmatig over het draaiplateau (begin
aan de rand van het draaiplateau).
De bereidingstijd van aardappelen is afhankelijk van de soort
aardappel die u gebruikt en van de tijd van het jaar (weinig of veel
vocht in de aardappel).
In principe gebruikt u alleen de magnetron functie bij het bereiden
van aardappelen, maar als u een wat drogere aardappel wilt dan
kunt u hierbij ook de grill gebruiken (combinatie functie), of nadat u
de magnetron functie heeft gebruikt, daarna nog even de grill erop.
Na het koken: Wikkel de aardappelen in aluminiumfolie om deze zo
ongeveer 5 minuten te laten nagaren.
Eieren & Kaas
Rijst, Pasta, Gedroogde groenten & Aardappelen
Page 59

Vraag en Antwoord
PROBLEEM OORZAAK OPLOSSING
Voedsel koelt snel af nadat het uit de Voedsel is niet goed verwarmd. Het voedsel moet nog wat langer
magnetron komt. worden verwarmd.
Vloeistoffen koken over. Schaal is te klein. Schaal moet ongeveer twee keer zo
groot zijn als het te bereiden inhoud.
Voedsel wordt te langzaam warm. Koelkast temperatuur is kouder dan Voedsel uit de koelkast heeft meer tijd
kamertemperatuur. nodig dan voedsel op kamer
temperatuur.
Vlees is wat ‘taai’. - Te hoog vermogen gebruikt. Lager vemogen inschakelen.
- Voor het bereiden met zout Vlees nooit voor het bereiden met zout
ingewreven. inwrijven: altijd na het bereiden.
Gerecht nog niet gaar in het midden. Te korte tijd ingesteld of te weinig Langere kooktijd instellen of langer
nagaartijd. laten nagaren.
Kleverige kaassaus. Kaas tezamen met saus bereidt. Kaas op het einde pas toevoegen.
Door de warmte van de saus smelt de
kaas.
Groente zijn wat te droog. Groenten niet afgedekt. Folie of deksel gebruiken.
- Groenten niet echt vers meer. - Voeg wat extra water toe.
- Voor koken al wat zout toegevoegd. - Zout na het koken toevoegen.
Condensatie in de magnetron. Dit is normaal. Eventueel met een zachte doek
afvegen.
Draaiplateau draait soms rechts- en Dit is normaal.
soms linksom.
Warme lucht voelt men langs de deur Dit is normaal.
afdichtingen.
Vonken in de magnetron gebruik ervan. Metalen schalen gebruikt. Programma onderbreken, geen metaal
bij alleen magnetron.
De grill gaat aan en uit tijdens grill Dit is normaal.
of combinatie.
Nl-19
Nederlands
Page 60

Cuisson aux micro-ondes . . . . . . . . . . . . . . . . . . . . . . . . . . . . . . . . . 2
Généralités . . . . . . . . . . . . . . . . . . . . . . . . . . . . . . . . . . . . . . . . . . . 2-3
Quels récipients utiliser dans votre four? . . . . . . . . . . . . . . . . . . . . . 4
Niveaux de puissance des micro-ondes . . . . . . . . . . . . . . . . . . . . . . 5
Utilisation du gril . . . . . . . . . . . . . . . . . . . . . . . . . . . . . . . . . . . . . . . . 5
Cuisson combinée . . . . . . . . . . . . . . . . . . . . . . . . . . . . . . . . . . . . . . . 5
Accessoires à utiliser . . . . . . . . . . . . . . . . . . . . . . . . . . . . . . . . . . . . . 5
Réchauffage . . . . . . . . . . . . . . . . . . . . . . . . . . . . . . . . . . . . . . . . . . . 6
Réchauffage aux micro-ondes . . . . . . . . . . . . . . . . . . . . . . . . . . . . 6-7
Trucs de cuisson aux micro-ondes . . . . . . . . . . . . . . . . . . . . . . . . . . 8
Conseils pour la décongélation . . . . . . . . . . . . . . . . . . . . . . . . . . . . . 9
Tableaux de temps de décongélation . . . . . . . . . . . . . . . . . . . . . . . 10
Tableaux de cuisson combinée et de réchauffage . . . . . . . . . . . 11-13
Viandes et volailles . . . . . . . . . . . . . . . . . . . . . . . . . . . . . . . . . . . 14-15
Poissons . . . . . . . . . . . . . . . . . . . . . . . . . . . . . . . . . . . . . . . . . . . . . 16
Légumes . . . . . . . . . . . . . . . . . . . . . . . . . . . . . . . . . . . . . . . . . . . . . 17
Œufs et fromage . . . . . . . . . . . . . . . . . . . . . . . . . . . . . . . . . . . . . . . 18
Féculents, légumes secs et pommes de terre avec la peau . . . . . . 18
Vos questions- Nos réponses . . . . . . . . . . . . . . . . . . . . . . . . . . . . . 19
SOMMAIRE
Les temps de cuisson donnés dans ce livre sont approximatifs. Les facteurs qui peuvent faire varier ces temps de cuisson sont : le degré de
cuisson désiré, la température initiale, le volume, la taille et la forme de la nourriture et des récipients utilisés. Dans tous les cas, vérifiez la
température de l'aliment avant de le consommer.
Fr-1
Votre four Panasonic bénéficie de la dernière technologie, celle de l'Inverter. Cette technologie unique est appliquée sur les fours micro-ondes
au Japon depuis longtemps. Elle permet d'améliorer sensiblement les performances de cuisson de votre four. Ce système, en réduisant aussi
le nombre de composants, autorise un plus grand volume intérieur et un poids moindre sans encombrer davantage votre plan de travail.
LE SERVICE CULINAIRE PANASONIC
Si vous désirez recevoir des feuillets de recettes complémentaires, si vous rencontrez des problèmes dans la réalisation de certaines recettes,
écrivez ou téléphonez au :
Spécialiste culinaire
PANASONIC France S.A
270 avenue du Président Wilson
93218- SAINT DENIS LA PLAINE CEDEX
TEL : 01 49 46 45 09 ou Service Consommateurs Panasonic : 08 92 35 05 05 (0.34 € la minute)
Adresse email : lecoincuisine@panasonic.fr
ou site Internet : http : //www.panasonic.fr
Note : pour des raisons indépendantes de notre volonté, nous ne pouvons nous engager sur le délai de ces envois de recettes complémentaires, et vous remercions de votre compréhension. Pensez à mentionner la référence de votre four dans toute correspondance ou message
électronique.
Français
Page 61

PERCER
Pendant la
cuisson, la
vapeur peut
s’accumuler sous
la peau ou la
membrane qui
recouvre certains
aliments. Vous
devez donc
percer ou peler
ces aliments
avant de les cuire afin que la vapeur puisse
s’echapper pendant la cuisson. Les œufs, les
pommes de terre, les pommes, les saucisses,
etc. doivent être percés avant d’être cuits.
N’ESSAYEZ JAMAIS DE CUIRE DES ŒUFS
DANS LEUR COQUILLE..
TAU X
D’HUMIDITE
Comme le taux
d’humidité des
fruits et des
légumes frais
varie selon la
saison, vous
devrez parfois
ajuster le temps
de cuisson en
fonction de la
période de l’année. Cela est particulièrement vrai
pour les pommes de terre en chemise. Les
aliments secs tels que le riz et les pâtes peuvent
sécher davantage encore pendant l’entreposage
et le temps de cuisson peut donc varier par
rapport aux aliments frais.
FILM
ALIMENTAIRE
Le film
alimentaire
permet de garder
les aliments
humides tandis
que la vapeur
ainsi
emprisonnée
accélère la
cuisson. Nous
vous conseillons toutefois de percer le film
alimentaire avant la cuisson, afin que le surplus de
vapeur puisse être libéré. Lorsque vous retirez le
film alimentaire qui recouvre un plat, soyez
prudent, car la vapeur qui s’est accumulée est
extrêmement chaude.
Utilisez exclusivement du film alimentaire adapté
aux fours à micro-ondes et employez-le
uniquement pour couvrir un plat. Ne tapissez
jamais vos plats avec du film alimentaire.
Les micro-ondes sont des ondes électromagnétiques hautes
fréquences semblables à celles utilisées dans une radio. Le
magnétron convertit le courant électrique en micro-ondes, qu’il envoie
à l’intérieur du four où elles sont réfléchies, transmises ou absorbées.
Réflexion
Les micro-ondes sont réfléchies par le métal, de la même manière
qu’un ballon rebondit contre un mur. Toutefois, la plupart des
ustensiles et récipients métalliques ne conviennent pas aux fours à
micro-ondes, car ils ne permettent pas une cuisson uniforme. En
outre, lorsque le récipient métallique est trop rapproché de la paroi du
four (également en métal), il peut provoquer la formation d’un arc
(étincelles bleuâtres), susceptible d’endommager le four, voire même
d’entraîner un incendie.
Transmission
Les micro-ondes passent au travers de certaines matières telles que
le papier, le verre et le plastique, un peu comme les rayons du soleil
traversent une fenêtre. Les récipients constitués de ces matières sont
donc parfaitement adaptés à la cuisson aux micro-ondes, puisqu’ils
n’absorbent pas ou ne réfléchissent pas les micro-ondes. Néanmoins,
comme la chaleur des aliments se transmet aux récipients, ceux-ci
chauffent pendant la cuisson.
Absorption
Les micro-ondes sont absorbées par les aliments et pénètrent jusqu’à
une profondeur de 2 à 4 cm. Les micro-ondes stimulent les molécules
des aliments (en particulier les molécules d’eau, de graisse et de
sucre) et les font vibrer très rapidement. Ces vibrations provoquent
une friction qui engendre la chaleur. Dans le cas d’aliments
volumineux, la chaleur engendrée par la friction se propage jusqu’au
centre de l’aliment en fin de cuisson.
Cuisson aux micro-ondes
Fr-2
POISSONS - Laissez-les reposer pendant
2 à 5 minutes.
PLATS AUX ŒUFS - Laissez-les reposer
pendant 2 à 3 minutes.
PLATS CUISINES PRECUITS - Laissez-les
reposer pendant 5 minutes.
PLATS PREPARES A LA MAISON Laissez-les reposer pendant 2 à 5 minutes.
LEGUMES - A l’exception des pommes de
terre cuites à l’eau, il est conseillé de laisser
reposer pendant 1 à 2 minutes. La plupart
des légumes peuvent être servis
immédiatement en fin de cuisson.
DECONGELATION - Pour boucler le
procédé, il est indispensable de tenir
compte du temps de repos. Celui-ci peut
varier entre 5 minutes (notamment pour les
framboises) et 1 heure dans le cas d’un rôti.
Une fois le TEMPS DE REPOS écoulé, si
les aliments ne sont pas cuits, replacez-les
dans le four et cuisez-les encore quelques
instants.
TEMPS DE REPOS
Il est important de laisser reposer tous les
aliments après la cuisson ou le réchauffage
et ce particulièrement pour les aliments
denses. La cuisson se poursuit par
conduction. Si l'aliment n'est pas
suffisamment cuit après le temps de repos,
rajouter quelques minutes de cuisson.
ROTIS - Recouvrez-les d’une feuille
d’aluminium et laissez-les reposer pendant
15 minutes.
POMMES DE TERRE AVEC LA PEAURecouvrez-les d’une feuille d’aluminium et
laissez-les pendant 5 minutes.
GATEAUX LEGERS - Laissez-les reposer
pendant 5 minutes avant de les retirer du four.
GATEAUX RICHES - Laissez-les reposer
pendant 15 à 20 minutes.
Conseils de cuisson
Page 62

Conseils de cuisson
DISPOSER
Les portions individuelles telles que
les cuisses de poulet, les côtes de
porc, etc. doivent être disposées
dans un plat de telle sorte que les
parties charnues soient vers
l'extérieur du plat et les parties
moins charnues (nécessitant moins
de cuisson) vers le milieu du plat.
ESPACER
Les aliments cuisent plus
rapidement et de manière plus
uniforme lorsqu’ils sont séparés.
N’EMPILEZ JAMAIS les aliments
les uns sur les autres.
INGRÉDIENTS
Des aliments contenant beaucoup
de graisse, de sucre ou de sel, se
réchauffent très rapidement. La
farce peut être beaucoup plus
chaude que la croûte. Faire
attention en les mangeant. Ne pas
surchauffer même si la croûte ne
paraît pas très chaude.
TEMPERATURE INITIALE
Plus les aliments sont froids, plus il
faut de temps pour les réchauffer.
Les aliments sortant du
réfrigérateur doivent être réchauffés
plus longtemps que ceux conservés
à la température ambiante.
COUVRIR
Couvrez les aliments à l’aide d’un
couvercle adapté ou de film
alimentaire pour four à microondes. Couvrez le poisson, les
légumes, les ragoûts et les
potages, mais pas les gâteaux, les
sauces, les pommes de terre avec
la peau et les pâtisseries.
RETOURNER ET REMUER
Il est souvent nécessaire de
mélanger les grandes quantités
d'aliments en cours de cuisson afin
de ramener les aliments de
l'extérieur vers l'intérieur et
inversement. Les grosses pièces
de viande et les volailles doivent
généralement être retournées à micuisson.
LIQUIDES
Tous les liquides et les boissons
doivent être remués avant et
pendant le réchauffage, et ce
particulièrement pour l'eau, afin
d'éviter des projections brûlantes.
Ne pas chauffer des liquides ayant
déjà bouilli. NE PAS
SURCHAUFFER.
NETTOYAGE
Il est important que votre four soit
constamment propre. Les fours
peuvent être nettoyés avec de la
mousse décapante pour four,
pulvérisée sur une éponge douce.
Eviter d'appliquer de la mousse sur
les parties en plastique et la porte.
Prendre soin d'essuyer
complètement le four avec un
chiffon sec après le rinçage.
Fr-3
TAILLE DU RECIPIENT
Les aliments disposés dans un plat
rond cuiront mieux que dans un
plat rectangulaire ou carré. Ils
cuiront plus vite dans un plat large
et plat que dans un plat haut et
étroit. La taille du plat doit être
proportionnelle à la quantité
d'aliment.
QUANTITE
Les petites quantités cuisent plus
vite que les grandes, de même que
les petits plats se réchauffent plus
rapidement que les grands.
DENSITE
Les aliments poreux et aérés
chauffent plus vite que ceux qui
sont lourds et denses.
FORME
Les formes régulières permettent
une cuisson homogène. Lorsque
cela est possible, couper les
légumes en tronçons ou en
rondelles et les autres aliments en
morceaux.
Français
Page 63

Quels récipients utiliser dans votre four?
Porcelaine et céramique
résistants à la chaleur
Plats en poterie/terre-cuite
Papier aluminium
Film plastique
Paniers en paille/bois/tressés
Papier aluminium/plats
métalliques
Plat en verre
résistant
à la chaleur
Récipient en plastique
résistant aux micro-ondes
Fr-4
Matériel de Cuisson Pour Micro-ondes Pour Gril Pour Utilisation Combinée
✔
✔✔
✔
✔
✔
✔
✔
✘
✘
✘
✘
✘
✘
✘
✘
✘
✘
✘
✘
✔
✔
✔
✔
N’utilisez pas de plats comportant
des décors métalliques ou des
dorures ou des anses fixées par de la
colle.
Le papier aluminium peut être utilisé
en petites quantités pour protéger la
viande ou le poisson .Cela permet de
protéger certaines parties d'une
surcuisson ou d'une décongélation
excessive. Prendre garde à ce que
l'aluminium ne touche ni les parois ni
la voûte.
Page 64

Utilisation du gril
Cuisson combinée
Niveau de puissance Utilisation
Puissance Maximum 1000 W Réchauffer des sauces, des liquides et cuire du poisson, des légumes, des volailles.
270 W (*) Décongélation des aliments surgelés.
600 W Cuisson des viandes blanches, des cakes, des sauces ; réchauffage du lait et des aliments pour bébé.
440 W Cuisson et réchauffage des quiches et des poulets en cocotte.
(NN-Q543/NN-Q523/NN-Q553)
250 W Mélanges délicats avec des œufs, quiches cuissons longues, pâtés, réchauffage des viandes rouges.
Remarque: (*) DECONGELATION CYCLIQUE avec temps de repos automatique (voir page 9).
NE PRECHAUFFEZ JAMAIS LE GRIL.
Le gril à quartz de votre four permet de colorer rapidement le dessus
des aliments sans nécessiter de préchauffage.
Le mode de cuisson au gril ne comprend qu’un seul réglage gril
d’une puissance de 1300 Watts.
Posez les aliments à griller sur le trépied, lui-même posé sur le
plateau tournant.
Les aliments qui grillent doivent en principe être retournés à micuisson.
Ne couvrez jamais les aliments que vous grillez.
Il n' y a pas de micro-ondes émises en mode GRIL.
Premier côté Deuxième côté
Côte de boeuf 1 kg 14 à 15 min. 14 à 15 min
Côtes de porc 12 à 14 min. environ 12 min.
Brochettes environ 12 min. environ 12 min.
Saucisses 6 à 7 min. environ 6 min.
Cuisses de poulet 15 à 20 min. 15 à 20 min.
Tranche de pain de mie 3 à 4 min. 3 min.
La cuisson combinée est parfaitement adaptée à la plupart des
aliments. En effet, pendant que la puissance des micro-ondes cuit
rapidement les aliments, le gril les dore et les rend plus croustillants.
Vous disposez des 3 modes combinés suivants :
REMARQUES:
• Ne couvrez jamais les aliments que vous cuisez à l’aide d’un
programme combiné.
• N’utilisez pas les programmes combinés pour cuire des petites
quantités. Pour une cuisson parfaite, utilisez plutôt le gril ou les
micro-ondes uniquement.
• En mode de cuisson combinée, ne préchauffez jamais le four.
Niveaux de puissance des micro-ondes
Accessoires à utiliser
Fr-5
Durées de cuisson au GRIL
Micro-ondes Gril Cuisson combinée
+
-
Mode Combiné Affichage Puissance Gril Puissance Micro-ondes Utilisations
1 G1-600 W 1300 W 600 W
Viandes blanches, agneau, volaille entière, gratins. Préchauffage du Croustiplat.
2 G1-440 W 1300 W 440 W Saucisses, viande rouge. Morceaux de volaille, poisson.
3 G1-250 W 1300 W 250 W Gâteaux style 4/4, quiches, côtes de porc, gratins avec des œufs.
Français
Page 65

Votre four vous permet de réchauffer en toute sécurité les nombreux
plats préparés proposés dans les supermarchés ainsi que vos plats
cuisinés maison. Il vous suffit de contrôler soigneusement si les
aliments sont suffisamment chauds avant de les servir, comme vous
le feriez avec un four traditionnel. Vous devez aussi veiller à
entreposer correctement les aliments froids que vous voulez
réchauffer, notamment en les conservant au réfrigérateur avant de
les réchauffer.
Quel mode utiliser pour réchauffer des aliments?
Le mode à utiliser, à savoir les micro-ondes uniquement ou la
cuisson combinée varie en fonction du type d’aliment à réchauffer.
Pour réchauffer des aliments qui ne doivent pas être dorés, utilisez
les micro-ondes uniquement. Pour réchauffer des aliments qui
doivent être gratinés, optez plutôt pour la cuisson combinée.
Dans le cas d’une tarte ou d’une quiche congelée, vous devez non
seulement réchauffer l’aliment mais aussi cuire la pâte. Comme les
micro-ondes et la cuisson combinée ne permettent pas d’obtenir une
pâte croustillante, vous devez cuire ce type d’aliment dans un four
traditionnel.
Combien de temps réchauffer les aliments?
Vous trouverez au dos de cette page les tableaux de réchauffage
pour les micro-ondes et la cuisson combinée. Les durées
mentionnées dans ces tableaux sont fournies à titre indicatif
UNIQUEMENT. Les durées exactes varient en fonction du poids des
aliments, de la taille du récipient utilisé et de la température initiale.
Que faire lorsque les aliments que je dois réchauffer ne sont
pas repris dans les tableaux?
Bien qu’il ne soit pas possible de reprendre dans ces tableaux tous
les aliments disponibles sur le marché, nous en avons testé un très
large éventail. En respectant nos recommandations, vous pourrez
donc réchauffer vos aliments parfaitement et en toute sécurité.
Retourner et remuer
Dans la mesure du possible, nous vous conseillons de retourner ou
de remuer les aliments pendant que vous les réchauffez afin
d’uniformiser leur température tant à l’extérieur qu’au centre.
Temps de repos
Dans la plupart des cas, vous devez LAISSER REPOSER les
aliments après les avoir réchauffés afin de permettre à la chaleur de
se propager jusqu’au coeur des aliments et d’uniformiser ainsi leur
température. Si vous avez couvert les aliments pendant le
réchauffage, laissez le couvercle en place pendant le temps de
repos. Ce temps de repos est particulièrement important lors du
réchauffage d'aliments denses tels que des lasagnes ou des gratins,
voire tout aliment que vous ne pouvez pas remuer pendant le
réchauffage.
Quand les aliments sont-ils réchauffés?
Les aliments réchauffés doivent être servis "chauds", c’est-à-dire
lorsqu’ils libèrent de la vapeur en tous points. Aussi longtemps que
les règles d’hygiène élémentaires ont été respectées pendant la
préparation et le stockage des aliments, le réchauffage à l’aide des
micro-ondes ou de la cuisson combinée ne présente aucun risque
supplémentaire pour la santé. Nous vous conseillons de couper à
l’aide d’un couteau les aliments qui ne peuvent pas être remués pour
vérifier s’ils sont correctement réchauffés. Outre le respect des
instructions du fabricant et des durées mentionnées dans les
tableaux de réchauffage illustrés ci-après, nous vous recommandons
vivement de vérifier si les aliments sont “chauds”. En cas de doute,
replacez les aliments dans le four et réchauffez-les encore pendant
quelques instants.
Réchauffage aux micro-ondes
Réchauffage
Fr-6
Aliment Poids ou Quantité Frais Surgelé
ENTRÉES TRAITEUR
- croque monsieur 1 pce (170 g) MAX 1 min MAX 2 min 30 sec à 3 min
2 pces (320 g) MAX 2 min MAX 5 min
- coquille de poisson (4) 1 pce (170 g) MAX 2 min MAX 3 min
2 pces (220 g) – MAX 6 à 7 min
- crêpe non fourrée (2) 1 pce MAX 30 sec –
- crêpe fourrée (2) (3) 1 pce (150 g) – MAX 3 à 4 min
2 pces (300 g) – MAX 5 min
- potage (2) 400 g MAX 4 min –
1 litre MAX 6 à 7 min MAX 11 à 12 min
- pizza petite (1) 1 pce (160 g) MAX 1 min MAX 2 min 30 sec à 3 min
- pizza américaine 1 pce (400 g) MAX 4 à 5 min MAX 7 à 8 min
- quiche petite (1) 1 pce (130 g) 600 W 1 min 10 sec MAX 3 min
- quiche grande 1 pce (400 g) 600 W 3 min 600 W 7 à 8 min
- Nem, Samossa (3) 2 pces (100 g) MAX 15 à 20 sec –
PLATS CUISINÉS
- tomate farcie 1 pce (170 g) MAX 2 min MAX 6 à 7 min
- Chilli con carne (2) (3) 400 g MAX 3 min 40 sec –
- Poulet et riz Korma (2) (3) 350 g – MAX 6 min
- Quenelles de brochet (2) (3) 6 pces (240 g) – 600 W 6 min
- Escargots (2) (3) 12 pces (100 g) 440 W 2 min 600 W 2 min à 2 min 30 sec
- Gratins (féculent avec viande) (4) 300 - 400 g MAX 3 min MAX 8 à 10 min
600 g MAX 6 à 8 min MAX 13 à 14 min
1 kg MAX 10 à 11 min MAX 16 à 18 min
Page 66

Réchauffage aux micro-ondes
BIBERONS POUR BEBES-PRECAUTIONS
Le lait ou la bouillie DOIT être complètement mélangé avant et après
avoir été chauffé. Il doit aussi être soigneusement contrôlé avant
d’être donné au bébé.
Dans le cas d’un biberon de lait de 210-240 ml conservé au
réfrigérateur, retirez le capuchon et la tétine, faites chauffer le lait à la
puissance MAX pendant 25 à 30 sec., puis CONTROLEZ
SOIGNEUSEMENT SA TEMPERATURE.
Dans le cas d’un biberon de lait de 90 ml conservé au réfrigérateur,
retirez le capuchon et la tétine, faites chauffer le lait à la puissance
MAX pendant 10 à 15 sec., puis CONTROLEZ SOIGNEUSEMENT
SA TEMPERATURE.
REMARQUE:
Le liquide en haut du biberon étant beaucoup plus chaud que celui
contenu dans le bas, vous devez bien secouer le contenu du biberon
avant de contrôler sa température.
Fr-7
Français
Aliment Poids ou Quantité Frais Surgelé
PLATS CUISINÉS (suite)
- Gratin de légumes (avec ou sans viande) (4) 300 - 400 g MAX 6 min MAX 11 à 13 min
1 kg MAX 12 min MAX 18 min puis 600 W 6 min
- Gratin de poisson (4) 450 g – 600 W 12 à 15 min
1 kg – MAX 18 min puis 250 W 5 min
- Poisson en sauce (cru) (2) (3) 225 g – MAX 6 à 7 min
GARNITURES
- Féculents (2) 300 g MAX 2 à 3 min MAX 4 à 5 min
- Légumes (2) 100 g MAX 1 min à 1 min 30 sec –
200 g MAX 1 min 30 sec à 2 min –
- Purée (2) (3)
de pommes de terre 200 g MAX 1 min 30 sec MAX 4 min 30 sec
de légumes 200 g MAX 1 à 2 min MAX 5 min
400 g MAX 3 min 30 sec MAX 8 min
- Spaghetti en sauce (2) 210 g MAX 2 min –
450 g MAX 4 min –
- Riz (2) 150 g MAX 1 min MAX 2 min 30 sec
300 g MAX 2 min 30 sec MAX 4 min 30 sec
VIANDES ET POISSON
- Hamburger (cru) (2) 1 pce (150 g) – MAX 1 min 30 sec
- Saucisses Cocktail (2) (3) 120 g 250 W 2 à 3 min –
- Tranches de viande cuites
steak haché (2) 100 g 600 W 40 à 50 sec –
porc 2 tranches (2) 130 g 600 W 1 min 30 sec –
agneau 2 tranches (2) 160 g 600 W 1 min –
bœuf 2 tranches (2) 120 g 600 W 50 sec –
cuisse de poulet (2) 205 g MAX 1 min 40 sec –
nuggets de poulet 10 pces (200 g) – MAX 2 min 30 sec
cordon Bleu 1 pce (100 g) – MAX 2 min
DIVERS
- Aliments pour bébé 30 g 600 W 15 sec Tester –
(petit pot à température ambiante) 120 g 600 W 25 sec Tester –
200 g 600 W 40 sec Tester –
- Viennoiserie (1) 2 pces (50 g) – MAX 30 à 40 sec ou 3 min
- Pain (1)
- de mie tranché 800 g – 8 min
- morceau 60 g – MAX 40 sec
- baguette 150 g – MAX 30 à 40 sec
- 1 boule pain complet 500 g – MAX 2 min 30 sec puis 1/2 h repos
- petit pain de seigle 1 pce (85 g) – MAX 40 sec
3 pces (85 g) – MAX 1 min 10 sec
Page 67

Fr-8
RAMOLLIR LE BEURRE À TARTINER AU SORTIR DU
RÉFRIGÉRATEUR
Faire ramollir 35 à 40 sec. sur (pour 150 g). Retirer au
préalable le papier métallisé le cas échéant.
FAIRE GONFLER DES FRUITS SECS
Ajouter 4 c. à s. d’eau à 200 g de pruneaux ou de raisins secs,
(possibilité de les faire gonfler avec du rhum pour les cakes).
Mélanger et faire chauffer sur Max 2 à 3 min. Laisser reposer
10 min.
RAMENER LE FROMAGE À TEMPÉRATURE AMBIANTE
Le fromage sorti du réfrigérateur doit être placé dans le four et
« tiède» 30 sec. à 1 min (selon la taille du fromage) sur 250 W.
MONDER DES AMANDES OU DES NOISETTES
Couvrir d’eau chaude à hauteur et cuire 3 à 6 min sur Max (jusqu’à
une bonne reprise d’ébullition). Rafraîchir, égoutter, la peau se retire
alors facilement.
FAIRE SÉCHER DES FINES HERBES
Placer du papier absorbant sur le plateau tournant. Bien étaler les
herbes fraîches finement hachées sur le papier. Procéder en
plusieurs fois si nécessaire. Chauffer sur Max quelques minutes en
surveillant toutes les 30 sec. jusqu’à ce que les herbes commencent
à sécher. Il faut faire très attention: si les herbes restent trop
longtemps au four, elles risquent de se désagréger et même de
s’enflammer. Laisser encore les herbes sèches sur le papier
absorbant 2 heures à l’air ambiant puis ranger dans des boîtes
hermétiques.
FAIRE UN CARAMEL
Cuisez 100 g de sucre avec 2 c. à s. d’eau dans un bol 2 à 3 min
sur Max en surveillant attentivement au bout d’1 min 30 sec. Sortez
le caramel avant qu’il ne soit foncé, il terminera de cuire à
l’extérieur. Vous pouvez arrêter la cuisson avec 2 c. à s. d’eau très
chaude (prendre garde aux projections).
LIQUÉFIER DU MIEL DURCI
Enlever le couvercle du pot, le poser dans le four et réchauffer sur
250W 30 à 50 sec. selon la quantité. Remuer et renouveler
l'opération si nécessaire.
FAIRE DURCIR DES PETITS CROÛTONS RAPIDEMENT
Couper 2 tranches de pain de mie en petits cubes. Étaler ces cubes
sur une assiette. Faire chauffer sur Max 2 min puis laisser reposer
5 min. Vous pouvez frotter une gousse d’ail sur les tranches de pain
de mie avant de les découper ou les humecter de quelques gouttes
d’huile d’olive.
OBTENIR PLUS DE JUS D’UNE ORANGE OU D’UN CITRON
Avant de le presser, passer 1 orange ou 1 citron 30 à 40 sec. sur Max,
puis pressez-la sans attendre : elle donnera plus de jus.
FAIRE FONDRE DU BEURRE
100 g de beurre dans un ramequin couvert d’une soucoupe seront
fondus en 1min - 1min 10 sec sur 600 W.
FAIRE FONDRE DU CHOCOLAT
Casser le chocolat dans un bol en petits morceaux et faire chauffer sur
600 W 2 min à 2 min 30 sec pour 100 g (la durée peut varier selon la
teneur en cacao et en sucre). Remuer au moins une fois en cours de
cuisson.
FAIRE LEVER UNE PÂTE
Placer la pâte recouverte dans le four et chauffer environ 5 min sur
(pour 500 g de pâte). Laisser reposer la pâte à l’intérieur du four
(à l’abri des courants d’air), jusqu’à ce qu’elle ait doublé de
volume.
FAIRE DU VIN CHAUD
Préparer dans un verre (ou une chope) résistant à la chaleur, 20 cl de
vin rouge additionné d’un zeste de citron, une pincée de canelle, un
clou de girofle et 2 à 4 morceaux de sucre selon votre goût. Faire
chauffer sur Max 1 min à 1 min 30 sec.
DÉSODORISER VOTRE FOUR
Pour débarrasser votre four d’une odeur de poisson trop tenace,
placer à l’intérieur un bol de vinaigre blanc ou d’eau additionnée d’un
jus de citron. Chauffer sur Max 5 min. Essuyer la vapeur déposée sur
les parois du four à l’aide d’un linge.
PRÉPARER UNE COMPRESSE CHAUDE
Faire chauffer un linge plié, propre et mouillé sur une assiette 1 à
2 min sur Max. Contrôler la température avant d’appliquer.
Trucs de cuisson aux micro-ondes
Page 68

Poids
Recommandés
(Min.-Max.)
1. petites pièces de viande ou de volaille,
escalopes, saucisses, viande hachée, 100-1200 g
darnes, côtelettes.
2. grosses pièces de viande ou de poisson,
rôtis, volaille entière; pensez à retourner 400-2000g
les rôtis et à protéger les parties fines
ou grasses aux bips sonores.
Fr-9
Conseils pour la décongélation
Le plus difficile dans la décongélation est
d'obtenir l'intérieur de l'aliment décongelé
avant que l'extérieur ne soit cuit.
C'est pourquoi, la décongélation sur les fours
PANASONIC fonctionne sur un mode
cyclique : le four divise le temps de
décongélation total en 8 périodes passant de
la décongélation effective (4 périodes) au
temps de repos (4 périodes). Pendant les
périodes de repos, il n'y a pas d'émission de
micro-ondes, même si le plateau tourne et la
lumière reste allumée, et la décongélation se
poursuit par conduction. Ce repos assure à
l'aliment une décongélation homogène et
permet de réduire le temps de repos après
décongélation, au moins pour les petites
pièces.
Cette touche vous permet de décongeler selon leur poids des viandes ou
des poissons crus surgelés. Ne pas l'utiliser pour d'autres aliments. 2
programmes vous sont proposés. La combinaison de la technologie
Inverter et de la logique floue dans le calcul des temps d'émission d'ondes
permet d'accélérer sensiblement le processus de décongélation ( jusqu'à
40 % pour certains poids).
Décongélation automatique selon le poids des
aliments
Contrôlez à plusieurs reprises la décongélation de l’aliment, même
lorsque vous utilisez les touches Automatiques. Respectez un temps
de repos.
TEMPS DE REPOS
Les petites pièces peuvent être cuites
presque
immédiatement après
la décongélation (5
min de repos pour des
steaks, 15 min pour
les fruits et les pâtes).
Il est normal que les
grosses pièces soient
encore congelées au
centre. Il faut leur
laisser au minimum une heure de repos avant de les cuire.
Pendant ce temps de repos, la température s'homogénéise et la
décongélation se poursuit par conduction. N.B.: Si l'aliment n'est pas
destiné à être cuit immédiatement, le conserver au réfrigérateur. Ne
jamais recongeler un aliment décongelé sans le cuire au préalable.
LES RÔTIS AVEC OS ET LES VOLAILLES ENTIÈRES
Il est préférable de
placer les rôtis sur
soucoupe retournée
ou bien une passoire
en plastique afin qu'ils
ne trempent pas dans
le liquide d'exsudation.
Il est indispensable de
protéger les parties
fines ou protubérantes de ces aliments avec de petits morceaux de
papier aluminium afin d'éviter un début de cuisson de ces parties. Il
n'est pas dangereux d'utiliser des petits morceaux de papier
aluminium dans votre four, à condition qu'ils ne touchent pas les
parois du four.
LA VIANDE HACHÉE OU EN CUBES, LES PETITS CRUSTACÉS
Les parties
extérieures de ces
aliments décongelant
rapidement, il faut les
séparer, briser les
blocs en morceaux à
plusieurs reprises
pendant la
décongélation et les
retirer au fur et à
mesure qu'ils sont
décongelés.
PETITES PIÈCES
Les côtelettes et les
morceaux de poulet
doivent être séparés
sitôt que possible pour
faciliter une décongélation homogène.
Les parties grasses et
les extrémités décongèlent plus rapidement. Placez-les vers
le centre du plateau ou
protégez-les.
Français
Page 69

Fr-10
Aliment Poids ou Quantité Durée en min. Temps de repos (min)
VIANDE
- rôti avec os# 500 g 18 - 20 60
- rôti sans os# 500 g 20 - 22 70
- côtes# 500 g 8 - 12 15
- côtelettes# 250 g 6 - 7 10
- rognons* 250 g 7 - 8 10
- bifteck maigre* 430 g (2) 11 - 12 10
- entrecôte* 150 g 4 - 6 10
- viande hachée, chair à saucisse* 500 g 10 - 12 10
- hamburger* 200 g (2) 6 - 7 10
400 g (4) 10 - 12 10
- morceaux pour ragoût* 500 g 12 - 14 15
- volaille entière# 500 g 12 - 13 60
- volaille en morceaux# 1 kg (4) 22 - 24 30
- coquelet# 400 g 15 30
- lapin# 500 g 14 - 15 30
- andouillette* 300 g (2) 10 - 11 15
BEURRE 250 g 2 10
COULIS DE FRUIT 200 g 3 - 4 10
FROMAGE* 450 g 3 10
FRUITS ROUGES* 200 g 5 - 6 10
300 g 9 10
500 g 12 10
GÂTEAUX CUITS
- génoise 400 g (1) 7 10
- Forêt Noire 550 g (1) 4 - 5 15
- Bavarois 110 g (1 portion) 8 seconds 15
- Tarte framboises 470 g (1) 10 15
JUS DE FRUIT CONCENTRÉ 200 ml 4 4
PÂTE
- sablée ou brisée* 370 g (block) 4 - 5 5
- feuilletée* 300 g (block) 3 - 4 5
POISSON
- entier# 400 g (2) 10 - 12 15
- filets# 500 g (4) 13 - 14 15
- darnes* 380 g (2) 10 15
- pavés* 200 g (2) (4) 9 15
- crevettes* 200 g 7 10
Sélectionnez la puissance de décongélation 270 W,
puis la durée mentionnée ci-dessous.
Les durées ci-dessous sont mentionnées à titre indicatif uniquement. Contrôlez à plusieurs reprises la décongélation de l'aliment. Adaptez la durée de
décongélation au poids et au volume de l'aliment. Il n’est pas nécessaire de couvrir les aliments pendant que vous les décongelez.
REMARQUES
* Dès que possible, remuez ou séparez ces aliments pendant la décongélation.
# Protégez les bords et les extrémités de ces aliments.
Décongélation des aliments courants
Page 70

Fr-11
Tableau de cuisson combinée et de réchauffage (NN-F663/NN-F623/NN-F653)
(1) : Poser dans un plat transparent aux ondes et résistant à la chaleur (ou bien un morceau de papier cuisson) sur le trépied.
(2) : Débarrasser de l’emballage et poser directement sur le trépied. (3) : Retourner ou remuer à mi-réchauffage.
Français
Aliment Poids ou Quantité Frais Surgelé
ENTREES
- croque monsieur (2) (3) 1 pce (100 g) 1 min 30 sec Combi 1 + 3 min gril 3 min Combi 1
2 pces (300 g) 5 min Combi 2 3 min 30 Combi 1
1 pce (150 g) 3 à 4 min Combi 1 + 1 min gril 3 à 4 min Combi 2
- coquille de poisson (1) 1 pce (100 g) – 5 min Combi 2
(retirer les fleurons en pâte à 1 pce (170 g) 2 min 30 sec Combi 1 + 2 min gril 5 à 7 min Combi 2
mi-temps) 2 pces (2 x150 g) 4 à 5 min Combi 1 7 min 30 sec Combi 1
- croissant fromage, gnocchi (1) 1 pce (160 g) 3 à 4 min Combi 1 3 min 30 sec Combi 2
2 pces (300 g) 4 à 5 min Combi 1 –
- roulé au fromage (1) (3) 1 pce (130 g) 3 min Combi 1 3 min Combi 2
- friand à la viande (2) (3) 1 pce (130 g) 1 min 40 sec Combi 3 3 min Combi 1
- ficelle picarde (1) (3) 1 pce (150 g) – 4 min 30 sec Combi 1
1 pce (190 g) 3 min Combi 1 –
2 pces (2 x 130 g) 3 min 30 sec à 4 min Combi 2 7 min Combi 1
- quiches apéritives (1) 12 pces (180 g) MAX 50 sec + 2 min gril MAX 2 min + 3 min gril
- pizza américaine (2)
petite 1 pce (200 g) 2 min Combi 3 + 2 min gril MAX 3 min + 3 min gril
grande 1 pce (450 g) – 5 à 6 min Combi 1
1 pce (750 g) – 8 min Combi 1 + 2 min gril
- pizza (2)
petite 1 pce (200 g)
4 min Combi 2
MAX 2 min 10 sec + 3 à 4 min gril
1 pce (300 g) 3 min Combi 1 + 1 min 30 sec gril –
grande 1 pce (400 g) 3 min 30 sec Combi 1 + 1 min 30 sec gril Autopizza***
1 pce (600 g) 5 min Combi 1 + 1 min 30 sec gril Autopizza***
pâte fine 1 pce (500 g) 4 min Combi 1 + 1 min 30 sec gril –
calzone (3) 1 pce (420 g) 3 min Combi 1 + 2 min gril –
- quiche petite (2) 1 pce (130 g) 2 min Combi 3 –
1 pce (200 g) 4 min Combi 2 –
2 pces (300 g) 4 min Combi 3 Autoquiche***
- quiche grande 1 pce (400 g) 3 min 30 sec Combi 1 –
1 pce (500 g) 4 min 30 sec Combi 1 + 1 min 30 sec gril Autoquiche***
1 pce (600 g) 5 min Combi 1 Autoquiche***
- Tourtefeuille (2) (3) 1 pce (300 g) 4 à 5 min Combi 1 –
1 pce (500 g) 6 à 7 min Combi 1 –
- Feuilleté aux champignons 1 pce (450 g) 8 min Combi 1 –
PLATS CUISINÉS
- Lasagne Bolognaise (1) 130 g 2 min Combi 1 + 3 min gril –
300 g 6 à 8 min Combi 2 AutoGratin***
1 kg Combi 1 10 à 12 min AutoGratin***
- Gratin de poisson (1) 450 g – AutoGratin***
800 g – AutoGratin***
- Gratin de légumes (1) 450 g 5 à 7 min Combi 1 AutoGratin***
1 kg 12 à 14 min Combi 1 AutoGratin***
GARNITURES
- Pommes Dauphine (1) (3) 200 g – 4 min 30 sec Combi 1
- Pommes noisettes (1) (3) 350 g – 4 min Combi 1 + 3 min gril
- Pomme Duchesse (1) 500 g – 7 min Combi 1 + 7 min gril
- Frites four (1) (3) 400 g – 8 à 10 min Combi 1
VIANDES ET POISSON
- Confit de canard (1) (3) 2 pces (400 g)
4 min Combi 1 + 3 min gril
–
- Cordon bleu (1) (3) 1 pce (120 g) 4 min Combi 1 3 min 30 sec Combi 1
- Nuggets de poulet (1) (3) 10 pces (200 g) 3 min Combi 1 + 2 min
gril
6 min Combi 2
DIVERS
-
Galette des rois précuite
(2) (3)
1 pce (400 g) 3 min à 3 min 30 sec Combi 3 4 à 5 min Combi 2
- Crumble aux abricots (1) 1 pce (300 g) – 5 à 6 min Combi 1
-
Viennoiserie
(2) (3)
1 pce (60 g) Gril 2 min MAX 12 sec + 2 min gril (ou Auto)
Page 71

Fr-12
Tableau de temps pour Panacrunch (NN-F663 / NN-F623)
(*) : retourner ou mélanger à mi-cuisson. (**) : laisser reposer dans le plat 5 min en fin de réchauffage.
Aliment Quantité ou poids Frais Surgelé
- Tartelettes apéritives 12 pces (160 g) – 2 min 30 sec Combi 1
- Feuilletés apéritifs (à cuire) 15 pces (210 g) – 7 min 30 sec Combi 2**
- Gougères 20 pces (150 g) – 1 min 30 sec Combi 1**
- Crique lardons-fromage 1 x 170 g 4 min Combi 2 3 min Combi 1 + 2 min gril
- Tarte alsacienne 1 x 120 g 4 min Combi 3 3 min 30 sec Combi 1
PIZZA
- pâte standard 2 x 140 g 4 min 30 sec Combi 2 –
200 g – 3 min Combi 1
300 g 6 min Combi 1 7 min Combi 1
500 g 5 min Combi 3 6 min Combi 1
- pâte fine 200 g 4 min Combi 3 3 min Combi 1
250 g 2 min Combi 1 + 2 min gril** 3 min Combi 1
- américaine 500 g – 6 min Combi 1
- McCain rise and up 500 g – 10 min 30 sec Combi 1
QUICHE ET TOURTE
- Quiche lorraine 1 x 100 g – 2 min 30 sec à 3 min Combi 1
2 x 150 g 3 min Combi 2 –
150 g – 2 min 30 sec à 3 min Combi 1
400 g – 5 à 6 min Combi 1
- Quiche poireaux 2 x 120 g – 5 min Combi 1
400 g – 6 min 30 sec Combi 1**
- Tourtefeuille savoyarde 450 g 4 min 30 sec à 5 min Combi 1** 10 min Combi 1* + **
- Feuilleté champignons 450 g 6 à 7 min Combi 1** –
- Tarte aux fruits de mer 350 g 4 min Combi 2** –
- Pissaladière 1 x 150 g – 2 min 40 sec Combi 1
- Crêpes fourrées 4 pces (200 g) – 3 min Combi 1
2 pces (100 g) – 1 min 40 sec Combi 1*
- Galettes fourrées 2 pces (140 g) 3 min Combi 2 5 min Combi 1
- roulé au fromage, Friand à la viande 130 g 2 min Combi 3 2 min 20 sec à 3 min (roulé) Combi 3
2 x 130 g 2 min 30 sec Combi 1 3 min Combi 1**
- Bouchée à la reine 1 pce (150 g) 2 min 20 sec Combi 1 4 min Combi 1 (enlever le chapeau)
2 x 150 g 3 min Combi 1 6 min 30 sec à 7 min Combi 1
(enlever le chapeau)
- gnocchis 2 x 130 g – 6 min Combi 1
- croque-monsieur 1 x 100 g 3 min Combi 3* –
2 x 100 g 4 min Combi 3 + 1 min gril –
1 x 160 g 3 min 30 sec à 4 min Combi 3 3 min Combi 1
2 x 160 g 5 à 6 min Combi 3 5 min Combi 1
- croque-bacon/tomates 1 x 140 g 2 min 30 sec Combi 2 3 min 30 sec Combi 1
POMMES DE TERRE
- frites à four 200 g – 5 min Combi 1 + 3 à 5 min gril*
400 g – 6 min Combi 1 + 5 à 7 min gril*
- pommes Wedge 300 g – 4 min Combi 1 + 5 min gril*
- pommes Duchesse 400 g – 9 min Combi 1 + 4 min gril
- pommes Dauphine 200 g – 4 à 5 min Combi 1*
- pommes Rösti 9 pces (600 g) – 10 min Combi 1*
- pommes noisettes 450 g – 8 min Combi 1 + 3 min gril*
- morceaux/quartiers crus 500 g à 1 kg 15 à 20 min Combi 1* –
SAUCISSES 2 pces (120 g) 2 min Combi 1* 3 min 30 sec Combi 1*
3 pces (180 g) 3 min Combi 1 * 4 min Combi 1*
- Saucisse Toulouse 1 pce (150 g) 3 min 30 sec à 4 min Combi 2* 4 min 30 sec Combi 1*
- Andouillette* 1 pce (150 g) 5 min Combi 2* 7 min Combi 1*
(sauf indication contraire, le plat est toujours préchauffé 4 min en combiné N° 1).
Page 72

Fr-13
Tableau de temps pour Panacrunch (NN-F663 / NN-F623)
(sauf indication contraire, le plat est toujours préchauffé 4 min en combiné N° 1).
(*) : retourner ou mélanger à mi-cuisson.
(**) : laisser reposer dans le plat 5 min en fin de réchauffage.
Français
Aliment Poids ou Quantité Frais Surgelé
- côte de porc* 180 g 3 à 4 min Combi 2* 6 min Combi 1*
- magret de canard* 1 pce (350 g) 4 min Combi 3 puis 5 min gril* –
- cuisses de poulet fermier 2 pces (670 g) 10 min Combi 1 puis 4 min gril* 18 min Combi 1 puis 4 min gril*
- Steak haché*
standard 1 pce (100 g) 1 min 50 sec à 2 min Combi 3* 3 min 30 sec à 4 min Combi 3*
1 pce (140 g) 2 min 30 sec à 3 min Combi 3* –
2 pces (200 g) – 4 min 20 sec Combi 3*
4 pces (400 g) – 3 min 30 sec à 4 min Combi 3
- Poisson pané* 2 pces (200 g) 3 min 40 sec Combi 2* 5 min Combi 1*
- Poisson en bâtonnets 5 pces (150 g) – 4 min Combi 1*
10 pces (300 g) – 5 min Combi 1*
- cordon bleu 1 pce (100 g) 3 min 30 sec Combi 3* 3 min Combi 1*
2 pces (200 g) 3 min 30 sec Combi 2* 5 min Combi 1*
- Nuggets de poulet 10 pces (200 g) 4 min Combi 2* 4 min Combi 1*
5 pces (100 g) 3 min Combi 2* 3 min Combi 1*
- omelette 4 œufs battus 1 à 2 min Combi 1* –
8 œufs battus 2 min à 2 min 30 sec Combi 1* –
- Strudel aux pommes (cuit)* 300 g – 4 min 30 sec à 5 min Combi 1* puis **
- Galette des rois (cuite) 400 g – 2 min 30 sec Combi 1**
- Beignets aux pommes (cuits) 7 pces (220 g) – 6 min Combi 3*
- Gauffres (cuites) 1 pce (70 g) – 2 min 30 sec Combi 3*
- Croustade aux pommes (cuite) 400 g – 5 min Combi 1**
- Kouing aman aux pommes (cuit) 550 g – 3 min Combi 1**
- Tarte Tatin 1 pce (600 g) – 7 min Combi 1** (poser côté pommes)
1 pce (150 g) – 2 min Combi 2** (poser côté pommes)
- Brownies aux noix (cuits) 2 pces (150 g) – 1 min 30 sec Combi 3 * puis **
Page 73

Fr-14
RÔTIS DÉCONGELÉS
Si la viande a été congelée, assurez-vous qu’elle a été correctement
dégelée avant de la cuire à l’aide des micro-ondes. Vous devez
laisser reposer les rôtis dégelés pendant 30 minutes minimum avant
de les cuire, afin d’être certain que le cœur de la viande est
complètement dégelé.
GRAISSE
Les surplus de graisse absorbent l’énergie des micro-ondes et
peuvent entraîner une surcuisson de la viande qu’ils enrobent.
Choisissez toujours des rôtis qui ne sont pas trop gras.
La cuisson en micro-ondes pures
Plaçer les rôtis sur
une soucoupe
retournée dans un plat
transparent aux ondes
sur le plateau
tournant. Il est
important que la
viande ne trempe pas
dans son jus. Cette
soucoupe n'est pas
nécessaire dans le
cas des viandes
braisées ou cuites en fricassée. Il est préférable de recouvrir le plat
d'un couvercle ou de film étirable afin d'accélerer la cuisson et de
prévenir les projections.
TEMPS DE REPOS
En fin de cuisson, vous devez recouvrir la viande et la volaille d’une
feuille d’aluminium et les LAISSER REPOSER pendant
15 minutes minimum. Une fois reposée, la viande rôtie peut être
découpée plus facilement. En outre, elle continue de cuire pendant le
TEMPS DE REPOS.
OS
Quand vous cuisez une épaule d'agneau ou une palette de porc avec
os dans votre four à micro-ondes, vous devez parfois couvrir
l’extrémité de l’os afin d’éviter qu’il cuise de manière excessive.
Comment cuire des petits morceaux de viande à l’aide des
micro-ondes?
Si certains morceaux de viande peuvent être facilement préparés au
four à micro-ondes, la réduction du temps de cuisson et l’absence
d’une source de chaleur empêchent ceux-ci d’être croustillants et
dorés. Il est préférable de cuire ces viandes dans une sauce.
RETOURNER
Les rôtis et la volaille doivent être retournés à mi-cuisson.
PROTECTION
Les extrémités des rôtis doivent parfois être protégées avec une
feuille d’aluminium à mi-cuisson afin d’éviter que les bords extérieurs
cuisent de manière excessive. Dans le cas d'une grosse volaille,
vous devez protéger les pilons et les bouts des ailes. Fixez la feuille
d’aluminium à l’aide de bâtonnets et évitez qu’elle touche les parois
du four.
Comment cuire un rôti à l’aide de la cuisson combinée?
Placez le rôti sur une
soucoupe retournée,
elle-même posée sur
un plat résistant à la
chaleur. Pour obtenir
une cuisson parfaite,
il est préférable de
cuire le rôti à l’aide
des micro-ondes
uniquement, puis
d’utiliser la cuisson
combinée pour le
dorer et le rendre croustillant. NE COUVREZ PAS.
CONSEILS POUR RAGOÛTS ET PLATS MIJOTÉS
Il est possible de cuire les ragoûts en micro-ondes pures, mais vous ne
gagnerez pas de temps par rapport à une cuisson traditionnelle. Par
contre, la viande ne risque pas d’attacher au fond du récipient, et la
dépense énergétique sera moindre.
AVAN T : les légumes de garniture doivent être coupés régulièrement
et précuits, ils risquent sans cela d’être encore croquants en fin de
cuisson. Fariner légèrement les morceaux de viande à saisir afin d’assurer une bonne liaison de la sauce.
PENDANT la cuisson, il est indispensable de maintenir les morceaux
de viande immergés à l’aide d’une soucoupe ou d’une assiette
retournée (afin d’éviter un dessèchement de la viande). La cuisson des
ragoûts étant longue et l’évaporation parfois importante, ne pas hésiter
à rajouter du liquide en cours de cuisson si nécessaire. Recouvrir le
récipient d’un couvercle afin de limiter l’évaporation. Amener à ébullition sur Max 10 à 12 min puis poursuivre la cuisson le temps désiré
sur 250W.
Comment cuire des petits
morceaux de viande à
l’aide du gril ou de la
cuisson combinée?
Placez la viande sur le
trépied, lui-même posé sur
le plateau tournant. Utilisez
un plat résistant à la chaleur
pour récolter la graisse/
éclaboussures.
Pour les morceaux plus
volumineux ou les rôtis ,
risquant de toucher la voûte
du four, ou les volailles
entières, placez-les dans un
plat résistant à la chaleur
posé sur le plateau tournant.
Le gril parviendra à dorer la
viande, mais cela risque de
prendre un peu plus de
temps.
Viandes et volailles
Conseils
Page 74

Fr-15
Type de Viande Micro-ondes pures*** Durée Combiné ou gril
Durée
BŒUF
- côte* Gril 25 à 30**
- rôti* 600 W 5 Combi 3 7 à 8
- ragoût MAX puis 250 W 10 puis 60 à 75** – –
AGNEAU
- rôti avec os* 600 W 6 à 7 Combi 1 7 à 8
- épaule roulée* 600 W 8 Combi 1 8 à 9
- ragoût* MAX puis 250 W 10 puis 40 à 50** – –
VEAU
- rôti épaule* 600 W 14 à 15 Combi 1 10 à 11
- ragoût MAX puis 250 W 10 puis 50 à 60 ** – –
PORC
- rôti filet* 600 W 15 à 17*** Combi 1 11 à 12
- rôti échine* 600 W 15 à 17*** Combi 1 12 à 13
- ragoût MAX puis 250 W 10 puis 50 à 60** – –
- côtes* – – Gril 20
POULET - PINTADE - DINDE
- rôti entier – – Combi 1 8 à 9
- morceaux* 600 W 7 à 8 Combi 2 12 à 14
ou Gril 25**
- cuisses de dinde* – – Combi 1 8 à 9
- roulé de dinde 600 W 12 Combi 1 10 à 11
CANARD
- rôti entier – – Combi 1 puis gril 9 à 10 puis 4**
- cuisses* – – Combi 1 puis gril 7 à 8 puis 6**
- civet MAX puis 250 W 10 puis 70** – –
LAPIN MAX 7 à 8 – –
GIBIER
- rôti* MAX 5 à 6*** Combi 3 9 à 11
- civet MAX puis 250 W 10 puis 70** – –
CHIPOLATAS, MERGUEZ* MAX 3 à 4 Gril 12 à 14**
ANDOUILLETTE (1 pce)* – – Combi 2 8**
SAUCISSE DE TOULOUSE – – Combi 2 10
(2 pces)* ou Gril 15**
Note : pour les viandes désossées ou farcies, prolongez le temps de cuisson d'au moins 5 min (quel que soit le poids).
* plat posé sur le trépied pour cuisson gril ou combinée, si l’épaisseur de la viande le permet, sinon, sur le plateau tournant.
** quelque soit le poids.
*** en micro-ondes pures, les temps de cuisson des rôtis (porc, veau, agneau, bœuf) s’appliquent à des viandes préalablement rissolées de
tous côtés dans une poêle (quelques minutes).
Temps de cuisson des viandes et des volailles (en minutes pour 500 g)
Viandes et volailles
Français
Page 75

Fr-16
DISPOSITION
Les filets de poisson irréguliers
ou très fins doivent être roulés ou
pliés sur eux-mêmes afin d’éviter
que la queue et les bords
extérieurs moins épais cuisent de
manière excessive.
COUVERTURE
Couvrez toujours le poisson
avec du film alimentaire pour
four à micro-ondes ou à l’aide
d’un couvercle adapté au plat
utilisé.
LIQUIDE
Le poisson frais ou surgelé doit
toujours être arrosé de 30 ml (2
cuillerées à soupe) de jus de
citron ou de vin blanc.
DARNES DE POISSON
Nous vous conseillons de
disposer les darnes de poisson
en rond, en plaçant la partie plus
épaisse vers l’extérieur, afin
d’éviter une surcuisson des
extrémités.
POISSON ENTIER
Quand vous cuisez
simultanément deux poissons
entiers, disposez-les en
quinconce afin d’obtenir une
cuisson homogène.
Dans le cas d’un poisson entier
plus épais, couvrez la tête et la
queue à mi-cuisson à l’aide
d’une mince feuille d’aluminium
fixée avec des bâtonnets.
SEL
NE SALEZ PAS le poisson avant
de le cuire, car il risque de
sécher.
Comment cuire du poisson à
l’aide du gril ou de la
cuisson combinée?
Enduisez le poisson de beurre
fondu ou d’huile pour éviter
qu’il se dessèche.
Placez-le sur la grille du four.
N’AJOUTEZ PAS DE SEL. Si
nécessaire, poivrez ou ajoutez
des aromates.
TEMPS DE REPOS
En fin de cuisson, vous devez
laisser reposer le poisson à
l'intérieur ou à l'extérieur du four
pendant 2 à 3 minutes.
Gros poissons (plus de 400 g)
Il est conseillé de les retourner à
mi-cuisson et de protéger la
queue et la tête avec un petit
morceau d’aluminium pour éviter
une éventuelle surcuisson.
(Attention : l’aluminium ne doit
pas toucher les parois du four).
Papillotes
Vous pouvez faire des papillotes
de poisson en remplaçant le
papier aluminium par du papier
sulfurisé (ou papier cuisson),
transparent aux ondes.
Aliment FRAIS SURGELÉ
Puissance
Temps
Puissance
Temps
Poisson en filets fins 600 W 4 - 5 MAX 10
Poisson en filets épais 600 W 5 - 6 MAX 11 - 12
Poisson en darnes 600 W 5 - 7 MAX 11 - 13
Poisson entier 600 W 5 MAX 12
Crevettes* 600 W 4 - 5
Moules* 600 W 5 - 6
Noix de St Jacques* 600 W 6 - 7
Calamars* 600 W 5 - 6 MAX 11
Tourteaux* 600 W 5 - 6
Croquettes MAX 3 min 30
de poisson (1 pce=50 g)* (2 pces)
ou 5 min
(4 pces)
* : Nous déconseillons l’utilisation de la touche Automatique pour ces
poissons.
TEMPS DE CUISSON pour 500 g en minutes
Le four à micro-ondes est le mode de cuisson par excellence du
poisson. En effet, non seulement il cuit le poisson sans le dessécher,
mais cette cuisson vapeur Express exalte le goût du poisson frais.
QUAND LE POISSON EST-IL CUIT?
Le poisson est cuit lorsqu’il s'émiette facilement et que sa chair
devient opaque.
Poissons
Page 76

Fr-17
* : Nous déconseillons la cuisson en touche Automatique pour ces légumes.
Temps de cuisson des légumes frais et surgelés (en min sur MAX pour 500 g)
pour 500 g en minutes
EAU AJOUTÉE
Il faut distinguer :
Les légumes très riches en eau comme les tomates, les courgettes,
les aubergines, les légumes surgelés pour ratatouille, les
champignons, les épinards, les endives, les laitues, oignons,
poivrons, la plupart des fruits, etc. auxquels il faudra ajouter peu ou
pas d’eau, la cuisson aux micro-ondes utilisant l’eau contenue
naturellement dans les aliments.
Les légumes raisonnablement riches en eau auxquels il faudra
ajouter 4 à 5 c. à s. d’eau pour 500 g, afin de créer de la vapeur qui
cuira les légumes et évitera la déshydratation : chou-fleur, poireaux,
brocolis, choux de Bruxelles, fenouils, carottes, céleri-rave, asperges,
haricots verts, pommes de terre, choux, navets, artichauts, etc.
Les légumes relativement pauvres en eau auxquels il faudra ajouter
8 à 10 c. à s. d’eau pour 500 g afin de favoriser une bonne
hydratation : petits pois, fèves, haricots frais, haricots verts.
Dans tous les cas : les légumes sont cuits sur la puissance Max (sauf
chou-fleur entier) et ne sont pas salés avant la cuisson, mais après.
En effet, le sel absorbe l’humidité naturelle du légume et favorise la
déshydratation.
LÉGUMES FRAIS SURGELÉS
Artichauts :
- entier 11 - 12 –
- fond 10 - 12 13 - 16
Asperges* 10 - 12 14 - 15
Aubergines 9 - 11 –
Betterave* 18 - 20 –
Blettes 8 - 10 14 - 15
Brocolis 8 - 10 13 - 15
Champignons 9 - 10 13 - 15
Carottes :
- rondelles 10 - 12 13 - 15
- tronçons 12 - 14 –
Chou* 12 - 14 –
Choux de Bruxelles 10 - 12 13 - 15
Chou-fleur 10 - 12 13 - 15
Céleri-boule 9 - 11 –
Céleri* 15 - 17 –
Courgettes 8 - 10 13 - 15
Endives 12 - 14 18 - 20
Épinards :
- hachés – 12
- branches 9 - 10 13
LÉGUMES FRAIS SURGELÉS
Fèves* 16 - 19 18 - 20
Fenouil :
- entier coupé en 2 12 - 14 –
- émincé 17 - 20 –
Haricots verts* 12 - 13 12 - 13
Haricots coco plats 10 - 13 –
Printanière de légumes* – 15 - 16
Maïs en épis (2 p)* 12 - 14 14 - 17
Navets 10 - 12 18 - 20
Oignons 9 - 12 15 - 18
Petits pois* 20 16 - 18
Pois mange-tout 10 - 12 –
Poireaux émincés 12 - 14 15 - 16
Poireaux tronçons 12 - 14 15 - 16
Potiron 10 - 12 –
Poivrons 12 - 14 14 - 16
Pommes de terre entières (<220 g)
9 - 12 –
Pommes de terre coupées 10 - 12 –
Ratatouille 16 - 18 14 - 16
Salsifis 12 - 14 14 - 16
Tomates* 4 - 5 –
Légumes
Un chou-fleur entier peut être cuit la tête en bas en
utilisant la puissance 600W pendant 18 à 22 min
(selon la taille du chou-fleur) avec 6 c. à s. d'eau.
Français
Page 77

Fr-18
Les œufs sont des
produits délicats
nécessitant une
attention spéciale.
En effet : mis tels
quels dans le four,
ils explosent du
fait de la pression
qui s'exerce à
l'intérieur de la
coquille. Cassés,
le jaune explose
également si la
pellicule qui le
recouvre n'est pas percée. Il ne faut donc pas hésiter à enfoncer la
pointe d'un cure-dent au centre du jaune ; si l'œuf est bien frais,
celui-ci ne s'écoule pas. Le jaune et le blanc réagissent différemment
aux ondes et c'est hélas le jaune qui cuit le plus vite. Lorsque les
œufs sont battus (omelette), il est nécessaire, à mi-cuisson, de
ramener les bords vers le centre.
Les œufs pochés :
faire chauffer 50 ml d'eau avec du sel et un trait de vinaigre pendant
1 min sur Max. Casser l'œuf dans l'eau bouillante et percer
délicatement le jaune et le blanc avec un cure-dent ; cuire sur 600W
40 à 60 sec (selon le calibre de l'œuf). Laisser reposer 1 min avant
d'égoutter et de servir.
Les œufs brouillés :
mélanger dans un bol 2 œufs crus avec un peu de crème ou de lait,
une noix de beurre, du sel et du poivre. Cuire 40 sec sur Max. Sortir
et battre énergiquement avec une fourchette. Poursuivre la cuisson
sur Max encore 30 à 40 sec. Les œufs doivent rester crémeux.
Les œufs cocotte :
casser l'œuf dans un ramequin beurré, saler et poivrer, percer le
jaune et le blanc avec un cure-dent. Ajouter les ingrédients désirés
(crème, champignons, œufs de lompes, etc.). Compter environ 2 min
de cuisson par œuf sur 250W selon le calibre de l'œuf et la quantité
de garniture.
Les fromages réagissent différemment selon leur nature ; plus ils
sont gras et plus ils fondent rapidement. S'ils sont cuits trop
longtemps, ils durcissent. Lorsque cela est possible, il est préférable
d'ajouter le fromage râpé au dernier moment (pour les pâtes, les
gratins, etc.).
Les temps de cuisson des légumes secs aux micro-ondes sont
sensiblement les mêmes qu’en cuisson traditionnelle. Par contre, ces
aliments se réchauffent très rapidement sans prendre le goût de
réchauffé, à condition d’être en récipient fermé, mêlés de beurre ou
de sauce. Pour la cuisson, utiliser un grand récipient (afin d’éviter
tout débordement). Couvrir très largement d’eau ou de bouillon.
Laissez reposer au moins 5 à 8 minutes après la cuisson.
Le riz
Une fois le liquide monté à ébullition, compter environ 20 minutes de
cuisson sur 250W quelque soit la quantité de riz.
La semoule
La semoule cuit parfaitement sans risque de brûler aux micro-ondes.
Il suffit de rajouter le même volume d’eau que de semoule, de porter
à ébullition à couvert sur Max 2 min 30 sec (pour 200 g de semoule
à grain moyen avec 2 dl d’eau) puis de faire gonfler sur 250W
environ 3 min.
Les pâtes
Penser à saler l’eau de cuisson et à remuer une fois en cours de
cuisson. Lorsque le liquide bout, compter 7 à 8 minutes sur Max pour
250 g de pâtes (pour 1 litre d’eau) et 10 minutes pour 250 g de
raviolis.
Les légumes secs
Recouvrir généreusement d'eau et laisser tremper une nuit. Le
lendemain, rincer et égoutter. Couvrir d'eau à hauteur. Ne pas saler
avant la cuisson (cela durcit les légumes secs).Compter 10 minutes
sur Max puis 15 à 30 minutes sur 250W. Surveiller la cuisson et
rajouter de l'eau si nécessaire ; les légumes secs doivent toujours
être recouverts de liquide.
Pommes de terre
Certaines variétés de pommes de terre se prêtent plutôt que d’autres
au four à micro-ondes. Pour la cuisson au micro-ondes ou la cuisson
combinée, le poids idéal des pommes de terre est compris entre
200 g et 250 g. Les pommes de terre avec la peau cuisent plus
rapidement aux micro-ondes qu’en mode de cuisson combinée, mais
elles sont plus molles. En revanche, la cuisson combinée permet
d’obtenir une texture plus sèche et plus croustillante. En fin de
cuisson si vous souhaitez dorer davantage vos pommes de terre,
utilisez le mode GRIL (voir le tableau ci-dessous).
Avant la cuisson
Lavez les pommes de terre et percez la peau en plusieurs endroits.
Disposez les pommes de terre sur le pourtour du plateau tournant.
Après la cuisson
Retirez les pommes de terre du four et recouvrez-les d’une feuille
d’aluminium pour les tenir au chaud.
Laissez-les reposer pendant 5 minutes.
Œufs et Fromage
Le Riz, les Pâtes, les Légumes secs & les Pommes de terre avec la peau
Pommes de terre avec la peau
- Tableau de cuisson manuelle
Quantité
1
2
4
Temps de cuisson en
minutes à la puissance
Maximale
(1000 W)
4-7
7-10
11-15
Temps de cuisson en
minutes en mode GRIL
pour une texture plus
croustillante
8-10
10-12
11-13
Page 78

Fr-19
Vos questions - Nos réponses
Problème Cause Solution
Les aliments cuits aux micro-ondes Les aliments ne sont pas complètement cuits. Replacez-les dans le four pendant quelques
refroidissent trop vite. instants supplémentaires. N’oubliez pas que
les aliments sortants du réfrigérateur doivent
cuire plus longtemps que ceux conservés à
la température ambiante.
L'aliment déborde pendant Le récipient est trop petit. Pour les aliments liquides, utilisez un
la cuisson aux micro-ondes. récipient d’une capacité deux fois supérieure
au volume des aliments.
Les aliments cuisent trop lentement dans le Les aliments sortant du réfrigérateur sont plus Plus les aliments sont foids, plus le temps de
four à micro-ondes. froids que ceux conservés à la température cuisson doit être augmenté.
ambiante.
La viande cuite à l’aide des micro-ondes ou La puissance de cuisson est trop élevée. Vous Ne salez jamais la viande avant de la cuire.
de la cuisson combinée est dure. avez salé la viande avant de la cuire. Si nécessaire, salez en fin de cuisson.
En mode de cuisson à l’aide des micro-ondes, Temps de cuisson et/ou temps de repos Augmentez le temps de cuisson et/ou le
le centre du gâteau n’est pas cuit. insuffisants. temps de repos.
Les oeufs, les flans et les quiches Le temps de cuisson est trop long Soyez prudent lorsque vous cuisez des œufs
sont durs et caoutchouteux. ou la puissance trop élevée. en petites quantités, car lorsqu’ils sont trop
cuits, vous ne pouvez plus remédier à la
situation.
La sauce béchamelle est élastique. Le fromage a cuit dans la sauce. N'ajoutez le fromage qu'en fin de cuisson. La
température de la sauce fera fondre le
fromage.
Les légumes sont secs lorsqu’ils sont cuits Vous avez cuit les légumes sans les couvrir. Couvrez-les à l’aide d’un couvercle ou de
dans le four à micro-ondes. film alimentaire.
Le taux d’humidité est bas (notamment parce Ajoutez 2 à 4 cuillerées à soupe d’eau
que les légumes ne sont plus frais). supplémentaires.
Vous avez salé les légumes avant de les cuire. Si nécessaire, salez-les en fin de cuisson
uniquement.
Présence de condensation dans le four. Cela est tout à fait normal et signifie que la Essuyez les parois avec un linge.
vitesse de cuisson des aliments est supérieure
à la vitesse d’évacuation de la vapeur
accumulée à l’interieur du four.
Le plateau pivotant tourne dans les deux sens. Cela est tout à fait normal.
De l’air chaud semble s’échapper par le La porte du four n’est pas équipée de joint Cela est tout à fait normal et ne signifie pas
joint de la porte. hermétique. que le four à micro-ondes présente une fuite.
Des étincelles bleuâtres ou des arcs En mode micro-ondes uniquement, vous ne Mettez IMMEDIATEMENT le four hors
apparaissent lorsque j’utilise des accessoires pouvez pas utiliser d’accessoire en métal. En tension. N’utilisez jamais d’accessoire
métalliques. mode de cuisson combinée, vérifiez si les métallique en mode micro-ondes uniquement.
accessoires n’ont pas été endommagés. Vérifiez le poids minimum des aliments ou
les programmes automatiques.
Français
Page 79

It-1
Cottura con l’energia delle microonde . . . . . . . . . . . . . . . . . . . . . . . 2
Istruzioni generali . . . . . . . . . . . . . . . . . . . . . . . . . . . . . . . . . . . . . . 2-3
Guida rapida di controllo degli utensil da cucina . . . . . . . . . . . . . . . 4
Livelli di potenza del forno a microonde . . . . . . . . . . . . . . . . . . . . . . 5
Cottura al grill . . . . . . . . . . . . . . . . . . . . . . . . . . . . . . . . . . . . . . . . . . 5
Cottura con il programma Combinato . . . . . . . . . . . . . . . . . . . . . . . . 5
Accessori da usare . . . . . . . . . . . . . . . . . . . . . . . . . . . . . . . . . . . . . . 5
Come riscaldare . . . . . . . . . . . . . . . . . . . . . . . . . . . . . . . . . . . . . . . . 6
Come riscaldare con il forno a microonde . . . . . . . . . . . . . . . . . . .6-7
Consigli per la cottura nel forno a microonde . . . . . . . . . . . . . . . . . . 8
Istruzioni per lo scongelamento del cibi . . . . . . . . . . . . . . . . . . . . . . 9
Come scongelare cibi ordinari . . . . . . . . . . . . . . . . . . . . . . . . . . . . 10
Tabelle per cucinare e riscaldare . . . . . . . . . . . . . . . . . . . . . . . . 11-13
Carni e pollami . . . . . . . . . . . . . . . . . . . . . . . . . . . . . . . . . . . . . . 14-15
Pesce . . . . . . . . . . . . . . . . . . . . . . . . . . . . . . . . . . . . . . . . . . . . . . . 16
Verdure . . . . . . . . . . . . . . . . . . . . . . . . . . . . . . . . . . . . . . . . . . . . . . 17
Uova e formaggio . . . . . . . . . . . . . . . . . . . . . . . . . . . . . . . . . . . . . . 18
Riso, pasta, legumi e patate cotte con la buccia . . . . . . . . . . . . . . 18
Risposte a comuni quesiti . . . . . . . . . . . . . . . . . . . . . . . . . . . . . . . . 19
Indice
Le informazioni contenute in questo manuale devono essere considerate a titolo indicativo. Il tempo totale varia a seconda della temperatura
iniziale del cibo e del contenitore che viene utilizzato. Verificare sempre che il cibo sia ben cotto e bollente prima di consumarlo.
La chiave si trova nella tecnologia dell' inverter
La tecnologia dell' inverter per forni a microonde è stata sviluppata da una iniziativa della Panasonic durante un periodo di più di 10 anni. E’
una tecnologia innovativa in grado di creare un nuovo concetto di forno a microonde, che ha un numero di qualità speciali:
• E’ il primo forno in questo settore a controllare linearmente l'ammontare di energia delle microonde. Questo nuovo sistema di distribuzione
permette di cucinare e scongelare gli alimenti senza perderne il sapore.
• Fornisce una conversione efficiente di energia elettrica in energia delle microonde, con conseguente minimizzazione dei requisiti di
potenza senza sacrificare l’erogazione di microonde.
• Permette anche uno spettacolare aumento delle dimensioni della cavità interna, persino in un forno compatto, grazie alle piccole
dimensioni del circuito dell'invertitore che sostituisce il voluminoso trasformatore attualmente usato.
• E per finire, alla fine della durata utile del prodotto, il fatto che non si usano grossi trasformatori di ferro rende molto più ecologico il
processo di riciclaggio dei forni inviati alla rottamazione.
Italiano
Page 80

It-2
Istruzioni generali
PERFORARE
La pelle o la
membrana di
alcuni cibi
provocano la
formazione di
condensa
durante la
cottura. Questi
cibi devono
essere perforati
o parte della
pelle deve
essere rimossa prima della cottura per
consentire alla condensa di liberarsi. Uova,
patate, mele, salsicce, ecc. devono tutti essere
perforati prima della cottura. NON TENTARE DI
BOLLIRE LE UOVA NEL LORO GUSCIO.
CONTENUTO DI
UMIDITÀ
Molti cibi freschi
come le verdure
e la frutta
variano nel loro
contenuto di
umidità a
seconda della
stagione
dell’anno. Le
patate intere con
la buccia ne
sono un esempio particolare. Per tale ragione i
tempi di cottura devono essere modificati nel
corso dell’anno. Gli alimenti asciutti, come il riso
e la pasta, possono seccarsi ulteriormente
durante la conservazione e il tempo di cottura
necessario potrebbe essere diverso da quello
consigliato per alimenti appena acquistati.
PELLICOLA
TRASPARENTE
PER ALIMENTI
La pellicola
trasparente per
alimenti
mantiene
l’umidità del cibo
e la condensa
trattenuta
favorisce una
cottura del cibo
più rapida.
Tuttavia anche questa pellicola deve essere
perforata prima della cottura per consentire
all’eccesso di umidità di uscire. Usare sempre
estrema cautela nel rimuovere la pellicola
trasparente dal cibo appena cotto in quanto la
temperatura del vapore formatosi all’interno è
molto elevata. Acquistare sempre la pellicola per
alimenti specificatamente concepita per la cottura
a microonde e utilizzarla solo per coprire i cibi.
Non foderare mai il piatto con la pellicola.
CIBI PRECOTTI - Lasciare riposare per
5 minuti.
PIETANZE SU PIATTO - Lasciare
riposare per 2-5 minuti.
VERDURE - Le patate lesse saranno
migliori se lasciate riposare per 1-2 minuti,
tuttavia la maggior parte delle verdure può
essere servita immediatamente.
SCONGELARE - È essenziale prevedere
un periodo di riposo per completare il
processo. Il tempo può variare da 5 minuti,
ad esempio per scongelare frutti di bosco,
fino a un’ora per un trancio di carne.
Se il cibo non è completamente cotto dopo
il tempo di riposo, rimettere in forno e
cuocere ulteriormente.
Cibi densi, ad esempio carne, patate intere
con la buccia e torte, richiedono, a cottura
ultimata, un TEMPO DI RIPOSO (all’interno
o all’esterno del forno) per consentire alla
conduzione di calore al centro del cibo di
terminare il suo ciclo e ultimare la cottura.
TEMPO DI RIPOSO
TRANCI DI CARNE -
Lasciare riposare il trancio per 8-10 minuti
avvolto in carta d’alluminio.
PATATE INTERE CON LA BUCCIA -
Lasciare riposare le patate per 5 minuti
avvolte in carta d’alluminio.
TORTE LEGGERE - Lasciare riposare la
torta per 5 minuti prima di estrarla dalla
teglia.
TORTE COMPATTE RICCHE -
Lasciare riposare per 15-20 minuti.
PESCE - Lasciare riposare per 2-5 minuti.
PIATTI A BASE DI UOVA -
Lasciare riposare per 2-3 minuti.
Le microonde sono una forma di onde elettromagnetiche ad alta
frequenza simili a quelle utilizzate nelle trasmissioni radio. L’elettricità
viene convertita in energia di microonde da un magnetron. Le
microonde si spostano dalla guida d’onda del magnetron, alla cavità
dal forno dove sono riflesse, trasmesse o assorbite.
Riflessione
Le microonde vengono riflesse dal metallo in maniera simile a una
palla che rimbalza su un muro. La maggior parte delle pentole e degli
utensili da cucina di metallo non sono raccomandati per la cottura a
microonde in quanto il risultato finale sarebbe poco uniforme. Inoltre,
se un piatto di metallo viene posto in prossimità delle pareti del forno
(che sono ugualmente di metallo) si potrebbe creare l’effetto arco
(scintille bluastre). Il quale può danneggiare il forno o causare un
incendio.
Trasmissione
Le microonde attraversano materiali quali carta, vetro e plastica, in
maniera simile ai raggi solari che passano attraverso il vetro di una
finestra. Le sostanze suddette non riflettono né assorbono l’energia
delle microonde e proprio per questo motivo sono materiali ideali da
usare come contenitori per la cottura al forno a microonde. Tali
materiali peraltro si riscaldano durante la cottura poiché, mentre il
cibo si cuoce, il calore viene condotto dal cibo al piatto contenitore.
Assorbimento
Le microonde sono assorbite dal cibo. Esse penetrano ad una
profondità di circa 2-4 cm. L’energia delle microonde stimola le
molecole del cibo (in special modo le molecole di acqua, grassi e
zuccheri) e le porta a un alto livello di vibrazione. La vibrazione
causa una frizione e pertanto viene prodotto calore. In grandi
quantità di cibo il calore prodotto viene condotto al centro per
ultimare la cottura del cibo.
Cottura con l’energia delle microonde
Page 81

It-3
DISPOSIZIONE DEL CIBO
Singole porzioni di cibo, ad esempio
pezzi di pollo o costolette di maiale,
devono essere disposte sul piatto in
modo che le porzioni più voluminose
rimangano sulla parte esterna del
piatto.
ALLARGARE
Gli alimenti cuociono più velocemente
e uniformemente se ben allargati nel
piatto. Non sovrapporre MAI i cibi.
INGREDIENTI
I cibi contenenti grassi, zuccheri o
sale si riscaldano molto velocemente.
Il ripieno potrebbe essere molto più
caldo della pasta. Fare attenzione
quando lo si mangia. Non riscaldare
eccessivamente anche se la pasta
non sembra essere molto calda.
TEMPERATURA INIZIALE
Più il cibo è freddo, più richiede
tempo per riscaldarsi. Il cibo estratto
da un frigorifero richiede un tempo
maggiore per riscaldarsi che non il
cibo a temperatura ambiente.
Istruzioni generali
DIMENSIONE DEL PIATTO
Osservare le raccomandazioni relative
alla dimensione dei piatti fornite nel
ricettario, in quanto queste hanno un
effetto sui tempi di cottura e di
riscaldamento dei cibi. Un alimento
allargato su un piatto di dimensioni
maggiori cuoce e si riscalda più
rapidamente.
QUANTITÀ
Piccole quantità di cibo cuociono più
rapidamente di grosse quantità;
inoltre pasti di piccole dimensioni
vengono riscaldati più rapidamente di
pasti voluminosi.
DENSITÀ
Cibi porosi e ad alto contenuto di aria
cuociono più rapidamente di cibi densi
e pesanti.
FORMA DEL CIBO
I cibi di forma regolare cuociono
uniformemente. Tutti i cibi cotti al
microonde cuociono meglio se posti in
un contenitore rotondo piuttosto che
quadrato.
COPRIRE
Coprire i cibi con la pellicola per
alimenti per microonde o con un
coperchio di esatte proporzioni.
Coprire alimenti quali pesce, verdure,
pasticci, minestre. Non coprire torte,
salse, patate intere con la buccia e
pasticceria.
RIGIRARE E MESCOLARE
Alcuni cibi devono essere mescolati
durante la cottura. La carne e i
pollami devono essere rigirati a metà
cottura.
LIQUIDI
Tutti i liquidi devono essere mescolati
prima e durante il riscaldamento. In
special modo, l’acqua deve essere
mescolata prima e durante il riscaldamento, per evitare che fuoriesca dal
contenitore. Non riscaldare i liquidi
che sono stati precedentemente
bolliti. NON SURRISCALDARE.
PULIZIA Dato che le microonde
agiscono sulle particelle di cibo,
tenere il forno sempre pulito. Le
macchie di cibo resistenti possono
essere rimosse utilizzando un
detergente per forni di marca,
spruzzato su di un panno
morbido. Asciugare sempre il forno
dopo averlo pulito. Evitare le parti in
plastica e l’area dello sportello.
Italiano
Page 82

It-4
Guida rapida di controllo degli utensili da cucina
Porcellane e ceramiche
resistenti al calore
Terraglie e terrecotte
Carta di alluminio
Pellicola per
alimenti
Cestini di vimini, legno e
paglia
Contenitori di lamina
d’alluminio e di metallo
Vetro resistente
al calore
Contenitori di plastica per
forno a microonde
Recipienti per la cottura Per la cottura al microonde Per la cottura al grill
Per la cottura con il
programma Combinato
✔
✔✔
✔
✔
✔
✔
✔
✘
✘
✘
✘
✘
✘
✘
✘
✘
✘
✘
✘
✔
✔
✔
✔
Non utilizzare piatti con bordi o
decorazioni di metallo, né caraffe
e tazze con manici incollati.
È possibile utilizzare piccole quantità
di carta di alluminio per
PROTEGGERE il cibo ed evitare che
si riscaldi eccessivamente durante la
cottura o lo scongelamento.
Assicurarsi che l’alluminio non tocchi
le pareti o la parte superiore del forno.
Page 83

It-5
Cottura al grill
Cottura con il programma Combinato
Livello di potenza Uso
Potenza massima: 1000 W Per riscaldare pietanze e sughi. Per cuocere pesce, verdure, sughi e conserve.
270 W (*) Per scongelare cibi congelati.
600 W Per arrostire. Per cuocere salse all’uovo e dolci. Per riscaldare latte.
440 W
(NN-Q543/NN-Q523/NN-Q553) Per cuocere e riscaldare casseruole di pollo e torte salate.
250 W Per cuocere spezzatini, pasticci, budini di riso, dolci alla frutta e creme pasticcere.
Nota: (*) SCONGELAMENTO CICLICO con tempo di riposo automatico (ved. a pag. 9).
NON TENTARE DI PRERISCALDARE IL GRILL. Il grill al quarzo
all’interno del forno a microonde consente di cuocere rapidamente e
uniformemente una grande varietà di cibi.
Esiste una sola impostazione del grill, corrispondente a 1300 W.
Disporre il cibo da cuocere al grill sul supporto di metallo. Porre il
supporto sul vassoio rotante.
Normalmente il cibo cotto al grill deve essere rigirato a metà cottura.
Non coprire mai i cibi che devono essere cotti al grill.
Non esiste nessuna emissione di microonde durante il programma
con il grill.
Primo lato Secondo lato
Bistecca (4 porzioni, ben cotte) circa. 10 min. circa. 10 min.
Lombata di maiale (a fette) circa. 12 min. circa. 10 min.
Costolette di maiale 12 - 14 min. circa. 12 min.
Kebab circa. 12 min. circa. 12 min.
Salsicce 6 - 7 min. circa. 6 min.
Cosce di pollo 15 - 20 min. 15 - 20 min.
Pane affettato 3 - 4 min. 3 min.
La cottura con il programma Combinato è ideale per molte varietà di
cibi. La potenza del microonde consente di cuocere velocemente e il
grill provvede a dorare e a rendere croccante la pietanza. Tutto ciò
accade simultaneamente.
Sono disponibili i seguenti 3 modi di programma Combinato:
NOTA:
• Non coprire mai i cibi da cuocere con il programma Combinato.
• Se le quantità sono piccole, non cuocere con il programma
Combinato, bensì cuocere al grill o al microonde per ottenere
risultati migliori.
• Non preriscaldare il forno per la cottura con il programma
Combinato.
Livelli di potenza del microonde
Accessori da utilizzare
Tempi di cottura al grill (approssimativi)
Microonde Grill Programma Combinato
+
_
Display Grill Microonde Uses
1 G1-600 1300 W 600 W Carni bianche, agnello, pollame intero, piatti gratinati. Preriscaldamento della teglia della pizza.
2 G1-440 1300 W 440 W Salsicce, carni rosse, pollame a pezzi, pesce.
3 G1-250 1300 W 250 W Torte del tipo 4/4, quiche, braciole di maiale, piatti gratinati con uova.
Impostazione di cottura con il
programma Combinato
Italiano
Page 84

It-6
Oggi si trovano in commercio molti cibi precotti. Spesso è inoltre
necessario riscaldare cibi cotti a casa o pietanze avanzate dal giorno
prima. Tutto ciò può essere fatto agevolmente con il vostro forno,
tuttavia è necessario controllare il cibo con attenzione per assicurarsi
che sia ben caldo prima di servirlo, esattamente come si farebbe con
un forno tradizionale.
Anche i cibi freddi da riscaldare devono essere controllati
correttamente.
Come scegliere il metodo con cui riscaldare il cibo?
Il metodo di utilizzo del calore, cioè solo al microonde o con il
programma Combinato, dipende dal tipo di cibo che si desidera
riscaldare. Per i cibi che non richiedono una doratura, è sufficiente
riscaldare al microonde. Per i cibi che invece richiedono una doratura,
riscaldare con il programma Combinato.
Alcuni alimenti congelati quali involtini, tortini e quiche (torte salate)
contengono della pasta non del tutto cotta che richiede una vera e
propria cottura, oltre che essere riscaldati. Se cotti al microonde o con
il programma Combinato questi alimenti avranno una base morbida,
pertanto devono essere cotti in maniera tradizionale.
Per quanto tempo bisogna riscaldare i cibi?
Ciò può essere verificato nelle tabelle per riscaldare al microonde o
con il programma Combinato: queste tabelle forniscono dei tempi che
sono SOLO dei suggerimenti, in quanto il tempo esatto dipende dal
peso del cibo, dalla dimensione del piatto utilizzato e dalla temperatura
iniziale del cibo.
Che fare se il cibo che si desidera riscaldare non è contemplato
nelle tabelle?
Non è possibile testare la totalità dei cibi esistenti per la compilazione
di queste tabelle, tuttavia è stata selezionata un’ampia varietà di cibi e
crediamo che seguendo le direttive indicate sia possibile riscaldare i
cibi correttamente ed efficacemente.
Rigirare e mescolare
Quando possibile, i cibi devono essere mescolati o rigirati mentre
vengono riscaldati. Ciò serve per assicurare che il cibo venga
riscaldato in maniera uniforme all’esterno e all’interno.
Tempo di riposo
Molti alimenti richiedono un TEMPO DI RIPOSO una volta riscaldati. Il
tempo di riposo permette al calore all’interno del cibo di continuare a
trasferirsi verso il centro eliminando in tal modo i punti freddi. Se il cibo
è stato coperto mentre veniva riscaldato, lasciare tale copertura anche
durante il tempo di riposo. Il tempo di riposo è particolarmente
raccomandato per cibi densi, quali lasagne, pasticci di carne e
pietanze che non possono essere mescolate quando vengono
riscaldate.
Quando si può considerare che il cibo sia riscaldato al punto
giusto?
Il cibo che è stato riscaldato deve essere servito caldissimo, cioè deve
essere chiaramente visibile il vapore esalante da ogni lato. Se le
norme di igiene durante la preparazione e la conservazione del cibo
sono state osservate riscaldare gli alimenti al microonde o con il
programma Combinato non presenterà ulteriori alterazioni o rischi alla
salute. I cibi che non è possibile mescolare dovrebbero essere
esaminati con un coltello per verificare che siano uniformemente caldi.
Anche quando le istruzioni sulla confezione e i tempi indicati nelle
tabelle per riscaldare i cibi fossero stati seguiti, è sempre importante
controllare che il cibo sia bollente. Se esistono dubbi, rimettere il cibo
nel forno.
Come riscaldare al microonde
Come riscaldare
Cibo Peso/Quantità Fresco Congelato
ANTIPASTI PRONTI
- toast di prosciutto e formaggio 1 pezzo (170 g) MAX 1 min MAX 2 min 30 sec - 3 min
2 pezzi (320 g) MAX 2 min MAX 5 min
- crostacei (4) 1 pezzo (170 g) MAX 2 min MAX 3 min
2 pezzi (220 g) – MAX 6 - 7 min
- frittelle non ripiene (2) 1 pezzo MAX 30 sec –
- frittelle ripiene (2) (3) 1 pezzo (150 g) – MAX 3 - 4 min
2 pezzi (300 g) – MAX 5 min
- minestra (2) 400 g MAX 4 min –
1 litre MAX 6 - 7 min MAX 11 - 12 min
- pizza piccola (1) 1 pezzo (160 g) MAX 1 min MAX 2 min 30 sec - 3 min
- pizza americana 1 pezzo (400 g) MAX 4 - 5 min MAX 7 - 8 min
- quiche piccola (1) 1 pezzo (130 g) 600 W 1 min 10 sec MAX 3 min
- quiche grande 1 pezzo (400 g) 600 W 3 min 600 W 7 - 8 min
PIATTI PRECOTTI
- pomodori ripieni 1 pezzo (170 g) MAX 2 min MAX 6 - 7 min
- chili con carne (2) (3) 400 g MAX 3 min 40 sec –
- Korma di pollo con riso (2) (3) 350 g – MAX 6 min
- polpettine di carne o pesce (2) (3) 6 pezzi (240 g) – 600 W 6 min
- lumache (2) (3) 12 pezzi (100 g) 440 W 2 min 600 W 2 min - 2 min 30 sec
- piatti gratinati (4) 300 - 400 g MAX 3 min MAX 8 - 10 min
(contenenti amido e con ripieno di carne) 600 g MAX 6 - 8 min MAX 13 - 14 min
1 kg MAX 10 - 11 min MAX 16 - 18 min
Page 85

It-7
Come riscaldare al microonde
BIBERON e VASETTI DI VETRO - AVVERTENZA
Il latte o latte in polvere per neonati Devono essere mescolati o
sbattuti perfettamente, prima di riscaldarli, e di nuovo una volta
riscaldati è necessario oltretutto, assaggiarli con molta attenzione
prima di darli al bambino. Per 210 - 240 ml di latte a temperatura
da frigorifero, rimuovere il tappo e il ciuccio. Riscaldare a 1000 W
per 25 - 30 secondi. VERIFICARE CON MOLTA CAUTELA.
Per 90 ml di latte a temperatura da frigorifero, rimuovere il tappo
e il ciuccio. Riscaldare a 1000 W per 10 - 15 secondi. Verificare
con molta cautela.
N.B. Il liquido che si trova sulla parte superiore del biberon è
molto più caldo di quello nella parte inferiore, pertanto è
necessario scuotere bene la bottiglia prima di controllare la
temperatura.
(1). Rimuovere l’imballaggio e avvolgere in carta assorbente. (2).Coprire. (3). Mescolare a metà del tempo di cottura.
(4). Rimuovere il vassoio in alluminio e mettere il gratin in un piatto resistente al calore per forno a microonde.
Cibo Peso/Quantità Fresco Congelato
PIATTI PRONTI (seguito)
- gratin di verdure (con o senza carne) (4) 300 - 400 g MAX 6 min MAX 11 - 13 min
1 kg MAX 12 min MAX 18 min + 600 W 6 min
- gratin di pesce (4) 450 g – 600 W 12 - 15 min
1 kg – MAX 18 min + 250 W 5 min
- pesce in salsa (2) (3) 225 g – MAX 6 - 7 min
RIPIENI
- contenenti amido (2) 300 g MAX 2 - 3 min MAX 4 - 5 min
- verdure (2) 100 g MAX 1 min - 1 min 30 sec –
200 g MAX 1 min 30 - 2 min –
- purea (2) (3)
di patate 200 g MAX 1 min 30 sec MAX 4 min 30 sec
di verdure 200 g MAX 1 - 2 min MAX 5 min
400 g MAX 3 min 30 sec MAX 8 min
- spaghetti con salsa (2) 210 g MAX 2 min –
450 g MAX 4 min –
- riso (2) 150 g MAX 1 min MAX 2 min 30 sec
300 g MAX 2 min 30 sec MAX 4 min 30 sec
CARNE E PESCE
- hamburger (crudo) (2) 1 (150 g) – MAX 1 min 30 sec
- salsicce per aperitivo (2) (3) 120 g 250 W 2 - 3 min –
- pezzi di carne cotta
carne trita (2) 100 g 600 W 40 - 50 sec –
maiale 2 pezzi (2) 130 g 600 W 1 min 30 sec –
agnello 2 pezzi (2) 160 g 600 W 1 min –
manzo 2 pezzi (2) 120 g 600 W 50 sec –
coscia di pollo (2) 205 g MAX 1 min 40 sec –
- crocchette di pollo impanate 10 pezzi (200 g) – MAX 2 min 30 sec
- cordon bleu 1 pezzo (100 g) – MAX 2 min
VARIE
- cibi per bambini - (assaggiare) 30 g 600 W 15 sec Test –
(vasetto piccolo a temperatura ambiente) 120 g 600 W 25 sec Test –
200 g 600 W 40 sec Test –
- paste per la prima colazione (1) 2 x 50 g MAX 30 - 40 sec o 3 min
- pane (1)
- pancarré affettato 800 g – 8 min
- fetta 60 g – MAX 40 sec
- baguette 150 g – MAX 30 - 40 sec
- 1 pagnotta integrale 500 g – MAX 2 min 30 sec + 1/2 hr di riposo
- panino di segale 1 pezzi (85 g) MAX 40 sec
3 x 85 g MAX 1 min 10 sec
Italiano
Page 86

It-8
Per ammorbidire il burro e renderlo facilmente spalmabile
appena tolto dal frigorifero
Ammorbidire per 35 - 40 secondi al (per 250 grammi). Prima
rimuovere eventuali pellicole che lo ricoprono.
Per fare gonfiare la frutta secca
Aggiungere 2 cucchiai da tavola di acqua a 200 grammi di uvette o
prugne secche (per le torte, possono essere fatte gonfiare
aggiungendo del rum). Mescolare e riscaldare a 1000 W da 2 a
3 minuti. Lasciare riposare per 10 minuti.
Per riportare il formaggio a temperatura ambiente
Il formaggio tolto dal frigorifero dovrà essere messo nel forno e
"riscaldato" per 30 secondi – 1 minuto (a seconda delle dimensioni
del formaggio) a 250 W.
Per mondare le mandorle o le nocciole
Coprire con acqua calda e cuocere per 3-6 minuti al Massimo
(riportare a ebollizione). Fare raffreddare, scolare, e la pelle potrà
essere tolta facilmente.
Per essiccare le erbe aromatiche
Collocare della carta assorbente sul piatto girevole. Disporre con
cura le erbe fresche tagliuzzate finemente sulla carta. Ripetere
diverse volte, se necessario. Scaldare al massimo per alcuni minuti,
controllando le erbe ogni 30 secondi finché non cominciano a
seccarsi. Occorrerà prestare particolare attenzione per evitare che le
erbe restino nel forno troppo a lungo; in tal caso, si disintegrerebbero
o potrebbero prendere fuoco. Lasciare le erbe sulla carta assorbente
per altre 2 ore a temperatura ambiente, quindi riporle in contenitori
ermetici.
Per fare il caramello
Cuocere 100 grammi di zucchero con 2 cucchiai da tavola di acqua
in una ciotola per 2 o 3 minuti al massimo, controllando a metà del
tempo di cottura. Togliere il caramello prima che diventi scuro poiché
continuerà a cuocere una volta tolto dal forno. Potete arrestare la
cottura con 2 cucchiai da tavola di acqua molto calda (fare attenzione
ai bordi taglienti).
Per sciogliere il miele indurito
Togliere il coperchio dal barattolo, metterlo nel forno e scaldare a
250 W per 20 – 40 secondi, a seconda della quantità. Mescolare e
ripetere, se necessario.
Crostini in pochi minuti
Tagliare due fette di pane bianco in piccoli cubetti. Disporre i cubetti
su un piatto. Riscaldare al massimo per 2 minuti, quindi lasciare
riposare per 5 minuti. Potete strofinare uno spicchio d’aglio sulle fette
di pane prima di tagliarle o spruzzarle con qualche goccia d’olio
d’oliva.
Come ottenere più succo da un’arancia o un limone
Prima di spemerli, mettere l’arancia o il limone nel forno a microonde
regolato a 1000 W per 30 – 40 secondi, quindi spremerli immediatamente; daranno più succo.
Per fondere il burro
100 grammi di burro in uno stampo coperto con un piattino si
scioglieranno in circa 1 minuto a 600 W.
Per fondere il cioccolato
Fare a pezzi 100 grammi di cioccolato in una ciotola e riscaldare a
600 W per 2-2 minuti e mezzo (il tempo può variare a seconda del
contenuto di cacao e zucchero). Durante la cottura mescolare
almeno una volta.
Per fare lievitare l’impasto
Mettere l’impasto coperto nel forno e riscaldare per circa 5 minuti al
(per 500 grammi d’impasto). Lasciare l’impasto nel forno
(lontano da correnti d’aria) finché il suo volume non è raddoppiato.
Per fare il vin brulé
In una pirofila di vetro (o una caraffa) mescolare 20 centilitri di vino
rosso, la scorza di un limone, un pizzico di cannella, un chiodo di
garofano e 2 – 4 cucchiaini di zucchero a seconda del gusto.
Riscaldare a 1000 W per 1-1 minuto e mezzo.
Come "deodorare" il vostro forno
Per togliere dal vostro forno quell’odore "di pesce", mettere una
ciotola di aceto di vino bianco o di acqua con il succo di un limone
dentro il forno. Riscaldare a 1000 W per 5 minuti. Togliere con uno
straccio il vapore che si formerà sulle pareti del forno.
Per preparare un impacco caldo
Riscaldare uno straccio pulito, umido e piegato su un piatto per
1 – 2 minuti a 1000 W. Controllare la temperatura prima di applicare
l’impacco.
Consigli per la cottura nel forno a microonde
Page 87

It-9
Questa caratteristica permette di inserire il
peso dell’alimento in grammi e il forno
seleziona automaticamente il corretto tempo
di scongelamento per il cibo selezionato.
Non utilizzare per cibi di tipo poroso, quali
pane, torte, cibi confezionati, ecc.
Durante il processo di scongelamento il
forno emette segnali sonori per ricordare
all’utente di verificare il progresso del cibo,
cioè di rigirarlo, proteggerlo o spezzettarlo,
come indicato più sotto.
Esistono due categorie di scongelamento
automatico a peso:
Istruzioni per lo scongelamento dei cibi
Il problema maggiore che si incontra quando si scongela in un forno
a microonde è scongelare l’interno dell’alimento prima che le parti
esterne comincino a cuocere.
Per tale motivo Panasonic ha concepito la tecnologia cosidetta a
SCONGELAMENTO CICLICO (CYCLIC DEFROST). È sufficiente
selezionare 270 watt DEFROST e impostare il tempo richiesto.
Il forno divide il tempo selezionato in 8 fasi. Queste fasi alternano
cicli di scongelamento (4 fasi totali) e cicli di riposo (4 fasi totali).
Durante le fasi di riposo non vi è alcuna emissione di microonde
all’interno del forno, sebbene la luce rimanga accesa e il vassoio
rotante continui a girare. I tempi di riposo automatici assicurano uno
scongelamento più uniforme; per piccole quantità di cibo è possibile
eliminare il tempo di riposo.
Peso raccomandato
(Min-Max)
1. Piccole quantità,
es. porzioni di 100 - 1200 g
pesce, costolette,
salsicce, pollo
2. Grosse quantità,
es. tranci di carne, 400 - 2000 g
polli interi.
Suggerimenti per lo scongelamento dei cibi
Scongelamento automatico a peso
Controllare diverse volte il grado di scongelamento, anche se si
utilizzano i pulsanti automatici. Rispettare i tempi di riposo.
TEMPI DI RIPOSO
Singole porzioni di cibo
possono essere
cucinate quasi
immediatamente dopo
lo scongelamento (5
minuti di tempo di
riposo per le
bistecche, 15 minuti
per la frutta e
l’impasto per dolci). È
normale che porzioni grandi di cibo restino congelate nel mezzo.
Prima di cucinarle, lasciarle a temperatura ambiente per almeno
un’ora. Durante il tempo di riposo, la temperatura si distribuirà
uniformemente e il cibo si scongelerà per conduzione. N.B. Se il cibo
non deve essere cotto immediatamente, metterlo in frigorifero. Non
congelare mai di nuovo cibi scongelati senza prima averli cotti.
TRANCI DI CARNE E POLLAME
È preferibile mettere i
tranci di carne su una
piattino rovesciato o
su una griglia di
plastica per evitare
che non rimangano
nel sangue prodotto. È
indispensabile
proteggere le parti delicate o sporgenti di questo cibo con piccoli
pezzi di foglio di alluminio per evitare che tali parti cuociano. Non è
pericoloso utilizzare piccoli pezzi di foglio nel forno, a condizione che
non entrino in contatto con le sue pareti.
CARNE TRITA O DADINI DI CARNE E PESCE
Dato che la parte
esterna di tali cibi si
scongela
velocemente, è
necessario separarli,
rompere parecchie
volte i blocchi in pezzi
durante lo scongelamento e toglierli dal
forno una volta
scongelati.
PICCOLE PORZIONI DI CIBO
Le braciole e i pezzi di
pollo devono essere
separati il più presto
possibile, in modo che
possano scongelare in
maniera uniforme
anche all’interno. Le
parti grasse e le
estremità si
scongelano più velocemente. Metterle vicino al centro del piatto
girevole o proteggerle.
Italiano
Page 88

It-10
Come scongelare cibi ordinari
NOTE
# Girare questo alimento a metà della fase di scongelamento, proteggere le
estremità e i bordi.
* Mescolare, girare, o separare diverse volte durante la fase di scongelamento.
Selezionare la potenza di scongelamento 270 W e quindi il tempo approssimativo
indicato nella tabella seguente.
I tempi indicati nella tabella sono solo indicativi. Controllare sempre il progresso del cibo aprendo la porta del forno e ricominciando il processo. Per
quantità più voluminose, regolare i tempi in maniera opportuna. Non è indispensabile coprire i cibi durante lo scongelamento.
Cibo Peso/Quantità Tempo in minuti Tempi di riposo (minimo)
CARNE
- tranci di carne# 500 g 18 - 20 60
- arrosto disossato# 500 g 20 - 22 70
- braciole# 500 g 8 - 12 15
- costolette# 250 g 6 - 7 10
- rognone* 250 g 7 - 8 10
- manzo magro* 430 g (2) 11 - 12 10
- costata* 150 g 4 - 6 10
- carne trita, carne per salsicce* 500 g 10 - 12 10
- hamburger* 200 g (2) 6 - 7 10
400 g (4) 10 - 12 10
- carne per stufati / brasati* 500 g 12 - 14 15
- pollame intero# 500 g 12 - 13 60
- pollame in pezzi# 1 kg (4) 22 - 24 30
- pollastrello# 400 g 15 30
- coniglio# 500 g 14 - 15 30
- salsicce di maiale* 300 g (2) 10 - 11 15
BURRO 250 g 2 10
PUREA DI FRUTTA 200 g 3 - 4 10
FORMAGGIO* 450 g 3 10
FRUTTA ROSSA* 200 g 5 - 6 10
300 g 9 10
500 g 12 10
TORTE E BUDINI
- pan di spagna 400 g (1) 7 10
- torta ai frutti di bosco 550 g (1) 4 - 5 15
- bavaresi 110 g (1 porzione) 8 sec 15
- crostata di lamponi 470 g (1) 10 15
SUCCO DI FRUTTA CONCENTRATO 200 ml 4 4
PASTA PER TORTE
- flan dolce o pasta frolla* 370 g 4 - 5 5
- pasta sfoglia* 300 g 3 - 4 5
PESCE
- intero# 400 g (2) 10 - 12 15
- filetti# 500 g (4) 13 - 14 15
- tranci di pesce* 380 g (2) 10 15
- pezzi* 200 g (2) (4) 9 15
- gamberetti / gamberi* 200 g 7 10
Page 89

It-11
Tabelle per cucinare e riscaldare (NN-F663/NN-F623/NN-F653)
(1) Mettere in un piatto per microonde resistente al calore (o su un pezzo di carta oleata) e porre sulla griglia. (2) Togliere l’imballaggio e
mettere direttamente sulla griglia. (3) Girare o mescolare a metà del tempo di cottura.
Italiano
Cibo Peso/Quantità Tempo necessario - fresco Tempo necessario - congelato
ANTIPASTI
- toast di prosciutto e formaggio (2) (3) 1 pezzo (100 g) 1 min 30 sec Combi 1 + 3 min grill 3 min Combi 1
2 pezzi (300 g) 5 mins Combi 2 3 min 30 Combi 1
1 pezzo (150 g) 3 - 4 min Combi 1 + 1 min grill 3 - 4 min Combi 2
- frutti di mare (1) 1 pezzo (100 g) – 5 min Combi 2
(Togliere il croissant a metà cottura) 1 pezzo (170 g) 2 min 30 sec Combi 1 + 2 min grill 5 - 7 min Combi 2
2 pezzi (2 x150 g) 4 - 5 min Combi 1 7 min 30 sec Combi 1
- croissant al formaggio, gnocchi (1) 1 pezzo (160 g) 3 - 4 min Combi 1 3 min 30 sec Combi 2
2 pezzi (300 g) 4 - 5 min Combi 1 –
- rotolo al formaggio (1) (3) 1 pezzo (130 g) 3 min Combi 1 3 min Combi 2
- rotolo di salsicca grande (2) (3) 1 pezzo (130 g) 1 min 40 sec Combi 3 3 min Combi 1
- frittelle ripiene (1) (3) 1 pezzo (150 g) – 4 min 30 sec Combi 1
1 pezzo (190 g) 3 min Combi 1 –
2 pezzi (2 x 130 g) 3 min 30 sec - 4 min Combi 2 7 min Combi 1
- quiche piccole (1) 12 pezzi (180 g) MAX 50 sec + 2 min grill MAX 2 min + 3 min grill
- pizza americana (2)
piccola 1 pezzo (200 g) 2 min Combi 3 + 2 min grill MAX 3 min + 3 min grill
grande 1 pezzo (450 g) – 5 - 6 min Combi 1
1 pezzo (750 g) – 8 min Combi 1 + 2 min grill
- pizza (2)
piccola 1 pezzo (200 g)
4 min Combi 2
MAX 2 min 10 sec + 3 - 4 min grill
1 pezzo (300 g) 3 min Combi 1 + 1 min 30 sec grill –
grande 1 pezzo (400 g) 3 min 30 sec Combi 1 + 1 min 30 sec grill Autopizza***
1 pezzo (600 g) 5 min Combi 1 + 1 min 30 sec grill Autopizza***
a pasta sottile 1 pezzo (500 g) 4 min Combi 1 + 1 min 30 sec grill –
calzone (3) 1 pezzo (420 g) 3 min Combi 1 + 2 min grill –
- quiche piccola (2) 1 pezzo (130 g) 2 min Combi 3 –
1 pezzo (200 g) 4 min Combi 2 –
2 pezzi (300 g) 4 min Combi 3 Autoquiche***
- quiche grande 1 pezzo (400 g) 3 min 30 sec Combi 1 –
1 pezzo (500 g) 4 min 30 sec Combi 1 + 1 min 30 sec grill Autoquiche***
1 pezzo (600 g) 5 min Combi 1 Autoquiche***
- pasticcio a crosta doppia con ripieno al 1 pezzo (300 g) 4 - 5 min Combi 1 –
formaggio, al prosciutto o alla pancetta (2) (3) 1 pezzo (500 g) 6 - 7 min Combi 1 –
- pasticcio di funghi a crosta doppia 1 pezzo (450 g) 8 min Combi 1 –
PIATTI PRONTI
- lasagne alla bolognese (1) 130 g 2 min Combi 1 + 3 min grill –
300 g 6 - 8 min Combi 2 AutoGratin***
1 kg 10 - 12 min Combi 1 AutoGratin***
- gratin di pesce (1) 450 g – AutoGratin***
800 g – AutoGratin***
- gratin di verdure (1) 450 g 5 - 7 min Combi 1 AutoGratin***
1 kg 12 - 14 min Combi 1 AutoGratin***
CONTORNI
- patate dauphine (1) (3) 200 g – 4 min 30 sec Combi 1
- patate noisette (1) (3) 350 g – 4 min Combi 1 + 3 min grill
- patate duchessa (1) 500 g – 7 min Combi 1 + 7 min grill
- patatine fritte al forno (1) (3) 400 g – 8 - 10 min Combi 1
CARNE E PESCE
- confit d’anatra (1) (3) 2 pezzi (400 g)
4 min Combi 1 + 3 min grill
–
- cordon bleu (1) (3) 1 pezzo (120 g) 4 min Combi 1 3 min 30 sec Combi 1
- crocchette di pollo impanate (1) (3) 10 pezzi (200 g) 3 min Combi 1 + 2 min
grill
6 min Combi 2
VARIE
-
galette des Rois precotte
(2) (3)
1 pezzo (400 g) 3 min - 3 min 30 sec Combi 3 4 - 5 min Combi 2
- crumble d’albicocche (1) 1 pezzo (300 g) – 5 - 6 min Combi 1
-
paste per la prima colazione
(2) (3)
1 pezzo (60 g) 2 min grill MAX 12 sec + 2 min grill (o Auto)
Page 90

It-12
Teglia per pizza - tabella di cottura (NN-F663 / NN-F623)
(*) girare a metà della cottura (**) lasciare riposare in padella 5 minuti prima di scaldare nuovamente
A meno che non sia altrimenti indicato, la padella per la pizza deve essere sempre preriscaldata per 4 minuti con la combinazione numero 1.
Cibo Peso/Quantità Fresco Congelato
- aperitivi – tartine 12 pezzi (160 g) – 2 min 30 sec Combi 1
- aperitivi – vol au vent 15 pezzi (210 g) – 7 min 30 sec Combi 2**
- pasta al cavolo 20 pezzi (150 g) – 1 min 30 sec Combi 1**
- crique lardons-fromage 1 x 170 g 4 min Combi 2 3 min Combi 1 + 2 min grill
- crostata alsaziana 1 x 120 g 4 min Combi 3 3 min 30 sec Combi 1
PIZZA
- pasta normale 2 x 140 g 4 min 30 sec Combi 2 –
200 g – 3 min Combi 1
300 g 6 min Combi 1 7 min Combi 1
500 g 5 min Combi 3 6 min Combi 1
- pasta sottile 200 g 4 min Combi 3 3 min Combi 1
250 g 2 min Combi 1 + 2 min grill** 3 min Combi 1
- tipo americano 500 g – 6 min Combi 1
- al tegame 500 g – 10 min 30 sec Combi 1
QUICHE E PASTICCI
- quiche lorraine 1 x 100 g – 2 min 30 sec - 3 min Combi 1
2 x 150 g 3 min Combi 2 –
150 g – 2 min 30 sec - 3 min Combi 1
400 g – 5 - 6 min Combi 1
- quiche ai porri 2 x 120 g – 5 min Combi 1
400 g – 6 min 30 sec Combi 1**
- pasticcio Savoie 450 g 4 min 30 sec - 5 min Combi 1** 10 min Combi 1* + **
- pasticcio di funghi con crosta doppia 450 g 6 - 7 min Combi 1** –
- seafood quiche 350 g 4 min Combi 2** –
- quiche con ripieno di acciughe e cipolle 1 x 150 g – 2 min 40 sec Combi 1
- crepes ripiene 4 pezzi (200 g) – 3 min Combi 1
2 pezzi (100 g) – 1 min 40 sec Combi 1*
- frittelle ripiene 2 pezzi (140 g) 3 min Combi 2 5 min Combi 1
- rotolo al formaggio, rotolo di 130 g 2 min Combi 3 2 min 20 sec - 3 min (rotolo) Combi 3
salsiccia grande 2 x 130 g 2 min 30 sec Combi 1 3 min Combi 1**
- vol au vent di pollo 1 pezzo (150 g) 2 min 20 sec Combi 1 4 min Combi 1
congelato - (togliere il coperchio 2 x 150 g 3 min Combi 1 6 min 30 sec - 7 min Combi 1
(vol au vent))
- gnocchi 2 x 130 g – 6 min Combi 1
- toast al prosciutto e formaggio 1 x 100 g 3 min Combi 3* –
2 x 100 g 4 min Combi 3 + 1 min grill –
1 x 160 g 3 min 30 sec - 4 min Combi 3 3 min Combi 1
2 x 160 g 5 - 6 min Combi 3 5 min Combi 1
- toast al bacon e pomodoro 1 x 140 g 2 min 30 sec Combi 2 3 min 30 sec Combi 1
PATATE
- patatine fritte al forno 200 g – 5 min Combi 1 + 3 to 5 min grill*
400 g – 6 min Combi 1 + 5 - 7 min grill*
- patate a dadini 300 g – 4 min Combi 1 + 5 min grill*
- patate duchessa 400 g – 9 min Combi 1 + 4 min grill
- patate dauphine 200 g – 4 - 5 min Combi 1*
- patate arrosto 9 pezzi (600 g) – 10 min Combi 1*
- patate noisettes 450 g – 8 min Combi 1 + 3 min grill*
- pezzi / quarti (crudi) 500 g - 1 kg 15 - 20 min Combi 1* –
SAUSAGES 2 pezzi (120 g) 2 min Combi 1* 3 min 30 sec Combi 1*
3 pezzi (180 g) 3 min Combi 1* 4 min Combi 1*
- salame di Tolosa 1 pezzo (150 g) 3 min 30 sec - 4 min Combi 2* 4 min 30 sec Combi 1*
- salsicce di maiale* 1 pezzo (150 g) 5 min Combi 2* 7 min Combi 1*
Page 91

Cibo Peso/Quantità Fresco Congelato
- braciole di maiale* 180 g 3 - 4 min Combi 2* 6 min Combi 1*
- filetto d’anatra* 1 pezzo (350 g) 4 min Combi 3 + 5 min grill* –
- cosce di pollo 2 pezzi (670 g) 10 min Combi 1 + 4 min grill* 18 min Combi 1 + 4 min grill*
- hamburger*
normali 1 pezzo (100 g) 1 min 50 sec - 2 min Combi 3* 3 min 30 sec - 4 min Combi 3*
1 pezzo (140 g) 2 min 30 sec - 3 min Combi 3* –
2 pezzi (200 g) – 4 min 20 sec Combi 3*
4 pezzi (400 g) – 3 min 30 sec - 4 min Combi 3
- pesce impanato* 2 pezzi (200 g) 3 min 40 sec Combi 2* 5 min Combi 1*
- bastoncini di pesce 5 pezzi (150 g) – 4 min Combi 1*
10 pezzi (300 g) – 5 min Combi 1*
- cordon bleu 1 pezzo (100 g) 3 min 30 sec Combi 3* 3 min Combi 1*
2 pezzi (200 g) 3 min 30 sec Combi 2* 5 min Combi 1*
- Crocchette di pollo impanate 10 pezzi (200 g) 4 min Combi 2* 4 min Combi 1*
5 pezzi (100 g) 3 min Combi 2* 3 min Combi 1*
- omelette 4 uova sbattute 1 - 2 min Combi 1* –
8 uova sbattute 2 min - 2 min 30 sec Combi 1* –
- strudel di mele (cotto)* 300 g – 4 min 30 sec - 5 min Combi 1* + **
-
pasticcio di mandorle con crosta doppia (cotto)
400 g – 2 min 30 sec Combi 1**
- frittelle di mele (cotte) 7 pezzi (220 g) – 6 min Combi 3*
- waffel (cotti) 1 pezzo (70 g) – 2 min 30 sec Combi 3*
- crostata di mele (cotta) 400 g – 5 min Combi 1**
- kouing aman alle mele (cotto) 550 g – 3 min Combi 1**
- tarte tatin (congelato - Rovesciare in 1 pezzo (600 g) – 7 min Combi 1**
modo che il lato con le mele sia di sotto) 1 pezzo (150 g) – 2 min Combi 2**
- brownie di noci (cotto) 2 pezzi (150 g) – 1 min 30 sec Combi 3 * + **
It-13
Teglia per pizza - tabella di cottura (NN-F663 / NN-F623)
(*) girare a metà della cottura
(**) lasciare riposare in padella 5 minuti prima di scaldare nuovamente
A meno che non sia altrimenti indicato, la padella per la pizza deve essere sempre preriscaldata per 4 minuti con la combinazione numero 1.
Italiano
Page 92

It-14
TRANCI DI CARNE SCONGELATI
Se la carne è stata congelata precedemente, assicurarsi che sia
completamente scongelata prima di cuocerla nel forno a microonde. I
tranci di carne scongelati devono essere lasciati RIPOSARE per un
minimo di 60 minuti prima di passare alla cottura per assicurare che
la parte centrale sia completamente scongelata.
GRASSO
Grandi quantità di grasso assorbono l’energia delle microonde e
possono causare un’eccessiva cottura della carne in prossimità del
grasso. Scegliere sempre tranci di carne non eccessivamente grassi.
Cottura soltanto con forno a microonde
Mettere i tranci di
carne su un piattino
rovesciato in un piatto
adatto per forno a
microonde e, porre sul
piatto girevole. È
importante che il
trancio di carne non
sia immerso nel
proprio sangue. Il
piattino rovesciato non
è necessario per pezzi di carne e di pollame se in fricassea o
cucinati con un contorno.
Si consiglia di coprire la carne con una pellicola aderente o con un
coperchio per accelerare i tempi di cottura ed evitare spruzzi.
TEMPO DI RIPOSO
La carne e i pollami richiedono un minimo di 15 minuti di TEMPO
DI RIPOSO avvolti in carta di alluminio subito dopo la cottura al
microonde. Sarà molto più facile affettare la carne arrostita se la si è
lasciata riposare; infatti la carne continua a cuocere durante il
TEMPO DI RIPOSO.
OSSI
Gli ossi delle estremità delle zampe dell’ agnello dovrebbero essere
protetti, se cucinati nel forno a microonde, per evitare una eccessiva
cottura.
Come cuocere piccoli tranci di carne al microonde
Alcuni tranci di carne possono essere cotti al microonde sebbene il
risultato finale non sarà un piatto croccante e dorato, a causa del
breve periodo di cottura richiesto e della mancanza di fonte di calore.
Tali tranci di carne devono sempre essere posti su un supporto
adatto alle microonde, per non lasciarli a contatto con i loro succhi.
RIGIRARE
Carni e pollami devono essere rigirati a metà cottura.
PROTEGGERE
Potrebbe essere necessario proteggere grossi tranci di carne con
fogli di alluminio a metà cottura per evitare che le zone esterne
cuociano eccessivamente. I tacchini e i grossi volatili dovrebbero
essere protetti nelle zone del petto, delle zampe e delle ali.
Assicurare i fogli di alluminio con stuzzicadenti ed evitare che
tocchino le pareti del forno.
Come arrostire un trancio di carne con il programma Combinato
Porre il trancio su un
piattino rovesciato.
Porre il piattino in un
piatto a prova di
calore. La cottura di
tranci di carne riesce
meglio solo al
microonde. Per
dorare e renderli
croccanti passare alla
fase finale di cottura
con il programma
Combinato. NON
coprire.
Consigli per stufati e ragù
PRIMA: le verdure presenti nella preparazione devono essere
tagliate in pezzi regolari e precotte, altrimenti potrebbero restare dure
una volta terminata la cottura della carne. Infarinare leggermente i
pezzi di carne affinché la salsa cuocia correttamente.
DURANTE la cottura. È indispensabile che i pezzi di carne siano
coperti dal liquido di cottura; per fare ciò utilizzare un piatto piano o
una fondina rovesciati (per evitare che la carne si secchi). Dato che
la cottura degli stufati è lunga e a volte c’è molta evaporazione, non
esitare ad aggiungere del liquido durante la cottura, se necessario.
Coprire il contenitore con un coperchio per limitare l’evaporazione.
Portare a ebollizione a 1000 W per 10 – 12 minuti, quindi proseguire
la cottura per il tempo desiderato a 250 W.
Come cuocere
piccoli tranci di
carne al grill o con il
programma
Combinato
Porre il cibo sul
supporto di mettalo.
Porre il supporto di
metallo sul vassoio
rotante. Utilizzare un
piatto a prova di calore
per contenere il grasso
e la sgocciolatura.
Per tranci di carne
voluminosi, disporre la
carne in un piatto a
prova di calore e porre
sul vassoio rotante.
L’azione del grill avrà
un effetto di doratura
sull’alimento benché
potrebbero essere
necessario un tempo
di cottura superiore.
Carni e pollami
Indicazioni
Page 93

It-15
Carne e pollami (seguito)
Tipo di carne solo per microonde***
Tempo di cottura
Combinazione o grill
Tempo di cottura
(min) (min)
MANZO
- costine* Grill 25 - 30**
- arrosto* 600 W 5 Combi 3 7 - 8
- stufato MAX + 250 W 10 + 60 - 75** – –
AGNELLO
- arrosto con osso* 600 W 6 - 7 Combi 1 7 - 8
- spalla arrotolata* 600 W 8 Combi 1 8 - 9
- stufato* MAX + 250 W 10 + 40 - 50** – –
VITELLO
- arrosto di spalla* 600 W 14 - 15 Combi 1 10 - 11
- stufato MAX + 250 W 10 + 50 - 60 ** – –
MAIALE
- filetto arrosto* 600 W 15 - 17*** Combi 1 11 - 12
- costine arrosto* 600 W 15 - 17*** Combi 1 12 - 13
- stufato MAX + 250 W 10 + 50 - 60** – –
- costine* – – Grill 20
POLLO, FARAONA, TACCHINO
- arrosto intero – – Combi 1 8 - 9
- pezzi* 600 W 7 - 8 Combi 2 12 - 14
o Grill 25**
- coscia di tacchino* – – Combi 1 8 - 9
- pezzi di tacchino 600 W 12 Combi 1 10 - 11
ANATRA
- arrosto intera – – Combi 1 + grill 9 - 10 + 4**
- pezzi* – – Combi 1 + grill 7 - 8 + 6**
- stufato MAX + 250 W 10 + 70* – –
CONIGLIO MAX 7 - 8 – –
SELVAGGINA
- arrosto* MAX 5 - 6*** Combi 3 9 - 11
- stufato MAX + 250 W 10 + 70** – –
CHIPOLATAS, MERGUEZ* MAX 3 - 4 Grill 12 - 14**
SALSICCIA DI MAIALE (1 pezzo)*
– – Combi 2 8**
Salame di Tolosa (2 pezzi)* – – Combi 2 10
or Grill 15**
Nota: per la carne con osso o ripiena, aumentare il tempo di cottura di almeno 5 minuti (a seconda del peso).
* piatto collocato sul supporto di metallo per la cottura alla griglia o combinata, se lo consente lo spessore della carne; altrimenti, sul piatto
girevole.
** indipendentemente dal peso
*** con cottura esclusivamente a microonde, i tempi di cottura dei tranci di carne (maiale, vitello, agnello, manzo) valgono per tranci di carne
che sono stati precedentemente passati in padella su ogni lato (per alcuni minuti).
Per 500 g (Tempo in minuti).
Italiano
Page 94

It-16
Il pesce cuoce molto bene nel forno a microonde in quanto mantiene
la sua umidità e l’odore che viene comunemente lasciato nei forni
tradizionali non viene prodotto.
QUANDO SI PUÒ CONSIDERARE COTTO IL PESCE?
Il pesce è cotto quando si scaglia facilmente ed è di colore opaco.
Pesce
COME DISPORRE SUL PIATTO
I filetti di pesce, ad esempio la
passera di mare, dovrebbero
essere arrotolati prima di
cuocerli, per evitare la cottura
eccessiva delle zone più sottili,
alle estremitá e ai lati.
COPRIRE
Coprire sempre il pesce con la
pellicola aderente per microonde
o con un coperchio adatto.
LIQUIDI
Il pesce fresco dovrebbe sempre
essere spruzzato con 30 ml (2
cucchiai) di succo di limone o di
vino bianco. Quando si cuoce
pesce congelato aggiungere del
liquido come descritto sopra per
ottenere una cottura più omogenea.
TRANCI DI PESCE
I tranci di pesce dovrebbero
essere disposti in circolo con le
parti più spesse rivolte verso
l’esterno per evitarne una cottura
eccessiva e il disfacimento delle
estremità più sottili.
PESCE INTERI
Quando si cuociono due pesci
interi simultaneamente, disporli
in senso contrario l’uno con
l’altro per ottenere una cottura
più omogenea.
A metà cottura è necessario
proteggere la coda e la testa di
pesci interi di grosse dimensioni
con fogli di alluminio lisci, da
assicurare con stuzzicadenti.
SALE
NON aggiungere del sale sul
pesce prima della cottura in
quanto ciò potrebbe renderlo
troppo asciutto.
COTTURA DEL PESCE
CON IL GRILL O CON IL
PROGRAMMA
COMBINATO
Spennellare il pesce con burro
fuso o con olio per mantenerne
l’umidità. Porre il pesce sul
supporto di metallo del forno.
NON aggiungere sale, tuttavia,
se si desidera, si possono
aggiungere pepe e erbette.
Cuocere piccole quantità di
pesce, solo al MICROONDE o
al GRILL, per ottenere i
risultati migliori.
TEMPO DI RIPOSO
Dopo la cottura è necessario
lasciare riposare il pesce per
2-3 minuti. Fare riposare il pesce
fuori dal forno per potere
utilizzare quest’ultimo per altri
scopi.
Pesci grandi (più di 400 grammi)
Si consiglia di girarli a metà del
tempo di cottura e di proteggere
la testa e la coda con un piccolo
pezzo di (foglio di) alluminio per
evitare che cuociano
eccessivamente. (Attenzione:
l’alluminio non deve toccare le
pareti del forno).
Pesce al cartoccio
Potete preparare cartocci di
pesce sostituendo il foglio
d’alluminio con carta oleata per
microonde.
Cibo
FRESCO
CONGELATO
Potenza
Tempo
Potenza Tempo
Filetti di pesce (sottili)
600 W 4 - 5 MAX 10
Filetti di pesce (spessi)
600 W 5 - 6 MAX 11 - 12
Tranci di pesce
600 W 5 - 7 MAX 11 - 13
Pesce intero
600 W 5 MAX 12
Gamberetti
* 600 W 4 - 5
Cozze
* 600 W 5 - 6
Pesce in conchiglia
* 600 W 6 - 7
Calamari
* 600 W 5 - 6 MAX 11
Granchio
* 600 W 5 - 6
Crocchette di pesce
MAX 3 min 30
(1 pezzo = 50 g)*
(2 pezzi)
o 5 min
(4 pezzi)
*Per questi pesci non è consigliabile cucinare con il menu automatico.
Per 500 g (Tempo in minuti).
Page 95

It-17
Verdure
* Per queste verdure non è consigliabile cucinare con il menu automatico.
Tabelle di cottura manuale per verdure fresche e congelate
Utilizzare la potenza massima (1000 W) Per 500 g (Tempo in minuti).
AGGIUNTA DI ACQUA
Le verdure molto ricche di acqua come i pomodori, le zucchine, le
melanzane, le verdure congelate per la ratatouille, i funghi, gli
spinaci, l’indivia, la lattuga, le cipolle, la maggior parte della frutta,
ecc., non richiedono l’aggiunta di acqua, oppure solo di una quantità
minima, in quanto la cottura al microonde utilizza l’acqua contenuta
naturalmente nei cibi.
Le verdure abbastanza ricche di acqua quali: cavolfiori, porri,
broccoli, cavolini di Bruxelles, finocchi, carote, sedano, asparagi,
fagiolini nani, taccole, patate, cavoli, rape, carciofi, ecc. richiedono
l’aggiunta di 4 - 5 cucchiai da tavola di acqua per ogni 500 grammi,
per generare il vapore che cuoce le verdure e impedisce la
disidratazione.
Le verdure contenenti relativamente poca acqua, quali piselli, fave,
fagiolini, richiedono l’aggiunta di 8 -10 cucchiai da tavola di acqua
per ogni 500 grammi per aiutare l’idratazione:
In tutti i casi: le verdure devono essere cotte a una potenza di
1000 W (con l’eccezione dei cavolfiori interi) e non devono essere
salate prima della cottura, bensì dopo. Questo perché il sale assorbe
l’umidità naturale della verdura e incoraggia le disidratazione.
VERDURE FRESCO CONGELATO
Carciofi:
- interi 11 - 12 –
- cuori 10 - 12 13 - 16
Asparagi* 10 - 12 14 - 15
Melanzane 9 - 11 –
Barbabietole* 18 - 20 –
Insalata cinese 8 - 10 14 - 15
Broccoli 8 - 10 13 - 15
Funghi 9 - 10 13 - 15
Carote:
- fette rotonde 10 - 12 13 - 15
- strisce 12 - 14 –
Cavolo* 12 - 14 –
Cavolfiore 10 - 12 13 - 15
Cavolini di Bruxelles 10 - 12 13 - 15
Sedanorapa 9 - 11 –
Sedano* 15 - 17 –
Zucchine 8 - 10 13 - 15
Indivia 12 - 14 18 - 20
Spinaci:
- tagliati – 12
- foglie intere 9 - 10 13
VERDURE FRESCO CONGELATO
Fave* 16 - 19 18 - 20
Finocchi:
- interi tagliati a metà 12 - 14 –
- tagliati sottili 17 - 20 –
Fagiolini* 12 - 13 12 - 13
Fagiolini nani 10 - 13 –
Misto di verdure primavera* – 15 - 16
Pannocchia di mais (2 pannocchie)*12 - 14 14 - 17
Rape 10 - 12 18 - 20
Cipolle 9 - 12 15 - 18
Taccole* 20 16 - 18
Porri a fette sottili 10 - 12 –
Porri interi 12 - 14 15 - 16
Porri (Gambo) 12 - 14 15 - 16
Zucchina 10 - 12 –
Peperoni 12 - 14 14 - 16
Patate intere (< 220 grammi) 9 - 12 –
Patate a pezzi 10 - 12 –
Ratatouille 16 - 18 14 - 16
Scorzonera 12 - 14 14 - 16
Pomodori* 4 - 5 –
Un cavolfiore intero deve essere cotto a testa in basso, a
una potenza di 600 W, per 12 – 15 minuti (a seconda delle
dimensioni del cavolfiore) con 6 cucchiai da tavola di acqua.
Italiano
Page 96

It-18
Le uova sono
alimenti delicati
che richiedono
attenzioni speciali.
Questo perché, se
vengono collocate
direttamente nel
forno, esploderanno
a causa della
pressione che si
crea all’interno del
guscio. Anche se
le uova vengono
rotte, il tuorlo esplode se la pellicola che lo ricopre non viene forata.
Per cui, inserire la punta di uno stuzzicadenti al centro del tuorlo: se
l’uovo è fresco, il tuorlo non si romperà. Il tuorlo e l’albume
reagiscono in maniera diversa alle microonde e, purtroppo, il tuorlo
cuoce più velocemente. Quando le uova sono sbattute (omelette), i
bordi dovranno essere portati al centro a metà del tempo di cottura.
Uova in camicia
Riscaldare 50 ml d’acqua con una spruzzata d’aceto per 1 minuto al
massimo. Rompere l’uovo nell’acqua in ebollizione e perforare con
cura il tuorlo e l’albume con uno stuzzicadenti; cuocere a 600 W da
30 a 40 secondi (a seconda delle dimensioni dell’uovo). Lasciare
riposare per 1 minuto, quindi scolare e servire.
Uova strapazzate
Mescolare 2 uova crude con poca panna o latte, una noce di burro,
sale e pepe. Cuocere per 40 secondi a 1000 W. Togliere dal forno e
sbattere energicamente con una forchetta. Riprendere la cottura a
1000 W per altri 30– 40 secondi. Le uova devono rimanere cremose.
Uova in casseruola
Rompere l’uovo in una formina imburrata, condire con sale e pepe,
perforare il tuorlo e l’albume con uno stuzzicadenti. Aggiungere gli
ingredienti desiderati (panna, funghi, uova di lompo, ecc.). Cuocere
da 1 minuto e mezzo fino a 2 minuti ogni uovo, a seconda delle
dimensioni dell’uovo e della quantità di condimento.
I formaggi reagiscono in modo diverso a seconda del tipo: più sono
grassi, più fondono velocemente. Se vengono cucinati troppo a
lungo, diventano duri. Ove possibile, è preferibile aggiungere
formaggio grattugiato all’ultimo momento (per la pasta, i gratin, ecc.).
I tempi di cottura delle verdure essiccate nel forno a microonde sono
molto simili a quelli della cucina tradizionale. D’altra parte, questi
alimenti si possono riscaldare molto velocemente senza che
prendano un sapore di cibo riscaldato, a condizione che siano in un
contenitore chiuso, mescolati con burro o salsa.
Per la cottura, utilizzare un contenitore grande (per evitare
traboccamenti). Coprire abbondantemente con acqua o brodo. Dopo
la cottura, lasciare riposare per almeno 5 – 8 minuti.
Riso
Dopo che il liquido ha raggiunto il punto d’ebollizione, cuocere per
circa 20 minuti a 250 W, indipendentemente dalla quantità di riso.
Semolino
Il semolino cuoce perfettamente nel forno a microonde, senza il
pericolo di bruciarlo. Semplicemente aggiungere un volume di acqua
pari a quello del semolino, portare a ebollizione (coprendo) a 1000 W
per 2 minuti e mezzo (per 200 grammi di semolino a grana media
con 0,2 litri d’acqua), quindi cuocere a 250 W per circa 3 minuti
mentre si gonfia.
Pasta
Ricordare di salare l’acqua di cottura e di mescolare una volta
durante la cottura. Da quando il liquido sta bollendo, cuocere per 7 o
8 minuti a 1000 W per 250 grammi di pasta (per 1 litro d’acqua) e
10 minuti per 250 grammi di ravioli.
Verdure essiccate
Coprire abbondantemente con acqua e lasciare in ammollo per una
notte. Il giorno successivo, sciacquare e scolare. Coprire con acqua.
Non salare prima della cottura (ciò fa indurire le verdure essiccate).
Cuocere per 10 minuti a 1000 W, quindi da 10 a 15 minuti a 250 W.
Controllare la cottura e aggiungere acqua, se necessario; le verdure
devono essere sempre coperte dal liquido.
Patate intere con la buccia
Prima della cottura. Lavare le patate e forare ripetutamente la pelle
con una forchetta. Disporle sui bordi del vassoio rotante.
Le diverse varietà di patate producono risultati diversi quando cotte al
forno a microonde. Il peso ideale delle patate da cuocere al
microonde o con il programma Combinato è di 200-250 g. Le patate
intere con la buccia cuoceranno più in fretta al microonde che non
con il programma Combinato sebbene il risultato finale produrrà una
patata tenera. La cottura invece con il metodo programma
Combinato produrrà una consistenza più asciutta e croccante. Se si
desidera una doratura ulteriore a cottura ultimata, utilizzare il GRILL
(consultare la tabella più in basso).
Dopo la cottura. Estrarre dal forno e avvolgere le patate in fogli di
alluminio per conservarne il calore. Lasciare riposare per 5 minuti.
Uova e formaggio
Riso, pasta, verdure essiccate e patate
Patate intere con la buccia - Tabella di cottura manuale
Qtà
1
2
4
Minuti al grill per rendere croccante
8-10
10-12
11-13
Minuti a potenza massima (1000 W)
4-7
7-10
11-15
Page 97

It-19
Risposte a quesiti comuni
Problema Cause Soluzione
Gli alimenti cotti a MICROONDE si Il cibo non è completamente cotto. Rimettere il piatto nel forno per un tempo
raffreddano rapidamente subito dopo la ulteriore. Rammentarsi che i cibi a
cottura. temperatura da frigorifero richiedono un
tempo di cottura superiore che non i cibi a
temperatura ambiente.
Budini di riso e piatti in casseruola che Il contenitore è troppo piccolo. Per gli alimenti liquidi utilizzare un contenitore
fuoriescono dal recipiente durante la cottura grande il doppio del volume dell’alimento.
a MICROONDE.
Il cibo cuoce troppo lentamente quando cotto
Il forno non riceve la potenza corretta. Il forno deve essere collegato a una presa
a MICROONDE o con il programma
indipendente.
Combinato.
La temperatura del cibo estratto dal frigorifero È necessario un tempo di cottura maggiore
è inferiore alla temperatura ambiente. per cuocere cibi più freddi.
La carne diventa dura quando cotta a L’impostazione della potenza è troppo elevata. Utilizzare un livello di potenza inferiore per
MICROONDE o con il programma cuocere carni.
Combinato. La carne è stata salata prima della cottura. Non aggiungere sale prima della cottura.
Se necessario aggiungere sale dopo la cottura.
I dolci rimangono crudi quando cotti a Tempo di cottura o di riposo troppo breve. Aumentare il tempo di cottura o il tempo di
MICROONDE. riposo.
Le uova strapazzate o affogate sono dure a Tempo di cottura troppo lungo. Fare molta attenzione nel cuocere piccole
gommose quando cotte a MICROONDE. quantità di uova; una volta rovinate non si
possono più salvare.
Le torte salate e le creme alle uova sono dure Livello di potenza troppo elevato. Utilizzare livelli di potenza inferiori per
e gommose quando cotte a MICROONDE. questi alimenti.
Le torte salate e le creme alle uova sono dure Tempo di cottura troppo lungo. La dimensione Controllare sempre il progresso del cibo
e gommose quando cotte con il programma del piatto è superiore a quella raccomandata durante la cottura.
Combinato. nella ricetta.
La salsa al formaggio diventa dura e Formaggio cotto con la salsa. Aggiungere il formaggio a cottura ultimata.
filamentosa quando cotta a MICROONDE. Il calore della salsa è sufficiente a cuocere
il formaggio.
Le verdure sono troppo asciutte quando Cottura senza coperchio/copertura. Coprire con un coperchio o con pellicola per
cotte a MICROONDE. alimenti.
Basso contenuto di umidità, es. l’ortaggio è un Aggiungere altri 2-4 cucchiai di acqua.
tubero non molto fresco.
È stato aggiunto sale prima della cottura. Aggiungere sale dopo la cottura se necessario.
Si forma della condensa nel forno. Ciò è normale. Significa che il cibo ha una Asciugare la condensa con un panno
cottura più rapida che non la capacità morbido.
dell’umidità di essere espulsa dal forno.
Il vassoio rotante gira nei due sensi. Ciò è normale.
Si sente dell’aria calda in provenienza La porta del forno non è sigillata a tenuta Ciò è normale e non indica alcuna perdita
delle giunture della porta. d’aria. di microonde.
Quando si usano accessori di metallo si L’uso degli accessori di metallo durante la cottura Spegnere il forno IMMEDIATAMENTE. Non
notano scintille bluastre (effetto arco). solo a MICROONDE non è raccomandato. Se utilizzare accessori di metallo se si cuoce
si usa il programma Combinato verificare che solo al MICROONDE. Controllare il peso
gli accessori non siano danneggiati. minimo del cibo sui programmi automatici.
Il GRILL si spegne ciclicamente durante la Durante la cottura il GRILL si accende e si Ciò è normale.
cottura al grill o con il programma spegne ciclicamente per far sì che il cibo non
Combinato. si bruci prima di essere completamente cotto
al centro.
Italiano
Page 98

Es-1
Cocción con Microondas . . . . . . . . . . . . . . . . . . . . . . . . . . . . . . . . . . 2
Consejos Generales . . . . . . . . . . . . . . . . . . . . . . . . . . . . . . . . . . . 2-3
Qué Recipiente Debemos Utilizar . . . . . . . . . . . . . . . . . . . . . . . . . . . 4
Microondas . . . . . . . . . . . . . . . . . . . . . . . . . . . . . . . . . . . . . . . . . . . . 5
Grill . . . . . . . . . . . . . . . . . . . . . . . . . . . . . . . . . . . . . . . . . . . . . . . . . . 5
Cocción Combinada . . . . . . . . . . . . . . . . . . . . . . . . . . . . . . . . . . . . . 5
Accesorios a Utilizar . . . . . . . . . . . . . . . . . . . . . . . . . . . . . . . . . . . . . 5
Calentar . . . . . . . . . . . . . . . . . . . . . . . . . . . . . . . . . . . . . . . . . . . . . . . 6
Calentar con Microondas . . . . . . . . . . . . . . . . . . . . . . . . . . . . . . . . 6-7
Consejos para cocinar con microondas . . . . . . . . . . . . . . . . . . . . . . 8
Descongelar con Microondas . . . . . . . . . . . . . . . . . . . . . . . . . . . . . . 9
Descongelación . . . . . . . . . . . . . . . . . . . . . . . . . . . . . . . . . . . . . . . . 10
Tablas de Cocción . . . . . . . . . . . . . . . . . . . . . . . . . . . . . . . . . . . 11-13
Aves y Carne . . . . . . . . . . . . . . . . . . . . . . . . . . . . . . . . . . . . . . . 14-15
Pescado . . . . . . . . . . . . . . . . . . . . . . . . . . . . . . . . . . . . . . . . . . . . . 16
Tabla de Cocción de Verduras Frescas . . . . . . . . . . . . . . . . . . . . . 17
Huevos y queso . . . . . . . . . . . . . . . . . . . . . . . . . . . . . . . . . . . . . . . 18
Arroz, pasta y legumbres . . . . . . . . . . . . . . . . . . . . . . . . . . . . . . . . 18
Preguntas y Respuestas . . . . . . . . . . . . . . . . . . . . . . . . . . . . . . . . . 19
Contenido
Los tiempos indicados en las siguientes tablas son aproximados, pudiendo variar en función del gusto personal, y de la temperatura inicial del
alimento.
La clave está en la tecnología de inversor
La tecnología de inversor para hornos microondas se viene desarrollando desde hace más de diez años, fruto de una iniciativa de
National/Panasonic. Se trata de la tecnología fundamental para fabricar un tipo de horno microondas muy diferente, que posee cierto número
de características especiales:
• Hace posible el primer horno del sector que controla la cantidad de energía de microondas de manera lineal. Este nuevo sistema de
distribución permite cocinar y descongelar los alimentos sin que éstos pierdan su sabor.
• Ofrece una transformación eficaz de la energía eléctrica en energía de microondas, lo que se traduce en una reducción al mínimo del
consumo eléctrico, sin sacrificar la potencia del microondas.
• Permite un espectacular aumento de la capacidad interior del horno, incluso en los modelos más compactos, debido al reducido tamaño del
circuito inversor, que sustituye a los voluminosos transformadores empleados en la actualidad.
• Por último, al prescindir de ese voluminoso transformador de hierro, el proceso de reciclaje del horno no daña el medio ambiente al final de
la vida útil del producto.
Español
Page 99

Es-2
Las microondas son ondas de alta frecuencia muy similares a las
ondas de radio o televisión. Al poner en funcionamiento un
microondas, la electricidad se convierte en energía de microondas
mediante el tubo de magnetrón, el cual la transmite al interior del
horno, donde es: Reflejada, Transmitida y Absorbida.
1 - Reflexión
El metal refleja las microondas. Al reflejarse las microondas en las
paredes metálicas, la energía de las microondas se reparte por toda
la cavidad del horno para producir una cocción uniforme. Las
microondas son reflejadas por los recipientes metálicos, por este
motivo no deberá usarlos, ya que al ser reflejadas por el metal, la
energía de las microondas no podría llegar hasta los alimentos,
impidiendo así su cocción.
2 - Transmisión
Las microondas atraviesan materiales como el papel, el cristal o el
plástico. Los citados materiales por tanto serán los adecuados para
cocinar en microondas.
3 - Absorción
La energía de las microondas es absorbida por los alimentos.
Cuando las microondas penetran en los alimentos hacen vibrar con
gran rapidez las moléculas de agua, grasa y azúcar. Esta vibración
produce una fricción entre dichas moléculas que genera calor. El
secreto de que los alimentos se calienten tan rápidamente está en
que sus moléculas vibran a una velocidad de 2,450 millones de
veces por segundo.
Cocción con Microondas
Si el alimento aún no está cocido una
vez finalizado el tiempo de reposo,
introdúzcalo nuevamente en el horno y
añada un tiempo adicional.
Descongelación:
Es conveniente dejar reposar los
alimentos para completar el proceso
de la descongelación. El tiempo de
reposo puede variar mucho en función
de tamaño del alimento. Por ejemplo:
Una hamburguesa puede necesitar
unos 5 minutos. Una pieza grande de
carne, 1 hora.
Una vez finalizado el tiempo de
cocción, el calor producido por las
microondas sigue actuando hacia el
interior del alimento. Por ello,
recomendamos dejar reposar los
alimentos después de su cocción. El
tiempo de reposo necesario para que
finalice una cocción puede variar,
dependiendo de la forma, tipo o
cantidad del alimento. Por ejemplo:
Unas patatas con piel necesitarán un
tiempo de 5-10 minutos. Una tarta
necesitará 2-3 minutos.
Consejos Generales
Alimentos
con piel
Las patatas,
las manzanas,
las yemas de
huevo o las
salchichas,
son alimentos
con pieles no
porosas. Antes
de cocinar
estos
alimentos en
el microondas pinche la piel con un palillo o
tenedor, para evitar que estallen durante la
cocción. NO INTENTE COCINAR HUEVOS
CON CASCARA.
Contenido en
humedad
El contenido
en humedad
de muchos
alimentos
(verduras,
frutas....)
variará según
la estación del
año. Las
patatas son un
claro ejemplo.
Por esta razón los tiempos de cocción
tendrán que ser ajustados a lo largo del año.
Los alimentos secos (arroz, pasta....),
pueden secarse durante su almacenaje y
necesitar tiempos de cocción muy distintos
de los alimentos recién envasados.
Film
transparente
El film
transparente
ayuda a
mantener la
humedad de
los alimentos
evitando su
resecamiento.
Cuando lo
utilice
recuerde
perforarlo para permitir que pueda salir el
vapor. Tenga cuidado al destapar el alimento
y procure hacerlo algo apartado de Vd. para
evitar que el vapor pueda producirle
quemaduras. Antes de utilizar el film
transparente mire que el fabricante le
indique que puede usarse en microondas.
TIEMPO DE REPOSO
Page 100

Es-3
Consejos Generales
TAMAÑO
Los alimentos dispuestos en
recipientes planos se calentarán
antes que si se colocan en platos
hondos.
CANTIDAD
Las porciones pequeñas se cuecen
más deprisa que las grandes.
Tenga cuidado al calentar alimentos
en pequeña cantidad, ya que el
tiempo será siempre muy corto.
DENSIDAD
Los alimentos porosos y ligeros
necesitan menor tiempo para
calentarse que los compactos y
duros.
FORMA
El alimento se calienta más
uniformemente en un recipiente
redondo que en uno cuadrado.
COBERTURA
Tape el pescado, verduras,
estofados. No tape pasteles,
salsas o alimentos de textura
crujiente.
REMOVER
Normalmente es necesario
remover los alimentos durante la
cocción. A los asados y otros
alimentos de gran tamaño se les
ha de dar la vuelta, generalmente,
a mitad de cocción.
LÍQUIDOS
Todos los líquidos deben
removerse antes de calentarlos y
mientras están en este proceso.
Especialmente debe removerse
el agua antes y durante su
calentamiento para evitar así que
borbotee. No caliente líquidos
que hayan hervido con
anterioridad. NO RECALIENTE
LIMPIEZA Ya que las microondas
actúan sobre las partículas de
comida, mantenga su horno limpio
siempre. Las salpicaduras de
comida más resistentes se
pueden retirar utilizando un
limpiador de horno de marca,
aplicado con un trapo suave,
secando siempre el horno después
de limpiarlo. No limpie las partes
de plástico ni la zona de la puerta.
ORDENAR
Los alimentos en porciones
individuales, como muslos de
pollo, deberán colocarse en el
recipiente de modo que las partes
más finas estén dispuestas hacia
el centro del plato.
SEPARACIÓN
Espaciar los alimentos ayuda a
acelerar la cocción. No deben
colocarse amontonados unos
encima de otros.
INGREDIENTES
Las comidas que contengan
grasa, azúcar o sal se calientan
muy rápidamente. Es posible que
el relleno esté mucho más caliente
que la pasta. Tenga cuidado al
comerlo. No lo recaliente, ni
siquiera si le parece que la pasta
no está muy caliente.
TEMPERATURA INICIAL
Los alimentos a temperatura
ambiente necesitan menos
tiempo para calentarse que los
que salen del frigorífico o
congelador.
Español
 Loading...