

Page 1

English
Deutsch
Nederlands
Français Italiano Polski
Česky
Magyar
®
Operating Instructions
Bedienungsanleitung
Gebruiksaanwijzing
Mode d’emploi
Manuale di istruzioni
Instrukcja obsługi
Návod k obsluze
Kezelési útmutató
Microwave/Grill/Convection Oven
Mikrowellengerät mit Grill/Heißluft
De Panasonic Microgolf/Warme Lucht Oven
Panasonic Four à Micro-ondes Multifonctions
Forno a microonde e Convezione
Kuchenka mikrofalowa z funkcjami Grill/Konwekcja
Mikrovlnná / Horkovzdušná trouba/ Gril
Grillezös / légkeveréses mikrohullámú sütö
NN-CT857/NN-CT878
Page 2

Before operating this oven, please read these instructions carefully and keep for
future reference.
Vor Gebrauch des Mikrowellengerätes bitte diese Bedienungsanleitung sorgfältig
durchlesen und aufbewahren.
Alvorens de Magnetronoven in gebruik te nemen, dient u de gebruiksaanwijzing
zorgvuldig door te lezen en bij te houden voor eventueel toekomstig gebruik.
Avant d’utiliser le four à micro-ondes, lisez attentivement les recommandations
d’utilisation et conservez-les soigneusement.
Prima di utilizzare il forno, leggere con attenzione questo manuale e conservare
per referenze future.
Przed włączeniem kuchenki prosimy o dokładne przeczytanie instrukcji obsługi
i o zachowanie jej na przyszłość.
Pečlivě si je prosím přečtěte a uložte pro příští použití.
Kérjük, olvassa el gondosan, és örizze meg a késöbbiekben.
Page 3
Examine your microwave oven
Unpack the oven, remove all packing
material, and examine the oven for any
damage such as dents, broken door latches
or cracks in the door. If you find any
damage, notify your dealer immediately. Do
not install a damaged microwave oven.
Earthing instructions
IMPORTANT: THIS UNIT HAS TO BE
PROPERLY EARTHED FOR PERSONAL
SAFETY. If your AC outlet is not grounded,
it is the personal responsibility of the
customer to have it replaced with a properly
grounded wall socket.
Operation voltage
The voltage has to be the same as
specified on the label on the oven. If a
higher voltage than specified is used, it may
cause a fire or other damages.
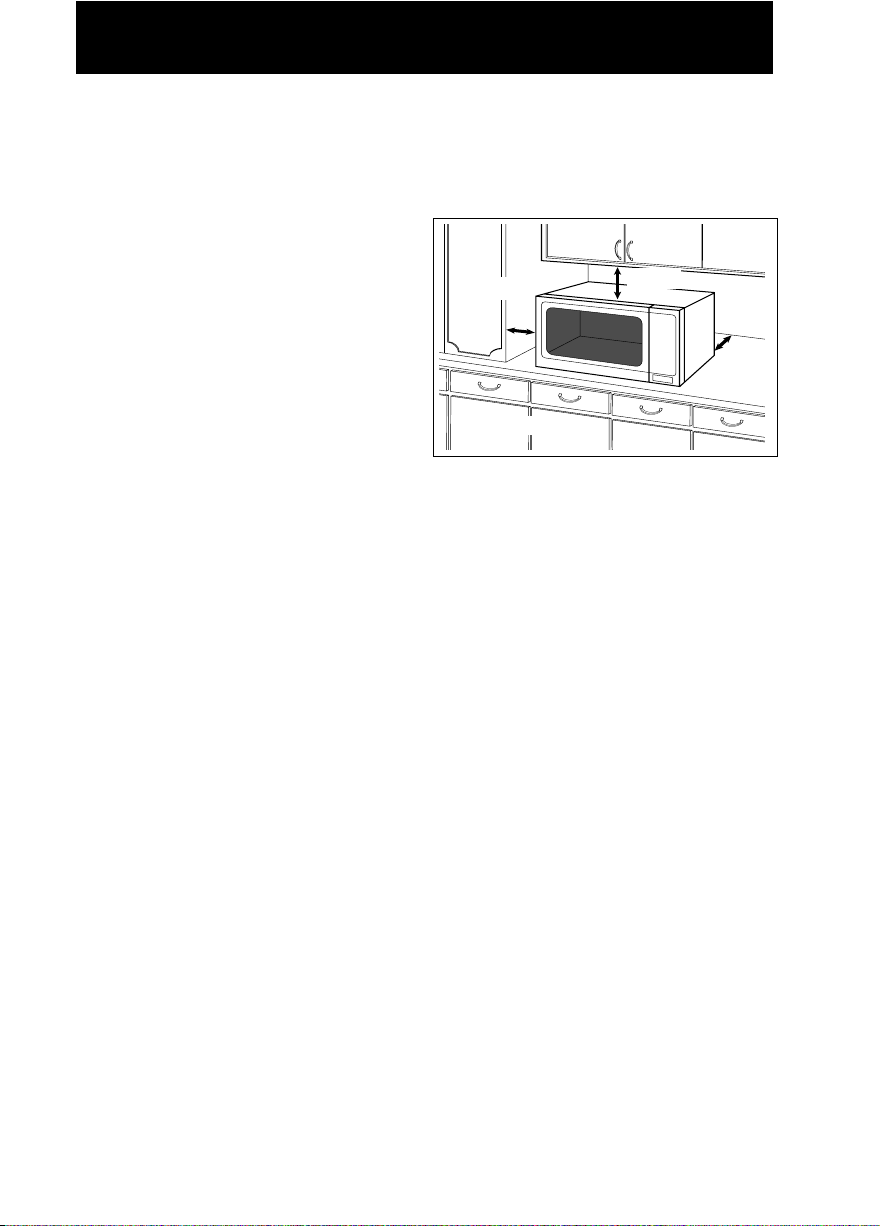
Placement of the Oven
This oven is intended for Counter-Top and
Built-In use only. It is not intended for use
inside a cupboard.
1. Place the oven on a flat and stable
surface, more than 85 cm above the
floor.
2. When this oven is installed, it should be
easy to isolate the appliance from the
electricity supply by pulling out the plug
or operating a circuit breaker.
3. For proper operation, ensure a sufficient
air circulation for the oven.
Counter-top use:
a. Allow 15 cm of space on the top of
the oven, 10 cm at the back, 5 cm on
one side, and the other side must be
opened more than 40 cm.
b. If one side of the oven is placed
flush to a wall, the other side or top
must not be blocked.
Counter-top
Installation and Connection
Open
10cm
15cm
5cm
Built-in
This oven may be built into a wall cabinet
by using the proper trim kit, white
NN-TKA80W, silver NN-TKA80M which
may be purchased from a local Panasonic
dealer.
En-1
4. Do not place this oven near an electric or
gas cooker range.
5. The feet should not be removed.
6. This oven is only for household usage.
Do not use outdoors.
7. Avoid using the microwave oven in high
humidity.
8. The power cord should not touch the
outside of the oven. Keep the cord away
from hot surfaces. Do not let the cord
hang over the edge of a table or work
top. Do not immerse the cord, plug or
oven in water.
9. Do not block the air vents on the top and
back of the oven. If these openings are
blocked during operation the oven may
overheat. In this case the oven is
protected by a thermal safety device and
resumes operation only after cooling
down.
Page 4

En-2
English
Installation and Connection
WARNING
1. The door seals and door seal areas should be cleaned with a damp cloth. The
appliance should be inspected for damage to the door seals and door seal areas and if
these areas are damaged the appliance should not be operated until it has been
repaired by a service technician trained by the manufacturer.
2. Do not attempt to tamper with or make any adjustments or repairs to the door, control
panel housing, safety interlock switches or any other part of the oven. Do not remove
the outer panel from the oven which gives protection against exposure to microwave
energy. Repairs should only be done by a qualified service person.
3. Do not operate this appliance if it has a damaged CORD OR PLUG, if it is not working
properly, or if it has been damaged or dropped. It is dangerous for anyone other than a
service technician trained by the manufacturer to perform repair service.
4. If the supply cord of this appliance is damaged, it must be replaced with the special
cord available from the manufacturer.
5. Only allow children to use the oven without supervision when adequate instructions
have been given so that the child is able to use the oven in a safe way and understands
the hazards of improper use.
6. Liquids and other foods must not be heated in sealed containers since they are liable to
explode.
7. This oven is not intended for use by persons (including children) with reduced physical,
sensory or mental capabilities, or lack of experience and knowledge unless they have
been given supervision or instruction concerning the use of the oven by a person
responsible for their safety. Children should be supervised to ensure they do not play
with the oven.
Use of your oven
1. Do not use the oven for any reason other than the preparation of food. This oven is
specifically designed to heat or cook food. Do not use this oven to heat chemicals or
other non-food products.
2. Before use, check that utensils/containers are suitable for use in microwave ovens.
3. Do not attempt to use this microwave oven to dry newspaper, clothing or any other
materials. They may catch on fire.
4. When the oven is not being used, do not store any objects other than oven accessories
inside the oven in case it is accidentally turned on.
5. The appliance shall not be operated by MICROWAVE or COMBINATION WITHOUT
FOOD IN THE OVEN. Operation in this manner may damage the appliance. Exception
to this is point 1 under heater operation.
6. If smoke or a fire occurs in the oven, press Stop/Cancel pad and leave the door closed
in order to stifle any flames. Disconnect the power cord, or shut off power at the fuse or
the circuit breaker panel.
Page 5

Safety Instructions
Heater Operation
1. Before using CONVECTION,
COMBINATION or GRILL function for
the first time, wipe excessive oil off in
the oven cavity and operate the oven
without food and accessories on
CONVECTION 250°C, for 10 minutes.
This will allow the oil that is used for rust
protection to be burned off. This is the
only time the oven is used empty.
2. Exterior oven surfaces, including air
vents on the cabinet and the oven door
will get hot during CONVECTION,
COMBINATION and GRILLING, take
care when opening or closing the door
and when inserting or removing food and
accessories.
3. The oven has two heaters situated in the
top and back of the oven. After using the
CONVECTION, COMBINATION and
GRILL function, these surfaces will be
very hot. N.B. After cooking by these
modes, the oven accessories will be
very hot.
4. The accessible parts may become hot in
combination use. Young children should
be kept away, and children should only
use the oven under adult supervision
due to the temperatures generated.
Fan Motor Operation
While the oven is in Microwave/Heater
operation, the cooling fan always rotates to
cool the electric components. After the
completion of operation, the fan may
continue rotating for a while.
Oven Light
When it becomes necessary to replace the
oven light, please consult your dealer.
Accessories
The oven comes equipped with a variety of
accessories. Always follow the directions
given for use of the accessories.
Glass Tray
1. Do not operate the oven without the
roller ring and the glass tray in place.
2. Never use another type of glass tray
than the one specially designed for this
oven.
3. If the glass tray is hot, let it cool before
cleaning or placing in water.
4. The glass tray can turn in either
direction.
5. If the food or cooking vessel on the
glass tray touches the oven walls and
stops the tray rotating, the tray will
automatically rotate in the opposite
direction. This is normal.
6. Do not cook foods directly on the glass
tray.
Roller Ring
1. The roller ring and the oven floor should
be cleaned frequently to prevent noise
and build-up of remaining food.
2. The roller ring must always be used for
cooking together with the glass tray.
Metal Tray
1. Metal Tray is for cooking on Grill,
Convection and Combination modes.
Do not use the Metal Tray in Microwave
mode only.
2. Metal Tray should be placed on Glass
Tray or Round Rack.
Round Rack
1. The Round Rack is used to facilitate
browning of small dishes and help with
the good circulation of the heat.
2. Do not use any metal container directly
on the Round Rack in COMBINATION
with MICROWAVE.
3. Do not use the Round Rack in
MICROWAVE mode only.
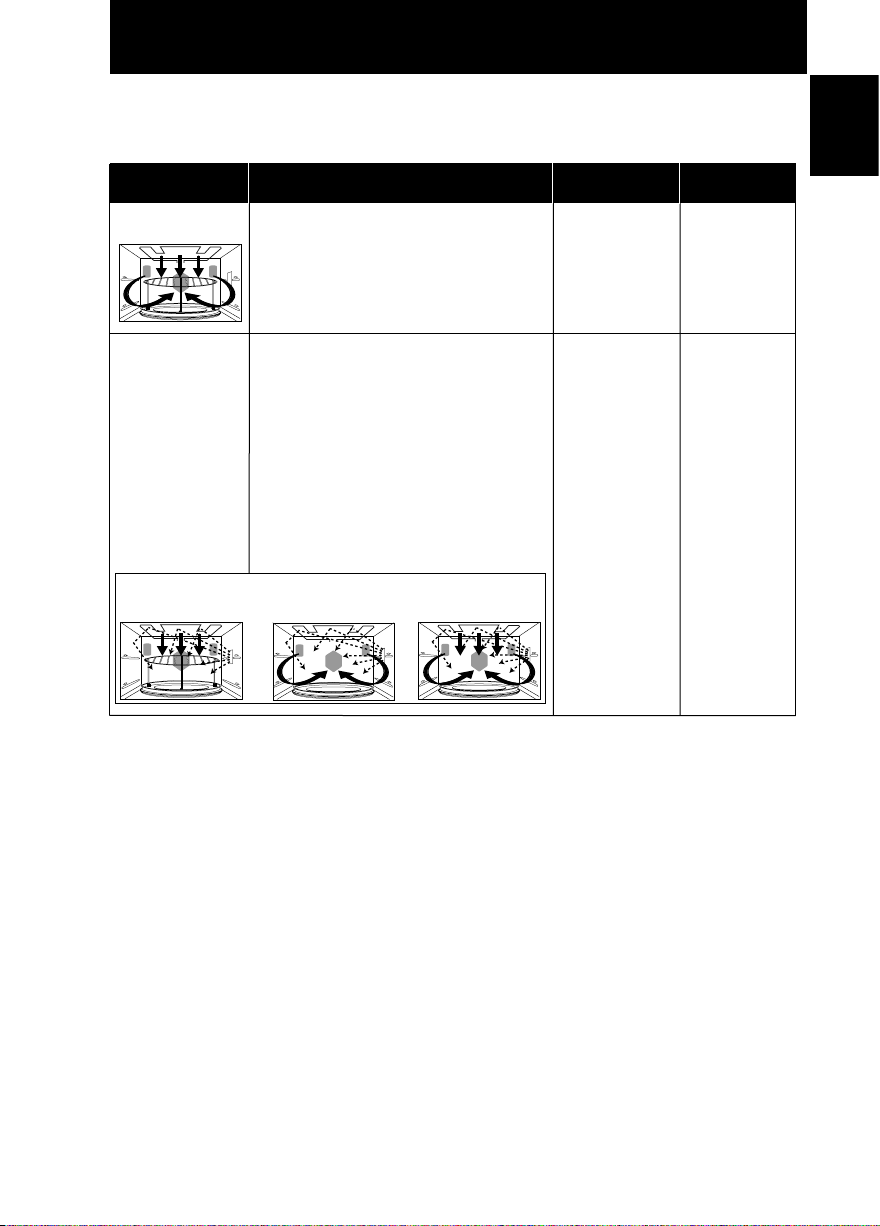
Enamel Shelf and Wire Shelf
1. The shelves are for cooking on
convection and grill modes. Do not use
the shelves on microwave mode or
combination mode.
2. When cooking on convection mode, use
just one or both of the shelves in
position. When cooking on grill mode,
use the shelf in the upper position.
En-3
Page 6

En-4
English
Installation and Connection
1) Cooking Times
• Cooking times given in the cookbook are
approximate. The cooking time depends
on the condition, temperature, amount of
food and on the type of cookware.
• Begin with the minimum cooking time to
help prevent overcooking. If the food is
not sufficiently cooked you can always
cook it for a little longer.
N.B. : If the recommended cooking
times are exceeded the food will be
spoiled and in extreme circumstances
could catch fire and possibly damage
the interior of the oven.
2) Small Quantities of Foods
• Small quantities of food or foods with low
moisture content can burn, dry out or
catch on fire if cooked too long. If
materials inside the oven should ignite,
keep the oven door closed, turn the oven
off and remove the plug from the socket.
3) Eggs
• Do not cook eggs in their shells and
whole hard-boiled eggs by MICROWAVE.
Pressure may build up and the eggs will
explode even after microwave heating
has ended.
4) Piercing Skin
• Food with non porous skins, such as
potatoes, egg yolks and sausages must
be pierced before cooking by
MICROWAVE to prevent bursting.
5) Meat Thermometer
• Use a meat thermometer to check the
degree of cooking of roasts and poultry
only when the meat has been removed
from the oven. Do not use a conventional
meat thermometer when using
MICROWAVE or COMBINATION because
it may cause sparking.
6) Liquids
• When heating liquids, e.g. soup, sauces
and beverages in your microwave oven,
overheating the liquid beyond boiling
point can occur without evidence of
bubbling. This could result in a sudden
boil over of the hot liquid. To prevent this
possibility the following steps should be
taken:
a) Avoid using straight-sided containers
with narrow necks.
b) Do not overheat.
c) Stir the liquid before placing the
container in the oven and again
halfway through the cooking time.
d) After heating, allow it to stand in the
oven for a short time, stir again
before carefully removing the
container.
7) Paper/Plastic
• When heating food in plastic or paper
containers, check the oven frequently as
these types of containers ignite if
overheated.
• Do not use recycled paper products (e.g.
Kitchen Roll) unless the paper product is
labelled as safe for microwave oven use.
Recycled paper products may contain
impurities which may cause sparks
and/or fires during use.
• Remove wire twist-ties from roasting
bags before placing the bags in the
oven.
8) Utensils/Foil
• Do not heat any closed cans or bottles
because they might explode.
• Metal containers or dishes with metallic
trim should not be used during
Microwave cooking. Sparking will occur.
• If you use any aluminium foil, meat
spikes or metalware the distance
between them and the oven walls and
door should be at least 2 cm to prevent
sparking.
9) Feeding Bottles/Baby Food Jars
• The top and teat or lid must be removed
from feeding bottles or baby food jars
before placing in the oven.
• The contents of feeding bottles and baby
food jars are to be stirred or shaken.
• The temperature has to be checked
before consumption to avoid burns.
Page 7
En-5
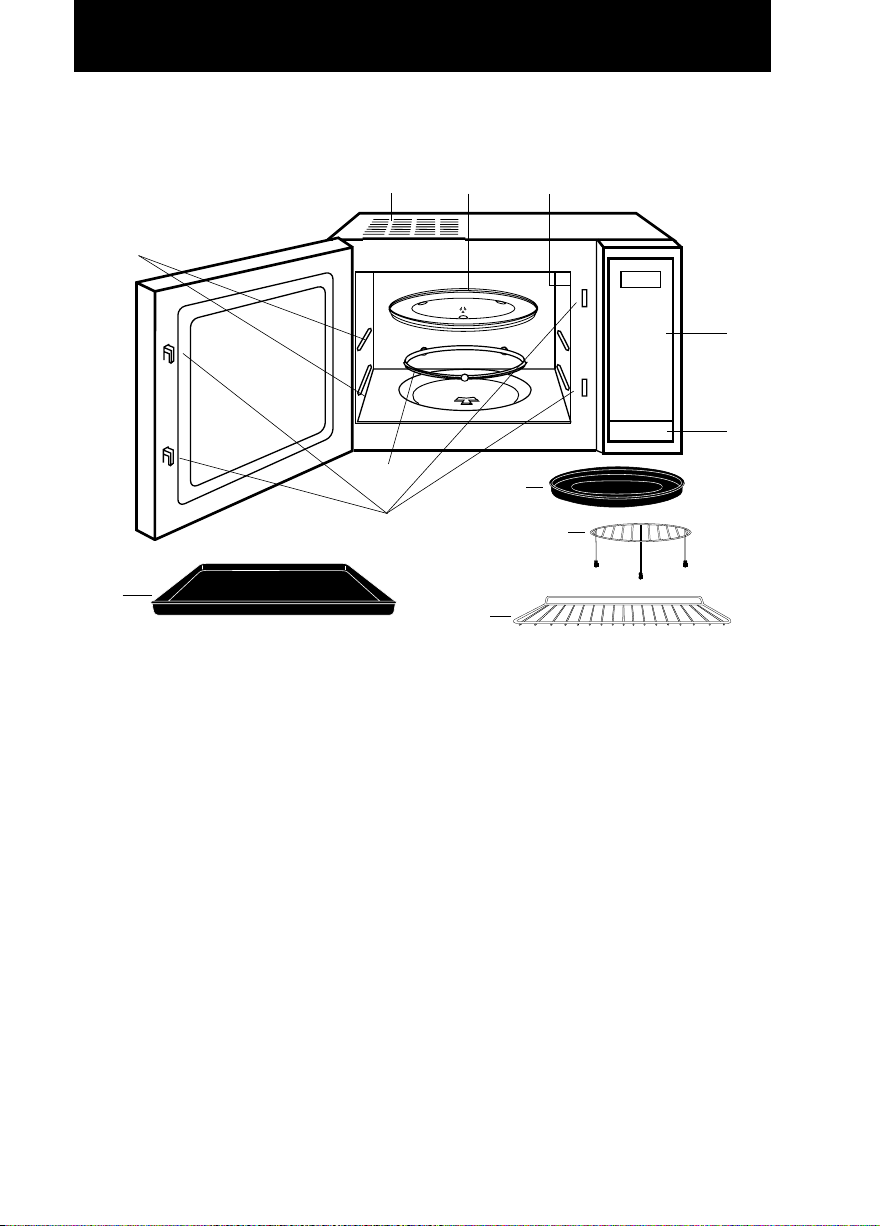
Outline Diagram
[1] Door Release Button
Press to open the door. When you open the oven door during cooking, the cooking is
stopped temporarily without clearing earlier made settings. The cooking is resumed as soon
as the door is closed and Start Pad pressed. The oven lamp lights as soon as the oven
door is opened.
[2] Oven Window
[3] Door Safety Lock System
[4] Oven Air Vent
[5] Control Panel
[6] Glass Tray
[7] Roller Ring
[8] External Oven Air Vents
[9] Metal Tray
[10] Round Rack
[11] Enamel Shelf
[12] Wire Shelf
[13] 2 Level Cooking Support guides
[1]
[2]
[3]
[4]
[5]
[7]
[8]
[6]
[9]
[10]
[12]
[11]
[13]
Page 8
En-6
English
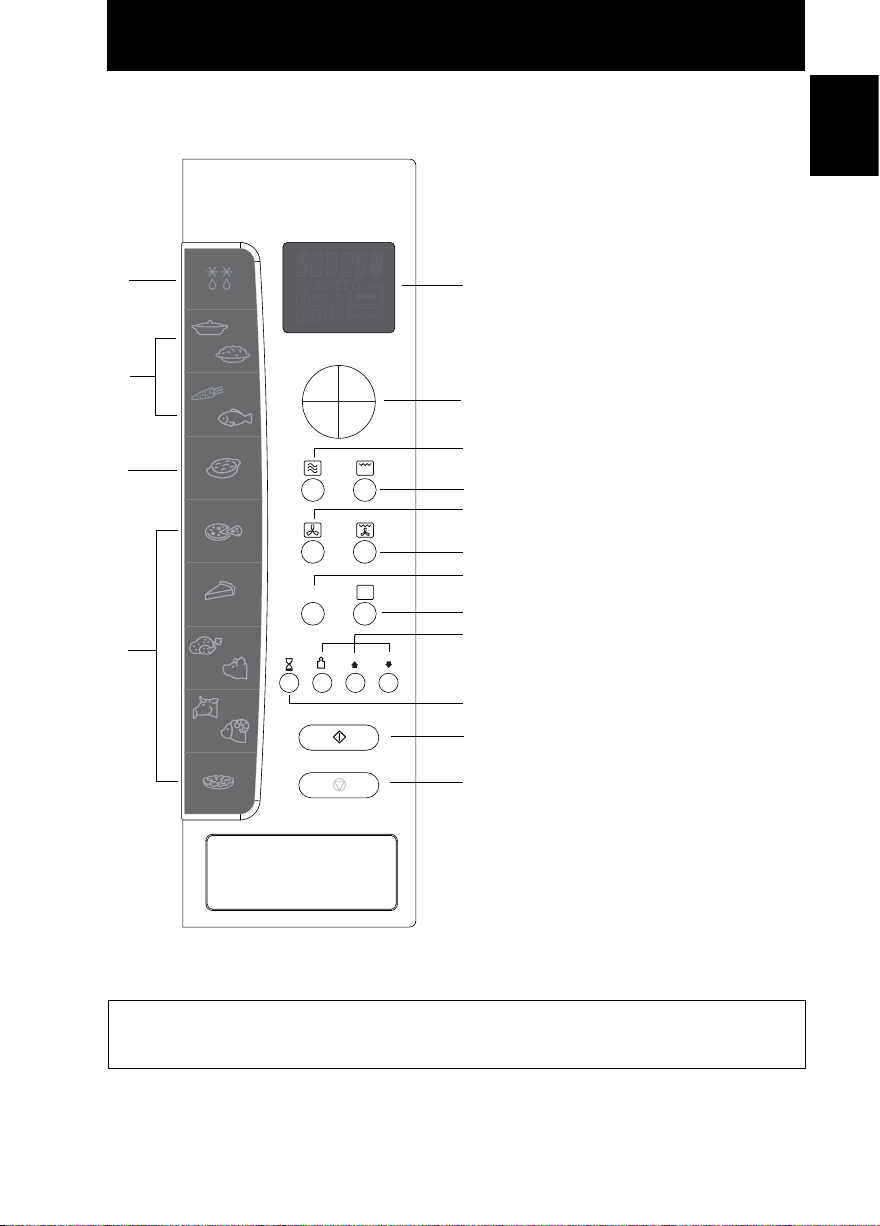
Control Panel
NN-CT857/NN-CT878
(1)
(2)
(3)
(4)
(5)
(6)
(7)
(8)
(10)
(11)
(15)
(16)
(9)
(12)
(13)
(14)
(1) Display Window
(2) Time Pads
(3) Microwave Power Pad
(4) Grill Power Pad
(5) Convection Pad
(6) Grill Convection Pad
(7) Combination Pad
(8) Memory Pad
(9) Auto Defrost Pad
(10) Plus/Minus/Weight
Selection Control Pads
(11) Delay/Stand Pad
(12) Auto Sensor microwave
Program Pad
(13) Auto Sensor Combination
Program Pad
(14) Auto Weight Combination
Program Pads
(15) Start Pad:
Press to start operating the
oven. If during cooking the
door is opened or Stop/Cancel
Pad is pressed once, Start
Pad has to be pressed again
to continue cooking.
(16) Stop / Cancel Pad
Before cooking: one press
clears your instructions.
During cooking: one press
temporarily stops the cooking
program. Another press
cancels all your instructions
and the time of day will
appear in the display.
Beep Sound: A beep sounds when a button is pressed. If this beep does not sound, the setting
is incorrect. When the oven changes from one function to another, two beeps sound. After
completion of cooking, five beeps sound.
Combi
1
10
h
min
1
10
min
s
M
g
NN-CT857W
Page 9
En-7
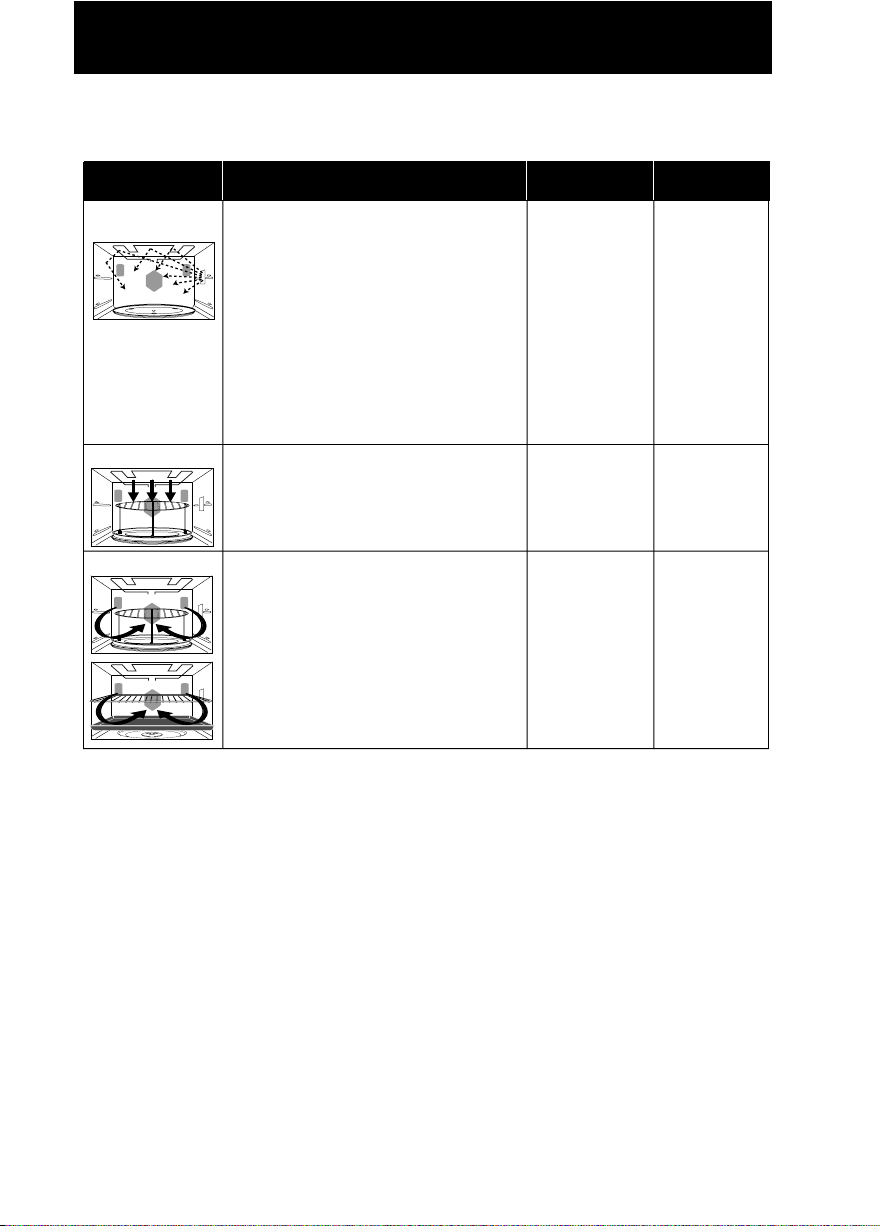
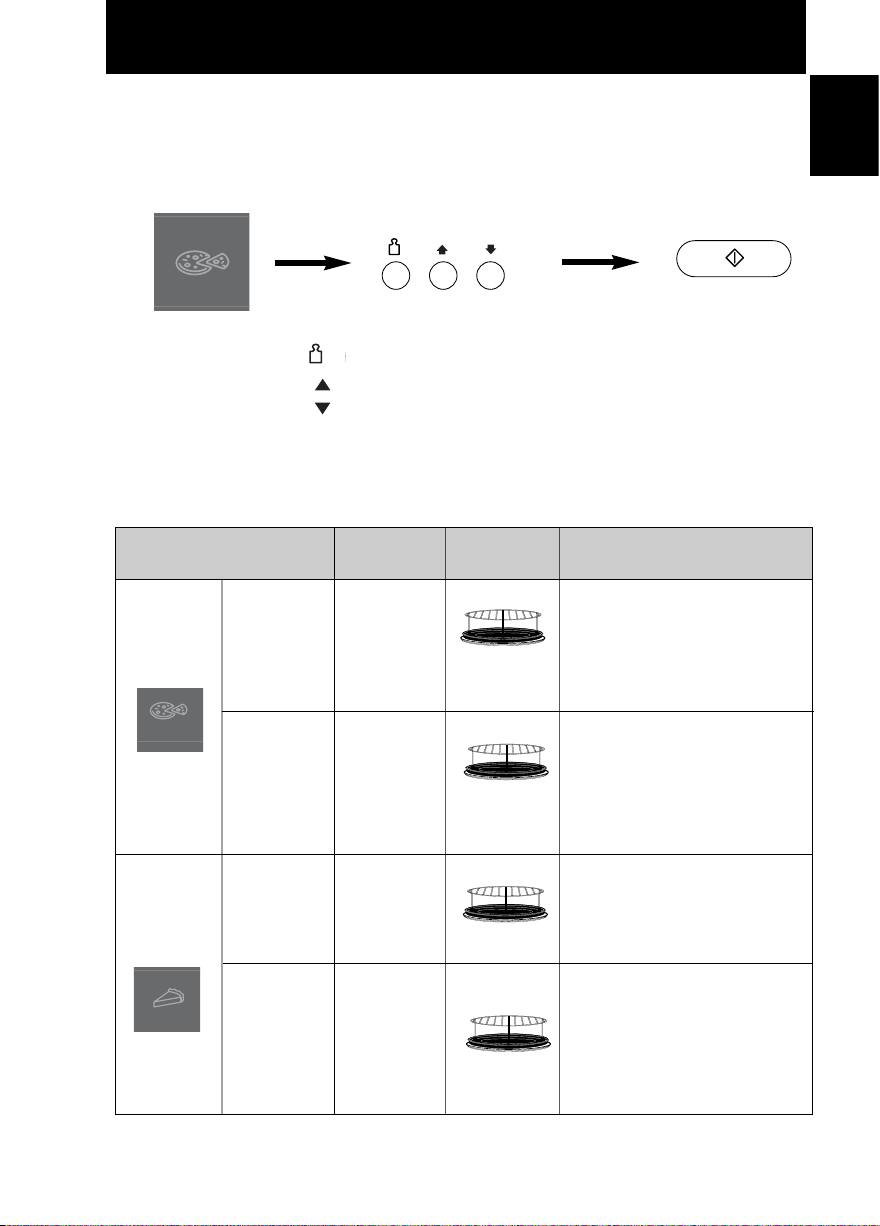
Choosing the right Cooking Mode
Containers
Accessories
to use
Uses
Cooking modes
Microwave
- Defrosting
- Reheating
- Melting : butter, chocolate, cheese.
- Cooking fish, vegetables, fruits, eggs.
- Preparing : stewed fruits, jam,
sauces, custards, choux, pastry,
béchamel, caramel, meat, fish or
vegetarian loaves.
- Baking cakes with eggs and baking
powder ingredients without colour.
(Victoria sandwich, clafoutis etc.)
No Preheating
Glass turntable
only
Microwaveable,
no metal.
Grill
- Grilling of meat or fish.
- Toast grilling.
- Colouring of gratin dishes or
meringue pies.
Preheating necessary
Glass turntable
+ metal tray +
round rack
Heatproof,
metal tin can
be used.
CONVECTION
- Baking of small pastry items with
short cooking times : puff
pastry, cookies, choux, short pastry
cookies, roll cakes.
- Special baking : souffles,
meringues, vol-au-vent, small
loaves of bread or brioches,
sponge cake, meat pie, etc.
- Baking of quiches, pizzas and tarts.
Preheating advised
Glass turntable
+ metal tray +
round rack or
enamel shelf
and/or wire shelf
Heatproof,
metal tin can
be used.
Page 10
En-8
English
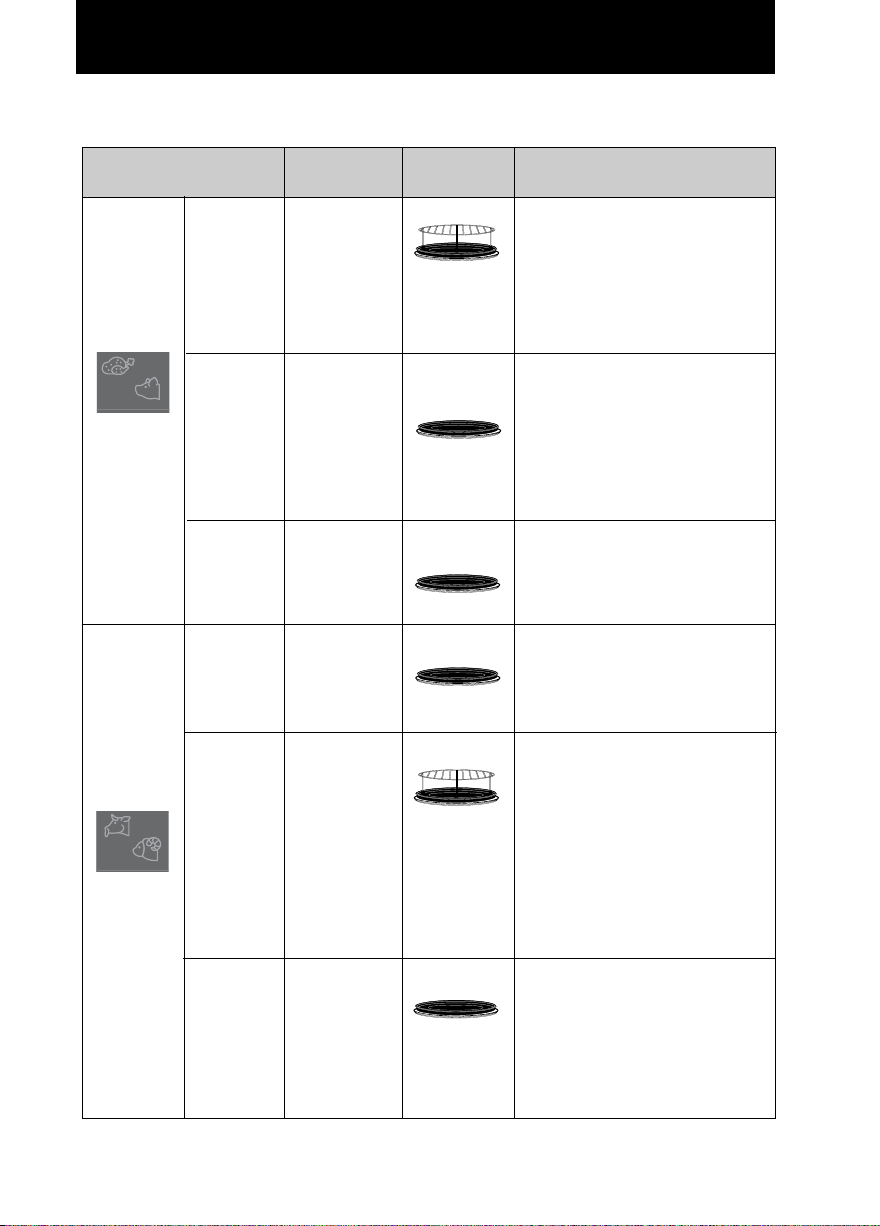
Choosing the right Cooking Mode
Containers
Accessories
to use
Uses
Cooking modes
COMBINATION
• Grill +
microwave
• Convection +
microwave
• Grill +
convection +
microwave
- Roasting meat and poultry.
- Defrosting and reheating crunchy foods
(quiche, pizza, bread, viennoiserie,
lasagne, gratin.)
- Cooking lasagne, meat, potatoes or
vegetable gratins.
- Baking cakes and puddings with eggs
or baking powder ingredients with
browning, baking of quiches, pies and
tarts.
Preheating advised
Glass turntable
+ metal tray +
round rack
(depending on
food size for the
latter)
Microwaveable
and heatproof.
Metal cake tin
to be used on
metal tray
only. DO NOT
USE spring
form tins.
Grill + microwave
convection + microwave
grill + convection
+ microwave
Grill + Convection
- Roasting red meats, thick steak
(rib or beef, Tbone steaks)
- braising of fish.
Preheating necessary
Glass turntable +
metal tray +
round rack or
enamel shelf
and/or wire shelf
Heatproof,
metal tin can
be used.
Page 11
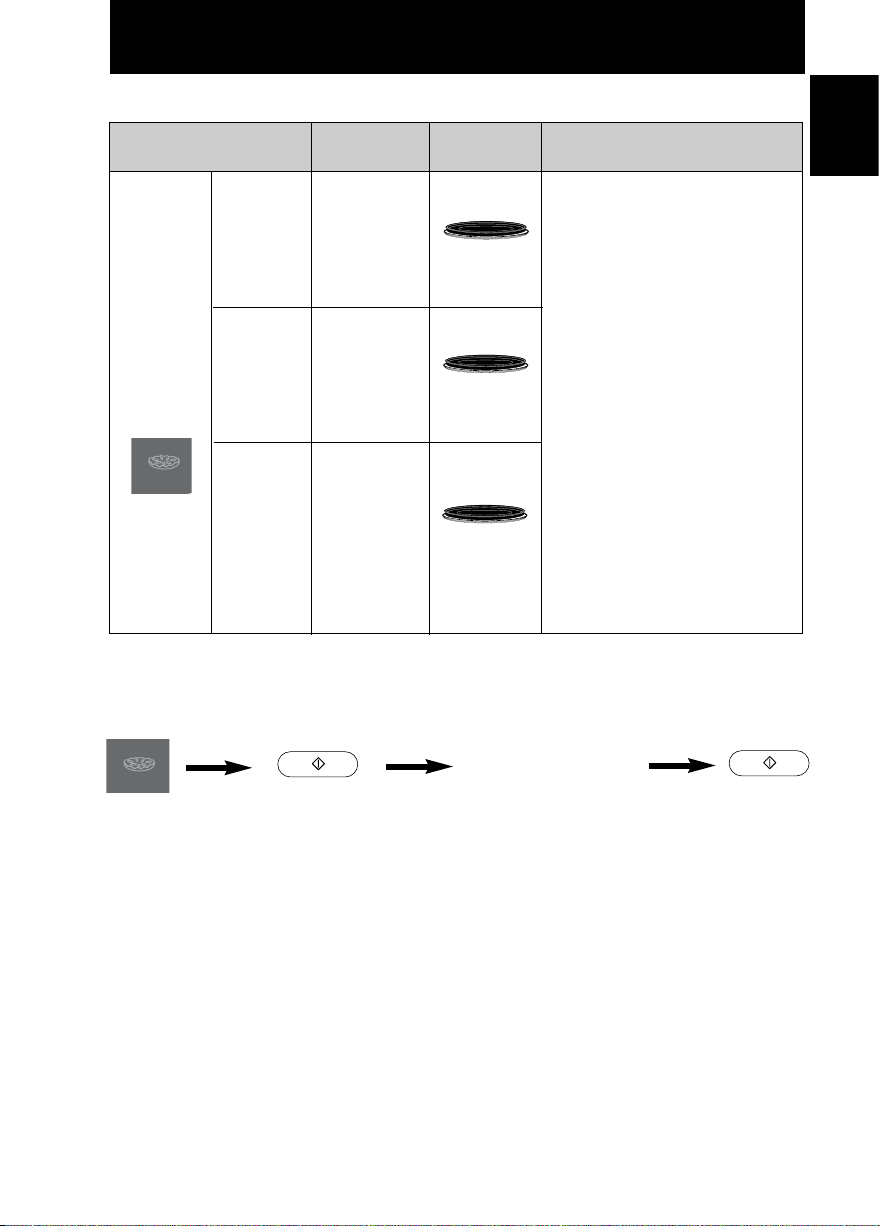
En-9
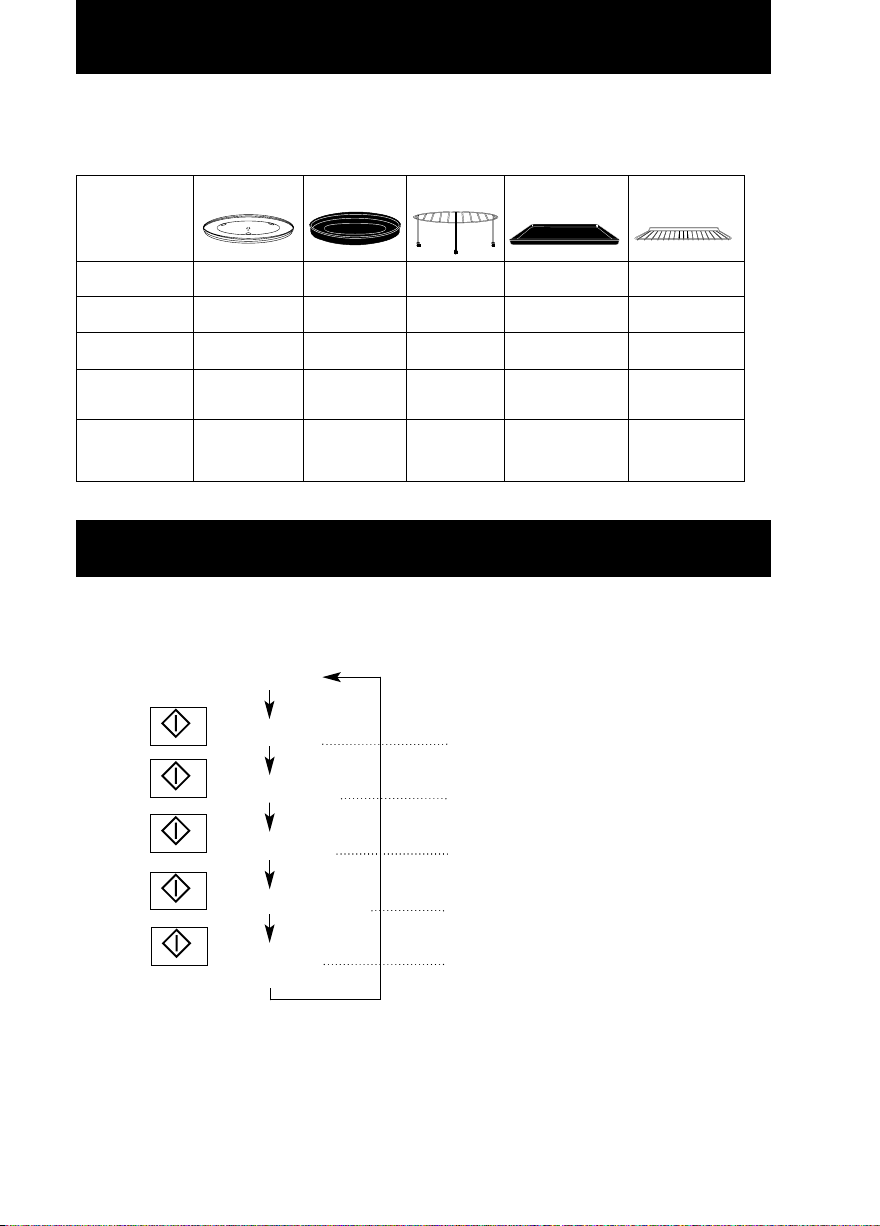
Oven Accessories
Glass Tray
Metal Tray
Round Rack
Enamel Shelf Wire Shelf
Microwave
Grill
Convection
Grill
Convection
Combination
YES
YES
YES
YES
YES
NO
YES
YES
YES
YES
NO
YES
YES
YES
NO
NO
YES
YES
YES
YES
NO
YES
YES
YES
NO
The following chart shows correct use of the accessories in the oven.
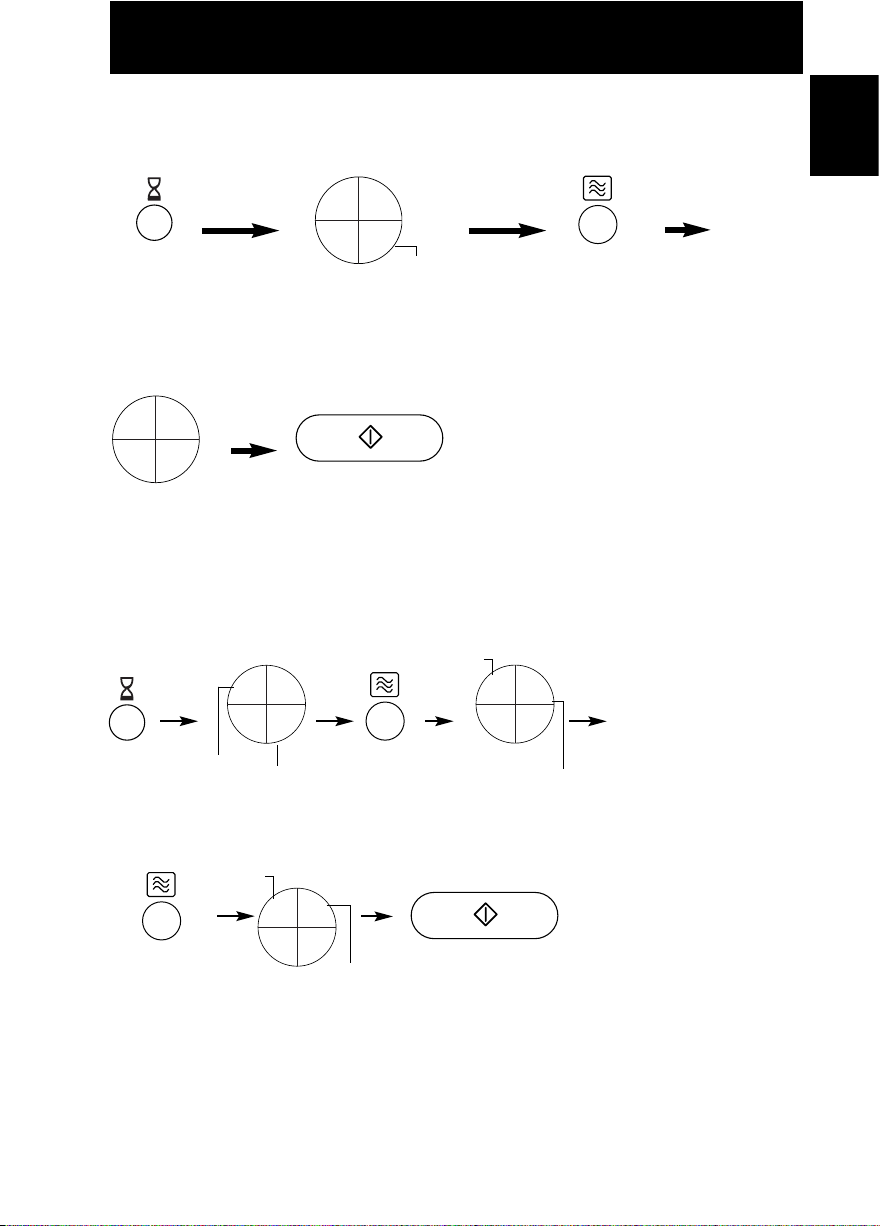
Word Prompting:
Controls and Operation Procedure
Word Prompting
In English e.g. “SET TIME”
In German eg. “UHRZEIT EINGEBEN”
In French e.g. “CHOISIR LA DUREE”
In Dutch e.g. “STEL DE TIJD IN”
In Italian e.g. “INSERITE IL TEMPO”
“88:88”
“ENGLISH”
“DEUTSCH”
“FRANCAIS”
“NEDERLANDS”
“ITALIANO”
These models have a unique function “Word Prompting” which guides you through the operation
of your microwave. After plugging in the oven press the Start Button until you locate your
language. As you press the buttons, the display will scroll the next instruction eliminating the
opportunities for mistakes. If for any reason you wish to change the language displayed, unplug
the oven and repeat this procedure.
Plug-in
Press
Press
Press
Press
Press
Page 12
En-10
English
Controls and operation Procedure
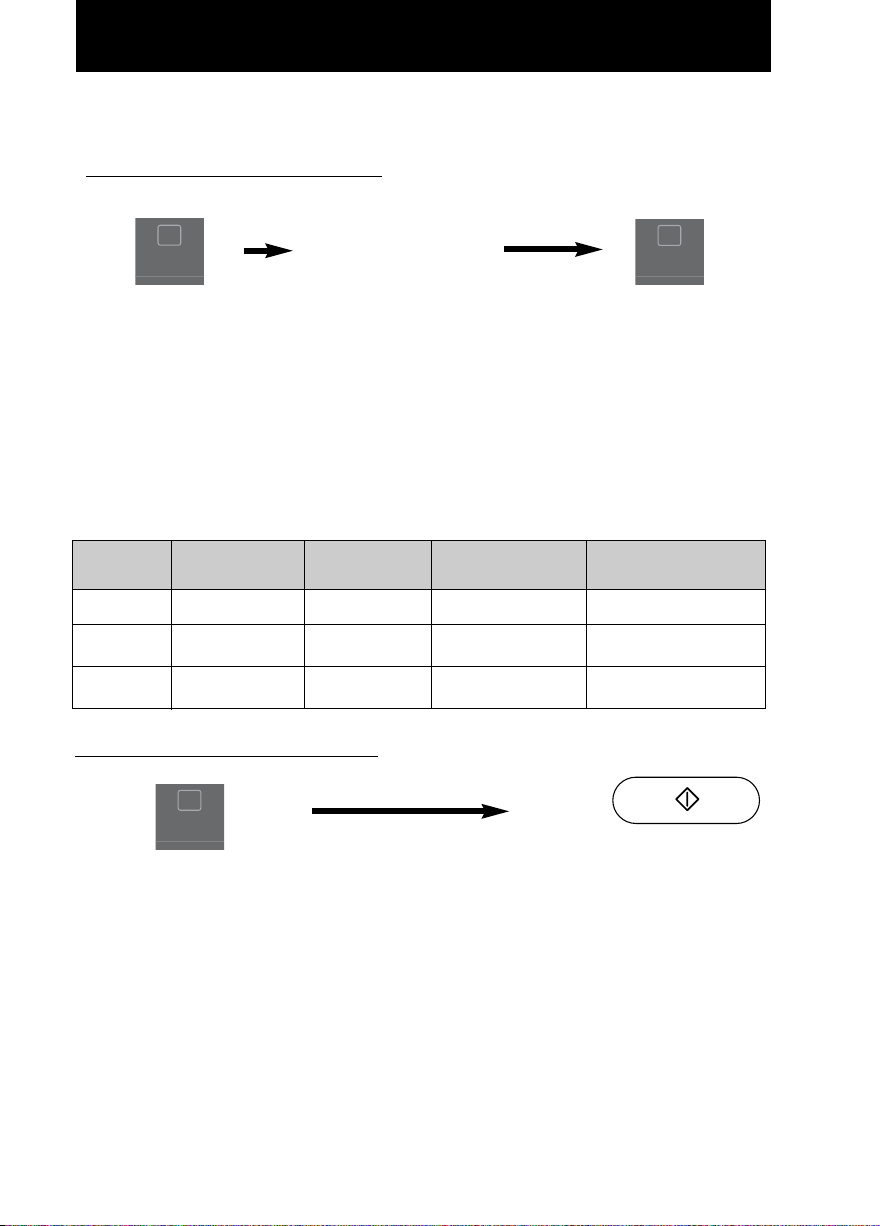
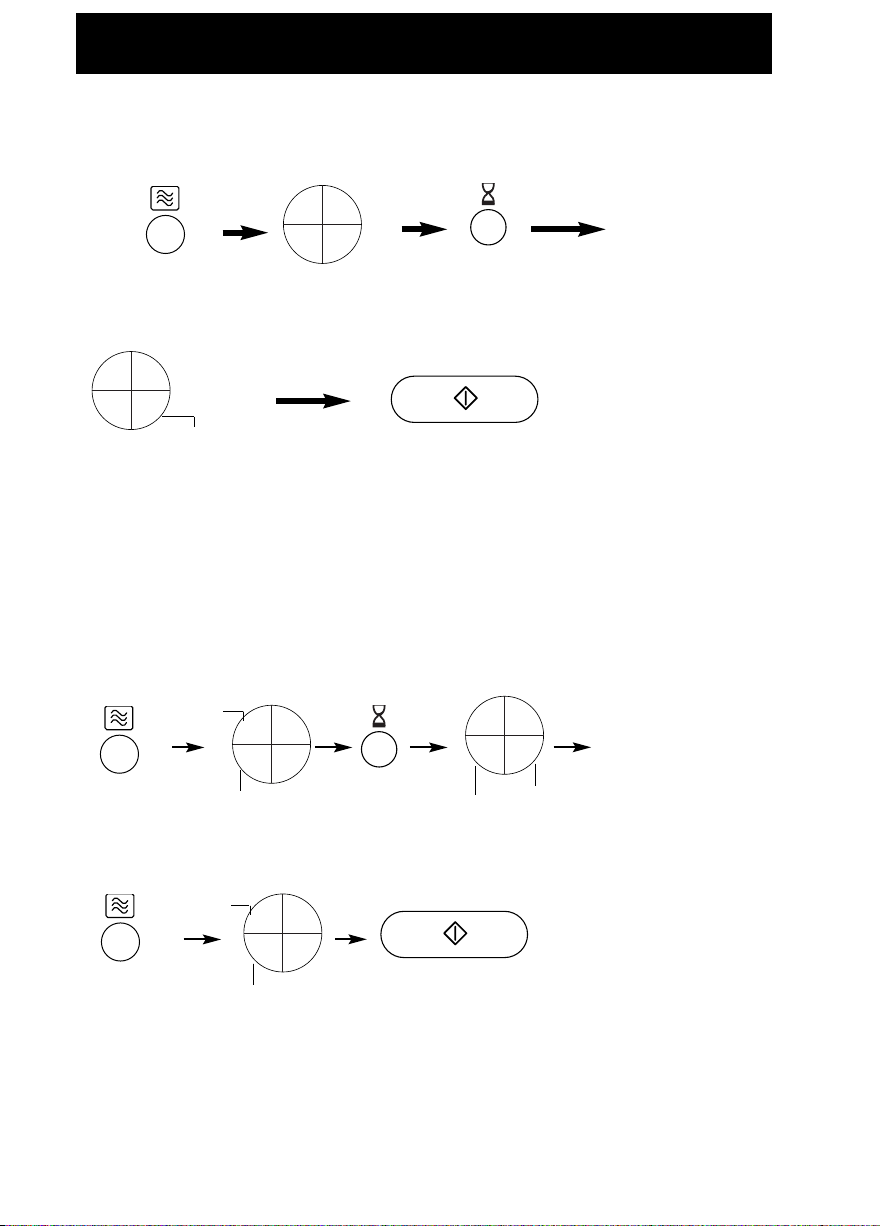
Child Safety Lock:
Using this system will make the oven controls inoperable; however, the door can be
opened. Child Lock can be set when the display shows a colon or the time.
To Set:
To Cancel:
• Press Start Pad three times.
The time of day will disappear.
Actual time will not be lost.
• Press Stop/Cancel Pad three times.
The time of day will reappear in the
display.
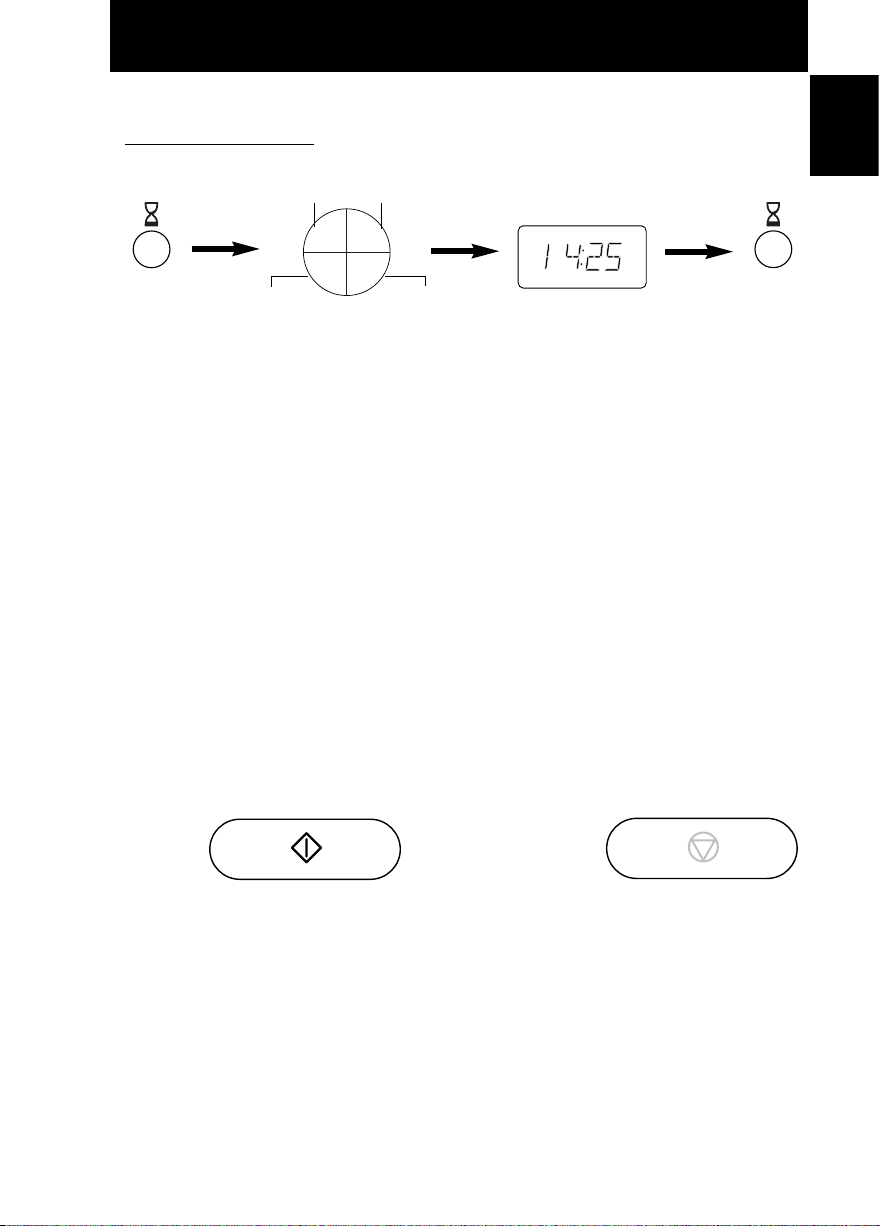
Clock Setting:
Example: To set 14:25
• Press Delay/Stand
Pad twice.
The colon starts
to blink.
• Enter the time by pressing
the appropriate Time
Pads.
The time appears in the
display and the colon
blinks.
• Press Delay/Stand Pad
once.
The colon stops blinking
and the time of day is
entered.
NOTE:
1. To reset the time of day repeat all the above steps.
2. The time of day is displayed, unless the power supply is interrupted.
3. This clock has a 24 hour display.
14 times twice
inoperable
5 times
10
min
1
min
10
s
1
h
Page 13
En-11
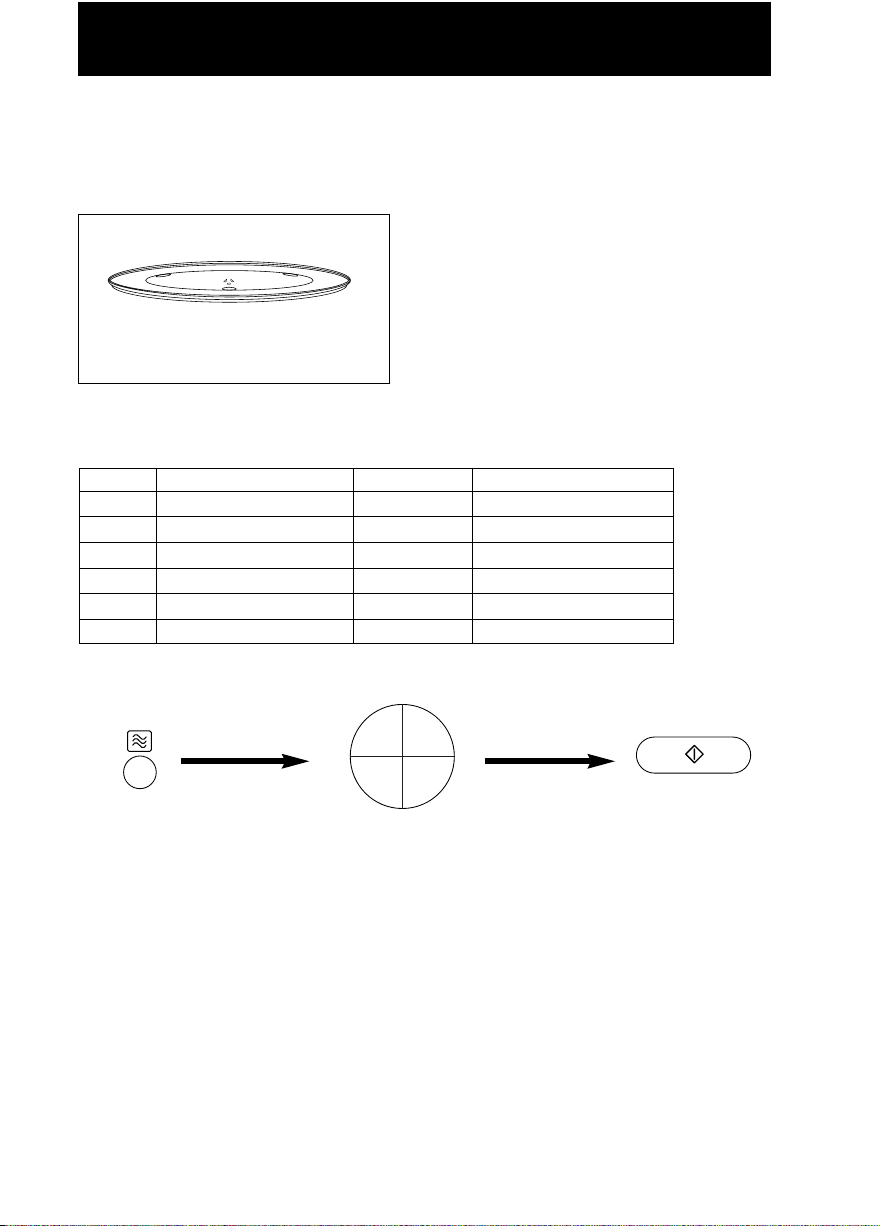
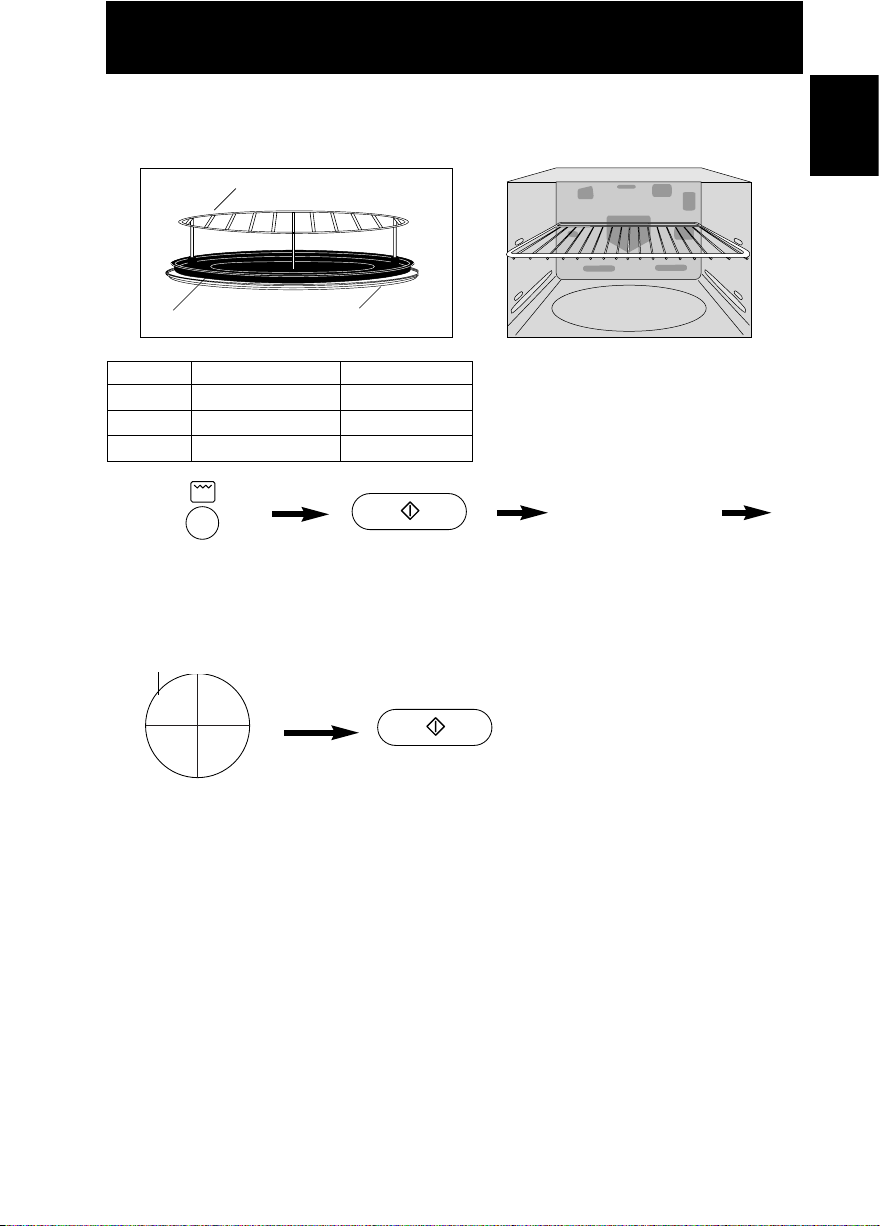
Microwave Cooking and Defrost
There are 6 different microwave power levels available (see the chart below).
Glass Tray
Press Power Level Wattage Max time available
once HIGH power 1000 W 30 minutes
twice DEFROST power 270 W 99 min. 90 sec.
3 times MEDIUM power 600 W 99 min. 90 sec.
4 times LOW power 440 W 99 min. 90 sec.
5 times SIMMER power 250 W 99 min. 90 sec.
6 times WARM power 100 W 99 min. 90 sec.
This chart shows approximate wattage for each power level.
Use of accessory:
• Select Microwave
power level.
• Set the cooking time.
• Press Start Pad.
NOTE:
1. For 2 or 3 stage cooking, before pressing Start Pad, repeat setting the Microwave power level
and cooking time.
e.g. Casserole - High 10 minutes to bring the casserole to boil. Simmer 60 minutes to cook.
Warm 10 minutes to allow flavours to develop.
2. Stand time can be programmed after the Microwave power and time setting.
3. You can add to the cooking time during cooking, if required. Press 1 min pad to increase the
cooking time. Time can be added in 1 minute increments up to maximum time available.
CAUTION: The oven will automatically operate on 1000 W Microwave Power if a cooking
time is entered without selecting the power level.
10
min
1
min
10
s
1
h
1
10
h
min
1
10
min
s
Page 14
En-12
English
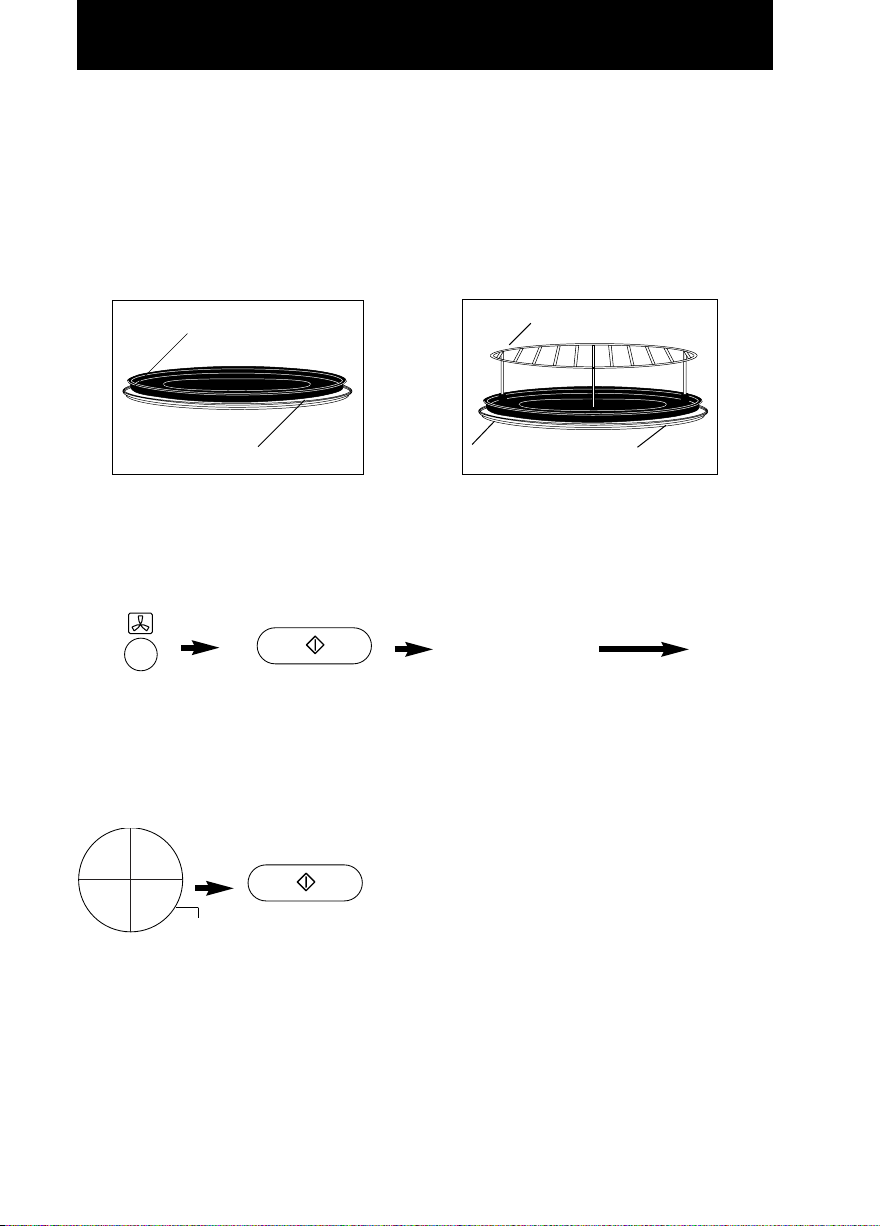
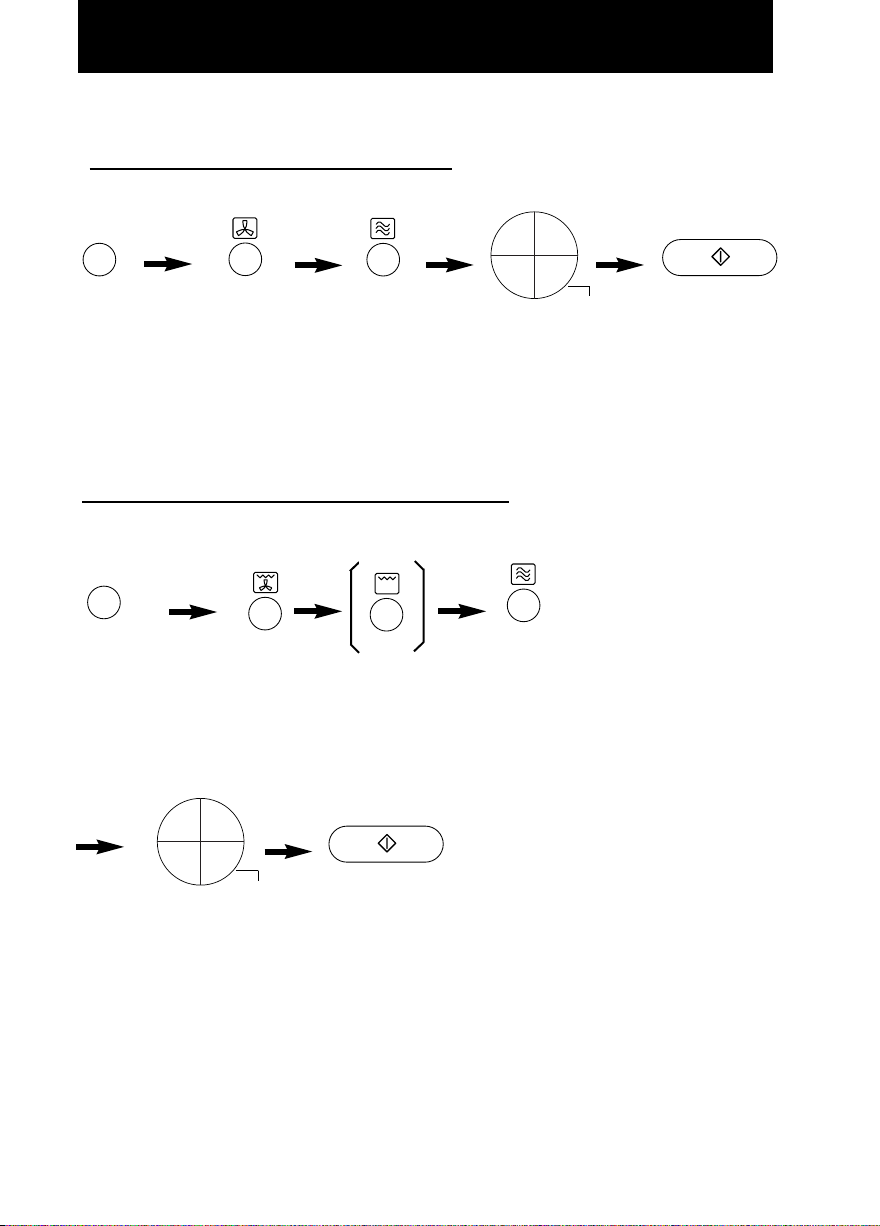
Grilling
The Grill Pad provides 3 Grill settings.
Press Power Level Wattage
once 1 HIGH 1500 W
twice 2 MEDIUM 1200 W
3 times 3 LOW 950 W
Round Rack
Metal Tray
Glass Tray
Use of accessory:
• Press Grill Power
Pad for the desired
Grill setting.
• Set the cooking time
(up to 99 minutes
90 seconds).
• Press Start Pad.
• Press Start Pad to
start preheating.
After preheating,
place the food in
the oven.
inoperable
NOTE ON PREHEATING:
1. Do not open the door during preheating. After preheating 3 beeps will be heard and the “P”
will flash in the display window. If the oven door is not opened after preheating, the oven will
maintain the selected temperature for 30 minutes. After 30 minutes, the oven will shut off
automatically and revert to time of day.
2. If you want to cook without preheating, after selecting the Grill power, set the cooking time
then press Start Pad.
NOTE:
1. The Grill will only operate with the oven door closed.
2. You can add to the cooking time during cooking, if required. Press 1 min pad to increase the
cooking time. Time can be added in 1 minute increments, up to 99 minutes.
1
10
h
min
1
10
min
s
Page 15
En-13
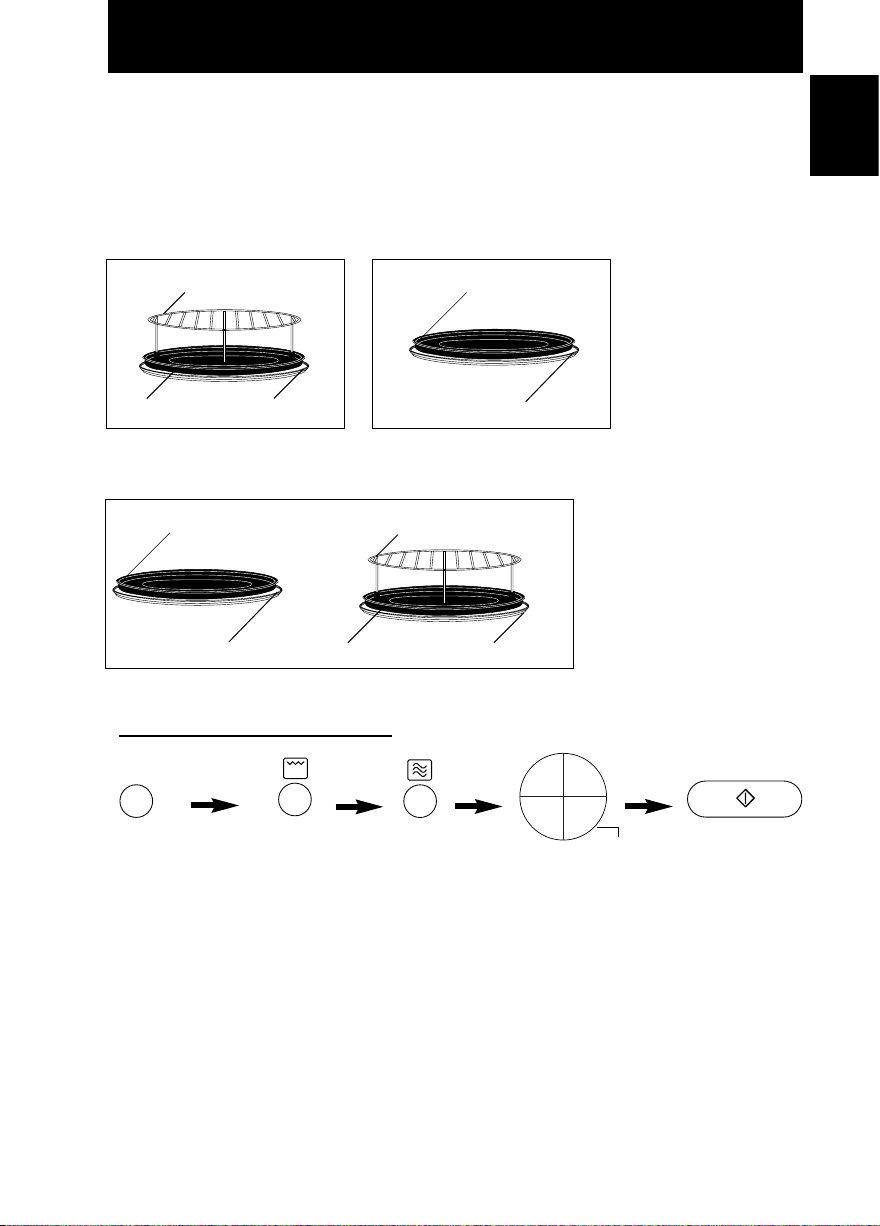
Cooking by Convection / Grill Convection
These Pads offer a choice of convection temperatures 40°C (only for Convection mode) and
100 - 250°C in 10°C increments. For quick selection of the most commonly used cooking
temperatures, the temperatures start at 150°C and count up to 250˚C then 40˚C (only for
Convection mode) and 100°C. It is possible to cook on one or two levels when using convection
cooking. See En-15 for shelf cooking.
Use of accessory: For one level cooking.
If using the turntable.
Metal Tray
Glass Tray
Round Rack
Metal Tray Glass Tray
Grill Convection
Convection
Cooking by Convection:
• Set the desired
temperature.
• Set the cooking time
(up to
9 hours 99 minutes).
• Press Start Pad.
• Press Start
Pad to start
preheating.
After preheating,
place the food in
the oven.
inoperable
1
10
h
min
1
10
min
s
Page 16

En-14
English
• Set the cooking time
(up to 9 hours
99 minutes).
• Press Start
Pad.
• Press Start Pad to
start preheating.
After preheating,
place the food in
the oven.
• If desired to
change Grill
power press
once; Medium
twice; Low.
• Set the desired
temperature. (Grill
power is preset to
High.)
Cooking by Convection / Grill Convection
NOTE ON PREHEATING:
1. Do not open the door during preheating. After preheating 3 beeps will be heard and the
“P” will flash in the display window. If the oven door is not opened after preheating, the
oven will maintain the selected temperature. After 30 minutes, the oven will shut off
automatically and revert to time of day.
2. If you want to cook without preheating, after selecting the desired temperature, set the
cooking time then press Start Pad.
NOTE:
1. When the selected cooking time is less than one hour, the time counts down second by
second.
2. When the selected cooking time is over one hour, the time counts down minute by minute
until only “1H 00” (1 hour) remains. The display then indicates minutes and seconds and
counts down second by second.
3. You can add to the cooking time during cooking, if required. Press 1 min pad to increase
the cooking time. Time can be added in 1 minute increments.
4. After pressing Start Pad, the selected temperature can be recalled and changed. Press
Convection or Grill Convection Pad once to indicate the temperature in the display
window. While the temperature is recalled in the display window, you can change the
temperature by pressing Convection or Grill Convection Pad.
inoperable
10
min
1
min
10
s
1
h
Cooking by Grill Convection:
Page 17
En-15
Cooking by Convection/Grill Convection
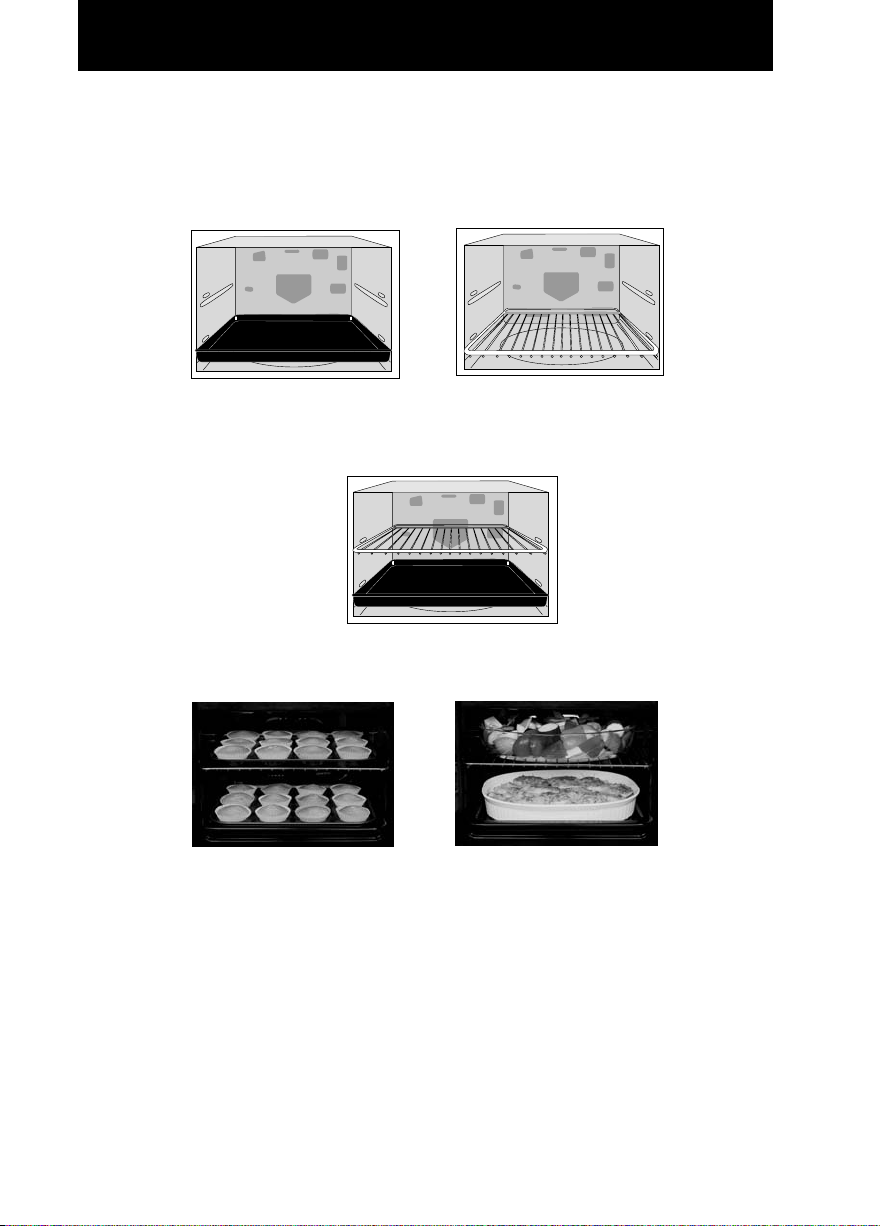
Two Level Cooking
When cooking on two levels use both the shelves supplied, with the enamel shelf on the lower
level and the wire shelf on the upper level.
The shelves are ideal for batch baking and when cooking in a large dish that will not turn on the
turntable.
NOTE:
1. When cooking with one or both of the shelves, remove all other accessories
(glass tray, roller ring and metal tray).
2. Ensure that the shelves are inserted correctly, and are secure before use.
3. Do not place a dish of food weighing more than 5Kg on each shelf.
4. ALWAYS USE OVEN GLOVES WHEN REMOVING THE FOOD AND ACCESSORIES AFTER
COOKING AS THE OVEN & ACCESSORIES WILL BE VERY HOT.
5. When removing food, only pull the shelf out halfway and then remove the food. The wire shelf
will lock in position.
6. If baking longer than 20 minutes at a high temperature (more than 210°C), it is preferable to turn
the shelves halfway during cooking time.
Batch Baking
Enamel Shelf
Wire Shelf
One Level Cooking
If using a shelf for one level cooking, place on the lower level.
Shelf Cooking
Depending on the recipe, you can preheat with or without the shelves in position. See individual
recipes for details.
Cooking Large Dishes of
Food
Page 18
En-16
English
Combination Cooking
Round Rack
Metal Tray Glass Tray
Grill + Microwave Convection + Microwave
1) Grill + Microwave
• Press
Combination
Pad.
• Set the desired
Grill setting.
• Press Start
Pad.
There are 3 combinations settings; 1) Grill + Microwave, 2) Convection + Microwave, 3) Grill
Convection + Microwave. 1000 W Microwave power level is not available on Combination
cooking. This would not be useful in normal use (the food would be cooked before browning is
achieved).
Use of accessory:
Metal Tray
Glass Tray
Grill Convection + Microwave
Round Rack
Metal Tray Glass Tray
Metal Tray
Glass Tray
or
inoperable
10
min
1
min
10
s
1
h
• Set the
desired
microwave
power level.
• Set the desired
cooking time (up to
9 hours 99 minutes).
NOTE ON PREHEATING:
The oven can be preheated on Combination cooking. Press Start Pad before setting the
cooking time and follow the NOTE ON PREHEATING on page En-14.
Combi
Page 19
En-17
Combination Cooking
2) Convection + Microwave
• Press
Combination
Pad.
• Set the
desired
temperature.
• Set the desired
Microwave
power level.
• Set the desired
cooking time (up to
9 hours 99 minutes).
• Press Start Pad.
3) Grill Convection + Microwave
• If desired to
change Grill
power press
once; Medium
twice; Low.
• Set the desired
temperature. (Grill
power is preset to
High.)
inoperable
10
min
1
min
10
s
1
h
• Set the desired
cooking time (up to
9 hours 99 minutes).
• Press Start Pad.
inoperable
10
min
1
min
10
s
1
h
• Set the desired
Microwave
power level.
• Press
Combination
Pad.
NOTE ON PREHEATING:
The oven can be preheated on Combination cooking. Press Start Pad before setting the
cooking time and follow the NOTE ON PREHEATING on page En-14.
Combi
Combi
Page 20

En-18
English
Combination Cooking
NOTE ON PREHEATING:
The oven can be preheated on Combination cooking. Press Start Pad before setting the
cooking time and follow the NOTE ON PREHEATING on page En-14.
NOTE:
1. When the selected cooking time is less than one hour, the time counts down second
by second.
2. When the selected cooking time is over one hour, the time counts down minute by
minute until only “1H 00” (1 hour) remains. The display then indicates minutes and
seconds and counts down second by second.
3. You can add to the cooking time during cooking, if required. Press 1 min pad to
increase the cooking time. Time can be added in 1 minute increments, up to
99 minutes.
4. After pressing Start Pad, the selected temperature can be recalled by pressing
Combination Pad. The selected setting appears in the display for 2 seconds.
Page 21
En-19
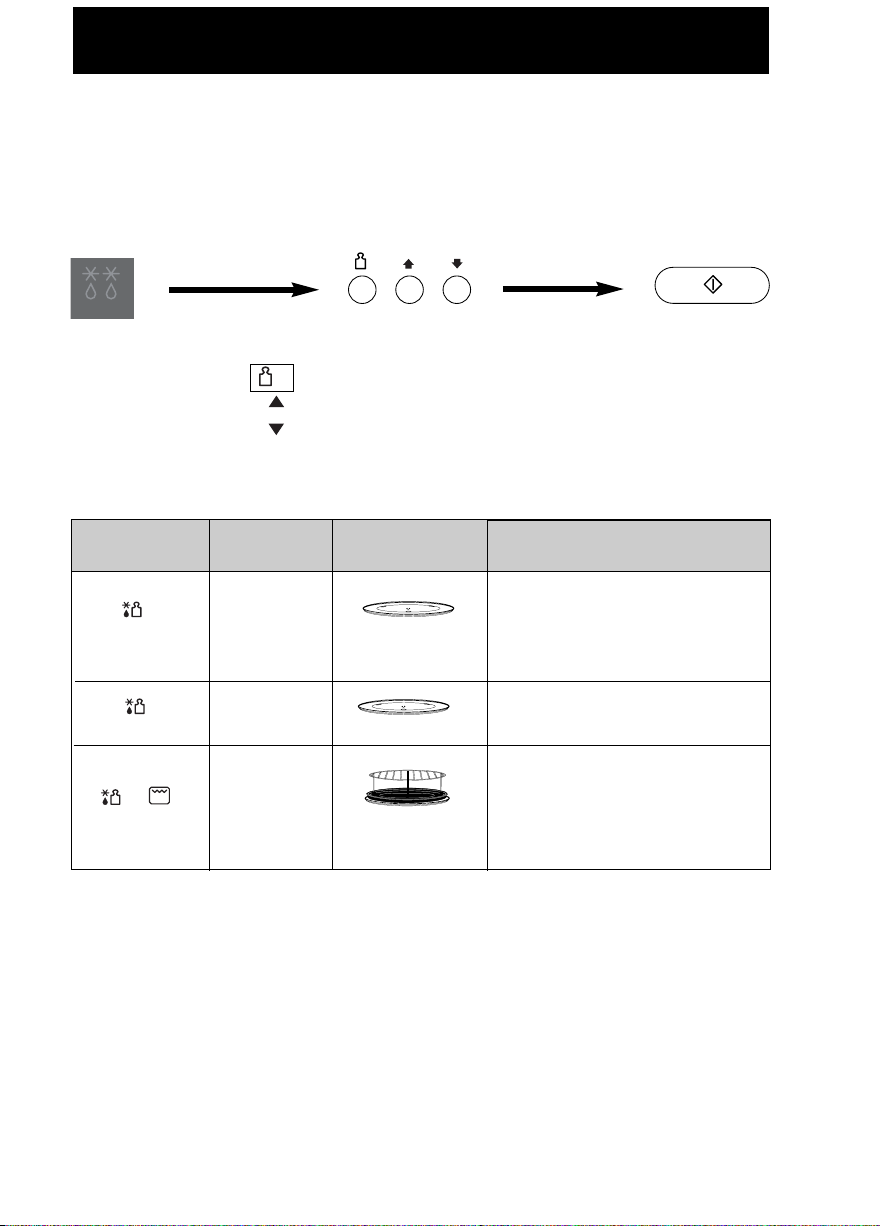
With this feature you can defrost frozen foods according to the weight. Select the
category and set the weight of the food. The weight is programmed in grams. For
quick selection, the weight starts from the most commonly used weight for each
category.
Auto Defrost
• Select the
desired Auto
Defrost
Program.
• Set the weight of the frozen food.
weight counts up in 100 g increments
weight counts up in 10 g increments
weight counts down in 10 g increments
• Press Start
Pad.
g
Program
Weight
Accessories
Suitable Foods
100 - 1600 g
Small pieces of meat, escallop,
sausages, fish fillets, steaks,
chops.
(each 100 g to 400 g). Turn at
beeps.
400 - 2000 g
Big pieces of meat, roast,
whole chicken. Turn at beeps.
70 - 400 g
For reheating frozen bread,
rolls and croissants. Remove all
packaging and place on Round
Rack on Metal Tray on Glass Tray.
Place large whole loaf directly on
the metal tray. Turn at beeps.
NOTE:
1. When the defrosting time is longer than 60 minutes, the time will appear in hours
and minutes.
2. The shape and size of the food will determine the maximum weight the oven can
accommodate.
NOTE on Program 3:
Take care when removing Bread and Rolls from the oven. The oven and
accessories will get hot during/after defrosting.
g
Bread
Big Pieces
Small Pieces
g
1
2
3
Page 22
En-20
English
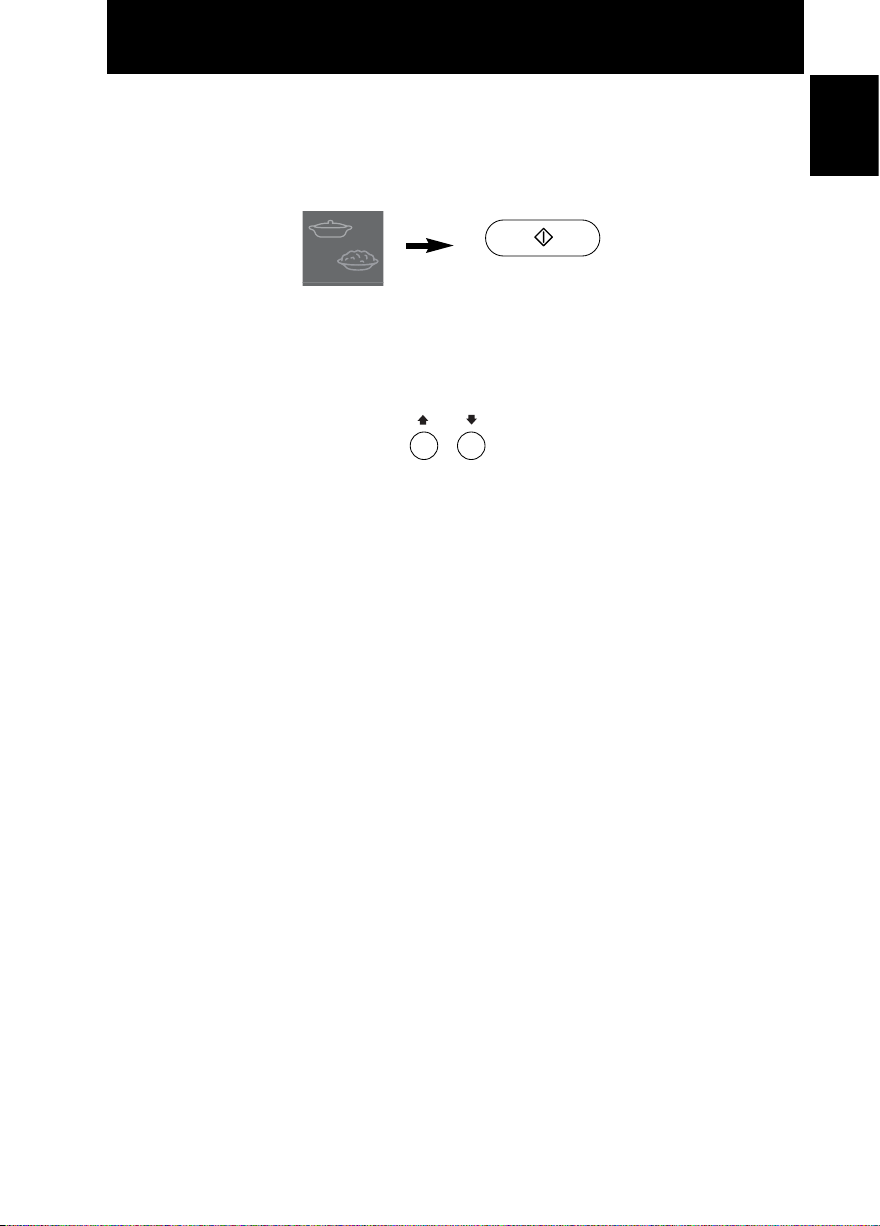
Auto Sensor Programs
A variety of food may be cooked without having to enter the cooking time, weight or
the power level.
Plus/Minus Control:
Preferences for degree of cooking vary for each individual. After having used Auto
Sensor Programs a few times, you may decide you would prefer your food cooked
to a different degree of cooking. By using Plus/Minus control, the programs can be
adjusted to cook food for a longer or shorter time. Press or pad before
pressing Start Pad. If you are satisfied with the result of the Auto Sensor Programs,
you do not have to use this control.
NOTE:
1. Auto Sensor Programs cannot work within 3 minutes after plug-in.
2. The oven automatically calculates the cooking time or the remaining cooking time.
3. The door should not be opened before the time appears in the display window.
4. The temperature for frozen food is assumed to be -18°C to -20°C, for other types of
food +5°C to +8°C (refrigerator temperature). The reheat pasta/rice and reheat
soup programs are suitable for foods at refrigerator or room temperature.
5. To prevent any mistakes during Auto Sensor Programs ensure that Glass Tray and
the plate are dry.
6. The room temperature should not be more than 35°C and not less than 0°C.
7. Only cook foods within the recommended weight range described on page En-21.
8. If the oven has previously been used on Convection, Grill Convection, Combination
or Grill, and it is too hot to be used on an Auto Sensor Program, “HOT” will appear
in the display window. After the “HOT” disappears, the Auto Sensor Programs may
be used. If in a hurry, cook food manually by selecting the correct cooking mode
and cooking time yourself.
e.g.
• Select the
desired Auto
Sensor Program.
• Press Start Pad.
Page 23
En-21
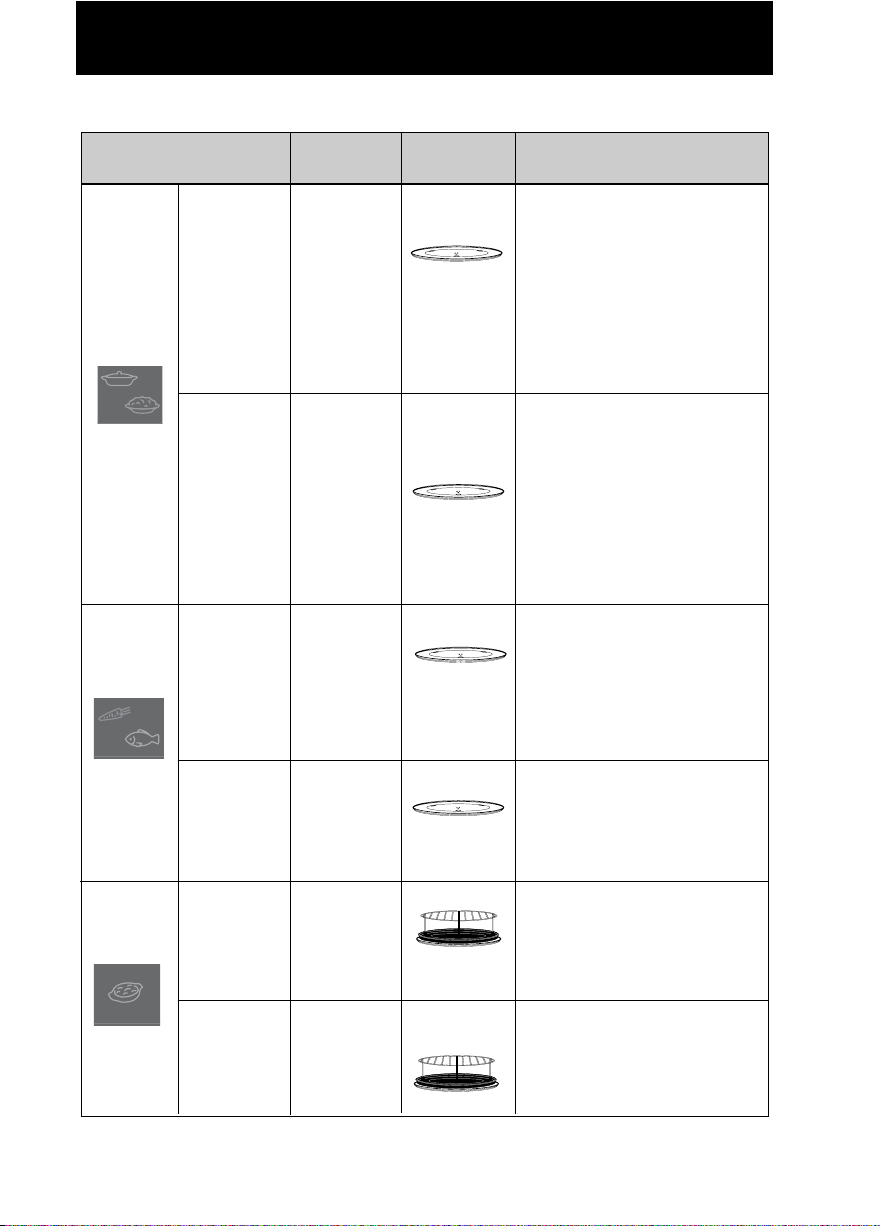
Auto Sensor Programs
Category
Weight
Accessories
Instructions
3 Cook
Fresh
Vegetables
200 - 1500 g
4 Cook
Fresh
Fish
200 - 1000 g
5 Reheat
Frozen
Gratin
300 - 1000 g
6 Reheat
Fresh
Gratin
200 - 1000 g
For cooking fresh vegetables.
Place the prepared vegetables in
a suitable sized container.
Sprinkle with 6 tbsp (90 ml) of
water. Cover them lightly with
pierced cling film or a lid. Large
quantities will require stirring at
beep.
For cooking fresh fish (whole
- no more than 300 g each,
fillets, steaks). Place it in a
suitable sized container. Add 2
tbsp (30 ml) liquid. Cover with
pierced cling film or a lid.
For reheating and browning
frozen gratin. Remove all
packaging and place the gratin
in a heat-proof dish on Round
Rack on Metal Tray on Glass
Tray.
For reheating and browning
fresh gratin. Remove all
packaging and place the gratin
in a heat-proof dish on Round
Rack on metal Tray on Glass
tray.
1 Reheat
Soup
300 - 1200 g
For reheating tetra, canned or
homemade soups. All foods
should be at room or
refrigerated temperatures. Stir
before and after reheating. It is
preferable to cover with a lid or
plate or saucer. Final
temperature of soup may vary
depending on thickness of soup,
starting temperature, sugar and
fat content of soup.
2 Reheat
Rice/Pasta
200 - 1200 g
For reheating pre-cooked
canned, vacuumed packed or
homemade pasta, rice or
potatoes. All foods should be at
room or refrigerated temperatures.
Stir before and after reheating. It
is preferable to cover with a lid or
plate. Final temperature may vary
depending on the amount of
sauce, fat content of sauce and
starting temperature
.
Page 24
En-22
English
Auto Weight Programs
This feature allows you to cook most of your favourite foods by setting the weight only. The
oven determines Microwave power level, Grill setting, Convection temperature and cooking
time automatically. Select the category and set the weight of the food. The weight is
programmed in grams. For quick selection, the weight starts from the most commonly used
weight for each category.
e.g.
• Set the weight of the frozen food.
weight counts up in 100 g increments
weight counts up in 10 g increments
weight counts down in 10 g increments
• Press Start
Pad.
g
• Select the desired
Auto Weight
Program.
NOTE:
1. When cooking time is over 60 minutes, the time will appear as Hours and Minutes.
2. Follow the charts on the following pages for the recommended weight and
accessories to be used.
Category
Weight
Accessories
Instructions
For reheating and browning
the top of fresh purchased
pizza. Remove all packaging
and place the pizza on Round
Rack on Metal Tray on Glass
Tray.
7
Reheat
Fresh
Pizza
150 - 800 g
9
Reheat
Fresh
Quiche
150 - 900 g
For reheating pre-cooked,
fresh quiche. Remove all
packaging and place the
quiche on Round Rack on
Metal Tray on Glass Tray.
For reheating and browning
the top of frozen (NOT fresh)
purchased pizza. Remove all
packaging and place the pizza
on Round Rack on Metal Tray
on Glass Tray.
8 Reheat
Frozen
Pizza
100 - 700 g
10
Small
Pastry
Items
150 - 700 g
g
For reheating, crisping, and
browning small pastry items
such as sausage rolls, meat
friands, vegetable or mushroom
or ham and cheese friands or
feuilletés. Place directly on
Round Rack on Metal Tray on
Glass Tray.
g
Page 25
En-23
Category
Weight
14 Cook
Chicken
Pieces
15 Cook
Whole
Chicken
150 - 1500 g
1000 - 2800 g
16 Cook
Pork or
Veal
800 - 2000 g
17 Cook
Beef
700 - 1300 g
750 - 1400 g
Accessories
Instructions
For cooking chicken pieces e.g.
chicken legs, thighs or drumsticks. Place the chicken on
Round Rack on Metal Tray on
Glass Tray. For even cooking
spread out the chicken and turn at
beep.
18 Cook
Beef
Rib
For cooking whole fresh
unstuffed chicken. Cook the
stuffing separately. Place the
chicken on a heat-proof upturned
saucer on Metal Tray on Glass
Tray. Start cooking the breast side
down and turn at beep.
For cooking fresh roast pork or
veal. Place the pork in a heat-
proof shallow dish on Metal Tray
on Glass Tray. Turn at beep.
For cooking fresh roast beef.
Place the beef in a heat-proof
shallow dish on Metal Tray on
Glass Tray. Turn at beep.
For cooking fresh roast rib of
beef with the bone. Place the
beef rib in a heatproof dish on the
High Wire Rack on a Metal Tray
on Glass Tray. For larger joints
(above 1000 g) place directly on
the High Wire Rack. Turn at beep.
After cooking, rest for 10 mins out
of the oven. This program cooks
the meat rare to medium.
Auto Weight Programs
800 - 2200 g
19 Cook
Lamb
For cooking fresh roast lamb.
Place the lamb in a heat-proof
shallow dish on Metal Tray on
Glass Tray. Large legs of lamb
can be placed directly on the
Metal Tray. Turn at beep. This
program is not suitable for boned
roast lamb.
Page 26
It is necessary to preheat the oven for the tart programs. Use the following sequence:-
En-24
English
NOTE FOR AUTO TART MENU:
1. Only use metallic tins for baking the tart - aluminium, teflon coated or other light metal.
The depth of the average tart tin is 30 mm. Do not use loose-bottomed tins, carton
forms or light aluminium forms on this auto menu.
2. The end colour of the pastry case may vary depending on the quality of the pastry.
3. The top colour of the tart may vary depending on the type of filling. For this reason, you
may wish to stop cooking a few minutes before the end of the program.
4. Do not use this auto menu for baking pizza or double crust pies.
Category
Weight
Accessories
Instructions
4 - 6
servings
6 - 8
servings
8 - 10
servings
20 Tart
21 Tart
22 Tart
For baking Tart from raw ingredients
- see cook book for recipes.
E.g. Savoury Quiche - Quiche
Lorraine, mushroom tart, onion tart,
spinach tart.
Sweet Tart - Bourdaloue tart,
fromage frais tart, rubarb tart, apple
tart.
• Select Tart auto menu
press
servings
diameter
presses
servings
diameter
presses
servings
diameter
Auto Weight Programs
3
8-10
30 cm
2
6-8
27 cm
1
4-6
25 cm
•
Select tart
program 20,21
or 22, depending
on size of tart
After pre-heating beeps
sound. Place the tart in
the oven.
• Press the start
button to
pre-heat the
oven.
• Press start
• After baking, stand the Tart for
a few minutes. Remove from
the tin and cool on a rack.
Page 27
En-25
Memory
Memory
M
This feature allows you to pre-program your oven for regular reheating or cooking tasks. You
are able to pre-program your oven for a specific power level and time that is convenient for
you. You are able to pre-program three memory tasks.
To set a Memory Program
• Press Memory Pad.
The oven is automatically
pre-set to memory 1. To
select memory 2 press memory pad twice. To select
memory 3 press memory pad
three times.
Program the desired
cooking program.
•
Press Memory Pad to store
this task or press Start Pad to
start cooking in this
sequence.
Memory
M
To use a Memory Program
• Press Memory Pad.
Memory
M
• Press Start Pad to
begin cooking.
The oven is automatically
pre-set to memory 1. To
select memory 2 press memory pad twice. To select
memory 3 press memory pad
three times.
NOTE:
1. Auto programs cannot be programmed into memory.
2. Convection pre-heat mode cannot be programmed into memory.
3. Memory can only store 1 stage cooking. It is not possible to store 2 or 3 stage cooking.
4. Setting a new cooking program into memory will cancel the cooking program previouslystored.
5. Memory program will be cancelled if the power supply is off or the plug gets disconnected.
6. If you program into the memory the reheating of a baby bottle or a baby food jar, ensure you
test the temperature before feeding the baby.
This memory feature is pre-programmed to reheat 1 cup, 1 bowl or 2 bowls of hot drink (e.g. tea,
coffee, milk or soup.
Memory 1
Memory 2
Memory 3
1 Presses
2 Presses
3 Presses
1 Cup
1 Bowl
2 Bowls
150 ml
300 ml
2 x 300 ml
1000 W 80 secs.
1000 W 120 secs.
1000 W 240 secs.
No. of presses
Category
Recommended
Weight
Power and
Time
Page 28
En-26
English
Delay Start Cooking
By using Delay/Stand Pad, you are able to program Delay Start cooking.
NOTE:
1. Three stage cooking can be programmed including Delay Start cooking.
e.g.
2. If the programmed delay time exceeds one hour, the time will count down in units
of minutes. If less than one hour, the time will count down in units of seconds.
3. Delay Start cannot be programmed before any Auto Programs.
• Press
Delay/Stand
Pad.
• Set the delay time by
pressing Time Pads (up to
9 hours 99 minutes).
• Set the desired cooking
program and cooking time.
• Press Start Pad.
e.g.
Delay Start: 1 hour
High Power: 10 min.
Simmer Power: 20 min.
once
once
once
5 times twice
inoperable
inoperable
inoperable
inoperable
10
min
1
min
10
s
1
h
10
min
1
min
10
s
1
h
10
min
1
min
10
s
1
h
10
min
1
min
10
s
1
h
10
min
1
min
10
s
1
h
Page 29
En-27
By using Delay/Stand Pad, you can program Stand Time after cooking is completed
or use to program the oven as a minute timer.
• Set the desired cooking program
and cooking time.
• Press
Delay/Stand
Pad.
•
Set desired amount of time by
pressing Time Pads (up to 9
hours 99 minutes).
•
Press Start Pad.
NOTE:
1. Three stage cooking can be programmed including Stand Time.
e.g.
2. If the oven door is opened during the Stand Time or Minute Timer, the time in the
display window will continue to count down.
3. This feature may also be used as a timer. In this case press Delay/Stand Pad, set
time and press Start Pad.
e.g. To program stand time after cooking.
High Power: 4 min. Stand Time: 5 min.
High Power: 2 min.
inoperable
Stand Time
once
once
twice
inoperable
4 times
inoperable
5 times
inoperable
10
min
1
min
10
s
1
h
10
min
1
min
10
s
1
h
10
min
1
min
10
s
1
h
10
min
1
min
10
s
1
h
10
min
1
min
10
s
1
h
Page 30

En-28
English
Questions and Answers
Q: Why won’t my oven turn on?
A: When the oven does not turn on, check the
following:
1. Is the oven plugged in securely? Remove
the plug from the outlet, wait 10 seconds
and reinsert.
2. Check the circuit breaker and the fuse.
Reset the circuit breaker or replace the
fuse if it is tripped or blown.
3. If the circuit breaker or fuse is all right,
plug another appliance into the outlet. If
the other appliance works, there probably
is a problem with the oven. If the other
appliance does not work, there probably
is a problem with the outlet. If it seems
that there is a problem with the oven,
contact an authorized Service Center.
Q: My microwave oven causes interference
with my TV. Is this normal?
A: Some radio and TV interference might occur
when you cook with the microwave oven.
This interference is similar to the interference
caused by small appliances such as mixers,
vacuums, blow dryers, etc. It does not
indicate a problem with your oven.
Q: The oven won’t accept my program.
Why?
A: The oven is designed not to accept an
incorrect program. For example, the oven will
not accept a fourth stage, and will not accept
Auto Weight Program after Delay Start.
Q: Why is there no word prompt in my
display?
A: The power supply had been off at your home
or the plug disconnected. Repeat the
procedure described on page 9.
Q: Sometimes warm air comes from the
oven vents. Why?
A: The heat given off from the cooking food
warms the air in the oven cavity. This
warmed air is carried out of the oven by the
air flow pattern in the oven. There are no
microwaves in the air. The oven vents should
never be blocked during cooking.
Q: There are humming and clicking noises
from my oven when I cook by
COMBINATION. What is causing these
noises?
A: The noises occur as the oven automatically
switches from microwave power to
CONVECTION/GRILL to create the
combination setting. This is normal.
Q: Can I check the pre-set oven temperature
while cooking or preheating by
CONVECTION?
A: Yes. Press Convection Pad and the oven
temperature will appear in the display
window for 2 seconds.
Q:
Can I easily cook my favourite recipes
using CONVECTION/GRILL?
A: Yes. You can cook your favourite recipe just
as you would in a conventional oven. Check
instructions in the Panasonic Cookbook for
suggested oven temperatures and cooking
times.
Q:
“D” appears in the display and the oven
does not cook. Why?
A: The oven has programmed DEMO MODE.
This mode is designed for retail store display.
Deactivate this mode by pressing Clock Pad
four times.
Q:
Can I use a conventional oven
thermometer in the oven?
A: Only when you are using
CONVECTION/GRILL cooking mode. The
metal in some thermometers may cause
arcing in your oven and should not be used
on MICROWAVE and COMBINATION
cooking modes.
Q:
My oven has an odour and generates
smoke when using the CONVECTION,
COMBINATION and GRILL function. Why?
A: After repeated use, it is recommended to
clean the oven and then run the oven
without food, glass tray, and roller ring on
CONVECTION 250°C for 10 minutes. This
will burn off any food, residue or oil which
may cause an odour and/or smoking.
Page 31

En-29
Care of Your Oven
1. Turn the oven off before cleaning.
2. Keep the inside of the oven, door seals and door seal areas clean. When food
spatters or spilled liquids adhere to the oven walls, door seals and door seal areas
wipe off with a damp cloth. Mild detergent may be used if they get very dirty. The
use of harsh detergent or abrasive is not recommended.
DO NOT USE COMMERCIAL OVEN CLEANERS.
3. The outside oven surface should be cleaned with a damp cloth. To prevent damage
to the operating parts inside the oven, water should not be allowed to seep into the
ventilation openings. Do not use harsh abrasive cleaners or sharp metal scrapers to
clean the door glass since they can scratch the surface, which may result in
shattering the glass.
4. If the Control Panel becomes dirty, clean it with a soft, dry cloth. Do not use harsh
detergents or abrasives on the Control Panel. When cleaning the Control Panel,
leave the oven door open to prevent the oven from accidentally turning on. After
cleaning touch STOP/CANCEL Pad to clear the display window.
5. If steam accumulates inside or around the outside of the oven door, wipe with a soft
cloth. This may occur when the microwave oven is operated under high humidity
conditions and in no way indicates a malfunction of the unit.
6. It is occasionally necessary to remove the glass tray for cleaning. Wash the tray in
warm soapy water or in a dishwasher.
7. The roller ring and oven cavity floor should be cleaned regularly to avoid excessive
noise. Simply wipe the bottom surface of the oven with mild detergent and hot
water then dry with a clean cloth. The roller ring may be washed in mild soapy
water. Cooking vapours collect during repeated use but in no way affects the
bottom surface or roller ring wheels. After removing the roller ring from the cavity
floor for cleaning, be sure to replace it in the proper position.
8. When using the GRILL, CONVECTION or COMBINATION mode, some foods may
inevitably splatter grease on to the oven walls. If the oven is not cleaned
occasionally, it may start to “smoke” during use.
9. A steam cleaner is not to be used for cleaning.
10. This oven should only be serviced by qualified personnel. For maintenance and
repair of the oven contact the nearest authorized dealer.
11. Keep air vents clean at all times. Check that no dust or other material is blocking
any of the air vents on the top, bottom or rear of the oven. If air vents become
blocked this could cause overheating which would affect the operation of the oven
and possibly result in a hazardous situation.
Care & Cleaning of your Microwave Oven - IMPORTANT
It is essential for the safe operation of the oven that it is kept clean,
and wiped out after each use. Failure to maintain the oven in a clean
condition could lead to deterioration of a surface that could adversely
affect the life of the appliance and possibly result in a hazardous
situation.
Page 32

English
Technical Specifications
Rated Voltage: 230 V, 50 Hz
Operating Frequency: 2,450 MHz
Input Power: Maximum; 2980 W
Microwave; 1275 W
Grill; 1560 W
Convection; 1500 W
Output Power: Microwave; 1000 W (IEC-60705)
Grill; 1500 W
Convection; 1400 W
Outer Dimensions: 530 (W) x 508 (D) x 344 (H) mm
Oven Cavity Dimensions: 350 (W) x 360 (D) x 250 (H) mm
Weight with internal accessories; 21.0 Kg
Noise: 52.7dB
This product is an equipment that fulfills the European standard for EMC disturbances
(EMC = Electromagnetic Compatibility) EN 55011. According to this standard this product is
an equipment of group 2, class B and is within required limits. Group 2 means that
radio-frequency energy is intentionally generated in the form of electromagnetic radiation
for warming up of foods. Class B means that this product may be used in normal household
areas.
Information on Disposal for Users of Waste Electrical & Electronic Equipment
(private households)
This symbol on the products and/or accompanying documents means that
used electrical and electronic products should not be mixed with general
household waste. For proper treatment, recovery and recycling, please take
these products to designated collection points, where they will be accepted
on a free of charge basis. Alternatively, in some countries you may be able to
return your products to your local retailer upon the purchase of an equivalent
new product. Disposing of this product correctly will help to save valuable
resources and prevent any potential negative effects on human health and
the environment which could otherwise arise from inappropriate waste
handling. Please contact your local authority for further details of your nearest
designated collection point. Penalties may be applicable for incorrect disposal of this waste,
in accordance with national legislation.
For business users in the European Union
If you wish to discard electrical and electronic equipment, please contact your dealer or
supplier for further information.
Information on Disposal in other Countries outside the European Union
This symbol is only valid in the European Union. If you wish to discard this product, please
contact your local authorities or dealer and ask for the correct method of disposal.
En-30
Page 33

Aufstellen und Anschließen
Arbeitsfläche
Freistehend
10 cm
15 cm
5 cm
D-1
Überprüfung Ihres Mikrowellengerätes
Das Gerät auspacken, Verpackungsmaterial
entfernen und auf Beschädigungen wie z.B.
Stoßstellen, gebrochene Türverriegelungen
oder Risse in der Tür überprüfen. Sofort den
Händler benachrichtigen, wenn das Gerät
beschädigt ist. Kein beschädigtes
Mikrowellengerät installieren.
Erdungsvorschriften
WICHTIG: ZUR SICHERHEIT VON
PERSONEN MUSS DIESES GERÄT
GEERDET SEIN!
Ist die Steckdose nicht geerdet, muß der
Kunde die Steckdose durch eine
ordnungsgemäße Schutzkontaktsteckdose
ersetzen lassen.
Betriebsspannung
Die Netzspannung muß der auf dem
Typenschild des Gerätes angegebenen
Spannung entsprechen. Wird eine höhere
Spannung als angegeben verwendet, so kann
ein Brand entstehen oder sonst ein Unfall die
Folge sein.
Aufstellen des Gerätes
Dieses Dampf-Mikrowellengerät ist nur zur
Benutzung auf der Tischplatte oder
Arbeitsfläche gedacht. Es ist nicht als
Einbaugerät zur Benutzung in einem Schrank
gedacht.
1. Stellen Sie das Mikrowellengerät auf eine
feste, ebene Stellfläche, die mindestens
85cm hoch ist (gemessen vom Fußboden).
2. Achten Sie beim Aufstellen des Gerätes
darauf, daß bei Gefahr jederzeit der
Stecker gezogen oder die Sicherung am
Sicherungskasten ausgeschaltet werden
kann.
3. Das Gerät arbeitet ordnungsgemäß, wenn
eine ausreichende Luftzirkulation stattfinden kann.
Aufstellen auf der Arbeitsfläche:
a. Sicherheitsrichtlinien empfehlen die
Einhaltung eines Mindestabstands von
15 cm über dem Gerät, 10 cm zur
Rückwand sowie 5 cm zu einer und
freistehend zur anderen Seite.
b. Sollte das Gerät an einer Seite direkt an
der Wand stehen, müssen die anderen
Seiten frei bleiben.
4. Das Gerät nicht in unmittelbarer Nähe
eines Gas- oder Elektroherdes aufstellen.
5. Die Stellfüße dürfen nicht entfernt
werden.
6. Dieses Gerät ist nur für den
Hausgebrauch konzipiert. Nicht im Freien
verwenden.
7. Das Mikrowellengerät nicht bei zu hoher
Luftfeuchtigkeit benutzen.
8. Das Netzanschlußkabel darf die
Gehäuseoberfläche nicht berühren, da
diese während des Betriebes heiß wird.
Das Kabel auch nicht mit anderen heißen
Oberflächen in Berührung bringen. Das
Netzanschlußkabel nicht über Tisch- oder
Thekenkanten hängen lassen. Das Kabel
oder den Netzstecker nicht in Wasser
tauchen.
9. Die Lüftungsöffnungen auf der Ober- und
Rückseite des Gehäuses nicht verdecken.
Sind diese Öffnungen blockiert während
das Gerät arbeitet, kann es überhitzen. In
diesem Fall wird das Gerät durch den
Überhitzungsschutz ausgeschaltet und
kann erst wieder in Betrieb gesetzt
werden, wenn es abgekühlt ist.
Einbaurahmen
Dieses Mikrowellengerät kann mit dem als
Sonderzubehör erhältlichen Einbaurahmen
(NN-TKA80W/ Weiß,
NN-TKA80M/ Silver) in
eine Einbauküche integriert werden. Erhältlich
vom örtlichen Panasonic-Kundendienst.
Page 34

D-2
Deutsch
WARNUNG
1. Die Türverriegelungen und die Türdichtungen sollten mit einem feuchten Tuch abgewischt
werden. Das Gerät ist vom Benutzer auf mögliche Beschädigungen an den
Türdichtungsflächen zu prüfen, und falls ein solcher Schaden aufgetreten ist, darf das
Gerät nicht betrieben werden, bevor es vom Panasonic-Kundendienst repariert worden ist.
2. Führen Sie weder eine Änderung oder Reparatur an der Tür, an den Kontrolleinrichtungen
oder Sicherheitsvorrichtungen noch an irgendeinem anderen Teil des Gerätes durch. In
keinem Fall das Gehäuse, das den Schutz gegen die Mikrowellenenergie sicherstellt,
abbauen. Das Gerät darf nur von einem geschulten Panasonic Kundendienst-
Techniker geprüft oder repariert werden.
3. Das Gerät nicht in Betrieb setzen, wenn das Netzanschlusskabel oder der Netzstecker
beschädigt ist, bzw. wenn es nicht ordnungsgemäß arbeitet oder eine sichtbare
Beschädigung aufweist.
4. Aus Sicherheitsgründen muß ein beschädigtes Anschlusskabel durch den Hersteller, seinen
Kundendienst oder eine andere gleichwertig qualifizierte Person ersetzt werden.
5. Kindern darf die Benutzung des Gerätes ohne Aufsicht nur erlaubt werden, wenn eine
ausreichende Einweisung gegeben wurde, die das Kind in die Lage versetzt, das Gerät in
sicherer Weise bedienen und die Gefahr einer falschen Bedienung verstehen zu können.
6. Keine Flüssigkeiten und Nahrungsmittel in versiegelten Behältern (z.B. Konserven)
erhitzen, da diese platzen können.
6. Keine Flüssigkeiten und Nahrungsmittel in versiegelten Behältern (z.B. Konserven)
erhitzen, da diese platzen können.
7. Dieses Gerät ist nicht zur Benutzung durch Personen (einschließlich Kindern) mit verminderten körperlichen, sensorischen oder geistigen Fähigkeiten oder mangelnder Erfahrung
oder Kenntnis gedacht, es sei denn, sie werden durch eine für ihre Sicherheit verantwortliche Person in die Benutzung des Gerätes eingewiesen oder von einer solchen Person
beaufsichtigt. Kinder sollten beaufsichtigt werden, um sicherzustellen, dass sie nicht mit
dem Gerät spielen.
Gebrauch und Ausstattung des Gerätes
1. Das Mikrowellengerät nur zur Nahrungsmittelzubereitung benutzen. Dieses Gerät ist
speziell zum Auftauen, Erwärmen und Garen von Lebensmitteln entsprechend der
Bedienungs- und Kochanleitung konzipiert. Erhitzen Sie in keinem Fall Chemikalien oder
andere Produkte.
2. Prüfen Sie vor der ersten Benutzung Ihres Geschirrs, ob es für den Gebrauch im
Mikrowellengerät geeignet ist.
3. Bitte versuchen Sie nicht, Kleidungsstücke, Zeitungen oder andere Materialien im
Mikrowellengerät zu trocknen. Diese Gegenstände können sich entzünden.
4. Im Garraum des Mikrowellengerätes dürfen keine Gegenstände aufbewahrt werden, die bei
unbeabsichtigtem Einschalten des Gerätes eine Gefahr für die Umgebung darstellen.
5. Nehmen Sie das MIKROWELLENGERÄT NIE OHNE LEBENSMITTEL in Betrieb. Dies
kann zu Beschädigung des Gerätes führen.
6. Kommt es zu einem Brand oder tritt während des Mikrowellenbetriebs Rauch aus dem
Gerät, halten Sie die Gerätetür geschlossen. Schalten Sie das Mikrowellengerät ab, indem
Sie auf die STOPP-TASTE drücken. Ziehen Sie den Netzstecker aus der Steckdose oder
schalten Sie die Installationssicherung aus.
Aufstellen und Anschließen
Page 35

Sicherheitshinweise
D-3
Grillbetrieb
1. Vor der ersten Inbetriebnahme des Gerätes
mit HEISSLUFT-, KOMBINATION oder GRILL
den Garraum mit einem Tuch auswischen, um
Ölreste zu entfernen. Nehmen Sie das Gerät
bei 250° HEISSLUFT für 20 Minuten ohne
Nahrungsmittel und Zubehör in Betrieb, um
konservierende Ölreste im Garraum vollständig zu verbrennen. Nur bei dieser
Gelegenheit darf das Gerät leer betrieben
werden.
2. Die Gehäuseoberflächen des Gerätes, einschließlich der Lüftungsöffnungen und
Gerätetür, werden während des Betriebs mit
HEISSLUFT, KOMBINATION und GRILL sehr
heiß. Seien Sie beim Öffnen/Schließen der
Tür und beim Hineinstellen/Herausnehmen
von Lebensmitteln deshalb sehr vorsichtig.
3. Das Gerät ist mit zwei Heizelementen an der
Garraumdecke und -rückseite ausgestattet.
Die entsprechenden Gehäuseoberflächen sind
nach dem Betrieb mit HEISSLUFT, KOMBINATION und GRILL sehr heiß, ebenso das
benutzte Zubehör.
4. Kinder müssen bei der Benutzung des Grills
ferngehalten werden, da die
Gehäuseoberflächen sehr heiß werden können.
Automatischer Entlüftungsbetrieb
Ist das Mikrowellengerät nach dem Betrieb heiß,
setzt automatisch für eine Minute der
Entlüftungsbetrieb ein. Dies ist keine
Fehlfunktion, sondern dient zum Abkühlen der
elektronischen Bauteile. Sie können währenddessen die Gerätetür öffnen und die Lebensmittel
herausnehmen. Der Entlüftungsbetrieb schaltet
sich automatisch ab.
Garraumbeleuchtung
Wenn es nötig wird die eingebaute
Garraumbeleuchtung zu wechseln, wenden Sie
sich bitte an Ihren Händler.
Zubehör
Das Mikrowellengerät ist mit unterschiedlichem
Zubehör ausgestattet. Verwenden Sie dieses bitte
laut Anweisung.
Glasdrehteller
1. Das Mikrowellengerät nicht ohne den dazugehörigen Glasdrehteller und Rollenring in
Betrieb setzen.
2. Benutzen Sie in keinem Fall einen anderen
als den speziell für dieses Gerät konzipierten
Glasdrehteller.
3. Den evtl. heißen Glasdrehteller abkühlen
lassen, bevor Sie diesen reinigen bzw. mit
Wasser abspülen.
4. Der Drehteller kann rechts- oder linksherum
laufen. Dies stellt keine Fehlfunktion dar.
5. Berührt das Lebensmittel bzw. Kochgeschirr
die Garraumwände, läuft der Drehteller nicht
weiter, sondern stoppt und beginnt, sich in die
entgegengesetzte Richtung zu drehen. Dies
ist normal.
6. Das Lebensmittel nicht direkt auf dem
Glasdrehteller auftauen, erwärmen oder
garen.
Rollenring
1. Der Rollenring und die Vertiefung im
Garraumboden müssen regelmäßig gereinigt
werden, um zu verhindern, daß Geräusche
entstehen und sich Nahrungsmittelreste
ansammeln.
2. Den Rollenring immer zusammen mit dem
Glasdrehteller benutzen.
Fettpfanne
1. Die Fettpfanne kann zum Garen bei den
Betriebsarten Grill, Kombination und Heißluft
verwendet werden. Benutzen Sie die
Fettpfanne nicht im reinen Mikrowellenbetrieb.
2. Die Fettpfanne sollte auf dem Glasdrehteller
oder dem Grillrost plaziert werden.
Runder Grillrost
1. Der runde Grillrost wird zum Bräunen von
kleineren Portionen benutzt und unterstützt
die gleichmäßige Hitzeverteilung.
2. Beim KOMBINATIONSBETRIEB MIT
MIKROWELLE kein Metallgeschirr direkt auf
den runden Grillrost stellen.
3. Den runden Grillrost nicht für den reinen
Mikrowellenbetrieb benutzen.
Emailliertes Backblech und Kombirost
1. Dieses Zubehör dient zur Speisenzubereitung
mit Heißluft und zum Grillen.
Das Zubehör nicht im reinen
Mikrowellenbetrieb oder im Kombinationsbetrieb benutzen.
2. Beim Garen mit Heißluft können eine oder
beide Ebenen benutzt werden. Beim Grillen
wird das Backblech bzw. der Rost in die obere
Ebene eingesetzt.
Page 36

D-4
Deutsch
Wichtige Informationen
1) Kochzeiten
• Die Kochzeit ist abhängig von Beschaffenheit,
Ausgangstemperatur und Menge der
Lebensmittel sowie von der Art des verwendeten Kochgeschirrs.
• Gehen Sie zunächst von einer kürzeren
Kochzeit aus, um ein Übergaren der Speisen
zu vermeiden. Hat das Lebensmittel noch
nicht den gewünschten Auftau-, Erwärmungsoder Garzustand erreicht, haben Sie immer
noch die Möglichkeit, die Garzeit zu verlängern.
Wird die empfohlene Kochzeit überschritten, können die Lebensmittel leicht verbrennen und ggf. einen Brand auslösen
und somit den Garraum beschädigen.
2) Geringe Lebensmittelmengen
• Sehr kleine Lebensmittelmengen oder
Speisen mit geringem Feuchtigkeitsgehalt
können schnell austrocknen und verbrennen,
wenn sie zu lange gegart werden. Kommt es
zu einem Brand, die Tür des Mikrowellengerätes geschlossen halten, das Gerät
abschalten und den Netzstecker aus der
Steckdose ziehen.
3) Eier
• Weder rohe oder gekochte Eier in der Schale
noch gepellte hartgekochte Eier mit
Mikrowellen erhitzen oder kochen. Nach Ende
des Mikrowellen-Kochvorgangs kann sich
noch weiterhin Druck bilden und die Eier können explodieren.
4) Lebensmittel mit Schale oder Haut
• Bei Lebensmitteln wie z.B. Kartoffeln und
Würstchen empfiehlt es sich, sie vor dem
Garen mit Mikrowellen anzustechen, um ein
evtl. Platzen zu vermeiden.
5) Speisethermometer
• Falls Sie den Garzustand mit einem
Speisethermometer überprüfen wollen, verwenden Sie bitte keine herkömmlichen
Thermometer im Mikrowellen- und
Kombinationsbetrieb. Diese können Funken
verursachen. Benutzen Sie diese Speisethermometer nur außerhalb des
Mikrowellengerätes.
6) Flüssigkeiten
• Beim Erhitzen von Flüssigkeiten im
Mikrowellengerät kann durch kurzfristiges
Aufkochen (Siedeverzug) die Flüssigkeit im
Gerät oder bei der Entnahme schlagartig verdampfen und explosionsartig aus dem Gefäß
entweichen. Dies kann zu Verbrennungen
führen.
Sie vermeiden einen Siedeverzug, indem Sie
beim Erhitzen von Flüssigkeiten in Gläsern
oder Tassen immer ein hitzebeständiges
Glasstäbchen mithineinstellen oder größere
Gefäße mit einem Deckel bzw. Teller abdecken. Zusätzlich sollten Sie folgende Punkte
beachten:
a) Vermeiden Sie die Verwendung von geraden
Gefäßen mit engem Ausguss.
b) Überhitzen Sie die Flüssigkeit nicht.
c) Rühren Sie die Flüssigkeit einmal um, bevor
Sie das Gefäß ins Gerät stellen sowie
nochmals nach der halben Kochzeit.
d) Lassen Sie nach Ablauf der Kochzeit das
Gefäß kurze Zeit im Gerät stehen, bevor Sie
es herausnehmen. Rühren Sie die Flüssigkeit
anschließend noch einmal um.
7) Papier und Plastik
• Wenn Behälter aus Papier, Kunststoff oder
anderen leicht entflammbaren Materialien zum
Erwärmen benutzt werden, darf das
Mikrowellengerät nicht unbeaufsichtigt
betrieben werden! Diese Behälter können sich
entzünden.
• Verwenden Sie keine recycelten
Papierprodukte (z.B. Küchenrollen), die nicht
ausdrücklich für die Benutzung im
Mikrowellengerät geeignet sind. Im
Recyclingpapier können Bestandteile sein, die
Funkenbildung oder einen Brand verursachen.
• Entfernen Sie Metallverschlüsse von
Bratfolien, bevor Sie diese ins Gerät stellen.
8) Hilfsmittel und Folien
• Erhitzen Sie keine geschlossenen Flaschen
oder Konserven im Mikrowellengerät, da
diese durch den Druck explodieren können.
• Verwenden Sie während des
Mikrowellenbetriebes weder Geschirr aus
Metall noch Geschirr mit Metallrand.
• Bei Benutzung von Alufolie, Metallspießen
oder anderen Metallwaren darauf achten, daß
sie mindestens 2 cm von der Gerätewand ent-
fernt sind, um Funkenbildung zu vermeiden.
9) Babynahrung
• Benutzen Sie nur Fläschchen oder
Glasformen aus hochwertigen hitzebeständi-
gen Materialien und platzieren Sie diese ohne
Deckel in der Mitte des Drehtellers.
• Nach dem Erhitzen sollte die Babynahrung in
Fläschchen oder Gläsern gut geschüttelt bzw.
durchgerührt werden, damit ein
Temperaturausgleich stattfinden kann.
• Überprüfen Sie die Temperatur vor dem
Verzehr, um Verbrennungen zu vermeiden.
Page 37

D-5
Schematische Ansicht
[1]
[2]
[3]
[4]
[5]
[7]
[8]
[6]
[9]
[10]
[12]
[11]
[13]
[1] Türöffner
Drücken Sie diese Taste, um die Tür zu öffnen. Wird während des Garvorganges die Tür
geöffnet, ist der Gerätebetrieb unterbrochen, das Programm bleibt aber erhalten. Wird die
Tür wieder geschlossen und die Starttaste gedrückt, läuft der Garvorgang weiter ab. Die
Garraumbeleuchtung schaltet sich ein, wenn die Tür geöffnet wird.
[2] Sichtfenster
[3] Türsicherheitsverriegelungen
[4] Innerer Entlüftungsschlitz
[5] Bedienfeld
[6] Glasdrehteller
[7] Rollenring
[8] Äußere Entlüftungsschlitze
[9] Fettpfanne
[10] Runder Grillrost
[11] Backblech
[12] Kombirost
[13] Zweistufige Rostauflagen
Page 38

D-6
Deutsch
Bedienfelder
NN-CT857W /
NN-CT878
(1)
(2)
(3)
(4)
(5)
(6)
(7)
(8)
(10)
(11)
(15)
(16)
(9)
(12)
(13)
(14)
Akustisches Signal:
Wird eine beliebige Funktionstaste gedrückt, ertönt ein akustisches Signal. Ist dies
nicht der Fall, war die Eingabe inkorrekt. Beim Wechsel der Betriebsarten ertönt das
Signal zweimal. Nach erfolgtem Vorheizen im Grill-, Heißluft- oder
Kombinationsbetrieb ertönt das Signal dreimal. Nach Ablauf eines Kochvorgangs ist
das akustische Signal fünfmal zu hören.
(1) Digitaldisplay
(2) Zeiteinstellung
(3) Ein-/Austaste für Mikrowelle
(4) Ein-/Austaste für Grill
(5) Heißluftbetrieb
(6) Grillheißluftbetrieb
(7) Kombinationsbetrieb
(8)
Speicher
(9) Automatisches Auftauen
(10) Plus/Minus-Tasten
(11) Vorwahlzeit/Standzeit-Taste
(12) Sensorautomatik
Mikrowellenprogramm
(13) Sensorautomatik-
Kombinationsprogramm
(14) Gewichtsautomatik-
Kombinationsprogramm
(15) Starttaste:
Drücken der Starttaste beginnt
den Betrieb des Geräts.
Wird während des Betriebs die
Tür geöffnet oder die Stopp-/
Löschtaste einmal betätigt, muss
die Starttaste erneut gedrückt
werden, um den Betrieb des
Geräts fortzusetzen.
(16) Stopp-/Löschtaste:
Vor dem Betrieb: Einmaliges
Drücken löscht alle Eingaben.
Während des Betriebs:
Einmaliges Drücken unterbricht
den Kochvorgang. Beim zweiten
Drücken werden alle Eingaben
gelöscht, und im Anzeigenfeld
erscheint wieder die Uhrzeit.
1
10
h
min
1
10
min
s
M
Combi
g
NN-CT857W
Page 39

D-7
Auswahl der gewünschten Betriebsart
Behälter
Erforderliches
Zubehör
Verwendung
Betriebsarten
Mikrowelle
- Auftauen
- Erwärmen
- Schmelzen: Butter, Schokolade, Käse
- Garen/Kochen von Fisch, Gemüse,
Obst, Eiern
- Zubereitung von gebackenen
Früchte, Marmelade,
Konfitüre, Soßen, Vanillesoße,
Brandteig, Béchamel,
Karamell, Fleisch, Fisch oder
Gemüseauflauf
- Backen von Kuchen mit Eiern und
Backpulver, ohne
Farbzusätze (Biskuitkuchen, Clafoutis
usw.)
Kein Vorheizen
Nur
Glasdrehteller
Mikrowellengeeignet, nicht
metallisch
HEISSLUFT
Geeignet sind
hitzebeständige
Metallformen
Grill
Glasdrehteller
+ Fettpfanne
+ runder
Grillrost
- Grillen von Fleisch oder Fisch
- Grillen von Toast
- Färben von Gratingerichten oder
Meringe-Pasteten
Vorheizen erforderlich
- Backen kleiner Pasteten mit kurzen
Backzeiten: Blätterteig,
Plätzchen, Brandteig, Plätzchen aus
Mürbeteig, Biskuitrollen
- Backen von Spezialitäten: Soufflés,
Meringes, Pasteten,
kleine Brote oder Brioches,
Biskuitkuchen, Fleischpasteten
usw.
- Backen von Quiches, Pizzas und
Törtchen
Vorheizen empfohlen
Glasdrehteller
+ Fettpfanne
+ runder
Grillrost oder
emailiertes
Backblech
und/oder
Kombirost
Geeignet
sind
hitzebeständ
-ige
Metallformen
Page 40

D-8
Deutsch
Auswahl der gewünschten Betriebsart
Grill + Mikrowelle
Heißluft
+Mikrowelle
Grill + Heißluft
+ Mikrowellee
Grill + Heißluft
- Braten von dunklem Fleisch, dickem
Steak (Rippchen oder Rind, T-BoneSteak)
- Dünsten von Fisch
Vorheizen erforderlich
Glasdrehteller
+ Fettpfanne
+ runder
Grillrost oder
emailliertes
Backblech
und/oder
Kombirost
Geeignet sind
hitzebeständige
Metallformen
- Braten von Fleisch und Geflügel
- Auftauen und Erwärmen von knusprigen Speisen (Quiche,
Pizza, Brot, Viennoiserie, Lasagne,
Gratin)
- Backen von Lasagne, Fleisch,
Kartoffeln oder
Gemüsegratins
- Backen von Kuchen und
Nachspeisen mit Eiern oder
Backpulver (einschl. Bräunen),
Backen von Quiches,
Pasteten und Törtchen
Vorheizen empfohlen
KOMBINATION
• Grill + Mikrowelle
• Heißluft +
Mikrowelle
• Grill + Heißluft +
Mikrowelle
Glasdrehteller
+ Fettpfanne
+ runder
Grillrost
(Grillrost: je
nach Größe
der Speisen)
Mikrowellengeeignet und
hitzebeständig.
Kuchenformen
aus Metall dürfen nur auf der
Fettpfanne
verwendet werden. KEINE
Springformen
benutzen!
Behälter
Erforderliches
Zubehör
Verwendung
Betriebsarten
Page 41

D-9
Gerätezubehör
Die nachfolgende Tabelle veranschaulicht den richtigen Einsatz des Zubehörs im
Mikrowellenherd.
Glasdrehteller
Runder
Grillrost
Backblech
Kombirost
Mikrowelle
Grill
Heißluft
Grillheißluft
Combination
Ja
Ja
Ja
Ja
Ja
Nein
Ja
Ja
Ja
Ja
Nein
Ja
Ja
Ja
Nein
Nein
Ja
Ja
Ja
Ja
Nein
Ja
Ja
Ja
Nein
Fettpfanne
Wird der Netzstecker angeschlossen, erscheint “88:88” in der Digitalanzeige.
Digitale Laufschrift
Tastatur und Bedienung
Starttaste drücken
Starttaste drücken
Starttaste drücken
Starttaste drücken
Starttaste drücken
“ITALIANO”
“NEDERLANDS”
“FRANCAIS”
“ENGLISH”
“88:88”
“DEUTSCH”
Digitale Laufschrift
Diese Funktion erleichtert Ihnen die Bedienung des Gerätes. Im Anzeigenfeld werden die
Funktionen und die nächsten Bedienschritte durch Worte und Symbole angezeigt.
Das Gerät ist betriebsbereit, wenn der Netzstecker angeschlossen wird. Betätigen Sie
anschließend die Starttaste so oft, bis die Sprache Ihrer Wahl im Anzeigenfeld erscheint.
Möchten Sie die Sprache verändern, so ziehen Sie den Netzstecker und verfahren Sie
anschließend erneut wie oben beschrieben.
In Englisch z.B. “SET TIME”
In Deutsch z.B. “UHRZEIT EINGEBEN”
In Französisch z.B. “CHOISIR LA DUREE”
In Holländisch z.B. “STEL DE TIJD IN”
In Italienisch z.B. “INSERITE IL TEMPO”
Page 42

D-10
Deutsch
Tastatur und Bedienung
14 mal zweimal
nicht einstellbar
5 mal
10
min
1
min
10
s
1
h
Aktivieren:
Deaktivieren:
Einstellen der Uhr:
Beispiel: Einstellen der Uhr auf 14:25
• Drücken Sie zweimal die
Vorwahlzeit/StandzeitTaste.
Der Doppelpunkt beginnt
zu blinken.
• Drücken Sie die
entsprechenden
Uhrzeittasten zum
Einstellen der korrekten
Uhrzeit.
Die Uhrzeit erscheint im
Anzeigenfeld und der
Doppelpunkt blinkt.
•
Drücken Sie einmal die
Vorwahlzeit/StandzeitTaste.
Der Doppelpunkt blinkt
nicht länger, und die
Eingabe der Uhrzeit ist
abgeschlossen.
Anmerkungen:
1. Zum Neueinstellen der Uhrzeit wiederholen Sie die zuvor erläuterten Schritte.
2. Die Uhrzeit wird angezeigt, insofern das Gerät an der Spannungsversorgung angeschlossen ist.
3. Die Uhrzeit wird im 24-Stunden-Format angezeigt.
Kindersicherung:
Nach Aktivierung der Kindersicherung ist die Eingabe über das Bedienfeld nicht möglich, weil die Funktionen des Gerätes blockiert sind. Die Tür kann wie gewohnt geöffnet werden. Die Kindersicherung kann aktiviert werden, wenn ein Doppelpunkt bzw.
die Uhrzeit im Anzeigenfeld steht.
• Drücken Sie drei mal die Starttaste.
Die Uhrzeit erscheint nicht mehr im
Anzeigenfeld, ist aber nicht gelöscht.
• Drücken Sie dreimal die Stopp-/Löschtaste.
Die Uhrzeit erscheint wieder im
Anzeigenfeld, die Kindersicherung ist gelöscht.
Page 43

D-11
Mikrowellen - und Auftaubetrieb
Glas-Drehteller
Das Gerät verfügt über 6 verschiedene Mikrowellen-Leistungsstufen. Die Wattleistung
der einzelnen Leistungsstufen entnehmen Sie bitte der nachfolgenden Tabelle.
Zubehör:
ACHTUNG! Wird eine Garzeit eingestellt, ohne dass eine Mikrowellen-Leistungsstufe aus
gewählt wird, erfolgt das Garen automatisch auf der 1000 W-Stufe.
Die in der Tabelle angegebenen Wattleistungen sind die ungefähren Werte für jede
Leistungsstufe.
• Wählen Sie die gewünschte
Mikrowellen-Leistungsstufe
aus.
• Stellen Sie die gewünschte
Garzeit ein.
• Drücken Sie die Starttaste.
ANMERKUNGEN:
1. Für das zwei- oder dreistufige Garen wiederholen Sie – vor dem Drücken der Starttaste – die
Einstellung der Mikrowellen-Leistungsstufe und der Garzeit.
z.B. Schmor-/Eintopf –– 10 Minuten auf hoher Stufe zum Sieden bringen und dann 60
Minuten köcheln lassen.
10 Minuten erwärmen, damit sich das Aroma voll entwickeln kann.
2. Die Standzeit kann nach dem Einstellen der Mikrowellenleistung und der Garzeit programmiert
werden.
3. Es ist möglich, die Garzeit während des Garens zu verlängern. Drücken Sie hierzu die 1-minTaste so oft, wie erforderlich. Die Garzeit wird hierdurch in Einminuten-Intervallen verlängert (bis
zur maximalen Garzeit).
Drücken Leistungsstufe
Wattleistung
Max. verfügbare Zeit
Einmal HOCH 1000 W 30 Minuten
Zweimal AUFTAUEN 270 W 99 Min. 90 Sek.
3 Mal MITTEL 600 W 99 Min. 90 Sek.
4 Mal NIEDRIG 440 W 99 Min. 90 Sek.
5 Mal KÖCHELN 250 W 99 Min. 90 Sek.
6 Mal ERWÄRMEN 100 W 99 Min. 90 Sek.
1
10
1
10
h
min
h
min
1
10
1
10
min
s
min
s
Page 44

D-12
Deutsch
Grillbetrieb
Mit der Grilltaste wird eine der 3 Grillstufen eingestellt.
Drücken
Leistungsstufe Wattleistung
Einmal 1 HOCH 1500 W
Zweimal 2 MITTEL 1200 W
3 Mal 3
NIEDRIG 950 W
Zubehör:
HINWEISE ZUM VORHEIZEN:
1. Öffnen Sie während des Vorheizens nicht die Tür des Geräts. Nach dem Vorheizen ertönen
drei akustische Signaltöne und im Anzeigenfeld blinkt der Buchstabe “P". Wird die Tür des
Mikrowellenherds nach dem Vorheizen nicht geöffnet, hält das Gerät die eingestellte Temperatur
für 30 Minuten aufrecht. Nach 30 Minuten wird das Gerät automatisch ausgeschaltet und es
erscheint wieder die Uhrzeit im Anzeigenfeld.
2. Soll ohne Vorheizen gekocht werden, stellen Sie nach Auswahl der Grillstufe die Garzeit ein
und drücken die Starttaste.
ANMERKUNGEN:
1. Der Grillbetrieb ist nur bei geschlossener Gerätetür möglich.
2. Die Garzeit kann während des Garens verlängert werden. Drücken Sie hierzu die 1 min Taste
so oft, wie erforderlich. Die Garzeit wird hierdurch in Einminuten-Intervallen verlängert (bis zu
maximal 99 Minuten).
Runder Grillrost
Fettpfanne Glasdrehteller
Kombirost
• Drücken Sie die Taste
für die gewünschte
Grillstufe.
• Drücken Sie die
Starttaste zum
Vorheizen.
Stellen Sie die
Speisen nach
dem Vorheizen
in den Herd.
nicht einstellbar
• Stellen Sie die Garzeit
ein (bis zu 99 Minuten
und 90 Sekunden).
• Drücken Sie die
Starttaste.
1
10
h
min
1
10
min
s
Page 45

D-13
Heißluft/Grillheißluft-Betrieb
Mit diesen Tasten können Heißluft-Temperaturen von 40°C (nur für den Heißluft-Modus) und von
100 bis 250°C in Intervallen von 10°C eingestellt werden. Zur schnellen Einstellung der am häufigsten verwendeten Temperaturen beginnen die Temperaturen bei 150°C, bis 250°C, gefolgt von
40°C (nur für den Heißluft-Modus) und 100°C. Im Heißluft-Betrieb ist es möglich, auf einer oder
zwei Stufen zu kochen. Hinweise zum Garen auf Rosten finden Sie auf Seite D-15.
Zubehör: Zum einstufigen Kochen.
Bei Verwendung des Glasdrehtellers.
Fettpfanne
Glasdrehteller
Runder Grillrost
Fettpfanne Glasdrehteller
Grillheißluft
Heißluft
Kochen mit Heißluft:
• Stellen Sie die
gewünschte
Temperatur ein.
• Drücken Sie die
Starttaste zum
Vorheizen.
Stellen Sie die
Speisen nach dem
Vorheizen in den
Herd.
• Stellen Sie die
Garzeit ein (bis zu 9
Stunden 99 Minuten).
• Drücken Sie die
Starttaste.
nicht einstellbar
1
10
h
min
1
10
min
s
Page 46

D-14
Deutsch
Heißluft/Grillheißluft-Betrieb
• Stellen Sie die gewün-
schte Temperatur ein.
(Die Grillstufe ‚ Hochʼ
ist voreingestellt.)
• Stellen Sie die
Garzeit ein (bis zu 9
Stunden 99 Minuten).
• Drücken Sie
die Starttaste.
• Drücken Sie die
Starttaste zum
Vorheizen.
Stellen Sie die
Speisen nach dem
Vorheizen in den
Herd.
•
Zum Ändern der
Grillstufe einmal
drücken für,
Mittelʼ, zweimal
drücken für
'Nierdig'.
nicht einstellbar
HINWEISE ZUM VORHEIZEN:
1. Öffnen Sie während des Vorheizens nicht die Tür des Geräts. Nach dem Vorheizen
ertönen drei akustische Signaltöne und im Anzeigenfeld blinkt der Buchstabe „P". Wird die
Tür des Mikrowellenherds nach dem Vorheizen nicht geöffnet, hält das Gerät die
eingestellte Temperatur aufrecht. Nach 30 Minuten wird das Gerät automatisch aus
geschaltet und es erscheint wieder die Uhrzeit im Anzeigenfeld.
2. Soll ohne Vorheizen gekocht werden, stellen Sie nach Auswahl der gewünschten
Temperatur die Garzeit ein und drücken die Starttaste.
ANMERKUNGEN:
1. Beträgt die Garzeit weniger als eine Stunde, wird die ablaufende Zeit in Sekunden
zurückgezählt.
2. Beträgt die Garzeit mehr als eine Stunde, wird die ablaufende Zeit in Minuten
zurückgezählt, bis nur noch „1H 00" (1 Stunde) verbleibt. Nun zeigt das Display Minuten
und Sekunden an, die verbleibende Zeit wird in Sekunden zurückgezählt.
3. Es ist möglich, die Garzeit während des Garens zu verlängern. Drücken Sie hierzu die
1-min-Taste so oft, wie erforderlich. Die Garzeit wird hierdurch in Einminuten-Intervallen
verlängert.
4. Die gewählte Temperatur kann nach dem Drücken der Starttaste abgerufen und geändert
werden. Bei einmaligem Drücken der Heißluft- oder Grillheißluft-Taste wird die
ursprünglich eingestellte Temperatur in der Digitalanzeige angezeigt. Während die
Temperatur im Anzeigenfeld sichtbar ist, kann sie durch Drücken der Heißluft- oder
Grillheißluft-Taste geändert werden.
1
10
h
min
1
10
min
s
Page 47

D-15
Heißluft/Grillheißluft-Betrieb
Beim Garen auf zwei Ebenen werden das beiliegende Backblech unten und der Rost oben
eingesetzt.
Das Vorheizen des Geräts ist mit oder ohne eingesetztem Backblech bzw. Rost möglich. Nähere
Angaben entnehmen Sie bitte dem jeweiligen Rezept.
Garen auf zwei Ebenen
Backblech
Kombirost
Garen auf einer Ebene
Wird der Kombirost oder das Backblech benutzt, bitte die untere Ebene benutzen.
Kochen auf dem Rost oder in dem emailliertem
Backblech
Garen von größeren Speisen
Backblech und Rost eignen sich ideal zum Backen von mehreren Backwaren zugleich sowie zum
Garen von größeren Speisen, die sich nicht auf dem Glasdrehteller drehen lassen würden.
ANMERKUNGEN:
1. Wenn Sie mit dem Backblech und / oder dem Kombirost kochen, bitte die anderen Zubehöre
(Glasdrehteller, Rollenring, Fettpfanne) entnehmen.
2. Überzeugen Sie sich vor dem Gebrauch des Geräts davon, dass das Backblech und/oder der
Rost richtig und sicher eingesetzt sind.
3. Legen Sie nur Speisen bis zu einem Gewicht von 5 kg in das Backblech bzw. auf den Rost.
4. TRAGEN SIE BEIM HERAUSNEHMEN DER SPEISEN UND DES GESCHIRRS AUS DEM
MIKROWELLENHERD STETS TOPFHAND-SCHUHE, WEIL SPEISEN UND GESCHIRR
NACH DEM KOCHEN SEHR HEISS SIND.
5. Ziehen Sie das Backblech bzw. den Rost nur bis zur Hälfte heraus, bevor Sie die Speisen aus
dem Gerät herausnehmen. Der Rost wird hierbei in seiner Stellung arretiert.
6. Wenn Sie für mehr als 20 Minuten mit hohen Temperaturen (mehr als 210°C) backen, sollten
das Backblech und / oder der Kombirost nach Hälfte der Backzeit umgedreht werden.
Backen von mehreren Backwaren zugleich
Page 48

D-16
Deutsch
Heißluft/Grillheißluft-Betrieb
Runder Grillrost
Fettpfanne Glasdrehteller
Grill + Mikrowelle
Heißluft + Mikrowelle
Ihnen stehen drei Kombinationsbetriebsarten zur Verfügung: 1) Grill + Mikrowelle, 2)
Heißluft + Mikrowelle, 3) Grillheißluft + Mikrowelle. Die Mikrowellen-Leistungsstufe
1000 W steht beim Kombinationsbetrieb nicht zur Verfügung, weil dies im Normalfall
wenig praktisch wäre: Die Speisen wären gar, bevor sie gebräunt sind.
Zubehör:
Fettpfanne
Glasdrehteller
Grillheißluft + Mikrowelle
Runder Grillrost
Fettpfanne Glasdrehteller
Fettpfanne
Glasdrehteller
oder
1) Grill + Mikrowelle
• Drücken Sie die
Kombinationstaste.
• Stellen Sie die
gewünschte
Grillstufe ein.
• Wählen Sie die
gewünschte
MikrowellenLeistungsstufe aus.
• Stellen Sie die gewünschte
Garzeit ein (bis zu 9 Stunden 99
Minuten).
• Drücken Sie die Starttaste.
nicht einstellbar
Combi
1
10
h
min
1
10
min
s
Page 49

D-17
Heißluft/Grillheißluft-Betrieb
2) Heißluft + Mikrowelle
• Drücken Sie die
Kombinationstaste.
• Stellen Sie die
gewünschte
Temperatur ein.
• Wählen Sie die
gewünschte
MikrowellenLeistungsstufe aus.
• Stellen Sie die
gewünschte Garzeit
ein (bis zu 9 Stunden
99 Minuten
• Drücken Sie
die Starttaste.
nicht einstellbar
• Drücken Sie die
Kombinationstaste.
• Wählen Sie die gewünschte
Mikrowellen-Leistungsstufe
aus.
• Stellen Sie die gewünschte
Garzeit ein (bis zu 9 Stunden
99 Minuten
• Drücken Sie
die Starttaste.
• Zum Ändern der
Grillstufe einmal für
‚Mittelʼ drücken, zweimal
für ‚Niedrigʼ.
• Stellen Sie die gewünschte
Temperatur ein. (Die Grillstufe
‚Hochʼ ist voreingestellt.)
nicht einstellbar
3) Grillheißluft + Mikrowelle
Combi
1
10
h
min
1
10
min
s
Combi
1
10
h
min
1
10
min
s
Page 50

D-18
Deutsch
Kombinationsbetrieb
HINWEISE ZUM VORHEIZEN:
Für den Kombinationsbetrieb ist das Vorheizen des Gerätes möglich. Drücken Sie vor dem
Einstellen der Garzeit die Starttaste und befolgen Sie die HINWEISE ZUM VORHEIZEN auf
Seite D-14.
ANMERKUNGEN:
1. Beträgt die Garzeit weniger als eine Stunde, wird die ablaufende Zeit in Sekunden
zurückgezählt.
2. Beträgt die Garzeit mehr als eine Stunde, wird die ablaufende Zeit in Minuten
zurückgezählt, bis nur noch „1H 00" (1 Stunde) verbleibt. Nun zeigt das Display Minuten
und Sekunden an, die verbleibende Zeit wird in Sekunden zurückgezählt.
3. Es ist möglich, die Garzeit während des Garens zu verlängern. Drücken Sie hierzu die
1-min-Taste so oft, wie erforderlich. Die Garzeit wird hierdurch in Einminuten-Intervallen
verlängert (bis zu 99 Minuten).
4. Nach dem Drücken der Starttaste kann die gewählte Temperatur durch Drücken der
Kombinationstaste abgerufen werden. Die gewählte Einstellung erscheint für zwei
Sekunden im Anzeigenfeld.
Page 51

D-19
Automatisches Auftauen
Mit dieser Funktion werden tiefgefrorene Speisen in Abhängigkeit ihres Gewichts
aufgetaut. Wählen Sie zunächst die entsprechende Lebensmittelkategorie aus und
geben Sie dann das Gewicht der Speise ein. Das Gewicht wird in Gramm programmiert. Zur zeitsparenden Auswahl beginnen die Gewichte mit den gebräuchlichsten
Werten in den jeweiligen Kategorien.
• Wählen Sie das
gewünschte
AuftauautomatikProgramm aus.
• Geben Sie das Gewicht der tiefgefrorenen
Speise ein.
• Drücken Sie die
Starttaste.
Programm
Gewicht
Zubehör
Geeignete Lebensmittel
100 - 1600 g
400 - 2000 g
70 - 400 g
ANMERKUNGEN:
1. Beträgt die Auftauzeit mehr als 60 Minuten, wird die ablaufende Zeit in Stunden und Minuten
angegeben.
2. Die maximale Gewichtsbegrenzung ist durch Größe und Form des Lebensmittels bedingt.
Hinweis zum Programm 3:
Besondere Vorsicht gilt bei der Entnahme von Brot und Brötchen aus dem Gerät. Gerät und
Zubehör werden während des Auftauens und nach dem Auftauen heiß.
Zum Auftauen von gefrorenem
Brot, Brötchen und Croissants.
Entfernen Sie die Verpackung und
stellen Sie den runden Grillrost in die
Fettpfanne auf den Glasdrehteller.
Legen Sie einen großen Brotlaib
direkt in die Fettpfanne. Bei Signalton
wenden.
Kleine Fleischstücke, Schnitzel,
Würstchen, Fischfilet, Steaks,
Koteletts (jedes Stück 100 bis 400 g).
Bei Signalton wenden.
Große Fleischstücke, Braten,
ganze Hähnchen. Bei Signalton
wenden.
g
Erhöhen des Gewichts um jeweils 100 g
Erhöhen des Gewichts um jeweils 10 g
Verringern des Gewichts um jeweils 10 g
1
2
3
g
a
b
c
Page 52

D-20
Deutsch
Sensorautomatik-Programme
Mit diesen Programmen können Sie die verschiedensten Lebensmittel zubereiten,
ohne eine Garzeit, das Gewicht oder die Leistungsstufe eingeben zu müssen.
Plus/Minus-Regelung:
Wie lange eine Speise gegart werden soll, ist vom Geschmack der jeweiligen
Person abhängig. Nachdem Sie die Sensorautomatik-Programme mehrere Male
benutzt haben, bevorzugen Sie eventuell einen unterschiedlichen Gargrad der
Speisen. Dieser lässt sich mittels der Plus/Minus-Regelung erreichen, so dass die
Speisen länger oder kürzer gegart werden.
Drücken Sie oder und anschließend die Starttaste.
Entspricht der Gargrad der Sensorautomatik-Programme genau Ihrem Geschmack,
brauchen Sie keine Änderungen vorzunehmen.
z.B
• Wählen Sie das
gewünschte
Sensorautomatik
-Programm aus.
• Drücken Sie die
Starttaste.
ANMERKUNGEN:
1. Sensorautomatik-Programme sind drei Minuten nach Anschluss des Gerätes an die
Spannungsversorgung einsatzbereit.
2. Vom Gerät werden die Garzeit bzw. die verbleibende Garzeit automatisch errechnet.
3. Die Tür sollte nicht geöffnet werden, bevor die Zeit im Anzeigenfeld erscheint.
4. Als Temperatur von Tiefkühlgut wird -18°C bis -20°C vorausgesetzt, bei anderen
Lebensmitteln +5°C bis +8°C (Kühlschranktemperatur). Die Programme zum Erwärmen von
Reis/Pasta und Suppe eignen sich für Lebensmittel mit Kühlschrank- oder Raumtemperatur.
5. Achten Sie vor dem Starten der Sensorautomatik-Programme darauf, dass der Glasdrehteller
und der Teller mit den Speisen trocken sind.
6. Die Raumtemperatur sollte zwischen 0°C und 35°C liegen.
7. Legen Sie nur solche Lebensmittel in das Gerät, deren Gewicht den empfohlenen
Gewichtsbereich (siehe Seite D-21) nicht überschreitet.
8. Wurde das Gerät zuvor im Heißluft-, Grillheißluft-, Kombinations- oder Grillbetrieb benutzt und
ist es zum Gebrauch eines Sensorautomatik-Programms zu heiß, erscheint „HOT" im
Anzeigenfeld. Die Sensorautomatik-Programme können erst verwendet werden, wenn „HOT"
nicht länger angezeigt wird. Falls Sie in Eile sind und bei der Zubereitung der Speisen Zeit
sparen möchten, wählen Sie die entsprechende Garmethode und Garzeit manuell aus.
Page 53

D-21
Sensorautomatik-Programme
Kategorie
Gewicht
Zubehör
Hinweise
200 - 1000 g
300 - 1200 g
Zum Erwärmen von Suppen aus
Kartons, Dosen oder selbstgemachten Suppen. Alle Speisen
sollten Raum- oder
Kühlschranktemperatur haben.
Vor und nach dem Erwärmen
umrühren. Möglichst Deckel, Platte
oder Teller auflegen. Die
Endtemperatur der Suppe kann je
nach Dicke der Suppe,
Ausgangstemperatur, Zucker- und
Fettgehalt schwanken.
2 Erwärmen
von
Reis/Pasta
1 Erwärmen
von
Suppen
3 Garen von
frischem
Gemüse
200 - 1500 g
Zum Garen von frischem Gemüse.
Das vorbereitete Gemüse in eine
geeignete Form legen. 6 Essl. (90
ml) Wasser darüber gießen. Mit
einer perforierten Klarsichtfolie oder
einem Deckel abdecken. Größere
Portionen bei Signalton umrühren.
4 Garen vo
frischem
Fisch
Zum Garen von frischem Fisch
(ganz – bis zu 300 g pro Fisch,
Filets, Steaks). Fisch in eine
geeignete Form geben. 2 Essl. (30
ml) Flüssigkeit hinzufügen. Den Fisch
mit perforierter Klarsichtfolie oder
einem Deckel abdecken.
5 Erwärmen von
gefrorenem
Gratin
Zum Erhitzen und Bräunen von
tiefgefrorenen Gratins. Die
Verpackung entfernen und das
Gratin in eine feuerfeste Form
geben. Diese Form auf den runden
Grillrost in die Fettpfanne, auf den
Glasdrehteller stellen.
Zum Erhitzen garer Pasta-, Reisoder Kartoffelportionen (aus der
Dose, vakuumverpackt oder selbst
zubereitet). Alle Gerichte sollten
Raum- oder Kühlschranktemperatur
haben. Vor und nach dem Erhitzen
durchrühren. Für ein optimales
Ergebnis mit einem Deckel oder
Teller abdecken. Die Endtemperatur
ist abhängig von der Menge und dem
Fettanteil der Soße und der
Ausgangstemperatur.
Zum Erhitzen und Bräunen von
frischem Gratin. Entfernen Sie
die Verpackung und geben Sie
das Gratin in eine feuerfeste
Form. Stellen Sie diese Form auf
den runden Grillrost in die
Fettpfanne auf den Glasteller.
6 Erwärmen
von
frischem
Gratin
200 - 1200 g
300 - 1000 g
200 - 1000 g
Page 54

D-22
Deutsch
ANMERKUNGEN:
1. Beträgt die Garzeit mehr als 60 Minuten, wird die ablaufende Zeit in Stunden und Minuten
angegeben.
2. Angaben zum empfohlenen Gewicht und zur Benutzung des Zubehörs entnehmen Sie bitte
den nachfolgenden Tabellen.
Gewichtsautomatik-Programme
Kategorie
Gewicht
Zubehör
Hinweise
7 Erwärmen
von frischer
Pizza
150 - 800 g
Zum Erhitzen und Bräunen der
Oberseite von frischer, vorgefertigter Pizza. Entfernen Sie die
Verpackung und stellen Sie den
runden Grillrost mit der Pizza in
die Fettpfanne, auf den
Glasdrehteller.
8 Erwärmen
tiefgefrorener
Pizza
100 - 700 g
Zum Erhitzen und Bräunen der
Oberseite von tiefgefrorener
(NICHT frischer), vorgefertigter
Pizza. Entfernen Sie die
Verpackung und stellen Sie den
runden Grillrost mit der Pizza in
die Fettpfanne, auf den
Glasdrehteller.
9 Erwärmen
von frischer
Quiche
150 - 900 g
Zum Erhitzen von vorgegarter,
frischer Quiche. Entfernen Sie die
Verpackung und setzen Sie die
Quiche mit dem runden Grillrost in
die Fettpfanne auf den Glasteller.
Diese Funktion gestattet Ihnen die Zubereitung der meisten Ihrer Lieblingsspeisen, wofür Sie
lediglich das Gewicht der Lebensmittel einzustellen brauchen. Vom Gerät werden MikrowellenLeistungsstufe, Grillstufe, Heißluft-Temperatur und Garzeit automatisch eingestellt. Wählen Sie
zunächst die entsprechende Lebensmittelkategorie aus und geben Sie dann das Gewicht der
Speisen ein. Das Gewicht wird in Gramm programmiert. Zur zeitsparenden Auswahl beginnen
die Gewichte mit den gebräuchlichsten Werten in den jeweiligen Kategorien.
• Wählen Sie das
gewünschte
Gewichtsautoma-
-tik-Programm
aus.
10
Kleingebäck
Zum Erwärmen, Knusprigbacken
und Bräunen von Kleingebäck
wie Würstchen in Blätterteig,
Fleischpasteten, Pasteten oder
Teigtaschen mit Gemüse oder
Pilzen oder Schinken/Käse. Setzen
Sie den runden Grillrost mit dem
Gebäck in die Fettpfanne auf den
Glasteller.
150 - 700 g
• Geben Sie das Gewicht der Speisen ein.
Erhöhen des Gewichts um jeweils 100 g
Erhöhen des Gewichts um jeweils 10 g
Verringern des Gewichts um jeweils 10 g
g
• Drücken sie die
Starttaste.
g
Page 55

D-23
Gewichtsautomatik-Programme
Kategorie
Gewicht
150 - 1500 g
1000 - 2800 g
800 - 2000 g
700 - 1300 g
750 - 1400 g
Zubehör
Hinweise
18
Garen von
RindRippenstück
700 - 2200 g
14 Garen
von
Hähnchen
- teilen
15 Garen von
ganzen
Hähnchen
16 Garen von
Schweineoder
Kalbsbraten
Zum Garen von Hähnchenteilen,
z.B. Hähnchenbeinen oder schenkeln. Stellen Sie den runden
Grillrost mit den Hähnchenteilen in die
Fettpfanne, auf den Glasdrehteller.
Zum gleichmäßigen Garen die
Hähnchenteile gut verteilen und beim
Ertönen des Signals wenden.
Zum Garen von ganzen, frischen
Hähnchen (ungefüllt). Bereiten Sie
die Füllung für das Hähnchen separat zu. Legen Sie das Hähnchen auf
eine feuerfeste, verkehrt herum
gestellte Untertasse in die
Fettpfanne, auf den Glasdrehteller.
Drehen Sie zunächst die Brustseite
des Hähnchens nach unten und
wenden Sie das Hähnchen beim
Ertönen des Signals.
17 Garen von
Rinderbraten
Zum Garen von frischem
Rinderrippenbraten mit Knochen.
Legen Sie die Rinderrippen in eine
feuerfeste Form. Stellen Sie diese mit
dem hohen Grillrost in die Fettpfanne
auf den Glasteller. Größere Braten
(über 1000 g) werden direkt auf den
hohen Grillrost gelegt. Beim Ertönen
des Signals wenden. Nach dem Garen
aus dem Gerät nehmen und 10 Min
ruhen lassen. Mit diesem Programm
wird der Braten ‚ rareʼ (blutig) bis ‚
mediumʼ (mittel).
Zum Garen von frischem Schweineoder Kalbsbraten. Legen Sie den
Braten in eine hitzebeständige, flache
Form und stellen Sie diese in die
Fettpfanne, auf den Glasdrehteller.
Beim Ertönen des Signaltons wenden.
19 Garen von
Lamm
Zum Garen von frischem
Lammbraten. Legen Sie den
Lammbraten in eine flache, feuerfeste Form und stellen Sie diese auf
die Fettpfanne auf den Glasteller.
Große Lammkeulen können direkt in
die Fettpfanne gelegt werden. Beim
Ertönen des Signals wenden.
Dieses Programm ist nicht für
Lammbraten ohne Knochen
geeignet.
Zum Garen von frischem
Rinderrostbraten. Legen Sie den
Braten in eine hitzebeständige, flache
Form und stellen Sie diese in die
Fettpfanne, auf den Glasdrehteller.
Beim Ertönen des Signaltons wenden.
Page 56

D-24
Deutsch
Für das Tarte-Programm muss das Gerät vorgeheizt werden. Gehen Sie hierzu folgendermaßen vor:
Gewichtsautomatik-Programme
Category
Weight
Accessories
Instructions
20 Quiches/
Obsttörtchen
21Quiches/
Obsttört-
chen
22 Quiches/
Obsttörtchen
4 - 6
Portionen
6 - 8
Portionen
8 - 10
Portionen
Rezepte zum Backen von Quiches oder
Obsttörtchen mit rohen Zutaten entnehmen Sie bitte dem Kochbuch, z.B.
für pikante Quiches – Quiche Lorraine,
Thunfisch-Quiche, RäucherlachsQuiche, Roquefort-Quiche, Pilz-Quiche,
Zwiebel-Quiche, Porree-Quiche, Spinatund Parmesan-Quiche, Muschel-Quiche.
Süße Törtchen – Apfel-, Aprikosen-,
Rhabarber-, Birnen- und Zimttörtchen.
• Wählen Sie das Auto-Menü für
Quiches/Obsttörtchen aus
1 Mal drücken 4-5
Portionen 25 cm
Durchmesser
2 Mal drücken 6-8
Portionen 27 cm
Durchmesser
3 Mal drücken 8-10
Portionen 30 cm
Durchmesser
AUTO-MENÜ FÜR QUICHES/OBSTTÖRTCHEN – HINWEIS:
1. Verwenden Sie für Quiche und Obsttörtchen nur Formen aus Metall, Aluminium und anderen
Leichtmetallen oder teflonbeschichtete Formen. Die durchschnittliche Tiefe der Formen für
Quiche bzw. Obsttörtchen beträgt 30 mm. Benutzen Sie für dieses Automatikprogramm keine
Formen mit herausnehmbarem Boden, keine Formen aus Karton und keine leichten
Aluminium-Formen.
2. Die endgültige Farbe der Pastete ist von der Qualität der Pastete abhängig.
3. Die Farbe der Oberseite von Quiche und Obsttörtchen kann von der Art der Füllung abhängig
sein. Deshalb sollte das Garen ggf. einige Minuten vor Abschluss des Programms beendet
werden.
4. Benutzen Sie dieses Automatikprogramm nicht zum Backen von Pizza oder von Pasteten mit
Doppelkruste.
•
Wählen Sie TarteProgramm 20, 21
oder 22, je nach
Größe der Tarte.
Nach dem Ertönen des
Vorheiz-Signals setzen
Sie die Tarte in das
Gerät.
•
Drücken Sie die
Starttaste, um das
Gerät vorzuheizen.
• Drücken Sie die
Starttaste.
Page 57

D-25
Speicher
Memory
M
Start
Einstellen eines Speicherprogramms
Memory
M
Memory
M
Diese Funktion gestattet Ihnen, Ihr Mikrowellengerät für regelmäßige Vorheiz- und Kochvorgänge zu
programmieren. Sie können Ihr Mikrowellengerät auf eine bestimmte Leistungsebene und eine für Sie
passende Zeit einstellen. Es lassen sich drei Speicheraufgaben vorprogrammieren.
• Drücken Sie die Memory-Taste. Das
Gerät ist auf Memory 1 voreingestellt.
Zum Ändern auf Memory 2 die MemoryTaste zweimal drücken. Zum Ändern auf
Memory 3 die Memory-Taste dreimal
drücken.
Programmieren Sie
das gewünschte
Kochprogramm ein.
• Drücken Sie die SpeicherTaste, um diese Aufgabe zu
speichern, oder drücken Sie
die Start-Taste, um in dieser
Sequenz zu kochen.
Verwenden eines Speicherprogramm
• Drücken Sie
die SpeicherTaste.
• Das Mikrowellengerät wird
automatisch auf Speicher 1
eingestellt. Um Speicher 2
oder 3 zu wählen, drehen Sie
den Auto-Menü-Drehregler im
Uhrzeigersinn.
• Drücken Sie die
Start-Taste, um
mit dem Kochen
zu beginnen.
HINWEIS:
1. Automatik-Programme können nicht in den Speicher programmiert werden.
2. Umluft-Vorheizmodus kann nicht in den Speicher programmiert werden.
3. Es können nur Einstufen-Kochvorgänge gespeichert werden. Es ist nicht möglich, 2- oder 3Stufen-Kochen zu speichern.
4. Durch Eingabe eines neuen Kochprogramms in den Speicher wird das vorher gespeicherte
Kochprogramm gelöscht.
5. Das Speicherprogramm wird gelöscht, wenn die Stromversorgung ausfällt oder der Stecker
aus der Steckdose gezogen wird.
6. Wenn Sie das Erwärmen einer Babyflasche oder einer Portion Babynahrung in die Memory
einprogrammieren, müssen Sie unbedingt anschließend die Temperatur überprüfen, bevor Sie
das Baby füttern.
Diese Memory-Funktion ist auf das Erwärmen von 1 Tasse, 1 Schüssel bzw. 2 Schüsseln eines
Heißgetränks (z.B. Tee, Kaffee, Milch oder Suppe) vorprogrammiert.
Speicher 1
Speicher 2
Speicher 3
1 Mal drücken
2 Mal drücken
3 Mal drücken
1 Tasse
1 Schüssel
2 Schüsseln
150 cl
300 cl
2 x 300 cl
1000 W 80 Sek.
1000 W 120 Sek.
1000 W 240 Sek.
Leistung und DauerDrücken Empfohlenes
Gewicht
Kategorie
Page 58

D-26
Deutsch
Gerätebetrieb mit Vorwahlzeit
Mittels der Vorwahlzeit/Standzeit-Taste können Sie eine Vorwahlzeit zum später
einsetzenden Gerätebetrieb eingeben.
z.B.
nicht einstellbar
10
min
1
min
10
s
1
h
•
Stellen Sie durch Drücken der
Zeittasten die gewünschte
Vorwahlzeit ein (bis zu 9 Stunden 99
Minuten).
• Drücken Sie die
Vorwahlzeit/Stand
zeit-Taste.
• Stellen Sie das gewünschte Garprogramm
und die Garzeit ein.
10
min
1
min
10
s
1
h
• Drücken Sie die
Starttaste.
ANMERKUNGEN:
1. Es ist möglich, den dreistufigen Gerätebetrieb, einschließlich des Betriebs mit
Vorwahlzeit, zu programmieren.
z.B.
Einmal
Einmal
Einmal
nicht einstellbar
nicht einstellbar
10
min
1
min
10
s
1
h
10
min
1
min
10
s
1
h
Vorwahlzeit: 1 Stunde
Hohe Leistungsstufe: 10 Min.
2. Beträgt die Vorwahlzeit mehr als eine Stunde, wird die ablaufende Zeit in Minuten
angegeben. Beträgt sie weniger als eine Stunde, wird die Vorwahlzeit in Sekunden
zurückgezählt.
3. Die Vorwahlzeit kann nicht vor einem Automatikprogramm einprogrammiert werden
.
nicht einstellbar
10
min
1
min
10
s
1
h
Köcheln: 20 Min.
5 Mal
Zweimal
Page 59

D-27
Standzeit
Mittels der Vorwahlzeit/Standzeit-Taste ist es möglich, die Standzeit nach dem
Garen einzuprogrammieren oder das Gerät als Minutentimer zu programmieren.
•
Stellen Sie das gewünschte
Garprogramm und die Garzeit ein.
•
Drücken Sie die
Vorwahlzeit/
Standzeit-Taste.
•
Stellen Sie durch Drücken der
Zeittasten den gewünschten
Zeitraum ein (bis zu 9 Stunden
99 Minuten).
•
Drücken Sie die
Starttaste.
ANMERKUNGEN
:
1. Es ist möglich, den dreistufigen Gerätebetrieb, einschließlich der Standzeit, zu programmieren.
z.B
2. Wird die Gerätetür bei eingestellter Standzeit oder bei eingestelltem Minutentimer
geöffnet, so wird die Zeit im Anzeigenfeld zurückgezählt.
3. Diese Funktion kann auch als Timer verwendet werden. Drücken Sie in diesem Fall die
Vorwahlzeit/Standzeit-Taste, stellen Sie die Zeit ein und drücken Sie die
Starttaste.
z.B.
inoperable
Einmal
Einmal
Zweimal
4 Mal
nicht einstellbar
5 Mal
nicht einstellbar
10
min
1
min
10
s
1
h
10
min
1
min
10
s
1
h
10
min
1
min
10
s
1
h
10
min
1
min
10
s
1
h
10
min
1
min
10
s
1
h
Hohe Leistungsstufe: 4 Min. Standzeit: 5 Min.
Hohe Leistungsstufe: 2 Min.
nicht einstellbar
Page 60

D-28
Deutsch
Fragen und Antworten
F: Warum läßt sich das Mikrowellengerät nicht einschalten?
A: Läßt sich das Mikrowellengerät nicht einschalten, dann überprüfen Sie bitte folgen-
des:
1. Steckt der Netzstecker fest in der Steckdose? Ziehen Sie den Stecker aus
der Steckdose und warten Sie 10 Sekunden, bevor Sie diesen wieder hineinstecken.
2. Überprüfen Sie die Netzsicherung und ersetzen Sie diese gegebenenfalls.
3. Ist die Netzsicherung in Ordnung, schließen Sie ein anderes Elektrogerät an
die Steckdose an. Arbeitet dieses Gerät auch nicht, ist die Steckdose defekt,
Arbeitet das Gerät jedoch ordnungsgemäß, ist wahrscheinlich Ihr Mikrowellengerät defekt. Wenden Sie sich in diesem Fall unbedingt an einen
Panasonic-Kundendienst.
F: Das Mikrowellengerät verursacht Fernsehstörungen. Ist das normal?
A: Beim Betrieb des Mikrowellengerätes können Fernseh- und Radiostörungen
auftreten. Es handelt sich um ähnliche Störungen, wie sie durch kleine
Elektrogeräte wie Mixer, Staubsauger, Haartrockner usw. verursacht werden können. Dies bedeutet nicht, daß Ihr Mikrowellengerät defekt ist.
F: Warum strömt manchmal warme Luft aus dem Mikrowellengerät?
A: Die erhitzten Lebensmittel erwärmen den Garraum. Diese warme Luft wird durch
die zirkulierende Luftströmung aus dem Gerät heraus befördert. In dieser
erwärmten Luft sind keine Mikrowellen enthalten. Die Lüftungsöffnungen dürfen
während des Garens in keinem Fall abgedeckt werden.
F: "D" erscheint im Anzeigenfeld. Was bedeutet das?
A: Das Gerät ist mit einem Demonstrationsprogramm für den Fachhandel ausgestat-
tet. Betätigen Sie 4mal die Taste für Uhrzeit/Signalwecker, um diese Funktion zu
löschen. Das Gerät ist wieder betriebsbereit.
F: Kann im Mikrowellengerät ein herkömmliches Fleischthermometer
verwendet werden?
A: Nur für den reinen GRILLBETRIEB können Sie ein Fleischthermometer verwen-
den. Benutzen Sie für den MIKROWELLENBETRIEB bzw. für den KOMBINATIONSBETRIEB niemals ein herkömmliches Fleischthermometer, denn das Metall
des Thermometers kann Funkenbildung verursachen.
Page 61

D-29
Fragen und Antworten
F: Warum sind während des Kombinationsgarens brummende und klickende
Geräusche zu hören?
A: Diese Geräusche sind bedingt durch das automatische Umschalten von MIKRO-
WELLENLEISTUNG auf GRILLEISTUNG während des Kombinationsbetriebs.
Dies ist normal.
F: Warum riecht das Mikrowellengerät unangenehm und erzeugt beim Betrieb
von Heißluft, Kombination und Grill Rauch?
A: Nach mehrfachem Gebrauch ist es notwendig, das Gerät gründlich zu reinigen.
Sie können zusätzlich das Gerät ohne Lebensmittel und Zubehör für 5 Minuten mit
dem Grill in Betrieb nehmen. Dadurch werden geruchsverursachende
Lebensmittelrückstände und konservierende Ölreste verbrannt.
F: Kann ich die gewählte Heißlufttemperatur während des Vorheiz- oder
Kochvorgangs abrufen?
A: Ja. Drücken Sie die Taste zur Wahl der Heißlufttemperatur und die gewählte
Temperatur erscheint für 2 Sekunden in der Digitalanzeige.
F: Kann ich mit dem Heißluft-/Grillbetrieb einfach beliebige Rezepte
nachkochen?
A: Ja. Sie können beliebige Rezepte genau wie mit einem herkömmlichen Backofen
nachkochen. Vergleichen Sie hierzu die Hinweise im Panasonic-Kochbuch für
empfohlene Temperaturen und Garzeiten.
F: Wieso ist keine Laufschrift im Display zu sehen?
A: Der Netzstrom ist ausgefallen oder der Netzstecker ist nicht eingesteckt. Befolgen Sie das
auf Seite 9 beschriebene Verfahren.
Page 62

D-30
Deutsch
Pflege des Mikrowellengerätes
Wird das Mikrowellengerät nicht in einem sauberen Zustand gehalten,
kann dies zu einer Güteminderung der Oberflächen führen, was
wiederum eine Beeinträchtigung der Lebensdauer des Geräts mit sich
bringen und eventuell eine Gefahr für den Benutzer darstellen kann.
1. Schalten Sie vor dem Reinigen das Gerät
ab.
2. Halten Sie stets den Garraum, die Tür und
den Türrahmen sauber. Entfernen Sie an
den Garraumwänden haftende Spritzer von
Speisen und Flüssigkeiten mit einem
feuchten Tuch und ggf. mildem
eini-gungsmittel. Scharfe Reinigungs- und
Scheuermittel sind nicht empfehlenswert.
VERWENDEN SIE IN KEINEM FALL
BACKOFEN-REINIGUNGSMITTEL.
3. Das Gehäuse des Gerätes sollte feucht
abgewischt werden. Achten Sie darauf,
daß kein Wasser durch die
Entlüftungsschlitze ins
Geräteinnere gelangt, da das Gerät
dadurch Schaden nehmen
könnte. Verwenden Sie zur Reinigung der
gläsernen Mikrowellentür keine
Scheuermittel oder scharfe Metallschaber,
da dies eine Beschädigung der Oberfläche
zur Folge haben und zum Zerspringen des
Glases führen könnte.
4. Ist das Bedienfeld verschmutzt, säubern
Sie dieses mit einem trockenen, weichen
Tuch. Verwenden Sie keine scharfen
Reinigungs- oder Scheuermittel. Damit es
nicht zu einem unvorhergesehenen
Betrieb des Gerätes kommt, lassen Sie die
Gerätetür beim Säubern geöffnet.
5. Während des Betriebs kann sich durch
Verdampfen von Feuchtigkeit innen oder
außen auf dem Sichtfenster des Gerätes
Kondenswasser niederschlagen und evtl.
unter der Tür abtropfen. Dieser Vorgang ist
normal und kann verstärkt bei niedrigen
Raumtemperaturen und hoher
Luftfeuchtigkeit auftreten. Die Sicherheit
des Gerätes ist dadurch nicht
beeinträchtigt. Bitte nach dem Betrieb das
Kondenswasser mit einem weichen Tuch
abwischen.
6. Gelegentlich sollten Sie den Glasteller in
warmem Seifenwasser oder in der
Spülmaschine reinigen.
7. Der Rollenring und die Vertiefung im
Geräteboden sollten regelmäßig gereinigt
werden. Damit werden unnötige
Betriebsgeräusche vermieden und die
Ansammlung von Lebensmittelresten
verhindert. Einfach den Boden mit
einem feuchten Tuch auswischen und
anschließend trocknen. Der Rollenring
kann mit mildem Seifenwasser gereinigt
werden. Achten Sie darauf, daß Sie
Rollenring und Drehteller nach dem
Reinigen wieder richtig einsetzen.
8. Beim GRILL-, HEISSLUFT oder
KOMBINATIONSBE-TRIEB können
Spritzer von Speisen an den
Garraumwänden haften bleiben. Wird das
Gerät nicht regelmäßig gereinigt, kann es
während des Betriebs zu
Rauchentwicklung kommen.
9. Ein Dampfreiniger darf nicht zur Reinigung
verwendet werden.
10. Das Mikrowellengerät darf ausschließeich
von einem quali-fizierten PanasonicKundendienst geprüft oder repariert
werden.
11. Halten Sie die Lüftungsöffnungen zu allen
Zeiten frei. Vergewissern Sie sich, dass
die Lüftungsöffnungen an der Ober-,
Unter- und Rückseite des Geräts nicht
durch Staub oder sonstiges Material
verstopft werden. Wenn die
Lüftungsöffnungen verstopft sind, kann
dies zu einem Überhitzen des Geräts
führen und dessen Betriebsfähigkeit
beeinträchtigen.
Page 63

D-31
Bei diesem Produkt handelt es sich um ein Gerät, das die europäische Norm für EMVFunkstörungen (EMV = Elektromagnetische Verträglichkeit), EN 55011, erfüllt. Gemäß dieser
Norm ist dieses Produkt ein Gerät der Gruppe 2, Klasse B und hält alle Grenzwerte ein. Gruppe
2 bedeutet, dass in diesem Gerät Hochfrequenz-Energie für das Erwärmen oder Garen von
Lebensmitteln absichtlich als elektromagnetische Strahlung erzeugt wird. Klasse B sagt aus,
dass dieses Produkt in einem normalen Wohnbereich betrieben werden darf.
Benutzerinformationen zur Entsorgung von elektrischen und elektronischen Geräten (private Haushalte)
Entsprechend der grundlegenden Firmengrundsätzen der Panasonic-Gruppe
wurde ihr Produkt aus hochwertigen Materialien und Komponenten entwickelt
und hergestellt, die recycelbar und wieder verwendbar sind.
Dieses Symbol auf Produkten und/oder begleitenden Dokumenten bedeutet,
dass elektrische und elektronische Produkte am Ende ihrer Lebensdauer vom
Hausmüll getrennt entsorgt werden müssen.
Bringen Sie bitte diese Produkte für die Behandlung, Rohstoffrückgewinnung und
Recycling zu den eingerichteten kommunalen Sammelstellen bzw.
Wertstoffsammelhöfen, die diese Geräte kostenlos entgegennehmen.
Die ordnungsgemäße Entsorgung dieses Produkts dient dem Umweltschutz und
verhindert mögliche schädliche Auswirkungen auf Mensch und Umwelt, die sich aus einer
unsachgemäßen Handhabung der Geräte am Ende Ihrer Lebensdauer ergeben könnten.
Genauere Informationen zur nächstgelegenen Sammelstelle bzw. Recyclinghof erhalten Sie bei
Ihrer Gemeindeverwaltung.
Für Geschäftskunden in der Europäischen Union
Bitte treten Sie mit Ihrem Händler oder Lieferanten in Kontakt, wenn Sie elektrische und elektronische Geräte entsorgen möchten. Er hält weitere Informationen für sie bereit.
Informationen zur Entsorgung in Ländern außerhalb der Europäischen Union
Dieses Symbol ist nur in der Europäischen Union gültig.
Technische Daten
Netzspannung: 230 V, 50 Hz
Operations Frequenz 2,450 MHz
Leistungsaufnahme: Maximum: 2980 W
Mikrowelle: 1275 W
Grill: 1560 W
Heißluft: 1500 W
Ausgangsleistung: Mikrowelle: 1000 W (IEC-60705)
Grill: 1500 W
Heißluft: 1400 W
Äußere Abmessungen: 530 (W) x 508 (D) x 344 (H) mm
Garraumabmessungen: 350 (W) x 360 (D) x 250 (H) mm
Gewicht: 21.0 kg
Geräusch: 52, 7 dB
Die Angaben sind Annäherungswerte;
Die technischen Daten Können ohne Vorankündigung verändert werden.
Page 64

werkblad
vrije
kant
10 cm
15 cm
5 cm
Nl-1
Installatie en aansluiting
Uw magnetronoven controleren
Pak de magnetronoven uit en verwijder alle
verpakkingsmaterialen. Controleer de
magnetronoven op beschadigingen zoals
deuken, beschadiging van de deurafsluiting of
scheuren in de deur. Waarschuw onmiddelijk
uw leverancier wanneer schade wordt geconstateerd. Gebruik het apparaat niet als het
beschadigd is.
Aansluiting op een geaard stopcontact
BELANGRIJK: VOOR PERSOONLIJKE VEILIGHEID, DIENT DIT APARAAT OP EEN
GEAARD STOPCONTACT AANGESLOTEN
TE WORDEN.
Het aansluiten van dit apparaat op een niet
geaard stopcontact is voor de persoonlijke
verantwoordelijkheid van de gebruiker.
Voltage
De netspanning, vermeld op deze magnetronoven, dient overeen te komen met de
netspanning op uw stopcontact. Gebruik geen
andere netspanning om brand of andere
schade te voorkomen.
Het plaatsen van de magnetronoven
Deze oven is uitsluitend bestemd voor gebruik
op een werkblad. Hij is niet bedoeld als
inbouwoven of voor gebruik in een kast.
1. De magnetronoven moet op een vlakke,
stevige ondergrond geplaatst worden, en
hoger dan 85 cm boven de grond.
2. Indien de magnetron ingebouwd wordt, let
er dan op dat de stekker uit het stopcontact
gehaald kan worden of op een andere
wijze de stroomvoorziening onderbroken
kan worden.
3. De magnetronoven kan alleen op de juiste
wijze functioneren, indien er voldoende
ventilatie is.
Plaatsing op een meubel:
a. Boven de magnetronoven moet een
ruimte vrij gelaten worden van 15 cm,
aan de achterzijde 10 cm, aan de
zijkant 5 cm, en aan de andere zijkant
een ruimte van meer dan 40 cm.
b. Als een van de kanten vlak tegen de
muur staat, moeten de andere kant en
de bovenkant vrij staan.
Inbouwen
De oven kan, indien gebruik wordt gemaakt
van een inbouwraam (wit, NN-TKA80W, zilver,
NN-TKA80M) ingebouwd worden in een
muurkast. Dit inbouwraam kunt u verkrijgen bij
een Panasonic voortverkoper (dealer).
4. Plaats de magnetronoven niet naast
andere elektrische apparatuur of naast een
gasfornuis.
5. Verwijder de voetsteunen van de magnetronoven niet.
6. Deze oven is uitsluitend bestemd voor particulier gebruik. Gebruik deze oven uitsluitend binnenshuis.
7. Het is af te raden deze magnetronoven in
een vochtige omgeving te plaatsen.
8. Zorg ervoor dat het snoer nooit de
buitenkant van de oven raakt. Hou het
snoer uit de buurt van warme of hete
oppervlaktes. Laat het snoer nooit over de
rand van een tafel of werkoppervlak
hangen. Laat het snoer, de stekker of de
oven nooit in het water hangen.
9. De ventilatie-openingen van de magnetron,
aan de achter- en bovenkant, moeten vrij
blijven en mogen niet geblokkeerd worden.
Indien deze openingen geblokkeerd zijn
terwijl de magnetronoven in werking is, kan
de oven oververhit raken. Een thermische
veiligheidsschakelaar zal de magnetronoven buiten werking stellen en de
oven weer inschakelen zodra deze
afgekoeld is.
Page 65

Nederlands
Installatie en aansluiting
WAARSCHUWING
1. De deurafdichtingen en de plaatsen hieromheen moeten met een vochtig doek worden
schoongemaakt.
Voordat het aparaat in werking gesteld wordt, dient het apparaat nagekeken te worden
op beschadigingen bij deurafdichtingen en de plaatsen hieromheen. Mochten zich hier
toch beschadigingen voordoen, dan mag het apparaat pas in gebruik worden genomen
nadat de magnetronoven is gerepareerd of nagekeken door een hiervoor, door de
fabrikant opgeleide, service monteur.
2. Tracht niet om zelf reparaties of wijzigingen aan de deur, het bedieningspaneel, de
veiligheids- of vergrendelingsschakelaars of welk ander deel dan ook, uit te voeren.
Verwijder de mantel van de magnetronoven niet, deze functioneert als een beveiliging
tegen het blootstellen aan magnetronstraling. Reparaties mogen alleen door
gekwalificeerd servicepersoneel uitgevoerd worden.
3. Gebruik het apparaat niet als het NETSNOER en/of de STEKKER beschadigd zijn, als
het apparaat niet goed functioneert of als het apparaat beschadigd is of nadat men het
apparaat heeft laten vallen. Reparaties mogen alleen door gekwalificeerde, door de
fabrikant opgeleide, servicemonteurs uitgevoerd worden.
4. Indien het netsnoer defect mocht raken, dient het altijd door een origineel netsnoer
vervangen te worden.
5. Kinderen, zonder toezicht, mogen alleen de magnetronoven bedienen als specifieke
instructies zijn gegeven, zodat het kind in staat is de oven zelfstandig en veilig te
bedienen en bewust is gemaakt van de gevaren die ontstaan als gevolg van onjuist
gebruik van de magnetronoven.
6. Ontploffingsgevaar bestaat indien voedsel of dranken in een gesloten blik of fles
verwarmd worden.
7.Deze oven is niet bestemd voor gebruik door personen (waaronder kinderen) met
verminderde fysieke, zintuigelijke of mentale vaardigheden, noch door personen met
een gebrek aan ervaring en kennis, tenzij zij onder toezicht staan of instructies hebben
gekregen over het gebruik van de oven door iemand die verantwoordelijk is voor hun
veiligheid. Er moet toezicht worden gehouden op kinderen zodat ze niet met de oven
kunnen spelen.
Gebruik van uw magnetronoven
1. Gebruik de magnetronoven enkel en alleen om voedsel te bereiden. Deze oven is
specifiek ontworpen om voedsel te koken of te verwarmen. Gebruik de magnetronoven
niet om chemisch of andere niet eetbare producten te verwarmen.
2. Voor gebruik dient u zich ervan te verzekeren dat alle te gebruiken hulpmiddelen
(schalen/bakvormen enz.) geschikt zijn voor gebruik in de magnetronoven.
3. Gebruik de magnetronoven niet om krantenpapier, kleding of andere materialen te
drogen. Deze kunnen vuur vatten.
4. Gebruik de oven niet om voorwerpen, anders dan accessoires als schalen, bakvormen,
enz., in op te bergen. Dit voor het geval dat de magnetronoven per ongeluk aangezet
wordt.
5. Gebruik de magnetronoven niet ZONDER DAT ZICH HIERIN VOEDSEL BEVINDT.
De magnetron-buis kan hierdoor beschadigd raken. Een uitzondering hierop is punt 1
onder ʻWerking ovenverwarmingʼ
6. Zoals er rook of vuur in uw magnetronoven ontstaat, druk dan op de Stop/Wis toets en
laat de ovendeur gesloten om zo de vlammen te laten doven. Trek de stekker uit het
stopcontact of sluit de elektriciteit af.
Nl-2
Page 66

Veiligheidsinstructies
Nl-3
Werking van de oven en grill
1. Voordat u de eerste keer gebruik gaat
maken van de HETE LUCHT-,
COMBINATIE- OF GRILLFUNCTIES, wrijf
dan eerst de eventueel resterende olie in
de oven weg en schakel de magnetron
gedurende 10 minuten in op de stand
HETE LUCHT 250°C. Op deze manier
wordt de olie, die gebruikt werd als
beschermingslaag tegen het roesten, eraf
gebrand. Dit is de enige keer dat de oven
'leeg' gebruikt mag worden.
2. De buitenwanden van de magnetronoven,
inclusief de ventilatie-openingen van de
kast en de ovendeur worden tijdens de
HETE LUCHT (CONVENTIE-),
COMBINATIE- en GRILL functies heet. Pas
dus op bij het openen en sluiten van de
ovendeur en bij het inzetten of uithalen van
voedsel en accessoires.
3. De magnetronoven is uitgerust met twee
verwarmingselementen; een bovenin en
een achterin de magnetronoven. Na het
gebruik van de HETE LUCHT-, COMBINATIE- OF GRILLFUNCTIES zullen deze
vlakken dan ook betrekkelijk warm zijn.
N.B. Na het koken m.b.v. deze functies
kunnen de oven-toebehoren heel heet zijn.
4. De buitenkant van de magnetronoven kan,
tijdens het grillen, warm worden. Kinderen
moeten buiten het bereik van de oven
gehouden worden.
Werking van de ventilatiemotor
Tijdens het werken met de microgolf/warme
lucht-functie draait er tegelijkertijd een
ventilatormotor die de elektrische onderdelen
koelt. Na het beëindigen van de kookfuncties,
draait de ventilatormotor soms nog een tijdje
door.
Verlichting van de magnetronoven.
Indien het noodzakelijk is dat de verlichting
van de oven vervangen dient te worden, neem
dan contact op met uw voortverkoper (dealer).
Accessoires
Er worden een aantal toebehoren bij deze
magnetronoven geleverd. Volg altijd de
instructies op die bij de diverse toebehoren
gevoegd zijn.
Het draaiplateau
1. Gebruik de magnetronoven nooit zonder
het draaiplateau.
2. Gebruik nooit een ander glazen
draaiplateau dan deze die bij het toestel
geleverd werd.
3. Als het draaiplateau warm is moet deze
eerst afkoelen voordat u het plateau
schoonmaakt of in het water legt.
4. Het glazen draaiplateau kan zowel naar
links als naar rechts draaien.
5. Indien het voedsel of de schaal de wanden
van de magnetronoven raakt, en zo het
roteren stopt, zal het draaiplateau
automatisch in de tegengestelde richting
draaien. Dit is een standaard werking.
6. Plaats het voedsel nooit direct op het
draaiplateau.
Loopring
1. De loopring en de ovenbodem moeten
regelmatig worden gereinigd om geluid te
voorkomen en om ervoor zorg te dragen
dat geen voedsel achterblijft.
2. Tijdens het koken moet de loopring altijd
tesamen met het draaiplateau gebruikt
worden.
Metalen draaiplateau
1. Het metalen draaiplateau moet gebruikt
worden bij de Grill-, Hete lucht- en
Combinatie- functies. Gebruik het metalen
draaiplateau nooit als alleen de
magnetronfunctie gebruikt wordt.
2. Het metalen draaiplateau dient op het
glazen draaiplateau op het ronde rooster
geplaatst te worden.
Ronde rooster
1. Het ronde rooster kan gebruikt worden voor
het bruiningsproces van kleine
hoeveelheden en zorgt mede voor een
goede circulatie van de warmte.
2. Gebruik geen metalen voorwerpen direct
op het ronde rooster in combinatie met de
magnetronfunctie.
3. Gebruik het ronde rooster nooit als alleen
de magnetronfuctie gebruikt wordt.
Geëmailleerd bakblik en bakrooster
1. Het bakblik en bakrooster zijn bestemd
voor convectieverwarming en grillen.
Gebruik deze accessoires niet met de
magnetronfunctie, ook niet in combinatie.
2. Wanneer u de convectiefunctie gebruikt,
dan kunt u het bakblik en het bakrooster op
beide ovenniveaus plaatsen. Wanneer u de
grillfunctie gebruikt, dan kunt u alleen het
bovenste ovenniveau gebruiken.
Page 67

Nl-4
Nederlands
Belangrijke informatie
1) Kooktijden
• De in het kookboek opgegeven kooktijden zijn
bij benadering gegeven. Factoren die invloed
hebben op de kookduur zijn: de begintemperatuur, de hoeveelheid, grootte, afmetingen en
vorm van het voedsel en van de materialen
die voor het koken gebruikt worden.
• Het is beter om te kort dan om te lang te
koken. Als het voedsel te kort wordt gekookt,
kan het altijd nog een keer in de
magnetronoven geplaatst worden.
N.B.: Als u het voedsel langer kookt dan
de aanbevolen kookijden, kan het
verbranden, en in extreme gevallen zelfs
vlam vatten. Hierdoor kan de oven worden
beschadigd.
2) Kleine hoeveelheden voedsel
• Kleine hoeveelheden voedsel met een gering
vochtgehalte kunnen uitdrogen, aanbranden
of zelfs verbranden als te lang wordt
doorgekookt. Indien het voedsel vlam vat,
dient u de ovendeur gesloten te houden, de
oven uit te zetten en de stekker uit het
stopontact te nemen.
3) Eieren
• Kook met de magnetron geen ongepelde
eieren en verwarm geen hardgekookte eieren.
Eieren kunnen ten gevolge van de druk
ontploffen, zelfs na hun opwarming in de
magnetron.
4) Niet poreuze schil
• Voedingsmiddelen zoals aardappelen,
eierdooiers en worstjes hebben geen poreuze
schil en dienen voor het koken met de magnetronfuctie eerst ingeprikt te worden met een
vork. Zo voorkomt u eventueel het uit elkaar
spatten.
5) Vleesthermometer
• Indien u gebruik maakt van een
vleesthermometer voor vlees en gevogelte,
gebruik deze dan alleen wanneer het voedsel
uit de magnetronoven gehaald is. Gebruik
geen conventionele vleesthermometer indien
u de MAGNETRON- of COMBINATIE-functie
gebruikt. Dit kan vonkvorming veroorzaken.
6) Vloeistoffen
• Indien vloeistoffen, zoals soepen, sausen en
drank opgewarmd wordt in uw magnetronoven, kunnen deze bij het bereiken van
het kookpunt gaan overkoken, zonder dat er
enige aanwijzingen zijn zoals het borrelen.
Dit kan resulteren in een plotseling overkoken
van de hete vloeistof. Om dit te voorkomen,
moet men het volgende doen:
a) Gebruik geen voorwerpen met smalle
halzen om vloeistoffen inop te warmen.
b) Niet teveel verwarmen.
c)Roer de vloeistof voor het verwarmen een
keer om en roer op halve kooktijd de
vloeistof nog een keer om.
d) Laat de vloeistof, wanneer deze op de
juiste temperatuur is, nog even in de oven
staan en roer goed voordat u het uit de
oven haalt.
7) Verpakkingsmateriaal
• Als u het voedsel in kunststof of papieren
bakjes gaat verwarmen dient u de oven
regelmatig te controleren omdat dit type
bakjes bij oververhitting vlam kunnen vatten.
• Gebruik geen gerecycleerd papier (bijv.
keukenrol) tenzij het product gemerkt is met
een teken dat dit zonder problemen in een
magnetronoven gebruikt mag worden.
Producten gemaakt van gerecycleerd papier
kunnen verontreinigingen in zich hebben, die
vonkvorming tot gevolg kunnen hebben en/of
brand veroorzaken.
• Verwijder metalen sluitingen van verpakkin-
gen voordat u deze in de oven plaatst.
8) Hulpmiddelen/Folie
• Verwarm nooit gesloten potjes of flessen in de
magnetronoven omdat deze zouden kunnen
ontploffen.
• Gebruik tijdens de magnetronfunctie geen
metalen schotels of schotels met metalen
randen. Dit kan resulteren in vonk-overslag.
• Als u aluminiumfolie of vleesspiezen gebruikt,
moet er een minimale afstand van 2 cm
tussen de spiezen en de ovenwanden
bestaan, dit om vonk-overslag te voorkomen.
9) Zuigflessen/potjes babyvoeding
• De deksel, de speen of de bovenkant dient
van de zuigfles en/of potjes babyvoeding
verwijderd te worden, voordat deze in de
oven geplaatst worden.
• Schud de zuigflessen goed en roer een paar
keer door de potjes met babyvoeding.
• Controleer de temperatuur van het voedsel
voor gebruik.
Page 68

[1]
[2]
[3]
[4]
[5]
[7]
[8]
[6]
[9]
[10]
[12]
[11]
[13]
De magnetronoven
Nl-5
[1] Deur ontgrendeltoets
Druk de toets in om de deur te openen. Indien u de ovendeur tijdens het koken opent, stopt
de magnetronoven met koken zonder het ingestelde kookprogramma te wissen. Het koken
gaat weer normaal door, zodra de deur wordt gesloten en de starttoets wordt aangeraakt.
Het lampje in de magnetronoven gaat, zodra u de ovendeur opent, aan.
[2] Doorkijkvenster
[3] Veiligheidsscharnieren
[4] Ventilatie-openingen
[5] Bedieningspaneel
[6] Glazen draaiplateau
[7] Loopring
[8] Luchtopeningen voor de ventilatie van de oven
[9] Metalen draaiplateau
[10] Ronde rooster
[11] Geëmailleerd bakblik
[12] Bakrooster
[13] Geleiders voor twee ovenniveaus
Page 69

Het bedieningspaneel
Nl-6
Nederlands
NN-CT857/
NN-CT878
(1)
(2)
(3)
(4)
(5)
(6)
(7)
(8)
(10)
(11)
(15)
(16)
(9)
(12)
(13)
(14)
Piepgeluid:
Zodra u een toets aangeraak c.q. indrukt, volgt er een pieptoon. Indien u niets hoort,
wil dat zeggen dat de instructie niet goed is of dat het systeem de instructie niet
accepteert. Tussen twee geprogrammeerde fases in hoort u twee piepjes. Bij het
einde van de voorverwarmingstijd van de warme lucht- of combinatiefunctie, laat de
magnetronoven 3 maal een pieptoontje horen. Bij het einde van welk programma
dan ook, hoort u vijfmaal achtereen het piepgeluid.
(1) Uitleesvenster
(2) Tijdtoetsen
(3) Vermogenstoets
(4) Grill toets
(5) Hete lucht toets
(6) Combinatie Grill + Hete lucht toets
(7) Combinatie toets
(8) Kopje/Schaaltje - Opnieuw
verwarmen
(9) Automatische ontdooitoets
(10) Gewichtsinvoertoetsen (plus/min)
(11) Programmeer/standaardtijdtoets
(12) Automatische sensor
programmatoetsen
(13) Automatische sensor Combinatie
programma toets
(14) Automatische combinatieprogram
ma's gewichtinstelling
(15) De starttoets:
Met een druk op deze toets stelt u de
magnetronoven in werking.
Indien u tussentijds de ovendeur
opent of de Stop/Wis toets aanraakt
tijdens het koken, dan moet de start
toets nogmaals worden aangeraakt
om de magnetronoven opnieuw in
werking te stellen.
(16) Stop/wistoets:
Voor het koken: Een druk op de
toets en het gehele ingestelde pro-
gramma wordt gewist.
Tijdens het koken: Met een druk op
de toets wordt het kookproces tijdelijk
onderbroken. Indien u dan nog een
keer de betreffende toets aanraakt is
het complete programma gewist en
verschijnt de klok in het
uitleesvenster.
1
h
1
min
Combi
g
10
min
10
s
M
NN-CT857W
Page 70

Nl-7
De juiste kookfunctie kiezen
Schalen
Te gebruiken
accessoires
Toepassingen
Kookfuncties
Magnetron
- Ontdooien
- Opwarmen
- Smelten: boter, chocolade, kaas
-Koken van vis, groente, fruit, eieren
- Bereiden: gestoofd fruit, jam, saus,
vla, soesjes, bechamel,
karamel, vlees-, vis- of vegetarische
pastei.
- Bakken van cake met eieren en
kleurloze bakpoederingrediënten (Victoria sandwich
cake, clafoutis, etc.)
Niet Voorverwarmen
Grill
- Grillen van vlees of vis
- Roosteren van brood
- Gratineren van gerechten of
schuimtaarten
Voorverwarmen noodzakelijk
CONVECTIE
- Bakken van kleine deegwaren met
korte kooktijden:
pasteitjes, koekjes, soesjes, koekjes
van kruimeldeeg,
boomstammen
- Speciaal gebak: soufflés, schuim
taarten, pasteitjes, luxe
broodjes of brioches, schuimcakes,
vleespasteitjes, etc.
- Bakken van quiches, pizzaʼs en har
tige taarten
Voorverwarmen aanbevolen
Uitsluitend
de glazen
draaiplateau
Geschikt
voor de
magnetron,
geen
metaal
Glazen
draaiplateau
+
metalen
schotel +
rond rek
Warmtebestendig,
metalen
kom is
bruikbaar
Glazen
draaiplateau
+
metalen
schotel +
rond rek of
geëmailleerd
bakblik en/of
bakrooster
Warmtebestendig,
metalen
kom is
bruikbaar
Page 71

Nl-8
Nederlands
De juiste kookfunctie kiezen
convectie +
magnetron
grill + convectie
+ magnetron
Schalen
Te gebruiken
accessoires
Toepassingen
Kookfuncties
Grill + convectie
COMBINATIE
• Grill + magnetron
• Grill + convectie +
magnetron
grill + magnetron
- Roosteren van rood vlees, dikke
biefstuk (ribeye of kogel-
biefstuk, T-bonesteak)
- Smoren van vis
Voorverwarmen noodzakelijk
Glazen
draaiplateau
+
metalen
schotel +
rond rek of
geëmailleerd
bakblik en/of
bakrooster
Warmtebestendig,
metalen
kom is
bruikbaar
- Roosteren van vlees en gevogelte
- Ontdooien en opwarmen van
krokante etenswaar (quiche,
pizza, brood, gebakjes, lasagne,
gratin)
- Bereiden van lasagne, vlees, aardappelen- of groentegratin
- Bakken en gratineren van cake en
pudding met eieren of
bakpoederingrediënten, bakken van
quiches en (hartige) taarten
Voorverwarmen aanbevolen
Glazen
draaiplateau +
metalen schotel + rond rek
(afhankelijk
van de
hoeveelheid
voedsel)
Geschikt
voor de
magnetron
en
warmtebestendig.
Metalen
cakevorm
mag uitsluitend op metalen schotel
worden
gebruikt.
GEBRUIK
GEEN
springvormen.
Page 72

Nl-9
Bedienings- en gebruiksprocedure
Toebehoren
De tabel hieronder vermeldt welke accessoires voor welk programma gebruikt
moeten worden.
Ja
Ja
Ja
Ja
Ja
Glazen
draaiplateau
Glazen
draaiplateau
Ronde
rooster
Geëmailleerd
bakblik
Bakrooster
Magnetron
Grillen
Hete lucht
Grill +
Hete lucht
Combinatie
Nee
Ja
Ja
Ja
Ja
Nee
Ja
Ja
Ja
Ja
Nee
Ja
Ja
Ja
Nee
Nee
Ja
Ja
Ja
Nee
Stap voor stap displayʼs:
Voor het instellen van "88:88"
Deze modellen hebben een unieke functie "Stap voor stap display" die u door de werking van de
magnetronoven heen leiden. Nadat u de stekker van de magnetronoven in het stopcontact heeft
gestoken, drukt u op de Starttoets totdat u de door u gewenste taal kunt selecteren.
Terwijl u op de toetsen drukt, schuift het uitleesvenster naar de volgende instructie, waardoor
mogelijke foutieve ingaven voorkomen worden. Mocht u voor welke reden dan ook de door u geselecteerde taal willen wijzigen, dan dient u de stekker uit het stopcontact te nemen en de procedure
opnieuw te starten.
Stap voor stap display
“ENGLISH”
“DEUTSCH”
“FRANCAIS”
“NEDERLANDS”
“ITALIANO”
Druk op
Druk op
Druk op
Druk op
Druk op
In het Engels b.v. "SET TIME"
In het Duits b.v.
“UHRZEIT EINGEBEN”
In het Frans b.v. "CHOISIR LA DUREE"
In het Nederlands b.v. "STEL DE TIJD IN"
In het Italiaans b.v. "INSERITE IL TEMPO"
Page 73

Nl-10
Nederlands
Bedienings - en gebruiksprocedure
De klok instellen:
Voorbeeld: Voor het instellen van 14:25
• Druk eenmaal op de toets
Wachttijd/Rusttijd.
Het dubbel punt houdt op met
knipperen en de tijd is in het
geheugen opgenomen en wordt
op het uitleesvenster getoond.
Opmerking:
1. Om de juiste tijd opnieuw in te stellen, moet u stap 1 t/m 3 herhalen.
2. De klok geeft de juiste tijd aan zolang de stekker op het lichtnet is aangesloten. Wanneer de
netspanning uitgeschakeld is geweest, dient u de klok opnieuw in te stellen.
3. Dit is een 24-uurs klok.
14 maal tweemaal
niet operationeelvijfmaal
• Druk tweemaal op de
toets Wachttijd/
Rusttijd.
het dubbel punt
gaat nu knipperen.
• Toets de juiste tijd in
door de betreffende
tijdtoetsen aan te raken.
De tijd verschijnt in het
uitleesvenster en het
dubbel punt knippert.
Gebruik van het kinderslot:
Door gebruik te maken van dit systeem, wordt het onmogelijk om de oven te bedienen; de deur
opent echter wel. Het kinderslot kan ingesteld worden wanneer het display een dubbel punt of
een tijd vertoont.
Hoe in te
schakelen:
Om te
annuleren:
• Druk 3 keer op de starttoets.
De tijdsaanduiding verdwijnt,
maar de tijd blijft in het geheugen.
• Druk 3 keer op de Stop/wistoets.
De tijdsindicatie verschijnt opnieuw in het
uitleesvenster.
1
10
h
min
1
10
min
s
Page 74

Nl-11
Koken met de magnetronfunctie en
ontdooien
Er zijn 6 verschillende niveaus voor het vermogen aanwezig (zie de onderstaande
tabel).
Indrukken Vermogen Wattage Max.beschikbare tijd
1 x Maximaal vermogen 1000 W 30 minuten
2 x Ontdooitoets vermogen 270 W 99 min. 90 sec.
3 x Middelmatig vermogen 600 W 99 min. 90 sec.
4 x Smoor vermogen 440 W 99 min. 90 sec.
5 x Sudder vermogen 250 W 99 min. 90 sec.
6 x Warmhoud vermogen 100 W 99 min. 90 sec.
Deze tabel geeft het gemiddelde vermogen weer dat voor ieder vermogensniveau
gebruikt kan worden.
Gebruik van de accessoires:
• Bepaal het vermogen dat
u wenst te gebruiken.
• Stel de kooktijd in.
• Druk de starttoets in.
Opmerking:
1. Voor 2-of 3- fasen koken, dient u de stappen 1 en 2 te herhalen, voordat u op de starttoets drukt.
Bv. Zelfbereide maaltijd: Maximaal – 10 minuten om de maaltijd te bereiden, Smoor – gedurende
60 minuten te laten koken, Warmhoud – 10 minuten warm houden om de smaak te laten
ontwikkelen.
2. De wachttijd kan of voor of na de 'stap voor stap ontdooien/automatisch koken', ingesteld worden.
3. Indien gewenst, kan de kooktijd tijdens het koken verlengd worden. De kooktijd kan met stappen
van 1 minuut verlengd worden. De kooktijd kan met stappen van 1 minuut tot de maximaal
beschikbare tijd verlengd worden.
OPLETTEN: Als de kooktijd ingesteld werd zonder een vermogen te selecteren zal de oven
automatisch op een vermogen van 1000 W werken.
Glazen draaiplateau
1
10
h
min
1
10
min
s
Page 75

Grillen
Nederlands
Bij het grillen kunt u een keuze maken uit drie standen.
Gebruik van de accessoires:
Ronde rooster
Metalen
draaiplateau
Glazen
draaiplateau
Indrukken Vermogen Wattage
1 x 1 HOOG 1500 W
2 x 2 MIDDEN 1200 W
3 x 3 LAAG 950 W
Opmerking over het voorverwarmen:
1. Maak de oven, tijdens het voorverwarmen nooit open. Na het voorverwarmen hoort u drie
pieptoontjes en op het uitleesvenster is een knipperende "P" te zien. Indien de ovendeur na
het voorverwarmen niet wordt geopend, behoudt de oven nog gedurende 30 minuten de
voorverwarmde temperatuur. Na deze 30 minuten slaat de oven automatisch af en koelt weer
af tot de omgevingstemperatuur.
2. Indien u zonder voorwarmen wenst te koken, dan selecteert u het grill-vermogen, stelt u vervolgens de tijd in en drukt u op de starttoets.
Opmerking:
1. De grill zal alleen werken wanneer de ovendeur gesloten is.
2. Indien gewenst, kunt u de kooktijd tijdens het koken verlengen. Druk op de 1 min. toets om
de kooktijd te verlengen. De kooktijd kan steeds met 1 minuut verlengd worden, tot 99
minuten.
Nl-12
• Druk de Grill-toets in
voor de gewenste grillstand.
• Druk de starttoets in
t.b.v. het voorverwarmen.
Plaats het voedsel
na het voorverwarmen
in de oven.
• Stel de griltijd in via de tijdtoetsen
(tot 99 minuten 90 seconden).
• Druk de starttoets in.
niet operationeel
1
10
h
min
1
10
min
s
Page 76

Koken met de Hete Lucht/Grill +
Hete lucht-functie
Nl-13
Deze toetsen bieden de mogelijkheid om een temperatuur van 40°C (alleen voor de
Hete lucht-functie) en 100 - 250°C te selecteren met een verhoging van steeds 10°C.
Voor een snelle selectie van de meest gebruikte temperatuur begint de temperatuur
op 150°C en telt door tot 250°C, daarna 40°C (alleen van toepassing voor de Hete
lucht-functie) en 100°C. Wanneer u de convectiefunctie gebruikt dan kunt u op één of
twee niveaus koken. Zie Nl-15 voor het koken op verschillende niveaus.
Gebruik van accessoires: Voor het koken op één niveau.
Indien u het draaiplateau gebruikt.
Metalen draaiplateau
Glazen draaiplateau
Ronde rooster
Metalen
draaiplateau
Glazen draaiplateau
Hete lucht Grill + Hete lucht
Koken met Hete lucht:
• Kies de gewenste
temperatuur.
• Druk de starttoets in om het
voorverwarmen te starten.
Plaats het voedsel na
het voorverwarmen in
de oven.
• Stel de gewenste
kooktijd in (tot 9 uur
99 minuten).
• Druk de starttoets
in.
niet operationeel
1
10
h
min
1
10
min
s
Page 77

Nl-14
Nederlands
• Druk de starttoets in
om het proces van
voorverwarmen te
starten.
Plaats het voedsel na
het voorverwarmen in
de oven.
• Als u het grillver-
mogen wilt veranderen, druk dan
eenmaal voor
ʻGemiddeldʼ
tweemaal voor
ʻLaagʼ.
• Stel de gewenste
temperatuur in.
(Het grillvermogen staat standaard op ʻHoogʼ.)
• Stel de gewenste
kooktijd/baktijd in
(tot 9 uur 99 minuten).
• Druk de start-
toets in.
niet operationeel
Opmerking over het voorverwarmen:
1. Maak de deur tijdens het proces van voorverwarmen niet open. Na het voorverwarmen hoort
u drie piepjes en op het uitleesvenster is een knipperende "P" te zien. Als de ovendeur na
het voorverwarmen niet geopend wordt, dan behoudt de oven nog gedurende 30 minuten de
voorverwarmde temperatuur. Na deze 30 minuten slaat de oven automatisch af tot de
omgevingstemperatuur.
2. Koken zonder voorverwarmen: kies de gewenste temperatuur, stel vervolgens de kooktijd in
en druk de starttoets in.
Opmerkingen:
1. Wanneer de ingestelde kooktijd/baktijd minder dan een uur bedraagt, wordt de tijd per
se-conde afgeteld.
2. Wanneer de ingestelde kooktijd/baktijd meer dan een uur bedraagt, wordt de tijd per minuut
afgeteld totdat er nog 1 uur overblijft "1H 00". Het uitleesvenster geeft dan de minuten en
seconden weer en telt per seconde af.
3. Tijdens het koken kunt u, indien gewenst, de kooktijd/baktijd verlengen. Druk op de 1 min.
toets om de kooktijd/baktijd te verlengen. De tijd kan per (1) minuut verlengd worden.
4. Nadat de starttoets is ingedrukt, kan de gekozen temperatuur opgeroepen en veranderd worden. Druk een keer op de toets Hete lucht of Grill + Hete lucht om de temperatuur in het
uitleesvenster te laten verschijnen. Terwijl de temperatuur in het uitleesvenster verschijnt,
kunt u deze veranderen door de toets Hete lucht of Grill + Hete lucht in te drukken.
Koken met de Hete Lucht/Grill +
Hete lucht-functie
1
10
h
min
1
10
min
s
Page 78

Als u op twee niveaus kookt, gebruik dan zowel het meegeleverde bakblik als het
bakrooster. Plaats het geëmailleerd bakblik dan op het onderste niveau en het
bakrooster op het bovenste niveau.
Afhankelijk van het recept kunt u de oven voorverwarmen met of zonder het bakblik
en/of -rooster. Zie afzonderlijke recepten voor meer informatie.
Nl-15
Koken met convectie/grill + convectie
Als u het bakblik of - rooster gebruikt, plaats dit dan op het onderste niveau.
Koken op één niveau
Koken met bakblik/-rooster
Koken op twee niveaus
Geëmailleerd bakblik
Bakrooster
Het bakblik en bakrooster zijn ideaal voor het bakken van een serie koekjes of het bereiden van
grote schotels die niet op het draaiplateau passen.
OPMERKING:
1. Wanneer u het bakblik of bakrooster gebruikt, verwijder dan alle andere accessoires (glazen
schotel, draairing en metalen schotel).
2. Zorg ervoor dat het bakblik en bakrooster goed zijn geplaatst, voordat u er iets op zet.
3. Plaats geen schaal met etenswaar zwaarder dan 5 kg op het bakblik of bakrooster.
4. GEBRUIK ALTIJD OVENWANTEN WANNEER U HET GERECHT EN DE ACCESSOIRES UIT
DE OVEN HAALT, WANT DIT IS ZEER HEET.
5. Wanneer u eten uit de oven wilt halen, trek het bakblik of -rooster dan voor de helft naar voren en
neem het gerecht eraf. Het draadrooster
vergrendelt vanzelf in deze stand.
6. Als U langer dan 20 minuten op een hoge temperatuur (meer dan 210°C) wilt bakken, dan raden
we aan om het bakblik en het bakrooster halverwege de baktijd te verwisselen.
Bakken van series
Bereiden van grote schotels
Page 79

Nl-16
Nederlands
Combinatie koken
Er zijn 3 combinaties voorgeprogrameerd; 1) Grill + Magnetron, 2) Hete lucht +
Magnetron, 3) Grill + Hete lucht + Magnetron. 1000 W Magnetron vermogen is niet
beschikbaar tijdens het Combinatie koken. Dit is bij regulier gebruik niet zinvol (het
voedsel zou gekookt zijn voordat het bruiningsproces heeft plaatsgevonden).
Gebruik van accessoires:
Ronde rooster
Metalen
draaiplateau
Glazen
draaiplateau
Grill + Magnetron Hete lucht + Magnetron
Metalen
draaiplateau
Glazen
draaiplateau
Grill/Hete lucht + Magnetron
Ronde rooster
Metalen
draaiplateau
Glazen
draaiplateau
Metalen
draaiplateau
Glazen
draaiplateau
of
1) Grill + Magnetron
• Druk de
Combinatietoets in.
• Kies de gewenste
Grill instelling.
• Kies het gewenste
vermogen.
• Stel de gewenste
baktijd in (tot 9 uur
99 minuten).
• Druk de start-
toets in.
niet operationeel
OPMERKING OVER HET VOORVERWARMEN:
De oven kan voorverwarmd worden in de stand Combinatie koken. Druk de starttoets in voordat u de
kooktijd/baktijd instelt en volg de instructies zoals gesteld op pagina NI-14. Opmerkingen over het
voorverwarmen.
Combi
1
10
h
min
1
10
min
s
Page 80

Combinatie koken
Nl-17
2) Hete lucht + Magnetron
• Druk de
Combinatietoets in.
• Kies de gewenste
temperatuur.
• Kies het gewenste
vermogen.
• Kies de gewenste
baktijd (tot 9 uur
99 minuten).
• Druk de start-
toets in.
niet operationeel
3) Grill/Hete Lucht + Magnetron
• Druk de
Combinatietoets
in.
• Indien gewenst, kan het grill-ver-
mogen gewijzigd worden, druk
1 x; Midden
2 x; Laag.
• Kies de gewenste temper-
atuur. (Grill vermogen is
vooraf ingesteld op Hoog.)
• Kies het gewenste
Magnetron vermogen.
• Kies de gewenste kooktijd/baktijd
(tot 9 uur 99 minuten).
• Druk de starttoets in.
niet operationeel
Combi
1
10
h
min
1
10
min
s
Combi
1
10
h
min
1
10
min
s
Page 81

Nl-18
Combinatie koken
Nederlands
OPMERKING OVER HET VOORVERWARMEN:
De oven kan voorverwarmd worden in de stand Combinatie koken. Druk de starttoets
in voordat u de kooktijd/baktijd instelt en volg de instructies zoals gesteld op pagina
NI-14. Opmerkingen over het voorverwarmen.
OPMERKINGEN:
1. Wanneer de ingestelde kooktijd/baktijd minder dan een uur bedraagt, wordt de tijd
per seconde afgeteld.
2. Wanneer de ingestelde kooktijd/baktijd meer dan een uur bedraagt, wordt de tijd
per minuut afgeteld totdat er nog een uur overblijft "1H 00".
Het uiltleesvenster geeft vervolgens de minuten en seconden weer en telt deze per
second af.
3. Indien gewenst, kan de kooktijd/baktijd, tijdens het koken/bakken verlengd worden.
Druk op de 1 min. toets om de kooktijd/baktijd te verlengen. De kooktijd/baktijd kan
steeds met 1 minuut verlengd worden tot 99 minuten.
4. Nadat de starttoets ingedrukt is, kan de gekozen temperatuur opgeroepen worden
door het indrukken van de Combinatietoets. De geselecteerde instelling verschijnt
gedurende twee seconden op het uitleesvenster.
Page 82

Nl-19
100 - 1600 g
400 - 2000 g
70 - 400 g
d
Automatisch ontdooien
g
Deze functie biedt u de mogelijkheid om het voedsel te ontdooien al naar gelang het
gewicht. Kies de categorie en stel het gewicht van het voedsel in. Het gewicht is
geprogrammeerd in grammen. Voor elke categorie, is het meest voor de hand
liggende gewicht geprogrammeerd.
• Druk op de
Automatische
ontdooitoets.
• Stel het gewicht van het bevroren voedsel in.
• Druk de
starttoets
in.
instellen van het gewicht - stapsgewijs per 100 g
verhogen van het gewicht - stapsgewijs per 10 g
verlagen van het gewicht - stapsgewijs per 10 g
Categorie
Gewicht
Geschikt voedsel/Tips
Accessoires
Voor het ontdooien van kleine
stukken vlees, kalfslapjes,
worstjes, visfilets, steaks, koteletten van 100 g tot 400 g elk. Draaien
als de pieptoon weergegeven wordt.
Voor het ontdooien van grote
stukken vlees, braadstukken, hele
kippen. Draaien als de pieptoon
weergegeven wordt.
Voor het ontdooien van bevroren
brood, broodjes en croissants.
Verwijder al het verpakkingsmateriaal en plaats het op het Ronde rooster op het Metalen draaiplateau op
het Glazen draaiplateau. Plaats het
hele brood direct op het Metalen
draaiplateau. Draai om als de pieptoon weergeven wordt.
Opmerkingen:
1. Wanneer de ontdooitijd langer dan 60 minuten is, zal de tijd in uren en minuten verschijnen.
2. De vorm en de afmeting van het voedsel bepalen het maximum gewicht dat de
oven kan bevatten.
Opmerking bij programma 3:
Let op als u het brood en de broodjes uit de oven neemt. De oven en accessoires
worden tijdens het ontdooien heet.
1
2
3
g
b
c
Page 83

Automatische sensor programma's
Nl-20
Nederlands
Het automatisch koken stelt u in staat om bepaalde etenswaren te koken zonder dat
u het gewicht, het vermogen of de kooktijd hoeft in te stellen.
b.v.
• Kies het gewenste Automatische
sensor programma.
• Druk de starttoets in.
Meer/minder toets:
Iedereen heeft een eigen smaak voor wat betreft het meer of minder gaar koken van het
voedsel. Nadat u de automatische sensor programma's een paar keer heeft gebruikt, kunt
u zelf beslissen of het voedsel wellicht iets meer of iets minder moet worden doorgekookt.
Bij gebruik van de Meer/minder toets kunt u dit zelf bepalen.
U drukt op deze toets om het voedsel iets meer of iets minder lang te laten koken.
Druk op de of toets voordat u op de starttoets drukt.
Indien u echter tevreden bent met het kookresultaat van het automatisch sensor program-
ma, dan hoeft u deze toetsen niet te gebruiken.
Opmerkingen:
1. Automatische sensor programma's kunnen 3 minuten na ingebruikneming worden
toegepast.
2. De oven berekent automatisch de kooktijd of de resterende kooktijd.
3. De deur mag niet geopend worden voordat de tijd in het uitleesvenster verschijnt.
4. Bij bevroren voedsel wordt uitgegaan van een temperatuur van -18°C tot -20°C, bij
ander voedsel tussen de +5°C tot +8°C (koelkast temperatuur). We gaan uit van een
temperatuur van bevroren voedsel van -18°C tot -20°C en van andere soorten voedsel
van +5°C tot +8°C (koelkasttemperatuur). De opwarmprogrammaʼs voor pasta/rijst en
voor soep zijn geschikt voor voedsel op koelkast- of kamertemperatuur.
5. Zorg ervoor dat de schalen, de magnetron-ovenruimte en het glazen draaiplateau tijdens het automatische sensor programma droog zijn.
6. De omgevingstemperatuur van de magnetronoven mag niet hoger dan 35°C en niet
lager dan 0°C zijn.
7. Kook alleen voedsel van een geadviseerd gewicht zoals omschreven op pagina NL-
21.
8. Wanneer de functies Hete lucht, Grill + Hete lucht, Combinatie of Grill zijn gebruikt kan
de oven te heet zijn voor het automatische sensor programma. Dan verschijnt de
melding "WARM" in het uitleesvenster.
Nadat de melding "WARM" uit het uitleesvenster is verdwenen, kan het automatische
sensor programma gebruikt worden.
Wanneer u haast heeft stelt u de juiste vermogensstand en kooktijd handmatig in.
Page 84

Nl-21
Automatische sensor programma's
Categorie
Gewicht
Toebehoren
Instructies/Tips
200 - 1500 g
200 - 1000 g
300 - 1000 g
200 - 1000 g
300 - 1200 g
200 - 1200 g
1 Opwarmen
van soep
Voor het opwarmen van zelfgemaakte soep of soep in tetrapak of
blik. De soep moet op kamer- of
koelkasttemperatuur zijn. Voor en
na het opwarmen
doorroeren. U kunt de soep het beste
afdekken met een
deksel, bord of schotel. De eindtemperatuur van de soep kan variëren al
naar gelang de dikte, de begintemperatuur en het suiker- en vetgehalte van
de soep.
2 Rijst/Pasta
opwarmen
3 Verse
groenten
koken
4 Het bereiden
van verse
vis
5 Het bereiden
van
diepvries
Gratin
Voor het koken van verse groenten.
Doe de groenten in een daarvoor
geschikte schaal en besprinkel deze
met 6 eetlepels (90 ml) water. Sluit
het geheel af met huishoudfolie met
gaatjes of een deksel. Grotere
hoeveelheden moeten bij het
weergeven van de pieptoon
omgeroerd worden.
Voor het bereiden van verse vis
(hele vis - niet meer dan 300 g per
stuk, filets, steaks). Doe de vis in
een daarvoor geschikte schaal en
voeg 2 eetlepels (30 ml) water toe.
Sluit het geheel af met huishoudfolie
met gaatjes of met een deksel.
Voor het opwarmen en bruinen
van gratin. Verwijder de ver-
pakking en plaats de gratin in een
vuurvaste schaal op het ronde
rooster op het metalen draaiplateau
op het glazen draaiplateau.
6 Verse gratin
opwarmen
Voor het opwarmen van
voorgekookte, ingeblikte, vacuüm
verpakte of zelfgemaakte pasta,
rijst of aardappelen. Al het voedsel
moet op kamer- of koelkasttemperatuur zijn. Omroeren voor en na het
opwarmen. Het beste kunt u het
gerecht afdekken met een deksel of
bord. De uiteindelijke temperatuur
kan variëren afhankelijk van de
hoeveelheid van saus, het vetgehalte
van de saus en de begintemperatuur.
Voor het opwarmen en bruineren
van verse gratin. Verwijder alle ver-
pakking en plaats de gratin in een
ovenschaal op het ronde rooster op
de metalen bakplaat op de glasplaat.
Page 85

Nl-22
Automatisch koken
Met deze ovenfunctie wordt het mogelijk om uw favoriete gerechten te bereiden. Het enige dat u
moet doen is het gewicht instellen. De oven bepaalt automatisch het magnetronvermogen, de
hete lucht temperatuur en de kooktijd. Kies de categorie en stel het gewicht van het voedsel in.
Het gewicht is geprogrammeerd in gram. Voor elke categorie is het meest voor de hand liggende
gewicht geprogrammeerd.
b.v.
Opmerkingen:
1. Indien de resterende kooktijd meer dan 60 minuten bedraagt, wordt de tijd in uren
en minuten weergegeven.
2. De tabel hieronder geeft het aanbevolen gewicht aan, alsmede de accessoires die
gebruikt moeten worden.
Categorie
Gewicht
Toebehoren
Instructies/Tips
8 Verwarmen
Diepvries
Pizza
7
Verwarmen
Verse Pizza
9 Verse quiche
opwarmen
Voor het opwarmen en bruinen
van de bovenkant van bevroren
(geen verse) pizza. Verwijder de
verpakking en zet de pizza op het
ronde rooster op het metalen
draaiplateau op het glazen
draaiplateau.
Voor het opwarmen en bruinen
van de bovenkant vaneen verse,
gekochte, pizza Verwijder de ver-
pakking en zet de pizza op het ronde
rooster op het metalen draaiplateau
op het glazen draaiplateau.
Voor het opwarmen van
voorgekookte, verse quiche.
Verwijder alle verpakking en plaats
de quiche op het ronde rooster op
de metalen bakplaat op de glasplaat.
10 Kleine
deegwaren
100 - 700 g
150 - 800 g
150 - 900 g
Voor opwarmen, knapperig maken
en bruineren van kleine deegwaren zoals worstenbroodjes,
vleespasteitjes, pasteitjes of
bladerdeeggerechten met groenten,
champignons of ham en kaas.
Plaats het gerecht rechtstreeks op
het ronde rooster op de metalen
bakplaat op de glasplaat.
150 - 700 g
g
• Druk op de
Automatische
ontdooitoets.
• Stel het gewicht van het bevroren voedsel in.
• Druk de
starttoets
in.
instellen van het gewicht - stapsgewijs per 100 g
verhogen van het gewicht - stapsgewijs per 10 g
verlagen van het gewicht - stapsgewijs per 10 g
Nederlands
g
Page 86

Nl-23
Automatisch koken
Categorie
Gewicht
Toebehoren
Instructies/Tips
14 Bereiden
Kip in
stukjes
15 Bereiden
hele kip
150 - 1500 g
1000 - 2800 g
16 Bereiden
varkensvlees of
kalfsvlees
800 - 2000 g
17 Bereiden
rundvlees
700 - 1300 g
19 Bereiden
lamsvlees
700 - 2000 g
Voor het bereiden van stukjes kip zoals
b.v. kippepootjes, kippevleugels of
drumsticks. Plaats de kip op het ronde
rooster op het metalen draaiplateau op het
glazen draaiplateau. Voor het beste resultaat dient de kip verspreid neergelegd te
worden en omgedraaid te worden zodra de
pieptoon weergegeven wordt.
Voor het bereiden van vers
varkensvlees of kalfsvlees. Leg het
vlees op een ondiepe vuurvaste schaal,
op het metalen draaiplateau op het
glazen draaiplateau. Draai het vlees om
zodra de pieptoon weergegeven wordt.
Voor het bereiden van verse rundvlees. Leg het vlees op een ondiepe,
vuurvaste schaal op het metalen
draaiplateau op het glazen
draaiplateau. Draai het vlees om zodra
de pieptoon weergegeven wordt.
Auto Gewicht Programmaʼs Voor
het bereiden van verse lamsbout.
Plaats de lamsbout in een ovenschaal
op de metalen bakplaat op de glasplaat. Grote lamsbouten kunt u rechtstreeks op de metalen bakplaat
leggen. Omdraaien zodra de pieptoon
klinkt. Dit programma is niet geschikt
voor lamsbout met bot.
Voor het bereiden van een hele, ongevulde, verse kip. Bereid de vulling sepa-
raat. Plaats de kip op een vuurvaste, platte, omgekeerde schaal op het metalen
draaiplateau op het glazen draaiplateau.
Begin het bereiden met de borstzijde naar
beneden en draai de kip zodra de pieptoon weergegeven wordt.
Voor het bereiden van verse runderribstukken. Plaats het runderrib-
stuk in een ovenschaal op het hoge
rooster op een metalen bakplaat op
de glasplaat. Plaats grotere stukken
(meer dan 1000 g) rechtstreeks op
het hoge rooster. Omdraaien zodra
de pieptoon klinkt. Laat de ribstukken
na bereiding 10 min. uit de oven
rusten. Met dit programma bakt u het
vlees saignant tot medium.
18 Bereiden
runderrib
750 - 1400 g
Page 87

Automatisch koken
Nl-24
Nederlands
Categorie
Gewicht
Toebehoren
Instructies/Tips
20 Taart
22 Taart
4 - 6
porties
6 - 8
porties
8 - 10
porties
21 Taart
Voor het bereiden van taarten van
diverse ingredienten - zie het kookboek
voor recepten.
Bv. hartige quiche – quiche lorraine,
champignontaart, uientaart,
spinazie-taart
Zoete taart – perentaart, verse kaastaart, rabarbertaart, appeltaart.
• Selecteer Taart automatisch menu
1 x indrukken 4-6 porties
diameter 25 cm
2 x indrukken 6-8 porties
diameter 27 cm
3 x indrukken 8-10 porties
diameter 30 cm
• Laat de taart/quiche na het bakken
een paar minuten staan. Neem de
taart/quiche uit het bakblik en zet het
op een rooster om af te koelen.
Opmerking over het automatische taart menu:
1. Gebruik alleen metalen bakblikken voor het bereiden van taarten en quiches - aluminium,
met een teflon-laag of ander licht metaal. De diepte van een standaard bakblik is 30 mm.
Gebruik geen bakvormen met een losse bodem, bakvormen van karton of lichte aluminium
bakvormen voor dit automatische programma.
2. De uiteindelijke kleur van de guiche is afhankelijk van het type en de kwaliteit van de guiche.
3. De kleuring van de bovenkant van het gebak is afhankelijk van het type vulling. Het is derhalve mogelijk dat u het programma, enige minuten voor de afloop, wenst te stoppen.
4. Bereid met dit automatische menu geen 'baking pizza' of taarten van bladerdeeg.
•
Selecteer taartprogramma 20, 21 of
22, afhankelijk van
de grootte van de
taart
Als de oven is voorverwarmd, klinkt er een
piep. Plaats de taart in
de oven.
•
Druk op de startknop om de oven
voor te verwarmen.
•
Druk op
start
U moet de oven voorverwarmen voor de taartprogrammaʼs. Gebruik de volgende
volgorde:
Page 88

Nl-25
Geheugen 1
Geheugen 2
Geheugen 3
1 maal
2 maal
3 maal
1 kop
1 kom
2 kommen
150 cl
300 cl
2 x 300 cl
1000 W 80 sec.
1000 W 120 sec.
1000 W 240 sec.
Aantal maal
drukken
Categorie
Aanbevolen
gewicht
Vermogen en
tijd
Geheugen
• Druk op de Geheugentoets.
De oven wordt automatisch
ingesteld op geheugen 1.
Om geheugen 2 te
selecteren, drukt u
tweemaal op de geheugentoets. Om geheugen 3 te
selecteren, drukt u driemaal
op de geheugentoets.
• Druk op de Geheugentoets
om deze taak op te slaan of
op de knop Start om het
koken in deze volgorde te
starten.
Programmeer het
gewenste kookprogramma.
Met deze functie kunt u veel gebruikte opwarm- of kookfuncties in uw oven voorprogrammeren.
Verder kunt u uw oven voorprogrammeren met het gewenste vermogen en de gewenste tijd. U
kunt drie geheugentaken voorprogrammeren.
Een geheugenprogramma instellen
• Druk op de
Geheugentoets.
• De oven kiest automatisch
geheugen 1. Om geheugen 2
of 3 te selecteren, draait u de
draaiknop Auto Menu met de
klok mee.
• Druk op de knop
Start om te
beginnen met
koken.
OPMERKING:
1. Automatische programmaʼs kunt u niet in het geheugen programmeren.
2. De stand Convectie-voorverwarmen kunt u niet in het geheugen programmeren.
3. In het geheugen kunt u alleen koken in 1 stap opslaan. Het is niet mogelijk om koken in 2 of 3
stappen op te slaan.
4. Als u een nieuw kookprogramma invoert in het geheugen, dan wordt het eerder opgeslagen
programma verwijderd.
5. Het geheugenprogramma wordt geannuleerd als de stroom uitvalt of als de stekker uit het
stopcontact wordt verwijderd.
6. Als u het opwarmen van een babyfles of een potje babyvoedsel in het geheugen heeft geprogrammeerd, controleer dan altijd zelf de temperatuur voordat u het aan de baby geeft.
Deze geheugenfunctie is voorgeprogrammeerd voor het opwarmen van 1 kopje, 1 kom of 2 kommen hete drank (bv. thee, koffie, melk of soep).
M
Memory
M
Memory
M
Memory
Page 89

Nl-26
Nederlands
Voorgeprogrammeerde start.
niet operationeel
Deze functie maakt het mogelijk, de uitgestelde begintijd van het koken, vooraf in te stellen.
• Druk op de
programmeer/
standaardtijdtoets.
• Stel het aantal uren/minuten in
waarna de magnetronoven met
koken moet beginnen door de
tijdtoetsen in te drukken
(tot 9 uur en 99 minuten).
b.v.
• Stel het gewenste
kookprogramma in.
• Druk de starttoets in.
Uitgestelde begintijd: 1 uur Hoog vermogen: 10 min.
een keer
een keer
een keer
niet operationeel
niet operationeel
Sudder vermogen: 20 min.
vijfmaal
twee keer
niet operationeel
2. Als de voorgeprogrammeerde uitgestelde begintijd langer dan een uur is, zal de tijd in minuten
aftellen. Indien de uitgestelde begintijd minder dan een uur is, zal de tijd in seconden worden
afgeteld.
3. De uitgestelde begintijd kan niet voor de automatische programma's ingesteld worden.
1. Drie fases van koken kunnen geprogrammeerd worden inclusief voorgeprogrammeerde start.
1
10
h
min
1
10
min
s
1
10
h
min
1
10
min
s
1
min
h
1
10
min
10
s
1
10
h
min
1
10
min
s
1
10
h
min
1
10
min
s
Page 90

Nl-27
Programmeer/Standaardtijdtoets
10
min
1
min
10
s
1
h
10
min
1
min
10
s
1
h
10
min
1
min
10
s
1
h
10
min
1
min
10
s
1
h
10
min
1
min
10
s
1
h
Door het gebruik van de Programmeer/Standaardtijdtoets kunt u de wachttijd, programmeren
nadat de bereiding heeft plaatsgevonden of deze gebruiken om de oven als een kookwekker te
gebruiken.
b.v. om de standtijd na het bakken in te stellen (nagaartijd)
• Stel de gewenste kooktijd en het
gewenste kookprogramma in.
• Druk op de programmeer/
standaardtijdtoets.
• Stel de gewenste tijdsduur in door
de tijdtoetsen in te drukken (tot 9
uur en 99 minuten).
niet operationeel
• Druk op de starttoets.
Opmerkingen:
1. Drie fases van het koken kunnen geprogrammeerd worden inclusief de wachttijd.
b.v.
Hoog vermogen: 4 min.
een keer 4 keer
niet operationeel
Wachttijd: 5 min.
5 keer
niet operationeel
Hoog vermogen: 2 min.
een keer
twee keer
niet operationeel
2. Indien de ovendeur tijdens de wachttijd of de kookklok (minuten teller) geopend wordt, blijft de
tijd in het uitleesvenster verder aftellen.
3. Deze functie kan tevens als een signalering (timer) dienen. Indien dit gewenst is, druk dan op
de programmeer/standaardtijdtoets, stel de tijd in en druk op de starttoets.
Page 91

Nederlands
Vraag en antwoord
V: Waarom kan de oven niet ingeschakeld worden?
A: Als de oven niet werkt, dienen de volgende punten
gecontroleerd te worden:
1. Is de stekker van de oven goed aangesloten?
Neem de stekker uit het stopcontact, wacht tien
seconden en stop de stekker weer in het stopcontact.
2. Controleer de stroomonderbreker en de zekering.
Stel de stroomonderbreker opnieuw in of vervang
de zekering als deze uitgeschakeld is of
doorgeslagen.
3. Wanneer de stroomonderbreker en de zekering in
orde worden bevonden, steek dan de stekker van
een ander apparaat in het stopcontact. Wanneer
het andere apparaat wel werkt, is er een probleem met de oven. Wanneer het andere apparaat
niet werkt, dan is er waarschijnlijk een probleem
met het stopcontact. Wanneer het erop lijkt dat er
een probleem met de oven is, neemt u dan contact op met een geautoriseerd service centrum.
V: V: Mijn microgolfoven veroorzaakt interferentie
met mijn TV Is dat normal?
A: Een bepaalde mate van storing op radio en TV
kan optreden wanneer de magnetronoven wordt
gebruikt. Deze storing is gelijk aan het soort interventie veroorzaakt door kleine huishoudelijke
apparaten zoals mixers, stofzuigers, haardrogers,
etc. Dit duidt niet op een storing in de magnetronoven.
V: De oven accepteert mijn programma niet. Waarom
niet?
A: De oven is zodanig ontworpen dat onjuiste pro-
grammering niet wordt geaccepteerd.
Bijvoorbeeld, de oven accepteert geen vierde
programma en accepteert geen Automatisch
weegprogramma na de Vertraagde begintijd.
V: Soms komt er warme lucht in de ventilatie-openin-
gen van de oven. Hoe kan dit?
A: Tijdens het koken geeft het voedsel stoom af. De
meeste stoom wordt via de ventialtie-openingen
afgevoerd. Er zitten echter geen microgolven in
de lucht. De ventilatie-openingen van de oven
mogen, tijdens het koken, nooit geblokkeerd worden.
V: Tijdens het combinatie koken hoor ik zoemende
en klikkende geluiden in de oven. Wat is de
oorzaak van deze geluiden?
A: De geluiden worden veroorzaakt door het automa-
tisch overschakelen van de oven van magnetronoven op Hete lucht- + Grill voor het realiseren van de juiste combinatie-afstelling. Dit is
normaal.
V: Kan ik de vooraf ingestelde oventemperatuur tij-
dens het koken of tijdens het voorverwarmen in
de Hete lucht-functie controleren?
A: Ja. Druk op de Hete lucht-functie en de oventem-
peratuur zal gedurende 2 seconden op het
uitleesvenster weergegeven worden.
V: Kan ik op eenvoudige wijze mijn favouriete
recepten in de Magnetron / Grill bereiden?
A: Ja. U kunt uw meest favouriete recepten net als in
een gewone oven bereiden. Controleer de
instructies in het Panasonic Kookboek voor geadviseerde oventemperaturen en kooktijden.
V: De melding "D" verschijnt in het uitleesvenster en
de oven werkt niet. Waarom niet?
A: De oven heeft DEMO MODUS geprogrammeerd.
Deze modus is ontworpen voor het tonen in
winkels. Deactiveer deze modus door vier keer
op de kloktoets te drukken.
V: Kan ik in de oven gebruik maken van een gewone
thermometer?
A: Alleen indien u de HETE LUCHT + GRILL functie
gebruikt. Het metaal in sommige thermometers
kan, in de MAGNETRON en COMBINATIE-functies, vonkontlading in uw oven veroorzaken.
V: Tijdens het hete lucht-, combinatie koken of grillen
komt er een onaangename geur uit mijn oven en
er onstaat rook. Hoe komt dat?
A: Na het herhaaldelijk gebruiken van uw oven is het
aan te bevelen om de oven te reinigen en de
oven zonder voedsel, glazen draaiplateau en
loopring te laten werken in de HETE LUCHTfunctie. Dit gedurende 10 minuten en op 250°C.
Op deze manier worden alle voedselresten,
vetaanslag etc., die geurtjes en of rook kunnen
veroorzaken weggebrand.
V: Waarom verschijnen er geen woorden op mijn dis-
play?
A: De stroomvoorziening in uw huis is onderbroken
de stekker is uitgetrokken. Herhaal de procedure
die is beschreven op pagina 9.
Nl-28
Page 92

Nl-29
Onderhoud van uw magnetronoven
1. Schakel de magnetronoven uit voordat u deze gaat schoonmaken.
2. Hou de binnenkant van de magnetronoven, de deurafdichtingen en de plaatsen rondom deze
afdichtingen schoon. Wanneer er voedselresten of gemorste vloeistoffen aan de wanden van
de magnetronoven, deurafdichtingen en plaatsen rondom deze afdichtingen kleven, veeg
deze dan weg met een vochtige doek. Indien deze vlekken erg vuil zijn geworden, kunt u
gebruik maken van een zachtwerkend schoonmaakmiddel. Het gebruik van scherpe reinigingsmiddelen of schuurmiddelen wordt afgeraden.
GEBRUIK GEEN STANDAARD OVENREINIGINGSMIDDELEN.
3. De buitenkant van de oven moet met een vochtige doek worden schoongemaakt. Om te
voorkomen dat de mechanische delen van de magnetronoven worden beschadigd dient men
er goed op te letten dat er geen water door de ventilatie-openingen kan binnendringen.
Gebruik geen ruwe, schurende reinigingsmiddelen of scherpe metalen schrapers om de ruit
van de ovendeur te reinigen, aangezien deze het oppervlak kunnen krassen en het glas kunnen doen barsten.
4. Indien het bedieningspaneel vuil is geworden, maak deze dan met een zachte, droge doek
schoon. Gebruik voor het bedieningspaneel geen sterke reinigingsmiddelen of schuurmiddelen. Bij het schoonmaken van het bedieningspaneel dient de ovendeur geopend te blijven om
zodoende te voorkomen dat de magnetronoven per ongeluk wordt ingeschakeld. Na het
schoonmaken moet de STOP/Wistoets opnieuw worden ingedrukt om het uitleesvenster weer
op de kloktijd te stellen.
5. Indien er aan de binnenkant van de ovendeur of rondom de buitenkant hiervan stoomvorming
plaatsvindt, veeg deze dan met een zachte doek weg. Dit zou nl. het geval kunnen zijn
waneeer de magnetronoven wordt gebruikt in een ruimte met een hoog vochtigheidsgehalte.
Deze stoomvorming heeft niets te maken met een slecht of foutief functioneren van het apparaat.
6. Het is af en toe noodzakelijk om het glazen draaiplateau te verwijderen om dit schoon te
maken. Was het plateau in warm water met een afwasmiddel of in een vaatwasmachine.
7. De loopring en de holle ruimte in de ovenbodem dienen ook regelmatig schoongemaakt te
worden om geruis tijdens het werken te voorkomen. Verwijder het vuil op de bodem van de
magnetronoven met een zacht schoonmaakmiddel en maak deze daarna met een schone
doek droog. De loopring moet worden afgewassen in een zacht zeepsopje. Bij een regelmatig
gebruik zetten zich kookdampen vast op de bodem en/of op de wielen van de loopring, maar
tasten deze op geen enkele wijze aan. Wanneer u de loopring uit de uitsparing van de grondplaat haalt, om deze schoon te maken, let er dan goed op dat deze weer in de juiste positie
teruggeplaatst wordt.
8. Bij het grillen of combinatie koken kunnen sommige voedselsoorten vetspatten op de ovenwanden veroorzaken. Maak de oven dan ook regelmatig schoon omdat dit vet zich anders
opeenhoopt met als gevolg dat de oven, tijdens het gebruik, kan gaan 'roken'.
9. Gebruik geen stoomreiniger voor het reinigen.
10.Deze oven dient alleen door gekwalificeerd personeel onderhouden te worden. Neem voor
het onderhoud en reparatie van de oven contact op met de meest dichtbijzijnde, geautoriseerde, voortverkoper (dealer).
13.Houd ventilatie-openingen altijd vrij. Controleer dat stof of andere materialen de ventilatieopeningen boven-, onder- of achteraan de oven niet blokkeren. Een blokkering van de ventilatie-openingen kan leiden tot oververhitting en de werking van de oven hinderen.
Houd verluchtingsopeningen altijd vrij. Controleer dat stof of andere materialen de verluchtingsopeningen boven-, onder of achteraan de oven niet blokkeren. Een blokkering van de verluchtingsopeningen kan leiden tot oververhitting en de werking van de oven hinderen.
Page 93

Nl-30
Nederlands
Technische specificaties
Netspanning: 230 V, 50 Hz
Werkfrequentie: 2,450 MHz
Opgenomen vermogen: Maximaal; 2980 W
Magnetron; 1275 W
Grill; 1560 W
Hete lucht; 1500 W
Afgegeven vermogen: Magnetron; 1000 W (IEC-60705)
Grill; 1500 W
Hete lucht; 1400 W
Buitenafmetingen: 530 (B) x 508 (D) x 344 (H) mm
Binnenafmetingen: 350 (B) x 360 (D) x 250 (H) mm
Gewicht van de
interne accessoires; 21.0 Kg
Geluidsniveau: 52,7 dB
De specificaties kunnen zonder voorafgaand bericht gewijzigd worden.
Dit produkt voldoet aan de Europese standaard (EN 55011) voor EMC interferentie's
(EMC = Elektromagnetische Compabiliteit). Overeenkomstig deze standaard behoord dit produkt
tot de groep 2 apparatuur, klasse B en voldoet deze aan alle normeringseisen. Groep 2 houdt in
dat de Frequentie energie wordt opgewekt in de vorm van elektromagnetische straling bedoeld
voor het verwarmen en koken van voedsel. Groep B informeerd dat dit produkt
toegepast kan worden voor normaal huishoudelijk gebruik.
Informatie over het weggooien van elektrische en elektronische apparatuur
(particulieren)
Dit symbool betekent in Europa dat gebruikte elektrische en elektronische
producten niet bij het normale huishoudelijke afval mogen.
Lever deze producten in bij de aangewezen inzamelingspunten, waar ze gratis
worden geaccepteerd en op de juiste manier worden verwerkt, teruggewonnen
en hergebruikt. In België kunt u uw producten bij uw winkelier inleveren bij de
aanschaf van een vergelijkbaar nieuw product.
Wanneer u dit product op de juiste manier als afval inlevert, spaart u waardevolle hulpbronnen
en voorkomt u potentiële negatieve gevolgen voor de volksgezondheid en het milieu, die anders
kunnen ontstaan door een onjuiste verwerking van afval. Neem contact op met uw gemeente
voor meer informatie over het dichtstbijzijnde inzamelingspunt of raadpleeg www.bebat.be of
www.recupel.be.
Voor zakelijke gebruikers in de Europese Unie
Neem voor het weggooien van elektrische en elektronische apparatuur contact op met uw leverancier voor verdere informatie.
Informatie over verwijdering van afval in landen buiten de Europese Unie
Dit symbool is alleen geldig in de Europese Unie.
Neem wanneer u dit product wilt weggooien, contact op met de lokale overheid of uw leverancier
en vraag wat de juiste verwijderingsmethode is.
Page 94

Vérifiez lʼétat du four à micro-ondes
Déballez le four et débarrassez-le de
lʼensemble du matériel dʼemballage.
Examinez soigneusement lʼappareil afin de
détecter toute déformation, défectuosité du
système de fermeture de la porte ou défaut
de la porte elle-même. Prévenez immédiatement votre revendeur si lʼappareil est
endommagé. Nʼinstallez pas un four à
micro-ondes endommagé.
Instructions pour la mise à la terre
IMPORTANT : POUR VOTRE SECURITE, IL
EST TRES IMPORTANT QUE CET APPAREIL SOIT CORRECTEMENT MIS A LA
TERRE.
Si la prise murale nʼest pas mise à la terre, il
incombe au client de la faire remplacer par
une prise murale correctement mise à la
terre.
Précaution concernant la tension
dʼalimentation
Utilisez la tension indiquée sur le four à
micro-ondes. Si vous utilisez une tension
supérieure à celle spécifiée, lʼappareil risque
de provoquer un incendie ou dʼautres dégâts.
Mise en place du four
Ce modèle est conçu pour être placé sur
un plan de travail ou encastré dans une
colonne. Il ne doit pas être installé dans
un placard.
1. Placez le four sur une surface plane et
stable à plus de 85 cm au-dessus du sol.
2. Une fois le four installé, il suffit, pour isoler lʼappareil de la source électrique, de
débrancher la prise ou dʼutiliser un disjoncteur.
3. Pour garantir une utilisation optimale du
four, veillez à ce quʼil soit suffisamment
ventilé.
Si vous placez lʼappareil sur un plan de
travail :
a. Laissez un espace de 15 cm en haut
du four, de 10 cm à lʼarrière, de 5 cm
dʼun côté du four et dʼau moins 40 cm
de lʼautre côté.
b. Si vous placez le four au raz du mur,
veillez à ce que lʼautre côté ou le dessus du four soit totalement libre.
Installation et branchement
4. Ne placez pas le four à proximité dʼune
cuisinière au gaz ou électrique.
5. Ne retirez pas les pieds du four.
6. Ce four est destiné uniquement à usage
domestique. Ne lʼutilisez pas à lʼextérieur.
7. Nʼutilisez pas le four dans une pièce dont
le taux dʼhumidité est très élevé.
8. Evitez tout contact entre le cordon dʼalimentation et lʼextérieur de lʼappareil et
éloignez-le de toute surface chaude. Ne
le laissez pas pendre sur le bord dʼune
table ou dʼun plan de travail. Evitez de
mouiller le cordon dʼalimentation, la prise
ou le four.
9. Nʼobstruez pas les ouvertures dʼaération
situées en haut et à lʼarrière du four de
manière à éviter toute surchauffe du four.
Un dispositif thermique de sécurité protège le four en cas de surchauffe. Sʼil sʼenclenche, le four ne pourra fonctionner à
nouveau quʼaprès refroidissement.
Plan de travail
Côté
libre
10 cm
15 cm
5 cm
Fr-1
Si vous encastrez lʼappareil
Si vous souhaitez encastrer le four dans le
mur, utilisez le kit dʼencastrement
NN-TKA80W (blanc),NN-TKA80M (argentée) disponible auprès de votre revendeur
Panasonic local.
Page 95

Fr-2
Français
Installation et branchement
AVERTISSEMENT
1. Nettoyez les joints dʼétanchéité de la porte à lʼaide dʼun linge humide. Vérifiez si
lʼappareil ne présente pas de défauts au niveau des joints dʼétanchéité. Si cʼest le
cas, ne lʼutilisez plus avant que ceux-ci aient été réparés par un technicien agréé
par le fabricant.
2. Ne tentez jamais de modifier, dʼajuster ou de réparer la porte, le boîtier du panneau
de commandes, les commutateurs de verrouillage de sécurité ou tout autre
élément du four. Ne retirez pas le panneau arrière du four, car il sert de protection
contre les micro-ondes émises par le four.
Confiez exclusivement les réparations à du personnel qualifié.
3. Nʼutilisez pas lʼappareil si la PRISE ou le CORDON DʼALIMENTATION est
endommagé, sʼil ne fonctionne pas correctement, sʼil est abîmé ou tombé. Il est
dangereux de confier la réparation de lʼappareil à une personne autre quʼun
technicien formé par le fabricant.
4. Si le câble dʼalimentation de cet appareil est endommagé, remplacez-le par le
câble spécial fourni exclusivement par le fabricant.
5. Nʼautorisez pas les enfants à se servir du four sans surveillance, sauf si vous leur
avez donné au préalable les instructions adéquates leur permettant de lʼutiliser
dans des conditions de sécurité optimales et sʼils sont parfaitement conscients des
dangers quʼentraînerait une mauvaise utilisation de celui-ci.
6. Les aliments et les liquides ne doivent pas être chauffés dans des récipients
fermés hermétiquement car ceux-ci risquent dʼexploser.
7. Cet appareil ne doit pas être utilisé par des personnes aux facultés mentales,
physiques ou sensorielles altérées, ni par des personnes inexpérimentées ou
ignorantes à moins qu'elles ne soient supervisées ou conseillées par une personne
responsable de leur sécurité.
Utilisation du four
1. Utilisez le four exclusivement à des fins culinaires. Ce four est spécialement conçu
pour réchauffer ou cuire des aliments. Ne lʼutilisez pas pour réchauffer des produits
chimiques ou tout autre produit non alimentaire.
2. Vérifiez si les ustensiles et les plats utilisés conviennent aux fours à micro-ondes.
3. Ne tentez pas de sécher des journaux, des vêtements ou tout autre matériau dans
votre four à micro-ondes, car ceux-ci pourraient sʼenflammer.
4. Ne placez dans le four aucun objet autre que ses accessoires et ce, même si vous
ne lʼutilisez pas, car celui-ci pourrait être fortuitement mis en route.
5. En fonction micro-ondes ou combiné, ne pas faire fonctionner le four à vide, ceci
pour maintenir le haut niveau de qualité du magnétron. Cette précaution ne
s'applique pas au préchauffage d'un mode combiné (les micro-ondes n'étant pas
émises en mode préchauffage).
6. Si vous constatez la présence de fumée ou de flammes dans le four, appuyez sur
la touche Arrêt/Annulation et laissez la porte fermée de manière à étouffer les
flammes. Débranchez le cordon dʼalimentation ou coupez le courant au niveau du
fusible ou du disjoncteur.
Page 96

Consignes de sécurité
Utilisation des résistances
1. Avant d'utiliser les modes Chaleur
Tournante, Gril, Turbogril ou Combiné pour
la première fois, faites fonctionner le four à
vide sans aucun accessoire en mode
Chaleur tournante 250° pendant 10 min,
ceci afin de brûler l'huile de protection.
2. Les surfaces extérieures du four, les grilles
d'aération et la porte du four chauffent
lorsque vous utilisez les fonctions
combinées ou traditionnelles (gril, turbogril
ou chaleur tournante). Prenez garde de ne
pas vous brûler en ouvrant ou en refermant
la porte et en disposant les aliments. De
même, après l'utilisation des fonctions
combinées, gril, turbogril ou chaleur
tournante, les parois du four ainsi que les
accessoires seront brûlants. Tenez les
enfants à l'écart du four pendant son
fonctionnement.
3. Le four est doté de deux résistances
situées dans sa partie supérieure et arrière.
Lorsque vous utilisez les modes CHALEUR
TOURNANTE, COMBINE et GRIL, ces
résistances sont brûlantes.
N.B : Les différents accessoires du four
sont également très chauds.
4. Les parties accessibles du four peuvent
s'échauffer lorsque vous utilisez le gril.
Maintenez les enfants à l'écart du four.
Fonctionnement du ventilateur
Pendant et après toute utilisation du four, un
ventilateur fonctionne pour refroidir les
composants électroniques. Vous pouvez ouvrir
la porte du four, sortir ou mettre un aliment à
cuire pendant ce temps de refroidissement
sans crainte.
Lampe du four
Si vous devez remplacer la lampe du four,
adressez-vous à votre revendeur.
Accessoires
Le four est fourni avec toute une série
dʼaccessoires. Utilisez-les toujours
conformément aux instructions.
Plateau tournant en verre
1. Utilisez le four uniquement si lʼanneau à
roulettes et le plateau tournant en verre
sont en place.
2. Nʼutilisez jamais un autre plateau tournant
en verre que celui spécialement conçu pour
votre four.
3. Si le plateau tournant est chaud, attendez
quʼil refroidisse pour le nettoyer ou le
plonger dans lʼeau.
4. Le plateau tournant en verre peut pivoter
dans les deux sens.
5. Si les aliments ou le plat disposés sur le
plateau tournant en verre touchent les
parois du four et lʼempêchent de tourner,
celui-ci pivote automatiquement dans la
direction inverse. Cʼest normal.
6. Ne cuisez pas dʼaliments à même le
plateau tournant en verre.
Anneau à roulettes
1. Nettoyez régulièrement lʼanneau à roulettes
et le plancher du four afin de réduire les
nuisances dues aux bruits ainsi que
lʼaccumulation de particules de nourriture.
2. Utilisez toujours lʼanneau à roulettes avec
le plateau tournant en verre pour la
cuisson des aliments.
Plateau noir émaillé
1. Le plateau noir sʼutilise en mode Gril,
Turbogril, Chaleur tournante et Combiné.
Nʼutilisez pas le plateau noir en mode
Micro-ondes uniquement.
2. Le plateau noir émaillé doit être placé sur le
plateau tournant en verre ou le trépied.
Trépied métallique
1. Usage autorisé : mode gril, turbogril,
chaleur tournante et cuisson Combinée.
2. Usage interdit : mode micro-ondes pures.
* - En mode COMBINE : NE PAS poser de
plat métallique directement sur ce trépied.
* - En modes traditionnels (gril, chaleur
tournante ou turbogril), vous pouvez poser
sur ce trépied tous vos plats résistants à la
chaleur y compris les récipients
métalliques. Veillez seulement à ce que leur
taille ne gêne pas la bonne rotation du
plateau tournant.
Grille et lèchefrite carrées
La grille et la lèchefrite carrées ne sont
utilisées qu'en modes Chaleur tournante,
Turbo gril ou Gril pour rôtir de grosses pièces
de viandes, poser des plats trop grands pour
le trépied ou bien cuire des plaques de
pâtisserie. Ces accessoires peuvent être positionnés sur 2 niveaux (rails de guidage sur les
parois du four). NE PAS utiliser ces accessoires en mode Micro-ondes ou Combiné.
Fr-3
Page 97

Fr-4
Informations importantes
Français
1) Temps de cuisson
• Les temps de cuisson indiqués dans le
manuel de cuisine sont approximatifs. Ils
peuvent varier selon la température initiale, la
hauteur de l'aliment, le volume et la forme
des récipients utilisés ainsi que le degré de
cuisson désiré.
• Il vaut mieux éviter la surcuisson. Les
aliments n'attachent pas mais peuvent brûler,
se dessécher et même dans des cas
extrêmes, prendre feu et endommager votre
four. Il vaut mieux suivre les minima des
temps de cuisson indiqués. Il est facile de
rajouter quelques secondes ou minutes si
cela n'est pas assez cuit pour votre goût.
2) Petites quantités de nourriture
• Si vous cuisez trop longtemps de petites
quantités de nourriture ou des aliments peu
riches en eau, ceux-ci peuvent se dessécher
et même s'enflammer. Si vous voyez des
flammes dans votre four, maintenez la porte
fermée et débranchez le four ou actionnez le
disjoncteur.
3) Œufs
• Ne préparez pas des oeufs à la coque ou des
oeufs durs en mode MICRO-ONDES. Ils
risquent dʼexploser sous lʼeffet de la pression,
même lorsque la cuisson est terminée.
4) Aliments avec peau
• Les aliments à peau ou à enveloppe imper-
méable tels que les pommes de terre, les
jaunes dʼoeufs et les saucisses doivent être
piqués avant dʼêtre cuits aux MICRO-ONDES
afin dʼéviter quʼils nʼéclatent.
5) Thermomètre à viande
• Utilisez un thermomètre à viande pour vérifier
le degré de cuisson des rôtis et des volailles
uniquement lorsque ceux-ci ont été retirés du
four. Il est déconseillé dʼutiliser un
thermomètre à viande conventionnel si vous
utilisez les modes MICRO-ONDES et
COMBINE afin dʼéviter les étincelles.
6) Liquides
• Lorsque vous réchauffez des liquides,
notamment de la soupe, des sauces et des
boissons dans votre four à micro-ondes, ils
peuvent dépasser le point dʼébullition sans
que vous remarquiez lʼapparition des bulles.
Cela peut entraîner un débordement soudain
du liquide chaud. Pour éviter cet
inconvénient, respectez les règles suivantes :
a) Evitez dʼutiliser des récipients à bords
droits et goulots étroits.
b) Ne surchauffez pas les liquides.
c) Mélangez le liquide avant et pendant la
cuisson ou le réchauffage.
d) Une fois le liquide réchauffé, laissez-le
reposer un court instant dans le four, puis
mélangez-le de nouveau avant de le sortir.
7) Papier/plastique
• Si vous réchauffez des aliments dans des
barquettes en plastique ou en papier, surveillez régulièrement la cuisson, car ces
matériaux ont tendance à sʼenflammer en cas
de surchauffe.
• Nʼutilisez aucun papier recyclé (par exemple
du papier essuie-tout), sauf sʼil est stipulé
quʼil convient aux fours à micro-ondes. En
effet, les papiers recyclés contiennent des
impuretés qui peuvent provoquer des
étincelles ou sʼenflammer en cours de
cuisson.
• Avant de placer un sac dans le four, retirez
les liens métalliques de fermeture.
8) Ustensiles/Papier aluminium
• Ne réchauffez pas des canettes ou des bou-
teilles fermées, car celles-ci pourraient exploser.
• Evitez dʼutiliser des récipients et des plats
métalliques dans votre four à micro-ondes. En
effet, ils peuvent provoquer des étincelles.
• Si vous utilisez du papier aluminium, ou des
barquettes métalliques, la distance entre ces
matériaux et les parois du four doit être de 2
cm minimum afin dʼéviter les étincelles.
9) Biberons et aliments pour bébés
• Enlevez toujours la partie supérieure, la tétine
ou le couvercle des biberons ou des petits
pots pour bébés avant de les placer dans le
four.
• Mélangez ou agitez le contenu des biberons
et des petits pots.
• Vérifiez toujours la température des aliments
avant de les proposer à lʼenfant afin dʼéviter
quʼil se brûle.
Page 98

Schéma descriptif
[1] Touche dʼouverture de la porte
Appuyez sur cette touche pour ouvrir la porte. Si vous ouvrez la porte du four
pendant quʼil est en marche, il sʼarrête de fonctionner sans toutefois que les
instructions de programmation soient annulées. Pour poursuivre la cuisson,
refermez la porte, puis appuyez sur la touche Marche. Lʼintérieur du four sʼéclaire
dès que vous ouvrez la porte.
[2] Fenêtre du four
[3] Système de verrouillage de sécurité de la porte
[4] Ouverture dʼaération du four
[5] Panneau de commandes
[6] Plateau tournant en verre
[7] Anneau à roulettes
[8] Ouvertures dʼaération externes du four
[9] Plateau noir émaillé
[10] Trépied rond
[11] Lèchefrite carrée
[12] Grille carrée
[13] Rails de guidage 2 niveaux
[1]
[2]
[3]
[4]
[5]
[7]
[8]
[6]
[9]
[10]
[12]
[11]
[13]
Fr-5
Page 99

(1) Fenêtre dʼaffichage
(2) Touches de durée
(3) Puissances micro-ondes
(6 niveaux)
(4) Gril (3 puissances)
(5) Touche de chaleur tournante
(6) Turbo gril (gril + chaleur
tournante)
(7) Touche de Cuisson Combinée
(8) Mémoires
(9) Décongélation automatique
selon le poids (3 catégories).
(10) Affichage du poids et
Plus/Moins (ajustement de
cuisson)
(11) Touche Minuteur
(12) Touches automatiques en
micro-ondes par senseur.
(13) Touches automatiques
combinées par senseur
(14) Touches automatiques
combinées selon le poids
(15) Touche de mise en marche :
Pressez une fois cette touche
pour démarrer le four. Si vous
ouvrez la porte ou si vous
appuyez une seule fois sur la
touche Arrêt/ Annulation, vous
devez à nouveau appuyer sur la
touche Marche pour poursuivre la
cuisson.
(16) Touche dʼarrêt/annulation :
Avant la mise en marche du
four : pressez 1 fois cette touche
pour effacer les instructions.
Pendant la cuisson : pressez 1
fois cette touche pour interrompre
momentanément la cuisson. Une
nouvelle pression annule toutes
vos instructions et affiche lʼheure.
Fr-6
Français
Panneau de commandes
NN-CT857/
NN-CT878
(1)
(2)
(3)
(4)
(5)
(6)
(7)
(8)
(10)
(11)
(15)
(16)
(9)
(12)
(13)
(14)
Bip sonore :
Un bip sonore retentit chaque fois que vous appuyez sur un bouton. Si ce nʼest pas le cas, cela
signifie que lʼinstruction est refusée. Deux bips sonores sont émis entre chaque étape de programmation. Au terme du préchauffage des modes Gril, Turbogril, Chaleur tournante ou
Combiné, le four émet trois bips sonores et cinq lorsque la cuisson est terminée.
1
h
1
min
Combi
g
10
min
10
s
M
NN-CT857W
Page 100

Micro-ondes
- Décongélation
- Réchauffage
- Fonte : beurre, chocolat, fromage
- Cuisson du poisson, des légumes,
des fruits, des œufs.
- Réalisation de : compotes, confitures,
sauces, crèmes, pâte à choux, caramel, pâtés ou pains de poisson, de
viandes, de légumes.
-
Cuisson des pâtisseries contenant
des œufs, de la levure (4/4, génoise,
cake, clafoutis, etc.) sans coloration.
Pas de Prèchauffage
Plateau
tournant en
verre
uniquement
Transparent
aux ondes.
pas de
métal.
- Grillades de viandes ou de poissons.
- Pain grillé.
- Finition des plats gratinés et des
desserts meringués.
Prèchauffage Nècessaire
Plateau
tournant
+ plateau noir
+ trépied ou
grille carrée
et/ou lèchefrite
carrée.
Résistant à
la chaleur.
metal
autorisé.
Chaleur
Tournante
- Cuisson de petites pièces nécessi-
tant une cuisson courte : feuilletés,
biscuits, choux, sablés, biscuit
roulé.
- Cuissons particulières : soufflés,
meringues, vol-au-vent,
pain, brioches, savarin, pâté en
croûte, etc.
- Cuisson des quiches, des pizzas
et des tartes
Prèchauffage conseillè
Plateau
tournant
+ plateau noir
+ trépied (selon
taille
de lʼaliment) ou
grille carrée
et/ou lèchefrite
carrée
Résistant à la
chaleur.
metal
autorisé.
Quel mode de cuisson choisir ?
Gril
RÉCIPIENTS
ACCESSOIRES
UTILISATIONS
LES MODES DE
CUISSON
Fr-7
 Loading...