

Panasonic NN-C980w User Manual [en, es]
Panasonic*
Operating Instructions
Micmwave/Convection Oven
Model NN-C980B/NN-C980W
Before operaUng this over), please read these instructions completely.
La referencia rápida en español puede ser encontrada en la páginas 25-42
Antes de operar este producto,lea este Instructivo en su totalidad.
(Spanish quick reference can be found on pages 25-42.)
for assistance, please call: 1^800-211-PANA(7262)
or send e-mail to: consumerproducts@panasonlc. com

Thank you for purchasing the Panasonic Microwave f Convection Oven.
Let's Start to Use Your Oven! ~—p^ge 11.
PRECAUTIONS
TO AVOID POSSIBLE EXPOSURE
TO EXCESSIVE MICROWAVE ENERGY
(a) Do not attempt to operate this oven with the door open since open-door operation can
result in harmful exposure to microwave energy. It is important not to defeat or tamper
with the safety interlocks. Under normal conditions, the oven will not operate with the
door open.
(b) Do not place any object between the oven front face and the door, or allow soil or
cleaner residue to accumulate on sealing surfaces.
(c) Do not operate the oven if it is damaged. It is particularly important that the oven door
close properly and that there is no damage to the ;
(1) door (bent)
(2) hinges and latches (broken or loosened)
(3) door seals and sealing surfaces.
(d) The oven should not be adjusted or repaired by anyone except properly qualified service
personnel.
EXAMINE YOUR OVEN
Unpack oven, remove all packing material.
Examine the oven for any damage such as dents, broken door latches or cracks in the door.
Check that none of the accessories are missing, by following the list below.
n Roller Ring
Place the Roller Ring
correctly on the oven floor.
r~l Ceramic Tray
Place the Ceramic Tray
exactly on Roller Ring.
Alway use Roller Ring and
Ceramic Tray in proper
position.
Notify dealer immediately if oven is damaged. DO NOT install if oven is damaged.
The serial number of this product may be found on
the right side of the oven door opening. You
should note the model number and the serial
number of this oven in the space provided and
retain this book as a permanent record of your
purchase for future reference.
I I
Oven Rack
<=fZ77T[Tmf>
U] Operating Instructions
Q Cookbook
Model No..
Serial No.
Date of Purchase
Oven Rack should be used
for Bake and Broil cooking.
© Copyrighted by Matsushita Electric Industrial Co., Ltd. 2000.

CONTENTS
Before Operation
IMPORTANT SAFETY INSTRUCTIONS.................................................................................................4
Installation and GROUNDING INSTRUCTIONS .....................................................................................5
Practical Hints.......................................................................................................................................6-7
Feature Diagram......................................................................................................................................8
Cooking Modes : Heating Source ............................................................................................................8
Control Panel ...........................................................................................................................................9
Operation & Hints
To Use Function.....................................................................................................................................10
Let’s Start to Use Your Oven!................................................................................................................11
To Set Clock.......................................................................................................................................... 11
To Defrost Micro Power and Time Setting..............................................................................................12
To Reheat Micro Power and Time Setting..............................................................................................12
To Cook Micro Power and Time Setting...................................................................................................12
To Use Keep Warm Pad ........................................................................................................................16
To Use Timer Function ..........................................................................................................................22
Quick Guide to Operation.......................................................................................................................43
Using Turbo Defrost Pad ................................................................................................ 17
Using Sensor Reheat Pad .........................................................................................18-19
on Bake ...........................................................................................................................13
on Broil.............................................................................................................................14
on Combination................................................................................................................15
Using Popcorn Pad..........................................................................................................16
Using Sensor Cooking ...............................................................................................18-19
Using Convection Cooking (Weight Cook by Combination).............................................20
Using Convection Cooking (Auto Cook by Bake) ...........................................................21
Using Quick Min Pad....................................................................................................... 12
Maintenance
Before Requesting Service.....................................................................................................................23
Care of Your Microwave Oven...............................................................................................................24
Technical Specifications ........................................................................................................................44
Referenda Rápida
INSTRUCCIONES DE SEGRIDAD........................................................................................................25
INSTRUCCIONES DE INSTALACIÓN...................................................................................................26
SUGERENCIAS UTILES .......................................................................................................................27
GUÍA PARA COCINAR Y UTENSILIOS................................................................................................ 28
Diagrama de Características..................................................................................................................29
Modos de Cocción .................................................................................................................................29
Panel de Controles.................................................................................................................................30
Funciones..............................................................................................................................................31
Para Ajustar el Reloj.............................................................................................................................. 32
Recalentamiento/Descongelación/Cocción con selección de Potencia y Tiempo
Hornear ................................................................................................................................................. 33
Parrilla ...................................................................................................................................................34
Combination........................................................................................................................................... 35
Descongelación Turbo........................................................................................................................... 36
Sensor de Recalentamiento Automático ...............................................................................................36
Sensor de cocción Automática..........................................................................................................37-38
Cocción Automática por Peso (Combinación) .......................................................................................39
Horneado Automática.............................................................................................................................39
Pulsadores de Palomitas de Maíz..........................................................................................................40
Función Rápido en Minutos ...................................................................................................................40
Temporizador (Timer)............................................................................................................................41
Cuidados de Su Horno de Microondas ..................................................................................................42
Antes de Acudir a Servicio .................................................................................................................... 42
Especificaciones Técnicas ....................................................................................................................44
3
................................
32

IMPORTANT SAFETY INSTRUCTIONS
Your microwave oven is a cooking device and you
should use as much care as you use with a stove or
any other cooking device. When using this electric
appliance, basic safety precautions should be
followed, including the following:
WARNING
shock, fire, injury to persons or exposure to
excessive.microwave energy:- _ . . _
1. Read all instructions before using the appliance.
2. Read and follow “PRECAUTIONS TO AVOID
3. This appliance must be grounded. Connect only
4. Install or locate this appliance only in
5. Do not cover or block any openings on this
6. Do not store or use this appliance outdoors. Do
7. Use this appliance only for its intended use as
8. When cleaning surfaces of door and oven that
9. As with any appliance, close supervision is
10. Do not operate this appliance if it has a
11. Do not immerse cord or plug in water.
12. Keep cord away from heated surfaces.
13. Do not let cord hang over edge of table or
14. This appliance should be serviced only by
15. Some products such as whole eggs and sealed
16. To reduce the risk of fire in the oven cavity:
(a) Do not overcook food. Carefully attend
(b) Remove wire twist-ties from paper or plastic
(c) If materials inside the oven should ignite,
-----
To reduce the risk of burns, electric
POSSIBLE EXPOSURE TO EXCESSIVE
MICROWAVE ENERGY,” found on page 2.
to a properly grounded outlet. See “Grounding
Instructions” found on page 5.
accordance with the provided installation
instructions found on page 5.
appliance.
not use this product near water—for example,
near a kitchen sink, in a wet basement, or near a
swimming pool, and the like.
described in this manual. Do not use corrosive
chemicals or vapors in this appliance. This type
of oven is specifically designed to heat, or cook
food. It is not designed for industrial or laboratory
use.
come together on closing the door, use only
mild, non-abrasive soaps or detergents applied
with a sponge or soft cloth.
necessary when used by children.
damaged cord or plug, if it is not working
properly, or if it has been damaged or dropped.
counter.
qualified service personnel. Contact the nearest
authorized service facility for examination, repair
or adjustment.
containers (for example, closed glass jars) may
explode and should not be heated in this oven.
appliance if paper, plastic, or other
combustible materials are placed inside the
oven to facilitate cooking.
bags before placing bag in oven.
keep oven door closed, turn oven off, and
disconnect the power cord, or shut off power
at the fuse or circuit breaker panel.
(d) Do not use the cavity for storage purposes.
Do not leave paper products, cooking
utensils, or food in the cavity when not in
use.
17. To avoid the possible risk of a burn, the appliance must not be used in areas such as island-type countertops where the rear surfaces would be exposed to user contact and the . . appliance must be placed more than 3 feet (85 cm) above the floor.
General Use
1. DO NOT tamper with or make any adjustments
or repairs to the door, control panel housing,
safety interlock switches or any other part of the
oven.
DO NOT remove outer panel from oven. Repairs
should only be done by qualified service person.
2. DO NOT use the microwave function when the
oven is empty. The microwave energy will reflect
continuously throughout the oven, if food or
water is not present to absorb energy. This could
damage the oven and result in the danger of a
fire.
3. DO NOT use this oven to heat chemicals or
other non-food products. DO NOT clean this
oven with any product that is labeled as
containing corrosive chemicals. The heating of
corrosive chemicals in this oven can cause
radiation leaks.
4. DO NOT dry clothes, newspapers or other
materials in the oven. They may catch on fire.
5. DO NOT use recycled paper products unless
the paper product is labeled as safe for
microwave oven use. Recycled paper products
may contain impurities which may cause sparks
and/or fires when used.
6. DO NOT use newspapers or paper bags for
cooking. Fire can result.
7. DO NOT hit or strike the control panel. Damage
to the controls may occur. Fire can result.
8. DO NOT store flammable materials next to, on
top of, or in the oven. These could be fire
hazards.
9. POT HOLDERS may be needed when handling
dishes. Heat is transferred from the hot food to
the cooking container and from the cooking
container to Glass Tray. Glass Tray can be very
hot after removing cooking container from oven.
10. Before using the BAKE, COMBINATION or
BROIL functions for the first time, operate the
oven without food on BROIL for 20 minutes. This
will allow the oil that is used for rust protection
to be burned off.
11. Door and exterior will get hot during BAKE,
COMBINATION and BROIL. Please handle door
carefully.
12. Use extreme caution when removing oven
accessories or cooking containers from oven or
disposing of hot grease.
SAVE THESE INSTRUCTIONS

Installation & GROUNDING INSTRUCTIONS
Placement of Your Oven
1. Oven must be placed on a flat, stable surface.
For proper operation, the oven must have
sufficient air flow. Allow 3” ( 8 cm ) of space on
both sides of the oven and 6” { 15 cm ) of space
on top of the oven.
a. DO NOT block air vents. If they are blocked
during operation, the oven may overheat. If
the oven overheats, a thermal safety device
will turn the oven off. The oven will remain
inoperable until it has cooled,
b. DO NOT place the oven near a hot, damp
surface such as a gas or electric range, or
dishwasher.
c. DO NOT operate the oven when room
humidity is too high.
2. This oven was manufactured for household use
only.
3. This oven may be built into a wall cabinet, if
desired, by using the proper trim kit, which may
be purchased from a local dealer.
Follow all installation instructions packed with
kit.
Grounding Instructions
This appliance must be grounded. In the event of an
electrical short circuit, grounding reduces the risk of
electric shock by providing an escape wire for the
electric current. This appliance is equipped with a
cord having a grounding wire with a grounding plug.
The plug must be plugged into an outlet that is
properly installed and grounded.
WARNING—Improper use of the grounding plug
can result in a risk of electric shock.
Consult a qualified electrician or service person if
the grounding instructions are not completely
understood, or if it is uncertain whether the
appliance is properly grounded or not.
If it is necessary to use an extension cord, use only
a three wire extension cord that has a three-blade
grounding plug, and a three-slot receptacle that will
accept the plug on the appliance. The marked rating
of the extension cord should be equal to, or greater
than, the electrical rating of the appiiance.
Power Supply
1. A short power-supply cord is provided to reduce
the risks resulting from becoming entangled in
or tripping over a ionger cord.
2. Longer cord sets or extension cords are
available and may be used if care is exercised in
their use.
3. If a long cord or extension cord is used, (1) the
marked electrical rating of the cord set or
extension cord shouid be at least as great as
the electrical rating of the appliance, (2) the
extension cord must be a grounding-type 3-wire
cord, and (3) the longer cord should be
arranged so that it will not drape over the
countertop or tabletop where it can be pulled on
by children or tripped over accidentally.
Wiring Requirements
1. The oven must be on a SEPARATE CIRCUIT.
No other appliance should share the circuit with
the microwave oven. If it does, the branch circuit
fuse may blow or the circuit breaker may trip, or
the food may cook slower than recommended in
this manual.
2. The VOLTAGE used must be the same as
specified on this microwave oven (120 V). Using
a higher voltage is dangerous and may result in
a fire or other accident causing oven damage.
Using a lower voltage will cause slow cooking.
Panasonic is NOT responsible for damage
resulting from the use of the oven with other
than specified voltage.
3. The oven must be plugged into at least a 20
AMP, 120 VOLT, 60 Hz GROUNDED OUTLET.
Where a standard two-prong outlet is
encountered, it is the personal responsibility and
obligation of the consumer
to have it replaced with
a properly grounded
three-prong outlet.
4. A TEMPORARY CONNECTION with a twoprong adapter may be made where LOCAL
CODES PERMIT it. Unless the cover screw is
grounded through the house wiring, attaching
the adapter grounding plate
to the cover screw will not
ground the oven. If there is
any doubt that the cover
screw is grounded, have it
checked by an electrician.
,na.
Radio Interference
1. Operation of the microwave oven may cause
interference to your radio, TV or similar
equipment.
2. When there is interference, it may be reduced or
eliminated by taking the following measures:
a. Clean door and sealing surfaces of the oven
(See Care of Your Microwave Oven found on
page 24)
b. Place the radio, TV, etc. away from the
microwave oven as far as possible.
c. Use a properly installed antenna to obtain
stronger signal reception.
Fan Motor Operation
After using the oven, the fan rotate to cook the
electric components. This is perfectly normal, and
you can take out the food from the oven while the
fan operates,
Practical Hints
Follow These Safety Precautions When Cooking in Your Oven
1) HOME CANNING/DRYING FOODS/SMALL
QUANTITIES OF FOODS
• Do not use your
combination oven for
home c^mng or the
heating~of any closed
jar. Pressure will build
up and the jar may
explode. In addition, the
combination oven
cannot maintain the
food at the proper
canning temperature. Improperly canned food
may spoil and be dangerous to consume.
• Small quantities of food or foods with low
moisture content can dry out, burn on catch on
fire. If a fire occurs, turn oven off and leave oven
door closed. Disconnect the power cord or shut
off power at the fuse or circuit breaker panel.
• Do not dry meats, herbs, fruits or vegetables in
your oven.
IMPORTANT
Proper cooking depends on time set and
weight of food. If you use a smaller portion
than recommended and cook at the time for
the recommended portion, fire can result.
If a fire occurs, turn oven off and leave oven
door closed. Disconnect the power cord or
shut off power at the fuse or circuit breaker
panel.
2) POPCORN
Popcorn must be popped in a microwave oven
corn popper. Microwave popcorn which pops in its
own package is also available. Follow popcorn
manufacturers’ directions and use a brand
suitable for the wattage of your combination oven.
Never leave oven unattended when popping
popcorn.
CAUTION:
When using pre-packaged microwave
popcorn, follow recommended package
instructions.
Check package weight before using the
popcorn pad. Set the oven for the weight of
the popcorn package, (see page 16)
If these instructions are not followed, the
popcorn may not pop adequately or may
ignite and cause a fire.
3) DEEP FAT FRYING
• Do not attempt to deep fat fry in your microwave
oven. Oil can be heated beyond ideal
temperatures very quickly in a microwave oven.
Temperatures can .climb high enough for^the cooking oils to reach their respective flash points
and burst into flames.
The heated oil may
bubble and spatter
causing possible
damage to the oven
and perhaps resulting
in burns. Additionally,
microwave-safe utensils
may not be able to
withstand the temperature of the hot oil, and
could result in the utensil shattering if it contains
even a slight imperfection, scratch or chip.
4) EGGS
• Do not heat eggs in
their shell in a
microwave oven.
Pressure will build
up and the eggs will
explode.
5) FOODS WITH NONPOROUS SKINS
• Potatoes, apples,
egg yolks, whole
squash and
sausages are
examples of foods
with nonporous
skins. This type of
food must be
pierced before
cooking, to prevent their bursting.
6) LIQUIDS
• Heated liquids can erupt if not mixed with air. Do
not heat liquids in your microwave oven without
first stirring.

Practical Hints
7) CERAMIC TRAY / COOKING UTENSILS / FOIL
• Cooking utensils get hot during cooking. Use
potholders when removing utensils and Glass
Tray from the oven or when removing lids or
plastic wrap covers from cooking utensils to
avoid burns.
• Ceramic Tray will get hot during cooking. It
should be allowed to cool before handling or
before paper products, such as paper plates,
napkins or microwave popcorn bags, are placed
in the oven for microwave cooking.
• During cooking, heat is transferred from the hot
food to the cooking utensil and from the utensil
to Ceramic Tray. Ceramic Tray can be very hot
after removing cooking utensils from oven.
• When using foil, skewers, warming rack or
utensils made of metal in the oven, allow at least
1-inch {2.5 cm) of space between metal material
and interior oven walls. If arcing occurs
(sparking) remove metal material (skewers etc.)
and/or transfer to a non-metallic container.
• Dishes with metallic trim should not be used
during Microwave or Comb/naf/on cooking,
arcing may occur.
8) PAPER TOWELS / CLOTHS
• Do not use paper
towels or cloths
which contain a
synthetic fiber
woven into them.
The synthetic fiber
may cause the towel
to ignite.
• Do not use paper
bags or recycled
paper products in
the microwave oven.
10) THERMOMETERS
• Do not use a conventional meat thermometer for
Microwave or Combination cooking. Arcing may
occur. Do not use a microwave meat
thermometer for Combination cooking or Bake. It
may melt.
11) BABY FORMULA / FOOD
• Do not heat baby formula or food in the
microwave oven. The glass jar or surface of the
food may appear warm while the interior can
burn the infant’s mouth and esophagus.
12) REHEATING PASTRY PRODUCTS
• When reheating pastry products, check
temperatures of any fillings before eating. Some
foods have fillings which heat faster and can be
extremely hot while the surface remains warm to
the touch (ex. Jelly Donuts).
13) GENERAL OVEN USAGE GUIDELINES / OVEN
DOOR
• Do not use the oven for any reason other than
the preparation of food.
• Do not leave oven unattended while in use.
• The oven door and the interior walls will get hot
during Combination, Bake and Broil cooking.
9) BROWNING DISHES / OVEN COOKING BAGS
• Microwave browning dishes or grills are
designed for microwave cooking only. Preheating
times vary depending on the size of the
browning dish and food being cooked. Always
follow instructions provided by the browning dish
or grill manufacturer. Do not preheat browning
dish more than 8 minutes.
• If an oven cooking bag is used for microwave
cooking, prepare according to package
directions. Do not use wire twist-tie to close bag.
Instead use nylon tie, a piece of cotton string or
a strip cut from the open end of the bag. Make
six Va-inch slits by closure. Place oven cooking
bag in a dish slightly larger than the food being
cooked.
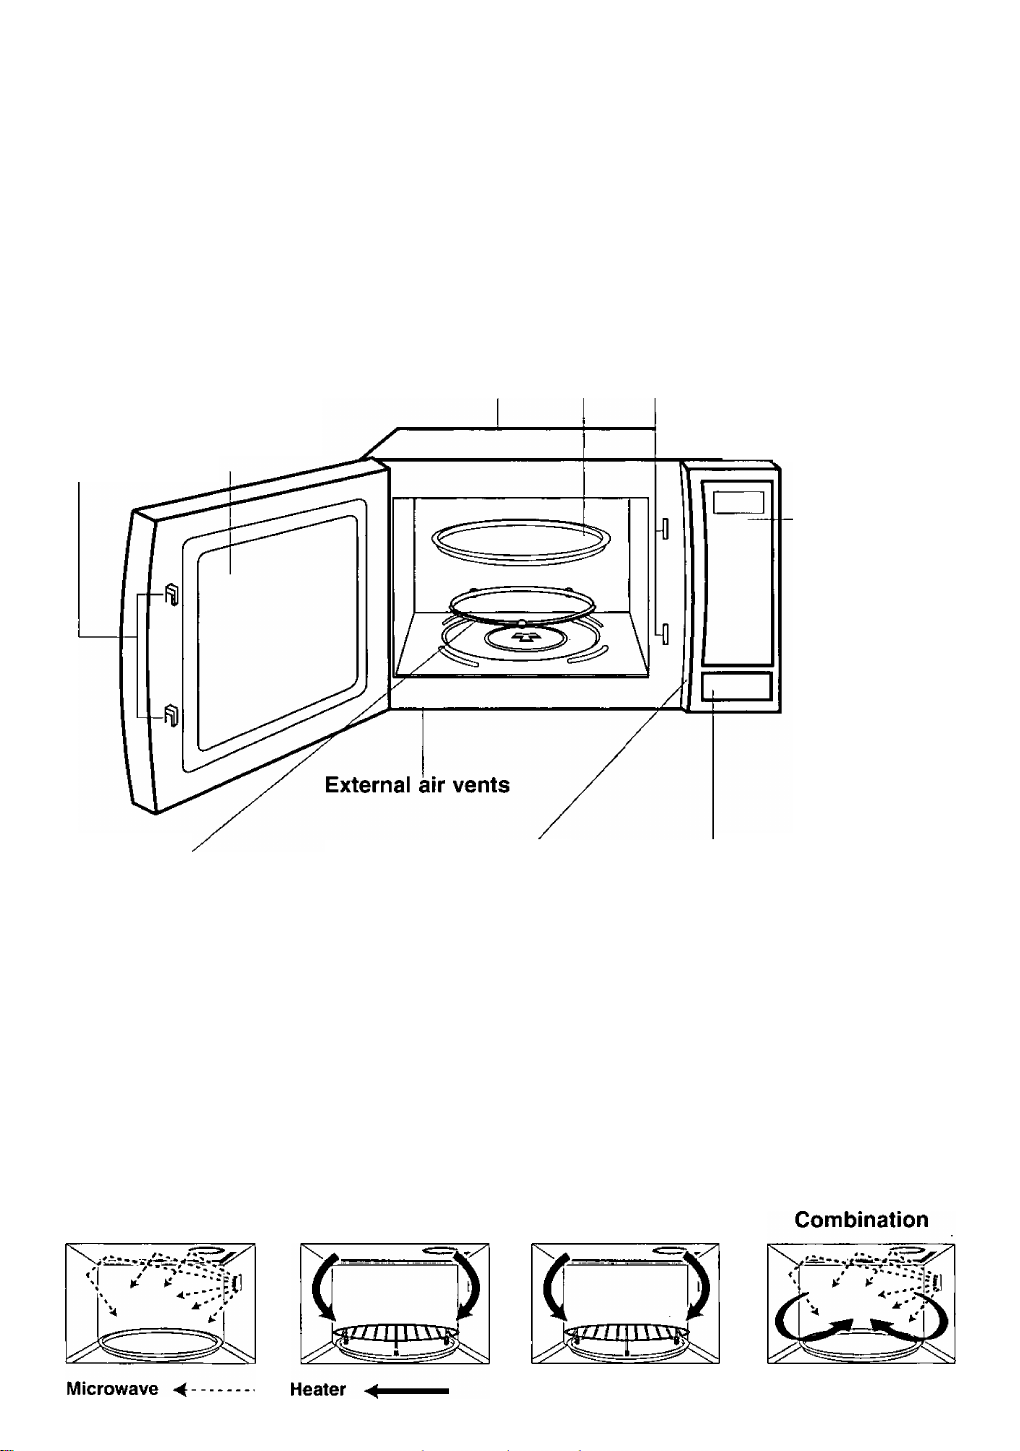
Feature Diagram
Ceramic Tray
1. Do not operate the oven without the Roller Ring and Ceramic Tray in place.
2. Only use Ceramic Tray specifically designed for this oven. Do not substitute any other Ceramic Tray.
3. If Ceramic Tray is hot, allow to cool before cleaning or placing in water.
4. Do not cook directly on Ceramic Tray unless othenwise indicated. Always place food in a microwave-safe
dish, or on a rack set in a microwave-safe dish.
5. Ceramic Tray can rotate in either direction.
6. If food of utensil on Ceramic Tray touches the oven walls, causing the tray to stop moving, the tray will
automatically rotate in the opposite direction. This is normal.
____
_ .
___
. - - —
Door Safety Lock System External air vents
See-through Oven Window
Roller Ring
1. Roller Ring and oven floor
should be cleaned
frequently to prevent
excessive noise.
2. Roller Ring must always be
used together with
Ceramic Tray for cooking.
Identification Plate
The oven model number
and serial number are
recorded here.
Door Safety Lock System
Control Panel:
Covered with a
removeable
protective film to
prevent scratches
during shipping.
Small bubbles may
appear under this
film. When this
happens, remove film
carefully. (Hint - apply
masking or clear
tape to an exposed
corner and pull
gently to remove).
Door Release Button
Press to open the door.
Opening the door during cooking will stop the
cooking process without cancelling the
program. Cooking resumes as soon as the
door is closed and Start Pad is pressed. The
oven light will stay on or turn on whenever the
door is opened. It is quite safe to open the door
at any time during a cooking program and
there is no risk of microwave exposure.
Cooking Modes: Heating Source
The diagram below shows examples of the accessories.
Use of these accessories may vary depending on the recipe/dish used. Further information can be found in
the Cookbook.
Microwave
Bake
Broii
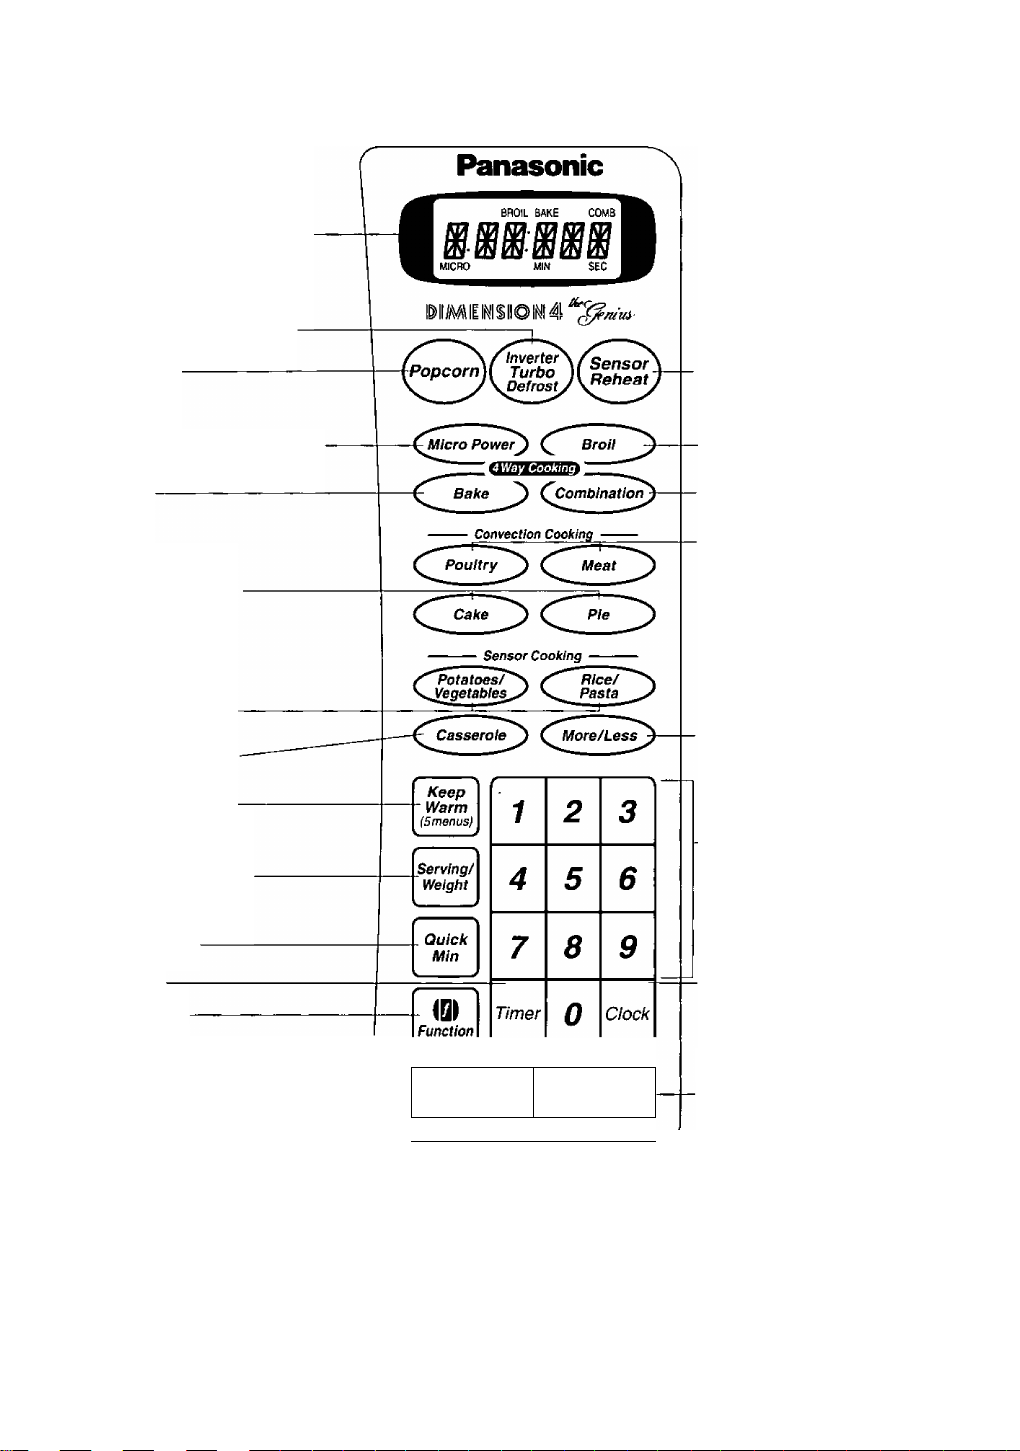
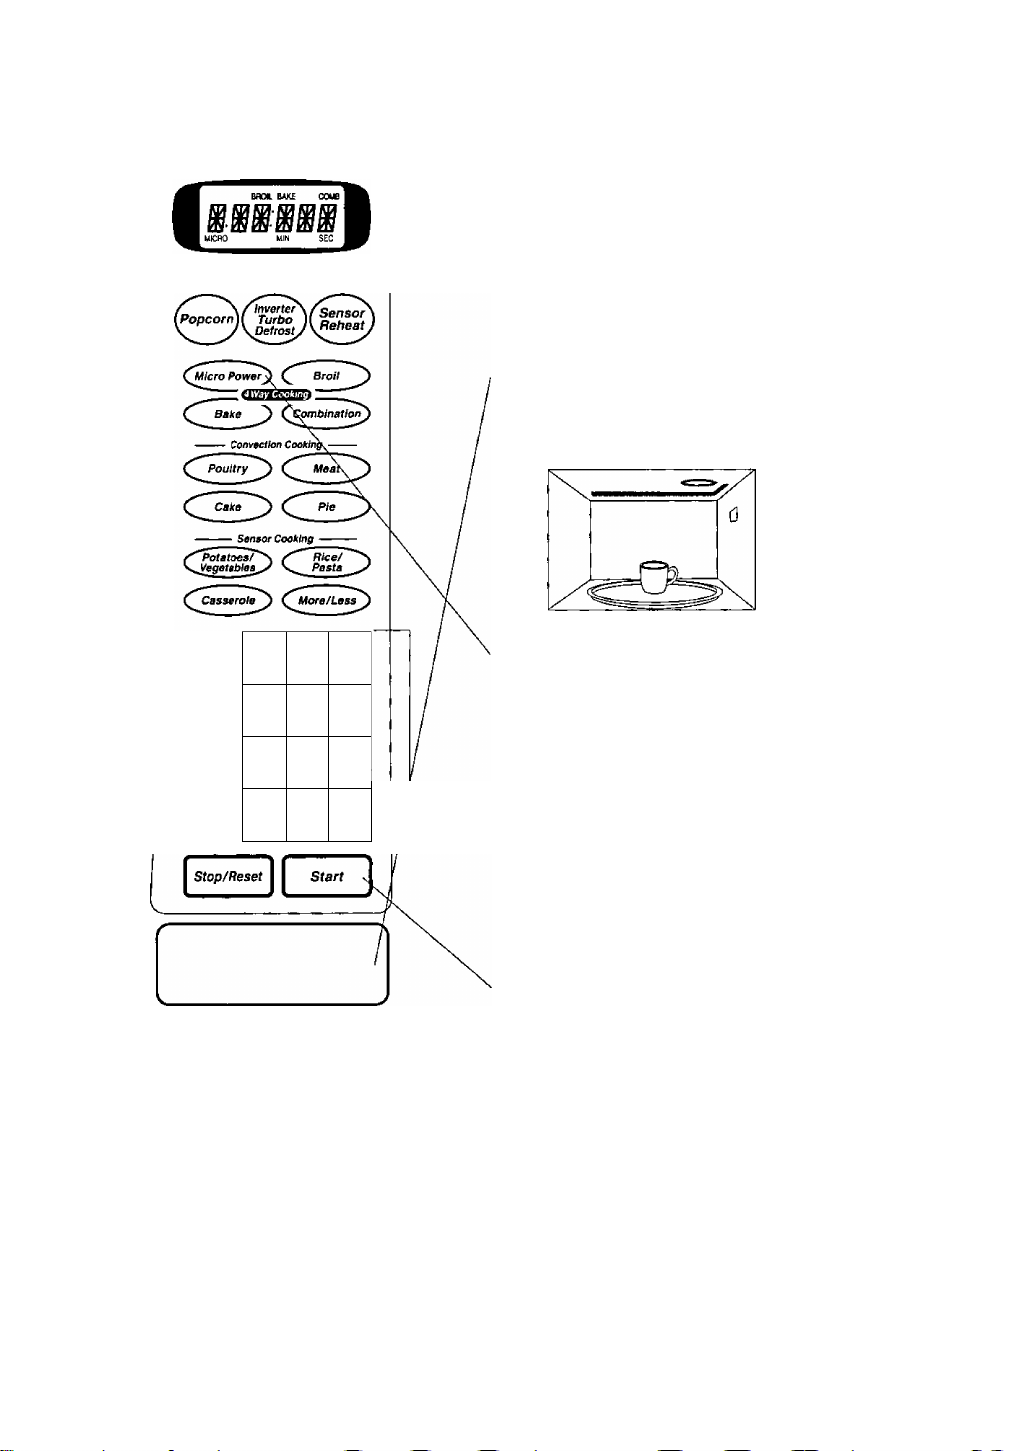
Menu Action Screen Display
inverter Turbo Defrost Pad
Control Panel
Popcorn Pad
Microwave Power Select Pad
Bake Pad
Auto Cook by Bake
Sensor Cooking by
Microwave
Sensor Cooking by
Combination
Keep Warm Pad
(5 menus)
Serving / Weight Pad
Quick Min Pad
Sensor Reheat Pad
Broil Pad
Combination Pad
Weight Cook by Combination
More / Less Pads
Number Pads
Timer Pad
Function Pad
.
_____
. i
____
Stop/Reset Pad
Before cooking: One tap ciears
your instructions.
During cooking: One tap
temporarily stops the cooking
process. Another tap cancels ali
your instructions and time of day
appears in Menu Action Screen
Display.
Prompters:
When a pad is pressed, a beep sound is heard and the corresponding letter or word(s) appear and scroll
across the Menu Action Screen Display. If a pad is pressed and no beep is heard, the unit does not or
cannot accept the instruction. As each pad is pressed the corresponding word{s) scroll across the screen.
Words will automatically appear to prompt user to perform the next step. It is not necessary to wait for the
words to appear before pressing pads for the next step. A two beep sound is heard between stages. At the
end of any complete program, the oven will beep five times.
-Stop/Reset Start
Clock Pad
Start Pad
One tap allows oven to begin
functioning. If door is opened
or STOP/RESET Pad is tapped
once during oven operation,
START Pad must again be
pressed to restart oven.

To Use Function
The unique function feature of your PANASONIC microwave oven allows you to set the non-cooking features
of your ovens such as CHILD LOCK, WORD SPEED, LANGUAGE CHOICE (ENGLISH, SPANISH OR
FRENCH), plus many more. See below. The Initial settings are in bold.
tm
b
LANGUAGE CHOICE
The oven has English, French and Spanish displays. The default setting is English.
1.ENGLISH .T^Display appears in English.-
¿.FRANÇAIS -^Display appears in French.
3.ESPAÑOL -^Display appears in Spanish.
Lb/kg CHOICE
The oven has both imperial and metric weight measurements. The oven displays the weight
in imperial measurements.
1. Lb °F-> Weight can be set in Ib/oz and oven temperature can be set in T
2. kg ‘C-* Weight can be set in kg/g and oven temperature can be set in °C
WORD SPEED
The word scrolling speed can be accelerated or slowed down.
1 .QUICK -»Words scroll quickly.
2.MEDIUM -»Scrolling speed returns to initial setting.
3.SLOW -»Words scroll slowly,
MENU ACTION ON/OFF
MENU ACTION SCREEN helps you program your oven by prompting you with the next step.
When you become familiar with your oven, the Prompting Guide can be turned off.
1.0N -»Prompting Guide will appear.
2.OFF -^Prompting Guide will not appear.
CHILD LOCK ON/OFF
The Child Safety Lock feature prevents children from using the oven.
1 .ON -»Child Lock has been set and operation is impossible.
2.0FF -»Child Lock has been cancelled.
.......
■u
Q
b
b
BEEP ON/OFF
If you wish to have the oven operate without beeping, this feature can be turned off.
1.0N -»Beep sound will be heard.
2.OFF -»Beep sound will not be heard.
REMINDER BEEP ON/OFF
A reminder beep reminds you to remove the food from the oven after cooking is complete.
The oven beeps every few seconds.
1 .ON -»Reminder beep activated.
2.0FF -»Reminder beep deactivated.
DAYLIGHT SAVING ON/OFF
1.0N -»Time of day will advance one hour.
2.0FF -»Time of day return to original setting. CLOCK ON/OFF
Clock display can be turned off.
1.0N -»Time of Day display will appear in the Menu Action Screen Display.
2.OFF -»Time of Day display will not appear in the Menu Action Screen Display.
Time of day will remain in memory even when the display is off.
DEMO MODE ON/OFF
Demo mode is designed for retail store display. In this mode, the oven can be demonstrated
without turning the oven on.
1 .ON -»Demo mode is activated.
2.0FF -»Demo mode is deactivated.
10
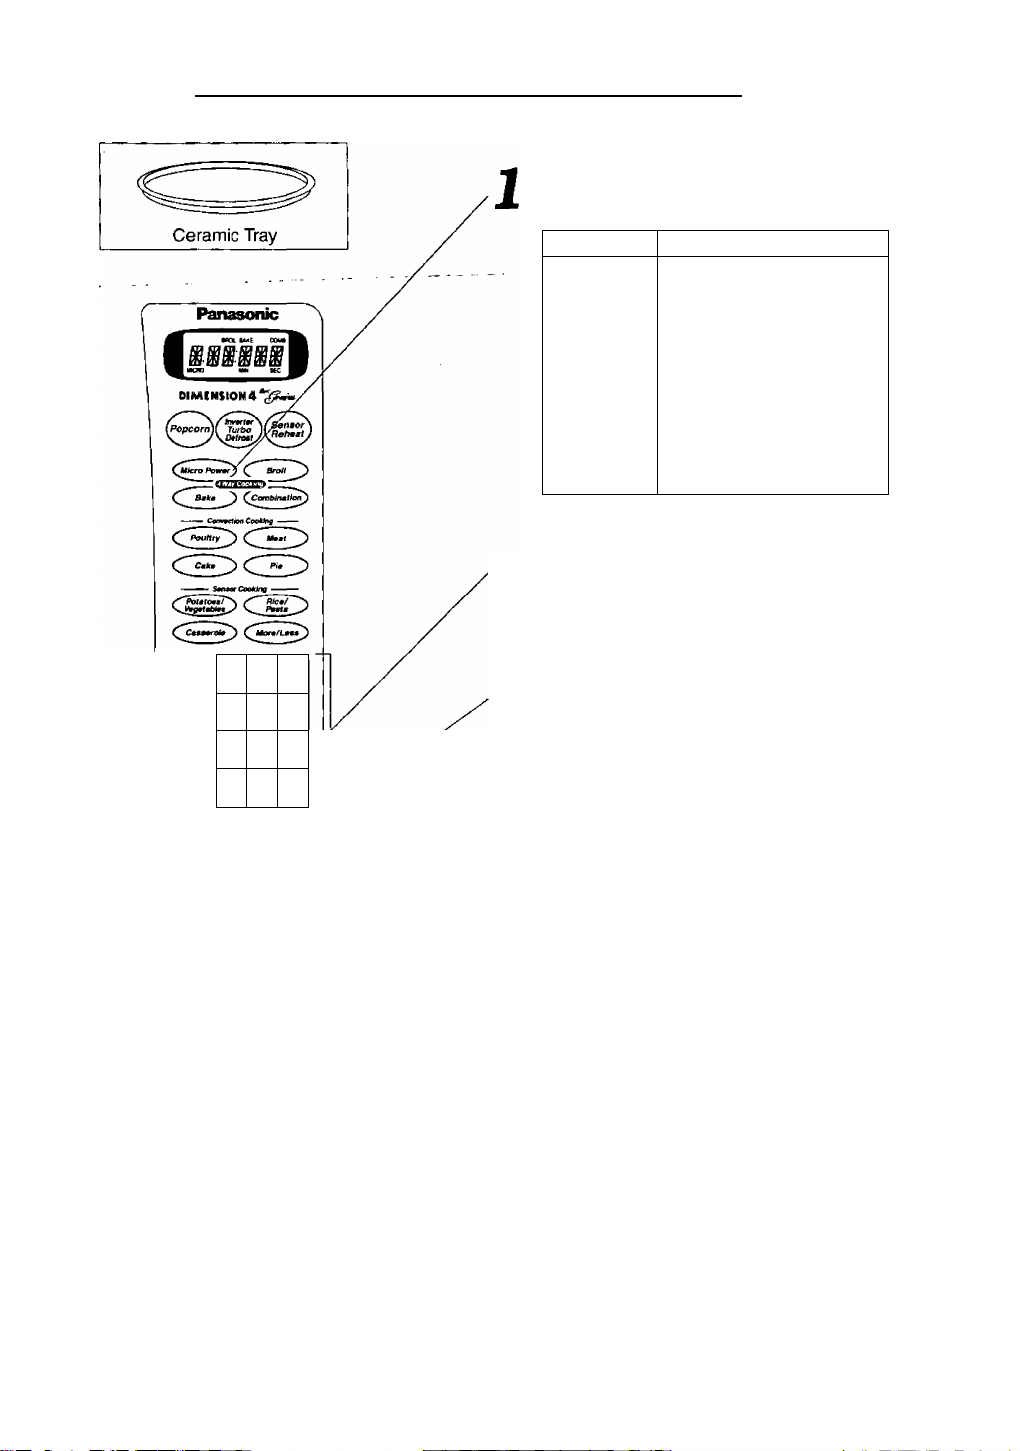
Let’s Start to Use Your Oven!
Panasonic
Keep
Warm
tSmenus)
Serving/
Weight
Quick
Min
1 2 3
4 5 6
8 9
7
1 Plug In
Plug into a properly grounded electrical outlet.
“WELCOME TO PANASONIC REFER TO
OPERATING INSTRUCTIONS BEFORE USE"
appears in the
(This will immediately cease
when any pad is pressed.) ^||
Menu Action Sereen Display.
2 Press
Open the door and place the food on Ceramic
Tray in the oven. Then close the door.
3 Select Power Level
e.g.PIO power — Press once
(Continue pressing for other power levels
— page 12)
Ш)
Function
Timer
Clock
0
i
4 Set Cooking Time
e.g. 1 minute 30 seconds
5 Press
^ The time in the Menu Action Sereen Display
will count down.
To Set Clock
Clock
1
Press. Enter time of day.(e.g. 11:25)
Using Number Pad.
NOTE
1. You can use the oven without setting the clock.
2. There is no a.m. or p.m. settings. Clock is a 12 hour display.
3. To reset the time of day, repeat steps above.
4. The clock will retain time setting only when plugged into power source.
1
Clock
Press.
11
Micro Power and Time Setting
Use of Accessory:
Select Power Level
Timer
(D
nmetioft
1 2
4
7 8
Press
- once
twice
3 times
4 times
5 times
6 times
7 times P4
8 times P3 (MEDIUM-LOW)
9 times
10 times
For P10 Power, you can start from step 2.
Power Level
PIO(HIGH)
P9
P8
P7 (MEDIUM-HIGH)
P6 (MEDIUM)
P5
P2
PI (LOW)
2 Set (booking Time
(P10 up to 30 minutes
Others up to 99 minutes and 99 seconds.)
3
6
5
9
Clock
0
3 Press
Cooking will starts. The time in the Menu
Action Screen Display will begin to count
down.
Stop/RCÈ^t
To recall the selected power level, press Micro
Power pad.
For 2 or 3 stage cooking,
Repeat above steps 1 and 2 before pressing Start
Pad.
To Use Quick Min Pad
This feature helps you in programming your oven without pressing the Number Pads and allows you to add
extra cooking time easily.
To Set Cooking Time:
Quick
Min
Set cooking time (up to
10 taps/minutes).
To Add Extra Cooking Time:
Quick
Min
Press to add extra cooking time (up to 10
taps) during cooking.
•-Cooking time changes to include extra time and
continues to count down in the Menu Action
Screen Dispiay.
I Start I
Press,
•-Cooking will start
on P10 power.
NOTE:
1. You can use other power levels or other cooking
modes, select the desired power level or cooking
mode before setting the cooking time.
2. After setting the time by Quick Min Pad, You
cannot use the Number Pads, and vice versa.
NOTE;
You can add cooking time for all features with power
and time settings.
12
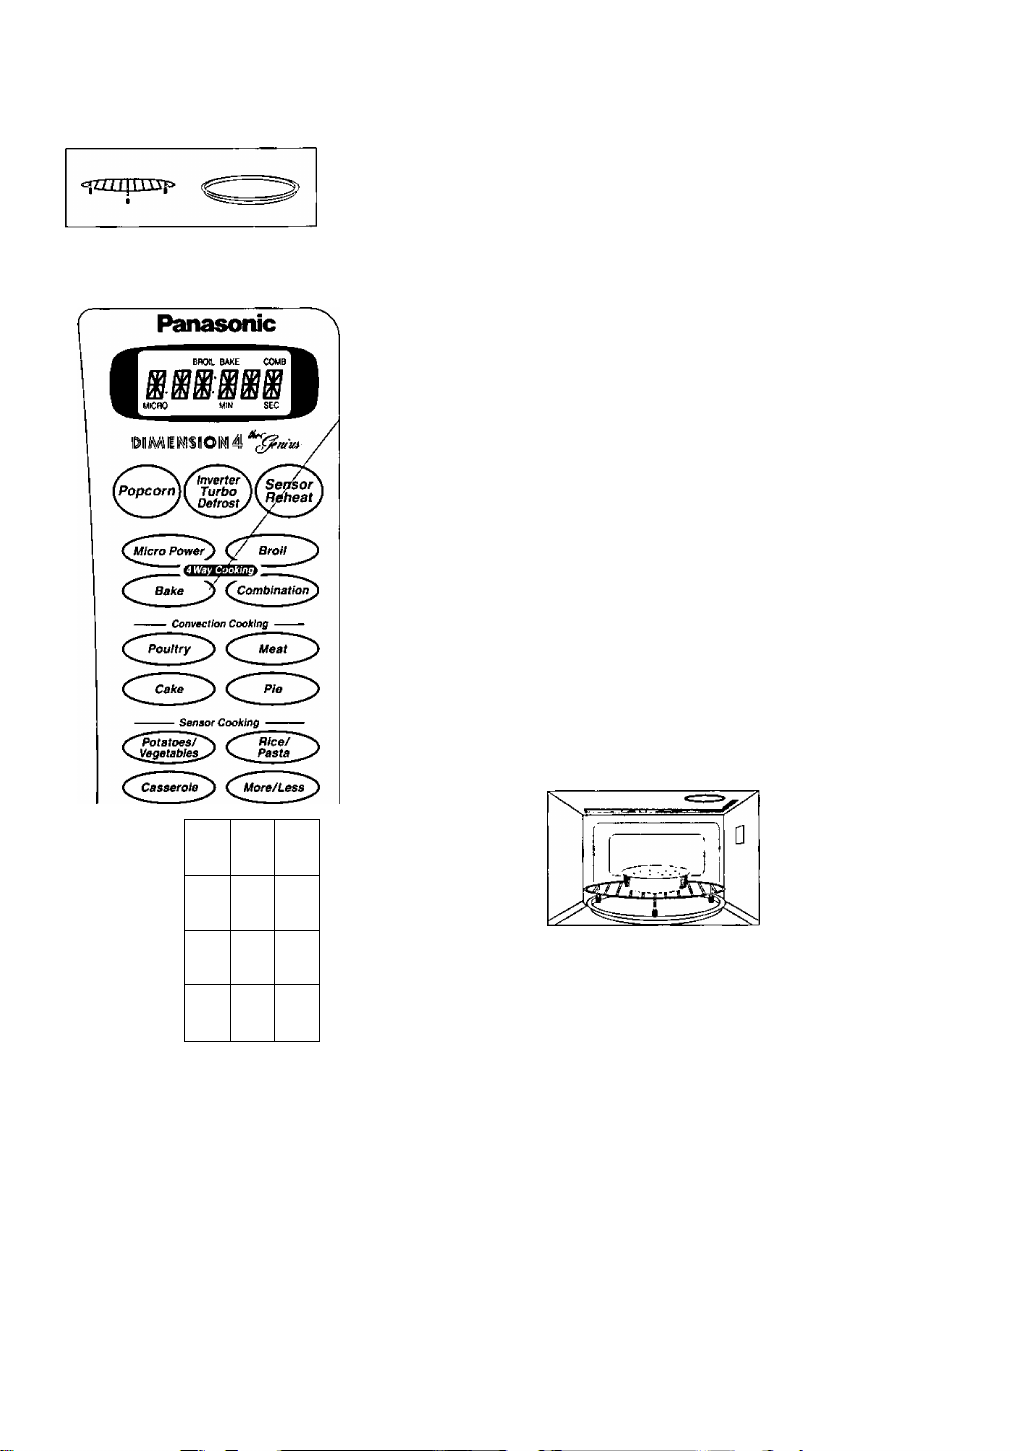
Use of Accessory:
To Cook on Bake
Bake temperature automatically counts-up in 25°F
(10°C) increments from 200°F to 450*F {from
100‘C to 230’C). Place Oven Rack on Ceramic
Tray before preheating.
Oven Rack & Ceramic Tray
-
--------
Keep
Warm
(Smenus)
2
1
1 Select Oven
Temperature
by pressing Bake Pad.
2 Press
Preheating will start.
For recipes that do not require preheating,
eliminate step 2.
NOTE: During preheating “P” appears in the
Menu Action Screen Display. Please do not
open door.
When preheating is completed, oven will beep
three times and “P END" will appear in the Menu
Action Screen Display.
3 Place the Food
Carefully
in an oven-safe dish on Oven Rack.
3
Serving/
Weight
Quick
Min
(SI
Function
Stop/Reset
5 6
4
7 8 9
Timer
0
Sfarf
Clock
4 Set Baking Time
Using Number Pads, (up to 9 hours 99 minutes)
e.g. 30 minutes
L
5 Press
Cooking starts. The cooking time in the Menu
Action Screen Display begins to count down.
To recall the selected oven temperature, press
Bake Pad.
NOTE:
1. If oven door is not opened after preheating, oven will maintain the selected temperature for 30 minutes.
After 30 minutes, oven will shut off automatically and beep five times.
2. When selected cooking time is less than one hour, time counts down second by second.
3. When selected cooking time is more than one hour, time counts down minute by minute until 1 hour
remains. The timer will then count down second by second.
13
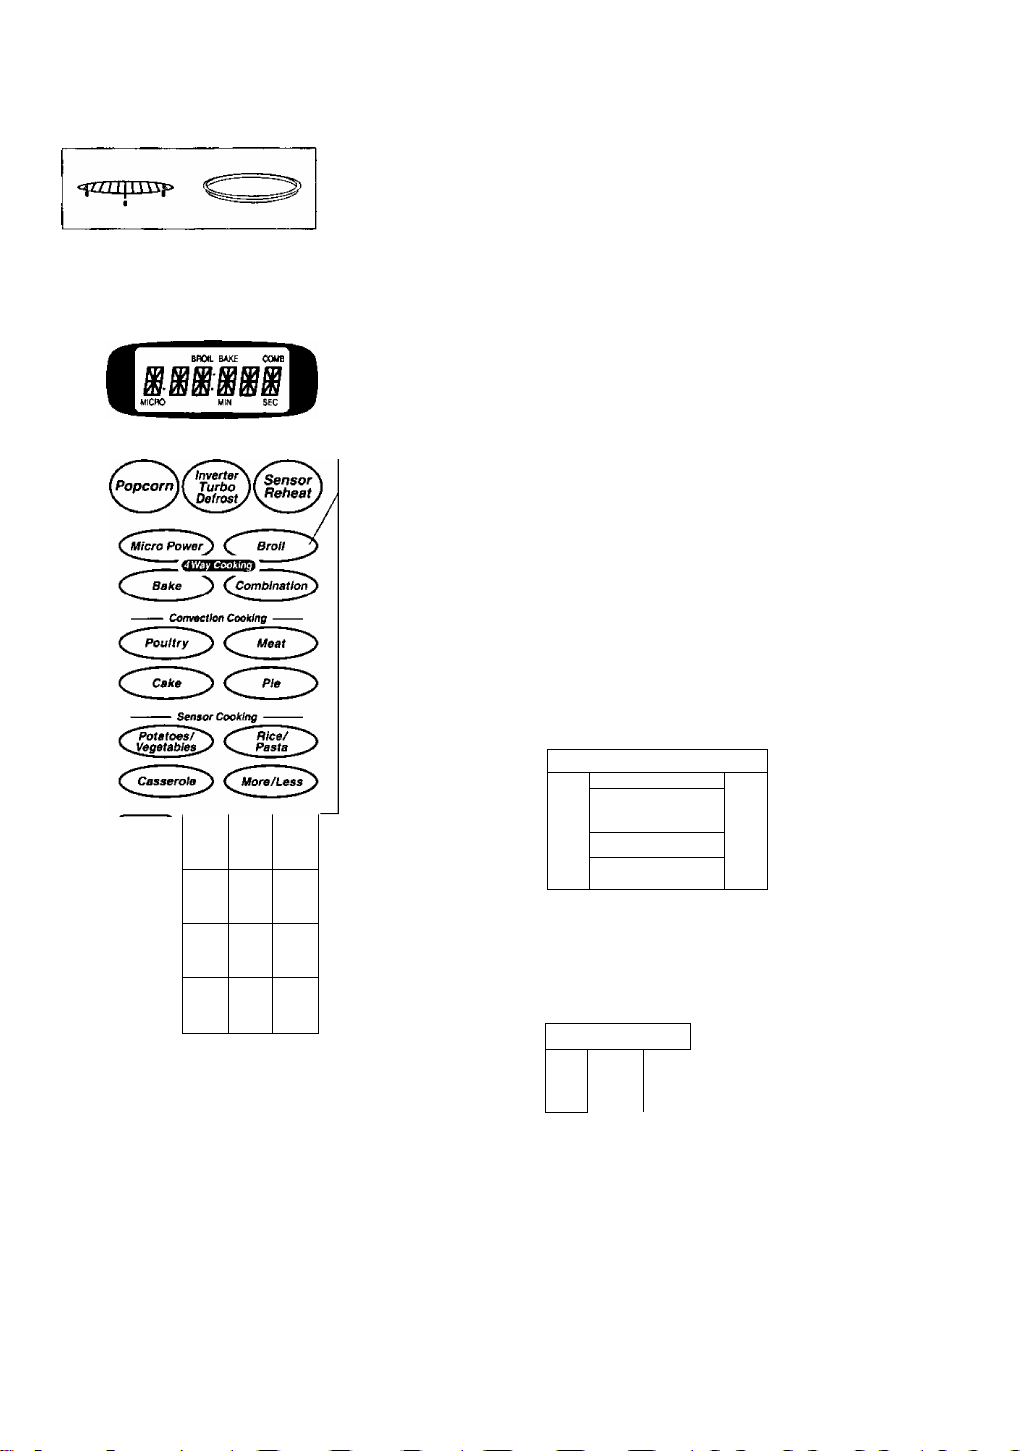
To Cook on Broil
Use of Accessory;
Oven Rack & Ceramic Tray
r
Panasonic
Most broil items require preheating the oven. Place Oven
Rack on Ceramic Tray.
Follow these steps.
1
Press Broil Pad
2 Press
«■Preheating will start.
For recipes that do not require preheating,
eliminate step 2.
NOTE: During preheating “P” appears in the
Menu Action Screen Display. Do not open door
during preheating.
When preheating is completed, oven will beep
three times and “P END" will appear in the Menu
Action Screen Display.
3 Place the Food
On spatter shield on broiler pan and carefully
place on the Oven Rack. You can purchase most
broiler pans from your local stores.
□
1 2 3
^
Serving/
Weight
Quick
Min
\u\
Function
Stop/Reset
4
5 6
7 8 9
Timer
0
1
____
Start
4 Set Broiling Time
Clock
---------*-----
using Number Pads.
(up to 99 minutes and 99 seconds)
e.g. 35 minutes
3
5
-
O Press
The cooking time in the Afenu Action Screen
Display begins to count down.
NOTE:
1. If oven door is not opened after preheating, oven will maintain the temperature for 30 minutes.
After 30 minutes, oven will shut off automatically and beep five times.
14
 Loading...