

Page 1
Order No. PAPTH160301CE
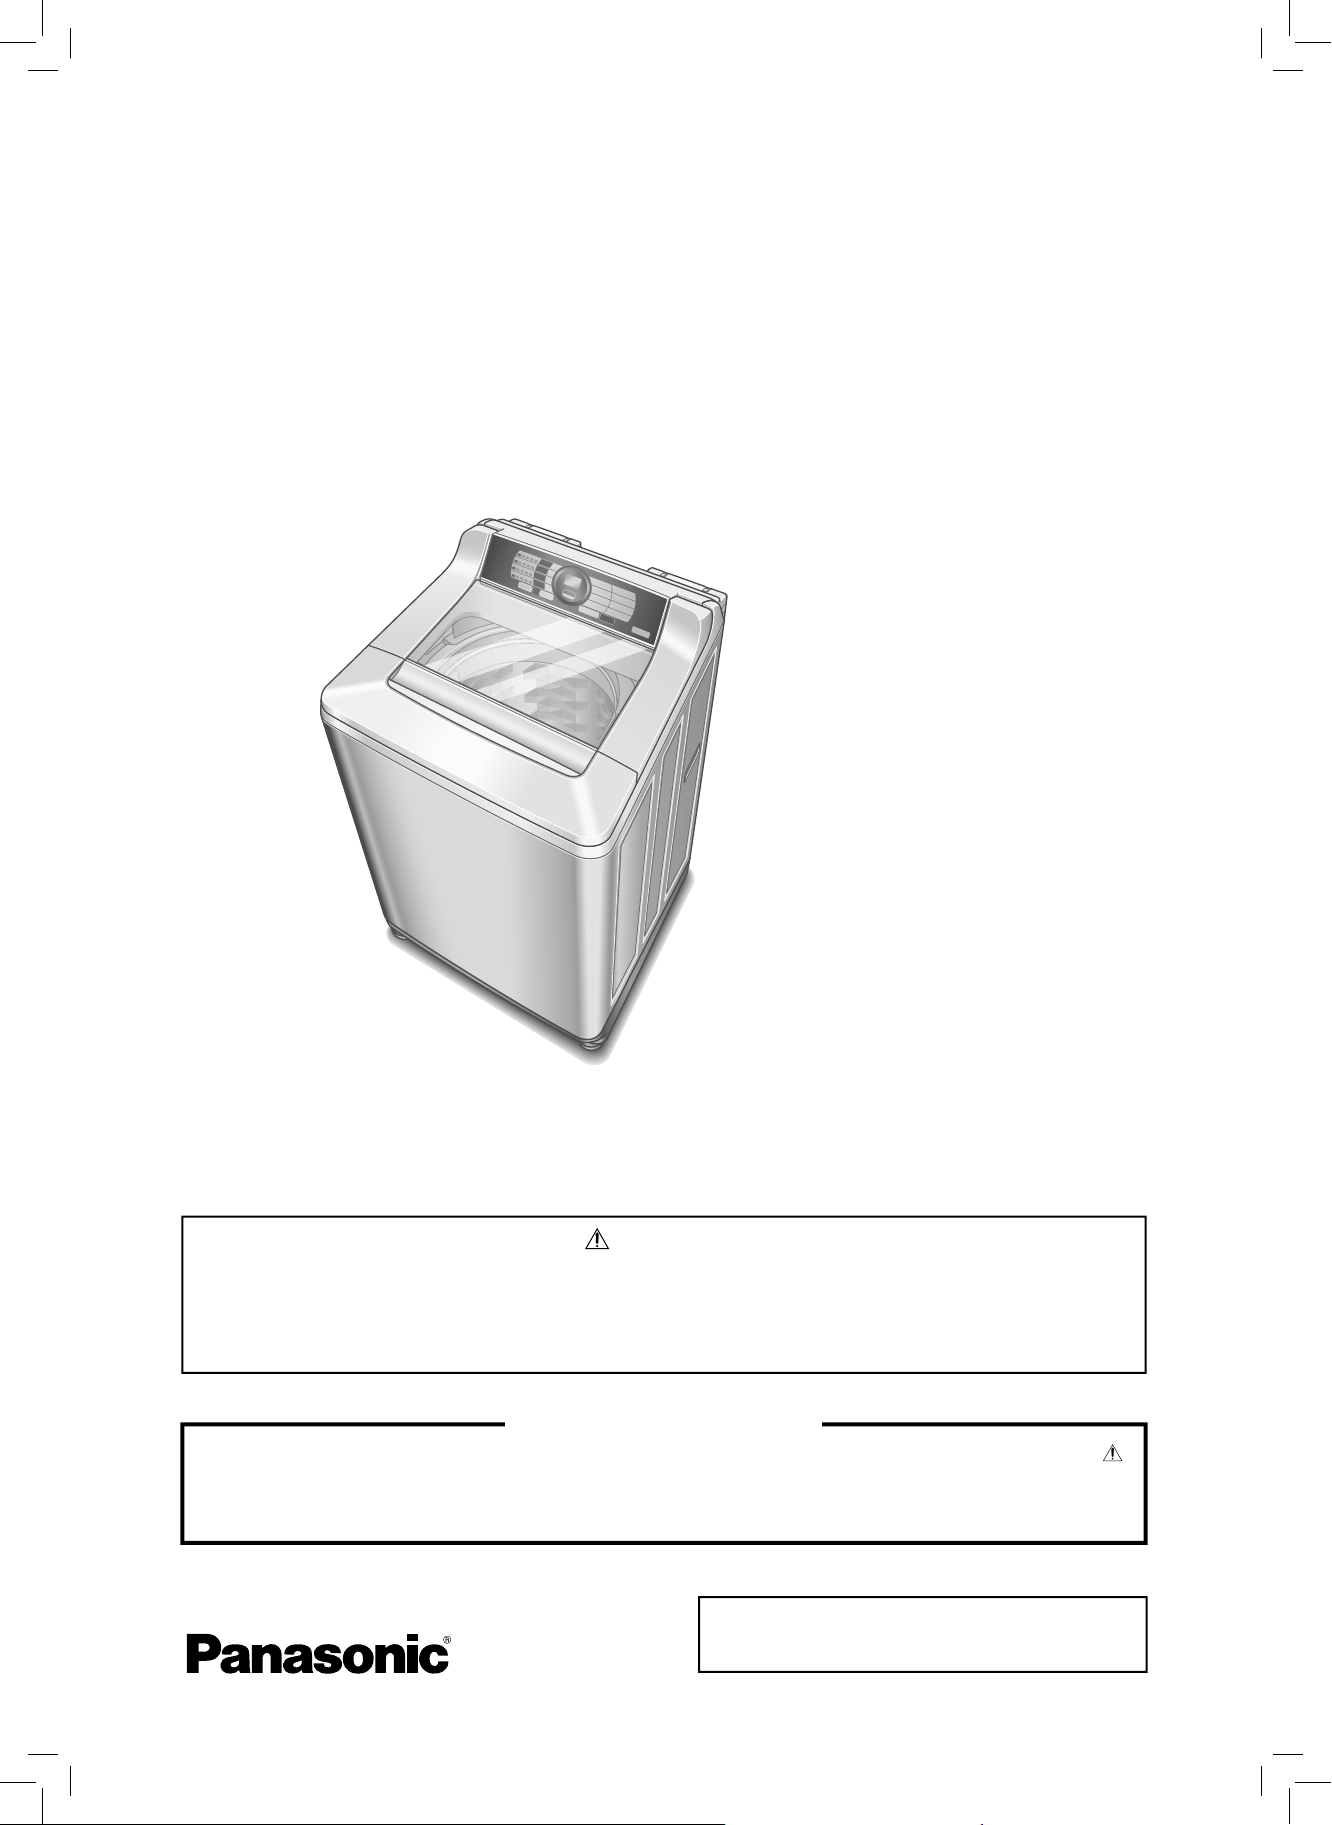
Service Manual
Fully Automatic Washing Machine
NA-F100A2
Product Colour
White (W)
Destination
Thailand
WARNING
The service information is designed for experienced repair technicians only and is not designed for use by the general
public. It does not contain warnings or cautions to advise non-technical individuals of potential dangers in attempting
to service a product. Products powered by electricity should be serviced or repaired only by experienced professional
technicians. Any attempt to service or repair the product or products dealt within this service information by anyone
else could result in serious injury or death.
IMPORTANT SAFETY NOTICE
There are special components used in this equipment which are important for safety. These parts are marked by
in the Schematic Diagrams, Circuit Board Diagrams, Exploded Views and Replacement Parts List. It is essential that
these critical parts should be replaced with manufacturer’s specifi ed parts to prevent shock, fi re or other hazards. Do
not modify the original design without permission of manufacturer.
© Panasonic Appliances (Thailand) Co., Ltd. 2016.
All rights reserved. Unauthorized copying and
distribution is a violation of law.
Service NA-F100A2.indd 1Service NA-F100A2.indd 1 4/26/2559 BE 11:50 AM4/26/2559 BE 11:50 AM
Page 2

CONTENT
1. Attention in the Repair Work Security 3
2. Parts Identifi cation 4
3. Specifi cations 5
4. Technical Information
4.1 Standard Wash Capacity 6
4.2 Standard Water Supply 6
5. Installation
5.1 Check the Location 7
5.2 Attach the bottom cover 7
5.3 Attach the external drain water hose 7
5.4 Connect the water tap adaptor and water supply hose 8
5.5 Connect the power plug and grounding wire 8
5.6 Check the Washing Machine does not wobble 8
5.7 Perform a trial operation 8
6. Operations Panel 9
7. Washing 10
8. Washing Options 11-12
9. Maintenance 13
10. Test Mode 14 - 15
11. Troubleshooting 16
12. Table of Errors
12.1 U-Error indication 17
12.2 H-Error indication 18
13. Wiring Diagram
NA-F100A2 19
14. Disassembly
14.1 Controller Unit 20
14.2 Panel Face B 20
15. Parts exploded view and replacement Parts List
15.1 Parts exploded view : Part A 21
15.2 Replacement Parts List : Part A 22
15.3 Parts exploded view : Part B 23
15.4 Replacement Parts List : Part B 24
15.5 Parts exploded view : Part C 25
15.6 Replacement Parts List : Part C 26
15.7 Parts exploded view : Packing 27
15.8 Replacement Parts List : Packing 28
- 2 -
Service NA-F100A2.indd 2Service NA-F100A2.indd 2 4/26/2559 BE 11:50 AM4/26/2559 BE 11:50 AM
Page 3
1. ATTENTION IN THE REPAIR WORK SECURITY
In order to prevent any accident during repair work and ensure security of the product after repair work,
somethings surely followed are explained below.
The level of the arised damages or dangers, when indicated contents are ignored, are classified by
following indications and explained.
WARNING
The content in the column of this indication is
´%HDVVXPHGWKDWSRVVLEO\GLHRUJHWVHULRXVO\LQMXUHGµ
ATTENTION
Types of the contents being followed are classified by following figured symbols and explained.
(The following is an example of expression in pictures)
This figured symbol means caution “ ATTENTION µ
This figured symbol means must not do “ PROHIBITION µ
This figured symbol means surely execute “ INSTRUCTIONS µ
The content in the column of this indication is
´%HDVVXPHGWKDWSRVVLEO\JHWGDPDJHVRUSRVVLEO\RQO\GDPDJHREMHFWRFFXUHGµ
WARNING
Connection of cables should be done according to regular work.
&RQQHFWLRQRIFDEOHVVKRXOGEHWLJKWHQHGUHOLDEO\ZLWKVWUHQJWKXVLQJVROGHUOHVVWHUPLQDO
(specified parts always using regular bonding plier)
,QVWDOODILUHSURWHFWLRQFRYHUILUHSURRIFRYHULQJFRQQHFWLQDUHDFRPSOHWHO\DQGFORVHRSHQLQJ
areas by tape. (Please reuse the fire protection cover which came with the products).
:KHQGUDZLQJFDEOHVDURXQGIL[LQJWKRVHFDEOHVZLWKFDEOHVXSSUHVVLRQSDUW'RQRWWRXFK
rotating part, high temperature part and surface of metal.
%HVXUHWRUHSODFHZLWKFDEOHXQLWZKHQDQ\FDEOHZDVVQDSSHG:KHQDSDUWRIWKHFDEOHXQLW
was cut, you must not do the connection repair. It may be the cause of smoke, ignition or
receiving an electric shock.
Be careful about receiving an electric shock.
:KHQGRLQJHOHFWULFFRQQHFWLRQVHUYLFH
such as voltage measurement, please be
careful enough about receiving an electric
shock at electric charging parts and cable
terminal parts.
Be sure to use specified parts.
Always use specified parts for the parts
with mark in the electric circuit
diagrams and parts list. It may be the
cause of smoke, ignition or damage.
Pull out electric plug when doing repair work.
'LVDVVHPEOLQJDVVHPEOLQJDQGUHSODFLQJ
parts should be done after pulling out
electric plug. Receiving an electric shock
or getting an injury may occur.
Do not touch any rotating object with hand
unless it stops completely.
Slow rotation may also roll in your hands
and cause injury.
Rebuilding is prohibited.
'RQRWUHEXLOGPDFKLQHSDUWVDQG
components when repairing service.
It may be the cause of damage or ignition.
Straightly pull out or insert in huasuton terminal.
'RQRWWZLVWLW,WPD\EHWKHFDXVHRI
damage or ignition.
ATTENTION
Please wear gloves when disassembling, replacing and assembling.
Always wear gloves to prevent an injury by the metal end face or an electric shock at the time of
the electricity service
Please be careful to the edges of the metal end face.
:HDUWKHZRUNLQJFORWKHVRIORQJVOHHYHVWRSUHYHQWDQLQMXU\E\WKHPHWDOHQGIDFHRUSOHDVH
work after covering the end face with tape or towel.
- 3 -
Service NA-F100A2.indd 3Service NA-F100A2.indd 3 4/26/2559 BE 11:50 AM4/26/2559 BE 11:50 AM
Page 4
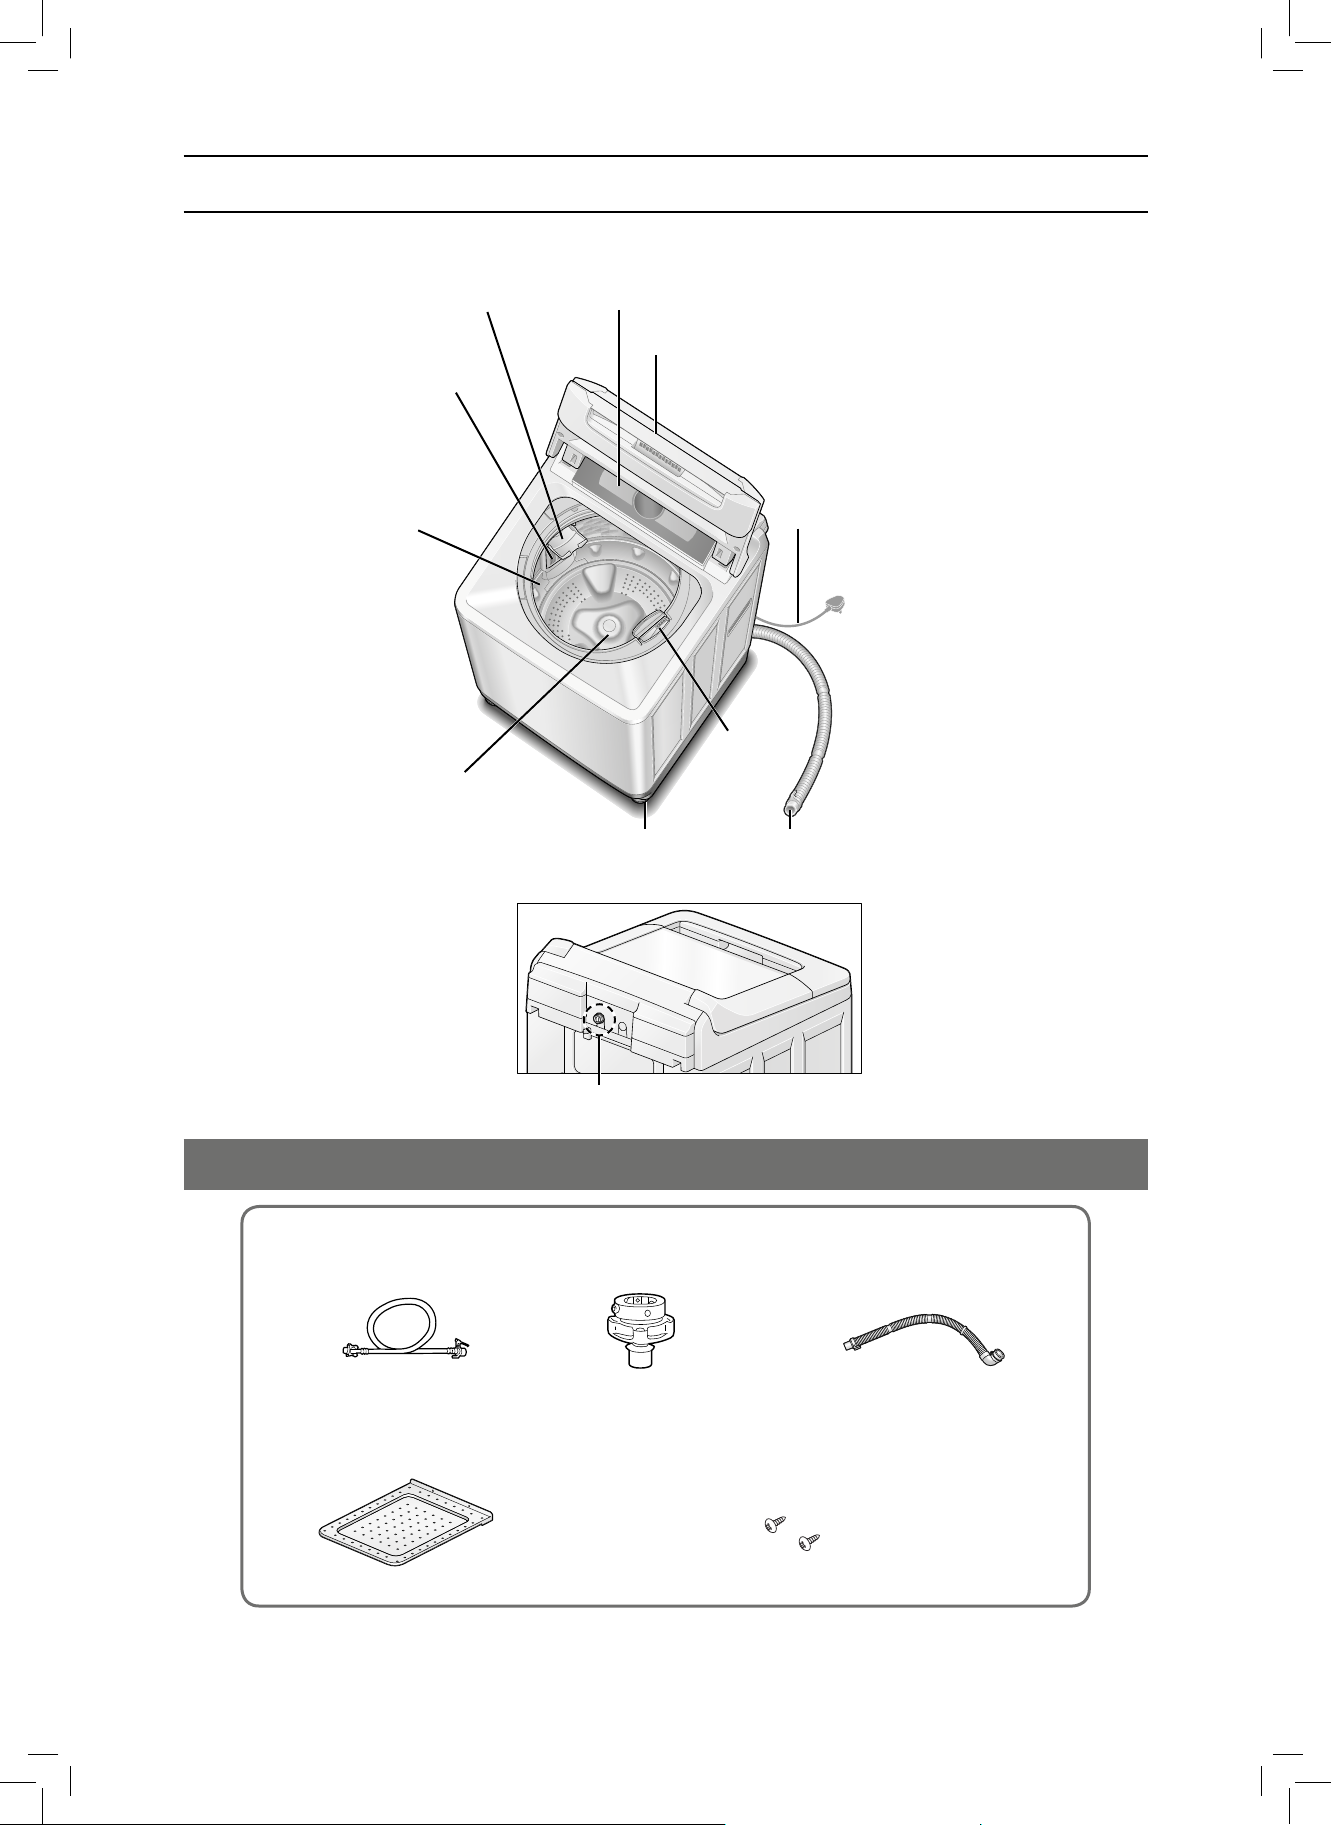
2. PARTS IDENTIFICATION
Lint fi lter
Operation PanelDetergent inlet
Lid
Tub
Pulsator
Adjustable leg
Power cord and plug
Softener
inlet
External drain water hose
Water supply valve
(P. 13)
Accessories
●Water supply hose ●Water tap adaptor ●External drain water
hose
●Bottom cover ●Screw
For the bottom cover
- 4 -
Service NA-F100A2.indd 4Service NA-F100A2.indd 4 4/26/2559 BE 11:50 AM4/26/2559 BE 11:50 AM
Page 5
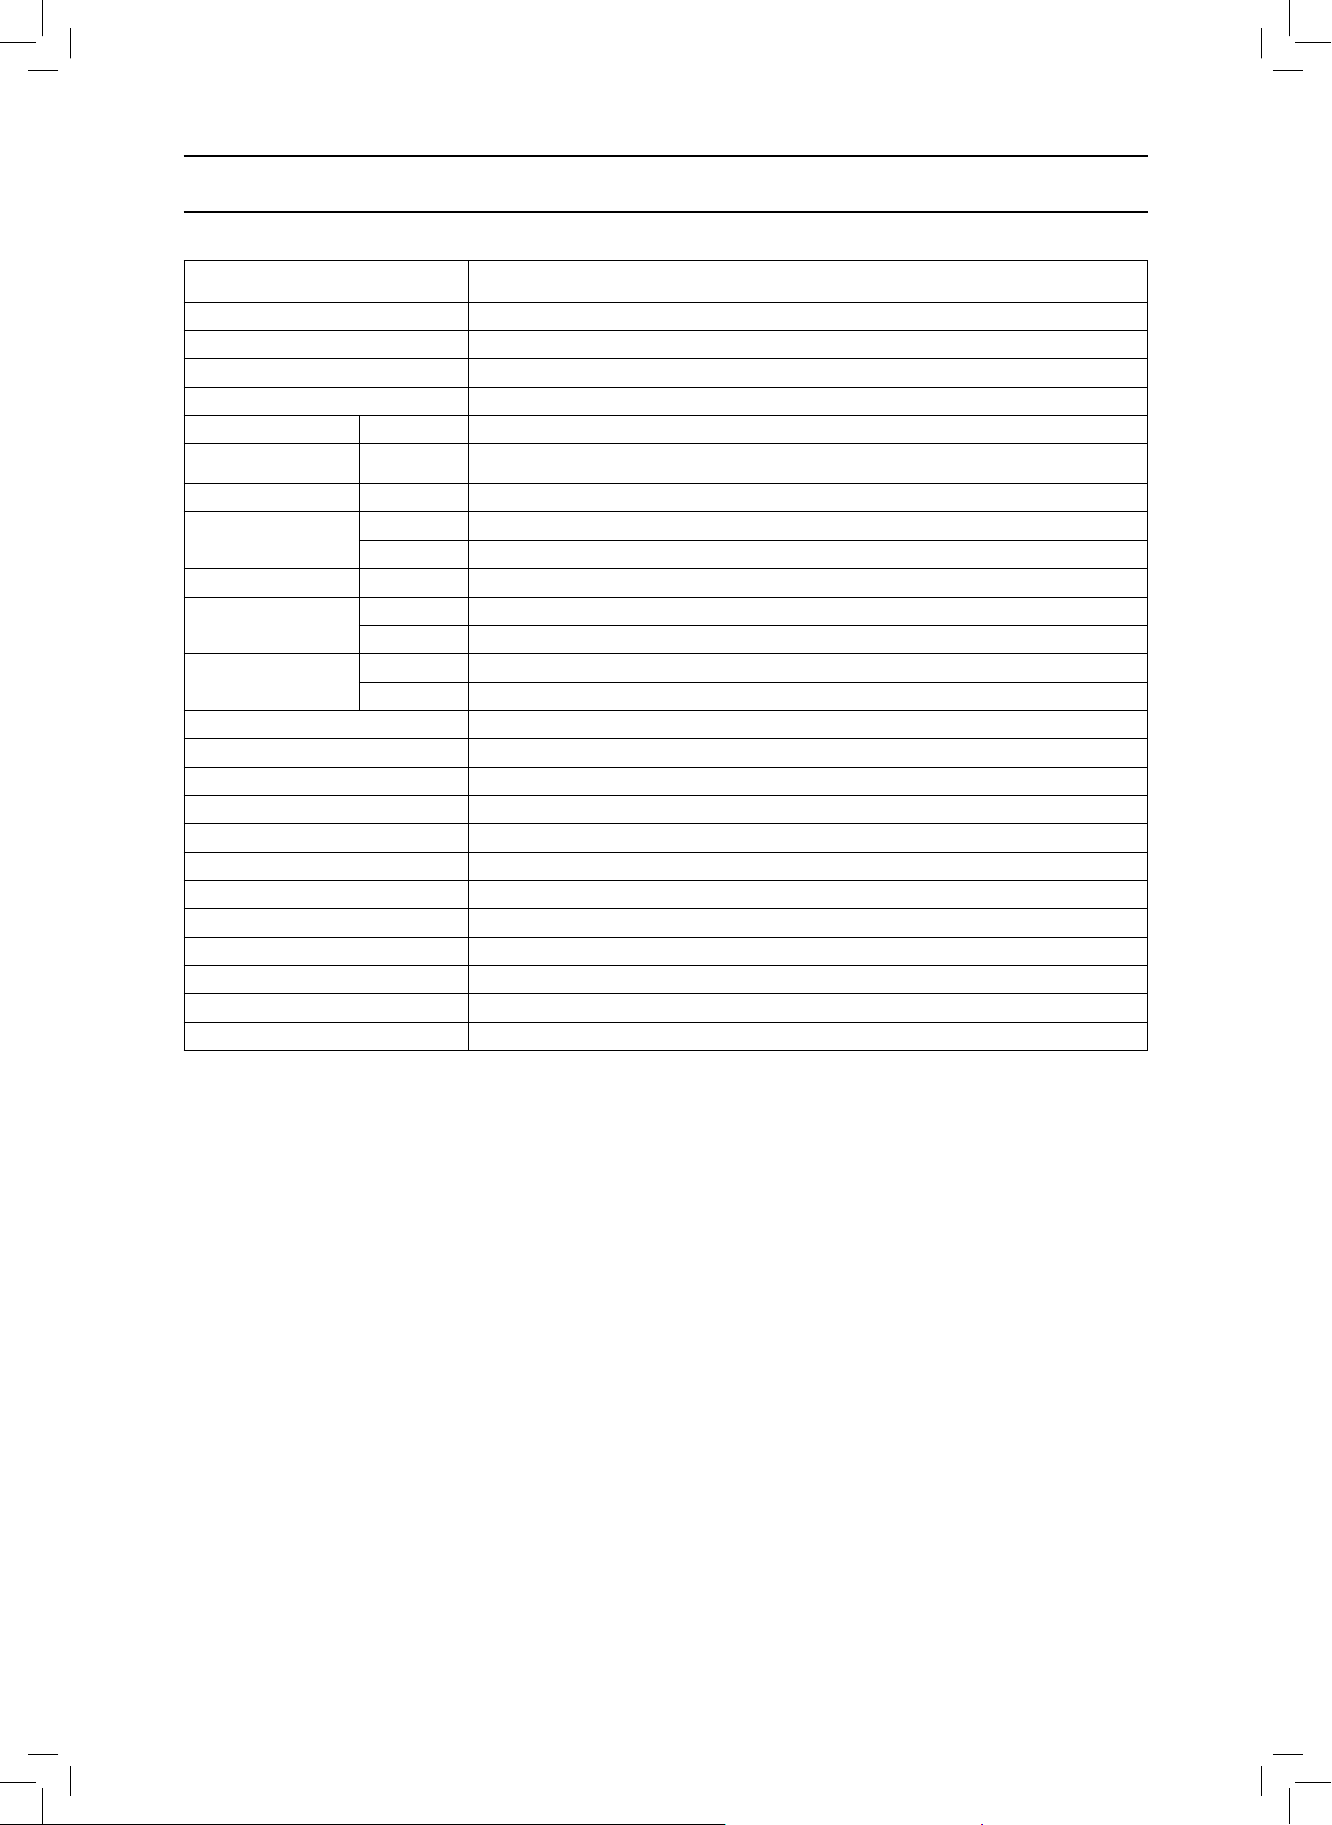
3. SPECIFICATIONS
Model NA-F100A2
Country Thailand
Model Code W9CP
Rate voltage and Frequency 220V / 50Hz
Power Cord Unit C3
Body Colour White
Rate Power Consumption
(Wash / Spin)
Power Consumption 220V/50Hz 120Wh
Standard Capacity Wash 10.0 Kg
Standard Consumption Water 160 Liter
Product Weight Accessories 38 Kg
Outer Dimension (mm.) Body 600 X 652 X 1034
Pulsator with rated load (rpm.) 95 rpm / min
Spin Tub with rated load (rpm.) 700 rpm / min
Water Supply Pressure 0.01 to 1 MPa (0.1 to 10 Kgf / cm
Motor Thermo protector of the single-phase induction motor 135°C
Safety Switch Checking Unbalance
Buzzer Rings when finishing washing or unusual
Detergent Case Dispenser Usable
Fabric Softener Dispenser Usable
Filter Unit Usable
Child Safety Usable
Auto Restart Usable
Auto Power Off Usable
220V/50Hz 400W / 220W
Spin 10.0 Kg
Packing 44 Kg
Package 660 X 720 X 1144
2
) / 1 ~ 18 liter / min.
- 5 -
Service NA-F100A2.indd 5Service NA-F100A2.indd 5 4/26/2559 BE 11:50 AM4/26/2559 BE 11:50 AM
Page 6
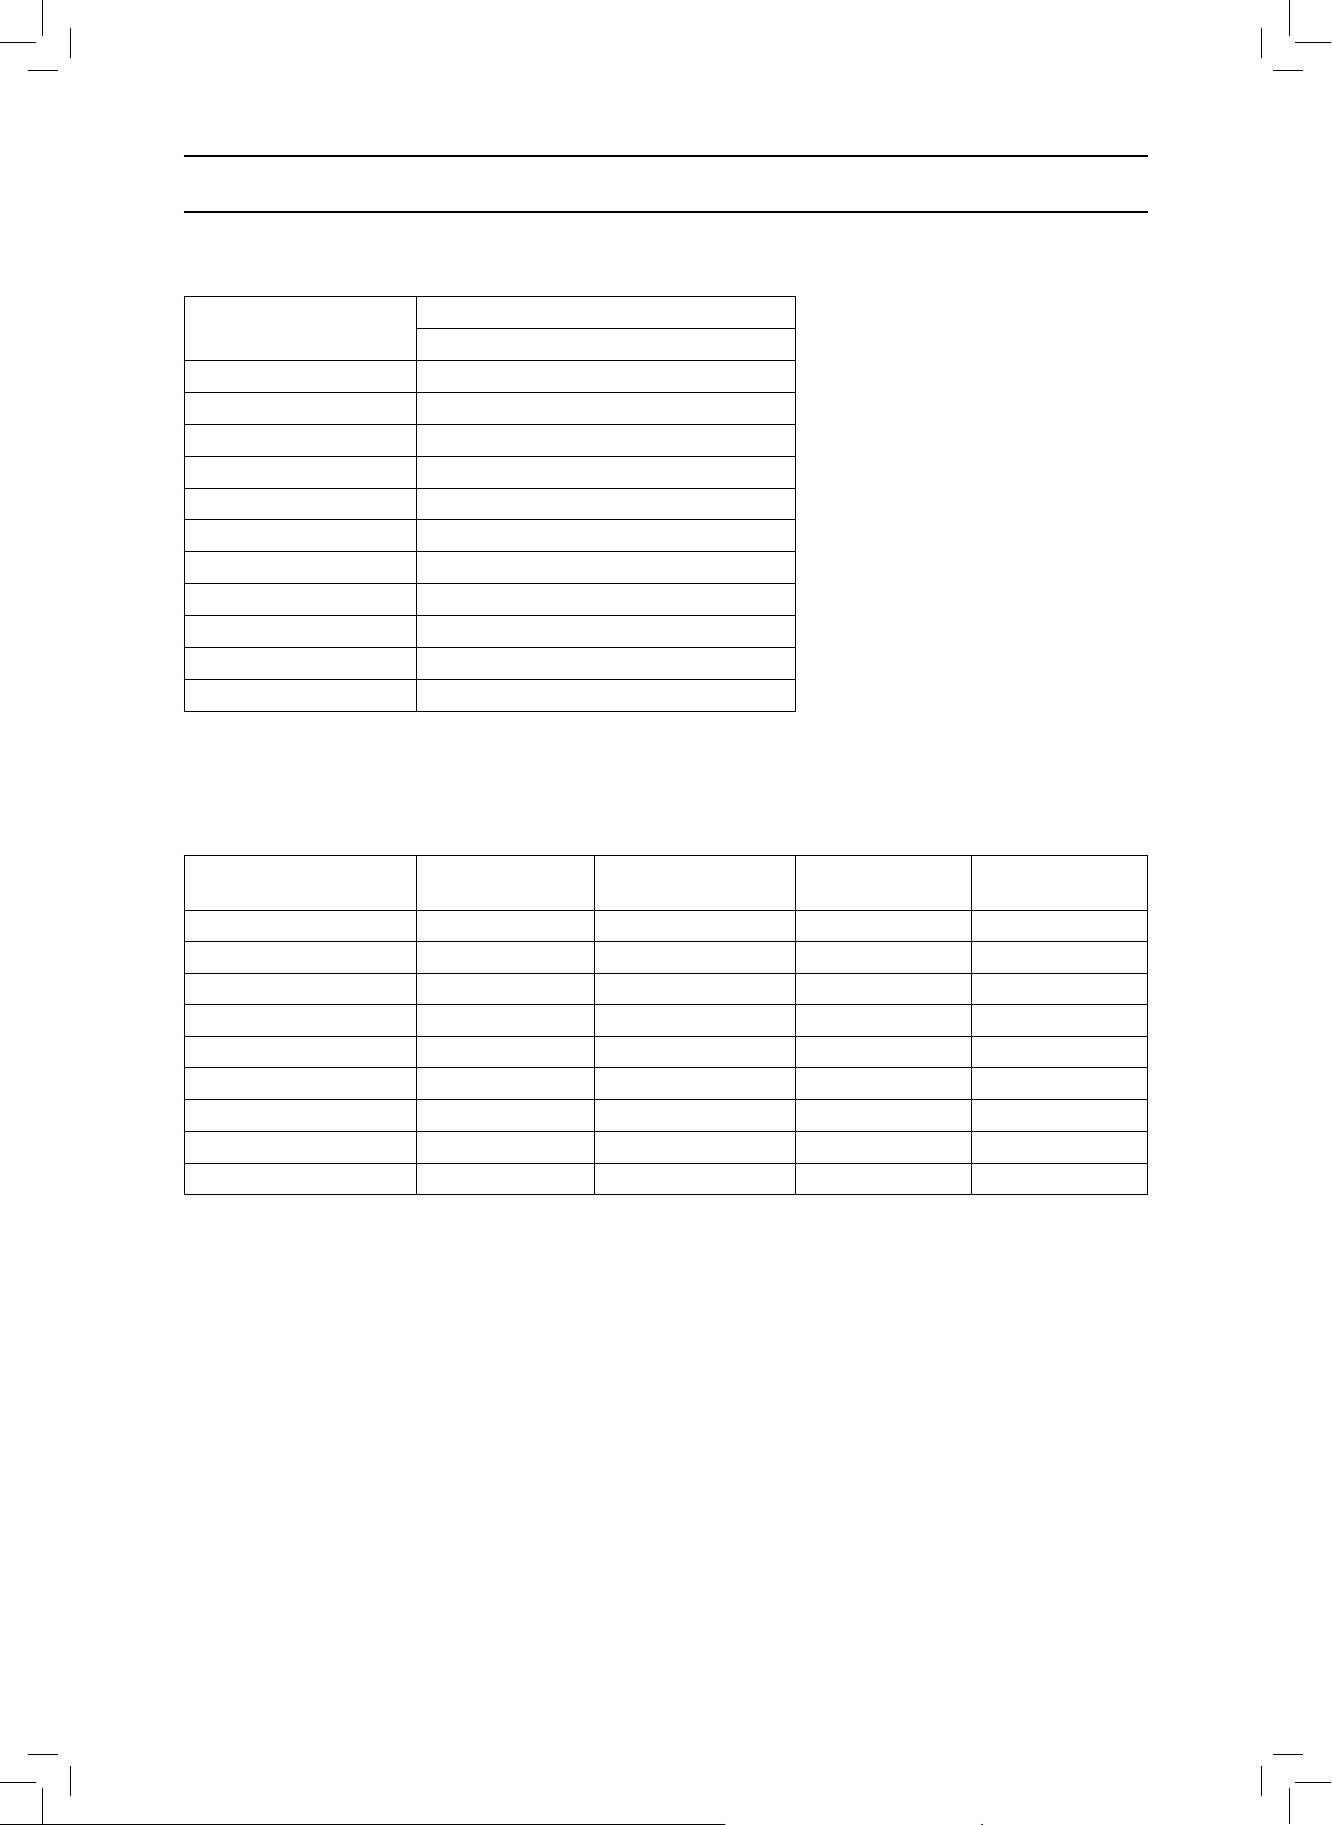
4. TECHNICAL INFORMATION
4.1 Standard Wash Capacity
PROGRAM
POWER WASH + SOAK 10.0 kg
STANDARD WASHING 10.0 kg
STANDARD SPIN 10.0 kg
ENERGY SAVE(SPEEDY)
DELICATE 4.2 kg
BABY-CARE 10.0 kg
FRAGRANCE 10.0 kg
BLANKET 4.2 kg
EXTREME WASH 10.0 kg
AIR DRY 2.0 kg
TUB HYGIENE -
Note : - Normal course and Water Save course are recommended for a normally soiled load at the rated
capacity of this washing machine.
MAXIMUM CAPACITY
NA-F100A2
10.0 kg
4.2 Standard Water Supply
PROGRAM
NORMAL 55 min 12 min Refill twice
ENERGY SAVE(SPEEDY)
DELICATE 40 min 9 min Twice
BABY-CARE 65 min 12 min Refill twice
FRAGRANCE 75 min 12 min Twice
BLANKET 65 min 12 min Refill twice
POWER WASH + SOAK 115 min (Soak 60min)+12 min Refill twice
EXTREME WASH 64 min 12 min Refill twice
TUB HYGIENE 145 min (Soak 60min)+12 min Refill twice 7 min
Note : -Total time is approximate (When the standard water supply rate is 15 L / min).
-Total time may increase depending on low water pressure, bad draining conditions, and the amount
and type of clothes.
TOTAL TIME
(APPROX.)
40 min 9 min Refill twice
WASH RINSE SPIN
5 min
5 min
1 min
7 min
5 min
3 min
5 min
5 min
- 6 -
Service NA-F100A2.indd 6Service NA-F100A2.indd 6 4/26/2559 BE 11:50 AM4/26/2559 BE 11:50 AM
Page 7
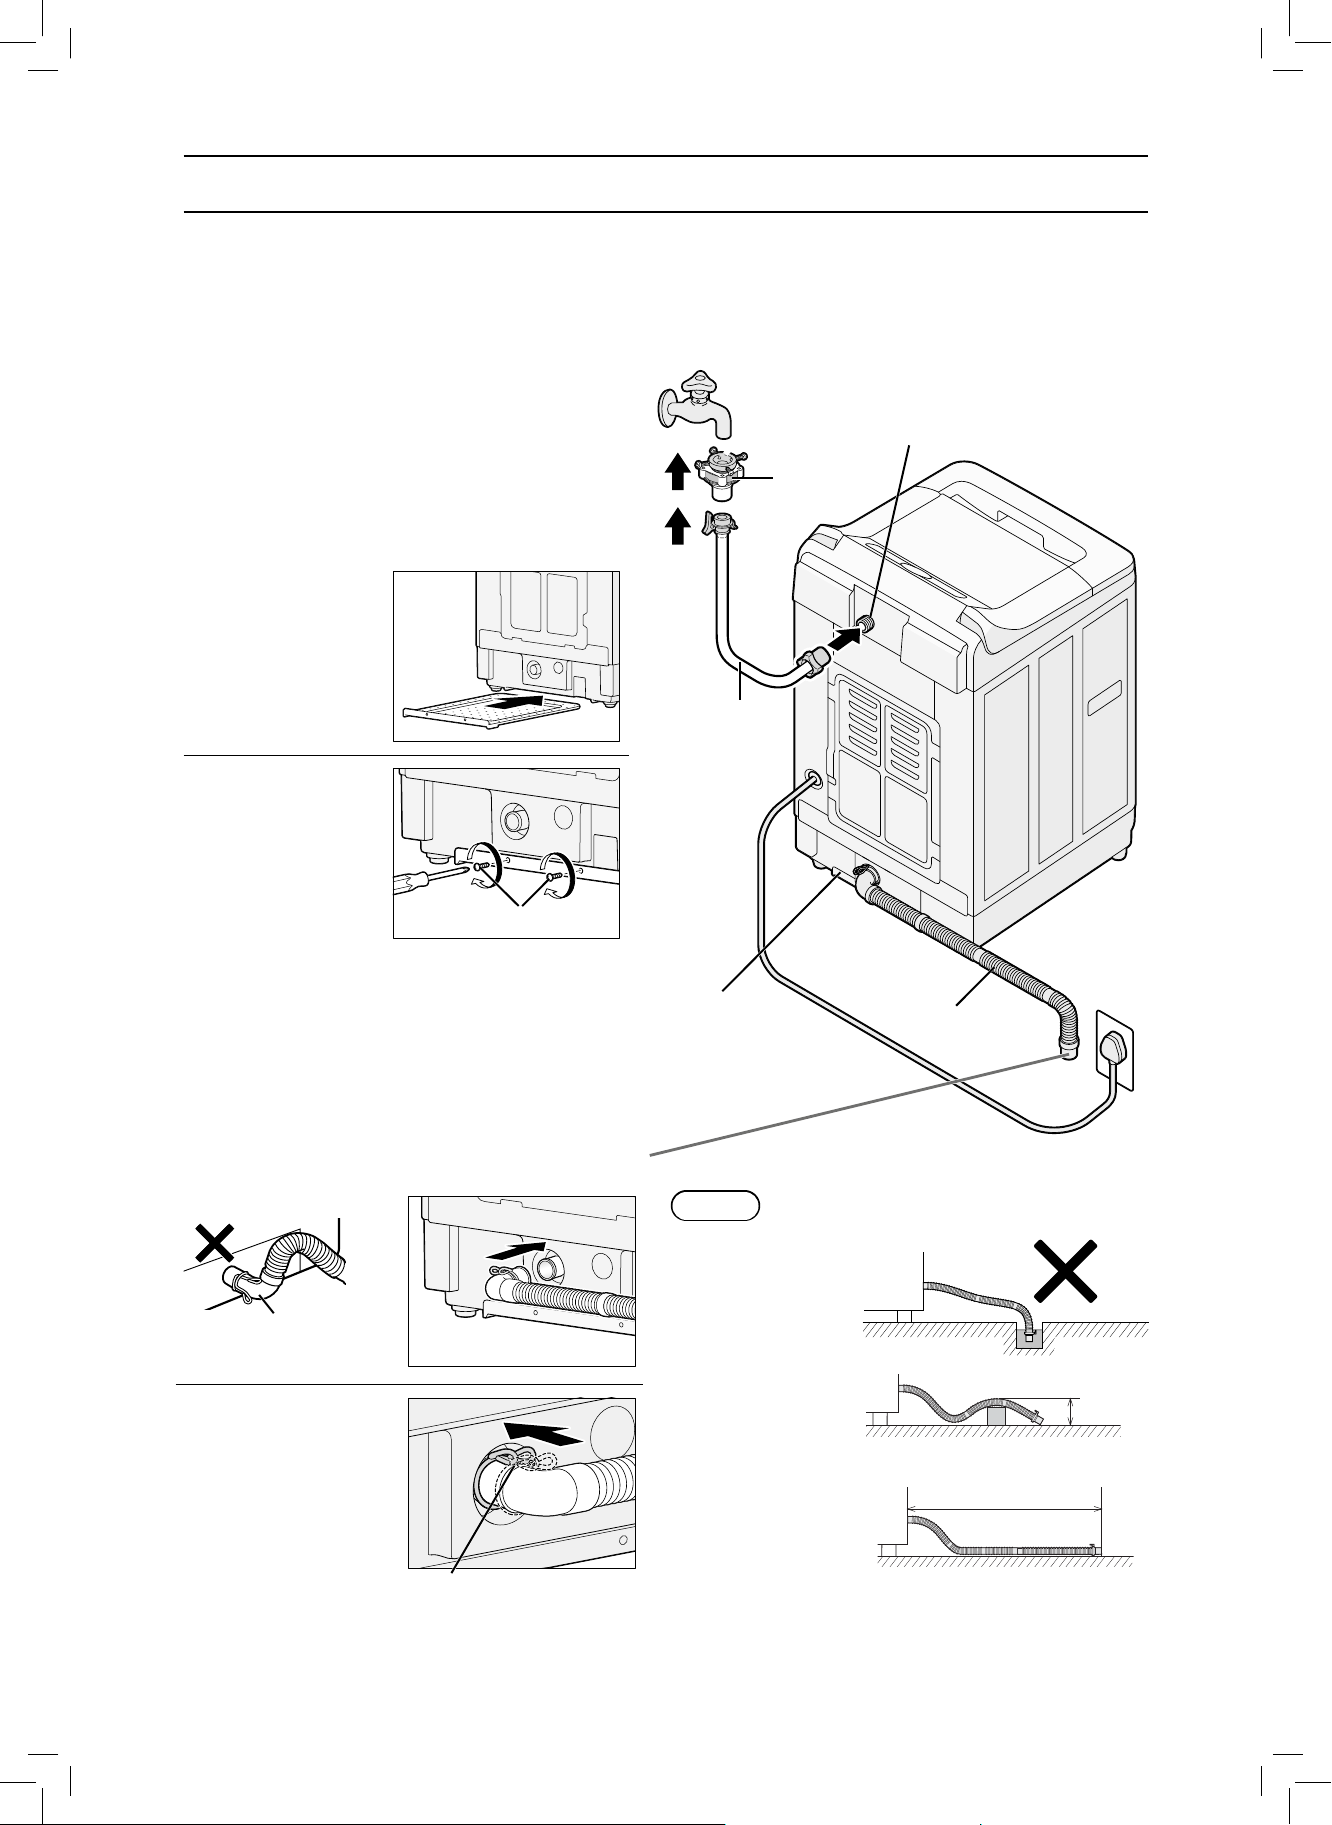
5. INSTALLATION
5.1 Check the location.
■
Avoid the following locations for installation.
Locations with a possibility of freezing
•
Damp locations or locations where it may be
•
exposed to rain, etc.
(To prevent electric shock or fi re)
Locations exposed to direct sunlight
•
(To prevent malfunction or deformation)
Uneven or unstable locations (on blocks,
•
timbers, a table with wheels, etc.)
5.2 Attach the bottom cover.
Insert the bottom
cover along the
guides.
Water supply
valve screw
Water tap
adaptor
Water supply
hose
Fix with 2 screws.
Screw
5.3 Attach the external drain water hose.
Connect.
Elbow
Do not direct the
elbow upward.
Slide the hose band in
the arrow direction.
●Slide all the way until
it stops.
Insert all the way.
Bottom cover
NOTE
●Do not put the
hose tip under
water.
●Do not raise the
hose higher than
10 cm above the
fl oor.
●Do not extend the
overall length to
more than 3 m.
External drain
water hose
10 cm or
less
3 m or less
Hose band
- 7 -
Service NA-F100A2.indd 7Service NA-F100A2.indd 7 4/26/2559 BE 11:50 AM4/26/2559 BE 11:50 AM
Page 8
■
Make sure to ask a service person for installation. Do not install by yourself.
■
If the installation, test run and inspection of the washing machine are not carried out following this
installation method, Panasonic will not be liable for any accident or damage caused.
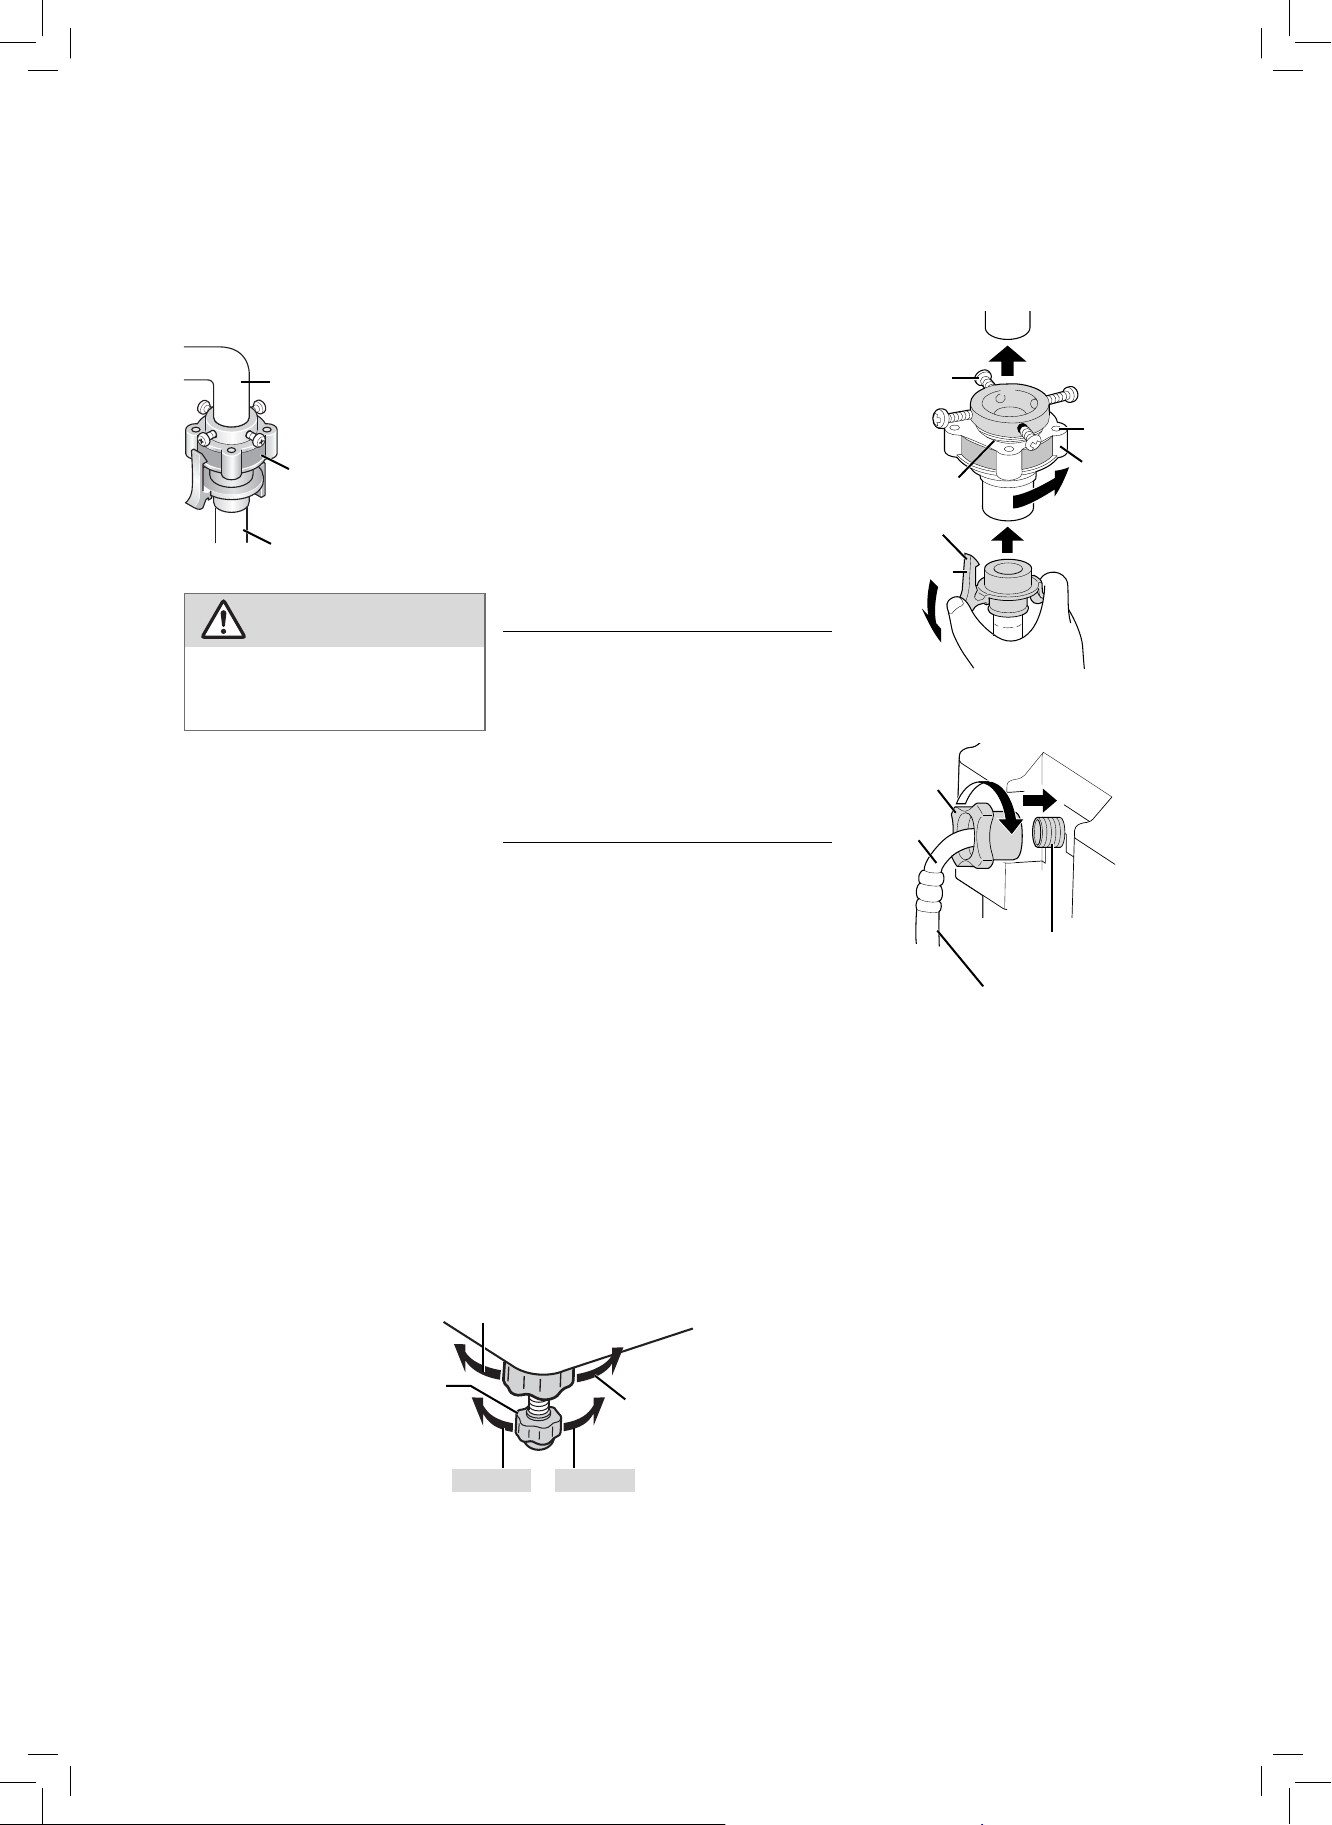
5.4 Connect the water tap adaptor and water supply hose.
Connect the water tap adaptor to
Water faucet
Water tap adaptor
Water supply hose
the water faucet.
Turn part A to the left until approx.
1
4 mm of the thread becomes
visible.
Loosen the 4 screws.
2
Connect to the faucet and tighten
3
the screws.
Turn part A to the right and tighten
4
securely. (To prevent water
leakage)
Screw
Thread
Claw
Lever
CAUTION
●Tighten the nut fi rmly.
●Do not twist, squash, modify
or cut the hose.
Connect the water supply hose to
the water tap adaptor.
Insert the hose into the adaptor while
pushing down the lever, and hook
the claw of the lever on the fl ange of
the adaptor.
Nut
Part A
Flange
Connect the water supply hose to
the water supply valve screw.
Hold the elbow and tighten the nut.
1
Check that the elbow is not loose.
2
5.5 Connect the power plug and grounding wire.
●Ask a service person to do the grounding work.
●In case of a 2-pin power cord, establish a ground.
5.6 Check the washing machine does not wobble.
■
If the washing machine wobbles
Turn the adjustable leg knob to
1
the left to loosen.
Turn the adjustable
2
leg to eliminate
wobble.
Turn to the right to
3
tighten.
Elbow
Water supply
valve screw
Water supply hose
To lowerTo raise
5.7 Perform a trial operation.
●Check that there is no water leakage, abnormal sounds or error display.
- 8 -
Service NA-F100A2.indd 8Service NA-F100A2.indd 8 4/26/2559 BE 11:50 AM4/26/2559 BE 11:50 AM
Page 9
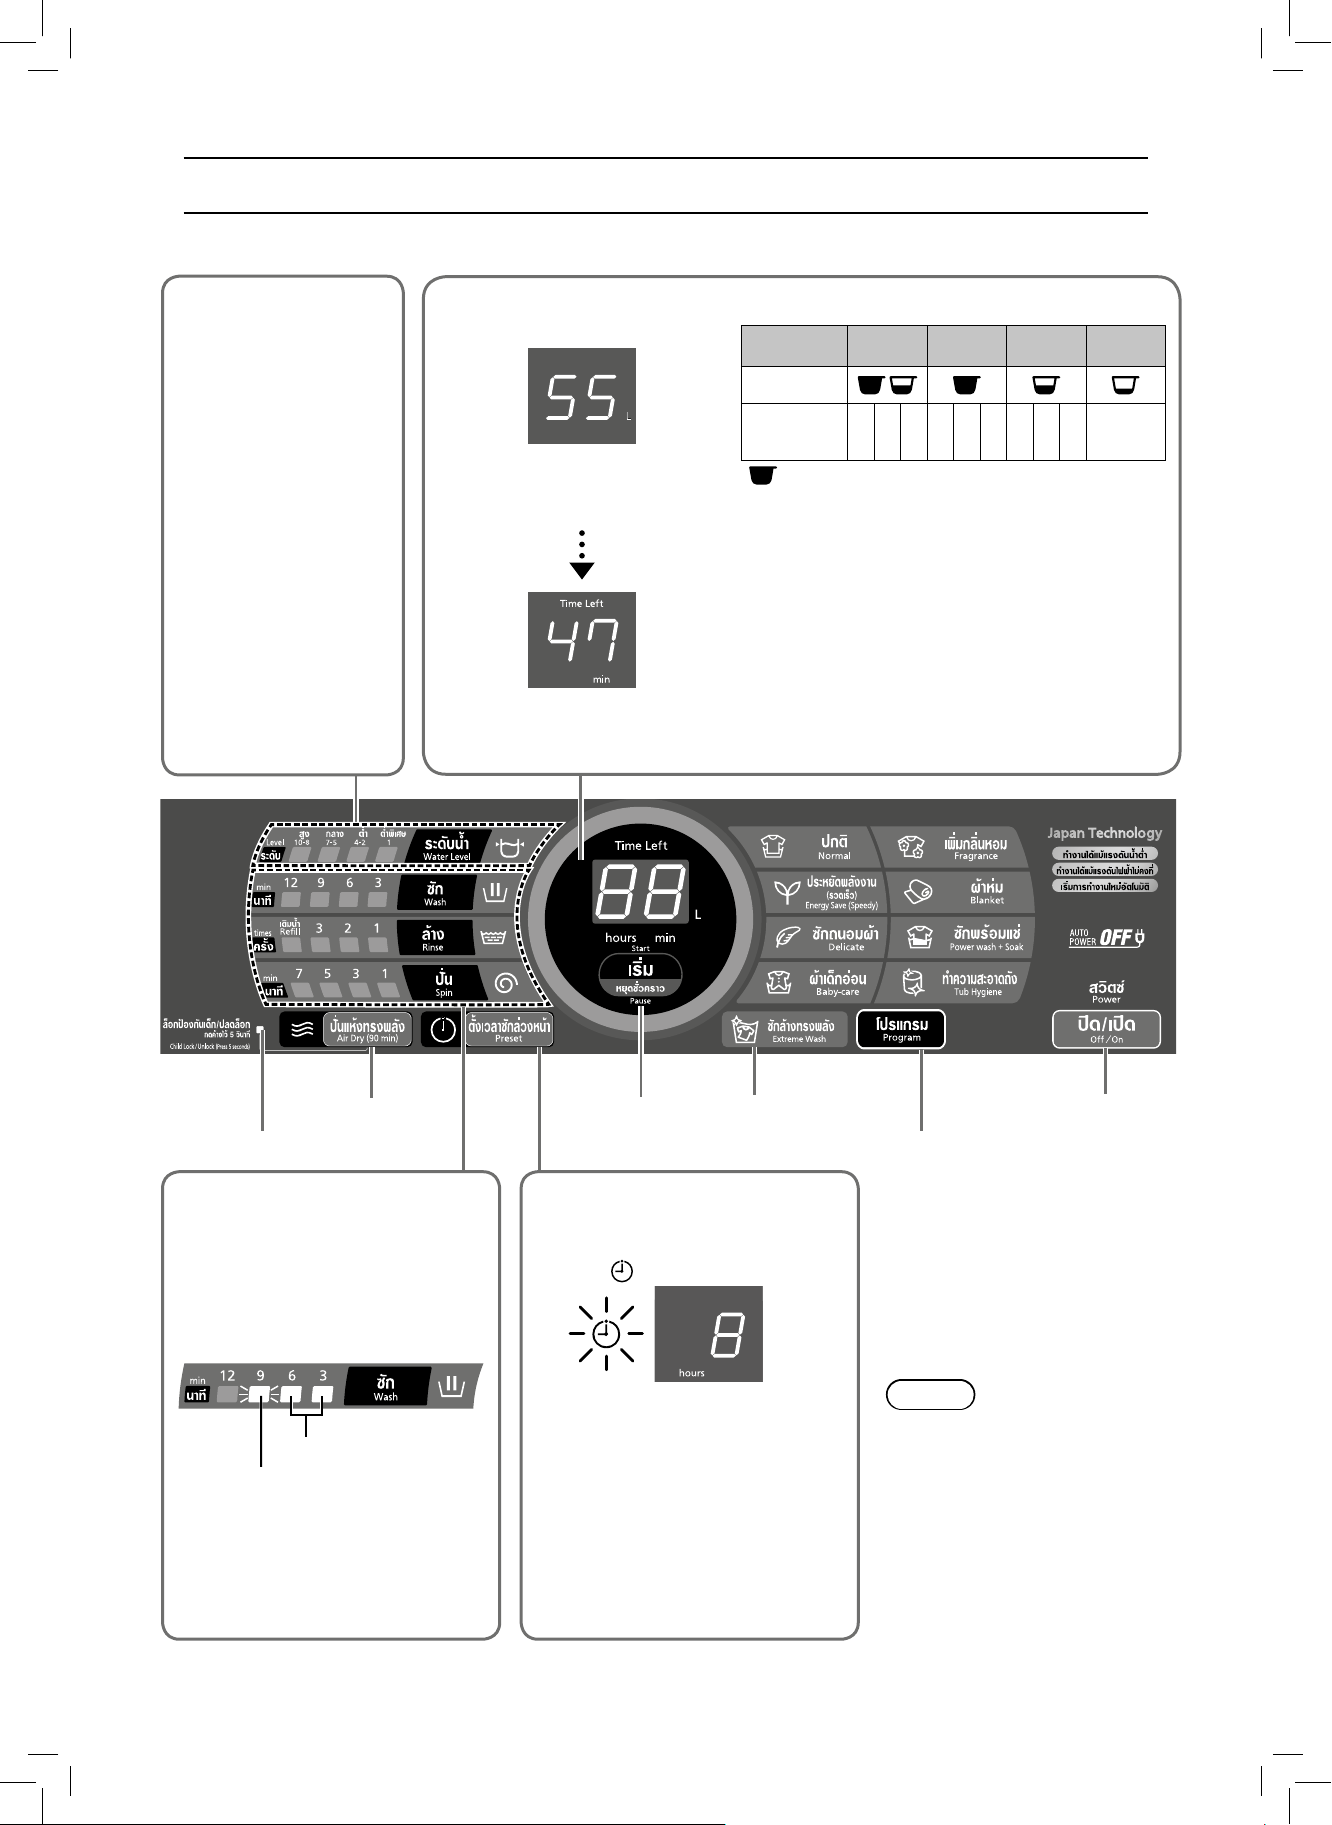
6. OPERATION PANEL
NA-F100A2
Change water
amount
During the wash
process, press “Water
Level” to change the
water amount.
●Some water amounts
cannot be selected
depending on the
program.
●When the remaining
time is displayed,
press “Water Level”
to check the water
amount.
Water amount/
remaining time
After starting operation, indicates
the water amount according to
the amount of laundry.
After approx. 5 seconds, indicates
the approximate remaining time
(min).
Water level/water amounts
Level
Detergent*
Water amount
(L)
* : 1 scoop of detergent
●Each water level, except “Extra Low”, has
three water amount options that can be
switched while the level is lit by pressing
“Water Level”.
High
10-8
72 59 55 51 47 43 38 33 27 14
Mid
7-5
Low
4-2
Extra Low
1
Air Dry (P.12)
Child Lock lamp (P.13)
Change process
settings
Change the combination of wash,
rinse and spin processes, and the
time length or number of times for
individual processes. (P.12)
Lighted
Flashing (in progress)
●After starting operation, you
can change settings only during
wash process by pressing
“Start/Pause”.
Start/Pause
Extreme Wash (P.11)
Preset
Set the time to finish washing (in
hours). (
●Setting range: 2 - 24 hours later,
in one-hour increments. (3 - 24
hours later for the Power wash
+ Soak program)
●Not available for the following
programs:
Delicate, Fragrance, Blanket,
Tub Hygiene, Air Dry
lights.)
e.g.) 8 hours later
- 9 -
Power Off/On
Program selection
NOTE
●In case of a power failure
during operation, operation will
resume from the point where it
was stopped when the power
is recovered (Auto Restart).
●The power turns off
automatically if you do not
press “Start/Pause” within
10 minutes after power-on.
Service NA-F100A2.indd 9Service NA-F100A2.indd 9 4/26/2559 BE 11:50 AM4/26/2559 BE 11:50 AM
Page 10

7. WASHING
Preparation:
●Check if the washing machine is properly installed.
●Turn on the water faucet.
1
2
3
4
Timer preset
3
After loading laundry
Turn the power on.
●The Normal program is selected when the
power is turned on.
Select a program.
Press the button repeatedly until
the desired program lights up.
■
Timer preset
Start.
The pulsator moves without
water and measures the amount
of laundry (approx. 5 seconds).
Water amount indication
(approx. 5 seconds)
Remaining time indication
●To check the water amount
Press “Water Level”.
→
After pressing "Start"
■
You can change the water level until the
●
end of the wash process.
You can change each of the "Wash",
●
"Rinse" and "Spin" operation contents until
the end of the wash process. Press "Pause"
beforehand.
You cannot change the program.
●
According to the water amount indication
Put in detergent.
●Approx. 20 seconds after the water amount
is displayed, water supply begins.
2
Set how many hours later to fi nish
operation. (P. 9)
●2 minutes after start-up, all indications except
turn off.
●To confi rm after the timer has been set, press
.
●To cancel or change, press .
●The hours that can be set differ depending on
the program.
1
Fragrance
Use this program to add a particularly large
amount of fabric softener for nice scent and
softness.
When the Fragrance program is
selected
●The buzzer sounds before the final rinse and
operation is paused.
●Put the desired amount of fabric softener which
has been diluted with water directly into the tub.
●Operation will resume if the lid is left closed for
more than 1 hour.
●The Fragrance program cannot be selected when
Child Lock (P. 13) is set.
¥p¥~
}pììm®p
®Ô¡Ó
Close the lid.
5
Operation ends with beeps.
Service NA-F100A2.indd 10Service NA-F100A2.indd 10 4/26/2559 BE 11:50 AM4/26/2559 BE 11:50 AM
- 10 -
Page 11

8. WASHING OPTIONS
Air Dry Select “Delicate”/“Blanket”/“Extreme Wash”
Delicate
Use this program to gently wash delicate
clothes and stylish garments.
Load laundry evenly.
●Load items that easily fl oat fi rst,
and press them from above.
●Use laundry nets for delicate
underwear only.
●Amount that can be washed at
one time:
Water Level Capacity
55 L 4.2 k
51 L 3.0 k
47 L 1.0 k
g
g
g
NOTE
●Do not use bleach.
●Use liquid delicate detergent.
●After operation ends, take out clothes immediately.
(To prevent wrinkles and colour staining)
Blanket
■
Washable blankets
Material: 100% synthetic fi bre or 100% cotton
•
Weight: 4.2 kg or less
•
Blankets with a machine-washable tag
•
attached
●Put a blanket in the net and load it in the tub.
Roll
●The zipper part
should face up.
(To prevent
damage to the
net)
Extreme Wash
Use this program to clean clothes thoroughly by
plenty of water in wash and rinse process.
■
Recommended type of clothes
Heavy dirt clothes
•
Thick clothes e.g. Jeans
•
Dark colour
•
Towel
•
Duvet
•
Ring Shower
Good to know
The amount of water in the wash will be used
•
more than normal program 2-3 levels.
The water flow from ring shower lets water
•
penetrate into fabric texture and the clothes stay
under water, resulting in higher dirt removing
effi ciency.
Rinsing twice with the maximum water level is
•
added to thoroughly clean clothes.
For higher rinsing effi ciency
NOTE
●Use liquid detergent.
●The water amount indication shows the maximum
and cannot be changed.
Service NA-F100A2.indd 11Service NA-F100A2.indd 11 4/26/2559 BE 11:50 AM4/26/2559 BE 11:50 AM
- 11 -
Page 12

WASHING OPTIONS
Air Dry
Water is removed from clothes by the air blown
from the tub rotation.
■
Clothes that can be dried
Material: Synthetic fi bre
•
Weight: 2.0 kg or less
•
After loading clothes and closing the lid
Turn the power on.
1
Press.
2
Start.
3
After 90 minutes, drying
ends with beeps.
NOTE
●Clothes may not be suffi ciently dried depending on
the amount and type of clothes, the temperature,
and the installation condition of the washing
machine.
●Since no heater is used for this function, you may
feel that clothes are cold and half dry.
Wash / Rinse / Spin
Preparation: Turn on the water faucet.
After loading laundry
Turn the power on.
1
According to your purpose
Change process
2
After closing the lid
settings.
●Change the water amount
as necessary.
Start.
3
Operation ends with
beeps.
Contents of Programs
Program
Normal 55 min 12 min Refi ll twice 5 min
Energy Save (Speedy) 50 min 9 min Refi ll twice 5 min
Delicate 40 min 9 min Twice 1 min
Baby-care 65 min 12 min Refi ll twice 7 min
Extreme Wash 65 min 12 min Twice 5 min
Fragrance 75 min 12 min Twice 5 min
Blanket 65 min 12 min Refi ll twice 3 min
Power wash + Soak 115 min
Tub Hygiene
NOTE
●
Total time is approximate.
(When the standard water supply rate is
15 L / min)
●Total time may increase depending on low water
pressure, bad draining conditions, and the amount
and type of clothes.
Total time
(approx.)
145 min
Wash Rinse
2)
2)
(Soak 60 min) +
(Soak 60 min) +
1) Refi ll:
It fills the tub with water, and rinses
laundry while supplying water.
2) Remaining time of 90 minutes or less
will be displayed.
3) Although the time indication is “12 min”, soaking is
done before that.
- 12 -
12 min
12 min
3)
Refi ll twice 5 min
3)
Refi ll twice 7 min
1)
Spin
Service NA-F100A2.indd 12Service NA-F100A2.indd 12 4/26/2559 BE 11:50 AM4/26/2559 BE 11:50 AM
Page 13

9. MAINTENANCE
Cancelling end buzzer
Pressing down,
press.
Then hold on for
3 seconds.
●To reset, do the same procedure.
2 short
beeps
4 short
beeps
Setting Child Lock
To prevent children from falling into the tub and
drowning, if the lid is opened while the washing
machine is operating, this function sounds a buzzer
until it is closed. Not closing it within 10 seconds
fl ushes the water out.
●This function does not lock the lid and button
operations.
●When water is drained forcibly, “U 99” is displayed.
(P.17)
After closing the lid
Turn the power on.
Lint fi lter
After each operation
Lint fi lter
Remove the
fi lter.
Open the fi lter
and remove
lint.
●If lint is diffi cult to
remove, soak and
wash the fi lter in
water.
Press and hold for
5 seconds.
●To cancel, do the same procedure.
2 short
beeps
4 short
beeps
Turning the tub by hand
If it is diffi cult to reach the detergent or softener inlet.
Turn the power on.
When a clicking sound is heard
Turn the tub.
(Clockwise only)
NOTE
●If there is water in the tub or “Start” is pressed, the
tub cannot be turned.
Attach the fi lter in its original
position.
1 2
3 4
NOTE
●Do not wash laundry without the fi lter.
(To prevent damage to clothes)
●Turn the tub by hand if it is diffi cult to remove the
fi lter.
●If the fi lter is broken, purchase a new one at your
local dealer.
Click
- 13 -
Service NA-F100A2.indd 13Service NA-F100A2.indd 13 4/26/2559 BE 11:50 AM4/26/2559 BE 11:50 AM
Page 14

10. TEST MODE
Fig-1
Fig-2
-Set the power switch to "off" as Fig-1.
-Press and hold both the "Water level" and "Wash" buttons with one hand.
-Press the power swith to "on".
-Release your fingers from the buttons and power switch which you pressed same as Fig-2.
-Within three seconds press the "Water level" button to set the desire check procedure.
(Check Contents as press button step by step : A,B,C,E M,G and H)
Number of timers
The “Water Level”
button is pressed
0A
1B
2C
Check
Procedure
Check
Contents
●Cycle end buzzer ●When the end buzzer sound
●Timer indicator
●Auto power off
●Washing operation
●Spinning operation
●Lid / SF switch
Lamp illumination
condition
Operation condition
three times, the lamps will fl ash
on and off the remaining time
display and the power will be
switched off immediately after
operation is fi nished.
●If there is no water in the
tub, the operation still wash.
●If the PCB fault occurred,
an error indication “H05” will
display.
●The spinning operation,
Check lid & SF switch
operation.
●“Light up” lid switch working.
●Adjust the water
amount against
amount detection
3E
●Press the “Wash” button to
adjust L0 (initial mode)
L1 (1-rank higher water level).
●Press “Start/Pause” button
to confi rm.
- 14 -
Service NA-F100A2.indd 14Service NA-F100A2.indd 14 4/26/2559 BE 11:50 AM4/26/2559 BE 11:50 AM
Page 15

Set to initial mode
for tension of belt
4M
In case to change PCB or
move V-belt. Set the V-belt
tension to initial mode for using
below procedure.
The initial display will be
indicated “b0”, after that press
“Start/Pause” button once, it
shall be listened click sound six
times to set properly.
Indicate the error
message of the last
time
5G
Indicate the
operation times
6H
“Digit lights” shall be indicate
“E” initially, press “Wash” button
to show the last error and press
the wash button again to return
to initial mode.
If any error message occurred
in the past, “H” or “U” some
number shall be indicated
alternately.
If no error message occurred,
the light indicates “00”.
“Digit lights” shall be indicate
“C” initially, press “Wash”
button to change indication
Digit of operation times.
Press once : Digit “Thousand.
Hundred”.
Press twice : Digit “Ten.One”.
- 15 -
Service NA-F100A2.indd 15Service NA-F100A2.indd 15 4/26/2559 BE 11:50 AM4/26/2559 BE 11:50 AM
Page 16

11. TROUBLESHOOTING
Symptoms Points to be checked
Time indication increases or
does not decrease
Time
Operation time is longer than
the time indication.
Operation does not stop even
after the preset time.
Main unit
No operation
Cannot change process settings
(after start-up).
No water supply
Water is supplied in the middle
of wash process.
Wash
●Time indication is approximate. Remaining time is corrected
during operation and displayed.
●The operation time may be longer if laundry is concentrated
on one side or the water supply or drainage is not good.
(Error Display "U11", "U14")
●Power failure?
●Is the lid closed completely?
●Has the power fuse blown or the breaker tripped?
●Is the power plug inserted completely?
●Is the water faucet turned on?
●Did you press “Start”?
●Is the timer preset?
●Process settings can be changed during wash process by
pressing “Pause”. To change the program or settings after the
end of wash process, turn the power off and on again.
●Is the water faucet turned on?
●Water outage?
●Is the water supply fi lter clogged with dirt?
●If the water level drops, water is added automatically.
●With a large amount of laundry, water is added several times
automatically.
The water level is too high for
the amount of laundry.
The water level is too low for the
amount of laundry.
Operation started with rinse, but
water is not supplied.
Rinse/Spin
Operation suddenly changes to
rinse process in the middle of
spin.
Only spin is desired, but
operation starts with rinse.
Irregular rotation during spin
Power failure/
The breaker has tripped.
Others
Water outage
Cannot select the Fragrance
program.
●If laundry is wet or there is water in the tub before operation,
the water level may be higher.
●With light clothes (of synthetic fi bre, etc.), the water level may
be lower.
●If there is no water in the tub, water is supplied after spin.
●If there is water in the tub, water is supplied after water
discharge.
●If clothes are concentrated on one side of the tub, the
washing machine automatically corrects unevenness by
starting rinse process.
(Place clothes as evenly as possible.)
●The tub rotation speed is adjusted to reduce foaming during
spin.
●Operation will resume from the point where it was stopped
when the power is recovered (Auto Restart).
●When water supply is recovered, remove the water supply
hose, release turbid water from the faucet, and then start the
washing machine.
●If Child Lock is set, the Fragrance program cannot be
selected.
- 16 -
Service NA-F100A2.indd 16Service NA-F100A2.indd 16 4/26/2559 BE 11:50 AM4/26/2559 BE 11:50 AM
Page 17

12. TABLE OF ERRORS
12.1 U-Error indication
● If there is an operation error or if there is a problem with the washing machine, such as faulty draining,
spining etc; operation will stop, the warning buzzer will sound, and an error indication will be displayed.
- All the switchs cannot be operated.
- An error indication will be displayed.
Indication Content Check Point Method to clear
U11
U12
U13
U14
U99
Water can not drain Check at drain water hose, clogged or not?
Check at hose tip under water flow.
Check at drain hose raised higher than 10 cm.
above the floor.
Check total length longer than 3 m.
(including the extension hose).
The lid is open Did you try to run the washing machine with
the lid open?
Spin or Air Dry is
not possible
Water can not be
supplied
Water has been
forcibly drained
Are clothes concentrated on one side of tub?
Is the washing machine installed on an
unstable or inclined surface?
Is the water faucet turned on?
Water outage?
Is the water supply filter clogged with dirt?
Water has been forcibly drained because the
lid was open for 10 seconds or more with Child
lock set.
Resume operation by
opening and closing
the lid
Clear and clean drain
hose
Close the lid
Distribute the clothes
evenly and close the lid
Resume operation by
opening and closing
the lid
Resume operation by
opening and closing
the lid
Disconnect the power
plug--->plug in (after 5
sec.)
- 17 -
Service NA-F100A2.indd 17Service NA-F100A2.indd 17 4/26/2559 BE 11:50 AM4/26/2559 BE 11:50 AM
Page 18

12.2 H-Error indication
● If there is an operation error or if there is a problem with the washing machine,
- All the switchs cannot be operated.
- An error indication will be displayed.
Indication
H01
H02
H04
H05
H12
H17
H21
Content Check Point Method to clear
Water level sensor
error
Motor triac error
Load relay short
error
The memory circuit
of IC error
Safety switch
connection error
Thermistor error
(for X series)
Overflow error
Check at condition of the connector
Replace the Pressure sensor switch
Replace PCB board
In water drain action check both side of
capacitor that voltage not equal to “0” V.
Replace PCB board
After turn on the Motor for 2 seconds,
capacitor voltage is not “0”
Replace PCB board
Replace Safety switch
Replace PCB board
Check Feed valve and PCB
Replace Feed valve
Disconnect the power
plug--->plug in
Disconnect the power
plug--->plug in
Change Capacitor
Disconnect the power
plug--->plug in
Disconnect the power
plug--->plug in
Disconnect the power
plug--->plug in
Disconnect the power
plug--->plug in
- 18 -
Service NA-F100A2.indd 18Service NA-F100A2.indd 18 4/26/2559 BE 11:50 AM4/26/2559 BE 11:50 AM
Page 19

13. WIRING DIAGRAM
NA-F100A2
FEED
VALVE1
YELLOW
WIRING DIAGRAM
ELECTRONIC CONTROLLER
RED
GRAY
BLUE
PURPLE
WHITE
YELLOW
BLACK
YELLOW WHITE
RED YELLOW
BROWN WHITE
GRAY BLACK
BLUE
LIGHT BLUE
ORANGE WHITE
BLUE
YELLOW
YELLOW
GEARED MOTOR
RED
CAPACITOR
BLUE
YELLOW
RED
BLUE
MOTOR
DIFFERENT COLOR CONNECTION CAUTION
MR.SENSOR
BROWN
GREEN/YELLOW
BLUE
SAFETY SW.
PRESSURE SENSOR
- 19 -
Service NA-F100A2.indd 19Service NA-F100A2.indd 19 4/26/2559 BE 11:50 AM4/26/2559 BE 11:50 AM
Page 20

14. DISASSEMBLY
14.1 Controller Unit
Fig.1 Fig.2 Fig.3 Fig.4
- Use Screwdriver (+) take off screws at Panel A as Fig.1
- Pull off Insulatiron Spacer A loose from lock of Controller Unit as Fig.2
- Use Screwdriver (+) take off screws at Controller Unit with Panel Face B as Fig.3
- Change new part of Controller Unit as Fig.4
14.2 Panel Face B
Fig.5 Fig.6 Fig.7
- Use Screwdriver (-) push lock loose from Panel Face C as Fig.5
- Use Screwdriver (-) push insert between Panel Face B and Panel Face C as Fig.6
- Take off all parts of Panel Face B for change new part as Fig.7
- 20 -
Service NA-F100A2.indd 20Service NA-F100A2.indd 20 4/26/2559 BE 11:50 AM4/26/2559 BE 11:50 AM
Page 21

15.
PARTS EXPLODED VIEW AND REPLACEMENT PARTS LIST
15.1 Parts Exploded View : Part A
A19
A20
A2
A3
A5
A4
A10
A8
A9
A7
A6
A13
A14
A10
A15
A21
A1
A11
- 21 -
A18
A17
A16
A12
Service NA-F100A2.indd 21Service NA-F100A2.indd 21 4/26/2559 BE 11:50 AM4/26/2559 BE 11:50 AM
Page 22

15.2 Replacement Parts List
Parts List - Part A
Ref.
No. TH
A1 BODY B AXW01029CP00 1
A2 PANEL FACE B AXW01469CP00 1 ENGLISH/THAI
A3 PANEL FACE D AXW01488XT00 1
A4 PANEL FACE E AXW01498XT00 1
A5 PANEL FACE C AXW01479CP00 1
A6 CONTROLLER UNIT AXW024C9CP06 S 1
A7 INSULATION SPACER A AXW04868XT00 1
A8 PANEL A AXW01309CP00 1 WHITE
A9 LOCATING INSTRUCTION D AXW99628XT00 1 THAI
A10 LID HINGE SPRING AXW11168XT00 1 RIGHT SIDE
A11 ANTIFREEZE INSTRUCTION B AXW99599CP00 1
A12 PANEL A BACK COVER AXW01389CP00 1
A13 PRESSURE SENSOR UNIT AXW024T04200 S 1
A14 SUB DRAIN HOSE UNIT AXW002Q9CP00 1
A15 SAFETY SWITCH A AXW166125000 S 1
A16 FEEDING VALVE AXW292126616 S 1
A17 SOAP CASE PACKING AXW21647EC00 1
A18 CONNECTOR LEAD WIRE UNIT AXW014A9CP00 S 1
A19 LID UNIT AXW001G9CP00 S 1 WHITE
A20 LID HINGE SHAFT AXW01937JS00 2
A21 SENSOR UNIT AXW024N09400 S 1
Part Name Part No. Safety
AXW01469ME00 ENGLISH/WATER SAVE
AXW01469CP10 ENGLISH/ENERGY SAVE
AXW024C9ME06 S
AXW99628XV00 ENGLISH
AXW99629CP00 INDONESIAN
AXW11168XT50 1 LEFT SIDE
F100A2
Remark
Screws
Ref.
No. TH
SPECIAL TAPPING SCREW XTWAXW469J 4
BINDING TAPPING SCREW XTB4+12CFJ 4
Part Name Part No. Safety
XTB4+15CFJ 6
XTB4+15CFJ 2
XTB4+15CFJ 4
XTB4+15CFJ 6
XTB4+15CFJ 2
F100A2
Remark
BODY B~BODY AU
LID UNIT
CONTROLLER HOLDER~PANEL A
PANEL A BACK COVER~SAFETY SW.
PANEL A~BODY B
PANEL A BACK COVER~BODY B
PANEL A BACK COVER~FEEDING VALVE
- 22 -
Service NA-F100A2.indd 22Service NA-F100A2.indd 22 4/26/2559 BE 11:50 AM4/26/2559 BE 11:50 AM
Page 23

15.3 Parts Exploded View : Part B
B2
B20
B1
B16
B18
B21
B16
B17
B14
B15
B9
B2
B19
B10
B11
B12
B4
B3
Accessories
B13
B4
B4
B6
B12
B7
B8
- 23 -
Service NA-F100A2.indd 23Service NA-F100A2.indd 23 4/26/2559 BE 11:50 AM4/26/2559 BE 11:50 AM
Page 24

15.4 Replacement Parts List
Parts List - Part B
Ref.
No. TH
B1 BODY A UNIT AXW001A9CP00 1
B2 GRIP AXW01106UP0W 2
B3 BASE A AXW03019CP00 1 BLACK
B4 LEG COVERING AXW03397JS00 3 BLACK
B6 ADJUSTABLE LEG UNIT AXW003D7EC00 1
B7 SERVICE PRESSURE HOSE UNIT AXW012D8AR00 1
B8 BOTTOM COVER AXW21586ZR00 1
B9 BACK PANEL AXW01566ZV10 1
B10 POWER CORD UNIT -S3 AXW004A772D4 S
POWER CORD UNIT -C3 AXW004A72974 S 1
POWER CORD UNIT -A2 AXW004A83440 S
POWER CORD UNIT -C2-E AXW004A73719 S
B11 CHEMICAL COVER AXW04487EC10 1
B12 HOSE B UNIT AXW002E8XT00 1
B13 HOSE BAND AXW02458AR00 1
B14 CAPACITOR AXW04037P967 S 1 12.5μF, COIL0.5
B15 NAME PLATE AXW01539CP00 S 1 THAI
B16 BODY A PROTECTION AXW90468AR30 2 t20x50x50/FRONT SIDE
B17 BODY A PROTECTION AXW90468AR10 1 t30x50x50/REAR SIDE
B18 BODY A PROTECTION AXW90467JP50 1 t1x70x240/LEFT SIDE
B19 BODY A PROTECTION AXW90466AA6M 1 t1x70x120/RIGHT SIDE
B20 SPINNER LID LABEL AXW11178XT1W 1 THAI
B21 EARTH WIRE UNIT AXW030C8XT00 S EXTERNAL EARTH
Part Name Part No. Safety
AXW001A9CP50 FOR EXTERNAL EARTH
AXW01539CP10 S ENGLISH
AXW01539CP20 S ENGLISH
AXW01539CP30 S ENGLISH
AXW01539CP40 S ENGLISH
AXW11178XV0W ENGLISH
AXW11179CP0W INDONESIAN
F100A2
Remark
Screws
Ref.
No. TH
SPECIAL TAPPING SCREW XTTAXW444J 10 BASE A
PAN HEAD TAPPING SCREW XTN4+8HFJ 1 EARTH U~BODY A
Part Name Part No. Safety
XTTAXW444J 4 BACK PANEL
XTTAXW444J 2 BOTTOM COVER
XSN4+W10FJ 1 CAPACITOR
F100A2
Remark
- 24 -
Service NA-F100A2.indd 24Service NA-F100A2.indd 24 4/26/2559 BE 11:50 AM4/26/2559 BE 11:50 AM
Page 25

15.5 Parts Exploded View : Part C
C1
GREY
C15
NATURAL
C13
C2
C3
C4
C5
C6
C7
(For A1)
C11
C14
C12
GREY
C15
C9
C8
C10
C30-1
C30-2
C30-3
C30-4
C30-5
C30-6
C30-7
C15
C17
C16
C18
C19
C20
C21
C22
C23
C25
C24
C26
C27
NATURAL
C15
C28
C30
C31
C32
C29
- 25 -
Service NA-F100A2.indd 25Service NA-F100A2.indd 25 4/26/2559 BE 11:50 AM4/26/2559 BE 11:50 AM
Page 26

15.6 Replacement Parts List
Parts List - Part C
Ref.
No. TH
C1 OUTER TUB COVER
C2 SCREW CAP
C3 O-RING
C4 PULSATOR
C5 SHAFT BUSHING
C6 SPINNER SHAFT FLANGE NUT
C7 SPINNER FLANGE WASHER B
C8 BALANCER UNIT
C9 SOFTENER CASE LID
C10 TUB B UNIT
C11 SLOT
C12 FILTER UNIT
C13 TUB E UNIT
C14 TUB UNIT
C15 SUSPENSION UNIT
C16 OUTER TUB A
C17 OUTER TUB B
C18 MOTOR WASHER A
C19 MOTOR
C20 MOTOR WASHER B
C21 MOTOR PULLEY UNIT
C22 V-BELT
C23 SPINNER PLATE B
C24 OVER FLOW HOSE B
C25 EARTH WIRE UNIT
C26 HOSE BAND
C27 HOSE A
C28 HOSE BAND
C29 MACHA-CASE UNIT
C30 VALVE UNIT
C30-1 VALVE ROD A
C30-2 VALVE WASHER
C30-3 VALVE LID
C30-4 VALVE SPRING B
C30-5 VALVE ROD B
C30-6 VALVE PACKING
C30-7 VALVE FRAME A
C31 GEARED MOTOR
C32 LEAD WIRE UNIT
Part Name Part No. Safety
AXW32248AR0W
AXW21118XW00
AXW02577BK00
AXW05019CP00
AXW05046ZR00
AXW15176RU10
AXW151980200
AXW035A8AR0W
AXW21778AR1B
AXW012T9CP00
AXW11989CP00
AXW022A8AR1W
AXW012V9CP00
AXW002A9CP00
AXW034U9CP00
AXW034U9CP50
AXW12018AR00
AXW12028AR00
AXW04207JS10
AXW040159626
AXW04217BK10
AXW004G8AR20
AXW004G8AR10
AXW041219860
AXW04127BL60
AXW32328AR00
AXW02348AR10
AXW003F9CP00
AXW02458AR00
AXW02479CP00
AXW02457EC00
AXW020A8AH20
AXW009D8AR00
AXW09328AR00
AXW09728AR00
AXW09038AR00
AXW09718AR00
AXW09818AR00
AXW090956N2A
AXW09018AR00
AXW348204506
AXW014B9CP00
S1
S 1 INTERNAL
S1
S1
F100A2
1
1
1
1
1
1
1
1
1 BLUE
1
1
1 WHITE
1
1
2
2 REAR/RIGHT+LEFT/GREY
1
1
2
2
1
1 M-19.8", 50Hz
1
1
1 HOSE A - BASE A
1
1 HOSE A - VALVE UNIT
1
1
1
1
1
1
1
1
1
FRONT/RIGHT+LEFT/NATURAL
M-19.5", 60Hz
GEARED MOTOR - SENSOR UNIT
Remark
Screws
Ref.
No. TH
SPECIAL TAPPING SCREW
PAN HEAD TAPPING SCREW
SPECIAL SMALL SCREW
SPECIAL BOLT
SPECIAL TAPPING SCREW
Part Name
Part No.
XTWAXW523
XTN4+8HFJ
XSSAXW682
XVGAXW705
XVGAXW839J
XVGAXW840J
XTWAXW6517J
XTWAXW6517J
XTWAXW6518J
XTWAXW530
Safety
F100A2
8 TUB A~TUB D
1 EARTH U~OUTER TUB B
1 PULSATOR UNIT
1 MOTOR PULLEY
2 MOTOR
4 MECHA CASE~OUTER TUB B
7 OUTER TUB A~B
4 SPINNER PLATE B
3 GEARED MOTOR (CLUTCH)
8 BALANCER U~TUB A
Remark
- 26 -
Service NA-F100A2.indd 26Service NA-F100A2.indd 26 4/26/2559 BE 11:50 AM4/26/2559 BE 11:50 AM
Page 27

15.7 Parts Exploded View : Packing
Accessories
7
6
9
8
10
1
4
3
THIS PART USE FOR PACKING,
NOT PART OF PRODUCT.
2
Fully Automatic
Washing Machine
Fully Automatic
Washing Machine
5
- 27 -
Service NA-F100A2.indd 27Service NA-F100A2.indd 27 4/26/2559 BE 11:50 AM4/26/2559 BE 11:50 AM
Page 28

15.8 Replacement Parts List
Parts List - Packing
Ref.
No. TH
1 PROTECTION CASE A AXW90019CP00 1 THAI
2 CASE PLATE A AXW91189CP00 2
3 CORNER CUSHION -F AXW90159CP00 1 FRONT SIDE
CORNER CUSHION -B AXW90159CP50 1 BACK SIDE
4 CORNER PAD AXW90168XT00 2 FRONT SIDE
5 PROTECTION CASE B UNIT AXW090B9CP00 1
6 LID SHEET AXW90698XT00 1 TOP LID UNIT
7 OPERATING INSTRUCTION AXW99019CP00 1 ENGLISH/THAI
8 ACCESORY BAG AXW90576UP30 1
9 SPIN TUB SUPPORT AXW90859CP00 1
10 SIDE CUSHION AXW90049CP00 1
Part Name Part No. Safety
AXW90019CP50 ENGLISH
AXW90698XT50 1 UNDER LID UNIT
AXW99019ME00 ENGLISH (WATER SAVE)
AXW99019CP10 ENGLISH (ENERGY SAVE)
AXW99019CP20 ENGLISH/INDONESIAN
F100A2
Remark
- 28 -
Service NA-F100A2.indd 28Service NA-F100A2.indd 28 4/26/2559 BE 11:50 AM4/26/2559 BE 11:50 AM
 Loading...