

Panasonic NA-148VG3WAU Operating Instructions & Installation Instructions
Read Before Using 02
SAFETY PRECAUTIONS 04
Washing Instructions 12
Optional Functions 20
Maintenance 22
Troubleshooting 25
Installation Instructions 30
Operating Instructions
& Installation Instructions
Washing Machine
(Domestic use)
Model No.
NA - 140VG3
NA - 148VG3
®
Thank you for purchasing this appliance.
- For optimum performance and safety, please read these instructions
carefully.
- Before connecting, operating or adjusting this appliance, please read the
instructions completely. Please keep this manual for future reference.
NA-140VG3_Australia.indb 1 2011-5-20 11:39:40
2 - Read Before Using
Consider the Environment
Disposing of packaging
The packaging used to protect the
washing machine from damage during
transportation is all recyclable. For
information on recycling, contact your local
authority.
Disposing of Waste
Electrical & Electronic
Equipment
Information on disposal for users of
waste electrical & electronic equipment
(private households)
This symbol on the products and/or
accompanying documents means that
used electrical and electronic products
should not be mixed with general
household waste.
For proper treatment, recovery and
recycling, please take these products to
designated collection points, where they
will be accepted on a free of charge basis.
Alternatively, in some countries you may be
able to return your products to your local
retailer upon the purchase of an equivalent
new product.
Disposing of this product correctly will
help to save valuable resources and
prevent any potential negative effects on
human health and the environment which
could otherwise arise from inappropriate
waste handling. Please contact your local
authority for further details of your nearest
designated disposable point.
Penalties may be applicable for incorrect
disposal of this waste, in accordance with
national legislation.
Information on disposal in other
countries outside the European Union
This symbol is only valid in the European
Union.
If you wish to discard this product, please
contact your local authorities or dealer and
ask for the correct method of disposal.
Eco-friendly Laundry
Keep to the load limit of each programme.
The washing machine automatically adjusts the operating time of each
programme depending on the load.
You only need to use a preliminary wash if your laundry is heavily soiled.
Using the 60°C Cotton programme instead of the 90°C Cotton one will save
energy, and will remove ordinary stains.
For lightly soiled laundry, using the Cold Wash programme instead of the 40°C
Quick 50 programme will save more
energy.
Detergent amount
Use the correct amount of detergent based on the detergent pack instructions
and local water hardness.
Adjust the amount of detergent depending on how soiled your laundry is.
When using a tumble dryer
To save energy, please select the correct
spin-dry revolution speed according to the
instruction of your tumble dryer.
This product complies with the directives
2006/95/EC and 2004/108/EC.
NA-140VG3_Australia.indb 2 2011-5-20 11:39:40

Read Before Using - 3
Contents
Read Before Using
Consider the Environment........2
SAFETY PRECAUTIONS ........4
Checking Your Washing Machine . . 6
Your washing machine .............6
Accessories......................6
Before You Start Washing ........7
Checking before use ...............7
Before initial use . . . . . . . . . . . . . . . . . .7
Preparing the laundry ..............7
Using the Buttons ..............8
Unlocking the door ................9
Adding Detergent and Other
Chemicals ...................10
Detergent compartment ...........10
Softener compartment.............11
Prewashing compartment ..........11
Washing Instructions
Washing.....................12
Setting washing..................12
Required time ...................13
Setting the buzzer ................13
Changing settings while washing ....13
Selecting the Programme .......14
Details of Programmes .........16
Washing Delicates.............18
Wool, Silk/Lingerie, and Delicates
programmes ....................18
Delicate laundry loads.............18
Tips for washing delicates..........18
Washing Bedding and Outdoor
Wear .......................19
Bedding programme . . . . . . . . . . . . . .19
Putting bedding into the drum .......19
Outdoor programme ..............19
Optional Functions.............20
Individual washing functions ........20
Additional functions...............20
Preset timer.....................21
Child safety lock .................21
Maintenance
Maintenance .................22
Cleaning the outside of the
appliance.......................22
Cleaning the drum................22
Cleaning the detergent drawer ......22
Cleaning the door seal and window . .23
Cleaning the drain filter ............23
Cleaning the water-supply filter......24
Preventing a frozen water-supply
hose ..........................24
Troubleshooting
Fault Checklist................25
Error Display .................29
Installation Instructions
Choosing the Right Location .....30
Carrying the appliance ............30
The right place for the appliance.....30
Installing a built-in washing machine..31
Moving and Installing...........32
Removing the anchor bolts .........32
Moving the appliance .............32
Levelling the appliance . . . . . . . . . . . .33
Connecting Hoses and Power
Supply . . . . . . . . . . . . . . . . . . . . . . 34
Hoses and cable lengths...........34
Water-supply hose ...............34
Water-drain hose.................35
Connecting to the power supply .....35
Checking After Installation.......36
Installation checklist ..............36
Test run after installation ...........37
Power and Water Consumption...38
Specifications ................39
NA-140VG3_Australia.indb 3 2011-5-20 11:39:40

4 - Read Before Using
SAFETY PRECAUTIONS
Please read and follow these safety
precautions.
WARNING
This describes issues which could
cause death or serious injury.
General Use
This appliance is not intended for use by persons (including children) with
reduced physical, sensory or mental
capabilities, or lack of experience and
knowledge, unless they have been given
supervision or instruction concerning use
of the appliance by a person responsible
for their safety.
Children should be supervised to ensure that they do not play with the appliance.
Do NOT place a stand or a chair close to the appliance.
Children may be able to reach the
control panel or climb onto or into the
appliance.
Turn off the water supply to the appliance if it is not going to be used
for a prolonged period, such as during
a holiday. This is especially important
if there is no drainage around the
appliance.
If the water supply is left on, the water
pressure may unnecessarily increase
and result in a leak.
Do NOT install the appliance in a damp location or in a location exposed to the
weather.
This may result in malfunction,
deterioration, electric shock, or fire.
Do NOT pour or spill water directly onto any part of the appliance.
This may result in malfunction, electric
shock, or fire.
Keep sources of ignition, such as candles or cigarettes, away from the
appliance.
They may cause a fire or damage to the
appliance.
Keep flammable materials away from the appliance, for example, gasoline,
thinner, alcohol, or clothing soaked with
these materials.
They may cause an explosion or a fire.
Power source and cable
Unplug the mains lead when cleaning the appliance.
Check the mains lead and mains plug for any damage.
If the mains lead is damaged, it must be
replaced by the manufacturer, its service
agent or similarly qualified person to
aviod a hazard.
Do NOT use a mains plug adaptor or extension cable. There is a possibility of
overheating which may cause a fire. Use
an unused household mains socket, fully
rated at AC 220 V to 240 V. If you are
not sure, contact a qualified electrician.
ENSURE the mains plug is fully inserted into the household mains socket. If the
mains plug is not fully pushed in, a loose
connection may overheat and cause an
electric shock or fire.
Do NOT touch the mains lead or mains plug with wet hands.
Possibility of an electric shock.
Do NOT pull the mains lead but hold the mains plug to unplug the appliance.
Otherwise, there is possibility of damage
to the mains lead, which may lead to an
electric shock or fire.
NA-140VG3_Australia.indb 4 2011-5-20 11:39:41
Read Before Using - 5
SAFETY PRECAUTIONS
To Prevent Injury
The installation of the appliance should be done by the manufacturer’s dealer or
service agent.
If the installation, test run and inspection
of the appliance are not carried out
following the installation method outlined
in these instructions, the manufacturer
will not be liable for any accident or
damage caused.
Do NOT dismantle, repair or modify the appliance.
There is a possibility the appliance may
malfunction which may result in a fire or
an injury. If repairs are needed, contact
your local Customer Service Centre.
Do NOT touch the laundry inside the drum until it has completely stopped,
as there is a possibility of injury. Keep
children away from the rotating laundry.
CAUTION
This describes issues which could
cause injury or damage your
belongings.
General Use
Prior to use, turn on the tap and check the hose and connections for any leaks.
Improper connection could cause leaks.
The new hose-sets supplied with the appliance are to be used and that old
hose-sets should not be reused.
This appliance is only suitable for textiles labelled washing machine washable.
Do NOT connect to the hot water supply. This appliance works ONLY with cold
water.
Do NOT apply pesticide, hair spray or deodorant to the appliance.
Do NOT put any electrical equipment, for example, TVs, radios or battery
chargers, on or near the appliance.
Do NOT put too much laundry or detergent into the appliance.
This may cause damage to the
appliance.
REMOVE the anchor bolts before installing the appliance using a spanner
supplied or similar tool. The anchor bolts
are used to transport the appliance.
If the anchor bolts are not removed, the
appliance will strongly vibrate during
use.
If this appliance is supplied from a cord extension set or electrical portable
outlet device, the cord extension set or
electrical portable outlet device must
be positioned so that it is not subject to
splashing or ingress of moisture.
To Prevent Injury
Do NOT climb onto the appliance. This may cause injury or damage to the
appliance.
Keep fingers away from the door hinge when opening and closing the door.
Do NOT slide your hand (or unprotected foot) underneath the appliance when in
use.
Check all washing and remove all objects such as nails, pins, coins, clips,
metal wires, etc.
They may cause damage to other
laundry or the appliance.
Do NOT use the appliance to wash waterproof sheets or clothing. There is
a possibility of excessive vibration or
failure during the spin-drying cycle that
may result in an injury, damage to the
appliance or a water leak.
BE CAREFUL when draining hot water or any detergent out of the drum.
BE CAREFUL not to get laundry caught in the door seal when it is closed. This
may result in a water leak or damage to
the laundry during the wash cycle.
NA-140VG3_Australia.indb 5 2011-5-20 11:39:41
6 - Read Before Using
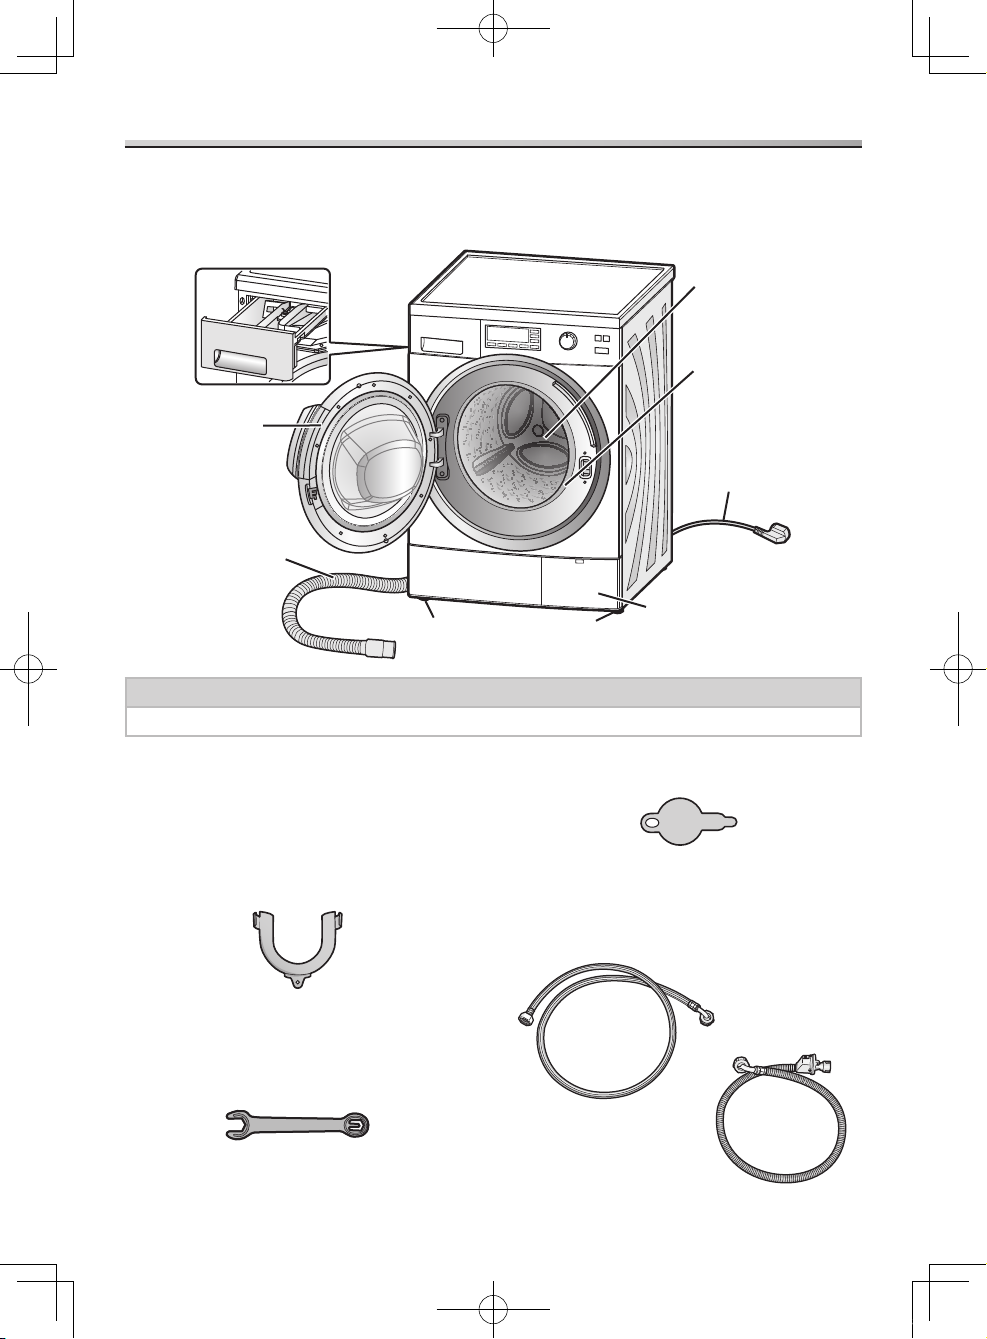
Checking Your Washing Machine
Your washing machine
Caution
Do NOT bend the mains lead when the appliance is running.
Accessories
Make sure that all the accessories are
supplied with the appliance.
Elbow (see page 35)
For fixing the water-drain hose
Spanner (see pages 32-33)
End A is for adjusting the stand. End B is
for the anchor bolts.
B
A
Cover cap (x4) (see pages 32-33)
Water-supply hose (see page 34)
Either one of these hoses is supplied with
the appliance.
Detergent drawer
(see page 10)
Door
Water-drain hose
Adjustable stands
(see page 33)
Drain filter cover
(see page 23)
Mains lead/
Mains plug
Door seal
Drum
(Washing/
spin-drying tub)
Standard
Hose
Hose with
water-supply valve
NA-140VG3_Australia.indb 6 2011-5-20 11:39:43
Read Before Using - 7
Before You Start Washing
Checking before use
For the appliance’s initial operation or
after a prolonged period of non-operation,
perform the following procedures:
Secure the water-supply hose.1.
Open the tap.2.
Connect the power.3.
Make sure that the water-drain hose 4.
is positioned towards a drain.
For more details, see page 35.
Before initial use
The default setting is the 40ºC Cotton
programme. For the appliance’s initial
operation, operate it WITHOUT any
detergent or clothing to rinse out residue or
moisture.
Note
There may be drops of water or
condensation in the appliance due
to the factory inspection prior to
shipment. This is not a malfunction.
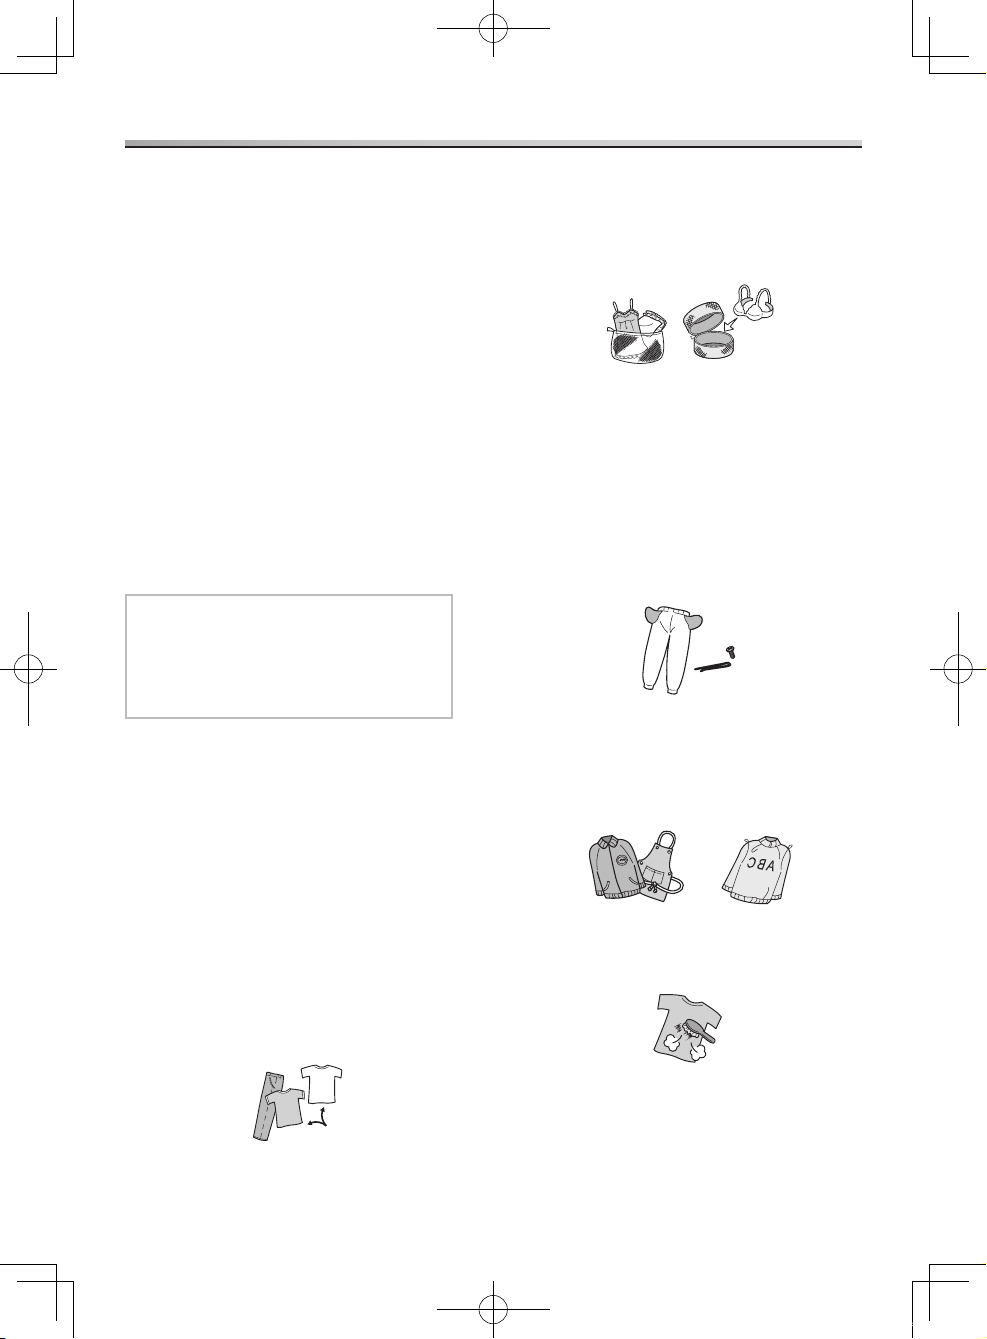
Preparing the laundry
Sorting clothing
Read clothing washing labels to help you sort them into different loads.
Sort the laundry by colour, by type of fabric, and by how soiled it is. Doing
so will help you choose the correct
programme and temperature for each
wash.
Clothes that are not colour fast should be washed separately. Wash denim
separately.
You should put bras with metal wires, tights, lace clothing and small items of
clothing into a laundry net to prevent
them or the appliance from getting
damaged.
Treating stains
Apply stain remover to stained portions.
For dirt and solid stains, wash lightly by
hand first.
Checking clothing
Check that pockets on clothing do not contain any objects that may damage
the clothes or the appliance.
Tie up any loose strings on the clothing and close zippers. Turn clothing with
raised fabrics and zippers inside out.
Otherwise, the clothes may be
damaged.
Remove any hair, animal fur, sand, and other materials with a brush before
washing.
NA-140VG3_Australia.indb 7 2011-5-20 11:39:44
8 - Read Before Using
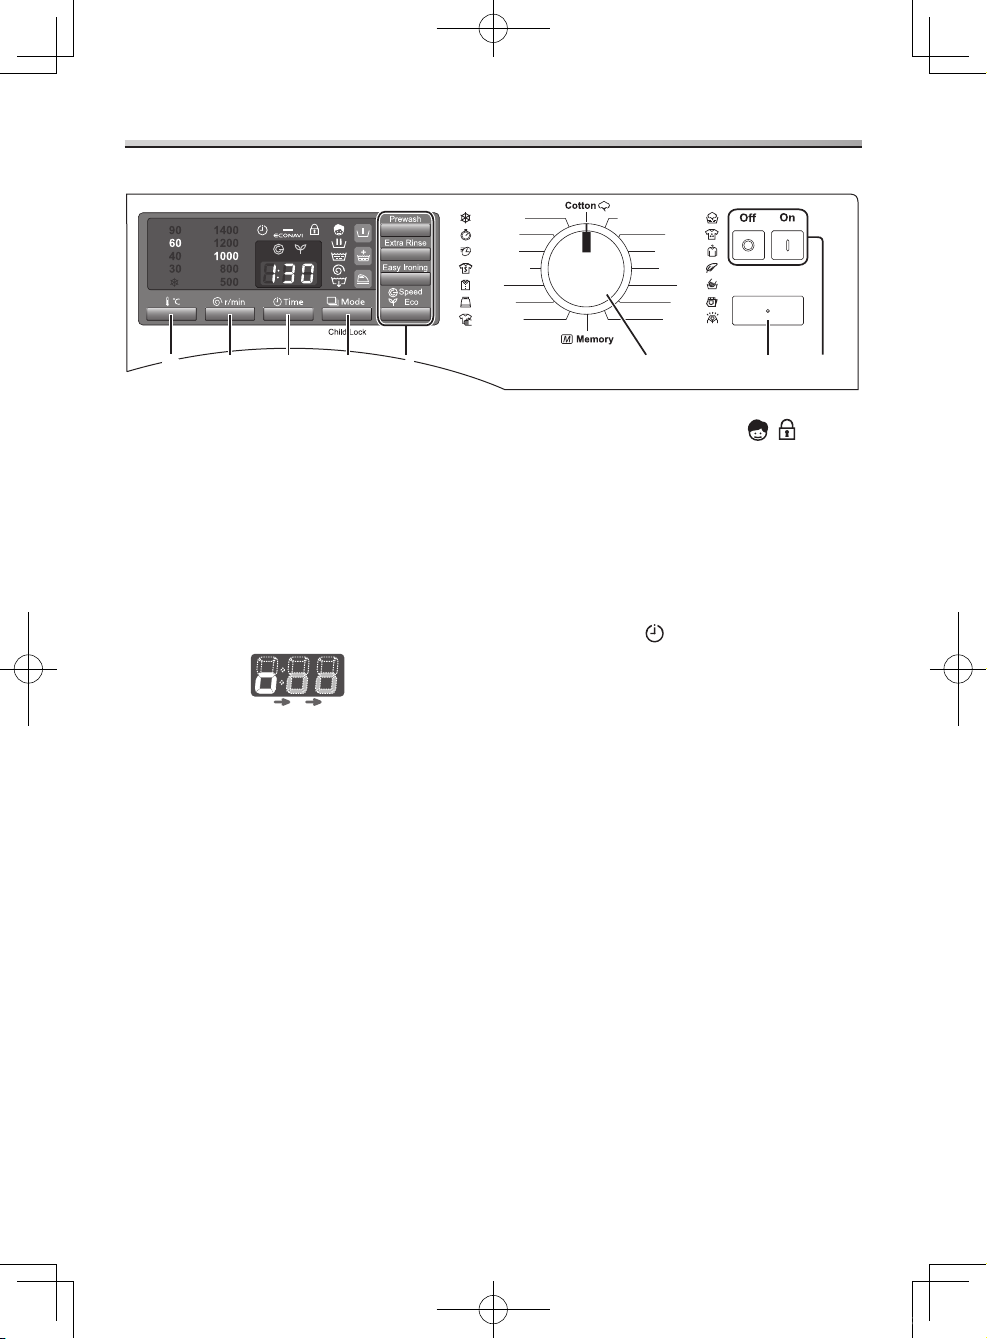
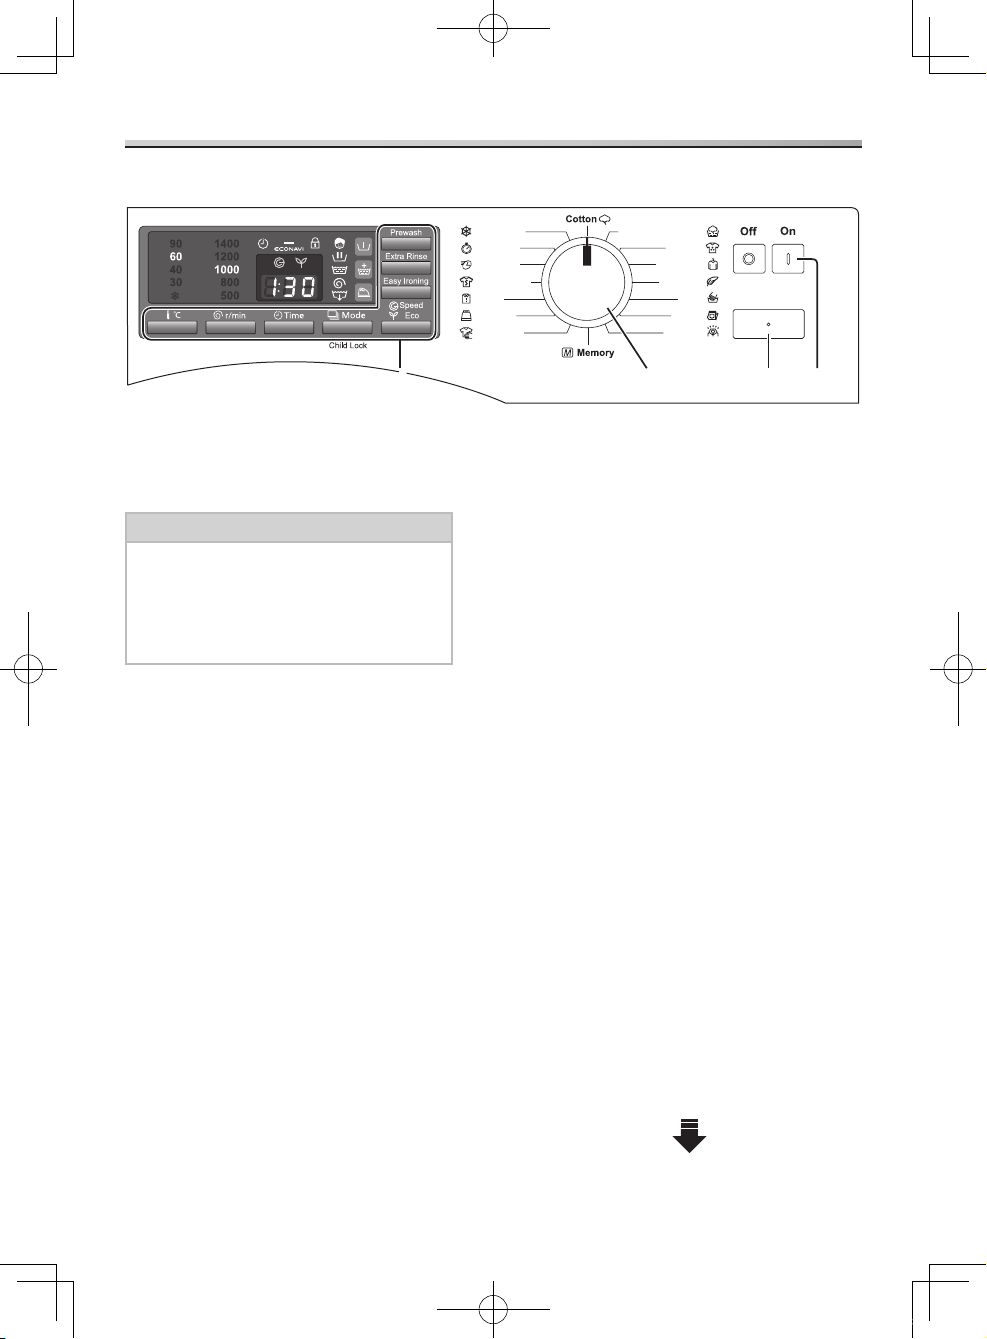
Using the Buttons
Power buttons1.
If you do not press the Start button within 10 minutes after the appliance
has been switched on, the appliance
automatically switches itself off.
The display below appears for 3 seconds after the appliance has
been switched off. You cannot turn
the appliance on until this display
disappears.
Start/Pause button2.
Press this button to start or pause the
wash programme.
Programme selection dial3.
Use this dial to choose the best
programme for the laundry. (See pages
14-15.)
Additional function buttons4.
Press these buttons to add functions to
the programme to suit the laundry. (See
pages 20-21.)
Mode/Child Lock button 5.
Press this button to select the function of processes, for example, the Rinse and
Spin function or the Drain only function.
(See page 20.)
Press and hold this button to set the child safety lock. The door and the
controls will be locked. (See page 21.)
Time button 6.
Press this button to preset the time for
when the washing finishes. (See page
21.)
Spin speed button7.
Press this button to see the spin speed
(r/min) or to choose the spin speed for
the programme you have selected. (The
maximum spin speeds of model NA140VG3 and NA-148VG3 are 1400
r/min.)
Temperature button8.
Press this button to choose water
temperatures ranging from cold to 90ºC.
You can choose hotter temperatures for
whites, cottons, or soiled laundry.
Model NA-148VG3
Cotton Rinse Plus
Colours
Easy-care
Delicates
Wool
Denim
Outdoor
Cold Wash
Quick 50
Rapid 15
Sportswear
Shirts
Bedding
Skin-care
1
2
2
6
7
8
8
5
4
4
3
Start/Pause
NA-140VG3_Australia.indb 8 2011-5-20 11:39:45
Read Before Using - 9
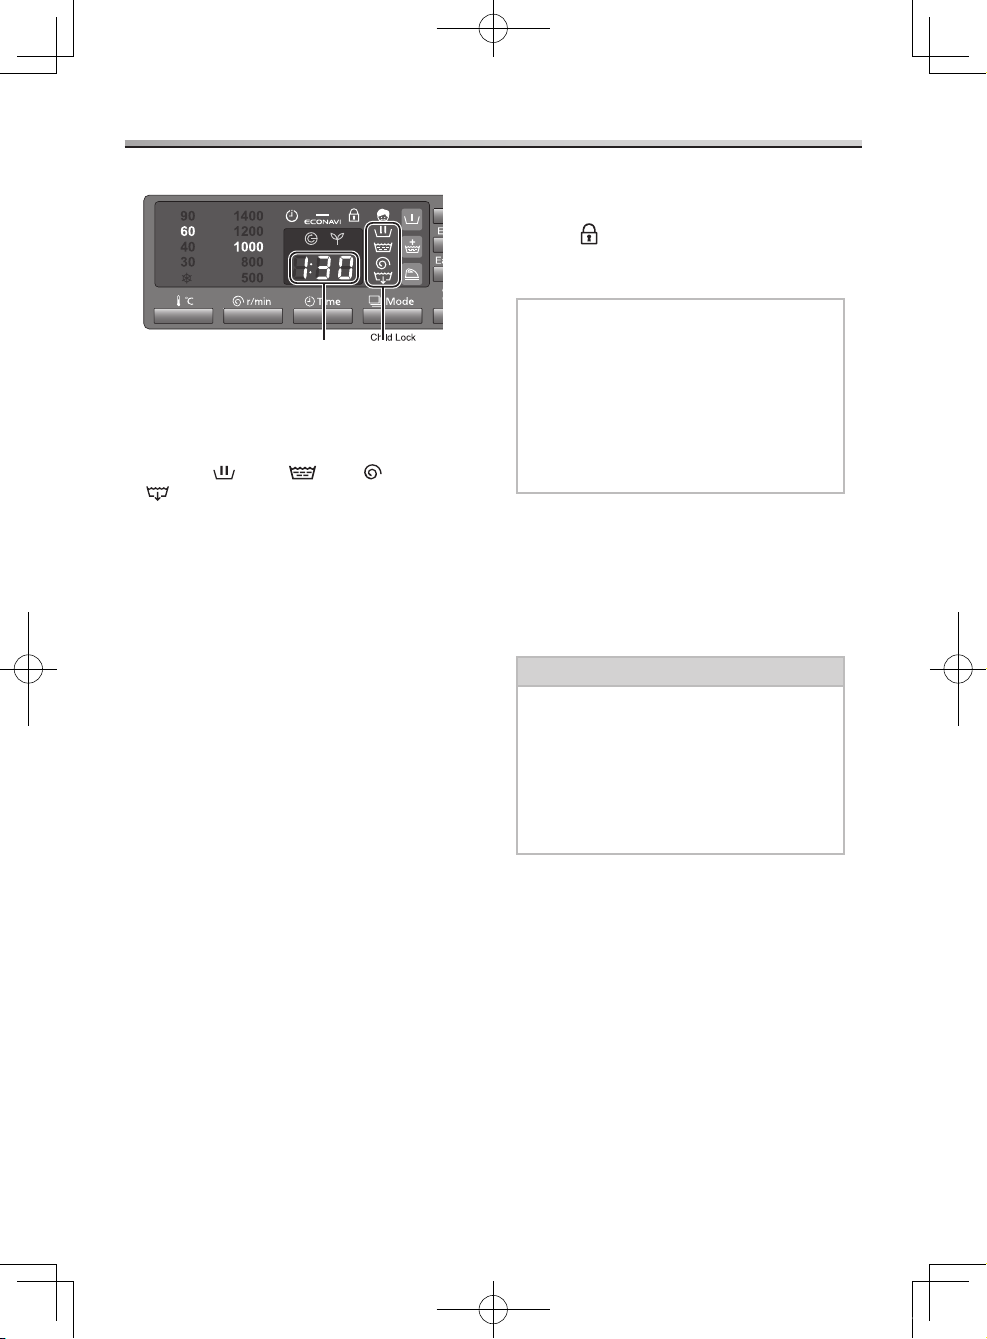
Using the Buttons
9
10
Process indicator9.
This indicator shows the current process of the programme. The process consists
of wash
, rinse , spin , and drain
.
The light goes off when the wash is finished.
Remaining time indicator10.
This indicator shows the approximate time until the washing finishes. For
example, ‘1:18’ means 1 hour and 18
minutes.
The time is acquired from the weight of the laundry measured when washing
starts.
Unlocking the door
The door automatically locks while in use,
and the
symbol is shown while the door
is locked. A click will be heard when the
door locks or unlocks.
Note
While the door is locked, if the appliance is switched off, or if there
is a power interruption, the door
stays locked until the switch is turned
on again.
This is different from the child safety lock. (See page 21.)
Press the Start button to unlock the
door during operation.
After about 1 minute, the drum stops
spinning, and the door will automatically
unlock.
If the door doesn’t open, see page 25.
Caution
If you have to unlock the door
mid-programme, make sure that
water from the drum does not
overflow onto the floor.
Water and soap suds might come out
of the door and the door opening. You
may need a towel to soak them up.
Display on NA-148VG3
NA-140VG3_Australia.indb 9 2011-5-20 11:39:47
10 - Read Before Using
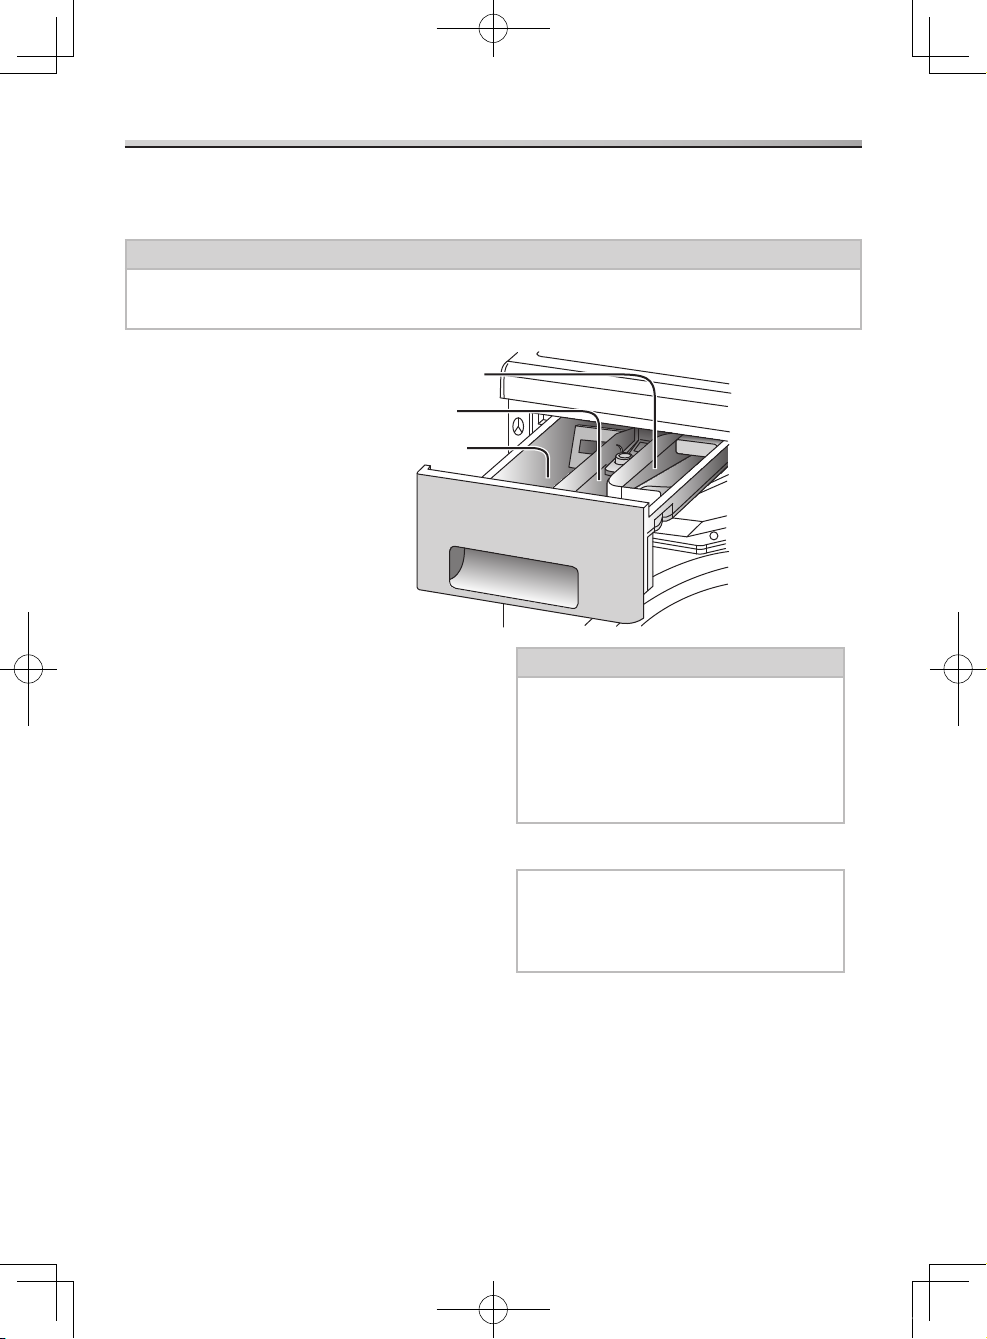
Adding Detergent and Other Chemicals
Detergent compartment
The following detergents and additives may
be added to this compartment:
Detergent Water softening agent Stain remover Tub cleaning detergent or bleach -
If you use multiple chemicals in this
compartment for washing, add them in the
following order:
1. Detergent
2. Water softening agent
3. Stain remover
Detergent
Use only detergents that are recommended
for fully-automated washing machines.
Please use low suds detergents.
Caution
If the instructions on the package
indicate that detergent should be
placed in the drum, do NOT put it
into the detergent drawer.
These detergents may not flow well
and remain in the detergent drawer.
Liquid detergent1.
Note
Do NOT use liquid detergent with the
Prewash function. It may flow away
during the prewash.
For the Wool programme, use mild liquid
detergent.
Powdered detergent2.
Detergent reaches the drum only when
water flushes through the detergent
drawer. Thus, if you forget to add
detergent, run the Drain only function using
the Mode button.
Pull out the detergent drawer and add detergent or softener to the correct
compartment. Check the packages for the appropriate recommended amounts.
Caution
Do NOT use the appliance when the detergent drawer is removed.
This may result in a water leak.
Prewashing compartment
Softener compartment
Detergent compartment
NA-140VG3_Australia.indb 10 2011-5-20 11:39:47
Read Before Using - 11
Adding Detergent and Other Chemicals
Then, add detergent and start washing
again.
To prevent powdered detergent from
remaining in the drawer, perform the
following:
Dry the inside of the drawer with a cloth. Make sure that the detergent is not -
lumpy when you add it as this may
cause a blockage over time.
Amount of Detergent
The amount of detergent you should use
depends on the following factors:
How soiled the laundry is The amount of the laundry Water hardness -
The amount of foam varies according to
the amount and type of detergent, how
soiled the laundry is, and the hardness and
temperature of the water.
Water softening agent
If you live in a hard water area (total
hardness of 1.3 mmol/L or higher), we
recommend the usage of a water softening
agent. For more details on water hardness,
contact your local water authority.
Use of a water softening agent can help
reduce the amount of detergent that is
required for each wash and help prevent
the formation of limescale deposits, which
may damage the appliance.
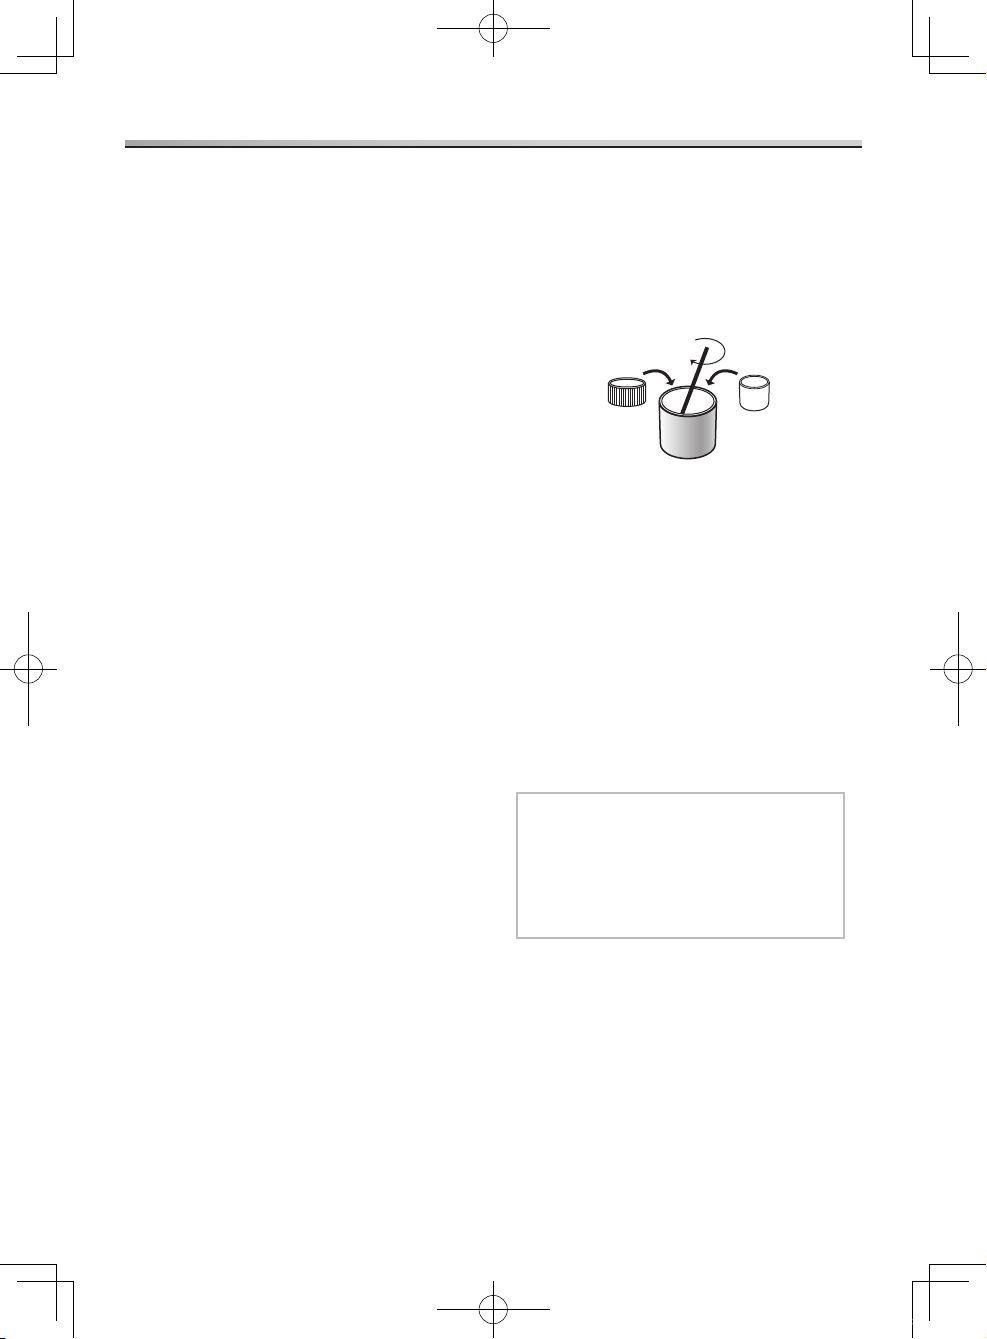
Softener compartment
The following additives may be added to
this compartment:
Fabric softener Laundry starch -
Fabric Softener
To prevent static, add softener before you
start washing. It will be automatically added
in the final rinse cycle.
Dilute concentrated softeners before you
add them. Add up to only 130 ml to the
compartment to avoid overflowing.
Rinse out the remaining softener with
a splash of water or a damp cloth after
washing. If it sticks to the compartment,
pull out the drawer and clean it out. (See
page 22.)
Laundry starch
Simply add laundry starch to the softener
compartment. It will be automatically added
to the clothing as part of the final rinsing
process. Make sure that you do not fill the
compartment over the MAX level.
If it is hard to pour, you can dilute the
starch slightly with water before adding it.
Note
After using starch, clean the detergent
drawer, especially the softener cover
(see page 22). Then, run the Rapid 15
programme WITHOUT detergent to
remove any excess starch in the drum.
Prewashing compartment
Detergent for prewashing
Whenever you use any programmes with
the Prewash function, always put detergent
for the prewash in this compartment.
Undiluted
softener
Water
NA-140VG3_Australia.indb 11 2011-5-20 11:39:48
12 - Washing Instructions
Washing
Open the door and put the laundry 1.
into the drum.
For details about preparing and sorting
the laundry, see pages 7, 14, and 15.
Caution
Make sure that no laundry gets caught in the door.
Do NOT overload the drum. -
This may cause excessive vibration
or damage to the appliance.
Close the door and press the On 2.
button.
Turn the programme selection dial 3.
either way to select the programme.
A wash time will be displayed.
Memory programme
You can design your own programme
based on the default settings of the Cotton
programme. Select Memory programme
and set other settings, then run the
programme. Later, this preset programme
can be run by simply accessing Memory
programme.
Cold Wash programme
This programme detects the amount of
clothes and water temperature, and then
selects the best suited wash time and
water amount to save energy and conserve
water.
The less the amount of clothes and the
higher the water temperature, the shorter
the wash time and smaller amount of water
will be used. The ECONAVI mark flashes
while clothes are checked and lights when
the ECONAVI function starts working.
Cotton Rinse Pluse programme
This programme has rinse performance
better than the cotton programme.
Select optional functions.4.
Process selection (See page 20.) Additional functions (See page 20-21.) Temperature (See page 8.) Spin speed (See page 8.) -
For more details about available
functions and settings for each
programme, see pages 16-17.
Add detergent to the detergent 5.
drawer.
(See pages 10-11.)
Press the Start button.6.
The appliance starts supplying water.
After the appliance has started, the
laundry is weighed. After about 5
seconds, a new wash time will be
displayed. If you select the Wool/Silk,
Bedding, Sportswear, Rapid 15, or
Shirt programmes, the laundry is not
weighed.
The buzzer will sound when the
programme has finnished, and the door
will unlock immediately.
Setting washing
Model NA-148VG3
Cotton Rinse Plus
Colours
Easy-care
Delicates
Wool
Denim
Outdoor
Cold Wash
Quick 50
Rapid 15
Sportswear
Shirts
Bedding
Skin-care
632
44
Start/Pause
NA-140VG3_Australia.indb 12 2011-5-20 11:39:48
 Loading...