

Panasonic N5HBD0000028 User Manual

Network Function Edition
(PT-LB10NTU)

Using Wireless Manager ME
.....18
Startup................................................18
Description of the connection select
window...............................................18
Description of the launcher and menu
.....19
Live mode ..........................................20
Quitting live mode ............................20
Multi live mode ..................................21
4-screen style...................................21
Index style ........................................22
One shot mode..................................23
Pointer mode .....................................24
Quitting pointer mode.......................24
Options...............................................24
Picture quality selection ...................24
Live mode settings ...........................25
Shortcut key settings........................25
Operations when password
entry is required for connection......26
Adding and deleting connections
......26
Adding a connection.........................26
Deleting a connection.......................26
2
Contents (Network Function Edition)
Notes on Using the
Wireless Card ..........................4
Channels that can be used ................6
Examples of Network
Function Usage .......................7
Inserting and Removing the Wireless
Card to and from the Projector
.........13
Inserting and Removing the Wireless
Card to and from a Computer
...........14
Software Installation ...............8
System requirements..........................8
Wireless Manager ME (Mobile Edition)
..........9
Wireless LAN Driver..........................10
Simple Wireless Connection
(Using the Initial Settings) ....15
Projector operations.........................15
Computer operations........................16
Canceling the connection with
the projector ......................................17
Displaying the Network Menu
........27

3
Using WebBrowser
Control....................................38
Projector settings..............................38
Computer settings ............................39
Starting up WebBrowser Control ....40
Top window ......................................40
Projector control ...............................41
Basic control window........................41
Option control window......................41
Monitor information window .............42
Network setting window ...................42
Password changing window.............42
Software Uninstall .................52
Wireless Manager ME .......................52
Wireless LAN Driver..........................52
Terminology ...........................53
Troubleshooting ....................55
Trademarks ............................57
Other Applications
(
Changing the Initial Settings
).....28
Changing the network number ........28
Projector operations .........................28
Computer operations........................28
Wireless connection with password....
29
Projector operations .........................29
Computer operations........................29
Wireless user connections...............30
Projector operations .........................30
Computer operations........................30
Changing the user settings..............31
Projector operations .........................31
Computer operations........................31
Computer settings ............................32
TCP/IP settings ................................32
Settings for optional wireless card
(ET-CDWL3U) use ...........................34
Contents (Network Function Edition) (cont.)
Returning to the Initial
Settings ..................................37
Projector operations.........................37
Computer operations........................37
Using the ET-CDWL2U
(Optional wireless card)........43
Channels that can be used ..............43
Installing the Wireless LAN Driver....44
Settings for ET-CDWL2U use ..........49
Please note the following.
• Panasonic cannot be held liable for any direct or indirect damages resulting from
the use or malfunction of this projector.
• Panasonic cannot be held liable for damages arising from data corruption or loss
as a result of using this projector.

4
The optional wireless card (ET-CDWL3U or ET-CDWL2U) uses radio waves in the 2.4
GHz band.
A radio station license is not required when using this wireless card, but be sure to
read and fully understand the following items before use.
■ Do not use near other wireless equipment.
The following equipment may use radio waves in the same band as the wireless
card. When the wireless card is used near these devices, radio wave interference
may make communication impossible, or the communication speed may become
slower.
• Microwave ovens, etc.
• Industrial, chemical and medical equipment, etc.
• In-plant radio stations for identifying moving objects such as those used in factory
manufacturing lines, etc.
• Designated low-power radio stations
Notes on Using the Wireless Card

5
■ If at all possible, avoid the use of cellular phones, TV sets or
radios near the wireless card.
Cellular phones, TV sets, radios and similar devices use different radio bands from
the wireless card, so there is no effect on wireless card communication or the
transmission and reception of these devices. However, radio waves from the
wireless card may produce audio or video noise.
■ The wireless card radio waves cannot penetrate steel
reinforcements, metal, concrete, etc.
Communication is possible through walls and floors made from materials such as
wood and glass (except glass containing wire mesh), but not through walls and
floors made from steel reinforcements, metal, concrete, etc.
Notes on Using the Wireless Card (cont.)

6
■ Channels that can be used
The channels (frequency range) that can be used differ according to the country or
region where the wireless card is used. Refer to the table below.
When using the ET-CDWL3U card (See page 43 for details on using the ET-CDWL2U card)
Country or region
Japan
United States
ARIB
STD33
& T66
FCC part 15
27
28
1 - 13
1 - 11
2,412 MHz 2,472 MHz
2,412 MHz 2,462 MHz
Taiwan
Malaysia
England, Germany,
France, Italy,
Belgium, Austria,
Sweden, Norway,
Denmark,
Switzerland, Holland,
Finland, Portugal,
Greece, Thailand,
South Korea,
Australia,
New Zealand
Spain
Singapore
DGT
SIRIM
ETSI
300.328
ETSI
300.328
IDA
29
31
30
1 - 13
10, 11
10 - 13
2,412 MHz 2,472 MHz
2,457 MHz 2,462 MHz
2,457 MHz 2,472 MHz
Standard
Last two digits
of the card product
number
Channels
used
Frequency band
(Center frequency)
Check the last two digits of the product number noted on
the card rear label in the position shown in the right figure
to determine the product region of the wireless card you
have purchased.
N5HBD0000028
Note:
Bringing a wireless card into a country other than the
designated country is prohibited, and may infringe upon the
wireless telegraphy laws of that country.
Notes on Using the Wireless Card (cont.)
7
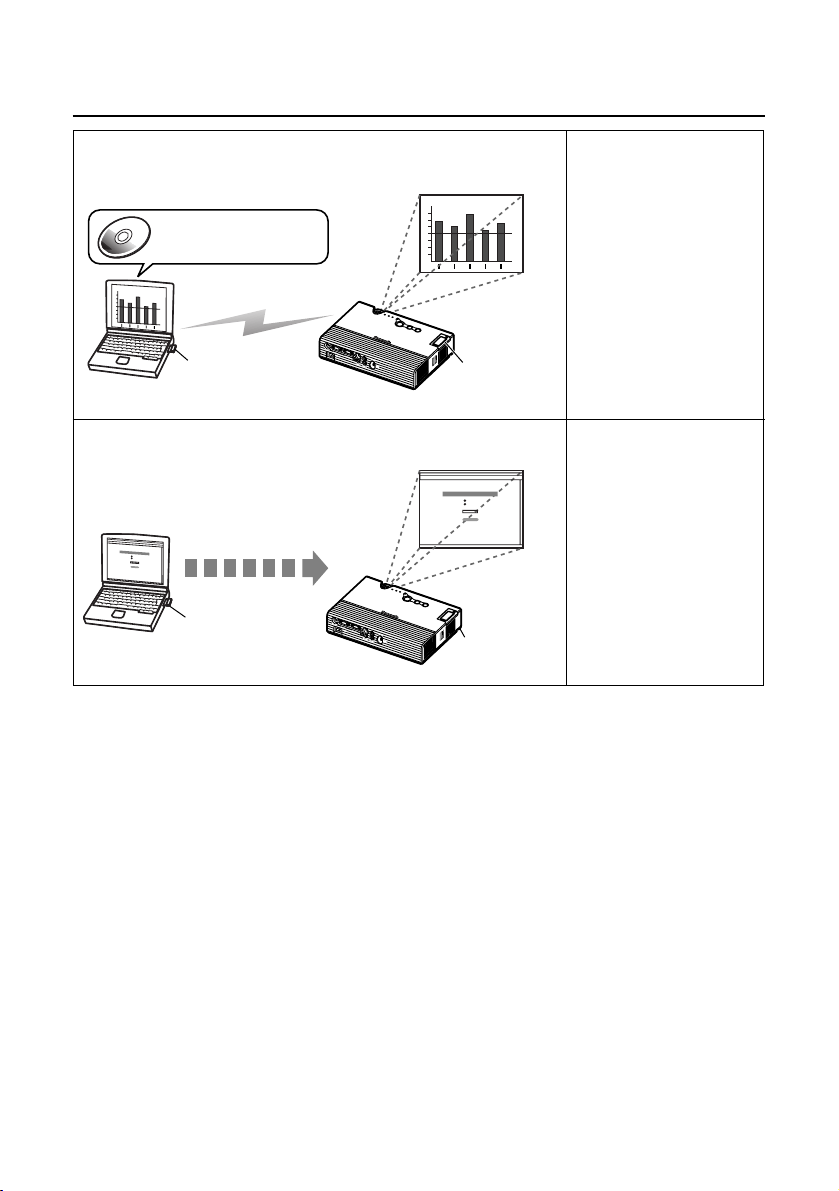
Examples of Network Function Usage
Software Installation
(See page 8)
Simple wireless
connection
(See page 15)
Projecting a computer image by wireless
operation
Computer
Control by WebBrowser
Control
Optional wireless card
Supplied wireless
card installed here
Projector
Controlling the projector by WebBrowser Control
Simple wireless
connection
(See page 15)
Using WebBrowser
Control
(See page 38)
Installation
Wireless Manager ME
Wireless LAN Driver
Transmission
Computer
Optional wireless card
Projector
Supplied wireless
card installed here

8
Software Installation
The computer must meet the following requirements in order to use the supplied
software.
OS: Windows XP/2000/Me (Millennium Edition)/98SE (Second Edition)
CPU: Pentium III or faster or compatible processor (Celeron 633 MHz or
faster is recommended. However, 800 MHz or faster is recommended
when using live mode.)
RAM: 64 MB or more (128 MB or more for Windows XP/2000)
Empty hard disk capacity:
44 MB or more
Hardware conditions:
CD-ROM drive (for software installation and viewing the user’s manual)
Built-in PC (PCMCIA) card slot (TYPE II or TYPE III)
The wireless card (ET-CDWL3U or ET-CDWL2U) must be installed
and operating properly.
Web browser: Internet Explorer 6.0 or newer
Netscape Communicator 7.0 or newer
System requirements
Note:
Note that operation is not guaranteed when used with system environments other
than the above or on homemade computers.
Operation is not guaranteed for all computers that
meet the above conditions.
9
Software Installation (cont.)
Notes:
• Shut down all software currently active on Windows. Otherwise, installation may
not be possible.
• Administrator authority is required for installation with Windows XP/2000.
Wireless Manager ME:
This software is used to send screen images from a computer to the projector via a
wireless LAN.
Wireless Manager ME (Mobile Edition)
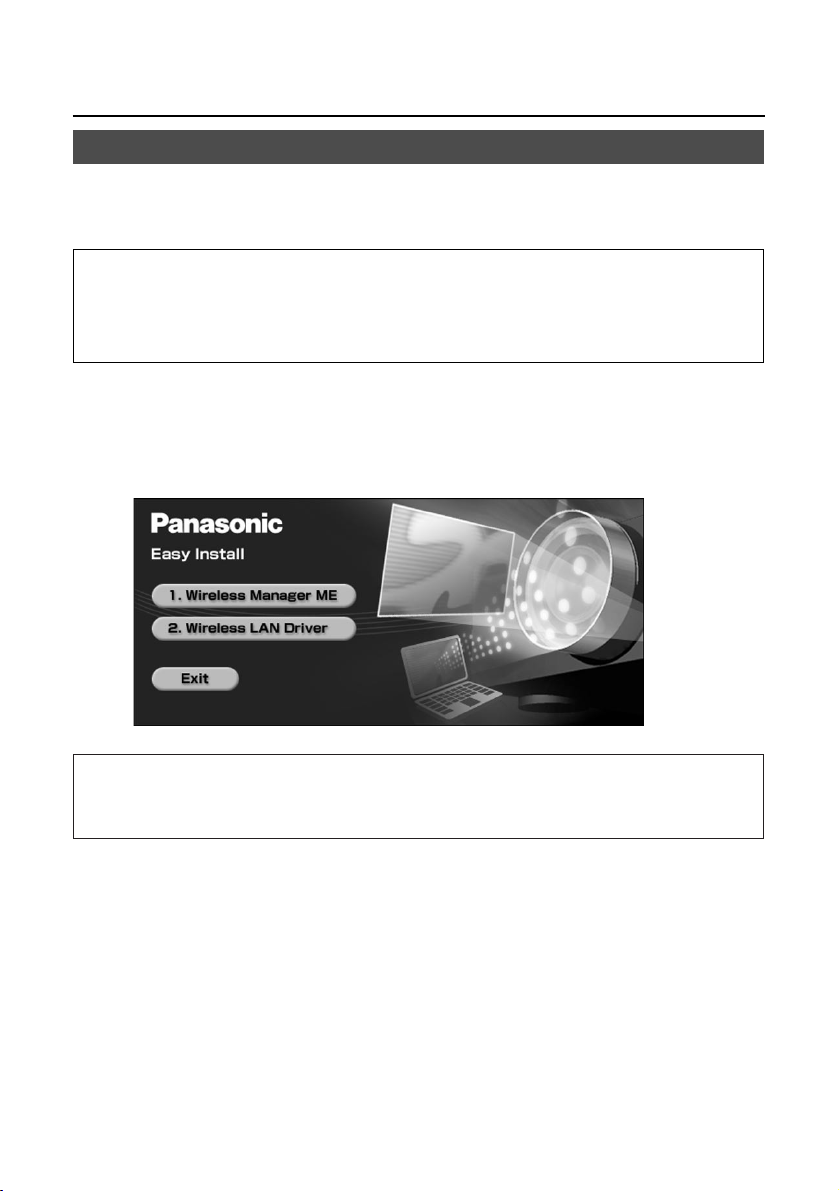
Set the supplied CD-ROM in the CD-ROM drive.
The installer starts up automatically and the following screen appears.
Note:
If the installer does not start up automatically, double-click [EasyInstall]
→
[Easy_Inst.exe] in the CD-ROM.
1
Click [Wireless Manager ME].
Follow the instructions on the screen and install the software.
2

10
Software Installation (cont.)
Notes:
• Be sure to install the Wireless LAN Driver in the computer before inserting the
wireless card into the computer.
• If you insert the card into the computer by mistake before installing the driver, the
card is recognized by the hardware auto detect function as an unknown device.
Perform the following operations with the card inserted and then install the driver.
Windows XP/2000: Open [Control Panel] →[System] →[Hardware]
→
[Device Manager], and delete the unknown device or
“Panasonic Wireless LAN PC Card”.
Windows 98SE/Me: Open [Control Panel] →[System] →[Device Manager],
and delete the unknown device or “Panasonic Wireless
LAN PC Card”.
Wireless LAN Driver
The Wireless LAN Driver must be installed in order to use the wireless card with a
computer.
• Described below is an example of installing the driver when using the ET-CDWL3U
card. (See page 44 for details when using the ET-CDWL2U card)
• When installing the driver while using a card other than the ET-CDWL3U or ETCDWL2U, refer to the user’s manual for that card.
• Some windows appear in English.
11
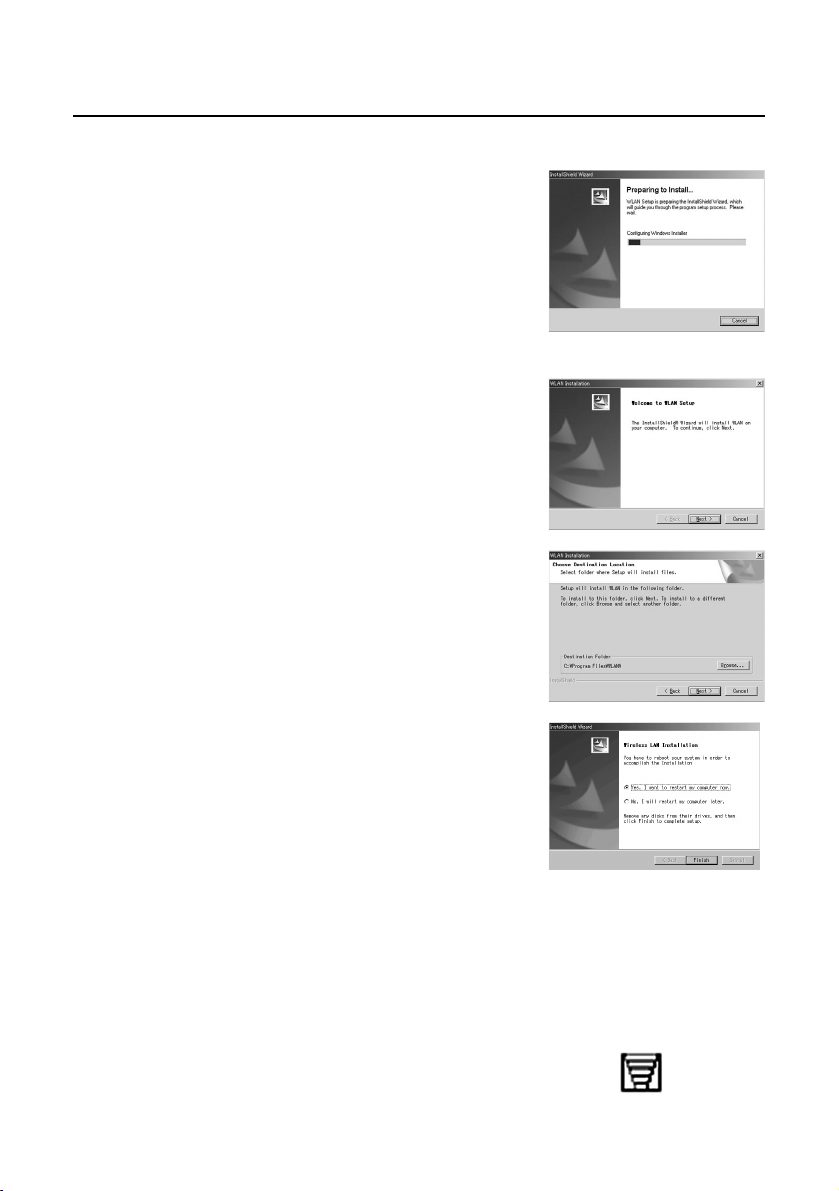
Windows 2000/98SE/Me:
Click [Wireless LAN Driver] at the
window appearing in step 1 on
page 9.
The wireless LAN installer starts up.
1
Click [Next].
The License Agreement appears.
2
Designate the utility storage
destination, and click [Next].
The software is downloaded.
3
Make sure that the [Yes, I want to
restart my computer now.]
checkbox is checked, then click
[Finish].
The computer reboots.
4
Mount the optional wireless card
(ET-CDWL3U) into the CF card
adapter and insert it into the
computer.
(See page 14)
When the permanent icon shown in the right can
be confirmed, the installation is complete. When
[Digital Signature Not Found] appears, click [Yes]
and continue the installation.
5
Software Installation (cont.)
12
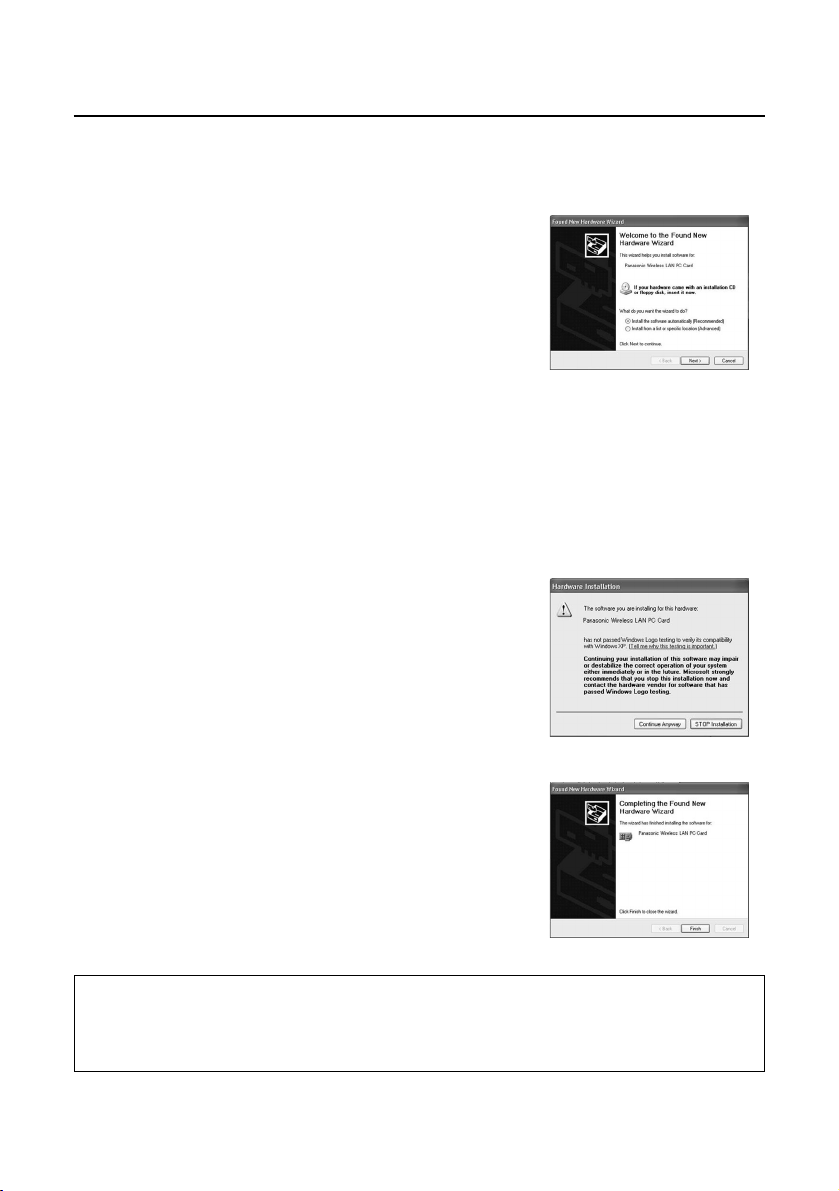
Windows XP:
Perform steps 1 to 4 of “Windows 2000/98SE/Me”, then perform the following
operations.
Mount the optional wireless card
(ET-CDWL3U) into the CF card
adapter and insert it into the
computer.
(See page 14)
The Found New Hardware Wizard starts up.
5
Make sure that the [Install the
software automatically
(Recommended)] checkbox is
checked, then click [Next].
A logo text message appears.
6
Click [Continue Anyway].
The Wizard complete message appears.
7
Click [Finish].
The logo authentication message appears.
8
Software Installation (cont.)
Check after installation:
Open [Start] →[All Programs] →[Connect To] →[Show all connections], and
check that [Panasonic Wireless LAN PC Card] has been added to the wireless
network connection icons.
13
1
Hexagonal key wrench
(supplied)
Card lock
2
4
5
3
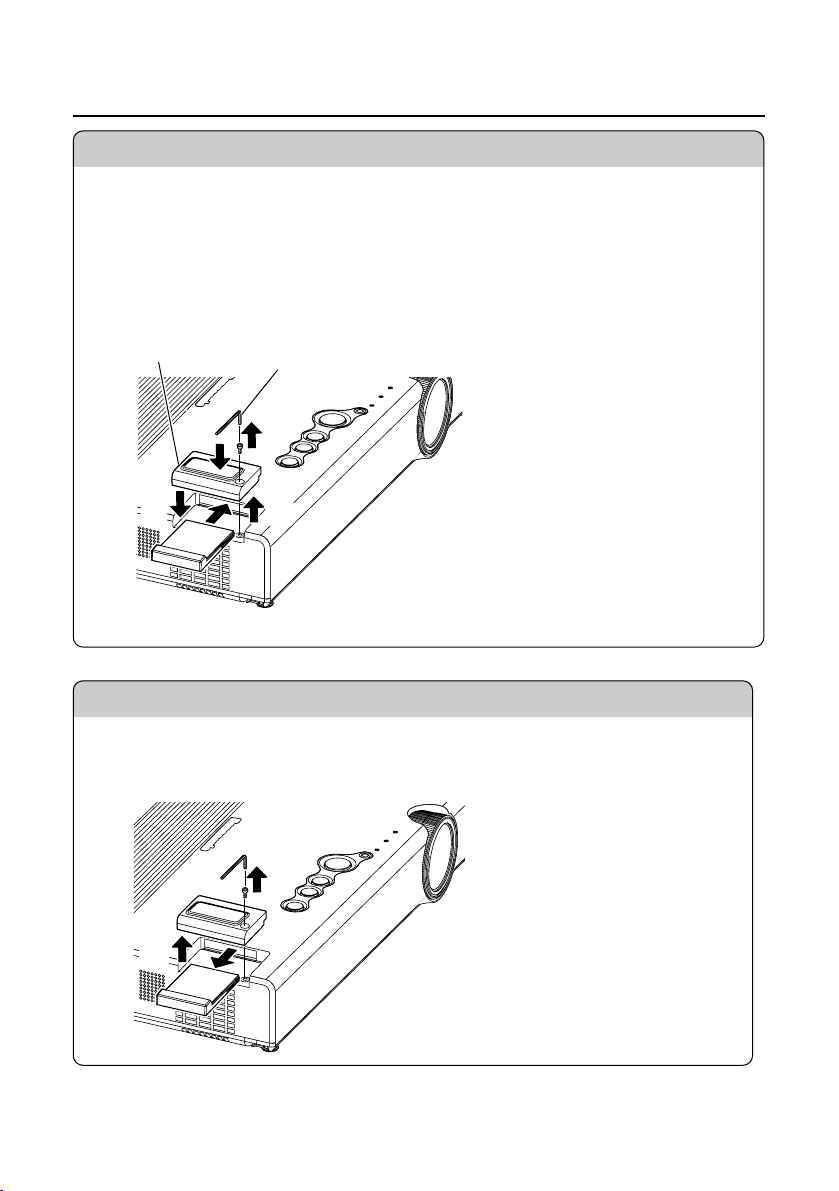
Insertion
• Before inserting the wireless card, turn off the power and keep it off for the
duration of the procedure.
• Attempting to force in the wireless card facing the wrong direction may result in
malfunction.
1
2
3
Removal
Before inserting the wireless card, turn off the power and keep it off for the
duration of the procedure.
Inserting and Removing the Wireless Card to and from the Projector
Remove the card
lock screw.
Remove the card
lock.
Remove the card.
3
2
1
Remove the card
lock screw.
Remove the card lock.
Insert the card until
it locks into place.
Mount the card lock.
Secure the card
lock with the screw.
5
4
3
2
1
14
Removal
Insertion
Shut down Wireless Manager ME if it is in use.
Click the [PC card] icon displayed in the task bar at the lower right of
the screen.
When the [PC card] icon is not displayed:
Open [Start] → [Control Panel] → [PC card], place a check in the [Show
control on the task bar] checkbox, and then click [OK].
Select [Panasonic Wireless LAN PC Card] and click [Stop].
Click [OK] and remove the wireless card.
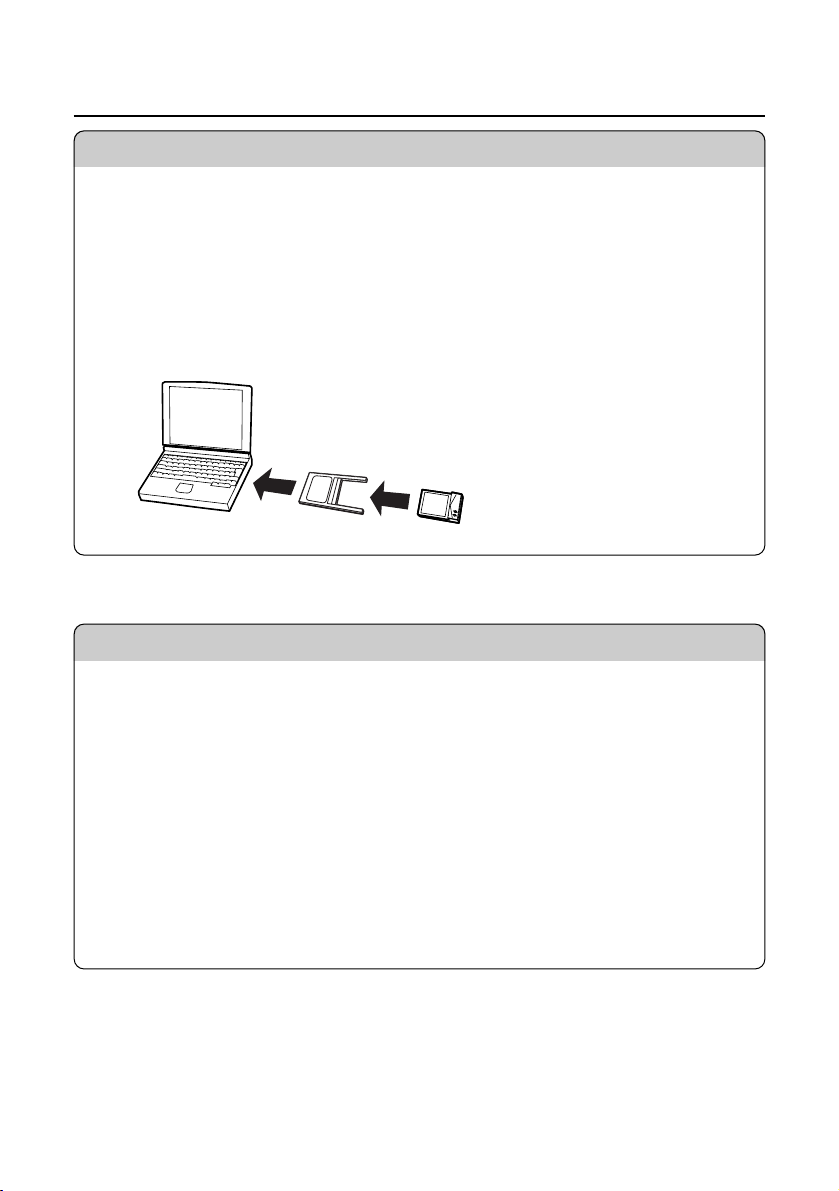
3
2
1
Mount the card in the
adapter.
Insert the adapter into
the PC card slot of the
computer.
2
1
• Be sure to install the Wireless LAN Driver before inserting the card.
(See page 10 or page 43)
• The example given here describes the insertion of the ET-CDWL3U or ET-
CDWL2U card.
When using a different card, refer to the user’s manual for that card.
• Be sure to also read the user’s manual for the computer.
• Attempting to force in the wireless card facing the wrong direction may result in
malfunction.
1
2
Inserting and Removing the Wireless Card to and from a Computer

15
Simple Wireless Connection (Using the Initial Settings)
When making a wireless connection between the projector and the computer using the
default settings with the supplied wireless card and the optional wireless card (ETCDWL3U or ET-CDWL2U), the IP address, communication mode and other necessary
settings are made automatically when Wireless Manager ME is started up.
However, note that Wireless Manager ME and the Wireless LAN Driver must be
installed.
For details on changing the initial settings and using the changed settings, refer to
pages 28 to 36.
Notes:
• When not using the optional wireless card noted above, simple connection cannot
be used with Windows Me/98SE.
• Operation is not guaranteed for all wireless cards and built-in wireless LAN
adapters, even when using Windows XP/2000.
• You may not be able to use other network adapters during simple connection.
Projector operations
Insert the supplied wireless card into the projector.
(See page 13)
Only the supplied card can be used for the projector side.
1
Turn on the projector.
2

16
Computer operations
Insert the optional wireless card into the computer.
(See page 14)
1
Turn on the computer.
2
Select [Start] →→[Programs] →→[Panasonic Wireless
Display]
→→
[Wireless Manager mobile edition].
• Wireless Manager ME starts up, and the connection select window shown
below appears.
3
Select the connection and click [OK].
The launcher shown below appears and the connection with the projector is
established.
4
Simple Wireless Connection (Using the Initial Settings) (cont.)
Notes:
• The initial network number setting for both the projector and the computer is “1”.
These numbers must match for the connection.
• Depending on the computer and wireless card used, automatic setup may not be
possible. If this is the case, the [Network] setting on the screen in step 3 above
will be switched to [USER] automatically. For details of the connection procedure,
first close Wireless Manager ME, and then refer to page 30.

17
Canceling the connection with the projector
Click [ ] on the launcher.
The following window appears.
1
Click [Yes].
The computer returns to the original network settings when the connection is
ended.
However, note that some time may be needed to return to the original network
settings.
2
Simple Wireless Connection (Using the Initial Settings) (cont.)
18
Using Wireless Manager ME
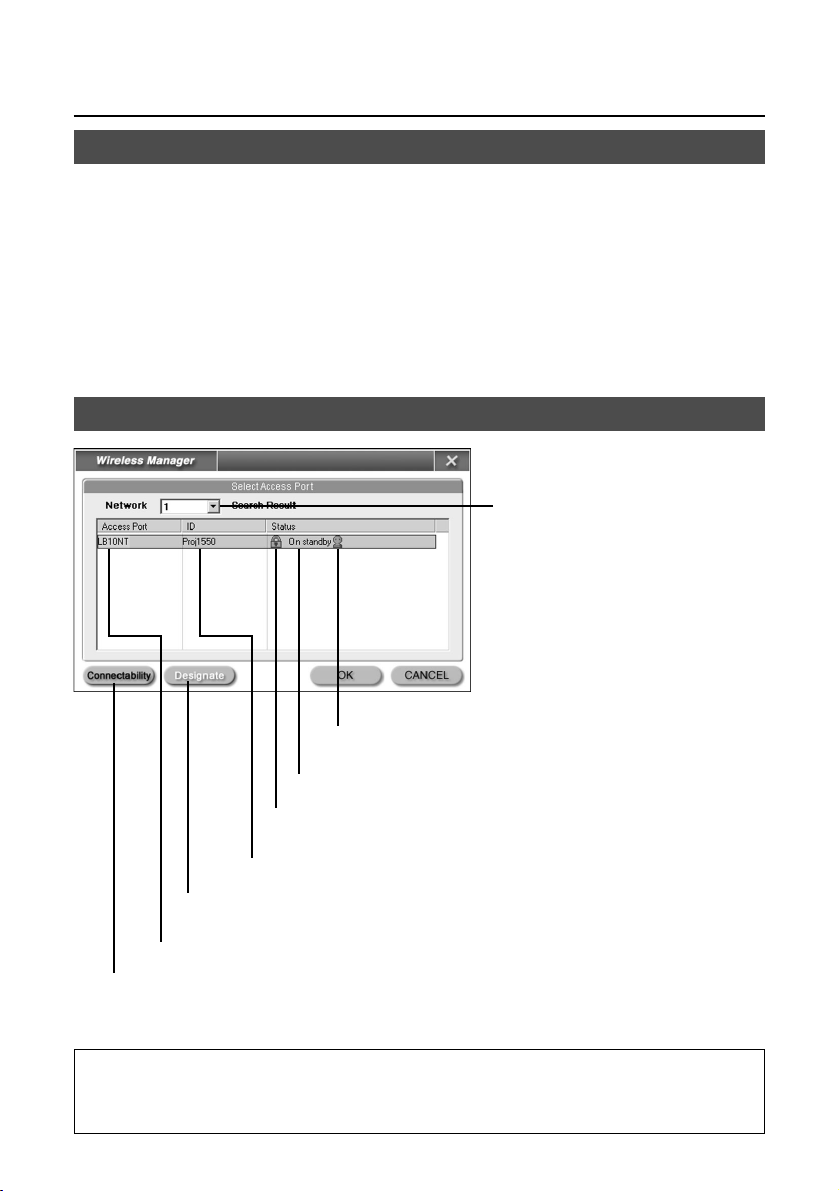
Description of the connection select window
When the network number to be
connected differs, select the
network number to be connected.
The network settings change
according to this selection.
This network number is stored in
the computer, so connection is
performed with the current
number the next time Wireless
Manager ME is started up.
This indicates the number of people connected to this
projector.
This indicates the status of this projector.
This appears when password entry is needed for connection.
(See page 26)
Projector name
Projector unique ID
The equipment to be connected can be designated when [Network]
is set to [USER].
Click this to display the projector name at the upper left of the
projection screen for the projector in question.
Startup
Select [Start] →→[Programs] →→[Panasonic Wireless Display]
→→
[Wireless Manager mobile edition].
Note:
With Windows Me or Windows 98SE, [1] or [USER] is the only available selection
option for the network number.
 Loading...