

Panasonic Lumix DMC-TS5, Lumix DMC-FT5, DMC-TS6 LUMIX, lumix DMC-FT6 Owner's Manual
Owner’s Manual
for advanced features
Digital Camera
Model No. DMC-TS5
Please read these instructions carefully before using this product,
Register onl ine at
www.panasonic.com/register
(U.S. customers only)
and save this manual for future use.
VQT4U19
F0113MG0

Contents
Before Use
Care of the camera...................................................................................................... 7
(Important) About the Waterproof/Dustproof and
Anti-shock Performance of the Camera .................................................................. 10
Standard Accessories............................................... .. .. .. .. .. ..... .. .. .. .. .. .. .. .. ..... .. .. .. .. .. .. 15
Names and Function s of Main Par ts............. ...................................... ................... ..16
Preparation
Charging the Batter y........... ................... ........... .................. ................... ........... ........ 18
• Charging........... ..................................... ................... ........... ................... ............ 18
• Approximate operating time and number of recordable pictures........................ 20
Inserting and Removing the Card (optional)/the Battery....................................... 22
About the Built-in Memory/the Card........................................................................ 24
• Approximate number of recordable pictures and available recording time......... 26
Setting Date/Time (Clock Se t) ........................................ ................... ........... ............ 28
• Changing the clock setting..................................................................................29
Tips for taking good pictures...................................................................................30
• Fit the strap and hold the camera carefully......................................................... 30
• Preventing jit te r (camera shake)..................... ................... ................................. 30
Basic
Selecting the Recording Mode................ ................... ................... .......... ................. 31
Taking Pictures using the Automatic Function
(Intelligent Auto Mode) .............................................................................................32
• Changing the settings.........................................................................................34
Taking Pictures with Your Favorite Settings
(Program AE Mode)................................................................................................... 36
Focusing .................................................................................................................... 37
Recording Motion Pictures....... ................... ........... ................... ................... .......... ..39
Playing Back.............................................................................................................. 42
• Displaying Multiple Screens (Multi Playback)..................................................... 43
• Using the Playback Zoom........ ................... .................. ........... ................... ........43
• Creating Still Pictures from a Motion Picture ...................................................... 44
• Playing Back Group Pictures.............................................................................. 44
Deleting Pictures........... ................... ................... .......... ................... ......................... 46
• To delete a single picture....................................................................................46
• To delete multiple pictures (up to 100) or all the pictures................................... 47
Setting the Menu ................... ...................................... ................... .......... ................. 48
• Setting menu items.......................................................................... .. ......... .... ....48
• Using the Quick Menu................. .......... ................... ...................................... .... 49
About the Setup Menu....................... ................... ...................................... .............. 50
- 2 -

Recording
About the LCD Monitor............................................................................................. 62
Using the Zoom ......................................................................................................... 64
• Optical Zoom.............. ................... ...................................... ................... .......... ..64
• Extended Optical Zoom (EZ).............................................................................. 65
• Intelligent Zoom................ .. ..... .. .. .. .. .. .. .. .. ..... .. .. .. .. .. .. .. .. ..... .... .. .. .. .. .. .. ..... .. .. .. .. .. ..65
• Digital Zoom............ ................... ...................................... .................. ........... ...... 65
Taking Pictures Using the Built-in Flash................................................................. 66
• Switching to the appropriate flash setting........................................................... 66
Taking Close-up Pictures ([AF Macro]/[Macro Zoom])...........................................69
Taking Pictures with the Self-timer.......................................................................... 70
Compensating th e Ex pos ure................................ ................... .......... ................... .... 71
Taking Pictures Using Auto Bracket ....................................................................... 72
Taking picture by setting the exposure manually
(Manual Expos ur e Mode)..................... ................... ................... .......... ................... ..73
Taking Pictures with different image effects
(Creative Control Mode)............................................................................................ 75
• [Expressive].............. ................... .......... ................... ................... ........... ............ 76
• [Retro]............................. ........... ................... ................... .......... ................... ......76
• [High Key]........... ................... ..................................... ................... ........... ..........76
• [Low Key].................. ................... .......... ................... ................... ........... ............ 76
• [Sepia]............ ................... ........... ................... ...................................... .............. 77
• [Dynamic Monochrome].............................................. ......... .... .. .... .... ......... .. .... ..77
• [Impressi ve Art]............. ................... ........... .................. ......................................77
• [High Dynamic]............... ................... ................... ........... .................. ................. 77
• [Cross Process] ..................... ..................................... ................... ........... ..........78
• [Toy Effect].......... ................... .......... ................... ................... .......... ...................78
• [Miniature Effect].............................. ...................................... ................... ..........78
• [Soft Focus]........... ................... .......... ................... ...................................... ........79
• [S tar Filter].............. ...................................... ................... .......... ................... ...... 79
• [One Point Col o r]....................... .......... ................... ................... ........... .............. 79
Take the Outdoors Scene Expressively .................................................................. 80
• Sport s Mode.............. .. .. .. .. .. ..... .. .. .. .. .. .. .. .. ..... .. .. .. .. .. .. .... ..... .. .. .. .. .. .. .. .. ..... .. .. .. .. .. ..80
• Snow Mode................................ ................... .......... ................... .........................80
• Beach & Snork eling Mode................................ .......... ................... .....................81
• Advanced Underwater Mode.............................................................................. 8 3
Taking panorama pictures (Panorama Shot Mode)................................................84
Taking pictures that match the scene being recorded (Scene Mode).................. 87
• [Portrait]................................. .......... ................... ................... .......... ...................88
• [Soft Skin] ................... ................... .......... ................... ................... ........... ..........88
• [Scenery].............................................................................................................88
• [Night Portrait]...................................... ................... ........... ................... .............. 89
• [Night Scenery].................................... ................... ........... ................... .............. 89
• [Handheld Night Shot]................................... .. .. .. .. .. .. .. .. ..... .. .. .. .. .... .. .. ..... .. .. .. .. .. ..89
• [HDR]............. ...................................... ................... ........... ................... .............. 90
• [Food].......................... .. .. .. ....... .. .. .. .. .. .. .. .. ..... .. .. .. .. .. .. .. .. ..... .. .. .. .. .. .. .... ..... .. .. .. .. .. ..90
• [Baby1]/[Baby2].................. ................... ................... ........... ................... ............ 91
- 3 -

• [Pet]....... ...................................... ................... .......... ................... ................... .... 91
• [Sunset]..................... ...................................... ................... .......... ................... .... 92
• [High Sens.].................... ................... ................... ........... .................. ................. 92
• [S tarry Sky] .............................. .......... ................... ................... .......... .................92
• [Glass Through]....................... ................... ..................................... ...................92
• [3D Photo Mode]............... ................... ................... ........... ................... .............. 93
Entering Text.............................................................................................................. 94
Using the [Rec] Menu....................... ...................................... .................. ........... ...... 95
• [Aspect Ratio] ................. ........... ................... ..................................... .................95
• [Picture Size].............................. .......... ................... ................... ........... .............. 96
• [Quality].......... ...................................... ................... ........... ................... .............. 97
• [Sensitivit y].......................... ................... ........... ................... ............................... 98
• [White Balance].................................. ................... ........... .................. ................. 99
• [AF Mode] ........................................ .... .. .. ..... .. .. .. .. .. .. .. .. ..... .. .. .. .. .. .. .. ....... .. .. .. .. ..102
• [Quick AF]................... ........... .................. ................... ........... ................... ........104
• [Face Recog.]............... ........... ................... ..................................... .................105
• [i.Exposure]................. ................... .......... ................... ................... ........... ........109
• [Min. Shtr Speed].............................................................................................. 109
• [i.Resolutio n].................................. ................... .......... ................... ................... .110
• [Digital Zoom].......... ................... .......... ................... ................... ........... .............110
• [Burst]................. .......... ................... ................... .......... ................... ..................111
• [Time Lapse Shot]..............................................................................................113
• [Color Mode] ...................................... .. .. .. ..... .. .. .. .. .. .. .. .. ..... .. .. .. .. .. .. .. ....... .. .. .. .. .. .115
• [Color Reproduction]................................................................................. .... .... .115
• [AF Assist Lamp]................................ ...................................... ................... .......115
• [Red-Eye Removal].................. .......... ................... ...................................... .......116
• [S tabilizer ]................... ........... .................. ...................................... ................... .116
• [Date St a mp]................. ........... ................... .................. ........... ................... .......117
• [Clock Set].................. ...................................... ................... .......... ................... .117
Using the [Motion Picture] Menu............................................................................118
• [Rec Format]................................ ................... .......... ................... ................... ...11 8
• [Rec Quality]............. ................... ...................................... ................... .......... ...119
• [Continuous AF]............................. .. .. .. .. .. ..... .. .. .. .. .. .. .. ....... .. .. .. .. .. .. .. .. ..... .. .. .. .. ..120
• [Wind Cut]............. ................... ................... .......... ................... ................... ...... 120
GPS/Sensor
Recording using the GPS function................................ ................... ........... ..........121
• Acquiring of the GPS information ..................................................................... 122
• Update the GPS information............................................................................. 125
• Change the recorded location name information . ............................................. 126
• Switch between displaying and hiding the location name information.............. 127
• Register additional landmarks ........................................................... ......... .. ....127
Reducing the Time Required for Positioning....................................................... 128
• Update using the “GPS Assist Tool” .................................................................128
• Update using the Wi-Fi Function ......................................................................131
• Check the validity period of the GPS assist data..............................................131
GPS Logs...... ...................................... ................... .......... ................... ................... ..132
• Record GPS Logs......................................................................................... ....132
- 4 -

• Output GPS logs to files ................................................................................... 133
• Delete GPS Logs........ ........... .................. ................... ........... ................... ........134
Sensors (compass/altimeter/barometer) are operated........................................135
Using the altimeter..................................................................................................136
• Adjusting the Altimeter......................................................................................137
• Adding an altimeter log.....................................................................................139
• Viewing the altimeter log................................................................................... 140
• Deleting the altimeter log................................ .......... ................... ................... ..141
Using the barometer ............................................................................................... 142
Using the compass ................................................................................................. 144
• Adjusting the compass...................................................................................... 145
Playback/Editing
Various methods of playback................................................................................. 146
• [Slide Show].................................................. ................... .......... ................... .... 147
• [Filtering Play]................... ........... ................... ................... .......... ................... ..149
• [Calendar]............................................ .... ......... .... .. .... ......... .. .... .... .. ......... .... ....152
Having Fun with Recorded Pictures (Ret ouch).......... ................... ................... .... 153
• [Auto Retouch ]............................................ .................. ........... ................... ...... 153
• [Creative Retouch]........ ...................................... ................... .......... .................154
• [Color Reproduction]................................................................................. .... ....155
Using the [Playback] Menu..................................................................................... 156
• [Location Logging] .................................................... .. ......... .... .... .. .... ......... .. ....156
• [Title Edit].......... .................. ................... ........... ................... ................... ..........158
• [Place-Name Edit]....... ........... .................. ................... ........... ................... ........159
• [Text Stamp]............ ................... ...................................... .................. ........... .... 160
• [Retouch]..... ................... ................... ........... ................... .................. ........... .... 162
• [Video Divide]............................. .. .. .. .. .. .. .. ..... .. .. .. .. .. .... .. ..... .. .. .. .. .. .. .. .. ..... .. .. .. .. ..163
• [Time Lapse Video]...........................................................................................164
• [Resize]............. .................. ................... ........... ................... .............................165
• [Cropping]............................................ .... ......... .. .... .... .. ......... .... .. .... ......... .... .. ..166
• [Favorite]........................... ........... ................... ................... .......... ................... ..167
• [Print Set].......... .................. ................... ........... ................... ................... ..........168
• [Protect]................................. .......... ................... ................... .......... ................. 170
• [Face Rec Edit]............. ................... ........... .................. .................................... 171
• [Copy]................... ................... .......... ................... ................... .......... ............... 172
Wi-Fi
Wi-FiR function........................................................................................................ 173
What you can do with the Wi-Fi function.............................................................. 175
Remote Shooting..................................................................................................... 176
• Installing the smartphone/tablet app “Image App” ........................................... 176
• Connecting to a smartphone/tablet................................................................... 177
• Taking pictures via a smartphone/tablet (remote recording)............................. 178
• Playing back p i ctures in the camera................... .......... ................... .................178
• Sending location information to the camera from a smartphone/tablet ............ 178
• History Connection .............................................................. .. .... .... .... ......... .... ..179
• Favorite Con nec tion................. .......... ................... ...................................... ......180
- 5 -

Connecting Easily to a Smartphone/tablet (NFC).................. ................... .......... ..182
• Controlling this camera remotely with a smartphone/tablet
by using the NFC function............. .......... ................... ................... ........... ........182
• Transferring images in this camera to a smartphone/tablet one at a time
by using the NFC function............. .......... ................... ................... ........... ........183
• About NFC.................... ...................................... ................... .......... ................. 184
Selecting the connection method................................................. ................... ...... 185
• Connecting via a wireless access point............................................................ 185
• Connecting directly........................................... .... .... .. ......... .... .. .... .... ....... .... ....187
Playback on TV........................................................................................................ 188
• Displaying the picture on TV right after taking it/
Displaying the picture on TV by playing it back on the camera ........................ 188
Send Images While Recording............................................................................... 190
• When sending images to smartphone/tablet .................................................... 190
• When sending images to PC............................................................................193
• When sending images to [Cloud Sync. Service]...............................................195
• When sending images to WEB Service............................................................ 196
• When sending images to AV device ................................................................. 197
Send Images Stored in the Camera.......................................................................198
• When sending images to smartphone/tablet .................................................... 198
• When sending images to PC............................................................................201
• When sending images to [Cloud Sync. Service]...............................................202
• When sending images to WEB Service............................................................ 203
• When sending images to AV device ................................................................. 204
• When sending images to Printer....................................................................... 205
Using “LUMIX CLUB”.............................................................................................. 206
• About the [LUMIX CLUB]..................................................................................206
• Using WEB services....... ........... ................... ................... .......... ................... .... 209
• Configuring the external AV device settings..... ................... .............................210
How to Use the [Wi-Fi Setup] Menu........................................................................211
Connecting to other equipment
Playing Back Pictures on a TV Screen .................................................................. 213
• Using VIERA Link (HDMI)............ .......... ................... ................... ........... ..........215
Playing back 3D pictures........................................................................................ 217
Saving still pictures and motion pictures on your PC............ ............................. 219
• About the supplied software............................................................................. 220
Saving stil l pic tures and motion pic tures on a Recorder................. ...................225
Printing th e Pictures..... ...................................... ................... .......... ................... .... 226
• Selecting a single picture and printing it...........................................................227
• Selecting multiple pictures and printing them................................................... 227
• Print Setting s.............. ................... ................... .......... ................... ...................228
Others
Screen Display.........................................................................................................231
Cautions for Use...................................................................................................... 233
Message Display ........................................ .. .. ..... .. .. .. .. .. .. .. .. ..... .. .. .. .. .. .. .. .. ..... .. .. .. .. ..247
Troubleshooting...................................................................................................... 251
- 6 -

Before Use
Please be sure to read
Performance of the Camera
being mishandled, which may cause water to seep in.
“(Important) About the Wa terpro of/Dustproof and Anti-shock
” (P10) before using this unit underwater to prevent the unit from
Care of the camera
∫ Handling of the camera (to prevent water leakage and malfunction)
•
Foreign objects may adhere to the inner side of the side door (around the
rubber seal or connecting terminals) when the side door is opened or
closed in places w ith sand or dust, etc. This may r esult in th e imp airmen t
of the waterproof performance if the side door is closed with foreign
object s ad hered. Be extreme ly careful since it may result in malfunction,
etc.
•In case foreign objects adhere to the inner side of the side door, wipe
them off with a dry , lint-free cloth.
•If any liquid such as water droplets is adhered to the camera or inner
side of the side door, wipe off with a soft, dry cloth. Do not open or close
the side door near the water, when underwater, using wet hands, or when
the camera is wet. It may cause water leakage.
Do not apply strong shock or vibration by dropping or knocking the
camera. Also, do not apply strong pressure to the camera.
e.g.:
Sit down with the camera in your trousers pocket or forcefully insert it into a
–
full or tight bag, etc.
–Attach any items such as accessories to the strap at tached to the camera.
–When strong pressure is applied using the camera at a depth exceeding 13 m (43 feet).
•Waterproof performance may be imp aired.
•Lens or LCD monitor may be damaged.
•It may cause malfunction in the performance or the function.
- 7 -

Before Use
∫ When inner side of the lens is fogged (condensation)
This unit has been designed to prevent condensation by
Anti-fog glass, however it may be caused by the environment
in which the camera is used. It is not a malfunction or failure of
the camera.
What to do when in ne r s id e of the lens is fogged
Turn this unit off and open the side door in a place with c onstant
•
ambient temperature , away from high temperatures, humidity, sand
and dust. The f og will disapp ear na turally in 10 minutes to 2 hours with
the side door open when the temperature of the camera gets clos e to
the ambient tempe r ature.
•Contact Panasonic if the fogging does not disappear.
Conditions in which inner side of the le ns may be fogged
Condensation may occur and the inner side of the lens may be fogged when the camera is
used in areas that undergo a significant change in temperature or in high humidity , such as the
following:
When the camera is used underwater suddenly after being on a hot beach, etc.
•
•When the camera is moved to a warm area from a cold area, such as at a ski resort or at high
altitude
•When the side door is opened in a high-humidity environment
- 8 -

Before Use
About the GPS
Your Panasonic Lumix digital still camera is GPS-equipped which can automatically record the
precise location coordinates of where the photo was taken. The specific physical address of
this location can easily be derived from this information.
If you upload such “geotagged” photos to the Internet, a social networking site or any other
electronic media, the precise location of where the photo was taken will remain embedded in
the photo and can be viewed by others.
Therefore, when taking digital still photos, care should be taken in determining whether you
wish to have the GPS feature enabled or disabled.
About the location name informat ion of this unit
Be sure to read the “User License Agreement for Location Name data” on P2 41 before using.
When [GPS Setting] is set to [ON], GPS function will operat e even when this unit is
turned off.
When you bring the camera on an airplane or to a hospital, etc., set [Airplane Mode] to [ON], and turn off
•
the camera because electromagnetic wav es, etc . emi tted by t he camera may interfere with gauges. (P53)
•Battery power is consumed even if this unit is turned off when [GPS Setting] is set to [ON].
About the information of recording location
•
Location names of the re cording locations or landmarks (such as name of the buildin g, etc.) are as
of October 2012. Information will not be updated.
•Depending on the country or the region, there may be less information for location names and
landmark names.
About the positioning
•
It will take lon ger for po sition ing in an en vironme nt wher e it is ha rde r to re ceive t he radio waves f rom
the GPS satellites. (P121)
•Even if the receiving condition of the radio waves is excellent, it may take approx. 2 to
3 minutes to complete the positioning when performing positioning for the first time or when
you perform positioning after turning this unit on again after turning the unit off with the
[GPS Setting] set to [OFF] or [Airplane Mode] set to [ON].
Using GPS assist data can reduce the time required for positioning. (P128, 131)
•The positions of the GPS satellites are changing constantly, so positioning may not be performe d or
the information may have errors depending on the recording location or conditions.
•
For details on how to perform positioning smoothly, read “Receiving signals from GPS satellites” on P121.
When used during overseas travel etc.
•
The GPS may not operate in China or cl ose to th e Chinese border in ne ighb ourin g count ries. (As of
January 2013)
The usage of GPS etc., may be restricted depending on the country or the region. This camera has
•
a GPS function, s o check with the embassies or travel agencies etc. prior to your overseas travel
regarding any restrictions on cameras with a built-in GPS f unction.
About the compass, altimeter, depth meter, and barometer
•
Information measured on this unit is only a rough indication. Do not use it for technical purposes.
•When using this unit for full-scale mountain climbing, trekking, or underwater, use the
measured information (direction, altitude, depth, atmospheric pressure) only as a rough
indication, and always carry a map and purp ose-built measurement tools.
- 9 -

Before Use
(Important) About the Waterproof/Dustproof and
Anti-shock Performance of the Camera
Wate r proof/Dustproof Performance
This camera’s waterproof/dustproof rating complies with the “IPX8” and “IP6X”
ratings. Provided the care and maintenance guidelines described in this document
are strictly followed, this camera can operate underwater , to a depth not exceeding
13 m (43 feet) for a time not exceeding 60 m inutes. (¢1)
Anti-shock Performance
This camera also complies with “MIL-STD 810F Method 516.5-Shock”. The camera
has cleared a drop test from a height of 2 m (6.6 f eet) onto 3 cm (0.1 feet ) thick
plywood. In most cases this camera should not sustain any damage if dropped from
a height not exceeding 2 m (6.6 feet). (¢2)
Withstand Load Perfor m ance
This camera complies with 100 kgf/220.5 lbf load tests. (¢3)
This does not guar a ntee no destruction, no malfunction, or waterproofing in all
conditions.
¢1 This means that the camera can be used underwater for specified time in specified pressure in
accordance with the handling method est ablished by Panasonic.
¢2 “MIL-STD 810F Method 516.5-Shock” is the test method standard of the U.S. Defense
Department, whic h specifies performing drop tests from a height of 122 cm (4 feet), at
26 orientations (8 corners, 12 ridges, 6 faces) using 5 sets of devices, and passing the
26 orientation drops within 5 devices. (If failure occurs during the test, a new set is used to pas s
the drop orientation test within a total of 5 devices)
Panasonic’s test method is based on the above “MIL-STD 810F Method 516.5-Shoc k”. However,
the drop height was changed from 122 cm (4 feet) to 200 cm (6.6 feet) dropping onto 3 cm
(0.1 feet) thick plyboard. This drop test was passed.
(Disregarding appear ance chan ge such as l oss of pain t or distor tion of the part where dr op impac t
is applied.)
¢3 According to the test conditions specified by Panasonic.
- 10 -

Before Use
∫ Handling of the camera
•
Waterproofing is not guaranteed if the unit is subject to an impact as a result of being hit or drop ped
etc. If an impact to the camera occurs, it should be inspected (subject to a fee) by Panasonic to
verify that the waterproofing is still effective.
•When the camera is splash ed with detergent, soap, hot spring, bath additive, sun oil, sun screen,
chemical, etc., wipe it off immediately.
•Waterproof function of the camera is for sea water and fresh water only.
•Any malfunction caused by customer misuse, or mishandling will not be covered by the warran ty.
•The inside of this unit is not waterproof. Water leakage wi ll cause malfunction.
•Supplied accessories are not waterproof.
•Card and battery are not waterproof. Do not handle with a wet hand. Also, do not insert wet card or
battery into th e ca m era .
•Do not leave the camera for a long period of time in places where the temperature is very low (such
as at ski resorts or high altitude s) or where the temperatur e may exceed 40 oC (104 oF) (such as
inside cars in stro ng sunlight , cl ose to a hea ter, on boats, or on the beac h). (W ater proof pe rformance
may become degraded.)
∫ About the [Precautions] demonstration display ([Requirements for Underwater use])
•
[Precautions] is displayed when this unit is turne d on for the first time af ter purchase, with the si de
door completely closed.
•Please check befo rehand to maintain t he waterproof performance.
1 Press 2 to select [Yes], and press [MENU/SET].
•
It will automatically skip to the clock setting screen if [No] is selected before it starts.
2 Press 2/1 to change the picture.
2: Return to the previous screen
1: View the next screen
•
It can be forcefully ended by pressing [MENU/ SET].
• When it is forcefu lly ended while checking by turning the unit off or pressing [MENU/SET],
[Precautions ] is displayed every time this unit is turned on.
3 After the final screen (12/12), press [MENU/SET] to finish.
•
When [MENU/SET] is p ressed af ter the final sc reen (12/12 ), [Prec autions] is not d isplayed fro m
the next time this unit is turned on.
• This can also be viewed from [Precautions] (P50) in the [Setup] menu.
- 11 -
Before Use
Check before using underwater
Always wipe the rubb er seal on the side door and the area wh ere rubber seal sits with a
dry , lint-free cloth.
1 Check that there are no foreign objects on the inner side of the side door.
•
If there is any foreign object, such as lint, hair, sand, etc., on the surrounding area, water will
leak within a few seconds causing malfunction.
• Wipe it off with a soft, dry cloth if there is any liquid.
It may cause water leaks and malf unction if you use the camera with liquid adhered.
• If foreign objects are present, wipe them off with a dry, lint-free clo th.
• Be extremely ca reful to remove any sand, etc. that may adhere to the sides and c orners of the
rubber seal.
2 Check for cracks and deformation of the rubber seal on the side door.
•
The integrity of the rubber seals may decrease after about 1 year, with us e and age. To avoid
permanently damaging the camera the seals should be replaced once each year. Please
contact Panas onic for related costs and other information.
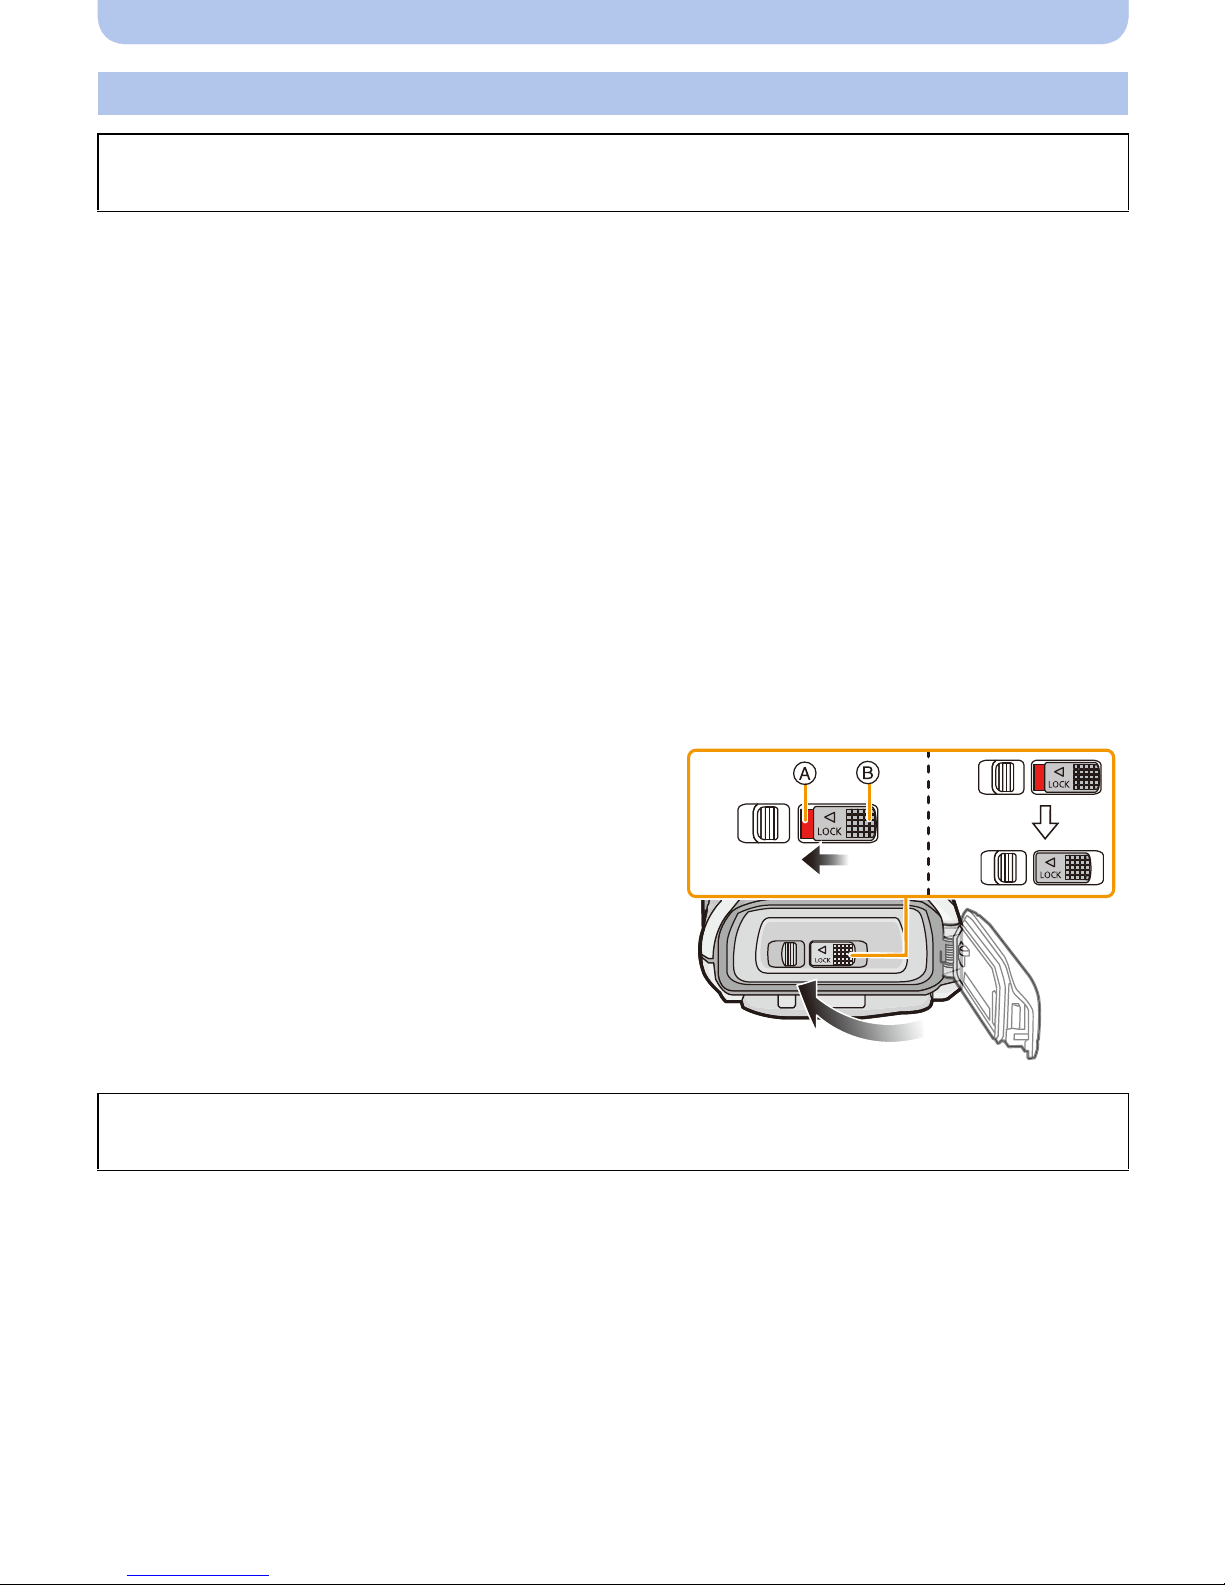
3 Close the side door securely.
•
Lock the [LOCK] switch securely until the red part is no longer visible.
• To prevent water intrusion, be careful not to catch foreign objects such as liquids, sand, hair,
dust, or the str a p cord.
A Red part
B [LOCK] switch (gr a y part)
C Released state
D Locked state
Do not open or close the side door in places with sand and dust, close to water, or with
wet hands. Sand or dust adhering may cause water leaks.
- 12 -

Before Use
Using the camera underwater
•Use the camera underwater to 13 m (43 feet) with the water temperature between 0 oC and 40 oC
(32 oF and 104 oF).
•Do not use for scuba diving (Aqualung).
•Do not us e th e c a m er a at a depth of ov er 13 m (43 feet).
•Do not use it in hot water over 40oC (104 oF) (in the bath or hot spring).
•Do not use the camera underwater for longer than 60 minutes continuously.
•Do not open or close the side door underwater.
•Do not apply sh ock to the camer a under wate r . (Waterproof performance may not b e mainta ined, and
there is a chance of water leak.)
•Do not dive into the water holding the camera. Do not use the camera in a location wher e the water
will splash strongly, such as rapid flow or waterfall. (Strong water pressure may be applied, and it
may cause malfunction.)
•The camera will sink in the water. Take care not to drop the camera and lose it underwater by
securely placing th e st rap around your wrist or similar meas ure.
Caring of the camera after using it underwater
Do not open or close the side door until the sand and dust is removed by rinsing the
camera with water.
Make sure to clean the camera after using it.
Thoroughly wipe off any water droplets, sand, and saline matter on your hands, body, hair, etc.
•
•It is recommended to clean the camera indoors, avoiding places where water spray or sand may
fall.
After using it underwater, always clean the camera rather than leaving it in a dirty
state.
Leaving the camera with foreign objects or saline matter on it may caus e damage, discoloration,
•
corrosion, unusual odour, or deterioration of the waterproof performance.
1 Rinse with water with the side door closed.
•
After use at the seaside or underwater, soak the unit in fresh
water pooled in a shallow container for about 10 minutes .
• If the zoom button or c amera [ON/OFF] button do not move
smoothly, it may be caused by an adhesion of foreign objec ts .
Using in such a stat e may cause malfunct ions, such as lock ing
up, so wash off any foreign objects by shaking the camera in
fresh water.
• Bubbles may come out of the drainage hole when you
immerse the camera in water, but this is not a malfunction.
- 13 -
Before Use
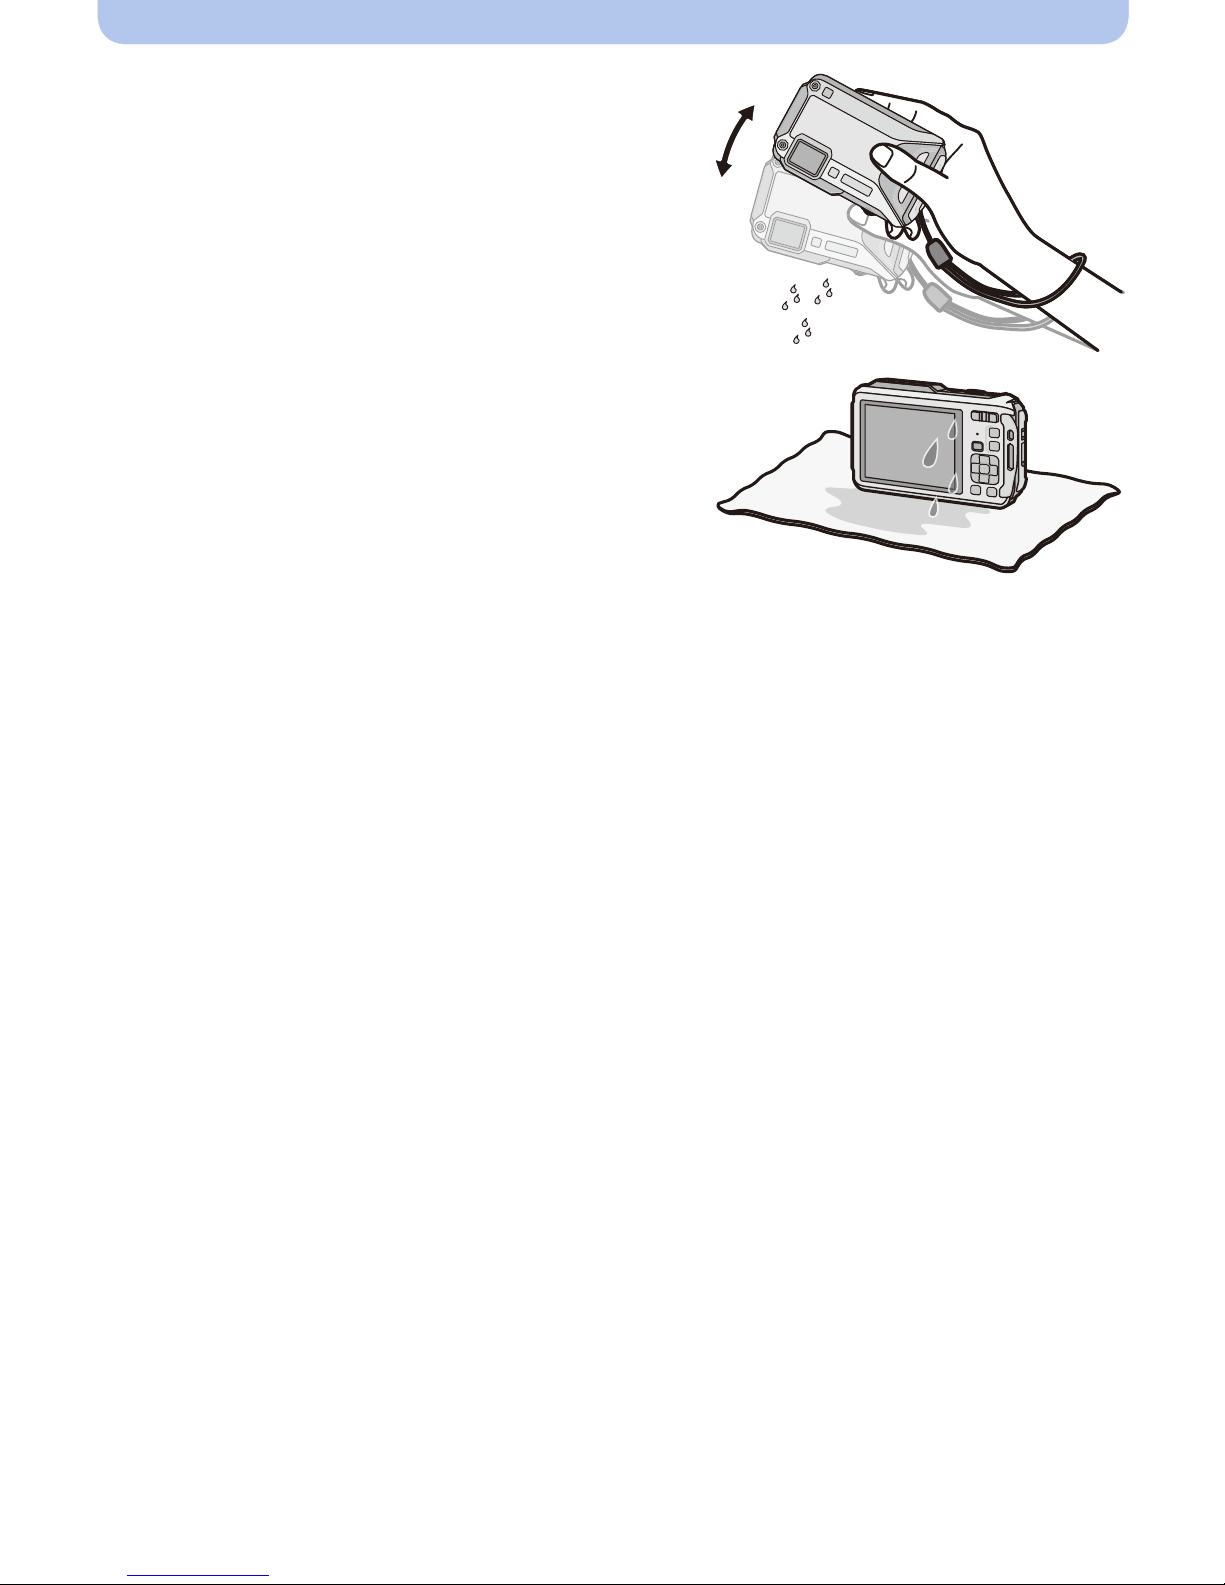
2 Drain water by holding the camera upside
down and shaking it lightly a few times.
Make sure to put your hand through the strap to
•
prevent the camera from falling.
3 Wipe off water drops on the camera with a
soft, dry cloth and dry the camera in a shaded
area that is well ventilated.
Dry the camera by standing it on a dry cloth. This
•
unit incorporates drain design, draining water in
gaps in the camera [ON/OFF] button and zoom
button, etc.
• Do not dry the camera with hot air from dryer or
similar. Waterpr oof performance will deteriorate due to deformation.
• Do not use chemicals such as benzine, thinner, alcohol or cleanser , soap or detergent s.
4 Confirm tha t there are no wa ter droplets, open the side door, and wipe off any wa ter
droplets or sand left inside using a soft, dry cloth.
Water droplets may adhere to the card or battery when the side door is opened without
•
thoroughly drying. Also, water may accumulate in the gap around the card/battery slot or the
terminal connector. Be sure to wipe any water off with a soft, dry cloth.
• The water droplets may seep into the camera when the side door is closed while it is still wet,
causing condensation or failure.
- 14 -

Before Use
Standard Accessories
Check that all the accessories are supplied before using the camera.
•
Supplied accessories are not waterproof.
•The accessories and their shape will di ffer dependi ng on the country or area where the camera was
purchased.
For details on the accessories, refer to “Basic Owner’s Manual”.
•Battery Pack is indicated as battery pack or battery in the text.
•Battery Charger is indicated as battery charger or charger in the text.
•SD Memory Card, SDHC Memory Card and SDXC Memory Card are indi ca ted as card in the text.
•The card is optional.
You can record or play back pictures on the built-in memory when you are not using a card.
•If any accessories are lost, cu stome rs in the USA and Pu ert o Rico should cont a ct Pan asonic’s parts
department at 1-800-833-9626 and customers in Canada should contact 1-800-99-LUMIX
(1-800-995-8649) for further informati on about obtaini ng replacement parts.
- 15 -
Before Use
1
23 4
MENU
/SET
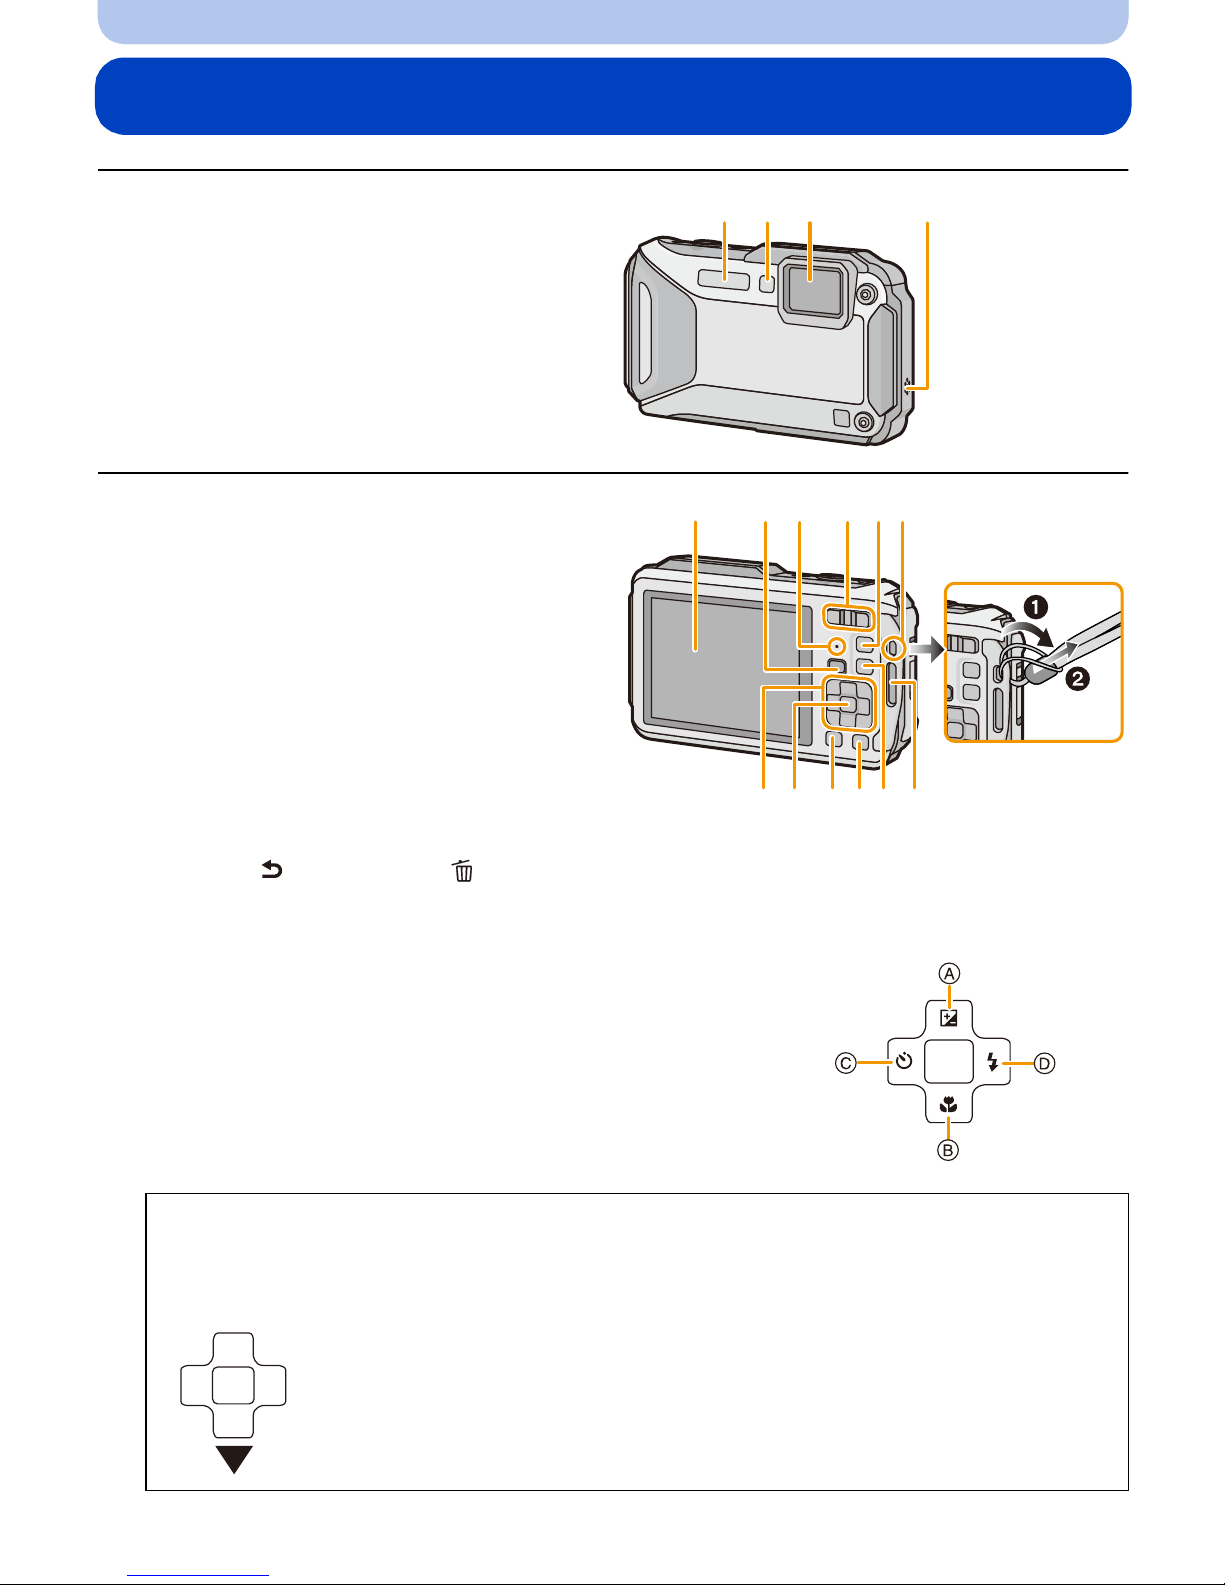
Names and Functions of Main Parts
1Flash (P66)
2 Self-timer indicator (P70)/
AF Assist Lamp (P115)/
LED light (P56)
3 Lens (P8, 237, 255)
4 Speaker (P53)
5 LCD monitor (P62, 231, 236)
5678910
6 [Wi-Fi] button (P177)
®
7Wi-Fi
connection lamp (P17 4)
8 Zoom button (P64)
9[(] (Playback) button (P42)
10 Strap eyelet (P30)
Be sure to attach th e stra p w h en usi n g the
•
camera to ensure that you will not drop it.
• Be sure to attach th e stra p to the str ap
eyelet.
11 Decor ative hole
12 [MODE] button (P31, 146)
13 [Q.MENU/ ] button (P49)/[ ] (Delete) button (P46)
14 [DISP.] button (P62)
15 [MENU/SET] button (P48)
16 Cursor buttons
A: 3/Exposure compensation (P71)
Auto Bracket (P72)
B: 4/Macro Mode (P69)
AF Tracking (P104)
C: 2/Self-timer (P70)
D: 1/Flash setting (P66)
111213141516
In this owner's manual, the cursor buttons are described as shown in the figure below or
described with 3/4/2/1.
e.g.: When you press the 4 (down) button
or Press 4
- 16 -
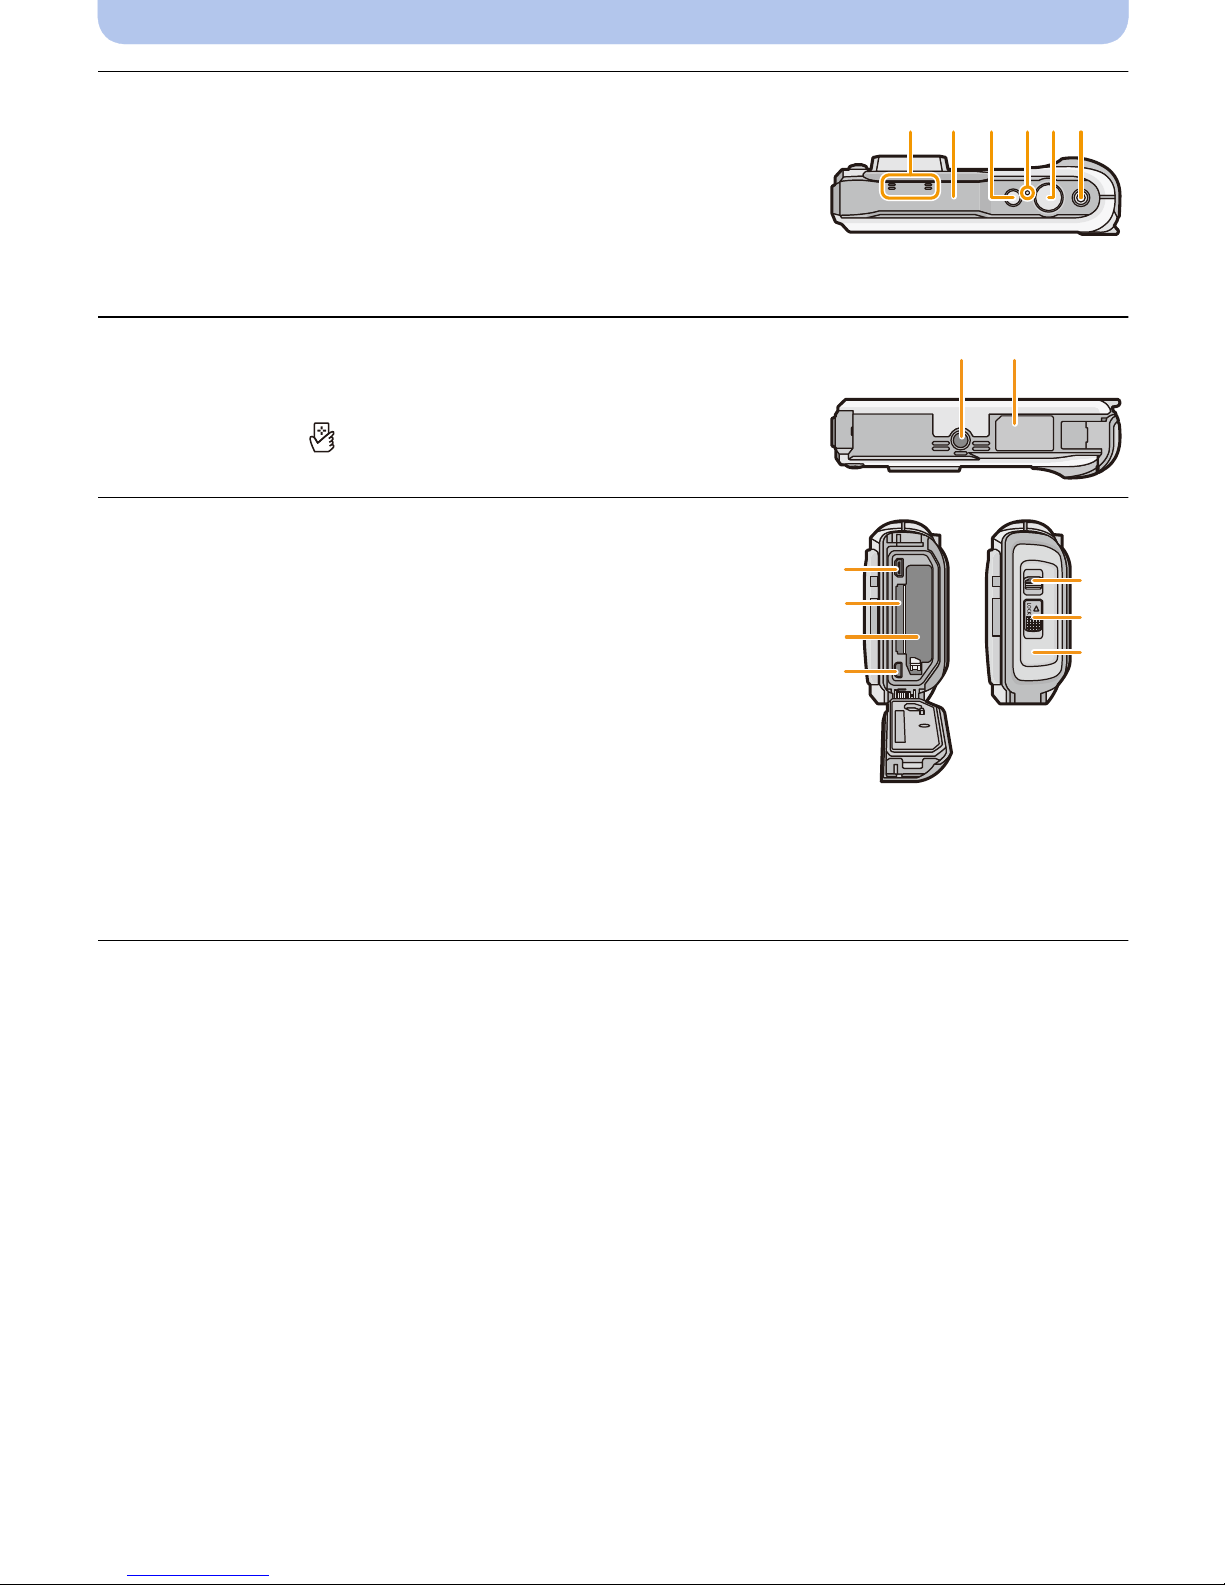
17 Microphone
17 18 19 20 21 22
23 24
18 GPS antenna (P121)
19 Camera [ON/OFF] button (P28)
20 GPS status indicator (P122)
21 Shutter button (P32, 36)
22 Motion picture button (P39)
23 Tripod mount
•
A tripod with a scre w length of 5.5 mm (0.22 inch) or more ma y
damage this unit if attached.
24 NFC antenna [ ] (P182)
25 [HDMI] socket (P213, 215)
•
Do not connect with any cable other than an HDMI micro
cable (RP-CHEU15: optional). Doing so may cause
malfunction.
26 Card slot (P22)
27 Battery slot (P22)
Before Use
25
26
27
28
29
30
31
When using an AC adaptor, ensure that the Panasonic DC
•
coupler (optional) and AC adaptor (optional) are used. For
connection details, refer to P23.
28 [AV OUT/DI GITAL] socket (P213, 222, 225, 226)
29 Release lever (P22)
30 [LOCK] switch (P12, 22)
31 Side door (P12, 22, 23)
- 17 -
Preparation
Charging the Battery
∫ About batteries that you can use with this unit
It has been found that counterfeit battery packs which look very similar to the
genuine product are made available to purchase in some markets. Some of these
battery packs are not adequately protected with internal protection to meet the
requirements of appropriate safety standards. There is a possibility that these battery
packs may lead to fire or explosion. Please be advised that we are not liable for any
accident or failure occurring as a result of use of a counterfeit battery pack. To
ensure that safe products are used, we would recommend that a genuine Panasonic
battery pack is used.
Use the dedicated charger an d battery.
•
Charging
•The battery is not ch arged when the camera is shipped. Charge the battery before use.
•Charge the battery with t he charger indoors.
•Charge the battery in areas with an ambient temperature between 10 oC and 30 oC (50 oF and
86 oF) (same as the battery temperature) is recommended.
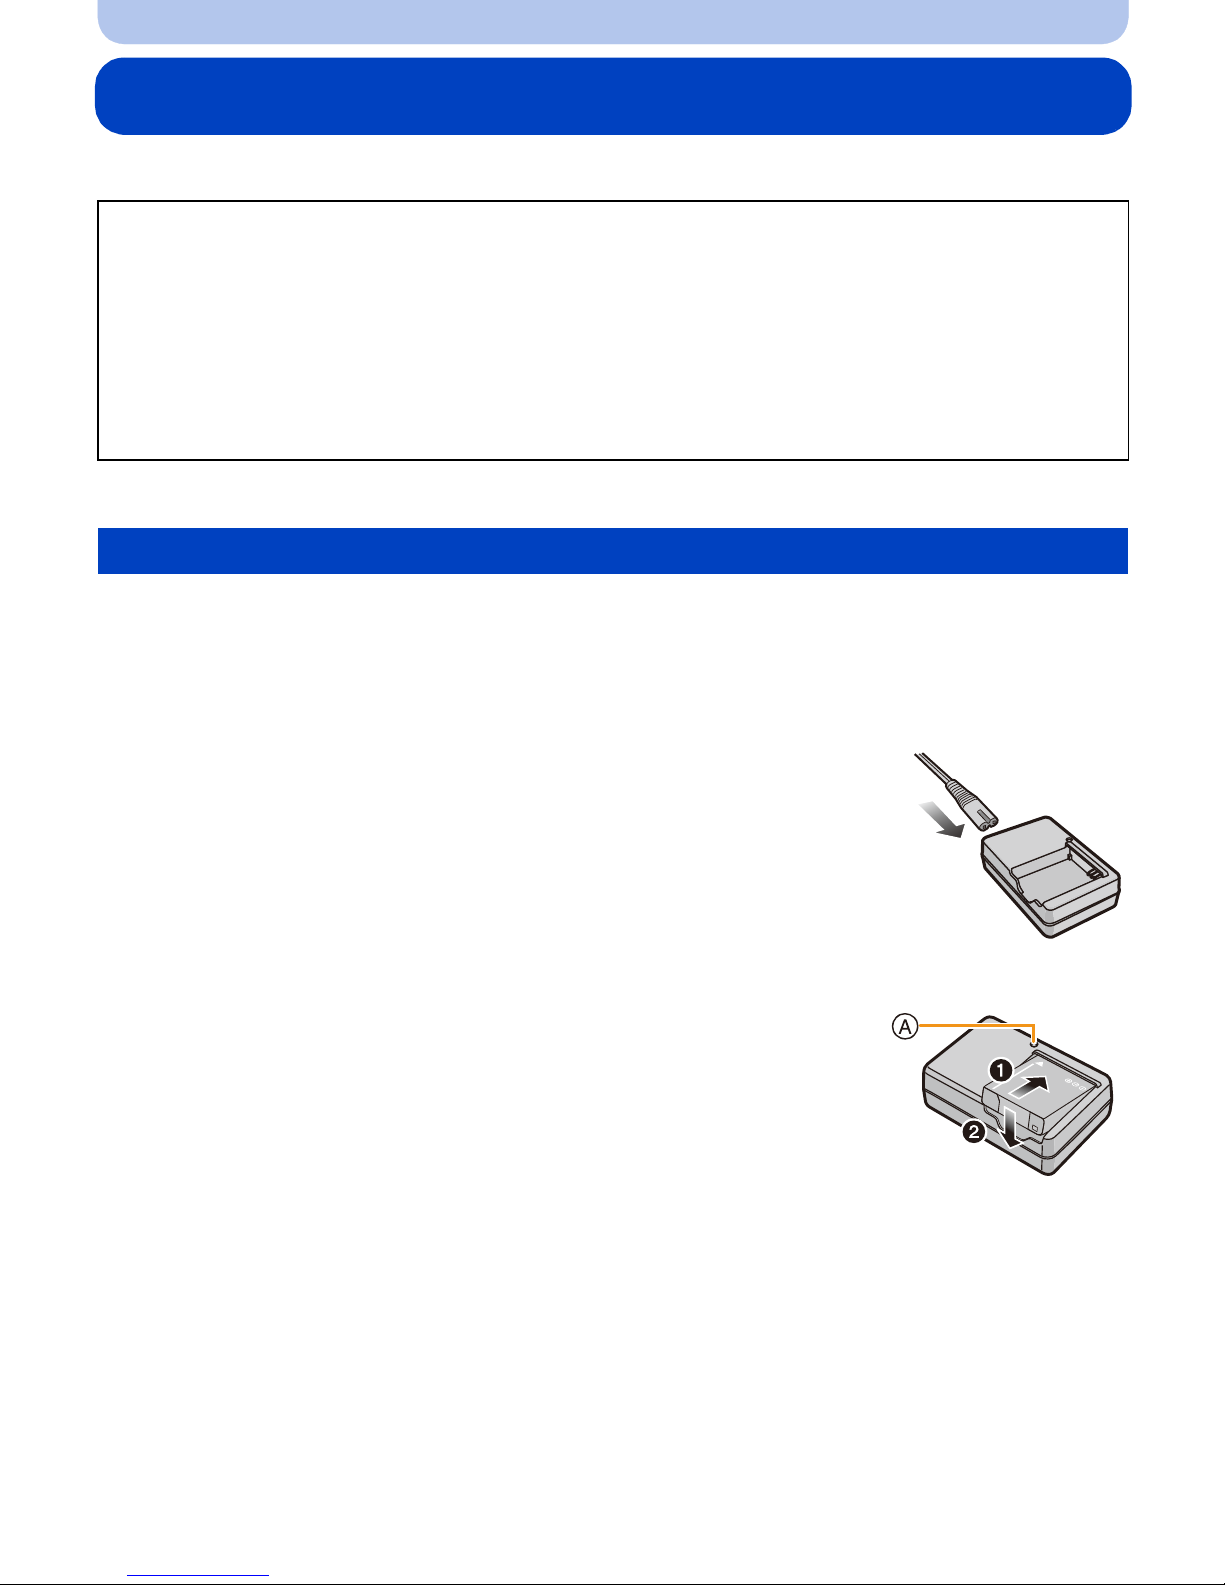
Connect the AC cable.
1
Attach th e batt ery p ayin g attention to the d irection of
2
the battery.
• The [CHARGE] indicator A lights up and charging begins.
- 18 -

Preparation
∫ About the [CHARGE] indicator
On: Charging.
Off: Charging has completed. (Disconnect the charger from the electrical socket and
detach the battery after charging is completed.)
•
When the [CHARGE] indicator flashes
–The battery temper ature is t oo high or too lo w . It is recommend ed to charge th e battery again in an
ambient temperature between 10oC and 30 oC (50 oF and 86 oF).
–The terminals of the charger or the battery are dirty. In this case, wipe off the dirt with a dry cloth.
∫ Charging time
Charging time Approx. 165 min
•
The indicated charg ing time is for when the batter y has been discharged completely. The
charging time may vary depending on how the battery has been used. The charging time for
the battery in hot/cold environments or a battery that has not been used for long time may be
longer than normal.
∫ Battery indication
The battery indication is displayed on the LCD monitor.
The indication t urns red a nd blinks if the remaining battery po wer is ex hausted. Rec harge th e batt ery
•
or replace it with a fully charged battery.
•Do not leave any metal items (such as clips) near the contact areas of the power plug.
Otherwise, a fire and/or electric shocks may be caused by short-circuiting or the resulting
heat generated.
•The battery becomes warm after using it and during and after char ging. The camera also becomes
warm during use. This is not a malf unction.
•The battery can be rech arged e ven whe n it still h as some cha rge left, but it is not r ecommend ed tha t
the battery cha r ge be frequently topped up while the battery is fully charged. (Since characteristic
swelling may occur.)
- 19 -

Preparation
Approximate operating time and num ber of recordable pictures
∫ Recording still pictures
Number of recordable
pictures
Recording ti me Approx. 185 min
Approx. 370 pictures
(By CIPA standard in Pr ogram AE
Mode)
Recording conditions by CIPA standard
•
CIPA is an abbreviation of [Camera & Imaging Products Association].
•Temperature: 23oC (73.4 oF)/Humidity: 50%RH when LCD monitor is on.
•Using a Panasonic SD Memory Card (32 MB).
•Using the supplied battery.
•Starting recording 30 seconds after the came ra is turned on. (When the Optic al Image Stabilizer
functio n is set to [ON] .)
•Recording once every 30 seconds with full flash every second recording.
•Changing the zoom magnification from Tele to Wide or vice versa in every recording.
•Turning t he camera off every 10 recordings and leaving it unt il the temperature of the battery
decreases.
•Not using the GPS function.
The number of recordable pictures varies depending on the recording interval time. If
the recording interval time becomes longer, the number of recordable pictures
decreases. [For example, if you were to take one picture every two minutes, then the
number of pictures would be reduced to approximately one-quarter of the number of
pictures given above (based upon one picture taken every 30 seconds).]
- 20 -

∫ Recording motion pictures
Preparation
[AVCHD]
(Recording with picture qua lity set
to [FHD/60p])
Recordable time Approx. 80 min Approx. 95 min
Actual recordable tim e Approx. 35 min Approx. 45 min
These times are fo r an ambien t temper at ure of 23 oC (73.4 oF) and a humidit y of 50% RH. Pleas e be
•
aware that these times are approximate.
(Recording with pictur e quality set
[MP4]
to [FHD/30p])
•Time of recording without using the GPS function.
•Actual recordable ti me is the time availabl e for record ing when repeat ing action s such as turni ng this
unit on and off, starting/stopping recording, z oom operation, etc.
•Maximum time to record motion pictures continuously with [FHD/60p/ ]/[FHD/60p]/[FHD/60i/ ]/
[FHD/60i] in [AVCHD] is 29 minutes 59 seconds.
•Maximum time to record motion pictures contin uously with [MP4] is 29 minutes 59 seconds or up to
4 GB. (For [FHD/30p] in [MP4] format, t he file s ize is large and so t he recorda ble time will d rop belo w
29 minutes 59 seconds.)
∫ Playback
Playback time Approx. 210 min
The operating times and number of recordable pictures will differ according to the
•
environment and the operating conditions.
For example, in the following cases, the operating t i mes shorten and the number of rec ordable
pictures is reduced .
–At low temperatur e or in cold locations such as ski reso rts or at high altitude
¢ Residual image may show on the LCD display when in use. The battery performance will
decrease, so keep the camera and spare batteries warm by placing them in a warm place
such as inside your cold protection gear or clothing. Performance of batteries and LCD
monitor will restore to normal when the temperature returns to normal.
¢
–When using [Monitor Luminance].
–When operations such as flash and zoom are us ed repeatedly.
–When the GPS function is operating.
•When the operating time of the camera becomes extremely short even after properly charging the
battery, the life of the battery may have expired. Buy a new battery.
- 21 -
Preparation
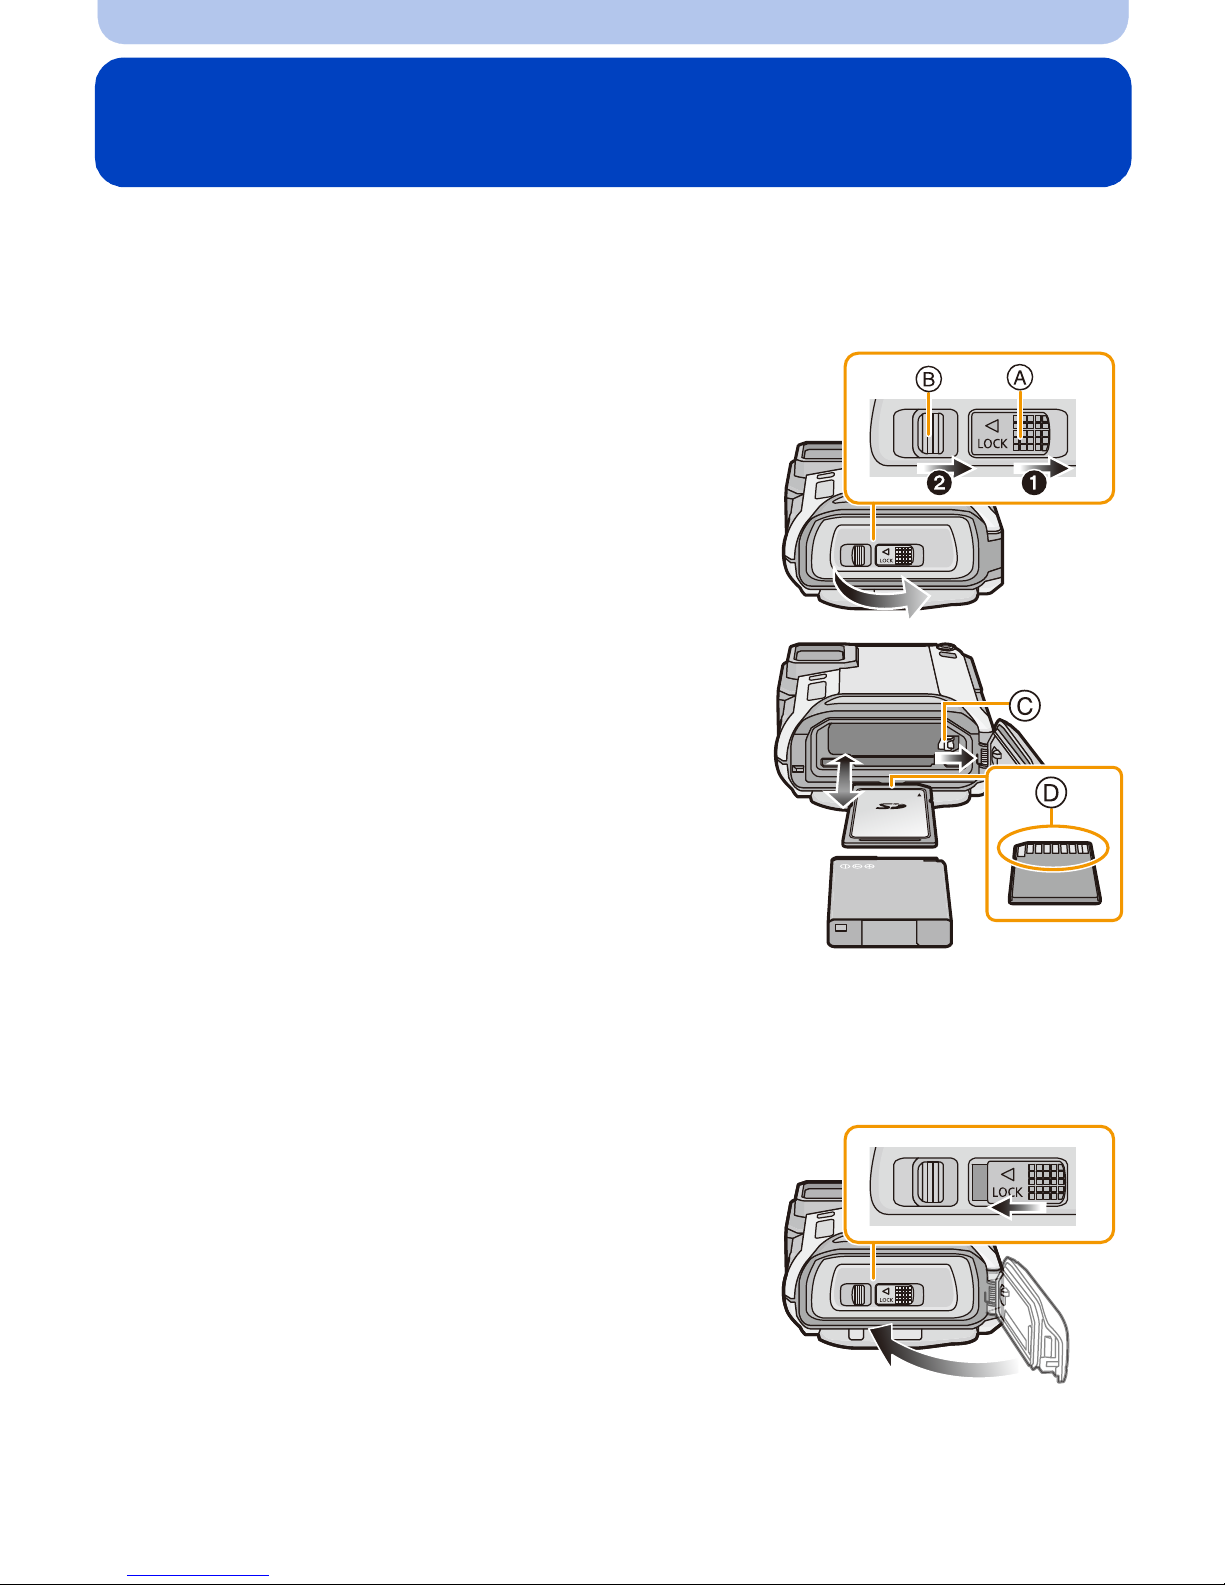
Inserting and Removing the Card (optional)/the
Battery
•Check that thi s un i t is turn ed off.
•Confirm that there is no foreign object. (P12)
•We recommend using a Panasonic card.
1: Slide the [LOCK] switch A, and release
1
the lock.
2: Slide the release lever B and open the
side door.
• Always use genuine Panasonic batteries.
• If you use other batteries, we cannot guarantee the
quality of this product.
Battery: Being careful about the battery
2
orientation, insert all the way until you hear
a locking sound and then check that it is
locked by lever C. Pull the lever C in the
direction of the arrow to remove the battery.
Card: Push it securely all the way until you
hear a “click” while being careful about the
direction in which you insert it. To remove
the card, push the card until it clicks, then
pull the card out upright.
D:Do not touch the connection terminals of the card.
Close the side door until it clicks, and then
3
lock the [LOCK] switch by sliding it toward
[2].
• Confirm that the red part on the [LOCK] s witch is not
showing.
- 22 -

Preparation
•Remove the battery after use. (T he battery will be exhausted if left for a long period of time after
being charged.)
•Turn the camera off and wait for the “LUMIX” display on the LCD monitor to clear before removing
the card or battery. (Otherwise, this unit may no longer operate normally and the card itself may be
damaged or the recorded pictures may be lost.)
∫ About the water leakage warning message
To maintain the waterproof performance of this unit, a message prompting to check for any
foreign material inside the side door or to perform maintenance is displayed along with a
warning sound when the following are performed. (P249)
When this unit is turned on after opening the si de door and replacing the card.
•
•When this unit is turned on after opening the si de door and replacing the battery.
•After opening the side door, close it securely taking care not to get any foreign objects caught.
•If foreign objects are present, wipe them off with a dry, lint-free cloth.
•Warning message display can be turn ed off by pressin g any button.
Using an AC adaptor (optional) and a DC coupler (optional) instead of the battery
The AC adaptor (optional) can only be used with the designated
Panasonic DC coupler (optional). The AC adaptor (optional)
cannot be used by itself.
1 Open the side door A.
2 Insert the DC coupler, being careful of the direction.
3 Plug the AC adaptor B into an electrical outlet.
4 Connect the AC adaptor B to the [DC IN ] socket C of the DC
coupler.
Ensure that onl y the AC ad aptor a nd DC cou pler fo r th is camera are used.
•
Using any other equipme nt may cause damage.
•Always use a genuine Panas onic AC adaptor (optional).
•When using an AC adaptor, use the AC cable supplied with the AC adaptor.
•Side door cannot be clo sed while the AC adaptor is connec ted.
•Some tripods cannot be attached when the DC coupler is connected.
•Do not apply any force to the side door with the weight of the cable or your hand when the AC
adaptor is connected. It may cause damage.
•The DC coupler may get disconnected from this unit if a cable is pulled when connecting the
AC adaptor, so take caution.
•Before removing the DC coupler, turn the camera off and disconnect t he AC adaptor.
•Also read the operating instructions for the AC adaptor and DC coupler.
•Waterproof/dustproof function does not operate when the AC adaptor is connected.
- 23 -
Preparation
1
About the Built-in Memory/the Card
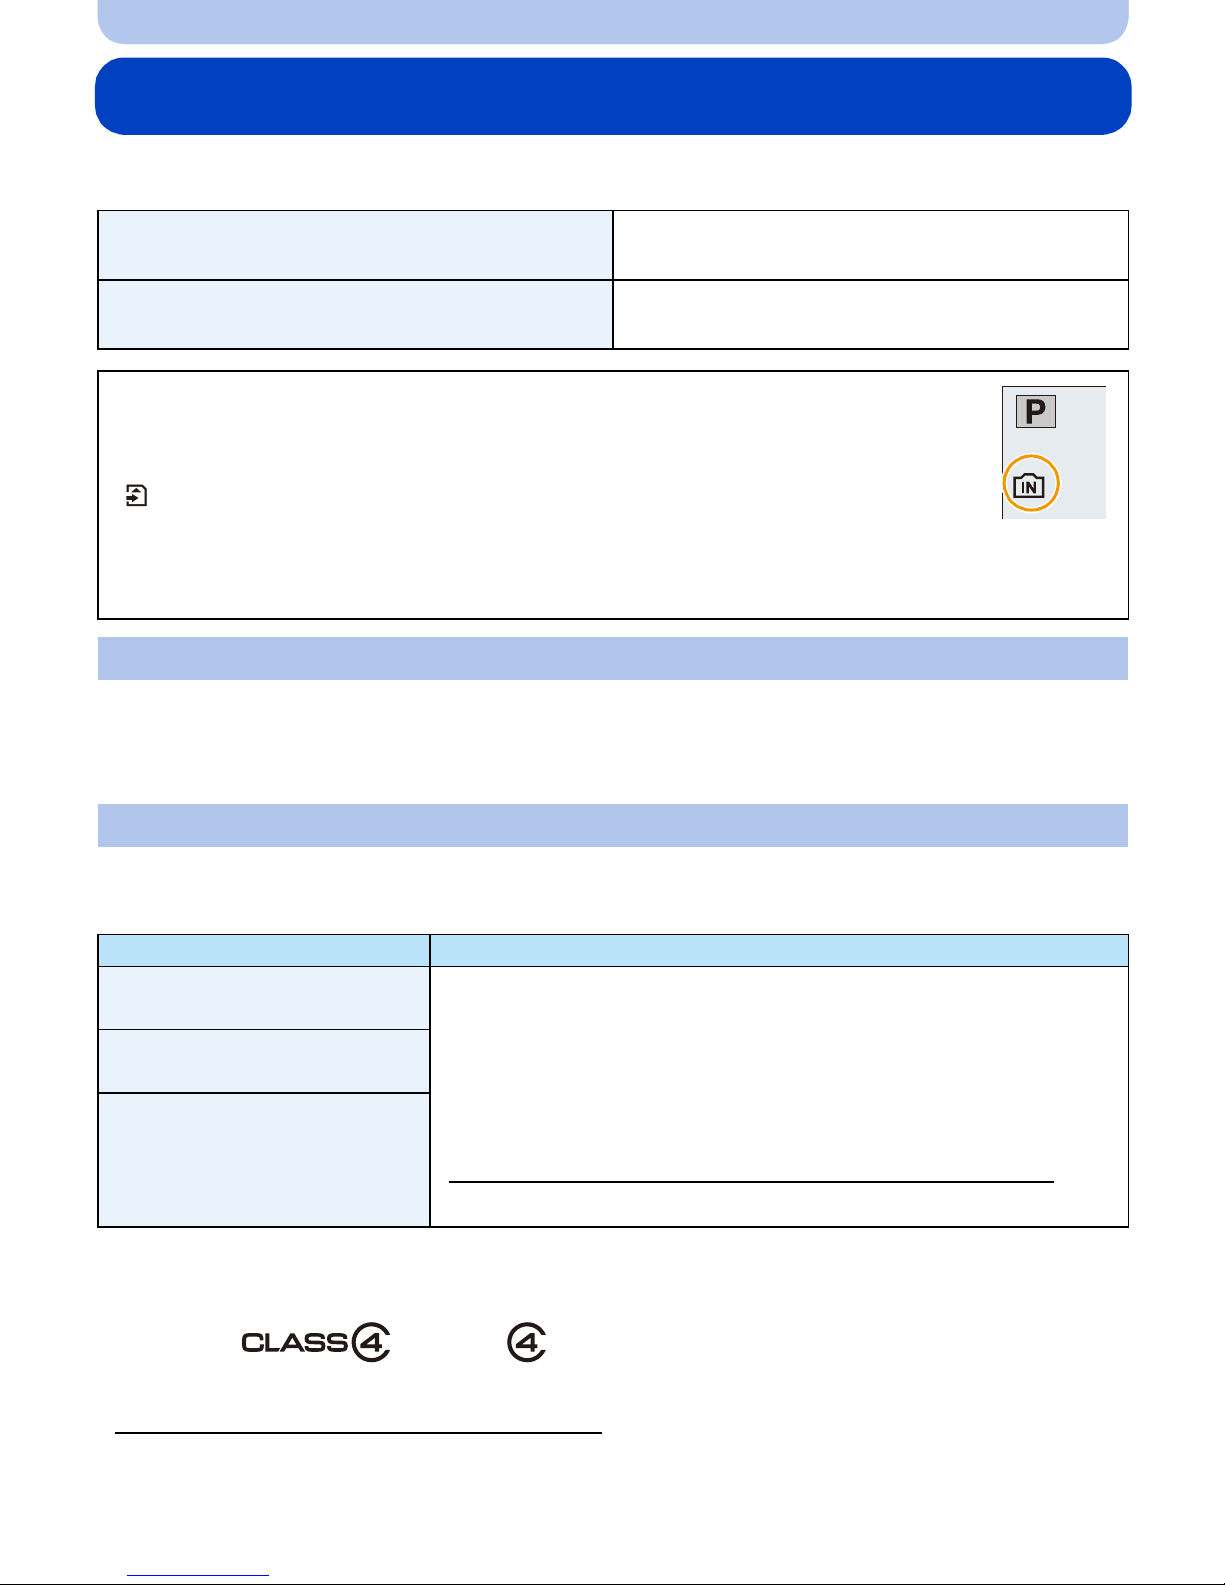
The following operations can be performed using this unit:
When a card has not been inserted
When a card has been inserted
Pictures can be recorded o n the built -in memory
and played back.
Pictures can be r ecorded on the card and
played back.
•When using the built-in memory:
>ð (access ind ication
k
¢
)
•When using the card:
¢
(access indication
¢ The access indication is display ed in red
when pictures are being recorded on the
built-in memory (or the card).
)
Built-in Memory
•You can copy the recorded pictures to a ca rd. (P172)
•Memory size: Approx. 10 MB
•The access time for the built-in memory may be longer than the access time for a card.
Card
The following cards which conform to the SD video standard can be used with this unit.
(These cards are indicated as card in the text.)
Remarks
SD Memory Card
(8 MB to 2 G B)
SDHC Memory Card
(4 GB to 32 GB)
•Use a card with SD Speed Class
when r ecording mot ion pictures.
•SDHC Memory Cards an d SDXC Memo ry Cards can be used only
with their compatib le devices.
¢
with “Class 4” or higher
•Check that the PC and other equipment are compatible when
SDXC Memory Card
(48 GB, 64 GB)
using the SDXC Memory Card s.
http://panasonic.net/avc/sdcard/information/SDXC.html
•Only the cards with capacity lis ted left can be used.
¢ SD Speed Class is the speed standard regarding continuous writing. Check via the label on the
card, etc.
e.g.:
•Please confirm the latest information on the following website.
http://panasonic.jp/support/global/cs/dsc/
(This Site is English only.)
- 24 -

Preparation
2
•Do not turn this unit off, remove its battery or card, or disconnect the AC adaptor (optional)
during access (when pictures are being written, read or deleted, or the built-in memory or the
card is being formatted). Furthermore, do not subject the camera to vibration, impact or static
electricity.
The card or the data on the card may be damaged, and this unit may no longer operate
normally.
If operation fails due to vibration, impact or static electricity, perform the operation again.
•Write-Protect switch A provided (When this switch is set to the [LOCK] position, no
further data writing, deletion or formatting is possible. The ability to write, delete and
format data is restored when the switch is returned to its original posit ion.)
•The data on the built-in memory or the card may be damaged or lost due to
electromagnetic wav es, static electricit y or breakdown of the camera or th e ca rd. We
recommend storing impo rtant data on a PC, et c.
•Do not format the card on your PC or other equipment. Format it on the camera only to ensure
proper operation. (P61)
•Keep the Memory Card out of reach of children to prevent swallowing.
- 25 -

Preparation
5
30
p
A
R1m10s
30
p
B
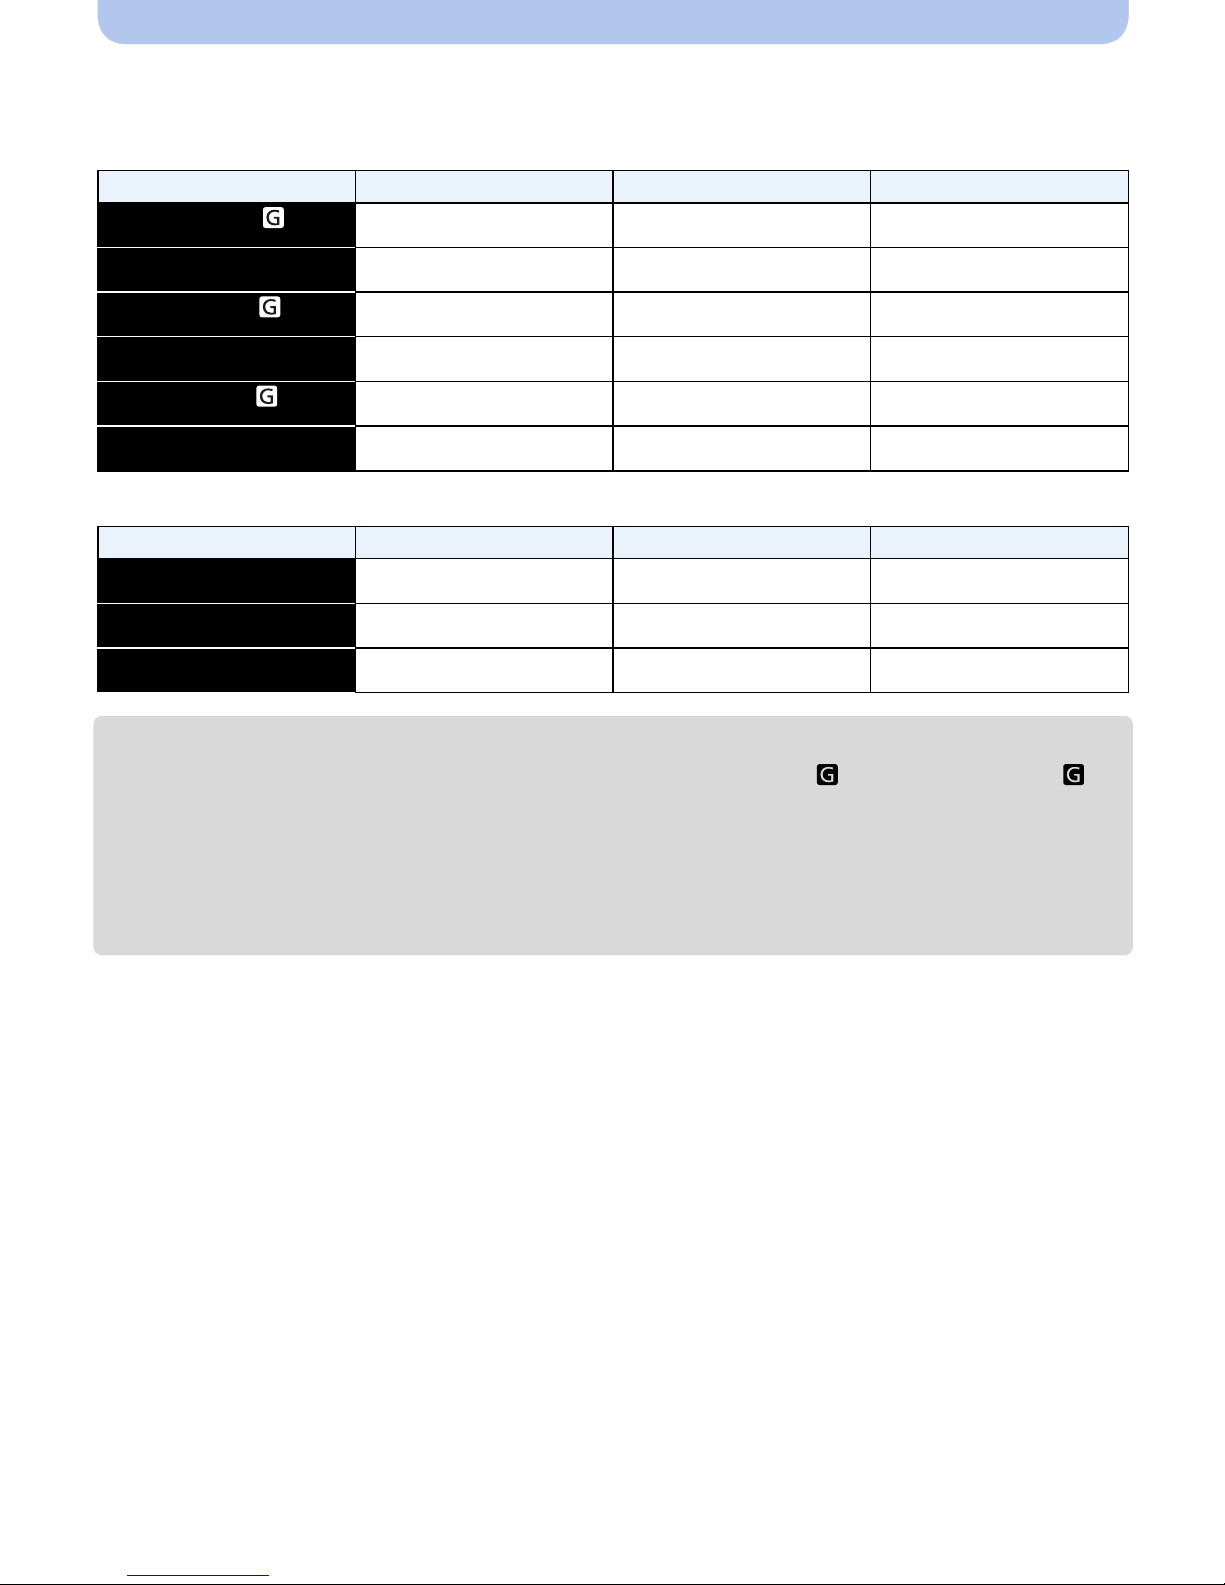
Approximate numb er of recorda ble pictures and available recording time
∫ About the display of the number of recordable pictures and available recording time
•
Switch the display (number of recordable pictures , available recording time , etc.) by pressing
[DISP.]. (P62)
A Number of recordable pictures
B Available recording time
•The number of recordable pictures and the available recording time are an approximation. (These
vary depending on the recording conditions and the type of c ard.)
•The number of recordable pictures and the availabl e recording time varies depending on the
subjects.
∫ Number of recordable pictures
•
[i99999] is displa yed if there are more than 100,000 pictures remaining.
•Aspect ratio [X], Quality [A]
[Picture Size]
Built-in Memory
(Approx. 10 MB)
2GB 32 GB 64 GB
16M 1 300 4910 9880
5M (EZ) 3 650 10620 21490
0.3M (EZ) 67 10050 162960 247150
- 26 -
Preparation
∫ Available recording time (when recording motion pictures)
•
“h” is an abbreviation for hour, “m” for minute and “s” for second.
•[AVCHD]
[Rec Quality] 2GB 32 GB 64 GB
[FHD/60p/ ]
9m00s 2h32m00s 5h08m00s
[FHD/60p]
[FHD/60i/ ]
[FHD/60i]
[HD/60p/ ]
[HD/60p]
9m00s 2h32m00s 5h08m00s
15m00s 4h10m00s 8h27m00s
15m00s 4h10m00s 8h27m00s
15m00s 4h10m00s 8h27m00s
15m00s 4h10m00s 8h27m00s
•[MP4]
[Rec Quality] 2GB 32 GB 64 GB
[FHD/30p]
[HD/30p]
[VGA/30p]
12m26s 3h23m22s 6h51m21s
23m45s 6h28m15s 13h05m20s
52m17s 14h14m28s 28h48m24s
•The recordable time is the total time of all the motion pictures which have been recorded.
•Maximum time to record motion pictures continuously with [FHD/60p/ ]/[FHD/60p]/[FHD/60i/ ]/
[FHD/60i] in [AVCHD] is 29 minutes 59 seconds.
•Maximum time to record motion pictures contin uously with [MP4] is 29 minutes 59 seconds or up to
4 GB. (For [FHD/30p] in [MP4] format, t he file s ize is large and so t he recorda ble time will d rop belo w
29 minutes 59 seconds.)
•The maximum available continuous recording time is dis played on the screen.
- 27 -

Preparation
Setting Date/Time (Clock Set)
•The clock is not set when the camera is shipped.
Press camera [ON/OFF] button.
1
• If the language select scr een is not dis pla yed, pro ce ed
to [Requirements for Underwater use] below.
Press [MENU/SET].
2
Press 3/4 to select the language, and press [MENU/SET].
3
[Requirements for Underwater use]
Be sure to check this so that you can maintain the waterproof performance.
[Please set the clock] is displayed after viewing the last screen.
For details, refer to P11.
Press [MENU/SET].
4
Press 2/1 to select the items (year, month,
5
day, hour, minute, display sequence or time
display format), and press 3/4 to set.
A: Time at the home area
B: Time at the travel destination
You can cancel withou t se tti n g the clock by pressing
•
[Q.MENU/ ].
- 28 -

Preparation
Press [MENU/SET].
6
• Confirmation screen is displayed. Press [MENU/SET].
Select [Yes] to automatically correct the clock, and then press [MENU/
7
SET].
• Message screen is displayed. Press [MENU/S ET ].
Press 2/1 to select the home area, and then
8
press [MENU/SET].
• Confirmation screen to operate the altimeter, barometer
and compass is displayed. Select [Yes] to operate them.
Changing the clock setting
Select [Clock Set ] in the [Rec] or [Setup] men u, and press [MENU/ SE T] . (P48)
The clock can be reset as shown in steps 5 and 6.
•
•The clock setting is maintained for 3 months using the built-in clock battery even without the
battery. (Leave the charged battery in the unit for 24 hours to charge the built-in battery.)
•If the clock is not set, the correct date cannot be printed when you order a photo studio to prin t the
picture, or when you st amp the date on the pictures with [Date Stamp] (P117) or [Te xt Stamp]
(P160).
•If the cl oc k is s et , th e c o rr e c t d ate can be pri n te d even if the da t e is no t di s p l a yed on the scr e en of
the camera.
•When [GPS Setting] is set to [ON], the G PS functio n will operate ev en when thi s unit i s turned
off. When you bring the camera on an airplane or to a hospital, etc., set [Airplane Mode] to
[ON], and turn off the camera because electromagnetic waves, etc. emitted by the camera
may interfere wi th gauges . (P53)
- 29 -
Preparation
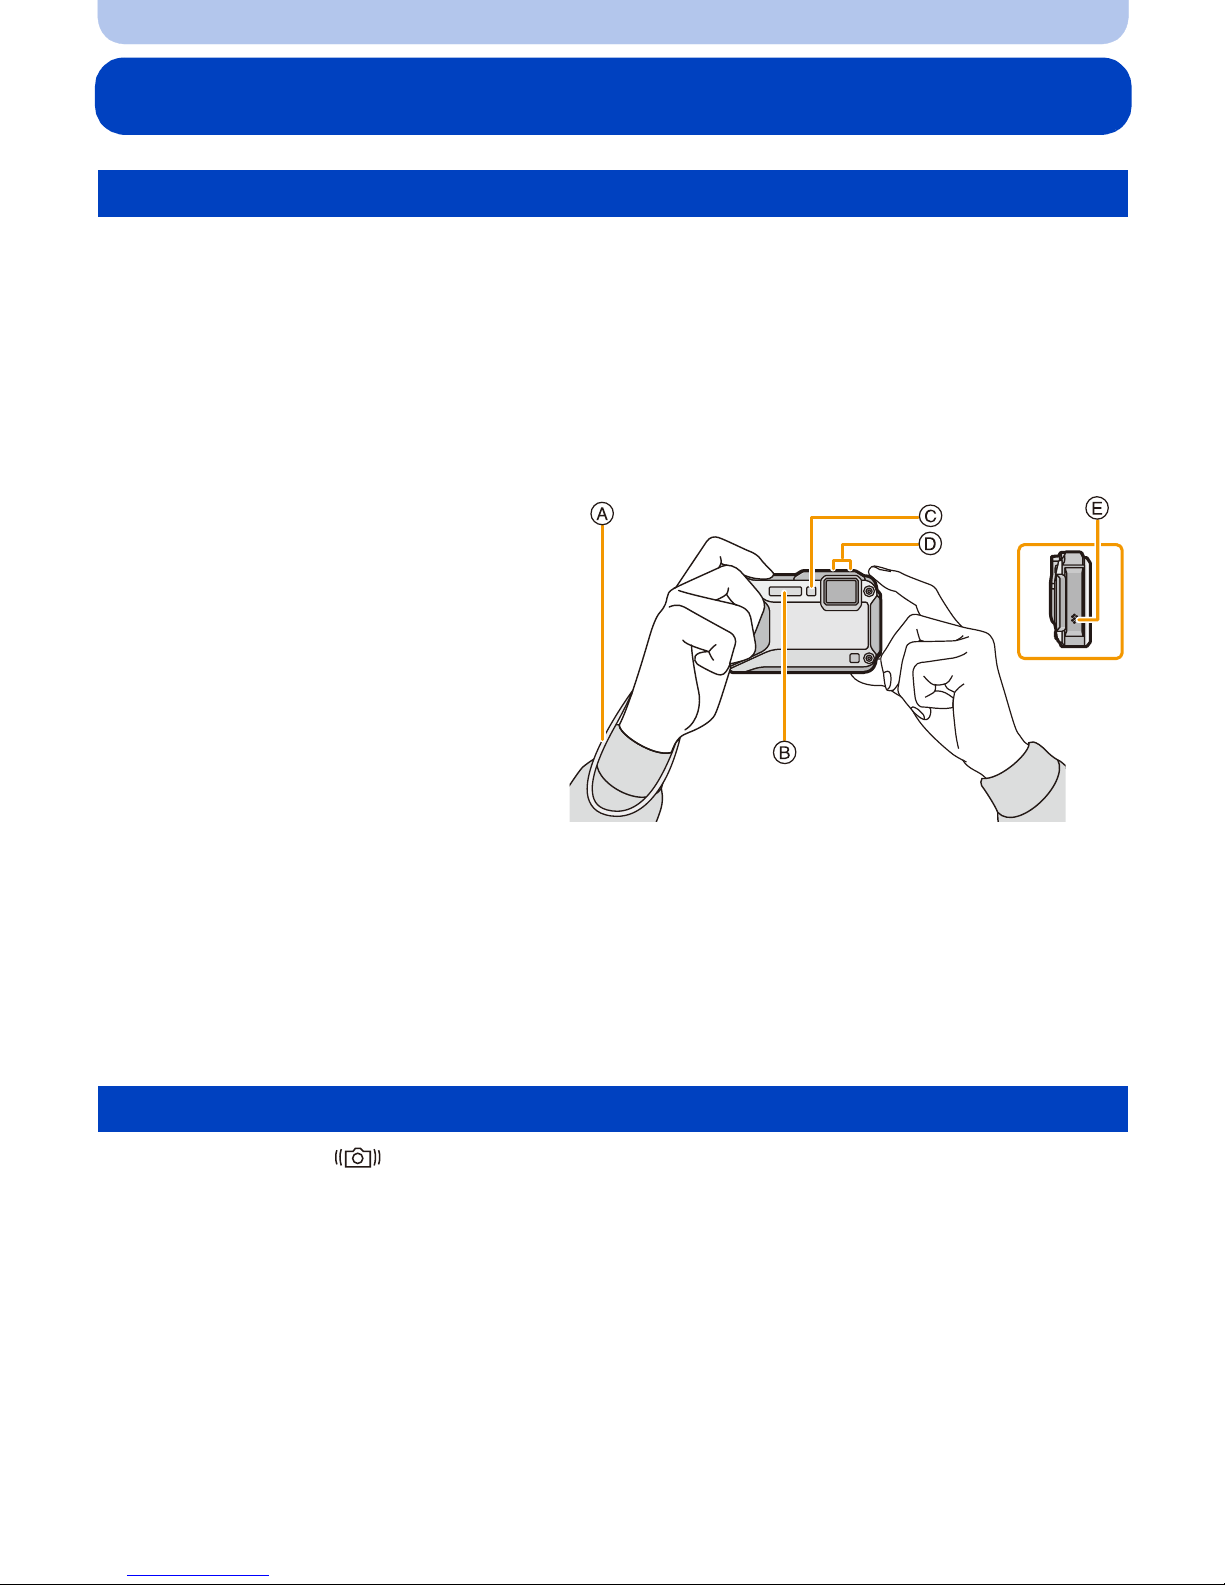
Tips for taking good pictures
Fit the strap and hold the camera carefully
Hold the camera gently with both hands, keep your arms still at your side and
stand with your feet slightly apart.
•To prevent dropping, be sure to attach the supplied strap and fit it to your wrist. (P16)
•Do not swing around or pull forcefully on the unit with the strap attached. The strap may break.
•Be careful not to move the camera when you press the shutter button.
•Be careful not to put y our fi ngers o n the fla sh, AF as sist l amp/LED l ight, mic rophone , speak er or len s
etc.
A Strap
B Flash
C AF Assist Lamp/LED light
D Microphone
E Speaker
∫ Directi on D e tection Function ([Rotate Disp.])
Pictures recorded with the camera held vertically are played back vertically (rotated). (Only
when [Rotate Disp.] (P60) is set)
When the camera i s held vert ically and t ilted up and down to re cord p ic tures , the Dire ctio n Det ection
•
function may not work correctly.
•Motion pictures t ak en with the camera held vertically are not displayed vertically.
Preventing jitter (camera shake)
When the Jitter alert [ ] appears, use [Stabilizer] (P116), a tripod or the Self-timer (P70).
•
Shutter speed will be slower particularly in the following cases. Keep the camera still from the
moment the shutte r butto n is pr essed unt il th e pict ure ap pears on the scr een. W e recommend usin g
a tripod.
–Slow sync./Red-Eye Reduction
–[Night Portrait]/[Night Scenery]/[Starry Sky] (Scene Mode)
–When the shutter speed is slowed in [Min. Shtr Speed]
- 30 -
 Loading...