

Page 1
TG9120_40_50EX(e).book Page 1 Monday, August 7, 2006 3:52 PM
Operating Instructions
Digital Cordless Answering System
Model No. KX-TG9120EX
KX-TG9120
KX-TG9140EX
KX-TG9150EX
Contents/Inhalt/Table des matières
English instructions
Deutsche Anleitung
Instructions en français
This unit is compatible with Caller ID and SMS. To use these
features, you must subscribe to the appropriate service of your
service provider/telephone company.
Page/Seite/Page
1 - 72
(1) - (76)
<1> - <76>
Charge the batteries for about 7 hours before initial use.
This unit is designed to be used in all EC and EFTA countries. To use this unit in your
country, first change the unit’s region setting to match your country (page 35).
Change the unit’s display language as needed (page 15).
Please read these operating instructions before using the unit and save them for
future reference.
Page 2
TG9120_40_50EX(e).book Page 2 Monday, August 7, 2006 3:52 PM
Introduction
Introduction
Thank you for purchasing a new Panasonic digital cordless phone.
For your future reference
Attach or keep original receipt to assist with any repair under warranty.
Serial No. (found on the bottom of the base unit)
Date of purchase
Name and address of dealer
Trademarks:
L Eatoni and LetterWise are trademarks of Eatoni Ergonomics, Inc.
L Skype, SkypeIn, SkypeOut and the S logo are trademarks of Skype Limited.
2
Page 3
TG9120_40_50EX(e).book Page 3 Monday, August 7, 2006 3:52 PM
Introduction
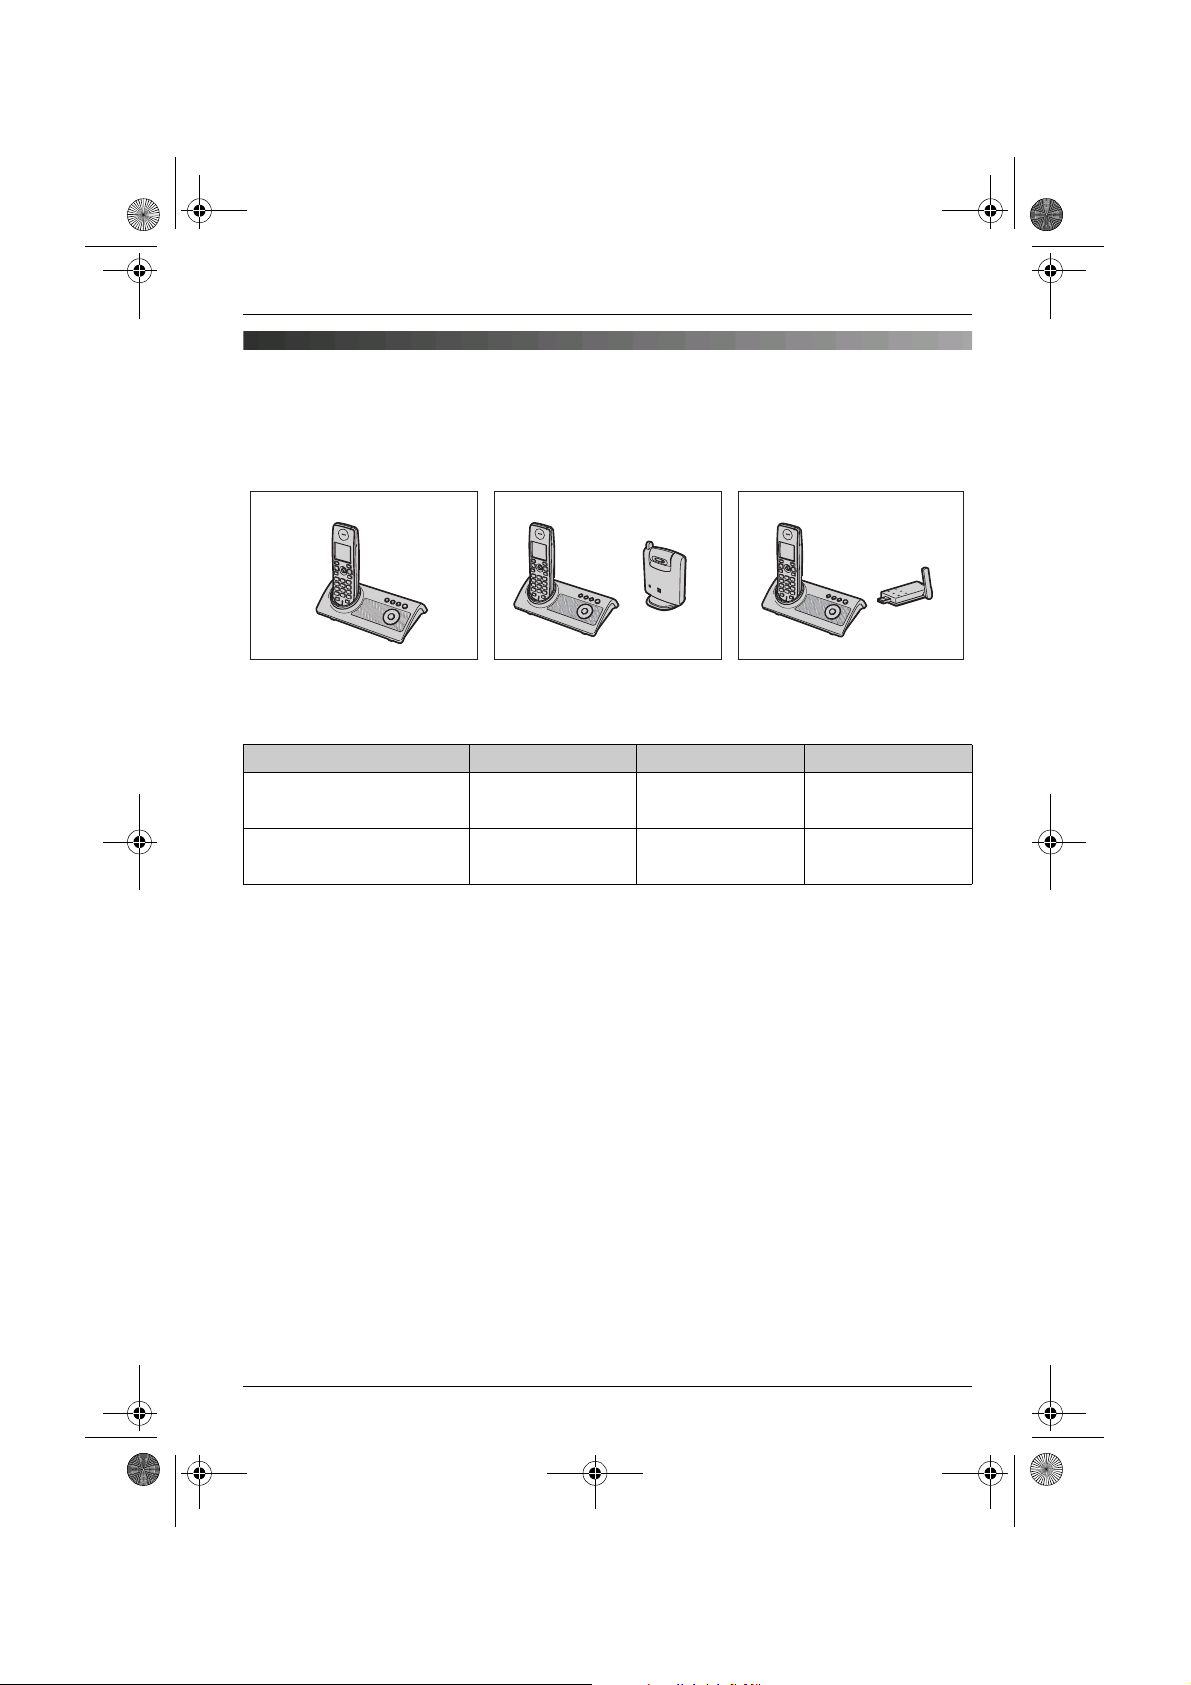
Product introduction
These operating instructions can be used for the KX-TG9120, KX-TG9140, and KX-TG9150
digital cordless answering systems.
KX-TG9120
KX-TG9140
Cordless camera
(KX-TGA914EX)
*1
KX-TG9150
USB adaptor
(KX-TGA915EX)
*1 Comes pre-registered to the base unit. Refer to the included operating instructions.
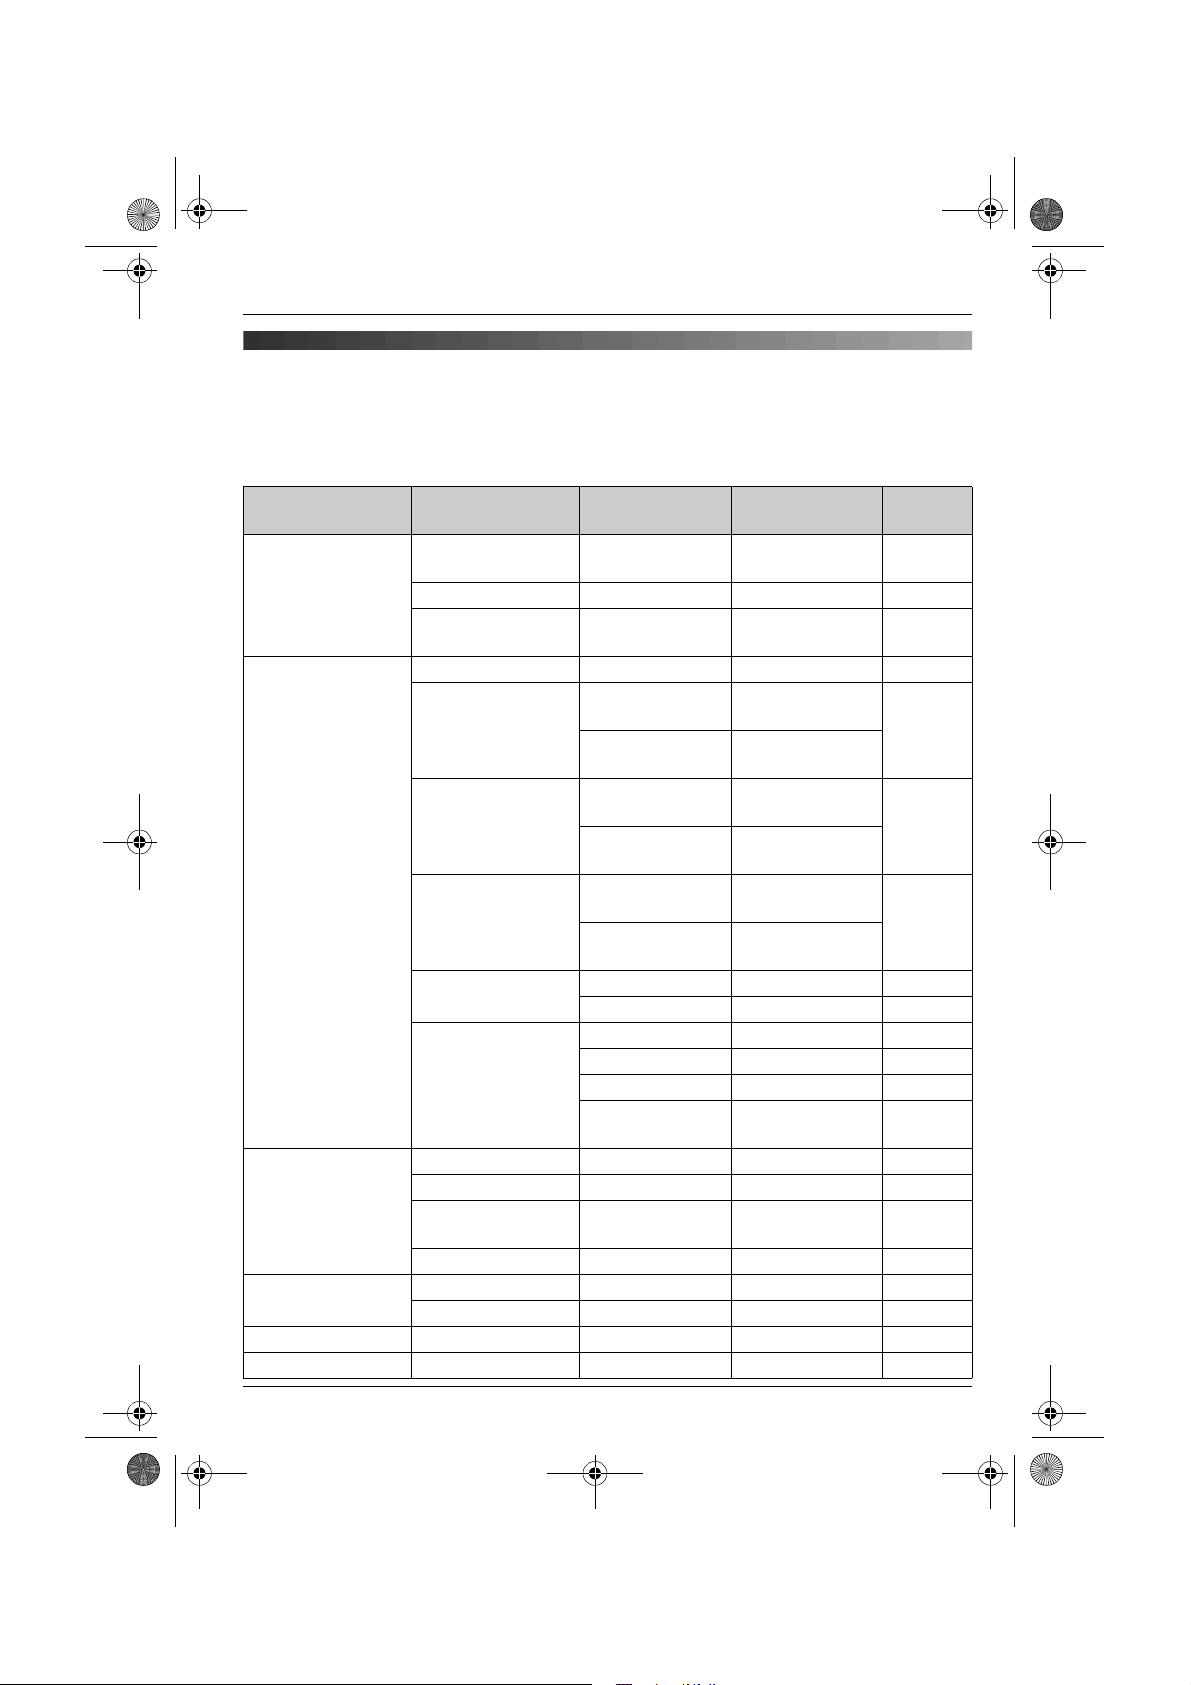
Notable differences among KX-TG9120, KX-TG9140, and KX-TG9150
Feature KX-TG9120 KX-TG9140 KX-TG9150
Camera monitoring using
the handset
Free internet calls
(between Skype users)
— r —
*1 *1
——r
*2 *2
*1 Available by purchasing and registering the optional cordless camera (KX-TGA914EX,
page 4).
*2 Available by purchasing and registering the optional USB adaptor (KX-TGA915EX,
page 4).
Feature highlights
Camera monitoring using the handset (KX-TGA914EX Cordless camera required)
L You can monitor the room where the cordless camera is located when:
– you access the cordless camera using the handset
– the cordless camera pages the handset when it detects sound
– the cordless camera user pages the handset using the call button
Free internet calls using Skype (KX-TGA915EX USB adaptor required)
L You can make free calls over the Internet to anyone in the world who has Skype.
L Skype software is free and works with most computers.
L Skype software is easy to download and use.
*1
3
Page 4
TG9120_40_50EX(e).book Page 4 Monday, August 7, 2006 3:52 PM
Introduction
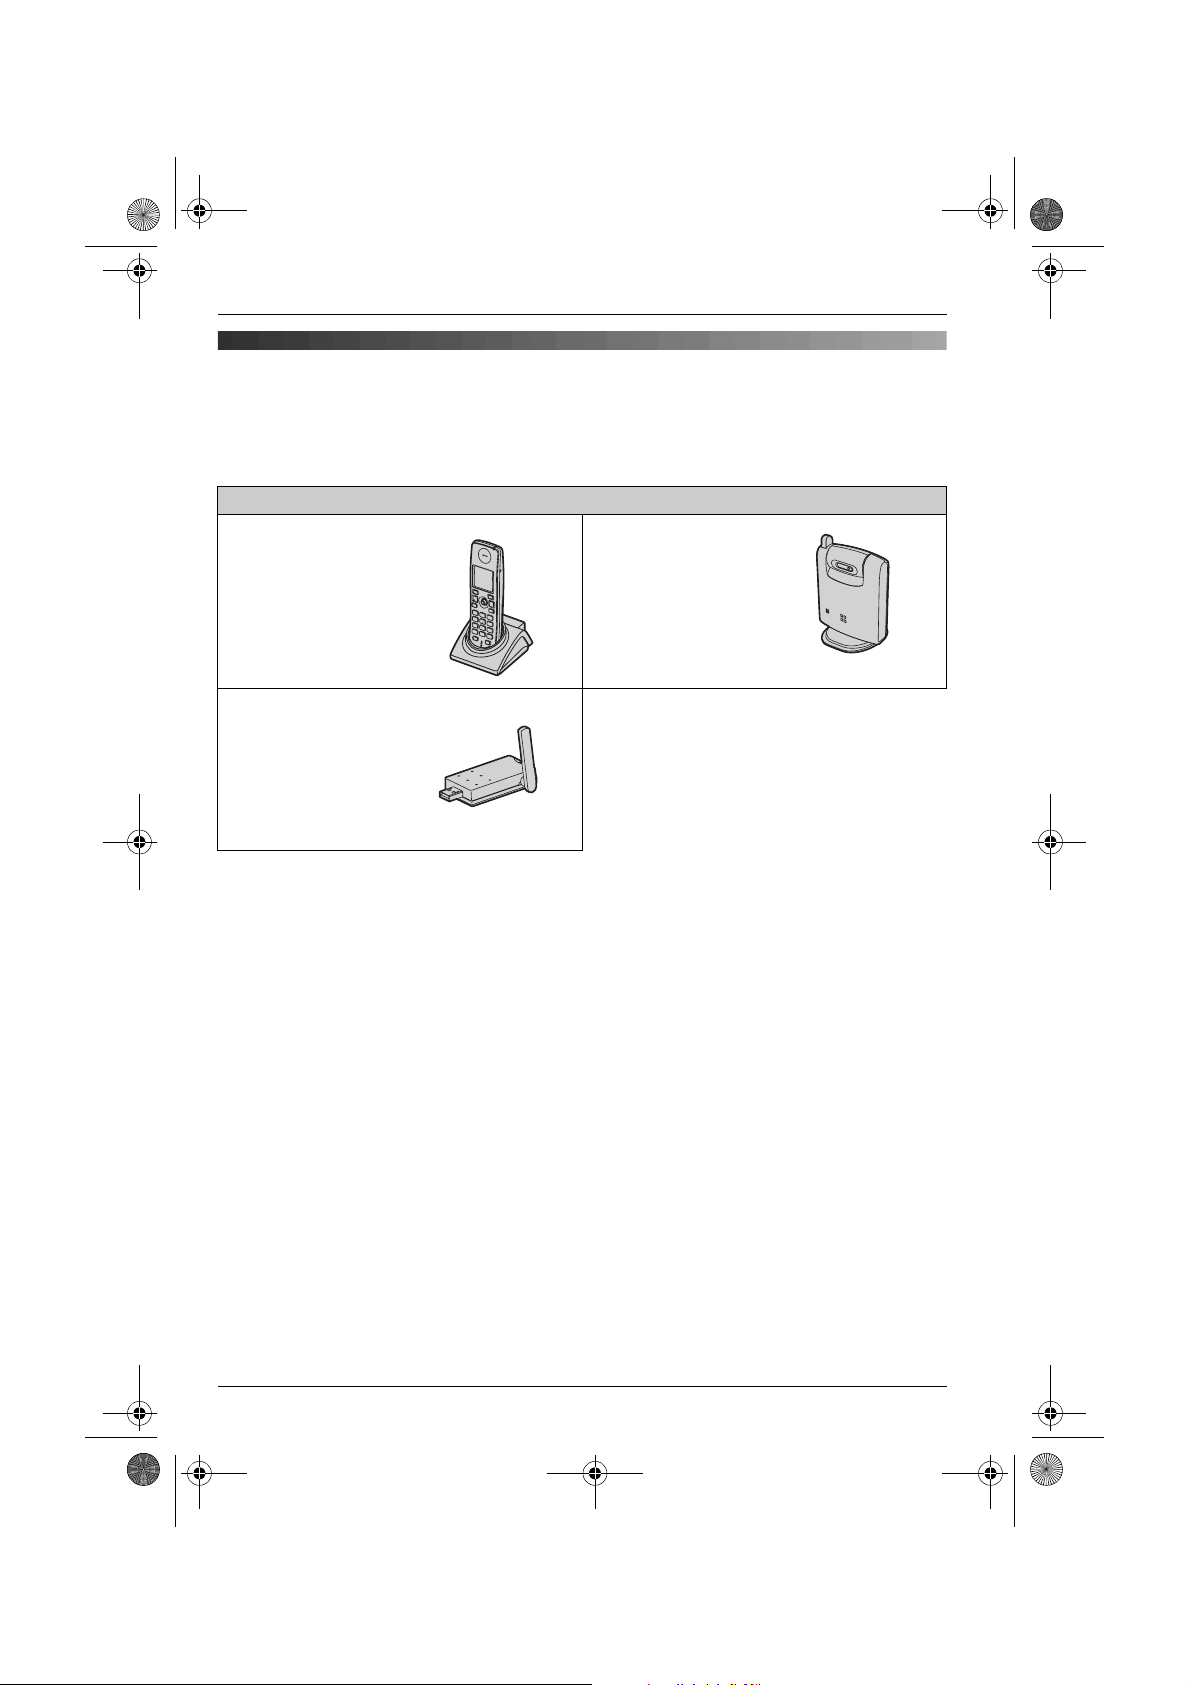
Expanding your phone system
You can expand your phone system by registering the optional devices to a single base unit
(KX-TG9120, KX-TG9140, or KX-TG9150).
L A maximum of 6 total units (optional and included) can be registered to a single base unit.
Optional devices
Additional Digital
Cordless Handset
KX-TGA910EX
max. 5
USB Adaptor
KX-TGA915EX
(For calls over the
Internet)
max. 1
*1
*2
Cordless Camera
KX-TGA914EX
(For camera
monitoring)
max. 5
*1 By registering the USB adaptor KX-TGA915EX to your base unit and installing Skype
software to your computer, you can make calls with your handset over the Internet via the
computer.
*2 KX-TG9150: An additional USB adaptor cannot be registered.
4
Page 5

TG9120_40_50EX(e).book Page 5 Monday, August 7, 2006 3:52 PM
Table of Contents
Preparation
Accessory information . . . . . . . . . . . . . . . 6
Important information . . . . . . . . . . . . . . . . 8
Controls . . . . . . . . . . . . . . . . . . . . . . . . . . 9
Displays . . . . . . . . . . . . . . . . . . . . . . . . . 10
Connections. . . . . . . . . . . . . . . . . . . . . . 12
Battery installation/replacement. . . . . . . 13
Battery charge . . . . . . . . . . . . . . . . . . . . 13
Screen saver mode . . . . . . . . . . . . . . . . 14
Turning the power on/off . . . . . . . . . . . . 14
Symbols used in these operating
instructions. . . . . . . . . . . . . . . . . . . . . . . 14
Region settings . . . . . . . . . . . . . . . . . . . 14
Display language . . . . . . . . . . . . . . . . . . 15
Date and time . . . . . . . . . . . . . . . . . . . . 15
C Making/Answering Calls
Making calls. . . . . . . . . . . . . . . . . . . . . . 16
Answering calls . . . . . . . . . . . . . . . . . . . 18
k Phonebooks
Handset phonebook. . . . . . . . . . . . . . . . 19
Quick dial for Call-by-Call: Making calls
using a telephone carrier access code
(Germany only) . . . . . . . . . . . . . . . . . . . 22
Shared phonebook . . . . . . . . . . . . . . . . 23
m Handset Settings
Handset settings . . . . . . . . . . . . . . . . . . 25
Time settings . . . . . . . . . . . . . . . . . . . . . 27
Ringer setup . . . . . . . . . . . . . . . . . . . . . 27
Display setup . . . . . . . . . . . . . . . . . . . . . 30
Baby monitor (additional handset
required) . . . . . . . . . . . . . . . . . . . . . . . . 30
Other options . . . . . . . . . . . . . . . . . . . . . 31
L Base Unit Settings
Base unit settings . . . . . . . . . . . . . . . . . 33
Ringer setup . . . . . . . . . . . . . . . . . . . . . 34
Call options . . . . . . . . . . . . . . . . . . . . . . 34
Other options . . . . . . . . . . . . . . . . . . . . . 35
X SMS (Short Message
Service)
Using SMS (Short Message Service) . . 39
Turning SMS on/off . . . . . . . . . . . . . . . . 41
Storing SMS message centre
numbers. . . . . . . . . . . . . . . . . . . . . . . . . 41
Registering/cancelling SMS service
(Spain only) . . . . . . . . . . . . . . . . . . . . . . 41
Sending a message. . . . . . . . . . . . . . . . 41
Receiving a message . . . . . . . . . . . . . . 45
SMS settings . . . . . . . . . . . . . . . . . . . . . 46
I Answering System
Features
Answering system . . . . . . . . . . . . . . . . . 49
Turning the answering system on/off. . . 49
Greeting message . . . . . . . . . . . . . . . . . 49
Listening to messages. . . . . . . . . . . . . . 50
Direct command operation using the
handset . . . . . . . . . . . . . . . . . . . . . . . . . 51
Remote operation . . . . . . . . . . . . . . . . . 51
Answering system settings . . . . . . . . . . 53
Multi-unit Operation
Operating additional units . . . . . . . . . . . 54
Registering a handset to a base unit. . . 54
Intercom between handsets . . . . . . . . . 56
Transferring calls between handsets,
conference calls. . . . . . . . . . . . . . . . . . . 56
Copying phonebook entries. . . . . . . . . . 57
Useful Information
Using the belt clip . . . . . . . . . . . . . . . . . 58
Character entry . . . . . . . . . . . . . . . . . . . 59
Error messages . . . . . . . . . . . . . . . . . . . 63
Troubleshooting. . . . . . . . . . . . . . . . . . . 64
Specifications. . . . . . . . . . . . . . . . . . . . . 69
Index
Index . . . . . . . . . . . . . . . . . . . . . . . . . . 70
j Caller ID Service
Using Caller ID service . . . . . . . . . . . . . 36
Caller list . . . . . . . . . . . . . . . . . . . . . . . . 37
Voice mail service . . . . . . . . . . . . . . . . . 38
5
Page 6

TG9120_40_50EX(e).book Page 6 Monday, August 7, 2006 3:52 PM
Preparation
Accessory information
Included accessories
No. Accessory items Quantity
KX-TG9120 KX-TG9140 KX-TG9150
1 AC adaptor for base unit
Part No. PQLV207CE
2 Telephone line cord (Germany) 1 1 1
3 Telephone line cord (France) 1 1 1
4 Telephone line cord
(Other countries)
5 Telephone plug (Italy) 1 1 1
6 Rechargeable batteries
AAA (R03) size
Part No. HHR-4EPT
7 Handset cover
8 Belt clip 1 1 1
9 Audio cable 1 1 1
j Cordless camera
Part No. KX-TGA914EX
k AC adaptor for cordless camera
Part No. PQLV209CE
l Wall-mounting adaptor for cordless
camera
m Call button for cordless camera — 1 —
n USB adaptor
Part No. KX-TGA915EX
o USB extension cable — — 1
p CD-ROM
*3
*1
*2
111
111
222
111
—1—
—1—
—1—
—— 1
—— 1
*1 Prepare the appropriate telephone plug needed for use in your country. For Italy, attach the
included telephone plug 5 to telephone line cord before connecting.
*2 The handset cover comes attached to the handset.
*3 Allows you to install the USB Adaptor Utility on a compatible computer.
6
Page 7

TG9120_40_50EX(e).book Page 7 Monday, August 7, 2006 3:52 PM
Preparation
123456
789jkl
mnop
Additional/replacement accessories
Please contact your nearest Panasonic dealer for sales information.
No. Model No. Description
1 KX-TCA717EX Wall-Mounting Adaptor (for the base unit)
2 KX-TCA94EX Headset
3 KX-A272 DECT repeater
12
Note:
L You can expand your phone system by registering optional Panasonic devices (page 4).
L When replacing the batteries, use only 2 rechargeable AAA (R03) size nickel metal hydride
(Ni-MH) batteries. We recommend using Panasonic rechargeable batteries (Model No.
P03P).
L We cannot be responsible for any damage to the unit or degradation of performance which
may occur from using non-Panasonic rechargeable batteries.
7
Page 8

TG9120_40_50EX(e).book Page 8 Monday, August 7, 2006 3:52 PM
Preparation
Important information
General
L Use only the AC adaptor included with this
product, noted on page 6.
L Do not connect the AC adaptor to any AC
outlet other than a standard 220–240 V
AC outlet.
L This product is unable to make calls when:
– the portable handset battery(ies) need
recharging or have failed.
– there is a power failure.
– the key lock feature is turned on.
L Do not open the base unit, charger, or
handset other than to replace the
battery(ies).
L This product should not be used near
emergency/intensive care medical
equipment and should not be used by
people with pacemakers.
L Care should be taken that objects do not
fall onto, and liquids are not spilled into,
the unit. Do not subject this product to
excessive smoke, dust, mechanical
vibration or shock.
Environment
L Do not use this product near water.
L This product should be kept away from
heat sources such as radiators, cookers,
etc. It should also not be placed in rooms
where the temperature is less than 5 °C or
greater than 40 °C.
L The AC adaptor is used as the main
disconnect device. Ensure that the AC
outlet is installed near the product and is
easily accessible.
Warning:
L To prevent the risk of electrical shock, do
not expose this product to rain or any
other type of moisture.
L Unplug this product from power outlets if it
emits smoke, an abnormal smell, or
makes unusual noise. These conditions
can cause fire or electric shock. Confirm
that smoke has stopped emitting and
contact an authorised service centre.
Battery caution
L We recommend using the battery(ies)
noted on page 7. Use only rechargeable
battery(ies).
L Do not mix old and new batteries.
L Do not dispose of the battery(ies) in a fire,
as they may explode. Check with local
waste management codes for special
disposal instructions.
L Do not open or mutilate the battery(ies).
Released electrolyte from the battery(ies)
is corrosive and may cause burns or injury
to the eyes or skin. The electrolyte may be
toxic if swallowed.
L Exercise care when handling the
battery(ies). Do not allow conductive
materials such as rings, bracelets or keys
to touch the battery(ies), otherwise a short
circuit may cause the battery(ies) and/or
the conductive material to overheat and
cause burns.
L Charge the battery(ies) in accordance
with the information provided in these
operating instructions.
L Only use the included base unit (or
charger) to charge the battery(ies). Do not
tamper with the base unit (or charger).
Failure to follow these instructions may
cause the battery(ies) to swell or explode.
8
Page 9
TG9120_40_50EX(e).book Page 9 Monday, August 7, 2006 3:52 PM
Controls
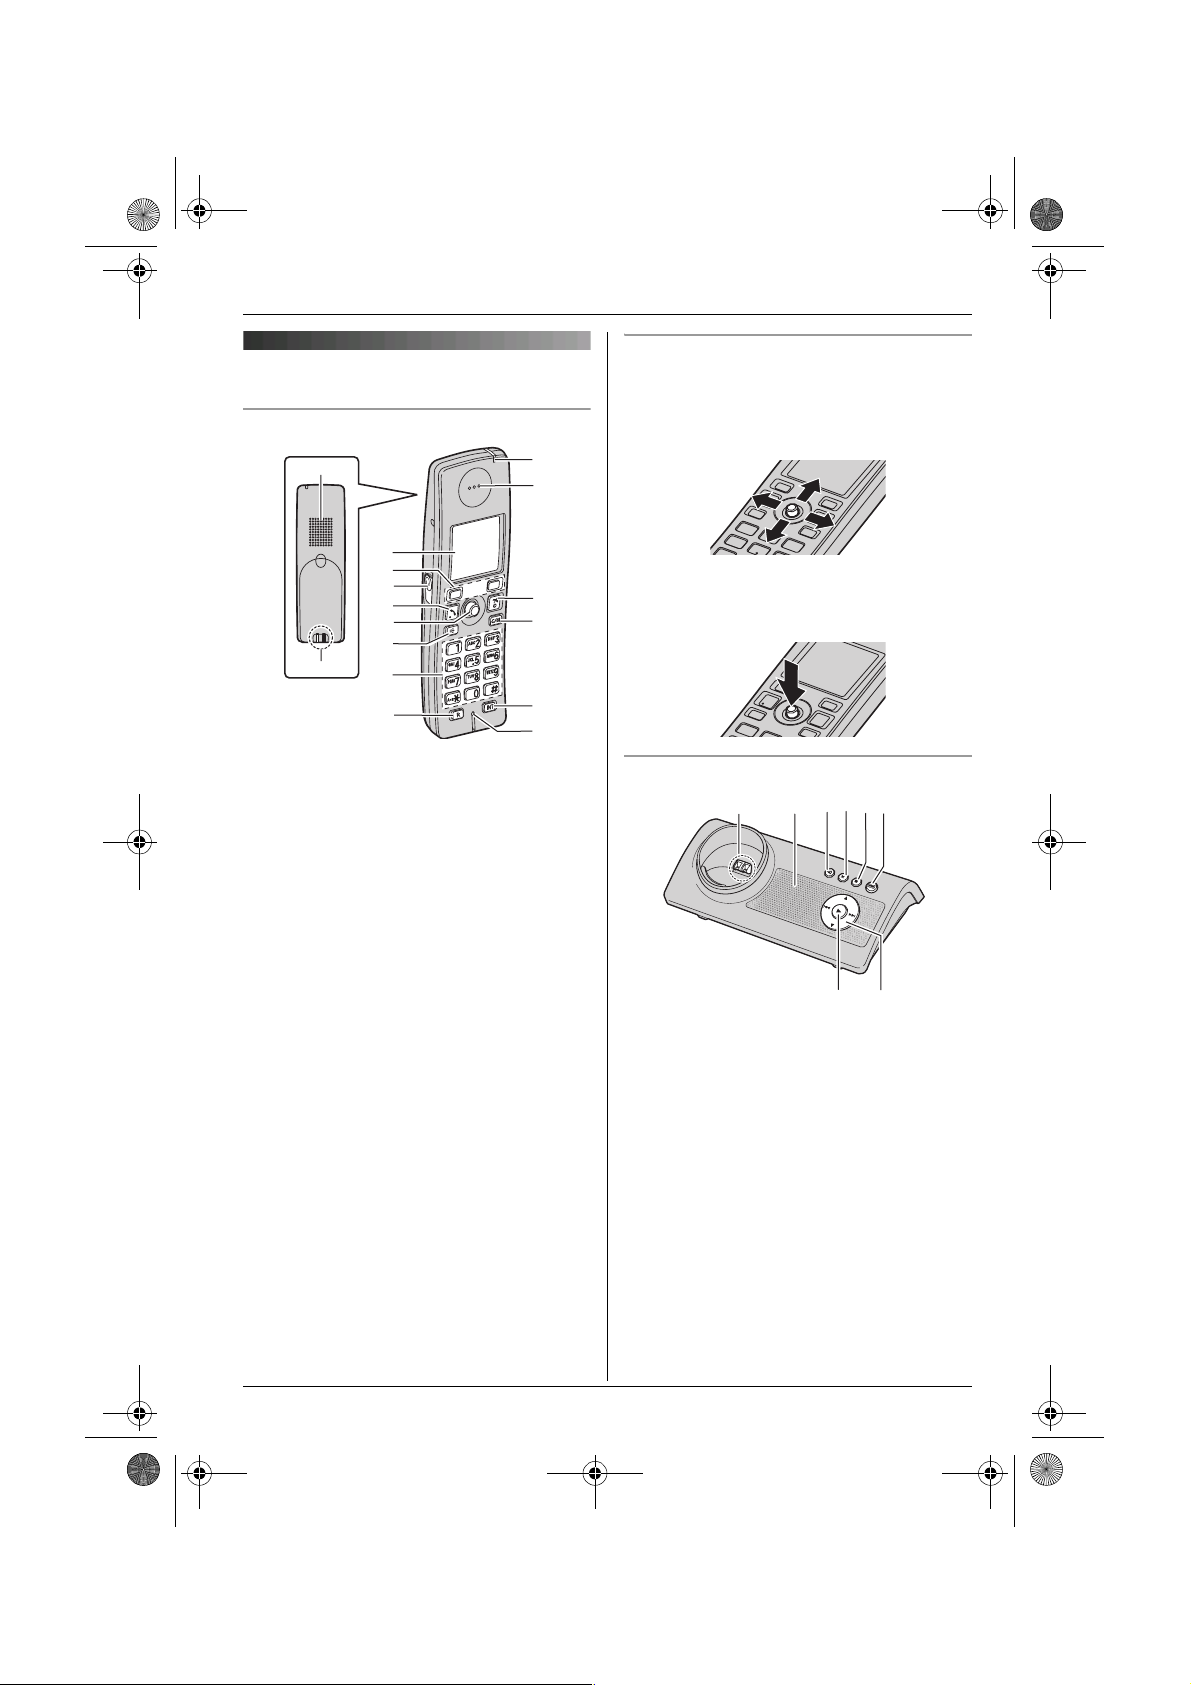
Handset
A
C
D
E
F
G
H
B
A Speaker
B Charge contact
C Display
D Soft keys
E Headset jack/Audio jack
F {C} (Talk)
G Joystick
H {s} (Speakerphone)
I Dial keypad
J {R} (Recall)
K Charge indicator/Ringer indicator/
Message indicator
L Receiver
M {ih} (Off/Power)
N {C/T} (Clear/Mute)
O {INT} (Intercom)
P Microphone
I
J
K
L
M
N
O
P
Preparation
Using the joystick
The handset joystick can be used to
navigate through menus and to select items
shown on the display, by pushing it up,
down, left, or right.
It can also be used to select the centre soft
key icon, by pressing down on the centre of
the joystick.
Base unit
DE
B
A
A Charge contact
B Speaker
C {x} (Page)
D {4} (Erase)
E {■} (Stop)
F {s} (Answer on)/Answer on indicator
G {6} (Play)/Message indicator
H Navigator key ({^}/{V}/{8}/{7})
C
G
F
H
9
Page 10
TG9120_40_50EX(e).book Page 10 Monday, August 7, 2006 3:52 PM
Preparation
Displays
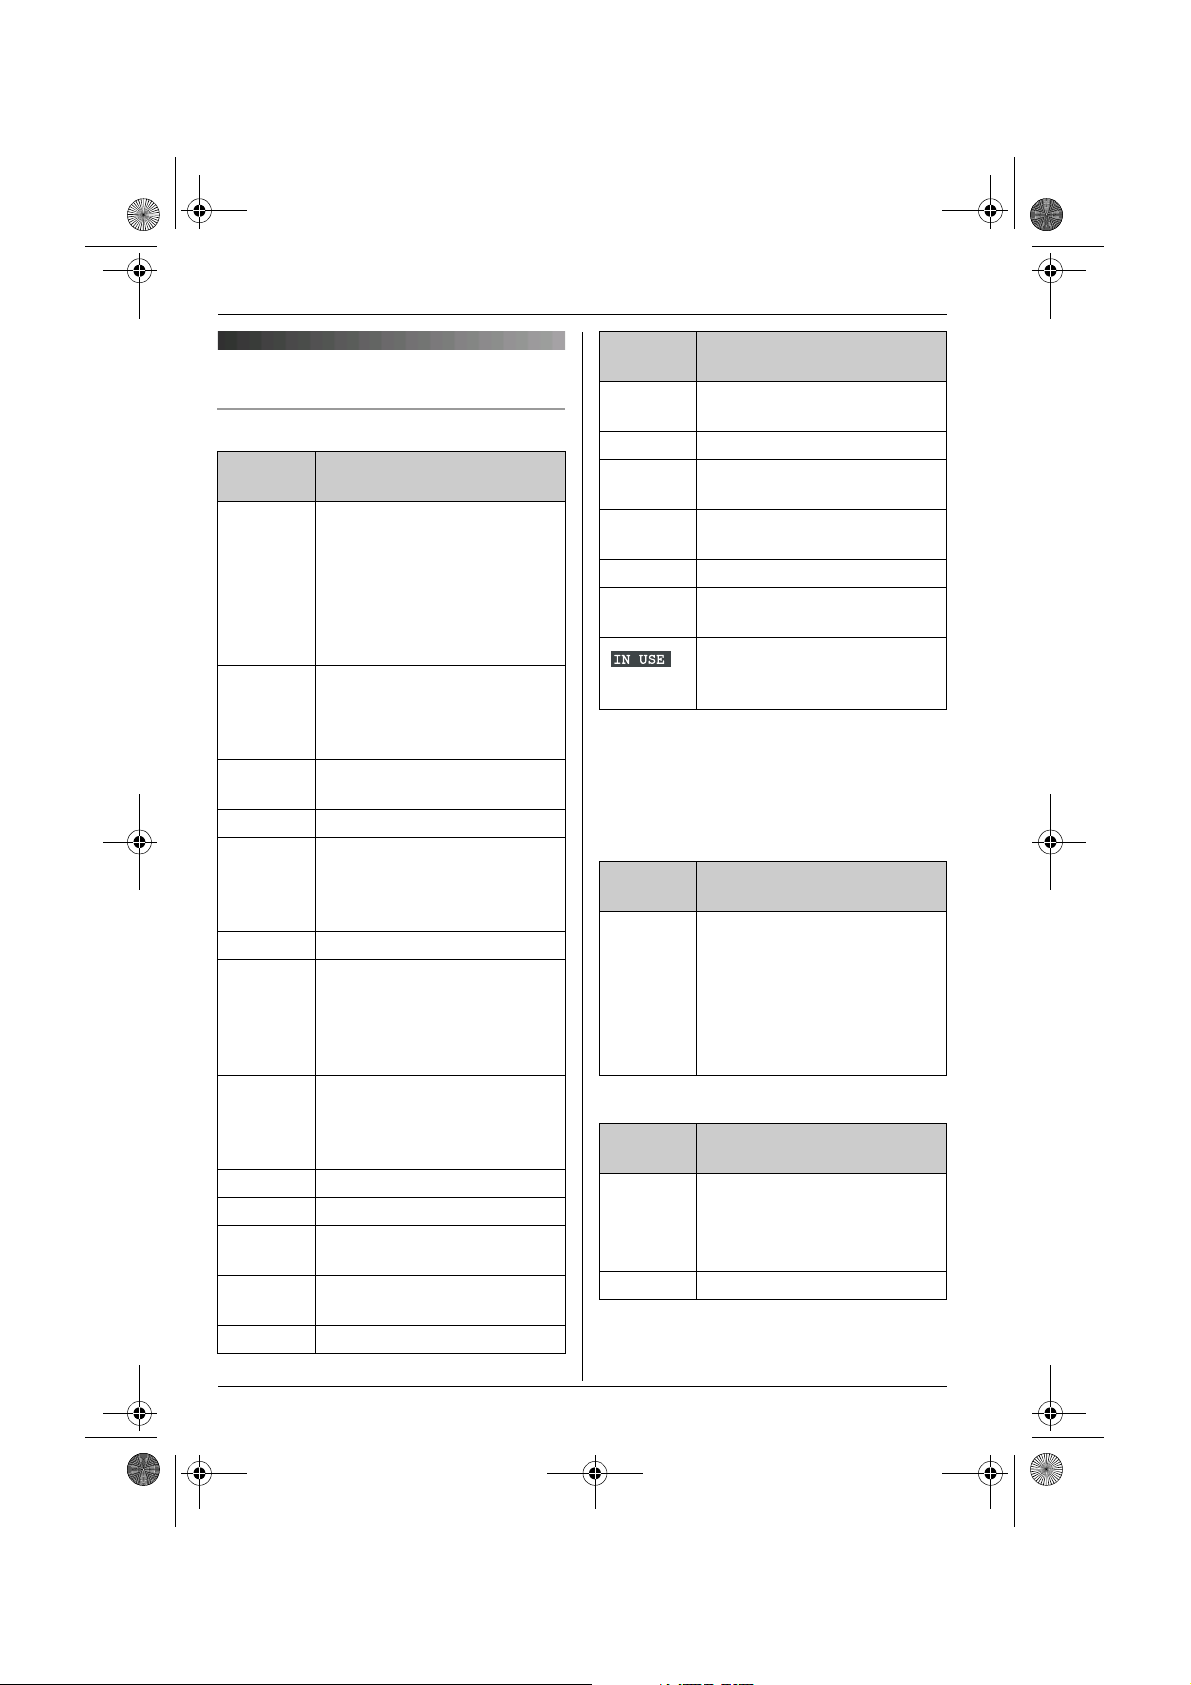
Display icons
Display
icon
w Within range of a base unit
x Handset is accessing base
k Handset is on an outside
y Missed call
u Answering system is on
n Answering system is full.
d Answering system answers
% An audible call
@ Battery strength
e Alarm is on. (page 27)
d Voice enhancer is set to high
x Call privacy mode is on.
T Mute is on. (page 17)
Meaning
L When flashing: Handset is
searching for base unit.
(out of range of base unit,
handset is not registered
to base unit, no power on
base unit)
unit. (intercom, paging,
changing base unit settings,
etc.)
call.
*1
(page 36)
(page 49) and/or new
messages have been
recorded. (page 49)
calls with a greeting
message and caller
messages are not recorded.
(page 53)
announcement has been
recorded for this entry.
(page 23)
or low tone. (page 17)
(page 17)
Display
Meaning
icon
~ Ringer volume is off.
(page 27)
f Night mode is on. (page 29)
h New SMS message
received
j Displayed when writing an
SMS message.
m SMS memory is full.
z New voice mail message
received
*2
(page 45)
*3
(page 38)
*2
(page 42)
*2
Line or answering system is
being used by another
handset or the base unit.
*1 Caller ID subscribers only
*2 SMS users only
*3 Voice mail users only
Cordless camera KX-TGA914EX users
only
Display
Meaning
icon
8 Handset is connected to the
cordless camera.
L When flashing: Cordless
camera is paging the
handset because it
detected sound or its call
button was pressed.
USB adaptor KX-TGA915EX users only
Display
Meaning
icon
D Handset is in IP phone
mode.
L When flashing: An internet
call is being received.
9 Missed internet call
10
Page 11
TG9120_40_50EX(e).book Page 11 Monday, August 7, 2006 3:52 PM
Preparation
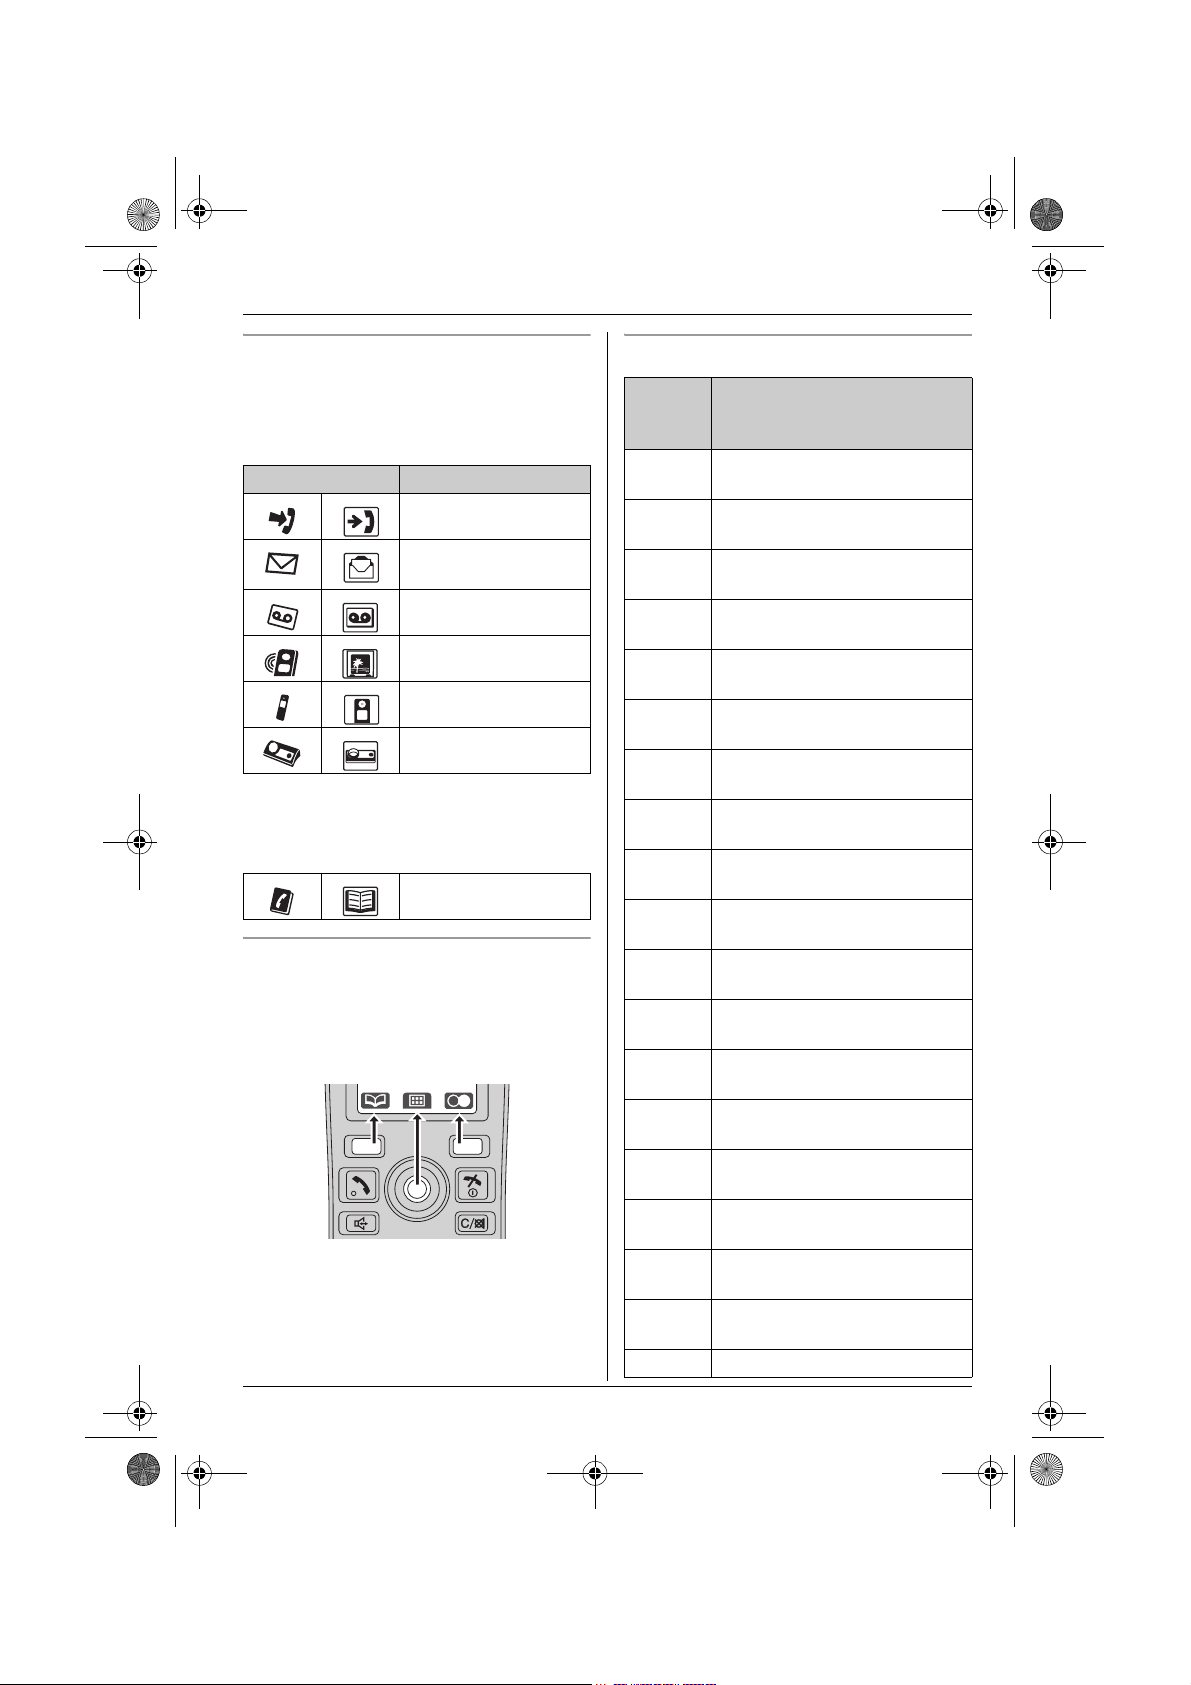
Menu icons
When in standby mode, pressing down on
the centre of the joystick reveals the
handset’s main menu. From here you can
access various features and settings.
Menu icon Menu/feature
Caller List
SMS (Short Message
Service)
Answer System
Display Setup
*1
Handset Setup
Base Unit Setup
*1 3 (“Ph.Book Setup”) is displayed
instead of M (“Display Setup”) for
USB adaptor KX-TGA915EX users.
Ph.Book Setup
Soft keys
The handset features two soft keys and a
joystick. By pressing a soft key, or by
pressing the centre of the joystick, you can
select the feature or operation indicated by
the soft key icon shown directly above it.
Soft key icons
Soft
Action
key
icon
U Returns to the previous
screen.
P Allows you to make an
intercom calls.
K
Displays the menu.
J
M
Accepts the current selection.
L
j Displays a previously dialled
phone number.
n Opens the handset
phonebook.
T Opens the shared
phonebook.
k Displays the phonebook
search menu.
I Turns the key lock feature off.
(page 17)
s Switches between AM, PM,
and 24-hour time entry.
X Displayed when LetterWise
character entry is selected.
Y Displayed when alphabet
character entry is selected.
Z Displayed when numeric
character entry is selected.
o Displayed when Greek
character entry is selected.
q Displayed when extended 1
character entry is selected.
r Displayed when extended 2
character entry is selected.
p Displayed when Cyrillic
character entry is selected.
e Turns the answering system
on/off.
Q Starts recording. (page 28)
®
11
Page 12
TG9120_40_50EX(e).book Page 12 Monday, August 7, 2006 3:52 PM
Preparation
Soft
key
icon
O
N
l Inserts a dialling pause.
W Erases the selected item.
b Displays the picture list.
V Displays the selected
c Displays the picture.
d Goes to the next screen.
w Establishes a conference call.
g
f
t Selects the highlighted item.
a Inserts a character.
Cordless camera KX-TGA914EX users
only
Soft
key
icon
B Adjusts the display
A Switches between Zoom In
v Selects the audio detection
USB adaptor KX-TGA915EX users only
Soft
key
icon
D Allows you to make an
G Switches to Outgoing call
F Switches to Incoming call
Action
Stops recording or playback.
(page 17)
phonebook entry.
Saves the handset
phonebook entry or the
recorded melody data.
Action
brightness.
and Normal mode.
sensitivity.
Action
internet call.
history for internet calls.
history for internet calls.
Soft
key
icon
u Switches to Voicemail history
E Rejects the 2nd call.
H Places the internet call on
Action
for internet calls.
hold.
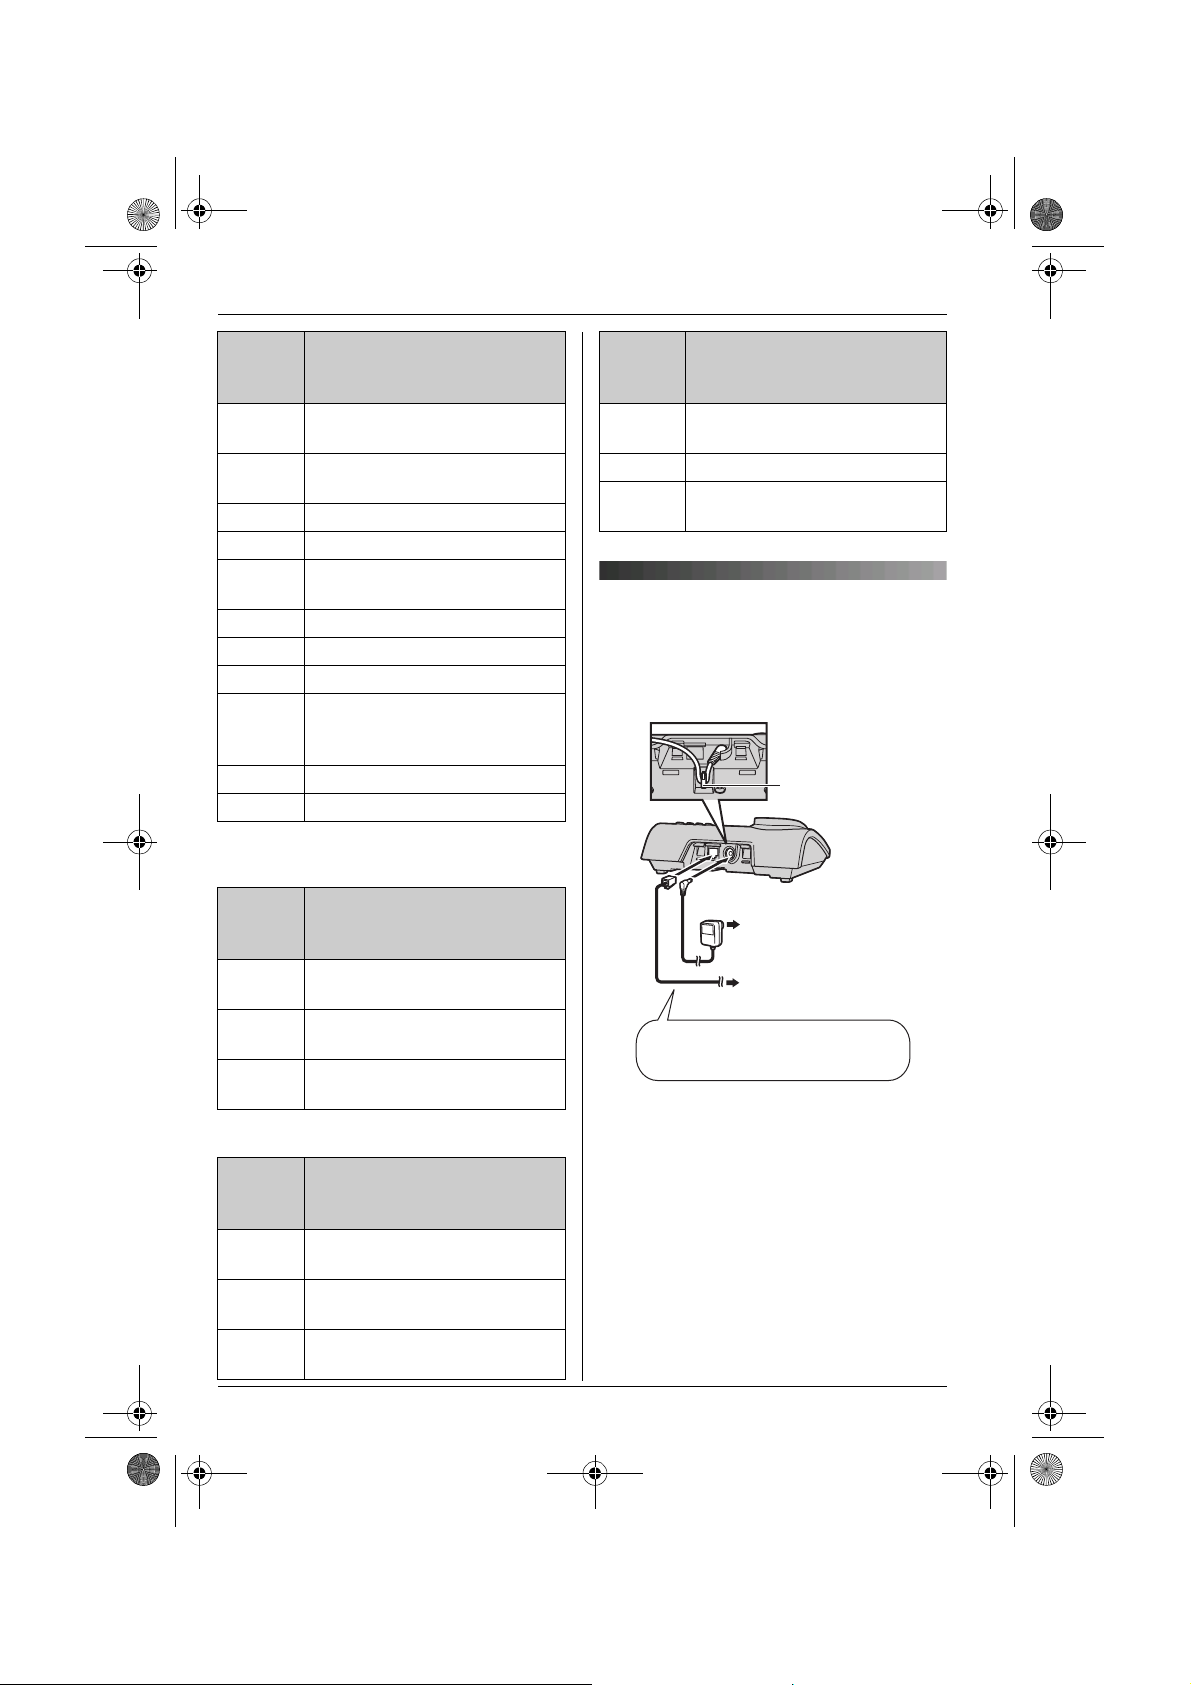
Connections
When connecting the AC adaptor to the
base unit, a short beep will be heard. If it is
not heard, check the connections.
Hook
(220–240 V, 50 Hz)
To telephone network
Use only the included AC adaptor
and telephone line cord.
Note:
L When connecting the telephone line cord
to the telephone network, use the included
telephone line cord or telephone plug
appropriate to your country, noted on
page 6.
L Never install telephone wiring during a
lightning storm.
L The AC adaptor must remain connected
at all times. (It is normal for the adaptor to
feel warm during use.)
12
Page 13
TG9120_40_50EX(e).book Page 13 Monday, August 7, 2006 3:52 PM
Preparation
L The AC adaptor should be connected to a
vertically oriented or floor-mounted AC
outlet. Do not connect the AC adaptor to a
ceiling-mounted AC outlet, as the weight
of the adaptor may cause it to become
disconnected.
Location
L For maximum distance and noise-free
operation, place your base unit:
– away from electrical appliances such as
TVs, radios, personal computers or
other phones.
– in a convenient, high and central
location.
Battery
installation/replacement
Important:
L Use only the included rechargeable
batteries noted on page 6, 8.
L When replacing batteries, we recommend
using the Panasonic rechargeable
batteries noted on page 7, 8.
L Wipe the battery ends (S, T) with a dry
cloth.
L When installing the batteries, avoid
touching the battery ends (S, T) or the
unit contacts.
1 Press the notch on the handset cover
firmly and slide it in the direction of the
arrow.
L When replacing batteries, remove the
old batteries positive (S) end first.
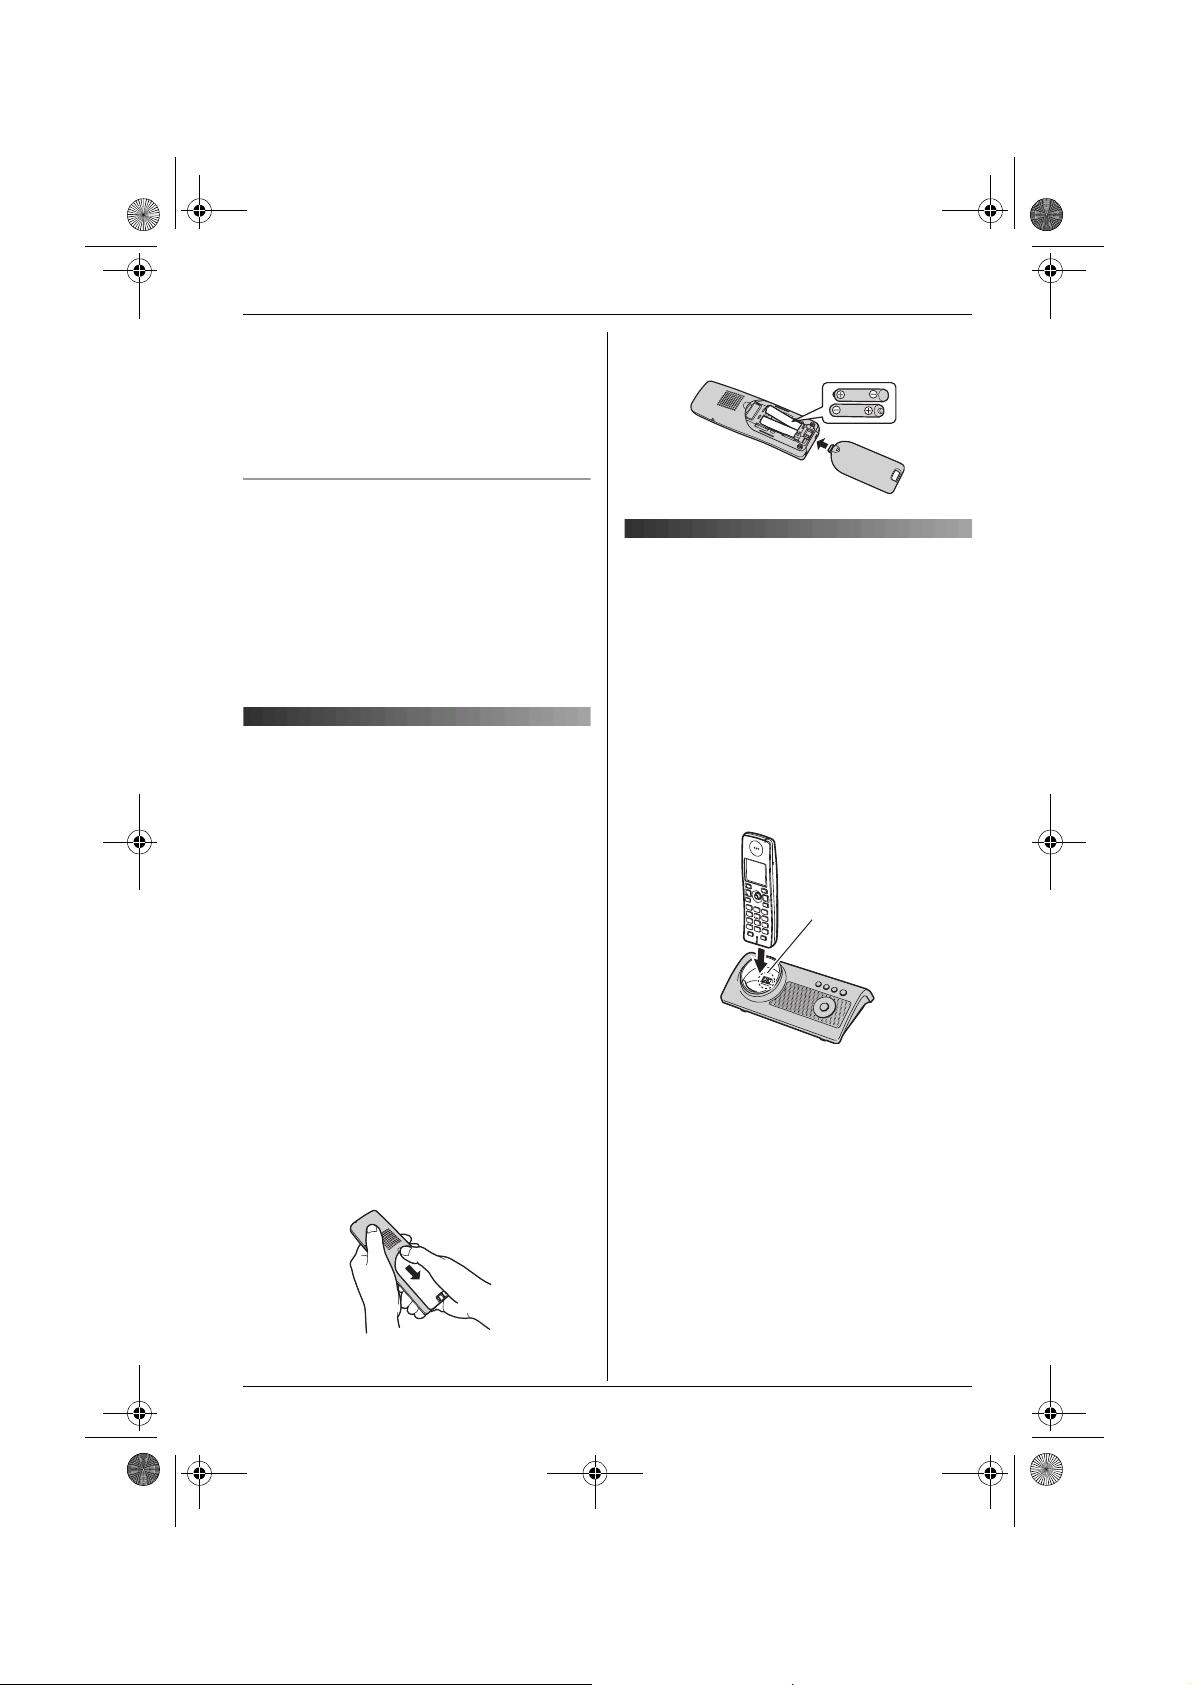
2 Insert the batteries negative (T) end
first. Close the handset cover.
Battery charge
Place the handset on the base unit for
about 7 hours before initial use.
When charging, “Charging” will be
displayed.
When the batteries are fully charged,
“Charge Completed” will be displayed.
L While charging, the charge indicator on
the handset lights in amber. When the
batteries are fully charged, the charge
indicator lights in green.
Charge
contact
Note:
L It is normal for the handset to feel warm
during charging.
L If you want to use the unit immediately,
charge the batteries for at least 15
minutes.
L Clean the charge contacts of the handset
and base unit with a soft, dry cloth once a
month, otherwise the batteries may not
charge properly. Clean more often if the
unit is exposed to grease, dust, or high
humidity.
13
Page 14
TG9120_40_50EX(e).book Page 14 Monday, August 7, 2006 3:52 PM
Preparation
Battery strength
Battery icon Battery strength
@ High
? Medium
/ Low
When flashing: Needs
to be charged.
Panasonic Ni-MH battery performance
(included batteries)
Operation Operating time
In continuous use 15 hours max.
In continuous
standby mode
Note:
L It is normal for batteries not to reach full
capacity at the initial charge. Maximum
battery performance is reached after a few
complete cycles of charge/discharge
(use).
L Actual battery performance depends on a
combination of how often the handset is in
use and how often it is not in use
(standby).
L Battery operating time may be shortened
over time depending on usage conditions
and ambient temperature.
L Even after the handset is fully charged,
the handset can be left on the base unit
without any ill effect on the batteries.
L The battery strength may not be displayed
correctly after you replace the batteries. In
this case, place the handset on the base
unit and charge for at least 7 hours.
240 hours max.
To use the handset when it is in screen
saver mode, first press {ih} to turn the
display on again.
Turning the power on/off
Power on
Press {ih} until a short beep sounds.
Power off
Press {ih} for about 2 seconds.
Symbols used in these
operating instructions
Symbol Meaning
J Press J (centre of joystick).
i Proceed to the next operation.
L Press L (centre of joystick).
j
X
I
M
3
m
L
“ ” Select the words in quotations
Select the mentioned handset
menu icon (page 11).
Example: m (handset setup
menu icon)
Select m by pushing the
joystick in any direction.
shown on the display (e.g.,
“Time Settings”) by
pushing the joystick up or
down.
Screen saver mode
The backlight will turn off completely
after 1 minute of inactivity if the handset is
not on the base unit.
14
Region settings
You can set the unit to use settings that
match your country (page 35). The display
language and other settings will change
accordingly.
Page 15
You can select
Deutsch
,
English
Espa
,
NORSK
FRANCAIS
Italiano
Dansk
Nederlands
Svenska
Suomi
EKKGMIJA
Portugu
or
Catal
TG9120_40_50EX(e).book Page 15 Monday, August 7, 2006 3:52 PM
Preparation
Note:
L The display language only changes (to the
selected country’s default setting) for the
handset used to select the region setting.
You must change the display language for
all other handsets separately.
Display language
14 display languages are available.
You can select
“English
“NORSK
“Dansk
“Suomi
“Portugu
“Deutsch
”,“Espa
”, , “FRANCAIS
”, , “Nederlands
”, , “EKKGMIJA
ês”, , or
ñolol”,
”, , “Italiano
”, , “Türkrkçe”,
“Catal
”,
”, , “Svenska
à”.
”,
”,
1 {ih} i J (centre of joystick)
2 Select m by pushing the joystick in any
direction. i L (centre of joystick)
3 Push the joystick up or down to select
“Display Setup”. i L
4 Push the joystick up or down to select
“Select Language”. i L
5 Push the joystick up or down to select
the desired language.i L i
{ih}
Note:
L If you select a language you cannot read,
press {ih}, press J, select m, press
L, push the joystick down 2 times,
press L, push the joystick down 2
times, press L, select the desired
language, then press L. Press {ih}.
Date and time
1 J (centre of joystick)
2 Select m by pushing the joystick in any
direction. i L (centre of joystick)
3 Push the joystick up or down to select
“Time Settings”. i L
4 Push the joystick up or down to select
“Set Date & Time”. i L
5 Enter the current day, month, and year.
Example: 17 May, 2006
{1}{7} {0}{5} {0}{6}
6 Enter the current hour and minute.
Example: 3:30 PM
{0}{3} {3}{0} i Press s until
“03:30 PM” is displayed.
7 L i {ih}
Note:
L To correct a digit, use the joystick to move
the cursor to the digit, then make the
correction.
L The date and time may be incorrect after a
power failure. In this case, set the date
and time again.
Time adjustment (Caller ID
subscribers only)
This feature allows the unit to automatically
adjust the date and time each time caller
information is received. To use this feature,
your caller ID service must provide caller
information, including date and time, in FSK
protocol. Consult your service provider/
telephone company for details.
To turn this feature on, select “Caller
ID[Auto]”. To turn this feature off, select
“Manual”.
1 J (centre of joystick) i m i L
2 “Time Settings” i L
3 “Time Adjustment” i L
4 “Caller ID[Auto]” or “Manual” i
L i {ih}
Important:
L To use this feature, set the date and time
first (page 15).
15
Page 16
TG9120_40_50EX(e).book Page 16 Monday, August 7, 2006 3:52 PM
C
Making/Answering Calls
To edit a number in the redial list before
Making calls
1 Lift the handset and dial the phone
number.
L To correct a digit, press {C/T}, then
enter the correct number.
2 {C}
calling it
1 j (right soft key)
2 Push the joystick up or down to select
3 “Edit and Call” i L
4 Use the joystick to move the cursor. i
3 When finished talking, press {ih} or
place the handset on the base unit.
Speakerphone
1 During a conversation, press {s} to turn
on the speakerphone.
L Speak alternately with the caller.
2 When finished talking, press {ih}.
Note:
L For best performance, use the
speakerphone in a quiet environment.
L To switch back to the receiver, press
{C}.
To adjust the receiver or speaker volume
Push the joystick up or down while on a call.
5 {C} / {s} / L
To erase numbers in the redial list
1 j (right soft key)
2 Push the joystick up or down to select
3 “Erase” i L
4 “Yes” i L i {ih}
Redial feature
Previously dialled phone numbers (each 48
digits max.) can be redialled.
To make a call using the redial list
The last 10 phone numbers dialled are
stored in the redial list.
1 j (right soft key)
2 Push the joystick up or down to select
the desired number.
To store a number from the redial list into
the handset phonebook
1 j (right soft key)
2 Push the joystick up or down to select
3 “Add Phonebook” i L
4 “Name” i L
5 Enter a name (16 characters max.; page
3 {C} / {s}
L If {s} is pressed and the other party’s
line is engaged, the unit will
automatically redial up to 11 more
times. While the handset is waiting to
redial, the ringer indicator will flash. To
cancel, press {ih}.
6 “<Save>” i L i {ih}
the desired number. i J
Edit the number.
L Place the cursor on the number you
wish to erase, then press {C/T}.
L Place the cursor to the right of where
you want to insert a number, then
press the appropriate dial key.
the desired number. i J
L If you want to erase all numbers in the
list, select “Erase All”, then press
L.
the desired number. i J
59). i L
L You can also press g to save the
entry.
L To assign a category to the entry,
continue from step 7, “Adding entries
to the handset phonebook”, page 19.
16
Page 17
TG9120_40_50EX(e).book Page 17 Monday, August 7, 2006 3:52 PM
C
Making/Answering Calls
Other features
Voice enhancer
You can change the tone quality of the
receiver while you are on a call.
1 Press J during a call.
2 “Voice Enhancer” i L
3 “High Tone” or “Low Tone” i L
L d is displayed.
Call share
A 2nd handset can join an existing outside
call.
To join the conversation, press {C} / {s}
when the other handset is on an outside call.
Call privacy
Call privacy allows you to prevent other
users from joining your conversations with
outside callers. To allow other users to join
your conversations, leave this feature off.
The default setting is “Off”.
1 Press J during an outside call.
2 “Privacy” i L
3 “On” or “Off” i L
L When this feature is turned on, x is
displayed.
Note:
L This feature will turn off after you hang up
the call.
Mute
While mute is turned on, you will be able to
hear the other party, but the other party will
not be able to hear you.
To mute your voice, press {C/T}.
L T is displayed.
L To return to the conversation, press
{C/T} again.
Key lock
The handset can be locked so that no calls
or settings can be made. Incoming calls can
be answered, but all other functions are
disabled while key lock is on.
To turn key lock on, press J (centre of
joystick) for about 2 seconds.
L I is displayed.
L To turn key lock off, press I (centre of
joystick) for about 2 seconds.
{R} button (to use the recall feature)
■ Germany/Austria:
{R} is used to access special telephone
services, such as call waiting. If your
telephone line supports call waiting, you can
press {R} to switch between the first and
second caller during a conversation.
Contact your service provider/telephone
company for details.
■ Other countries:
{R} is used to access optional telephone
services. Contact your service
provider/telephone company for details.
Note:
L If your unit is connected to a PBX (private
branch exchange), pressing {R} can allow
you to access certain features of your host
PBX such as transferring an extension
call. Consult your PBX dealer for details.
L You can change the recall time (page 34).
Pause button (for PBX/long distance
service users)
A pause is sometimes required when
making calls using a PBX or long distance
service.
Example: If you have to dial {0} before
dialling outside numbers manually, you will
probably need to pause after dialling {0}
until you hear a dial tone.
1 {0} i l
2 Dial the phone number. i {C} / {s}
Note:
L A 3 second pause is inserted each time
l is pressed. Press repeatedly to insert
longer pauses.
17
Page 18

TG9120_40_50EX(e).book Page 18 Monday, August 7, 2006 3:52 PM
C
Making/Answering Calls
Answering calls
When a call is being received, the ringer
indicator on the handset flashes.
1 Lift the handset and press {C} or {s}
when the unit rings.
L You can also answer a call by pressing
any dial key from {0} to {9}, {*}, {#},
or {INT}. (Any key answer feature)
2 When finished talking, press {ih} or
place the handset on the base unit.
Auto talk feature
You can answer calls simply by lifting the
handset off the base unit. You do not need to
press {C}. To turn this feature on, see
page 31.
To adjust the ringer volume when
receiving a call
Push the joystick up or down.
Other features
Handset locator
Using this feature, you can locate the
handset if it has been misplaced.
1 Press {x} on the base unit.
2 To stop paging, press {x} on the base
unit or press {ih} on the handset.
18
Page 19

TG9120_40_50EX(e).book Page 19 Monday, August 7, 2006 3:52 PM
k
Phonebooks
Handset phonebook
The handset phonebook allows you to make
calls without having to dial manually. You
can store up to 3 phone numbers for each
entry and assign each handset phonebook
entry to the desired category.
The total number of entries that can be
stored varies by the number of phone
numbers stored for each entry, as shown
below:
1 name + 1 phone
number
1 name + 2 phone
numbers
1 name + 3 phone
numbers
Adding entries to the handset
phonebook
■ KX-TG9120/KX-TG9140 (no USB
1
adaptor registered):
n (left soft key) i J
■ KX-TG9150 or USB adaptor
registered model:
J (centre of joystick) i 3 i L
i J
2 “New Entry” i L
3 “Name” i L
4 Enter the party’s name (16 characters
max.; page 59). i L
5 “Phone No. 1” i L
L You can store up to 3 phone numbers
for each entry.
6 Enter the party’s phone number (24
digits max.). i L
7 “Category 1” i L
8 Select the desired category. i L
9 “<Save>” i L i {ih}
200 entries
133 entries
100 entries
Categories
Categories can help you find entries in the
handset phonebook quickly and easily.
When adding an entry to the handset
phonebook, you can assign it to the desired
category. You can change the names of
categories assigned for handset phonebook
entries (“Friends”, “Family”, etc.) and then
search for handset phonebook entries by
category. Additional category features are
available for Caller ID subscribers (page
36).
Changing category names
1 ■ KX-TG9120/KX-TG9140 (no USB
adaptor registered):
n (left soft key) i J
■ KX-TG9150 or USB adaptor
registered model:
J (centre of joystick) i 3 i L
i J
2 “Category” i L
3 Select the desired category. i L
4 “Category Name” i L
5 Edit the name (10 characters max.;
page 59). i L i {ih}
Finding and calling a handset
phonebook entry
Handset phonebook entries can be
searched for alphabetically, by first
character, by category, or by scrolling
through all handset phonebook entries.
When you have found the desired entry,
press {C}.
L If more than 1 phone number is assigned
to the entry, press {C} / V. i Select
the desired phone number. i {C} /
{s}
19
Page 20
TG9120_40_50EX(e).book Page 20 Monday, August 7, 2006 3:52 PM
k
Phonebooks
Scrolling through all entries
1 ■ KX-TG9120/KX-TG9140 (no USB
adaptor registered):
n (left soft key)
■ KX-TG9150 or USB adaptor
registered model:
J (centre of joystick) i 3 i L
2 Push the joystick up or down to display
the desired entry.
Searching alphabetically
This method is useful when you are
searching for an entry which starts with a
letter of the alphabet.
1 ■ KX-TG9120/KX-TG9140 (no USB
adaptor registered):
n (left soft key)
■ KX-TG9150 or USB adaptor
registered model:
J (centre of joystick) i 3 i L
2 Press the dial key ({0} to {9}) which
corresponds to the letter you are
searching for (page 59).
L Press the same dial key repeatedly to
display the first entry corresponding to
each letter located on that dial key.
L If there is no entry corresponding to
the letter you selected, the next entry
will be displayed.
3 Push the joystick up or down to scroll
through the phonebook if necessary.
3 Press the right soft key repeatedly to
select the character entry mode that
contains the character you are
searching for.
4 Push the joystick in any direction to
select the desired character. i L
L If there is no entry corresponding to
the letter you selected, the next entry
will be displayed.
5 Push the joystick up or down to scroll
through the phonebook if necessary.
Note:
L In step 4, you can also press the dial key
({0}-{9}) that contains the character you
are searching for (page 59).
Searching by category
1 ■ KX-TG9120/KX-TG9140 (no USB
adaptor registered):
n (left soft key) i k
■ KX-TG9150 or USB adaptor
registered model:
J (centre of joystick) i 3 i L
i k
2 “Category Search” i L
3 Select the category you want to search.
i L
L If you select “All”, the unit will end
the category search.
4 Push the joystick up or down to scroll
through the phonebook if necessary.
Searching by first character (index
search)
1 ■ KX-TG9120/KX-TG9140 (no USB
adaptor registered):
n (left soft key) i k
■ KX-TG9150 or USB adaptor
registered model:
J (centre of joystick) i 3 i L
i k
2 “Index Search” i L
20
Viewing phonebook entry details
Find the desired entry (page 19). i
1
V
L The name and phone numbers
assigned to the entry are displayed.
2 Push the joystick right or left to view the
next or previous entry.
Page 21

TG9120_40_50EX(e).book Page 21 Monday, August 7, 2006 3:52 PM
k
Phonebooks
Editing entries in the handset
phonebook
Changing a name, phone number, or
category
1 Find the desired entry (page 19). i
K
2 “Edit” i L
3 Select the desired item you want to
change. i L
4 To change the name and phone
number
Edit the name or phone number. i
L
To change the category
Select the desired category. i L
5 “<Save>” i L i {ih}
Erasing a phone number from an entry
1 Find the desired entry (page 19). i
K
2 “Edit” i L
3 Select the desired phone number you
want to erase. i W
4 “<Save>” i L i {ih}
Erasing entries from the handset
phonebook
■ KX-TG9150 or USB adaptor
registered model:
J (centre of joystick) i 3 i L
i J
2 “Erase All” i L
3 “Yes” i L
4 “Yes” i L i {ih}
One touch dial
Assigning an entry in the handset
phonebook to a one touch dial key
Dial keys {1} to {9} can each be used as a
one touch dial key, allowing you to dial a
number from the handset phonebook by
simply pressing a dial key.
1 Find the desired entry (page 19). i
V
2 Select the desired phone number you
want to assign to a one touch dial key.
i J
3 “One Touch Dial” i L
4 Push the joystick up or down to select
the desired dial key number. i L
L When the dial key is already used as a
one touch dial key, “@” is displayed
next to the dial key number. If you
select this dial key, you can overwrite
the previous assignment.
5 “Save” i L i {ih}
Erasing an entry
1 Find the desired entry (page 19). i
K
2 “Erase” i L
3 “Yes” i L i {ih}
Erasing all entries
1 ■ KX-TG9120/KX-TG9140 (no USB
adaptor registered):
n (left soft key) i J
Making a call using a one touch dial key
1 Press and hold the desired one touch
dial key ({1} to {9}).
L You can view other one touch dial
assignments by pushing the joystick
up or down.
2 {C} / {s}
21
Page 22

TG9120_40_50EX(e).book Page 22 Monday, August 7, 2006 3:52 PM
k
Phonebooks
Erasing a one touch dial assignment
1 Press and hold the desired one touch
dial key ({1} to {9}). i J
2 “Erase” i L
3 “Yes” i L i {ih}
Note:
L The corresponding handset phonebook
entry is not erased.
Chain dial
This feature allows you to dial phone
numbers in the handset phonebook while
you are on a call. This feature can be used,
for example, to dial a calling card access
number or bank account PIN that you have
stored in the handset phonebook, without
having to dial manually.
1 While on a call, press n.
Quick dial for Call-by-Call:
Making calls using a
telephone carrier access
code (Germany only)
Different telephone carriers charge different
rates to call to different areas. If you store
the telephone carrier access codes you use
into the handset phonebook beforehand,
you can select the appropriate telephone
carrier access code when you make calls in
an effort to save on costs.
Important:
L In order to make calls using a telephone
1 Find the desired telephone carrier
2 Push the joystick up or down to select
the desired entry.
L To search by first character (index
search), see page 20. To search by
category, see page 20.
2 Press {C} to dial the telephone carrier
3 Press M to dial the number.
L If more than 1 phone number is
assigned to the entry, press V /
M. i Select the desired phone
number. i L
3 As soon as the number is dialled, press
4 Press L to dial the desired entry.
carrier access code, you may need to
subscribe to that carrier’s service.
access code stored in the handset
phonebook.
L To search by first character (index
search), see page 20. To search by
category, see page 20.
access code.
n. i Push the joystick up or down to
select the desired entry.
L Select the desired entry before the line
automatically disconnects.
22
Page 23
TG9120_40_50EX(e).book Page 23 Monday, August 7, 2006 3:52 PM
Shared phonebook
The shared phonebook allows you to make
calls without having to dial manually. Any
handset registered to the same base unit
can use the shared phonebook. You can
add 20 names and phone numbers to the
shared phonebook. If you subscribe to
Caller ID service, you can use the shared
phonebook’s audible call feature (page 37).
Adding entries to the shared
phonebook
■ KX-TG9120/KX-TG9140 (no USB
1
adaptor registered):
n (left soft key) i T i J
■ KX-TG9150 or USB adaptor
registered model:
J (centre of joystick) i 3 i L
i T i J
2 “New Entry” i L
3 Enter the party’s name (16 characters
max.; page 59). i L
4 Enter the party’s phone number (24
digits max.). i L
5 To record an audible call
announcement
“Start Recording” i L
To skip recording
“Skip Recording” i L i Go to
step 8.
L Audible call (page 37) can be used by
Caller ID subscribers only.
6 When “Recording” is displayed, speak
into the microphone.
L Maximum recording time is 10
seconds.
L Hold the handset about 20 cm away
and speak clearly into the microphone.
7 Press N to end recording.
k
Phonebooks
L To change the audible call
announcement, press U, then
repeat from step 5.
8 “Save” i L i {ih}
Note:
L Phonebook entries that have an audible
call announcement are indicated by %.
Finding and calling a shared
phonebook entry
Shared phonebook entries can be searched
for by first character or by scrolling through
all shared phonebook entries.
Once you have found the desired entry,
press {C} or {s} to dial the phone number.
Scrolling through all entries
1 ■ KX-TG9120/KX-TG9140 (no USB
adaptor registered):
n (left soft key) i T
■ KX-TG9150 or USB adaptor
registered model:
J (centre of joystick) i 3 i L
i T
2 Push the joystick up or down to display
the desired entry.
Searching by first character (index
search)
1 ■ KX-TG9120/KX-TG9140 (no USB
adaptor registered):
n (left soft key) i T i k
■ KX-TG9150 or USB adaptor
registered model:
J (centre of joystick) i 3 i L
i T i k
2 Press the right soft key repeatedly to
select the character entry mode that
contains the character you are
searching for.
3 Push the joystick in any direction to
select the desired character. i L
23
Page 24

TG9120_40_50EX(e).book Page 24 Monday, August 7, 2006 3:52 PM
k
Phonebooks
L If there is no entry corresponding to
the letter you selected, the next entry
will be displayed.
4 Push the joystick up or down to scroll
through the phonebook if necessary.
Note:
L In step 3, you can also press the dial key
({0}-{9}) that contains the character you
are searching for (page 59).
Editing entries in the shared
phonebook
Changing a name, phone number, or
audible call
1 Find the desired entry (page 23). i
J
2 “Edit” i L
3 Edit the name if necessary (16
characters max.; page 59). i L
4 Edit the phone number if necessary (24
digits max.). i L
5 Skip, record, or erase an audible call
recording.
L To record the audible call
announcement, continue from step 5,
“Adding entries to the shared
phonebook”, page 23.
L To skip recording, select “Skip
Recording”. i L
L To erase the audible call
announcement, select “Erase”. i
L
6 “Save” i L i {ih}
Erasing entries from the shared
phonebook
Erasing an entry
1 Find the desired entry (page 23). i
J
2 “Erase” i L
3 “Yes” i L i {ih}
Erasing all entries
1 ■ KX-TG9120/KX-TG9140 (no USB
adaptor registered):
n (left soft key) i T i J
■ KX-TG9150 or USB adaptor
registered model:
J (centre of joystick) i 3 i L
i T i J
2 “Erase All” i L
3 “Yes” i L
4 “Yes” i L i {ih}
Playing back an audible call
announcement
1 Find the desired entry (page 23). i
J
2 “Audible Call” i L i {ih}
24
Page 25
TG9120_40_50EX(e).book Page 25 Monday, August 7, 2006 3:52 PM
m
Handset Settings
Handset settings
For your reference, a chart of all items which can be customised for the handset is shown
below.
L When customising the handset, the current item or setting is highlighted on the display.
Handset settings
menu
Time Settings Set Date &
Ringer Setup Ringer Volume — Maximum page 27
Display Setup Wallpaper — Picture 1 page 30
Baby Monitor On/Off — Off page 30
Registration Register H.set — — page 54
Select Base ——Auto page 55
Sub-menu Sub-menu 2 Default setting Page
— — page 15
Time
Memo Alarm — Off page 27
Time
Adjustment
Ext. Ringtone Preset
Int. Ringtone Preset
IP Ringtone
Cust. Ringtone Record — page 28
Night Mode Start/End 23:00/06:00 page 29
Display Colour — Colour1 page 30
Select
Language
Contrast — Contrast 3 page 30
Sensitivity — Middle page 30
*1
— Caller
ID[Auto]
Ringtone 1 page 27
Ringtones
User
Ringtones
Ringtone 3 page 27
Ringtones
User
Ringtones
Preset
Ringtones
User
Ringtones
List — page 28
On/Off Off page 29
Ring Delay 60 sec. page 29
Select
Category
— English
Ringtone 6 —
—
—
—
— page 29
*2
page 15
page 15
25
Page 26

Deutschland
Deutsch
Espa
Espa
FRANCE
FRANCAIS
Italia
Italiano
Nederland
Nederlands
EKKADA
EKKGMIJA
TG9120_40_50EX(e).book Page 26 Monday, August 7, 2006 3:52 PM
m
Handset Settings
Handset settings
menu
Other Options Handset Name — — page 31
*1 For USB adaptor KX-TGA915EX users only. Please refer to the USB adaptor’s
operating instructions.
*2 The default display language will be as follows if you select the following regional codes
when changing the unit’s region setting (page 35):
““Deutschland
“Espa
ña” = “Espa
“FRANCE
“Italia
“Nederland
“EKKADA
” = “FRANCAIS
” = “Italiano
” = “EKKGMIJA
Sub-menu Sub-menu 2 Default setting Page
New Msg. Alert — Off page 31
LetterWise — English
Keytones — On page 31
Auto Talk — Off page 31
Auto Intercom — Off page 32
Calling Code — — page 32
” = “Deutsch
ñolol”
” = “Nederlands
”
”
”
”
”
*2
page 31
26
Page 27
TG9120_40_50EX(e).book Page 27 Monday, August 7, 2006 3:52 PM
Time settings
Memo alarm
An alarm will sound for 3 minutes at the set
time once or daily. A text memo can also be
displayed for the alarm. Set the date and
time beforehand (page 15).
A total of 5 separate alarm instances can be
programmed at once.
1 J (centre of joystick) i m i L
2 “Time Settings” i L
3 “Memo Alarm” i L
4 Select an alarm (1 to 5). i J
5 Select an alarm mode. i L
“Off”
Turns alarm off. Press L again, then
press {ih} to finish.
“Once”
The alarm sounds once at the set time.
Enter the desired day and month.
“Daily”
An alarm sounds daily at the set time.
m
Handset Settings
L If you are on an outside call, beeps will
sound and e will flash at the set time. The
alarm will not sound until you hang up.
L If you select “Once”, the setting will
change to “Off” after the alarm sounds.
Ringer setup
Ringer volume
J (centre of joystick) i m i L
1
2 “Ringer Setup” i L
3 “Ringer Volume” i L
4 Push the joystick up or down to select
the desired volume. i L i {ih}
L When the ringer volume is turned off,
~ is displayed.
Note:
L When the ringer is turned off, the handset
will ring:
– at the minimum level for alarm and
intercom calls
– at the maximum level for paging
6 Enter the desired hour and minute. i
L
7 Enter a text memo (30 characters max.;
page 59). i L
8 Select the desired item. i L
“Preset Ringtones”
Ringtones stored in the handset at the
time of purchase.
“User Ringtones”
Ringtones you stored in the handset
(page 28).
9 Select the desired ringtone. i L
10 “Save” i L i {ih}
L When the alarm is set, e is displayed.
Note:
L To stop the alarm, press any dial key.
Changing ringtones
J (centre of joystick) i m i L
1
2 “Ringer Setup” i L
3 Select the desired item. i L
“Ext. Ringtone”
Selects the ringtone for outside calls.
“Int. Ringtone”
Selects the ringtone for intercom calls.
4 Select the desired item. i L
“Preset Ringtones”
Ringtones stored in the handset at the
time of purchase.
“User Ringtones”
Ringtones you stored in the handset
(page 28).
27
Page 28
TG9120_40_50EX(e).book Page 28 Monday, August 7, 2006 3:52 PM
m
Handset Settings
5 Select the desired ringtone. i L i
{ih}
Note:
L If you select one of the melody ringtones,
the ringtone will continue to sound for
several seconds if the caller hangs up
before you answer. You may hear a dial
tone or no one on the line when you
answer a call.
L The preset melodies in this product are
used with permission of © 2006
Copyrights Vision Inc.
Customising ringtones
You can record melodies (max. 30 seconds
each) from an audio device by connecting
the included audio cable. These melodies
can be assigned as user ringtones (page 27,
36).
Important:
L The total of about 4 minutes and 30
seconds (max. 32 melodies) can be
recorded. The recording time may
decrease depending on the size of
melodies already stored in the handset.
L If a call is received while the audio cable is
connected to the handset, disconnect the
audio cable from the handset and answer
the call, otherwise you and the caller will
not hear each other’s voice.
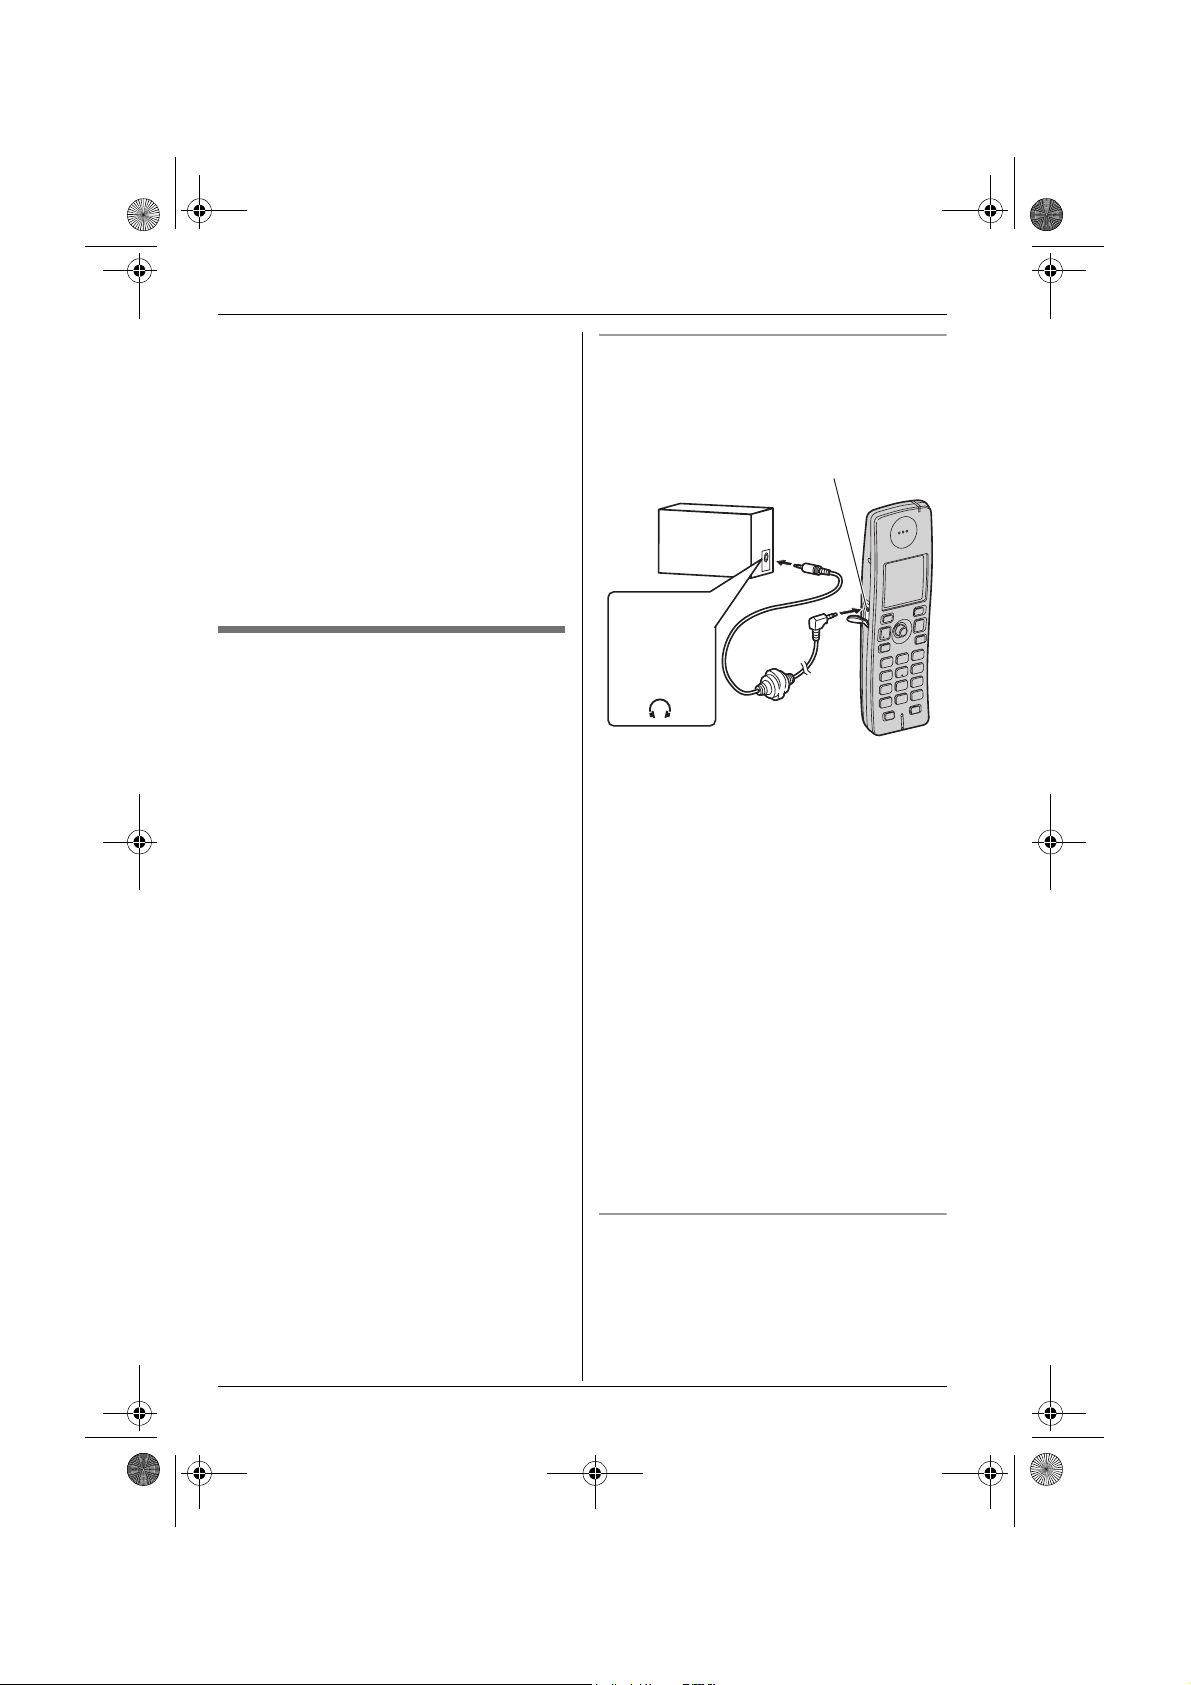
Recording melodies for user ringtones
1 Connect the handset to the audio device
(such as a CD player or computer) using
the included audio cable.
Audio jack
Audio device
Headphone
output, line
out, etc.
Example:
Audio cable
2 J (centre of joystick) i m i L
3 “Ringer Setup” i L
4 “Cust. Ringtone” i L
5 “Record” i L
6 Start playing the audio device.
7 Press Q to start recording.
8 To stop recording, press N.
L To listen to the recording, select
“Play”. i L
L To re-record, select “Re-record”.
i L i Repeat from step 5.
9 “Save” i L
10 Edit the name (10 characters max.;
page 59). i f i {ih}
11 Disconnect the audio cable from the
handset.
28
Erasing a ringtone
1 J (centre of joystick) i m i L
2 “Ringer Setup” i L
3 “Cust. Ringtone” i L
4 “List” i L
Page 29
TG9120_40_50EX(e).book Page 29 Monday, August 7, 2006 3:52 PM
m
Handset Settings
5 Select the desired item. i J
6 “Erase” i L
7 “Yes” i L i {ih}
Renaming a ringtone
1 J (centre of joystick) i m i L
2 “Ringer Setup” i L
3 “Cust. Ringtone” i L
4 “List” i L
5 Select the desired item. i J
6 “Rename” i L
7 Edit the name (10 characters max.;
page 59). i L i {ih}
Night mode
Night mode allows you to select a block of
time during which the handset will not ring
for outside calls. This feature is useful for
times when you do not want to be disturbed,
for example, while sleeping. Night mode can
be set independently for the handset and the
base unit (page 34).
Using the handset phonebook’s category
feature (page 19), you can also select
categories of callers whose calls will
override night mode and ring the handset
(Caller ID subscribers only).
Set the date and time beforehand (page 15).
Setting the start and end time for night
mode
1 J (centre of joystick) i m i L
2 “Ringer Setup” i L
3 “Night Mode” i L
4 “Start/End” i L
5 Enter the desired hour and minute you
wish to start this feature.
6 Enter the desired hour and minute you
wish to end this feature.
7 L i {ih}
Turning night mode on/off
1 J (centre of joystick) i m i L
2 “Ringer Setup” i L
3 “Night Mode” i L
4 “On/Off” i L
5 “On” or “Off” i L i {ih}
L When the night mode is set, f is
displayed.
Setting the ring delay for night mode
This setting allows the handset to ring during
night mode if the caller waits long enough.
After the selected amount of time passes,
the handset will ring. If you select “No
Ringing”, the handset will never ring
during night mode.
1 J (centre of joystick) i m i L
2 “Ringer Setup” i L
3 “Night Mode” i L
4 “Ring Delay” i L
5 Select the desired setting. i L i
{ih}
Note:
L When the answering system answers the
call, this feature does not work.
Selecting categories to bypass night
mode
1 J (centre of joystick) i m i L
2 “Ringer Setup” i L
3 “Night Mode” i L
4 “Select Category” i L
5 Select the desired category numbers.
i t i L
L Selected category numbers are
indicated by a “Q”.
L To cancel a selected category
number, select the number again,
then press t.
6 {ih}
29
Page 30

TG9120_40_50EX(e).book Page 30 Monday, August 7, 2006 3:52 PM
m
Handset Settings
Display setup
Selecting wallpaper
You can select the “wallpaper” shown on the
display in standby mode.
1 J (centre of joystick) i m i L
2 “Display Setup” i L
3 “Wallpaper” i L
4 Push the joystick up or down to select
the desired picture.
L You can switch between the picture list
and the picture view by pressing b
or c.
5 L i {ih}
Note:
L If you select “No Picture”, the display
colour will be changed to the colour you
selected for display colour (page 30).
L The preset wallpaper patterns in this
product are used with permission of ©
Digital Vision.
Selecting a display colour
J (centre of joystick) i m i L
1
2 “Display Setup” i L
3 “Display Colour” i L
4 Select the desired colour. i L i
{ih}
Baby monitor (additional
handset required)
Using the baby monitor
This feature allows you to listen in on a room
where another handset is located, allowing
you to easily monitor from different areas of
the house. The monitored handset (placed
in a baby’s room, for example) will
automatically call the monitoring handset
when it detects sound.
Perform the following procedure with the
handset to be monitored (for example, the
handset placed in the baby’s room).
1 J (centre of joystick) i m i L
2 “Baby Monitor” i L
3 “On/Off” i L
4 “On” i L
5 Select the desired handset number to
monitor with. i L
L “Baby Monitor” will be displayed.
Note:
L The monitoring handset will answer calls
automatically when the auto intercom
feature is set to “On” (page 32).
L The monitored handset cannot be used
while baby monitor is set to “On”. To
cancel monitoring;
J i “On/Off” i L i “Off”
i L i {ih}
Changing the display contrast
This feature is available for wallpaper and
display icons.
1 J (centre of joystick) i m i L
2 “Display Setup” i L
3 “Contrast” i L
4 Push the joystick up or down to select
the desired contrast. i L i
{ih}
30
Baby monitor sensitivity
You can adjust the sensitivity of the baby
monitor. Increase or decrease the sensitivity
to adjust the sound level needed to trigger
the baby monitor feature.
L This feature cannot be set during a
monitoring call.
1 Press J on the handset being
monitored.
2 “Sensitivity” i L
Page 31

TG9120_40_50EX(e).book Page 31 Monday, August 7, 2006 3:52 PM
m
Handset Settings
3 Push the joystick up or down to select
the desired setting. i L i {ih}
Other options
Assigning/changing handset
names
Each handset can be given a customised
name (“Bob”, “Kitchen”, etc.). This is useful
when you have multiple handsets.
Turn this feature on to display the handset
name in standby mode. The default setting
is “Off”.
1 J (centre of joystick) i m i L
2 “Other Options” i L
3 “Handset Name” i L
4 Enter/edit the name (10 characters
max.; page 59). i L
5 “On” or “Off” i L i {ih}
Turning message alert on/off
This feature alerts you when new messages
have been received or recorded:
– SMS (page 39)
– Answering system (page 49)
The message indicator on the handset
slowly flashes blue until you have read or
listened to all new messages.
1 J (centre of joystick) i m i L
2 “Other Options” i L
3 “New Msg. Alert” i L
4 “On” or “Off” i L i {ih}
Note:
L While message alert is on, battery
operating time is shortened (page 14).
Changing the LetterWise®
language
You can change which language is used for
LetterWise character entry (page 60, 61).
1 J (centre of joystick) i m i L
2 “Other Options” i L
3 “LetterWise” i L
4 Select the desired language. i L
i {ih}
Turning keytones on/off
Keytones include confirmation tones and
error tones.
1 J (centre of joystick) i m i L
2 “Other Options” i L
3 “Keytones” i L
4 “On” or “Off” i L i {ih}
Turning auto talk on/off
When this feature is turned on, you can
answer calls simply by lifting the handset off
the base unit. You do not need to press
{C}.
1 J (centre of joystick) i m i L
2 “Other Options” i L
3 “Auto Talk” i L
4 “On” or “Off” i L i {ih}
31
Page 32

TG9120_40_50EX(e).book Page 32 Monday, August 7, 2006 3:52 PM
m
Handset Settings
Turning auto intercom on/off
This feature allows the handset to answer
intercom calls automatically when it is
called. You do not need to press {C}.
When this feature is set to “On”, the
monitoring handset for the baby monitor
feature (page 30) will also answer baby
monitor calls automatically.
1 J (centre of joystick) i m i L
2 “Other Options” i L
3 “Auto Intercom” i L
4 “On” or “Off” i L i {ih}
Calling code
If you need to dial a special calling code to
make calls using the telephone services of a
certain service provider/telephone company,
you can store the calling code in advance
and dial it by simply pressing and holding
the {*} while dialling a phone number.
Important:
L To use this feature you must store the
calling code in advance.
Example: If you store the calling code “098”
and press and hold {*} before dialling
“12345”, the unit dials “09812345”
automatically.
L The calling code you stored will be
displayed.
2 Dial the phone number manually.
3 {C} / {s} / L
When dialling from the redial list,
phonebook, one touch dial, or caller list:
1 Display the desired phone number in the
redial list, phonebook, one touch dial, or
caller list.
2 Press and hold {*}.
L The calling code you stored will be
displayed before the phone number.
3 {C} / {s} / L
Assigning the calling code number
1 J (centre of joystick) i m i L
2 “Other Options” i L
3 “Calling Code” i L
4 Enter the desired calling code (24 digits
max.). i L
5 “Save” i L i {ih}
Making calls using a calling code
When dialling manually:
1 Lift the handset, then press and hold
{*}.
32
Page 33

TG9120_40_50EX(e).book Page 33 Monday, August 7, 2006 3:52 PM
L
Base Unit Settings
Base unit settings
For your reference, a chart of all items which can be customised for the base unit is shown
below.
L These items are customised using the handset.
L When customising the base unit, the current item or setting is highlighted on the display.
Base unit
settings menu
Ringer Setup Ringer
Call Options Recall/Flash — 100 msec. page 34
Other Options Base Unit PIN — 0000 page 35
Sub-menu Sub-menu 2 Default setting Page
— Medium page 34
Volume
Night Mode Start/End 23:00/06:00 page 34
On/Off Off page 34
Ring Delay 60 sec. page 34
Repeater
Mode
Country — Other page 35
— Off page 56
33
Page 34

TG9120_40_50EX(e).book Page 34 Monday, August 7, 2006 3:52 PM
L
Base Unit Settings
5 “On” or “Off” i L i {ih}
Ringer setup
Ringer volume
J (centre of joystick) i L i L
1
2 “Ringer Setup” i L
3 “Ringer Volume” i L
4 Push the joystick up or down to select
the desired volume. i L i {ih}
Night mode
Night mode allows you to select a block of
time during which the base unit will not ring
for outside calls. This feature is useful for
times when you do not want to be disturbed,
for example, while sleeping. Night mode can
be set independently for the handset (page
29) and the base unit.
Set the date and time beforehand (page 15).
Setting the start and end time for night
mode
1 J (centre of joystick) i L i
L
2 “Ringer Setup” i L
3 “Night Mode” i L
4 “Start/End” i L
5 Enter the desired hour and minute you
wish to start this feature.
6 Enter the desired hour and minute you
wish to end this feature.
7 L i {ih}
Setting the ring delay for night mode
This setting allows the base unit to ring
during night mode if the caller waits long
enough. After the selected amount of time
passes, the base unit will ring. If you select
“No Ringing”, the base unit will never ring
during night mode.
1 J (centre of joystick) i L i
L
2 “Ringer Setup” i L
3 “Night Mode” i L
4 “Ring Delay” i L
5 Select the desired setting. i L i
{ih}
Note:
L When the answering system answers the
call, this feature does not work.
Call options
Changing the recall time
Change the recall time, if necessary,
depending on the requirements of your
service provider/telephone company or
PBX.
1 J (centre of joystick) i L i L
2 “Call Options” i L
3 “Recall/Flash” i L
4 Select the desired setting. i L i
{ih}
Turning night mode on/off
1 J (centre of joystick) i L i
L
2 “Ringer Setup” i L
3 “Night Mode” i L
4 “On/Off” i L
34
Page 35

Deutschland
Germany
Espa
Spain
FRANCE
France
Italia
Italy
Nederland
Netherlands
EKKADA
Greece
Other
Austria, Switzerland,
Belgium, Norway, Sweden, Finland,
and Denmark
Deutschland
German
FRANCE
French
All other countries = English
TG9120_40_50EX(e).book Page 35 Monday, August 7, 2006 3:52 PM
Other options
Changing the base unit PIN
(Personal Identification Number)
Important:
L If you change the PIN, please make note
of your new PIN. The unit will not reveal
the PIN to you. If you forget your PIN,
consult your nearest Panasonic service
centre.
1 J (centre of joystick) i L i L
2 “Other Options” i L
3 “Base Unit PIN” i L
4 Enter the current 4-digit base unit PIN
(default: “0000”).
5 Enter the new 4-digit base unit PIN. i
L i {ih}
Changing the unit’s region
setting/Resetting the base unit
J (centre of joystick) i L i L
1
2 “Other Options” i L
3 “Country” i L
4 Select the desired country. i L
““Deutschland
“Espa
ña” = Spain
“FRANCE
“Italia
“Nederland
“EKKADA
“Other
Belgium, Norway, Sweden, Finland,
and Denmark
” = Austria, Switzerland,
” = Germany
” = France
” = Italy
” = Netherlands
” = Greece
L
Base Unit Settings
– Time adjustment
– All SMS messages
– Caller list
L The following items will be retained:
– Date and time
– Shared phonebook entries
– Repeater mode
– Recordings, including your greeting
message, caller messages, and audible
call announcements
L If you select the desired country in step 4,
the following default settings will be
changed for the selected country’s default
settings:
– Display language (page 25)
– LetterWise (page 25)
– Number of rings to turn on the
answering system remotely
– SMS features by country (page 39)
– Maximum number of characters you
can send or receive for SMS (page 42)
L According to your country selection in step
4, the answering system announcement
language changes as follows:
– “Deutschland
– “FRANCE
– All other countries = English
L After resetting the base unit, w will flash
on the handset momentarily. This is
normal. The handset can be used once w
stops flashing.
” = German
” = French
5 “Yes” i L i {ih}
Note:
L The following items will be deleted or reset
to their default settings:
– Settings listed on page 33, 46, 53
35
Page 36

TG9120_40_50EX(e).book Page 36 Monday, August 7, 2006 3:52 PM
j
Caller ID Service
Call Waiting Caller ID
Using Caller ID service
Important:
L This unit is Caller ID compatible. To use
Caller ID features (such as displaying
caller phone numbers), you must
subscribe to Caller ID service. Consult
your service provider/telephone company
for details.
Caller ID features
When an outside call is received, the caller’s
phone number will be displayed.
L Phone numbers of the last 50 callers will
be logged in the caller list.
L While listening to a message recorded by
the answering system using the handset,
you can call back the caller without having
to dial the phone number (page 51).
L When caller information is received and it
matches a phone number stored in the
unit’s phonebook:
– The stored name will be displayed and
logged in the caller list.
– The handset will use the display colour
and ringtone assigned to the caller’s
category.
– The handset will announce the audible
call recording you made.
L If the unit is connected to a PBX system,
you may not receive the caller information.
L When the caller dialled from an area
which does not provide Caller ID service,
“Out of Area” will be displayed.
L When the caller requested not to send
caller information, either no information or
“Private Caller” will be displayed.
Missed calls
If a call is not answered, the unit treats the
call as a missed call. y and the number of
missed calls are shown on the display. This
lets you know if you should view the caller
list to see who called while you were out.
This is a service of your service
provider/telephone company and will only
operate if you have subscribed to this
service. Consult your service
provider/telephone company for details of
this service.
■ Germany/Austria:
When you hear a call waiting tone during a
conversation, the display will show the
second caller’s information. You can answer
the second call by pressing {R}. The first
caller will be placed on hold. Press {R}
again to switch back to the first caller.
■ France/Spain/Greece/Belgium/
Sweden:
When you hear a call waiting tone during a
conversation, the display will show the
second caller’s information. You can answer
the second call, keeping the first call on
hold.
Category features for handset
phonebook
Categories can help you identify who is
calling by using different ringtones and
display colours for different categories of
callers. When adding an entry to the
handset phonebook you can assign it to the
desired category (page 19). When a call is
received from a caller assigned to a
category, the category’s display colour and
ringtone you selected are used.
Changing category ringtones
If you select “Ext. Ringtone”, the unit
will use the external ringtone you set on
page 27 when calls from this category are
received. The default setting is “Ext.
Ringtone”.
1 ■ KX-TG9120/KX-TG9140 (no USB
adaptor registered):
n (left soft key) i J
36
Page 37

TG9120_40_50EX(e).book Page 37 Monday, August 7, 2006 3:52 PM
j
Caller ID Service
■ KX-TG9150 or USB adaptor
registered model:
J (centre of joystick) i 3 i L
i J
2 “Category” i L
3 Select a category. i L
4 Select the current setting of the category
ringtone. i L
5 Select the desired item. i L
“Ext. Ringtone”
The ringtone assigned for external calls.
Press {ih} to finish.
“Preset Ringtones”
Ringtones stored in the handset at the
time of purchase.
“User Ringtones”
Ringtones you stored in the handset
(page 28).
6 Select the desired ringtone. i L
i {ih}
Changing category display colours
If you select “Display Colour”, the unit
will use the display colour you set on page
30 when calls from this category are
received. The default setting is “Display
Colour”.
1 ■ KX-TG9120/KX-TG9140 (no USB
adaptor registered):
n (left soft key) i J
■ KX-TG9150 or USB adaptor
registered model:
J (centre of joystick) i 3 i L
i J
2 “Category” i L
3 Select a category. i L
4 Select the current setting of the category
colour. i L
5 Select the desired colour. i L i
{ih}
Audible call for shared
phonebook
Audible call allows you to know who is
calling without looking at the display. If you
record an audible call announcement for a
shared phonebook entry (page 23), the
audible call recording will be announced
when you receive a call from that person.
Note:
L If the handset ringer is turned off, audible
call announcements will not be heard.
Caller list
Viewing the caller list and calling
back
J (centre of joystick) i j i L
1
2 Push the joystick down to search from
the most recent call. Push the joystick up
to search from the oldest call.
L If the item has already been viewed or
answered, “Q” is displayed, even if it
was viewed or answered using
another handset.
L To erase the item, press W. i
“Yes” i L
3 {C} / {s}
Editing a caller’s phone number
before calling back
1
J (centre of joystick) i j i L
2 Push the joystick up or down to display
the desired entry.
3 J i “Edit and Call” i L
4 Edit the number.
L Press dial key ({0} to {9}) to add,
{C/T} to delete.
5 {C} / {s} / L
37
Page 38

TG9120_40_50EX(e).book Page 38 Monday, August 7, 2006 3:52 PM
j
Caller ID Service
Erasing caller information
J (centre of joystick) i j i L
1
2 Push the joystick up or down to display
the desired entry. i J
3 “Erase” i L
L To erase all entries, select “Erase
All”. i L
4 “Yes” i L i {ih}
Storing caller information into the
handset phonebook
J (centre of joystick) i j i L
1
2 Push the joystick up or down to display
the desired entry. i J
3 “Add Phonebook” i L
4 Continue from step 3, “Adding entries to
the handset phonebook”, page 19.
Voice mail service
L For more information on using the unit’s
answering system and your service
provider/telephone company’s voice mail
service, see page 53.
Voice mail is an automatic answering
service offered by your service
provider/telephone company. If you
subscribe to this service, your service
provider/telephone company’s voice mail
system will answer calls for you when you
are unavailable to answer the phone or
when your line is busy. Messages are
recorded by your service provider/telephone
company, not your telephone.
When you have new messages, z will be
displayed on the handset. Please consult
your service provider/telephone company
for details of this service.
Note:
L If z still remains on the display even after
you have listened to new messages, turn
it off by pressing and holding {C/T} for 2
seconds.
38
Page 39

TG9120_40_50EX(e).book Page 39 Monday, August 7, 2006 3:52 PM
X
SMS (Short Message Service)
Using SMS (Short Message Service)
SMS allows you to send and receive text messages between other fixed-line and mobile
phones that support compatible SMS networks and features.
SMS features by country
L Change the unit’s region setting (page 35) to match your country.
Feature Germany France Italy Spain Other
countries
Private mailbox
(page 46)
Terminal number
(page 47)
Public key (page 47) — — rr —
SMS to FAX (page 43) — rrr —
SMS to E-mail address
(page 44)
E-mail access number
(page 48)
Requesting a receipt
(page 43)
Registering/cancelling
SMS service (page 41)
rr—— —
——rr —
— rrr —
— r —— —
— rrr —
———r —
Important:
L To use SMS features, you must:
– subscribe to Caller ID and/or appropriate service
– confirm SMS is turned on
– confirm the correct message centre numbers are stored
– register for SMS service (Spain only)
Consult your service provider/telephone company for details and availability.
Using the public mailbox and private mailboxes/public keys
■ Germany/France:
SMS messages can be sent and received using the public mailbox or any one of the 6 private
mailboxes. The public mailbox can be accessed freely. The private mailboxes are password
protected to ensure privacy.
Important:
L To use a private mailbox, you must first create it by storing its name and password (page
47).
39
Page 40

TG9120_40_50EX(e).book Page 40 Monday, August 7, 2006 3:52 PM
X
SMS (Short Message Service)
■ Italy/Spain:
SMS messages can be sent and received using the public mailbox or any one of the 6 public
keys. The public keys are password protected to ensure privacy only when you receive
messages.
Important:
L To use a public key, you must first create it by storing its name and password (page 47).
Note:
L Germany/France/Italy/Spain:
A total of 47 messages (at 160 characters/message) in all mailboxes added together can
be saved. Total number may be more than 47 if length of messages is less than 160
characters/message.
Other countries:
A total of 47 messages (at 160 characters/message) can be saved. Total number may be
more than 47 if length of messages is less than 160 characters/message.
L If the unit is connected to a PBX system, you may not be able to use SMS features.
40
Page 41

TG9120_40_50EX(e).book Page 41 Monday, August 7, 2006 3:52 PM
Turning SMS on/off
1 ■ Germany/France:
J (centre of joystick) i X i L
i “Public” i L
■ Other countries:
J (centre of joystick) i X i L
2 “Settings” i L
3 “SMS On/Off” i L
4 “On” or “Off” i L i {ih}
Storing SMS message
centre numbers
SMS message centre telephone numbers
must be stored in order to send and receive
SMS messages.
Message Centre 1 is used for
sending/receiving SMS messages, and
Message centre 2 is used for receiving
messages.
L Consult your service provider/telephone
company for more information.
1 ■ Germany/France:
J (centre of joystick) i X i L
i “Public” i L
■ Other countries:
J (centre of joystick) i X i L
2 “Settings” i L
3 “Message Centre1” or “Message
Centre2” i L
4 Enter the number.
L Belgium:
In order to receive SMS messages,
you must store your terminal number
after the Message centre 2 number
and tell it to the sender.
5 L i “Save” i L i {ih}
X
SMS (Short Message Service)
Note:
L For PBX users:
– You need to add the PBX line access
number and a dialling pause to the
beginning of the Message Centre 1
phone number.
– If you only use the Message Centre 1
phone number for SMS, store the
Message Centre 1 phone number as is
(without adding a line access number or
dialling pause) to Message Centre 2.
Registering/cancelling
SMS service (Spain only)
Before you sending and receiving SMS
messages, you must register for SMS
service.
1 J (centre of joystick) i X i L
2 “Settings” i L
3 “SMS Account” i L
4 To register for SMS service
“Register SMS” i L
To cancel SMS service
“Cancel SMS” i L
L The unit will send a message to your
SMS provider to register or cancel
your SMS service.
Sending a message
Writing and sending a new
message (to a phone)
■ Germany/France:
1
J (centre of joystick) i X i L
To access the public mailbox
“Public” i L
41
Page 42

TG9120_40_50EX(e).book Page 42 Monday, August 7, 2006 3:52 PM
X
SMS (Short Message Service)
To access a private mailbox
Select the desired mailbox. i L i
Enter its password.
■ Other countries:
J (centre of joystick) i X i L
2 “Create” i L
L If “^Use Last Text?” is displayed,
you can use the text from the last
message you created by pushing the
joystick up.
3 Enter the message (page 59). i L
L j is displayed.
4 ■ Belgium:
Enter the destination number followed
by the receiver’s terminal number (20
digits max.). i L
■ Other countries:
Enter the destination phone number (20
digits max./19 digits max. for France).
i L
L Using the handset phonebook:
n i Select the handset
phonebook entry. i M
When only 1 phone number is
stored
L
When 2 or more phone numbers are
stored
Select the desired phone number. i
L 2 times
L Using the caller list:
Push the joystick up or down to select
the party. i L 2 times
L Using the redial list:
Press j repeatedly to select the
phone number. i L 2 times
L Germany:
If you wish to send the message to the
other party’s mailbox, enter the other
party’s mailbox number after the
destination phone number.
42
Example: The other party’s phone
number is 123456 and their mailbox
number is 1.
Enter 1234561.
5 To save the message, select “Yes”. i
L
6 To send the message, press L.
L To cancel sending, press {ih}.
Note:
L This unit supports SMS messages of up to
612 characters (Italy/Spain: 640
characters), however, the maximum
number of characters you can send or
receive may be limited by your SMS
service provider/telephone company.
Consult your SMS service
provider/telephone company for details.
L Italy/Spain:
The remaining number of characters that
can be entered is displayed next to j.
Your service provider/telephone company
may treat long messages differently from
other messages. Consult your service
provider/telephone company for details.
Other countries:
If your message contains over 160
characters, the message is divided into
multiple messages (up to 4). You can
confirm how many messages are required
to send your text by the number shown on
the display (“1”, “2”, “3”, or “4”). The
remaining number of characters that can
be entered is displayed next to j. Your
service provider/telephone company may
treat long messages (messages over 160
characters long) differently from other
messages. Consult your service
provider/telephone company for details.
L If your phone is connected to a PBX, store
the PBX line access number (page 48).
Selecting a specific terminal when
sending a message (Italy/Spain)
When sending a message to a party which
has more than one SMS-compatible phone,
Page 43

TG9120_40_50EX(e).book Page 43 Monday, August 7, 2006 3:52 PM
X
SMS (Short Message Service)
you can select which phone (terminal) will
receive your message. If the message
receiver has only one SMS-compatible
phone, there is no need to select a terminal
number when sending a message.
1 Write a message (page 41), but do not
send it.
2 Before selecting “Send”, select
“Terminal No.”. i L
3 Enter a terminal number (1 to 9). i
L
4 “Send” i L
Sending a message to a specific person
(Italy/Spain)
For privacy, you can send a message to a
specific person if you know the person’s
public key (mailbox name).
1 Write a message (page 41), but do not
send it.
2 Before selecting “Send”, select
“Public Key”. i L
3 Enter the public key (5 characters max.).
i L
4 “Send” i L
Selecting a destination mailbox when
sending a message (France only)
When sending a message to a party that has
a private mailbox, you can select that
mailbox number to ensure privacy.
1 Write a message (page 41), but do not
send it.
2 Before selecting “Send”, select
“Mailbox No.”. i L
3 Enter the party’s mailbox number (0 to
9). i L
L Press {0} to select the party’s public
mailbox.
4 “Send” i L
Requesting a receipt when sending a
message (France/Italy/Spain)
When sending a message, you can request
a receipt to be sent to you when your
message has been sent by your SMS
provider.
1 Write a message (page 41), but do not
send it.
2 Before selecting “Send”, select
“Receipt”. i L
3 “Yes” or “No” i L
4 “Send” i L
Writing and sending a new
message to a fax (France/
Italy/Spain)
1
■ France:
J (centre of joystick) i X i L
To access the public mailbox
“Public” i L
To access a private mailbox
Select the desired mailbox. i L i
Enter its password.
■ Italy/Spain:
J (centre of joystick) i X i L
2 “Create” i L
3 Enter the message. i L i J
4 “Fax Number” i L
5 ■ France:
Enter the fax number (20 digits max.).
i L
■ Italy/Spain:
Enter the fax number (20 digits max.).
i L i Enter a header to be
printed at the top of the fax (50
characters max.). i L
6 To save the message, select “Yes”. i
L
7 “Send” i L
43
Page 44

TG9120_40_50EX(e).book Page 44 Monday, August 7, 2006 3:52 PM
X
SMS (Short Message Service)
Writing and sending a new
message to an e-mail address
(France/Italy/Spain)
■ France:
1 J (centre of joystick) i X i L
2 To access the public mailbox
“Public” i L
To access a private mailbox
Select the desired mailbox. i L i
Enter its password.
3 “Create” i L
4 Enter the e-mail address. i “#” (see
page 59 to enter) i Enter the message
(page 59).
5 L i J
6 “E-Mail Address” i L
L The e-mail access number stored in
the unit is displayed (page 46).
7 L i To save the message, select
“Yes”. i L
8 “Send” i L
■ Italy/Spain:
1 J (centre of joystick) i X i L
2 “Create” i L
3 Enter the message. i L i J
4 “E-Mail Address” i L
5 Enter the e-mail address (70 characters
max.). i L
6 To save the message, select “Yes”. i
L
7 “Send” i L
Sending a saved message
■ Germany/France:
1
J (centre of joystick) i X i L
To access the public mailbox
“Public” i L
To access a private mailbox
Select the desired mailbox. i L i
Enter its password.
■ Other countries:
J (centre of joystick) i X i L
2 “Send List” i L
3 To read a saved message, push the
joystick up or down to select the
message. i L
4 To send the message, press J. i
“Send” i L
5 Press and hold {C/T} to erase all
numbers, then continue from step 4,
“Writing and sending a new message (to
a phone)”, page 41.
Editing and sending a saved
message
■ Germany/France:
1
J (centre of joystick) i X i L
To access the public mailbox
“Public” i L
To access a private mailbox
Select the desired mailbox. i L i
Enter its password.
■ Other countries:
J (centre of joystick) i X i L
2 “Send List” i L
3 Push the joystick up or down to select
the message. i L
4 J i “Edit Message” i L i
Continue from step 3, “Writing and
sending a new message (to a phone)”,
page 41.
Erasing saved messages
■ Germany/France:
1
J (centre of joystick) i X i L
To access the public mailbox
“Public” i L
To access a private mailbox
Select the desired mailbox. i L i
Enter its password.
44
Page 45

TG9120_40_50EX(e).book Page 45 Monday, August 7, 2006 3:52 PM
X
SMS (Short Message Service)
■ Other countries:
J (centre of joystick) i X i L
2 “Send List” i L
3 Push the joystick up or down to select
the message. i L
4 J i “Erase” i L
L Germany/France:
To erase all messages in the selected
mailbox, select “Erase All”. i
L
L Other countries:
To erase all messages, select “Erase
All”. i L
5 “Yes” i L i {ih}
Note:
L Italy/Spain:
If “Inform SMSC?” is displayed, select
“Yes” then press L to have the unit
inform the SMS message centre that
memory is now available to receive new
messages.
Receiving a message
When an SMS message is received:
– a tone is heard (if the handset ringer is
turned on)
– “Receiving SMS Message” is
displayed
– h is displayed
– the message indicator on the handset
flashes if the message alert feature (page
31) has been turned on
– the total number of new (unread) SMS
messages is displayed next to h
Reading a received message
■ Germany/France:
1
J (centre of joystick) i X i L
To access the public mailbox
“Public” i L i “Receive
List” i L
To access a private mailbox
Select the desired mailbox. i L i
Enter its password. i “Receive
List” i L
L If a mailbox contains new (unread)
SMS messages, “@” is displayed next
to the total number of messages for
that mailbox.
■ Italy/Spain:
J (centre of joystick) i X i L
i “Receive List” i L
To access the public mailbox
“Public” i L
To access a private mailbox
Select the desired mailbox. i L i
Enter its password.
L If a mailbox contains new (unread)
SMS messages, “@” is displayed next
to the total number of messages for
that mailbox.
■ Other countries:
J (centre of joystick) i X i L
i “Receive List” i L
2 Push the joystick up or down to select a
message.
L Messages which have already been
read are indicated by a “Q”, even if
they were read using another handset.
L To erase a message, press W. i
“Yes” i L
3 Press L to read the message content.
Note:
L To call the message sender, press {C}
or {s}.
Replying to a message
While reading a received message,
1
press J.
2 “Reply” i L
3 Enter a message (page 59). i L
45
Page 46

TG9120_40_50EX(e).book Page 46 Monday, August 7, 2006 3:52 PM
X
SMS (Short Message Service)
4 Edit the destination phone number
and/or press L, then continue from
step 5, “Writing and sending a new
message (to a phone)”, page 41.
Editing/forwarding a message
While reading a received message,
1
press J.
SMS settings
If the base unit is reset to its default settings
(page 35), the following SMS-related
settings will be reset. The contents of the
receive and send lists will be erased.
2 “Edit Message” i L i
Continue from step 3, “Writing and
sending a new message (to a phone)”,
page 41.
Erasing received messages
While reading a received message,
1
press J.
2 “Erase” i L
L Germany/France/Italy/Spain:
To erase all messages in the selected
mailbox, select “Erase All”. i
L
L Other countries:
To erase all messages, select “Erase
All”. i L
3 “Yes” i L i {ih}
Storing the sender’s number in
the handset phonebook
While reading a received message,
1
press J.
2 “Add Phonebook” i L
3 Continue from step 3, “Adding entries to
the handset phonebook”, page 19.
Creating private mailboxes
(Germany/France)
Private mailboxes can be used for sending
and receiving SMS messages. Each private
mailbox is password protected.
1 J (centre of joystick) i X i L
2 “Public” i L
3 “Settings” i L
4 “Private Mailbox” i L
5 Select the desired new mailbox number
6 Enter a name for the mailbox (5
Editing the sender’s number
before calling back
While reading a received message,
1
press J.
7 Enter a 4-digit password for the mailbox.
8 “Save” i L i {ih}
2 “Edit and Call” i L
3 Edit the number. i {C} / {s} / L
SMS settings Page
SMS on/off (default: “Off”) page 41
Message Centre 1 page 41
Message Centre 2 page 41
Private mailboxes
(default: —)
Terminal number
(default: “1”)
Public keys
(default: —)
E-mail access number page 48
PBX line access number
(default: “Off”)
(“Mailbox1” to “Mailbox6”). i L
characters max.; page 59). i L
i L
page 46
page 47
page 47
page 48
46
Page 47

TG9120_40_50EX(e).book Page 47 Monday, August 7, 2006 3:52 PM
X
SMS (Short Message Service)
Note:
L To receive SMS messages using a
mailbox, inform others of your mailbox
number.
L If you forget the password assigned to a
private mailbox, reset the base unit (page
35). Note that all SMS messages will be
erased and SMS-related settings (page
46) will also be reset.
Changing private mailbox
settings (Germany/France)
You can change the password or name of
the private mailbox and erase the mailbox.
1 J (centre of joystick) i X i L
2 “Public” i L
3 “Settings” i L
4 “Private Mailbox” i L
5 Select the desired mailbox name. i
L 2 times
6 Enter the mailbox’s 4-digit password.
7 Edit the mailbox name (5 characters
max.; page 59). i L
L To erase the mailbox, press and hold
{C/T}. i L i “Yes” i L
i {ih}
8 Enter a 4-digit password for the mailbox.
i L
9 “Save” i L i {ih}
Note:
L If you erase a mailbox, its messages will
also be erased.
Assigning a terminal number to
the base unit (Italy/Spain)
If you have more than one SMS-compatible
telephone, you can allow outside parties to
send SMS messages to this unit specifically
by assigning it a terminal number. If an
outside party enters this terminal number
when sending you an SMS message, the
message will be received by this unit only.
1 J (centre of joystick) i X i L
2 “Settings” i L
3 “Terminal No.” i L
4 Enter the desired number (1 to 9). i
L
5 “Save” i L i {ih}
Note:
L To receive SMS messages with this unit
specifically, inform others of the terminal
number assigned to it.
Storing/changing the public keys
(Italy/Spain)
Public keys are similar to mailboxes, and
allow you to password protect your received
messages. You can create 6 public keys and
assign a password to each. You can change
the password or name of the public key and
erase the public key.
1 J (centre of joystick) i X i L
2 “Settings” i L
3 “Public Key” i L
4 Select the desired public key (“Public
Key1” to “Public Key6”) i L
L To change a public key, select the
public key. i L 2 times i Enter
the 4-digit public key password. i
Go to step 5.
L To erase the public key, select the
public key. i L 2 times i Enter
the 4-digit public key password. i
Press and hold {C/T}. i L i
“Yes” i L i {ih}
5 Enter a name for the public key (5
characters max., page 59). i L
6 Enter a 4-digit password for the public
key. i L
7 “Save” i L i {ih}
47
Page 48

TG9120_40_50EX(e).book Page 48 Monday, August 7, 2006 3:52 PM
X
SMS (Short Message Service)
Note:
L To receive SMS messages with your
public key, inform others of your public key
name.
L If you change the name of a public key
which has messages in the receive list,
the messages will remain in the receive
list under the new public key name.
L If you erase a public key which has
messages in the receive list, the
messages will also be erased.
L If you forget the password assigned to a
public key, reset the base unit (page 35).
Note that all SMS messages will be
erased and SMS-related settings (page
46) will also be reset.
Changing the e-mail access
number (France only)
Your SMS service provider’s e-mail access
number must be stored in the unit in order to
send a message to an e-mail address. You
can change it if necessary.
L Consult your service provider for more
information.
1 J (centre of joystick) i X i L
2 “Public” i L
3 “Settings” i L
4 “E-mail Access” i L
5 Enter your SMS service provider’s e-
mail access number (20 digits max.).
i L
6 “Save” i L i {ih}
1 ■ Germany/France:
J (centre of joystick) i X i L
i “Public” i L
■ Other countries:
J (centre of joystick) i X i L
2 “Settings” i L
3 “PBX Access No.” i L
4 “On” i L
5 Enter your PBX line access code and a
dialling pause, if necessary. i L
6 “Save” i L i {ih}
Storing the PBX line access
number (for PBX users only)
Store your PBX line access number (4 digits
max.) so that SMS messages are sent
properly. When sending SMS messages to
entries in the handset phonebook or redial
list, the PBX line access number will be
deleted.
48
Page 49

TG9120_40_50EX(e).book Page 49 Monday, August 7, 2006 3:52 PM
Answering system
This unit contains an answering system
which can answer and record calls for you
when you are unavailable to answer the
phone.
Important:
L Only 1 person can access the answering
system (listen to messages, record a
greeting message, etc.) at a time.
L When callers leave messages, the unit
records the day and time of each
message. Make sure the date and time
have been set (page 15).
Memory capacity
The total recording capacity (including your
greeting message, caller messages, and
audible call announcements) is about 40
minutes. A maximum of 64 messages can
be recorded.
Note:
L If message memory becomes full:
– “Answer Sys. Full” is shown on the
handset display
– {s} on the base unit flashes rapidly
Turning the answering
system on/off
Using the base unit
Press {s} to turn on/off the answering
system.
L When the answering system is turned on,
{s} lights up.
Using the handset
J (centre of joystick) i I i L
1
2 e i {ih}
I
Answering System Features
Note:
L When the answering system is turned on,
u is displayed next to the battery icon.
Greeting message
When the unit answers a call, callers are
greeted by a greeting message. You can
record your own greeting message or use a
prerecorded greeting message.
Recording a greeting message
You can record your own greeting message
(2 minutes max.).
1 J (centre of joystick) i I i L
2 “Record Greeting” i L
L Hold the handset about 20 cm away
and speak clearly into the microphone.
3 Press N to stop recording.
4 {ih}
Using a prerecorded greeting
message
If you erase or do not record your own
greeting message, the unit will play a
prerecorded greeting message for callers
and ask them to leave messages. If the
message recording time (page 53) is set to
“Greeting Only”, caller messages will
not be recorded and the unit will play a
different prerecorded greeting message
asking callers to call again.
Playing back the greeting
message
J (centre of joystick) i I i L
1
2 “Play Greeting” i L
3 {ih}
49
Page 50

TG9120_40_50EX(e).book Page 50 Monday, August 7, 2006 3:52 PM
I
Answering System Features
Erasing the greeting message
If you erase your own greeting message, the
unit will play a prerecorded greeting
message for callers.
1 J (centre of joystick) i I i L
2 “Erase Message” i L
3 “Erase Greeting” i L
4 “Yes” i L i {ih}
Listening to messages
Messages are stored and played back
chronologically, from oldest message to
newest.
Listening to new/all messages
When you have new messages:
– {6} on the base unit flashes
– the message indicator on the handset
flashes if the message alert feature (page
31) has been turned on
– u is displayed
– the total number of new messages is
displayed next to u
Using the base unit
Press {6}.
L If new messages have been recorded, the
base unit plays back new messages.
L If there are no new messages, the base
unit plays back all messages.
Note:
L To adjust the speaker volume during
playback, press {^} or {V}.
L After playing back all of the new
messages, {6} will stop flashing but
{s} will remain lit up when the answering
system is turned on.
Using the handset
1 J (centre of joystick) i I i L
2 “Play New Msg.” or “Play All
Msg.” i L
Note:
L To adjust the speaker volume during
playback, push the joystick up or down.
Repeating, skipping, stopping,
and erasing a message during
playback
L To repeat a message during playback:
– for the base unit, press {7}
– for the handset, push the joystick left
If pressed within the first 5 seconds of a
message, the previous message will be
played.
L To skip a message during playback:
– for the base unit, press {8}
– for the handset, push the joystick right
L To stop a message during playback:
– for the base unit, press {■}
– for the handset, press O
L To erase a message during playback:
– for the base unit, press {4}
– for the handset, press W. i “Yes”
i L
Erasing all messages
Using the base unit
Press {4} 2 times.
Using the handset
1 J (centre of joystick) i I i L
2 “Erase Message” i L
3 “Erase All” i L
4 “Yes” i L i {ih}
50
Page 51

TG9120_40_50EX(e).book Page 51 Monday, August 7, 2006 3:52 PM
I
Answering System Features
Calling back (Caller ID
subscribers only)
If caller information was received for the call,
you can call the caller back while listening to
a message.
1 Press J during playback.
2 “Call Back” i L
Editing the number before calling back
1 Press J during playback.
2 “Edit and Call” i L
3 Edit the number. i L
Direct command
operation using the
handset
You can operate the answering system by
pressing dial keys, rather than navigating
through the menus. To use the following
commands, press J (centre of joystick).
i I i L
Key Direct commands
{1} Repeat message (during
playback)
{2} Skip message (during
playback)
{3} Enter the “Settings” menu
{4} Play new messages
{5} Play all messages
{6} Play greeting message
{7}{6} Record greeting message
{8} Turn answering system on
{9} Stop (recording, playback)
{0} Turn answering system off
{*}{4} Erase this message (during
playback)
*1
Key Direct commands
{*}{5} Erase all messages
{*}{6} Erase greeting message
*1 If pressed within the first 5 seconds of
a message, the previous message will
be played.
Remote operation
Using a touch tone phone, you can call your
phone number from outside and access the
unit to listen to messages or change
answering system settings.
Important:
L In order to operate the answering system
remotely, you must first turn on remote
operation by setting a remote access
code. This code must be entered each
time you operate the answering system
remotely.
Turning remote operation on
A 3-digit remote access code must be
entered when operating the answering
system remotely. This code prevents
unauthorised parties from listening to your
messages remotely. After you store your
remote access code, remote operation is
possible.
1 J (centre of joystick) i I i L
2 “Settings” i L
3 “Remote Code” i L
4 To turn on remote operation, enter a
3-digit remote access code.
L To turn off remote operation, press
{*}.
5 L i {ih}
Note:
L If you have stored the remote access
code, you can turn on the answering
51
Page 52

Nederland
TG9120_40_50EX(e).book Page 52 Monday, August 7, 2006 3:52 PM
I
Answering System Features
system by calling the unit even when it is
turned off (page 52). This call may be
answered before the ring delay feature of
the night mode (page 29, 34) activates.
You need to select “30 sec.” for
activating the ring delay feature.
Using the answering system
remotely
Dial your phone number from a touch
1
tone phone.
2 After the greeting message starts, enter
your remote access code.
L The unit will announce the number of
new messages.
3 Enter remote commands.
Note:
L You can hang up at any time.
L If less than 5 minutes of recording time is
available, the unit will announce the
remaining recording time after the last
message is played back.
Remote commands
Key Remote command
{1} Repeat message (during
playback)
{2} Skip message (during
playback)
{4} Play new messages
{5} Play all messages
{6} Play greeting message
{7} Record greeting message
{9} Stop (recording, playback)
{0} Turn answering system off
{*}{4} Erase this message (during
playback)
{*}{5} Erase all messages
*1
Key Remote command
{*}{6} Erase greeting message
(during greeting message
playback)
{*}{#} End remote operation (or
hang up)
*1 If pressed within the first 5 seconds of
a message, the previous message will
be played.
Turning on the answering system
remotely
If the answering system is off, you can turn it
on remotely.
1 Dial your phone number from a touch
tone phone.
2 Let the phone ring 10 times.
L Netherlands:
If you change the unit’s region setting
““Nederland
to (page 35), the phone
rings 12 times.
L A long beep will be heard.
”
3 Enter your remote access code within 10
seconds after the long beep.
L The greeting message is played back.
L You can hang up, or enter your remote
access code again and begin remote
operation.
52
Page 53

TG9120_40_50EX(e).book Page 53 Monday, August 7, 2006 3:52 PM
Answering system
settings
If the base unit is reset to its default settings
(page 35), the following answering systemrelated settings will be reset.
Answering
system setting
Answering
system on/off
Remote access
code
Number of
rings
Caller’s
recording time
Call screening On page
Default
setting
Answer On page
— page
4 Rings page
3 Minutes page
Page
49
51
53
53
53
I
Answering System Features
– To receive messages correctly with your
voice mail service, we recommend that
you do not use the unit’s answering
system. Make sure that the answering
system is turned off (page 49).
– If you would rather use the unit’s
answering system than the voice mail
service provided by your service
provider/telephone company, ask your
service provider/telephone company to
deactivate your voice mail service.
If your service provider/telephone
company cannot do this, set this unit’s
“Number of Rings” setting so that this
unit’s answering system answers calls
before the service provider/telephone
company’s voice mail service tries to
answer your calls. It is necessary to check
the number of rings required to activate
the voice mail service provided by your
service provider/telephone company
before changing this setting.
Changing the number of rings
You can change the number of times the
phone rings before the unit answers calls.
You can select 2 to 5 rings, or “Auto”.
“Auto”: The unit answers after 2 rings when
new messages have been recorded, and
after 5 rings when there are no new
messages. If you call your phone from
outside to listen to new messages (page
52), you will know that there are no new
messages when the phone rings for the 3rd
time. You can then hang up without being
charged for the call.
1 J (centre of joystick) i I i L
2 “Settings” i L
3 “Number of Rings” i L
4 Select the desired setting. i L i
{ih}
For voice mail service subscribers
Please note the following:
Selecting the caller’s recording
time
You can change the maximum message
recording time allotted to each caller, or set
the unit to greet callers but not record
messages.
1 J (centre of joystick) i I i L
2 “Settings” i L
3 “Recording Time” i L
4 Select the desired setting. i L i
{ih}
Turning call screening on/off
While a caller is leaving a message, you can
screen the call through the handset speaker.
1 J (centre of joystick) i I i L
2 “Settings” i L
3 “Call Screening” i L
4 “On” or “Off” i L i {ih}
53
Page 54

TG9120_40_50EX(e).book Page 54 Monday, August 7, 2006 3:52 PM
Multi-unit Operation
To register an additional handset to a
Operating additional units
Additional handsets
Up to 6 handsets can be registered to a
single base unit.
Important:
L The additional handset model
recommended for use with this unit is
noted on page 4. If other model handset is
used, certain operations (handset
settings, base unit settings, etc.) may not
be available.
L Additional handsets will give you the
freedom to, for example, have an intercom
call with another handset while a third
handset is on an outside call.
Additional base units
Handsets can be registered to up to 4 base
units, allowing you to add additional base
units and extend the area in which your
handset(s) can be used. If a handset moves
out of range of its base unit when “Auto” is
selected on base unit selection (page 55), it
will look for another base unit to make or
receive calls. A base unit and the handsets it
communicates with is called a “radio cell”.
Note:
L Calls will be disconnected when the
handset moves from one radio cell to
another.
base unit (easy registration)
After purchasing an additional handset,
register it to the base unit. Ensure that the
additional handset is switched on. If it is not
on, press and hold {ih} for few seconds
to turn the handset on.
1 Lift the additional handset and press
2 Press and hold {x} on the base unit for
3 Place the additional handset on the
Note:
L If an error tone sounds, or if w is still
L If all registered handsets start ringing in
L Charge the batteries of your additional
L This registration method cannot be used
{ih} to put the handset in standby
mode.
about 3 seconds, until the registration
tone sounds.
base unit. The registration tone
continues to sound. With the handset
still on the base unit, wait until a
confirmation tone sounds and w stops
flashing.
flashing, register the handset manually
(manual registration; page 54).
step 2, press {x} to stop. Start again from
step 1.
handset for about 7 hours before initial
use.
for handsets that have already been
registered to a base unit. Register the
handset manually (manual registration;
page 54).
Registering a handset to a
base unit
The included handset and base unit are
preregistered. If for some reason the
handset is not registered to the base unit (for
example, w flashes even when the handset
is near the base unit), register the handset
manually (page 54).
54
To register a handset to an additional
base unit (manual registration)
You can register a handset to a base unit
manually using the following method.
1 J (centre of joystick) i m i L
2 “Registration” i L
3 “Register H.set” i L
4 Select a base unit number. i L
Page 55

TG9120_40_50EX(e).book Page 55 Monday, August 7, 2006 3:52 PM
Multi-unit Operation
L This number is used by the handset
as a reference only.
5 Press and hold {x} on the base unit for
about 3 seconds, until the registration
tone sounds.
L If all registered handsets start ringing,
press {x} to stop, then repeat this
step.
L After pressing {x}, the rest of this
procedure must be completed within 1
minute.
6 Wait until “Enter Base PIN” is
displayed, then enter the base unit PIN
(default: “0000”), then press L.
L When the handset has been
registered successfully, w will stop
flashing. If keytones are turned on
(page 31), a confirmation tone will be
heard.
Selecting a base unit
When “Auto” is selected, the handset will
automatically use any available base unit it
is registered to. When a specific base unit is
selected, the handset will make and receive
calls using that base unit only. If the handset
is out of range of that base unit, no calls can
be made.
1 J (centre of joystick) i m i L
2 “Select Base” i L
3 Select the desired base unit number, or
“Auto”. i L
L The handset starts searching for the
base unit.
Cancelling a handset
A maximum of 6 handsets can be registered
to a base unit. A handset can cancel its own
registration (or the registration of another
handset) that is stored in the base unit. This
will allow the base unit to “forget” the
handset.
1 J (centre of joystick) i L i L
2 Enter “335”.
3 “Cancel Handset” i L
L All handsets registered to the base
unit are displayed.
4 Select the handset(s) you want to
cancel. i t
L The selected handsets are indicated
by a “Q”.
L To cancel a selected handset, press
t again.
5 L i “Yes” i L
L “Please Wait...” will be displayed
and a long beep will sound.
L The handset does not beep when
cancelling its own registration.
6 {ih}
Cancelling a base unit
A handset can be registered to a maximum
of 4 base units. A handset can cancel a base
unit that it is registered to. This allows the
handset to “forget” the base unit.
1 J (centre of joystick) i m i L
2 “Registration” i L
3 Enter “335”.
4 “Cancel Base” i L
5 Select the base unit(s) you want to
cancel. i t
L The selected base unit number(s) are
indicated by a “Q”.
L To cancel a selected base unit
number, press t again.
6 L i “Yes” i L
L A long beep will sound.
7 {ih}
Note:
L To register the handset to another base
unit or to the same base unit again, see
manual registration (page 54).
55
Page 56

TG9120_40_50EX(e).book Page 56 Monday, August 7, 2006 3:52 PM
Multi-unit Operation
Increasing the range of the base
unit
You can increase the signal range of the
base unit by using a DECT repeater. Please
use only the Panasonic DECT repeater
noted on page 7. Consult your Panasonic
dealer for details.
Important:
L Before registering the repeater to this
base unit, you must turn the repeater
mode on.
L Do not use more than one repeater at a
time.
L You cannot make a monitoring connection
via a DECT repeater. (Cordless camera
KX-TGA914EX users only)
Setting the repeater mode
1 J (centre of joystick) i L i
L
2 “Other Options” i L
3 “Repeater Mode” i L
4 “On” i L i {ih}
Note:
L After turning repeater mode on or off, w
will flash on the handset momentarily. This
is normal. The handset can be used once
w stops flashing.
L While the repeater mode is turned on,
audible call announcements may not be
heard from the handset speaker.
{INT} i Select handset 2 (desired
handset number). i P / {C} / {s}
2 Handset 2:
Press {C} / {s} to answer.
3 When finished talking, press {ih}.
Transferring calls
between handsets,
conference calls
Outside calls can be transferred between 2
people in the same radio cell. 2 people in the
same radio cell can have a conference call
with an outside party.
Example: When handset 1 transfers a call
to handset 2
1 Handset 1:
During an outside call, press {INT}. i
Select handset 2 (desired handset
number). i P / {C} / {s}
L The outside call will be put on hold.
L If there is no answer, press {INT} to
return to the outside call.
2 Handset 2:
Press {C} / {s} to answer the page.
L Handset 2 can talk with handset 1.
3 Handset 1:
To complete the call transfer, press
{ih}.
To establish a conference call, press
w.
Intercom between
handsets
Intercom calls can be made between
handsets in the same radio cell.
Example: When handset 1 calls handset 2
1 Handset 1:
56
Transferring a call without speaking to
the other handset user
1 During an outside call, press {INT}. i
Select the desired handset number. i
P / {C} / {s}
L k flashes to indicate the outside call
is on hold.
2 {ih}
Page 57

TG9120_40_50EX(e).book Page 57 Monday, August 7, 2006 3:52 PM
Multi-unit Operation
L The outside call rings at the other
handset.
Note:
L If the other handset user does not answer
the call within 1 minute, the call will ring at
your handset again.
Copying phonebook
entries
You can copy handset phonebook entries
(page 19) to the shared phonebook or to the
handset phonebook of another compatible
Panasonic handset.
Note:
L Category settings for phonebook entries
are not copied.
Copying one entry
1 Find the desired handset phonebook
entry (page 19). i K
2 “Copy” i L
3 Select the copy destination. i L
L When an entry has been copied,
“Completed” is displayed.
L To continue copying another entry:
“Yes” i L i Find the desired
handset phonebook entry. i M
4 {ih}
3 Select the copy destination. i L
L The shared phonebook cannot be
selected. Entries can only be copied
to the shared phonebook one at a
time.
L When all entries have been copied,
“Completed” is displayed.
4 {ih}
Copying all entries between handset
phonebooks
1 ■ KX-TG9120/KX-TG9140 (no USB
adaptor registered):
n (left soft key) i J
■ KX-TG9150 or USB adaptor
registered model:
J (centre of joystick) i 3 i L
i J
2 “Copy All” i L
57
Page 58

TG9120_40_50EX(e).book Page 58 Monday, August 7, 2006 3:52 PM
Useful Information
Using the belt clip
Attaching the belt clip
Removing the belt clip
58
Page 59

TG9120_40_50EX(e).book Page 59 Monday, August 7, 2006 3:52 PM
Useful Information
Character entry
The dial keys are used to enter characters and numbers. Each dial key has multiple
characters assigned to it. The available character entry modes are Alphabet Y, Numeric
Z, Greek o, Extended 1 q, Extended 2 r, and Cyrillic p. For SMS messages,
Alphabet Y, Numeric Z, Greek o, and Extended q modes are available. When in
these entry modes except Numeric, you can select which character is entered by pressing a
dial key repeatedly.
– Use the joystick to move the cursor.
– Press dial keys to enter characters and numbers. When you press {1}, a list of symbols is
displayed. Select the desired symbol then press L to insert the selected symbol, or press
a to insert additional symbols.
–Press {C/T} to erase the character or number highlighted by the cursor. Press and hold
{C/T} to erase all characters or numbers.
–Press {*} to switch between uppercase and lowercase.
– To enter another character located on the same dial key, push the joystick right to move the
cursor to the next space, then press the appropriate dial key. (This is not necessary when
entering text in LetterWise mode.)
Character entry modes
Several character entry modes can be used when entering text. The characters that can be
entered depend on the entry mode.
LetterWise
LetterWise is a simplified text entry system which suggests the most likely letter to follow the
previously entered letter. Each time you press a dial key, the letter most likely to be used is
displayed. If the suggested character is incorrect, press {#} repeatedly to display the desired
character. You can change the language which LetterWise uses to base its suggestions on
(page 31).
Characters available in each character entry mode
When the unit displays the character entry screen:
Press right soft key repeatedly to select a character entry mode.
Note:
L For character entry when writing SMS messages, see page 61.
Y Alphabet character table
59
Page 60

TG9120_40_50EX(e).book Page 60 Monday, August 7, 2006 3:52 PM
Useful Information
Z Numeric entry table
o Greek character table
q Extended 1 character table
L The following are used for both uppercase and lowercase:
r Extended 2 character table
L The following are used for both uppercase and lowercase:
p Cyrillic character table
X LetterWise character table (for English)
60
Page 61

TG9120_40_50EX(e).book Page 61 Monday, August 7, 2006 3:52 PM
X LetterWise character table (for Dutch)
When writing SMS messages
X LetterWise character table (for English)
X LetterWise character table (for Dutch)
Useful Information
Y Alphabet character table
Z Numeric entry table
61
Page 62

TG9120_40_50EX(e).book Page 62 Monday, August 7, 2006 3:52 PM
Useful Information
o Greek character table
q Extended character table
L The following are used for both uppercase and lowercase:
62
Page 63

TG9120_40_50EX(e).book Page 63 Monday, August 7, 2006 3:52 PM
Useful Information
Error messages
Error message Cause & solution
Answer Sys. Full LErase unnecessary messages (page 50).
Connect an audio device. L An audio device is not connected to the handset.
Connect an audio device to the handset.
Error L Recording was too short. Try again.
Error. Charge battery. L Battery strength is low. Charge the batteries and try
again.
Failed L Phonebook copy failed. Confirm the other handset
(the receiver) is in standby mode and try again.
Incomplete L The receiver’s phonebook memory is full. Erase the
unnecessary phonebook entries from the other
handset (the receiver) and try again.
Invalid Number L You tried to send an SMS message to a phone
number saved in the handset phonebook, caller list,
or redial list that is over 20 digits long.
Memory Full L There is no space to store new phonebook entries.
Erase unnecessary entries for the handset
phonebook (page 21) or for the shared phonebook
(page 24).
L There is no space to store new data. Erase
unnecessary ringtones (page 28).
L Message memory is full. Erase unnecessary
messages (page 50).
SMS Full L Erase unnecessary messages (page 44, 46).
You must first subscribe
to Caller ID.
L You must subscribe to Caller ID service. Once you
receive caller information after subscribing to Caller
ID service, this message will not be displayed.
63
Page 64

TG9120_40_50EX(e).book Page 64 Monday, August 7, 2006 3:52 PM
Useful Information
Troubleshooting
If you still have difficulties after following the instructions in this section, disconnect the AC
adaptor and turn off the handset, then reconnect the AC adaptor and turn on the handset.
Telephone
Problem Cause & solution
w is flashing. LThe handset is not registered to the base unit.
Register it (page 54).
L The handset is too far from the base unit. Move
closer.
L The AC adaptor is not connected. Check the
connections.
L You are using the handset or base unit in an area
with high electrical interference. Place the handset
and base unit away from interference sources, such
as antennas and mobile phones.
The handset display is blank. L The handset is in screen saver mode (page 14).
Press {ih} to activate the handset display again.
L The handset is not turned on. Turn the power on
(page 14).
The handset will not turn on. LMake sure that the batteries are installed correctly
(page 13).
L Fully charge the batteries (page 13).
L Clean the charge contacts and charge again (page
13).
I have changed the display
language to a language I cannot
read.
L Change the display language (page 15).
64
Page 65

TG9120_40_50EX(e).book Page 65 Monday, August 7, 2006 3:52 PM
Useful Information
Problem Cause & solution
I cannot make or receive calls. L The AC adaptor or telephone line cord is not
connected. Check the connections.
L If you are using a splitter to connect the unit,
remove the splitter and connect the unit to the wall
socket directly. If the unit operates properly, check
the splitter.
L Disconnect the base unit from the telephone line
and connect the line to a known working telephone.
If the working telephone operates properly, contact
our service personnel to have the unit repaired. If
the working telephone does not operate properly,
contact your service provider/telephone company.
L The key lock feature is turned on. Turn it off (page
17).
I cannot receive a call from the
monitored handset.
The unit does not ring. L The ringer volume is turned off. Adjust the ringer
The batteries should be charging
but the battery icon does not
change.
A busy tone is heard when {C} is
pressed.
Static is heard, sound cuts in and
out. Interference from other
electrical units.
L Make sure the monitoring handset is not on any of
the following calls:
–Intercom call
– Cordless camera monitoring call (Cordless
camera KX-TGA914EX users only)
– Internet call (USB adaptor KX-TGA915EX users
only)
volume (page 27, 34).
L The night mode feature is turned on. Turn it off
(page 29, 34).
L Clean the charge contacts and charge again (page
13).
L The handset is too far from the base unit. Move
closer and try again.
L Another handset is in use or the answering system
is being used. Wait and try again later.
L Place the handset and the base unit away from
other electrical appliances.
L Move closer to the base unit.
L Your unit is connected to a telephone line with
DSL/ADSL service. We recommend connecting a
filter (contact your DSL/ADSL service provider) to
the telephone line between the base unit and the
telephone line jack.
65
Page 66

TG9120_40_50EX(e).book Page 66 Monday, August 7, 2006 3:52 PM
Useful Information
Problem Cause & solution
Noise is heard during a call. L You are using the handset or base unit in an area
with high electrical interference. Place the handset
and base unit away from interference sources, such
as antennas and mobile phones.
The handset/base unit stops
working while being used.
Pressing j does not display/dial
the last number dialled.
I cannot store a number from the
redial list into the phonebook.
Mute does not turn off after the line
is connected.
The handset beeps intermittently
and/or / flashes.
I fully charged the batteries, but /
still flashes.
I fully charged the batteries, but the
operating time seems to be short.
Caller information is not displayed. L You need to subscribe to Caller ID service. Consult
While viewing caller information,
the display returns to standby
mode.
I cannot register a handset to a
base unit.
L Disconnect the AC adaptor and turn off the
handset. Reconnect the AC adaptor, then turn on
the handset and try again.
L The redialled number was more than 48 digits long.
Redial the number manually.
L The phone number is more than 24 digits long.
Phone numbers stored in the phonebook cannot be
more than 24 digits long (page 19).
L Press {C/T}.
L Fully charge the batteries (page 13).
L Clean the charge contacts and charge again (page
13).
L It is time to replace the batteries (page 13).
L Wipe the battery ends (S, T) and the unit contacts
with a dry cloth.
your service provider/telephone company for
details.
L Your unit is connected to a telephone line with
DSL/ADSL service. We recommend connecting a
filter (contact your DSL/ADSL service provider) to
the telephone line between the base unit and the
telephone line jack.
L Do not pause for over 1 minute while searching.
L The maximum number of base units (4) are already
registered to the handset. Cancel unused base unit
registrations from the handset (page 55).
L The maximum number of handsets (6) are already
registered to the base unit. Cancel unused handset
registrations from the base unit (page 55).
L You entered the wrong PIN number. If you forget
your PIN, consult your nearest Panasonic service
centre.
L Place the handset and the base unit away from
other electrical appliances.
66
Page 67

TG9120_40_50EX(e).book Page 67 Monday, August 7, 2006 3:52 PM
Useful Information
SMS (Short Message Service)
Problem Cause & solution
I cannot send or receive SMS
messages.
The SMS message centre number
is logged in the caller list but a
message was not received.
“FD” is displayed. L The unit could not connect to the SMS message
“FE” is displayed. L An error occurred while sending the message. Try
“E0” is displayed. L Your phone number is permanently withheld or you
“Q” is not displayed after I read a
message.
L You have not subscribed to the appropriate service.
Consult your service provider/telephone company.
L The SMS message centre number(s) are not stored
or are incorrect. Store the correct numbers (page
41).
L Message transmission was interrupted. Wait until
the message has been sent before using other
telephone functions.
L Your unit is connected to a telephone line with
DSL/ADSL service. We recommend connecting a
filter (contact your DSL/ADSL service provider) to
the telephone line between the base unit and the
telephone line jack.
L Belgium:
To send SMS messages, enter the destination
number followed by the receiver’s terminal number
(“Writing and sending a new message (to a
phone)”, page 41). To receive SMS messages,
store your terminal number after the Message
centre 2 number and tell it to the sender (“Storing
SMS message centre numbers”, page 41).
L Someone tried to send you a message while SMS
was turned off.
centre. Confirm that the correct SMS message
centre numbers are stored (page 41). Confirm that
SMS is turned on (page 41).
again.
have not subscribed to the appropriate service.
Consult your service provider/telephone company.
L When an error code (“FD”, “FE”, or “E0”) is
displayed, “Q” will not be displayed even if you
have read the message.
67
Page 68

TG9120_40_50EX(e).book Page 68 Monday, August 7, 2006 3:52 PM
Useful Information
Answering system
Problem Cause & solution
The unit does not record new
messages.
The other party complains that they
cannot leave a message.
I cannot operate the answering
system with the handset.
When I try to operate the
answering system with the base
unit, {s} flashes for a few
seconds and I cannot operate the
answering system.
I cannot operate the answering
system remotely.
While recording a greeting
message or listening to messages,
the unit rings and recording stops.
L The answering system is turned off. Turn it on (page
49).
L The recording time is set to “Greeting Only”.
Select “1 Minute” or “3 Minutes” (page 53).
L If you subscribe to the voice mail service,
messages are recorded by your service
provider/telephone company not your telephone.
Change the unit’s “Number of Rings” setting so
that the unit’s answering system can answer the
call before the voice mail service or consult your
service provider/telephone company (page 53).
L The recording time is set to “Greeting Only”.
Select “1 Minute” or “3 Minutes” (page 53).
L The base unit or another handset is being used.
Wait for the other user to finish.
L A caller is leaving a message. Wait for the caller to
finish.
L The handset is too far from the base unit. Move
closer.
L Another handset is being used. Wait for the other
user to finish.
L A caller is leaving a message. Wait for the caller to
finish.
L You are entering the wrong remote access code. If
you forget the remote access code, store a new
remote access code and try again (page 51).
L You are pressing the dial keys too quickly. Press
each key firmly.
L The answering system is turned off. Turn it on (page
52).
L You are using a pulse telephone. Try again using a
touch tone phone.
L A call is being received. Answer the call and try
again later.
68
Page 69

TG9120_40_50EX(e).book Page 69 Monday, August 7, 2006 3:52 PM
Specifications
■ Standard:
DECT (Digital Enhanced Cordless
Telecommunications),
GAP (Generic Access Profile)
■ Number of channels:
120 Duplex Channels
■ Frequency range:
1.88 GHz to 1.90 GHz
■ Duplex procedure:
TDMA (Time Division Multiple Access)
■ Channel spacing:
1,728 kHz
■ Bit rate:
1,152 kbit/s
■ Modulation:
GFSK (Gaussian Frequency Shift Keying)
■ RF transmission power:
Approx. 250 mW
■ Voice coding:
ADPCM 32 kbit/s
■ Power source:
220–240 V, 50 Hz
■ Power consumption, Base unit:
Standby: Approx. 1.9 W
Maximum: Approx. 6.8 W
■ Operating conditions:
5 °C–40 °C, 20 %–80 % relative air humidity
(dry)
■ Dimensions:
Base unit: Approx. 63 mm × 173 mm ×
99 mm
Handset: Approx. 156 mm × 49 mm ×
34 mm
■ Mass (weight):
Base unit: Approx. 250 g
Handset: Approx. 140 g
Note:
L Specifications are subject to change.
Useful Information
L The illustrations used in these operating
instructions may differ slightly from the
actual product.
L The range of the handset under maximum
conditions is 50 meters indoors and 300
meters outdoors. Please note it will
probably be shortened when near
concrete barriers, etc.
Connections:
L The unit will not work during a power
failure. We recommend you connect a
standard telephone on the same line for
power protection.
69
Page 70

TG9120_40_50EX(e).book Page 70 Monday, August 7, 2006 3:52 PM
Index
Index
A Additional base units: 54
Additional handsets: 54
Alarm: 27
Answering calls: 18
Answering system: 49
Listening to messages: 50
Remote operation: 51
Settings: 53
Turning on/off: 49
Audible call: 23, 24, 37
Auto intercom: 32
Auto talk: 18, 31
B Base unit
Cancelling: 55
Selecting: 55
Settings: 33
Battery
Charge: 13
Installation: 13
Performance: 14
Replacement: 13
Strength: 14
Belt clip: 6, 58
C Call-by-Call: 22
Caller ID service: 36
Calling code: 32
Call privacy: 17
Call share: 17
Category: 19
Display colours: 37
Ringtones: 36
Chain dial: 22
Character entry: 59
Conference calls: 56
Connections: 12
Copy
Phonebook: 57
Cordless camera: 3, 4
Customise ringtones: 28
D Date and time: 15
Display
Colour: 30
Contrast: 30
H Handset
I Intercom: 56
K Key lock: 17
L LetterWise: 31, 60, 61
M Making calls: 16
N Night mode
O One touch dial: 21
P Pause: 17
R Recall: 17, 34
S Screen saver mode: 14
Icons: 10
Language: 15
Wallpaper: 30
Cancelling: 55
Locator: 18
Power on/off: 14
Registration: 54
Settings: 25
Keytones: 31
Memo alarm: 27
Message alert: 31
Missed calls: 36
Monitor
Baby monitor: 30
Mute: 17
Base unit: 34
Handset: 29
Phonebook copy: 57
Phonebooks
Handset phonebook: 19
Shared phonebook: 23
PIN
Base unit: 35
Power on/off: 14
Recording
Audible call: 23
Greeting message: 49
Redialling: 16
Redial list: 16
Region setting: 35
Registration: 54
Repeater: 56
Ringtones: 27
SMS feature: 39
Speakerphone: 16
70
Page 71

TG9120_40_50EX(e).book Page 71 Monday, August 7, 2006 3:52 PM
T Time adjustment: 15
Transfer calls: 56
U USB adaptor: 3, 4
V Voice enhancer: 17
Voice mail: 38
Volume
Receiver: 16
Ringer (Base unit): 34
Ringer (Handset): 27
Speakerphone: 16
Index
71
Page 72

TG9120_40_50EX(e).book Page 72 Monday, August 7, 2006 3:52 PM
Copyright:
This material is copyrighted by Panasonic Communications Co., Ltd., and may be reproduced
for internal use only. All other reproduction, in whole or in part, is prohibited without the written
consent of Panasonic Communications Co., Ltd.
© 2006 Panasonic Communications Co., Ltd. All Rights Reserved.
72
Page 73

TG9120_40_50EX(g-g).book Page 1 Monday, August 7, 2006 2:15 PM
Digitales Schnurlos-Telefon mit
integriertem Anrufbeantworter
KX-TG9120
Bedienungsanleitung
Modellbez. KX-TG9120EX
KX-TG9140EX
KX-TG9150EX
Dieses Gerät ist kompatibel mit den Funktionen Anruferanzeige (CLIP)
und SMS. Wenn Ihr Service Provider/Ihre Telefongesellschaft diese
Dienste anbietet und Ihr Anschluss dafür freigeschaltet ist, können Sie
diese Funktionen nutzen.
Laden Sie die Akkus vor dem ersten Gebrauch ca. 7 Stunden lang.
Dieses Gerät ist für Verwendung in allen Ländern der EG und EFTA ausgelegt. Um das Gerät
in Ihrem Land zu verwenden, ändern Sie zunächst die regionale Einstellung des Geräts
entsprechend Ihrem Land (Seite 37). Ändern Sie bei Bedarf die Display-Sprache des Geräts
(Seite 16).
Bitte lesen Sie diese Bedienungsanleitung durch, bevor Sie das Gerät in Betrieb nehmen.
Bewahren Sie sie zur künftigen Bezugnahme gut auf.
Page 74

TG9120_40_50EX(g-g).book Page 2 Monday, August 7, 2006 2:15 PM
Einführung
Einführung
Vielen Dank, dass Sie sich für den Kauf dieses digitalen schnurlosen Telefons von Panasonic
entschieden haben.
Zur künftigen Bezugnahme
Bewahren Sie den Originalbeleg auf oder heften Sie ihn ab, damit Sie ihn bei Reparaturen innerhalb des
Garantiezeitraums stets verfügbar haben.
Seriennummer (ist auf der Rückseite der Basisstation angegeben)
Datum des Kaufs
Name und Adresse des Händlers
Marken:
L
Eatoni und LetterWise sind Warenzeichen von Eatoni Ergonomics, Inc.
L
Skype, SkypeIn, SkypeOut und das S-Logo sind Marken der Skype Limited.
(2)
Page 75

TG9120_40_50EX(g-g).book Page 3 Monday, August 7, 2006 2:15 PM
Einführung
Einführung zum Produkt
Diese Bedienungsanleitung kann für die digitalen Schnurlos-Telefone mit integriertem Anrufbeantworter
KX-TG9120, KX-TG9140 und KX-TG9150 verwendet werden.
KX-TG9120
KX-TG9140
Schnurlose Kamera
(KX-TGA914EX)
*1
KX-TG9150
USB-Adapter
(KX-TGA915EX)
*1 Wird bereits an der Basisstation registriert geliefert. Siehe mitgelieferte Bedienungsanleitung.
Bemerkenswerte Unterschiede zwischen KX-TG9120, KX-TG9140 und
KX-TG9150
Funktion KX-TG9120 KX-TG9140 KX-TG9150
Kameraüberwachung über
das Mobilteil
Kostenlose Internetanrufe
(zwischen SkypeBenutzern)
—
*1 *1
——
*2 *2
r
—
r
*1 Verfügbar nach Kauf und Registrierung der optionalen schnurlosen Kamera (KX-TGA914EX,
Seite 4).
*2 Verfügbar nach Kauf und Registrierung des optionalen USB-Adapters (KX-TGA915EX, Seite 4).
Besondere Leistungsmerkmale
Kameraüberwachung über das Mobilteil (KX-TGA914EX schnurlose Kamera erforderlich)
L
Der Raum, in dem sich die schnurlose Kamera befindet, wird auf dem Telefondisplay angezeigt,
wenn:
– Sie die schnurlose Kamera über das Mobilteil rufen
– Die schnurlose Kamera das Mobilteil ruft, weil sie Geräusche erkennt
– Der Benutzer der schnurlosen Kamera das Mobilteil durch Benutzung der Ruftaste ruft
Kostenfreie internetanrufe mit Skype (KX-TGA915EX USB-Adapter erforderlich)
L
Sie können mit allen Personen weltweit, die Skype nutzen, kostenlose Telefongespräche über das
Internet führen.
L
Die Skype-Software ist kostenlos und funktioniert auf den meisten Computern.
L
Das Herunterladen und die Benutzung der Skype Software gestaltet sich sehr einfach.
*1
(3)
Page 76

TG9120_40_50EX(g-g).book Page 4 Monday, August 7, 2006 2:15 PM
Einführung
Erweiterung des Telefonsystems
Sie können das Telefonsystem erweitern, indem Sie die optionalen Geräte an einer Basisstation
(KX-TG9120, KX-TG9140 oder KX-TG9150) registrieren.
L
Es können insgesamt maximal 6 Geräte (optionale und mitgelieferte) an einer Basisstation registriert
werden.
Optionale Mobilteile
Zusätzliches DECT
Mobilteil
KX-TGA910EX
max. 5
USB Adapter
KX-TGA915EX
(Für Anrufe über das
*1
Internet)
*2
max. 1
Schnurlose Kamera
KX-TGA914EX
(zur
Raumüberwachung)
max. 5
*1 Durch die Registrierung des USB-Adapters KX-TGA915EX an Ihrer Basisstation und die Installation
der Skype-Software auf Ihrem Computer können Sie über Ihren Computer das Mobilteil zur
Internettelefonie nutzen.
*2 KX-TG9150: Ein zusätzlicher USB-Adapter kann nicht registriert werden.
(4)
Page 77

TG9120_40_50EX(g-g).book Page 5 Monday, August 7, 2006 2:15 PM
Inhalt
Vorbereitung
Zubehör . . . . . . . . . . . . . . . . . . . . . . . . . . . . . 7
Wichtige Informationen. . . . . . . . . . . . . . . . . . 9
Bedienelemente . . . . . . . . . . . . . . . . . . . . . . 10
Displays . . . . . . . . . . . . . . . . . . . . . . . . . . . . .11
Anschlüsse . . . . . . . . . . . . . . . . . . . . . . . . . 14
Einsetzen/Auswechseln der Akkus . . . . . . . 14
Laden des/der Akku(s) . . . . . . . . . . . . . . . . . 15
Bildschirmschoner-Modus . . . . . . . . . . . . . . 15
Ein-/Ausschalten des Geräts . . . . . . . . . . . . 16
In dieser Bedienungsanleitung verwendete
Symbole . . . . . . . . . . . . . . . . . . . . . . . . . . . . 16
Regionale Einstellungen. . . . . . . . . . . . . . . . 16
Display-Sprache . . . . . . . . . . . . . . . . . . . . . . 16
Datum und Uhrzeit . . . . . . . . . . . . . . . . . . . . 17
C
Anrufen/Beantworten von
Anrufen
Anrufen. . . . . . . . . . . . . . . . . . . . . . . . . . . . . 18
Beantworten von Anrufen. . . . . . . . . . . . . . . 20
k
Telefonbücher
Mobilteil-Telefonbuch . . . . . . . . . . . . . . . . . . 21
Kurzwahl für Call-by-Call: Telefonieren über die
Zugangsnummer eines Telefonanbieters (Nur
Deutschland) . . . . . . . . . . . . . . . . . . . . . . . . 24
Gemeinsames Telefonbuch . . . . . . . . . . . . . 25
m
Mobilteil-Einstellungen
Mobilteil-Einstellungen . . . . . . . . . . . . . . . . . 27
Zeiteinstellungen . . . . . . . . . . . . . . . . . . . . . 29
Ruftoneinstellung . . . . . . . . . . . . . . . . . . . . . 29
Display-Einstellungen. . . . . . . . . . . . . . . . . . 31
Babyphon (zusätzliches Mobilteil
erforderlich) . . . . . . . . . . . . . . . . . . . . . . . . . 32
Sonstige Optionen . . . . . . . . . . . . . . . . . . . . 33
L
Einstellungen der
Basisstation
Einstellungen der Basisstation . . . . . . . . . . . 35
Ruftoneinstellung . . . . . . . . . . . . . . . . . . . . . 36
Ruf-Optionen . . . . . . . . . . . . . . . . . . . . . . . . 36
Sonstige Optionen . . . . . . . . . . . . . . . . . . . . 36
j
Leistungsmerkmal
Anruferanzeige (CLIP)
Verwenden des Leistungsmerkmals
Anruferanzeige (CLIP). . . . . . . . . . . . . . . . . .38
Anruferliste . . . . . . . . . . . . . . . . . . . . . . . . . .39
Voice Mail-Dienst. . . . . . . . . . . . . . . . . . . . . .40
X
SMS (Short Message
Service:
Kurzmitteilungsdienst)
Verwenden von SMS (Short Message Service:
Kurzmitteilungsdienst) . . . . . . . . . . . . . . . . . .41
Aktivieren/Deaktivieren von SMS . . . . . . . . .43
Speichern von SMS Message Center-
Nummern. . . . . . . . . . . . . . . . . . . . . . . . . . . . 43
Registrierung zum Löschen des SMS Service
(Nur Spanien) . . . . . . . . . . . . . . . . . . . . . . . .43
Senden einer Nachricht. . . . . . . . . . . . . . . . .43
Empfangen einer Nachricht. . . . . . . . . . . . . .47
SMS-Einstellungen . . . . . . . . . . . . . . . . . . . .48
I
Anrufbeantworter-
funktionen
Anrufbeantworter. . . . . . . . . . . . . . . . . . . . . .51
Aktivieren/Deaktivieren des
Anrufbeantworters . . . . . . . . . . . . . . . . . . . . .51
Ansagetext. . . . . . . . . . . . . . . . . . . . . . . . . . .51
Abhören von Nachrichten . . . . . . . . . . . . . . .52
Direkteingabe über das Mobilteil . . . . . . . . . .53
Fernbedienung . . . . . . . . . . . . . . . . . . . . . . .53
Anrufbeantwortereinstellungen . . . . . . . . . . . 54
Verwenden mehrerer Geräte
Verwenden von Zusatzgeräten . . . . . . . . . . .56
Registrieren eines Mobilteils an eine
Basisstation. . . . . . . . . . . . . . . . . . . . . . . . . .56
Interngespräch zwischen Mobilteilen. . . . . . .58
Weiterleiten von Anrufen zwischen Mobilteilen,
Konferenzschaltungen. . . . . . . . . . . . . . . . . . 58
Kopieren von Telefonbucheinträgen . . . . . . .59
(5)
Page 78

TG9120_40_50EX(g-g).book Page 6 Monday, August 7, 2006 2:15 PM
Inhalt
Nützliche Informationen
Verwendung des Gürtelclips . . . . . . . . . . . . .60
Eingabe von Zeichen . . . . . . . . . . . . . . . . . . .61
Fehlermeldungen . . . . . . . . . . . . . . . . . . . . . .65
Fehlerbehebung. . . . . . . . . . . . . . . . . . . . . . .66
Technische Daten . . . . . . . . . . . . . . . . . . . . .72
Index
Index . . . . . . . . . . . . . . . . . . . . . . . . . . . . . . 73
(6)
Page 79

TG9120_40_50EX(g-g).book Page 7 Monday, August 7, 2006 2:15 PM
Zubehör
Mitgeliefertes Zubehör
Nr. Zubehör Menge
KX-TG9120 KX-TG9140 KX-TG9150
1
Netzteil für Basisstation
Teile-Nr. PQLV207CE
2
Telefonkabel (Deutschland) 1 1 1
3
Telefonkabel (Frankreich) 1 1 1
4
Telefonkabel (Andere Länder)
5
Telefonstecker (Italien) 1 1 1
6
Standardakkus
AAA (R03)
Teile-Nr. HHR-4EPT
7
Akkufachabdeckung
8
Gürtelclip 1 1 1
9
Audio-Kabel 1 1 1
j
Schnurlose Kamera
Teile-Nr. KX-TGA914EX
k
Netzteil für schnurlose Kamera
Teile-Nr. PQLV209CE
l
Wandhalterung für die schnurlose
Kamera
m
Ruftaste für die schnurlose Kamera — 1 —
n
USB-Adapter
Teile-Nr. KX-TGA915EX
o
USB-Verlängerungskabel — — 1
p
CD-ROM
*3
*2
*1
Vorbereitung
111
111
222
111
—1—
—1—
—1—
—— 1
—— 1
*1 Verwenden Sie zum Gebrauch in Ihrem Land den erforderlichen entsprechenden Telefonstecker. In
Italien: Befestigen Sie vor dem Anschließen den mitgelieferten Telefonstecker
*2 Das Mobilteil wird mit angebrachter Akkufachabdeckung geliefert.
*3 Ermöglicht die Installation des USB-Adapter-Dienstprogramms auf einem kompatiblen PC.
5
am Telefonkabel.
(7)
Page 80

TG9120_40_50EX(g-g).book Page 8 Monday, August 7, 2006 2:15 PM
Vorbereitung
123456
789jkl
mnop
Optionales Zubehör/Ersatzteile
Verkaufsinformationen erfahren Sie bei Ihrem Panasonic-Händler.
Nr. Modellbez. Beschreibung
1
KX-TCA717EX Wandmontagehalterung (für die Basisstation)
2
KX-TCA94EX Kopfhörergarnitur
3
KX-A272 DECT-Verstärker
12
Hinweis:
L
Das Telefonsystem lässt sich durch Registrierung anderer optionaler Panasonic-Geräte erweitern
(Seite 4).
L
Wenn Sie die Akkus austauschen müssen, verwenden Sie 2 AAA (R03) Nickelmetallhydrid-Akkus
(Ni-MH). Wir empfehlen die Verwendung von Panasonic-Akkus (Modell Nr. P03P).
L
Panasonic ist nicht haftbar für Schäden am Gerät oder Beeinträchtigung der Leistung, die durch die
Verwendung von nicht von Panasonic hergestellten Akkus verursacht werden.
(8)
Page 81

TG9120_40_50EX(g-g).book Page 9 Monday, August 7, 2006 2:15 PM
Wichtige Informationen
Allgemein
L
Verwenden Sie nur das im Lieferumfang
enthaltene, auf Seite 7 angegebene Netzteil.
L
Das Netzteil nur an eine StandardNetzsteckdose mit 220–240 V AC
anschließen.
L
In folgenden Fällen können mit diesem
Produkt keine Anrufe getätigt werden:
– Der/Die Akku(s) des schnurlosen Mobilteils
muss/müssen geladen werden oder ist/sind
defekt.
– Bei einem Stromausfall.
– Die Tastensperre ist aktiviert.
L
Öffnen Sie Basisstation, Ladegerät oder
Mobilteil nur zum Auswechseln des/der Akkus.
L
Dieses Produkt darf nicht in der Nähe von
medizinischer Notfall/Intensivpflegeausrüstung verwendet und nicht
von Menschen mit Herzschrittmachern
betrieben werden.
L
Stellen Sie sicher, dass keine Objekte auf das
Gerät fallen können und keine Flüssigkeiten in
das Gerät verschüttet werden. Setzen Sie das
Produkt weder übermäßigem Rauch oder
Staub noch mechanischen Schwingungen
oder Stößen aus.
Betriebsumgebung
L
Verwenden Sie dieses Produkt nicht in der
Nähe von Wasser.
L
Betreiben Sie dieses Produkt nicht in der Nähe
von Wärmequellen, wie Heizungen, Kochern
usw. Stellen Sie dieses Produkt nicht in
Räumen auf, in denen die Temperatur unter
°
C oder über 40°C liegt.
5
L
Das Netzteil dient als Trennung zum übrigen
Stromnetz. Stellen Sie sicher, dass sich die
Netzsteckdose in der Nähe des Produkts
befindet und leicht zugänglich ist.
Warnung:
L
Setzen Sie dieses Gerät niemals Regen oder
Feuchtigkeit aus, um elektrische Schläge zu
vermeiden.
Vorbereitung
L
Ziehen Sie den Netzstecker des Produkts aus
der Steckdose, wenn es Rauch entwickelt,
einen anomalen Geruch verströmt oder
ungewöhnliche Geräusche von sich gibt.
Diese Bedingungen können Brände oder
elektrische Schläge auslösen. Warten Sie, bis
das Gerät nicht mehr raucht, und wenden Sie
sich an eine autorisierte Kundendienststelle.
Sicherheitshinweis für den Umgang mit
Akkus
L
Wir empfehlen den/die auf Seite 8 genannten
Akku(s).
Standardakku(s).
L
Verwenden Sie keine alten und neuen Akkus
zusammen.
L
Entsorgen Sie Akku(s) nicht durch
Verbrennen, da sie explodieren können.
Überprüfen Sie die lokalen
Abfallbeseitigungscodes bezüglich
besonderer Entsorgungsvorschriften.
L
Öffnen und beschädigen Sie den/die Akku(s)
nicht. Freigesetztes Elektrolyt aus dem/den
Akku(s) ist korrosiv und kann Verbrennungen
oder Verletzungen an Augen und Haut
hervorrufen. Der Elektrolyt kann bei
Verschlucken toxisch wirken.
L
Lassen Sie beim Umgang mit dem/den
Akku(s) Vorsicht walten. Lassen Sie keine
leitenden Materialien, wie Ringe, Armbänder
oder Schlüssel, den/die Akku(s) berühren, da
dies zu einem Kurzschluss führen kann, bei
dem sich der/die Akku(s) und/oder die
leitenden Materialien überhitzen und somit
Verbrennungen verursachen können.
L
Laden Sie den/die im Lieferumfang des
Produkts enthaltenen Akku(s) gemäß den
Angaben in dieser Gebrauchsanweisung.
L
Verwenden Sie zum Laden des/der Akku(s)
nur die mitgelieferte Basisstation (bzw. das
Ladegerät). Nehmen Sie keine Änderungen an
der Basisstation (bzw. am Ladegerät) vor. Die
Nichtbefolgung dieser Anweisungen kann zum
Aufquellen oder Explodieren des/der Akku(s)
führen.
Verwenden Sie nur
(9)
Page 82

TG9120_40_50EX(g-g).book Page 10 Monday, August 7, 2006 2:15 PM
Vorbereitung
Verwendung des Joysticks
Bedienelemente
Mobilteil
A
C
D
E
F
G
H
B
A
Lautsprecher
B
Ladekontakt
C
Display
D
Softtasten
E
Sprechgarnitur-Buchse/Audio-Buchse
F
{C}
(Gespräch)
G
Joystick
H
{s}
(Freisprecheinrichtung)
I
Wähltastatur
J{R} (Rückfrage)
K
Ladeanzeige/Ruftonanzeige/
Nachrichtenanzeige
L
Hörer
M
{ih}
N{C/T}
O{INT} (Interngespräch)
P
(Löschen/Stumm)
Mikrofon
I
J
(Aus/Ein)
K
L
M
N
O
P
Der Mobilteil-Joystick kann zur Navigation durch
das Menü verwendet werden sowie zur Auswahl
von im Display angezeigten Einträgen, hierzu
wird er nach oben, nach unten, nach links oder
rechts gedrückt.
Er kann auch verwendet werden, um das mittlere
Tastensymbol auszuwählen. Hierzu wird auf die
Joystickmitte gedrückt.
Basisstation
A
B
C
D{4} (Löschen)
E{■} (Stoppen)
F{s} (Anrufbeantworter ein)/
G{6} (Wiedergabe)/Nachrichtenanzeige
H
B
A
Ladekontakt
Lautsprecher
{x}
(Ruf-Taste)
Anrufbeantworteranzeige
Navigationstaste (
C
{^}/{V}/{8}/{7}
DE
G
F
H
)
(10)
Page 83

TG9120_40_50EX(g-g).book Page 11 Monday, August 7, 2006 2:15 PM
Vorbereitung
Displays
Display-Symbole
DisplaySymbol
w
x
k
y
u
n
d
%
@
e
d
Bedeutung
Innerhalb der Reichweite einer
Basisstation
L
Mobilteil greift auf Basisstation
zu. (internes Gespräch,
Mobilteilsuche, Ändern der
Einstellungen der Basisstation
usw.)
Das Mobilteil wird für einen
externen Anruf verwendet.
Versäumter Anruf*1 (Seite 38)
Der Anrufbeantworter ist
aktiviert (Seite 51) und/oder
neue Nachrichten wurden
aufgezeichnet. (Seite 51)
Der Anrufbeantworter ist voll.
Der Anrufbeantworter
beantwortet Anrufe mit einem
Ansagetext und es werden
keine Anrufernachrichten
aufgezeichnet. (Seite 55)
Für diesen Eintrag wurde eine
Namensansage aufgezeichnet.
(Seite 25)
Akkuladung
Alarm ist aktiviert. (Seite 29)
Stimmverstärker ist auf hoch
oder niedrig eingestellt.
(Seite 19)
Blinkt: Mobilteil sucht
Basisstation. (Mobilteil
befindet sich außerhalb der
Reichweite der Basisstation,
ist nicht an der Basisstation
registriert oder Basisstation
ist nicht an das Stromnetz
angeschlossen)
DisplaySymbol
x
T
~
f
h
j
m
z
*1 Nur für Teilnehmer des Leistungsmerkmals
Anruferanzeige (CLIP)
*2 Nur SMS-Anwender
*3 Nur für Voice Mail-Benutzer
Nur für Benutzer der schnurlosen Kamera
KX-TGA914EX
DisplaySymbol
8
Bedeutung
Privatfunktion ist aktiviert.
(Seite 19)
Stumm ist aktiviert. (Seite 19)
Ruftonlautstärke ist deaktiviert.
(Seite 29)
Nachtmodus ist aktiviert.
(Seite 31)
Neue SMS-Nachricht
empfangen
Wird beim Schreiben einer
SMS-Nachricht angezeigt.
(Seite 44)
SMS-Speicher ist voll.
Neue Voice Mail empfangen*3
(Seite 40)
Leitung oder Anrufbeantworter
wird von einem anderen
Mobilteil oder der Basisstation
verwendet.
Bedeutung
Das Mobilteil ist mit der
schnurlosen Kamera
verbunden.
L
Blinkt: Die schnurlose
Kamera ruft das Mobilteil,
weil sie Geräusche erkannt
hat oder ihre Ruftaste
gedrückt wurde.
*2
(Seite 47)
*2
*2
(11)
Page 84

TG9120_40_50EX(g-g).book Page 12 Monday, August 7, 2006 2:15 PM
Vorbereitung
Nur für Benutzer des USB-Adapters
KX-TGA915EX
Display-
Bedeutung
Symbol
D
Das Mobilteil befindet sich im
IP-Telefon-Modus.
L
Blinkt: Ein Internet-Anruf wird
empfangen.
9
Versäumter Internet-Anruf
Menüsymbole
Durch Drücken der Joystickmitte im StandbyModus wird das Hauptmenü des Mobilteils
aufgerufen. Von dort aus können Sie eine
Vielzahl von Funktionen und Einstellungen
aufrufen.
Menüsymbol Menü/Funktion
Anruferliste
(Short Message
SMS
Service:
Kurzmitteilungsdienst)
Anrufbeantw.
Display-Einst.
*1
Mobilteileinst.
Basis-Einstell.
*13 (“Telbuch-Einst.”) wird anstelle
M (“
von
Display-Einst.”) angezeigt
bei Benutzern des USB-Adapters
KX-TGA915EX.
Telbuch-Einst.
Softtasten
Das Mobilteil umfasst zwei Tasten und einen
Joystick. Durch Drücken einer Taste oder der
Joystickmitte können Sie die auf dem Display
angezeigte Funktion auswählen.
Softtastensymbole
Softtasten-
Aktion
symbol
U
Schaltet zur vorherigen
Anzeige zurück.
P
K
Ermöglicht Interngespräche.
Zeigt das Menü an.
J
M
L
j
Übernimmt die aktuelle
Auswahl.
Zeigt eine zuvor gewählte
Rufnummer an.
n
Öffnet das MobilteilTelefonbuch.
T
Öffnet das gemeinsame
Telefonbuch.
k
Ruft das Menü zum
Durchsuchen des
Telefonbuchs auf.
I
Schaltet die Tastensperre
aus. (Seite 19)
s
Wechselt zwischen AM, PM
und 24-Stunden-Zeitformat.
X
Wird angezeigt, wenn der
Zeichen-Eingabemodus
LetterWise® ausgewählt ist.
Y
Wird angezeigt, wenn der
Zeichen-Eingabemodus
alphabetisch ausgewählt ist.
(12)
Page 85

TG9120_40_50EX(g-g).book Page 13 Monday, August 7, 2006 2:15 PM
Vorbereitung
Softtastensymbol
Z
o
q
r
p
e
Q
O
N
l
W
b
V
c
d
w
g
f
t
a
Aktion
Wird angezeigt, wenn der
Zeichen-Eingabemodus
nummerisch ausgewählt ist.
Wird angezeigt, wenn der
Zeichen Eingabemodus
Griechisch ausgewählt ist.
Wird angezeigt, wenn der
Zeichen-Eingabemodus
Durchwahl 1 ausgewählt ist.
Wird angezeigt, wenn der
Zeichen-Eingabemodus
Durchwahl 2 ausgewählt ist.
Wird angezeigt, wenn der
Zeichen-Eingabemodus
Kyrillisch ausgewählt ist.
Aktiviert/Deaktiviert den
Anrufbeantworter.
Beginnt mit der
Aufzeichnung. (Seite 30)
Stoppt die Aufnahme oder
Wiedergabe.
Fügt eine Wählpause ein.
(Seite 30)
Löscht den ausgewählten
Menüeintrag.
Zeigt die Bildliste an.
Zeigt den ausgewählten
Telefonbucheintrag an.
Zeigt das Bild an.
Geht zur nächsten Anzeige.
Richtet eine
Konferenzschaltung ein.
Speichert den Mobilteil-
Telefonbucheintrag bzw. die
aufgenommenen
Klingeltondaten.
Wählt den markierten Punkt
aus.
Fügt ein Zeichen ein.
Nur für Benutzer der schnurlosen Kamera
KX-TGA914EX
Softtastensymbol
B
A
v
Nur für Benutzer des USB-Adapters
KX-TGA915EX
Softtastensymbol
D
G
F
u
E
H
Aktion
Stellt die Helligkeit der
Anzeige ein.
Wechselt zwischen
Heranzoomen und dem
Normalmodus.
Stellt die Empfindlichkeit der
Audio-Erkennung ein.
Aktion
Ermöglicht Ihnen,
Internetgespräche zu tätigen.
Wechselt zur
Wahlwiederholung für
Internetanrufe.
Wechselt zur Anruferliste für
Internetanrufe.
Wechselt zur Anruferliste
Voice Mail für Internetanrufe.
Lehnt den 2. Anruf ab.
Hält den Internetanruf.
(13)
Page 86

TG9120_40_50EX(g-g).book Page 14 Monday, August 7, 2006 2:15 PM
Vorbereitung
Anschlüsse
Wenn das Netzteil an die Basisstation
angeschlossen wird, ertönt ein kurzes
akustisches Signal. Prüfen Sie die Anschlüsse,
wenn das akustische Signal nicht ertönt.
Einsetzen/Auswechseln der
Akkus
Haken
(220–240 V, 50 Hz)
Zum Fernsprechnetz
Verwenden Sie nur das im Lieferumfang
enthaltene/angegebene Netzteil und
Telefonkabel.
Hinweis:
L
Zum Anschließen des Telefonkabels an das
Telefonnetz benutzen Sie das mitgelieferte
Telefonkabel und den mitgelieferten
Telefonstecker, der für Ihr Land zutrifft, siehe
Seite 7.
L
Schließen Sie das Telefonkabel niemals
während eines Gewitters an.
L
Das Netzteil muss stets angeschlossen
bleiben. (Es ist normal, dass sich das Netzteil
während des Betriebs warm anfühlt.)
L
Das Netzteil sollte an einer Wand- oder
Bodensteckdose angeschlossen werden.
Schließen Sie das Netzteil nicht an einer
Deckensteckdose an, da sein Gewicht es aus
der Steckdose ziehen könnte.
Wichtig:
L
L
L
L
1
2
– Nicht in der Nähe von elektrischen Geräten,
wie TV-Geräten, Radiogeräten, PCs oder
weiteren Telefonen.
– An einer leicht zu erreichenden und
zentralen Stelle.
Verwenden Sie nur die mitgelieferten, auf
Seite 7, 9 angegebenen Standardakkus.
Wenn Sie die Akkus austauschen müssen,
empfehlen wir, nur die auf Seite 8, 9
angegebenen Panasonic-Akkus zu
verwenden.
Die Pole des Akkus (S, T) mit einem
trockenen Tuch abwischen.
Achten Sie beim Einlegen der Akkus darauf,
S, T
die Pole der Akkus (
Geräts nicht zu berühren.
Drücken Sie fest auf die Aussparung auf der
Akkufachabdeckung und schieben Sie die
Abdeckung in Pfeilrichtung.
L
Nehmen Sie die alten Akkus mit dem
Pluspol (
Setzen Sie die Akkus mit dem Minuspol (T)
zuerst ein. Schließen Sie die
Akkufachabdeckung.
S
) zuerst heraus.
) und Kontakte des
Aufstellort
L
Für einen rauschfreien Betrieb bei maximaler
Kommunikationsentfernung stellen Sie die
Basisstation wie folgt auf:
(14)
Page 87

TG9120_40_50EX(g-g).book Page 15 Monday, August 7, 2006 2:15 PM
Panasonic Ni-MH-Akkuleistung
Laden des/der Akku(s)
Legen Sie das Mobilteil vor dem ersten
Gebrauch ca. 7 Stunden lang auf die
Basisstation.
Beim Aufladen, wird “Ladend” angezeigt.
“
Wenn die Akkus geladen sind, wird
”
beendet
L
Während des Ladevorgangs leuchtet die
Ladeanzeige des Mobilteils bersteinfarben.
Wenn die Akkus vollkommen aufgeladen sind,
leuchtet die Ladeanzeige grün.
Hinweis:
L
Es ist normal, dass sich das Mobilteil während
des Ladens warm anfühlt.
L
Laden Sie die Akkus mindestens 15 Minuten,
wenn Sie das Gerät sofort benutzen möchten.
L
Reinigen Sie die Ladekontakte des Mobilteils
und des Basisgeräts ein Mal im Monat mit
einem weichen, trockenen Tuch, ansonsten
lassen sich die Akkus möglicherweise nicht
richtig laden. Reinigen Sie die Kontakte
häufiger, wenn das Gerät Schmierstoffen,
Staub oder hoher Luftfeuchtigkeit ausgesetzt
ist.
Akkuladung
Akkusymbol Akkuladung
angezeigt.
@
?
/
Ladekontakt
Hoch
Mittel
Niedrig
Wenn die Anzeige blinkt,
muss aufgeladen
werden.
Aufladen
(mitgelieferte Akkus)
Hinweis:
L
L
L
L
L
Bildschirmschoner-Modus
Die Display-Beleuchtung schaltet sich
vollständig aus,
Basisstation liegt
benutzt wird.
Drücken Sie zur Verwendung des Mobilteils (im
Bildschirmschonermodus) zuerst
das Display einzuschalten.
Vorbereitung
Betrieb Betriebsdauer
In Dauerbetrieb Max. 15 Stunden
In dauerhaftem
Standby-Modus
Es ist normal, wenn die Akkus beim ersten
Aufladen nicht die volle Kapazität erreichen.
Die maximale Akkuleistung wird erst nach
einigen abgeschlossenen Lade/Entladezyklen (Gebrauch) erreicht.
Die tatsächliche Akkuleistung hängt davon ab,
wie häufig das Mobilteil verwendet bzw. nicht
verwendet wird (Standby).
Die Akku-Betriebsdauer kann sich je nach
Gebrauchsbedingungen und
Umgebungstemperatur mit der Zeit verkürzen.
Auch wenn das Mobilteil voll aufgeladen ist,
kann es auf der Basisstation liegen gelassen
werden, ohne dass die Akkus dadurch
Schaden nehmen.
Der Ladezustand wird nach dem
Wiedereinsetzen der Akkus möglicherweise
nicht richtig angezeigt. Legen Sie in diesem
Fall das Mobilteil auf die Basisstation und
laden Sie es mindestens 7 Stunden lang auf.
wenn das Mobilteil nicht auf der
und länger als 1 Minute nicht
Max. 240 Stunden
{ih}
, um
(15)
Page 88

Sie k
nnen
Deutsch
English
Espa
NORSK
FRANCAIS
,
Italiano
Dansk
Nederlands
,
Svenska
Suomi
EKKGMIJA
,
Portugu
oder
Catal
ausw
hlen.
TG9120_40_50EX(g-g).book Page 16 Monday, August 7, 2006 2:15 PM
Vorbereitung
Hinweis:
Ein-/Ausschalten des Geräts
Einschalten
Drücken Sie
ertönt.
Ausschalten
Halten Sie
{ih}
, bis ein kurzes Piepen
{ih}
ca. 2 Sekunden gedrückt.
L
Display-Sprache
14 Display-Sprachen stehen zur Auswahl.
In dieser
Bedienungsanleitung
verwendete Symbole
Symbol Bedeutung
J
i
L
j
X
I
M
3
m
L
“ ” Wählen Sie die in
Drücken Sie auf J
(Joystickmitte).
Gehen Sie weiter zum nächsten
Vorgang.
Drücken Sie auf L
(Joystickmitte).
Wählen Sie das erwähnte
Mobilteil-Menüsymbol (Seite 12)
aus.
Beispiel:m (Menüsymbol für
Mobilteil-Einstellungen)
Wählen Sie m, indem Sie den
Joystick in eine beliebige Richtung
drücken.
Anführungszeichen gesetzten
Wörter im Display (z. B.
“
Zeiteinstell.”), indem Sie
den Joystick nach oben oder
unten drücken.
Sie k
“Espa
“Italiano
“Svenska
“Türkrkçe”, “Portugu
ausw
1
2
3
4
5
Hinweis:
L
Regionale Einstellungen
Sie können das Gerät so einstellen, dass es die
zu Ihrem Land passenden Einstellungen benutzt
(Seite 37). Die Display-Sprache und andere
Einstellungen ändern sich dementsprechend.
Die Display-Sprache ändert sich nur (auf die
Standardeinstellungen des gewählten Landes)
für das Mobilteil, mit dem die entsprechende
Ländereinstellung vorgenommen wurde. Für
alle anderen Mobilteile muss die DisplaySprache extra eingestellt werden.
önnen
“Deutsch
ñolol”,“NORSK
”, “Dansk
”, “Suomi
ählen.
{ih} i J
Wählen Sie m, indem Sie den Joystick in eine
beliebige Richtung drücken.
(Joystickmitte)
Drücken Sie den Joystick nach oben oder
unten, um
auszuwählen.
Drücken Sie den Joystick nach oben oder
unten, um
auszuwählen.
Drücken Sie den Joystick nach oben oder
unten, um die gewünschte Sprache
auszuwählen.i L i
Wenn Sie eine Sprache ausgewählt haben, die
Sie nicht lesen können, drücken Sie
und dann
drücken Sie dann den Joystick 2 Mal nach
unten, drücken Sie L, drücken Sie den
Joystick 2 Mal nach unten, drücken Sie
wählen Sie die gewünschte Sprache aus und
drücken Sie abschließend L. Drücken Sie
{ih}
“
Display-Einst.”
“
Auswahl Sprache”
J
, wählen Sie m, drücken Sie L,
.
”,“English
”, , “FRANCAIS
”, , “Nederlands
”, , “EKKGMIJA
ês” oder
(Joystickmitte)
i L
i L
“Catal
i L
{ih}
”,
”,
”,
{ih}
L
”,
à”
,
(16)
Page 89

TG9120_40_50EX(g-g).book Page 17 Monday, August 7, 2006 2:15 PM
3
Datum und Uhrzeit
1
J
(Joystickmitte)
2
Wählen Sie m, indem Sie den Joystick in eine
beliebige Richtung drücken.
(Joystickmitte)
3
Drücken Sie den Joystick nach oben oder
“
unten, um
i L
4
Drücken Sie den Joystick nach oben oder
unten, um
auszuwählen.
5
Geben Sie Tag, Monat und Jahr ein.
Beispiel:
{1}{7} {0}{5} {0}{6}
6
Geben Sie die aktuelle Uhrzeit ein.
Beispiel:
{0}{3} {3}{0} i
“
03:30 PM” angezeigt wird.
7
L i {ih}
Hinweis:
L
Um eine Ziffer zu korrigieren, bewegen Sie den
Cursor mit dem Joystick zu der
entsprechenden Ziffer und nehmen Sie die
Änderungen vor.
L
Nach einem Stromausfall stimmen Datum und
Uhrzeit möglicherweise nicht mehr. Stellen Sie
Datum und Uhrzeit ggf. neu ein.
Zeiteinstell.” auszuwählen.
“
Datum/Uhr eing.”
i L
17. Mai 2006
3:30 PM
Drücken Sie auf s, bis
i L
4
Wichtig:
L
Vorbereitung
“
Zeiteinstellung” i
“
Anrufer ID” oder “manuell” i L
i {ih}
Um diese Funktion zu nutzen, müssen Sie
zuerst Datum und Uhrzeit einstellen (Seite 17).
L
Zeiteinstellung (nur für Anwender der
Anruferanzeige (CLIP))
Durch diese Funktion kann das Gerät bei jeder
Übermittlung von Anruferdaten automatisch
Datum und Uhrzeit erfassen. Um diese Funktion
zu verwenden, muss das Leistungsmerkmal
Anruferanzeige (CLIP) die Anruferdaten,
einschließlich Datum und Uhrzeit, im FSKProtokoll bereitstellen. Einzelheiten erfahren Sie
bei Ihrem Service Provider/Ihrer
Telefongesellschaft. Zum Aktivieren dieser
“
Funktion wählen Sie
Zum Deaktivieren dieser Funktion wählen Sie
“
manuell”.
1
J
(Joystickmitte) i m i
2
“
Zeiteinstell.” i
Anrufer ID”.
L
L
(17)
Page 90

TG9120_40_50EX(g-g).book Page 18 Monday, August 7, 2006 2:15 PM
C
Anrufen/Beantworten von Anrufen
Anrufen
1
Nehmen Sie das Mobilteil ab und wählen Sie
die Rufnummer.
L
Zur Korrektur einer Ziffer drücken Sie auf
{C/T} und geben dann die korrekte
Nummer ein.
2
{C}
3
Drücken Sie nach Beendigung des
{ih}
Gesprächs
Mobilteil auf die Basisstation.
Freisprecheinrichtung
1
Drücken Sie während eines Gesprächs
um die Freisprecheinrichtung zu aktivieren.
L
Sprechen Sie im Wechsel (nicht
gleichzeitig) mit Ihrem Gesprächspartner.
2
Sprechen Sie in den Hörer und drücken Sie
nach Beendigung des Gesprächs
Hinweis:
L
Für eine optimale Verständigung sollten Sie
die Freisprecheinrichtung in einer ruhigen
Umgebung verwenden.
L
Um wieder auf den Hörer umzuschalten,
drücken Sie
oder legen Sie das
{C}
.
{ih}
{s}
Bearbeiten einer Nummer in der
Wahlwiederholungsliste vor dem Anruf
1
2
,
3
4
.
5
L
Wenn
{s}
gedrückt wird und der
Anschluss des anderen Teilnehmers
besetzt ist, wählt das Gerät die Nummer
automatisch bis zu 11 weitere Male.
Während das Mobilteil auf die
Wahlwiederholung wartet, blinkt die
Ruftonanzeige. Zum Abbrechen drücken
{ih}
Sie
j
(rechte Soft-Taste)
Drücken Sie den Joystick nach oben oder
unten, um die gewünschte Nummer
auszuwählen.
“
Bearb.&Anrufen” i
Bewegen Sie mit dem Joystick den Cursor.
i
Bearbeiten Sie die Nummer.
L
Platzieren Sie den Cursor auf der zu
löschenden Nummer, und drücken Sie
{C/T}.
L
Platzieren Sie den Cursor rechts neben
der Stelle, an der Sie eine Nummer
einfügen wollen. Drücken Sie dann die
entsprechende Wahltaste.
{C}
.
i J
L
/
{s}
/
L
Einstellen der Lautstärke des Hörers oder
Lautsprechers
Drücken Sie den Joystick während des
Gesprächs nach oben oder unten.
Wahlwiederholung
Zuvor gewählte Rufnummern (jeweils max. 48
Ziffern) können per Wahlwiederholung erneut
gewählt werden.
Einen Anruf mithilfe der
Wahlwiederholungsliste tätigen
Die letzten 10 gewählten Rufnummern sind in der
Wahlwiederholungsliste gespeichert.
1
j
(rechte Soft-Taste)
2
Drücken Sie den Joystick nach oben oder
unten, um die gewünschte Nummer
auszuwählen.
3
{C}
/
{s}
(18)
Löschen einer Nummer in der
Wahlwiederholungsliste
1
j
(rechte Soft-Taste)
2
Drücken Sie den Joystick nach oben oder
unten, um die gewünschte Nummer
auszuwählen.
3
“
Löschen” i
L
Wenn Sie alle Nummern in der Liste
löschen wollen, wählen Sie
“
Alle löschen” und drücken dann L.
4
“Ja” i L i {ih}
Speichern einer Nummer aus der
Wahlwiederholungsliste im MobilteilTelefonbuch
1
j
(rechte Soft-Taste)
2
Drücken Sie den Joystick nach oben oder
unten, um die gewünschte Nummer
auszuwählen. i
i J
L
J
Page 91

TG9120_40_50EX(g-g).book Page 19 Monday, August 7, 2006 2:15 PM
C
3
“
Telbuch hinzuf.” i
4
“
Name” i
5
Geben Sie einen Namen ein (maximal 16
Zeichen; Seite 61).
6
“
<Speichern>” i L i
Sie können auch g drücken, um den
L
Eintrag zu speichern.
L
Um den Eintrag einer Kategorie
zuzuordnen, fahren Sie mit Schritt 7, “Dem
Mobilteil-Telefonbuch Einträge
hinzufügen”, Seite 21 fort.
L
Sonstige Funktionen
Stimmverstärker
Sie können während eines Telefongesprächs die
Tonqualität des Hörers ändern.
1
Drücken Sie während des Gesprächs J.
2
“
Sprachoptimier.” i
3
“
Höhen” oder “Tiefen” i
Ld wird angezeigt.
Konferenz
Ein 2. Mobilteil kann an einem bereits
existierenden externen Anruf teilnehmen.
Um an diesem Gespräch teilzunehmen, drücken
{C}
/
{s}
Sie
gerade ein externer Anruf erfolgt.
Privatfunktion
Mit der Privatfunktion können Sie verhindern,
dass andere Nutzer an Ihren Gespräche mit
externen Gesprächspartnern teilnehmen. Um
anderen Nutzern die Möglichkeit zu geben an
Ihren Gesprächen teilzunehmen, deaktivieren
Sie diese Funktion. Die Standardeinstellung ist
“
Aus”.
1
Drücken Sie J während eines externen
Anrufs.
2
“
Privatsphäre” i
3
“
Ein” oder “Aus” i
L
Hinweis:
L
Diese Funktion wird ausgeschaltet, sobald Sie
das Gespräch durch Auflegen beenden.
, wenn über das andere Mobilteil
Wenn diese Funktion aktiviert ist, wird x
angezeigt.
i L
L
L
L
L
{ih}
L
Stumm
Wenn die Funktion Stumm aktiviert ist, können
Sie Ihren Gesprächspartner hören, Ihr
Gesprächspartner kann Sie jedoch nicht hören.
Tastensperre
Das Mobilteil kann gesperrt werden, sodass
keine Anrufe getätigt oder Einstellungen
vorgenommen werden können. Eingehende
Anrufe können entgegengenommen werden, alle
anderen Funktionen sind bei aktivierter
Tastensperre jedoch inaktiv.
Zur Aktivierung der Tastensperre halten Sie
(Joystickmitte) ca. 2 Sekunden lang gedrückt.
LI wird angezeigt.
L
{R}
Rückfragefunktion)
■
{R}
Ihrer TK-Anlage bzw. Ihres Telefonanbieters
(Anklopfen, Makeln, usw.) verwendet. Wenn Ihr
Telefon Anklopfen unterstützt, können Sie
während eines Gesprächs durch Drücken von
{R}
Anrufer umschalten. Einzelheiten erfahren Sie
bei Ihrem Service Provider/Ihrer
Telefongesellschaft.
■
{R}
Telefonfunktionen verwendet. Einzelheiten
erfahren Sie bei Ihrem Service Provider/Ihrer
Telefongesellschaft.
Hinweis:
L
Anrufen/Beantworten von Anrufen
Zum Stummschalten Ihrer Stimme drücken Sie
{C/T}.
LT wird angezeigt.
L
Um zurück zum Gespräch zu gelangen,
drücken Sie erneut auf
Um die Tastensperre auszuschalten, halten
I
(Joystickmitte) ca. 2 Sekunden lang
Sie
gedrückt.
Taste (zur Verwendung der
Deutschland/Österreich:
wird als Zugang zu speziellen Funktionen
zwischen dem ersten und dem zweiten
Andere Länder:
wird als Zugang zu optionalen
Falls Ihr Telefon an eine Nebenstellenanlage
angeschlossen ist, können Sie durch Drücken
der Taste {R} bestimmte Leistungsmerkmale
Ihrer lokalen Nebenstellenanlage nutzen; z.B.
die Weiterleitung eines externen Anrufs.
{C/T}.
J
(19)
Page 92

TG9120_40_50EX(g-g).book Page 20 Monday, August 7, 2006 2:15 PM
C
Anrufen/Beantworten von Anrufen
Einzelheiten erfahren Sie bei Ihrem TKFachhändler.
L
Sie können die Rückfragezeit ändern (Seite
36).
Die Pause-Taste
(Nebenstellenanlage/Amtsleitungsmerkmale)
Eine Pause ist gelegentlich erforderlich, wenn ein
Anruf über eine Nebenstellenanlage getätigt
wird, oder wenn Ferngespräche geführt werden.
Beispiel:
der externen Nummern eingeben müssen,
müssen Sie wahrscheinlich nach dem Wählen
von
Wählton hören.
1
2
Hinweis:
L
Wenn Sie {0} manuell vor dem Wählen
{0}
eine Pause einlegen, bis Sie einen
{0} i l
Wählen Sie die Rufnummer. i
Jedes Mal, wenn Sie l drücken, wird eine 3sekündige Pause eingefügt. Wird die Taste
mehrmals gedrückt, werden die Pausen
länger.
{C}
/
{s}
Beantworten von Anrufen
Wenn ein Anruf eingeht, blinkt die Ruftonanzeige
am Mobilteil.
1
Nehmen Sie das Mobilteil ab und drücken
{C}
oder
{s}
Sie
L
Sie können einen Anruf auch
entgegennehmen, indem Sie eine
beliebige Wähltaste,
oder
{
INT}, drücken.
jeder Taste)
2
Drücken Sie nach Beendigung des
Gesprächs
Mobilteil auf die Basisstation.
, wenn das Gerät klingelt.
{0}
bis {9},
(Rufannahme mit
{ih}
oder legen Sie das
{*}, {#}
Zum Einstellen der Ruftonlautstärke bei
eingehenden Anrufen
Drücken Sie den Joystick nach oben oder unten.
Sonstige Funktionen
Mobilteil-Suchfunktion
Mit dieser Funktion können Sie das Mobilteil
finden, wenn Sie es verlegt haben.
1
Drücken Sie
2
Um die Mobilteilsuche zu beenden, drücken
{x}
Sie
Mobilteil.
{x}
an der Basisstation.
an der Basisstation oder
{ih}
am
Automatischer Gesprächsmodus
Sie können Anrufe auch entgegennehmen,
indem Sie einfach das Mobilteil von der
Basisstation nehmen. Sie müssen nicht
drücken. Zum Aktivieren dieser Funktion siehe
Seite 33.
{C}
(20)
Page 93

TG9120_40_50EX(g-g).book Page 21 Monday, August 7, 2006 2:15 PM
gewünschten Kategorie zuordnen. Sie können
Mobilteil-Telefonbuch
Das Mobilteil-Telefonbuch ermöglicht es Ihnen
Anrufe zu tätigen, ohne manuell wählen zu
müssen. Sie können bis zu 3 Rufnummern für
jeden Eintrag abspeichern und diese Einträge im
Mobilteil-Telefonbuch der gewünschten
Kategorie zuordnen.
Die Gesamtanzahl der Einträge, die gespeichert
werden können, variiert wie unten gezeigt je nach
Anzahl der Rufnummern, die für jeden einzelnen
Eintrag gespeichert sind:
1 Name + 1 Rufnummer 200 Einträge
1 Name + 2 Rufnummern 133 Einträge
1 Name + 3 Rufnummern 100 Einträge
die Namen der Kategorien für Einträge im
Mobilteil-Telefonbuch (“Freunde”, “Familie” usw.)
ändern und Einträge im Mobilteil-Telefonbuch
nach Kategorien suchen. Für Anwender des
Leistungsmerkmals (CLIP) stehen weitere
Kategoriefunktionen zur Verfügung (Seite 38).
Ändern von Kategorienamen
Dem Mobilteil-Telefonbuch Einträge
hinzufügen
1
■
KX-TG9120/KX-TG9140 (kein USB-
Adapter registriert):
n
(linke Soft-Taste) i
■
Modell mit KX-TG9150 oder USB-
Adapter registriert:
J
(Joystickmitte) i 3 i L i
2
“
Neuer Eintrag” i
3
“
Name” i
4
Geben Sie den Namen des Teilnehmers ein
(maximal 16 Zeichen; Seite 61).
5
“
Telefon-Nr. 1” i
L
Sie können bis zu 3 Rufnummern pro
Eintrag speichern.
6
Geben Sie die Rufnummer des Teilnehmers
ein (max. 24-stellig).
7
“
Kategorie 1” i
8
Wählen Sie die gewünschte Kategorie aus.
i L
9
“
<Speichern>” i L i
L
J
L
i L
L
i L
L
{ih}
J
Suchen und Anrufen eines Eintrags
im Mobilteil-Telefonbuch
Einträge im Mobilteil-Telefonbuch können
alphabetisch, nach dem ersten Zeichen, nach
Kategorien oder durch Abrollen durchsucht
werden.
Wenn Sie den gewünschten Eintrag gefunden
haben, drücken Sie
L
Durchblättern aller Einträge
Kategorien
Mithilfe von Kategorien können Sie Einträge im
Mobilteil-Telefonbuch schnell und einfach finden.
Wenn Sie dem Mobilteil-Telefonbuch einen
Eintrag hinzufügen, können Sie ihn der
k
Telefonbücher
1
■
KX-TG9120/KX-TG9140 (kein USB-
Adapter registriert):
n
(linke Soft-Taste) i
■
Modell mit KX-TG9150 oder USB-
Adapter registriert:
J
(Joystickmitte) i 3 i L i
2
“
Kategorie” i
3
Wählen Sie die gewünschte Kategorie aus.
i L
4
“
Kategorie Name” i
5
Bearbeiten Sie den Namen (maximal 10
Zeichen; Seite 61).
{C}
Wenn dem Eintrag mehr als 1 Rufnummer
zugeordnet ist, drücken Sie
Wählen Sie die gewünschte Rufnummer aus.
i {C}
1
2
/
{s}
■
KX-TG9120/KX-TG9140 (kein USB-
Adapter registriert):
n
(linke Soft-Taste)
■
Modell mit KX-TG9150 oder USB-
Adapter registriert:
J
(Joystickmitte) i 3 i
Drücken Sie den Joystick nach oben oder
unten, um den gewünschten Eintrag
anzuzeigen.
J
L
L
i L i {ih}
.
{C}
/ V. i
L
J
(21)
Page 94

TG9120_40_50EX(g-g).book Page 22 Monday, August 7, 2006 2:15 PM
k
Telefonbücher
Alphabetische Suche
Diese Methode ist nützlich, wenn Sie nach einem
Eintrag suchen, der mit einem Buchstaben
beginnt.
1
■
KX-TG9120/KX-TG9140 (kein USB-
Adapter registriert):
n
(linke Soft-Taste)
■
Modell mit KX-TG9150 oder USB-
Adapter registriert:
J
(Joystickmitte) i 3 i
2
Drücken Sie die Wähltaste ({0} bis {9}), die
dem gesuchten Buchstaben entspricht
(Seite 61).
L
Drücken Sie dieselbe Wahltaste
wiederholt, um den ersten Eintrag
anzuzeigen, der mit dem Buchstaben auf
dieser Wahltaste übereinstimmt.
L
Wenn kein Eintrag vorliegt, der mit dem
von Ihnen ausgewählten Buchstaben
übereinstimmt, wird der nächste Eintrag
angezeigt.
3
Drücken Sie den Joystick nach oben oder
unten, um nach Bedarf durch das
Telefonbuch zu blättern.
L
5
Hinweis:
L
Suche nach Kategorie
1
2
3
4
Einzelheiten der Telefonbucheinträge
anzeigen
Suche nach Anfangsbuchstaben
(Indexsuche)
1
■
KX-TG9120/KX-TG9140 (kein USB-
Adapter registriert):
n
(linke Soft-Taste) i
■
Modell mit KX-TG9150 oder USB-
Adapter registriert:
J
(Joystickmitte) i 3 i L i
2
“
Stichwort Suche” i
3
Drücken Sie wiederholt auf die rechte Taste,
um den Zeicheneingabe-Modus zu wählen,
der das gesuchte Zeichen enthält.
4
Drücken Sie den Joystick in eine beliebige
Richtung, um das gewünschte Zeichen
auszuwählen. i
L
Wenn kein Eintrag vorliegt, der mit dem
von Ihnen ausgewählten Buchstaben
übereinstimmt, wird der nächste Eintrag
angezeigt.
k
L
L
k
1
2
Bearbeiten von Einträgen im
Mobilteil-Telefonbuch
Ändern eines Namens, einer Rufnummer oder
einer Kategorie
1
2
3
Drücken Sie den Joystick nach oben oder
unten, um nach Bedarf durch das
Telefonbuch zu blättern.
In Schritt 4 können Sie ebenfalls die Wähltaste
{0}-{9}
) drücken, die mit dem gesuchten
(
Zeichen belegt ist (Seite 61).
■
KX-TG9120/KX-TG9140 (kein USB-
Adapter registriert):
n
(linke Soft-Taste) i
■
Modell mit KX-TG9150 oder USB-
Adapter registriert:
J
(Joystickmitte) i 3 i L i
“
Kategoriesuche” i
Wählen Sie die Suchkategorie. i
L
Wenn Sie “Alle” wählen, beendet das
Gerät die Kategoriesuche.
Drücken Sie den Joystick nach oben oder
unten, um nach Bedarf durch das
Telefonbuch zu blättern.
Wählen Sie den gewünschten Eintrag (Seite
i V
21).
L
Der dem Eintrag zugeordnete Name und
die entsprechende Rufnummer werden
angezeigt.
Drücken Sie den Joystick nach rechts oder
links, um den nächsten oder vorherigen
Eintrag anzuzeigen.
Wählen Sie den gewünschten Eintrag (Seite
i K
21).
“
Editieren” i
Wählen Sie den Eintrag aus, den Sie ändern
möchten.
i L
k
k
L
L
L
(22)
Page 95

TG9120_40_50EX(g-g).book Page 23 Monday, August 7, 2006 2:15 PM
4
Zum Ändern des Namens und der
Rufnummer
Bearbeiten Sie den Namen oder die
Rufnummer.
Um die Kategorie zu ändern
Wählen Sie die gewünschte Kategorie aus.
i L
5
“
<Speichern>” i L i
Löschen einer Rufnummer aus einem Eintrag
1
Wählen Sie den gewünschten Eintrag (Seite
21).
i K
2
“
Editieren” i
3
Wählen Sie die Rufnummer aus, die Sie
löschen möchten.
4
“
<Speichern>” i L i
i L
{ih}
L
i W
{ih}
k
Telefonbücher
1
Wählen Sie den gewünschten Eintrag (Seite
i V
21).
2
Wählen Sie die Rufnummer aus, die Sie
einer Zielwahltaste zuweisen möchten.
J
3
“
Kurzwahl” i
4
Drücken Sie den Joystick nach oben oder
unten, um die gewünschte
Wahltastennummer auszuwählen. i
L
Wenn die Wahltaste bereits als
Zielwahltaste verwendet wird, wird neben
der Wahltastennummer
Wenn Sie diese Wahltaste auswählen,
können Sie die frühere Zuweisung
überschreiben.
5
“
Speichern” i L i
L
“@”
angezeigt.
{ih}
i
L
Löschen von Einträgen aus dem
Mobilteil-Telefonbuch
Löschen eines Eintrags
1
Wählen Sie den gewünschten Eintrag (Seite
21).
i K
2
“
Löschen” i
3
“Ja” i L i {ih}
Löschen aller Einträge
1
■
KX-TG9120/KX-TG9140 (kein USB-
Adapter registriert):
n
(linke Soft-Taste) i
■
Modell mit KX-TG9150 oder USB-
Adapter registriert:
J
(Joystickmitte) i 3 i L i
2
“
Alle löschen” i
3
“Ja” i L
4
“Ja” i L i {ih}
L
J
J
L
Zielwahl
Zuweisen eines Eintrags im MobilteilTelefonbuch zu einer Zielwahltaste
Die Wähltasten {1} bis {9} lassen sich als
Zielwahltasten verwenden, mit deren Hilfe Sie
eine Rufnummer aus dem Mobilteil-Telefonbuch
mit nur einem Tastendruck wählen können.
Tätigen eines Anrufs mit einer Zielwahltaste
1
Halten Sie die gewünschte Zielwahltaste
(
{1}
bis {9}) gedrückt.
L
Sie können sich andere KurzwahltastenZuweisungen anzeigen lassen, indem Sie
den Joystick nach oben oder unten
drücken.
2
{C}
/
{s}
Löschen einer Zielwahltasten-Belegung
1
Halten Sie die gewünschte Zielwahltaste
{1}
bis {9}) gedrückt. i
(
2
“
Löschen” i
3
“Ja” i L i {ih}
Hinweis:
L
Der entsprechende Eintrag im MobilteilTelefonbuch wird nicht gelöscht.
L
J
Kettenwahl
Mit dieser Funktion können Sie während eines
Gesprächs Rufnummern im Telefonbuch wählen.
Diese Funktion kann beispielsweise verwendet
werden, um eine in Ihrem Telefonbuch
gespeicher te Telefon karten-Zugriffsnummer o der
eine Konto-PIN-Nummer zu wählen, ohne sie
manuell eingeben zu müssen.
1
Drücken Sie während des Telefongesprächs
n
.
(23)
Page 96

TG9120_40_50EX(g-g).book Page 24 Monday, August 7, 2006 2:15 PM
k
Telefonbücher
2
Drücken Sie den Joystick nach oben oder
unten, um den gewünschten Eintrag
auszuwählen.
L
Weitere Informationen zur Suche mithilfe
des ersten Zeichens (Indexsuche) finden
Sie auf Seite 22. Weitere Informationen
zur Suche nach Kategorie finden Sie auf
Seite 22.
3
Drücken Sie M, um die Nummer zu
wählen.
L
Wenn dem Eintrag mehr als 1 Rufnummer
zugeordnet ist, drücken Sie
i
Wählen Sie die gewünschte
Rufnummer aus.
i L
V
/ M.
2
3
4
Kurzwahl für Call-by-Call:
Telefonieren über die
Zugangsnummer eines
Drücken Sie
des gewünschten Telefonanbieters zu
wählen.
Wenn die Nummer gewählt wird, drücken Sie
n. i
oben oder unten, um den gewünschten
Eintrag auszuwählen.
L
Wählen Sie den gewünschten Eintrag,
bevor die Verbindung automatisch
getrennt wird.
Drücken Sie L, um den gewünschten
Eintrag zu wählen.
{C}
, um die Zugangsnummer
Drücken Sie den Joystick nach
Telefonanbieters (Nur
Deutschland)
Verschiedene Telefonanbieter berechnen
unterschiedliche Gebühren für Anrufe in
unterschiedliche Ortsnetze. Wenn Sie die
Zugangsnummern der verwendeten
Telefonanbieter vorher im Mobilteil-Telefonbuch
speichern, können Sie beim Telefonieren Geld
sparen, indem Sie die gewünschte
Zugangsnummer auswählen.
Wichtig:
L
Um die Zugangsnummer eines
Telefonanbieters nutzen zu können, müssen
Sie sich unter Umständen vorher bei diesem
anmelden.
1
Suchen Sie die Zugangsnummer des
gewünschten Telefonanbieters im MobilteilTelefonbuch.
L
Weitere Informationen zur Suche mithilfe
des ersten Zeichens (Indexsuche) finden
Sie auf Seite 22. Weitere Informationen
zur Suche nach Kategorie finden Sie auf
Seite 22.
(24)
Page 97

TG9120_40_50EX(g-g).book Page 25 Monday, August 7, 2006 2:15 PM
7
Gemeinsames Telefonbuch
Das gemeinsame Telefonbuch ermöglicht es
Ihnen, Anrufe zu tätigen, ohne manuell wählen
zu müssen. Alle Mobilteile, die an der gleichen
Basisstation registriert sind, können das
gemeinsame Telefonbuch verwenden. Sie
können dem gemeinsamen Telefonbuch 20
Namen und Telefonnummern hinzufügen. Nach
der Anmeldung für das Leistungsmerkmal
Anruferanzeige (CLIP) können Sie die Funktion
Namensansage des gemeinsamen Telefonbuchs
nutzen (Seite 39).
Hinzufügen von Einträgen zum
gemeinsamen Telefonbuch
1
■
KX-TG9120/KX-TG9140 (kein USB-
Adapter registriert):
n
(linke Soft-Taste) i T i
■
Modell mit KX-TG9150 oder USB-
Adapter registriert:
J
(Joystickmitte) i 3 i L i T
i J
2
“
Neuer Eintrag” i
3
Geben Sie den Namen des Teilnehmers ein
(maximal 16 Zeichen; Seite 61).
4
Geben Sie die Rufnummer des Teilnehmers
ein (max. 24-stellig).
5
Zum Aufzeichnen einer Namensansage
Start” i
“
Zum Überspringen der Aufzeichnung
Überspringen” i L i Weiter mit
“
Schritt 8.
L
Die Namensansage (Seite 39) kann nur
von Teilnehmern genutzt werden, die sich
für die Anruferanzeige (CLIP) angemeldet
haben.
6
Wenn “Aufzeichnung” angezeigt wird,
sprechen Sie in das Mikrofon.
L
Die Aufzeichnung darf maximal 10
Sekunden dauern.
L
Halten Sie das Mobilteil ca. 20 cm weit
entfernt und sprechen Sie deutlich in das
Mikrofon.
L
L
i L
J
i L
8
Hinweis:
L
Suchen und Anrufen eines Eintrags
im gemeinsamen Telefonbuch
Einträge im gemeinsamen Telefonbuch lassen
sich nach dem ersten Zeichen oder durch
Abrollen durchsuchen.
Wenn Sie den gewünschten Eintrag gefunden
haben, drücken Sie
Rufnummer zu wählen.
Durchblättern aller Einträge
Suche nach Anfangsbuchstaben
(Indexsuche)
k
Telefonbücher
Drücken Sie auf N, um die Aufzeichnung
zu beenden.
L
Um zur Namensansage zu wechseln,
U
drücken Sie
Vorgang ab Schritt 5.
“
Speichern” i L i
Telefonbucheinträge mit einer Namensansage
werden durch
1
■
KX-TG9120/KX-TG9140 (kein USB-
Adapter registriert):
n
(linke Soft-Taste) i
■
Modell mit KX-TG9150 oder USB-
Adapter registriert:
J
(Joystickmitte) i 3 i L i
2
Drücken Sie den Joystick nach oben oder
unten, um den gewünschten Eintrag
anzuzeigen.
1
■
KX-TG9120/KX-TG9140 (kein USB-
Adapter registriert):
n
(linke Soft-Taste) i T i
■
Modell mit KX-TG9150 oder USB-
Adapter registriert:
J
(Joystickmitte) i 3 i L i T
i k
2
Drücken Sie wiederholt auf die rechte Taste,
um den Zeicheneingabe-Modus zu wählen,
der das gesuchte Zeichen enthält.
3
Drücken Sie den Joystick in eine beliebige
Richtung, um das gewünschte Zeichen
auszuwählen.
und wiederholen den
%
gekennzeichnet.
{C}
oder
i L
{ih}
{s}
T
, um die
k
T
(25)
Page 98

TG9120_40_50EX(g-g).book Page 26 Monday, August 7, 2006 2:15 PM
k
Telefonbücher
L
Wenn kein Eintrag vorliegt, der mit dem
von Ihnen ausgewählten Buchstaben
übereinstimmt, wird der nächste Eintrag
angezeigt.
4
Drücken Sie den Joystick nach oben oder
unten, um nach Bedarf durch das
Telefonbuch zu blättern.
Hinweis:
L
In Schritt 3 können Sie ebenfalls die Wähltaste
{0}-{9}
) drücken, die mit dem gesuchten
(
Zeichen belegt ist (Seite 61).
Löschen von Einträgen aus dem
gemeinsamen Telefonbuch
Löschen eines Eintrags
1
2
3
Löschen aller Einträge
1
Bearbeiten von Einträgen im
gemeinsamen Telefonbuch
Ändern eines Namens, einer Rufnummer oder
einer Namensansage
1
Wählen Sie den gewünschten Eintrag (Seite
25).
i J
2
“
Editieren” i
3
Bearbeiten Sie den Namen nach Bedarf
(maximal 16 Zeichen; Seite 61).
4
Bearbeiten Sie die Rufnummer nach Bedarf
(maximal 24-stellig).
5
Überspringen, Aufzeichnen oder Löschen
einer Namensansage.
L
Zur Aufzeichnung einer Namensansage
fahren Sie mit Schritt 5 auf “Hinzufügen
von Einträgen zum gemeinsamen
Telefonbuch”, Seite 25 fort.
L
Zum Überspringen der Aufzeichnung
wählen Sie
L
Zum Löschen der Namensansage wählen
“
Löschen”. i
Sie
6
“
Speichern” i L i
L
i L
i L
“
Überspringen”. i
L
{ih}
L
2
3
4
Wählen Sie den gewünschten Eintrag (Seite
i J
25).
“
Löschen” i
“Ja” i L i {ih}
■
KX-TG9120/KX-TG9140 (kein USB-
Adapter registriert):
n
(linke Soft-Taste) i T i
■
Modell mit KX-TG9150 oder USB-
Adapter registriert:
J
(Joystickmitte) i 3 i L i T
i J
“
Alle löschen” i
“Ja” i L
“Ja” i L i {ih}
L
J
L
Wiedergabe einer Namensansage
1
Wählen Sie den gewünschten Eintrag (Seite
i J
25).
2
“
Sprachanwahl” i L i
{ih}
(26)
Page 99

TG9120_40_50EX(g-g).book Page 27 Monday, August 7, 2006 2:15 PM
m
Mobilteil-Einstellungen
Mobilteil-Einstellungen
Als Referenz finden Sie im Folgenden eine Übersicht aller Komponenten, die für das Mobilteil
eingestellt werden können.
L
Beim Einstellen des Mobilteils wird der aktuelle Eintrag oder die aktuelle Einstellung auf dem Display
hervorgehoben.
Menü MobilteilEinstellungen
Zeiteinstell. Datum/Uhr eing.
Ruftoneinstell. Ruflautstärke
Display-Einst. Hintergrund
Babyphone Ein/Aus
Registrierung Mobilt.registr.
Auswahl Basis
Andere Optionen Name Mobilt.
Untermenü Untermenü 2 Standardeinstellung Seite
——Seite 17
Terminruf
Zeiteinstellung
Rufsignal ext. Standardtöne Klingelton 1
Benutzertöne
Rufsignal int. Standardtöne Klingelton 3
IP Rufton
Eigene Töne Aufzeichnen
Nachtmodus Start/Ende
Displayfarbe
Auswahl Sprache
Kontrast
Empfindlichkeit
Neue Nachricht
LetterWise
Tastentöne
Autom.Gespräch
Auto-Intern
Vor-Vorwahl
*1
——
Benutzertöne
Standardtöne Klingelton 6
Benutzertöne
Liste
Ein/Aus Aus
Rufverzögerung 60 Sek
Kateg.
Auswähl.
—
—
— Max. Seite 29
—
—
—
—
—
— Mittel Seite 32
——Seite 56
——Seite 33
—
—
—
—
—
——Seite 34
Aus
Anrufer ID
—
—
—
— Seite 30
— Seite 30
23:00/06:00 Seite 31
— Seite 31
Bild 1
Farbe1
English
Kontrast 3
Aus
Automatisch
Aus
English
Ein
Aus
Aus
*2
*2
Seite 29
Seite 17
Seite 29
Seite 29
—
Seite 31
Seite 31
Seite 31
Seite 32
Seite 16
Seite 32
Seite 32
Seite 57
Seite 33
Seite 33
Seite 33
Seite 33
Seite 33
(27)
Page 100

Deutschland
Deutsch
Espa
Espa
FRANCE
FRANCAIS
Italia
Italiano
Nederland
Nederlands
EKKADA
EKKGMIJA
TG9120_40_50EX(g-g).book Page 28 Monday, August 7, 2006 2:15 PM
m
Mobilteil-Einstellungen
*1 Nur für Benutzer des USB-Adapters KX-TGA915EX. Weitere Informationen hierzu finden Sie in
der Bedienungsanleitung des USB-Adapters.
*2 Die standardmäßig eingestellte Display-Sprache ändert sich folgendermaßen bei der Auswahl
einer Ländereinstellung für das Gerät (Seite 37):
““Deutschland
“Espa
ña” = “Espa
“FRANCE
“Italia
“Nederland
“EKKADA
” = “Deutsch
ñolol”
” = “FRANCAIS
” = “Italiano
” = “Nederlands
” = “EKKGMIJA
”
”
”
”
”
(28)
 Loading...