

Page 1
TG9120FX(e).book Page 1 Tuesday, August 29, 2006 9:44 AM
Digital Cordless Answering System
Operating Instructions
Model No. KX-TG9120FX
Contents/Obsah/
English instructions
Pokyny v češtině
Pokyny v slovenčine
Türkçe talimatlar
Appendix/Dodatek/Príloha/Ek
İçindekiler
Page/Strana/Str./Sayfa
1 – 68
–
<1>
[1]
(64)
–
<68>
–
((64))
–
[8]
(1)
((1))
This unit is compatible with Caller ID and SMS. To use these
features, you must subscribe to the appropriate service of your
service provider/telephone company.
Charge the batteries for about 7 hours before initial use.
This unit is designed to be used in Czech, Slovakia, Turkey, and central Europe. To
use this unit in your country, first change the unit’s region setting to match your
country (page 35). Change the unit’s display language as needed (page 14).
Please read these operating instructions before using the unit and save them for
future reference.
(For Czech and Slovakia)
This cordless telephone is possible to use according to General licence No.:
VO-R/8/08.2005-23 (for Czech), VPR-7/2001 (for Slovakia).
Page 2
TG9120FX(e).book Page 2 Tuesday, August 29, 2006 9:44 AM
Introduction
Introduction
Thank you for purchasing a new Panasonic digital cordless phone.
For your future reference
Attach or keep original receipt to assist with any repair under warranty.
Serial No. (found on the bottom of the base unit)
Date of purchase
Name and address of dealer
Note:
L In the event of problems, you should contact your equipment supplier in the first instance.
Declaration of Conformity:
L Panasonic Communications Co., Ltd. declares that this equipment is in compliance with the
essential requirements and other relevant provisions of Radio & Telecommunications
Terminal Equipment (R&TTE) Directive 1999/5/EC.
Declarations of Conformity for the relevant Panasonic products described in this manual
are available for download by visiting:
http://www.doc.panasonic.de
Contact:
Panasonic Services Europe
a Division of Panasonic Marketing Europe GmbH
Panasonic Testing Centre
Winsbergring 15, 22525 Hamburg, Germany
Trademarks:
L Eatoni and LetterWise are trademarks of Eatoni Ergonomics, Inc.
L Skype, SkypeIn, SkypeOut and the S logo are trademarks of Skype Limited.
2
Page 3

TG9120FX(e).book Page 3 Tuesday, August 29, 2006 9:44 AM
Introduction
Feature highlights
This unit is compatible with the cordless camera and USB adaptor for Skype. By purchasing
and registering the optional cordless camera and/or USB adaptor (page 4), the following
features become available to you.
Camera monitoring using the handset (KX-TGA914FX Cordless
camera required)
L You can monitor the room where the cordless camera is located when:
– you access the cordless camera using the handset
– the cordless camera pages the handset when it detects sound
– the cordless camera user pages the handset using the call button
Free internet calls using Skype (KX-TGA915EX USB adaptor required)
L You can make free calls over the Internet to anyone in the world who has Skype.
L Skype software is free and works with most computers.
L Skype software is easy to download and use.
3
Page 4
TG9120FX(e).book Page 4 Tuesday, August 29, 2006 9:44 AM
Introduction
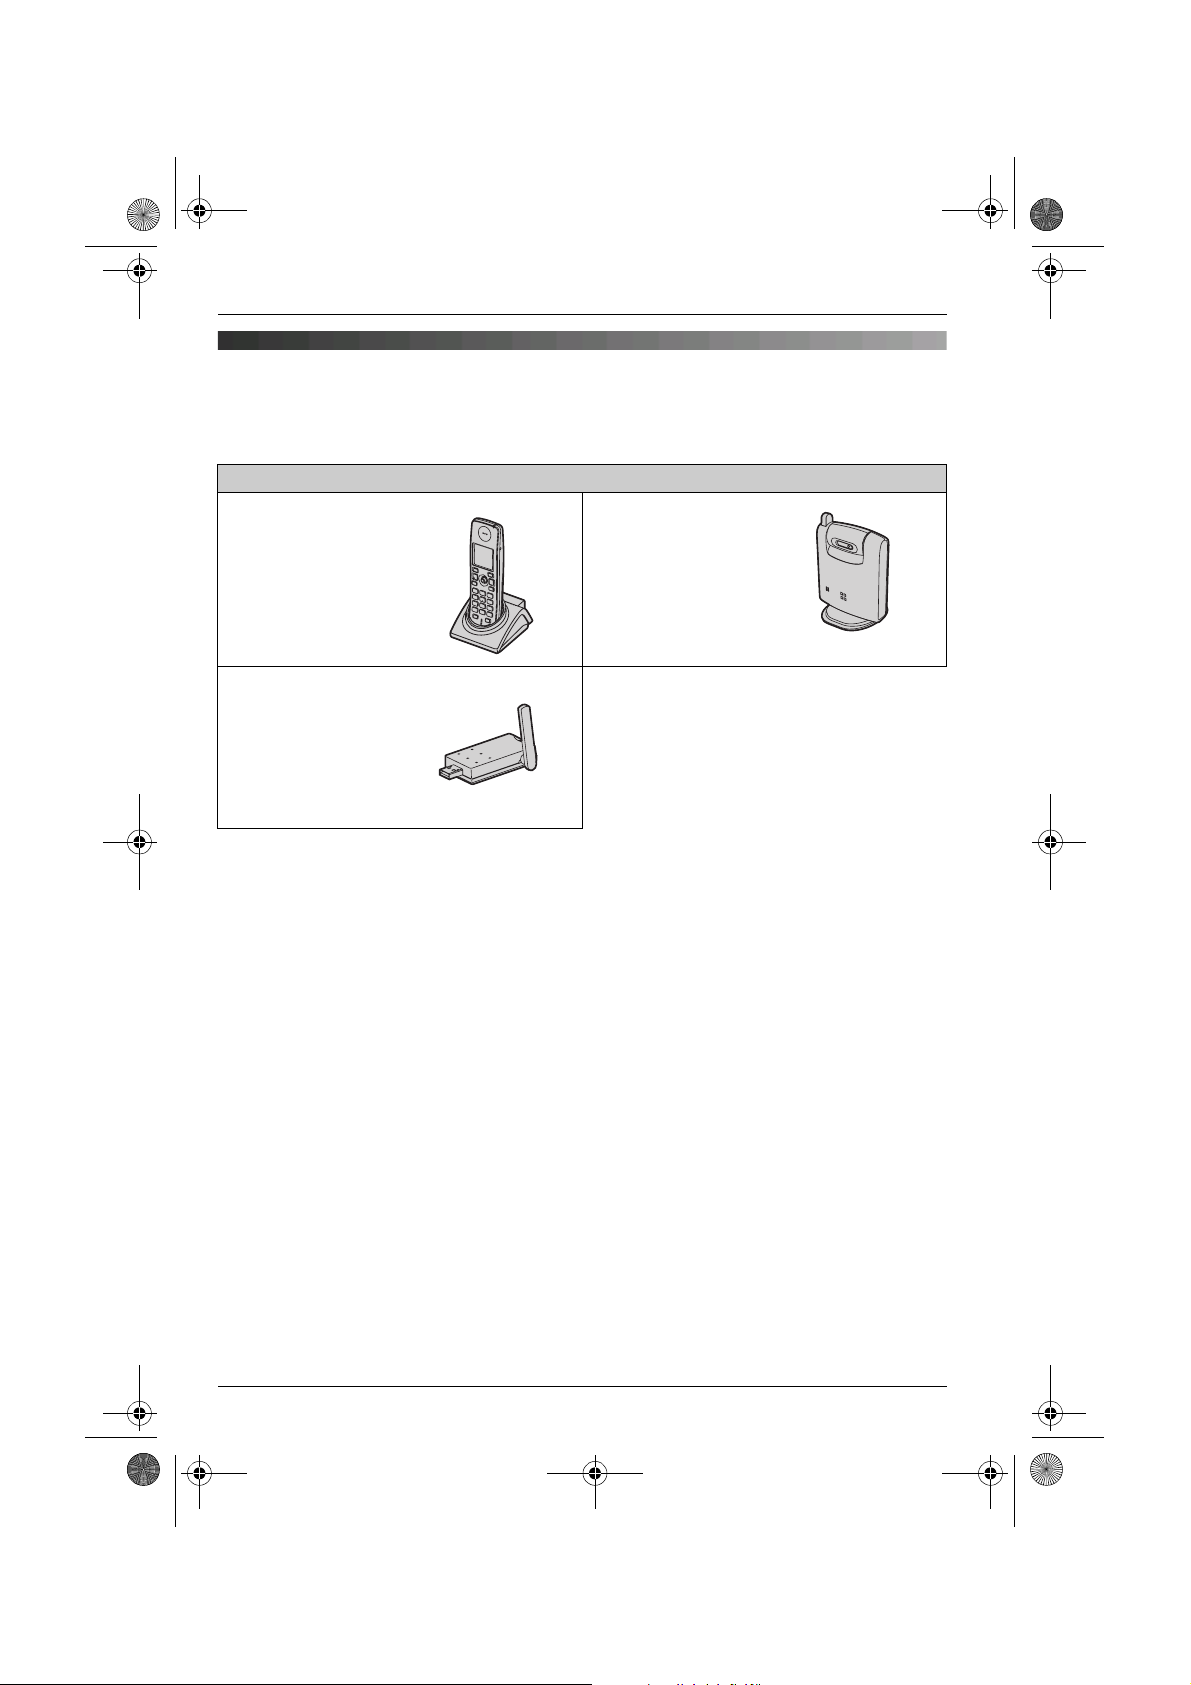
Expanding your phone system
You can expand your phone system by registering the optional devices to a single base unit.
L A maximum of 6 total units (optional and included) can be registered to a single base unit.
Optional devices
Additional Digital
Cordless Handset
KX-TGA910FX
max. 5
USB Adaptor
KX-TGA915EX
(For calls over the
Internet)
max. 1
*1
Cordless Camera
KX-TGA914FX
(For camera
monitoring)
max. 5
*1 By registering the USB adaptor KX-TGA915EX to your base unit and installing Skype
software to your computer, you can make calls with your handset over the Internet via the
computer.
4
Page 5
TG9120FX(e).book Page 5 Tuesday, August 29, 2006 9:44 AM
Table of Contents
Preparation
Accessory information . . . . . . . . . . . . . . . 6
Important information . . . . . . . . . . . . . . . . 7
Controls . . . . . . . . . . . . . . . . . . . . . . . . . . 8
Displays . . . . . . . . . . . . . . . . . . . . . . . . . . 9
Connections. . . . . . . . . . . . . . . . . . . . . . 12
Battery installation/replacement. . . . . . . 12
Battery charge . . . . . . . . . . . . . . . . . . . . 13
Screen saver mode . . . . . . . . . . . . . . . . 13
Turning the power on/off . . . . . . . . . . . . 14
Symbols used in these operating
instructions. . . . . . . . . . . . . . . . . . . . . . . 14
Region settings . . . . . . . . . . . . . . . . . . . 14
Display language . . . . . . . . . . . . . . . . . . 14
Dialling mode (tone/pulse) . . . . . . . . . . . 14
Date and time . . . . . . . . . . . . . . . . . . . . 15
C Making/Answering Calls
Making calls. . . . . . . . . . . . . . . . . . . . . .16
Answering calls . . . . . . . . . . . . . . . . . . . 18
k Phonebooks
Handset phonebook. . . . . . . . . . . . . . . . 19
Shared phonebook . . . . . . . . . . . . . . . . 23
m Handset Settings
Handset settings . . . . . . . . . . . . . . . . . . 25
Time settings . . . . . . . . . . . . . . . . . . . . . 27
Ringer setup . . . . . . . . . . . . . . . . . . . . . 27
Display setup . . . . . . . . . . . . . . . . . . . . . 30
Baby monitor (additional handset
required) . . . . . . . . . . . . . . . . . . . . . . . . 30
Other options . . . . . . . . . . . . . . . . . . . . . 31
L Base Unit Settings
Base unit settings . . . . . . . . . . . . . . . . . 33
Ringer setup . . . . . . . . . . . . . . . . . . . . . 34
Call options . . . . . . . . . . . . . . . . . . . . . . 34
Other options . . . . . . . . . . . . . . . . . . . . . 35
X SMS (Short Message
Service)
Using SMS (Short Message Service) . . 39
Turning SMS on/off . . . . . . . . . . . . . . . . 39
Storing SMS message centre
numbers. . . . . . . . . . . . . . . . . . . . . . . . . 39
Sending a message. . . . . . . . . . . . . . . . 39
Receiving a message . . . . . . . . . . . . . . 40
SMS settings . . . . . . . . . . . . . . . . . . . . . 41
I Answering System
Features
Answering system . . . . . . . . . . . . . . . . . 43
Turning the answering system on/off. . . 43
Greeting message . . . . . . . . . . . . . . . . . 43
Listening to messages. . . . . . . . . . . . . . 44
Direct command operation using the
handset . . . . . . . . . . . . . . . . . . . . . . . . . 45
Remote operation . . . . . . . . . . . . . . . . . 45
Answering system settings . . . . . . . . . . 47
Multi-unit Operation
Operating additional units . . . . . . . . . . . 48
Registering a handset to a base unit. . . 48
Intercom between handsets . . . . . . . . . 50
Transferring calls between handsets,
conference calls. . . . . . . . . . . . . . . . . . . 50
Copying phonebook entries. . . . . . . . . . 51
Useful Information
Using the belt clip . . . . . . . . . . . . . . . . . 52
Character entry . . . . . . . . . . . . . . . . . . . 53
Error messages . . . . . . . . . . . . . . . . . . . 56
Troubleshooting. . . . . . . . . . . . . . . . . . . 57
Specifications. . . . . . . . . . . . . . . . . . . . . 62
Index
Index . . . . . . . . . . . . . . . . . . . . . . . . . . 63
j Caller ID Service
Using Caller ID service . . . . . . . . . . . . . 36
Caller list . . . . . . . . . . . . . . . . . . . . . . . . 37
Voice mail service . . . . . . . . . . . . . . . . . 38
5
Page 6
TG9120FX(e).book Page 6 Tuesday, August 29, 2006 9:44 AM
Preparation
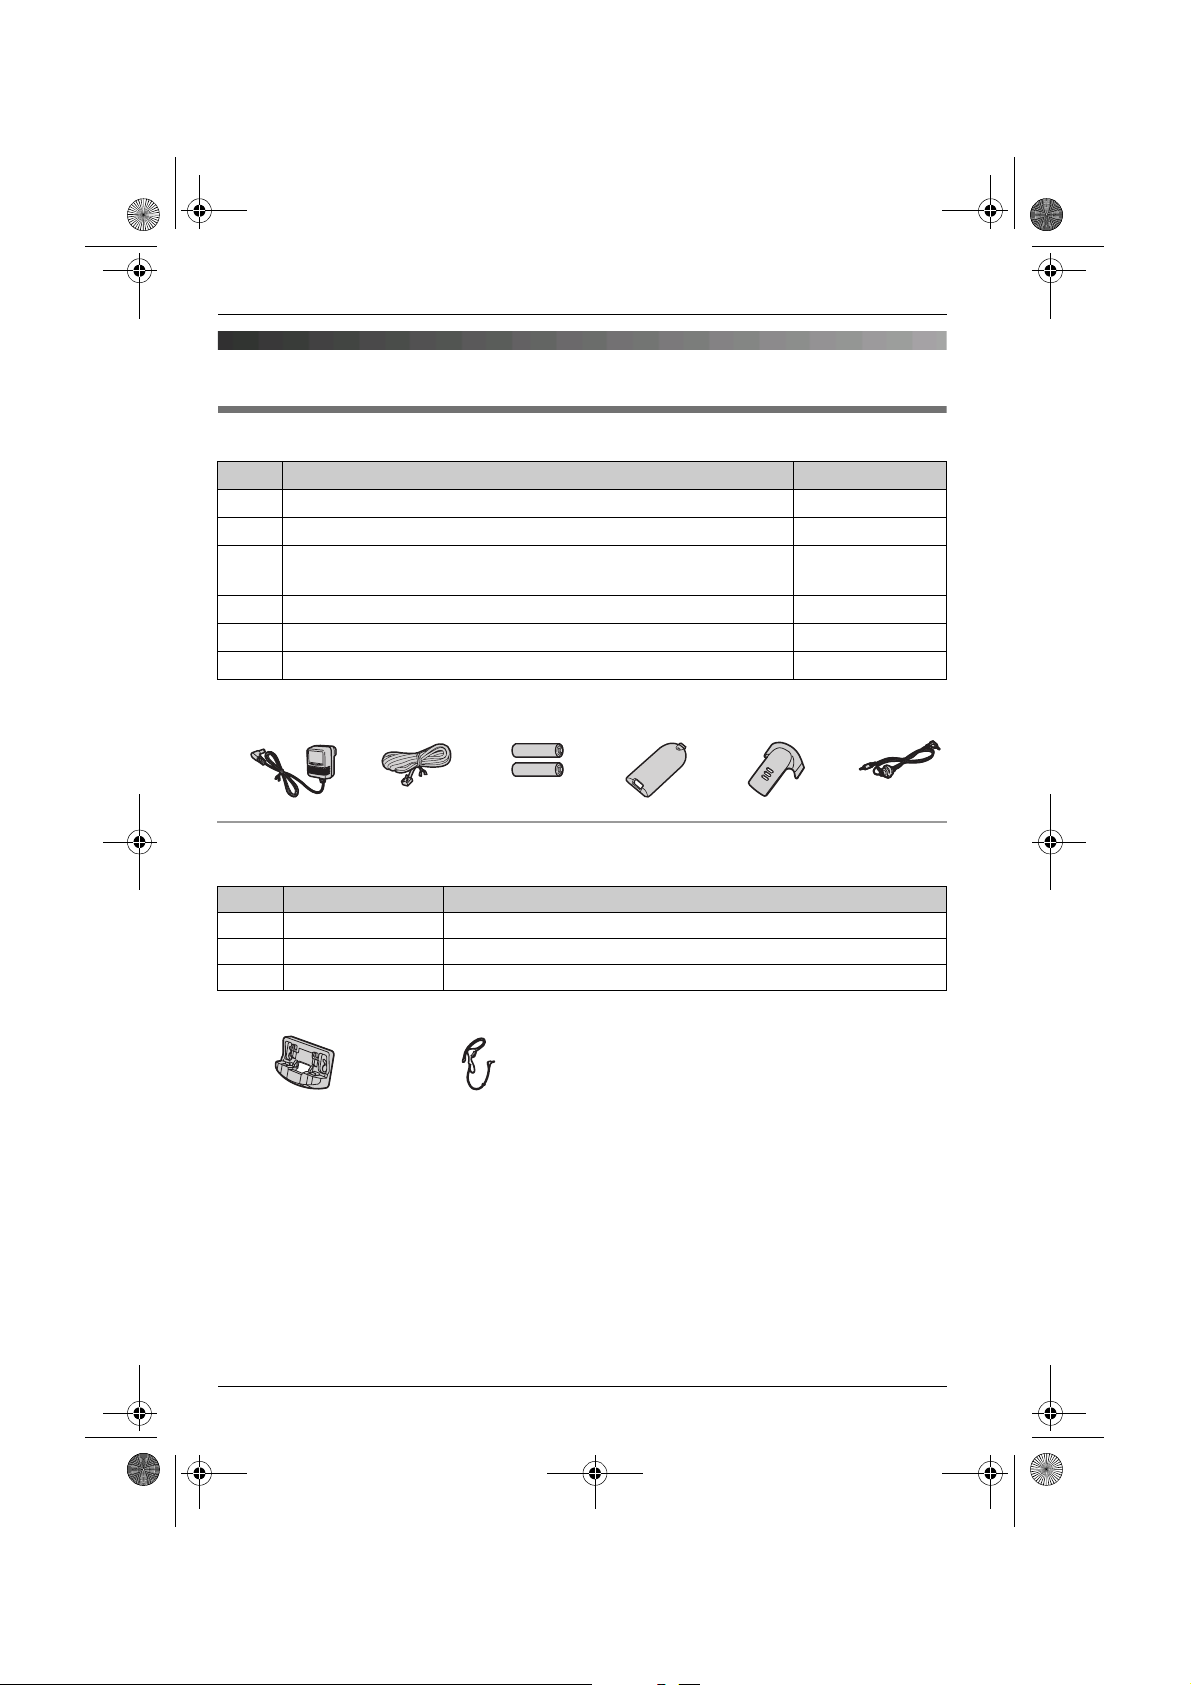
Accessory information
Included accessories
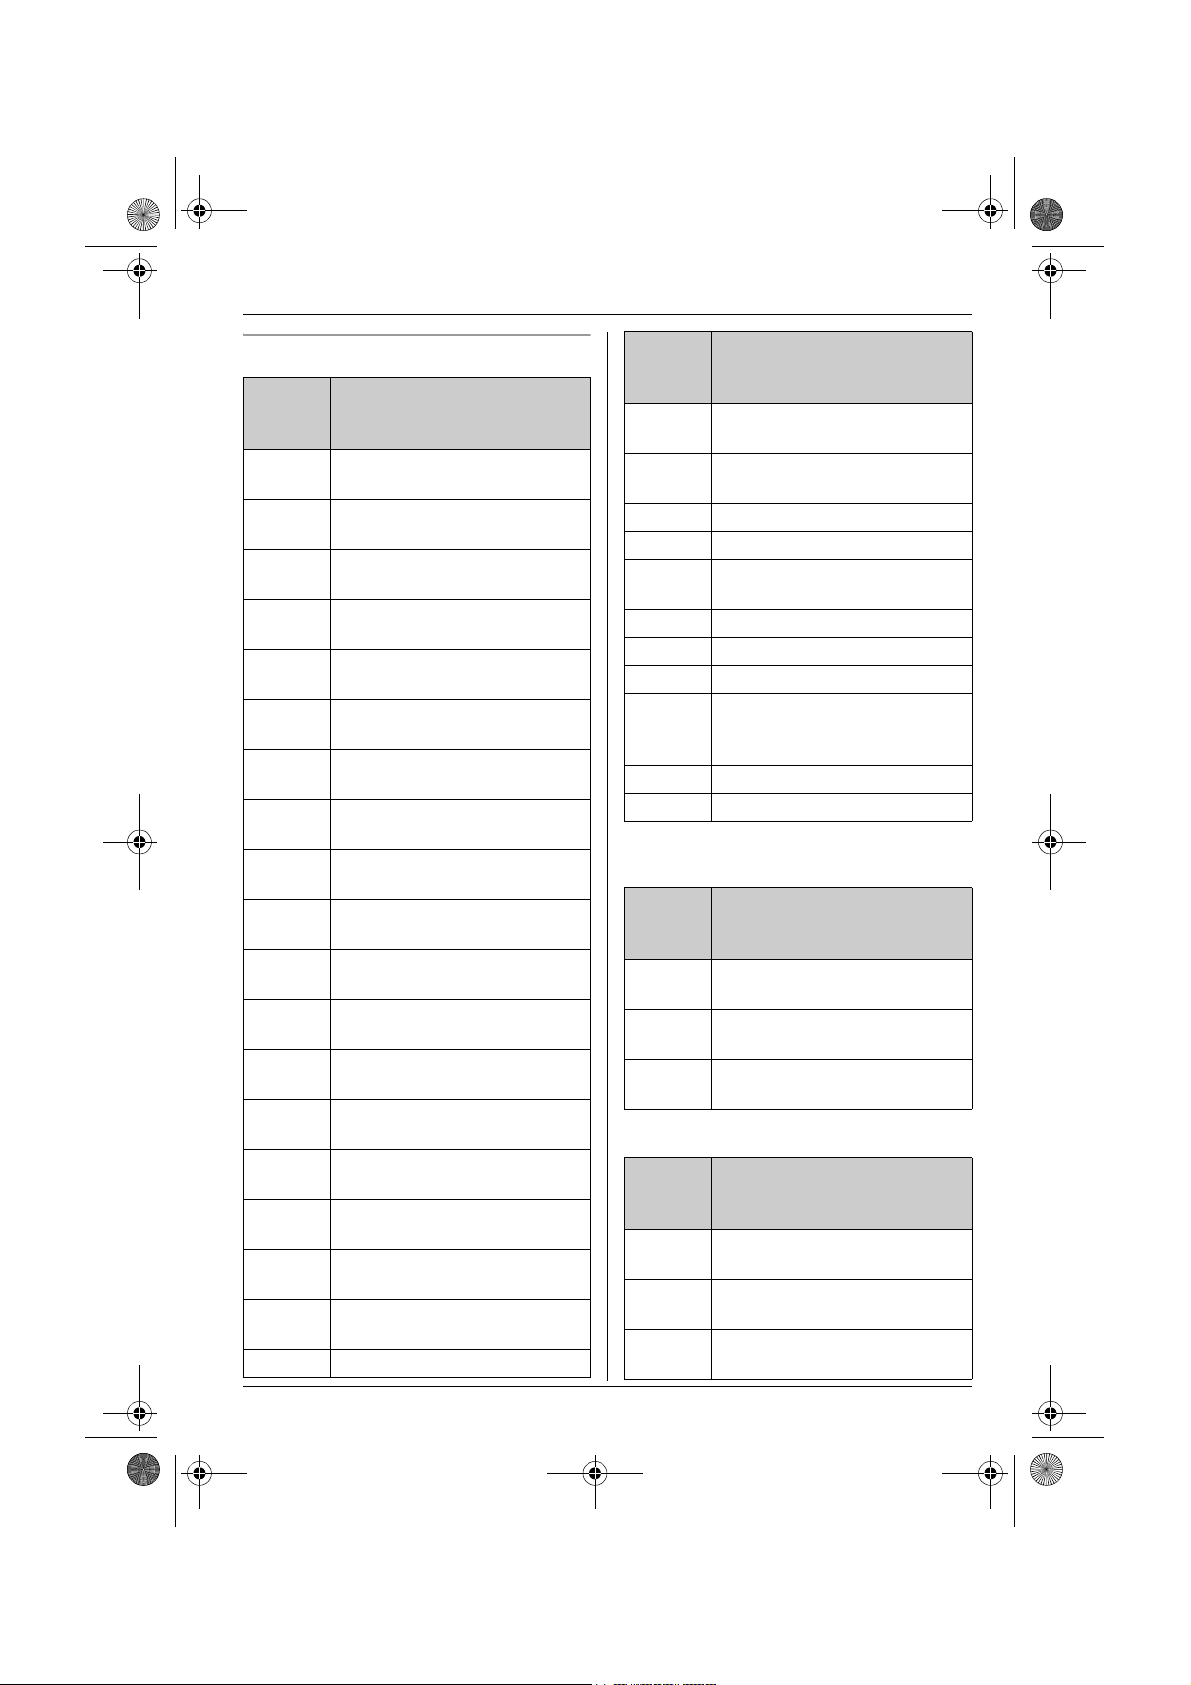
No. Accessory items Quantity
1 AC adaptor for base unit (Part No. PQLV207CE) 1
2 Telephone line cord 1
3 Rechargeable batteries AAA (R03) size
(Part No. HHR-4EPT)
4 Handset cover
5 Belt clip 1
6 Audio cable 1
*1 The handset cover comes attached to the handset.
123456
*1
2
1
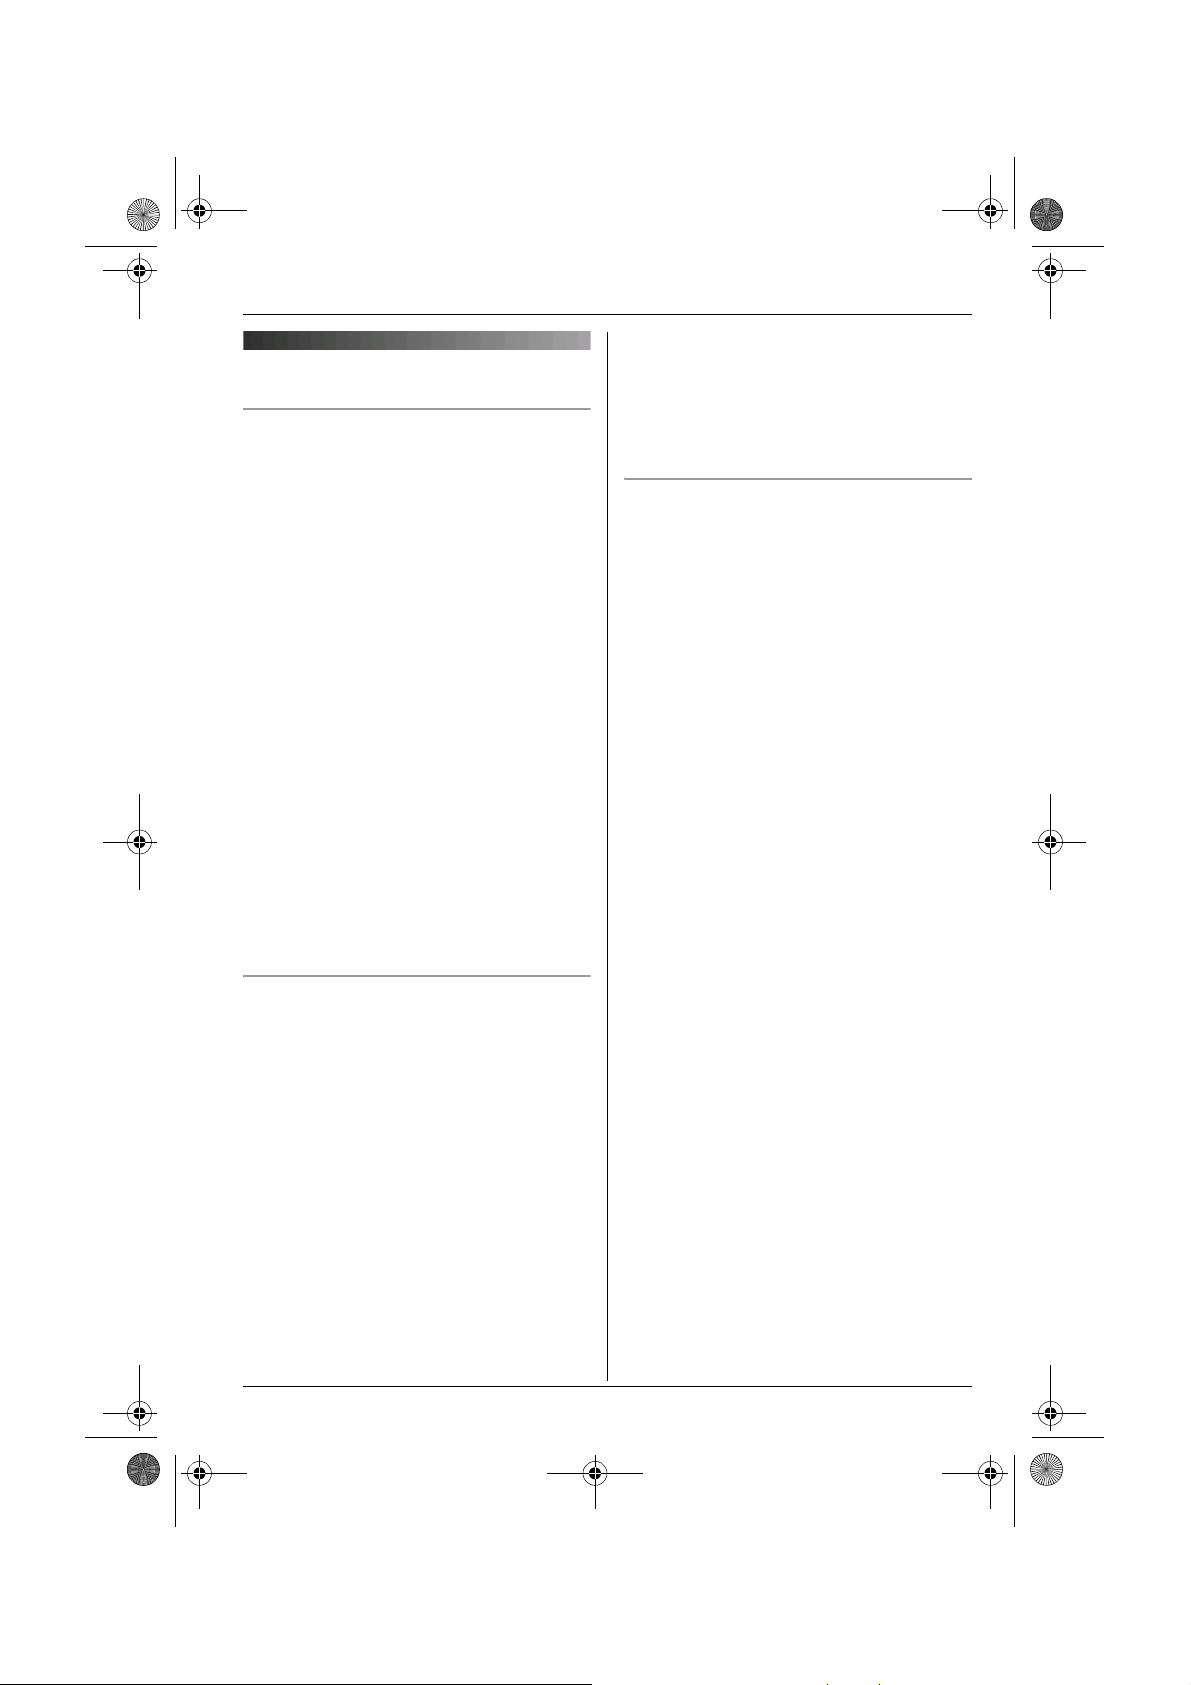
Additional/replacement accessories
Please contact your nearest Panasonic dealer for sales information.
No. Model No. Description
1 KX-TCA717EX Wall-Mounting Adaptor
2 KX-TCA94EX Headset
3 KX-A272 DECT repeater
12
Note:
L You can expand your phone system by registering optional Panasonic devices (page 4).
L When replacing the batteries, use only 2 rechargeable AAA (R03) size nickel metal hydride
(Ni-MH) batteries. We recommend using Panasonic rechargeable batteries (Model No.
P03P).
L We cannot be responsible for any damage to the unit or degradation of performance which
may occur from using non-Panasonic rechargeable batteries.
6
Page 7
TG9120FX(e).book Page 7 Tuesday, August 29, 2006 9:44 AM
Important information
General
L Use only the AC adaptor included with this
product, noted on page 6.
L Do not connect the AC adaptor to any AC
outlet other than a standard 220–240 V
AC outlet.
L This product is unable to make calls when:
– the portable handset battery(ies) need
recharging or have failed.
– there is a power failure.
– the key lock feature is turned on.
L Do not open the base unit, charger, or
handset other than to replace the
battery(ies).
L This product should not be used near
emergency/intensive care medical
equipment and should not be used by
people with pacemakers.
L Care should be taken that objects do not
fall onto, and liquids are not spilled into,
the unit. Do not subject this product to
excessive smoke, dust, mechanical
vibration or shock.
Environment
L Do not use this product near water.
L This product should be kept away from
heat sources such as radiators, cookers,
etc. It should also not be placed in rooms
where the temperature is less than 5 °C or
greater than 40 °C.
L The AC adaptor is used as the main
disconnect device. Ensure that the AC
outlet is installed near the product and is
easily accessible.
Warning:
L To prevent the risk of electrical shock, do
not expose this product to rain or any
other type of moisture.
Preparation
L Unplug this product from power outlets if it
emits smoke, an abnormal smell, or
makes unusual noise. These conditions
can cause fire or electric shock. Confirm
that smoke has stopped emitting and
contact an authorised service centre.
Battery caution
L We recommend using the battery(ies)
noted on page 6. Use only rechargeable
battery(ies).
L Do not mix old and new batteries.
L Do not dispose of the battery(ies) in a fire,
as they may explode. Check with local
waste management codes for special
disposal instructions.
L Do not open or mutilate the battery(ies).
Released electrolyte from the battery(ies)
is corrosive and may cause burns or injury
to the eyes or skin. The electrolyte may be
toxic if swallowed.
L Exercise care when handling the
battery(ies). Do not allow conductive
materials such as rings, bracelets or keys
to touch the battery(ies), otherwise a short
circuit may cause the battery(ies) and/or
the conductive material to overheat and
cause burns.
L Charge the battery(ies) in accordance
with the information provided in these
operating instructions.
L Only use the included base unit (or
charger) to charge the battery(ies). Do not
tamper with the base unit (or charger).
Failure to follow these instructions may
cause the battery(ies) to swell or explode.
7
Page 8
TG9120FX(e).book Page 8 Tuesday, August 29, 2006 9:44 AM
Preparation
Information on Disposal for
Users of Waste Electrical &
Electronic Equipment (private
households)
This symbol on the products and/or
accompanying documents means that used
electrical and electronic products should not
be mixed with general household waste. For
proper treatment, recovery and recycling,
please take these products to designated
collection points, where they will be
accepted on a free of charge basis.
Alternatively, in some countries you may be
able to return your products to your local
retailer upon the purchase of an equivalent
new product.
Disposing of this product correctly will help
to save valuable resources and prevent any
potential negative effects on human health
and the environment which could otherwise
arise from inappropriate waste handling.
Please contact your local authority for
further details of your nearest designated
collection point.
Penalties may be applicable for incorrect
disposal of this waste, in accordance with
national legislation.
For business users in the European
Union
If you wish to discard electrical and
electronic equipment, please contact your
dealer or supplier for further information.
Information on Disposal in other
Countries outside the European Union
This symbol is only valid in the European
Union.
8
If you wish to discard this product, please
contact your local authorities or dealer and
ask for the correct method of disposal.
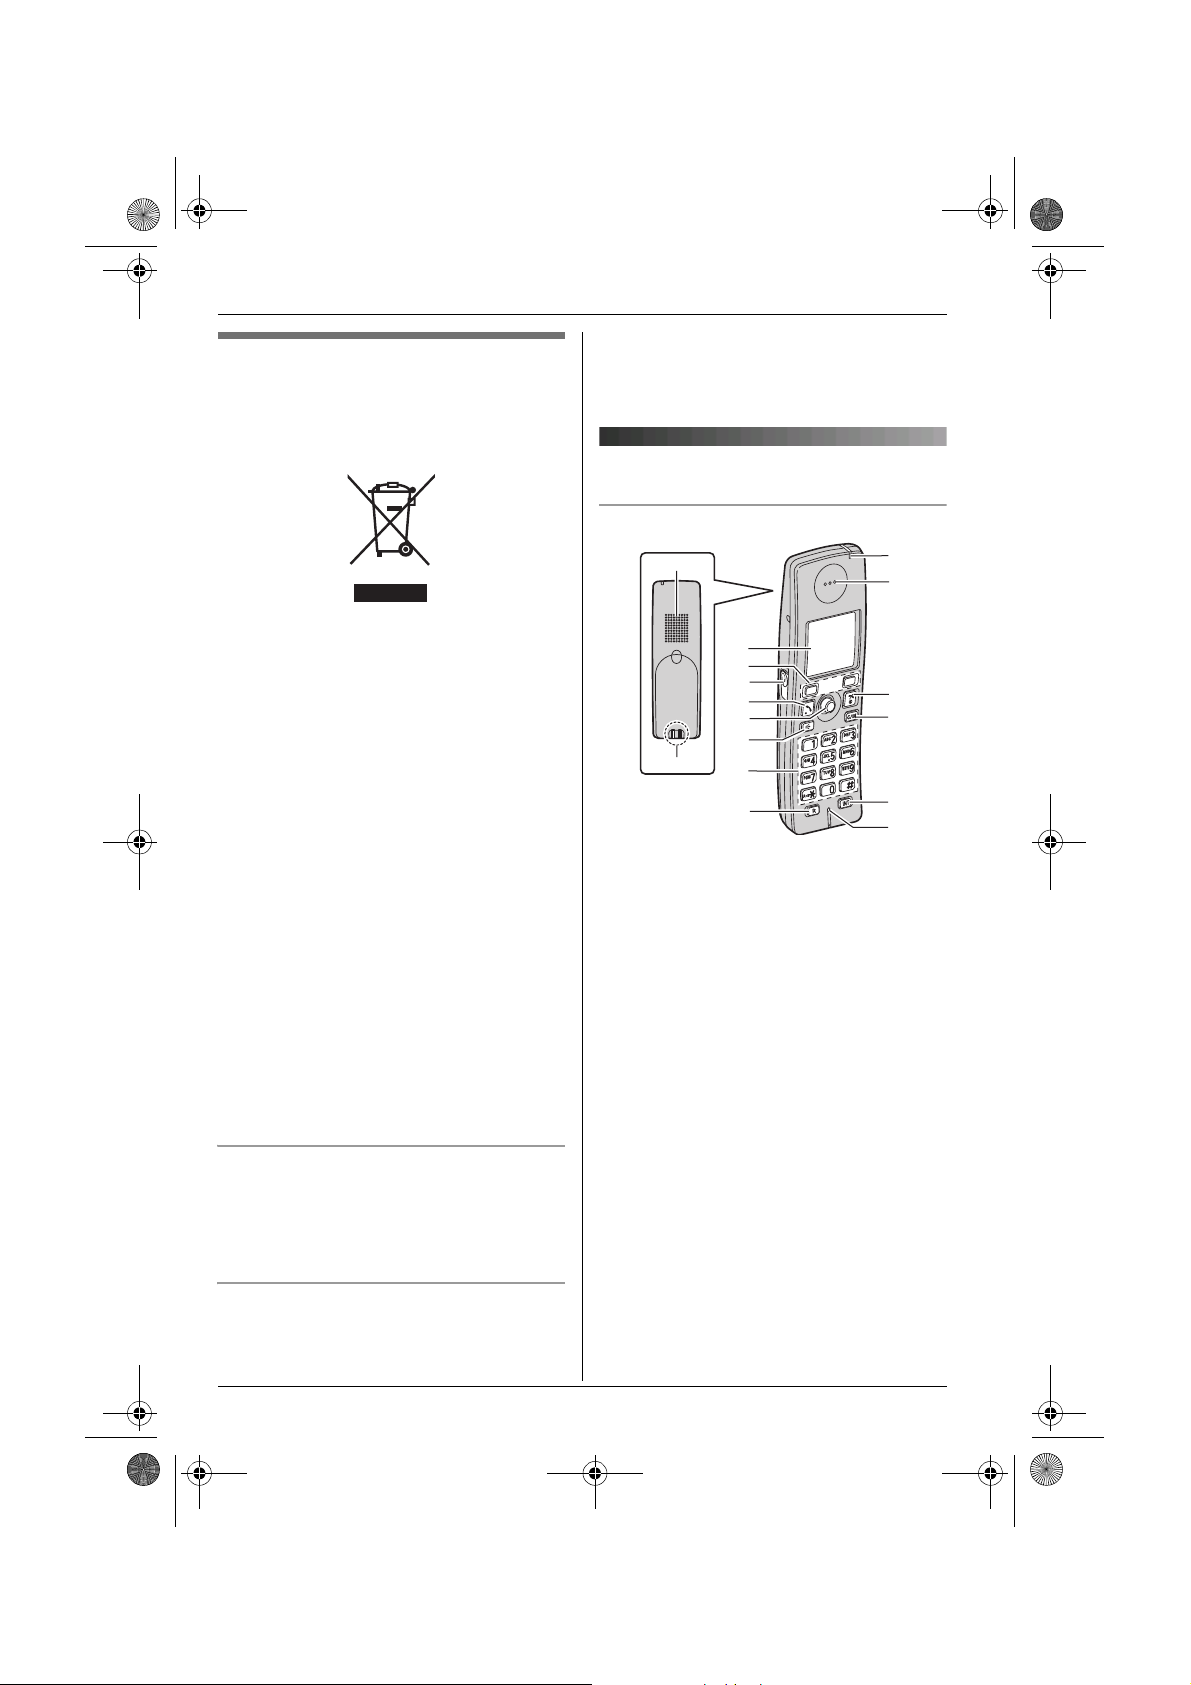
Controls
Handset
A
C
D
E
F
G
H
B
A Speaker
B Charge contact
C Display
D Soft keys
E Headset jack/Audio jack
F {C} (Talk)
G Joystick
H {s} (Speakerphone)
I Dial keypad
J {R} (Recall)
K Charge indicator/Ringer indicator/
Message indicator
L Receiver
M {ih} (Off/Power)
N {C/T} (Clear/Mute)
O {INT} (Intercom)
P Microphone
I
J
K
L
M
N
O
P
Page 9
TG9120FX(e).book Page 9 Tuesday, August 29, 2006 9:44 AM
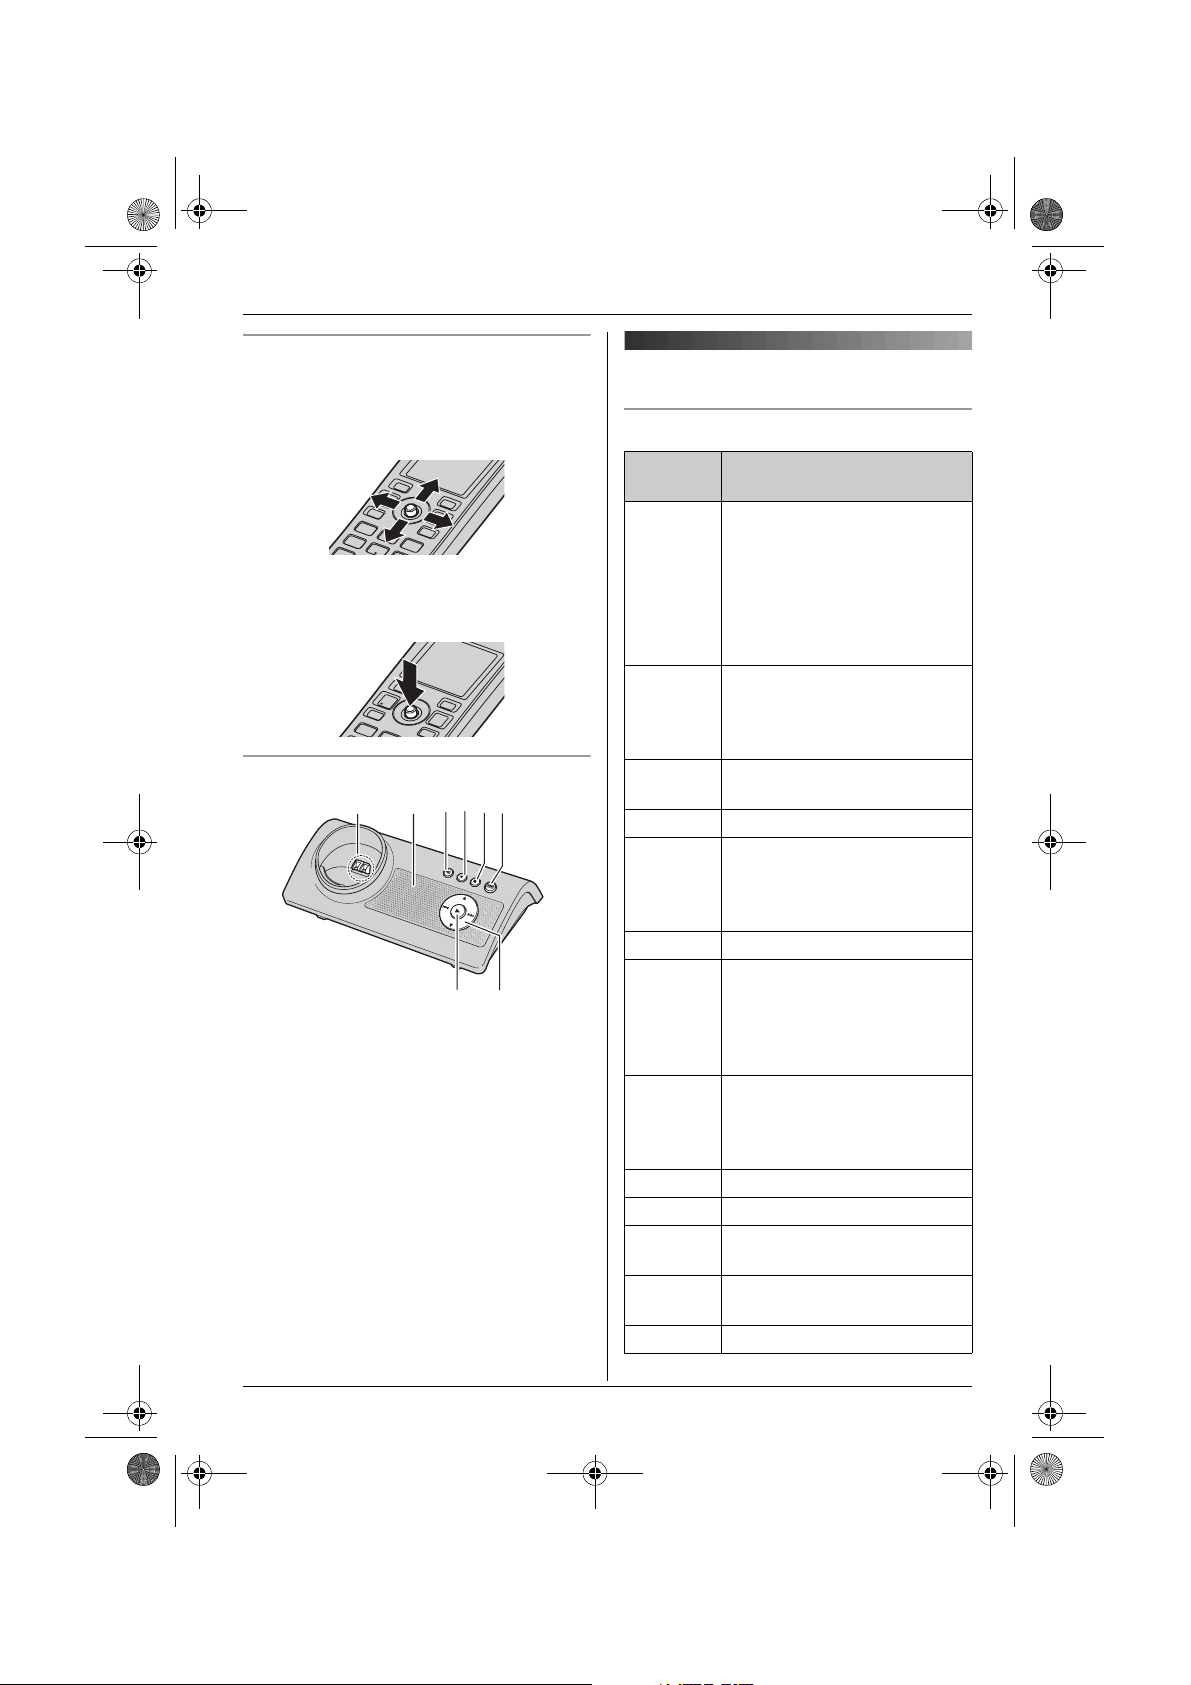
Using the joystick
The handset joystick can be used to
navigate through menus and to select items
shown on the display, by pushing it up,
down, left, or right.
It can also be used to select the centre soft
key icon, by pressing down on the centre of
the joystick.
Base unit
DE
B
A
A Charge contact
B Speaker
C {x} (Page)
D {4} (Erase)
E {■} (Stop)
F {s} (Answer on)/Answer on indicator
G {6} (Play)/Message indicator
H Navigator key ({^}/{V}/{8}/{7})
C
G
F
H
Preparation
Displays
Display icons
Display
icon
w Within range of a base unit
x Handset is accessing base
k Handset is on an outside
y Missed call
u Answering system is on
n Answering system is full.
d Answering system answers
% An audible call
@ Battery strength
e Alarm is on. (page 27)
d Voice enhancer is set to high
x Call privacy mode is on.
T Mute is on. (page 17)
Meaning
L When flashing: Handset is
searching for base unit.
(out of range of base unit,
handset is not registered
to base unit, no power on
base unit)
unit. (intercom, paging,
changing base unit settings,
etc.)
call.
*1
(page 36)
(page 43) and/or new
messages have been
recorded. (page 43)
calls with a greeting
message and caller
messages are not recorded.
(page 47)
announcement has been
recorded for this entry.
(page 23)
or low tone. (page 17)
(page 17)
9
Page 10

TG9120FX(e).book Page 10 Tuesday, August 29, 2006 9:44 AM
Preparation
Display
Meaning
icon
~ Ringer volume is off.
(page 27)
f Night mode is on. (page 29)
h New SMS message
received
j Displayed when writing an
SMS message.
m SMS memory is full.
z New voice mail message
received
*2
(page 40)
*3
(page 38)
*2
(page 39)
*2
Line or answering system is
being used by another
handset or the base unit.
*1 Caller ID subscribers only
*2 SMS users only
*3 Voice mail users only
Cordless camera KX-TGA914FX users
only
Display
Meaning
icon
8 Handset is connected to the
cordless camera.
L When flashing: Cordless
camera is paging the
handset because it
detected sound or its call
button was pressed.
USB adaptor KX-TGA915EX users only
Menu icons
When in standby mode, pressing down on
the centre of the joystick reveals the
handset’s main menu. From here you can
access various features and settings.
Menu icon Menu/feature
Caller List
SMS (Short Message
Service)
Answer System
Display Setup
*1
Handset Setup
Base Unit Setup
*1 3 (“Ph.Book Setup”) is displayed
instead of M (“Display Setup”) for
USB adaptor KX-TGA915EX users.
Ph.Book Setup
Soft keys
The handset features two soft keys and a
joystick. By pressing a soft key, or by
pressing the centre of the joystick, you can
select the feature or operation indicated by
the soft key icon shown directly above it.
Display
Meaning
icon
D Handset is in IP phone
mode.
L When flashing: An internet
call is being received.
9 Missed internet call
10
Page 11
TG9120FX(e).book Page 11 Tuesday, August 29, 2006 9:44 AM
Preparation
Soft key icons
Soft
Action
key
icon
U Returns to the previous
screen.
P Allows you to make an
intercom calls.
K
Displays the menu.
J
M
Accepts the current selection.
L
j Displays a previously dialled
phone number.
n Opens the handset
phonebook.
T Opens the shared
phonebook.
k Displays the phonebook
search menu.
I Turns the key lock feature off.
(page 17)
s Switches between AM, PM,
and 24-hour time entry.
X Displayed when LetterWise
character entry is selected.
Y Displayed when alphabet
character entry is selected.
Z Displayed when numeric
character entry is selected.
o Displayed when Greek
character entry is selected.
q Displayed when extended 1
character entry is selected.
r Displayed when extended 2
character entry is selected.
p Displayed when Cyrillic
character entry is selected.
e Turns the answering system
on/off.
Q Starts recording. (page 28)
Soft
Action
key
icon
O
Stops recording or playback.
N
l Inserts a dialling pause.
(page 17)
W Erases the selected item.
b Displays the picture list.
V Displays the selected
phonebook entry.
c Displays the picture.
d Goes to the next screen.
w Establishes a conference call.
g
f
Saves the handset
phonebook entry or the
recorded melody data.
t Selects the highlighted item.
a Inserts a character.
Cordless camera KX-TGA914FX users
only
Soft
Action
key
®
icon
B Adjusts the display
brightness.
A Switches between Zoom In
and Normal mode.
v Selects the audio detection
sensitivity.
USB adaptor KX-TGA915EX users only
Soft
Action
key
icon
D Allows you to make an
internet call.
G Switches to Outgoing call
history for internet calls.
F Switches to Incoming call
history for internet calls.
11
Page 12
TG9120FX(e).book Page 12 Tuesday, August 29, 2006 9:44 AM
Preparation
Soft
key
icon
u Switches to Voicemail history
E Rejects the 2nd call.
H Places the internet call on
Action
for internet calls.
hold.
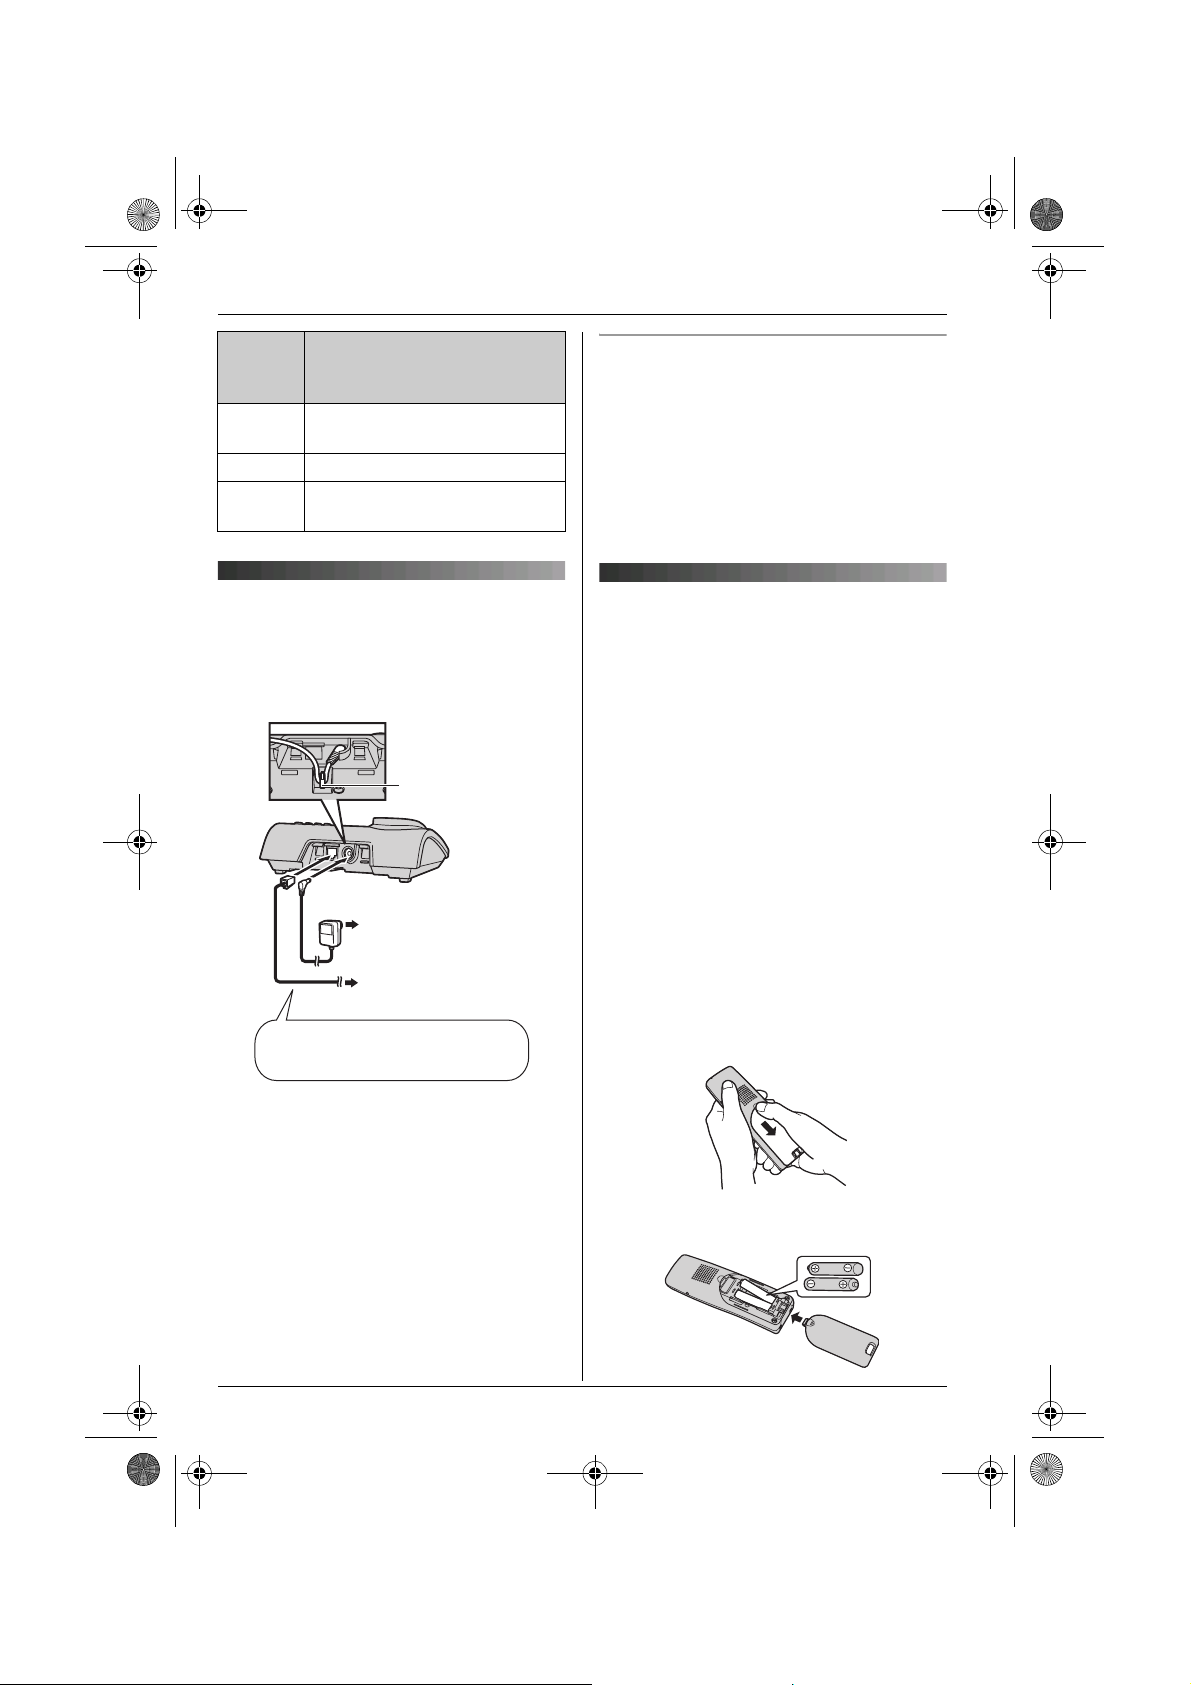
Connections
When connecting the AC adaptor to the
base unit, a short beep will be heard. If it is
not heard, check the connections.
Hook
(220–240 V, 50 Hz)
To telephone network
Use only the included AC adaptor
and telephone line cord.
Location
L For maximum distance and noise-free
operation, place your base unit:
– away from electrical appliances such as
TVs, radios, personal computers or
other phones.
– in a convenient, high and central
location.
Battery
installation/replacement
Important:
L Use only the included rechargeable
batteries noted on page 6, 7.
L When replacing batteries, we recommend
using the Panasonic rechargeable
batteries noted on page 6, 7.
L Wipe the battery ends (S, T) with a dry
cloth.
L When installing the batteries, avoid
touching the battery ends (S, T) or the
unit contacts.
1 Press the notch on the handset cover
firmly and slide it in the direction of the
arrow.
L When replacing batteries, remove the
old batteries positive (S) end first.
Note:
L Never install telephone wiring during a
lightning storm.
L The AC adaptor must remain connected
at all times. (It is normal for the adaptor to
feel warm during use.)
L The AC adaptor should be connected to a
vertically oriented or floor-mounted AC
outlet. Do not connect the AC adaptor to a
ceiling-mounted AC outlet, as the weight
of the adaptor may cause it to become
disconnected.
12
2 Insert the batteries negative (T) end
first. Close the handset cover.
Page 13
TG9120FX(e).book Page 13 Tuesday, August 29, 2006 9:44 AM
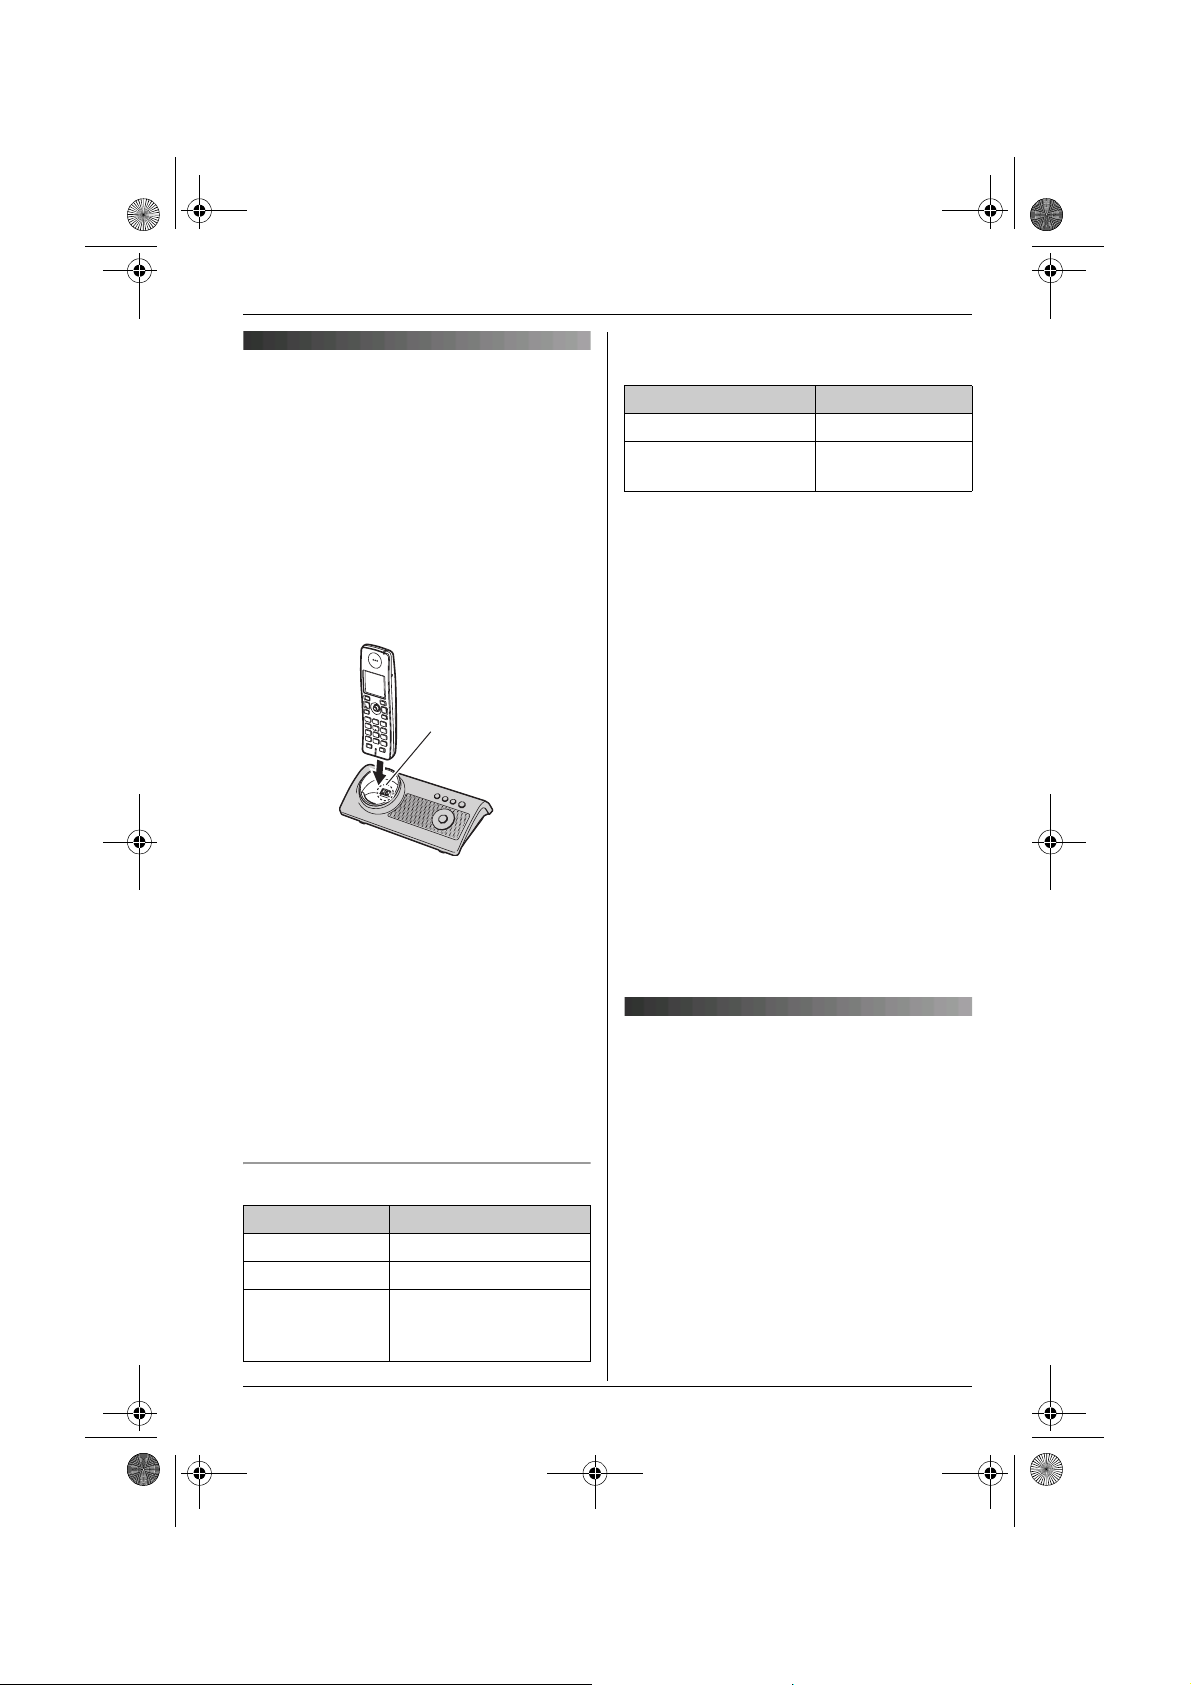
Battery charge
Place the handset on the base unit for
about 7 hours before initial use.
When charging, “Charging” will be
displayed.
When the batteries are fully charged,
“Charge Completed” will be displayed.
L While charging, the charge indicator on
the handset lights in amber. When the
batteries are fully charged, the charge
indicator lights in green.
Charge
contact
Note:
L It is normal for the handset to feel warm
during charging.
L If you want to use the unit immediately,
charge the batteries for at least 15
minutes.
L Clean the charge contacts of the handset
and base unit with a soft, dry cloth once a
month, otherwise the batteries may not
charge properly. Clean more often if the
unit is exposed to grease, dust, or high
humidity.
Battery strength
Battery icon Battery strength
@ High
? Medium
/ Low
When flashing: Needs
to be charged.
Preparation
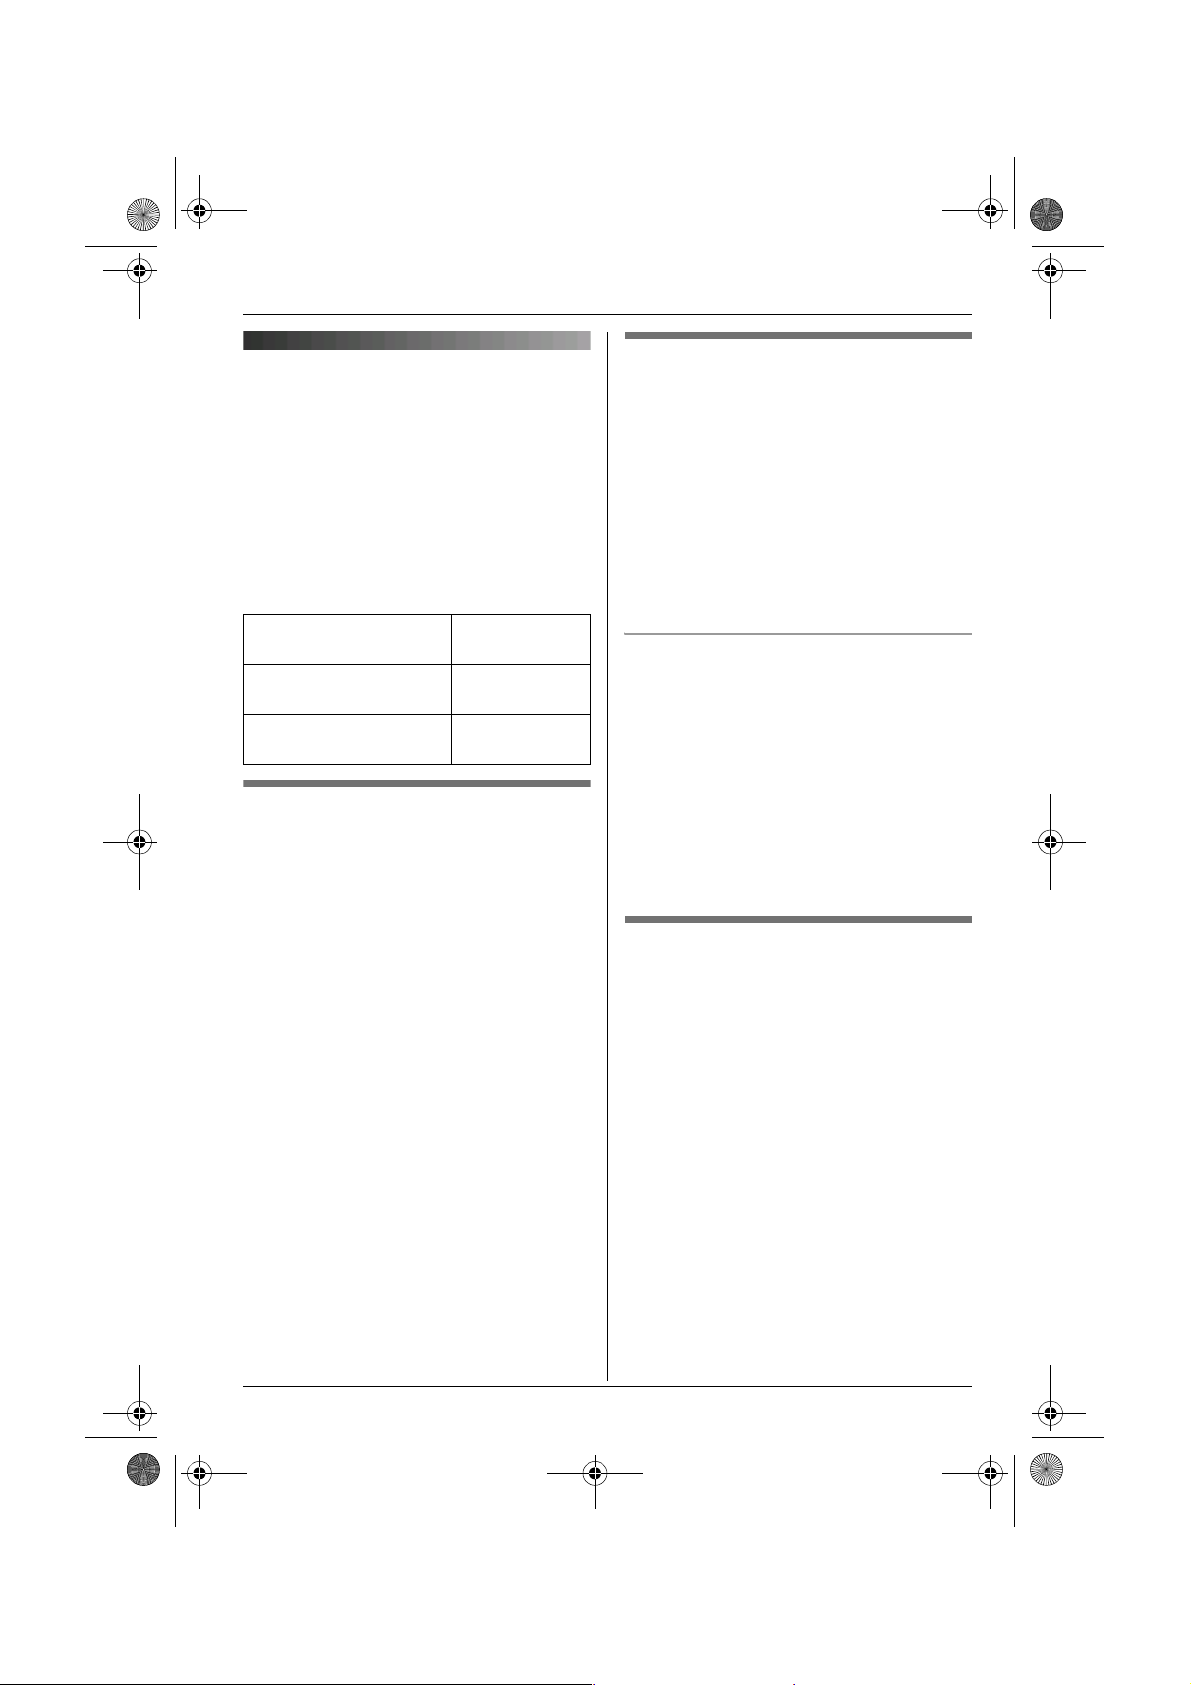
Panasonic Ni-MH battery performance
(included batteries)
Operation Operating time
In continuous use 15 hours max.
In continuous
standby mode
Note:
L It is normal for batteries not to reach full
capacity at the initial charge. Maximum
battery performance is reached after a few
complete cycles of charge/discharge
(use).
L Actual battery performance depends on a
combination of how often the handset is in
use and how often it is not in use
(standby).
L Battery operating time may be shortened
over time depending on usage conditions
and ambient temperature.
L Even after the handset is fully charged,
the handset can be left on the base unit
without any ill effect on the batteries.
L The battery strength may not be displayed
correctly after you replace the batteries. In
this case, place the handset on the base
unit and charge for at least 7 hours.
240 hours max.
Screen saver mode
The backlight will turn off completely
after 1 minute of inactivity if the handset is
not on the base unit.
To use the handset when it is in screen
saver mode, first press {ih} to turn the
display on again.
13
Page 14
You can select
Deutsch
English
,
Magyar
Polski
slovensky
tina
Hrvatski
,
Slovenscina
Eesti
LIETUVI
KAI
Latvie
,
Rom
БЪЛГАРСКИ
Srpski
МАКЕДОНСКИ
, or
Shqiptar
TG9120FX(e).book Page 14 Tuesday, August 29, 2006 9:44 AM
Preparation
Turning the power on/off
Power on
Press {ih} until a short beep sounds.
Power off
Press {ih} for about 2 seconds.
Symbols used in these
operating instructions
You must change the display language for
all other handsets separately.
Display language
17 display languages are available.
You can select
“Türkrkçe”, , “Magyar
“slovensky
“Slovenscina
“LIETUVI
“Rom
ânã”, , “БЪЛГАРСКИ
“МАКЕДОНСКИ
“Deutsch
”, “ČeŠtina
”, , “Eesti
ŠKAI
”, , “Latvie
”, or
”, , “English
”, , “Polski
”, , “Hrvatski
”,
Šu”,
”, , “Srpski
“Shqiptar
”,
”,
”.
”,
”,
Symbol Meaning
J Press J (centre of joystick).
i Proceed to the next operation.
L Press L (centre of joystick).
j
X
I
M
3
m
L
“ ” Select the words in quotations
Select the mentioned handset
menu icon (page 10).
Example: m (handset setup
menu icon)
Select m by pushing the
joystick in any direction.
shown on the display (e.g.,
“Time Settings”) by
pushing the joystick up or
down.
Region settings
You can set the unit to use settings that
match your country (page 35). The display
language and other settings will change
accordingly.
Note:
L The display language only changes (to the
selected country’s default setting) for the
handset used to select the region setting.
1 {ih} i J (centre of joystick)
2 Select m by pushing the joystick in any
direction. i L (centre of joystick)
3 Push the joystick up or down to select
“Display Setup”. i L
4 Push the joystick up or down to select
“Select Language”. i L
5 Push the joystick up or down to select
the desired language. i L i
{ih}
Note:
L If you select a language you cannot read,
press {ih}, press J, select m, press
L, push the joystick down 2 times,
press L, push the joystick down 2
times, press L, select the desired
language, then press L. Press {ih}.
14
Page 15
TG9120FX(e).book Page 15 Tuesday, August 29, 2006 9:44 AM
Dialling mode (tone/pulse)
Change the dialling mode depending on
your telephone line service.
“Tone”: Select when you have a touch tone
service.
“Pulse”: Select when you have rotary or
pulse service.
1 J (centre of joystick)
2 Select L by pushing the joystick in any
direction. i L (centre of joystick)
3 Push the joystick up or down to select
“Call Options”. i L
4 Push the joystick up or down to select
“Dial Mode”. i L
5 Push the joystick up or down to select
the desired setting. i L i {ih}
Date and time
1 J (centre of joystick)
2 Select m by pushing the joystick in any
direction. i L (centre of joystick)
3 Push the joystick up or down to select
“Time Settings”. i L
4 Push the joystick up or down to select
“Set Date & Time”. i L
5 Enter the current day, month, and year.
Example: 17 May, 2006
{1}{7} {0}{5} {0}{6}
6 Enter the current hour and minute.
Example: 3:30 PM
{0}{3} {3}{0} i Press s until
“03:30 PM” is displayed.
7 L i {ih}
Note:
L To correct a digit, use the joystick to move
the cursor to the digit, then make the
correction.
Preparation
L The date and time may be incorrect after a
power failure. In this case, set the date
and time again.
Time adjustment (Caller ID
subscribers only)
This feature allows the unit to automatically
adjust the date and time each time caller
information is received. To use this feature,
your caller ID service must provide caller
information, including date and time, in FSK
protocol. Consult your service provider/
telephone company for details.
To turn this feature on, select “Caller
ID[Auto]”. To turn this feature off, select
“Manual”.
1 J (centre of joystick) i m i L
2 “Time Settings” i L
3 “Time Adjustment” i L
4 “Caller ID[Auto]” or “Manual” i
L i {ih}
Important:
L To use this feature, set the date and time
first (page 15).
15
Page 16
TG9120FX(e).book Page 16 Tuesday, August 29, 2006 9:44 AM
C
Making/Answering Calls
Making calls
1 Lift the handset and dial the phone
number.
L To correct a digit, press {C/T}, then
enter the correct number.
2 {C}
3 When finished talking, press {ih} or
place the handset on the base unit.
Speakerphone
1 During a conversation, press {s} to turn
on the speakerphone.
L Speak alternately with the caller.
2 When finished talking, press {ih}.
Note:
L For best performance, use the
speakerphone in a quiet environment.
L To switch back to the receiver, press
{C}.
To adjust the receiver or speaker volume
Push the joystick up or down while on a call.
Redial feature
Previously dialled phone numbers (each 48
digits max.) can be redialled.
To make a call using the redial list
The last 10 phone numbers dialled are
stored in the redial list.
1 j (right soft key)
2 Push the joystick up or down to select
the desired number.
3 {C} / {s}
L If {s} is pressed and the other party’s
line is engaged, the unit will
automatically redial up to 11 more
times. While the handset is waiting to
redial, the ringer indicator will flash. To
cancel, press {ih}.
To edit a number in the redial list before
calling it
1 j (right soft key)
2 Push the joystick up or down to select
the desired number. i J
3 “Edit and Call” i L
4 Use the joystick to move the cursor. i
Edit the number.
L Place the cursor on the number you
wish to erase, then press {C/T}.
L Place the cursor to the right of where
you want to insert a number, then
press the appropriate dial key.
5 {C} / {s} / L
To erase numbers in the redial list
1 j (right soft key)
2 Push the joystick up or down to select
the desired number. i J
3 “Erase” i L
L If you want to erase all numbers in the
list, select “Erase All”, then press
L.
4 “Yes” i L i {ih}
To store a number from the redial list into
the handset phonebook
1 j (right soft key)
2 Push the joystick up or down to select
the desired number. i J
3 “Add Phonebook” i L
4 “Name” i L
5 Enter a name (16 characters max.; page
53). i L
6 “<Save>” i L i {ih}
L You can also press g to save the
entry.
L To assign a category to the entry,
continue from step 7, “Adding entries
to the handset phonebook”, page 19.
16
Page 17
TG9120FX(e).book Page 17 Tuesday, August 29, 2006 9:44 AM
C
Making/Answering Calls
Other features
Voice enhancer
You can change the tone quality of the
receiver while you are on a call.
1 Press J during a call.
2 “Voice Enhancer” i L
3 “High Tone” or “Low Tone” i L
L d is displayed.
Call share
A 2nd handset can join an existing outside
call.
To join the conversation, press {C} / {s}
when the other handset is on an outside call.
Call privacy
Call privacy allows you to prevent other
users from joining your conversations with
outside callers. To allow other users to join
your conversations, leave this feature off.
The default setting is “Off”.
1 Press J during an outside call.
2 “Privacy” i L
3 “On” or “Off” i L
L When this feature is turned on, x is
displayed.
Note:
L This feature will turn off after you hang up
the call.
Mute
While mute is turned on, you will be able to
hear the other party, but the other party will
not be able to hear you.
To mute your voice, press {C/T}.
L T is displayed.
L To return to the conversation, press
{C/T} again.
Key lock
The handset can be locked so that no calls
or settings can be made. Incoming calls can
be answered, but all other functions are
disabled while key lock is on.
To turn key lock on, press J (centre of
joystick) for about 2 seconds.
L I is displayed.
L To turn key lock off, press I (centre of
joystick) for about 2 seconds.
{R} button (to use the recall feature)
{R} is used to access optional telephone
services. Contact your service
provider/telephone company for details.
Note:
L If your unit is connected to a PBX (private
branch exchange), pressing {R} can allow
you to access certain features of your host
PBX such as transferring an extension
call. Consult your PBX dealer for details.
L You can change the recall time (page 34).
Pause button (for PBX/long distance
service users)
A pause is sometimes required when
making calls using a PBX or long distance
service.
Example: If you have to dial {0} before
dialling outside numbers manually, you will
probably need to pause after dialling {0}
until you hear a dial tone.
1 {0} i l
2 Dial the phone number. i {C} / {s}
Note:
L A 3 second pause is inserted each time
l is pressed. Press repeatedly to insert
longer pauses.
Temporary tone dialling (for rotary or
pulse service users)
You can temporarily switch the dialling mode
to tone when you need to access touch tone
services (e.g., telephone banking services).
1 Make a call.
17
Page 18
TG9120FX(e).book Page 18 Tuesday, August 29, 2006 9:44 AM
C
Making/Answering Calls
2 Press {*} when prompted to enter your
code or PIN, then press the appropriate
dial keys.
Note:
L The dialling mode will return to pulse
when you hang up.
Answering calls
When a call is being received, the ringer
indicator on the handset flashes.
1 Lift the handset and press {C} or {s}
when the unit rings.
L You can also answer a call by pressing
any dial key from {0} to {9}, {*}, {#},
or {INT}. (Any key answer feature)
2 When finished talking, press {ih} or
place the handset on the base unit.
Auto talk feature
You can answer calls simply by lifting the
handset off the base unit. You do not need to
press {C}. To turn this feature on, see
page 31.
To adjust the ringer volume when
receiving a call
Push the joystick up or down.
Other features
Handset locator
Using this feature, you can locate the
handset if it has been misplaced.
1 Press {x} on the base unit.
2 To stop paging, press {x} on the base
unit or press {ih} on the handset.
18
Page 19
TG9120FX(e).book Page 19 Tuesday, August 29, 2006 9:44 AM
k
Phonebooks
Handset phonebook
The handset phonebook allows you to make
calls without having to dial manually. You
can store up to 3 phone numbers for each
entry and assign each handset phonebook
entry to the desired category.
The total number of entries that can be
stored varies by the number of phone
numbers stored for each entry, as shown
below:
1 name + 1 phone
number
1 name + 2 phone
numbers
1 name + 3 phone
numbers
Adding entries to the handset
phonebook
n (left soft key) i J
1
(When USB adaptor is registered:
J (centre of joystick) i 3 i L
i J)
2 “New Entry” i L
3 “Name” i L
4 Enter the party’s name (16 characters
max.; page 53). i L
5 “Phone No. 1” i L
L You can store up to 3 phone numbers
for each entry.
6 Enter the party’s phone number (24
digits max.). i L
7 “Category 1” i L
8 Select the desired category. i L
9 “<Save>” i L i {ih}
200 entries
133 entries
100 entries
Categories
Categories can help you find entries in the
handset phonebook quickly and easily.
When adding an entry to the handset
phonebook, you can assign it to the desired
category. You can change the names of
categories assigned for handset phonebook
entries (“Friends”, “Family”, etc.) and then
search for handset phonebook entries by
category. Additional category features are
available for Caller ID subscribers (page
36).
Changing category names
1 n (left soft key) i J
(When USB adaptor is registered:
J (centre of joystick) i 3 i L
i J)
2 “Category” i L
3 Select the desired category. i L
4 “Category Name” i L
5 Edit the name (10 characters max.;
page 53). i L i {ih}
Finding and calling a handset
phonebook entry
Handset phonebook entries can be
searched for alphabetically, by first
character, by category, or by scrolling
through all handset phonebook entries.
When you have found the desired entry,
press {C}.
L If more than 1 phone number is assigned
to the entry, press {C} / V. i Select
the desired phone number. i {C} /
{s}
19
Page 20
TG9120FX(e).book Page 20 Tuesday, August 29, 2006 9:44 AM
k
Phonebooks
Scrolling through all entries
1 n (left soft key)
(When USB adaptor is registered:
J (centre of joystick) i 3 i L)
2 Push the joystick up or down to display
the desired entry.
Searching alphabetically
This method is useful when you are
searching for an entry which starts with a
letter of the alphabet.
1 n (left soft key)
(When USB adaptor is registered:
J (centre of joystick) i 3 i L)
2 Press the dial key ({0} to {9}) which
corresponds to the letter you are
searching for (page 53).
L Press the same dial key repeatedly to
display the first entry corresponding to
each letter located on that dial key.
L If there is no entry corresponding to
the letter you selected, the next entry
will be displayed.
3 Push the joystick up or down to scroll
through the phonebook if necessary.
Searching by first character (index
search)
1 n (left soft key) i k
(When USB adaptor is registered:
J (centre of joystick) i 3 i L
i k)
2 “Index Search” i L
3 Press the right soft key repeatedly to
select the character entry mode that
contains the character you are
searching for.
4 Push the joystick in any direction to
select the desired character. i L
L If there is no entry corresponding to
the letter you selected, the next entry
will be displayed.
5 Push the joystick up or down to scroll
through the phonebook if necessary.
Note:
L In step 4, you can also press the dial key
({0}-{9}) that contains the character you
are searching for (page 53).
Searching by category
1 n (left soft key) i k
(When USB adaptor is registered:
J (centre of joystick) i 3 i L
i k)
2 “Category Search” i L
3 Select the category you want to search.
i L
L If you select “All”, the unit will end
the category search.
4 Push the joystick up or down to scroll
through the phonebook if necessary.
Viewing phonebook entry details
Find the desired entry (page 19). i
1
V
L The name and phone numbers
assigned to the entry are displayed.
2 Push the joystick right or left to view the
next or previous entry.
20
Page 21
TG9120FX(e).book Page 21 Tuesday, August 29, 2006 9:44 AM
k
Phonebooks
Editing entries in the handset
phonebook
Changing a name, phone number, or
category
1 Find the desired entry (page 19). i
K
2 “Edit” i L
3 Select the desired item you want to
change. i L
4 To change the name and phone
number
Edit the name or phone number. i
L
To change the category
Select the desired category. i L
5 “<Save>” i L i {ih}
Erasing a phone number from an entry
1 Find the desired entry (page 19). i
K
2 “Edit” i L
3 Select the desired phone number you
want to erase. i W
4 “<Save>” i L i {ih}
Erasing entries from the handset
phonebook
Erasing an entry
1 Find the desired entry (page 19). i
K
2 “Erase” i L
3 “Yes” i L i {ih}
2 “Erase All” i L
3 “Yes” i L
4 “Yes” i L i {ih}
One touch dial
Assigning an entry in the handset
phonebook to a one touch dial key
Dial keys {1} to {9} can each be used as a
one touch dial key, allowing you to dial a
number from the handset phonebook by
simply pressing a dial key.
1 Find the desired entry (page 19). i
V
2 Select the desired phone number you
want to assign to a one touch dial key.
i J
3 “One Touch Dial” i L
4 Push the joystick up or down to select
the desired dial key number. i L
L When the dial key is already used as a
one touch dial key, “@” is displayed
next to the dial key number. If you
select this dial key, you can overwrite
the previous assignment.
5 “Save” i L i {ih}
Making a call using a one touch dial key
1 Press and hold the desired one touch
dial key ({1} to {9}).
L You can view other one touch dial
assignments by pushing the joystick
up or down.
2 {C} / {s}
Erasing all entries
1 n (left soft key) i J
(When USB adaptor is registered:
J (centre of joystick) i 3 i L
i J)
21
Page 22
TG9120FX(e).book Page 22 Tuesday, August 29, 2006 9:44 AM
k
Phonebooks
Erasing a one touch dial assignment
1 Press and hold the desired one touch
dial key ({1} to {9}). i J
2 “Erase” i L
3 “Yes” i L i {ih}
Note:
L The corresponding handset phonebook
entry is not erased.
Chain dial
This feature allows you to dial phone
numbers in the handset phonebook while
you are on a call. This feature can be used,
for example, to dial a calling card access
number or bank account PIN that you have
stored in the handset phonebook, without
having to dial manually.
1 While on a call, press n.
2 Push the joystick up or down to select
the desired entry.
L To search by first character (index
search), see page 20. To search by
category, see page 20.
3 Press M to dial the number.
L If more than 1 phone number is
assigned to the entry, press V /
M. i Select the desired phone
number. i L
22
Page 23
TG9120FX(e).book Page 23 Tuesday, August 29, 2006 9:44 AM
Shared phonebook
The shared phonebook allows you to make
calls without having to dial manually. Any
handset registered to the same base unit
can use the shared phonebook. You can
add 20 names and phone numbers to the
shared phonebook. If you subscribe to
Caller ID service, you can use the shared
phonebook’s audible call feature (page 37).
k
Phonebooks
Note:
L Phonebook entries that have an audible
call announcement are indicated by %.
Finding and calling a shared
phonebook entry
Shared phonebook entries can be searched
for by first character or by scrolling through
all shared phonebook entries.
Once you have found the desired entry,
press {C} or {s} to dial the phone number.
Adding entries to the shared
phonebook
n (left soft key) i T i J
1
(When USB adaptor is registered:
J (centre of joystick) i 3 i L
i T i J)
2 “New Entry” i L
3 Enter the party’s name (16 characters
max.; page 53). i L
4 Enter the party’s phone number (24
digits max.). i L
5 To record an audible call
announcement
“Start Recording” i L
To skip recording
“Skip Recording” i L i Go to
step 8.
L Audible call (page 37) can be used by
Caller ID subscribers only.
6 When “Recording” is displayed, speak
into the microphone.
L Maximum recording time is 10
seconds.
L Hold the handset about 20 cm away
and speak clearly into the microphone.
7 Press N to end recording.
L To change the audible call
announcement, press U, then
repeat from step 5.
8 “Save” i L i {ih}
Scrolling through all entries
1 n (left soft key) i T
(When USB adaptor is registered:
J (centre of joystick) i 3 i L
i T)
2 Push the joystick up or down to display
the desired entry.
Searching by first character (index
search)
1 n (left soft key) i T i k
(When USB adaptor is registered:
J (centre of joystick) i 3 i L
i T i k)
2 Press the right soft key repeatedly to
select the character entry mode that
contains the character you are
searching for.
3 Push the joystick in any direction to
select the desired character. i L
L If there is no entry corresponding to
the letter you selected, the next entry
will be displayed.
4 Push the joystick up or down to scroll
through the phonebook if necessary.
Note:
L In step 3, you can also press the dial key
({0}-{9}) that contains the character you
are searching for (page 53).
23
Page 24
TG9120FX(e).book Page 24 Tuesday, August 29, 2006 9:44 AM
k
Phonebooks
Editing entries in the shared
phonebook
Changing a name, phone number, or
audible call
1 Find the desired entry (page 23). i
J
2 “Edit” i L
3 Edit the name if necessary (16
characters max.; page 53). i L
4 Edit the phone number if necessary (24
digits max.). i L
5 Skip, record, or erase an audible call
recording.
L To record the audible call
announcement, continue from step 5,
“Adding entries to the shared
phonebook”, page 23.
L To skip recording, select “Skip
Recording”. i L
L To erase the audible call
announcement, select “Erase”. i
L
6 “Save” i L i {ih}
Erasing all entries
1 n (left soft key) i T i J
(When USB adaptor is registered:
J (centre of joystick) i 3 i L
i T i J)
2 “Erase All” i L
3 “Yes” i L
4 “Yes” i L i {ih}
Playing back an audible call
announcement
1 Find the desired entry (page 23). i
J
2 “Audible Call” i L i {ih}
Erasing entries from the shared
phonebook
Erasing an entry
1 Find the desired entry (page 23). i
J
2 “Erase” i L
3 “Yes” i L i {ih}
24
Page 25
TG9120FX(e).book Page 25 Tuesday, August 29, 2006 9:44 AM
m
Handset Settings
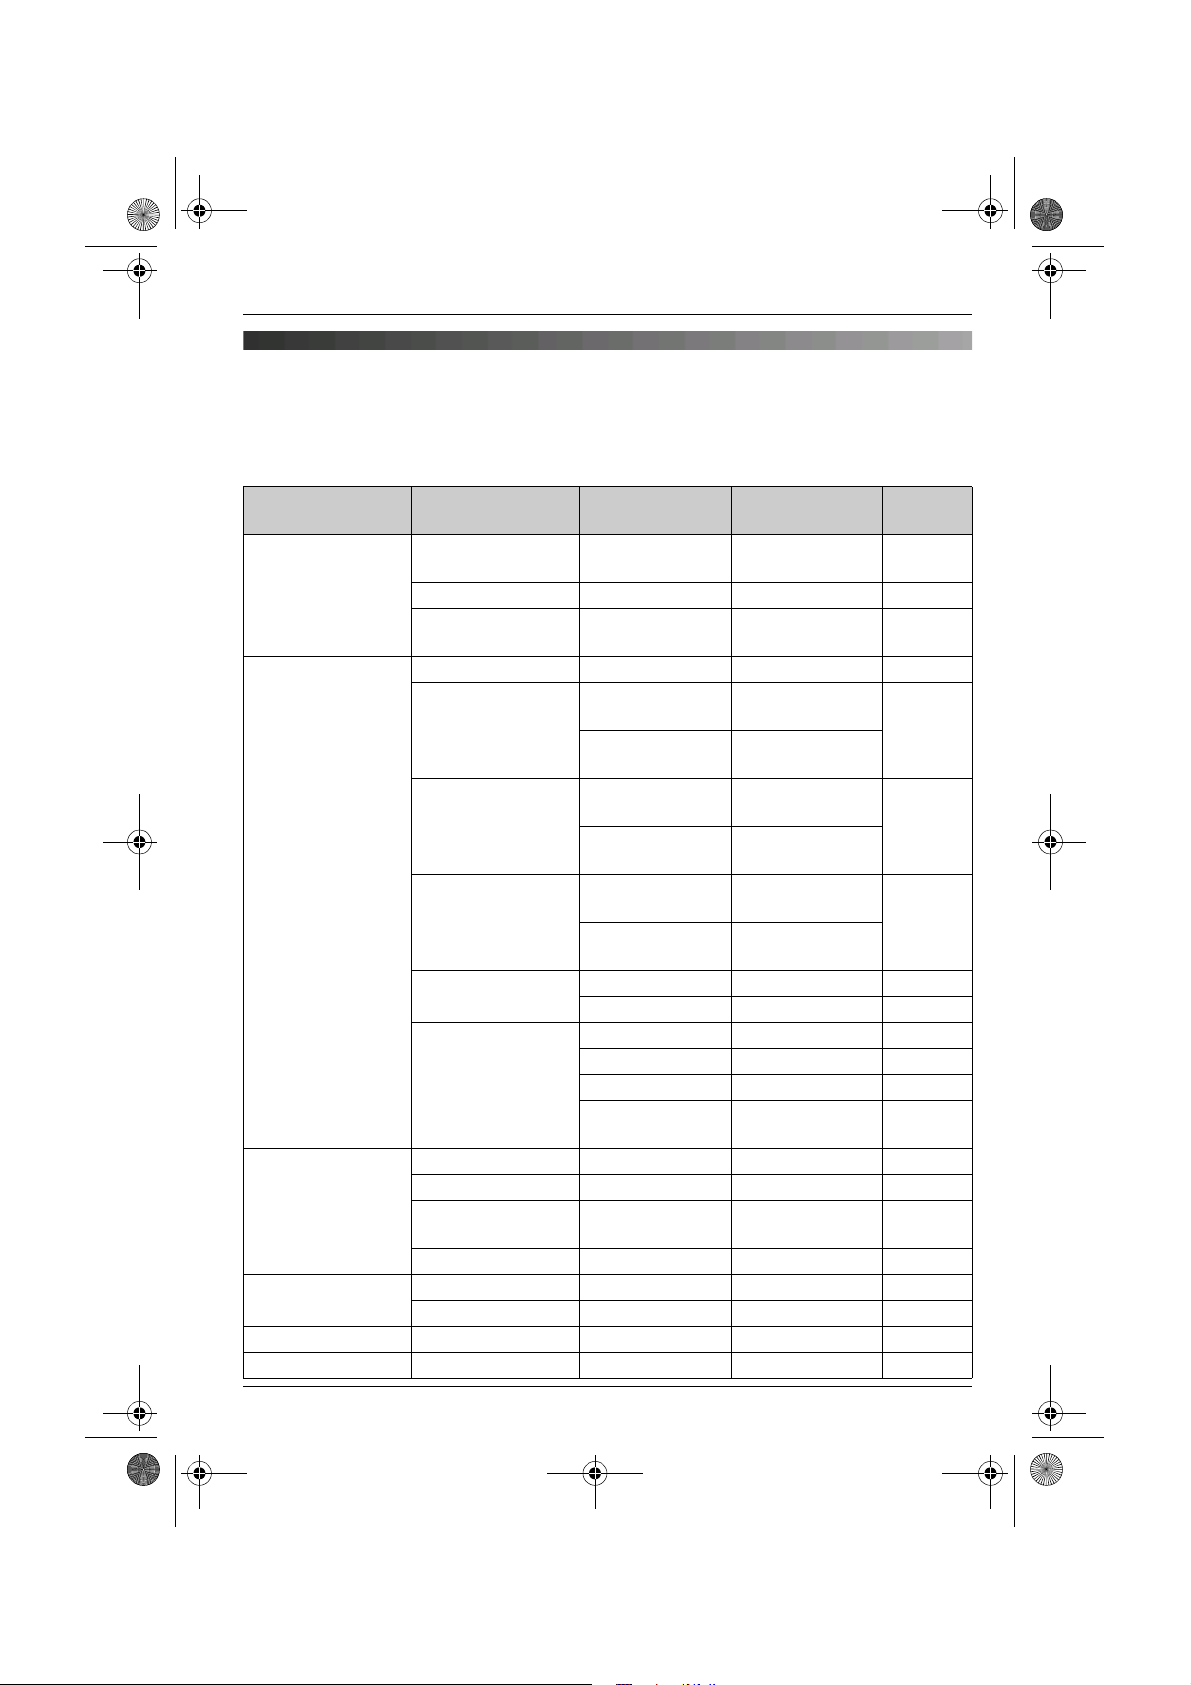
Handset settings
For your reference, a chart of all items which can be customised for the handset is shown
below.
L When customising the handset, the current item or setting is highlighted on the display.
Handset settings
menu
Time Settings Set Date &
Ringer Setup Ringer Volume — Maximum page 27
Display Setup Wallpaper — Picture 1 page 30
Baby Monitor On/Off — Off page 30
Registration Register H.set — — page 48
Select Base ——Auto page 49
Sub-menu Sub-menu 2 Default setting Page
— — page 15
Time
Memo Alarm — Off page 27
Time
Adjustment
Ext. Ringtone Preset
Int. Ringtone Preset
IP Ringtone
Cust. Ringtone Record — page 28
Night Mode Start/End 23:00/06:00 page 29
Display Colour — Colour1 page 30
Select
Language
Contrast — Contrast 3 page 30
Sensitivity — Middle page 30
*1
— Manual page 15
Ringtone 1 page 27
Ringtones
User
Ringtones
Ringtones
User
Ringtones
Preset
Ringtones
User
Ringtones
List — page 28
On/Off Off page 29
Ring Delay 60 sec. page 29
Select
Category
— English
—
Ringtone 3 page 27
—
Ringtone 6 —
—
— page 29
*2
page 14
25
Page 26
rkiye
Slovensko
slovensky
esk
republika
tina
TG9120FX(e).book Page 26 Tuesday, August 29, 2006 9:44 AM
m
Handset Settings
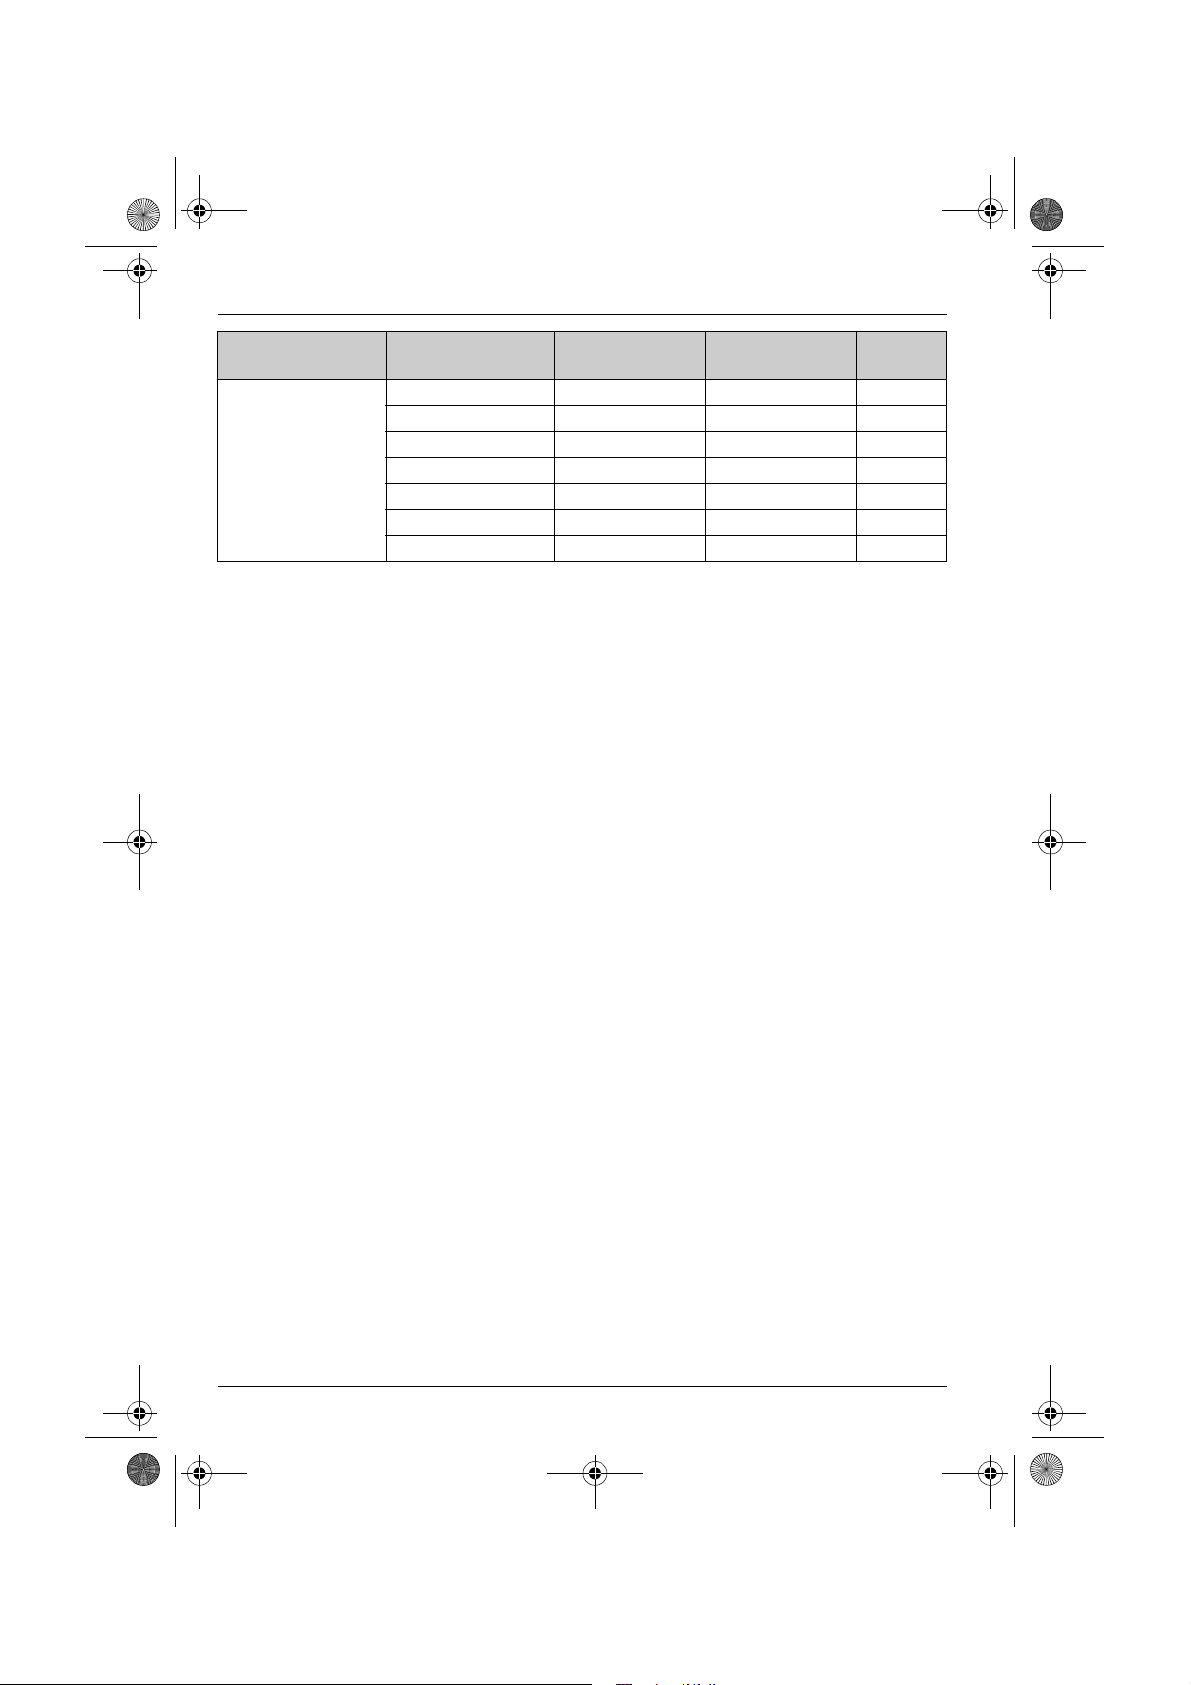
Handset settings
menu
Other Options Handset Name — — page 31
*1 For USB adaptor KX-TGA915EX users only. Please refer to the USB adaptor’s
operating instructions.
*2 The default display language will be as follows if you select the following regional codes
when changing the unit’s region setting (page 35):
““Türkiye
“Slovensko
“
Č
esk
” = “Türkrkçe”
á republika
Sub-menu Sub-menu 2 Default setting Page
New Msg. Alert — Off page 31
LetterWise — English
Keytones — On page 31
Auto Talk — Off page 31
Auto Intercom — Off page 32
Calling Code — — page 32
” = “slovensky
” = “ČeŠtina
”
”
*2
page 31
26
Page 27
TG9120FX(e).book Page 27 Tuesday, August 29, 2006 9:44 AM
Time settings
Memo alarm
An alarm will sound for 3 minutes at the set
time once or daily. A text memo can also be
displayed for the alarm. Set the date and
time beforehand (page 15).
A total of 5 separate alarm instances can be
programmed at once.
1 J (centre of joystick) i m i L
2 “Time Settings” i L
3 “Memo Alarm” i L
4 Select an alarm (1 to 5). i J
5 Select an alarm mode. i L
“Off”
Turns alarm off. Press L again, then
press {ih} to finish.
“Once”
The alarm sounds once at the set time.
Enter the desired day and month.
“Daily”
An alarm sounds daily at the set time.
m
Handset Settings
L If you are on an outside call, beeps will
sound and e will flash at the set time. The
alarm will not sound until you hang up.
L If you select “Once”, the setting will
change to “Off” after the alarm sounds.
Ringer setup
Ringer volume
J (centre of joystick) i m i L
1
2 “Ringer Setup” i L
3 “Ringer Volume” i L
4 Push the joystick up or down to select
the desired volume. i L i {ih}
L When the ringer volume is turned off,
~ is displayed.
Note:
L When the ringer is turned off, the handset
will ring:
– at the minimum level for alarm and
intercom calls
– at the maximum level for paging
6 Enter the desired hour and minute. i
L
7 Enter a text memo (30 characters max.;
page 53). i L
8 Select the desired item. i L
“Preset Ringtones”
Ringtones stored in the handset at the
time of purchase.
“User Ringtones”
Ringtones you stored in the handset
(page 28).
9 Select the desired ringtone. i L
10 “Save” i L i {ih}
L When the alarm is set, e is displayed.
Note:
L To stop the alarm, press any dial key.
Changing ringtones
J (centre of joystick) i m i L
1
2 “Ringer Setup” i L
3 Select the desired item. i L
“Ext. Ringtone”
Selects the ringtone for outside calls.
“Int. Ringtone”
Selects the ringtone for intercom calls.
27
Page 28
TG9120FX(e).book Page 28 Tuesday, August 29, 2006 9:44 AM
m
Handset Settings
4 Select the desired item. i L
“Preset Ringtones”
Ringtones stored in the handset at the
time of purchase.
“User Ringtones”
Ringtones you stored in the handset
(page 28).
5 Select the desired ringtone. i L i
{ih}
Note:
L If you select one of the melody ringtones,
the ringtone will continue to sound for
several seconds if the caller hangs up
before you answer. You may hear a dial
tone or no one on the line when you
answer a call.
L The preset melodies in this product are
used with permission of © 2006
Copyrights Vision Inc.
Customising ringtones
You can record melodies (max. 30 seconds
each) from an audio device by connecting
the included audio cable. These melodies
can be assigned as user ringtones (page 27,
36).
Important:
L The total of about 4 minutes and 30
seconds (max. 32 melodies) can be
recorded. The recording time may
decrease depending on the size of
melodies already stored in the handset.
L If a call is received while the audio cable is
connected to the handset, disconnect the
audio cable from the handset and answer
the call, otherwise you and the caller will
not hear each other’s voice.
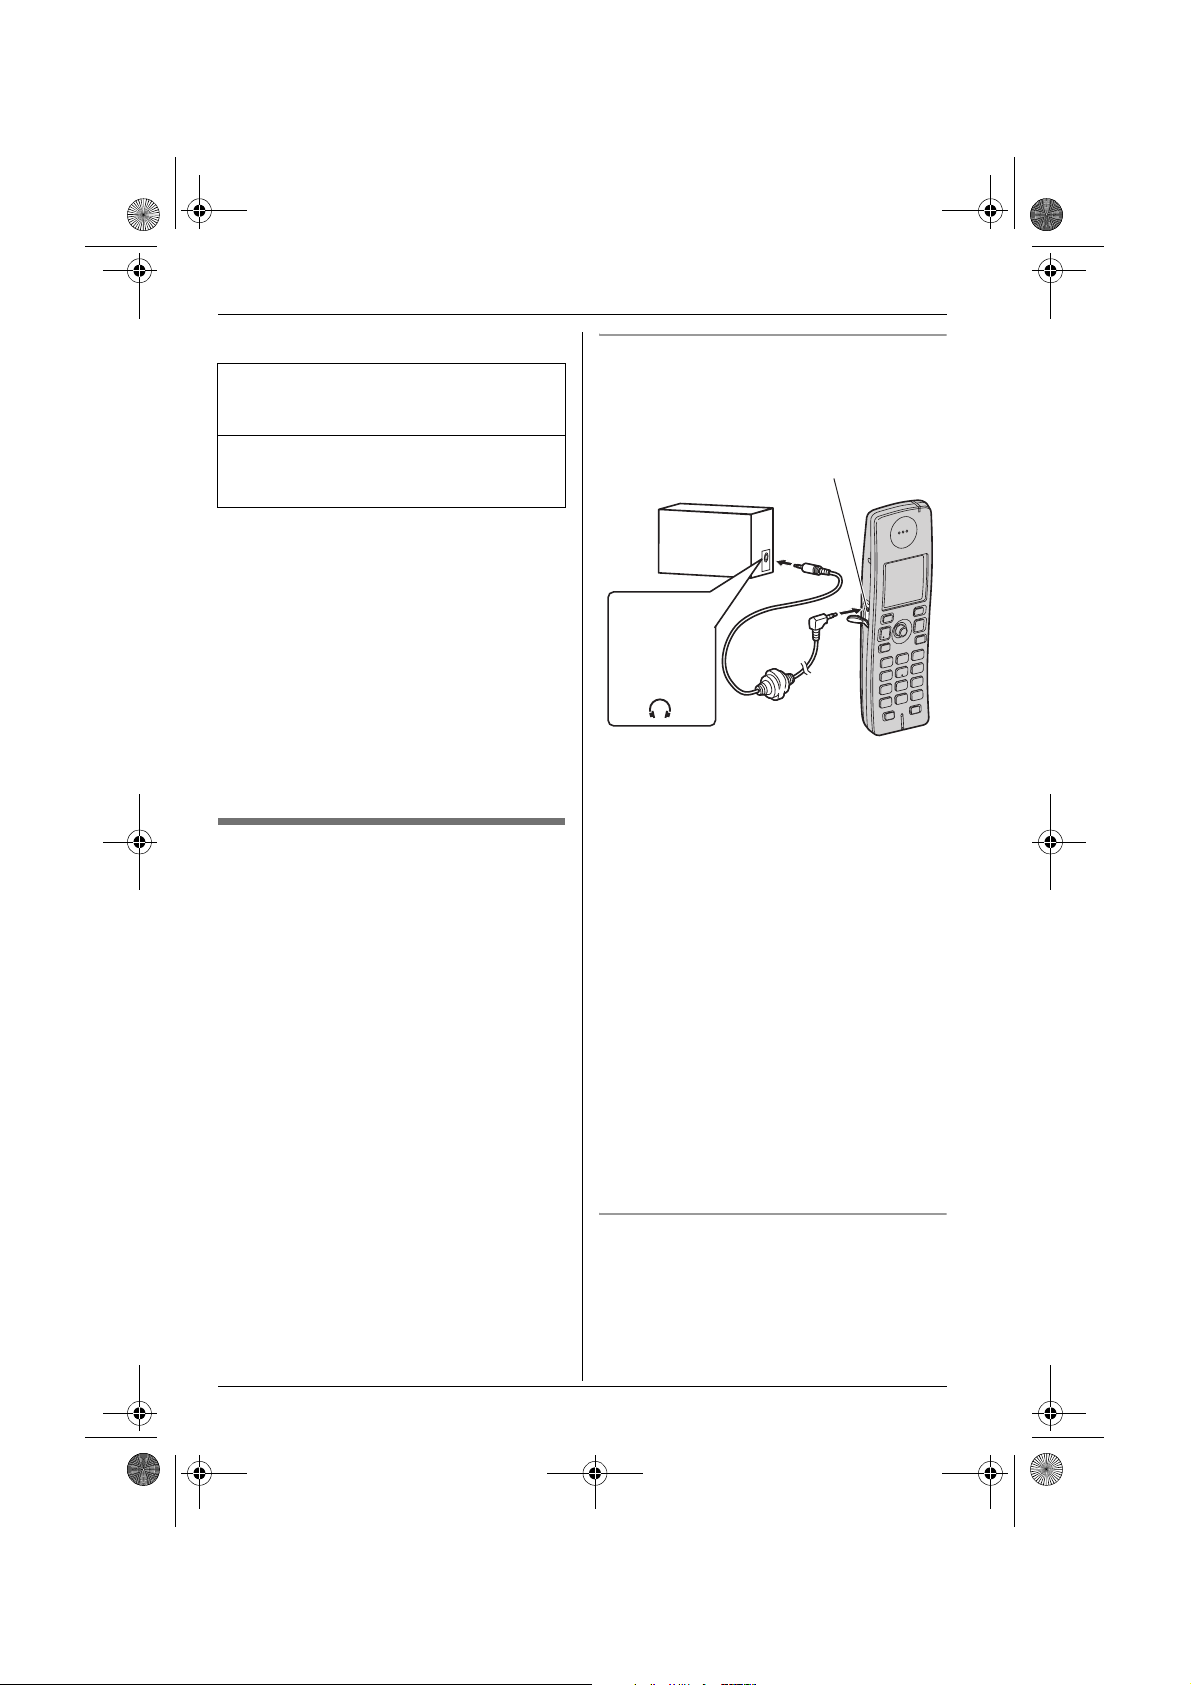
Recording melodies for user ringtones
1 Connect the handset to the audio device
(such as a CD player or computer) using
the included audio cable.
Audio jack
Audio device
Headphone
output, line
out, etc.
Example:
Audio cable
2 J (centre of joystick) i m i L
3 “Ringer Setup” i L
4 “Cust. Ringtone” i L
5 “Record” i L
6 Start playing the audio device.
7 Press Q to start recording.
8 To stop recording, press N.
L To listen to the recording, select
“Play”. i L
L To re-record, select “Re-record”.
i L i Repeat from step 5.
9 “Save” i L
10 Edit the name (10 characters max.;
page 53). i f i {ih}
11 Disconnect the audio cable from the
handset.
Erasing a ringtone
1 J (centre of joystick) i m i L
2 “Ringer Setup” i L
3 “Cust. Ringtone” i L
4 “List” i L
28
Page 29
TG9120FX(e).book Page 29 Tuesday, August 29, 2006 9:44 AM
m
Handset Settings
5 Select the desired item. i J
6 “Erase” i L
7 “Yes” i L i {ih}
Renaming a ringtone
1 J (centre of joystick) i m i L
2 “Ringer Setup” i L
3 “Cust. Ringtone” i L
4 “List” i L
5 Select the desired item. i J
6 “Rename” i L
7 Edit the name (10 characters max.;
page 53). i L i {ih}
Night mode
Night mode allows you to select a block of
time during which the handset will not ring
for outside calls. This feature is useful for
times when you do not want to be disturbed,
for example, while sleeping. Night mode can
be set independently for the handset and the
base unit (page 34).
Using the handset phonebook’s category
feature (page 19), you can also select
categories of callers whose calls will
override night mode and ring the handset
(Caller ID subscribers only).
Set the date and time beforehand (page 15).
Setting the start and end time for night
mode
1 J (centre of joystick) i m i L
2 “Ringer Setup” i L
3 “Night Mode” i L
4 “Start/End” i L
5 Enter the desired hour and minute you
wish to start this feature.
6 Enter the desired hour and minute you
wish to end this feature.
7 L i {ih}
Turning night mode on/off
1 J (centre of joystick) i m i L
2 “Ringer Setup” i L
3 “Night Mode” i L
4 “On/Off” i L
5 “On” or “Off” i L i {ih}
L When the night mode is set, f is
displayed.
Setting the ring delay for night mode
This setting allows the handset to ring during
night mode if the caller waits long enough.
After the selected amount of time passes,
the handset will ring. If you select “No
Ringing”, the handset will never ring
during night mode.
1 J (centre of joystick) i m i L
2 “Ringer Setup” i L
3 “Night Mode” i L
4 “Ring Delay” i L
5 Select the desired setting. i L i
{ih}
Note:
L When the answering system answers the
call, this feature does not work.
Selecting categories to bypass night
mode
1 J (centre of joystick) i m i L
2 “Ringer Setup” i L
3 “Night Mode” i L
4 “Select Category” i L
5 Select the desired category numbers.
i t i L
L Selected category numbers are
indicated by a “Q”.
L To cancel a selected category
number, select the number again,
then press t.
6 {ih}
29
Page 30
TG9120FX(e).book Page 30 Tuesday, August 29, 2006 9:44 AM
m
Handset Settings
Display setup
Selecting wallpaper
You can select the “wallpaper” shown on the
display in standby mode.
1 J (centre of joystick) i m i L
2 “Display Setup” i L
3 “Wallpaper” i L
4 Push the joystick up or down to select
the desired picture.
L You can switch between the picture list
and the picture view by pressing b
or c.
5 L i {ih}
Note:
L If you select “No Picture”, the display
colour will be changed to the colour you
selected for display colour (page 30).
L The preset wallpaper patterns in this
product are used with permission of ©
Digital Vision.
Selecting a display colour
J (centre of joystick) i m i L
1
2 “Display Setup” i L
3 “Display Colour” i L
4 Select the desired colour. i L i
{ih}
Baby monitor (additional
handset required)
Using the baby monitor
This feature allows you to listen in on a room
where another handset is located, allowing
you to easily monitor from different areas of
the house. The monitored handset (placed
in a baby’s room, for example) will
automatically call the monitoring handset
when it detects sound.
Perform the following procedure with the
handset to be monitored (for example, the
handset placed in the baby’s room).
1 J (centre of joystick) i m i L
2 “Baby Monitor” i L
3 “On/Off” i L
4 “On” i L
5 Select the desired handset number to
monitor with. i L
L “Baby Monitor” will be displayed.
Note:
L The monitoring handset will answer calls
automatically when the auto intercom
feature is set to “On” (page 32).
L The monitored handset cannot be used
while baby monitor is set to “On”. To
cancel monitoring;
J i “On/Off” i L i “Off”
i L i {ih}
Changing the display contrast
This feature is available for wallpaper and
display icons.
1 J (centre of joystick) i m i L
2 “Display Setup” i L
3 “Contrast” i L
4 Push the joystick up or down to select
the desired contrast. i L i
{ih}
30
Baby monitor sensitivity
You can adjust the sensitivity of the baby
monitor. Increase or decrease the sensitivity
to adjust the sound level needed to trigger
the baby monitor feature.
L This feature cannot be set during a
monitoring call.
1 Press J on the handset being
monitored.
2 “Sensitivity” i L
Page 31

TG9120FX(e).book Page 31 Tuesday, August 29, 2006 9:44 AM
m
Handset Settings
3 Push the joystick up or down to select
the desired setting. i L i {ih}
Other options
Assigning/changing handset
names
Each handset can be given a customised
name (“Bob”, “Kitchen”, etc.). This is useful
when you have multiple handsets.
Turn this feature on to display the handset
name in standby mode. The default setting
is “Off”.
1 J (centre of joystick) i m i L
2 “Other Options” i L
3 “Handset Name” i L
4 Enter/edit the name (10 characters
max.; page 53). i L
5 “On” or “Off” i L i {ih}
Turning message alert on/off
This feature alerts you when new messages
have been received or recorded:
– SMS (page 39)
– Answering system (page 43)
The message indicator on the handset
slowly flashes blue until you have read or
listened to all new messages.
1 J (centre of joystick) i m i L
2 “Other Options” i L
3 “New Msg. Alert” i L
4 “On” or “Off” i L i {ih}
Note:
L While message alert is on, battery
operating time is shortened (page 13).
Changing the LetterWise®
language
You can change which language is used for
LetterWise character entry (page 54, 55).
1 J (centre of joystick) i m i L
2 “Other Options” i L
3 “LetterWise” i L
4 Select the desired language. i L
i {ih}
Turning keytones on/off
Keytones include confirmation tones and
error tones.
1 J (centre of joystick) i m i L
2 “Other Options” i L
3 “Keytones” i L
4 “On” or “Off” i L i {ih}
Turning auto talk on/off
When this feature is turned on, you can
answer calls simply by lifting the handset off
the base unit. You do not need to press
{C}.
1 J (centre of joystick) i m i L
2 “Other Options” i L
3 “Auto Talk” i L
4 “On” or “Off” i L i {ih}
31
Page 32

TG9120FX(e).book Page 32 Tuesday, August 29, 2006 9:44 AM
m
Handset Settings
Turning auto intercom on/off
This feature allows the handset to answer
intercom calls automatically when it is
called. You do not need to press {C}.
When this feature is set to “On”, the
monitoring handset for the baby monitor
feature (page 30) will also answer baby
monitor calls automatically.
1 J (centre of joystick) i m i L
2 “Other Options” i L
3 “Auto Intercom” i L
4 “On” or “Off” i L i {ih}
Calling code
If you need to dial a special calling code to
make calls using the telephone services of a
certain service provider/telephone company,
you can store the calling code in advance
and dial it by simply pressing and holding
the {*} while dialling a phone number.
Important:
L To use this feature you must store the
calling code in advance.
Example: If you store the calling code “098”
and press and hold {*} before dialling
“12345”, the unit dials “09812345”
automatically.
L The calling code you stored will be
displayed.
2 Dial the phone number manually.
3 {C} / {s} / L
When dialling from the redial list,
phonebook, one touch dial, or caller list:
1 Display the desired phone number in the
redial list, phonebook, one touch dial, or
caller list.
2 Press and hold {*}.
L The calling code you stored will be
displayed before the phone number.
3 {C} / {s} / L
Assigning the calling code number
1 J (centre of joystick) i m i L
2 “Other Options” i L
3 “Calling Code” i L
4 Enter the desired calling code (24 digits
max.). i L
5 “Save” i L i {ih}
Making calls using a calling code
When dialling manually:
1 Lift the handset, then press and hold
{*}.
32
Page 33

TG9120FX(e).book Page 33 Tuesday, August 29, 2006 9:44 AM
L
Base Unit Settings
Base unit settings
For your reference, a chart of all items which can be customised for the base unit is shown
below.
L These items are customised using the handset.
L When customising the base unit, the current item or setting is highlighted on the display.
Base unit
settings menu
Ringer Setup Ringer
Call Options Dial Mode — Tone page 14
Other Options Base Unit PIN — 0000 page 35
Sub-menu Sub-menu 2 Default setting Page
— Medium page 34
Volume
Night Mode Start/End 23:00/06:00 page 34
On/Off Off page 34
Ring Delay 60 sec. page 34
Recall/Flash — 600 msec. page 34
Repeater
Mode
Country — Other page 35
— Off page 50
33
Page 34

TG9120FX(e).book Page 34 Tuesday, August 29, 2006 9:44 AM
L
Base Unit Settings
5 “On” or “Off” i L i {ih}
Ringer setup
Ringer volume
J (centre of joystick) i L i L
1
2 “Ringer Setup” i L
3 “Ringer Volume” i L
4 Push the joystick up or down to select
the desired volume. i L i {ih}
Night mode
Night mode allows you to select a block of
time during which the base unit will not ring
for outside calls. This feature is useful for
times when you do not want to be disturbed,
for example, while sleeping. Night mode can
be set independently for the handset (page
29) and the base unit.
Set the date and time beforehand (page 15).
Setting the start and end time for night
mode
1 J (centre of joystick) i L i
L
2 “Ringer Setup” i L
3 “Night Mode” i L
4 “Start/End” i L
5 Enter the desired hour and minute you
wish to start this feature.
6 Enter the desired hour and minute you
wish to end this feature.
7 L i {ih}
Setting the ring delay for night mode
This setting allows the base unit to ring
during night mode if the caller waits long
enough. After the selected amount of time
passes, the base unit will ring. If you select
“No Ringing”, the base unit will never ring
during night mode.
1 J (centre of joystick) i L i
L
2 “Ringer Setup” i L
3 “Night Mode” i L
4 “Ring Delay” i L
5 Select the desired setting. i L i
{ih}
Note:
L When the answering system answers the
call, this feature does not work.
Call options
Changing the recall time
Change the recall time, if necessary,
depending on the requirements of your
service provider/telephone company or
PBX.
1 J (centre of joystick) i L i L
2 “Call Options” i L
3 “Recall/Flash” i L
4 Select the desired setting. i L i
{ih}
Turning night mode on/off
1 J (centre of joystick) i L i
L
2 “Ringer Setup” i L
3 “Night Mode” i L
4 “On/Off” i L
34
Page 35

rkiye
Turkey
Slovensko
Slovakia
esk
republika
Czech
Other
countries except Turkey,
Slovakia and Czech
rkiye
Turkish
esk
republika
Czech
All other countries = English
TG9120FX(e).book Page 35 Tuesday, August 29, 2006 9:44 AM
Other options
Changing the base unit PIN
(Personal Identification Number)
Important:
L If you change the PIN, please make note
of your new PIN. The unit will not reveal
the PIN to you. If you forget your PIN,
consult your nearest Panasonic service
centre.
1 J (centre of joystick) i L i L
2 “Other Options” i L
3 “Base Unit PIN” i L
4 Enter the current 4-digit base unit PIN
(default: “0000”).
5 Enter the new 4-digit base unit PIN. i
L i {ih}
Changing the unit’s region
setting/Resetting the base unit
J (centre of joystick) i L i L
1
2 “Other Options” i L
3 “Country” i L
4 Select the desired country. i L
““Türkiye
“Slovensko
“Česk
“Other
Slovakia and Czech
5 “Yes” i L i {ih}
Note:
L The following items will be deleted or reset
to their default settings:
– Settings listed on page 33, 41, 47
– Time adjustment
– All SMS messages
– Caller list
L The following items will be retained:
” = Turkey
” = Slovakia
á republika
” = countries except Turkey,
” = Czech
L
Base Unit Settings
– Date and time
– Shared phonebook entries
– Repeater mode
– Recordings, including your greeting
message, caller messages, and audible
call announcements
L If you select the desired country in step 4,
the following default settings will be
changed for the selected country’s default
settings:
– Display language (page 25)
– LetterWise (page 25)
– Number of rings to turn on the
answering system remotely
L According to your country selection in step
4, the answering system announcement
language changes as follows:
– “Türkiye
– “Česk
– All other countries = English
L After resetting the base unit, w will flash
on the handset momentarily. This is
normal. The handset can be used once w
stops flashing.
” = Turkish
á republika
” = Czech
35
Page 36

TG9120FX(e).book Page 36 Tuesday, August 29, 2006 9:44 AM
j
Caller ID Service
Using Caller ID service
Important:
L This unit is Caller ID compatible. To use
Caller ID features (such as displaying
caller phone numbers), you must
subscribe to Caller ID service. Consult
your service provider/telephone company
for details.
Caller ID features
When an outside call is received, the caller’s
phone number will be displayed.
L Phone numbers of the last 50 callers will
be logged in the caller list.
L While listening to a message recorded by
the answering system using the handset,
you can call back the caller without having
to dial the phone number (page 45).
L When caller information is received and it
matches a phone number stored in the
unit’s phonebook:
– The stored name will be displayed and
logged in the caller list.
– The handset will use the display colour
and ringtone assigned to the caller’s
category.
– The handset will announce the audible
call recording you made.
L If the unit is connected to a PBX system,
you may not receive the caller information.
L When the caller dialled from an area
which does not provide Caller ID service,
“Out of Area” will be displayed.
L When the caller requested not to send
caller information, either no information or
“Private Caller” will be displayed.
Call Waiting Caller ID (Turkey only)
This is a service of your service
provider/telephone company and will only
operate if you have subscribed to this
service. When you hear a call waiting tone
during a conversation, the display will show
the second caller’s information. You can
answer the second call, keeping the first call
on hold. Consult your service
provider/telephone company for details of
this service.
Category features for handset
phonebook
Categories can help you identify who is
calling by using different ringtones and
display colours for different categories of
callers. When adding an entry to the
handset phonebook you can assign it to the
desired category (page 19). When a call is
received from a caller assigned to a
category, the category’s display colour and
ringtone you selected are used.
Changing category ringtones
If you select “Ext. Ringtone”, the unit
will use the external ringtone you set on
page 27 when calls from this category are
received. The default setting is “Ext.
Ringtone”.
1 n (left soft key) i J
(When USB adaptor is registered:
J (centre of joystick) i 3 i L
i J)
2 “Category” i L
3 Select a category. i L
4 Select the current setting of the category
ringtone. i L
Missed calls
If a call is not answered, the unit treats the
call as a missed call. y and the number of
missed calls are shown on the display. This
lets you know if you should view the caller
list to see who called while you were out.
36
Page 37

TG9120FX(e).book Page 37 Tuesday, August 29, 2006 9:44 AM
5 Select the desired item. i L
j
Caller ID Service
“Ext. Ringtone”
The ringtone assigned for external calls.
Press {ih} to finish.
“Preset Ringtones”
Ringtones stored in the handset at the
time of purchase.
“User Ringtones”
Ringtones you stored in the handset
(page 28).
6 Select the desired ringtone. i L
i {ih}
Changing category display colours
If you select “Display Colour”, the unit
will use the display colour you set on page
30 when calls from this category are
received. The default setting is “Display
Colour”.
1 n (left soft key) i J
(When USB adaptor is registered:
J (centre of joystick) i 3 i L
i J)
2 “Category” i L
3 Select a category. i L
4 Select the current setting of the category
colour. i L
5 Select the desired colour. i L i
{ih}
Caller list
Viewing the caller list and calling
back
J (centre of joystick) i j i L
1
2 Push the joystick down to search from
the most recent call. Push the joystick up
to search from the oldest call.
L If the item has already been viewed or
answered, “Q” is displayed, even if it
was viewed or answered using
another handset.
L To erase the item, press W. i
“Yes” i L
3 {C} / {s}
Editing a caller’s phone number
before calling back
J (centre of joystick) i j i L
1
2 Push the joystick up or down to display
the desired entry.
3 J i “Edit and Call” i L
4 Edit the number.
L Press dial key ({0} to {9}) to add,
{C/T} to delete.
5 {C} / {s} / L
Audible call for shared
phonebook
Audible call allows you to know who is
calling without looking at the display. If you
record an audible call announcement for a
shared phonebook entry (page 23), the
audible call recording will be announced
when you receive a call from that person.
Note:
L If the handset ringer is turned off, audible
call announcements will not be heard.
Erasing caller information
J (centre of joystick) i j i L
1
2 Push the joystick up or down to display
the desired entry. i J
3 “Erase” i L
L To erase all entries, select “Erase
All”. i L
4 “Yes” i L i {ih}
37
Page 38

TG9120FX(e).book Page 38 Tuesday, August 29, 2006 9:44 AM
j
Caller ID Service
Storing caller information into the
handset phonebook
J (centre of joystick) i j i L
1
2 Push the joystick up or down to display
the desired entry. i J
3 “Add Phonebook” i L
4 Continue from step 3, “Adding entries to
the handset phonebook”, page 19.
Voice mail service
Voice mail is an automatic answering
service offered by your service
provider/telephone company. If you
subscribe to this service, your service
provider/telephone company’s voice mail
system will answer calls for you when you
are unavailable to answer the phone or
when your line is busy. Messages are
recorded by your service provider/telephone
company, not your telephone.
When you have new messages, z will be
displayed on the handset. Please consult
your service provider/telephone company
for details of this service.
Note:
L If z still remains on the display even after
you have listened to new messages, turn
it off by pressing and holding {C/T} for 2
seconds.
L For more information on using the unit’s
answering system and your service
provider/telephone company’s voice mail
service, see page 47.
38
Page 39

TG9120FX(e).book Page 39 Tuesday, August 29, 2006 9:44 AM
Using SMS (Short
Message Service)
SMS allows you to send and receive text
messages between other fixed-line and
mobile phones that support compatible SMS
networks and features.
Important:
L To use SMS features, you must:
– subscribe to Caller ID and/or
appropriate service
– confirm SMS is turned on
– confirm the correct message centre
numbers are stored
Consult your service provider/telephone
company for details and availability.
Note:
L A total of 47 messages (at 160
characters/message) can be saved. Total
number may be more than 47 if length of
messages is less than 160
characters/message.
L If the unit is connected to a PBX system,
you may not be able to use SMS features.
Turning SMS on/off
1 J (centre of joystick) i X i L
2 “Settings” i L
3 “SMS On/Off” i L
4 “On” or “Off” i L i {ih}
Storing SMS message
centre numbers
SMS message centre telephone numbers
must be stored in order to send and receive
SMS messages.
X
SMS (Short Message Service)
L Consult your service provider/telephone
company for more information.
1 J (centre of joystick) i X i L
2 “Settings” i L
3 “Message Centre1” or “Message
Centre2” i L
4 Enter the number. i L
5 “Save” i L i {ih}
Note:
L For PBX users:
– You need to add the PBX line access
number and a dialling pause to the
beginning of the Message Centre 1
phone number.
– If you only use the Message Centre 1
phone number for SMS, store the
Message Centre 1 phone number as is
(without adding a line access number or
dialling pause) to Message Centre 2.
Sending a message
Writing and sending a new
message
J (centre of joystick) i X i L
1
2 “Create” i L
L If “^Use Last Text?” is displayed,
you can use the text from the last
message you created by pushing the
joystick up.
3 Enter the message (page 53). i L
L j is displayed.
4 Enter the destination phone number (20
digits max.). i L
L Using the handset phonebook:
n i Select the handset
phonebook entry. i M
39
Page 40

TG9120FX(e).book Page 40 Tuesday, August 29, 2006 9:44 AM
X
SMS (Short Message Service)
When only 1 phone number is
stored
L
When 2 or more phone numbers are
stored
Select the desired phone number. i
L 2 times
L Using the caller list:
Push the joystick up or down to select
the party. i L 2 times
L Using the redial list:
Press j repeatedly to select the
phone number. i L 2 times
5 To save the message, select “Yes”. i
L
6 To send the message, press L.
L To cancel sending, press {ih}.
Note:
L This unit supports SMS messages of up to
612 characters, however, the maximum
number of characters you can send or
receive may be limited by your SMS
service provider/telephone company.
Consult your SMS service
provider/telephone company for details.
L If your message contains over 160
characters, the message is divided into
multiple messages (up to 4). You can
confirm how many messages are required
to send your text by the number shown on
the display (“1”, “2”, “3”, or “4”). The
remaining number of characters that can
be entered is displayed next to j. Your
service provider/telephone company may
treat long messages (messages over 160
characters long) differently from other
messages. Consult your service
provider/telephone company for details.
L If your phone is connected to a PBX, store
the PBX line access number (page 42).
Sending a saved message
J (centre of joystick) i X i L
1
2 “Send List” i L
3 To read a saved message, push the
joystick up or down to select the
message. i L
4 To send the message, press J. i
“Send” i L
5 Press and hold {C/T} to erase all
numbers, then continue from step 4,
“Writing and sending a new message”,
page 39.
Editing and sending a saved
message
J (centre of joystick) i X i L
1
2 “Send List” i L
3 Push the joystick up or down to select
the message. i L
4 J i “Edit Message” i L i
Continue from step 3, “Writing and
sending a new message”, page 39.
Erasing saved messages
J (centre of joystick) i X i L
1
2 “Send List” i L
3 Push the joystick up or down to select
the message. i L
4 J i “Erase” i L
L To erase all messages, select “Erase
All”. i L
5 “Yes” i L i {ih}
Receiving a message
When an SMS message is received:
– a tone is heard (if the handset ringer is
turned on)
– “Receiving SMS Message” is
displayed
– h is displayed
40
Page 41

TG9120FX(e).book Page 41 Tuesday, August 29, 2006 9:44 AM
X
SMS (Short Message Service)
– the message indicator on the handset
flashes if the message alert feature (page
31) has been turned on
– the total number of new (unread) SMS
messages is displayed next to h
Reading a received message
J (centre of joystick) i X i L
1
2 “Receive List” i L
3 Push the joystick up or down to select a
message.
L Messages which have already been
read are indicated by a “Q”, even if
they were read using another handset.
L To erase a message, press W. i
“Yes” i L
4 Press L to read the message content.
Note:
L To call the message sender, press {C}
or {s}.
Replying to a message
While reading a received message,
1
press J.
2 “Reply” i L
3 Enter a message (page 53). i L
4 Edit the destination phone number
and/or press L, then continue from
step 5, “Writing and sending a new
message”, page 39.
Editing/forwarding a message
While reading a received message,
1
press J.
2 “Edit Message” i L i
Continue from step 3, “Writing and
sending a new message”, page 39.
Erasing received messages
While reading a received message,
1
press J.
2 “Erase” i L
L To erase all messages, select “Erase
All”. i L
3 “Yes” i L i {ih}
Storing the sender’s number in
the handset phonebook
While reading a received message,
1
press J.
2 “Add Phonebook” i L
3 Continue from step 3, “Adding entries to
the handset phonebook”, page 19.
Editing the sender’s number
before calling back
While reading a received message,
1
press J.
2 “Edit and Call” i L
3 Edit the number. i {C} / {s} / L
SMS settings
If the base unit is reset to its default settings
(page 35), the following SMS-related
settings will be reset. The contents of the
receive and send lists will be erased.
SMS settings Page
SMS on/off (default: “Off”) page 39
Message Centre 1 page 39
Message Centre 2 page 39
PBX line access number
(default: “Off”)
page 42
41
Page 42

TG9120FX(e).book Page 42 Tuesday, August 29, 2006 9:44 AM
X
SMS (Short Message Service)
Storing the PBX line access
number (for PBX users only)
Store your PBX line access number (4 digits
max.) so that SMS messages are sent
properly. When sending SMS messages to
entries in the handset phonebook or redial
list, the PBX line access number will be
deleted.
1 J (centre of joystick) i X i L
2 “Settings” i L
3 “PBX Access No.” i L
4 “On” i L
5 Enter your PBX line access code and a
dialling pause, if necessary. i L
6 “Save” i L i {ih}
42
Page 43

TG9120FX(e).book Page 43 Tuesday, August 29, 2006 9:44 AM
Answering system
This unit contains an answering system
which can answer and record calls for you
when you are unavailable to answer the
phone.
Important:
L Only 1 person can access the answering
system (listen to messages, record a
greeting message, etc.) at a time.
L When callers leave messages, the unit
records the day and time of each
message. Make sure the date and time
have been set (page 15).
Memory capacity
The total recording capacity (including your
greeting message, caller messages, and
audible call announcements) is about 40
minutes. A maximum of 64 messages can
be recorded.
Note:
L If message memory becomes full:
– “Answer Sys. Full” is shown on the
handset display
– {s} on the base unit flashes rapidly
Turning the answering
system on/off
Using the base unit
Press {s} to turn on/off the answering
system.
L When the answering system is turned on,
{s} lights up.
Using the handset
J (centre of joystick) i I i L
1
2 e i {ih}
I
Answering System Features
Note:
L When the answering system is turned on,
u is displayed next to the battery icon.
Greeting message
When the unit answers a call, callers are
greeted by a greeting message. You can
record your own greeting message or use a
prerecorded greeting message.
Recording a greeting message
You can record your own greeting message
(50 seconds max.).
1 J (centre of joystick) i I i L
2 “Record Greeting” i L
L Hold the handset about 20 cm away
and speak clearly into the microphone.
3 Press N to stop recording.
4 {ih}
Using a prerecorded greeting
message
If you erase or do not record your own
greeting message, the unit will play a
prerecorded greeting message for callers
and ask them to leave messages. If the
message recording time (page 47) is set to
“Greeting Only”, caller messages will
not be recorded and the unit will play a
different prerecorded greeting message
asking callers to call again.
Playing back the greeting
message
J (centre of joystick) i I i L
1
2 “Play Greeting” i L
3 {ih}
43
Page 44

TG9120FX(e).book Page 44 Tuesday, August 29, 2006 9:44 AM
I
Answering System Features
Erasing the greeting message
If you erase your own greeting message, the
unit will play a prerecorded greeting
message for callers.
1 J (centre of joystick) i I i L
2 “Erase Message” i L
3 “Erase Greeting” i L
4 “Yes” i L i {ih}
Listening to messages
Messages are stored and played back
chronologically, from oldest message to
newest.
Listening to new/all messages
When you have new messages:
– {6} on the base unit flashes
– the message indicator on the handset
flashes if the message alert feature (page
31) has been turned on
– u is displayed
– the total number of new messages is
displayed next to u
Using the base unit
Press {6}.
L If new messages have been recorded, the
base unit plays back new messages.
L If there are no new messages, the base
unit plays back all messages.
Note:
L To adjust the speaker volume during
playback, press {^} or {V}.
L After playing back all of the new
messages, {6} will stop flashing but
{s} will remain lit up when the answering
system is turned on.
Using the handset
1 J (centre of joystick) i I i L
2 “Play New Msg.” or “Play All
Msg.” i L
Note:
L To adjust the speaker volume during
playback, push the joystick up or down.
Repeating, skipping, stopping,
and erasing a message during
playback
L To repeat a message during playback:
– for the base unit, press {7}
– for the handset, push the joystick left
If pressed within the first 5 seconds of a
message, the previous message will be
played.
L To skip a message during playback:
– for the base unit, press {8}
– for the handset, push the joystick right
L To stop a message during playback:
– for the base unit, press {■}
– for the handset, press O
L To erase a message during playback:
– for the base unit, press {4}
– for the handset, press W. i “Yes”
i L
Erasing all messages
Using the base unit
Press {4} 2 times.
Using the handset
1 J (centre of joystick) i I i L
2 “Erase Message” i L
3 “Erase All” i L
4 “Yes” i L i {ih}
44
Page 45

TG9120FX(e).book Page 45 Tuesday, August 29, 2006 9:44 AM
I
Answering System Features
Calling back (Caller ID
subscribers only)
If caller information was received for the call,
you can call the caller back while listening to
a message.
1 Press J during playback.
2 “Call Back” i L
Editing the number before calling back
1 Press J during playback.
2 “Edit and Call” i L
3 Edit the number. i L
Direct command
operation using the
handset
You can operate the answering system by
pressing dial keys, rather than navigating
through the menus. To use the following
commands, press J (centre of joystick).
i I i L
Key Direct commands
{1} Repeat message (during
playback)
{2} Skip message (during
playback)
{3} Enter the “Settings” menu
{4} Play new messages
{5} Play all messages
{6} Play greeting message
{7}{6} Record greeting message
{8} Turn answering system on
{9} Stop (recording, playback)
{0} Turn answering system off
{*}{4} Erase this message (during
playback)
*1
Key Direct commands
{*}{5} Erase all messages
{*}{6} Erase greeting message
*1 If pressed within the first 5 seconds of
a message, the previous message will
be played.
Remote operation
Using a touch tone phone, you can call your
phone number from outside and access the
unit to listen to messages or change
answering system settings.
Important:
L In order to operate the answering system
remotely, you must first turn on remote
operation by setting a remote access
code. This code must be entered each
time you operate the answering system
remotely.
Turning remote operation on
A 3-digit remote access code must be
entered when operating the answering
system remotely. This code prevents
unauthorised parties from listening to your
messages remotely. After you store your
remote access code, remote operation is
possible.
1 J (centre of joystick) i I i L
2 “Settings” i L
3 “Remote Code” i L
4 To turn on remote operation, enter a
3-digit remote access code.
L To turn off remote operation, press
{*}.
5 L i {ih}
Note:
L If you have stored the remote access
code, you can turn on the answering
45
Page 46

rkiye
TG9120FX(e).book Page 46 Tuesday, August 29, 2006 9:44 AM
I
Answering System Features
system by calling the unit even when it is
turned off (page 46). This call may be
answered before the ring delay feature of
the night mode (page 29, 34) activates.
You need to select “30 sec.” for
activating the ring delay feature.
Using the answering system
remotely
Dial your phone number from a touch
1
tone phone.
2 After the greeting message starts, enter
your remote access code.
L The unit will announce the number of
new messages.
3 Enter remote commands.
Note:
L You can hang up at any time.
L If less than 5 minutes of recording time is
available, the unit will announce the
remaining recording time after the last
message is played back.
Remote commands
Key Remote command
{1} Repeat message (during
playback)
{2} Skip message (during
playback)
{4} Play new messages
{5} Play all messages
{6} Play greeting message
{7} Record greeting message
{9} Stop (recording, playback)
{0} Turn answering system off
{*}{4} Erase this message (during
playback)
{*}{5} Erase all messages
*1
Key Remote command
{*}{6} Erase greeting message
(during greeting message
playback)
{*}{#} End remote operation (or
hang up)
*1 If pressed within the first 5 seconds of
a message, the previous message will
be played.
Turning on the answering system
remotely
If the answering system is off, you can turn it
on remotely.
1 Dial your phone number from a touch
tone phone.
2 Let the phone ring 9 times.
L Turkey:
If you change the unit’s region setting
““Türkiye
to (page 35), the phone
rings 10 times.
L A long beep will be heard.
”
3 Enter your remote access code within 10
seconds after the long beep.
L The greeting message is played back.
L You can hang up, or enter your remote
access code again and begin remote
operation.
46
Page 47

TG9120FX(e).book Page 47 Tuesday, August 29, 2006 9:44 AM
Answering system
settings
If the base unit is reset to its default settings
(page 35), the following answering systemrelated settings will be reset.
Answering
system setting
Answering
system on/off
Remote access
code
Number of
rings
Caller’s
recording time
Call screening On page
Default
setting
Answer On page
— page
4 Rings page
3 Minutes page
Page
43
45
47
47
47
I
Answering System Features
– To receive messages correctly with your
voice mail service, we recommend that
you do not use the unit’s answering
system. Make sure that the answering
system is turned off (page 43).
– If you would rather use the unit’s
answering system than the voice mail
service provided by your service
provider/telephone company, ask your
service provider/telephone company to
deactivate your voice mail service.
If your service provider/telephone
company cannot do this, set this unit’s
“Number of Rings” setting so that this
unit’s answering system answers calls
before the service provider/telephone
company’s voice mail service tries to
answer your calls. It is necessary to check
the number of rings required to activate
the voice mail service provided by your
service provider/telephone company
before changing this setting.
Changing the number of rings
You can change the number of times the
phone rings before the unit answers calls.
You can select 2 to 6 rings, or “Auto”.
“Auto”: The unit answers after 2 rings when
new messages have been recorded, and
after 5 rings when there are no new
messages. If you call your phone from
outside to listen to new messages (page
46), you will know that there are no new
messages when the phone rings for the 3rd
time. You can then hang up without being
charged for the call.
1 J (centre of joystick) i I i L
2 “Settings” i L
3 “Number of Rings” i L
4 Select the desired setting. i L i
{ih}
For voice mail service subscribers
Please note the following:
Selecting the caller’s recording
time
You can change the maximum message
recording time allotted to each caller, or set
the unit to greet callers but not record
messages.
1 J (centre of joystick) i I i L
2 “Settings” i L
3 “Recording Time” i L
4 Select the desired setting. i L i
{ih}
Turning call screening on/off
While a caller is leaving a message, you can
screen the call through the handset speaker.
1 J (centre of joystick) i I i L
2 “Settings” i L
3 “Call Screening” i L
4 “On” or “Off” i L i {ih}
47
Page 48

TG9120FX(e).book Page 48 Tuesday, August 29, 2006 9:44 AM
Multi-unit Operation
Operating additional units
Additional handsets
Up to 6 handsets can be registered to a
single base unit.
Important:
L The additional handset model
recommended for use with this unit is
noted on page 4. If other model handset is
used, certain operations (handset
settings, base unit settings, etc.) may not
be available.
L Additional handsets will give you the
freedom to, for example, have an intercom
call with another handset while a third
handset is on an outside call.
Additional base units
Handsets can be registered to up to 4 base
units, allowing you to add additional base
units and extend the area in which your
handset(s) can be used. If a handset moves
out of range of its base unit when “Auto” is
selected on base unit selection (page 49), it
will look for another base unit to make or
receive calls. A base unit and the handsets it
communicates with is called a “radio cell”.
Note:
L Calls will be disconnected when the
handset moves from one radio cell to
another.
To register an additional handset to a
base unit (easy registration)
After purchasing an additional handset,
register it to the base unit. Ensure that the
additional handset is switched on. If it is not
on, press and hold {ih} for few seconds
to turn the handset on.
1 Lift the additional handset and press
{ih} to put the handset in standby
mode.
2 Press and hold {x} on the base unit for
about 3 seconds, until the registration
tone sounds.
3 Place the additional handset on the
base unit. The registration tone
continues to sound. With the handset
still on the base unit, wait until a
confirmation tone sounds and w stops
flashing.
Note:
L If an error tone sounds, or if w is still
flashing, register the handset manually
(manual registration; page 48).
L If all registered handsets start ringing in
step 2, press {x} to stop. Start again from
step 1.
L Charge the batteries of your additional
handset for about 7 hours before initial
use.
L This registration method cannot be used
for handsets that have already been
registered to a base unit. Register the
handset manually (manual registration;
page 48).
Registering a handset to a
base unit
The included handset and base unit are
preregistered. If for some reason the
handset is not registered to the base unit (for
example, w flashes even when the handset
is near the base unit), register the handset
manually (page 48).
48
To register a handset to an additional
base unit (manual registration)
You can register a handset to a base unit
manually using the following method.
1 J (centre of joystick) i m i L
2 “Registration” i L
3 “Register H.set” i L
4 Select a base unit number. i L
Page 49

TG9120FX(e).book Page 49 Tuesday, August 29, 2006 9:44 AM
Multi-unit Operation
L This number is used by the handset
as a reference only.
5 Press and hold {x} on the base unit for
about 3 seconds, until the registration
tone sounds.
L If all registered handsets start ringing,
press {x} to stop, then repeat this
step.
L After pressing {x}, the rest of this
procedure must be completed within 1
minute.
6 Wait until “Enter Base PIN” is
displayed, then enter the base unit PIN
(default: “0000”), then press L.
L When the handset has been
registered successfully, w will stop
flashing. If keytones are turned on
(page 31), a confirmation tone will be
heard.
Selecting a base unit
When “Auto” is selected, the handset will
automatically use any available base unit it
is registered to. When a specific base unit is
selected, the handset will make and receive
calls using that base unit only. If the handset
is out of range of that base unit, no calls can
be made.
1 J (centre of joystick) i m i L
2 “Select Base” i L
3 Select the desired base unit number, or
“Auto”. i L
L The handset starts searching for the
base unit.
Cancelling a handset
A maximum of 6 handsets can be registered
to a base unit. A handset can cancel its own
registration (or the registration of another
handset) that is stored in the base unit. This
will allow the base unit to “forget” the
handset.
1 J (centre of joystick) i L i L
2 Enter “335”.
3 “Cancel Handset” i L
L All handsets registered to the base
unit are displayed.
4 Select the handset(s) you want to
cancel. i t
L The selected handsets are indicated
by a “Q”.
L To cancel a selected handset, press
t again.
5 L i “Yes” i L
L “Please Wait...” will be displayed
and a long beep will sound.
L The handset does not beep when
cancelling its own registration.
6 {ih}
Cancelling a base unit
A handset can be registered to a maximum
of 4 base units. A handset can cancel a base
unit that it is registered to. This allows the
handset to “forget” the base unit.
1 J (centre of joystick) i m i L
2 “Registration” i L
3 Enter “335”.
4 “Cancel Base” i L
5 Select the base unit(s) you want to
cancel. i t
L The selected base unit number(s) are
indicated by a “Q”.
L To cancel a selected base unit
number, press t again.
6 L i “Yes” i L
L A long beep will sound.
7 {ih}
Note:
L To register the handset to another base
unit or to the same base unit again, see
manual registration (page 48).
49
Page 50

TG9120FX(e).book Page 50 Tuesday, August 29, 2006 9:44 AM
Multi-unit Operation
Increasing the range of the base
unit
You can increase the signal range of the
base unit by using a DECT repeater. Please
use only the Panasonic DECT repeater
noted on page 6. Consult your Panasonic
dealer for details.
Important:
L Before registering the repeater to this
base unit, you must turn the repeater
mode on.
L Do not use more than one repeater at a
time.
L You cannot make a monitoring connection
via a DECT repeater. (Cordless camera
KX-TGA914FX users only)
Setting the repeater mode
1 J (centre of joystick) i L i
L
2 “Other Options” i L
3 “Repeater Mode” i L
4 “On” i L i {ih}
Note:
L After turning repeater mode on or off, w
will flash on the handset momentarily. This
is normal. The handset can be used once
w stops flashing.
L While the repeater mode is turned on,
audible call announcements may not be
heard from the handset speaker.
{INT} i Select handset 2 (desired
handset number). i P / {C} / {s}
2 Handset 2:
Press {C} / {s} to answer.
3 When finished talking, press {ih}.
Transferring calls
between handsets,
conference calls
Outside calls can be transferred between 2
people in the same radio cell. 2 people in the
same radio cell can have a conference call
with an outside party.
Example: When handset 1 transfers a call
to handset 2
1 Handset 1:
During an outside call, press {INT}. i
Select handset 2 (desired handset
number). i P / {C} / {s}
L The outside call will be put on hold.
L If there is no answer, press {INT} to
return to the outside call.
2 Handset 2:
Press {C} / {s} to answer the page.
L Handset 2 can talk with handset 1.
3 Handset 1:
To complete the call transfer, press
{ih}.
To establish a conference call, press
w.
Intercom between
handsets
Intercom calls can be made between
handsets in the same radio cell.
Example: When handset 1 calls handset 2
1 Handset 1:
50
Transferring a call without speaking to
the other handset user
1 During an outside call, press {INT}. i
Select the desired handset number. i
P / {C} / {s}
L k flashes to indicate the outside call
is on hold.
2 {ih}
Page 51

TG9120FX(e).book Page 51 Tuesday, August 29, 2006 9:44 AM
Multi-unit Operation
L The outside call rings at the other
handset.
Note:
L If the other handset user does not answer
the call within 1 minute, the call will ring at
your handset again.
Copying phonebook
entries
You can copy handset phonebook entries
(page 19) to the shared phonebook or to the
handset phonebook of another compatible
Panasonic handset.
Note:
L Category settings for phonebook entries
are not copied.
Copying one entry
1 Find the desired handset phonebook
entry (page 19). i K
2 “Copy” i L
3 Select the copy destination. i L
L When an entry has been copied,
“Completed” is displayed.
L To continue copying another entry:
“Yes” i L i Find the desired
handset phonebook entry. i M
4 {ih}
to the shared phonebook one at a
time.
L When all entries have been copied,
“Completed” is displayed.
4 {ih}
Copying all entries between handset
phonebooks
1 n (left soft key) i J
(When USB adaptor is registered:
J (centre of joystick) i 3 i L
i J)
2 “Copy All” i L
3 Select the copy destination. i L
L The shared phonebook cannot be
selected. Entries can only be copied
51
Page 52

TG9120FX(e).book Page 52 Tuesday, August 29, 2006 9:44 AM
Useful Information
Using the belt clip
Attaching the belt clip
Removing the belt clip
52
Page 53

TG9120FX(e).book Page 53 Tuesday, August 29, 2006 9:44 AM
Useful Information
Character entry
The dial keys are used to enter characters and numbers. Each dial key has multiple
characters assigned to it. The available character entry modes are Alphabet Y, Numeric
Z, Greek o, Extended 1 q, Extended 2 r, and Cyrillic p. For SMS messages,
Alphabet Y, Numeric Z, Greek o, and Extended q modes are available. When in
these entry modes except Numeric, you can select which character is entered by pressing a
dial key repeatedly.
– Use the joystick to move the cursor.
– Press dial keys to enter characters and numbers. When you press {1}, a list of symbols is
displayed. Select the desired symbol then press L to insert the selected symbol, or press
a to insert additional symbols.
–Press {C/T} to erase the character or number highlighted by the cursor. Press and hold
{C/T} to erase all characters or numbers.
–Press {*} to switch between uppercase and lowercase.
– To enter another character located on the same dial key, push the joystick right to move the
cursor to the next space, then press the appropriate dial key. (This is not necessary when
entering text in LetterWise mode.)
Character entry modes
Several character entry modes can be used when entering text. The characters that can be
entered depend on the entry mode.
LetterWise
LetterWise is a simplified text entry system which suggests the most likely letter to follow the
previously entered letter. Each time you press a dial key, the letter most likely to be used is
displayed. If the suggested character is incorrect, press {#} repeatedly to display the desired
character. You can change the language which LetterWise uses to base its suggestions on
(page 31).
Characters available in each character entry mode
When the unit displays the character entry screen:
Press right soft key repeatedly to select a character entry mode.
Note:
L For character entry when writing SMS messages, see page 55.
Y Alphabet character table
53
Page 54

TG9120FX(e).book Page 54 Tuesday, August 29, 2006 9:44 AM
Useful Information
Z Numeric entry table
o Greek character table
q Extended 1 character table
L The following are used for both uppercase and lowercase:
r Extended 2 character table
L The following are used for both uppercase and lowercase:
p Cyrillic character table
X LetterWise character table (for English)
54
Page 55

TG9120FX(e).book Page 55 Tuesday, August 29, 2006 9:44 AM
When writing SMS messages
X LetterWise character table (for English)
Y Alphabet character table
Useful Information
Z Numeric entry table
o Greek character table
q Extended character table
L The following are used for both uppercase and lowercase:
55
Page 56

TG9120FX(e).book Page 56 Tuesday, August 29, 2006 9:44 AM
Useful Information
Error messages
Error message Cause & solution
Answer Sys. Full L Erase unnecessary messages (page 44).
Connect an audio device. L An audio device is not connected to the handset.
Connect an audio device to the handset.
Error L Recording was too short. Try again.
Error. Charge battery. L Battery strength is low. Charge the batteries and try
again.
Failed L Phonebook copy failed. Confirm the other handset
(the receiver) is in standby mode and try again.
Incomplete L The receiver’s phonebook memory is full. Erase the
unnecessary phonebook entries from the other
handset (the receiver) and try again.
Invalid Number L You tried to send an SMS message to a phone
number saved in the handset phonebook, caller list,
or redial list that is over 20 digits long.
Memory Full L There is no space to store new phonebook entries.
Erase unnecessary entries for the handset
phonebook (page 21) or for the shared phonebook
(page 24).
L There is no space to store new data. Erase
unnecessary ringtones (page 28).
L Message memory is full. Erase unnecessary
messages (page 44).
SMS Full L Erase unnecessary messages (page 40, 41).
You must first subscribe
to Caller ID.
L You must subscribe to Caller ID service. Once you
receive caller information after subscribing to Caller
ID service, this message will not be displayed.
56
Page 57

TG9120FX(e).book Page 57 Tuesday, August 29, 2006 9:44 AM
Useful Information
Troubleshooting
If you still have difficulties after following the instructions in this section, disconnect the AC
adaptor and turn off the handset, then reconnect the AC adaptor and turn on the handset.
Telephone
Problem Cause & solution
w is flashing. L The handset is not registered to the base unit.
Register it (page 48).
L The handset is too far from the base unit. Move
closer.
L The AC adaptor is not connected. Check the
connections.
L You are using the handset or base unit in an area
with high electrical interference. Place the handset
and base unit away from interference sources, such
as antennas and mobile phones.
The handset display is blank. L The handset is in screen saver mode (page 13).
Press {ih} to activate the handset display again.
L The handset is not turned on. Turn the power on
(page 14).
The handset will not turn on. L Make sure that the batteries are installed correctly
(page 12).
L Fully charge the batteries (page 13).
L Clean the charge contacts and charge again (page
13).
I have changed the display
language to a language I cannot
read.
L Change the display language (page 14).
57
Page 58

TG9120FX(e).book Page 58 Tuesday, August 29, 2006 9:44 AM
Useful Information
Problem Cause & solution
I cannot make or receive calls. L The AC adaptor or telephone line cord is not
connected. Check the connections.
L If you are using a splitter to connect the unit,
remove the splitter and connect the unit to the wall
socket directly. If the unit operates properly, check
the splitter.
L Disconnect the base unit from the telephone line
and connect the line to a known working telephone.
If the working telephone operates properly, contact
our service personnel to have the unit repaired. If
the working telephone does not operate properly,
contact your service provider/telephone company.
L The dialling mode setting is incorrect. Set to
“Tone” or “Pulse” as needed (page 14).
L The key lock feature is turned on. Turn it off (page
17).
I cannot receive a call from the
monitored handset.
The unit does not ring. L The ringer volume is turned off. Adjust the ringer
The batteries should be charging
but the battery icon does not
change.
A busy tone is heard when {C} is
pressed.
Static is heard, sound cuts in and
out. Interference from other
electrical units.
L Make sure the monitoring handset is not on any of
the following calls:
– Intercom call
– Cordless camera monitoring call (Cordless
camera KX-TGA914FX users only)
– Internet call (USB adaptor KX-TGA915EX users
only)
volume (page 27, 34).
L The night mode feature is turned on. Turn it off
(page 29, 34).
L Clean the charge contacts and charge again (page
13).
L The handset is too far from the base unit. Move
closer and try again.
L Another handset is in use or the answering system
is being used. Wait and try again later.
L Place the handset and the base unit away from
other electrical appliances.
L Move closer to the base unit.
L Your unit is connected to a telephone line with DSL
service. We recommend connecting a filter (contact
your DSL service provider) to the telephone line
between the base unit and the telephone line jack.
58
Page 59

TG9120FX(e).book Page 59 Tuesday, August 29, 2006 9:44 AM
Useful Information
Problem Cause & solution
Noise is heard during a call. L You are using the handset or base unit in an area
with high electrical interference. Place the handset
and base unit away from interference sources, such
as antennas and mobile phones.
The handset/base unit stops
working while being used.
Pressing j does not display/dial
the last number dialled.
I cannot store a number from the
redial list into the phonebook.
Mute does not turn off after the line
is connected.
The handset beeps intermittently
and/or / flashes.
I fully charged the batteries, but /
still flashes.
I fully charged the batteries, but the
operating time seems to be short.
Caller information is not displayed. L You need to subscribe to Caller ID service. Consult
While viewing caller information,
the display returns to standby
mode.
I cannot register a handset to a
base unit.
L Disconnect the AC adaptor and turn off the
handset. Reconnect the AC adaptor, then turn on
the handset and try again.
L The redialled number was more than 48 digits long.
Redial the number manually.
L The phone number is more than 24 digits long.
Phone numbers stored in the phonebook cannot be
more than 24 digits long (page 19).
L Press {C/T}.
L Fully charge the batteries (page 13).
L Clean the charge contacts and charge again (page
13).
L It is time to replace the batteries (page 12).
L Wipe the battery ends (S, T) and the unit contacts
with a dry cloth.
your service provider/telephone company for
details.
L Your unit is connected to a telephone line with DSL
service. We recommend connecting a filter (contact
your DSL service provider) to the telephone line
between the base unit and the telephone line jack.
L Do not pause for over 1 minute while searching.
L The maximum number of base units (4) are already
registered to the handset. Cancel unused base unit
registrations from the handset (page 49).
L The maximum number of handsets (6) are already
registered to the base unit. Cancel unused handset
registrations from the base unit (page 49).
L You entered the wrong PIN number. If you forget
your PIN, consult your nearest Panasonic service
centre.
L Place the handset and the base unit away from
other electrical appliances.
59
Page 60

TG9120FX(e).book Page 60 Tuesday, August 29, 2006 9:44 AM
Useful Information
SMS (Short Message Service)
Problem Cause & solution
I cannot send or receive SMS
messages.
The SMS message centre number
is logged in the caller list but a
message was not received.
“FD” is displayed. L The unit could not connect to the SMS message
“FE” is displayed. L An error occurred while sending the message. Try
“E0” is displayed. L Your phone number is permanently withheld or you
“Q” is not displayed after I read a
message.
L You have not subscribed to the appropriate service.
Consult your service provider/telephone company.
L The SMS message centre number(s) are not stored
or are incorrect. Store the correct numbers (page
39).
L Message transmission was interrupted. Wait until
the message has been sent before using other
telephone functions.
L Your unit is connected to a telephone line with DSL
service. We recommend connecting a filter (contact
your DSL service provider) to the telephone line
between the base unit and the telephone line jack.
L Someone tried to send you a message while SMS
was turned off.
centre. Confirm that the correct SMS message
centre numbers are stored (page 39). Confirm that
SMS is turned on (page 39).
again.
have not subscribed to the appropriate service.
Consult your service provider/telephone company.
L When an error code (“FD”, “FE”, or “E0”) is
displayed, “Q” will not be displayed even if you
have read the message.
60
Page 61

TG9120FX(e).book Page 61 Tuesday, August 29, 2006 9:44 AM
Answering system
Problem Cause & solution
The unit does not record new
messages.
The other party complains that they
cannot leave a message.
I cannot operate the answering
system with the handset.
When I try to operate the
answering system with the base
unit, {s} flashes for a few
seconds and I cannot operate the
answering system.
I cannot operate the answering
system remotely.
While recording a greeting
message or listening to messages,
the unit rings and recording stops.
L The answering system is turned off. Turn it on (page
43).
L The recording time is set to “Greeting Only”.
Select “1 Minute” or “3 Minutes” (page 47).
L If you subscribe to the voice mail service,
messages are recorded by your service
provider/telephone company not your telephone.
Change the unit’s “Number of Rings” setting so
that the unit’s answering system can answer the
call before the voice mail service or consult your
service provider/telephone company (page 47).
L The recording time is set to “Greeting Only”.
Select “1 Minute” or “3 Minutes” (page 47).
L The base unit or another handset is being used.
Wait for the other user to finish.
L A caller is leaving a message. Wait for the caller to
finish.
L The handset is too far from the base unit. Move
closer.
L Another handset is being used. Wait for the other
user to finish.
L A caller is leaving a message. Wait for the caller to
finish.
L You are entering the wrong remote access code. If
you forget the remote access code, store a new
remote access code and try again (page 45).
L You are pressing the dial keys too quickly. Press
each key firmly.
L The answering system is turned off. Turn it on (page
46).
L You are using a pulse telephone. Try again using a
touch tone phone.
L A call is being received. Answer the call and try
again later.
Useful Information
61
Page 62

TG9120FX(e).book Page 62 Tuesday, August 29, 2006 9:44 AM
Useful Information
Specifications
■ Standard:
DECT (Digital Enhanced Cordless
Telecommunications),
GAP (Generic Access Profile)
■ Number of channels:
120 Duplex Channels
■ Frequency range:
1.88 GHz to 1.90 GHz
■ Duplex procedure:
TDMA (Time Division Multiple Access)
■ Channel spacing:
1,728 kHz
■ Bit rate:
1,152 kbit/s
■ Modulation:
GFSK (Gaussian Frequency Shift Keying)
■ RF transmission power:
Approx. 250 mW
■ Voice coding:
ADPCM 32 kbit/s
■ Power source:
220–240 V, 50 Hz
■ Power consumption, Base unit:
Standby: Approx. 1.9 W
Maximum: Approx. 6.8 W
■ Operating conditions:
5 °C–40 °C, 20 %–80 % relative air humidity
(dry)
■ Dimensions:
Base unit: Approx. 63 mm × 173 mm ×
99 mm
Handset: Approx. 156 mm × 49 mm ×
34 mm
■ Mass (weight):
Base unit: Approx. 250 g
Handset: Approx. 140 g
Note:
L Specifications are subject to change.
L The illustrations used in these operating
instructions may differ slightly from the
actual product.
Connections:
L The unit will not work during a power
failure. We recommend you connect a
standard telephone on the same line for
power protection.
62
Page 63

TG9120FX(e).book Page 63 Tuesday, August 29, 2006 9:44 AM
Index
A Additional base units: 48
Additional handsets: 48
Alarm: 27
Answering calls: 18
Answering system: 43
Listening to messages: 44
Remote operation: 45
Settings: 47
Turning on/off: 43
Audible call: 23, 24, 37
Auto intercom: 32
Auto talk: 18, 31
B Base unit
Cancelling: 49
Selecting: 49
Settings: 33
Battery
Charge: 13
Installation: 12
Performance: 13
Replacement: 12
Strength: 13
Belt clip: 6, 52
C Caller ID service: 36
Calling code: 32
Call privacy: 17
Call share: 17
Category: 19
Display colours: 37
Ringtones: 36
Chain dial: 21
Character entry: 53
Conference calls: 50
Connections: 12
Copy
Phonebook: 51
Cordless camera: 3, 4
Customise ringtones: 28
D Date and time: 15
Dialling mode: 14
Display
Colour: 30
Contrast: 30
Index
Icons: 9
Language: 14
Wallpaper: 30
H Handset
Cancelling: 49
Locator: 18
Power on/off: 14
Registration: 48
Settings: 25
I Intercom: 50
K Key lock: 17
Keytones: 31
L LetterWise: 31, 54, 55
M Making calls: 16
Memo alarm: 27
Message alert: 31
Missed calls: 36
Monitor
Baby monitor: 30
Mute: 17
N Night mode
Base unit: 34
Handset: 29
O One touch dial: 21
P Pause: 17
Phonebook copy: 51
Phonebooks
Handset phonebook: 19
Shared phonebook: 23
PIN
Base unit: 35
Power on/off: 14
R Recall: 17, 34
Recording
Audible call: 23
Greeting message: 43
Redialling: 16
Redial list: 16
Region setting: 35
Registration: 48
Repeater: 50
Ringtones: 27
S Screen saver mode: 13
SMS feature: 39
Speakerphone: 16
63
Page 64

TG9120FX(e).book Page 64 Tuesday, August 29, 2006 9:44 AM
Index
T Temporary tone dialling: 17
Time adjustment: 15
Transfer calls: 50
U USB adaptor: 3, 4
V Voice enhancer: 17
Voice mail: 38
Volume
Receiver: 16
Ringer (Base unit): 34
Ringer (Handset): 27
Speakerphone: 16
64
Page 65

TG9120FX(e).book Page 65 Tuesday, August 29, 2006 9:44 AM
Notes
65
Page 66

TG9120FX(e).book Page 66 Tuesday, August 29, 2006 9:44 AM
Notes
66
Page 67

TG9120FX(e).book Page 67 Tuesday, August 29, 2006 9:44 AM
Notes
67
Page 68

TG9120FX(e).book Page 68 Tuesday, August 29, 2006 9:44 AM
Copyright:
This material is copyrighted by Panasonic Communications Co., Ltd., and may be reproduced
for internal use only. All other reproduction, in whole or in part, is prohibited without the written
consent of Panasonic Communications Co., Ltd.
© 2006 Panasonic Communications Co., Ltd. All Rights Reserved.
68
Page 69

TG9120FX(cz-cz).book Page 1 Tuesday, August 29, 2006 5:28 PM
Digitální bezdrátový telefon se
Návod k obsluze
záznamníkem
Model č. KX-TG9120FX
Toto zařízení je kompatibilní se službami ID volajícího a SMS. Chcete-li
používat tyto funkce, musíte si objednat příslušnou službu u svého
poskytovatele služeb.
Před prvním použitím nabíjejte baterie po dobu přibližně 7 hodin.
Tot o z ařízení je určeno pro použití v České republice, Slovenské republice, Turecku a střední
Evropě. Chcete-li zařízení použít ve vaší zemi, nejprve změňte nastavení regionu na zařízení
podle vaší země (strana 34). Dle potřeby změňte jazyk na displeji (strana 14).
Před použitím zařízení si přečtěte tento návod k obsluze a uschovejte jej pro budoucí použití.
(Pro Českou republiku a Slovensko)
Tento bezdrátový telefon je možné používat na základě generální licence č.:
VO-R/8/08.2005-23 (pro Českou republiku) a VPR-7/2001 (pro Slovensko).
Page 70

TG9120FX(cz-cz).book Page 2 Tuesday, August 29, 2006 5:28 PM
Úvod
Úvod
Děkujeme vám, že jste si zakoupili nový digitální bezdrátový telefon společnosti Panasonic.
Pro budoucí použití
Přiložte nebo uschovejte originální doklad – je důležitý při záručních opravách.
Výrobní číslo (je uvedeno na spodní straně základny)
Datum nákupu
Jméno a adresa prodejce
Poznámka:
L
Vpřípadě jakýchkoliv problémů byste měli nejdříve kontaktovat dodavatele zařízení.
Prohlášení o shodě:
L
Společnost Panasonic Communications Co., Ltd. tímto prohlašuje, že toto zařízení je v souladu
sklíčovými požadavky a dalšími platnými opatřeními směrnice Radio & Telecommunications
Terminal Equipment (R&TTE – směrnice pro rádiové a telekomunikační stanice) 1999/5/EC.
Prohlášení o shodě pro příslušné produkty Panasonic popsané v této příručce jsou k dispozici ke
stažení na stránkách:
http://www.doc.panasonic.de
Kontakt:
Panasonic Services Europe
a Division of Panasonic Marketing Europe GmbH
Panasonic Testing Centre
Winsbergring 15, 22525 Hamburg, Germany
Ochranné známky:
L
Eatoni a LetterWise jsou ochranné známky společnosti Eatoni Ergonomics, Inc.
L
Skype, SkypeIn, SkypeOut a logo S jsou ochrannými známkami společnosti Skype Limited.
(2)
Page 71

TG9120FX(cz-cz).book Page 3 Tuesday, August 29, 2006 5:28 PM
Popis hlavních funkcí
Toto za řízení je kompatibilní s bezdrátovou kamerou a USB adaptérem pro Skype. Po zakoupení
a zaregistrování přídavné bezdrátové kamery a/nebo USB adaptéru (strana 4) vám budou k dispozici
následující funkce.
Monitorování kamerou pomocí mikrotelefonu (potřebujete bezdrátovou
kameru KX-TGA914FX)
L
Místnost, v níž je kamera umístěna, můžete monitorovat pokud:
– máte přístup k bezdrátové kameře pomocí mikrotelefonu,
– bezdrátová kamera se v případě zaznamenání zvuku ohlásí mikrotelefonu,
– uživatel bezdrátové kamery zavolá na mikrotelefon pomocí tlačítka volání.
Bezplatné internetové hovory pomocí Skype (potřebujete USB adaptér
KX-TGA915EX)
L
Zdarma můžete telefonovat přes Internet komukoliv na světě, kdo používá Skype.
L
Software Skype je bezplatný a funguje na většině počítačů.
L
Software Skype je jednoduše ke stažení a snadno se používá.
Úvod
(3)
Page 72

TG9120FX(cz-cz).book Page 4 Tuesday, August 29, 2006 5:28 PM
Úvod
Rozšíření telefonního systému
Svůj telefonní systém můžete rozšířit tak, že na jednu základnu zaregistrujete další volitelná zařízení.
L
Na jednu základnu lze zaregistrovat maximálně 6 zařízení (volitelných a dodaných).
Volitelná zařízení
Přídavné digitální
sluchátko DECT
KX-TGA910FX
max. 5
USB Adaptér
KX-TGA915EX
(pro volání přes
*1
Internet)
max. 1
Bezdrátová kamera
KX-TGA914FX
(pro monitorování
pomocí kamery)
max. 5
*1 Po zaregistrování USB adaptéru KX-TGA915EX k základně a nainstalování softwaru Skype na
vašem počítači můžete pomocí mikrotelefonu a vašeho počítače telefonovat přes Internet.
(4)
Page 73

TG9120FX(cz-cz).book Page 5 Tuesday, August 29, 2006 5:28 PM
Obsah
Příprava
Informace o příslušenství. . . . . . . . . . . . . . . . 6
Důležité informace . . . . . . . . . . . . . . . . . . . . . 7
Ovládací prvky . . . . . . . . . . . . . . . . . . . . . . . . 8
Displej. . . . . . . . . . . . . . . . . . . . . . . . . . . . . . . 9
Připojení . . . . . . . . . . . . . . . . . . . . . . . . . . . . 12
Instalace/výměna baterie . . . . . . . . . . . . . . . 12
Nabíjení baterií. . . . . . . . . . . . . . . . . . . . . . . 13
Režim spořiče displeje . . . . . . . . . . . . . . . . . 13
Vypnutí a zapnutí . . . . . . . . . . . . . . . . . . . . . 13
Symboly použité v tomto návodu
k obsluze . . . . . . . . . . . . . . . . . . . . . . . . . . . 14
Nastavení regionu . . . . . . . . . . . . . . . . . . . . 14
Jazyk na displeji . . . . . . . . . . . . . . . . . . . . . . 14
Režim volby čísla (tónový/pulzní). . . . . . . . . 14
Datum a čas . . . . . . . . . . . . . . . . . . . . . . . . . 15
C
Uskutečňování/příjem
hovorů
Hovory . . . . . . . . . . . . . . . . . . . . . . . . . . . . . 16
Odpověď na hovory . . . . . . . . . . . . . . . . . . . 18
k
Telefonní seznamy
Telefonní seznam mikrotelefonu. . . . . . . . . . 19
Sdílený telefonní seznam . . . . . . . . . . . . . . 22
m
Nastavení mikrotelefonu
Nastavení mikrotelefonu. . . . . . . . . . . . . . . . 24
Nastavení času. . . . . . . . . . . . . . . . . . . . . . . 26
Nastavení vyzvánění . . . . . . . . . . . . . . . . . . 26
Nastavení displeje . . . . . . . . . . . . . . . . . . . . 29
Odposlech (je nutný přídavný
mikrotelefon). . . . . . . . . . . . . . . . . . . . . . . . . 29
Další možnosti . . . . . . . . . . . . . . . . . . . . . . . 30
L
Nastavení základny
Nastavení základny . . . . . . . . . . . . . . . . . . . 32
Nastavení vyzvánění . . . . . . . . . . . . . . . . . . 33
Možnosti volby . . . . . . . . . . . . . . . . . . . . . . . 33
Další možnosti . . . . . . . . . . . . . . . . . . . . . . . 33
X
Služba SMS (Short Message
Service: krátké textové zprávy)
Použití služby SMS (Short Message Service:
krátké textové zprávy) . . . . . . . . . . . . . . . . . .38
Zapnutí/vypnutí služby SMS . . . . . . . . . . . . .38
Ukládání čísel střediska zpráv služby
SMS. . . . . . . . . . . . . . . . . . . . . . . . . . . . . . . .38
Odeslání zprávy. . . . . . . . . . . . . . . . . . . . . . .38
Příjem zprávy. . . . . . . . . . . . . . . . . . . . . . . . .39
Nastavení služby SMS . . . . . . . . . . . . . . . . .40
I
Funkce záznamníku
Záznamník. . . . . . . . . . . . . . . . . . . . . . . . . . .41
Zapnutí a vypnutí záznamníku . . . . . . . . . . .41
Uvítací zpráva . . . . . . . . . . . . . . . . . . . . . . . .41
Poslech zpráv . . . . . . . . . . . . . . . . . . . . . . . .42
Provoz pomocí přímých příkazů
mikrotelefonu. . . . . . . . . . . . . . . . . . . . . . . . .43
Dálkové ovládání. . . . . . . . . . . . . . . . . . . . . .43
Nastavení záznamníku . . . . . . . . . . . . . . . . . 44
Provoz několika jednotek
Provoz přídavných sluchátek. . . . . . . . . . . . .46
Registrace mikrotelefonu k základně. . . . . . .46
Režim interkom mezi dvěma
mikrotelefony. . . . . . . . . . . . . . . . . . . . . . . . .48
Přesměrování hovorů mezi mikrotelefony,
konferenční hovory . . . . . . . . . . . . . . . . . . . .48
Kopírování položek telefonního seznamu . . . 49
Užitečné informace
Používání spony na opasek . . . . . . . . . . . . .50
Zadávání znaků . . . . . . . . . . . . . . . . . . . . . . .51
Chybové zprávy. . . . . . . . . . . . . . . . . . . . . . .54
Řešení potíží . . . . . . . . . . . . . . . . . . . . . . . . .55
Technické údaje. . . . . . . . . . . . . . . . . . . . . . .59
Rejstřík
Rejstřík . . . . . . . . . . . . . . . . . . . . . . . . . . . . 60
j
Služba ID volajícího
Použití služby ID volajícího . . . . . . . . . . . . . 35
Seznam volajících . . . . . . . . . . . . . . . . . . . . 36
Hlasová pošta . . . . . . . . . . . . . . . . . . . . . . . 37
(5)
Page 74

TG9120FX(cz-cz).book Page 6 Tuesday, August 29, 2006 5:28 PM
Příprava
Informace o příslušenství
Dodávané příslušenství
Č. Položky příslušenství Množství
1
Síùový adaptér pro základnu (objednací č. PQLV207CE) 1
2
Telefonní kabel 1
3
Nabíjecí baterie typu AAA (R03)
(objednací č. HHR-4EPT)
4
Kryt na mikrotelefon
5
Spona na opasek 1
6
Audiokabel 1
*1 Kryt se dodává připevněný k mikrotelefonu.
123456
*1
2
1
Další volitelné příslušenství
Informace o prodeji získáte u nejbližšího prodejce značky Panasonic.
Č. Model č. Popis
1
KX-TCA717EX Adaptér pro montáž na stěnu
2
KX-TCA94EX Náhlavní souprava
3
KX-A272 Opakovač DECT
12
Poznámka:
L
Svůj telefonní systém můžete rozšířit zaregistrováním volitelných zařízení Panasonic (strana 4).
L
Při výměně baterií použijte pouze 2 nabíjecí Ni-MH baterie velikosti AAA (R03). Doporučujeme
použití nabíjecích baterií značky Panasonic (č. modelu P03P).
L
Neneseme žádnou odpovědnost za jakékoliv poškození zařízení ani za pokles jeho výkonu
vdůsledku použití nabíjecích baterií jiných než Panasonic daného typu.
(6)
Page 75

TG9120FX(cz-cz).book Page 7 Tuesday, August 29, 2006 5:28 PM
Důležité informace
Obecné informace
L
Používejte pouze síùový adaptér dodávaný
s tímto produktem (informace viz strana 6).
L
Síùový adaptér nezapojujte do jiné než
standardní zásuvky s napájením 220–240 V.
L
Z tohoto přístroje nebude možné telefonovat
v následujících případech:
–baterie přenosného mikrotelefonu potřebuje
dobít nebo není v pořádku,
– došlo k výpadku napájení,
– je zapnutá funkce blokování tlačítek.
L
Nedemontujte základnu, nabíječku ani
mikrotelefon (s výjimkou výměny baterií).
L
Tot o z ařízení by se nemělo používat v blízkosti
záchranných lékařských přístrojů aneměly by
ho používat osoby s kardiostimulátorem.
L
Dbejte také na to, aby do zařízení nezapadly
žádné předměty a aby se do něj nevylila
tekutina. Tento přístroj nevystavujte
nadměrnému kouři, prachu, mechanickým
otřesům ani nárazům.
Prostředí
L
Nepoužívejte tento produkt v blízkosti vody.
L
Neponechávejte tento produkt v blízkosti
zdrojů tepla, například topných těles, sporáků
atd. Umísùujte jej v místnostech s teplotou
°
vrozmezí 5
L
Jako hlavní připojovací zařízení je použit
síùový adaptér. Poblíž výrobku musí být
umístěna snadno přístupná zásuvka.
Výstraha:
L
Abyste zamezili nebezpečí úrazu elektrickým
proudem, nevystavujte zařízení dešti ani
vlhkosti.
L
Výrobek odpojte od zásuvky napájení, pokud
zněj vychází kouř, neobvyklý zápach nebo
pokud vydává neobvyklé zvuky. Mohlo by dojít
k požáru nebo úrazu elektrickým proudem.
Ověřte, že se z výrobku již nekouří,
a kontaktujte autorizované servisní středisko.
C až 40°C.
Příprava
Upozornění týkající se baterie
L
Doporučujeme používat baterie uvedené na:
strana 6.
L
Nekombinujte staré baterie s novými.
L
Nevhazujte baterie do ohně, mohly by
explodovat. Při likvidaci baterií dodržujte
místní předpisy pro likvidaci odpadu.
L
Baterii neotevírejte a nepoškozujte. Elektrolyt,
který se z baterie uvolňuje, je korozívní
amůže způsobit popáleniny nebo poranění očí
či pokožky. Elektrolyt může být v případě požití
toxický.
L
Při manipulaci s bateriemi buďte opatrní.
Baterie nesmí přijít do styku s vodivými
materiály, jako jsou prsteny, náramky nebo
klíče – vzniklý zkrat by mohl vést k přehřátí
baterie nebo vodivých materiálů anásledně
způsobit popáleniny.
L
Baterie je třeba nabíjet v souladu
s informacemi uvedenými v tomto návodu
kobsluze.
L
K nabíjení baterií používejte pouze dodanou
základnu nebo nabíječku. Základnu nebo
nabíječku neupravujte. Pokud se těmito
pokyny nebudete řídit, baterie se mohou
zdeformovat nebo může dojít k explozi.
Používejte pouze nabíjecí baterie.
Informace pro uživatele k likvidaci
elektrických a elektronických
zařízení (domácnosti)
Tento symbol na produktech anebo v průvodních
dokumentech znamená, že použité elektrické
a elektronické výrobky nesmí být přidány do
běžného komunálního odpadu. Ke správné
likvidaci, obnově a recyklaci doručte tyto výrobky
na určená sběrná místa, kde budou přijata
zdarma. Alternativně vněkterých zemích můžete
(7)
Page 76

TG9120FX(cz-cz).book Page 8 Tuesday, August 29, 2006 5:28 PM
Příprava
vrátit své výrobky místnímu prodejci při koupi
ekvivalentního nového produktu.
Správnou likvidací tohoto produktu pomůžete
zachovat cenné přírodní zdroje a napomáháte
prevenci potenciálních negativních dopadů na
životní prostředí a lidské zdraví, což by mohly být
důsledky nesprávné likvidace odpadů. Další
podrobnosti si vyžádejte od místního úřadu nebo
nejbližšího sběrného místa.
Při nesprávné likvidaci tohoto druhu odpadu
mohou být v souladu s národními předpisy
uděleny pokuty.
Pro podnikové uživatele v zemích Evropské
unie
Chcete-li likvidovat elektrická a elektronická
zařízení, vyžádejte si potřebné informace od
svého prodejce nebo dodavatele.
Informace k likvidaci v ostatních zemích
mimo Evropskou unii
Tento symbol je platný jen v Evropské unii.
Chcete-li tento výrobek zlikvidovat, vyžádejte si
potřebné informace o správném způsobu
likvidace od místních úřadů nebo od svého
prodejce.
C
Displej
D
Funkční tlačítka
E
Sluchátkový konektor typu jack/
Audio konektor typu jack
F
{C}
(Hovor)
G
Navigační tlačítko
H
{s}
(Hlasitý telefon)
I
Klávesnice pro zadávání čísel / znaků
J{R} (Zpětný dotaz/Flash)
K
Indikátor nabití/Indikátor vyzvánění/
Indikátor zpráv
L
Reproduktor sluchátka
M
{ih}
(Vypnout/Zapnout)
N{C/T}
O{INT} (Interkom)
P
Používání navigačního tlačítka
Stisknutím navigačního tlačítka nahoru, dolů,
vlevo nebo vpravo lze procházet nabídkami
a vybírat položky na displeji.
(Smazat/vypnout)
Mikrofon
Ovládací prvky
Mikrotelefon
A
C
D
E
F
G
H
B
A
Reproduktor
B
Kontakty nabíjení
(8)
I
J
K
L
M
N
O
P
Stisknutím střední části ovladače lze vybrat ikonu
prostředního funkčního tlačítka.
Page 77

TG9120FX(cz-cz).book Page 9 Tuesday, August 29, 2006 5:28 PM
Příprava
Základna
DE
B
A
A
Kontakty nabíjení
B
Reproduktor
C
{x}
(Lokátor)
D{4} (Mazání)
E{■} (Zastavit)
F{s} (Zapnutí záznamníku)/
Indikátor stavu záznamníku
G{6} (Přehrát zprávu)/Indikátor zpráv
H
Navigační tlačítka (
{^}/{V}/{8}/{7}
C
G
F
H
Displej
Ikony displeje
Ikona
displeje
w
x
k
y
Význam
V dosahu základny
L
Pokud bliká: Mikrotelefon se
přihlašuje k základně. (mimo
dosah základny, mikrotelefon
není k žádné základně
zaregistrován, základna je
vypnutá)
Mikrotelefon se přihlašuje
k základně. (interkom,
vyvolávání, změna nastavení
základny atd.)
Mikrotelefon přijímá příchozí
hovor.
Zmeškaný hovor*1 (strana 35)
Ikona
displeje
u
n
d
%
@
e
d
x
)
T
~
f
h
j
m
z
*1 Pouze pro odběratele služby ID volajícího
*2 Pouze pro uživatele služby SMS
*3 Pouze pro uživatele hlasové pošty
Význam
Záznamník je zapnutý
(strana 41) a/nebo byly
zaznamenány nové zprávy.
(strana 41)
Záznamník je plný.
Záznamník přijme hovor,
přehraje uvítací zprávu, ale
zprávy volajících se
nezaznamenají. (strana 45)
Oznámení hlasové identifikace
bylo pro tuto položku
zaznamenáno. (strana 22)
Intenzita nabití baterie
Alarm je zapnutý. (strana 26)
Funkce zvýraznění hlasu je
nastavena na vysoké nebo
hluboké tóny. (strana 17)
Režim soukromého hovoru je
zapnut. (strana 17)
Zvuk je ztlumený (tj. vypnutý
mikrofon). (strana 17)
Vyzvánění je vypnuté.
(strana 26)
Noční režim je zapnutý.
(strana 28)
Byla přijata nová zpráva SMS*2
(strana 39)
Zobrazí se při psaní zprávy
*2
(strana 38)
SMS.
Paměù pro zprávy SMS je
*2
plná.
Přijata nová hlasová zpráva*3
(strana 37)
Linka nebo záznamník jsou
používány jiným
mikrotelefonem nebo
základnou.
(9)
Page 78

TG9120FX(cz-cz).book Page 10 Tuesday, August 29, 2006 5:28 PM
Příprava
Pouze pro uživatele bezdrátové kamery
KX-TGA914FX
Ikona
Význam
displeje
8
Mikrotelefon je připojen
k bezdrátové kameře.
L
Když bliká: Bezdrátová
kamera vyvolává
mikrotelefon neboù
zaznamenala zvuk nebo bylo
stisknuto tlačítko volání.
Pouze pro uživatele USB adaptéru
KX-TGA915EX
Ikona
Význam
displeje
D
Mikrotelefon je v IP režimu
telefonu.
L
Když bliká: Probíhá příjem
internetového hovoru.
9
Zmeškaný internetový hovor
Ikony nabídky
Po stisknutí středu navigačního tlačítka
v pohotovostním režimu se zobrazí hlavní
nabídka mikrotelefonu. Tato nabídka umožňuje
přístup k různým funkcím a nastavení.
Ikona nabídky Nabídka/funkce
Sezn.volajících
SMS
(Short Message
Service: krátké textové
zprávy)
Záznamník
Nast. displeje
*1
Nast. sluchátka
Nastavení báze
*13 Uživatelům USB adaptéru
“
KX-TGA915EX se zobrazí (
”
seznamu
displeje
) namísto M (“Nast.
”
).
Nast.
Nast. seznamu
Funkční tlačítka
Mikrotelefon je vybaven dvěma funkčními tlačítky
anavigačním tlačítkem. Stisknutím funkčního
tlačítka nebo střední části navigačního tlačítka
můžete vybrat funkci nebo operaci, která je
označena ikonou funkčního tlačítka přímo nad
tlačítkem.
Ikony funkčních tlačítek
Ikona
Akce
funkčního
tlačítka
U
P
Vrátí předchozí obrazovku.
Umožňuje uskutečnit volání
v režimu interkom.
K
Zobrazí nabídku.
J
M
Potvrdí aktuální výběr.
L
j
Zobrazí předchozí volané
telefonní číslo.
n
Otevře telefonní seznam
mikrotelefonu.
T
Otevře sdílený telefonní
seznam.
k
Zobrazí nabídku vyhledávání
v telefonním seznamu.
I
Vypne funkci blokování
tlačítek. (strana 17)
(10)
Page 79

TG9120FX(cz-cz).book Page 11 Tuesday, August 29, 2006 5:28 PM
Příprava
Ikona
funkčního
tlačítka
s
X
Y
Z
o
q
r
p
e
Q
O
N
l
W
b
V
c
d
w
g
f
t
a
Akce
Přepíná mezi formátem
zadávání času AM, PM a 24
hodin.
Zobrazí se při výběru zadání
znaku v režimu LetterWise
®
.
Zobrazí se při výběru zadání
znaku abecedy.
Zobrazí se při výběru zadání
číselného znaku.
Zobrazí se při výběru zadání
řeckého znaku.
Zobrazí se při výběru zadání
z tabulky 1 rozšířených znaků.
Zobrazí se při výběru zadání
z tabulky 2 rozšířených znaků.
Zobrazí se při výběru zadání
znaku cyrilice.
Zapne a vypne záznamník.
Zahájí nahrávání. (strana 27)
Ukončí nahrávání nebo
přehrávání.
Vloží pauzu při volbě čísla.
(strana 17)
Vymaže vybranou položku.
Zobrazí seznam obrázků.
Zobrazí vybranou položku
telefonního seznamu.
Zobrazí obrázek.
Zobrazí další obrazovku.
Vytvoří konferenční hovor.
Uloží položku telefonního
seznamu mikrotelefonu nebo
nahraná hudební data.
Vybere zvýrazněnou položku.
Vloží znak.
Pouze pro uživatele bezdrátové kamery
KX-TGA914FX
Ikona
Akce
funkčního
tlačítka
B
A
Upravuje jas obrazu.
Přepíná mezi možnostmi
Přiblížení a Normální režim.
v
Volí citlivosti detekce zvuků.
Pouze pro uživatele USB adaptéru
KX-TGA915EX
Ikona
Akce
funkčního
tlačítka
D
Umožňuje uskutečnit
internetové volání.
G
Pro internetové hovory přepíná
na Seznam odchozích hovorů.
F
Pro internetové hovory přepíná
na Seznam příchozích hovorů.
u
Pro internetové hovory přepíná
na Historii hlasové pošty.
E
H
2. hovor odmítne.
Internetový hovor podrží.
(11)
Page 80

TG9120FX(cz-cz).book Page 12 Tuesday, August 29, 2006 5:28 PM
Příprava
Připojení
Při připojení síùového adaptéru zazní krátký
signál. Pokud signál neuslyšíte, zkontrolujte
zapojení.
Háček
(220–240 V, 50 Hz)
Do telefonní sít
Používejte pouze dodaný síťový
adaptér a telefonní kabel.
Poznámka:
L
Telefonní kabely nikdy nepřipojujte během
bouřky.
L
Síùový adaptér musí být vždy zapojen. (Při
používání je adaptér obvykle teplý.)
L
Síùový adaptér musí být připojen do zásuvky
na stěně nebo v podlaze. Nezapojujte síùový
adaptér do stropní zásuvky, protože by
hmotností adaptéru mohlo dojít k odpojení.
ě
Instalace/výměna baterie
Důležité:
L
Používejte pouze přiložené nabíjecí baterie
uvedené v části strana 6, 7.
L
Při výměně baterií doporučujeme použít
nabíjecí baterie Panasonic uvedené v části
strana 6, 7.
L
Otřete kontakty baterií (S, T) suchým
hadříkem.
L
Baterie vkládejte tak, abyste se nedotkli jejich
S, T
konců (
1
Jemně stiskněte západku na mikrotelefonu
aposuňte ji ve směru šipky.
L
Při výměně baterií vyjměte staré baterie
pozitivním (
2
Nejprve vložte konec baterie označený
znaménkem mínus (
baterií zavřete kryt mikrotelefonu.
) ani kontaktů zařízení.
S
) koncem napřed.
T
). Po vložení obou
Umístění
L
Abyste dosáhli maximální vzdálenosti a co
nejnižší hladiny šumu, umístěte základnu
následujícím způsobem:
– v dostatečné vzdálenosti od elektrických
přístrojů například: televizorů, rozhlasových
přijímačů, počítačů nebo jiných telefonů,
– na vhodném, přiměřeně vysokém
apřístupném místě.
(12)
Page 81

TG9120FX(cz-cz).book Page 13 Tuesday, August 29, 2006 5:28 PM
Nabíjení baterií
Vložte mikrotelefon do základny zhruba 7
hodin před prvním použitím.
Při nabíjení se zobrazí “Nabíjení”.
Jakmile jsou baterie plně nabity, zobrazí se
“
Nabíjení dokonČ.”.
L
Při nabíjení svítí na mikrotelefonu indikátor
nabíjení žlutě. Jakmile jsou baterie plně nabity,
svítí indikátor nabíjení zeleně.
Kontakt
nabíjení
Poznámka:
L
Při nabíjení je mikrotelefon obvykle teplý.
L
Pokud chcete použít zařízení ihned, nabíjejte
baterie po dobu alespoň 15 minut.
L
Kontakty nabíjení mikrotelefonu a základny
vyčistěte jednou měsíčně měkkým suchým
hadříkem – zajistíte tím jejich správné
dobíjení. Čištění provádějte častěji, pokud je
zařízení vystaveno mastnotě, prachu nebo
vysoké vlhkosti.
Intenzita nabití baterie
Ikona baterie Intenzita nabití baterie
@
?
/
Vysoká
Střední
Nízká
Jestliže bliká: Baterii je
třeba nabít.
Příprava
Výkon baterie Panasonic Ni-MH (dodávané
baterie)
Operace Doba provozu
Při nepřetržitém
používání
V pohotovostním
režimu
Poznámka:
L
Pokud baterie při prvním nabíjení nedosáhnou
plné kapacity, nejedná se o vadu. Baterie
dosáhnou maximálního výkonu po několika
úplných cyklech nabití/vybití (použití).
L
Skutečný výkon baterie závisí na frekvenci
používání (hovorů) a nepoužívání
(pohotovostní režim) mikrotelefonu.
L
Doba provozu baterie může být za určitou
dobu kratší v závislosti na podmínkách využití
a okolní teplotě.
L
Když je nabíjení mikrotelefonu dokončeno, lze
jej ponechat v základně. Baterie se nepoškodí.
L
Po výměně baterií se nemusí zobrazit správný
údaj o intenzitě jejich nabití. V takovém
případě vložte mikrotelefon do základny
alespoň na 7 hodin.
Maximálně 15
hodin
Maximálně 240
hodin
Režim spořiče displeje
Pokud mikrotelefon není v základně,
se úplně vypne po 1 minutě nečinnosti
Pokud chcete použít mikrotelefon, který je
v režimu spořiče displeje, nejprve zapněte displej
{ih}
tlačítkem
.
podsvícení
.
Vypnutí a zapnutí
Zapnutí
Podržte stisknuté tlačítko
neozve krátké pípnutí.
{ih}
, dokud se
Vypnutí
Na zhruba 2 sekundy stiskněte tlačítko
{ih}
(13)
.
Page 82

ete zvolit
Deutsch
English
,
Magyar
Polski
slovensky
tina
Hrvatski
,
Slovenscina
Eesti
LIETUVI
KAI
Latvie
,
Rom
БЪЛГАРСКИ
Srpski
МАКЕДОНСКИ
Shqiptar
TG9120FX(cz-cz).book Page 14 Tuesday, August 29, 2006 5:28 PM
Příprava
Symboly použité v tomto
návodu k obsluze
Symbol Význam
J
i
L
j
X
I
M
3
m
L
“ ” Stisknutím navigačního tlačítka
Stiskněte tlačítko J (střed
navigačního tlačítka).
Přejděte k další činnosti.
Stiskněte tlačítko L (střed
navigačního tlačítka).
Vyberte uvedenou ikonu nabídky
mikrotelefonu (strana 10).
Příklad:m (ikona nabídky
nastavení mikrotelefonu)
Pohybujte navigačním tlačítkem
určitým směrem, až se dostanete
m
na ikonu
směrem nahoru nebo dolů vyberte
slova v uvozovkách zobrazená na
displeji (například
Času
.
“
Nastavení
”
).
Nastavení regionu
Můžete nastavit přístroj tak, aby byla použita
nastavení, která odpovídají vaší zemi
(strana 34). Podle toho se změní příslušná
nastavení jazyka a další nastavení.
Poznámka:
L
Jazyk na displeji se změní (na výchozí
nastavení vybrané země) pouze na
mikrotelefonu, který použijete ke změně
nastavení regionu. U všech ostatních
mikrotelefonů musíte jazyk na displeji změnit
samostatně.
Jazyk na displeji
Je dostupných 17 jazyků na displeji.
MMůžete zvolit
“Türkrkçe”, , “Magyar
“slovensky
“Slovenscina
“LIETUVI
“Rom
ânã”, , “БЪЛГАРСКИ
“МАКЕДОНСКИ
1
{ih} i J
2
Stisknutím navigačního tlačítka v libovolném
směru vyberte
tlačítka)
3
Stisknutím navigačního tlačítka nahoru nebo
dolů vyberte
4
Stisknutím navigačního tlačítka nahoru nebo
dolů vyberte
5
Stisknutím navigačního tlačítka nahoru nebo
dolů vyberte požadovaný jazyk.
{ih}
Poznámka:
L
Pokud zvolíte jazyk, kterému nerozumíte,
stiskněte tlačítko
vyberte
stiskněte navigační tlačítko směrem dolů,
stiskněte tlačítko L, 2 krát stiskněte
navigační tlačítko směrem dolů, stiskněte
tlačítko L, vyberte požadovaný jazyk a poté
stiskněte tlačítko
{ih}
“Deutsch
”, “ČeŠtina
”, , “Eesti
ŠKAI
”, , “Latvie
”, , nebo “Shqiptar
m. i L
“
Nast. displeje”. i
“
Vybrat jazyk”. i
m
, stiskněte tlačítko L, 2 krát
.
”, , “English
”, , “Polski
”, , “Hrvatski
”,
Šu”,
”, , “Srpski
(střed navigačního tlačítka)
(střed navigačního
{ih}
atlačítko J,
L
. Stiskněte tlačítko
”,
”,
”,
”.
L
L
i L i
Režim volby čísla
(tónový/pulzní)
Změňte režim volby čísla v závislosti na službě
telefonní linky.
“
Tónová”: Tuto možnost vyberte, pokud
používáte tónovou volbu.
“
Pulsní”: Tuto možnost vyberte, pokud
používáte pulzní volbu.
1
J
(střed navigačního tlačítka)
”,
(14)
Page 83

TG9120FX(cz-cz).book Page 15 Tuesday, August 29, 2006 5:28 PM
2
Stisknutím navigačního tlačítka v libovolném
směru vyberte
navigačního tlačítka)
3
Stisknutím navigačního tlačítka nahoru nebo
dolů vyberte
4
Stisknutím navigačního tlačítka nahoru nebo
dolů vyberte
5
Opakovaným stisknutím navigačního tlačítka
nahoru nebo dolů vyberte požadované
nastavení. i L i
L. i L
“
MoŽnosti volby”. i
“
Typ volby”. i
(střed
L
L
{ih}
Datum a čas
1
J
(střed navigačního tlačítka)
2
Stisknutím navigačního tlačítka v libovolném
směru vyberte
tlačítka)
3
Stisknutím navigačního tlačítka nahoru nebo
dolů vyberte
4
Stisknutím navigačního tlačítka nahoru nebo
dolů vyberte
5
Zadejte aktuální den, měsíc a rok.
Příklad:
{1}{7} {0}{5} {0}{6}
6
Zadejte aktuální hodinu a minutu.
Příklad:
{0}{3} {3}{0} i
tlačítko
“
03:30 PM”.
7
L i {ih}
Poznámka:
L
Chcete-li opravit číslici, pomocí navigačního
tlačítka posuňte kurzor na číslici a poté
proveďte opravu.
L
Po výpadku napájení možná bude nastaveno
nesprávné datum a čas. V takovém případě
nastavení data a času opravte.
m. i L
“
Nastavení Času”. i
“
Nast. Data/Času”. i
17. května 2006
3:30 PM (odpoledne)
s
, dokud se neobjeví položka
(střed navigačního
L
L
Opakovaně stiskněte
Příprava
Podrobné informace získáte u vašeho
poskytovatele telekomunikačních služeb.
“
Chcete-li tuto funkci zapnout, vyberte
vol.
”
. Chcete-li tuto funkci vypnout, vyberte
“
Manuálně”.
1
J
(střed navigačního tlačítka) i m i
L
2
“
Nastavení Času” i
3
“
Seřízení Času” i
4
“
Aut. ID vol.” nebo “Manuálně” i
L i {ih}
Důležité:
L
Chcete-li tuto funkci používat, nejprve nastavte
datum a čas (strana 15).
L
Aut. ID
L
Úprava času (pouze pro odběratele
služby ID volajícího)
Tato funkce umožňuje zařízení automaticky
upravovat datum a čas při každém přijetí údajů
volajícího. Chcete-li tuto funkci používat, vaše
služba ID volajícího musí poskytovat údaje
o volajícím včetně data a času, v protokolu FSK.
(15)
Page 84

TG9120FX(cz-cz).book Page 16 Tuesday, August 29, 2006 5:28 PM
C
Uskutečňování/příjem hovorů
Hovory
1
Zvedněte mikrotelefon a zvolte telefonní
číslo.
L
Potřebujete-li číslo opravit, stiskněte
{C/T} a zadejte správné číslo.
tlačítko
2
{C}
3
Po skončení hovoru stiskněte tlačítko
nebo vložte mikrotelefon do základny.
Hlasitý telefon
1
Chcete-li hlasitý telefon zapnout během
hovoru, stiskněte tlačítko
L
Hovořte střídavě s volajícím.
2
Až ukončíte hovor, stiskněte tlačítko
Poznámka:
L
Pro dosažení optimálního výkonu používejte
hlasitý telefon v tichém prostředí.
L
Chcete-li znovu aktivovat reproduktor
sluchátka, stiskněte tlačítko
Upravení hlasitosti mikrotelefonu nebo
reproduktoru
Během hovoru stiskněte navigační tlačítko
nahoru nebo dolů.
{s}
{C}
Funkce opakované volby posledního
čísla
Dříve volaná telefonní čísla (každé o délce
maximálně 48 číslic) lze znovu vytočit.
Volání pomocí seznamu opakované volby
Posledních 10 volaných telefonních čísel je
uloženo v seznamu opakované volby.
1
j
(pravé funkční tlačítko)
2
Opakovaným stisknutím navigačního
tlačítka nahoru nebo dolů vyberte
požadované číslo.
3
{C}
/
{s}
L
Je-li stisknuto tlačítko
volaného obsazená, zařízení bude volbu
až 11 krát automaticky opakovat. Zatímco
mikrotelefon čeká na opakovanou volbu,
bliká indikátor vyzvánění. Chcete-li
operaci zrušit, stiskněte tlačítko
{s}
a pokud je linka
.
.
{ih}
{ih}
{ih}
.
.
Úprava čísla v seznamu opakované volby
před volbou čísla
1
j
(pravé funkční tlačítko)
2
Opakovaným stisknutím navigačního
tlačítka nahoru nebo dolů vyberte
požadované číslo.
3
“
Upravit a volat” i
4
Pomocí navigačního tlačítka přesunete
i
kurzor.
L
Přesuňte kurzor na číslo, které chcete
vymazat, a potom stiskněte tlačítko
{C/T}.
L
Umístěte kurzor vpravo od místa, na které
chcete vložit číslo, a potom stiskněte
příslušné tlačítko na klávesnici.
5
{C}
/
{s}
Vymazání čísel v seznamu opakované volby
1
j
(pravé funkční tlačítko)
2
Opakovaným stisknutím navigačního
tlačítka nahoru nebo dolů vyberte
požadované číslo.
3
“
Vymazat” i
L
Pokud chcete vymazat všechna čísla ze
seznamu, vyberte
a potom stiskněte tlačítko
4
“
Ano” i L i
Uložení čísla ze seznamu opakované volby do
telefonního seznamu mikrotelefonu
1
j
(pravé funkční tlačítko)
2
Opakovaným stisknutím navigačního
tlačítka nahoru nebo dolů vyberte
požadované číslo.
3
“
Přidat záznam” i
4
“
Jméno” i
5
Zadejte jméno (maximálně 16 znaků; strana
i L
51).
6
“
<UloŽit>” i L i
L
Položku můžete rovněž uložit stisknutím
g
.
L
Chcete-li položce přiřadit kategorii,
pokračujte krokem 7, „Přidávání položek
do telefonního seznamu mikrotelefonu“,
strana 19.
i J
Upravte číslo.
/
L
i J
L
“
Vymazat vŠe”
{ih}
i J
L
L
L
L
{ih}
.
(16)
Page 85

TG9120FX(cz-cz).book Page 17 Tuesday, August 29, 2006 5:28 PM
C
Uskutečňování/příjem hovorů
Další funkce
Funkce zvýraznění hlasu
Během hovoru lze změnit charakteristiku zvuku
reproduktoru sluchátka.
1
Během volání stiskněte tlačítko J.
2
“
VylepŠení zvuku” i
3
“
Vysoké tóny” nebo “Nízké tóny” i
L
L
Je zobrazeno d.
Sdílení hovoru
Ke stávajícímu příchozímu hovoru se může
připojit 2. mikrotelefon.
Pro vstoupení do konverzace stiskněte, během
příchozího hovoru na jiném mikrotelefonu,
{C}
/
{s}
tlačítko
Soukromý hovor
Soukromý hovor vám umožní zabránit ostatním
uživatelům vstoupit do příchozího hovoru.
Chcete-li ostatním uživatelům umožnit vstup do
konverzace, nechte tuto funkce vypnutou.
Výchozí nastavení je
1
Při příjmu volání stiskněte tlačítko J.
2
“
Soukromé” i
3
“
Zap.” nebo “Vyp.” i
L
Když je tato funkce zapnutá, zobrazí se
x
.
Poznámka:
L
Tato funkce se po ukončení hovoru vypne.
Ztlumení
Pokud je zapnuto ztlumení, můžete slyšet
druhého účastníka, avšak druhý účastník vás
neuslyší.
Chcete-li zapnout ztlumení, stiskněte tlačítko
{C/T}.
L
Je zobrazeno T.
L
Oboustranný hovor obnovíte opětovným
stisknutím tlačítka
Blokování tlačítek
Mikrotelefon je možné uzamknout tak, aby
nebylo možné volit čísla ani provádět nastavení.
Je-li blokování tlačítek zapnuté, je možné
.
{C/T}.
“
Vyp.”.
L
L
L
odpovídat na příchozí hovory, ale žádná jiná
funkce není k dispozici.
Chcete-li zapnout blokování tlačítek, stiskněte na
J
dobu zhruba 2 sekund tlačítko
navigačního tlačítka).
L
Je zobrazeno I.
L
Chcete-li vypnout blokování tlačítek, stiskněte
na dobu zhruba 2 sekund
navigačního tlačítka).
{R}
Tlačítko (k použití funkce Zpětný dotaz /
Flash)
Tlačítko {R} zajišùuje přístup k volitelným
telefonním službám. Podrobné informace získáte
u poskytovatele služeb nebo správce vaší místní
pobočkové ústředny.
Poznámka:
L
Pokud je zařízení připojeno k systému PBX
(pobočková telefonní ústředna), můžete
stisknutím tlačítka {R} získat přístup
kněkterým funkcím hostitelské ústředny PBX,
jako je například přenos hovoru z externího
telefonu. Podrobné informace získáte
u dodavatele pobočkové ústředny.
L
Čas zpětného volání/Flash lze změnit
(strana 33).
Tlačítko Pauza (pro uživatele ústředny PBX
nebo služby pro meziměstská volání)
Při realizaci hovorů prostřednictvím ústředny
PBX nebo služby pro meziměstská volání je
někdy vyžadována pauza.
Příklad:
hovoru musíte zvolit číslo
pravděpodobně po volbě čísla
do doby, než uslyšíte oznamovací tón.
1
2
Poznámka:
L
Pokud před ruční volbou odchozího
{0}
{0} i l
Zvolte telefonní číslo. i
Při každém stisknutí tlačítka l je vložena
3sekundová pauza. Chcete-li vložit delší
pauzy, stiskněte tlačítko opakovaně.
(střed
I
(střed
, použijete
{0}
pauzu, a to až
{C}
/
{s}
(17)
Page 86

TG9120FX(cz-cz).book Page 18 Tuesday, August 29, 2006 5:28 PM
C
Uskutečňování/příjem hovorů
Dočasná tónová volba (pro uživatele pulzní
volby)
Pokud jste připojeni k lince vyžadující pulzní
volbu a potřebujete zadat libovolná čísla pomocí
tónové volby (například pro přístup k telefonním
bankovním službám), můžete režim volby čísla
dočasně přepnout na tónový.
1
Zvolte číslo.
2
Pokud budete vyzváni k zadání kódu nebo
čísla PIN, stiskněte tlačítko
příslušná tlačítka na klávesnici.
Poznámka:
L
Režim volby čísla se při zavěšení vrátí
k pulznímu režimu.
{*}
apotom
Odpověď na hovory
Vprůběhu přijímání hovoru bliká na
mikrotelefonu indikátor vyzvánění.
1
Jakmile přístroj zazvoní, zvedněte
mikrotelefon a stiskněte tlačítko
{s}
.
L
Hovor můžete přijmout také stisknutím
libovolné klávesy:
{
INT}.
nebo
tlačítkem)
2
Po skončení hovoru stiskněte tlačítko
nebo vložte mikrotelefon do základny.
{0}
(Příjem hovoru libovolným
až {9},
{C}
nebo
{*}, {#}
{ih}
2
Vyvolávání ukončíte stisknutím tlačítka
na základně nebo tlačítka
mikrotelefonu.
{ih}
na
{x}
Funkce automatického příjmu
Hovory můžete přijímat tak, že zvednete
mikrotelefon ze základny. Není nutné stisknout
tlačítko
{C}
. Informace o zapnutí této funkce
uvádí strana 30.
Úprava hlasitosti vyzvánění při příjmu volání
Stiskněte navigační tlačítko nahoru nebo dolů.
Další funkce
Vyhledávání mikrotelefonu (Lokátor)
Pokud jste mikrotelefon někam založili, můžete
jej pomocí této funkce najít.
1
Stiskněte tlačítko
(18)
{x}
na základně.
Page 87

TG9120FX(cz-cz).book Page 19 Tuesday, August 29, 2006 5:28 PM
Telefonní seznam
mikrotelefonu
Telefonní seznam mikrotelefonu umožňuje volání
bez nutnosti ručního vytáčení. Ke každé položce
můžete uložit až 3 telefonní čísla a každé
položce telefonního seznamu mikrotelefonu
přidělit požadovanou kategorii.
Celkový počet položek, který lze uložit, je závislý
na počtu telefonních čísel uložených pro každou
položku. Viz níže:
1 jméno + 1 telefonní číslo 200 položek
1 jméno + 2 telefonní čísla 133 položek
1 jméno + 3 telefonní čísla 100 položek
Přidávání položek do telefonního
seznamu mikrotelefonu
1
n
(levé funkční tlačítko) i
(Když je USB adaptér zaregistrován:
J
(střed navigačního tlačítka) i 3 i
L i J
2
“
Nový záznam” i
3
“
Jméno” i
4
Zadejte jméno (maximálně 16 znaků;
strana 51).
5
“
Tel. Č. 1” i
L
Pro jednu položku lze uložit až 3 telefonní
čísla.
6
Zadejte telefonní číslo volaného nebo
volajícího (maximálně 24 číslic).
7
“
Kategorie 1” i
8
Vyberte požadovanou kategorii. i
9
“
<UloŽit>” i L i
)
L
L
i L
L
L
Kategorie
Kategorie usnadňují vyhledávání položek
v telefonním seznamu mikrotelefonu. Při
přidávání položky do telefonního seznamu
mikrotelefonu můžete položce přiřadit kategorii.
Názvy kategorií pro položky telefonního
seznamu mikrotelefonu lze změnit („Přátelé“,
„Rodina“ atd.). Položky telefonního seznamu
mikrotelefonu lze hledat podle nastavených
J
i L
L
{ih}
k
Telefonní seznamy
kategorií. Pro odběratele služby ID volajícího
jsou k dispozici další funkce kategorií (strana 35).
Změna názvů kategorií
1
n
(levé funkční tlačítko) i
(Když je USB adaptér zaregistrován:
J
(střed navigačního tlačítka) i 3 i
L i J
2
“
Kategorie” i
3
Vyberte požadovanou kategorii. i
4
“
Jméno skupiny” i
5
Upravte jméno (maximálně 10 znaků; strana
i L i {ih}
51).
)
L
J
L
L
Vyhledání a zavolání položky
v telefonním seznamu mikrotelefonu
Položky v telefonním seznamu mikrotelefonu lze
vyhledávat abecedně, podle prvního znaku,
kategorie nebo procházením všech položek
v seznamu mikrotelefonu.
Po nalezení požadované položky stiskněte
{C}
tlačítko
L
Je-li k 1 položce přiřazeno více telefonních
čísel, stiskněte
požadované telefonní číslo.
Procházení všemi položkami
1
n
(Když je USB adaptér zaregistrován:
J
L
2
Stisknutím navigačního tlačítka nahoru nebo
dolů zobrazte požadovanou položku.
Abecední vyhledávání
Tato metoda je vhodná, pro urychlení
vyhledávání v telefonním seznamu.
1
n
(Když je USB adaptér zaregistrován:
J
L
2
Stiskněte tlačítko klávesnice ({0} až {9}),
které odpovídá hledanému písmenu
(strana 51).
L
.
{C}
/ V. i Vyberte
i {C}
(levé funkční tlačítko)
(střed navigačního tlačítka) i 3 i
)
(levé funkční tlačítko)
(střed navigačního tlačítka) i 3 i
)
Opakovaným stisknutím stejného tlačítka
klávesnice zobrazíte první položku, která
/
{s}
(19)
Page 88

TG9120FX(cz-cz).book Page 20 Tuesday, August 29, 2006 5:28 PM
k
Telefonní seznamy
odpovídá vámi zvolenému písmenu na
tomto tlačítku.
L
Pokud pro vybrané písmeno není
k dispozici žádná položka, zobrazí se
následující položka.
3
Opakovaným stisknutím navigačního
tlačítka nahoru nebo dolů můžete procházet
telefonním seznamem podle potřeby.
Vyhledávání podle prvního znaku (indexové
hledání)
1
n
(levé funkční tlačítko) i
(Když je USB adaptér zaregistrován:
J
(střed navigačního tlačítka) i 3 i
L i k
2
“
Index hledání” i
3
Opakovaným stisknutím pravého funkčního
tlačítka vyberte režim zadávání znaků, který
obsahuje hledaný znak.
4
Vyberte znak posunutím navigačního
tlačítka v požadovaném směru.
L
Pokud pro vybrané písmeno není
k dispozici žádná položka, zobrazí se
následující položka.
5
Opakovaným stisknutím navigačního
tlačítka nahoru nebo dolů můžete procházet
telefonním seznamem podle potřeby.
Poznámka:
L
V kroku 4 lze také stisknout tlačítko klávesnice
{0}
- {9}) obsahující hledaný znak (strana 51).
(
Vyhledávání podle kategorie
1
n
(levé funkční tlačítko) i
(Když je USB adaptér zaregistrován:
J
(střed navigačního tlačítka) i 3 i
L i k
2
“
Hledat v kateg.” i
3
Vyberte kategorii, kterou chcete prohledat.
i L
L
Pokud vyberete nastavení “VŠechno”,
zařízení ukončí hledání podle kategorie.
4
Opakovaným stisknutím navigačního
tlačítka nahoru nebo dolů můžete procházet
telefonním seznamem podle potřeby.
)
)
k
L
i L
k
L
Zobrazení podrobností položky
telefonního seznamu
1
Vyhledejte požadovanou položku
(strana 19).
L
Zobrazí se název a telefonní číslo
přiřazené položce.
2
Stisknutím navigačního tlačítka vpravo nebo
vlevo zobrazíte další nebo předchozí
položku.
i V
Úprava položek v telefonním
seznamu mikrotelefonu
Změna jména, telefonního čísla nebo
kategorie
1
Vyhledejte požadovanou položku
(strana 19).
2
“
Editovat” i
3
Vyberte položku, kterou chcete změnit. i
L
4
Změna jména nebo telefonního čísla
Upravte jméno nebo telefonní číslo. i
Změna kategorie
Vyberte požadovanou kategorii. i
5
“
<UloŽit>” i L i
Smazání telefonního čísla z položky
1
Vyhledejte požadovanou položku
(strana 19).
2
“
Editovat” i
3
Vyberte telefonní číslo, které chcete smazat.
i W
4
“
<UloŽit>” i L i
i K
L
{ih}
i K
L
{ih}
Mazání položek z telefonního
seznamu mikrotelefonu
Mazání položky
1
Vyhledejte požadovanou položku
(strana 19).
2
“
Vymazat” i
3
“
Ano” i L i
i K
L
{ih}
L
L
(20)
Page 89

TG9120FX(cz-cz).book Page 21 Tuesday, August 29, 2006 5:28 PM
Mazání všech položek
1
n
(levé funkční tlačítko) i
(Když je USB adaptér zaregistrován:
J
(střed navigačního tlačítka) i 3 i
L i J
2
“
Vymazat vŠe” i
3
“
Ano” i
4
“
Ano” i L i
)
L
L
{ih}
J
Rychlá volba
Přiřazení položky v telefonním seznamu
mikrotelefonu k tlačítku rychlé volby čísla
Tlačítka klávesnice {1} až {9} lze použít jako
tlačítka pro rychlou volbu čísel z telefonního
seznamu mikrotelefonu; tato telefonní čísla pak
bude možné vytočit pouhým stisknutím
příslušných tlačítek klávesnice.
1
Vyhledejte požadovanou položku
(strana 19).
2
Vyberte požadované telefonní číslo, které
chcete přidělit tlačítku rychlé volby.
3
“
Rychlá volba” i
4
Stisknutím navigačního tlačítka nahoru nebo
dolů vyberte požadované číslo na klávesnici.
i L
L
Pokud se vybrané tlačítko pro rychlou
volbu již používá, vedle čísla tlačítka se
zobrazí
klávesnice, můžete přepsat předchozí
přiřazení.
5
“
UloŽit” i L i
i V
L
“@”
. Pokud vyberete toto tlačítko
{ih}
i J
k
Telefonní seznamy
3
“
Ano” i L i
Poznámka:
L
Příslušná položka telefonního seznamu
mikrotelefonu vymazána nebude.
{ih}
Řetězové vytáčení
Tato funkce umožňuje vytáčet telefonní čísla
v telefonním seznamu mikrotelefonu během
jiného hovoru. Tuto funkci lze použít například
kvolbě přístupového čísla volací karty nebo kódu
PIN bankovního účtu, které jste uložili do
telefonního seznamu mikrotelefonu, bez ručního
vytáčení.
1
Během hovoru stiskněte tlačítko n.
2
Stisknutím navigačního tlačítka nahoru nebo
dolů vyberte požadovanou položku.
L
Hledání podle prvního znaku (indexové
hledání): strana 20. Hledání podle
kategorie: strana 20.
3
Stisknutím tlačítka M číslo vytočte.
L
Je-li k 1 položce přiřazeno více telefonních
V
čísel, stiskněte
požadované telefonní číslo.
/ M. i Vyberte
i L
Volání pomocí tlačítka rychlé volby
1
Stiskněte a podržte požadované tlačítko
{1}
rychlé volby čísla (
L
Stisknutím navigačního tlačítka nahoru
nebo dolů můžete zobrazit přiřazení
rychlé volby.
2
{C}
/
{s}
Smazání rychlé volby
1
Stiskněte a podržte požadované tlačítko
rychlé volby čísla (
2
“
Vymazat” i
až {9}).
{1}
až {9}). i
L
J
(21)
Page 90

TG9120FX(cz-cz).book Page 22 Tuesday, August 29, 2006 5:28 PM
k
Telefonní seznamy
Sdílený telefonní seznam
Sdílený telefonní seznam umožňuje volání bez
nutnosti ručního vytáčení. Sdílený telefonní
seznam může používat jakýkoli mikrotelefon
registrovaný u stejné základny. Do sdíleného
telefonního seznamu lze přidat 20 jmen
a telefonních čísel. Pokud si objednáte službu ID
volajícího, můžete používat funkci hlasové
identifikace sdíleného telefonního seznamu
(strana 36).
Přidávání položek do sdíleného
telefonního seznamu
1
n
(levé funkční tlačítko) i T i
(Když je USB adaptér zaregistrován:
J
(střed navigačního tlačítka) i 3 i
L i T i J
2
“
Nový záznam” i
3
Zadejte jméno (maximálně 16 znaků;
strana 51).
4
Zadejte telefonní číslo volaného nebo
volajícího (maximálně 24 číslic).
5
Nahrání oznámení hlasové identifikace
Start” i
“
Přeskočení nahrávání
PřeskoČit” i L i Přejděte ke
“
kroku 8.
L
Hlasovou identifikaci (strana 36) mohou
použít pouze předplatitelé služby ID
volajícího.
6
Pokud je zobrazena zpráva “Nahrávání”,
hovořte do mikrotelefonu.
L
Maximální doba nahrávání je 10 sekund.
L
Podržte mikrotelefon ve vzdálenosti asi 20
cm a zřetelně hovořte do mikrofonu.
7
Nahrávání ukončete stisknutím tlačítka N.
L
Chcete-li nahrát oznámení slyšitelného
hovoru, stiskněte tlačítko
od kroku 5.
8
“
UloŽit” i L i
Poznámka:
L
Položky telefonního seznamu s oznámením
hlasové identifikace jsou označeny symbolem
%
.
i L
L
)
L
{ih}
U
apokračujte
J
i L
Vyhledání a zavolání položky ve
sdíleném telefonním seznamu
Položky ve sdíleném telefonním seznamu lze
vyhledávat podle prvního znaku nebo
procházením všech položek ve sdíleném
seznamu.
Po vyhledání požadované položky vytočte
{C}
nebo
telefonní číslo stisknutím tlačítka
Procházení všemi položkami
1
n
(levé funkční tlačítko) i
(Když je USB adaptér zaregistrován:
J
(střed navigačního tlačítka) i 3 i
L i T
2
Stisknutím navigačního tlačítka nahoru nebo
dolů zobrazte požadovanou položku.
Vyhledávání podle prvního znaku (indexové
hledání)
1
n
(levé funkční tlačítko) i T i
(Když je USB adaptér zaregistrován:
J
(střed navigačního tlačítka) i 3 i
L i T i k
2
Opakovaným stisknutím pravého funkčního
tlačítka vyberte režim zadávání znaků, který
obsahuje hledaný znak.
3
Vyberte znak posunutím navigačního
tlačítka v požadovaném směru.
L
Pokud pro vybrané písmeno není
k dispozici žádná položka, zobrazí se
následující položka.
4
Opakovaným stisknutím navigačního
tlačítka nahoru nebo dolů můžete procházet
telefonním seznamem podle potřeby.
Poznámka:
L
V kroku 3 lze také stisknout tlačítko klávesnice
{0}
- {9}) obsahující hledaný znak (strana 51).
(
)
)
T
{s}
k
i L
Úprava položek ve sdíleném
telefonním seznamu
Změna jména, telefonního čísla nebo hlasové
identifikace
1
Vyhledejte požadovanou položku
(strana 22).
i J
.
(22)
Page 91

TG9120FX(cz-cz).book Page 23 Tuesday, August 29, 2006 5:28 PM
2
“
Editovat” i
3
Chcete-li, upravte jméno (maximálně 16
znaků; strana 51).
4
Vpřípadě potřeby upravte telefonní číslo
(maximálně 24 číslic).
5
Přeskočení, nahrání nebo smazání
záznamu hlasové identifikace.
L
Chcete-li nahrát oznámení hlasové
identifikace, pokračujte od kroku 5,
„Přidávání položek do sdíleného
telefonního seznamu“, strana 22.
L
Chcete-li vynechat nahrávání, vyberte
položku
L
Chcete-li oznámení hlasové identifikace
vymazat, vyberte položku
i L
6
“
UloŽit” i L i
Přehrání oznámení hlasové identifikace
1
Vyhledejte požadovanou položku
(strana 22).
2
“
Hlasové vyzv.” i L i
L
i L
i L
“
PřeskoČit”. i
{ih}
i J
L
“
Vymazat”.
{ih}
k
Telefonní seznamy
Mazání položek ze sdíleného
telefonního seznamu
Mazání položky
1
Vyhledejte požadovanou položku
(strana 22).
2
“
Vymazat” i
3
“
Ano” i L i
Mazání všech položek
1
n
(Když je USB adaptér zaregistrován:
J
L i T i J
2
“
Vymazat vŠe” i
3
“
Ano” i
4
“
Ano” i L i
i J
L
{ih}
(levé funkční tlačítko) i T i
(střed navigačního tlačítka) i 3 i
)
L
L
{ih}
J
(23)
Page 92

TG9120FX(cz-cz).book Page 24 Tuesday, August 29, 2006 5:28 PM
m
Nastavení mikrotelefonu
Nastavení mikrotelefonu
Pro vaši informaci je níže je uvedena tabulka všech položek, které můžete u mikrotelefonu přizpůsobit
vlastním potřebám.
L
Při úpravách mikrotelefonu je aktuální položka nebo nastavení na displeji zvýrazněno.
Nabídka nastavení
mikrotelefonu
Nastavení Času Nast. Data/Času
Nast. zvonění Hlasitost vyzv.
Nast. displeje Tapeta
Sledování
místn.
Registrace Registr. sluch.
Vybrat bázi
DalŠí volby Název sluchátka
Podnabídka Podnabídka 2 Výchozí
nastavení
— — strana 15
Signal. Času
Seřízení Času
Ext. zvonění Původní zvonění Zvonění 1
UŽivatel.zvonění
Int. zvonění Původní zvonění Zvonění 3
UŽivatel.zvonění
VoIP vyzvánění*1Původní zvonění Zvonění 6
UŽivatel.zvonění
Vlastní zvonění Nahrát
Seznam
NoČní program Start/Konec
Zap./Vyp. Vyp.
ZpoŽ.zvonění 60 s.
Vyber kategorii
Barva displeje
Vybrat jazyk
Kontrast
Zap./Vyp.
Citlivost
——
Indik. Nové zp.
LetterWise
Tóny kláves
Autom. Hovor
Autom.Interkom
Kód předvolby
—
—
— Maximální strana 26
—
—
—
—
—
— Střední strana 29
— — strana 46
— — strana 30
—
—
—
—
—
— — strana 31
Vyp.
Manuálně
—
—
—
— strana 27
— strana 27
23:00/06:00 strana 28
— strana 28
Obrázek 1
Barva1
English
Kontrast 3
Vyp.
Automaticky
Vyp.
English
Zap.
Vyp.
Vyp.
*2
*2
Strana
strana 26
strana 15
strana 26
strana 26
—
strana 28
strana 28
strana 29
strana 29
strana 14
strana 29
strana 29
strana 47
strana 30
strana 30
strana 30
strana 30
strana 30
(24)
Page 93

rkiye
Slovensko
slovensky
esk
republika
tina
TG9120FX(cz-cz).book Page 25 Tuesday, August 29, 2006 5:28 PM
m
Nastavení mikrotelefonu
*1 Pouze pro uživatele USB adaptéru KX-TGA915EX. Viz návod k obsluze USB adaptéru.
*2 Vyberete-li při změně nastavení regionu (strana 34) následující kódy, bude výchozí jazyk
následující:
““Türkiye
“Slovensko
“
Č
esk
” = “Türkrkçe”
” = “slovensky
á republika
”
” = “ČeŠtina
”
(25)
Page 94

TG9120FX(cz-cz).book Page 26 Tuesday, August 29, 2006 5:28 PM
m
Nastavení mikrotelefonu
Nastavení času
Budík
Signalizace se ve stanovenou dobu zapne na 3
minuty, a to buď pouze jedenkrát, nebo denně.
Pro alarm je možné zobrazit také textové
upozornění. Datum a čas je třeba nastavit
předem (strana 15).
Najednou lze naprogramovat až 5 samostatných
alarmů.
1
J
(střed navigačního tlačítka) i m i
L
2
“
Nastavení Času” i
3
“
Signal. Času” i
4
Vyberte alarm (1 až 5). i
5
Vyberte režim alarmu. i
“
Vyp.
”
Vypne alarm. Znovu stiskněte tlačítko L
a potom dokončete nastavení stisknutím
{ih}
.
“
Jednou
”
Alarm se spustí jednou ve stanovenou dobu.
Zadejte požadovaný den a měsíc.
“
Opakovat denně
Alarm se spustí jednou za den ve stanovenou
dobu.
6
Zadejte požadovanou hodinu a minutu. i
L
7
Zadejte textové upozornění (maximálně 30
znaků; strana 51).
8
Vyberte požadovanou položku. i
“
Původní zvonění
Vyzvánění uložená v mikrotelefonu v době
zakoupení.
“
UŽivatel.zvonění
Vyzvánění, která jste uložili do mikrotelefonu
(strana 27).
L
L
J
L
”
i L
L
”
”
Poznámka:
L
Chcete-li alarm ukončit, stiskněte libovolné
tlačítko na klávesnici.
L
Pokud stále přijímáte příchozí hovor, ozvou se
signály a položka
Alarm nezazní, dokud nezavěsíte.
L
Pokud vyberete možnost “Jednou”,
nastavení se po spuštění alarmu změní na
“
Vyp.”.
e
zabliká v nastavený čas.
Nastavení vyzvánění
Hlasitost vyzvánění
1
J
(střed navigačního tlačítka) i m i
L
2
“
Nast. zvonění” i
3
“
Hlasitost vyzv.” i
4
Opakovaným stisknutím navigačního tlačítka
nahoru nebo dolů vyberte požadovanou
hlasitost.
L
Poznámka:
L
Mikrotelefon zazvoní:
–při minimální hlasitosti alarmu a volání
v režimu interkom,
–při maximální hlasitosti pro paging.
i L i {ih}
Pokud je vyzvánění vypnuto, zobrazí se
~
.
Změna vyzvánění
1
J
(střed navigačního tlačítka) i m i
L
2
“
Nast. zvonění” i
3
Vyberte požadovanou položku. i
“
Ext. zvonění
Vybere vyzvánění pro příchozí hovory.
“
Int. zvonění
Vybere vyzvánění pro hovory v režimu
intercom.
”
”
L
L
L
L
9
Vyberte požadované vyzvánění. i
10
“
UloŽit” i L i
L
Pokud je nastaven alarm, na displeji se
e
objeví
.
{ih}
(26)
L
Page 95

TG9120FX(cz-cz).book Page 27 Tuesday, August 29, 2006 5:28 PM
4
Vyberte požadovanou položku. i
“
Původní zvonění
Vyzvánění uložená v mikrotelefonu v době
zakoupení.
“
UŽivatel.zvonění
Vyzvánění, která jste uložili do mikrotelefonu
(strana 27).
5
Vyberte požadované vyzvánění. i L
i {ih}
Poznámka:
L
Pokud vyberete některý z melodických typů
vyzvánění, bude vyzvánění několik sekund
pokračovat, i když volající zavěsí dříve, než
hovor přijmete. Při příjmu hovoru se může
ozývat oznamovací tón nebo žádný tón.
L
Melodie přednastavené v tomto výrobku jsou
používány se svolením společnosti © 2006
Copyrights Vision Inc.
”
”
L
Přizpůsobení vyzvánění
Lze nahrávat melodie (max. 30 sekund dlouhé)
zaudiozařízení připojeného dodaným
audiokabelem. Tyto melodie lze nastavit jako
uživatelská vyzvánění (strana 26, 35).
Důležité:
L
Nahrát lze celkem maximálně 4 minuty a 30
sekund (max. 32 melodií). Nahrávací čas
může být v závislosti na velikosti již uložených
melodií v mikrotelefonu kratší.
L
Pokud je přijato volání, když je k mikrotelefonu
připojen audiokabel, odpojte audiokabel od
mikrotelefonu a přijměte volání, jinak se
účastníci neuslyší.
m
Nastavení mikrotelefonu
Nahrávání melodií pro uživatelská vyzvánění
1
Pomocí dodaného audio kabelu připojte
mikrotelefon k audio zařízení (jako např. CD
přehrávači nebo počítači).
Audio konektor
typu jack
Audio zařízení
Výstup
sluchátek,
Line out,
atd.
Příklad:
2
J
(střed navigačního tlačítka) i m i
L
3
“
Nast. zvonění” i
4
“
Vlastní zvonění” i
5
“
Nahrát” i
6
Na audio zařízení spusùte přehrávání.
7
Stisknutím tlačítka Q spusùte nahrávání.
8
Chcete-li záznam ukončit, stiskněte tlačítko
N
.
L
Chcete-li záznam přehrát, vyberte
“
Přehrát”. i
L
Chcete-li nahrávání zopakovat, vyberte
položku
Proces zopakujte od kroku 5.
9
“
UloŽit” i
10
Upravte jméno (maximálně 10 znaků;
strana 51).
11
Odpojte audio kabel od mikrotelefonu.
Audio kabel
L
L
L
L
“
Nahrát znovu”. i L i
L
i f i {ih}
Mazání vyzváněcího tónu
1
J
(střed navigačního tlačítka) i m i
L
2
“
Nast. zvonění” i
3
“
Vlastní zvonění” i
4
“
Seznam” i
5
Vyberte požadovanou položku. i
L
L
L
J
(27)
Page 96

TG9120FX(cz-cz).book Page 28 Tuesday, August 29, 2006 5:28 PM
m
Nastavení mikrotelefonu
6
“
Vymazat” i
7
“
Ano” i L i
Přejmenování vyzváněcího tónu
1
J
(střed navigačního tlačítka) i m i
L
2
“
Nast. zvonění” i
3
“
Vlastní zvonění” i
4
“
Seznam” i
5
Vyberte požadovanou položku. i
6
“
Přejmenovat” i
7
Upravte jméno (maximálně 10 znaků; strana
i L i {ih}
51).
L
{ih}
L
L
L
J
L
Noční režim
Noční režim umožňuje vybrat časový úsek,
během kterého mikrotelefon v případě p říchozích
volání nebude zvonit. Tato funkce je užitečná,
když v určitou dobu nechcete být rušeni,
například během spánku. Noční režim lze pro
mikrotelefon a základnu nastavit nezávisle
(strana 33).
Pomocí funkce kategorií telefonního seznamu
mikrotelefonu (strana 19) lze také vybrat
kategorie volajících, jejichž volání na
mikrotelefonu i přes nastavený noční režim zazní
(pouze pro odběratele funkce ID volajícího).
Datum a čas je třeba nastavit předem
(strana 15).
Nastavení počátečního a koncového času pro
noční režim
1
J
(střed navigačního tlačítka) i m i
L
2
“
Nast. zvonění” i
3
“
NoČní program” i
4
“
Start/Konec” i
5
Zadejte požadovanou hodinu a minutu
spuštění této funkce.
6
Zadejte požadovanou hodinu a minutu
ukončení této funkce.
7
L i {ih}
L
L
L
2
“
Nast. zvonění” i
3
“
NoČní program” i
4
“
Zap./Vyp.” i
5
“
Zap.” nebo “Vyp.” i L i
L
Je-li noční režim zapnutý, na displeji se
zobrazí
f
.
Nastavení zpožděného zvonění pro noční
režim
Toto nastavení umožňuje, aby mikrotelefon
zvonil v nočním režimu, pokud volající čeká
dostatečně dlouhou dobu. Po uplynutí vybrané
doby mikrotelefon zazvoní. Pokud vyberete
“
položku
režimu nebude zvonit.
1
2
3
4
5
Poznámka:
L
Volba kategorií, pro které nebude platit noční
režim
1
2
3
4
5
6
Bez zvonění”, mikrotelefon v nočním
J
(střed navigačního tlačítka) i m i
L
“
Nast. zvonění” i
“
NoČní program” i
“
ZpoŽ.zvonění” i
Vyberte požadované nastavení. i L
i {ih}
Pokud záznamník přijme hovor, nebude tato
funkce k dispozici.
J
(střed navigačního tlačítka) i m i
L
“
Nast. zvonění” i
“
NoČní program” i
“
Vyber kategorii” i
Vyberte požadovaná čísla kategorie. i
t i L
L
Vybraná čísla kategorie jsou indikována
Q
symbolem „
L
Chcete-li vybrané číslo kategorie zrušit,
vyberte požadované číslo a stiskněte
tlačítko t.
{ih}
“.
L
L
L
{ih}
L
L
L
L
L
L
Zapnutí/vypnutí nočního režimu
1
J
(střed navigačního tlačítka) i m i
L
(28)
Page 97

TG9120FX(cz-cz).book Page 29 Tuesday, August 29, 2006 5:28 PM
m
Nastavení mikrotelefonu
Nastavení displeje
Volba tapet y
V pohotovostním režimu můžete na displeji
vybrat „tapetu“.
1
J
(střed navigačního tlačítka) i m i
L
2
“
Nast. displeje” i
3
“
Tapeta” i
4
Stisknutím tlačítkového ovladače nahoru
nebo dolů vyberte požadovaný obrázek.
L
Mezi seznamem obrázků a zobrazením
obrázku můžete přepínat stisknutím
nebo
5
L i {ih}
Poznámka:
L
Pokud vyberete položku “Bez obrázku”,
barva displeje se změní podle vámi vybrané
barvy (strana 29).
L
Předvolené vzory tapet jsou v tomto výrobku
použity se souhlasem společnosti © Digital
Vision.
c
L
.
Volba barvy displeje
1
J
(střed navigačního tlačítka) i m i
L
2
“
Nast. displeje” i
3
“
Barva displeje” i
4
Vyberte požadovanou barvu. i L i
{ih}
Změna kontrastu displeje
Tato funkce je dostupná pro tapetu a ikony na
displeji.
1
J
(střed navigačního tlačítka) i m i
L
2
“
Nast. displeje” i
3
“
Kontrast” i
4
Stisknutím navigačního tlačítka nahoru nebo
dolů vyberte požadovaný kontrast.
i {ih}
L
b
L
L
L
L
i L
Odposlech (je nutný
přídavný mikrotelefon)
Použití odposlechu
Tato funkce umožňuje naslouchat v místnosti
sumístěným mikrotelefonem, což umožňuje
sledování dění v různých částech domu.
Monitorující mikrotelefon (umístěný například
vdětském pokoji) automaticky zavolá určený
mikrotelefon, jakmile detekuje zvuk.
Následující postup proveďte s monitorovaným
mikrotelefonem (například mikrotelefon umístěný
vdětském pokoji).
1
J
(střed navigačního tlačítka) i m i
L
2
“
Sledování místn.” i
3
“
Zap./Vyp.” i
4
“
Zap.” i
5
Zvolte číslo požadovaného mikrotelefonu,
s kterým budete monitorovat.
L
Zobrazí se údaj “Sledování místn.”.
Poznámka:
L
Když je funkce auto interkom nastavena na
“
Zap.” (strana 30), bude odposlouchávací
mikrotelefon automaticky odpovídat na volání.
L
Monitorovaný mikrotelefon nelze použít pokud
je odposlech nastaven na
sledování;
J i “
i L i {ih}
Citlivost odposlechu
Můžete nastavit citlivost odposlechu. Zvýšením
nebo snížením citlivosti upravte úroveň zvuku, při
které bude spuštěna funkce odposlechu.
L
Tuto funkci nelze během monitorovacího
hovoru nastavit.
1
2
3
Zap./Vyp.” i L i “Vyp.”
Na monitorovaném mikrotelefonu stiskněte
J
.
“
Citlivost” i
Opakovaným stisknutím navigačního
tlačítka nahoru nebo dolů vyberte
požadované nastavení.
L
L
L
L
i L
“
Zap.”. Zrušení
i L i {ih}
(29)
Page 98

TG9120FX(cz-cz).book Page 30 Tuesday, August 29, 2006 5:28 PM
m
Nastavení mikrotelefonu
Další možnosti
Přidělení/změna názvu mikrotelefonu
Každému mikrotelefonu můžete přidělit vlastní
název („Karel“, „Kuchyň“, atd.). To je užitečné
vpřípadě, že máte několik mikrotelefonů.
Chcete-li název mikrotelefonu zobrazit
v pohotovostním režimu na displeji, tuto funkci
“
zapněte. Výchozí nastavení je
1
J
(střed navigačního tlačítka) i m i
L
2
“
DalŠí volby” i
3
“
Název sluchátka” i
4
Zadejte/upravte název (maximálně 10 znaků;
strana 51).
5
“
Zap.” nebo “Vyp.” i L i
i L
Zapnutí/vypnutí upozornění na
zprávu
Tato funkce vás upozorní na nahrání nových
zpráv:
– SMS (strana 38)
– Záznamník (strana 41)
Indikátor zpráv na mikrotelefonu pomalu modře
bliká, dokud si nepřečtete nebo neposlechnete
všechny nové zprávy.
1
J
(střed navigačního tlačítka) i m i
L
2
“
DalŠí volby” i
3
“
Indik. Nové zp.” i
4
“
Zap.” nebo “Vyp.” i L i
Poznámka:
L
Při zapnutém upozorňování na zprávy se
provozní doba baterie zkracuje (strana 13).
Vyp.”.
L
L
{ih}
L
L
{ih}
4
Vyberte požadovaný jazyk. i L i
{ih}
Zapnutí/vypnutí tónů tlačítek
Mezi tóny tlačítek patří i potvrzující tóny a tóny
chyby.
1
J
(střed navigačního tlačítka) i m i
L
2
“
DalŠí volby” i
3
“
Tóny kláves” i
4
“
Zap.” nebo “Vyp.” i L i
L
L
{ih}
Zapnutí/vypnutí automatického
příjmu
Je-li tato funkce zapnutá, můžete přijímat hovory
jednoduše zvednutím mikrotelefonu ze základny.
{C}
Není nutné stisknout tlačítko
1
J
(střed navigačního tlačítka) i m i
L
2
“
DalŠí volby” i
3
“
Autom. Hovor” i
4
“
Zap.” nebo “Vyp.” i L i
.
L
L
{ih}
Zapnutí/vypnutí funkce auto
intercom
Tato funkce umožňuje automaticky přijmout
volání v režimu interkom. Není nutné stisknout
{C}
tlačítko
“
Zap.”, bude odposlouchávací mikrotelefon
(strana 29) automaticky odpovídat na volání.
1
J
L
2
“
3
“
4
“
. Když je tato funkce nastavena na
(střed navigačního tlačítka) i m i
DalŠí volby” i
Autom.Interkom” i
Zap.” nebo “Vyp.” i L i
L
L
{ih}
Změna jazyka LetterWise
Můžete nastavit jazyk, který bude použit pro
zadání položky ve znacích LetterWise
(strana 52, 53).
1
J
(střed navigačního tlačítka) i m i
L
2
“
DalŠí volby” i
3
“
LetterWise” i
®
L
L
(30)
Page 99

TG9120FX(cz-cz).book Page 31 Tuesday, August 29, 2006 5:28 PM
Kód volání
Pokud musíte vytočit speciální kód volání, abyste
mohli uskutečnit hovor pomocí telefonních
služeb konkrétního dodavatele/telefonní
společnosti, můžete si kód volání předem uložit
a vytočit jej jednoduše stisknutím a podržením
{*}
tlačítka
Důležité:
L
Abyste tuto funkci mohli využít, musíte si
předem uložit kód volání.
Příklad:
apřed vytáčením čísla „12345“ stisknete
apodržíte tlačítko
vytočí číslo „09812345“.
Přidělení čísla kódu volání
1
2
3
4
5
během vytáčení telefonního čísla.
Pokud si jako kód volání uložíte „098“
{*}
, zařízení automaticky
J
(střed navigačního tlačítka) i m i
L
“
DalŠí volby” i
“
Kód předvolby” i
Zadejte požadovaný kód volání (maximálně
24 číslic).
“
UloŽit” i L i
i L
L
L
{ih}
m
Nastavení mikrotelefonu
Uskutečnění hovorů pomocí kódu volání
Při ručním vytáčení:
1
Zvedněte mikrotelefon a poté stiskněte
{*}
a podržte tlačítko
L
Zobrazí se kód volání, který jste uložili.
2
Ručně zvolte telefonní číslo.
3
{C}
/
{s}
/
L
Při vytáčení ze seznamu opakované volby,
z telefonního seznamu, ze seznamu volajících
nebo pomocí rychlé volby:
1
V seznamu opakované volby, v telefonním
seznamu, v seznamu volajících nebo
pomocí rychlé volby zobrazte požadované
telefonní číslo.
2
Stiskněte a podržte tlačítko
L
Před telefonním číslem se zobrazí kód
volání, který jste uložili.
3
{C}
/
{s}
/
L
.
{*}
.
(31)
Page 100

TG9120FX(cz-cz).book Page 32 Tuesday, August 29, 2006 5:28 PM
L
Nastavení základny
Nastavení základny
Pro vaši informaci je níže uvedena tabulka všech položek, které můžete u základny přizpůsobit svým
potřebám.
L
Tyto položky lze přizpůsobit pomocí mikrotelefonu.
L
Při úpravách základny je aktuální položka nebo nastavení na displeji zvýrazněno.
Nabídka nastavení
základny
Nast. zvonění Hlasitost
MoŽnosti volby Typ volby
DalŠí volby PIN Báze
Podnabídka Podnabídka 2 Výchozí
nastavení
— Střední strana 33
vyzv.
NoČní program Start/Konec
Zap./Vyp. Vyp.
ZpoŽ.zvonění 60 s.
—
Opakování
volby
ReŽim
Repeateru
Země
—
—
—
—
23:00/06:00 strana 33
Tónová
600 ms.
0000
Vyp.
Další
Strana
strana 33
strana 33
strana 14
strana 33
strana 33
strana 48
strana 34
(32)
 Loading...