

Panasonic KX-TG5583 User Manual
TG5583.book Page 1 Friday, April 8, 2005 6:33 PM
5.8 GHz Expandable Digital Cordless Answering System
Operating Instructions
Model No.
KX-TG5583
This unit is compatible with Caller ID. To use this feature, you must
subscribe to the appropriate service offered by your service provider.
Charge the battery for 6 hours before initial use.
Please read these Operating Instructions before using the unit and save
for future reference.
For assistance, visit our website: http://www.panasonic.com for
customers in the U.S.A. or Puerto Rico.
TG5583.book Page 2 Friday, April 8, 2005 6:33 PM
Table of Contents
Introduction
Accessory information . . . . . . . . . . . . . . 5
Expanding your phone . . . . . . . . . . . . . . 6
Available accessory handsets . . . . . . 7
Important safety instructions . . . . . . . . . 8
For best performance . . . . . . . . . . . . . . 10
Preparation
Connections . . . . . . . . . . . . . . . . . . . . . 11
Battery installation . . . . . . . . . . . . . . . . 12
Battery charge . . . . . . . . . . . . . . . . . . . 13
Battery replacement . . . . . . . . . . . . . . . 14
Screen saver mode . . . . . . . . . . . . . . . 15
Controls and displays . . . . . . . . . . . . . . 16
Controls . . . . . . . . . . . . . . . . . . . . . 16
Displays . . . . . . . . . . . . . . . . . . . . . . 18
Setting the unit before use . . . . . . . . . . 20
Setting the dialing mode . . . . . . . . . 20
Setting the date and time O . . . . . 20
Making/Answering Calls
Making calls using the handset . . . . . . 21
Useful features during a call . . . . . . 22
Making calls using the base unit . . . . . 24
Useful features during a call . . . . . . 25
Answering calls using the handset . . . . 26
Answering calls using the base unit . . . 27
Adjusting the ringer volume . . . . . . 27
Changing the ringer tone . . . . . . . . 27
Phonebook
Handset phonebook . . . . . . . . . . . . . . . 28
Adding items to the phonebook . . . 28
Calling someone in the phonebook . 29
Editing items in the phonebook . . . . 29
Erasing items in the phonebook . . . 29
Chain dial feature. . . . . . . . . . . . . . . 30
Copying phonebook items . . . . . . . . 30
Speed Dialer
Base unit speed dialer . . . . . . . . . . . . . 32
Adding phone numbers to the speed
dialer . . . . . . . . . . . . . . . . . . . . . . . . 32
Calling someone with the speed
dialer . . . . . . . . . . . . . . . . . . . . . . . . 32
Caller ID Service
Using Caller ID service. . . . . . . . . . . . . 33
Talking Caller ID . . . . . . . . . . . . . . . 33
Ringer ID and light-up ID . . . . . . . . . 34
Caller list. . . . . . . . . . . . . . . . . . . . . . . . 35
Viewing the caller list and calling
back . . . . . . . . . . . . . . . . . . . . . . . . . 35
Editing a caller’s phone number before
calling back . . . . . . . . . . . . . . . . . . . 35
Storing caller information into the
phonebook . . . . . . . . . . . . . . . . . . . 36
Erasing caller information . . . . . . . . 36
Intercom Features
Intercom . . . . . . . . . . . . . . . . . . . . . . . . 37
Voice paging . . . . . . . . . . . . . . . . . . 38
Transferring a call. . . . . . . . . . . . . . . . . 38
Transferring a call from the handset 38
Transferring a call from the base
unit . . . . . . . . . . . . . . . . . . . . . . . . . 39
Transferring a call to the answering
system . . . . . . . . . . . . . . . . . . . . . . . 39
Conference calls. . . . . . . . . . . . . . . . . . 40
Using the handset . . . . . . . . . . . . . . 40
Using the base unit . . . . . . . . . . . . . 40
Room monitor . . . . . . . . . . . . . . . . . . . . 41
Setting room monitor . . . . . . . . . . . . 41
Monitoring a room . . . . . . . . . . . . . . 41
Programmable Settings
Guide to handset programming . . . . . . 43
Programming via direct commands . . . 45
Direct commands chart . . . . . . . . . . 45
Ringer settings K . . . . . . . . . . . . . . . . 48
Handset ringer volume . . . . . . . . . . 48
Handset ringer tone . . . . . . . . . . . . . 48
Recording songs from an audio device
for ringer tones (Customize ring) . . . 49
Ring color . . . . . . . . . . . . . . . . . . . . 50
Function M . . . . . . . . . . . . . . . . . . . . . 51
Voice enhancer . . . . . . . . . . . . . . . . 51
Customer support . . . . . . . . . . . . . . 51
Display setting L . . . . . . . . . . . . . . . . 51
Wallpaper . . . . . . . . . . . . . . . . . . . . 51
Handset display color (Appearance) 52
Handset LCD contrast . . . . . . . . . . . 52
Initial setting N . . . . . . . . . . . . . . . . . . 52
Handset Talking Caller ID . . . . . . . . 52
Caller ID edit . . . . . . . . . . . . . . . . . . 52
Handset key tone . . . . . . . . . . . . . . . 53
Auto talk . . . . . . . . . . . . . . . . . . . . . 53
2 For assistance, please visit http://www.panasonic.com/consumersupport

TG5583.book Page 3 Friday, April 8, 2005 6:33 PM
Table of Contents
Handset interrupt tone . . . . . . . . . . 53
Handset display language . . . . . . . 53
Flash time . . . . . . . . . . . . . . . . . . . . 53
Line mode . . . . . . . . . . . . . . . . . . . . 54
Base unit settings . . . . . . . . . . . . . . 54
Canceling the handset registration . 55
Registering the handset . . . . . . . . . . 56
Set date & time O . . . . . . . . . . . . . . . 56
Time adjustment (Caller ID subscribers
only) . . . . . . . . . . . . . . . . . . . . . . . . 56
Answering System
Features
Answering system . . . . . . . . . . . . . . . . 57
Recording your greeting message . . . . 57
Erasing your greeting message . . . 58
Pre-recorded greeting message . . . 58
Turning the answering system on/off . . 58
Screening your calls . . . . . . . . . . . . 58
Listening to messages . . . . . . . . . . . . . 59
Listening to messages using the base
unit . . . . . . . . . . . . . . . . . . . . . . . . . 59
Listening to messages using the
handset . . . . . . . . . . . . . . . . . . . . . . 60
Recording a voice memo . . . . . . . . . . . 61
Memory capacity . . . . . . . . . . . . . . . . . 62
Remote operation. . . . . . . . . . . . . . . . . 62
Using the answering system
remotely . . . . . . . . . . . . . . . . . . . . . 62
Answering system settings J . . . . . . 64
Remote code . . . . . . . . . . . . . . . . . 64
Ring count . . . . . . . . . . . . . . . . . . . . 64
Caller’s recording time . . . . . . . . . . . 65
Message alert . . . . . . . . . . . . . . . . . 65
Turning call screening on/off . . . . . . 65
Guide to programming . . . . . . . . . . . 70
Memory status (KX-TGA552 only) . . 72
Wallpaper (KX-TGA552 only). . . . . . 73
Handset LCD contrast (KX-TGA550
only) . . . . . . . . . . . . . . . . . . . . . . . . . 74
Useful Information
Belt clip . . . . . . . . . . . . . . . . . . . . . . . . . 75
Headset (optional) . . . . . . . . . . . . . . . . 75
Wall mounting. . . . . . . . . . . . . . . . . . . . 76
Error messages . . . . . . . . . . . . . . . . . . 79
Troubleshooting . . . . . . . . . . . . . . . . . . 81
FCC and other information . . . . . . . . . . 87
openLCR service for the Caller IQ
feature . . . . . . . . . . . . . . . . . . . . . . . . . 89
Specifications . . . . . . . . . . . . . . . . . . . . 90
Warranty . . . . . . . . . . . . . . . . . . . . . . . . 91
Customer services . . . . . . . . . . . . . . . . 93
Index
Index. . . . . . . . . . . . . . . . . . . . . . . . . . . 94
For KX-TGA550/KXTGA552 Users
Controls . . . . . . . . . . . . . . . . . . . . . . . . 66
Operation . . . . . . . . . . . . . . . . . . . . . . . 66
Differences between the handsets
included with the KX-TG5583, KX-
TGA550, KX-TGA551, and KX-
TGA552 . . . . . . . . . . . . . . . . . . . . . 66
Adding items/calling someone in the
phonebook using the unit’s menu P
(KX-TGA550 only) . . . . . . . . . . . . . . 68
Picture ID (KX-TGA552 only). . . . . . 69
For assistance, please visit http://www.panasonic.com/consumersupport 3
TG5583.book Page 4 Friday, April 8, 2005 6:33 PM
Introduction
Thank you for purchasing a Panasonic cordless telephone.
We recommend keeping a record of the following information for future reference.
Serial No. Date of purchase
(found on the bottom of the unit)
Name and address of dealer
Attach your purchase receipt here.
Energy Star:
ENERGY STAR
As an
that this product meets the ENERGY STAR guidelines for energy
efficiency. ENERGY STAR is a U.S. registered mark.
Trademarks:
openLCR, openLCR.com, and the openLCR logo are the trademarks of openLCR.com,
Inc.
®
Participant, Panasonic has determined
4 For assistance, please visit http://www.panasonic.com/consumersupport
TG5583.book Page 5 Friday, April 8, 2005 6:33 PM
Introduction
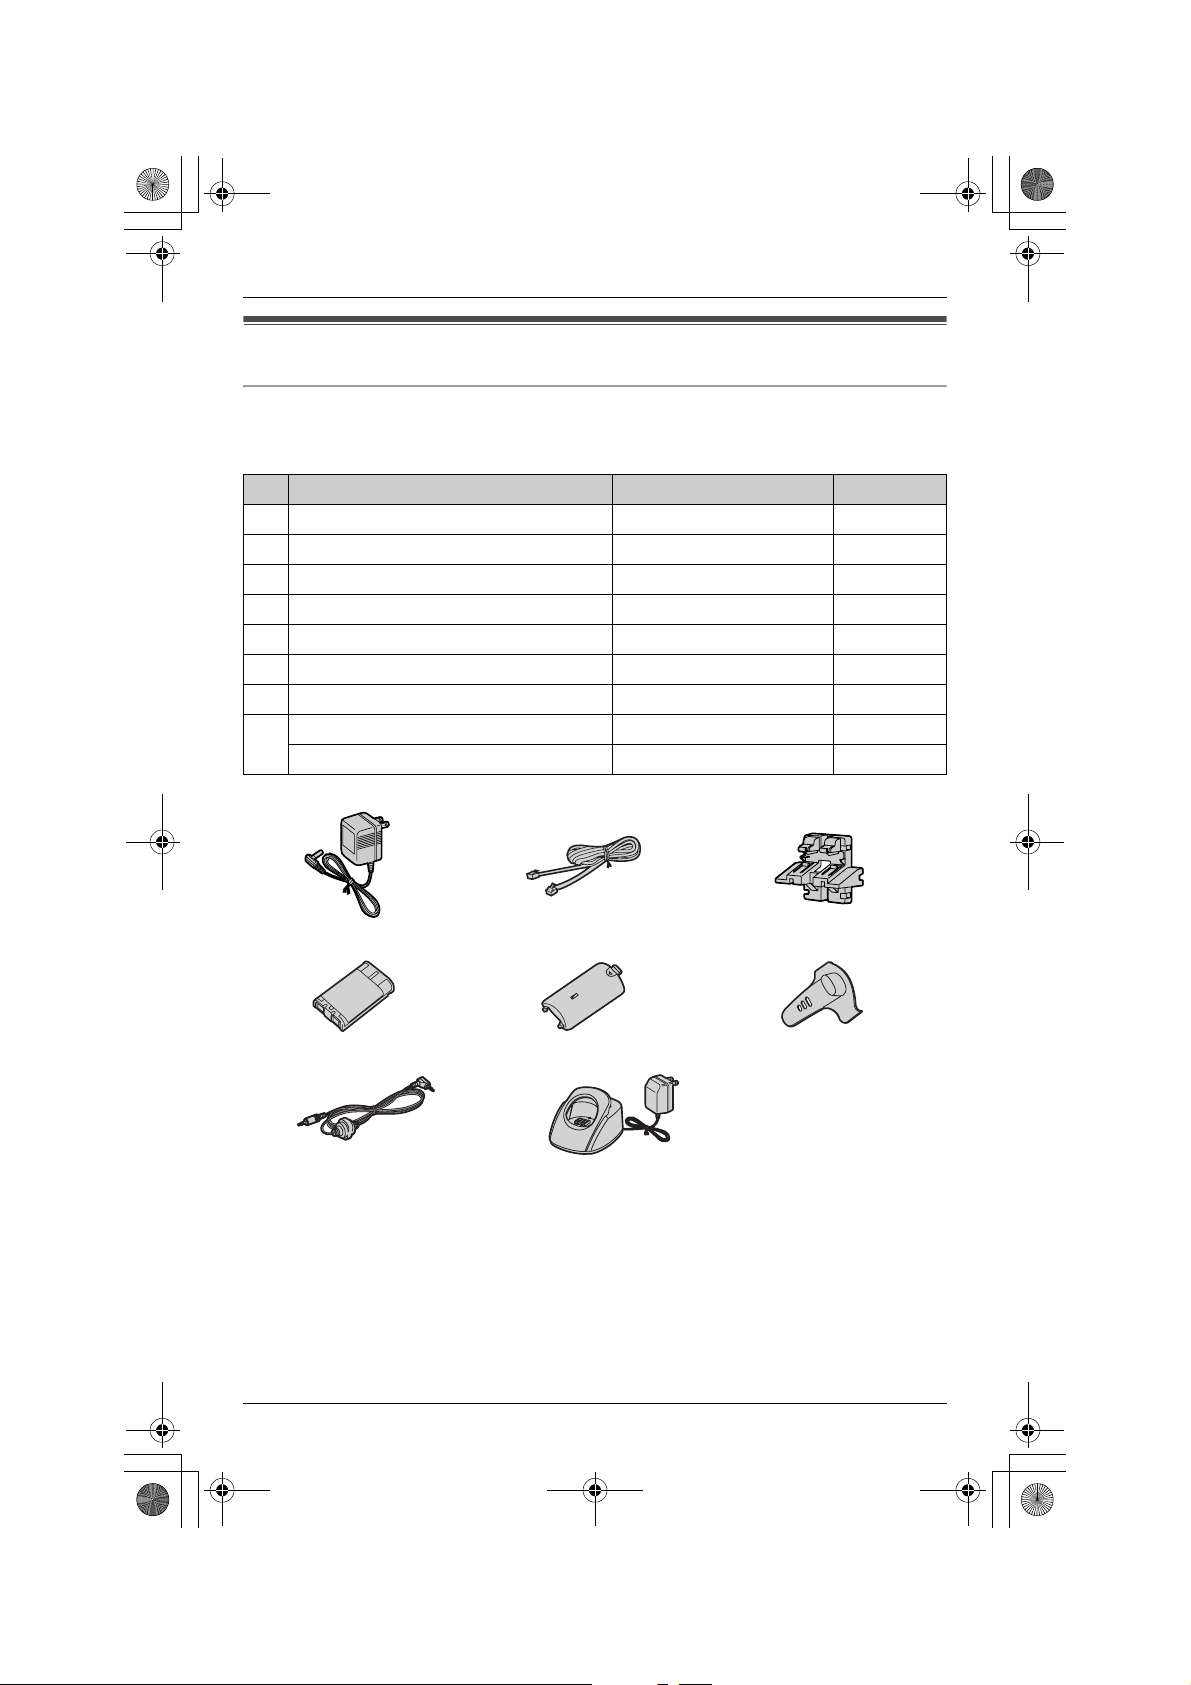
Accessory information
Included accessories
L To order replacement accessories, call 1-800-332-5368.
TTY users (hearing or speech impaired users) can call 1-866-605-1277.
No. Accessory items Order number Quantity
1 AC adaptor for base unit PQLV1W 1
2 Telephone line cord PQJA10075Z 1
3 Wall mounting adaptor PQKL10068Z2 1
4 Battery HHR-P104 3
5 Handset cover PQYNTG5432MR 3
6 Belt clip PQKE10396Z2 3
7 Audio cable PQJA10165Z 1
8 Charger PQLV30030ZM 2
AC adaptor for charger KX-TCA1-2 2
12 3
45 6
78
For assistance, please visit http://www.panasonic.com/consumersupport 5
TG5583.book Page 6 Friday, April 8, 2005 6:33 PM
Introduction
Additional/replacement accessories
L To order replacement accessories, call 1-800-332-5368.
TTY users (hearing or speech impaired users) can call 1-866-605-1277.
Accessory items Order number
Rechargeable nickel metal
hydride (Ni-MH) battery
Accessory handset with
charger
Headset KX-TCA60, KX-TCA86, KX-TCA88, KX-TCA88HA,
Battery back-up power
supply
HHR-P104
KX-TGA550 (features a 1.6 inch monochrome display)
KX-TGA551 (features a 1.4 inch color display)
KX-TGA552 (features a 1.6 inch color display)
KX-TCA91, KX-TCA92, or KX-TCA98
KX-TCA200
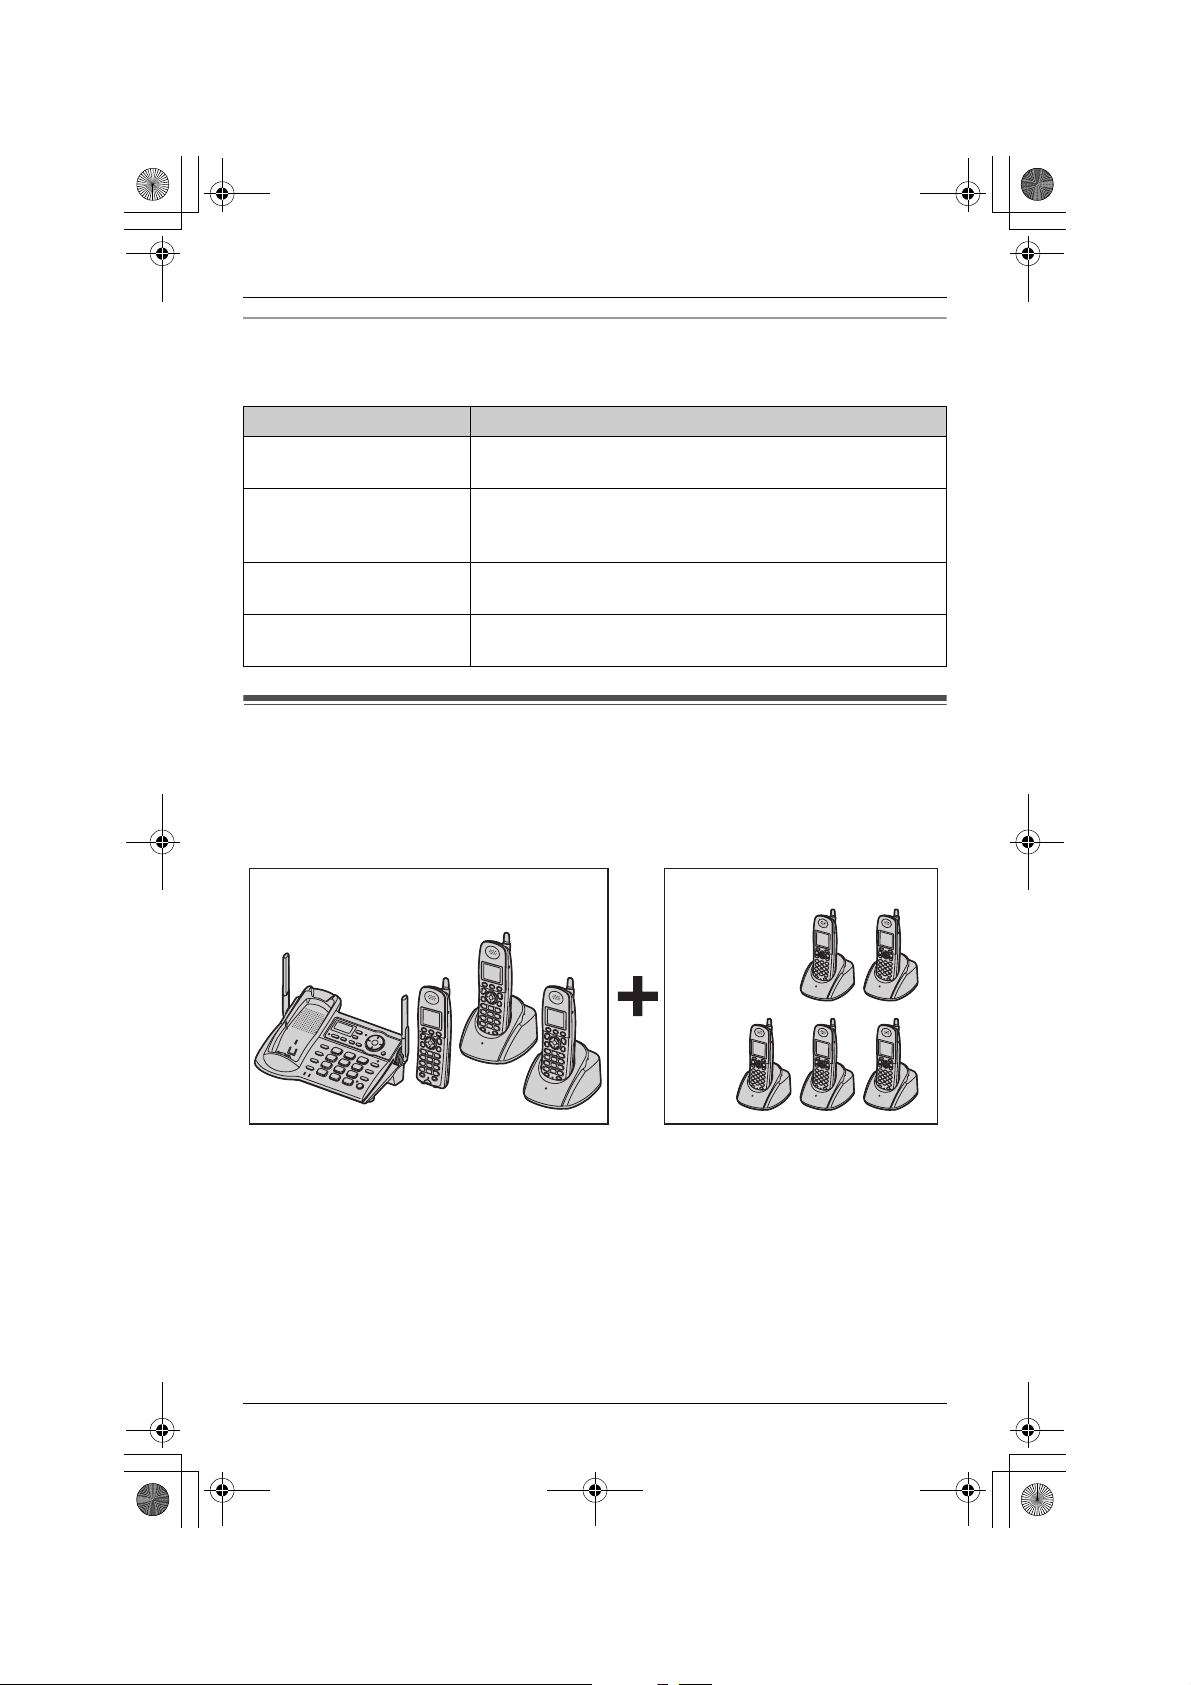
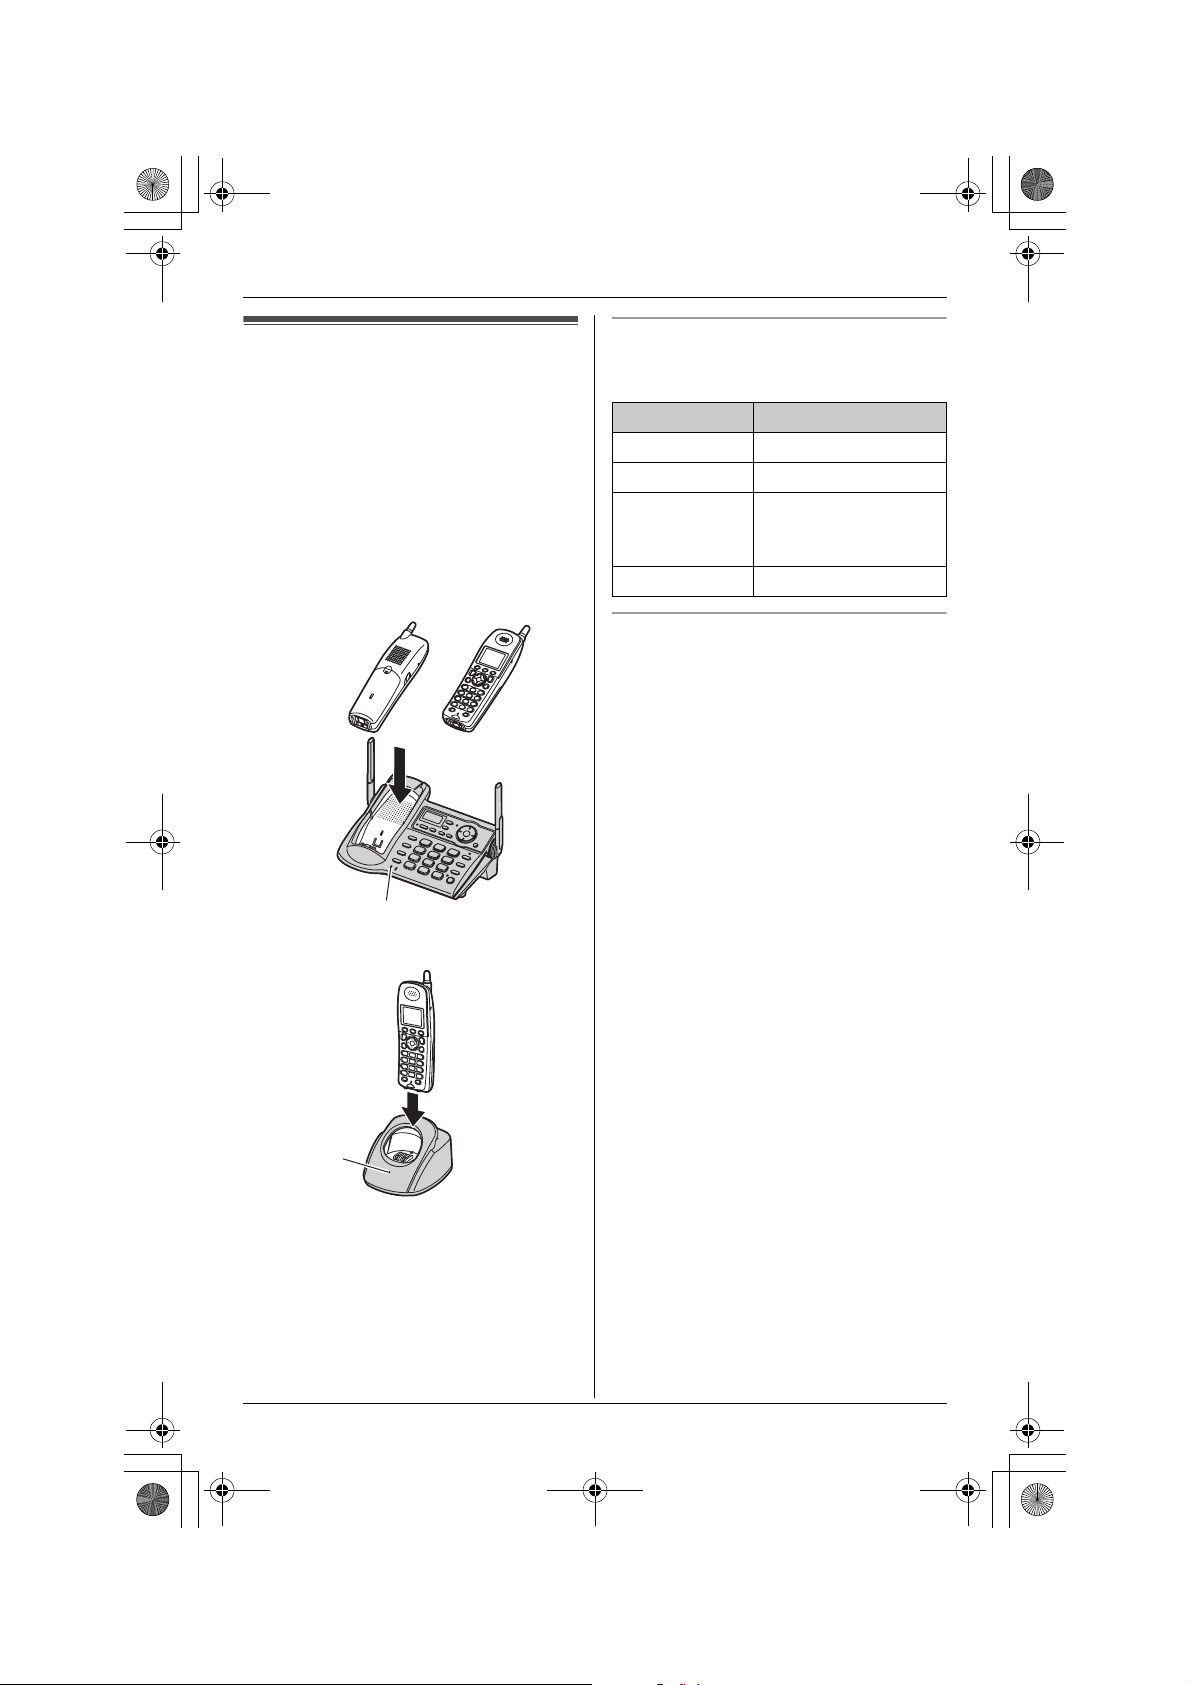
Expanding your phone
The KX-TG5583 includes 3 handsets and one base unit. You can expand the system by
adding up to 5 accessory handsets, sold separately. A maximum of 8 handsets can be
registered to a base unit.
Any combination of the 3 available accessory handsets is possible.
KX-TG5583 Accessory handsets
KX-TGA550
KX-TGA551
KX-TGA552
Note:
L The included handsets are pre-registered at the factory and assigned the extension
numbers 1, 2, and 3.
L In most situations 4 units can be operated at once, however, the number of units that can
be operated at once may be lower depending on the features being used.
6 For assistance, please visit http://www.panasonic.com/consumersupport
TG5583.book Page 7 Friday, April 8, 2005 6:33 PM
Introduction
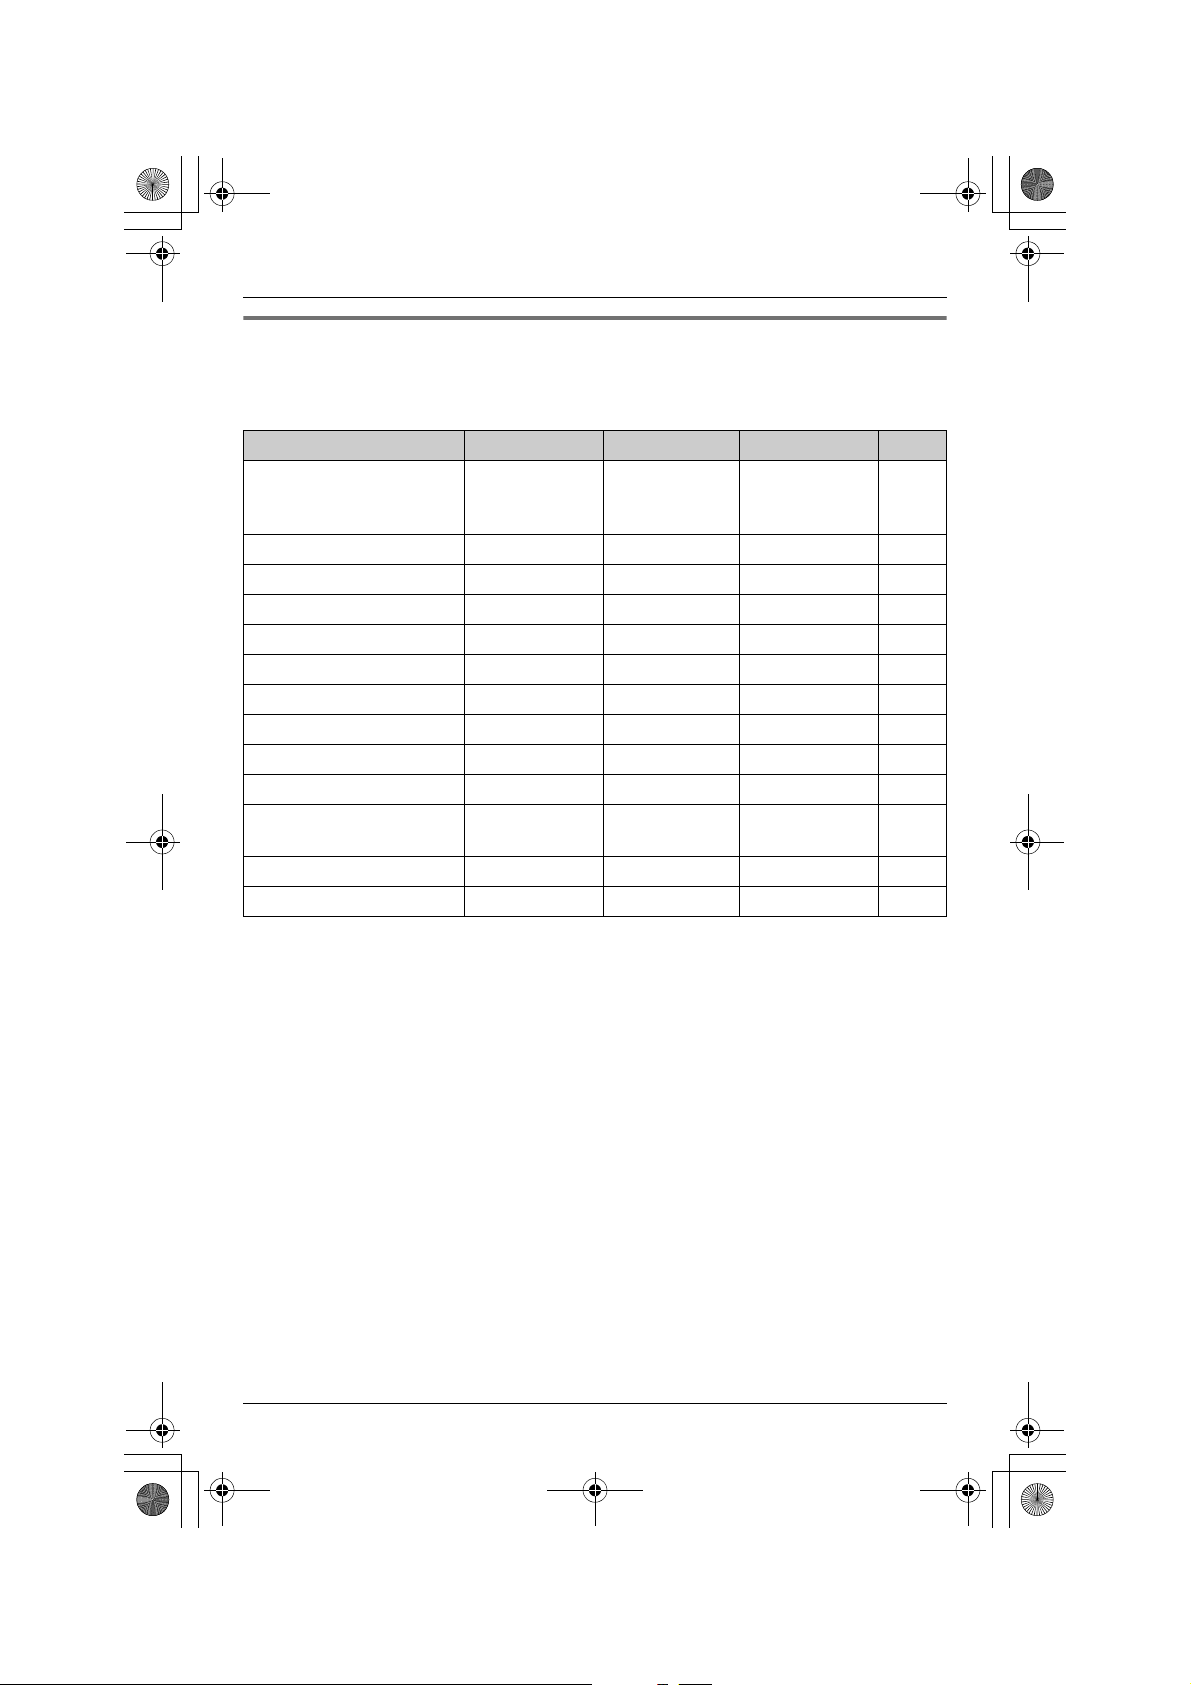
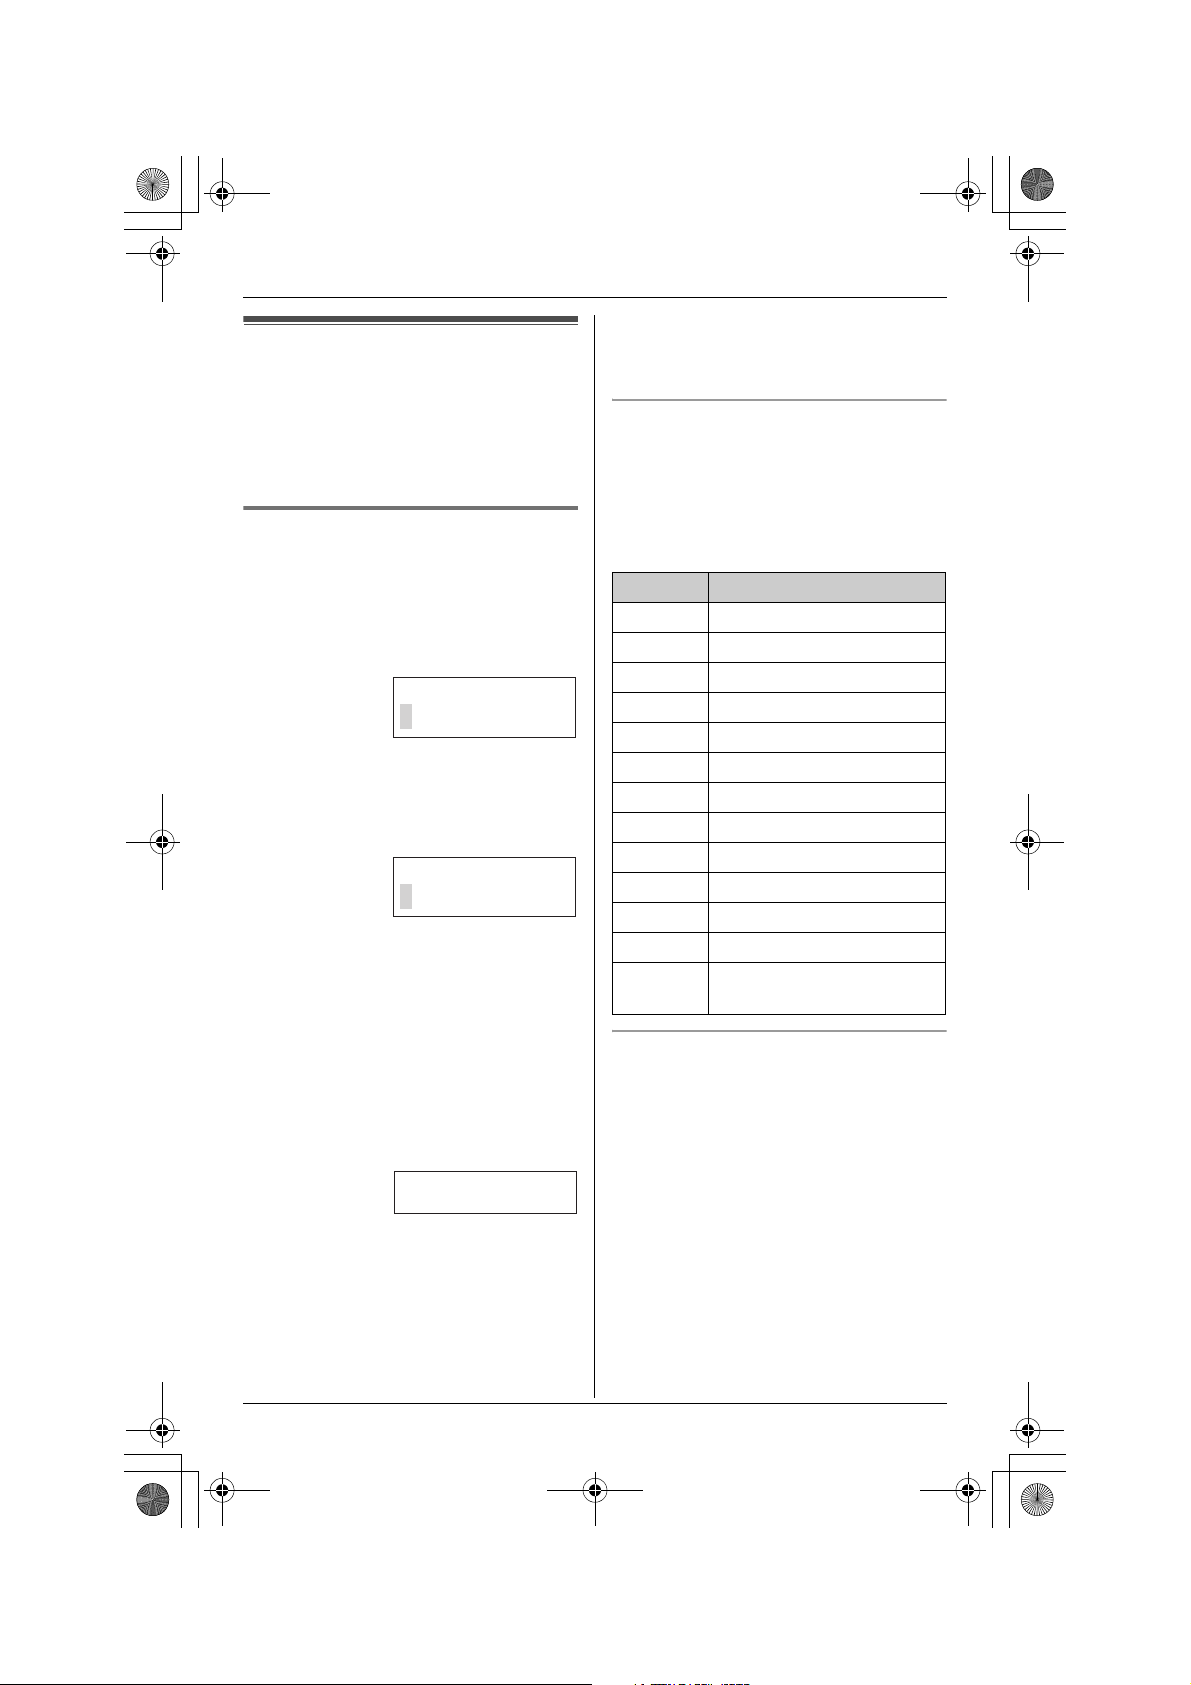
Available accessory handsets
3 accessory handset models are available for the KX-TG5583.
Operations and features of 3 different accessory handsets have certain differences as
indicated in the table below.
Feature KX-TGA550 KX-TGA551 KX-TGA552 Page
Description Available as
accessory
handset only
Display type Monochrome Color Color –
Display size 1.6 inch 1.4 inch 1.6 inch –
Control type Joystick Navigator key Joystick 17, 66
USB-support
*1
––r
Picture ID – – r 69
Picture download feature – – r
Song record feature rrr49
Song download feature – – r
Wallpaper – rr51, 73
Wallpaper download
––r
feature
Memory status display – – r 72
Screen saver mode – rr15
Same handset
supplied with
KX-TG5583
Available as
accessory
handset only
–
*2
*2
*2
*2
*1 USB-support allows you to connect the handset to your PC and send pictures and
songs from your PC to the handset, as well as create and edit phonebook entries using
your PC.
*2 For information on using this feature, refer to the help section of the GIGARANGE USB
Utility software. If you have not installed the GIGARANGE USB Utility software, refer to
the included “Installation Guide for GIGARANGE USB Utility” for details.
For information on ordering accessory handsets, see page 6.
For KX-TGA550 and KX-TGA552 operations, see page 66 to page 68 beforehand.
For assistance, please visit http://www.panasonic.com/consumersupport 7

TG5583.book Page 8 Friday, April 8, 2005 6:33 PM
Introduction
Important safety
instructions
When using this unit, basic safety
precautions should always be followed to
reduce the risk of fire, electric shock, or
personal injury.
1. Read and understand all instructions.
2. Follow all warnings and instructions
marked on this unit.
3. Unplug this unit from power outlets
before cleaning. Do not use liquid or
aerosol cleaners. Use a damp cloth for
cleaning.
4. Do not use this unit near water, for
example near a bathtub, wash bowl,
kitchen sink, etc.
5. Place the unit securely on a stable
surface. Serious damage and/or injury
may result if the unit falls.
6. Do not cover slots and openings on the
unit. They are provided for ventilation
and protection against overheating.
Never place the unit near radiators, or
in a place where proper ventilation is
not provided.
7. Use only the power source marked on
the unit. If you are not sure of the type
of power supplied to your home,
consult your dealer or local power
company.
8. Do not place objects on the power
cord. Install the unit where no one can
step or trip on the cord.
9. Do not overload power outlets and
extension cords. This can result in the
risk of fire or electric shock.
10. Never push any objects through slots
in this unit. This may result in the risk of
fire or electric shock. Never spill any
liquid on the unit.
11. To reduce the risk of electric shock, do
not disassemble this unit. Take the unit
to an authorized service center when
service is required. Opening or
removing covers may expose you to
dangerous voltages or other risks.
Incorrect reassembly can cause
electric shock when the unit is
subsequently used.
12. Unplug this unit from power outlets and
refer servicing to an authorized service
center when the following conditions
occur:
A. When the power cord is damaged
or frayed.
B. If liquid has been spilled into the
unit.
C. If the unit has been exposed to rain
or water.
D. If the unit does not work normally
by following the operating
instructions. Adjust only controls
covered by the operating
instructions. Improper adjustment
may require extensive work by an
authorized service center.
E. If the unit has been dropped or
physically damaged.
F. If the unit exhibits a distinct change
in performance.
13. During thunderstorms, avoid using
telephones except cordless types.
There may be a remote risk of an
electric shock from lightning.
14. Do not use this unit to report a gas
leak, when in the vicinity of the leak.
SAVE THESE
INSTRUCTIONS
CAUTION:
Installation
L Never install telephone wiring during a
lightning storm.
L Never install telephone jacks in wet
locations unless the jack is specifically
designed for wet locations.
L Never touch uninsulated telephone
wires or terminals unless the telephone
line has been disconnected at the
network interface.
L Use caution when installing or modifying
telephone lines.
8 For assistance, please visit http://www.panasonic.com/consumersupport

TG5583.book Page 9 Friday, April 8, 2005 6:33 PM
Introduction
L Do not touch the plug with wet hands.
L The AC adaptor is used as the main
disconnect device. Ensure that the AC
outlet is installed near the unit and is
easily accessible.
L To prevent the electric shock, use only
the included audio cable with the
transformer when connecting the unit to
an audio device.
Battery
To reduce the risk of fire or injury to
persons, read and follow these
instructions.
L Use only the battery(ies) specified.
L Do not dispose of the battery(ies) in a
fire. They may explode. Check with local
waste management codes for special
disposal instructions.
L Do not open or mutilate the battery(ies).
Released electrolyte is corrosive and
may cause burns or injury to the eyes or
skin. The electrolyte may be toxic if
swallowed.
L Exercise care when handling the
battery(ies). Do not allow conductive
materials such as rings, bracelets or
keys to touch the battery(ies), otherwise
a short circuit may cause the battery(ies)
and/or the conductive material to
overheat and cause burns.
L Charge the battery(ies) provided with or
identified for use with this product only in
accordance with the instructions and
limitations specified in this manual.
Medical
L Consult the manufacturer of any
personal medical devices, such as
pacemakers or hearing aids, to
determine if they are adequately
shielded from external RF (radio
frequency) energy. (The unit operates in
the frequency range of 5.76 GHz to 5.84
GHz, and the power output level can
range from 0.25 to 0.5 watts.) Do not use
the unit in health care facilities if any
regulations posted in the area instruct
you not to do so. Hospitals or health care
facilities may be using equipment that
could be sensitive to external RF (radio
frequency) energy.
WARNING:
L To prevent the risk of fire or electrical
shock, do not expose this product to rain
or any type of moisture.
L Unplug this unit from power outlets if it
emits smoke, an abnormal smell or
makes an unusual noise. These
conditions can cause fire or electric
shock. Confirm that smoke has stopped
and contact the Panasonic Call Center
at 1-800-211-PANA (7262).
For assistance, please visit http://www.panasonic.com/consumersupport 9
TG5583.book Page 10 Friday, April 8, 2005 6:33 PM
Introduction
For best performance
Base unit location/noise
The base unit and handset use radio
waves to communicate with each other.
For maximum distance and noise-free
operation, we recommend the following:
L Placing the unit away from electrical
appliances such as a TV, personal
computer or another cordless phone.
L Placing the base unit in a HIGH and
CENTRAL location with no obstructions
such as walls.
L Raising the antennas vertically.
L If you use the handset near a microwave
oven which is being used, noise may be
heard. Move away from the microwave
oven and closer to the base unit.
L If you use the handset near another
cordless phone’s base unit, noise may
be heard. Move away from the other
cordless phone’s base unit and closer to
your base unit.
L The maximum calling distance may be
shortened when the unit is used in the
following places: Near obstacles such as
hills, tunnels, undergrounds, near metal
objects such as wire fences, etc.
L Operating near 5.8 GHz electrical
appliances may cause interference.
Move away from the electrical
appliances.
Routine care
L Wipe the outer surface of the unit with a
soft cloth. Do not use benzine, thinner or
any abrasive powder.
Environment
L Keep the unit away from electrical noise
generating devices, such as fluorescent
lamps and motors.
L The unit should be kept free from
excessive smoke, dust, high
temperature and vibration.
L The unit should not be exposed to direct
sunlight.
L Do not place heavy objects on top of the
unit.
L When you leave the unit unused for a
long period of time, unplug this unit from
power outlet.
L The unit should be kept away from heat
sources such as heaters, kitchen stoves,
etc. It should not be placed in rooms
where the temperature is less than 5 °C
(41 °F) or greater than 40 °C (104 °F).
Damp basements should also be
avoided.
10 For assistance, please visit http://www.panasonic.com/consumersupport
TG5583.book Page 11 Friday, April 8, 2005 6:33 PM
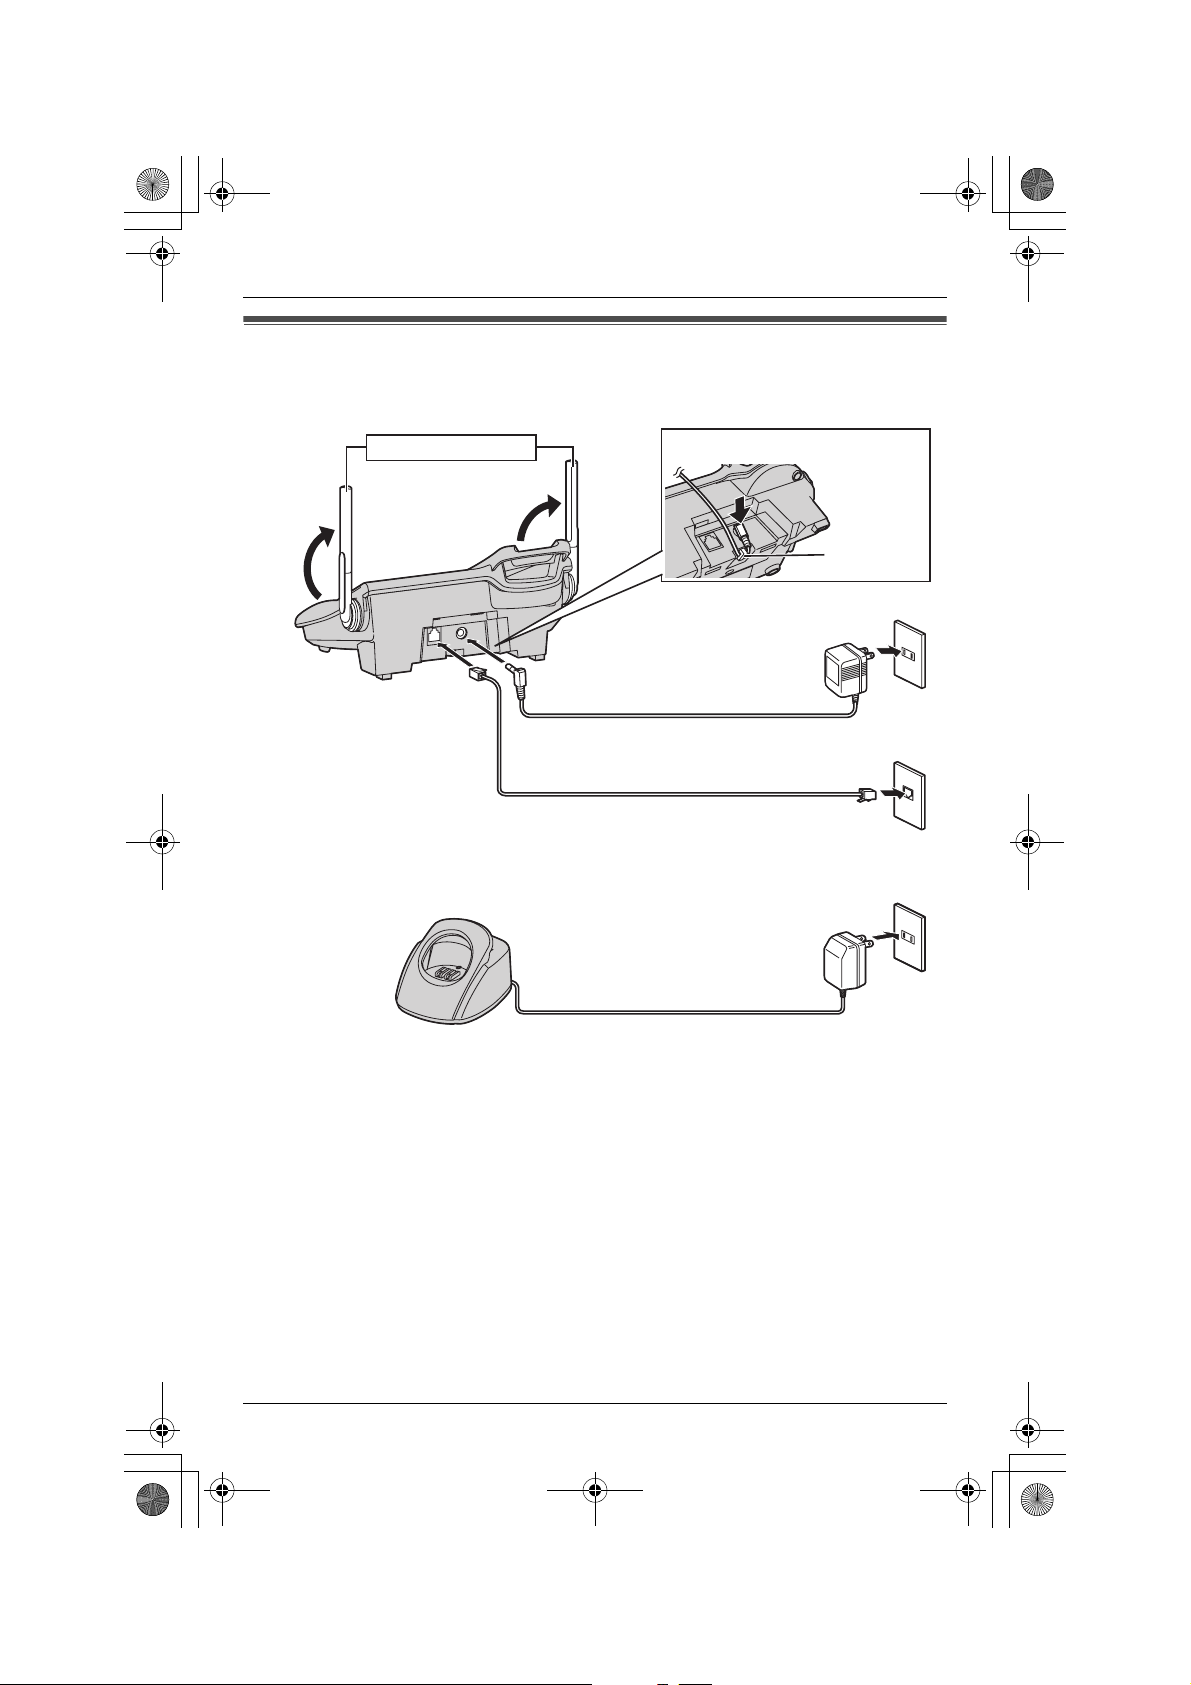
Connections
Base unit
Preparation
Charger
Raise the antennas.
Fasten the AC adaptor cord.
Hook
To power outlet (120 V AC, 60 Hz)
AC adaptor
To single-line telephone jack (RJ11C)
Telephone line cord
To power outlet (120 V AC, 60 Hz)
AC adaptor
Note:
L Base unit: Use only the included Panasonic AC adaptor PQLV1.
L Charger: Use only the included Panasonic AC adaptor KX-TCA1.
L The AC adaptor must remain connected at all times. (It is normal for the adaptor to feel
warm during use.)
L The AC adaptor should be connected to a vertically oriented or floor-mounted AC outlet.
Do not connect the AC adaptor to a ceiling-mounted AC outlet, as the weight of the
adaptor may cause it to become disconnected.
L The unit will not work during a power failure. We recommend connecting a standard
telephone to the same telephone line or to the same telephone jack using the Panasonic
KX-J66 T-adaptor. Emergency power can be supplied to the unit by connecting a
Panasonic battery back-up power supply noted on page 6.
For assistance, please visit http://www.panasonic.com/consumersupport 11

TG5583.book Page 12 Friday, April 8, 2005 6:33 PM
Preparation
If you subscribe to a DSL service
L Please attach a noise filter (contact your
DSL provider) to the telephone line
between the base unit and the telephone
line jack in the event of the following:
– Noise is heard during conversations.
– Caller ID features (page 33) do not
function properly.
To single-line telephone
jack (RJ11C)
Telephone
line cord
Noise filter
(For DSL users)
Battery installation
1 Insert the battery (1), and press it
down until it snaps into the
compartment (2).
2
1
2 Close the handset cover.
12 For assistance, please visit http://www.panasonic.com/consumersupport
TG5583.book Page 13 Friday, April 8, 2005 6:33 PM
Preparation
Battery charge
Place the handset on the base unit or
charger for 6 hours before initial use.
L The unit will beep once, the CHARGE
indicator will light, and “Charging” will
be displayed.
L “Charge completed” is displayed
when the battery has been fully charged.
The CHARGE indicator will remain lit.
Base unit
OR
CHARGE indicator
Charger
Battery strength
You can confirm the battery strength on the
handset display.
Battery icon Battery strength
1 Fully charged
2 Medium
3 Low
When flashing: needs
to be recharged.
4 Discharged
Recharging the battery
Recharge the battery when:
–“Recharge battery” is displayed or
3 flashes on the handset display.
– the handset beeps intermittently while it
is in use.
Note:
L Recharge the handset battery for more
than 15 minutes, or the display will
continue showing the indication.
L If the battery has been discharged, the
handset will display “Charge for 6
HRS” and 4 when you place the
handset on the base unit or charger.
CHARGE
indicator
Note:
L To ensure the battery charges properly,
clean the charge contacts of the
handset, base unit, and charger with a
soft, dry cloth once a month. Clean more
often if the unit is subject to grease, dust,
or high humidity.
For assistance, please visit http://www.panasonic.com/consumersupport 13
TG5583.book Page 14 Friday, April 8, 2005 6:33 PM
Preparation
Battery performance
After your Panasonic battery is fully
charged, you can expect the following
performance:
Operation Operating time
While in use
(talking)
While not in use
(standby)
While using the
clarity booster
feature (page 23)
*1 Handset is off the base unit or charger
but not in use.
Note:
L Battery power is consumed whenever
the handset is off the base unit or
charger, even when the handset is not in
use. The longer you leave the handset
off the base unit or charger, the shorter
you can actually talk on the handset.
Actual battery performance depends on
a combination of how often the handset
is in use and how often it is not in use.
L Once the battery is fully charged, you do
not have to charge it again until
“Recharge battery” is displayed or
3 flashes. This will maximize the
battery life.
*1
Up to 5 hours
Up to 11 days
Up to 3 hours
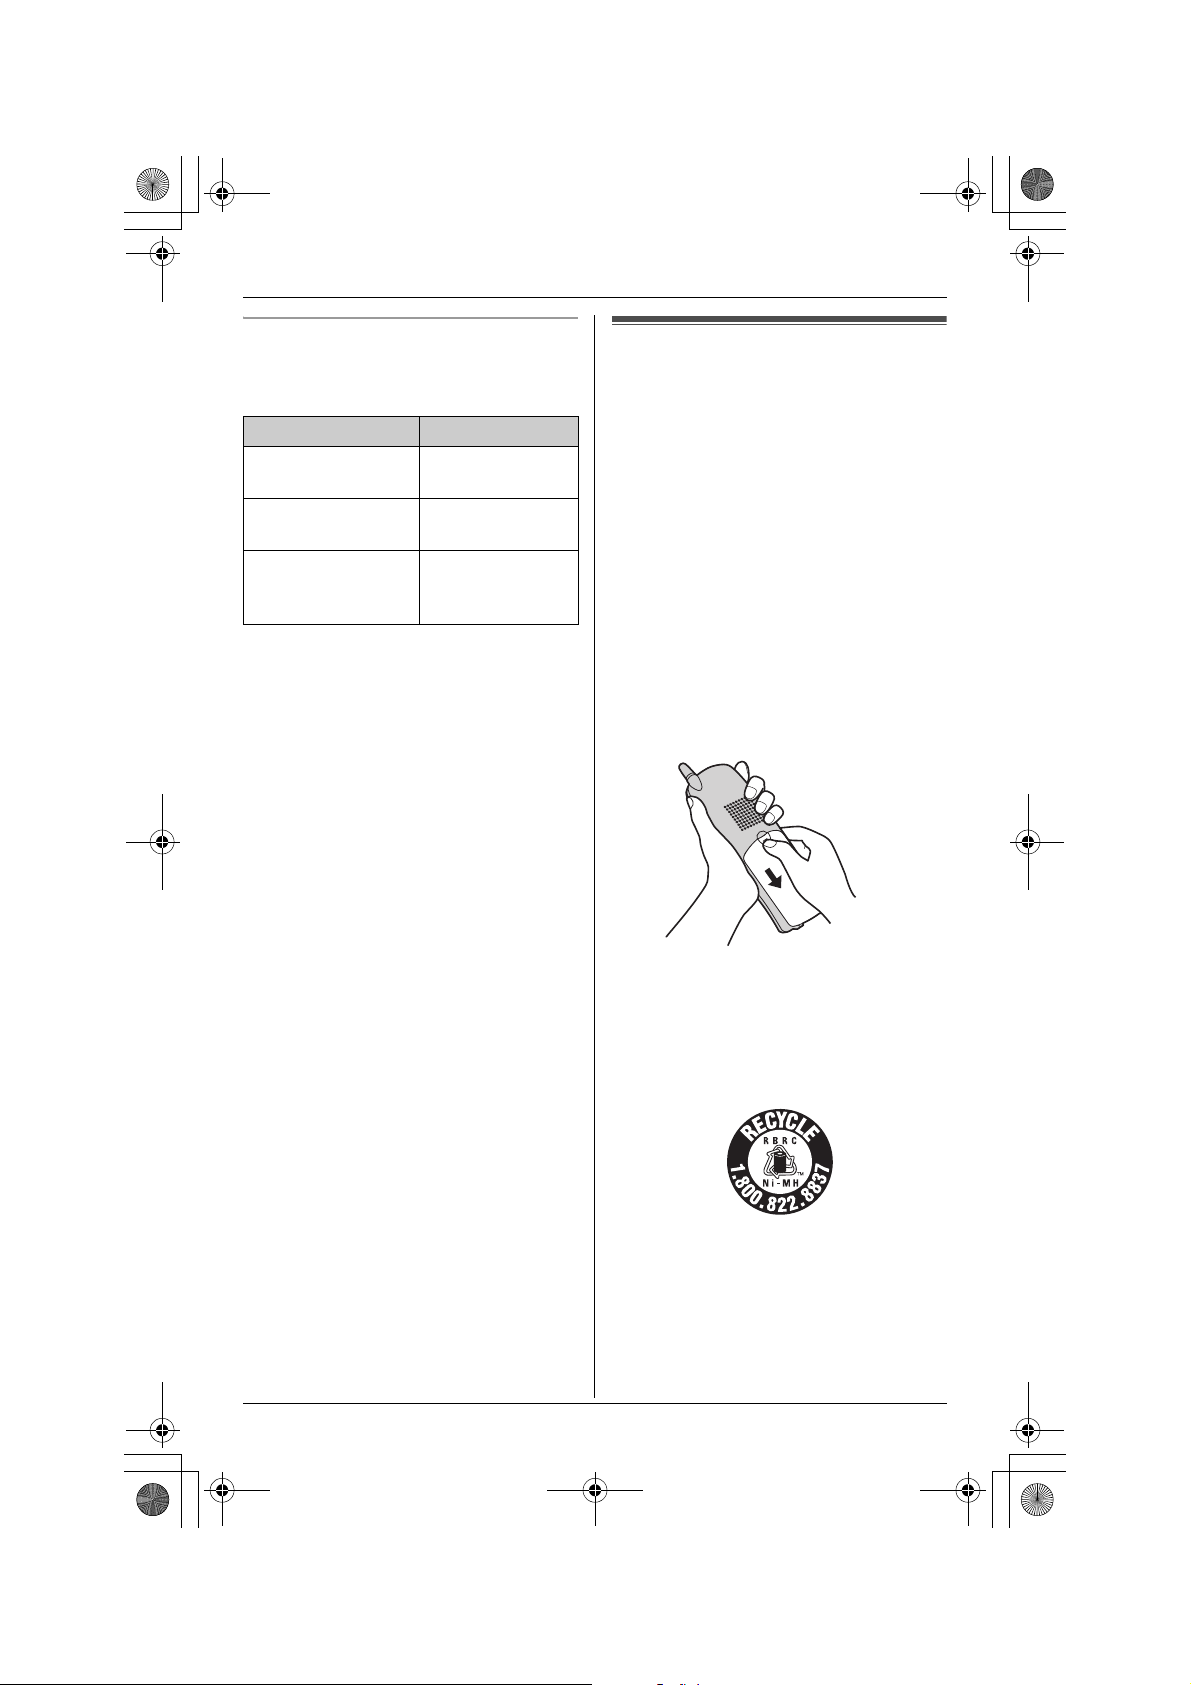
Battery replacement
If battery performance diminishes, make
sure you have cleaned the charge
contacts and fully charged the battery. The
battery needs to be replaced if any of the
following are displayed after a few phone
calls even when you have fully charged the
battery.
–“Recharge battery”
– 3 (flashing)
–“Charge for 6 HRS”
– 4
L Use only the rechargeable Panasonic
battery noted on page 6.
1 Press the notch on the cover firmly and
slide it as indicated by the arrow.
2 Replace the old battery with a new one,
and close the cover (see page 12 for
battery installation).
Attention:
A nickel metal hydride battery that is
recyclable powers the product you have
purchased.
Please call 1-800-8-BATTERY for
information on how to recycle this battery.
14 For assistance, please visit http://www.panasonic.com/consumersupport
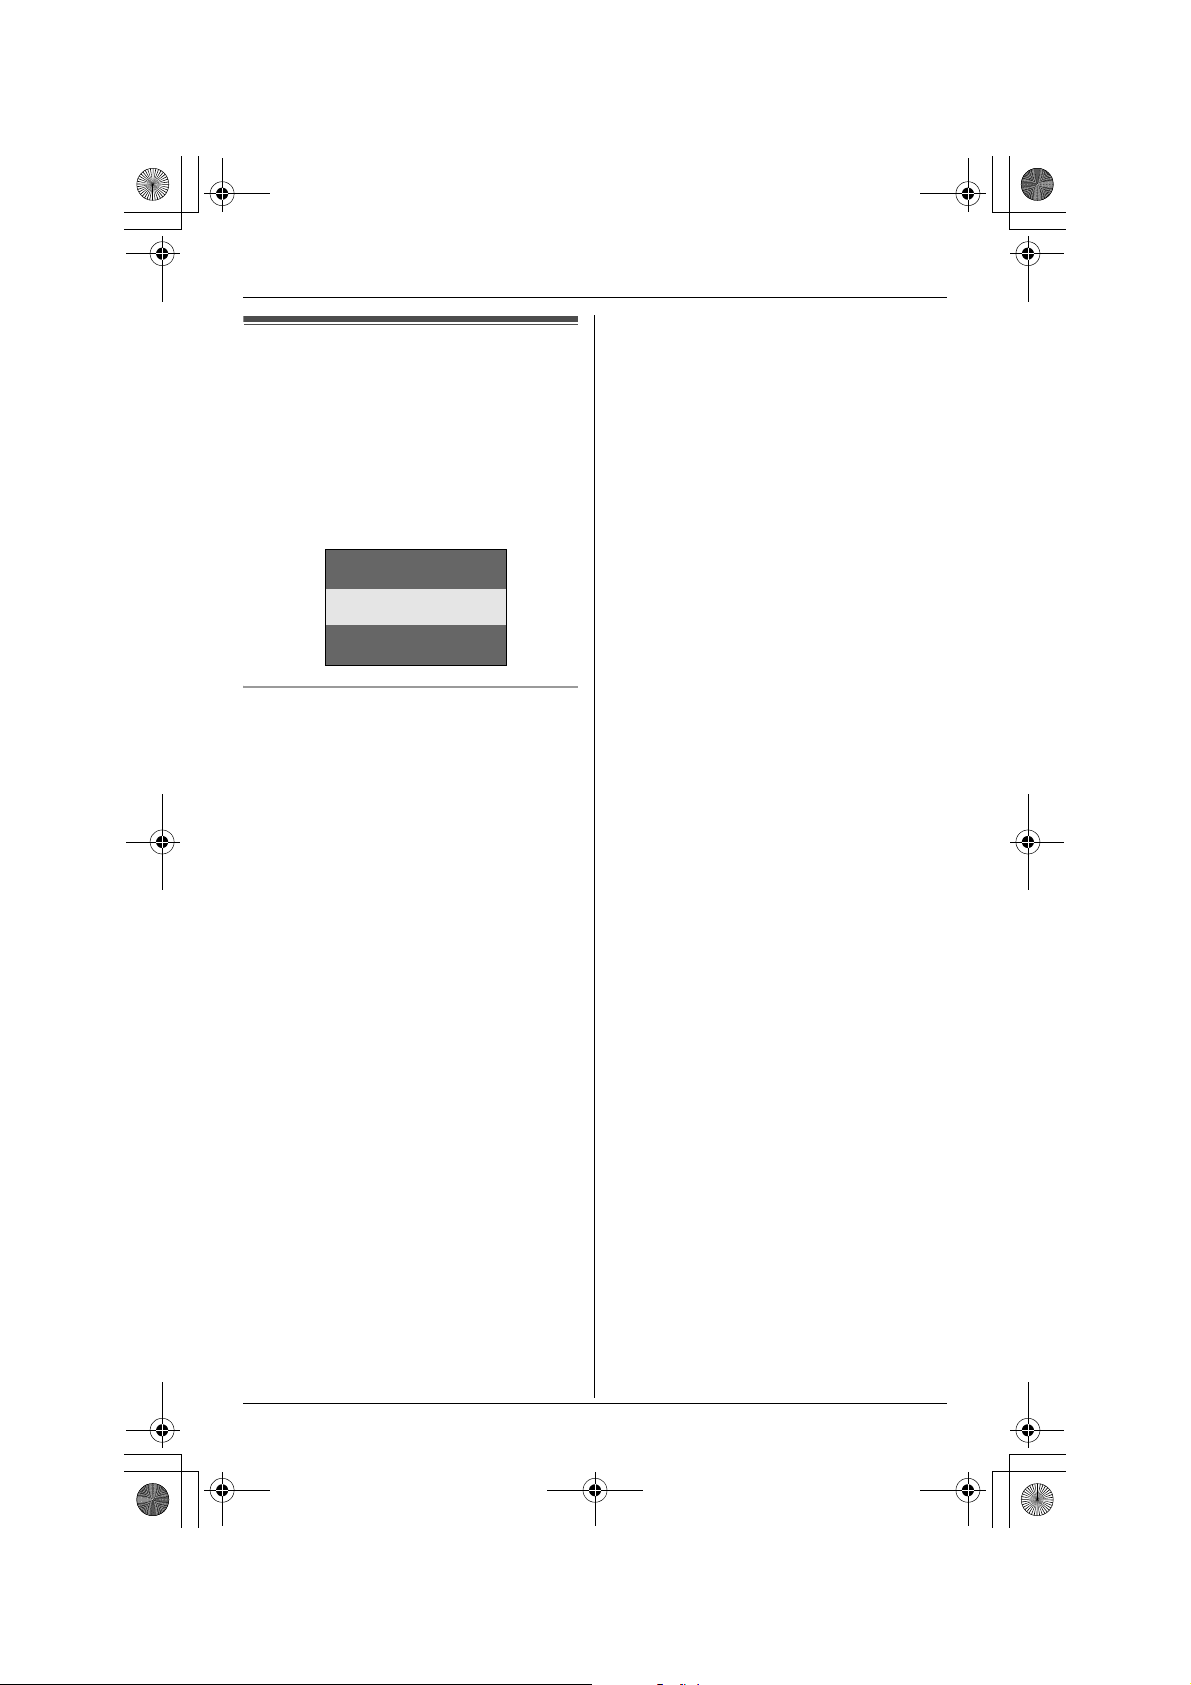
TG5583.book Page 15 Friday, April 8, 2005 6:33 PM
Screen saver mode
After 1 minute of inactivity, the handset will
enter screen saver mode if the handset is
not on the base unit or charger.
“Screen saver” will be displayed, and
will occasionally change position in order
to preserve the life of the display.
Example:
Screen saver
To cancel screen saver mode
To use the handset when it is in screen
saver mode, first press {OFF} to turn the
display on again.
Preparation
For assistance, please visit http://www.panasonic.com/consumersupport 15
TG5583.book Page 16 Friday, April 8, 2005 6:33 PM
Preparation
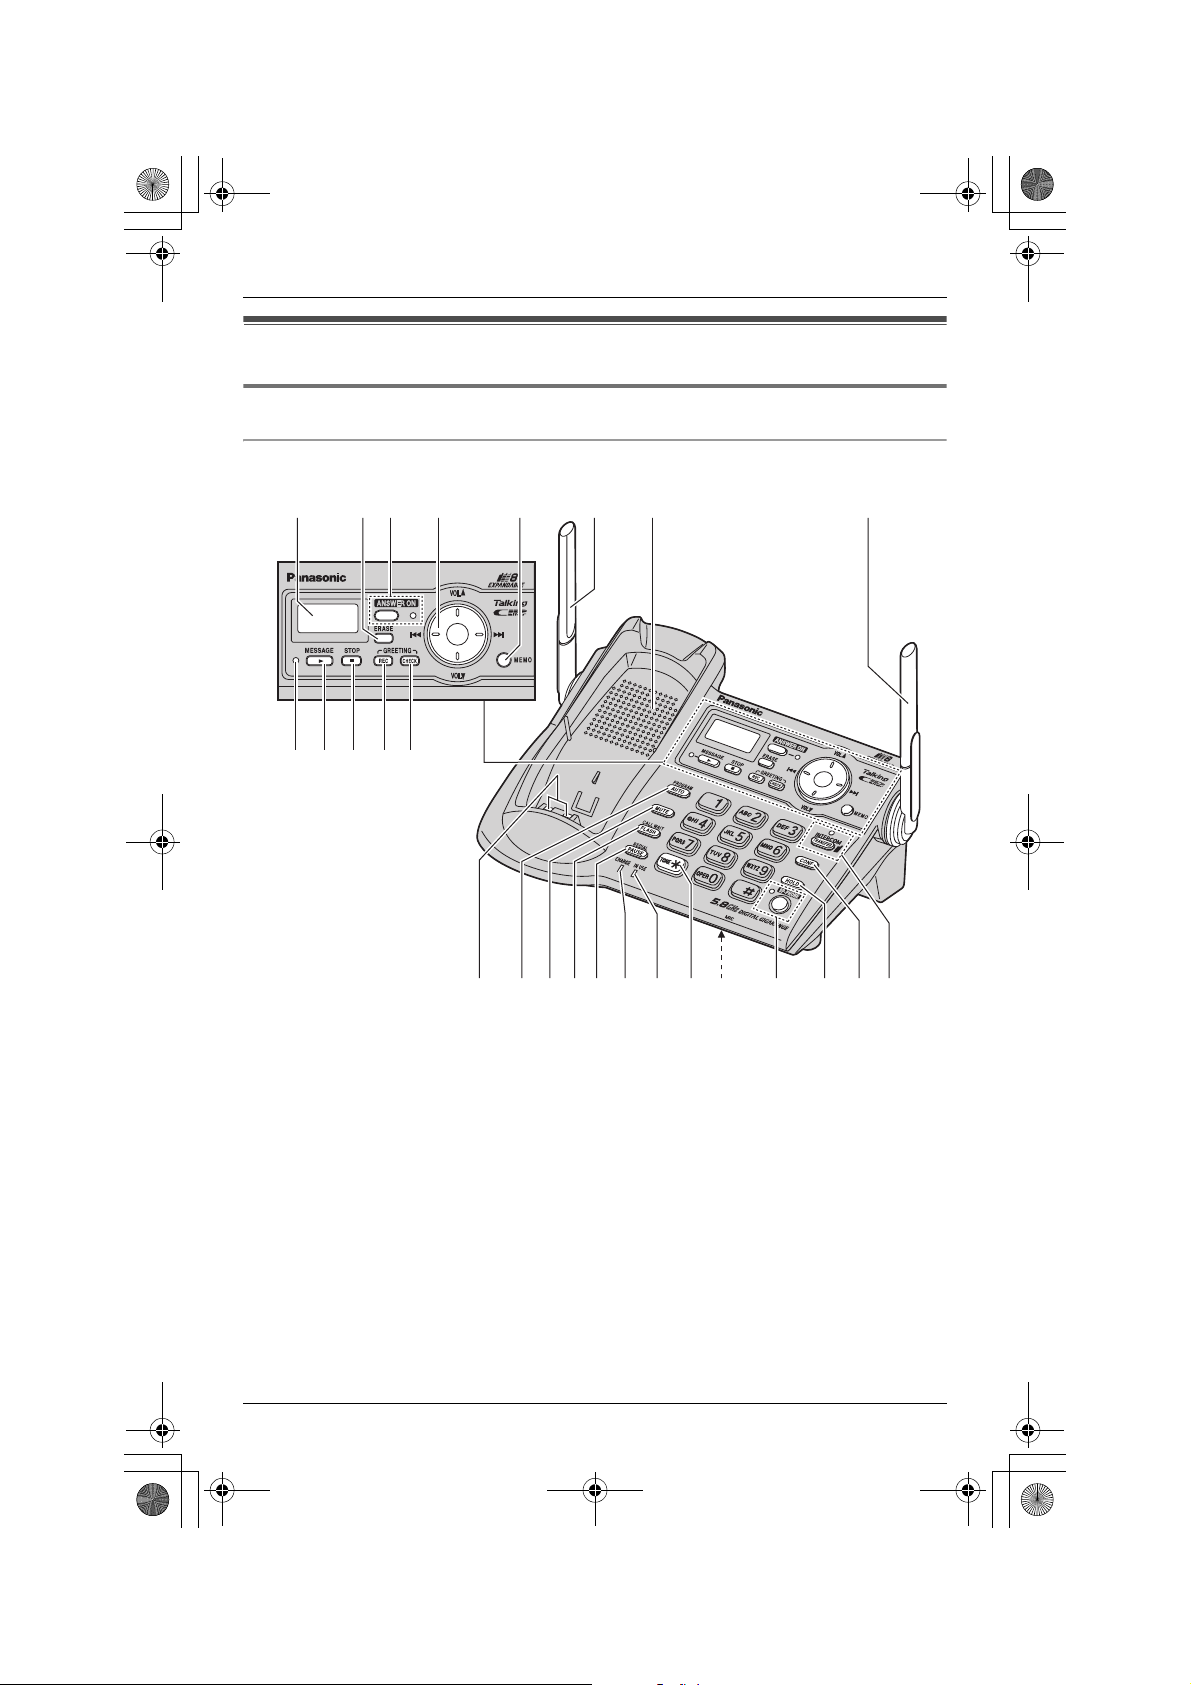
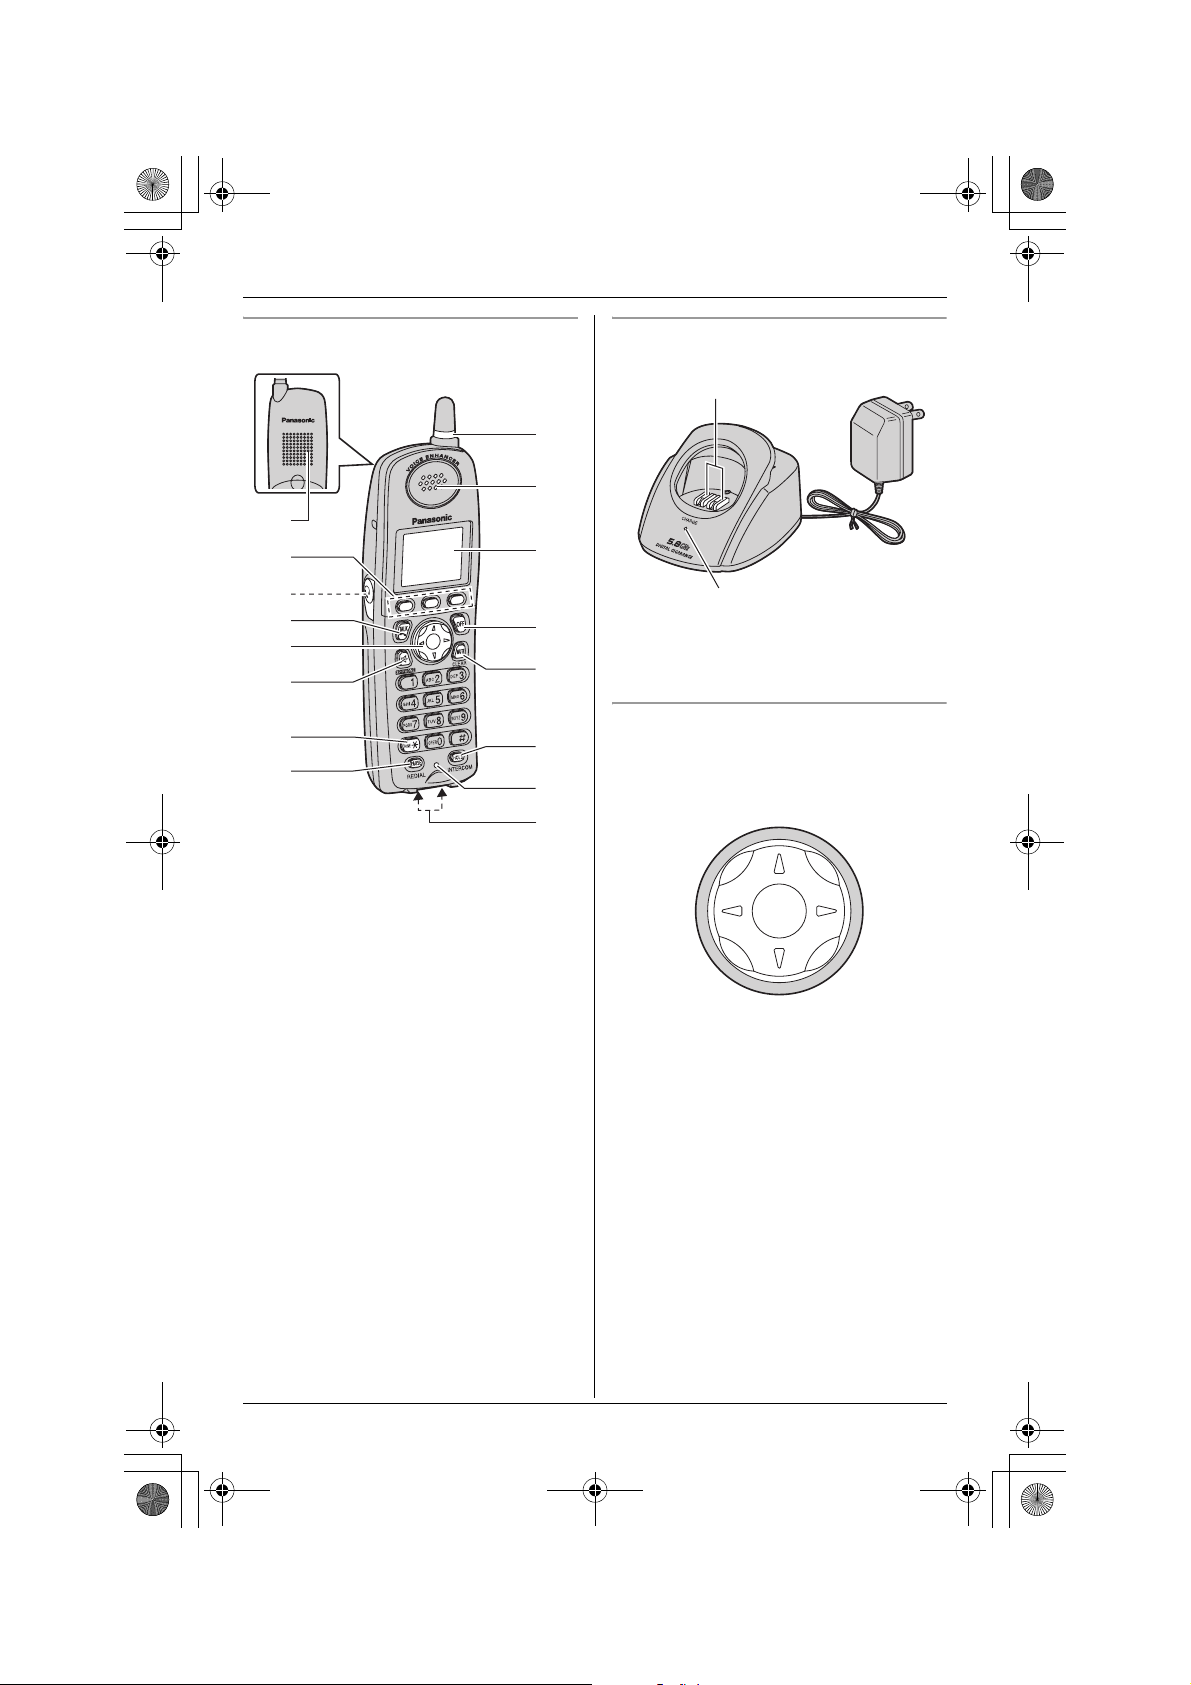
Controls and displays
Controls
Base unit
ABCD E
FGHIJ
MNOPQRSTU V WXY
A Display
B {ERASE}
C {ANSWER ON}
ANSWER ON indicator
D Navigator key
E {MEMO}
F MESSAGE indicator
G {MESSAGE}
H {STOP}
I {GREETING REC} (Recording)
J {GREETING CHECK}
K Antenna
L Speaker
M Charge contacts
KKL
A
N {PROGRAM} {AUTO}
O {MUTE}
P {CALL WAIT} {FLASH}
Q {REDIAL} {PAUSE}
R CHARGE indicator
S IN USE indicator
T {*} (TONE/A)
U MIC (Microphone)
V {SP-PHONE} (Speakerphone)
SP-PHONE indicator
W {HOLD}
X {CONF} (Conference)
Y {INTERCOM} {TRANSFER}
INTERCOM indicator
16 For assistance, please visit http://www.panasonic.com/consumersupport
TG5583.book Page 17 Friday, April 8, 2005 6:33 PM
Preparation
Handset
A
B
C
D
E
F
G
H
A Speaker
B Soft keys
C Headset jack/Audio jack
D {C} (TALK)
E Navigator key
F {s} (SP-PHONE)
G {*} (TONE)
H {REDIAL} {PAUSE}
I Ringer indicator
Message indicator
J Receiver
K Display
L {OFF}
M {CLEAR} {MUTE}
N {INTERCOM} {HOLD}
O Microphone
P Charge contacts
I
J
K
L
M
N
O
P
Charger
A
B
A Charge contacts
B CHARGE indicator
Using the navigator key
The handset navigator key can be used to
navigate through menus and to select
items shown on the display, by pressing
{^}, {V}, {<}, or {>}.
For assistance, please visit http://www.panasonic.com/consumersupport 17
TG5583.book Page 18 Friday, April 8, 2005 6:33 PM
Preparation
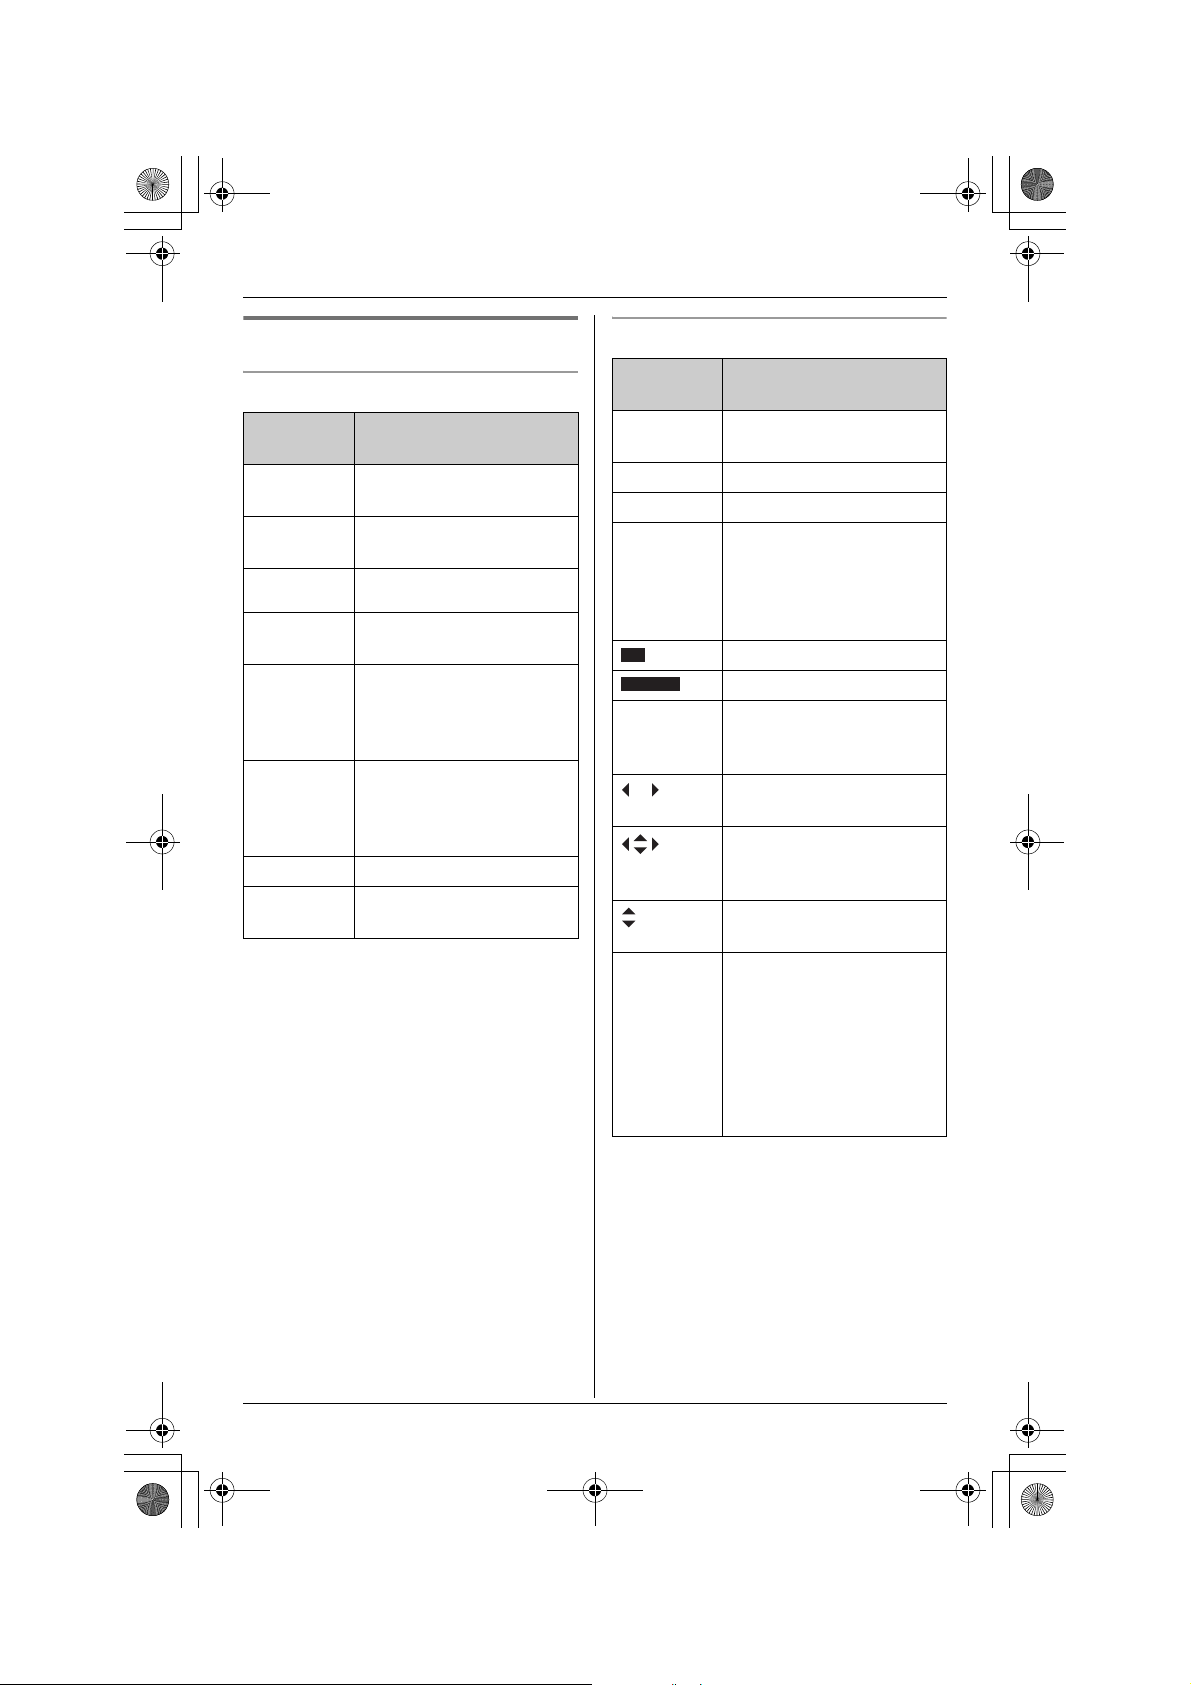
Displays
Base unit display items
Displayed
item
E Flashes when the date
E Flashes when message
O
E Greeting or memo
9@ Answering system is in
H1 Handset number;
H Paging all handsets.
P Base unit is in
Meaning
and time need to be set.
memory is full.
Base unit ringer is off.
message recording error
greeting only mode (caller
messages will not be
recorded).
displayed when paging or
being paged. (example
shown here: handset 1)
programming mode.
Handset display items
Displayed
item
--:-- The date and time need to
W Voice enhancer is on.
1 Battery strength
S Line is in use.
SP
PRIVACY
! This handset’s extension
Q When customizing the
Meaning
be set.
When flashing: a call is on
hold.
When flashing rapidly: a
call is being received.
Speaker is on.
Call Privacy mode is on.
number (example shown
here: handset 1)
You can move the cursor
right and left.
You can scroll or move the
cursor right and left or up
and down.
You can scroll up and
down.
unit: indicates the current
setting.
When viewing the caller
list: indicates that you
have called back this
caller or viewed this caller
information.
18 For assistance, please visit http://www.panasonic.com/consumersupport

TG5583.book Page 19 Friday, April 8, 2005 6:33 PM
Preparation
Handset menu icons
When in standby mode, pressing {MENU}
(middle soft key) reveals the handset’s
main menu. From here you can access
various features and settings.
Important:
L The menu icons shown in these
instructions vary slightly from the actual
icons shown on the display.
Menu
icon
J
K
L
M
N
O
Menu/feature
Answering device
Ringer setting
Display setting
Function
Initial setting
Set date & time
Handset soft keys
The handset features 3 soft keys. By
pressing a soft key, you can select the
function displayed directly above it.
L The functions displayed will vary
depending on how you are using the
unit.
L When a function does not appear above
a soft key, the soft key has no function.
Note:
L In these operating instructions, soft key
names are written inside brackets, the
same way as other unit keys.
Example:
Unit keys: {C}, {OFF}, etc.
Soft keys: {CID}, {MENU}, {C}, etc.
Handset backlit display and handset
keypad
The handset display and dialing buttons
will light for a few seconds after pressing
any of the handset’s controls or lifting the
handset off the base unit or charger. They
will also light when a call is being received.
For assistance, please visit http://www.panasonic.com/consumersupport 19

TG5583.book Page 20 Friday, April 8, 2005 6:33 PM
Preparation
Setting the unit before
use
Setting the dialing mode
If you cannot make calls, change this
setting depending on your telephone line
service. The default setting is “Tone”.
“Tone”: For tone dial service.
“Pulse”: For rotary pulse dial service.
1 Press {MENU} (middle soft key).
2 Scroll to N, then press {SELECT}.
3 Scroll to “Set tel line”, then press
{SELECT}.
4 Scroll to “Set dial mode”, then press
{SELECT}.
5 Press {V} or {^} repeatedly to select
the desired setting.
6 Press {SAVE}, then press {OFF}.
Setting the date and time O
1 Press {MENU} (middle soft key).
2 Scroll to O, then press {SELECT}.
3 Scroll to “Date and time”, then press
{SELECT}.
Date and time
Time adjustment
5 Enter the current hour and minute (12-
hour clock format) by selecting 2 digits
for each.
Example: 9:30 PM
Press {0}{9} {3}{0}.
6 Select “AM” or “PM” by pressing {AM/
PM}.
7 Press {SAVE}.
L When the date and time are set, E
disappears from the base unit
display.
L If the handset beeps 3 times, the date
and time were not set correctly. Enter
the correct digits.
8 Press {OFF}.
Note:
L If you make a mistake when entering the
date and time, press {V}, {^}, {<}, or
{>} to move the cursor, then make the
correction.
Time adjustment (Caller ID subscribers
only)
When calls are received, Caller ID will
automatically adjust the date and time
(including daylight saving time).
L If you have not set the date and time
manually, Caller ID will not adjust the
date and time.
L You can turn this feature off (page 56).
4 Enter the current month, day, and year
by selecting 2 digits for each.
Example: June 15, 2005
Press {0}{6} {1}{5} {0}{5}.
Date:06.15.2005
Time:12:00 AM
0-9=Date&Time
20 For assistance, please visit http://www.panasonic.com/consumersupport
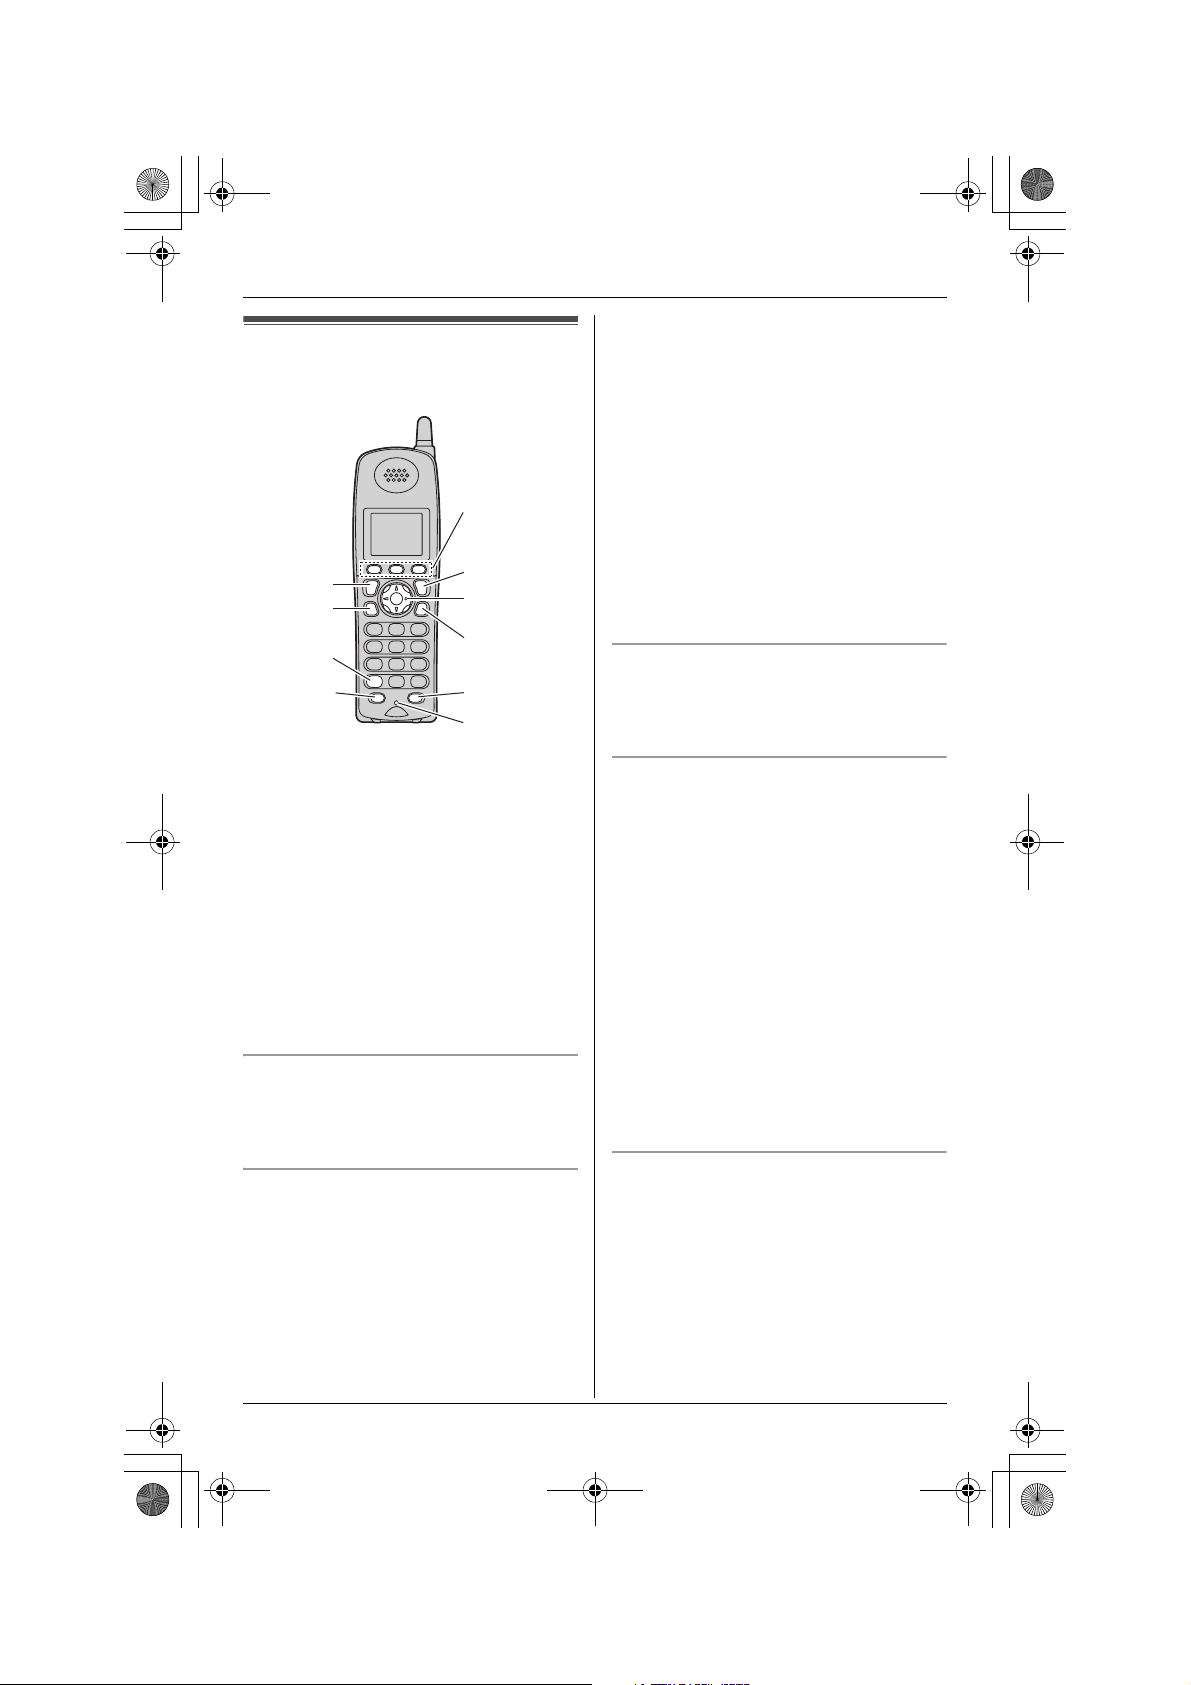
TG5583.book Page 21 Friday, April 8, 2005 6:33 PM
Making calls using the
handset
Soft keys
{C}
{s}
{*}
{REDIAL}
{PAUSE}
{OFF}
Navigator key
{CLEAR}
{MUTE}
{HOLD}
Microphone
Making/Answering Calls
4 When finished talking, press {OFF} or
place the handset on the base unit or
charger.
Note:
L Talk alternately with the caller in a quiet
room.
L If the other party has difficulty hearing
you, press {V} to decrease the speaker
volume.
L While on a call, you can switch from the
receiver to the speakerphone by
pressing {s}. To switch back to the
receiver, press {C}.
To adjust the speaker volume
6 levels (high to low) are available.
While using the speaker, press {V} or {^}
repeatedly.
1 Lift the handset and press {C}.
L “Talk” will be displayed.
2 Dial the phone number.
3 When finished talking, press {OFF} or
place the handset on the base unit or
charger.
Note:
L The IN USE indicator on the base unit
lights while the handset user is on an
outside conversation.
To adjust the receiver volume
3 levels (high/medium/low) are available.
While using the receiver, press {V} or {^}
repeatedly.
To use the speakerphone
1 Lift the handset and press {s}.
L “SP-phone” will be displayed.
2 Dial the phone number.
3 When the other party answers, speak
into the microphone.
To dial after confirming the entered
number
1 Enter the phone number.
L To correct a digit, press {<} or {>} to
move the cursor, then press
{CLEAR}. Enter the correct number.
L If a pause is required when dialing,
press {PAUSE } where needed (page
23).
L To cancel, press {OFF}.
2 Press {C}, {s}, or {CALL}.
3 When finished talking, press {OFF} or
place the handset on the base unit or
charger.
To redial the last number dialed
1 Press {C} or {s}.
2 Press {REDIAL}.
For assistance, please visit http://www.panasonic.com/consumersupport 21
TG5583.book Page 22 Friday, April 8, 2005 6:33 PM
Making/Answering Calls
To make a call using the redial list
The last 5 phone numbers dialed are
stored in the redial list.
1 Press {REDIAL}.
L The last number dialed will be
displayed.
2 Press {V} or {^} repeatedly to display
the desired number.
L To delete the displayed number,
press {CLEAR}.
L To exit the list, press {OFF}.
3 Press {C}, {s}, or {CALL}.
Useful features during a call
HOLD button
This feature allows you to put an outside
call on hold.
1 Press {HOLD} during an outside call.
L To transfer the call to another
extension, see page 38.
2 Press {HOLD} again.
L “Hold” will be displayed.
L To return to the call, press {C} or
{s}.
L The base unit user can take the call
by pressing {SP-PHONE}.
L Another handset user can take the
call by pressing {C} or {s}.
Note:
L If another phone is connected on the
same line (page 11), you can also take
the call by lifting its handset.
L If a call is kept on hold for more than 6
minutes, an alarm tone will start to
sound and the ringer indicator will flash
rapidly. After 4 additional minutes on
hold, the call will be disconnected.
MUTE button
You can mute your voice during a
conversation. While mute is turned on you
will be able to hear the other party, but the
other party will not be able to hear you.
To mute your voice, press {MUTE}.
L “<Mute>” will flash on the display.
L To return to the conversation, press
{MUTE}, {C}, or {s}.
Voice enhancer
This feature clarifies the voice of the
person you are talking to, reproducing a
more natural-sounding voice that is easier
to hear and understand.
1 Press {MENU} (middle soft key) during
an outside call.
2 To turn this feature on or off, press {3}.
L You can also turn this feature on or off
by pressing {V} or {^}, then pressing
{SELECT}.
L When turned on, W will be
displayed.
Note:
L Once you turn voice enhancer on, it will
be activated for all outside calls until
turned off.
L You can also turn this feature on or off by
programming (page 51).
L Depending on the condition and quality
of your telephone line, this feature may
emphasize existing line noise. If it
becomes difficult to hear, turn this
feature off.
22 For assistance, please visit http://www.panasonic.com/consumersupport
TG5583.book Page 23 Friday, April 8, 2005 6:33 PM
Making/Answering Calls
Clarity booster
This feature can improve sound clarity
when the handset is used in an area where
there may be interference. During an
outside call, this feature will be turned on
automatically when necessary. This
feature will turn off when you hang up or
put a call on hold. It will not turn off
automatically during a call. You can also
turn this feature on or off manually.
1 Press {MENU} (middle soft key) during
an outside call.
2 To turn this feature on or off, press {2}.
L You can also turn this feature on or off
by pressing {V} or {^}, then pressing
{SELECT}.
L While this feature is turned on,
“Booster on” will flash on the
display.
Note:
L If this feature is turned off manually
during a call, it will not be turned on
automatically during the same call.
L While this feature is turned on, battery
operating time will be shortened (page
14).
L The maximum number of extensions
which can be used at a time may
decrease when using this feature.
Call privacy
Call privacy allows you to prevent other
users from joining your conversations with
outside callers. To allow other users to join
your conversations, leave this feature off.
This feature is only available for the
handset.
To turn this feature on or off, press
{PRIVACY} during a conversation.
L While this feature is turned on,
will be displayed.
L While this feature is turned on, other
users cannot join the conversation.
L Call privacy will turn off after you hang
up the call.
PAUSE button (for PBX/long distance
service users)
A pause is sometimes required when
making calls using a PBX or long distance
service.
For example, if you need to dial the line
access number “9” when making outside
calls with a PBX:
PRIVACY
1 Press {9}.
2 Press {PAUSE}, then dial the phone
number.
Example:
9P15556667777
Call share
When another extension is on an outside
call, this feature allows you to join that call.
To join a conversation, press {C} or {s}
when another extension is on an outside
call.
L “Conference” will be displayed.
L A maximum of 4 parties (including the
outside party) can join a conversation.
For assistance, please visit http://www.panasonic.com/consumersupport 23
3 Press {C}, {s}, or {CALL}.
Note:
L A 3.5 second pause is inserted each
time {PAU SE} is pressed. Press
repeatedly to insert longer pauses.
TG5583.book Page 24 Friday, April 8, 2005 6:33 PM
Making/Answering Calls
FLASH button
Pressing {FLASH} allows you to use
special features of your host PBX such as
transferring an extension call, or accessing
optional telephone services such as Call
Waiting.
Note:
L To change the flash time, see page 53.
For Call Waiting service users
To use Call Waiting, you must subscribe to
your telephone company’s Call Waiting
service.
This feature allows you to receive calls
while you are already talking on the phone.
If you receive a call while on the phone,
you will hear a Call Waiting tone.
Press {FLASH} to answer the 2nd call.
L The 1st call is put on hold while you
answer the 2nd call.
L To switch between calls, press
{FLASH}.
Note:
L Please contact your telephone company
for details and availability of this service
in your area.
Temporary tone dialing (for rotary/
pulse service users)
You can temporarily switch the dialing
mode to tone when you need to access
touch tone services (for example,
answering services, telephone banking
services, etc.).
Press {*} (TONE) before entering access
numbers which require tone dialing.
Note:
L The dialing mode will return to pulse
when you hang up.
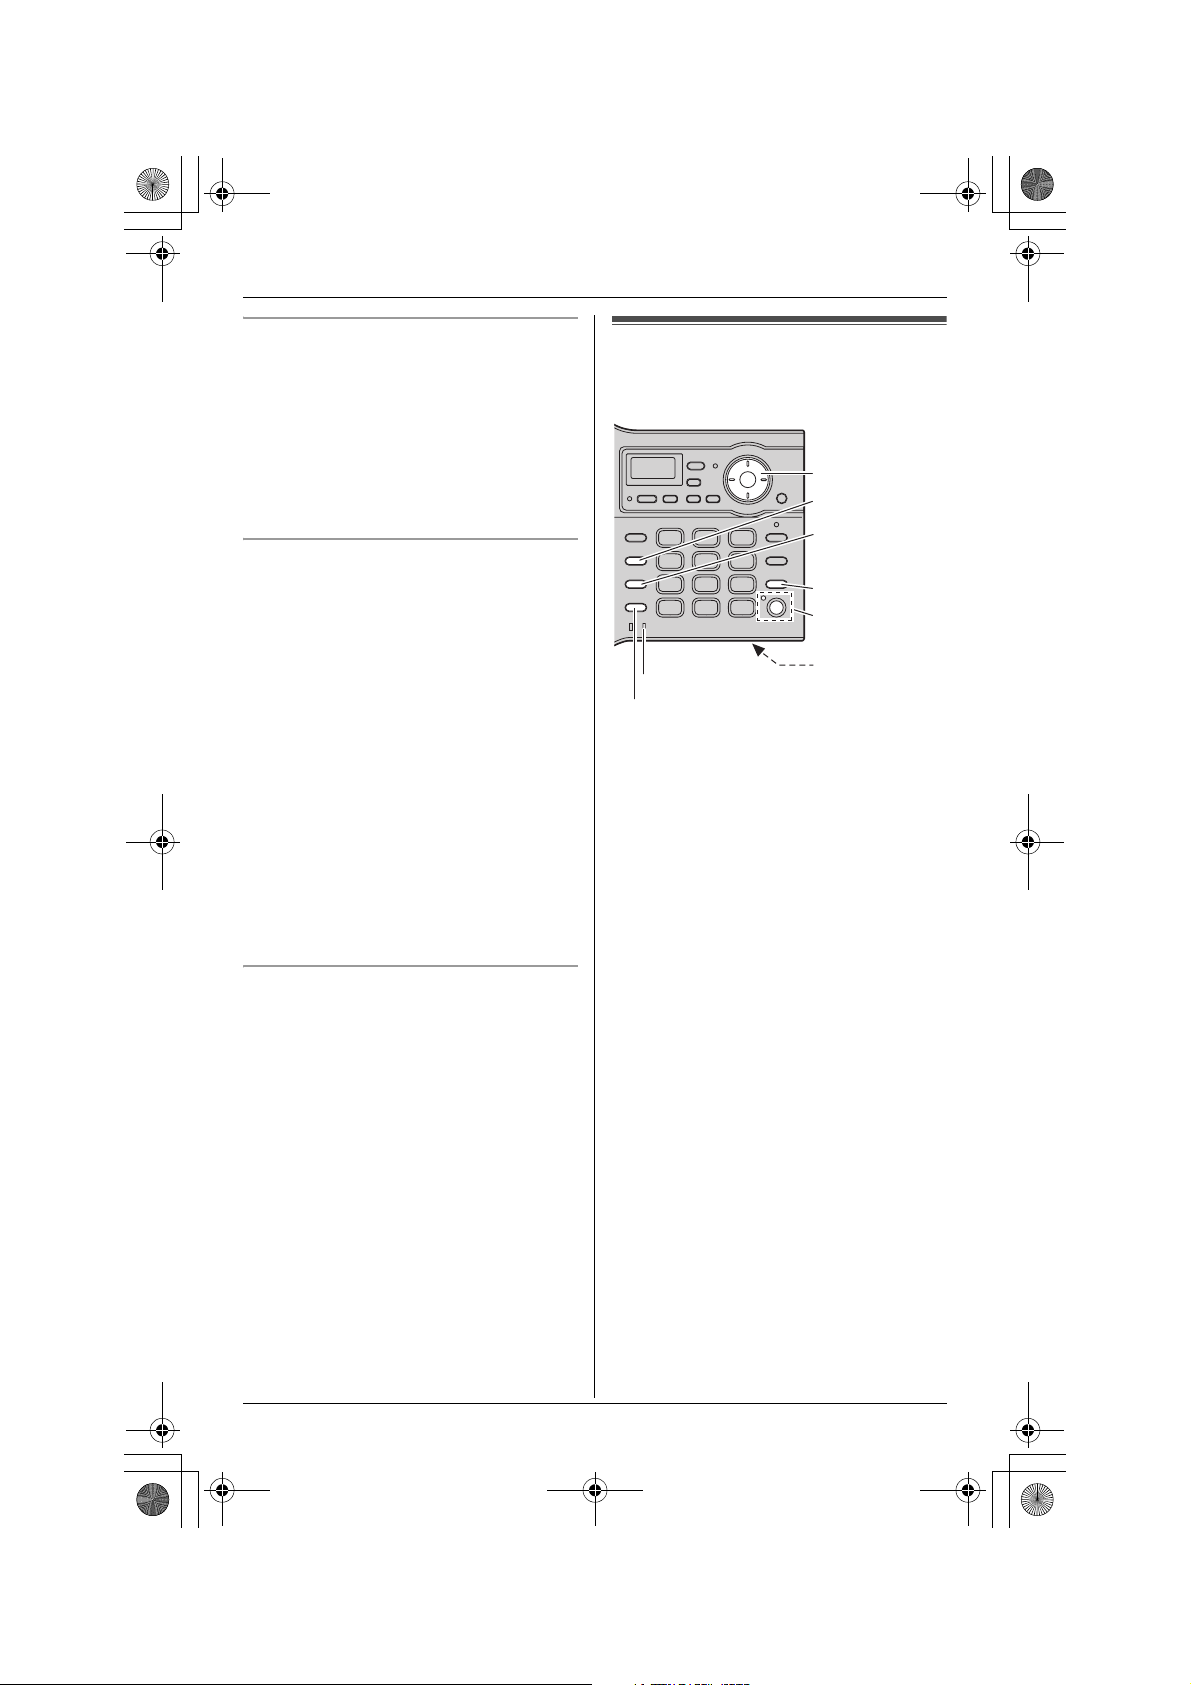
Making calls using the
base unit
{V}, {^}
{MUTE}
{CALL WAIT}
{FLASH}
{HOLD}
{SP-PHONE}
and indicator
MIC
IN USE indicator
{REDIAL} {PAUSE}
1 Press {SP-PHONE}.
L The SP-PHONE and IN USE
indicators light.
2 Dial the phone number.
3 When the other party answers, speak
into the MIC.
4 When finished talking, press {SP-
PHONE}.
L The SP-PHONE and IN USE
indicators go out.
Note:
L Talk alternately with the caller in a quiet
room.
L If the other party has difficulty hearing
you, press {V} to decrease the speaker
volume.
L While on a call, you can switch from the
speaker phone to the handset:
– If the handset is off the base unit,
press {C} or {s} on the handset,
then press {SP-PHONE} on the base
unit.
– If the handset is on the base unit,
simply lift the handset.
24 For assistance, please visit http://www.panasonic.com/consumersupport
TG5583.book Page 25 Friday, April 8, 2005 6:33 PM
Making/Answering Calls
To adjust the speaker volume
8 levels (high to low) are available.
While on a call press {V} or {^} repeatedly.
To redial the last number dialed
1 Press {SP-PHONE}.
2 Press {REDIAL}.
Useful features during a call
HOLD button
This feature allows you to put an outside
call on hold.
Press {HOLD} during an outside call.
L The SP-PHONE indicator and IN USE
indicator flash.
L To return to the call, press {SP-
PHONE}.
L The handset user can take the call by
pressing {C} or {s}.
Note:
L If another phone is connected on the
same line (page 11), you can also take
the call by lifting its handset.
L If a call is kept on hold for more than 6
minutes, an alarm tone will start to
sound. After 4 additional minutes on
hold, the call will be disconnected.
MUTE button
You can mute your voice during a
conversation. While mute is turned on you
will be able to hear the other party, but the
other party will not be able to hear you.
To mute your voice, press {MUTE}.
L The SP-PHONE indicator flashes.
L To return to the conversation, press
{MUTE} or {SP-PHONE}.
Call share
When another extension is on an outside
call, this feature allows you to join that call.
To join a conversation, press {SP-
PHONE} when another extension is on an
outside call.
L A maximum of 4 parties including the
outside party can join a conversation.
FLASH button
Pressing {FLASH} allows you to use
special features of your host PBX such as
transferring an extension call, or accessing
optional telephone services such as Call
Waiting.
Note:
L To change the flash time, see page 53.
For Call Waiting service users
To use Call Waiting, you must subscribe to
your telephone company’s Call Waiting
service.
This feature allows you to receive calls
while you are already talking on the phone.
If you receive a call while on the phone,
you will hear a Call Waiting tone.
Press {CALL WAIT} to answer the 2nd
call.
L The 1st call is put on hold while you
answer the 2nd call.
L To switch between calls, press {CALL
WAIT}.
Note:
L Please contact your telephone company
for details and availability of this service
in your area.
For assistance, please visit http://www.panasonic.com/consumersupport 25
TG5583.book Page 26 Friday, April 8, 2005 6:33 PM
Making/Answering Calls
Temporary tone dialing (for rotary/
pulse service users)
You can temporarily switch the dialing
mode to tone when you need to access
touch tone services (for example,
answering services, telephone banking
services, etc.).
Press {*} (TONE) before entering access
numbers which require tone dialing.
Note:
L The dialing mode will return to pulse
when you hang up.
Answering calls using
the handset
When a call is being received, the ringer
indicator flashes rapidly.
1 Lift the handset and press {C} or {s}.
L You can also answer a call by
pressing any button except {V}, {^},
{<}, {>}, or {OFF}. (Any key talk
feature)
2 When finished talking, press {OFF} or
place the handset on the base unit or
charger.
Auto talk
This feature allows you to answer a call by
simply lifting the handset off the base unit
or charger. You do not need to press {C}.
To activate this feature, see page 53.
Temporary ringer off
While the handset is ringing for an outside
call, you can turn the ringer off temporarily
by pressing {OFF}. The handset will ring
the next time a call is received.
26 For assistance, please visit http://www.panasonic.com/consumersupport
TG5583.book Page 27 Friday, April 8, 2005 6:33 PM
Answering calls using
the base unit
When a call is being received, the IN USE
indicator flashes rapidly.
1 Press {SP-PHONE}.
2 Speak into the MIC.
3 When finished talking, press {SP-
PHONE}.
Adjusting the ringer volume
4 levels (high/medium/low/off) are
available.
While the base unit is not being used,
press {V} or {^} repeatedly to select the
desired volume.
L To stop ringing, press {STOP}.
Making/Answering Calls
Note:
L If you subscribe to a distinctive ring
service (such as IDENTA-RING), select
a tone (Tone 1 to 3). If you select a
melody, you will not be able to
distinguish lines by their ringers.
L If you select one of the melody ringer
patterns, the ringer will continue to
sound for several seconds if:
– the caller hangs up before you answer
the call.
– another person answers the call using
another phone connected on the
same line.
To turn the ringer off, press and hold {V}
until the base unit beeps 2 times.
O will be displayed.
L
Note:
L When the ringer volume is set to off, the
base unit will not ring for outside calls
and it will ring at the low level for
intercom calls.
L When the ringer volume is set to off, the
base unit will not announce caller names
(page 33).
Changing the ringer tone
You can change the base unit ringer tone
heard when an outside call is received.
There are 3 tones and 4 melodies.
1 Press {^} or {V}.
2 Within 10 seconds, press {<} or {>}
repeatedly to select the desired ringer
tone.
L To stop ringing, press {STOP}.
For assistance, please visit http://www.panasonic.com/consumersupport 27
TG5583.book Page 28 Friday, April 8, 2005 6:33 PM
Phonebook
Handset phonebook
The handset phonebook allows you to
make calls without having to dial manually.
You can add 50 names and phone
numbers to the handset phonebook and
search for phonebook entries by name.
Adding items to the phonebook
1 Press {C} (right soft key).
L The display shows the number of
items in the phonebook.
2 Press {ADD}.
Enter name
3 Enter the name (max. 16 characters).
See the character table for entry.
4 Press {NEXT}.
Enter phone no.
5 Enter the phone number (max. 32
digits).
L If a pause is required when dialing,
press {PAUSE } where needed (page
23).
6 Press {NEXT}.
L If you want to change the name and
number, press {EDIT}, then repeat
from step 3.
Example:
7 Press {SAVE}.
L To add other items, repeat from step
2.
Tom
555-765-4321
Note:
L Caller ID subscribers can use ringer ID
and light-up ID features (page 34).
Character table
The dial keys can be used to enter
characters. To enter a character, press the
appropriate dial key, repeatedly if
necessary. To enter another character that
is located on the same dial key, first press
{>} to move the cursor to the next space.
Key Characters
{1} &’ (),–./1
{2} abcABC2
{3} def DEF3
{4} ghi GHI 4
{5} jklJKL5
{6} mn o MN O 6
{7} pqr sPQRS7
{8} tuvTUV8
{9} wxyzWXYZ9
{0} 0Space
{*} ;
{#} #
{CLEAR} To delete a character or
number
To edit/correct a mistake
Press {<} or {>} to move the cursor to the
character or number you wish to erase,
then press {CLEAR}. Enter the
appropriate character or number.
Note:
L Press and hold {CLEAR} to erase all
characters or numbers.
8 Press {OFF}.
28 For assistance, please visit http://www.panasonic.com/consumersupport
TG5583.book Page 29 Friday, April 8, 2005 6:33 PM
Phonebook
Calling someone in the
phonebook
Phonebook items can be searched for
alphabetically by scrolling through the
phonebook items.
1 Press {C} (right soft key).
L For quick search, you can skip to step
3.
2 Press {SEARCH}.
0-9=Name search
dB
=Scroll list
3 Press {V} or {^} repeatedly to display
the desired item.
L To exit the phonebook, press {OFF}.
4 Press {C}, {s}, or {CALL}.
To search for a name by initial
1 Press {C} (right soft key).
2 Press the dialing button ({0} to {9},
{#}, or {*}) which corresponds to the
first letter you are searching for (see the
character table, page 28).
Example: “LISA”
Press {5} repeatedly to display any
name with the initial “L”.
L If there is no item corresponding to
the letter you selected, the next item
will be displayed.
3 Press {V} repeatedly to display the
desired item.
L To exit the phonebook, press {OFF}.
L To dial the displayed number, press
{C}, {s}, or {CALL}.
Editing items in the phonebook
1 Press {C} (right soft key).
2 Press {V} or {^} repeatedly to display
the desired item.
3 Press {EDIT}.
4 Edit the name if necessary. See the
character table on page 28 for
character entry.
5 Press {NEXT}.
6 Edit the phone number if necessary.
7 Press {NEXT}, then press {SAVE}.
L To edit other items, repeat from step
2.
8 Press {OFF}.
Erasing items in the phonebook
1 Press {C} (right soft key).
2 Press {V} or {^} repeatedly to display
the desired item.
3 Press {CLEAR}.
L To cancel erasing, press {NO}.
4 Press {YES}.
L To erase other items, repeat from
step 2.
5 Press {OFF}.
For assistance, please visit http://www.panasonic.com/consumersupport 29
 Loading...