

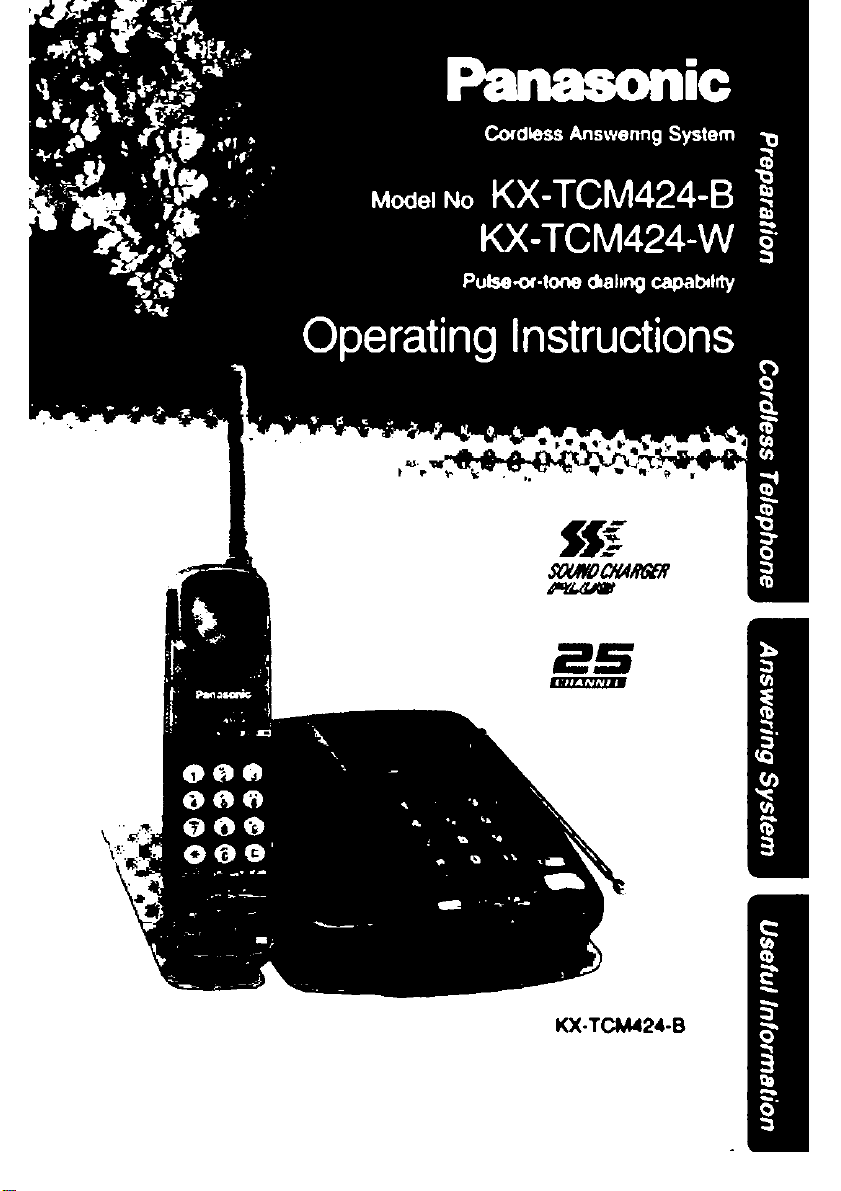
Panasonic KX-TCM424-W User Manual
PLEASE READ BEFORE USE AND SAVE.
Charge the battery for about 3 hours before initial use.

Before Initial Use
Please read IMPORTANT SAFETY
INSTRUCTIONS on pages 60-61 before use.
Read and understand all instructions.
Thank you for purchasing this Panasonic cordtess
telephone.
I----------------------------------------------------------1
I Attach your purchase receipt here. ■
For your future reference
Serial No.____________________
(found on the bottom of the unit)
Name and address of dealer
Date of purchase
Accessories To order accessories, call 1-800-211-PANA(7262).
□ AC Adaptor (p. 10)
Order No. KX-A11-6
□ Telephone Line
Cord(p. 10)
□ Wall Mounting
Adaptor (p. 54, 56)
Order No.
PQKL10028Z1 (White)
PQKL1002822 (Black)
one
one
one
For Best Performance
Battery Charge
A rechargeable Ni-Cd battery
powers the handset. Charge the
battery for about 3 hours before
initial use (p. 11).
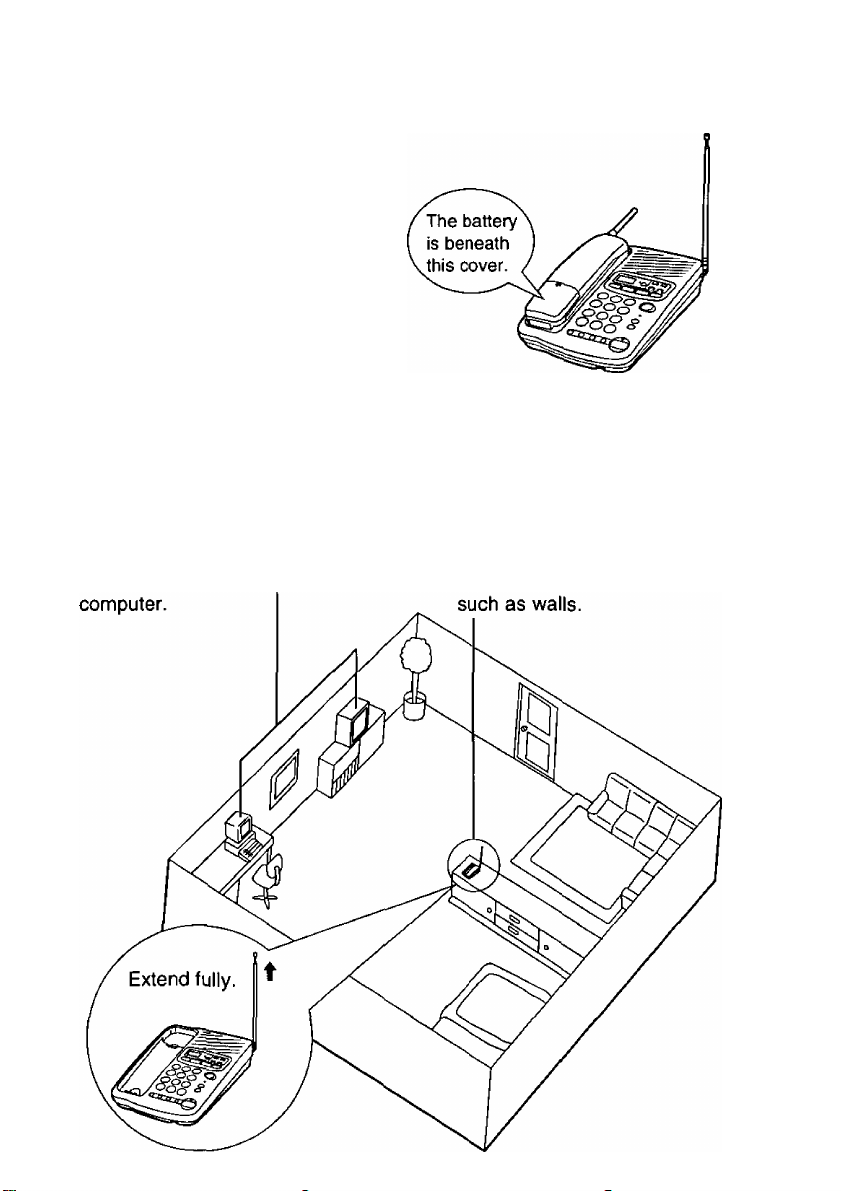
Operating Distance/Noise
Calls are transmitted between the base unit and the handset using
wireless radio waves. For maximum distance and noise free
operation, the recommended base unit location is:
Away from electrical appliances
such as a TV, radio, or personal
In a HIGH and CENTRAL
location with no obstructions

Contents
Location of Controls
Settings................................................................................................ 10
Connections ..................................................................................... 10
Battery Charge................................................................................11
Selecting the Dialing Mode..............................................................12
Greeting Message...............................................................................13
Programmable Preparations ...............................................................15
Time and Day Adjustment
Selecting the Caller’s Recording Time
Selecting the Number of Rings........................................................18
Setting the CPC (Calling Party Control) Function
Setting the Greeting Monitor Function.............................................19
Gondiess
__________
Making/Answering Calls......................................................................20
Making Calls with the Handset
Answering Calls with the Handset
Making Calls with the Base Unit (Digital Duplex Speakerphone). .22
Answering Calls with the Base Unit.................................................24
Simultaneous Keypad Dialing ..........................................................25
Remote Speakerphone ....................................................................26
IMisgiAms
.............................................................................
...............................................................
............................................
...........................
__________________________________________
.......................................................
..................................................
6
16
17
19
20
21
Speed Dialer .......................................................................................28
Storing Phone Numbers in Memory
Dialing a Stored Number
One-Touch Dialer ...............................................................................30
Storing Phone Numbers in Memory
Dialing a Stored Number .................................................................31
Intercom ...............................................................................................32
Transferring a Call Using the Intercom............................................33
................................................................
................................................
................................................
28
29
30

Special Features .................................................................................34
For Call Waiting Service Users........................................................34
Automatic Security Code Setting ....................................................34
Temporary Tone Dialing (For Rotary or Pulse Service Users). .34
If Your Unit is Connected to a PBX (Analog PBX Line Only) . .34
Automatic Answering Operation .........................................................35
Setting the Unit to Answer Calls .....................................................35
Listening to Messages
Erasing Messages...............................................................................38
Recording a Memo Message..............................................................39
Pager Call ...........................................................................................40
Storing the Pager Number...............................................................40
Setting the Unit to Call a Pager.......................................................41
Remote Operation from a Touch Tone Phone
Setting the Remote Code
Voice Menu .....................................................................................44
Direct Remote Operation ................................................................46
Remote Operation with the Handset ..................................................48
Remote Operation Card
Battery Replacement ..........................................................................53
Wall Mounting......................................................................................54
........................................................................
..................................
...............................................................
....................................................................
36
42
43
51
Convenient Desk Usage......................................................................56
Adding Another Phone .......................................................................56
Before Requesting Help .....................................................................57
Important Safety Instructions
FCC and Other Information ................................................................62
.............................................................
60
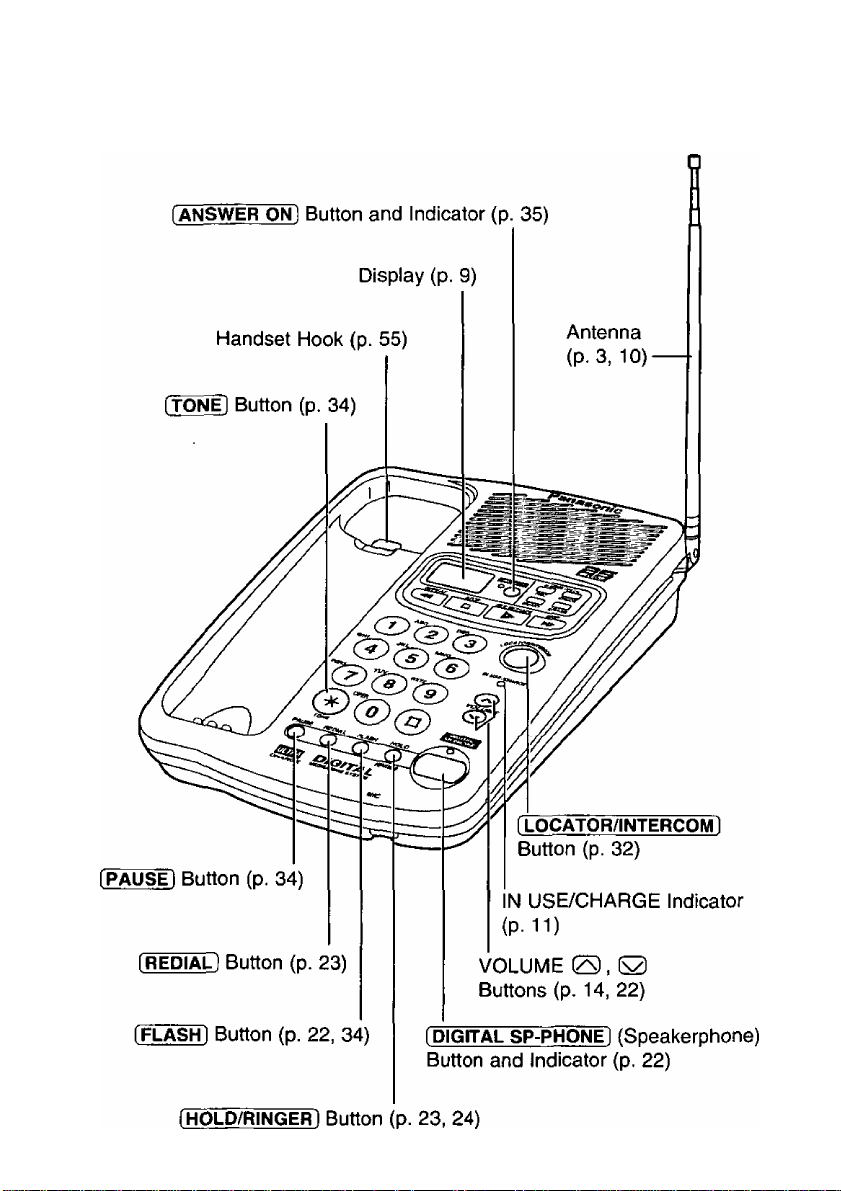
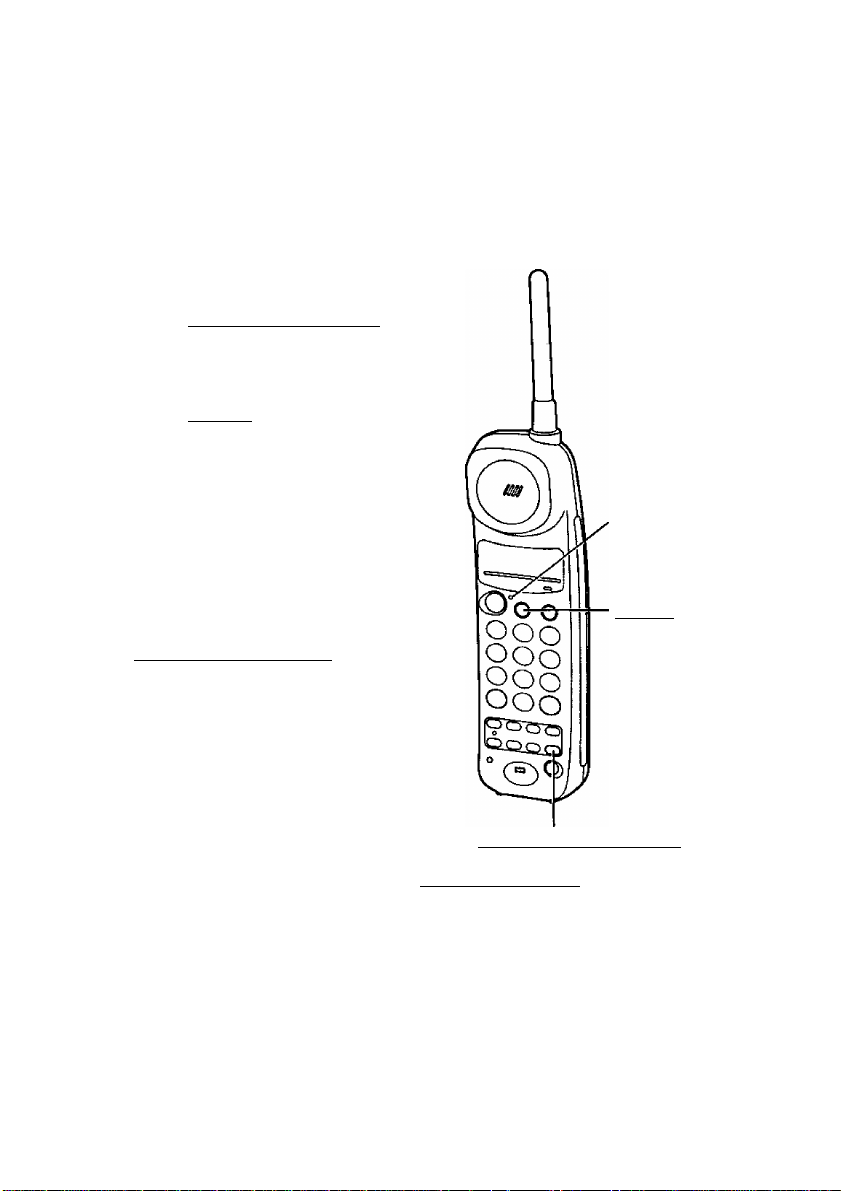
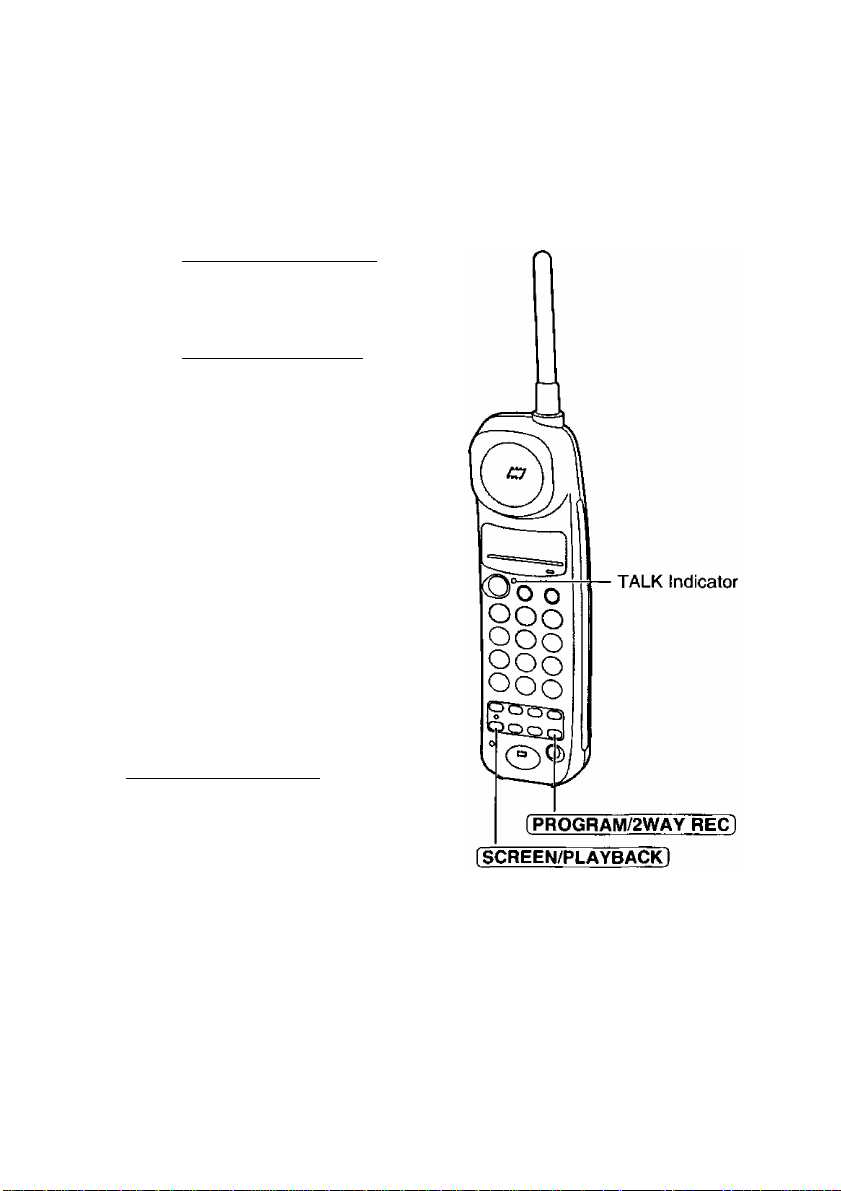
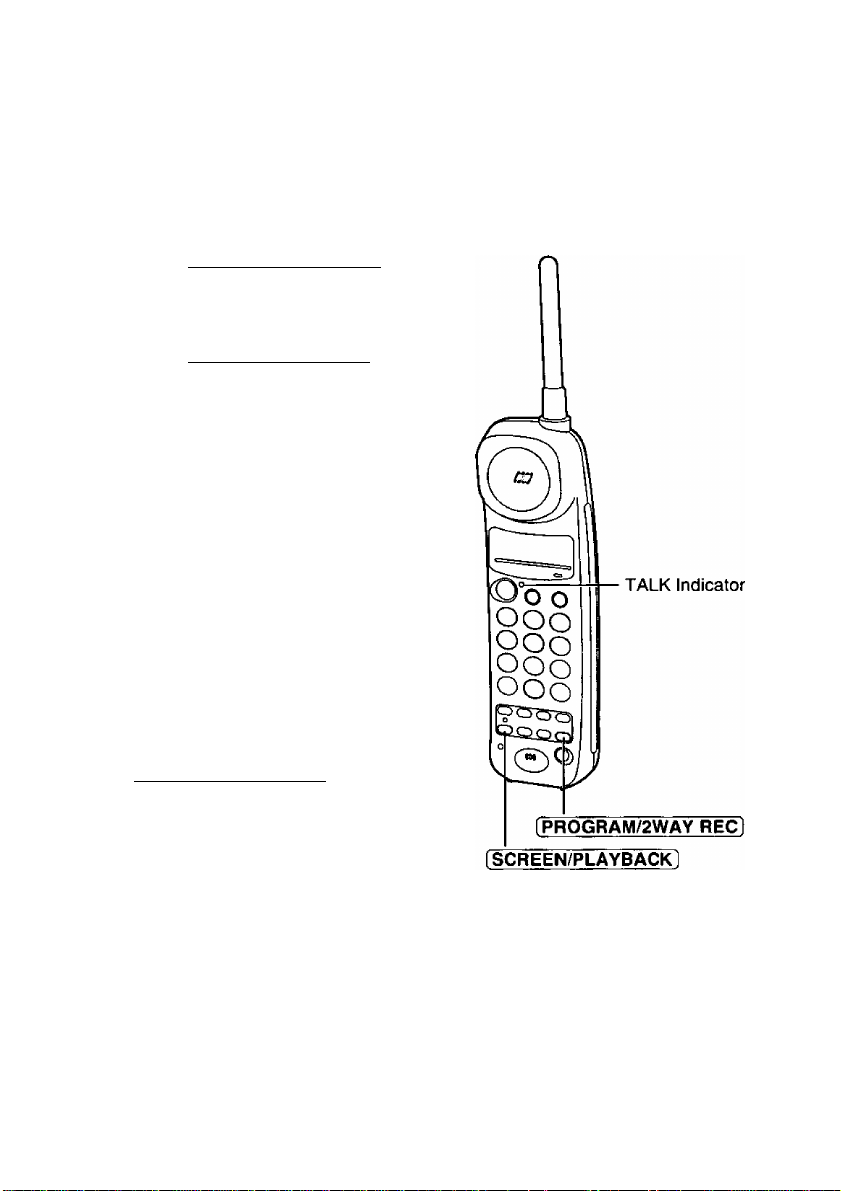
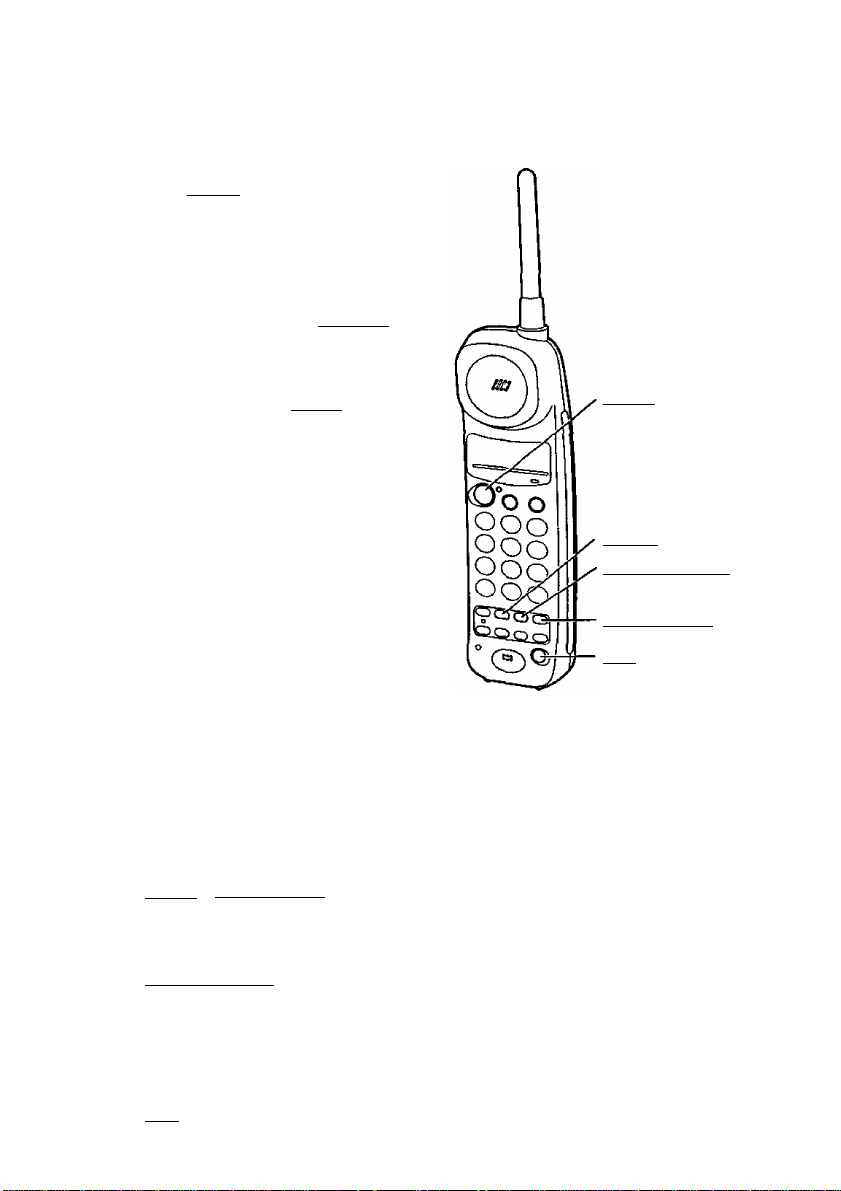
Location of Controls
Base unit
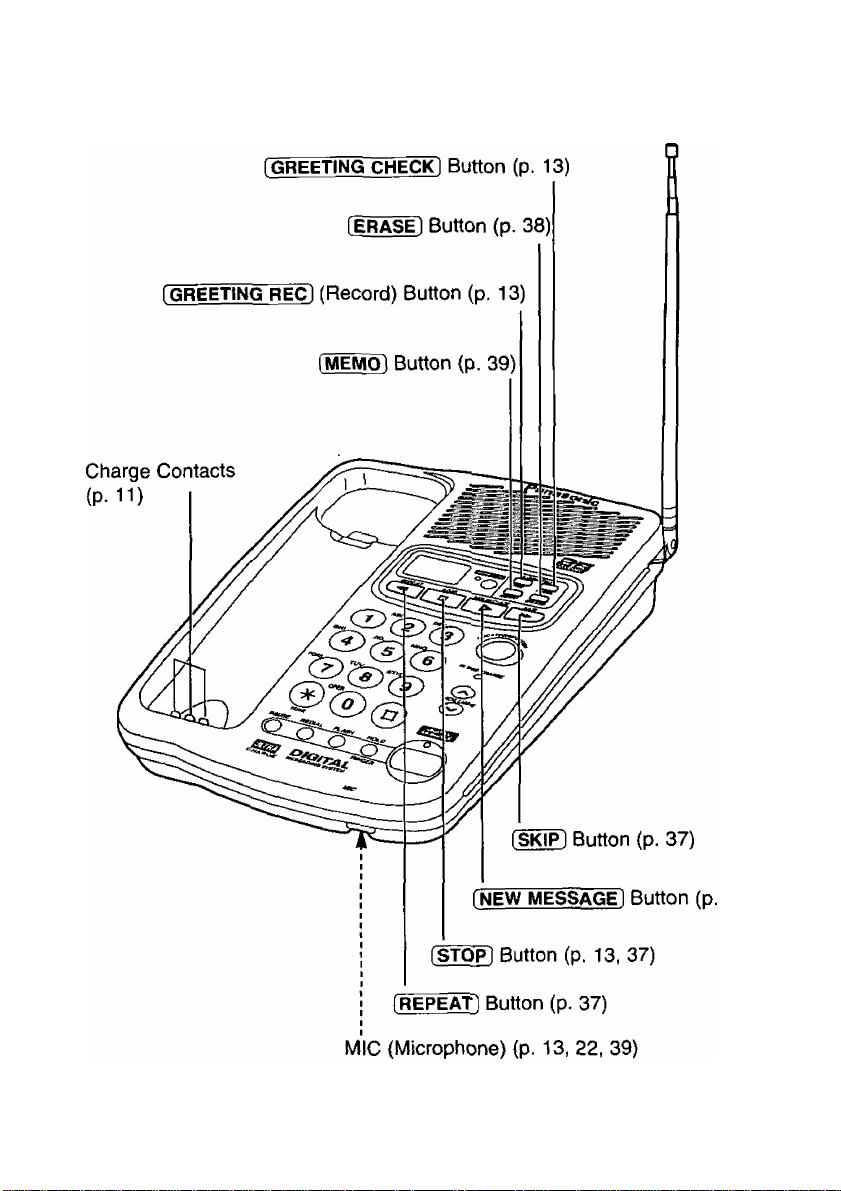
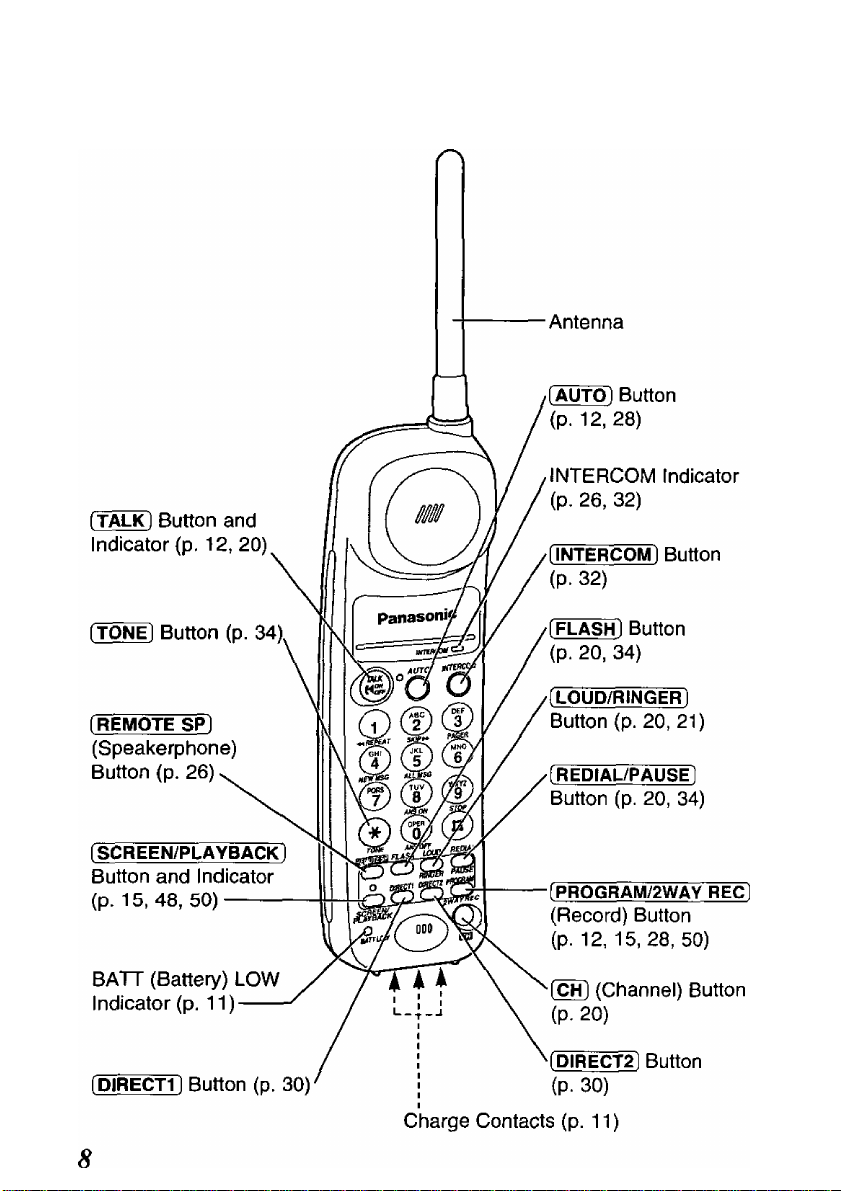
^ Location of Controls
Handset
Base unit display
c
J
The clock needs adjusting {p. 16). 12 messages have been recorded.
r
N
iZ
j
Your message was not recorded
correctly. Record it again
{p. 13, 39).
N
0
1
J
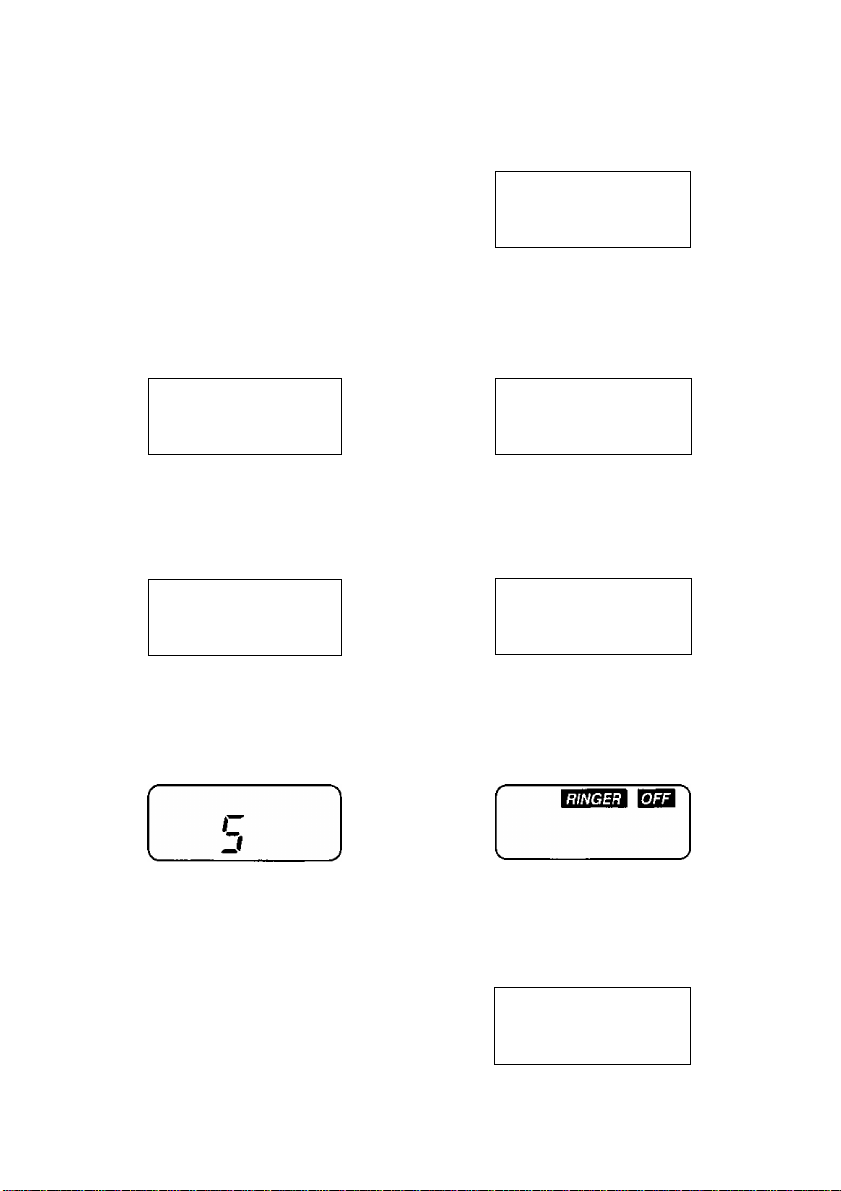
The unit is in programming mode.
The speaker volume level is set to
“5". You can select:
•9 levels (0-8) while using the
answering system (p. 14, 36).
•8 levels (1-8) while using the
speakerphone (p. 22).
-Effl-
^ 1 ^
V
J
Memory is full. Erase some or all
of the messages (p. 38).
r n
u. u.
The recording time is set to
“greeting only” (p. 17).
The base unit ringer volume is set
to OFF (p. 24).
J
The pager call mode is set to ON
(p.41).
Settings
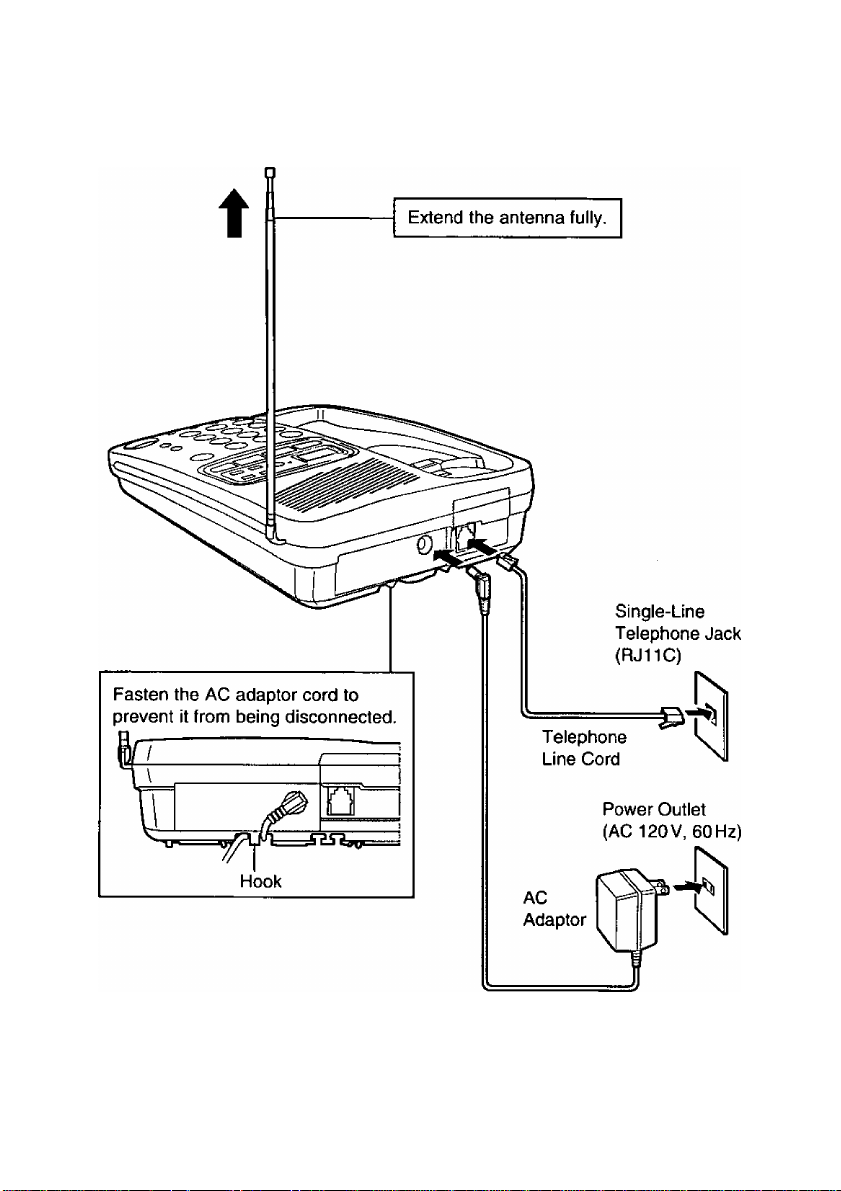
Connections
• USE ONLY WITH Panasonic AC ADAPTOR KX-A11 or KX-A11 -6.
•The AC adaptor must remain connected at all times. (It is normal for the
adaptor to feel warm during use.)
•To connect a standard telephone on the same line, see page 56.
10
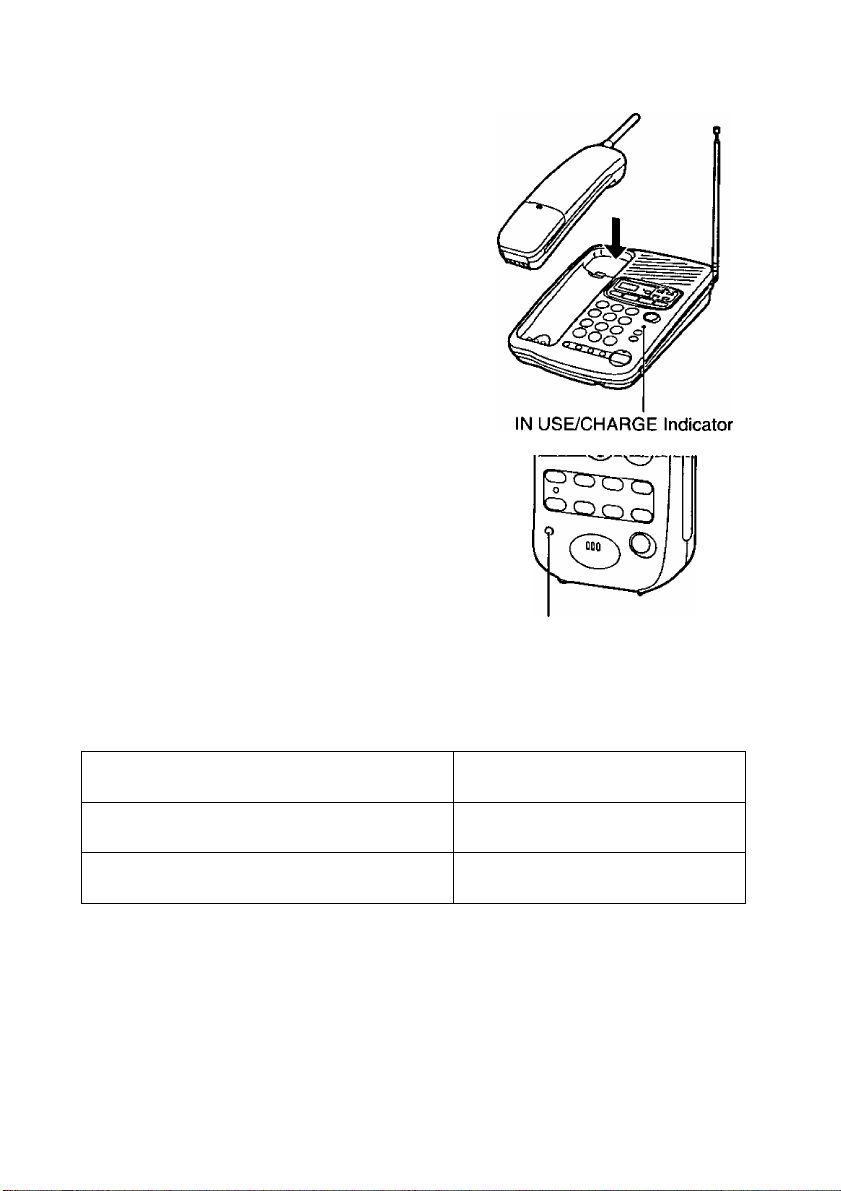
Battery Charge
Place the handset on the base unit and
charge for about 3 hours before initial use.
•The IN USE/CHARGE indicator lights.
Recharge
When the ВАТТ LOW indicator flashes or
the unit beeps intermittently, recharge the
battery.
•The ВАТТ LOW indicator will continue
to flash for at least 10 minutes once you
begin recharging. This time will increase
the more you use the handset while
recharging.
Battery information
If your Panasonic battery is fully charged;
•
ВАТТ LOW Indicator
Operation
While in use (TALK)
While not in use (Stand-By)
• Battery life may vary depending on usage conditions and ambient
temperature.
•Clean the handset and the base unit charge contacts with a soft
dry cloth once a month. Clean more often if the unit is subject to
grease, dust or high humidity. If not, the battery may not charge
properly.
• If the battery is fully charged, you do not have to place the handset on
the base unit until the ВАТТ LOW indicator flashes. This will maximize
the battery life.
•The battery cannot be overcharged.
Approx, battery life
Up to about 8 hours
Up to about 30 days
11
^ Settings
Selecting the Dialing Mode
You can program the dialing mode by using the handset near the base
unit. If you have touch tone service, set to TONE. If rotary or pulse
service is used, set to PULSE. The factory preset is TONE.
The TALK and DIGITAL SP-PHONE indicator lights must be off
before programming.
Press [PROGRAM/2WAY RECl.
1
•The TALK indicator flashes.
Press (AUTOl.
To select PULSE, press ® twice.
OR
To select TONE, press @ twice.
When finished, press
(PROGRAM/2WAY REC1.
•A confirmation tone sounds.*
(P^OGRAM/2WAY ]
•To cancel during programming, press [PRO^AM/2WAY R^. then start
from step 1.
• If 3 beeps sound during programming, a wrong key was pressed.
Restart from step 1.
TALK Indicator
[AUTO]
*What the confirmation tone means
1 beep: The mode is different from the previously selected one.
2 beeps: The mode is the same as the previously selected one.
If a power failure occurs, the mode will return to the factory preset
(TONE). Reprogram if necessary.
12
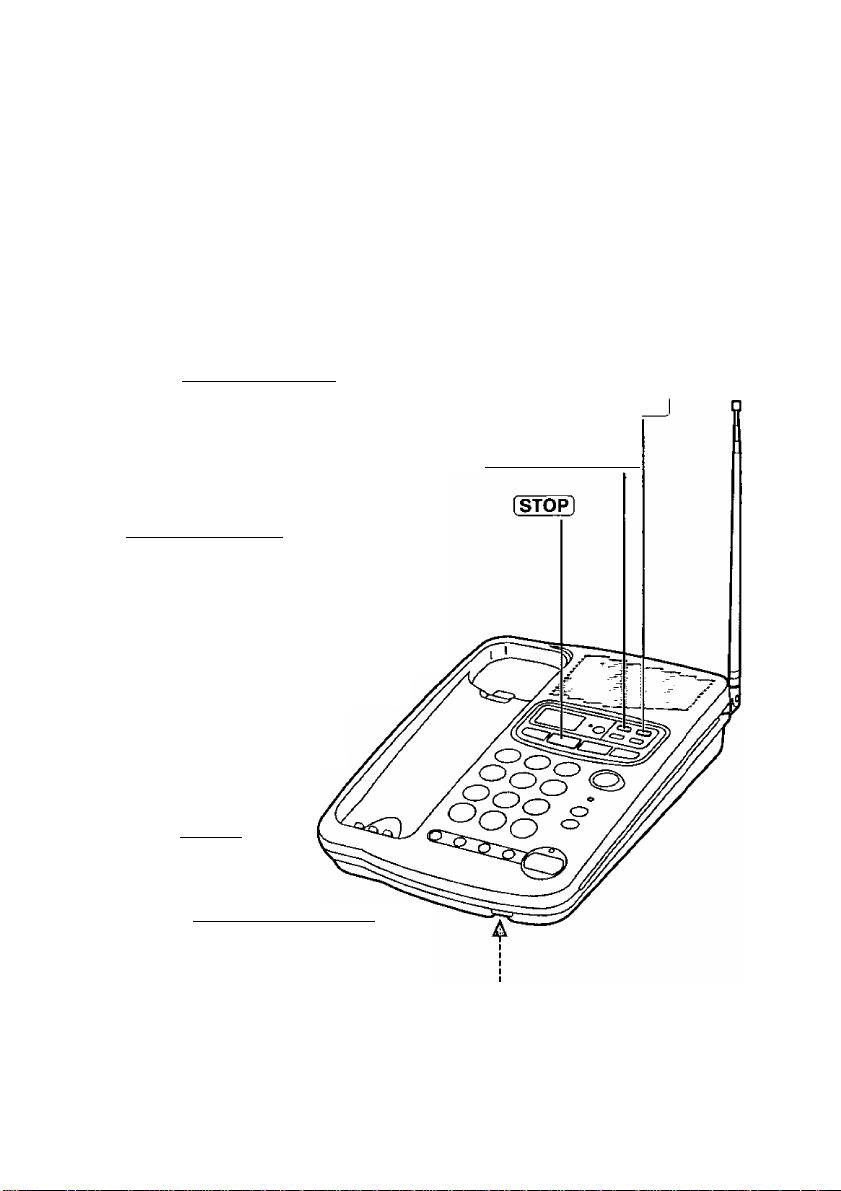
Greeting Message
You can record a personal greeting message. If not, one of two pre
recorded greetings will be played when a call is received (p. 14).
All messages (greeting, incoming, memo, etc.) are stored in digital
memory (p. 37). The total recording time is about 16 minutes. We
recommend you record a brief greeting message (see the sample
below) in order to leave more time for recording new messages.
To record a greeting message
Press [GREETING RECl to Start
the recording mode.
1
o“Prcss RECORD again to record
greeting.” is heard.
Within 5 seconds, press
(GREETING REC] again to record
your greeting.
oA long beep sounds.
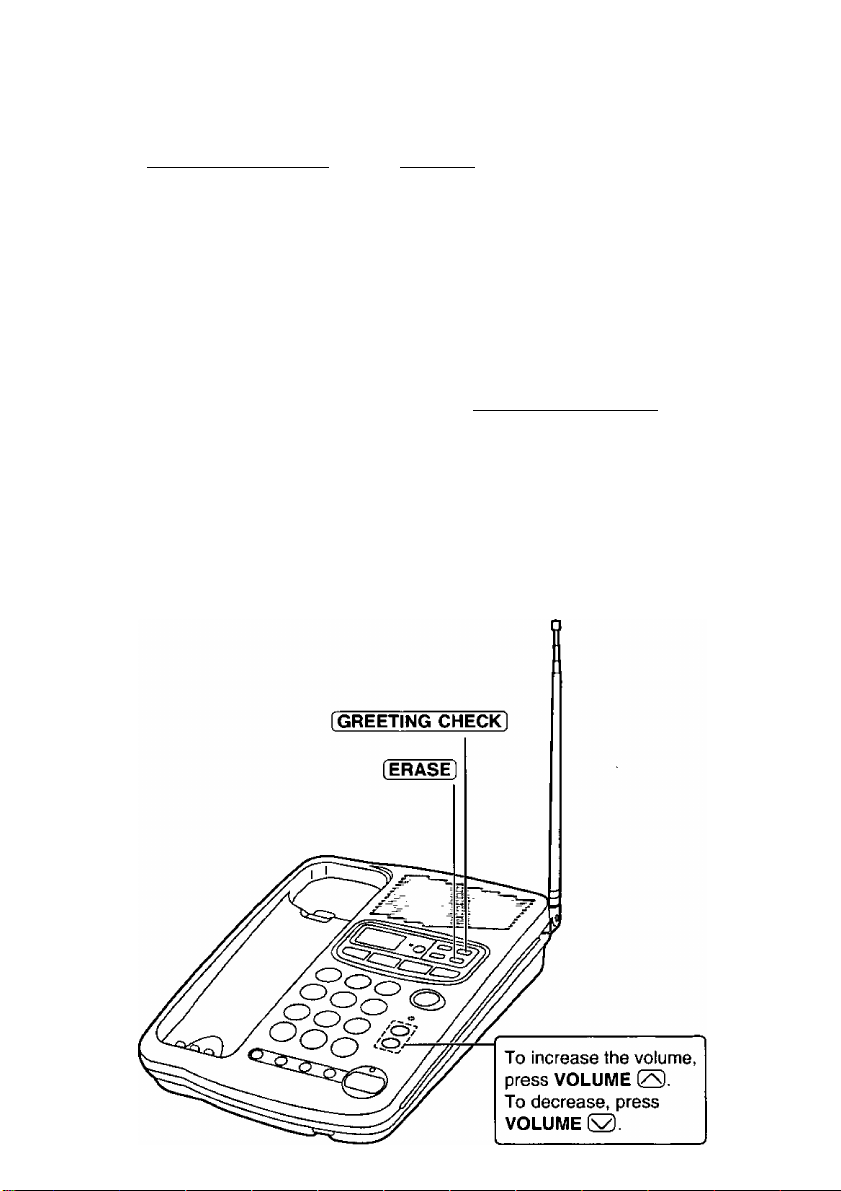
GREETING CHECK
[GREETING REC]
After the long beep, talk clearly
about 8 inches (20 cm) away
from the MIC (microphone).
oThe display shows the
elapsed recording time.
When finished,
4
press [STOP].
oTo check the
recorded greeting,
press [GREETifTC CHECK]
oTo change the message,
repeat from step 1.
MIC
Greeting message sample
“Hello, this is (your name and/or number). Sorry I cannot take your
call. Please leave a message after the beep. Thank you.”
13
^ Greeting Message
To erase the recorded greeting message
Press (GREETING CHECK] ^ press [ERASE] while the message is being
played.
•The unit will answer a call with a pre-recorded greeting.
Pre-recorded greeting message
If you do not record a greeting message (p. 13), one of the following two
messages will be played when a call is received depending on the caller’s
recording time (p. 17).
To check the pre-recorded greeting, press (GREETING CHECK].
•A pre-recorded greeting will be played as below.
■When the recording time is set to "1 minute” or “unlimited”:
“Hello, we are not available now. Please leave your name and phone number
after the beep. We will return your call.”
. »When the recording time is set to “greeting only”;
“Hello, we are not available now. Please call again. Thank you for your call.”
14

Programmable Preparations
You can program the following functions by using the handset near the
base unit. See the noted pages for details.
The TALK and DIGITAL SP-PHONE indicator lights must be off before programming.
Lift the handset, then press [PROGRAM/2WAY RE^.
Press fSCREEN/PLAYBACKl.
>lf an alarm tone sounds, move
towards the base unit, then try again.
To adjust the time and day, press
To set the remote code, press (T).
To select the number of rings, press
To set the CPC function, press (3).
To set the greeting monitor function, press ®.
To select the caller’s recording time, press ®.
To store the pager number, press
When finished, press (PROGRAM/2WAY RECl.
•A confirmation tone sounds.*
•To cancel during programming, press [ PROGRAM/2WAY RE^. then start
from the beginning.
• If 6 beeps sound during programming, a wrong key was pressed.
Enter the correct number again.
{page 16)
(page 43)
(page 18)
(page 19)
(page 19)
(page 17)
(page 40)
*What the confirmation tone means
1 beep: The new programmed number is stored.
2 beeps: The number is the same as the previously stored one.
6 beeps: The number is not correct. Try again from the beginning.
If a power failure occurs, the setting will return to the factory preset.
Reprogram if necessary.
15
^ Programmable Preparations
Time and Day Adjustment
Voice Time/Day Stamp: During playback, a synthesized voice will
announce the time and day when each message was recorded.
Press fPROGRAM/2WAY REC).
1
•The TALK indicator flashes.
Press [SCREEN/PLAYBACK].
•The indicator lights.
•“P” is displayed on the base unit.
Press (o).
•“ 0 ” is displayed.
•“Set time” is announced.
The time/day will be heard if it
was adjusted beforehand.
TALK Indicator
Enter the current time {hour and
minute) by using a 4-digit number.
(Ex. To set 9:30, enter “0930”.)
O o
OOO
OOo
•The entered number is displayed.
Press @ to select “AM” or “PM”.
Press @ repeatedly to set the day.
When finished, press
[PROGRAM/2WAY RECl.
•The unit announces the time/day.
The clock starts working.
• In step 4, you cannot enter numbers greater than 12. Do not use
military time. (To set 13:00 hours, enter “0100” and select “PM” by
pressing @.)
•The accuracy of the clock is approximately ±45 seconds a month at
room temperature.
To check the time/day
Press [PROGRAM/2WAY REC) ^ [SCREEN/PLAYBACK] ®.
•The current time/day is heard.
When finished, press ÌPROGRAM/2WÀY REC].
OOO
®C!)
zv
[PROGRAM/2WAY RÉi^
SCREEN/PLAYBACK]
and Indicator
16
Selecting the Caller’s Recording Time
You may select the caller’s recording time as either “1 minute”, “unlimited”
or “greeting only”. The factory preset is “unlimited”.
Press [PROGRAM/2WAY REC].
1
•The TALK indicator flashes.
Press [SCREEN/PLAYBACKl.
•The indicator lights.
•“P” is displayed on the base unit.
Press (5].
•The current setting is displayed.
1: 1 minute
2: unlimited (factory preset)
3: greeting only
Press (T), @ or [D to select the
recording time.
•The setting is displayed.
When finished, press
(PROGRAM/2WAY RECl.
•The indicator lights go out.
and Indicator
If you select “greeting only”, the unit will answer a call with the
greeting message, and then hang up. The unit will not record any
messages.
17
^ Programmable Preparations
Selecting the Number of Rings
You may select the number of rings before the answering system answers
a call, from “1” to “7” or “AUTO (for Toll Saver)”. The factory preset is
“AUTO”.
Press iPROGRAM/2WAY REC).
1
•The TALK indicator flashes.
Press [SCREEN/PLAYBACK].
•The indicator lights.
•“P” is displayed on the base unit.
Press
•The current setting is displayed.
Press a dialing button (o) to ® to
set the number of rings.
0: Selects “AUTO”.
“A” is displayed.
1-7; The unit will answer after the
selected number of rings.
When finished, press
[ PROGRAM/2WAY RE^.
•The indicator lights go out.
and Indicator
Toll Saver (When set to “AUTO”)
When you call the unit from a touch tone telephone;
If the unit answers on the 2nd ring, there is at least one new
message.
If the unit answers on the 4th ring, there are no new messages.
Hang up when you hear the 3rd ring. This will save you the toll
charge for the call.
18

Setting the CPC (Calling Party Control) Function
The CPC function is preset to “A”. If you use a call waiting service, set to
“b”, or the cal! waiting tone will disconnect someone leaving a message.
1. Press [PROGRAM/2WAY~RE^.
2. Press [SCREEN/PLAYBACin.
3. Press®.
•The current setting, “A” or “b”, is displayed on the base unit.
4. To select “b", press [2].
OR
To select “A”, press (T).
•The setting is displayed.
5. When finished, press (PROGRAM/2W^Y REC).
Setting the Greeting Monitor Function
When your greeting message is being played to the caller, you can also
listen to it through the speaker. To listen to your greeting, set to “2 (ON)”.
The factory preset is “1 (OFF)”.
1. Press IPROGRAM/2WAY RECl
2. Press [screen/playbaciD.
3. Press®.
•The current setting, “1” or “2”, is displayed on the base unit.
4. To select “2 (ON)”, press ®.
OR
To select “1 (OFF)”, press ®.
•The setting is displayed.
5. When finished, press (PROGRAM/2WAY REC).
19
Making/Answering Calls
Making Calls with the Handset
Press [TALK).
1
•The TALK indicator lights.
Dial a telephone number.
• If you misdial, press [ FLASH)
firmly then dial again.
To hang up, press [TALKl or
place the handset on the base
unit.
•The TALK indicator light
goes out.
[TALK] and
Indicator
(FLA^l
(LOUD/RINGERl
[redial/pause:
fCHl
• If an alarm tone sounds in step 1, move closer to the base unit or place
the handset on the base unit. Then try again.
•To switch to the speakerphone during a call with the handset, see
page 26.
To redial the last number dialed on the handset
Press [TALK] ^ (redial/pause].
To select the receiver volume
Press [ LbUD/RiNGER] while talking.
• Each time you press the button, the volume level will change from
MEDIUM (preset) to HIGH to LOW.
If noise interferes with the conversation
Press [CH] to select a clearer channel or move closer to the base unit.
20
 Loading...