

Page 1
Digital Cordless Phone
Model No. KX-TCD700BX
Operating Instructions
Charge the batteries for approx. 10 hours before initial use.
Caller ID Compatible
PLEASE READ BEFORE USE AND SAVE
31939_KX-TCD700CX_Czech 18/6/01 1:54 pm Page 1
Page 2
Thank you for purchasing your new Panasonic digital
cordless telephone.
For your future reference
Serial No. Date of purchase
(found on the bottom of the unit)
Name and address of dealer
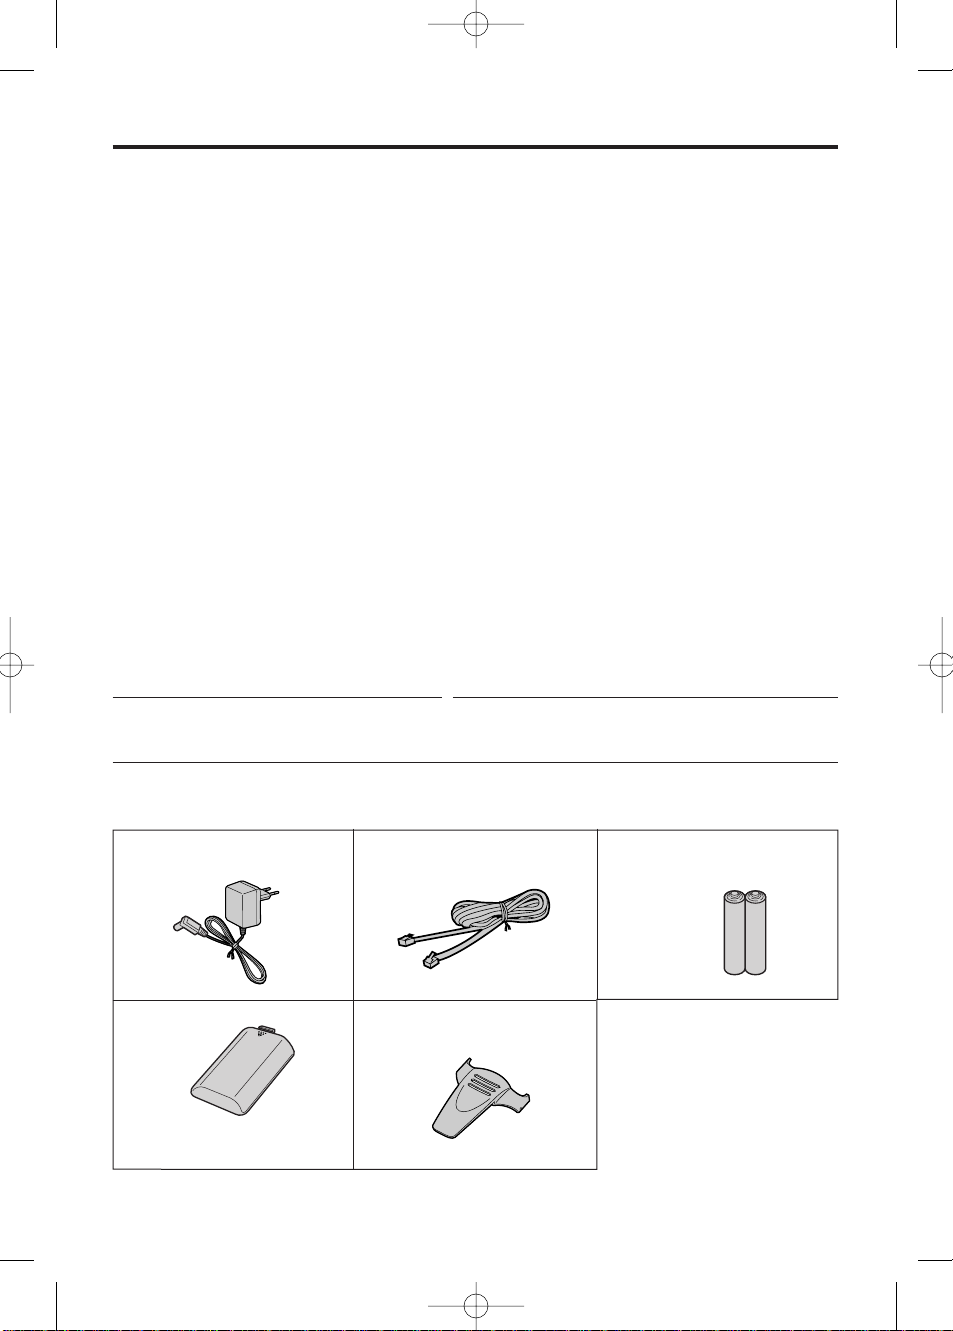
Accessories included
2
AC Adaptor
one
Telephone Line Cord
one
Batteries
Panasonic AA(R6)P-6P or BYD
PQHHR120AA12
two (AA size)
Battery Cover
one
Belt Clip
one
Dear purchaser,
You have acquired a KX-TCD700BX, which is a product made in regard with
the European Standards for Cordless Telephones (DECT). DECT technology
is characterized by high-security protection against interceptions as well as
high-quality digital transmission.
This telephone was designed for a wide range of applications.
For example, this telephone can be used within a network of base units and
handsets, constituting a telephone system which:
• operates up to 6 handsets at one base unit
• allows an intercom between handsets
• allows the operation of a handset at up to 4 base units, expanding the
communication radio area.
This telephone may be used for:
• operating several handsets
• operating at several base units
• connecting the base unit to a PBX.
31939_KX-TCD700CX_Czech 18/6/01 1:54 pm Page 2
Page 3

3
Safety Instructions
Take special care to follow the safety suggestions listed below.
Environment
1) Do not use this unit near water—for example, near a bathtub, washbowl, sink, etc.
Damp basements should also be avoided.
2) The unit should be kept away from heat sources such as radiators, cookers, etc. It also
should not be placed in rooms where the temperature is less than 5°C or greater than
40°C.
3) The AC adaptor is used as the main disconnect device, ensure that the AC outlet is
located/installed near the unit and is easily accessible.
Placement
1) Do not place heavy objects on top of this unit.
2) Care should be taken so that objects do not fall onto, and liquids are not spilled into,
the unit. Do not subject this unit to excessive smoke, dust, mechanical vibration or
shock.
3) Place the unit on a flat surface.
31939_KX-TCD700CX_Czech 18/6/01 1:54 pm Page 3
WARNING:
TO PREVENT THE RISK OF FIRE OR ELECTRICAL SHOCK, DO NOT
EXPOSE THIS PRODUCT TO RAIN OR ANY TYPE OF MOISTURE.
WARNING:
TO PREVENT THE RISK OF FIRE OR ELECTRICAL SHOCK, DO NOT
EXPOSE THIS PRODUCT TO RAIN OR ANY TYPE OF MOISTURE.
WARNING:
TO PREVENT THE RISK OF FIRE OR ELECTRICAL SHOCK, DO NOT
EXPOSE THIS PRODUCT TO RAIN OR ANY TYPE OF MOISTURE.
Page 4
Contents
4
Chapter 1
Preparation
Chapter 3
Programmable Functions
(On the Handset)
Chapter 2
Basic Operations
Getting Started ................................6
Connections....................................6
Installing the Batteries in the
Handset ..........................................7
Battery Charge ...............................7
Battery Information .........................7
Battery Replacement......................8
Base Unit Location .........................8
Wall Mounting.................................9
Location of Controls......................10
Displays..........................................11
Basic Start-up Operations ............12
Summary of Programmable
Functions........................................27
Setting Time Alarm Function........28
Set Time of Alarm.........................28
Set Alarm ON/OFF .......................28
Setting Ringer Options .................29
Select Handset Ringer Volume ....29
Select Ringer Pattern for
External Incoming Calls................29
Select Ringer Pattern for Internal
Call ...............................................29
Select Ringer Pattern for Paging
Tone..............................................29
Select Ringer Pattern for Alarm
Tone..............................................29
Setting T one Options.....................30
Set Key Confirmation Tone
ON/OFF ........................................30
Set Call Waiting Tone ON/OFF ....30
Set Range Warning Alarm
ON/OFF ........................................30
Set Battery Low Tone ON/OFF ....30
Setting Display Options................31
Select the Standby Mode Display 31
Select the Talk Mode Display.......31
Setting Call Options ......................32
Set Direct Call Number ................32
Set Direct Call ON/OFF................33
Set Call Prohibition.......................33
Setting Other Options ...................34
Set Auto Talk ON/OFF ..................34
Select Battery Type ......................34
Change Handset PIN ...................35
Registration....................................36
Registering a Handset to a
Base Unit......................................36
Cancelling a Base Unit.................37
Select Base Unit ............................38
Reset Handset ................................39
Making Calls ...................................13
To Select the Receiver Volume.....14
Answering Calls .............................15
Speed Dialling ...............................16
Caller ID Service ............................19
Using the Caller List ......................21
For Optional Multi-Unit Users.......22
Paging/Intercom.............................23
Special Features............................25
How to Use the Pause Feature
(For Analog PBX Line/Long
Distance Service Users)
..............25
Temporary Tone Dialling...............25
Using the Recall Feature..............25
Setting the Key Lock ON/OFF......26
31939_KX-TCD700CX_Czech 18/6/01 1:54 pm Page 4
Page 5

5
Chapter 4
Programmable Functions
(On the Base Unit)
Programmable Functions (On
the Base Unit) ................................40
Bell Selection................................40
Select Base Unit Ringer Volume..41
Select the Dialling Mode ..............41
Setting the Clock ..........................41
Select Earth/Flash Mode ..............42
Select Pause Timing.....................42
Set Base Unit PIN ........................43
Cancelling a Handset ...................43
Option Covers ................................46
Using the Belt Clip.........................47
Before Requesting Help................48
Chapter 5
Useful Information
31939_KX-TCD700CX_Czech 18/6/01 1:54 pm Page 5
Reset Base Unit .............................45
Page 6
6
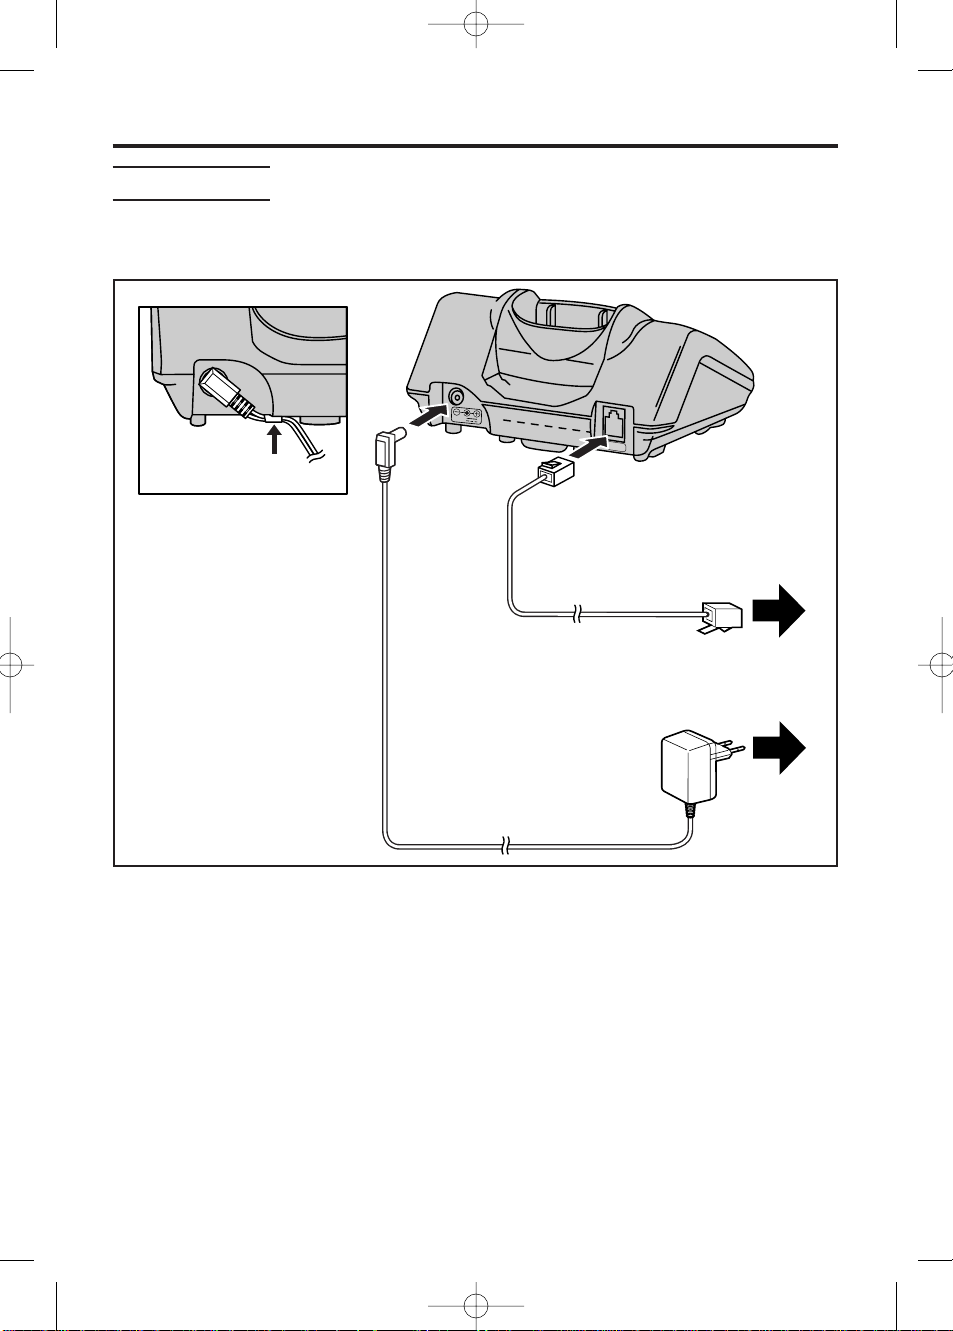
Connections
Plug in the AC Adaptor and the telephone line cord to the rear of the unit. Then
connect the cord as shown.
Getting Started
USE ONLY WITH Panasonic AC ADAPTOR PQLV1CE.
• Be careful not to confuse the telephone line jack with the AC adaptor jack on
the Base unit. If connected improperly, the base unit will not work and damage
may occur.
• The AC Adaptor must remain connected at all times. (It is normal for the
adaptor to feel warm during use.)
• The connect a standard telephone on the same line, see page 49.
To Power Outlet
(AC 230V, 50Hz)
AC Adaptor
Telephone Line Cord
To Line Socket
Fasten the AC adaptor cord
to prevent it from being
disconnected
31939_KX-TCD700CX_Czech 18/6/01 1:54 pm Page 6
Connection of Power Supply
This apparatus is intended for use when powered by the PQLV1CE.
Using other power supplies will invalidate any approval given to this apparatus.
9v
LINE
Hook
Page 7
7
➡
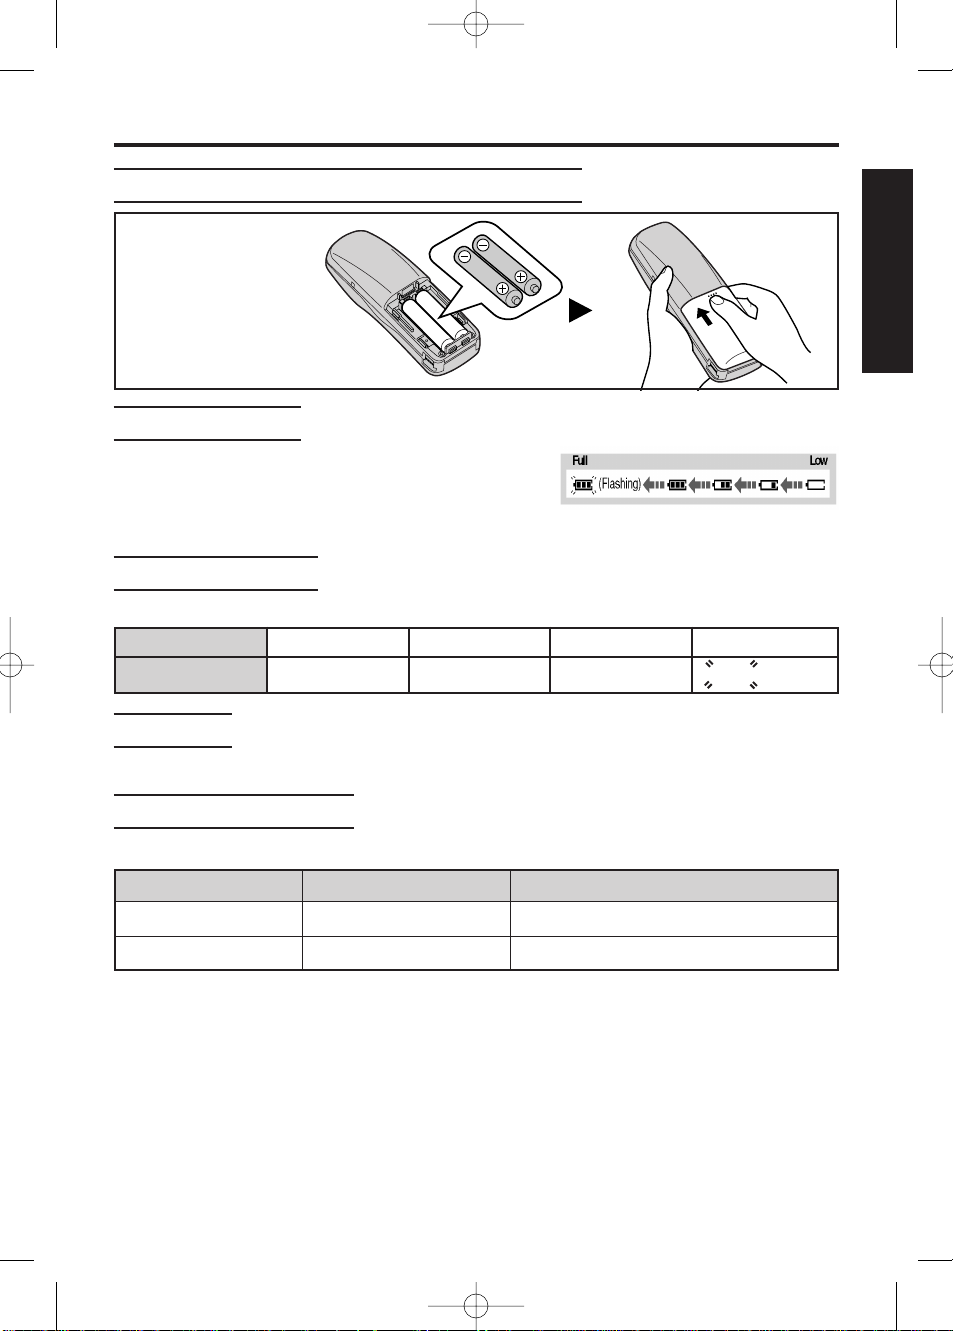
Installing the Batteries in the Handset
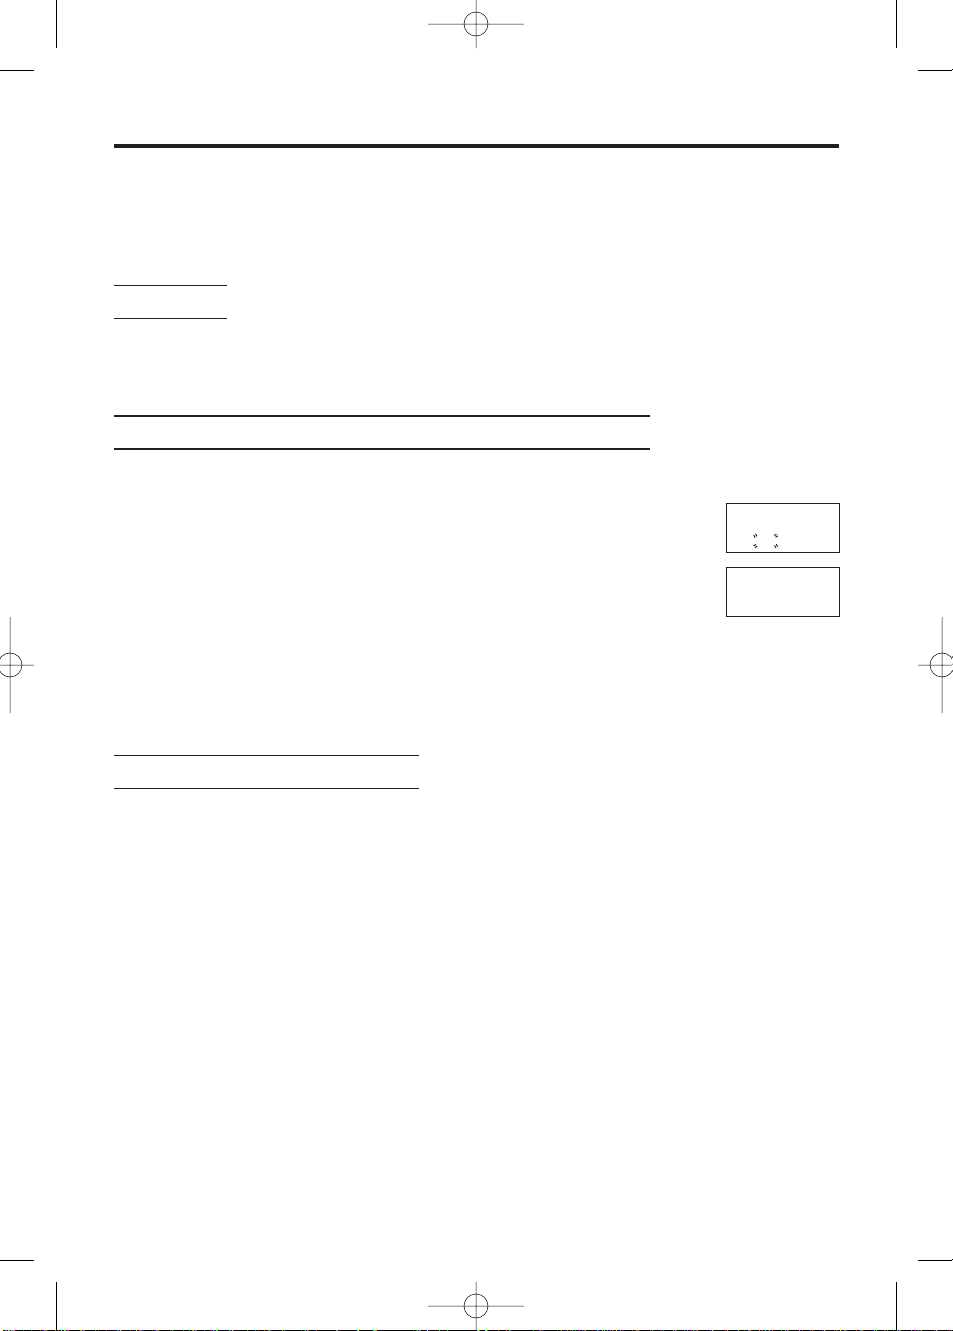
Battery Strength
You can check the present battery strength on the display.
Battery strength Fully charged Medium Low No power
Battery icon ÒÚ ÛÛ
(Flashing)
Recharge
When “Û” flashes or the unit beeps every 15 seconds, recharge the batteries.
• If the
rechargeable
batteries are not
inserted correctly,
the handset will
not work.
Chapter 1
Battery Information
After your batteries are fully charged:
• Battery life may vary depending on usage conditions, such as:
– when viewing the Caller ID Caller List, and
– ambient temperature.
• Clean the handset charge contacts with a soft, dry cloth once a month.
Clean more often if the unit is subject to grease, dust or high humidity.
Otherwise the batteries may not charge properly.
• If the batteries are fully charged, you do not have to place the handset on the
base unit until “Û” flashes. This will maximise the battery life.
• The batteries cannot be overcharged.
Operation Ni-MH battery life (Included) Ni-Cd battery life (optional)
While in use (Talk) Up to about 20 hours Up to about 12 hours (based on 800m/A per hour)
While not in use (Standby) Up to about 160 hours Up to about 100 hours
Battery Charge
At the time of shipment, the batteries are not
charged. To charge, place the handset on the base
unit. Please charge the batteries for approximately
10 hours before initial use. During charging, the battery icon is as shown above.
31939_KX-TCD700CX_Czech 18/6/01 1:54 pm Page 7
Page 8

8
Battery Caution:
To reduce the risk of fire or injury to persons, read and follow these instructions.
1. Use only the batteries specified.
2. Do not use non-rechargeable batteries.
3. Do not mix old and new batteries.
4. Do not dispose of the batteries in a fire, they may explode. Check with local
waste management codes for special disposal instructions.
5. Do not open or mutilate the batteries. Released electrolyte is corrosive and
may cause burns or injury to the eyes or skin. The electrolyte may be toxic if
swallowed.
6. Exercise care in handling the batteries in order not to short the batteries with
conductive materials such as rings, bracelets, and keys. The batteries and/or
conductor may overheat and cause burns.
7. Charge the batteries provided with or identified for use with this product only
in accordance with the instructions and limitations specified in this manual.
➡ Getting Star ted
Battery Replacement
If “Û” flashes after a few telephone calls even when the handset batteries
have been fully charged, it is time to replace the batteries with new ones.
Remember to charge the new batteries after replacement (see page 7).
• Discard defective batteries as soon as possible. Defective batteries may leak
into the unit.
For maximum distance and noise-free operation, the recommended base unit
location is:
• Away from electrical appliances such as TV, radio, personal computer or
another telephone.
• In a convenient high and central location.
Base Unit Location
31939_KX-TCD700CX_Czech 18/6/01 1:54 pm Page 8
Page 9
9
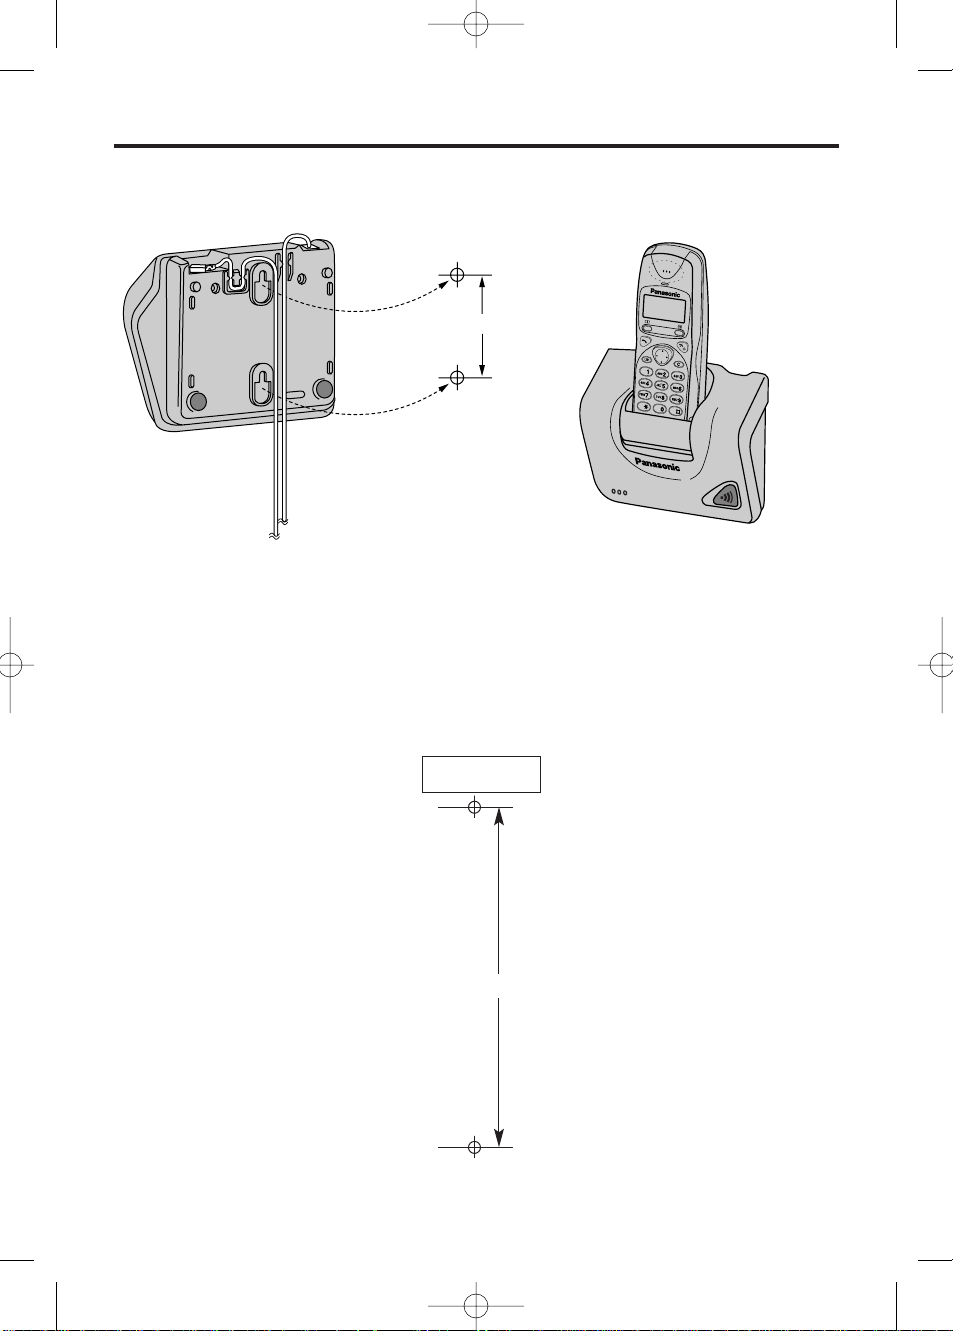
Wall Mounting
This unit can be mounted on a wall.
• Install screws using the wall template below.
• Connect the line cord, and AC Adaptor.
• Arrange the wires as shown, then mount the unit.
6cm
6cm
WALL TEMPLATE
31939_KX-TCD700CX_Czech 18/6/01 1:54 pm Page 9
Page 10
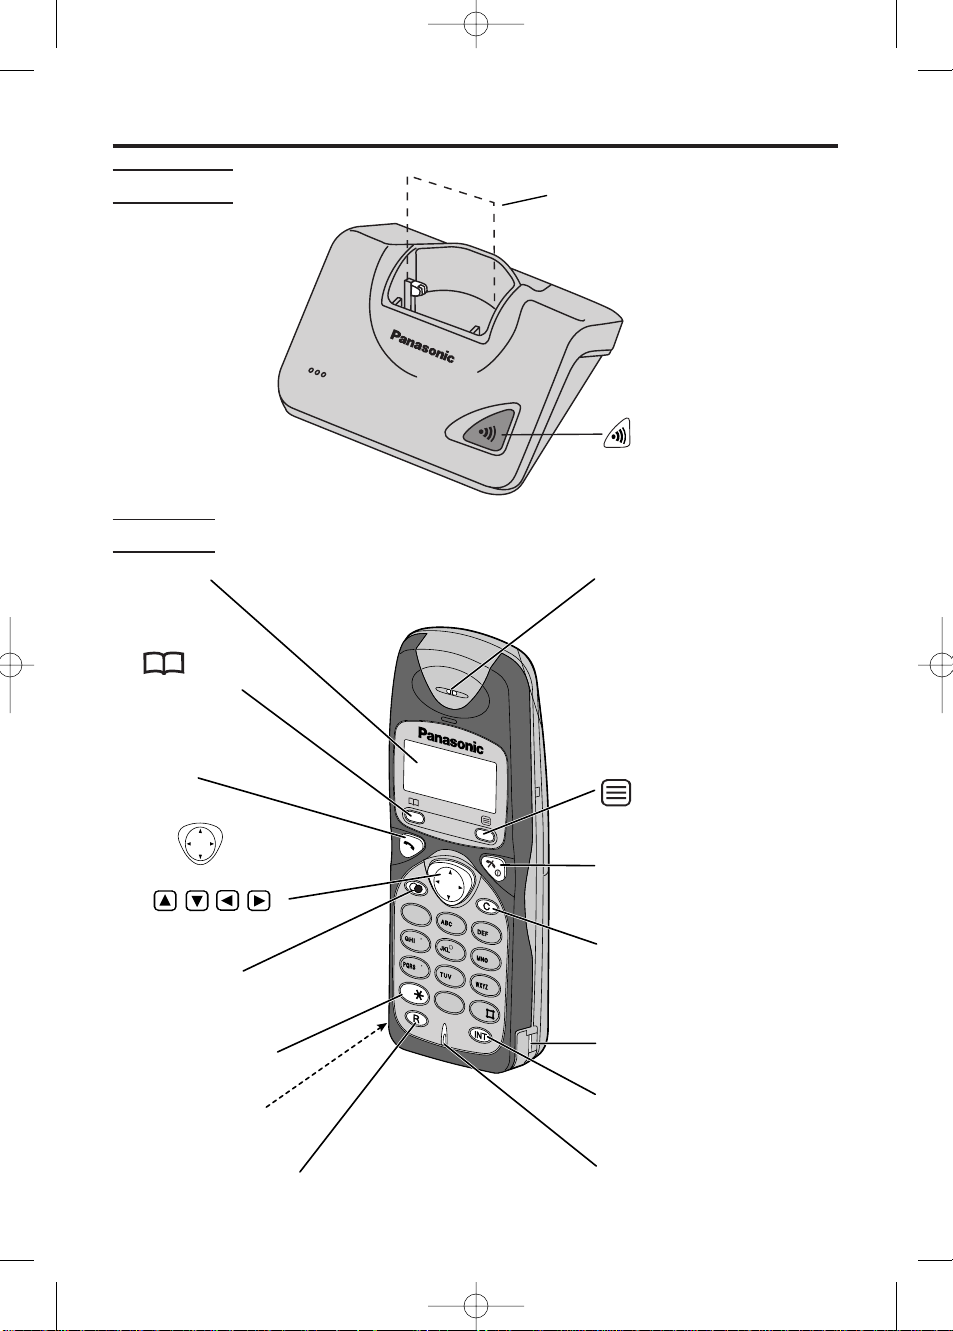
Location of Controls
Base Unit
Handset
10
Page Button
Charge Contacts
7
1
0
3
2
4
6
8
9
5
Display
Receiver
(Function/OK) Button
P (Talk Off/Power) Button
N (Intercom) Button
Charge Contact
Microphone
M (Recall) Button
(Speed Dial)
Button
O (Talk) Button
Navigator Key
( , , , )
Charge Contact
W (Cancel) Button
X (Redial/
Pause) Button
J (Tone) Button
31939_KX-TCD700CX_Czech 18/6/01 1:54 pm Page 10
Page 11
Displays
Handset Display
Icons
11
(The display shows all possible configurations)
Î The in-range icon indicates that
the handset is in range of the base
unit. It flashes when the handset is
out of range.
Ï The page/intercom icon is
displayed when paging or using
the intercom. It flashes when
another unit pages the handset.
The talk icon is displayed when
making or answering calls. It
flashes when an outside call is
being received.
Ë The direct call icon is displayed
when this mode is turned on.
Ô The call prohibition icon is displayed
when this mode is turned on.
 The program icon indicates that the
unit is in the programming mode.
È The ringer off icon indicates that
ringer tone is temporarily turned
OFF.
Ò The battery icon indicates the
battery strength.
Ó The Key Lock icon is displayed
when key lock is set on the
handset. In this mode, keypad is
disabled.
Á The speed dial icon is displayed
when this mode is turned on.
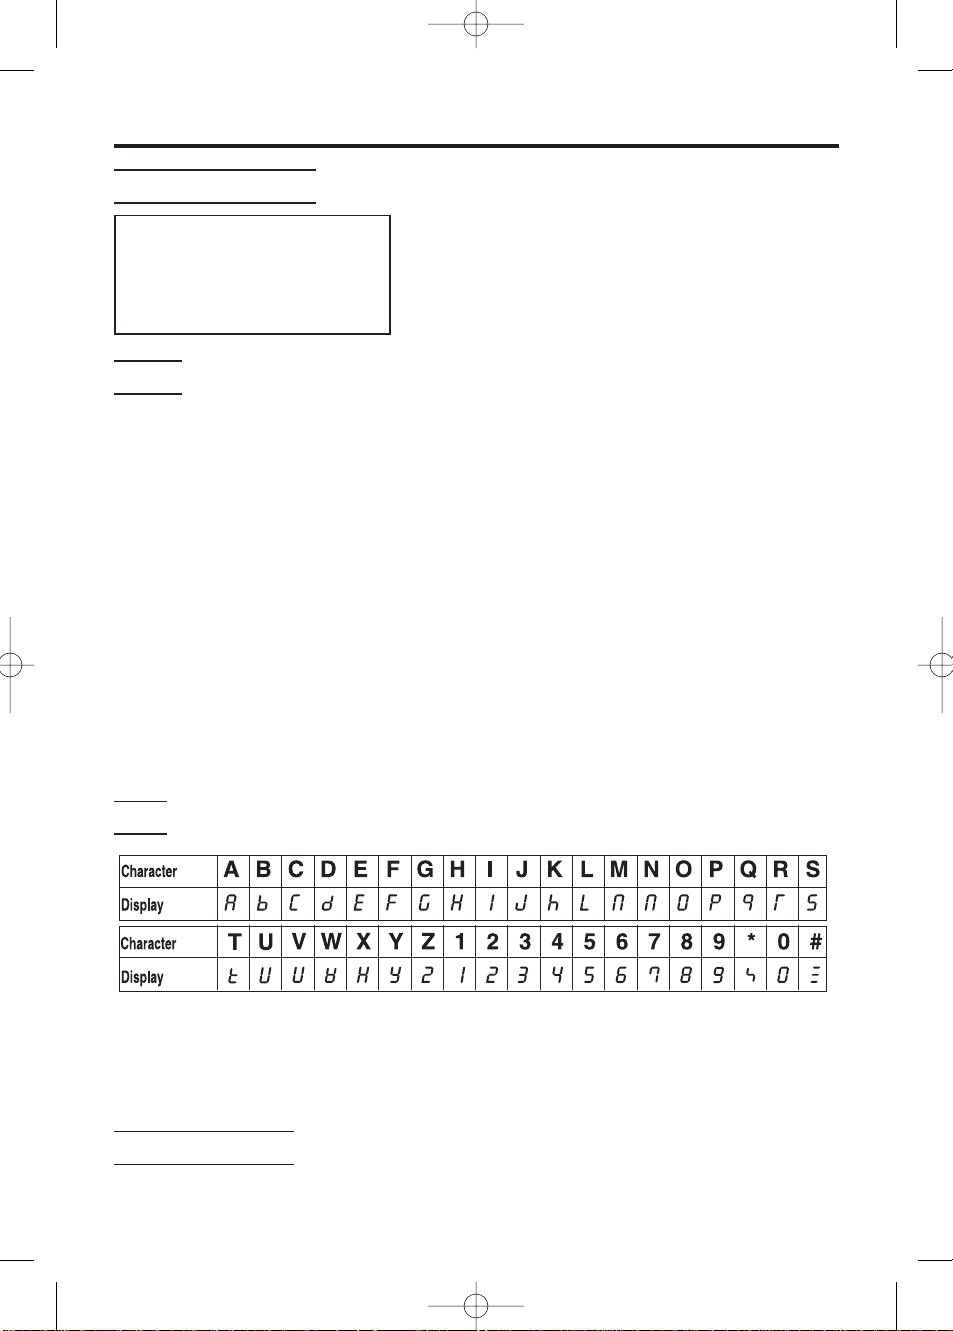
LCD
Note: The LCD on your handset is a 7 segment display and each character will
be displayed as shown in the table above. Some displayed characters differ e.g.
character M is displayed as m. This is not a fault of the display and is normal
display condition.
Symbols Used
Z shows that you should press the following key(s).
888888888888
ВКБЛИН
ОПФУТ
.
31939_KX-TCD700CX_Czech 18/6/01 1:54 pm Page 11
Page 12

Making a Call
(For further information on making calls, see pages 13-14.)
1. ZO
2. Dial a phone number
The dialled number is displayed.
(If a number is entered incorrectly, ZP).
After a few seconds, the display will start showing the length of the call.
12
Terminating a Call
1. To hang up, ZP.
• The handset will return to the standby mode.
• The dialled number is stored in the redial memory.
Turning the Power On
1. Z and hold P
• After all characters briefly appear a confirmation tone
sounds. The display will change to the standby mode when
the button is released.
• The current connected base unit number is displayed (–1–)
• The number of New Caller ID calls received are displayed (eg. 02)
• You can choose whether to display the base unit number, handset number,
clock or no display in the standby mode (see page 31).
Basic Start-up Operations
-1-œœœœœœœ02
Î Ò
Answering a Call
(For further information on answering calls, see page 15.)
1. ZO
• You can also answer a call by pressing any dialling button
K to I, J or L (-Any Key Answer).
After a few seconds, the display will start showing the length of the call.
Turning the Power Off
Make sure that the unit is in the standby mode.
1. Z and hold P until a long beep sounds
• The display will go blank.
(On location of the handset in the base unit, the battery icon will display even
after power off).
31939_KX-TCD700CX_Czech 18/6/01 1:54 pm Page 12
Page 13

Making Calls ➡
13
Note: for basic making calls operation, see page 12.
To Dial after Confirming the Entered Number
With this feature you are able to confirm the entered number before you start
dialling.
1. Dial a Phone Number
If number is not entered correctly:
To clear one digit, ZWbriefly.
To clear all digits, Z and hold W.
2. Phone number confirmed, ZO
(After a few seconds, the length of call is
displayed).
3. To end call, ZP.
(After a few seconds, the display returns to the standby
mode).
• Note: If Î flashes and an alarm tone sounds after pressing O, move closer
to the base unit. Then try again.
To Redial the Last Number Dialled
1. ZO
2. ZX
(The last number dialled is displayed and automatically
redialled).
• After a few seconds, the length of call is displayed.
To Redial after Confirming the Numbers in Redial Memory
The unit automatically stores the last 10 numbers dialled into redial memory.
1.
ZX
(The last number dialled is displayed).
2. ZSor U to select required number
(To exit the list, ZW).
3. ZO
(After a few seconds the length of call is displayed).
0123456789
ВКБЛИН
Î ÏÔÓÒ
0123456789
ВКБЛИН
Î Ï ÔÓÒ
00-00-31
ВКБЛИН
Î Ï ÔÓÒ
-1-œœœœœœœ02
ВКБЛИН
Î ÏÔÓÒ
0123456789
ВКБЛИН
Î Ï ÔÓÒ
00-00-00
ВКБЛИН
Î Ï ÔÓÒ
0123456789
ВКБЛИН
Î ÏÔÓÒ
00-00-00
ВКБЛИН
Î Ï ÔÓÒ
Chapter 2
31939_KX-TCD700CX_Czech 18/6/01 1:54 pm Page 13
Page 14
➡ Making Calls
To Edit/Clear Numbers in the Redial List
To edit and clear numbers in the redial memory, press X, select number and
then follow from step 2 (page 20).
Direct Call
You can store one number into memory and then call this number by pressing O.
Incoming calls are accepted. To use this feature, store the direct call number and
turn on the mode by programming (see page 32). The factory pre-set is OFF.
Dialling the Stored Number
Make sure that “Ë” is displayed (see page 32), then ZO.
• The number stored in the direct call memory is dialled automatically.
• When the handset is in “direct call”mode, it is not possible to make any
calls until direct call is cancelled.This also includes emergency calls.
To Select the Receiver Volume
3 levels (HIGH, MEDIUM, LOW) are available. The factory
preset is MEDIUM.
1. During conversation, ZSor U to select level
S = receiver volume up
U = for receiver volume down
⁄⁄⁄
= HIGH, ⁄⁄= MEDIUM, ⁄= LOW
2. After volume selection, ZW
(The display returns to length of call, etc).
Dialling a Stored Hot Key Number
(To register a number as Hot Key, see page 17).
You can assign up to 9 phone numbers in the speed dial list as hot key dials. The
dialling buttons (A to I) function as memory stations.
1. Z and hold a memory station number (A to I).
• The stored number is displayed.
• To search for a number, ZUor S until the desired number is displayed.
2. ZO
• The number is dialled automatically.
3. To hang up, ZP.
14
S U
00-00-31
ВКБЛИН
Î Ï ÔÓÒ
vol
⁄⁄⁄
ВКБЛИН
Î Ï ÔÓÒ
vol⁄œœ
ВКБЛИН
Î Ï ÔÓÒ
00-00-36
ВКБЛИН
Î Ï ÔÓÒ
31939_KX-TCD700CX_Czech 18/6/01 1:54 pm Page 14
Page 15
Answering Calls
For basic answering call operation, see page 12.
• The handset and base unit will not ring if both ringer volumes are set to OFF
(p. 29, 41)
Auto T alk
If you set the Auto Talk Feature to ON (p. 34), you can answer a call by lifting the
handset off the base unit without pressing O.
To Turn the Handset Ringer Off Temporarily
When an external call is incoming, user can turn off ringer
temporarily.
1. During incoming call, Z and hold U.
(Bell off symbol is displayed and the handset stops ringing).
2. Answer call by pressing O, K-I, J or L (-Any
Key Answer).
• The ringer will turn back on for the next call.
• This function will not work when the handset is on the base
unit or if an internal call is incoming
Lighted Handset Keypad
The handset dialling buttons will light when you press a button, lift the handset off
the base unit or receive a call. The lights will go out about 10 seconds after
pressing a button, lifting the handset or answering a call.
15
888888888888
ÂÊÁËÈ Í
Î Ï ÔÓÒ
00-00-00
ВКБЛИН
Î Ï ÔÓÒ
31939_KX-TCD700CX_Czech 18/6/01 1:54 pm Page 15
Page 16
Speed Dialling
Storing Phone Numbers in Memory
You can store up to 20 telephone numbers in the handset
Storing new numbers
1. ZYor V
2. ZYor V
(Speed dial is selected, speed dial icon is displayed Á).
3. Enter phone number (Up to 24 digits)
(Phone numbers are displayed from the left edge of the LCD).
• If a pause is required for dialling, ZXwhile entering
number. Pressing X counts as one digit.
4. ZY
(Speed dial is saved (saved) - a confirmation tone sounds)
(After 2 seconds, next index list No. is displayed. If user
wants to continue, start again from step 3).
• If speed dial memory is full, ‘memory full’ is displayed.
5. ZWor T (twice) or P (once).
• The display returns to the standby mode.
Dialling a Stored Number
There are 3 ways to display the speed dial list, (scrolling,
jumping and hot key).
To register a speed dial to hot key, see page 17.
Displaying the list by Scrolling/Jumping.
1. ZÁ
2. (Scrolling) ZSor U to select phone number.
(Jumping) Z 00 to 19 to select Index No.
3. ZO
To exit speed dial memory, ZW.
• If no digits are input over 1 minute, speed dial is cancelled and display
returns to standby mode.
16
new speed
ВКБЛИН
Î ÏÔÓÒ
00-É00000000
Â Ê Á ËÈÍ
Î ÏÔÓÒ
-1-1 01
ВКБЛИН
Î ÏÔÓÒ
00-1234567É0
Â Ê Á ËÈÍ
Î ÏÔÓÒ
saved
Â Ê Á ËÈÍ
Î ÏÔÓÒ
-1-1 01
ВКБЛИН
Î ÏÔÓÒ
memory full
Â Ê Á ËÈÍ
Î ÏÔÓÒ
01-É
Â Ê Á ËÈÍ
Î ÏÔÓÒ
(Standby Mode)
31939_KX-TCD700CX_Czech 18/6/01 1:54 pm Page 16
Page 17

➡
17
Speed Dial Menu
In the speed dial menu, it is possible to carry out the following operations:
• Edit a speed dial number (edit).
• Clear a speed dial number (clear).
• Register a speed dial number to Hot Key (hot key reg).
(Standby Mode)
01-111222333
ÂÊÁ ËÈÍ
Î ÏÔÓÒ
• If key is already related
to speed dial no., the
key no. flashes.
• Select key (eg.2)
ZYor V
• A confirmation tone
sounds.
• Display returns to
standby mode.
Z
SU
ZY
or V
• Select key (1-9)
3. ZYor V
ZY
or V
• The number to edit
flashes.
• To clear
ZW.
• New digits are added to
the left of the flashing
digit.
• To move cursor
Z T V
.
• When No. is confirmed
ZY
• Speed dial is saved.
• A confirmation tone
sounds.
ZYor V
edit
Â Ê Á ËÈÍ
Î ÏÔÓÒ
clear
Â Ê Á ËÈÍ
Î ÏÔÓÒ
hot key reg
Â Ê Á ËÈÍ
Î ÏÔÓÒ
Z
SU
01-Ü11222333
Â Ê Á ËÈÍ
Î ÏÔÓÒ
ZU
no
Â Ê Á ËÈÍ
Î ÏÔÓÒ
ZYor V
yes
Â Ê Á ËÈÍ
Î ÏÔÓÒ
• A confirmation tone
sounds.
• Next speed dial no. is
displayed.
cleared
Â Ê Á ËÈÍ
Î ÏÔÓÒ
• If last speed dial no. is
deleted, ‘no item’ is
displayed.
02-333444555
Â Ê Á ËÈÍ
Î ÏÔÓÒ
no item
ÂÊÁ ËÈÍ
Î ÏÔÓÒ
saved
Â Ê Á ËÈÍ
Î ÏÔÓÒ
-1- 01
ВКБЛИН
Î ÏÔÓÒ
-1- 01
ВКБЛИН
Î ÏÔÓÒ
key 1
Â Ê Á ËÈÍ
Î ÏÔÓÒ
SU
key z
Â Ê Á ËÈÍ
Î ÏÔÓÒ
key 3
Â Ê Á ËÈÍ
Î ÏÔÓÒ
ZU
no
Â Ê Á ËÈÍ
Î ÏÔÓÒ
yes
Â Ê Á ËÈÍ
Î ÏÔÓÒ
ZYor V
01-111222333
ÂÊÁ ËÈÍ
Î ÏÔÓÒ
-1-888888801
ВКБЛИН
Î ÏÔÓÒ
1. ZÁ 2. ZSUto select no.
SU
Note:
• To exit the programming mode at anytime, Z P.
• To exit the speed dial
list, ZP.
31939_KX-TCD700CX_Czech 18/6/01 1:54 pm Page 17
Page 18

Saving Numbers in Speed Dial List (save speed)
Telephone numbers can be saved into the speed dial list from other lists
eg. Caller ID list, re-dial list, etc.
To save a number from other lists;
1. Display number to be saved
2. ZYor V
3. ZYor V
“save speed” is selected.
Speed dial icon is displayed.
• Edit number if required.
4. ZYto save number.
• A confirmation tone sounds.
• The display returns to the standby mode.
➡ Speed Dialling
18
0123456789
ВКБЛИН
Î ÏÔÓÒ
–1–000000001
ВКБЛИН
Î ÏÔÓÒ
save speed
 КБЛИН
Î ÏÔÓÒ
saved
Â Ê Á ËÈÍ
Î ÏÔÓÒ
07-Ö12345678
Â Ê Á ËÈÍ
Î ÏÔÓÒ
31939_KX-TCD700CX_Czech 18/6/01 1:54 pm Page 18
Page 19

This unit is compatible with a Caller ID service offered by your telephone
company. If you should subscribe to a Caller ID service, the calling party’s
information will be shown on the handset display after the first ring.
You cannot access the Caller ID service while using the handset and base unit
for an internal call.
How Caller Information is Displayed when a Call is Received
• Incoming Call
• Caller’s phone number is displayed after first ring.
1.ZO(Length of call is displayed).
• Caller’s phone number cannot be displayed in the following
cases:
– If the caller dialled from an area which does not provide a
Caller ID service, the display will show.
• – If the caller has requested not to display his/her phone
number, the display will show.
• If your unit is connected to a telephone line or a PBX which
does not support Caller ID service, you cannot access
those services.
Checking the Number of New Calls
In the standby mode, when new calls have been received, the
display shows the number of new calls.
• For example if you have received 10 new calls the display will
show the following.
out of area
ВКБЛИН
Î Ï ÔÓÒ
Caller ID Service ➡
19
888888888888
ВКБЛИН
Î Ï ÔÓÒ
0123456789
ВКБЛИН
Î Ï ÔÓÒ
00-00-00
ВКБЛИН
Î Ï ÔÓÒ
private
ВКБЛИН
Î Ï ÔÓÒ
-1-888888810
ВКБЛИН
Î ÏÔÓÒ
Caller ID, where available, is a telephone company service. After subscribing
to Caller ID, this phone will display the caller’s phone number.
31939_KX-TCD700CX_Czech 18/6/01 1:54 pm Page 19
Page 20

➡ Caller ID Service
Caller ID Sub-Menu
In the Caller ID sub-menu, it is possible to carry out the following operations:
• Save a Caller ID Number to speed dial list (save speed).
• Edit a Caller ID Number (edit call no).
• Delete a Caller ID Number (clear).
• Delete all Caller ID Numbers (all clear).
20
1. ZSor U to select number
2. ZYor V
0123456789
ВКБЛИН
ÎÏÔÓÒ
save speed
 КБЛИН
ÎÏÔÓÒ
3. S U
edit call no
 КБЛИН
ÎÏÔÓÒ
4. S U
clear
 КБЛИН
ÎÏÔÓÒ
5. S U
all clear
 КБЛИН
ÎÏÔÓÒ
001122334455
ÎÏÔÓÒ
cleared
 КБЛИН
ÎÏÔÓÒ
yes
 КБЛИН
ÎÏÔÓÒ
no
 КБЛИН
ÎÏÔÓÒ
07-Ö12345678
Â Ê Á ËÈÍ
Î ÏÔÓÒ
Ö123456789
ВКБЛИН
Î ÏÔÓÒ
S U
no
 КБЛИН
ÎÏÔÓÒ
cleared
 КБЛИН
ÎÏÔÓÒ
S U
yes
 КБЛИН
ÎÏÔÓÒ
no item
ВКБЛИН
ÎÏÔÓÒ
(Speed dial icon is turned on)
ZYto save number.
(Edit no. as required).
(Move cursor using V or T to select
digit, W = cancel, new digits are
input to left of flashing digit).
Then ZYto save number.
A confirmation
tone sounds.
Next Caller’s
No. is displayed.
A confirmation
tone sounds.
Z
V or Y
Z
V or Y
Z
V or Y
Z
V or Y
Z
Y
Z
Y
Note: The intercom icon will not be displayed when editing/clearing numbers in
the Redial List.
31939_KX-TCD700CX_Czech 18/6/01 1:54 pm Page 20
Page 21

Using the Caller List ➡
21
Viewing the Caller List
Telephone numbers of up to 50 different callers are stored from the most recent
to the oldest call in the Caller List. When the 51st call is received, the oldest call
is deleted.
To check the caller’s phone number, follow the steps below.
1. Ensure display is in standby mode
eg. (Clock is displayed – 3 new calls).
2. ZSor U (newest number is displayed).
• To search from the most recent to the oldest call, ZU
repeatedly.
• To search from the oldest to the most recent call ZS
repeatedly.
• To scroll between callers, ZSor U.
• If no number is displayed in step 2, the Caller List is empty.
• If more than one call is received from the same caller only
the most recent call will be recorded.
3. To exit the list, ZWor P.
• Display returns to standby mode.
• New call counter is cleared.
What ‘⁄’ means
When you have checked new calls, answered the call or called
back the caller, ‘⁄’ will be added to the caller’s number.
When the same caller calls again, the call entry with ‘
⁄’ will be
deleted and replaced with the new call entry.
When viewing long telephone numbers
If the caller’s number is greater than 12 digits the whole
telephone number will not be shown. ZCto see the
remaining numbers.
16-00 03
ВКБЛИН
Î ÏÔÓÒ
0123456789
ВКБЛИН
ÎÏÔÓÒ
16-02 00
ВКБЛИН
Î ÏÔÓÒ
no item
ВКБЛИН
ÎÏÔÓÒ
012345678901
ВКБЛИН
ÎÏÔÓÒ
23
ВКБЛИН
ÎÏÔÓÒ
ZC
31939_KX-TCD700CX_Czech 18/6/01 1:54 pm Page 21
01234567890
⁄
ВКБЛИН
ÎÏÔÓÒ
Page 22

Calling Back from the Caller List
Using the list you can automatically call back a caller.
1. Select Caller ID number by pressing S or U.
2. ZO.
• After a few seconds the length of call is displayed.
3. To hang up ZP.
(The handset will return to the standby mode).
➡ Using the Caller List
22
Operating More than One Handset
You can register and operate up to 6 handsets at the base unit. Operating more
than one handset allows you to have an internal call while simultaneously
conducting an external phone call using another handset.
• The optional handset/charger model number is KX-A114EX. The functions of
the optional handset are the same as those of KX-TCD700BX handset.
• To register a handset to a base unit, see page 36.
Operating More than One Base Unit
You can register and operate your handset at up to 4 base units.
Since each base unit forms a radio cell, you can extend the range or area in
which you can make/answer calls with the same handset by placing the base
units in suitable locations. For example you can use a handset in different radio
areas, such as at home or the office. However, calls in progress are cancelled
when the unit moves to another radio area.
Ex. optional KX-A114EX handsets are added to 2 base units.
0123456789
ВКБЛИН
ÎÏÔÓÒ
-1-0-00-0001
ВКБЛИН
Î ÏÔÓÒ
00-00-00
ВКБЛИН
Î Ï ÔÓÒ
For Optional Multi-Unit Users
7
1
0
3
2
4
6
8
9
5
7
1
0
3
2
4
6
8
9
5
7
1
0
3
2
4
6
8
9
5
7
1
0
3
2
4
6
8
9
5
7
1
0
3
2
4
6
8
9
5
1
2
3
5
4
Radio Range
31939_KX-TCD700CX_Czech 18/6/01 1:54 pm Page 22
Page 23

Paging/Intercom ➡
Paging All Handsets from the Base Unit
1. ZÏ(On the Base Unit).
• All handsets will ring for one minute.
2. To stop paging, ZÏagain or ZOon one of the handsets.
Intercom between Handsets
A 2-way intercom is available between handsets.
Eg. Handset 1 is paging Handset 2
1. (Handset 1) ZN
(Int icon blinks until connection is established).
2. (Handset 1) ZB
3. (Handset 2)
When the unit rings, ZOto answer.
• The intercom duration is displayed.
4. (Handsets 1 and 2)
To end the intercom, ZP.
• Intercom calls can be conducted within the radio area of the
current base unit, but not with units in neighbouring radio
areas.
Intercom cannot be accepted in the following areas:
– when the other party is in intercom mode.
– when the other party is on hold during external call.
– while the other party is in conference call.
Transferring a Call from One Handset to Another
The intercom can be used during a call, enabling you to transfer
a call between handsets registered to the same base unit.
Transferring a Call using the Intercom
Eg. Handset 1 is transferring an external call to Handset 2.
1. (Handset 1)
During a call, ZN(Intercom icon turns on).
• The call is put on hold.
2. (Handset 1) Z desired handset no. eg. B
• You will hear an internal ring back tone until the other
handset is answered.
23
-1-œœœœœœœ02
ВКБЛИН
Î ÏÔÓÒ
(1)
ВКБЛИН
ÎÏÔÓÒ
(1)-(2)
ВКБЛИН
ÎÏÔÓÒ
00-00-00
ВКБЛИН
ÎÏÔÓÒ
(1)
ВКБЛИН
ÎÏÔÓÒ
(1)-(2)
ВКБЛИН
ÎÏÔÓÒ
31939_KX-TCD700CX_Czech 18/6/01 1:54 pm Page 23
Page 24

➡ Paging/Intercom
Transferring a Call using the Intercom (continued)
3. (Handset 2) When the unit rings,ZOor N to answer.
4. (Handset 1) Transferring a call ZP
• The transfer is completed
or
to return to the External Call ZN.
Transferring a Call without the Intercom
This feature enables you to transfer the call to another handset without waiting
for the paged handset to answer.
Eg. Handset 1 is transferring a call to Handset 2.
1. (Handset 1)
During a call, ZN(Intercom icon turns on).
• The call is put on hold.
2. (Handset 1) Z desired handset no. eg. B
• You will hear an internal ring back tone until the other
handset is answered.
3. (Handset 1) ZP.
4. (Handset 2) When the unit rings, ZOto answer.
• The transfer is completed.
• If the paged handset is not answered within 30 seconds, a ring tone
sounds at the paging handset. The paging handset can return to the call by
pressing O.
Conference
During a call using the handset, you can make an intercom call to another
handset and then combine the calls together to establish a conference call
between handsets registered to the same base unit.
1. (Handset 1) During a call, ZNthen enter the desired handset
number eg. B.
• The call is put on hold.
• If there is no answer, ZNto return to the call.
2. (Handset 2) When the unit rings,ZOor N to answer.
3. (Handset 1) ZCto establish a conference call.
4. (Handset 1 or 2) ZPto hang up on conference call.
24
31939_KX-TCD700CX_Czech 18/6/01 1:54 pm Page 24
Page 25

Special Features ➡
How to Use the Pause Feature
We recommend you insert “X” if a pause is required for dialling with a PBX or to
access a long distance service. (When X is pressed, ‘p’ is displayed on LCD).
Eg. Line access number I (PBX).
1. ZI, X and then phone number.
2. ZO
(After a few seconds, display will start showing the length of the call).
• Pressing X once creates a pause.
This prevents misdialling when you redial or dial a stored number.
• Pressing X more than once increases the length of the pause between
numbers.
T emporary T one Dialling
(For Rotary or Pulse Service Users)
ZJbefore entering access numbers which require tone dialling.
• The dialling mode changes to tone. You can enter numbers to access an
answering service, electronic banking service, etc. When you hang up, the
mode will return to pulse.
31939_KX-TCD700CX_Czech 18/6/01 1:54 pm Page 25
Using the Recall Feature
M is used to access special telephone services (optional) such as call waiting
(When M is pressed ‘f’ is displayed on LCD). Contact your telephone
company for details.
Example: Call waiting.
When a call waiting tone is heard during a conversation:
a) To hold the existing call and accept the waiting call.
ZM
• Each time you ZM, you can switch between the first and second call.
• Depending on the provider, you may need to enter a code after pressing M.
Follow the instructions given by your provider.
b) To accept the waiting call and hang up the existing call.
ZP. When the unit rings, ZOto answer the new call.
c) To reject the waiting call.
Wait for the call waiting to time out. This will take about 40 seconds. If your
unit is connected to a PBX, pressing M allows you to access some features
of your host PBX such as transferring an extension call.
25
(For Analog PBX Line/Long Distance Service Users)
Page 26

➡ Special Features
Setting the Key Lock (ON)
You can lock the handset dialling buttons. Only incoming calls
are accepted until the key lock is cancelled. You can answer a
call by pressing any dialling button K to I, J or L
(-Any Key Answer). Make sure that the unit is in the standby
mode.
To Cancel the Key Lock
Make sure that the unit is in the standby mode.
1. ZYfor more than 2 seconds
• Key lock icon ‘Ó’ disappears and key lock is cancelled.
Note:
• The key lock will also be cancelled when the power is turned
OFF.
• When the handset is in ‘Key Lock’ mode, emergency calls
cannot be made until the key lock is cancelled.
26
-1-œœœœœœœ02
ВКБЛИН
Î ÏÔÓÒ
-1-œœœœœœœ02
ВКБЛИН
Î ÏÔÓÒ
31939_KX-TCD700CX_Czech 18/6/01 1:54 pm Page 26
1. ZYfor more than 2 seconds.
• Confirmation tone sounds and all dialling buttons are locked.
• Key lock icon ‘Ó’ is displayed.
Page 27

Summary of Programmable Functions
27
Chapter 3
On the Handset
You can program the following function items using the handset near the base
unit. See the corresponding pages for function details.
-1- 01
ВКБЛИН
Î ÏÔÓÒ
(Standby Mode)
new speed
ВКБЛИН
Î ÏÔÓÒ
ZYor V
setting hs
ВКБЛИН
Î ÏÔÓÒ
ZSor U
ZY
or V
Note:
• To return to the previous step during programming, ZT.
• To exit the programming mode at any time, ZP.
• time alarm
• ringer opt
• tone opt
• display opt
• call opt
• other opt
• registration
• select bs
• set time Set Time of Alarm (p.28)
• set alarm Set Alarm ON/OFF (p.28)
• ringer vol Select the Handset Ringer Volume (p.29)
• eht ringer Set Ringer Pattern for Ext. Incoming Call (p.29)
•int ringer Set Ringer Pattern for Internal Call (p.29)
• paging Set Ringer Pattern for Paging Tone (p.29)
• alarm Set Ringer Pattern for Alarm Tone (p.29)
• key tone Set Key Confirmation Tone ON/OFF (p.30)
• call waiting Set Call Waiting Tone ON/OFF (p.30)
• range alarm Set Range Warning Alarm ON/OFF (p.30)
• battery low Set Battery Low Tone ON/OFF (p.30)
• standby mode Select the Standby Mode Display (p.31)
(Base Unit Number, Handset Number, Clock or Off)
• talk mode Select the Talk Mode Display (p.31)
(Talk Time, or Phone No.)
• callbar Set Call Prohibition (p.33)
• direct no Set Direct Call Number (p.32)
• set direct Set Direct Call ON/OFF (p.33)
• hspin change Change Handset PIN (p.35)
• auto talk Set Auto Talk ON/OFF (p.34)
• battery type Select Battery Type (p.34)
• register hs Registering a Handset to a Base Unit (p.36)
• cancel base Cancelling a Base Unit (p.37)
Select Base Unit (p.38)
Reset Handset (p.39)
• reset hs
SU
SU
SU
SU
SU
SU
SU
SU
SU
Refer to relevant page as indicated.
31939_KX-TCD700CX_Czech 18/6/01 1:54 pm Page 27
Page 28

Setting Time Alarm Function
28
Within the Time Alarm menu, it is possible to program the following:
• Set Time of Alarm (
sseett ttiimmee
).
• Set Alarm ON/OFF (
sseett aallaarrmm
). (In this mode, it is possible to set the alarm
to once (
oonnccee
), repeat daily (
rreeppeeaatt ddaaiillyy
) or off (
ooffff
)).
-1- 01
ВКБЛИН
Î ÏÔÓÒ
(Standby Mode)
new speed
ВКБЛИН
Î ÏÔÓÒ
ZYor V
setting hs
ВКБЛИН
Î ÏÔÓÒ
ZSor U
ZY
or V
Z
Y
or V
Z
Y
or V
Z
Y
or V
time alarm
 КБЛИН
Î ÏÔÓÒ
set time
 КБЛИН
Î ÏÔÓÒ
Éœ–œœ000000
 КБЛИН
Î ÏÔÓÒ
á1–590000000
 КБЛИН
Î ÏÔÓÒ
19–5É0000000
 КБЛИН
Î ÏÔÓÒ
• If time has previously been
entered, time is displayed.
• Enter new time.
• A confirmation tone
sounds.
• Display returns to
function menu.
• Make selection.
• If time is currently
displayed, new time will
be entered over existing
digit.
• To cancel one digit,
ZWbriefly.
• To cancel all digits
Z and hold W.
• The flashing icon
indicates the digit to be
edited.
ZY
set alarm
 КБЛИН
Î ÏÔÓÒ
once88888888
 КБЛИН
Î ÏÔÓÒ
S U
repeat daily
 КБЛИН
Î ÏÔÓÒ
S U
off88888888
 КБЛИН
Î ÏÔÓÒ
Z Y or V
S U
Note:
• To return to the previous step during programming, ZT.
• To exit the programming mode at any time, ZP.
To Stop the Alarm
When the alarm sounds, press any dialling button K
to I, J, L or O to end alarm tone.
• The alarm time turns off and the display returns to the
standby mode. If ‘once’ is selected, the setting is
automatically turned off.
• If the unit is in talk or intercom mode during the alarm
time, the alarm will not sound. After finishing, the
alarm will start ringing.
31939_KX-TCD700CX_Czech 18/6/01 1:54 pm Page 28
Page 29

Setting Ringer Options
29
Within the Ringer Option menu, it is possible to program the following:
• Select the Handset Ringer Volume (
rriinnggeerr vvooll
) (6 levels available plus
OFF (
rriinnggeerr ooffff
)).
• Select the Ringer Pattern for External Incoming
Call (
eexxtt rriinnggeerr
).
• Select the Ringer Pattern for Internal Call (
iinntt rriinnggeerr
).
• Select the Ringer Pattern for Paging Tone (
ppaaggiinngg
).
• Select the Ringer Pattern for Alarm Tone (
aallaarrmm
).
-1- 01
ВКБЛИН
Î ÏÔÓÒ
(Standby Mode)
new speed
ВКБЛИН
Î ÏÔÓÒ
ZYor V
Z
Y
or V
Z
Y
or V
setting hs
ВКБЛИН
Î ÏÔÓÒ
ZSor U
ZS
or U
ZY
or V
Z
Y
or V
time alarm
 КБЛИН
Î ÏÔÓÒ
ringer opt
 КБЛИН
Î ÏÔÓÒ
• Select Ringer Volume.
• ZYor V
• A confirmation tone
sounds.
ringer vol
 КБЛИН
Î ÏÔÓÒ
ext ringer
 КБЛИН
Î ÏÔÓÒ
S U
int ringer
 КБЛИН
Î ÏÔÓÒ
S U
paging
 КБЛИН
Î ÏÔÓÒ
vol⁄œœœœœ
 КБЛИН
Î ÏÔÓÒ
S U
vol
⁄⁄⁄
œœœ
 КБЛИН
Î ÏÔÓÒ
vol
⁄⁄⁄⁄⁄⁄
 КБЛИН
Î ÏÔÓÒ
ringer off
 КБЛИН
Î ÏÔÓÒ
S U
alarm
 КБЛИН
Î ÏÔÓÒ
ringer vol
 КБЛИН
Î ÏÔÓÒ
S U
• Volume is sounded
during scrolling.
• Current setting is
displayed.
• Select Ringer.
• ZYor V
• A confirmation tone
sounds.
• Display returns to
function menu.
ringer 1
 КБЛИН
Î ÏÔÓÒ
S U
ringer 20
 КБЛИН
Î ÏÔÓÒ
• Ringer is sounded
during scrolling.
• Current setting is
displayed.
S U
Note:
• To return to the previous step during programming, ZT.
• To exit the programming mode at any time, ZP.
}
(20 patterns available).
S U
31939_KX-TCD700CX_Czech 18/6/01 1:54 pm Page 29
Page 30

Setting T one Options
Within the Tone Option menu, it is possible to program the following:
• Set Key Confirmation Tone ON/OFF (
kkeeyy ttoonnee
) (
oonn//ooffff
).
You can choose whether or not the handset keys will sound tones (eg. key
tone, confirmation tone, error tone).
• Set Call Waiting Tone ON/OFF (
ccaallll wwaaiittiinngg
) (
oonn//ooffff
).
If an incoming call has been received during an intercom between handsets, a
call waiting tone sounds.
• Set Range Warning Alarm ON/OFF (
rraannggee aallaarrmm
) (
oonn//ooffff
).
You can choose whether or not the handset will sound a range warning alarm.
• Set Battery Low Tone ON/OFF (
bbaatttteerryy llooww
) (
oonn//ooffff
).
You can choose whether or not the handset will sound a battery low tone.
30
Z
Y or V
• Current setting is
displayed.
• Select ON/OFF.
ZYor V
• Display returns to
function menu.
on
 КБЛИН
Î ÏÔÓÒ
S U
off
 КБЛИН
Î ÏÔÓÒ
-1- 01
ВКБЛИН
Î ÏÔÓÒ
(Standby Mode)
new speed
ВКБЛИН
Î ÏÔÓÒ
ZYor V
setting hs
ВКБЛИН
Î ÏÔÓÒ
ZSor U
ZS
or U
ZY
or V
Z
Y
or V
time alarm
 КБЛИН
Î ÏÔÓÒ
tone opt
 КБЛИН
Î ÏÔÓÒ
Note:
• To return to the previous step during programming, ZT.
• To exit the programming mode at any time, ZP.
S U
key tone
 КБЛИН
Î ÏÔÓÒ
call waiting
 КБЛИН
Î ÏÔÓÒ
battery low
 КБЛИН
Î ÏÔÓÒ
S U
range alarm
 КБЛИН
Î ÏÔÓÒ
S U
31939_KX-TCD700CX_Czech 18/6/01 1:54 pm Page 30
Page 31

Setting Display Options
Within the Display Option menu, it is possible to program the following:
• Select the Standby Mode Display (
ssttaannddbbyy mmooddee
).
In the standby mode, it is possible to set the display to show; Base Number
(
bbss nnoo
), Handset Number (
hhss nnoo
), Clock (
cclloocckk
) and OFF (
ooffff
).
• Select the Talk Mode Display (
ttaallkk mmooddee
).
In the talk mode, it is possible to set the display to show Talk Time
(
ttaallkk ttiimmee
) or Phone Number (
pphhoonnee nnoo
).
31
bs no
 КБЛИН
Î ÏÔÓÒ
S U
hs no
 КБЛИН
Î ÏÔÓÒ
S U
-1- 01
ВКБЛИН
Î ÏÔÓÒ
(Standby Mode)
new speed
ВКБЛИН
Î ÏÔÓÒ
ZYor V
Z
Y
or V
setting hs
ВКБЛИН
Î ÏÔÓÒ
ZSor U
ZS
or U
ZY
or V
ZY
or V
time alarm
 КБЛИН
Î ÏÔÓÒ
display opt
 КБЛИН
Î ÏÔÓÒ
standby mode
 КБЛИН
Î ÏÔÓÒ
Z
Y or V
talk mode
 КБЛИН
Î ÏÔÓÒ
• ZPor
(W 3 times).
-1- 01
ВКБЛИН
Î ÏÔÓÒ
• Select Setting.
• ZYor V
clock
 КБЛИН
Î ÏÔÓÒ
S U
off
 КБЛИН
Î ÏÔÓÒ
standby mode
 КБЛИН
Î ÏÔÓÒ
S U
• ZPor
(W 3 times).
-1- 01
ВКБЛИН
Î ÏÔÓÒ
• Select Setting.
•
ZYor V
talk mode
 КБЛИН
Î ÏÔÓÒ
talk time
 КБЛИН
Î ÏÔÓÒ
S U
phone no
 КБЛИН
Î ÏÔÓÒ
Note:
• In the Standby Mode, (standby mode) your handset is pre-set to display
‘Base Number’ (bs no).
• In Talk Mode your handset is pre-set to display ‘Talk Time’ (talk time).
• To return to a previous step during programming, ZT.
• To exit the programming mode at any time, ZP.
31939_KX-TCD700CX_Czech 18/6/01 1:54 pm Page 31
Page 32

Setting Call Option
32
Within the Call Option menu, it is possible to program the following:
• Set Call Prohibition (
ccaallll bbaarr
) see page 33.
• Set Direct Call Number (
ddiirreecctt nnoo
). You can store a number in the direct call
memory. This feature allows you to make a call easily by pressing O.
Incoming calls are accepted.
• Set Direct Call ON/OFF (
sseett ddiirreecctt
) (
oonn//ooffff
) see page 33.
save
 КБЛИН
Î ÏÔÓÒ
-1- 01
ВКБЛИН
Î ÏÔÓÒ
(Standby Mode)
new speed
ВКБЛИН
Î ÏÔÓÒ
ZYor V
setting hs
ВКБЛИН
Î ÏÔÓÒ
ZSor U
ZS
or U
ZY
or V
ZY
or V
time alarm
 КБЛИН
Î ÏÔÓÒ
ZYor V
call opt
 КБЛИН
Î ÏÔÓÒ
ZSor U
call bar
 КБЛИН
Î ÏÔÓÒ
direct no
 КБЛИН
Î ÏÔÓÒ
É
 КБЛИН
Î ÏÔÓÒ
ZY
• ZYor V
• A confirmation tone
sounds.
• Select ON/OFF.
eg. (Select OFF).
eg. (Select ON).
ZYor V
• Direct Call No.
Input mode.
• If direct call no. is
already registered,
it is displayed. If not
enter new number.
direct no
 КБЛИН
Î ÏÔÓÒ
• ZPor
(
W 3 times).
(eg. Direct Call “ON”).
off
 КБЛИН
Î ÏÔÓÒ
on
 КБЛИН
Î ÏÔÓÒ
direct no
 ÊÁË ÈÍ
Î ÏÔÓÒ
-1- 01
ÂÊÁË ÈÍ
Î ÏÔÓÒ
Ö123456789
 КБЛИН
Î ÏÔÓÒ
0123456789É
 КБЛИН
Î ÏÔÓÒ
Note:
• To return to the previous step during programming, ZT(except while editing number).
• To exit the programming mode at any time, ZP.
S U
31939_KX-TCD700CX_Czech 18/6/01 1:54 pm Page 32
Page 33

33
• Set Call Prohibition (this prohibits anyone from making a call with your handset
including emergency numbers. Incoming calls are accepted (
ccaallllbbaarr
)).
• Set Direct Call ON/OFF (
sseett ddiirreecctt
) (
oonn//ooffff
).
hs pin
 ÈÍ
Î ÏÔÓÒ
off
 КБЛИН
Î ÏÔÓÒ
S U
-1- 01
ВКБЛИН
Î ÏÔÓÒ
(Standby Mode)
new speed
ВКБЛИН
Î ÏÔÓÒ
ZYor V
Z
Y
or V
setting hs
ВКБЛИН
Î ÏÔÓÒ
ZSor U
ZS
or U
ZY
or V
ZY
or V
time alarm
 КБЛИН
Î ÏÔÓÒ
call opt
 КБЛИН
Î ÏÔÓÒ
call bar
 КБЛИН
Î ÏÔÓÒ
S U
See ‘Set Direct
Call Number’
(p.32)
direct mo
 КБЛИН
Î ÏÔÓÒ
Z
Y or V
set direct
 КБЛИН
Î ÏÔÓÒ
• I
f ON is selected
‘Direct Call’ icon is
displayed.
•
ZPor
(W 3 times).
•
ZYor V
• A confirmation
tone sounds.
• If ON is selected
‘Ô’ Icon is
displayed.
•
ZPor
(W 3 times).
-1- 01
ÂÊÁË ÈÍ
Î ÏÔÓÒ
• Select ON/OFF.
• ZYor V
(Display if OFF is
selected).
on
 КБЛИН
Î ÏÔÓÒ
call bar
 КБЛИН
Î ÏÔ Ó Ò
set direct
 КБЛИН
Î ÏÔÓÒ
S U
S U
on
 КБЛИН
Î ÏÔÓÒ
-1- 02
КБЛИН
Î ÏÔ Ó Ò
off
 КБЛИН
Î ÏÔÓÒ
set direct
 ÊÁË ÈÍ
Î ÏÔÓÒ
Note:
• To return to the previous step during programming, ZT.
• To exit the programming mode at any time, ZP.
• Enter PIN (4 digits)
----
31939_KX-TCD700CX_Czech 18/6/01 1:54 pm Page 33
Page 34

Setting Other Options
34
Within the Other Option menu, you can program the following:
• Change Handset PIN (
hhssppiinn cchhaannggee
). The factory pre-set is 0000.
• Set Auto Talk ON/OFF (
aauuttoo ttaallkk
).
The Auto Talk feature allows you to answer a call by lifting the handset off the
base unit without pressing O. If you want to use this feature, turn the feature
ON. The factory pre-set is OFF. In order to view caller’s phone number before
answering a call, leave the Auto Talk feature OFF.
• Select Battery Type (
bbaatttteerryy ttyyppee
).
Two Nickel Metal Hydride (Ni-MH) rechargeable batteries are included with this
unit. Ensure that the battery selection is set to Ni-MH, or the battery strength
will not be displayed correctly.
on
 КБЛИН
Î ÏÔÓÒ
-1- 01
ВКБЛИН
Î ÏÔÓÒ
(Standby Mode)
new speed
ВКБЛИН
Î ÏÔÓÒ
ZYor V
setting hs
ВКБЛИН
Î ÏÔÓÒ
ZSor U
ZS
or U
ZY
or V
Z
Y
or V
time alarm
 КБЛИН
Î ÏÔÓÒ
other opt
 КБЛИН
Î ÏÔÓÒ
hspin change
 КБЛИН
Î ÏÔÓÒ
ZYor V
ZPor
(
W 3 times).
ZYor V
See Change
handset PIN(p.35).
battery type
 КБЛИН
Î ÏÔÓÒ
ZPor
(
W 3 times).
auto talk
 КБЛИН
Î ÏÔÓÒ
ni-nh
 КБЛИН
Î ÏÔÓÒ
-1- 01
ВКБЛИН
Î ÏÔÓÒ
-1- 01
ВКБИН
Î ÏÔÓÒ
ni-cd
 КБЛИН
Î ÏÔÓÒ
S U
S U
S U
auto talk
 КБЛИН
Î ÏÔÓÒ
S U
battery type
 КБЛИН
Î ÏÔÓÒ
off
 КБЛИН
Î ÏÔÓÒ
Note:
• To return to the previous step during programming, ZT.
• To exit the programming mode at any time, ZP.
Z
Y or V
Z
Y
or V
Z
Y
or V
31939_KX-TCD700CX_Czech 18/6/01 1:54 pm Page 34
Page 35

35
• Change Handset PIN (
hhssppiinn cchhaannggee
)
• You can program a 4 digit password for the handset. The factory pre-set is
0000. Changing the password may prevent the unauthorised use of your unit by
another person.
-1- 01
ВКБЛИН
Î ÏÔÓÒ
(Standby Mode)
new speed
ВКБЛИН
Î ÏÔÓÒ
ZYor V
setting hs
ВКБЛИН
Î ÏÔÓÒ
ZSor U
ZS
or U
ZY
or V
Z
Y or V
time alarm
 КБЛИН
Î ÏÔÓÒ
ZYor V
other opt
 КБЛИН
Î ÏÔÓÒ
hspin change
 КБЛИН
Î ÏÔÓÒ
old pin8œœœœ
 КБЛИН
Î ÏÔÓÒ
new pin8œœœœ
 КБЛИН
Î ÏÔÓÒ
verify88œœœœ
 КБЛИН
Î ÏÔÓÒ
• Re-enter new
PIN (verify).
hspin change
 КБЛИН
Î ÏÔÓÒ
• Enter current PIN
(old pin). If PIN is
incorrect, error tone
sounds.
• Enter new PIN (4 digits).
Note: The PIN is not
displayed
É is deleted
as a number is entered.
• If PIN is incorrect, error
tone sounds. (Display
returns to new pin).
If PIN is correct,
confirmation tone
sounds.
• ZPor (W 3 times)
to return to standby mode.
NOTE: Once you have programmed the password, you cannot confirm it. We
recommend you write down the password. If you forget it, please consult your
nearest Panasonic Service Centre.
31939_KX-TCD700CX_Czech 18/6/01 1:54 pm Page 35
Page 36

Registration
• Registering a Handset to a Base Unit (
rreeggiisstteerr hhss
)
The handset supplied with the base unit is already registered. If an optional
handset/base unit is purchased, the following procedure needs to be carried out
before initial use.
Z and Hold Ï on base unit for 10 secs. A confirmation tone sounds.
36
-1-888888800
ВКБЛИН
Q ÏÔÓÒ
(Standby Mode)
new speed
ВКБЛИН
Î ÏÔÓÒ
ZYor V
setting hs
ВКБЛИН
Î ÏÔÓÒ
ZSor U
ZS
or U
ZY
or V
Z
Y
or V
time alarm
 КБЛИН
Î ÏÔÓÒ
registration
 КБЛИН
Î ÏÔÓÒ
Z
Y or V
base 2
 КБЛИН
Î ÏÔÓÒ
S U
base 4
 КБЛИН
Î ÏÔÓÒ
• Select base unit.
ZYor V
• (“Hyphen” is moving during
searching).
Connection OK.
• Enter PIN (4 digits).
• Base is found.
• On completion of
registration, a
confirmation tone
sounds.
• If registration is not
successful within
5 minutes, an error
tone sounds and
display returns to
original standby
mode.
ZYor V
(Searching Base).
bs9pin É
 КБЛИН
Î ÏÔÓÒ
88-888888888
 КБЛИН
Q ÏÔÓÒ
-2-888888801
ВКБЛИН
Î ÏÔÓÒ
register hs
 КБЛИН
Î ÏÔÓÒ
S U
cancel base
 КБЛИН
Î ÏÔÓÒ
NOTES:
• Charge the optional handset batteries for about 10 hours
before initial use.
• Register the handset within 1 minute. If not registered
within 1 minute, ZP on the handset to cancel the
programming mode. Then re-start registration.
• Calls (both incoming and outgoing) can be conducted only
via the displayed base unit (even if the radio areas overlap
with neighbouring base units).
Note:
• To return to the previous step during programming, ZT.
• To exit the programming mode at any time, ZP.
See Page 37.
31939_KX-TCD700CX_Czech 18/6/01 1:54 pm Page 36
Page 37

• Cancelling a Base Unit (
ccaanncceell bbaassee
)
If another handset is out of range and/or its power is OFF when ‘Cancelling a
Handset’, the previous base unit number will still remain in the cancelled
handset.
Therefore, you need to cancel the base unit registered in the cancelled
handset.
37
-1-888888801
ВКБЛИН
Î ÏÔÓÒ
(Standby Mode)
new speed
ВКБЛИН
Î ÏÔÓÒ
ZYor V
setting hs
ВКБЛИН
Î ÏÔÓÒ
ZSor U
ZS
or U
ZY
or V
Z
Y
or V
ZYor V
ZV or Y
time alarm
 КБЛИН
Î ÏÔÓÒ
registration
 КБЛИН
Î ÏÔÓÒ
register hs
 КБЛИН
Î ÏÔÓÒ
S U
cancel base
 КБЛИН
Î ÏÔÓÒ
hs9pin99œœœœ
 КБЛИН
Î ÏÔÓÒ
• Enter PIN
(4 digits)
(hs pin).
• If entered PIN is
correct, registered
base number is
displayed.
base 1
 КБЛИН
Î ÏÔÓÒ
base 1
 КБЛИН
Î ÏÔÓÒ
• ZSor U
t
o select base
unit(s) to cancel.
ZYor V
• “Base1” flashes.
ZYor V
• Display returns to
function menu.
no
 КБЛИН
Î ÏÔÓÒ
S U
yes
 КБЛИН
Î ÏÔÓÒ
cleared
 КБЛИН
Î ÏÔÓÒ
Note:
• To return to the previous step during programming, ZT.
• To exit the programming mode at any time, ZP.
See Page 36.
31939_KX-TCD700CX_Czech 18/6/01 1:54 pm Page 37
Page 38

Select Base Unit (select bs)
• Automatic Base Unit Access (
aauuttoo
)
The handset automatically selects a registered base unit.
• When the handset moves to another base unit radio area, it loses contact with
the previous base unit and automatically accesses the new base unit.
• If the handset is in the overlap area between several base unit radio areas, the
handset will access the nearest base unit.
• Specified Base Unit Access eg. (
bbaassee11
)
You can only select one registered base unit (1 to 4) you want to operate
(select bs).
• You can choose the base unit/telephone line where you can make/receive calls.
The factory pre-set is ‘Automatic Base Unit Access’. To select the desired base
unit, program as follows:
38
base 1
 КБЛИН
Î ÏÔÓÒ
-1- 01
ВКБЛИН
Î ÏÔÓÒ
(Standby Mode)
new speed
ВКБЛИН
Î ÏÔÓÒ
ZYor V
ZY
or V
setting hs
ВКБЛИН
Î ÏÔÓÒ
ZSor U
ZYor V
ZS
or U
time alarm
 КБЛИН
Î ÏÔÓÒ
eg. H/set is
registered to Base
1 and 2.
ZYor V
• Search for base
unit.
base 2
 КБЛИН
Î ÏÔÓÒ
ni-cd
ВКБЛИН
Q ÏÔÓÒ
auto
 КБЛИН
Î ÏÔÓÒ
-2-œœœœœœœ01
ВКБЛИН
Î ÏÔÓÒ
S U
select bs
 КБЛИН
Î ÏÔÓÒ
auto
 КБЛИН
Î ÏÔÓÒ
S U
S U
eg. Base 2 is
selected.
Note:
• To return to the previous step during programming, ZT.
• To exit the programming mode at any time, ZP.
31939_KX-TCD700CX_Czech 18/6/01 1:54 pm Page 38
Page 39

Reset Handset (reset hs)
This function enables the handset to clear the following settings at one time.
They will return to their initial settings.
39
-1-888888801
ВКБЛИН
Î ÏÔÓÒ
(Standby Mode)
new speed
ВКБЛИН
Î ÏÔÓÒ
ZYor V
setting hs
ВКБЛИН
Î ÏÔÓÒ
ZSor U
ZS
or U
ZY
or V
Z
Y
or V
time alarm
 КБЛИН
Î ÏÔÓÒ
reset hs
 КБЛИН
Î ÏÔÓÒ
• If PIN is correct
“no” is displayed.
• A confirmation tone
sounds.
• Enter PIN (4 digits).
hs9pin00œœœœ
 КБЛИН
Î ÏÔÓÒ
no
 КБЛИН
Î ÏÔÓÒ
S U
yes
 КБЛИН
Î ÏÔÓÒ
cleared
 КБЛИН
Î ÏÔÓÒ
• Select ‘yes’.
ZY
Note:
• To return to the previous step during programming, ZT.
• To exit the programming mode at any time, ZP.
Function Initial Setting
Time Alarm Mode OFF
Alarm Time Clear
Handset Ringer Volume 3
Handset External
Ringer Pattern
1
Handset Internal Ringer
Pattern
1
Handset Paging Tone
Pattern
1
Handset Alarm Tone
Pattern
1
Key Tones ON
Call Waiting Tone ON
Range Warning Alarm OFF
Battery Low Alarm ON
Standby Mode Display Base Unit Number
Talk Mode Display Length of the Call
Call Prohibition OFF
Direct Call Mode OFF
Direct Call Number Clear
Handset Password 0000
Auto Talk OFF
Base Unit Access Automatic Base
Unit Access
Handset Receiver
Volume
2
Redial Memory All Clear
• Display returns to
standby mode.
ZPor
(W twice).
-1-888888801
ВКБЛИН
Î ÏÔÓÒ
• Display returns to
function menu.
31939_KX-TCD700CX_Czech 18/6/01 1:54 pm Page 39
Page 40

40
Programmable Functions (On the Base Unit)
Bell Selection
There are three choices for Bell Selection when a call is being received
• all handsets ring. “All handsets”
• the selected handset(s) ring(s). “Selected handset(s)”
• the selected handset rings first. Then if it does not answer, all other handsets
will ring, “Selected then all handsets”.
The factory pre-set is “All handsets”. To change the bell selection, program as follows:
(Standby Mode)
1. Select “all handsets” to
ring.
ZA
• Enter PIN (4 digits).
Z
Y
or V
Z
S
or U
Z
Y
or V
-1-888888801
ВКБЛИН
Î ÏÔÓÒ
new speed
ВКБЛИН
Î ÏÔÓÒ
setting bs
ВКБЛИН
Î ÏÔÓÒ
input code
 КБЛИН
ÎÏÔÓÒ
ZA
• A confirmation tone
sounds.
• Display returns to
function menu.
• “All Handset” ringing mode.
ZYor V
2. Select “selected
handset(s)” to ring.
ZA
• Enter PIN (4 digits).
ZB
ZA
-F
to select
handset(s).
ZYor V
182-Ü23456
 КБЛИН
ÎÏÔÓÒ
3. Select “selected
then all handsets”
to ring.
ZA
• Enter PIN (4 digits).
ZC
183-Ü23456
 КБЛИН
ÎÏÔÓÒ
11
 КБЛИН
ÎÏÔÓÒ
setting bs
ВКБЛИН
Î ÏÔÓÒ
setting bs
ВКБЛИН
Î ÏÔÓÒ
• The current selected
handset flashes.
ZA
-F
to select handset(s).
ZYor V
183-Ü234ä6
 КБЛИН
ÎÏÔÓÒ
183-Ü234ä6-3
 КБЛИН
ÎÏÔÓÒ
• The current number of
rings is displayed.
ZA-F
to select no. of rings.
• A confirmation tone
sounds.
• Display returns to
function menu.
ZYor V
183-Ü234ä6-5
 КБЛИН
ÎÏÔÓÒ
setting bs
ВКБЛИН
Î ÏÔÓÒ
• A confirmation tone
sounds.
• Display returns to
function menu.
• The current selected
handset flashes.
31939_KX-TCD700CX_Czech 18/6/01 1:54 pm Page 40
Page 41

To Select the Base Unit Ringer Volume
4 levels are available. The factory pre-set is MEDIUM. When set to OFF, the
base unit will not ring.
To Select the Dialling Mode
You can program the dialling mode to tone or pulse. If you have touch tone
service, set to tone. If rotary or pulse service is used, set to pulse. The factory
pre-set is tone.
Setting the Clock
To set clock, please program as below. The clock can be displayed as an option
in standby mode (see page 31). After a power failure the clock will need resetting. Clock may take up to one minute to appear on the handset display.
(Standby Mode)
Z
Y
or V
Z
S
or U
Z
Y or V
-1-888888801
ВКБЛИН
Î ÏÔÓÒ
new speed
ВКБЛИН
Î ÏÔÓÒ
setting bs
ВКБЛИН
Î ÏÔÓÒ
input code
 КБЛИН
ÎÏÔÓÒ
• Setting the Clock.
ZJ
• If the clock has been set
previously, time will be
displayed.
Enter new time (4-digits)
eg. ZA
ZB, C, D
(24 hour clock)
• A confirmation tone sounds.
• Display returns to function
menu.
ZY
Ø œœ–œœ
 КБЛИН
ÎÏÔÓÒ
Ø1–834000000
 КБЛИН
ÎÏÔÓÒ
Ø12-34000001
 КБЛИН
ÎÏÔÓÒ
setting bs
ВКБЛИН
Î ÏÔÓÒ
➡
41
Current setting is displayed.
ZK- C to select
volume
0 = Ringer OFF
1 = Low Volume
2 = Medium Volume
3 = High Volume
(Ringer sounds on selection)
ZYor V
• Select Ringer Volume
ZB
ZB
221
 КБЛИН
ÎÏÔÓÒ
2222
 КБЛИН
ÎÏÔÓÒ
• A confirmation tone sounds.
• Display returns to function
menu.
setting bs
ВКБЛИН
Î ÏÔÓÒ
Current setting is
displayed.
ZA- B to
select Dial Mode.
1 = Tone Dial Mode.
2 = Pulse Dial Mode.
ZYor V
ZA
•
Select Dial Mode
(Tone/Pulse).
ZC
Enter PIN (4 digits).
3 œœœœ
 КБЛИН
ÎÏÔÓÒ
3221
 КБЛИН
ÎÏÔÓÒ
3121
 КБЛИН
ÎÏÔÓÒ
• A confirmation tone
sounds.
• Display returns to
function menu.
setting bs
ВКБЛИН
Î ÏÔÓÒ
Chapter 4
31939_KX-TCD700CX_Czech 18/6/01 1:54 pm Page 41
Page 42

• 3 seconds is selected.
ZAor B to
select Pause time.
eg.
1 = 3 seconds
2 = 5 seconds.
• Select Pause Timing.
ZC
• Enter PIN (4 digits)
ZC
• Select Flash Timing.
ZC
• Enter PIN (4 digits)
ZB
Select Earth/Flash Mode
The earth relay can be installed as an option depending on your PBX requirements.
Please consult your nearest Panasonic Service Centre for installation. Then you can
select the flash or earth mode. The factory pre-set is Flash.
Select Pause Timing
You can set the pause timing to 3 or 5 seconds, depending on your PBX
requirements. The factory pre-set is 3 seconds.
(Standby Mode)
• Select Earth.
ZC
• Enter PIN (4 digits)
ZB
Z
Y
or V
Z
S
or U
Z
Y
or V
-1-888888801
ВКБЛИН
Î ÏÔÓÒ
new speed
ВКБЛИН
Î ÏÔÓÒ
setting bs
ВКБЛИН
Î ÏÔÓÒ
3221
 КБЛИН
ÎÏÔÓÒ
• Current setting is displayed.
1 = Flash
2 = Earth
ZB
• Earth is selected.
Current setting is displayed.
ZAto select Flash.
(If Flash is already selected
ZY).
eg. Flash 1 is selected.
ZYor V
• A confirmation tone
sounds.
• Display returns to function
menu.
eg. Earth is selected.
ZYor V
3222
 КБЛИН
ÎÏÔÓÒ
33-123456
 КБЛИН
ÎÏÔÓÒ
3222
 КБЛИН
ÎÏÔÓÒ
setting bs
ВКБЛИН
Î ÏÔÓÒ
• A confirmation tone
sounds.
• Display returns to function
menu.
setting bs
ВКБЛИН
Î ÏÔÓÒ
3221-2
 КБЛИН
ÎÏÔÓÒ
• Current setting is displayed.
1=Flash 1 (100m sec)
2=Flash 2 (600m sec)
ZA- B to select
Flash time.
3221-1
 КБЛИН
ÎÏÔÓÒ
ZYor V
• A confirmation tone
sounds.
• Display returns to
function menu.
setting bs
ВКБЛИН
Î ÏÔÓÒ
➡ Programmable Functions (On the Base Unit)
42
31939_KX-TCD700CX_Czech 18/6/01 1:54 pm Page 42
input code
 КБЛИН
ÎÏÔÓÒ
Page 43

➡
43
Set Base Unit PIN
You can program a 4 digit password for the base unit. The factory pre-set is
0000. Changing the password may prevent the unauthorised use of your unit by
another person.
Cancelling a Handset
Each handset can cancel itself or another handset.
(Standby Mode)
• Set Base Unit PIN.
ZE
• Enter NEW PIN (4 digits) twice.
• Enter PIN (4-digits).
• If 2nd entry of NEW PIN
is incorrect, error tone
sounds.
• If 2nd input is correct, a
confirmation tone sounds
and display returns to
function menu.
Z
Y
or V
Z
S
or U
Z
Y
or V
-1-888888801
ВКБЛИН
Î ÏÔÓÒ
new speed
ВКБЛИН
Î ÏÔÓÒ
setting bs
ВКБЛИН
Î ÏÔÓÒ
input code
 КБЛИН
ÎÏÔÓÒ
5 œœœœ œœœœ
 КБЛИН
ÎÏÔÓÒ
5 œœœœ œœœœ
 КБЛИН
ÎÏÔÓÒ
setting bs
ВКБЛИН
Î ÏÔÓÒ
• To Cancel a
Handset.
ZG
• Enter PIN (4-digits).
• All registered
handset numbers are
displayed.
ZA-F to
select the handset to
cancel.
• A confirmation tone
sounds.
• Display returns to
function menu.
eg. Handset
F is
selected to cancel.
ZYor V
7 123456
 КБЛИН
ÎÏÔÓÒ
7 12345ã
 КБЛИН
ÎÏÔÓÒ
setting bs
ВКБЛИН
Î ÏÔÓÒ
NOTE: Once you have programmed the password, you
cannot confirm it. We recommend you write down the
password. If you forget it, please consult your nearest
Panasonic Service Centre.
31939_KX-TCD700CX_Czech 18/6/01 1:54 pm Page 43
Page 44

44
Reset Base Unit
This function enables the base unit to clear the following settings at one time.
They will return to their initial settings.
The following are factory default settings of the Base Unit.
-1-888888801
ВКБЛИН
Î ÏÔÓÒ
new speed
ВКБЛИН
Î ÏÔÓÒ
ZYor V
setting bs
ВКБЛИН
Î ÏÔÓÒ
ZSor U
ZY
or V
input code
 КБЛИН
ÎÏÔÓÒ
ZK
ZY
or V
• Enter PIN (4 digits).
• A confirmation tone
sounds.
• Display returns to
function menu.
0 œœœœ000000
 КБЛИН
ÎÏÔÓÒ
œœœœœœœœœœœœ
 КБЛИН
ÎÏÔÓÒ
setting bs
ВКБЛИН
Î ÏÔÓÒ
31939_KX-TCD700CX_Czech 18/6/01 1:54 pm Page 47
Function Initial Setting
Bell Selection All Handsets
Dialling Mode Tone
Earth/Flash Flash
Flash Timing 600 m seconds
Pause Timing 3 seconds
Base Unit PIN 0000
Clock No setting
Base Unit Ringer Volume Medium
Page 45

Option Covers
You can change the look of your phone’s handset with Option Covers.
1. Remove the battery cover by sliding while pressing the arrow. Remove the
batteries.
2. The option cover is locked with the right and left tabs. Unlock one of the tabs
by pressing horizontally ➀ and vertically ➁, and partially pull down the option
cover ➂, ➃ as shown.
3. Unlock the other tab by pressing horizontally ➀ and vertically ➁, and partially
pull down the option cover ➂ in the same way. Remove the cover from the
handset completely.
45
1
2
3
Ta bTa b
4
31939_KX-TCD700CX_Czech 18/6/01 1:54 pm Page 48
Ta b Ta b
2
1
3
Page 46

46
4. Place the new option cover fitting the tabs on the
cover into their slots on the handset.
5. Snap the option cover shut on the lower ➀,
middle ➁ and upper ➂ parts of the handset.
6. Connect the batteries and close the battery cover.
Using the Belt Clip
You can hang the handset on your belt or pocket using the belt clip.
To remove the belt clip
Tabs
Slot
Slot
3
3
2
1
1
22
Chapter 5
31939_KX-TCD700CX_Czech 18/6/01 1:54 pm Page 49
Page 47

31939_KX-TCD700CX_Czech 18/6/01 1:54 pm Page 50
Before Requesting Help
Problem Remedy
The unit does not work. • Turn the power ON (p.12).
• Check the settings.
• Charge the batteries fully (p.7).
• Clean the charge contacts and charge again (p.7).
• Unplug the AC adaptor and turn the power OFF to
reset. Plug in the AC adaptor and turn the power
ON. Then try again.
• The handset has been cancelled or has not been
registered. Register the handset (p.36).
• Re-install the handset batteries and try again.
“Δ flashes and an alarm tone • You are too far from the base unit. Move closer and
sounds when you
ZO
. • try again.
• Plug in the AC adaptor.
A busy tone sounds when you • Another handset is in use.
ZO
.
You cannot dial. • The unit is in call prohibition mode. Cancel the mode
(p.33).
“Δ flashes during a conversation • The handset is out of range. Move closer to the
and the call is disconnected. • base unit and make the call again.
• Plug in the AC adaptor.
Static, sound cuts in/out, fades. • Locate the handset and base unit away from other
Interference from other electrical • electrical appliances.
units. • Move closer to the base unit.
The handset does not ring. • Turn the power ON (p.12).
• The ringer is set to OFF. Select the desired volume
level (p.29).
The base unit does not ring. • The ringer is set to OFF. Set to HIGH, MEDIUM or
LOW (p.41).
You cannot program function items • Programming is not possible while the unit is in the
such as the handset ringer volume. • talk or intercom mode.
• Do not pause for over 60 seconds while
programming.
You cannot store a phone number • You cannot store a phone number while the unit is
in memory. • in the talk or intercom mode.
• Do not pause for over 60 seconds while storing.
47
• Key lock mode is set. Cancel the mode (p.26).
Page 48

31939_KX-TCD700CX_Czech 18/6/01 1:54 pm Page 51
48
Problem Remedy
While programming or searching, • To answer the call, lift the handset or
ZO
.
the unit starts to ring and stops • Start again from the beginning after hanging up.
the program/search.
The unit does not display the • Other telephone equipment may be interfering with
caller’s phone numbers. • your phone. Disconnect them and try again.
• Other electrical appliances connected to the same
outlet may be interfering with the Caller ID
information. Telephone line noise may be affecting
the Caller ID information.
Ï
does not function. • The handset is too far from the base unit.
• The handset is engaged in an outside call.
You cannot redial. • If the last number dialled was more than 24 digits
long, the number will not be redialled correctly.
The paged handset does not • The handset is not in the same radio area.
answer. • The handset is engaged in an outside call.
• The handset has been cancelled or has not been
registered. Register the handset to the base unit
(p.36).
The unit misdials when connected • Check the pause function (p.25).
to a PBX.
You cannot register the handset • The base unit has registered a maximum of 6
in the base unit. • handsets or the handset has registered a maximum
of 4 base units.
• Awrong base unit password was entered. Enter the
correct password.
• There is interference from other electrical units,
locate the handset and base unit away from them.
• You must finish registration within 1 minute after the
ringer tone sounds, or programming will be
cancelled (p.36).
The battery strength is not • Check that the battery type selection is correct
displayed correctly. • (p.34).
➡
While using the intercom, two tones • A call is being received. To answer,
ZP
then
sound. • O.
Page 49

28426_English 13/2/01 3:58 pm Page 3
49
You charged the batteries fully, • Clean the charge contacts and charge again (p.7).
but “Û” flashes. • Install new batteries (p.7).
This unit will not function during a power failure. To connect a standard telephone
on the same line, use a T-adaptor.
Adding Another Phone
Problem Remedy
“Û” flashes or the unit bleeps • Charge the batteries fully (p.7).
every 15 seconds.
➡ Before Requesting Help
You charged the batteries fully,
but “Û” flashes.
To Telephone Socket
T-Adaptor
Telephone Line Cord
Standard Telephone
Page 50

28426_English 13/2/01 3:58 pm Page 3
Page 51

28426_English 13/2/01 3:58 pm Page 3
Page 52

Kyushu Matsushita Electric (U.K.) Ltd.
Pencarn Way, Duffryn, Newport, South Wales, NP10 8YE, United Kingdom
Printed in Thailand PQQX13170ZA KU0601LL0
31939_KX-TCD700CX_Czech 18/6/01 1:54 pm Page 52
MODEL No. KX-TCD700BX
 Loading...