

Panasonic KX-TC1170ALN User Manual
Cordless Phone
Model No. KX-TC1170ALN
Operating lnstructions
Preparation
Basic Operation
Advanced Operation
Useful Information
Charge the battery for about 10 hours before initial use.
Caller ID Compatible
PLEASE READ BEFORE USE
AND SAVE.
Before Initial Use
Thank you for purchasing your new Panasonic cordless telephone.
For Australia
When you subscribe to Caller ID services from your telephone operator,
this telephone will display the caller’s phone number. When available
from your telephone operator, this telephone will also display the
number of the second call or call waiting.
For New Zealand
Caller ID, where available, is telephone company service. After
subscribing to Caller ID, this phone will display a caller’s phone number.
For your future reference
Serial No. Date of purchase
(found on the bottom of the unit)
Name and address of dealer
Attach or keep original receipt to assist with any repair under warranty.
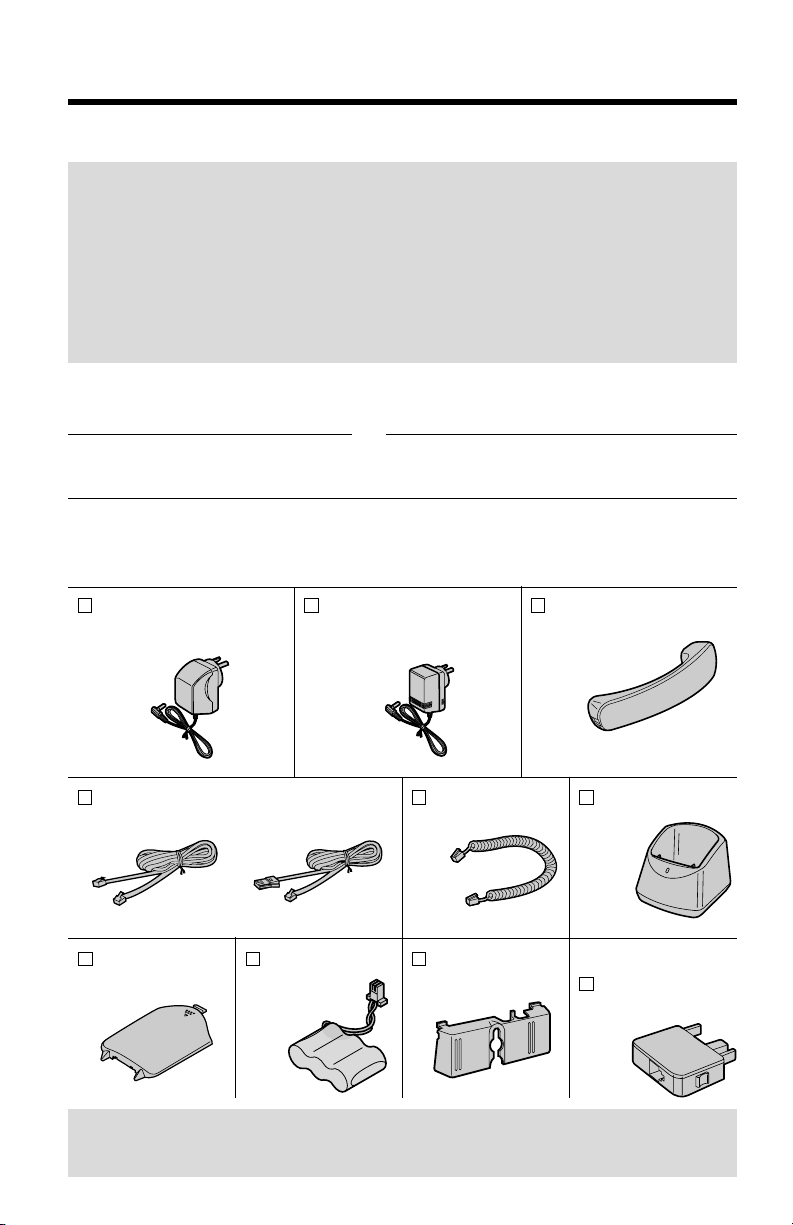
Accessories (included)
AC Adaptor for Base Unit
(Model No. KX-TCA1AL)
(p. 11)
one
Telephone Line Cord
For Australia
one
Portable Unit
Cover (p. 12)
one
To use more than one portable unit, please purchase the optional
portable unit KX-TCA391ALN. The charger is included.
For New Zealand
one
AC Adaptor for Charger
(Model No. PQLV13AL)
(p. 10)
one one
(p. 11)
Battery (p. 12)
one
Handset Cord
(p. 11)
one
Wall Mounting
Adapter (p. 72)
one
Base Unit
(p. 11)
For Australia only
Handset
Charger (p. 10, 12)
one
Telephone Plug
(p. 11)
one
2
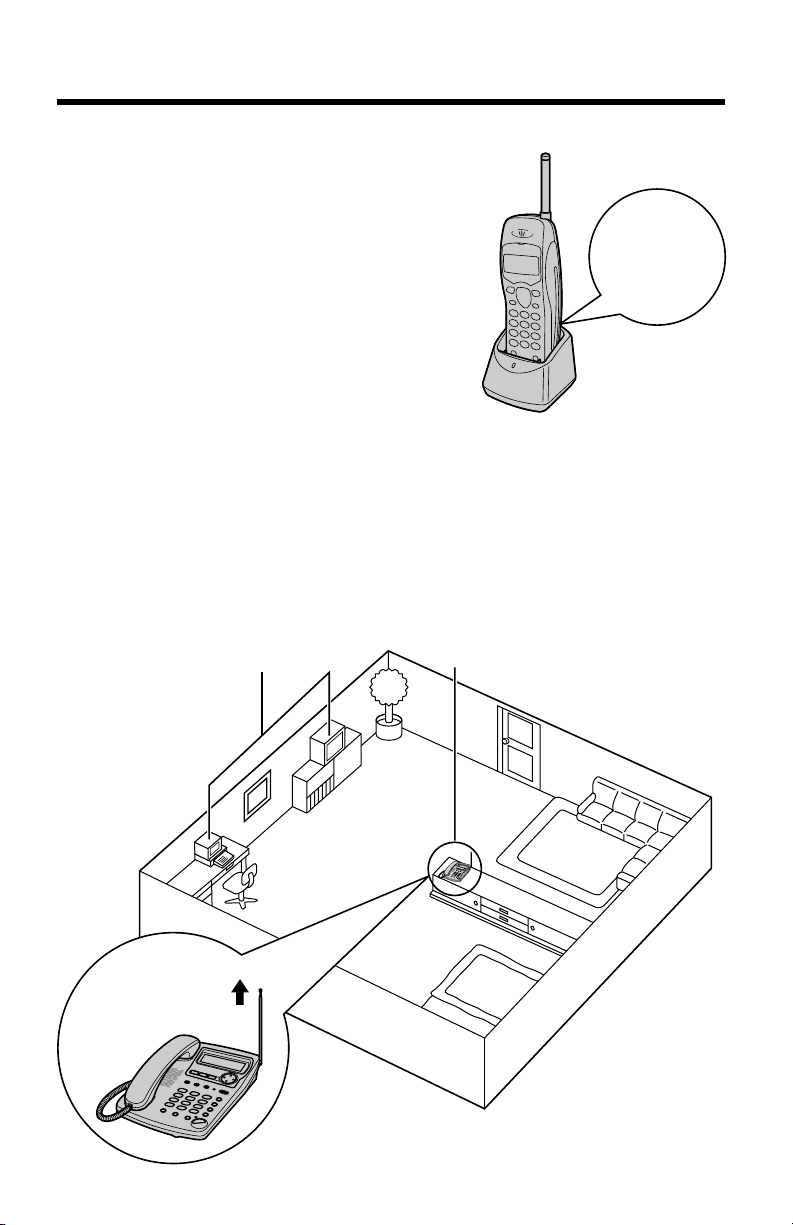
For Best Performance
Extend the
antenna fully.
Away from electrical appliances
such as a TV, personal computer,
cellular phone, charging unit.
In a HIGH and CENTRAL
location with no obstructions
such as walls.
The battery
is beneath
the portable
unit cover.
Battery Charge
A rechargeable Nickel Cadmium (Ni-Cd)
battery powers the portable unit. Charge the
battery for about 10 hours before initial use
(p. 12). Make sure the portable unit faces
forward as shown.
•
Clean the charge contacts of the portable unit
and the charger with a soft, dry cloth once a
month. Clean more often if the unit is subject
to grease, dust or high humidity. Otherwise
the battery may not charge properly.
Base Unit Location
Calls are transmitted between the base unit and the portable unit using
wireless radio waves. For maximum distance and noise free operation,
the recommended base unit location is:
3

Contents
Portable Unit
Portable Unit
Base Unit
Portable Unit
Base Unit
Portable Unit
Base Unit
Portable Unit
Base Unit
Portable Unit
Base Unit
Portable Unit
Base Unit
Base Unit
Base Unit
Base Unit
Preparation
Location of Controls ........................................................................... 6
Displays ............................................................................................... 8
Settings ................................................................................................ 10
Connections ....................................................................................... 10
Installing the Battery .......................................................................... 12
Battery Charge .................................................................................. 12
Selecting the Ringer Volume ................................ 14
Setting the Time and Date .................................................. 16
Setting the LCD Contrast .................................................... 18
Programming Summary of Preparations ............ 19
Basic Operation
Making Calls ........................................................... 21
With the Portable Unit......................................................................... 21
With the Base Unit.............................................................................. 23
Answering Calls ..................................................... 25
With the Portable Unit......................................................................... 25
With the Base Unit.............................................................................. 25
Caller ID Service ..................................................... 26
Using the Caller List .............................................. 28
Viewing the Caller List ........................................................................ 28
Calling Back from the Caller List ........................................................ 32
Editing the Caller’s Phone Number .................................................... 33
Storing Caller List Information in the Directory ................................... 35
Storing Caller List Information in the One-Touch Dialler Memory ...... 36
Storing Caller List Information in the Speed Dialler Memory.............. 37
Erasing Caller List Information ........................................................... 38
Using the Directory ............................................................ 40
Storing Names and Numbers in the Directory ................................... 40
Steps for Entering Names and Symbols............................................. 42
Finding Items in the Directory
Dialling from
Editing an Item in the Directory
Erasing an Item from the Directory .................................................... 47
One-Touch Dialler ................................................................. 48
Storing Phone Numbers in Memory ................................................... 48
Dialling a Stored Number .................................................................. 49
the Directory
.............................................................. 44
.................................................................. 45
................................................................
46
4

Speed Dialler ......................................................................... 50
Portable Unit
Base Unit
Base Unit & Portable Unit
Base Unit
Portable Unit
Portable Unit
Portable Unit
Base Unit
Portable Unit
Base Unit
Portable Unit
Base Unit
Portable Unit
Base Unit
Portable Unit
Base Unit
Portable Unit
Base Unit
Portable Unit
Base Unit
Base Unit
Base Unit
Base Unit
Base Unit
Base Unit
Base Unit & Portable Unit
Storing Phone Numbers in Memory ................................................... 50
Dialling a Stored Number .................................................................. 51
Advanced Operation
Using the Alarm Clock .......................................................... 52
Dial Lock ................................................................................ 55
Call Restriction ..................................................................... 56
Intercom .................................................................. 58
Transferring a Call Using the Intercom ................. 60
Special Features ................................................................................. 62
How to Use the PAUSE Button (For Analog PBX Line/
Long Distance Service Users) .......................... 62
Call Waiting and Caller ID Compatible (For Australia only)
............................................................................ 62
RECALL Button .................................................... 62
Setting the Password ........................................................... 64
For Optional Multi-Portable Unit Users ............................................ 65
Registering Optional Portable Units ........................ 66
Intercom Between the Portable Unit(s)
and Base Unit .................................................... 68
Transferring Calls Using the Intercom .................. 70
Transferring Calls from One Portable Unit to Another ..... 71
Preparation
Basic Operation
Advanced Operation
Useful Information
Wall Mounting ..................................................................................... 72
Battery Replacement .......................................................................... 74
Before Requesting Help ..................................................................... 75
Safety Instructions ............................................................................. 79
Important Information ........................................................................ 81
Important:
: Must be carried out with the portable unit.
: Must be carried out with the base unit.
Useful Information
: Must be carried out by both the base unit and portable
unit together.
: Must be carried out separately by the base unit and
the portable unit.
5
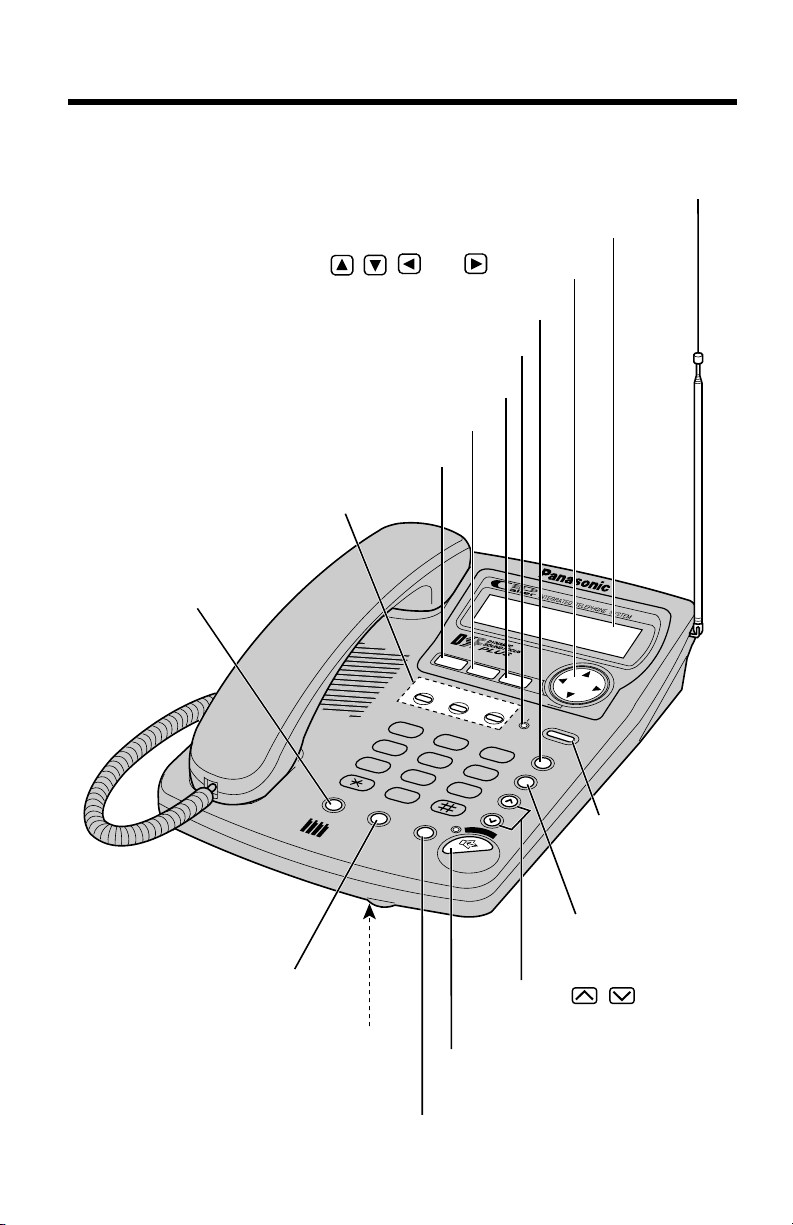
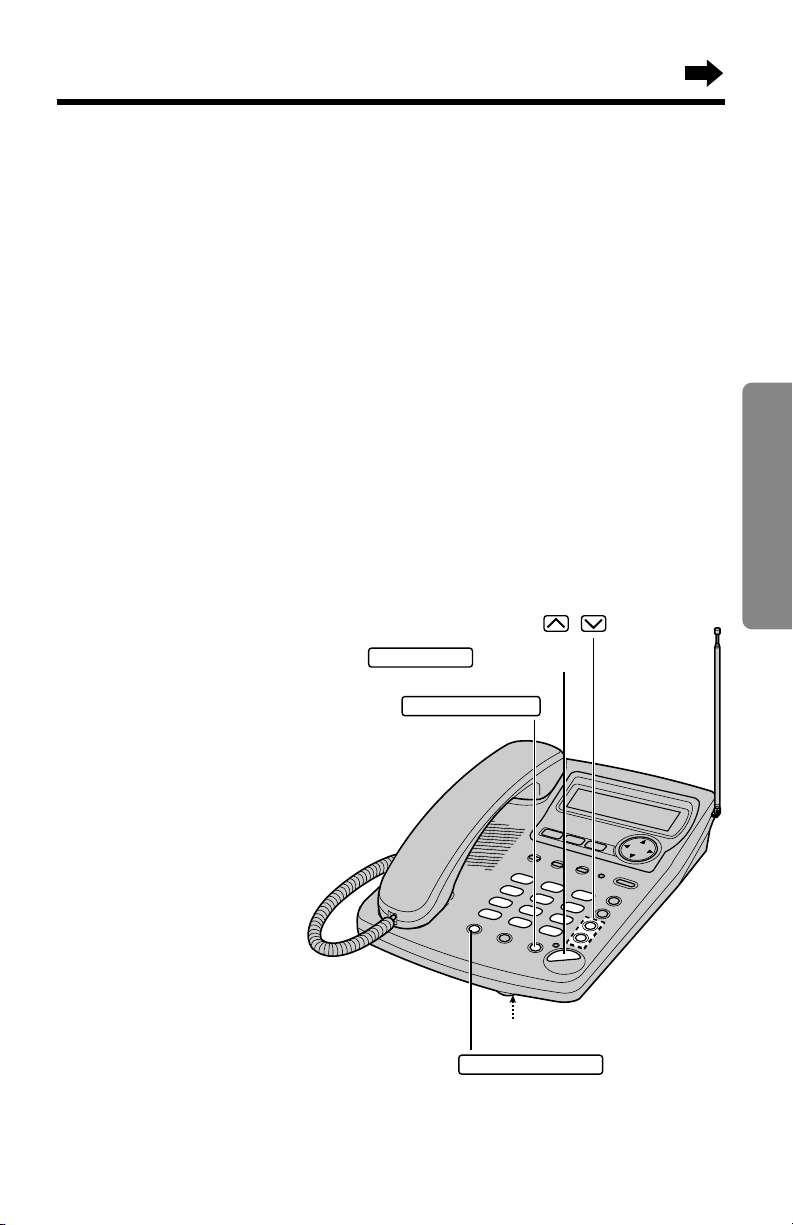
Location of Controls
CALLER ID
IN USE
FUNCTION
ED
IT
C
LE
AR
EX
IT
S
E
A
R
C
H
LOCATOR/
INTERCOM
ABC
DEF
GHI
JKL
M
NO
A
U
T
O
P
Q
R
S
TUV
W
X
Y
Z
V
O
L
U
M
E
HOLD
RECALL
REDIAL
PAUSE
MULTI4
M
IC
S
P
-
P
H
O
N
E
RINGER
4
1
2
5
3
6
7
8
0
9
OK
M3
M2
M1
VOLUME , Buttons
(p. 24)
(AUTO) Button
(p. 50)
(RECALL) Button (p. 62)
(HOLD/RINGER) Button (p. 15, 24)
(SP-PHONE) (Speakerphone)
Button and Indicator (p. 23, 25)
MIC (Microphone) (p. 23, 58)
IN USE Indicator (p. 21, 66)
One-Touch Auto Dial Buttons
(p. 48)
(CLEAR) Button (p. 38, 39)
(EXIT) Button (p. 17, 20)
Display (p. 8)
(CALLER!ID)
Button and
Indicator (p. 26, 30)
Antenna (p. 3, 11)
(LOCATOR/INTERCOM) Button (p. 59, 68, 70)
(REDIAL/PAUSE) Button
(p. 24, 48, 62)
Navigator Key ( , , , OK ) (p. 20, 30)
(FUNCTION/EDIT) Button (p. 16, 20, 34)
Base unit
6
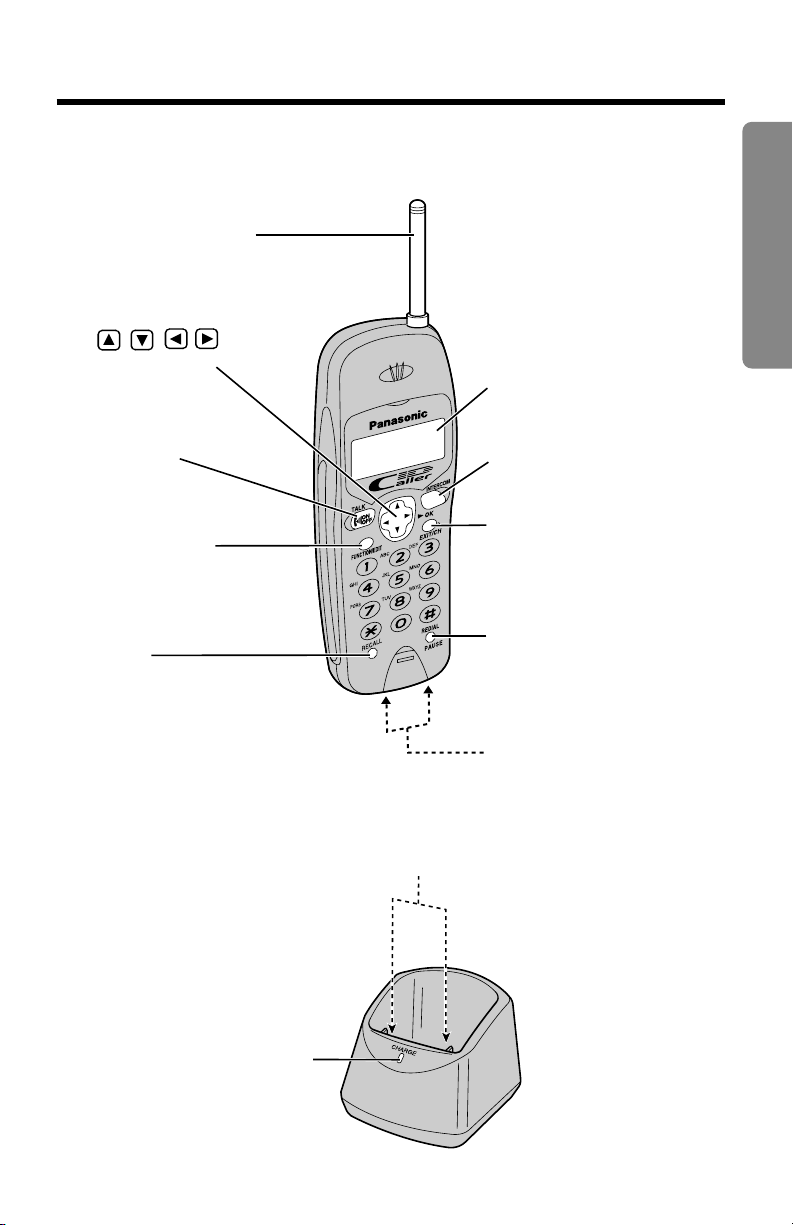
CHARGE Indicator (p. 12)
Charge Contacts (p. 13)
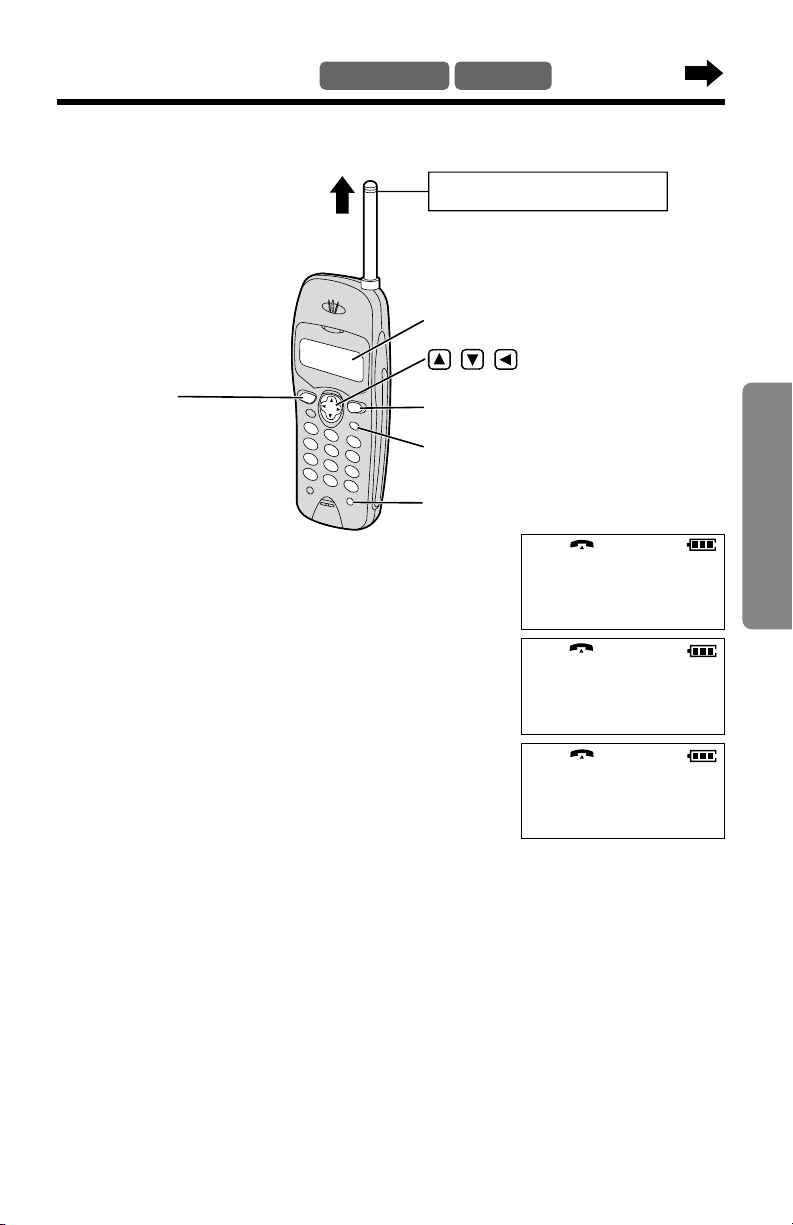
Portable unit
(TALK) Button
(p. 21, 25)
Antenna
Navigator Key
( , , , OK )
(p. 19, 28, 44)
Display (p. 9)
(FUNCTION/EDIT) Button
(p. 14, 19, 33)
(RECALL) Button
(p. 62)
Charge Contacts (p. 13)
(EXIT/CH) (Channel)
Button (p. 19, 22)
(REDIAL/PAUSE) Button
(p. 21, 62)
(INTERCOM) Button
(p. 22, 58)
Preparation
Charger
7
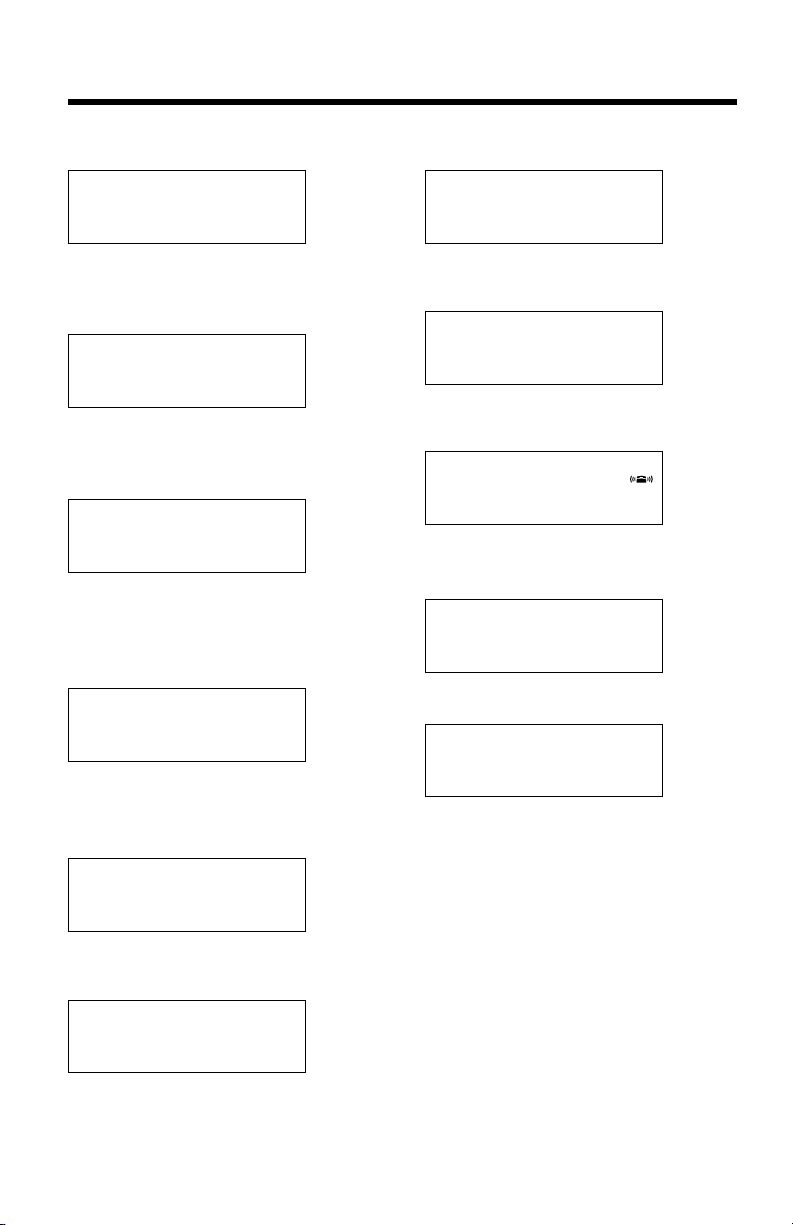
Displays
Base unit display
AM
12:00
1/1
11:34
AM
12/25
10 NEW CALLS
If the display continuously shows
“12:00
the clock needs adjusting (p. 16).
11:34
AM
1/1” or “0:00 1/1”,
AM
12/25
10 NEW CALLS
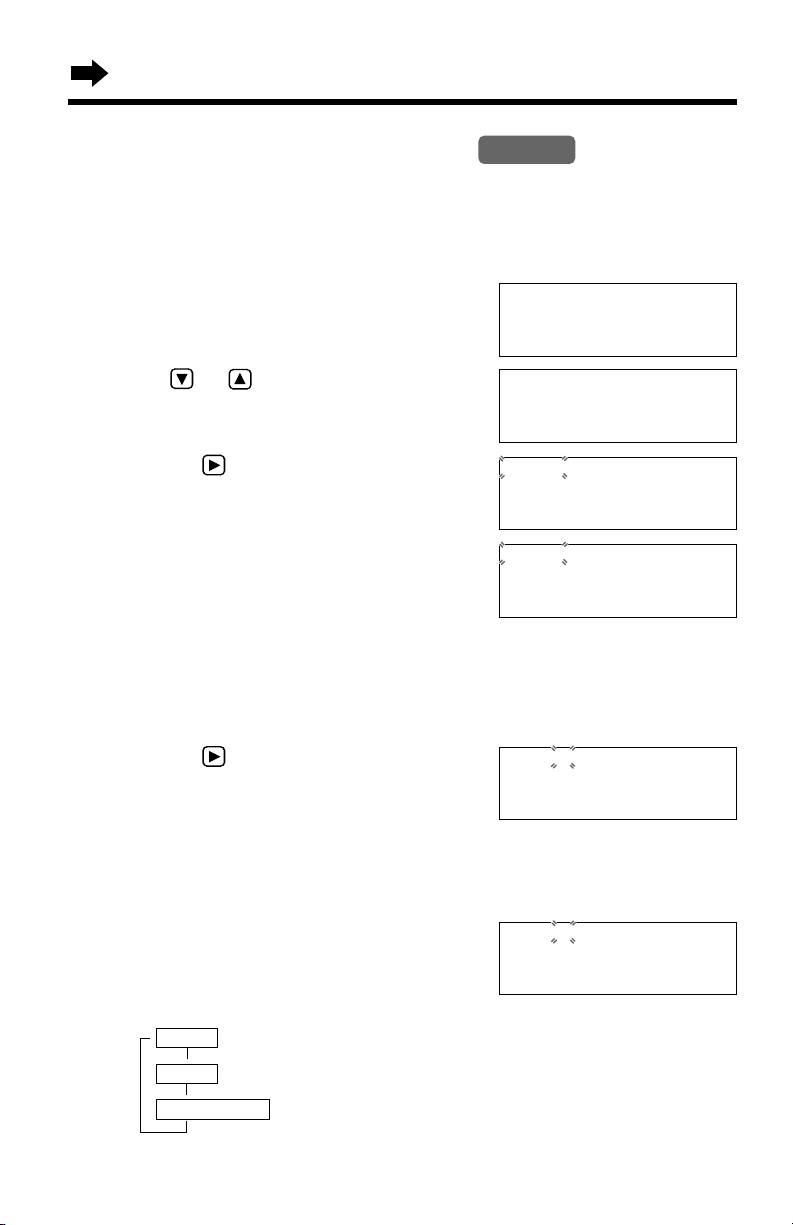
In the standby mode, the display
shows the current time and date,
and the number of new calls.
AM
11:50
11/24
1-06-35
During a conversation, the display
shows the length of the call.
(Ex. 1 hour, 6 minutes and 35
seconds.)
AM
11:50
12/25
RINGER OFF
The base unit ringer volume is off.
To turn the ringer on, see page
15.
AM
11:50
11/24
DIAL LOCKED
The dial lock mode is set. To
cancel the mode, see page 56.
AM
11:50
11/24
CALL RESTRICTED
When the restricted number (0 or
00) is dialled, it is displayed. To
cancel the mode, see page 57.
LINE BUSY
While the portable unit is engaged
in an outside call, it is displayed.
AM
11:34
12/25
CALLER-ID BUSY
While the portable unit user is
using the Caller List, it is displayed.
AM
11:50
12/25
The alarm clock is turned on. To
cancel the mode, see page 54.
AM
11:50
12/25
NO ITEM STORED
The Caller List is empty.
11:50
AM
11/24
#
41 ✕3
NEW
0355667788
This is a display from the Caller
List.
The display shows:
— the time and date of the last call
(Ex. Nov. 24, 11:50 AM),
— the number of the call in the
Caller List (Ex. #41),
— the caller information is new
and has not been viewed
(“NEW” is displayed),
— the number of times called
(Ex. 3 times) and
— the caller’s phone number.
8

Portable unit display
–1–
Recharge
12 new calls
G
=New F=Old
01-06-35
Out of range
Save error
battery
–1–
The battery needs to be charged. Place the
portable unit on the charger to charge the battery
(p. 12).
The display will show the number of new calls
when or
To search from the most recent call, press
(New key). To search from the oldest call, press
(Old key) (p. 28).
During a conversation, the display shows the
length of the call (Ex. 1 hour, 6 minutes and 35
seconds). The battery strength is also displayed
(p. 12).
This display will be shown when:
—the portable unit has lost communication with
the base unit. Move closer to the base unit, or
—another portable unit is in use.
While programming, the portable unit lost
communication with the base unit. Move closer
to the base unit.
OK is pressed.
Preparation
0211115555
0355667788
11:50A NOV24
No items stored
3
✕
When a call is received, the display shows the
caller’s phone number after the first ring.
This is information from the Caller List.
The display shows:
—the caller’s phone number,
—the time and date of the last call (Ex. Nov. 24,
11:50 AM), and
—the number of times called (Ex. 3 times).
This display will be shown when:
—the Caller List is empty,
—the directory list is empty, or
—there are no stored items in the dialling button
you pressed in the directory.
9
Displays
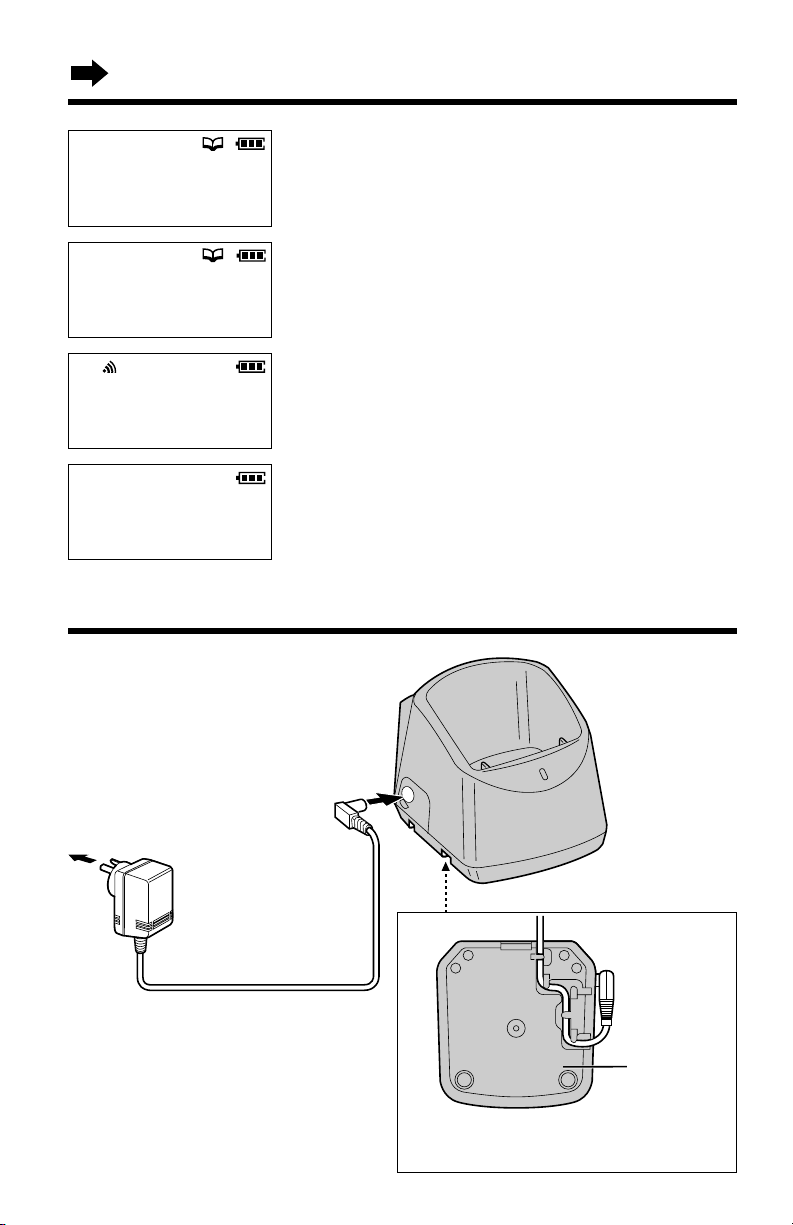
To Power Outlet
(AC 230 V–240 V, 50 Hz)
AC Adaptor
(PQLV13AL)
Bottom of
the charger
Fasten the AC adaptor cord to prevent
it from being disconnected.
Memory is full
Ann
1234567890
00-02-05
–1–
Not available
Settings
When trying to store an item or Caller List
information in the directory, the directory memory
is full (p. 35, 41).
This is a name from the directory. The stored
name and phone number are displayed.
The length of the intercom call between the
portable unit and base unit is displayed
(Ex. 2 minutes 5 seconds).
(TALK) was pressed while the base unit was in
use.
Connections
Charger
• USE ONLY WITH Panasonic AC
ADAPTOR PQLV13AL.
• The AC adaptor must remain
connected at all times.
(It is normal for the adaptor to feel
warm during use.)
10
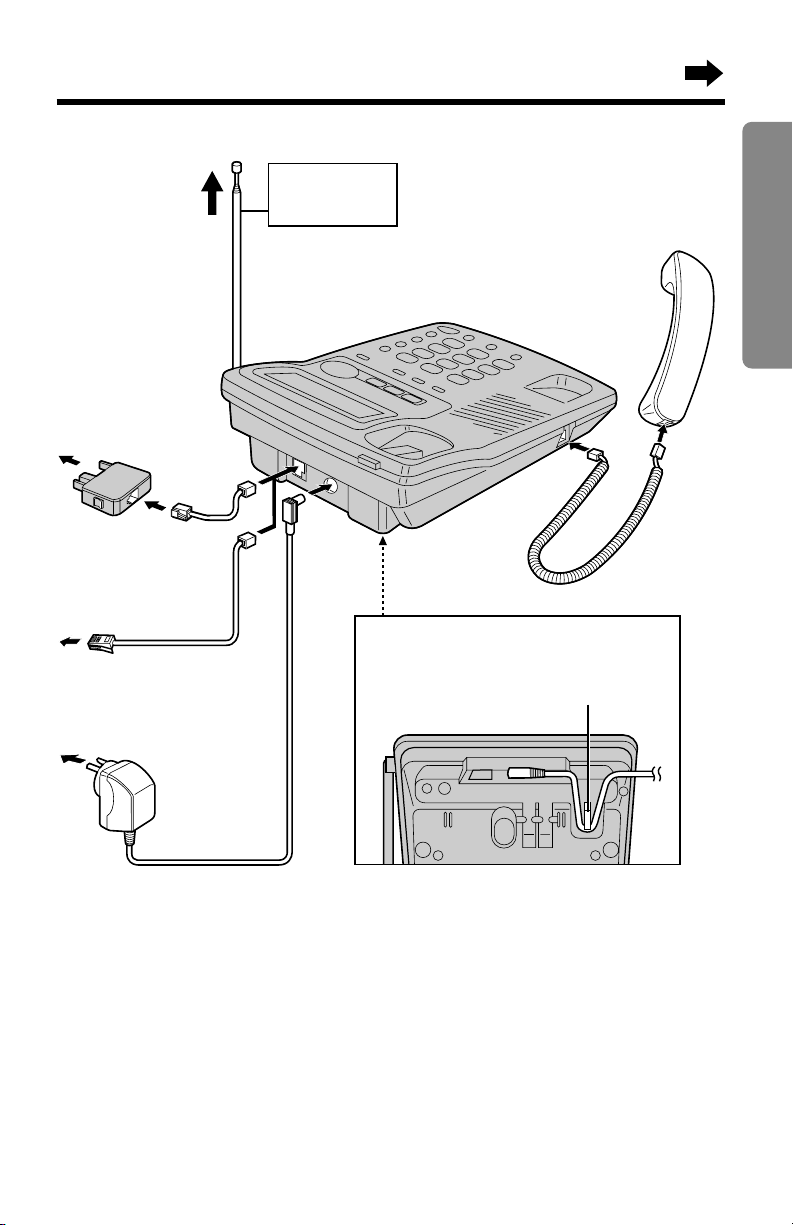
Base unit
Hook
Extend the
antenna fully.
Handset
Handset Cord
To Socket
For Australia
OR
For New Zealand
To Power Outlet
(AC 230 V–240 V, 50 Hz)
AC Adaptor
(KX-TCA1AL)
Fasten the AC adaptor cord to
prevent it from being disconnected.
Telephone Line Cord
Telephone
Line Cord
Telephone Plug
To Single-Line
Telephone Jack
Preparation
• USE ONLY WITH Panasonic AC ADAPTOR KX-TCA1AL.
• The AC adaptor must remain connected at all times. (It is normal for the
adaptor to feel warm during use.)
• Use only a Panasonic Handset for the KX-TC1170ALN.
• During a power failure, this unit functions only as a regular telephone.
• If your unit is connected to a PBX which does not support Caller ID
services, you cannot access those services.
• When more than one unit is used, the units may interfere with each other.
To prevent or reduce interference, please leave ample space between
the base units.
• The unit is not designed to be used with rotary (pulse dialling) services.
11
Settings
CHARGE Indicator
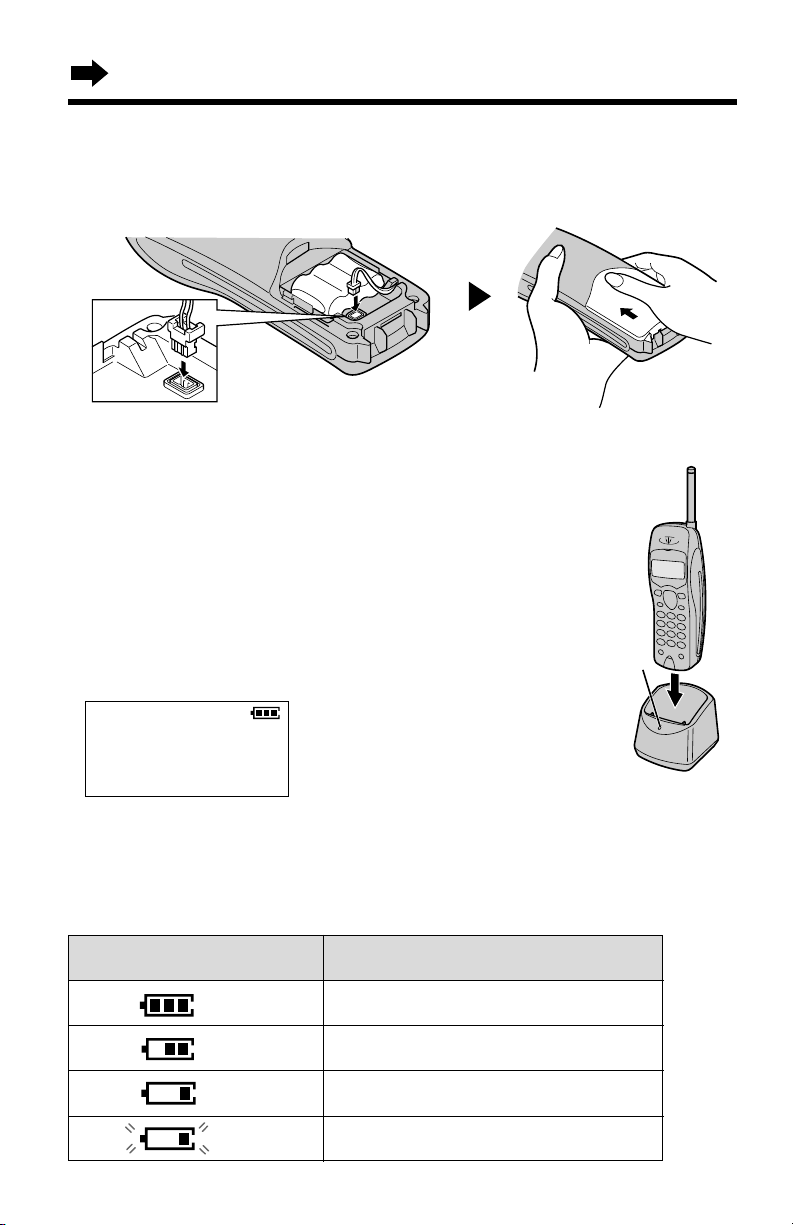
Installing the Battery
Install the battery and close the portable unit cover, locking it into place.
Battery Charge
Place the portable unit on the charger and
charge for about 10 hours before initial
use.
• Make sure that the confirmation tone
sounds when the portable unit is placed
on the charger.
• The CHARGE indicator lights.
• The portable unit number is displayed.
Battery strength
You can check the preset battery strength on the display.
The battery strength is as shown in the chart below.
Display prompt Battery strength
12
–1–
Fully charged
Medium
Low
Needs to be recharged.(flashing)
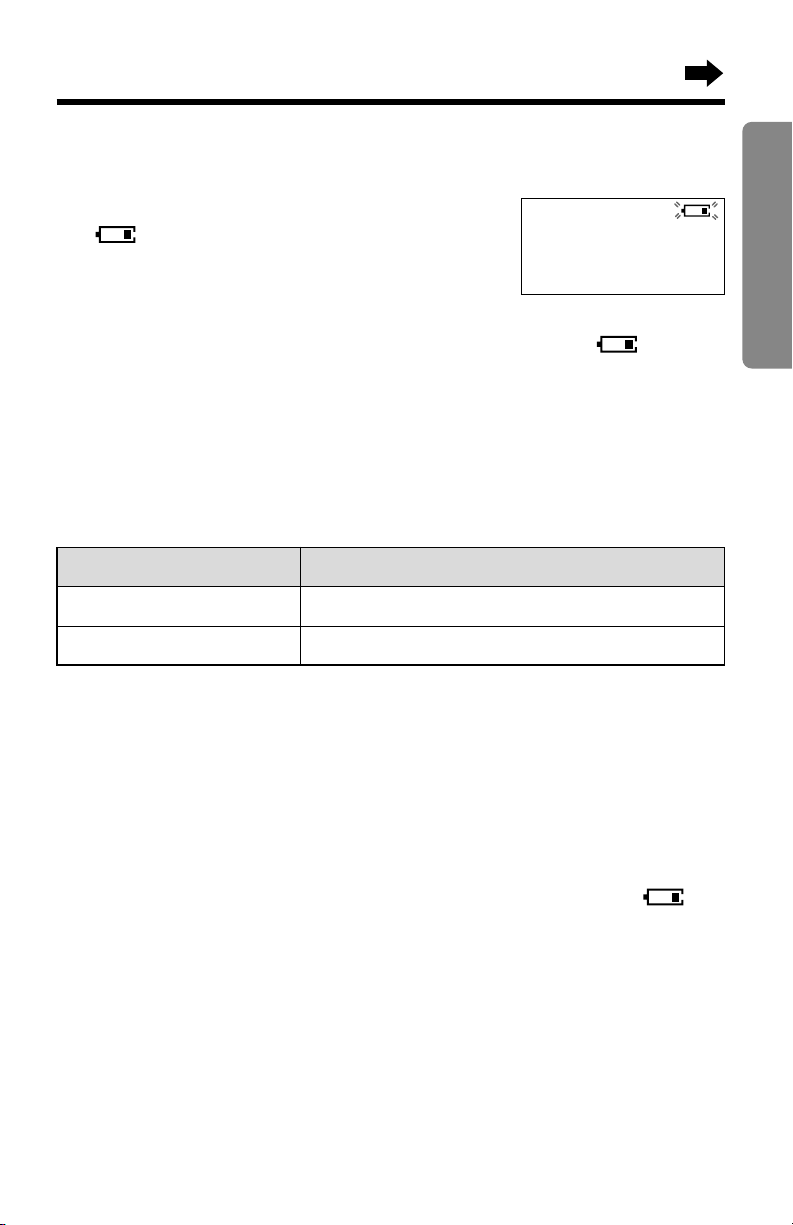
Recharge
Recharge the battery when:
— “Recharge battery” is displayed,
— “” flashes on the display, or
— the portable unit beeps intermittently while it is
in use.
• If you DO NOT recharge the battery for more than 30 minutes, the
display will keep indicating “Recharge battery” and/or “” will
continue to flash.
• To fully recharge the battery, the portable unit should be left on the
charger for 10 hours.
Recharge battery
–1–
Battery information
After your Panasonic battery is fully charged (p. 12):
Preparation
Operation
While in use (TALK)
While not in use (Standby)
• Battery life may be shortened depending on usage conditions, such as
viewing the Caller ID Caller List or directory items and ambient
temperature.
• Clean the charge contacts of the portable unit and the charger with
a soft, dry cloth once a month. Clean more often if the unit is
subject to grease, dust or high humidity. Otherwise the battery may
not charge properly.
• If the battery is fully charged, you do not have to place the portable unit
on the charger until “Recharge battery” is displayed and/or “”
flashes. This will maximize the battery life.
• The battery cannot be overcharged.
Approx. battery life
8 hours
20 days
Portable unit standby mode
(The portable unit is off the charger.)
The portable unit goes into the standby mode after you finish using the
portable unit (making/answering a call, viewing the Caller List or directory
items etc.). The display is blank, but the portable unit can receive calls.
The battery life is conserved in this mode.
13
Settings
Handset
Portable Unit
Base Unit
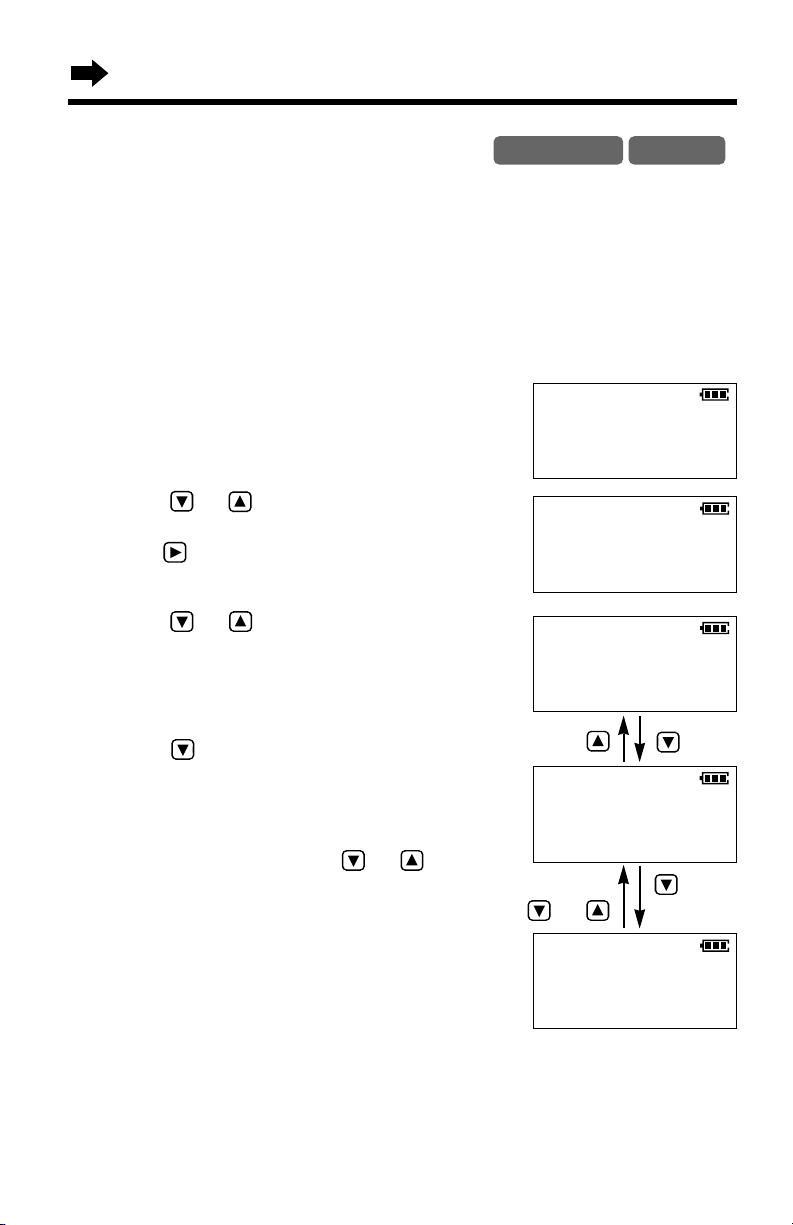
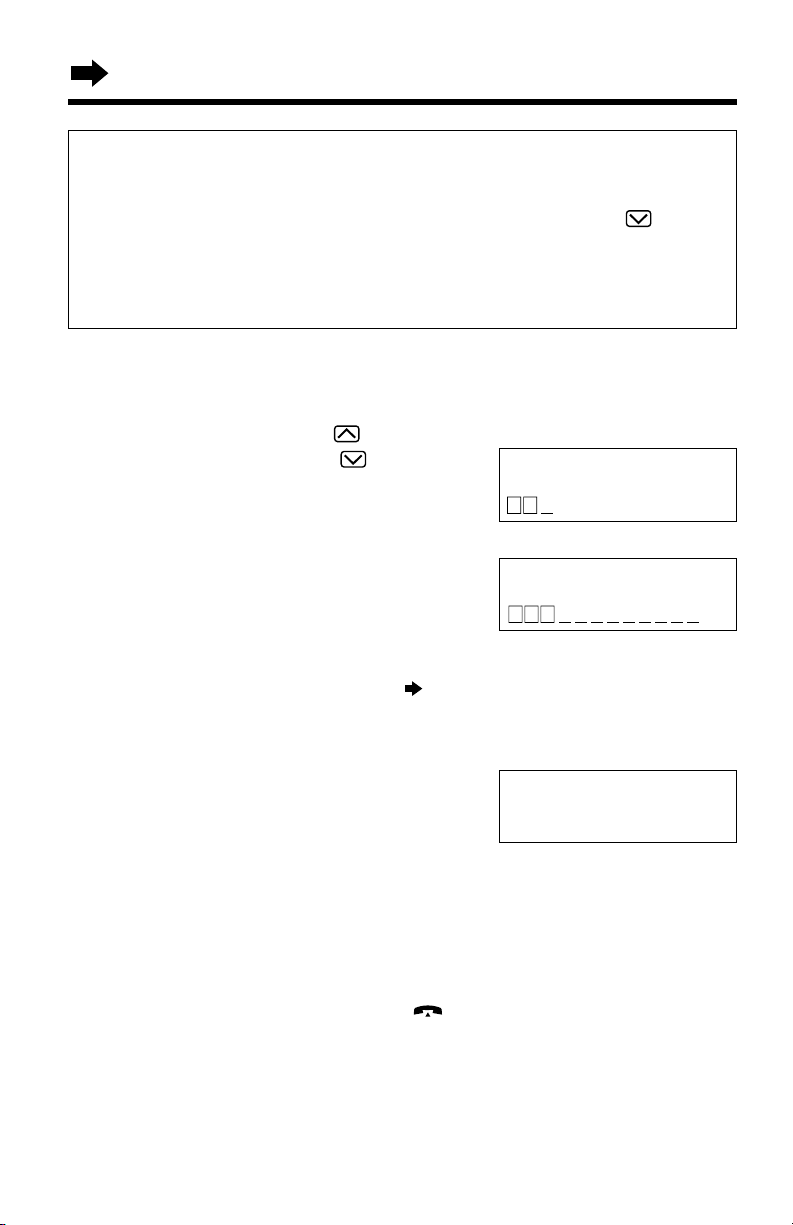
Selecting the Ringer Volume
You can set the base unit and portable unit ringer volumes to HIGH, LOW
or OFF. If set to OFF, the base unit and portable unit will not ring. Your
phone comes from the factory set to HIGH.
With the portable unit
Make sure that the portable unit is in the standby mode.
Press (FUNCTION/EDIT) on the portable
1
unit.
Press or repeatedly until the
2
arrow points to “Ringer volume”. Then
press OK (Yes key).
Press or to select the desired
3
volume.
• The selected volume is displayed and
rings.
• To turn the ringer OFF, press and
hold until 2 beeps sound.
• The portable unit will return to the
standby mode.
To turn the ringer ON, press or in
step 3.
• The ringer will sound at the LOW level.
HIGH
LOW
Save directory
H
Ringer volume
GF
Save directory
Ringer volume
H
GF
Ringer
❚❚❚❚❚❚
Low
GF
Ringer
❚❚
Low
GF
or
OK=Yes
H
OK=Yes
H
until 2 beeps
High
High
14
OFF
Ringer off
GF
With the base unit
Make sure that the base unit and portable unit are in the standby
mode.
Preparation
• To select HIGH (preset) or LOW,
press (HOLD/RINGER).
HIGH
11:34
AM
12/25
(Each time you press the button,
the ringer volume will change.)
—
“”
is displayed for about 5
seconds.
LOW
11:34
AM
12/25
• To turn the ringer OFF, press (HOLD/RINGER) until 2 beeps sound.
—“RINGER OFF” is displayed.
• To turn the ringer ON, press (HOLD/RINGER).
The ringer will sound at the HIGH level and “” is displayed for about
5 seconds.
15
Settings
Base Unit
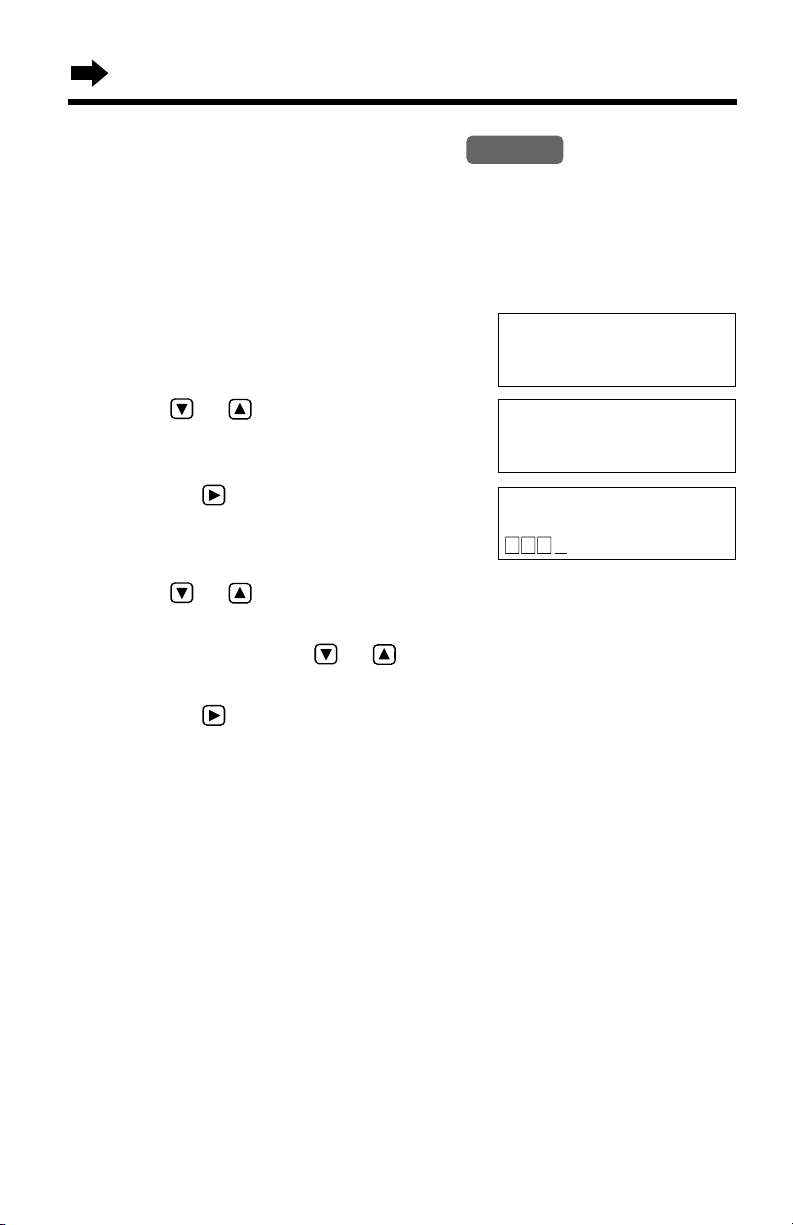
Setting the Time and Date
You can select AM/PM or 24-hour clock by programming.
Make sure that the base unit and portable unit are in the standby
mode.
AM
Press (FUNCTION/EDIT) on the base unit.
12:00
1/1
1
SAVE AUTO# ?
AM
Press or repeatedly until “SET
2
CLOCK ?” is displayed.
Press OK .
3
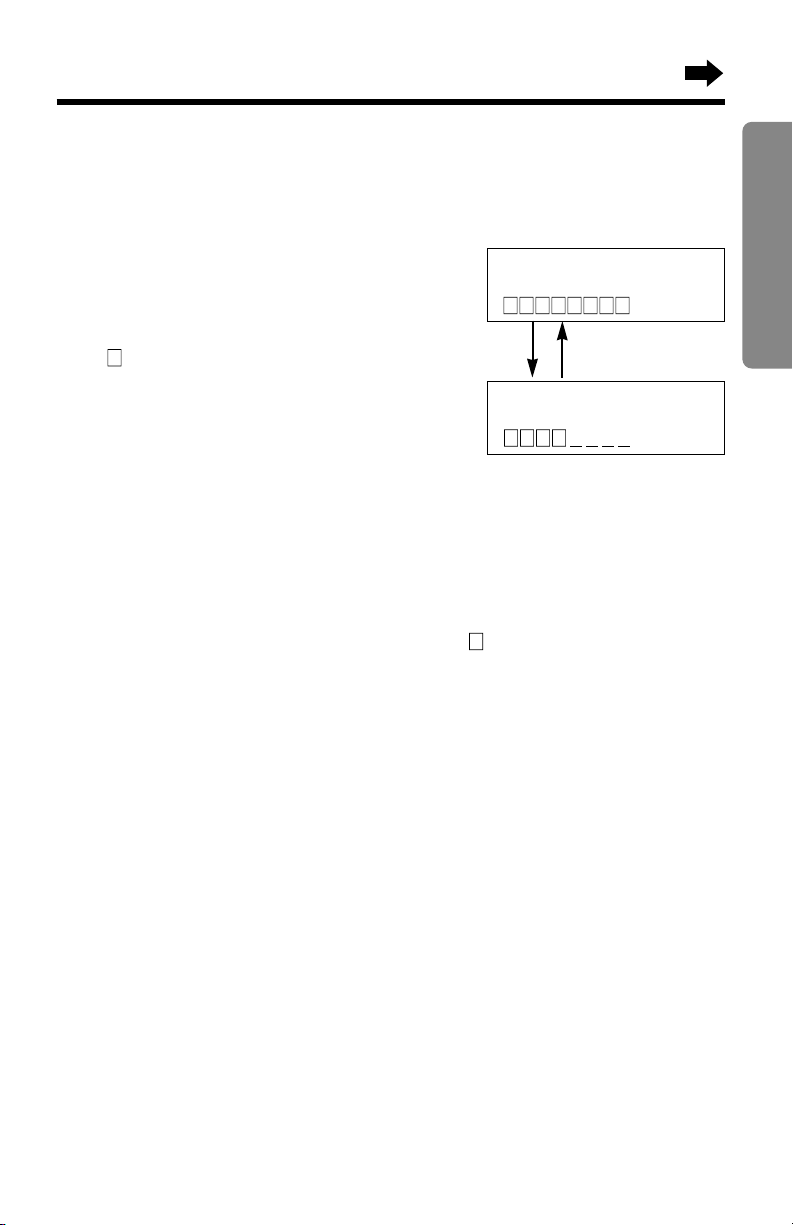
Enter the current time (hour and minute)
4
by using a 4-digit number.
(Ex. To set 9:30, enter “0930”.)
• For AM/PM setting: Enter numbers
between 0100 and 1259.
For 24-hour clock: Enter numbers
between 0000 and 2359.
12:00
SET CLOCK ?
12:00
2000
ENTER TIME
09:30
2000
ENTER TIME
1/1
AM
01/01
AM
01/01
Press OK .
5
• If numbers between 0000 and 0059, or
Press (#) to select “AM” or “PM” or
6
24-hour clock.
(Ex. You select “PM”.)
• Each time you press (#), the selection
16
1300 and 2359 are entered, the time
will automatically be set using the
24-hour clock. Skip the steps 6 and 7
and go to the step 8.
Display Option
AM ..................... AM
→
→
PM ..................... PM
→
(Blank display)
will change on the display.
.......... 24-hour clock
AM
09:30
01/01
2000
#=AM/PM
09:30PM01/01
2000
#=AM/PM

Press OK .
7
09:30PM01/01
2000
ENTER MONTH/DATE
Preparation
Enter the current month and day by
8
using a 4-digit number.
(Ex. To set Dec. 27, enter “1227”.)
Press OK .
9
09:30PM12/27
2000
ENTER MONTH/DATE
09:30PM12/27
2000
ENTER YEAR
Enter the current year by using a 4-digit
10
number.
(Ex. To set the year 2001, enter “2001”.)
Press OK .
09:30PM12/27
2001
ENTER YEAR
9:30PM12/27
11
• A beep sounds.
• The clock starts working.
• To return to the standby mode, press
(EXIT).
• You can go back to the previous display by pressing , when setting
the time and date.
• If 6 beeps sound when entering the time and date, a wrong number was
entered. Enter the correct time and date.
If a power failure occurs or the AC adapter is disconnected from the base
unit for more than about 30 minutes, the time and date will be shown as
“12:00AM1/1” or “0:00 1/1”. Readjust the date/time.
SET CLOCK ?
For Caller ID service users (p. 26)
• The Caller ID information will re-set the clock after the first ring if the
adjusted time and/or date is incorrect. However, if the time has not
previously been set, the Caller ID information will not adjust the clock.
• The Caller ID information will automatically adjust the clock for daylight
saving time.
17
Settings
Base Unit
Setting the LCD Contrast
You can select the LCD contrast level from 1 to 4 by programming. Your
phone comes from the factory set to 3.
Make sure that the base unit and portable unit are in the standby
mode.
AM
Press (FUNCTION/EDIT) on the base unit.
11:34
12/25
1
SAVE AUTO# ?
Press or repeatedly until “LCD
2
CONTRAST ?” is displayed.
11:34
12/25
AM
LCD CONTRAST ?
Press OK .
11:34
AM
12/25
3
• The current setting is displayed.
Press or to select the desired
4
LCD contrast level.
• Each time you press or , the
Press OK .
5
• A beep sounds.
• To return to the standby mode, press
• You can exit the programming mode any time by pressing (EXIT).
18
level will change on the display.
(EXIT).

Programming Summary of Preparations
Handset
Portable Unit
Base Unit
With the portable unit
You can program the following function items using the portable unit near
the base unit. The display shows the programming instructions. See the
corresponding pages for function details.
Make sure that the base unit and portable unit are in the standby
mode.
Press (FUNCTION/EDIT) on the portable unit.
Preparation
<Function menu>
Save directory
H
Ringer volume
Program
<Function menu>*
Set recall time
H
Unit option
During programming
*
To use the directory (p. 41).
To select the ringer volume (p. 14).
Press OK.
To select the recall time (p. 62).
To register each optional portable units (p. 66).
*To select a desired function item, press or repeatedly until the
arrow points to the item. Then press OK to go to the next step.
• You can exit the programming mode any time by pressing
• If you do not press any buttons for 60 seconds, the unit will return to the
standby mode.
(EXIT/CH).
19

Programming Summary of Preparations
With the base unit
You can program the following function items using the base unit. See
the corresponding pages for function details.
Make sure that the base unit and portable unit are in the standby
mode.
Press (FUNCTION/EDIT) on the base unit.
AM
11:34
SAVE AUTO# ?
SET CLOCK ?
SET ALARM ?
CHANGE PASSWORD?
12/25
Press or
Press or (FUNCTION/EDIT).
Press or (FUNCTION/EDIT).
(FUNCTION/EDIT).
To store the phone numbers in the
base unit memory (p. 48, 50).
To set the current time/day (p. 16).
To set the alarm clock time (p. 52).
To change the password (p. 64).
Press or (FUNCTION/EDIT).
DIAL LOCK ?
Press or (FUNCTION/EDIT).
CALL RESTRICT ?
Press or (FUNCTION/EDIT).
LCD CONTRAST ?
Press or (FUNCTION/EDIT).
During programming
• To scroll between the programming mode, press or or
(FUNCTION/EDIT).
• You can exit the programming mode any time by pressing
• If you do not press any buttons for 60 seconds, the unit will return to the
standby mode.
To set the dial lock (p. 55).
To set the call restriction (p. 56).
To select the contrast of the display
(p. 18).
(EXIT).
20
21
Basic Operation
Making Calls
Handset
Portable Unit
Base Unit
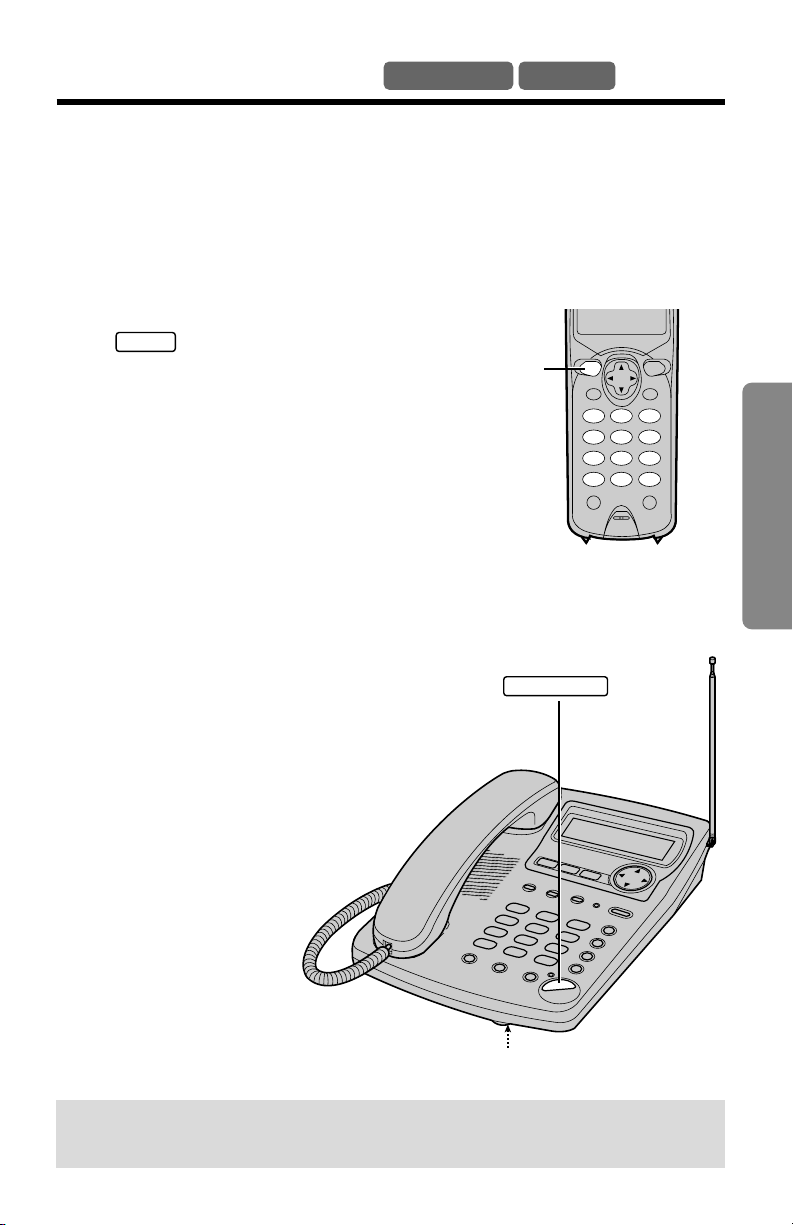
With the Portable Unit
1
Press (TALK).
2
Dial a phone number.
• The dialled number is displayed.
• After a few seconds, the display will show
the length of the call.
3
To hang up, press (TALK) or place the
portable unit on the charger.
• While the portable unit is in use, the IN USE indicator on the base unit
lights.
• If “Out of range” is displayed and an alarm tone sounds in step 1;
— m
ove closer to the base unit or place the portable unit on the charger
and try again, or
—
another portable unit is in use.
• If “Not available” is displayed and busy tones sound when you press
(TALK), the base unit is in use.
• When the base unit is in use, the portable unit user cannot hear/join the
base unit conversation, and vice versa (— Conversation Protection).
To redial the last number dialled
Press (TALK)
➡
(REDIAL/PAUSE).
1112222
00-00-00
(TALK)
Extend the antenna fully.
Display
,,
(INTERCOM)
(EXIT/CH)
(REDIAL/PAUSE)
22
1. Enter a phone number.
• If you misdial, press . Digits are erased
from the right.
• To cancel, press (EXIT/CH).
2. Press (TALK).
To dial after confirming the entered number
• After a few seconds, the display will show the length of the call.
3. To hang up, press (TALK) or place the portable unit on the charger.
To redial after confirming the last number dialled
Press (REDIAL/PAUSE)
➡
(TALK).
To put a call on hold
Press (INTERCOM) twice.
• “ ” on the portable unit display flashes.
• “HOLD” is displayed on the base unit and the SP-PHONE indicator
flashes.
• During the hold, the caller will hear music.
To release the hold
From the portable unit, press (TALK).
From the base unit, press (SP-PHONE) or lift the handset.
If noise interferes with the conversation
Press (EXIT/CH) to select a clearer channel or move closer to the base unit.
1112222
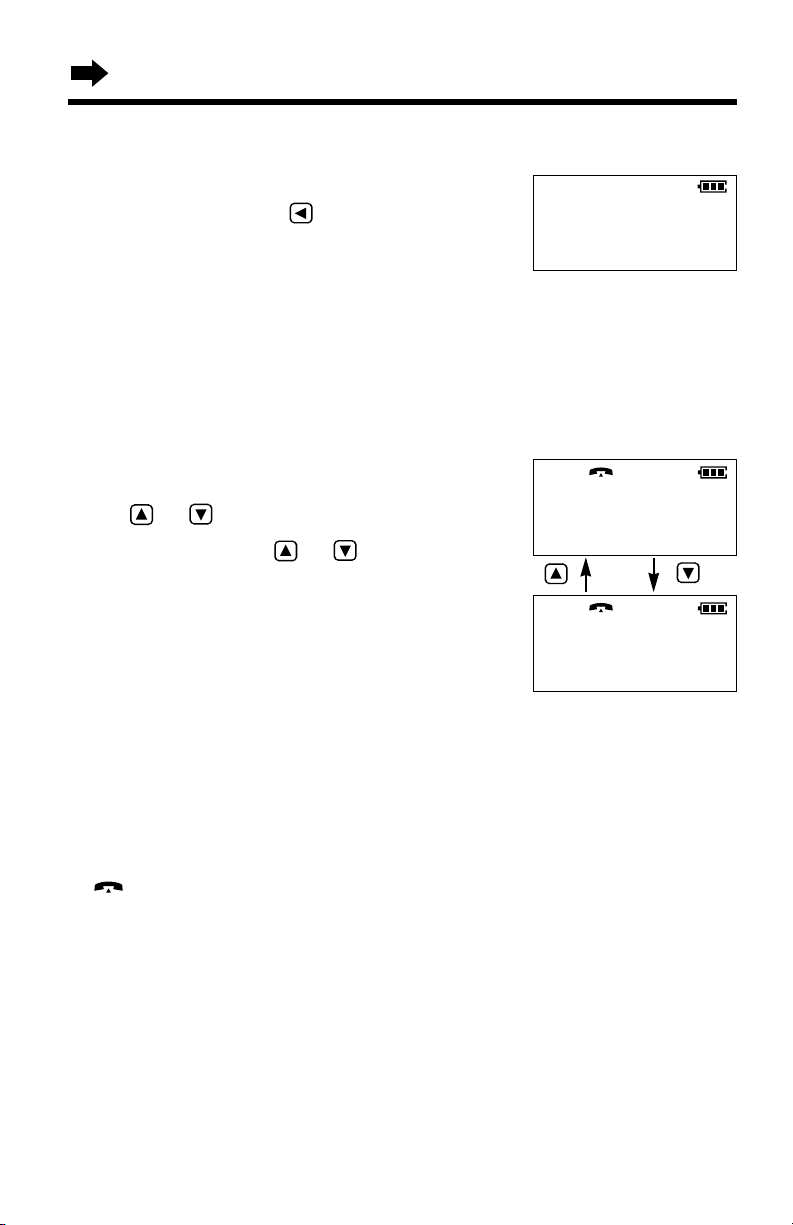
To select the receiver volume
Press or while talking.
• Each time you press or , the
volume level will change.
• The display will return to the length
of the call.
Making Calls
HIGH
LOW
Loud
Low
❚❚❚❚❚❚
High
GF
Loud
Low
❚❚
High
GF
23
Basic Operation
With the Base Unit
You can make a call by simply lifting the handset and dialling the phone
number. To hang up, place the handset on the cradle.
Using the speakerphone
1
Press (SP-PHONE).
• The indicator lights.
2
Dial a phone number.
• The dialled number is
displayed.
• After a few seconds,
the display will show
the length of the call.
3
When the other party
answers, talk into the
MIC (microphone).
4
To hang up, press
(SP-PHONE).
• The SP-PHONE
indicator light goes out.
SP-PHONE and Indicator
VOLUME ,
HOLD/RINGER
REDIAL/PAUSE
MIC
Backlit LCD display
The backlit portable unit display will stay on for about 10 seconds after
pressing a portable unit button or lifting the portable unit off the charger.
Backlit keypad on the portable unit
The dialling buttons on the portable unit will light when you press a button
or lift the portable unit off the charger, and flash when a call is received.
The lights will go out about 10 seconds after pressing a button, lifting the
portable unit off the charger or answering a call.
• “LINE BUSY” is displayed, while the portable unit is engaged in an
outside call.
24
To adjust the handset volume (3 levels) or speaker volume
(12 levels) while talking
To increase, press VOLUME .
To decrease, press VOLUME .
• The display shows the volume
level for a few seconds.
To redial the last number dialled
Lift the handset or press (SP-PHONE) (REDIAL/PAUSE).
During the speakerphone operation:
• For best speakerphone performance, use in a quiet room and talk
alternately with the caller.
• If the other party has difficulty hearing you, press VOLUME to
decrease the speaker volume. Decreasing the speakerphone volume
will increase the microphone sensitivity.
• You can switch to the handset by lifting it up. To switch back to the
speakerphone, press (SP-PHONE).
To put a call on hold
Press (HOLD/RINGER).
• The SP-PHONE indicator flashes.
• During the hold, the caller and the base
unit speakerphone user will hear music.
To release the hold
From the base unit handset, press (HOLD/RINGER).
From the base unit speakerphone, press (SP-PHONE) or lift the handset.
From the portable unit, press (TALK). “ ” on the portable unit display
flashes. After 3 beeps sound, press (TALK) again within 3 seconds.
Ex. Handset volume level: 2
Ex. Speaker volume level: 3
Making Calls
11:34
AM
12/25
0-00-12
11:34
AM
12/25
0-00-12
11:34
AM
12/25
0-02-12
HOLD
25
Basic Operation
Answering Calls
Handset
Portable Unit
Base Unit
With the Base Unit
You can answer a call by simply lifting the handset. To hang up, place the
handset on the cradle.
Using the speakerphone
1
Press (SP-PHONE).
2
Talk into the MIC.
3
To hang up, press
(SP-PHONE).
MIC
SP-PHONE
With the Portable Unit
Press .
• You can also answer a call by
pressing any dialling button (0) to (9),
(*) or (#) (—Any Key Talk).
TALK
When the base unit and portable unit ringer volumes are set to OFF,
they will not ring (p. 14, 15).
(TALK)
When a call is received, the unit rings and the CALLER ID indicator on the
base unit flashes quickly. If you subscribe to a Caller ID service, the calling
party’s information will be displayed after the first ring (p. 26). In order to
view the CALLER ID information, please wait until the second ring to
answer a call.
• The display will show
“INCOMING CALL”
when receiving a call in
case you do not
subscribe to the Caller
ID service.
Caller ID Service
Handset
Portable Unit
Base Unit
26
This unit is compatible with a Caller ID service offered by your telephone
company. After subscribing to a Caller ID service, the calling party’s
information will be displayed on the portable unit and base unit after the
first ring.
The unit can record information of up to 50 different callers, including the
time and date the call was received and the number of times called, in the
Caller List. The Caller List information is sorted from the most recent to the
oldest call. When the 51st call is received, the oldest call is deleted.
Using the list, you can automatically call back a caller. You can store the
callers’ names and numbers from the Caller List in the directory, one-touch
dialler or speed dialler. (The callers’ names cannot be stored in the onetouch dialler and speed dialler.)
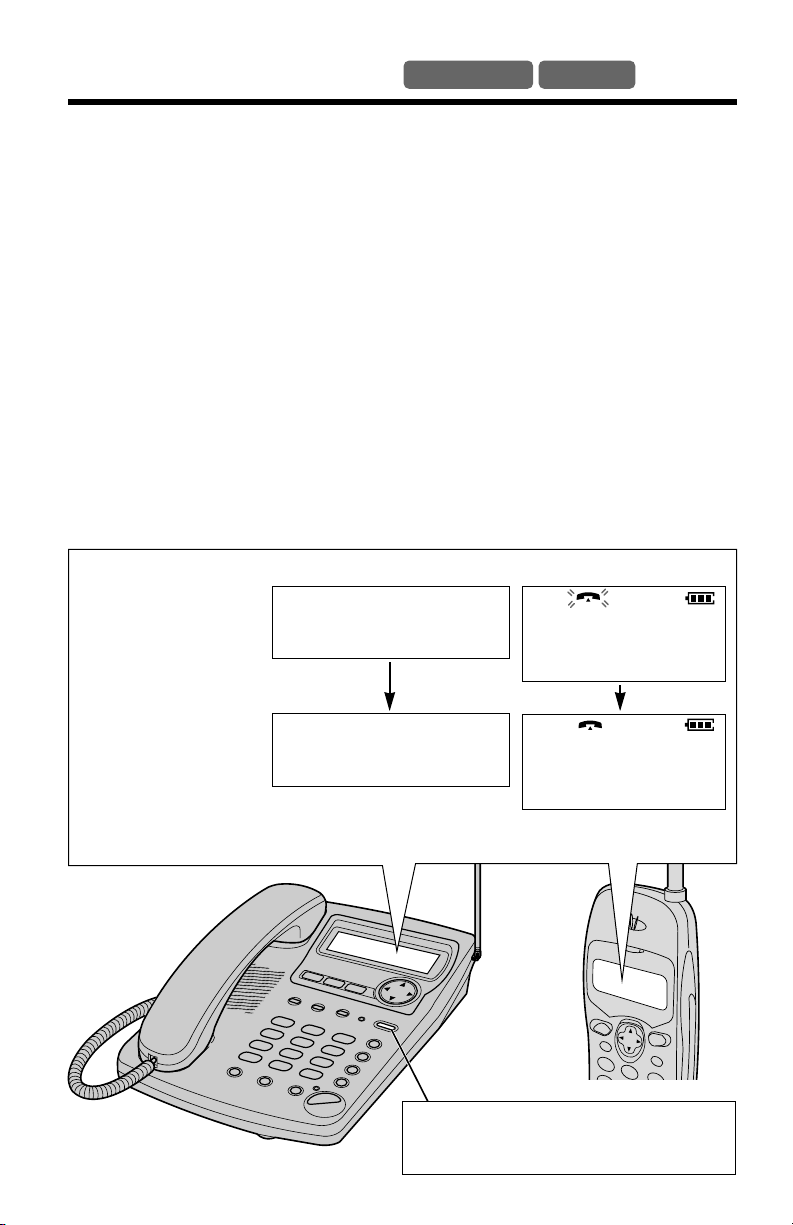
When a second call is received while talking, the new caller’s phone
number will be displayed (p. 62). (For Australia only)
The displays show
the caller’s phone
number after the
first ring.*
After you answer
the call with the
base unit or portable
unit, its display will
show the length of
the call.
Portable unit displayBase unit display
How caller information is displayed when a call is received
0211115555
00-00-00
11:34
AM
7/25
0211115555
11:34
AM
7/25
0-00-00
The CALLER ID indicator light will flash
quickly when a call is being received.
 Loading...