

Page 1
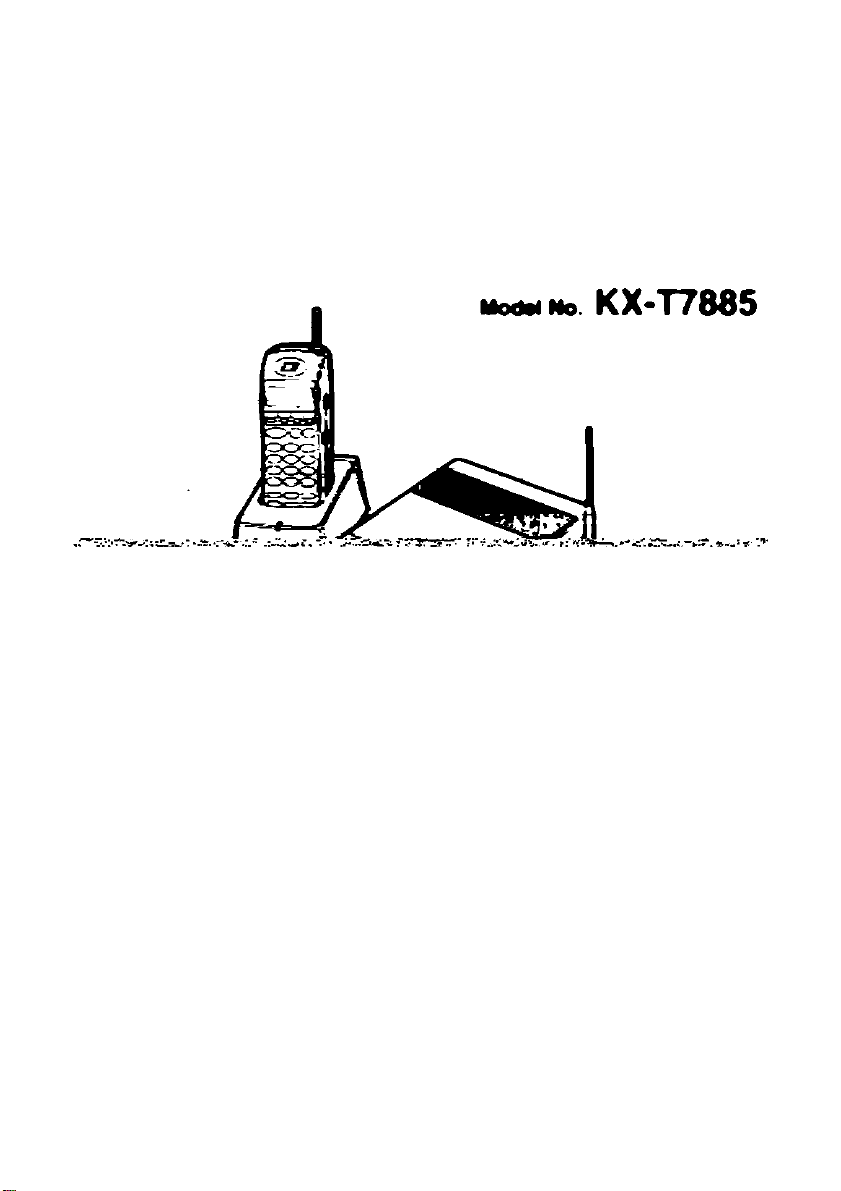
Panasonic
Operating Instructions
Page 2
Thank you for purchasing a Panasonic Wireless Phone.
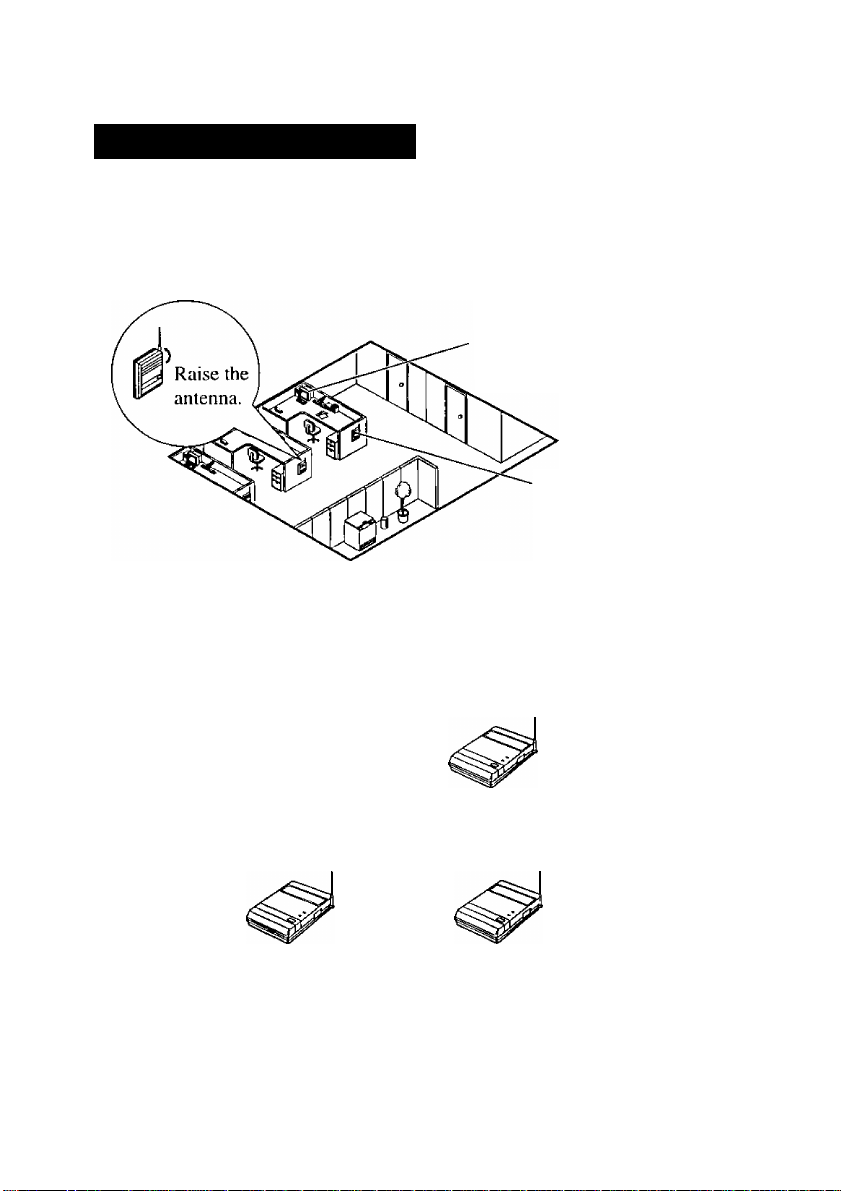
For Best Performance
Noise
Calls are transmitted between the base unit and the handset using wireless radio
waves. For maximum distance and noise free operation, the recommended base
unit location is:
Away from electrical appliances such
as a fax, radio, or personal computer.
In a HIGH location, with no
obstructions or interference
from electrical appliances.
• Wireless telephones, except for the 900MHz telephone, can be used together.
Operating Distance
The handset should always be at least 1 m away from the base unit.
1m
When using more than two base units, place the base units at least I m away from
each other, or else proper radio transmission cannot be obtained.
1m
Battery Charging
You must charge the battery for about 1.5 hours before initial use.
When charging is completed, the charge indicator will turn from red to green.
Page 3

Contents
Getting Started.............................................................................................. 4
Location of Controls........................................................................................ 4
Installing and Charging the Battery
Location of Controls and Connection for the Base Unit
Before using KX-T7885 in EMSS mode
Power ON/OFF................................................................................................ 9
About the LCD.............................................................................................. 10
Controlling the Volume
Making Calls..................................................................................................13
...............................................................................
Calling .......................................................................................................... 13
In EMSS mode
.......................................................................................
In SLT mode........................................................................................... 13
Dialing the last number you dialed (Last Number Redial)
Speed Dialing................................................................................................ 15
One-touch Dialing......................................................................................... 16
Receiving Calls.............................................................................................17
In EMSS mode.............................................................................................. 17
In SLT mode
During a Conversation................................................................................ 18
Placing a Call on Hold
.................................................................................................
.................................................................................
Three-party Conversation (Conference) ....................................................... 18
Transferring a Call ........................................................................................ 19
Message Waiting...........................................................................................20
Leaving a call notification............................................................................. 20
Call back when you receive a notification
Useful Features.............................................................................................22
Forwarding your calls (Call Forwarding [FWDJ) ........................................ 22
Preventing others from disturbing you (Do Not Disturb [DND])
Flash.............................................................................................................. 25
Key Lock ...................................................................................................... 25
Station Programming...................................................................................26
Station Programming in SLT mode............................................................... 26
PBX Station Programming ........................................................................... 26
Handset Programming.................................................................................27
Programming Instructions............................................................................. 27
Vibrator and Ringer ...................................................................................... 28
Ringer Pattern Selection ............................................................................... 28
Key Click Tone Set....................................................................................... 29
Up/Down Key Assignment
...........................................................................
Automatic Flexible Key Selection................................................................. 30
LCD Contrast................................................................................................. 30
Back Light .................................................................................................... 31
Flexible Key Name Set.................................................................................. 32
Others.............................................................................................................33
Wall Mounting ............................................................................................. 33
Installing the Handset Clip ........................................................................... 33
Replacing the Battery.................................................................................... 34
Locating the Handset from the Base Unit
Troubleshooting ............................................................................................ 36
Important Safety Instructions ....................................................................... 37
Features List................................................................................................. 42
................................................................
................................
........................................................
...........................
....................................................
................
....................................................
6
7
8
11
13
14
17
18
21
24
29
35
Page 4
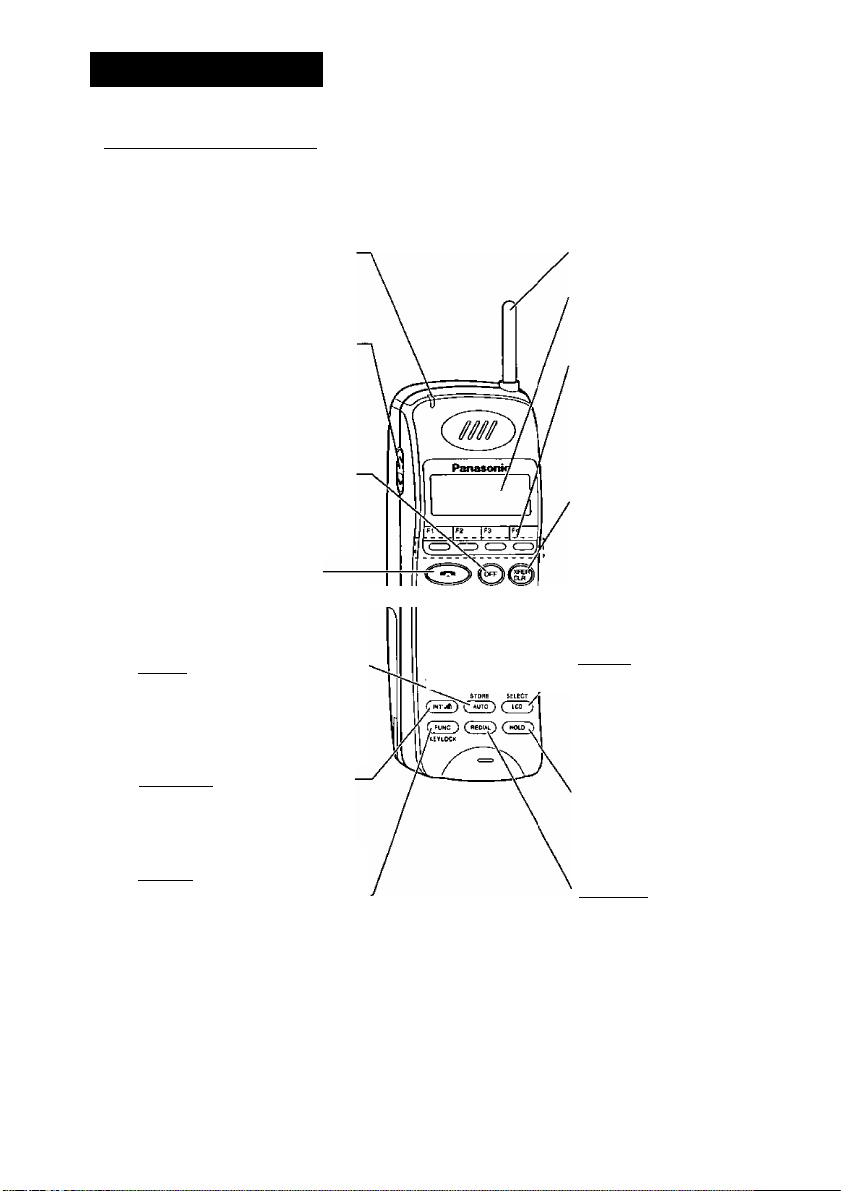
Getting Started
[ Location of Controls
P> Handset
Ringing Indicator
Flashes green when an
incoming call is received.
----------
Volume Control Button
Used to select the ringer or
receiver volume or used to
select the display of Flexible
key.
©(OFF) Button
U.sed to end calls or exit
the programming mode.
^^(Talk) Button
Used to make, receive or
end calls.
(auto) (Auto/Store) Button
U.sed for System Speed
Dialing or storing program
changes.
QNT'.ri|) (Intercom) Button
Used to make or receive
intercom calls.
Antenna
Liquid Crystal
Display
Flexible CO Buttons
(FI through F12)
Used to seize a CO line
or access one of several
features.
@ (Transfer/Clear) Button
Used to clear incorrect
digits while entering
numbers, and transfer a
call to another extension.
( LCo )(LCP/Select)
Button
Used to refresh the LCD
or select the item in
programming mode.
(h^ (Hold) Button
Used to place a call on
hold.
(func) (Fu net! on/Key lock)
Button
---------------------------
Used to enter into the Function
mode or access features by pressing
additional keys or lock/unlock the
key in idle status.
(redial) (Redial) Button
Used to redial the last
number dialed.
Page 5
Getting Started
Combination Buttons }-
Pause Button ((FUNc)^(f^)
Used to insert a pause in numbers.
FWD/DND Button ((func)^ (*|))
Used to set the Call Forwarding or
Do Not Disturb (DND) features.
Mid
Message Button (Cfunc)^(»^)
Used to leave a notification to the
called party or call back the
message sender (Message Waiting).
Conference Button {(fu^^<2))
Used to establish a three party
conversation.
Flash Button (Cfunc)^ (J|))
_______
FLA*H
Used to disconnect a
current call and make another call.
CH Button (Cfunc)^
Used to change the communication
radio channel when encountering
interference from another unit.
Program Button f(FUNc)^
Used to enter the programming mode.
Page 6

Getting Started
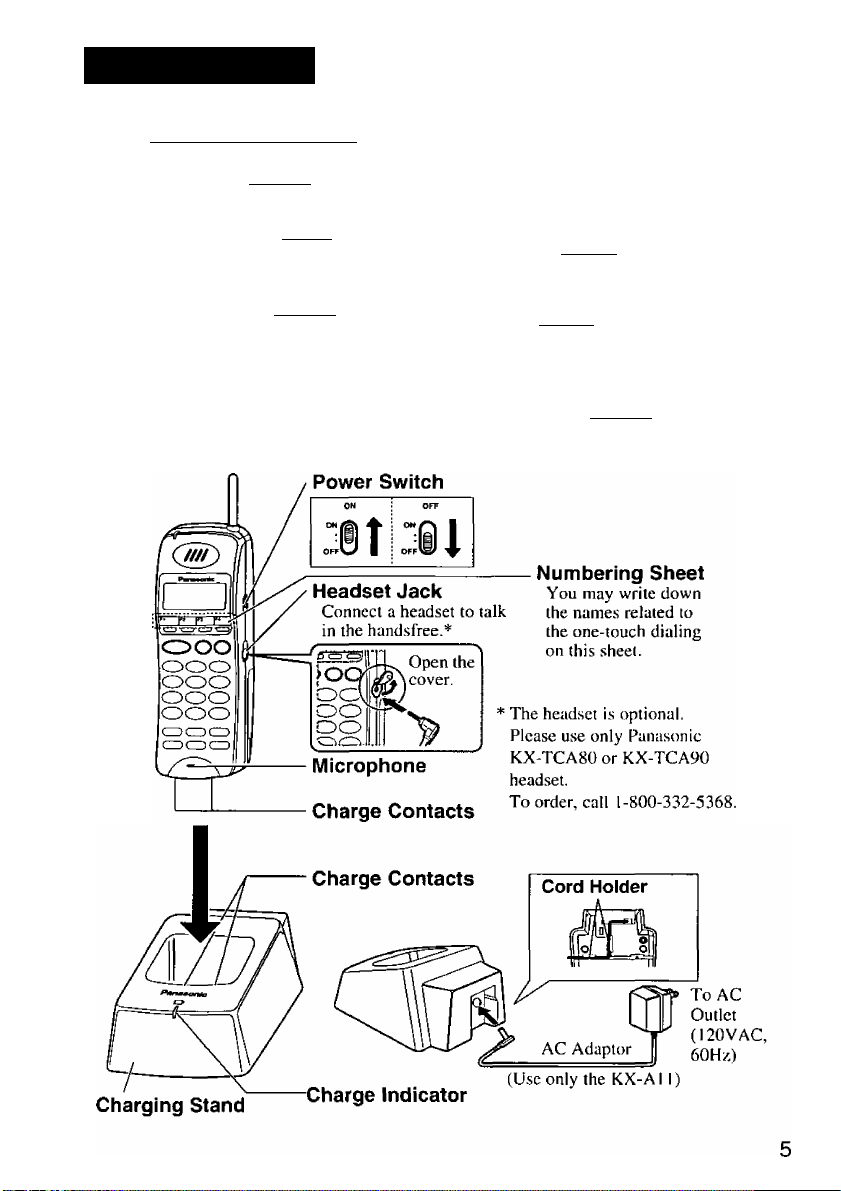
[ installing and Charging the Battery
P> Installing a Battery
Hook the bottom of the battery on the
handset, and place the battery in the handset
until you hear a click.
P> Charging the Battery
You need to charge the battery before initial use and when the battery strength
becomes low.
Slide the battery-attached handset in the charging stand (see page 5).
Charge the battery for about 1.5 hours. When charging is completed, the
charge indicator will change from red to green.
Standard Battery Life
If your Panasonic battery is fully charged [at 25°C (77°F)]:
In Talk mode
In Stand-by mode
Up to about 4 hours
Up to about 50 hours
Note:-------------------------------------------------------------------------------------------------
- When the battery strength becomes low, beep tones sound every fifteen
seconds and battery low indicator ( H : ) appears on the LCD. During a
conversation, the call will hang up automatically within five minutes. In these
ca.ses, recharge the battery.
- If the charge indicator is green, even before charging the battery, remove the
battery and reinsert it after 5 seconds.
- The battery power is used even while the handset’s power is OFF.
- Battery life may vary depending on usage conditions and ambient temperature.
- Please use only a Panasonic KX-A276 battery (see page 34).
CAUTION:-----------------------------------------------------------------------------------
Danger of explosion if battery is incorrectly replaced.
Replace only with the same or equivalent type recommended by the
manufacturer.
Dispose of used batteries according to the manufacturer’s instructions.
The product that you have purchased contains a rechargeable battery. The
battery is recyclable. At the end of its useful life, under various state and
local laws, it may be illegal to dispose of this battery into the municipal
waste stream. Check with your local solid waste officials for details in your
area for recycling options or proper disposal.
Page 7
Getting Started
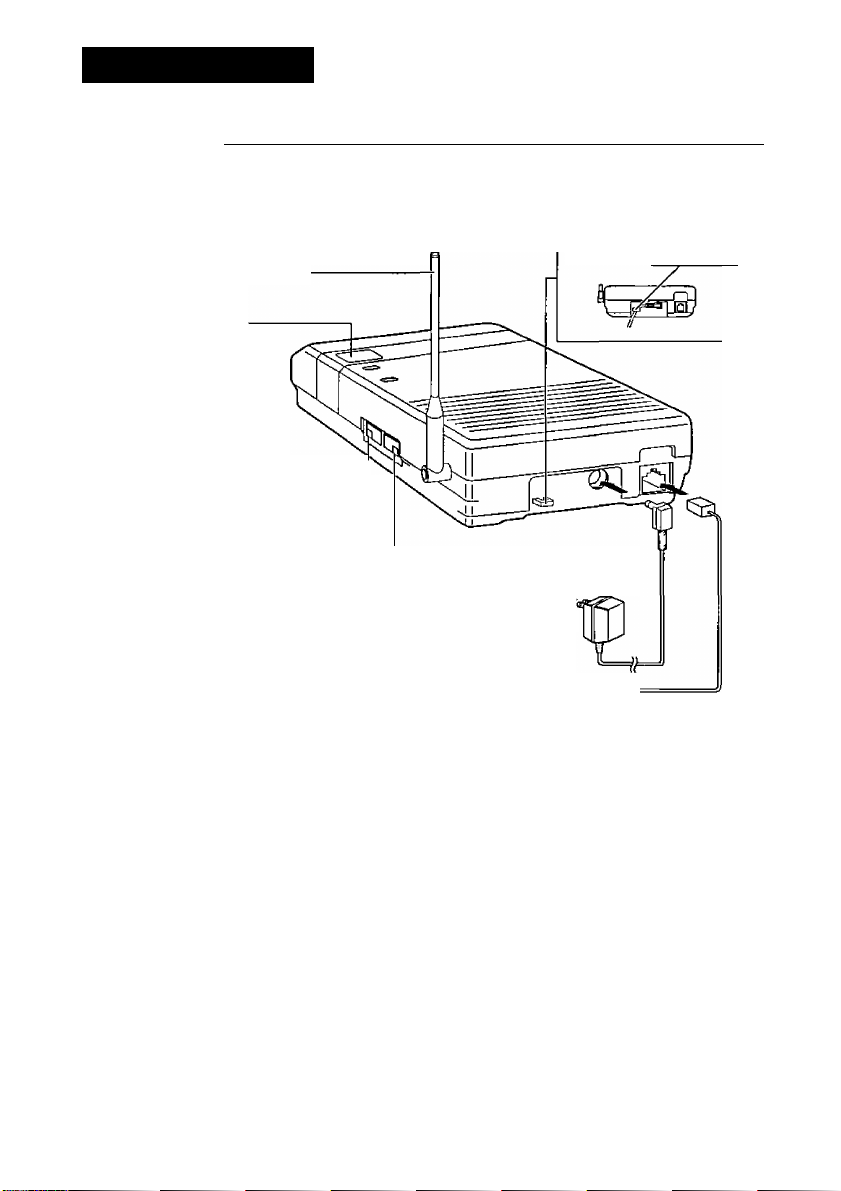
[ Location of Controls and Connection for the Base Unit ]
^ Base Unit
Q Connect as shown,
13 Raise the antenna.
Locator key:
Used to locate the
handset.
DIALING MODE Selector:—
When in the SLT mode,
setting is necessary.
If your telephone line has touch
tone service, set to “TONE".
If it has rotary service, set to
“PULSE".
CONNECTION MODE
Selector:
If connected to a Telephone Line Jack or
a PBX, except for Panasonic KX-T,
KX-TA or KX-TD series, set to “SLT”.
If this unit is connected to Panasonic
KX-T, KX-TA or KX-TD series, set to
“EMSS”.
To AC Outlet
(120VAC, 60Hz)
AC Adaptor
(KX-All)
To Telephone
Line Jack (RJ14C)
or PBX.
Fasten the AC adaptor
cord to the cord holder.
Telephone Line Cord
THE AC OUTLET POWER SOCKET SHOULD BE LOCATED NEAR
THIS EQUIPMENT AND BE EASILY ACCESSIBLE.
Note:-------------------------------------------------------------------------------------------------
- USE ONLY Pana,sonic AC ADAPTOR KX-A11. The adaptor must remain
connected at all times.
- The AC adaptor may feel warm during use. This is normal.
- The unit will not function during a power failure.
- This unit cannot be connected in parallel with a single line telephone.
- If the unit does not operate after connecting the AC Adaptor to the AC Outlet,
disconnect the AC Adaptor once and re-insert it.
Page 8

Getting Started
[ Before USING IO(-T7885 in EMSS mode
This unit does not have speaker phone and monitor features. Therefore please
take care of the following contents before using KX-T7885 in EMSS mode.
Please refer to your PBX Manual for more information.
Alternative Calling
-Ring/Voice
Live Call Screening Hands Free Mode:
Back Ground Music
Parallel Connection
This unit cannot receive alternative voice call.
Please inform another extension user not to use
voice calling.
LCS hands free mode is not available on this unit.
Please set to private mode only, by station
programming. To change the setting, please refer
to the manual of your PBX.
Private Mode:
In this mode the user can monitor or answer the
call.
I ) To monitor the call
Press when hearing alert tone.
2) To answer the call
Press LCS key* when monitoring the call or
hearing alert tone.
* The LCS key has to be assigned on a Flexible Key
before using this feature.
Back Ground Music is not available on this unit in
spite of the BGM setting.
This unit cannot be connected in parallel with a
single line telephone in EMSS mode. If the parallel
connection mode of the PBX port is set to “Parallel
ON (SLT ringing is enabled)”, please set to
“Parallel OFF (SLT ringing is disabled)”. Please
refer to your PBX manual for more information.
8
Page 9
Getting Started
( Power ON/OFF
P> Power ON
Q Turn the POWER switch OFF to ON.
The LCD shows the date and time of PBX or
your extension number (EMSS mode only),
P> Power OFF
n Turn the POWER switch ON to OFF.
10 seconds later —►
Power Switch
wiii -T»Q-K>^ci:
TUE MAY16 12 : OOP
FI F2 F3 F4
Fl F2 F3 F4
i
If the following display appears, send phone to your nearest authorized
service center.
Need Repair N
(N=1 -3)
Page 10

Getting Started
About the LCD
The display has two lines with 16 characters per line, and related symbols to
show information for call activities as shown below.
0123456789flBCDEF
FI F2 F3 F4
P> Description of Symbois
Intercom Indicator
In Use status
In the Function mode
Q
Note:------------------------------------------------------------------------------------------------
- When you press ( lcd ) in on-hook status, the LCD shows the date and time
of PBX or your extension number for 10 seconds.
(On-hook display) (EMSS mode only)
How to change the LCD depends on your PBX. Please refer to your PBX
manual for more information.
In the Programming mode
Message Waiting notification
(You have a message.)
Battery Low Indicator
J
10
1. Press ( LCD) .
The date and time (day/month/time) of PBX
are displayed.
2. Press ,
Your extension number is displayed.
3. Press (5^.
The date and time (day/month/time) of PBX
are displayed.
4. The PBX information disappears after lO seconds.
■ The LCD also shows Flexible Key Name.
1. Press (func) first, then 0 or 0 (see page 29).
ITUE MAY16 12:00P]
j Fl F2 _F3.
_____
f
MAY16 12:0op]
F5 F6 F7 F8 f
TUE MAY16 12:OOP I
Fl F2 F3 F4
j 123: ABCDEFGHIJj
I Fl F2 F3 F4J
TUE MAY16 12:OOP
Fl F2 F3 F4
Fl F2 F3 F4
TUE MAY16 12:OOP!
F9 FIO Fll F12 !
:
_____
ZJ
I
Page 11

Getting Started
( Controlling the Volume
Ringer Volume Adjustment
The ringer volume has three levels (low / middle / high). Moreover, you can
select the Step Ringer mode, Vibrator mode or Off mode. [Default: middle]
Press 0 or g repeatedly to select the desired
mode.
• Step Ringer mode: Rings progressively louder.
• Vibrator mode: The handset does not ring but
vibrates.
• Off mode: The handset does not ring or vibrate.
Only the indicator flashes green.
Ringer Volume
=High
High
Ringer Volume
=Middle
Middle
Ringer Volume
= Low
Low
Ringer Volume
=Step
Step Ringer mode
Ringer Volume
=Vibrate
Vibrator mode
Press 0 for more than
2 seconds.
Ringer Volume
=Off
Off mode
Note:----------------------------------------------------------------------------------
- If you select Vibrator mode, the display will show
“Vibrate” while the handset is idle.* *
- If you select Off mode, the display will show
“Ringer OFF” while the handset is idle.*
*This is unavailable when FWD/DND is set.
Vibrate
FI F2
I Ringer OFF
I FI F2 F3 F4
F3 F4
This information will not display in the following cases:
• While LCD shows your extension number or time
• While LCD shows duration time after finishing the conversation
- When charging, the handset always rings for incoming calls (except in Off mode).
- In addition to the above, the Vibrator and Ringer mode (vibrates several times
and then starts to ring) is available. Refer to “Vibrator and Ringer” in Handset
Programming (see page 28).
- When you set @ and 0 to “F-Key Select”, you can select ringer volume by
pressing (func) first, then 0 or 0 (see page 29).
11
Page 12

Getting Started
P> Receiver/Headset Volume Adjustment
The receiver volume has three levels (low/middle/high).
This can be changed during a conversation.
[Default: middle]
Receiver Volume
Press 0 or® repeatedly during a conversation.
Headset Volume
Press 0 or® repeatedly during a conversation.
¡Receiver Volume j
■=High !
“High
!Receiver Volume
'=Middle
‘ Middle "
I Receiver Volume
|=Low 1
Low
Headset Volume
:=High^ _ „
“Hi^h '
Headset Volume
-Middle
Middle
:Headset Volume
! -Low
Low
Note: — -------------------------------------------------------------------------------------—-
- When you set 0 and ® to ‘'F-Key Select", you can select receiver or headset
volume by pressing (func) first, then 0 or ® (see page 29).
- You can change the receiver volume when you are not using a headset.
- You can change the headset volume when using a headset.
12
Page 13

Making Calls
[ Calling"
[> In EMSS mode
■ Intercom Calling
Q Press (iNT’.vfi)or
Q Dial the extension number.
□ Talk.
Q Press after finishing the conversation.
■ Outside Dialing, Line Access
H Press (Flexible CO) or ''tte
access number.
Q Dial the phone number.
B Talk.
Q Press after finishing the conversation.
In SLT mode
□ Press
.vi\ ^
FI F2 F3 F4
FI F2 F3 F4
FI F2 F3 F4
CO02
PI F2 F3 F4
.....
............
FI F2 F3 F4
Fl F2 F3 F4
101
~
0123456789
Q Dial the phone number.
El Talk.
Q Press @i after finishing the conversation.
Fl F2 F3 F4
_____
------
Fl F2 F3 F4
-
0123456789
__ ^ 1
0:00:10
Fl F2 F3 F4
_ __ ______ —-..
Fl F2 F3 F4
(Continued)
.
13
Page 14

Making Calls
Note;---------------------------------------------------------------------------------- .
------------
- You can also enter the phone number first and then press or
(iff). (Predialing) (In SLT mode, button only)
- Predialing is unavailable in the following cases:
• While LCD shows your extension number or time
• While LCD shows duration time after finishing the conversation
Press before entering the phone number in these cases.
- You can change the dialing mode temporarily from pulse to tone during a call
in SLT mode. Press °^^to change the dialing mode.
- You can select the display of Flexible Key by pressing (func) first, then 0 or
0 (see page 29).
- Inserting a pause prevents misdialing. A pause can be inserted when you
predial or while storing a number for memory dialing. Press (func) then
to insert a pause.
- When you press ( lcd ), the display of proprietary telephone appears on your
display. (LCD Refresh) You can refresh the LCD while idle and talking.
(EMSS mode only)
- To confirm the connection mode, see page 7, “CONNECTION MODE
Selector”.
Dialing the last number you dialed (Last Number Redial) ^
This unit automatically saves the last number you dialed.
14
D Press
Press (rediai) .
Press @1 after finishing the conversation.
FI F2 F3 F4
0123456789
F2 F3 F4
Fl
Fl F2 F3 F4
Page 15

Making Calls
[ Speed Dialing
You can use the dial keys as Speed Dialing keys, and the stored number is
dialed automatically by pressing Speed Dialing keys.
P> Storing
Enter Station Programming Mode.
• To enter the Programming mode, see page 26.
Enter speed dialing number ((^^-<^¡9)).
Enter a phone number (up to 20 digits).
• The valid characters are through
Pause Button ((func) ^ (3)^
Fla.sh Button ((func) ► (3))-
• You can clear all digits by pressing .
To store another number, press (hold) then
repeat steps 2 through 4.
To exit, press
Select F-Key
Fl F2 F3 F4
Auto 1
0123456789
Auto 1
0123456789
Auto 1 Stored
Fl F2 F3 F4
Dialing
n Press
Press (auto) and dial a speed dialing number
Fl
Fl
F2 F3 F4
0123456789
F2 F3 F4
(("3) ~ )■
Note:----------------------------------------------------------------------------------------
- You can use this feature only in SET mode. To confirm the mode, see page 7,
“CONNECTION MODE Selector”.
1
15
Page 16

Making Calls
[ One-touch Dialing
The stored number is dialed automatically by pressing a (Flexible Key),
or which is assigned as a one-touch dialing button.
P> Storing
Enter Station Programming Mode.
• To enter the Programming mode, see page 26.
Press 0 or g until the desired F-Key appears.
Press the desired (3^ (Flexible Key), (iNT'.tfy) or
• The valid characters are through
Pause Button ((func)^ ) and
Flash Button (Cfunc) ►(¿|) ).
• You can press 0, @ or to select
another Flexible Key.
Select F-Key '
Fl_ F2 F3 _ F4
Select F-Key
F5 F6 F7 F8 I
F5
-*6
Enter a phone number (up to 20 digits).
• You can clear all digits by pressing .
Press
(AirrO) •
To store another number, press (hold) then
F5
F5
repeat steps 2 through 5.
To exit, press .
P> Dialing
Press
Press an available one-touch key (
^)-
Note:-------------------------------------------------------------------------------------------------
- You can use this feature only in SET mode. To confirm the mode, see page 7,
“CONNECTION MODE Selector“.
- and (iNT'.<ij) can be also assigned as a Full one-touch dialing button
which you can press directly without pressing
16
123
123 I
Stored :
FI F2 F3 F4
0123456789;
FI F2 F3 F4 '
Page 17

Receiving Calls
In EMSS MODE
P> Intercom Incoming Call
Your handset will ring or vibrate and the call
call is received.
Q Press or Ont'.*'i').
Q Press after finishing the conversation.
^ CO Incoming Call
n Press the flashing (Flexible CO)
or@>-
Q Press after finishing the conversation.
In SLT Mode
Press
Press after finishing the conversation.
ndicator will flash green when a
j 123: ABCDEFGHIJ|
j -T* 1
1 Fl F2 F3 F4 1
ICOOl; 1234567890
j Fl F2 F3 F4
0:00:00
Fl F2
F3 F4
J
N
>
Note:------------------------------------------------------------------
- When you receive an intercom call, the extension number
and name of the receiving call appear on the display.
- When you receive a CO call, the CO line number or
name of the receiving call appears on the display.
123; ABCDEPGHIJI
Fl F2 F3 F4 '
cool: 1234567890
Fl F2 F3 F4
- When you receive a call in SLT mode, “Receiving” | Receiving
appears on the display. \ Fl F2 F3
- [XI (Message Waiting notification) on the display lets you know that a call
has been received. To call back, see page 21. (EMSS mode only)
-To confirm the connection mode, see page 7, “CONNECTION MODE
Selector”.
- You can also answer the call by pulling out the handset from the charging
stand. '17
F4
Page 18

During a Conversation
Placing a Call on Hold
You can place a call on hold,
n Press (hold) during a conversation.
To retrieve a call on hold
QntuS) ^
Press the flashing
Note;-----------------------------------------------------------------------------------------------
— In SLT mode, press to retrieve a call on hold. To confirm the mode,
see page 7 “CONNECTION MODE Selector”.
Three-party Conversation (Conference)
You can make a three-party conversation. The operations shown below are
available when you connect to KX-TD500. If you connect to another system,
refer to Features List (pages 42-45) or the connecting system manual.
or
Press (func) then during a conversation.
PI F2 F3 F4
Dial the third party’s number.
FI F2 F3 F4
Press (func) then after the third party
answers.
FI F2 F3 F4
Note;--------------------------------------------------------------------------------------
- You can use this feature only in EMSS mode. To confirm the mode, .see
page 7, “CONNECTION MODE Selector ”.
18
101
Page 19

During a Conversation
Transferring a Call
You can transfer a call to another extension or an outside party. The operations
shown below are available when you connect to KX-TD500. If you connect to
another system, refer to Features List (pagevS 42-45) or the connecting system
manual.
P>Transferring a call to an extension
Q Press during a conversation.
FI
F2 F3 F4
13 Dial the extension number.
FI
F2 F3
Q Press @.
FI
F2 F3 F4
P> Transferring a call to an outside line
Q Press @1 during a conversation.
101
F4
Fl
F2 F3 F4
Q Press p^and dial the phone number,
0123456789
Fl
F2 F3 F4
g Press 0.
Fl
F2 F3 F4
This feature must be enabled by PBX
programming.
Note:---------------------------------------------------------------------------------
- You can use this feature only in EMSS mode. To confirm the mode, .see
page 7, “CONNECTION MODE Selector”.
19
Page 20

Message Waiting
[ Leaving a call notification
When the called extension is busy or does not answer, you can leave a
notification to have the called extension call you back. The operations shown
below are available when you connect to KX-TD500. If you connect to another
system, refer to Features List (pages 42-45) or the connecting system manual.
To leave a notification
>
Press Cfunc) then when the called extension ' mw at ExtToi
is busy or does not answer.
Confirmation tone
Press
[^To leave/cancel a notification
H Press
i
F5 F6 F7 F8
Q Press to set.
Press cancel.
Q Dial an extension number.
El Press .
Note:---------------------------------------------------------------------------------
- You can use this feature only in EMSS mode. To confirm the mode, see
page 7, “CONNECTION MODE Selector’.
20
Page 21

Message Waiting
Call back when you receive a notification
l>v<il(Message Waiting Notification) on the display lets you know that a call
has been received. The operations shown below are available when you
connect to KX-TD500. If you connect to another system, refer to Features List
(pages 42-45) or the connecting system manual.
[)> To call back
H Press
FI F2 F3 F4
Q Press (func) then .
Q An extension number appears on the display and
the unit call back automatically.
P> To clear all notifications
101: ABCDEFGHIJ
F5 F6 F7 F8
Q Press
Q Press
13 Dial your own extension number.
El Press Ml.
Note:---------------------------------------------------------------------------------
— You can use this feature only in EMSS mode. To confirm the mode, see
page 7, CONNECTION MODE Selector ’.
21
Page 22

Useful Features
Forwarding your calls (Call Forwarding [FWD])
Specified calls to your telephone are automatically forwarded to another preset
extension. The operations shown below are available when you connect to
KX-TD500. If you connect to another system, refer to Features List (pages 42-
45) or the connecting system manual.
P> Setting
Press
Press (func) then («2) ■
Enter a feature number.
~ : All Calls
— : Busy
— : No Answer
— : Busy/No Answer
— <*|) : To an outside line
— <^) : Follow Me
Dial an extension number.
• If you select in step 3, dial line access
code, phone number then .
• If you select in step 3, dial your own
extension number.
Press .
Note:----------------------------------------------------------------------------------------------
- If FWD is set, the display will flash “FWD/DND” while the handset is idle.*
*This information will not display in the following cases:
• While LCD shows your extension number or time
• While LCD shows duration time after finishing the conversation
22
FWD(ALL) ExtlOl
FI F2 F3 F4
Page 23

Useful Features
P> Canceling
Q Press
Q Press (func) then ,
Q Enter a feature number.
— : Cancel
— : Cancel Follow Me
Q If you select in step 3, dial your own
extension number.
El Press ^.
FWD/DND Cancel
FI F2 F3 F4
Note: —-----------------------------------------------------------------------------
- You can use this feature only in EMSS mode. To confirm the mode, see
page 7, “CONNECTION MODE Selector”.
23
Page 24

Useful Features
[ Preventing others from disturbing you (Do Not Disturb [DND]) ]
Allows you to prevent other parties from disturbing you. Your extension does
not receive intercom or CO calls. The operations shown below are available
when you connect to KX-TD500. If you connect to another system, refer to
Features List (pages 42-45) or the connecting system manual.
^ Setting
Press .
^ FWOTNO
Press (FUNc)then
Press (2) ■
Do Not Disturb
Press
Canceling
FI F2 F3 F4
Press ■
Press (func) then («2)
Press .
FWD/DND Cancel
Press -
Note:-----------------------------------------------------------------------------------------------
FI F2 F3 F4
— You can use this feature only in EMSS mode. To confirm the mode, see
page 7 , CONNECTION MODE Selector”.
- If DND is set, the display will show “FWD/DND” while the handset is idle.*
*This information will not display in the following cases:
• While LCD shows your extension number or time
• While LCD shows duration time after finishing the conversation
24
Page 25

Useful Features
Flash
You can disconnect the current call and make another call.
Press (func) then (^5) while hearing any tone,
dialing or talking.
Make another call.
Note:---------------------------------------------------------------------------------------------
- You can use this feature only in EMSS mode. In SET mode, this operation
also functions as a hooking signal which is used to access special features
offered by a PBX or Central Office.
To confirm the mode, see page 7 “CONNECTION MODE Selector”.
( Key Lock
You can lock the buttons (In idle status only).
P> Setting (ON)
Press for 1 second while idle.
keylock ON
FI F2 F3 F4
[]> Canceling (OFF)
Press C^UNc) for 1 second while idle.
KEYLOCK
* •
Note:
During the Key Lock mode, all buttons except ^^^^will not work in this
status. However, you can answer the calls by pressing (iNT’-tfi), or
flashing and press any key when the unit is not in idle status.
Key lock setting/canceling is unavailable in the following cases:
• While LCD shows your extension number or time
• While LCD shows duration time after finishing the conversation
Press before pressing ¡n these cases.
25
Page 26

Station Programming
[ Station Programming in SLT mode
You have to enter this programming mode when you store telephone numbers
for Speed Dialing and One-touch Dialing (see pages 15-16).
t>TO enter Station Programming mode
Q Press (^NC) then
I Handset Program
i FI
SELECT
( lcd)‘
Press
(auto)'
To exit, press .
i
1
j StatjLOn Program
1 FI F2
1
1 Select F -key
1-Fl—
[ PBX Station Programming
PBX Station Programming allows you to program certain features of PBX
from your telephone individually in EMSS mode. To program, you need to
enter the PBX Station Programming mode. And during the programming
mode, your handset is put in busy condition to caller. If you want to make a
normal call handling operation, you should finish the programming mode. The
features you can program depend on your PBX system. For details, please
refer to the manual of your PBX.
F2
-----
F2
F3
F3
F3
F4
F4
F4
P> To enter PBX Station Program mode
Q Press (func) then .
Press
(auto) •
To exit, press
26
Handset
FI F2 F3 F4
r——
Station Program
FI F2 F3 F4
FI F2 F3 F4
Program
PT-PGK Mode
Page 27

Handset Programming
[ Programming Instructions
You can change the default settings or programming of handset according to
your needs. The possible programmings are shown below in order they are
displayed. For programming operations, see pages 28 to 32.
To enter the Handset Programming Mode
Q Press (func) then
Handset Program
FI F2 F3 F4
Vibrator&Ringer
=Off
Q Select the menu by pressing (g)or (^.
Q To exit, press .
Note:----------------------------------------------------------------------------------------------
- If you receive a call while programming, the unit quits the programming
mode.
- The unit returns to idle status if you do not program within 30 seconds. Do
not pause for over 30 seconds while programming.
Ringer Pattern
= 1
FI F2 F3 F4
P> The possible programmings
• Vibrator and Ringer (see page 28)
• Ringer Pattern Selection (see page 28)
• Key Click Tone Set (see page 29)
• Up/Down Key Assignment (see page 29)
• Automatic Flexible Key Selection (see page 30)
• LCD Contrast (see page 30)
• Back Light (see page 31)
• Flexible Key Name Set (see page 32)
27
Page 28

Handset Programming
r
Vibrator and Ringer
When a call is received, your handset vibrates four times and then starts to ring.
[Default: Off]
Q Enter the Handset Programming mode and select [vibrator&Ring^r
“Vibrator and Ringer’menu by pressing _
or .
D
p'-“* (Si)-
Press (si) or to program other items.
El To exit, press .
( ranger Pattern Selection
You can select the ringer type (1 through 6) for receiving calls.
[Default: 1]
n Enter the Handset Programming mode and select i Rin^eF PatTeFn
‘Ringer Pattern” menu by pressing or
c®.
SELECT
• When you press ( lcd ), the next ringer pattern
appears on the display.
:Vibrator&Ringer
=On
=1
iRinger Pattern
: =2
28
Press or to program other items.
CT To exit, press @i.
Page 29

Handset Programming
Key Click Tone Set
You can turn off the key tone which is heard when any button on your
handset is pressed. [Default; On]
Enter the Handset Programming mode and select fKey Click
“Key Click” menu by pressing or . Uon
SELECT
( LCD ) •
Press (a*) or to program other items.
To exit, press .
[ U p/DoWN KeY Assign menT
You can set Q and Q to “Volume” key or “F-Key Select” key.
[Default: Volume]
Enter the Handset Programming mode and select
“Vol Key Assign” menu by pressing (**) or
Press
Cy
press or to program other items.
Key Click
Vol Key Assign
=Volume
Vol Key Assign
=F-Key Select
H To exit, press .
Note:---------------------------------------------------——
--------------------------------------
- When you set 0 and 0 to Volume, press (func) then 0 or @ to F-Key
Select.
- When you set 0 and 0 to F-Key Select, press (func) then 0 or @ to select
Volume.
29
Page 30

Handset Programming
Automatic Flexible Key Selection
When making or answering a call, you can see the green F-Key automatically
on the display. [Default: Off]
Q Enter the Handset Programming mode and select
Auto FKey Select
“Auto Fkey Select” menu by pressing (J*) or = Off
Auto FKey Select
= On
Q Press (2) or to program other items.
Ei To exit, press .
Note:
- This feature is unavailable in SLT mode.
( LCD Contrast
You can adjust the display contrast as desired. There are three contrast levels;
Low, Middle and High. [Default; High]
D
30
Enter the Handset Programming mode and select
“LCD Contrast” menu by pressing or .
Press (^lcd) until the desired setting is
displayed.
Q Press <2) Of to program other items.
Ei To exit, press .
LCD Contrast
=High
LCD Contrast
= Low
LCD Contrast
=Middle
Page 31

Handset Programming
[ Back Light
You can turn off the LCD and keypad back lights to conserve battery energy.
[Default: OnJ
Enter the Handset Programming mode and select
“Back Light” menu by pressing or (¿a) .
Press
0^-
Press or to program other items.
To exit, press .
Back Light
-On
Back Light
=Off
31
Page 32

Handset Programming
[ Flexible Key Name Set
You can name Ihe 12 F-keys (three characters max per a key).
[Default: FXX (XX=1-12)]
Q Enter the Handset Programming mode and select "^Key~Name~Set
“F-Key Name Set” menu by pressing (5?) or i Fl f2 f3 f4 j
Press @ or 0 and show the F-Key you want to
name on the display.
Press
want.
Press .
Enter the name.
When you finish, press
-> the next F-Key appears on the display.
^ Character Combination Table
Dialing buttons can be used as letters and symbols for character input keys.
Use (5^ (Next) or (**) (Previous) to move the cursor to change or enter a
character.
Keys 1 2 3 4 5
1
2 A B
3 D E
4 G H 1
5- J K L
6 M
7 P
8 T
W
9
0 (space) - -X- # &
Note:
-------------------------------------------------
- Three space characters cannot be stored.
32
or chose the F-Key you
Number of pressing times
6 7 8 9
,
c
F
N 0
R S
Q
V t u
U
X Y Z
1
a b c 2
e f 3
d
h
g
j
i
k 1 5
m n 0 6
P q
V
w X
$
:F-Key Name Set 1
' ^ F^ F7 F8 I
F-Key Name Set j
^F1 =F;1 _ j
F-Key Name Set
1^1
______________
¡F-Key Name Set
|F1 =C
F-Key Name Set
Fl =C01 Stored
4
r s 7
8
z
y
( )
9
0
Page 33

Others
Wall Mounting
The base unit can be mounted on a wall.
^ Drill two holes spaced 8.4 cm (3.3 inches)
apart and install two screws.
2 Insert the tabs of the wall mounting plate
(included) into the openings of the base
unit, then push it in the direction of the
arrow.
Mount the base unit on the wall.
JZ
rn
oo
CJ
o
c
£
CJ
Installing the Handset Clip
You can hang the handset on your belt or pocket by attaching the handset clip.
Handset Clip
33
Page 34

Others
[ Replacing the Battery
^ Set the POWER switch to “OFF’’ to prevent
memory loss.
2 While pressing the open-button, remove the
battery.
0 Hook the bottom of the battery on the handset,
and place the battery in the handset until you
hear a click.
Set the POWER switch to “ON.”
r- Installing the Panasonic KX-A276 battery:
While holding the charging stand with one
hand, push the battery in with the other hand
until you hear a click.
When removing the battery, be sure to hold
the stand.
D
Note:-------------------------------------------------------------------------------------------------
- If you do not replace the battery within five minutes, memory (e.g. Redial
data in SLT mode. Flexible key position - F1-F4/F5-F8/F9-F12) may be lost.
- If beep tones sound every fifteen seconds and battery low indicator (H ;)
flashes after a few telephone calls even when the handset battery has been
fully charged, it is time to install a new battery. Remember to charge the new
battery before use.
- If you change the battery while on the phone, hold the call first.
34
Page 35

Others
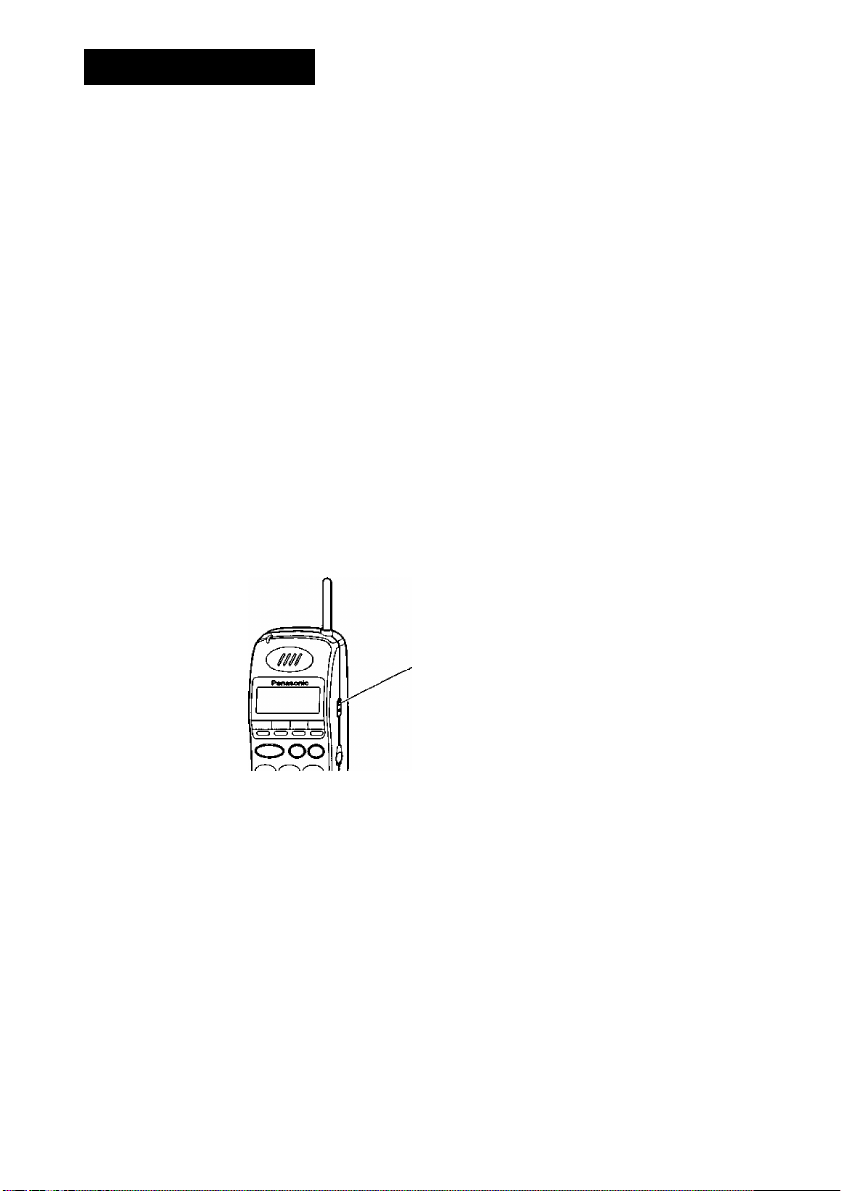
[ Locating the Handset From the Base Unit ]
This feature helps you find the handset if misplaced. You may also locate a
person at the handset from the base unit by emitting beep tones for 60 seconds.
If the handset is in use, locating is not available.
^ Press LOCATOR button on the base
unit.
The IN USE indicator flashes and the
handset beeps.
To stop the beeping, press LOCATOR
button again.
LOCATOR Button
Helpful Hint: -----------------------------------------------------------------------------------
Pressing on the handset stops the beeping and the IN USE indicator on
the base unit changes from flashing to a steady light.
35
Page 36

Others
[ Troubleshooting
The unit does not work. • Set the POWER switch to “ON.”
Sound flutters or fades.
Noise occurs.
I am encountering interference from
another unit.
I pressed the CH Button, but still
have a noise.
The handset does not ring.
Beep tones sound every fifteen
seconds during a conversation.
I charged the battery for 1.5 hours,
but the beep tones sound every
fifteen seconds and battery low
indicator (^ ;) flashes after a few
telephone calls.
I cannot use the unit during a power
failure.
I cannot store a phone number into
memory.
While operating the unit, the AC
adaptor feels warm. While charging
the battery, the unit feels warm.
1 cannot make a call from a
paralleled single line telephone.
36
Trouble Remedy
• The unit was not connected properly
(see pages 5 and 7).
• The handset battery is weak. Charge the
battery fully.
• You are too far from the base unit.
Move closer to the base unit.
• Raise the base unit antenna.
• Place the base unit away from office
equipment such as computers,
• Approach the base unit.
• Set the handset and the base unit away
from other electrical appliances.
• Press CH Button ((func)^ (^|)) during
a conversation.
• Approach the base unit.
• Press CH Button ((func)^ («e)) again.
• Set the POWER switch to “ON.”
• Change the ringer volume level.
• Charge the battery fully, or replace the
new handset battery.
• Clean the battery charge contacts and
charge once more.
• It is time to change the battery.
Replace with a new one.
• The unit will not function during a
power failure.
• Do not pause for over 30 seconds while
storing.
• These are normal conditions.
• A single line telephone cannot be
connected in parallel with this unit in
EMSS mode (see page 8).
Page 37

Others
Important Safety Instructions
When using this unit, basic safety precautions should always be followed to
reduce the risk of tíre, electric shock, or personal injury.
1. Read and understand all instructions.
2. Follow all warnings and instructions marked on this unit.
3. Unplug this unit from AC outlets before cleaning. Do not use liquid or
aerosol cleaners. Use a damp cloth for cleaning.
4. Do not use this unit near water, for example, near a bathtub, washbowl,
kitchen sink, or the like.
5. Place this unit securely on a stable surface. Serious damage and/or injury
may result if the unit falls.
6. Do not cover slots and openings on the unit. They are provided for
ventilation and protection against overheating. Never place the unit near
radiators, or in a place where proper ventilation is not provided.
7. Use only the power source marked on the unit. If you are not sure of the
type of power supplied to your home, consult your dealer or local power
company.
8. Do not place objects on the power cord. Install the unit where no one can
step or trip on the cord.
9. Do not overload wall outlets and extension cords. This can result in the
risk of fire or electric shock.
10. Never push any objects through slots in this unit. This may result in the
risk of fire or electric shock. Never spill any liquid on the unit.
11. To reduce the risk of electric shock, do not disassemble this unit. Take the
unit to an authorized servicenter when service is required. Opening or
removing covers may expose you to dangerous voltages or other risks.
Incorrect reassembly can cause electric shock when the unit is
subsequently used.
12. Unplug this unit from the AC outlet and refer servicing to an authorized
servicenter when the following conditions occur:
A. When the power supply cord or plug is damaged or frayed.
B. If liquid has been spilled into the unit.
C. If the unit has been exposed to rain or water.
D. If the unit does not work normally by following the operating
instructions. Adjust only controls covered by the operating
instructions. Improper adjustment may require extensive work by an
authorized servicenter.
E. If the unit has been dropped or physically damaged.
F. If the unit exhibits a distinct change in performance.
13. During thunderstorms, avoid using telephones except cordless types.
There may be a remote risk of an electric shock from lightning.
14. Do not use this unit to report a gas leak, when in the vicinity of the leak.
37
Page 38

Others
CAUTION
To reduce the risk of fire or injury to persons, read and follow these
instructions.
1. Use only the battery(ies) specified.
2. Do not dispose of the battery(ies) in a fire. They may explode. Check with
local waste management codes for special disposal instructions.
3. Do not open or mutilate the battcry(ics). Released electrolyte is corrosive
and may cause burns or injury to the eyes or skin. The electrolyte may be
toxic if swallowed.
4. Exercise care in handling batteries in order not to short the battery to
conductive materials such as rings, bracelets, and keys. The battery and/or
conductor may overheat and cause bums.
5. Charge the battery(ies) provided with or identified for use with this product
only in accordance with the instructions and limitations specified in this
manual.
WARNING:
TO PREVENT FIRE OR SHOCK HAZARD, DO NOT EXPOSE THIS
PRODUCT TO RAIN OR ANY TYPE OF MOISTURE.
FCC Information
If requested by the telephone company, inform them as follows.
— FCC Registration No.:
(found on the bottom of the unit)
— Ringer Equivalence: 0.2B
— The particular telephone line to which the equipment is connected.
38
This unit must not be connected to a coin operated line. If you are on a party
line, check with your local telephone company.
Ringer Equivalence Number (REN):
The REN is useful in determining the quantity of devices you may connect to
your telephone line and still have all of those devices ring when your
telephone number is called. In most, but not all areas, the sum of the REN’s
of all devices connected to one line should not exceed five (5.0). To be
certain of the number of devices you may connect to your line, as determined
by the REN, you should contact your local telephone company to determine
the maximum REN for your calling area.
Page 39

Others
In the event terminal equipment causes harm to the telephone network, the
telephone company should notify the customer, if possible, that service may
be stopped. However, where prior notice is impriictical, the company may
temporarily cease service providing that they:
a) Promptly notify the customer.
b) Give the customer an opportunity to correct the problem with their
equipment.
c) Inform the customer of the right to bring a complaint to the Federal
Communication Commission pursuant to procedures set out in FCC
Rules and Regulations Subpart E of Part 68.
The Telephone Company may make changes in its communications facilities,
equipment, operations, or procedures, where such action is reasonably
required in the operation of its business and is not inconsistent with the rules
and regulations in FCC Part 68.
If such changes can be reasonably expected to render any customer terminal
equipment incompatible with telephone company communications facilities,
or require modification or alteration of such terminal equipment, or otherwise
materially affect its use or performance, the customer shall be given adequate
notice in writing, to allow the customer an opportunity to maintain
uninterrupted service.
When programming emergency numbers and/or making test calls to
emergency numbers:
1. Remain on the line and briefly explain to the dispatcher the reason for the
call before hanging up.
2. Perform such activities in the off-peak hours, such as early morning hours
or late evenings.
CAUTION:
Any changes or modifications not expressly approved by the party responsible
for compliance could void the user’s authority to operate this device.
NOTE:
This equipment has been tested and found to comply with the limits for a
Class B digital device, pursuant to Part 15 of the FCC Rules. These limits are
designed to provide reasonable protection against harmful interference in a
residential installation. This equipment generates, uses, and can radiate radio
frequency energy and, if not installed and used in accordance with the
instructions, may cause harmful interference to radio communications.
39
Page 40

Others
However, there is no guarantee that interference will not occur in a particular
installation. If this equipment does cause harmful interference to radio or
television reception, which can be determined by turning the equipment off
and on, the user is encouraged to try to correct the interference by one or
more of the following measures:
— Reorient or relocate the receiving antenna.
— Increase the separation between the equipment and receiver.
— Connect the equipment into an outlet on a circuit different from that to
which the receiver is connected.
— Consult the dealer or an experienced radio/TV technician for help.
Some wireless telephones operate at frequencies that may cause interference
to nearby TVs and VCRs. To minimize or prevent such interference, the base
of the cordless telephone should not be placed near or on top of a TV or VCR.
If interference is experienced, move the cordless telephone further away from
the TV or VCR. This will often reduce or eliminate interference.
Environment
Do not place the unit in rooms where the temperature is less than 5°C (41°F)
or greater than 40°C (104°F).
Allow 10 cm (4') clearance around the unit for proper ventilation.
Avoid excessive smoke, dust, mechanical vibration, shock, or direct sunlight.
Keep away magnetic cards, such as bank cards, telephone cards, etc. from the
handset, as the magnet in the handset may cause the data on the card's
magnetic strip to be erased.
Consult the manufacturer of any personal medical devices, such as
pacemakers, to determine if they are adequately shielded from external RF
energy.
Do not use the unit in health care facilities when any regulations posted in the
area instruct you to do so. Hospitals or health care facilities may be using
equipment that could be sensitive to external RF energy.
40
Routine care — wipe the unit with a soft cloth. Do not use benzine, thinner,
or any abrasive powder.
When you left the unit unused for long time, unplug the AC adaptor from the
outlet.
If there is any trouble — disconnect the unit from the telephone line and
connect a known working phone. If the known working phone operates
properly, have your unit repaired by one of the authorized Panasonic Factory
Servicenter. If the known working phone does not operate properly, consult
with your telephone company.
Page 41

Others
Hearing Aid Compatibility
This telephone provides magnetic coupling for hearing aids.
Privacy of communications
Privacy of communications may not be ensured when using this phone.
For Product Service
• Panasonic Servicenters are listed in the servicenter directory.
• Call 1-800-211-7262 for the location of an authorized servicenter.
When you ship the product
• Carefully pack your unit, preferably in the original carton.
• Attach a letter, detailing the symptom, to the outside of the carton.
Symptom
Send the unit to an authorized servicenter, prepaid and adequately insured.
Do not send your unit to the Panasonic Consumer Electronics Company
listed on the back cover or to executive or regional sales offices. These
locations do not repair consumer products.
41
Page 42

Features List
The features of the KX-TA624, KX- TD816/1232/308, KX-TD500 and KX-T336
are listed below. For more information, please refer to the manual of your PBX.
For the KX-TA624
Desired Function
► All Calls
Call Forwarding
Operation
> fOFfl
■ Cj) ► extension no. ►
;Busy/No Answer
► extension no. ►
To an outside line
|@) ► line access no. ►
► phone no. ►
Follow Me
■ <HE) ► your extension no. ►
Cancel
Cancel Follow Me
► your extension no.
Call on Hold
Call Transfer
Conference
Do Not Disturb
(DND)
Message Waiting
42
Holding
extension no.
ri-F1!
Cn^ ► third party’s no. ► Talk ► Cfuwc) ►
To leave a notification
To retrieve a call on hold
~F1 F12
► Talk
(iwr.*)
to an extension
phone no. to an external party
►c^► (*!)►
<@) to cancel
to set
)► 0
To cancel a notification
To check a message
To call back
To clear all notifications
► extension no. ► Cfwc) ► ►
►Talk
► 0
► Announced
0
Page 43

Features List
For the KX-TD816/1232/308
Desired Function
Call Forwarding
► <«|) ►
Operation
All Calls
► extension no.
Busy
(^►extension no.
No Answer
extension no.
Busy/No Answer
► extension no.
To an outside line
► line access no. ►
► phone no. ►
Foliow Me
► your extension no.
Cancei
Cancei Follow Me
► your extension no.
► ^
Call on Hold
Call Transfer
Conference
Do Not Disturb
(DND)
Message Waiting
Holding
extension no. to an extension
(FUNc) ► (©)► third party’s no. ► Talk ► (fwc) ^ <3)
To leave a notification
To retrieve a call on hold
"pi-Fia ~1
► Talk
(lNTV*j
phone no. to an external party
► ►
Cj) to set
to cancel
► Announced
► №ff)
(FUWC)»-
To cancei a notification
^^^1 ► @) ► extension no. ►
To che^ a message
To call back
To clear all notifications
^ (FUMc)»' ►Talk
@) your extension no. ►
43
Page 44

Features List
For the KX-TD500
Desired Function
Call Forwarding
^ (rjnc) ^ ^
Operation
All Calls
► extension no.
Busy
► extension no.
No Answer
► extension no.
Busy/No Answer
<«5) ► extension no.
To an outside line
► line access no. ►
► phone no. ► (¿5)
Follow Me
► your extension no.
Cancel
Cancel Follow Me
@) ► your extension no.
► M
Call on Hold
Call Transfer
Conference
Do Not Disturb
(DND)
Message Waiting
44
Holding
(hold)
extension no. to an extension
(njNc) ► third party’s no. ► Talk ►
To retrieve a call on hold
FI Ft 2
► Talk
phone no. to an external party
► ►
To leave a notification
(FUNC) ► (w3)^
To cancel a notification
@) ► extension no. ►
To check a message
(FUMC)»-(w3)
To call back
^►Talk
To clear all notifications
@) ► your extension no. ►
to set
to cancel
► Announced
► ^
Page 45

Features List
For the KX-T336
Desired Function
Call Forwarding
^ (FUNC) ^ ►
Operation
All Calls
<5^ ► extension no.
Busy/Off-Hook
► extension no.
No Answer
► extension no.
Busy/Off-Hook/No Answer
<$6) ► extension no.
To an outside line
(HE) ► tine access no. ►
► phone no. ►
Follow Me
► your extension no.
Cancel
Cancel Follow Me
(Si?) ^ your extension no.
Call on Hold
Call Transfer
Conference
Do Not Disturb
(DND)
Message Wailing
Holding To retrieve a call on hold
extension no. to an extension
(func) ► third party’s no. ► Talk ► (rjhc) ►
To leave a notification
Cfunc)^ (S3) ►
To cancel a notification
► C© @) ► extension no. ►
To check a message
(FUNC)^ (^3)
To call back ^
► Cf^)^ @)^Talk
To clear all notifications
►(¿^@)^ your extension no. ►
F1‘F12
► Talk
phone no. to an external party
to set
to cancel
► Announced
► iW)
45
Page 46

46
Page 47

47
Page 48

For your future reference
SERIAL NO._______________
(found on the bottom of the unit)
NAME OF DEALER
DEALER’S ADDRESS
Panasonic Consumer Electronics Company,
Division of Matsushita Electric Corporation of America
Оле Panasonic Way, Secaucus, New Jersey 07094
Panasonic Sates Company,
Division of Matsushita Electric of Puerto Rico, Inc.
Ave. 65 de Infantería, Km.9.5, San Gabriel Industrial Park
Carolina, Puerto Rico 00985
Printed in Japan
_________
DATE OF PURCHASE
PSQX1739WA KF0599MY3099
É
PRINUD WITH
SOYINK
 Loading...