

Page 1

DSS Console
Quick Reference Guide
Model No.
KX-T7740
Impor tant Information
When using the KX-T7740, keep the following
conditions in mind.
• If there is any troub le , disconnec t the DSS Console
from the telephone line and have it repaired.
• Keep the unit away from heating appliances and
electrical noise generating devices such as
fluorescent lamps and motors.
• The unit should be kept free of dust, moisture and
vibration, and it should not be exposed to direct
sunlight.
• Do not use benzine, thinner, or the like, or any
abrasive po wder to cle an the cabinet. Wipe it with a
soft cloth.
• Do not disassemble this product. Dangerous
electrical shock could result. The unit must only be
disassembled and repaired by qualified service
technicians.
• When a failure occurs which results in the internal
parts becoming accessible, disconnect the
telephone line cord immediate ly and return this unit
to service centre.
W ARNING:
TO PREVENT FIRE OR SHOCK HAZARD, DO NOT
EXPOSE THIS PRODUCT TO RAIN OR ANY TYPE
OF MOISTURE.
Note:
In this manual, the suffix of each model number is
d.
omitte
Page 2
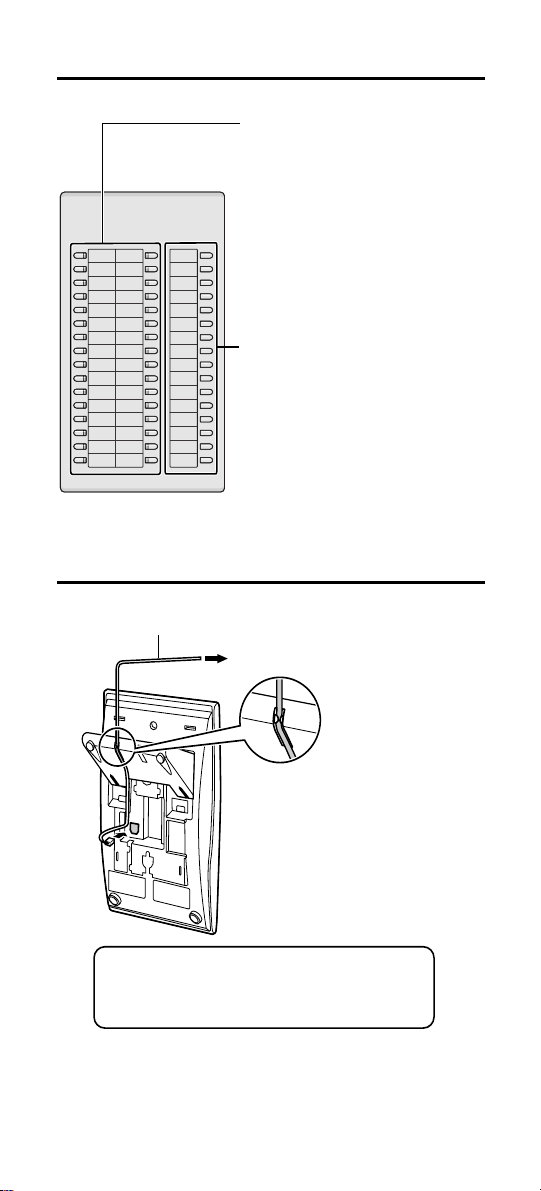
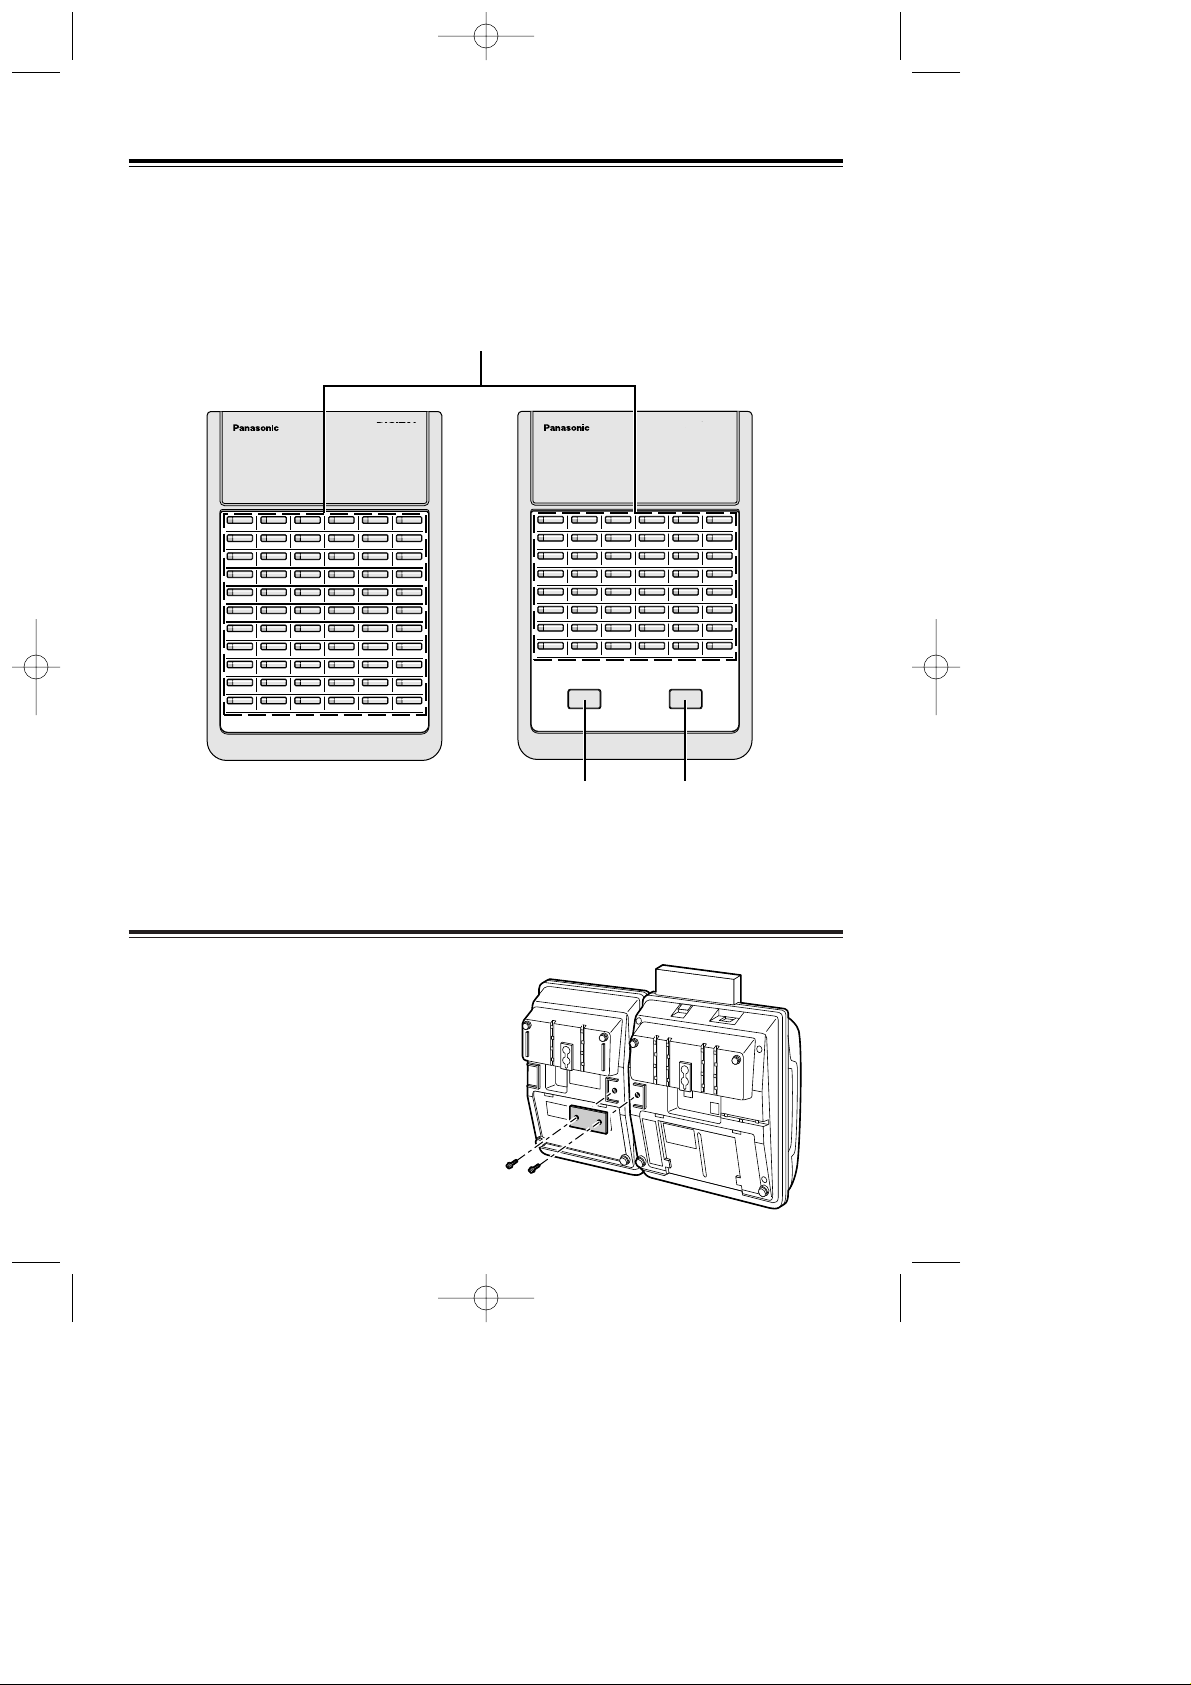
Location of Controls
DSS Buttons with Busy
Lamp Field (BLF):
To access an extension,
simply press a DSS button.
These buttons also can be
32
16
31
15
30
14
29
13
28
12
27
11
26
10
25
9
24
8
23
7
22
6
21
5
20
4
19
3
18
2
1 F1
17
F16
F15
F14
F13
F12
F11
F10
F9
F8
F7
F6
F5
F4
F3
F2
assigned for the one-touch
dialling. The BLF indicates
the current status of the
corresponding extention.
Function Buttons:
You can access various
functions with one touch
once the buttons are
programmed.
For the programming, refer
to the user manual of the
main unit.
Connection
The telephone line cord
To the main unit
< Back view >
CAUTION
Ensure the cord is inserted in the groove
to prevent damage to the connector.
2
Page 3
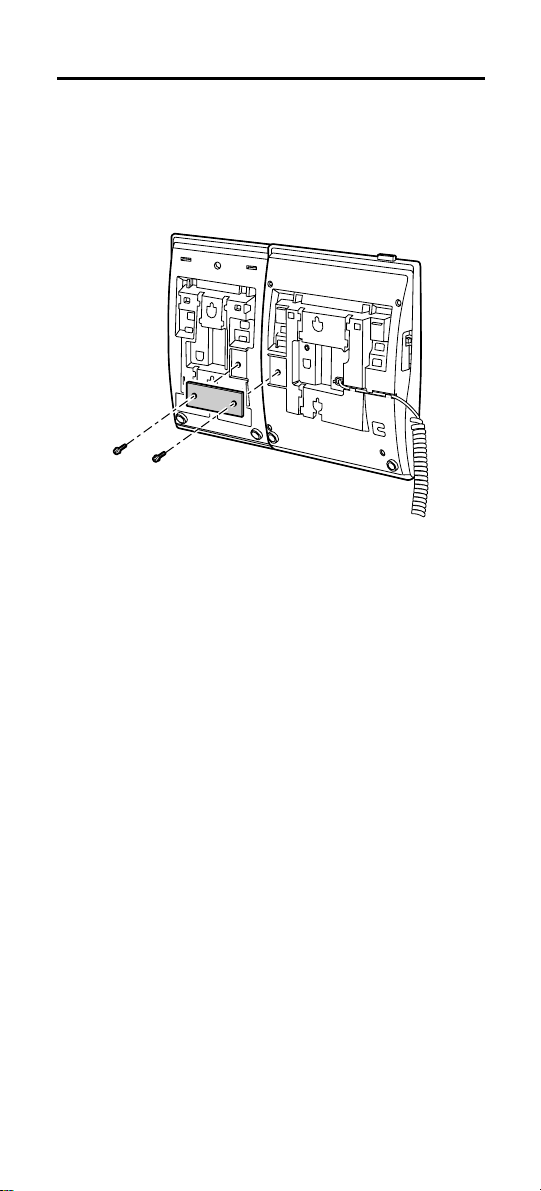
Attaching a Proprietary Telephone
This unit can be connected to a Pan aso nic
proprietary telephone (e.g., KX-T7720, KX-T7730,
KX-T7750).
Use the attached plate and screws.
3
Page 4
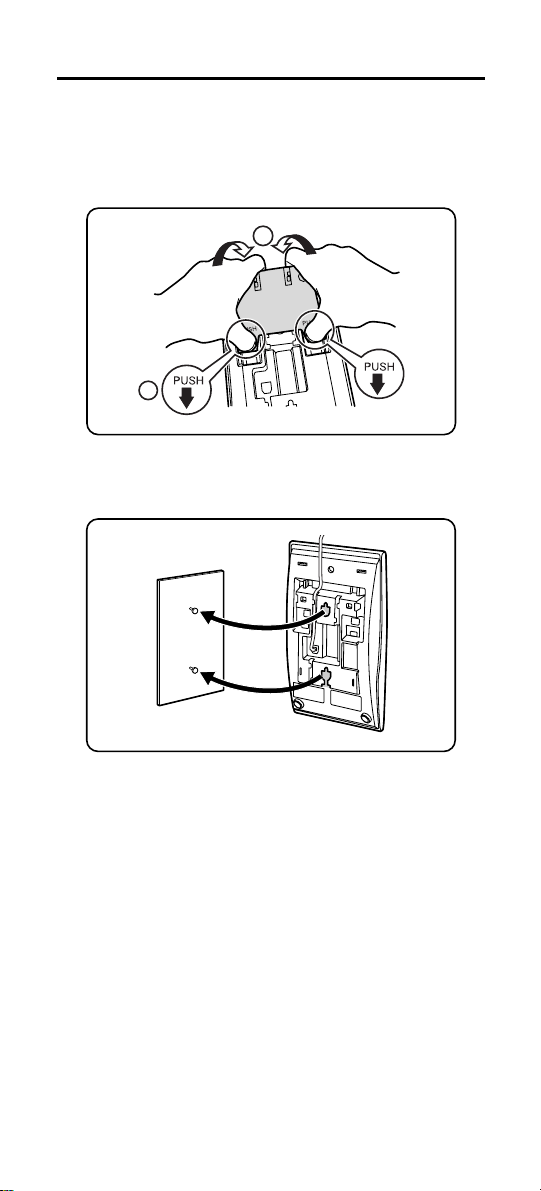
Wall Mounting
This unit can be mounted on a wall.
1
Remove the attached stand.
2
1
2
Mount the unit on the wall.
Kyushu Matsushita Electric Co., Ltd.
1-62, 4-chome, Minoshima, Hakata-ku,
Fukuoka 812-8531, Japan
© 2001 Kyushu Matsushita Electric Co., Ltd.
All Rights Reserved.
Printed in Japan
PSQW1800ZA
KK0102YK0
Page 5
DSS Console and DSS Console for Attendant
for Digital Super Hybrid Systems
Reference Guide
Model KX-T7440/KX-T7441
<KX-T7440> <KX-T7441>
8
16
24
32
40
48
7
15
23
31
39
47
6
14
22
30
38
46
51321
29
37
45
4
12
20
28
36
44
3
11
19
27
35
43
2
10
18
26
34
42
1
9
17
25
33
41
RELEASE
ANSWER
Please read this manual before using the DSS Console
and DSS Console for Attendant.
PSQX1526ZA 98.8.5 7:32 PM Page 1
Page 6

2
Thank you for purchasing the Panasonic DSS Console
and DSS Console for Attendant.
Preparation
Connection
Connect as shown.
For more details, refer to the
Installation Manual of the Panasonic
Digital Super Hybrid System.
The KX-T7440 Direct Station Selection (DSS) Console and KX-T7441 DSS Console
for Attendant can be connected to Digital Super Hybrid Systems (DSHS).
This requires a DSHS Digital Proprietary Telephone (e.g. KX-T7420, KX-T7425,
KX-T7431, KX-T7433, KX-T7436) for proper operation.
The DSS Console can work with any Panasonic Proprietary Telephone.
The DSS Console and the paired proprietary telephone should be placed next to one
another.
The DSS Console must be connected directly to the main unit.
Note: – A standard telephone cannot be used with the DSS Console.
Accessories
Telephone line cord............. 1 Plate............................... 1
Screws ................................. 2
Included telephone line cord
Connect to a Digital
Super Hybrid System.
Contents
Preparation.......................................................................................................... 2
Connection.......................................................................................................... 2
Location of Controls........................................................................................... 3
Attaching a Proprietary Telephone..................................................................... 3
Wall Mounting.................................................................................................... 4
Important Safety Instructions............................................................................. 5
FCC and Other Information ............................................................................... 7
PSQX1526ZA 98.8.5 7:32 PM Page 2
Page 7
3
Location of Controls
DSS Buttons with Busy Lamp Field (BLF):
The KX-T7440 has 66 DSS buttons and the KX-T7441 has 48 DSS buttons.
To access an extension, simply press a DSS button.
These buttons also can be assigned for one-touch dialing.
The BLF indicates the current status of the corresponding extension.
Off : Idle
Red : Busy
11
10
9
8
22
21
20
19
33
32
31
30
44
43
42
41
55
54
53
52
66
65
64
63
7 18 29 40 5 1 62
6 17 2 8 39 50 61
5 16 2 7 38 49 60
4 15 2 6 37 48 59
3 14 2 5 36 47 58
2 13 2 4 35 46 57
1 12 2 3 34 45 56
SUPER HYBRID SYSTEM
KX-T7440
8
7
6
5
16
15
14
13
24
23
22
21
32
31
30
29
40
39
38
37
48
47
46
45
4 12 20 28 36 44
3 11 19 27 35 43
2 10 18 26 34 42
1 9 17 25 33 41
SUPER HYBRID SYSTEM
ANSWER RELEASE
KX-T7441
■ KX-T7440 ■KX-T7441
ANSWER Button
Used to answer an
incoming call.
RELEASE Button
Used to disconnect
the line.
Attaching a Proprietary Telephone
This unit can be connected to a Panasonic
digital proprietary telephone.
Use the attached plate and screws.
PSQX1526ZA 98.8.5 7:32 PM Page 3
Page 8
4
Wall Mounting
This unit can be mounted on a wall.
1 Remove the attached stand.
2 Turn the stand in the opposite
direction.
3 Attach the stand.
4 Mount the unit on the wall phone
plate.
PSQX1526ZA 98.8.5 7:32 PM Page 4
Page 9

Important Safety Instructions
5
When using your telephone equipment,
basic safety precautions should always be
followed to reduce the risk of fire, electric
shock and injury to persons, including the
following:
1. Read and understand all
instructions.
2. Follow all warnings and
instructions marked on the product.
3. Unplug this product from the wall
outlet before cleaning. Do not use
liquid cleaners or aerosol cleaners.
Use a damp cloth for cleaning.
4. Do not use this product near water,
for example, near a bath tub, wash
bowl, kitchen sink, or laundry tub,
in a wet basement, or near a
swimming pool.
5. Do not place this product on an
unstable cart, stand, or table. The
product may fall, causing serious
damage to the product.
6. Slots and openings in the cabinet
and the back or bottom are
provided for ventilation, to protect
it from overheating, these openings
must not be blocked or covered.
The openings should never be
blocked by placing the product on
the bed, sofa, rug, or other similar
surface. This product should never
be placed near or over a radiator or
heat register. This product should
not be placed in a built-in
installation unless proper
ventilation is provided.
7. Do not allow anything to rest on
the telephone cord. Do not locate
this product where the cord will be
abused by persons walking on it.
8. Do not overload wall outlets and
extension cord as this can result in
the risk of fire or electric shock.
9. Never push objects of any kind
into this product through cabinet
slots as they may touch dangerous
voltage points or short out parts
that could result in a risk of fire or
electric shock. Never spill liquid of
any kind on the product.
10. To reduce the risk of electric
shock, do not disassemble this
product, but take it to a qualified
serviceman when some service or
repair work is required. Opening or
removing covers may expose you
to dangerous voltages or other
risks. Incorrect reassembly can
cause electric shock when the
appliance is subsequently used.
11. Unplug this product from the wall
outlet and refer servicing to
qualified service personnel under
the following conditions:
A. When the power supply cord or
plug is damaged or frayed.
B. If liquid has been spilled into
the product.
C. If the product has been exposed
to rain or water.
PSQX1526ZA 98.8.5 7:32 PM Page 5
Page 10

Important Safety Instructions
6
D. If the product does not operate
normally by following the
operating instructions. Adjust
only those controls, that are
covered by the operating
instructions because improper
adjustment of other controls
may result in damage and will
often require extensive work by
a qualified technician to restore
the product to normal
operation.
E. If the product has been dropped
or the cabinet has been
damaged.
F. If the product exhibits a distinct
change in performance.
12. Avoid using a telephone (other
than a cordless type) during an
electrical storm. There may be a
remote risk of electric shock from
lightning.
13. Do not use the telephone to report
a gas leak in the vicinity of the
leak.
SAVE THESE
INSTRUCTIONS
PSQX1526ZA 98.8.5 7:32 PM Page 6
Page 11

FCC and Other Information
7
NOTE:
This equipment has been tested and found
to comply with the limits for a Class B
digital device, pursuant to Part 15 of the
FCC Rules. These limits are designed to
provide reasonable protection against
harmful interference in a residential
installation. This equipment generates,
uses and can radiate radio frequency
energy and, if not installed and used in
accordance with the instructions, may
cause harmful interference to radio
communications. However, there is no
guarantee that interference will not occur
in a particular installation. If this
equipment does cause harmful
interference to radio or television
reception, which can be determined by
turning the equipment off and on, the user
is encouraged to try to correct the
interference by one or more of the
following measures:
– Reorient or relocate the receiving
antenna.
– Increase the separation between the
equipment and receiver.
– Connect the equipment into an outlet on
a circuit different from that to which the
receiver is connected.
– Consult the dealer or an experienced
radio/TV technician for help.
WARNING:
TO PREVENT FIRE OR SHOCK
HAZARD, DO NOT EXPOSE THIS
PRODUCT TO RAIN OR ANY TYPE
OF MOISTURE.
CAUTION:
To assure continued compliance with
FCC rules, do not make any unauthorized
modifications. When programming
emergency numbers and/or making test
calls to emergency numbers:
1) Remain on the line and briefly
explain to the dispatcher the reason
for the call before hanging up.
2) Perform such activities in the offpeak hours, such as early morning
hours or late evenings.
If there is any trouble, disconnect the unit
from the extension line and connect a
known working phone. If the known
working phone operates properly, have it
repaired by one of the specified Panasonic
Factory Service Centers. If the known
working phone does not operate properly,
check the Electronic Modular Switching
System and the internal extension wiring.
• Keep the unit away form heating
appliances and electrical noise
generating devices such as fluorescent
lamps and motors.
• The unit should be kept free of dust,
moisture and vibration, and should not
be exposed to direct sunlight.
• Do not use benzine, thinner, or the like,
or any abrasive powder to clean the
cabinet. Wipe it with a soft cloth.
PSQX1526ZA 98.8.5 7:32 PM Page 7
Page 12

SERIAL NO. DATE OF PURCHASE
(found on the bottom of the unit)
NAME OF DEALER
DEALER’S ADDRESS
For your future reference
When you ship the product
Carefully pack and sent it prepaid, adequately insured and preferably in the original
carton. Attach a postage-paid letter, detailing the symptom to the outside of the carton.
DO NOT send the product to the Executive or Regional Sales offices. They are NOT
equipped to make repairs.
Product service
Panasonic Servicenters for this product are listed in the servicenter directory.
Consult your authorized Panasonic dealer for detailed instructions.
Panasonic Consumer Electronics
Company,
Division of Matsushita Electric
Corporation of America
One Panasonic Way, Secaucus,
New Jersey 07094
Printed in the United Kingdom
PSQX1526ZA KU0898TT0
Panasonic Sales Company
(“PSC”), Division of Matsushita
Electric of Puerto Rico, Inc.
Ave. 65 de Infantería, Km. 9.5,
San Gabriel Industrial Park,
Carolina, Puerto Rico 00985
PSQX1526ZA 98.8.5 7:32 PM Page 8
Page 13
Digital Proprietary Telephones
for Digital Super Hybrid Systems
Operating Instructions
Model KX-T7420
KX-T7425
KX-T7431
KX-T7433
KX-T7436
KX-T7436
Please read this manual before using the
Digital Proprietary Telephone.
PSQX1525ZA 98.8.6 7:39 PM Page 1
Page 14

2
Thank you for purchasing a Panasonic Telephone.
Accessories
Handset ...................................................... one
Telephone line cord ..................................... one
Handset cord .............................................. one
Overlay ...................................................... one (KX-T7431, KX-T7433 and
KX-T7436 only)
Card holder with memory station card .......... one (KX-T7420, KX-T7425 only)
SERIAL NO. DATE OF PURCHASE
(found on the bottom of the unit)
NAME OF DEALER
DEALER’S ADDRESS
For your future reference
When you ship the product
Carefully pack and sent it prepaid, adequately insured and preferably in the original
carton. Attach a postage-paid letter, detailing the symptom to the outside of the carton.
DO NOT send the product to the Executive or Regional Sales offices. They are NOT
equipped to make repairs.
Product service
Panasonic Servicenters for this product are listed in the servicenter directory. Consult
your authorized Panasonic dealer for detailed instructions.
When unpacking, check the following items.
PSQX1525ZA 98.8.6 7:39 PM Page 2
Page 15

3
Location of Controls ......................................................................... 4
Getting Started................................................................................... 6
Connection.................................................................................................. 6
Controlling the volume/adjusting the display contrast ................................. 6
Description of the symbols.......................................................................... 7
Making Calls....................................................................................... 8
Calling ......................................................................................................... 8
Speed dialing............................................................................................... 8
One-touch dialing........................................................................................ 8
Dialing the last number you dialed (Last Number Redial) .......................... 8
Receiving Calls.................................................................................. 9
Receiving calls ............................................................................................ 9
Handsfree answerback................................................................................ 9
Picking up a call for someone else (Call Pickup) ........................................ 9
When the Dialed Extension is Busy/No Answer........................... 10
Reserving a busy line (Automatic Callback Busy) .................................... 10
Leaving a call notification (Message Waiting) ........................................... 10
Calling Back..................................................................................... 11
When you receive a notification (Message Waiting)................................. 11
Calling using the call log (Incoming Call Log) (KX-T7433/KX-T7436 only)..... 11
During a Conversation.................................................................... 12
Placing a call on hold................................................................................ 12
Transferring a call ..................................................................................... 13
Paging....................................................................................................... 13
Paging a person and transferring a call.................................................... 14
Answering an announced page................................................................. 14
Answering a call waiting ............................................................................ 14
Useful Features................................................................................ 15
Forwarding your calls (Call Forwarding) ................................................... 15
Preventing others from disturbing you (Do Not Disturb [DND])................ 17
Three-party conversation (Conference).................................................... 17
Ringing tone selection for CO buttons...................................................... 18
Storing numbers for One-touch dialing ..................................................... 18
How to Use the Display................................................................... 19
Using the Jog Dial..................................................................................... 19
KX-T7431.................................................................................................. 20
KX-T7433.................................................................................................. 21
KX-T7436.................................................................................................. 23
Storing in Speed Dialing................................................................. 25
Storing names and numbers at your extension for personal use ............. 25
Storing names and numbers in the system............................................... 27
Wall Mounting.................................................................................. 28
Installing the Card Holder............................................................... 29
Features List .................................................................................... 30
Important Safety Instructions......................................................... 32
FCC and Other Information ............................................................ 34
Contents
PSQX1525ZA 98.8.6 7:39 PM Page 3
Page 16

4
Location of Controls
KX-T7431
KX-T7436
MODESELECT
KX-T7431
SUPER HYBRID SYSTEM
MODE
LCD (Liquid Crystal Display)
SELECT
KX-T7433
SHIFT
KX-T7433
SUPER HYBRID SYSTEM
LCD (Liquid Crystal Display)
Soft Buttons (S1 through S3)
SHIFT
FLASH
AUTO D IAL
STORE
AUTO A NSWER
MUTE
MESSA GE
SP-PHONE
HOLD
REDIA L
1 2 3 4 5 6
7 8 9 10 11 12
13 14 15 16 17 18
19 20 21 22 23 24
PROGR AM TRAN SFERPAUSEFWD/D NDINTER COM CONF
ABC DEF
JKL MNOGHI
TUV W XY
OPER
PRS
SHIFT
SUPER HYBRID SYSTEM
MIC
KX-T743 6
LCD (Liquid Crystal Display)
Function Buttons
(F1 through F10)
Soft Buttons
(S1 through S3)
Flexible
Outside
(CO) Line
Buttons
INTERCOM
CONF
(Conference)
FWD/DND
(Call Forwarding/Do Not Disturb)
REDIAL HOLD
SP-PHONE (Speakerphone)
MIC (Microphone)
FLASH
Jog Dial
AUTO DIAL
/STORE
SHIFT
PAUSE
MESSAGE
AUTO ANSWER
/MUTE
PROGRAM
TRANSFER
* The KX-T7420 and KX-T7425 are non-display models.
PSQX1525ZA 98.8.6 7:39 PM Page 4
Page 17

5
The display can be adjusted.
1 Press the LCD ADJ button.
2 Lift or put down the display.
LCD ADJ
button
Display
For KX-T7433 and KX-T7436 Users
AUTO ANSWER/MUTE
AUTO ANSWER is used to answer
an intercom call.
MUTE is used to listen to the other
party without them hearing you.
AUTO DIAL/STORE
Used for speed dialing in the system
or storing program changes.
CONF
Used to make a three-party conference.
FLASH
Used to disconnect the current call
and make another call with holding
the same outside line.
Flexible Outside (CO) Line Button
Used to make or receive an outside
call, or access a feature if the button
is assigned as a One-touch dialing
button.
Function Button
Used to perform the displayed
function or operation.
FWD/DND
Used to perform Call Forwarding or
Do Not Disturb.
HOLD
Used to place a call on hold.
INTERCOM
Used to make or receive intercom calls.
Jog Dial
Used to adjust the volume and the
display contrast or select desired items
for each functions.
MESSAGE
Used to leave a notification or call
back the party who left the
notification.
MODE
Used to set the display to access a
feature.
PAUSE
Used to insert a pause in speed dial
numbers or in other numbers.
PROGRAM
Used to enter and exit the
programming mode.
REDIAL
Used to redial.
SELECT
Used to select the displayed function
or to call the displayed phone
number.
SHIFT
Used to alternate the sub function on
the display.
Soft Button
Used to perform the function or
operation that appears on the bottom
line of the display.
SP-PHONE
Used for the handsfree operation.
TRANSFER
Used to transfer a call to another
party.
MODE
AUTO ANSWER
MUTE
AUTO DIAL
STORE
SELECT
CONF
FLASH
FWD/DND
HOLD
INTERCOM
MESSAGE
PAUSE
PROGRAM
REDIAL
SHIFT
SP-PHONE
TRANSFER
PSQX1525ZA 98.8.6 7:39 PM Page 5
Page 18

6
Getting Started
* While rotating the Jog Dial, the display shows the volume level.
Connection
Controlling the volume/adjusting the display contrast
→ Connect to a Digital Super Hybrid System (
TO MAIN UNIT
).
→ Connect to a standard telephone jack (
TO TEL
),
telephone answering machine, or fax for XDP*
or parallel connections.
The telephone line cord (included)
< Back view >
* For more details about XDP,
consult with your dealer.
Speaker volume
1 Press the SP-PHONE button.
2 Rotate the Jog Dial in the desired
direction.*
Handset/Headset volume
1 Lift the handset.
(Press the SP-PHONE button for
headset volume.)
2 Rotate the Jog Dial in the desired
direction.*
Display contrast
While idle and on-hook
1 Press the MODE button six
times.
Display:
2 Rotate the Jog Dial in the desired
direction.*
Ringer volume
While idle and on-hook
1 Press the MODE button five
times.
Display:
2 Rotate the Jog Dial in the desired
direction.*
Ringer: Contrast:
For KX-T7431 Users
Ringer volume
1 Adjust the RINGER Volume
selector lever to the desired
setting (OFF/LOW/HIGH).
For KX-T7420 and KX-T7425 Users
<Side view of the KX-T7420 and KX-T7425>
RINRIN GE RG ER
HIGHHIGH
LOWLOW
OFFOFF
RINGER Volume selector
PSQX1525ZA 98.8.6 7:39 PM Page 6
Page 19

7
Description of the symbols
In this manual, many symbols are used. Some of the symbols are described below.
Off-hook
• Lift the handset.
• Press the SP-PHONE
button.
On-hook
• Replace the handset.
• Press the SP-PHONE
button.
Press the desired number keys
on the telephone.
Various tones are heard
depending on the operation.
• If the other party’s voice is difficult to hear;
Raise the sound level using the speaker volume control.
• If the other party has difficulty hearing you;
Lower the speaker volume.
• Absorbing echoes;
Use this unit in a room which has curtains and/or carpeting.
• To avoid missing part of the conversation;
If you and the other party speak at the same time, parts of your conversation will be
lost. To avoid this, speak alternately.
Helpful hints for the handsfree operation
Display contrast
While on-hook or during a
conversation
1 Press the CONT (S1) button.
Display:
2 Rotate the Jog Dial in the desired
direction.*
Ringer volume
While idle and on-hook
1 Press the RING (S2) button.
Display:
2 Rotate the Jog Dial in the desired
direction.*
Ringer:
Contrast:
For KX-T7433 and KX-T7436 Users
* While rotating the Jog Dial, the display shows the volume level.
PSQX1525ZA 98.8.6 7:39 PM Page 7
X Y
Page 20

8
Making Calls
Speed dialing
Using a speed dial number stored in your telephone
Using a speed dial number stored in the system
To store numbers,
refer to page 27.
To store numbers,
refer to page 25.
Calling
To an extension To an external party
One-touch dialing
To store numbers,
refer to page 18.
Dialing the last number you dialed (Last Number Redial)
extension no.
Off-hook. Talk.Dial the extension
number.
PSQX1525ZA 98.8.6 7:39 PM Page 8
CO
phone no.
Off-hook. Press an idle
CO button.
3
Off-hook. Dial the station speed
Dial 3 .
station speed
dial no.
dial number (0-9).
Talk.
AUTO DIAL
STORE
Off-hook. Press the
AUTO DIAL/STORE
button.
system speed
dial no.
Dial the system
speed dial number.
Talk.
number.
Talk.Dial the phone
Off-hook. Talk.Press the One-touch dialing button.
REDIAL
Off-hook. Talk.Press the REDIAL button.
Page 21

9
Receiving Calls
Receiving calls
If your telephone rings,
• Lift the handset or press the SP-PHONE button.
(Default: The ringing line is selected.)
• Press the rapid flashing green outside (CO) line
button or rapid flashing INTERCOM button.
Handsfree answerback
You can answer an intercom call without lifting the handset.
The AUTO ANSWER/MUTE button light shows the current status as follows.
On: Set
Off: Not set
To set / cancel
Picking up a call for someone else (Call Pickup)
You can answer an incoming call that is ringing at another extension from your
telephone. A call within your extension group can be picked up.
Off-hook.
Talk.
PSQX1525ZA 98.8.6 7:39 PM Page 9
While on-hook
AUTO ANSWER
MUTE
Press the AUTO ANSWER/MUTE button.
4 0
Off-hook.
Dial 40.
Confirmation tone
Talk.
Page 22

10
When the Dialed Extension is Busy/No Answer
Reserving a busy line (Automatic Callback Busy)
You can receive a notification when a busy extension becomes free.
To answer the notification, lift the handset or press the SP-PHONE button. The
called extension starts ringing automatically.
To set
To answer and call*
2
*1The C.BCK (S3) button is only available
for KX-T7433 and KX-T7436 users.
*
2
If you do not answer after four callback
rings, this feature will be canceled.
Leaving a call notification (Message Waiting)
When the called extension is busy or does not answer, you can leave a notification to
have the called extension call you back.
To leave a notification
To cancel a notification
When hearing a busy tone
On-hook.Dial 6 or press the C.BCK (S3) button.*1Confirmation tone
OR
6
C.BCK
PSQX1525ZA 98.8.6 7:39 PM Page 10
If you hear call back ringing
Off-hook.
The extension is
called automatically.
When the called extension is busy or does not answer
MESSAGE
Press the MESSAGE button.
7 0 0
extension no.
On-hook.Confirmation tone
On-hook.Confirmation toneOff-hook. Dial 700. Dial the extension number.
Page 23

11
Calling Back
When you receive a notification (Message Waiting)
The MESSAGE button lights to let you know that a call has been received.
To check and select the party
(display telephone only) To call back
To clear all notifications
Press the MESSAGE button
until the desired message appears.
While on-hook
MESSAGE
Calling using the call log (Incoming Call Log)
(KX-T7433/KX-T7436 only)
If you do not answer a call, your telephone automatically records the incoming
outside call information with the CLIP (Calling Line Identification Presentation)
service*. You can also record the existing call during a conversation or call back the
logged numbers. To confirm or call back using the call log, refer to pages 22 (for
KX-T7433) and 24 (for KX-T7436).
* The CLIP service provides you with the caller’s telephone number.
For more details, consult with your dealer.
To record the information of an existing call
During a conversation
Press the LOG (S2) button.
LOG
PSQX1525ZA 98.8.6 7:39 PM Page 11
MESSAGE
Off-hook. Press the
MESSAGE button.
Talk.
your
extension no.
Enter your
extension number.
On-hook.Confirmation tone
Off-hook.
7 0 0
Dial 700.
Page 24

12
During a Conversation
Placing a call on hold
The corresponding outside (CO) line button or the INTERCOM button lights show
the current status as follows.
Flashing green slowly: Your held call
Flashing red slowly: Another extension’s held call
Holding
To retrieve a call at the holding extension*
To retrieve an outside call from another extension*
On-hook.Dial tonePress the HOLD button.
HOLD
* If a call is not retrieved
within a specified time,
you will hear an alarm as
a reminder.
PSQX1525ZA 98.8.6 7:39 PM Page 12
CO
INTERCOM
Off-hook. Press the CO or INTERCOM button.ORTalk.
CO
Off-hook. Press the CO button. Talk.
Page 25

13
Transferring a call
Using the TRANSFER button
To an extension
To an external party
*
2
*1To retrieve the held call, press the TRANSFER button, corresponding Outside (CO)
line button, or the INTERCOM button.
*
2
Transferring a call to an external party may be restricted by System Programming.
Through Paging
Refer to page 14, “Paging a person and transferring a call”.
Paging
You can make a voice announcement to all people in the office through the
telephone speaker and external speaker at the same time.
Dial tonePress the TRANSFER
button.
Announce.
extension no.
Enter the extension
number.*
1
TRANSFER
On-hook.
PSQX1525ZA 98.8.6 7:39 PM Page 13
TRANSFER
button.
CO
Press the
CO button.
phone no.
Enter the phone
number.*
1
Announce.
33
Off-hook.
Dial 33 .
Announce.Confirmation tone
On-hook.Dial tonePress the TRANSFER
Page 26

14
During a Conversation
Paging a person and transferring a call
Answering an announced page
Answering a call waiting
During a conversation, a call waiting tone occurs when an outside call is received or
another extension is letting you know that another call is waiting. (Default: Cancel)
To set / cancel
To talk to the new party
*1If you terminate the
current call,
disregard this step.
*
2
If both parties are
extensions, disregard
this step.
During a conversation
Announce
and wait for
an answer.
Confirmation
tone
On-hook.
Press the
TRANSFER
button.
TRANSFER
33
Dial 33 .
PSQX1525ZA 98.8.6 7:39 PM Page 14
Through a telephone speaker
4 3
Off-hook.
Dial 43.
Confirmation tone
Talk.
Through an external speaker
+
external pager no.
Confirmation tone
Talk.
Off-hook.
4 2
Dial 42 and the external pager number.
7 3 1
7 3 110
To cancel: Dial 7310.
To set
To cancel
While hearing a tone
HOLD
CO
OR
INTERCOM
1
Press the CO or INTERCOM button.*Press the HOLD button.*
2
On-hook.Confirmation toneOff-hook. To set: Dial 7311.
Page 27

15
Useful Features
Forwarding your calls (Call Forwarding)
You can have your incoming calls forwarded to another extension or external party.
All calls
All calls are forwarded to another extension.
On-hook.Confirmation
tone
Off-hook. Press the
FWD/DND button.
extension no.
2
FWD/DND
Dial 2 and the extension
number.
Busy
All calls are forwarded to another extension when your extension is busy.
No answer
All calls are forwarded to another extension when you do not answer the call.
Busy/No answer (BSY N/A)
All calls are forwarded to another extension when you do not answer or when your
extension is busy.
On-hook.Confirmation
tone
Off-hook. Press the
FWD/DND button.
extension no.
5
FWD/DND
Dial 5 and the extension
number.
PSQX1525ZA 98.8.6 7:39 PM Page 15
FWD/DND
Off-hook. Press the
FWD/DND button.
extension no.
3
Dial 3 and the extension
number.
tone
On-hook.Confirmation
extension no.
FWD/DND
Off-hook. Press the
FWD/DND button.
4
Dial 4 and the extension
number.
tone
On-hook.Confirmation
Page 28

16
Useful Features
To outside (CO) line
All calls are forwarded to an external party. Some extensions may be restricted.
Follow Me (From)
All calls are forwarded to another extension which you set to receive your calls.
Canceling (except Follow Me)
On-hook.Confirmation
tone
Off-hook. Press the
FWD/DND button.
FWD/DND
Dial 7 and your extension
number.
your
extension no.
7
Canceling Follow Me
On-hook.Confirmation
tone
Off-hook. Press the
FWD/DND button.
FWD/DND
Dial 8 and your extension
number.
your
extension no.
8
PSQX1525ZA 98.8.6 7:39 PM Page 16
FWD/DND
6
#
phone no.
9
Off-hook. Press the
FWD/DND button.
Dial 69, the phone number
and #.
tone
On-hook.Confirmation
FWD/DND
FWD/DND button.
0
Dial 0.
On-hook.Confirmation toneOff-hook. Press the
Page 29

17
Preventing others from disturbing you
(Do Not Disturb [DND])
During a meeting or when you are busy, you can refuse an incoming call.
On-hook.Confirmation
tone
Off-hook. Press the FWD/DND
button.
To set: Dial 1.
To cancel: Dial 0.
0
1
FWD/DND
To set
To cancel
Three-party conversation (Conference)
You can add another party during a conversation.
Adding a third party during a conversation
*1To add an external party, press an outside (CO) line button and dial the phone number.
To talk to one party by terminating the other
*2This is only available for a combination of one extension and two outside (CO) lines
or two extensions and one outside (CO) line.
*
3
If the other parties are both outside lines, they will be disconnected.
Confirmation
tone
Press the
CONF button.
Enter the third
party’s number.*
1
Press the
CONF button.
Talk to the
third party.
third party’s no.
CONF CONF
Leaving a conference
PSQX1525ZA 98.8.6 7:39 PM Page 17
CO
OR
INTERCOM
Press the CO or
INTERCOM button.*
2
Confirmation
tone
On-hook.*
3
Page 30

18
Useful Features
Ringing tone selection for CO buttons
You can select the desired ringer frequency for each outside (CO) line button.
To program
Storing numbers for One-touch dialing
The stored number is dialed automatically by pressing an outside (CO) line button
which is assigned as a one-touch dialing button.
To program
Enter the tone
type number
(1 through 8).
tone type no.
Press the
PROGRAM
button.
Dial 99. Press the CO
button twice.
Press the
AUTO DIAL/
STORE
button.
Press the
PROGRAM
button.
9 9
PROGRAM PROGRAM
AUTO DIAL
STORE
CO CO
PSQX1525ZA 98.8.6 7:39 PM Page 18
PROGRAM PROGRAM
Press the
9 9 2
Dial 99. Press
PROGRAM
button.
CO
the
desired
Dial 2.
desired number
Enter the desired
number.
CO button.
AUTO DIAL
STORE
Press the
AUTO DIAL/
STORE button.
Press the
PROGRAM
button.
Page 31

19
How to Use the Display
* For more details about the accessible features, refer to your Digital Super Hybrid
system manual or consult with your dealer.
Using the Jog Dial
Using the display message and the Jog Dial, KX-T7431, KX-T7433 and KX-T7436
users can make a call or operate the features without programming the feature
numbers. The displays used in this page are a KX-T7431.
System Feature Access
Feature Access
You can make an
intercom call using
the directory.
You can make a call
to a party stored in
the system using the
directory.
You can make a call
to a party stored in
your telephone using
the directory.
Only items which have a
name assigned are
displayed in alphabetical
order.
Items which have a name
assigned are displayed by
priority in stored order.
If a name is not assigned,
the number is displayed.
You can access the features which are displayed
in alphabetical order.*
Extension Dialing
Extension
System Speed Dialing
System Speed
Station Speed Dialing
Station Speed
PSQX1525ZA 98.8.6 7:39 PM Page 19
Page 32

20
How to Use the Display
KX-T7431
→To m J ones
→BS Y O vr DNY 1 /0
System Speed
Dialing
Station Speed
Dialing
Extension
Dialing
System Feature
Access
If a parameter is
required, the feature
name and parameter
will flash.
< Initial Display >
WE D J AN0 1 0 3:0 0p
< Second Display >
Sy ste m S pee d
< Third Display >
St ati on Spe ed
< Fourth Display >
Ex ten sio n
< Fifth Display >
Fe atu re Acc ess
< Sixth Display >
Ri nge r:
< Seventh Display >
Co ntr ast :
MODE
MODE MODE MODE
MODE
MODEMODE
1 Press the MODE button repeatedly to
11 set the display to the Jog Dial function
11 (the second to fifth displays).
2 Rotate the Jog Dial
2 until the desired item
2 is at the arrow on
2 the display.
3 Press the SELECT
2 button.
4 Enter a parameter, if required or follow the procedure for
4 standard operation (for System Feature Access only).
Operating the feature
PSQX1525ZA 98.8.6 7:39 PM Page 20
Page 33

21
KX-T7433
Operating the feature
Bo b Jo n es
Ca r ol
ME N U
CA L L
→
An n Pa r ker
Al i ce
ME N U
CA L L
→
If a parameter is required,
the feature name and
parameter will flash.
EXT
FEATSTA
SHIFT
WED JAN01 03:00p
< Third Display >
1 Press the SHIFT button repeatedly to set
1 the display to the third display.
Extension
Dialing
Station Speed
Dialing
System Feature
Access
2 Select the desired feature.*
• Press the STA (S1) button
(for Station Speed Dialing).
• Press the EXT (S2) button
(for Extension Dialing).
• Press the FEAT (S3) button
(for System Feature Access).
3 Rotate the Jog Dial until
2 the desired item is at the
2 arrow on the display.
4 • Press the CALL (S3) button
2 (for System Speed Dialing,
2 Station Speed Dialing and
2 Extension Dialing).
2 • Press the SEL (S3) button
2 (for System Feature Access).
* Step 2 can be skipped for System Speed Dialing.
BS Y Ov r DNY 1/0
C. P ick u p CO
ME N U
SE L
→
System Speed
Dialing
5 Enter a parameter, if required or follow the procedure for
5 standard operation (for System Feature Access only).
PSQX1525ZA 98.8.6 7:39 PM Page 21
Page 34

22
How to Use the Display
Confirming and calling back using the call log
To see another
caller’s
information
Pressing the INFO button provides
you with more information.
• Once: sequence number/caller’s
name
• Twice: date/time/number of times
called (15 times max.)
• Three times: outside line number
/outside line name
NEW5
OLD7
SHIFT
WED JAN01 03:00p
< Second Display >
The sequence
number and
caller’s number
are displayed.
CLR
INFO
SHIFT
01 :011111111
NEXT
CALL
SHIFT
05 :011223344
Press the SHIFT button to set the
display to the second display.
Select the desired call log.
• Press the OLD (S1) button to see the
confirmed information.
• Press the NEW (S2) button to see
the unconfirmed information.
• Press the INFO (S1) button to see the
information in detail.
• Press the NEXT (S3) button to see
another caller’s information.
Off-hook.
Press the CALL (S1) button.
PSQX1525ZA 98.8.6 7:39 PM Page 22
Page 35

23
KX-T7436
If a parameter is required,
the parameter will flash.
SHIFT
< Third Display >
1 Press the SHIFT button repeatedly to set
the display to the third display.
Extension
Dialing
Station Speed
Dialing
System Feature
Access
2 Select the desired feature.*
• Press the STA (S1) button
(for Station Speed Dialing).
• Press the EXT (S2) button
(for Extension Dialing).
• Press the FEAT (S3) button
(for System Feature Access).
3 Rotate the Jog Dial until the
3 desired item is at the arrow
3 on the display.
4 • Press the CALL (S3) button
3 (for System Speed Dialing,
3 Station Speed Dialing and
3 Extension Dialing).
2 • Press the SEL (S3) button
3 (for System Feature Access).
3 Or press the corresponding
3 buttons on the side of the display
3 (Function button).
* Step 2 can be skipped for System Speed Dialing.
System Speed
Dialing
EXT FEAT
STA
WED JAN01 03:00p
Extension STA Speed
Features SYS Speed
Call Log
NEXT
MENU
Ronald
Zaydel
Adam
Alice
Ann Parker
MENU
CALL
→
NEXT
MENU
Ann Parker
Beth
Bob Jones
Carol
Chris
MENU
CALL
→
NEXT
MENU
Absent MSG off
Absent MSG on (→1-9)
Busy Ovrd Deny (→1/0)
C.Pickup CO
C.Pickup Deny (→1/0)
MENU
SEL
→
5 Enter a parameter if required or follow the procedure for standard
5 operation (for System Feature Access only).
Operating the feature
PSQX1525ZA 98.8.6 7:39 PM Page 23
Page 36

24
How to Use the Display
Confirming and calling back using the call log
CO02:AB COMPANY
0102030405
Bob Jones
Oct30 09:03PM
SEQ01 2 Calls
CALL
CLR
MENU
1234567890
111
0987654
000111222333
100200300400500
Call Log, Outgoing
To make a call using the
call log (last five outside
calls you dialled).
To see the
unconfirmed
information
NEXT
MENU
CO02:AB COMPANY
0102030405
Bob Jones
Oct30 09:03PM
SEQ01 2 Calls
MENU
NEXTCLR
Outside line number/name
Caller’s telephone number
Caller’s name
Date and time
Sequence number (01-15)
/number of times called
(15 times max.)
To see another
caller’s
information
SHIFT
< Second Display >
NEW5
OLD7
WED JAN01 03:00P
Extension STA Speed
Features SYS Speed
Call Log
display to the second display.
• Press the Function button (call log)
to call a number previously dialed
(for the outgoing call log).
• Press the OLD (S1) button to see the
confirmed call information you
received.
• Press the NEW (S2) button to see the
unconfirmed call information you
received.
To see the
confirmed
information
see another caller’s information.
*
* Step 3 and 5 can be skipped for the outgoing call log.
PSQX1525ZA 98.8.6 7:39 PM Page 24
Page 37

25
Storing in Speed Dialing
Storing names and numbers at your extension for personal
use
To store a phone number
*1“ ” and PAUSE
can be also stored as digits.
To store a phone number
– For KX-T7431 and KX-T7433 users
*
2
– For KX-T7436 users
Off-hook.
On-hook.
Dial 30.
Dial #. Confirmation tone
Enter the station speed dial number (0-9).
phone no.
station speed dial no.
3 0
Enter the phone number.*
1
*2This is only available for KX-TD816/1232 users.
*
3
“ ”, “#”, FLASH, SECRET (INTERCOM)
,-(CONF) and PAUSE can be also stored.
PSQX1525ZA 98.8.6 7:39 PM Page 25
9 9
PROGRAM
Press the PROGRAM
button and dial 99.
AUTO DIAL
STORE
AUTO DIAL/STORE button.
Dial and enter the station
speed dial number (0-9).
station speed dial no.
station speed dial no.
Confirmation tonePress the
PROGRAM
Press the PROGRAM
button and dial 99.
Confirmation tone
9 9
Press the desired
function button.
PROGRAM
Press the PROGRAM
button.
To continue
To continue
desired no.
Enter the
desired number
(16 digits max.).*
desired no.
Enter the desired number
(16 digits max.).*
PROGRAM
Press the
PROGRAM button.
Press the
AUTO DIAL/STORE
3
button.
3
AUTO DIAL
STORE
Page 38

26
Storing in Speed Dialing
– For KX-T7436 users
*1This is only available for KX-TD816/1232 users.
*
2
To enter characters, press 2 and rotate the Jog Dial to select the character.
You can continue entering characters by pressing 2 and using the jog dial repeatedly.
To correct a wrong entry, press the TRANSFER button and enter the new one.
Confirmation tone
Press the PROGRAM
button and dial 99.
Press the
AUTO DIAL/STORE
button.
Press the
desired function
button.
Press the PROGRAM
button.
To continue
name
NEXT
Press the NEXT (S3) button
and enter the desired name
(10 characters max.).*
9 9
PROGRAM
PROGRAM
AUTO DIAL
STORE
2
1 Press 2, rotate the Jog Dial to enter “M”.
2 Press 2, rotate the Jog Dial to enter “i”.
3 Press 2, rotate the Jog Dial to enter “k”.
4 Press 2, rotate the Jog Dial to enter “e”.
Example: To enter “Mike”
To store a name
– For KX-T7431 and KX-T7433 users
*
1
Press the
PROGRAM button.
Confirmation
tone
Press the
AUTO DIAL/STORE button.
name
Enter the desired name
(10 characters max.).*
Press the MODE or
NEXT (S3) button.
NEXT
OR
MODE
PROGRAM
AUTO DIAL
STORE
Press the PROGRAM
button and dial 99.
9 9
station speed dial no.
station speed dial no.
PROGRAM
Dial and enter the station
speed dial number (0-9)
.
2
To continue
PSQX1525ZA 98.8.6 7:39 PM Page 26
Page 39

27
Storing names and numbers in the system
As the stored numbers can be used by all of the users in the system, confirm the
stored entries with other users.
To store a phone number
To store a name
Press the
PROGRAM button.
desired no.
Enter the user
password.
Dial .
User Password
Press the
AUTO DIAL/STORE
button.
Enter the desired
number.
speed dial no.
Enter the speed dial
number (000-499).
*
Dial 001.
NEXT
Press the NEXT
(S3) button.
0 0 1
PROGRAM
Press the
PROGRAM button.
PROGRAM
AUTO DIAL
STORE
1
Press the HOLD
button.
2
HOLD
Confirmation tone*
*1100 speed dial numbers (00-99) can be stored in the KX-TD308.
*
2
You can continue entering the number/name by pressing the NEXT (S3) or
SP-PHONE button after the confirmation tone.
PSQX1525ZA 98.8.6 7:39 PM Page 27
PROGRAM
Press the
PROGRAM button.
speed dial no.
Enter the speed dial
number (000-499).*
HOLD
Press the HOLD
button.
Dial .
Enter the desired
1
name.
Press the
PROGRAM button.
User Password
Enter the user
password.
desired name
PROGRAM
0 0 2
Dial 002.
AUTO DIAL
STORE
Press the
AUTO DIAL/STORE
button.
NEXT
Press the NEXT
(S3) button.
Confirmation tone*
2
Page 40

28
Wall Mounting
1 Remove the handset hook by pulling it
toward the top of the unit. Turn it
around and re-insert it.
2 Remove the attached stand.
3 Turn it around 180 degrees.
4 Insert the stand in the center slots.
5 Mount the unit on the wall.
To temporary place the handset
down during a conversation.
Hook it over the top edge of the phone
as shown.
* The illustrations used in this page are a KX-T7436.
PSQX1525ZA 98.8.6 7:39 PM Page 28
Page 41

29
Installing the Card Holder
The KX-T7420 and KX-T7425 are equipped with a card holder with memory
station card. Follow the instructions below to install the card holder to the unit.
1 Place the card holder edges so that
they can be inserted under the
slide rails on the unit.
2 While pushing on the areas
marked “PUSH”, insert the edges
of the holder under the slide rails
and then slide in the direction of
arrow .
Remove the card holder:
Push the card holder in the direction
of arrow . Then, while pressing on
the tab, pull the top of the holder in
the direction of arrow .
PUSH
PUSH
PUSH
PUSH
A
PUSH
PUSH
B
C
PSQX1525ZA 98.8.6 7:39 PM Page 29
A
B
C
Page 42

30
Features List
Desired Function Operation
Setting Absent
Message
Account Code Entry
Sending a Call
Waiting tone (BSS)
Forwarding a call
Holding a call
Holding a call
exclusively
Parking a call in the
system
Picking up a call
Transferring a call
Call Waiting
Three-party
conference
message no.
7 5 0
phone no.
account code
+
/
# 94 9
CO
1
Holding To retrieve a call at the holding extension
INTER COM
CO
HOLD
Holding To retrieve a call on exclusive hold
INTER COM
CO
HOLDHOLD
parking zone no.
5 2
TRANS FER
04
phone no.
extension no.
to an external party
to an extension
Announce.
TRANS FER
CO
Set
Cancel
7 3 1 1
7 3 1 0
third party’s no.
CONF CONF
Paging
Announce.
All extensions &
external speaker
3 3
Busy
To Outside Line
Cancel
No Answer
Busy / No Answer
#
extension no.
All Calls
extension no.
extension no.
extension no.
Follow Me
your extension no.
Cancel Follow Me
your extension no.
phone no.
2
3
4
5
6 9
7
0
8
FWD/DND
PSQX1525ZA 98.8.6 7:39 PM Page 30
Page 43

31
Desired Function Operation
Do Not Disturb (DND)
Locking your
extension
Clearing the setting
Message Waiting
Calling an operator
Connecting an SLT in
parallel
Calling a preprogrammed party
(Pickup Dialing)
Speed dialing
(Station)
Speed dialing
(System)
FWD/D ND
Set
Cancel
1
0
lock code lock code
lock code
Lock
Unlock
7 7
7 7
7 9 0
To leave a notification
To cancel a notification
To call back
extension no.
To clear all notifications
your extension no.
7 0 0
7 0 0
MESSA GE
MESSA GE
0
Set
Cancel
3 9 1
3 9 0
To set / To cancel
To store
To dial
Set
Cancel
phone no.
7 4 2
#
7 4 1
7 4 0
To set
phone no.
To dial
station speed dial no.
station speed dial no.
#
3 0
3
system speed dial no.
AUTO D IAL
STORE
PSQX1525ZA 98.8.6 7:39 PM Page 31
Page 44

32
Important Safety Instructions
When using your telephone equipment,
basic safety precautions should always be
followed to reduce the risk of fire, electric
shock and injury to persons, including the
following:
1. Read and understand all
instructions.
2. Follow all warnings and
instructions marked on the product.
3. Unplug this product from the wall
outlet before cleaning. Do not use
liquid cleaners or aerosol cleaners.
Use a damp cloth for cleaning.
4. Do not use this product near water,
for example, near a bath tub, wash
bowl, kitchen sink, or laundry tub,
in a wet basement, or near a
swimming pool.
5. Do not place this product on an
unstable cart, stand, or table. The
product may fall, causing serious
damage to the product.
6. Slots and openings in the cabinet
and the back or bottom are
provided for ventilation, to protect
it from overheating, these openings
must not be blocked or covered.
The openings should never be
blocked by placing the product on
the bed, sofa, rug, or other similar
surface. This product should never
be placed near or over a radiator or
heat register. This product should
not be placed in a built-in
installation unless proper
ventilation is provided.
7. Do not allow anything to rest on
the telephone cord. Do not locate
this product where the cord will be
abused by persons walking on it.
8. Do not overload wall outlets and
extension cord as this can result in
the risk of fire or electric shock.
9. Never push objects of any kind
into this product through cabinet
slots as they may touch dangerous
voltage points or short out parts
that could result in a risk of fire or
electric shock. Never spill liquid of
any kind on the product.
10. To reduce the risk of electric
shock, do not disassemble this
product, but take it to a qualified
serviceman when some service or
repair work is required. Opening or
removing covers may expose you
to dangerous voltages or other
risks. Incorrect reassembly can
cause electric shock when the
appliance is subsequently used.
11. Unplug this product from the wall
outlet and refer servicing to
qualified service personnel under
the following conditions:
A. When the power supply cord or
plug is damaged or frayed.
B. If liquid has been spilled into
the product.
C. If the product has been exposed
to rain or water.
PSQX1525ZA 98.8.6 7:39 PM Page 32
Page 45

33
D. If the product does not operate
normally by following the
operating instructions. Adjust
only those controls, that are
covered by the operating
instructions because improper
adjustment of other controls
may result in damage and will
often require extensive work by
a qualified technician to restore
the product to normal
operation.
E. If the product has been dropped
or the cabinet has been
damaged.
F. If the product exhibits a distinct
change in performance.
12. Avoid using a telephone (other
than a cordless type) during an
electrical storm. There may be a
remote risk of electric shock from
lightning.
13. Do not use the telephone to report
a gas leak in the vicinity of the
leak.
SAVE THESE
INSTRUCTIONS
PSQX1525ZA 98.8.6 7:39 PM Page 33
Page 46

34
FCC and Other Information
NOTE:
This equipment has been tested and found
to comply with the limits for a Class B
digital device, pursuant to Part 15 of the
FCC Rules. These limits are designed to
provide reasonable protection against
harmful interference in a residential
installation. This equipment generates,
uses and can radiate radio frequency
energy and, if not installed and used in
accordance with the instructions, may
cause harmful interference to radio
communications. However, there is no
guarantee that interference will not occur
in a particular installation. If this
equipment does cause harmful interference
to radio or television reception, which can
be determined by turning the equipment
off and on, the user is encouraged to try to
correct the interference by one or more of
the following measures:
– Reorient or relocate the receiving
antenna.
– Increase the separation between the
equipment and receiver.
– Connect the equipment into an outlet on
a circuit different from that to which the
receiver is connected.
– Consult the dealer or an experienced
radio/TV technician for help.
WARNING:
TO PREVENT FIRE OR SHOCK
HAZARD, DO NOT EXPOSE THIS
PRODUCT TO RAIN OR ANY TYPE
OF MOISTURE.
CAUTION:
To assure continued compliance with FCC
rules, do not make any unauthorized
modifications. When programming
emergency numbers and/or making test
calls to emergency numbers:
1) Remain on the line and briefly
explain to the dispatcher the reason
for the call before hanging up.
2) Perform such activities in the offpeak hours, such as early morning
hours or late evenings.
If there is any trouble, disconnect the unit
from the extension line and connect a
known working phone. If the known
working phone operates properly, have it
repaired by one of the specified Panasonic
Factory Service Centers. If the known
working phone does not operate properly,
check the Electronic Modular Switching
System and the internal extension wiring.
• Keep the unit away form heating
appliances and electrical noise
generating devices such as fluorescent
lamps and motors.
• The unit should be kept free of dust,
moisture and vibration, and should not
be exposed to direct sunlight.
• Do not use benzine, thinner, or the like,
or any abrasive powder to clean the
cabinet. Wipe it with a soft cloth.
• Do not use any handset other than
Panasonic handset.
This telephone provides magnetic
coupling for hearing aids.
PSQX1525ZA 98.8.6 7:39 PM Page 34
Page 47

35
PSQX1525ZA 98.8.6 7:39 PM Page 35
Page 48

Panasonic Consumer Electronics
Company, Division of Matsushita
Electric Corporation of America
One Panasonic Way, Secaucus, New
Jersey 07094
Panasonic Sales Company (“PSC”),
Division of Matsushita Electric of
Puerto Rico, Inc.
Ave. 65 de Infantería, Km. 9.5, San
Gabriel Industrial Park, Carolina,
Puerto Rico 00985
Printed in the United Kingdom
PSQX1525ZA KU0898TT0
PSQX1525ZA 98.8.6 7:39 PM Page 36
 Loading...