

Page 1
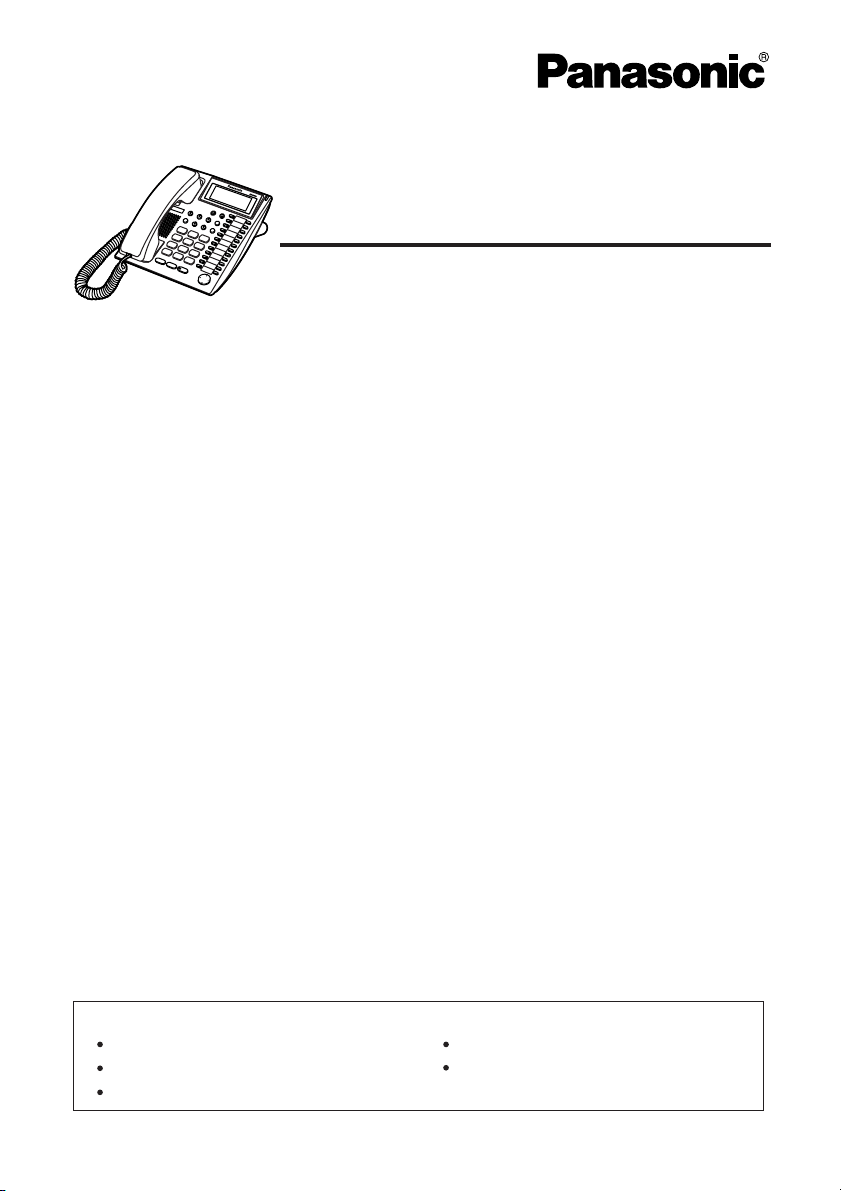
Proprietary Telephone
Quick Reference Guide
Model No. KX-T7737
Table of Contents
Operation for KX-TA624/TA824......................... 2
Operation for KX-TAW848/TDA Series............. 8
Location of Controls..........................................14
Before Operating the Telephone...................... 16
Tilt Angle............................................................ 17
Connection......................................................... 18
Wall Mounting.................................................... 18
Important Information....................................... 19
Important Safety Instructions.......................... 20
FCC Information................................................ 21
Other Information.............................................. 23
Thank you for purchasing the Panasonic KX-T7737 Proprietary Telephone.
Please read this manual before using and save for future reference.
This product can be used with a Panasonic KX-TA624/KX-TA824/KXTAW848/KX-TDA series PBX.
Included Accessories: (for extra orders, call toll free 1-800-332-5368)
Handset . . . . . . . . . . . . . . . 1 Handset Cord . . . . . . . . . 1
Telephone Line Cord . . . . . 1 Stand . . . . . . . . . . . . . . . .1
Overlay . . . . . . . . . . . . . . . . 1
Page 2
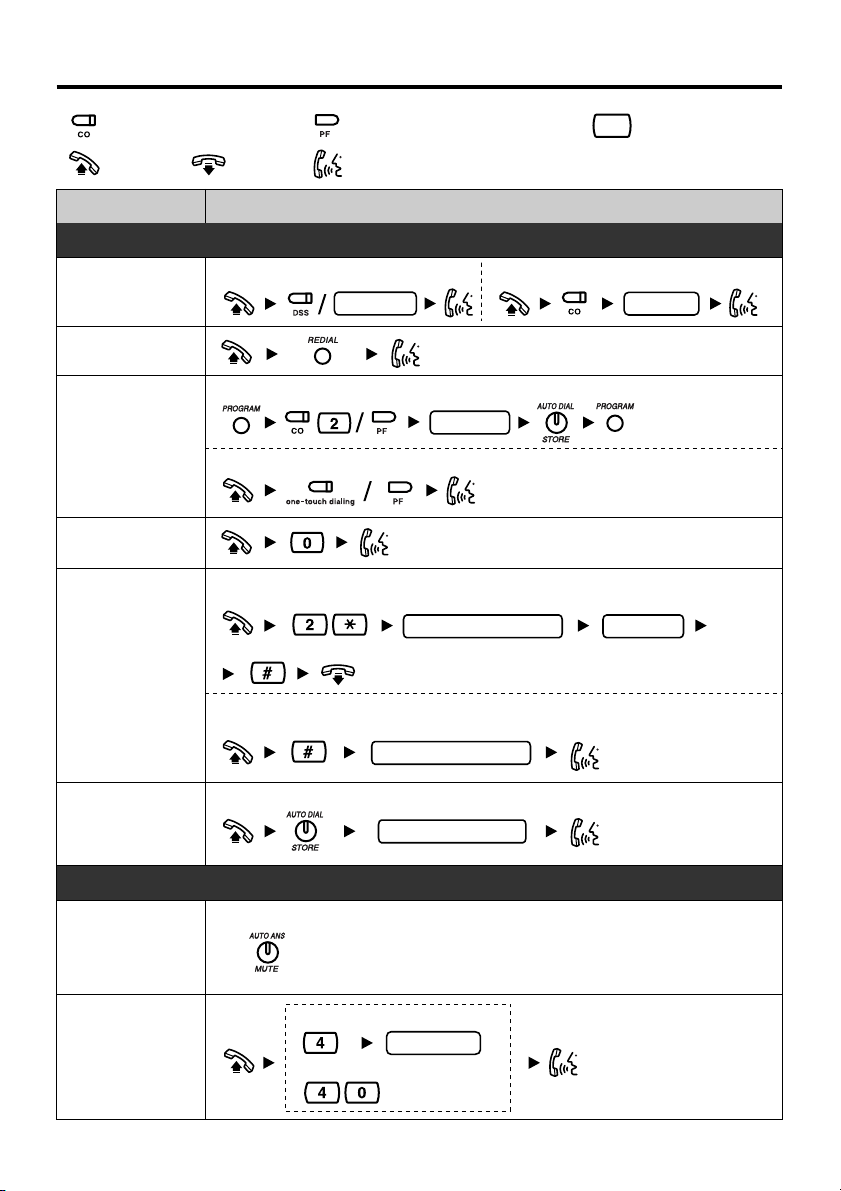
Operation for KX-TA624/TA824
Outside (CO) Line button Feature number
( )
Off-hook On-hook
Programmable Feature button
( )
*
Talk
"Location of Controls" is shown on pages 14-15.
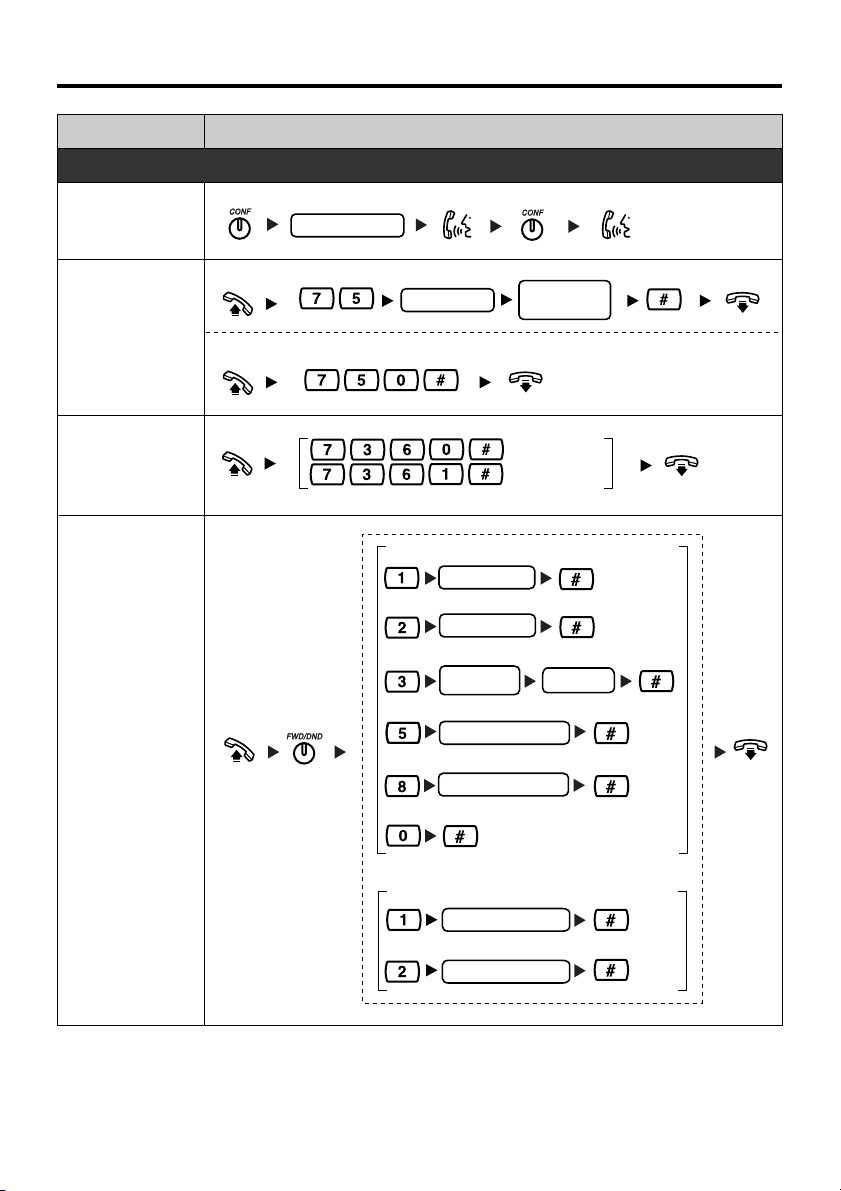
Desired Feature Operation
Making Calls
To an extension To an external party
Calling
( )
extension no.
( )
phone no.
Redial
To program
One-touch
Dialing
To dial
( )
(
( )
)
desired no.
( )
Calling an
operator
To store
personal speed dial no.
(0-9)
desired no.
Speed Dialing
(Personal)
To dial
Speed Dialing
(System)
Hands-free
answerback
Picking up
a call
2
personal speed dial no.
(0-9)
To dial
system speed dial no.
(00-99)
Receiving Calls
While on-hook
Directed
extension no.
Group
Page 3
Operation for KX-TA624/TA824
Desired Feature Operation
When the Dialed Extension is Busy/No Answer
Automatic
Callback Busy
To set
While hearing a busy tone
To leave a notification
To call
If you hear callback ringing
Message
Waiting
Call Waiting
Sender
Receiver
Sender
Receiver
To cancel a notification
receiver's extension no.
To call back
To clear all notifications
While hearing a busy tone
Wait for an answer.
For outside calls
For intercom calls
To talk to the new party
Terminating a current status
( )
Set
Cancel
Set
Cancel
While hearing the Call Waiting tone
Holding a current status
( )
3
Page 4
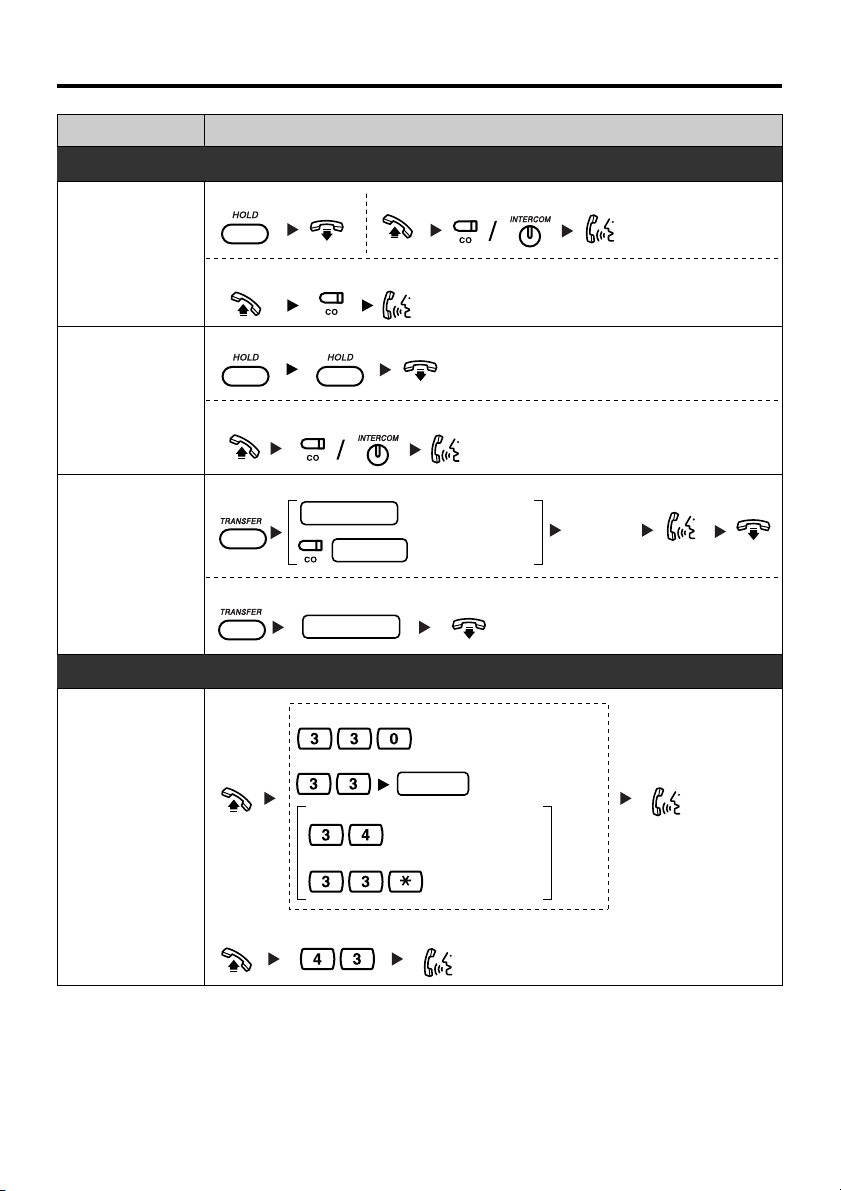
Operation for KX-TA624/TA824
Desired Feature Operation
During a Conversation
Holding To retrieve a call at the holding extension
Holding a call
Holding a call
exclusively
Transferring
a call
Paging
( )
To retrieve an outside call from another extension
( )
Holding
To retrieve a call on exclusive hold
( )
Screened
To an extension
To an external party
(System programming
is required.)
Unscreened
extension no.
phone no.
( )
to an extension
extension no.
Useful Features
To page
All extensions
Group
group no.
All external speakers
All extensions & external speakers
Wait for
an answer.
Announce.
Announce.
To answer an announced page
4
Page 5
Operation for KX-TA624/TA824
Desired Feature Operation
Useful Features
Three-party
conference
Setting Absent
Message
Log-in/Log-out
Forwarding
a call
To set
To cancel
third party's no.
All calls
Busy/No answer
To an outside line
Follow Me
Cancel Follow Me
Cancel
message no.
extension no.
extension no.
line access
code
your extension no.
your extension no.
parameter
(if required)
For Log-in
For Log-out
phone no.
To Voice Mail
All calls
VPS extension No.
Busy/No answer
VPS extension No.
5
Page 6

Operation for KX-TA624/TA824
Desired Feature
Do Not Disturb
(DND)
Locking your
extension
Clearing the
setting
Useful Features
(Lock code is 4 digits.)
7 7
7 7
7 9 #
lock code
lock code
Operation
Set
#
Cancel
#
lock code
Lock
#
#
Unlock
6
Page 7
Operation for KX-TA624/TA824
Desired Feature Operation
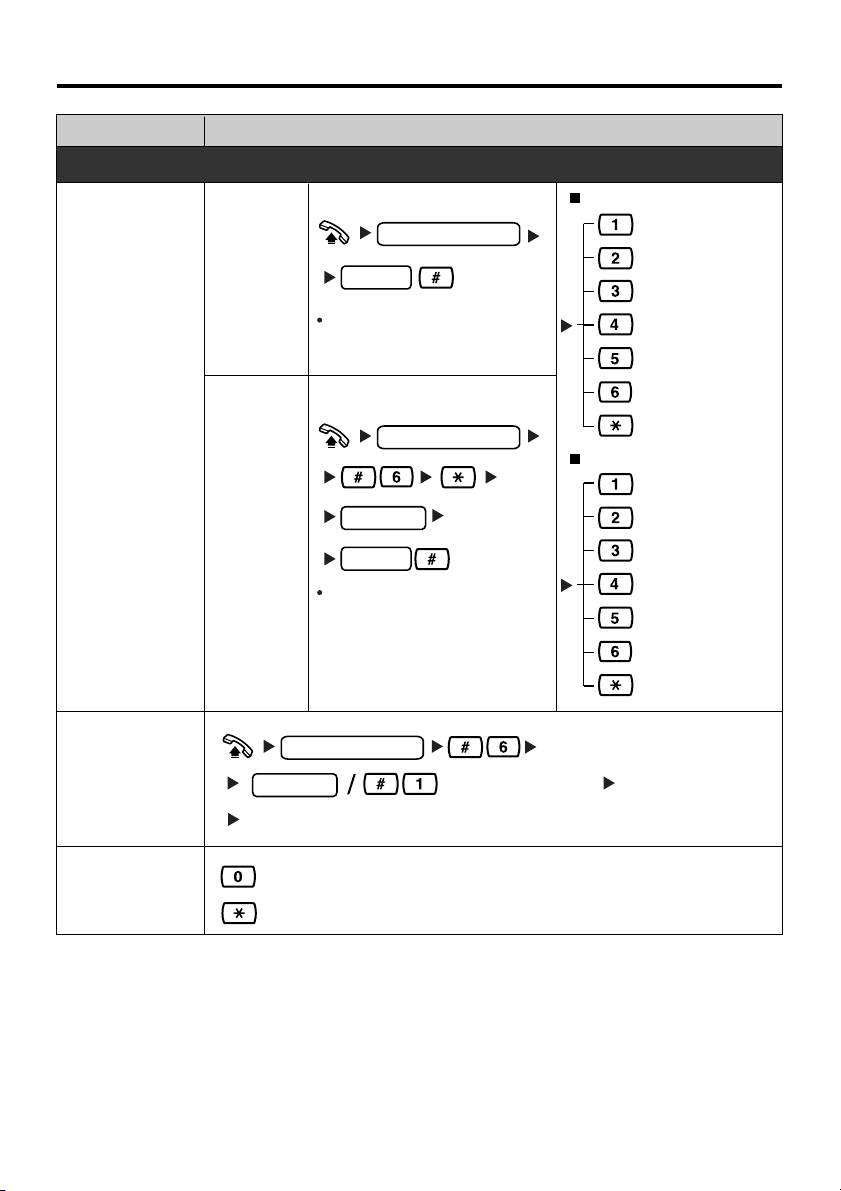
To Make Use of Voice Mail Service
Extension No. of the VPS
From your
Own
Extension
Listening
Message
From
someone
else's
extension
Password
If you have no password, you can
skip the last step.
Extension No. of the VPS
Mailbox No.
Password
If you have no password, you can
skip the last step.
KX-TVA series
Listen to Message
Deliver Message
Mailbox Management
Automated Attendant
Message Notification
Other Features
End Call
KX-TVS series
Listen to Message
Deliver Message
Check Mailbox
Distribution
Automated Attendant
Mailbox Management
Leaving
Message
During
Playback
Extension No. of the VPS
Mailbox No.
Leave Message
Repeat Voice Guidance
Exit Menu
Other Features
End Call
first 3 or 4 of name
7
Page 8
Operation for KX-TAW848/TDA Series
Outside (CO) Line button Feature number
( )
Off-hook On-hook
Programmable Feature button
( )
*
Talk
"Location of Controls" is shown on pages 14-15.
Desired Feature Operation
Making Calls
To an extension To an external party
Calling
( )
extension no.
( )
phone no.
Redial
To program
One-touch
Dialing
To dial
( )
(
( )
)
( )
desired no.
Calling an
operator
To store
personal speed dial no.
(00-99)
desired no.
Speed Dialing
(Personal)
To dial
Speed Dialing
(System)
Hands-free
answerback
Picking up
a call
8
personal speed dial no.
(00-99)
To dial
system speed dial no.
(000-999)
Receiving Calls
While on-hook
Directed
extension no.
Group
group no.
Page 9

Operation for KX-TAW848/TDA Series
Desired Feature Operation
When the Dialed Extension is Busy/No Answer
Automatic
Callback Busy
To set
While hearing a busy tone
To leave a notification
To call
If you hear callback ringing
Message
Waiting
Call Waiting
Sender
Receiver
Sender
Receiver
To cancel a notification
To call back
To clear all notifications
While hearing a busy tone
Wait for an answer.
For outside calls
For intercom calls
To talk to the new party
Terminating a current status
receiver's extension no.
your extension no.
No tone
Tone
No call
Tone
While hearing the Call Waiting tone
Holding a current status
( )
9
Page 10

Operation for KX-TAW848/TDA Series
Desired Feature Operation
During a Conversation
Holding To retrieve a call at the holding extension
Holding a call
Holding a call
exclusively
Transferring
a call
Paging
( )
To retrieve an outside call from another extension
( )
Holding
To retrieve a call on exclusive hold
( )
Screened
extension no.
phone no.
( )
To an extension
To an external party
Useful Features
To page
Group
group no.
To answer an announced page
Wait for
an answer.
Announce.
Announce.
10
Page 11

Operation for KX-TAW848/TDA Series
Desired Feature Operation
Useful Features
Three-party
conference
Setting Absent
Message
Log-in/Log-out
Forwarding
a call
To set
To cancel
All calls
Busy
No answer
Busy/No answer
third party's no.
desired no.*
desired no.*
desired no.*
desired no.*
message no.
For Log-in
For Log-out
Both calls
Outside calls
Intercom calls
Follow Me
Follow Me Cancel
Cancel
parameter
(if required)
ICD Group*
extension no.
*ICD Group: Incoming Call Distribution Group
your extension no.
your extension no.
Specified
All
Enter your desired extension no., or line access code and outside phone no.
*
To Voice Processing System (VPS)
All calls
Busy
No Answer
Busy/No Answer
Cancel
VPS extension no.
11
Page 12

Operation for KX-TAW848/TDA Series
Desired Feature
Do Not Disturb
(DND)
Setting your
extension PIN
(Personal
Identification
Number)
Locking your
extension
Clearing the
setting
To set
To cancel
Useful Features
7
7 9
extension PIN
stored
extension PIN
7 7
7 7
7 9
9
Operation
Both calls
Outside calls
Intercom calls
same
extension PIN
extension PIN
Set
Cancel
Lock
Unlock
WARNING
Whe
n a third party discovers the password (extension PIN) of the Hybrid IP-PBX, there is a risk
that fraudulent telephone calls will be made using the telephone line.
The cost of such calls will be billed to your own account.
To protect this kind of fraudulent use, we strongly recommend:
a) Keeping the PIN secret.
b) Selecting a complex, random PIN that cannot be easily guessed.
c) Changing the PIN regularly.
12
Page 13

Operation for KX-TAW848/TDA Series
Desired Feature Operation
To Make Use of Voice Mail Service
Extension No. of the VPS
From your
Own
Extension
Listening
Message
From
someone
else's
extension
Password
If you have no password, you can
skip the last step.
Extension No. of the VPS
Mailbox No.
Password
If you have no password, you can
skip the last step.
KX-TVA series
Listen to Message
Deliver Message
Mailbox Management
Automated Attendant
Message Notification
Other Features
End Call
KX-TVS series
Listen to Message
Deliver Message
Check Mailbox
Distribution
Automated Attendant
Mailbox Management
Leaving
Message
During
Playback
Extension No. of the VPS
Mailbox No.
Leave Message
Repeat Voice Guidance
Exit Menu
Other Features
End Call
first 3 or 4 of name
13
Page 14

Location of Controls
20
OFFON
RINGERTALK CID
RINGER Volume/
BACKLIGHT
Illumination/Talking
Caller ID Selector
1
2
3
4
5
6
7
8
9
1
BACKLIGHT
LCD (Liquid Crystal Display) with Backlight
18
17
16
15
14
10 1311 12
Headset Jack
Microphone
* The use of a headset is optional. Recommended headsets are KX-TCA91 and KX-TCA92.
14
Page 15

Location of Controls
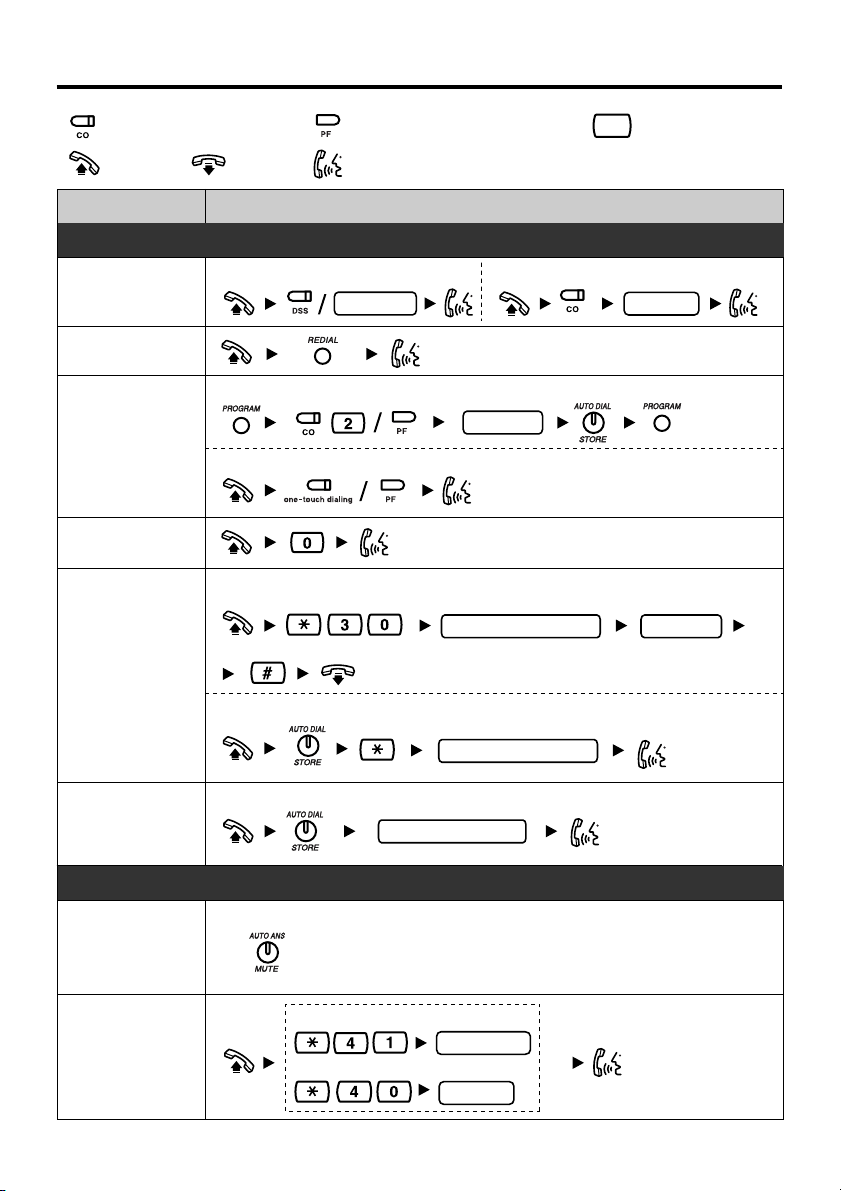
PROGRAM: Used to enter and exit the
1
programming mode.
CONF (Conference): Used to establish a
2
multiple party conversation.
INTERCOM: Used to make or receive
3
intercom calls.
FWD/DND (Call Forwarding/Do Not
4
Disturb):
or Do Not Disturb.
FLASH/RECALL: Used for External Feature
5
Access or to disconnect the current call and
make another call without hanging up.
AUTO ANS (Auto Answer)/Mute: Used to
6
answer an incoming call in the hands-free
mode or mute the microphone during a
conversation.
AUTO DIAL/STORE: Used for speed
7
dialing or storing program changes.
REDIAL: Used to redial.
8
DIALING BUTTONS WITH BACKLIGHT:
9
Dialing buttons are backlit (1) when you
receive a call, (2) during a conversation, (3)
when BGM is activated at your phone, or (4)
when you press any button.
10
TRANSFER: Used to transfer a call to
another party.
HOLD: Used to place a call on hold.
11
Used to perform Call Forwarding
SP-PHONE:
12
operation.
NAVIGATOR KEY: Used to adjust the
13
volume and the display contrast, or select
desired items.
Programmable Feature (PF) Button:
14
Used as a One-touch Dialing button.
(Button assignment is required.)
Flexible Outside (CO) Line Button:
15
Used to make or answer an outside call.
Pressing this button seizes an idle outside
line automatically. (Button assignment is
required.) Also used as a feature button.
(Button assignment is required.)
PAUSE: Used to insert a pause during
16
dialing.
MESSAGE: Used to leave a message
17
waiting indication, or call back the party
who left the message waiting indication.
Message/Ringer Lamp: The Message/
18
Ringer lamp informs you visually that you
have a message or a call.
When you receive a call, the lamp
flashes depending on the ringing pattern.
When the ringing pattern is set to Single
(Slow flash), Double (Moderate flash), or
Triple (Rapid flash) in your PBX, the lamp
flashes accordingly. When any of the
other ringing patterns are set in your
PBX, the lamp may not flash. (e.g., SDouble, Call Waiting Tone1.)
When someone has left you a message,
the lamp is lit continuously.
Used for the hands-free
15
Page 16

Before Operating the Telephone
Speaker/Handset/Headset volume *
Speaker volume
While in hands-free conversation
Handset/Headset volume
While using the handset or headset
Press Up or Down.
Ringer volume/Backlight illumination
20
1
RINGER
Slide the lever of the RINGER Volume Selector and
BACKLIGHT Illumination Selector to the desired setting.
BACKLIGHT SW POSITION 2 1 0
LCD backlight
DIALING BUTTONS backlight
AUTO: The backlight shines only during operation.
Display contrast
Press Left (Light) or Right (Dark).
*
BACKLIGHT
HIGH LOW OFF
AUTO AUTO OFF
* The above settings may return to default settings if the
telephone line cord is disconnected, or the main unit's power
is interrupted.
16
Page 17

Before Operating the Telephone
Talking Caller ID
You can hear Caller ID information vocally sent from
your PBX through the built-in speaker. The voice volume of
Talking Caller ID depends on the setting of the Ringer volume.
For the Ringer volume, refer to "Ringer volume" on page 16.
OFFON
TALK CID
Slide the TALK CID Selector to ON to enable the Talking Caller ID
feature.
Note: If the character ":" is included in the Caller ID name, it will not be announced normally.
Therefore, we recommend that you do not use ":" in the Caller ID name.
Tilt Angle
The tilt angle of the unit can be adjusted.
To adjust the angle, insert the stand into the desired holes as shown below.
< LOW > < HIGH >
17
Page 18

2
1
Connection
The telephone line cord
(included)
< Back view >
CAUTION
Ensure the cord is
inserted in the groove
to prevent damage
to the connector.
Disable the parallel setting for the single line
telephone (SLT) in PBX programming. If it is enabled,
the Talking Caller ID feature may not operate properly.
For information on how to disable, refer to the
documentation for your PBX.
Wall Mounting
1
Pull down the handset hook until it locks,
so the tab holds the handset.
To the main unit ( )
2
Remove the attached stand.
TO MAIN UNIT
/PABX
Headset
To temporarily place the handset down
3
Mount the unit on the wall.
83 mm
(3-1/4 in)
during a conversation, hook it over the
top edge of the phone as shown.
18
Page 19

Important Information
WARNING:
TO PREVENT POSSIBLE FIRE OR ELECTRIC SHOCK, DO NOT EXPOSE THIS
PRODUCT TO RAIN OR MOISTURE.
THIS HANDSET EARPIECE IS MAGNETIZED AND MAY RETAIN SMALL FERROUS
OBJECTS.
DISCONNECT THE TELEPHONE LINE CORD FROM THIS PRODUCT IF THIS
PRODUCT EMITS SMOKE, AN ABNORMAL SMELL OR MAKES UNUSUAL NOISE.
THESE CONDITIONS CAN CAUSE FIRE OR ELECTRIC SHOCK. CONFIRM THAT
SMOKE HAS STOPPED AND CONTACT AN AUTHORIZED SERVICENTER.
IMPORTANT NOTICE:
During a power failure, this telephone will not operate. Please ensure that a separate
telephone, not dependent on local power, is available for use in an emergency.
When you ship the product:
Carefully pack and send it prepaid, adequately insured and preferably in the original
carton. Attach a postage-paid letter, detailing the symptom to the outside of the carton.
DO NOT send the product to the Executive or Regional Sales offices. They are NOT
equipped to make repairs.
Product service:
Panasonic Servicenters for this product are listed in the servicenter directory.
Consult your certified Panasonic dealer for detailed instructions.
For your future reference
SERIAL NO.
(found on the bottom of the unit)
NAME OF DEALER
DEALER'S ADDRESS
DEALER'S TEL. NO.
DATE OF PURCHASE
19
Page 20

Important Safety Instructions
When using this unit, basic safety
precautions, including those below, should
always be followed to reduce the risk of
fire, electric shock and injury to persons.
1. Read and understand all instructions.
2. Follow all warnings and instructions
marked on this unit.
3. Unplug this unit from the main unit
before cleaning. Do not use liquid or
aerosol cleaners. Clean with a damp
cloth.
4. Do not use the unit near water, for
example, near a bathtub, kitchen sink,
or laundry tub, in a wet basement, or
near a swimming pool.
5. Place this unit on a flat surface.
Serious damage and/or injury may
result if the unit falls.
6. The unit should never be placed near
or over a radiator or other heat source.
7. Do not allow anything to rest on the
extension cord. Do not locate this unit
where the cord may be stepped on or
tripped on.
8. To reduce the risk of fire or electric
shock, do not overload wall outlets and
extension cords.
9. Do not insert objects of any kind into
this unit through openings, as they
may touch dangerous voltage points or
short out parts that could result in a
risk of fire or electric shock. Never spill
liquid of any kind on the unit.
10. To reduce the risk of electric shock, do
not disassemble this unit. Only
qualified personnel should service this
unit. Opening or removing covers may
expose you to dangerous voltages or
other risks. Incorrect reassembly can
cause electric shock.
11. Unplug this unit from the main unit
and have the unit serviced by
qualified service personnel in the
following cases:
A. When the extension cord is
damaged or frayed.
B. If liquid has been spilled on the
unit.
C. If the unit has been exposed to rain
or water.
D. If the unit does not work normally
by following the manual. Adjust
only controls covered by the
manual. Improper adjustment may
require repair by an authorized
servicenter.
E. If the unit has been dropped, or
damaged.
F. If the unit's performance
deteriorates.
12. Avoid using a telephone (other than
a cordless type) during an electrical
storm. There is a remote risk of
electric shock from lightning.
13. Do not use the telephone in the
vicinity of a gas leak to report the
leak.
SAVE THESE
INSTRUCTIONS
20
Page 21

FCC Information
NOTE:
This equipment has been tested and found to comply with the limits for a Class B
digital device, pursuant to Part 15 of the FCC Rules. These limits are designed to
provide reasonable protection against harmful interference in a residential installation.
This equipment generates, uses, and can radiate radio frequency energy and, if not
installed and used in accordance with the instructions, may cause harmful interference
to radio communications. However, there is no guarantee that interference will not
occur in a particular installation. If this equipment does cause harmful interference to
radio or television reception, which can be determined by turning the equipment off
and on, the user is encouraged to try to correct the interference by one or more of the
following measures:
– Reorient or relocate the receiving antenna.
– Increase the separation between the equipment and receiver.
– Connect the equipment to an outlet on a circuit different from that to which the
receiver is connected.
– Consult the dealer or an experienced radio/TV technician for help.
FCC Part 68 Approved Device:
This equipment is approved under FCC Part 68 as a component device for use with a
Panasonic KX-TA624/KX-TA824/KX-TAW848/KX-TDA series PBX. In order for
approval of this product to be valid, all other products used in conjunction with this
product must also be FCC Part 68 approved as a component device for use with the
PBXs listed above. If any of these components are not approved, then you, as owner
or user, are required to obtain FCC Part 68 approval of the assembled equipment prior
to connection to the telephone network. Part 68 approval requires that you maintain
this approval over time and as such you are responsible for the following:
– Any component added to your equipment, whether it bears component approval or
not, will require a Part 68 compliance evaluation. You may need to test, reapprove,
and make a filing to the ACTA database before that new component can be used;
– Any modification/update made to any approved component within your equipment
will require a Part 68 compliance evaluation. The modifying entity becomes the
Responsible Party for the modified equipment. The Responsible Party will need to
determine if a new test, approval, and filing to the ACTA database is required before
that modified component can be connected to the network;
– If the Responsible Party continues to produce this component that party is required
to comply with all continuing compliance requirements under FCC rules.
21
Page 22

FCC Information
If the telephone service provider requests the approval number and REN of the device
you are connecting, supply the FCC registration or "US" numbers for all components
and host devices that have a direct PSTN connection and the highest REN.
If at any time the ownership of this component device is transferred to someone else
(whether independently or as part of a system), supply this manual to the new owner.
Therefore only approved devices bearing the "CN" or "CE" equipment code as part of
the "US" approval number may be used with this equipment. (NOTE: The host
equipment used in conjunction with this product may bear a "US" approval or an FCC
registration number with other than the "CN" or "CE" equipment code.) When
determining if your particular component device is appropriately approved, look for the
"US" approval or FCC registration number on all components and ensure that the
classification code "-CN-" or "-CE-" is part of that number. Refer to the "US" approval
number on this product as an example.
Hearing Aid Compatibility:
This telephone provides magnetic coupling for hearing aids.
Use only handsets or other acoustic devices with this equipment that are compliant
with the hearing aid compatibility requirements of FCC Part 68.
CAUTION:
To assure continued compliance with FCC rules, do not make any unauthorized
changes or modifications to this equipment would void the user's authority to operate
this device.
When programming emergency numbers and/or making test calls to emergency
numbers:
1) Remain on the line and briefly explain to the dispatcher the reason for the call
before hanging up.
2) Perform such activities in the off peak hours, such as early morning hours or late
evenings.
22
Page 23

Other Information
• If you are having problems making calls, unplug the extension and connect a known
working telephone. If the known working telephone operates properly, have the
defective telephone repaired by an authorized Panasonic Factory Servicenter. If the
known working telephone does not operate properly, check the PBX System and
the internal extension wiring.
• Keep the unit away from heating appliances and devices that generate electrical
noise, such as fluorescent lamps, motors and televisions. These noise sources can
interfere with the performance of the unit. It also should not be placed in rooms
˚
where the temperature is less than 5
10 cm (3-15/16 in) clearance around the unit for proper ventilation.
Avoid environments with excessive smoke, dust, mechanical vibration, shock, or
direct sunlight.
• Wipe the unit with a soft cloth. Do not clean the unit with abrasive powders or with
chemical agents such as benzine or thinner.
• Use only the correct Panasonic handset.
• Do not disassemble this unit. Dangerous electrical shock could result. The unit must
only be disassembled and repaired by qualified service technicians.
• If damage to this unit exposes any internal parts, immediately disconnect the
telephone line and mains supply. Then return the unit to a servicenter.
C (41 ˚F) or greater than 40 ˚C (104 ˚F). Allow
23
Page 24

Panasonic Consumer Electronics Company
Division of Panasonic Corporation of North America
One Panasonic Way,
Secaucus, New Jersey 07094
Panasonic Puerto Rico, lnc.
Ave. 65 de Infantería, Km. 9.5,
San Gabriel Industrial Park, Carolina,
Puerto Rico 00985
http://www.panasonic.com/csd
Copyright:
This material is copyrighted by Panasonic Communications Co., Ltd., and may be
reproduced for internal use only. All other reproduction, in whole or in part, is prohibited
without the written consent of Panasonic Communications Co., Ltd.
2005 Panasonic Communications Co., Ltd. All Rights Reserved.
PSQX3878ZA
KK0905SY0
 Loading...