

Page 1
Panasoillic
MODEL NO.
EASA-PHOIME
Automatic Tel
Answering
KX-T1470$A
ephone
System
Page 2

Introduction
Thank you for purchasing the Panasonic Telephone
Answering System,
This unit is capable of recording two greeting messages (2 OGMs).
You can use the unit to:
Answer calls and record messages with the
Time/Day stamp when you cannot answer the
telephone or do not want to be disturbed
Monitor (screen) calls
Record telephone conversations and message
memo
Leave the Priority Message
By using the advanced remote-control features of your unit, you can also:
Call in from a touch tone telephone to listen to
your messages
Record new greeting messages even when you
are away from your unit
Leave messages when you are away from
your unit
Quick Reference Card for remote operation can be found on page 36.
Detach the Card from the Operating Instructions and use it at your convenience.
1 -
Page 3
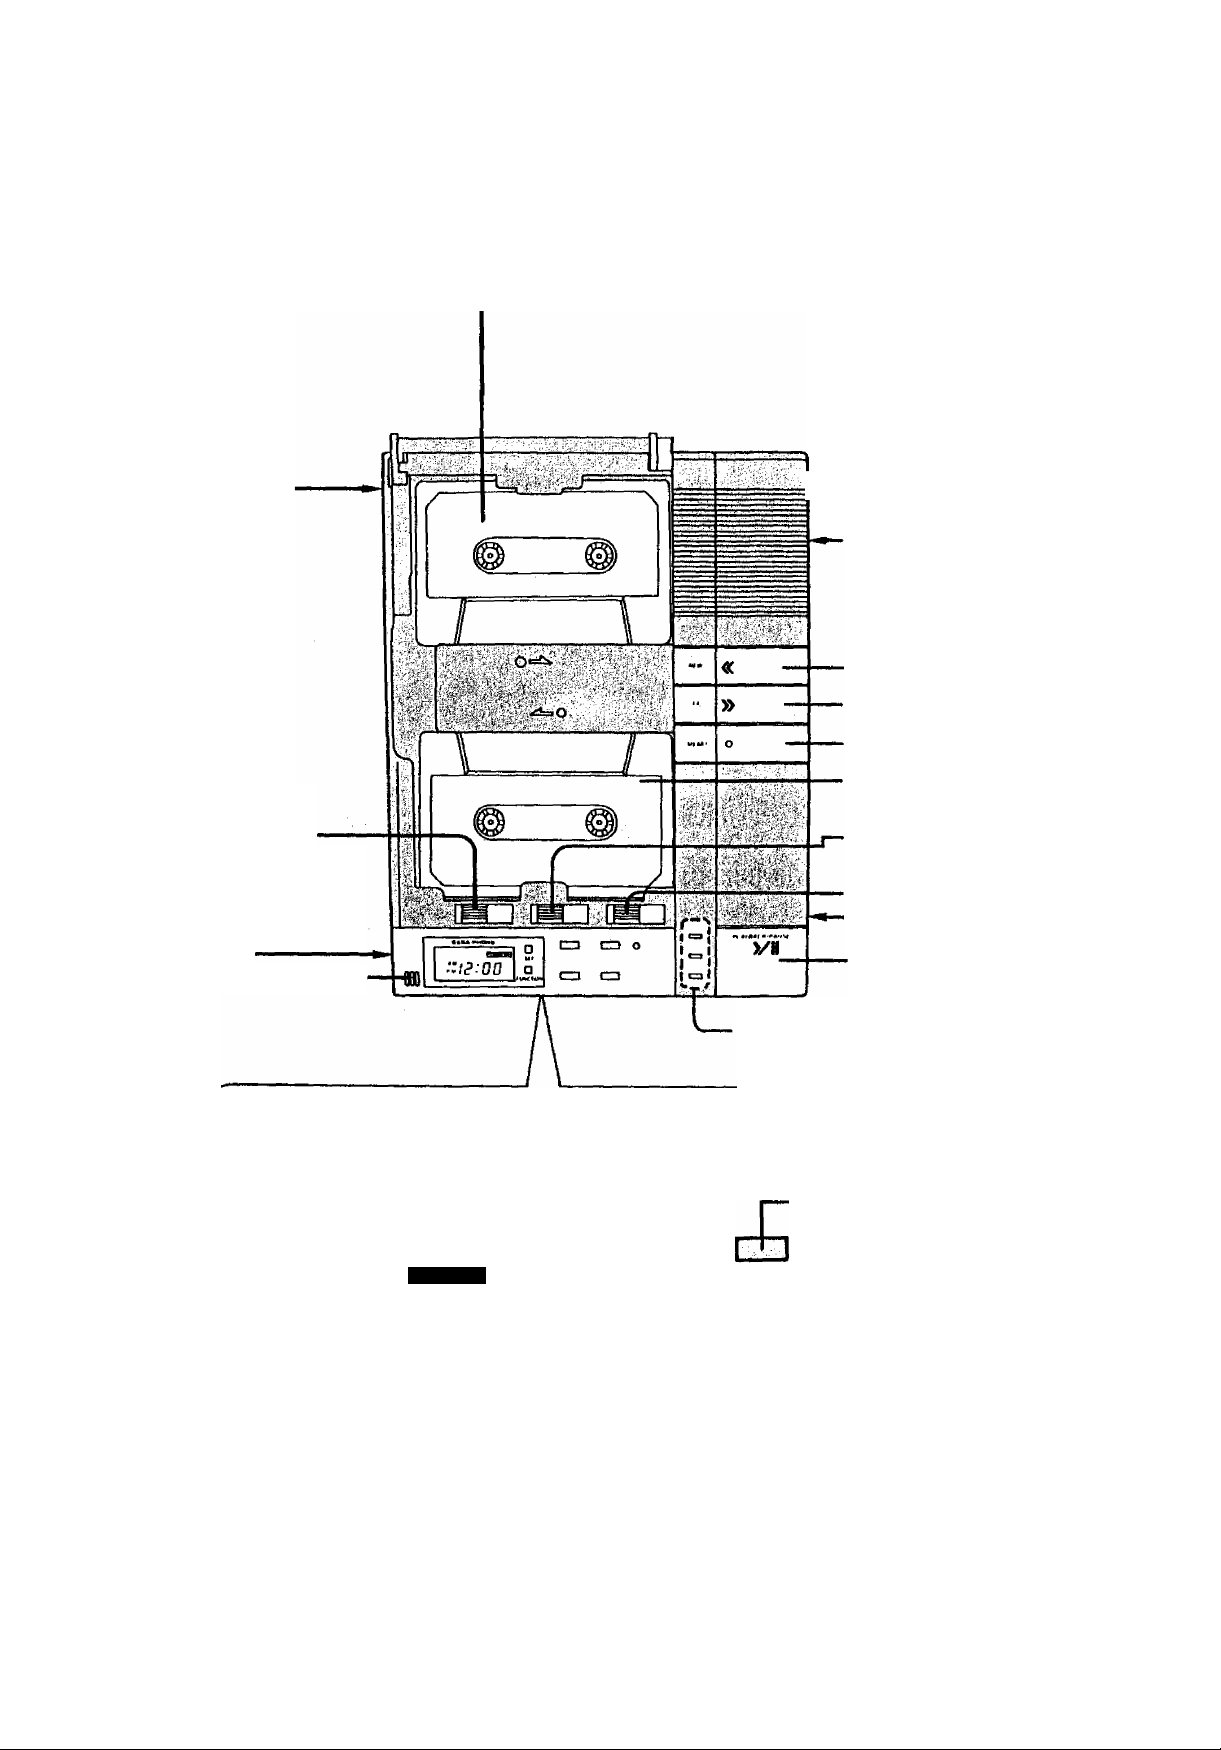
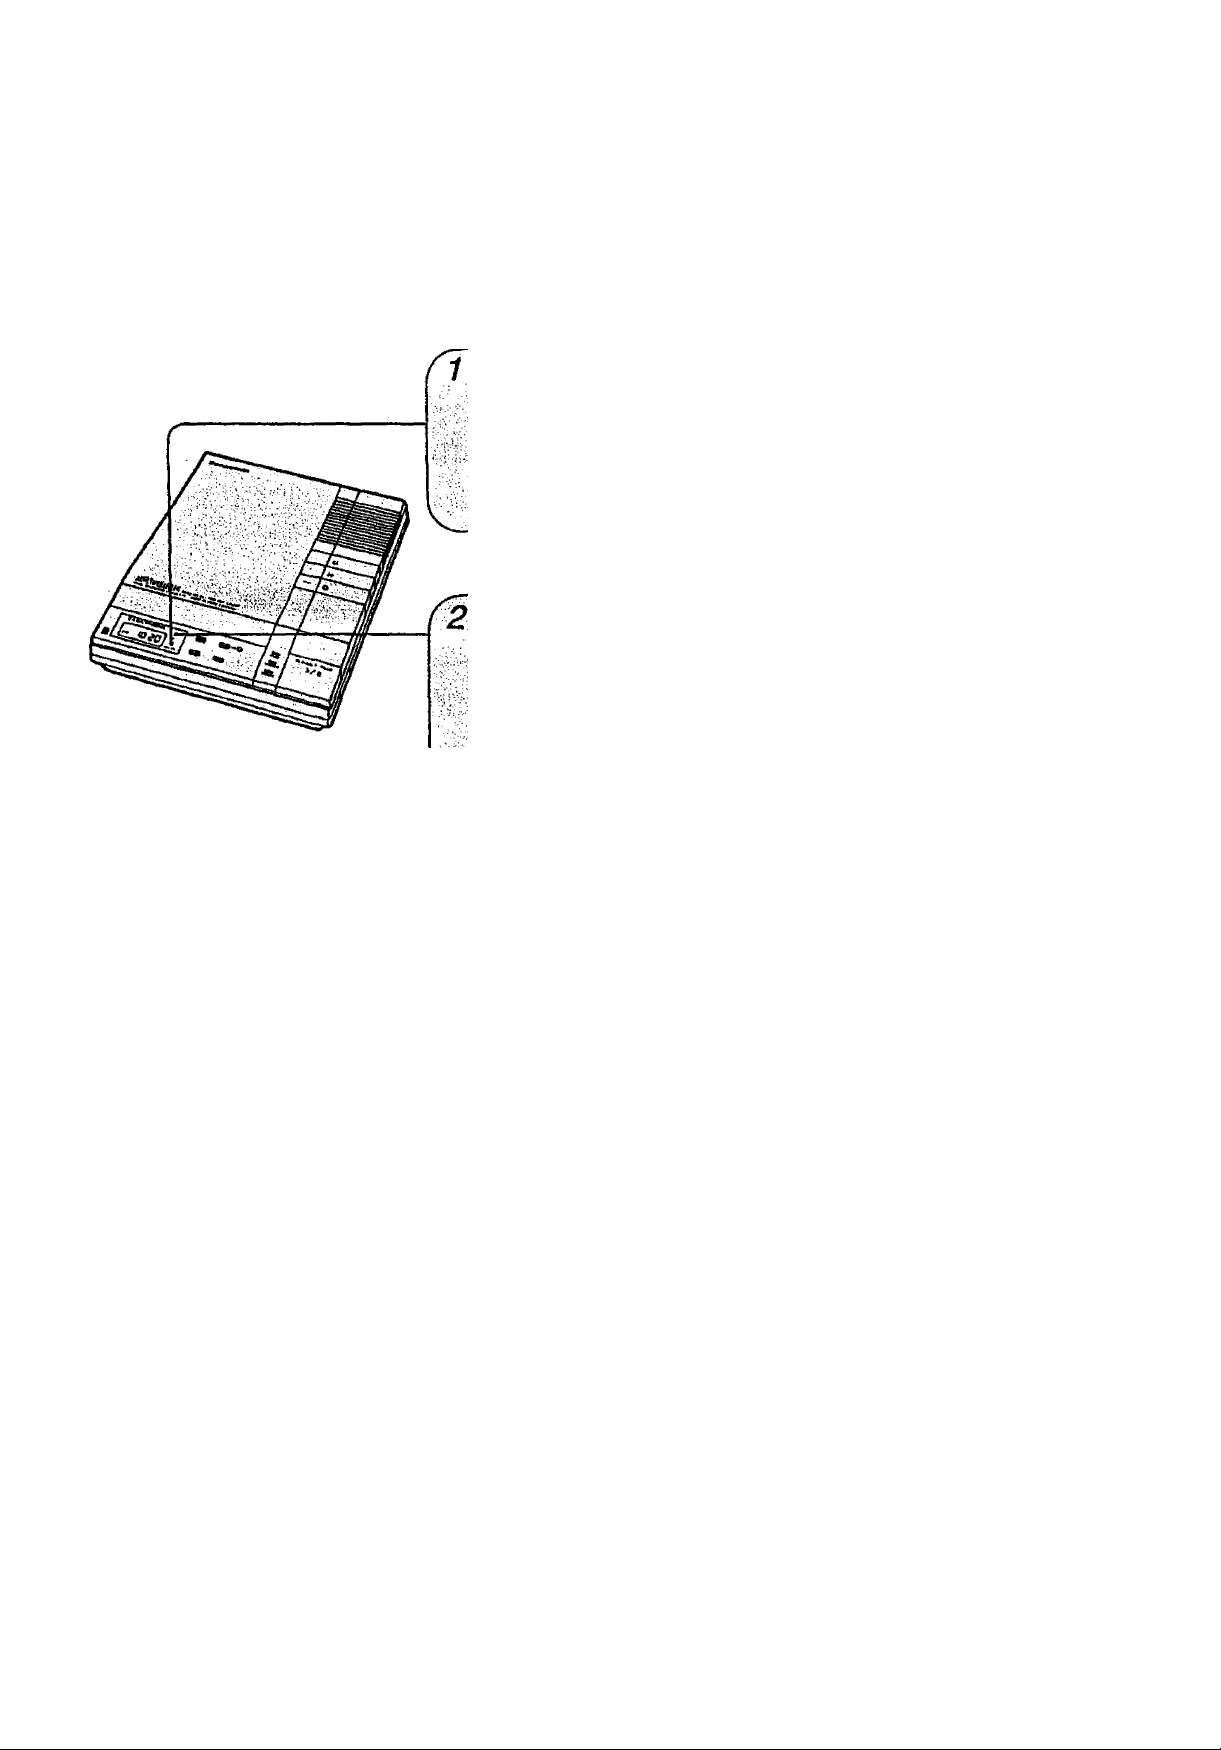
Location of the Controls
Incoming Message (ICM) Tape (p. 5)
CPC Switch {p. 7)
OGM (GREETING)
Recording Button (p. 12)
POWER ON/OFF
Switch (p. 15)
Microphone (MIC) (p. 12)
-^RING Selector (RINGS)
(p.7)
Recording Time
(REC TIME) Selector (p. 7)
Rewind (REW) Button (p. 17)
Fast Forward (FF) Button (p. 17)
MEMO Button (p. 21)
Greeting (Outgoing)
Message Tape (p. 5)
OGM (GREETING) PLAY Button
(p. 13)
ICM ERASE Button (p. 24)
VOLUME Control (p. 24)
PLAYBACK/PAUSE Button
(P. 16)
IN USE/ANSWER/POWER Indicators
LC Display (p. 35)
EASA-PHONE
MESSAGE
PM
* u
FUNCTION Button
(p.8)
SET Button (p. 8)
CD
SET
©
CD
FUNi TION
GRE TING
sen cr
T№AE/DAY
CHECK
TIME/DAY CHECK Button
(p. 10) PRIORITY
REC Button
I
PRIORITY
REC
Z WAV REC
•GREETING SELECT Button
and Indicator
(P. 19)
2 WAY REC
Button (p. 22)
(P-15)
Page 4

Table of Contents
Preparation
CASSETTE TAPE INSTALLATION ................................................ 5
CONNECTION.................................................................................... 6
INITIAL SETTINGS
TOLL SAVER...................................................................................... 7
REMOTE CODE (ID CODE) SETTING............................................. 8
ADJUSTING TIME
CHECKING THE TIME AND DAY ................................................... 10
Howto Record a Greeting Message (OGM)
SELECTING THE FIRST
............................................................................
.............................................................................
7
9
OR SECOND GREETING MESSAGE (OGM)
RECORDING A GREETING MESSAGE (OGM)
CHECKING THE GREETING MESSAGE (OGM) ............................... 13
Setting Prior to Leaving
RECORDING THE CALLERS’ MESSAGES
SELECTING THE FIRST
OR SECOND GREETING MESSAGE (OGM)
Listening to the Recorded Messages
VOICE TIME/DAY STAMP ................................................................ 16
LISTENING TO THE MESSAGES
WHILE LISTENING TO THE MESSAGES
RE-PLAYING BACK ALL THE MESSAGES
AFTER LISTENING TO THE MESSAGES
Priority Message
RECORDING A PRIORITY MESSAGE ............................................. 19
...............................
..............................
......................................
................................
....................................................
.......................................
.....................................
.........................................
11
12
15
15
16
17
18
18
Other Features
RECORDING A MESSAGE MEMO .................................................. 21
RECORDING A 2-WAY CONVERSATION
(2 WAY RECORDING)............................................................. 22
SAVING THE RECORDED MESSAGES ......................................... 23
ERASING THE RECORDED MESSAGES
MONITORING THE INCOMING CALLS........................................... 24
How to Operate from a Remote Phone
REMOTE SYNTHESIZED VOICE INSTRUCTION
GOING INTO THE VOICE MENU...................................................... 25
.......................................
.............................
3 -
24
25
Page 5

Direct Remote Operation
PLAYING BACK NEWLY-RECORDED MESSAGES
(NEW MESSAGE PLAYBACK)
REWINDING/FAST FORWARDING THE TAPE
WHILE LISTENING TO THE MESSAGES
RESETTING THE ICM TAPE FOR FUTURE MESSAGES ................ 30
MONITORING ROOM SOUND
Table of Contents
................................................
...................:............
........................................................
28
29
31
CHANGING THE GREETING MESSAGE
RE-RECORDING A GREETING MESSAGE...................................... 32
SKIPPING THE GREETING MESSAGE FOR ICM
RECORDING .................................................................. ....33
SETTING/CANCELING THE ANSWER MODE
Troubleshooting Guide............................................................................. 34
Liquid Crystal Display
Announcements by the Unit
Maintenance
Cassette Tape .......................................................................................... 37
Others....................................................................................................... 38
.........................................................................................
.............................................................................
....................................................................
....................
.................................
.....................
36
31
33
35
35
Accessories
AC Adaptor
Telephone Line Cord
Greeting Message Tape
Incoming Message Tape ......................one
...........................................
............................
.......................
one
one
one
4 -
Page 6
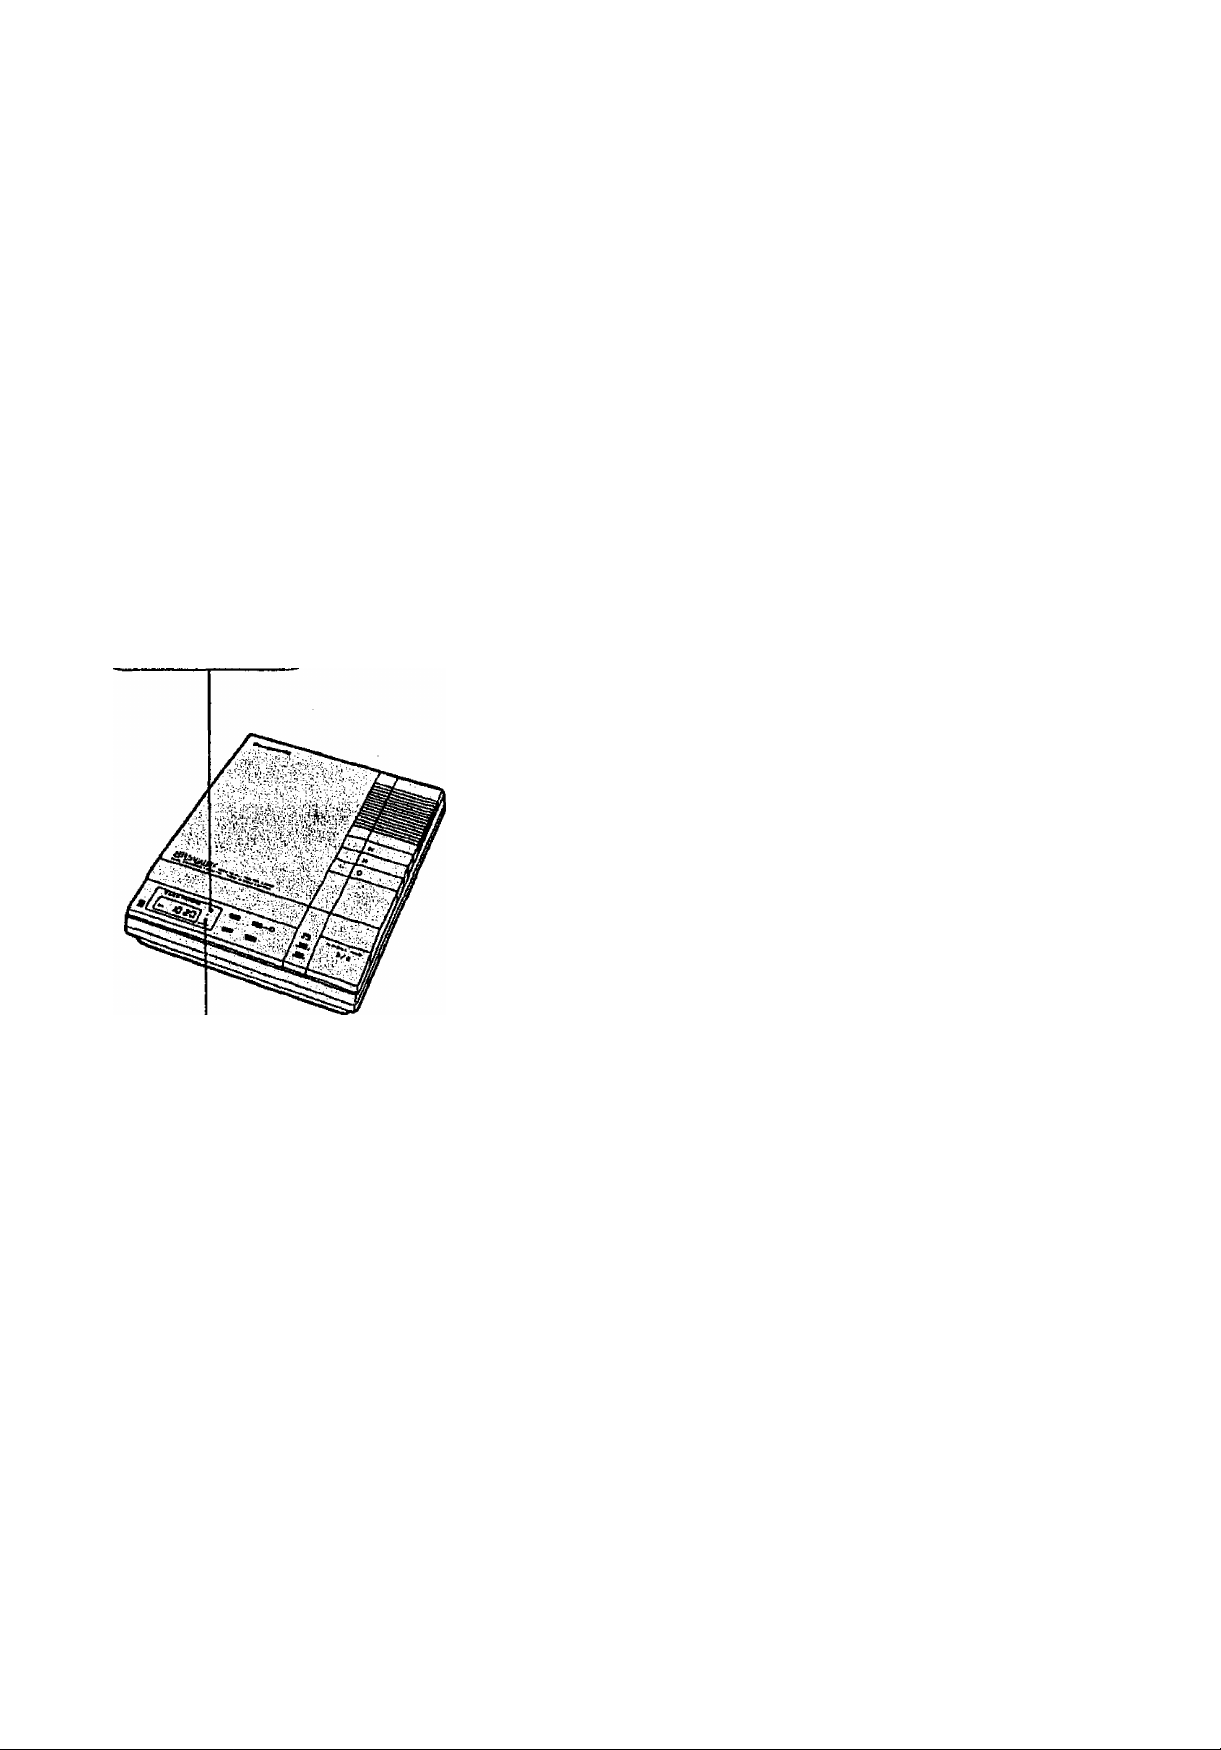
Preparation
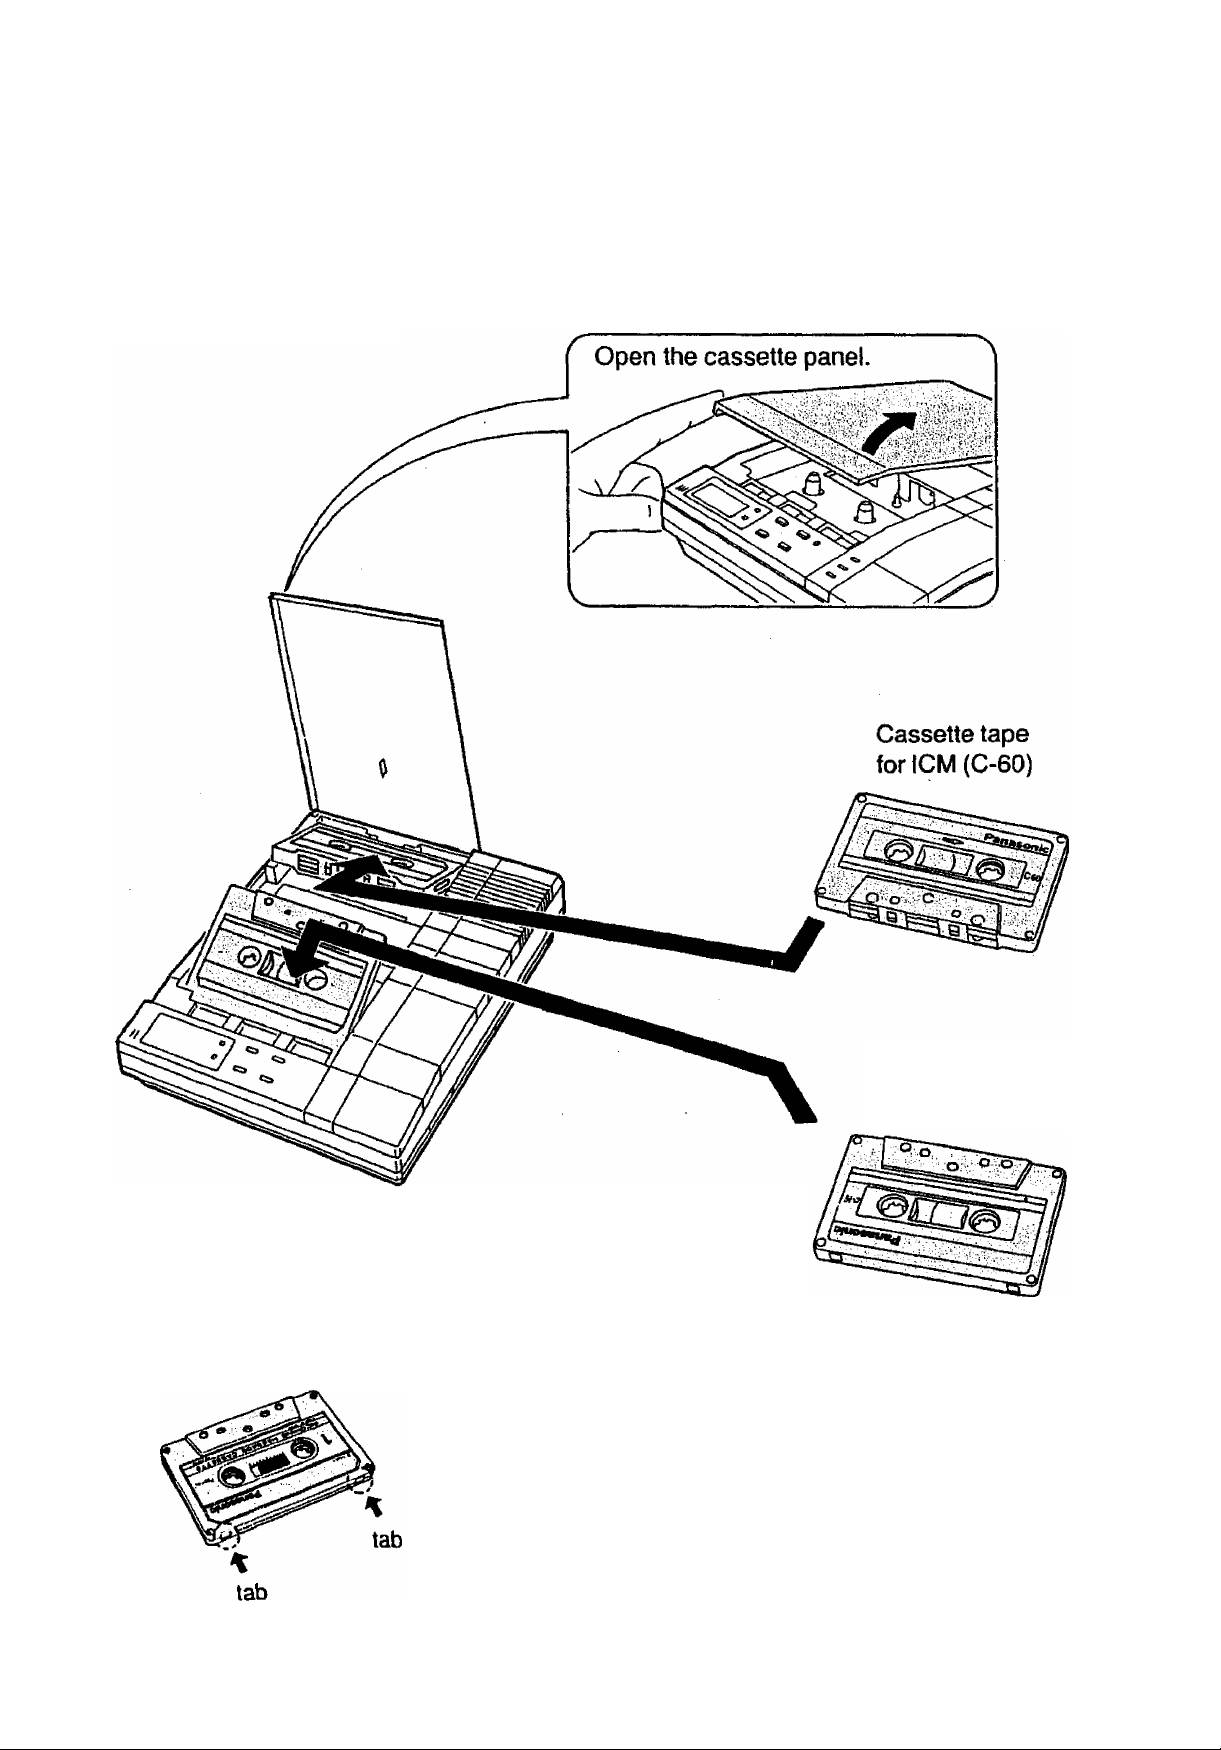
CASSETTE TAPE INSTALLATION
1 Insert the cassette tapes.
Cassette tape
for greeting message
(C-15)
After replacing the greeting message tape, press the OGM (GREETING) PLAY and the
REW buttons to reset it.
The tape can be erased even if the
record-prevention (knock-out) tabs have been
removed.
- 5 -
Page 7
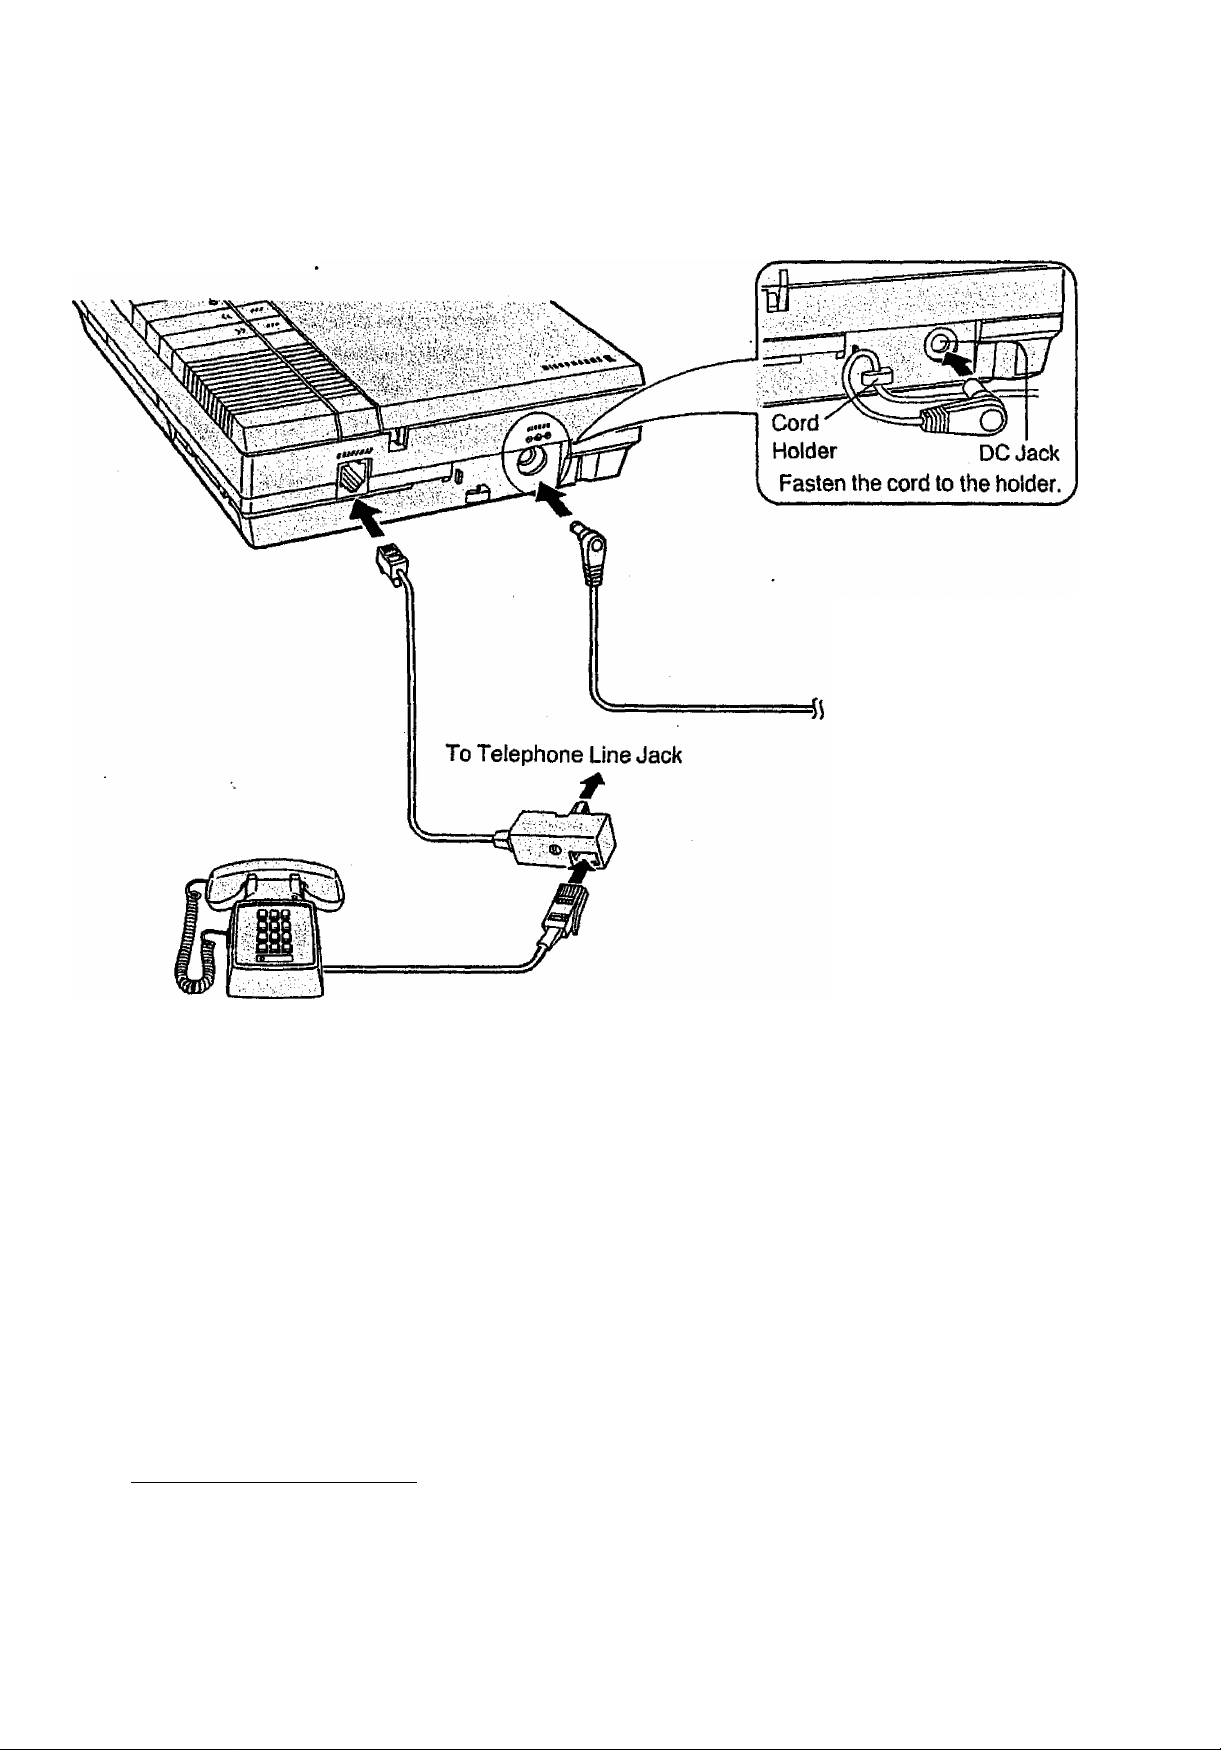
CONNECTION
1 Connect as shown
Preparation
To Power Outlet
Telephone
2 Press the POWER ON/OFF switch to turn the unit ON. (left side of unit)
•The unit will rewind the ICM tape. After 7 seconds, the unit will fast forward the Priority
Message area on the ICM tape, then stop.
The unit wiii start to reset the greeting message tape after resetting the ICM tape.
(See page 19 for Priority Message.)
— ICM tape end reset point ICM tape start
Priority Message area
•3 minutes after connecting the AC adaptor, the unit will be turned on automaticaliy
and reset the ICM and greeting message tapes even when the POWER ON/OFF
switch is not set to ON.
_______________________________________
For the best results, use the included telephone cord.
If you cannot connect this unit to your telephone line, consult your dealer.
Use only the included AC Adaptor. (KX-A07BA or KX-A11 BA)
- 6 -
Page 8
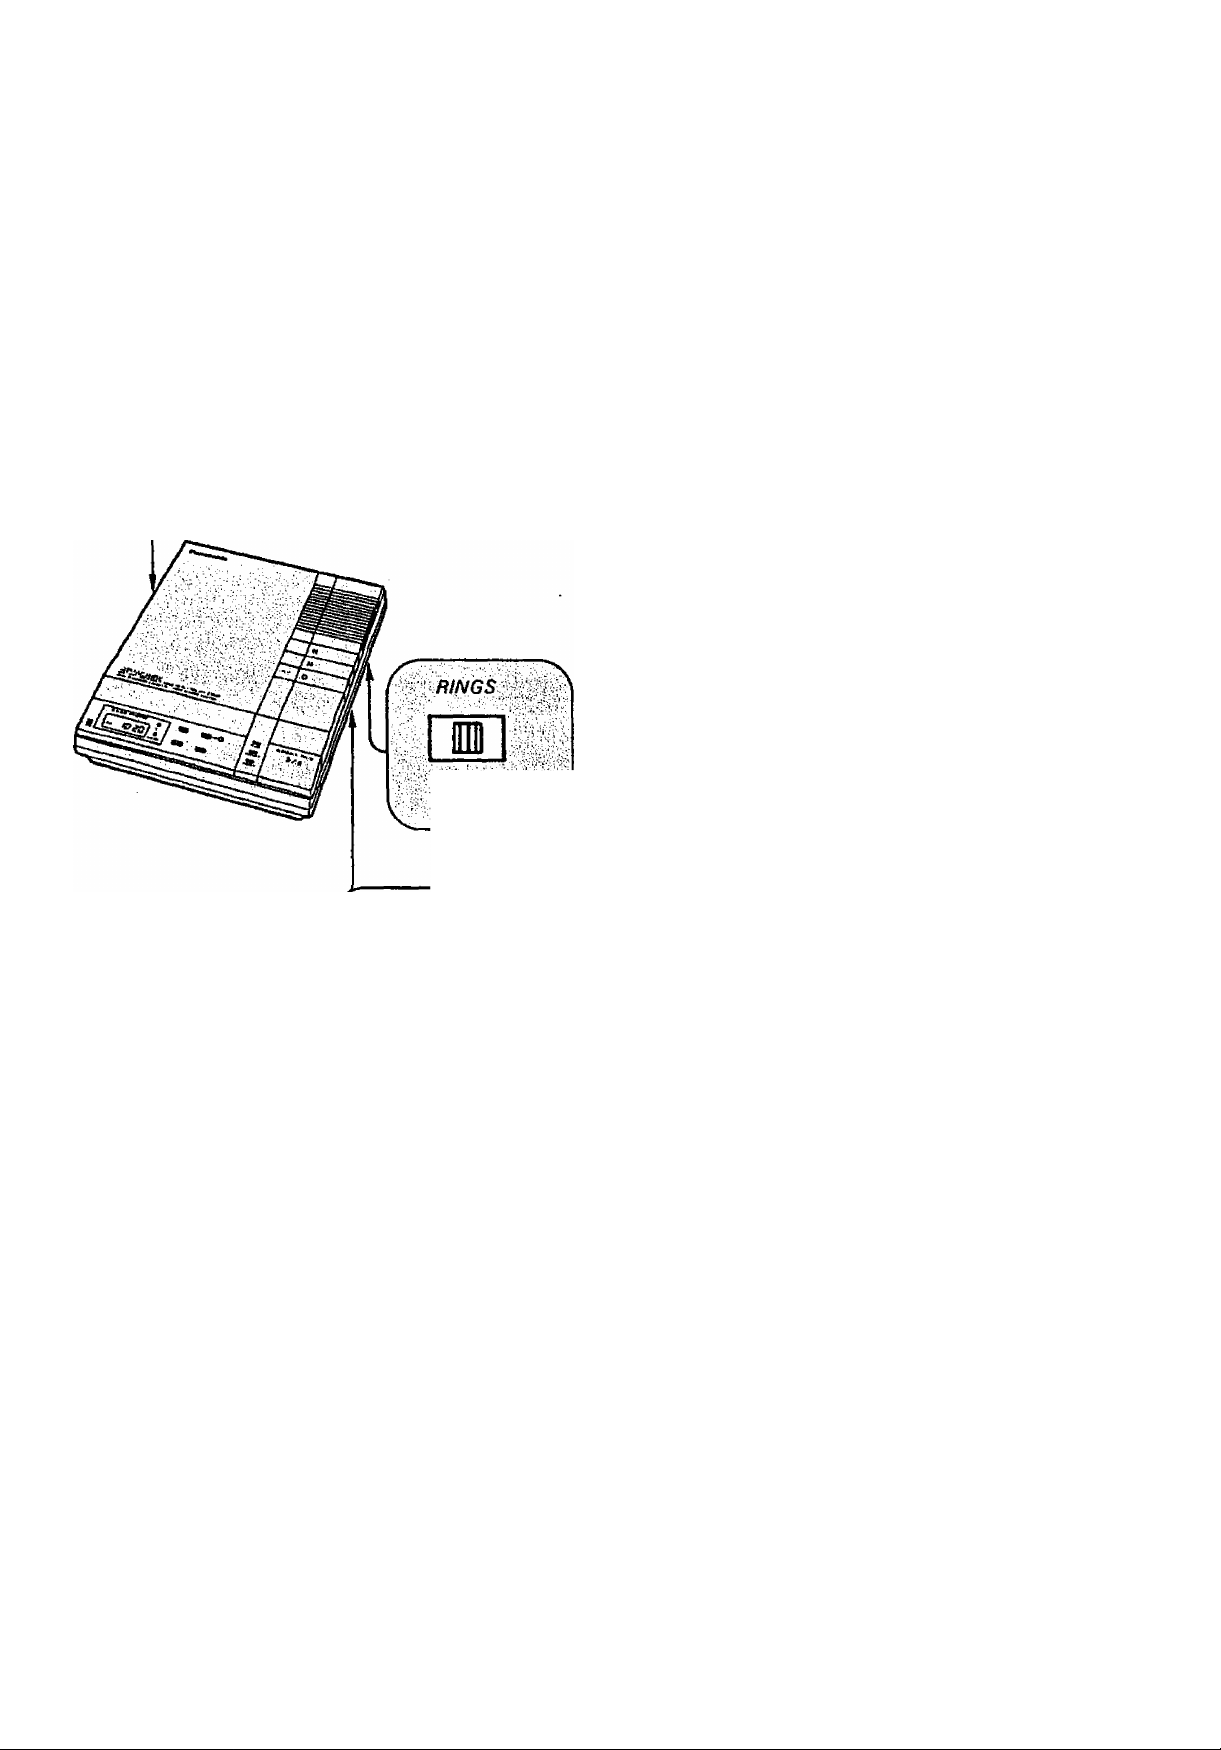
r ì cpaiauLfii
INITIAL SETTINGS
r
11
■ A • • B
Calling Party Control (CPC) Setting
Set to “A", (no call waiting service line.)
If you have call waiting service or
•incoming Messages are
interrupted, set to B.
TOLL SAVER
2*»<A0r0i
REC
I
ANNOUNCE ••• VOX
, 1MIN
Number of Rings
•2
The unit will answer a call on
the second ring.
•4
The unit wilt answer a call on
the fourth ring.
•AUTO
Recording Time Selector
See “TOLL SAVER”.
•VOX ... The unit will record for as long
as the caller speaks.
• 1 MIN ,. The unit will record up to 1 minute.
•ANNOUNCE.,.
The unit will play back the
greeting message only and will
not record any caller’s messages.
The LC Display will show ssn .
The TOLL SAVER feature lets you avoid a toll charge when you call your unit and no
messages have been recorded.
1 Set the number of rings to AUTO.
•If the unit does not pick up on the third ring, hang up immediately. This means you
have no messages and you have saved a toll charge.
■ The unit picks up on the second ring:
It means that at least one message has been recorded.
■ After you have played back all the messages from a remote phone, the unit will pick
up the next call on the fourth ring. If the unit picks up on the second ring, it means
that at least one new message has been recorded.
_7 _
Page 9
Preparation
REMOTE CODE (ID CODE) SETTING
You must set and remember your own Remote Code Number (ID code).
Choose your Code Number among the digits 00—99, then start your Remote Code
programming with a pointed object such as a ball point pen as follows.
Press FUNCTION to enter the
programming mode.
•The LC Display will flash
Indicating "1 r.
FUNCTION
•“Enter ID code.“ will be
announced.
Hold down SET until your desired
number is indicated on LC Display.
•The LC Display will count up the
number;
SET-
“11 ->12-^ 13 ...99-^00-^ 01
->02-*...“
•To adjust the time, you may go
directly to step 2 of “ADJUSTING
TIME“ on page 9 if you wish.
3 When programming is finished, leave the unit as it is.
•After 30 seconds, the unit will end the
programming mode automatically.
Your selected number (on the LC Display) will be stored into memory.
-8-
Page 10
Hreparation
ADJUSTING TIME
Press the FUNCTION and SET buttons with a pointed object such as a ball point pen.
f J • n n
I L • U U
Hour Minute
Selected mode flashes.
1 Press FUNCTION to enter the programming
mode.
•The LC Display will flash indicating the ID
code.
•“Enter ID code." will be announced.
tiiiSpSnilllli
iillliili
2 Press FUNCTION.
•“Sunday" will be announced.
•“.'"will flash.
3 Press SET to adjust the Day.
• Day will be announced.
4 Press FUNCTION.
•Hour digits will flash.
5 Press SET to adjust the Hour.
6 Press FUNCTION.
•Minute digits will flash.
7 Press SET to adjust the Minute.
:,4l:iFUNCTiON
8 Press FUNCTION to complete adjustment.
•The unit will announce the day and time.
When completing the adjustment, press the FUNCTION button according to the time
signal to set the 0 second.
-9-
Page 11

Preparation
CHECKING THE TIME AND DAY
Press TIME/DAY CHECK.
•The unit will announce the programmed
Time and Day.
•The LC Display will show the present
time.
•Turn up the volume if necessary.
(VOLUME control is right side of unit.)
If the unit does not announce the Time and Day, set Time and Day again.
The programmed time can be stored up to about 3 hours during a power failure.
The accuracy of the clock will be approximately ±45 seconds a month at room
temperature.
-10-
Page 12

How to Record a Greeting Message (OGM)
‘'OGM'’ is an abbreviation of ^‘Outgoing Message’' and it means ’'Greeting
Message”.
Before operating your unit, you must record a greeting message. The greeting message
will inform the calling party of your absence and will ask to leave a message,
■ You can record two greeting messages.
•Recording time for the first greeting message is limited to 30 seconds. So you may
leave a short message.
•The second greeting message is an extended greeting message and its recording time
may be any length up to the end of the tape. So you can leave any kind of message you
like, for example, advertisement for your company.
•The LC Display shows the selected greeting message.
SELECTING THE FIRST OR SECOND GREETING MESSAGE (OGM)
__________________
Which message is recorded or played depends on the selection of first or second greeting
message.
The greeting message will change alternately everytime you press the GREETING
SELECT button,
1 Press GREETING SELECT.
•The unit will announce the selected
greeting message "First greeting” or
"Second greeting”, and LC Display will
show your selection.
You can see which greeting message is selected from the LC Display.
•The first greeting message is selected.
n
u
fgj?33ii g maLWJHj
n
U
•The second greeting message is selected.
After selecting the first or second greeting message, proceed to “RECORDING A
GREETING MESSAGE (OGM)” on page 12.
-11
Page 13

How to Records Greeting Message (OGM)
RECORDING A GREETING MESSAGE (OGM)
Be sure that your desired greeting message is indicated on LC Display. (Refer to
“SELECTING THE FIRST OR SECOND GREETING MESSAGE (OGM)” on page 11.)
First greeting message: Recording time is up to 30 seconds.
If you do not finish recording within 30 seconds, the unit will
automatically stop recording.
Second greeting message: Recording time may be any length up to the end of the
tape.
■ If you pause for over 2 seconds white recording, you will hear series of warning
tones (6 beeps) and the announcement of “Record your greeting again.“, then the unit
will rewind the tape. If this happens, start with step 1 again after the unit stops
rewinding.
1 Press OGM (GREETING) REC until a long
beep is heard, then release it.
Immediately after the long beep, speak
ciearly and toudly into the microphone
(MIC), from approximately 20 cm away.
•The LC Display will count the seconds
that you use recording your greeting
message.
When you finish recording, press OGM
(GREETING) REC again.
•The unit will rewind the tape to the
beginning, and will be ready for recording
incoming calls.
-12-
Page 14

How to Record a Greeting Message (OGM)
CHECKING THE GREETING MESSAGE (PGM)
__________________________
You can check your greeting message any time.
After selecting the first or second greeting message that you want to check.
1 Press OGM (GREETING) PLAY.
•The unit will play back the greeting
message, then rewind the tape to the
beginning.
•Use the VOLUME control on the right of
your unit to regulate the volume during
playback if necessary,
•To cancel the operation during playback,
press the OGM (GREETING) PLAY
button.
NOTE:
•The unit will automatically change to the Answer mode 7 seconds after completing the
greeting message recording or playing back. At this time, the ANSWER indicator will
light.
•Answer mode:
When a call is received, the unit will automatically answer and record Incoming
Messages on the ICM tape.
-13
Page 15

SAMPLE GREETING MESSAGES (OGMS)
1. “This is the Panasonic (your name or business) Sales Company. We are glad that
you called but our office will open at 9 o’clock in the morning. If you leave a
message, including your name and telephone number after the beep, we will return
your call as soon as we can. Thank you,”
2. “Hello, this is (your name, business and/or telephone No.).
I am sorry I am not here to speak to you at the moment. Please leave a message
after the beep^ You have up to 1 minute for recording. Thank you/’ i ^
3. ”Hello, this is thevSm|th^ miss your call, but wé can’t come to the
phone right how. If yÜO ball bacW td^r^ talk to you; Thanks.”
NOTE:,;-.';
The unit may be set to récord an unlimited incoming message in the “VOX” position, an
incoming message limited to 1 minute “1 MIN” position or to announce only and not
record any incoming messages “ANNOUNCE/ position of the Recording Time : j
" fífllfinthr; ThA h cQhinio hrAatihn maccanocYnif^MeV ahr\\/t> rnrrocnnnH tn thoco ^
-14
Page 16

SAMPLE GREETING MESSAGES (OGMS)
1. “This is the Panasonic (your name or
you called but our office will open at 9 o'clock in the morning. If you leave a
message, including your name and telephone number after the beep, we will return
your call as soon as we can. Thank you.”
2. “Hello, this is (your name, business and/or telephone No,).
I am sorry I am not here to speak to you at the moment. Please leave a message
3. “Hello, this is the Sm Sorry to miss your call, but we canTcome to the
phone right nowl If VbO-ball back tomorrow,be happy to talk to;ypu;^fThanks."
The unit may be set to record an unlimited Incoming message in the “VOX" position, an
incomlng rnessage llmiled tp 1 minute “1 MIN” position or to announce only and not^^^^^^^^
^record ariyii^drpihg^messageisi-“^ Recording fihrie^lli^y^^
-14-
Page 17

Setting Prior to Leaving
RECORDING THE CALLERS’ MESSAGES
Confirm that the POWER indicator is lit. (The unit is turned on.)
If the unit is not turned on:
Press POWER ON/OFF to turn the unit on.
•After 7 seconds, Day and Time will be
announced.
•The ANSWER indicator will light.
•The LC Display will show ”0".
When you want to inform your greeting message but do not want to record the callers*
messages, set the Recording Time selector to “ANNOUNCE”. (See page 7.)
If you do not want the unit to answer the call, press the POWER ON/OFF switch to turn
the unit OFF.
SELECTING THE FIRST OR SECOND GREETING MESSAGE
(OGM)
Which message is played is depended upon the selection of first or second greeting
message.
________________________________________________________________________
Press GREETING SELECT.
•The unit will announce the selected
greeting message “First greeting*’ or
“Second greeting”, and LC Display will
show your selection.
-15-
Page 18

Listening to the Recorded Messages
•When an Incoming Message has been recorded, the LC Display will show the number
of messages and the ANSWER indicator will flash.
•in case of power interruption, the LC Display will flash with indicating the wrong time
after the power is restored. In this case, adjust the time again. (See page 9.)
•The greeting message will remain the same after the power is restored.
AUTO-LOGIC (One-Touch Operation):
At the touch of the PLAYBACK/PAUSE button, the unit will automatically rewind
and play back all the recorded messages. At the end of the last message, “End of
final message.*’ will be announced. After 7 seconds, the unit will be ready for
recording incoming calls. All calls will be automatically saved.
VOICE TIME/DA Y STAMP
When the messages are received, a voice synthesized announcement of the time and
day will be recorded on the ICM tape after the recorded message.
•If the Voice Time/Day Stamp is not recorded after the recorded messages, set time and
day again. (See page 9.)
LISTENING TO THE MESSAGES
1 Press PLAYBACK/PAUSE.
•The playback volume is adjustable using
the VOLUME control (right side of unit),
•After playing back, “End of final
message.” will be announced.
When the Priority Message is recorded, the unit will play back it at first, then the
recorded messages will be played back.
16-
Page 19

Listening to the Recorded Messages
WHILE LISTENING TO THE MESSAGES
To stop the tape temporarily, press
PLAYBACK/PAUSE.
•The IN USE indicator will flash.
The tape will pause until you
restart it by pressing the same
button again.
To rewind the tape, press REW.
To fast forward the tape, press FF.
■ If you want the unit to stop rewinding or fast forwarding the tape, press the
PLAYBACK/PAUSE button. The unit will play back the tape from the point you press
the button.
REPLACING THE TAPE(S)
Greeting Message tape: After replacing the greeting message tape, press the
OGM (GREETING) PLAY and the REW buttons to reset it.
incoming Message tape: After replacing the ICM tape, press the REW button to reset
it.
•The unit will rewind the tape to the beginning, then stop.
After 7 seconds, the unit will fast forward the Priority
Message area on the ICM tape, then stop.
-17-
Page 20

Listening to the Recorded Messages
RE-PLA YING BACK ALL THE MESSAGES
1 Wait until the ANSWER indicator is lit after
playing back all the messages.
2 Press PLAYBACK/PAUSE.
•The unit will play back alt the recorded
messages again.
If you press the PLAYBACK/PAUSE button before the ANSWER indicator is lit by
mistake, press the REW button to rewind the tape. Within 7 seconds after rewinding,
press the PLAYBACK/PAUSE button to re-play back all the messages.
AFTER LISTENING TO THE MESSAGES
After reviewing the ICM, the unit will automatically reset itself to the Answer mode.
To Record after the Last Message
Confirm that the LC Display shows “0”, then leave the unit as it is.
•The old messages are automatically saved.
To Record from the Beginning of the ICM area of thé Tape
Press REW.
•The unit will rewind and reset the tape.
(The Priority Message area will be
fast-forwarded.)
•The ANSWER indicator will light, and the
unit will be ready for recording incoming
calls.
•When the Priority Message has been
recorded, it will be reset at the same time
and the PRIORITY REG indicator will go
out.
-18-
Page 21

Priority Message
Incoming Messages
Your family member can leave an urgent
message up to 60 seconds at the
beginning of the ICM tape as the Priority
Message. When you play back from a
remote phone, the Priority Message will be
played back first, then other messages will
be played back.
RECORDING A PRIORITY MESSAGE
Recording time is up to 60 seconds.
■ If you pause for over 2 seconds while recording, you will hear a series of warning
tones (6 beeps), LC Display will show "Err”, then the unit will rewind the tape. If this
happens, start with step 1 again after the unit stops rewinding.
1 Press PRIORITY REG until a beep is
heard.
•The unit will rewind to the beginning of
the tape and a long beep will be heard.
After a tong beep, speak clearly and
loudly approximately 20 cm away from
MIC.
•The IN USE indicator will flash.
When recording is finished, press
PRIORITY REG again.
•The unit will rewind the tape and play
back the recorded Priority Message
automatically.
•The PRIORITY REC indicator will flash.
NOTE: Please note that the message counter on LC Display does not count the Priority
Message as one, but if you use the remote feature, the voice menu will count
the Priority Message.
-19-
Page 22

I 1 —n-
PRIORny ' '
^flgc^pgK;;
rnoniy message
The PRIORITY REG indicator will
flash to show a new priority
message is recorded.
When you play back ICM tape from a remote phone, the Priority Message can be heard
first.
One Priority Message can be recorded (up to 60 seconds),
•To change the Priority Message, follow the procedures on page 19. The previously
recorded message will be erased.
•To record more private messages, follow the procedures of “MESSAGE MEMO" on
page 21.
To play back the Priority Message, press the PLAYBACK/PAUSE button until a beep is
heard.
-20-
Page 23

other Features
RECORDING A MESSAGE MEMO
Your family member may record a message memo any time at home on the ICM tape. It
will be heard by anyone retrieving messages from a remote phone.
1 Press MEMO until a beep is heard.
•The number on the LC Display will
increase by one.
2 Speak into the MIC.
•The IN USE indicator will light.
3 When you finish recording, press MEMO
again.
•The IN USE indicator will go out.
•The ANSWER indicator will flash to show
that your message was recorded.
•New messages will be automatically
recorded after your message memo.
The recorded message can be played back with other messages by manually or
remotely.
-21-
Page 24

uintfr r&aiures
RECORDING A 2^WAY CONVERSATION (2-WAY RECORDING)
While speaking with someone on the telephone, you can record the conversation.
1 While having a conversation,
press 2 WAY REC until a beep is heard.
•The number on the LC Display will
increase by one.
•The IN USE indicator will light.
•The ANSWER indicator will light.
•A beep will sound every 15 seconds.
2 When you finish recording, press 2 WAY
REC again.
•The IN USE indicator will go out.
•The ANSWER indicator will flash to show
that your conversation was recorded.
•The unit will be ready for recording
incoming calls.
-22-
Page 25

other Featufos
SAVING THE RECORDED MESSAGES
You can save the desired messages.
1 Play back the tape, then press
PLAYBACK/PAUSE at the end of the
message you want to save.
(pause mode)
^ 2 Press PLAYBACK/PAUSE and REW
simultaneously.
•The IN USE indicator will go out.
•The ANSWER indicator will light.
•The LC Display will show "0”.
-23-
Page 26

ERASING THE RECORDED MESSAGES
After you have played back the recorded messages, you can erase them by simply
pressing the ICM ERASE button.
1 Press ICM ERASE until a beep is heard.
•The unit will erase the recorded messages
while the tape is rewinding.
•The LC Display will show “0".
If the Priority Message is recorded, It will be erased at the same time.
MONITORING THE INCOMING CALLS
While an Incoming Message is being recorded, you can monitor it. Then you may
choose to lift the telephone handset and speak to the caller directly.
1 Adjust the VOLUME control,
(right side of unit)
^ 2 If you want to talk to the caller, lift the
telephone handset and talk.
•The unit wilt automatically stop recording
and will be ready to record the next
incoming messages.
-24-
Page 27

How to Operate from a Remote Phone
REMOTE SYNTHESIZED VOICE INSTRUCTION
You can retrieve the recorded incoming messages from a remote location with tone
telephone.
The remote operation is simplified by a synthesized voice that offers you options over the
telephone.
The synthesized voice will give you the
direction how to operate your unit from a
remote location using a tone telephone.
Without any manuais you can easily
access remote operations such as
Marker Message.
To operate the unit directly skipping the
order of the Voice Menu, see pages 28
through 33.
GOING INTO THE VOICE MENU
--1-':';:":! ■■■ ^ '4'.' \
m№0mXSTc6de No. I ;;
IMililiiiitliitii
1 Call your unit.
2 Press your Remote Code No. during the
greeting message playback.
•The voice will tell you how many
messages you have received.
•Refer to “REMOTE CODE SETTING"
on page 8.
3 After 5 seconds the unit will go into the
Voice Menu. The voice wilt say; “Press
1 to playback all messages. Press 2 for
other functions.”
4 Press 1 to go into the announced feature
or press 2 to proceed to another feature.
-25-
Page 28

How to Operate from a Remote Phone
5 seconds after you have used each function, the unit will repeat Voice Instruction
from the beginning.
-26-
Page 29

How io Operaie from a Remoie Phone
ALL MESSAGE PLAYBACK
The unit will rewind the tape even if
the tape is fuli and play back all the
recorded messages.
•After the last message, the voice wili
say, *'End of final message”.
•If “End of tape” is announced, the
IGM tape is full.
•If you want to operate in succession,
wait for 5 seconds. The unit will
re-start Voice Menu from the
beginning.
NEW MESSAGE PLAYBACK
The unit will play back the newly
recorded messages.
MARKER MESSAGE
You can leave your index message on
the ICM tape.
1) Start to talk right after “Please
leave your message.” is
announced.
RECORDING GREETING
MESSAGE
You can re-record the greeting
message remotely. The voice will say;
“Press 7 to record your first
greeting. Press 8 to record your
second greeting. Press 9 to end
recording your greeting”.
1) Press‘T*.
•Short beeps will be heard
continuously until the greeting
message tape has been reset and
then a long beep will be heard.
2) Speak clearly and loudly after the
long beep.
3) When finished, press “9’*.
•The new greeting message will be
played back. So you can check or
amend it.
• If you pause for over 2 seconds
while recording, the unit will
sound 6 beeps and announce
“Record your greeting again.”
If this happens, repeat from step 1.
2) When finished, hang up.
TO REWIND/FAST FORWARD/
RESET DURING PLAYBACK
Press “9” while messages are being
RESET TAPE
The unit will rewind the tape to the
beginning. .
played, the voice will say: “Press
1 for backspace, 2 for skip, 3 to
reset tape.”
•Press “1” or “2”; The tape will be
rewound or skipped forward for
ROOM MONITOR
You can screen any sound in the
room where the unit is installed tor
30 seconds.
approximately 15 seconds
corresponding to playback time.
•Press “3”: The unit will rewind the
tape to the beginning.
You may hang up at any time and the unit will automatically go into the Answer
mode. If you hang up without resetting, future Incoming Messages will be recorded after
the last message.
-27-
Page 30

Direct Remote Operation
PLA YING BACK NEWL Y-RECORDED MESSAGES
(NEW MESSAGE PLAYBACK)
_____________________________________________
When you have already heard the messages from a remote phone, you can skip them
and listen to the newly-recorded messages.
1 Press the Code No. during the greeting
message.
2 Press “4” right after you hear the
A
Code No.
Once the recorded messages are played back, they won't be played back by
“NEW MESSAGE PLAYBACK” procedures.
Only newly recorded messages will be played back. To make sure you have retrieved
all messages BY YOURSELF, we recommend you sometimes play back the ICM by
following the procedures of "ALL MESSAGE PLAYBACK".
synthesized voice telling the number of
the recorded messages.
•The unit will play back the new messages.
• Even during the playback of previously
heard messages, you can skip them by
pressing
“4’V
-28-
Page 31

Direct Remote Operation
REWINDING/FAST FORWARDING THE TAPE WHILE LISTENING TO THE MESSA GES
To Back Space
Press “1”.
•The tape will be rewound for
iilIflÜSiu
iS^^|ílNaia$$»
To Skip Forward
'L':íVíñ>'y»S;sí;S^^
approximately 15 seconds corresponding
to the playback time.
Press “2”.
•The tape will be skipped forward for
approximately 15 seconds corresponding
to the playback time.
-29-
Page 32

Direct Remote Operation
RESETTING THE ICM TAPE FOR FUTURE MESSAGES
To record new Incoming Messages from the beginning of the tape, after the recorded
messages have been played back or while they are being played;
Press “3”.
•“Reset tape“ will be announced. The unit
will rewind the tape to the beginning and a
beep will be heard.
Then hang up.
•If the Priority Message Is recorded, it will
be reset at the same time.
If you have used Memory Playback
Memory
Playback
If you have reset the tape by mistake
1 Press “3”.
•The unit will rewind the tape to the
beginning of newly-recorded messages
and a beep will be heard.
Jy 2 Press “3” again.
•“Reset tape” will be announced and
future messages will be recorded from the
beginning of the ICM tape excluding the
Priority Message area.
ABC
2
Press "2” after the tape has been reset
(“Skip" will be announced), then hang up.
•The unit will advance the tape to the end
of the recorded messages.
-30-
Page 33

Direct Remote Operation
MONITORING ROOM SOUND
You can monitor sounds in the room where the unit is instaiied. Cail your unit, then;
1 Press the Code No. during the greeting
message.
2 Press “S’* right after you hear the
synthesized voice indicating the number
Code No.
of the recorded messages.
•“Room Monitor'* will be announced.
•You can listen for 30 seconds.
•To listen further, press “5" again within
10 seconds of hearing one beep.
CHANGING THE GREETING MESSAGE
You can change your greeting message. Call your unit, then;
From First Greeting Message to Second Greeting Message
/ Press the Code No. during the first greeting
message.
Code No.
2 Press then press “2” right after you
hear the synthesized voice indicating the
number of the recorded messages.
•“Second greeting” will be announced.
•The unit will play back the second greeting
message.
The second greeting message has now
been selected.
From Second Greeting Message to First Greeting Message
Press “1" instead of ‘'2" at step 2 of “From First Greeting Message to Second Greeting
Message".
•“First greeting” will be announced.
•The unit will play back the first greeting message.
The first greeting message has now been selected.
-31-
Page 34

RE RECORDING A GREETING MESSAGE
You can re-record greeting messages from a remote phone.
■ if you pause for over 2 seconds while recording, you will hear a series of warning
tones (6 beeps) and the announcement of “Record your greeting again.“ If this
happens, repeat from step 2 within 10 seconds of hearing the beeps.
Re-recording first greeting message
Recording time for the first greeting message is
up to 30 seconds.
1 Press the Code No. during the greeting
message.
2 Press “7” right after you hear the
synthesized voice indicating the number
of recorded messages.
•“Recording your first greeting“ will be
announced.
• Short beeps will be heard continuously
until the greeting message tape has been
reset, and then a long beep will be heard.
Re-recording second greeting message
3 Speak clearly and loudly after you hear the
long beep.
4 When recording is finished, press “9”.
•The new greeting message will be played
back, so that it can be checked or
amended if necessary.
Recording time for the second greeting message
is up to the length of the tape minus 30 seconds
reserved for the first greeting message.
Press “8” instead of “7'* at step 2 of
“Re-recording first greeting message”.
•“Recording your second greeting** will be
announced.
'"!'v jjjjjj Tc";
-32-
Page 35

Direct Remote Operation
SKIPPING THE GREETING MESSAGE FOR ICM RECORDING
If you or the caller does not want to hear the Greeting Message, the unit can be
switched promptly to the Incoming Message. Call you unit, then;
1 Press “**’ during the greeting message.
2 Speak clearly and loudly after you hear the
long beep to record your Incoming Message.
pliSllilii
SETTINGICANCELING THE ANSWER MODE
You can easily set or cancel the Answer mode from a remote phone.
To Set
1 Call your unit.
■ wmm fV «
-I rVi
To Cancel
15 rings
2 Wait for 15 rings, the unit will answer.
(You may hang up at this time.)
•A greeting message will be heard.
:;i
•The unit will be ready for recording
incoming calls.
1 Call your unit.
2 Press the Code No. during the greeting
message.
i?f
Code No.l ^ :
3 Press “0” right after you hear the
synthesized voice Indicating the number
of the recorded messages.
•“Turn off” will be announced.
•The unit will not pick up any calls.
-33
Page 36

Troubleshooting Guide
Problem Cause & Remedy
•The unit does not work when 1 press any
buttons.
^•1 cannot remove the cassette from the unit.
N
Plug In the AC adaptor then switch
the power on.
J
^he unit has been set to the Answer mode,
but no Incoming Messages are recorded.
1
_________________________________________________
"^The unit does not function. However, 6 beeps
sound and the Call-Counter shows “Err”.
V
__ _ _ _ _ _^_ _ _____________________
'^Whiie recording a greeting message, 6 beep
sounds are heard.
V
_________________________________
• Re-record a greeting message. Speak
•The greeting message or ICM
cassette is cut or is not inserted.
Replace the cassette with a new one.
•The greeting message is recorded
improperly.
Record a new greeting message.
•The recording time selector is set to
“ANNOUNCE". .
•Greeting message cassette might ^
be broken.
•Clean the heads. (See page 36.)
A
clearly and loudly, and do not pause
for over 2 seconds while recording.
J
^When the greeting message or the ICM tape
is played back, the sound level is low, even if
the VOLUME control is turned up fully.
have played back alt the recorded
messages and 1 want to record the next
phone call after the last previously recorded
message.
press the button of a remote phone, but
the unit does not respond.
L. ... . . •
—
Some ICM have not been recorded up to
their end.
V
_____________
Clean the Heads. (See Maintenance ^
instruction on page 36.)
J
•Wait for 7 seconds. The unit will be ^
ready to record the next phone call.
•In case of remote operation, just
hang up.
•Make sure that you are entering your^
correct Code number.
• Record a greeting message in a
quiet place. ^
Set the CPC switch to “B". ^
(See page 7.)
J
1 The ICM tape continues to run after a caller
^ ‘angs up.
-34-
Set the recording time selector to
“1 MIN”. (See page 7.)
Page 37

Maintenance
Because the head and capstan assemblies are in contact with the tape, dirt and
residue from the tape can easily adhere to these parts, causing distortion. These parts
should be cleaned periodically in the manner described below.
•Clean the head surface, pinch roller and capstan with a cotton swab.
If these surfaces are extremely dirty, dampen the cotton swab with alcohol.
r
(Do not bring magnetic or metal objects, such as a screwdriver, near the head
assemblies, as such objects could magnetize the heads.
►Do not oil any part of the unit.
FORTONE REMOTE CONTROL
ABC
I
2
DEF
3
Back Space Skip Forward Reset
GHl
4 5
4
_________________
New Message
JKL
.-A____________________________
Room Monitor
MNO
6
Playback
Call your unit. For Greeting
-------
Press Code
No.
------
' Message Skip,
press B,
For New
Message
Playback,
press Q.
-36-
1
1
First Second
Greeting
Message
Recording
Greeting
Message
Recording
0
Greeting
Turn Off
Greeting
Message
Recording
Stop
n
Message Skip
•When you press a button, press firmly.
•The unit will enter into the Voice Menu
mode if you don’t press a button.
For Room Monitor, press Q.
During ICM being played back;
•For Backspace, press D-
•For Skip Forward, press B.
•For ICM Tape Reset, press B.
•To save the ICM, hang up after
playback.
•To record a Marker Message.
speak after the announcement of
'‘Please leave your message".
Page 38

Maintenance
Because the head and capstan assemblies are in contact with the tape, dirt and
residue from the tape can easily adhere to these parts, causing distortion. These parts
should be cleaned periodically in the manner described below.
•Clean the head surface, pinch roller and capstan with a cotton swab.
If these surfaces are extremely dirty, dampen the cotton swab with alcohol.
r
M
•Do not bring magnetic or metal objects, such as a screwdriver, near the head
assemblies, as such objects could magnetize the heads.
•Do not oil any part of the unit.
FOR TONE REMOTE CONTROL
-36-
ABC
1
2
DEF
3
Back Space Skip Forward Reset
CHI
4
A
_____________
New Message
JK L
5
A
M N O
Room Monitor
6
Playback
PRS
7
A
First
Greeting Greeting
Message
Recording
A
______
Greeting
TUV
6
_____A_____
Second
Message
Recording
0
A
Turn Off
WXY
9
A
Greeting
Message
Recording
Stop
u
Message Skip
•When you press a button, press firmly.
•The unit will enter into the Voice Menu
mode if you don’t press a button.
Call your unit.
Press Code
No.
------
During iCM being played back:
•For Back Space, press D.
•For Skip Forward, press B.
•For ICM Tape Reset, press Q.
•To save the ICM, hang up after
playback.
•To record a Marker Message,
speak after the announcement of
''Please leave your message".
For Greeting
Message Skip,
press B-
Page 39

Cassette Tape
•For optimum sound quality and performance, we recommend that you re-record your
greeting message every three months, use side two after six months and replace
the tape every year assuming that the unit answers about ten calls a day.
•Should the Incoming Message cassette tape break or become worn, replace it with a
high quality “NORMAL” tape. Use Panasonic (C15 and C30 for greeting message, C60
and C90 for Incoming Message), or other high quality tape. Metal or chrome tape cannot
be used.
•Never place a cassette tape near a magnetic source, such as a magnet or a TV set,
because it may erase the tape.
•Slack in the tape can be tightened by rotating the tape reel with a pencil, as shown.
-37-
Page 40

others
•If there is any trouble, disconnect the unit from the telephone line and connect a known
working phone. If the known working phone operates properly, have your Panasonic
unit repaired. If the known working telephone does not operate properly, consult with a
telephone company.
•Do not use benzine, thinner, or similar solvents. Do not use abrasive powder to clean
the cabinet. Wipe it with a soft cloth.
•Keep the unit away from heating appliances and electrical noise generating devices
such as fluorescent lamps, motors and television. These noise sources can interfere
with the performance of the unit.
•The unit should be kept free of dust, moisture high temperature and vibration, and
should not be exposed to direct sunlight.
•Never attempt to Insert wires, pins, etc. into the vents or other holes of this unit.
WARNING:
TO PREVENT FIRE OR SHOCK HAZARD, DO NOT EXPOSE THIS PRODUCT TO
RAIN OR ANY TYPE OF MOISTURE.
CASSETTE PANEL
If the panel comes off,
replace it as shown:
Q Insert into a
slot slowly.
Insert the panel’s rib (O),
then slide into the hole (@)
-38-
 Loading...