

Page 1
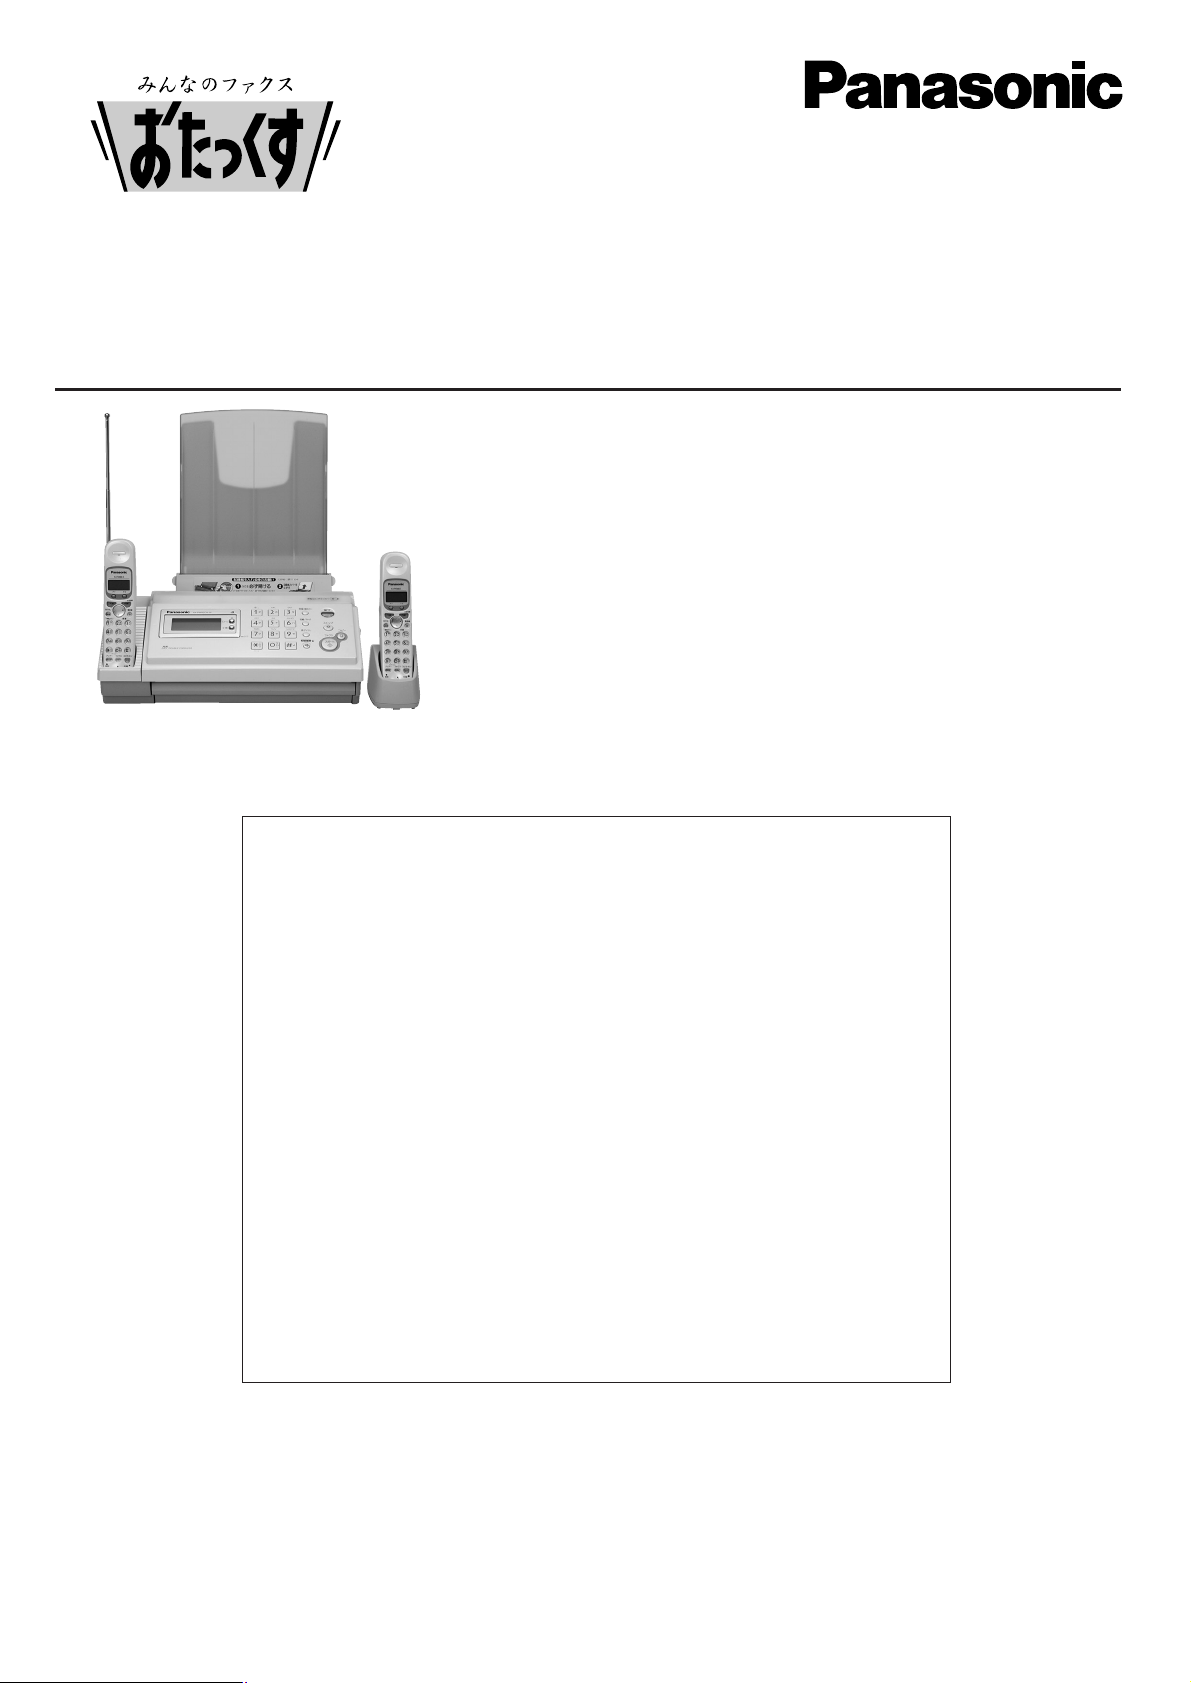
Facsimile
Quick Reference Guide
KX-PW92CW
Model No.
Table of Contents
Finding the controls ……………………………………………………………2
Installations and connections …………………………………………………4
Setting the date and time ………………………………………………………7
Setting your facsimile telephone number ……………………………………7
Setting your logo…………………………………………………………………8
Character input and command key table ……………………………………9
Automatic dialing on the main unit……………………………………………10
Automatic dialing on the portable handset …………………………………11
Intercom between the main unit and portable handset ……………………12
Sending faxes …………………………………………………………………13
Receiving faxes ………………………………………………………………14
Operating the built-in answering device ……………………………………16
Individual e-mail services ……………………………………………………18
Specifications…………………………………………………………Back cover
Thank you for purchasing a Panasonic facsimile.
●
This guide explains some basic features and operations, but not all of them.
For further details, see the Japanese operating instructions.
●
This product is designed for use in Japan.
Panasonic cannot provide service for this product if used outside Japan.
●
Any details given in this guide are subject to change without notice.
Page 2
2
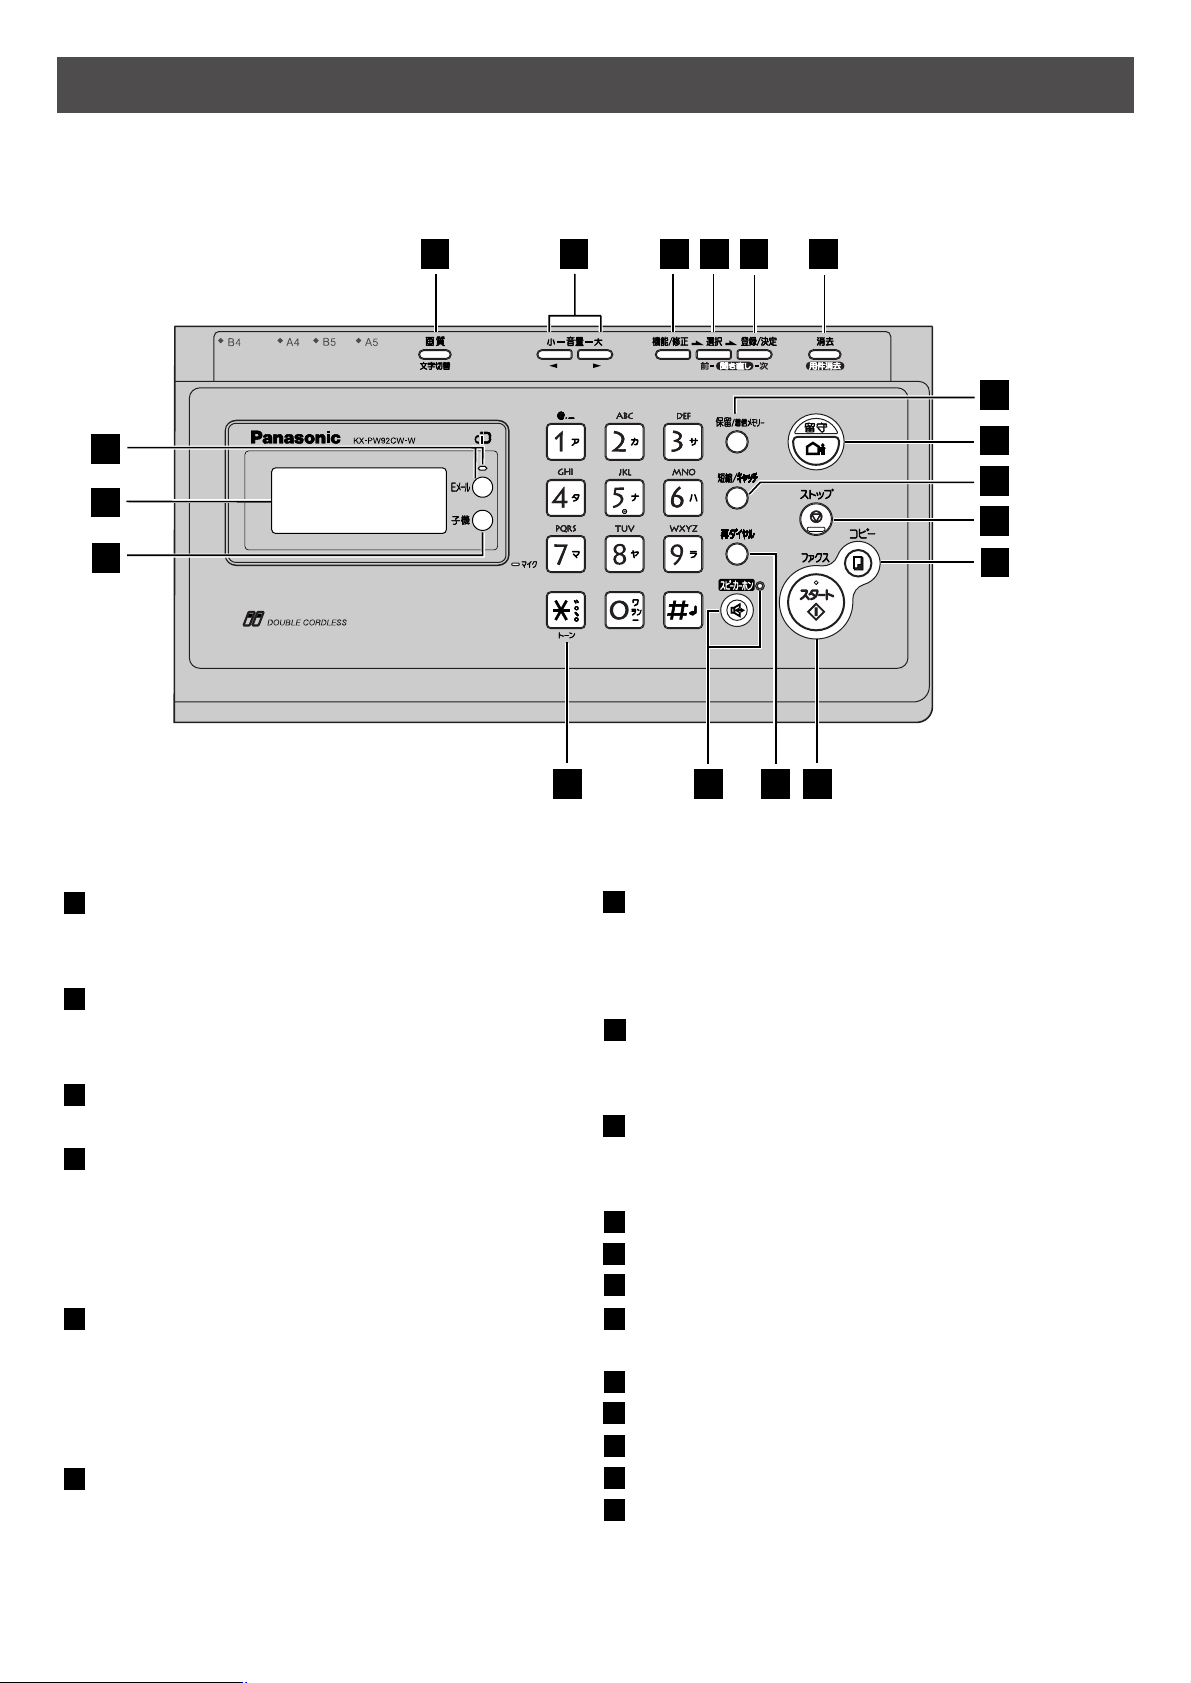
Finding the controls
Main unit (control panel)
1
2
4
53
6
7
9
8
10
12
14
13
15
16
17
18
11
Resolution button selects the resolution
when faxing or copying.
Character Input Mode button
Volume buttons adjust ringer, speaker
and handset volume by pressing the up
and down buttons.
Function button initiates programming.
Edit button
Select button selects feature settings.
Previous Replay button
—plays back recorded messages.
—returns to the previous message while
listening to a recorded message.
Register/Set button stores a parameter.
Next Replay button
—plays back recorded messages.
—skips to the next message while
listening to a recorded message.
Erase button
Hold button
Call Memory button starts a search in
the Number Display log.
(For caller ID display service users.)
Auto Answer button & indicator
—light on: answering device activated.
—light off: used as a regular telephone.
Speed Dialer button
Flash button
(For call waiting service users.)
Stop button
Copy button starts copying.
Start/Fax button starts faxing.
Redial button
Pause button
Speakerphone button & indicator
Tone button switches to tone dialing.
Portable Handset button
Liquid crystal display
E-Mail button & indicator
1817161514
13
12
11
1098765432
1
Page 3
3
Finding the controls
Portable handset
●
To adjust the volume.
●
To redial the last number
dialed.
●
To insert a pause.
●
To make/answer calls.
●
To page the main unit.
●
To change the character
input mode.
●
To end a call.
●
To end or exit from editing or
other operations.
●
To put a call on hold.
●
To start a search in the
Number Display log.
(For caller ID display service
users.)
●
To clear letters/numbers.
●
For call waiting service
users.
●
To receive faxes.
●
To use the speakerphone.
●
Used when installing
additional portable
handsets.
Sharp button
●
To use the phonebook.
and buttons refer to the function
displayed on the bottom of the display.
They function differently depending on
the mode.
Charge indicator
Dial buttons
Charging
Full
Red
Off
LCD (with back light)
Speaker
Microphone
Do not cover the
microphone while
talking.
How to use buttons
How to use key
1
3
●
Displays battery strength, telephone
numbers etc.
Function menu that is
controlled by or .
Portable handset number
Battery strength
●
To adjust the volume.
Tone button
●
To switch to Tone dialing mode.
コキ
1
1
32
2
2
Page 4
4
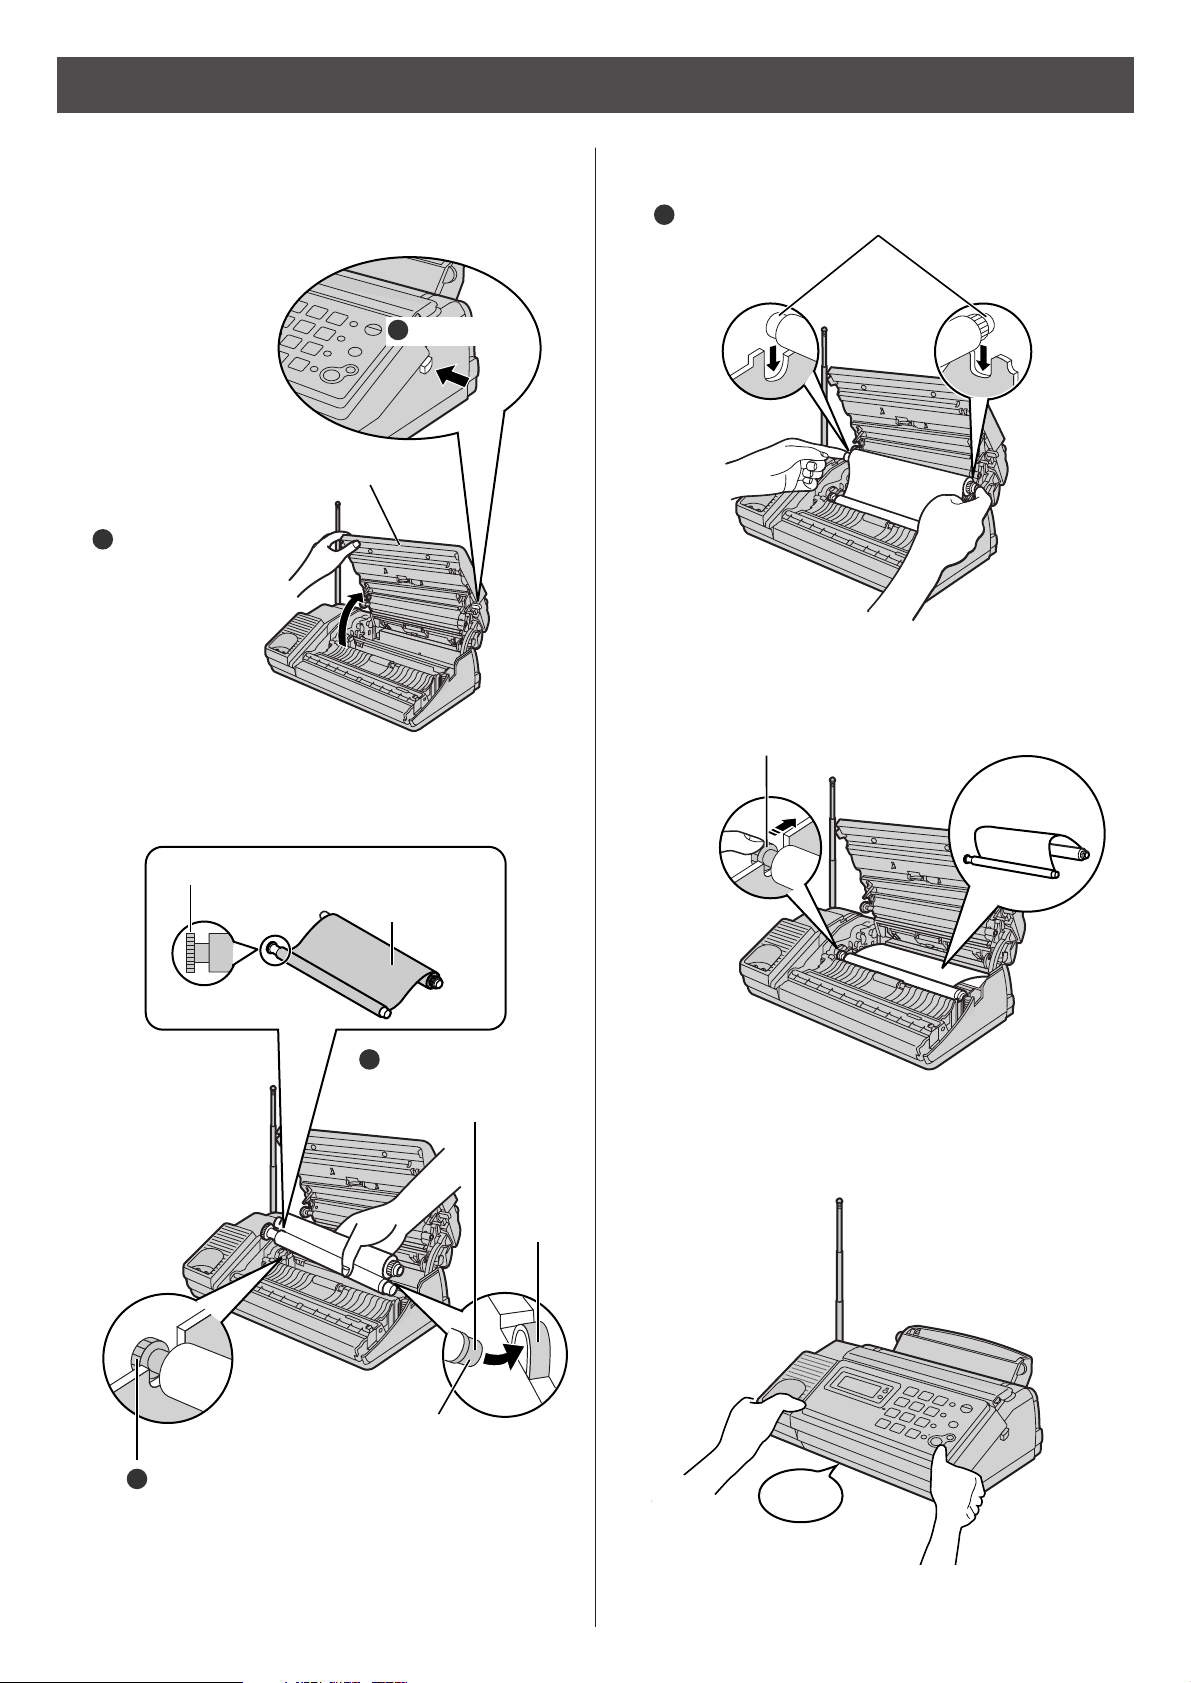
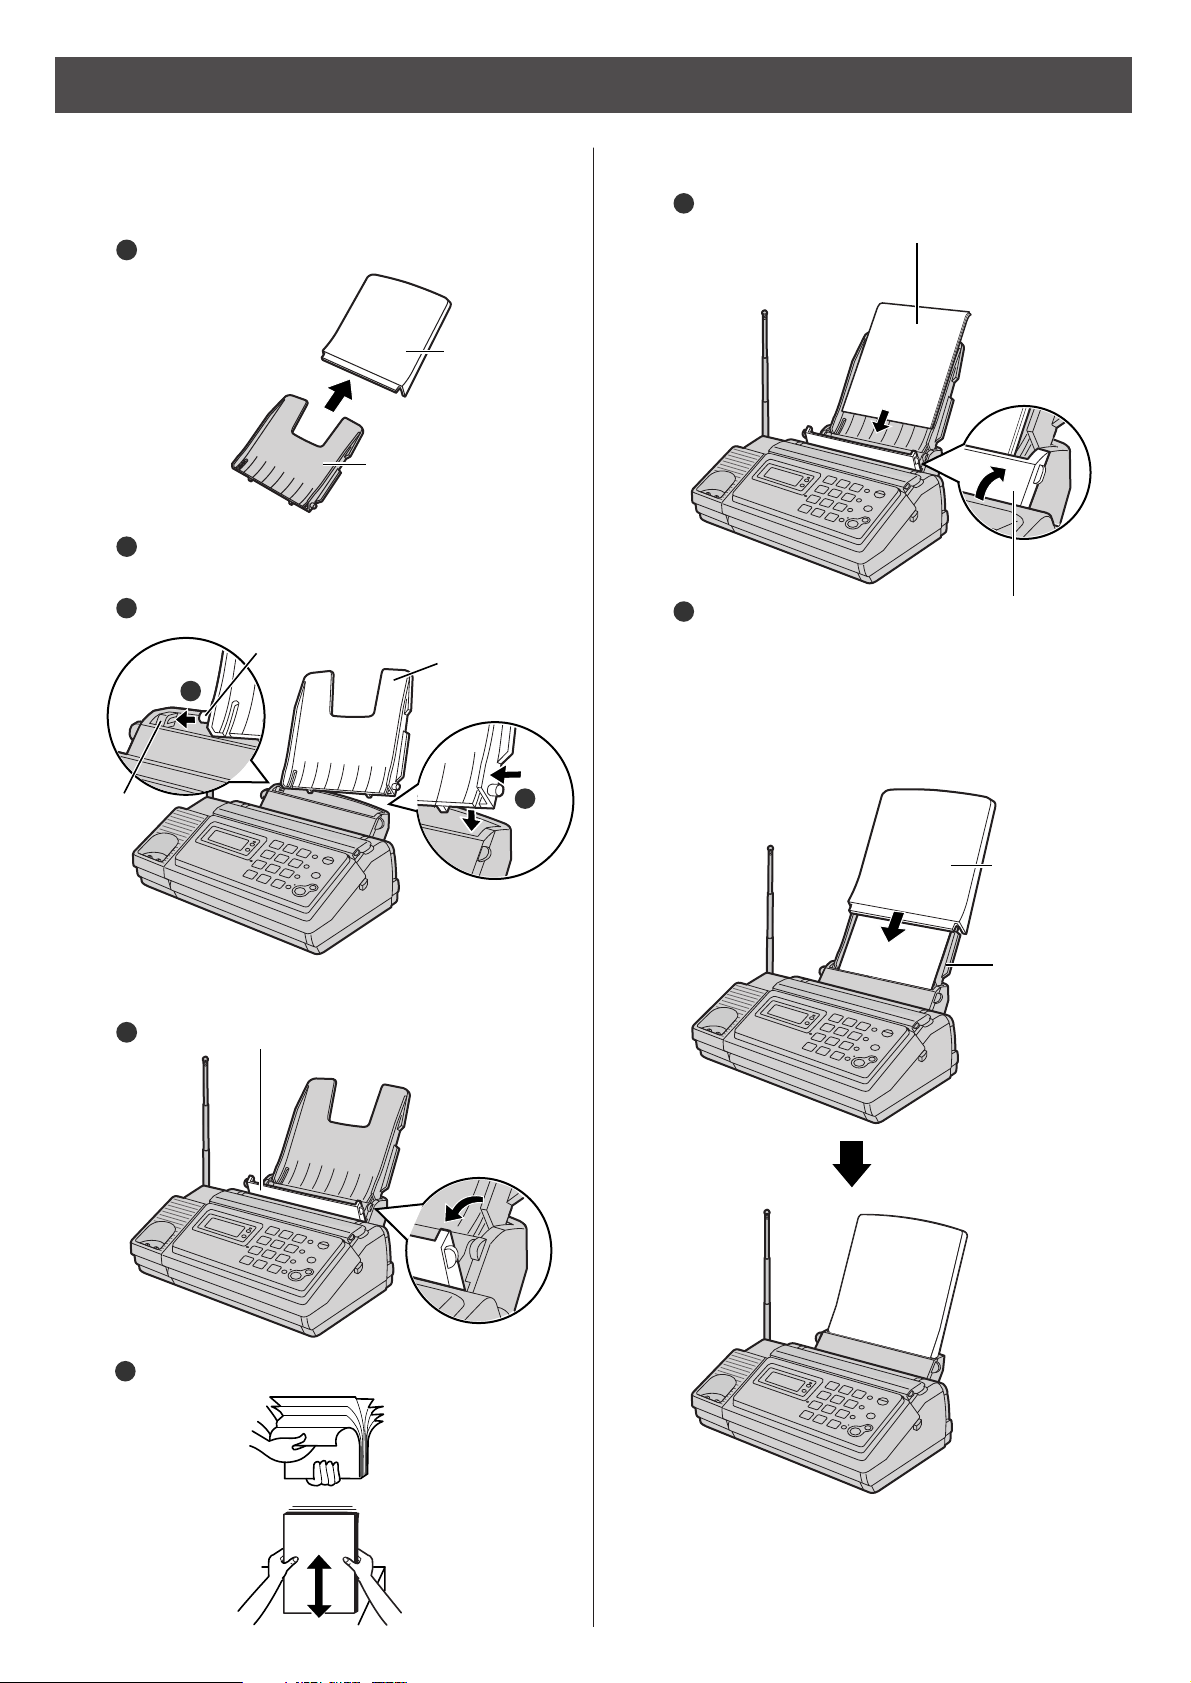
Installations and connections
Installing the ink film
2 Insert the ink film.
1 Open the control panel.
Find the “T” shaped gear (blue).
Ink film
Right slot
Blue core
Insert the “T” shaped gear (blue)
into the left slot of the main unit.
Do not
be slacken.
Click
Control panel
Press here.
1
Open the control
panel until it locks.
2
2
Insert the blue core
into the right slot of
the main unit.
1
3 If the ink film is slack, tighten it by winding the “T”
shaped gear.
4 Close the control panel until it locks.
Insert the white core into the slots.
3
Page 5
5
Installations and connections
Installing recording paper
(A4
size)
3 Install the recording paper cover on the recording
paper tray by sliding it down from the top.
Recording
paper tray
Slot
Tab
Recording
paper cover
Recording
paper tray
Printing
side is on
the back
Recording
paper cover
Recording
paper tray
Fan the stack of recording paper (A4 size).
2
Insert the recording paper into the recording
paper tray. (Up to 30 sheets)
3
Close the paper entrance cover by leaning it
back.
4
2 Insert the recording paper into the recording paper tray.
Open the paper entrance cover until it locks.
1
1 Install the recording paper tray.
Separate the recording paper cover from the
recording paper tray.
1
Insert the left tab on the recording paper tray into
the left slot of the main unit.
Insert the right tab into the right slot of the main unit.
3
2
2
3
Page 6
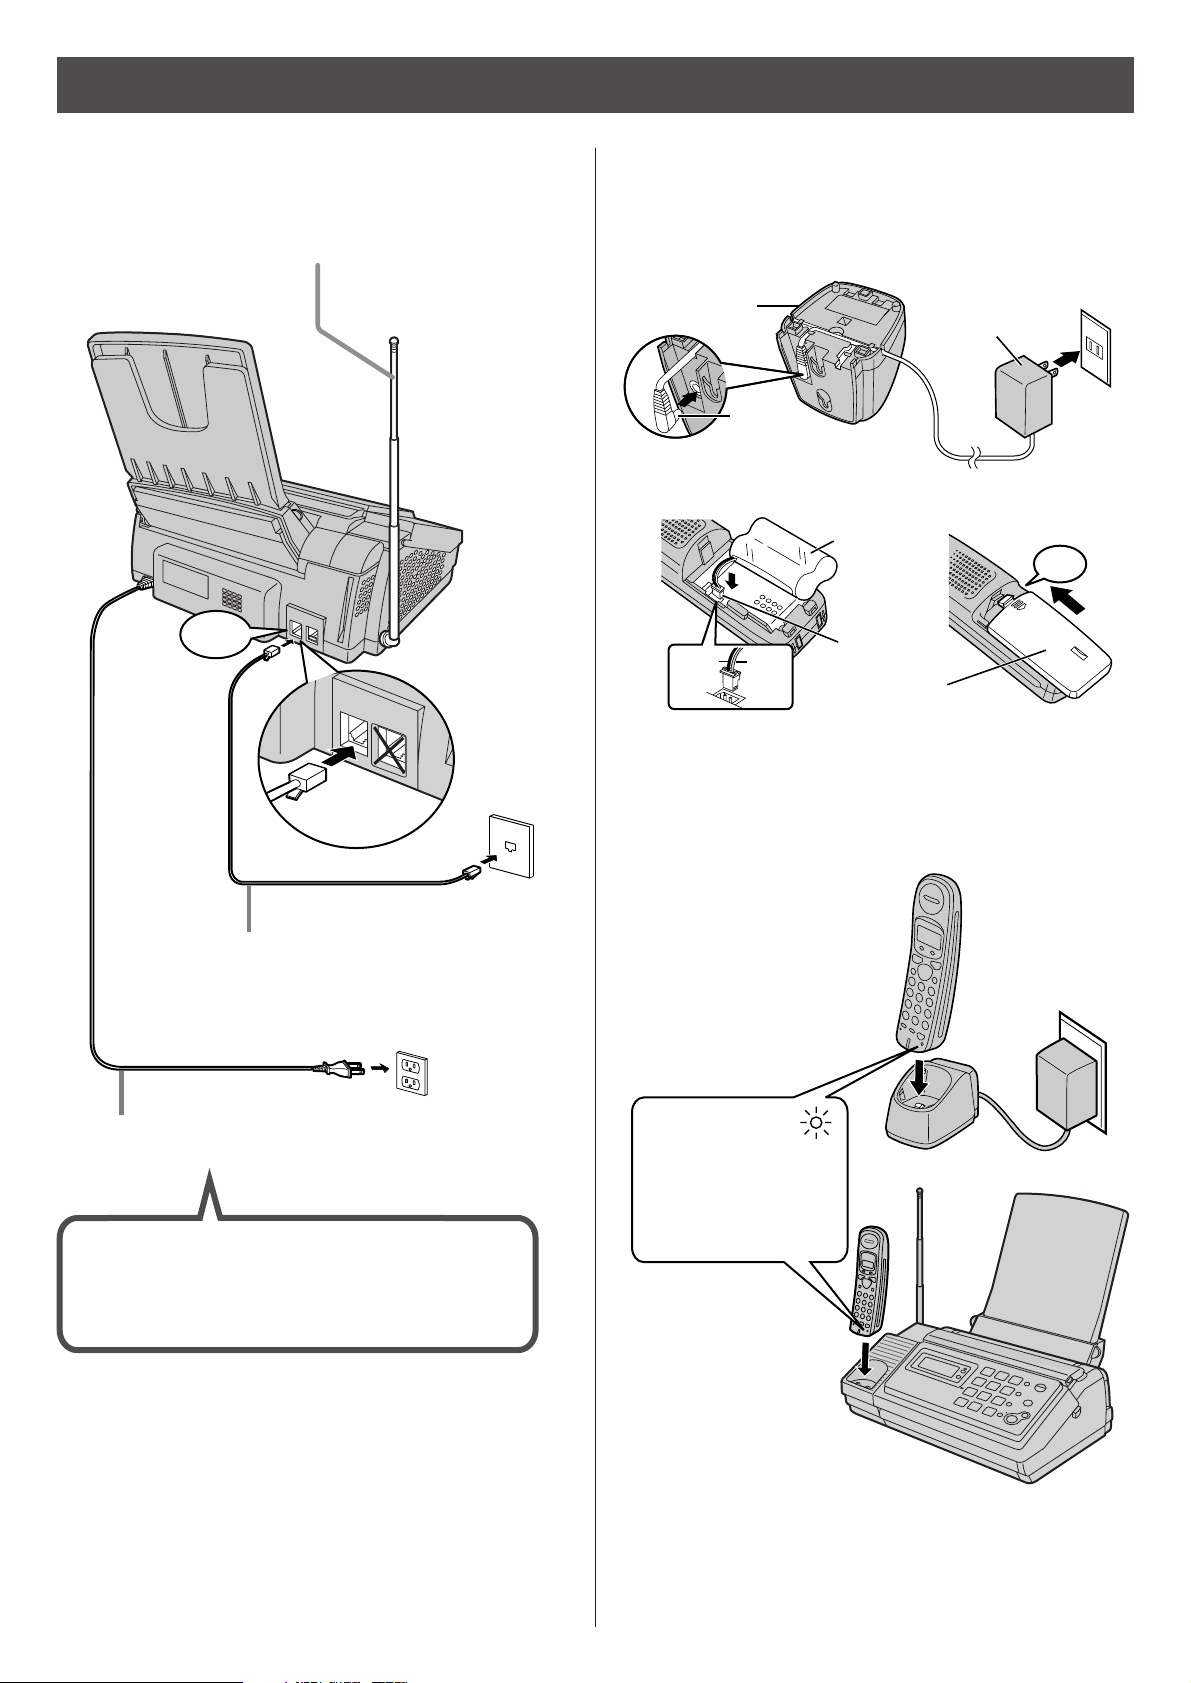
6
Connecting the main unit
Installations and connections
3 Charge the battery in the charger for 10 hours.
Plug
Charger
AC adaptor
Power outlet
(AC 100 V)
Black
Red
Connector
Battery
Click
Battery cover
Setting up the portable handset
1
2
●
After your Panasonic battery is fully charged,
it will last up to about 7 hours of conversation.
Charge indicator
–lights red:
while charging.
–lights off:
charging
completed.
(
電
話
回
線
へ
)
回
線
電
話
機
停
電
用
(
電話回線へ
)
回線
電話機
停電用
Power cord
Telephone line cord
Wall jack
Power outlet
(AC 100V)
1 Raise the antenna.
2 Connect the telephone line
cord (Supplied accessory).
3 Connect the power cord.
Click
After the Power On...
This unit will automatically select the dialing
mode (Tone/Pulse).
Page 7
7
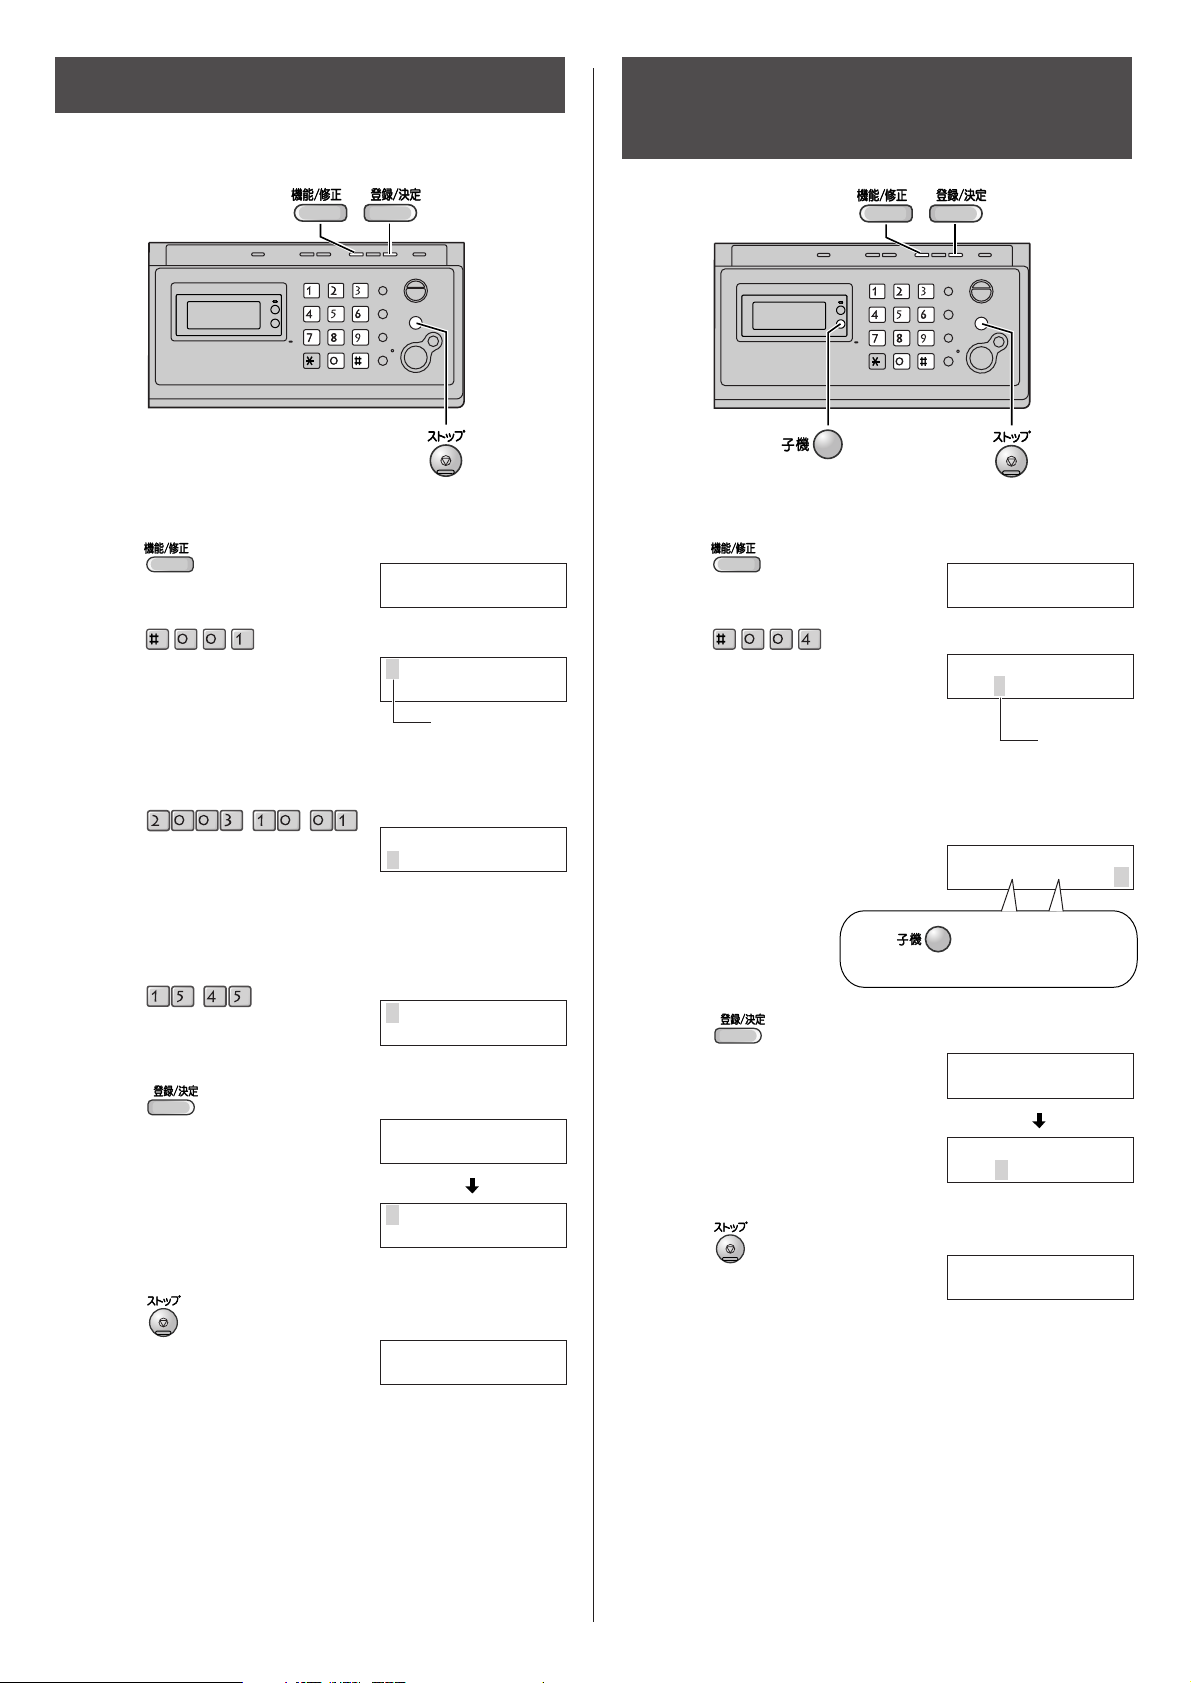
Setting the date and time
1Open the document cover and
press (Function/Edit).
1Open the document cover and
press (Function/Edit).
2Press .
3Enter the correct year/month/day.
Example: October 1, 2003
Press .
2Press .
3Enter your facsimile telephone number, up to 20
digits.
Example: 098 765 43 · ·
4Enter the correct hour/minute in a 24-hour clock entry.
Example: 15:45 (3:45 PM)
Press .
4Press (Register/Set).
5Press (Register/Set).
6Press (Stop).
5Press (Stop).
Setting your facsimile
telephone number
キノウアトウロクアモード
カイセシシシシ[センタク]オス
2003年06月01
日
20:10
2003
年10月
01
日
00:10
10月01日0015:45
ヨウケン0ロクオン
0000
ケン
2003年10月01
日
15:45
トウロクアシマシタ
2003年10月01
日
15:45
キノウアトウロクアモード
カイセシシシシ[センタク]オス
アナタノデンワバンゴウ?
TEL=...........
10月01日0015:45
ヨウケン0ロクオン
0000
ケン
アナタノデンワバンゴウ?
TEL=80765043
..
2
.
The (Space) button
replaces the digit with a space.
Example :
Cursor
Example :
Cursor
Example :
.
2
2
2
アナタノデンワバンゴウ?
TEL=098.765.43
.
トウロクアシマシタ
0
Page 8
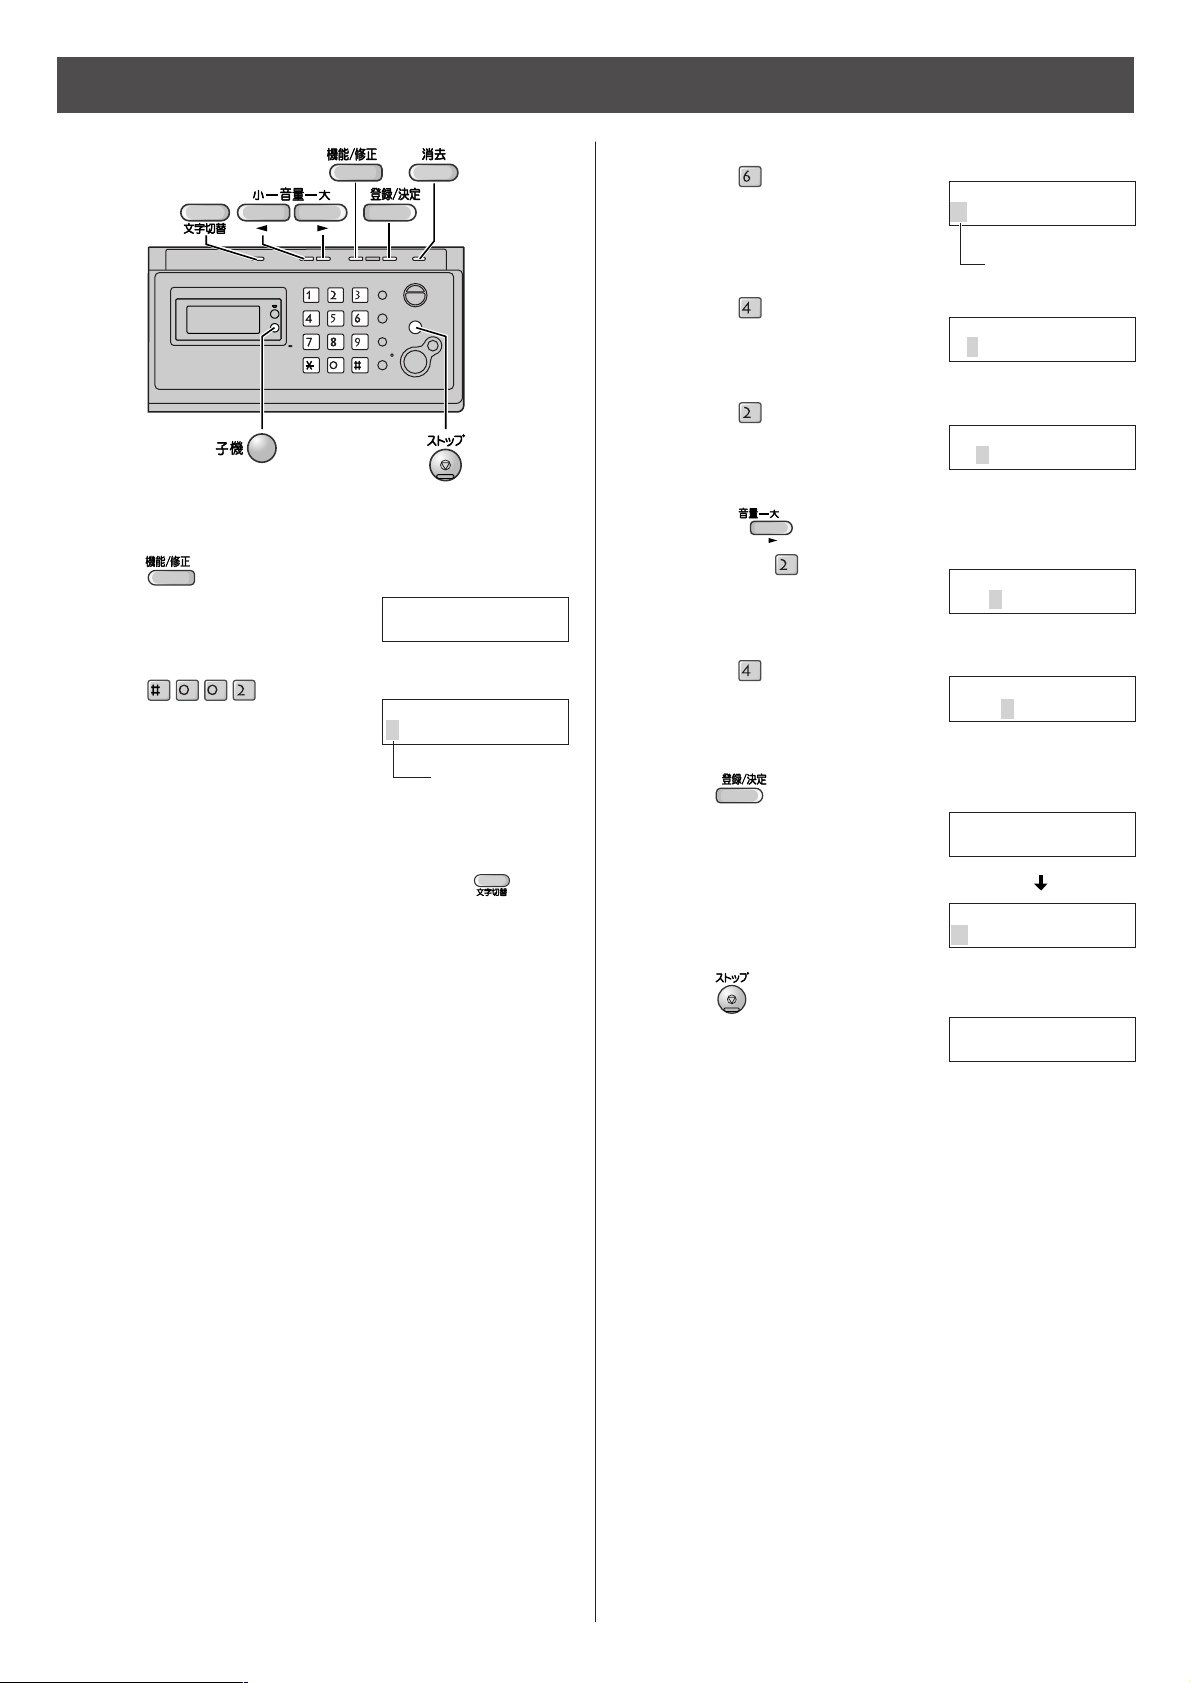
8
1Open the document cover and
press (Function/Edit).
2Press .
3Enter your logo, up to 30 characters, using the dial
keypad.
●
To enter English characters easily, press
(Character input mode) repeatedly and select
“英” (English and sign input mode).
●
For details, see the table on page 9 for instructions.
5Press (Stop).
Setting your logo
キノウアトウロクアモード
カイセシシシシ[ センタク] オス
ナマエ?
ナマエ?
ナマエ?
M
ナマエ?
Mi
ナマエ?
Mic
ナマエ?
Mica
2. Press six times.
3. Press six times.
4. Press to move the cursor to the next space
and press four times.
5. Press five times.
Example: Micah
1. Press once.
M
i
c
h
a
4Press (Register/Set).
ナマエ?
Micah
トウロクアシマシタ
Cursor
Cursor
M
10月01日0015:45
ヨウケン
0
ロクオン
0000
ケン
Example :
Page 9

9
Character input and command key table
Used to change the character input mode.
Used to move the cursor to the left and right.
Used to delete a character.
Used to insert a space.
(Portable handset), (Main unit)
(Portable handset), (Main unit)
(Portable handset), (Main unit)
●
When entering e-mail address, the small letters are displayed before the capital letters.
●
When entering e-mail address, you can not enter the following symbols: 、。−
.
「」
●
When entering e-mail address, you can enter only English and Numbers.
●
When entering e-mail message, pressing enables you to begin the new line. ( “ ” is displayed.)
●
The display items of the main unit are somewhat different from that of the portable handset.
、、。
、。
英
[AB]
English
カナ
[カナ]
Katakana
数
[12]
Numbers
!?/ー
#
‚ ;:|
・
’”
()
[]
{}〈〉「」
ワヲン
ー
!? ( )
アイウエオァィゥェォ
@
・
ー&$¥%+=〜^
DEFdef
GHI gh i
JKL j k l
MNOmn o
PQRSpqrs
TUVtuv
WXYZwxyz
カキクケコ
サシスセソ
タチツテトッ
ナニヌネノ
ハヒフヘホ
マミムメモ
ヤユヨャュョ
ラリルレロ
1
2
3
4
5
6
7
8
9
0
ABCabc
、。
Display of the
portable handset
Display of the
main unit
Character
Portable
(
handset
)
Main
(
unit
)
Dial key
(Portable handset),
(Main unit)
Pressing the dial keys will select a character as shown below.
Command keys
Page 10

10
Automatic dialing on the main unit
Storing telephone numbers in the
speed dialer
Making a voice call using the
speed dialer
1Press (Speed dialer).
2Press the memory station number ( to ).
3Enter the telephone number, up to 30 digits.
●
To correct a mistake, press (Clear).
4Press (Speed dialer).
Editing a stored number in the
speed dialer
1Press (Speed dialer).
2Press the memory station number ( to ).
3Press (Speakerphone).
2Press the memory station number ( to ).
1Press (Speed dialer).
5Press (Speed dialer).
3Press (Function/Edit).
4Edit the telephone number.
Erasing a stored number in the
speed dialer
2Press the memory station number ( to ).
1Press (Speed dialer).
3Press (Erase).
4Press .
You can store up to 9 stations.
The dialing buttons ( to ) function as memory
stations.
タンシュクア
1
アトウロクア
バンゴウ?
タンシュクア
1
ア
トウロクアサレテアイマセン
Memory station number
Page 11

11
Automatic dialing on the portable handset
Storing names and telephone
numbers in the phonebook
Making a voice call using the
phonebook
2Press (Register).
●
“XXX” shows the remaining
station numbers you can
store.
●
You can program up to 100
stations, including 4 preprogrammed stations.
登録
1Press (Phonebook).
3Enter the name, up to 12 characters (see the table on
page 9 for instructions).
4Press (Register).
登録
3Press (Talk) or press (Speakerphone).
5Enter the telephone number, up to 30 digits.
●
To correct a mistake, press (Clear).
6Press (Register).
●
To program other items, repeat steps 3 to 6.
登録
7Press (Off) to exit the program.
Editing a stored name or number
3Press (Edit).
修正
4Press .
5Edit the name (see the table on page 9 for
instructions).
●
If you do not need to edit the name, skip to step 6.
6Press (Register).
登録
7Enter the correct telephone number.
●
If you do not need to edit the telephone number,
skip to step 8.
8Press (Register).
登録
1Press (Phonebook).
2Press (Search button) repeatedly until the
desired name is displayed.
2Press (Search button) repeatedly until the
desired name is displayed.
1Press (Phonebook).
ケンサクハ
アアアアアア[
▼▲
]オス
デンワチョウアケンサク
ナマエ?アアアア[カナ]
ナマエ?アアアア[カナ]
デンワチョウアトウロク
テアキキ
×××
ケン
Page 12

12
Intercom between the main unit and portable handset
An intercom is available between the main unit and portable handset.
Using the main unit: Using the portable handset:
2Start talking using the speakerphone.
1Press (Portable handset), then press the
portable handset number ( to ) which you want
to call.
3Press (Speakerphone) to end the intercom call.
2Start talking after the unit sounds "Pi peep" and
shows the following.
●
You can switch to the
speakerphone by pressing
(Speakerphone).
1Press (Intercom), then press .
3Press (Off) to end the intercom call.
コキ
1
アナイセンツウワアチュウ
ナイセンツウワアチュウ
Page 13

13
Sending faxes
1Open the document cover, and adjust the width of the
document guides to the size of the document.
2Insert the document (up to 5 pages) FACE DOWN
until a single beep is heard.
3If necessary, press (Resolution) repeatedly to
select the desired setting (see below).
FACE DOWN
Document cover
Document
Document
guide
Document
4Dial the fax number.
5Press (Fax).
●
The unit will start fax transmission.
FACE DOWN
Document cover
Document
guide
Sending a fax manually Sending a fax using the
speed dialer
1Open the document cover, and adjust the width of the
document guides to the size of the document.
2Insert the document (up to 5 pages) FACE DOWN
until a single beep is heard.
3If necessary, press (Resolution) repeatedly to
select the desired setting (see below).
5Press (Fax).
●
The unit will start fax transmission.
To select the resolution
Select the desired resolution according to the type of document, by pressing (Resolution).
(Standard) for printed or typewritten originals with normal-sized characters.
(Fine) for originals with minute printing.
(Photo) for originals containing photographs.
ガシツ=シャシン
ガシツ=チイサイ
ガシツ=フツウ
4Press (Speed dialer), then press the memory
station number ( to ).
Page 14

1414
Receiving faxes
Receiving a fax manually
(AUTO ANSWER off)
2When:
– document reception is required,
– a fax calling tone (slow beep) is heard, or
– no sound is heard,
press (Fax).
●
The unit will start fax reception.
Using the main unit:
1When you hear a ring, press (Speakerphone)
to answer the call.
Using the portable handset:
1When you hear a ring, lift the portable handset from
the charger to answer the call.
●
If the portable handset is not set on the charger,
press (Talk).
2When:
–document reception is required,
–a fax calling tone (slow beep) is heard, or
–no sound is heard,
press (Fax reception).
●
The main unit will start fax reception.
Page 15

15
Receiving faxes
2When receiving a call, the unit will receive a fax
document or record a voice message automatically
depending on the caller’s request.
light on
Receiving a fax automatically
(AUTO ANSWER on)
1If the (Auto answer) light is off, turn it on by
pressing .
マイク
(Microphone)
Recording your own greeting
message
You can record your own greeting message. When
receiving a call, it will be played to callers instead of the
pre-recorded Japanese greeting message.
3Press (Register/Set).
4Press (Start) and speak your greeting
message, up to 16 seconds, to the microphone.
5Press (Stop).
●
Your greeting message will be played back
automatically.
1Press (Function/Edit).
2Press .
ジサクアオウトウアロクオン
カイセシシシシ[ケッテイ]オス
Page 16

1616
Operating the built-in answering device
2When receiving a call, a greeting message will be
played and the unit will record a voice message.
●
To record your own greeting message, see page 15.
light on/flash
Activating the answering device
1Turn the (Auto answer) light on by pressing .
Listening to recorded messages
When new messages are recorded, the (Auto
answer) light will flash.
Press to listen to recorded messages.
After the messages are played back, the following will be
displayed.
■
To erase the messages, push .
■
To save the messages, push
.
Listening to all of the recorded
messages
Press or (Replay).
After the messages are played back, the following will be
displayed.
■
To erase the messages, push .
■
To save the messages, push
.
2Press .
Erasing your own greeting message
サイセイシタヨウケンショウキョ
スル
=
アアシナイ=#
サイセイシタヨウケンショウキョ
スル
=
アアシナイ=#
1Press (Function/Edit).
ジサクセオウトウセショウキョ
カイセシシシシ[ ケッテイ] オス
3Press (Register/Set).
4Press .
●
The pre-recorded Japanese greeting message will
be played when you receive a call.
Erasing a specific message
Press (Erase) while listening to the message you
want to erase, then press .
Erasing all of the recorded messages
1Press (Erase).
2Press .
スベテセショウキョシマスカ?
ハイ
=
アアイイエ=#
Page 17

17
Operating the answering device
from a remote location
Preparation: Programming the remote operation ID
1. Press (Function/Edit).
2.
Press .
3. Enter any 4-digit number (remote operation ID) except
or #.
4. Press (Register/Set).
5. Press (Stop).
Operation: Listening to a recorded message from a
remote location
Turn the (Auto answer) light on before you go out.
Remote operations are available only from a touch tone
telephone.
1. Call your unit.
2. Enter the remote operation ID during the greeting
message.
3. Press or wait 4 seconds.
●
Only the new recorded messages will be played
back.
●
To listen to all the recorded messages, press
after the new messages have been played back.
4
2
アンショウアNo.
=1234
アアア[4ケタ, トウロク] オス
Operating the built-in answering device
1
Example :
Page 18

18
Individual e-mail services
Using the e-mail services
Panasonic Communications Co., Ltd. (hereafter called
“PCC”) offers individual information services, such as
e-mail.
Your fax machine with e-mail features will enable you to
send an e-mail to another party’s personal computer (PC)
or another e-mail fax machine anywhere in the world
through the Internet. Also, you will be able to receive an
e-mail from them.
To access the Internet using your fax machine,
●
you need a credit card (VISA, JCB or MASTER as of
January 2003) and
●
have to subscribe to individual information services
offered by PCC beforehand.
The application fee including call charges will be charged
to your Credit Card.
Important:
●
If your fax machine is connected to a home telephone
system or a private branch exchange (PBX) system,
these services are not available.
Application fee and call charges
PCC information
services
Registration fee
¥500
Information
Service fee
Call charge
included
¥20/minute
(8 am-11 pm)
¥18.5/minute
(11 pm-8 am)
●
As of January 2003.
●
Tax not included.
The following services are available with your fax
machine. The information service fee including the call
charge will be applied.
●
E-mail reception and printing (page 20)
●
Text e-mail sending (page 21)
●
Fax e-mail sending (page 22)
●
Storing e-mail addresses in the speed dialer
(free of charge) (page 23)
●
Others
Note:
●
PCC plans to add new information services and the
information service fee is subject to change.
PCC will announce them by e-mail to its customers.
●
For the PC user to view your fax e-mail sent from your
fax machine, the following PC software will be required.
–E-mail software that can read the MIME format
–TIFF viewer software
PCC information services
()
Page 19

19
Individual e-mail services
Subscribing to PCC information
services
●
Please save the address and ID code for
future reference.
11After approx. 5 minutes, the unit will ring, and a
data communication will start automatically
between your unit and PCC.
●
If you answer this call, wait for a while until the
communication is completed.
10Press (Register/Set).
●
The unit will start fax transmission.
////////////// 「ユーザー登録完了」案内 //////////////
こちらはパナソニックコミュニケーションズ株式会社です。
このたびは、「おたっくす情報サービス」にお申し込みいただきましてありがとうございます。
おたっくすEメールのご利用が可能になりましたので、お知らせいたします。
あなたの電話番号 : ○○○○○○△△△△
◆あなたの
Eメールアドレス : p××××△△△△@fem.dion.ne.jp
◆あなたの
セキュリティID : □□□□
EメールアドレスとセキュリティIDは、新サービスの提供時や引越しに伴う電話番号の
変更連絡等に必要になりますので、取扱説明書裏表紙の「おたっくすEメールお客様メモ」
欄に必ず記入しておいてください。
Your e-mail address
Your security ID code
1Fill in the included application form.
パナソニックコミュニケーションズ株式会社 行
「おたっくすEメール」のご利用には「おたっくす情報サービス」への加入登録が必要です。
フリガナ
サイン
連絡先電話番号
(勤務先など)
申込者
ご氏名
ご住所
ご利用クレジットカード(□(チェックボックス)を塗りつぶしてください)
■VISA □JCB □MASTER
都道
府県
お申し込み
電話番号
(NTT契約番号)
お申し込み年月日:西暦
PHS、携帯電話、ポケットベルなどの番号は登録できません。
年 月 日
• おたっくす情報サービスのご利用条件は「おたっくす情報サービス契約約款」によります。
お申し込みにあたっては、本約款の内容をよくお読みいただき、同内容にご同意のうえ、お申し込みください。
• 本サービスのご利用には、登録料・情報料(通話料を含みます)がかかります。
• 本サービスのお申し込みにあたっては、ご利用料金を引き落とすためのクレジットカードが必要です。
(ご利用可能なクレジットカード:VISA、JCB、MASTER 2002年8月現在)
・
下記の太枠内に必要事項をご記入ください。
•太枠内をかい書にてご記入ください。 • ご記入にあたっては、濃い鉛筆をご使用願います。
おたっくす情報サービス
(おたっくすEメール)ご利用申込書
この面を裏向きにして、
矢印の方向へ入れてください。
Eメール
【お申し込み前に必ずお読みください】
申し込み
のしかた
・
ご利用可能なクレジットカード(VISA,JCB,MASTER)をご準備ください。
「おたっくす情報サービス」
の利用申し込みをします。
・
裏面の申し込みのしかたに従って、ファクス送信してください。
Your
signature
Date of application
The telephone no.
you wish to
subscribe to PCC
Your telephone no.
for contact
Your name
Your
address
Check your credit card type
FACE DOWN
2Press (Function/Edit), then press
(E-mail).
9Insert the application form FACE DOWN.
3Press (Register/Set).
6Enter your credit card number again, then press
(Register/Set).
5Press (Register/Set).
8Press (Register/Set).
4 Enter your 16-digit credit card number.
●
To correct a mistake, press (Clear).
7 Enter the valid date of your credit card.
12When the communication is completed, a user
registration form will be printed.
13Press (E-mail).
14Press (Register/Set).
●
An information service guide will be printed.
クレジットカードNo.?
....ー....ー....ー
カクニンノタメモモウイチド
....ー....ー....ー
ユウコウキゲン?
../..(
月/年
)
Month Year
.
.
.
Page 20

20
Individual e-mail services
Receiving and printing an e-mail
2Press (Register/Set).
●
If there is an e-mail you have not viewed yet, the
unit will print the received e-mail.
●
If there is no e-mail, the following will be displayed.
1Press (E-mail) .
The file formats recognized by your fax machine are:
●
JPEG
●
~. doc
●
TIFF
●
~. xls
●
BMP
●
~. ppt
●
TXT
●
~. pdf
(as of January 2003)
ミジュシンEメールアア0ケン
Page 21

21
Individual e-mail services
1Press (E-mail).
2Press (Select).
Sending a text e-mail from the
main unit
3Press (Register/Set).
5Press (Register/Set).
●
The display will show the last title you entered.
To delete this title, press (Clear) for 2 or more
seconds.
6Enter the title of your e-mail, up to 32 characters (see
the table on page 9 for instructions).
9Press (Register/Set).
7Press (Register/Set).
●
The display will show the last message you entered.
To delete this message, press (Clear) for 2 or
more seconds.
8Enter your e-mail message, up to 200 characters
(see the table on page 9 for instructions).
4Enter the desired e-mail address (see the table on
page 9 for instructions).
●
You can select the desired address using the speed
dialer.
1. Press (Speed dialer), then press the
memory station number ( to ).
2. Press (Register/Set).
To store an address, see page 23.
モジアEメールアソウシン
カイセシシシシ[ ケッテイ] オス
Page 22

22
1Open the document cover, and adjust the width of the
document guides to the size of the document.
2Insert the document (up to 5 pages) FACE DOWN
until a single beep is heard.
3If necessary, press (Resolution) repeatedly to
select the desired setting (see page 13).
Adjust the
document
guides
FACE DOWN
Document cover
5Enter the desired e-mail address (see the table on
page 9 for instructions).
●
You can select the desired address using the speed
dialer.
1. Press (Speed dialer), then press the
memory station number ( to ).
2. Press (Register/Set).
To store an address, see page 23.
Sending a fax e-mail
4Press (E-mail), then press
(Register/Set).
6Press (Register/Set).
●
The display will show the last title you entered.
To delete this title, press (Clear) for 2 or more
seconds.
7Enter the title of your fax e-mail, up to 32 characters
(see the table on page 9 for instructions).
8Press (Register/Set).
Individual e-mail services
Page 23

23
Individual e-mail services
5Enter the e-mail address, up to 60 characters (see the
table on page 9 for instructions).
Storing e-mail addresses in the
speed dialer
3Press (Register/Set).
7Press (Stop) to exit the program.
1Press (Function/Edit), then press
(E-mail).
2Press (Select).
4Press the memory station number ( to ).
●
You can program up to 9 stations, including 1 preprogrammed stations.
6Press (Register/Set).
●
To program other items, repeat 4 to 6.
Editing a stored e-mail address
7Press (Register/Set).
5Press (Function/Edit).
3Press (Register/Set).
1Press (Function/Edit), then press
(E-mail).
2Press (Select).
6Edit the e-mail address (see the table on page 9 for
instructions).
タンシュクアアドレス
カイセシシシシ[ ケッテイ] オス
タンシュクアアドレス
[
1-9
] ヲオシテクダサイ
8Press (Stop) to exit the program.
4Press the memory station number ( to ).
Page 24

KX-PW92CW
Main unit
PFQX1828ZA FK0203TU0
Specifications
© Panasonic Communications Co., Ltd. 2003
Main unit
Applicable line Public Switch Telephone Network (Tone/Pulse), F-Net, NCC Lines
320 Ω (*2)
G3 compatible
B4-A5(Max.257 mm in width, Max. 800 mm in length)
252 mm (B4) 208 mm (A4)
202 mm (A4 size plain paper)
Approx. 15 s/page (Original mode) (*3)
9,600 / 7,200 / 4,800 / 2,400 bps; Automatic fallback
64-level
Horizontal: 8 pels/mm
Vertical: 7.7 lines/mm (Fine/Photo), 3.85 lines/mm (Standard)
Contact image sensor
Thermal transfer printing on plain paper
Modified Huffman (MH), Original mode
A4: 210 mm x 297 mm (Plain paper)
Greeting message: Digital recording system (up to 16 sec)
Pre-recording greeting message
ICM Recording: Digital recording system (Approx. 18 min. in total) (*4)
Max. Approx. 46 pages (Only receiving fax etc.) (*5)
Max. Approx. 18 min. (Only Recording message) (*4)
DC resistance
Compatibility
Document size
Effective scanning size
Effective printing size
Transmission time
Modem speed
Halftone level
Scanning density
Scanner type
Printer type
Data compression
system
Recording paper size
Answering device
Memory capacity
*1 When copying a 100% black document.
*2 If you cannot make a call due to DC resistance, consult your dealer.
*3 Transmission speed is based on an A4-size document of 700 characters sent in standard resolution at 9,600 bps.
The actual transmission speed depends upon the contents of the page, resolution, telephone line conditions and
capability of the other party’s machine.
*4 If there is a silent pause, the total recording time will be longer.
*5 The memory capacity is based on an A4-size document of 700 characters.
Power supply
Power
consumption
Dimensions
(H x W x D)
Mass
(Weight)
AC 100 V (50 Hz/60 Hz)
Ni-Cd battery
(Part no. KX-FAN37)
DC 2.4 V, 600 mAh
Approx. 181 X 44 X 40 mm
Approx. 170 g
(battery installed)
AC adaptor
(Part no. PFAP1009)
AC 100 V (50 Hz/60 Hz)
DC 7.5 V, 100 mA
• Charging:
Approx. 1.1 W
• Stand by:
Approx. 0.4 W
Approx. 72 X 72 X 90 mm
Approx. 77 g
Transmission: Approx. 16 W
Reception: Approx. 20 W
Copy: Approx. 20 W
Stand by: Approx. 1.4 W
(Portable handset on cradle)
Approx. 0.9 W
(Portable handset off cradle)
Maximum(*1): Approx. 125 W
Approx. 139 X 358 X 253 mm
(without projections)
Approx. 378 X 358 X 300 mm
(recording paper tray installed,
without projections)
Approx. 3.7 kg
(10 m ink film installed)
Main unit Portable handset Battery charger
Operating
environment
5 °C – 35 °C, 45 % – 85 % RH (Relative Humidity)
KX-PW92CW
 Loading...