

Panasonic KX-FC235AL, KX-FC231NZ User Manual

Compact Plain Paper Fax
with Digital Cordless Phone
Operating Instructions
Model No. KX-FC235AL
KX-FC231NZ
Please read these operating instructions
before using the unit and save for future
reference.
This unit is compatible with Caller ID
and SMS (SMS is for KX-FC235AL only).
To use these features, you must
subscribe to the appropriate service of
your service provider.
Be sure to use the telephone line
cord included in this unit.
Location of Controls
N
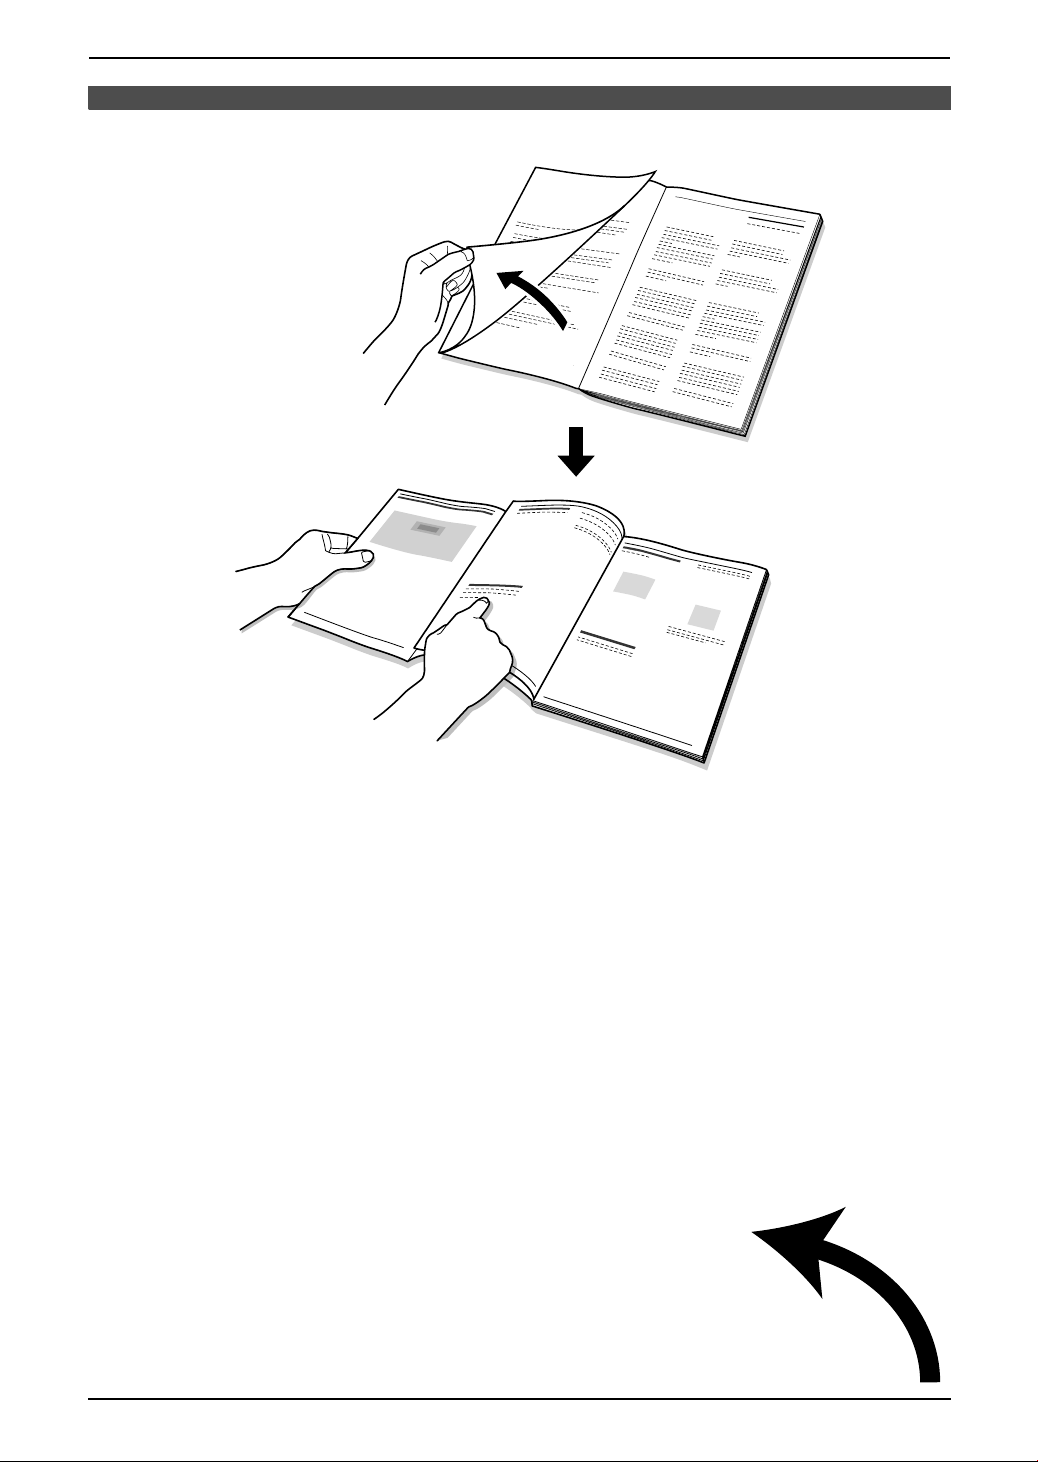
How to use the operating instructions
When following operating instructions, always keep the front cover page (next page) open for easy
reference to the buttons.
OPE
i
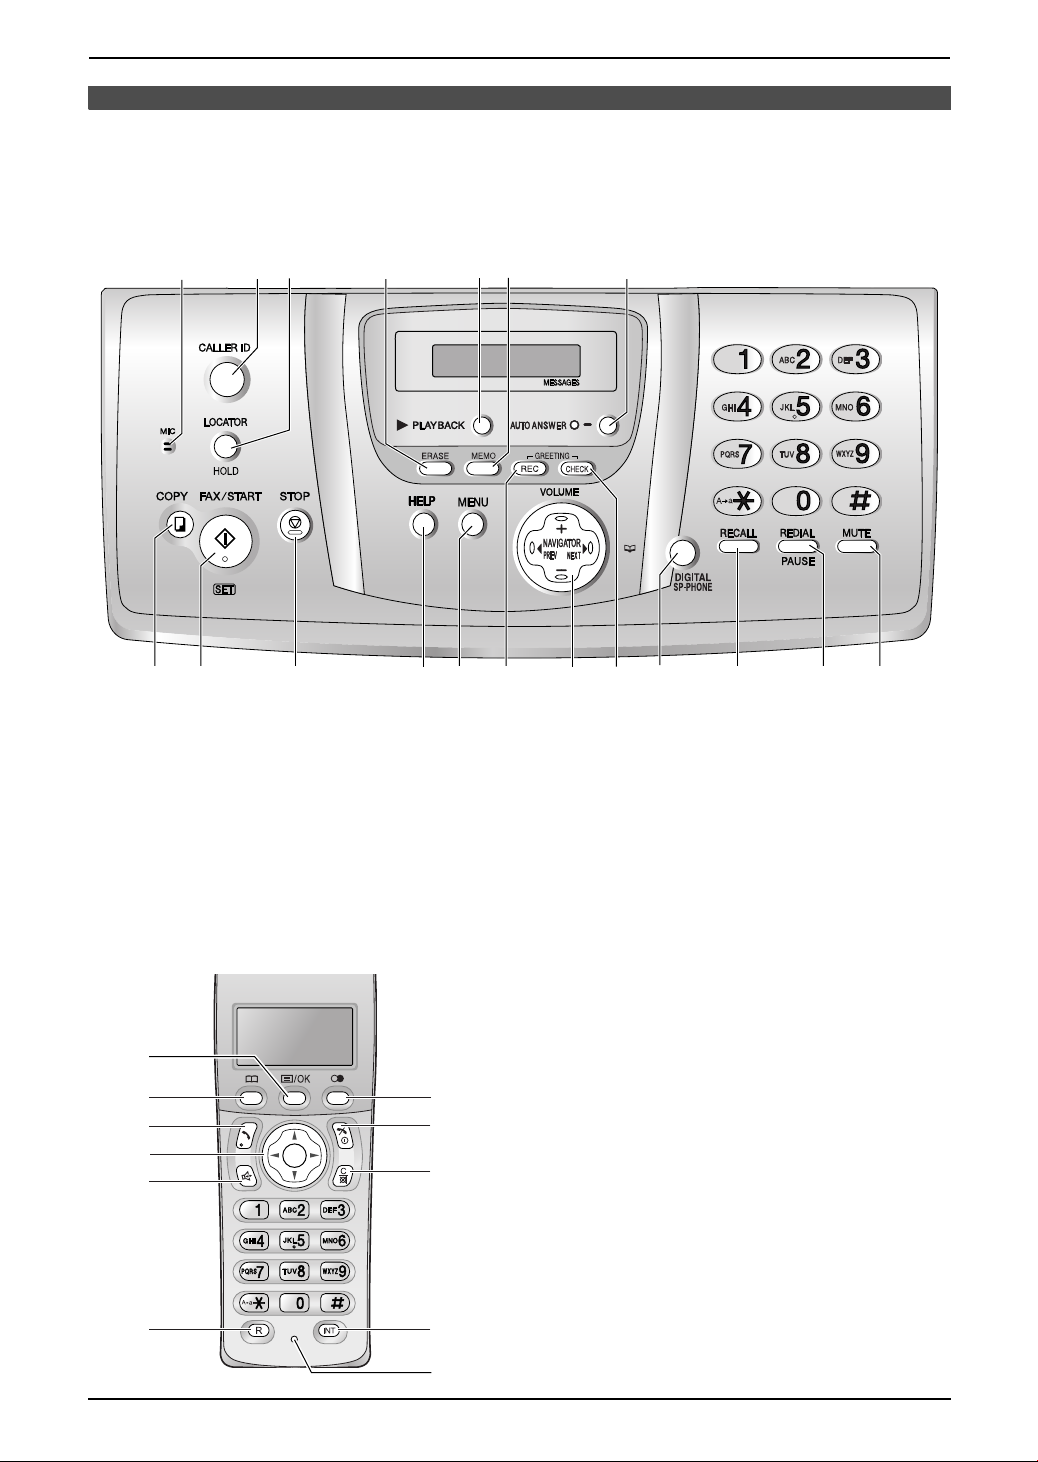
Location of Controls
Please keep this page open when following operating instructions.
For a description of each button, see page 12, 13.
Base unit
ABC D EF G
H
IKLMO PQ RS
Buttons (Listed in alphabetical order)
AUTO ANSWER G HELP K PAUSE R
CALLER ID B HOLD C PLAYBACK E
COPY H LOCATOR C RECALL Q
DIGITAL SP-PHONE P MEMO F REDIAL R
ERASE D MENU L SET I
FAX/START I MIC A START I
GREETING/CHECK O MUTE S STOP J
GREETING/REC M NAVIGATOR N VOLUME N
J
N
Handset
A
B
C
D
E
F
G
H
I
J
K
Buttons
j/OK (Menu/OK) A
k (Phonebook) B
C (Talk) C
Navigator D
s (Speakerphone) E
R (Recall) F
R (Redial/Pause) G
ih (Off/Power) H
C/T (Clear/Mute) I
INT (Intercom) J
Microphone K
ii

Thank you for purchasing a Panasonic fax machine.
For your future reference
Date of purchase
Serial number (found on the rear of the unit)
Dealer’s name and address
Dealer’s telephone number
Attach your sales receipt here.
Caution:
L Note that the images of copied or received documents will remain on the used ink film. Use
discretion when disposing of the used ink film.
L Do not rub or use an eraser on the printed side of recording paper, as the print may smear.
L In the event of problems, you should contact your equipment supplier in the first instance.
KX-FC235AL:
L This equipment is designed for use on the Australia network.
KX-FC231NZ:
L This equipment is designed for use on the New Zealand network.
Trademarks:
L Eatoni and LetterWise are trademarks of Eatoni Ergonomics, Inc.
2

For Australian users
Warning:
●
Please ensure that a separate telephone, not dependent on local power, is available for emergency
use.
●
This equipment will be inoperable when mains power fails.
●
When a failure occurs which results in the internal parts becoming accessible, disconnect the power
supply cord immediately and return this unit to an authorised service centre.
●
Disconnect the telephone connection before disconnecting power connection prior to relocating the
equipment, and reconnect the power first.
●
To minimize the possibility of lightning damage, when you know that a thunderstorm is coming, we
recommend that you:
A. Unplug the telephone line cord from the phone jack.
B. Unplug the power supply cord from the AC power outlet.
●
No “000” or other calls can be made from this device during a mains power failure.
●
The earcap on the handset is magnetised and may retain metallic objects.
For New Zealand users
Warning:
●
WHEN A FAILURE OCCURS WHICH RESULTS IN THE INTERNAL PARTS BECOMING
ACCESSIBLE, DISCONNECT THE POWER SUPPLY CORD IMMEDIATELY AND RETURN THIS
UNIT TO AN AUTHORISED SERVICE CENTRE.
●
DISCONNECT THE TELECOM CONNECTION BEFORE DISCONNECTING THE POWER
CONNECTION PRIOR TO RELOCATING THE EQUIPMENT, AND RECONNECT THE POWER
FIRST.
●
NO “111” OR OTHER CALLS CAN BE MADE FROM THIS DEVICE DURING A MAINS POWER
FAILURE.
IMPORTANT NOTICE
Under power failure conditions, this telephone may not operate. Please ensure that a separate
telephone, not dependent on local power, is available for emergency use.
Notice:
●
The grant of a Telepermit for any item of terminal equipment indicates only that Telecom has
accepted that the item complies with minimum conditions for connection to its network. It indicates no
endorsement of the product by Telecom, nor does it provide any sort of warranty. Above all,
it provides no assurance that any item will work correctly in all respects with another item of
Telepermitted equipment of a different make or model, nor does it imply that any product is compatible
with all of Telecom’s network services.
●
This equipment shall not be set to make automatic calls to the Telecom “111” Emergency Service.
●
This equipment should not be used under any circumstances which may constitute a nuisance to
other Telecom customers.
●
Not all telephones will respond to incoming ringing when connected to the extension socket.
●
This equipment may not provide for the effective hand-over of a call to another device connected to
the same line.
3
Important information (for Australian users)
Instructions to customer
Installation
Attached to this apparatus is an approval label. This label is evidence that it is a “Permitted Attachment”
which has been authorised to be connected to your telephone service.
Conditions relating to connection and operation of this Permitted Attachment are contained in
Telecommunications General By-Law 220 (5).
You are authorised to install this Permitted Attachment yourself by plugging it into the line socket of any
regular telephone. You may connect it in place of your existing telephone or to any spare telephone
socket installed in your premises.
To disconnect your existing telephone you must first remove its plug from the line socket. You can then
insert the plug of your Permitted Attachment into the socket and use your equipment.
If the plug of your existing telephone cannot be readily removed, you will have to remove the screw
securing it. To do this proceed as follows:
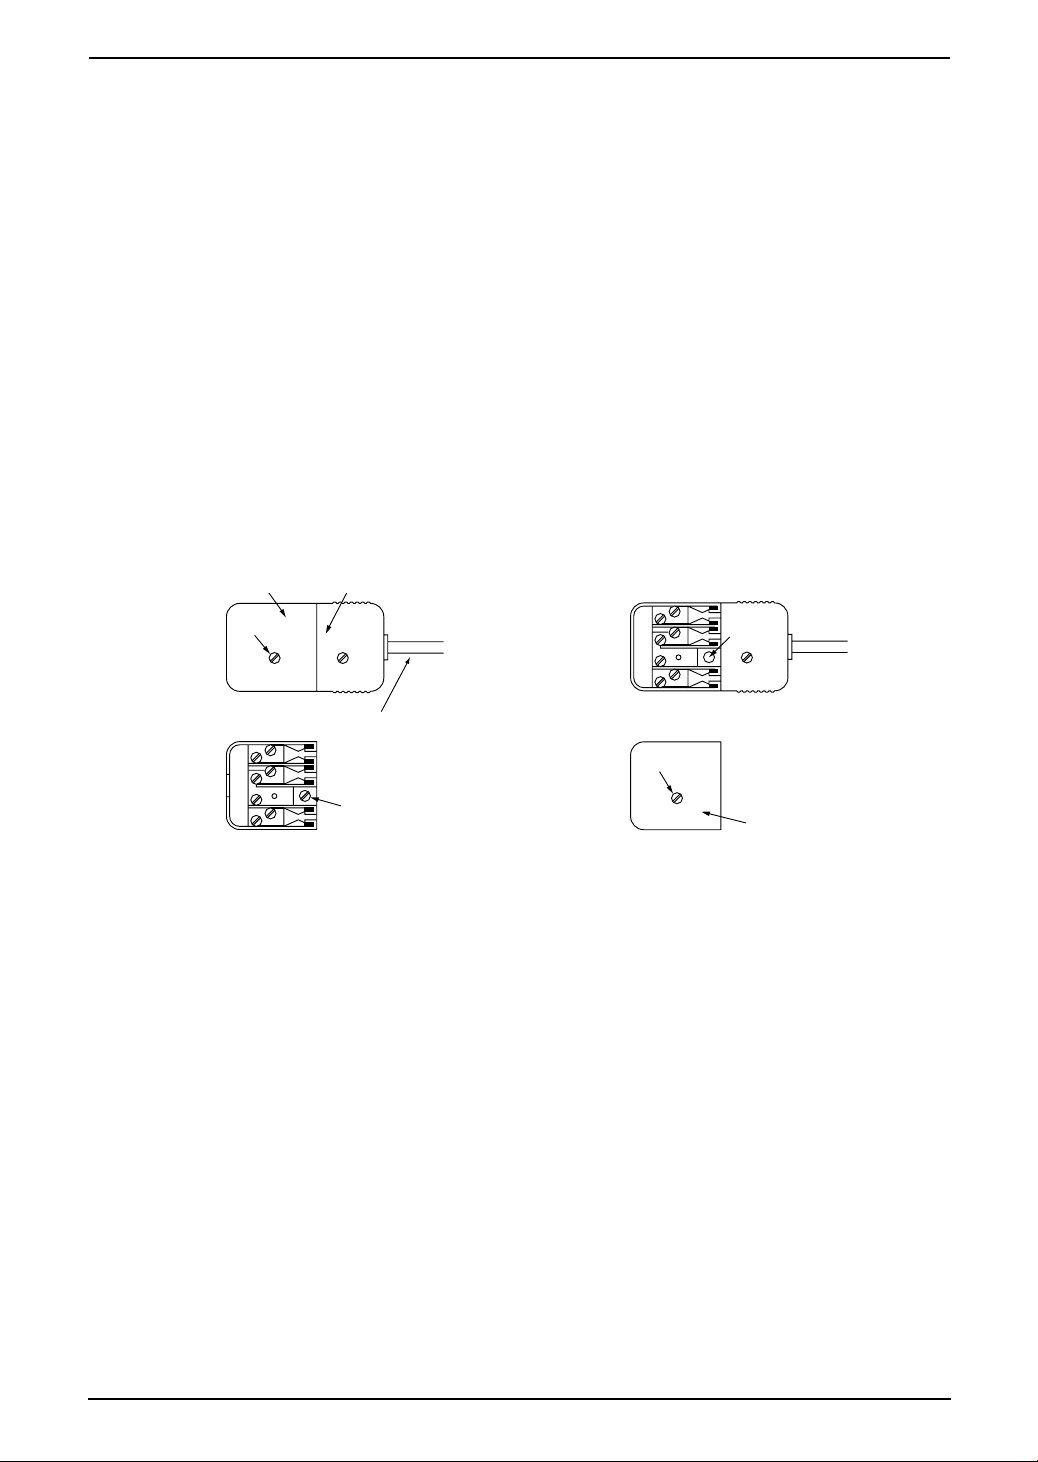
1. Loosen screw “A” sufficiently to remove the socket cover. (See Fig. 1.)
2. Remove screw “B” and withdraw the plug. (See Fig. 2.)
3. Replace screw “B”. (See Fig. 3.) Ensure that it screws completely into the socket recess. (If the screw
is too long, increase the hole depth or replace the screw with one 5 mm shorter.)
4. Replace socket cover and tighten screw “A”. (See Fig. 4.)
SOCKET
SCREW “A”
If you are satisfied with the operation of your telephone service after plugging in your Permitted
Attachment, your installation is completed.
You will be unable to connect this Permitted Attachment if your telephone service consists only of a wall
phone or an old style telephone which is not connected by means of a modern plug and socket. In such
cases a new socket will need to be installed.
Should the Permitted Attachment not operate when plugged into a socket, it is either faulty or unsuitable
for operation with your telephone service. It should be returned to the store where purchased.
Fig. 1
Fig. 3
PLUG
Fig. 2
TELEPHONE CORD
Connect to the PLUG
( )
as shown in Fig. 1.
SCREW
“B”
SCREW “A”
Fig. 4
SCREW
“B”
SOCKET
Service difficulties
If at any time a fault occurs on your telephone service carry out the following checks before you call for
service:
L Disconnect the Permitted Attachment and try using the service with the normal telephone.
L
If the telephone service then operates satisfactorily, the fault is in your Permitted Attachment. Leave the
Permitted Attachment disconnected and report the fault to its supplier or agent to arrange for repair.
L If when using the telephone the service is still faulty, report the fault to “Service Difficulties and Faults”
for attention.
You are required to keep this Permitted Attachment in good working order while it is connected to your
telephone service. Its construction or internal circuit must not be modified in any way without permission.
WARNING
This cordless telephone system does not incorporate provision for secrecy of conversations.
Appropriately tuned radio equipment and other cordless telephone systems in close proximity may be
used by a third party to monitor and possibly interrupt conversations in progress when this system is on
radio operation.
4

Important Instructions
Important InstructionsSafety Instructions
Important safety
instructions
When using this unit, basic safety precautions
should always be followed to reduce the risk of
fire, electric shock, or personal injury.
1. Read and understand all instructions.
2. Follow all warnings and instructions marked
on this unit.
3. Unplug this unit from power outlets before
cleaning. Do not use liquid or aerosol
cleaners. Use a damp cloth for cleaning.
4. Do not use this unit near water, for example
near a bathtub, wash bowl, kitchen sink, etc.
5. Place the unit securely on a stable surface.
Serious damage and/or injury may result if
the unit falls.
6. Do not cover slots and openings on the unit.
They are provided for ventilation and
protection against overheating. Never place
the unit near radiators, or in a place where
proper ventilation is not provided.
7. Use only the power source marked on the
unit. If you are not sure of the type of power
supplied to your home, consult your dealer or
local power company.
8. For safety purposes this unit is equipped with
a grounded plug. If you do not have this type
of outlet, please have one installed. Do not
defeat this safety feature by tampering with
the plug.
9. Do not place objects on the power cord.
Install the unit where no one can step or trip
on the cord.
10.Do not overload power outlets and extension
cords. This can result in the risk of fire or
electric shock.
11.Never push any objects through slots in this
unit. This may result in the risk of fire or
electric shock. Never spill any liquid on the
unit.
12.To reduce the risk of electric shock, do not
disassemble this unit. Take the unit to an
authorised service centre when service is
required. Opening or removing covers may
expose you to dangerous voltage or other
risks. Incorrect reassembly can cause
electric shock when the unit is subsequently
used.
13.Unplug this unit from power outlets and refer
servicing to an authorised service centre
when the following conditions occur:
A. When the power cord is damaged or
frayed.
B. If liquid has been spilled into the unit.
C. If the unit has been exposed to rain or
water.
D. If the unit does not work normally by
following the operating instructions.
Adjust only controls covered by the
operating instructions. Improper
adjustment may require extensive work
by an authorised service centre.
E. If the unit has been dropped or physically
damaged.
F. If the unit exhibits a distinct change in
performance.
14.During thunderstorms, avoid using
telephones except cordless types. There may
be a remote risk of an electric shock from
lightning.
15.Do not use this unit to report a gas leak, when
in the vicinity of the leak.
16.It is advised not to use the equipment at a
refuelling point. Users are reminded to
observe restrictions on the use of radio
equipment in fuel depots, chemical plants or
where blasting operations are in progress.
SAVE THESE
INSTRUCTIONS
5

Important Instructions
CAUTION:
Installation
L Never install telephone wiring during a
lightning storm.
L Never install telephone jacks in wet locations
unless the jack is specifically designed for
wet locations.
L Never touch uninsulated telephone wires or
terminals unless the telephone line has been
disconnected at the network interface.
L Use caution when installing or modifying
telephone lines.
L Do not touch the plug with wet hands.
L This unit should not be used near
emergency/intensive care medical
equipment and should not be used by people
with pacemakers.
Battery
To reduce the risk of fire or injury to persons,
read and follow these instructions.
L Use only the battery(ies) specified.
L Do not dispose of the battery(ies) in a fire.
They may explode. Check with local waste
management codes for special disposal
instructions.
L Do not open or mutilate the battery(ies).
Released electrolyte is corrosive and may
cause burns or injury to the eyes or skin. The
electrolyte may be toxic if swallowed.
L Exercise care when handling the battery(ies).
Do not allow conductive materials such as
rings, bracelets or keys to touch the
battery(ies), otherwise a short circuit may
cause the battery(ies) and/or the conductive
material to overheat and cause burns.
L Charge the battery(ies) provided with or
identified for use with this product only in
accordance with the instructions and
limitations specified in these operating
instructions.
L Only use the included base unit (or charger)
to charge the battery(ies). Do not tamper with
the base unit (or charger). Failure to follow
these instructions may cause the battery(ies)
to swell or explode.
stopped and contact an authorised service
centre.
WARNING:
L To prevent the risk of fire or electrical shock,
do not expose this product to rain or any type
of moisture.
L Unplug this unit from power outlets if it emits
smoke, an abnormal smell or makes unusual
noise. These conditions can cause fire or
electric shock. Confirm that smoke has
6
For best performance
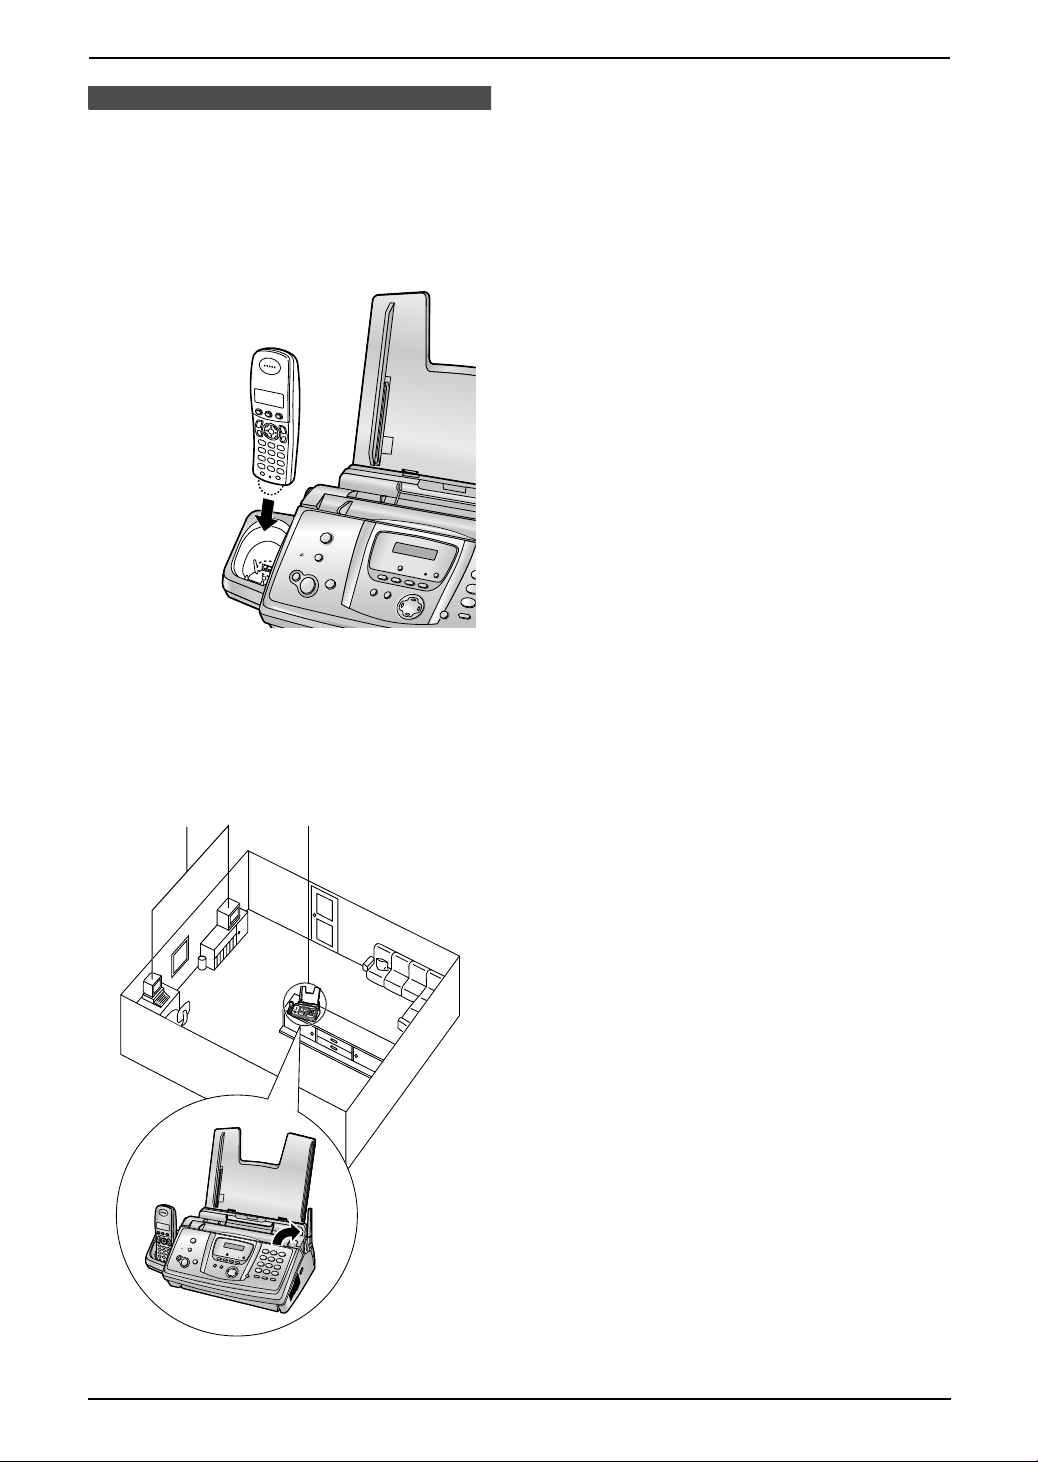
Battery charge
L Place the handset on the cradle of the base
unit for about 7 hours before initial use.
L For details, see page 22.
Important Instructions
1 Placing your base unit away from electrical
appliances such as TVs, radios, personal
computers or other phones.
2 Placing the base unit in a HIGH and
CENTRAL location with no obstructions
such as walls.
3 Raising the antenna vertically.
Environment
L Keep the unit away from electrical noise
generating devices, such as fluorescent
lamps and motors.
L The unit should be kept free from dust, high
temperature and vibration.
L The unit should not be exposed to direct
sunlight.
L Do not place heavy objects on top of the unit.
L The unit should be kept away from heat
sources such as heaters, kitchen stoves, etc.
It should not be placed in rooms where the
temperature is less than 5 °C or greater than
35 °C (base unit) / 40 °C (handset). Damp
basements should also be avoided.
Operating distance and noise
L The base unit and handset use radio waves
to communicate with each other.
For maximum distance and noise-free
operation, we recommend the following:
1
2
3
Routine care
L Wipe the outer surface of the unit with a soft
cloth. Do not use benzine, thinner, or any
abrasive powder.
Recording paper
L Store unused paper in the original packaging,
in a cool and dry place. Not doing so may
affect print quality.
7

Table of Contents
1. Table of Contents
1. Introduction
Accessories
1.1 Included accessories........................10
1.2 Accessory information ...................... 11
Finding the Controls
1.3 Button descriptions of the base unit .12
1.4 Button descriptions of the handset ... 13
1.5 Display descriptions of the handset..14
1.6 Overview ..........................................15
2. Installation
Base Unit
2.1 Ink film installation / replacement ..... 16
2.2 Paper tray .........................................18
2.3 Recording paper...............................19
Handset
2.4 Battery installation / replacement ..... 20
3. Preparation
Connections and Setup
3.1 Connections .....................................21
3.2 Battery charge .................................. 22
3.3 Turning the handset power ON/OFF 23
Help Button
3.4 Base unit help function ..................... 23
Vo lu me
3.5 Adjusting handset volume ................24
3.6 Adjusting base unit volume...............24
Initial Programming
3.7 Date and time ................................... 25
3.8 Your logo........................................... 26
3.9 Your fax number ...............................28
4. Telephone
Making and Answering Calls
4.1 Making phone calls........................... 29
4.2 Answering phone calls......................31
Automatic Dialling
4.3 Handset phonebook ......................... 31
4.4 Base unit phonebook........................ 34
Caller ID
4.5 Caller ID service ............................... 35
4.6 Viewing and calling back using caller
information........................................ 37
4.7 Editing a caller’s telephone number
before calling back............................38
4.8 Erasing caller information................. 38
4.9 Storing caller information into the
phonebook........................................ 39
4.10 Voice mail service (for Australian users
only).................................................. 40
4.11 Call minder (for New Zealand users
only).................................................. 40
5. SMS (KX-FC235AL only)
SMS
5.1 SMS (Short Message Service)......... 41
5.2 Turning SMS ON/OFF ......................41
5.3 Changing SMS message centre
numbers ...........................................41
5.4 Sending a message..........................42
5.5 Receiving a message ....................... 43
5.6 Guide to SMS settings......................45
5.7 Available character entries for SMS . 46
6. Fax
Sending Faxes
6.1 Sending a fax manually.................... 48
6.2 Documents you can send................. 49
6.3 Sending a fax using the base unit
phonebook........................................ 50
6.4 Broadcast transmission .................... 50
Receiving Faxes
6.5 Selecting the way to use your fax
machine............................................52
6.6 Auto receive......................................52
6.7 Manual receive ................................. 53
6.8 Receiving a fax manually – Auto answer
OFF .................................................. 54
6.9 Receiving a fax automatically – Auto
answer ON........................................55
6.10 Receive polling (retrieving a fax placed
on another fax machine)................... 56
6.11 Junk fax prohibitor (preventing fax
reception from undesired callers) ..... 57
7. Distinctive Ring
Distinctive Ring
7.1 Using with the ring detection feature 58
8. Copy
Copying
8.1 Making a copy .................................. 59
9. Answering Machine
Greeting
9.1 Recording your greeting message....61
Incoming Messages
9.2 Listening to recorded messages ......62
Memo Message
9.3 Leaving a message for others or
yourself.............................................62
Remote Operation
9.4 Operating from a remote location.....64
8

10.Programmable Features
Base Unit
10.1 Base unit programming .................... 66
10.2 Basic features................................... 67
10.3 Advanced features............................ 68
10.4 Direct commands for programming
features.............................................71
Handset
10.5 Handset programming......................73
11.Multi-unit Operation
Additional Units
11.1 Operating additional units................. 81
11.2 Registering a handset to a base unit 81
11.3 Handset locator ................................ 82
11.4 Intercom between handsets ............. 83
11.5 Transferring calls between handsets /
Conference calls............................... 83
11.6 Copying handset phonebook items.. 84
12.Useful Information
Useful Information
12.1 Available character entries for the
handset............................................. 85
Table of Contents
13.Help
Error Messages
13.1 Error messages – Reports ...............87
13.2 Error messages – Base unit display. 88
Troubleshooting
13.3 When a function does not work, check
here .................................................. 90
Jams
13.4 Recording paper jams ...................... 98
13.5 Document jams – sending.............. 101
Cleaning
13.6 Document feeder / scanner glass
cleaning .......................................... 102
13.7 Thermal head cleaning...................103
14.General Information
Printed Reports
14.1 Reference lists and reports (Base unit
only)................................................ 105
Specifications
14.2 Specifications ................................. 106
15.Index
15.1 Index.............................................. 108
9

1. Introduction
1I ntroduction
1.1 Included accessories
No. Item Quantity Notes
1 Power cord 1 ----------
2 Telephone line cord 1 For Australian users
(Australian type plug)
For New Zealand users
(New Zealand BT type plug)
3 Paper tray 1 ----------
4 Starter ink film (10 metres long) 1 prints about 28 A4-sized
5 Handset 1 ----------
6 Rechargeable batteries 2 AAA (R03) size
7 Handset cover 1 ----------
8 Operating instructions 1 ----------
9 Quick installation guide 1 ----------
*1 For replacement film, see page 11.
12 34
For Australian
users
56789
For New Zealand
users
pages.
*1
Note:
L If any items are missing or damaged, contact the place of purchase.
L Save the original carton and packing materials for future shipping and transportation of the unit.
10

1. Introduction
1.2 Accessory information
1.2.1 Available accessories
Additional/replacement accessories
Model No. Item Specifications/Usage
KX-FA54E Replacement film
HHR-4EPT Rechargeable batteries 2 rechargeable nickel metal hydride (Ni-
KX-TGA121AZ Additional handset ----------
KX-A272 DECT repeater ----------
*1 We recommend that you buy a full-size replacement film for continuous use of your unit. Please use
genuine Panasonic replacement film. The ink film is not reusable. Do not rewind and use the ink
film again.
For Users in New Zealand
General Warning:
The grant of a Telepermit for any item of terminal equipment indicates only that Telecom has accepted
that the item complies with minimum conditions for connection to its network. It indicates no endorsement
of the product by Telecom, nor does it provide any sort of warranty. Above all, it provides no assurance
that any item will work correctly in all respects with another item of Telepermitted equipment of a different
make or model, nor does it imply that any product is compatible with all of Telecom’s network services.
Important Notice:
Under power failure conditions, this telephone may not operate. Please ensure that a separate
telephone, not dependent on local power, is available for emergency use.
*1
35 m × 2 rolls (Each roll will print about 105
A4-sized pages.)
MH) batteries
11

1. Introduction
Finding the Controls
1.3 Button descriptions of
the base unit
L Keep the front cover page open for button
locations.
A {MIC} (Microphone)
L The built-in microphone.
B {CALLER ID}
L To use Caller ID features (page 37).
C {LOCATOR}{HOLD}
L To locate a handset (page 82).
L To put a call on hold.
D {ERASE}
L To erase messages (page 61, 62).
E {PLAYBACK}
L To play messages (page 62).
F {MEMO}
L To record a memo message (page 62).
G {AUTO ANSWER}
L To turn the auto answer setting ON/OFF
(page 52).
H {COPY}
L To copy a document (page 59).
I {FAX/START }{SET}
L To start sending or receiving a fax.
L To store a setting during programming.
J {STOP}
L To stop an operation or programming
session.
L To erase a character/number (page 27).
Press and hold to erase all
characters/numbers.
K {HELP}
L To print helpful information for quick
reference (page 23).
L {MENU}
L To initiate or exit programming.
M {GREETING/REC}
L To record a greeting message (page 61).
N {NAVIGATOR}{VOLUME}
L To adjust volume (page 24).
L To search for a stored item (page 34, 50).
L To select features or feature settings
during programming (page 66).
L To navigate to the next operation.
O {GREETING/CHECK}
L To check a greeting message (page 61).
P {DIGITAL SP-PHONE}
L For speakerphone operation (page 30).
Q {RECALL}
L To access special telephone services or
for transferring extension calls.
R {REDIAL}{PAU SE}
L To redial the last number dialled from the
base unit.
L To insert a pause during dialling.
S {MUTE}
L To mute your voice to the other party
during a conversation. Press again to
resume the conversation.
12

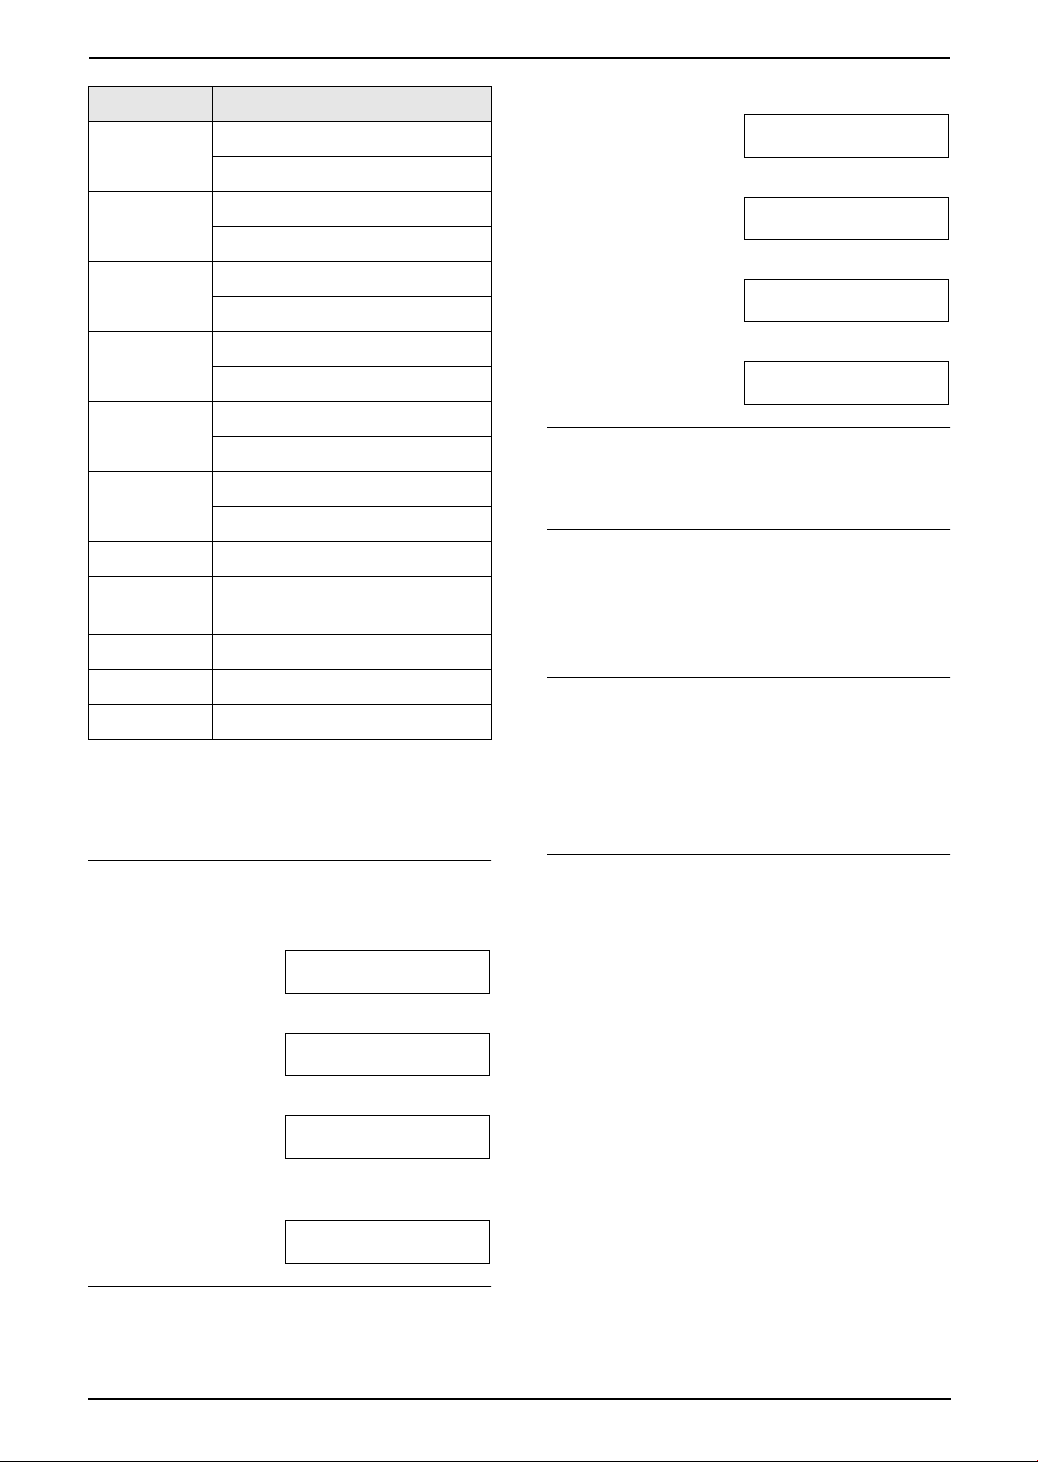
1.4 Button descriptions of
the handset
L Keep the front cover page open for button
locations.
A {j/OK} (Menu/OK)
L To initiate programming.
L To store a setting during programming.
L To lock/unlock the handset buttons (page
30).
B {k} (Phonebook)
L To access the phonebook (page 31).
C {C} (Talk)
L To make/answer calls (page 29, 31).
D Navigator
L To adjust volume (page 24).
L To search for a stored item (page 32).
L To select features or feature settings
during programming.
L To navigate to the next operation.
E {s} (Speakerphone)
L For speakerphone operation (page 29).
F {R} (Recall)
L To access special telephone services or
for transferring extension calls.
G {R} (Redial/Pause)
L To redial one of the last 10 numbers
dialled from the handset (page 29).
L To insert a pause during dialling.
H {ih} (Off/Power)
L To turn power ON/OFF (page 23).
L To hang up (page 29, 31).
L To stop an operation or programming
session.
L To exit programming.
I {C/T} (Clear/Mute)
L To erase a character/number (page 32).
Press and hold to erase all
characters/numbers.
L To mute your voice to the other party
during a conversation. Press again to
resume the conversation.
J {INT} (Intercom)
L To page or locate another handset (page
83).
K Microphone
L The built-in microphone.
Note:
L Up to 3 menu items can be displayed at a
time. To select a menu item not shown on the
1. Introduction
current page, scroll up or down by pressing
the navigator key, {e} or {v}, respectively.
13
1. Introduction
1.5 Display descriptions of
the handset
Display icons
Various icons appear on the handset display to
indicate the current status of the unit.
Display icon Meaning
Within range of a base unit
L When flashing: Handset
is searching for base unit
w
k Handset is on an outside call
o Call bar is ON (page 77)
5 Battery strength (page 22)
(out of range of base unit,
handset is not registered
to base unit, no power on
base unit)
“[VE]”
“[N]” Night mode is ON (page 75)
“[X]” Key lock is ON (page 30)
“[2]”
“-2-”
F
0
Voice enhancer is set to high
or low tone (page 29)
Handset number: The left
icon shows handset 2
example (page 76)
Base unit number: The left
icon shows base unit 2
example (page 76)
New SMS message received
(SMS users only, page 43)
(KX-FC235AL only)
New call minder message
received (call minder users
only; page 40) (KXFC231NZ only)
Line is being used by
another handset
14
1.6 Overview
1. Introduction
1.6.2 Handset
1.6.1 Base unit
2654873
1
j9
1 Microphone
2 Document guides
3 Paper tray
4 Metal recording paper guide
5 Recording paper entrance
6 Recording paper exit
7 Tension plate
8 Antenna
9 Front cover
j Document entrance
k Document exit
l Speaker
m Green button (Back cover release button)
n Back cover
lk
nm
1
2
3
1 Speaker
2 Receiver
3 Microphone
Removing the shipping tape
Open the front cover by pulling up the centre part
(1), then remove the shipping tape (2).
2
1
15
2. Installation
2InstallationBase Unit
2.1 Ink film installation /
replacement
The included film roll is a starter ink film.
Important:
L Remove all blue shipping tape from the
unit before installation.
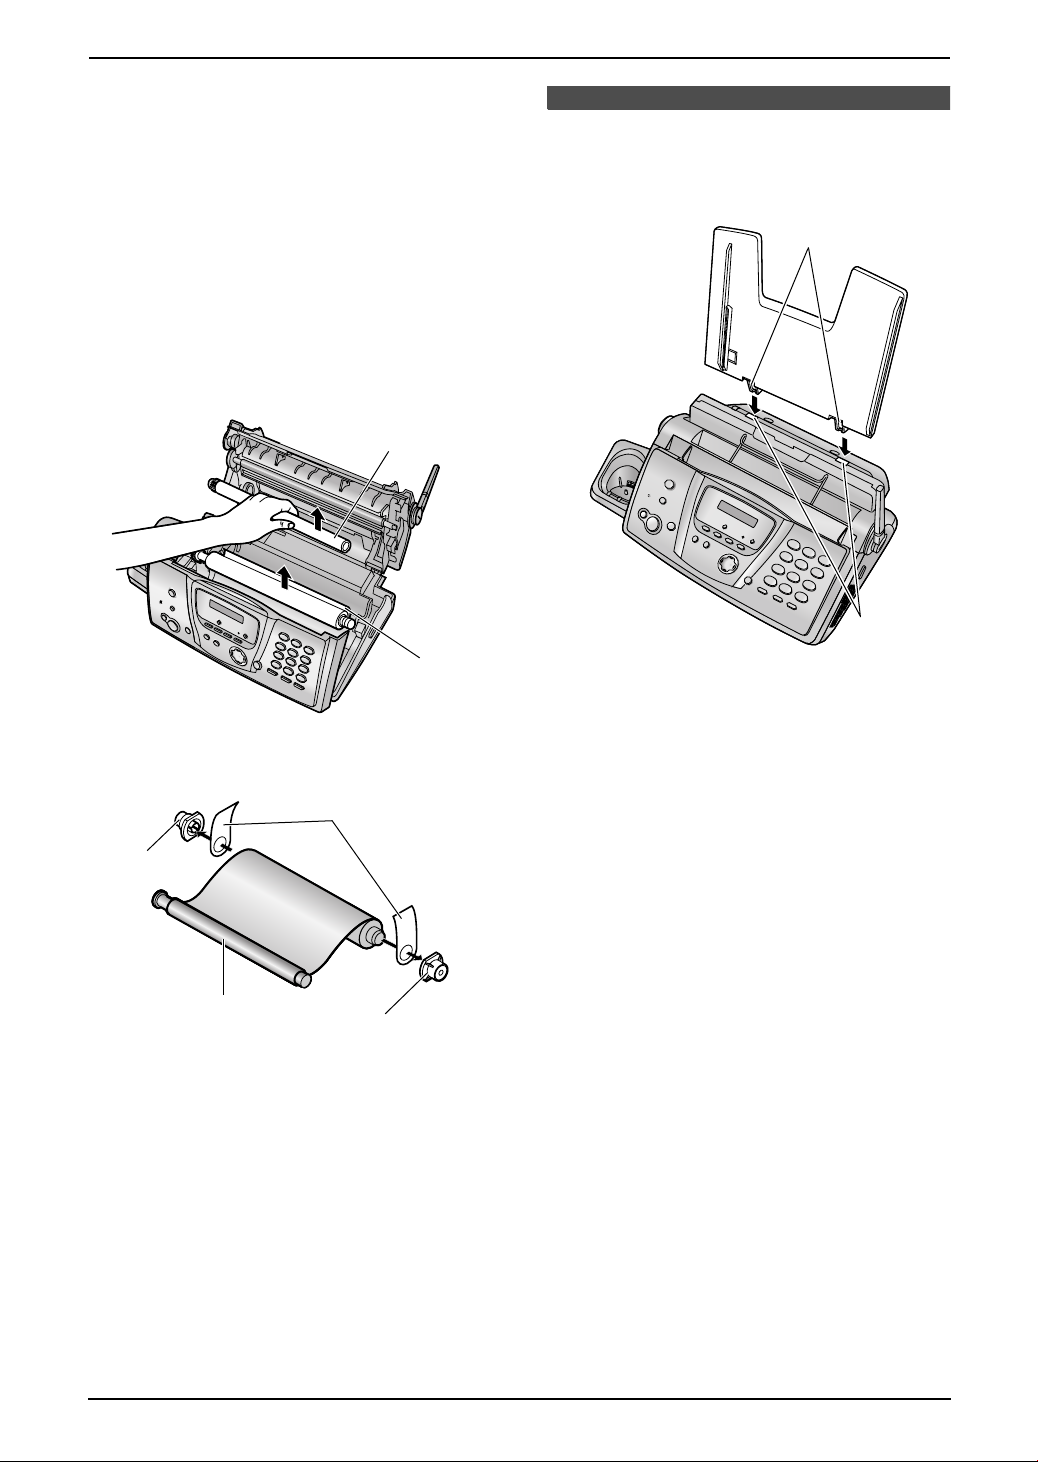
2.1.1 Installing the ink film
The included film roll is a starter ink film.
1 Open the front cover by pulling up the centre
part.
3 Open the back cover.
4 Insert the front ink film roll by inserting its
blue gear into the left slot of the unit (1).
Insert the rear ink film roll by inserting its
white gear into the left slot of the unit (2).
L The ink film is safe to touch and will not
rub off on your hands like carbon paper.
L Make sure the blue gear (1) and white
gear (2) are installed as shown.
2 Release the back cover by pushing the green
button (1).
L You can also release the back cover by
pushing in the green lever (2).
1
2
2
1
16
2. Installation
5 Turn the gear of the blue core (1) in the
direction of the arrow until the ink film is tight
(2).
1
L The ink film is reversed.
L The ink film is slack or creased.
6 Close the back cover securely by pushing
down on the notched area at both ends (1).
1
2
Correct
L The ink film is wrapped around the blue
core (3) at least once.
1 turn
Tight
3
Incorrect
L The ink film is not wrapped around the
blue core (4).
4
7 Close the front cover securely.
17
2. Installation
2.1.2 Replacing the ink film
To ensure that the unit operates properly, we
recommend the use of Panasonic replacement
film. See page 11 for accessory information.
L We cannot be responsible for any damage to
the unit or degradation of print quality which
may occur from the use of non-Panasonic
replacement film.
1 Open the covers (see steps 1 to 3 on page
16).
2 Remove the used core (1) and used ink film
(2).
1
2.2 Paper tray
Insert the tabs on the paper tray (1) into the
slots on the back of the unit (2).
1
2
3 Remove the stoppers (1) and tags (2) from
the new ink film (3).
2
1
3
1
4 Insert the ink film and close the covers (see
steps 4 to 7 on page 16).
2
18
2.3 Recording paper
The unit can hold up to 30 sheets of 80 g/m2
paper.
Please refer to page 106 for information on
recording paper.
1 Pull the tension plate forward (1).
1
2. Installation
3 Insert the paper, print-side down (1).
1
4 Push the tension plate back (1).
2 Fan the paper to prevent paper jams.
1
L If the paper is not inserted correctly,
readjust the paper, or the paper may jam.
Correct Incorrect
19

2. Installation
Handset
2.4 Battery installation /
replacement
2.4.1 Installing the batteries
1 Insert the batteries negative (T) terminal
first.
2 Close the handset cover.
2.4.2 Replacing the batteries
If 7 flashes even after the handset batteries
have been charged for 7 hours, the batteries
must be replaced. We recommend the use of
Panasonic batteries. See page 11 for
accessory information.
Important:
L Use only rechargeable batteries. If you
install non-rechargeable batteries and
start charging, the batteries may leak
electrolyte and damage the phone.
L Do not mix old and new batteries.
1 Press the notch on the handset cover firmly
and slide it in the direction of the arrow.
2 Remove the old batteries positive (S)
terminal first and install the new ones. See
the battery installation procedure.
20

3. Preparation
3Pr eparationConnections and Set up
3.1 Connections
Important:
L The unit will not function when there is a
power failure. To make calls in emergency
situations, you should connect a
telephone that can function during a
power failure to the telephone line.
1 Power cord
L Connect to the power outlet (220 V – 240
V, 50/60 Hz).
2 Telephone line cord
L Connect to a single telephone line jack.
L If you use the unit with a computer and your
internet provider instructs you to install a
filter, please connect the telephone line cord
as follows (page 91, 92).
Telephone
line cord
Noise filter
(For ADSL users)
1
2
(For Australian
users)
(For New
Zealand users)
Caution:
L After connection, you must charge the
batteries to make or answer calls with the
handset (page 22).
L When you operate this product, the power
outlet should be near the product and
easily accessible.
L Be sure to use the telephone line cord
included in this unit.
L Do not extend the telephone line cord.
L This unit is not designed to be used with
rotary (pulse dialling) services.
Note:
L If any other device is connected to the same
telephone line, this unit may disturb the
network condition of the device.
21
3. Preparation
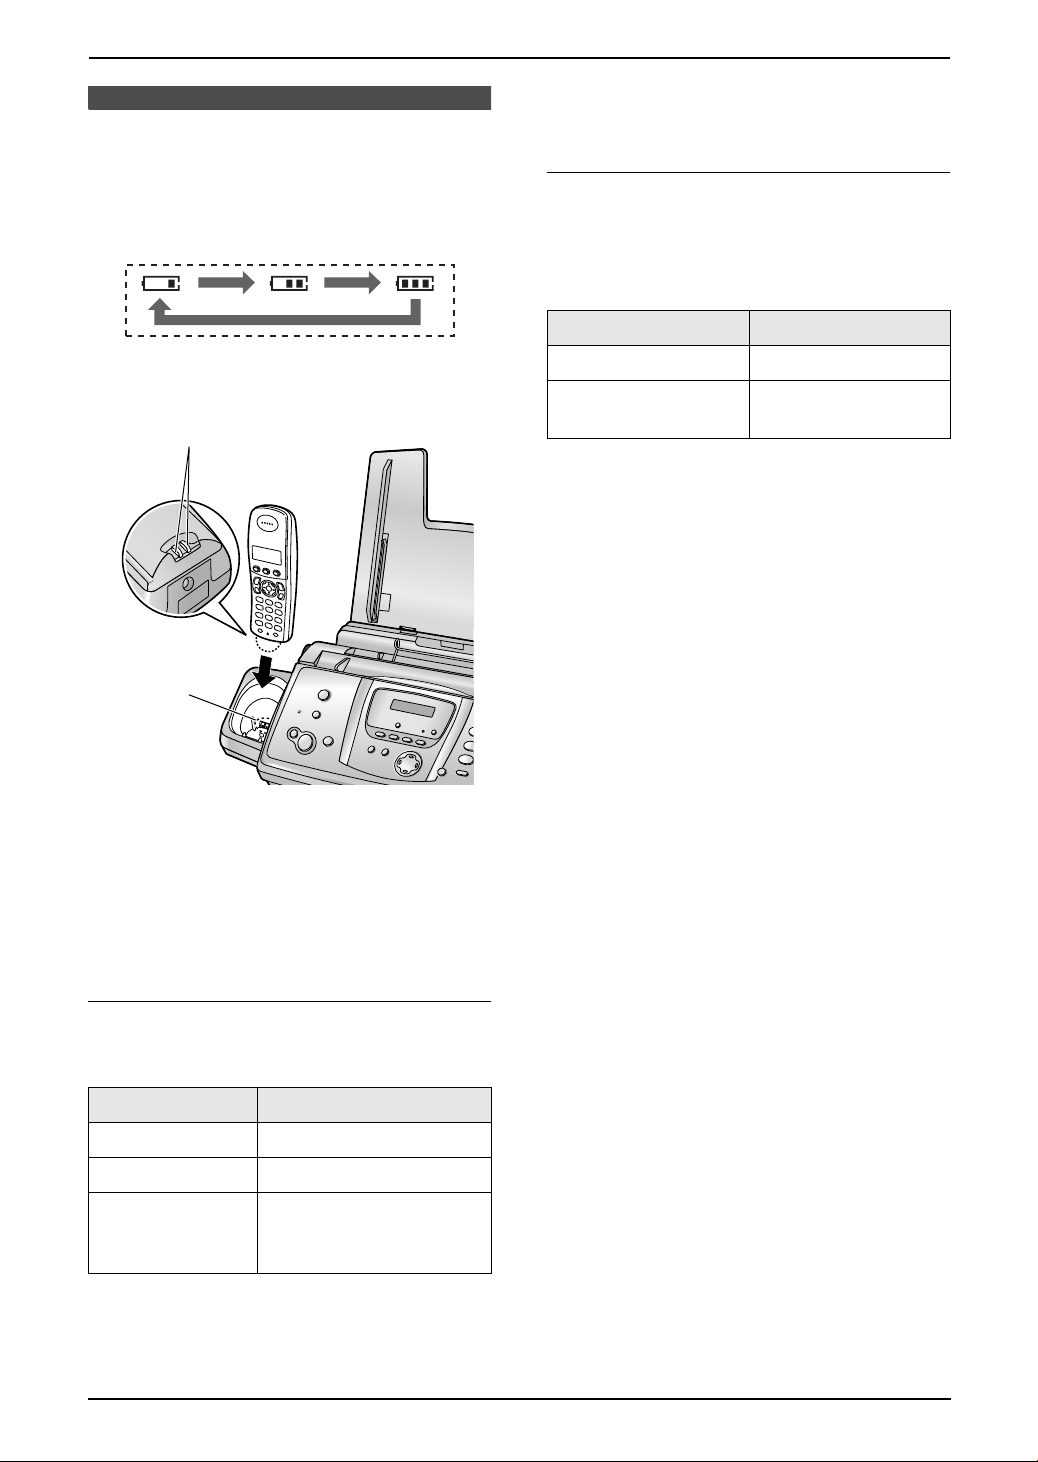
3.2 Battery charge
Place the handset on the cradle of the base
unit for about 7 hours before initial use.
When charging, the battery icon is shown as
follows.
L If 7 flashes when you lift the handset off
the base unit, charge the batteries at least 15
minutes.
Battery life
After your Panasonic batteries are fully charged,
you can expect approximately the following
performance:
Ni-MH Batteries (typical 700 mAh)
Operation Operating Time
When the batteries are fully charged, 5
remains on the display.
1
2
Note:
L Clean the handset charge contacts (1) and
the charger charge contacts (2) with a soft,
dry cloth once a month, otherwise the
batteries may not charge properly. Clean
more often if the unit is exposed to grease,
dust or high humidity.
While in use (talking) 20 hours approx.
While not in use
(standby)
Note:
L Actual battery performance depends on a
combination of how often the handset is in
use (talking) and how often it is not in use
(standby).
L Battery operating time may be shortened
over time depending on usage conditions
and ambient temperature.
170 hours approx.
Battery strength
You can confirm the battery strength on the
handset display.
Battery icons Battery strength
5 High
6 Medium
7 Low
L When flashing:
Needs to be charged
Note:
L If the handset is turned OFF, it will be turned
ON automatically when it is placed on the
base unit.
22
Help Button
3. Preparation
3.3 Turning the handset
power ON/OFF
3.3.1 Power ON
Press {ih} for about 1 second.
L The display will change to the standby mode.
{ih}
3.3.2 Power OFF
Press {ih} for about 2 seconds.
L The display will go blank.
3.4 Base unit help function
The unit contains helpful information which can
be printed for quick reference.
“BASIC SETTINGS”:
How to set the date, time, your logo and fax
number.
“FEATURE LIST”:
How to program the features.
“PHONEBOOK”:
How to store names and numbers in the base
unit phonebook and how to dial them.
“TAM OPERATION”:
How to use the telephone answering machine.
“FAX RECEIVING”:
How to set the base unit to receive faxes.
“COPIER”:
How to use the copier function.
“REPORTS”:
List of available reports.
{SET} {HELP}
{<}{>}
1 Press {HELP}.
2 Press {<} or {>} repeatedly to display the
desired item.
3 Press {SET}.
L The selected item will be printed.
23

3. Preparation
Volume
3.5 Adjusting handset
volume
{j/OK}
{C}
{>}{e}{v}
{s}
Ringer volume
1. Press {j/OK}.
2. Select “Handset Setup”, then press {>}.
3. Select “Ringer Setup”, then press {>}.
4. Select “Ringer Volume”, then press {>}.
5. Press {e} or {v} repeatedly to select the
desired volume.
6. Press {>}.
7. Press {ih}.
Note:
L Alarms will sound and the handset will ring
for intercom calls and when paged even if the
ringer is turned OFF.
Ring tone
You can select one of 15 ring tones for outside
calls and intercom calls (page 75). Caller ID
service users can also use a different ringer for
each category (page 36).
{ih}
{INT}
3.6 Adjusting base unit
volume
SET}
{
Ringer volume
While the unit is idle, press {A} or {B}.
L If any documents are in the document
entrance, you cannot adjust the volume.
Confirm that there are no documents in the
entrance.
To turn the ringer OFF
1. Press {B} repeatedly to display “RINGER
OFF= OK?”.
2. Press {SET}.
L When a call is received, the base unit will not
ring and will display “INCOMING CALL”.
L To turn the ringer back ON, press {A}.
Ring tone
You can select the ring tones from one of 3 tones
for outside calls (feature #17 on page 67).
Speaker volume
While using the speakerphone, press {A} or
{B}.
{A}{B}
Receiver volume
While using {C} or {INT}, press {e} or {v}.
Speaker volume
While using {s}, press {e} or {v}.
24
Answering machine volume
While listening to messages, press {A} or
{B}.
3. Preparation
Initial Programming
3.7 Date and time
You must set the date and time for both the
handset and the base unit.
Times are set independently and may not
necessarily be identical.
L The other party’s fax machine will print the
date and time on each page you send
according to your base unit’s date and time
setting.
L The accuracy of the clock is approximately
±60 seconds a month.
3.7.1 With the handset
{j/OK}
{<}{>}
{ih}
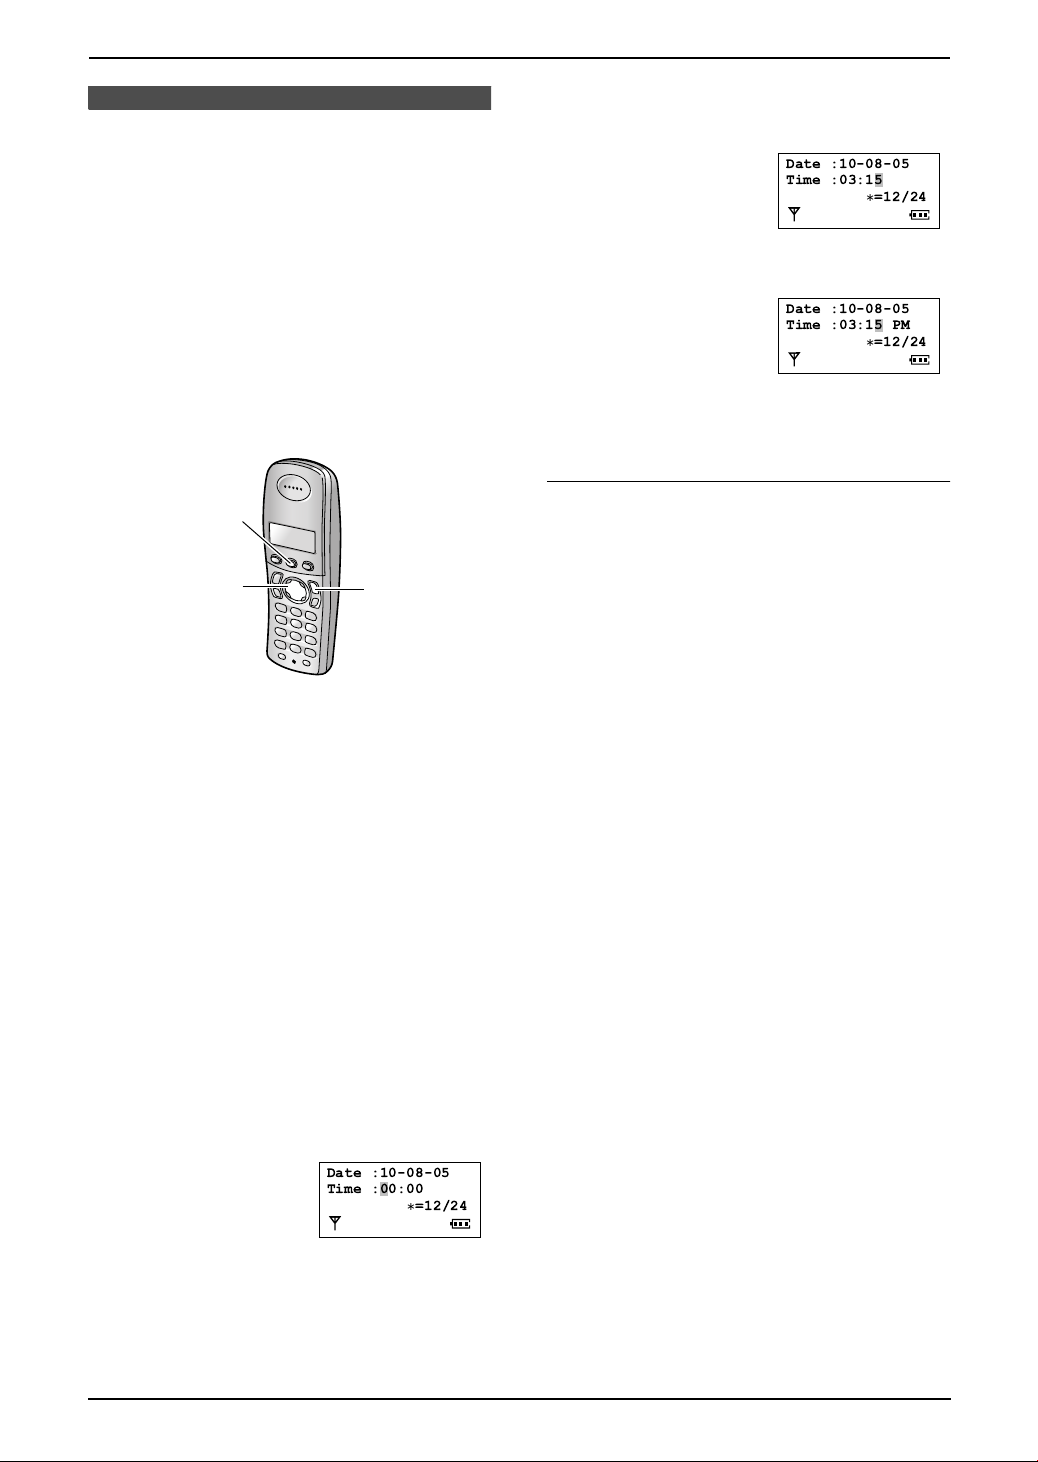
Example: 3:15 PM (12-hour time entry)
1. Press {0}{3} {1}{5}.
Date :10-08-05
Time :03:15
2. Press {*} repeatedly to display “PM”.
Date :10-08-05
Time :03:15 PM
@
=12/24
@
=12/24
7 Press {j/OK}.
8 Press {ih}.
To correct a mistake
Press {<} or {>} to move the cursor to the
incorrect number, and make the correction.
Note:
L The date and time on the handset will be lost
after a power failure and must be reset, but
the base unit has backup to keep the time.
Important:
L Confirm that the power cord of the base
unit is connected.
L Ensure that w is not flashing.
L If a power failure occurs, set the date and
time for the handset again.
1 Press {j/OK}.
2 Select “Handset Setup”, then press {>}.
3 Select “Time Settings”, then press {>}.
4 Select “Set Date & Time”, then press
{>}.
L The cursor (|) will appear on the display.
5 Enter the current date/month/year by
selecting 2 digits for each.
Example: 10 August, 2005
Press {1}{0} {0}{8} {0}{5}.
Date :10-08-05
Time :00:00
@
=12/24
6 Enter the current hour/minute by selecting 2
digits for each. Press {*} repeatedly to
select “AM”, “PM”, or 24-hour time entry.
25
3. Preparation
3.7.2 With the base unit
{SET} {MENU}
{<}{>}
1 Press {MENU}.
SYSTEM SETUP
PRESS NAVI.[()]
2 Press {<} or {>} repeatedly to display the
following.
SET DATE & TIME
PRESS SET
3 Press {SET}.
L The cursor (|) will appear on the display.
D:|01/M:01/Y:05
TIME: 00:00
4 Enter the current date/month/year by
selecting 2 digits for each.
Example: 10 August, 2005
Press {1}{0} {0}{8} {0}{5}.
D:10/M:08/Y:05
TIME: |00:00
3.8 Your logo
Your logo will be printed on the top of each page
sent from your unit.
The logo can be your name or the name of your
company.
{MENU}
{SET}
{<}{>}{A}{B} {MUTE}
1 Press {MENU}.
2 Press {<} or {>} repeatedly to display the
following.
3 Press {SET}.
L The cursor (|) will appear on the display.
{RECALL}{STOP}
SYSTEM SETUP
PRESS NAVI.[()]
YOUR LOGO
PRESS SET
LOGO=|
5 Enter the current hour/minute by selecting 2
digits for each. Press {*} repeatedly to
select “AM”, “PM”, or 24-hour time entry.
Example: 3:15PM (12-hour time entry)
1. Press {0}{3} {1}{5}.
D:|10/M:08/Y:05
TIME: 03:15
2. Press {*} repeatedly to display “PM”.
D:|10/M:08/Y:05
TIME: 03:15PM
6 Press {SET}.
L The next feature will be displayed.
7 Press {MENU}.
To correct a mistake
Press {<} or {>} to move the cursor to the
incorrect number, and make the correction.
26
4 Enter your logo, up to 30 characters. See the
following character table for details.
5 Press {SET}.
L The next feature will be displayed.
6 Press {MENU}.
To select characters with the base unit dial
keypad
Keypad Characters
{1} Space # & ’ ()
@ , – ./1
{2} ABC2
abc2
{3} DEF 3
def 3
3. Preparation
Keypad Characters
{4} GHI 4
ghi 4
{5} JKL5
jkl5
{6} MNO6
mno6
{7} PQRS7
pqr s7
{8} TUV8
tuv8
{9} WXYZ9
wxyz9
{0} Space 0
{*} To change uppercase or
lowercase letter.
{RECALL} To enter a hyphen.
1. Press {2} 2 times.
LOGO=|B
2. Press {4} 3 times.
LOGO=B|I
3. Press {*}.
LOGO=B|i
4. Press {5} 3 times.
LOGO=Bi|l
To correct a mistake
Press {<} or {>} to move the cursor to the
incorrect character, and make the correction.
To delete a character
Press {<} or {>} to move the cursor to the
character you want to delete and press {STOP}.
L To erase all characters, press and hold
{STOP}.
{MUTE} To insert a space.
{STOP} To delete a digit.
Note:
L To enter another character that is located on
the same dial key, press {>} to move the
cursor to the next space.
To enter your logo
Example: “BILL”
1. Press {2} 2 times.
LOGO=|B
2. Press {4} 3 times.
LOGO=B|I
3. Press {5} 3 times.
LOGO=BI|L
4. Press {>} to move the cursor to the next
space and press {5} 3 times.
LOGO=BIL|L
To insert a character
1. Press {<} or {>} to move the cursor to the
position to the right of where you want to
insert the character.
2. Press {MUTE} to insert a space and enter
the character.
To select characters using {A} or {B}
Instead of pressing the dial keys, you can select
characters using {A} or {B}.
1. Press {B} repeatedly to display the desired
character. Characters will be displayed in the
following order:
1 Uppercase letters
2 Number
3 Symbol
4 Lowercase letters
L If you press {A}, the order will be
reversed.
2. Press {>} to insert the character.
3. Return to step 1 to enter the next character.
To change uppercase or lowercase letters
Pressing the {*} button will change to
uppercase or lowercase letters alternately.
27

3. Preparation
3.9 Your fax number
Your fax number will be printed on the top of
each page sent from your unit.
To delete a number
Press {<} or {>} to move the cursor to the
number you want to delete and press {STOP}.
L To erase all numbers, press and hold
{STOP}.
{MENU}
{SET}
{RECALL}{STOP}
{<}{>}
1 Press {MENU}.
SYSTEM SETUP
PRESS NAVI.[()]
2 Press {<} or {>} repeatedly to display the
following.
YOUR FAX NO.
PRESS SET
3 Press {SET}.
L The cursor (|) will appear on the display.
NO.=|
4 Enter your fax number, up to 20 digits.
Example: NO.=1234567|
5 Press {SET}.
L The next feature will be displayed.
6 Press {MENU}.
Note:
L The {*} button enters a “+” and the {#}
button enters a space.
Example: +64 9 1234567
Press {*}{6}{4}{#}{9}{#}{1}{2}{3}{4}
{5}{6}{7}.
L To enter a hyphen in a telephone number,
press {RECALL}.
To correct a mistake
Press {<} or {>} to move the cursor to the
incorrect number, and make the correction.
28
 Loading...