

Page 1

Color Laser Printer
Setup Guide
KX-CL500
Model No. KX-CL510
Using Manuals:
C
o
lo
r
L
a
S
e
t
Model No.
K
X
C
L
5
0
0
/
K
Please carefully read this manual and keep this documentation in a safe place for
future reference.
This manual describes basic setup procedures for the Panasonic KX-CL500/KX-CL510 Color
s
e
r
P
r
in
t
e
r
u
p
G
u
i
d
e
X
C
L
5
1
0
Laser Printer and necessary precautions for safety and use. First read this guide to setup the
printer.
For other detailed information, refer to Operating Instructions included on the printer
CD-ROM*
1
, or it is automatically installed on your computer when installing the KX-CL500/
KX-CL510 software (see page 17).
If the Acrobat Reader application has not been installed in your computer, it is required to be
installed to read the documentation for the printer (see page 22).
*1
The KX-CL510 printer CD-ROM provided is the Hybrid CD-ROM including both files for Windows*2 and
Macintosh. Each files can be displayed in applicable operating system only.
*2
Microsoft Windows operating system (hereafter Windows)
Page 2

As an ENERGY STAR Partner, Panasonic has
determined that this product meets the E
S
TAR
guidelines for energy efficiency. (ENERGY
S
TAR and the ENERGY STAR certification mark
are registered US marks.)
Adobe, the Adobe logo, Acrobat, the
Acrobat logo, Adobe Type Manager,
ATM, PostScript, PostScript 3 and
PostScript 3 logo are either registered
trademarks or trademarks of Adobe
Systems Incorporated in the United
States and/or other countries.
NERGY
Thank you for purchasing the Panasonic
KX-CL500 / KX-CL510 Color Laser Printer.
Contents
For Your Safety
General. . . . . . . . . . . . . . . . . . . . . . . . . . . . . . . . . 3
Power Source . . . . . . . . . . . . . . . . . . . . . . . . . . . 3
Laser Safety. . . . . . . . . . . . . . . . . . . . . . . . . . . . . 3
Ozone Release. . . . . . . . . . . . . . . . . . . . . . . . . . . 3
Moving the Unit . . . . . . . . . . . . . . . . . . . . . . . . . . 3
Scalable type outlines are licensed from
Agfa Monotype Corporation. CG,
Intellifont, MicroType and Universal Font
Scaling Technology (UFST) are
trademarks of Agfa Monotype
Corporation and may be registered in
some jurisdictions.
• Microsoft, Windows and Windows NT are either registered
trademarks or trademarks of Microsoft Corporation in the
United States and/or other countries.
• Apple, AppleTalk, ColorSync, LaserWriter, Mac, Mac OS,
Macintosh and TrueType are trademarks of Apple Computer,
Inc.
• Intel, Pentium and Pentium II are trademarks or registered
trademarks of Intel Corporation or its subsidiaries in the United
States and other countries.
• Avery and all other related brands and product names are
trademarks of Avery Dennison Corporation.
• PeerlessPage
Corporation.
• PeerlessPrint® and Memory Reduction Technology® are
registered trademarks of Peerless Systems Corporation.
• Tornado and VxWorks are registered trademarks of Wind
River Systems, Inc.
• All other acknowledgements are trademarks or registered
trademarks of their respective holders.
The instructions are subject to change without notice.
Screen shot(s) reprinted with permission from Microsoft
Corporation.
TM
is a trademark of Peerless Systems
Waste Disposal . . . . . . . . . . . . . . . . . . . . . . . . . . 3
Caution Labels . . . . . . . . . . . . . . . . . . . . . . . . . . 4
Before You Start
Cautions . . . . . . . . . . . . . . . . . . . . . . . . . . . . . . . 6
Part Names . . . . . . . . . . . . . . . . . . . . . . . . . . . . . 8
Printer Panel . . . . . . . . . . . . . . . . . . . . . . . . . . . . 9
System Requirements . . . . . . . . . . . . . . . . . . . . 10
Minimum Space Requirements . . . . . . . . . . . . . 11
Accessories . . . . . . . . . . . . . . . . . . . . . . . . . . . . 11
Options and Supplies . . . . . . . . . . . . . . . . . . . . . 12
Setup
Setting up the Printer . . . . . . . . . . . . . . . . . . . . . 13
Connecting the Printer to a Computer . . . . . . . 15
Loading Media in the Media Tray . . . . . . . . . . . 15
Installing the KX-CL500/KX-CL510 Software
(For Windows) . . . . . . . . . . . . . . . . . . . . . . . . . 17
Installing Applications . . . . . . . . . . . . . . . . . . . . 22
Installing the KX-CL510 Software
(For Macintosh) . . . . . . . . . . . . . . . . . . . . . . . . 22
Acrobat Reader Copyright 1987-2001 Adobe Systems
Incorporated. All rights reserved.
COPYRIGHT © 2002 Peerless Systems Corporation. All Rights
Reserved.
COPYRIGHT © 2002 Adobe Systems Incorporated. All Rights
Reserved.
Adobe® PostScript® 3
Incorporated. All Rights Reserved.
Copyright © 2002 Wind River Systems, Inc. All right reserved.
This product contains an implementation of LZW licensed under
U.S.Patent 4,558,302.
Copyright 1998-2002 silex technology, Inc.
Matsushita Electric Industrial Co., Ltd. 2003
Panasonic Communications Co., Ltd. 2003
TM
Copyright © 2002 Adobe Systems
2
Using the Manuals . . . . . . . . . . . . . . . . . . . . . . . 27
Removing the KX-CL500/KX-CL510 Software . 28
Power On . . . . . . . . . . . . . . . . . . . . . . . . . . . . . . 29
Setting the LCD Language . . . . . . . . . . . . . . . . . 29
Printing a Test Page from the Printer Panel . . 29
Adjusting the Color Density (Color Calibration)
30
Troubleshooting . . . . . . . . . . . . . . . . . . . . . . . . . 32
Page 3
For Your Safety
For Your Safety
General
Warning
To prevent fire or shock hazard, do not expose this
product to rain or any type of moisture.
Caution
• Do not open covers and do not attempt to repair the unit
yourself. Refer servicing to qualified personnel.
• This product uses low frequency electromagnetic fields
and may cause harmful interference to sensitive
medical implant devices. If you have a cardiac
pacemaker or implantable defibrillator, please consult
your doctor for additional suggestion or advice.
Power Source
Warning
• The power source voltage of this unit is listed on the
nameplate. Only plug the unit into an outlet with the
proper voltage.
• When you operate this equipment, the outlet should be
near the equipment and accessible.
• To ensure safe operation the AC cord supplied must be
inserted into standard three-prong AC outlet which is
effectively grounded (earthed) through the normal
wiring.
• The fact that the equipment operates satisfactorily does
not imply that the power point is grounded (earthed) and
that the installation is completely safe. For your safety, if
in any doubt about the effective grounding (earthing) of
the power point, consult a qualified electrician.
• If the plug cannot be inserted into the AC outlet, contact
a licensed electrician to replace the outlet with a
properly grounded (earthed) one.
• Do not defeat the purpose of the grounding (earthing)
plug (ex. do not use a conversion plug).
Laser Safety
For Your SafetyFor Your Safety
CLASS 1 LASER PRODUCT
Caution
This printer utilizes a laser. Use of controls or adjustments
or performance of procedures other than those specified
herein may result in hazardous radiation exposure.
Laser diode properties (4 provided)
Laser output : 5 mW max
Wavelength : 785 nm
Emission duration : Continuous
Ozone Release
Warning
Make sure that the printer is installed in a well ventilated
room so as not to increase density of ozone in the air.
Since ozone is heavier than air, it is recommended that air
at floor level be ventilated.
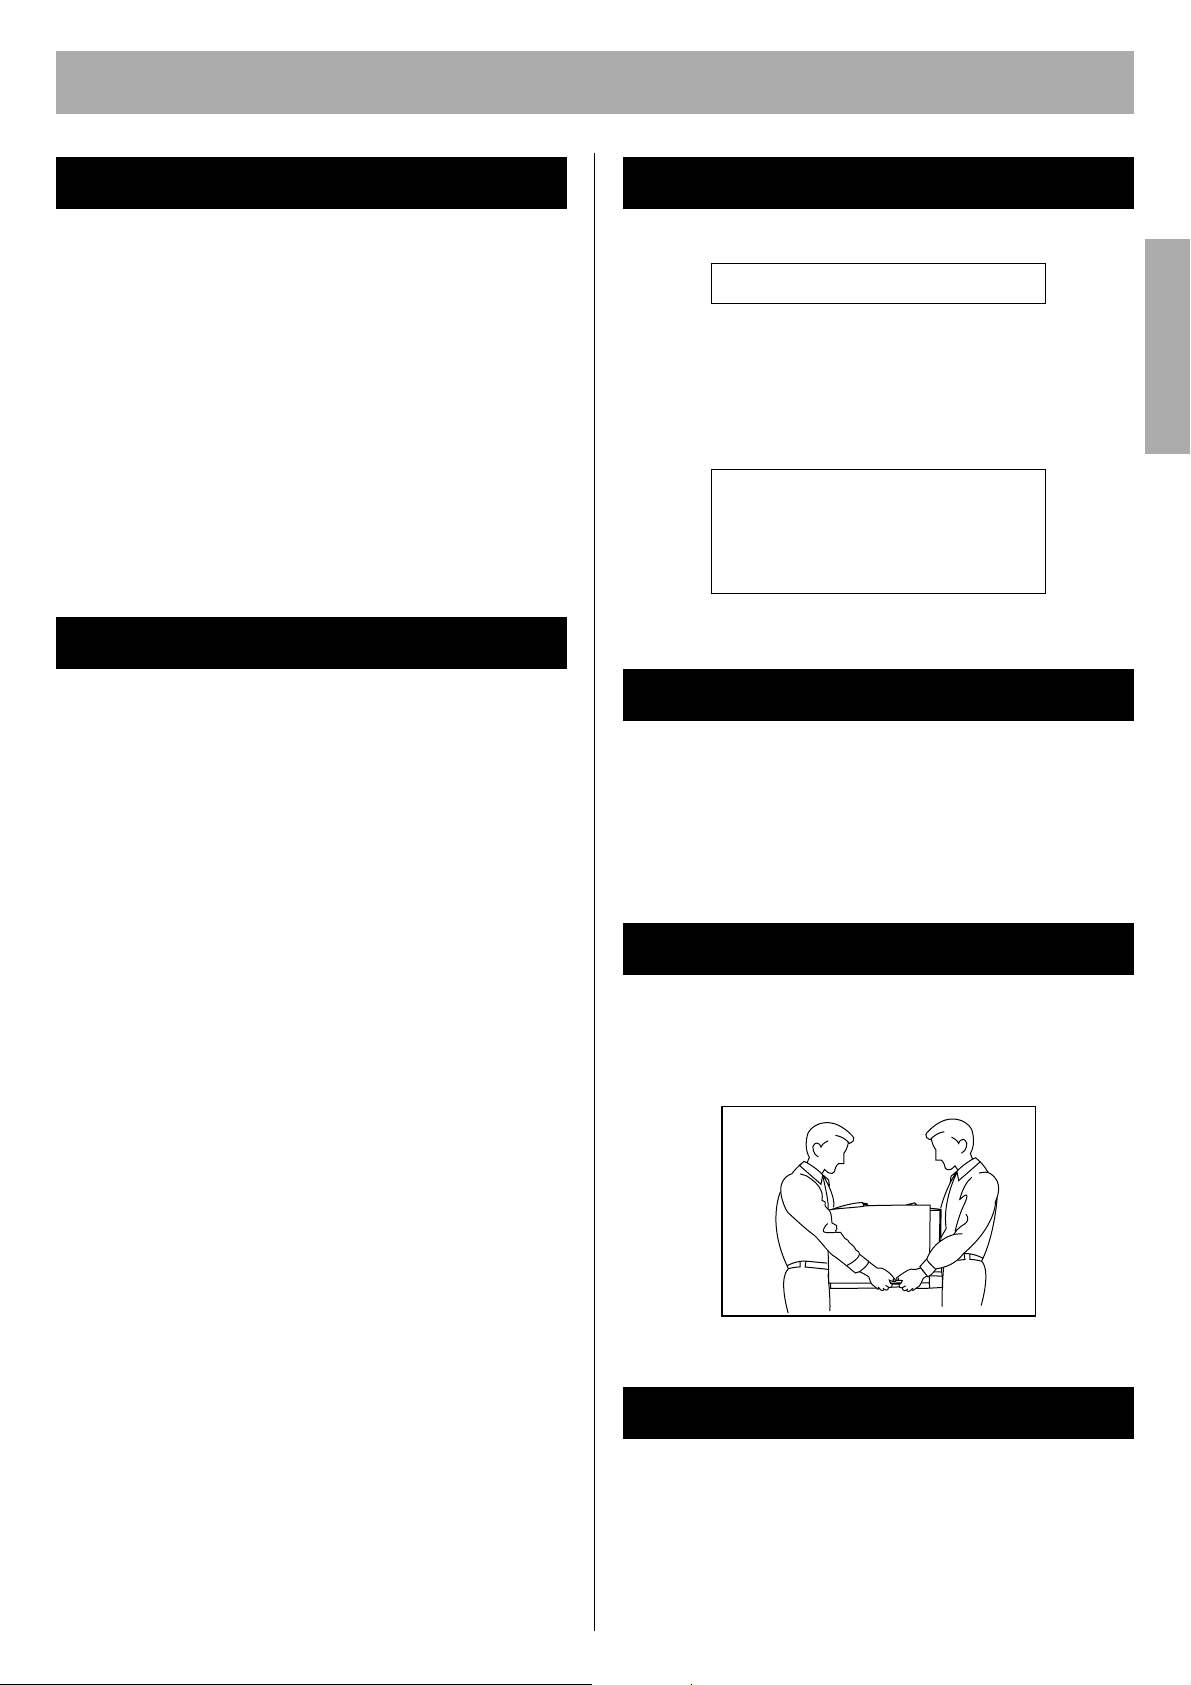
Moving the Unit
The printer weighs approximately 30 kg (66 lbs.). It must
be handled by two people. Turn the power off and remove
the power cord when handling the unit.
• (220-240 V equipment)
A certified power supply cord has to be used with this
equipment. The relevant national installation and/or
equipment regulations shall be considered. A certified
power supply cord not lighter than ordinary polyvinyl
chloride flexible cord according to IEC 60227
(designation H05VV-F 3G 1.0 mm
2
).
Waste Disposal
Warning
Do not incinerate toner or toner containers. Toner dust
may cause flashback when exposed to an open flame.
3
Page 4
For Your Safety
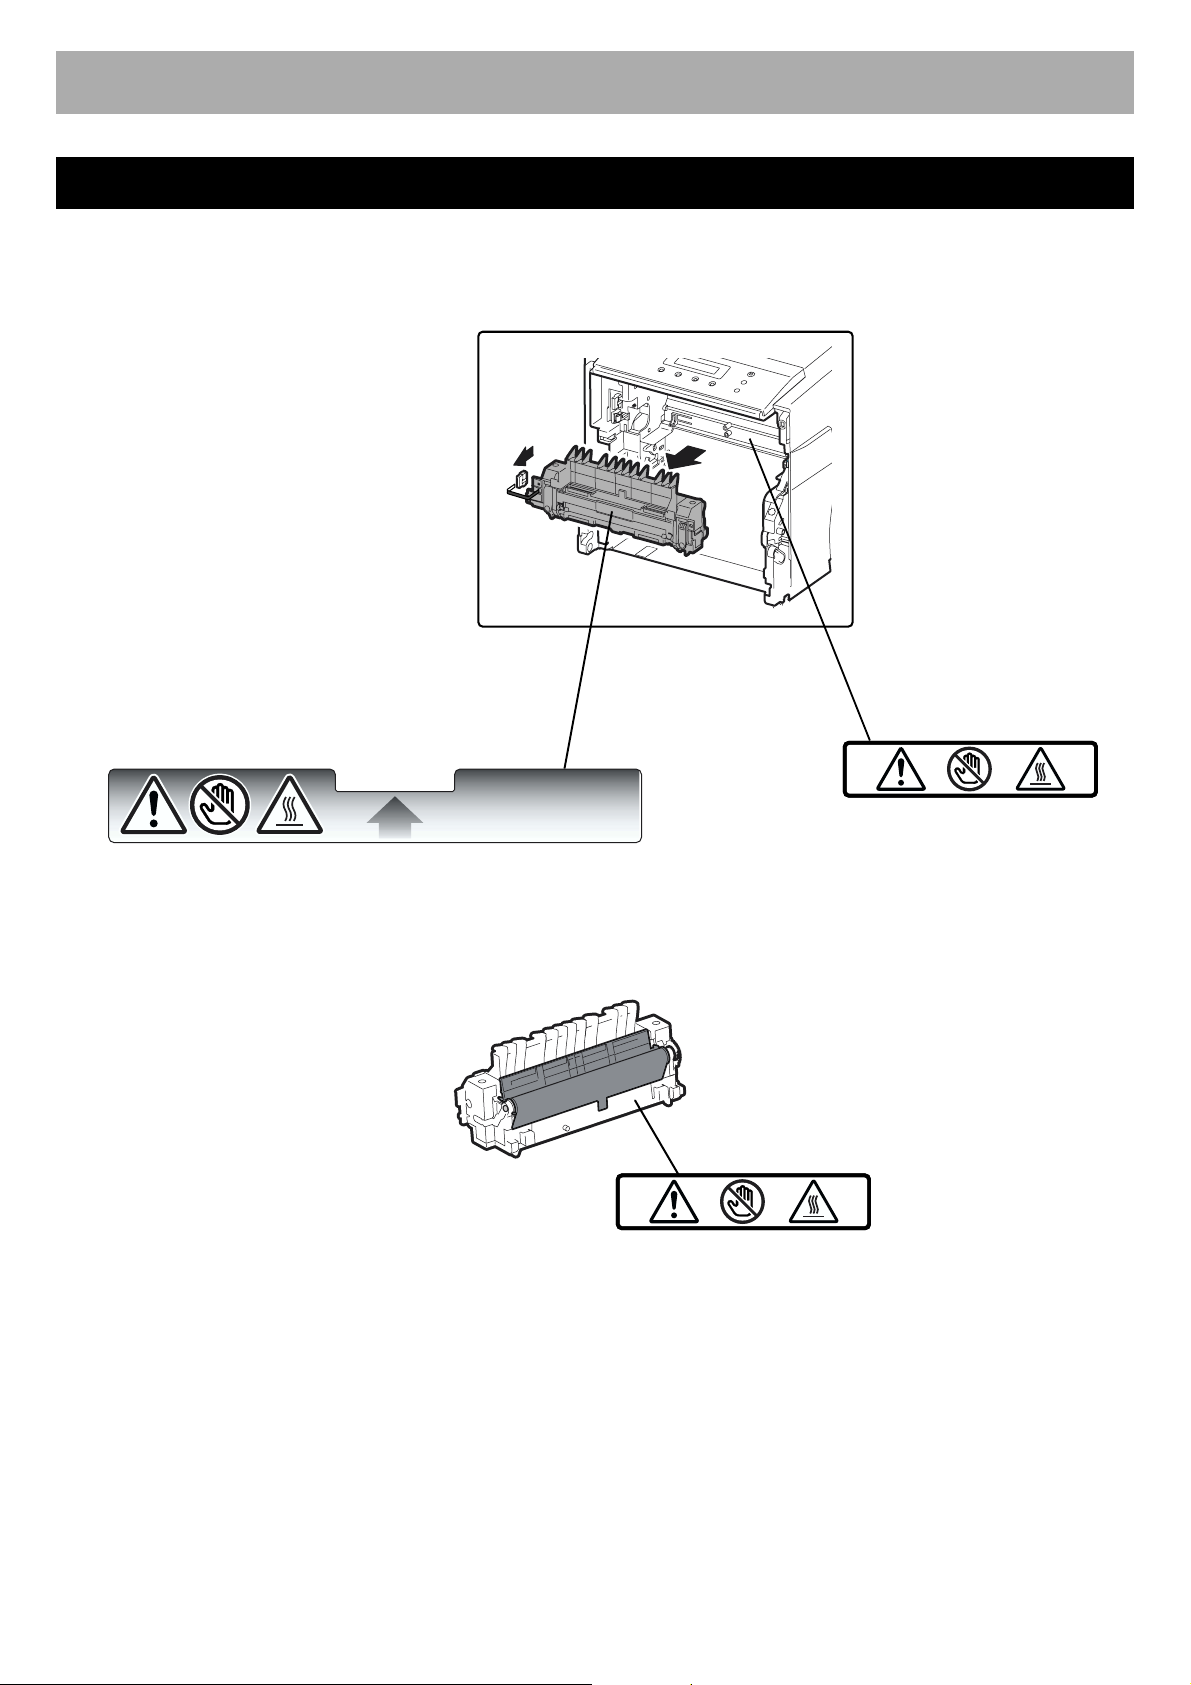
Caution Labels
CAUTION
HOT SURFACE
DO NOT TOUCH.
CAUTION
HOT SURFACE
DO NOT TOUCH.
CAUTION
HOT SURFACE
DO NOT TOUCH.
4
Page 5
For Your Safety
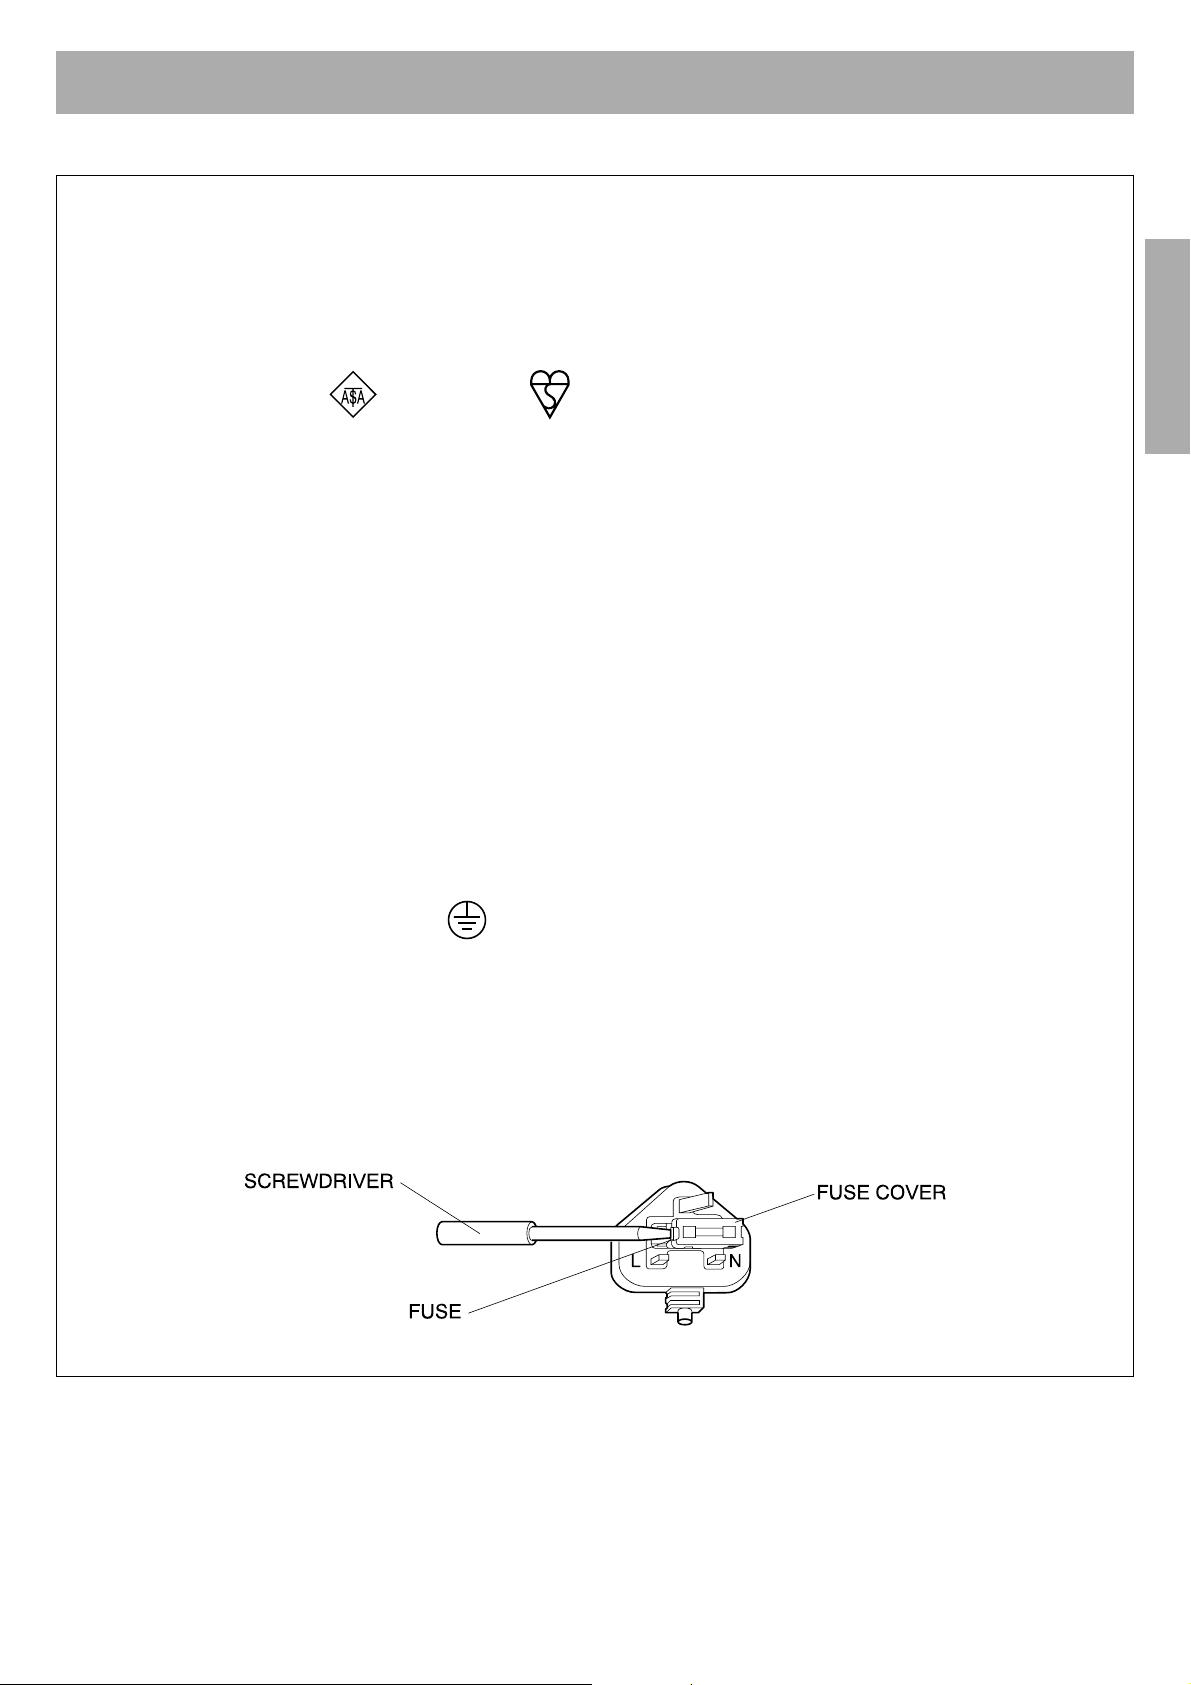
FOR USERS IN U.K.
IMPORTANT: FOR YOUR SAFETY PLEASE READ THE FOLLOWING TEXT CAREFULLY
This printer is supplied with a moulded three pin mains plug for your safety and convenience. A 13 amp fuse is
fitted in this plug. Should the fuse need to be replaced please ensure that the replacement fuse has a rating of 13
amps and that it is approved by ASTA or BSI to BS 1362.
Check for the ASTA mark or the BSI mark on the body of the fuse.
If the plug contains a removable fuse cover you must ensure that it is refitted when the fuse is replaced.
If you lose the fuse cover the plug must not be used until a replacement cover is obtained.
A replacement fuse cover can be purchased from your local Panasonic Dealer.
IF THE FITTED MOULDED PLUG IS UNSUITABLE FOR THE SOCKET OUTLET IN YOUR HOME THEN THE
FUSE SHOULD BE REMOVED AND THE PLUG CUT OFF AND DISPOSED OF SAFELY. THERE IS A
DANGER OF SEVERE ELECTRICAL SHOCK IF THE CUT OFF PLUG IS INSERTED INTO ANY 13 AMP
SOCKET.
If a new plug is to be fitted please observe the wiring code as shown below.
If in any doubt please consult a qualified electrician.
WARNING: THIS APPLIANCE MUST BE EARTHED.
IMPORTANT: The wires in this mains lead are colored in accordance with the following code.
Green-and-Yellow: Earth Blue: Neutral Brown: Live
For Your SafetyFor Your Safety
As the colors of the wire in the mains lead of this appliance may not correspond with the colored markings
identifying the terminals in your plug, proceed as follows.
The wire which is colored GREEN-AND-YELLOW must be connected to the terminal in the plug which is marked
with the letter E or by the Earth symbol , or colored GREEN or GREEN-AND-YELLOW.
The wire which is colored BLUE must be connected to the terminal in the plug which is marked with the letter N or
colored BLACK.
The wire which is colored BROWN must be connected to the terminal in the plug which is marked with the letter L
or colored RED.
How to replace the fuse: Open the fuse compartment with a screwdriver and replace the fuse.
5
Page 6
Before You Start
Before You Start
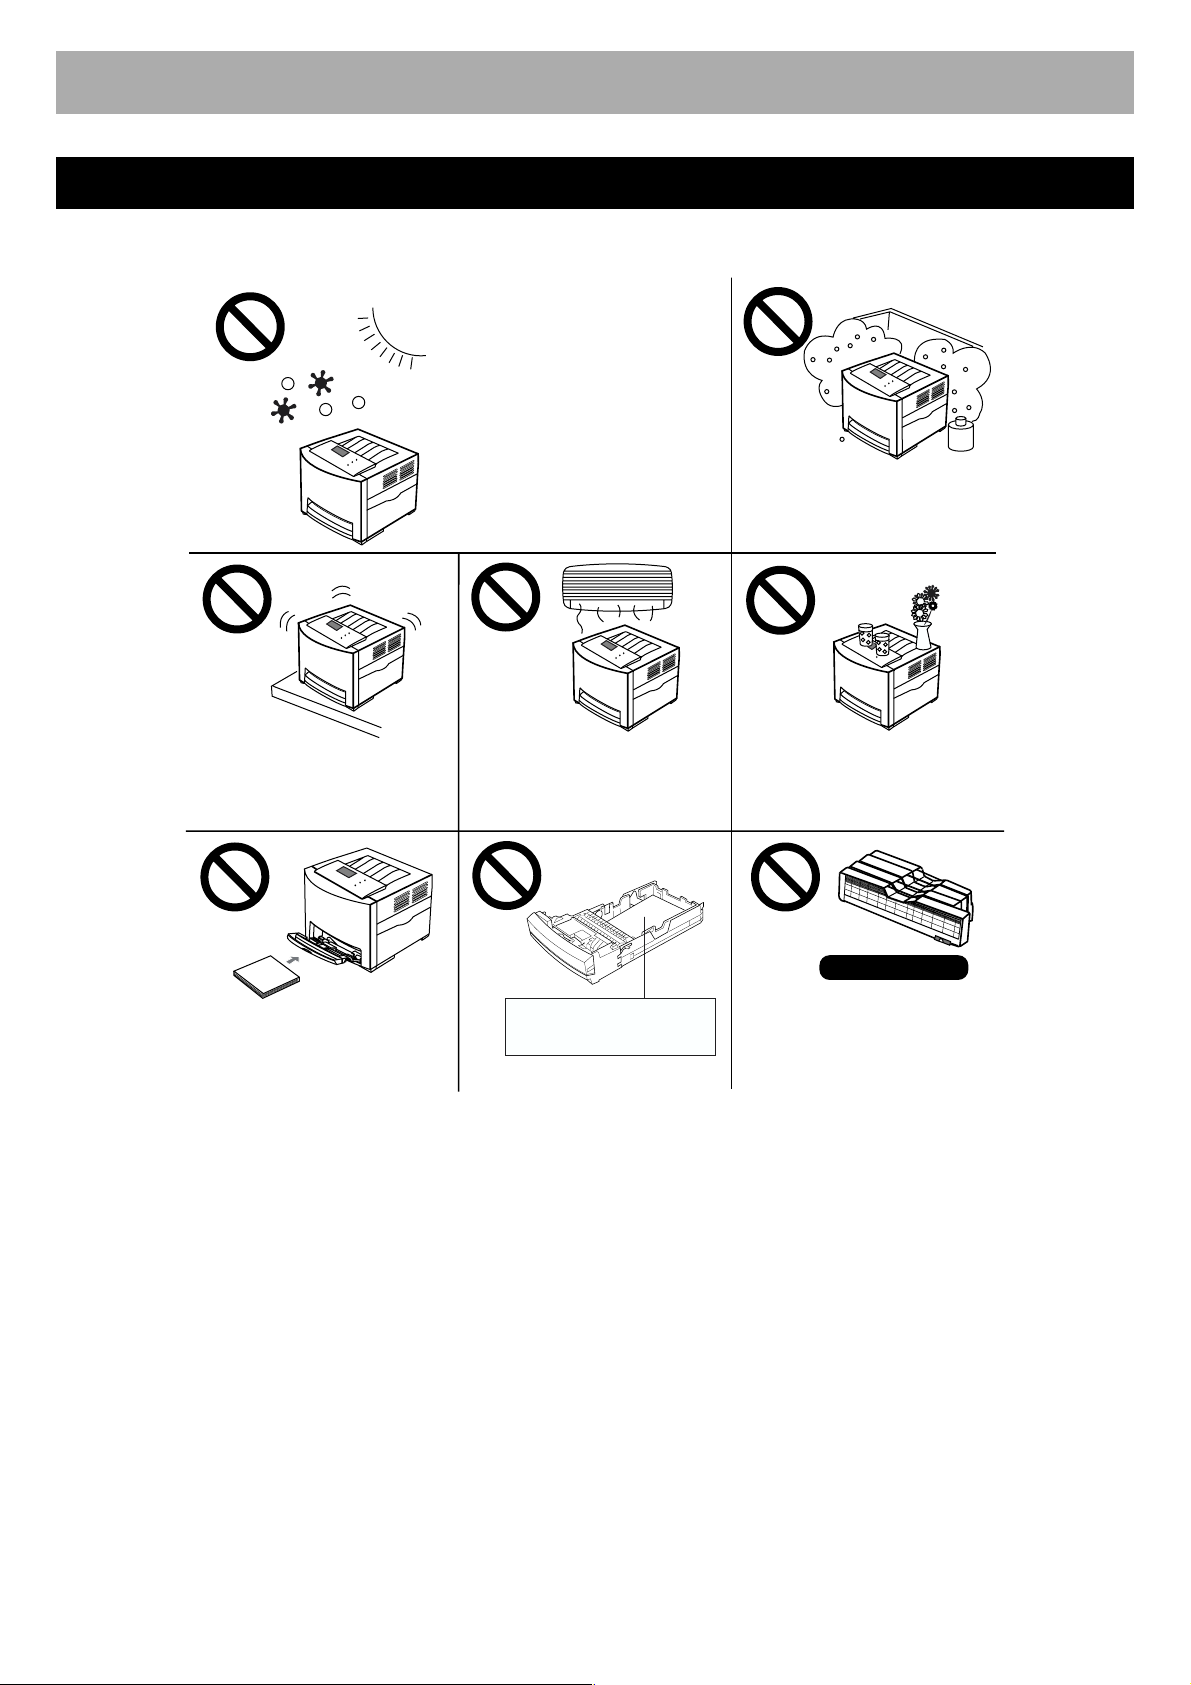
Cautions
To avoid machine malfunction, do not use the equipment under the following conditions:
• Direct exposure to sunlight.
• Extremely high or low
temperature [temperature
range: 10°C to 32.5°C (50°F
to 90.5°F)]
• Extremely high or low
humidity. (humidity range:
15% to 80% RH)
• Condensation due to rapid
change of temperature.
• Areas of poor ventilation.
• Areas of high dust or
chemical fume concentration.
(solvent etc.)
• Unstable or unlevel surfaces.
• A very large stack of media
into the manual feed.
• Directly in front of air
conditioning vents.
Media for ink jet (paper,
transparency, etc.)
• Liquids near the equipment.
Not genuine toner
• Any toner other than genuine
Panasonic toner; it may
damage the printer.
■ Static Electricity Damage
To prevent static electricity damage to any of the following components, touch a grounded metal surface, such as the
printer's bare metal frame prior to touching the component.
• Interface connectors: parallel, USB, network, and connector for optional paper feeder
• Connector pins on the optional paper feeder
• Electrical components, connectors inside the printer
■ Interface Cable
Always use a shielded interface cable. Use of an unshielded cable can result in radio interference with data.
■ Power Source
The voltage level of the power source must not vary more than ±10% from the voltage level marked on the nameplate
(located on the rear of the unit).
Do not use an extension cord.
Do not use a line conditioner, transient suppressor or surge protector as it may cause a machine error.
■ Ventilation Space
The ventilation space is needed more than 20 mm (0.8") between the printer and a wall.
6
Page 7

Before You Start
■ FOR USERS IN UNITED STATES
This equipment has been tested and found to comply with the limits for a Class B digital device, pursuant to Part 15 and 18
of the FCC Rules. These limits are designed to provide reasonable protection against harmful interference in a residential
installation.
This equipment generates, uses, and can radiate radio frequency energy and, if not installed and used in accordance with
the instructions, may cause harmful interference to radio communications.
However, there is no guarantee that interference will not occur in a particular installation. If this equipment does cause
harmful interference to radio or television reception, which can be determined by turning the equipment off and on, the user
is encouraged to try to correct the interference by one or more of the following measures:
• Reorient or relocate the receiving antenna.
• Increase the separation between the equipment and receiver.
• Connect the equipment into an outlet on a circuit different from that to which the receiver is connected.
• Consult the dealer or an experienced radio/TV technician for help.
The user may find the booklet “Something About Interference” available from FCC local regional offices helpful.
FCC Warning: To assure continued FCC emission limit compliance, the user must use the recommended shielded
interfacing cable when connecting to a host computer. Also, any unauthorized changes or modifications to this equipment
would void the user's authority to operate this device.
FCC Declaration of Conformity
Trade Name : Panasonic
Model Number : KX-CL500 or KX-CL510
Responsible Party: Matsushita Electric Corporation of America
One Panasonic Way
Secaucus, NJ 07094 U.S.A.
Telephone No.: 1-800-726-2797
This device complies with Part 15 and 18 of the FCC Rules.
Operation is subject to the following two conditions: (1) This device may not cause harmful interference, and (2) this device
must accept any interference received, including interference that may cause undesired operation.
Before You Start
7
Page 8
Before You Start
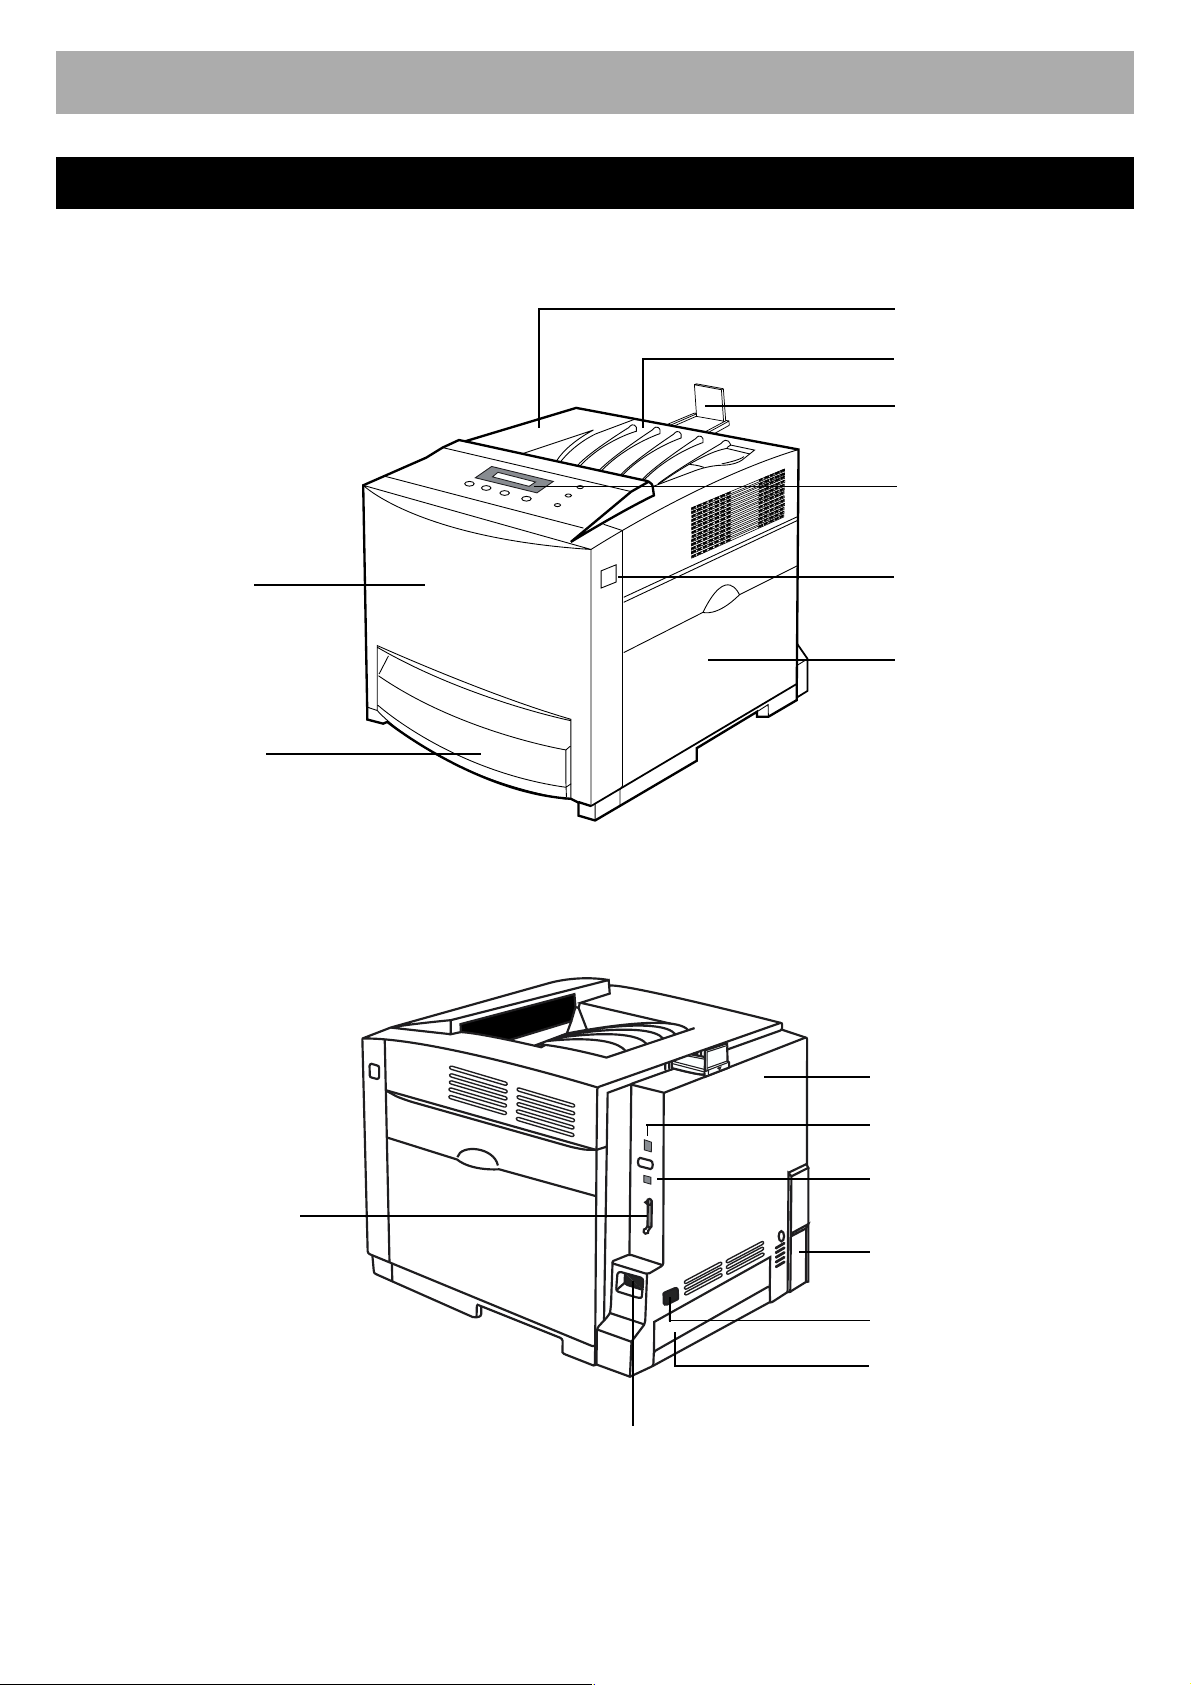
Part Names
Front View
Toner door
Output tray
Paper support
Printer panel
Media tray /
Multi-purpose tray
Rear View
Front door
Front door release
Right side door
Rear cover
Network interface connector
Parallel interface connector
8
USB interface connector
Optional paper feeder
cable cover
AC inlet
Tray cover
Power switch
Page 9
Before You Start
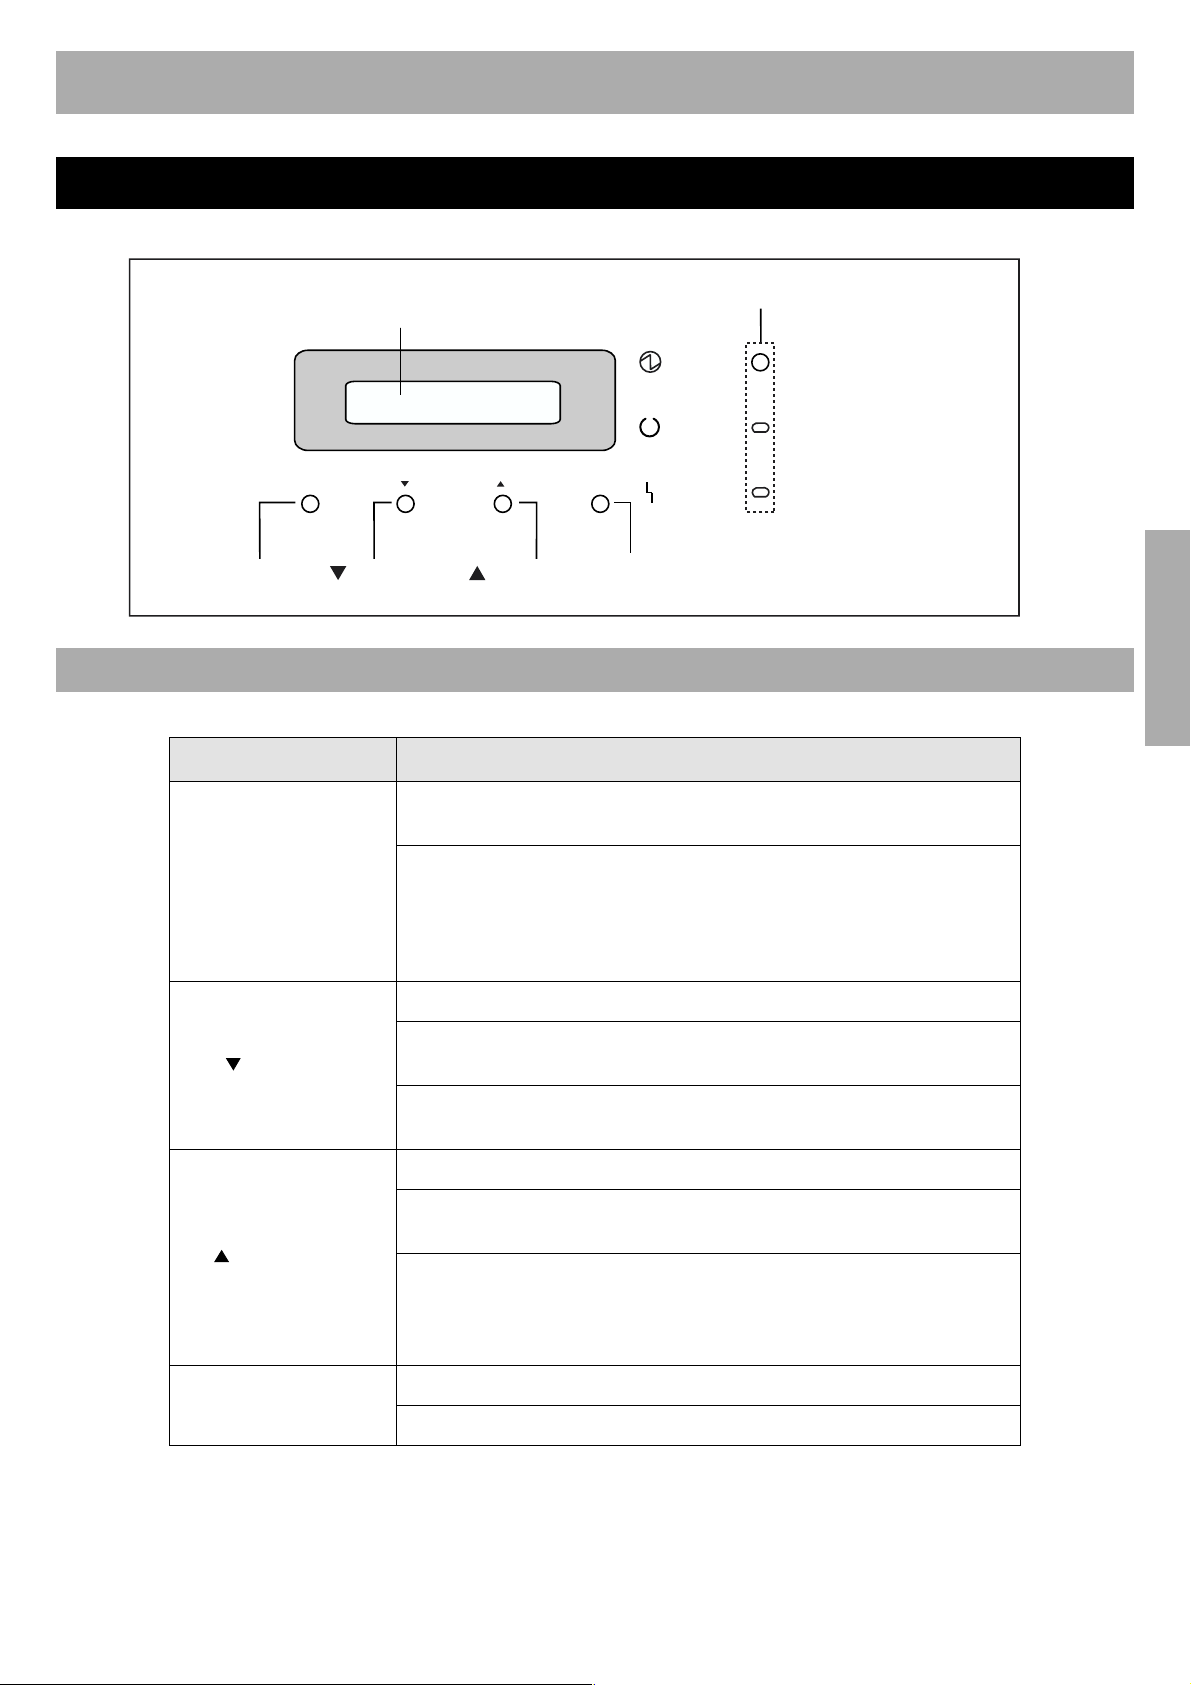
Printer Panel
MENU/EXIT
(PAUSE) button
Button Operation
Button Operation
MENU/EXIT (PAUSE)
LCD Panel
(2-line/40-character)
MENU/EXIT
PAUSE
CANCEL
(CANCEL)
button
Indicators
POWER
READY
ENTER
CONTINUE
(CONTINUE)
button
In the Menu mode, pressing the MENU/EXIT (PAUSE) button will
allow you to exit the Menu mode and Ready is displayed.
When Processing or Printing is displayed in the upper line of the
LCD, pressing the MENU/EXIT (PAUSE) button will allow you to
pause printing.
While Pause printing is displayed, pressing the MENU/EXIT
(PAUSE) button will allow you to resume printing.
ERROR
ENTER
button
Before You Start
(CANCEL)
(CONTINUE)
ENTER
Displays the previous menu or item.
Decreases the numerical value of the selection by 1. Hold down this
button to scroll faster.
While the printer prints, pressing this button will allow you to stop
printing or processing the current job.
Displays the next menu or item.
Increases the numerical value of the selection by 1. Hold down this
button to scroll faster.
When performing the manual duplex printing function, after even
pages are printed, odd pages are printed by pressing this button.
When “LOAD XX” appears on the LCD, you can print the current job
anyhow by pressing this button.
Enters a sub-menu.
Activates a selection.
9
Page 10
Before You Start
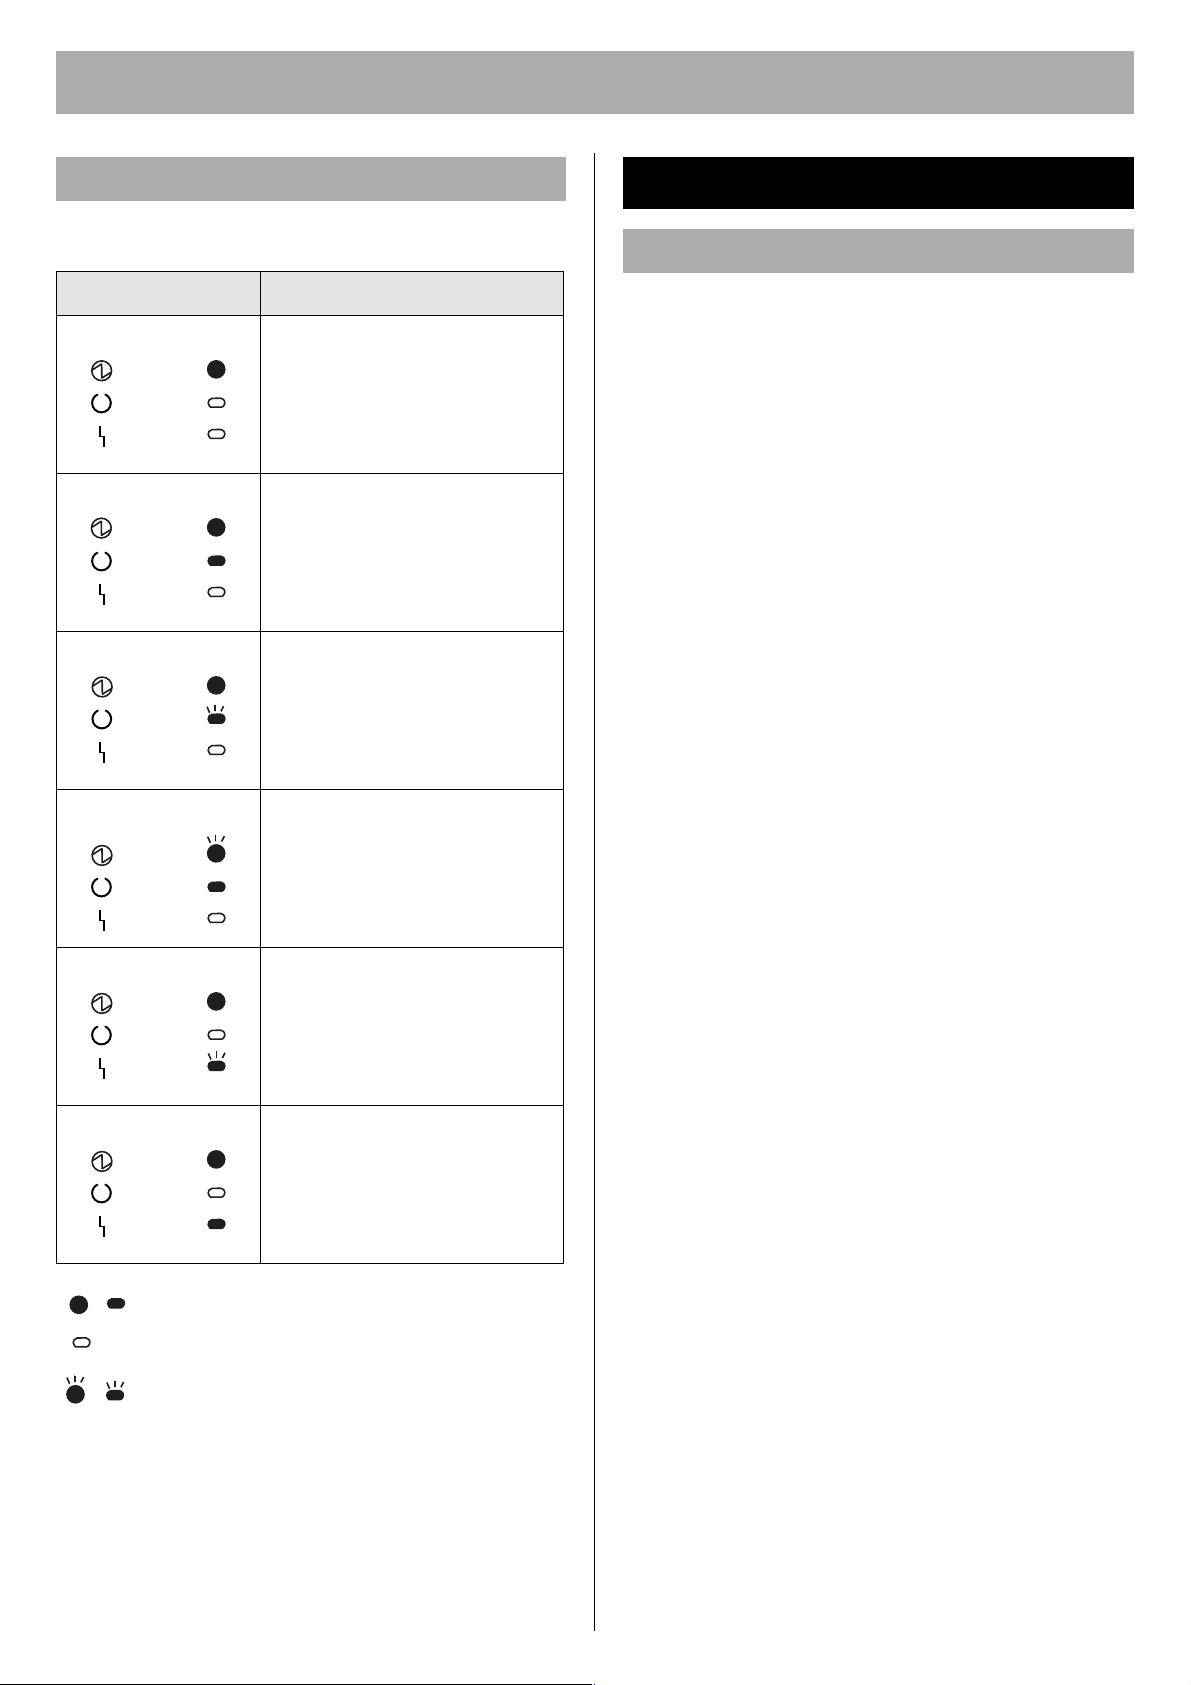
Indicators
Three indicators show the following printer's status.
Indicators Printer Status
• Printer is warming up.
POWER
READY
ERROR
• Printer is ready for printing.
POWER
READY
ERROR
• Printer is receiving data,
POWER
READY
ERROR
POWER
READY
ERROR
printing or data remains in the
memory.
• Printer is in the Menu mode.
• Printer is in the Power Save
mode.
System Requirements
PC
CPU:
Pentium 133 MHz or greater
Operating System:
Windows 95*1, Windows 98*2, Windows Me*3,
Windows NT 4.0*
Pack 6 is recommended.), Windows 2000*
Windows XP*
Mac OS 8.1, 8.5, 8.6, 9.0, 9.1,9.2
Mac OS X 10.1, 10.2
RAM:
32 MB or more
NOTE:
• If the system requirement of the operating system is
larger than 32 MB, follow it.
Free disk space:
100 MB or more
Drive:
CD-ROM drive
4
(Service Pack 3 or later - Service
6
5
,
• Printer recoverable errors
POWER
READY
ERROR
POWER
READY
ERROR
, Indicator is lit.
Indicator is turned off.
, Indicator is blinking.
(media jam, media empty,
etc.) has occurred.
• An internal error (Call for
Service Error) has occurred.
1
Microsoft Windows 95 operating system (hereafter
*
Windows 95)
2
*
Microsoft Windows 98 operating system (hereafter
Windows 98)
3
Microsoft Windows Millennium Edition operating
*
system (hereafter Windows Me)
4
*
Microsoft Windows NT operating system Version 4.0
(hereafter Windows NT 4.0)
5
*
Microsoft Windows 2000 operating system
(hereafter Windows 2000)
6
Microsoft Windows XP operating system (hereafter
*
Windows XP)
10
Page 11

Before You Start
Minimum Space Requirements
120 mm (4.8")
For toner door
110 mm (4.4")
130 mm (5.2")
For toner door
650 mm (25.6")
For media tray
NOTE:
• When you install a consumable component or replace it
with new one, additional space may be required.
350 mm (13.8")
For right side door
For power cord
Accessories
Make sure that all accessories shown below were
provided and have not been damaged. Report damage or
shortages to the reseller from which the units were
purchased. Page 32 includes an area for recording
important information such as the name of reseller, serial
number, and date of purchase.
NOTE:
• Save the original carton and packing materials for future
shipping and transporting of the unit. They have been
specifically designed to protect the equipment during
shipment.
Before You Start
Toner cartridges
(Cyan, Magenta, Yellow,
Black)
Printer includes free
starter toner cartridges
that yield 2,500 pages
(based on 5% page
coverage per color).
Color print cartridge
Black print cartridge
Waste toner cartridge
Power cord
Color calibration card
Keep this Color calibration
card for adjusting color
density (see page 30).
Printer CD-ROM
Setup Guide (this manual)
Supplies Re-order Label
(See “Setting the LCD
Language” on page 29.)
11
Page 12

Before You Start
Options and Supplies
Please contact the reseller from which the printer was
purchased when purchasing options or supplies.
Options
Model Number Description
KX-CLHD1 Hard Disk Drive (10 GB 2.5”)
KX-CLPF1 Optional Paper Feeder
KX-CLEM1 128MB DIMM (Optional Memory)
KX-CLAD1 Automatic Duplex Unit
KX-CLUG1 Upgrade Kit (for PostScript 3)
Cautions on Toner Use
CAUTION:
Avoid ingestion, inhalation, eye or skin contact.
If ingestion occurs, drink several glasses of water to
dilute stomach contents; if inhalation occurs, remove to
fresh air; if skin contact occurs, wash thoroughly with
soap and water; or if eye contact occurs, flush
thoroughly with water.
In all cases, seek medical treatment if adverse
symptoms occur.
When the toner cartridge is at the end of its life, do not
dispose in fire.
Keep the toner cartridge out of children's reach. Store
in a cool and dry place.
Supplies
Use of supplies other than genuine Panasonic supplies
can damage the printer. This will void the warranty of the
printer.
Model
Number
KX-CLTC1
KX-CLTC1B*
KX-CLTM1
KX-CLTM1B*
KX-CLTY1
KX-CLTY1B*
KX-CLTK1
KX-CLTK1B*
KX-CLPC1 Color print
KX-CLPK1 Black print
KX-CLFU1 Fuser Unit 100,000
KX-CLWT1 Waste Toner
KX-CLAU1 Accumulator
KX-CLTR1 Transfer Roller 100,000
Description Average life
Cyan Toner
2
Cartridge
Magenta Toner
2
Cartridge
Yel lo w Ton er
2
Cartridge
Black Toner
2
Cartridge
cartridge
cartridge
Cartridge
Unit
5,000
(5% coverage)
5,000
(5% coverage)
5,000
(5% coverage)
5,000
(5% coverage)
13,000
13,000
24,000
(Black and White 5% coverage)
6,000
(Full color 5% coverage)
83,000
(pages)*
1
BLACK TONER INGREDIENTS:
Carbon black (1333-86-4)
Silica (68909-20-6)
Charge control agent (31714-
55-3)
Polyester resin (2 kinds)
CYAN TONER
MAGENTA TONER
YELLOW TONER
For USA only
Distributed by Panasonic Digital Document Company
A Unit of Matsushita Electric Corporation of America
Secaucus, NJ 07094
INGREDIENTS:
Silica (68909-20-6)
Charge control agent (72869-
85-3)
Polyester resin (2 kinds)
Wax (1 kind)
1
*
The rated life expectancy of each consumable is based
on printing under specific operating conditions such as
page coverage for a particular page size (5% coverage
per color at 600 x 600 dpi resolution on letter size
paper). The actual consumables life will vary depending
on its use and other printing variables including page
coverage, page size, media type, print resolution,
continuous or intermittent printing, number of color
planes, ambient temperature and humidity.
2
*
For other countries except U.S.A.
12
Page 13

Setup
Setup
Setting up the Printer
Installing the Toner Cartridges
1 Open the toner door and remove the sealing tapes.
2 Open the plastic bags and take out the toner
cartridges. Shake the toner cartridges several times.
Installing the Print Cartridges
1 Open the right side door.
2 Unlock and open the print cartridge holder.
3 Insert the toner cartridges in the appropriately labeled
slots. From right to left, the order of the color toner
cartridges is BLACK (1), CYAN (2), MAGENTA (3),
YELLOW (4).
(4) (3) (2) (1)
3 Open the plastic bags and take out the print
cartridges.
4 Remove the upper seal covers.
Color print cartridge
NOTE:
To prevent damage to the print cartridges,
• Do not touch the green drum surface.
• Do not expose to light for more than 45 seconds.
• Do not expose to direct sunlight.
Black print cartridge
Setup
4 Close the toner door.
Green
drum
13
Page 14

Setup
2
5 Holding the color print cartridge with the protective
tray, match the arrow marks ( ) then insert the color
print cartridge halfway into the printer.
( )
( )
Protective tray
6 Firmly push the color print cartridge until it snaps into
place.
• Store the protective tray for repacking in future.
8 Install the waste toner cartridge (1) and slide the
green lever (2) to the left.
1
9 Close the print cartridge holder until it clicks and locks
it.
7 Repeat Step 4 - 6 for the black print cartridge.
Protective tray
( )
10 Close the right side door.
( )
14
Page 15

Setup
Connecting the Printer to a Computer
NOTE:
• If you do not have a (Bidirectional) parallel interface
cable or USB cable, you may need to purchase one.
(A) When using a parallel interface cable:
NOTE:
• Use a shielded cable 2.0 m (6.6 ft.) or less in length.
(B) When using the USB interface cable:
NOTE:
• Use a shielded cable 5.0 m (16.4 ft.) or less in length.
• Windows 98, Windows Me, Windows 2000,
Windows XP, Mac OS 8.6, 9.0, 9.1, 9.2 or Mac OS X
10.1, 10.2 is required for a USB connection.
(C) When using the network interface cable:
NOTE:
• Use category 5 shielded twisted pair cable with RJ-45
connectors.
• Do not connect other connectors than 100Base-TX /
10Base-T. Excessive current flow may cause damage of
the unit.
Loading Media in the Media Tray
Media Type Media Weight Media Size
Plain paper
Bond/Letterhead
Recycled paper
Thin paper 60 -75 g/m2
1 Pull the media tray (1) out of the printer while slightly
raising its front portion and remove the tray pad (2).
75 -105 g/m2
(20 -28 lb.)
(16 - 20 lb.)
2
Letter, Legal, A4,
B5 (JIS)
1
(C) Network
interface
1
2
Computer
3
(B) USB interface
(A) Parallel interface
Power cord
1 Connect the interface cable to the printer.
2 Connect the other end of the interface cable to the
computer.
3 Connect the power cord to the printer.
Setup
CAUTION:
• Be sure to hold the media tray with both hands so you
do not drop it.
NOTE:
• When the tray cover is opened or the multi-purpose tray
is used, you cannot pull the media tray out of the printer.
Be sure to push the multi-purpose tray and close the
tray cover before you pull the media tray out of the
printer or open the front door.
15
Page 16

Setup
11
2 Pinch the media guides and slide them to the width of
the media.
3 Slide the length guide unit to adjust it to the media
length. Slide the length guide unit (2) while pressing
the PUSH mark (1) to extend it.
2
5 Place media with the print side up under the hooks
in the tray.
Hook
Fill media up
to here.
Load media with
print side up.
NOTE:
• Coated Paper, Transparencies or Envelopes can be
loaded in the multi-purpose tray. See “About Media” of
“Setting and Printing” in the Operating Instructions.
• Most media has instructions recommending the side to
be printed first.
• Do not mix different types or thickness of media in the
media tray at one time; this may cause a jam.
• Loading media exceeding the designated sheets may
cause a media jam or shifting of print.
4 Tap the media stack on a level surface to avoid media
jams or skewed printing.
NOTE:
• Be careful not to leave fingerprints on the media, which
can result in a smudged print.
• Reusing media (used paper or jammed paper) that has
been fed through the printer once can reduce the life of
the consumables and paper path components.
6 Confirm the media guides are adjusted to the media
size.
7 Slide the media tray completely into the slot.
CAUTION
• Be sure to hold the media tray with both hands so that
you do not drop it. The media tray weighs approximately
6.4 kg (14 lbs.) when it is fully loaded.
8 Pull (1) and raise (2) the paper support so that the
media does not drop from the output tray.
Paper support
1
2
16
Page 17

Setup
Installing the KX-CL500/
KX-CL510 Software
(For Windows)
There are two methods of installing printer software for
Windows, Automated Printer Setup and Custom
Printer Setup. This Setup Guide only explains the
Automated Printer Setup. If you want to use the
Custom Printer Setup, refer to Network section of the
Operating Instructions.
Step 2: Setting up TCP/IP on the printer
You need to set the IP Address, Subnet Mask and Default
Gateway for the printer. It can be set by using one of the
following three methods.
• Using the DHCP server
• Using the Network Setup Tool
• Using the Printer Panel
If the administrator manages the network with DHCP
server, it will automatically assign an IP Address, Subnet
Mask and Default Gateway. These can be viewed by
printing out the configuration page (see below).
Printer Software Automated Printer Setup
KX-CL500 KX-CL510
PCL 5c Printer Driver
PS Printer Driver – !
LPR Port Monitor ! !
Status Display ! !
HDD Utility
(It is installed when a
hard disk drive option is
installed in the printer.)
Print Media Test
Pattern*
Operating Instructions
1
! !
! !
––
! !
!: It is automatically installed.
1
It can be installed using the Custom Printer Setup.
*
When using the Network Interface Cable:
The following are the steps to set up LPR Port printing
using TCP/IP.
For the instructions of another method, refer to “Network”
section in the Operating Instructions (see “Using the
Manuals” on page 27).
1 Turn the printer on (see “Power On” on page 29).
2 Press MENU/EXIT (PAUSE) button on the printer
panel.
3 Press (CONTINUE) button until Test Page menu
appears.
4 Press ENTER button.
Menu Map item menu appears.
5 Press (CONTINUE) button until Configuration
Page item menu appears.
6 Press ENTER button.
The configuration page will be printed.
7 Confirm the IP Address on the configuration page.
NOTE:
• If the printer receives the IP Address with unlimited
lease term, the printer keeps the address permanently.
The printer saves the address statically and the DHCP
function becomes disable automatically.
Setup
Step 1: Setting up TCP/IP on the computer
Step 2: Setting up TCP/IP on the printer
Step 3: Installing the printer driver and utilities
Step 1: Setting up TCP/IP on the computer
If the TCP/IP protocol is already installed on your
computer and it is configured, proceed to the next step. If
it is not installed, you need to install TCP/IP in the
operating system on the computer and configure it.
If the administrator manages the IP Address, contact him/
her to confirm the values before setting up. Be sure to
assign the unique value for the IP Address that is not
used on another device on the network. Regarding the
configuration of TCP/IP, refer to the help menu or
documentation for Windows.
Step 3: Installing the printer driver and
utilities
If you want to install the printer driver and utilities using
the network interface cable, be sure to connect the printer
with a network interface cable and to turn it on in advance.
Perform the following steps to complete the installation.
For Windows NT 4.0, Windows 2000, Windows XP
• Log in as an Administrator.
For Windows NT 4.0
• Confirm the LPR port is installed. (Refer to Network
section of the Operating Instructions.)
(1) Click Custom Printer Setup.
(2) Click Install Network Port.
(3) Insert the Windows NT 4.0 CD-ROM and install the
Microsoft TCP/IP Printing Service.
17
Page 18

Setup
1 Insert the printer CD-ROM disk into the CD-ROM
drive.
The CD-ROM launches automatically.
NOTE:
• If the CD-ROM does not launch automatically,
perform the following steps (1) - (2).
(1) Double click My computer icon.
(2) Double click the CD-ROM icon.
2 Click Automated Printer Setup.
3 If the Purchase Information window*
select the shop where you purchased the printer and
click [Next >].
• If you cannot find the shop where you purchased
the printer, select Other and click [Next >].
The License Agreement window is displayed.
1
*
Displayed depending on the country.
1
is displayed,
4 Click [Yes].
The Select Printer window is displayed.
5 Select the printer of the IP Address confirmed on the
Configuration Page at Step 2.
6 Click [Next >].
The Installed Device window is displayed.
When using the Parallel Interface Cable
When you install the printer driver and utilities using the
parallel interface cable, be sure to turn off the printer or
not to connect the printer with a parallel interface cable to
avoid the Plug and Play installation.
Perform the following steps to complete the installation,
then turn the printer on (see “Power On” on page 29).
1 Insert the printer CD-ROM disk into the CD-ROM
drive.
The CD-ROM launches automatically.
NOTE:
• If the CD-ROM does not launch automatically,
perform the following steps (1) - (2).
(1) Double click My computer icon.
(2) Double click the CD-ROM icon.
2 Click Automated Printer Setup.
3 If the Purchase Information
select the shop where you purchased the printer and
click [Next >].
• If you cannot find the shop where you purchased
the printer, select Other and click [Next >].
The License Agreement window is displayed.
window is displayed,
4 Click [Yes].
The Select Printer window is displayed.
NOTE:
• If you cannot find the printer on your network, the
Warning message will be displayed. Click [OK] to
continue.
5 Click on the Choose the current port myself (LPT /
USB) check button and click [Next>].
The Select Printer Port window is displayed.
NOTE:
• The installed devices are already detected and
checked.
7 Click [Next >].
This wizard starts installing the Printer Driver and
Utilities.
The InstallShield Wizard Complete window is
displayed.
8 Click [Finish].
The printer driver is installed after restarting
Windows. (For Windows NT 4.0, Windows 2000,
Windows XP, you must log on the computer as an
Administrator.)
18
6 Click on the LPT port (Ex. LPT1:) and click [Next >].
The Installed Device window is displayed.
7 Click on the check box of the installed options in your
printer, then Click [Next >].
The Setup program starts installing the Printer Driver
and Utilities.
The InstallShield Wizard Complete window is
displayed.
8 Click [Finish].
Page 19

Setup
NOTE:
For Windows XP
If
the Found New Hardware Wizard window is displayed
•
during restarting Windows after installing the printer
driver, perform the following instructions.
(1) Select Install the software automatically
[Recommended] in the Found New Hardware
Wizard window and click [Next >].
(2) Select Printer Driver and click [Next >].
(3) Click [Continue Anyway].
(4) Click [OK].
The Files Needed window is displayed.
(5) Click [Browse...] and select
PCL folder [D (CD-ROM drive letter):\WinXP \
ENGLISH \ PCL or
PS folder [D (CD-ROM drive letter):\WinXP \
ENGLISH \ PS].
(6) Follow the instructions on the screen.
When using the USB Interface Cable
(for Windows 98 / Windows Me / Windows
2000 / Windows XP):
6-A (For Windows 98)
(1) Click [Next>].
(2) Click on the Search for the best driver for your
device [Recommended] check button and click
[Next>].
When you connect the printer and the computer using a
USB interface cable, turn off the printer to avoid the Plug
and Play installation.
1 Start Windows.
2 Quit all applications.
3 Insert the printer CD-ROM disk into the CD-ROM
drive.
4 Exit the Panasonic Setup window to setup the USB
port first.
5 Turn the printer on (see “Power On” on page 29).
The Wizard window appears. Go to the following
step depending on the operating system.
- step 6-A for Windows 98.
- step 6-B for Windows Me.
- step 6-C for Windows 2000.
- step 6-D for Windows XP.
NOTE:
• When using the printer and other USB device
simultaneously, we cannot guarantee normal printing.
• For Windows 98 and Windows Me, restarting of the
computer may be required.
(3) Click on the Specify a location check box, then click
[Browse...].
(4) Select Win98 folder [D (CD-ROM drive
letter):\Usb\Win98], then click [OK].
(5) Click [Next>] until [Finish] window is displayed.
(6) Click [Finish].
(7) Click [Next>].
(8) Click on the Search for the best driver for your
device [Recommended] check button and click
[Next>].
(9) Click on the Specify a location check box, then click
[Browse...].
(10) Select Pcl folder [D (CD-ROM drive
letter):\Win9x\English\Pcl] or Ps folder [D (CD-ROM
drive letter):\Win9x\English\Ps], then click [OK].
(11) Click [Next>].
(12) Click [Next>].
(13) Follow the instructions on the screen.
(14) Proceed to step
7 on page 21.
Setup
19
Page 20

Setup
6-B (For Windows Me)
(1) Click on the Specify the location of the driver
(Advanced) check button and click [Next>].
(2) Click on the Search for the best drive for your
device(Recommended) check button and Specify a
location check box and click [Browse].
6-C (For Windows 2000)
(1) Click [Next>].
(2) Click on the Search for a suitable driver for my
device(recommended) check button and click
[Next>].
(3) Select WINME folder [D (CD-ROM drive
letter):\USB\WINME] and click [OK].
(4) Click [Next>] until [Finish] window is displayed.
(5) Click [Finish].
(6) Click on the Specify the location of the driver
(Advanced) check button and click [Next>].
(7) Click on the Search for the best drive for your
device(Recommended) check button and Specify a
location check box and click [Browse].
(8) Select PCL folder [D (CD-ROM drive
letter):\WINME\ENGLISH\PCL] or
PS folder [D (CD-ROM drive
letter):\WINME\ENGLISH\PS], then click [OK].
(9) Click [Next>].
(10) Click [Next>].
(11) Follow the instructions on the screen.
(12) Proceed to step
7 on page 21.
(3) Confirm the Specify a location is checked and click
[Next>].
(4) Click [Browse...] and select PCL folder [D (CD-ROM
drive letter):\Win2000\ENGLISH\PCL] or
PS folder [D (CD-ROM drive
letter):\Win2000\ENGLISH\PS]. Click [Open]. Click
[OK].
(5) Click [Next>].
(6) If the Digital Signature Not Found window is
displayed, click [Yes].
(7) Click [Finish].
(8) Proceed to step
7 on page 21.
20
Page 21

Setup
6-D (For Windows XP)
(1) Click on the Install from a list or specific location
(Advanced) check button and click [Next>].
(2) Click on the Search for the best driver in these
locations check button and Include this location in
the search check box and remove the check mark of
the Search removable media (floppy, CD-ROM...)
check box and click [Browse].
(3) Select PCL folder [D (CD-ROM drive
letter):\WinXP\ENGLISH\PCL] or PS folder [D (CD-
ROM drive letter):\WinXP\ENGLISH\PS]. Click [OK].
(4) Click [Next>].
(5) If the Hardware Installation window is displayed, click
[Continue Anyway].
(6) Click [Finish].
(7) Proceed to step
7 on page 21.
7 To install utilities software, double click My computer
icon, then double click the drive (example D:) for CDROM.
The Panasonic Setup window is displayed.
8 Click Automated Printer Setup.
9 If the Purchase Information window is displayed,
select the shop where you purchased the printer and
click [Next >].
• If you cannot find the shop where you purchased
the printer, select Other and click [Next >].
The License Agreement window is displayed.
10 Click [Yes].
The Select Printer window is displayed.
NOTE:
• If you cannot find the printer on your network, the
Warning message will be displayed. Click [OK] to
continue.
11 Click on the Choose the current port myself (LPT /
USB) check button and click [Next>].
The Select Printer Port window is displayed.
12 Click on the USB port (Ex. USB001) and click
[Next >].
The Installed Device window is displayed.
13 Click on check box of the installed options in your
printer, then click [Next >].
The Installer starts installing the Printer Driver and
Utilities by this condition.
Follow the instruction on the screen to complete the
installation.
The InstallShield Wizard Complete window is
displayed.
14 Click [Finish].
Setup
21
Page 22

Setup
Installing Applications
Application KX-CL500 KX-CL510
Adobe Acrobat Reader
1
5.0*
Remote Maintenance
Setting Tool
Web Administrative Tool*
Adobe Type Manager 4.1 – !
!: It can be installed.
1
File name of Acrobat Reader may differ depending on
*
the version.
2
*
Only available in Windows NT 4.0, Windows 2000 or
Windows XP Professional.
To install the desired application:
1 Insert the printer CD-ROM disk into the CD-ROM
drive.
The CD-ROM launches automatically.
2 Click the Install Applications.
! !
! !
2
! !
Installing the KX-CL510 Software (For Macintosh)
Install the KX-CL510 Software following the steps below.
1. Installing the PPD file (and Printer Driver)
(see below)
2. Setting the Computer (and Printer)
(see page 23)
3. Installing the Additional Software
(For Mac OS 8.1 - Mac OS 9.2)
(see page 27)
Installing the PPD File (and Printer Driver)
For Mac OS 8.1 - Mac OS 9.2
Step 1: Installing the KX-CL510 PPD file and
utilities
Install the KX-CL510 PPD (PostScript Printer Description)
file, and then install the Adobe PostScript printer driver.
1 Insert the KX-CL510 CD-ROM disk in your CD-ROM
drive, and then double-click the KX-CL510 icon, the
Mac OS folder and the English folder.
3 Click the desired applications above.
4 Follow the instructions on the screen to complete the
installation.
NOTE:
• Web Administrative Tool enables the ability to manage
the device connected to the network. For the installation
and usage, see Readme as follows.
(1) Double click the Readme.txt in the printer
CD-ROM disk [D (CD-ROM drive letter):
\Network\WebTool\English\Readme.txt].
(2) See the System requirements. (To install the Web
Administrative Tool, Web server is required. Refer
to the help menu of Windows to install the Web
server.)
• When using Adobe Type Manager, install it by following
“To install the desired application:” (select “Adobe Type
Manager 4.1” at step 3).
This application does not include fonts. If you use ATM
fonts, double click the PS3FONT.EXE in the printer CD-
ROM disk to extract the ATM fonts. PS3FONT.EXE is in
the Fonts folder [D (CD-ROM drive letter):\ ATM \
Fonts].
2 Double-click the KX-CL510 Installer icon.
The END-USER LICENSE AGREEMENT window is
displayed.
3 Click [Continue].
The KX-CL510 Installer window is displayed.
4 Click Easy Install and select Custom Install.
5 If you find the shop where you purchased the printer,
click on its check box.
Or
If you cannot find the shop where you purchased the
printer, select Easy Install from the Installation type.
6 Change the Install Location if you need to, then click
[Install].
The installation starts.
The “Installation was successful” window will be
displayed after finishing installation.
7 Follow the instruction on the screen to complete the
installation.
22
Page 23

Setup
NOTE:
• The Easy Install installs the KX-CL510 printer
description file, USB printer class driver, ColorSync
profile and Status Display.
If you want to install the additional software “KX-Printer
Network Setup Tool”, select Custom Install to complete
the installation.
• The Status Display folder is created in the (Macintosh
HD:Panasonic:KX-CL510) folder after finishing
installation successfully.
If you install the “KX-Printer Network Setup Tool” using
the Custom Install, its folder is also created in the same
folder.
Step 2: Installing the Adobe PostScript
printer driver
1 Insert the KX-CL510 CD-ROM disk in your CD-ROM
drive, and then double-click the KX-CL510 icon, the
Mac OS folder and the English folder.
2 Double-click the AdobePS Installer icon in
accordance with the Macintosh OS version.
- AdobePS 8.7.2 Installer: Mac OS 8.6 / 9.0 / 9.1 / 9.2
- AdobePS 8.6 Installer: Mac OS 8.1 / 8.5
The Adobe PostScript Driver window is displayed.
For Mac OS X 10.1 - Mac OS X 10.2
Step 1: Installing the KX-CL510 PPD
(PostScript Printer Description) file
and ColorSync profile
1 Insert the KX-CL510 CD-ROM disk in your CD-ROM
drive, and then double-click the KX-CL510 icon,
Mac OS X, English folder.
2 Double click the KX-CL510Install icon.
3 Follow the instructions to complete the installation.
NOTE:
• If you want to print Classic application documents, you
are required to install the KX-CL510 software for Mac
OS 9.2, then set the computer and printer. Refer to “For
Mac OS 8.1-Mac OS 9.2” in this section.
Setting the Computer (and Printer)
Set the computer (and printer) depending on the interface:
network (see below) or USB (see page 25).
3 Click [Continue...].
The License window is displayed.
4 Click [Accept] to proceed this installation.
The AdobePS Installer window is displayed.
5 Click [Install].
The installation starts.
The “Installation was successful” will be displayed
after finishing installation.
6 Follow the instruction on the screen to complete the
installation.
NOTE:
• For best results any job sent to the printer should be
sent using the Adobe driver and the KX-CL510 PPD.
Provide the installer to all users who send jobs.
■ When using the Network Interface Cable
The following are the steps to set up network printing
using AppleTalk and TCP/IP.
Step 1: Setting up AppleTalk and TCP/IP on the computer
Step 2: Setting up TCP/IP on the printer
Step 3: Setting the PostScript printer driver
Step 1: Setting up AppleTalk and TCP/IP on
the computer
If the AppleTalk and TCP/IP of your computer are already
set, proceed to the next step. If they are not set, consult
with your network administrator. Regarding the
configuration of TCP/IP, refer to the help menu or
documentation for Macintosh.
NOTE:
• Refer to “Network” section in the Operating Instructions
about setting the AppleTalk and TCP/IP to your
Macintosh.
Setup
23
Page 24

Setup
Step 2: Setting up TCP/IP on the printer
You need to set the IP Address, Subnet Mask and Default
Gateway for the printer. It can be set by using one of the
following three methods.
• Using the DHCP server
• Using the KX-Printer Network Setup Tool
• Using the Printer Panel
If the administrator manages the network with DHCP
server, it will automatically assign an IP Address, Subnet
Mask and Default Gateway. These can be viewed by
printing out the configuration page (see below).
For the instructions of another method, refer to “Network”
section in the Operating Instructions (see “Using the
Manuals” on page 27).
1 Turn the printer on (see “Power On” on page 29).
2 Press MENU/EXIT (PAUSE) button on the printer
panel.
3 Press (CONTINUE) button until Tes t Pa ge menu
appears.
4 Press ENTER button.
Menu Map item menu appears.
5 Press (CONTINUE) button until Configuration
Page item menu appears.
Step 3: Setting the PostScript printer driver
For Mac OS 8.1 - Mac OS 9.2
If you want to select the KX-CL510 in Chooser, be sure
the printer is connected to the network and turn it on in
advance. Perform the following steps to select the KXCL510 printer.
1 Select Chooser from the Apple menu.
2 Confirm AppleTalk is active.
3 Click the AdobePS printer icon in the Chooser.
4 Select the correct AppleTalk zone if necessary.
5 Select the AppleTalk name KX-CL510-XXXXXX from
the “Select a PostScript Printer:” scroll list.
XXXXXX indicates the last 3 byte of MAC address of
the printer network interface. You can obtain the
number (hexadecimal six digits) from the label near
the network interface connector or by printing a
configuration page.
If an icon is not appeared on the left of the printer
name you selected, follow the instructions below.
(1) Click [Create].
(2) Confirm that an icon appears to the left of the
printer name.
The KX-CL510 desktop printer icon is created on
your desktop screen.
6 Press ENTER button.
The configuration page will be printed.
7 Confirm the IP Address and MAC Address on the
configuration page.
6 Close the Chooser.
24
Page 25

Setup
For Mac OS X 10.1 - Mac OS X 10.2
Before you can use a printer, you must add it in the Print
Center. If you want to select the KX-CL510 in the Print
Center, be sure the printer is connected to the network
and turned it on in advance (see “Power On” on page 29).
KX-CL510 appears in the Print Center by choosing
AppleTalk as the connection type. Perform the following
steps to select the KX-CL510 printer.
NOTE:
• Log on the computer as an Administrator.
• The Print Center is in the Utilities folder (Macintosh HD:
Applications:Utilities).
1 Open the Print Center.
2 Select Add Printer... from the Printers menu.
3 Choose AppleTalk as the connection type, and click
KX-CL510-XXXXXX.
KX-CL510-XXXXXX is displayed in the Printer List.
XXXXXX indicates the last 3 byte of MAC address of
the printer network interface. You can obtain the
number (hexadecimal six digits) from the label near
the network interface connector or by printing a
configuration page.
4 Confirm the Printer Model is set to Auto Select... and
click Add.
5 Close the Print Center.
■ When using the USB Interface Cable
For Mac OS 8.6 - Mac OS 9.2
Step 1: Setting the PostScript printer driver
When you connect the printer and your Macintosh using a
USB interface cable and turn the printer on (see “Power
On” on page 29), KX-CL510 appears in the “Select a USB
Printer:” list of the Desktop Printer Utility.
1 Start the Desktop Printer Utility.
(Macintosh HD:AdobePS Components:Desktop
Printer Utility)
The New Desktop Printer window is displayed.
2 Select AdobePS from the With menu.
3 Select Printer (USB) from the Create Desktop list,
and click [OK].
The Untitled 1 window is displayed.
4 Click [Change...] button in the USB Printer
Selection group.
The USB Printer window is displayed.
5 Select KX-CL510 from the “Select a USB Printer:”
list, then click [OK].
6 Click [Auto Setup].
The “Panasonic KX-CL510.PPD” is displayed in the
“PostScript
™ Printer Description (PPD) File”.
Setup
7 Click [Create...].
The confirmation window is displayed.
8 Click [Save].
9 Be sure to edit “KX-CL510USB” in the “Save desktop
printer as:”, then click [Save].
The KX-CL510USB desktop printer icon is created on
your desktop screen.
Step 2: Setting the KX-CL510 to the Default
Printer:
1 Click the KX-CL510USB desktop printer icon.
2 Click Printing menu and select Set Default Printer.
25
Page 26

Setup
For Mac OS X 10.1
Step 1: Setting the PostScript printer driver
Before you can use a printer, you must add it in the Print
Center. If you want to select the KX-CL510 in the Print
Center, be sure you connect the printer and your
Macintosh using a USB interface cable and turn the
printer on (see “Power On” on page 29). KX-CL510
appears in the Print Center by choosing USB as the
connection type. Perform the following steps to select the
KX-CL510 printer.
NOTE:
• The Print Center is in the Utilities folder (Macintosh HD:
Applications:Utilities).
1 Open the Print Center and choose Add Printer...
from the Printers menu.
2 Choose USB as the connection type, and click
KX-CL510.
For Mac OS X 10.2
Step 1: Setting the PostScript printer driver
The printer is automatically added in the Print Center if the
printer is connected to a computer and turned on (see
“Power On” on page 29). Change the printer’s PPD file
from Generic to the specific one as follows.
NOTE:
• The Print Center is in the Utilities folder (Macintosh HD:
Applications:Utilities).
1 Open the Print Center and click KX-CL510.
2 Select Show Info from the Printers menu.
3 Click Name & Location and select PPD or Printer
Model.
4 Click Generic PostScript Printer and select
Panasonic.
3 Confirm the Printer Model is set to Auto Select... and
click Add.
4 Close the Print Center.
Step 2: Setting the KX-CL510 to the Default
Printer
1 Open the Print Center and click KX-CL510.
2 Select Make Default from the Printers menu.
3 Close the Print Center.
NOTE:
• When you add a printer in the Print Center, the new
printer becomes the default printer.
5 Click Panasonic KX-CL510 from the Model Name
list, and click [Apply Changes].
6 Close the Print Center.
Step 2: Setting the KX-CL510 to the Default
Printer
1 Open the Print Center and click KX-CL510.
2 Select Make Default from the Printers menu.
3 Close the Print Center.
NOTE:
• When you add a printer in the Print Center, the new
printer becomes the default printer.
• Selection menus may be changed depending on the
version of the operating system.
26
Page 27

Setup
Installing the Additional Software
(For Mac OS 8.1 - Mac OS 9.2)
Additional software, including Adobe Type Manager, and
PostScript screen fonts are included on the KX-CL510
CD-ROM. Copy fonts files from PS3 Fonts folder on the
KX-CL510 CD-ROM to the System Folder of your
Macintosh hard drive. Note that font files need to be
moved to specific locations (Fonts folder of the System
Folder); others can be moved to a folder of your choice.
Adobe Type Manager
Adobe Type Manager (ATM) is included on the KX-CL510
CD-ROM. Adobe Type Manager (hereafter ATM) can be
installed by using the installer in the ATM folder. This
application can be used to transfer Type 1 fonts to the
printer's memory or hard disk drive, or to manage fonts on
the printer.
Manual downloading of fonts not already provided on the
printer eliminates the need for automatic downloading of
fonts used by a document, which speeds printing. You can
also:
• Improve the screen display of PostScript fonts
Using the Manuals
To read the Operating Instructions, Acrobat Reader must
be installed in your computer.
For Windows
■ Installing the Acrobat Reader
To install the Acrobat Reader, see “Installing Applications”
on page 22.
■ Reading the Operating Instructions using
the printer CD-ROM
1 Insert the printer CD-ROM disk into the CD-ROM
drive.
The CD-ROM launches automatically.
2 Click O/I Manual.
PostScript and TrueType fonts
In addition to PostScript Type 1 fonts, TrueType fonts are
included in the PS3 Fonts folder on the KX-CL510 CDROM.
ATM cannot be used to install TrueType fonts. These fonts
can, however, be installed by dragging a copy of each
from the PS3 Fonts folder on the KX-CL510 CD-ROM to
your System folder.
■ Reading the Operating Instructions from
the Start menu
1 Click Start, move the pointer to Programs,
Panasonic, Panasonic KX-CL500 or Panasonic
KX-CL510, and Manual.
2 Click Operating Instructions.
Setup
27
Page 28

Setup
For Macintosh
The following files are included on the KX-CL510 CDROM:
Setup.pdf Setup Guide
Contents.pdf
Print.pdf
Mainte.pdf
Network.pdf
Reader Installer Acrobat Reader Installer
To open and read a manual on your computer screen,
install Acrobat Reader for Macintosh in your computer.
■ Installing the Acrobat Reader:
Operating Instructions
1 Insert the KX-CL510 CD-ROM disk in your CD-ROM
drive, and then double-click the KX-CL510 icon.
2 Open the Manual folder, then the English folder.
Removing the KX-CL500/ KX-CL510 Software
If you need to remove the KX-CL500/KX-CL510 software,
perform the following steps.
For Windows
1 Click [Start], move the pointer to Programs,
Panasonic, and Panasonic KX-CL500 or
Panasonic KX-CL510.
2 Click Uninstall Driver and Utilities.
3 Select Remove check button and click [Next>].
4 Follow the instructions on the screen.
5 After uninstalling, restart your computer.
For Macintosh
3 Double-click the Reader Installer icon.
4 Follow the instructions on the screen to install the
Acrobat Reader program.
■ Opening a Manual's File:
1 Perform step 1 to 2 of “Installing the Acrobat Reader”.
2 Double-click a manual's file name (Setup.pdf or
Contents.pdf) that you want to read.
The first page of the manual will be displayed on your
computer screen.
Refer to the Help of the Acrobat Reader for details on its
operation.
For Mac OS 8.1 - Mac OS 9.2
1 Open the KX-CL510 Installer Log File.
(Macintosh HD: KX-CL510 Installer Log File)
2 After confirming each location of installed files,
remove them manually.
3 Remove the KX-CL510 desktop printer icon.
NOTE:
• If you are not familiar with the Macintosh computer, you
only have to remove the KX-CL510 folder. (Macintosh
HD:Panasonic:KX-CL510)
For Mac OS X 10.1 - Mac OS X 10.2
1 Remove the ColorSync profile CL510PS.icc.
(Macintosh HD:Library:ColorSync:Profiles:
CL510PS.icc)
2 Remove the PostScript Printer Description file
Panasonic KX-CL510.PPD.
(Macintosh HD:Library:Printers:PPDs:Contents:
Resources:en.lproj:Panasonic KX-CL510.PPD)
28
3 Click the printer (KX-CL510 or KX-CL510-XXXXXX)
to be removed in the printer list of the Print Center,
and then click Delete (Delete Printer) from the
Printers menu.
NOTE:
• If the KX-CL510 software for Mac OS 9.2 is installed,
remove it (refer to “For Mac OS 8.1 - Mac OS 9.2”).
Page 29

Setup
Power On Setting the LCD Language
Turn the printer on, then the computer.
The READY indicator on the printer starts blinking.
After approximately 30 seconds [Standard Memory
without the printer’s hard disk drive at 20°C (68°F) /
65%RH / 120V], “Ready” is displayed on the printer LCD
panel.
NOTE:
• If the Self Calibration is done, it will take much time.
• When the printer enters the Power Save mode, the
POWER indicator will start blinking and “Power Save”
will be displayed on the printer LCD panel.
• When you turn on the printer for the first time, it will take
about 5 minutes to fill the printer with toner. When the
process is completed, the printer's LCD will display
“Ready”.
• Select English, German, French, Spanish or Italian as
the language which is to appear on the LCD panel.
• English is the default language.
1 Press MENU/EXIT (PAUSE) button to enter the
Menu mode.
2 Press (CONTINUE) or (CANCEL) button until
the Other menu appears.
3 Press ENTER button.
Language item menu appears.
4 Press ENTER button.
English selection menu appears.
5 Press (CONTINUE) or (CANCEL) button until
the desired language is displayed.
6 Press ENTER button to activate your selection.
NOTE:
• Adhere the enclosed “Supplies Re-order Label” near the
printer’s LCD panel to assist you in interpreting the
supplies related messages that may appear on the
printer’s LCD display.
Printing a Test Page from the Printer Panel
It is possible to confirm the printer's settings by printing a
configuration page.
Setup
1 Press MENU/EXIT (PAUSE) button to enter the
Menu mode.
2 Press (CONTINUE) button until Test Page menu
appears.
3 Press ENTER button.
Menu Map item menu appears.
4 Press (CONTINUE) button until Configuration
Page item menu appears.
5 Press ENTER button.
The printer will start printing a configuration page.
29
Page 30

Setup
Adjusting the Color Density (Color Calibration)
The printer panel provides an interface to adjust the
density of the toner applied to the media.
This feature compensates for the changes that can occur
as environmental conditions change, replacement of
accumulator unit and/or print cartridge.
Perform the following steps to adjust the color density:
1. Print a Color Calibration Test Print Page to confirm the
current density (Color Calibration) and compare it with
the provided Color Calibration Card.
2. If you wish to adjust the density for all colors
simultaneously, proceed to “Adjusting the Density
for All Colors Simultaneously”.
OR
If you wish to adjust the density for each color
independently, proceed to “Adjusting the Density for
Each Color Independently”.
Color Calibration Test Print Page (Example):
Current
CMY
Composite
1
Gray*
color
density
settings
Printing a Color Calibration Test Print
Page
1 Press MENU/EXIT (PAUSE) button on the printer
panel.
2 Press (CONTINUE) button until Color Calibration
menu is displayed.
3 Press ENTER button.
Calibration Offset item menu appears.
4 Press (CONTINUE) button until Calib. Test Prn.
menu is displayed.
5 Press ENTER button.
A Color Calibration Test Print Page will be printed.
• The current density setting for each color is
indicated by the line enclosure on the Color
Calibration Test Print Page as shown in the
following example.
*1
CMY Composite Gray is the color mixed CYAN,
MAGENTA and YELLOW. If the color calibration is
proper, the CMY Composite Gray is near gray.
6 Compare the current color density settings on the
Color Calibration Test Print Page with the color
density samples on the Color Calibration Card to see
if they match.
• Place the Color Calibration Test Print Page on at
least 2 sheets of clean white paper in a well-lighted
area.
Color Calibration
Card
Color Calibration
Test Print Page
• If they match and CMY Composite Gray is proper,
then you do not need to adjust the color density and
you may proceed with any operation you wish to
perform.
• If they do not match, go to the next step.
Clean
white
paper
30
7 Determine which block on the Color Calibration Test
Print Page most closely matches the density of the
cyan sample on the Color Calibration Card.
• Repeat this step for each color.
8 Proceed to “Adjusting the Density for All Colors
Simultaneously” or “Adjusting the Density for
Each Color Independently”.
Page 31

Setup
Adjusting the Density for All Colors
Simultaneously
1 Press MENU/EXIT (PAUSE) button on the printer
panel.
2 Press (CONTINUE) button until Color Calibration
menu is displayed.
3 Press ENTER button.
Calibration Offset item menu appears.
4 Press ENTER button.
0* (-5 to 5) selection menu appears.
5 Press (CONTINUE) or (CANCEL) button to
darken/lighten for all the colors to match with the
colors of the Color Calibration Card.
To make the color density setting of the Color
Calibration Test Print Page darker or lighter by 1
level, increase or decrease a value of the Calibration
Offset by 1 by pressing (CONTINUE) or
(CANCEL) button.
For example, when Calibration Offset is 0:
• If you wish to make the density setting darker by 1
level: Select 1 by pressing (CONTINUE) button
once.
• If you wish to make the density setting lighter by 1
level: Select -1 by pressing (CANCEL) button
once.
6 Press ENTER button.
CYAN item menu appears.
Adjusting the Density for Each Color
Independently
1 Press MENU/EXIT (PAUSE) button on the printer
panel.
2 Press (CONTINUE) button until Color Calibration
menu is displayed.
3 Press ENTER button.
Calibration Offset item menu appears.
4 Press (CONTINUE) button.
CYAN item menu appears.
5 Press ENTER button.
0* (-5 to 5) selection menu appears.
6 Press (CONTINUE) or (CANCEL) button to
darken/lighten the cyan color to match with the cyan
color of the Color Calibration Card.
To make the color density setting of the Color
Calibration Test Page darker or lighter by 1 level,
increase or decrease a value of the CYAN density by
1 by pressing (CONTINUE) or (CANCEL)
button.
For example, when the CYAN density is 0:
• If you wish to make the density setting darker by 1
level: Select 1 by pressing (CONTINUE) button
once.
• If you wish to make the density setting lighter by 1
level: Select -1 by pressing (CANCEL) button
once.
Setup
7 Press (CONTINUE) or (CANCEL) button until
Calib. Test Prn. menu is displayed.
8 Press ENTER button to reprint the Color Calibration
Test Print Page.
• The line enclosure and Gray Balance reflects the
changes made to the settings.
• If you are not satisfied with the current color density
settings, repeat the above steps.
7 Press ENTER button.
8 Repeat steps 5 through 7 for each color (MAGENTA,
YELLOW, BLACK).
• To skip a color, press (CONTINUE) button.
• To return to a previous color, press
(CANCEL) button.
• Before going to step 9, make sure Calib. Test Prn.
item menu is displayed.
9 Press ENTER button to reprint the Color Calibration
Test Print Page.
• The line enclosure and Gray Balance reflects the
changes made to the settings.
• If you are not satisfied with the current color density
settings, repeat the above steps.
NOTE:
• Changes made using Color Calibration are retained
until the color density is adjusted next time.
• The color density setting affects the average life of
toner.
31
Page 32

Troubleshooting
For the detailed information, refer to the “Maintenance
and Specifications” section of the Operating Instructions.
FOR USERS IN UNITED STATES
Technical Support Calls
If you have read this manual and tried the troubleshooting
procedures and you are still having difficulty, please
contact the reseller from which the unit was purchased.
You may also call the end user technical support
telephone number which is operational during East Coast
business hours (9:00 AM to 5:00 PM).
The end user technical support number is 1-800PANASYS.
This number is available within the U.S. only.
The serial number is located on the label on the
rear of the unit. For your convenience, record the
number below and keep this book along with
your proof of purchase, in the event of a theft or
for future reference.
MODEL NO.
NAME OF RESELLER
SERIAL NO.
DATE OF PURCHASE
Panasonic Digital Document Company
A Unit of Matsushita Electric Corporation of America
Two Panasonic Way, Secaucus, New Jersey 07094
Panasonic Sales Company (PSC)
Division of Matsushita Electric of Puerto Rico, Inc.
Ave. 65 de Infateria, Km. 9.5, San Gabriel Industrial Park Carolina, Puerto Rico 00985
Panasonic Canada Inc.
5770 Ambler Drive, Mississauga, Ontario, L4W 2T3
Web Site : http://www.panasonic.ca/
Matsushita Electric Industrial Co., Ltd.
Web Site : http://www.panasonic.co.jp/global/
World Wide Web Support : http://panasonic.co.jp/pcc/products/en/printer/
Printed in Japan PJQQB0022ZA K0403M0
 Loading...