

Page 1

Basic Operating Instructions
Dual Camera
Model No. HX-WA2
Before use, please read these instructions completely.
More detailed instructions on the
operation of this unit are contained in
“Operating Instructions (PDF format)” in
the supplied CD-ROM. Install it on your
PC to read it.
VQT4F16
1AG6P1P6489--(S)
Page 2

Information for Your Safety
WARNING:
To reduce the risk of fire, electric shock or product damage,
≥ Do not let water or other liquids drip or splash inside the unit.
≥ Do not expose accessories (battery pack, AC adaptor, SD memory
card and etc.) to rain, moisture, dripping or splashing.
≥ Do not place objects filled with liquids, such as vases, on
accessories.
≥ Use only the recommended accessories.
≥ Do not remove covers.
≥ Do not repair this unit by yourself. Refer servicing to qualified
service personnel.
CAUTION!
To reduce the risk of fire, electric shock or product damage,
≥ Do not install or place this unit in a bookcase, built-in cabinet or in
another confined space. Ensure this unit is well ventilated.
≥ Do not obstruct this unit’s ventilation openings with newspapers,
tablecloths, curtains, and similar items.
≥ Do not place sources of naked flames, such as lighted candles, on
this unit.
The socket outlet shall be installed near the equipment and shall be
easily accessible.
2 VQT4F16
Page 3
∫ Concerning the battery
Warning
Risk of fire, explosion and burns. Do not disassemble, heat above
60 oC or incinerate.
CAUTION
≥ Danger of explosion if battery is incorrectly replaced. Replace only
with the type recommended by the manufacturer.
≥ When disposing the batteries, please contact your local authorities
or dealer and ask for the correct method of disposal.
For EG only
∫ EMC Electric and magnetic compatibility
This symbol (CE) is located on the rating plate.
Use only the recommended accessories.
≥ Always use a genuine Panasonic HDMI micro cable (RP-CHEU15:
optional).
∫ Product identification marking
Product Location
Dual Camera Inner side of LCD monitor
VQT4F16 3
Page 4
-If you see this symbol-
Cd
∫ Information for Users on Collection and Disposal
of Old Equipment and used Batteries
These symbols on the products, packaging, and/or
accompanying documents mean that used
electrical and electronic products and batteries
should not be mixed with general household waste.
For proper treatment, recovery and recycling of old
products and used batteries, please take them to
applicable collection points, in accordance with
your national legislation and the Directives 2002/
96/EC and 2006/66/EC.
correctly, you will help to save valuable resources and prevent any
potential negative effects on human health and the environment
which could otherwise arise from inappropriate waste handling.
For more information about collection and recycling of old products
and batteries, please contact your local municipality, your waste
disposal service or the point of sale where you purchased the items.
Penalties may be applicable for incorrect disposal of this waste, in
accordance with national legislation.
outside the European Union]
These symbols are only valid in the European Union. If you wish
to discard these items, please contact your local authorities or
dealer and ask for the correct method of disposal.
By disposing of these products and batteries
For business users in the European Union
If you wish to discard electrical and electronic
equipment, please contact your dealer or supplier
for further information.
[Information on Disposal in other Countries
Note for the battery symbol (bottom two
symbol examples):
This symbol might be used in combination with a
chemical symbol. In this case it complies with the
requirement set by the Directive for the chemical
involved.
4 VQT4F16
Page 5

∫ Cautions for use
For Australia and New Zealand
In the event of abnormal operation (e.g. if the unit emits smoke or an
unusual smell), immediately stop operating the unit and consult the
Panasonic Customer Care Centre on 132600.
Keep this unit as far away as possible from electromagnetic
equipment (such as microwave ovens, TVs, video games etc.).
≥ If you use this unit on top of or near a TV, the pictures and/or sound on
this unit may be disrupted by electromagnetic wave radiation.
≥ Do not use this unit near cell phones because doing so may result in
noise adversely affecting the pictures and/or sound.
≥ Recorded data may be damaged, or pictures may be distorted, by
strong magnetic fields created by speakers or large motors.
≥ Electromagnetic wave radiation generated by microprocessors may
adversely affect this unit, disturbing the pictures and/or sound.
≥ If this unit is adversely affected by electromagnetic equipment and
stops functioning properly, turn this unit off and remove the battery or
disconnect AC adaptor. Then reinsert the battery or reconnect AC
adaptor and turn this unit on.
Do not use this unit near radio transmitters or high-voltage lines.
≥ If you record near radio transmitters or high-voltage lines, the recorded
pictures and/or sound may be adversely affected.
About connecting to a PC
≥ Do not use any other USB cables except the supplied one.
∫ About recording formats and compatibility of the unit
≥ The unit is an MP4 format (MPEG-4 AVC file standard) Dual Camera
for recording high-definition motion pictures.
≥ AVCHD and MPEG2 motion pictures are different formats, and are not
therefore supported by the unit.
VQT4F16 5
Page 6

∫ Indemnity about recorded content
Panasonic does not accept any responsibility for damages directly or
indirectly due to any type of problems that result in loss of recording or
edited content, and does not guarantee any content if recording or editing
does not work properly. Likewise, the above also applies in a case where
any type of repair is made to the unit (including any other non-built-in
memory related component).
∫ Cards that you can use with this unit
SD Memory Card, SDHC Memory Card and SDXC Memory Card
≥ 4 GB or more Memory Cards that do not have the SDHC logo or 48 GB
or more Memory Cards that do not have the SDXC logo are not based
on SD Memory Card Specifications.
≥ Refer to page 26 for more details on SD cards.
∫ For the purposes of these operating instructions
≥ SD Memory Card, SDHC Memory Card and SDXC Memory Card are
referred to as the “SD card”.
≥ Functions that can be used for motion picture recording/motion picture
playback are indicated by in these operating instructions.
≥ Functions that can be used for still picture recording/still picture
playback are indicated by in these operating instructions.
≥ Functions that can be used for audio recording/audio playback are
indicated by in these operating instructions.
≥ Pages for reference are indicated by an arrow, for example: l 00
≥ “File” is used to mean “scene”, “still picture” and “audio file”.
6 VQT4F16
Page 7

Contents
Information for Your Safety............................................................... 2
Preparation
(Important)
About the Waterproof Performance of this unit.............................. 9
Check before using underwater .................................................. 11
Using this unit underwater........................................................... 14
Caring of this unit after using it underwater................................. 14
Accessories...................................................................................... 18
Optional accessories................................................................... 19
Power supply.................................................................................... 20
Inserting/removing the battery..................................................... 20
Charging the battery ................................................................... 23
Charging and recording time....................................................... 25
Recording to a card ......................................................................... 26
Cards that you can use with this unit .......................................... 26
Inserting/removing an SD card.................................................... 28
Turning the unit on/off ..................................................................... 31
Selecting a mode ............................................................................. 31
Setting date and time....................................................................... 32
VQT4F16 7
Page 8

Basic
Recording motion pictures ............................................................. 34
Recording still pictures ................................................................... 35
Recording audio............................................................................... 36
Intelligent Auto Mode ...................................................................... 36
Motion picture/Still picture/Audio playback .................................. 37
Watching Video/Pictures on your TV........................................... 39
Using the menu screen ................................................................... 40
Language selection ..................................................................... 41
Formatting ........................................................................................ 42
Using the zoom ................................................................................ 42
Double range zoom..................................................................... 43
Recording underwater ..................................................................... 44
Record with colour balance and audio that are suitable for
recording underwater.................................................................. 44
Others
Specifications................................................................................... 45
About copyright ............................................................................... 49
Reading the Operating Instructions (PDF format) ........................ 50
8 VQT4F16
Page 9

Preparation
(Important)
About the Waterproof
Performance of this unit
Waterproof Performance
This unit’s waterproof rating complies with the “IPX8” rating.
Provided the care and maintenance guidelines described in
this document are strictly followed, this unit can operate
underwater, to a depth not exceeding 3 m for a time not
exceeding 60 minutes. *
This does not guarantee no destruction, no malfunction, or
waterproofing in all conditions.
* This means that this unit can be used underwater for specified time in
specified pressure in accordance with the handling method established
by Panasonic.
∫ Handling of this unit
≥ Waterproofing is not guaranteed if the unit is subject to an impact as a
result of being hit or dropped etc. If an impact to this unit occurs, it
should be inspected (subject to a fee) by a Panasonic’s Service Centre
to verify that the waterproofing is still effective.
≥ The waterproof performance may be degraded due to the strong water
pressure when this unit is used deeper than 3 m underwater.
≥ When this unit is splashed with detergent, soap, hot spring, bath
additive, sun oil, sun screen, chemical, etc., wipe it off immediately.
≥ Waterproof function of this unit is for sea water and fresh water only.
≥ Any malfunction caused by customer misuse, or mishandling will not
be covered by the warranty.
≥ The inside of this unit is not waterproof. Water leakage will cause
malfunction.
≥ Supplied accessories such as battery pack etc. are not waterproof.
(excluding handstrap)
≥ Cards are not waterproof. Do not handle with a wet hand. Also, do not
insert wet card into this unit.
VQT4F16 9
Page 10

≥ Do not leave this unit for a long period of time in places where
temperature is very low (at ski resorts or at high altitude etc.) or very
high (above 35 oC), inside a car under strong sunlight, close to a
heater, on the beach, etc. Waterproof performance may be degraded.
≥ Foreign objects may adhere to the inner side of the rear door
(around the rubber seal or connecting terminals) when the rear
door is opened or closed in places with sand or dust etc. This
may result in the impairment of the waterproof performance if the
rear door is closed with foreign objects adhered. Be extremely
careful since it may result in malfunction etc.
≥ If any foreign object has adhered to the inner side of the rear door,
remove with the lint-free cloth.
≥
If any liquid such as water droplets has adhered to this unit or inner
side of the rear door, wipe off with a soft dry cloth. Do not open or
close the rear door near the water, when underwater, using wet
hands, or when this unit is wet. It may cause water leakage.
∫ When inner side of the lens is fogged (condensation)
It is not a malfunction or failure of this unit. It may be caused by the
environment in which this unit is used.
≥ Be careful of condensation since it causes lens stains, fungus and unit
malfunction.
What to do when inner side of the lens is fogged
≥ Turn off the unit and open the rear door in a place with constant
ambient temperature, away from high temperatures, humidity, sand
and dust. The fog will disappear naturally in about 2 hours with the rear
door open when the temperature of this unit gets close to the ambient
temperature.
≥ Contact Panasonic’s Service Centre if the fogging does not disappear.
Conditions in which inner side of the lens may be fogged
Condensation may occur and the inner side of the lens may be fogged
when this unit is used in areas that undergo a significant change in
temperature or in high humidity, such as the following:
≥ When this unit is used underwater suddenly after being on a hot
beach etc.
≥ When this unit is moved to a warm area from a cold area, such as
at a ski resort or at high altitude
≥ When the rear door is opened in a high-humidity environment
10 VQT4F16
Page 11
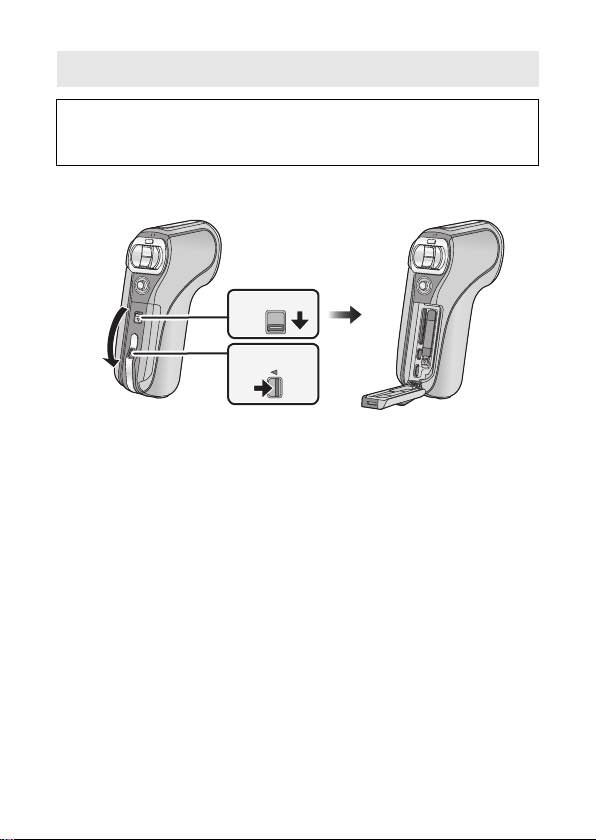
Check before using underwater
LOCK
SD CARD/
BATTERY
Do not open or close the rear door in places with sand and dust,
close to water, or with wet hands. Sand or dust adhering may
cause water leaks.
1 Open the rear door.
1 Unlock the LOCK lever.
2 Slide the open/close lever.
3 Open the rear door.
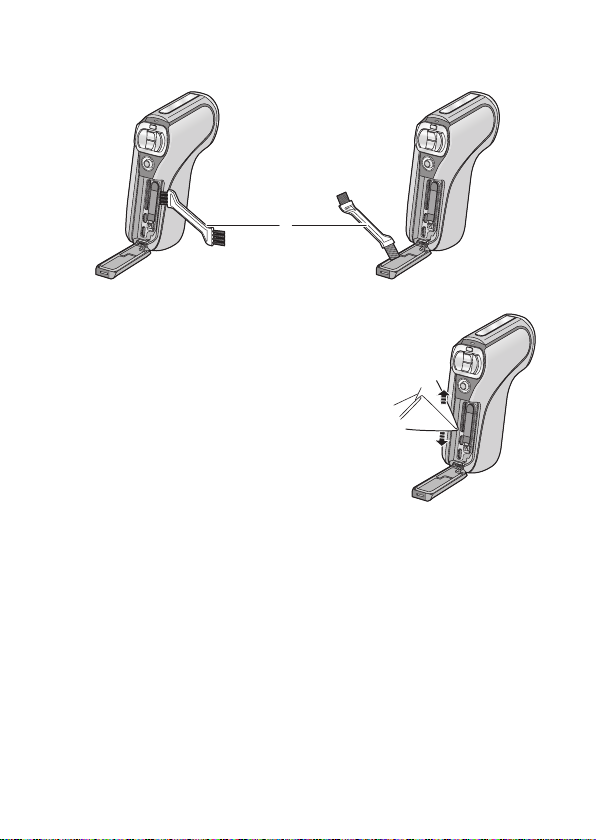
2 Check that there are no foreign objects on the inner
side of the rear door.
≥ If there are any foreign objects, such as lint, hair, sand, etc., on the
surrounding area, water will leak within a few seconds causing
malfunction.
3 If there is foreign matter adhering to the unit, use the
supplied brush to remove it.
≥ Be extremely careful to remove any sand etc. that may adhere to the
sides and corners of the rubber seal.
≥ Keep the brush out of reach of children to prevent swallowing.
VQT4F16 11
Page 12
≥ Use the brush end with the short (hard) bristles to remove larger
foreign matter or damp sand from the unit.
A Brush (supplied)
≥ Wipe it off with a dry soft cloth if there is any
liquid. It may cause water leaks and
malfunction if you use this unit with liquid
adhered.
4 Check for cracks and deformation of the rubber seal
on the rear door.
≥ The integrity of the rubber seals may decrease after about 1 year, with
use and age. To avoid permanently damaging this unit the seals should
be replaced once each year. Please contact Panasonic’s Service
Centre for related costs and other information.
12 VQT4F16
Page 13
5 Close the rear door securely.
SD CARD/
BATTERY
LOCK
1 Close the rear door.
2 Slide the open/close lever.
3 Lock the LOCK lever.
≥ Lock securely to the points where the red portion of the open/close
lever and LOCK lever are no longer visible.
≥ To prevent water seeping into this unit, be careful not to trap foreign
objects such as liquids, sand, hair or dust etc.
∫ About handling the brush
≥ Before use, check that foreign matter has not adhered to the brush.
≥ After use, remove any adhered foreign matter and clean in preparation
for next use.
VQT4F16 13
Page 14

Using this unit underwater
≥ Use this unit underwater at a depth of down to 3 m with the water
temperature between 0 oC and 35 oC.
≥ Do not use this unit at a depth of over 3 m.
≥ Do not use it in hot water over 35 oC (in the bath or hot spring).
≥ Do not use this unit underwater not longer than 60 minutes
continuously.
≥ Do not open or close the rear door.
≥ Do not apply shock to this unit underwater. (Waterproof performance
may not be maintained, and there is a chance of water leak.)
≥ Do not dive into the water holding this unit. Do not use this unit in a
location where the water will splash strongly, such as rapid flow or
waterfall. (Strong water pressure may be applied, and it may cause
malfunction.)
≥ This unit will sink in the water. Take care not to drop this unit and lose it
underwater by securely placing the strap around your wrist or similar
measure.
≥ Attaching a tripod with a 5.5 mm screw or larger may open a hole in
this unit through which water will leak.
Caring of this unit after using it underwater
Do not open or close the rear door until the sand and dust is
removed by rinsing this unit with water.
Make sure to clean this unit after using it.
≥ Thoroughly wipe off any water droplets, sand, and saline matter on
your hands, body, hair, etc.
≥ It is recommended to clean this unit indoors, avoiding places where
water spray or sand may fall.
Do not leave this unit uncared for longer than 60 minutes after
using it underwater.
≥ Leaving this unit with foreign objects or saline matter on it may
cause damage, discolouration, corrosion, unusual odour, or
deterioration of the waterproof performance.
14 VQT4F16
Page 15
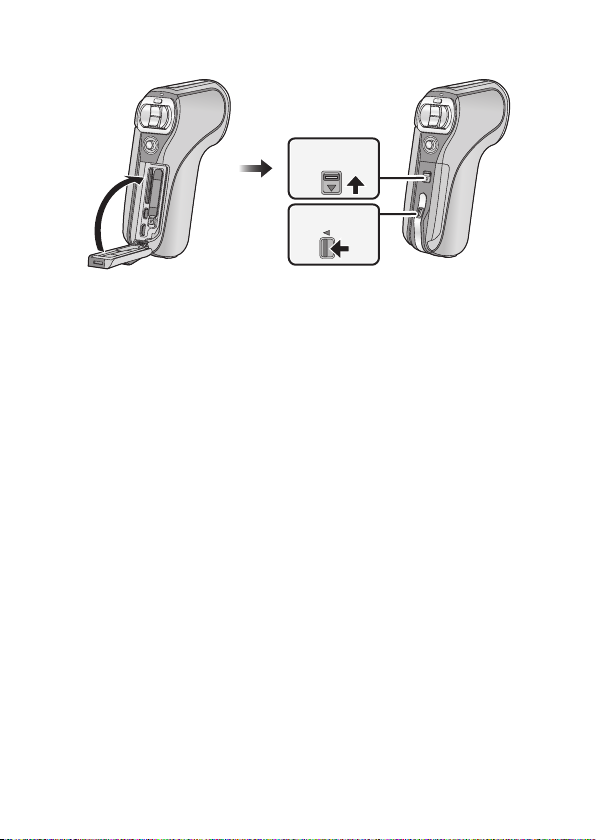
1 Rinse with water with the rear door closed.
≥ After use at the seaside or underwater, soak the unit in fresh water
pooled in a shallow container for 10 minutes or less.
SD CARD/
BATTERY
LOCK
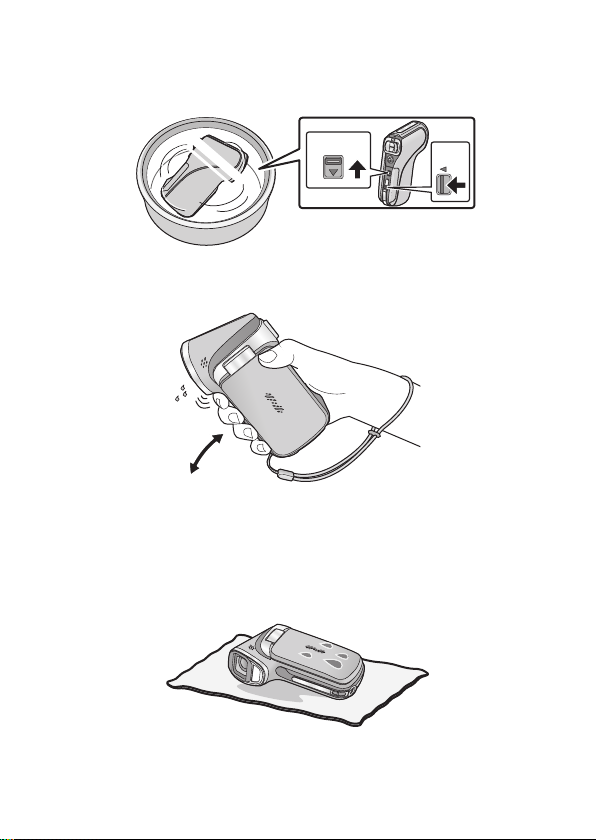
2 Drain water by holding this unit upside down and
shaking it lightly a few times.
≥ After using this unit at the seaside or underwater, or after washing it,
water will remain at the speaker site of this unit for a while and it may
cause lower sound or sound distortion.
≥ Fasten the strap firmly to prevent this unit from dropping.
3
Wipe off water drops on this unit with a dry soft cloth and
dry this unit in a shaded area which is well ventilated.
≥ Dry this unit by standing it on a dry cloth.
VQT4F16 15
Page 16
≥ Do not dry this unit with hot air from dryer or similar. It will deteriorate
the waterproof performance or cause failure due to deformation.
≥ Do not use chemicals such as benzine, thinner, alcohol, or cleanser, or
soap or detergents.
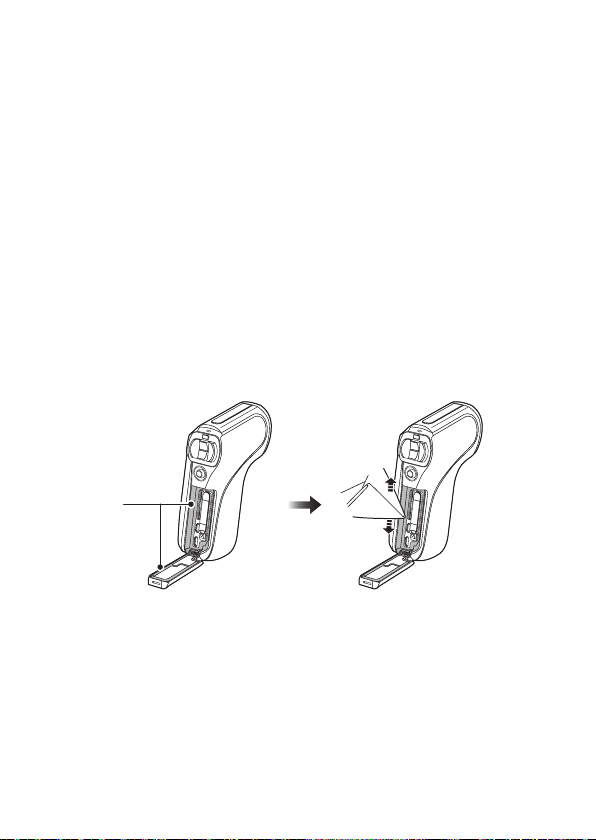
4 Confirm that there are no water droplets, open the
rear door, and wipe off any water droplets or sand left
inside using a soft dry cloth.
≥ Water droplets may adhere to the card when the rear door is opened
without thoroughly drying. Also, water may accumulate in the gap
around the card compartment, the battery compartment or the terminal
connector. Be sure to wipe any water off with a soft dry cloth.
≥ The water droplets may seep into this unit when the rear door is closed
while it is still wet, causing condensation or failure.
∫ Wiping moisture from the unit
If there is moisture inside the rear door, wipe every crevice completely
clear of moisture.
(This moisture is not due to exposure to water)
A Moisture here
16 VQT4F16
Page 17

∫ About the water draining design
This unit is designed so that water that entered the gaps around the
zoom button etc. drains out. For this reason, bubbles may appear when
the unit is immersed in water, but this is not a malfunction.
Draining water from the unit
Drainage holes are found on the bottom of the unit. Hold the unit
vertically, as shown, to drain off the water.
When draining, attach the hand strap to the unit and secure the hand
strap to your wrist to prevent the unit from dropping.
B Drainage holes
VQT4F16 17
Page 18

Preparation
Accessories
Check the accessories before using this unit.
Keep the accessories out of reach of children to prevent swallowing.
Product numbers correct as of Jan. 2012. These may be subject to
change.
Battery pack
VW-VBX090
AC adaptor
(EG/GA)
A VSK0751
(GC)
B VSK0752
(GN)
C VSK0753
AV cable
VFA0555
USB cable
VFA0554
Handstrap
VFC4817
To prevent the unit from dropping, be sure
to attach the handstrap.
Brush
VYC1064
18 VQT4F16
Page 19

CD-ROM
Software
CD-ROM
(EG)
Operating Instructions
VFF1003
(GC/GA/GN)
Operating Instructions
VFF1004
Optional accessories
Some optional accessories may not be available in some countries.
Battery pack (lithium/VW-VBX090)
HDMI micro cable (RP-CHEU15)
VQT4F16 19
Page 20

Preparation
Power supply
∫ About batteries that you can use with this unit
The battery that can be used with this unit is VW-VBX090.
It has been found that counterfeit battery packs which look very
similar to the genuine product are made available to purchase in
some markets. Some of these battery packs are not adequately
protected with internal protection to meet the requirements of
appropriate safety standards. There is a possibility that these
battery packs may lead to fire or explosion. Please be advised that
we are not liable for any accident or failure occurring as a result of
use of a counterfeit battery pack. To ensure that safe products are
used we would recommend that a genuine Panasonic battery pack
is used.
Inserting/removing the battery
≥ Press the power button to turn off the unit. (l 31)
1 Open the rear door.
SD CARD/
BATTERY
LOCK
1 Unlock the LOCK lever.
2 Slide the open/close lever.
3 Open the rear door.
20 VQT4F16
Page 21

2 (To insert the battery pack)
Confirm the orientation of the terminal markings and
insert the battery.
A terminal markings
≥ Confirm that lever B is locked on to the battery.
≥ It is possible to mistakenly insert the battery upside down, so be sure to
check the orientation carefully.
(To remove the battery pack)
Push the lever B toward the
direction of arrow, and pull the
battery straight out.
VQT4F16 21
Page 22

3 Close the rear door.
LOCK
SD CARD/
BATTERY
LOCK
SD CARD/
BATTERY
SD CARD/
BATTERY
LOCK
Unlocked
state
Locked state
Open/close
lever
Lock lever
1 Close the rear door.
2 Slide the open/close lever.
3 Lock the LOCK lever.
≥ Lock securely to the points where the red portion C of the open/close
lever and LOCK lever are no longer visible.
22 VQT4F16
Page 23

Charging the battery
When this unit is purchased, the battery is not charged. Charge
the battery fully before using this unit for the first time.
The unit is in the standby condition when the AC adaptor is connected.
The primary circuit is always “live” as long as the AC adaptor is
connected to an electrical outlet.
Important:
≥ Be sure to use the supplied AC adaptor and USB cable. Do not
use parts supplied with other equipment.
≥ The AC adaptor and USB cable are for use with this unit only. Do
not use them with other equipment. Similarly, do not use AC
adaptors and USB cables from other equipment with this unit.
≥ The battery is charged while the unit is off or in the sleep mode.
The battery cannot be charged while the unit is recording or
playing back.
≥
It is recommended to charge the battery in a temperature between
10
o
C and 30 oC. (The battery temperature should also be the same.)
A Status indicator
B AC adaptor
C To the AC outlet
≥ Insert the plugs as far as they will go.
VQT4F16 23
Page 24

1 Connect the USB cable to the AC adaptor.
≥ Check that the plug portion of the AC adaptor is not loose or
misaligned.
2 Plug the AC adaptor into the AC outlet.
3 Connect the USB cable to the unit.
≥ The status indicator flashes red with a period of approximately
2 seconds (approximately 1 second on, 1 second off), and charging
begins. It will turn off when the charging is completed.
≥ Do not use any other AC adaptors except the supplied one.
≥ Do not use any other USB cables except the supplied one.
≥ We recommend using Panasonic batteries (l 18, 19).
≥ If you use other batteries, we cannot guarantee the quality of this
product.
≥ Do not heat or expose to flame.
≥ Do not leave the battery(ies) in a car exposed to direct sunlight for a
long period of time with doors and windows closed.
24 VQT4F16
Page 25

Charging and recording time
∫ Charging/Recording time
≥ Temperature: 25 oC/humidity: 60%RH (When using AC adaptor)
Battery model
number
[Voltage/Capacity
(minimum)]
Supplied battery/
VW-VBX090
(optional)
[3.7 V/880 mAh]
≥ These times are approximations.
≥ The indicated charging time is for when the battery has been
discharged completely. Charging time and recordable time vary
depending on the usage conditions such as high/low
temperature.
≥ The actual recordable time refers to the recordable time when
repeatedly starting/stopping recording, turning the unit on/off, moving
the zoom button etc.
≥ The batteries heat up after use or charging. This is not a malfunction.
Charging
time
2h
30 min
Recording
mode
Maximum
continuous
recordable
time
1h5min 40min
1h15min 40min
1h10min 40min
1h20min 45min
1h50min 50min
1h25min 45min
1h55min s
Actual
recordable
time
VQT4F16 25
Page 26

Battery capacity indication
≥ The display changes as the battery capacity reduces.
#### (red)
When the charge is low, is displayed at the centre of the LCD
monitor.
≥ Depending on the characteristics of the battery, it may not be
possible to correctly display the charge remaining on the battery.
For instance, at low temperatures, the indicator may turn on
earlier. Because the status of the charge remaining indicator
changes according to the ambient temperature, conditions of use,
etc., the indicator should be considered as an approximate guide.
Preparation
Recording to a card
The unit can record motion pictures, still pictures or audio to an SD card
or built-in memory. To record to an SD card, read the following.
This unit (an SDXC compatible device) is compatible with SD Memory
Cards, SDHC Memory Cards and SDXC Memory Cards. When using
an SDHC Memory Card/SDXC Memory Card with other equipment,
check the equipment is compatible with these Memory Cards.
Cards that you can use with this unit
Use SD cards conforming to Class 4 or higher of the SD Speed
Class Rating* for motion picture recording.
Card type Capacity
SD Memory Card 512 MB/1 GB/2 GB
SDHC Memory Card
SDXC Memory Card 48 GB/64 GB
4GB/6GB/8GB/12GB/16GB/
24 GB/32 GB
26 VQT4F16
Page 27

* SD Speed Class Rating is the speed standard regarding continuous
32
writing. Check via the label on the card, etc.
e.g.:
≥ Please confirm the latest information about SD Memory Cards/SDHC
Memory Cards/SDXC Memory Cards that can be used for motion
picture recording on the following website.
http://panasonic.jp/support/global/cs/e_cam
(This website is in English only.)
≥ To use the Eye-Fi transfer feature, an Eye-Fi X2 series SD card is
required.
≥ Operation of SD Memory Cards with a capacity of 256 MB or less is not
guaranteed.
≥ 4 GB or more Memory Cards that do not have the SDHC logo or 48 GB
or more Memory Cards that do not have the SDXC logo are not based
on SD Memory Card Specifications.
≥ The operation of Memory cards exceeding 64 GB cannot be
guaranteed.
≥ When the write-protect switch A on SD card is
locked, no recording, deletion or editing will be
possible on the card.
≥ Keep the Memory Card out of reach of children to
prevent swallowing.
VQT4F16 27
Page 28

Inserting/removing an SD card
LOCK
SD CARD/
BATTERY
When using an SD card not from Panasonic, or one previously used on
other equipment, for the first time on this unit, format the SD card.
(l 42) When the SD card is formatted, all of the recorded data is
deleted. Once the data is deleted, it cannot be restored.
Caution:
Check that the status indicator has gone off.
1 Open the rear door.
Status indicator A
≥ When this unit is accessing the SD card or built-in memory, the status
indicator lights up red.
1 Unlock the LOCK lever.
2 Slide the open/close lever.
3 Open the rear door.
28 VQT4F16
Page 29

2 Insert (remove) the SD card into (from) the card slot.
LOCK
SD CARD/
BATTERY
≥ Face the label side A in the direction shown in the illustration and
press it straight in as far as it will go.
≥ Press the centre of the SD card and then pull it straight out.
3 Close the rear door.
1 Close the rear door.
2 Slide the open/close lever.
3 Lock the LOCK lever.
≥ Lock securely to the points where the red portion of the open/close
lever and LOCK lever are no longer visible.
≥ Do not touch the terminals on the back of the SD card.
≥ Do not shock, bend, or drop the SD card.
≥ Electrical noise, static electricity or the failure of this unit or the SD card
may damage or erase the data stored on the SD card.
VQT4F16 29
Page 30

≥ When the status indicator illuminates in red, do not:
j Remove the SD card
j Turn the unit off
j Insert and remove the USB cable
j Expose the unit to vibrations or shock
Performing the above while the indicator is on may result in damage to
data/SD card or this unit.
≥ Do not expose the terminals of the SD card to water, dirt or dust.
≥ Do not place SD cards in the following areas:
j In direct sunlight
j In very dusty or humid areas
j Near a heater
j Locations susceptible to significant difference in temperature
(condensation can occur.)
j Where static electricity or electromagnetic waves occur
≥ To protect SD cards, return them to their cases when you are not using
them.
≥ About disposing of or giving away the SD card.
(Refer to the Operation Instructions (PDF format))
30 VQT4F16
Page 31

Preparation
To turn off the unit
Hold down the power button until the
LCD monitor goes off.
≥ Pressing the power button for a short
time sends the unit into sleep mode.
Turning the unit on/off
Open the LCD monitor and press the power button to
turn on the unit.
The LCD monitor turns on.
Preparation
Selecting a mode
Change the mode to recording or playback.
Press the REC/ button.
≥ Each press of the REC/ button changes the mode.
Recording Mode (l 34, 35, 36)
Playback Mode (l 37)
For recording motion pictures,
still pictures and audio
For playing back motion
pictures, still pictures and audio
VQT4F16 31
Page 32

Preparation
1
Setting date and time
If the screen to set the date and time appears when you turn on the unit,
skip to step 2 and follow the steps to set the date and time.
1 Select the menu. (l 40)
[MENU]: # [CLOCK SET]
2 Select an item (DATE/TIME/DISP) using the SET
button and then tilt the SET button to the right or
press the SET button.
3 (When [DATE] or [TIME] is selected)
Tilt the SET button to the left or right to select the
desired item and then up and down to set the
numerical values.
e.g.: When [DATE] is selected
≥ The year can be set between 2000 and 2039.
32 VQT4F16
Page 33

(When [DISP] is selected)
Select the year/month/day display method using the
SET button.
4 Press the SET button.
5 Select [SET DATE AND TIME] using the SET button
and then press the SET button.
≥ To return to the recording screen or playback screen, press the MENU
button.
≥ At the time of purchase, the [CLOCK SET] are not set.
≥ If the date and time have not been set or the built-in clock battery has
run down, the screen display and recording day/month/year
information will appear as follows.
Recording screen display: --.--.---- -:-Recording day/month/year: 01.01.2012 0:00
≥ To charge the built-in clock battery, install a fully charged battery in the
unit. If you leave the battery in for approximately 2 days, the time
settings will be stored for approximately 7 days. (The charging
continues even when the unit is turned off)
≥ [Before using the unit under water] and [Maintenance after use in
water] are displayed when setting date and time for the first time after
purchase. Please check beforehand to maintain the waterproof
performance. Press the MENU button to exit the message screen.
For Australia and New Zealand
WARNING
THE LITHIUM BATTERY IN THIS UNIT MUST ONLY BE REPLACED
BY QUALIFIED PERSONNEL. IF THIS IS NECESSARY, CONTACT
THE PANASONIC CUSTOMER CARE CENTRE ON 132600 FOR
YOUR NEAREST AUTHORIZED SERVICE CENTRE.
VQT4F16 33
Page 34

Basic
000:00:00
Recording motion pictures
≥ Motion pictures are recorded to the SD card if one is inserted. If no SD
card is inserted, the motion pictures are recorded to the built-in
memory.
1 Open the LCD monitor.
2 Press the recording start/stop button to start
recording.
000:00:00
000:00:00
A When you begin recording, ¥ appears.
3 Press the recording start/stop button again to pause
recording.
34 VQT4F16
Page 35

Basic
F3.5F3.5F3.5
1/301/301/30
Recording still pictures
≥ Still pictures are recorded to SD card if one is inserted. If no SD card is
inserted, the still pictures are recorded to the built-in memory.
1 Open the LCD monitor.
2 (For auto focus only)
Press the button halfway.
A Focus area (area inside brackets)
3 Press the button fully.
≥ If you continue to hold down the button, you can check the
recorded image on the LCD monitor.
VQT4F16 35
Page 36

Basic
1
Press the button to
switch to Intelligent Auto
Mode.
Recording audio
≥ Audio is recorded to the SD card if one is inserted. If no SD card is
inserted, the audio is recorded to the built-in memory.
1 Open the LCD monitor.
2 Select the menu. (l 40)
[MENU]: # [REC MODE] # [ (VOICE RECORD)]
3 Start recording by pressing the recording start/stop
button.
4 Press the recording start/stop button again to stop
recording.
Basic
Intelligent Auto Mode
The modes (appropriate for the condition) are set just by pointing the unit
to what you want to record.
36 VQT4F16
Page 37

Basic
Thumbnail display
Motion picture/Still picture/Audio
playback
1 Press the REC/ button to change to playback
mode.
2 Select the file to play back using the SET button and
press the SET button.
A The information for the file in the yellow frame is displayed.
≥ Tilt and hold the SET button up or down to display the next (or
previous) page.
VQT4F16 37
Page 38

3 Play back using the SET button.
Motion picture/audio playback
Playback/Pause
Rewind playback
Fast forward playback
Stops the playback and
shows the thumbnails.
B Operation icon*
* If the operation icon disappears, perform a SET button operation to
display it.
Still picture playback
Deletes still picture
Displays previous file
Displays next file
38 VQT4F16
Stops playback and returns to
thumbnail display
Page 39

Watching Video/Pictures on your TV
A AV cable (supplied)
1 Connect this unit to a TV.
≥ Check that the plugs are inserted as far as they go.
≥ Do not use any other AV cables except the supplied one.
2 Select the video input on the TV.
3 Play back from the unit.
VQT4F16 39
Page 40

Basic
MENU
MENU
Using the menu screen
1 Press the MENU button.
2 Tilt the SET button to the left.
3 Select tab A or option tab B using the SET button,
and press down the right side of the SET button or
press the SET button.
4 Select from menu items C using the SET button, and
tilt the SET button to the right, or press the SET
button.
40 VQT4F16
Page 41

5 Select the setting content using the SET button and
2
press the SET button to set.
∫ About applicable mode indicator
In the recording menu, the recording mode that reflects the currently
displayed setting is displayed.
D Applicable mode indicator
: Setting is applied to still picture and motion picture recording.
: Setting is applied to still picture recording.
: Setting is applied to motion picture recording.
To get back to the previous screen
Press the MENU button.
To end the menu setting
Press the MENU button several times.
Language selection
You can select the language on the screen display and the menu screen.
[MENU]: # [LANGUAGE]
VQT4F16 41
Page 42

Basic
2
A Zoom bar
Formatting
Please be aware that if a medium is formatted, then all the data
recorded on the medium will be erased and cannot be restored.
Back up important data on a PC, disc etc.
[MENU]: # [FORMAT]
Basic
Using the zoom
≥ Set to Recording mode. (l 31)
Zoom button
T side: Close-up recording (zoom in)
W side: Wide-angle recording (zoom out)
≥ During zoom operations, the zoom bar is displayed.
≥ i.Zoom and digital zoom can be set in [ZOOM MODE].
42 VQT4F16
Page 43

Double range zoom
The enlarged size will be approximately double size (double range
zoom). Press again to return to normal size.
≥ Set to Recording mode. (l 31)
Press the zoom range button.
≥ On the normal zoom recording screen, the icon is displayed. On
the double-range zoom recording screen, the icon is displayed.
≥ You cannot operate the zoom range button in the i.Zoom/Digital zoom
region (blue).
≥ The image enlarged using the double range zoom can be recorded
only as a motion picture. Still pictures are recorded without being
enlarged.
VQT4F16 43
Page 44

Basic
1
Recording underwater
The unit can record underwater at depths of down to 3 m (for periods
within 60 minutes).
Before recording underwater, be sure to read “(Important) About
the Waterproof Performance of this unit” (page 9 to 17) and to
use the camera correctly. Incorrect use may result water entering
the unit and malfunction.
Record with colour balance and audio
that are suitable for recording underwater
When recording underwater, set [SCENE MODE] to (UNDER
WATER). The colour balance and audio recording will be suitable for
recording underwater.
≥ Set to Recording mode. (l 31)
Select the menu. (l 40)
[MENU]: # [SCENE MODE] # [ (UNDER WATER)]
≥ When [SCENE MODE] is set to (UNDER WATER), [Before using
the unit under water] and [Maintenance after use in water] are
displayed. Please check beforehand to maintain the waterproof
performance. Press the MENU button to exit the message screen.
≥ After use underwater, wash the unit in fresh water and dry well. (l 14)
≥ Do not use the Under Water Mode except when recording underwater.
≥ When recording underwater, the sound of the unit motor will be
recorded at a relatively high volume. However, in Under Water Mode,
the sound of the motor is suppressed through the action of an audio
filter. (sound quality differs to when recording in other modes)
44 VQT4F16
Page 45

Others
Specifications
Dual Camera
Information for your safety
Power source: DC 5.0 V (When using AC adaptor)
Power consumption: Recording;
Signal system:
1080/60i, 1080/30p, 720/60p, 720/30p, 540/30p, 480/30p
Recording format:
MPEG-4 AVC file format standard (.MP4)
Motion picture compression:
MPEG-4 AVC/H.264, iFrame
Audio compression:
AAC (2 ch)
Recording mode and transfer rate:
; Approx. 17 Mbps (VBR)
; Approx. 15 Mbps (VBR)
; Approx. 15 Mbps (VBR)
; Approx. 9 Mbps (VBR)
; Approx. 3 Mbps (VBR)
; Approx. 24 Mbps (VBR)
Refer to the operating instructions (PDF format) for the recordable time
and picture size.
Still picture recording format:
JPEG (Design rule for Camera File system, based on Exif 2.2 standard)
Refer to the operating instructions (PDF format) for the picture size and
number of recordable pictures.
DC 3.7 V (When using battery)
4.1 W
Charging;
4.5 W
VQT4F16 45
Page 46

Recording media:
SD Memory Card (FAT12 and FAT16 system compliant)
SDHC Memory Card (FAT32 system compliant)
SDXC Memory Card (exFAT system compliant)
Refer to page 26 for details on SD cards usable in this unit.
Built-in memory; Approx. 64 MB
Image sensor:
1/2.33 type (1/2.33z) 1MOS image sensor
Total; Approx. 14400 K
Effective pixels;
Motion picture; 14300 K (4:3), 11900 K (16:9)
Still picture; 14300 K (4:3), 11900 K (16:9)
Lens:
Auto iris
F3.5 to F3.7
Focal length;
6.8 mm to 34.0 mm
35 mm equivalent;
Motion picture;
38.9 mm to 233.4 mm (Double range zoom W mode, 4:3)
40.0 mm to 240.0 mm (Double range zoom W mode, 16:9)
80.9 mm to 485.4 mm (Double range zoom T mode, 4:3)
82.4 mm to 494.4 mm (Double range zoom T mode, 16:9)
Still picture;
38.6 mm to 193.0 mm (4:3)
39.9 mm to 199.5 mm (16:9)
Minimum focus distance;
Normal; Approx. 10 cm (Wide)/Approx. 1 m (Tele)
Macro; Approx. 1 cm (Wide)/Approx. 80 cm (Tele)
Zoom:
Motion picture; 5k optical zoom, 12k double range zoom, 15k i.Zoom,
120k digital zoom
Still picture; 5k optical zoom, 50k digital zoom
Image stabiliser function:
Electronic
Monitor:
6.7 cm (2.6z) wide LCD monitor (Approx. 230 K dots)
Microphone:
Stereo
46 VQT4F16
Page 47

Speaker:
1 round speaker, dynamic type
White balance adjustment:
Auto tracking white balance system
Standard illumination:
1,400 lx
Minimum required illumination:
Approx. 3 lx (1/15 with Low Light mode in the Scene mode)
Approx. 9 lx (Scene mode off 1/30)
USB/AV connector video output level:
1.0 Vp-p, 75 h
HDMI micro connector video output level:
™
HDMI
1080i/720p/480p
USB/AV connector audio output level (Line):
155 mV, 220 h, 2 ch
HDMI micro connector audio output level:
Linear PCM
USB:
Reader function
SD card; Read only (No copyright protection support)
Built-in memory; Read only
Hi-Speed USB (USB 2.0), USB terminal Type micro B (AV output share)
Battery charging function (Charges from USB terminal when the unit is
off, 500 mA)
Web camera;
Compression format; Motion JPEG
Image size; 640
Flash:
Available range; Approx. 80 cm to 2.1 m
Dimensions:
93.9 mm (W)k125.6 mm (H)k44.1 mm (D)
(including projecting parts)
Mass:
Approx. 238
[without battery (supplied) and an SD card (optional)]
Mass in operation:
Approx. 259
[with battery (supplied) and an SD card (optional)]
k480/30p (VGA)
g
g
VQT4F16 47
Page 48

Operating temperature:
0 oCto35oC
Operating humidity:
10%RH to 80%RH
Waterproof performance:
Equivalent to IEC 60529 “IPX8”
Depths less than 3.0 m for 60 minutes or less
Battery operation time:
See page 25
AC adaptor
Information for your safety
Power source: AC 100 V to 240 V, 50/60 Hz
Power
consumption: 7W
DC output: DC 5.0 V, 1.0 A
(EG/GA)
VSK0751
Dimensions:
48.9 mm (W)k32.8 mm (H)k95.1 mm (D)
Mass:
Approx. 58
(GC)
VSK0752
Dimensions:
49.7 mm (W)k49.0 mm (H)k80.9 mm (D)
Mass:
Approx. 64
(GN)
VSK0753
Dimensions:
48.9 mm (W)k40.5 mm (H)k76.0 mm (D)
Mass:
Approx. 56
g
g
g
48 VQT4F16
Page 49

Others
About copyright
∫ Carefully observe copyright laws
Recording of pre-recorded tapes or discs or other published or
broadcast material for purposes other than your own private use
may infringe copyright laws. Even for the purpose of private use,
recording of certain material may be restricted.
∫ Licenses
≥ SDXC Logo is a trademark of SD-3C, LLC.
≥ HDMI, the HDMI Logo, and High-Definition Multimedia Interface are
trademarks or registered trademarks of HDMI Licensing LLC in the
United States and other countries.
≥ Microsoft
trademarks or trademarks of Microsoft Corporation in the United States
and/or other countries.
≥ iMovie, iChat, Mac and Mac OS are trademarks of Apple Inc.
registered in the U.S. and other countries.
≥ Other names of systems and products mentioned in these instructions
are usually the registered trademarks or trademarks of the
manufacturers who developed the system or product concerned.
This product is licensed under the AVC patent portfolio license for the
personal and non-commercial use of a consumer to (i) encode video in
compliance with the AVC Standard (“AVC Video”) and/or (ii) decode AVC
Video that was encoded by a consumer engaged in a personal and noncommercial activity and/or was obtained from a video provider licensed
to provide AVC Video. No license is granted or shall be implied for any
other use. Additional information may be obtained from MPEG LA, LLC.
See http://www.mpegla.com
®
, Windows® and Windows Vista® are either registered
.
VQT4F16 49
Page 50

Others
Reading the Operating
Instructions (PDF format)
More detailed instructions on the operation of this unit are
contained in “Operating Instructions (PDF format)” in the supplied
CD-ROM. Install it on your PC to read it.
∫ For Windows
1 Turn the PC on and insert the CD-ROM containing the
Operating Instructions (supplied).
2 Select the desired language and then click
[Operating Instructions] to install.
(Example: When an English language OS)
3 Double click the “Operating Instructions” shortcut
icon on the desktop.
50 VQT4F16
Page 51

∫ When the Operating Instructions (PDF format) will not open
You will need Adobe Acrobat Reader 5.0 or later or Adobe Reader 7.0 or
later to browse or print the Operating Instructions (PDF format).
Download and install a version of Adobe Reader that you can use with
your OS from the following Web Site.
http://get.adobe.com/reader/otherversions
If using the following OS
j Windows XP SP3
j Windows Vista SP2
j Windows 7
Insert the CD-ROM containing the Operating Instructions (supplied), click
[Adobe(R) Reader(R)] and then follow the messages on the screen to
install.
∫ To uninstall the Operating Instructions (PDF format)
Delete the PDF file from the “Program Files\Panasonic\HX\” folder.
≥ When the contents in the Program Files folder cannot be displayed,
click the [Show the contents of this folder] to display them.
∫ For Mac
1 Turn the PC on and insert the CD-ROM containing the
Operating Instructions (supplied).
2 Open the “Manual” folder in the CD-ROM and then
copy the PDF file with the desired language inside
the folder.
3 Double click the PDF file to open it.
VQT4F16 51
Page 52

Pursuant to at the directive 2004/108/EC, article 9(2)
Panasonic Testing Centre
Panasonic Marketing Europe GmbH
Winsbergring 15, 22525 Hamburg, Germany
Panasonic Corporation
Web site: http://panasonic.net
© Panasonic Corporation 2012
EU
VQT4F16
F0212RN0
1AG6P1P6489--(S)
EU
 Loading...