

PANASONIC HXDC3GA User Manual

Operating Instructions
Dual Camera
Model No. HX-DC3
Please read these instructions carefully before using this product, and
save this manual for future use.
VQT4U96

Read this first
∫ About recording formats and compatibility of the unit
≥ The unit is an MP4 format (MPEG-4 AVC file standard) Dual Camera
for recording high-definition motion pictures.
≥ AVCHD and MPEG2 motion pictures are different formats, and are not
therefore supported by the unit.
∫ Indemnity about recorded content
Panasonic does not accept any responsibility for damages directly or
indirectly due to any type of problems that result in loss of recording or
edited content, and does not guarantee any content if recording or editing
does not work properly. Likewise, the above also applies in a case where
any type of repair is made to the unit (including any other non-built-in
memory related component).
∫ Handling built-in memory
This unit is equipped with the built-in memory. When using this
component, pay attention to the following points.
Back up data periodically.
The built-in memory is temporary storage. In order to avoid erasing data
due to static electricity, electromagnetic waves, breakage, and failures,
back up the data to a PC or disc. (l 115 )
≥ The status indicator (l 9) illuminates in red while the SD card or built-
in memory is being accessed (initialization, recording, playback,
deleting etc.). Do not perform the following operations when the
indicator illuminates. It may damage the built-in memory or cause a
malfunction in the unit.
jTurn the unit off (remove the battery)
jInsert and remove the SD Card
jInsert and remove the USB cable
jExpose the unit to vibrations or shock
≥ About disposing of or giving away this unit. (l 152)
- 2 -

∫ About Condensation (When the lens or the LCD
monitor is fogged up)
Condensation occurs when there is a change in temperature or humidity,
such as when the unit is taken from outside or a cold room to a warm
room. Please be careful, as it may cause the lens or LCD monitor to
become soiled, moldy, or damaged.
When taking the unit to a place which has a different temperature, if the
unit is accustomed to the room temperature of the destination for about
one hour, condensation can be prevented. (When the difference in
temperature is severe, place the unit in a plastic bag or the like, remove
air from the bag, and seal the bag.)
When condensation has occurred, remove the battery and/or the AC
adaptor and leave the unit like that for about one hour. When the unit
becomes accustomed to the surrounding temperature, fogginess will
disappear naturally.
∫ Cards that you can use with this unit
SD Memory Card, SDHC Memory Card and SDXC Memory Card
≥ 4 GB or more Memory Cards that do not have the SDHC logo or 48 GB
or more Memory Cards that do not have the SDXC logo are not based
on SD Memory Card Specifications.
≥ Refer to page 16 for more details on SD cards.
∫ For the purposes of these operating instructions
≥ SD Memory Card, SDHC Memory Card and SDXC Memory Card are
referred to as the “SD card”.
≥ Functions that can be used for motion picture recording/motion picture
playback are indicated by in these operating instructions.
≥ Functions that can be used for still picture recording/still picture
playback are indicated by in these operating instructions.
≥ Functions that can be used for audio recording/audio playback are
indicated by in these operating instructions.
≥ Pages for reference are indicated by an arrow, for example: l 00
≥ “File” is used to mean “scene”, “still picture” and “audio file”.
- 3 -

Contents
Read this first ..................................................................................... 2
Preparation
Names and Functions of Main Parts ................................................ 7
Power supply.................................................................................... 10
Inserting/removing the battery..................................................... 10
Charging the battery ................................................................... 12
Charging and recording time....................................................... 14
Recording to a card ......................................................................... 16
Cards that you can use with this unit .......................................... 16
Inserting/removing an SD card.................................................... 18
Turning the unit on/off ..................................................................... 20
About Standby Mode................................................................... 20
About the high temperature warning icon ................................... 21
Selecting a mode ............................................................................. 22
Setting date and time....................................................................... 23
Basic
Before recording .............................................................................. 25
Recording motion pictures ............................................................. 27
Recording still pictures ................................................................... 30
About recording still pictures during motion picture recording
and audio recording .................................................................... 33
Recording audio............................................................................... 34
Intelligent Auto Mode ...................................................................... 36
Motion picture/Still picture/Audio playback .................................. 39
Using the menu screen ................................................................... 43
Using Option Menu .......................................................................... 45
OPTION MENU 1 ........................................................................ 45
OPTION MENU 2 ........................................................................ 47
OPTION MENU 3 ........................................................................ 49
- 4 -

Advanced (Recording)
Using the zoom ................................................................................ 52
Double range zoom..................................................................... 53
Zoom Mode ................................................................................. 54
Image Stabiliser ............................................................................... 55
Burst recording ................................................................................ 57
Recording panorama still pictures ................................................. 59
Recording functions of menus ....................................................... 62
RECORDING MENU 1................................................................ 62
RECORDING MENU 2................................................................ 70
RECORDING MENU 3................................................................ 73
RECORDING MENU 4................................................................ 75
Manual recording ............................................................................. 81
White Balance ............................................................................. 81
Setting the focus and recording .................................................. 83
Advanced (Playback)
Playback Operations ....................................................................... 84
Playback using operation icon .................................................... 84
Creating still picture from motion picture..................................... 86
Cutting out a section of a panorama still picture......................... 87
Zooming in on a still picture during playback
(Playback zoom) ......................................................................... 87
Various playback functions ............................................................ 89
Changing the playback settings and playing back
the slide show ............................................................................. 89
Displaying file information ........................................................... 91
Using the playback menu................................................................ 93
PLAYBACK MENU 1 ................................................................... 93
PLAYBACK MENU 2 ................................................................... 95
Deleting files/folders...................................................................... 100
Protecting a file ......................................................................... 103
Watching Video/Pictures on your TV ........................................... 104
Connecting with an HDMI mini cable ........................................ 108
TV format setting ....................................................................... 108
Playback using VIERA Link .......................................................... 109
- 5 -

Copy/Dubbing
Copying from Built-in Memory to SD card .................................. 111
Dubbing images onto other video devices.................................. 113
With a PC
What you can do with a PC ........................................................... 115
End User License Agreement ................................................... 118
Operating environment ................................................................. 120
Installation ...................................................................................... 124
Connecting to a PC........................................................................ 125
Use as a card reader ................................................................ 126
Using the unit as a web camera................................................ 129
Starting HD Writer VE 3.0 .............................................................. 131
Reading the operating instructions of the
software applications................................................................. 131
If using Mac .................................................................................... 132
Using the Eye-Fi™ card................................................................. 134
Others
Indications ...................................................................................... 138
Messages ........................................................................................ 142
Troubleshooting............................................................................. 143
Cautions for use............................................................................. 151
About copyright ............................................................................. 157
Recording Modes/approximate recordable time......................... 159
Approximate number of recordable pictures .............................. 161
- 6 -
Preparation
1
2
3
4
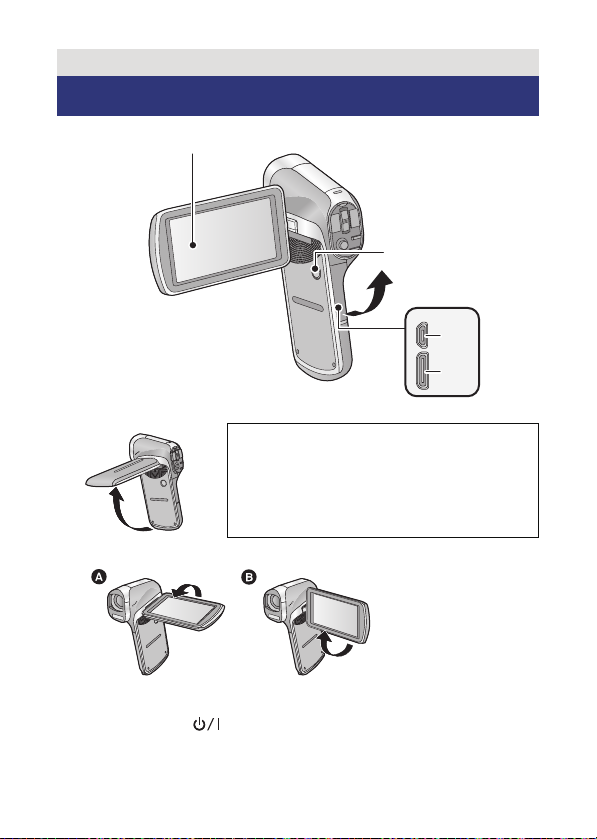
Names and Functions of Main Parts
1 LCD monitor (l 26)
Due to limitations in LCD production
technology, there may be some tiny bright or
dark spots on the LCD monitor screen.
However, this is not a malfunction and does
not affect the recorded picture.
≥ It can open up to 90o.
≥ It can rotate up to 180o A towards the lens or 105o B towards the
opposite direction.
2 Power button [ ] (l 20)
3 USB/AV connector (l 12, 104, 113, 125)
≥ Use the USB cable/AV cable (only the supplied cable).
4 HDMI mini connector (l 104, 109)
- 7 -
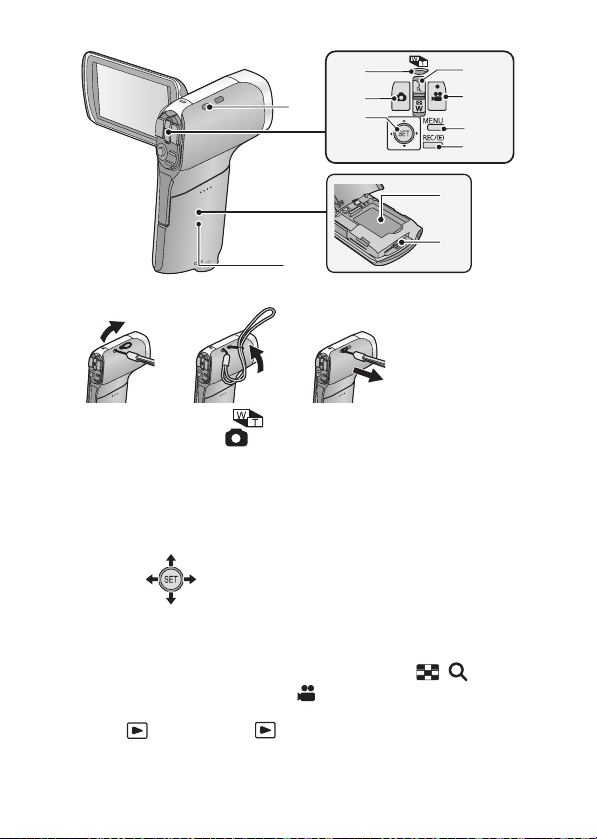
5 Hand strap fixture
8
7
13
12
11
10
9
6
5
14
15
6 Zoom range button [ ] (l 53)
7 Photoshot button [ ] (l 30)
8 SET button [SET] (l 39, 43, 77, 84)
≥ Use the SET button to select the recording functions and playback
operations, and to operate the menu screen.
≥
In these operating instructions
denoted as shown below.
Example: or Select using the SET button
, the operation of the SET button is
9 In Recording Mode: Zoom lever [W/T] (l 52)
In Playback Mode: Volume lever (l 41, 90)
10 Recording start/stop button [ ] (l 27)
11 MENU button [MENU] (l 43)
12 REC/ button [REC/ ]
13 Battery/Card cover (l 10, 18)
14 Battery holder
15 Card slot
Zoom lever [W/T] (l 87)
Thumbnail display switch [ / ] (l 41)
(
l 22
)
- 8 -
18
16
17
19
20
21
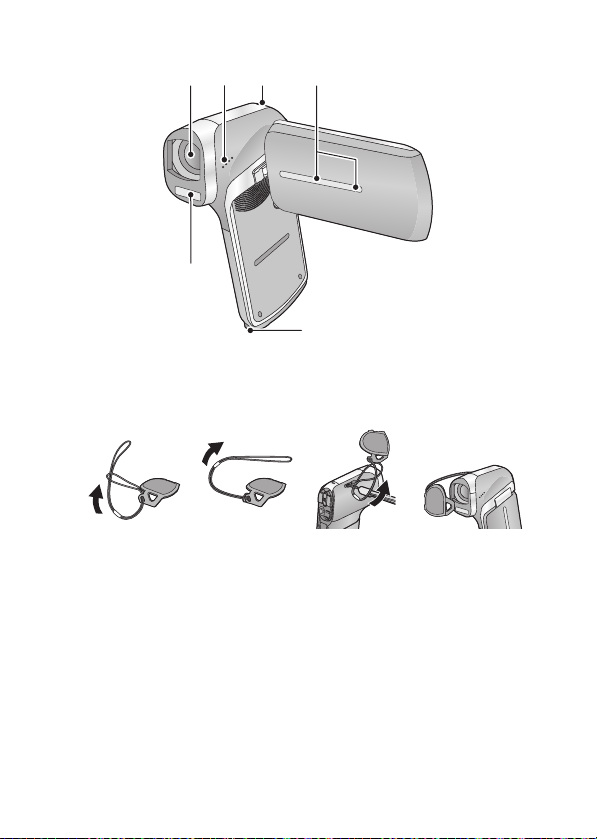
16 Lens
≥ When not using the unit, be sure to fit the lens cap to protect the lens.
≥ Keep the lens cap out of reach of children to prevent swallowing.
17 Speaker
18 Status indicator (l 2, 12, 18, 155)
19 Internal stereo microphones
20 Built-in flash (l 70)
21 Tripod receptacle
≥ If you attach a tripod which has a 5.5 mm screw or larger, it may
damage this unit. The screw may also be difficult to tighten depending
on the type of tripod used.
- 9 -
Preparation
Power supply
∫ About batteries that you can use with this unit
The battery that can be used with this unit is VW-VBX070.
It has been found that counterfeit battery packs which look very
similar to the genuine product are made available to purchase in
some markets. Some of these battery packs are not adequately
protected with internal protection to meet the requirements of
appropriate safety standards. There is a possibility that these
battery packs may lead to fire or explosion. Please be advised that
we are not liable for any accident or failure occurring as a result of
use of a counterfeit battery pack. To ensure that safe products are
used we would recommend that a genuine Panasonic battery pack
is used.
Inserting/removing the battery
≥ Press the power button to turn off the unit. (l 20)
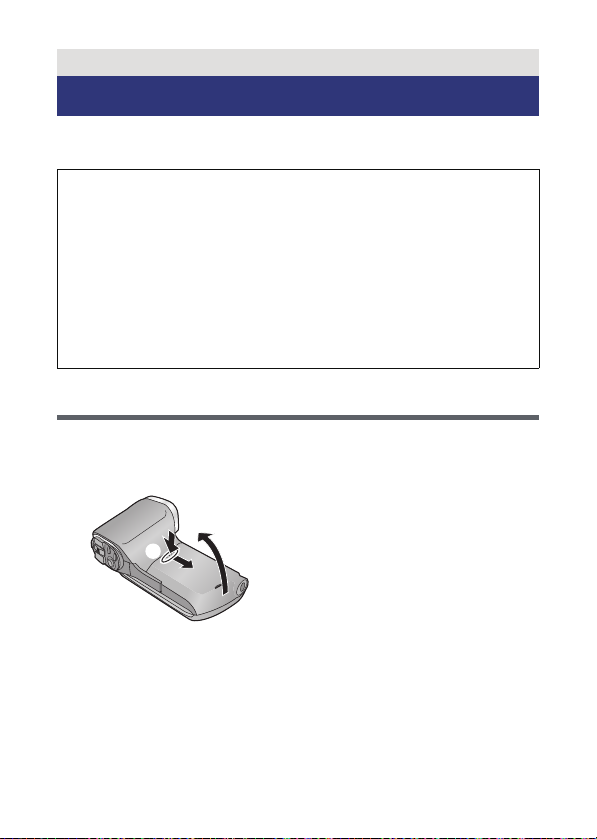
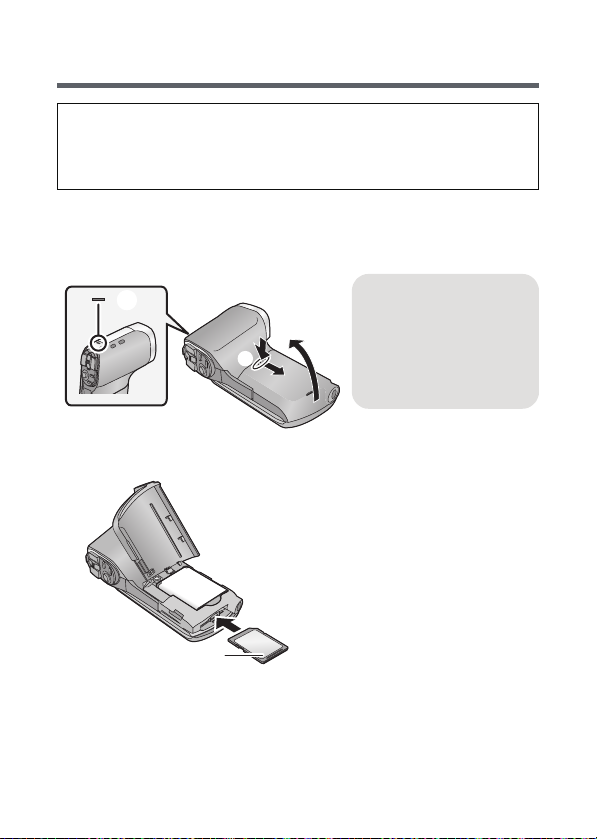
1 Open the battery/card cover.
1
Slide while pushing the battery/
card cover.
2 Open the battery/card cover.
- 10 -
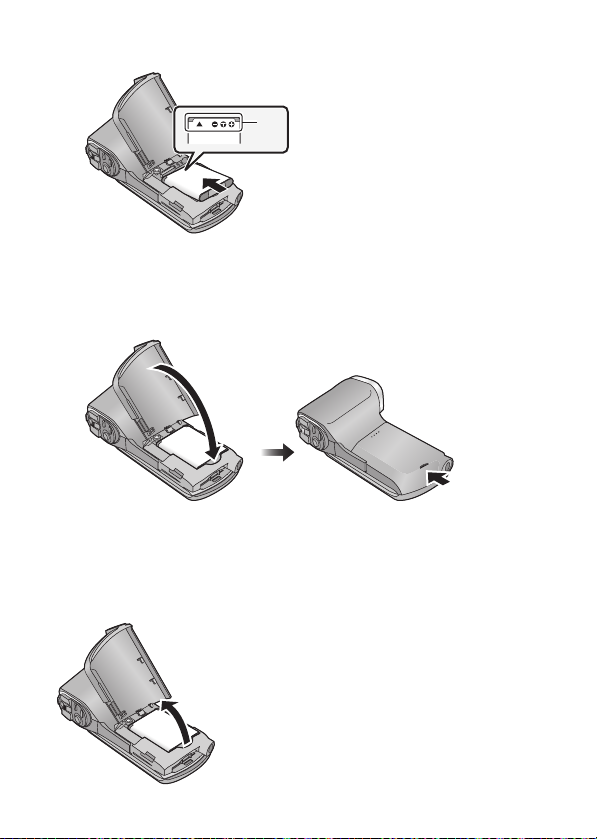
2
Insert the battery, taking care to match up the terminal markings.
A terminal markings
≥ Insert the battery so that the terminal markings face up. It is possible to
mistakenly insert the battery upside down, so be sure to check the
orientation carefully.
3 Close the battery/card cover.
≥ Securely close it until it clicks.
Removing the battery
Press and hold down the power button to turn off the unit, then pull up and
remove the battery.
≥ Always check that the LCD monitor and status indicator lamp are off.
≥ Keep the battery pack out of reach of children to prevent swallowing.
- 11 -

Charging the battery
When this unit is purchased, the battery is not charged. Charge
the battery fully before using this unit for the first time.
The unit is in the standby condition when the AC adaptor is connected.
The primary circuit is always “live” as long as the AC adaptor is
connected to an electrical outlet.
Important:
≥ The AC adaptor and USB cable are for use with this unit only. Do
not use them with other equipment. Similarly, do not use AC
adaptors and USB cables from other equipment with this unit.
≥ The battery is charged while the unit is off or in the Standby Mode.
(l 20)
The battery cannot be charged while the unit is recording or
playing back.
≥ It is recommended to charge the battery in a temperature between
10 oC and 30 oC. (The battery temperature should also be the
same.)
A Status indicator
B AC adaptor
C To the AC outlet
≥ Insert the plugs as far as they will go.
- 12 -

1 Connect the USB cable to the AC adaptor.
≥
Check that the plug portion of the AC adaptor is not misaligned.
2 Connect the AC adaptor into the AC outlet.
3 Connect the USB cable to the unit.
≥
Connecting the USB cable in the wrong direction may cause damage to
the USB/AV connector of the unit. If the connector has become damaged,
it may not operate correctly, including failure to recognise the cable even if
it has been connected.
≥
The status indicator flashes red with a period of approximately 2 seconds
(approximately 1 second on, 1 second off), and charging begins.
It will turn off when the charging is completed.
≥ Do not use any other AC adaptors except the supplied one.
≥ Do not use any other USB cables except the supplied one.
≥ We recommend using Panasonic batteries (l 14).
≥ If you use other batteries, we cannot guarantee the quality of this
product.
≥ Do not heat or expose to flame.
≥ Do not leave the battery(ies) in a car exposed to direct sunlight for a
long period of time with doors and windows closed.
≥ For charging by connecting to another device, refer to page 128.
≥ If the status indicator flashes at a particularly fast or slow rate, refer to
page 155.
- 13 -
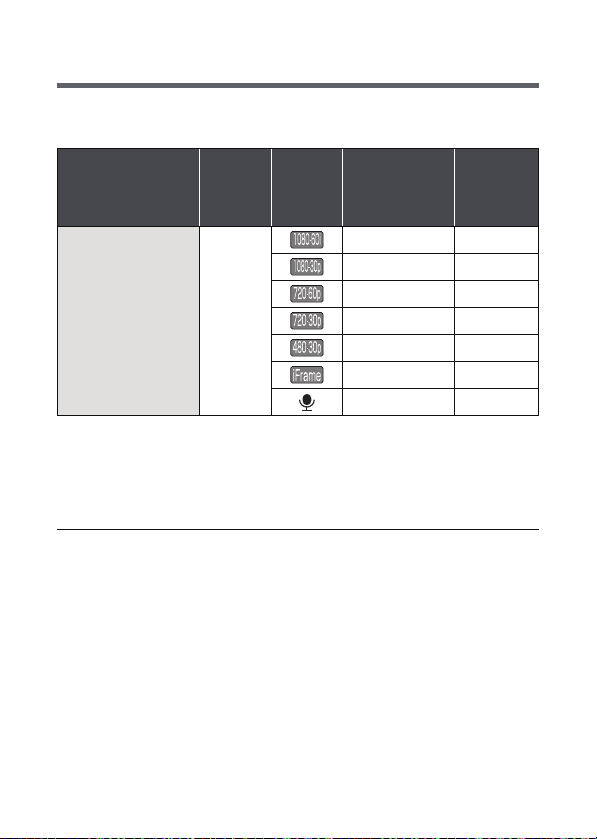
Charging and recording time
∫ Charging/Recording time
≥ Temperature: 25 oC/humidity: 60%RH (When using AC adaptor)
Battery model
number
[Voltage/Capacity
(minimum)]
Supplied battery/
VW-VBX070
(optional)
[3.7 V/700 mAh]
≥ These times are approximations.
≥ The indicated charging time is for when the battery has been
discharged completely. Charging time and recordable time vary
depending on the usage conditions such as high/low
temperature.
≥ The actual recordable time refers to the recordable time when
repeatedly starting/stopping recording, turning the unit on/off, moving
the zoom lever etc.
≥ The batteries heat up after use or charging. This is not a malfunction.
Charging
time
2h
Recording
Mode
Maximum
continuously
recordable
time
50 min 30 min
55 min 35 min
50 min 30 min
1h5min 35min
1h25min 45min
1h5min 40min
1h30min s
Actual
recordable
time
- 14 -
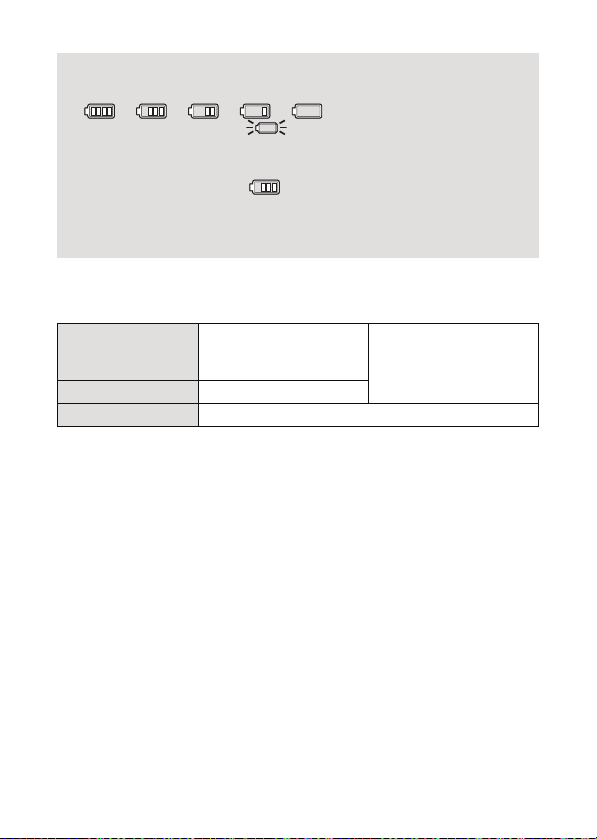
Battery capacity indication
≥ The display changes as the battery capacity reduces.
#### (red)
When the charge is low, is displayed.
≥ Due to the characteristics of the battery, it may not be possible to
correctly display the charge remaining on the battery. For instance,
at low temperatures, the indicator may turn on earlier.
Because the status of the charge remaining indicator changes
according to the ambient temperature, conditions of use, etc., the
indicator should be considered as an approximate guide.
∫ Approximate operating time and number of
recordable still pictures
Number of
recordable
pictures
Recording time Approx. 105 min
Playback time Approx. 210 min
Recording conditions by CIPA standard
≥ CIPA is an abbreviation of Camera & Imaging Products Association.
≥ Use of supplied battery
≥ Using a Panasonic SD Memory Card (2 GB)
Approx. 210 pictures
By CIPA standard
- 15 -
Preparation
Recording to a card
The unit can record motion pictures, still pictures or audio to an SD card
or built-in memory. To record to an SD card, read the following.
This unit (an SDXC compatible device) is compatible with SD Memory
Cards, SDHC Memory Cards and SDXC Memory Cards. When using
an SDHC Memory Card/SDXC Memory Card with other equipment,
check the equipment is compatible with these Memory Cards.
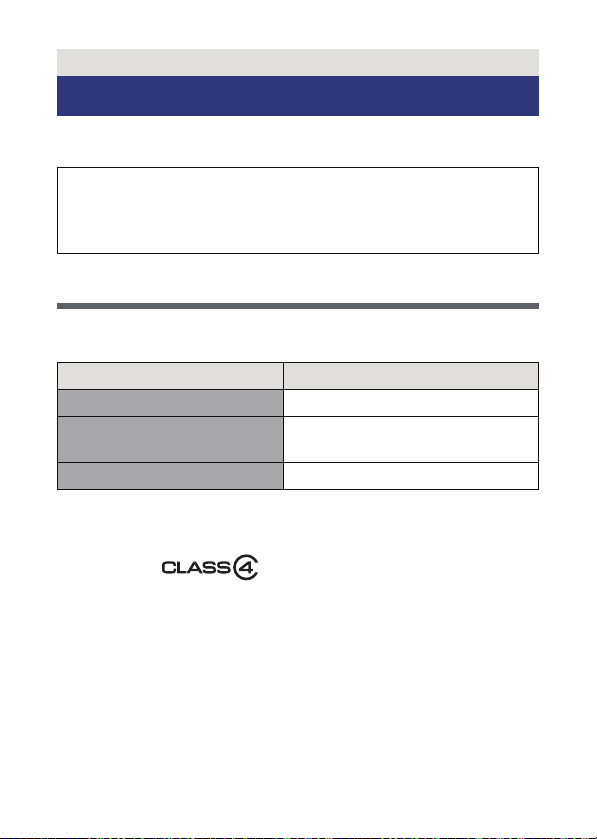
Cards that you can use with this unit
Use SD cards conforming to Class 4 or higher of the SD Speed
Class Rating* for motion picture recording.
Card type Capacity
SD Memory Card 512 MB/1 GB/2 GB
SDHC Memory Card
SDXC Memory Card 48 GB/64 GB
* SD Speed Class Rating is the speed standard regarding continuous
writing. Check via the label on the card, etc.
e.g.:
4GB/6GB/8GB/12GB/16GB/
24 GB/32 GB
- 16 -
≥ Please confirm the latest information about SD Memory Cards/SDHC
32
Memory Cards/SDXC Memory Cards that can be used for motion
picture recording on the following website.
http://panasonic.jp/support/global/cs/e_cam
(This website is in English only.)
≥ To use the Eye-Fi transfer feature (l 134), an Eye-Fi X2 series SD
card is required.
≥ Operation of SD Memory Cards with a capacity of 256 MB or less is not
guaranteed.
≥ 4 GB or more Memory Cards that do not have the SDHC logo or 48 GB
or more Memory Cards that do not have the SDXC logo are not based
on SD Memory Card Specifications.
≥ The operation of Memory cards exceeding 64 GB cannot be
guaranteed.
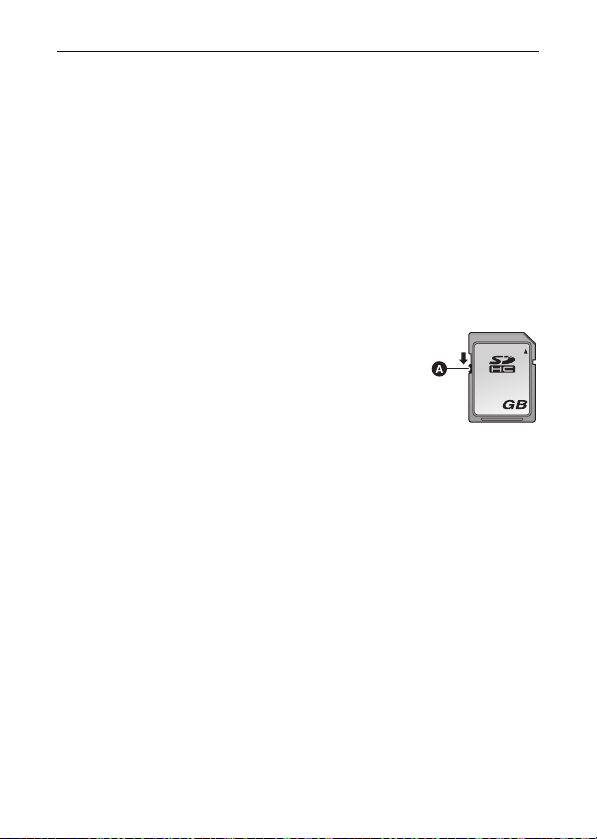
≥ When the write-protect switch A on SD card is
locked, no recording, deletion or formatting will be
possible on the card.
≥ Keep the Memory Card out of reach of children to
prevent swallowing.
- 17 -
Inserting/removing an SD card
When using an SD card not from Panasonic, or one previously used on
other equipment, for the first time on this unit, format the SD
card. (l 48) When the SD card is formatted, all of the recorded data is
deleted. Once the data is deleted, it cannot be restored.
Caution:
Check that the status indicator has gone off.
1 Open the battery/card cover.
Status indicator A
≥ When this unit is
accessing the SD card
or built-in memory, the
status indicator lights up
red.
2 Insert (remove) the SD card into (from) the card slot.
≥ Face the label side B in the direction shown in the illustration and
press it straight in as far as it will go.
≥ Press the centre of the SD card and then pull it straight out.
- 18 -

3 Close the battery/card cover.
≥ Securely close it until it clicks.
≥ Do not touch the terminals on the back of the SD card.
≥ Do not shock, bend, or drop the SD card.
≥ Electrical noise, static electricity or the failure of this unit or the SD card
may damage or erase the data stored on the SD card.
≥ When the status indicator (l 9) illuminates in red, do not:
jRemove the SD card
jTurn the unit off
jInsert and remove the USB cable
jExpose the unit to vibrations or shock
Performing the above while the indicator is on may result in damage to
data/SD card or this unit.
≥ Do not expose the terminals of the SD card to water, dirt or dust.
≥ Do not place SD cards in the following areas:
jIn direct sunlight
jIn very dusty or humid areas
jNear a heater
jLocations susceptible to significant difference in temperature
(condensation can occur.)
jWhere static electricity or electromagnetic waves occur
≥ To protect SD cards, return them to their cases when you are not using
them.
≥ About disposing of or giving away the SD card. (l 156)
- 19 -
Preparation
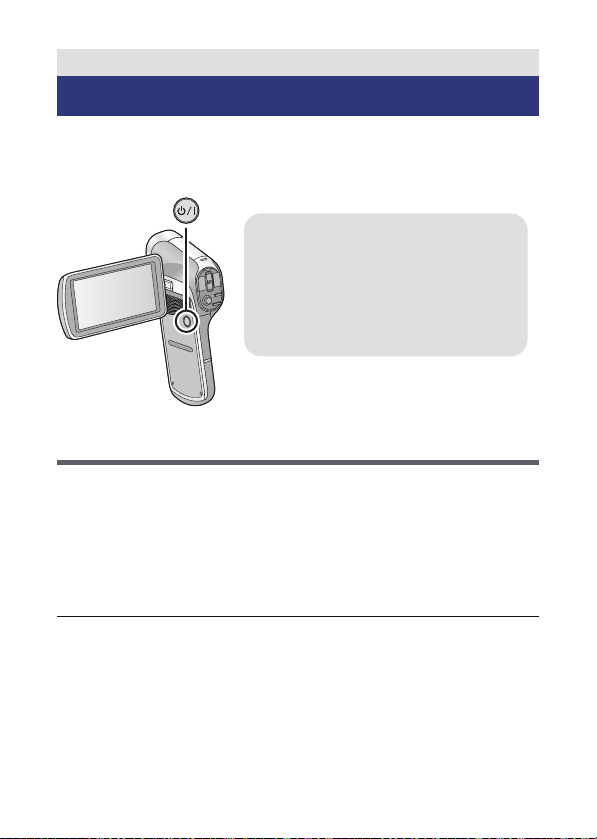
To turn off the unit
Hold down the power button until the
LCD monitor goes off.
≥ Pressing the power button for a short
time sends the unit into Standby
Mode. (l 20)
Turning the unit on/off
Open the LCD monitor and press the power button to
turn on the unit.
The LCD monitor turns on.
About Standby Mode
When the LCD monitor is closed while the unit is on, the unit enters
Standby Mode which consumes very little power.
Standby Mode allows pictures to be recorded as soon as the LCD
monitor is opened. Setting [QUICK START] to [ON] will allow the device
to switch to Recording Standby Status even faster. (l 45)
Use Standby Mode when you stop using the unit but intend to use it
again after a short time.
≥ The unit does not go into Standby Mode when you close the LCD
monitor during motion picture recording or audio recording.
≥ If you open the LCD monitor when in Standby Mode, the unit enters
Recording Mode.
- 20 -
≥ If the unit has not been operated for approximately 5 minutes (settings
at the time of purchase) when the power is turned on, the ECONOMY
function will activate and switch to Standby Mode to limit power
consumption in situations such as the user forgetting to turn the unit
off.
jWhen the unit is in Standby Mode, you can turn on the unit by
pressing the power button.
jThe time until the unit goes into Standby Mode can be changed.
(l 47)
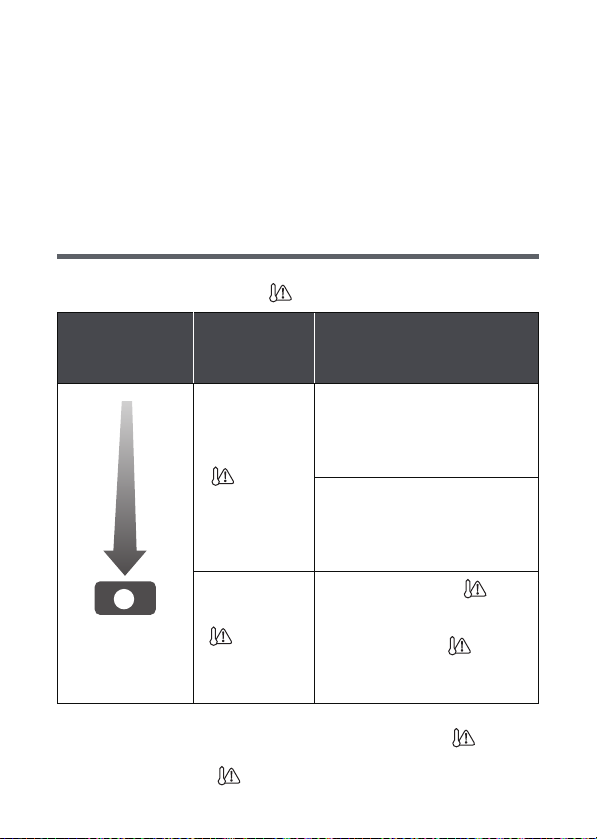
About the high temperature warning icon
If the battery temperature or unit internal temperature (excluding battery) rises,
the high temperature warning icon will provide warning as indicated below.
Battery/unit
internal
temperature
A High temperature
≥ When you turn off the unit while the temperature is high ( is
lighting), you will not be able to turn on the unit again until the
temperature lowers. ( will flash.)
Screen
display
(Lighting)
(Flashing)
Unit operation
Although it is possible to record/play
back, please stop using the unit as
soon as possible and turn off the
unit.
Motion picture recording is no longer
possible. (If you are recording a
motion picture, the recording stops.)
Please turn off the unit.
After the flashing of the , the
unit turns off automatically. The unit
does not turn on when the
temperature drops. ( flashes.)
Wait for the temperature to drop
before using the unit again.
- 21 -
Preparation
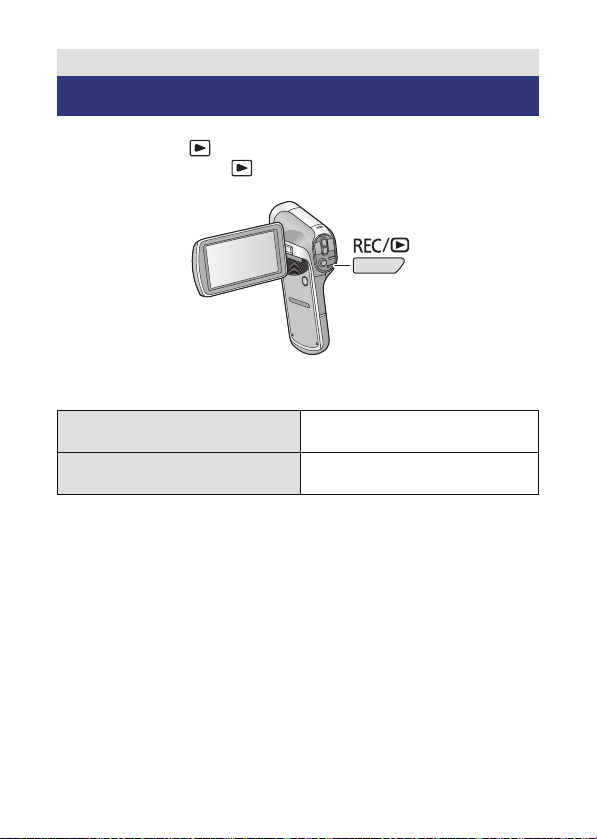
Selecting a mode
Change the mode to recording or playback.
Press the REC/ button.
≥ Each press of the REC/ button changes the mode.
Recording Mode (l 27, 30, 34)
Playback Mode (l 39, 84)
For recording motion pictures,
still pictures and audio
For playing back motion
pictures, still pictures and audio
- 22 -
Preparation
1
Setting date and time
If the screen to set the date and time appears when you turn on the unit,
skip to step 2 and follow the steps to set the date and time.
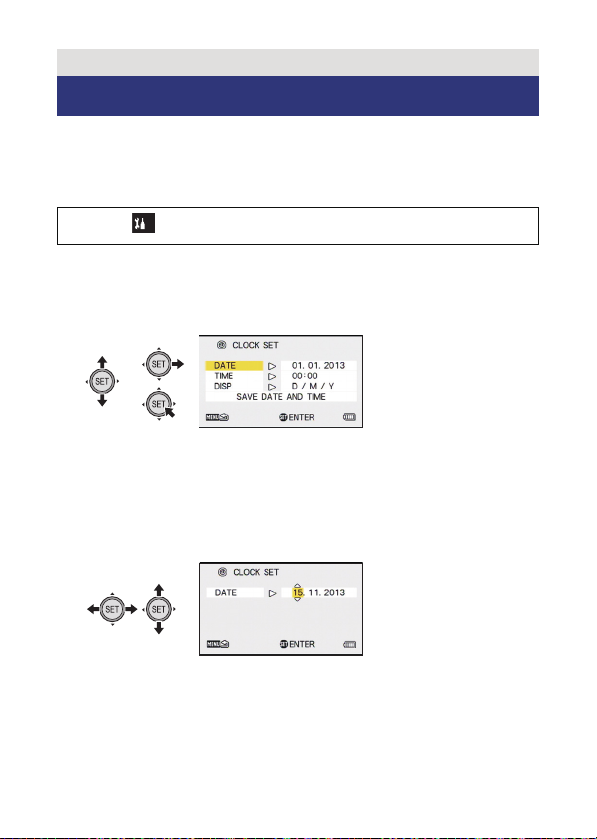
1 Select the menu. (l 43)
[MENU]: # [CLOCK SET]
2 Select an item ([DATE]/[TIME]/[DISP]) using the SET
button and then tilt the SET button to the right or
press the SET button.
3 (When [DATE] or [TIME] is selected)
Tilt the SET button to the left or right to select the
desired item and then up and down to set the
numerical values.
e.g.: When [DATE] is selected
≥ The year can be set between 2000 and 2039.
- 23 -

(When [DISP] is selected)
Select the date format display method using the SET
button.
4 Press the SET button.
5 Select [SAVE DATE AND TIME] using the SET button
and then press the SET button.
≥ To return to the recording screen or playback screen, press the MENU
button.
≥ At the time of purchase, the [CLOCK SET] is not set.
≥ If the [CLOCK SET] have not been set or the built-in clock battery has
run down, the screen display and recording time information will
appear as follows.
Recording screen display: --.--.---- -:-Recording time information: 01.01.2013 0:00
≥ To charge the built-in clock battery, install a fully charged battery in the
unit. If you leave the battery for approximately 24 hours, the time
settings will be stored for approximately 7 days. (The charging
continues even when the unit is turned off)
- 24 -
Basic
Before recording
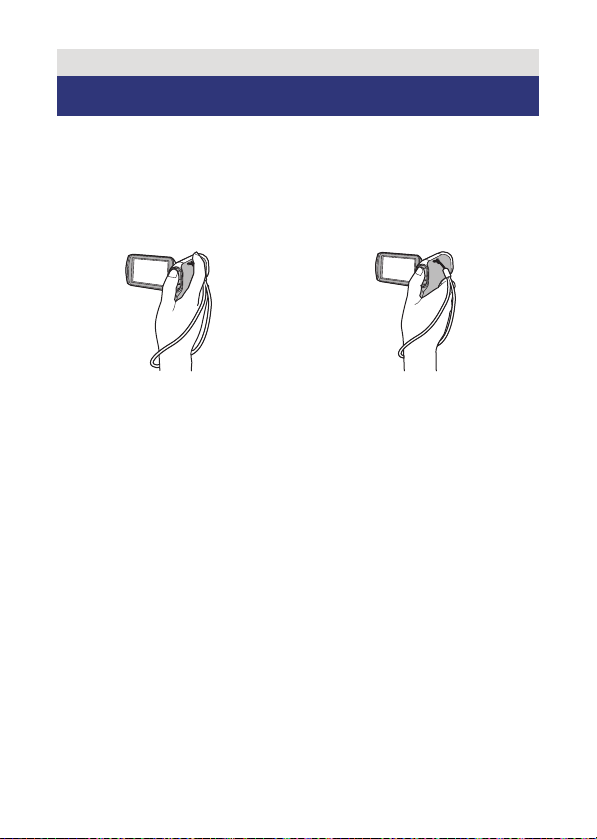
∫ Basic camera positioning
Example 1:
Grip the unit with the forefinger of
your right hand above the lens and
the middle finger to little finger
surrounding the body.
≥ To avoid dropping the unit, be sure to attach a handstrap.
≥ When recording, make sure your footing is stable and there is no
danger of colliding with another person or object.
≥ When you are outdoors, record pictures with the sunlight behind you. If
the subject is backlit, it will become dark in the recording.
≥ Keep your arms near your body and separate your legs for better
balance.
≥ When performing zoom operations, you can prevent the jitter
associated with zoom operations by placing your other hand on the
LCD monitor to stabilise the unit.
≥ Ensure that the lens and flash are not obstructed by your fingers or the
handstrap. Also, ensure that your hand is not blocking the
microphones on the LCD monitor.
Example 2:
Grip the unit with the forefinger to
little finger of your right hand
surrounding the body.
- 25 -
∫ Basic motion picture recording
≥ The unit should normally be held steady when recording.
≥ If you move the unit when recording, do so slowly, maintaining a
constant speed.
≥ The zoom operation is useful for recording subjects you cannot get
close to, but overuse of zoom in and zoom out can make the resulting
motion picture less enjoyable to watch.
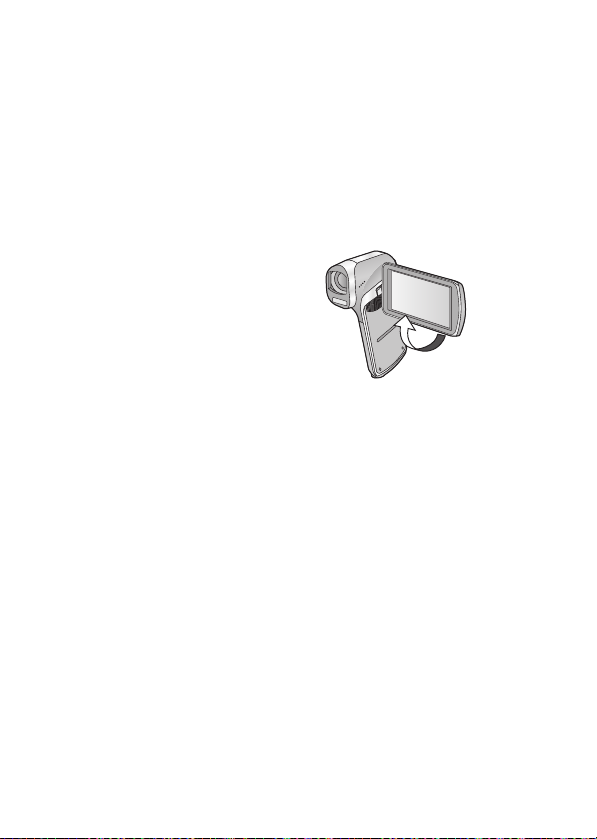
∫ Recording yourself
Rotate the LCD monitor towards the lens side.
≥ The image is horizontally flipped
as if you see a mirror image.
(However the image recorded is
the same as a normal recording.)
∫ If the surface of the unit gets hot
Due to the characteristics of the unit, the outer surface may become
warm during use, but this does not indicate a malfunction.
≥ If the unit starts to feel uncomfortably hot during use, you might
temporarily discontinue use until it cools down, or try holding it in your
other hand for a while. Please use a tripod or other support when using
the unit for a long time.
- 26 -
Basic
000:00:00
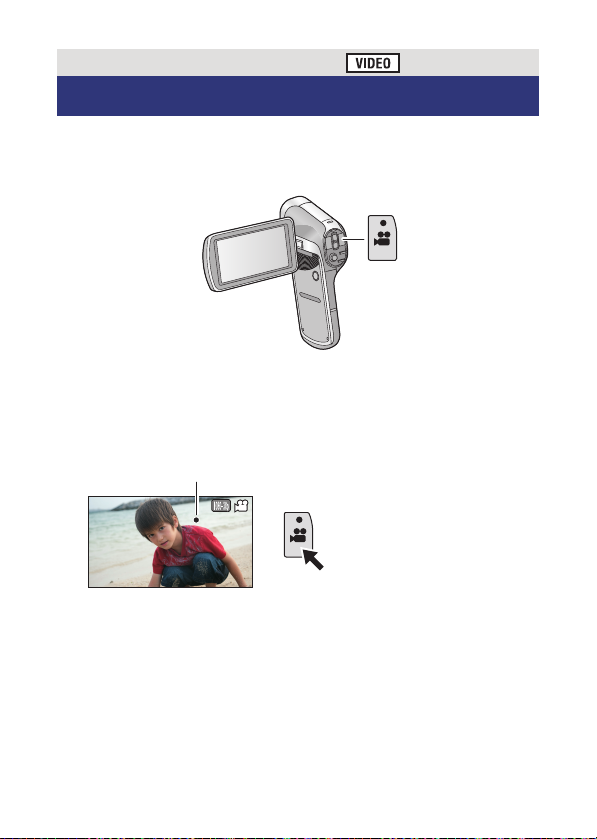
Recording motion pictures
≥ Before turning on the unit, remove the lens cap.
≥
Motion pictures are recorded to the SD card if one is inserted. If no SD
card is inserted, the motion pictures are recorded to the built-in memory.
1 Open the LCD monitor.
2 Press the recording start/stop button to start
recording.
000:00:00
000:00:00
A When you begin recording, ¥ appears.
3 Press the recording start/stop button again to pause
recording.
- 27 -
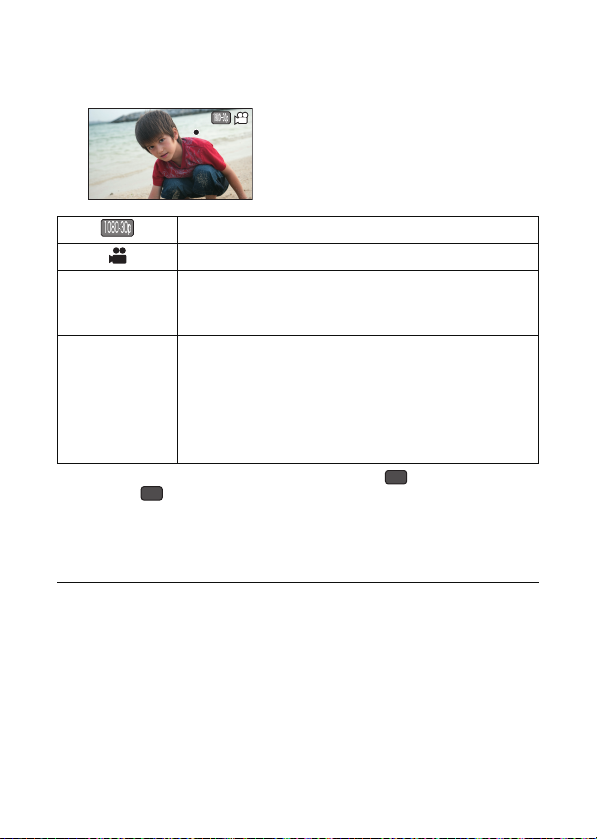
∫ About the screen indications in the motion picture
000:00:15000:00:15000:00:15
MINI
recording
Recording Mode (l 62)
Motion picture operation indicator (l 140)
μ (Red)
000:00:15
* When [CREATIVE CONTROL] (l 64) is set to (Miniature Effect
(MINI)) or (Time Lapse Rec (INTV)), the maximum recordable time
for one scene (012:00:00) is displayed. (When the remaining space on
the SD card is equal to less than 12 hours or when recording to the
built-in memory, the remaining recordable time on the SD card or builtin memory is displayed.)
≥ The images recorded between pressing the recording start/stop button
to start recording and pressing it again to pause recording become one
scene.
≥ If the file size exceeds 4 GB during recording, the unit saves the file
and saves the continuation in a new file. (A new file is created
automatically every 4 GB (l 42))
≥ While recording is in progress, the recording will not stop even if the
LCD monitor is closed.
During motion picture recording
When the remaining recordable time drops to
approximately 30 seconds or less, μ flashes.
During recording:
Recording time elapsed
Each time the unit is put into recording pause, the
counter display will be reset to 000:00:00.
During recording standby:
Approximate remaining recordable time*
INTV
- 28 -

≥ Recording may become out of focus if the unit is subjected to shock
while the power is turned on. If this happens, hold the power button
until the LCD monitor turns off to turn the power to the unit off, and turn
the power on again.
≥ Maximum number of recordings per SD card
file : 899100
folder : 900
≥ Please refer to page 159 for details about approximate recordable
time.
About the compatibility of the recorded motion
pictures
≥ They are not compatible with devices other than those that support
MP4. Images cannot be played with equipment that does not
support MP4. Confirm that your equipment supports MP4 by
referring to the operating instructions.
≥ There are some cases where the recorded motion pictures cannot
be played back, even if the device supports MP4. In such a case,
play back on this unit instead.
- 29 -
Basic
F3.5
1/30
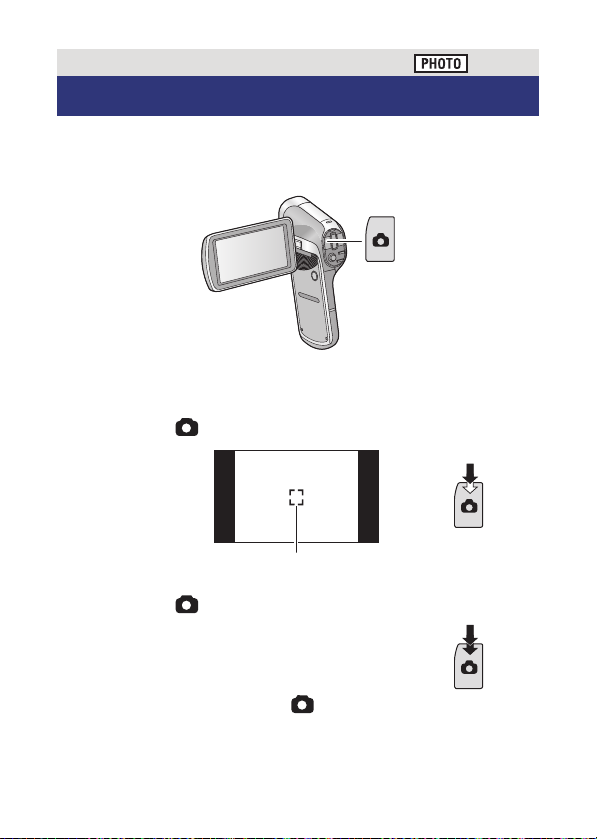
Recording still pictures
≥ Before turning on the unit, remove the lens cap.
≥ Still pictures are recorded to SD card if one is inserted. If no SD card is
inserted, the still pictures are recorded to the built-in memory.
1 Open the LCD monitor.
2 (For Auto Focus only)
Press the button halfway.
F3.5
F3.5
1/30
1/30
A Focus area (area inside brackets)
3 Press the button fully.
≥ If you continue to hold down the button, you can check the
recorded image on the LCD monitor.
- 30 -
 Loading...