

Page 1

Operating Instructions
Dual Camera
Model No. HX-WA2
HX-DC2
Before use, please read these instructions completely.
VQT4F33
Page 2

Information for Your Safety
∫ About recording formats and compatibility of the unit
≥ The unit is an MP4 format (MPEG-4 AVC file standard) Dual Camera
for recording high-definition motion pictures.
≥ AVCHD and MPEG2 motion pictures are different formats, and are not
therefore supported by the unit.
∫ Indemnity about recorded content
Panasonic does not accept any responsibility for damages directly or
indirectly due to any type of problems that result in loss of recording or
edited content, and does not guarantee any content if recording or editing
does not work properly. Likewise, the above also applies in a case where
any type of repair is made to the unit (including any other non-built-in
memory related component).
∫ Handling of built-in memory
This unit is equipped with the built-in memory. When using this
component, pay attention to the following points.
Back up data periodically.
The built-in memory is temporary storage. In order to avoid erasing data
due to static electricity, electromagnetic waves, breakage, and failures,
back up the data to a PC or disc. (l 135)
≥ The status indicator (l 17, 22) illuminates in red while the SD card or
built-in memory is being accessed (initialization, recording, playback,
deleting etc.). Do not perform the following operations when the
indicator illuminates. It may damage the built-in memory or cause a
malfunction in the unit.
jTurn the unit off (remove the battery)
jInsert and remove the SD Card
jInsert and remove the USB cable
jExpose the unit to vibrations or shock
≥ About disposing of or giving away this unit. (l 175)
- 2 -
Page 3
∫ Cards that you can use with this unit
HX-WA2
HX-DC2
SD Memory Card, SDHC Memory Card and SDXC Memory Card
≥ 4 GB or more Memory Cards that do not have the SDHC logo or 48 GB
or more Memory Cards that do not have the SDXC logo are not based
on SD Memory Card Specifications.
≥ Refer to page 32 for more details on SD cards.
∫ For the purposes of these operating instructions
≥ SD Memory Card, SDHC Memory Card and SDXC Memory Card are
referred to as the “SD card”.
≥ Functions that can be used for motion picture recording/motion picture
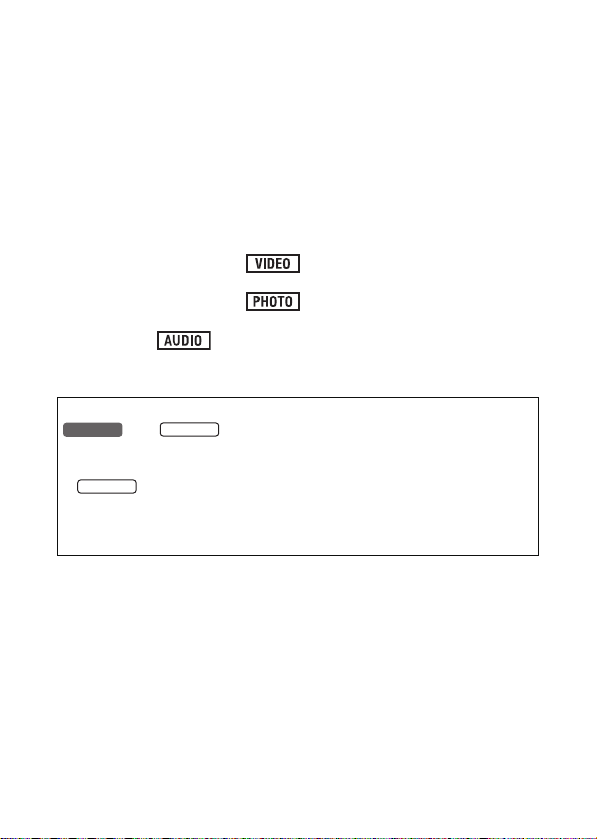
playback are indicated by in these operating instructions.
≥ Functions that can be used for still picture recording/still picture
playback are indicated by in these operating instructions.
≥ Functions that can be used for audio recording/audio playback are
indicated by in these operating instructions.
≥ Pages for reference are indicated by an arrow, for example: l 00
≥ “File” is used to mean “scene”, “still picture” and “audio file”.
These operating instructions are designed for use with models
original.
≥ The illustrations used in these operating instructions show model
≥ Depending on the model, some functions are not available.
≥ Features may vary, so please read carefully.
≥ Not all models may be available depending on the region of purchase.
and . Pictures may be slightly different from the
, however, parts of the explanation refer to different models.
HX-DC2
- 3 -
Page 4

Contents
Information for Your Safety............................................................... 2
Preparation
(Important)
About the Waterproof Performance of this unit [HX-WA2] ............ 8
Check before using underwater .................................................. 10
Using this unit underwater........................................................... 13
Caring of this unit after using it underwater................................. 13
Names and Functions of Main Parts .............................................. 17
HX-WA2 ...................................................................................... 17
HX-DC2....................................................................................... 20
Power supply.................................................................................... 23
Inserting/removing the battery..................................................... 23
Charging the battery ................................................................... 27
Charging and recording time....................................................... 29
Recording to a card ......................................................................... 32
Cards that you can use with this unit .......................................... 32
Inserting/removing an SD card.................................................... 34
Turning the unit on/off ..................................................................... 38
About standby mode ................................................................... 38
About economy function ............................................................. 39
About the high temperature warning icon ................................... 40
Selecting a mode ............................................................................. 41
Setting date and time....................................................................... 42
- 4 -
Page 5

Basic
Before recording .............................................................................. 44
Recording motion pictures ............................................................. 46
Recording still pictures ................................................................... 49
About recording still pictures during motion picture recording
and audio recording .................................................................... 52
Recording audio............................................................................... 53
Intelligent Auto Mode ...................................................................... 55
Motion picture/Still picture/Audio playback .................................. 58
Using the menu screen ................................................................... 62
Using Option Menu .......................................................................... 64
OPTION MENU 1 ........................................................................ 64
OPTION MENU 2 ........................................................................ 66
OPTION MENU 3 ........................................................................ 68
Advanced (Recording)
Using the zoom ................................................................................ 71
Double range zoom..................................................................... 72
Zoom mode ................................................................................. 73
Image stabiliser ................................................................................ 74
Burst recording................................................................................ 75
Recording panorama still pictures ................................................. 77
Recording underwater [HX-WA2] ................................................... 80
Record with colour balance and audio that are suitable for
recording underwater.................................................................. 80
Recording functions of menus ....................................................... 81
RECORDING MENU 1................................................................ 81
RECORDING MENU 2................................................................ 86
RECORDING MENU 3................................................................ 91
RECORDING MENU 4................................................................ 97
Manual recording ............................................................................. 99
White Balance ............................................................................. 99
Setting the focus and recording ................................................ 101
- 5 -
Page 6

Advanced (Playback)
Playback Operations ..................................................................... 102
Playback using operation icon .................................................. 102
Creating still picture from motion picture................................... 104
Cutting out a section of a panorama still picture....................... 105
Zooming in on a still picture during playback
(Playback zoom) ....................................................................... 106
Various playback functions .......................................................... 107
Changing the playback settings and playing back the
slide show ................................................................................. 107
Displaying file information ......................................................... 109
Using the playback menu.............................................................. 111
PLAYBACK MENU 1.................................................................. 111
PLAYBACK MENU 2 ................................................................. 113
Deleting scenes/still pictures/audio files..................................... 117
Protecting a file ......................................................................... 120
Watching Video/Pictures on your TV ........................................... 121
Connecting with a HDMI micro cable/HDMI mini cable............. 126
TV format setting ....................................................................... 126
Playback using VIERA Link .......................................................... 127
Copy/Dubbing
Copying from Built-in Memory to SD card .................................. 131
Dubbing images onto other video devices.................................. 133
- 6 -
Page 7

With a PC
What you can do with a PC ........................................................... 135
End User License Agreement ................................................... 138
Operating environment ................................................................. 140
Installation ...................................................................................... 144
Connecting to a PC........................................................................ 145
Use as a card reader ................................................................ 146
Using the unit as a web camera................................................ 149
Starting HD Writer VE 2.0 .............................................................. 151
Reading the operating instructions of the software
applications ............................................................................... 151
If using Mac .................................................................................... 152
Uploading files to a web service .................................................. 154
Using the Eye-Fi
™
transfer feature .............................................. 157
Others
LCD Display Indications................................................................ 160
Messages ........................................................................................ 164
Troubleshooting............................................................................. 164
Cautions for use............................................................................. 173
About copyright ............................................................................. 180
Recording modes/approximate recordable time ........................ 182
Approximate number of recordable pictures .............................. 184
- 7 -
Page 8

Preparation
(Important) About the Waterproof Performance of this unit [HX-WA2]
Waterproof Performance
This unit’s waterproof rating complies with the “IPX8” rating.
Provided the care and maintenance guidelines described in
this document are strictly followed, this unit can operate
underwater, to a depth not exceeding 3 m for a time not
exceeding 60 minutes. *
This does not guarantee no destruction, no malfunction, or
waterproofing in all conditions.
* This means that this unit can be used underwater for specified time in
specified pressure in accordance with the handling method established
by Panasonic.
∫ Handling of this unit
≥ Waterproofing is not guaranteed if the unit is subject to an impact as a
result of being hit or dropped etc. If an impact to this unit occurs, it
should be inspected (subject to a fee) by a Panasonic’s Service Centre
to verify that the waterproofing is still effective.
≥ The waterproof performance may be degraded due to the strong water
pressure when this unit is used deeper than 3 m underwater.
≥ When this unit is splashed with detergent, soap, hot spring, bath
additive, sun oil, sun screen, chemical, etc., wipe it off immediately.
≥ Waterproof function of this unit is for sea water and fresh water only.
≥ Any malfunction caused by customer misuse, or mishandling will not
be covered by the warranty.
≥ The inside of this unit is not waterproof. Water leakage will cause
malfunction.
≥ Supplied accessories such as battery pack etc. are not waterproof.
(excluding handstrap)
≥ Cards are not waterproof. Do not handle with a wet hand. Also, do not
insert wet card into this unit.
- 8 -
Page 9

≥ Do not leave this unit for a long period of time in places where
temperature is very low (at ski resorts or at high altitude etc.) or very
high (above 35 oC), inside a car under strong sunlight, close to a
heater, on the beach, etc. Waterproof performance may be degraded.
≥ Foreign objects may adhere to the inner side of the rear door
(around the rubber seal or connecting terminals) when the rear
door is opened or closed in places with sand or dust etc. This
may result in the impairment of the waterproof performance if the
rear door is closed with foreign objects adhered. Be extremely
careful since it may result in malfunction etc.
≥ If any foreign object has adhered to the inner side of the rear door,
remove with the lint-free cloth.
≥
If any liquid such as water droplets has adhered to this unit or inner
side of the rear door, wipe off with a soft dry cloth. Do not open or
close the rear door near the water, when underwater, using wet
hands, or when this unit is wet. It may cause water leakage.
∫ When inner side of the lens is fogged (condensation)
It is not a malfunction or failure of this unit. It may be caused by the
environment in which this unit is used.
≥ Be careful of condensation since it causes lens stains, fungus and unit
malfunction.
What to do when inner side of the lens is fogged
≥ Turn off the unit and open the rear door in a place with constant
ambient temperature, away from high temperatures, humidity, sand
and dust. The fog will disappear naturally in about 2 hours with the rear
door open when the temperature of this unit gets close to the ambient
temperature.
≥ Contact Panasonic’s Service Centre if the fogging does not disappear.
Conditions in which inner side of the lens may be fogged
Condensation may occur and the inner side of the lens may be fogged
when this unit is used in areas that undergo a significant change in
temperature or in high humidity, such as the following:
≥ When this unit is used underwater suddenly after being on a hot
beach etc.
≥ When this unit is moved to a warm area from a cold area, such as
at a ski resort or at high altitude
≥ When the rear door is opened in a high-humidity environment
- 9 -
Page 10
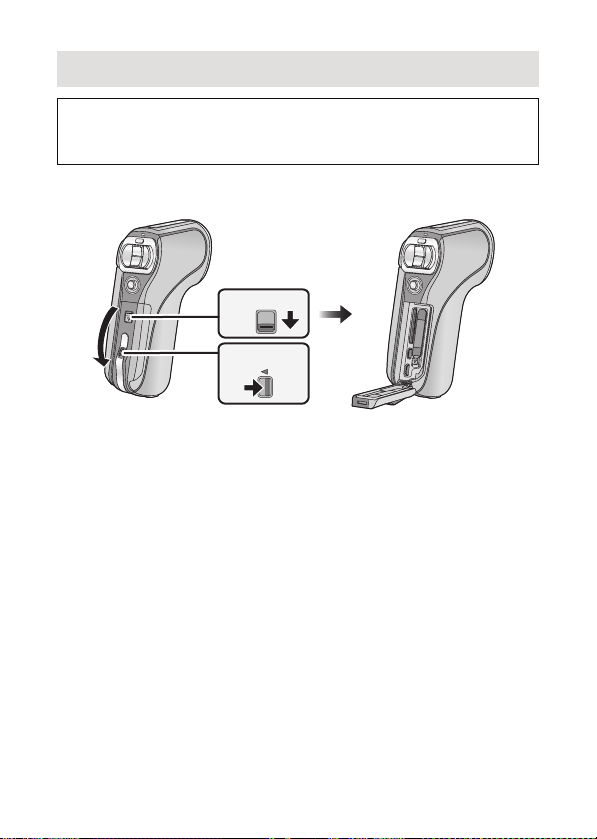
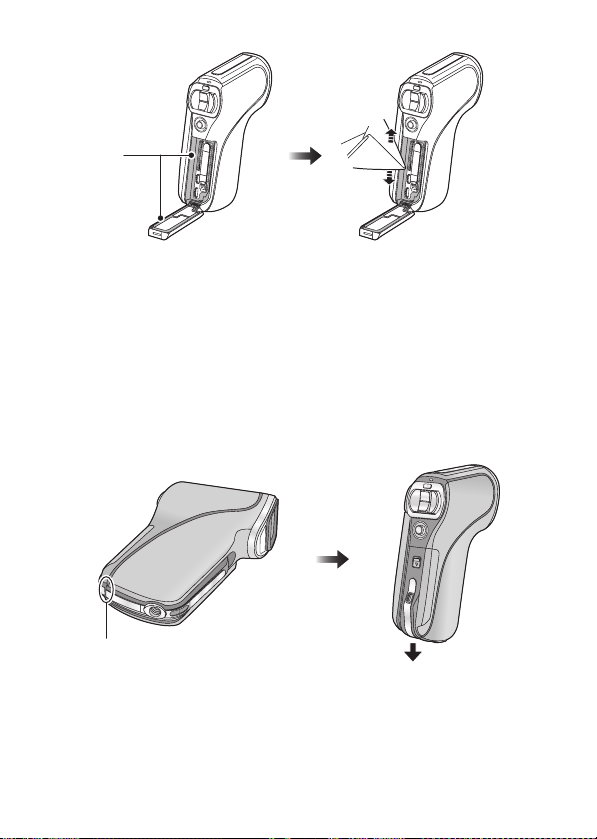
Check before using underwater
LOCK
SD CARD/
BATTERY
Do not open or close the rear door in places with sand and dust,
close to water, or with wet hands. Sand or dust adhering may
cause water leaks.
1 Open the rear door.
1 Unlock the LOCK lever.
2 Slide the open/close lever.
3 Open the rear door.
2 Check that there are no foreign objects on the inner
side of the rear door.
≥ If there are any foreign objects, such as lint, hair, sand, etc., on the
surrounding area, water will leak within a few seconds causing
malfunction.
3 If there is foreign matter adhering to the unit, use the
supplied brush to remove it.
≥ Be extremely careful to remove any sand etc. that may adhere to the
sides and corners of the rubber seal.
≥ Keep the brush out of reach of children to prevent swallowing.
- 10 -
Page 11
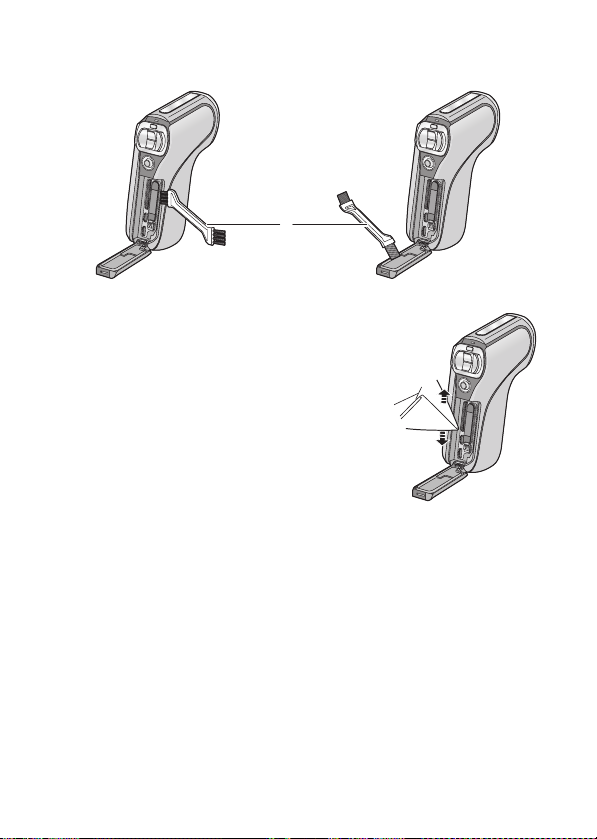
≥ Use the brush end with the short (hard) bristles to remove larger
foreign matter or damp sand from the unit.
A Brush (supplied)
≥ Wipe it off with a dry soft cloth if there is any
liquid. It may cause water leaks and
malfunction if you use this unit with liquid
adhered.
4 Check for cracks and deformation of the rubber seal
on the rear door.
≥ The integrity of the rubber seals may decrease after about 1 year, with
use and age. To avoid permanently damaging this unit the seals should
be replaced once each year. Please contact Panasonic’s Service
Centre for related costs and other information.
- 11 -
Page 12

5 Close the rear door securely.
SD CARD/
BATTERY
LOCK
1 Close the rear door.
2 Slide the open/close lever.
3 Lock the LOCK lever.
≥ Lock securely to the points where the red portion of the open/close
lever and LOCK lever are no longer visible.
≥ To prevent water seeping into this unit, be careful not to trap foreign
objects such as liquids, sand, hair or dust etc.
∫ About handling the brush
≥ Before use, check that foreign matter has not adhered to the brush.
≥ After use, remove any adhered foreign matter and clean in preparation
for next use.
- 12 -
Page 13

Using this unit underwater
≥ Use this unit underwater at a depth of down to 3 m with the water
temperature between 0 oC and 35 oC.
≥ Do not use this unit at a depth of over 3 m.
≥ Do not use it in hot water over 35 oC (in the bath or hot spring).
≥
Do not use this unit underwater not longer than 60 minutes continuously.
≥ Do not open or close the rear door.
≥ Do not apply shock to this unit underwater. (Waterproof performance
may not be maintained, and there is a chance of water leak.)
≥
Do not dive into the water holding this unit. Do not use this unit in a location
where the water will splash strongly, such as rapid flow or waterfall. (Strong
water pressure may be applied, and it may cause malfunction.)
≥ This unit will sink in the water. Take care not to drop this unit and lose it
underwater by securely placing the strap around your wrist or similar
measure.
≥ Attaching a tripod with a 5.5 mm screw or larger may open a hole in
this unit through which water will leak.
Caring of this unit after using it underwater
Do not open or close the rear door until the sand and dust is
removed by rinsing this unit with water.
Make sure to clean this unit after using it.
≥ Thoroughly wipe off any water droplets, sand, and saline matter on
your hands, body, hair, etc.
≥ It is recommended to clean this unit indoors, avoiding places where
water spray or sand may fall.
Do not leave this unit uncared for longer than 60 minutes after
using it underwater.
≥ Leaving this unit with foreign objects or saline matter on it may
cause damage, discolouration, corrosion, unusual odour, or
deterioration of the waterproof performance.
- 13 -
Page 14
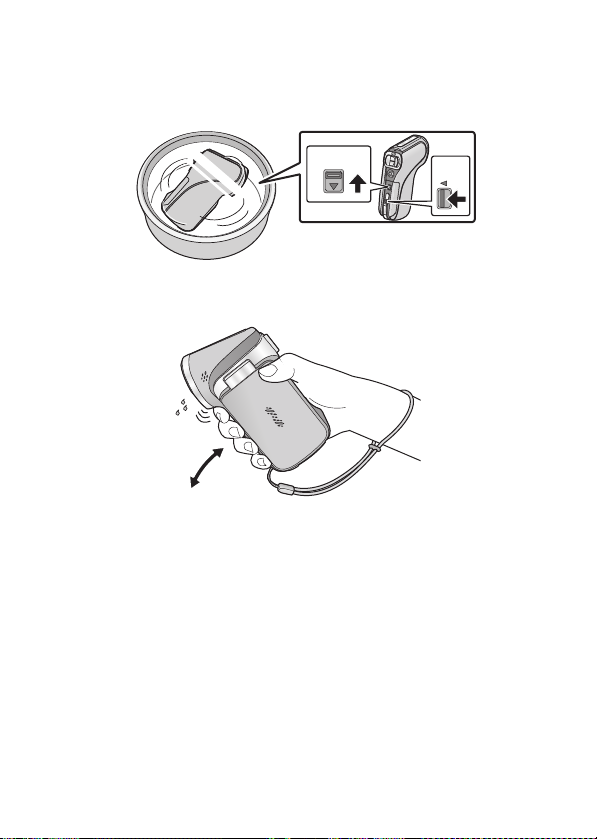
1 Rinse with water with the rear door closed.
≥ After use at the seaside or underwater, soak the unit in fresh water
pooled in a shallow container for 10 minutes or less.
SD CARD/
BATTERY
LOCK
2 Drain water by holding this unit upside down and
shaking it lightly a few times.
≥ After using this unit at the seaside or underwater, or after washing it,
water will remain at the speaker site of this unit for a while and it may
cause lower sound or sound distortion.
≥ Fasten the strap firmly to prevent this unit from dropping.
- 14 -
Page 15

3 Wipe off water drops on this unit with a dry soft cloth
and dry this unit in a shaded area which is well
ventilated.
≥ Dry this unit by standing it on a dry cloth.
≥ Do not dry this unit with hot air from dryer or similar. It will deteriorate
the waterproof performance or cause failure due to deformation.
≥ Do not use chemicals such as benzine, thinner, alcohol, or cleanser, or
soap or detergents.
4 Confirm that there are no water droplets, open the
rear door, and wipe off any water droplets or sand left
inside using a soft dry cloth.
≥ Water droplets may adhere to the card when the rear door is opened
without thoroughly drying. Also, water may accumulate in the gap
around the card compartment, the battery compartment or the terminal
connector. Be sure to wipe any water off with a soft dry cloth.
≥ The water droplets may seep into this unit when the rear door is closed
while it is still wet, causing condensation or failure.
∫ Wiping moisture from the unit
If there is moisture inside the rear door, wipe every crevice completely
clear of moisture.
(This moisture is not due to exposure to water)
- 15 -
Page 16
A Moisture here
∫ About the water draining design
This unit is designed so that water that entered the gaps around the
zoom button etc. drains out. For this reason, bubbles may appear when
the unit is immersed in water, but this is not a malfunction.
Draining water from the unit
Drainage holes are found on the bottom of the unit. Hold the unit
vertically, as shown, to drain off the water.
When draining, attach the hand strap to the unit and secure the hand
strap to your wrist to prevent the unit from dropping.
B Drainage holes
- 16 -
Page 17

Preparation
12
8
3
7
6
4
5
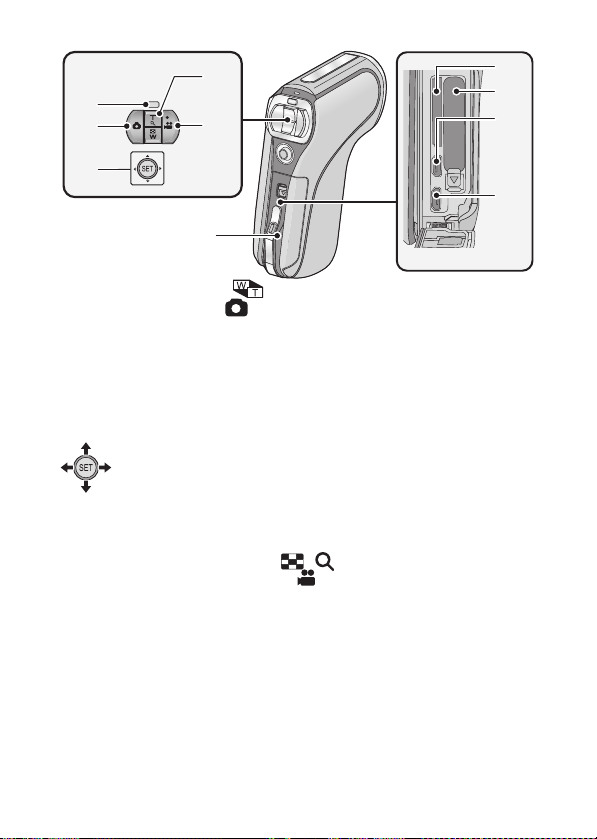
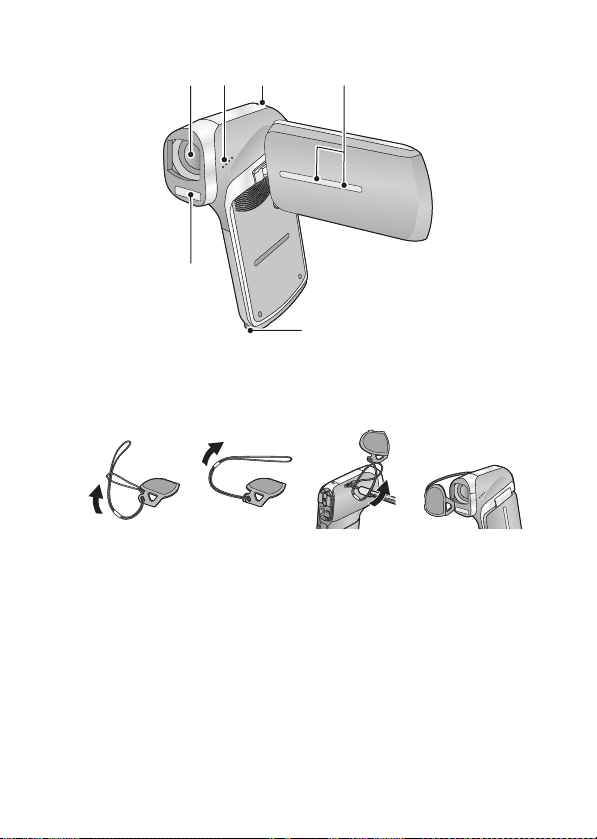
Names and Functions of Main Parts
HX-WA2
1 LCD monitor (l 45)
≥ It can open up to 90o A, rotate up to 180o B towards the lens or 105o
C towards the opposite direction.
Due to limitations in LCD production technology, there may be some
tiny bright or dark spots on the LCD monitor screen. However, this is
not a malfunction and does not affect the recorded picture.
2 Power button [ ] (l 38)
3 Status indicator (l 2, 27, 34, 177)
4 Open/close lever [SD CARD/BATTERY] (l 23, 34)
5 Lock lever [LOCK] (l 23, 34)
6 Menu button [MENU] (l 62)
7 REC/ button [REC/ ] (l 41)
8 Intelligent auto button [ ] (l 55)
- 17 -
Page 18
9 Zoom range button [ ] (l 72)
9
10
11
12
18
17
16
15
14
13
10 Photoshot button [ ] (l 49)
11 SET button [SET] (l 58, 62, 93, 102)
≥ Use the SET button to select the recording functions and playback
operations, and to operate the menu screen.
≥ In these operating instructions, the SET button is denoted as shown
below.
Example:
or Select using the SET button
12 In Recording Mode: Zoom button [W/T] (l 71)
In Playback Mode: Volume button (l 60, 108)
Zoom button [W/T] (l 106)
Thumbnail display switch [ / ] (l 60)
13 Recording start/stop button [ ] (l 46)
14 Rear door (l 23, 34)
15 Card slot
16 Battery holder
17 HDMI micro connector (l 121, 128)
18 USB/AV connector (l 121, 133, 145)
≥ Use the USB cable/AV cable (only the supplied cable).
- 18 -
Page 19

19
20
22
23
21
19 Lens
20 Built-in flash (l 86)
≥ The flash reaches high temperatures and may cause burns if touched.
Please do not touch the flash.
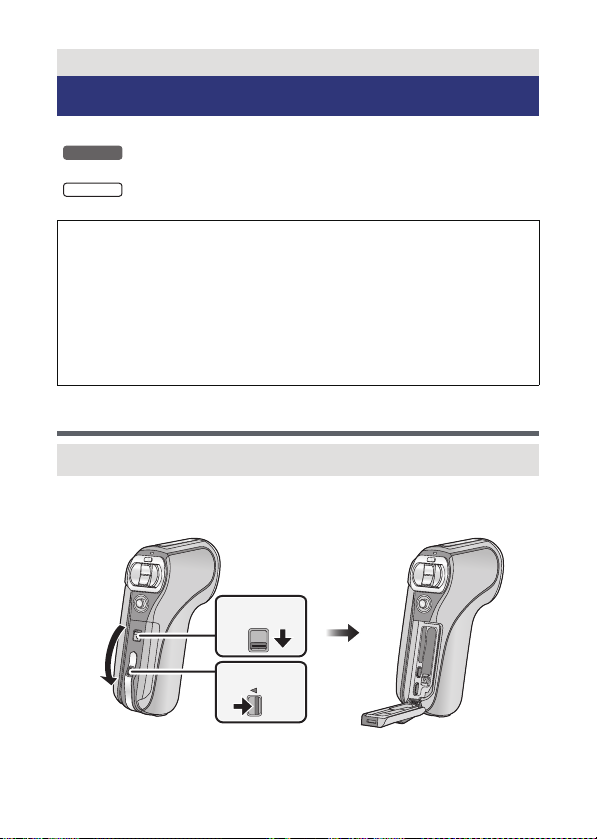
21 Hand strap fixture
≥ Adjust the length after passing your arm through the hand strap.
22 Speaker
23 Internal stereo microphones
24 Tripod receptacle
≥ If you attach a tripod which has a 5.5 mm screw or larger, it may
damage this unit.
24
- 19 -
Page 20
HX-DC2
1
2
3
4
1 LCD monitor (l 45)
≥ It can open up to 90o.
Due to limitations in LCD production
technology, there may be some tiny bright or
dark spots on the LCD monitor screen.
However, this is not a malfunction and does
not affect the recorded picture.
≥ It can rotate up to 180o A towards the lens or 105o B towards the
opposite direction.
2 Power button [ ] (l 38)
3 USB/AV connector (l 122, 133, 145)
≥ Use the USB cable/AV cable (only the supplied cable).
4 HDMI mini connector (l 122, 128)
- 20 -
Page 21
5 Hand strap fixture
8
7
13
12
11
10
9
6
5
14
15
6 Zoom range button [ ] (l 72)
7 Photoshot button [ ] (l 49)
8 SET button [SET] (l 58, 62, 93, 102)
≥ Use the SET button to select the recording functions and playback
operations, and to operate the menu screen.
≥
In these operating instructions, the SET button is denoted as shown below.
Example:
or Select using the SET button
9 In Recording Mode: Zoom lever [W/T] (l 71)
In Playback Mode: Volume lever (l 60, 108)
Zoom lever [W/T] (l 106)
Thumbnail display switch [ / ] (l 60)
10 Recording start/stop button [ ] (l 46)
11 Menu button [MENU] (l 62)
12 REC/ button [REC/ ]
13 Battery/Card cover (l 25, 36)
14 Battery holder
15 Card slot
(
l 41
)
- 21 -
Page 22
16
17
18
19
20
21
16 Lens
≥ When not using the unit, be sure to fit the lens cap to protect the lens.
≥ Keep the lens cap out of reach of children to prevent swallowing.
17 Speaker
18 Status indicator (l 2, 28, 36, 177)
19 Internal stereo microphones
20 Built-in flash (l 86)
≥ The flash reaches high temperatures and may cause burns if touched.
Please do not touch the flash.
21 Tripod receptacle
≥ If you attach a tripod which has a 5.5 mm screw or larger, it may
damage this unit.
- 22 -
Page 23
Preparation
HX-WA2
HX-DC2
LOCK
SD CARD/
BATTERY
Power supply
∫ About batteries that you can use with this unit
The battery that can be used with this unit is VW-VBX090.
The battery that can be used with this unit is VW-VBX070.
It has been found that counterfeit battery packs which look very
similar to the genuine product are made available to purchase in
some markets. Some of these battery packs are not adequately
protected with internal protection to meet the requirements of
appropriate safety standards. There is a possibility that these battery
packs may lead to fire or explosion. Please be advised that we are not
liable for any accident or failure occurring as a result of use of a
counterfeit battery pack. To ensure that safe products are used we
would recommend that a genuine Panasonic battery pack is used.
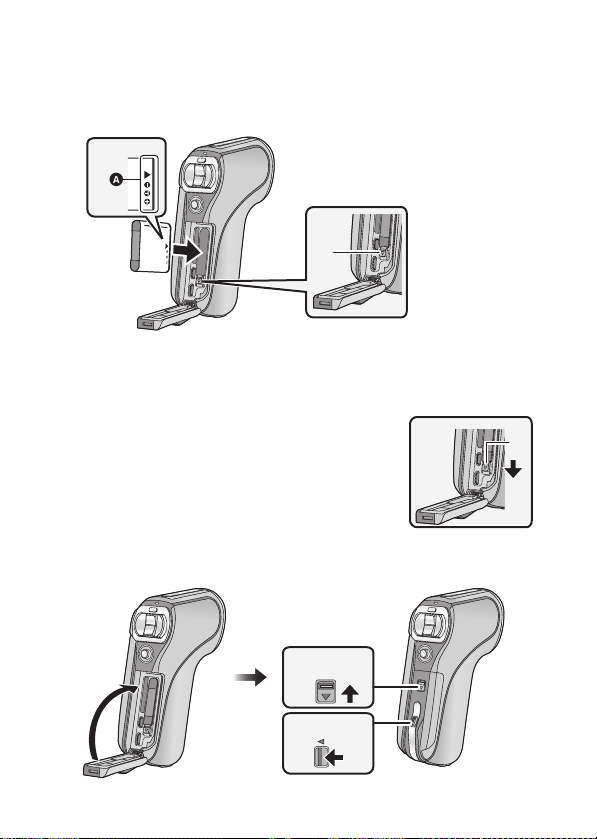
Inserting/removing the battery
HX-WA2
≥ Press the power button to turn off the unit. (l 38)
1 Open the rear door.
1 Unlock the LOCK lever.
2 Slide the open/close lever.
3 Open the rear door.
- 23 -
Page 24
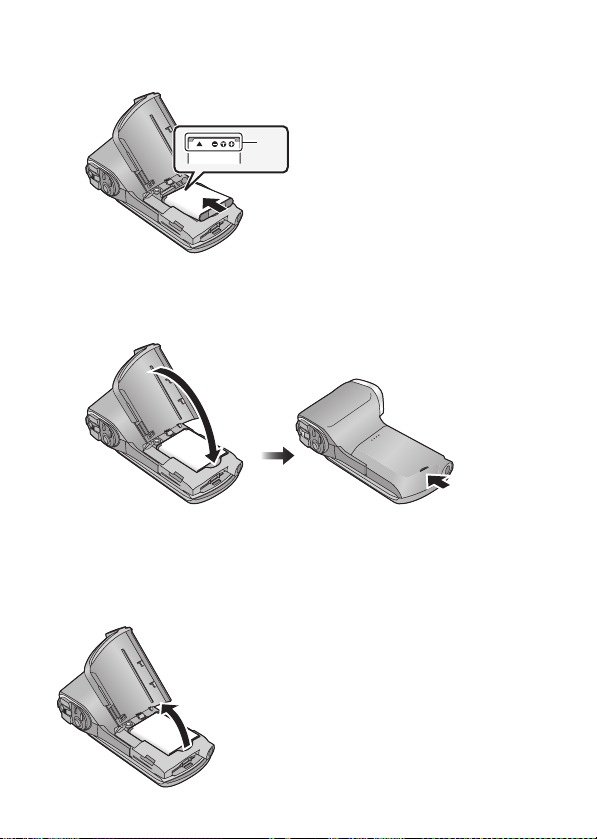
2 (To insert the battery pack)
LOCK
SD CARD/
BATTERY
Confirm the orientation of the terminal markings and
insert the battery.
A terminal markings
≥ Confirm that lever B is locked on to the battery.
≥ It is possible to mistakenly insert the battery upside down, so be sure to
check the orientation carefully.
(To remove the battery pack)
Push the lever B toward the
direction of arrow, and pull the
battery straight out.
3 Close the rear door.
- 24 -
Page 25

1 Close the rear door.
LOCK
SD CARD/
BATTERY
SD CARD/
BATTERY
LOCK
Unlocked
state
Locked state
Open/close
lever
Lock lever
2 Slide the open/close lever.
3 Lock the LOCK lever.
≥ Lock securely to the points where the red portion C of the open/close
lever and LOCK lever are no longer visible.
HX-DC2
≥ Press the power button to turn off the unit. (l 38)
1 Open the battery/card cover.
1
Slide while pushing the battery/
card cover.
2 Open the battery/card cover.
- 25 -
Page 26
2 Insert the battery, taking care to match up the terminal
markings.
A terminal markings
≥ It is possible to mistakenly insert the battery upside down, so be sure to
check the orientation carefully.
3 Close the battery/card cover.
≥ Securely close it until it clicks.
Removing the battery
Press and hold down the power button to turn off the unit, then pull up and
remove the battery.
≥ Always check that the LCD monitor and status indicator lamp are off.
≥ Keep the battery pack out of reach of children to prevent swallowing.
- 26 -
Page 27
Charging the battery
When this unit is purchased, the battery is not charged. Charge
the battery fully before using this unit for the first time.
The unit is in the standby condition when the AC adaptor is connected.
The primary circuit is always “live” as long as the AC adaptor is
connected to an electrical outlet.
Important:
≥ Be sure to use the supplied AC adaptor and USB cable. Do not
use parts supplied with other equipment.
≥ The AC adaptor and USB cable are for use with this unit only. Do
not use them with other equipment. Similarly, do not use AC
adaptors and USB cables from other equipment with this unit.
≥ The battery is charged while the unit is off or in the sleep mode.
(l 39)
The battery cannot be charged while the unit is recording or
playing back.
≥ It is recommended to charge the battery in a temperature between
10 oC and 30 oC. (The battery temperature should also be the
same.)
HX-WA2
- 27 -
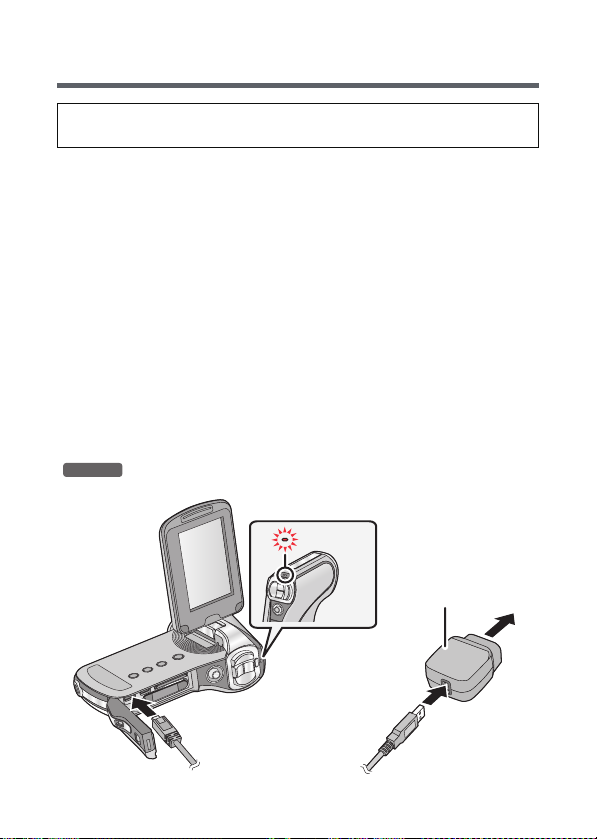
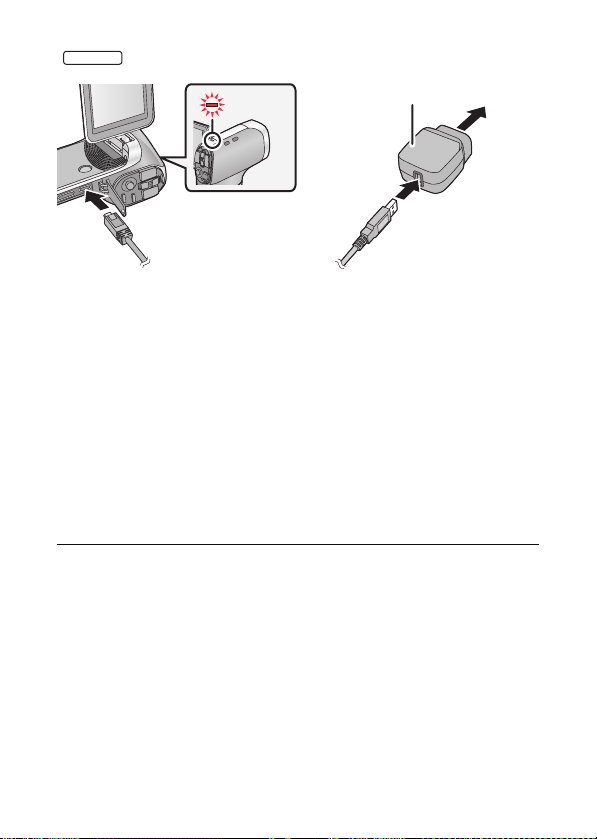
Page 28
HX-DC2
A Status indicator
B AC adaptor
C To the AC outlet
≥ Insert the plugs as far as they will go.
1 Connect the USB cable to the AC adaptor.
≥
Check that the plug portion of the AC adaptor is not loose or misaligned.
2 Plug the AC adaptor into the AC outlet.
3 Connect the USB cable to the unit.
≥
The status indicator flashes red with a period of approximately 2 seconds
(approximately 1 second on, 1 second off), and charging begins.
It will turn off when the charging is completed.
≥ Do not use any other AC adaptors except the supplied one.
≥ Do not use any other USB cables except the supplied one.
≥ We recommend using Panasonic batteries (l 29).
≥ If you use other batteries, we cannot guarantee the quality of this
product.
≥ Do not heat or expose to flame.
≥ Do not leave the battery(ies) in a car exposed to direct sunlight for a
long period of time with doors and windows closed.
≥ For charging by connecting to another device, refer to page 148.
≥ If the status indicator flashes at a particularly fast or slow rate, refer to
page 177.
- 28 -
Page 29
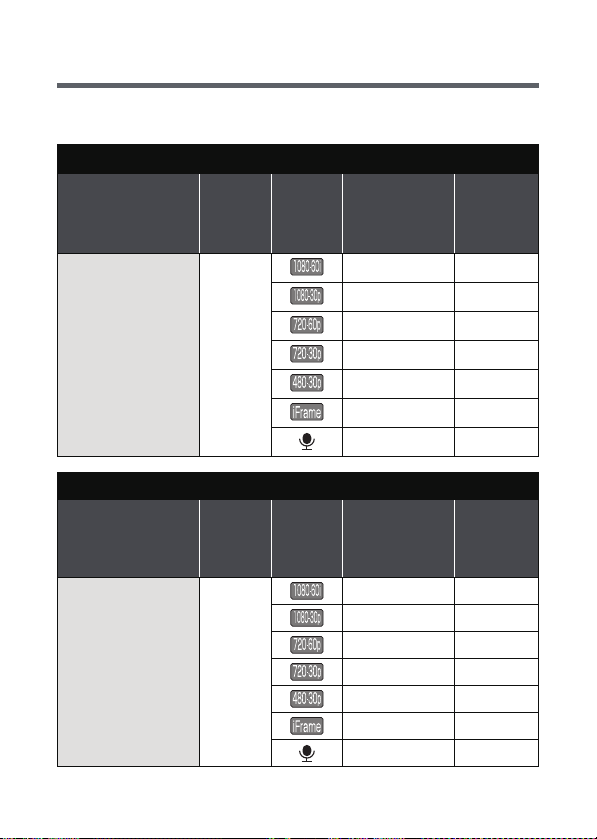
Charging and recording time
∫ Charging/Recording time
≥ Temperature: 25 oC/humidity: 60%RH (When using AC adaptor)
HX-WA2
Battery model
number
[Voltage/Capacity
(minimum)]
Supplied battery/
VW-VBX090
(optional)
[3.7 V/880 mAh]
Battery model
number
[Voltage/Capacity
(minimum)]
Supplied battery/
VW-VBX070
(optional)
[3.7 V/700 mAh]
≥ These times are approximations.
Charging
time
2h
30 min
HX-DC2
Charging
time
2h
Recording
mode
Recording
mode
- 29 -
Maximum
continuous
recordable
time
1h5min 40min
1h15min 40min
1h10min 40min
1h20min 45min
1h50min 50min
1h25min 45min
1h55min s
Maximum
continuous
recordable
time
50 min 30 min
55 min 35 min
50 min 30 min
1h5min 35min
1h25min 45min
1h5min 40min
1h30min s
Actual
recordable
Actual
recordable
time
time
Page 30

≥ The indicated charging time is for when the battery has been
discharged completely. Charging time and recordable time vary
depending on the usage conditions such as high/low
temperature.
≥ The actual recordable time refers to the recordable time when
repeatedly starting/stopping recording, turning the unit on/off, moving
the zoom lever etc.
≥ The batteries heat up after use or charging. This is not a malfunction.
Battery capacity indication
≥ The display changes as the battery capacity reduces.
#### (red)
When the charge is low, is displayed at the centre of the LCD
monitor.
≥ Due to the characteristics of the battery, it may not be possible to
correctly display the charge remaining on the battery. For instance,
at low temperatures, the indicator may turn on earlier.
Because the status of the charge remaining indicator changes
according to the ambient temperature, conditions of use, etc., the
indicator should be considered as an approximate guide.
- 30 -
Page 31

∫ Approximate operating time and number of
recordable still pictures
HX-WA2
Number of
recordable
pictures
Recording time Approx. 130 min
Playback time Approx. 255 min
Number of
recordable
pictures
Recording time Approx. 105 min
Playback time Approx. 210 min
Recording conditions by CIPA standard
≥ CIPA is an abbreviation of Camera & Imaging Products Association.
≥ Use of supplied battery
≥ Using a Panasonic SD Memory Card (2 GB)
Approx. 260 pictures
HX-DC2
Approx. 210 pictures
By CIPA standard
By CIPA standard
- 31 -
Page 32

Preparation
Recording to a card
The unit can record motion pictures, still pictures or audio to an SD card
or built-in memory. To record to an SD card, read the following.
This unit (an SDXC compatible device) is compatible with SD Memory
Cards, SDHC Memory Cards and SDXC Memory Cards. When using
an SDHC Memory Card/SDXC Memory Card with other equipment,
check the equipment is compatible with these Memory Cards.
Cards that you can use with this unit
Use SD cards conforming to Class 4 or higher of the SD Speed
Class Rating* for motion picture recording.
Card type Capacity
SD Memory Card 512 MB/1 GB/2 GB
SDHC Memory Card
SDXC Memory Card 48 GB/64 GB
* SD Speed Class Rating is the speed standard regarding continuous
writing. Check via the label on the card, etc.
e.g.:
≥ Please confirm the latest information about SD Memory Cards/SDHC
Memory Cards/SDXC Memory Cards that can be used for motion
picture recording on the following website.
http://panasonic.jp/support/global/cs/e_cam
(This website is in English only.)
≥ To use the Eye-Fi transfer feature (l 157), an Eye-Fi X2 series SD
card is required.
≥ Operation of SD Memory Cards with a capacity of 256 MB or less is not
guaranteed.
4GB/6GB/8GB/12GB/16GB/
24 GB/32 GB
- 32 -
Page 33

≥ 4 GB or more Memory Cards that do not have the SDHC logo or 48 GB
32
or more Memory Cards that do not have the SDXC logo are not based
on SD Memory Card Specifications.
≥ The operation of Memory cards exceeding 64 GB cannot be
guaranteed.
≥ When the write-protect switch A on SD card is
locked, no recording, deletion or editing will be
possible on the card.
≥ Keep the Memory Card out of reach of children to
prevent swallowing.
- 33 -
Page 34

Inserting/removing an SD card
LOCK
SD CARD/
BATTERY
When using an SD card not from Panasonic, or one previously used on
other equipment, for the first time on this unit, format the SD
card. (l 66) When the SD card is formatted, all of the recorded data is
deleted. Once the data is deleted, it cannot be restored.
HX-WA2
Caution:
Check that the status indicator has gone off.
1 Open the rear door.
Status indicator A
≥ When this unit is accessing the SD card or built-in memory, the status
indicator lights up red.
1 Unlock the LOCK lever.
2 Slide the open/close lever.
3 Open the rear door.
- 34 -
Page 35

2 Insert (remove) the SD card into (from) the card slot.
LOCK
SD CARD/
BATTERY
≥ Face the label side A in the direction shown in the illustration and
press it straight in as far as it will go.
≥ Press the centre of the SD card and then pull it straight out.
3 Close the rear door.
1 Close the rear door.
2 Slide the open/close lever.
3 Lock the LOCK lever.
≥ Lock securely to the points where the red portion of the open/close
lever and LOCK lever are no longer visible.
- 35 -
Page 36

HX-DC2
Caution:
Check that the status indicator has gone off.
1 Open the battery/card cover.
Status indicator A
≥ When this unit is
accessing the SD card
or built-in memory, the
status indicator lights up
red.
2 Insert (remove) the SD card into (from) the card slot.
≥ Face the label side B in the direction shown in the illustration and
press it straight in as far as it will go.
≥ Press the centre of the SD card and then pull it straight out.
- 36 -
Page 37

3 Close the battery/card cover.
≥ Securely close it until it clicks.
≥ Do not touch the terminals on the back of the SD card.
≥ Do not shock, bend, or drop the SD card.
≥ Electrical noise, static electricity or the failure of this unit or the SD card
may damage or erase the data stored on the SD card.
≥ When the status indicator (l 17, 22) illuminates in red, do not:
jRemove the SD card
jTurn the unit off
jInsert and remove the USB cable
jExpose the unit to vibrations or shock
Performing the above while the indicator is on may result in damage to
data/SD card or this unit.
≥ Do not expose the terminals of the SD card to water, dirt or dust.
≥ Do not place SD cards in the following areas:
jIn direct sunlight
jIn very dusty or humid areas
jNear a heater
jLocations susceptible to significant difference in temperature
(condensation can occur.)
jWhere static electricity or electromagnetic waves occur
≥ To protect SD cards, return them to their cases when you are not using
them.
≥ About disposing of or giving away the SD card. (l 178)
- 37 -
Page 38

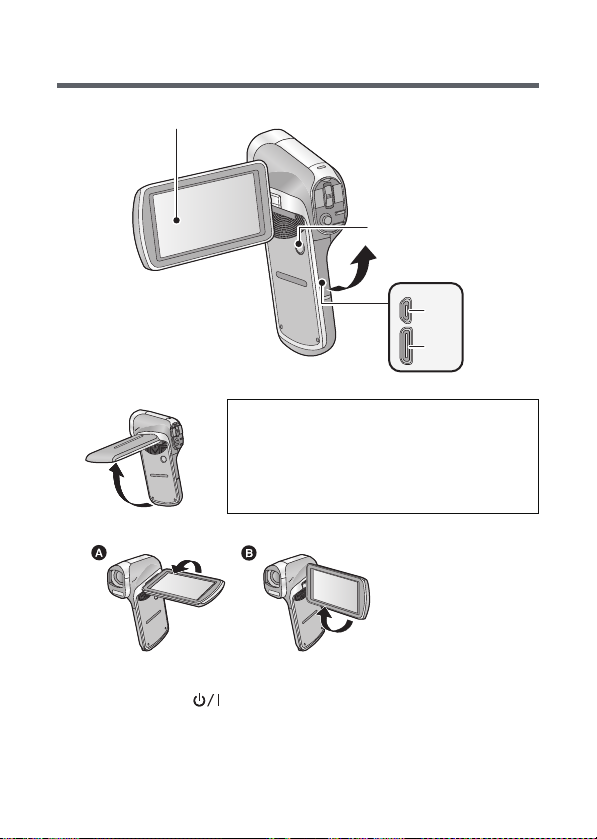
Preparation
To turn off the unit
Hold down the power button until the LCD monitor goes off.
≥ Pressing the power button for a short time sends the unit into
sleep mode. (l 39)
Turning the unit on/off
Open the LCD monitor and press the power button to
turn on the unit.
The LCD monitor turns on.
HX-WA2 HX-DC2
About standby mode
When the LCD monitor is closed while the unit is on, the unit enters
standby mode which consumes very little power.
In standby mode, opening the LCD monitor turns on the unit, making the
unit ready for recording immediately. Use standby mode when you stop
using the unit but intend to use it again after a short time.
- 38 -
Page 39

∫ Standby mode ∫ To turn on the unit
≥ The unit does not go into standby mode when you close the LCD
monitor during motion picture recording or audio recording.
≥ If you open the LCD monitor when in standby mode, the unit enters
recording mode.
≥ In the following cases, opening the LCD monitor does not turn on the
unit. Press the power button to turn on the unit.
jWhen the unit is originally purchased
jWhen you have turned off the unit using the power button
About economy function
To prevent battery consumption due to forgetting to turn the unit off etc.,
the economy mode function works to send the unit into sleep mode if the
unit has been on for approximately 5 minutes (default setting) without an
operation being performed. (The LCD monitor switches off, and the
status indicator flashes green)
≥ When the unit is in sleep mode, you can turn on the unit by pressing
any of the buttons on the unit. (The mode prior to entering sleep mode
is restored.)
≥ The time until the unit goes into sleep mode can be changed. (l 65)
≥ Approximately 1 hour after entering sleep mode, the unit enters
standby mode.
- 39 -
Page 40

About the high temperature warning icon
If the battery temperature or unit internal temperature (excluding battery)
rises, the high temperature warning icon will provide warning as
indicated below.
Battery/unit
internal
temperature
A High temperature
≥ When you turn off the unit while the temperature is high ( is
displayed), you will not be able to turn on the unit again until the
temperature lowers. ( will flash.)
Screen
display
(ON)
(ON)
(Flashing)
Unit operation
Although it is possible to
record/play back, please stop
using the unit as soon as
possible and turn off the unit.
Motion picture recording is no
longer possible. (If you are
recording a motion picture, the
recording stops.) Please turn
off the unit.
After the flashing of the ,
the unit turns off automatically.
The unit does not turn on when
the temperature drops. (
flashes.)
Wait for the temperature to
drop before using the unit
again.
- 40 -
Page 41

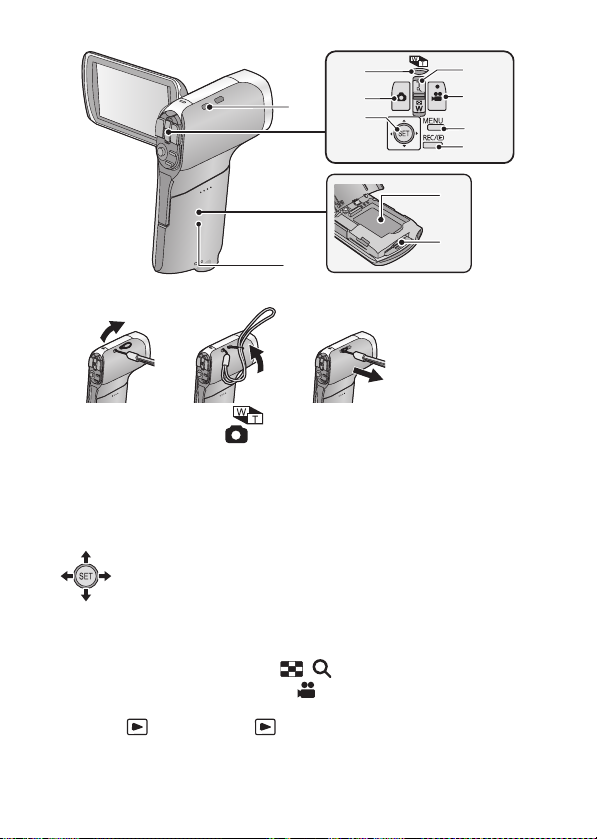
Preparation
Selecting a mode
Change the mode to recording or playback.
Press the REC/ button.
≥ Each press of the REC/ button changes the mode.
HX-WA2 HX-DC2
Recording Mode (l 46, 49, 53)
Playback Mode (l 58, 102)
For recording motion pictures,
still pictures and audio
For playing back motion
pictures, still pictures and audio
- 41 -
Page 42

Preparation
1
Setting date and time
If the screen to set the date and time appears when you turn on the unit,
skip to step 2 and follow the steps to set the date and time.
1 Select the menu. (l 62)
[MENU]: # [CLOCK SET]
2 Select an item (DATE/TIME/DISP) using the SET
button and then tilt the SET button to the right or
press the SET button.
3 (When [DATE] or [TIME] is selected)
Tilt the SET button to the left or right to select the
desired item and then up and down to set the
numerical values.
e.g.: When [DATE] is selected
≥ The year can be set between 2000 and 2039.
- 42 -
Page 43

(When [DISP] is selected)
HX-WA2
Select the year/month/day display method using the
SET button.
4 Press the SET button.
5 Select [SAVE DATE AND TIME] using the SET button
and then press the SET button.
≥ To return to the recording screen or playback screen, press the MENU
button.
≥ At the time of purchase, the [CLOCK SET] is not set.
≥ If the date and time have not been set or the built-in clock battery has
run down, the screen display and recording day/month/year
information will appear as follows.
Recording screen display: --.--.---- -:-Recording day/month/year information: 01.01.2012 0:00
≥ To charge the built-in clock battery, install a fully charged battery in the
unit. If you leave the battery for approximately 2 days, the time settings
will be stored for approximately 7 days. (The charging continues even
when the unit is turned off)
≥
[Before using the unit under water] and [Maintenance after use in
water] are displayed when setting date and time for the first time after
purchase. Please check beforehand to maintain the waterproof
performance. Press the MENU button to exit the message screen.
- 43 -
Page 44

Basic
Before recording
∫ Basic camera positioning
Example 1:
Grip the unit with the forefinger of
your right hand above the lens and
the middle finger to little finger
surrounding the body.
≥ To avoid dropping the unit, be sure to attach a handstrap.
≥ When recording, make sure your footing is stable and there is no
danger of colliding with another person or object.
≥ When you are outdoors, record pictures with the sunlight behind you. If
the subject is backlit, it will become dark in the recording.
≥ Keep your arms near your body and separate your legs for better
balance.
≥ When performing zoom operations, you can prevent the jitter
associated with zoom operations by placing your other hand on the
LCD monitor to stabilise the unit.
≥ Ensure that the lens and flash are not obstructed by your fingers or the
handstrap. Also, ensure that your hand is not blocking the
microphones on the LCD monitor.
∫ Basic motion picture recording
≥ The unit should normally be held steady when recording.
≥ If you move the unit when recording, do so slowly, maintaining a
constant speed.
≥ The zoom operation is useful for recording subjects you cannot get
close to, but overuse of zoom in and zoom out can make the resulting
motion picture less enjoyable to watch.
Example 2:
Grip the unit with the forefinger to
little finger of your right hand
surrounding the body.
- 44 -
Page 45

∫ Recording yourself
Rotate the LCD monitor towards the lens side.
≥ The image is horizontally flipped
as if you see a mirror image.
(However the image recorded is
the same as a normal recording.)
∫ If the surface of the unit gets hot
Due to the characteristics of the unit, the outer surface may become
warm during use, but this does not indicate a malfunction.
≥ If the unit starts to feel uncomfortably hot during use, you might
temporarily discontinue use until it cools down, or try holding it in your
other hand for a while. Please use a tripod or other support when using
the unit for a long time.
- 45 -
Page 46

Basic
000:00:00
Recording motion pictures
≥
HX-DC2
Before turning on the unit, remove the lens cap.
≥
Motion pictures are recorded to the SD card if one is inserted. If no SD
card is inserted, the motion pictures are recorded to the built-in memory.
HX-WA2 HX-DC2
1 Open the LCD monitor.
2 Press the recording start/stop button to start
recording.
000:00:00
000:00:00
A When you begin recording, ¥ appears.
3 Press the recording start/stop button again to pause
recording.
- 46 -
Page 47

∫ About the screen indications in the motion picture
000:00:15000:00:15000:00:15
recording
Recording mode
Motion picture operation indicator (l 162)
μ (Red)
000:00:15
During motion picture recording
When the remaining recordable time drops to
approx. 30 seconds or less, μ flashes.
During recording:
Recording time elapsed
Each time the unit is put into recording pause, the
counter display will be reset to 000:00:00.
During recording standby:
Approximate remaining recordable time
- 47 -
Page 48

≥ The images recorded between pressing the recording start/stop button
to start recording and pressing it again to pause recording become one
scene.
≥ If the file size exceeds 4 GB during recording, the unit saves the file
and saves the continuation in a new file. (A new file is created
automatically every 4 GB (l 183))
≥ While recording is in progress, the recording will not stop even if the
LCD monitor is closed.
≥ Please refer to page 182 for details about approximate recordable
time.
About the compatibility of the recorded motion
pictures
≥ They are not compatible with devices other than those that support
MP4. Images cannot be played with equipment that does not
support MP4. Confirm that your equipment supports MP4 by
referring to the operating instructions.
≥ There are some cases where the recorded motion pictures cannot
be played back, even if the device supports MP4. In such a case,
play back on this unit instead.
- 48 -
Page 49

Basic
F3.5F3.5F3.5
1/301/301/30
Recording still pictures
≥
HX-DC2
Before turning on the unit, remove the lens cap.
≥ Still pictures are recorded to SD card if one is inserted. If no SD card is
inserted, the still pictures are recorded to the built-in memory.
HX-WA2 HX-DC2
1 Open the LCD monitor.
2 (For auto focus only)
Press the button halfway.
A Focus area (area inside brackets)
3 Press the button fully.
≥ If you continue to hold down the button, you can check the
recorded image on the LCD monitor.
- 49 -
Page 50

∫ About the recording standby screen display
MM
141414
300030003000
F3.5F3.5F3.5
1/301/301/30
ISO400ISO400ISO400
The field of view of the image displayed on the LCD monitor differs for
motion picture recording and still picture recording. At time of purchase,
the recording standby screen displays video view. Press the button
halfway to change to photo view.
≥ When [PHOTO VIEW] is set to (ON), you can change the recording
standby screen display to the photo view. (l 97)
Video view Photo view
A Video recording area
∫ About the screen indications in the still picture
recording
Still picture operation indicator (l 160)
Size of still pictures (l 82)
3000 Remaining number of still pictures
ß Flash (l 86)
ISO400 ISO (l 91)
F3.5 Iris value
1/30 Shutter speed
Image stabiliser for still picture (l 74)
- 50 -
Page 51

∫ About the focusing area
14
M
≥ When [FOCUS MODE] (l 88) is set to
[9-PT AUTOFOCUS], (focusing area A)
is displayed at the position where focus is
achieved.
The unit automatically determines the
position where focus is achieved from nine
focus points within the recording area. If the
focusing area doesn’t appear in a desired position, try adjusting the
camera angle etc., and focus again.
When focus is achieved over a wide range at the centre of the screen,
a large focusing area is displayed.
≥ When [FOCUS MODE] (l 88) is set to [SPOT FOCUS], the unit can
focus on the subject in the centre of the recording area.
≥ When the risk of jitter increases due to a slower shutter speed while
recording still picture, (camera shake icon) will appear on the LCD
monitor. When this occurs, attach the unit to a tripod to prevent jitter
while recording or set [FLASH] to ßA (AUTO). (l 86)
≥ When recording in a dark environment, writing to the card may take
time.
≥ To print a picture, save the picture to the SD card (l 131) and print
using a PC or a printer.
≥ The edges of still pictures recorded on this unit with a 16:9 aspect ratio
may be cut at printing. Check the printer or photo studio before
printing.
≥ Please refer to page 184 for details about the number of recordable
pictures.
14
14
M
- 51 -
Page 52

About recording still pictures during
0.9
M
motion picture recording and audio
recording
You can record still pictures while recording a motion picture or while
recording audio. (simultaneous recording)
Press the button fully (press to the bottom) to take
the picture.
≥ When the recordable time drops to approximately
30 seconds or less, the unit can no longer record still
pictures while recording a motion picture or while
recording audio.
∫ About picture size
When you record a still picture while recording a motion picture or audio,
the picture size will depend on the Recording mode. (l 81)
Recording
mode
/ 1920k1080 16:9
/ 1280k720 16:9
/ 640k480 4:3
≥ Still pictures cannot be recorded during recording.
≥ Burst recording is not possible.
≥ The Flash (l 86) and Image stabiliser for still picture (l 74) are
disabled.
Picture size Aspect ratio
- 52 -
Page 53

Basic
1
Recording audio
≥ Audio is recorded to the SD card if one is inserted. If no SD card is
inserted, the audio is recorded to the built-in memory.
1 Open the LCD monitor.
2 Select the menu. (l 62)
[MENU]: # [REC MODE] # [ (VOICE RECORD)]
3 Start recording by pressing the recording start/stop
button.
4 Press the recording start/stop button again to stop
recording.
- 53 -
Page 54

∫ About the screen display for audio recording
000:00:15
000:00:15
000:00:15
Audio operation indicator (l 161)
(Red)
000:00:15
≥ When the recording time exceeds approximately 5 hours, the file is
saved and the audio recording ends.
During audio recording
When the remaining recordable time drops to
approx. 30 seconds or less, μ flashes.
During audio recording:
Recording time elapsed
Every time recording is stopped, the indicator
returns to 000:00:00.
During audio recording standby:
Approximate remaining recordable time
- 54 -
Page 55

Basic
Press the button to
switch to Intelligent Auto
Mode.
≥ Please refer to page 99 for
details about Manual Mode.
1
MENU
Intelligent Auto Mode
The modes (appropriate for the condition) are set just by pointing the unit
to what you want to record.
HX-WA2
HX-DC2
Select the menu. (l 62)
[MENU]: # [INTELLIGENT AUTO] # [ (ON)]
≥ Please refer to page 99 for details about Manual Mode.
- 55 -
Page 56

Mode Effect
Portrait Faces are detected and focused
automatically, and the brightness is adjusted
so it is recorded clearly.
Scenery The whole landscape will be recorded vividly
without whiting out the background sky,
which may be very bright.
*1
Spotlight Very bright object is recorded clearly.
*1
Low light It can record very clearly even in a dark
room or twilight.
*2
Night portrait A person and the background are recorded
with near real-life brightness.
*2
Night scenery You can record night scenery vividly by
slowing the shutter speed.
*2
Macro This allows recording while going near to the
object of recording.
*1
Normal Adjusts the contrast and gives a clean image
*2
when not using the above modes.
*1 Mode for motion picture recording only
*2 Mode for still picture recording only
≥ Depending on the recording conditions, the unit may not enter the
desired mode.
≥ We recommend using a tripod in Night portrait/Night scenery/Low light.
≥ Faces cannot be detected depending on the recording conditions, such
as when faces are of certain sizes or at certain tilts or when digital
zoom is used.
- 56 -
Page 57

∫ Intelligent Auto Mode
When switching to Intelligent Auto Mode, the Auto White Balance and
Auto Focus operate and automatically adjust the colour balance and
focusing.
Depending on the brightness of the subject etc., the aperture and shutter
speed are automatically adjusted for an optimum brightness.
≥ Colour balance and focus may not be adjusted automatically
depending on light sources or scenes. If so, manually adjust these
settings. (l 99, 101)
Automatic White Balance
The illustration shows the range over which Automatic White Balance
functions.
1) The effective range of Automatic
White Balance adjustment on this unit
2) Blue sky
3) Cloudy sky (rain)
4) Sunlight
5) White fluorescent lamp
6) Halogen light bulb
7) Incandescent light bulb
8) Sunrise or sunset
9) Candlelight
If the Automatic White Balance is not
functioning normally, adjust the White
Balance manually. (l 99)
10 000K
9 000K
8 000K
7 000K
6 000K
5 000K
1)
4 000K
3 000K
7)
8)
2 000K
9)
2)
3)
4)
5)
6)
Auto Focus
The unit focuses automatically.
≥ Auto Focus does not work correctly in the following situations. Record
pictures in the Manual Focus Mode. (l 101)
jRecording distant and close-up objects at the same time
jRecording a subject behind dirty or dusty window
jRecording a subject that is surrounded by objects with glossy
surfaces or by highly reflective objects
- 57 -
Page 58

Basic
HX-WA2
HX-DC2
Thumbnail display
Motion picture/Still picture/Audio playback
1 Press the REC/ button to change to playback
mode.
2 Select the file to play back using the SET button and
press the SET button.
A The information for the file in the yellow frame is displayed.
≥ Tilt and hold the SET button up or down to display the next (or
previous) page.
- 58 -
Page 59

3 Play back using the SET button.
Motion picture/audio playback
Playback/Pause
Rewind playback
B Operation icon*
* If the operation icon disappears, perform a SET button operation to
display it.
Still picture playback
Fast forward playback
Stops the playback and
shows the thumbnails.
Deletes still picture (l 117)
Displays previous file
Displays next file
Stops playback and returns to
thumbnail display
- 59 -
Page 60

∫ Change the thumbnail display
HX-WA2
HX-DC2
HX-DC2
HX-WA2
HX-DC2
HX-WA2
HX-DC2
WW
TT
VOLUME SETTING
While the thumbnail is displayed, the thumbnail display changes in the
following order if the zoom button ( ) or zoom lever ( ) is
operated to side or side.
21
files () 8 files () 1 file
≥ If you operate the zoom button ( ) or
HX-WA2
zoom lever ( ) to the side from the
21
files display mode, the unit goes to the
playback folder selection screen. (l 69)
≥ If you operate the zoom button ( ) or
zoom lever ( ) to the side with a still
picture in a single file display state, the unit enters playback zoom
(l 106).
≥ When the SET button is tilted to the right (left) during single file display,
the next (previous) file is displayed.
≥ When following operations are performed, 8 file display is restored.
jIf you turn the unit off
jIf you change the recording mode
jIf you display the menu screen
∫ Speaker volume adjustment
To adjust the speaker volume during motion picture or audio playback,
operate the volume button ( ) or volume lever ( ) during
playback.
Tow a r ds :
Increases the volume
Tow a r ds :
Decreases the volume
≥ When a playback of a motion picture file or audio file ends, the
thumbnail display is restored.
≥ Except in normal motion picture/audio playback, sound is not emitted.
≥ The elapsed time for motion picture playback indication will be reset to
00:00:00 for each scene.
≥ The elapsed time for audio playback indication will be reset to
000:00:00 for each file.
- 60 -
Page 61

≥ On the thumbnail screen for continuously recorded files (l 183)
exceeding 4 GB, (8 file display) or (1 file display) is displayed.
≥ Closing the LCD monitor stops playback and sends the unit into
standby mode. (l 38)
Motion picture compatibility
≥ The unit conforms to the MP4 format (MPEG-4 AVC file standard).
≥ Motion pictures recorded on other MP4-compatible equipment may
not play back normally or may not play back at all on this unit.
Similarly, motion pictures recorded on this unit may not play back
normally or may not play back at all on other MP4-compatible
equipment.
Still picture compatibility
≥ This unit conforms to the universal DCF (Design rule for Camera
File system) standard and Exif (Exchangeable Image File Format)
stipulated by JEITA (Japan Electronics and Information Technology
Industries Association). Files which do not conform to the DCF
standard cannot be played back.
≥ The file format of still pictures supported by this unit is JPEG. (Not
all JPEG formatted files will be played back.)
≥ This unit may degrade or not play back still pictures recorded or
created on other products and other products may degrade or not
play back still pictures recorded on this unit.
Audio compatibility
≥ The unit conforms to the AAC file standard.
≥ This unit may degrade or not play back audio recorded or created
on other products and other products may degrade or not play back
audio recorded on this unit.
- 61 -
Page 62

Basic
MENU
Using the menu screen
HX-WA2 HX-DC2
1 Press the MENU button. /
MENU
2 Tilt the SET button to the left.
3 Select tab A or option tab B using the SET button,
and press down the right side of the SET button or
press the SET button.
4 Select from menu items C using the SET button, and
tilt the SET button to the right, or press the SET
button.
- 62 -
Page 63

5 Select the setting content using the SET button and
press the SET button to set.
∫ About applicable mode indicator
In the recording menu, the recording mode that reflects the currently
displayed setting is displayed.
D Applicable mode indicator
: Setting is applied to still picture and motion picture recording.
: Setting is applied to still picture recording.
: Setting is applied to motion picture recording.
To get back to the previous screen
Press the MENU button.
To end the menu setting
Press the MENU button several times.
- 63 -
Page 64

Basic
123
1
Using Option Menu
≥ The displayed items change depending on the mode setting
(recording mode, playback mode).
Select the menu.
[MENU]: , or # desired setting
OPTION MENU 1
[CLOCK SET]
Please refer to page 42.
[ALERT SOUND]
Set the type and volume of operation sounds for the unit.
[TURN ON/OFF]:
Sets the sound emitted when the unit is turned on/off. ([ON]/[OFF])
[RECORD BEEP]:
Sets the sound emitted when recording is started and stopped.
([ON]/[OFF])
[SHUTTER]:
Sets the sound emitted when the button is pressed.
([OFF]/[A]/[B]/[C]/[D])
[KEY SW]:
Sets the sound emitted when the buttons (SET button, MENU button,
etc.) are pressed. ([OFF]/[A]/[B]/[C]/[D])
[OPERATION VOL]:
Sets the volume of the operation sounds. ([1] to [7])
[ALL OFF]/[OPERATION SOUNDS ON]:
Sets all operation sounds on/off
- 64 -
Page 65

[DISPLAY]
Turns screen display [ON] (display) or [OFF] (not-display).
[ECONOMY]
Sets the time until the unit goes into sleep mode to save on battery
consumption. (l 39)
[BATTERY:REC]: Sets the time for which the unit is in the
[BATTERY:PLAY]: Sets the time for which the unit is in the
[AC:REC/PLAY]: Sets the time for which the unit is in the
recording mode using the battery, before it goes
into sleep mode.
([1 min]/[3 min]/[5 min]/[10 min])
playback mode using the battery, before going
into sleep mode.
([1 min]/[3 min]/[5 min]/[10 min]/[30 min])
recording/playback mode using the AC adaptor,
before going into sleep mode.
([1 min]/[3 min]/[5 min]/[10 min]/[30 min]/
[60 min])
[BRIGHTNESS]
Sets the brightness of the LCD monitor of the unit (7 steps).
- 65 -
Page 66

OPTION MENU 2
2
[LANGUAGE]
You can select the language on the screen display and the menu screen.
[TV OUTPUT]
[TV SYSTEM]: Please refer to page 126.
[TV ASPECT]: Please refer to page 125.
[HDMI]: Please refer to page 126.
[VIERA Link]: Please refer to page 127.
[INITIAL SET]
Returns the menu to the settings at the time of purchase.
≥ Settings for [CLOCK SET], [LANGUAGE] and the double range zoom
will not be changed.
[FORMAT]
Please be aware that if a medium is formatted, then all the data recorded
on the medium will be erased and cannot be restored. Back up important
data on a PC, disc etc. (l 135)
≥ To format the built-in memory, perform a format with the SD card
removed.
[FORMAT]:
A logical format is performed on the SD card or built-in memory.
[DELETE DATA]:
A physical format is performed on the SD card or built-in memory.
Select [FORMAT] or [DELETE DATA] using the SET button and
press the SET button.
≥ When selecting [DELETE DATA], please use the AC adaptor. When
using the battery, [DELETE DATA] cannot be selected.
- 66 -
Page 67

≥ Select [DELETE DATA] and perform a physical formatting of the SD
card when the SD card is to be disposed/ transferred. (l 178)
≥ Select [DELETE DATA] and perform a physical formatting of the built-in
memory when this unit is to be disposed/ transferred. (l 175)
≥ Do not turn this unit off or remove the SD card, while formatting. Do not
expose the unit to vibrations or shock.
Use this unit to format media.
Formatting built-in memory is only available with this unit.
Do not format an SD card using any other equipment such as a
PC. The card may not be used on this unit.
- 67 -
Page 68

OPTION MENU 3
3
[REC FOLDER]
Creates or selects a recording folder (folder containing a recorded file).
(SD card recording only)
≥ Insert the SD card.
≥ Set to Recording mode. (l 41)
1 Select [REC FOLDER] using the SET button and press the SET
button.
2
(When creating a folder)
Select [CREATE NEW FOLDER] using the SET button and press
the SET button.
≥ The created folder is set as the recording folder.
(When selecting a folder)
Select the folder number of the desired folder using the SET
button and press the SET button.
≥ You cannot select folders which have been created on other
equipment or folders which already contain the maximum number
of files.
- 68 -
Page 69

[PLAYBACK FOLDER]
When the SD card or built-in memory contains multiple folders, you can
select a folder for playback.
≥ Set to Playback mode. (l 41)
1 Select [PLAYBACK FOLDER] using the SET button and press
the SET button.
2 Select the folder to play back using the SET button and press
the SET button.
≥ The thumbnail screen is displayed with the first file in the selected
folder surrounded by a yellow frame.
3 Select the file to playback using the SET button and press the
SET button.
[FILE NO. CONT’D]
This function sets the file numbers when the card is exchanged or
formatted.
[ON]: File numbers are retained even when the card is
[OFF]: File numbers are reset to start from [0001] when the
exchanged or formatted.
card is exchanged or formatted.
- 69 -
Page 70

When [FILE NO. CONT’D] is set to [ON] and there are files remaining
on the newly inserted card, the files subsequently recorded on the
card will be numbered as described below.
When the newly inserted card contains file numbers which are
smaller than the file numbers recorded before changing the
cards
The numbering continues from the file currently being recorded.
Example:
If you record files up to 0015 on a first card and then exchange the
first card for a second card, which already has files up to 0005
recorded on it, the new file numbers on the second card will start from
0016.
When the newly inserted card contains file numbers which are
larger than the file numbers recorded before changing the cards
The file number will be consecutive to the last file number recorded on
the second card.
Example:
If you record files up to 0005 on a first card and then exchange the
first card for a second card, which already has files up to 0015
recorded on it, the new file numbers on the second card will start from
0016.
≥ In the case of the built-in memory, when [FILE NO. CONT’D] is set to
[ON] the file numbers can be given consecutive in the same way as
when the card is used.
[Eye-Fi]
Please refer to page 157.
- 70 -
Page 71

Advanced (Recording)
HX-WA2
HX-DC2
A Zoom bar
HX-WA2
HX-DC2
TW
Using the zoom
≥ Set to Recording mode. (l 41)
Zoom button ( ) / Zoom lever ( )
T side: Close-up recording (zoom in)
W side: Wide-angle recording (zoom out)
≥ i.Zoom and digital zoom can be set in [ZOOM MODE]. (l 73)
∫ About the zoom bar
B : Optical zoom
C : i.Zoom/Digital zoom (blue)
≥ During zoom operations, the zoom bar is displayed.
≥ The magnification displayed at the left and right of the zoom bar is the
minimum and maximum zoom magnification.
≥ When recording motion pictures at high levels of magnification, we
recommend fixing the unit to a tripod to prevent it moving.
- 71 -
Page 72

HX-DC2
≥
If you take your finger off the zoom lever during zoom operation, the
operation sound may be recorded. When returning the zoom lever to
the original position, move it quietly.
≥ The unit will focus from approximately 1 m or more when the zoom
magnification is at its maximum.
When the zoom magnification is 1k, this unit can focus on a subject
approx. 10 cm away from the lens. (When switching to Intelligent Auto
Mode, or [FOCUS] is set to (MACRO), you can record from as
close as 1 cm with the zoom magnification at 1 times and from 80 cm
with the zoom magnification at its maximum.)
Double range zoom
The enlarged size will be approximately double size (double range
zoom). Press again to return to normal size.
≥ Set to Recording mode. (l 41)
Press the zoom range button.
HX-WA2 HX-DC2
≥ On the normal zoom recording screen, the icon is displayed. On
the double-range zoom recording screen, the icon is displayed.
≥ You cannot operate the zoom range button in the i.Zoom/Digital zoom
region (blue). (l 71)
≥ The image enlarged using the double range zoom can be recorded
only as a motion picture. Still pictures are recorded without being
enlarged.
- 72 -
Page 73

Zoom mode
4
Set the digital zoom and i.Zoom.
≥ Select the menu.
[MENU]: # [ZOOM MODE] # desired setting
(DIGITAL ZOOM): Digital zoom
(i.ZOOM): This zoom function allows you to maintain
(OFF): Optical zoom only
≥ The larger the digital zoom magnification, the more the image quality is
degraded.
≥ With still picture recording, i.Zoom is disabled.
∫ About the maximum zoom magnification
The maximum zoom magnification differs according to the mode and
settings of the unit.
Image
stabiliser
for
motion
pictures
Motion
picture
recording
Still
picture
recording
OFF/ON
ACTIVE
MODE
––1k 5k 5k 50k
high-definition picture quality.
Double
range
zoom
W
(Wide)
(OFF) (i.ZOOM)
1k 6k 7.5k 60k
2k 12k 15k 120k
1k 5k 6k 50k
2k 10k 12k 100k
T (Tele)
Zoom mode setting
(DIGITAL
ZOOM)
- 73 -
Page 74

Advanced (Recording)
3
Image stabiliser
Use the Image stabiliser to reduce the effects of shake during recording.
≥ Set to Recording mode. (l 41)
∫ Image stabiliser for motion pictures
Select the menu.
[MENU]: # [E.I.S.(VIDEO)] # desired setting
≥
When (ACTIVE MODE) is set, the field of view will differ from normal recording.
Video view in normal recording Video view in (ACTIVE MODE)
3
(ACTIVE MODE): This setting gives more stabilisation and is
suitable for recording when moving.
(ON): This setting is suitable for recording in a
stable state such as scenery.
(OFF): Cancel the setting.
∫ Image stabiliser for still pictures
Select the menu.
[MENU]: # [E.I.S.(PICTURE)] # [ (ON)]
≥ During zoom operation, image stabiliser does not work.
≥
When recording with a tripod, we recommend that you set the Image stabiliser off.
≥
[SCENE MODE] will be set to (OFF) when the [E.I.S.(PICTURE)] is set to
(ON) while the [SCENE MODE] (
≥ Stabilisation may not be possible under strong shaking conditions.
≥
When [SCENE MODE] is set to (FIREWORKS), (NIGHT SCENERY),
(NIGHT PORTRAIT) or (LOW LIGHT), the Image stabiliser may be less effective.
≥ The screen may shake when using optical zoom or during the auto focus
operation, but this does not indicate a fault.
l
82) is set to (HDR (Backlight Comp.)).
- 74 -
Page 75

Advanced (Recording)
1
Burst recording
Records a sequence of still pictures at a rate of 10 per second or 1 per
second.
Use this function to record fast-moving subject.
≥ Set to Recording mode. (l 41)
1 Select the menu.
[MENU]: # [BURST] # desired setting
(14M BURST):
Records approximately 1 still picture every 1 second.
The unit records as you hold down the button, ending the
recording when the maximum number pictures in the burst are reached.
(3M BURST):
Records approximately 10 still pictures every 1 second.
The unit records as you hold down the button, ending the
recording when the maximum number pictures in the burst are reached.
(14M REVERSE BURST):
Records approximately 1 still picture every 1 second.
The unit records as you hold down the button. On release of the
button, it stores the maximum number of pictures in the burst,
going back from the moment of release.
(3M REVERSE BURST):
Records approximately 10 still pictures every 1 second.
The unit records as you hold down the button. On release of the
button, it stores the maximum number of pictures in the burst,
going back from the moment of release.
(OFF):
Cancel the setting.
2 (For auto focus only)
Press the button halfway.
- 75 -
Page 76

3 Press the button fully.
≥ During recording, lights up in red.
≥ The auto focus works to fix the focus when the button is pressed
halfway.
∫ Maximum number of pictures in the burst
[BURST] setting
/8
/40
≥ When recording with the self-timer, the recording ends when the
maximum number of pictures in the burst is reached.
≥ When burst recording, the following functions are disabled and cannot
be used.
j[FLASH]
j [HDR (Backlight Comp.)] in [SCENE MODE]
j (HDR (Paint)) in [COLOUR MODE]
j[PANORAMA]
≥ The following functions cannot be used with burst recording.
j[E.I.S.(PICTURE)]
j[FACE CHASER]
≥ With burst recording, the shutter speed is faster than 1/30.
Maximum number of pictures
in the burst
- 76 -
Page 77

Advanced (Recording)
1
A guide
(Example) When
panning horizontally
Recording panorama still pictures
By recording while panning the unit vertically or horizontally you can
record a 180e or 360e panorama still picture.
≥ Set to Recording mode. (l 41)
1 Select the menu.
[MENU]: # [PANORAMA] #
[ (360e PANORAMA)] or [ (180e PANORAMA)]
≥ A white cross is displayed on the LCD monitor.
2 Press the button to start the recording.
≥ A red cross is displayed at the centre of
the LCD monitor.
3 Pan the unit horizontally or vertically.
≥ The red cross will shift in the panning
direction. Record in such a way that the
red cross and the white cross align. (If the
red cross separates from the guide, the
panorama still picture cannot be correctly
recorded.)
To stop panorama recording part-way
through
Press the button.
- 77 -
Page 78

∫ Recording technique
Move the camera toward the direction of recording taking care not to
shake. (Correct recording is not possible when the shake is too big.)
∫ About size of still pictures
The sizes of panorama still pictures are as follows.
Picture size
Panorama setting
(360e PANORAMA) 14400k720 1280k14400
(180e PANORAMA) 7200k720 1280k7200
≥ During panorama still picture recording, the zoom function is disabled.
≥ If you record a motion picture with [PANORAMA] set to (360e
PANORAMA) or (180e PANORAMA), zoom operations are
available during recording but zoom will be automatically cancelled
when you stop.
≥ The panorama still picture that will be recorded will be narrower than
what is displayed in the recording screen.
≥ Panorama still pictures are indicated by or in the 1-file or 8-
file thumbnail display.
≥ When recording panorama still pictures, the following functions are
disabled and cannot be used.
j[FLASH], [SCENE MODE], (HDR (Paint)) in [COLOUR MODE],
[BURST] and [SELF TIMER]
≥ The following functions do not work with recording panorama still
pictures.
j[E.I.S.(PICTURE)]
≥ When recording panorama still pictures, [FOCUS] is set to
(AUTO).
Horizontal
panorama still
picture
Verti ca l
panorama still
picture
- 78 -
Page 79

≥ Focus and white balance will be fixed to the optimal values for the still
picture for first frame. Therefore, it may not record with focus or
brightness optimal for the whole panorama still picture when focus or
brightness changes drastically during the recording.
≥ Since panorama still picture is composed from multiple still pictures,
there may be cases where the subject may warp or connection may
stand out.
≥ In the following cases, it may not be possible to record correctly.
jWhen the swing speed is too fast or too slow
jWhen recording the subject that have monotone colours or patterns
repeating (such as sky, sandy beach, etc.).
jWhen recording moving subjects (such as people, pets, automobile,
wave, flower dancing in the wind, etc.)
jWhen recording in dark place
jWhen recording in places with flickering light source such as
fluorescent lamp, candle, etc.
jWhen recording the unit held away from your body (axis of rotation)
≥ The recorded panorama picture will not be saved when the recording is
terminated before reaching the half of the set angle. Even if the
recording exceeds half point, black strip will be recorded in the area
that was not recorded when the recording is terminated before
reaching the set angle.
- 79 -
Page 80

Advanced (Recording)
1
Recording underwater [HX-WA2]
The unit can record underwater at depths of down to 3 m (for periods
within 60 minutes).
Before recording underwater, be sure to read “(Important) About
the Waterproof Performance of this unit [HX-WA2]” (page 8 to 16)
and to use the camera correctly. Incorrect use may result water
entering the unit and malfunction.
Record with colour balance and audio that are suitable for recording underwater
When recording underwater, set [SCENE MODE] to (UNDER
WATER). The colour balance and audio recording will be suitable for
recording underwater. (l 82)
≥ Set to Recording mode. (l 41)
Select the menu. (l 62)
[MENU]: # [SCENE MODE] # [ (UNDER WATER)]
≥ When [SCENE MODE] is set to (UNDER WATER), [Before using
the unit under water] and [Maintenance after use in water] are
displayed. Please check beforehand to maintain the waterproof
performance. Press the MENU button to exit the message screen.
≥ After use underwater, wash the unit in fresh water and dry well. (l 13)
≥ Do not use the Under Water Mode except when recording underwater.
≥ When recording underwater, the sound of the unit motor will be
recorded at a relatively high volume. However, in Under Water Mode,
the sound of the motor is suppressed through the action of an audio
filter. (sound quality differs to when recording in other modes)
- 80 -
Page 81

Advanced (Recording)
1
234
1
1
Recording functions of menus
≥ Set to Recording mode. (l 41)
≥ Select the menu. (l 62)
[MENU]: , , or # desired setting
RECORDING MENU 1
[REC MODE]
You can switch between motion picture recording and audio recording,
and switch the image quality of the motion picture to record.
[MENU]: # [REC MODE] # desired setting
: Records with 1920k1080 pixels. (60i)
: Records with 1920k1080 pixels. (30p)
: Records with 1280k720 pixels. (60p)
: Records with 1280k720 pixels. (30p)
*
: Records with 960k540 pixels. (30p)
: Records with 640k480 pixels. (30p)
: Records audio. (VOICE RECORD)
* is a format suitable for Mac (iMovie’11). It is recommended when
using a Mac.
≥ Recordable time using the battery (l 29)
≥ This function’s default setting is mode.
≥ Please refer to page 182 about approximate recordable time.
≥ When the unit is moved a lot or moved quickly, or when a fast-moving
subject is recorded (particularly when recording in mode),
mosaic-type noise may appear at playback.
- 81 -
Page 82

[PICTURE SIZE]
1
1
The higher the number of pixels, the higher the clarity of the picture when
printing.
[MENU]: # [PICTURE SIZE] # desired setting
Picture size Aspect ratio
4352k3264 4:3
3744k2808 4:3
2560k1920 4:3
2048k1536 4:3
640k480 4:3
4352k2448 16:9
3744
k2106 16:9
2560k1440 16:9
1920k1080 16:9
HX-DC2
[INTELLIGENT AUTO]
Please refer to page 55.
[SCENE MODE]
When you record images in different situations, this mode automatically
sets optimum shutter speeds and apertures.
[MENU]: # [SCENE MODE] # desired setting
(OFF):
Cancel the setting
- 82 -
Page 83

5 (SPORTS):
HX-WA2
To make fast moving scenes less shaky with slow playback and pause
of playback
(PORTRAIT):
To make people stand out against the background
(SPOT LIGHT):
Improved quality when subject is brightly illuminated
(SNOW):
Improved image quality when shooting in snowy locations
(BEACH):
To make blue in the sea or sky vibrant
(SUNSET):
To make red in the sunrise or sunset vibrant
(FIREWORKS):
To capture the fireworks in the night sky beautifully
(LANDSCAPE):
For spatial scenery
(NIGHT SCENERY):
To capture the evening or night scenery beautifully
(NIGHT PORTRAIT):
To capture a person and the background brightly
(HDR (Backlight Comp.))*:
Provides definition in regions that would otherwise be black or white
(UNDER WATER):
For reduced background noise and clear underwater recording (l 80)
(LOW LIGHT):
For dark scenes, such as at dusk
* Mode for still picture recording only. This will not operate during the
motion picture recording.
≥ (SUNSET/FIREWORKS/LANDSCAPE/NIGHT SCENERY/NIGHT
PORTRAIT)
jImage may get blurry when close object is recorded.
- 83 -
Page 84

≥ (FIREWORKS)
jThe shutter speed is 1/30. (Motion picture recording)
jImage may get washed out when recorded in bright surrounding.
j (the camera shake icon) is displayed constantly when recording
still pictures, but this does not indicate a fault.
≥ (NIGHT SCENERY/NIGHT PORTRAIT/HDR (Backlight Comp.))
jUsing a tripod is recommended.
≥ (LOW LIGHT)
jThe shutter speed is 1/15 or more. (Motion picture recording)
≥ (HDR (Backlight Comp.))
jWhen recording a moving subject, a ghost image may appear.
jThe field of view of the recorded still picture is smaller than the range
displayed on the recording screen.
∫ Limitations of scene mode settings
Setting Limitations
(SPORTS) PANORAMA: Fixed to (OFF).
(PORTRAIT)
(SPOT LIGHT)
(SNOW)
(BEACH) PANORAMA: Fixed to (OFF).
(SUNSET)
(FIREWORKS) PANORAMA: Fixed to (OFF).
(LANDSCAPE) PANORAMA: Fixed to (OFF).
COLOUR MODE: Fixed to .
FOCUS: Fixed to .
COLOUR MODE: Fixed to .
FOCUS: Fixed to .
WHITE BALANCE: Fixed to .
COLOUR MODE: Fixed to .
FOCUS: Fixed to .
FLASH: Fixed to .
ISO: Fixed to AUTO.
FACE CHASER: Fixed to (OFF).
EXP COMPENSATION: Fixed to ± 0.
WHITE BALANCE: Fixed to .
COLOUR MODE: Fixed to .
FOCUS: Fixed to .
FACE CHASER: Fixed to (OFF).
- 84 -
Page 85

Setting Limitations
HX-WA2
(NIGHT SCENERY) PANORAMA: Fixed to (OFF).
(NIGHT PORTRAIT) PANORAMA: Fixed to (OFF).
(HDR (Backlight
Comp.))
(UNDER WATER)
(LOW LIGHT) PANORAMA: Fixed to (OFF).
COLOUR MODE: Fixed to .
FOCUS: Fixed to .
FLASH: Fixed to .
FACE CHASER: Fixed to (OFF).
COLOUR MODE: Fixed to .
FOCUS: Fixed to .
BURST: Fixed to (OFF).
PANORAMA: Fixed to (OFF).
COLOUR MODE: Fixed to .
FOCUS: Fixed to .
FLASH: Fixed to .
E.I.S.(PICTURE): Fixed to .
METERING MODE: Fixed to .
ISO: Fixed to AUTO.
PANORAMA: Fixed to (OFF).
COLOUR MODE: Fixed to .
FOCUS: Fixed to .
COLOUR MODE: Fixed to .
FOCUS: Fixed to .
FLASH: Fixed to .
ISO: Fixed to AUTO.
[BURST]
Please refer to page 75.
[PANORAMA]
Please refer to page 77.
- 85 -
Page 86

[FLASH]
HX-WA2
1
HX-DC2
2
2
[MENU]: # [FLASH] # desired setting
≥ Please see below. ( [FLASH])
RECORDING MENU 2
HX-DC2
[FLASH]
When the button is pressed, the flash is activated and the picture
will be recorded. Use the built-in flash in order to record still pictures in
dark places.
[MENU]: # [FLASH] # desired setting
ßA (AUTO): The unit determines the brightness of the subject
and emits a flash if necessary.
ß (ON): The unit emits a flash irrespective of the brightness
of the subject.
(OFF): Cancel the setting.
≥ When [FLASH] is set to ßA (AUTO) or ß (ON), [BURST] and
[PANORAMA] are set to (OFF).
≥ [SCENE MODE] will be set to (OFF) when the [FLASH] is set to
ßA (AUTO) or ß (ON) while the [SCENE MODE] (l 82) is set to
(FIREWORKS), (NIGHT SCENERY), (HDR (Backlight
Comp.)), or (LOW LIGHT).
≥ If you register a shortcut function (l 93) to the SET button, you can
change the flash setting from the recording screen.
- 86 -
Page 87

[SELF TIMER]
2
The timer can be used to record images or audio.
[MENU]: # [SELF TIMER] # desired setting
(OFF): Cancel the setting
Ø2 (2sec): Records after 2 seconds
Ø10 (10sec): Records after 10 seconds
When Ø2 (2sec) is selected
When you press the button or the recording start/stop button, the
status indicator flashes red for approximately 2 seconds, then recording
begins.
On the LCD monitor, an indication of ( # ) appears
to notify you of the recording timing.
When Ø10 (10sec) is selected
When you press the button or the recording start/stop button, the
status indicator flashes red for approximately 10 seconds, then recording
begins.
On the LCD monitor, an indication of ( # #
recording timing.
≥ After the recording, the self-timer setting is cancelled.
# # ) appears to notify you of the
To stop the timer midway through
Press the button or the recording start/stop button.
≥ Setting the self-timer to Ø2 or Ø10 is a good way to prevent image
shake when the button is pressed while using a tripod etc.
≥ If you register a shortcut function (l 93) to the SET button, you can
change the self-timer setting from the recording screen.
≥ If you set [FOCUS] (l 101) to (AUTO) or (MACRO) when
recording still pictures, the unit will focus automatically immediately
before recording.
- 87 -
Page 88

≥ With motion picture recording/audio recording, recording does not turn
2
off automatically.
≥ If you perform any of the following cases, the self-timer will be
cancelled.
jIf you turn the unit off
jIf you change to the playback mode
jIf you send unit into standby mode by closing the LCD monitor
jWhen it goes into sleep mode
[FOCUS]
Please refer to page 101.
[FOCUS MODE]
You can select the focusing method according to the position of the
subject.
[MENU]: # [FOCUS MODE] # desired setting
(9-PT AUTOFOCUS): The unit determines the focus
(SPOT FOCUS): The unit focuses on the subject over the
automatically from 9 focus points ( )
in the recording range.
focus mark ( ) displayed at the
centre of the LCD monitor.
- 88 -
Page 89

[METERING MODE]
2
You can change the light-metering method used to measure brightness.
[MENU]: # [METERING MODE] # desired setting
(MULTI): The unit automatically assesses the
(CENTRE): The unit averages light measurements
(SPOT): The unit meters the subject over spot
≥ [SCENE MODE] will be set to (OFF) when the [METERING
MODE] is set to (CENTRE) or (SPOT) while the [SCENE
MODE] (l 82) is set to (HDR (Backlight Comp.)).
distribution of brightness over the
screen and meters to ensure that the
exposure is appropriate.
over the entire screen, giving higher
weight to the subject at the centre of the
screen.
meter target ( ) displayed at the
centre of the LCD monitor.
- 89 -
Page 90

[COLOUR MODE]
2
You record in different colours and add effects such as skin smoothing.
[MENU]: # [COLOUR MODE] # desired setting
(OFF): Cancel the setting.
(HDR (Paint))*: Records still pictures with picture effects.
(SOFT SKIN): Records with skin softening effects.
(MONOCHROME): Records in monochrome.
(SEPIA): Records with colours adjusted to sepia.
(VIVID): Reduced sharpness and increases colour.
(SOFT): Records with reduced sharpness for a
* Mode for still picture recording only
≥ When [COLOUR MODE] is set, [SCENE MODE] (l 82) is cancelled.
≥ (HDR (Paint))
jWe recommend use of a tripod.
jThe flash is disabled.
j[BURST] and [PANORAMA] are set to (OFF).
j[E.I.S.(PICTURE)] is set to (OFF).
j[METERING MODE] is set to (MULTI).
j[ISO] is set to AUTO.
jThe field of view of the recorded still picture is smaller than the range
visible on the recording screen.
softer image.
- 90 -
Page 91

[ISO]
HX-WA2
2
HX-DC2
3
[MENU]: # [ISO] # desired setting
≥ Please see below. ( [ISO])
RECORDING MENU 3
3
HX-DC2
[ISO]
Although, with the default settings, the ISO sensitivity is set automatically
in accordance with the brightness of the subject, the ISO sensitivity can
be fixed.
[MENU]: # [ISO] # desired setting
AUTO: ISO sensitivity is set automatically.
50: Sets the sensitivity to ISO 50.
100: Sets the sensitivity to ISO 100.
200: Sets the sensitivity to ISO 200.
400: Sets the sensitivity to ISO 400.
800: Sets the sensitivity to ISO 800.
1600: Sets the sensitivity to ISO 1600.
≥ The displayed ISO display value is the default output sensitivity.
≥ The higher the ISO sensitivity, the greater the capability of the unit to
record with fast shutter speeds and in dark environments. However, a
higher sensitivity may also mean more noise in the recorded image
and a more grainy image.
- 91 -
Page 92

≥ [SCENE MODE] will be set to (OFF) when the [ISO] is set to other
3
than AUTO while the [SCENE MODE] (l 82) is set to
(FIREWORKS), (HDR (Backlight Comp.)), or (LOW
LIGHT).
≥ If you register a shortcut function (l 93) to the SET button, you can
change the ISO sensitivity setting from the recording screen.
[WHITE BALANCE]
Please refer to page 99.
[FACE CHASER]
The detected face is displayed in the frame.
[MENU]: # [FACE CHASER] # [(ON)]
∫ About prioritised face framing
The prioritised face frame is displayed in
yellow. When the unit is set to Portrait mode
in Intelligent Auto Mode, the unit will focus
on the prioritised face frame and adjust the
brightness accordingly.
≥ The grey frames are for face detection only.
≥ When you press the button halfway while recording still pictures,
the unit focuses on the prioritised frame. When focus is achieved, the
prioritised frame turns green.
≥ A maximum of 15 frames are detected, with the frames near the centre
of the screen and large frames being prioritised.
≥ For still pictures with detected faces, is displayed on the 1-file
thumbnail display. (l 60)
≥ If the subject is small or dark on the LCD monitor, the unit may not be
able to detect it.
≥ [SCENE MODE] will be automatically set to (OFF) when the
[FACE CHASER] is set to (ON) while the [SCENE MODE] (l 82)
is set to (FIREWORKS), (LANDSCAPE), or (NIGHT
SCENERY).
- 92 -
Page 93

≥ [FOCUS MODE] (l 88) is set to (9-PT AUTOFOCUS) and
3
[METERING MODE] (l 89) is set to (MULTI).
≥ Face detection is disabled when using burst recording or panorama
still picture recording.
≥ When [FOCUS] (l 101) is set to (MANUAL), Auto focus is
disabled.
≥ When it is set to [ISO] (l 91) or [EXP COMPENSATION] (l 96), the
brightness is not adjusted.
[E.I.S.(VIDEO)]
Please refer to page 74.
[E.I.S.(PICTURE)]
Please refer to page 74.
[SHORTCUTS]
This setting registers the functions (shortcut functions) performed when
the SET button is tipped up, down, left and right with the recording screen
displayed.
[MENU]: # [SHORTCUTS]
1 Select the destination (up, down, left or right on the SET button)
for the function using the SET button and press the SET button.
///:
Functions are registered individually to up, down, left and right of the
SET button.
RECOMMENDED SETTINGS:
Regular functions are automatically registered.
- 93 -
Page 94

2 Select the function to register using the SET button, and press
-
+
ISO
the SET button.
(AF LOCK):
Locks the focus. (l 95)
(AE LOCK):
Locks the exposure. (l 95)
(FOCUS):
Sets the focus. (l 101)
(Can be registered to and only)
(FLASH):
Sets the flash operation. (l 86)
(EXP COMPENSATION):
Corrects the exposure. (l 96)
ISO
ISO
(ISO):
Sets the ISO sensitivity. (l 91)
Ø(SELF TIMER):
Sets the self-timer. (l 87)
(PHOTO VIEW):
Sets photo view. (l 97)
[OFF]:
Shortcut functions are not registered.
≥ To continue and register other functions, repeat Steps 1 and 2.
3 Press the MENU button.
≥ A confirmation screen for the shortcut
settings appears.
4 Press the MENU button to complete
the settings.
5 Tilt the SET button in the direction in
which you registered the function.
≥ Each tip of the SET button changes the registered function setting.
≥ To confirm the shortcut settings, press the MENU button on the screen
in Step 1. A confirmation screen appears.
- 94 -
Page 95

∫ AF lock
If you register AF lock as a shortcut function (l 93), you can record with
the focus locked.
≥ Register the shortcut function. (l 93)
Tilt the SET button in the direction to which you registered AF lock.
≥ will appear on the LCD monitor.
≥ When [FOCUS] is set to (MANUAL), AF Lock is disabled.
≥ The AF lock setting is cancelled if any of the following operations is
performed.
jSetting playback mode
jIf [SCENE MODE] is set to (FIREWORKS)
jIf the [FOCUS] setting is changed
jTurning off the unit
jSetting standby mode
∫ AE lock
If you register AE lock as a shortcut function (l 93), you can record with
the exposure locked.
≥ Register the shortcut function. (l 93)
Tilt the SET button in the direction to which you registered AE lock.
≥ will appear on the LCD monitor.
≥ The AE lock setting is cancelled if any of the following operations is
performed.
jSetting playback mode
jIf the [SCENE MODE] setting is changed
jIf [COLOUR MODE] is set to (HDR (Paint))
jIf the [ISO] setting is changed
jIf the [WHITE BALANCE] setting is changed
jIf the [EXP COMPENSATION] setting is changed
jTurning off the unit
jSetting standby mode
- 95 -
Page 96

∫ Exposure compensation
-
+
00
If you register exposure compensation as a shortcut function (l 93), you
can record with altered brightness.
≥ Register the shortcut function (l 93)
1 Tilt the SET button in the direction to which you registered the
exposure compensation.
≥ The exposure compensation bar is displayed.
2 Tilt the SET button to the left or right to correct the exposure.
≥ The exposure compensation value is displayed to the left side of the
exposure compensation bar.
≥ The exposure compensation value can be corrected in the range –1.8
to +1.8.
≥ The exposure compensation bar disappears when the SET button is
pressed.
≥ The exposure setting is cancelled if any of the following operations is
performed.
jSetting the pointer to n 0
jSetting playback mode
jChanging the [SCENE MODE] settings
jTurning off the unit
jSetting standby mode
- 96 -
Page 97

[PHOTO VIEW]
HX-WA2
3
HX-DC2
4
[MENU]: # [PHOTO VIEW] # desired setting
≥ Please see below. ( [PHOTO VIEW])
RECORDING MENU 4
4
HX-DC2
[PHOTO VIEW]
Selects the desired field of view (photo view or video view) for the
recording standby screen display. When photo view is selected, a frame
to show the field of view during video recording appears.
[MENU]: # [PHOTO VIEW] # desired setting
(ON): Photo view (OFF): Video view
A Video recording area
≥ If you register a shortcut function (l 93) to the SET button, you can
change the photo view setting from the recording screen.
[ZOOM MODE]
Please refer to page 73.
- 97 -
Page 98

[WIND CUT]
4
4
1
2
This is for reducing the wind noise coming into the built-in microphones.
[MENU]: # [WIND CUT] # [ (ON)]
≥ This function’s default setting is [ (ON)].
≥ You may not see the full effect depending on the recording conditions.
[AUTO REVIEW]
Sets the period for which the recorded image appears on the LCD
monitor after the button is pressed.
[MENU]: # [AUTO REVIEW] # desired setting
(1sec): Still pictures are displayed for approximately
1 second after being recorded.
(2sec): Still pictures are displayed for approximately
2 seconds after being recorded.
(OFF): Still pictures are not displayed after being recorded.
- 98 -
Page 99

Advanced (Recording)
3
Manual recording
White Balance
Automatic White Balance function may not reproduce natural colours
depending on the scenes or lighting conditions. If so, you can adjust the
White Balance manually.
1 Select the menu.
[MENU]: # [WHITE BALANCE]
2 Select the white balance using the SET button, and
press the SET button.
(AUTO): The unit distinguishes the weather and
lighting at the recording location and
automatically adjusts the white balance.
(Auto)
(SUNNY): Outdoors under a clear sky
(CLOUDY): Outdoors under cloudy sky
(INDOOR 1): Incandescent light, video lights like in the
studio, etc.
(INDOOR 2): Colour fluorescent lamps, sodium lamps in
gymnasiums etc.
(WHITE SET): ≥ Mercury-vapor lamps, sodium lamps,
≥ Lights used for wedding receptions at
≥ Sunrise, sunset, etc.
≥ To return to auto setting, select (AUTO).
some fluorescent lights
hotels, stage spotlights in theaters
- 99 -
Page 100

∫ To set the White Balance manually
1 Point the unit at a white subject that fills the screen.
2 Select the (WHITE SET) and press the SET button.
≥ The LCD monitor display will go dark for a moment and then return to
the recording menu. When the icon appears on the recording
menu, the white balance has been set.
≥ When the brightness changes or the recording location changes and
the colour balance is not longer correct, check whether the white
balance setting is suitable for the light source.
≥
HX-DC2
If you turn on the unit with the lens cap still fitted, the auto white
balance will not be set correctly. Always remove the lens cap before
turning on the unit.
≥ [SCENE MODE] will be set to (OFF) when the [WHITE BALANCE]
is set to other than (AUTO) while the [SCENE MODE] (l 82) is set
to (BEACH), (SUNSET), or (FIREWORKS).
- 100 -
 Loading...