

Page 1

Owner’s Manual
Dual Camera
Model No.HX-DC10
HX-DC1
Before connecting, operatin g or adjusting this product, please read the instructions completely.
For USA and Puerto Rico assistance, please call: 1-800-211-PANA(7262) or,
contact us via the web at: http://www.panasonic.com/contactinfo
P
VQT3M88
1AG6P1P6280--(S)
Page 2

Things You Should
Know
Thank you for choosing Panasonic!
You have purchased one of the most
sophisticated and reliable products on
the market today. Used properly, we’re
sure it will bring you and your family
years of enjoyment. Please take time
to fill in the information on the right.
The serial number is on the tag
located on the battery holder of your
camera. Be sure to retain this
manual as your convenient camera
information source.
Date of Purchase
Dealer Purchased From
Dealer Address
Dealer Phone No.
Model No.
Serial No.
Safety Precautions
WARNING:
TO REDUCE THE RISK OF FIRE, ELECTRIC SHOCK OR PRODUCT
DAMAGE,
i DO NOT EXPOSE THIS APPARATUS TO RAIN, MOISTURE,
DRIPPING OR SPLASHING AND THAT NO OBJECTS FILLED
WITH LIQUIDS, SUCH AS VASES, SHALL BE PLACED ON THE
APPARATUS.
i USE ONLY THE RECOMMENDED ACCESSORIES.
i DO NOT REMOVE THE COVER (OR BACK); THERE ARE NO USER
SERVICEABLE PARTS INSIDE. REFER SERVICING TO QUALIFIED
SERVICE PERSONNEL.
CAUTION!
DO NOT INSTALL OR PLACE THIS UNIT IN A BOOKCASE, BUILT-IN
CABINET OR IN ANOTHER CONFINED SPACE. ENSURE THE UNIT IS
WELL VENTILATED. TO PREVENT RISK OF ELECTRIC SHOCK OR
FIRE HAZARD DUE TO OVERHEATING, ENSURE THAT CURTAINS
AND ANY OTHER MATERIALS DO NOT OBSTRUCT THE
VENTILATION VENTS.
2 VQT3M88
Page 3

FCC Note:
This equipment has been tested and found to comply with the limits for a
Class B digital device, pursuant to Part 15 of the FCC Rules. These limits
are designed to provide reasonable protection against harmful
interference in a residential installation. This equipment generates, uses,
and can radiate radio frequency energy and, if not installed and used in
accordance with the instructions, may cause harmful interference to radio
communications. However, there is no guarantee that interference will not
occur in a particular installation. If this equipment does cause harmful
interference to radio or television reception, which can be determined by
turning the equipment off and on, the user is encouraged to try to correct
the interference by one or more of the following measures:
i Reorient or relocate the receiving antenna.
i Increase the separation between the equipment and receiver.
i Connect the equipment into an outlet on a circuit different from that to
which the receiver is connected.
i Consult the dealer or an experienced radio/TV technician for help.
FCC Caution: To assure continued compliance, follow the attached
Any changes or modifications not expressly approved by the party
responsible for compliance could void the user’s authority to operate this
equipment.
Declaration of Conformity
Trade Name: Panasonic
Model No.: HX-DC10/HX-DC1
Responsible party: Panasonic Corporation of North America One
Support Contact: Panasonic Consumer Electronics Company 1-800-
This device complies with Part 15 of the FCC Rules. Operation is subject
to the following two conditions: (1) This device may not cause harmful
interference, and (2) this device must accept any interference received,
installation instructions and use only shielded
interface cables with ferrite core when connecting to
computer or peripheral devices.
Panasonic Way, Secaucus, NJ 07094
211-PANA (7262)
including interference that may cause undesired operation.
HX-DC10 HX-DC1
VQT3M88 3
Page 4

AC adaptor
This AC adaptor operates on AC between 100V and 240V.
But
i In the U.S.A. and Canada, the AC adaptor must be connected to a
120V AC power supply only.
i When connecting to an AC supply outside of the U.S.A. or Canada,
use a plug adaptor to suit the AC outlet configuration.
THE SOCKET OUTLET SHALL BE INSTALLED NEAR THE
EQUIPMENT AND SHALL BE EASILY ACCESSIBLE.
k Concerning the battery
Battery pack (Lithium ion battery pack)
i Use the specified unit to recharge the battery pack.
i Do not use the battery pack with equipment other than the specified
unit.
i Do not get dirt, sand, liquids, or other foreign matter on the terminals.
i Do not touch the plug terminals (+ and -) with metal objects.
i Do not disassemble, remodel, heat or throw into fire.
If any electrolyte should come into contact with your hands or clothes,
wash it off thoroughly with water.
If any electrolyte should come into contact with your eyes, never rub the
eyes. Rinse eyes thoroughly with water, and then consult a doctor.
Warning
Risk of fire, explosion and burns. Do not disassemble, heat above 60 °C
(140 °F) or incinerate.
4 VQT3M88
Page 5
CAUTION
Danger of explosion if battery is incorrectly replaced. Replace only with
the same or equivalent type recommended by the manufacturer. Dispose
of used batteries according to the manufacturer’s instructions.
k Product Identification Marking
Product Location
Dual Camera Battery holder
U.S.A./CANADA CONSUMERS: ATTENTION:
A lithium ion battery that is recyclable powers the product
you have purchased. Please call 1-800-8-BATTERY for
information on how to recycle this battery.
VQT3M88 5
Page 6

Precautions
USE & LOCATION
WARNING
i TO AVOID SHOCK HAZARD ...
Your camera and power supply
should not be exposed to rain or
moisture. Do not connect the
power supply or operate your
camera if it gets wet. Your
camera has been designed for
outdoor use, however it is not
designed to sustain direct
exposure to water, rain, sleet,
snow, sand, dust, or a direct
splashing from a pool or even a
cup of coffee. This action could
permanently damage the internal
parts of your camera. Do not
attempt to disassemble this unit.
There are no user serviceable
parts inside. Unplug your camera
from the power supply before
cleaning.
i AS WITH ANY SMALL OBJECT,
SD CARDS CAN BE
SWALLOWED BY YOUNG
CHILDREN. DO NOT ALLOW
CHILDREN TO HANDLE THE
SD CARD.
CAUTION
i DO NOT AIM YOUR CAMERA
AT THE SUN OR OTHER
BRIGHT OBJECTS
i DO NOT LEAVE THE CAMERA
WITH THE EVF AIMED
DIRECTLY AT THE SUN AS
THIS MAY CAUSE DAMAGE TO
THE INTERNAL PARTS OF THE
EVF
i DO NOT EXPOSE YOUR
CAMERA TO EXTENDED HIGH
TEMPERATURE ... Such as, in
direct sunlight, inside a closed
car, next to a heater, etc... This
action could permanently
damage the internal parts of your
camera.
i AVOID SUDDEN CHANGES IN
TEMPERATURE ... If the unit is
suddenly moved from a cold
place to a warm place, moisture
may form on the SD card and
inside the unit.
i DO NOT LEAVE YOUR
CAMERA OR THE POWER
SUPPLY TURNED ON WHEN
NOT IN USE.
i STORAGE OF YOUR CAMERA
... Store and handle your camera
in a manner that will not subject it
to unnecessary movement (avoid
shaking and striking). Your
camera contains a sensitive pickup device which could be
damaged by improper handling
or storage.
CARE
i TO CLEAN YOUR CAMERA ...
Do not use strong or abrasive
detergents when cleaning your
camera body.
i TO PROTECT THE LENS ... Do
not touch the surface of the lens
with your hand. Use a
commercial camera lens solution
and lens paper when cleaning
the lens. Improper cleaning can
scratch the lens coating.
6 VQT3M88
Page 7
i TO PROTECT THE FINISH OF
YOUR CAMERA ... Before
handling your camera, make sure
your hands and face are free
from any chemical products, such
as sunblock, as it may damage
the finish.
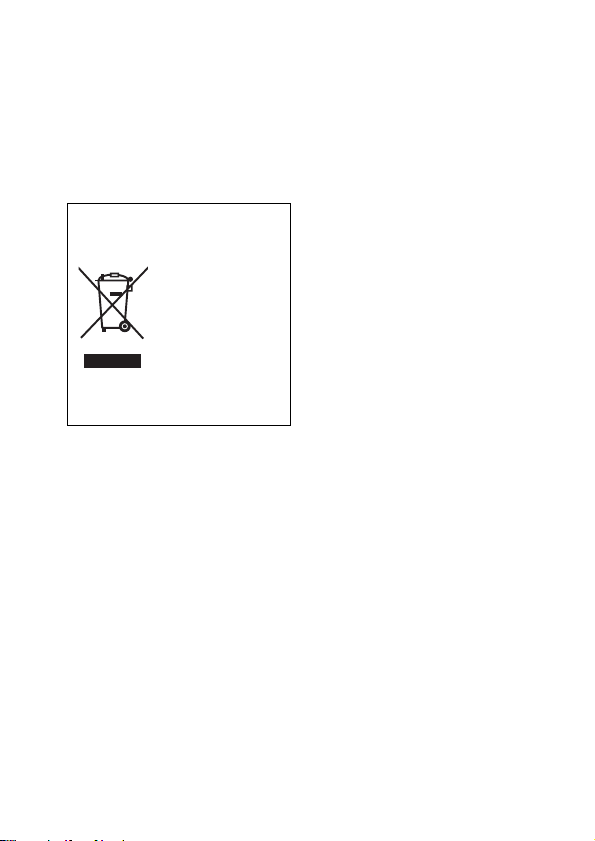
-If you see this symbol-
Information on Disposal in other
Countries outside the European
Union
This symbol is only
valid in the
European Union. If
you wish to discard
this product, please
contact your local
authorities or
dealer and ask for
the correct method
of disposal.
VQT3M88 7
Page 8

IMPORTANT! PLEASE READ
k About the models covered by this owner’s manual
i This manual pertains to models HX-DC10 and HX-DC1.
i Where passages refer to a specific model(s), the model number is
indicated.
k Be sure to take some test pictures beforehand
Before those important events, be sure to take some trial pictures to confirm
that the images and audio are being properly recorded.
k Indemnity about recorded content
Panasonic does not accept any responsibility for damages directly or
indirectly due to any type of problems that result in loss of recording or edited
content, and does not guarantee any content if recording or editing does not
work properly. Likewise, the above also applies in a case where any type of
repair is made to the unit (including any other non-built-in memory/HDD
related component).
k Handling of built-in memory
This unit is equipped with an built-in memory (HX-DC10: Approx. 80 MB, HXDC1: Approx. 80 MB). When using this component, pay attention to the
following points.
Back up data periodically.
The built-in memory is temporary storage. In order to avoid erasing data
due to static electricity, electromagnetic waves, breakage, and failures,
back up the data to a computer or DVD disc. (page 129)
i The status indicator (page 21) illuminates while the SD card or built-in
memory is being accessed (reading, recording, playback, deleting etc.). Do
not perform the following operations when the lamp illuminates. It may
damage the built-in memory or cause a malfunction in the unit.
h Turn the unit off (remove the battery)
h Eject the SD card from the camera
h Insert or remove the USB cable
h Expose the unit to vibrations or shock
i For disposing of or transferring this unit, please see page 118.
8 VQT3M88
Page 9

k Concerning this unit’s recording method and compatibility
<Video compatibility>
i This camera is an MP4 standard (MPEG-4AVC/H.264 format) digital movie
camera that records high-definition HDTV video.
The AVCHD and MPEG2 video formats are different and are therefore not
compatible.
i This camera may degrade or be unable to play back videos recorded or
created with other products, and other products may degrade or not be
able to play back videos recorded with this camera, even if the products
support the MP4 format.
<Photo compatibility>
i This unit is compliant with the unified standard DCF (Design rule for
Camera File system) established by JEITA (Japan Electronics and
Information Technology Industries Association) and with Exif
(Exchangeable Image File Format). Files which do not comply with the
DCF standard cannot be played back.
i The file format of images supported by this unit is JPEG. (Not all JPEG
format files will be played back.)
i This unit may degrade or not play back images recorded or created on
other products, and other products may degrade or not play back images
recorded on this unit.
k About the battery pack
i Never place the battery pack within the reach of infants. In the event that
the battery pack is swallowed, consult a doctor immediately.
k About the photos and illustrations in this manual
i The product images, illustrations, menu displays etc. in this manual may
differ slightly from the actual product.
i Unless noted otherwise, the screen and camera illustrations are those of
Model HX-DC10.
k For the purposes of this owner’s manual
i SD Memory Card, SDHC Memory Card and SDXC Memory Card are
referred to as the “SD card”.
i Pages for reference are indicated by parentheses, for example: (page 00).
VQT3M88 9
Page 10
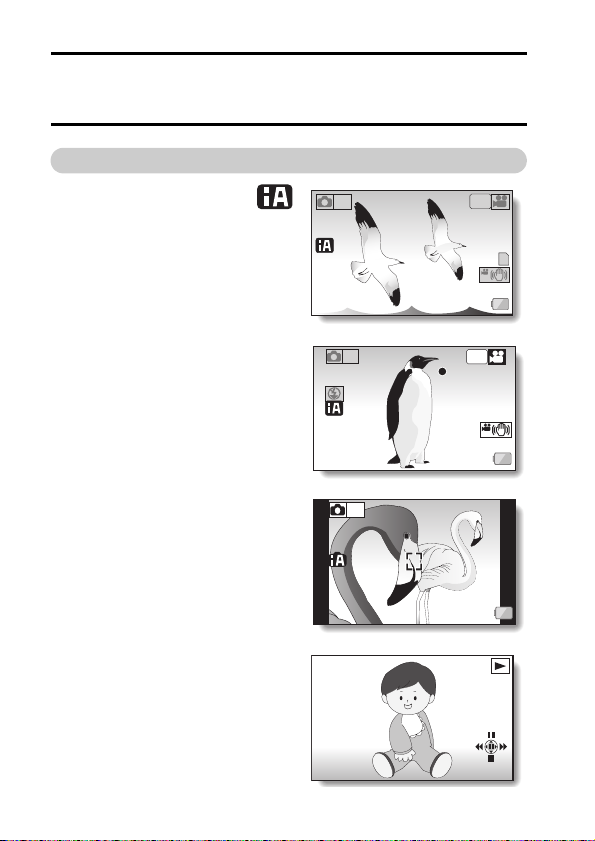
WHAT YOU CAN DO WITH YOUR
000:00:09
F3.5
1/30
DEC.20.
2011
DIGITAL MOVIE CAMERA
Easy shooting/playback (Basic features)
Intelligent Auto Mode
(HX-DC10)
... (page 48)
Just point the camera at the subject, and
it automatically ascertains the scene
and captures the images with the
optimum settings.
Shoot movies
... (page 53)
Take photos
... (page 54)
Play back videos and
photos
... (page 59)
10 VQT3M88
1080-30
-
16
M
S
353 000:15:53
2
M
000:00:09
000:00:09
-
16
M
S
F3.5
F3.5
1/30
1/30
DEC.20
2011
DEC.20.2011
p
1080-30
p
Page 11

Using the convenient features (Practical
applications)
Image stabilizer... (pages 43, 74)
Subject tracking... (pages 45, 80)
Scene mode... (pages 41, 72, 171 to 173)
HINT
User guide on the Internet
When this camera is connected to an Internet-connected VIERA via an HDMI
mini cable (sold separately), you can press the VIERA’s remote control Menu
button and from the resulting menu select “User guide on the Internet” to see
easy-to-understand explanations of the camera’s operation and convenient
functions on the VIERA screen.
i Applicable to VIERA units sold from December 2010.
i To connect the camera to the VIERA via an HDMI mini cable, please see
pages 150 to 152.
VQT3M88 11
Page 12
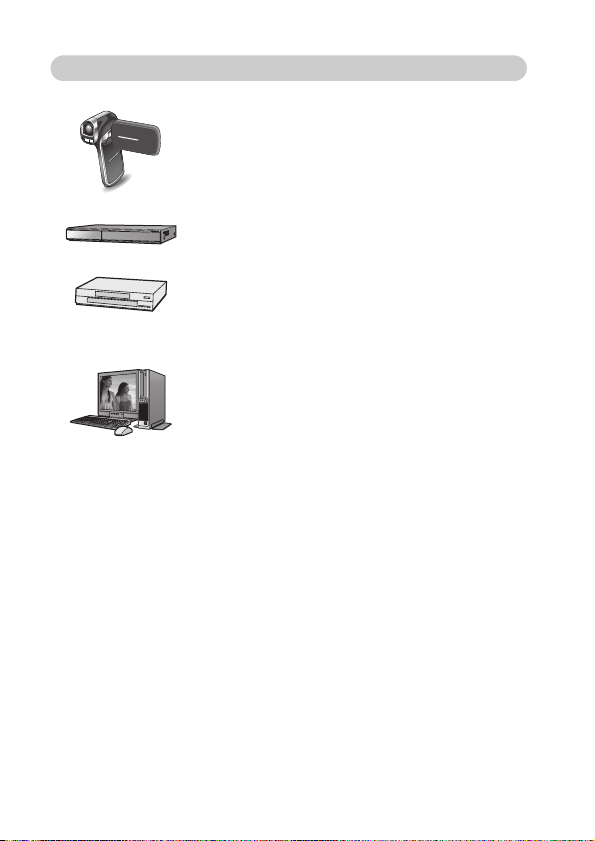
Keeping recorded videos (Copy/dubbing)
From built-in memory to SD
card...
(page 47)
DVD recorder and video deck...
(page 154)
* It is not possible to directly insert in the card slot
an SD card recorded with this camera and play
back or dub from it.
* It is not possible to connect the camera to the
USB connector and play back or dub from it.
* Recording with HD image quality on a Blu-ray
disc recorder is not possible.
On a computer...
(pages 123 to 148)
12 VQT3M88
Page 13

CONTENTS
CHECKING THE INCLUDED ACCESSORIES ....................................17
ABOUT THE CARD ..............................................................................18
Media cards that can be used with this camera
(as of February 2011) ...............................................................18
SETUP
PARTS NAMES ....................................................................................20
CHARGING THE BATTERY PACK ......................................................23
About the temperature alert icon ............................................29
INSTALLING THE CARD .....................................................................30
TURNING THE CAMERA ON AND OFF ..............................................32
Turning on the camera .................................................................. 32
Turning off the camera ..................................................................33
Turning on the camera when it is in the sleep mode .....................33
DATE AND TIME SETTING .................................................................34
Date and time backup ...................................................................36
SWITCHING BETWEEN THE RECORDING MODE AND PLAYBACK
MODE ...............................................................................................37
MENU SCREEN ...................................................................................38
Accessing/exiting the Menu Screen ..............................................38
Using the Menu .............................................................................39
Overview of the Menu Screen .......................................................40
INTELLIGENT AUTO MODE (HX-DC10) .............................................48
BASIC OPERATION
SHOOTING
BEFORE TAKING PICTURES .............................................................51
For best results ..............................................................................51
How to use the accessories ..........................................................52
VIDEO RECORDING ............................................................................53
TAKING PHOTOS ................................................................................54
Shoot a photo while recording a video ..........................................56
MACRO-PHOTOGRAPHY (ZOOM) .....................................................57
PLAYBACK
PLAYING BACK VIDEOS AND PHOTOS ............................................59
How to save one frame from a video as a photo ...........................62
DELETING FILES .................................................................................63
Delete single/delete all/delete folder .............................................63
Delete selected ..............................................................................64
VQT3M88 13
Page 14

PLAYBACK MODES ............................................................................ 66
21-image display playback ........................................................... 66
Magnifying (zooming in) the image (photos only) ......................... 67
ADVANCED OPERATION
SHOOTING
RECORDING MENU 1 ......................................................................... 68
Recording mode setting (page 40) ............................................... 68
Recorded pixels (page 40) ............................................................ 71
Scene mode setting (page 41) ...................................................... 72
Self-timer setting (page 41) .......................................................... 73
RECORDING MENU 2 ......................................................................... 74
Motion compensation (image stabilizer) setting (page 43) ........... 74
Focus setting (page 43) ................................................................ 75
ISO sensitivity setting (page 43) ................................................... 76
White balance setting (page 43) ................................................... 77
RECORDING MENU 3 ......................................................................... 78
Exposure setting (HX-DC10) (page 45) ........................................78
Subject tracking settings (page 45) .............................................. 80
Shortcut setting (page 45) ............................................................ 82
Exposure compensation ............................................................... 85
PLAYBACK
PLAYBACK MENU 1 ........................................................................... 86
Slideshow settings (page 46) ........................................................ 86
File protect setting (page 46) ........................................................ 87
Rotate (page 46) ........................................................................... 89
Resize (page 46) .......................................................................... 89
PLAYBACK MENU 2 ........................................................................... 90
Correcting red-eye (page 47) ........................................................ 90
Editing videos (page 47) ............................................................... 91
Copy (page 47) ........................................................................... 100
FILE INFO DISPLAY .......................................................................... 102
OPTION SETTINGS
DISPLAY THE OPTION SETTING MENU ......................................... 103
INTRODUCTION TO THE OPTION SETTING MENU ...................... 104
TV output setting (page 107) ...................................................... 110
Storage folder setting (page 109) ............................................... 114
Playback folder setting (page 109) ............................................. 115
File No. continued setting (page 109) .........................................116
Formatting (initializing) (page 107) ............................................. 118
14 VQT3M88
Page 15

CHECKING THE REMAINING CARD MEMORY ...............................119
Checking the remaining number of images and
video recording time ................................................................119
Check the available audio recording time ...................................120
CHECKING THE REMAINING BATTERY PACK CHARGE ..............121
OTHER DEVICES AND CONNECTIONS
CONNECTING TO A COMPUTER
SETTING THE CONNECTION MODE ...............................................123
USING AS A CARD READER ............................................................125
ABOUT THE CONTENTS OF THE CARD .........................................126
Configuration of directories in the card ........................................126
File formats ..................................................................................126
When using as a card reader ......................................................127
Selecting which medium to access .............................................128
USING AS A WEBCAM ......................................................................130
Operating environment ................................................................130
Using as a webcam .....................................................................131
WHAT YOU CAN DO WITH A COMPUTER ......................................132
Contents of the supplied CD-ROM ..............................................132
End User License Agreement .....................................................134
OPERATING ENVIRONMENT ...........................................................136
Operating environment for HD Writer VE 1.0 ..............................136
To use the HD Writer VE 1.0 .......................................................139
Operating environment for the card reader function
(mass storage) ........................................................................140
INSTALLATION ..................................................................................141
Uninstalling HD Writer VE 1.0 .....................................................144
STARTING HD WRITER VE 1.0 ........................................................145
Reading the owner’s manual of the software applications ..........146
IF USING Mac ....................................................................................147
Operating environment ................................................................147
Copying photos on a computer ...................................................147
To disconnect USB cable safely ..................................................148
CONNECTING TO A TV
CONNECTING TO A TV .....................................................................149
Connecting to a video input terminal ...........................................150
Connecting to the HDMI terminal ................................................150
PLAYING BACK ON A TV ..................................................................151
Playback using VIERA Link™ (HDAVI Control™) .......................151
VQT3M88 15
Page 16

COPYING/DUBBING
COPYING/DUBBING ......................................................................... 154
Dubbing in standard picture quality ............................................ 154
IMPORTANT MESSAGES AND ALERTS
COMMONLY ASKED QUESTIONS ................................................... 156
TROUBLESHOOTING ....................................................................... 164
Camera ....................................................................................... 164
Restrictions concerning the Scene Mode and
Color Mode features ............................................................... 171
ABOUT COPYRIGHT ........................................................................ 174
CAUTIONS FOR USE ....................................................................... 175
RECORDING MODES/APPROXIMATE RECORDABLE TIME ......... 181
APPROXIMATE NUMBER OF RECORDABLE PICTURES .............. 183
SPECIFICATIONS ............................................................................. 185
OPTIONAL ACCESSORIES .............................................................. 191
Limited Warranty (ONLY FOR U.S.A. AND PUERTO RICO) ............ 193
Spanish Quick Use Guide/Guía española para el uso rápido ............ 196
16 VQT3M88
Page 17
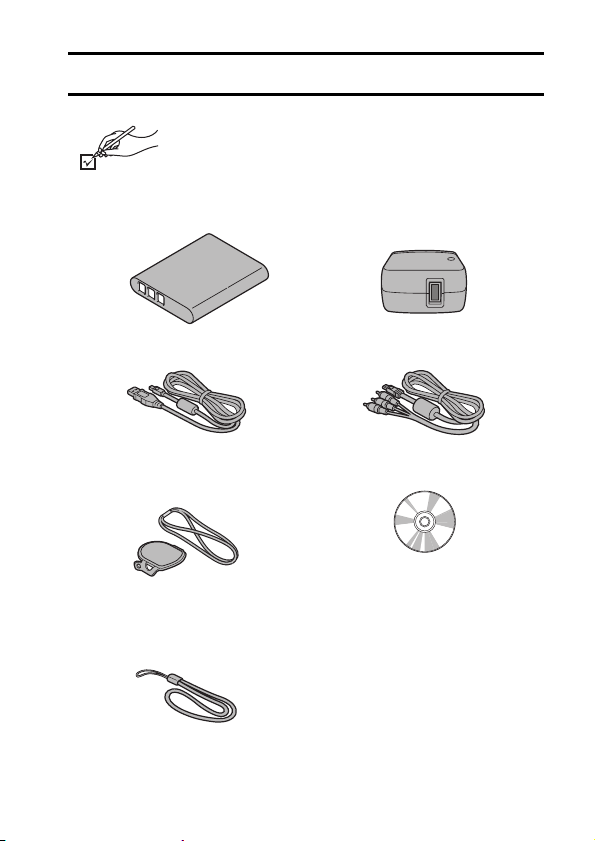
CHECKING THE INCLUDED ACCESSORIES
Check the accessories before using this unit.
Product numbers correct as of February, 2011.
These may be subject to change.
Battery pack
VW-VBX070
USB cable
VFA0544
Lens cap
VFC4701
Lens cap strap
VFC4702
Handstrap
* To prevent the camera from
dropping, be sure to attach the
handstrap (page 52).
VFC4627
i Please dispose of packing materials properly.
i Keep the battery pack and the lens cap out of reach of children to
prevent swallowing.
AC adaptor
VSK0750
AV cabl e
VFA0543
CD-ROM
Software
VQT3M88 17
Page 18
ABOUT THE CARD
Media cards that can be used with this camera (as of February 2011)
Use SD cards conforming to Class 4 or higher of the SD Speed Class Rating*
for video recording.
This camera is compatible with SDXC devices (SD Memory Card/SDHC
Memory Card/SDXC Memory Card compatible devices). If using an
SDHC memory card/SDXC memory card in different device, please
confirm that it is compatible with the respective memory card.
Card type Capacity Video recording
8 MB/16 MB/
SD Memory
Card
SDHC Memory
Card
SDXC Memory
Card
* The SD Speed class Rating is the speed standard for successive writes.
See the card label to confirm the rating.
(Example)
Please confirm which of our SD Memory Cards/SDHC Memory Cards/
SDXC Memory Cards can be used with this product by visiting the
support web site at the address below.
32 MB/64 MB/
128 MB/256 MB
512 MB/
1 GB/ 2 GB
4 GB/6 GB/
8 GB/12 GB/
24 GB/32 GB
48 GB/64 GB
http://panasonic.jp/support/global/cs/e_cam
(This website is in English only.)
Operation is not
guaranteed.
Can be used. Can be used.
16 GB/
Photo
shooting
Operation
is not
guaranteed.
18 VQT3M88
Page 19

i 4 GB or more Memory Cards that do not have the SDHC logo or 48 GB or
more Memory Cards that do not have the SDXC logo are not based on SD
Memory Card specifications.
i Cards with capacity larger than 64 GB cannot be used.
i When the write-protect switch on the SD card is locked, no recording,
deletion or editing will be possible on the card.
i Keep the Memory Card out of reach of children to prevent swallowing.
Write-protect switch
VQT3M88 19
Page 20

SETUP
SETUP
PARTS NAMES
SETUP
Front
Status indicator
Speaker
Lens
Flash
i The flash unit
becomes very
hot and may
cause a burn.
Avoid touching
the flash unit
when shooting.
Monitor unit
Internal stereo
microphone
* The tripod mounting
hole is on the bottom.
Attaching to a tripod
having a screw length
longer than 5.5 mm
(0.22”) may damage the
camera.
20 VQT3M88
Page 21

k About the status indicator (See page 173 regarding the charging
status.)
Status indicator
i The status indicator lights or flashes to
show the camera’s operating status.
SETUP
Status indicator status
Color Lit/flashing
Lit Accessing
Flashing
(Faster)
Red
Green
Orange
Flashing
(Fast)
Flashing
(Slow)
Flashing
(Slower)
Lit USB
Flashing During
Lit AV cable/
Camera
status
built-in
memory or
SD card
Battery
charge
error
Self-timer
is operating
Battery is
charging
connection
sleep mode
HDMI mini
cable
connection
VQT3M88 21
Page 22
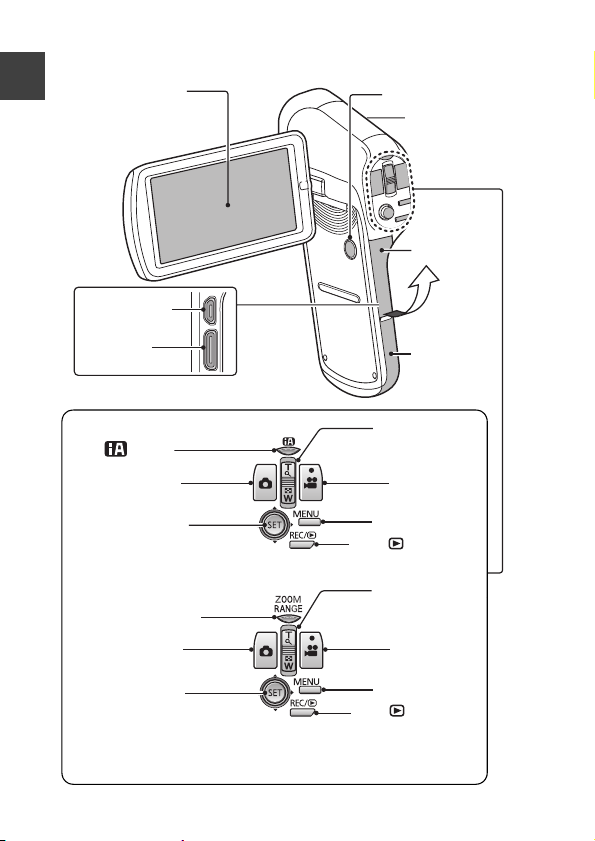
Rear
SETUP
LCD monitor
USB/AV terminal
Powe r bu tt on
Hand strap eyelet
(page 52)
terminal cover
HDMI terminal
k Operation pad
HX-DC10
button
[O] button
Photo shooting button
SET button
HX-DC1
ZOOM RANGE
button
[O] button
Photo shooting button
SET button
* During recording: zoom photography [W/T] (page 57)
During playback: volume adjustment (page 60 and 70), image
magnification (page 67), playback display switching (page 66)
Zoom switch*
[@] button
Video recording button
MENU button
REC/ button
Zoom switch*
[@] button
Video recording button
MENU button
REC/ button
22 VQT3M88
Battery cover
Page 23
CHARGING THE BATTERY PACK
At the time of purchase, the battery pack is not charged. Please charge it fully
before using it.
It has been found that counterfeit battery packs which look very similar to
the genuine product are made available to purchase in some markets.
Some of these battery packs are not adequately equipped with protective
devices to meet the requirements of appropriate safety standards. There
is a possibility that these battery packs may lead to fire or explosion.
Please be advised that we are not liable for any accident or failure
occurring as a result of use of a counterfeit battery pack. To ensure that
safe products are used we recommend that a genuine Panasonic battery
pack be used.
Guide to charging time and recording capacity
k Charging/recording time
i Temperature: 25 °C (77 °F)/humidity: 60 %RH
i It is recommended that the battery be recharged in a place where the
ambient temperature (and the battery temperature as well) is between
10 °C and 30 °C (50 °F to 86 °F). (The battery temperature should also be
the same.)
The indicated charging time is for when the AC adaptor is used for
charging.
<HX-DC10>
Battery model
number [voltage/
capacity (minimum)]
Charging
time
Recording
mode
Maximum
continuous
recordable time
Actual
recordable
time
SETUP
Supplied battery/
VW-VBX070
(optional)
[3.7 V/700 mAh]
Approx.
2 h
<
Approx. 1 h
Approx.
1 h 10 min
Approx.
1 h 15 min
Approx.
1 h 10 min
Approx.
1 h 20 min
Approx.
30 min
Approx.
35 min
-
VQT3M88 23
Page 24
<HX-DC1>
Battery model
number [voltage/
SETUP
capacity (minimum)]
Charging
time
Recording
mode
Maximum
continuous
recordable time
Actual
recordable
time
Approx. 50 min
Supplied battery/
VW-VBX070
(optional)
[3.7 V/700 mAh]
i These times are approximations.
i The indicated charging time is for when the battery has been discharged
completely. Charging time and recordable time vary depending on the
usage conditions such as high/low temperature.
i The actual recordable time refers to the recordable time when repeatedly
starting/stopping recording, turning the unit on/off, moving the zoom lever
etc.
i The batteries heat up after use or charging. This is not a malfunction.
i See page 121 concerning the remaining battery pack charge.
i Always use genuine Panasonic batteries (VW-VBX070).
i If you use other batteries, we cannot guarantee the quality of this product.
i Do not heat or expose to flame.
i Do not leave the battery in an automobile exposed to direct sunlight for a
long period of time with doors and windows closed.
Approx.
2 h
<
Approx. 1 h
Approx.
1 h 25 min
Approx.
1 h 5 min
Approx.
1 h 30 min
Approx.
30 min
Approx.
35 min
Approx.
40 min
Approx.
35 min
-
24 VQT3M88
Page 25
Approximate operating time and number of
recordable images
<HX-DC10>
Number of
recordable images
Recording time Approx. 85 min
Playback time Approx. 180 min
<HX-DC1>
Number of
recordable images
Recording time Approx. 90 min
Playback time Approx. 180 min
Recording conditions by CIPA standard
i CIPA is an abbreviation of Camera & Imaging Products Association.
i Using the supplied battery
i Using a Panasonic SD Memory Card (2 GB)
Approx.
170 images
Approx.
180 images
By CIPA standard
By CIPA standard
SETUP
VQT3M88 25
Page 26
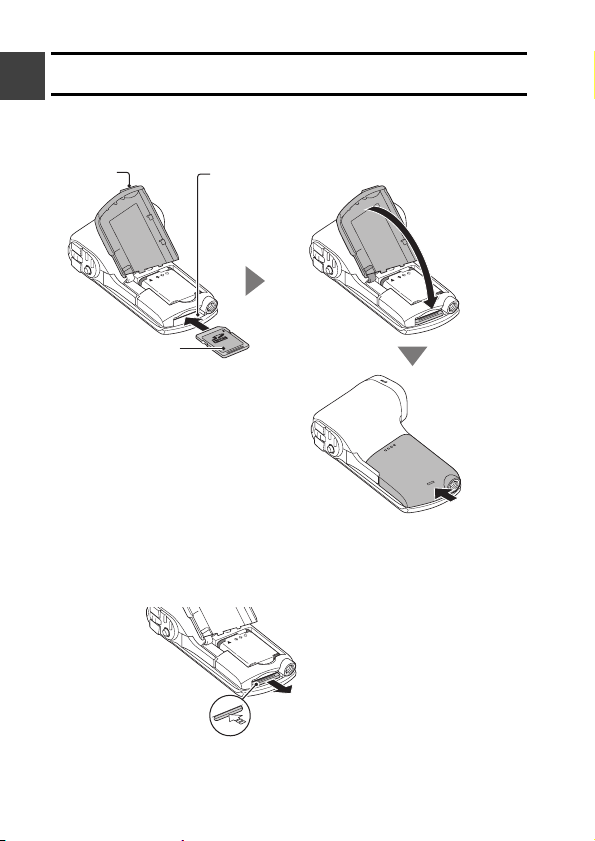
1 Insert the battery pack.
h It is possible to insert the battery incorrectly, so please pay particular
SETUP
attention when inserting that it is correctly oriented.
Battery cover
1 Push
out
<To remove the battery pack...>
Be sure the turn off the camera by
i
pressing the power button until
the status indicator (page 21)
turns off before removing the
battery pack.
i
Raise the end of the battery pack
to remove it.
3 Open
2
4 Insert by matching the connector markings
Connector
markings
Battery
pack
5 Close
26 VQT3M88
6 Close firmly
until you hear
a click.
Page 27
2 Use the USB cable (supplied) to connect the camera and the AC
adaptor, and then connect the AC adaptor to a power outlet.
h Use only the supplied USB cable. Operation is not guaranteed if
a different USB cable is used.
h The AC adaptor is for this camera only. Do not use it with other
devices.
h Recharging takes place only when the camera is turned off or is in the
sleep mode (page 33). Recharging does not take place when the
camera is in the recording mode or playback mode.
3 To p o w e r
outlet
SETUP
1 Open
To AC adaptor
h Do not use any other AC adaptors except the supplied one.
h Do not use any other USB cables except the supplied one.
<During charging...>
h The status indicator flashes red at 0.5-second intervals if the battery
pack is defective or is not installed correctly. Make sure that the
battery pack is correctly installed.
h If the battery pack still fails to recharge, it is possible that there is a
malfunction in the camera, the battery pack or the AC adaptor. In case
the status indicator is flashing fast or slow, please see page 173.
h When charging is completed, the status indicator turns off.
h The charging time is approx. 120 minutes.
Status indicator
2
AC adaptor
VQT3M88 27
Page 28

HINT
Recharging when connected to a computer (page 123)
i The battery can be recharged while the camera is connected to a
SETUP
computer.
i Use only the supplied USB cable. Operation is not guaranteed if a different
USB cable is used.
i The charging time is two to three times longer than when the AC adaptor is
used to charge the battery pack.
i It is not possible to charge the battery if the status indicator flashes fast
and then turns off, or if it doesn't light at all. In this case, use the AC
adaptor to charge the battery.
i Connect the USB cable to the USB terminal on your computer. Do not
connect it to the USB terminal on the monitor or the keyboard, or to the
USB hub.
i If the camera is not going to be used for an extended period of time, please
disconnect the USB cable from the camera.
Do not use the battery with the outer covering or label removed
i Doing so may result in malfunction.
When not using the camera for a long time, remove the battery pack
i A small amount of power is still used even if the camera is turned off, and it
is therefore recommended that the battery pack be removed from the
camera if it is not going to be used for a long time. Note that when the
battery pack is removed for a long period, the time and date settings may
be cleared. Before using your camera again, be sure to confirm that the
camera settings are correct.
To maximize the battery pack life
i The battery pack is a consumable product, but the battery life can be
prolonged by heeding the following suggestions.
h Don’t leave the battery pack in a high-temperature environment, such as
outside in extremely hot weather in the summer.
h Don’t repeatedly charge the battery pack when it is fully charged. After a
full recharge, the battery should be used for a while before charging
again.
h For prolonged periods of unuse, avoid fully charging the battery pack,
and store it in a cool dark place.
28 VQT3M88
Page 29
About the temperature alert icon
During camera use, if the temperature of the battery or inside the camera
(excluding the battery) rises, a temperature alert icon will appear as
described below.
k When the battery or internal camera (excluding battery) temperature
rises during use
h During camera use, if the temperature of the battery or inside the
camera (excluding the battery) rises, a icon lights on the LCD
monitor. It is still possible to record and play back even when the
icon is lit; however it is advised that you discontinue use as soon as
possible and turn the camera off.
h If the temperature rises further, the icon will start to flash, and the
camera will turn off automatically.
The camera cannot be turned on until the temperature has dropped (or
as long as the icon remains flashing). Please wait until the
temperature has dropped before resuming use.
h If the camera is turned off while the temperature is high (that is, while
the icon is flashing), it cannot be turned on again until the
temperature has dropped (or as long as the icon remains flashing).
SETUP
VQT3M88 29
Page 30
INSTALLING THE CARD
SETUP
Before using a newly purchased card or one that was used in another device,
be sure to format it with this camera (page 107 and 118). If an unformatted
card is used, the card itself may become unusable.
1 Open
Card’s label side
<When removing the card...>
h To remove the card, press it in, and then release. The card will
protrude slightly, and you can then pull it out.
2 Insert the card
i Push straight in
until you hear a
click.
3 Close
4 Close firmly
until you hear
a click.
30 VQT3M88
2 Pull the card
out straight.
1 Push the middle part of the card.
Page 31

HINT
Do not attempt to forcibly remove the card
i Doing so may damage the card or the stored files.
If the status indicator is lit red...
i Never remove the card when the status indicator is flashing red, as doing
so may result in loss of files stored in the card.
SETUP
VQT3M88 31
Page 32

TURNING THE CAMERA ON AND
SETUP
OFF
Turning on the camera
1 Open the monitor unit, and
press the power button.
h The LCD monitor turns on.
<How to open the monitor unit>
90°
Monitor unit
Power button
LCD monitor
180°
105°
32 VQT3M88
Page 33

Turning off the camera
1 Press the power button for at least 1 second.
h The camera turns off.
h If you briefly press the power button, once, the camera will switch to
the sleep mode.
Turning on the camera when it is in the sleep mode
In order to preserve battery pack power, the ECONOMY function operates to
automatically turn off the camera (sleep mode) after about 5 minutes of no
use during shooting, or about 5 minutes of no use during playback (factorypreset settings).
i When the camera is in the sleep mode, it turns on when the monitor unit is
opened or one of the camera’s buttons is pressed.
i When the AC adaptor is connected, the ECONOMY mode will become
active about 5 minutes after the camera is turned on (factory-preset
setting).
i The user can specify the time elapsed before the sleep mode is activated
(page 105).
HINT
About the standby mode
i The camera goes into the standby mode if you close the monitor unit, or if
you leave it in the sleep mode for about 1 hour. The standby mode uses
almost no power.
i Open the monitor unit, or press the power button briefly, and the camera
turns on immediately and you are ready to shoot or view images without
any delay. Use the standby mode to turn off the camera only briefly, or if
you want to be able to use it immediately.
i If you close the monitor unit while recording a video, recording stops and
the camera switches to the standby mode.
SETUP
VQT3M88 33
Page 34

DATE AND TIME SETTING
SETUP
The camera will record the date and time an image or audio recording is
taken so that you can display them during playback. Therefore, before
capturing images, make sure the correct date and time are set.
h If the screen to set the date and time appears when you turn on the
camera, skip to step 3 and follow the steps to set the date and time.
h To correct the date and time setting, please see under HINT on page 36.
Example: To set the clock to 7:30 p.m. on December 20, 2011
1 Turn on the camera (page 32), and display Option Setting Menu 1
(page 103).
2 Select [CLOCK SET] and press
the SET button.
h The Clock Set Screen appears.
h Follow the procedures below to
enable or disable the date
display during playback, to set
the display format for the date,
and to set the date and time.
3 Set the date.
1 Select [DATE].
2 Press the SET button.
h The Set Date Screen
appears.
3 Set the date to “DEC/20/2011”.
h The date is set in the
following order: Set the
month → Set the day → Set
the year.
h Toggle the SET button left or
right to select month, day or
year. Toggle the SET button
up or down to increase or
decrease the number.
4 Press the SET button.
34 VQT3M88
CLOCK SET
DATE
TIME
DISP M / D / Y
CLOCK SET
DATE
JAN/01/2011
12:00 AM
SET
ENTER
DEC/20/2011
SET
ENTER
Page 35

4 Set the clock.
1 Select [TIME].
2 Press the SET button.
h The Set Time Screen
appears.
3 Set the time to “07:30 PM”.
h The time is set in the
following order: Set the hour
→ Set the minute.
4 Press the SET button.
CLOCK SET
TIME
07 : 30 PM
SET
ENTER
SETUP
5 Set the order in which the date is
displayed during playback.
1 Select [DISP].
2 Press the SET button.
h The Set Date Format Screen
appears.
3 Toggle the SET button up or
down.
h The order of the date display
changes.
4 Press the SET button.
CLOCK SET
DISP
M / D / Y
SET
ENTER
6 Press the MENU button.
h The date and time setting is completed.
h To display the Recording or Playback Screen, press the MENU button.
VQT3M88 35
Page 36

HINT
To correct the date and time settings
1 Turn on the camera.
SETUP
2 Display the Option Setting Menu 1 (page 103).
3 Select [CLOCK SET] and press the SET button.
h The screen to set the date and time appears.
h The current date and time settings are shown.
4 Select the line you wish to change, and make the correction.
If the camera’s date and time are not set...
h The screen display and capture date information will show as follows:
* The date and time format is determined by the [DISP] setting specified
on the Clock Set Screen.
Recording Screen display: ---.--.---- --:-Photo capture date/time information: JAN/01/2011 00:00:00
Video/audio file recording date/time information: JAN/01/2011 00:00:00
Date and time backup
Under normal conditions, while the battery pack is being replaced, an internal
battery will maintain the date and time settings. However, there is a small
chance the settings may be lost (the backup will last for about 7 days). It is
recommended to check that the date and time settings are still correct after
replacing the battery pack and before shooting or recording of any type.
HINT
About the internal backup battery
i This camera’s internal battery serves to maintain the date and time
settings, as well as the shooting settings. To charge the backup battery,
leave the fully charged battery pack installed in the camera continuously
for about 2 days. In the fully charged state, the backup battery will maintain
the camera settings for about 7 days.
36 VQT3M88
Page 37

SWITCHING BETWEEN THE RECORDING MODE AND PLAYBACK MODE
Switch between the recording mode (for recording) and the playback mode
(for viewing your recorded images).
1 Turn on the camera (page 32).
2 Press the REC/ button.
h The mode changes.
h The mode changes each time
the REC/ button is pressed.
REC/ button
SETUP
VQT3M88 37
Page 38

MENU SCREEN
SETUP
Accessing/exiting the Menu Screen
1 Set the camera to the recording or playback mode (page 37).
2 Press the MENU button.
h The Menu Screen appears.
h To cancel the Menu Screen, press the MENU button again.
SET button
Ta b
RECORDING MENU 1
1
REC MODE
2
PICTURE SIZE
3
SCENE MODE
COLOR MODE
1
2
FLASH
3
SELF TIMER
SET
ENTER
Option tab
k To display a different Tab Menu
h The Menu Screen consists of the
Tabs Menu (tabs 1, 2 and 3) and
the Option Tabs Menu (tabs 1, 2
and 3).
h To switch from the active tab menu
to the other tab menu, while the
screen shown above is displayed,
toggle the SET button to the left;
then toggle the SET button up or
down to select the desired tab. The
menu for the selected tab appears.
1080-30
p
-
16
M
S
MENU button
38 VQT3M88
Page 39

Using the Menu
1 Display the desired menu (page 38).
2 Toggle the SET button up or down to select the item you wish to
change, and press the SET button.
h The Setting Screen for the selected item appears.
h To return to the Menu Screen, press the MENU button.
Select an item to
change
Push up
Push down
Press
RECORDING MENU 1
1
REC MODE
2
PICTURE SIZE
3
SCENE MODE
COLOR MODE
1
2
FLASH
3
SELF TIMER
PICTURE SIZE
-
4608x3456
16
M
H
-
4608x3456
16
M
S
4608x2592[16:9]
12
M
1920x1080[16:9]
2
M
1600x1200
2
M
1280x720[16:9]
0.9
M
<Setting Screen>
ENTER
Applicable mode
ENTER
1080-30
16
M
SETUP
p
-
S
HINT
About the applicable mode indicator
i This indicator shows the shooting mode(s) for which the selected setting is
effective.
i O@: This setting is effective during photo shooting.
iO@: This setting is effective during video recording.
iO@: This setting is effective during photo shooting and video
recording.
VQT3M88 39
Page 40

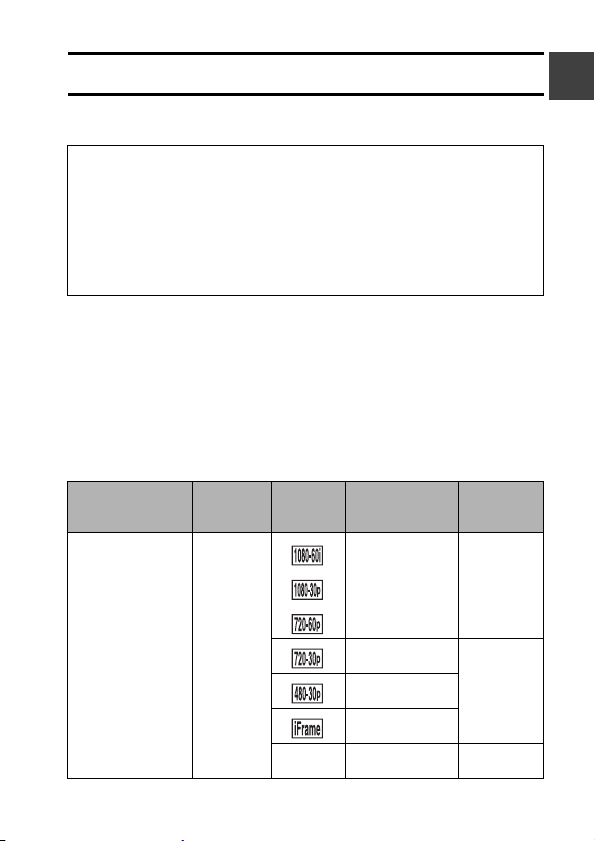
Overview of the Menu Screen
SETUP
Recording Menu
<Tab 1>
RECORDING MENU 1
1
REC MODE
2
PICTURE SIZE
3
SCENE MODE
COLOR MODE
1
2
FLASH
3
SELF TIMER
ENTER
p
1080-30
-
16
M
S
1
2
3
4
5
6
7
1 Recording mode (page 68)
<HD mode>
: Record at 1920 × 1080
pixels (60i).
: Record at 1920 × 1080
pixels (30p).
Record at 1280 × 720
:
pixels (60p).
: Record at 1280 × 720
pixels (30p).
:
Record at 960 × 540
pixels (30p).
<SD mode>
: Record at 640 × 480
pixels (30p).
<: Make an audio recording.
40 VQT3M88
2 Recorded pixels (page 71)
<Photo recording (singleshot)>
HX-DC10
A: Image size is 4608 × 3456
pixels (low compression).
B: Image size is 4608 × 3456
pixels (normal
compression).
: Image size is 4608 × 2592
pixels (16:9 aspect ratio).
HX-DC1
6: Image size is 4352 × 3264
pixels (low compression).
7: Image size is 4352 × 3264
pixels (normal
compression).
: Image size is 4352 × 2448
pixels (16:9 aspect ratio).
Page 41

All models
: Image size is 1920 × 1080
pixels (16:9 aspect ratio).
G: Image size is 1600 × 1200
pixels.
: Image size is 1280 × 720
pixels (16:9 aspect ratio).
[: Image size is 640 × 480
pixels.
<Hi-Speed Burst>
HX-DC10
C: 4608 × 3456-pixel
hi-speed burst.
HX-DC1
:: 4352 × 3264-pixel
hi-speed burst.
All models
t: 1600 × 1200-pixel
hi-speed burst.
3 Scene mode (page 72)
: Scene mode is
deactivated.
: Shoot fast-moving subjects
with less blur.
: Blur the background to
accentuate the subject in
the foreground.
: Record a clear image of a
subject illuminated by
spotlight.
: Natural looking images in
bright surroundings, such
as in a ski area.
: Vivid blue for sea and sky,
subjects do not appear
dark even in bright sunlight.
: Capture the vibrant reds in
sunrise and sunset shots.
: Record fireworks in the
night sky.
: When recording a
landscape, focus on the
distant subject.
: Beautiful shots of evening
and night scenes.
: Light up both the subject
and the background.
: Shoot in darkened
surroundings, such as at
dusk.
4 Color mode
: Color mode is deactivated.
: Enhanced color saturation.
: Reduce sharpness to
produce a softer image.
: Reduce sharpness and
increase color saturation.
: Skin tones are enhanced.
: Produces a monochrome
(black and white) image.
: Produces a sepia image.
5 Flash
k: The camera will detect the
subject brightness and use
the flash only when
necessary.
m: The flash will operate with
every image captured
regardless of the
conditions.
: The flash will not operate
even in dark situations.
6 Self-timer (page 73)
N: Self-timer is off.
y: Shooting begins 2 seconds
after the [O] button or
[@] button is pressed.
x: Shooting begins
10 seconds after the [O]
button or [@] button is
pressed.
7 Remaining battery power
indication (page 121)
VQT3M88 41
SETUP
Page 42

<Tab 2>
SETUP
1
RECORDING MENU 2
E.I.S.
2
FOCUS
3
FOCUS MODE
METERING MODE
1
2
ISO
3
WHITE BALANCE
ENTER
1
2
3
4
5
6
7
42 VQT3M88
Page 43

1 Image stabilizer (page 74)
h Compensate for camera shake
during recording.
: During video recording, the
image stabilizer is always
active.
: Camera shake in the
captured photo is
corrected.
: Camera shake during video
and photo recording is
compensated for and
corrected.
: The image stabilizer is not
active.
2 Focus (page 75)
h Adjust the focus according to
the distance to the subject.
*: The camera automatically
focuses on the subject with
a range of 10 cm (3.9”) to ∞
(normal).
-: The focus can be set
manually.
: The camera focuses on the
subject within a range of
1 cm (0.4”) to ∞ (macro).
3 Focus mode
: 9-point range finder focus
: Spot focus
A focus mark ' appears in
the center of the LCD
monitor.
4 Metering mode
n: Multi-metering
W: Center-weighted light
measuring
Y: Spot light-measuring
A metering spot @ mark
appears in the center of the
LCD monitor.
5 ISO sensitivity (page 76)
=: Sensitivity is set
automatically
*: Sets sensitivity to ISO 50
u: Sets sensitivity to ISO 100
v: Sets sensitivity to ISO 200
w: Sets sensitivity to ISO 400
6: Sets sensitivity to ISO 800
-: Sets sensitivity to ISO 1600
z: Set sensitivity to ISO 3200
(HX-DC10)
h The indicated ISO value is the
standard output sensitivity.
6 White balance (page 77)
>: White balance is
automatically adjusted
depending on the ambient
lighting (auto).
: For shooting in sunny
conditions (sunny).
o: For shooting in overcast
conditions (cloudy).
: For shooting under
incandescent lighting
(incandescent).
: For setting the most
accurate white balance
(white set).
7 Remaining battery power
indication (page 121)
SETUP
VQT3M88 43
Page 44

<Tab 3>
<HX-DC10>
SETUP
<HX-DC1>
1
RECORDING MENU 3
2
EXPOSURE
SUBJECT TRACKING
3
DIGITAL ZOOM
WIND CUT
1
2
AUTO REVIEW
3
SHORTCUTS
ENTER
1
RECORDING MENU 3
2
SUBJECT TRACKING
DIGITAL ZOOM
3
WIND CUT
AUTO REVIEW
1
2
SHORTCUTS
3
ENTER
P
1
2
3
4
5
1
6
7
2
3
4
5
1
6
7
44 VQT3M88
Page 45

1 Exposure (page 78)
(HX-DC10)
@: The exposure is set
automatically.
T: Set the shutter speed
manually (shutter speed
priority).
g: Set the aperture manually
(aperture priority).
H: Set the aperture and
shutter speed manually.
2 Subject tracking (page 80)
h Automatically target a specific
color with the color tracking
function, or capture sharp face
shots with the face tracking
function.
: Enable face tracking.
: Enable color tracking.
: Disable face tracking and
color tracking.
3 Digital zoom
: Enable the digital
zoom.
: Disable the digital
zoom.
4 Wind noise reduction
h Turn ON/OFF the wind noise
reduction function during
video/audio recording.
: Wind noise is reduced.
: Wind noise is not affected.
5 Auto review
h Specify the duration that the
captured image is shown on
the LCD monitor after the
[O] button is pressed.
: The image is shown on the
LCD monitor for about 1
second after capture.
: The image is shown on the
LCD monitor for about 2
seconds after capture.
: The image is not shown on
the LCD monitor after
capture.
6 Shortcuts setting (page 82)
h Assign operation shortcuts to
the SET button.
7 Remaining battery power
indication (page 121)
SETUP
VQT3M88 45
Page 46

Playback Menu
<Tab 1>
SETUP
PLAYBACK MENU 1
1
2
1
2
3
SLIDESHOW
PLAY VOLUME
PROTECT
DELETE
ROTATE
RESIZE
ENTER
1
2
3
4
5
6
7
1 Slideshow (page 86)
h Specify the slideshow settings
and play the slideshow.
2 Play volume
h Adjust the volume for video
and audio file playback.
3 Protect (page 87)
h File protect setting (delete
prohibited)
46 VQT3M88
4 Delete (page 63)
h Delete files.
5 Rotate (page 89)
h Rotate a photo.
6 Resize (page 89)
h A captured image can be
resized to a smaller size and
saved as a separate image.
7 Remaining battery power
indication (page 121)
Page 47

<Tab 2>
1
PLAYBACK MENU 2
2
1
RED-EYE CORRECT.
EDIT VIDEO
COPY
2
3
SETUP
1
2
3
1 Red-eye correction (page 90)
h Repair the “red-eye” caused
by the flash (photos only).
2 Edit video (page 91)
h Edit videos.
ENTER
3 Copy (page 100)
h Copy files from the built-in
memory to the card.
4 Remaining battery power
indication (page 121)
VQT3M88 47
4
Page 48

INTELLIGENT AUTO MODE (HX-DC10)
SETUP
The following modes (appropriate for the condition) are set just by pointing
the unit to what you want to record.
button
Mode Scene Effect
Portrait When the subject is
Landscape Recording outdoors The whole landscape
*1 Spot light Under a spotlight Very bright subject is
a person
button
Press the button once to
activate the Intelligent Auto (iA)
mode.
i The icon appears on the
LCD monitor.
i Press it again to cancel the
Intelligent Auto mode.
Faces are detected
and focused
automatically, and the
brightness is adjusted
so it is recorded
clearly.
will be recorded
vividly without whiting
out the background
sky, which may be
very bright.
recorded clearly.
*1 Low light Dark room or
*2 Night
portrait
twilight
Recording night
portrait
48 VQT3M88
It can record very
clearly even in a dark
room or twilight.
A subject and the
background are
recorded with near
real-life brightness.
Page 49

Mode Scene Effect
*2 Night
scenery
*2 Macro Recording zooming
*1*2Normal Other situations Contrast is adjusted
*1 Video recording only
*2 Photo shooting only
HINT
i Depending on the recording conditions, the unit may not enter the desired
mode.
i Using a tripod is recommended in Night Portrait, Night Scenery and Low
Light modes.
i Faces may not be detected depending on the recording conditions, such
as when faces are of certain sizes or at certain tilts.
Recording night
scenery
in on a flower etc.
You can record night
scenery vividly by
slowing the shutter
speed.
This allows recording
at very close
proximity to the object
of recording.
automatically for clear
images.
SETUP
VQT3M88 49
Page 50

k Intelligent Auto Mode
When switching to Intelligent Auto Mode, the Auto White Balance and Auto
Focus operate and automatically adjust the color balance and focusing.
SETUP
Depending on the brightness of the subject etc., the aperture and shutter
speed are automatically adjusted for an optimum brightness.
i Color balance and focus may not be adjusted automatically depending on
light sources or scenes. If so, manually adjust these settings.
Automatic white balance
The illustration shows the range over which Automatic white balance
functions.
1 The effective range of
Automatic white balance
adjustment on this unit
2 Cloudy sky (rain)
3 Sunlight
4 White fluorescent lamp
5 Halogen light bulb
6 30-minute span just before and
after sunset
7 Incandescent light bulb
8 Sunrise or sunset
9 Candlelight
1
10 000K
9 000K
8 000K
7 000K
6 000K
5 000K
4 000K
3 000K
2 000K
8
6
2
3
4
5
7
9
1 000K
If the automatic white balance is not functioning normally, adjust the white
balance manually. (page 77)
Auto focus
The unit focuses automatically.
i Auto focus does not work correctly in the following situations. Record
pictures in the Manual Focus Mode. (page 75)
h Recording distant and close-up objects at the same time
h Recording a subject through a dirty or dusty window
h Recording a subject that is surrounded by objects with glossy surfaces
or by highly reflective objects
50 VQT3M88
Page 51

BASIC OPERATION
SHOOTING
BASIC OPERATION/SHOOTING
BEFORE TAKING PICTURES
For best results
Hold the camera securely, keeping your elbows close to your body and
making sure the camera is stable. When zooming in or out, you can minimize
the effects of camera shake by using your other hand on the monitor unit to
help stabilize the camera.
Correct hold Incorrect hold
A finger is blocking the
<Holding the camera>
i
To avoid dropping the camera, be sure to attach a handstrap.
Make sure that the lens and flash unit are not blocked by your fingers or the
handstrap. And don’t block the built-in microphone on the monitor unit with
your hand.
<If the camera feels warm...>
i Due to the characteristics of the camera, the outer surface may
become warm during use, but this does not indicate a malfunction.
i If the camera starts to feel uncomfortably hot during use, you might
temporarily discontinue use until it cools down, or try holding it in your
other hand for a while.
Please use a tripod or other support when using the camera for a
long time.
Example 1:
Grip the camera by
wrapping the fingers
of the right hand,
from the little finger
to the middle finger,
around the camera,
and hook the index
finger above the
lens.
lens or flash.
Example 2:
Grip the camera by
wrapping the fingers
of the right hand, from
the little finger to the
index finger, around
the camera.
BASIC OPERATION/SHOOTING
VQT3M88 51
Page 52

How to use the accessories
k Handstrap
BASIC OPERATION/SHOOTING
k Lens cap
12
34
52 VQT3M88
Page 53

VIDEO RECORDING
000:00:09
5
1 Turn on the camera (page 32),
and set it to the recording
mode (page 37).
h If the subject is a person, a
green double-frame appears
around the face (page 80).
2 Press the [@] button.
h Recording begins.
h It is not necessary to keep the
[@] button pressed while
recording.
h When the remaining recording
time available for the currently
recording video becomes 30
seconds or less, a countdown
of the remaining recording
time appears on the display.
h When the file size of the
current recording exceeds 4
GB, the file is saved once, and
recording begins in a new file.
(4-GB files are automatically
created (page 181).)
h HX-DC1: When the file size of
the recording exceeds 4 GB,
recording pauses (from a few
seconds up to 10 seconds),
and then resumes.
3 End the recording.
h Press the [@] button again
to stop recording.
h The elapsed recording time
returns to 000:00:00 each
time recording is stopped.
[@] button
BASIC OPERATION/SHOOTING
Elapsed
recording time
(hours:minutes:
seconds)
1080-30
2
M
000:00:09
000:00:09
5
5
Available recording
time remaining
(seconds)
p
VQT3M88 53
Page 54

TAKING PHOTOS
F3.5
1/30
1 Turn on the camera (page 32),
and set it to the recording
mode (page 37).
BASIC OPERATION/SHOOTING
h If the subject is a person, a
green double-frame appears
around the face (page 80).
2 Press the [O] button.
1 Press the [O] button
halfway.
h The autofocus operates,
and the image is focused
(focus lock).
2 Continue to gently press
the [O] button all the
way.
h The shutter releases and
the image is captured.
12
h You can view the captured
image on the LCD monitor
by keeping the [O]
button depressed when
you capture the image.
For shooting hi-speed burst, see
page 71.
F3.5
F3.5
1/30
1/30
16
-
M
S
[O] button
Target mark
54 VQT3M88
Page 55

HINT
What is the camera focusing on?
i A target mark & on the LCD monitor
shows the area the camera is
focusing on.
i The camera automatically
determines the correct focus by
measuring from 9 different focus
points within the shooting area. If the
target mark is at a position that is
different from the point you wish to
focus on, you can refocus, for
example, by changing the shooting
angle.
i The large target mark appears when
the camera focuses on a wide area
in the center of the screen.
The focus and exposure can be locked
i By assigning an operation shortcut to the SET button (page 82), you can
set the autofocus or the exposure to a fixed setting. When the exposure
setting is fixed, the icon appears on the LCD monitor; when the
autofocus setting is fixed, the icon appears on the LCD monitor.
i When the focus setting or scene mode setting (pages 72 and 75) is
changed, the focus lock and AE lock are released.
The shutter speed and aperture are displayed
i The shutter speed and aperture settings are shown on the Recording
Screen.
If the camera shake icon > appears...
i During photo shooting, if the shutter speed is slow and the possibility that
the image may be blurred due to camera shake becomes high, the camera
shake icon may appear on the LCD monitor. In this case, use a tripod to
stabilize the camera when shooting, or set the flash operation mode to
Auto (page 41).
i When shooting with the scene mode function set to the fireworks
mode, the camera shake icon always appears, but this is normal.
Does it seem to take a long time to save images?
i When shooting in dimly lit conditions, it may take some time to save the
data to the card.
Does the image in the LCD monitor appear to waver?
i When the [O] button is pressed halfway, the image in the LCD monitor
may waver vertically. This is the result of internal image processing and is
not a malfunction. This wavering is not recorded and will not affect your
images in any way.
Target mark
-
16
M
S
F3.5
1/2
Camera shake icon
Shutter speed
Aperture
BASIC OPERATION/SHOOTING
VQT3M88 55
Page 56

Shoot a photo while recording a video
You can capture a photo (single frame) while recording a video.
1 While recording a video, when you see a scene you’d like to capture
a photo of, press the [O] button.
BASIC OPERATION/SHOOTING
HINT
i When shooting a photo while recording a video, the flash does not operate.
i The photo stabilizer (page 74) is inoperative.
i When the remaining video recording time becomes approximately
30 seconds, it will no longer be possible to capture a photo while recording
a video. The exact remaining recording time at which this occurs will differ
depending on the subject and on the recording size (page 71), as well as
on the recording mode setting (page 68).
About the recording size of photos
i The size of a photo captured during video recording depends on the video
recording size setting.
Video recording size setting Photo recording size
(16:9)
(16:9)
(4:3)
[
h It is not possible to capture a photo while recording a video in the
mode.
h It is not possible to shoot hi-speed bursts.
56 VQT3M88
Page 57

MACRO-PHOTOGRAPHY (ZOOM)
Your camera has two zoom functions: Optical zoom and Digital zoom
(page 45).
1 Point the camera lens at the
subject.
2 Push the zoom switch toward
[T/]] or [W/P] to compose
the desired image.
[T/]]: Zoom in on the subject.
[W/P]: Zoom out.
h When the zoom switch is
pushed, the zoom bar appears
on the LCD monitor.
3 Take the picture.
For video recording, see page 53.
For shooting photos (single), see
page 54.
For shooting hi-speed bursts, see
page 71.
Zoom switch
When both optical and
digital zoom are enabled
Digital zoom (blue)
When optical zoom only
is enabled
BASIC OPERATION/SHOOTING
Zoom bar
Optical zoom
Pointe r
VQT3M88 57
Page 58

HINT
When recording videos at a high magnification
i When recording videos at a high magnification, a moving subject or
moving camera can cause camera shake, resulting in a distorted playback
image. This phenomenon is due to the characteristics of the MOS sensor
and is not a malfunction.
i It is recommended that you use a tripod to stabilize the camera when
BASIC OPERATION/SHOOTING
recording videos at a high magnification.
i When the digital zoom is used, the picture quality becomes grainier as the
magnification increases.
i See page 186 regarding zoom magnification.
When the ZOOM RANGE button is pressed... (HX-DC1)
i The magnification is approximately doubled (double-range zoom). Press
the button again to return to normal magnification.
i The [W] icon is shown on the Recording Screen during normal
magnification, and a [T] icon on the double-range zoom Recording Screen.
i Double-range zoom is effective only when recording video. Photos are
recorded without enlargement.
ZOOM RANGE
button
58 VQT3M88
Page 59

PLAYBACK
BASIC OPERATION/PLAYBACK
PLAYING BACK VIDEOS AND PHOTOS
1 Set the camera to the playback mode (page 37).
2 Select the image to play back.
h Toggle the SET button up,
down, left or right to move
the yellow frame to the file
you wish to play back.
h The image information for the
framed image is shown at the
bottom of the LCD monitor.
3 Press the SET button.
h The image you selected in
step 2 is displayed on the
LCD monitor.
h If a video was selected,
playback begins.
<Photo file: To return to the
screen to select playback
files>
Toggle the SET button down.
HINT
i Photos can be rotated when they
are played back (pages 46 and
89).
i If you close the monitor unit,
playback stops and the camera
switches to the standby mode.
DEC .2 0. 2011 6:41 PM
10.5MB
1080-60i
Yellow frame
SET
ENTER
100-0006
00:00:05
Image
information
BASIC OPERATION/PLAYBACK
SET button
VQT3M88 59
Page 60

Video playback operation
To do this... Do this
Normal forward playback
Stop playback During playback, toggle the SET button down.
BASIC OPERATION/PLAYBACK
To play back
one image
frame step)
accelerate
Return to normal playback
Vol ume
adjustment
at a time
(single-
Slow
playback
To
playback
Pause
During forward
playback
During reverse
playback
During forward
playback
During reverse
playback
Forward
playback
(Maximum
15×)
Reverse
playback
(Maximum
15×)
speed
Louder
Softer
Press the SET button or toggle the SET button
up.
During playback, press the SET button or
toggle the SET button up.
During accelerated playback, toggle the SET
button up.
After pausing playback, toggle the SET button
to the right.
After pausing playback, toggle the SET button
to the left.
After pausing playback, press and hold the
SET button to the right.
After pausing playback, press and hold the
SET button to the left.
During forward playback, toggle the SET
button to the right.
The forward playback speed changes each
h
time the SET button is toggled to the right.
Toggle the SET button to the left to resume
normal playback speed.
During forward playback, toggle the SET
button to the left.
h The reverse playback speed changes each
time the SET button is toggled to the left.
Toggle the SET button to the right to resume
normal playback speed.
Press the SET button.
During playback, push the zoom switch toward
the [T/]] side.
During playback, push the zoom switch toward
the [W/P] side.
60 VQT3M88
Page 61

HINT
If the appears on the Playback Screen...
i The icon appears when playing back a file that was saved in
segments (page 182).
BASIC OPERATION/PLAYBACK
VQT3M88 61
Page 62

How to save one frame from a video as a photo
1 Play back the video. Pause the playback at the point you wish to
“snap” a photo.
2 Press the [O] button.
BASIC OPERATION/PLAYBACK
h The screen to select the aspect ratio of the photo appears. Select the
desired aspect ratio, and press the SET button. Note, however, that if
the video aspect ratio is 4:3, you cannot select 16:9.
h The latest image number is assigned to the photo when it is saved.
HINT
The file size for a video is very large
i Therefore, be aware that if the video is uploaded to a computer to be
played back, the computer may not be able to play back the video fast
enough, making it appear jerky. (The video will always be displayed
properly on the camera LCD monitor or a television.)
If no audio is heard...
i The audio is not played back when the video is played back in the frame-
by-frame, slow-motion, fast playback or reverse playback mode.
62 VQT3M88
Page 63

DELETING FILES
Deleted files cannot be restored, so delete files only after carefully checking
the contents.
Delete single/delete all/delete folder
1 Display the Playback Menu 1
(page 38), select the delete
setting, and press the SET
button.
DELETE SINGLE:
Deletes one file at a time.
DELETE SELECTED:
Deletes the selected files
(page 64).
DELETE ALL:
Deletes all files.
DELETE FOLDER:
Delete the folder and all the files in the folder.
DELETE
DELETE SINGLE
DELETE SELECTED
DELETE ALL
DELETE FOLDER
SET
ENTER
2 Select the desired delete mode, and press the SET button.
h The Delete Confirmation Screen appears.
<DELETE SINGLE>
h Toggle the SET button to the left or right to select the file you wish to
delete.
h There is no confirmation screen when deleting single files.
Please make sure that the displayed image is one you wish to
delete.
<DELETE ALL>
h Toggle the SET button to the left or right to confirm the files to delete.
<DELETE FOLDER>
h Toggle the SET button up or down to select the folder you wish to
delete, and press the SET button.
BASIC OPERATION/PLAYBACK
VQT3M88 63
Page 64

3 Select [DELETE], and press the SET button.
<DELETE SINGLE>
h The currently displayed file is deleted.
h To delete other files, select the files, select [DELETE] and press the
SET button.
<DELETE ALL, DELETE FOLDER>
h The Delete Confirmation Screen again appears. To delete the files,
BASIC OPERATION/PLAYBACK
select [YES] and press the SET button. If [DELETE FOLDER] was
selected, select [YES] again and press the SET button, and the files
will be deleted.
Delete selected
Delete selected files.
1 Display the Playback Menu 1 (page 38), select the delete setting, and
press the SET button.
2 Select [DELETE SELECTED], and
press the SET button.
h The screen to select files to
delete appears.
DEC.20.2011 2:25 PM
51.6MB
1080-60i
SET
DELETE
OK
3 Select an image you wish to delete.
h Toggle the SET button left, right, up or down to move the yellow frame
to the file you wish to delete.
100-0006
00:00:25
64 VQT3M88
Page 65

4 Press the SET button.
h The selected file is marked with the delete icon [>].
h Up to 100 files can be selected.
h To cancel a delete selection and remove the delete icon from a file,
move the yellow frame to the marked file and press the SET button.
5 Press the [O] button or [@] button.
h The Delete Confirmation Screen appears.
6 Select [YES], and press the SET button.
h The selected files are deleted.
HINT
i Files that are protected from accidental delete cannot be deleted. To delete
protected files, set the protect setting for the files to off (page 87), and then
follow the file delete procedure.
BASIC OPERATION/PLAYBACK
VQT3M88 65
Page 66

PLAYBACK MODES
21-image display playback
1 Display the image you wish to play back.
BASIC OPERATION/PLAYBACK
h The 8-image display appears.
2 Push the zoom switch toward the
[W/P] side.
h The 21-image display appears.
h While the 21-image display is
shown, you can push the zoom
switch toward the [T/]] side to
change to the 8-image display,
and push it again toward the [T/
]] side to change to the singleimage display.
3 Select the image to play back.
h Toggle the SET button left, right, up or down to move the yellow frame
to the desired image, and press the SET button.
h If the zoom switch is pushed toward the [W/P] side while the 21-
image display is shown, the display changes to the screen to select
the playback folder (page 115).
HINT
Photo playback:
In step 2, press the SET button to display the selected photo on the LCD
monitor.
Video playback:
In step 2, press the SET button to play the selected video.
DEC.20.2011 2:25 PM 100-0021
66 VQT3M88
Page 67

Magnifying (zooming in) the image (photos only)
100%
Mo ve
1 Display a photo.
2 Push the zoom switch toward the
[T/]] side.
h Magnification is enabled.
h The image is magnified, and the
central portion of image is
displayed.
h For a photo that was captured
with the face tracking function
enabled (page 80), the detected
face is in the center of the
magnified image.
h Toggle the SET button left, right,
up or down to view different
parts of the magnified image.
To magnify:
Magnification increases each time the
zoom switch is pushed toward the [T/
]] side.
To return to normal size:
Magnification decreases each time
the zoom switch is pushed toward the
[W/P] side.
h Press the SET button to return to the
normal (100%) view.
HINT
The magnified portion of the image can be saved as a separate image
i Press the [O] button. The magnified portion is saved as a new photo.
i The image size of the saved photo of the magnified portion will be smaller
than that of the original photo.
SAVE
SET
100%
100%
Move
Move
105%
BASIC OPERATION/PLAYBACK
VQT3M88 67
Page 68

ADVANCED OPERATION
SHOOTING
ADVANCED OPERATION/SHOOTING
RECORDING MENU 1
To access and use the Menu Screen, see page 38 to 39.
Recording mode setting (page 40)
When recording a video, smoother motion and better image clarity can be
achieved by a higher pixel rate (resolution) and a faster frame rate. However,
the file size will also be proportionately larger, requiring longer times to edit
and store (page 47). It is recommended that you adjust the settings to those
suitable for the desired purpose. Note that this menu is also used for
recording audio only files.
ADVANCED OPERATION/SHOOTING
HINT
About recording in the mode
i Use this mode when using a Mac computer for playing back and editing.
When editing videos...
i In order for videos to be spliced, they must have been recorded in the
same mode.
i Videos that were recorded in different modes cannot be spliced.
Playback of a video that was recorded in the mode.
i In some cases it may not be possible to play back videos recorded in this
mode even on other devices equipped with this mode.
About the compatibility of recorded videos
i This unit does not support non-MP4-compatible devices. Playback is not
possible on devices that are not MP4 compatible, so please check the
user’s manual for your device to confirm its compatibility.
i In some cases, playback may not be possible on an MP4-compatible
device. In this case, please use the camera for playback.
Concerning recordable time and image quality
i See page 181.
68 VQT3M88
Page 69

Audio recording and playback
340 014:59:15
000:00:06
k Recording
1 Select <, and press the SET
button.
h The audio recording mode is
enabled.
h The menu display is canceled if
the MENU button is pressed.
2 Press the [@] button.
h Audio recording begins.
h During audio recording, <
appears in the LCD monitor.
h It is not necessary to continue
pressing the [@] button while
recording.
h When the remaining recording
time available for the currently
recording video becomes 30
seconds or less, a countdown of
the remaining recording time
appears on the display.
3 End the audio recording.
h Press the [@] button again to stop recording.
h The elapsed recording time returns to 000:00:00 each time recording
is stopped.
HINT
You can capture a photo during an audio recording
i Press the [O] button during audio recording to capture a [ photo.
Maximum audio recording time?
When the recording mode setting is set to audio < and the recording exceeds
i
about 5 hours, the recorded file is saved and the audio recording ends.
i If you close the monitor unit, audio recording stops and the camera
switches to the standby mode.
Remaining recordable time
-
16
M
S
340 014:59:15
340 014:59:15
Elapsed recording time
0.3
M
000:00:06
000:00:06
ADVANCED OPERATION/SHOOTING
Turns red
VQT3M88 69
Page 70

k Audio playback
1 Select an audio file (: icon), and press the SET button.
h Playback begins.
To do this... Do this
ADVANCED OPERATION/SHOOTING
Normal
playback
Fast
forward/
fast reverse
Vol ume
adjustment
Start
playback
Paus e
Stop
playback
Fast
forward
(Maximum
15×)
Fast
reverse
(Maximum
15×)
Pause Toggle the SET button up.
Return to
normal
playback
Louder
Softer
Press the SET button.
Toggle the SET button up.
Press the SET button.
Toggle the SET button up.
Toggle the SET button down.
During playback, toggle the SET button to
the right.
Each time the SET button is toggled to the
right, the speed increases. If the SET
button is toggled to the left during fast
forward, the speed decreases.
During playback, toggle the SET button to
the left.
Each time the SET button is toggled to the
left, the speed increases. If the SET button
is toggled to the right during fast reverse,
the speed decreases.
Press the SET button.
During playback, push the zoom switch
toward the [T/]] side.
During playback, push the zoom switch
toward the [W/P] side.
HINT
If no audio is heard...
i The audio is not played back when the audio recording is played back in
the fast playback or fast reverse mode.
70 VQT3M88
Page 71

Recorded pixels (page 40)
For photos, you can select either the 4:3 or 16:9 horizontal to vertical aspect
ratio. This menu is also used for shooting hi-speed bursts.
Hi-Speed Burst
1 Select the desired hi-speed burst icon, and press the SET button.
HX-DC10: Select C or t.
HX-DC1: Select : or t.
h The menu display is canceled if the MENU button is pressed.
2 Press the [O] button.
h Shooting begins. Shooting continues as long as the [O] button is
kept pressed.
HINT
What is the maximum number of images in a hi-speed burst sequence?
HX-DC10
C: 8 shots
t: 20 shots
i If you continue shooting even after the maximum number of images has
been captured, recording does not stop.
i If you continue shooting after the maximum number of images has been
captured, the photos are saved extending backward from the last photo
captured.
HX-DC1
:: 9 shots
t: 12 shots
ADVANCED OPERATION/SHOOTING
Press the
[O] button.
Not saved
During recording, images are temporarily
recorded in the built-in memory.
Perfect shot
Images are recorded (maximum number of
images) starting from this point.
Release the
[O] button.
VQT3M88 71
Page 72

When the self-timer is used...
i Shooting stops automatically after the maximum number of images has
been captured.
About the focus when shooting hi-speed bursts
i When a hi-speed burst is captured, the autofocus operates when the [O]
button is pressed halfway, fixing the focus.
Can the flash be used?
i The flash does not operate when shooting hi-speed bursts.
Scene mode setting (page 41)
You can select from various preset settings (aperture, shutter speed, etc.) for
specific shooting conditions.
ADVANCED OPERATION/SHOOTING
HINT
i To return to normal photography, select from the scene mode menu,
and press the SET button.
i A table showing the limitations for settings corresponding to scene mode
icons other than is on page 171.
Scene mode characteristics
Low light mode
iThe shutter speed will be faster than 1/15 sec (when recording video).
Sunset /fireworks /landscape /night scenery /night
portrait modes
iWhen shooting a nearby subject, the image may appear blurry.
Fireworks mode
iThe shutter speed is 1/30 sec (when recording video).
iIf shooting in bright surroundings, the image may appear whitish.
Night scenery /night portrait modes
iIt is recommended that a tripod be used.
72 VQT3M88
Page 73

Self-timer setting (page 41)
By assigning an operation shortcut to the SET button (page 82), you can set
the self-timer from the Recording Screen.
HINT
To cancel the self-timer function...
i If the [O] button or [@] button is pressed again before the shutter is
released, the self-timer countdown is canceled.
i For video photography, recording does not stop automatically.
i The self-timer is automatically reset to off N after recording is ended and
the camera turned off.
When x is selected...
i When the [O] button or [@] button is
pressed, the status indicator will blink for
about 10 seconds, and then the image
is captured. Also, the countdown
indication shown in the illustration to the
right appears on the LCD monitor.
When y is selected...
i When the [O] button or [@] button is
pressed, the status indicator will blink
and the indication shown in the
illustration to the right appears on the
LCD monitor to indicate when the
shutter will release.
<2 seconds before>
ADVANCED OPERATION/SHOOTING
<1 second before>
Shutter release
VQT3M88 73
Page 74

RECORDING MENU 2
To access and use the Menu Screen, see page 38 to 39.
Motion compensation (image stabilizer) setting (page 43)
Your camera can minimize a jittery picture by compensating for unintentional
hand motion.
HINT
ADVANCED OPERATION/SHOOTING
If the motion compensation does not seem to be working...
i Due to the mechanical characteristics of this function, it may not be
possible for the camera to compensate for violent motion.
i If the digital zoom (page 45) is being used, the large magnification factor
may make it difficult for the motion compensation function to work correctly.
i When the scene mode function is set to night portrait , low light ,
night scenery or fireworks , the motion compensation effect may
be insignificant.
i When the optical zoom is used or when the autofocus is operating, the
image may appear to waver, but this is not a malfunction.
When motion compensation is enabled,
i The following icons are shown on the LCD monitor:
1080-30
p
001:00:05
The video stabilizer is active
The photo stabilizer is active
Both the video stabilizer and the photo stabilizer are active
74 VQT3M88
Page 75

Focus setting (page 43)
340 000:15:17
How to use the manual focus
1 Select -, and press the SET
button.
h The focus adjustment bar
appears.
2 Toggle the SET button to the left
or right to adjust the focus, and
press the SET button.
h The focus is set, and you are
returned to the Recording
Screen.
HINT
About the macro mode
i When the focus range is set to macro , the zoom is temporarily set to
the wide end.
i By assigning an operation shortcut to the SET button (page 82), you can
change the focus setting from the Recording Screen.
i In some cases it may be difficult for the auto focus to work.
-
16
M
S
340 000:15:17
340 000:15:17
1080-30
p
ADVANCED OPERATION/SHOOTING
VQT3M88 75
Page 76

ISO sensitivity setting (page 43)
With the initial settings, the ISO sensitivity is automatically set according to
the brightness of the subject. However, the ISO sensitivity can be set to a
fixed setting.
HINT
i By setting a higher ISO sensitivity, you can set faster shutter speeds and
capture images in darker locations, but noise in the captured images may
increase or the images may be irregular.
i By assigning an operation shortcut to the SET button (page 82), you can
change the ISO setting from the Recording Screen.
ADVANCED OPERATION/SHOOTING
76 VQT3M88
Page 77

White balance setting (page 43)
This camera automatically adjusts the white balance under most lighting
conditions. However, if you want to specify the lighting conditions or change
the overall tone of the image, the white balance can be manually set.
How to use the “white set”
1 Fill the entire screen with a plain white card (or piece of paper, etc.).
2 Select the icon, and press the SET button.
h This completes the white balance setting.
h The LCD monitor display momentarily goes dark, and then you are
returned to the Recording Menu. If the icon shows on the
Recording Menu, it indicates that the white balance setting was
completed.
HINT
To cancel the white balance setting
i Select >, and then press the SET button.
If the color or brightness of the screen changes, if bands appear on the
screen, or if the LCD monitor flickers during indoor photography...
i When shooting under fluorescent lighting, sodium-vapor lighting, mercury
lighting, etc., the color and/or brightness of the screen may change, or
horizontal bands may appear across the screen. This is not a malfunction.
Reset the white balance in the following cases.
h When there is a change in the lighting, or the recording location is
changed
i If the colors in the image are not correct, confirm that the white balance
setting matches the actual light source.
VQT3M88 77
ADVANCED OPERATION/SHOOTING
Page 78

RECORDING MENU 3
To access and use the Menu Screen, see page 38 to 39
Exposure setting (HX-DC10) (page 45)
The shutter speed and aperture size can be set individually.
1 Select the desired icon from the
exposure menu, and press the
SET button.
ADVANCED OPERATION/SHOOTING
<If T, g or , was
selected>
1 If , is selected, toggle the
SET button up or down to
select aperture value or
shutter speed.
2 Toggle the SET button to the
left or right to change the
setting for the selected
parameter.
<Setting ranges>
Aperture: F3.5 to F8.0
Shutter speed: 2S (2 sec) to 1/1500 (1/1500 sec)
* When the aperture is other than F8.0, the shutter speed range is 2S
to 1/1000.
* When the aperture priority g is set to F8.0, the shutter speed range
is 2S to 1/1500.
* Depending on the zoom magnification, the aperture value (F-number)
may not be displayed.
2 Press the SET button.
h This completes the exposure setting.
F3.5
1/1000
Shutter speed
Aperture
78 VQT3M88
Page 79

HINT
i To prevent the effects of camera shake at slow shutter speeds, it is
recommended to use a tripod or other method to stabilize the camera.
i A slow shutter speed may be useful for taking pictures in a darker
environment, but noise in the image may be increased.
i If the exposure setting is set to T, g or H, by assigning an operation
shortcut to the SET button (page 82), you can select the T, g or H
exposure setting from the Recording Screen.
i The exposure setting automatically becomes @ if the scene mode
function is active.
When shooting a hi-speed burst...
i The shutter speed will be faster than 1/30 sec.
When recording a video...
i Even if the shutter speed is set to slower than 1/29 sec, the shutter speed
will be 1/30 sec.
ADVANCED OPERATION/SHOOTING
VQT3M88 79
Page 80

Subject tracking settings (page 45)
Adjust the settings to automatically target a specific color with the color
tracking function, or capture sharp face shots with the face tracking function.
Shooting with the face tracking function
1 Set the face tracking setting to .
h When the face tracking function is activated, a double green frame
appears superimposed on the face in the center of the LCD monitor.
h Each of the other faces is framed by a single green frame.
ADVANCED OPERATION/SHOOTING
<When shooting photos: HX-DC10/HX-DC1>
2 Press the [O] button halfway.
h The double green frame changes to orange.
3 Press the [O] button.
h Gently press the [O] button all the way to capture the photo.
<When recording videos: HX-DC10>
2 Press the [@] button.
h Recording begins.
HINT
About recording with the subject tracking
i The tracking function may not work when the subject in the LCD monitor is
relatively small or appears dark.
i If the scene mode function setting was fireworks , landscape or
night scenery , it automatically changes to .
i The focus mode changes to 9-point range finder , and the metering
mode changes to multi n.
80 VQT3M88
Page 81

Shooting with the color tracking function (photos
only)
1 Set the color tracking setting to .
h A target mark (+) appears in the center of the LCD monitor.
2 Move the target mark to the desired subject, and press the SET
button.
h When the subject is successfully targeted, a target frame icon (blue
) appears superimposed on the subject.
<To cancel the color tracking operation>
h While the target frame icon is displayed, press the SET button.
<If the subject is not successfully targeted>
h The target frame icon (red ) continues to be displayed. Press the
SET button once more, and try to engage the target again.
3 Press the [O] button.
h The image is captured at the moment the [O] button is pressed.
HINT
If the target frame turns red...
i The target frame turns red if it has lost track of the subject. It will turn blue
when the subject is successfully targeted again.
ADVANCED OPERATION/SHOOTING
VQT3M88 81
Page 82

Shortcut setting (page 45)
Assign functions (operation shortcuts) to the SET button when it is toggled
up, down, left or right when the Recording Screen is displayed.
1 Select [SHORTCUTS], and
press the SET button.
: Assign the function when the
SET button is toggled up.
: Assign the function when the
SET button is toggled down.
ADVANCED OPERATION/SHOOTING
: Assign the function when the
SET button is toggled to the
left.
: Assign the function when the
SET button is toggled to the
right.
RECOMMENDED SETTINGS:
The most commonly used
settings are automatically
assigned.
2 Select the SET button operation to which you wish to assign the
function, and press the SET button.
h The screen to assign a function to the key appears.
AF LOCK: Lock the focus (page 55).
AE LOCK: Lock the exposure setting (page 55).
FOCUS: Set the focus (page 75). (This operation shortcut can be
m FLASH: Set the flash operation (page 41).
) EXP COMPENSATION: Adjust the exposure (page 85).
s ISO: Set the ISO sensitivity (pages 43 and 76).
O SELF TIMER: Set the self-timer (page 73).
H EXPOSURE: Set the exposure value for the exposure setting
PHOTO VIEW: Select the desired field of view (photo view or video
OFF: No operation shortcut is assigned to the key.
assigned only to the or key.)
(page 78) (HX-DC10).
view) for the Recording Standby Screen display.
When “photo view” is selected, a frame to show the
field of view during video recording appears.
SHORTCUTS
OFF
OFF
OFF
RECOMMENDED SETTINGS
SET button
OFF
SET
ENTER
82 VQT3M88
Page 83

<Video view>
3 Toggle the SET button up or down.
h Display the function you wish to assign to the key.
Video recording area
<Photo view>
ADVANCED OPERATION/SHOOTING
4 Press the SET button.
h The selected function is
assigned to the key, and you are
returned to the Shortcuts
Screen.
h To assign functions to the other
keys, repeat steps 2 through 4.
SHORTCUTS
PHOTO VIEW
FOCUS
RECOMMENDED SETTINGS
<When [RECOMMENDED
FLASH
SELF TIMER
SET
ENTER
SETTINGS] is selected>
VQT3M88 83
Page 84

5 Press the MENU button.
h The screen to confirm the
shortcut settings appears, and
then you are returned to the
Recording Menu.
h This completes the shor tcuts
setting.
<To confirm the assigned
shortcuts>
h On the screen in step 1, press
the MENU button, and the
ADVANCED OPERATION/SHOOTING
screen to confirm the shortcut
settings appears.
SHORTCUTS
84 VQT3M88
Page 85

Exposure compensation
By assigning the exposure compensation operation shortcut to the SET button
(page 82), you can make the image lighter or darker when capturing images.
1 Assign the operation shortcut to
the SET button (page 82).
1080-30
-
16
M
S
2 Press the SET button to which
the operation shortcut was
assigned.
The exposure compensation bar
h
appears.
340 000:15:17
0.0
3 Toggle the SET button to the left
or right to adjust the exposure.
The exposure compensation
h
numerical value is shown at the
left end of the exposure
compensation bar.
h
The exposure compensation
can be set to a value from
–1.8 to +1.8.
h
The exposure compensation bar
is canceled when the MENU
button or the SET button is
pressed.
HINT
The exposure compensation setting is canceled in the following cases:
When the pointer is set to ±0.0.
i
i
When the camera is set to the playback mode.
i
After the power is turned off.
i
When the camera is set to the standby mode.
i
When the scene mode is changed.
i
When the USB cable is inserted or removed.
i
Intelligent Auto mode is activated or deactivated (HX-DC10).
Exposure compensation bar
Pointe r
p
ADVANCED OPERATION/SHOOTING
VQT3M88 85
Page 86

PLAYBACK
ADVANCED OPERATION/PLAYBACK
PLAYBACK MENU 1
To access and use the Menu Screen, see page 38 to 39.
Slideshow settings (page 46)
Specify the settings for playing back files continuously in a “slideshow” format.
In a slideshow of photos, you can set the transition time, transition effects and
BGM.
Changing a setting
ADVANCED OPERATION/PLAYBACK
1 Select the item you wish to
change, and press the SET
button.
2 Toggle the SET button up or
down to change the setting.
3 Press the SET button.
Begin the slideshow
1 Select [START] and press the SET button.
h Slideshow playback begins.
h To stop slideshow playback, press an operation button. (Playback also
stops if the zoom switch is pushed.)
HINT
BGM for videos?
i When videos are played back in a slideshow, the recorded audio track is
played back; the BGM is not played.
BGM volume?
i Adjust the volume before beginning the slideshow (page 46).
SLIDESHOW
MODE
SLIDES INTERVAL
EFFECT SETUP
MUSIC SELECT
START
SET
ENTER
ALL
SHORT
OFF
86 VQT3M88
Page 87

File protect setting (page 46)
Prevent accidental erasure of image and audio files.
Protect files one by one
1 Display the file that you want to protect from accidental erasure, and
display the Playback Menu 1 (page 38).
2 Select [PROTECT] and press the SET button.
3 Select [PROTECT SINGLE] and
press the SET button.
h [LOCK] appears.
h If the protect mode has already
been enabled for the file, then
[UNLOCK] appears.
4 Select [LOCK] and press the SET
button.
h The protect mode is set for the
file.
h The protect mark indicates
that the file is locked.
HINT
i Even if the protect mode is set for certain files, they will be deleted if the
card is reformatted.
To select a different image in step 3...
i Toggle the SET button to the left or right.
To cancel the protect mode for a file...
i Display the desired file and repeat steps 1 to 3, select [UNLOCK], and
press the SET button. The protect mark will disappear and the protect
mode is canceled.
PROTECT
LOCK
RETURN
SET
ENTER
ADVANCED OPERATION/PLAYBACK
VQT3M88 87
Page 88

Protect selected files
Select multiple files to protect.
1 Display the Playback Menu 1 (page 38).
2 Select [PROTECT] and press the SET button.
3 Select [PROTECT SELECTED]
and press the SET button.
h Toggle the SET button left, right,
ADVANCED OPERATION/PLAYBACK
up or down to move the yellow
frame to the file you wish to
protect.
4 Press the SET button.
h The selected file is marked with the protect icon .
h To cancel a protect selection and remove the protect icon from a file,
move the yellow frame to the marked file and press the SET button.
DEC.20.2011 2:25 PM
51.6MB
1080-60i
SET
LOCK
100-0006
00:00:25
88 VQT3M88
Page 89

Rotate (page 46)
Captured photos can be rotated to the correct orientation for viewing.
HINT
i An image for which the protect mode has been enabled cannot be rotated.
To rotate a protected image, cancel the protect mode before beginning the
rotate image procedure (page 87).
Resize (page 46)
A captured image can be resized to a smaller size and saved as a separate
image.
You can set the size to 1600×1200 pixels or 640×480 pixels.
The latest image number is assigned to the photo when it is saved.
HINT
Why can’t the image be resized?
i An image can be resized only to a smaller (or the same) size, not to a
larger size.
ADVANCED OPERATION/PLAYBACK
VQT3M88 89
Page 90

PLAYBACK MENU 2
To access and use the Menu Screen, see page 38 to 39.
Correcting red-eye (page 47)
Repair the red-eye effect in photos to make the eyes appear more natural.
In the case of [SAVE AS NEW], the latest image number is assigned to the
photo when it is saved.
HINT
ADVANCED OPERATION/PLAYBACK
If the “Red-eye correction not successful” message appears...
i The camera was not able to successfully repair the image.
The correction function works to automatically edit flaws that the camera
i
detects in captured images. In some cases, the camera may fail to correctly
repair a flaw.
90 VQT3M88
Page 91

Editing videos (page 47)
You can trim away unwanted portions from a video and save it as a new video
(video trimming [extracting]). You can also join videos together and save them
as one separate clip (“splicing”).
Procedure to trim (extract) a portion of a video
Specify the frames
(1, 2) where the
video is to be split.
[Two ways to split the
video]
i Tr i m a w a y p o rt io n s
A and C, and save
portion B.
i Delete portion B,
and join portions A
and C.
i The original
video is not
affected.
Extract the specified portion.
12
ABC
J
ADVANCED OPERATION/PLAYBACK
(You can also choose to erase the original video when the new is saved.)
VQT3M88 91
Page 92

Procedure to splice videos
Specify the video that will come first.
J
Specify the video clip that you wish to
append (splice).
ADVANCED OPERATION/PLAYBACK
i The videos are spliced.
The original videos are not affected.
i
(You can also choose to erase the
original videos when the new video is
saved.)
J
Splice the videos.
When editing videos...
i When editing videos, do not turn off the camera, as doing so may erase
the original video.
i As the number or size of the videos increases, the card memory may
become full, making it impossible to edit or save the videos. In this case,
you will need to free some of the memory on the card by deleting files that
are no longer necessary (pages 46 and 63).
92 VQT3M88
Page 93

Video trimming (extracting)
1 Select the video to be trimmed from the 8-image display.
h Move the yellow frame to the video you wish to trim (page 59).
2 Display the Playback Menu 2
(page 38), select [EDIT VIDEO],
and press the SET button.
EDIT VIDEO
3 Select [SPLIT] and press the SET
button.
h The Split Screen appears.
SPLIT
SPLICE
Start point
SPLIT
SAVE
SET
ENTER
00:00:10
VQT3M88 93
ADVANCED OPERATION/PLAYBACK
Page 94

4 Specify the start point of the extract.
h Play the video until approximately the desired point, pause the video
then play the video one frame at a time, stopping at the start point of
the extract. This will be the first frame of the extract.
h If the start point of the video is also the start point of the extract,
proceed to step 5.
<Procedure>
Play:
After pausing playback, press and hold the SET button to the right for
about 2 seconds for forward playback, or to the left for reverse
playback.
ADVANCED OPERATION/PLAYBACK
Pause:
During playback, press the SET button.
Accelerated playback:
During playback, toggle the SET button to the left or right to change
the playback speed.
Single frame:
After pausing playback, toggle the SET button to the right to move
forward one frame, or to the left to move back one frame.
94 VQT3M88
Page 95

5 Toggle the SET button up.
h The start point of the video
extract is set, and the screen to
specify the end point appears.
h Specify the end point of the
extract by following the same
procedure as in step 4.
<When joining the first and latter
portions>
1 Toggle the SET button down.
h Each time the SET button is
toggled down, the sections to
delete and the sections to
save are reversed.
2 Specify the end point of the
extract. The frame following the
end point of the extract will be
the start point of the latter portion
to be joined.
6 Press the [O] button or [@ ]
button.
h A screen appears for you to
select either to save the edited
video as a new (separate) file, or
to delete the original video and
replace it with the edited video.
SAVE AS NEW:
The edited video will be saved as
a new file. The original video
remains unchanged.
OVERWRITE:
The original video will be deleted.
Only the edited video will be
saved.
REVIEW CLIP:
Play back the edited video before
saving it.
Approximate playback time
SPLIT
SAVE
Portion to be deleted (Black)
SPLIT
SAVE AS NEW
OVERWRITE
REVIEW CLIP
SET
ENTER
00:00:06
End point
ADVANCED OPERATION/PLAYBACK
VQT3M88 95
Page 96

7 Select the desired option, and press the SET button.
h Editing starts.
h When editing videos, do not turn off the camera, as doing so may
erase the original video.
h When editing ends, you are returned to the Playback Menu.
HINT
i You will not be able to overwrite the file if the original file is protected.
i If the “CARD FULL.” or “Built-in Memory full.” message appears, you will
need to free some of the memory by deleting files that you do not need to
keep.
ADVANCED OPERATION/PLAYBACK
i Audio files cannot be trimmed.
Playback volume?
i Adjust the volume before beginning editing (page 60).
In case of prolonged recording...
i During the editing of lengthy videos, the time to process the large amount
of data can become quite long. To avoid problems caused by the battery
pack becoming depleted in the middle of video editing, before starting to
edit be sure that a sufficiently charged battery pack is installed in the
camera, or connect the AC adaptor.
i It is recommended that a computer (HD Writer VE 1.0) be used to edit long
videos.
i Videos shorter than 1 second cannot be edited.
96 VQT3M88
Page 97

Splicing (joining) videos
HINT
i Videos that were recorded in different modes cannot be spliced.
1 Display the Playback Menu 2
(page 38), select [EDIT VIDEO],
and press the SET button.
EDIT VIDEO
2 Select [SPLICE] and press the
SET button.
h The 8-image playback display for
videos appears.
3 Move the yellow frame to the
video you wish to splice, and
press the SET button.
h The specified video is labeled
with a number.
h Up to 9 videos can be selected.
h The splice order follows the
order in which the numbers are
assigned.
h To cancel a selection and
remove the number label from a
video, select the video and press
the SET button.
SPLIT
SPLICE
SET
ENTER
DEC.20.2011 8:53 PM
1080-60i
SAVE
DEC.20.2011
1080-60i
SAVE
Approx. playback time
SET
Assigned number
1
8:53 PM
00:00:05
SET
OK
UNLOCK
VQT3M88 97
100-0016
00:00:05
100-0016
00:00:05
ADVANCED OPERATION/PLAYBACK
Page 98

4 Press the [O] button or [@]
button.
h A screen appears for you to
select either to save the spliced
video as a new (separate) file, or
to delete the original videos and
replace them with the joined
video.
SAVE AS NEW:
The spliced video clip will be saved
as a new file. The original videos
remain unchanged.
ADVANCED OPERATION/PLAYBACK
OVERWRITE:
The original videos will be deleted.
Only the joined video will be saved.
REVIEW CLIP:
Play back the spliced video before
saving it.
5 Select the desired option, and press the SET button.
h Editing starts.
h When editing videos, do not turn off the camera, as doing so may
erase the original video.
h When editing ends, you are returned to the Playback Menu.
SPLICE
SAVE AS NEW
OVERWRITE
REVIEW CLIP
SET
ENTER
98 VQT3M88
Page 99

HINT
i If the file size of the video after editing exceeds 4 GB, it is not possible to
either “SAVE AS NEW” or “OVERWRITE”.
i You will not be able to overwrite the file if the original file is protected. If you
want it to be erased, you will need to first remove the protection (page 87).
i If the “CARD FULL.” or “Built-in Memory full.” message appears, you will
need to free some of the memory by deleting files that you do not need to
keep.
i Audio files cannot be spliced.
Playback volume?
i Adjust the volume before beginning editing (page 60).
In case of prolonged recording...
i During the editing of lengthy videos, the time to process the large amount
of data can become quite long. To avoid problems caused by the battery
pack becoming depleted in the middle of video editing, before starting to
edit be sure that a sufficiently charged battery pack is installed in the
camera, or connect the AC adaptor.
i It is recommended that a computer (HD Writer VE 1.0) be used to edit long
videos.
ADVANCED OPERATION/PLAYBACK
VQT3M88 99
Page 100

Copy (page 47)
Files can be copied from the built-in memory to the SD card.
1 Display Playback Menu 2, select [COPY], and press the SET button.
h The Copy Screen appears.
2 Select the desired option, and press the SET button.
[COPY SINGLE]: Copy files one at a time.
[COPY SELECTED]: Copy selected files (page 101).
[COPY ALL]: Copy all the files.
ADVANCED OPERATION/PLAYBACK
<If [COPY SINGLE] was selected>
h Toggle the SET button left or right to select the file you wish to copy.
h Proceed to step 3.
<If [COPY ALL] was selected>
h Press the SET button to begin copying.
h When copying is completed, you are returned to the Playback Menu.
3 Select [COPY], and press the SET button.
h Copying begins.
h To continue copying files, toggle the SET button left or right to display
the desired file to copy, select [COPY], and press the SET button.
100 VQT3M88
 Loading...