

Panasonic HL-CK644S, HL-CK644B User Manual
Operating Instructions
Installation Instructions
Electric Built-in Oven
FOR DOMESTIC USE ONLY
Model No. HL-CK644S
HL-CK644B
IMPORTANT SAFETY INSTRUCTIONS: Before operating this oven, please read these
instructions carefully and keep for future reference.

2

■ This appliance can be used by children aged from 8
years and above and persons with reduced physical,
sensory or mental capabilities or lack of experience
and knowledge if they have been given supervision or
instruction concerning use of the appliance in a safe way
and understand the hazards involved. Children shall not
play with the appliance. Cleaning and user maintenance
shall not be made by children without supervision.
■ WARNING: The appliance and its accessible parts
become hot during use. Care should be taken to avoid
touching heating elements. Children less than 8 years of
age shall be kept away unless continuously supervised.
■WARNING:Dangerofre:donotstoreitemsonthe
cooking surfaces.
■ WARNING: Ensure that the appliance is switched off
before replacing lamp to avoid the possibility of electric
shock.
■ Do not use harsh abrasive cleaners or sharp metal
scrapers to clean the oven door glass since they can
scratch the surface, which may result in shattering of the
glass.
■ Do not use steam cleaners or high-pressure cleaners
to clean the cooking appliance, as this may result in an
electric shock.
3

Contents
Important safety instructions....................................................................................................5-7
Outline diagram .......................................................................................................................... 8
Operation modes ................................................................................................................. 10-11
Before using your oven.............................................................................................................12
Using your oven...................................................................................................................13-17
Accessories .............................................................................................................................. 17
Food preparation .................................................................................................................19-28
Cleaning and maintenance ..................................................................................................29-34
Questions and answers .......................................................................................................35-36
Installation and connection ..................................................................................................37-39
Technical Specications ...........................................................................................................40
Thank you for purchasing a Panasonic electric oven.
4
Important safety instructions
This manual constitutes an integral part of the appliance. It should be kept intact and at hand for the
appliance’s entire life cycle. It is important to carefully read this manual and all of the instructions
contained herein before using the appliance.
Installation and Connection
Examine your oven
Please make sure the appliance was supplied to you undamaged. Remove all packaging and
examine the oven for any damage such as dents, broken door latches or cracks in the door. If you
nd any damage, notify your dealer immediately. Do not install a damaged oven.
WARNING
Remove all internal and external packaging. Please ensure all internal packaging is
removed before switching the oven on.
Identication label
The identication label indicating the basic information of the appliance is attached to the inside of
the oven and is visible when you open the door. (see page 8). Do not remove the label.
WARNING
Only a qualied electrician may connect the appliance.
Oven connection should be carried out in compliance with the instructions in the section
“Connection to the power mains” (see page 38), and the relevant effective regulations and
standards.
The appliance must be properly earthed for personal safety.
WARNING
You will lose your warranty entitlement in the event of any damage caused by incorrect
installation.
Servicing and Repairs
Servicing and repairs should only be carried out by a qualied electrician. If the appliance is
defective, disconnect from mains or switch off the appliance at the circuit breaker in the fuse box.
Contact the nearest authorised dealer.
Sprays, areosols and inammable subtances
Spray canisters, areosols and other inammable substances can ignite when heated. Do not store
or use such item near the oven.
5
Important safety instructions
WARNING
The appliance is intended solely for cooking. Do not use it for any other purpose, e.g.
for room heating.
Improper Use
Do not place empty cookware inside the oven.
Never obstruct the openings and slits provided for ventilation and heat dispersal.
Do not rest any weight or sit on the open door of the appliance.
To avoid a short circuit, ensure that the power cords of appliances located near this appliance are
not caught in the oven door.
Do not use sealed tins or containers in the appliance. Overpressure may occur inside the containers
during cooking, creating a danger of explosion.
Do not leave the appliance unattended during cooking processes where fats or oils could be
released. Fats and oils may catch re.
Do not cover the bottom of the oven with aluminium or tinfoil sheets during cooking and do not place
pans or trays on it to avoid damage to the enamelled surface.
Do not attempt to tamper with or make any adjustments or repairs to the door, control panel
housing, safety interlock switches or any other part of the oven. Repairs should only be carried out
by service technicians authorised by the appliance manufacturer.
All cooking operations must take place with the door closed.
Risk of Burns
The appliance becomes very hot during use. Suitable heat-proof gloves should always be worn.
Never prepare food containing high alcohol content. Alcoholic vapours can catch re in the oven
cavity.
WARNING
The manufacturer cannot be held liable for damage to persons or items caused by
failure to observe the above instructions, by interference with any part of the appliance
or by the use of non-original spare parts.
6

Important safety instructions
Information on Disposal for Users of Waste Electrical &
Electronic Equipment (private households)
This symbol on the products and/or accompanying documents means that used electrical and
electronic products should not be mixed with general household waste.
For proper treatment, recovery and recycling, please take these products to designated collection
points, where they will be accepted on a free of charge basis. Alternatively, in some countries you
may be able to return your products to your local retailer upon the purchase of an equivalent new
product.
Disposing of this product correctly will help to save valuable resources and prevent any potential
negative effects on human health and the environment which could otherwise arise from
inappropriate waste handling. Please contact your local authority for further details of your nearest
designated collection point.
Penalties may be applicable for incorrect disposal of this waste, in accordance with national
legislation.
Information on Disposal in other Countries outside the European Union
This symbol is only valid in the European Union.
If you wish to discard this product, please contact your local authorities or dealer and ask for the
correct method of disposal.
7
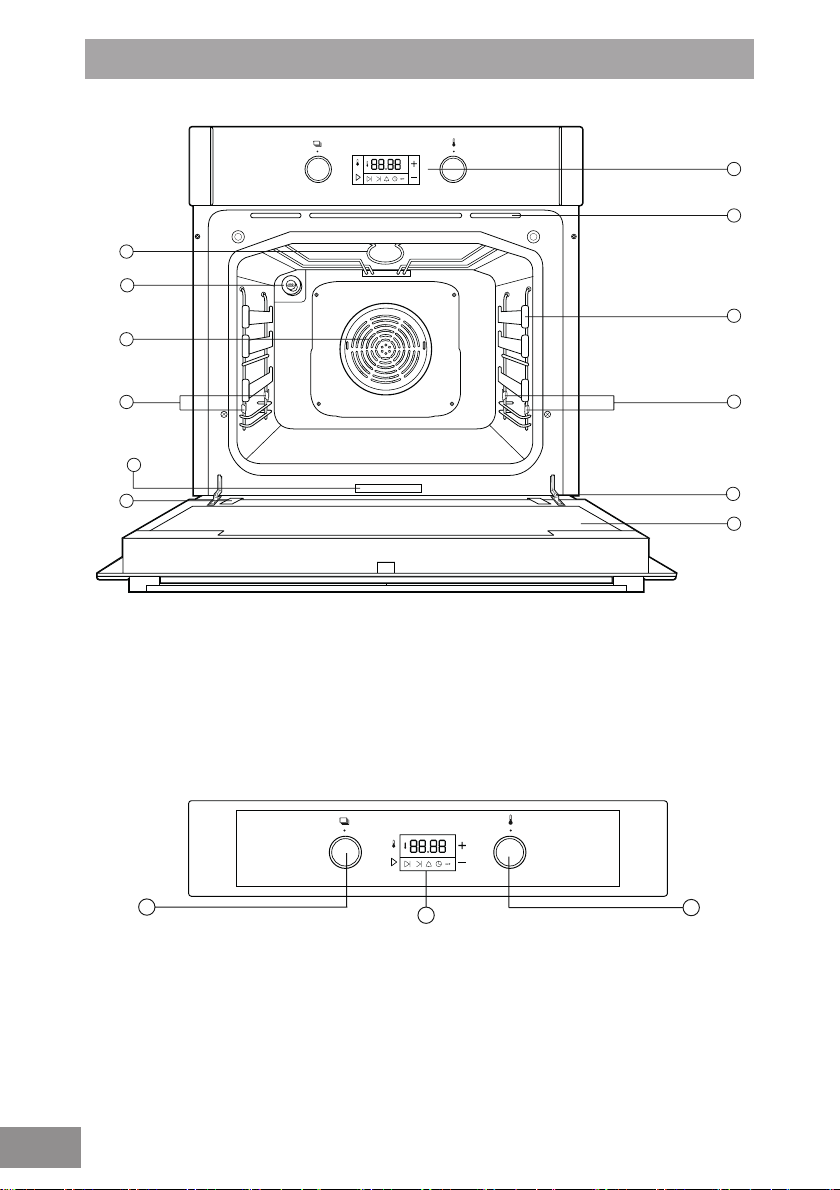
Outline diagram
1
2
3
6
7
8
9
4
5
1. Grill elements
2. Oven lamp
3. Oven fan
4. Identication label
5. Door glass release
1
6. Control Panel
7. Air vents
8. Telescopic guides
9. Shelving clips
10. Door hinge
11. Door glass
2
9
10
11
3
1 On/Off and function dial
2 Program timer (see page 13)
8
3 Plus / Minus dial.
This illustration is for reference only.
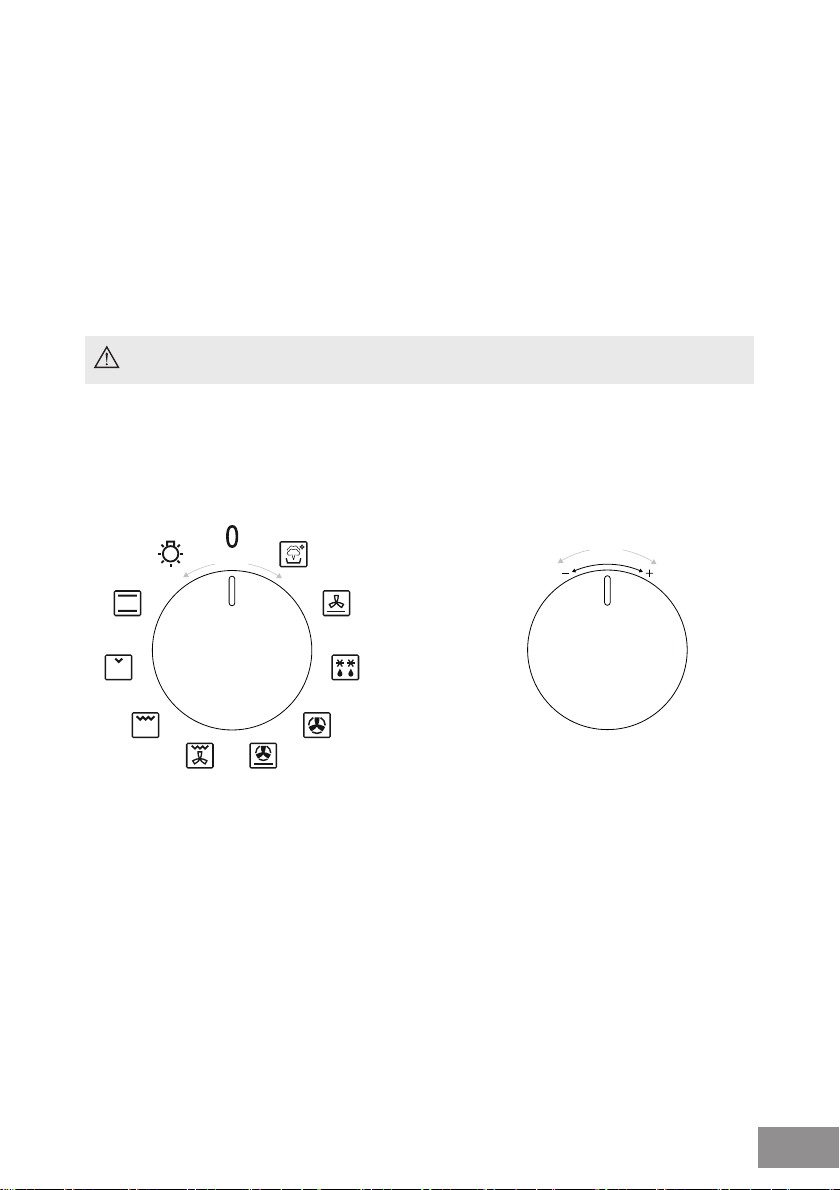
Operation dials
The recessed dial may only be pushed back into its recessed postion when it is in the
“off” position.
The oven is operated by the function and the plus/ minus
dials.
• Push the dial slightly, to make it pop out of the control
panel. After use press it back into its recessed position,
ush with the control panel.
On/off and function dial.
Setting the temperature using the Plus / Minus dial.
Temperature and other settings can also be adjusted by using the Plus /Minus dial. This is an
alternative method to using the + / - keys.
• Rotate the plus/ minus dial clockwise or counterclockwise. The set temperature is displayed,
and the symbol “°C” will ash.
• The temperature is changed in 5°C steps.
• Temperature and all timer settings can be deleted using the temperature dial: decrease the
temperature to 30°C, then rotate the dial to the left once again. This will bring the oven back
to clock mode.
Plus / Minus dial.
9
Operation modes
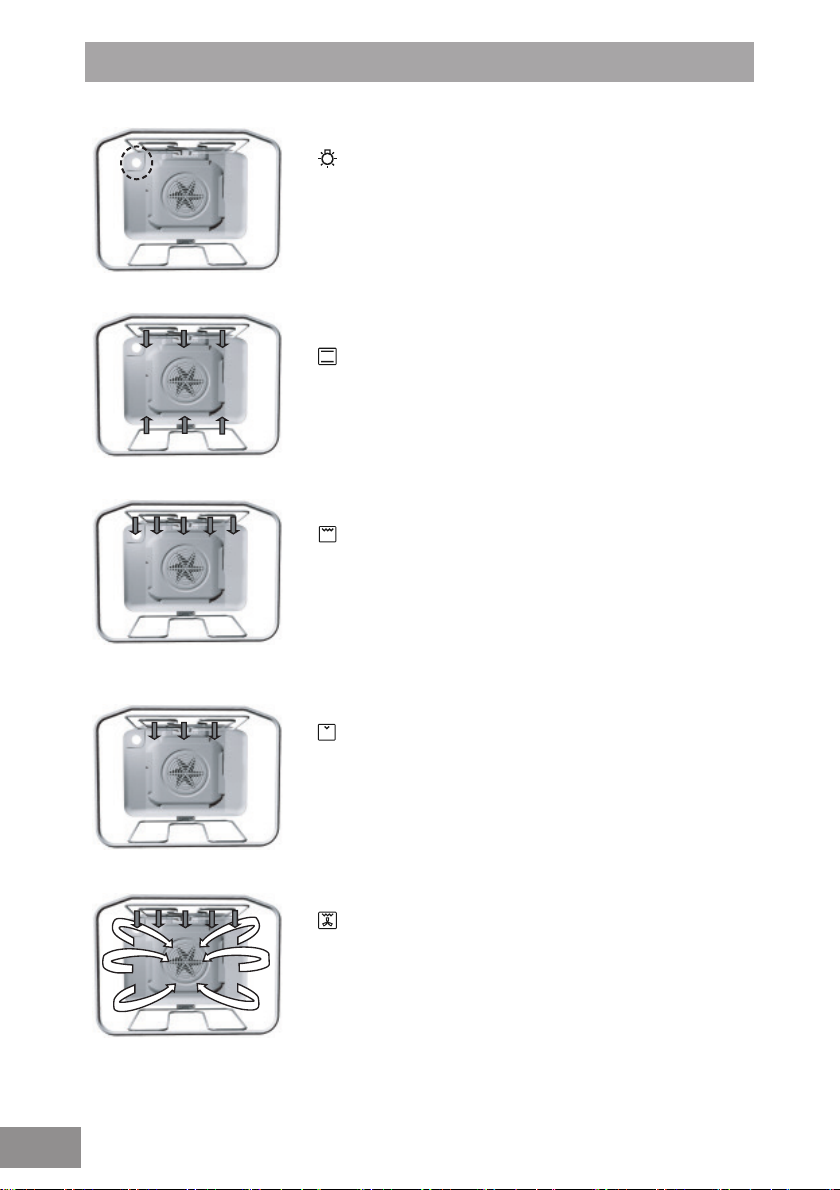
Oven lighting
There is one interior lighting lamp: on the upper part of the
back wall. Oven lighting can be selected independently. With
all other modes of operation, the oven lighting is turned on
automatically when the operation mode is selected.
Upper / lower heater
The heaters on the upper and lower side of the oven radiate
uniformly and evenly into the oven interior. Pastries, cakes
and meat can be cooked on one shelf level only.
Full grill
The inner and the outer heaters are activated simultaneously.
This operation mode is appropriate for cooking smaller pieces
of meat, such as steaks, roasts, chops, ribs, etc.
10
Half grill
The inner heater is activated. This mode is appropriate for
grilling smaller quantities of toasted sandwiches, sausages
or bread.
Fan grill
The upper heater and the fan are activated simultaneously. It
is appropriate for grilling and browning large pieces of meat,
poultry or gratins on one shelf level.
Convection
The back heater and the fan operate simultaneously in order
for the hot air to circulate constantly. This mode is appropriate
for roasting meat and making pastry on several shelves
simultaneously. Cooking temperature should be set lower
than conventional operation.
Convection and lower heater
The back heater, the fan and the lower heater operate
simultaneously. This is suitable for making pizza, pastries,
fruit cakes or baked cheesecakes.
Defrosting
The air is circulated without any heater being turned on. Only
the fan is in operation. This is used for defrosting frozen food.
Lower heater and fan
The lower heater and the fan operate simultaneously. Used
for baking sweet bread dough and preserving fruit and
vegetables. Use the rst shelf position from the bottom and
shallow rather than deep baking trays.
Lower heater/ Steam clean
The bottom heater is activated. Select this mode when you
wish to cook the bottom side of the dish more thoroughly
(e.g. for deep pastry with fruit lling). Set the temperature with
the temperature selection dial. The lower heater can also be
used for cleaning the oven, for instructions please see the
“Cleaning and maintenance” section on page 29.
11

Before using your oven
• Before using the oven for the rst time, run Convection at 250 C for 5 minutes. A specic odour of
a “new appliance” will be present. Make sure the room is ventilated.
• After the oven has cooled down, clean the inside and all accessories with warm water and a
conventional detergent. Do not use abrasive cleaning aids.
Important warnings
• Use dark, black silicon coated or enamel coated baking trays, as these transmit the heat well.
• Only preheat the oven if specically stated in the recipe or in the cooking charts supplied.
Note
Oven door switch
Cooling fan
Extended operation
of the cooling fan
The switch will turn off the oven heating and the fan when
the door is opened during oven operation; when the door is
closed again, the heating is resumed.
The appliance features a built-in cooling fan which cools the
appliance housing and control panel.
After the oven is switched off, the cooling fan continues to
operate for a short time to cool the appliance.
12
Using your oven
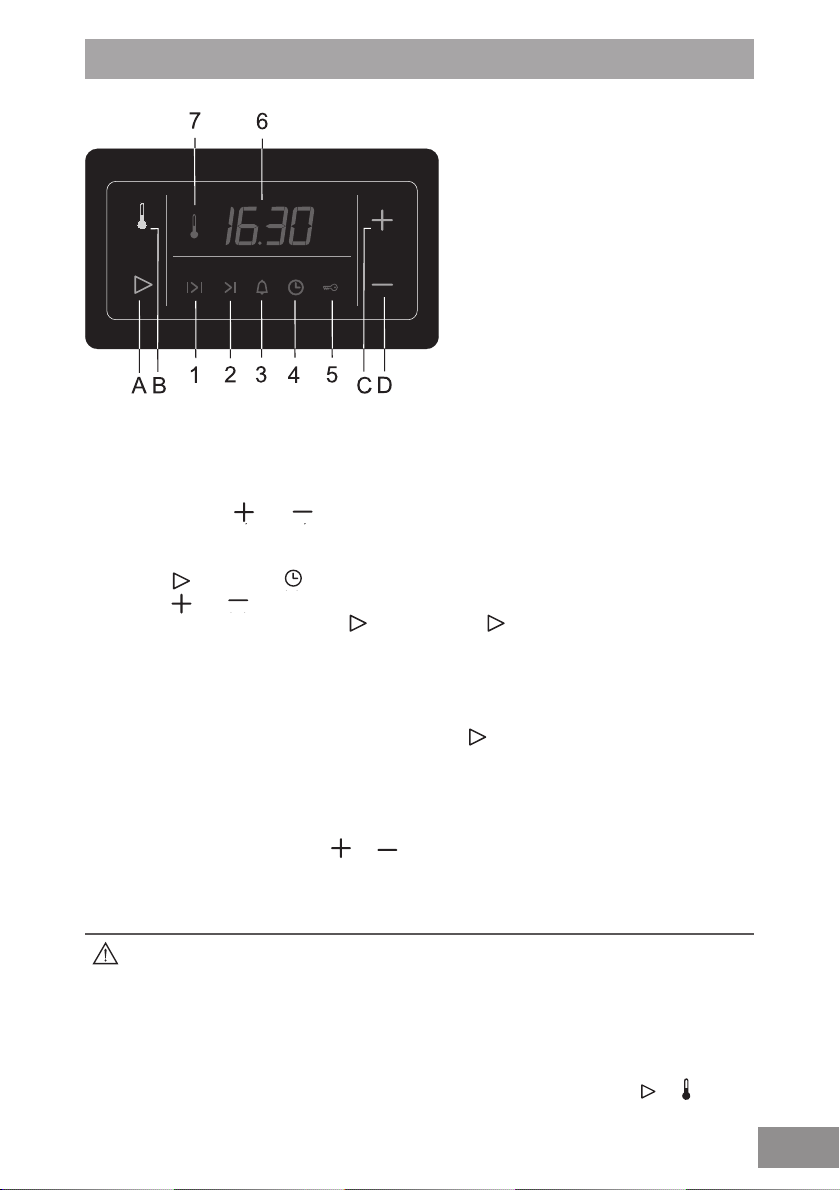
Operation keys:
A Function selection and conrmation
key
B Temperature setting key
C Plus key
D Minus key
Display:
1 Duration/cooking timer
2 Program end time
3 Kitchen timer
4 Clock
5 Child lock
6 Time/ Temp display
7 Heater operation symbol
• When the appliance is connected to the power supply or after a power failure, the word
“GLAS” is rst displayed; then, the display ashes. To allow operation of the oven the time
must be set using (b) and (c) .
Setting the clock
• Press the (a) key until the (4) is selected .
• Press the (B) and (C) key to set the time of day.
• Conrm the setting by pressing the (A) key again; if the (A) key is not pressed, the time will
automatically set after a few seconds.
• This is a 24 hour clock.
Selecting timer functions
• Select the type of function required by pressing the (A) key. The selected function will ash
for ve seconds, the value can be set during this time. Once set, the function will ash
slowly and the time is displayed. N.B. The symbols lit are selected. The most recent setting
will be shown in the display.
• Each press of a key is acknowledged by a beep.
• If one of the value settings keys (B) or (C) is touched and held, the speed of changing the
value will increase.
• In case of a power failure which lasts less than two minutes, all settings are maintained.
To improve the response of the keys, touch them with a larger surface of your
nger.
Temperature and other settings may also be set using the plus/minus dial.
Setting the timer functions
The electronic program timer can also be used to set the temperature and the timer function. Both
settings are indicated on the same display. This is set by pressing the relevant key (A) or (B).
13
 Loading...