

Page 1

Operating Instructions - Reference Manual
RM172A_EN_RM_
Draft1.0
Tablet Computer
Model No. FZ-T1 series
Page 2

Table of Contents
Table of Contents
Introduction ..............................................................................................4
About this manual .............................................................................................................4
Disclaimers ........................................................................................................................4
Handling cautions .............................................................................................................5
Trademarks ........................................................................................................................7
Getting started ..........................................................................................8
Confirming the included items ........................................................................................8
Description of parts ..........................................................................................................8
Installing and removing the battery ..............................................................................11
Installing a SIM card (certain models only) ..................................................................13
Installing an SD card .......................................................................................................14
Replacing the battery (Battery warm swap) .................................................................14
Charging the battery .......................................................................................................15
Turning the unit on and off ............................................................................................16
Screen description .................................................................................17
Home screen ....................................................................................................................17
Navigation buttons ..........................................................................................................17
Status bar .........................................................................................................................17
Notifications panel ..........................................................................................................17
Icons .................................................................................................................................18
Customizing the home screen .......................................................................................19
Input ........................................................................................................21
Typing and voice input ...................................................................................................21
Using the keyboard .........................................................................................................21
Connectivity ............................................................................................22
Mobile network (certain models only) ...........................................................................22
Wi-Fi .................................................................................................................................23
Bluetooth .........................................................................................................................25
Airplane mode .................................................................................................................26
USB connection ..............................................................................................................26
SD memory card ..............................................................................................................26
Security ...................................................................................................27
Locking the screen .........................................................................................................27
Encrypting the SD card (certain models only) .............................................................27
[DeviceManagement] app ...............................................................................................28
Settings ...................................................................................................29
[Settings] app ..................................................................................................................29
Power options menu .......................................................................................................30
[Dashboard] app ..............................................................................................................30
[UserButtonManager] app ..............................................................................................31
Touch operation settings ...............................................................................................32
Accessibility settings .....................................................................................................32
Apps ........................................................................................................33
Starting apps ...................................................................................................................33
2 Operating Instructions - Reference Manual
Page 3

Table of Contents
Preinstalled apps ............................................................................................................33
Camera ....................................................................................................35
Taking pictures ................................................................................................................35
Recording videos ............................................................................................................35
Using the option menu ...................................................................................................35
Camera settings ..............................................................................................................36
Barcode reader .......................................................................................37
Configuring the barcode reader ....................................................................................37
Using the barcode reader ...............................................................................................37
NFC card reader/writer ..........................................................................38
Hardware diagnostics ............................................................................39
About hardware diagnostics ..........................................................................................39
Running hardware diagnostics ......................................................................................39
Saving or checking the system log and diagnosis results .........................................41
Supplementary items .............................................................................42
Protective Film ................................................................................................................42
Holster ..............................................................................................................................44
Troubleshooting .....................................................................................45
General information ........................................................................................................45
Starting up .......................................................................................................................45
Shutting down .................................................................................................................45
Screen ..............................................................................................................................45
Indicator ...........................................................................................................................46
Touch screen operation .................................................................................................46
Connectivity .....................................................................................................................47
Sound ...............................................................................................................................47
Other .................................................................................................................................47
Appendix .................................................................................................49
Factory data reset ...........................................................................................................49
Tips for battery usage .....................................................................................................49
Updating the software ....................................................................................................50
Regulatory information ...................................................................................................52
Specifications ..................................................................................................................54
Accessories .....................................................................................................................57
WARRANTY for U.S.A .....................................................................................................58
WARRANTY for Canada .................................................................................................62
WARRANTY for Europe ..................................................................................................66
Operating Instructions - Reference Manual 3
Page 4

Introduction
Introduction
About this manual
Thank you for purchasing this Panasonic product. For optimum performance and safety, please read these
instructions carefully.
This manual describes the preparation of the unit for use, and the operations and settings of the main
features.
• Panasonic Corporation and/or its affiliates are referred to collectively as “we” or “Panasonic”.
• This product supports microSD, microSDHC, and microSDXC memory cards. In this document, the term
“SD card” is used as a generic term for any supported memory card.
• This product supports Nano SIM cards (certain models only). In this document, the term “SIM card” is
used as a generic term for any supported SIM card.
• Some illustrations in this document may look different from the actual product. Also, the details of the
descriptions may vary due to differences between the software versions or automatic updates of some
software.
• Information in this document is subject to change without notice.
• For the latest information about optional products, refer to the product catalogs, etc.
Disclaimers
• Descriptions in this document are based on models with GMS (Google Mobile Services).
• Some illustrations in this document may look different from the actual product.
• Some screen text and procedures in this document may vary from the actual product. To confirm the
OS version, swipe up the home screen, and then in the app list, tap [Settings] ® [System] ® [About
tablet] ® confirm under [Android version].
Also, the details of the descriptions may vary due to automatic updates of some software.
• Panasonic assumes no liability for damage incurred from customer misuse or use under other irregular
conditions, and damage resulting from the use or the unavailable use of the product.
• Panasonic shall not be liable for loss of data or other incidental or consequential damages resulting from
the use of this product. This product can download, store, forward, and receive additional content, such
as applications, ringtones, contact information, and media files. The use of such content may be
restricted or prohibited by the rights of third parties, including but not limited to restriction under applicable
copyright laws. You are entirely responsible for additional content that you download to or forward from
this product; Panasonic is not responsible for such content or its use. Before using such content, it is
your responsibility to verify that your intended use is properly licensed or is otherwise authorized.
Panasonic does not warrant or guarantee the accuracy, integrity or quality of any additional content or
any other third-party content. Under no circumstances will Panasonic be liable in any way for the
improper use of additional content or other third-party content by this product or its operator. This
document and any related product documentation may refer to services and applications that are
provided by third parties. The use of such services or programs may require separate registration with
the third party provider and may be subject to additional terms of use. For applications accessed on or
through a third-party web site, please review the web sites’ terms of use and applicable privacy policy
in advance. Panasonic does not warrant or guarantee the availability or performance of any third-party
web sites, services, or applications.
• The availability of some functions depends on your unit’s specifications and the locale of purchase. See
“Specifications” (page 54) for information about your unit.
• This manual is written with the display language set to US English.
4 Operating Instructions - Reference Manual
Page 5

Handling cautions
General use
Introduction
• Operating environment
Temperature: Operation: -20 °C to 50 °C {-4 °F to 122 °F} (IEC60068-2-1, 2)
Storage: -30 °C to 70 °C {-22 °F to 158 °F}
Humidity: Operation: 30 % to 80 % RH (No condensation)
Storage: 30 % to 90 % RH (No condensation)
Even within the above temperature/humidity ranges, operation for a long time in extreme environments,
smoking nearby, or operation in places where oil is used or where there is a lot of dust will result in
product deterioration and will shorten the product life.
Also, when using the product in cold environments, the product may take longer to start up and battery
operation time may be reduced.
If the product is wet in temperatures of 0 °C {32 °F} or below, freeze damage may occur. Make sure to
dry off the product in such temperatures.
*1
Do not directly touch this product with your bare hands when using it in a hot or cold environment.
*1
• Do not place the product in the following areas, as doing so may damage the product.
– Near electric appliances. The image may be distorted or noise may occur.
• This product is designed to reduce physical shock applied to the LCD and internal electrical components
(camera, etc.). However, protection against malfunction due to such shock is not guaranteed. As with
any portable device, precautions should be taken to avoid any damage.
• When operating the screen using the dedicated stylus, do not firmly press it down. Doing so may damage
the dedicated stylus or result in scratches or dents on the screen.
• Do not place objects on the surface of the product or press down hard on the product with sharp objects.
The screen surface may get scratched.
• Do not damage the panels of the barcode reader, rear camera, and photo light.
• Do not use the dedicated stylus when dust or dirt (e.g., oil) is on the screen. Otherwise foreign particles
on the screen/dedicated stylus may scratch the screen surface or obstruct operation of the dedicated
stylus.
• Use the dedicated stylus only for touching the screen. Using it for any other purpose may damage the
dedicated stylus and result in scratches on the screen.
• Confirm the safety and security of software before downloading or installing it on the product. Installing
malware or viruses can cause malfunction and the disclosure of any private information stored in the
product, or may cause excessive sound volume.
• Turn off the product before removing the SIM card or SD card. Failure to do so can result in data loss
or damage to the SIM card, SD card, or product.
• Do not place the product near a television or radio receiver. This may cause television or radio
interference.
• Keep the product away from magnets. Failure to do so may cause malfunction.
• When using the product in a vehicle, it may affect electronic devices in the vehicle depending on the
vehicle type. Confirm the effects from radio waves with the vehicle manufacturer or sales dealer before
use.
• It is illegal in many areas to record a call without permission. Always ask the other party for permission
before recording a call.
• Follow these instructions and this manual to avoid any damage to the devices. Carefully read the
instruction manuals of the peripheral devices.
– Use peripheral devices that conform to the product’s specifications.
– Connect to the connectors in the correct direction.
– If a connector is hard to insert, do not try forcibly. Check its shape, direction, alignment of pins, etc.
Operating Instructions - Reference Manual 5
Page 6

Introduction
Protecting your data
• To prevent accidental loss of data, we recommend that you regularly back up any important data that
you store in the product, SIM card, and SD card.
• To prevent the unintended disclosure of private information, always confirm the destination before
sending messages, file attachments, or any other communications, such as email.
• To prevent the unintended disclosure of sensitive information stored in the product or the SD card, we
recommend using the product’s encryption feature (page 27).
• Before disposing of the product or handing the product over to a third party, remove the SIM card, SD
card, and any other accessories.
• Before disposing of the product or handing the product over to a third party, perform a factory data reset
(page 49) to erase any data stored in the product.
• Before using Wi-Fi or Bluetooth features, take appropriate action to secure your data.
Waterproof/dustproof
• The product is waterproof/dustproof when the interface cover is closed, and the battery is attached.
Therefore, keep water and dust away from product’s internal components, accessories, and optional
products.
• To prevent liquids, sand, dust, or any foreign objects from entering the product, always keep the battery
cover and battery clean and make sure to firmly close the cover after opening. Take care not to get
anything caught between the cover or battery and the product.
• If the product is exposed to water droplets, wipe them off with a dry, soft cloth and shake the product to
remove the water droplets, then dry thoroughly.
• Do not leave any water droplets on the product. Water droplets may cause the micro USB port or headset
jack to short circuit, or create smears on the screen.
• If the product is wet, wipe off the moisture before connecting with peripheral devices.
• Do not dry the product with an appliance or heat source such as a microwave oven or dryer.
• Use the optional charger while dry and do not use it in places with water such as bathrooms because it
is not waterproof/dustproof.
Maintenance
• When cleaning the product, make sure to turn it off.
• When cleaning the product, wipe it with a soft, dry cloth. An alcohol-based disinfectant may be used if
necessary.
– If the product is particularly dirty, thoroughly wring a cloth soaked in water, wipe off the dirt, and then
wipe with a dry cloth.
– Do not clean the product with solvents such as benzene, thinner, or strong alkaline detergent because
they may affect the surface of the product.
Battery
• The battery is a consumable item. Depending on the usage conditions, it may swell as it reaches the
end of its life. When the typical battery life of approximately one year or about 500 charge cycles is
exceeded, the battery deteriorates. If the battery begins to swell, or the amount of time it can be used
after a full charge becomes dramatically shorter, the battery should be replaced with a new one. Contact
your technical support representative.
• Do not touch the terminals of the battery. Failure to observe this may cause poor contact.
• When the battery is left installed in the product, it discharges electricity gradually in small amounts even
if the product’s power is off. If left for a long period (several months or more), the battery will over
discharge and its performance may deteriorate.
• Store the battery in environments with an ambient temperature of -20 °C to 35 °C (-4 °F to 95 °F). If the
battery is stored in other environments, battery performance and battery life may be reduced.
• When storing or transporting the battery, make sure that the battery’s terminals do not become dirty and
that no foreign objects or debris become attached to the battery’s terminals.
6 Operating Instructions - Reference Manual
Page 7

Introduction
• Do not use the battery if the gasket is damaged, deformed, or peeled off.
• If battery charging is not completed after the specified charging time has passed, remove the battery
from the product. The battery protection device may be damaged.
• You cannot charge an installed battery if it is not recognized by the product. Make sure that you use the
specified battery.
• Dispose properly in compliance with local waste regulations.
Trademarks
• The Bluetooth
use of such marks by Panasonic Corporation is under license.
®
word mark and logos are registered trademarks owned by Bluetooth SIG, Inc. and any
• microSDXC Logo is a trademark of SD-3C, LLC.
• The N-Mark is a trademark or registered trademark of NFC Forum, Inc. in the United States and in other
countries.
• Wi-Fi
®
, the Wi-Fi logo, the Wi-Fi CERTIFIED logo and Wi-Fi CERTIFIED are trademarks or registered
trademarks of Wi-Fi Alliance®.
• “FeliCa” is a contactless IC card technology developed by Sony Corporation. “FeliCa” is a trademark of
Sony Corporation.
• All other trademarks identified herein are the property of their respective owners.
Operating Instructions - Reference Manual 7
Page 8

Getting started
Getting started
Confirming the included items
If any items are missing, please contact your technical support representative.
– Main unit ´ 1
– Battery (Model number FZ-VZSUT10U) ´ 1
– Operating Instructions - Read Me First ´ 1
Description of parts
Front view
A Indicator
Orange, lit: Battery is charging
Green, lit: Battery charging is complete
Red, lit: Battery level is 14 % or less of a full charge
B Ambient light sensor, proximity sensor
The ambient light sensor automatically adjusts the screen brightness. The proximity sensor prevents
accidental operations on the touch panel during phone calls.
C Earpiece
D NFC antenna (internal)
When using an NFC card or other NFC device, touch the card/device to this area of the unit.
8 Operating Instructions - Reference Manual
Page 9

E Display (touch panel)
Glove mode: Can be operated while using gloves.
Rain mode: Prevents misoperation in wet conditions.
F Speaker
G Headset jack
H Barcode reader
I Air vent
J Microphone
K Interface cover
L micro USB port (page 15)
M Side button
*1
The registered function can be changed (see “[UserButtonManager] app” (page 31)).
*1
IMPORTANT
• Observe the following to ensure the waterproof and dustproof performance of the unit.
– Make sure the interface cover is securely closed when the micro USB port is not being used.
– When closing the interface cover, make sure there is no debris lodged in the gasket that seals
the cover.
Getting started
Operating Instructions - Reference Manual 9
Page 10

Getting started
Rear view
A Microphone
B Rear camera
C Photo light
Can be used when taking pictures.
D Battery (cover integrated type)
E Cover latch lock
F Cover latch
G Strap attachment hole
H GPS antenna (internal)
I Wi-Fi, Bluetooth antenna (internal)
J Power button (page 16)
K Side button
*1
L Volume buttons
M Mobile antenna (internal)
N Expansion bus connector
Used when connecting an optional cradle, etc.
*1
The registered function can be changed (see “[UserButtonManager] app” (page 31)).
10 Operating Instructions - Reference Manual
Page 11

Getting started
Installing and removing the battery
• If the cover latch is closed, open it (page 12).
Installing the battery
1. Insert the tabs at the battery’s terminal side into the notches of the unit ( ), and then lower the battery
into place ( ).
2. Press down firmly on the outside edges of the battery to seal it closed.
3. Close the cover latch ( ) and lock it ( ) by sliding the switch (circled in the illustration) toward .
• If the gap above the latch or the red area inside the switch is visible, the latch is not properly closed
or locked.
IMPORTANT
• Observe the following to ensure the waterproof and dustproof performance of the unit.
– When installing the battery, make sure there is no debris lodged in the gasket of the battery and
the unit.
– Make sure the gasket of the unit is not damaged, deformed, or peeled off.
Operating Instructions - Reference Manual 11
Page 12

Getting started
– Always make sure the battery is securely installed and locked.
Removing the battery
• Make sure to turn off the unit before replacing the battery.
1. Unlock the cover latch by sliding the switch (circled in the illustration) away from (A), and then open
the cover latch by sliding it (B).
2. Insert your fingertip into the bottom-right groove of the battery (circled in the illustration), lift the battery
(A) and then remove it (B).
IMPORTANT
• Do not remove the battery while the unit is wet. When the unit is wet, remove the water by wiping
off the water droplets and thoroughly drying the unit before removing the battery. (See
“Waterproof/dustproof” (page 6).)
12 Operating Instructions - Reference Manual
Page 13

Getting started
Installing a SIM card (certain models only)
• When installing or removing a SIM card, place the unit on a flat surface.
• If a battery is installed, remove it (page 12).
1. Open the card slot cover ( ), and then insert the Nano SIM card into the Nano SIM card slot ( ).
• Install only Nano SIM cards.
• Hold the SIM card so that the metal terminals are facing down, and insert with the notch facing in
the same direction of the circled area in the illustration below.
2. Slide the Nano SIM card until you hear a click.
• To remove a Nano SIM card, push it slightly into the slot to eject it.
3. Close the card slot cover until you hear a click.
Operating Instructions - Reference Manual 13
Page 14

Getting started
Installing an SD card
• When installing or removing an SD card, place the unit on a flat surface.
• If a battery is installed, remove it (page 12).
1. Open the card slot cover ( ), and then insert the microSD card into the microSD card slot ( ).
• Install only microSD cards.
• Hold the microSD card so that the metal terminals are facing down, and insert with the notch facing
in the same direction of the circled area in the illustration below.
2. Slide the microSD card until you hear a click.
• To remove a microSD card, push it slightly into the slot to eject it.
3. Close the card slot cover until you hear a click.
Replacing the battery (Battery warm swap)
You can replace the battery without turning the unit off.
• Replace the battery within 30 seconds. If more than 30 seconds has passed, apps that are running are
forced to close and you may lose unsaved data.
• During warm swapping, all wireless functions are turned off temporarily.
1. Press and hold (power button) until the power options dialog is displayed, and then tap [Battery
Warm Swap].
• You can also operate from [Warm Swap] in the app list.
2. Follow the on-screen instructions.
• It may take some time until the indicator turns off.
3. Replace the battery.
IMPORTANT
• Make sure the unit is not accessing the microSD card or SIM card before warm swapping the battery.
• Do not remove the SD card or SIM card while warm swapping the battery.
• Make sure you save any important data before warm swapping the battery.
14 Operating Instructions - Reference Manual
Page 15

Getting started
Charging the battery
The battery is not charged at the time of purchase. Charge the battery before turning on the unit for the first
time or after an extended period of storage.
• This section explains how to connect the optional AC adaptor and charge.
AC Adaptor: CF-AA6373A (USB connection cable included)
1. Face the USB mark of the USB connection cable upward, and connect the AC adaptor ( ) and the
unit ( ).
2. Plug the power plug ( ) of the AC adaptor into a power outlet.
• The shape of the power plug varies depending on your country.
• Charge the battery in environments with an ambient temperature of 10 °C to 35 °C (50 °F to 95 °F).
• The indicator lights in orange while the battery is charging, and lights in green when charging is
complete.
• The unit prevents overcharging of the battery by charging only when the remaining battery level is
less than approximately 96 % of its full capacity.
Note
• When removing the USB connection cable, make sure to remove it while holding the plug. Do not pull
by the cable.
• When connecting a USB connection cable, note the shape of the micro USB plug and the micro USB
port. Do not attempt to connect the USB connection cable upside down.
• Remove any dust or water droplets from plugs before connecting them. Do not use excessive force
when inserting plugs or insert them at an angle.
Confirming the battery level
The battery level is displayed in the upper-right corner of the screen, in the status bar.
Fully charged
You can also confirm the specific amount of battery level remaining. Swipe up the home screen, and then
in the App list, tap [Settings] ® [Battery].
Charging Very low
Operating Instructions - Reference Manual 15
Page 16

Getting started
Turning the unit on and off
Turning the unit on
Press and hold (power button) until the unit briefly vibrates.
Turning the unit off
1. Press and hold until the power options dialog is displayed.
2. Tap [Power off].
• To restart the unit, tap [Restart].
Turning the screen on and off
Going into sleep mode
1. Press
.
Waking up from sleep
1. Press .
2. Swipe up the screen to release the screen lock.
Configuring the unit for the first time
The first time you turn the unit on, you will be prompted to configure the initial settings. Follow the on-screen
instructions and configure each item as needed. An internet connection is required to configure certain
items.
16 Operating Instructions - Reference Manual
Page 17

Screen description
Screen description
Home screen
The home screen is the main screen from which you can launch apps, check widgets, etc. You can customize
the home screen to suit your needs by adding, moving, and removing items as desired.
(“Customizing the home screen” (page 19))
You can also view a list of all installed apps in the app list by swiping up the home screen.
You can display the home screen at any time by tapping
Navigation buttons
The navigation buttons are available in most screens and help you navigate the unit’s screens.
Returns to the previous screen or closes the current dialog box, menu, etc.
Displays the home screen.
.
Displays a list of recently used apps. Once the list is displayed, tap an app to launch it, or swipe
left or right to remove an app from the list.
You can also tap and hold this while an app is running to split the screen and display two apps
at the same time. To return to single screen, swipe the middle line up or down.
Status bar
The status bar is displayed at the top of the screen when using most apps. It displays icons that let you know
the status of the battery, network signal, and other features.
Notifications panel
The notifications panel provides detailed information about incoming email messages, app updates,
calendar events, etc. You can open the notifications panel by swiping down from the top of the screen toward
the center of the screen. To close the notifications panel, swipe up the screen. While the notifications panel
is open, you can swipe down/up or tap “ ” / “ ” to show or hide the hidden items.
While the notifications panel is open, you can tap a notification and open the corresponding app, adjust the
screen brightness, or switch the displayed apps on and off. You can also swipe a notification left or right to
delete it from the panel.
• Tap
to move to [Settings] app.
• Tap
to move or add apps, or to reset the notification panel.
Operating Instructions - Reference Manual 17
Page 18

Screen description
Icons
Status icons
Status icons are displayed in the right side of the status bar. Some commonly displayed icons are explained
below.
Battery is fully charged
Battery is charging
Battery level is very low
*1
You can also use the [Settings] app to view details about battery usage. Swipe up the home screen, and then in the app list,
tap [Settings] ® [Battery].
*1
*1
*1
Vibration mode is active
Do not disturb mode (alarms only/priority only) is active
Do not disturb mode (total silence) is active
Pen mode is active
Glove mode is active
Rain mode is active
SIM slot 1 is active (certain models only)
SIM slot 2 is active (certain models only)
UMTS mobile network mode is active (certain models only)
CDMA2000 mobile network mode is active (certain models only)
Airplane mode is active
Bluetooth is enabled
18 Operating Instructions - Reference Manual
Page 19

Screen description
Unit is connected to a Wi-Fi network
Unit is not connected to a Wi-Fi network
Portable Wi-Fi hotspot is active
NFC is active
Unit is connected to a mobile network (certain models only)
Unit is not connected to a mobile network (certain models only)
Notification icons
Notification icons are displayed in the left side of the status bar and in the notifications panel. Some
commonly displayed icons are explained below.
New email received
New Gmail™ received (models with GMS only)
USB tethering is enabled (certain models only)
Multiple tethering methods are enabled (certain models only)
App updates are available (models with GMS only)
App was updated successfully (models with GMS only)
Customizing the home screen
Adding app shortcuts/folders to the home screen
1. Swipe up the home screen, and then in the app list, find the desired app.
2. Tap and hold the desired app, and then move it slightly.
• The screen switches to the home screen.
3. Drag the app and drop it in the home screen.
• A folder will be created if you overlap it with another app. To change the folder name, tap [Unnamed
Folder] while the folder is open.
Operating Instructions - Reference Manual 19
Page 20

Screen description
Adding widgets to the home screen
1. Tap and hold a blank area in the home screen.
2. Tap [WIDGETS].
3. Scroll to find the desired widget.
4. Tap and hold the desired widget.
• The screen switches to the home screen.
5. Drag the widget and drop it in the home screen.
Moving or deleting items in the home screen
1. Tap and hold the item, and then move it slightly.
2. Drag the item to the desired location (to move) or to [Remove] at the top of the screen (to delete).
Changing the wallpaper in the home screen
1. Tap and hold a blank area in the home screen.
2. Tap [WALLPAPERS].
3. Select the app, and then tap [JUST ONCE] or [ALWAYS].
4. Select an image to set as the wallpaper, and then tap [SET WALLPAPER].
Configuring the home screen
1. Tap and hold a blank area in the home screen.
2. Tap [HOME SETTINGS].
3. Follow the on-screen instructions and configure the desired settings as necessary.
20 Operating Instructions - Reference Manual
Page 21

Input
Typing and voice input
The unit’s keyboard is displayed automatically when you tap a text entry field or when you are prompted to
enter information. You can type using the on-screen keyboard; in some cases, you can also enter text by
speaking.
Using the keyboard
Changing the default keyboard
1. Swipe up the home screen, and then in the app list, tap [Settings] ® [System] ® [Language &
input].
2. Tap [Virtual keyboard], and then select the desired keyboard.
Changing the keyboard language
1. Swipe up the home screen, and then in the app list, tap [Settings] ® [System] ® [Language &
input].
2. Tap [Virtual keyboard] ® [Manage keyboards], and then select the desired keyboard.
3. Tap
settings according to your needs.
to return to the virtual keyboard list, tap the desired keyboard, and then configure the desired
Input
Using the SwiftKey keyboard (certain models only)
Tap to display the number and symbol keyboard.
Tap to display the additional symbols keyboard.
Tap to display the alphabet keyboard.
Tap to delete the character to the left of the cursor.
Tap to switch between uppercase and lowercase letter entry. Double-tap to enter all caps.
Tap to turn all caps letter entry off.
Tap to enter a comma.
Operating Instructions - Reference Manual 21
Page 22
Connectivity
Connectivity
Mobile network (certain models only)
You can use the unit to connect to a mobile network and access emails and the Internet. Mobile
network-related settings are available by swiping up the home screen, and then in the app list, tapping
[Settings] ® [Network & Internet] ® [Mobile network].
Note
• Attach a SIM card before using a mobile network.
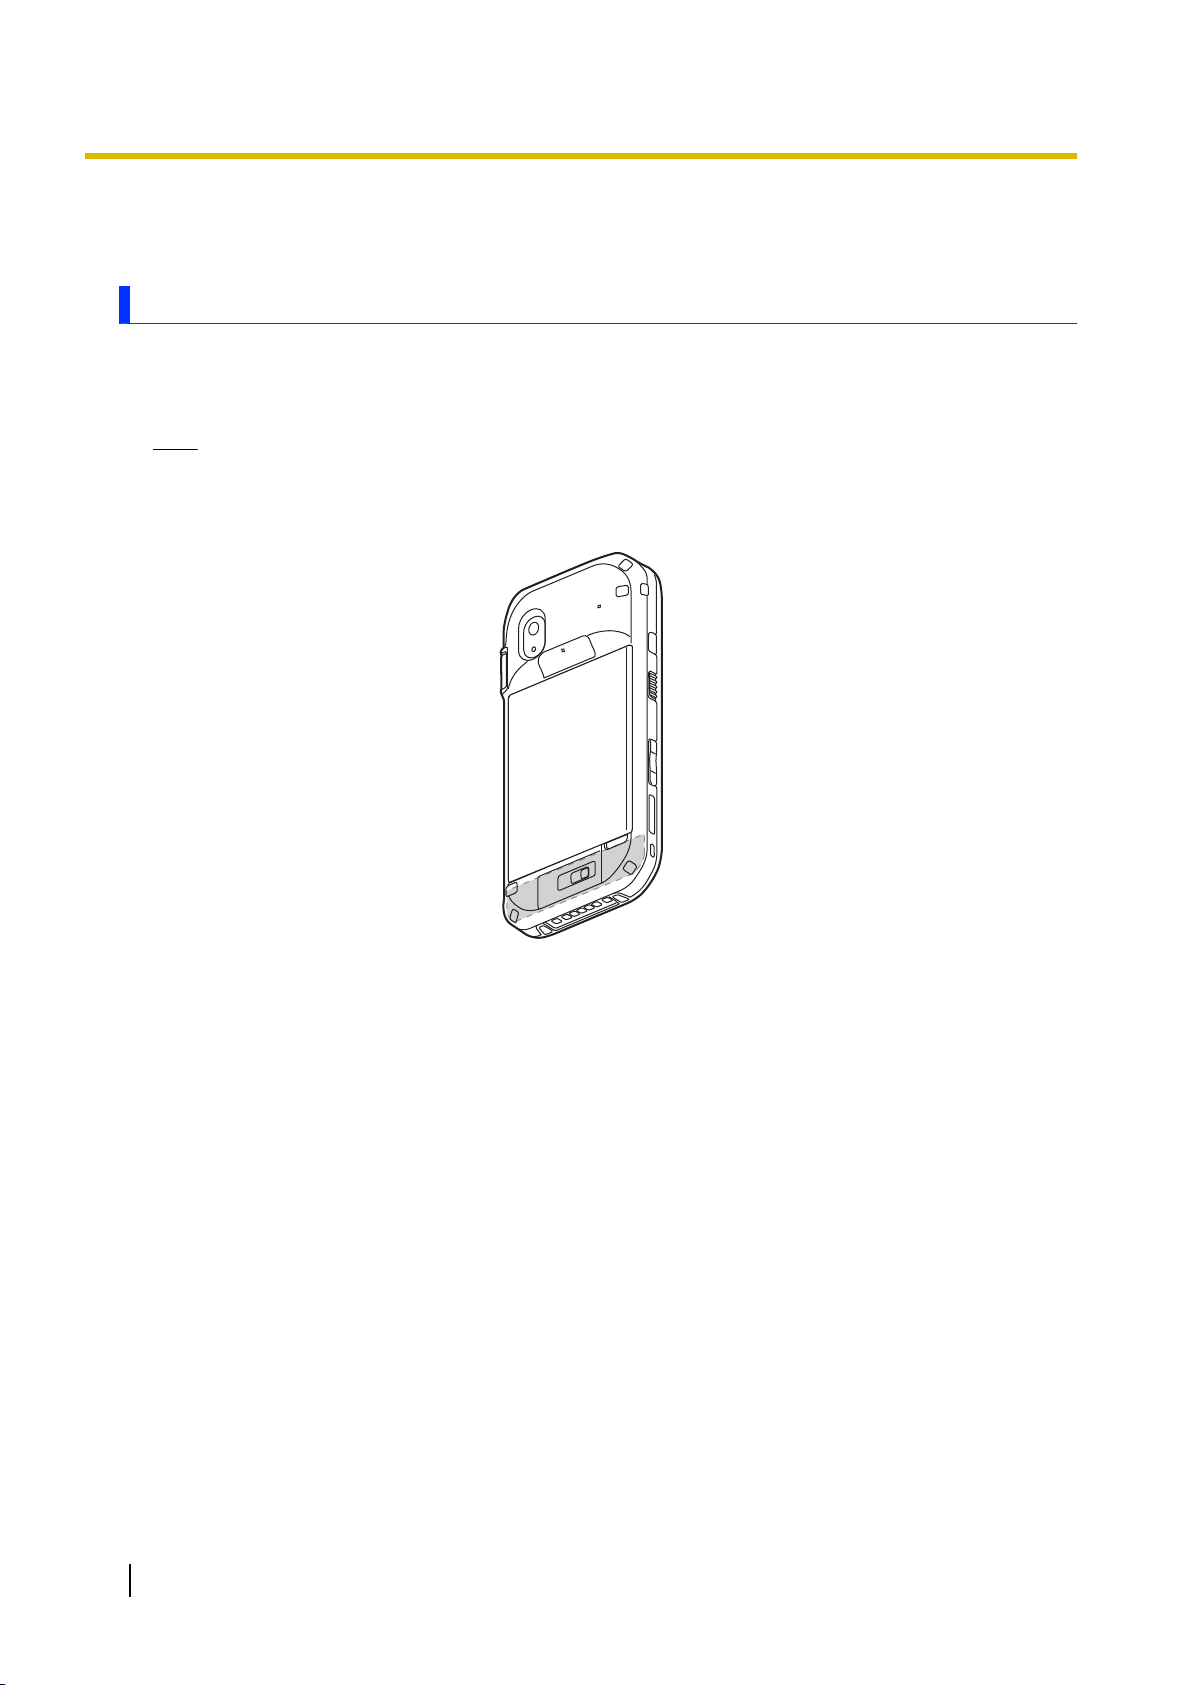
• The wireless WAN antenna is contained in the gray area indicated in the illustration below. Covering
the area around the antenna with your hand may affect the signal quality.
Changing the active SIM card slot (models with dual SIM card slots)
You may be able to insert two SIM cards into the unit and select which card is active.
See “Installing a SIM card (certain models only)” (page 13) for the card installation procedure.
1. Swipe up the home screen, and then in the app list, tap [Settings] ® [Network & Internet] ® [Mobile
network] ® [Advanced] ® [SIM card slot].
2. Select the desired slot and then tap [OK] ® [OK].
• The unit restarts.
• Depending on the mobile network service provider associated with the corresponding SIM card, you
may need to change the preferred mobile network mode (see
“Changing the preferred mobile network mode” (page 22)).
Changing the preferred mobile network mode
You can select the preferred mobile network mode used for mobile network connections.
1. Swipe up the home screen, and then in the app list, tap [Settings] ® [Network & Internet] ® [Mobile
network] ® [Advanced] ® [Preferred network mode].
2. Select the preferred network mode.
22 Operating Instructions - Reference Manual
Page 23
Connectivity
Wi-Fi
You can use the unit to connect to a wireless LAN access point and access emails and the Internet.
Note
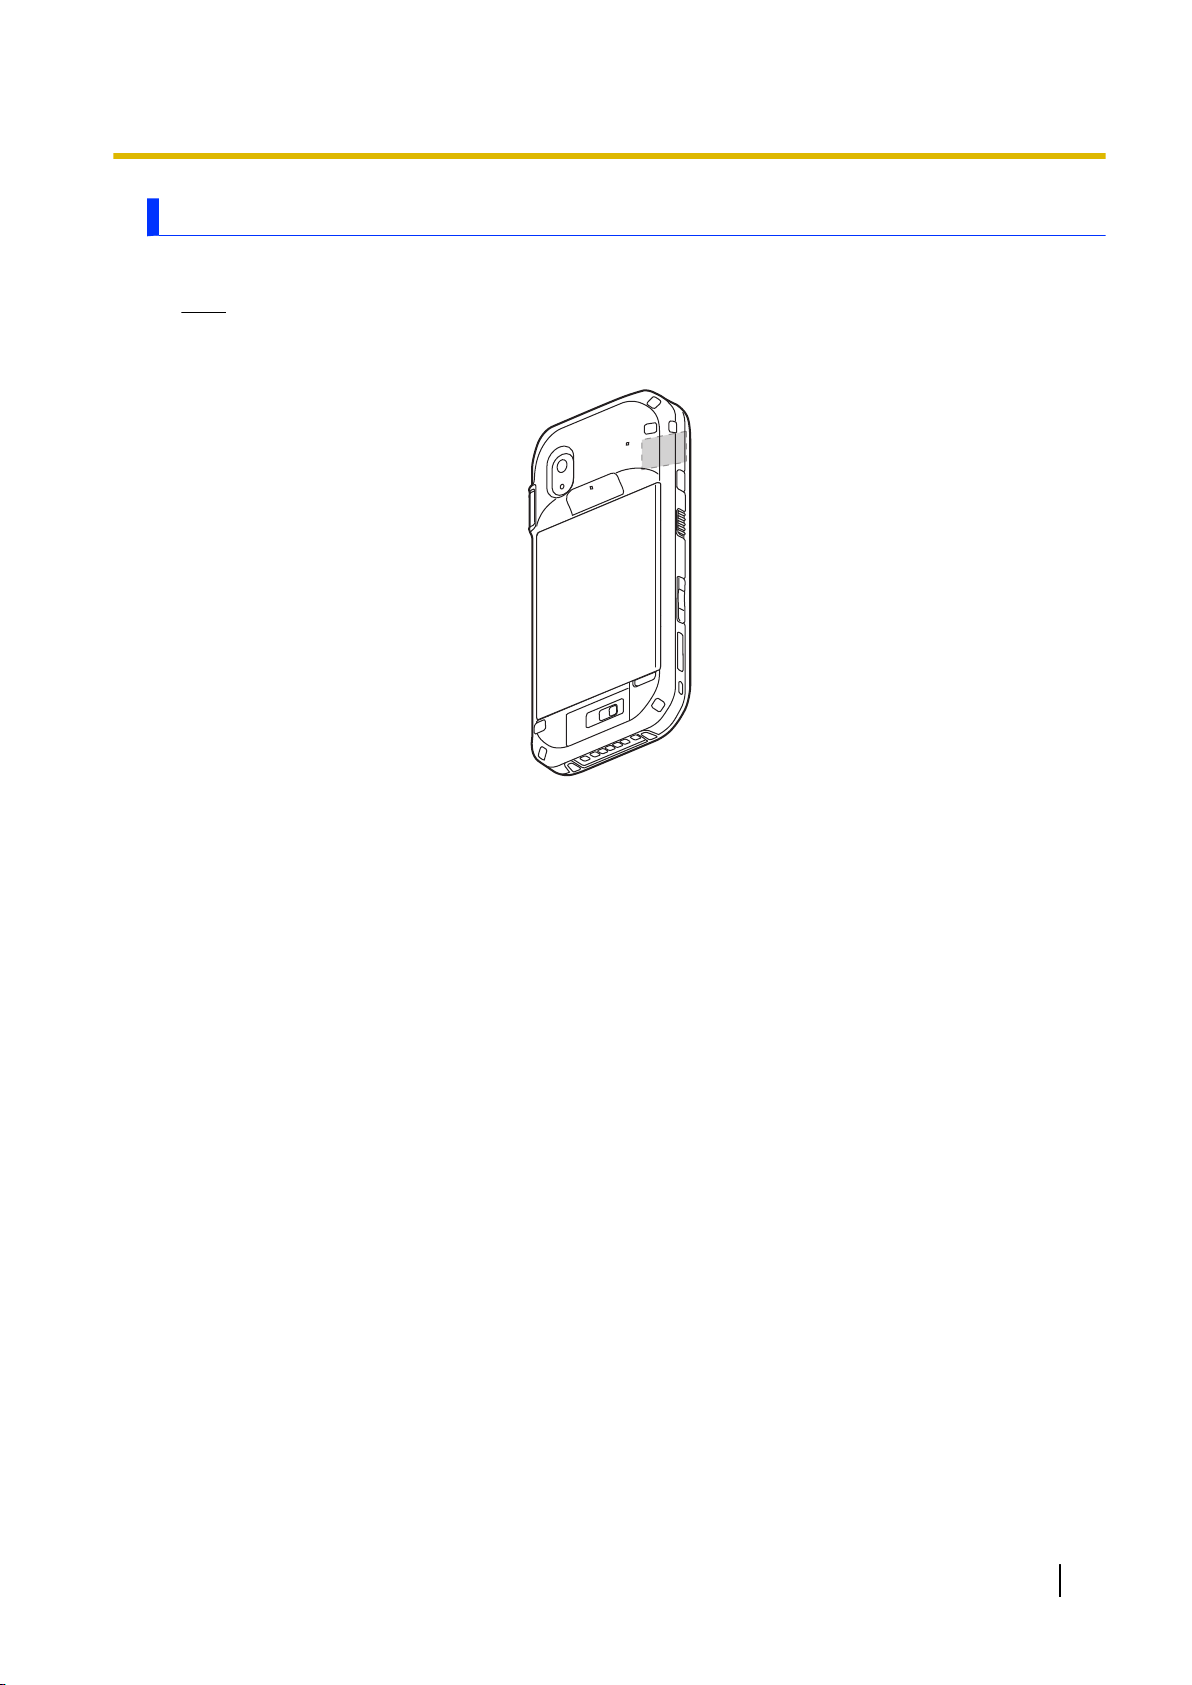
• The Wi-Fi antenna is contained in the gray area indicated in the illustration below. Covering the area
around the antenna with your hand may affect the signal quality.
Turning Wi-Fi on and off
1. Swipe up the home screen, and then in the app list, tap [Settings] ® [Network & Internet] ®
[Wi-Fi].
2. Tap the switch to turn Wi-Fi on or off.
Connecting to a Wi-Fi access point
1. Swipe up the home screen, and then in the app list, tap [Settings] ® [Network & Internet] ®
[Wi-Fi].
• Make sure that Wi-Fi is turned on.
2. Select the desired network name.
• If the desired network name is not displayed, you may need to enter the network name (SSID)
manually. See “Entering the network name (SSID) manually” (page 23) for more information.
3. If you are connecting to a network with security protection, enter the password.
4. Tap [CONNECT].
Entering the network name (SSID) manually
1. Swipe up the home screen, and then in the app list, tap [Settings] ® [Network & Internet] ®
[Wi-Fi].
• Make sure that Wi-Fi is turned on.
2. Tap [Add network].
3. Enter the network name (SSID), then select the network’s security type and enter the password, if
required.
• Select the security type from [None], [WEP], [WPA/WPA2 PSK], or [802.1x EAP].
4. Tap [SAVE].
Operating Instructions - Reference Manual 23
Page 24

Connectivity
Selecting the frequency band used for Wi-Fi
1. Swipe up the home screen, and then in the app list, tap [Settings] ® [Network & Internet] ®
[Wi-Fi].
• Make sure that Wi-Fi is turned on.
2. Tap [Wi-Fi preferences] ® [Advanced] ® [Wi-Fi frequency band].
3. Select the desired setting.
Setting a portable Wi-Fi access point (certain models only)
You can use the unit as a Wi-Fi access point to connect other devices that are compatible with wireless
LAN to the Internet.
1. Swipe up the home screen, and then in the app list, tap [Settings] ® [Network & Internet] ® [Hotspot
& tethering].
2. Tap the [Wi-Fi hotspot] switch to turn it on.
3. Tap [Set up Wi-Fi hotspot].
4. Configure the network name, security type, and password as desired, and then tap [SAVE].
Using peer-to-peer Wi-Fi connections (Wi-Fi Direct)
The unit can establish peer-to-peer connections with other devices that are compatible with Wi-Fi Direct.
This allows you to directly send and receive data between the unit and other devices without using a
wireless access point.
1. Swipe up the home screen, and then in the app list, tap [Settings] ® [Network & Internet] ®
[Wi-Fi].
• Make sure that Wi-Fi is turned on.
2. Tap [Wi-Fi preferences] ® [Advanced] ® [Wi-Fi Direct].
3. Select the desired settings and functions as necessary.
• Available devices are displayed under [Peer devices].
24 Operating Instructions - Reference Manual
Page 25
Connectivity
Bluetooth
You can use the unit to connect to other Bluetooth-compatible devices.
Note
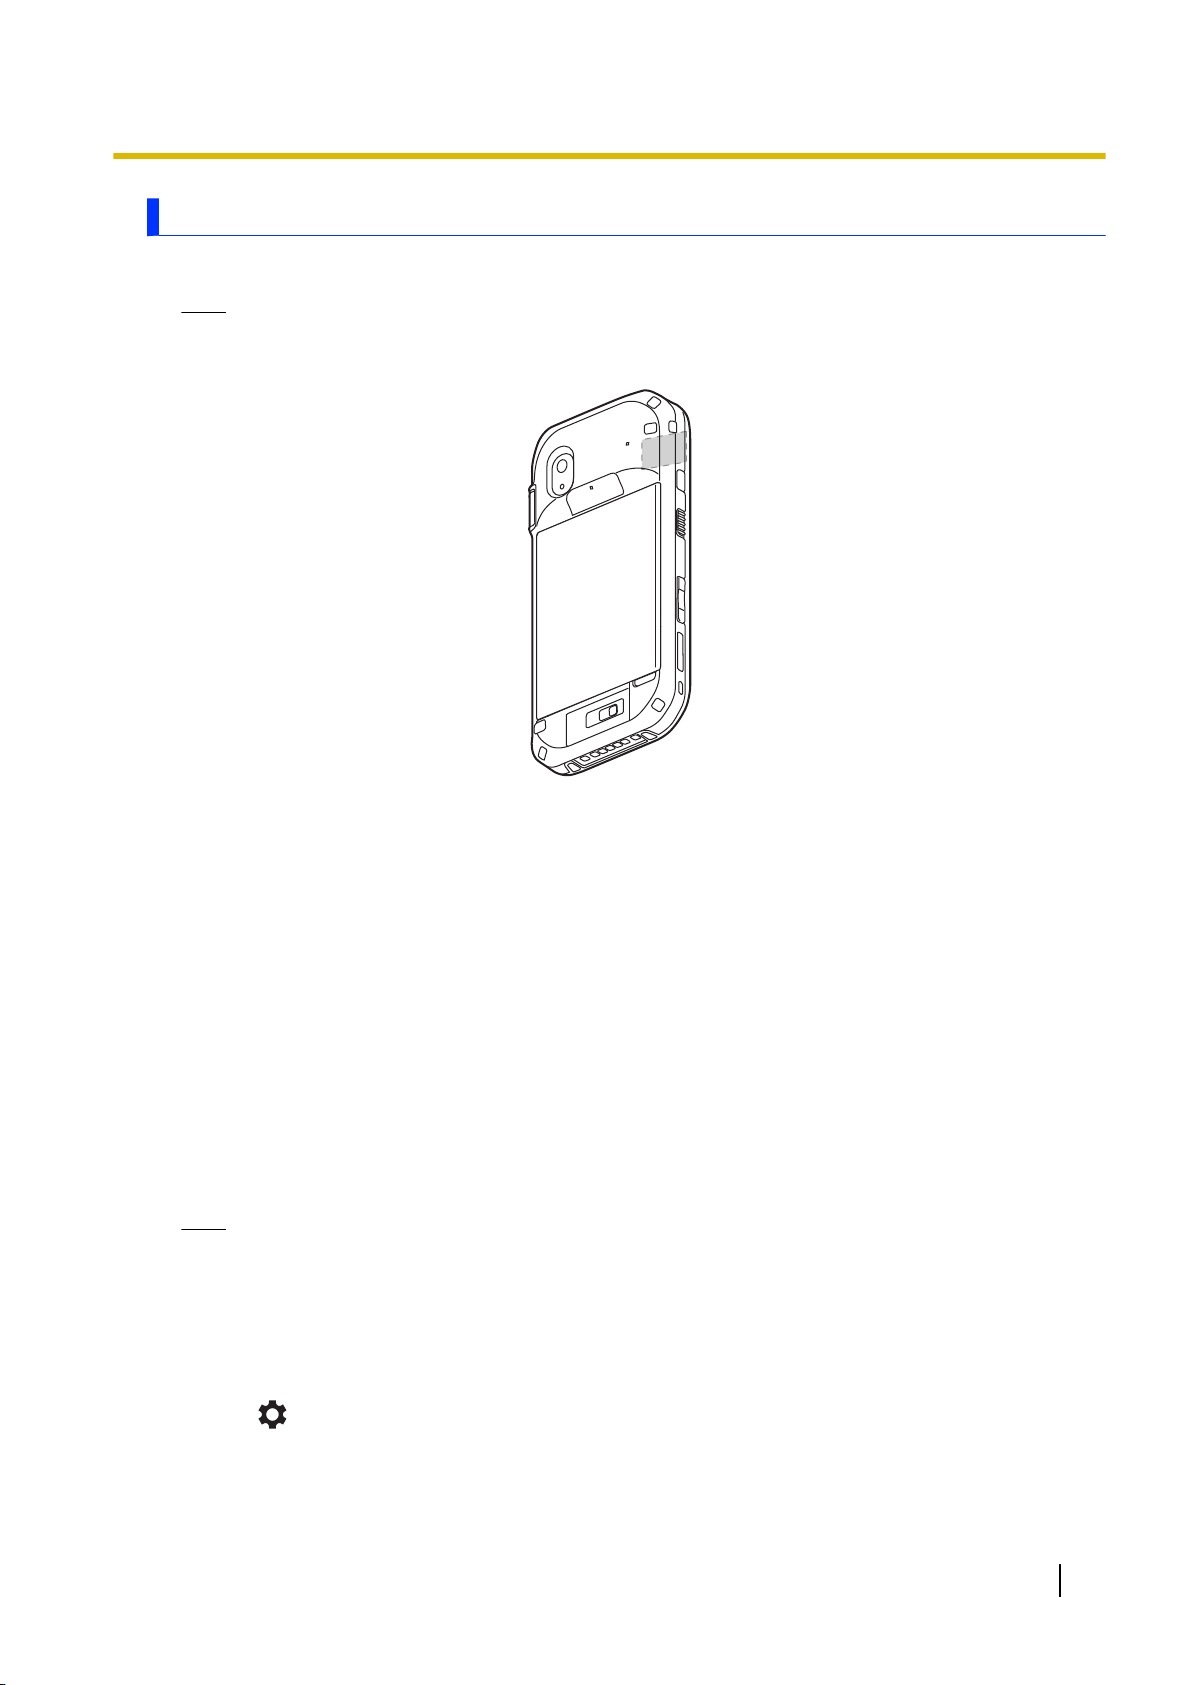
• The Bluetooth antenna is contained in the gray area indicated in the illustration below. Covering the
area around the antenna with your hand may affect the signal quality.
Turning Bluetooth on and off
1. Swipe up the home screen, and then in the app list, tap [Settings] ® [Connected devices] ®
[Bluetooth].
2. Tap the switch to turn Bluetooth on or off.
Pairing a Bluetooth device
Use this procedure to use the unit to initiate the pairing process, such as when pairing a Bluetooth headset.
• Make sure that Bluetooth is turned on, and set the other Bluetooth device to pairing mode or discoverable
mode. (Refer to the instruction manuals included with the other device for details.)
1. Swipe up the home screen, and then in the app list, tap [Settings] ® [Connected devices] ®
[Bluetooth] ® [Pair new device].
• The unit searches for nearby Bluetooth devices, and the names of Bluetooth devices available for
pairing are displayed.
2. Tap the name of the device that you want to pair with the unit.
3. Follow the on-screen instructions.
Note
• When the unit receives a connection request from the other Bluetooth device, a pairing request
screen is displayed. Follow the on-screen instructions.
Removing a paired Bluetooth device
1. Swipe up the home screen, and then in the app list, tap [Settings] ® [Connected devices] ®
[Bluetooth].
2. Tap ® [FORGET] of the paired device that you want to remove.
Operating Instructions - Reference Manual 25
Page 26

Connectivity
Airplane mode
When using the unit where wireless connections are prohibited, such as on airplanes and in hospitals, you
can turn off all wireless connections by enabling airplane mode. Once you have turned on airplane mode,
you can manually turn certain wireless communication features on again, such as Wi-Fi and Bluetooth.
Turning airplane mode on and off
1. Swipe up the home screen, and then in the app list, tap [Settings] ® [Network & Internet].
2. Tap the [Airplane mode] switch to turn it on or off.
Note
• You can also turn airplane mode on and off by using the [Dashboard] app (see
“[Dashboard] app” (page 30)).
USB connection
You can use the unit’s micro USB port to connect the unit to a computer or other device.
Connecting the unit to a computer
You can connect the unit to a computer and transfer files. Connect the unit to a computer using the USB
connection cable and follow the procedure below.
1. Swipe up the home screen, and then in the app list, tap [Settings] ® [Connected devices] ®
[USB].
2. Tap [Transfer files].
Note
• You can also change the setting by tapping the notification in the notifications panel.
• Do not remove the USB connection cable while the unit is being accessed. Doing so may corrupt
the data.
Sharing the unit’s Internet connection via USB (USB tethering) (certain models only)
Use this procedure to use the unit’s USB connection to share the unit’s Internet connection with a computer.
You may not be able to share the unit’s mobile network connection (certain models only) depending on
your mobile network service provider.
1. Swipe up the home screen, and then in the app list, tap [Settings] ® [Network & Internet] ® [Hotspot
& tethering].
2. Tap the [USB tethering] switch to turn it on.
SD memory card
See “Installing an SD card” (page 14) for the card installation procedure.
See “Encrypting the SD card (certain models only)” (page 27) for information about encrypting the contents
of the SD card.
Confirming the available space on the SD card
Swipe up the home screen, and then in the app list, tap [Settings] ® [Storage].
26 Operating Instructions - Reference Manual
Page 27

Security
Locking the screen
You can lock the screen to prevent accidental operation. You can also enhance security by requiring a PIN,
pattern, or password to prevent the screen from being unlocked.
Configuring the screen lock
1. Swipe up the home screen, and then in the app list, tap [Settings] ® [Security & location] ® [Screen
lock].
• If the screen lock is already configured, you must unlock the unit before configuring a different unlock
method.
2. Select the desired unlock method and then follow the on-screen instructions.
Note
• The risk of unauthorized access to the unit is increased when using the [None] and [Swipe] unlock
methods as these methods provide little to no security. For increased security, select an unlock
method that is unknown to others and difficult to guess.
• Do not use a password, etc. that you already use for other features.
Security
Locking the screen
Press
(power button) to put the unit into sleep mode, or wait for the screen to automatically turn off.
Encrypting the SD card (certain models only)
You can encrypt the contents of the SD card. After it is encrypted, the PIN or password used for unlocking
the screen must be entered before the SD card can be mounted.
IMPORTANT
• To prevent the unintended disclosure of sensitive information stored on the SD card, we recommend
using this feature to encrypt the SD card.
1. Swipe up the home screen, and then in the app list, tap [Settings] ® [Security & location] ®
[Encryption & credentials] ® [Encrypt SD card].
2. Tap the [Encryption] switch to turn it on, and then tap [Next].
3. Enter the unit’s PIN or password, and then tap [ ].
• This is the same PIN or password used for the screen lock feature (see “Locking the screen”
(page 27)).
4. Tap [ENCRYPT SD CARD].
Note
• Encryption and disabling encryption takes time. Fully charge the battery before starting and continue
to charge until the process is finished.
Decrypting the SD card
1. Swipe up the home screen, and then in the app list, tap [Settings] ® [Security & location] ®
[Encryption & credentials] ® [Encrypt SD card].
2. Tap the [Encryption] switch to turn it off, and then tap [Next].
Operating Instructions - Reference Manual 27
Page 28

Security
3. Enter the unit’s PIN or password, and then tap [ ].
• This is the same PIN or password used for the screen lock feature (see “Locking the screen”
(page 27)).
4. Tap [DISABLE SD CARD ENCRYPTION].
[DeviceManagement] app
You can disable the unit’s individual hardware features to prevent access to certain functions.
IMPORTANT
• A password must be set in order to use this feature. If you forget this password, there is no way to
reset it (it is not erased if the unit is reset using the factory data reset utility) and therefore you will
no longer be able to change this feature’s settings. If you forget the password, contact your technical
support representative.
Enabling and disabling certain hardware features
1. Swipe up the home screen, and then in the app list, tap [DeviceManagement] ® [Device setting
items].
2. Select the desired feature and then select the desired setting.
• Repeat this step to change the settings for other features, if desired.
3. Tap [APPLY], enter the password and then tap [OK].
• If a password is not set, you will be prompted to create a new one.
Note
• Some settings will take place the next time the corresponding hardware component is connected,
mounted, etc.
Changing or deleting the password used for [DeviceManagement]
1. Swipe up the home screen, and then in the app list, tap [DeviceManagement] ® [Password
settings].
2. Select the desired item and then follow the on-screen instructions.
28 Operating Instructions - Reference Manual
Page 29

Settings
[Settings] app
Configure the unit’s settings. Swipe up the home screen, and then in the app list, tap [Settings] to display
the settings menu. Suggestions for frequently used settings are displayed at the top of the settings menu,
and you can display or hide them using “ ” / “ ” at the right side.
The settings are grouped into the categories below.
Network & Internet
Contains settings related to Wi-Fi, mobile networks, Ethernet configuration, hotspots, tethering, etc.
Connected devices
Contains settings related to connected devices, such as Bluetooth, NFC, USB, and external devices*1.
*1
Gadget settings are available only for certain models.
Apps & notifications
Contains settings related to apps and notifications.
Settings
Battery
Allows you to confirm battery status and usage. Also contains settings related to the battery.
Display
Contains settings related to screen functionality, such as brightness, wallpaper, font size, and touch
operation.
Sound
Contains settings related to the unit’s various sounds, volume, Do Not Disturb mode, etc.
Storage
Allows you to confirm the available space in the unit’s internal storage and SD card, and to manage files.
Security & location
Contains settings that control security-related features such as screen lock and data encryption. Also
contains settings related to location information.
Users & accounts
Allows you to register and edit your information. You can also add a new user to share the unit with other
users. Also, you can configure settings related to adding accounts and data syncing.
Accessibility
Contains settings that assist the user such as screen readers, display, and interaction controls
(“Accessibility settings” (page 32)).
Google
Contains settings related to Google™ services.
Operating Instructions - Reference Manual 29
Page 30

Settings
System
Allows you to configure the display and input language, date and time, backup, reset, etc. You can also
confirm information about the tablet, such as the status of the battery and the network, and the software
version.
Power options menu
You can press and hold (power button) to display the power options menu. From here, you can perform
or set the following commonly-used features.
– Power off
– Battery Warm Swap (page 14)
– Restart
– Touch operation mode (page 32)
[Dashboard] app
The [Dashboard] app provides quick access to various unit features. You can use this app to perform the
following.
– Change screen brightness
– Change speaker volume
– Confirm battery level
– Enable and disable airplane mode, Wi-Fi, WWAN (mobile network connections) (certain models
only)*1, Bluetooth, location information, screen auto rotation, microphone*1.
– Launch apps
*1
This item is not displayed by default; you can add it to [Dashboard] if desired.
Using [Dashboard]
1. Swipe up the home screen, and then in the app list, tap [Dashboard].
2. Operate the desired function.
Note
• Features that have been disabled using the [DeviceManagement] app (see
“[DeviceManagement] app” (page 28)) are not available in [Dashboard].
Adding and deleting tiles
You can add up to 12 tiles.
1. Swipe up the home screen, and then in the app list, tap [Dashboard].
2. To add tiles
Tap [MENU] ® [Add], select the desired tile type, and then follow the on-screen instructions.
• Two types of tiles are available.
– [Toggles]: Tiles that allow you to enable or disable certain features.
– [Application]: Tiles that allow you to launch a specific app.
To remove tiles
Tap and hold the desired tile, and then tap [YES].
To change the color theme
Tap [MENU] ® [Skin], select the desired theme, and then tap [OK].
Importing and exporting [Dashboard] settings
1. Swipe up the home screen, and then in the app list, tap [Dashboard].
30 Operating Instructions - Reference Manual
Page 31

Settings
2. To export
Tap [MENU] ® [Export], enter the desired file name (up to 10 characters), and then tap [OK].
To import
Tap [MENU] ® [Import], and then select the desired file.
Note
• Settings are exported to:
Swipe up the home screen, and then in the app list, tap [Settings] ® [Storage] ® [Files] ®
[com.panasonic.mobile.dashboard].
[UserButtonManager] app
You can customize the unit’s function buttons. Some of the available functions that you can assign to the
buttons are listed below.
– Back (the same function as )
– Home (the same function as )
– Menu
– Barcode reader trigger (certain models only)
– Flashlight
– Launch an app of your choosing
– Capture a screenshot
– Security mode (turns off the screen and sound)
– Wake up from sleep mode
Changing the functions assigned to the buttons
1. Swipe up the home screen, and then in the app list, tap [UserButtonManager].
2. Tap
Default button assignments
The default button assignments are explained below.
next to the item you want to change, and then select the desired function.
Short press assignments
Left Side button
No function by default.
Right Side button
No function by default.
Volume up button
Increases the volume.
Volume down button
Decreases the volume.
Long press (press and hold) assignments
Left Side button
No function by default.
Right Side button
No function by default.
Wakeup Setting
Assigns a button to wake up from sleep mode. (No assignment by default.)
Operating Instructions - Reference Manual 31
Page 32

Settings
Touch operation settings
You can select the following touch operation modes to suit your working conditions.
– Glove mode: Makes the screen more sensitive to touch operations. Useful when operating the unit while
wearing gloves.
– Pen mode: Changes the screen to a sensitivity optimized for stylus pen operations.
– Rain mode: Prevents accidental operation when the screen is wet.
1. Swipe up the home screen, and then in the app list, tap [Settings] ® [Display] ® [Advanced] ®
[Touch operation mode].
2. Tap the desired modes to turn them on.
Note
• You can also change the touch operation mode by tapping [Touch operation mode] in the power
options menu (see “Power options menu” (page 30)).
• Turn glove mode off when you are not wearing gloves.
• Even if glove mode is enabled, the unit may not be able to be operated while wearing certain types
of gloves.
• Even if rain mode is enabled, the unit may not be able to be operated or may not respond properly
to touches when the entire screen is wet or depending on the amount of water on the screen.
Temporarily put the unit to sleep mode and wipe the water off of the screen.
Accessibility settings
The unit provides a variety of settings that allow you to change how the user and unit interact.
1. Swipe up the home screen, and then in the app list, tap [Settings] ® [Accessibility].
2. Select the desired feature or option and configure it as desired.
– [Volume key shortcut]: Allows you to press and hold both volume buttons to start the selected
accessibility feature.
– [Select to Speak]: Allows you to tap specific items on your screen to hear them read aloud.
– [TalkBack] (models with GMS only): Reads items on the screen aloud.
– [Text-to-speech output]: Allows you to configure the unit’s text-to-speech features.
– [Font size]: Allows you to make the text on the screen smaller or larger.
– [Display size]: Allows you to make the items on your screen smaller or larger.
– [Magnification]: Allows you to turn on the unit’s screen magnification feature.
– [Color correction]: Allows you to correct the colors in the screen.
– [Color inversion]: Allows you to invert the colors in the screen.
– [Large mouse pointer]: Allows you to make the pointer size larger when a mouse is connected.
– [Switch Access] (models with GMS only): Allows you to use one or more switches to select items,
scroll, enter text, and more.
– [Click after pointer stops moving]: Allows you to set the connected mouse pointer to click when
it stops moving.
– [Power button ends call] (certain models only): Allows you to end a phone call by pressing the
power button.
– [Auto-rotate screen]: Allows you to configure the unit to rotate the screen automatically when the
unit is tilted.
– [Touch & hold delay]: Allows you to adjust the amount of time that passes before the unit recognizes
a “long tap” as a tap-and-hold operation.
– [Mono audio]: Combines channels when playing audio.
– [Captions]: Allows the display of captions.
– [High contrast text]: Allows you to clearly display text by increasing its contrast.
32 Operating Instructions - Reference Manual
Page 33
Apps
Starting apps
There are several ways you can start an app.
– Swipe up the home screen, and then in the app list, tap the app’s icon
– Create a shortcut to the app in the home screen (see
“Adding app shortcuts/folders to the home screen” (page 19))
– Use the [UserButtonManager] app to assign the app to one of the unit’s buttons (see
“Changing the functions assigned to the buttons” (page 31))
– Add the app to the [Dashboard] app (see “Adding and deleting tiles” (page 30))
Preinstalled apps
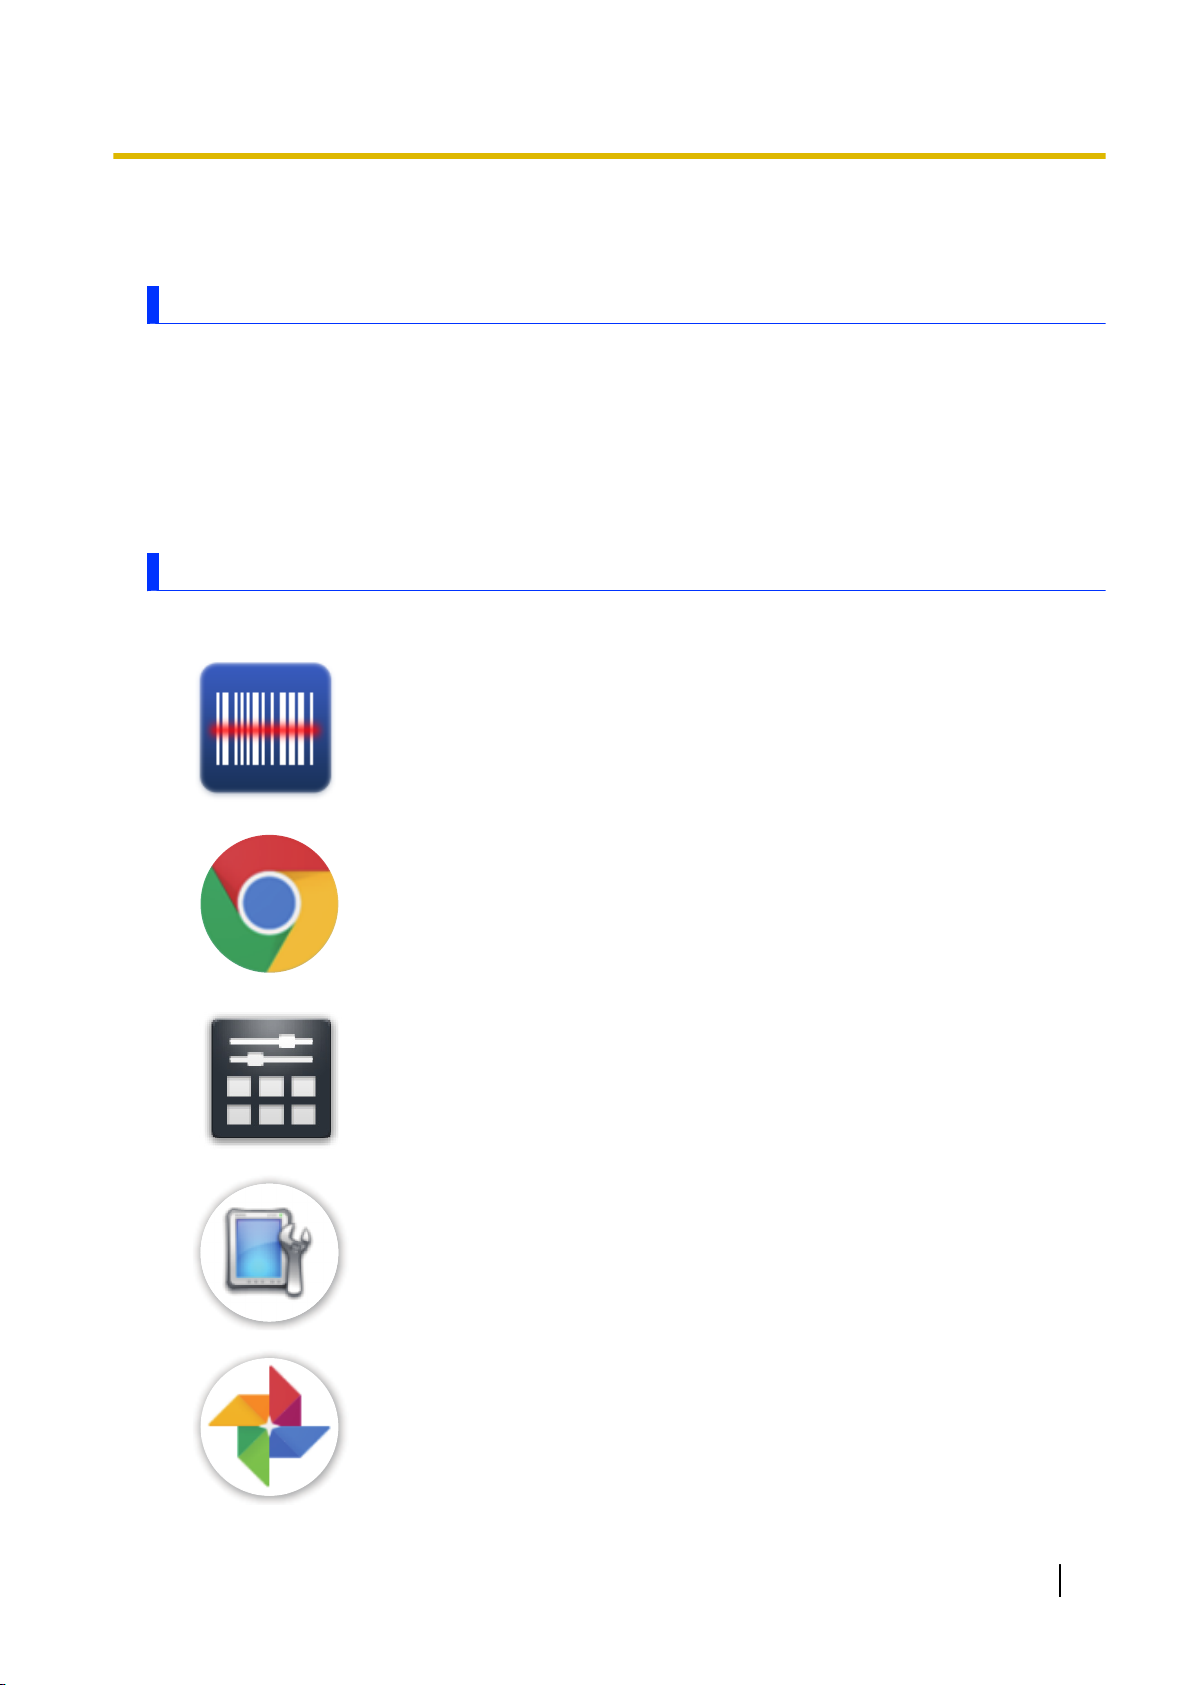
The unit comes preinstalled with the following apps.
Barcode Reader
Allows you to configure the barcode reader (“Configuring the barcode reader”
(page 37)).
Apps
Chrome (models with GMS only)
Internet browser app.
Dashboard
Allows easy access to various features (“[Dashboard] app” (page 30)).
DeviceManagement
Allows you to disable the unit’s individual hardware features
(“[DeviceManagement] app” (page 28)).
Photos (models with GMS only)
Allows you to display, edit, and manage photos and movies.
Operating Instructions - Reference Manual 33
Page 34
Apps
Contacts
Allows you to store and manage your contacts.
UserButtonManager
Allows you to configure the unit’s buttons (“[UserButtonManager] app” (page 31)).
Hardware Diagnostic
Allows you to check if the unit’s functions are operating correctly
(“About hardware diagnostics” (page 39)).
File Copy
Allows you to work with files in storage.
Other apps are preinstalled in addition to those mentioned above.
34 Operating Instructions - Reference Manual
Page 35
Camera
Taking pictures
1. Swipe up the home screen, and then in the app list, tap [Camera].
• You can also start the [Camera] app by swiping
Camera
at the bottom right of the lock screen to the left.
2. Confirm that
(camera mode) is displayed.
• If is displayed, swipe the screen to the right and then tap to select camera mode.
3. Tap to take a picture.
• You can use the digital zoom by pinching in and out or by pressing the volume buttons to adjust the
zoom ratio.
Recording videos
1. Swipe up the home screen, and then in the app list, tap [Camera].
• You can also start the [Camera] app by swiping at the bottom right of the lock screen to the left.
2. Confirm that (video mode) is displayed.
• If is displayed, swipe the screen to the right and then tap to select video mode.
3. Tap
to start recording, and tap to stop recording.
• You can use the digital zoom by pinching in and out or by pressing the volume buttons to adjust the
zoom ratio.
Using the option menu
1. While using the [Camera] app, tap in the lower-right corner of the screen.
2. Tap the desired icon and then select the desired option.
• Flash modes
: On
: Off
• Scene modes
: Snow
: Sunset
: Night view
: Landscape
: Auto
: HDR
*1
• Grid lines
Set whether to display guiding grid lines in the shooting screen.
Operating Instructions - Reference Manual 35
Page 36

Camera
• Self timer
• Exposure
*1
Only in camera mode
*2
Only when [Manual exposure] is enabled in the camera settings
Camera settings
1. In the [Camera] app, swipe the screen to the right and then tap .
2. Select the desired feature and configure it as desired.
– [Resolution]: Allows you to set the resolution.
– [Quality]: Allows you to set the picture quality.
– [Focus mode]
– [White balance]: Allows you to adjust the color development of images according to the weather
and conditions of the shooting location.
– [Date stamp]: Allows you to display the date and time when the picture was taken.
– [ISO]
– [Save location]: Allows you to save location information in pictures.
– [Advanced]: Allows you to set the exposure, storage location, and shutter sound.
*1
Only in camera mode
*1
*1*2
*1
: Allows you to set the shooting mode according to the subject.
*1
: Allows you to set the ISO sensitivity.
36 Operating Instructions - Reference Manual
Page 37

Barcode reader
Configuring the barcode reader
Barcode reader settings
1. Swipe up the home screen, and then in the app list, tap [Barcode Reader].
2. Select the desired settings and then configure them according to your needs.
Triggering the barcode reader
You can use the [UserButtonManager] app to configure which button is used to start scanning the
barcode. See “Changing the functions assigned to the buttons” (page 31) for more information.
Using the barcode reader
Typically, scanned barcodes are entered into the currently selected text field of the app that is in the
foreground.
About the demo app
Barcode reader
You can try using the barcode reader by launching the demo app.
1. Swipe up the home screen, and then in the app list, tap [Barcode Reader] ® ® [Demo].
Note
• Although no functions are assigned to the side buttons by default, the barcode scan function is
assigned to them in the demo app. Pressing the buttons emits a laser. Take care not to look directly
at the laser or point it at other people’s eyes. Doing so will cause damage to the eyes.
Operating Instructions - Reference Manual 37
Page 38
NFC card reader/writer
NFC card reader/writer
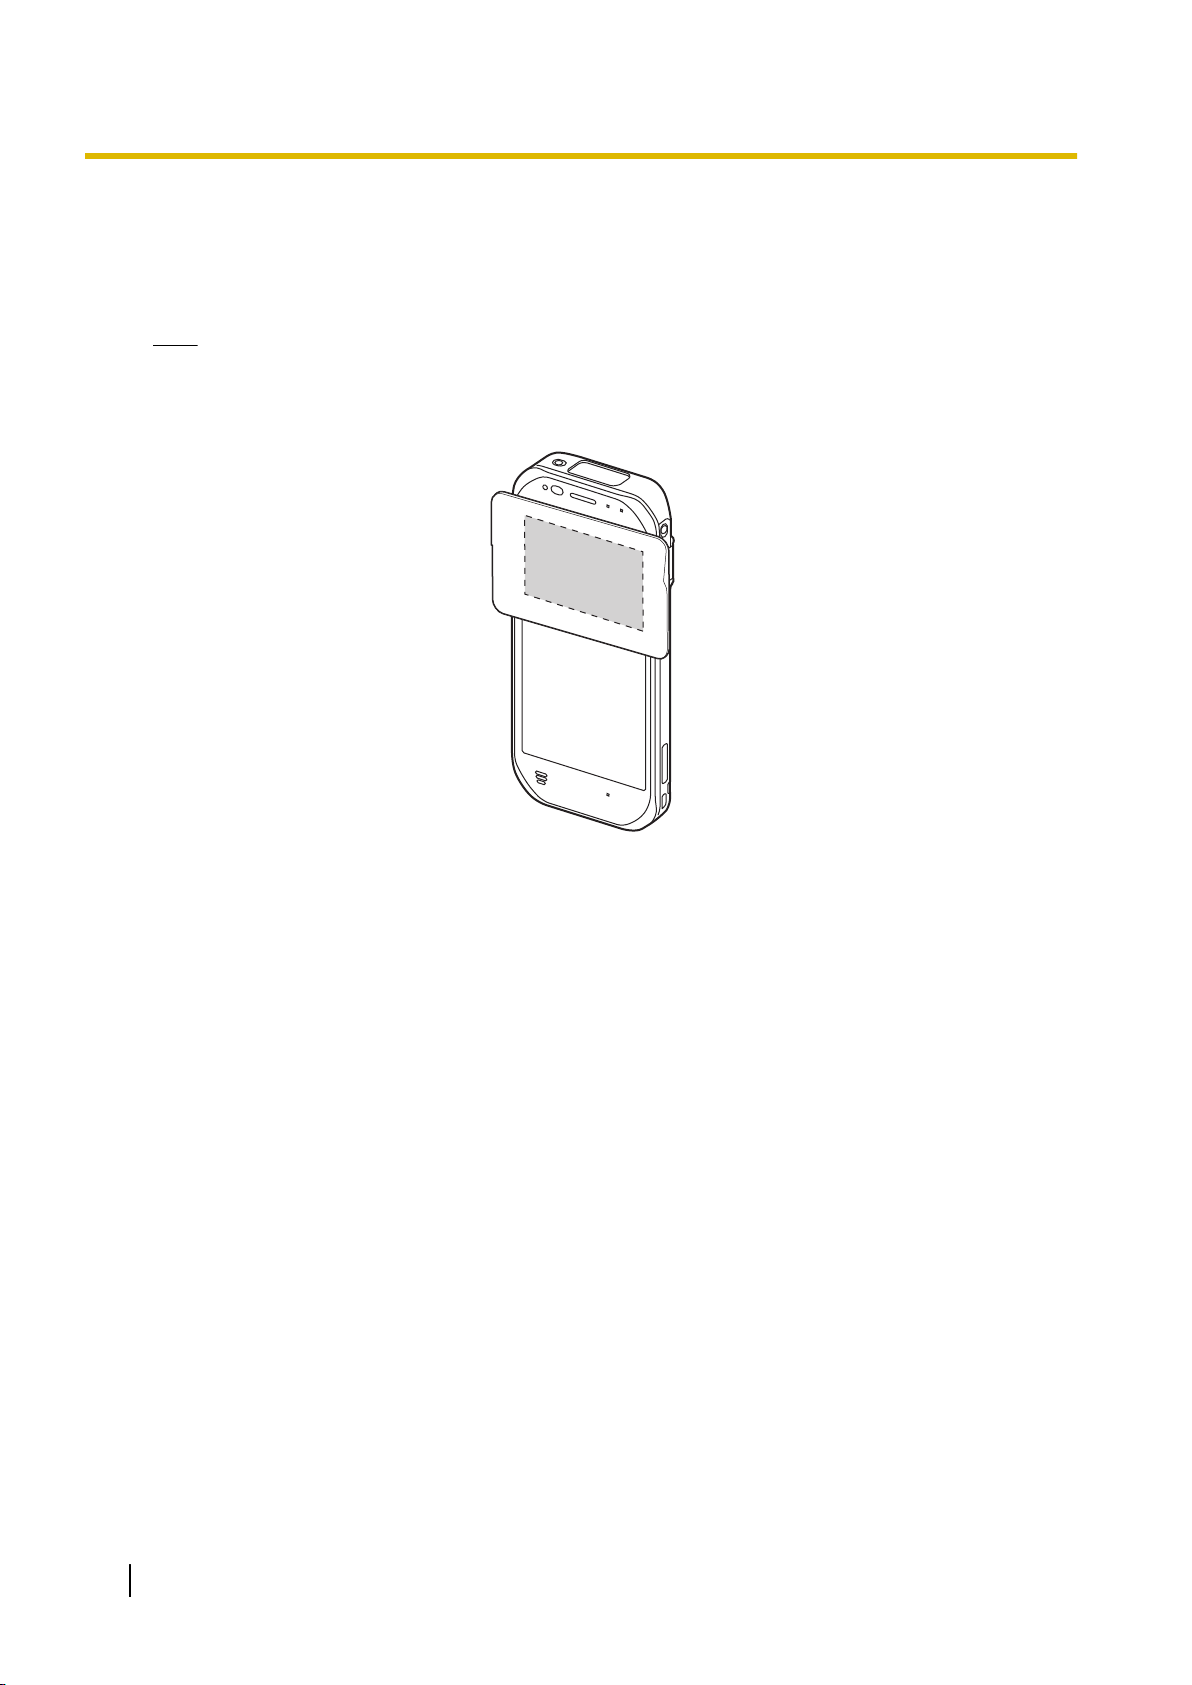
The unit can read NFC card data. It can also transmit data with other devices that have NFC built in.
Note
• Hold the NFC card in the orientation as shown in the figure.
• When using NFC, unlock the screen.
• If the unit is having difficulty reading, slightly shift the position of the card.
Turning NFC on and off
1. Swipe up the home screen, and then in the app list, tap [Settings] ® [Connected devices].
2. Tap the [NFC] switch to turn it on or off.
Advanced NFC settings
1. Swipe up the home screen, and then in the app list, tap [Settings] ® [Connected devices].
• Make sure that NFC is turned on.
2. Tap [Advanced NFC settings].
3. Select the desired settings and then configure them according to your needs.
38 Operating Instructions - Reference Manual
Page 39

Hardware diagnostics
Hardware diagnostics
About hardware diagnostics
If you suspect that the unit’s hardware is not operating correctly, you can use the [Hardware Diagnostic]
app to check if there are problems with the hardware. If there is a hardware problem, contact your technical
support representative. This app cannot check for software problems.
Diagnosable hardware
Automatic Test
Wi-Fi, Bluetooth, Wireless WAN (WWAN) (certain models only), GPS, microSD card (external SD),
USB storage, Ethernet
Manual Test
Touchscreen (Multi-touch, Single-touch), LCD, Sound, Battery Health (certain models only)
Running hardware diagnostics
A result icon is displayed on the left of the diagnosed device.
: Pass
: Fail
Diagnosing with the automatic test
1. Swipe up the home screen, and then in the app list, tap [Hardware Diagnostic].
2. Turn on the checkbox by tapping the device name ([1. Wi-Fi], [2. Bluetooth], [3. WWAN] (certain
models only), [4. GPS], [5. External SD], [6. USB storage], [7. Ethernet]) that you want to diagnose.
• To diagnose a microSD card or USB storage device, insert the microSD card or USB storage device
into the unit. Back up any important data in the microSD card or USB storage device before
diagnosis.
3. Tap [RUN] to start diagnosis.
4. When a message indicating that diagnosis is finished is displayed, tap [FINISH].
Diagnosing the touchscreen (multi-touch)
1. Swipe up the home screen, and then in the app list, tap [Hardware Diagnostic] ® [8. Touchscreen
(Multi-touch:5points)].
2. Touch the screen with five fingers.
3. When you remove your fingers from the screen and a message indicating that diagnosis is finished is
displayed, tap [PASS], [FAIL], or [RETRY].
Diagnosing the touchscreen (single-touch)
1. Swipe up the home screen, and then in the app list, tap [Hardware Diagnostic] ® [9. Touchscreen
(Single-touch)].
2. Touch A with your finger and trace the screen in order to E.
3. When a message indicating that diagnosis is finished is displayed, tap [PASS], [FAIL], or [RETRY].
Operating Instructions - Reference Manual 39
Page 40
Hardware diagnostics
Diagnosing the LCD
1. Swipe up the home screen, and then in the app list, tap [Hardware Diagnostic] ® [10. LCD].
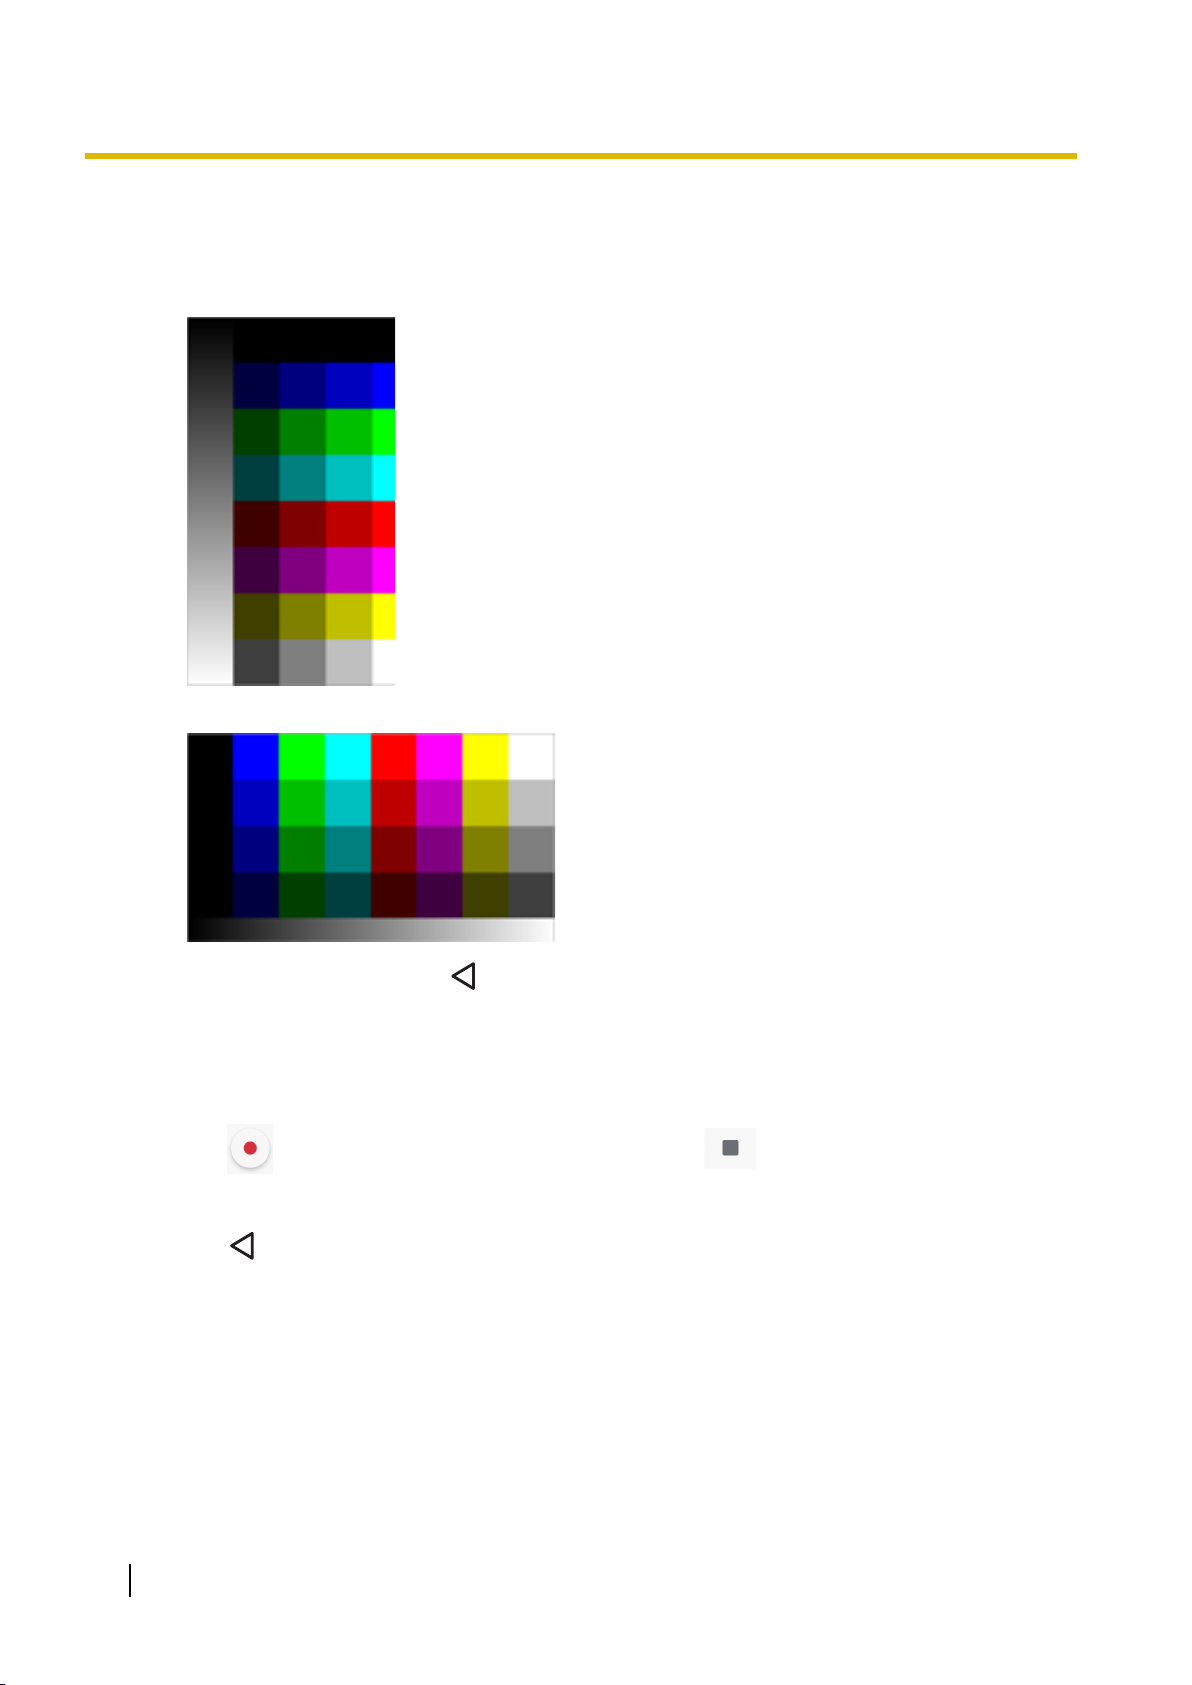
2. Rotate the unit and check that the screen is displayed as follows.
<Vertical>
<Horizontal>
3. Tap the screen, and then tap .
4. When the confirmation items are displayed, tap the test result items to turn on the checkboxes, and
then tap [OK].
Diagnosing the sound
1. Swipe up the home screen, and then in the app list, tap [Hardware Diagnostic] ® [11. Sound].
2. Tap , speak into the unit’s microphone, and then tap to stop recording.
3. Tap [SAVE].
4. Tap the saved file to check the sound.
5. Tap twice, and the confirmation items are displayed. Tap the test result items to turn on the
checkboxes, and then tap [OK].
Diagnosing the battery health (certain models only)
1. Swipe up the home screen, and then in the app list, tap [Hardware Diagnostic] ® [12. Battery
Health].
2. Check the details and then tap [OK].
40 Operating Instructions - Reference Manual
Page 41

Hardware diagnostics
Saving or checking the system log and diagnosis results
Checking the system information
1. Swipe up the home screen, and then in the app list, tap [Hardware Diagnostic] ® [System
Information].
2. Check the details and then tap [OK].
Checking the system log
1. Swipe up the home screen, and then in the app list, tap [Hardware Diagnostic] ® [System Log].
2. Check the details and then tap [OK].
Saving the test results
1. After running hardware diagnostics, tap
Note
® [Save test result to the internal storage].
• The test results are saved to:
Swipe up the home screen, and then in the app list, tap [Settings] ® [Storage] ® [Files] ®
[DiagnosticResults].
Checking saved test results
1. Swipe up the home screen, and then in the app list, tap [Hardware Diagnostic] ® [Test Result].
2. Select the XML file of a saved test result, and then tap [OK].
3. Check the details, and then tap to finish displaying the diagnosis results.
Sharing saved test results
1. Swipe up the home screen, and then in the app list, tap [Hardware Diagnostic] ®
result to mail].
® [Attach test
2. Select the zip file of a saved test result, and then tap [OK].
3. Select an app with which to share, and follow the on-screen instructions.
Saving the background Logcat (system log) to the internal storage
1. Swipe up the home screen, and then in the app list, tap [Hardware Diagnostic] ® ® [Save Logcat
in background].
2. Check the details and then tap [OK].
• To stop saving, tap [Save Logcat in background] again to turn off the checkbox, and then tap
[OK].
Operating Instructions - Reference Manual 41
Page 42
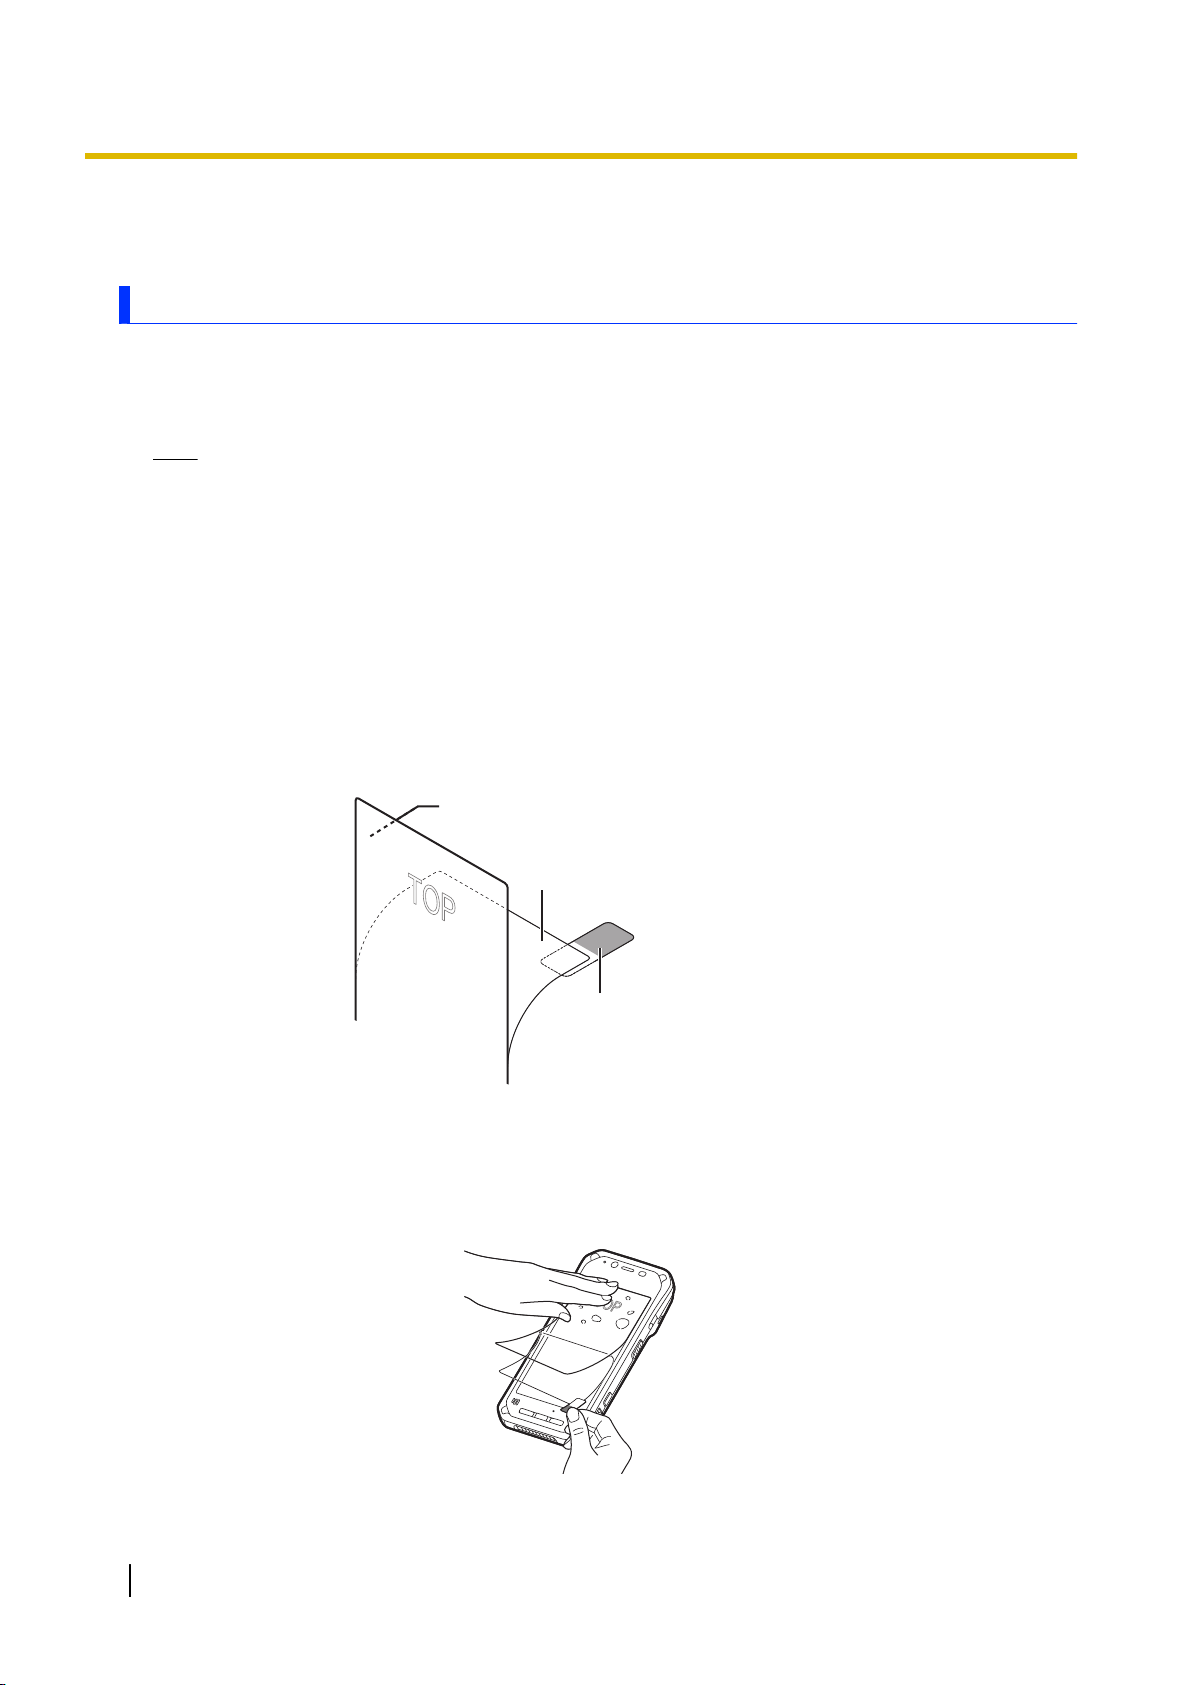
Adhesive side of the Protective Film
Peel-off sheet
Tab (Apply so that about
1 mm sticks out)
Supplementary items
Supplementary items
Protective Film
How to apply the Protective Film
Apply the Film so that the word TOP or UP on the peel-off sheet can be read from the top.
* The word TOP is used in the illustrations.
Note
• Do not bend the Protective Film. Creases may prevent the Film from being applied smoothly to the
screen, and may make the screen difficult to see.
1. Use a soft, dry cloth to remove dirt, dust, fingerprints, etc., from the screen surface.
• If the Protective Film is applied while foreign matter remains on the screen surface, air bubbles or
abrasions may result.
2. Firmly apply the entire adhesive part of a tab to the top corner of the peel-off sheet on the adhesive
side as positioned in the figure. Pull the tab to peel back about 3 cm of the sheet from the Protective
Film.
• At this time, do not touch the adhesive side, or leave the Film lying around, as dust or other foreign
matter might settle on it.
• You cannot reuse tabs.
3. Align the adhesive side of the Protective Film with the top edge of the screen, and carefully attach the
Film to the screen while peeling off the peel-off sheet.
• If the Film is positioned incorrectly, or if large air bubbles are visible, peel off the Film and re-apply.
If dust or other foreign matter should settle on the adhesive side of the Protective Film, remove it
with cellophane tape.
42 Operating Instructions - Reference Manual
Page 43
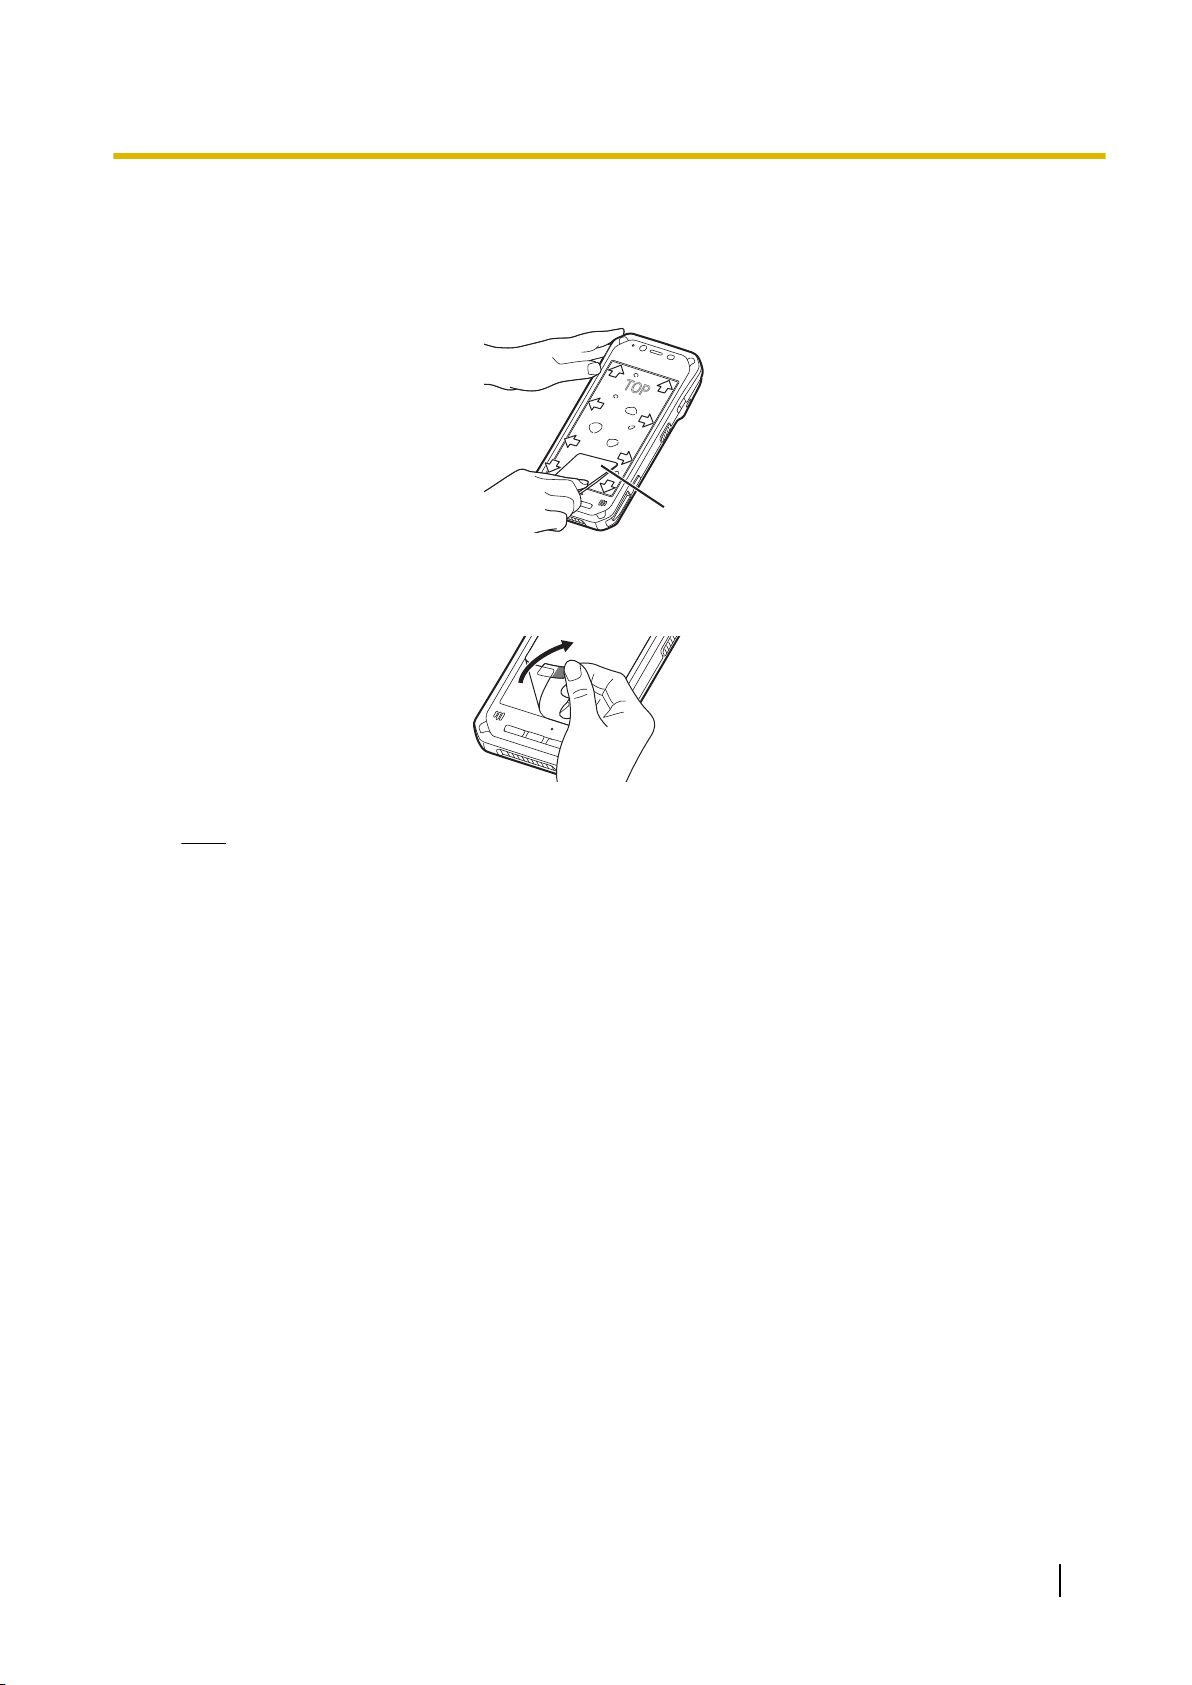
Spatula
Supplementary items
4. Use the spatula provided to remove any remaining air bubbles.
• Remove air bubbles by pushing them toward the outer edge of the screen, as shown in the figure.
Do not apply too much force, as damage to the screen may result. Also, be careful not to scratch
the surface of the Protective Film with the corner of the spatula.
5. Apply a tab to the bottom corner of the peel-off sheet on the front side similar to step 2. Carefully pull
the tab diagonally to peel away the entire sheet from the Protective Film.
Note
• If the surface of the Protective Film becomes dirty, wipe it with a soft, dry cloth.
• When removing the Protective Film, be careful not to scratch the screen with your fingernails, etc.
• Peel off the Protective Film slowly and carefully.
Operating Instructions - Reference Manual 43
Page 44
Supplementary items
Holster
Handling and maintenance
• The holster is designed for carrying the specified unit; it is not designed to protect the unit from drops,
shock, vibration, water, etc.
• Wrap the belt around the waist.
• Do not leave the holster in areas with high temperatures, such as near a fire or heater, in areas exposed
to direct sunlight, such as inside a vehicle, or in areas with high humidity, such as bathing areas.
• Store the holster in a cool, dry place with sufficient air circulation, free from dust and chemicals.
• Keep the belt out of reach of children.
• For typical cleaning, wipe the holster with a soft, dry cloth.
– If the holster becomes dirty, wet a soft cloth with water and wring it thoroughly before wiping the
holster.
– Do not clean the holster with benzene, thinner, alcohol, household cleansers, etc., as these may harm
the holster.
• If the holster becomes wet from cleaning or from typical use, dry it with a dry cloth and allow it to air dry.
Attaching
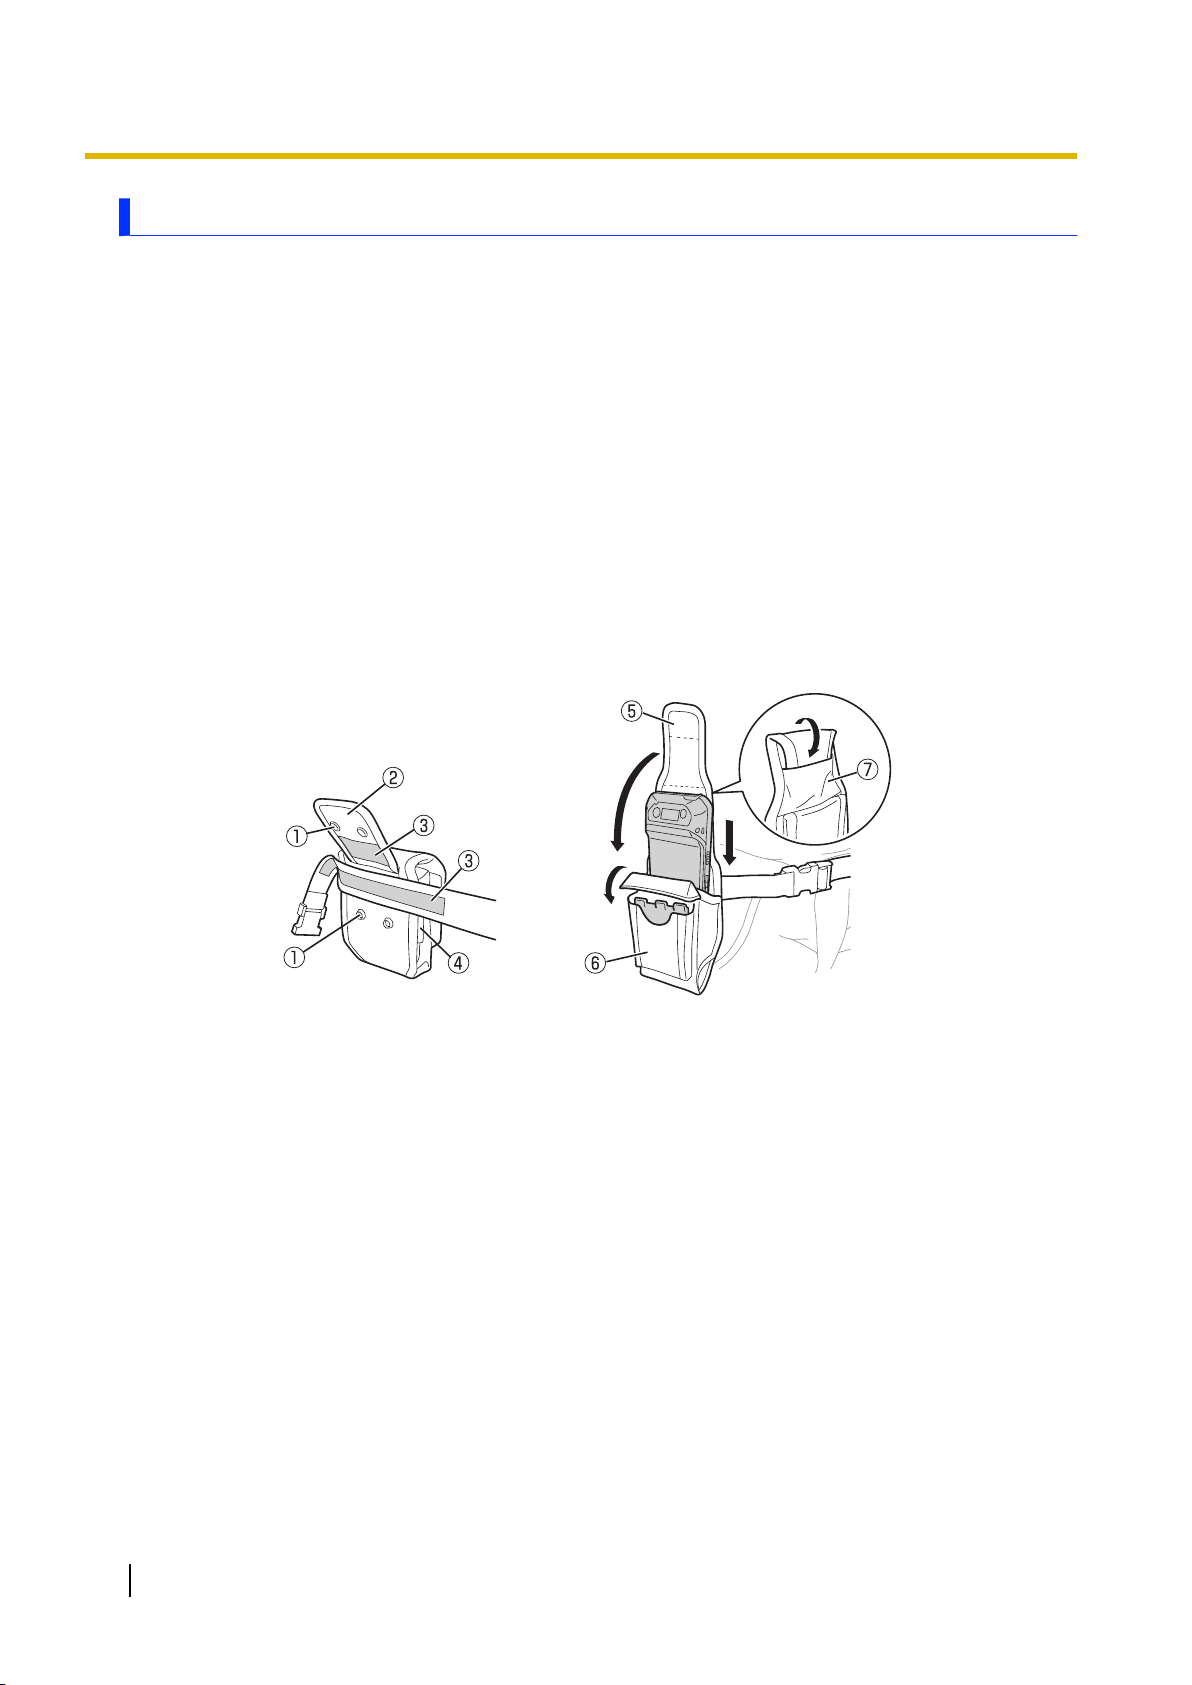
1. Open the snaps (A) on rear of the holster and lift up the rear flap (B).
2. Rest the included belt against the rear of the holster as shown in the illustration on the left.
3. Lower the rear flap and close the snaps.
• Make sure the belt and the back of the holster (C) are fastened to each other.
4. Attach the included belt to the wearer and adjust the belt length so that it fits snugly.
• A pen holder (D) is also attached.
5. Insert the unit as shown in the right illustration above, and close the front flap (E).
• You can store a spare battery in the pocket (F).
• Firmly fasten the front flap and pocket.
• You can also fold back the front flap twice at the seam lines (the dotted lines in the upper-right
illustration) and insert it into the storage area (G).
44 Operating Instructions - Reference Manual
Page 45

Troubleshooting
Troubleshooting
General information
If you experience any trouble while using the unit, refer to the information in this section for troubleshooting.
If the problem persists, contact your technical support representative.
Starting up
The unit does not turn on.
• To turn the unit on, press and hold (power button) until the unit briefly vibrates.
• The battery level may be low or completely discharged. Charge the battery.
• The unit may be too hot or too cold. Leave the unit in an environment of 10 °C to 35 °C (50 °F to 95
°F) for about an hour, and then try again.
The unit does not wake up from sleep.
• The battery may have become completely discharged while the unit was in sleep mode. In this case,
any data which has not been saved will be lost. Charge the battery.
• The unit may be too hot or too cold. Leave the unit in an environment of 10 °C to 35 °C (50 °F to 95
°F) for about an hour, and then try again.
Nothing appears on the screen.
• The unit is in sleep mode. Press
• Charge the battery.
• Install the battery correctly.
• Replace the battery with a fully-charged one.
• The screen is too dark. See “The screen is too dark.” (page 45).
Other startup problems
• Disconnect and remove all peripheral devices.
(power button).
Shutting down
The unit does not turn off.
• It may take one or two minutes for the unit to turn off. This is not a malfunction.
• Press and hold (power button) for at least 10 seconds to force the unit to restart, and then try
again.
• Disconnect and remove all peripheral devices.
Screen
The screen is too dark.
• The [Adaptive brightness] setting reduced the brightness according to the ambient brightness.
Manually adjust the screen brightness.
1. Swipe up the home screen, and then in the app list, tap [Settings] ® [Display].
2. Tap the [Adaptive brightness] switch to turn it off.
3. Tap [Brightness level] and then adjust the slider.
Operating Instructions - Reference Manual 45
Page 46

Troubleshooting
There are red, green, or blue dots on the screen, or there is unevenness in screen colors or
brightness.
• The following are not malfunctions.
– Although advanced high-precision technologies are used in the production of color LCD screens,
– Due to the natural characteristics of LCD screens, you may notice unevenness in colors and
I cannot operate the touchscreen.
The touchscreen operates involuntarily.
• Temporarily put the unit into sleep mode and then wake it up again.
Indicator
The indicator flashes in orange.
• The battery cannot be charged temporarily because the ambient temperature is too low or too high.
Leave the unit in an environment of 10 °C to 35 °C (50 °F to 95 °F) for about an hour, then charge
again.
The indicator lights in red.
• The remaining battery level is approximately 14 % or less of a full charge. Charge the battery.
The indicator flashes in red.
• Battery authentication failed. Use only a specified battery.
• There may be debris lodged in the battery charge terminals. Remove the battery and remove any
debris found.
• Charging may have stopped automatically. Disconnect the charger and then reconnect it.
The indicator does not light during charging.
Battery charging ends quickly, or the battery cannot be charged at all.
• The charger is not connected properly. Confirm all connections.
• There may be debris lodged in the battery charge terminals. Remove the battery and remove any
debris found.
• Replace the battery with a new one.
a very small number of the screen pixels may be dark or remain constantly lit.
brightness depending on your angle of view. Hues may also vary by product.
Touch screen operation
The settings described below are explained in “Touch operation settings” (page 32).
I cannot operate the screen while wearing gloves.
Select [Glove mode].
The screen responds before I have touched the screen.
Select [Normal].
The screen responds incorrectly when it is wet.
Select [Rain mode].
The screen seems slightly unresponsive to touches.
Select [Normal].
I cannot operate the unit with a stylus pen.
Select [Pen mode].
46 Operating Instructions - Reference Manual
Page 47

Troubleshooting
Connectivity
The SD card or other external device does not work.
The unit cannot connect to a network.
• The corresponding hardware feature may be disabled by the [DeviceManagement] app (see
“Enabling and disabling certain hardware features” (page 28)).
The unit is not recognized as a mass storage device when connected to a computer (certain models
only).
• Make sure that USB tethering is turned off.
1. Swipe up the home screen, and then in the app list, tap [Settings] ® [Network & Internet] ®
[Hotspot & tethering].
2. Tap the [USB tethering] switch to turn it off.
I want to confirm the unit’s MAC address.
• Follow the procedure below.
1. Swipe up the home screen, and then in the app list, tap [Settings] ® [System] ® [About
tablet] ® [Status].
2. Confirm the address.
Sound
No sound is heard.
• Using the [Dashboard] app, adjust the speaker volume and make sure that the [Silent] checkbox
is turned off.
• Do not disturb mode is set to [Total silence]. Open the notifications panel, and then turn off Do not
disturb mode or change the mode type.
Sound stops or is distorted.
• It is normal for the sound to stop or be distorted in the following situations.
– When connecting or disconnecting a headset or headphones
– When rotating the screen
Sounds are heard from the speaker even when a headset or headphones are connected.
• Notification sounds and alarms are played using the speaker even when a headset or headphones
are connected to the unit. This is normal.
Other
The date and time are incorrect.
• Confirm the date and time settings. Swipe up the home screen, and then in the app list, tap
[Settings] ® [System] ® [Date & time].
• Set the date and time automatically.
1. Swipe up the home screen, and then in the app list, tap [Settings] ® [System] ® [Date &
time].
2. Tap the [Automatic date & time] and [Automatic time zone] (certain models only) switches
to turn them on.
3. Make sure the unit is in an area with good wireless reception, turn the unit off, and then turn it
on again.
• The unit will not recognize dates after December 30, 2037.
The unit’s operation is slow.
• Ambient temperature may be too low or too high. Leave the unit in an environment of 10 °C to
35 °C (50 °F to 95 °F) for about an hour and then try again.
Operating Instructions - Reference Manual 47
Page 48

Troubleshooting
The unit does not respond.
• Turn the unit off and then on again.
• If an app does not work normally, follow the instructions below to force quit or uninstall the
problematic app or process.
1. Swipe up the home screen, and then in the app list, tap [Settings] ® [Apps & notifications].
2. Select the desired app or process and then tap [UNINSTALL] or [FORCE STOP].
The screen freezes and no operations can be performed.
• Press and hold (power button) for at least 10 seconds to force the unit to restart, and then try
again.
I cannot enter text using voice recognition.
• An Internet connection is needed to enter text using your voice. Make sure the unit can connect to
the Internet.
Some apps do not function after updating the unit’s software.
• The apps may not be compatible with the newest version of the unit’s software. To return the unit to
the previous version of the software, contact your technical support representative.
The unit cannot connect to external services (Google services, mobile networks, etc.).
• Confirm all relevant settings and contact the service provider. If the trouble persists, contact your
technical support representative.
Location information is incorrect.
• Mobile networks (certain models only) and radio waves from satellites are used to acquire location
information.
Positioning may take time, or location information may be less accurate under the following
conditions because radio wave signal reception is poor.
– Immediately after turning on the unit
– When acquiring location information for the first time
– When out of the mobile network range
– When you are in the following places:
• Inside a building
• Inside a vehicle such as car or train
• Inside a tunnel or underground
• Under an elevated bridge
• In a city with skyscrapers
• In an area dense with trees
• In a mountainous region
48 Operating Instructions - Reference Manual
Page 49

Appendix
Factory data reset
CAUTION
• The following procedure resets all settings and erases any data you have stored in the unit. Back
up important data before performing this procedure.
1. Swipe up the home screen, and then in the app list, tap [Settings] ® [System] ® [Reset options].
2. Tap [Erase all data (factory reset)] ® [RESET TABLET] ® [ERASE EVERYTHING].
• The unit restarts when the factory data reset is complete.
• Data stored in the SD card will not be erased.
Tips for battery usage
Minimizing battery deterioration
The battery is a consumable and the deterioration of its performance and battery life is accelerated under
the following conditions.
– Repeatedly charging the battery
– Using, charging, or storing the battery in a high-temperature environment
To minimize battery deterioration and ensure longer battery life, keep the following tips in mind.
• Charge in an environment between 10 °C and 35 °C (50 °F to 95 °F)
If the surrounding temperature is too high or too low, the unit’s indicator flashes in orange and the battery
cannot be charged temporarily.
• Avoid charging more than once per day
Charging the battery too often will cause the battery performance to deteriorate. Therefore, the unit will
not charge the battery immediately after it is fully charged unless the remaining charge is below 96 %
to avoid overcharging.
Appendix
Maximizing battery operation time
To maximize the battery operation time, keep the following tips in mind.
• Reduce the screen’s power consumption
Reduce power consumption by pressing (power button) to put the unit in sleep mode when not in
use, or by reducing the screen’s brightness level.
• Turn off wireless devices when not in use
You can use the [Dashboard] app to easily turn off Wi-Fi, Bluetooth, GPS, and mobile network
connections (certain models only). You can also turn on airplane mode to quickly turn off all wireless
connections.
• Reduce the time taken to automatically go into sleep mode
Swipe up the home screen, and then in the app list, tap [Settings] ® [Display] ® [Advanced] ®
[Sleep], and select a shorter amount of time taken for the unit to automatically go into sleep mode.
Operating Instructions - Reference Manual 49
Page 50

Appendix
Updating the software
You can update the software when a system update is released.
IMPORTANT
• Check the following before starting the update.
– The remaining battery level is sufficient
– The unit has available storage space (swipe up the home screen, and then in the app list, tap
[Settings] ® [Storage], and if there is no storage space, make some room for the update)
– The date and time are correct
1. Swipe up the home screen, and then in the app list, tap [Settings] ® [System] ® [System
updates].
2. Follow the on-screen instructions.
License agreement for the system update service
1. Service introduction
The system update service (“this service”) is offered as a way to keep the product’s software*1 up to
date after purchase, for feature and performance enhancement.
Without visiting a customer service center, you can take advantage of convenient software updating
to check for any required product updates and wirelessly*2 download and replace outdated software
with the latest version.
This service is managed by Panasonic Corporation and/or its affiliates, hereafter referred to collectively
as “we” or “Panasonic”.
Read the following terms of use carefully and make sure you understand them before use. By using
this service, you agree to accept all terms of use.
2. Disclaimer
Panasonic is not liable for any loss or damage of data with user-installed software from use of this
service. Nor are we liable for any malfunction or damage to the product due to user error. For details,
see “Precautions” below. No guarantee is made that this service will be suitable for specific purposes,
and we are not liable in any way for indirect, incidental, or consequential loss or lost profit to you or
third parties arising from or related to use of this service.
Panasonic reserves the right to change or discontinue this service, terms of use, and other matters
without prior notice. Check the latest terms of use before using this service. Similarly, we reserve the
right to interrupt or discontinue this service without prior notice.
3. Prohibited actions
The following actions are prohibited when using this service. If you violate the terms of use by taking
the following actions, Panasonic may interrupt or discontinue this service or terminate the agreement
without prior notice, and seek compensation.
– Action that disadvantages Panasonic or third parties, or that causes or poses a risk of loss
– Action that infringes on or may infringe on intellectual property rights (such as copyrights or
trademark rights) of Panasonic or third parties
– Action that undermines or may undermine the credibility or dignity of Panasonic, such as action
offensive to public order and morals
– Action that is illegal or linked to criminal acts, or which poses a risk of same
– Action that violates or may violate laws, regulations, or ordinances
– Other action that we have deemed inappropriate and have requested you to cease
4. Privacy policy
As this service is used, information identifying the product (such as model or serial numbers) is sent
to our software update servers. We use this information only to provide service or support, and not for
any other purposes.
50 Operating Instructions - Reference Manual
Page 51

5. Limitation on liability
Regarding liability borne by Panasonic in providing this service, and in the context of this license
agreement, in the event of willful or gross negligence on our part in providing this service, regardless
of the reason, users will be compensated only for an amount equivalent to the value of this service.
6. Precautions
Although user data such as photos, email messages, and downloaded files remain on the product
during software updates, in some cases it may not be possible to safeguard this data, depending on
the condition of the product. We therefore recommend backing up important data. However, please
understand that some data (e.g., downloaded files) cannot be backed up.
Never turn off the product, reset it, or perform similar operations while a download is in progress, or
during updates.
If the product’s software is already up to date, no update is necessary. Note that updating the software
may take some time, as data is being downloaded and uploaded.
Thank you for understanding that you cannot specify the timing of file distribution to the product or the
period for which updates will be valid.
This service is not available under the following conditions.
– When the product is not turned on, or when it is in sleep mode
– When the product is not connected to a wireless network
– When the product is in international roaming mode
– When the product is in airplane mode
– When tethering mode is enabled
– When the correct date and time is not set
– When the remaining battery level is less than 50 %
– When the server polling interval of the update application is set to “00”
– While the battery is being replaced (“warm swap”)
7. Intellectual property rights
Data provided to you for this service is licensed to you under the same conditions as in the license
agreement of the software for which the data is used. Unless otherwise indicated, use of this service
does not constitute licensing or transfer of any intellectual property rights from Panasonic to you.
8. Governing law and court of jurisdiction
Japanese law forms the basis for use of this service and interpretation and application of this license
agreement. In the case of any disputes over this service, the Tokyo District Court will serve as the
competent court of first instance.
9. Service inquiries
For any inquiries regarding this service, please contact the Panasonic customer service center.
*1
Only applies to software provided by Panasonic.
*2
A fee may be incurred for users enrolled in pay-per-use data plans, as data transmission for this service will be added to the
user's other data consumption.
Appendix
Operating Instructions - Reference Manual 51
Page 52
Appendix
Regulatory information
For USA
models
FCC RF exposure information
The highest SAR value for this product as reported to the FCC when tested for use at the ear is listed
below:
Highest value (W/kg)
0.84
And when worn on the body in a holder or carry case, is listed below:
Highest value (W/kg)
1.44
For Canada
models / Pour les modèles du Canada
RF exposure information
The highest SAR value for this product as reported to the IC when tested for use at the ear is listed below:
Highest value (W/kg)
0.84
And when worn on the body in a holder or carry case, is listed below:
Highest value (W/kg)
1.44
Information sur l’exposition aux radiofréquences (RF)
La valeur de DAS la plus élevée obtenue pour ce produit, telle que rapportée à l’IC lors des essais pour
une utilisation près de l’oreille, est telle que décrite ci-dessous :
Valeur la plus élevée (W/kg)
0.84
Et avec l’appareil porté sur soi dans un portoir ou un boîtier, la valeur est telle que ci-dessous :
Valeur la plus élevée (W/kg)
1.44
52 Operating Instructions - Reference Manual
Page 53

Appendix
For Europe
SAR (Specific Absorption Rates)
This product is a radio transmitter and receiver. When it is on, it receives and transmits RF energy. When
you are on a phone call, the system handling your call controls the power level at which the product
transmits. This product is designed not to exceed the limits for exposure to radio waves recommended by
international guidelines. These guidelines were developed by the independent scientific organization
ICNIRP and include safety margins designed to assure the protection of all persons, regardless of age and
health.
The guidelines use a unit of measurement known as the Specific Absorption Rate, or SAR. The SAR limit
for mobile devices is 2 W/kg and the highest SAR value for this product when tested at the ear is XXXX
W/kg (for models supporting cellular transmission) and XXXX W/kg (for models supporting Wi-Fi
transmission only)*1.
For body-worn operation, this product has been tested and meets RF exposure guidelines when used with
a Panasonic accessory designated for this product and when used with an accessory that contains no
metal and that positions the mobile device a minimum of 5 mm from the body.
In this case, the highest tested SAR value is XXXX W/kg (for models supporting cellular transmission) and
XXXX W/kg (for models supporting Wi-Fi transmission only). Use of other accessories may not ensure
compliance with RF exposure guidelines. As SAR is measured utilizing the product's highest transmitting
power the actual SAR of this product while operating is typically below that indicated above. This is due to
automatic changes to the power level of the product to ensure it only uses the minimum level required to
reach the network.
The World Health Organization has stated that present scientific information does not indicate the need
for any special precautions for the use of mobile devices. They note that if you want to reduce your exposure
then you can do so by limiting the length of calls or using a hands-free device to keep the mobile device
away from the head and body.
*1
The tests are carried out in accordance with international guidelines for testing.
Disposal of Old Equipment and Batteries
Only for European Union and countries with recycling systems
These symbols on the products, packaging, and/or accompanying documents mean that used
electrical and electronic products and batteries must not be mixed with general household
waste.
For proper treatment, recovery and recycling of old products and used batteries, please take
them to applicable collection points in accordance with your national legislation.
By disposing of them correctly, you will help to save valuable resources and prevent any
potential negative effects on human health and the environment.
For more information about collection and recycling, please contact your local municipality.
Penalties may be applicable for incorrect disposal of this waste, in accordance with national
legislation.
Note for the battery symbol (bottom symbol):
This symbol might be used in combination with a chemical symbol. In this case it complies
with the requirement set by the Directive for the chemical involved.
Operating Instructions - Reference Manual 53
Page 54

Appendix
Specifications
Typical unit specifications and certain options are described below.
Unit configuration may vary.
Model No. FZ-T1
CPU Qualcomm® MSM8909
1.1 GHz Quad Core
Memory 2 GB
Storage 16 GB
Display Internal LCD
*1
5 in. HD (1280 ´ 720 dots),
Aspect ratio 16:9
16 777 216 colors
Wi-Fi
(for NA model)
Standards supported
IEEE 802.11a / IEEE 802.11b / IEEE 802.11g / IEEE 802.11n / IEEE
802.11d / IEEE 802.11h / IEEE 802.11i / IEEE 802.11r
Transmission method
OFDM system, DSSS system
Wireless channels used
IEEE 802.11a / IEEE 802.11n (5 GHz)
• W52 (36, 38, 40, 44, 46, 48 ch)
• W53 (52, 54, 56, 60, 62, 64 ch)
• W56
(100, 102, 104, 108, 110, 112, 116, 118, 120, 124, 126, 128, 132,
134, 136, 140 ch)
• W58 (149, 151, 153, 157, 159, 161, 165 ch)
IEEE 802.11b / IEEE 802.11g / IEEE 802.11n (2.4 GHz): 1 ch - 11 ch
RF frequency band
2.4 GHz Band: 2.412 GHz - 2.462 GHz
5 GHz Band: 5.18 GHz - 5.32 GHz, 5.5 GHz - 5.7 GHz, 5.745 GHz - 5.825
GHz
Data transfer rate
IEEE 802.11a: 54 Mbps
IEEE 802.11b: 11 Mbps
IEEE 802.11g: 54 Mbps
IEEE 802.11n:
• HT20: 72.2 Mbps
• HT40: 150 Mbps
54 Operating Instructions - Reference Manual
Page 55

Appendix
Wi-Fi
(for EU model)
Standards supported
IEEE 802.11a / IEEE 802.11b / IEEE 802.11g / IEEE 802.11n / IEEE
802.11d / IEEE 802.11h / IEEE 802.11i / IEEE 802.11r
Transmission method
OFDM system, DSSS system
Wireless channels used
IEEE 802.11a / IEEE 802.11n (5 GHz)
• W52 (36, 38, 40, 44, 46, 48 ch)
• W53 (52, 54, 56, 60, 62, 64 ch)
• W56
IEEE 802.11b / IEEE 802.11g / IEEE 802.11n (2.4 GHz): 1 ch - 13 ch
RF frequency band
2.4 GHz Band: 2.412 GHz - 2.472 GHz
5 GHz Band: 5.18 GHz - 5.32 GHz, 5.5 GHz - 5.7 GHz
Data transfer rate
IEEE 802.11a: 54 Mbps
IEEE 802.11b: 11 Mbps
IEEE 802.11g: 54 Mbps
IEEE 802.11n:
(100, 102, 104, 108, 110, 112, 116, 118, 120, 124, 126, 128, 132,
134, 136, 140 ch)
• HT20: 72.2 Mbps
• HT40: 150 Mbps
Bluetooth Version 4.2, Class 1
Transmission method
FHSS system
Wireless channels used
0 - 78 ch (Low energy: 0 - 39 ch)
RF frequency band
2402 MHz - 2480 MHz
Supported profile
A2DP,
only), PBAP, SPP, GAVDP, GATT, DUN (certain models only)
AVRCP, HFP, HID, HOGP, HSP, MAP, OPP, PAN (certain models
Mobile networking
(for NA model
supporting cellular
transmission)
Mobile networking
(for EU model
supporting cellular
transmission)
Sound Speaker
Security chip ARM® TrustZone® (built-in)
Camera 8 megapixels
GNSS GPS/GLONASS CEP50 (±2 to 4 m)
LTE, HSPA+, UMTS
SIM card slot
Nano SIM card slot ´1
LTE, HSPA+, UMTS, EDGE, GPRS, GSM
SIM card slot
Nano SIM card slot ´1
Twin speakers (95 dBA), phone speaker
Microphone
3 microphones, noise suppressor
Video: 1280 ´
Still: 3264 ´ 2448 pixels
720 pixels, 30 fps
Operating Instructions - Reference Manual 55
Page 56

Appendix
Barcode reader 1D, 2D support
Sensors Ambient light sensor, Acceleration sensor
NFC Built-in (Type A, B, FeliCa*7, ISO 15693)
Card slots
microSD card slot ´1
*2
(microSDXC compatible)
Interfaces
USB 2.0 port ´1*3, Headset jack ´1, Expansion bus connector (lower part
of the unit)
Touchscreen 10-finger touch (capacitive) with:
Glove mode
Rain mode
*4
*5
Pen mode (Passive type)
Power supply Battery Pack
Battery
(FZ-VZSUT10U)
Lithium-ion
3200 mAh (typ.) / 3100 mAh (min.)
Rated Voltage
3.8 V
Operating time (approx.)
Talk: XX hours
*7
On user profiles: 12 hours
Charging time (approx.)
*6
*8
*9
3 hours (when using the optional AC adaptor)
3.5 hours (when using the optional cradle)
Rated power
Approx. 9 W
consumption
Dimensions
(W
´ D ´ H)
*10
Approx. 75 mm ´ 154 mm ´ 13.1 mm / 17.6 mm (barcode reader
section)
[3.0 in. ´ 6.1 in. ´ 0.5 in. / 0.7 in (barcode reader section)]
without protrusions
Weight
*11
Approx. 230 g (0.51 lb) with the Battery Pack
Operating
environment
*12
Temperature
-
10 °C to 50 °C (14 °F to 122 °F)
Humidity
30 % to 80 % RH
Storage environment Temperature
-
30 °C to 70 °C (-22 °F to 158 °F)
Humidity
30 % to 90 % RH
Operating system
Water and dust
*13
Android 8.1
IP66, IP68
resistance
56 Operating Instructions - Reference Manual
Page 57

Specifications are subject to change without notice.
*1
1 MB = 1 048 576 bytes, 1 GB = 1 073 741 824 bytes
*2
Operation has been tested and confirmed using the following Panasonic brand memory cards: SD (up to 2 GB), SDHC (up to
32 GB). Compatibility with other SD devices is not guaranteed.
*3
Does not guarantee operation of all USB-compatible peripherals.
*4
This mode may not operate properly depending on the type of glove.
*5
Only single-finger operation is enabled.
*6
Actual performance varies depending on usage conditions, connected peripherals, etc. Typically, operating time is reduced in
colder environments.
*7
Talk time may vary depending on the condition of the mobile network.
*8
Including barcode scans, voice call and data transfer based on a typical user profile.
*9
Varies depending on usage conditions.
*10
Actual size may vary by unit configuration.
*11
Average weight. Actual weight may vary by unit configuration.
*12
Product or application booting can dependent upon the battery charge level.
Do not expose the skin to this product when using the product in a hot or cold environment.
When using the product in hot or cold environments, some peripherals may not perform properly. Confirm the recommended
operation environment of the peripherals.
Using the product continuously in hot environments will shorten the product life. Avoid continuous use in these types of
environments.
When using the product in cold environments, the product may take longer to start up and battery operation time may be reduced.
Even when using the product within the temperature and humidity ranges listed here, using the product continuously in extreme
environments will result in product deterioration and will shorten the life of the product.
*13
Product functionality cannot be guaranteed if the operating system is modified or replaced by the user or a third party.
Appendix
Accessories
• For the latest information about optional products, refer to the product catalogs, etc.
Product name Model number
AC Adaptor FZ-AAE184E
Battery Pack FZ-VZSUT10U
FZ-VZSUT1AU
Cradle FZ-VEH1T1A
Charging Cup FZ-VCBT11U
5-Bay Cradle FZ-VEH5T1AA
5-Bay Charge only Cradle FZ-VCH5T1AA
5-Bay Battery Charger FZ-VCBT131
Holster FZ-VSTT12U
Protective Film (10 sheets) FZ-VPFT11U
Tether (qty 3) FZ-VNTT11
Operating Instructions - Reference Manual 57
Page 58

Appendix
WARRANTY for U.S.A
Panasonic System Solutions Company of North America (PSSNA)
Computer Products - Worldwide Warranties
Section 1: Limited Warranty - Hardware
PSSNA, referred to hereinafter as “Panasonic”, will repair the computer products listed below
(“Product(s)”) with new or rebuilt parts, free of charge in a Global Panasonic designated service location
or Panasonic Authorized Service Center for the period specified below from the date of original purchase
in the event of a defect in materials or workmanship.
These warranties are extended solely to the original purchaser. A purchase receipt or other proof of date
of original purchase will be required before warranty performance is rendered.
• Laptop PC (CF-##) – 3 Years
• Tablet PC / Handheld (FZ-## / JT-##) – 3 Years
• Ultra-Mobile (CF-U#/CF-H# Series) – 3 Years
• PDRC - LCD & Keyboard Assembly – 3 Years
Original Battery Warranty
Batteries supplied with the product are covered under the warranty for one (1) year from date of purchase.
Batteries purchased separately are covered under the warranty for one (1) year from the date of purchase.
A replacement battery furnished under the product warranty is covered for the remaining period of the one
year warranty of the original or purchased battery.
Optional: Extended Warranty Program (PC)
If this coverage is purchased, the serial numbered Product is entitled to the same manufacturer’s warranty
coverage on the Product with the exception of the battery. The cost of labor, parts, and shipping are
included in the price of the Extended Warranty Program.
Optional: Panasonic “Protection Plus” Warranty
Any Product for which the Panasonic “Protection Plus” warranty has been purchased will receive additional
coverage for any failure that occurs due to accidental damage. All other terms and conditions of the
standard warranty apply and this additional coverage will exist for the duration of the standard warranty
period of the Product.
If an extended Protection Plus warranty program is purchased, coverage is extended to the end of the last
year of extended coverage purchased.
This warranty does not cover failures or defects that are caused by fire, intentional acts, loss, theft, improper
maintenance, modification or service by anyone other than a Panasonic Authorized Service Provider, or
damage that is attributable to acts of God.
Cosmetic damage that does not affect functionality is not covered. Cosmetic damage on Products with
hardware failures will be repaired in accordance with the warranty terms. This warranty is extended solely
to the original purchaser on the Product’s serial number for which it was purchased.
Complete Product replacement fulfills the full obligation and is at the discretion of Panasonic and is limited
to once during the coverage term.
Refer to the Panasonic website for full terms and conditions on the above programs.
• Additional exclusions apply – please refer to limited warranty exclusions section below.
Optional: Panasonic “Ultimate Care” Warranty
Any Product for which the Panasonic “Ultimate Care” warranty program has been purchased will receive
additional coverage as specified in that program, for any failure that occurs due to accidental damage.
All other terms and conditions of the standard warranty will apply and this additional warranty coverage
will exist for the duration of the standard warranty period of the applicable Product. If an extended warranty
58 Operating Instructions - Reference Manual
Page 59

Appendix
is purchased for the Product together with the Ultimate Care warranty program coverage, the warranty
term will be extended to the end of the last year of the purchased extended warranty coverage.
The Ultimate Care warranty will cover any hardware failures occurring due to accidental damage of the
Product
control, for up to a maximum of 1 % of the total of Products deployed for a specific customer.
This includes unlimited replacement of major sub-assemblies and components of the Product during the
standard warranty term and any extended warranty term plan that has been purchased by the customer.
This also includes cosmetic damages that may result from exposure of the internal components of the
Product to the environmental conditions.
with an exclusion only of customer intentional acts and damage caused by events beyond human
• Additional exclusions apply – please refer to limited warranty exclusions section below.
Wireless Module Warranty
Panasonic approved wireless modems installed in Panasonic brand computers and integrated by
Panasonic or an Authorized Panasonic Wireless Integrator are covered under the warranty for the
remaining warranty period of the device in which the modem is installed. For devices with less than three
(3) months remaining on the unit warranty, the wireless modem will be covered for a period of three (3)
months from the date of installation of the modem, covering only modem replacement or modem installation
related issues.
All modems must be approved by the wireless carrier prior to use. Any use or attempted use of a wireless
modem not approved and activated by the carrier for use on their network is strictly prohibited and is not
sanctioned or warranted by Panasonic and may result in legal action. In addition, all modems must be
approved by Panasonic as compatible with the device hardware before installation or use.
Panasonic’s sole responsibility for the warranty or technical support of the software required to install or
operate the modem is defined in Section 2 (Limited Software Warranty). Any attempted software installation
by anyone other than a Panasonic Authorized Wireless Integrator is not covered under warranty and may
result in service charges.
Installation or attempted installation by any party other than Panasonic or an Authorized Panasonic
Wireless Integrator is strictly not covered under the warranty and may void the computer warranty if damage
results.
Options and Accessories Warranties
The below listed Panasonic brand or supplied options and accessories are covered under this limited
warranty for the period specified from the date of purchase or as specifically stated:
• AC adaptor / Power Cord – 3 Years
• Memory Expansion Card (Panasonic Brand) – 3 Years
• Car Mount - Docking Station PCB or Vehicle Docking Station – 3 Years
• Desktop Port Replicator, I-O Box, Docking Cradle (like CF-U1) – 3 Years
• Antenna Pass-through Cable – 3 Years
• Backlit or Full-sized keyboard – 3 Years or assumes warranty of the unit in which it is installed
• Integrated Panasonic supplied options and kits including, but not limited to Wireless Modems, Media
Bay Drives (Floppy, CD, DVD, Combo), Camera, GPS, Bluetooth, Smartcard Reader, Magnetic Card
Reader, Barcode Scanner, and Fingerprint Reader – 3 Years or assumes warranty period of the unit
in which it is installed provided the integration was performed by Panasonic or an Authorized Integrator.
• Hard Drive / Solid State Drive (Internal) - 3 Years
• Separately purchased 2nd Hard Drive – 1 Year
• External USB Drives (CD / DVD / Floppy / Hard Drive) – 1 Year
• Optional Battery – 1 Year
• Battery Charger / Multi-Bay Battery Charger – 1 Year
• Stylus Pens, Digitizer & Standard – 90 Days (physical damage excluded)
Operating Instructions - Reference Manual 59
Page 60

Appendix
Section 2: Limited Warranty - Software
Panasonic warrants to you only that the disk(s) or other media on which the Programs are furnished will
be free from defects in material and workmanship under normal use for a period of sixty (60) days from
the date of delivery thereof to you, as evidenced by your purchase receipt.
This is the only warranty Panasonic makes to you.
Panasonic does not warrant that the functions contained in the Programs will meet your requirements or
that the operation of the Programs will be uninterrupted or error free.
Panasonic shall have no obligation for any defects in the disk(s) or other media on which the Programs
are furnished resulting from your storage thereof, or for defects that have been caused by operation of the
disk(s) or other media.
Panasonic’s entire liability and your exclusive remedy under this warranty shall be limited to the
replacement, in the United States or other Panasonic designated location, of any defective disk or other
media which is returned to Panasonic’s Authorized Service Center, together with a copy of the purchase
receipt, within the aforesaid warranty period.
Section 3: Limited Warranty Exclusions - Specifically excluded from the warranty are:
• All consumable items; such as screen protection films, logo badges, labels, cleaning cloths, carry
cases, manuals, cables, straps, belts, holsters, tethers, and harnesses and any other options and
accessories not listed above or covered under a separate warranty
• The Warranty excludes 3 or less faulty pixels on the LCD screen
• Failures related to the product operating system, hard drive or solid state drive image, software setup,
software program, virus, other program(s) or file(s) on any drive or in any computer memory location
• Failures due to BIOS settings or changes, as well as any cosmetic or physical damage to the unit
• Any unit or device with a missing or altered model number or serial number label
• Cosmetic damage or any damage which occurs in shipment
• Failures which are caused by products not supplied by Panasonic
• Failures which result from alteration, accident, misuse, introduction of liquid or other foreign matter into
the unit, abuse, neglect, installation, maladjustment of consumer controls, improper maintenance or
modification, use not in accordance with product use instructions
• Failures due to service by anyone other than a Panasonic Authorized Service Provider
• Failures caused by improper installation of options or accessories or due to integration by any company
other than Panasonic or a Panasonic Authorized Service Center
• Damage, failure, or loss due to the unit being stolen, lost, misplaced, or used by anyone other than the
original purchaser
• Damage that is attributable to acts of God
• * Protection Plus and Ultimate Care warranty programs provide protection against accidental damage.
Neither program is intended to provide product refurbishment due to normal wear and tear through
normal use.
• * Customers who have twenty (20) or more units requiring service are required to contact Panasonic
at 800-527-8675 and request Field Engineering assistance to coordinate higher volume repairs.
This limited warranty only covers failures due to defects in materials or workmanship which occur during
normal use. If a unit is sent to a Panasonic Authorized Service Center and no hardware failure is found,
the customer will be billed for labor to correct a software issue or reimage the applicable Hard Disk, or
Solid State Drive plus shipping and applicable administrative fees at the current rates set by the service
provider.
THIS PRODUCT IS NOT INTENDED FOR USE AS OR PART OF NUCLEAR EQUIPMENT/SYSTEMS,
AIR TRAFFIC CONTROL EQUIPMENT/SYSTEMS, OR AIRCRAFT COCKPIT EQUIPMENT/
SYSTEMS*1. PANASONIC WILL NOT BE RESPONSIBLE FOR ANY LIABILITY RESULTING FROM THE
USE OF THIS PRODUCT ARISING OUT OF THE FOREGOING USES.
*1
AIRCRAFT COCKPIT EQUIPMENT/SYSTEMS include class 2 Electronic Flight Bag (EFB) Systems and Class 1 EFB Systems
when used during critical phases of flight (e.g., during take-off and landing) and/or mounted onto the aircraft. Class 1 EFB
Systems and 2 EFB Systems are defined by FAA: AC (Advisory Circular) 120-76A or JAA: JAA TGL (Temporary Guidance
Leaflets) No. 36.
60 Operating Instructions - Reference Manual
Page 61

Appendix
Other Limits and Exclusions: There are no other express warranties except as listed above.
PANASONIC SHALL NOT BE LIABLE FOR LOSS OF DATA OR OTHER INCIDENTAL OR
CONSEQUENTIAL DAMAGES RESULTING FROM THE USE OF THIS PRODUCT, OR ARISING OUT
OF ANY BREACH OF THIS WARRANTY. ALL EXPRESS AND IMPLIED WARRANTIES, INCLUDING
THE WARRANTIES OF MERCHANTABILITY AND FITNESS FOR A PARTICULAR PURPOSE ARE
LIMITED TO THE APPLICABLE WARRANTY PERIOD SET FORTH ABOVE. Some states do not allow
the exclusion or limitation of incidental or consequential damages, or limitations on how long an implied
warranty lasts, so the above limitations or exclusions may not apply to you.
This limited warranty gives you specific legal rights, and you may also have other rights which vary from
state to state.
For technical support or to arrange for service on your Panasonic computer product, call our toll-free hotline
at 1-800-LAPTOP5 [option 1] (800-527-8675).
Operating Instructions - Reference Manual 61
Page 62

Appendix
WARRANTY for Canada
For Canada
Coverage – Panasonic Canada Inc. (“PCI”) warrants to you, the first end user customer, this computer
product (excluding software media), when purchased from PCI or from a PCI authorized reseller, to be free
from defects in materials and workmanship under normal use, subject to the terms set forth below, during
the period of warranty coverage specified.
Scope of Coverage Period of Coverage Type of Failure
PANASONIC COMPUTER AND PERIPHERALS LIMITED WARRANTY
Coverage
• Laptop Computers (except Battery) and AC
Adaptor
• Factory/PCI installed options including Wireless
WAN, GPS, Bluetooth, Finger print reader,
Backlit keyboard, Memory Card, Optical Drives,
Cameras, Smart card Readers, Magnetic Card
Readers and Barcode Scanners
• Ultra-Mobile PC
• Tablet PC
• PDRC – LCD and Keyboard Assemblies
• Port Replicator
• Cradle
• Charging Cup
• Battery
• Battery charger
• AC Adaptor and Power Cord
• Car Adaptor and Power Cord
• External USB Drives
• Standard or Digitizer Stylus Pen
Three (3) Years from
Date of Original End
User Customer
Purchase
One (1) Year from Date
of Original End User
Customer Purchase
Ninety (90) Days from
Date of Original End
User Customer
Purchase
Defective Materials or
Workmanship
Defective Materials or
Workmanship
Defective Materials or
Workmanship
• All consumable items including protection film,
cleaning cloth, carry case, tether and harness
Remedy – In the event of a warranty claim, contact PCI’s representatives within the applicable warranty
period, identifying the nature of the defect claimed, at 1-800-668-8386 between 9:00 A.M. and 5:00 P.M.,
Eastern Time Zone, Mon. – Fri. (excluding holidays) for instructions on how to obtain service. A purchase
receipt or other proof of date of original purchase is required before warranty service is performed. Defective
parts covered by this Limited Warranty will be repaired or replaced with new or comparable rebuilt parts
on an exchange basis. Warranty replacement or repair is subject to the terms of this Limited Warranty for
the balance of the original period of warranty coverage.
No Coverage – This Limited Warranty does not cover products purchased outside Canada. Neither does
it cover damage to, failure of, or defects in a product or accessory through mishandling, improper
installation, abnormal use, misuse, neglect, accident, introduction of liquid or other foreign matter into the
product, alteration or servicing by anyone not authorized by PCI, or act of God.
THIS PRODUCT IS NOT INTENDED FOR USE AS, OR AS PART OF, NUCLEAR EQUIPMENT/
SYSTEMS, AIR TRAFFIC CONTROL EQUIPMENT/SYSTEMS, OR AIRCRAFT COCKPIT EQUIPMENT/
62 Operating Instructions - Reference Manual
No Coverage
Page 63

Appendix
SYSTEMS*1.
USE OF THIS PRODUCT ARISING OUT OF THE FOREGOING USES.
*1
AIRCRAFT COCKPIT EQUIPMENT/SYSTEMS include Class2 Electrical Flight Bag (EFB) Systems and Class1 EFB Systems
when used during critical phases of flight (e.g., during take-off and landing) and/or mounted on to the aircraft. Class1 EFB
Systems and 2 EFB Systems are defined by FAA: AC (Advisory Circular) 120-76A or JAA: JAA TGL (Temporary Guidance
Leaflets) No.36
PANASONIC WILL NOT BE RESPONSIBLE FOR ANY LIABILITY RESULTING FROM THE
IF YOU SHIP THE PRODUCT FOR WARRANTY SERVICE
Carefully
pack the product, preferably in the original carton. Include details of defect claimed and proof
of date of original purchase. No liability is assumed for loss or damage to the product while in transit, if
you chose your own transportation carrier.
SOFTWARE MEDIA LIMITED WARRANTY
Coverage – PCI warrants to you, the first end user customer, that the disk(s) or other media on which
software program(s) is/are supplied will be free from defects in materials and workmanship under normal
use in Canada for a period of sixty (60) days from date of receipt as evidenced by your purchase receipt
for your Panasonic Computer product.
THIS IS THE ONLY WARRANTY THAT PCI MAKES RESPECTING THE SOFTWARE MEDIA. PCI does
not warrant the software. Please refer to the software licensor’s written warranty (accompanying the copy
of the software) for any software warranty claim.
Claim Procedure – In the event of a defect in material or workmanship in the media during the sixty (60)
day warranty period, and you return it, transportation costs prepaid, to Panasonic Canada Inc., Computer
Products Marketing, 5770 Ambler Drive, Mississauga, Ontario L4W 2T3, within the warranty period,
together with a copy of your purchase receipt, and an explanation of the suspected defect, PCI will replace
in Canada the defective disk(s) or other media.
Remedy – PCI’s entire liability, and your only remedy for any breach of this software media warranty is
limited to replacement of the media only. It does not cover any other damages, including, but not limited
to, loss of use or profit loss, or special, indirect or consequential damages, or other claims, whether or not
of similar character.
No Coverage – This limited warranty does not apply if the disk(s) or other media has been used in other
than a Panasonic product, or in environmental conditions other than those specified by PCI or the
manufacturer, or if subjected to misuse, neglect, mishandling, modification or attempted modification of
the program, or if damaged by accident or act of God. PCI is not responsible for damage to or loss of any
program, data or removable storage media.
GENERAL
NO OTHER WARRANTIES – PCI DISCLAIMS ALL OTHER WARRANTIES, EITHER EXPRESS OR
IMPLIED, INCLUDING, BUT NOT LIMITED TO, IMPLIED WARRANTIES OF MERCHANTABILITY AND
FITNESS FOR A PARTICULAR PURPOSE, WITH RESPECT TO THE SOFTWARE, SOFTWARE MEDIA,
COMPUTER PRODUCT, OPTIONS AND ACCESSORIES.
NO LIABILITY FOR CONSEQUENTIAL DAMAGES – IN NO EVENT SHALL PCI BE LIABLE FOR ANY
SPECIAL, INDIRECT OR CONSEQUENTIAL DAMAGES ARISING FROM ANY BREACH OF THE
LIMITED WARRANTIES SET OUT IN THIS DOCUMENT, OR FROM THE USE OF THE COMPUTER
PRODUCT, INCLUDING, WITHOUT LIMITATION, LOSS OF DATA, BUSINESS, PROFIT OR
GOODWILL.
IN ANY EVENT, PCI’S MAXIMUM LIABILITY FOR ANY BREACH SHALL NOT EXCEED THE AMOUNT
ACTUALLY PAID BY YOU FOR THE COMPUTER PRODUCT.
NO ACTION, REGARDLESS OF ITS BASIS, MAY BE BEGUN AGAINST PCI MORE THAN TWO (2)
YEARS AFTER THE CAUSE OF ACTION AROSE.
Statutory Warranties – Some jurisdictions do not allow these limitations or exclusions, so they may not
apply to you.
Operating Instructions - Reference Manual 63
Page 64

Appendix
Pour le Canada
Couverture – Panasonic Canada Inc. (« PCI ») garantit à l’acheteur original que ce produit informatique
(à l’exclusion des supports des logiciels) est, au moment de sa vente par PCI ou d’un revendeur agréé par
PCI, exempt de défauts de pièces et de fabrication dans les conditions normales d’utilisation, et ce, pendant
la période de couverture de la garantie, sous réserve des modalités décrites ci-dessous.
Éléments couverts Durée de couverture Type de couverture
GARANTIE LIMITÉE – ORDINATEURS ET PÉRIPHÉRIQUES PANASONIC
• Ordinateurs blocs-notes (sauf batteries) et
adaptateur secteur
• Options installées en usine/par PCI incluant :
WAN sans fil, GPS, Bluetooth, lecteur
d’empreintes digitales, clavier rétroéclairé, carte
mémoire, lecteurs optiques, caméras, lecteurs
de carte à puce, lecteurs de carte magnétique et
scanners de code-barres
• Ordinateurs personnels ultra-portables
• Ordinateurs tablettes
• Ensembles PDRC – ACL et clavier
• Duplicateur de port
• Station d’accueil
• Coque de charge
• Batterie
• Chargeur de batterie
• Adaptateur secteur et cordon d’alimentation
• Adaptateur automobile et cordon d’alimentation
• Périphériques USB
• Stylo pointeur standard ou pour numériseur
graphique
Trois (3) ans à partir de
la date d’achat original.
Un (1) an à partir de la
date d’achat original.
Quatre-vingt-dix (90)
jours à partir de la date
d’achat original.
Défauts de pièces et de
fabrication
Défauts de pièces et de
fabrication
Défauts de pièces et de
fabrication
• Tous les articles consommables incluant les
pellicules protectrices, chiffons de nettoyage,
étuis de transport, longes et sangles
Recours – Pour obtenir des informations sur la marche à suivre dans le cas où une réclamation en vertu
de la garantie deviendrait nécessaire, communiquez par téléphone avec un représentant de PCI au
1-800-668-8386, entre 9h00 et 17h00 (heure de l’Est) du lundi au vendredi (sauf les jours fériés), avant
l’échéance de la garantie applicable, en prenant soin d’identifier la nature de la défaillance. Un reçu ou
toute autre pièce justificative de la date d’achat original sera exigé avant toute réparation. Toute pièce
défectueuse couverte par la présente garantie limitée sera réparée ou remplacée par une pièce neuve ou
remise à neuf. Le remplacement ou la réparation sera fait conformément aux modalités de la présente
garantie limitée pendant la durée restante de la période originale de la garantie.
Produits non couverts – La présente garantie limitée ne couvre pas les produits achetés à l’extérieur du
Canada. Elle ne couvre pas non plus les dommages, la défaillance ou les défauts attribuables à une
manutention inadéquate, une mauvaise installation, une utilisation anormale ou abusive, de la négligence,
un accident, un déversement ou la pénétration d’un objet étranger, une modification, un cas fortuit ou une
réparation effectuée par une personne non agréée par PCI.
CE PRODUIT N’EST PAS DESTINÉ À ÊTRE UTILISÉ, EN TOUT OU EN PARTIE, COMME SYSTÈME/
ÉQUIPEMENT NUCLÉAIRE, SYSTÈME/ÉQUIPEMENT DE CONTRÔLE DU TRAFFIC AÉRIEN OU
SYSTÈME/ÉQUIPEMENT DE POSTE DE PILOTAGE D’AVION*1. PANASONIC DÉCLINE TOUTE
64 Operating Instructions - Reference Manual
Aucune couverture
Page 65

Appendix
RESPONSABILITÉ CONCERNANT L’UTILISATION DE CE PRODUIT DANS LES CAS
SUSMENTIONNÉS.
*1
Les SYSTÈMES/ÉQUIPEMENTS DE POSTE DE PILOTAGE D’AVION sont dotés de systèmes OEPP (organiseur électronique
de poste de pilotage) de classe 2 et de classe 1 utilisés pendant des phases critiques de vol (par exemple, pendant le décollage
et l’atterrissage) et(ou) montés sur l’avion. Les systèmes OEPP de classe 1 et de classe 2 sont définis par le circulaire
d’information FAA : AC (Advisory Circular) 120-76A ou le feuillet JAA : JAA TGL (Temporary Guidance Leaflets) No 36.
EXPÉDITION DU PRODUIT POUR SERVICE SOUS GARANTIE
Emballez soigneusement le produit, de préférence dans son emballage d’origine. Joignez une
description de la défaillance de même qu’une pièce justificative de la date d’achat. Panasonic Canada
Inc. ne peut être tenue responsable pour tout dommage ou perte subi pendant le transport si vous avez
choisi le transporteur.
GARANTIE LIMITÉE – SUPPORTS DES LOGICIELS
Couverture – Panasonic Canada Inc. (« PCI ») garantit à l’acheteur original que le ou les disques ou tout
autre support sur lequel le ou les programmes sont fournis sont exempts de défauts de pièces et de
fabrication dans des conditions normales d’utilisation au Canada, et ce, pour une période de soixante (60)
jours suivant la date de réception indiquée sur la preuve d’achat.
LA PRÉSENTE GARANTIE EST LA SEULE OFFERTE PAR PCI COUVRANT LES SUPPORTS DE
LOGICIELS. PCI ne garantit pas les logiciels. Reportez-vous à la garantie écrite du concédant de licence
d’utilisation du logiciel (qui accompagne la copie du logiciel) pour toute réclamation en vertu de la garantie.
Réclamation – marche à suivre – Panasonic Canada Inc. remplacera tout disque ou support défectueux
si l’article en question est retourné, port payé, à son service de Marketing – produits informatiques, 5770
Ambler Drive, Mississauga (Ontario) L4W 2T3, dans les soixante (60) jours suivant la date d’achat original.
Joignez à votre envoi une pièce justificative de votre achat et une description du problème.
Recours – La responsabilité de PCI - et votre seul recours - dans le cas de toute défaillance couverte par
la garantie sur ce support de logiciel est limitée au seul remplacement du support. Elle ne couvre aucun
autre dommage, y compris, mais non exclusivement, la perte d’usage ou de profits, ni aucun dommage
spécial, indirect ou consécutif, ni aucune autre réclamation de nature similaire ou autre.
Produits non couverts – La présente garantie limitée ne s’applique pas si le ou les disques ou autre
support ont été utilisés dans un produit d’une marque autre que Panasonic ou dans des conditions
environnementales autres que celles spécifiées par PCI ou le fabricant, ou soumis à une mauvaise
utilisation, à la négligence, à une manutention inadéquate ou encore si le programme a été modifié ou subi
une tentative de modification ou des dommages attribuables à un accident ou à un cas fortuit. De plus,
PCI n’assume aucune responsabilité pour toute perte de, ou tout dommage à, un programme, des données
ou un support de sauvegarde amovible.
GÉNÉRALITÉS
PCI NE RECONNAÎT AUCUNE AUTRE GARANTIE, EXPLICITE OU IMPLICITE, Y COMPRIS, MAIS NON
EXCLUSIVEMENT, LES GARANTIES IMPLICITES DE VALEUR COMMERCIALE ET D’UTILITÉ À UNE
FIN QUELCONQUE, À L’ÉGARD DU LOGICIEL, SUPPORTS DE LOGICIELS, PRODUITS
INFORMATIQUES, PÉRIPHÉRIQUES ET ACCESSOIRES.
SOUS AUCUNE CIRCONSTANCE PCI NE POURRA ÊTRE TENUE RESPONSABLE DES DOMMAGES
SPÉCIAUX, INDIRECTS OU CONSÉCUTIFS ATTRIBUABLES À UN MANQUEMENT AUX GARANTIES
LIMITÉES DÉCRITES DANS LE PRÉSENT DOCUMENT OU À L’UTILISATION DU PRODUIT
INFORMATIQUE, Y COMPRIS, SANS RESTRICTION, LA PERTE DE DONNÉES, D’AFFAIRES,
D’ACHALANDAGE OU DE PROFIT.
DANS TOUS LES CAS, LA RESPONSABILITÉ MAXIMALE DE PCI POUR TOUT MANQUEMENT NE
POURRA EXCÉDER LE PRIX DE VENTE DU PRODUIT INFORMATIQUE.
AUCUNE RÉCLAMATION, SANS ÉGARD À SES MOTIFS, NE POURRA ÊTRE FAITE AUPRÈS DE PCI
PLUS DE DEUX (2) ANS APRÈS LES FAITS INVOQUÉS À LA BASE D’UNE TELLE RÉCLAMATION.
Garantie statutaires – Certaines juridictions interdisent de telles limitations ou exclusions ; aussi,
pourraient-elles ne pas s’appliquer.
Operating Instructions - Reference Manual 65
Page 66

Appendix
WARRANTY for Europe
Panasonic System Communications Company Europe (referred to as "Panasonic") will repair this product
(other than software, which is treated in a different section of this warranty) with new or refurbished parts,
from the date of original purchase in the event of a defect in materials or workmanship. This warranty only
applies to new Panasonic Toughbooks or Toughpads purchased in the EEA and Switzerland and Turkey.
Panasonic (or its authorised Service Provider) target to repair your equipment within 48 hours from its receipt
in our service centre.
Additional charges may apply for shipment to countries outside of the European Union. Panasonic will use
all reasonable endeavours to ensure this service.
This warranty only covers failures due to defects in materials or workmanship which occur during normal
use for the applicable Service Agreement Period listed below. In the event that any product (or part thereof)
is replaced, Panasonic shall transfer ownership of the replacement product (or part) to the customer and
the customer shall transfer ownership of the replaced product (or part) to Panasonic.
Service Agreement Period - from original date of purchase
• Toughbooks (and every accessory included in the original packaging except the battery) - 3 years
• Toughpads (and every accessory included in the original packaging except the battery) - 3 years
• Additional peripherals manufactured by Panasonic (AC Adaptor and Power Cord, Car Adaptor and
Power Cord, Cradle, Battery Charger) - 1 year
• Batteries - 6 months. Panasonic Warranty covers the battery for six months. A battery is considered
good if it maintains 50 % of its charge capacity during the warranty period. If a battery is returned under
this contract and testing determines that it has charge capacity greater than 50 %, the battery will be
returned with an invoice for the retail purchase price of a new battery.
This warranty is extended solely to the original purchaser. A purchase receipt or other proof of date of original
purchase will be required before warranty performance is rendered.
Limits and Exclusions:
This warranty does not cover and shall be void for:
• Broken or cracked LCD screen.
• Defective pixel in notebook displays and LCD screens within 0.002 %
• Damage that is attributable to fire, theft or acts of God.
• Damage caused by environmental influences (electrical storms, magnetic fields etc.).
• Damage which has not been caused during normal operation
• Repair of damage that is cosmetic only or does not affect product functionality such as wear and tear,
scratches and dents.
• Failures caused by products not supplied by Panasonic.
• Failures resulting from alteration, accidental damage, casualty, misuse, abuse or neglect.
• Introduction of liquid or other foreign matter into the unit.
• Improper installation, operation or maintenance.
• Improper connections with peripherals.
• Maladjustment of consumer controls such as function settings.
• Modification or service by anyone other than Panasonic or its approved Service Providers.
• Products used as short term rental or leased equipment.
• Products whose serial number has been removed making the unit warranty condition impossible to
clearly determine.
THIS PRODUCT IS NOT INTENDED FOR USE AS, OR AS PART OF, NUCLEAR EQUIPMENT/SYSTEMS,
AIR TRAFFIC CONTROL EQUIPMENT/SYSTEMS, OR AIRCRAFT COCKPIT EQUIPMENT/SYSTEMS.
PANASONIC WILL NOT BE RESPONSIBLE FOR ANY LIABILITY RESULTING FROM THE USE OF THIS
PRODUCT ARISING OUT OF THE FOREGOING USES.
There are no other express warranties except as listed above.
66 Operating Instructions - Reference Manual
Page 67

Appendix
We strongly recommend that customers backup their data before sending back their unit to an Authorised
Service Provider.
Panasonic shall not be liable for loss of data or other incidental or consequential damages resulting from
the use of this product, or arising out of any breach of this warranty. All express and implied warranties,
including the warranties of satisfactory quality and fitness for a particular purpose are limited to the applicable
warranty period set forth above. Panasonic shall not be liable for any indirect, special or consequential loss
or damage (including without limitation any loss of profits) arising from the use of this product or for any
breach of this warranty.
This limited warranty gives you specific legal rights, and you may have other rights that vary from country
to country. You must consult the applicable country laws for a full determination of your rights. This limited
warranty is in addition to, and does not affect any rights arising out of any contract of sale or by statute.
Panasonic System Communications Company Europe
Data Storage Media
Data Storage Media is the media on which the Operating System, drivers and programs originally installed
by Panasonic on the main unit are stored. This media is originally provided with the unit.
Panasonic warrants to you only that the disc(s) or other media on which the Programs are furnished will be
free from defects in material and workmanship under normal use for a period of sixty (60) days from the
date of delivery thereof to you, as evidenced by your purchase receipt.
This is the only warranty Panasonic makes to you. Panasonic does not warrant that the functions contained
in the Programs will meet your requirements or that the operation of the Programs will be uninterrupted or
error free.
Panasonic's entire liability and your exclusive remedy under this warranty shall be limited to the replacement
of any defective disk or other media which is returned to Panasonic's authorized Service Centre, together
with a copy of the purchase receipt, within the aforesaid warranty period.
Panasonic shall have no obligation for any defects in the disk(s) or other media on which the Programs are
furnished resulting from your storage thereof, or for defects that have been caused by operation of the
disk(s) or other media otherwise than on the Product or in the environment conditions other than those
specified by Panasonic by alteration, accident, misuse, abuse, neglect, mishandling, misapplication,
installation, maladjustment of consumer controls, improper maintenance, modification or damage that is
attributable to acts of God. In addition, Panasonic shall have no obligation for any defects in the disk(s) or
other media if you have modified, or attempted to modify any Program.
Duration of implied warranties, if any is limited to sixty (60) days.
Pre-installed software
Pre-installed software means the software shipped pre-loaded by Panasonic, not that loaded by any third
party or selling agent.
Panasonic and its suppliers makes no warranty, either express, implied or statutory, with respect to software
provided with the Product and licensed to Purchaser, its quality, performance, merchantability, or fitness for
a particular purpose. Panasonic does not warrant that the functions contained in the software will be
uninterrupted or error free. Panasonic assumes no risk of and shall not in any case be liable for any damages,
including, without limitation, any special, incidental, consequential, or punitive damages arising from breach
of warranty or contract, negligence or any other legal theory, including, without limitation loss of goodwill,
profits or revenue, loss of use of the Programs or Products or any associated equipment, cost of capital,
cost of any substitute equipment, facilities, or services, downtime costs, or claims of any party dealing with
such damages.
Some countries do not allow the exclusion or limitation of incidental or consequential damages, or limitations
on how long an implied warranty lasts, so the above limitations or exclusions may not apply to you.
This limited warranty gives you specific legal rights and you may also have other rights that vary from country
to country. You must consult applicable country laws for a full determination of your rights.
Operating Instructions - Reference Manual 67
Page 68

Appendix
Contacts
Address Panasonic System Communications Company Europe
Panasonic Manufacturing U.K. Ltd.
Service Centre Building B4, Wharfedale Road,
Pentwyn Industrial Estate, Cardiff,
United Kingdom
CF23 7XB
Web page
Panasonic Helpdesk
France:
German:
Austria:
Swiss (German):
Swiss (French):
Italy:
Spain:
UK:
e-mail:
Czech speaking service
Hungarian speaking service
Polish speaking service
http://www.toughbook.eu/
+33(0) 805636449
+49(0) 8007235211
+43(0) 800006493
+41(0) 800002429
+41(0) 800588017
+39 800986915
+34(0)901101157
+44(0) 8000884324
0800 143234 (in country only)
06800 163 67 (in country only)
00800 4911558 (in country only)
Romanian speaking service
Slovakian speaking service
e-mail:
Payments
68 Operating Instructions - Reference Manual
0800 894 743 (in country only)
00800 42672627 (in country only)
Page 69
© Panasonic Mobile Communications Co., Ltd. 2018
600 Saedo-cho, Tsuzuki-ku, Yokohama-city,
Kanagawa 224-8539, Japan
Panasonic System Solutions Company of North America
Two Riverfront Plaza, Newark, NJ 07102, USA
Importer's name & address pursuant to the EU legislation
Panasonic System Communications Company Europe,
Panasonic Marketing Europe GmbH
Hagenauer Straße 43
65203 Wiesbaden
Germany
DHQP1012ZA/J1 C0918-0
 Loading...