

Page 1
nasonic
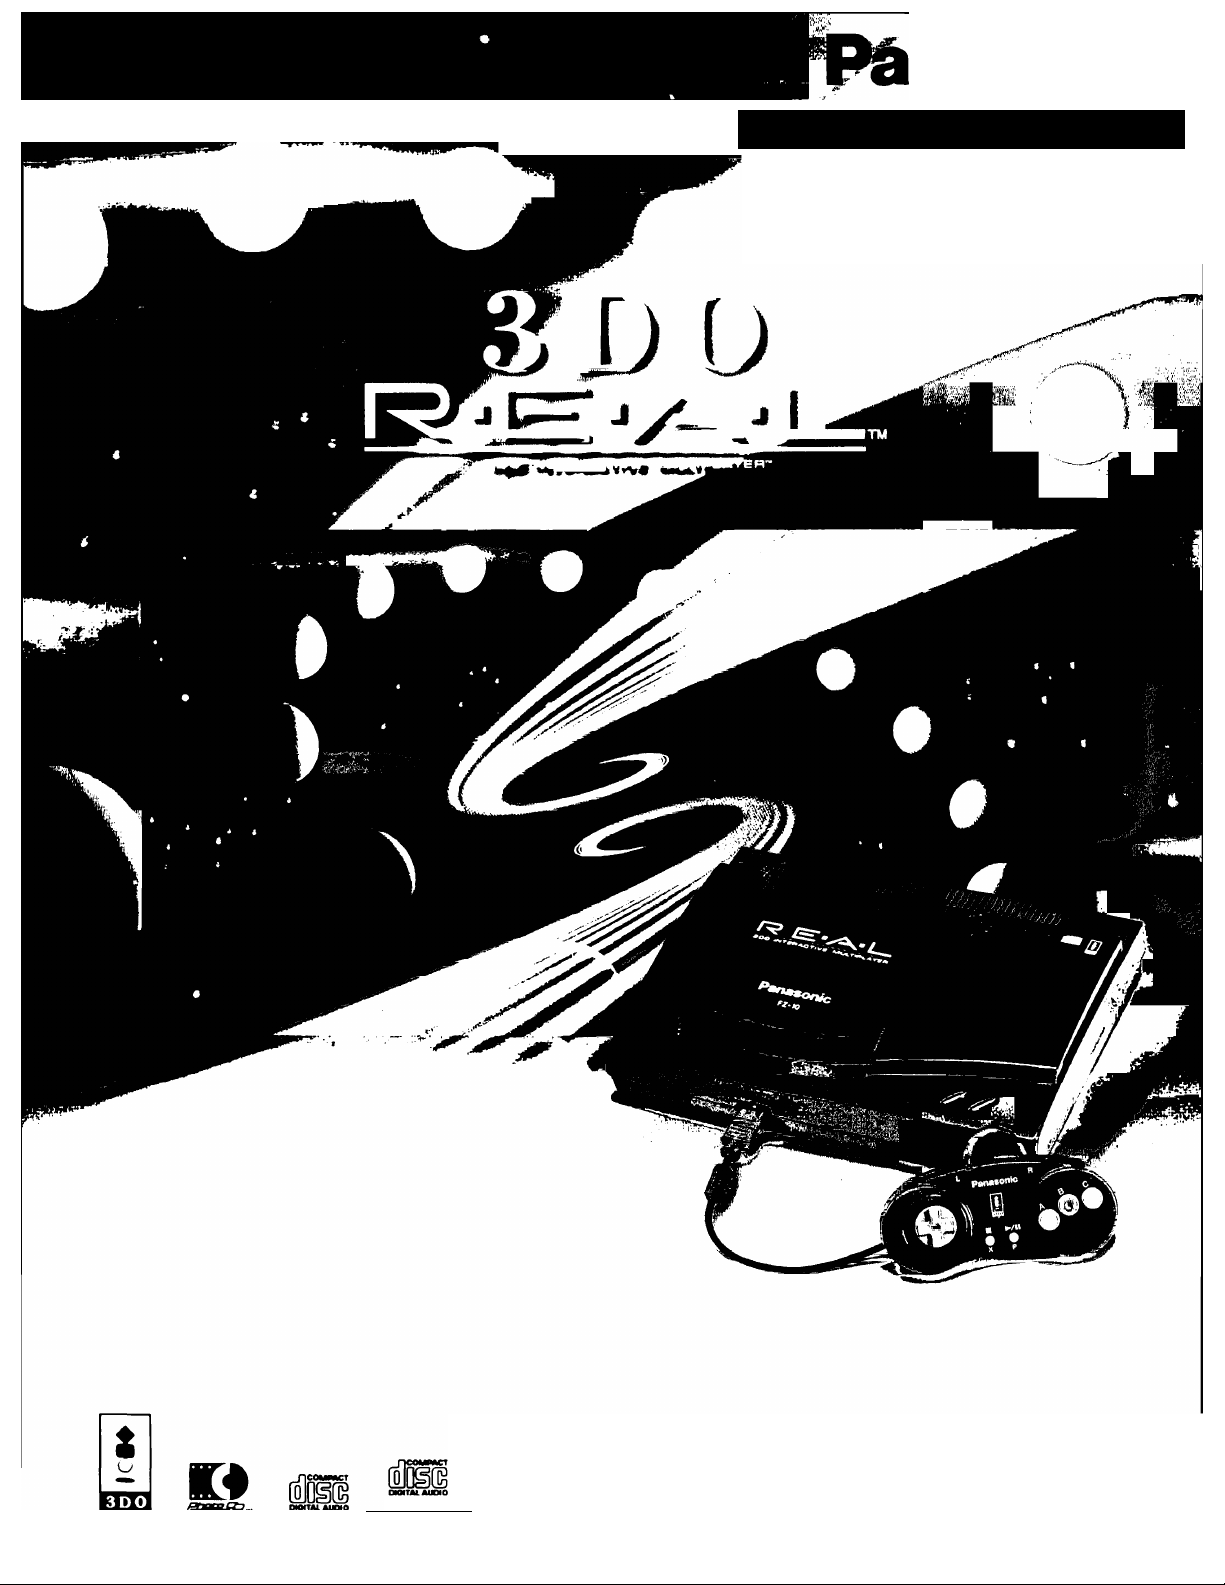
3DO"‘lnteractive Multiplayer
Model No. FZ-10
Operating Instructions
(Digital audio CD)
( GRAPtacs )
(CD-G)
Please read these instructions completely before operating this product.
3DO. the 3DO logos, and Interactive Multiplayer are trademarks of The 3DO Company.
Panasonic is a registered trademark and REAL is a trademark of Matsushita Electnc Industrial Co., Ltd.
Photo CD mark licensed from Kodak.
Page 2
Precautions and Warnings
Please be sure to read through this instruction manual and completely
follow all the written procedures before using the muitiplayer.
The following mark and symbols are located on bottom of the product
The lightning flash with arrowhead symbol, within an equilateral triangle, is
A
intended to alert the user to presence of uninsulated “dangerous voltage”
within the product’s enclosure that may be of sufficient magnitude to constitute
a risk of electric shock to persons
RISK OF ELECTRIC SHOCK
DO NOT OPEN
A
CAUTION To reduce the risk of
electric shock do not remove cover
or back No user-serviceable parts
inside Refer servicing to qualified
service personnel
“Warnings” and “Cautions” are also included to indicate the need for take special care Please do not discard
these important instructions
The exclamation point within an equilateral triangle is intended to alert the
user to the presence of important operating and maintenance (servicing)
instructions in the literature accompanying the product
WARNING
To reduce the risk of fire or electric shock, do not expose this product to ram, moisture, or any type of liquid
Installation
Placement
In order to prevent injuries or unit damage, do not place
the unit on top of an unstable TV set (cart, table, etc )
where it would be prone to fall Place it on a flat, level
surface
Heat
The unit should be situated away from heat sources such
as radiators, heat registers, stoves, or other products
(including amplifiers) that produce heat
Operating 10“C to 35°C ( SOT to 95T )
Storage -20‘^C to 60“C (-4T to 140T )
When packed for shipment
Environment
Do not use or store the unit in locations exposed to heat,
direct sunlight, extreme cold, high humidity, excessive
smoke, or dust The unit should be situated away from
equipment or devices that generate strong magnetism
Wail or Ceiling Mounting
The unit should not be mounted on a wall or ceiling
Ventilation
Ventilation openings are provided in this unit to prevent
overheating These openings must not be blocked or
covered Do not use this unit directly against a wall, on
top of a bed or sofa or in any other place where heat
generated will be confined inside the unit
Water and Moisture
Do not use this unit near water - for example, near a
bath tub, wash bowl, in a wet basement, swimming pool,
etc Do not handle this unit or compact discs with wet
hands
Stacking
Do not place heavy objects (TV, etc ) on top of the unit
Never allow anyone to stand or sit on this unit
Page 3
Transporting
This unit IS a precis 10nomade device Take care
to protect It from vibration and impact while
moving it In particular, care must be taken when moving
the unit together with a cart, or it may topple over
If the unit IS moved suddenly from a cold to a warm
location, water vapor may condense in this unit To
correct this problem, turn on the power and wait about
one hour for the moisture to evaporate
Always remove a disc before moving the console
Safety
Attachments
When connecting attachments {control pad, etc ), use
only those authorized products that display the 3D0
compatibility symbol
Note to CATV system installer
This reminder is provided to call the CATV system
installer’s attention to Section 820-40 of the NEC
(National Electrical Code) which provides guidelines for
proper grounding and, in particular, specifies that the
cable ground shall be connected to the grounding system
of the building, as close to the point of cable entry as
practical
Object and Liquid Entry
Never push objects of any kind into this unit through
openings as they may touch dangerous voltage points
or short-out parts that could result in a fire or electric
shock Never spill liquid of any kind on the unit
Power Sources
This unit should be operated only from the type of power
source indicated on the unit surface If you are not sure
of the type of power supply to your home, consult your
product dealer or local power company
Polarization
This unit IS equipped with a polarized alternating-current
line plug (a plug having one blade wider than the other)
This plug will fit into the wall outlet only one way This is
a safety feature If you are unable to insert the plug fully
into the wall outlet, try reversing the plug If the plug
should still fail to fit, contact your electrician to replace
your obsolete wall outlet Do not defeat the safety
purpose of the polarized plug
Power Cord Protection
Power supply cords should be routed so that they are
not likely to be walked on or pinched by items placed on
top of or against them, with particular attention paid to
cords at plugs, convenience receptacles, and the point
where they exit from the unit
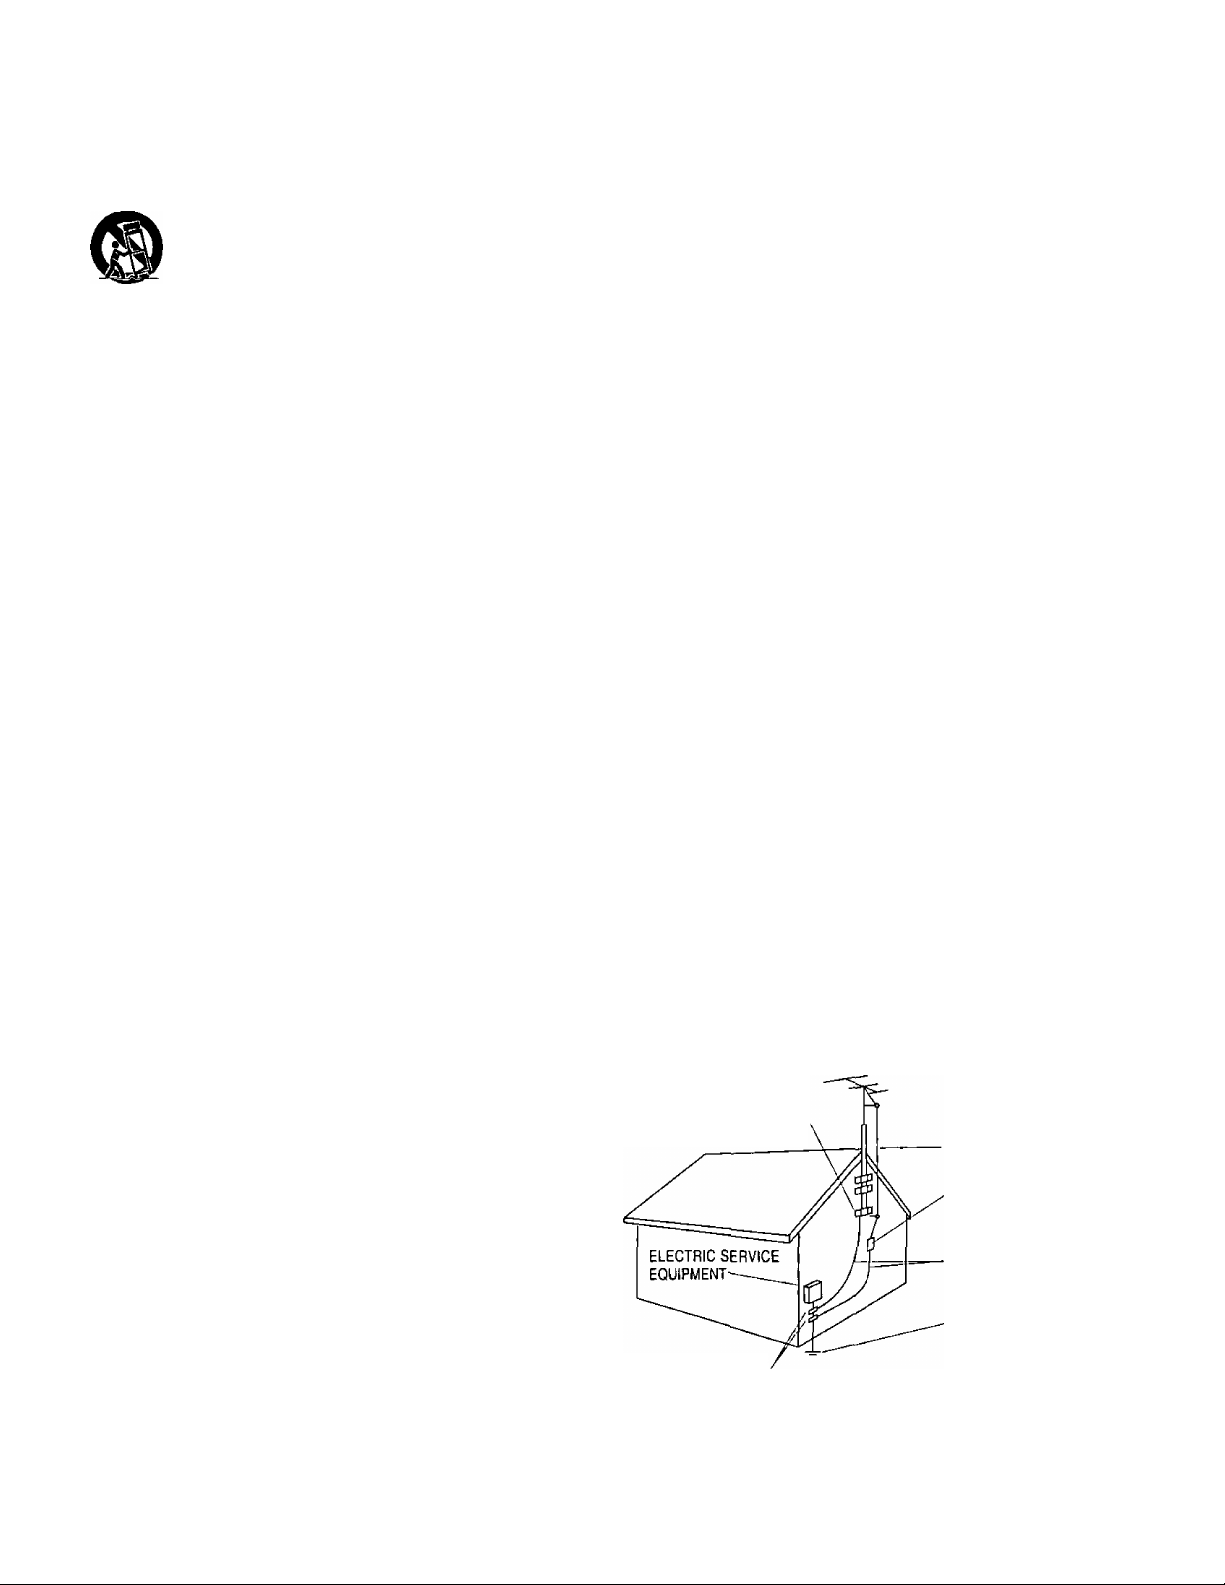
Outdoor Antenna Grounding
If an outside antenna or cable system is connected to
the unit, be sure the antenna or cable system is grounded
so as to provide some protection against voltage surges
and built-up static charges Article 810 of the National
Electrical Code, ANSI/NFPA 70, provides information
with regard to proper grounding of the mast and
supporting structure, grounding of the lead-in wire to an
antenna discharge unit, size of grounding conductors,
location of the antenna-discharge unit, connection to
grounding electrodes, and requirements for the
grounding electrode
See following diagram
NATIONAL ELECTRICAL CODE (NEC)
GROUND CLAMP.
ANTENNA LEAD-IN
WIRE
ANTENNA DISCHARGE
UNIT
(NEC SECTION 810-20)
GROUNDING
CONDUCTORS
(NEC SECTION 810-21)
POWER SERVICE
GROUNDING
GROUND CLAMPS
ELECTRODE SYSTEM
(NEC ART 250, PART H)
Page 4

Lightning
For added protection for this unit during a lightning storm,
or when It IS left unattended and unused for long periods
of time, unplug it from the wall outlet and disconnect the
antenna or cable system This will prevent damage to
the unit due to lightning and power-line surges
Power lines
An outside antenna system should not be located in the
vicinity of overhead power lines or other electric light or
power circuits, or where it can fall into such power lines
or circuits When installing an outside antenna system,
extreme care should be taken to keep from touching such
power lines or circuits, as contact with them might be
fatal
Maintenance and Service
Overloading
Do not overload wall outlets, extension cords or
convenience receptacles, as this can result in a risk of
fire or electric shock
Cleaning
Unplug this unit from the wall outlet before cleaning Do
not use liquid cleaners or aerosol cleaners Use a damp
cloth for cleaning
Servicing
Do not attempt to service this unit yourself as opening or
removing covers may expose you to dangerous voltage
or other hazards Refer all servicing to qualified service
personnel
Damage Requiring Service
Under the following conditions, unplug this unit from the
wall outlet and refer servicing to qualified service
personnel
a) When the power supply cord or plug is damaged
b) If liquid has been spilled, or objects have fallen, into
the unit
c) If the unit has been exposed to ram or water
d) If the unit does not operate normally when following
the operating instructions Adjust only those controls
that are described in the operating instructions, as an
improper adjustment of other controls may result in
Control Pad Warning
Warning
The connection of control pad (or other attachments) to
the Interactive Multiplayer console which are not produced
under license from The 3DO Company may be hazardous
damage and will often require extensive work by a
qualified technician to restore the unit to its normal
operation
e) If the unit has been dropped or damaged in any way
f) When the unit exhibits a distinct change in
performance
Replacement Parts
When replacement parts are required, be sure the service
technician has used replacement parts specified by the
manufacturer, or parts which have the same
characteristics as the original parts Unauthorized
substitutions may result in fire, electric shock, or other
hazards
Safety Checks
Upon completion of any service or repairs to this unit, ask
the service technician to perform safety checks to
determine that the unit is in proper operating condition
and result in electrical shock, fire or injury, and could
damage the player and/or the unlicensed attachment
Please use caution not to connect any device to the player
which does not bear the 3DO logo
IA caution to projection TV users
To avoid causing damage to the display mechanism of a
projection television, do not use the Interactive Multiplayer
with this type of television
Due to the nature of projection television it is advisable to
limit the amount of time a frozen or non changing image
IS displayed on the screen
Panasonic can accept no responsibility for burn-in
condition of the display tubes of the projection
televisions.
Page 5

Federal communications commission radio frequency interference statement
Note: This equipment has been tested and found to comply
with the limits for a Class B digital device, pursuant to
Part 15 of the FCC Rules. These limits are designed to
provide reasonable protection against harmful interference
in a residential installation. This equipment generates,
uses and can radiate radio frequency energy and, if not
installed and used in accordance with the instructions,
may cause harmful interference to radio communications.
However, there is no guarantee that interference will not
occur in a particular installation. If this equipment does
cause harmful interference to radio or television reception,
which can be determined by turning the equipment off
and on, the user is encouraged to try to correct the
interference by one or more of the following measures:
❖ Reorient or relocate the receiving antenna.
❖ Increase the separation between the equipment and
receiver.
❖ Connect the equipment into an outlet on a circuit
different from that to which the receiver is connected.
❖ Consult the dealer or an experienced radio/TV
technician for help.
Warning
To assure continued FCC compliance, the user must use
only shielded interfacing cables when connecting to a TV
or Accessaries, also use the exclusive control pad
equipped with shielded cable or shielded cable with ferrite
core at end of plug side. Also, any unauthorized changes
or modifications to this equipment would void the user’s
authority to operate.
CAUTION
THIS PRODUCT UTILIZES A LASER.
USE OF CONTROLS OR ADJUSTMENTS OR PERFORMANCE OF PROCEDURES OTHER THAN THOSE SPECIFIED HEREIN
MAY RESULT IN HAZARDOUS RADIATION EXPOSURE.
DO NOT OPEN COVERS AND DO NOT REPAIR YOURSELF. REFER SERVICING TO QUALIFIED PERSONNEL.
CLASS 1 LASER PRODUCT:
THIS PRODUCT CONTAINS A CLASS 1 CD-ROM DRIVE UNIT WHICH COMPLIES WITH DHHS RULES, 21 CFR CHAPTER I,
SUBCHAPTER J.
PLEASE ONLY USE TYPE OF CD MENTIONED IN THESE INSTRUCTIONS.
Warning
1. Physical activities involving regular repeated movements of the wrists, hands and/or fingers
may possibly cause repetitive strain injury. Such injury may also affect muscles in the
A
The model number and serial number of this product can
be found on bottom of the product. Please note them in
the space provided right and retain them for future
reference.
arms, wrists, hands, fingers, shoulders and neck, chest and abdomen, and the legs and
back.
2. There have been reports that some people may experience epileptic symptoms or even
seizures while.concentrating on flashing lights. It is possible that persons with no previous
epileptic experiences may, nevertheless, have an undetected condition. To avoid a possible
medical problem, if you have an epileptic condition, consult your physician before playing
video games or any other visually intensive software products.
To avoid either of these situations, and as sound practice, if you should use this product for
an extended period of time, it is suggested that you take periodic breaks of 10-15 minutes
each hour. Product should be used in a brightly lit room. Operating in a close distance to the
TV should be avoided.
In any event, stop using this product and consult your physician if you detect involuntary
muscle movements (such as twitching), altered vision, mental or visual confusion, convulsions,
muscular pain, numbness of fingers, palms or other areas.
MEDICAL PRECAUTIONS
MODEL NUMBER:.
SERIAL NUMBER:
FZ-10
Page 6
Unpacking
Contents
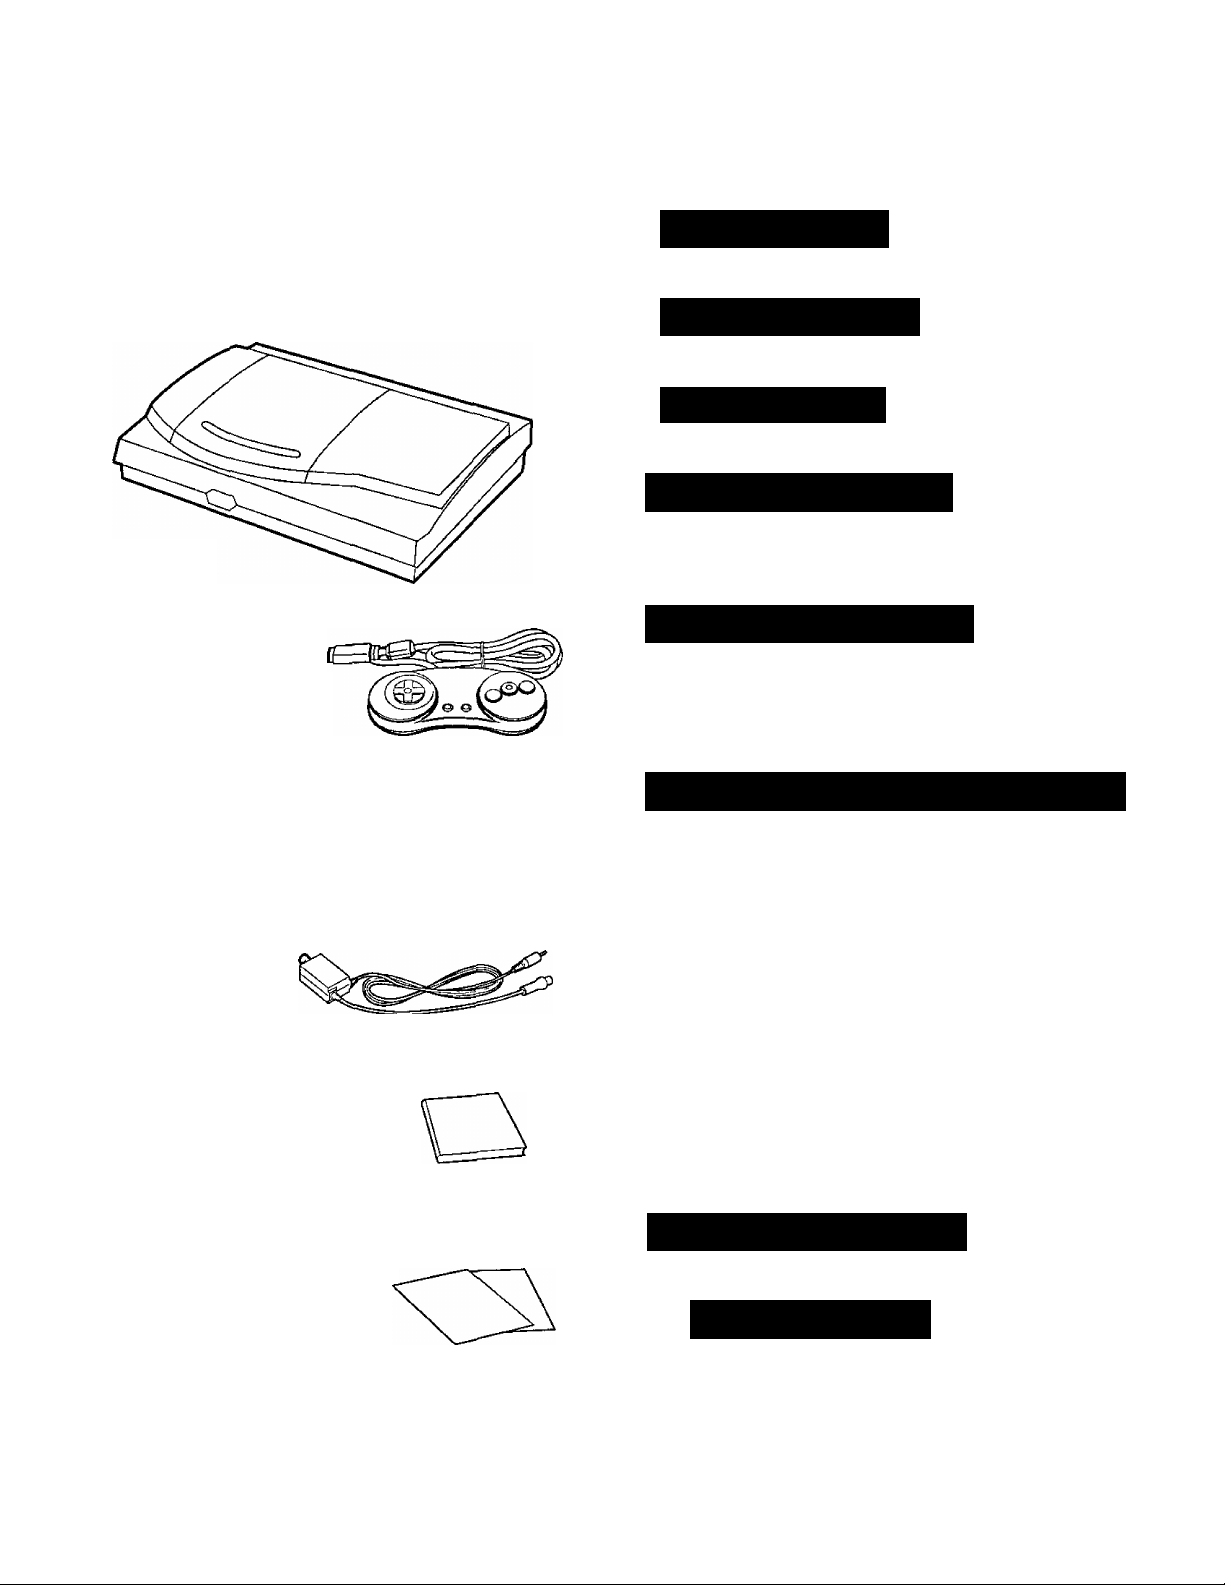
Check the packing carton for these items
If any Item is missing, please contact your dealer
immediately
□ Player (1)
□ 3DO Control Pad (1)
Can also be purchased
separately
7 Control pad
7 Handling CDs
8 Connection
10 Basic operation
10 Playing games with a 3D0 CD
12 Using Photo CDs
12 Viewing photo collections
(Photo CDs) on the TV screen
14 Using audio CDs and CD-G
□ Power Cord (1)
□ RF Cable (1)
□ Operating Instructions (1)
□ Service Center List and Warranty Sheet (1)
□ Consumer Registration (1)
14 Listening to audio CDs and
viewing CD-G
16 NORMAL setting
16 RANDOM setting
17 PROGRAM setting
18 Repeat play (REPEAT ON)
18 To switch from stereo to
monaural or vice versa
19 Troubleshooting
Specifications
Page 7
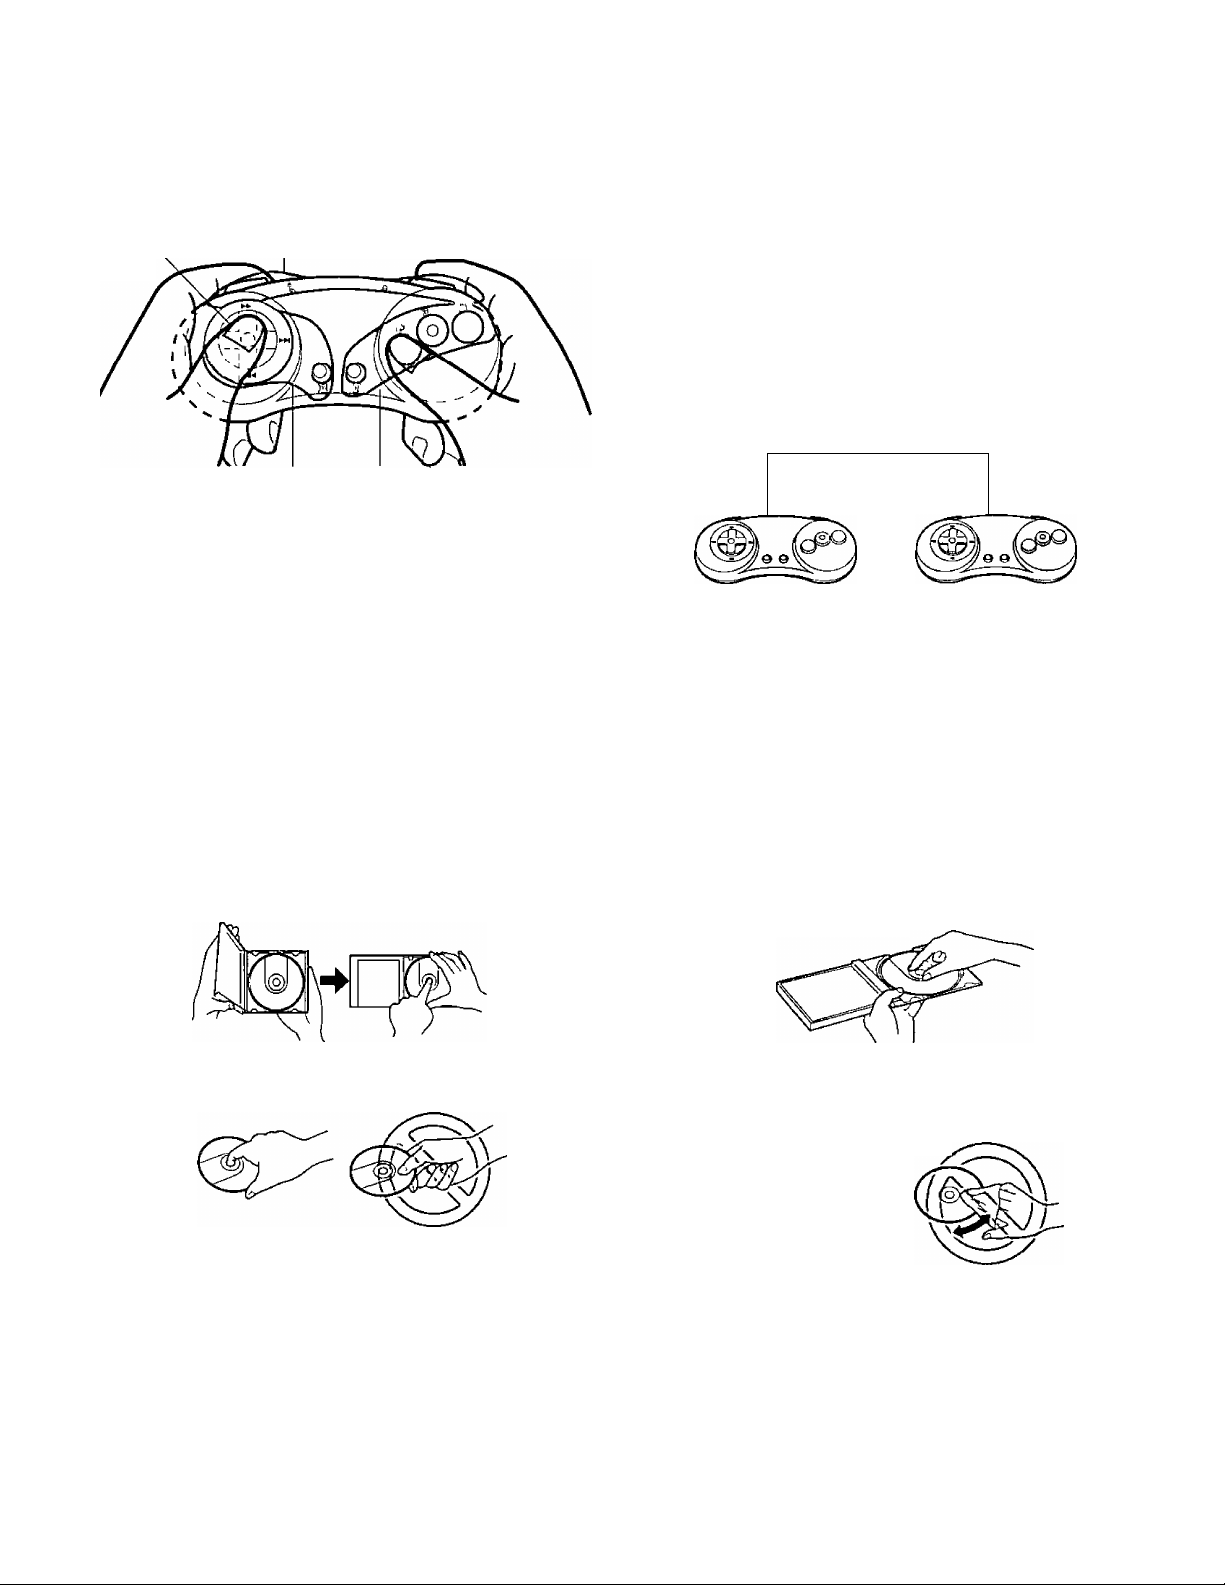
Control pad
■ How to hold the control pad
Directional ■ Place your finger here
pad
Place your left
thumb here
Place your right
thumb here
■ When connecting two or more
controi pads
Some software allows the connection of additional
control pads so that two or more (up to 8) persons
can play together at the same time
S'""
■ Details on directional pad and
button functions
The functions performed by the directional pad and
buttons differ depending on the software used
Refer to the instructions accompanying each
software package
C* When using 3DO'"control pads made by another manufacturers, follow the instructions accompanying them
A control pad (model number FZ-JP1X) with a
headphone jack can also be used
Handling CDs
Connector
(detach port cover
and connect)
Control port
(EXTENSION)
Control pad (sold separately)
■ How to remove a CD from its case
Press the center holder down and remove
■ How to hold a CD
Do not touch the surface of the CD
Precautions
For the label side (with the printing)
• Do not write anything with a pencil or ballpoint pen
• Do not apply any paper, stickers, etc
For the disc side (shiny side)
• Handle this side carefully so that no fingerprints
or marks are left on it
• Do not use a conventional record cleaner or
solvent
• Do not use a CD lens cleaner
■ How to return a CD to its case
With the label side facing up, press the CD down
over the center holder
■ When a CD is dirty
First wipe the CD with a soft cloth moistened with water
and then wipe with a dry cloth Always wipe from the
center of the CD toward its edge
■ When condensation has formed
If condensation has formed when a CD has been
suddenly brought from a cold environment into a warm
room, wipe it off using a soft dry cloth
■ Where to keep or store your CDs
• Anywhere not exposed to direct sunlight
• Anywhere with minimal moisture and dust
• Anywhere not directly exposed to heat from a heater
Page 8
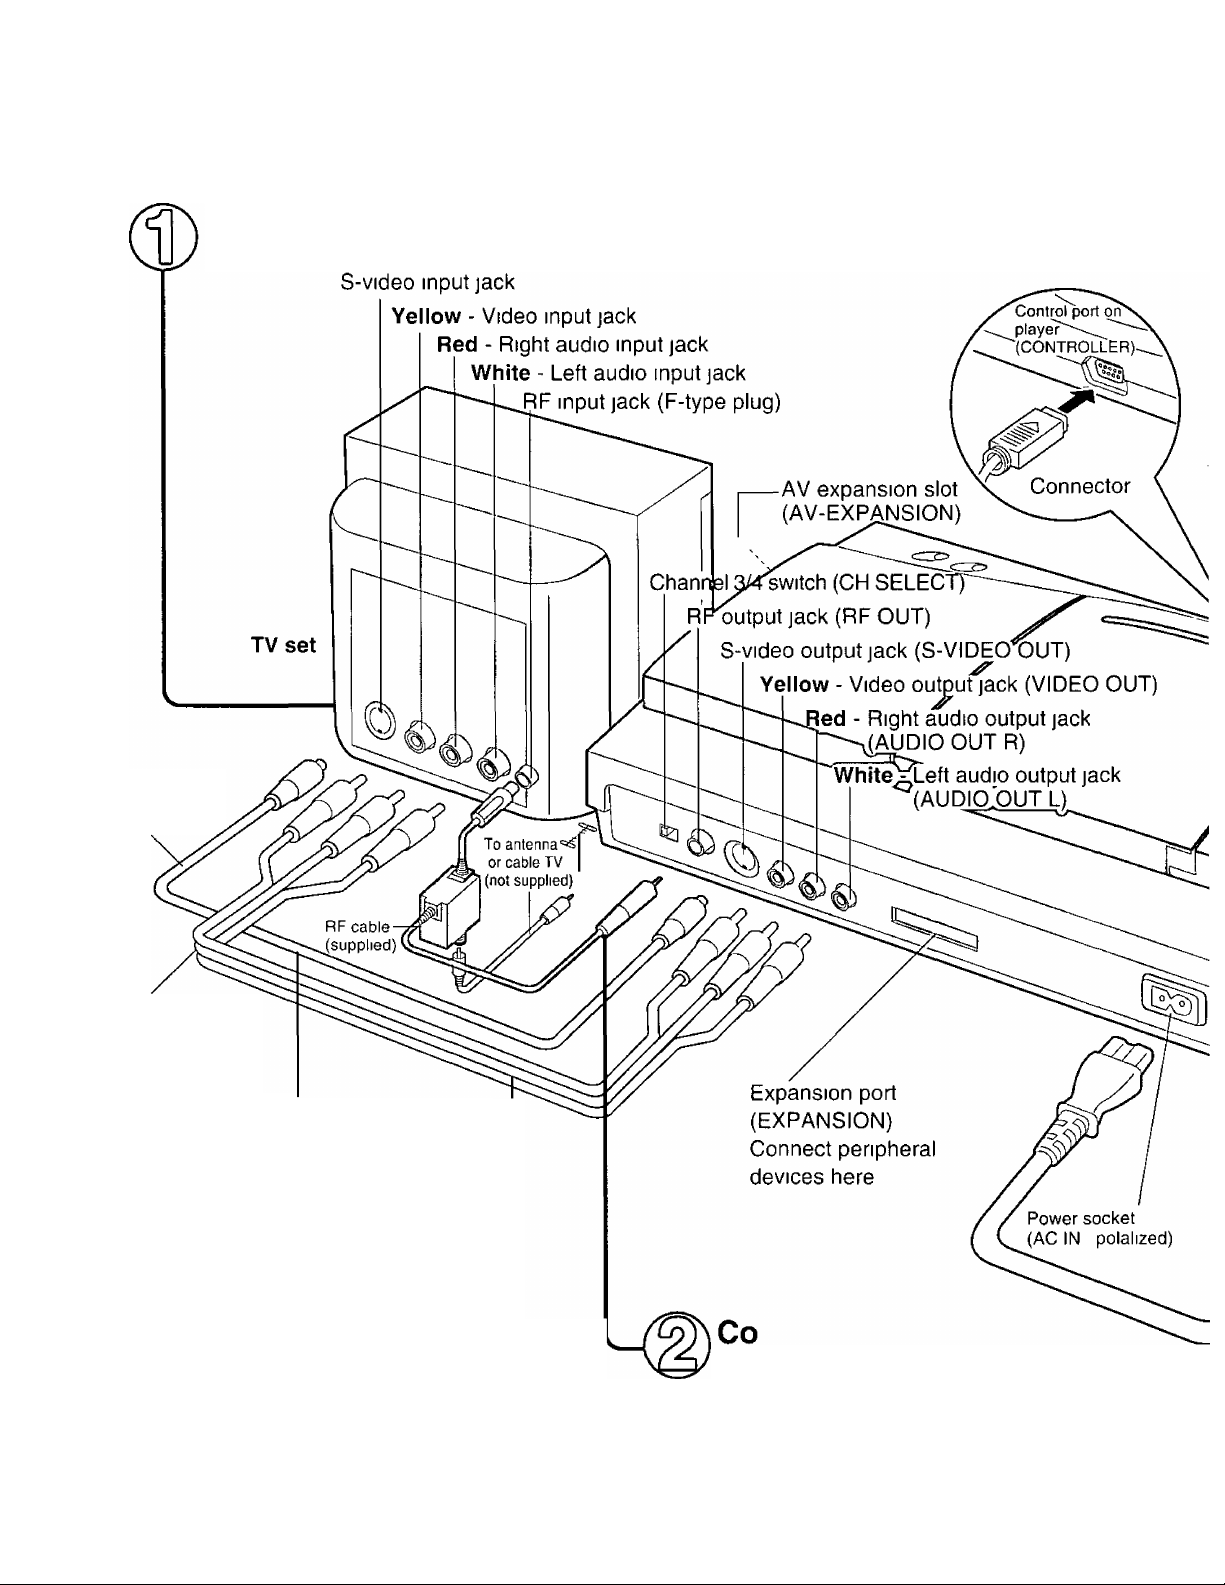
Connection
Connecting the player to a TV set (or stereo system, etc.)
Switch off the TV set.
S-video cable
(not supplied)
Audio/Video cable
(not supplied)
Connecting to a TV set with an S-video input jack
It IS recommended that the S-video cable
(not supplied) be used for connection
In this case, disconnect both video plugs
(yellow) of the Audio/Video cable, if it is
used
Use the Audio/Video cable sold on stores
when connecting with a TV set having audio/
video input jacks.
Match up the colors of the jacks and plugs
❖ In the case of connection with RF cable, all
CDs are played in monaural sound
Connect to the TV set
and Antenna.
Set CH SELECT to the channel not
used for broadcasting in your area
(3 or 4), using the tip of a ballpoint
pen or similar instrument
8
Page 9
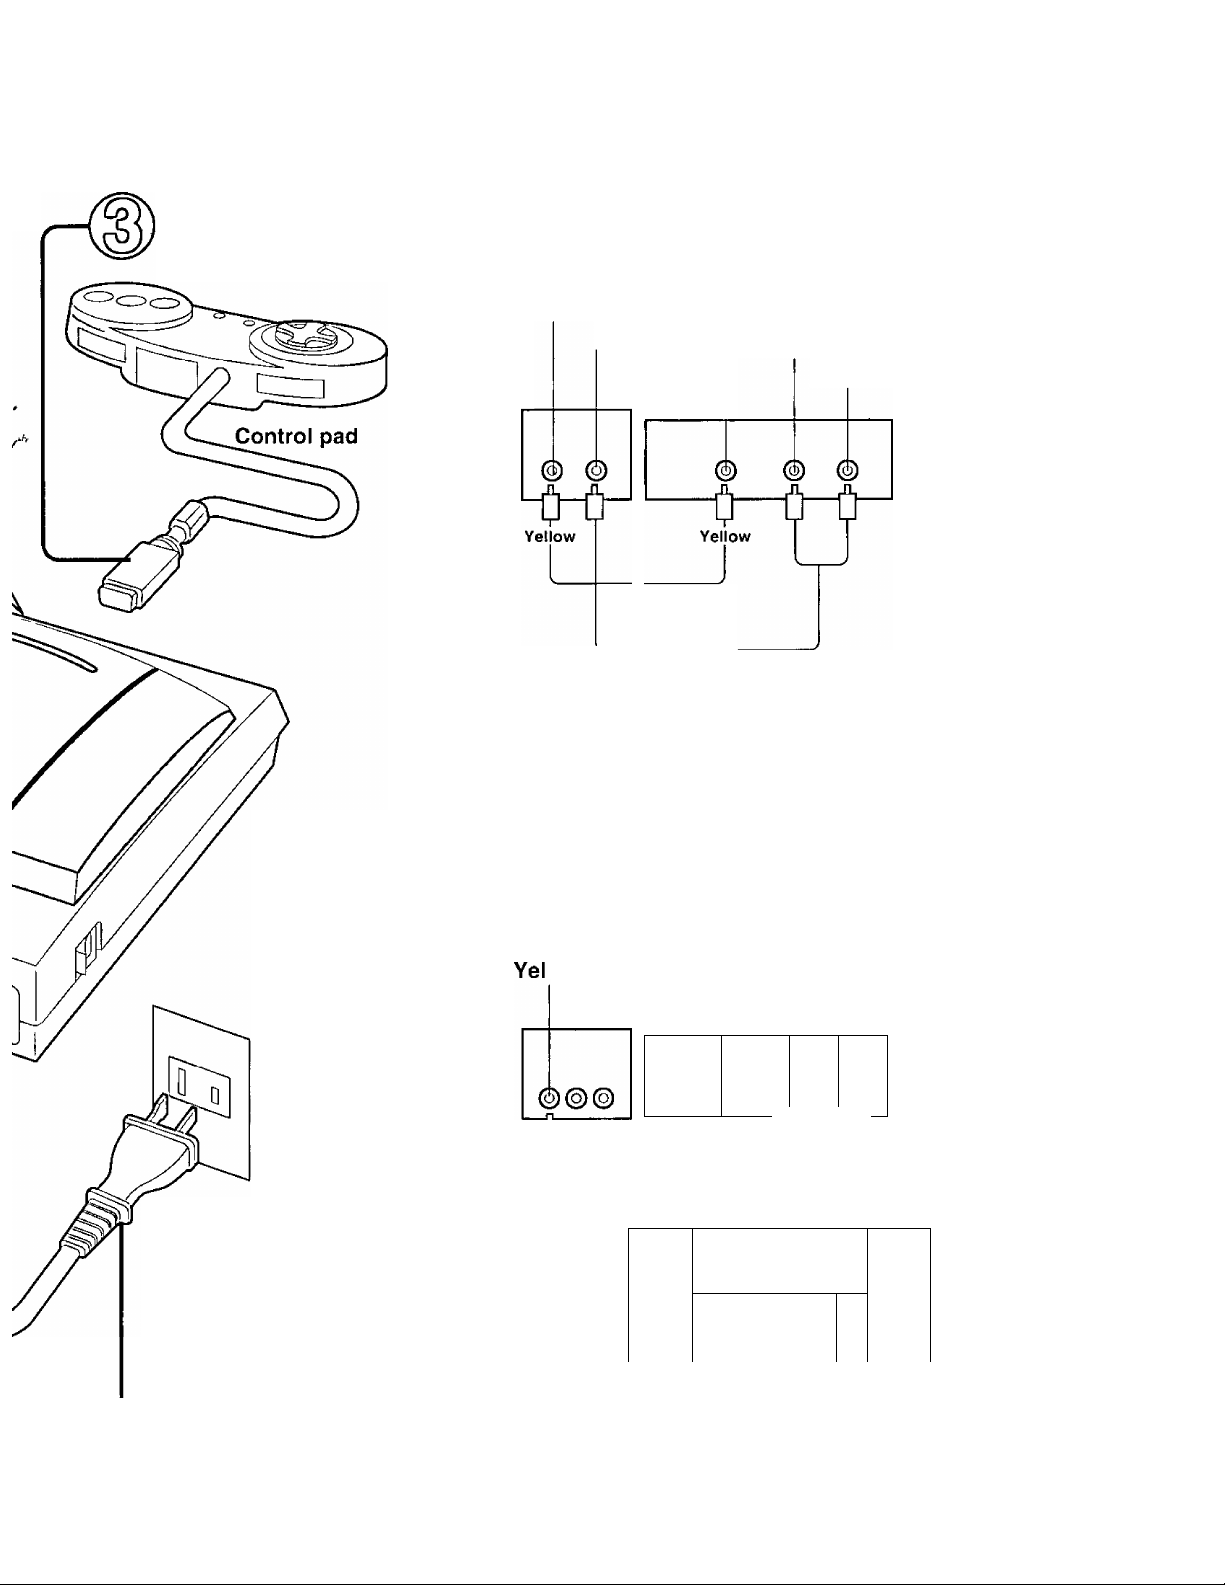
Connect the control pad.
r;
Connection with a TV set
TV set With “MONO” audio and video input jacks
Player
Video input jack
(VIDEO)
TV set
When a different type of TV set or antenna is used
Different parts (not supplied) are required depending on the type of TV set
or antenna First check the type of TV set and antenna and then consult
with your Audio/Video dealer
pAudio input
jack
(AUDIO)
Video cable
(not supplied)
Pin-to-pin cable (not supplied)
Yellow - Video output jack
Red - Right audio output jack (R)
White - Left audio output jack (L)
Player
AC120V outlet
Connect the power cord.
Connection to a TV set and stereo system
Yellow - Video output jack
low - Video
input jack
TV set
Video cable
(not supplied)
Stereo system
Also refer to the operating instructions accompanying the stereo system
__
Red - Right audio output jack (R)
White - Left audio output jack (L)
3 c
3 i 3
Red White
I
____
)
Audio cable
(not supplied)
Red Wiiite
Player
^
f
White - Left audio input jack (L)
Red - Right audio input jack (R)
Page 10
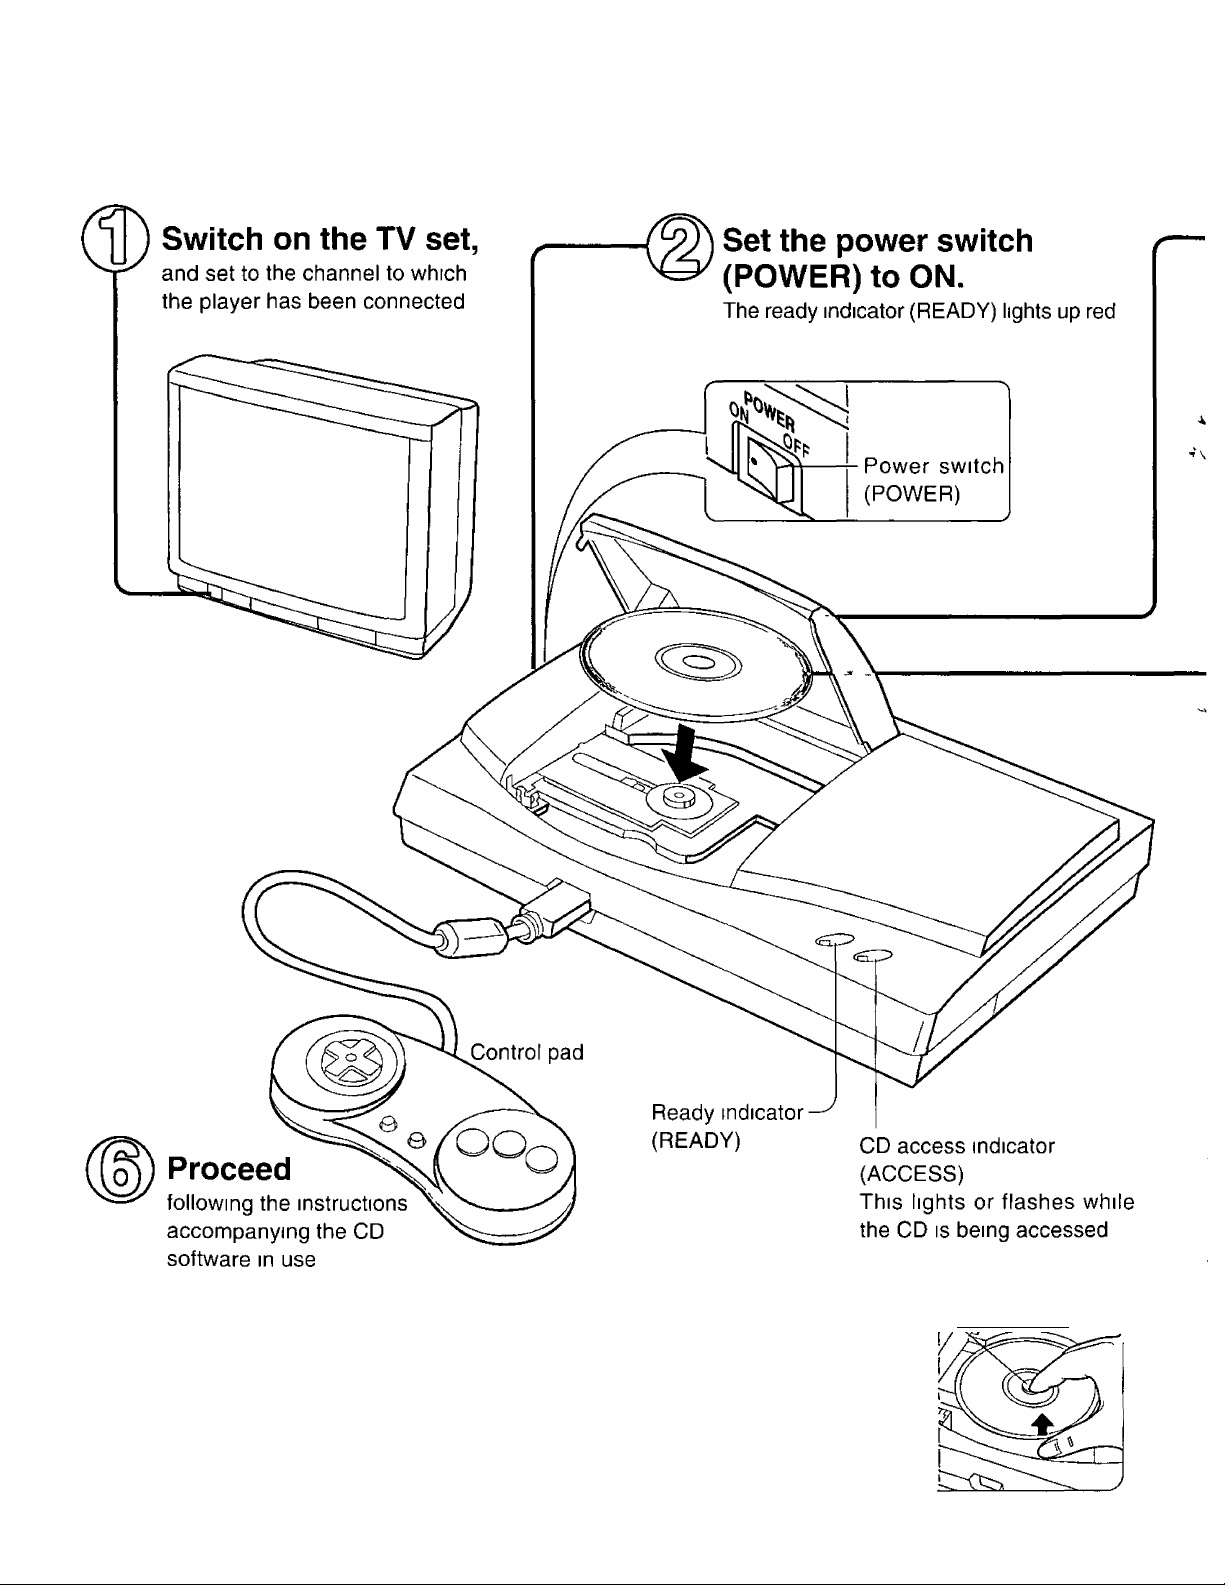
Basic operation
Playing games with a 3D0™CD
10
ri
How to quit
(X) QlJit the software being used (Refer to the
instructions accompanying the software used )
(2) Open the lid
(3) Remove the CD once it has stopped spinning
@ Close the lid
v
Set the power switch (POWER) to OFF
Removing the CD I center holder
Put your finger on the center
holder while raising one side
of the CD with your thumb
Don’t press down hard the
center holder
Page 11
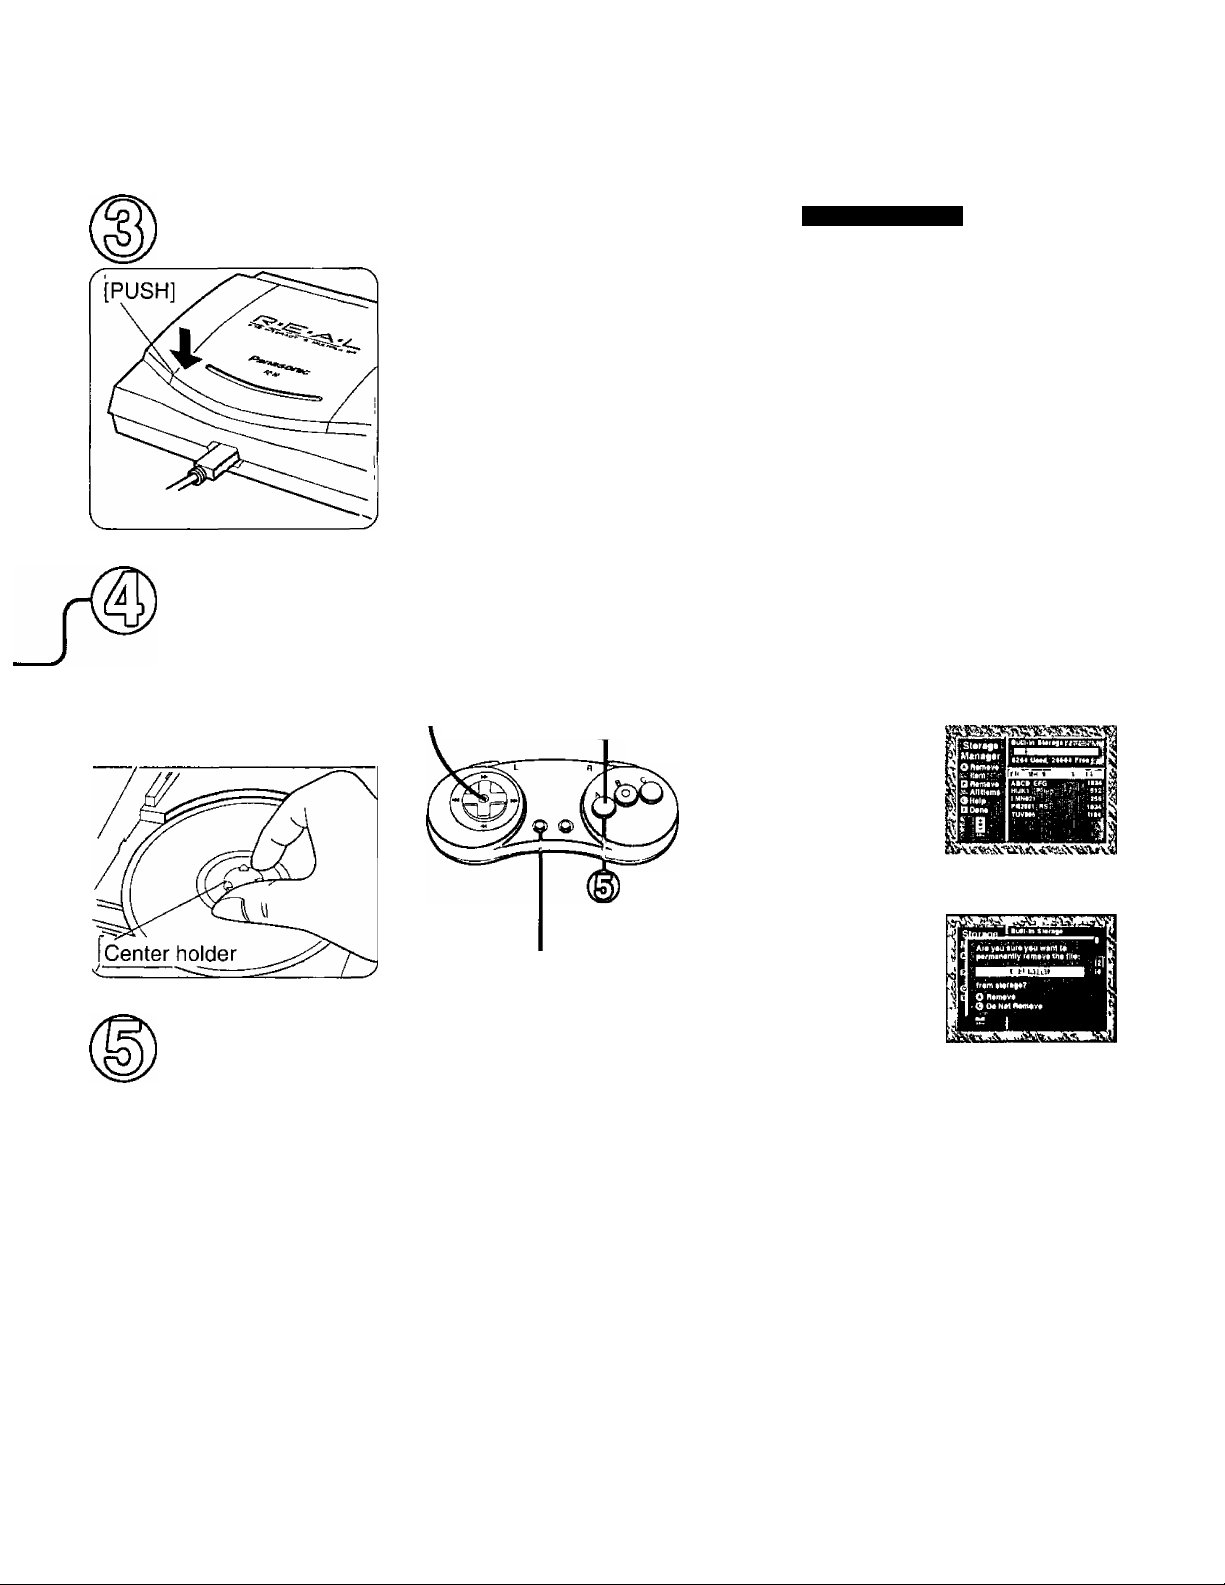
Press [PUSH] to
open the lid.
Insert the CD.
Insert the CD with its
label side facing up
/----------------------------------------------^
Press down on the CD label
side so that it slides over the
center holder
KJSM QS) QD@S tin©
Game data can be saved.
Depending on the game software, it may be possible to save results and
other such data at interim stages in the built-in storage The saved data will
not be lost even when the power is turned off (For details on operation,
refer to the instructions accompanying the software concerned )
Saved data can be removed.
When the built-in storage is full, no more new data can be saved In this
case. It IS possible to remove data no longer required by following the
procedure given below
Without inserting a CD in the player, turn on the power
When the “Press X to start STORAGE MANAGER” message appears,
press the button (The data list screen now appears )
Select the item to be removed using the
up/down directional pad
Press the ® button screen
(Confirmation is needed )
Press [PUSH] to
close the lid until it clicks.
With a 3DO™ CD
The game now
starts automatically
If the CD has not been
properly placed on the
center holder, it may be
damaged when the lid is
closed
The sound of CD drive
accessing may be heard
when operating software
This IS not a malfunction
Check the name of the item,
and remove it using the
® button
(§) Quit Storage Manager using
the ® button
' Press the 0 button to remove all the item
Data names
• When a name is too long to be viewed on the list screen, check it on the
confirmation screen
• All track sequences of audio CDs (see page 17) are stored in “acd playlist ”
This IS listed as “Audio CD Program” on the list screen
• Always press the ® button when the list screen is displayed to quit
Storage Manager If the power is turned off or the lid is opened or closed
before quitting Storage Manager, the contents of the back-up memory
may be lost
• The numbers on the list screen denote the amount of data in the back-up
memory Included in these numbers are the 64 bytes used by the system
“Total memory size” denotes the total memory in use The system uses
152 bytes at all times
• Once removed, data cannot be restored'
Confirmation screen
11
Page 12
Using Photo CDs
Viewing photo coliections (Photo CDs) on the TV screen
Important or valuable photographs can be stored semi-permanently in a CD album where they will not be
subject to discoloration Up to 100 photos can be stored on a CD and viewed on a TV’s large screen
How to create a Photo CD
Take your 35 mm films to a camera store which handles Photo CDs
(For details, consult a camera store which is qualified to handle Photo CDs )
r
(IMsiSsoiED («ail
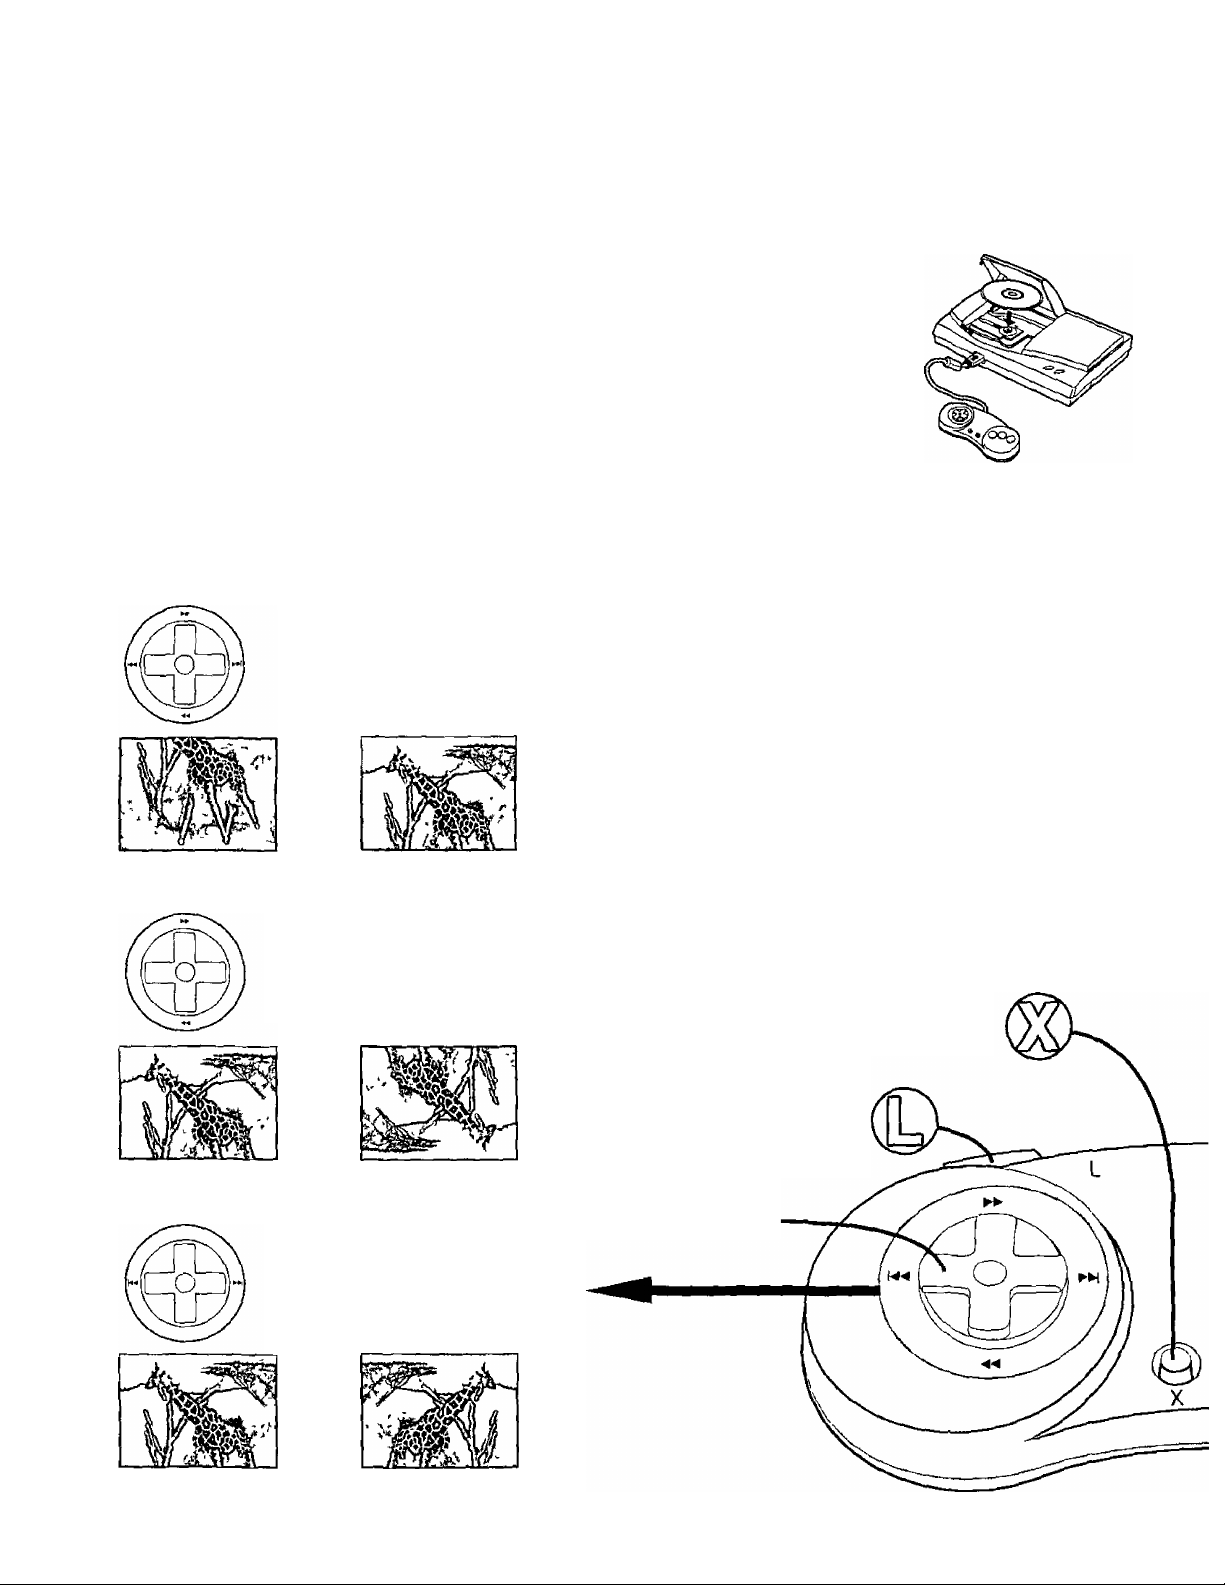
Panning up/down or to the left/right
The photo IS panned up or
down or to the left or right,
depending on which direction
the pad is pressed
Rotate function
The photo IS rotated when the
up/down directional pad is
used while the (t) (or ©)
button IS held down
• First, insert a CD bearing
»
this logo The total number of photos on the
CD IS now indicated, and the first photo is
then displayed
To automatically flip through
photos or stop this
To display the photo number >
Press the ® (or ®) and 0 buttons (Press the
buttons again to remove this number)
To return to the first photo
12
Mirror function
A mirror image of the photo is
displayed if the left/nght
directional pad is operated
while the ® (or (R)) button is
held down
Use the (t) button together
with another button or the
directional pad
Directional pad
Page 13
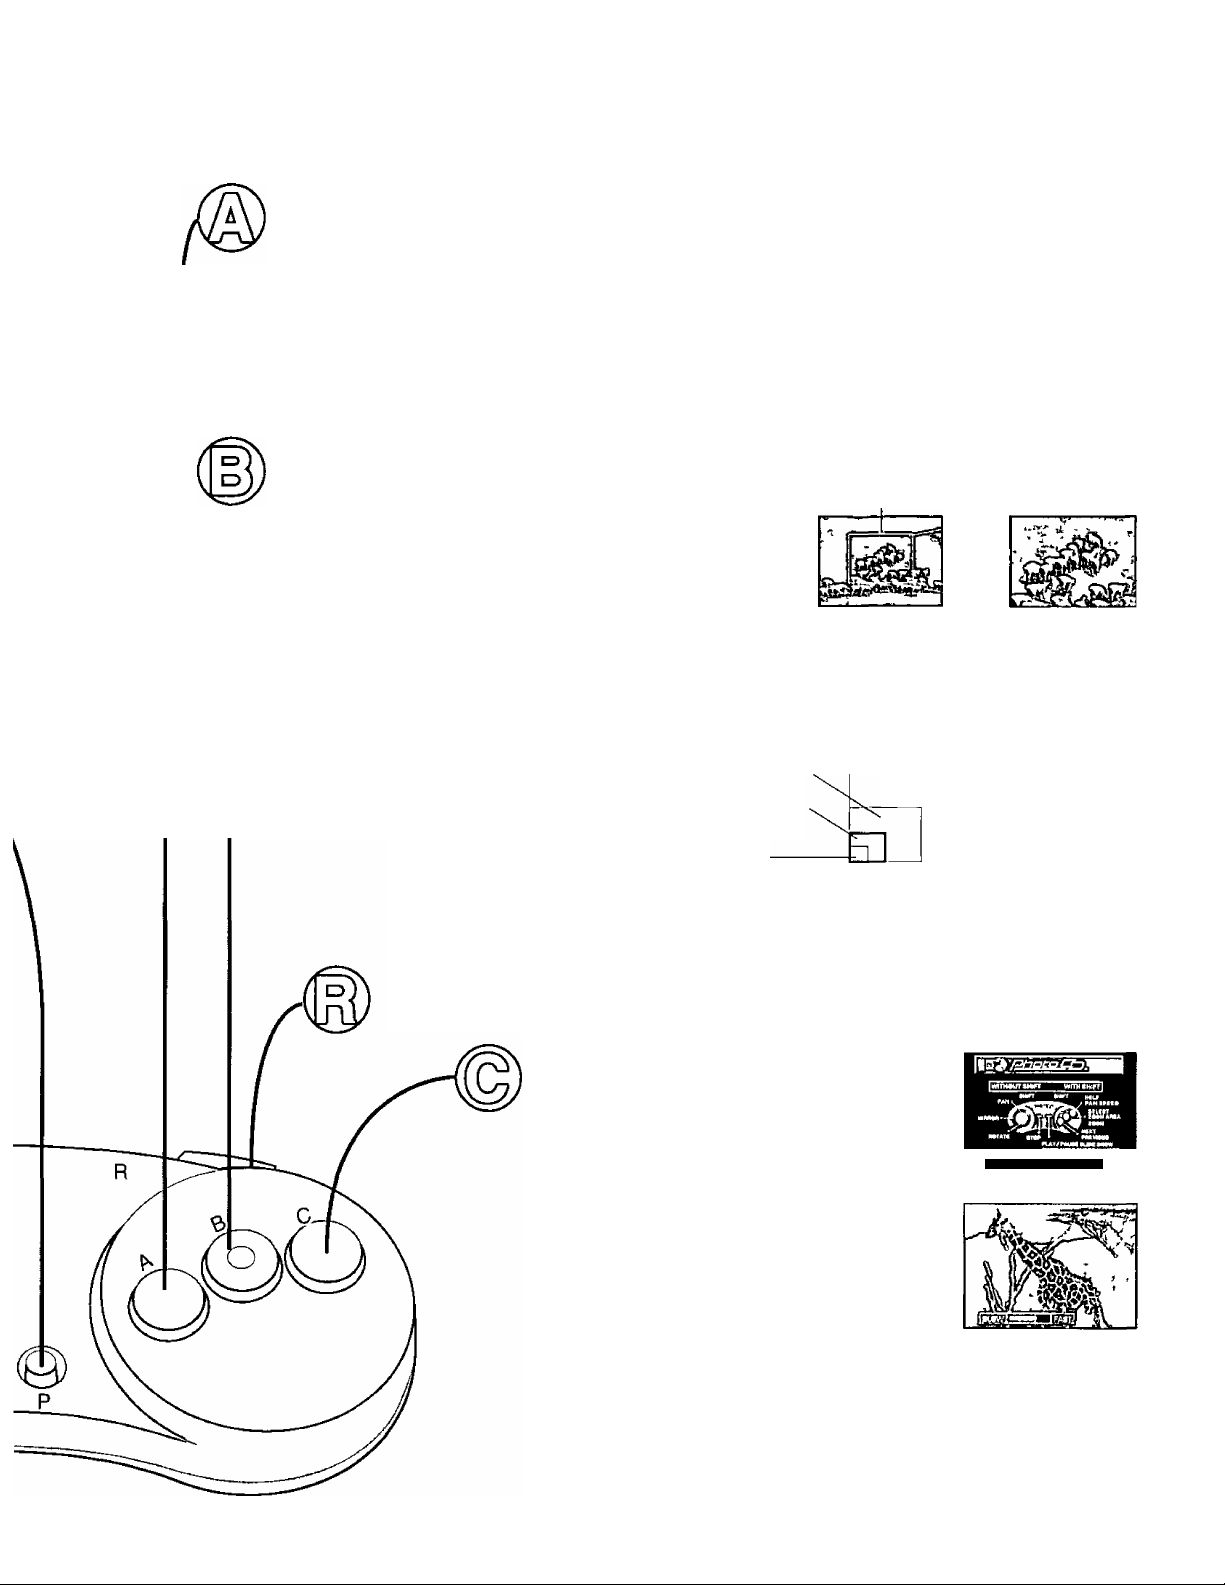
To view the next photo: Press ® button
To view the previous photo: Press down either © or ® button and
then press ® button
To flip through photos
Hold the ® button down and the photos will flip forward
To go backwards, hold down either the © or (g) button and then press the ® button
until you reach the photo you want to see again
To use the zoom function
Each time the ® button is pressed, the zoom box
changes, zooming commences when it is
pressed while the © (or ®) button is held down
Zoom box
To set the photo display to half size
When there is no box, press the ©
(or ®) and d) buttons (When the
buttons are pressed again, the display
returns to normal size )
Use the ® button together with
another button or the directional pad
To view the control pad
HELP screen
(The screen appears only while the button
IS pressed)
Up/down or left/right
Zoom sizes
(5 types)
x2 normal size
Normal size
1/2 size
x8 normal size
x4 normal size
n THt tnnAvm (mrnKmm
panning speed
This speed can be adjusted by pressing
the © (or ®) and © buttons together
How to quit
Press [PUSH] on the player to open the lid Remove
the CD once it has stopped spinning
13
Page 14
Using audio CDs and CD-G
Listening to audio CDs and viewing CD-G
Audio CDs and CD graphics containing still pictures can be used
^COMPACT ^ insert a CD bearing one of these logos
DIGITAL AUDIO ' o j r ^ /
(olO§®
DIGITAL AUDIO
f Graphics ]
(For details on inserting the CD, see page 11 )
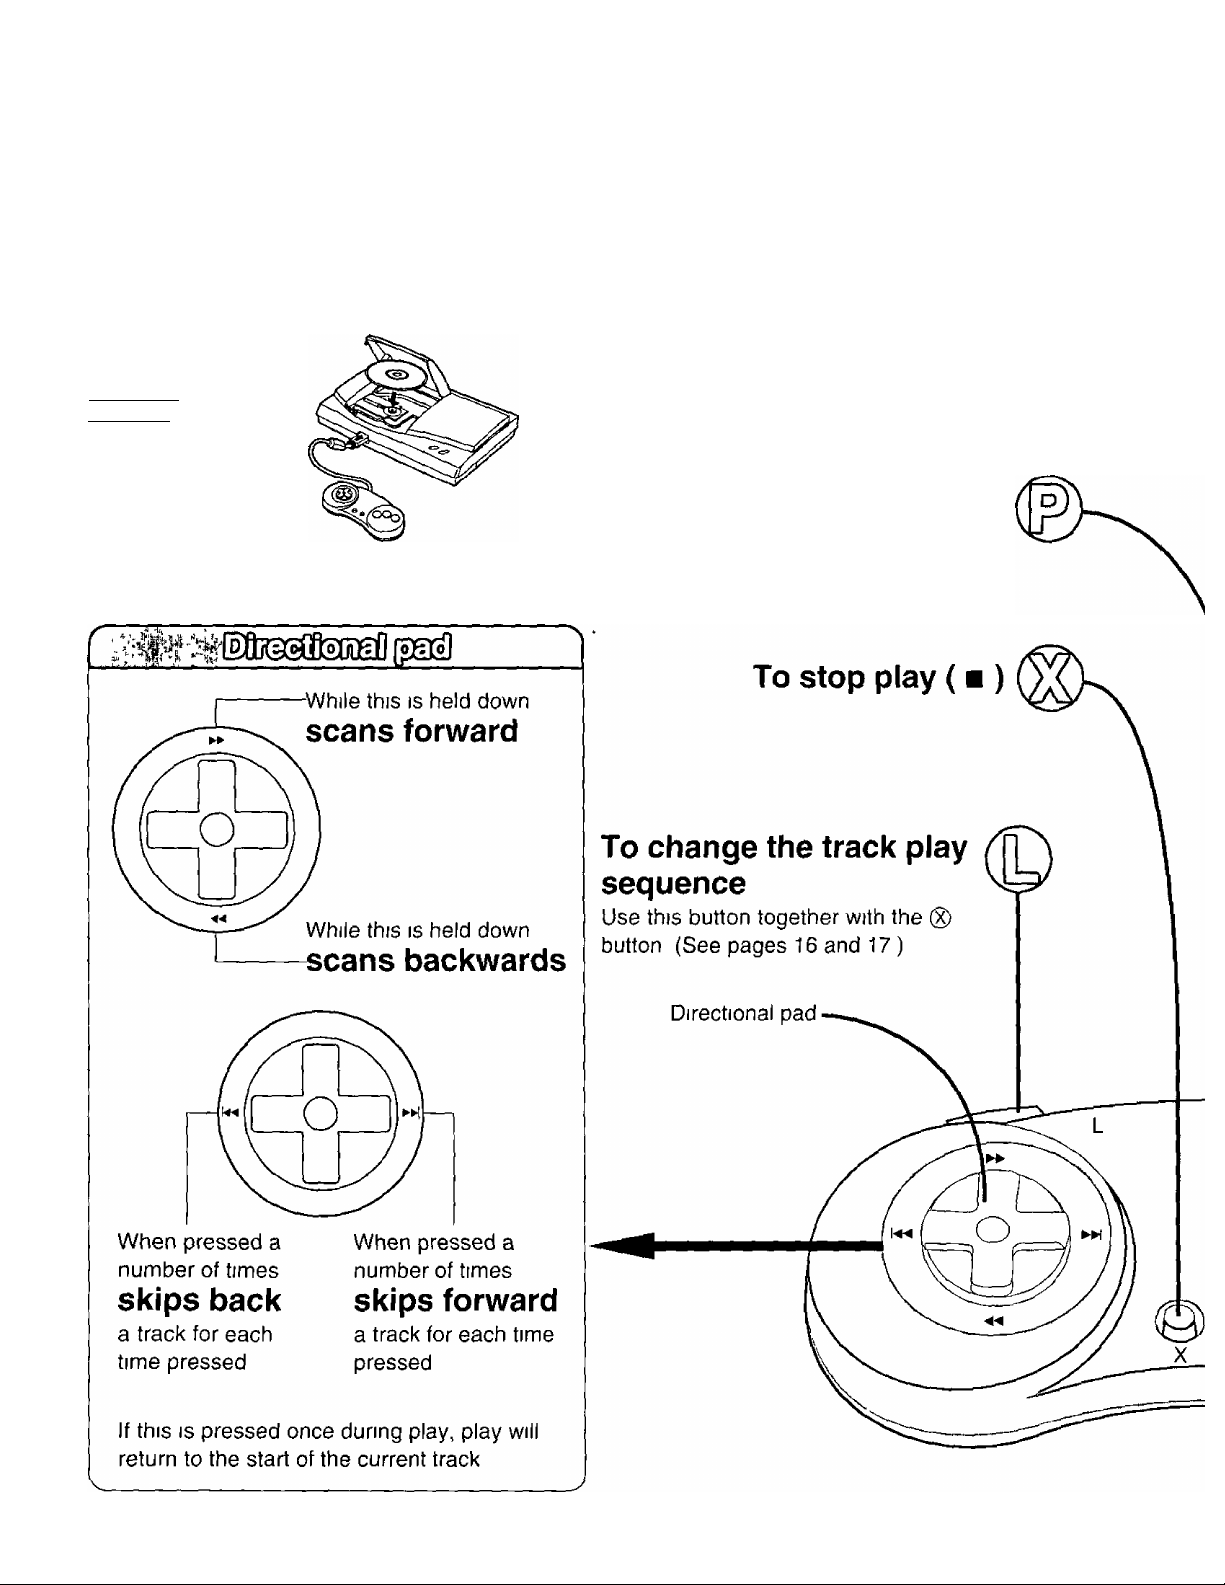
To play or pause (►/")
14
Page 15
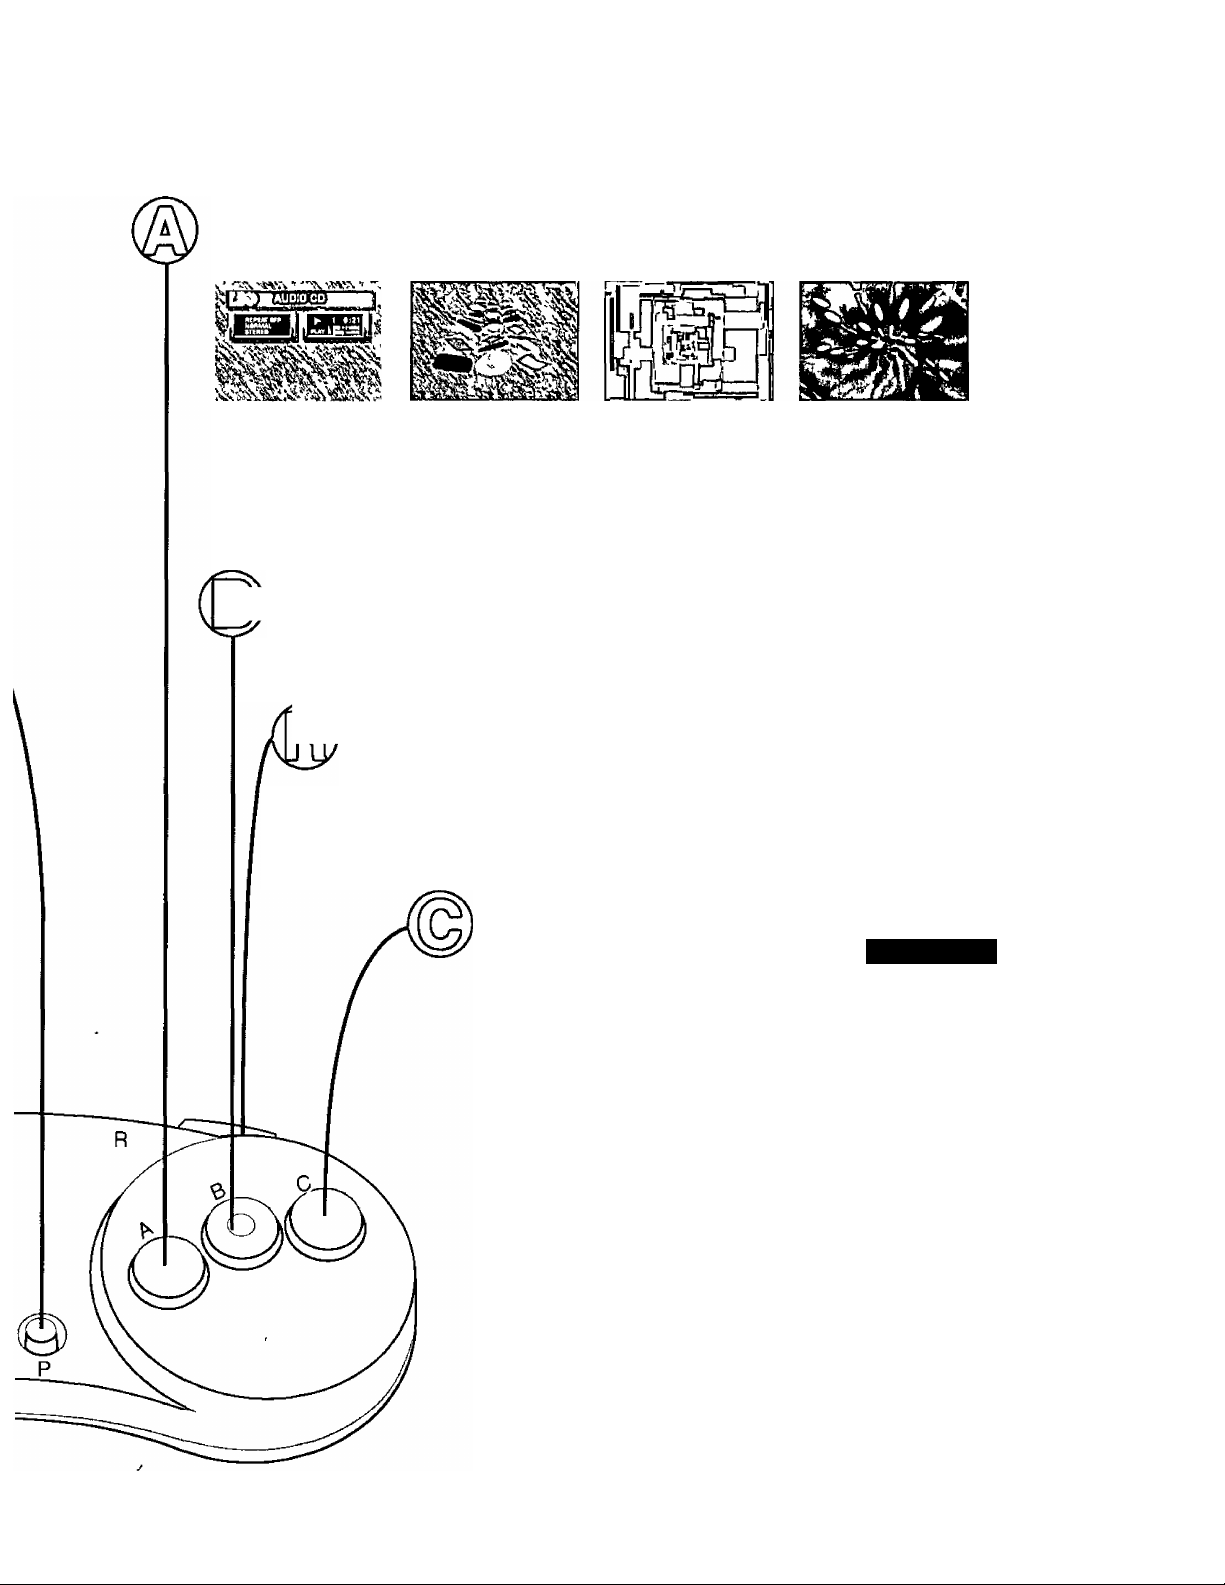
To set the image screen where graphics
dance to the rhythm
(This player contains four screens Any screen can be viewed while the CDs are being played )
Qj] To switch screens during CD-G play
(Only for CD-G With multiple screens)
^ To change the track play sequence
Press this button together with the (x) button
(See pages 16 and 17 )
ip 75
To view the control pad
HELP screen
(The screen appears only while the button is pressed )
PIN! AISCTMNAL HIIP
IN T Hi APCnATINQ INiriMJCTWM
How to adjust the volume
Adjust the volume to the desired level using the
controls on the TV set or stereo system
How to quit
Press [PUSH] on the player to open the lid Remove
the CD once it has stopped spinning
The images may be disturbed if any operations (such as
scan) are done during CD-G play sequence
15
Page 16
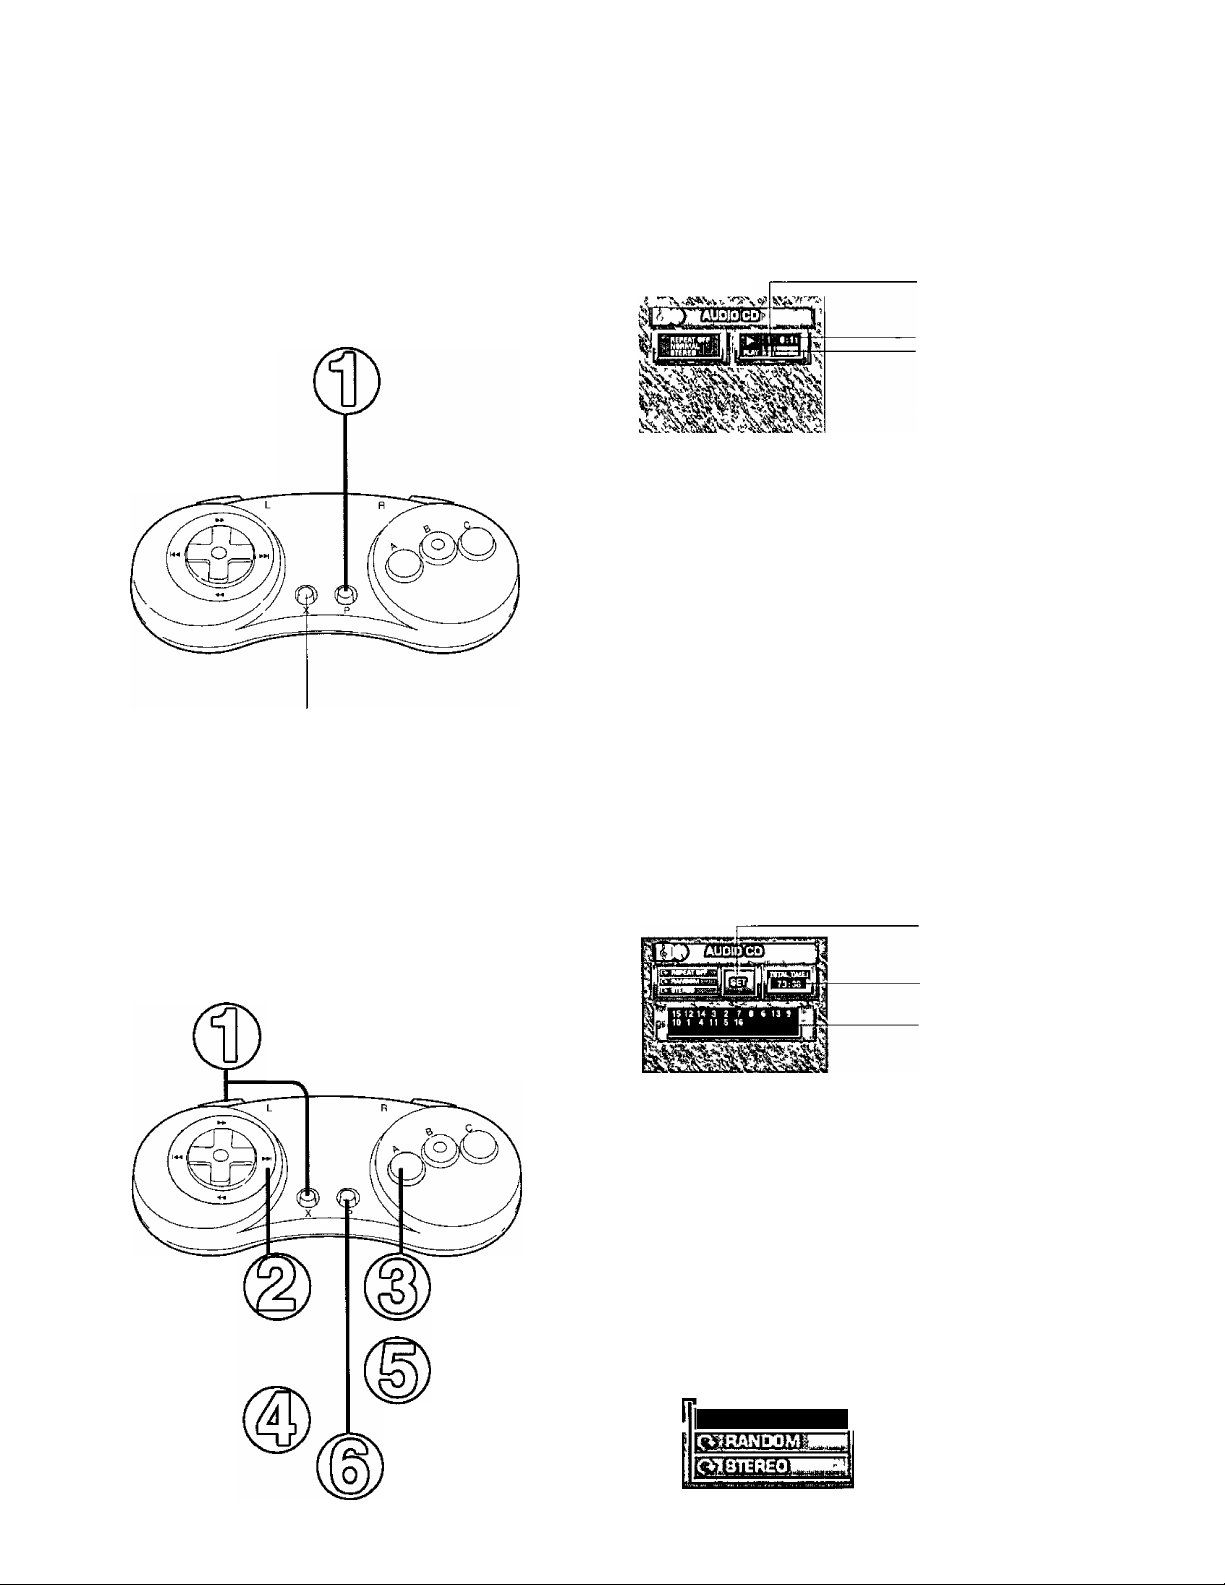
Using audio CDs and CD-G
NORMAL setting for listening to tracks from the beginning
All the tracks starting with the first
Play screen
Track number
track are heard.
Elapsed play time
Audio level
Press the © button
(Play now begins)
■ To find out the number of
tracks or total play time
Display the programming screen by pressing
the © (or ®) and (x) buttons
Programming screen
■Total play time
To stop play
Press the ® button
Press the buttons again to return to the play screen
RANDOM setting for listening to the tracks in random order
With this setting the player decides Programming screen
the sequence in which it will play
the tracks. (It does this automatically )
Display the screen shown on the right by
pressing the ® (or ®) and ® buttons
The tracks will be played at the RANDOM
setting from now on
A CD which was last played in the RANDOM
Select NORMAL
using the up/
down directional
pad
Select SET using
the left/right
directional pad
Select RANDOM
using the ® button
Return to the play
screen using the ®
button
Press the © button
(Play now commences)
mode will be played at the RANDOM setting
when it IS next played
This setting needs to be reset to return to the
NORMAL setting if the CD is to be played
starting from the first track
SET
Total play time
Track sequence
NORMAL
4^
RANDOM
4-
■-PROGRAM
16
Page 17
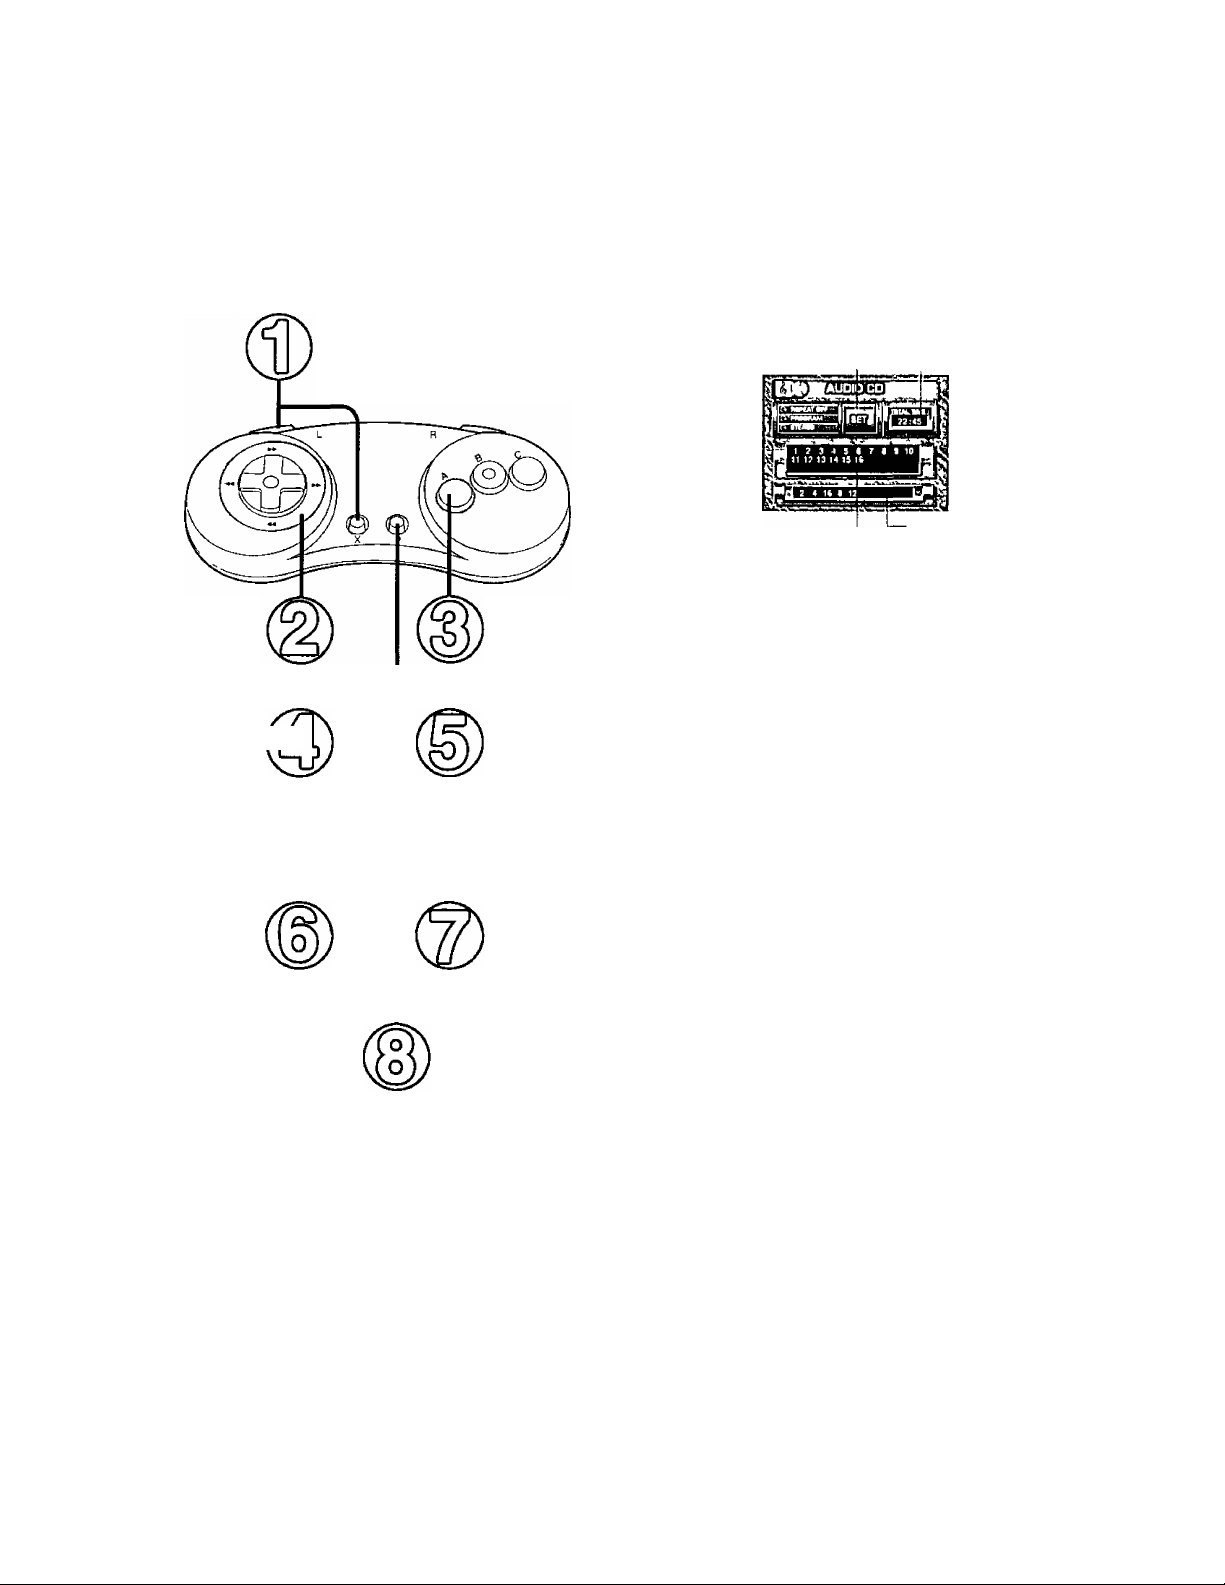
I
PROGRAM setting for listening to selected tracks only
Selected tracks are heard in their programmed sequence.
Select NORMAL
using the up/down
directional pad
Select the
preferred track
number using the
directional pad
Select SET using
the directional pad
Press the © button
(Play now commences)
Display the screen on the right by
pressing the (t) (or (r)) and (g) buttons
Select PROGRAM using
the ® button
Press the ® button
(The track number is
entered on the
programmed track
number list)
Repeat steps® and ®
Return to the play screen
using the ® button
(The information is saved
in the player)
Programming screen
SET Total program time
Programmed track
number list
Track number list
To delete a
programmed track
Use the directional pad to select
the number of the track to be
deleted from the programmed track
number list, and press the (A)
button
To add another track
Use the directional pad to select
the position in the programmed
track number list where the track is
to be added
Use the directional pad to select
the number of the track to be
added from the track number list
Press the ® button
Track sequences for about 80 audio CDs can be saved.
Simply by inserting the same CD, it is possible to listen to the tracks in their saved sequence
• In some cases, a track sequence can not be saved
A sequence can not be saved when the amount of game data saved is too large In this case, remove data
which IS no longer required (See page 11 )
However, when even one sequence has been saved,
Memory for about 80 CDs is set aside so that it is not affected by the amount of game data stored
• When the memory size for saving track sequences (equivalent to about 80 CDs) has been exceeded,
Track sequences are automatically erased, starting from the oldest ones, and new track sequences are
stored
17
Page 18
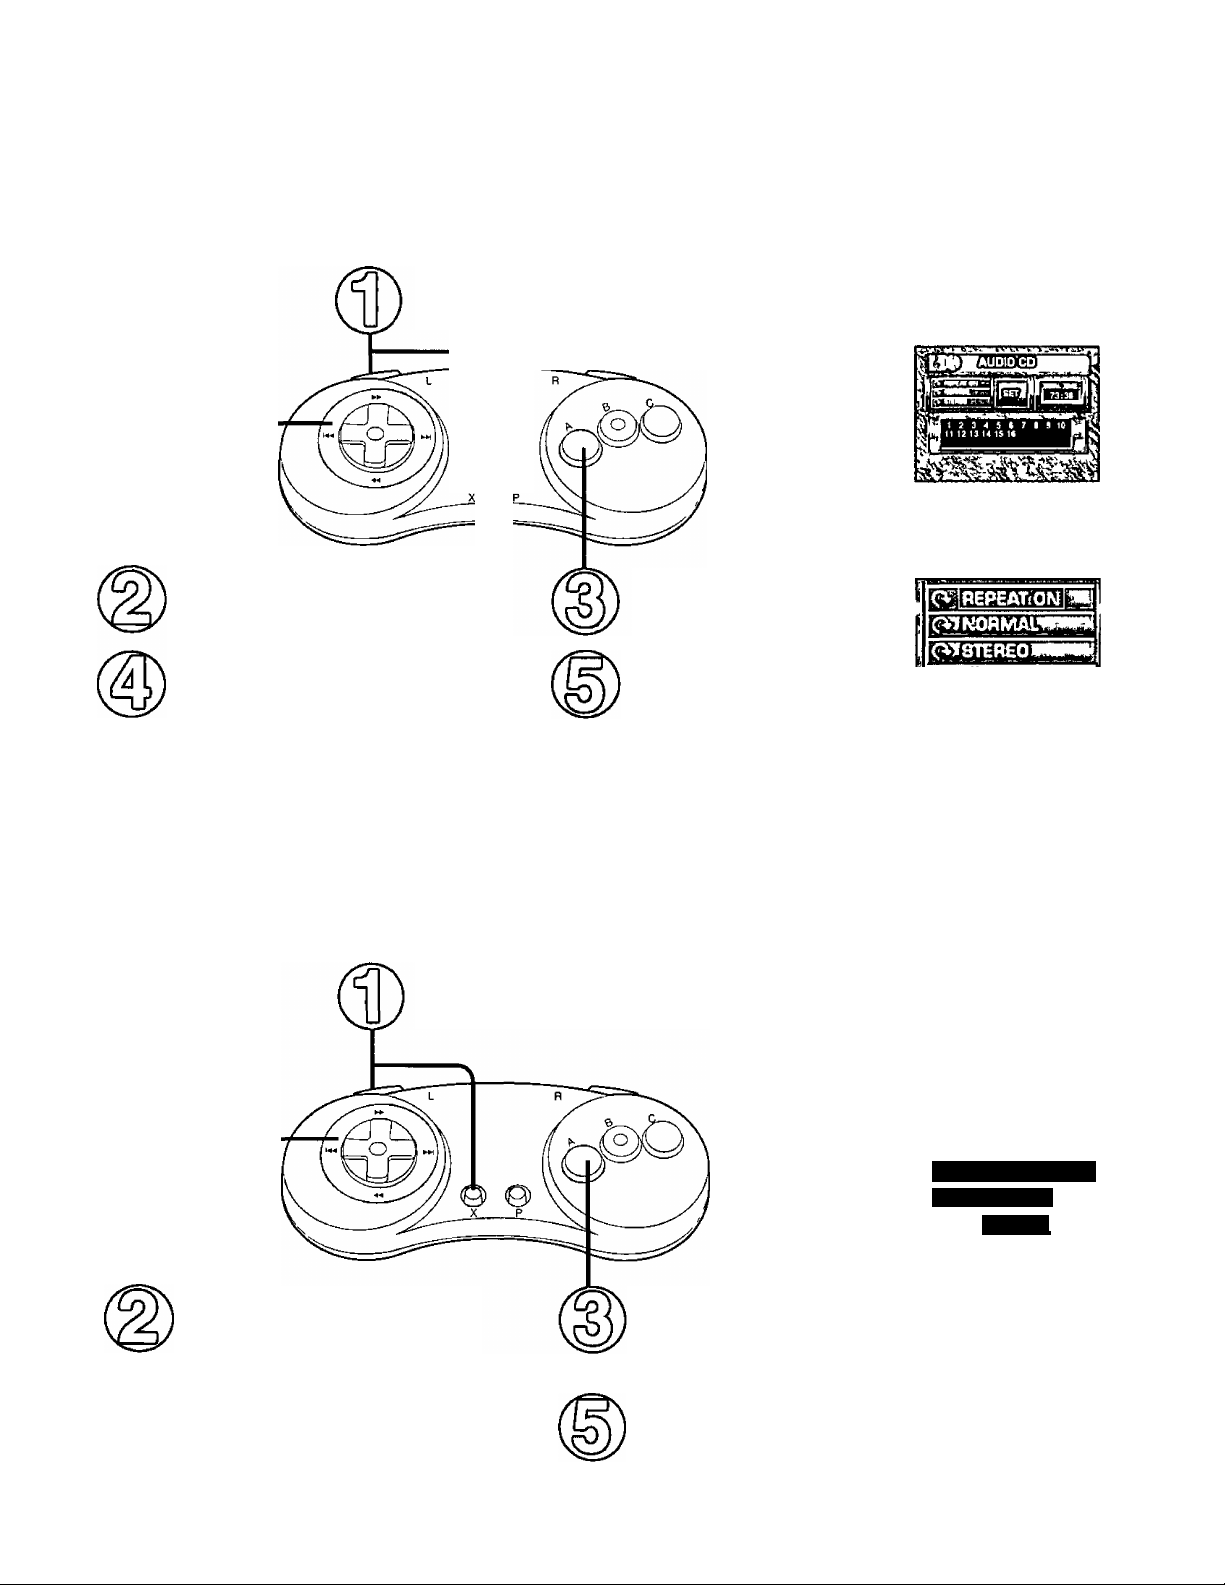
Repeat play (REPEAT ON)
Switch to the programming screen
by pressing the ® (or ®) and (x) buttons
e 0
Select REPEAT OFF using the
up/down directional pad
Select SET using the left/right
directional pad
Set REPEAT ON using
the ® button
Return to the play screen
using the ® button
To switch from stereo to “MONO” or vice versa
• When using a sound-multiplexed CD for “karaoke” such as CD-G (when the singer’s voice is heard
through the right channel and the accompaniment through the left)
When the sound mode is set to R-MONO or MONO, you can listen to the example singing first, or
when the sound mode is set to L-MONO you can sing along to just the accompaniment
Display the programming screen by pressing
the ® (or (R)) and ® buttons
<V»REPEATiON!^
CVINORMAU
18
Select STEREO using the
up/down directional pad
Select SET using the left/right
directional pad
Decide on one of the
settings on the right using
the ® button
Return to the play screen
using the ® button
sa
STEREO
4^
MONO
4
L-MONO
4
R-MONO
_____
I
Page 19
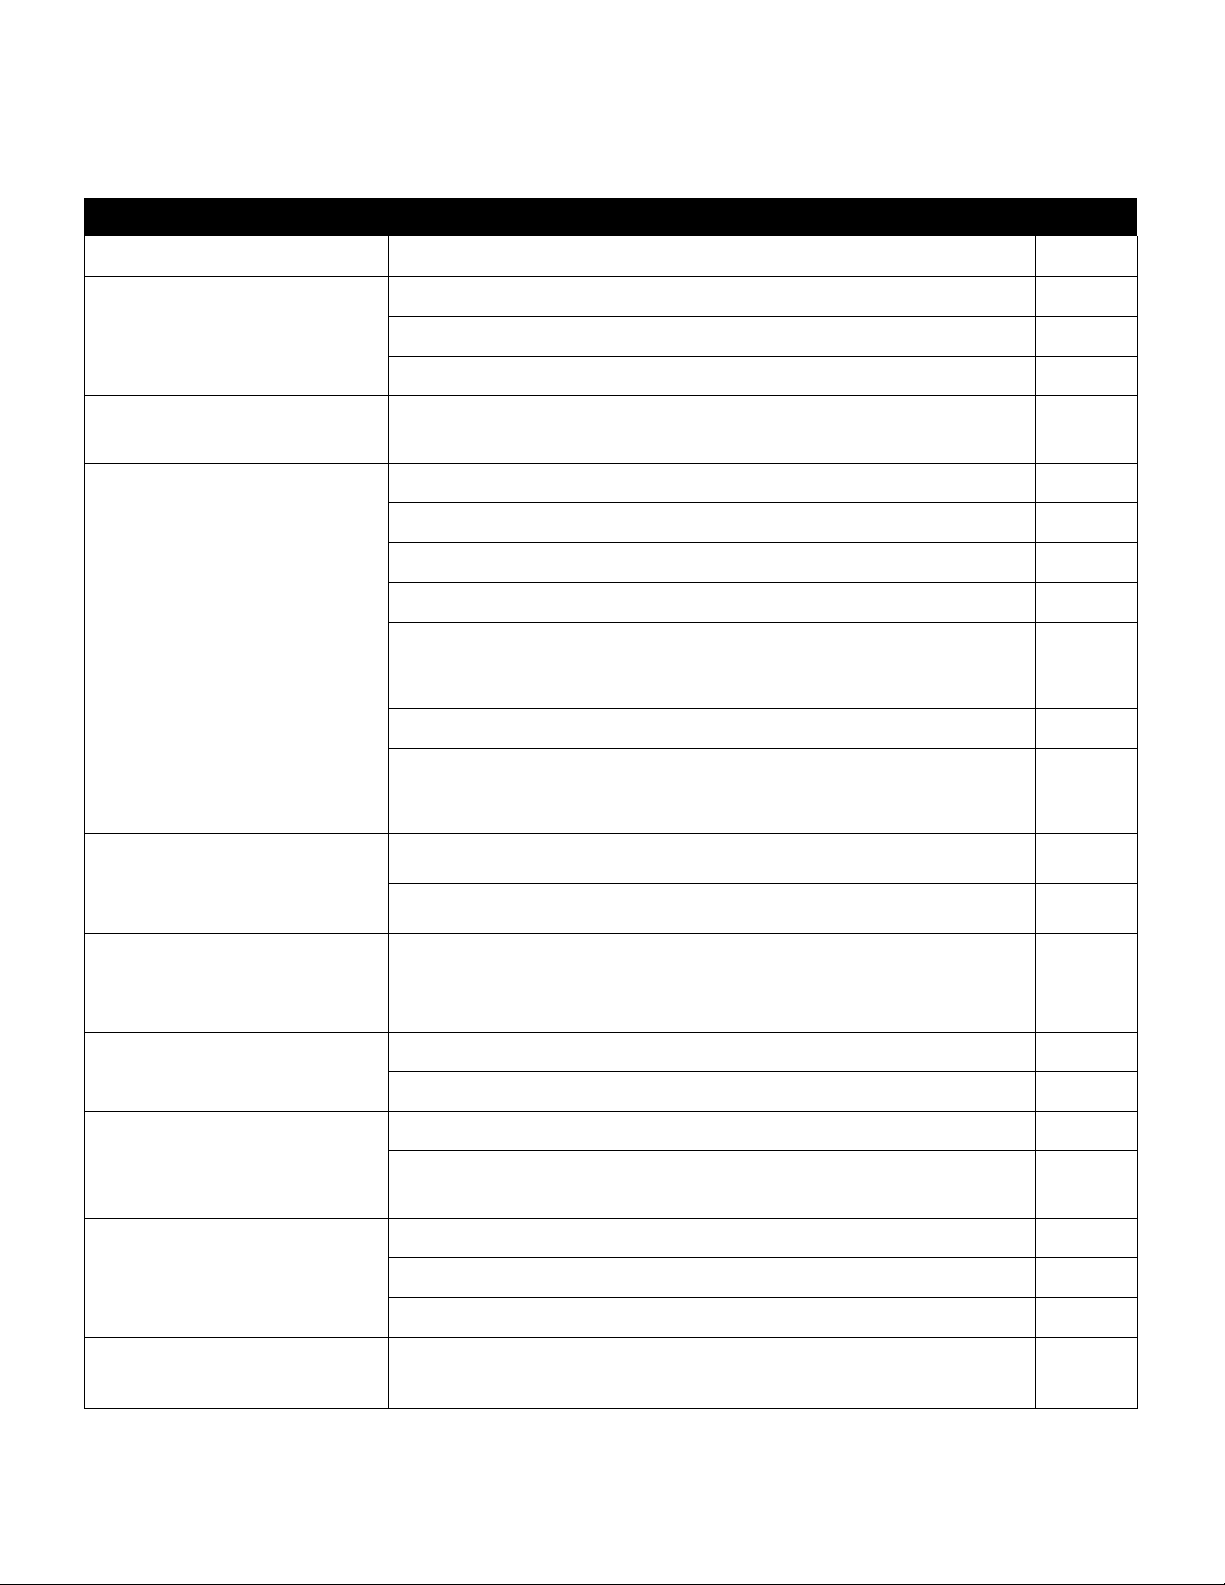
Troubleshooting
Please check through the items listed below before requesting repair service
1
Symptom
No power.
No picture.
No further operation is
possible.
No CD play.
Checkpoint
• Has the power cord been plugged in properly'?
• Have the player and TV set been turned on'?
• Have the player and TV set been connected properly'?
• Is the TVA/CR selector set to the correct position'?
• Set the power switch (POWER) to OFF and reset the power switch
to ON
• Has the CD been set properly over the center holder'?
• Has the CD been inserted with its label side facing Ob'?
• A CD which IS not compatible with the player can not be used
• The CD IS dirty —► Wipe off the dirt using a soft cloth
• The lens is dirty -► Wipe off the dirt using a cotton swab or blow it
away using a rubber blower for cleaning lenses (available from
camera stores)
• Is the CD scratched, cracked, or warped'? (If so, do not use it)
• Has condensation formed on the player'?
—► Turn off the power, wait an hour or so for the
condensation to dry out, and then try operating the player
Reference'
page No.
9
10
8
10
—
11
11
Front
cover
7
—
—
—
Demonstration screen
• Has a CD been inserted'? 11
appears but no further
operation is possible.
Software program screen
appears but no further
• Has the CD been inserted properly over the center holder'?
• Has the control pad been connected properly*?
11
8
operation is possible.
Picture appears but
there is no sound.
Something is wrong
with the sound.
Poor picture quality.
Edges of the picture are
cut off or distorted.
If the problem persists even though the steps described above have been taken, discontinue use, disconnect
the power cord, and consult with a Panasonic service center (In the United States, consult an MSC''
Authorized Servicenter for detailed instructions )
Matsushita Services Company
• Have the player and TV set been connected properly*?
• Is the TV set volume at its lowest setting or is it muted*?
• Has the audio/video cable (if used) been connected properly*?
• In the case of a monaural TV set, has the pin-to-pin cable
(not supplied) been connected properly*?
• Have the player and TV set been connected properly*?
• Have the TV set’s brightness and contrast been adjusted properly"?
• Place the player at a distance from the TV set
• This may occur due to the condition of the TV set and the software,
and It IS not a malfunction
8
—
8
9
8
—
—
19
Page 20
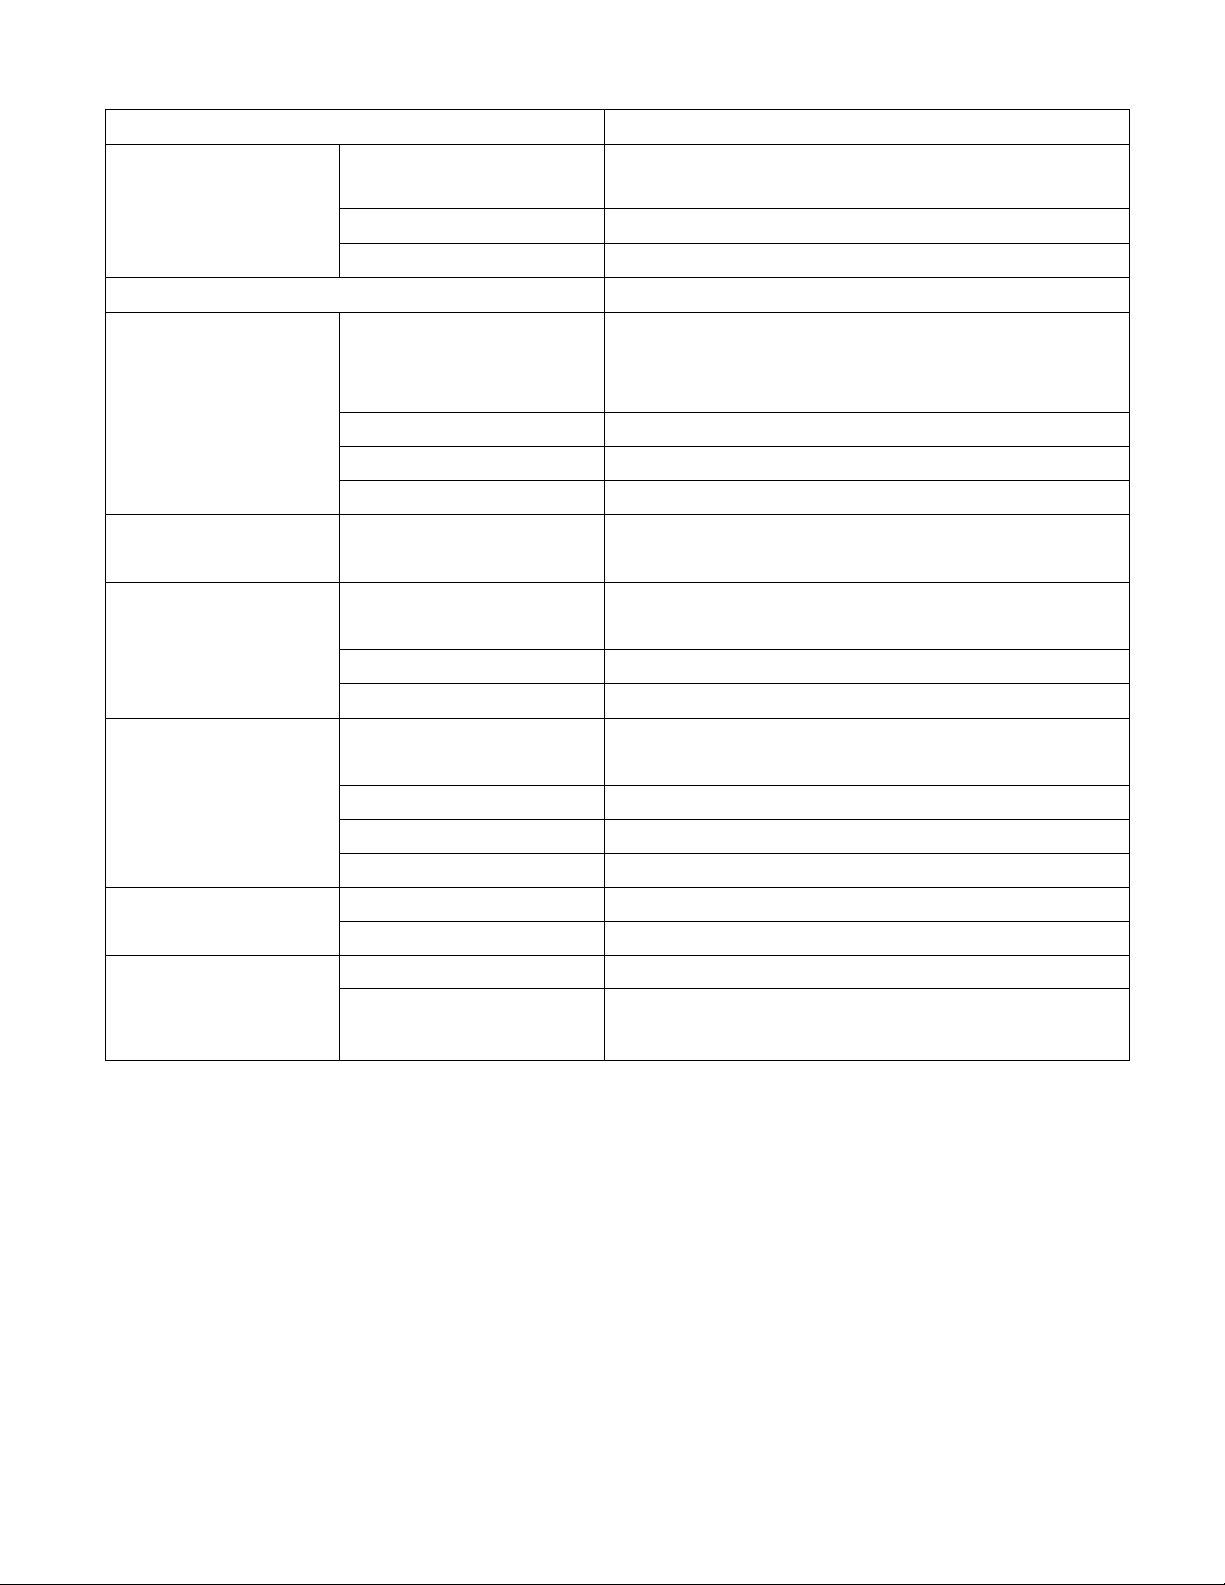
Specifications
CPU
Memory
DSP
Video/Audio
Storage
I/O Port
System
32-bit RISC processor ARM60 (12 5 MHz)
3 MB
---------
RAM/
VRAM
SRAM
ROM
Video output
Resolution
32 KB (Battery back up)
1 MB
Original 16-bit digital signal processor '
RF Video, NTSC, channel 3 or 4 (Switch selectable)
S-Video, NTSC
Composite video, NTSC (RS170 A standard)
640 (H) X 480 (V) dots (Inside 320 x 240 dots)
—2 MB Main-RAM
-------
1 MB VRAM .
Colors Max 16 7 Million/Std 32 k
Audio
CD-ROM drive
Control port
Expansion port
AV Expansion port
System dimensions
Stereo 16-bit PCM (Sampling 44 1 kHz)
Size 12 and 8 cm (CD single)
Double Speed CD-ROM Drive (Read Buffer 32 KB)
Low speed I/O Dsub-9 pin x 1
Daisy-chain system
High speed I/O 30 pm x 1
High speed AV-I/O (Video CD Adaptor) 68 pm x 1
310 X 236 x 68 mm (122x93x27 inch)
(W X D X H)
Weight
Power requirement
Power consumption
Indicator
Power indicator
CD-access indicator
Temperature
Operating 10°C to 35“C (50°F to 95°F)
Storage
Specifications are subject to change without notice
Weight and dimensions are approximate
© Matsushita Electric Industrial Co , Ltd 1994, All Rights Reserved
1 7 kg (3 8 lbs )
120 VAC 60 Hz
30 W
Red-LED x 1
Green-LED x 1
-20°C to 60°C (-4°F to 140°F)
(When packed for shipment)
Panasonic
Matsushita Consumer Electronics
Company, Division of Matsushita
Electric Corporation of America
One Panasonic Way Secaucus,
New Jersey 07094
Panasonic Sales Company,
Division of Matsushita Electric of
Puerto Rico, Inc. (“PSC”)
Ave 65 de Infantería Km 9 5
San Gabriel Industrial Park, Carolina,
Puerto Rico 00985
20
Printed in Japan
DFQS3015ZD SS1294-4065
 Loading...