


Programmable Controller
User's Manual
FP-Industry 4.0 Communicator
(FP-I4C)
ACGM0162V3EN
2021.01
industry.panasonic.eu

Before beginning
Before beginning
Liability and copyright
This manual and everything described in it are copyrighted. You may not copy this manual, in
whole or part, without written consent of Panasonic Electric Works Europe AG (PEWEU).
PEWEU pursues a policy of continuous improvement of the design and performance of its
products. Therefore, we reserve the right to change the manual/product without notice. In no
event will PEWEU be liable for direct, special, incidental, or consequential damage resulting
from any defect in the product or its documentation, even if advised of the possibility of such
damages.
We invite your comments on this manual. Please e-mail us at:
techdoc.peweu@eu.panasonic.com.
Limited warranty
Please direct support matters and technical questions to your local Panasonic
representative.
If physical defects caused by distribution are found, PEWEU will replace/repair the product
free of charge. Exceptions include:
• When physical defects are due to different usage/treatment of the product other than
described in the manual.
• When physical defects are due to defective equipment other than the distributed product.
• When physical defects are due to modifications/repairs by someone other than PEWEU.
• When physical defects are due to natural disasters.
2 FP-I4C

Software legal notices
This product incorporates the following software:
(1) The software developed independently by or for Panasonic Electric Works Europe AG,
(2) the software owned by third party and licensed to Panasonic Electric Works Europe AG,
(3) the software licensed under the GNU General Public License, Version 2.0 (GPL V2.0),
(4) the software licensed under the GNU LESSER General Public License, Version 2.1
(LGPL V2.1), and/or
(5) open source software other than the software licensed under the GPL V2.0 and/or LGPL
V2.1.
The software categorized as (3) - (5) are distributed in the hope that it will be useful, but
WITHOUT ANY WARRANTY, without even the implied warranty of MERCHANTABILITY or
FITNESS FOR A PARTICULAR PURPOSE.
Software legal notices
Please refer to the detailed terms and conditions thereof shown in the device settings menu.
At least three (3) years from delivery of this product, Panasonic will give to any third party
who contacts us at the contact information provided below, for a charge no more than our
cost of physically performing source code distribution, a complete machine-readable copy of
the corresponding source code covered under GPL V2.0, LGPL V2.1 or the other licenses
with the obligation to do so, as well as the respective copyright notice thereof.
Contact information: plc.peweu@eu.panasonic.com
FP-I4C 3
Important symbols
Important symbols
One or more of the following symbols may be used in this documentation.
The following symbols are used to indicate the type of hazard.
Indicates a hazardous situation which, if not avoided, will result in death or serious injury.
Indicates a hazardous situation which, if not avoided, could result in death or serious injury.
Indicates a hazardous situation which, if not avoided, could result in minor or moderate
injury.
Indicates a property damage message.
4 FP-I4C

Safety precautions
Observe the following notices to ensure personal safety or to prevent accidents. To ensure
that you use this product correctly, read this User’s Manual thoroughly before use. Make
sure that you fully understand the product and information on safety.
• Always take precautions to ensure the overall safety of your system, so that the whole
system remains safe in the event of failure of this product or other external factor.
• Do not use this product in areas with inflammable gas. It could lead to an explosion.
• Exposing this product to excessive heat or open flames could cause damage to electronic
parts.
Safety precautions
• To prevent abnormal exothermic heat or smoke generation, do not use this product
continuously at the maximum performance values listed in the specifications.
• Do not disassemble or modify the product. It could lead to abnormal exothermic heat or
smoke generation.
• Do not touch the terminals while the electricity is turned on. It could lead to an electric
shock.
• Use external devices to ensure safety related functions such as the emergency stop and
interlock circuit.
• Connect the wires and connectors securely. A loose connection might pose an electrical
hazard, which could result in a short-circuit, exothermic heat or smoke generation.
• Do not allow foreign matter such as liquid, flammable materials, metals to enter the
product. It could cause excessive exothermic heat or smoke generation.
• Do not undertake construction (such as connection and disconnection) while the power
supply is on. It could lead to an electric shock.
FP-I4C 5

Network security
Network security
Implementing measures to protect your network is crucial to keep your network and its traffic
secured.
As you will use this product connected to a network, your attention is called to the following
security risks.
• Leakage or theft of information through this product
• Use of this product for illegal operations by persons with malicious intent
• Interference with or stoppage of this unit by persons with malicious intent
It is your responsibility to take precautions such as those described below to protect yourself
against the above network security risks.
• If this product is connected to a network that includes PCs, make sure that the system
is not infected by computer viruses or other malicious entities (using a regularly updated
antivirus program, anti-spyware program, etc.).
• Use this product in an environment that has LAN, VPN (virtual private network) or leased
line network.
• Use this product in an environment where only limited people concerned can enter.
• Use this product and connected devices such as a PC and tablet securing safety.
• Do not install this product in locations where the product or the cables can be destroyed
or damaged by persons with malicious intent.
Note that incorrect setting of the connection to the existing LAN might cause malfunction in
the devices on the network. Consult your network administrator before connecting.
6 FP-I4C

Table of contents
Table of contents
Before beginning.......................................................................................................................... 2
Software legal notices................................................................................................................. 3
Important symbols....................................................................................................................... 4
Safety precautions....................................................................................................................... 5
Network security...........................................................................................................................6
1 Product overview........................................................................................................................9
1.1 Product package............................................................................................................................... 9
1.2 System requirements........................................................................................................................ 9
1.3 Features............................................................................................................................................ 9
1.4 Part names......................................................................................................................................11
1.5 Status LEDs.................................................................................................................................... 12
1.6 Reset tact switch............................................................................................................................ 13
1.7 Devices supported by USB host ports........................................................................................... 13
1.8 Specifications.................................................................................................................................. 14
1.9 Dimensions......................................................................................................................................15
2 Installation................................................................................................................................. 16
2.1 General installation procedure........................................................................................................16
2.2 Installation environment.................................................................................................................. 17
2.3 Installation space............................................................................................................................ 18
2.4 Attach the unit to a DIN rail........................................................................................................... 18
2.5 Remove the unit from a DIN rail.................................................................................................... 19
2.6 Install the unit on a slim type mounting plate................................................................................ 19
2.7 Install the unit on a flat type mounting plate.................................................................................. 20
2.8 Add FP0/FP0R expansion units to the FP-I4C unit....................................................................... 21
3 Wiring.........................................................................................................................................23
3.1 Connection to PLC TOOL port using cable AIGT8192.................................................................. 23
3.2 Connection to PLC COM port........................................................................................................ 23
3.3 RS485 connection to Eco-POWER METER.................................................................................. 24
3.4 Wire the power supply....................................................................................................................25
4 Getting started.......................................................................................................................... 26
4.1 Overview......................................................................................................................................... 26
4.2 Getting connected to the FP-I4C unit.............................................................................................27
FP-I4C 7

Table of contents
4.3 Connect the FP-I4C unit directly to a PC.......................................................................................27
4.4 Connect the FP-I4C unit to a PC via DHCP server....................................................................... 28
4.5 Change the default user names and passwords............................................................................29
4.6 User rights.......................................................................................................................................30
5 Example: Data logging from different devices......................................................................32
5.1 Functional overview........................................................................................................................ 32
5.2 Connect the devices.......................................................................................................................32
5.3 Make FP-I4C communication settings............................................................................................34
5.4 Make PLC communication settings................................................................................................ 35
5.5 Configure data logging for FP0R....................................................................................................35
5.6 Configure data logging for KW2M..................................................................................................36
5.7 Configure data logging for KW9M..................................................................................................37
5.8 Import variables from CSV files......................................................................................................39
5.9 List and download log files.............................................................................................................40
6 Example: HTTP connection to a cloud server...................................................................... 41
6.1 Functional overview........................................................................................................................ 41
6.2 Connect the devices.......................................................................................................................41
6.3 Make FP-I4C communication settings............................................................................................42
6.4 Configure the HTTP client and download the sample files............................................................ 43
6.5 Set up the programming examples................................................................................................ 44
6.6 Get weather data from a cloud server........................................................................................... 44
6.7 Forward weather data to a dashboard........................................................................................... 45
6.8 Minimize security risks....................................................................................................................46
7 Example: Web-based data visualization................................................................................ 47
7.1 Functional overview........................................................................................................................ 47
7.2 Connect the devices.......................................................................................................................47
7.3 Make FP-I4C communication settings............................................................................................48
7.4 Make PLC communication settings................................................................................................ 49
7.5 Configure the PLC connections......................................................................................................50
7.6 Create tags for PLC variables........................................................................................................51
7.7 Create a simple HTML page.......................................................................................................... 52
7.8 Import variables in HMWIN Studio.................................................................................................53
8 Record of changes...................................................................................................................54
8 FP-I4C

1 Product overview
1.1 Product package
The FP-I4C product package contains the following items.
• 1 x FP-Industry 4.0 Communicator (FP-I4C unit)
Product number: AFP4C
• 1 x 24V DC power supply cable
Product number: AFPG805
• 1 x leaflet providing installation instructions
• 1 x 16-pin spring force plug (Phoenix Contact Co. MC0.5/8-ST-2,5)
1 Product overview
1.2 System requirements
To configure your applications and to access FP series PLCs via Ethernet, you only need a
standard browser. For HMWIN Studio, your PC must meet some basic requirements.
Supported browsers:
• Microsoft Edge
• Mozilla Firefox
• Google Chrome
• Safari
• Opera
HMWIN Studio has the following system requirements:
• Microsoft Windows® 7, Windows® 8.x or Windows® 10
• Hard disk with at least 500MB free disk space, 512MB RAM, Ethernet connection
HMWIN Studio can be downloaded free of charge from the Panasonic Download Center.
1.3 Features
The FP-I4C unit works as an interface between a LAN or a WAN network (Internet/Intranet)
and all PLCs of the FP series.
The FP-I4C unit comes in a compact housing with multiple interfaces and offers various
services for data exchange.
FP-I4C 9

1 Product overview
RS232C/Ethernet interface:
• RS232C interface and a switchable RS232C/RS485 interface for PLC connections
• 2 Ethernet 10BASE-T/100BASE-T interfaces for network connections
• RS232C to Ethernet redirection
• Programming and visualization tools access via Ethernet
• Optional password protection and IP lock security
Other interfaces:
• 2 USB 2.0 host ports
• 2 digital function inputs
Web server:
• Representation of PLC data in individually created HTML5 pages
• Access via standard Internet browsers
• Password protection
Modbus RTU/TCP:
• Modbus RTU master/slave functionality
• Modbus-TCP client/server functionality
• Modbus RTU/TCP gateway
• MEWTOCOL/Modbus gateway
Data logger:
• Logging of PLC data and storage of logged data in the internal memory or transmission
via FTP
Secure data transmission and authentication:
• Communication via OpenVPN to ensure encrypted and secure data transmission and
authentication
MQTT:
• Communication in the Internet of Things (IoT)
SQL:
• Connection to databases
HTTP client:
• Communication with cloud services
REST API:
• Reading and writing PLC data using HTTP requests (GET, POST)
IEC60870 protocol:
• IEC60870-5-104 standard telecontrol communication protocol via Ethernet
10 FP-I4C
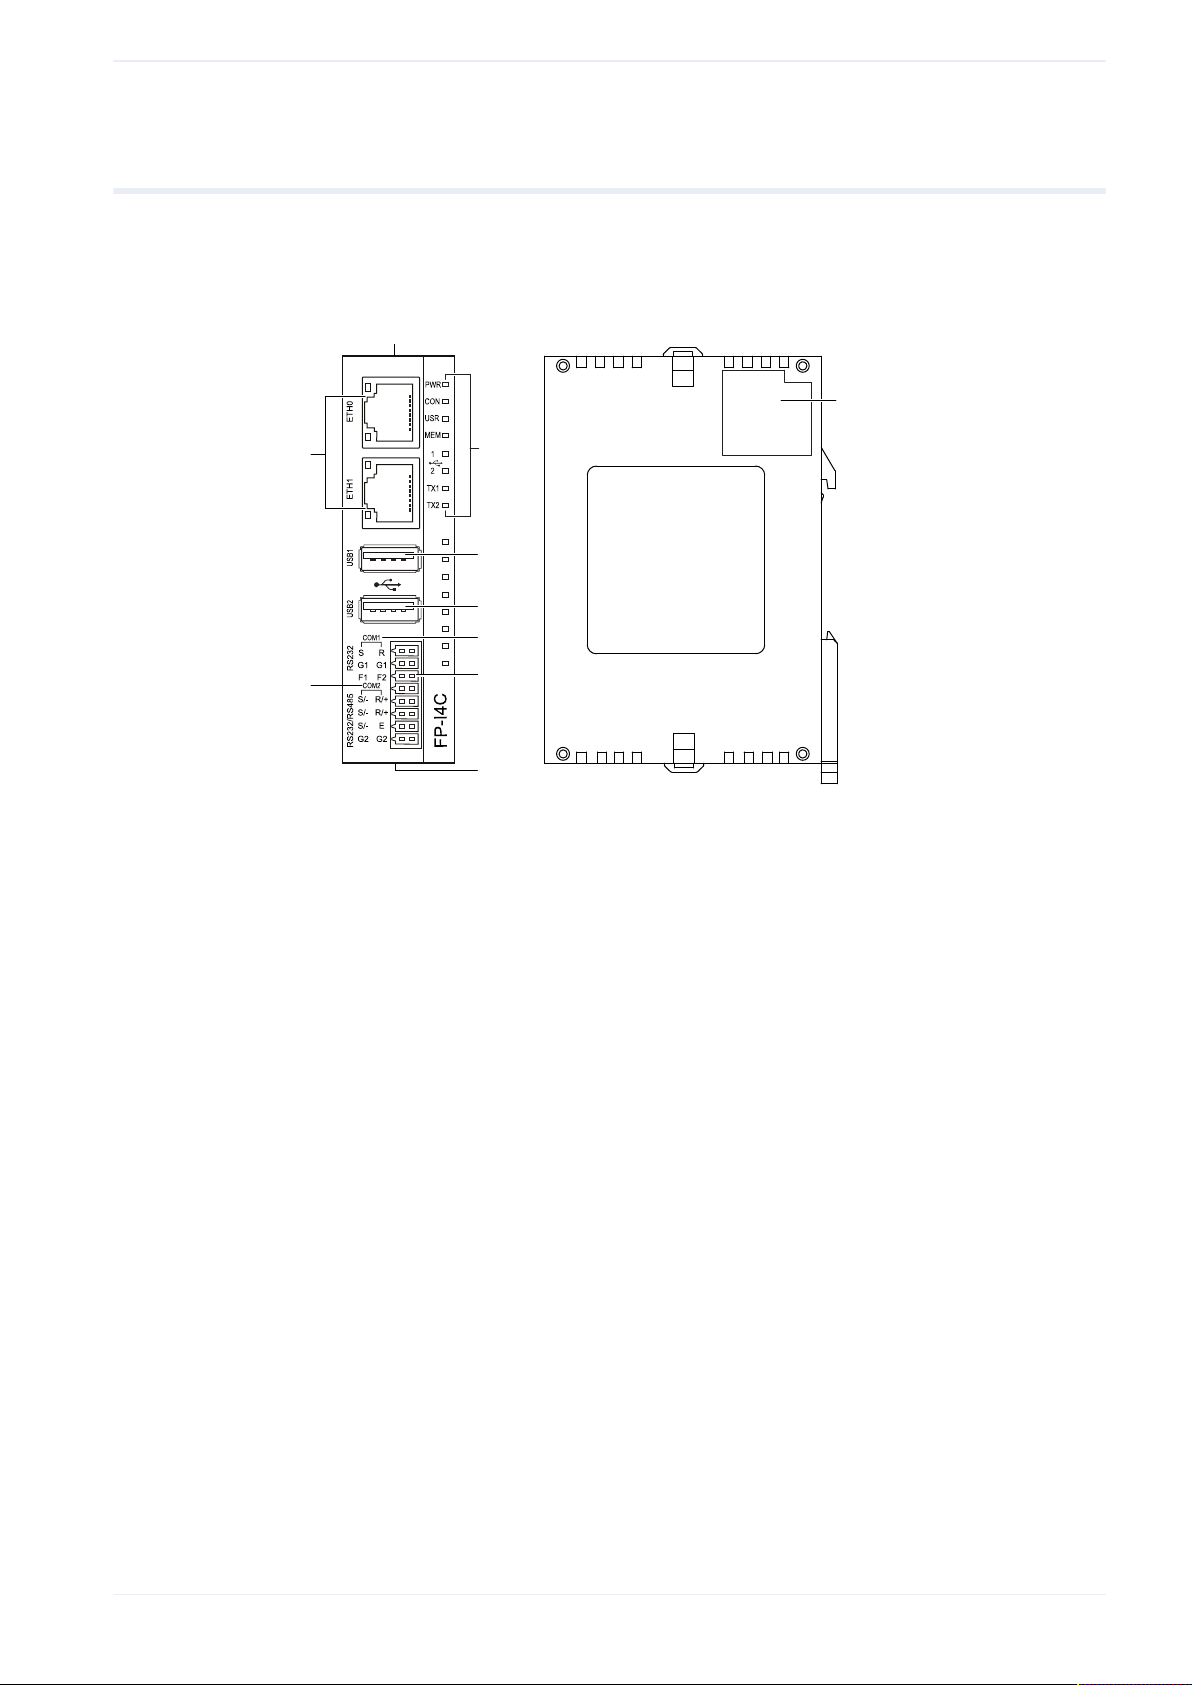
1.4 Part names
The FP-I4C unit is equipped with multiple communication interfaces, status LEDs, function
inputs, a reset tact switch, and an expansion connector.
1 Product overview
(1)
(10)
(3)
(8)
(1)
(2)
(3)
(4)
(5)
(6)
(7)
(8)
(9)
(10)
(2)
(4)
(5)
(6)
(7)
(9)
Reset tact switch
Status LEDs
ETH0, ETH1, Ethernet connectors
USB1, USB 2.0 host port (500mA)
USB2, USB 2.0 host port (100mA)
COM1 RS232 (non-insulated)
F1, F2, function inputs (pull-up design)
COM2 RS232/RS485 (insulated, switchable)
24V DC power supply connector
Expansion connector for FP0/FP0R expansion units (16 pins)
Related topics
Reset tact switch (page 13)
Wire the power supply (page 25)
Status LEDs (page 12)
FP-I4C 11

1 Product overview
1.5 Status LEDs
The LEDs on the FP-I4C unit display the operation and communication status.
ETH0
ETH1
(1)
PWR
(2)
CON
(3)
USR
(4)
MEM
(5)
USB 1, USB 2
(6)
TX1
(7)
TX2
(1)
(2)
(3)
(4)
(5)
(6)
(7)
LED Color LED status Description
PWR Green On Power supply is on and self-test is
completed.
CON Yellow User-defined User-defined, controlled by script function
User-defined User-defined, controlled by script functionUSR Yellow
Flashes
(heartbeat 1/s)
MEM Orange On Data is written to the USB flash drive.
USB 1 Green On A device is connected to USB port 1.
USB 2 Green On A device is connected to USB port 2.
TX1 Green Flashes
(rate depending on data
traffic)
TX2 Green Flashes
(rate depending on data
traffic)
A system reset initiated by the reset tact
switch is active.
Communication via COM1 (RS232) is
active.
Communication via COM2 (RS232/
RS485) is active.
Related topics
Reset tact switch (page 13)
12 FP-I4C

1.6 Reset tact switch
A small tact switch within the housing on the top side can be used to restart or to reset the
FP-I4C unit.
To restart or to reset the unit, use a paperclip or similar and press the tact switch 3 times
within 3s. The yellow USR LED starts flashing (heartbeat 1/s).
• To restart the unit, press the tact switch again for 3 to 6s.
• To reset the unit to the factory settings, press the tact switch again for at least 6s. The unit
will be restarted and all user data are removed.
1 Product overview
1.7 Devices supported by USB host ports
The USB host ports support the FP series PLCs and GT series HMIs listed in the following
targeted peripheral list.
Commercial USB flash drives and hard disks (max. 500mA on upper USB connector) can
also be connected.
• Panasonic GT USB driver ver. 1.0
Model: GT series, manufacturer: Panasonic Electric Works, Ltd., vendor ID: 0x0986,
product ID: 0x0310
• Panasonic FP series USB driver
Model: PLC FP0H, FP7, FP0R, manufacturer: Panasonic Electric Works, Ltd., vendor ID:
0x0986, product ID: 0x0320
• Panasonic Eco-POWER METER
Model: Eco-POWER METER, manufacturer: Panasonic Electric Works, Ltd., vendor ID:
0x04da, product ID: 0x4201
• Panasonic FP-X series USB driver
Model: CP210x UART Bridge, e.g. FP-X, manufacturer: Cygnal Integrated Products,
vendor ID: 0x10C4, product ID: 0xEA60
FP-I4C 13

1 Product overview
1.8 Specifications
The FP-I4C unit has the following characteristics and technical specifications.
Item Description
Product number AFP4C
Rated input voltage 24V DC, use the power supply cable (AFPG805) supplied with the unit
Operating voltage range 21.6–26.4V DC, supplied by class 2 circuit only
Serial interfaces COM1 RS232 (non-insulated), COM2 RS232/RS485 (insulated,
Ethernet 2 Ethernet connectors, 10BASE-T/100BASE-TX auto-negotiation via
USB 2 USB connectors, USB 2.0 full speed, max. 500mA (USB1), max.
switchable)
16-pin spring force plug by Phoenix Contact Co. (MC0.5/8-ST-2,5)
RJ45 female connector
100mA (USB2)
Function inputs 2 binary inputs (pull-up design) for optional functions
Operation status LEDs 7
Protocols and standards TCP/IP, UDP/IP, DHCP, FTP, FTPS, SSH, http, https, SMTP, ESMTP-
Auth, POP3, NTP, Modbus, DNS, SNMP, VPN, VNC, MQTT, SQL,
OPC UA
Flash memory 2.4GB user/configuration data
RAM 496MB
Current consumption ≈75mA at 24V DC (without expansion unit, USB flash memory, etc.)
Degree of protection IP20
Operating temperature 0°C to +55°C
Storage temperature -20°C to +70°C
Operating humidity 10%–95% RH (at 25°C, non-condensing)
Storage humidity 10%–95% RH (at 25°C, non-condensing)
Vibration resistance 10Hz to 55Hz, 1 cycle per minute with a double amplitude of 0.75mm;
10min on 3 axes
Shock resistance ≥10g, 4 times on 3 axes
Unit dimensions Height: 90mm, width: 25mm, depth: 64mm
Weight ≈110g
Operation conditions Free from corrosive gases and excessive dust
Conformity to CE
Directives
UL approval UL number "2LD7" (file E232530)
EMC Directive 89/336/EEC; EN 55022/Class B; EN 61000-4-2/A1; EN
61000-4-3; EN 61000-4-4 + A1:2010; EN 61000-4-6
14 FP-I4C
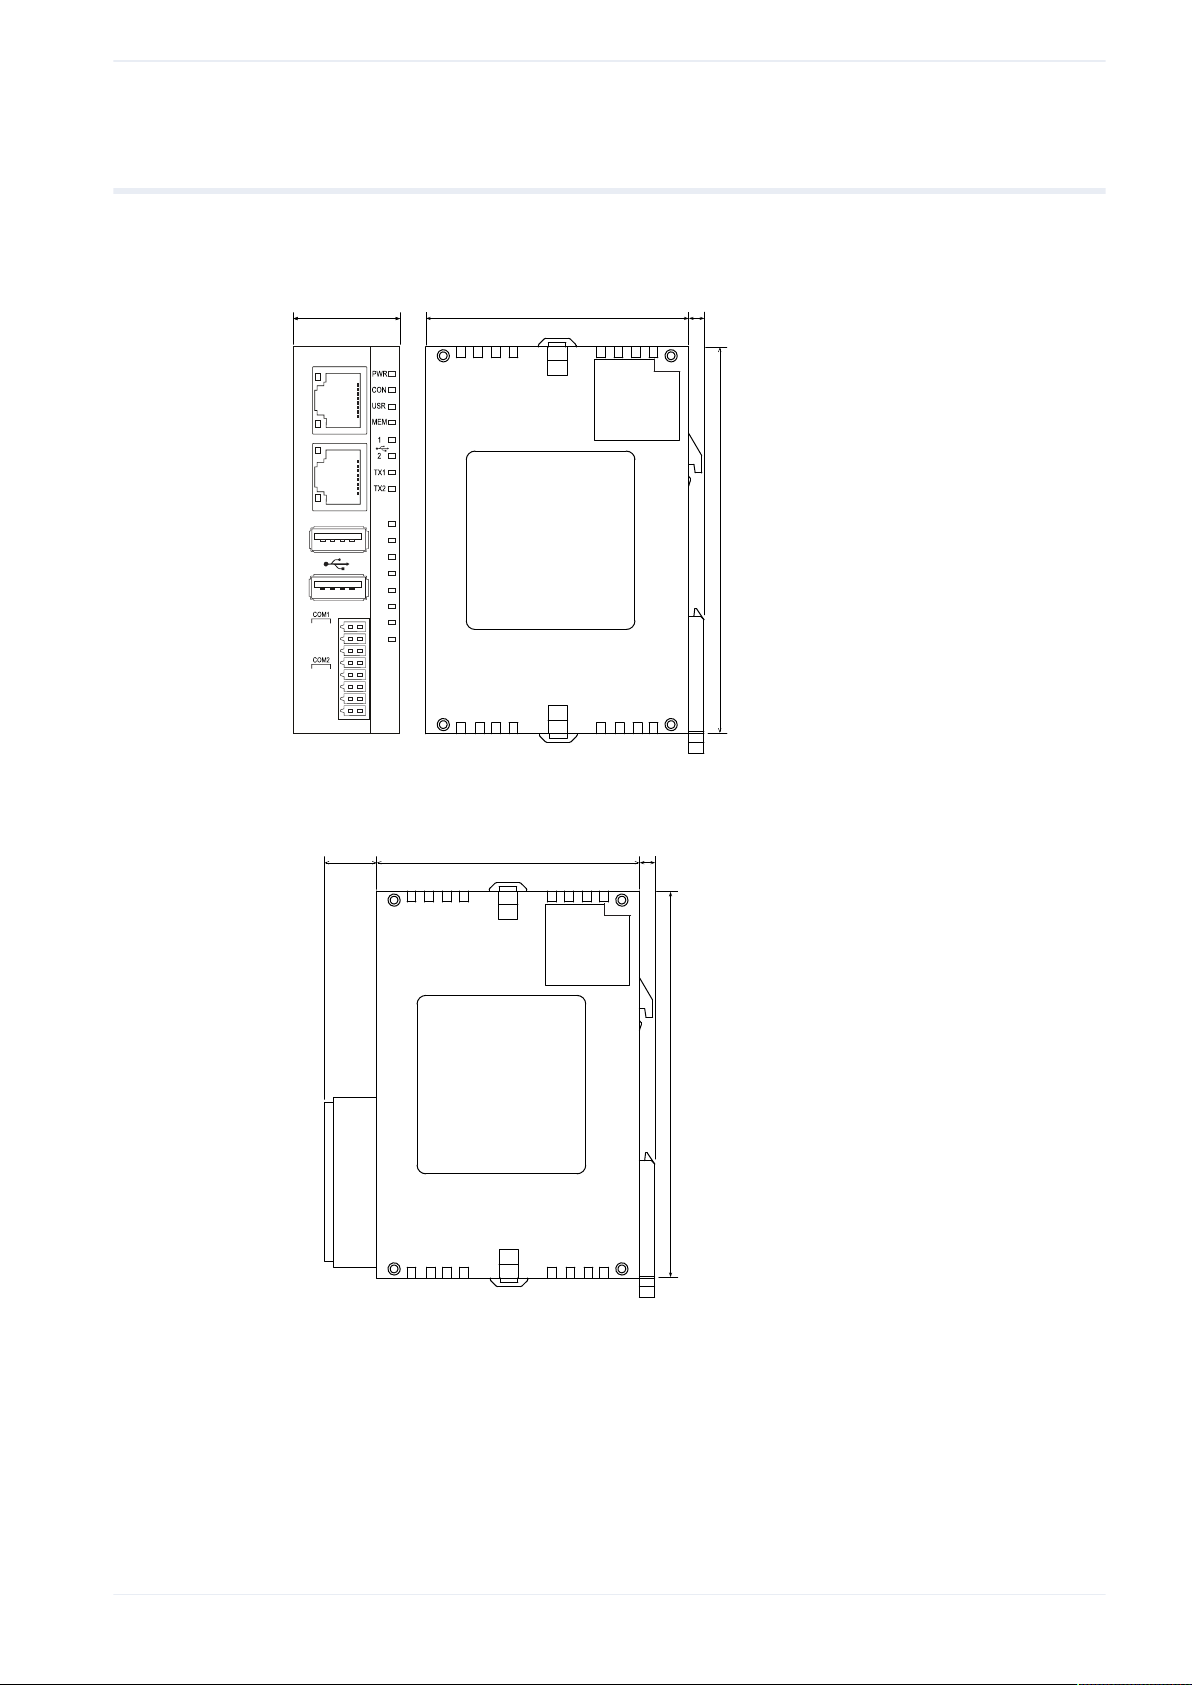
1.9 Dimensions
The dimensions of the FP-I4C unit are indicated in the technical drawing.
1 Product overview
60.0 3.5
90.0
ETH0
ETH1
USB1
USB2
S R
G1
RS232RS232/RS485
F1 F2
S/- R/+
S/S/- E
G2 G2
25.0
G1
R/+
FP-I4C
[mm]
60.011.5 3.5
90.0
[mm]
Right side view of the unit with the 16-pin spring force plug installed
FP-I4C 15

2 Installation
2 Installation
2.1 General installation procedure
Mount the unit and connect the PLC and all communication cables before you turn on the
power supply.
• Perform the installation with the power turned off.
• Before touching the unit or equipment, always touch some grounded metal to discharge
any static electricity you may have generated (especially in dry locations). The discharge
of static electricity can damage parts and equipment.
Related topics
Install the FP-I4C unit in the following order:
1. Mount the FP-I4C unit on a DIN rail or use a mounting plate.
2. Connect the FP-I4C unit to a PC with a standard Ethernet cable (at least Category 5).
Make sure you do not have an IP address conflict. The ETH0 port is configured as a
DHCP client. The ETH1 port is configured with a pre-defined fixed IP address.
Please read the instructions on how to connect the FP-I4C unit to the network.
3. Connect an FP series PLC via RS232C, USB, or RS485.
For wiring examples, refer to the section on wiring or to the “FP-I4C Installation
Instructions” leaflet.
4. Connect the power supply.
Make sure you read the information on how to connect the power supply.
Connect the FP-I4C unit directly to a PC (page 27)
Connect the FP-I4C unit to a PC via DHCP server (page 28)
Connection to PLC TOOL port using cable AIGT8192 (page 23)
Connection to PLC COM port (page 23)
Wire the power supply (page 25)
16 FP-I4C

2.2 Installation environment
To prevent failure or malfunctions, the installation environment must comply with the
specifications of the FP-I4C unit.
After installing the unit, make sure to use it within the range of the general specifications:
• Operating temperature: 0°C to +55°C
• Operating humidity: 30%–85% RH (at 25°C, non-condensing)
• Pollution degree: 2
• Do not use the unit in the following environments:
‒ Direct sunlight
‒ Sudden temperature changes causing condensation
‒ Flammable or corrosive gases
2 Installation
‒ Excessive airborne dust, metal particles or salts
‒ Benzine, paint thinner, alcohol or other organic solvents, or strong alkaline solutions
such as ammonia or caustic soda
‒ Vibration, shock, or direct drop of water
• Avoid noise interference from the following items:
‒ Influence from power transmission lines, high voltage equipment, power cables,
power equipment, radio transmitters, or any other equipment that would generate
high switching surges. Maintain at least 100mm of space between these devices and
the unit.
‒ If noise occurs in the power supply line even after the above countermeasures are
taken, it is recommended to supply power through an isolated transformer, noise
filter, or the like.
• Take measures regarding heat discharge:
‒ Always install the unit orientated with the Ethernet port facing outward on the top in
order to prevent the generation of heat.
‒ Do not install the unit above devices which generate heat, such as heaters,
transformers or large-scale resistors.
FP-I4C
G2 G2
S/- E
S/-
R/+
S/- R/+
COM2
F1 F2
RS232RS232/RS485
G1
G1
S R
COM1
USB2
USB1
TX2
ETH1
TX1
2
1
MEM
ETH0
USR
CON
PWR
(1)
ETH0
ETH1
USB1
USB2
COM1
S R
G1
G1
RS232RS232/RS485
F1 F2
COM2
S/- R/+
R/+
S/S/- E
G2 G2
DIN rail
PWR
CON
USR
MEM
1
2
TX1
TX2
(1)
FP-I4C
FP-I4C 17

2 Installation
2.3 Installation space
Make sure to keep a minimum distance to other devices to avoid effects from noise or heat
and to permit unit replacement.
• Leave at least 50mm of space between the wiring ducts of the unit and other devices to
allow heat radiation and unit replacement.
(1)
(1)
(1)
50mm or more
• Maintain a minimum of 100mm between devices to avoid adverse effects from noise and
heat when installing a device or panel door to the front of the FP-I4C unit.
(1)
FP-I4C
(1)
100mm or more
(2)
Other device or panel door
(2)
• Keep the first 100mm from the front surface of the FP-I4C unit open in order to allow
room for wiring.
2.4 Attach the unit to a DIN rail
The FP-I4C unit is designed for easy installation on DIN rails.
1. Fit the upper hook of the FP-I4C unit onto the DIN rail.
18 FP-I4C

2. Without moving the upper hook, press on the lower hook to fit the FP-I4C unit into
position.
1
(1)
2
(1) Mounting panel
(2) DIN rail
(2)
2.5 Remove the unit from a DIN rail
You can easily remove the FP-I4C unit from a DIN rail with a slotted screwdriver.
2 Installation
1. Insert a slotted screwdriver into the DIN rail attachment lever.
2. Pull the attachment lever downwards.
3. Lift the FP-I4C unit and remove it from the rail.
3
1
(1) DIN rail
(2) DIN rail attachment lever
(1)
(2)
2
2.6 Install the unit on a slim type mounting plate
To attach the unit directly to the wall, you can use a slim type mounting plate, which can be
ordered separately.
Use M4 size pan-head screws to attach the FP0 slim type mounting plate (AFP0803) to the
mounting panel.
FP-I4C 19

2 Installation
(1)
60.0
(3)
(2)
6.0
(1)
FP0 slim type mounting plate AFP0803
(2)
Screw
(3) Mounting panel
[mm]
1. Fit the upper hook of the FP-I4C unit onto the FP0 slim type mounting plate.
2. Without moving the upper hook, press on the lower hook to fit the FP-I4C unit into
position.
1
2
2.7 Install the unit on a flat type mounting plate
To attach the unit sideways, you can use a flat type mounting plate, which can be ordered
separately.
Use M4 size pan-head screws to attach the FP0 flat type mounting plate (AFP0804) to the
mounting panel.
(1)
(3)
60.0
AFP0804
(1)
FP0 flat type mounting plate AFP0804
(2)
Screw
(3) Mounting panel
(2)
[mm]
1. Raise the expansion hooks on the top and bottom of the unit.
2. Install the FP-I4C unit on the FP0 flat type mounting plate.
20 FP-I4C

Note
3. Align the expansion hooks with the plate and press the hooks back down.
1
3
ETH0
ETH1
2
USB1
USB2
S R
G1
G1
RS232RS232/RS485
F1 F2
S/- R/+
S/- R/+
S/- E
G2 G2
FP-I4C
3
1
An FP-I4C unit with an attached FP0 flat type mounting plate can also be installed
sideways on a DIN rail.
2 Installation
ETH0
ETH1
USB1
USB2
2
S
R
G1
G1
RS232
F1
F2
S/-
R/+
S/-
R/+
S/-
E
G2
G2
RS232/RS485
FP-I4C
1
(1)
(2)
(1) DIN rail
(2) FP0 flat type mounting plate AFP0804
2.8 Add FP0/FP0R expansion units to the FP-I4C unit
The FP0/FP0R expansion units are connected on the right side of the FP-I4C unit.
1. Raise the expansion hooks on the top and bottom sides of the unit with a screwdriver.
FP-I4C 21

2 Installation
2. Align the pins and holes in the four corners of the control unit and expansion unit, and
insert the pins into the holes so that there is no gap between the units.
(1)
(2)
(1) FP-I4C unit
(2) FP0/FP0R expansion unit
3. Press down the expansion hooks raised in step 1 to secure the unit.
22 FP-I4C

3 Wiring
3.1 Connection to PLC TOOL port using cable AIGT8192
Use the cable AIGT8192 to connect the FP-I4C unit to the 5-pin mini DIN male TOOL port of
an FP0R, FPƩ, FP-X, or FP2SH type PLC.
Use either COM1 or COM2 depending on your setting for “Service control interface” in the
Web interface of the FP-I4C unit.
The cable AIGT8192 can be ordered as an accessory.
Using COM1:
3 Wiring
S (COM1)
G1 (COM1)
F1
2
1
AIGT8192, 5-pin mini DIN male (left) and FP-I4C 16-pin connector (right)
4
3
5
S/- (COM2)
S/- (COM2)
S/- (COM2)
R (COM1)
G1 (COM1)
F2
R/+ (COM2)
R/+ (COM2)
E
G2 (COM2)G2 (COM2)
Using COM2:
S (COM1)
G1 (COM1)
F1
S/- (COM2)
S/- (COM2)
S/- (COM2)
R (COM1)
G1 (COM1)
F2
R/+ (COM2)
R/+ (COM2)
E
G2 (COM2)G2 (COM2)
2
4
1
3
5
FP-I4C 16-pin connector (left) and AIGT8192, 5-pin mini DIN male (right)
3.2 Connection to PLC COM port
Wire the 16-pin connector of the FP-I4C unit directly to the COM port of an FP0R, FP-X,
FPƩ, FP0H, or FP7 type PLC.
Use either COM1 or COM2 depending on your setting for “Service control interface” in the
Web interface of the FP-I4C unit.
FP-I4C 23

3 Wiring
Suitable wire: AWG26-24
Using COM1:
S (COM1)
G1 (COM1)
F1
S R G
PLC COM port, 3-pin screw terminal (left) and FP-I4C 16-pin connector (right)
S/- (COM2)
S/- (COM2)
S/- (COM2)
R (COM1)
G1 (COM1)
F2
R/+ (COM2)
R/+ (COM2)
E
G2 (COM2)G2 (COM2)
Using COM2:
S (COM1)
G1 (COM1)
F1
S/- (COM2)
S R G
S/- (COM2)
S/- (COM2)
R (COM1)
G1 (COM1)
F2
R/+ (COM2)
R/+ (COM2)
E
G2 (COM2)G2 (COM2)
PLC COM port, 3-pin screw terminal (left) and FP-I4C 16-pin connector (right)
3.3 RS485 connection to Eco-POWER METER
Use COM2 RS485 to connect the FP-I4C unit to an Eco-POWER METER.
Suitable wire: AWG26-24
S (COM1)
G1 (COM1)
F1
S/- (COM2)
S/- (COM2)
S/- (COM2)
FP-I4C 16-pin connector (left) and Eco-POWER METER terminal block (right)
R (COM1)
G1 (COM1)
F2
R/+ (COM2)
R/+ (COM2)
E
G2 (COM2)G2 (COM2)
1+2+3-4
-
5
END
6
END
24 FP-I4C

3.4 Wire the power supply
Use the power supply cable (AFPG805) that comes with the unit to connect the power
supply.
3 Wiring
(1)
(2)
(3)
Related topics
(4)
(5)
(1)
Power supply connector
(2)
Power supply cable (AFPG805)
(3)
Brown: 24V DC
(4)
Blue: 0V
(5)
Green: must be connected to frame ground
The FP-I4C unit will turn on as soon as the power supply has been connected. The green
LED PWR will turn on after self-test.
When connecting the power supply (class 2 circuit), make sure the polarity (+/-) is correct.
If you connect an FP0/FP0R expansion unit, this unit and the FP-I4C unit must be supplied
by the same power supply.
General installation procedure (page 16)
FP-I4C 25

4 Getting started
4 Getting started
4.1 Overview
The FP-I4C Web interface is used to configure the interfaces and services of the FP-I4C unit.
The FP-I4C unit has multiple interfaces and connects PLCs, PCs, and other external devices
to databases, cloud servers, and other components used in automation.
HMWin runtime
via localhost
RS232
RS232/RS485
USB
INTERN
ETHERNET
127.0.0.1
PLCs
and other
devices
Services:
Data logger
FTPC
MQTT
SQL...
...
RTC updates
Device control
Logging
control
External calls
Getting data
(any interface)
Service
control
interface
Port bindings:
e.g. port 9094 → RS232
e.g. port 9095 → USB
• The services (on the left) all use the service control interface you specified in the
configuration.
• Data logging is controlled by the service control interface but can collect data from all
other interfaces.
• External clients, such as Control FPWIN Pro or SCADA systems, can use all interfaces.
• Web pages created with HMWIN Studio can collect data via all interfaces.
After you have accessed your FP-I4C unit via the Web interface, you can configure the
required services under “Application Settings”.
Go to “System Settings” to make general settings of the network addresses and services, to
change the user interface language, and to change the default user names and passwords.
Use the logout button in the title bar to log out or to switch users.
26 FP-I4C

4.2 Getting connected to the FP-I4C unit
The FP-I4C unit is configured using any standard Web browser.
To perform an initial function test and to configure the FP-I4C unit, connect a PC and an FPI4C unit in the same Ethernet network and connect the 24V DC power supply.
If you connect the FP-I4C unit and the PC directly via LAN cable, you must use the ETH1
connector, which has a fixed IP address. You must also set the proper IP address in your
PC.
In larger networks where IP addresses area usually assigned by a DHCP server, you first
need to find out the IP address of your FP-I4C unit. This can easily be done with the HMWIN
Studio software. To connect the FP-I4C unit to a network with a DHCP server, use the ETH0
connector.
When you know the IP address of your device, you can open the FP-I4C Web interface by
entering the proper URL in your browser. You can now activate and configure the services
and functions you want to use.
4 Getting started
Related topics
Connect the FP-I4C unit directly to a PC (page 27)
Connect the FP-I4C unit to a PC via DHCP server (page 28)
4.3 Connect the FP-I4C unit directly to a PC
To connect the FP-I4C unit directly to a PC use a standard LAN cable and set the IP address
in your PC.
The factory default IP address of the FP-I4C unit's ETH1 connector is 192.168.0.1. This
address is printed on a label attached to the unit's housing.
1. Connect a LAN cable between your PC and the ETH1 connector of the FP-I4C unit.
It is important that you use this bottom Ethernet connector because the ETH0 connector
above is reserved for Ethernet connections using a DHCP server.
FP-I4C
FP-I4C 27

4 Getting started
2. Set the IP address in your PC.
In Windows, go to “Network Connections” > “Change adapter options”. Select
“Ethernet” > “Properties”. On the “Network” tab, select “Internet protocol, Version
4 (TCP/IPv4)” > “Properties”. Select “Use the following IP address” and set the IP
address.
Example:
IP address: 192.168.0.10
Subnet mask: 255.255.255.0
(settings for default gateway and preferred DNS server not required)
3. Open your browser and enter the URL https://192.168.0.1/machine_config.
Depending on your browser, an insecure connection warning may be displayed. Follow
the instructions in your browser to accept the connection. You will then be forwarded to
the Web interface of the FP-I4C unit.
4. Log in with the default user name "admin" and password "admin".
You are now in the system settings area of the FP-I4C Web interface where you can
make general network and service settings or change the user interface language.
We recommend that you change the default password as soon as possible.
5. Select “Application Settings” to go to the application settings area.
You are now ready to configure the services required for your application.
Related topics
Change the default user names and passwords (page 29)
4.4 Connect the FP-I4C unit to a PC via DHCP server
If you connect the FP-I4C unit and the PC in an Ethernet network with a DHCP server, you
need to know which IP address was assigned to the unit.
You can easily find out the IP address of your unit with the HMWIN Studio software. The
software is available free of charge in our Panasonic Download Center.
1. Connect a LAN cable between the ETH0 connector of the FP-I4C unit and your Ethernet
network.
For Ethernet connections using a DHCP server it is important that you use the top
Ethernet connector ETH0.
28 FP-I4C

4 Getting started
FP-I4C
2. Start HMWIN Studio to find out the IP address of the FP-I4C unit.
3. Go to “Run” > “Manage Target” and select the “Board” tab.
In the device list of your DHCP network you can find the IP address of the FP-I4C unit. If
there are multiple devices in the list, compare the MAC address to the MAC address of
the ETH0 connector to find the right device. The MAC address is printed on a label that
can be found on the unit's housing.
4. Open your browser and enter the URL https://192.168.0.xx/machine_config.
Substitute "xx" with the last digits of the unit's IP address.
Depending on your browser, an insecure connection warning may be displayed. Follow
the instructions in your browser to accept the connection. You will then be forwarded to
the Web interface of the FP-I4C unit.
5. Log in with the default user name "admin" and password "admin".
You are now in the system settings area of the FP-I4C Web interface where you can
make general network and service settings or change the user interface language.
We recommend that you change the default password as soon as possible.
6. Select “Application Settings” to go to the application settings area.
You are now ready to configure the services required for your application.
Related topics
Change the default user names and passwords (page 29)
4.5 Change the default user names and passwords
For security reasons, we recommend that you change the default passwords in the FP-I4C
Web interface.
You can set different passwords for the administrator and standard users. There are certain
access restrictions for standard users such as deleting log files.
If you forget your password, you must reset the FP-I4C unit to the default settings with the
reset tact switch.
FP-I4C 29

4 Getting started
Related topics
The following default user names and passwords have been set:
Service User name Password
Configuration/SSH (if enabled) admin admin
SSH (if enabled) standard user user user
FTP server (if enabled) for logged data log log
1. Go to “System Settings” > “Authentication”.
2. Select “EDIT” to change the passwords.
Allowed characters for passwords: all letters, numbers and special characters (e.g. #!$).
Reset tact switch (page 13)
4.6 User rights
Access to certain functions and settings is restricted to administrators. The functions
accessible to users have a check mark.
System settings
Function Admin User
Change language ✓ ✓
View system status ✓ ✓
Save log file ✓ ✓
Change date and time ✓ ✓
Change network settings ✓ ✓
View data, settings, and main OS partitions ✓ ✓
Change, clear, and update partitions ✓ ✕
Restart system ✓ ✓
Change user password ✓ ✓
Change admin password ✓ ✕
Application settings
Function Admin User
Change COM settings ✓ ✕
Change port settings ✓ ✕
30 FP-I4C

4 Getting started
Function Admin User
PLC connection test ✓ ✓
Change data logging settings ✓ ✕
Download log files ✓ ✓
Delete log files ✓ ✕
Change MQTT settings ✓ ✕
Save or download MQTT library or example ✓ ✓
Change date and time settings ✓ ✕
Change FTP client settings ✓ ✕
Save or download FTP library or example ✓ ✓
Change script settings ✓ ✕
Change SQL client settings ✓ ✕
Related topics
Change the default user names and passwords (page 29)
FP-I4C 31

5 Example: Data logging from different devices
5 Example: Data logging from different devices
5.1 Functional overview
During data logging, the FP-I4C unit collects and saves the data from all connected devices.
The log files can then be downloaded or transmitted to a server.
In this sample application, power meters of the Panasonic Eco-POWER METER series and
an FP series PLC are connected to the FP-I4C unit. This is the basic configuration of a PLCbased monitoring and control system that uses energy consumption parameters to reduce
unwanted energy usage.
5.2 Connect the devices
In this example, two KW2M power meters are connected via Ethernet and two KW9M
power meters are connected via RS485. An FP0R PLC is connected via RS232C and
MEWTOCOL.
FP-I4C FP0R
KW2M
KW9M
Follow the instructions in this manual (see related topics) or in the device documentation to
perform the following tasks:
• Connect the TOOL port of the FP0R PLC to the COM 1 interface of the FP-I4C unit.
• Connect the FP0R unit and your PC to the FP-I4C unit and set the IP address of the PC,
e.g. 192.168.10. (must be on the same subnet as the FP-I4C unit). You can connect the
devices either directly or using a network switch.
32 FP-I4C

5 Example: Data logging from different devices
If a DHCP server is used, follow the instructions on how to connect the FP-I4C unit via
DHCP server.
Because we are using fixed IP addresses, connect the LAN cable to the ETH1 connector
of the FP-I4C unit.
• Connect the KW9M power meters in a daisy chain:
S (COM1)
G1 (COM1)
F1
S/- (COM2)
S/- (COM2)
S/- (COM2)
R (COM1)
G1 (COM1)
F2
R/+ (COM2)
R/+ (COM2)
E
G2 (COM2)G2 (COM2)
A+B
-
We recommend that you install a terminating resistor on both ends of the RS485
connection. On the FP-I4C side, place a 100Ω resistor between E and R/+. On the
second KW9M power meter, place a 120Ω resistor between A+ and B-.
• Make the communication settings for the PLC in Control FPWIN Pro.
• Make the power meter settings:
KW2M:
Set the IP address to 192.168.0.70 and 192.168.0.71 and the subnet mask to
255.255.255.0.
KW9M:
Protocol: MEWTOCOL
Baud rate: 19200
Parity: Odd (8b - o)
Station numbers: 1 and 2
A
B
+
-
Related topics
Connection to PLC TOOL port using cable AIGT8192 (page 23)
Connect the FP-I4C unit directly to a PC (page 27)
Connect the FP-I4C unit to a PC via DHCP server (page 28)
Make FP-I4C communication settings (page 34)
Make PLC communication settings (page 35)
FP-I4C 33

5 Example: Data logging from different devices
5.3 Make FP-I4C communication settings
Use a standard browser to make the communication settings for the FP-I4C unit.
1. Open your browser and enter the URL https://192.168.0.1/fp_config.
Depending on your browser, an insecure connection warning may be displayed. Follow
the instructions in your browser to accept the connection. You will then be forwarded to
the Web interface of the FP-I4C unit.
2. Log in with the default or your modified administrator credentials.
3. Select “Application Settings” to go to the application settings area.
4. Go to “COM Interface” > “COM settings - FP-I4C” and enable the COM1 RS232
interface for communication with the FP0R PLC.
Make the following settings:
“Protocol”: “MEWTOCOL”
“Autobaud”: “Enabled”
“Baud rate”: “115200”
“Parity”: “Odd”
“Timeout (ms)”: “2000”
5. Enable the COM2 RS485/RS232 interface for communication with the KW9M power
meters.
Make the following settings:
“Protocol”: “MEWTOCOL”
“Autobaud”: “Disabled” (only PLCs can respond to status requests)
“Baud rate”: “19200”
“Parity”: “Odd”
“Mode”: “RS485”
“Timeout (ms)”: “2000”
6. Enable the COM4 ETHERNET interface for communication with the KW9M power
meters.
Make the following settings:
“Protocol”: “MODBUS”
“Timeout (ms)”: “2000”
“IP address”: “192.168.0.0”
“Port”: “502”
“Address offset”: “Enabled” and set to 0
7. Select “Save” to save your configuration.
34 FP-I4C

5.4 Make PLC communication settings
Make the communication settings for the PLC in Control FPWIN Pro.
1. Create a new project and set the appropriate PLC type. When you have completed your
settings, transfer the configuration to the PLC.
2. Go to “System registers” > “Serial ports” > “TOOL”, and make the following settings:
“Communication mode”: “MEWTOCOL-COM slave”
“Station number”: “1”
“Baud rate”: “115200”
“Data length”: “8 bits”
“Parity”: “Odd”
“Stop bits”: “1 bit”
5 Example: Data logging from different devices
5.5 Configure data logging for FP0R
Configure data logging for the FP0R PLC via the RS232 interface in the application settings
area of the FP-I4C Web interface.
If you add more than one log file, you need to make the general log settings only once.
1. Go to “Data Logger” > “General log settings”, and make the following settings:
“Use data logger”: Enabled
“Delete renamed files”: Disabled
“Write midnight value to previous day”: Disabled
“Data storage location”: “Internal memory”
“CSV file header”: “3 rows”
“CSV file separator”: “,” (comma)
“CSV decimal separator”: "." (point)
“Enable PLC memory area, start address”: Disabled
“Enable PLC flags”: Disabled
2. Go to “Log file settings”, select “Add new”, and make the following settings:
“File name (max. 30 characters)”: FP0R_RS232
“File splitting”: “File per day”
“COM interface/station number”: RS232, 0
“Trigger type”: “Fixed cycle”
“Trigger cycle time (s)”: 300 (a new value is logged every 5min)
“Save cache to file flag”: Disabled
“Log records in cache”: 0
“Max. number of files before auto-delete”: 0
3. Go to “Data point settings”, select “Add new”, and make the following settings:
“Data point name (max. 30 characters)”: Temperature
“Unit (max. 7 characters)”: C
FP-I4C 35

5 Example: Data logging from different devices
“COM interface/station number”: RS232, 0
“Register type/address”: “Momentary value”, DT100
“Data format”: “INT (16 bits, signed)”, “2 decimal”, “Little Endian”
“Apply Scaling”: Disabled
With these settings, logging is performed for a single data point. If you want to configure
multiple data points, we recommend importing the variables from a CSV file.
Related topics
Import variables from CSV files (page 39)
5.6 Configure data logging for KW2M
Configure data logging for the KW2M power meter via the Ethernet interface in the
application settings area of the FP-I4C Web interface.
In this example, the two power meters log the total energy consumption. Please refer to the
power meter documentation for details on register addresses and data format.
If you add more than one log file, you need to make the general log settings only once.
1. Go to “Data Logger” > “General log settings” and make the following settings:
“Use data logger”: Enabled
“Delete renamed files”: Disabled
“Write midnight value to previous day”: Disabled
“Data storage location”: “Internal memory”
“CSV file header”: “3 rows”
“CSV file separator”: “,” (comma)
“CSV decimal separator”: "." (point)
“Enable PLC memory area, start address”: Disabled
“Enable PLC flags”: Disabled
2. Go to “Log file settings”, select “Add new”, and make the following settings:
“File name (max. 30 characters)”: KW2M_ETHERNET_70
“File splitting”: “File per day”
“COM interface/station number”: ETHERNET, 70 (station number 70 corresponds to
the last octet of the target IP address)
“Trigger type”: “Fixed cycle”
“Trigger cycle time (s)”: 300 (a new value is logged every 5min)
“Save cache to file flag”: Disabled
“Log records in cache”: 0
“Max. number of files before auto-delete”: 0
3. Go to “Data point settings”, select “Add new”, and make the following settings:
“Data point name (max. 30 characters)”: Energy
“Unit (max. 7 characters)”: kWh
“COM interface/station number”: ETHERNET, 70
36 FP-I4C

5 Example: Data logging from different devices
“Register type/address”: “Momentary value”, DT112
“Data format”: “UINT64 (64 bits, unsigned)”, “3 decimal”, “Little Endian”
“Apply Scaling”: Disabled
4. Go to “Log file settings”, select “Add new”, and make the following settings:
“File name (max. 30 characters)”: KW2M_ETHERNET_71
“File splitting”: “File per day”
“COM interface/station number”: ETHERNET, 71 (station number 71 corresponds to
the last octet of the target IP address)
“Trigger type”: “Fixed cycle”
“Trigger cycle time (s)”: 300 (a new value is logged every 5min)
“Save cache to file flag”: Disabled
“Log records in cache”: 0
“Max. number of files before auto-delete”: 0
5. Go to “Data point settings”, select “Add new”, and make the following settings:
“Data point name (max. 30 characters)”: Energy
“Unit (max. 7 characters)”: kWh
“COM interface/station number”: ETHERNET, 71
“Register type/address”: “Momentary value”, DT112
“Data format”: “UINT64 (64 bits, unsigned)”, “3 decimal”, “Little Endian”
“Apply Scaling”: Disabled
With these settings, logging is performed for a single data point. If you want to configure
multiple data points, we recommend importing the variables from a CSV file.
Related topics
Import variables from CSV files (page 39)
5.7 Configure data logging for KW9M
Configure the data logging for the KW9M via the RS485 interface in the application settings
area of the FP-I4C Web interface.
In this example, the two power meters log the total energy consumption. Please refer to the
power meter documentation for details on register addresses and data format.
If you add more than one log file, you need to make the general log settings only once.
1. Go to “Data Logger” > “General log settings” and make the following settings:
“Use data logger”: Enabled
“Delete renamed files”: Disabled
“Write midnight value to previous day”: Disabled
“Data storage location”: “Internal memory”
“CSV file header”: “3 rows”
“CSV file separator”: “,” (comma)
“CSV decimal separator”: "." (point)
FP-I4C 37

5 Example: Data logging from different devices
“Enable PLC memory area, start address”: Disabled
“Enable PLC flags”: Disabled
2. Go to “Log file settings”, select “Add new”, and make the following settings:
“File name (max. 30 characters)”: KW9M_RS485_1
“File splitting”: “File per day”
“COM interface/station number”: RS485/232, 1
“Trigger type”: “Fixed cycle”
“Trigger cycle time (s)”: 300 (a new value is logged every 5min)
“Save cache to file flag”: Disabled
“Log records in cache”: 0
“Max. number of files before auto-delete”: 0
3. Go to “Data point settings”, select “Add new”, and make the following settings:
“Data point name (max. 30 characters)”: Energy
“Unit (max. 7 characters)”: kWh
“COM interface/station number”: RS485/232, 1
“Register type/address”: “Momentary value”, DT106
“Data format”: “UDINT (32 bits, unsigned)”, “2 decimal”, “Little Endian”
“Apply Scaling”: Disabled
4. Go to “Log file settings”, select “Add new”, and make the following settings:
“File name (max. 30 characters)”: KW9M_RS485_2
“File splitting”: “File per day”
“COM interface/station number”: RS485/232, 1
“Trigger type”: “Fixed cycle”
“Trigger cycle time (s)”: 300 (a new value is logged every 5min)
“Save cache to file flag”: Disabled
“Log records in cache”: 0
“Max. number of files before auto-delete”: 0
5. Go to “Data point settings”, select “Add new”, and make the following settings:
“Data point name (max. 30 characters)”: Energy
“Unit (max. 7 characters)”: kWh
“COM interface/station number”: RS485/232, 2
“Register type/address”: “Momentary value”, DT106
“Data format”: “UDINT (32 bits, unsigned)”, “2 decimal”, “Little Endian”
“Apply Scaling”: Disabled
With these settings, logging is performed for a single data point. If you want to configure
multiple data points, we recommend importing the variables from a CSV file.
Related topics
Import variables from CSV files (page 39)
38 FP-I4C

5.8 Import variables from CSV files
Instead of adding single data points, you can import CSV files.
The following restrictions apply:
• A maximum of 700 variables can be imported. Entries beyond this number will be
ignored.
• Data point names that are longer than 30 characters will be cut during import.
• The data types DT, LD, FL, R, Y, and X can be imported. Other data types (e.g. WR, WL,
WX, WY) are skipped and an error message is displayed when the import is finished.
Use the default import settings to import variables and array elements that have been
exported in Control FPWIN Pro with the default settings.
1. Go to “Data Logger” > “Import variables from CSV”.
5 Example: Data logging from different devices
2. Select a CSV file with “Import from CSV file”.
3. Select a log file with “Import to log file”.
The variables from the CSV file are imported into this log file.
4. Select a separator from the “Separator” list box.
5. Select “Header” if your CSV file contains header lines.
Specify the number of header lines in the CSV file. By default, CSV files do not have
header lines in FPWIN Pro.
If the header settings do not match your file's header, header lines will not be imported
correctly.
6. Under “Column numbers”, specify the number of the columns containing the data point
name, the FP address, the data type, and the unit.
• “Data point name”
Specify the number of the column containing the data point name. The default
column number in FPWIN Pro is 2 (starting with column 1).
• “FP address”
Specify the number of the column containing the FP address (e.g. DT100, R10). The
default column number in FPWIN Pro is 4 (starting with column 1).
• “Data type”
Specify the number of the column containing the data type (e.g. INT, BOOL). The
default column number in FPWIN Pro is 5 (starting with column 1).
• “Unit”
Specify the number of the column containing the unit of the data point (e.g. °C, kg
etc.). The default column number in FPWIN Pro is column 7 for comments (starting
with column 1).
7. To import individual entries of the CSV file, enter any text string in the “Filter” text box.
The text is searched in all columns of the selected CSV file. Use “Set filter” to start your
search and “Reset filter” to clear the filter.
To use the filter function, you must open a CSV file.
FP-I4C 39

5 Example: Data logging from different devices
8. Select the desired entries and click “Import selection”, or click “Import all” to import all
entries from the CSV file.
5.9 List and download log files
Use this function to generate a list of all log files and to download individual or all log files.
1. Go to “Data Logger” > “List and download log files”.
2. Select the file storage area of the log files, and click “List files” to list all files available.
3. To download a single file, click on the file name. To download all files, select “Download
all files”.
This button is disabled if no log file is available.
With “Download all files”, all log files will be saved in a zipped file.
4. To delete one or more entries from the list, select the desired check boxes and click
“Delete selection”. To delete all entries, select “Delete all”.
These buttons are disabled if no files are listed.
40 FP-I4C

6 Example: HTTP connection to a cloud server
6 Example: HTTP connection to a cloud server
6.1 Functional overview
When you use the FP-I4C unit as an HTTP client, you can use the HTTP GET and HTTP
POST methods to exchange data with a cloud server. A PLC is needed to control the send
and receive operations.
In this sample application, weather data is collected from the online service OpenWeather
and forwarded to a dashboard provided by Emoncms.org (both offer free access). The FPI4C receives the commands via USB/MEWTOCOL from the PLC. The FP-I4C library for
Control FPWIN Pro offers ready-made function blocks that support the HTTP client service.
OpenWeather content and data are licensed under https://creativecommons.org/licenses/bysa/4.0/.
Emoncms.org content and data are licensed under https://www.gnu.org/licenses/
agpl-3.0.html.
6.2 Connect the devices
In this example, an FP0H PLC is connected to the USB port of the FP-I4C unit. The FP-I4C
unit and a PC are connected to the network via a DHCP server.
An Internet connection is required for the HTTP and HTTPS communication.
The HTTP client function is available from version 1.2.1.0 of the FP-I4C unit.
FP-I4CFP0H
FP-I4C 41

6 Example: HTTP connection to a cloud server
Follow the instructions in this manual (see related topics) or in the device documentation to
perform the following tasks:
• Connect the USB port of the FP0H PLC to the USB port of the FP-I4C unit.
• Connect the FP-I4C unit and your PC to the network using a DHCP server and set the IP
address of the FP-I4C unit.
Because we use a DHCP server, connect the LAN cable to the ETH0 connector of the
FP-I4C unit.
• Make the communication settings in the FP-I4C unit.
• Make the communication settings for the PLC in Control FPWIN Pro.
Related topics
Connect the FP-I4C unit to a PC via DHCP server (page 28)
Make FP-I4C communication settings (page 42)
Configure the HTTP client and download the sample files (page 43)
Set up the programming examples (page 44)
6.3 Make FP-I4C communication settings
Use a standard browser to make the communication settings for the FP-I4C unit.
1. Open your browser and enter the URL https://192.168.0.1/fp_config.
Depending on your browser, an insecure connection warning may be displayed. Follow
the instructions in your browser to accept the connection. You will then be forwarded to
the Web interface of the FP-I4C unit.
2. Log in with the default or your modified administrator credentials.
3. Select “Application Settings” to go to the application settings area.
4. Go to “COM Interface” > “COM settings - FP-I4C” and enable the COM3 USB interface
for communication with the FP0H PLC.
Make the following settings:
“Protocol”: “MEWTOCOL”
“Autobaud”: “Enabled”
“Baud rate”: “230400”
“Parity”: “Odd”
“Timeout (ms)”: “1100”
5. Go to “COM Interface” > “Service control interface” > “COM interface to control device
(PLC)” and select “USB”.
The station number 0 ("EE") is automatically set.
6. Select “Save” to save your configuration.
42 FP-I4C

6 Example: HTTP connection to a cloud server
7. Go to “Port” > “Ports” and select “Add new” to configure a redirect from the TCP port to
the COM1 RS232 interface.
Make the following settings:
“Modbus gateway”: “Disabled”
“Allow FPWIN Pro”: “Enabled”
“COM interface”: “RS232”
“Port”: “9096” (or any other port between 1025 and 65535)
“Number of clients”: “3”
“IP start address”: “255.255.255.255”
“IP end address”: “255.255.255.255”
“Timeout (s)”: “60”
All packages received on the specified port are now forwarded to the USB interface that
is used for communication with the PLC.
8. Select “Save” to save your configuration.
6.4 Configure the HTTP client and download the sample files
To set up the FP-I4C unit to function as an HTTP client, you need to enable the function and
specify a memory area in the PLC for the DUT that handles the data exchange.
1. Go to the “HTTP Client” page and enable the HTTP client function.
2. Specify free DT registers in the user area of the PLC that can be used to control data
transmission.
The same address must be set in the corresponding DUT of the programming example.
The server IP address and the login parameters are set in the PLC. Do not enter any
data in these fields in this example.
Do not enable “Use HTTPS” for now. If you want to establish a secure connection later,
specify at least a list of CA root certificates. For more information, please refer to your
HTTP server provider.
3. Download the FP-I4C library for Control FPWIN Pro and the HTTP client example by
clicking on the two “Save to PC” buttons.
4. Select “Save” to save your configuration. The settings are applied without requiring a
restart of the FP-I4C unit.
Related topics
Set up the programming examples (page 44)
FP-I4C 43

6 Example: HTTP connection to a cloud server
6.5 Set up the programming examples
The programming examples use ready-made function blocks for the HTTP client service to
collect data from a weather server and forward it to a dashboard server.
Download the FP-I4C library and the programming example for Control FPWIN Pro on the
“HTTP Client” page.
1. Unzip the downloaded library and sample files.
2. Double-click the file HTTPC_example.pce to open the sample project in Control
FPWIN Pro.
The library is automatically installed when the project is opened.
The project contains different sample POUs. These POUs contain all settings required
to establish a connection with a weather server.
3. Go to “Online” > “Communication settings” and make the following settings:
• “Network type”: “Ethernet”
Related topics
• “Title”: Enter a title for your Ethernet connection.
• “Use ET-LAN unit”: Disabled
• “Computer”:
“Automatically acquire IP address”: Disabled
“IP address”: 0.0.0.0
“Port number”: 0
• “Destination”:
“IP address”: Enter the IP address of the FP-I4C unit.
“Port number”: Enter the port number of the fP-I4C unit (in this example 9096).
• “Communications timeout (sec)”: 15s
• “Connection time out (sec)”: 60s
You can now try the sample programs available in Control FPWIN Pro.
Get weather data from a cloud server (page 44)
Forward weather data to a dashboard (page 45)
6.6 Get weather data from a cloud server
The sample program collects data from a weather server.
In this example, we will use the POU "Easy_HTTP_Client". This POU contains all settings
required to establish a connection with a weather server.
44 FP-I4C

6 Example: HTTP connection to a cloud server
Prepare and compile the PLC program:
• Make sure that the POU "Easy_HTTP_Client" is the only POU assigned to the program
task.
• Replace the value for the parameter appid in the variable sMyCommandToSend with
your API key.
You must register on the home page of the provider (api.openweathermap.org) to get
your own API key.
• Specify the start address of the g_dutFPI4C_HTTPClient DUT in the global variable list.
The default setting is DT240. (If you kept the default value DT240 on the "HTTP client"
page, you do not need to change the address.)
The project is now ready to be compiled and transmitted to the PLC.
• Select “Online” > “Online mode”, then “Compile all...” and “Download program code and
PLC configuration to PLC” to transmit the program to the PLC.
Start communication with the weather server and monitor your POU:
• Double-click on the variable bTrigger to turn the value of the Boolean variable to TRUE.
Communication with the weather server starts and weather data is received.
• Select “Monitor” > “Entry data monitor” to monitor your POU.
If the communication is working properly, you can read the weather data in the string
variable g_sHTTPC_Receive.
6.7 Forward weather data to a dashboard
The sample program collects data from a weather server and transmits the data to a
dashboard server.
In this example, we will use the POU "Weather_Power_Values_EMONCMS_GET_Method".
This POU contains all settings required to establish a connection with a weather
server. (Depending on the HTTP server you choose, you can also use the POU
"Weather_Power_Values_EMONCMS_POST_Method". Emoncms.org supports both
methods.)
Prepare and compile the PLC program:
FP-I4C 45

6 Example: HTTP connection to a cloud server
• Make sure that the POU "Weather_Power_Values_EMONCMS_GET_Method" is the only
POU assigned to the program task.
• Replace the value for the parameter appid in the variable sFileOr_URL with your API
key of the weather data server.
You must register on the home page of the provider (api.openweathermap.org) to get
your own API key.
• Replace the value of the variable sEmoncmsAPIKey of this POU with your API key of
the dashboard server.
You must register on the home page of the provider (emoncms.org) to get your own API
key.
The project is now ready to be compiled and transmitted to the PLC.
• Select “Online” > “Online mode”, then “Compile all...” and “Download program code and
PLC configuration to PLC” to transmit the program to the PLC.
Start communication with the weather server and the dashboard server:
• Double-click on the variable bTrigger to turn the value of the Boolean variable to TRUE.
First, communication with the weather server starts and weather data is received. Then
the HTTP client transmits weather information to the dashboard server.
If the communication is working properly, the weather data is displayed in your Emoncms
profile and workspace. Please refer to the tutorials on the Emoncms Web site for details
on how to configure your workspace.
6.8 Minimize security risks
To minimize security risks, you should take the following precautionary measures.
• Change the default passwords of the FP-I4C unit to new and more complex passwords.
• Be sure that only those FP-I4C services are enabled that are actually used by your
application.
• Use encrypted transmission methods for your communication. A root CA certificate list or
self-signed certificates help to ensure that you are communicating with the correct server.
Please be aware that public root CA certificate lists expire after a certain time.
46 FP-I4C

7 Example: Web-based data visualization
7 Example: Web-based data visualization
7.1 Functional overview
With the FP-I4C unit, you can visualize data from different sources on an HTML Web page.
In this sample application, two Panasonic PLCs are connected to the FP-I4C unit. You will
learn how to create a simple HTML page that displays data from these PLCs.
To create the Web pages for the FP-I4C unit, use HMWIN Studio version 4.0 or newer. The
software is available free of charge in our Panasonic Download Center.
7.2 Connect the devices
In this example, an FP0R PLC is connected via RS232C and MEWTOCOL, and an FP0H
PLC is connected via Ethernet using Modbus TCP.
Follow the instructions in this manual (see related topics) or in the device documentation to
perform the following tasks:
• Connect the TOOL port of the FP0R PLC to the COM 1 interface of the FP-I4C unit.
• Make the communication settings for the PLC in Control FPWIN Pro.
• Connect the KW2M units and your PC to the FP-I4C unit and set the IP address of the
PC, e.g. 192.168.10. (must be on the same subnet as the FP-I4C unit). You can connect
the devices either directly or using a network switch.
If a DHCP server is used, follow the instructions on how to connect the FP-I4C unit via
DHCP server.
Because we are using fixed IP addresses, connect the LAN cable to the ETH1 connector
of the FP-I4C unit.
FP-I4CFP0H FP0R
Direct connection of the devices
FP-I4C 47

7 Example: Web-based data visualization
Connection using a network switch
Related topics
Connection to PLC TOOL port using cable AIGT8192 (page 23)
Connect the FP-I4C unit directly to a PC (page 27)
Connect the FP-I4C unit to a PC via DHCP server (page 28)
Make FP-I4C communication settings (page 48)
Make PLC communication settings (page 49)
7.3 Make FP-I4C communication settings
Use a standard browser to make the communication settings for the FP-I4C unit.
1. Open your browser and enter the URL https://192.168.0.1/fp_config.
Depending on your browser, an insecure connection warning may be displayed. Follow
the instructions in your browser to accept the connection. You will then be forwarded to
the Web interface of the FP-I4C unit.
FP-I4CFP0H
FP0R
2. Log in with the default or your modified administrator credentials.
3. Select “Application Settings” to go to the application settings area.
4. Go to “COM Interface” > “COM settings - FP-I4C” and enable the COM1 RS232
interface for communication with the FP0R PLC.
Make the following settings:
“Protocol”: “MEWTOCOL”
“Autobaud”: “Enabled”
“Baud rate”: “115200”
“Parity”: “Odd”
“Timeout (ms)”: “2000”
48 FP-I4C

7 Example: Web-based data visualization
5. Select “Save” to save your configuration.
6. Go to “Port” > “Ports” and select “Add new” to configure a redirect from the TCP port to
the COM1 RS232 interface.
Make the following settings:
“Modbus gateway”: “Disabled”
“Allow FPWIN Pro”: “Enabled”
“COM interface”: “RS232”
“Port”: “9094”
“Number of clients”: “3”
“IP start address”: “255.255.255.255”
“IP end address”: “255.255.255.255”
“Timeout (s)”: “60”
7. Select “Save” to save your configuration.
7.4 Make PLC communication settings
Make the communication settings for the PLC in Control FPWIN Pro.
Create a new project for each PLC, set the appropriate PLC type, and go to the navigator.
Once you have completed your settings, transfer the configuration to the PLC.
Make settings for the FP0R PLC:
• Go to “System registers” > “Serial ports” > “TOOL”, and make the following settings:
“Communication mode”: “MEWTOCOL-COM slave”
“Station number”: “1”
“Baud rate”: “115200”
“Data length”: “8 bits”
“Parity”: “Odd”
“Stop bits”: “1 bit”
Make settings for the FP0H PLC:
• Go to “PLC” > “System registers” > “Ethernet” > “IP addresses”, and make the following
settings:
“Automatically obtain IPv4 address”: “Disable”
“IPv4 address”: “192.168.0.21” (must be on the same subnet as the FP-I4C unit)
“IPv4 subnet mask”: “255.255.255.0”
• Go to “System registers” > “Ethernet” > “User connections”:
“User connection 1”: “Enable”
“Communication mode”: “Modbus TCP master/slave”
“Communication method”: “TCP/IP”
“Open method”: “Server connection (unspecified partner)”
“Automatic opening”: “Enable”
“Source port number”: “502”
FP-I4C 49

7 Example: Web-based data visualization
7.5 Configure the PLC connections
To configure the PLC connections, you must create a new project in HMWIN Studio and then
specify the protocol for each PLC.
1. Start HMWIN Studio and select “File” > “New project” to start the project wizard.
2. Enter a project name and click “Next”.
3. Select the “FP-I4C” device and click “Next”.
4. Select “Unified” and click “Finish” to complete the creation of the new project.
5. Go to “ProjectView” > “Configuration” and double-click “Protocols”.
Make settings for the protocol used by the FP0R:
6. Click the “+” icon and select “Panasonic FP/FP7”.
Make the following settings:
“PLC network”: Deactivated
“Alias”: “FP0R”
“Node ID”: “1”
“Media”: “Ethernet”
“Request delay (ms)”: “0”
“IP address”: “127.0.0.1” (localhost)
“Port”: “9094” (must match the port setting in the FP-I4C Web interface)
“Timeout (ms)”: “500”
“PLC models”: “FP”
7. Select “OK”
Make settings for the protocol used by the FP0H:
8. Click the “+” icon and select “Modbus TCP”.
Make the following settings:
“PLC Network”: Deactivated
“Alias”: “FP0H”
“IP address”: “192.168.0.21” (must match the IP address setting in Control FPWIN
Pro)
“Port”: “502”
“Use UDP/IP”: Deactivated
“Encapsulated RTU”: Deactivated
“Timeout (ms)”: “2000”
“Server busy timeout”: “0”
“Busy retry time (ms)”: “20”
“Modbus ID”: “1”
“Max. read bit block”: “2000”
“Write holding registers”: “16”
“Write coils”: “15”
“PLC models”: “Generic Modbus (0 based)”
50 FP-I4C

9. Select “OK”.
7.6 Create tags for PLC variables
HMWIN Studio uses tags to display PLC variables. Tags contain information about the
memory location and data type of the variables.
In this example, we will define two tags for each PLC type. One displays a special flag for
a 1s clock pulse and the other a special data register for a ring counter that is increased by
one every 2.5ms. Refer to the Control FPWIN Pro online help for system variables and the
corresponding address offsets.
Special flags and special data registers cannot be accessed directly by Modbus TCP but
must be moved to an accessible memory area first.
1. Go to “ProjectView” and double-click “Tags”.
7 Example: Web-based data visualization
Create tags for the protocol used by the FP0R:
2. Select the FP0R protocol and click the “+” icon to add a new tag.
Make the following settings:
“Memory type”: “R - Internal rel”
“Offset”: “901”
“Data type”: “Boolean”
“SubIndex”: “0x0C”
3. Select “OK” and rename the tag to Pulse1s.
4. Click the “+” icon to add another tag.
Make the following settings:
“Memory type”: “DT - Data reg”
“Offset”: “90019”
“Data type”: “short” (corresponds to INT in the PLC)
5. Select “OK” and rename the tag to RingCounter_2ms5.
Create tags for the protocol used by the FP0H:
6. Select the FP0H protocol and click the “+” icon to add a new tag.
Make the following settings:
“Memory type”: “Coil status”
“Offset”: “1” (corresponds to Y0 of the PLC)
“Data type”: “Boolean”
7. Select “OK” and rename the tag to DigitalOutput_Y0.
8. Click the “+” icon to add another tag.
Make the following settings:
“Memory type”: “Holding registers” (corresponds to DT in the PLC)
“Offset”: “400000” (corresponds to DT0 in the PLC, 400001 is DT1 etc.)
“Data type”: “short” (corresponds to INT in the PLC)
FP-I4C 51

7 Example: Web-based data visualization
9. Select “OK” and rename the tag to DataRegister_DT0.
Related topics
Create a simple HTML page (page 52)
7.7 Create a simple HTML page
The HTML page we will create contains two lamps to visualize a clock pulse and two
numeric fields to display the current ring counter value.
This example uses the tags created in the task Create tags for PLC variables (page 51).
1. Go to “ProjectView” > “Unified” > “Normal” and double-click “1 : Page1”.
2. Go to “View” > “Toolbars and Docking Windows” > “Widget Gallery” to open a
collection of HMI objects.
The widget gallery is divided into several categories. To add a widget to your page, go
to the desired category and drag the widget on the page.
Add two numeric fields:
3. Go to the “Basic” > “Text/Numeric” category in the widget gallery.
4. Drag the “99999” widget on the page.
5. Go to the “Properties” panel and select the “+” icon in the “Value” field to add a tag to
the widget.
6. Select the RingCounter_2ms5 tag and click “OK”.
7. To add a label to your widget, drag the “[Label]” widget next to the “99999” widget and
enter "FP0R RingCounter_2ms5" in the “Text” field of the “Properties” panel.
8. Repeat the procedure for the DataRegister_DT0 tag and add the label "FP0H
DataRegister_DT0".
Add two lamps:
9. Go to the “Symkeys” > “HM Symkeys real elements” category in the widget gallery.
10. Drag a lamp widget on the page.
11. Go to the “Properties” panel and select the “+” icon in the “Value” field.
12. Select the Pulse1s tag and click “OK”.
13. Add the label "FP0R Pulse1s".
14. Repeat the procedure for the DigitalOutput_Y0 tag and add the label "FP0H
DigitalOutput_Y0".
15. Select “Run” > “Download to Target” to transfer the page to the FP-I4C unit.
HMWIN Studio searches for all units on the same subnet. Select your device and click
“Download”.
52 FP-I4C

The first time you perform a download, HMWIN Studio will ask you to install the
runtime environment on your FP-I4C unit. The installation takes approximately 2
minutes. Then the unit will automatically reboot.
16. Display the HTML page by entering the IP address of your FP-I4C unit (192.168.0.1)
in your browser.
7.8 Import variables in HMWIN Studio
If you do not want to enter the variables manually, you can import them from a Control
FPWIN Pro export file.
1. To export the variables in Control FPWIN Pro, go to “Project” > “Export” > “Variables as
CSV file” > “Global variables”.
2. To import the variables in HMWIN Studio, go to “Configuration” and double-click on
“Tags”.
7 Example: Web-based data visualization
3. Select the desired protocol and click the Import Dictionary icon to start the import.
4. Select the FPWIN Pro import type and the CSV file to be imported.
The available variables are listed in gray color.
5. Select the variables you want to import and click the Import Tags icon.
All imported tags are now listed in black color.
FP-I4C 53

8 Record of changes
8 Record of changes
ACGM0162V3EN, 2021.01
Updated list of features
Added unit dimensions with Phoenix Contact connector installed
Added information on changing access credentials and restrictions
Added application example for data logging from different devices
Added application example for the HTTP client function
Added application example for Web-based data visualization
ACGM0162V2EN, 2020.06
Cover page: changed manual title, corrected product name
Frontmatter: added software legal notes, safety precautions, network security notes
Corrected list of features
Deleted section on hardware version information
Updated description of LEDs
Specifications: corrected product number and list of supported protocols, corrected
operating voltage range, corrected operating and storage humidity
Added dimensional drawing
Devices supported by USB host ports: added FP0R
Revised installation instructions for FP0R expansion units
Corrected wiring diagram for "Connecting the TOOL port" with COM1
Revised section "Getting started"
ACGM0162V1EN, 2019.07
First edition
54 FP-I4C
 Loading...