

Panasonic FP-D355, FP-D605, FP-D355DC, FP-D455, D355DC User Manual

2
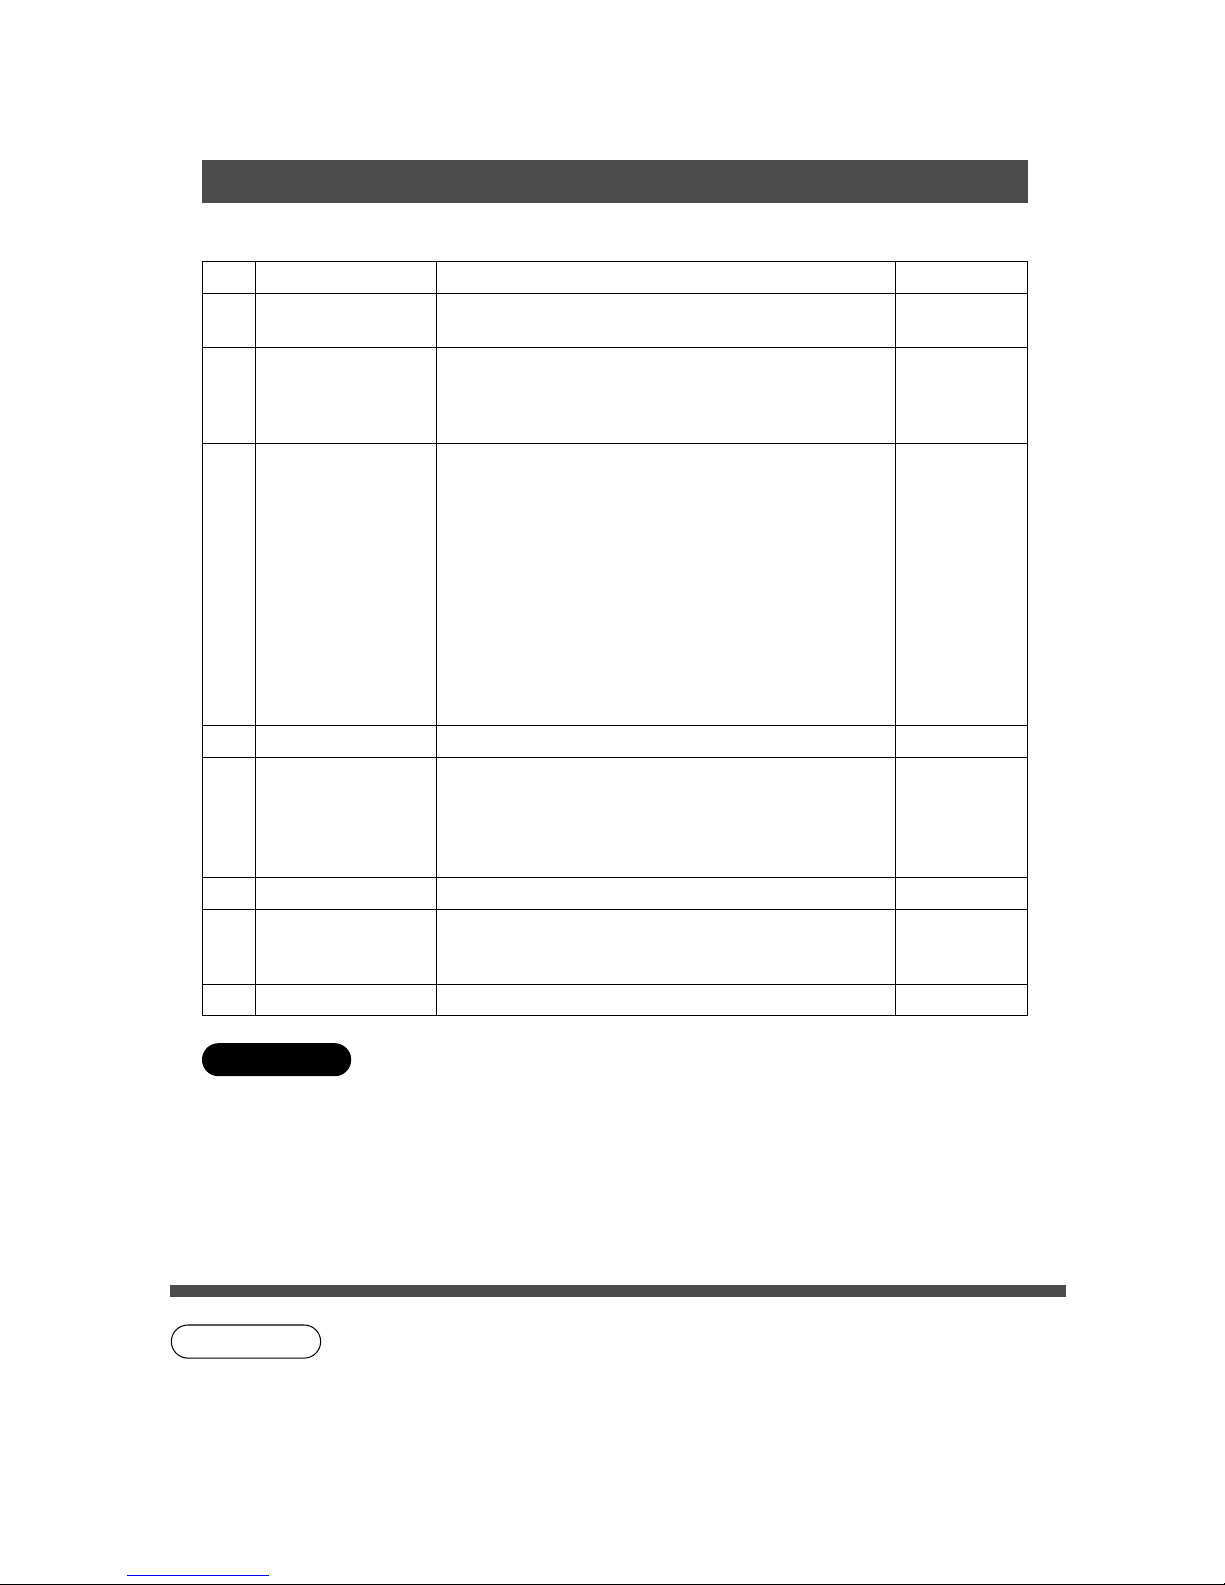
Table of Contents (Printer)
Before Operation
Precautions .................................................................................................................................... 3
Features ......................................................................................................................................... 4
Overview ........................................................................................................................................ 5
Selection of Function .................................................................................................................... 6
Basic Operation ............................................................................................................................. 7
Making Prints
Setting up Print
Condition
■ For Windows 95/98/Me/2000/NT 4.0 .................................................. 10
■ For Mac OS ....................................................................................... 19
■ For Control Panel of Digital Copier .....................................................25
Printing the Security Print file(s) ................................................................................................ 26
Contents of Limitation ................................................................................................................ 27
Printer Settings (User Preset Mode) .......................................................................................... 29
Options
Components ................................................................................................................................ 35
Inverting Shift Tray/2 Bin Inverting Shift Tra y ............................................................................. 36
3 Bin Finisher , Inverting Unit, Exit Guide Unit ........................................................................... 37
2 Bin Finisher , Inverting Unit, Exit Guide Unit ........................................................................... 40
2 Bin Finisher , Exit Guide Unit .................................................................................................... 45
Maintenance
Printer cannot Print ..................................................................................................................... 50
(Adding Paper, Adding Toner, Replace waste toner bottle, Remo ving the Punch Dust,
Removing a Paper Misfeed)
Troubleshooting ........................................................................................................................... 67
Appendix
Printing Area ................................................................................................................................ 69
Parallel Interface Connector ....................................................................................................... 70
Specifications .............................................................................................................................. 71
System Information ..................................................................................................................... 73
Font T able 1/2 ............................................................................................................................... 74
Symbol T able ................................................................................................................................ 76
Index ............................................................................................................................................. 77
Back to cover

3
Precautions
■ You need to read software license agreement before setting up the Printer Driver.
■ You need to read following precautions which describes in the Copier Operating Guide.
C Installation
C Ventilation
C Handling
C Toner and Paper
C Transportation
■ Precautions for hardware
C Precautions for the restriction of the use of the hard disk in the digital copier. Hard disk for this
unit is exclusively for the Printer. Do not use for other purpose by disassembling and/or
reconnecting cables. In that case, printer function may be failed..
C Data back up in the hard disk data
When repairing hard disk, it is for drive equipment only to repair or replace.
As it is not be possible to warranty or repair the saved data, always save back up data.
C Precautions when power switch of the digital copier is turned on/off.
Be sure never turn the power switch off while hard disk (HDD) is accessing or writing files.
This may cause the damage to the hard disk, and the data in the disk may be destroyed.
(If the power switch should turned off, turn on the power switch again after more than 15 seconds.
If data in the hard disk should be destroyed on that time, Panasonic will not bear any
responsibility.)
C When the digital copier is in operation, especially the hard disk is operating or just after the turning
off the power switch (approx. 10 sec.), do not move the digital copier.
(Wait until hard disk completely stops.)
For U.S.A.
This equipment has been tested and found to comply with the limits for a Class A digital device,
pursuant to part 15 of the FCC Rules. These limits are designed to provide reasonable protection
against harmful interference when the equipment is operated in a commercial environment. This
equipment generates, uses, and can radiate radio frequency energy and, if not installed and used
in accordance with the instruction manual, may cause harmful interference to radio
communications. Operation of this equipment in a residential area is likely to cause harmful
interference in which case the user will be required to correct the interference at his/her own
expense.
Any unauthorized changes or modifications to this equipment would void the users authority to
operate this device.

4
Features
C High resolution printing of 600 × 600 dpi (1200 dpi: Smoothing)
Enables the printing of documents, photographs, and fine line drawings from the PC.
Changing the resolution to 300 × 300 dpi, the printing time can be minimized.
C Ledger/A3 size printing
Enables the printing of Invoice/A5 to Ledger/A3 size.
Useful for output such as drawings.
C
Printing speed of 35 (FP-D355/D355DC)/45 (FP-D455)/60 (FP-D605) prints per minute (Letter/A4)
Enables high volume document printing in a short time.
C FA-PC360 (PCL5e emulation)/FA-MC360 (PCL5e and PostScript emulation)
PCL5e is the Page Description Language developed by the Hewlett-Packard Company.
PostScript is the Page Description Language developed by the Adobe Systems Company.
C Windows® 95/98/Me/Windows® 2000/Windows NT® 4.0/Mac OS
Document can be printed out using application software designed for Windows
®
95/98/Me*,
Windows® 2000 & Windows NT® 4.0 and Mac OS.
C Fonts
(1) The printer comes standard with 46 scaleable fonts. (See P.74) (For FA-MC360, See P.75)
(2) You can scale TrueType fonts within the printer. You also receive matching TrueType screen
fonts for true WYSIWYG, short for “What you see is what you get”. These internal fonts are
part of the PCL language.
C Options
(1) Printer expansion memory (16/32 MB)
Increase the speed of rusterization when printing.
C The rusterization process takes place in the printer memory.
(2) Printer hard disk
Enables the spool function which is not included in the unit.
C The spool function will save the data from the PC into printer hard disk and release
the responsibility of PC for printing.
(3) Network Adapter Card
Use as local network printer in the office.
Network format is Ethernet.
When the Ethernet is installed, operation status of the printer and connection of the optional
accessories can be checked from the PC. (Refer to the Operating Instructions for Status
Monitor)
(4) Multi Page Discription Language Controller
Illustrations and Photograph data made by PostScript type can be printed out clearly.
NOTE
C Windows® 95/98/Me/Windows® 2000/Windows NT® 4.0 are registered
trademarks of Microsoft Corporation in the United States and/or other countries.
Mac OS is registered trademark of Apple Computer, Inc. in the United States
and/or other countries.
C Contact your authorized dealer when the additional memory is required.
5
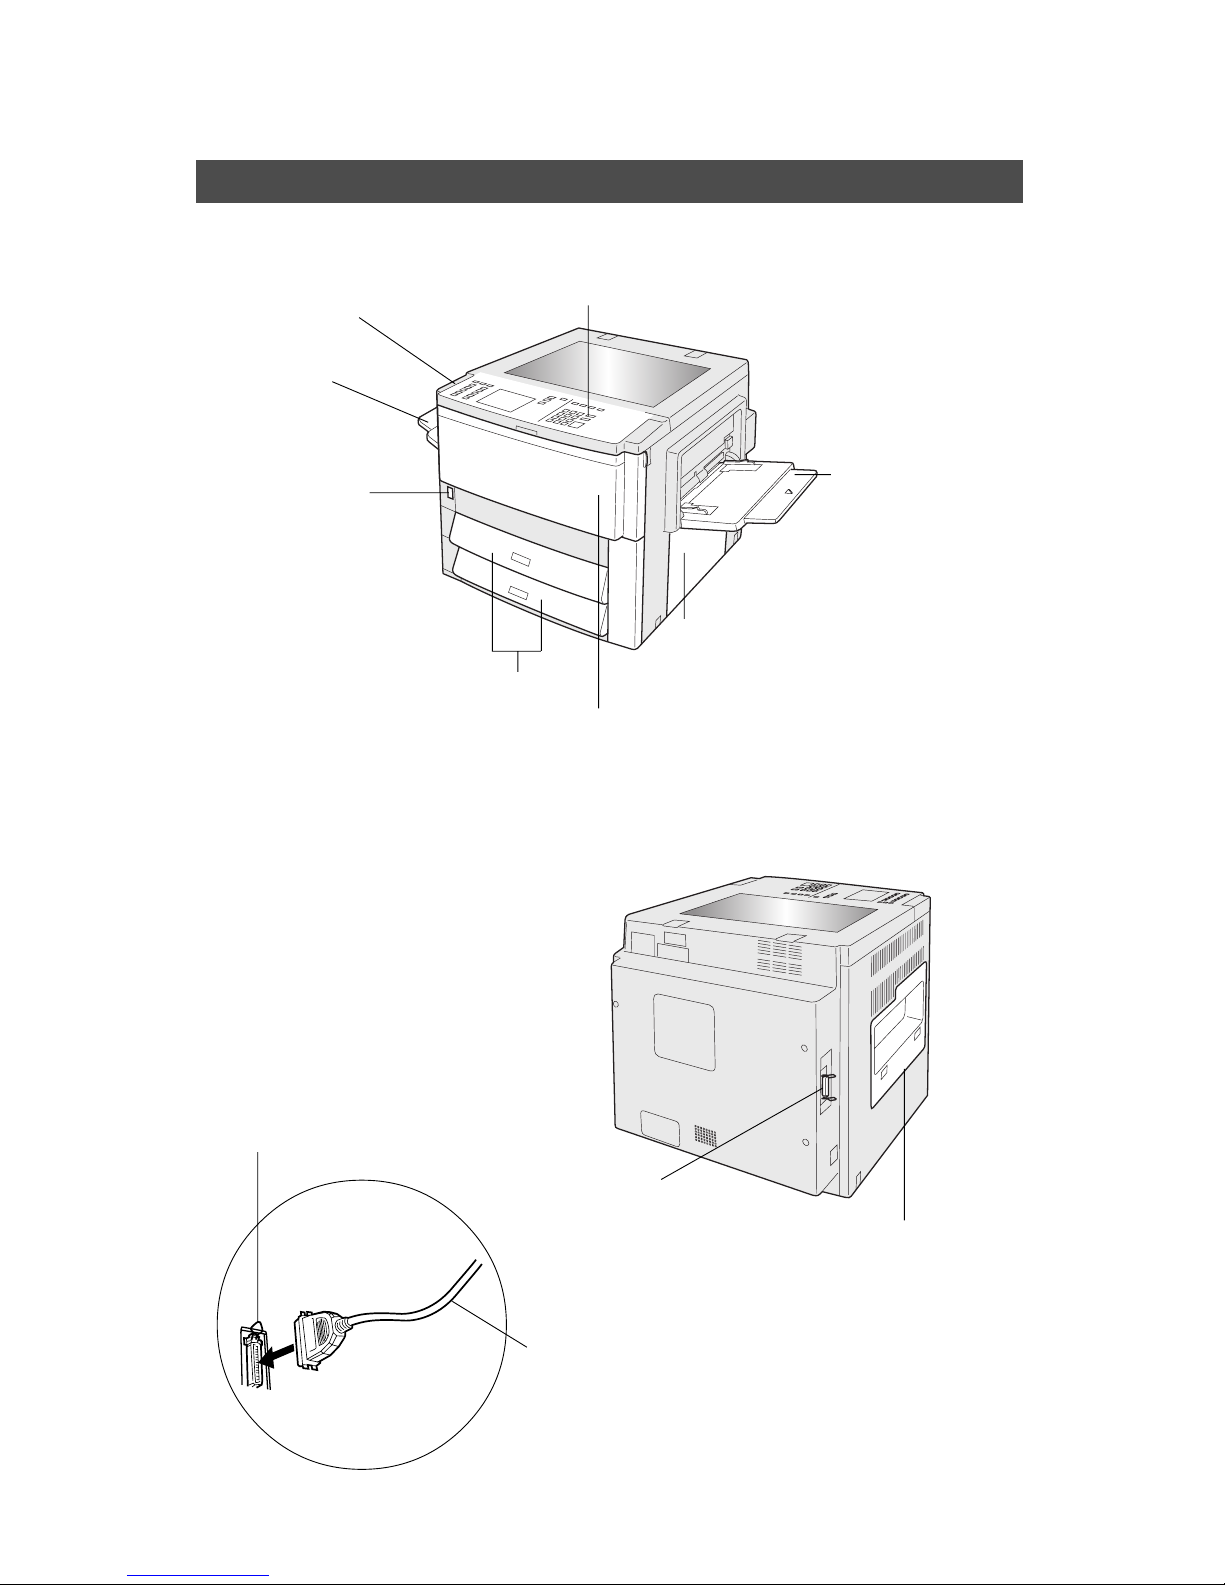
Overview
Main unit
■■
■■
■ Front/Right side
Control Panel
Exit T ray
(Face-Up)
Po wer Switch
(FP-D355/D355DC)
C The switch should
be turned ON
normally.
(d: ON, N: OFF)
Sheet Bypass
(See P.52)
Paper T ray
Front Panel
C Open to replace toner bottle/
to remove paper misfeed.
Paper Feed Cover
C Open to remove paper misfeed.
■■
■■
■ Rear side/Left side/Connection to PC
Parallel Interface Connector
C Connection to PC
Exit Cover
C Open to remove
paper misfeed.
Parallel Interface Cable
C Be sure to use only a shielded
bi-directional parallel interface
cable (36 pin) in accordance
with the PC.
(within 6.5 ft./2 meters in length)
Po wer Switch
(FP-D455/D605 Series)
6
1 32
4 65
7 98
#0
LEDGER
LEGAL
INVOICE
LETTER
LETTER
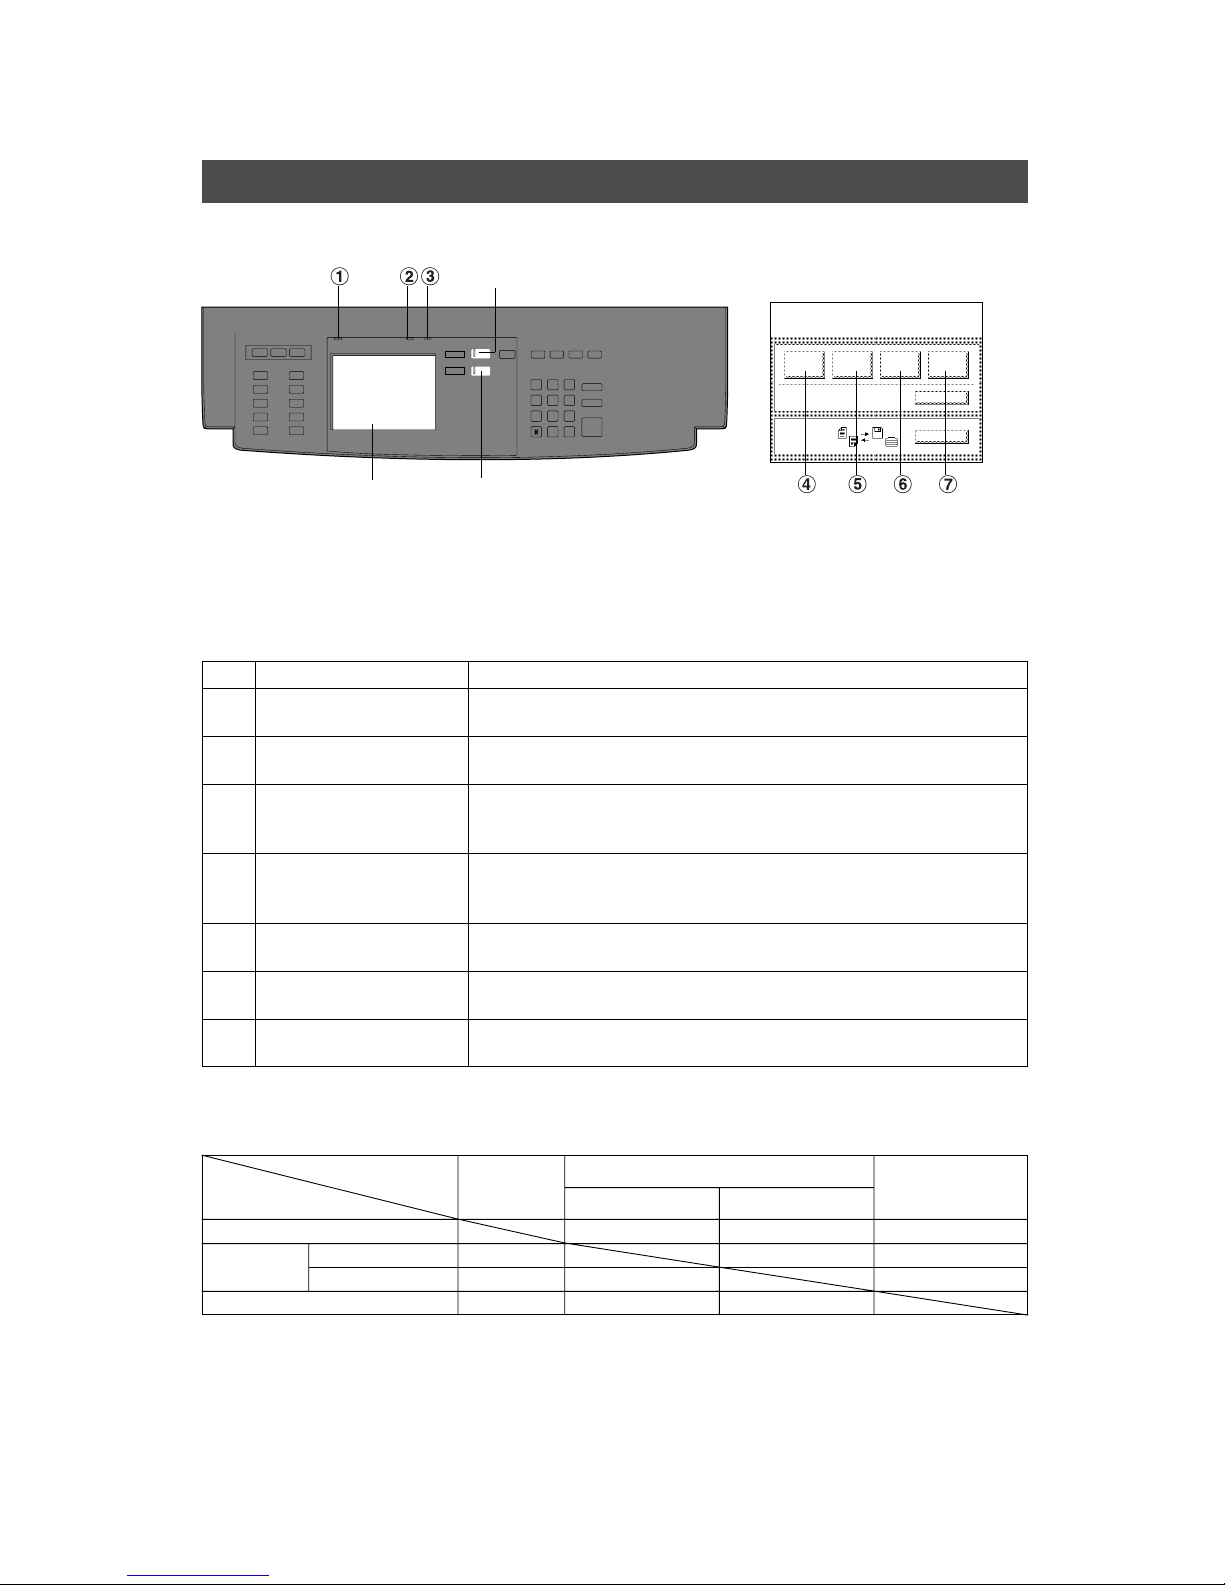
Selection of Functions
■■
■■
■ Control P anel
Copy Mode key
ON LINE
OFF LINE
PRINT
DATA
RESET
Printer settings
Filing
Select function
Touch Panel
Display
Advanced Functions key
When selecting the Printer/
Filing (option) functions.
(See P.26)
Contents Function
# ADD PAPER LED On: When paper supply is required. (See P.51-53)
$ ON LINE LED
On: When printer is ready to print.
Off: When the printer is off-line.
% DATA LED
Flashing: Data is being received from the PC.
On: During printing
Off: The printer is in standby or when the print job is completed.
& ON LINE key
Change the printer off-line to on-line.
C Do not press the ON LINE key when the data LED is flashing or
turned On.
( OFF LINE key Takes the printer to off-line.
) PRINT DATA key When depressed, this will print any data in the printer memory.
* RESET key Clear (Reset) the data in the printer.
No
■■
■■
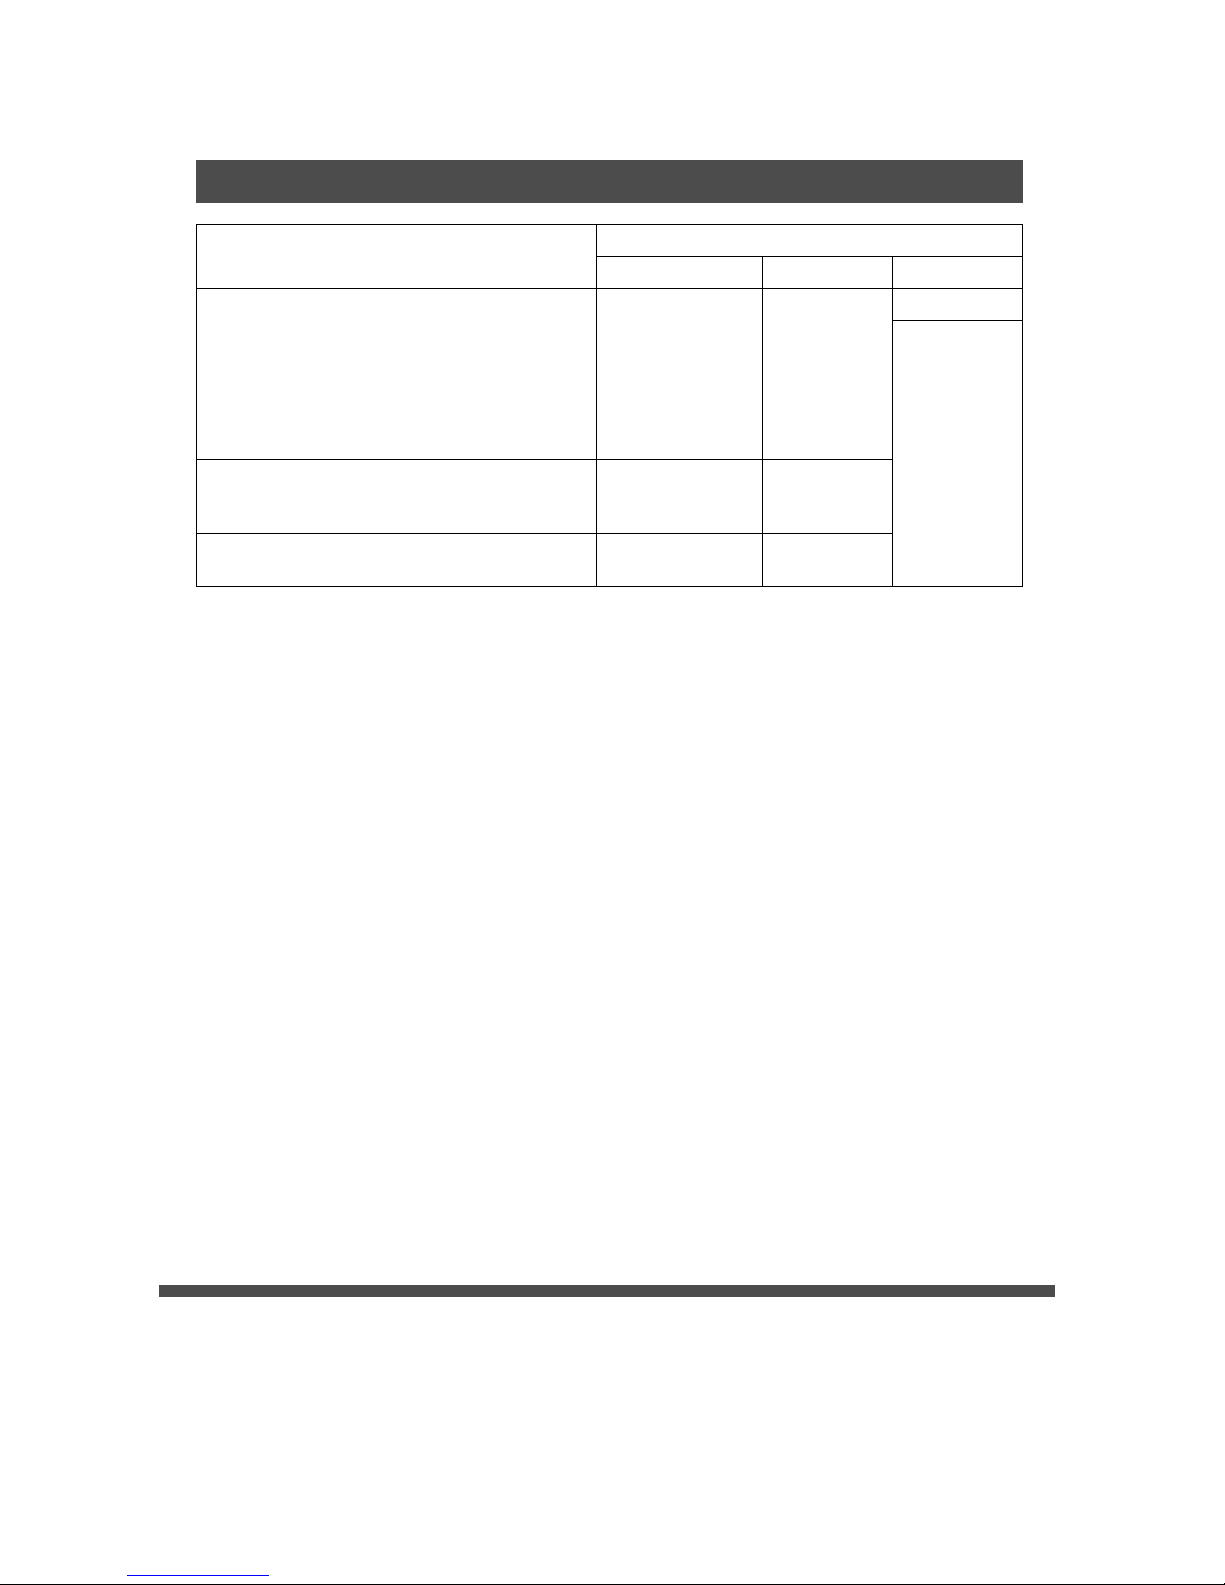
■ Combining Function Table
C Combination function in Copy, Filing and Printer mode is as follows.
Later Selections
First Selections
Copy
Filing
File memory File output
PC data output
Copy
Filing
File memory
File output
Copy reserve Copy reserve
PC data output BUSY
—
—
—
—
a BUSY
—
a
e
a: Combination use possible.
—: No combination use possible.
BUSY: Last selection not accepted as Printer is in use, wait until job is completed.
e: Filing/printer is in use. Last selection job will start automatically when current job is completed.
Copy reserve: Filing/printer is in use. Copy job can be reserved.
C When DD Filing is installed, inserting
ID card or inputting password is
needed to choose printer settings, or
by pressing “Advanced Functions”
Key, it can be changed to the printer
setting screen.
7
Basic Operation
1
2
Install the printer driver software
Refer to the Software Installation
Instructions.
Create the document using
application software.
3
Set the print status and options as
necessary.
Windows 95/98/Me/2000/NT 4.0: See P.10-18
Mac OS: See P.19-24
4
Print the document which has
been created by the application
software.
Follow the procedure of the print by the
application software which you are using.
NOTE
C Print quantity can be selected either by the printer driver or the application
software. If both are selected, multiple quantity may be printed out.
C Paper size and print direction can be selected either by the printer or by the application
software. In this case, selection by the application software has priority to set.
C If a machine error occurs when printing, such as gray color Ledger/A3 size print is being
printed, even though printer memory is installed, install the optional electric sorting hard
disk. (FA-HD13/HD14)
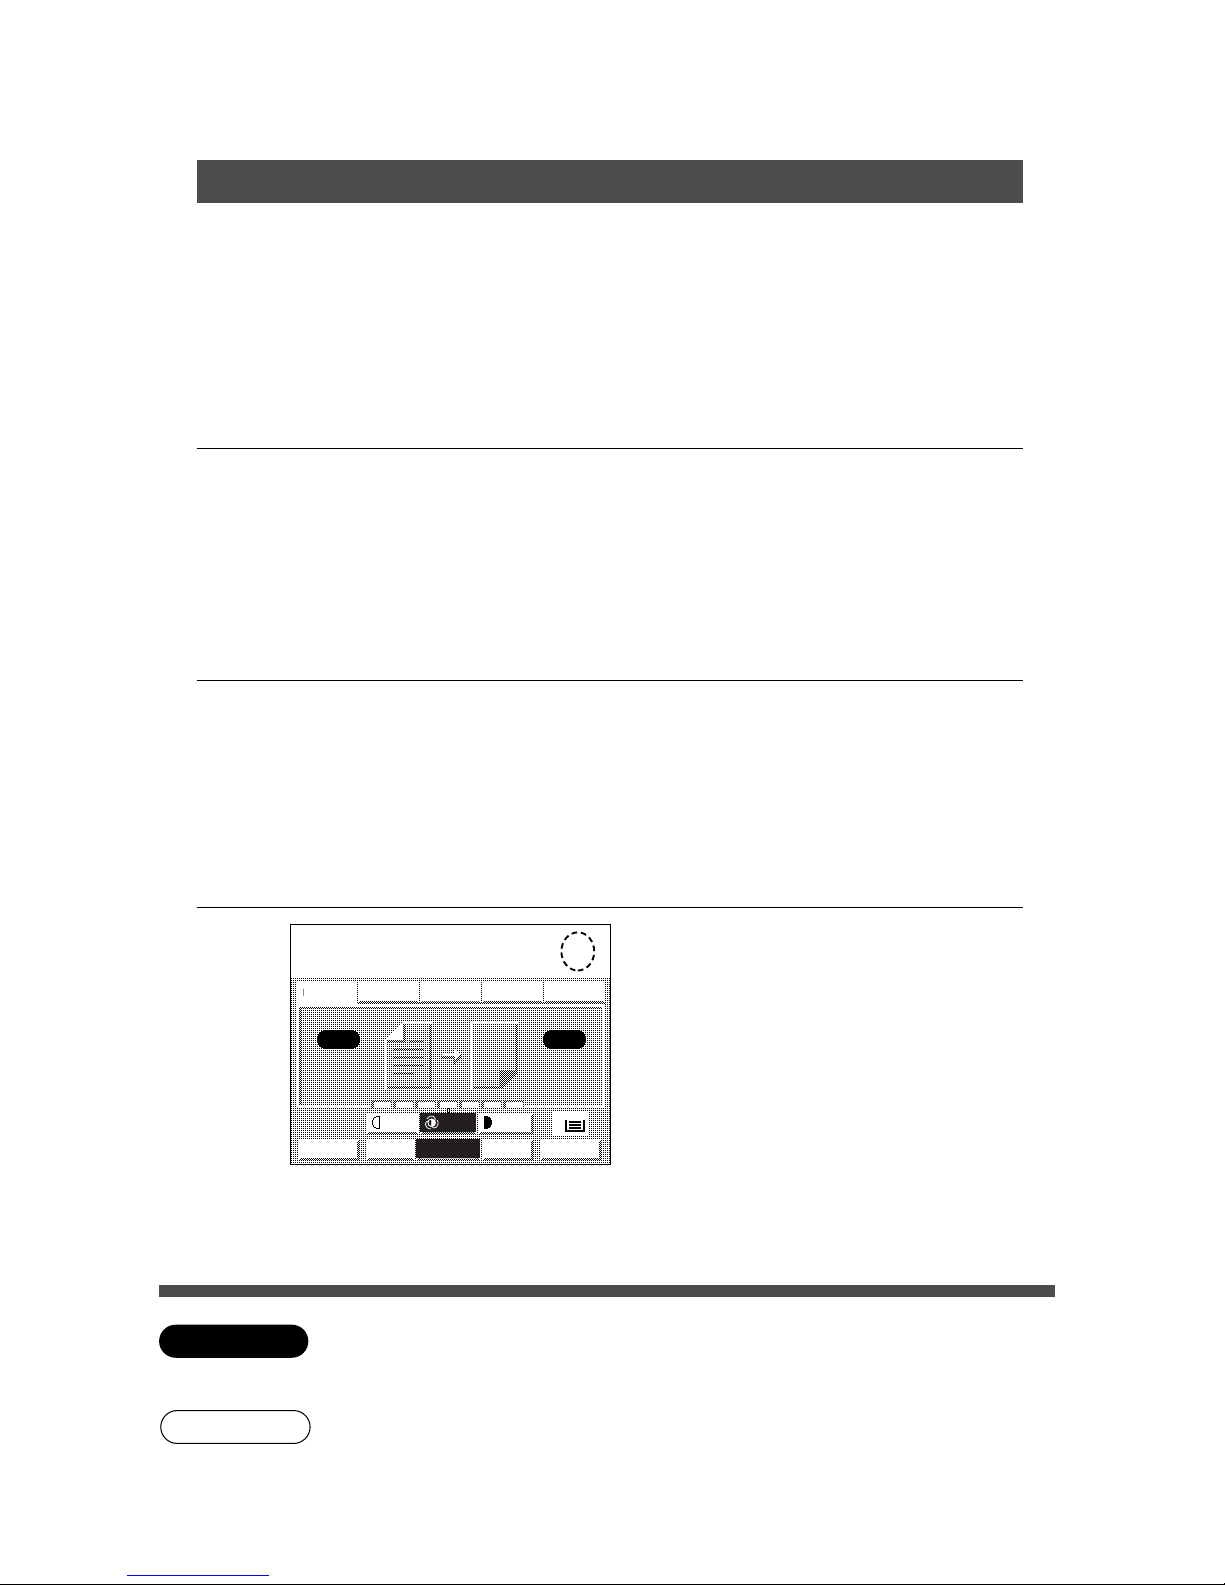
Job memory
Basic Menu
ZOOM/EFFECTS
INSERTION JOB
Job memory
JOB STATUS
TEXT
CASSETTE
PHOTO
BASIC MENU
DUPLEX/
ORIG. --> COPY
ZOOM/
EFFECTS
INSERTION
JOB
JOB
MEMORY
LIGHT
DARK
LETTER
LETTER
Printing page(s)
1
AUTO
TEXT/PHOTO
2
ATTENTION
8
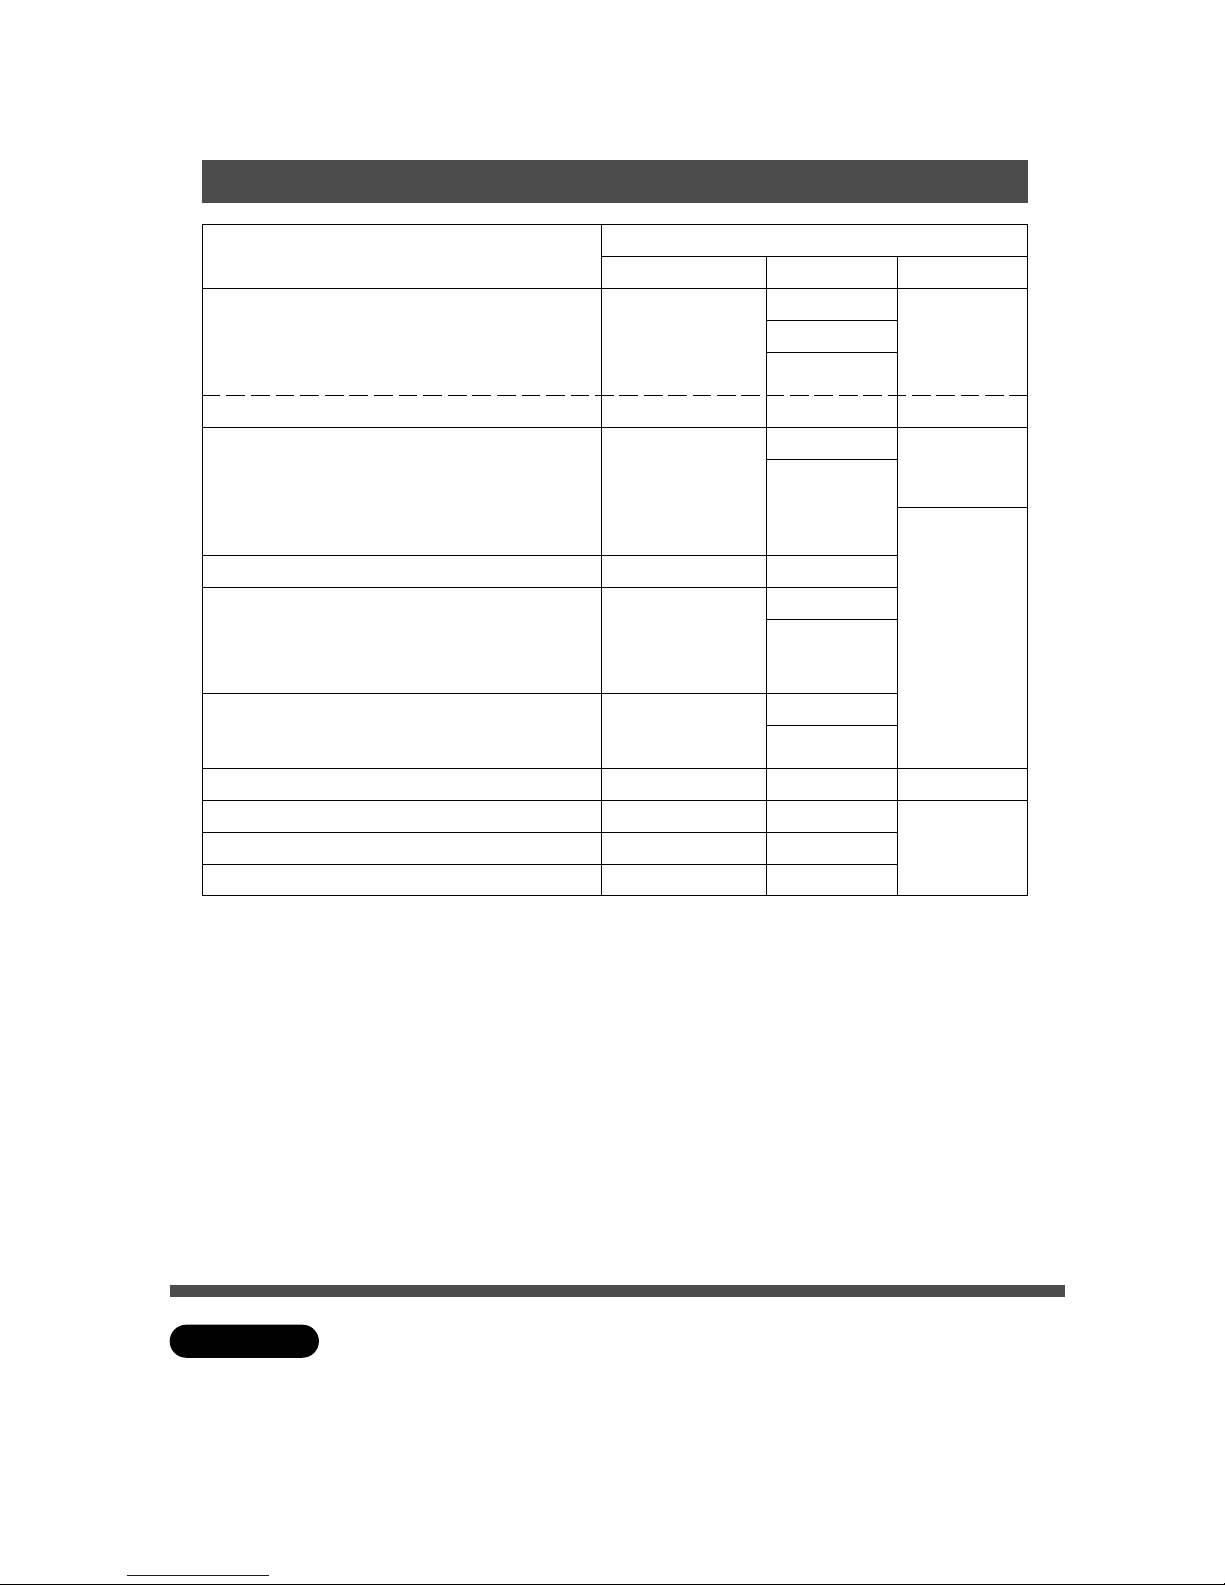
Basic Operation
Table of the selectable print conditions
Item
Refer page
Windows® 95/98/Me/2000/NT® 4.0
Mac™ OS
Paper Source
Copies
Output Paper Size
Orientation*
1
16
20
∗
1 The orientation with application software is priority than printer setting.
If the printed direction is differed from selected direction, fit the
both direction (application software and printer setting).
∗
2 When using the duplexing mode, select the size and orientation to the document.
∗
3 When the options are newly installed, set the connected options in the device
option setting screen, otherwise, some functions may not be possible to use.
(See P.12)
ATTENTION
Magnify 23
Duplex*
2
Output Order (Ascending, Descending)
Output Form (Face Up, Face Down)
Staple (Position Setting)
Booklet (When Duplexing)
15
(—)
N in 1 16
Owner Informations
Filing (Register the document to the Filing)
Security Print
Image overlay
13
Resolution
Density
Toner Save
10
Smoothing (1200 dpi) 10 24
(—)
Halftone 10, 18
Fonts 11
Device Options*
3
12
25
(—)
(—)
25
(—)
24
(—)
(—)
19
22
22
23
Digital Copier
25
(—)
(—)
24
9
Basic Operation
Table of the selectable print conditions
Item
Refer page
Windows® 95/98/Me/2000/NT® 4.0
Mac™ OS
25
Digital Copier
Portrait/Landscape Mirroring
Pattern Inverse
Font substitution
Smooth font
Smooth image
Bitmap arraignment
Unlimit for font download
(—) 20
Pages
Destination
Save settings
(—) 22
(—)
Layout direction
Border
(—) 21
Check the operating status of the printer and connecting status of the optional accessories.
10
Setting up Print Condition
■■
■■
■ Open the printer
Property
and setup the print condition.
Click the following procedure.
For Windows 95/98/Me/2000/NT 4.0
Start Settings Printers
Printer Properties
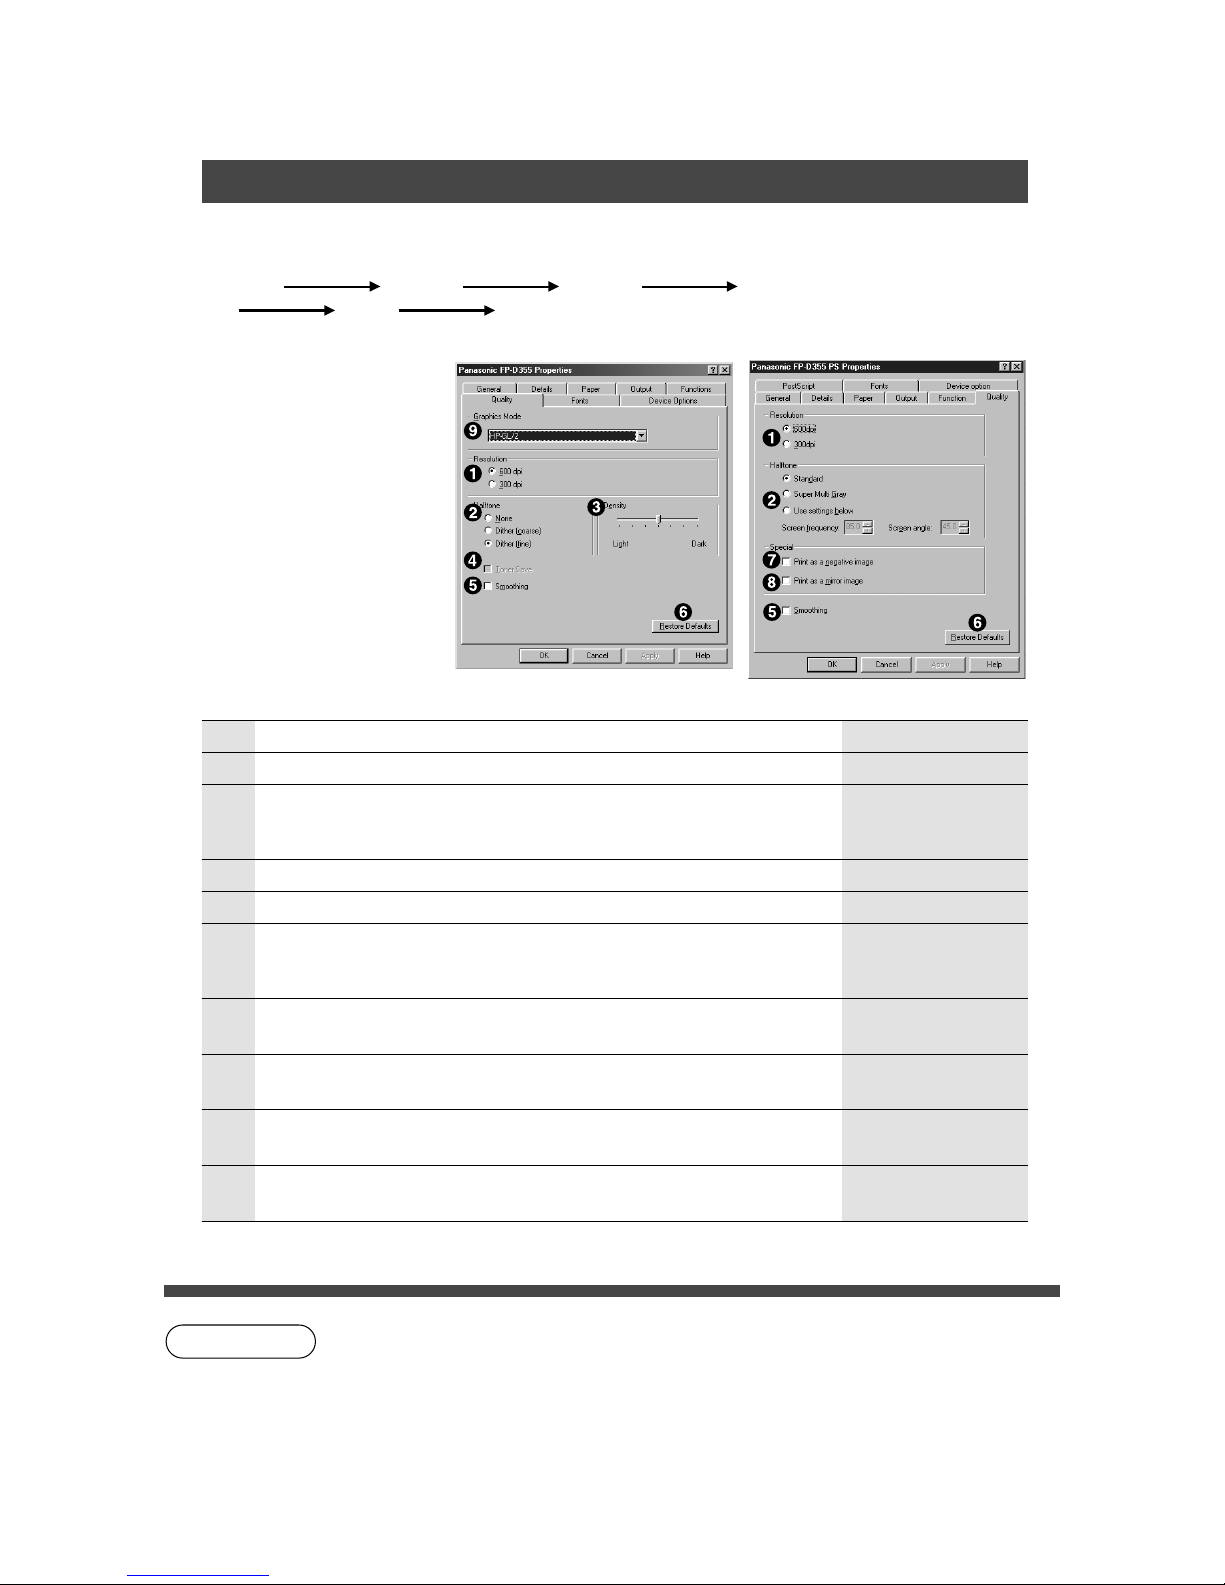
No Item Default settingSetting
# Resolution 600 dpi600 dpi, 300 dpi
$ Halftone*
1
Dither (fine)
Standard
C PCL5e: None, Dither (coarse), Dither (fine)
PS:Standard, Super Multi Gray,
Use settings below
% Density Center positionVaries Light to Dark (7 positions)
& Toner Save*
2
(1) Print Quality
(For windows 95/98/Me)
For Windows 2000/
NT 4.0:
Following items can be
set with printer setting
menu of application
software.
Save the toner consumption.
NOTE
∗
1 For Windows NT 4.0: refer to page 18
∗
2 When select the Toner Save mode, font setting will be changed to “Always use
True Type fonts” automatically. (See P. 11)
No selection
( Smoothing Reduce the notches when enlargement print
is made.
No: 600/300 dpi Yes: 1200 dpi suitable
No selection
) Restore Defaults Reset the setting of item # – - to default
setting.
* Print as a negative
image
Prints a inverse image.
+ Print as a mirror
image
Prints a mirror image.
No selection
No selection
(PS driver)(PCL5e driver)
- Graphics Mode C HP-GL/2
C Raster
HP-GL/2
PanasonicSSSSSS
11
Setting up Print Condition
NOTE
For Windows 95/98/Me/2000/NT 4.0
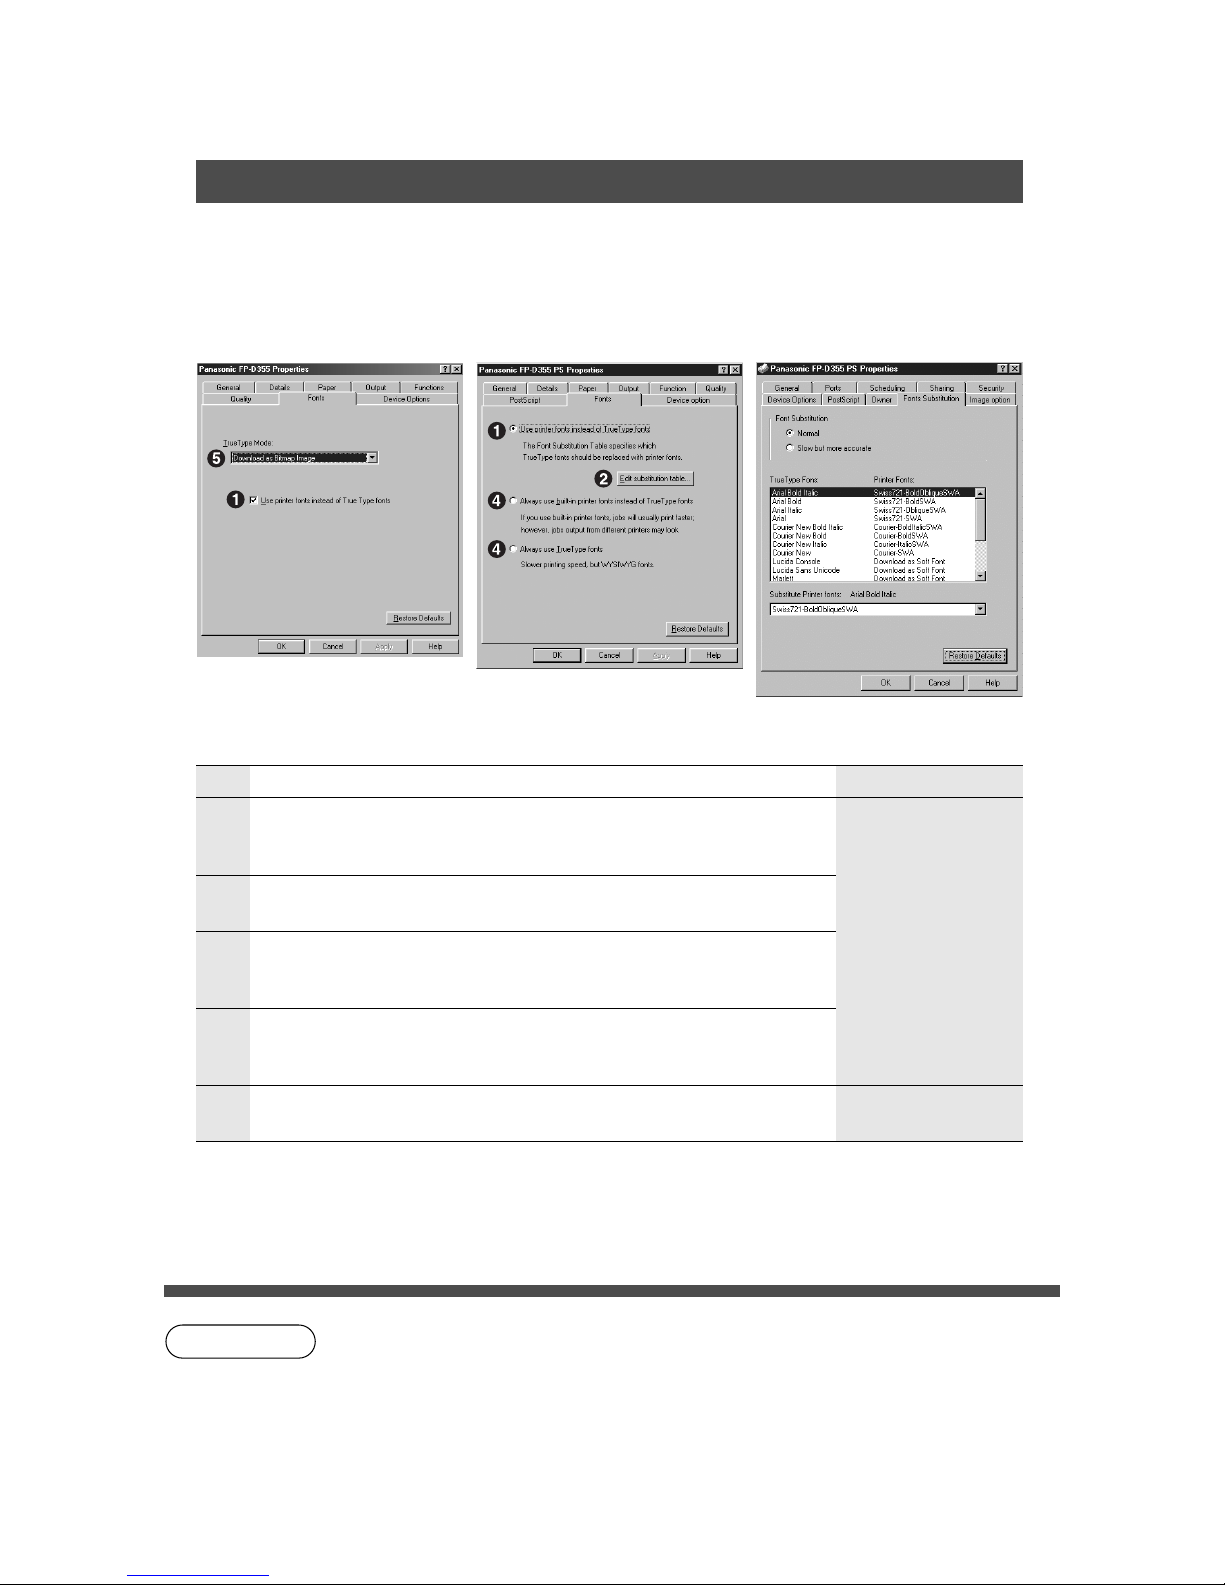
(2) Fonts
Windows 95/98/Me/2000
(PCL5e screen.)
Windows 95 Windows NT 4.0
(PS screen.)
(PS screen.)
# Use printer fonts
instead of True Type
fonts
Use printer instead
of True Type fonts
Use PC font or Truetype font according to
selected font in the edit substitution table.
$ Edit substitution
table
% Always use True
Type fonts
Use PC font (TrueType) by down loading to
printer. Although print speed is slow, it is
possible to print a similar font from the PC
Select printer font to substitute TrueType font
in the font table.
& Always use built-in
printer fonts instead
of True Type fonts.
Use built-in printer fonts.
Although print speed is fast however, print out
form different printers may look.
No
Item Default settingSetting
( True Type Mode Bitmap ImageDownload PC font (True Type) as Bitmap
Image or as True Type font.
C Print quantity in the electronic sort mode should be set by either application
software or printer setting dialog box. If it is selected by both setting, print
quantity will be multiple quantity by both settings.
C When select the Toner Save mode, font setting will be changed to “Always use
True Type fonts” automatically.

12
Setting up Print Condition
For Windows 95/98/Me/2000/NT 4.0
(3) Device Options
No Default settingSetting
# Number of Paper
Tr a y
21 (Copier upper), 2 (Copier lower), 3 (System
upper), 4 (System middle), 5 (System lower)
$ Change Paper Tray Auto SelectAuto Select, Specified Tray
% Addtional memory
(Memory)
NoneNone, 16 MB, 32 MB
(This shows only additional memory added.)
& Accessory setting NoneLarge Capacity Paper Tray (LCC), Automatic
Duplex Unit, Inverting Unit, Inverting Shift
Tray, Finisher, Punch Unit, HDD for Filing.
( About
(Version information)
Printer Version information is displayed.
Item
(PS screen)*
1
(PCL5e screen)
) Auto Configuration
When the Printer is connected to the Network
(TCP/IP). This Auto Configuration key is
pressed and select printer then installed device
options will be automatically detected.
*
2
NOTE
∗
1 When using the PostScript emulation, estabish it correctly by manual operation.
∗
2 When the device option is not correctly detected, estabish it by manual operation.
13
NOTE
For Windows 95/98/Me/2000/NT 4.0
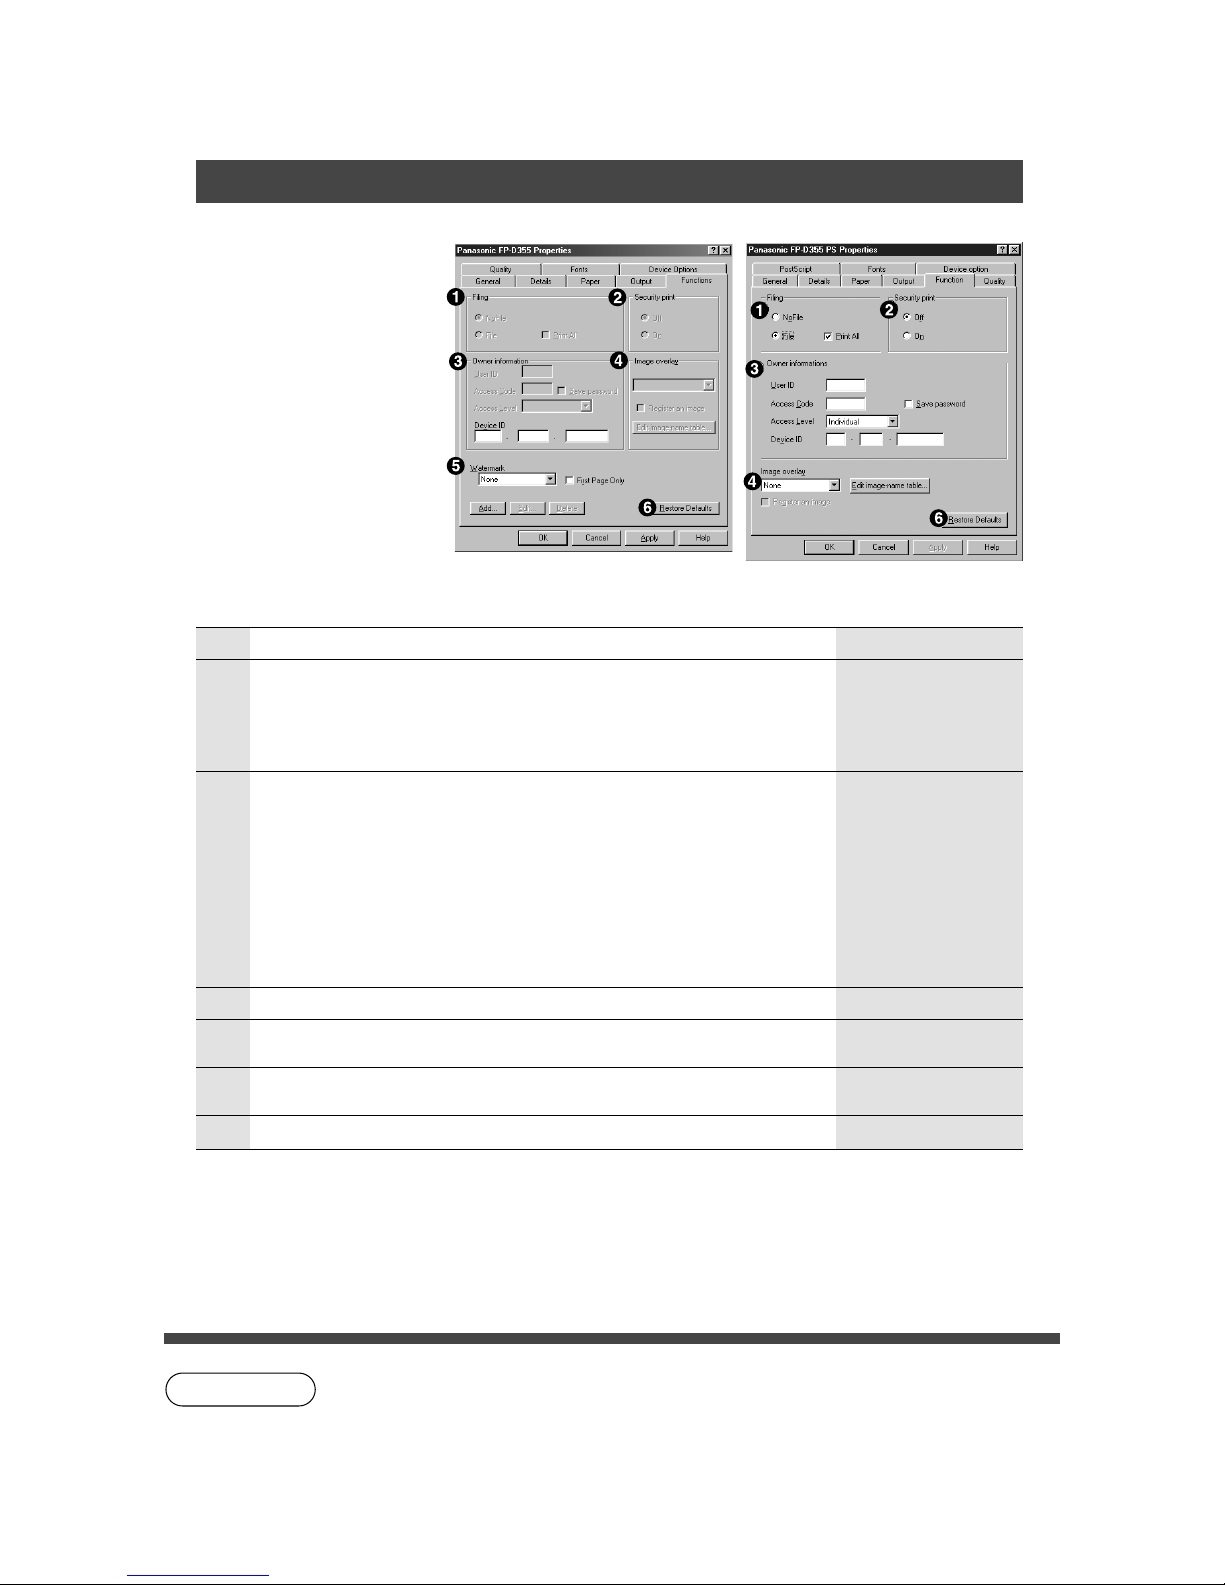
(4) Functions
(For Windows 95)
For Windows NT 4.0:
Following items can be
set with printer setting
menu of application
software.
No Item Default settingSetting
# Filing No File
The function is available only when the filing unit
is installed and owner information is inputted.
No File
File: Save the created document.
Print All: Prints the entire document and files a copy.
$ Security Print*
1
Off
Off:
On:
For filing function:
When using as network printer and owner
information is inputted, the cover sheet with
DD code and title is printed.
For Image memory hard disk:
Document will be only registered into the hard
disk and will not be printed.
When printing (See P.26)
C It is not possible to re-save a file if the security print is made.
C It is not possible to save a file if print is made in the image overlay.
Setting up Print Condition
% Owner Informations NoneUser ID, Access Code, Access Level, Device ID
&
Image overlay*
1*2
(same as Security Print)
None
When printing, selected image format is
combined together.
) Restore Defaults Reset the setting of item # – ( to default setting.
∗
1
Filing function or Image memory hard disk is installed together with the Network Adapter Card.
∗
2 Registration procedure of the “images 1 to 10”.
1) Create the image (fixed format) using application software of the PC.
2) Select one of the images 1 to 10 of the image overlay in the above function.
3) Click the “Edit image-name table”.
4) Select the image name (1 to 10) and re-input the image name.
5) Click “OK”.
6) Click “Register an image”.
(PS screen)(PCL5e screen)
(
Watermark
None
When printing, selected watermark is
combined with the document.

14
(4-a) Watermark
Select “Tex t ” #
on the screen
then click
“Edit” -.
Setting up Print Condition
For Windows 95/98/Me/2000/NT 4.0
No Item Default settingSetting
# Text Displays the selected text.*
1
C CONFIDENTIAL, COPY.....
$
Font Arial
Select the text font.
C Arial, Helvetica .....
%
Style
Size
Style : Bold
Size : 72
Select the text style and size.
Style : Regular, Bold, Italic, Bold Italic
Size : 8 - 400 point
&
Density 20
Varies Light to Dark.
C 0 (Light) - 100 (Dark)
(
Position Center position
Select the text position.
C Center, Position relative to center
)
Angle 45
Select the text angle.
C -90° to +90°
*
Restore Defaults
Reset the setting of item $ – ) to default
setting.
+
Add
Add other texts.
- Edit Change the setting of Watermark.
C Position, Angle, Density, Font
∗
1 To change the text, click “Cancel” on the Watermark screen and re-select new text on
the functions screen.
(Above is Functions screen.)
(Above is Watermark screen.)
. Delete Delete the text.
NOTE
15
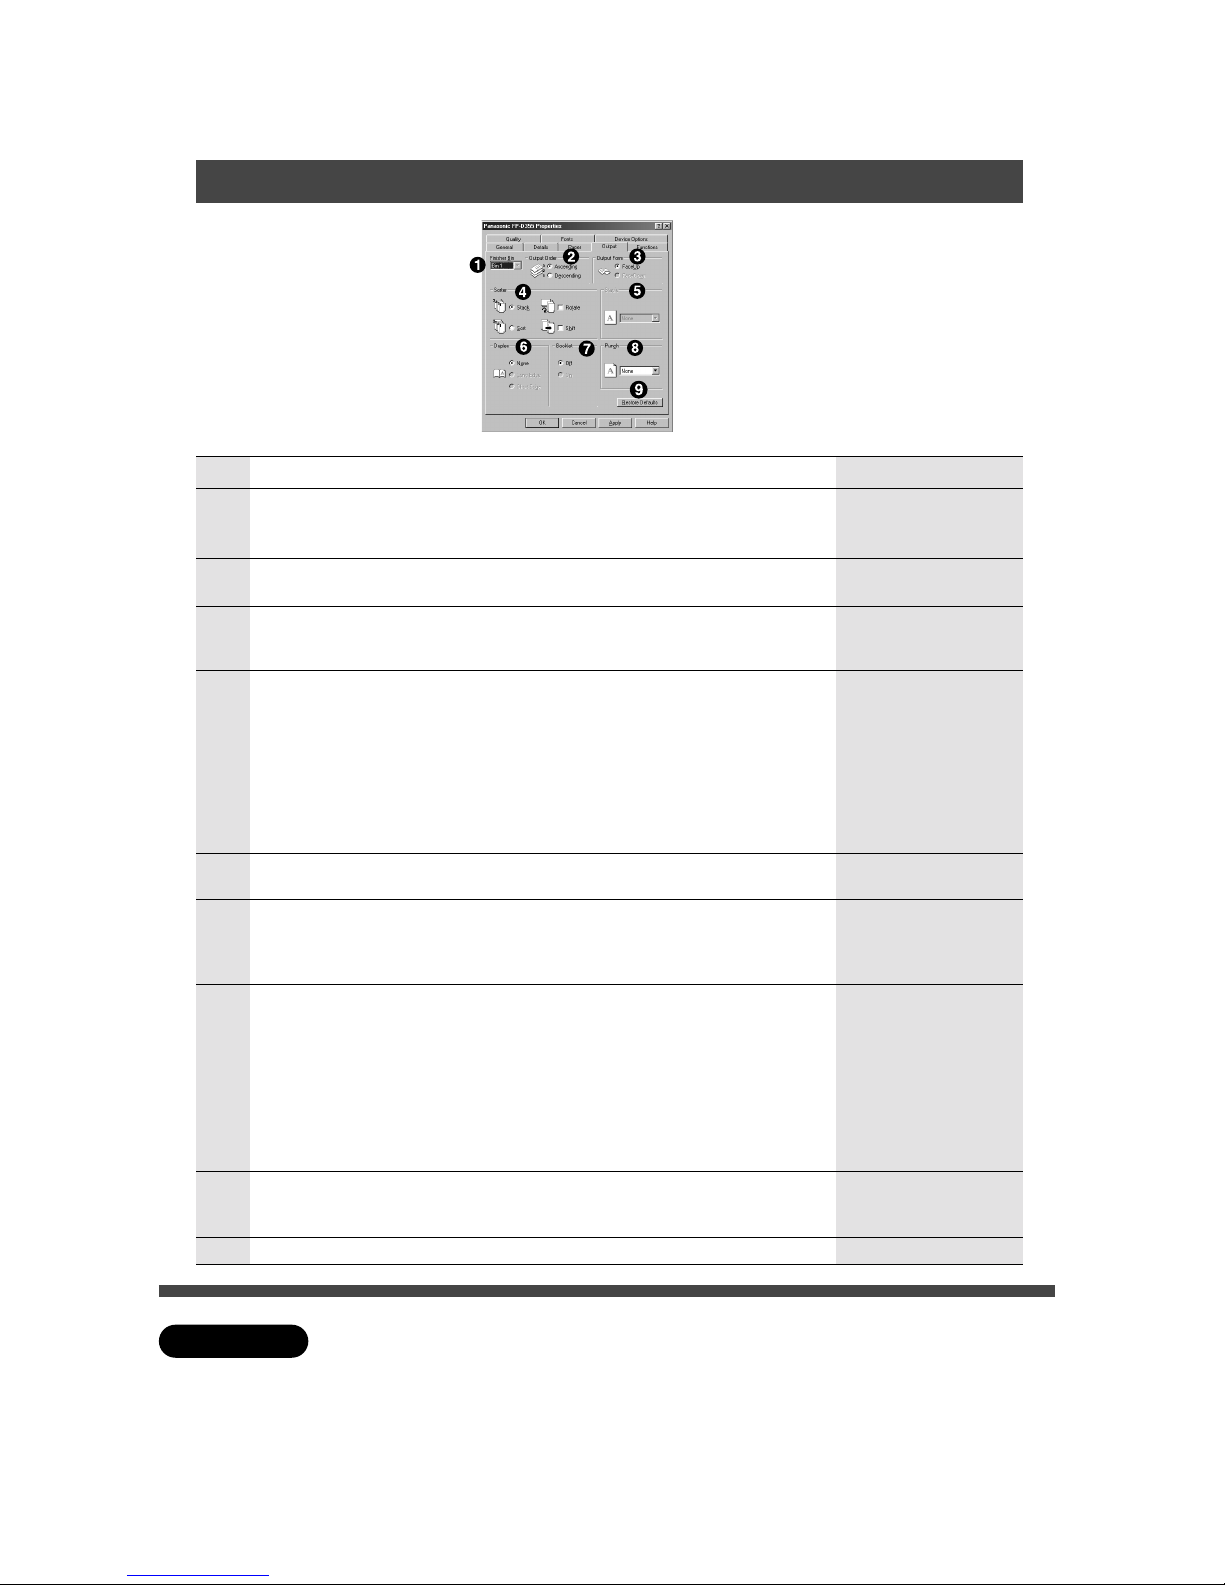
(5) Output
(For windows 95)
C Both PCL5e and PS
are the same screen.
For Windows NT 4.0:
Following items can be
set with printer setting
menu of application
software.
Setting up Print Condition
For Windows 95/98/Me/2000/NT 4.0
ATTENTION
No Item Default settingSetting
#
Finisher Bin Bin 1
Select the paper exit bin from the printer
when using FA-F320/F350/F355/F365/TR355
(option).
$
Output Order Ascending
Ascending: Paper exit from the first page.
Descending: Paper exit from the last page.
%
Output Form Face Up
Face Up:
When using inverting unit, it is
possible to select face up paper exit.
Face Down: Print out with print side down
& Sorter*
1
Stack
Stack (Group): Multiple prints of each original
are placed into separate bins.
Sort: 1 sheet of each original is placed into a
separate bin.
(available only selecting the sort mode)
Rotate: Grouped or sorted sheets are
separated rotation and exit onto tray.
Shift: Grouped or sorted sheets are offset
and exit onto tray.
( Staple*
1
None
You can only use staple when sort is selected.
None, Left-1, Left-2, Right-1, Right-2
) Duplex*
1
(with Automatic
duplex unit)
None
None: It disables double sided printing.
Long Edge: Regular book format
Short Edge: Sketch book format
(Rotate mode of sorter can not be used)
* Booklet*
2
Off
Booklet requires the Automatic duplex unit.
It allows use with Filing settings.
Off
On:Prints will come out in book style.
Paper Source: Paper size setting (must be set)
(Ledger/Letter/A3/A4 only)
(FA-F365:Punch mode cannot be used)
(FA-F320/F350/F355: Staple and Punch mode
can not be used)
+
Punch None
When using FA-F320/F365+SP30/40 (option),
it enables hole punch printing.
(Rotate mode of sorter can not be used)
-
Restore Defaults
Reset the setting of item # – + to default setting.
∗
1 All sorting selections must be made at the printer driver screen.
The collate option must be turned off in the application software.
∗
2 When using the booklet mode, descending and face down mode can not be used.
Descending mode of output order is selected:
If the printer image memory is full, change to the ascending mode or print the document
separately.
16
∗
From two (or four) page documents,
side by side, to 1-sided prints.
Margin Add: Create the margin (8 mm)
between each page.
2
34
1
NOTE
241
3
Setting up Print Condition
For Windows 95/98/Me/2000/NT 4.0
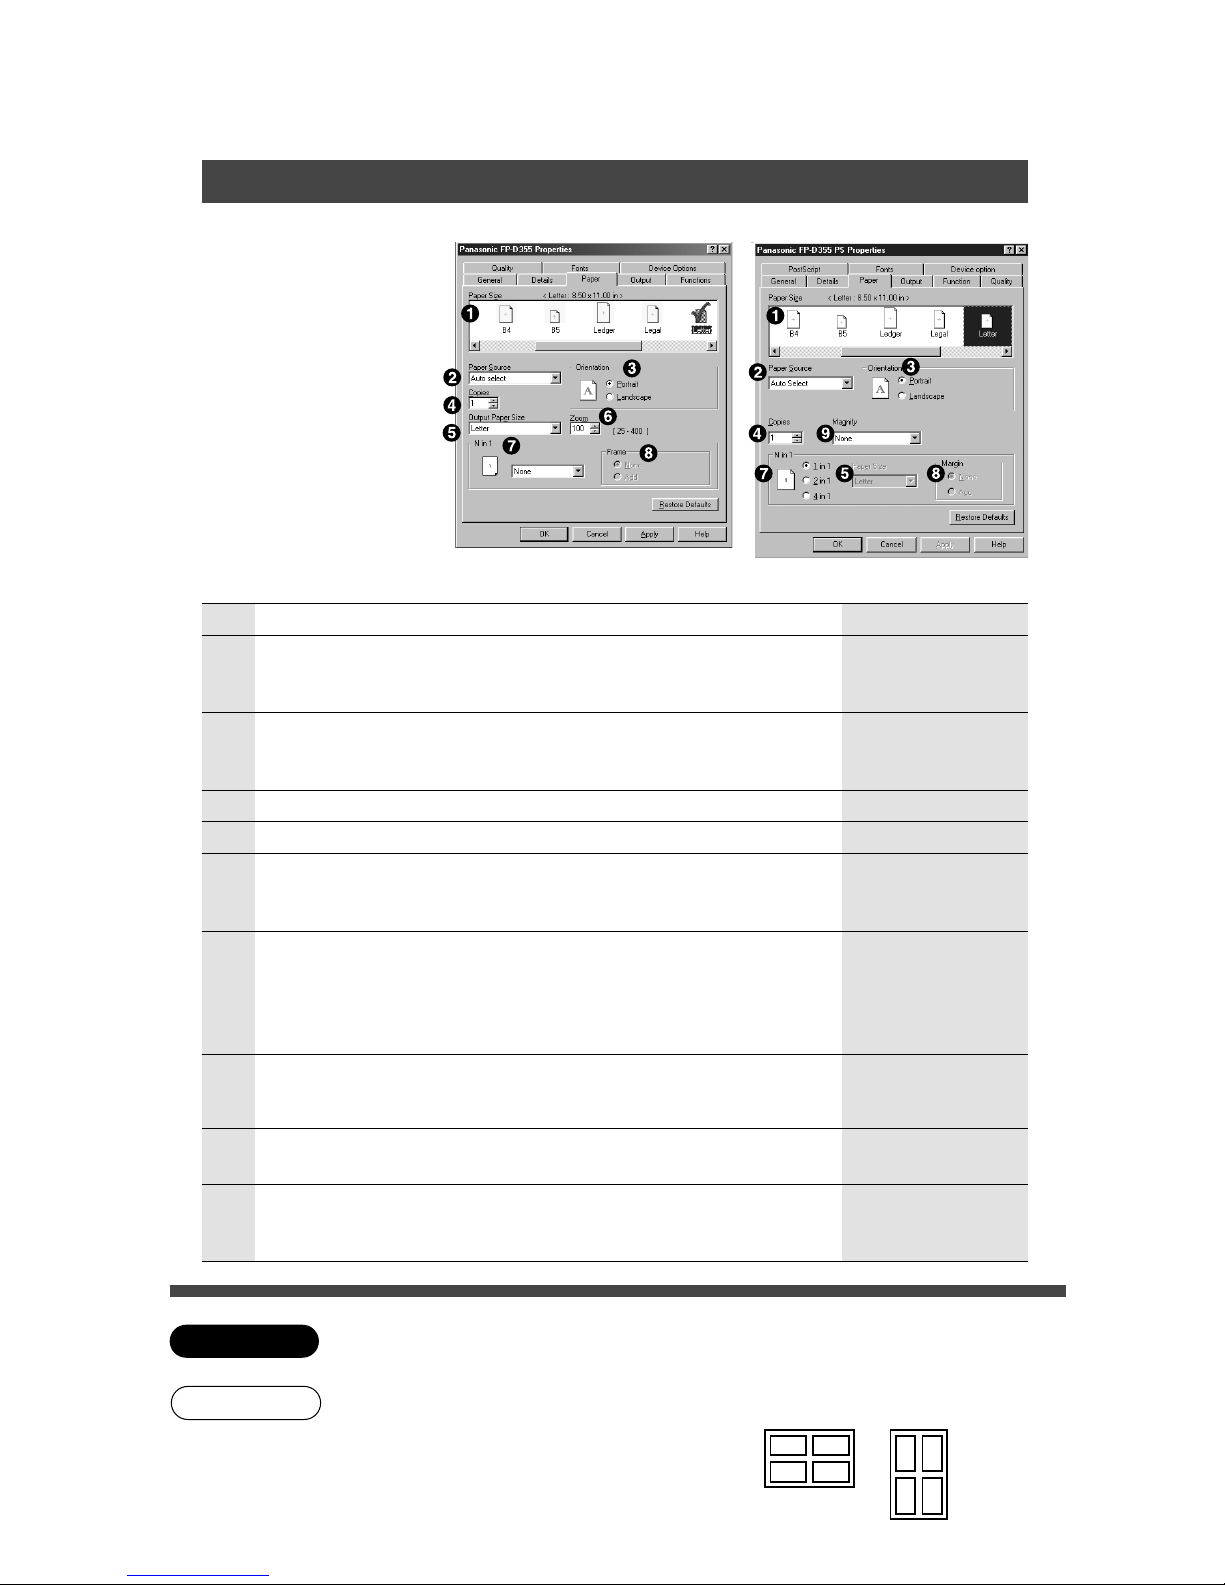
(6) Paper
(For windows 95)
For Windows NT 4.0:
Following items can be
set with printer setting
menu of application
software.
No Item Default settingSetting
# Paper Size Letter/A4Ledger, Legal, Letter, Invoice, Post Card
A3, A4, A5, B4, B5
User Preset size (Fixed size)
$ Paper Source Auto selectAuto select, Upper tray, Lower tray, System
console (upper/middle/lower), LCC, Sheet
bypass
% Orientation PortraitPortrait, Landscape
& Copies 11 to 999
( Output Paper Size Letter/A4Print size when selecting N in 1
A3, B4, A4, B5, A5
Ledger, Legal, Letter, Invoice
) Zoom 100
Print with variable zoom ratios from 25 % to 400 %
C Limitation(600 dpi)
A3 : up to 330 % Ledger : up to 320 %
B4 : up to 380 % Legal : up to 390 %
User definition size : 320 - 400 %
* N in 1* 1 in 1PCL5e: 1 in 1,..., 2 in 1, 4 in 1, 6 in 1, 8 in 1,
9 in 1, 16 in 1
PS: 1 in 1, 2 in 1, 4 in 1
+ Frame (PCL5e)
Margin (PS)
NoneFrame when selecting N in 1 mode
None, Add
- Magnify Selects print size
None, Print sizes
ex: Letter \ Ledger, Letter \ Legal...
ATTENTION
∗
The N in 1 modes must be made at the printer driver screen.
The collate option must be turned off in the application software.
Example: 4 in 1
(Landscape) (Portrait)
(PS screen)(PCL5e screen)
None
17
Setting up Print Condition
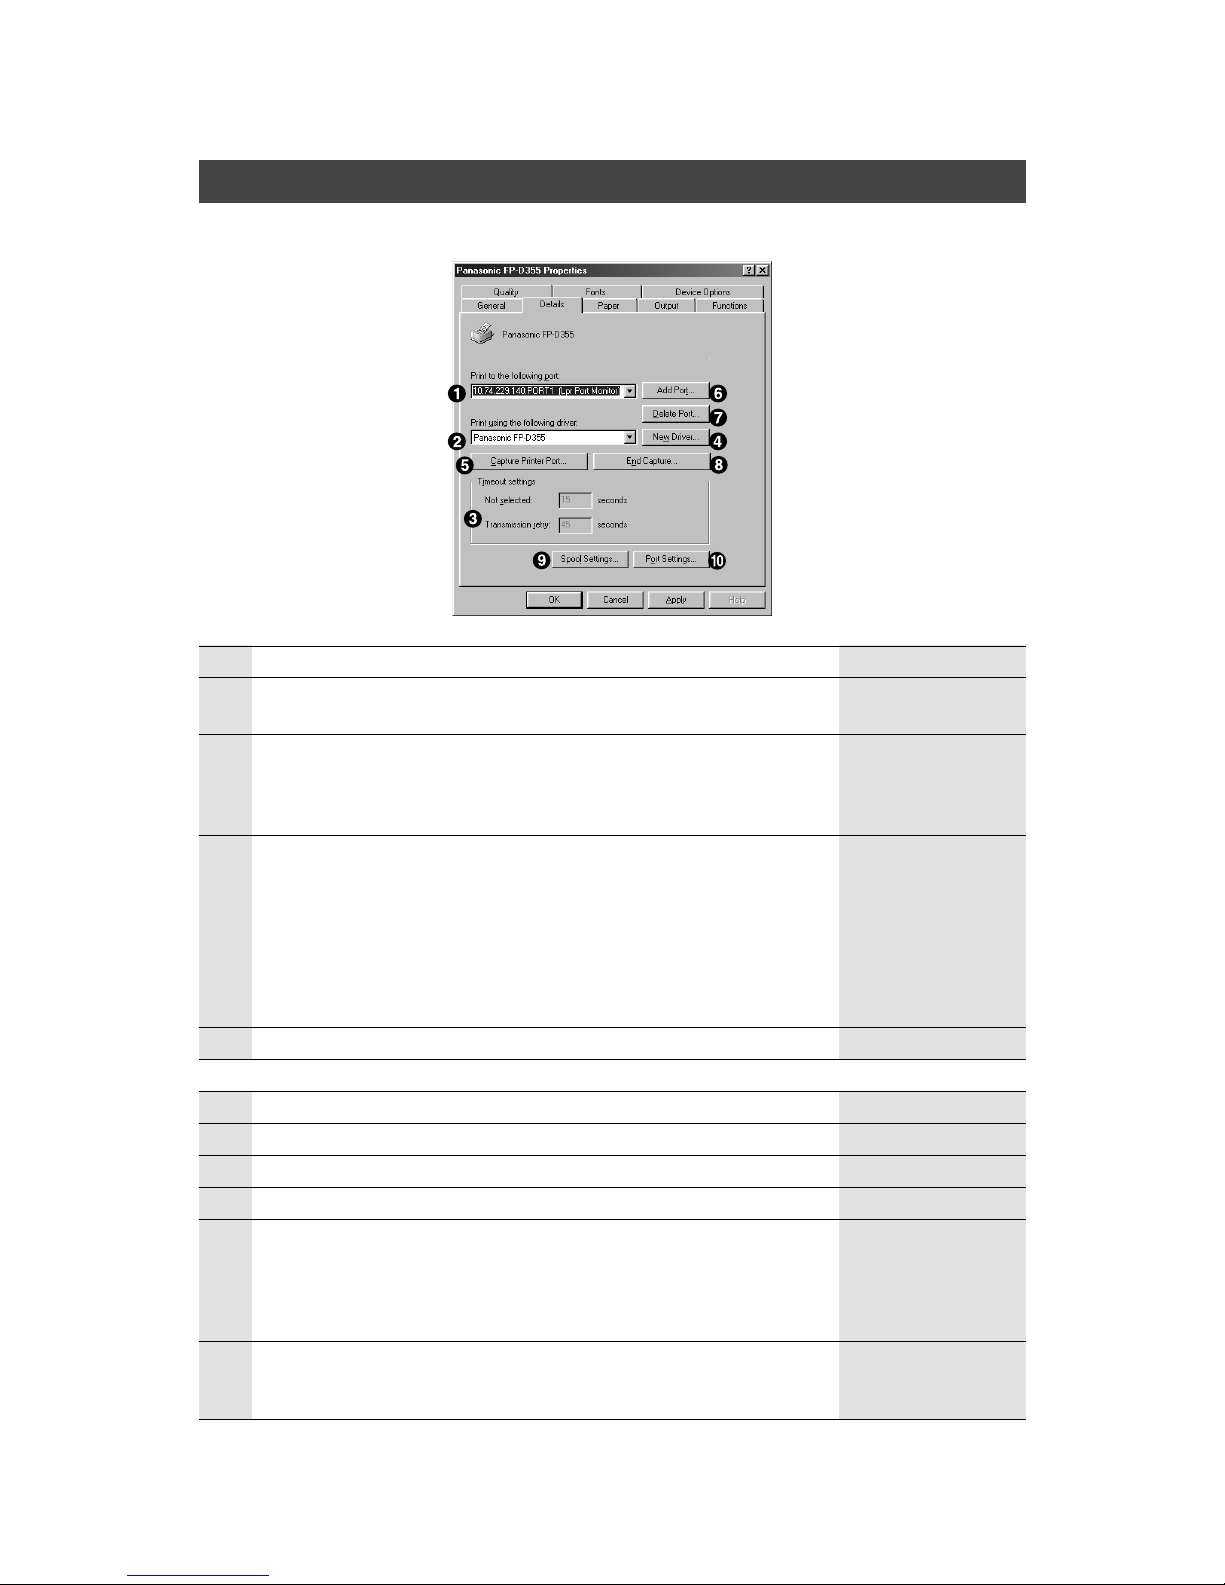
(7) Details
C Both PCL5e and PS
are the same screen.
No Item
Default settingSetting
For Windows 95/98/Me/2000
# Print to the
following port
LPT1: Printer
port
FILE: creates a file on disk
LPT1: Printer port
$ Print using the
following driver
Display all print
drivers which
selected Regular
Use Printer
Displays the currently selected
default printer.
% Timeout settings Displays error indication when its over wait
time setting after transmitting the document
data.
C Not selected: Waiting time from sending
data to recognize the next data.
C Transmission retry: After error display,
waiting time after sending
the data to retry.
15
45
& New Driver Installing another printer driver.
Following item will be used when using as a network printer.
( Capture Printer port
Add Port)
Delete Port*
End Capture+
Spool Settings- After spooling the
data from the first
page
Set up the timing when print data is sent to
the printer.
C After spooling the entire print job
C After spooling the first page of data
C Without spool
Port Settings. Check the port
condition before
printing
It allows to set the printer port which is using
C Spool print job of MS-DOS (S)
C Check port condition before printing (C)

18
Setting up Print Condition
Windows 95/NT 4.0
No Item Default settingSetting
# PostScript output Selects printing method.
C PostScript (optimize for speed)
Enscapsulated PostScript (EPS)
(8) PostScript
C PS only
Windows 95 Windows NT 4.0
PostScript
PostScript header Selects header download.
C Download header with each print job
Assume header is downloaded and retained
Download header
with each print job
Bitmap% Selects image data is (or not) compressed.
C Compress bitmap images
No bitmap compression
Compress bitmap
images
$
& PostScript timeout
values
Selects timeout values
C Job tiomeout: Waiting time from sending
data to recognize the next data.
C Wait: After error display, waiting time after
sending the data to retry.
0 second
240 seconds
( Data format Selects timing of CTRL+D signal
C Send CTRL+D before job
Send CTRL+D after job
Send CTRL+D
before job
Print PostScript
error information
) When inform the PostScript error
C Select, Not select
Select
* Halftone (See P.10)
+ Halftone Setup When printing the halftone or color image.
C Halftone Pattern, Device Gamma, Pixel
Diameter, Device Alignment White
C Revert: Revert the before setting.
C Default:Reset the above setting items to
default setting.
19
Setting up Print Condition
For Mac OS
Print conditions can be selected as follows:
Item Reference pageProcedures
When installing the options Setting the
Configure
of
Printer Description file (PPD).
Set the following items after starting the application software.
Paper size, Orientation, Scale etc., Setting the
Page setup
of File menu.
See P.20
Copies, Pages, Paper, Duplex, N in 1,
Printer Specific Options
(Resolution, Output Order, etc.,)
Setting the
Print
of File menu. See P.22
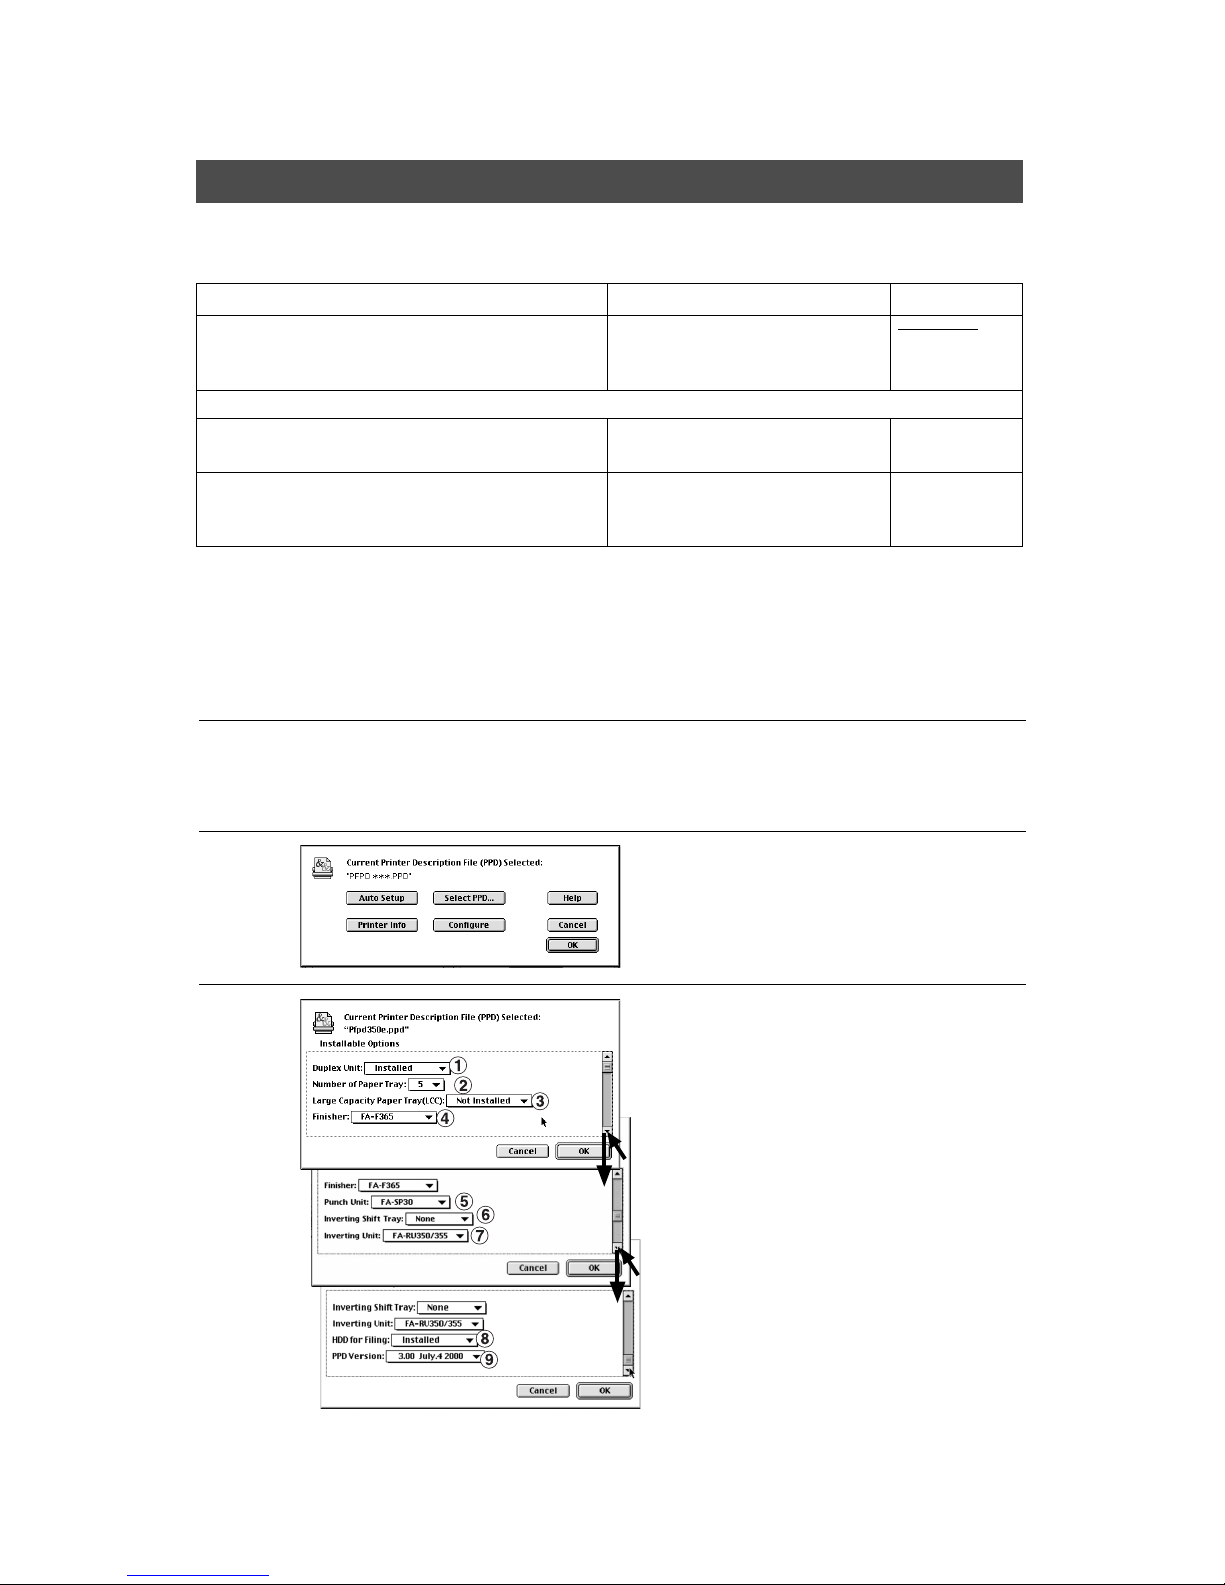
When installing the options
1
# Select the
Apple
mark.
$ Click the Chooser of indicated list.
2
# Click the
LaserWriter
SSS
.
$ Select the
MEI_
SSSSSS
.
% Click the
Setup...
3
Click the
Configure
.
4
Set the installable option(s) and
Click OK.
1/3 window
# Duplex unit
(Not installed, installed)
$ Number of paper tray (1 - 5)
3 - 5: For System console only
% Large Capacity Paper Tray (LCC)
(Not installed, installed)
& Finisher
(Not installed, FA-F320, FA-F350/F355,
FA-F365)
2/3 window
( Punch Unit
(Not installed, FA-SP30, FA-SP40)
) Inverting Shift Tray
(Not installed, FA-TR350, FA-TR355)
* Inverting Unit
(Not installed, FA-RU350/355)
3/3 window
+ HDD for Filing
(Not installed, installed)
- PPD Version
20
Setting up Print Condition
For Mac OS
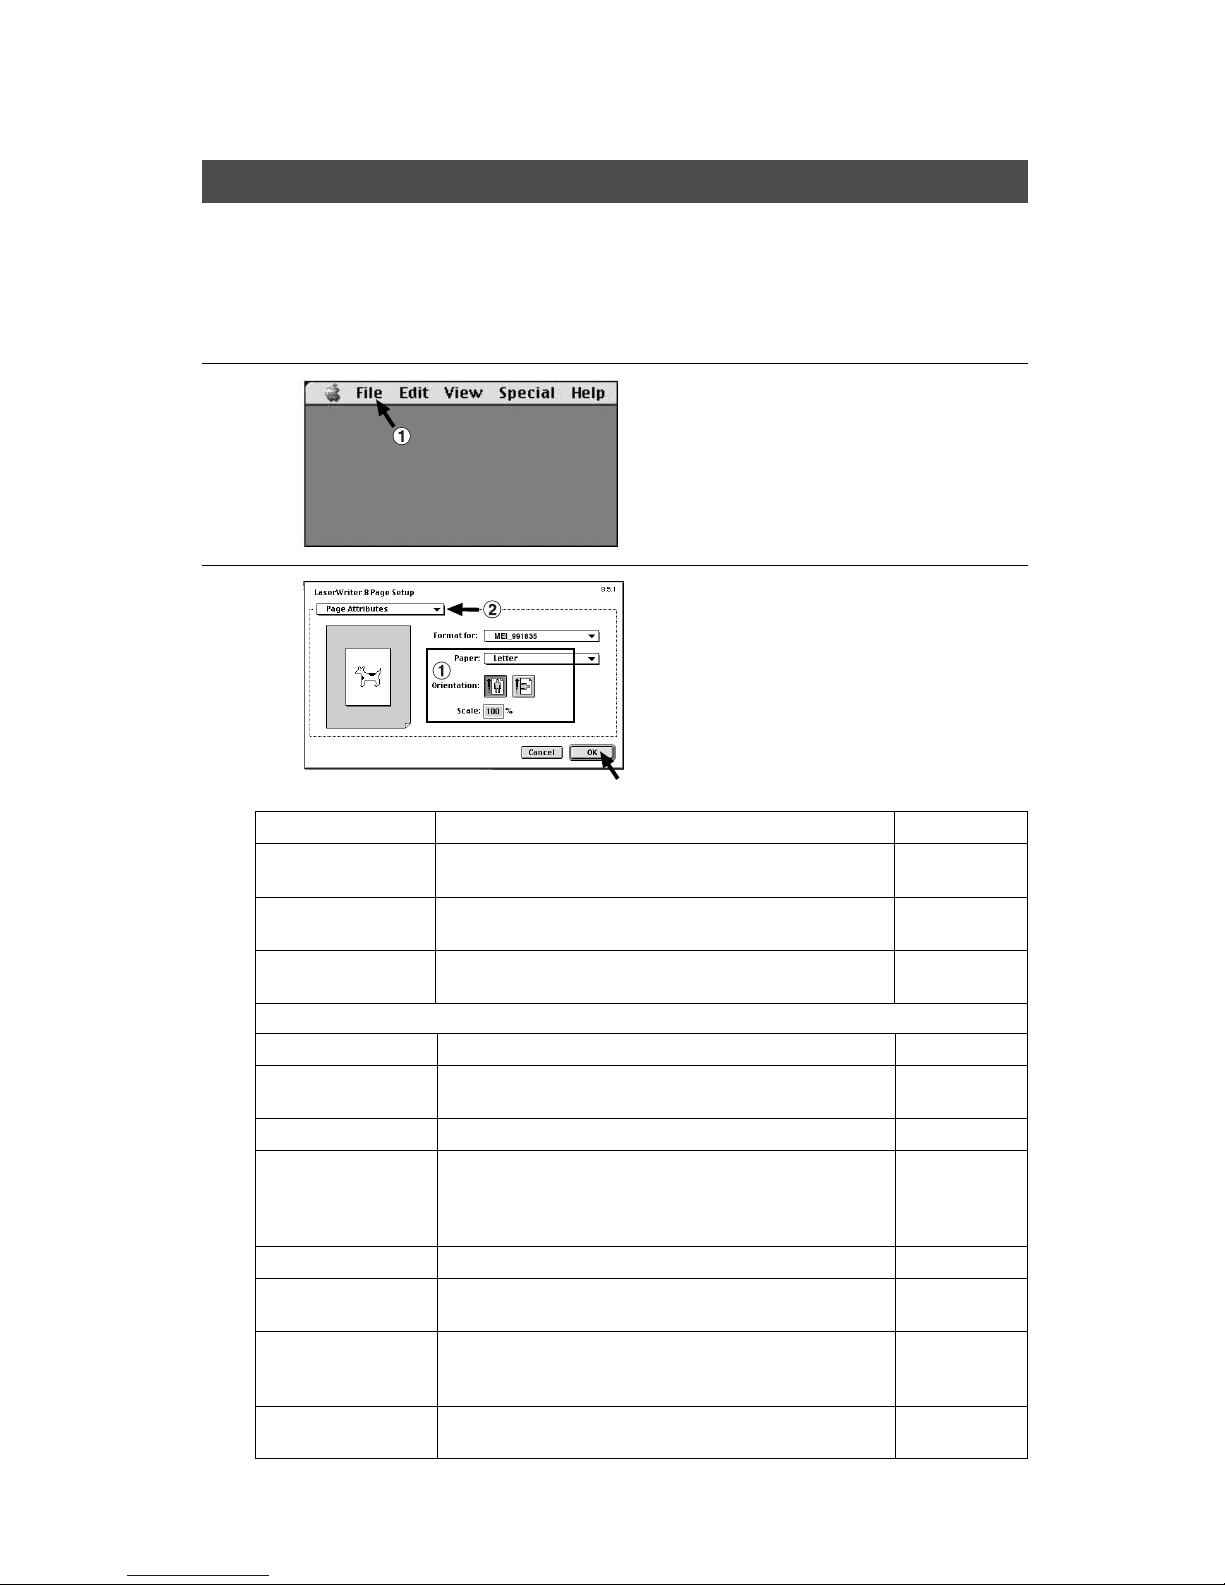
1
Start the application software.
Example: Simple Text, Ms-Word etc.,
2
# Click the
File
.
$ Click the
Page setup
of indicated list.
3
Set the above # $ and click OK if necessary.
Item Default settingSetting
Paper Letter/A4
C Ledger, Legal, Letter, Invoice
A3, A4, A5, B4, B5
Orientation PortraitC Portrait, Landscape
Scale 100%
Prints with variable zoom ratios
C 1 to ###% in 1% increments
Mirroring of portrait NoneA mirror image can be made with portrait direction
Mirroring of
landscape
NoneA mirror image can be made in landscape
direction
Following items can be set by selecting the PostScript Option on $ menu
Pattern Inverse NoneNegative/Positive image can be made
Font substitution SelectedUsed fonts can be substituted with PostScript fonts for
highly resolution.
Example: New York, Times, Geneva Helvetica,
Monaco, Courier
Smooth font SelectedUsed fonts will be substituted with Bitmap fonts.
Smooth image SelectedReduce the notiches when enlargement print
is made.
Bitmap arraignment NoneWhen the graphic image is warped, warp can be
removed with reducing the image.
Ratios: 4% (300/600 dpi), 10%(300 dpi)
Unlimit for font
download
NoneWhen the fonts are downloading.
21
Setting up Print Condition
Layout setting
For Mac OS
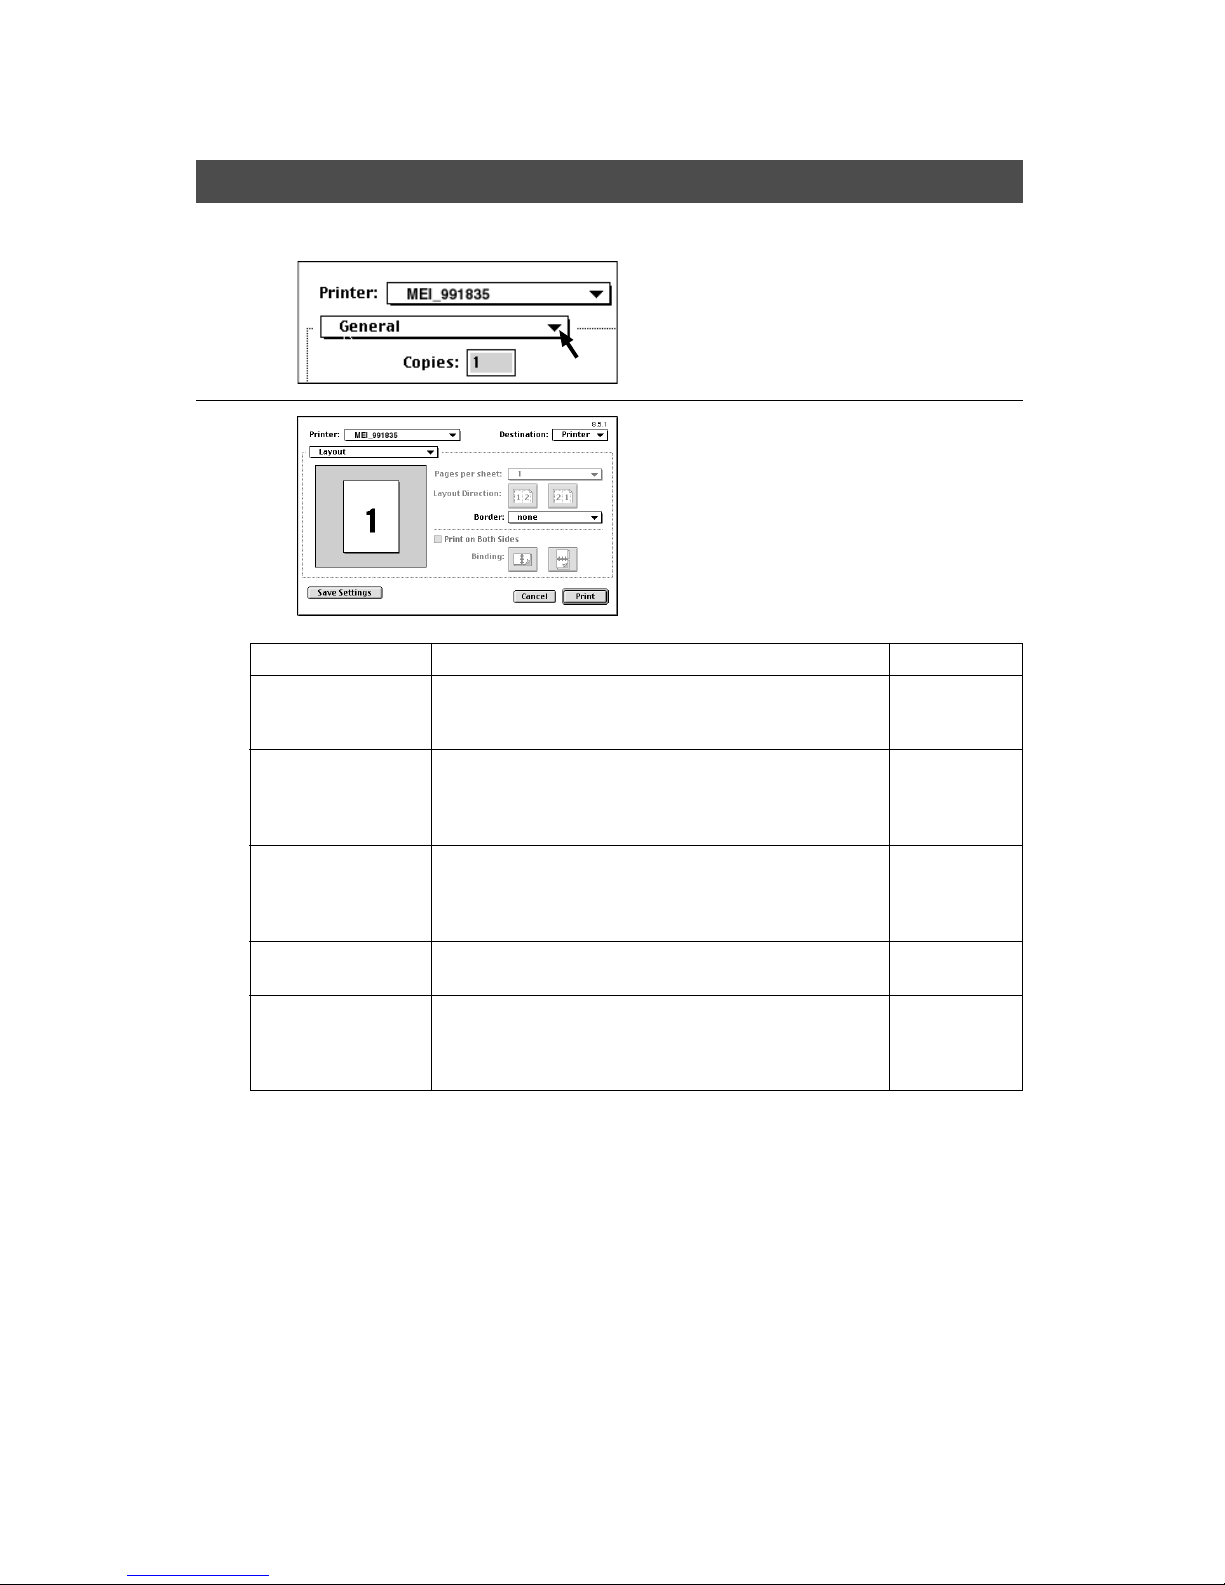
4
Click and hold G mark then
select the Layout.
5
Item Default settingSetting
Page per sheet 1 page
From plural pages documents, side by side, to
1-sided prints
C 1, 2, 4, 6, 9, 16 – page
Layout direction Left to right
page
Selecting the page layout when page per sheet is
selected.
C Left to right page (left side icon)
C Right to left page (right side icon)
Border None
Selecting the line type when the page per sheet is
selected.
C None, Single hairline, Single thin line,
Double hairline, Double thin line.
Print on both sides Not selected
Selecting the print on both sides.
(When the duplex unit is installed)
Binding Regular book
format
Selecting the binding direction when the print on
both sides is selected.
C Regular book format (left side icon)
C Sketch book format (right side icon)
22
Setting up Print Condition
For Mac OS
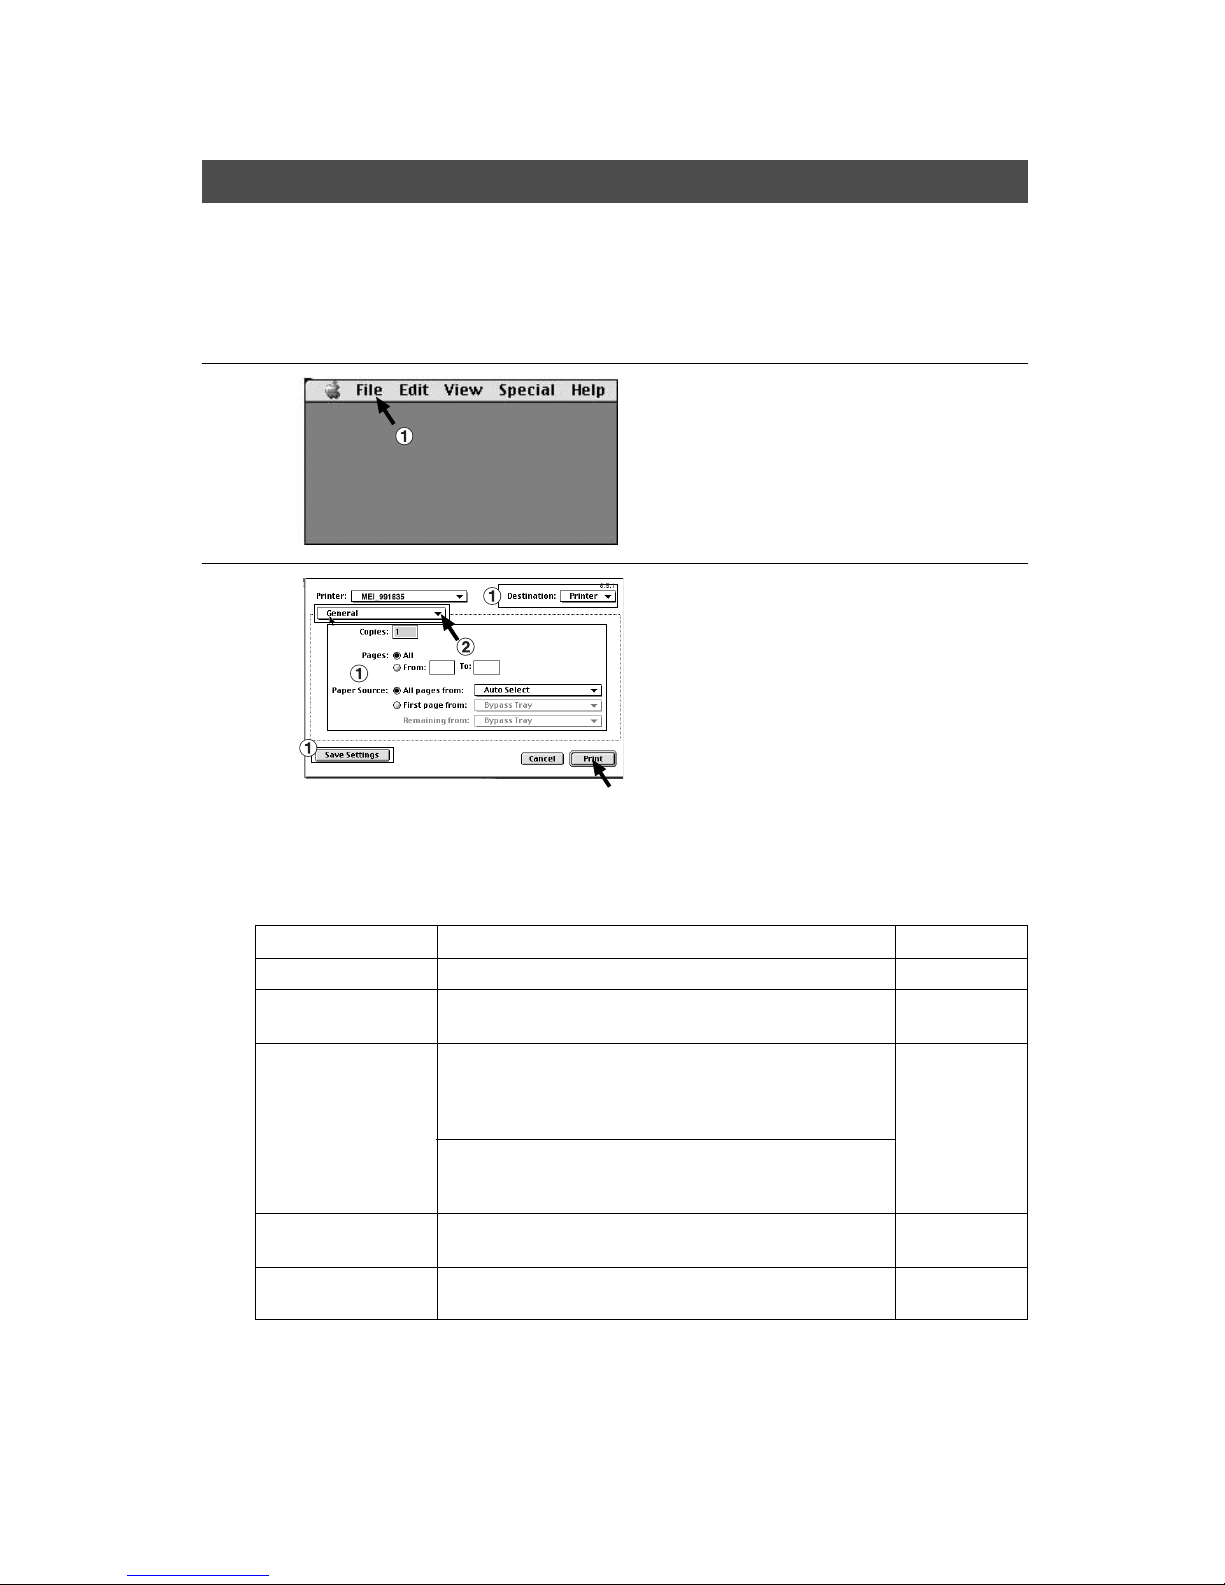
1
Start the application software.
Example: Simple Text, Ms-Word etc.,
2
# Click the
File
.
$ Click the
Print
of indicated list.
3
Set the above # and $ click
Print
, then Print out will start.
C When click G mark, following items can be selected.
Layout (See P.21), Option (See P.23)
Page setting
Item Default settingSetting
Copies 11 to 999
Pages All
Set up the print page(s)
C All, From: ## To: ##
Paper Source All pages from
Auto select
All pages from
C Auto select, Main upper tray, Main lower tray
Following settings are option.
System console upper/middle/lower, LCC tray
C First page from: Set up tray for first page
Remaining: Set up tray for remaining page
Destination Printer
C Printer
C File (When output the file format)
Save settings
C When saving the settings
23
Setting up Print Condition
For Mac OS
Printer Specific Options
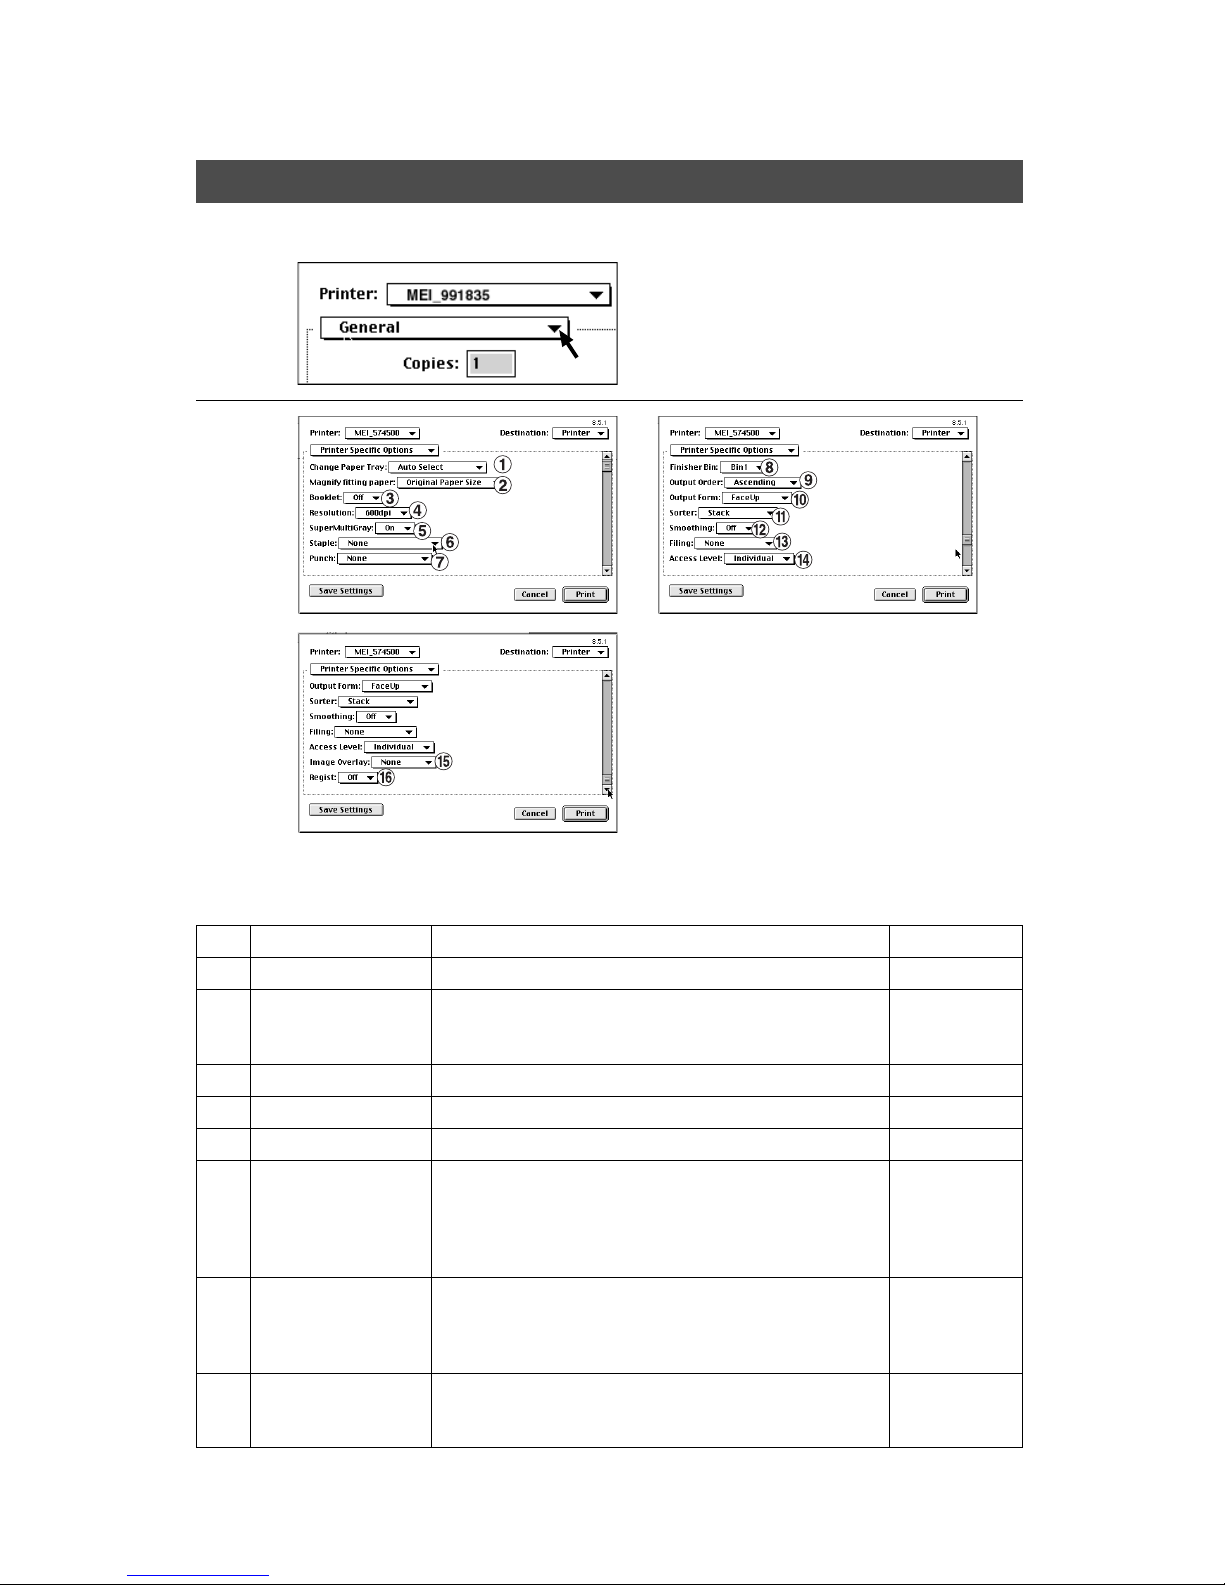
4
Click and hold G mark then select
the Printer Specific Options.
5
No. Item Default settingSetting
# Change Paper Tray Auto SelectAuto Select, Specified Tray
$ Magnify fitting paper Original Paper
Size
C Original Paper Size
C Select from following size:
A3, A4, A5, B4, B5, Invoice, Letter, Legal, Ledger
% Booklet OffC On, Off
& Resolution 600 dpiC 600 dpi, 300 dpi
( Super Multi Gray OnC On, Off
) Staple NoneC None
Portrait Left-1/2, Landscape Left-1/2, Portrait Right1/2, Landscape Right-1/2, Portrait Top-2,
Landscape Top-2, Center
(FA-F320: Left-1 only)
NoneCNone
C Portrait Left/Right, Landscape Left/Right, Portrait
Top, Landscape Top
(Left only when FA-F320 is installed.)
* Punch
+ Finisher Bin
C 1 to 3 Bin
When FA-TR355/F320/F350/F355/F365 is installed.
(FA-TR355/F320/F365:1, 2 bin only)
1 Bin
24
ATTENTION
Setting up Print Condition
For Mac OS
NOTE
C Please ensure [Collate] function is not checked when Sort, N in 1 and/or
Booklet is selected.
C 1 Filing, 3 Image Overlay, 4 Regist functions cannot work when
PFPD
User Information Chooser US
screen is not opened.
No. Item Default settingSetting
- Output Order AscendingC Ascending: Paper exit from the first page.
C Descending: Paper exit from the last page.
. Output Form FaceUpC FaceUp: Print out with print side up.
C FaceDown: Print out with print side down.
(FaceDown: When FA-TR350/TR355/RU350/
RU355 is installed.)
/ Sorter StackC Stack: None Sort/Group mode
C Sort: 1 sheet of each original is placed into a
separate bin.
C Rotated Stack (Group): Grouped sheets are placed
and separated rotation onto
tray.
C Rotated Sort: Sorted sheets are separated rotation
and exit onto tray.
C Shifted Stack:Grouped sheets are offset and exit
onto tray.
C Shifted Sort: Sorted sheets are offset and exit onto
tray.
0 Smoothing OffCOn, Off
1 Filing NoneAvailable to select when Filing unit is installed.
C None
C Filing
C Filing Print
C SecurityPrint
2 Access Level IndividualC Individual, Group, Public
NoneAvailable to select when Network adaptor and filing
unit are installed.
C None, Image 1 to 10
3 Image Overlay
4 Regist C On, Off Off

25
1 32
4 65
7 98
#0
LEDGER
LEGAL
INVOICE
LETTER
LETTER
COPY MODE
ADVANCED
FUNCTIONS
Setting up Print Condition
For Control Panel of Digital Copier
ON LINE
OFF LINE
PRINT
DATA
RESET
Printer settings
Filing
Select function
1
Press the Advanced
Functions key
2
Touch the OFF LINE key and Printer settings key
3
Set the desired Item key
OK
01 Number of prints
02 Paper size Letter
1
03 Paper tray select
04 Output direction
05 Auto paper tray select
Auto
Portrait
Yes
1/2
Printer Setting 1/2
OK
06 Smoothing
07 Security print
On
Face Up
Ascending
None
08 Output Form
09 Output Order
10 Duplex
2/2
Printer setting 2/2
4
Select the desired setting item with
LCD display and touch OK key.
5
Touch OK key and
ON LINE key
Item Default settingSetting
01 Number of prints 1
Input the number of prints with quantity key of the
copier control panel and touch OK key of LCD.
1 to 999
02 Paper Size Letter/A4Select the size and touch OK key.
A3, B4, A4, B5, A5, FLS1, FLS2,
LEDGER, LEGAL, LETTER, INVOICE
03 Paper tray select Select the cassette and touch OK key.
Automatic cassette selection, Upper
cassette, Lower cassette, Bypass.
The following is available when installing
optional accessories.
LCC, System console (upper/middle/lower)
Auto
04 Output direction PortraitSelect the print direction and touch OK key.
Portrait, Landscape
05 Auto paper tray select YesWhen the paper of selected cassette was
empty, other direction paper of same size will
be selected.
Select this feature and touch OK key.
Ye s , N o
06 Smoothing On1200 dpi, used to reduce jagged areas on
curves and fine lines.
On, Off
NOTE
C When printing with a PC:
Windows 95/98/Me/2000/NT 4.0: See P.10-18
Mac OS: See P.19-24
07 Security print
See P.26
When registered document is printed (one by one).
08 Output Form
Face Up
Select putput form and touch OK key.
Face Up, Face Down
09 Output Order
Ascending
Select output order and touch OK key.
Acsending, Descending
10 Duplex
None
Select duplex and touch OK key.
No, Long Edge, Short Edge
 Loading...