


Operating Instructions
Manuel d’utilisation
Rechargeable Shaver
Rasoir rechargeable
Model No.
N° de modèle
English 2
Français 11
Español 20
ES‑SA40
Before operating this unit, please read these instructions completely.
Il est recommandé de lire attentivement ce manuel avant d’utiliser l’appareil.

English
IMPORTANT SAFETY
INSTRUCTIONS
When using an electrical appliance, basic precautions
should always be followed, including the following:
Read all instructions before using this appliance.
DANGER
1. Do not reach for an appliance that has fallen into
water. Unplug immediately.
2. Charger unit is not for immersion or for use in shower.
3. Do not place or store appliance where it can fall or be
pulled into a tub or sink. Do not place in or drop into
water or other liquid.
4. Except when charging, always unplug this appliance
from the electrical outlet immediately after using.
5. Unplug this appliance before cleaning.
6. Do not use an extension cord with this appliance.
WARNING
1. Close supervision is necessary when this appliance is
used by, on, or near children or invalids.
2. Use this appliance only for its intended use as
described in this manual. Do not use attachments not
recommended by the manufacturer.
3. Never operate this appliance if it has a damaged plug,
if it is not working properly, if it has been dropped or
damaged, or dropped into water. Return the appliance
to a service center for examination and repair.
4. Never drop or insert any object into any opening.
2
To reduce the risk of electric shock:
To reduce the risk of burns, fire,
electric shock, or injury to persons:

5. Do not use outdoors or operate where aerosol (spray)
products are being used or where oxygen is being
administered.
6. Do not use this appliance with damaged shaving blade
and/or foil, as facial injury may occur.
7. Always attach plug to appliance first, then to outlet. To
disconnect, turn all controls to “off” then remove plug
from outlet.
8. Plug charger directory into receptacle ‑ do not use an
extention cord.
9. Unplug charger before plugging or unplugging
appliance.
SAVE THESE INSTRUCTIONS
English
SPECIFICATIONS
Power source: See the name plate on the product.
Motor voltage: 1.2 V DC
Charging time: 8 hours
This product is intended for household use only.
3

Important
English
Before use
This WET/DRY shaver can be used for wet shaving with shaving lather or
for dry shaving. You can use this watertight shaver in the shower and
clean it in water. The following is the symbol of Wet shaver. The symbol
means that the hand‑held part may be used in a bath or shower.
Treat yourself to wet lather shaves for at least three weeks and notice the
difference. Your Panasonic WET/DRY shaver requires a little time to get
used to because your skin and beard need about a month to adjust to
any new shaving method.
Using the shaver
Caution ‑ The outer foil is very thin and can be damaged if not used
correctly. Check that the foil is not damaged before using the shaver. Do
not use the shaver if the foil etc. is damaged as you will cut your skin.
Charging the shaver
Do not use any charging adaptor other than one specifically designed for
this model (RE7‑53). Plug in the adaptor into a household outlet where
there is no moisture and handle it with dry hands. The shaver may
become warm during use and charging. However, this is not a
malfunction. Do not charge the shaver where it will be exposed to direct
sunlight or other heat sources.
Adequate ambient temperature for charging is 0‑40 °C (32‑104 °F).
The charging adaptor is intended to be correctly oriented in a vertical or
floor mount position.
Cleaning the shaver
Warning ‑ Remove the shaver from the charging adaptor before cleaning
it to prevent electric shock.
If you clean the shaver with water, do not use salt water or hot water. Do
not soak the shaver in water for a long period of time. Wipe it with a cloth
dampened with soapy water. Do not use thinner, benzine or alcohol.
Storing the shaver
Remove the shaver from the charging adaptor when storing it. This
appliance is not intended for use by persons (including children) with
reduced physical, sensory or mental capabilities, or lack of experience
and knowledge, unless they have been given supervision or instruction
4
concerning use of the appliance by a person responsible for their safety.
Children should be supervised to ensure that they do not play with the
appliance. Keep these operating instructions in a safe place.
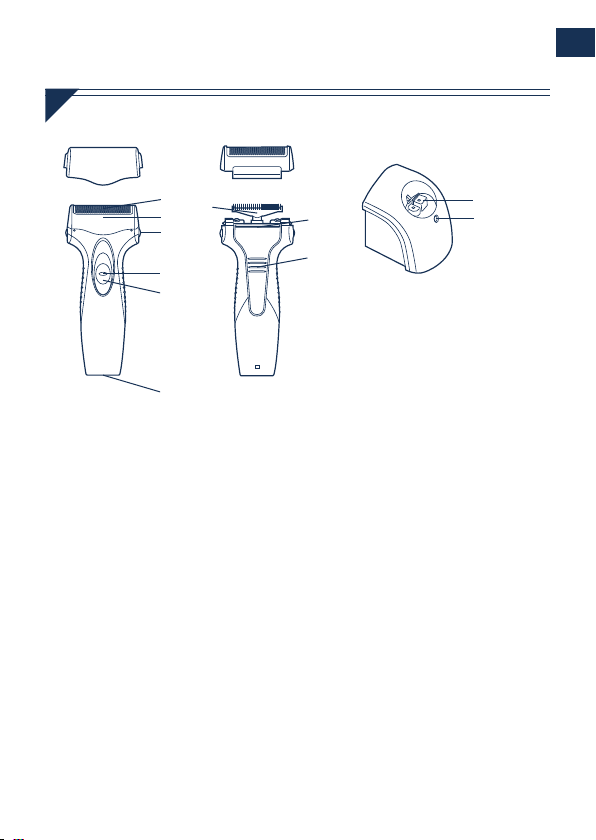
A Protective cap
B Outer foil section
1 Outer foil
2 Foil frame
C Inner blade
D Main body
3 Foil frame release buttons
4 Switch lock button
Parts identification
English
5 OFF/ON switch
6 Appliance socket
7 Trimmer
8 Trimmer handle
E Charging adaptor (RE7‑53)
9 Charging plug
Charge indicator lamp
5
English
Charge
Perform the following steps to charge the shaver if it seems to lose the
speed.
You can fully charge the shaver in 8 hours.
A full charge will supply enough power for approx. 7 shaves of 3 minutes
•
each.
1
1
2
2
•
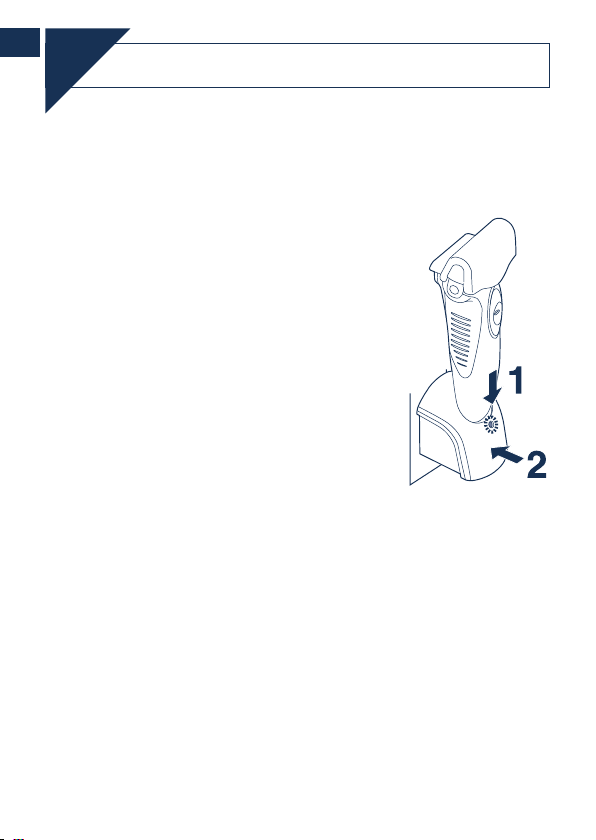
The charge indicator lamp glows and stays on until the shaver is removed
from the charging adaptor.
Charging
Turn off the shaver and insert it in the
charging adaptor as illustrated.
Plug in the adaptor into a household
outlet.
6
Using the shaver
90˚
Shave
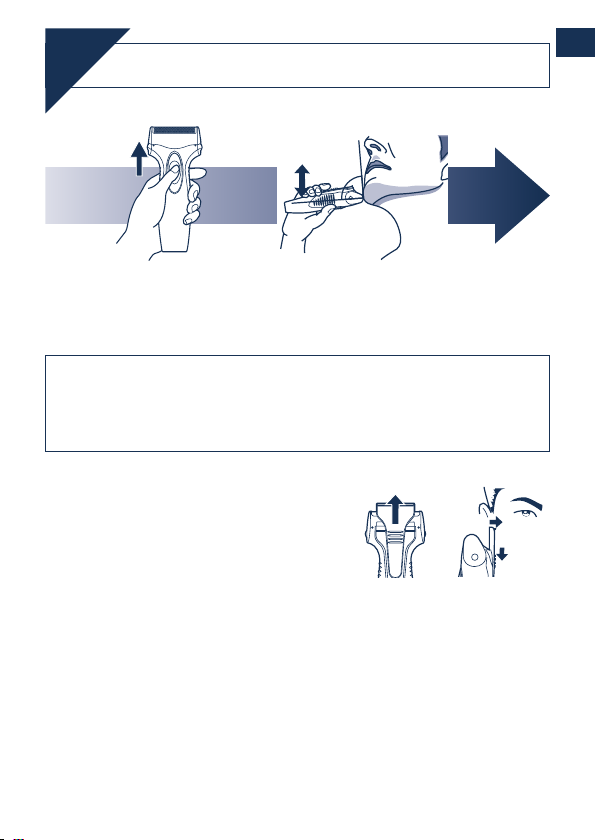
English
Depress the switch lock
1
1
button and slide the OFF/
ON switch upwards.
Start out shaving by applying gentle pressure to your face. Stretch your
•
skin with your free hand and move the shaver back and forth in the
direction of your beard. You may gently increase the amount of pressure
as your skin becomes accustomed to this shaver. Applying excessive
pressure does not provide a closer shave.
Using the trimmer
Slide the trimmer handle up. Place at a right
angle to your skin and move downwards to
trim your sideburns.
Hold the shaver as
2
2
illustrated above and
shave.
7
English
Clean
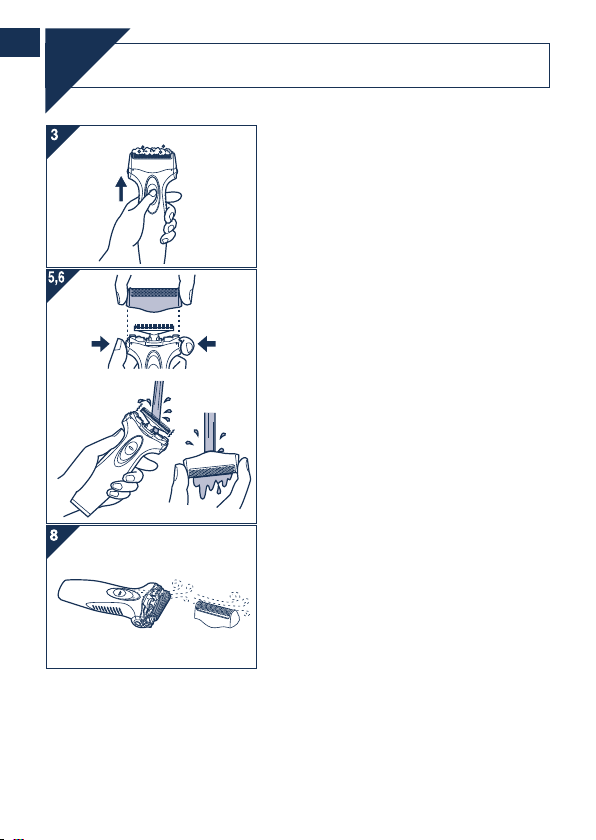
Cleaning
1. Remove the shaver from the charging
adaptor.
2. Apply some hand soap and some water
to the outer foil.
3. Turn the shaver on.
4. Turn the shaver off after 10‑20 seconds.
5. Remove the outer foil section and turn
the shaver on.
6. Clean the shaver and the outer foil
section with running water.
7. Wipe off any drops of water with a dry
cloth.
8. Dry the outer foil section and the shaver
completely.
9. Attach the outer foil section to the
shaver.
8
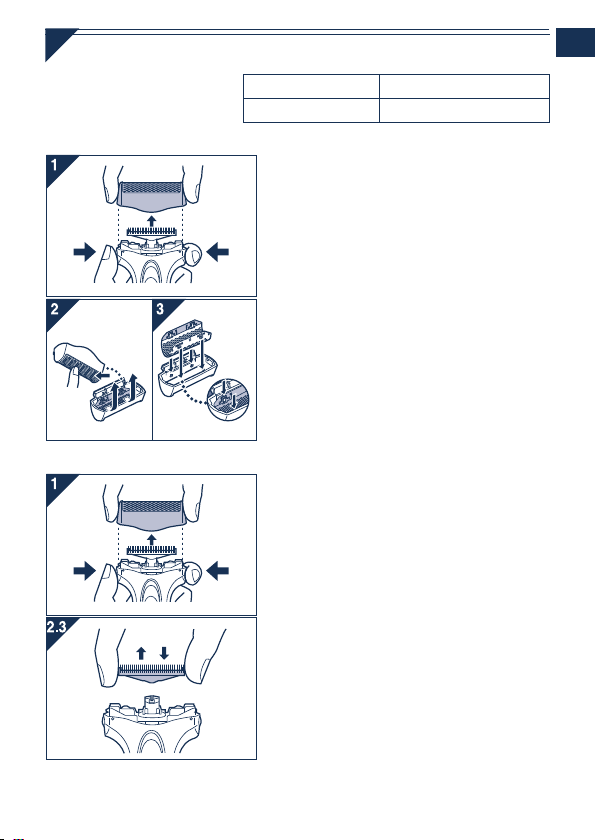
Replacing the outer foil and the inner blade
2 3
outer foil once every year
inner blade once every two years
Replacing the outer foil
Replacing the inner blade
1. Press the foil frame release buttons and
lift the outer foil section upwards as
illustrated.
2. Gently push the outer foil in the way as
illustrated. Then it will pop up from the
foil frame.
3. The new outer foil should be slightly
bent and pushed in until it is hooked in
the foil frame.
1. Press the foil frame release buttons and
lift the outer foil section upwards as
illustrated.
2. Remove the inner blade as illustrated.
Do not touch the edges (metal parts)
•
of the inner blade to prevent injury to
your hand.
3. Insert the inner blade until it clicks as
illustrated.
English
9

Removing the built-in rechargeable battery
R B R C
N i- M H
TM
English
ATTENTION:
A nickel metal hydride battery that is recyclable powers the product you
have purchased. Please call 1‑800‑8‑BATTERY for information on how to
recycle this battery.
Remove the built‑in rechargeable battery before disposing of the shaver.
Do not dismantle or replace the battery so that you can use the shaver
again. This could cause fire or an electric shock. Replace it at an
authorized service center.
Remove the shaver from the charging adaptor when removing the battery.
•
Perform steps 1 to and lift the battery, and then remove it.
•
FOR YOUR CONVENIENCE, WE HAVE ESTABLISHED A TOLL-FREE (IN
USA ONLY) NATIONAL ACCESSORY PURCHASE HOT LINE AT 1-800332-5368.
IN CANADA, CONTACT PANASONIC CANADA INC. AT THE
ADDRESS OR TELEPHONE NUMBER ON THE BACK PAGE.
10

CONSIGNES DE
SÉCURITÉ IMPORTANTES
Lors de l’utilisation d’un appareil électrique, il faut toujours
prendre des précautions de base, y compris les suivantes:
Lisez toutes les instructions avant d’utiliser cet appareil.
DANGER
1. Ne touchez pas un appareil qui est tombé dans l’eau.
Débranchez-le immédiatement.
2. N’immergez ni n’utilisez le chargeur dans la douche.
3. Ne placez ni ne rangez l’appareil là où il peut tomber ou être
précipité dans une baignoire ou un évier. Ne déposez ou
n’échappez pas dans l’eau ou dans un autre liquide.
4. Débranchez toujours cet appareil de la prise électrique
immédiatement après usage, excepté pendant la charge.
5. Débranchez cet appareil avant de le nettoyer.
6. N’employez pas de rallonge avec cet appareil.
An de réduire tout risque
d’électrocution:
Français
11

MISES EN GARDE
1. Une grande vigilance est nécessaire lorsque cet appareil est
utilisé par des enfants ou des personnes handicapées, sur
eux ou en leur présence.
2. Utilisez cet appareil uniquement pour son usage prévu,
comme le décrit le présent manuel. N’utilisez pas
d’acessoires qui ne sont recommandés par le fabriquant.
3. N’utilisez jamais cet appareil si le cordon ou la che est
endommagé, s’il ne fonctionne pas correctement, s’il est
tombé, endommagé ou tombé dans l’eau. Retournez
l’appareil à un centre de réparation pour le faire inspecter et
réparer.
4. Ne faites jamais tomber ou n’insérez pas un objet dans les
ouvertures de l’appareil.
5. N’utilisez pas à l’extérieur, dans des endroits où des
aérosols (pulvérisateurs) sont utilisés ou là où de l’oxygène
Français
est administré.
6. N’utilisez pas ce rasoir avec une lame de rasage et/ou une
grille endommagées, car des blessures au visage risquent
de se produire.
7. Branchez toujours la che à l’appareil en premier, puis pour
débrancher, commutez toutes les commandes sur “arrêt”.
8. Branchez le chargeur directement sur une prise secteur
murale - n’utilisez aucun cordon prolongateur.
9. Débranchez le chargeur avant de brancher ou de
débrancher l’appareil.
An de réduire le risque de brûlures, d’incendie,
d’électrocution ou de blessures corporelles:
CONSERVEZ LES PRÉSENTES INSTRUCTIONS
Spécications
Source d’alimentation : Voir la plaque signalétique sur le produit.
Tension du moteur : 1,2 V CC
Temps de chargement : 8 heures
Ce produit est destiné à une utilisation domestique uniquement.
12

Important
Avant utilisation
Ce rasoir est utilisable sur peau sèche ou peau mouillée avec du gel de rasage.
Vous pouvez utiliser ce rasoir étanche sous la douche et le nettoyer sous l’eau.
Le symbole suivant indique un rasoir mouillé. Ce symbole signie que la partie du
rasoir qui est tenue à la main peut être utilisée dans un bain ou sous la douche.
Essayez le rasage mouillé au gel pendant un minimum de trois semaines et vous
verrez la différence! Il vous faudra un peu de temps pour vous habituer à votre
rasoir Panasonic sec/mouillé car votre peau et votre barbe ont besoin d’un mois
environ pour s’adapter à une nouvelle méthode de rasage.
Utilisation du rasoir
Attention - La grille de protection est très ne et peut être endommagée en cas
d’utilisation incorrecte. Vériez que la grille n’est pas endommagée avant
d’utiliser le rasoir. N’utilisez pas le rasoir si la grille est endommagée car vous
pourriez vous couper la peau.
Chargement du rasoir
N’utilisez pas un adaptateur de charge autre que celui prévu pour ce modèle
(RE7-53). Branchez l’adaptateur dans une prise secteur qui n’est pas humide et
manipulez-le en ayant les mains sèches. Le rasoir pourrait dégager de la chaleur
lors de son utilisation et de son chargement. Ceci est tout à fait normal. Ne
chargez pas le rasoir dans un endroit où il sera exposé à la lumière directe du
soleil ou à une autre source de chaleur.
La température adéquate pour le chargement est 0-40 °C (32-104 °F).
Il convient de placer l’adaptateur de charge à la verticale ou sur le plancher.
Nettoyage du rasoir
Avertissement - Retirez le rasoir de l’adaptateur de charge avant de nettoyer ce
dernier, an de ne pas vous électrocuter.
Si vous nettoyez le rasoir à l’eau, n’utilisez pas d’eau salée ni d’eau chaude. Ne
laissez pas tremper le rasoir dans l’eau trop longtemps. Nettoyez-le avec un
chiffon trempé dans de l’eau savonneuse. N’utilisez pas de solvant, de benzène
ou d’alcool.
Rangement du rasoir
Retirez le rasoir de l’adaptateur de charge avant de le ranger. Cet appareil n’a
pas été conçu pour être utilisé par des personnes (enfants y compris) souffrant
d’un handicap physique, sensoriel ou mental, ou ne disposant pas de
13
Français

l’expérience et des connaissances nécessaires à une utilisation sûre, à moins
qu’elles aient reçu toutes les consignes requises par la personne responsable de
leur sécurité quant à l’utilisation de l’appareil. Surveillez les enfants, an de vous
assurer qu’ils ne jouent pas avec l’appareil. Conservez et rangez ces instructions
dans un endroit sûr.
Identication des pièces
Français
A
Couvercle de protection
B
Section de la grille de protection
1 Grille de protection
2 Cadre de la grille de protection
C
Lame intérieure
D
Corps principal
3 Boutons de déverrouillage du
cadre de grille de protection
4 Bouton de verrouillage
d’interrupteur
5 Interrupteur MARCHE/ARRET
6 Prise
7 Taille-favoris
8 Levier du taille-favoris
E
Adaptateur de charge (RE7-53)
9 Fiche de charge
Témoin lumineux de charge
14

Chargement
Charge
Suivez les étapes suivantes pour charger le rasoir s’il parait perdre de la vitesse.
Vous pouvez charger complètement le rasoir en 8 heures.
Une pleine charge permettra d’effectuer environ 7 rasages de 3 minutes chacun.
•
Mettez le rasoir hors-marche et placez-le
1
1
sur l’adaptateur de charge de la façon
indiquée.
Branchez l’adaptateur à la prise secteur.
2
2
•
Le témoin lumineux de charge s’allume et reste allumé jusqu’à ce que le rasoir soit
retiré de l’adaptateur de charge.
Français
15

Se raser
90˚
Utilisation du rasoir
Appuyez sur le bouton de
1
1
verrouillage de l’interrupteur
et faites glisser
l’interrupteur MARCHE/
ARRET vers le haut.
Commencez à vous raser en appuyant légèrement sur votre visage. Tendez
•
Français
votre peau à l’aide de l’autre main et faites des allers-retours en direction de la
barbe. Vous pouvez appuyer un peu plus au fur et à mesure que votre peau
s’habitue au rasoir. Néanmoins, le fait d’appuyer très fort n’augmente pas
l’efcacité du rasage.
Utilisation du taille-favoris
Faites glisser le levier du taille-favoris vers le haut.
Positionnez le taille-favoris à angle droit sur votre
peau et descendez pour tailler vos favoris.
Tenez le rasoir comme
2
2
illustré ci-dessus et rasezvous.
16

Nettoyer
Nettoyage
1. Retirez le rasoir de l’adaptateur de charge.
2. Nettoyez la grille de protection avec de l’eau
savonneuse.
3. Mettez le rasoir en marche.
4. Mettez le rasoir hors-marche après environ
10-20 secondes.
5. Retirez la section de la grille de protection et
mettez le rasoir en marche.
6. Nettoyez le rasoir et la section de la grille de
protection avec de l’eau courante.
7. Essuyez toute trace d’eau à l’aide d’un
chiffon sec.
8. Faites sécher la section de la grille de
protection et le rasoir complètement.
9. Fixez la section de la grille de protection au
rasoir.
Français
17

Remplacement de la grille de protection et de la lame intérieure
2 3
grille de protection une fois par an
lame intérieure du système une fois tous les deux ans
Remplacement de la grille de protection
Français
Remplacement de la lame intérieure
1. Appuyez sur les boutons de retrait de la
grille de protection et soulevez cette
dernière vers le haut comme indiqué sur
l’illustration.
2. Poussez doucement sur la grille de
protection de la façon illustrée. Elle se
détache du cadre de la grille de protection.
3. La nouvelle grille de protection doit être
incurvée légèrement et poussée dans
l’appareil jusqu’à ce qu’elle s’emboîte dans
le cadre de la grille de protection.
1. Appuyez sur les boutons de retrait de la
grille de protection et soulevez cette
dernière vers le haut comme indiqué sur
l’illustration.
2. Retirez la lame intérieure, comme indiqué
sur l’illustration.
Ne touchez pas le l (partie métallique) de
•
la lame intérieure pour ne pas vous
blesser les mains.
3. Insérez la lame intérieure, une à la fois,
jusqu’à ce qu’elles émettent un “clic” comme
indiqué sur l’illustration.
18

Retrait de la batterie rechargeable intégrée
R B R C
N i- M H
TM
ATTENTION:
L’appareil que vous vous êtes procuré est alimenté par une pile au nickel-métalhydrure (NiMH). Pour des renseignements sur le recyclage de la pile, veuillez
composer le 1-800-8-BATTERY.
Retirez la batterie rechargeable intégrée avant de mettre le rasoir au rebut. Ne
démontez pas et ne remettez pas la batterie en place pour utiliser à nouveau le
rasoir. Cela pourrait entraîner un incendie ou une électrocution. Faites-la remettre
en place dans un centre de service agréé.
Retirez le rasoir de l’adaptateur de charge avant de retirer la batterie.
•
Effectuez les étapes de 1 à , surélevez la batterie, et retirez-la.
•
Français
POUR PLUS DE RENSEIGNEMENTS, COMMUNIQUER AVEC L’UNE DES
SUCCURSALES MENTIONNÉES À L’ENDOS DU MANUEL.
POUR LE CANADA, CONTACTER L’UNE DES SUCCURSALES DE VENTE
INDIQUÉES AU DOS.
19

INSTRUCCIONES DE
SEGURIDAD IMPORTANTES
Al utilizar un dispositivo eléctrico, deben seguirse siempre
unas precauciones básicas que incluyen las siguientes:
Lea todas las instrucciones antes de utilizar este dispositivo.
PELIGRO
1. No intente alcanzar un dispositivo que se haya caído al
agua. Desenchúfelo inmediatamente.
2. El cargador no debe sumergirse ni utilizarse en la ducha.
3. No coloque ni guarde el dispositivo donde pueda caerse en
una bañera o lavabo. No lo coloque ni lo deje caer en agua
o algún otro líquido.
4. Excepto cuando lo esté cargando, desenchufe siempre este
aparato de la toma eléctrica tras utilizarlo.
5. Desenchufe este dispositivo antes de limpiarlo.
6. No utilice un alargador con este dispositivo.
ADVERTENCIA
1. Es necesaria una supervisión cercana cuando el dispositivo
sea utilizado por o cerca de niños o minusválidos.
2. Utilice este dispositivo solamente para el uso para el que se
ha diseñado como se describe en este manual. No utilice
ningún accesorio no recomendado por el fabricante.
3. Nunca utilice el dispositivo si tiene el enchufe dañado, si no
funciona correctamente, o si se ha caído, dañado o mojado.
Español
Devuelva el dispositivo a un centro de servicio para
examinarlo y repararlo.
4. Nunca deje caer ni introduzca ningún objeto por cualquier
abertura.
Para reducir el riesgo de descargas
eléctricas:
Para reducir el riesgo de quemaduras, fuego,
descargas eléctricas o daños personales:
20

5. No utilice la afeitadora en exteriores o donde se estén
utilizando aerosoles (spray) o donde se esté administrando
oxígeno.
6. No utilice este dispositivo si la hoja de corte o la lámina
están dañadas, ya que podrían causarle heridas en la cara.
7. Conecte siempre el enchufe al dispositivo y, a continuación,
a la toma de corriente. Para desconectarlo, coloque todos
los controles en la posición “apagado” y, a continuación,
retire el enchufe de la toma de corriente.
8. Enchufe el directorio de carga en el tomacorriente - no use
un cable de extensión.
9. Desenchufe el cargador antes de enchufar o desenchufar el
dispositivo.
GUARDE ESTAS INSTRUCCIONES
ESPECIFICACIONES
Fuente de alimentación: Ver placa identicatoria sobre el producto.
Voltaje del motor: 1,2 V DC
Tiempo de carga: 8 horas
Este producto está destinado solamente para su uso doméstico.
Español
21

Importante
Antes de utilizarlo
Esta afeitadora en Mojado/Seco puede utilizarse para afeitado en mojado con
espuma o para afeitado en seco. Puede utilizar esta afeitadora impermeable bajo
la ducha y limpiarla con agua. El siguiente es el símbolo de la afeitadora en
mojado. El símbolo indica que el dispositivo manual puede utilizarse en un baño
o ducha.
Afeítese con espuma durante tres semanas y observe la diferencia. Su afeitadora
Panasonic en Mojado/Seco requiere algo de tiempo para ajustarse debido a que
su piel y barba necesitan alrededor de un mes para acostumbrarse a un nuevo
método de afeitado.
Utilización de la afeitadora
Precaución - La lámina exterior es muy na y puede dañarse si no se utiliza
correctamente. Compruebe que la lámina no esté dañada antes de utilizar la
afeitadora. No utilice la afeitadora si la lámina o algún otro elemento está
dañado, ya que podría cortarse la piel.
Carga de la afeitadora
No utilice ningún adaptador de carga que no sea el que se diseñó
especícamente para este modelo (RE7-53). Enchufe el adaptador en una toma
de corriente doméstica donde no haya humedad y manéjela con las manos
secas. El aparato podría calentarse durante su uso y durante la carga. Sin
embargo, esto no supone una avería. No cargue el aparato en un lugar donde
pueda estar expuesto a la luz solar directa o a otras fuentes de calor.
La temperatura ambiente adecuada para la carga es de 0-40 °C (32-104 °F).
El adaptador de carga está preparado para orientarlo correctamente en una
posición vertical o en el suelo.
Limpieza de la afeitadora
Advertencia- Quite la afeitadora del adaptador de carga antes de limpiarla para
evitar descargas eléctricas.
Si limpia la afeitadora con agua, no utilice agua salada ni agua caliente. No moje
Español
la afeitadora con agua durante un largo periodo de tiempo. Frótela con un paño
humedecido en agua jabonosa. No utilice disolventes, bencina ni alcohol.
Guardado de la afeitadora
Quite la afeitadora del adaptador de carga cuando la guarde. Este aparato no
debe ser utilizado por personas (incluyendo niños) con capacidades físicas,
22

sensoriales o mentales reducidas, o con falta de conocimiento y experiencia, a
menos que se encuentren bajo supervisión o bajo instrucciones sobre el uso del
aparato de una persona responsable de la seguridad. Supervise a los niños
pequeños para asegurarse de que no se encuentren próximos al aparato.
Guarde estas instrucciones de operación en un lugar seguro.
Identicación de las partes
A
Tapa protectora
B
Sección de la lámina exterior
1 Lámina exterior
2 Marco de la lámina
C
Cuchilla interna
D
Cuerpo principal
3 Botones de liberación del marco de
la lámina
4 Botón de bloqueo del Interruptor
5 Interruptor Apagado/Encendido
6 Conexión del aparato
7 Cortapatillas
8 Mango del cortapatillas
E
Adaptador de carga (RE7-53)
9 Enchufe de carga
Lámpara indicadora de carga
Español
23

Cargar
Cumpla con los siguientes pasos para cargar la afeitadora si parece perder la
velocidad.
Puede cargar completamente la afeitadora en 8 horas.
Una carga completa proporcionará suciente alimentación durante 7 afeitadas de
•
3 minutos cada una.
1
1
2
2
•
La lámpara indicadora de carga se ilumina y permanece así hasta que se quita la
afeitadora del adaptador de carga.
Carga
Apague la afeitadora e insértela en el
adaptador de carga según se muestra en
la ilustración.
Enchufe el adaptador en una toma de
corriente doméstica.
Español
24

Afeitado
90˚
Utilización de la afeitadora
Pulse el botón de bloqueo
1
1
del interruptor y deslice el
interruptor de Apagado/
Encendido hacia arriba.
Comience a afeitarse aplicando una suave presión sobre la cara. Estire la piel
•
con la mano libre y mueva la afeitadora hacia delante y atrás en la dirección de
la barba. Puede incrementar la presión a medida que la piel se acostumbre a la
afeitadora. Aplicar una presión excesiva no proporciona un afeitado más
apurado.
Utilización del cortapatillas
Deslice el mango del cortapatillas hacia arriba.
Colóquelo en ángulo recto con su piel y muévalo
hacia abajo para recortar las patillas.
Sujete la afeitadora como
2
2
se muestra anteriormente
y aféitese.
25
Español

Limpieza
Limpieza
1. Quite la afeitadora del adaptador de carga.
2. Aplique jabón de manos y un poco de agua
a la lámina exterior.
3. Encienda la afeitadora.
4. Apague la afeitadora tras 10-20 segundos.
5. Retire la sección de la lámina exterior y
encienda la afeitadora.
6. Limpie la afeitadora y la sección de la
lámina exterior con agua corriente.
7. Limpie las gotas de agua con un paño seco.
8. Seque completamente la sección de la
lámina exterior y la afeitadora.
9. Monte la sección de la lámina exterior en la
afeitadora.
Español
26

Sustitución de la lámina exterior y la cuchilla interna
2 3
lámina exterior una vez al año
cuchilla interna una vez cada dos años
Sustitución de la lámina exterior
Sustitución de la cuchilla interna
1. Pulse los botones de liberación del marco
de la lámina y levante la sección de la
lámina exterior hacia arriba como se
muestra en la ilustración.
2. Empuje delicadamente la lámina exterior
como se muestra en la ilustración. Se
desprenderá del marco de la lámina.
3. La nueva lámina exterior se debe doblar
levemente y empujar hasta engancharla en
el marco de la lámina.
1. Pulse los botones de liberación del marco
de la lámina y levante la sección de la
lámina exterior hacia arriba como se
muestra en la ilustración.
2. Retire la cuchilla interna como se muestra
en la ilustración.
No toque los bordes (partes de metal) de
•
la cuchilla interna para evitar daños en las
manos.
3. Inserte la cuchilla interna hasta que haga
clic tal y como se muestra en la ilustración.
Español
27

Retirar la batería recargable interna
R B R C
N i- M H
TM
ATENCIÓN:
El producto que ha comprado se alimenta con una batería de hidruros de metal
níquel (Ni-MH) reciclable. Llame al teléfono 1-800-8-BATTERY para obtener
información acerca de cómo reciclar esta batería.
Retire la batería recargable interna antes de deshacerse de la afeitadora. No
desmantele ni reemplace la batería para utilizar de nuevo la afeitadora. Podría
causar fuego o descargas eléctricas. Reemplácela en un centro de servicio
autorizado.
Quite la batería del adaptador de carga cuando la extraiga.
•
Lleve a cabo los pasos 1 a y levante la batería, después retírela.
•
Español
PARA SU CONVENIENCIA, AHORA DISPONEMOS DE UNA LÍNEA NACIONAL
DE LLAMADA GRATIS PARA LA COMPRA DE ACCESORIOS (SOLEMENTE EN
USA); LLAME AL 1-800-332-5368.
PARA CANADÁ, CONTACTE A NUESTRAS SUCURSALES DE VENTA QUE SE
MENCIONAN EN LA CONTRATAPA.
28

MEMO
29

MEMO
30

MEMO
31

IN USA CONTACT:
Panasonic Consumer Electronics Company
One Panasonic Way 2F‑3 Secaucus, NJ 07094
IN PUERTO RICO CONTACT:
Panasonic Puerto Rico, Inc.
San Gabriel Industrial Park 65th Infantry Avenue KM9.5
Carolina, Puerto Rico 00630
IN CANADA CONTACT:
AU CANADA, CONTACTER:
Panasonic Canada Inc.
5770 Ambler Drive, Mississauga, Ontario L4W 2T3
(905) 624‑5010
En México:
Panasonic de México, S.A de C.V.
México D.F.
Moras No. 313 Col. Tlacoquemecatl del Valle Del. Benito Juarez,
Mexico, D.F, C.P.03200 R.F.C PME‑780907754 Tel: 54‑88‑10‑00
• Assistance • Accessories
Service
Dépannage
Call 1-800-338-0552 (In USA)
http://www.panasonic.com/shavers/
http://www.panasonic.com/consumersupport/
Call 1-800-561-5505 (In Canada)
Composer 1-800-561-5505 (Au Canada)
http://www.panasonic.ca/
• Assistance • Accessoires
No.1 EN FR ES (U.S.A./CANADA)
Printed in China
Imprimé en Chine
 Loading...