

Page 1
Operating
Instructions
Cosmetic Groomer
Panasonic
Before operating this unit, please read these Instructions completely.
Page 2
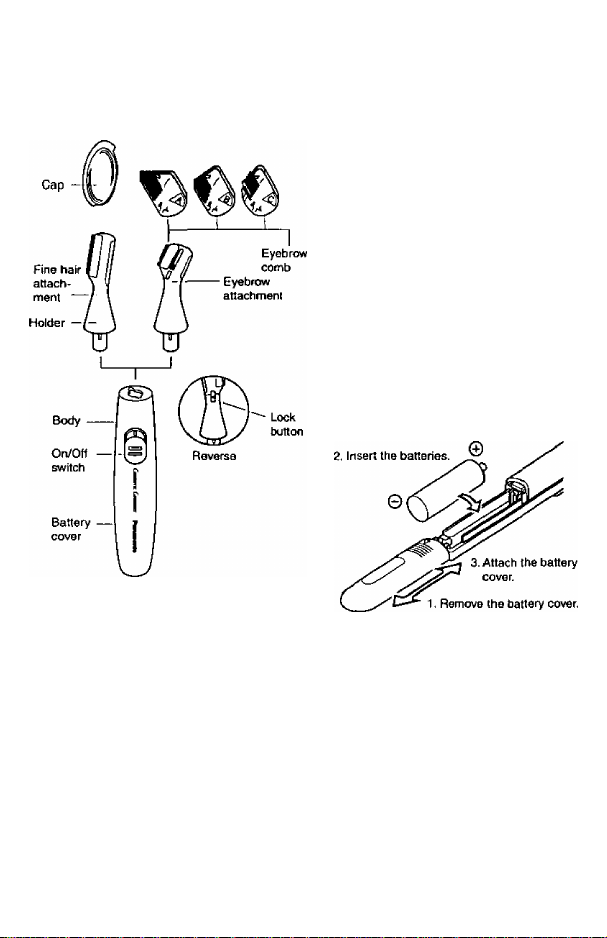
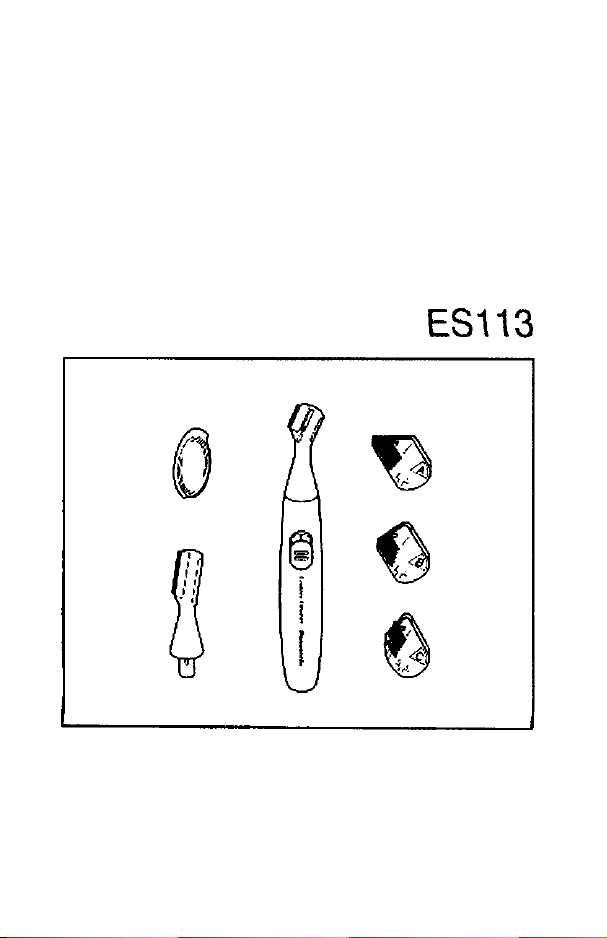
Parts Identification Notes to Users
When using for the first time, testshave by holding the blade lightly
against your skin.
Do not use if you have an allergic
reaction. Also, do not use on the fol
lowing areas;
• Irritations or rashes (caused by shav
ing or cosmetics), acne or boils
Do not use the eyebrow comb if
your eyebrow hairs are already
shorter than 2 mm.
Before Use
Inserting the alkaline batteries
Do not use rechargeable batteries.
A single AA alkaline battery will last
approximately one month (when
used for two 5-minute sessions each
week).
When the trimmer begins losing
power, replace the battery.
Page 3
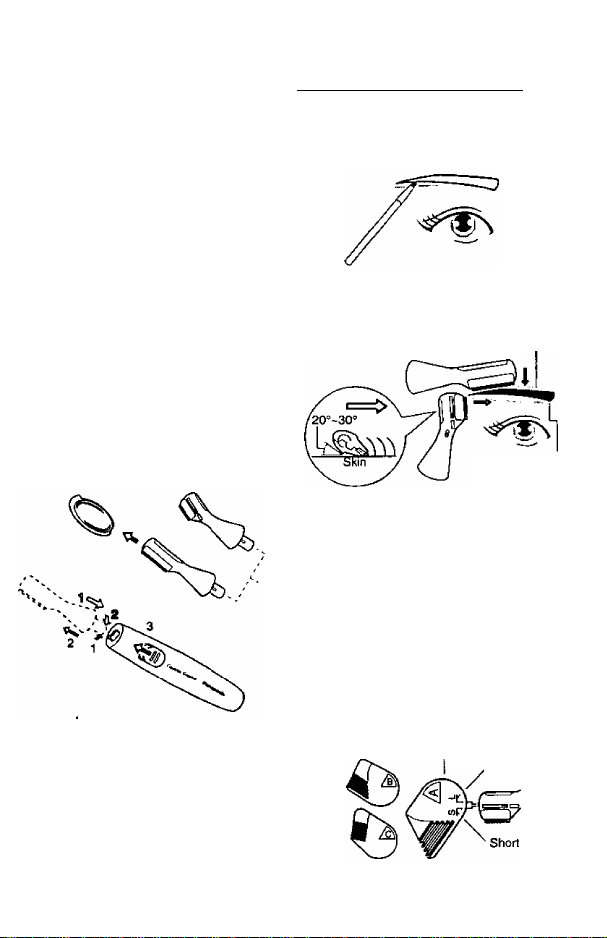
How to use
Remove the cap.
Select the attachment.
To attach
u,
Insert the attachment and turn to the
left.
To remove
1,2
Turn the attachment to the right and
pull up.
3. Move the switch to the “1” position
to operate it.
To protect the blade, always at
tach the cap after use.
Trimming your eyebrows
Contouring your eyebrows
1. Use an eyebrow pencil to draw the
desired outline for your eyebrow.
2. Trim away any eyebrow hairs out
side the contour.
. . Ill'S area.
Angle the trimmer so that
the side is close to the skin
and the blade moves almost
parallel to the skin.
Using the eyebrow comb
1. Attach
Select the eyebrow comb with the
angle you want (depending on the
length you wish to trim your eyebrow
hairs to), then slide it over the blade.
• To attach, align the Short/Long
mark with the groove in the eye
brow comb.
Use the tine hair
attachment (or
this area.
Use the eyebrow
attachment for
Eyebrow attachment
. Long
Page 4
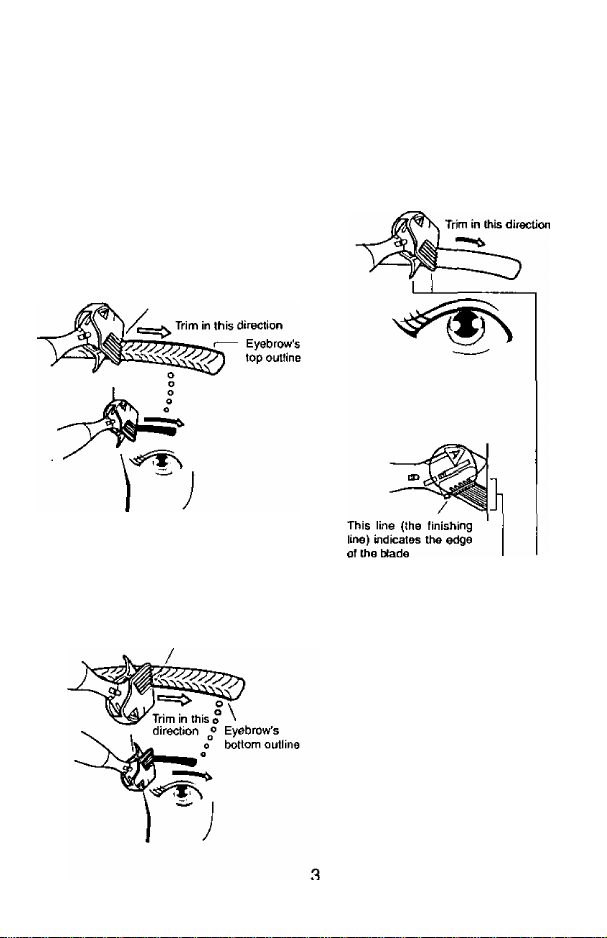
Trim by aligning the guide mark with
your eyebrow's outline.
2. Trim the top and bottom parts of
your eyebrow separately.
3. Move the comb slowly (taking
about 10 seconds) from the tip of
the eyebrow towards the eyebrow
base.
Trimming the top of your eyebrow
Guide mark
4. Repeat 3 or 4 times, until the de
sired length is reached.
ACaution: The comb must stay
pressed against the skin
while being moved.
To trim the bottom part of your eyebrow,
turn the trimmer over in your hand.
Bottom of the eyebrow
Guide mark
Keep the entire comb sur
face in contact with the
skin.
Page 5
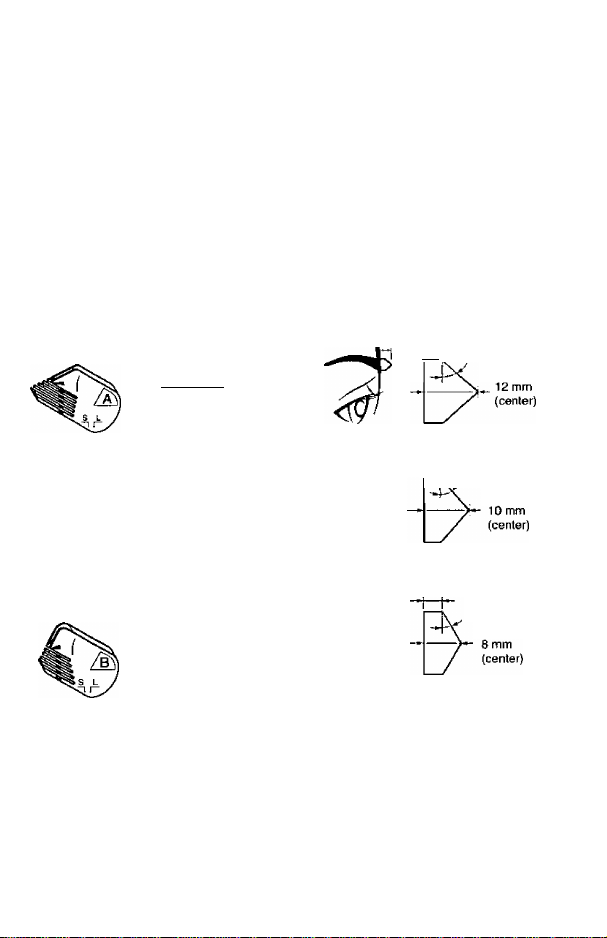
About the eyebrow comb
(T) The eyebrow comb is used to shorten eyebrow hairs.
(D There are three different types of eyebrow combs (A, B and C), each used
to create a different eyebrow shape (i.e., length and eyebrow angle).
CD Each eyebrow comb can be set to one of two trimming lengths (long or
short) by sliding the eyebrow comb into the appropriate groove.
From among the six trimming lengths (angles), select the length you want for
your eyebrows.
gfirgOJInmitig)
Eyebrow
Hairs in the center are left long
comb A
<‘)0PTfrrnrn>^
Viewed from the side, the eyebrow will have a full
appearance.
The hairs at the edges are cut short while those at the
center are left long, giving the eyebrow a natural feeling.
Use this comb if your eyebrows are naturally thick.
Eyebrow
comb B
Hairs in the center are cut shorter
(shorter than eyebrow comb A)
4 mm (edge)
Angle after
"I I*' trimming;50 deg.
2 mm (edge)
—.|—|— Angle after
—\ , trimming:50 deg.
4 mm (edge)
Angle after
trimming:30 deg.
Viewed from the side, the eyebrow will have a full
appearance.
The hairs at the edge are cut short while those at the
center are left long (although shorter than eyebrow comb
A), giving the eyebrow a slightly thin yet natural feeling.
Use this comb if your eyebrows are slightly thin.
2 mm (edge)
Angle after
trimming:30 deg.
•- 6 mm
(center)
Page 6
9?SD3B!)esiijfi)
Eyebrow
comb C
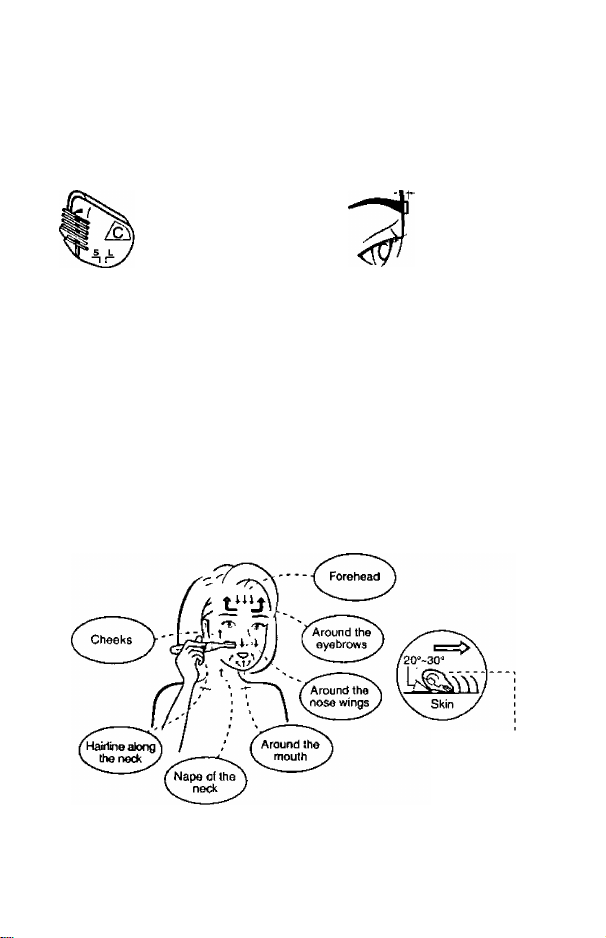
Eyebrow hairs are cut to a uniform length, (Hairs are
trimmed short overall.)
Use this comb to reshape your eyebrows the way you
want them, without leaving the flow of the hairs.
Use this comb if your eyebrow hairs are too short to trim
with eyebrow comb A or B. (Use at the “Short" setting.)
All hairs are cut short
(Length is uniformly short)
Trimming fine hair
KHa?ii3s0ii)
EiB27(58umfla@
4mm (edge)
2 mm (edge)
ACaution: To prevent skin injury, check the blade before use and make sure
it is not bent or warped.
The order of trimming
Angis the trimmer so that
the side is close to the skin
and the blade moves almost
parallel to the skin.
Trim by moving the blade in the direction of the arrows shown for each
area.
5
Page 7

Eyebrow trimming manual
How to shape your eyebrows
The five basic rules
Q] The eyebrow base should lie be
tween imaginary lines extended
from the inner and outer edges of
the wings of the nose,
d] The eyebrow crest should lie be
tween imaginary lines extended
from the corner of the eye and the
iris.
[3] The tip of the eyebrow should lie
along an imaginary line connect
ing the outer edge of the nose's
wing and the corner of the eye.
Ul The top line should follow the line
of the arcus superciliaris.*
{* The muscle above the eyebrow
that swells up when the eyebrow
is moved vertically.)
[D The bottom line should follow the
arc above the eye when it is open.
Shaping the eyebrow to suit the shape of your eyes
The eyebrow has a major effect on the
impression you give others.
Relationship to the eye
• An eyebrow's ideal shape greatly
depends on the shape of the eye. In
other words, the eyebrow should be
shaped to suit the eye’s shape.
Inward-slanting eyes
• Lower the eyebrow arch and eye
brow tip to give the eyebrow a falling
appearance.
(
Downward-slanting eyes
• Raise the eyebrow arch and eyebrow
tip to give the eyebrow a rising ap
pearance.
j
Page 8

Average eyes
• The base and tip of the eyebrow
should be roughly level to give the
eyebrow a level appearance.
Rectangular face
• Thin eyebrows that arch gently
Shaping the eyebrow to
suit the shape of your face
Relationship to the face
• The shape of your eyebrow must
also suit the shape of your face.
Oval face
• Accent on the eyebrow crest, with a
slight bend
Shape the eyebrow crest so it ¡5
sharp and higher than the ends.
How to accent the eyebrow crest
The eyebrow should have an in
termediate thickness.
* •
How the eyebrow should arch
Matte the bottom of the eyebrow
round.
Face with an inverted-triangle shape
• Round eyebrows with a sharp crest
How to make your eyebrows round
Shape so that the eyebrow
crests inward (at roughly the
halfway point between the eye
brow base and the eyebrow tip).
Round face
• Rising eyebrows that are roughly
level
Page 9

How to give your eyebrows a rising
appearance
Make the eyebrow crest high
Leave the
eyebrows slightly thick.
arxl sharp.
Maks the
overall Increase the diseyebrow tance between the
somewhat eyebrow crest and
long the eyebrow tip
Long face
• Rising, level eyebrows
How to make your eyebrows level
Make the eyebrow
somewhat straight.
The eyebrow
should have an
intermediate
thickness.
Shorten the distance be
tween the eyebrow crest and
the eyebrow tp
Push down the lock button and open
the blade mechanism.
Clean the interior of the blade
mechanism.
Do not use water to clean, as this
will damage the unit.
To remove clippings trapped between
the blades
1. Using the notch at the end of the
brush, turn the swiveling latch 90
degrees to align it with the groove.
After use
Cleaning the brush
Move the switch to the OFF position.
2. Remove the stationary blade and
clean it and the moving blade.
Page 10

3. Attach in the sequence 1, 2 as
shown in the illustration.
Cautions
When cleaning the outside of the
unit, use a dry cloth or a cloth mois
tened in liquid soap to wipe dirt.
Never use thinner, benzene or alco
hol.
The micro fine trimmer is very thin.
If handled roughly, it can be dam
aged and cause skin injury.
If you have sensitive skin, use care
when trimming the sensitive areas
around the mouth and eyebrows.
When the trimmer begins losing
power, replace the battery. The battery may leak if not replaced
promptly when it reaches the end of
its life span.
Use the trimmer only on clean skin.
If you wear makeup, be sure to wash
it off and dry your face well before
using the trimmer.
Page 11

Identificación de las piezas
Notas para ios usuarios
Cuando utilice el apartado por prime
ra vez, efectúe una prueba deslizan
do suavemente la hoja sobre su piel.
No utilice el aparato si tiene alguna
reacción alérgica. Asimismo, no lo
utilice en las siguientes zonas;
• Zonas irritadas o con erupciones
cutáneas (provocadas por depilación
o por la utilización de cosméticos),
acné o quemaduras.
No utiiíce el peine para cejas si la
longitud del pelo es inferior a 2 mm.
Cuerpo —
Conmuta
dor de “
encendido
Tapa de
las pilas
Antes de utilizar el aparato
■Traba Colocación de ias pilas alcalinas
3. Coloque la lapa de
las pilas.
1. Eictraiga la tapa de las pilas.
No utilice pilas recargables.
Las pilas alcalinas tipo AA duran un
mes aproximadamente (si se utiliza
el aparato dos veces por semana en
sesiones de 5 minutos cada una).
Cuando la recortadora, comience a
perder potencia, reemplace las pi
las.
10
Page 12

Modo de empleo
Extraiga la tapa.
Seleccione el complemento.
Colocación
Inserte el complemento para cejas y
gírelo hacia la izquierda.
Extracción
Recorte de cejas
Para perfilar las cejas
1. Utilice un lápiz de cejas para mar
car el contorno de la ceja que de
see.
1,2
Gire el complemento para cejas ha
cia la derecha y tire hacía arriba.
3. Coloque el interruptor en la posi
ción "1" para operarlo.
Para proteger la hoja, coloque
siempre la tapa después de su
utilización.
2. Recorte el pelo que sobresalga del
contorno.
utilice el complemento
para рек) fino correspon
diente a esta zona.
Utilice el comple
mento para cejas
Coloque la recortadora en
ángulo de forma que que
de del lado de la piel y la
hoja se desplace casi para
lelamente a la piel.
correspondiente
a esta zona.
11
Page 13

utilización del peine para cejas
1. Colocación
Seleccione en peine para cejas de
acuerdo con el ángulo que desee
(dependiendo de la longitud de
corte que prefiera en sus cejas) y
luego desticelo sobre la hoja.
• Para colocar el peine, alinee la
marca Short/Long con la ranura
del peine para cejas.
Complemento para cejas
Efectúe el recorte alineando la marca
de guía con el contorno de su ceja.
I
^ Largo
Corto
2. Recorte las partes superiore infe
rior de su ceja por separado.
3. Mueva el peine lentamente (duran
te 10 segundos aproximadamen
te) desdo la punta de la ceja hacia
la base de la misma.
Recorte de la parte superior de ta ceja
Marca de guía
Para recortar la parte inferior de la
ceja, gire la recortadora.
Parte inferior de la ceja
Marca de gula
4. Repita este proceso 3 o 4 veces
hasta obtener la longitud deseada.
APrecaución:Mantenga el peine
apretado en la piel
mientras lo desliza.
12
ele del pel ríe en contacto
con la piel.
Page 14

El peine para cejas
© El peine para cejas se utiliza para disminuir la longitud del pelo de las cejas.
@ Hay tres tipos diferentes de peines para cejas (A, B y C). Cada peine se
utiliza para crear una forma de ceja diferente (longitud y ángulo de la ceja).
© Cada uno de los peines para cejas puede ajustarse a una de las dos longi
tudes de recorte (largo o corto) insertándolo en la ranura adecuada.
Seleccione una de las seis longitudes (ángulos) de recorte de acuerdo con su
preferencia.
RajDíS (ífe (ÉC3^
OSSSDQS
Peine A para
cejas
El pelo de la parte central se deja
largo
Visto desde el lateral, la ceja tendrá un aspecto tupido.
El pelo de los extremos se deja corto mientras que el
de la parte central se deja largo, dando a la ceja un
aspecto muy natural.
Utilice este peine si sus cejas son naturalmente gruesas.
Peine B para
cejas
El pelo de la parte central se deja más
corto (más corto que con el peine A
para cejas)
Visto desde el lateral, la ceja tendrá un aspecto tupido.
El pelo de los extremos se deja corto mientras que el
de la parte central se deja largo (aunque será más corto
que el logrado con el peine A), dando a la ceja un
aspecto natural ligeramente fino.
Utilice este peine sus cejas son ligeramente finas.
0030503
4 mm (extremo)
Ángulo después
del recorte: 50"
2 mm (extremo)
—j—j..- Ángulo después
. del recorte: 50"
4 mm (extremo)
Ángulo después
del recorte: 30’
ÿ— 8 mm
(centro)
2 mm (extremo)
__ Angulo después
del recorte; 30’
6 mm
(centro)
13
Page 15

tSteeaBGSs
Peine C para
cejas
El pelo de las cejas se corta con una longitud uniforme
(todo el pelo se deja corto).
Utilice este peine para volver a dar forma a sus cejas
de la manera que desee, sin modificar la disposición
natural del pelo.
Utilice este peine si el pelo de sus cejas es demasiado
corto como para efectuar el recorte con los peines A o
B (utilice el ajuste "Short“).
RmüE)(3sto(3^(íls^5Há0cía)
G003iQ3
Todo el pelo de la ceja se deja corto
(la longitud es uniforme)
Recorte del pelo fino
^^^ïâ(iÎE0(fE03
(í]3@[sn^eaGeesca3
4 mm (eirtremo)
2 mm (extremo)
APrecaucióntPara prevenir el daño en la piel, compruebe la hoja antes
de su uso y verifique que no esté doblada ni deformada.
Orden de recorte
Coloque la recortadora en ángulo de
forma que el lateral quede cerca de
la piel y la hoja se mueva de forma
casi paralela a la piel.
Para efectuar el recorte, mueva la hoja en las direcciones indicadas por
las flechas para cada zona.
14
Page 16

Guía de recorte de cejas
Cómo dar forma a sus cejas
Las cinco reglas básicas
[T] La base de la ceja debe situarse
entre las líneas imaginarias que se
extienden desde los bordes inte
rior y exterior de los laterales de la
nariz.
[2] La cresta de la ceja debe situarse
entre tas líneas imaginarias que se
extienden desde el extremo exte
rior del ojo y el iris.
[3] La punta de la ceja debe situarse
entre la línea imaginaria que conec
ta el borde exterior del lateral de la
nariz y el extremo exterior del ojo.
Cómo dar forma a las cejas
de acuerdo con la forma de
los ojos__________________
Las cejas tienen un gran efecto en el
aspecto que se da a los demás.
Relación con el ojo
• Una forma ideal de cejas tiene mucha
relación con la forma de los ojos. En
otras palabras, la forma de las cejas
debe adecuarse a la de los ojos.
U1
m
[4] La línea superior de la ceja debe
seguir la línea que forma el arco
superciliar.*
('Músculo situado encima de la
ceja que sube cuando mueve la
ceja verticalmente.)
H] La línea inferior de la ceja debe
seguir el arco situado encima del
ojo cuando éste está abierto.
Ojos con inclinación ascendente
• Baje el arco y la punta de las cejas
para darle un aspecto de caída.
Ojos con inclinación descendente
• Levante el arco y la punta de las
cejas para darle un aspecto de ele
vación.
¡ ''3^
15
Page 17

Ojos normales
• La base y la punta de las cejas de
ben estar ligeramente nivelados
para darle a las cejas un aspecto de
nivelación.
(
Cara rectangular
• Disminuya el grosor de las cejas con
un gran arco
Cómo dar forma a las cejas de acuerdo con la forma de la cara
Relación con la cara
• La forma de las cejas también debe
Cara ovalada
• Acentúe la cresta de las cejas me
Cómo acentuar la cresta de las cejas
__________________
adecuarse a la de su cara.
diante ligera curva
De forma a la cresta de las c^s para que
sea más pronuTKáada y elevada que los ex
tremos.
Las cejas deben tener un gro
sor rnedio.
Cómo arquear sus cejas
Redondee la parte inferior del
arco.
Cara con forma de triángulo invertido
• Redondee las cejas mediante una
curva acentuada
Cómo redondear sus cejas
La forma de la cresta de las ce
jas debe tener una inclinación
ascendente (aproximadamente
en el punto medio entre la base
y la punta de la ceja).
* •
Cara redo(\a
• Eleve las cejas que estén ligeramen
te niveladas
16
Page 18

Cómo dar a sus cejas un aspecto de
elevación
Eleve e intensi Fique la cres
ta de las cejas.
Deje las cejas con
un espesor fino. -—
\
Conserve
la longitud Aumento la distannatural de eia entre Fa cresta
las cejas, y la punta do las
cejas.
Cara alargada
• Nivele las cejas que estén elevadas
Cómo nivelar sus cejas
Otorgue a sus cejas una for
ma ligeramente recta.
Las cejas de- '
ben tener un
espesor medio.
Disminuya la distancia entre
la cresta y la punta de la
ceja.
Pulse la traba y abra el mecanismo
de la hoja.
Limpie el interior del mecanismo de
la hoja.
No utilice agua para la limpieza del
aparato ya que podría dañarlo.
Para extraer los restos que queden
entre las hojas
1. Gire el pestillo 90 grados hasta ali
nearlo con la ranura mediante la
muesca situada en el extremo del
cepillo.
Después de utilizar el aparato
Limpieza del cepillo
Coloque el interruptor en la posición
OFF.
2. Extraiga la hoja fija y la hoja móvil
y limpíelas.
17
Page 19

3. Coloque las hojas siguiendo los'
pasos 1 y 2 tal y como se muestra
en la ilustración.
Precauciones
utilice un paño seco o un paño hu
medecido con jabón líquido para lim
piar la parte exterior del aparato. No
utilice nunca diluyante, benceno ni
alcohol.
La recortadora de gran precisión es
muy delgada. Si la sujeta con fuer
za, podría estropearse y producir
daños en la piel.
Si tiene la piel sensible, tenga cui
dado al utilizar este aparato en las
zonas sensibles como alrededor de
la boca y las cejas.
Cuando el aparato comience a per
der potencia, reemplace las pilas.
Las pilas pueden tener pérdidas de
líquido si no se reemplazan cuando
finaliza su duración.
Sólo utilice la recortadora con la piel
limpia. Si lleva puesto maquillaje,
asegúrese de lavarse y secarse la
cara antes de utilizar este aparato.
18
Page 20

IN USA CONTACT:
PANASONIC PERSONAL AND
PROFESSIONAL PRODUCTS COMPANY
One Panasonic Way 4A-3
Secaucus, NJ 07094
Questions, Comments ? Call 1-800-338-0552
IN PUERTORICO CONTACT:
PANASONIC SELES COMPANY
DIVISION OF MATSUSHITA
ELECTRIC OF PUERTO RICO, INC.
San Gabriel Industrial Park
65th Infantry Avenus KM9.5
Carolina, Puerto Rico 00630
No.l EN ES(U.S.A)
Printed in Japan
 Loading...