

Panasonic EP-3205R2 User Manual
36
MASSAGE LOUNGER
Instruction Manual
EP3205
39
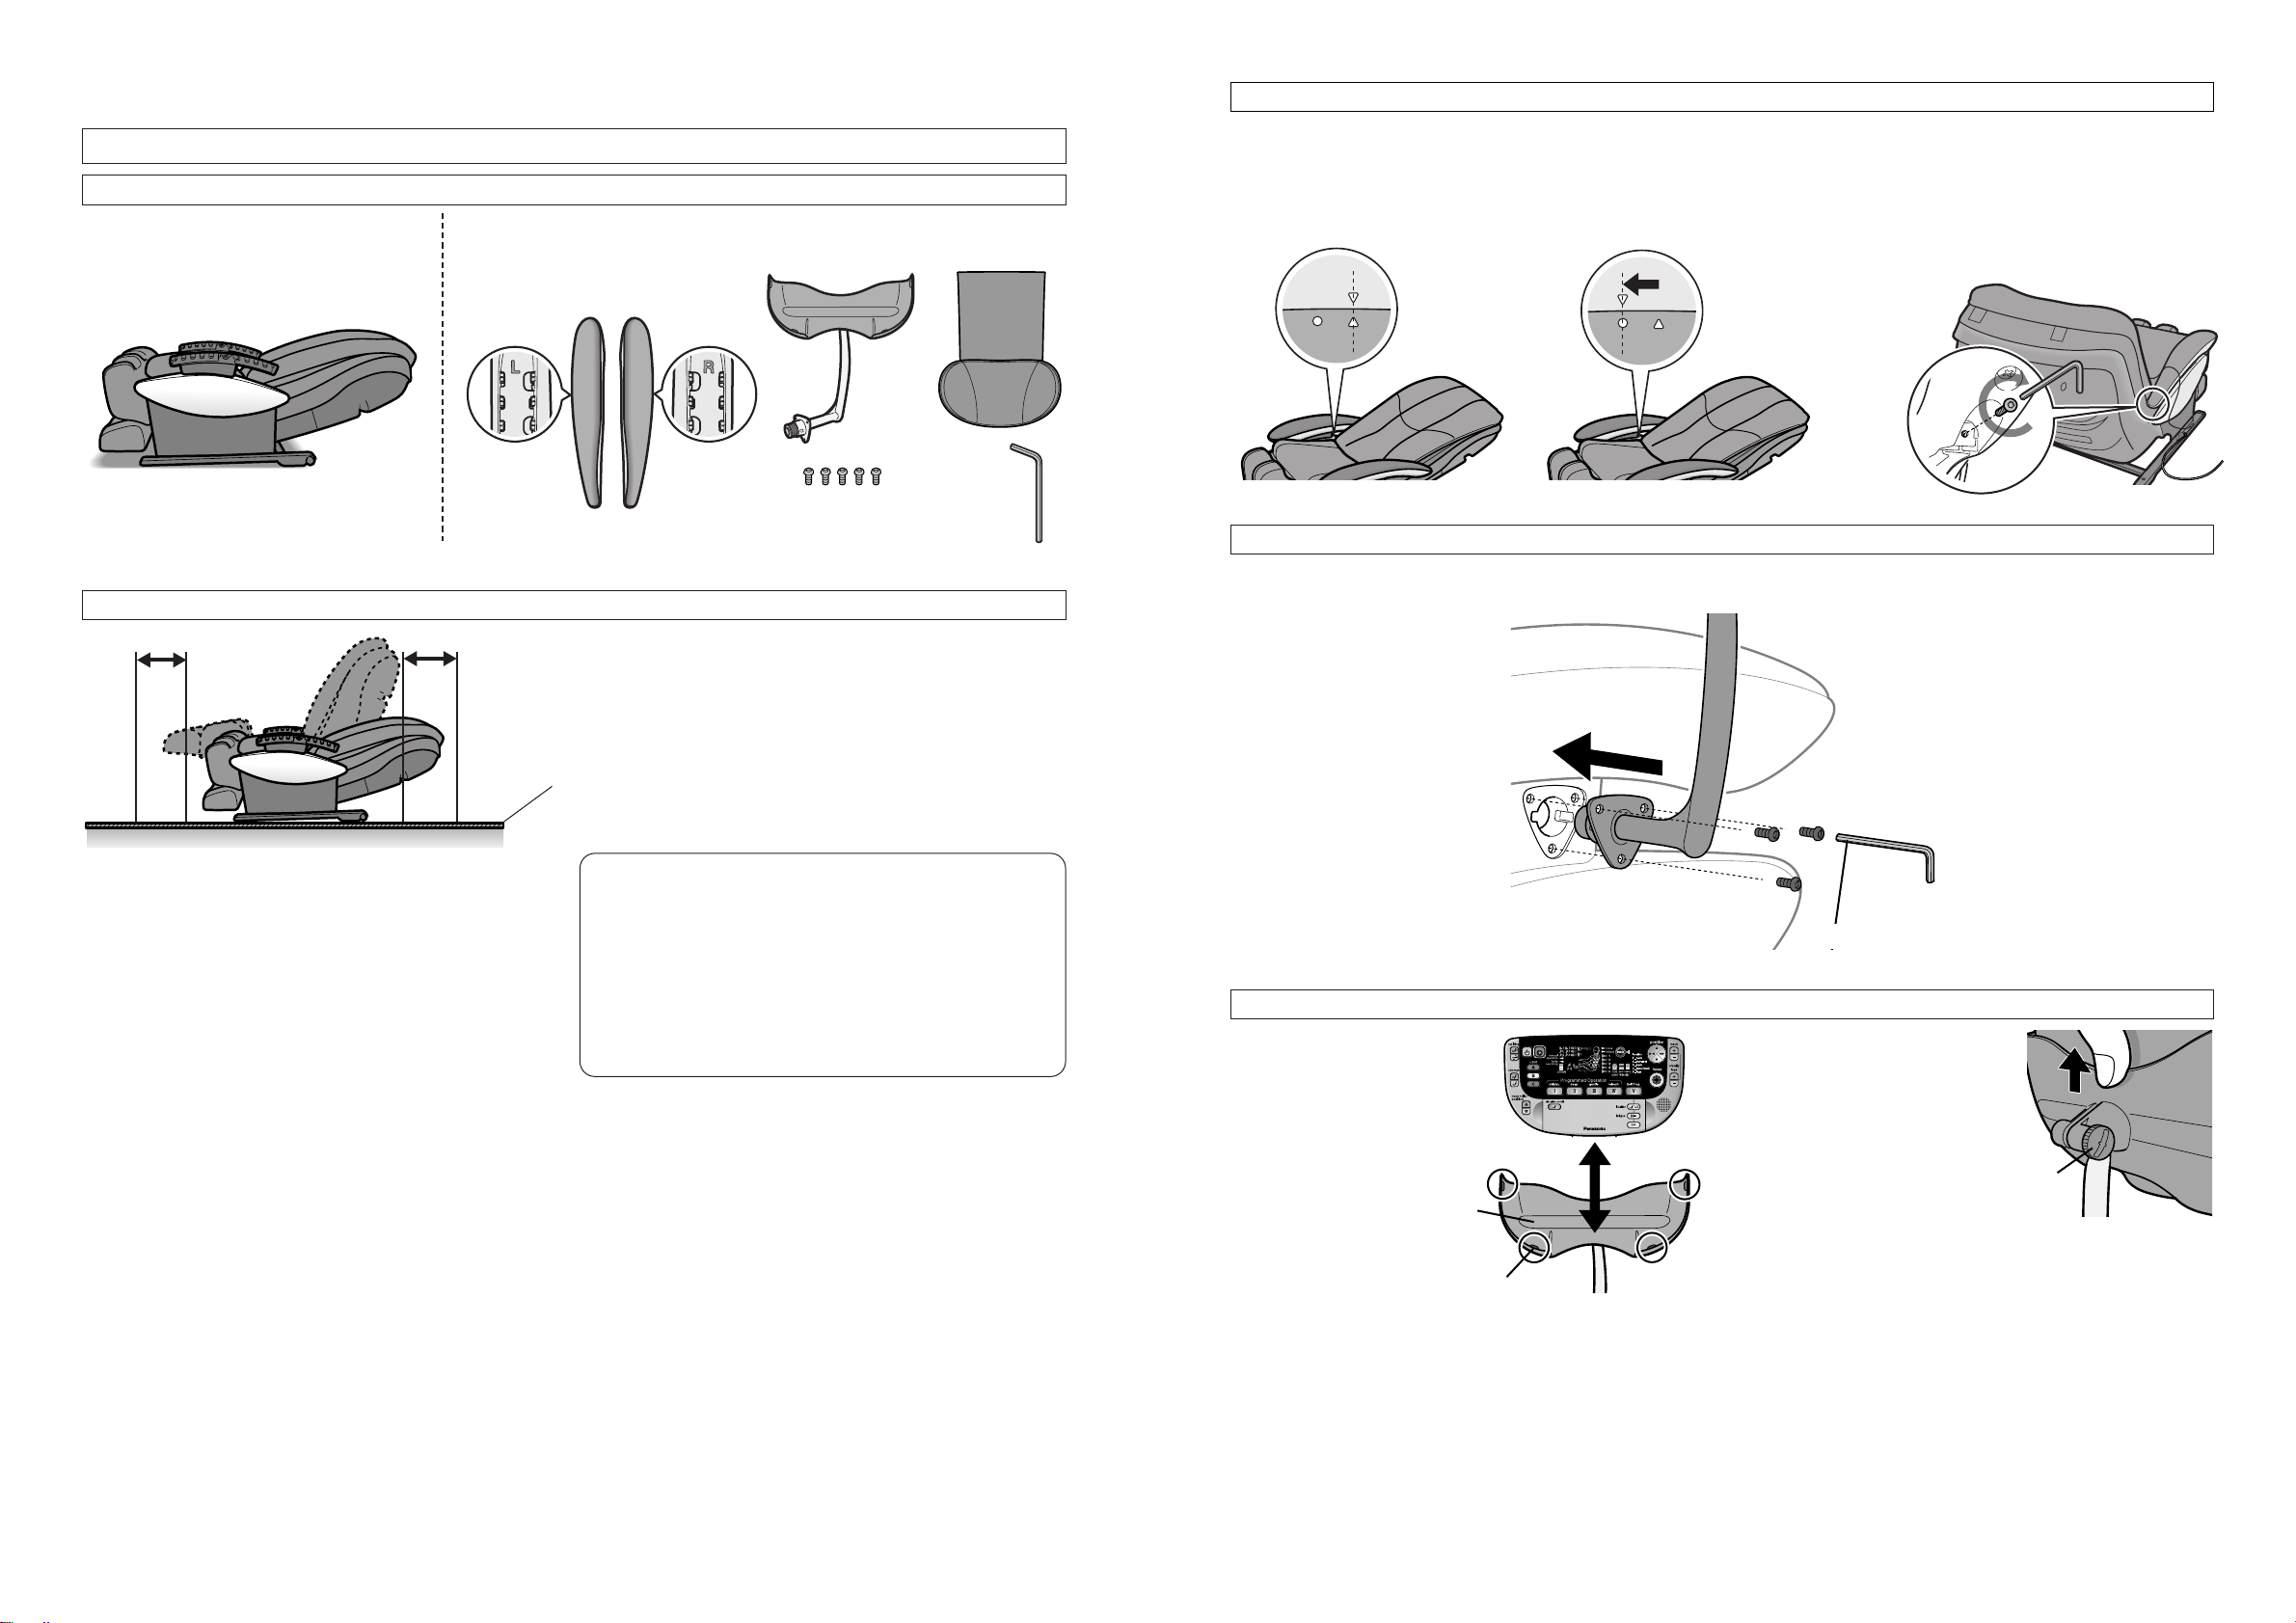
Attaching the Armrests
Align the o
marks.
Control
Panel Stand
Allen Key (provided)
Slide the armrest
forward until the p
aligns with the A.
1. Insert the armrests into
the seat.
• Marks indicating left and right can
be found on the underside of each
armrest.
Attaching the Control Panel Stand
Secure the control panel stand to the right hand side of the unit using the three
screws provided.
Attaching and Removing the Control Panel
When attaching the
control panel, slide
it in from the top.
Slide the control panel
up to remove it.
• Loosen the screw to situate the
control panel stand at the desired
angle, then tighten screw again.
For smooth removal of the
control panel, press on the back
of the unit while sliding up.
2. Push the armrest
forward until it clicks
into position.
3. Insert the attachment
screw into the hole and use
the Allen key to secure it.
(Repeat the procedure for the armrest
on the other side.)
Clip
Screw
Turn the screw
clockwise to
tighten it.
38
SETTING UP THE MASSAGE LOUNGER
BEFORE USING THE UNIT
Ensure there is adequate space for reclining
• Do not use the massage lounger in direct sunlight
or in places where it will be exposed to high
temperatures, such as in front of a heater, etc., as
this can cause discoloration or hardening of the
synthetic leather.
• Place the unit on a mat to prevent floor damage.
After removing everything from the box, you should have the following
Where to Use the Unit
Massage Lounger Accessories
Armrest
Marks indicating left and right
can be found on the underside
of each armrest.
Control Panel Stand
Pillow
Front Front
Back
Left
Right
Back
Attachment Screws (M6#10) – 5
Control Panel Stand – 3
Left Armrest – 1
Right Armrest – 1
Allen Key
At Least 40 cm
Mat
At Least 40 cm
CAUTION
• Do not use the unit in areas with high humidity,
such as the bathroom, etc. as this can lead to
electric shock or other accidents.
• Do not allow children to play on the unit. Doing
so may lead to accidents or injury.
• Place the unit on a totally flat surface.
Failure to do so may result in the seat tipping over.
4140
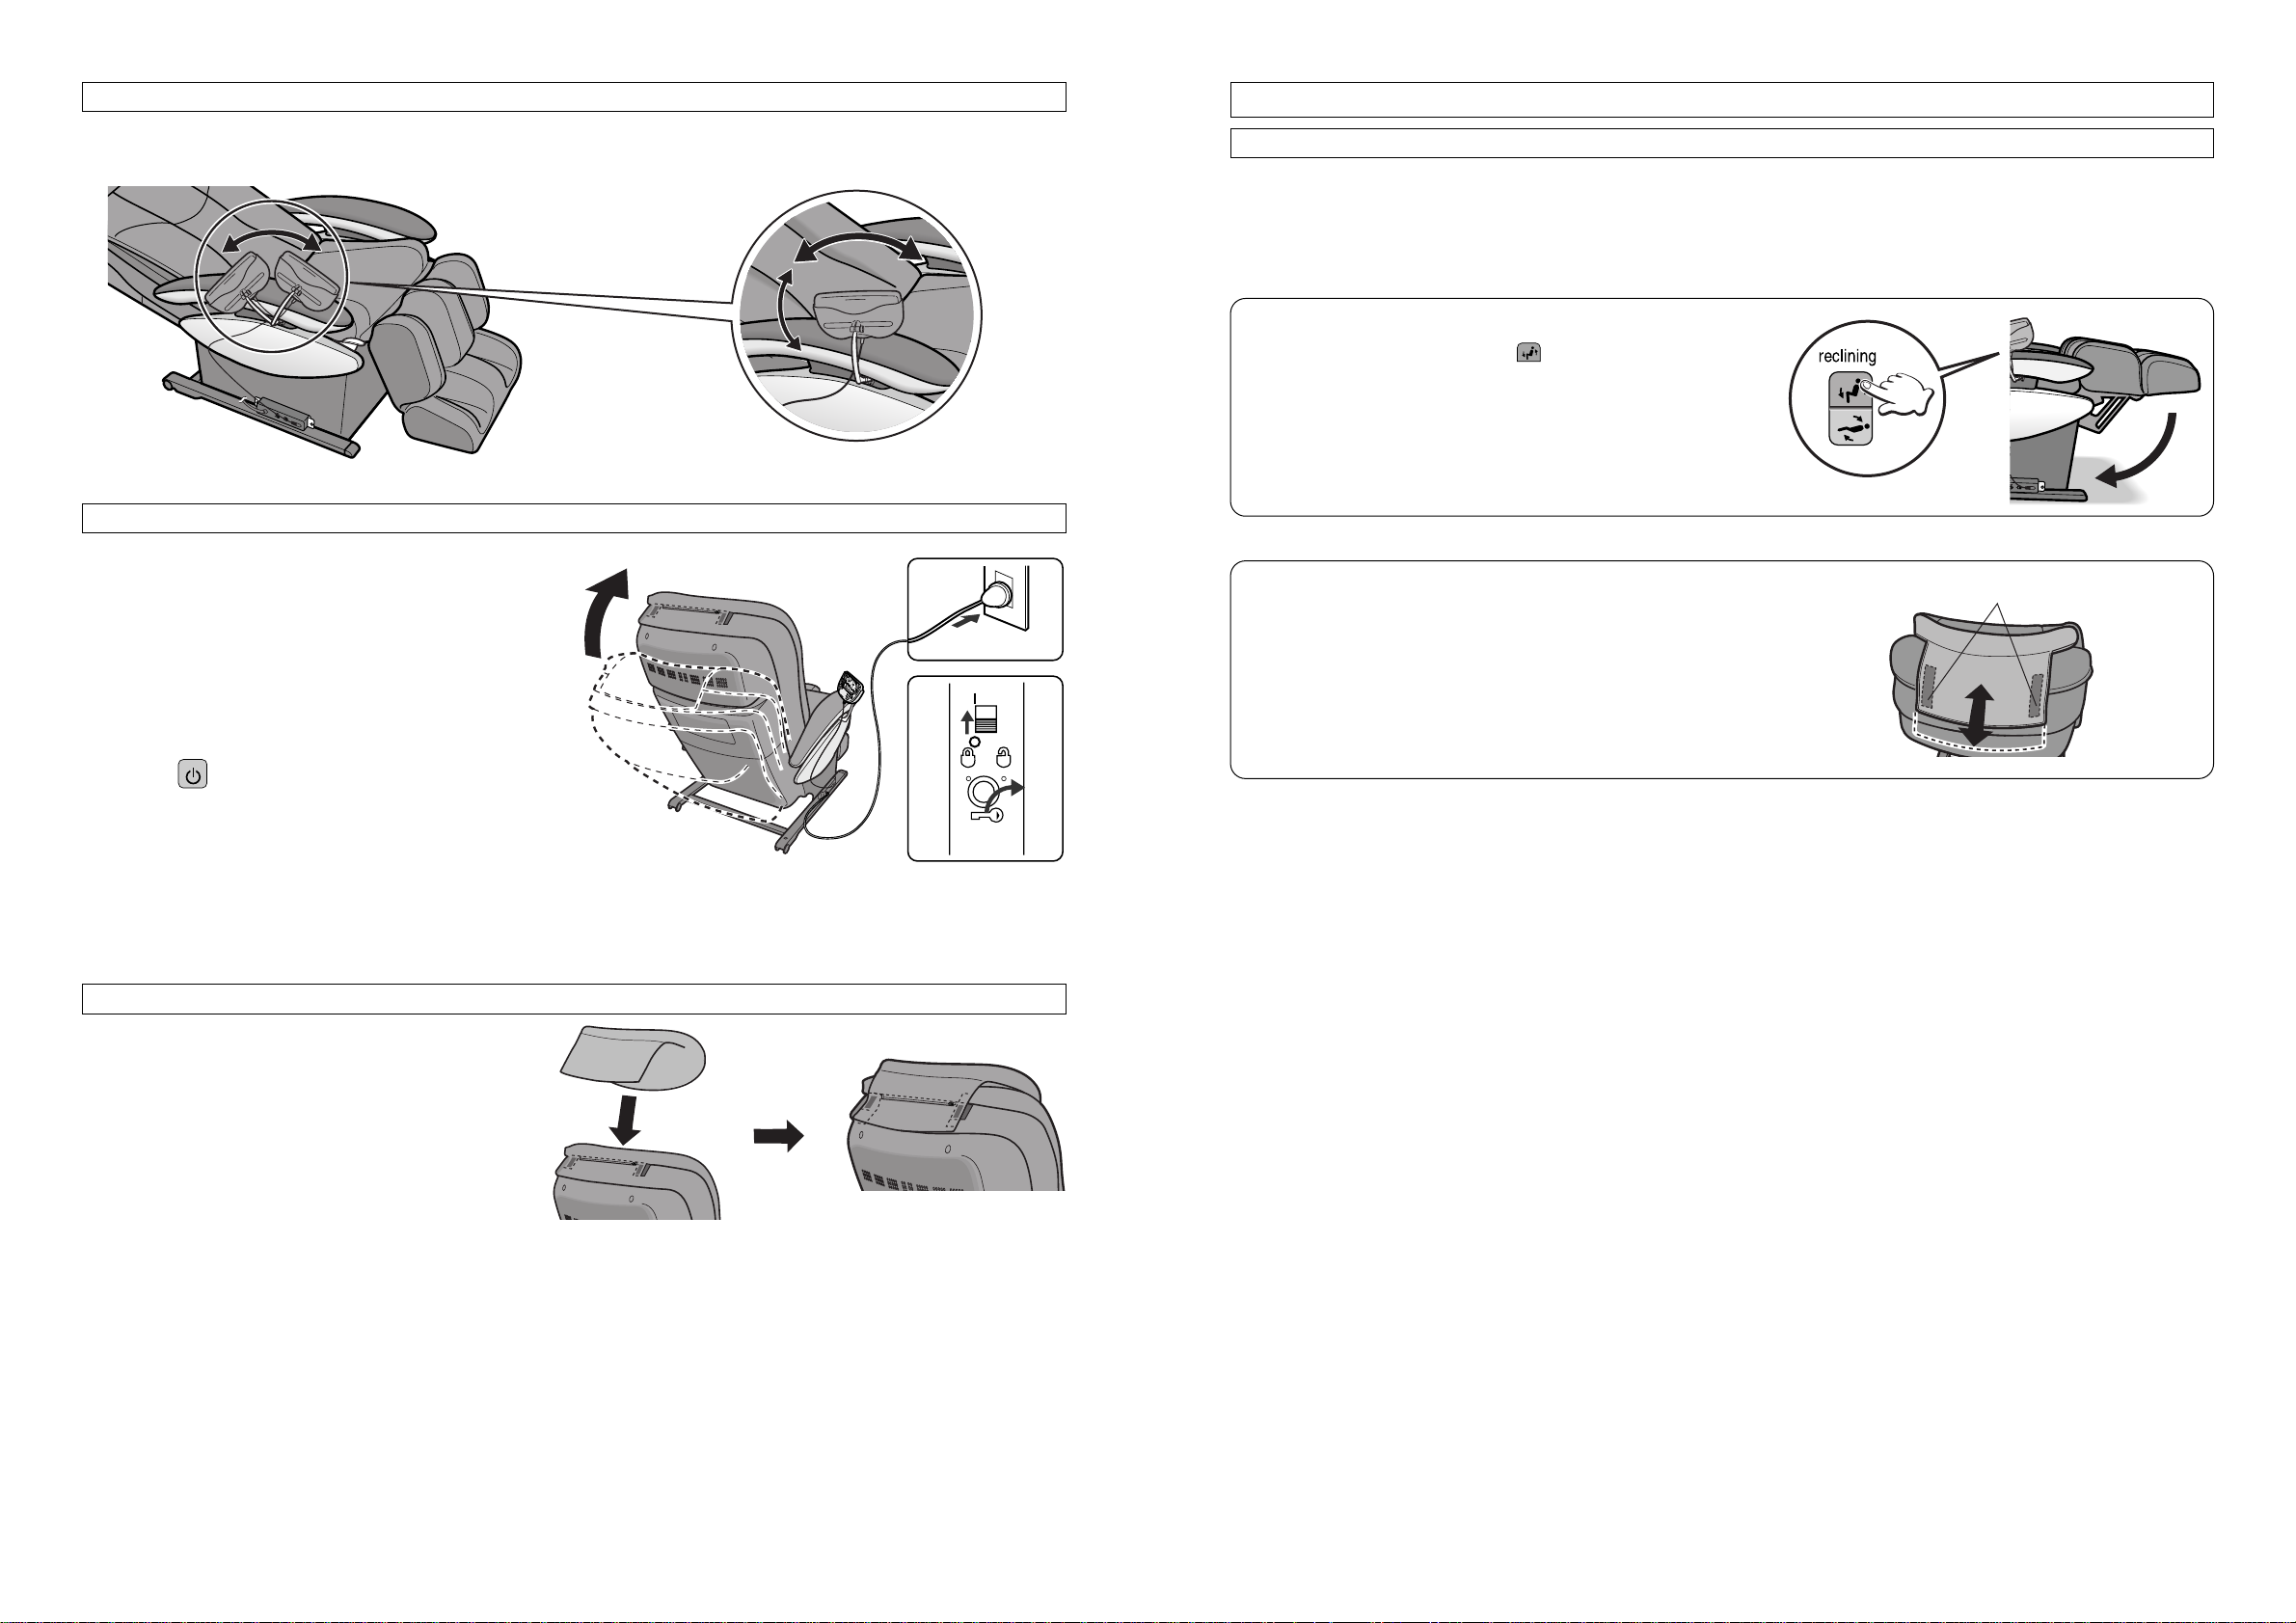
BEFORE USING THE UNIT
Please Check the Following Before Using the Unit
Check the Surrounding Area
(1) Check that there is nothing around the unit.
(2) Check that there is enough room (40 cm) to recline the unit.
Lower the Legrest Prior to Sitting Down.
• When the legrest is raised, press to lower the legrest before
sitting down.
• Do not sit on the legrest when it is raised. Doing so may cause it
to collapse down or bend the ottoman. The ottoman is not meant
to support full body weight.
Adjust the Height of the Pillow
• Adjust the height of the pillow using the pillow fastener.
• Adjust the front part of the pillow so that it supports the back of the
head and will not be too far down when massaging the neck.
Press
Fastener
Adjusting the Control Panel Stand
1. The control panel stand can rotate
forward and back.
Return the Backrest to the Upright Position
1. Plug the power plug into the power
outlet.
2. Turn the lock switch to the “Open”
position.
3. Turn on the power switch on the back
of the unit.
4. Push Twice. (See Page 43)
• The backrest will return to the upright position
automatically.
• The massage heads will move to the retracted position.
Attaching the Pillow
Attach the pillow using the fasteners
on the pillow and on the top of the
backrest.
2. The angle can also be adjusted.
off
lock
lock switch
open
on
3
2
1
4342
CONTROL PANEL
Go to any one of the following sections if you want to start the massage lounger immediately.
When you want to use the massage lounger straight away.
PROGRAMMED OPERATION (shiatsu, deep, gentle, refresh)
This program is ideal for the following people:
• Those who feel tired all over.
• Those who want to operate the massager simply by using one of the 15 minute stored programs.
When you want a massage suited to your degree of fatigue.
SELF PROGRAM
This program is ideal for the following people:
• Those who feel tired in different parts of their body.
• Those who want only their shoulders or legs massaged. This program allows the user to customize the massage. (See Page 52)
USER ADJUSTMENT FUNCTIONS
When you want more control over individual massage settings.
MANUAL OPERATION (open the control panel)
This program is ideal for the following people:
• Those who want to massage a certain area using a certain kind of massage.
• Those who want to make many different adjustments to massage settings.
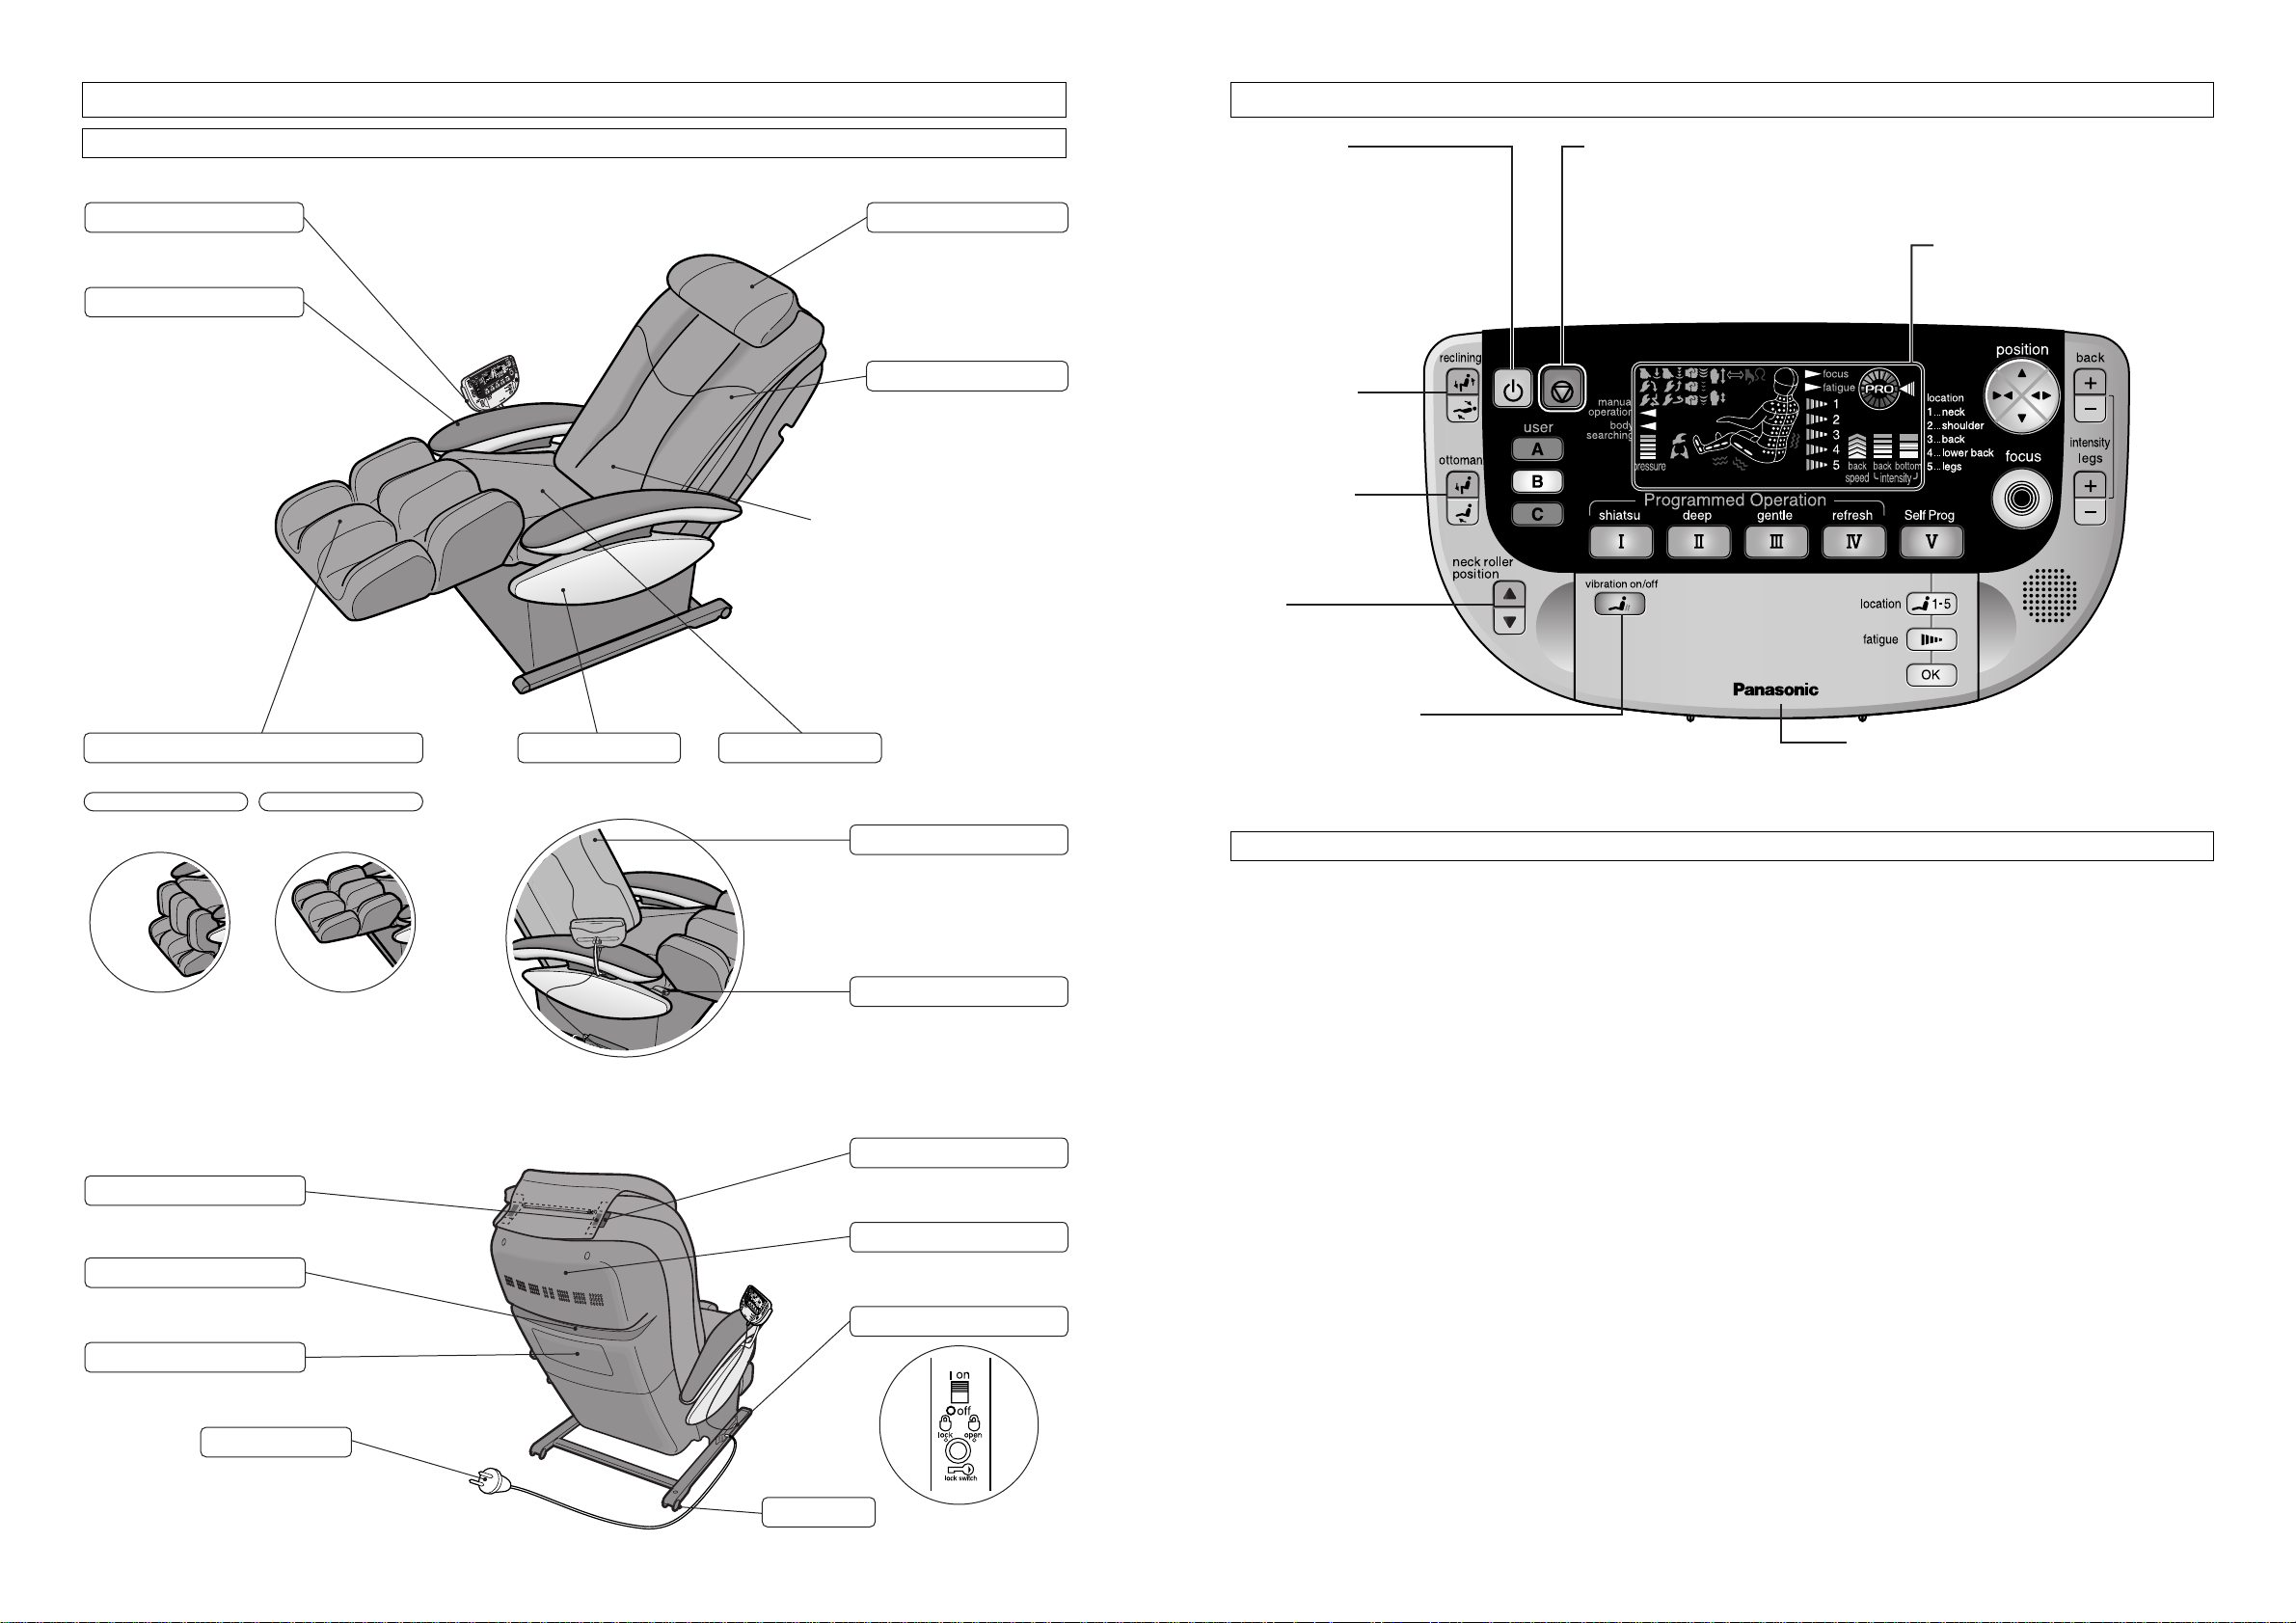
PART NAMES AND FUNCTIONS
Massage Lounger
Control Panel Stand
Armrest
Front
Pillow
• For use when watching TV or
just relaxing.
• The pillow has a height
adjustment. (See Page 41)
• The pillow is detachable, and
can also be flipped over.
Back Cushion
Retracted Position of Massage Heads
*The massage heads are normally
retracted to the left and right in the lower
part of the backrest.
(However, if the Quick Stop Button is
pushed to stop the massage then the
massage heads will not return to the
retracted position.)
ON/OFF Button
• Press this button to start the massage and
to stop it at any time during the massage.
* The massage heads will not move until
you press one of the Programmed
Operation buttons or Manual Operation
buttons.
* If this button is pressed during the
massage, the massage heads will move
to the retracted position and both the
backrest and the legrest will return to their
original positions.
Reclining Button
• Use this button to adjust
the angle of the backrest
and legrest.
Ottoman Button
• Use this button to adjust
the angle of the legrest.
Neck Roller Position
Button
• Pressing this button allows
the unit to adjust the shoulder
position after searching the
position of your body.
Quick Stop Button
• Press this button to stop the
massage immediately.
(The massage heads will stop in
the position they are in without
retracting and air will be released
from the legrest.)
Display
• The display shows the kind
of massage selected.
• Includes an air massage function.
When Lowered When Raised
• Massages the calves and
the soles.
• Massages the legs from
the ankles to the knees.
Back Cushion Fastener
• The back cushion is detachable.
Handle
Back
SeatSide CoverLegrest
• Includes an air massage
function.
(Contains massage heads.)
• Used to slide the legrest in and
out. (See Page 47)
Backrest
Legrest Slide Lever
Pillow Fastener
Back Cover
Vibration ON/OFF Button
Control Panel Cover
• Open the cover to manually
select massage settings.
Safety Precaution Label
Power Cord
Power Switch
Wheels
4544
4. After the Massage has been Completed the Unit will Automatically Stop.
After the designated program has been completed the massage lounger will automatically stop.
(Approximately 15 minutes.)
Stopping the Massage during a Program
• Press again.
• The legrest will automatically be lowered and the massage heads will return to the retracted position.
After the massage heads have stopped moving the backrest will return to the original position.
Stopping the Massage Immediately
• Press if you want to stop the massage immediately.
• All movement will immediately stop.
• Please press twice in order to return the massage heads to the retracted position.
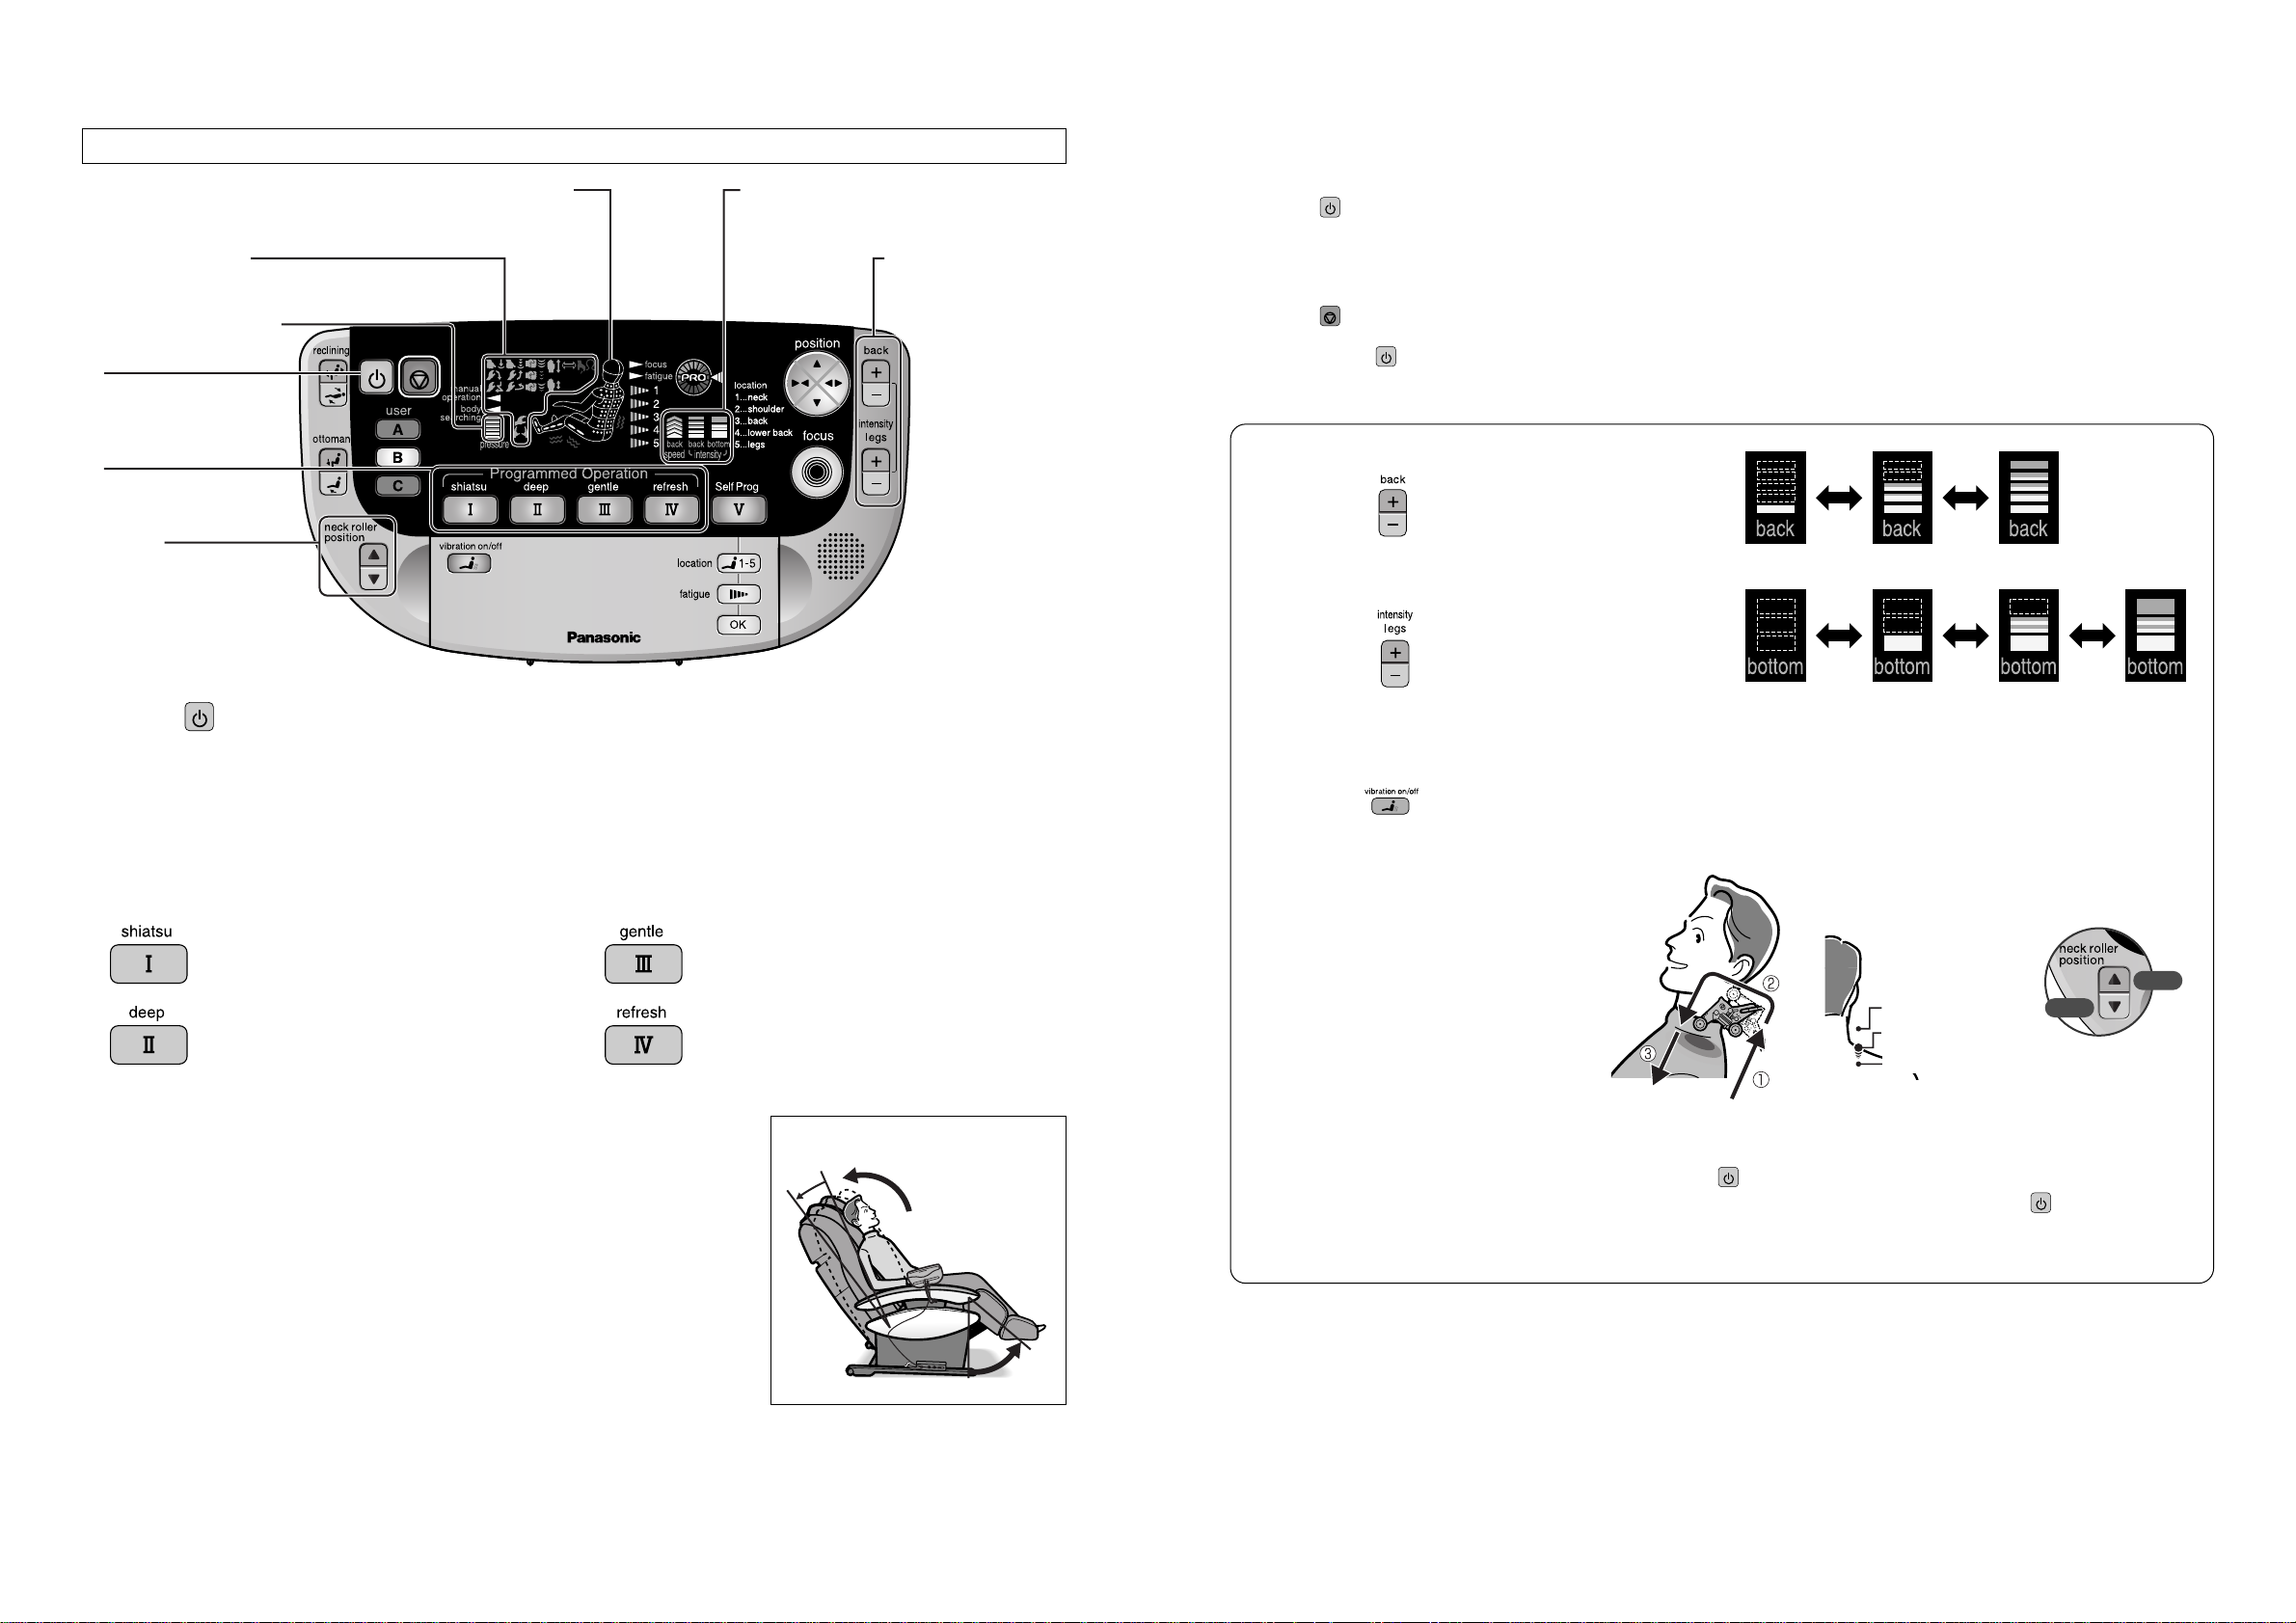
Adjusting the Strength of the Back Massage
Please press to adjust massage strength.
Adjusting the Strength of the Leg/Calf Massage
Please press to adjust massage strength.
3-Stage
Adjustment
*When the strength is set to 0 (i.e. no bars are lit on the display)
the leg/calf air massage will stop and change to the back
massage only.
Body Searching — Adjusting Shoulder Position
The massage rollers will rise up the back until
they reach the area behind the neck, after
which they will descend to the level of the
shoulders where soft tapping will be carried
out for approximately 10 seconds.
Turning off Vibration
Please press to stop the vibration in the desired area. Press it again to restart it.
Soft Tapping
Use the Neck Roller Position Adjustment button
to properly set the shoulder position while soft
tapping is being carried out.
Pressing one of the buttons
once will raise or lower the
massage heads by approximately 1.8 cm.
• When there is nobody sitting in the seat or when body searching has not been carried out successfully, “massage
terminated” will be announced and the soft tapping will stop. If this happens then please sit as far back as possible with
your head on the pillow (back cushion/backrest) and push to carry out body searching again.
• When someone else wishes to use the massage lounger midway through a massage, please push to stop the
massage and start from the beginning again as the shoulder position will vary from person to person.
Down
Up
Too High
Correct Position
Too Low
WHEN YOU W ANT TO USE THE MASSAGE LOUNGER RIGHT AW AY. (PROGRAMMED OPERATION)
USING THE MASSAGE LOUNGER
Display of Massage Areas
• Shows the massage areas currently
being massaged by flashing.
Program Strength Display
• This displays the strength of
the selected program.
Pressure Level Display
• This displays the amount of
pressure exerted on the body.
Neck Roller Position
Button
• Pressing this button allows
you to adjust the shoulder
position after body searching
has been carried out.
Movement Display
• This displays the program
that is currently in use.
Program Strength Button
• Use these buttons to adjust
the strength of the back
massage or calf/foot
massage.
1
2
1. Press .
• The Programmed Operation buttons (four) and the Self Program buttons will start to flash.
• The massage heads will not start to move until you press one of the program buttons.
2. Select the program you want.
• Please press one of the flashing buttons.
• See Page 46 for details regarding the content of each of these Programmed Operation.
• It is possible to change programs during the massage by pressing one of the other program buttons.
3. Sit as far back in the seat as possible with your head
on the pillow (back cushion/backrest).
Press the program button you desire to start the massage. The seat will
automatically recline to the massage position and body searching will
commence.
• You will feel a light tapping sensation on your shoulders. Always check the
shoulder position and when necessary adjust it manually with the neck roller
position button.
• Body searching can be carried out for people with a height of 140 cm to 185 cm.
After body searching has been completed the massage will commence.
• The air massage on the legs/calf will commence at the same time that body
searching commences.
• You can freely adjust the angle of the backrest and legrest.
• Slide the legrest to adjust the position of your knees and calves. (See Page 47)
• This program uses mainly Shiatsu massage
to provide a strong massage that is ideal for
people who have extremely stiff shoulders, etc.
• This program uses kneading massage to
thoroughly relax stiff muscles in many areas.
Still a strong massage.
• This program uses a gentle massage to help
soothe a tired body with a gentler, longer
Swedish style massage strokes.
• This is a more general program using a variety
of massage movements to help refresh people
when they’re feeling tired. Mixes both Shiatsu
and Swedish.
• If the massage lounger is reclined further than
this angle then it will not automatically recline.
Reclined approximately 11°.
Raised approximately 50°.
Correct Massage Position

4746
1. Hold down until you reach the desired angle.
• Holding the button down will recline the seat and raise the legrest.
• Shortly after the backrest starts to recline the legrest will be raised.
• When both the backrest and legrest have been raised or lowered as far
as possible you will hear a “beep-beep-beep” sound.
• The backrest and legrest may reach their limits at different times.
• Adjust the position of the back cushion so that it does not come into
contact with your elbows.
2. Release when you have reached the desired
position.
• If you have reclined the back more than you want, press to raise it
again.
• Do not recline the back too far when first using the unit as you may find
the massage to be too strong.
Raising the Backrest and Legrest
Hold down to raise the backrest and legrest
• When both the backrest and legrest have been raised as far as
possible you will hear a “beep-beep-beep” sound.
ADJUSTING THE SEAT
Raising and Lowering Only the Legrest
Raising the Legrest
Hold down to raise the legrest.
• When the legrest has been raised as far as possible you will hear a
“beep-beep-beep” sound.
Lowering the Legrest
Hold down to lower the legrest.
• When the legrest has been lowered as far as possible you will hear a
“beep-beep-beep” sound.
• Ensure that the legrest slide has been fully retracted before lowering
the legrest otherwise it will hit the floor (see below).
Extending the Legrest
1. Slide the legrest out to the desired position by
pulling the legrest slide lever.
2. Release the legrest lever.
Reclining the Massage Lounger
1
2
Approx. –5°
Approx. 85°
Approx.
170°
Approx. 120°
Push the legrest
down with the backs
of your legs.
Legrest Slide Lever
Once you have released the legrest
slide lever the legrest will click into
place and lock.
When you wish to retract the legrest, pull the legrest slide lever to
release the legrest. Raise your legs slightly to allow the springs to
retract the legrest.
Additional Information
Display of Massage Areas
Sometimes the massage areas displayed on the control panel will be different from what
you are actually experiencing.
* Due to limitations in the size of the display, the massage areas displayed on the control panel
are only a general indication of the area being massaged. This means that sometimes the
areas that are actually being massaged are different from those shown on the display. Areas
of massage displayed may change depending on changes to massage intensity or position of
massage heads.
Pressure Level Display
The pressure being applied to the body is shown on the display.
• The actual pressure experienced may vary from the level indicated on the display.
• Depending on the seatback fabric, the pressure level indicated may change even when nobody is sitting in the seat.
Pressure Feedback Function
The strength of the massage (pressure level) is automatically adjusted if it is too much or too little.
• The standard body pressure level varies according to the strength of the program selected.
Programmed Operation
• Please see Page 58 for details regard the lower body massage.
• The movements below are shown in simplified form for the sake of illustration.
① Shoulder grasp
and Shiatsu A
② Tap A and Roll ③ Shiatsu A,
Shoulder grasp
and Tap A
④ Shiatsu A,
Shiatsu B and
Knead A
⑤ Knead B and Roll ⑥ Shoulder grasp,
Shiatsu A and
Knead B
⑦ Knead A and
Tap B
⑧ Shiatsu B, Tap A
and Knead B
⑨ Tap B, Knead B
and Roll
① Shiatsu A and
Knead B
② Swedish and Roll ③ Knead A and
Knead B
④ Knead A and
Tap B
⑤ Knead B and Roll ⑥ Shiatsu A and
Knead B
⑦ Knead A and
Tap B
⑧ Knead B and
Shiatsu B
⑨ Swedish, Roll
and Tap B
① Knead B and
Swedish
② Knead B and
Tap A
③ Knead B and Roll ④ Swedish, Knead B
and Tap B
⑤ Knead A, Tap B
and Knead B
⑥ Tap B, Swedish
and Knead B
⑦ Knead B, Knead A
and Tap B
⑧ Knead A, Knead B,
Swedish and
Tap B
⑨ Swedish, Roll
and Tap B
① Shiatsu A and
Knead B
② Tap A and Roll ③ Knead B, Tap A
and Shiatsu A
④ Knead A, Tap B,
Roll and Tap B
⑤ Knead A and
Tap A
⑥ Knead B, Tap B
and Tap C
⑦ Knead B ⑧ Tap C, Roll,
Tap B and Roll
⑨ Swedish and Roll
Shiatsu Program
Deep Program
Gentle Program
Refresh Program
 Loading...