

Panasonic EN37 - SC Micro System, SA-EN37, SB-EN37, SB-EN37A Operating Instructions Manual
Operating Instructions
CD Stereo System
Model No. SC-EN37
Dear customer
Thank you for purchasing this product.
Before connecting, operating or adjusting this product, please read the instructions completely.
Please keep this manual for future reference.
System SC-EN37
Main unit SA-EN37
Speakers
SB-EN37
SB-EN37A
Panasonic Consumer Electronics
Company, Division of Panasonic
Corporation of North America
One Panasonic Way Secaucus,
New Jersey 07094
http://www.panasonic.com
Panasonic Puerto Rico, Inc.
Ave. 65 de Infantería, Km. 9.5
San Gabriel Industrial Park, Carolina,
Puerto Rico 00985
©2007 Matsushita Electric Industrial Co., Ltd.
Printed in Malaysia
RQTV0224-3P
H0107FL3047
En
PC
These instructions are applicable to the following systems.
Before requesting service, make the following checks. If you are in doubt about any of the check points, or if the solutions indicated in the chart do not solve the
problem, refer to the “Customer Services Directory” on page 7 if you reside in the U.S.A, or refer to the “Product information” on page 7 if you reside in Canada.
No play.
The disc isn’t correctly set.
The disc is scratched or dirty. (Tracks skipped.)
There is moisture on the lens. Wait for about an hour and then try again.
•
•
•
MP3 cannot be read.
You may not be able to play MP3 if you have copied a multi-session disc that has no data between sessions.
When creating a multi session disc, it is necessary to close the session.
The amount of data on the disc is too small. Set the amount of data to greater than approximately 5 MB.
•
•
•
Sound is unfixed, reversed or comes
from one speaker only.
Check the speaker connections. (➡ page 3)•
No sound or there is a lot of noise.
Noise may occur when playing MP3 if recording quality is poor.
Keep this unit away from mobile telephones if the interference is apparent.
Turn the volume up.
Switch the unit off, determine and correct the cause, then switch the unit on. Causes include shorting of the positive and
negative speaker wires, straining of the speakers through excessive volume or power, and using the unit in a hot environment.
•
•
•
•
Humming heard during play. An AC power supply cord or fluorescent light is near the cords. Keep other appliances and cords away from this unit’s cables.•
A beat sound or noise is heard while
receiving a radio broadcast.
Switch the TV or other audio player off or separate it from the unit.
Switch off the portable audio player connected to “MUSIC PORT”.
•
•
A low hum or noise is heard during AM
broadcasts.
Keep the antenna away from other cables and cords.
Keep the AM antenna away from the unit.
•
•
The picture on the television near the
set disappears or stripes appear on the
screen.
The location and orientation of the antenna are incorrect.
The television antenna wire is too close to the unit. Separate the antenna wire of the television from the unit.
•
•
Remote control doesn’t work.
Check that the batteries are inserted correctly. (➡ page 2)
Replace the batteries if they are worn.
•
•
Display
--:--
You plugged the AC power supply cord in for the first time and there was a power failure recently. Set the time. (
➡ page 6)•
PGM FULL The number of programmed tracks is limited to 24. No further tracks can be programmed.•
NO PLAY A CD-ROM disc that is not CD-DA or MP3 format is inserted. It cannot be played.•
ERROR Incorrect operation performed. Read the instructions and try again.•
F76 There is a power supply problem. Consult the dealer.•
Troubleshooting guide
If you have any questions contact
In the U.S.A.: 1-800-211-PANA (7262)
In Canada: 1-800-561-5505
iPod
®
iPod does not turn on.
Verify that the iPod battery is not depleted by attempting to turn it on without connecting it to the CD Stereo System.
Turn off both your CD Stereo System and iPod before inserting it to the Dock. Power on the CD Stereo System and select the
appropriate source.
•
•
No sound is coming from the speakers.
The iPod is not correctly seated into the Dock. Turn off the iPod, remove it from the Dock connector. Reseat it and turn it on
again.
Make sure that iPod is actually playing something.
Adjust the volume.
•
•
•
Music is distorted or the sound level is
too low.
Check and make sure the equalizer function of your iPod is turned OFF .•
Cannot control the iPod from the CD
Stereo System.
Make sure the iPod is inserted properly into the Dock.
Check the Dock connection and make sure that OPTION port is selected as the source of music. (➡ page 5)
•
•
iPod does not charge.
Check all connections. (➡ page 3)•
P
Panasonic Canada, Inc.
5770 Ambler Drive
Mississauga, Ontario
L4W 2T3
www.panasonic.ca
R
L
AC IN
3
2
1
4
R6/LR6, AA
Aim at the sensor, avoiding obstacles, at a
maximum range of 7 m directly in front of
the unit.
Operation can be affected by strong light
sources, such as direct sunlight, and the
glass doors on cabinets.
•
•
Keep your speakers at least 10 mm (13/32”) away
from the system for proper ventilation.
These speakers do not have magnetic shielding. Do
not place them near televisions, personal computers
or other devices easily influenced by magnetism.
You cannot take the front net off the speakers.
•
•
•
Note
Left and right speakers are different.
Insert so the poles (+ and – ) match those
in the remote control.
Do not use rechargeable type batteries.
•
•
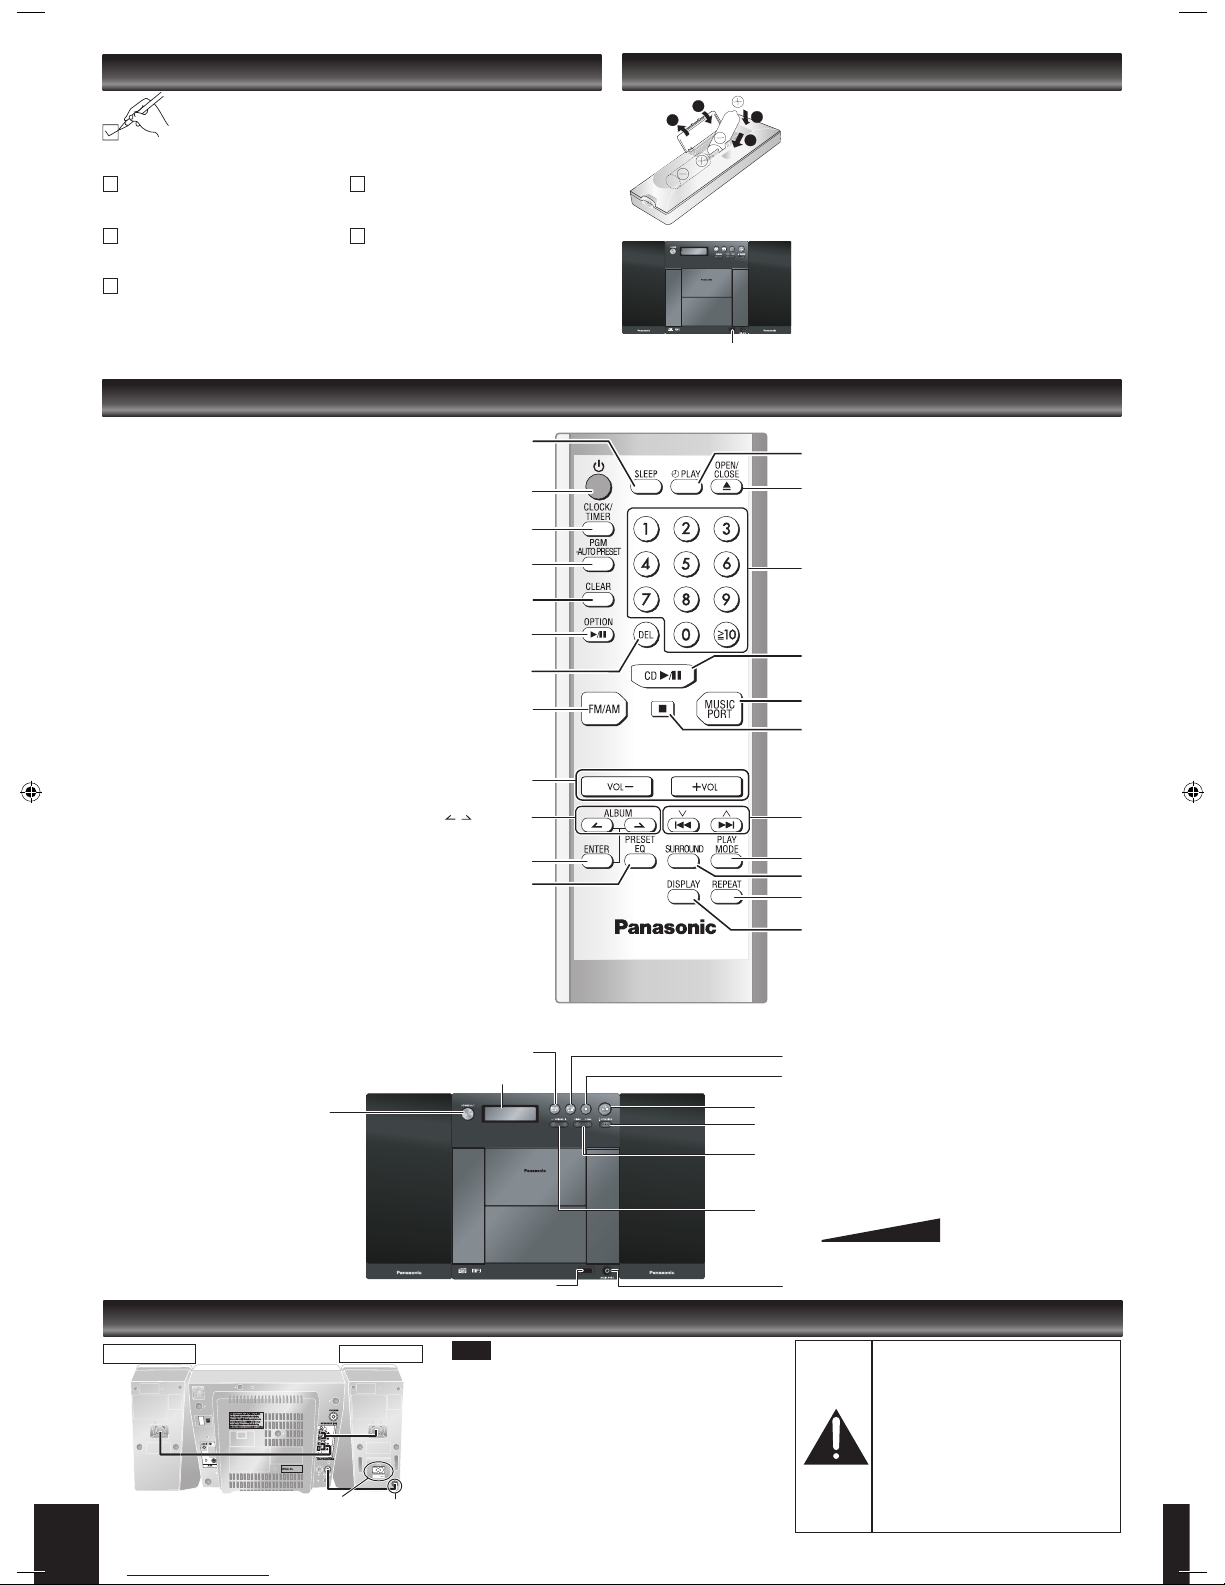
Standby/on switch [POWER 8]
Press to switch the unit from on to
standby mode or vice versa.
In standby mode, the unit is still
consuming a small amount of power.
[SLEEP]
SLEEP timer operation ON/OFF or SLEEP time setting
CD/MP3 Program, Tuner Preset (Manual) [PGM, -AUTO PRESET]
[Long press] Tuner Preset (Auto)
CD/MP3: Delete all programs [CLEAR]
[PLAY MODE] Play mode button
[CD q/h] Selector switch to CD.
Direct CD Play/CD Pause
Selector switch to Tuner for FM and AM [FM/AM]
Turn the volume up/down [VOL-], [+VOL]
[z PLAY] Timer PLAY ON/OFF
Clock and Timer setting [CLOCK/TIMER]
[1-9, 0, ≧10] Numbered buttons
To select a 2-digit number
e.g. 16: [≧10] [1] [6]
To select a 3-digit number
e.g. 226: [≧10] [≧10] [2] [2] [6]
[MUSIC PORT] Selector switch to MUSIC PORT
[g] Stop button
[2/u, 1\i] CD: Skip/Search
MP3: Track Skip
TUNER: Tune up/down, [Long press] Auto tuning
SA-EN35
-EN3SA 7
[REPEAT] Repeat ON/OFF
[SURROUND] SURROUND mode ON/OFF
Delete last programmed track [DEL]
[DISPLAY]
CD: CD Display (Elapsed play time/Remaining play time)
MP3: MP3 Display (Elapsed time/Album name/Track
name/ID3 [Album]/ID3 [Track]/ID3 [Artist])
Preset EQ mode selector [PRESET EQ]
SA-EN35
SA-EN37
Remote control signal sensor
■ Use
■ Batteries
The remote control
Control guide
Display
Standby/on switch
[^]
Remote control signal sensor
Placement of speakers
Caution
Use the speakers only with the
recommended system. Failure to
do so may lead to damage to the
amplifier
and/or speakers, and may
result in the risk of fire. Consult a
qualified service person if damage
has occurred or if you experience a
sudden change in performance.
Do not attach these speakers to
walls or ceilings.
•
•
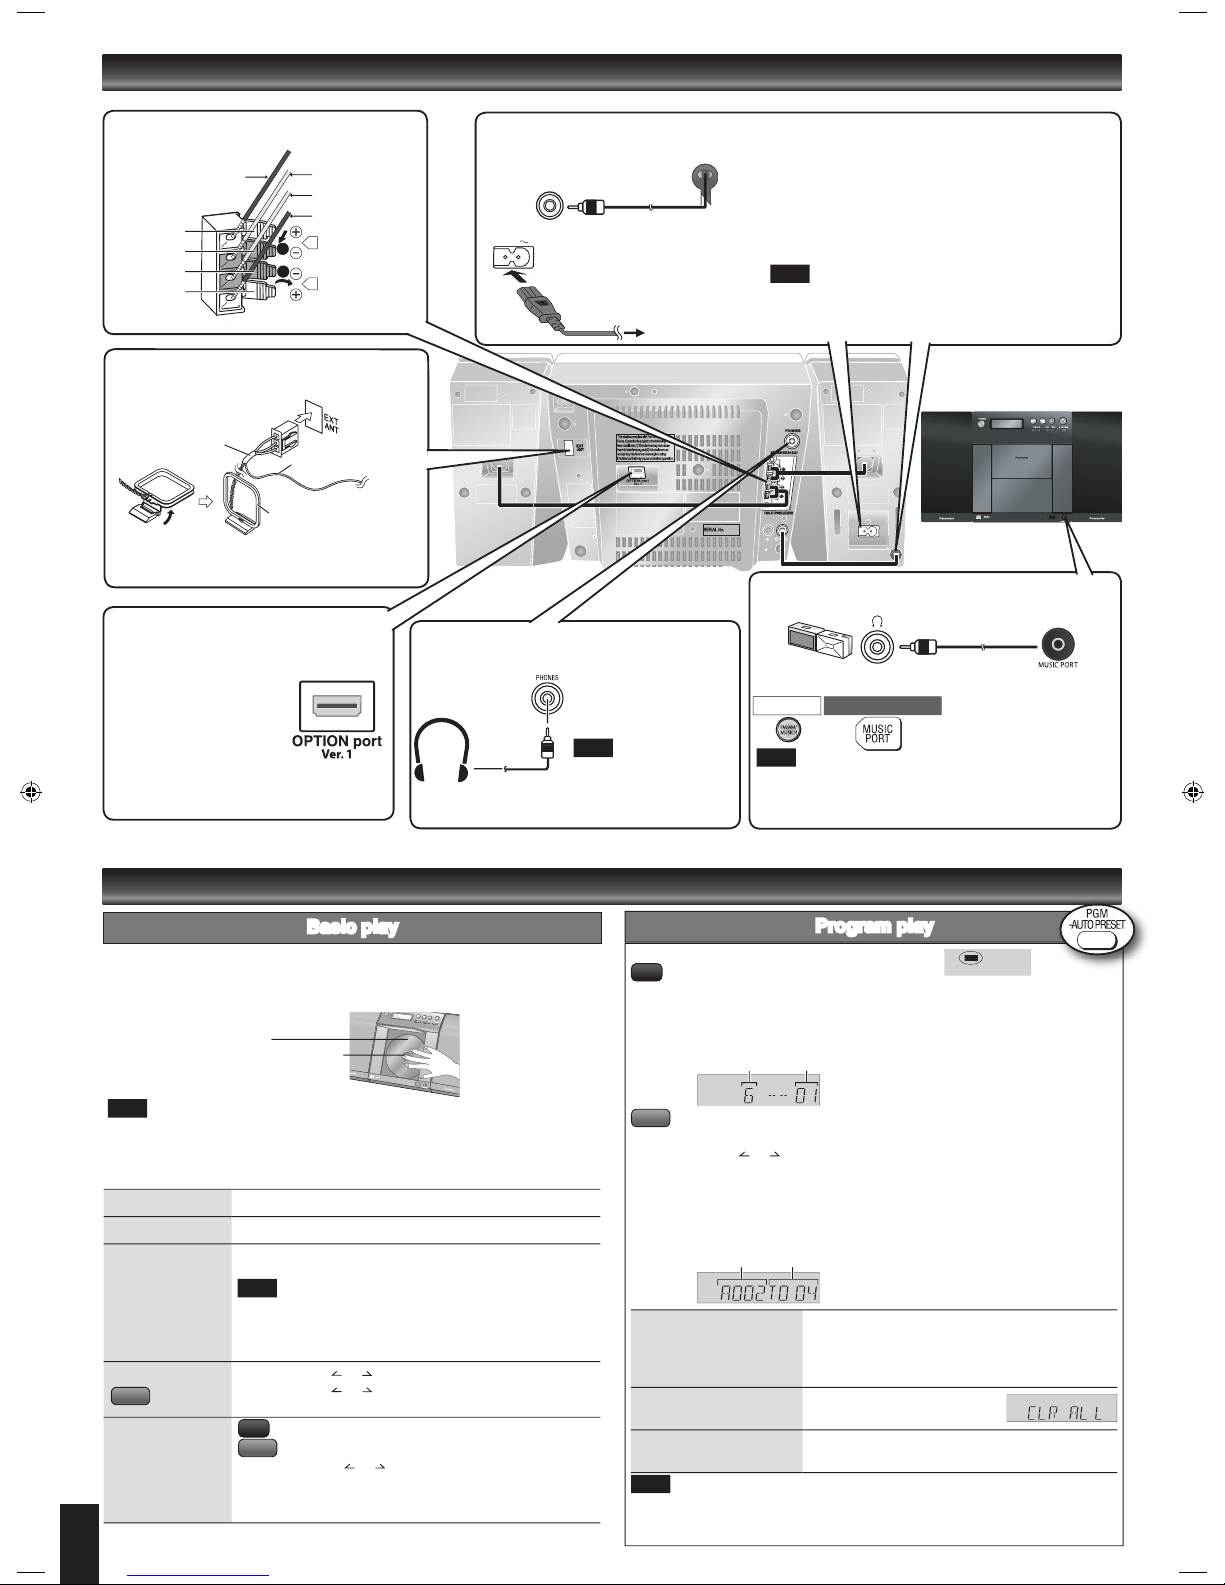
Music port jack
[- VOLUME +] To adjust the volume
[2/u, 1\i] CD: Skip/Search
MP3: Track Skip
TUNER: Tune up/down, [Long press] Auto tuning
[g] Stop button
[CD q/h] Selector switch to CD. Direct CD Play/CD Pause
[OPTION q/h] Selector switch to OPTION.
Direct OPTION Play/OPTION Pause
[; OPEN/CLOSE] Open and Close CD lid
FM/AM/MUSIC PORT select button [FM/AM/MUSIC P.]
2 3
[;, OPEN/CLOSE] Open and Close CD lid
Previous/Next Album [ , ALBUM]
0
(Minimum)
50
(Maximum)
Use the numbers indicated in parentheses when asking for replacement
parts.
Supplied accessories
(As of January 2007)
To order accessories, refer to “Accessory Purchases” on page 7.
1 Remote control [➡ page 2] 1 AC power supply cord [➡ page 3]
1 FM/AM antenna [➡ page 3] 2 Batteries [➡ page 2]
1 Universal Dock for iPod [➡ page 5]
The included AC power supply cord is for use with this unit only. Do not use it with
other equipment.
Do not use an AC power supply cord from other equipment.
•
•
(N2QAYB000109) (K2CB2CB00018)
(N1DADYY00003)
AC power supply cord
Right Speaker
Left Speaker
DC in cord to connect to main set
Selector switch to OPTION [q/h, OPTION]
Direct OPTION Play/OPTION Pause
Confirm track selection during MP3 Program Mode [ENTER]
(RFE0205)
3
Press [POWER 8] to turn the unit on.
Press [; OPEN/CLOSE] to open the CD lid and then set the CD in place.
Press [; OPEN/CLOSE] again to close the lid.
Keep fingers away from the CD lid when it is closing to avoid possible minor injury.
Label must face outward.
Press until you hear it click into place.
Press [CD q/h] to start play.
Adjust the volume.
Be sure to press the [; OPEN/CLOSE] button to open and close the CD lid.
Damage may occur if the lid is forced closed.
During standby, if the CD is ready in the unit, the unit comes on and play begins.
(One touch play)
•
•
•
Basic play
Discs operations
Connections
R
L
SA-EN35
SA-EN37
2. FM/AM antenna
Stand the antenna up on its base.
Unplug the antenna connector by holding the taped part.
Taped part
FM antenna
AM antenna
3.
iPod connection
Proceed to step 4 if you are not connecting an
iPod to the main unit.
➡ Refer to page 5 for further information.
Headphones
(not included)
Reduce the volume
level and connect the
headphones.
Plug type: 3.5 mm (1/8”)
stereo.
To prevent hearing damage,
avoid listening for prolonged
periods of time .
Note
Stop
Press [g].
Pause
Press [CD q/h]. Press again to resume play.
Skip/Search
Press [2/u] or [1/i] to skip/
Press and hold [2/u] or [1/i] to search.
You can search during play or while paused.
You cannot search through MP3 files.
You can only search within the current track during
program play, one track repeat, and random play.
•
•
•
Skip album Press [ALBUM or ] in the play mode.
Press [ALBUM or ] once and then the numbered buttons
in the stop mode.
Direct access play
(Play starts with the
track you select.)
Press the numbered buttons to select the desired track.
Press [ALBUM or ] to select the album.
Press [1/i] once and then press the numbered buttons
to
select the desired track.
Note
Note
1. Speakers
R
L
1
2
Copper (+)
Silver (-)
Silver (-)
Copper (+)
➡
Page 2 for the position of remote control and
main unit buttons.
The function allows you to program up to 24 tracks.
Press [PGM, -AUTO PRESET] while stopped.
Press the numbered buttons to select tracks. (Maximum 24 tracks)
Repeat this step to program other tracks.
Press [CD q/h] to start play.
Press [PGM, -AUTO PRESET] while stopped.
Press [ALBUM or ] to select your desired album.
Press [1/i] once and then press the numbered buttons to select tracks.
(Maximum 24 tracks)
Press [ENTER].
Repeat step 2 to 4 to program other tracks.
Press [CD q/h] to start play.
g Confirm a programmed
track
Press [2/u] or [1/i] when “PGM” is displayed
in the stop mode. To check while programming,
press [PGM, -AUTO PRESET] twice after “PGM”
appears, then press [2/u] or [1/i].
g Delete all programs
Press [CLEAR] in the stop mode.
“CLR ALL” is displayed.
g Cancel program mode
Press [PGM, -AUTO PRESET] in the stop mode to
clear “PGM” indicator from the display.
Program contents are stored in the unit’s memory even after changing to a different
function or turning the unit off. All program contents are erased by pressing [CLEAR]
or by opening the CD lid.
Program play
Track number
Program number
Note
PGM
Album number Track number
MP3
CD
MP3
CD
MP3
4. AC power supply cord
AC IN
To household
AC outlet
Conserving power
The unit consumes 2.0 W even it is turned off with [POWER
8]. To save power when the unit is not to be used for a
long time, unplug it from the household AC outlet.
Remember to reset the radio stations and any other memory
items before using the unit again.
If the unit is left unplugged for longer than approximately two
weeks, all settings will revert to the factory settings.
Connect the AC power supply
cord after all other connections
are complete.
Note
Connect the DC in cord from
left speaker to main set.
Connect the AC power supply cord.
Red
Red
Black
Black
Portable audio equipment
(Cords and equipment not included)
Use
Adjust the volume and sound quality of this unit and the
other equipment.
For details, refer to the instruction manual of the other
equipment.
•
•
Portable audio player
Plug type:
3.5 mm (1/8”) stereo
➡
Start Playback from the
Portable audio source.
Note
MAIN UNIT
REMOTE CONTROL
Connect the Universal
Dock for iPod to OPTION
port.
 Loading...