

Panasonic EASA-PHONE KX-T2470 Operating Instructions Manual

Panasonic
Integrated Telephone
Answering
System
EASA-PHONE'
MoDELro KX-T2470
Pulse-or-tone
dialing
capability
ry
Features
'l'hrurk
you
lirr.your purchasing
the
Panasonic
telephone
snswrring
syslcm.
Volcc
Syntheclzed
Announcements
lor lhe
time
of day,
remote menu, memo
check,
number
of calls,
and
time/day stamp
on each
incoming message
(lCM).
LCD Readout
for the clock,
number
of
messages,
OGM
1/2,
OGM tape counter, OGM
error,
and announce
modes.
New
Message
Transfer
lets
you
record
a
personal
introductory transfer message;
automatically
transfers
your
incoming messages to a
predetermined
tone telephone.
I
Two Variable Outgoing
Messages
(OGMs)
for recording two
outgoing
messages on a regular
audio cassette
tape
(C-15
tape included).
One
message is
extended;
it's limited
only by
the
length of
your
tape.
ir{
4'
&
lq
lJ
,t
r!4
fh
l,r
p
lr
$
tr
n
r
ifll
Tone
Remote
Control
System
lets
you
activate functions
such as Remote Turn
On/Off, Transfer
On/Off,
OGM Switch
(112),
and Answer-Back
Speakerphone.
New Message
Playback
lets
you
review
only those
messages
which
haven't
been
played
before.
Built-in
Speakerphone
to converse
"hands
free"
or
have
conference
calls.
One-Touch/Speed
Dialing
with 12
one-touch dialing
buttons
and
20
speed dialing
memory
stations.
I
1
(t
_"tF
--
_Y*
Contents
Features
..
....
I-II
Contents ...
III-VI
Preparation
*
$
t
L
IncludedAccessories
......1
Location
of Controls.
3-6
lnsertingtheTapes
..,,....7
Connection
.. .. .. .
8
Initial Settings
.....9
Setting the Time
and
Day
11
Initial Programming..
13
Selecting the CPC
(Calling
Party
Control)
13
Selecting the
number
of rings
15
Selecting the caller's recording time . .
17
Setting the remote
code
.
19
Recording
an
Outgoing
Message
(OGM)
21
Recording
an OGM
22
Checking
your
recorded message
(OGM)
23
f
Telephone
Manual Dialing
and Receiving
Making calls
using the handset
Making calls using the
SP-PHONE button
(on-hook
dialing)
Answering
calls
. .
Automatic Dialing
Speed dialing
One{ouch
dialing .
Storing telephone numbers for
speed dialing
Storing telephone numbers for
one-touch dialing
Storing
telephone numbers
with
secret
features
Correcting
an error
while
storing
Confirming
a stored
number
Erasing
a
stored
number
Voice Memo
Check .
OtherOperation ...
Redial .
Mute,
Hold .. i. ..
.
Tone, Flash
Pause .
Combination Dialing
25
25
25
25
26
26
26
27
28
29
30
30
JI
32
33
33
34
35
36
37
I
i
ill
IV
Answering Machine
Setting
the Answering Machine
to
Record Incoming
Messages
Recording from
the beginning of the ICM tape . .
Recording
after
the last recorded message
Recording
after the messages
you
want to
save . .
Listening to the
Recorded
Messages
Voice
time/day stamp
Playing
back
the
tape
from
the beginning
Playing
back
the newly recorded messages
Voice Menu
Remote
synthesized
voice instruction
Going to the voice menu
Direct Remote
Ooeration
Playing back newly-recorded messages
(Memory
Playback)
Rewinding/fast forwarding while listening
to the messages
Resetting the ICM tape for future message
Recording
your
message without listening to
the OGM
Recording a new
OGM
(Outgoing
Message)
Changing OGM mode
(1
or 2)
Turning
on
the
speakerphone
(Answer
Back) .
Setting/canceling
the
answer
mode remotely . . .
.
Transferring the ICM
Initial
programming
for
transferring ICM
Recording the
transfer OGM
Checking
your
transfer OGM .
Storing
the
telephone
number into
the transfer memory
station
Setting the transfer
mode.
.
Listening to the transferred ICM
Storing a
transfer number from a remote
phone
.
Setting the transfer mode remotely
OtherFeatures.....
Recording
a
personal
messages
(Message
Memo)
Recording a conversation
(2-Way
Recording)
Screening incoming calls . .
Erasing the
recorded messages
39
40
40
40
il
jt
41
41
42
42
43
43
4J
46
46
46
47
48
49
50
5'l
52
53
53
53
54
55
5b
57
58
58
59
59
60
61
61
r:
t
&
.t
t
*
i
q
{t
$'
General
Information
I
Liquid
Crystal
Display 63
I
Announcement bv
the Unit
64
t'
f
Troubleshooting Guide 65
Wall Mounting 67
Referencia
Rapida
(Spanish
Quick
Reference) . .
69-79
AccessoryOrderlnformation... 80
Maintenance
82
Precaution
84
lmoortant Information
U,
85
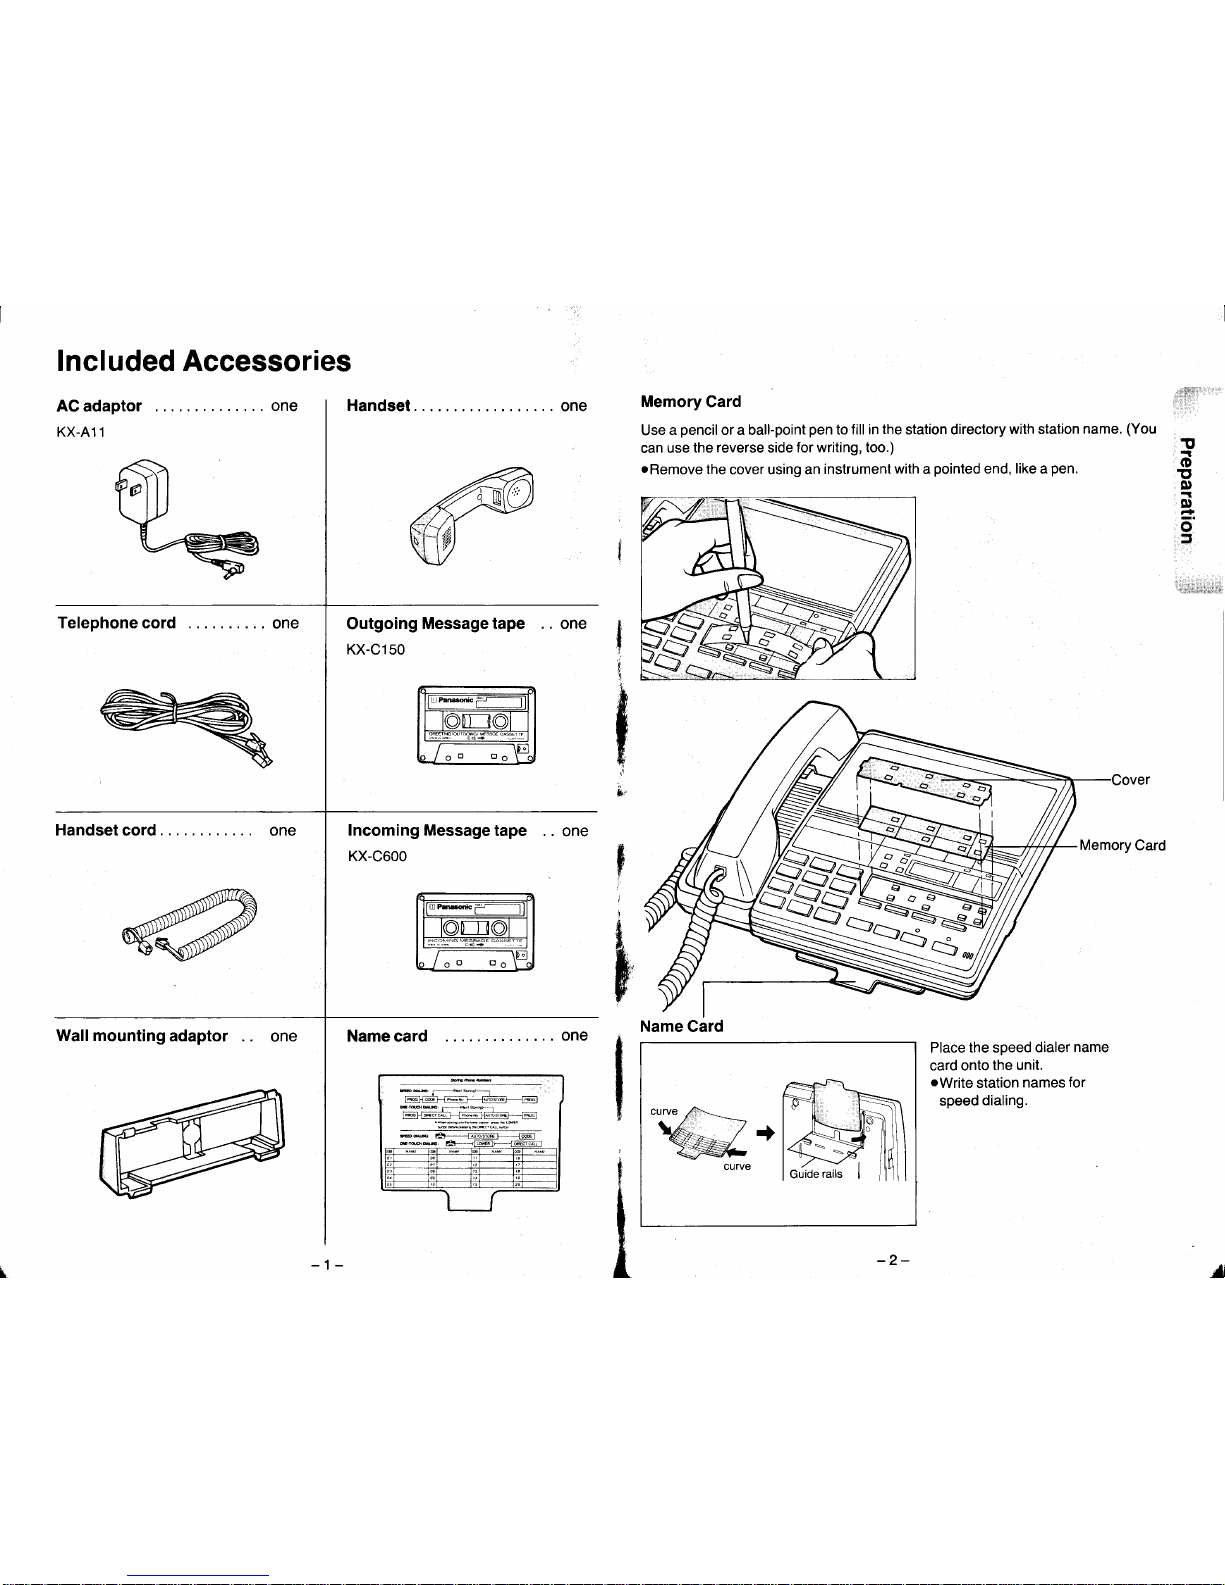
Included Accessories
ACadaptor
.. one
KX-A11
Telephonecord ....
one
Handset
,,.... one
Memory
Card
Use
a
pencil
or a ball-point
pen
to fill in
the
station directory
with station
name.
(You
can
use the
reverse
side
for writing, too.)
oRemove
the
cover using an
instrument
with
a
pointed
end,
like
a
pen.
at::ilt;t::r:
t
o
E'
A'
ot
:3
o
:
Outgoing
Message tape
KX-C150
..
one
I
I
5r
f
i
*
p'
il
i
I
t
t
Handset cord
.
Incoming Message
tape
KX-C600
Wallmountingadaptor
one Namecard
.. one
Place the speed
dialer
name
card onto
the unit.
oWrite
station
names
for
speed
dialing.
w
Name Card
-2-

Location
of
Controls
w"
iilllitilll
ri:.,:r,'.'
!
o
rtl
,'ol
!,
o
5
i**ir
rliUi]i.i
?
o
@
@
@
@
@
o
@
@
@
@
@
@
@
@
@
@
@
@
@
@
&.
*
?
+
f
t
*
t
a:
TRANSFER indicator
Lights when
the transfer
mode is
set.
Flashes
when the
unit
is resetting the OGM tape.
MEMO/2
WAY button
Used
to record a
message
memo or
a telephone
conversation.
FF
(Fast
forward) button
Used
to fast
forward the
Incoming Message cassette
tape.
OGM
REC
(Recording)
button
Used
to record
the
Outgoing
Message.
OGM
PLAY button
Used
to
play
the recorded Outgoing
Message.
ICM
ERASE button
Used
to erase
the recorded
Incoming
Messages.
REW/Rewind)
button
Used
to rewind the Incoming
Message cassette
tape.
TIME DAY
CHECK button
Used
to
announce
the
day and time.
Transfer
(TRANS.)
OGM button
Used
to select
the Transfer OGM
mode.
OGM
SELECT
button
Used
to
select
OGM mode 1 or
2. The
display
indicates the selected OGM
While
the
OGM
tape is
rewinding
or
forwarding, the
selected
OGM's indication
on the display
will flash.
TRANSFER
button
This
is the memory station
for
storing
the transfer
telephone
number.
Liquid Crystal
Display
NEW
MESSAGE button
Used
to
play
back
the
newly recorded
messages.
PLAYBACT(PAUSE
button
Used
to
play
back
the recorded
Incoming
Messages and
to stop
the ICM
tape
temporarily
during
ICM
playback.
Volume selector
ANSWER
indicator
lN USE
indicator
AC Jack
(Power)
Telephone
line
jack
Ringer
volume selector
(See
page
'10.)
Dialing
mode selector
Used
to change
the dialing
mode tone/pulse.
(See
page
10.)
-3-
-4-
W
f'
Location
of
Controls
(cont.)
.,:!lilll.
:l:"'lj
',
!
o
T'
0)
o
t
o
=
@
@
@
@
@
@
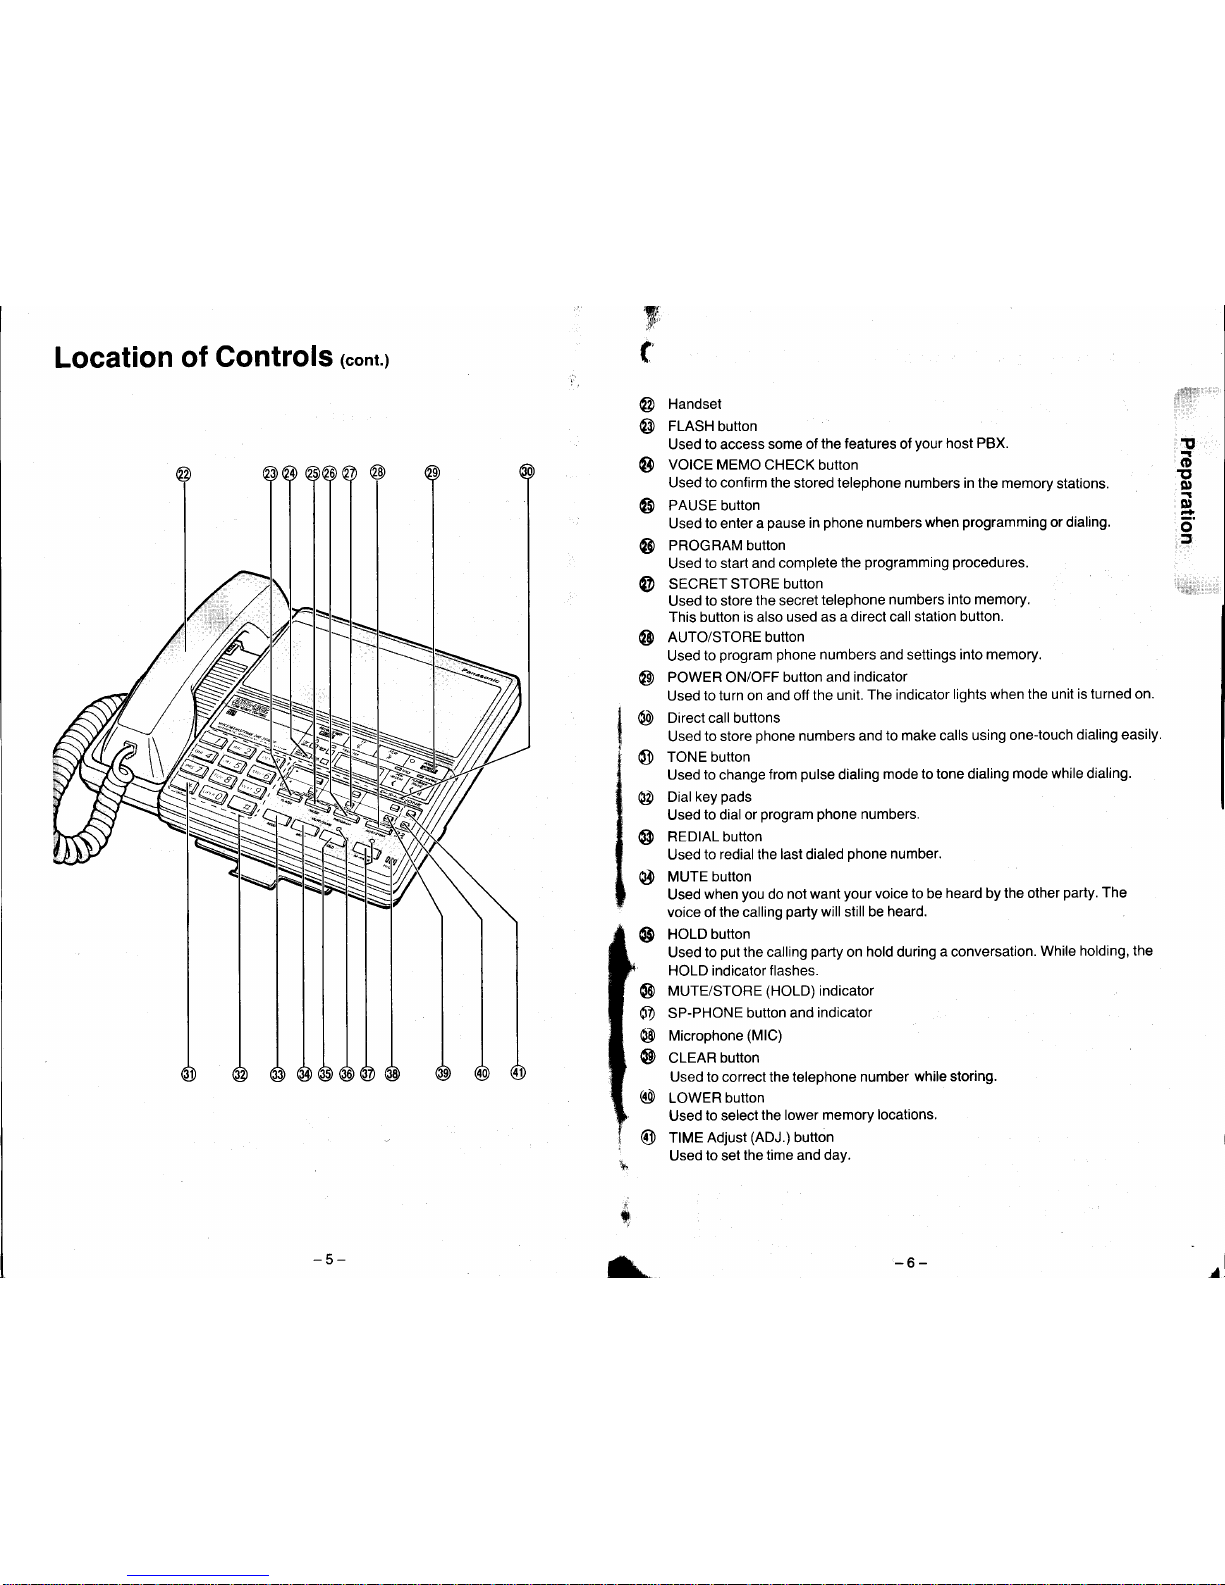
Handset
FLASH
button
Used
to
access
some of
the features
of
your
host
PBX.
VOICE MEMO CHECK
button
Used to confirm the
stored
telephone
numbers in the memory
stations.
PAUSE button
Used to enter a
pause
in
phone
numbers when
programming
or dialing.
PROGRAM button
Used
to start and
complete the
programming procedures.
SECRET STORE
buttON
Used
to store
the secret
telephone
numbers
into memory.
This button
is
also
used as a direct call station
button.
AUTO/STORE button
Used
to
program
phone
numbers
and settings into
memory.
POWER
ON/OFF
button and
indicator
Used
to turn on and off
the unit.
The indicator
lights when the unit
is turned on.
Direct call buttons
Used
to store
phone
numbers and
to make calls using
one-touch
dialing easily.
TONE button
Used
to
change
from
pulse
dialing
mode
to tone dialing
mode while dialing.
Dial key
pads
Used
to
dial or
program
phone
numbers.
REDIAL button
Used
to redial the last dialed
phone
number.
MUTE button
Used
when
you
do
not want
your
voice to be
heard
by
the other
party.
The
voice of
the calling
party
will still be
heard.
HOLD button
Used to
put
the calling
party
on
hold
during a conversation.
While
holding, the
HOLD indicator flashes.
MUTE/STORE
(HOLD)
indicator
SP-PHONE
button and
indicator
Microphone
(MlC)
CLEAR
button
Used to
correct the telephone
number
while storing.
LOWER
button
Used
to select
the lower
memory
locations.
TIME Adjust
(ADJ.)
button
Used
to
set
the time and day.
@
@
lo
@
AD
@
@
@
@
o,
@
@
@
@
?
*.
-5-
-6-
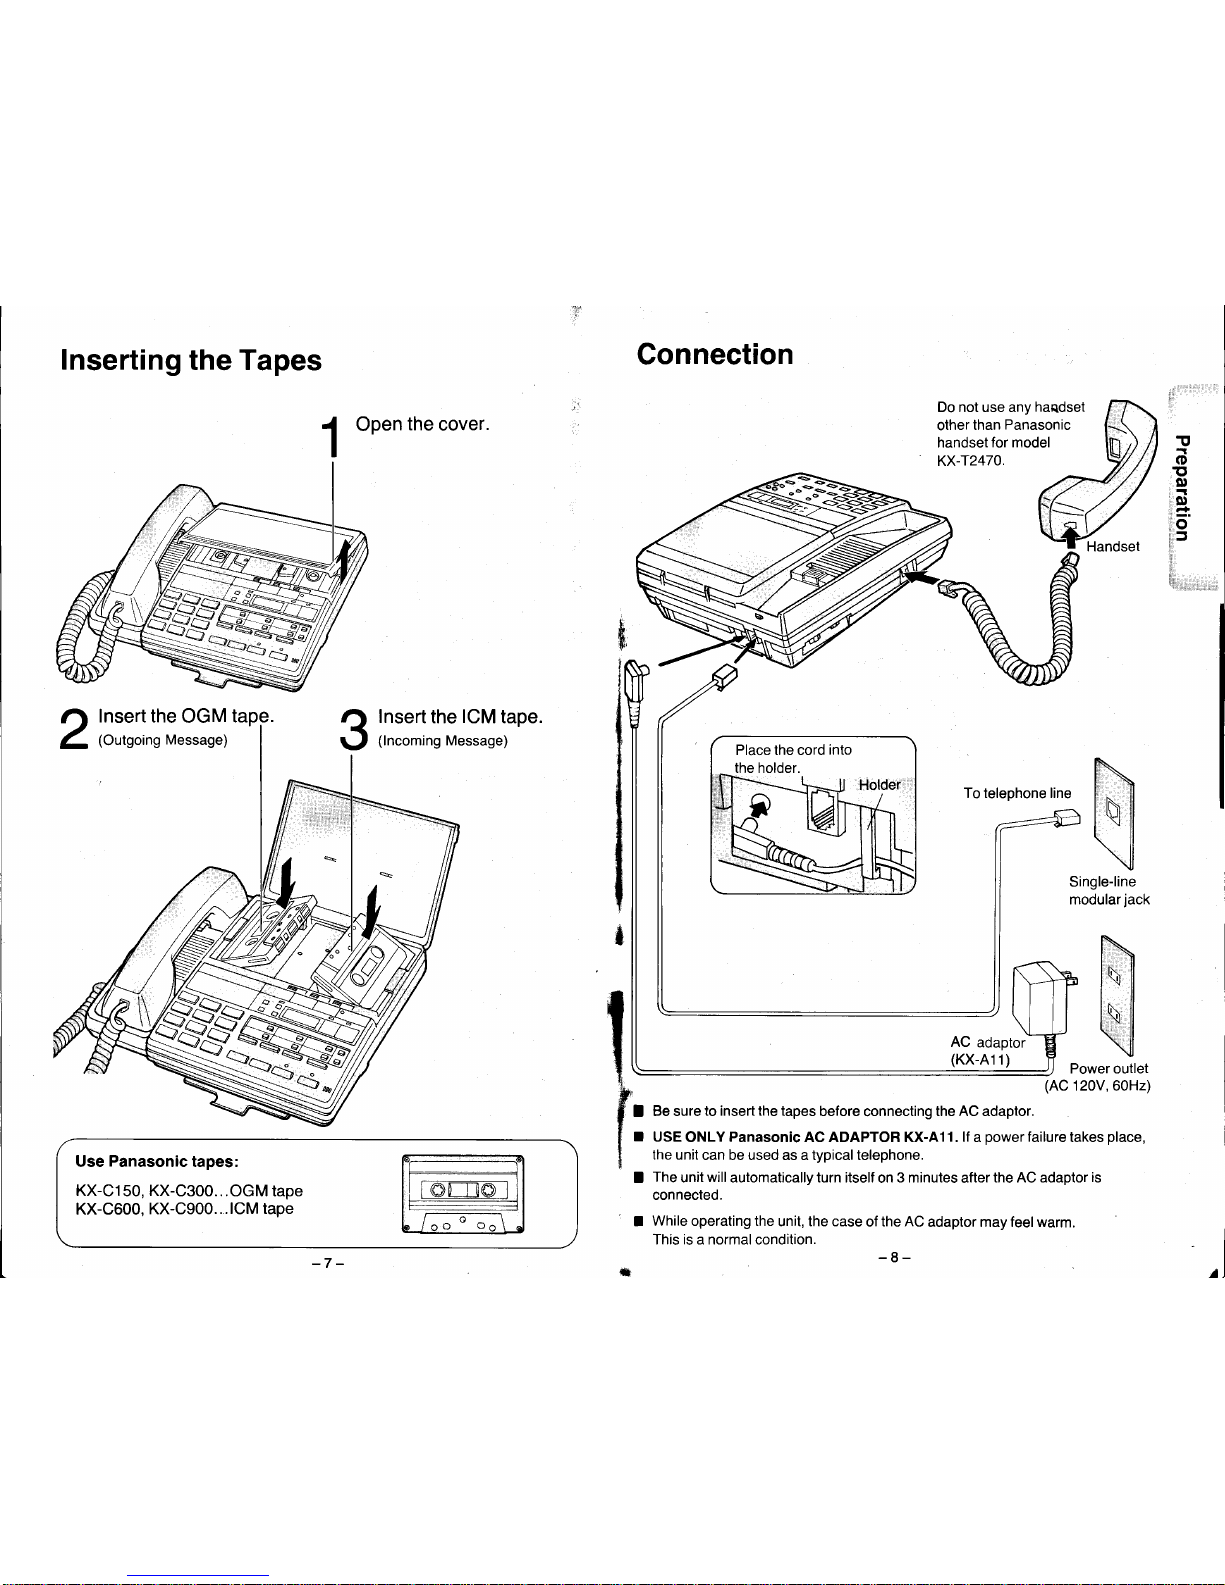
Inserting
the Tapes
!
o
at
E'
,'
Ol
;6'
tr=
i
ti;rt,,,r,'i,r:],j,,,
,l>
nl*ll
\il
Power outlet
120V,60Hz)
ffi
Connection
Do not use any
handset
other
than
Panasonic
handset
for model
KX-r2470.
Single-line
modular
jack
(AC
Be sure
to insert the tapes
before
connecting
the AC adaptor.
USE
ONLY
Panasonic
AC ADAPTOR KX-A11. lf a
power
failure
takes
place,
the unit
can be used as a typical telephone.
The
unit
will
automatically turn itself
on
3 minutes
after
the AC adaptor
is
connected.
While operating the
unit, the case
of the
AC
adaptor may feel warm.
This is a normal condition.
-8-
Insert the
OGM
tapg.
Insert
the
ICM
tape.
(lncoming
Message)
Place the cord
into
the holder.
AC
adaptor
I
I
Use
Panasonic
tapes:
KX-C1
50,
KX-C300...OGM
tape
KX-C600,
KX-C900...
ICM tape
T@-ro=O.t
oto
-7-
-
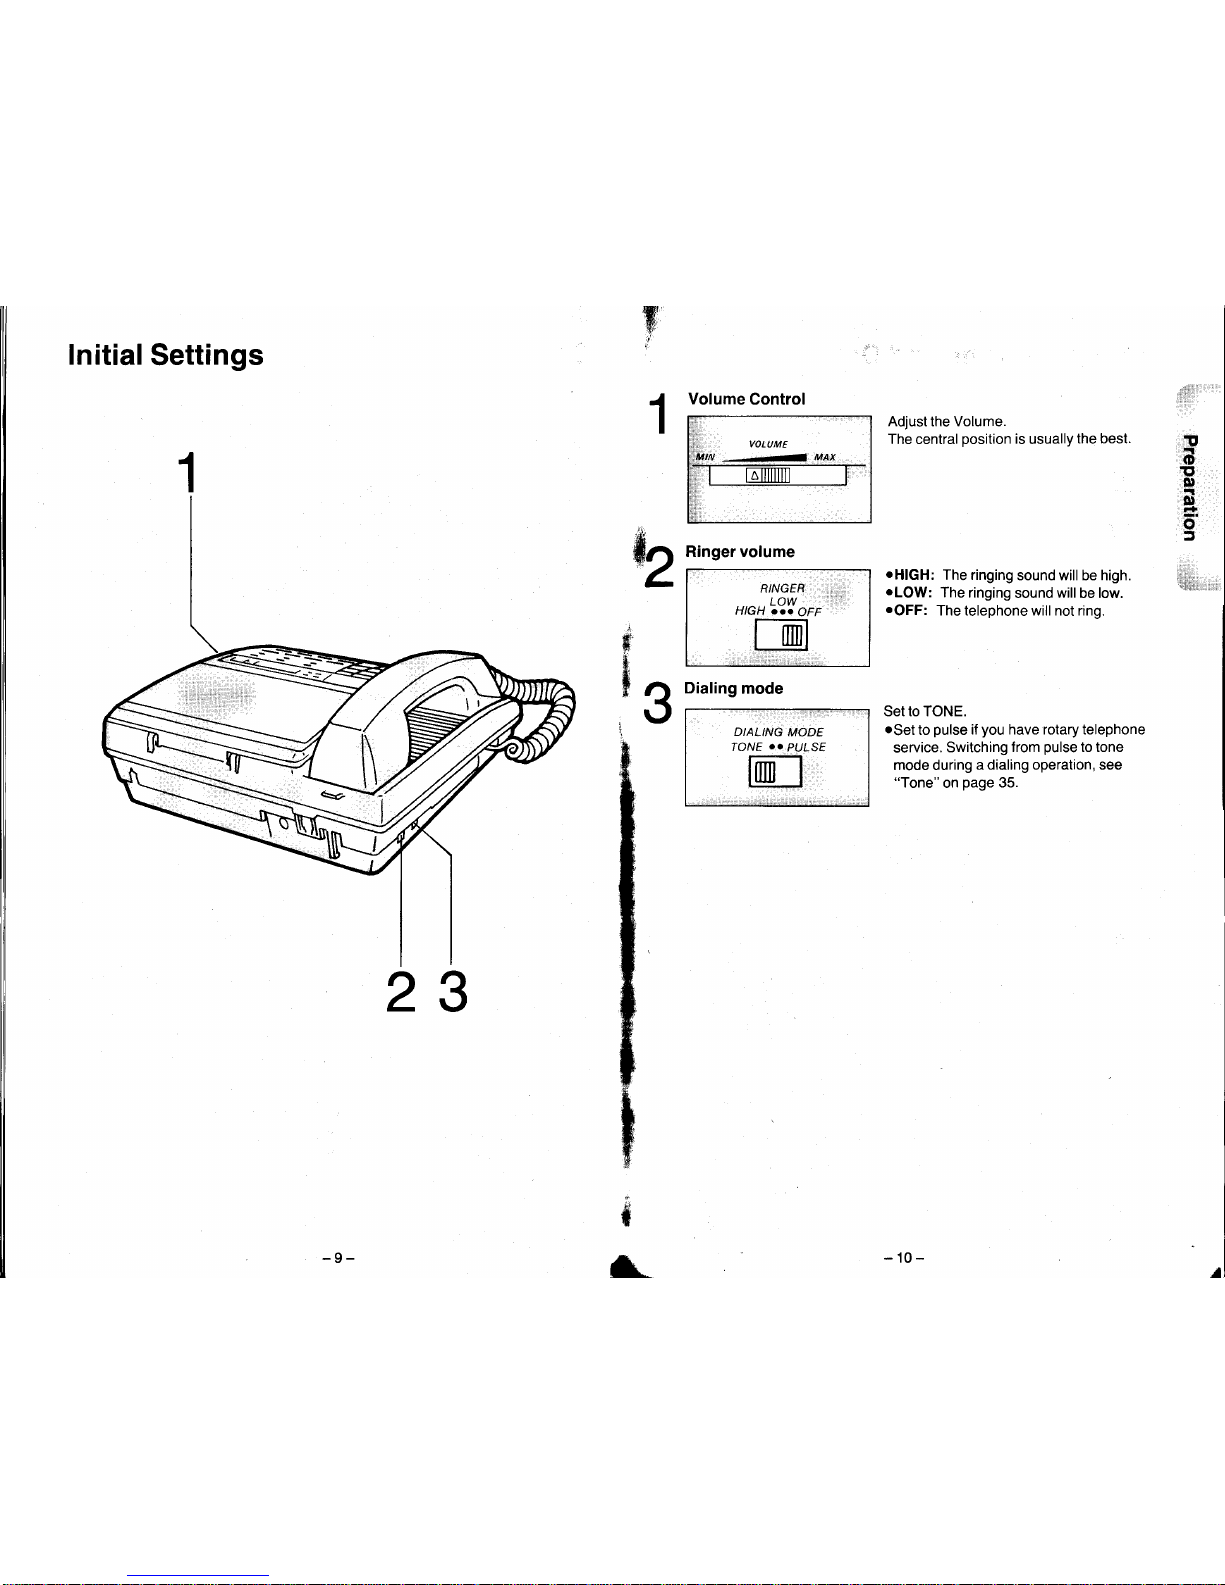
Initial
Settings
Ringer volume
Dialing
mode
DIALINC
MADE
IONE
..
PULSf
Adjust the Volume.
The central
position
is
usually
the
best.
oHIGH:
The ringing
sound will be high.
oLOW:
The
ringing
sound
will
be low.
oOFF:
The telephone will not ring.
Set to TONE.
oSet
to
pulse
if
you
have rotary telephone
service.
Switching
from
pulse
to tone
mode during
a dialing operation, see
"Tone"
on
page
35.
, iEl
nl
o
p
ll
rl
qr
;
o
:'
ril*l.,:.
!l*llil:
#
$.
p3
3
2
t
Volume
Control
VALUME
MIN
MAX
A
-9-
-10-
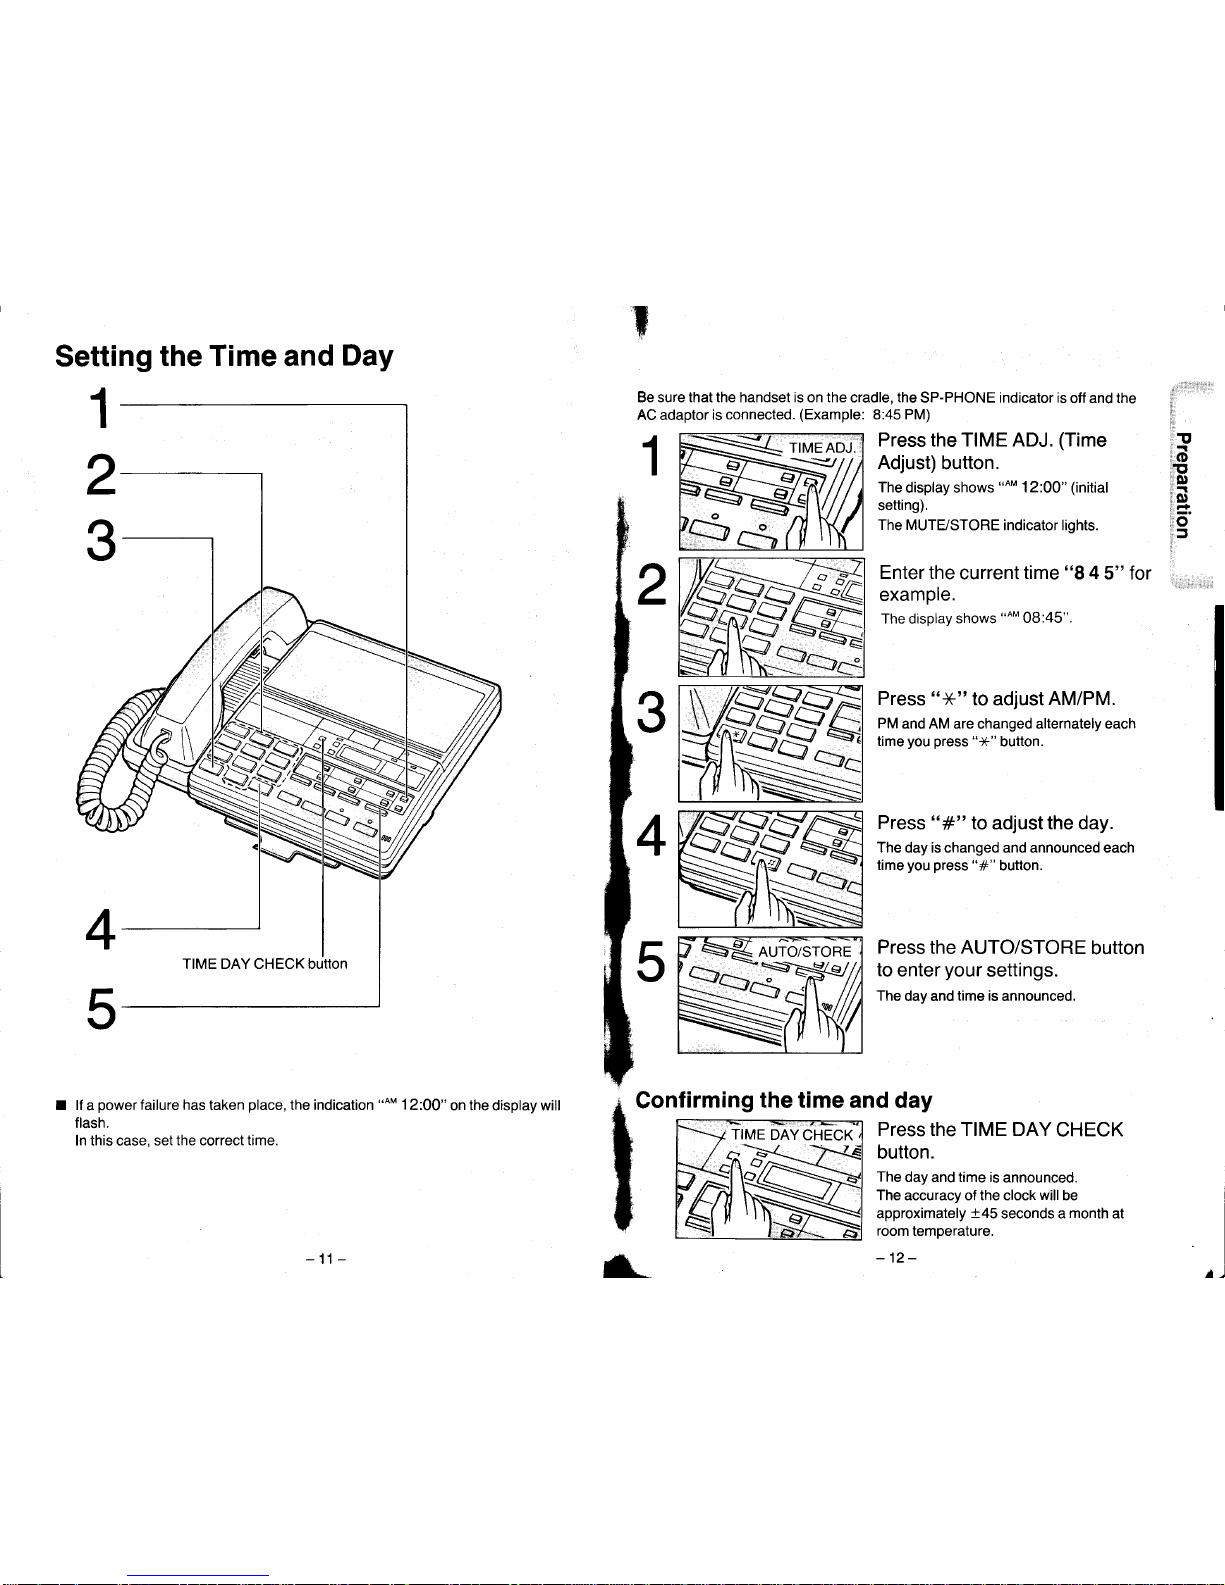
Setting
the Time
and
Day
lf
a
power
failure has taken
place,
the indication
"o"
12:00"
on the display will
flash,
In this case, set
the correct time.
1
2
3
TIME DAY CHECK button
-
11
-
i
I
i!
.i.rt
;:.o
trtl
:l!,
:i.-
r:O
:o
i,-
1
1il
-
il,
Be sure that the handset is on the
cradle,
the
SP-PHONE indicator is
otf and the
AC adaptor
is
connected.
(Example:
8:45
PM)
Press the TIME ADJ.
(Time
Adjust)
button.
The
display shows
"AM
12:00"
(initial
setting).
The MUTUSTORE
indicator lights.
Enter the
current
time
"8
4 5" lor
example.
The display
shows
"AM
08:45".
Press
")C"
to adjust
AM/PM.
PM
and AM are changed alternately each
time
you press
"*"
button.
Press
"#"
lo
adjust
the day.
The day is changed and announced each
time
you press
"#"
button.
Press the AUTO/STORE
button
to
enter
your
settings.
The
day and
time is
announced.
s_s
ffi
aE
ffi-
I
\=ft AUrO/S
3*LT
TIME
DAY
CHECK
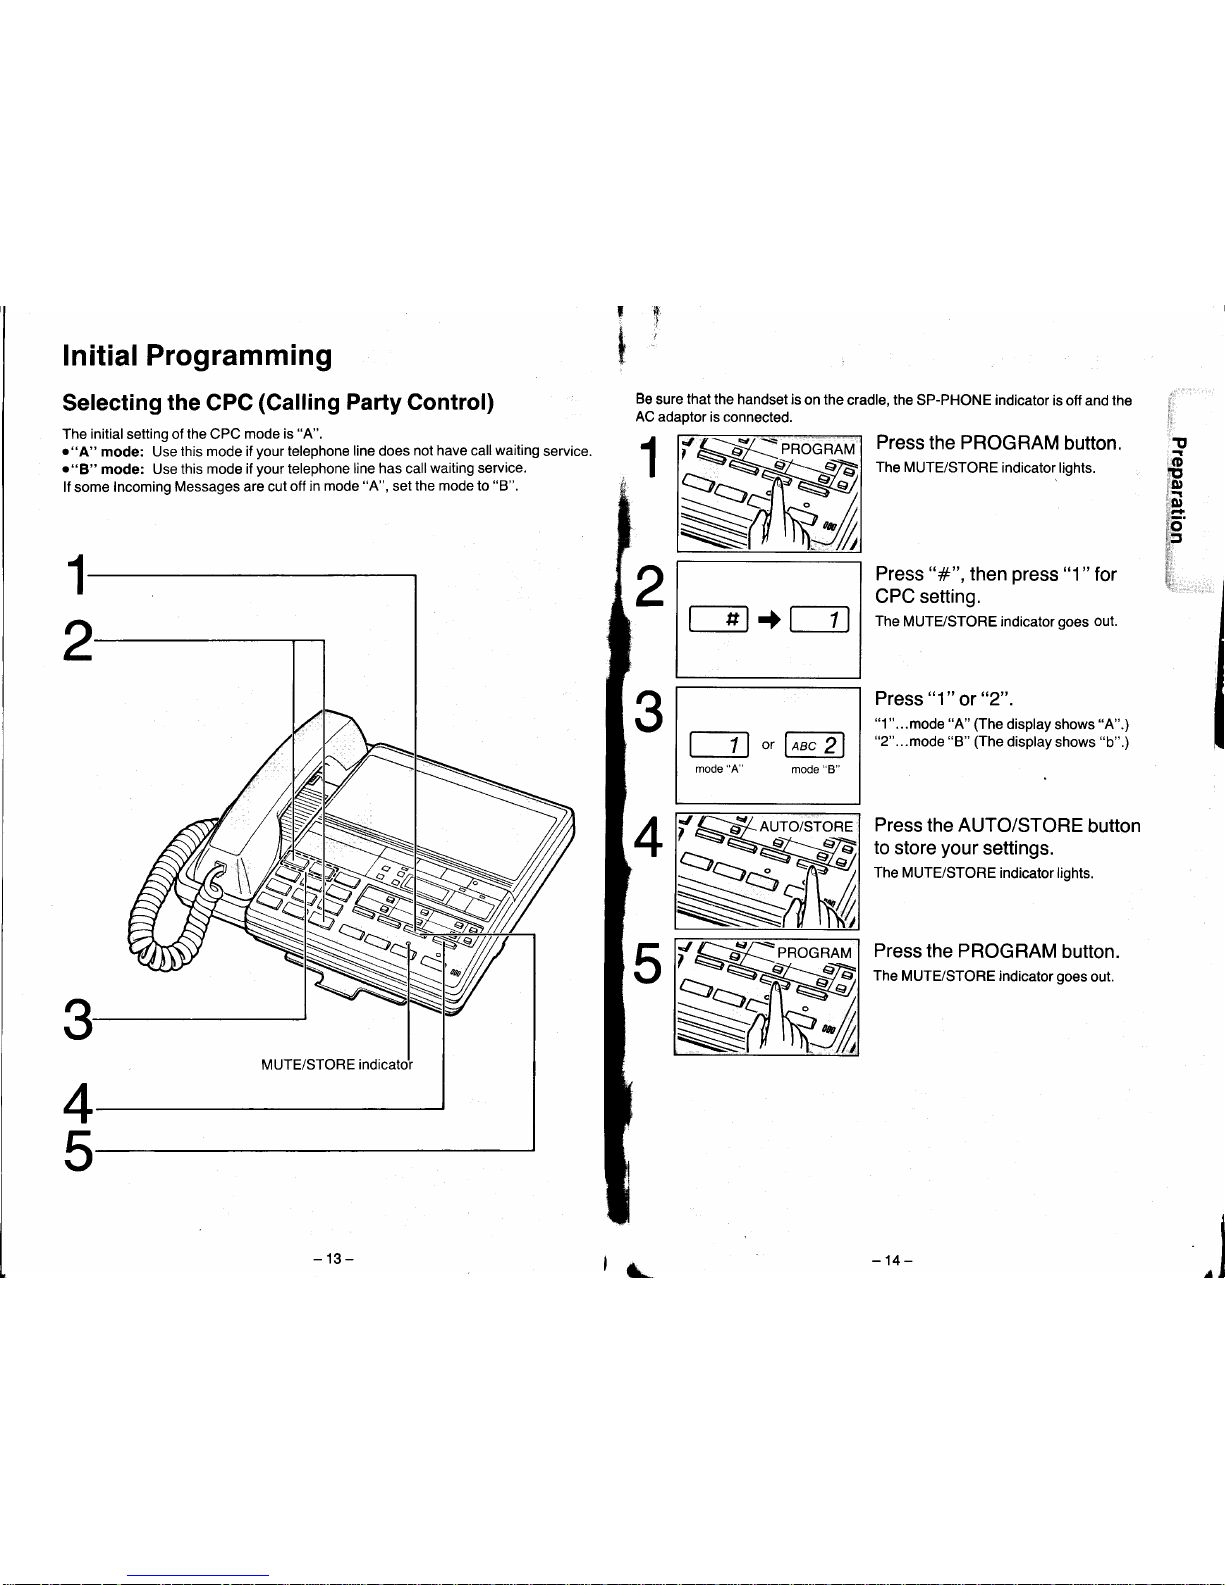
Initial Programming
Selecting
the
CPC
(Galling
Party
Control)
The
initial
setting of
the
CPC
mode is
"A".
o"A"
mode: Use
this mode if
your
telephone
line does
not have call
waiting
service.
o"B"
mode: Use this
mode if
your
telephone
line has call
waiting service.
lf
some
Incoming
Messages are cut
off in mode
"A",
set
the mode to
"B".
!ry
iu
{"
l
1
Be
sure
that
the handset is
on the
cradle, the
SP-PHONE
indicator
is off
and
the
AC adaptor is connected.
Press
the PROGRAM
button.
The MUTE/STORE
indicator
lights.
I
#l+l-7
mode"A"
mode
"8"
Press
"#",
then
press
"1"
for
CPC setting.
The
MUTE/STORE indicator
goes out.
Prgss
"1"
or
"2".
"1"...mode
"A"
(The
display
shows
"A".)
"2"...mode "8"
(The
display
shows
"b".)
Press
the AUTO/STORE
button
to
store
your
settings.
The MUTE/STORE
indicator lights.
Press
the PROGRAM
button.
The
MUTE/STORE indicator
goes
out.
Vl*pnocnnM
ea,
s=
$f
enocnnv
ss-=
MUTE/STORE
indica
-13-
la
-14-

Initial Programmihg
rcont.)
Be sure that
the
handset
is
on
the
cradle.
the
SP-PHONE
indicator
is
off and
the
AC adaptor
is
connected.
Press the
PROGRAM
button.
The MUTE/STORE
indicator lights.
ilri.
ir,l
;:t
r',O
.tl
.r.!)
::ii
lii!,
o
5
t.
1
I
ttl+
[*"
Zl
W^01... [r"-r]r.7l
Auto mode
7 rings
Press
"
#"
,
lhen
press
"7"
lol
number
of
rings
setting.
The MUTE/STORE
indicator
goes
out.
Select
the number
of
rings
by
pressing
"0", "1", "2"
...or
"7"
.
"O"...auto
mode
(The
display
shows
"A".)
See
"AUTO
setting" on
page
15.
"1"...one
ring
(The
display shows
"1".)
"2"...two
rings
(The
display shows
"2".)
:
"7"...seven
rings
(The
display
shows
"7".)
Press
the AUTO/STORE button
to
store
your
settings.
The MUTE/STORE indicator
lights.
Press the
PROGRAM
button.
The MUTE/STORE
indicator
goes
out.
4
5
Selecting
the
number of
rings
It is used
to select
the number of
rings
when
this
unit answers the calls.
The
initial setting
of the
number
of
rings is
"2
rings".
fl=-t-
enocnRv
a,e
V
nurolsrone
Function
of
the AUTO
setting
(TOLL
SAVER)
When
you
call the unit
from
an outside
phone,
the number of
rings that it takes
for the unit to answer
tells
you
if there
are
any new messages.
lf the unit
answers on
the 2nd ring:There
is
at
least
one
new message.
lf the unit
answers on
the 4th
ring:There
are
no new messages.
Hang
up
immediately when
you
hear the 3rd ring. Because
the
3rd ring
indicates
there are no
new messages. This will save
you
the toll
charge
for the
call.
-15-
I
-16-
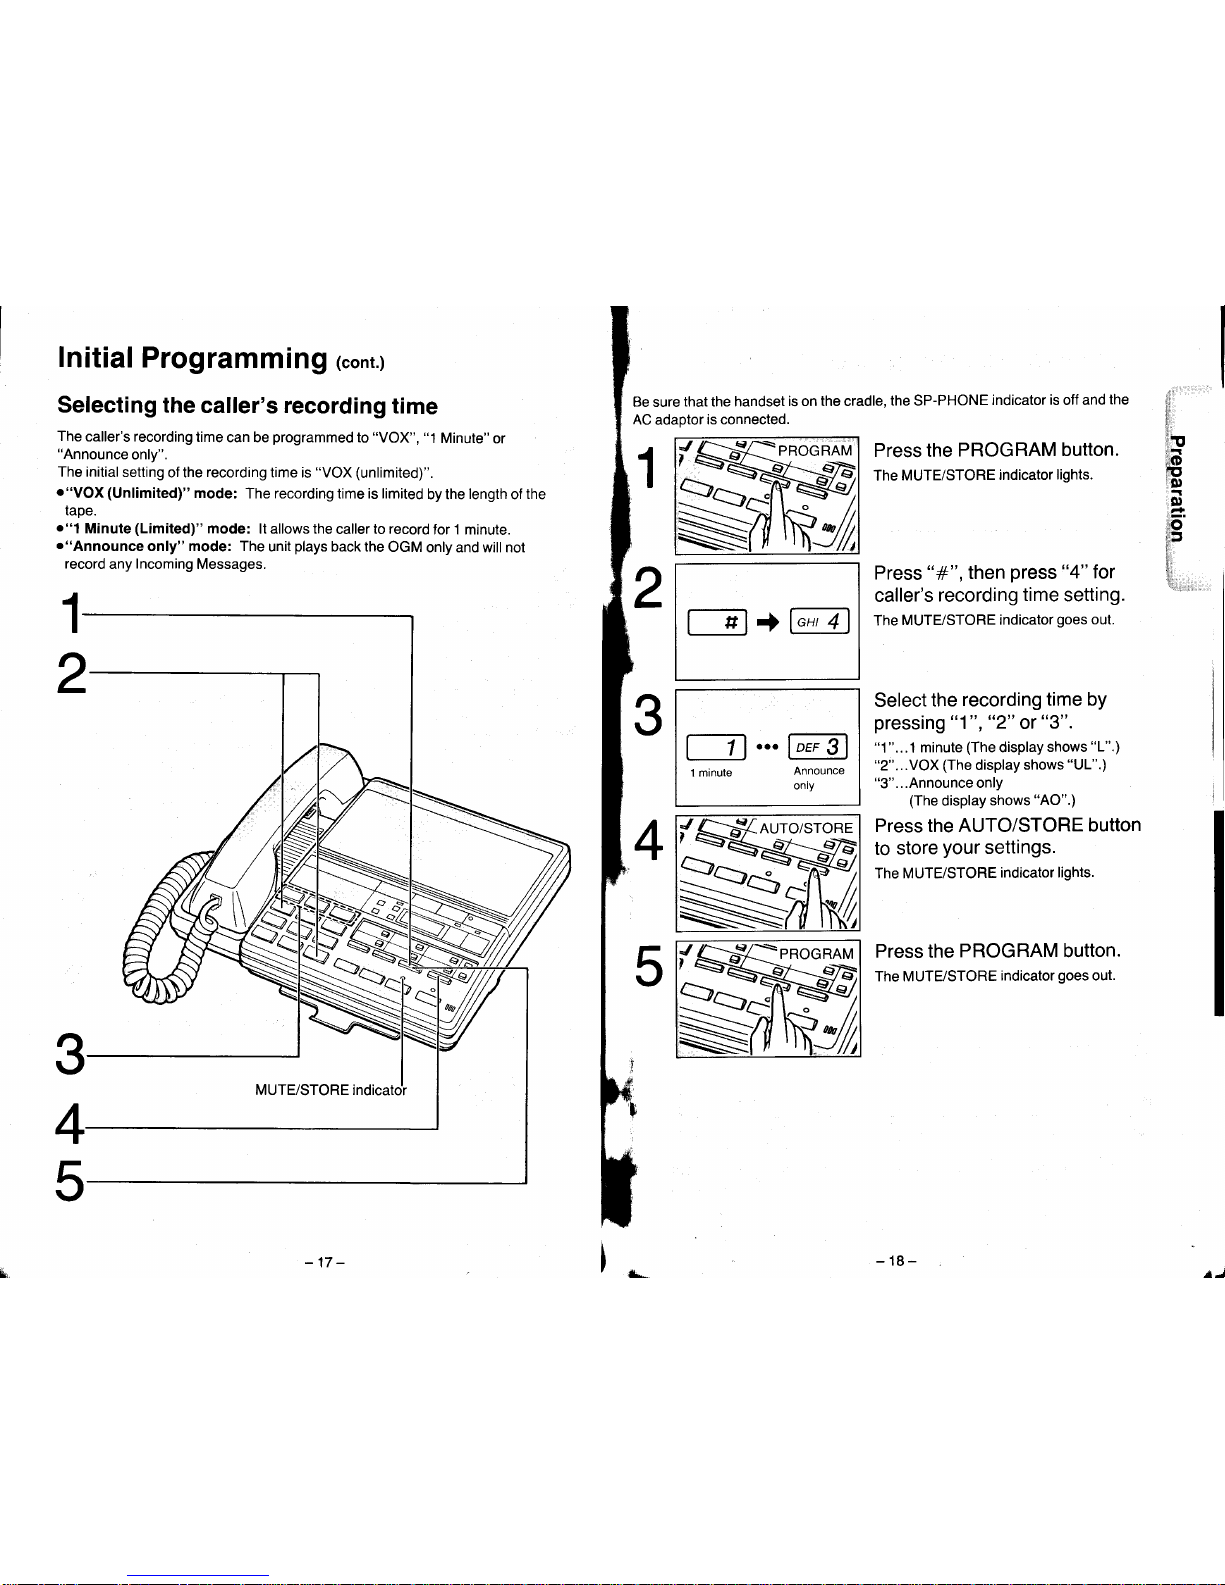
Initial
Programmihg
rcont.)
Selecting the
caller's recording
time
The
caller's recording
time
can be
programmed
to
"VOX",
"1
Minute"
or
"Announce
only".
The initial
setting
of the
recording
time is
"VOX
(unlimited)".
."VOX
(Unlimited)"
mode:
The recording time is limited
by the
length
of
the
taoe.
o"1
Minute
(Limited)"
mode:
lt allows the
caller
to record
for 1 minute.
o"Announce
only" mode: The
unit
plays
back the
OGM
only and will not
record
any
Incoming
Messages.
-'t7 -
)_-
-18-
SC=pnocnnv
Be sure
that the handset
is on the cradle,
the SP-PHONE
indicator
is
off and
the
AC adaotor
is connected.
Press the
PROGRAM
button.
The
MUTE/STORE
indicator
lights.
t
ttl
+W4l
l minute
Announce
only
Prgss
"#",
then
press
"4"
for
caller's
recording
time
setting.
The
MUTE/STORE
indicator
goes
out.
Select
the
recording
time by
pressing
"1","2"
or
"3".
"1
"...1
minute
(The
display
shows
"1".)
"2"...VOX
(The
display
shows
"U1".)
"3"...Announce
only
(The
display
shows
"AO".)
Press the AUTO/STORE
button
to
store
your
settings.
The MUTE/STORE
indicator lights.
Press the
PROGRAM button.
The MUTE/STORE
indicator
goes
out.
iril
l,
1,
ll
lfo
{il-l
rrlD
g
riiO)
SC:pnocnnvt
 Loading...