

Page 1
Operating Instructions
Manuel d’utilisation
DVD/CD PLAYER
Lecteur DVD/CD
Model No./Modèle DVD-S77
If you have any questions contact/
Pour toute demande de
renseignements, appeler au
In the U.S.A.:
1-800-211-PANA(7262)
In Canada/Au Canada:
1-800-561-5505
PP
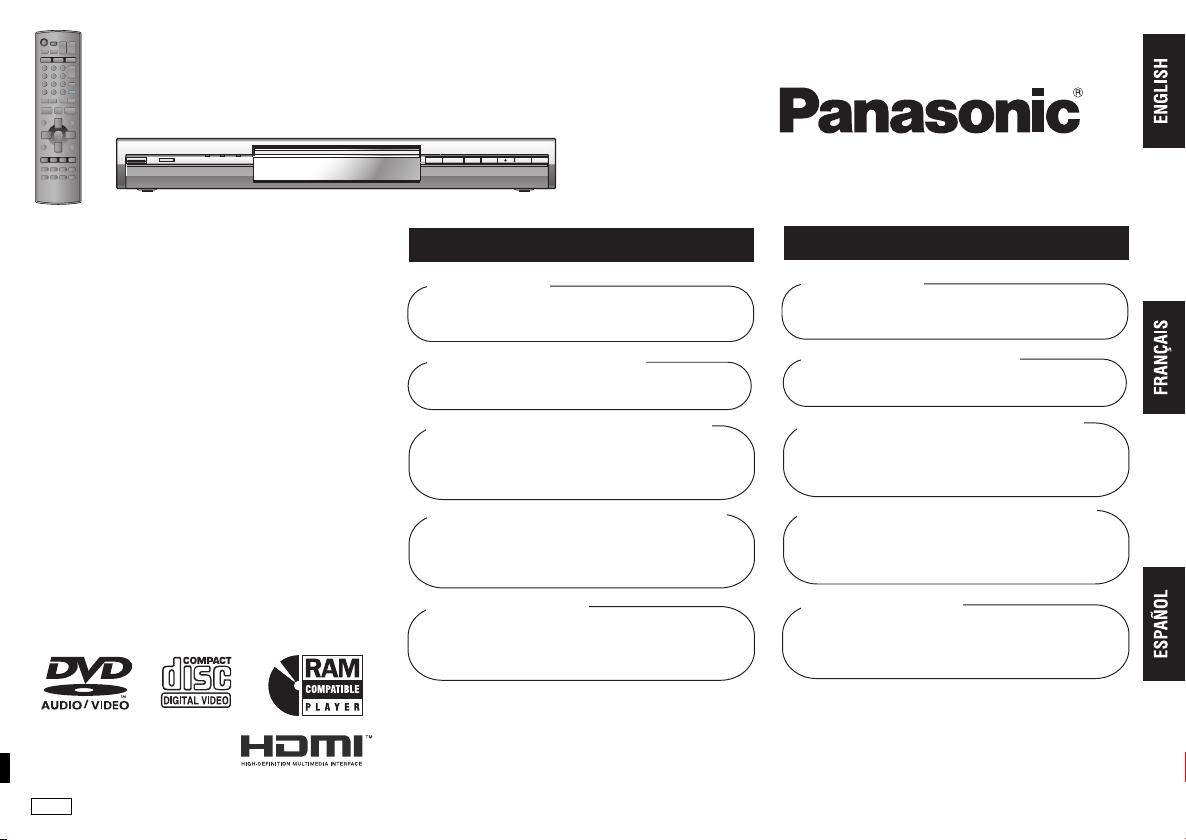
MULTI-FORMAT PLAYBACK
DVD-RAM
recorded with DVD video recorders etc.
Video & Still pictures (JPEG)
DVD-RW (DVD-VR)
recorded and finalized with DVD video
recorders etc.
DVD-Audio/DVD-Video/
Video CD/CD
sold on the market
Movie, Music etc.
DVD-R/DVD-RW/+R/+RW
recorded and finalized with DVD video
recorders etc.
Video (played as DVD-Video)
CD-R/CD-RW
recorded and finalized with personal
computers etc.
Music (WMA/MP3) & Still pictures (JPEG)
See page 4 for details.
For U.S.A.: The warranty can be found on page 26.
For Canada: The warranty can be found on page 27.
Pour le Canada: La garantie se trouve à la page 27.
La referencia rápida en español se puede encontrar en la página anterior a la contraportada.
LECTURE MULTI FORMAT
DVD-RAM
enregistrés sur enregistreurs DVD-Vidéo, etc.
Vidéos et images fixes (JPEG)
DVD-RW (DVD-VR)
enregistrés et finalisés sur enregistreurs
DVD-Vidéo, etc.
DVD-Audio/DVD-Vidéo/
CD-Vidéo/CD
disponibles dans le commerce
Films, Musique, etc.
DVD-R/DVD-RW/+R/+RW
enregistrés et finalisés sur enregistreurs
DVD-Vidéo, etc.
Vidéos (lues comme DVD-Vidéo)
CD-R/CD-RW
enregistrés et finalisés sur ordinateur, etc.
Musique (WMA/MP3) et images
fixes (JPEG)
Pour plus de renseignements, voir
à la page
RQT8087-Y
4.
Page 2
CAUTION!
THIS PRODUCT UTILIZES A LASER.
USE OF CONTROLS OR ADJUSTMENTS OR
PERFORMANCE OF PROCEDURES OTHER THAN
THOSE SPECIFIED HEREIN MAY RESULT IN
HAZARDOUS RADIATION EXPOSURE.
DO NOT OPEN COVERS AND DO NOT REPAIR
YOURSELF. REFER SERVICING TO QUALIFIED
PERSONNEL.
WARNING:
TO REDUCE THE RISK OF FIRE,
ELECTRIC SHOCK OR PRODUCT
DAMAGE, DO NOT EXPOSE THIS
APPARATUS TO RAIN, MOISTURE,
DRIPPING OR SPLASHING AND THAT
NO OBJECTS FILLED WITH LIQUIDS,
SUCH AS VASES, SHALL BE PLACED
ON THE APPARATUS.
The socket outlet shall be installed near the equipment
and easily accessible or the mains plug or an
appliance coupler shall remain readily operable.
CAUTION
RISK OF ELECTRIC SHOCK
DO NOT OPEN
CAUTION: TO REDUCE THE RISK OF ELECTRIC
IMPORTANT SAFETY INSTRUCTIONS
RQT8087
2
2
SHOCK, DO NOT REMOVE SCREWS.
NO USER-SERVICEABLE PARTS
INSIDE.
REFER SERVICING TO QUALIFIED
SERVICE PERSONNEL.
The lightning flash with arrowhead
symbol, within an equilateral triangle, is
intended to alert the user to the presence
of uninsulated “dangerous voltage” within
the product’s enclosure that may be of
sufficient magnitude to constitute a risk of
electric shock to persons.
The exclamation point within an
equilateral triangle is intended to alert the
user to the presence of important
operating and maintenance (servicing)
instructions in the literature accompanying
the appliance.
(Inside of product)
THE FOLLOWING APPLIES ONLY IN THE U.S.A.
CAUTION:
This equipment has been tested and found to comply
with the limits for a Class B digital device, pursuant to
Part 15 of the FCC Rules.
These limits are designed to provide reasonable
protection against harmful interference in a residential
installation. This equipment generates, uses and can
radiate radio frequency energy and, if not installed and
used in accordance with the instructions, may cause
harmful interference to radio communications. However,
there is no guarantee that interference will not occur in a
particular installation. If this equipment does cause
harmful interference to radio or television reception,
which can be determined by turning the equipment off
and on, the user is encouraged to try to correct the
interference by one or more of the following measures:
≥Reorient or relocate the receiving antenna.
≥Increase the separation between the equipment and
receiver.
≥Connect the equipment into an outlet on a circuit
different from that to which the receiver is connected.
≥Consult the dealer or an experienced radio/TV
technician for help.
Any unauthorized changes or modifications to this
equipment would void the user’s authority to operate
this device.
This device complies with Part 15 of the FCC Rules.
Operation is subject to the following two conditions: (1)
This device may not cause harmful interference, and
(2) this device must accept any interference received,
including interference that may cause undesired
operation.
IMPORTANT SAFETY
INSTRUCTIONS
Read these operating instructions carefully before using
the unit. Follow the safety instructions on the unit and the
applicable safety instructions listed below. Keep these
operating instructions handy for future reference.
1) Read these instructions.
2) Keep these instructions.
3) Heed all warnings.
4) Follow all instructions.
5) Do not use this apparatus near water.
6) Clean only with dry cloth.
7) Do not block any ventilation openings. Install in
accordance with the manufacturer’s instructions.
8) Do not install near any heat sources such as
radiators, heat registers, stoves, or other apparatus
(including amplifiers) that produce heat.
9) Do not defeat the safety purpose of the polarized or
grounding-type plug. A polarized plug has two blades
with one wider than the other. A grounding-type plug
has two blades and a third grounding prong. The
wide blade or the third prong are provided for your
safety. If the provided plug does not fit into your
outlet, consult an electrician for replacement of the
obsolete outlet.
10) Protect the power cord from being walked on or
pinched particularly at plugs, convenience
receptacles, and the point where they exit from the
apparatus.
11) Only use attachments/accessories
specified by the manufacturer.
12) Use only with the cart, stand, tripod,
bracket, or table specified by the
manufacturer, or sold with the
apparatus. When a cart is used, use
caution when moving the cart/
apparatus combination to avoid injury from tip-over.
13) Unplug this apparatus during lightning storms or
when unused for long periods of time.
14) Refer all servicing to qualified service personnel.
Servicing is required when the apparatus has been
damaged in any way, such as power-supply cord or
plug is damaged, liquid has been spilled or objects
have fallen into the apparatus, the apparatus has
been exposed to rain or moisture, does not operate
normally, or has been dropped.
Page 3

Product Service
1. Damage requiring service— The unit should be serviced by qualified service
personnel if:
(a) The AC power supply cord or AC adaptor has been damaged; or
(b) Objects or liquids have gotten into the unit; or
(c) The unit has been exposed to rain; or
(d) The unit does not operate normally or exhibits a marked change in
performance; or
(e) The unit has been dropped or the cabinet damaged.
2. Servicing—Do not attempt to service the unit beyond that described in these
operating instructions. Refer all other servicing to authorized servicing personnel.
3. Replacement parts—When parts need replacing ensure the servicer uses parts
specified by the manufacturer or parts that have the same characteristics as the
original parts. Unauthorized substitutes may result in fire, electric shock, or other
hazards.
4. Safety check—After repairs or service, ask the servicer to perform safety checks to
confirm that the unit is in proper working condition.
Product information
For product information or assistance with product operation:
In the U.S.A., refer to “Customer Services Directory” on page 26.
In Canada, contact the Panasonic Canada Inc. Customer Care Centre at
1-800-561-5505, or visit the website (www.panasonic.ca), or an authorized Servicentre
closest to you.
User memo:
DATE OF PURCHASE _____________________________________________
DEALER NAME __________________________________________________
DEALER ADDRESS ______________________________________________
_______________________________________________________________
TELEPHONE NUMBER ___________________________________________
The model number and serial number of this product can be found on either the back
or the bottom of the unit. Please note them in the space provided below and keep for
future reference.
MODEL NUMBER
SERIAL NUMBER
DVD-S77
Dear customer
Thank you for purchasing this product. Before connecting, operating or adjusting this
product, please read the instructions completely. Please keep this manual for future
reference.
Table of contents
Getting started
IMPORTANT SAFETY INSTRUCTIONS . . . . . . . . . . . . . . . . . . . . . . . . . . .2
Product Service . . . . . . . . . . . . . . . . . . . . . . . . . . . . . . . . . . . . . . . . . . . . . .3
Discs that can be played. . . . . . . . . . . . . . . . . . . . . . . . . . . . . . . . . . . . . . .4
Accessories . . . . . . . . . . . . . . . . . . . . . . . . . . . . . . . . . . . . . . . . . . . . . . . . .5
STEP 1
STEP 2
STEP 3
STEP 4
Basic play. . . . . . . . . . . . . . . . . . . . . . . . . . . . . . . . . . . . . . . . . . . . . . . . . .10
Changing the play sequence . . . . . . . . . . . . . . . . . . . . . . . . . . . . . . . . . .11
Convenient functions . . . . . . . . . . . . . . . . . . . . . . . . . . . . . . . . . . . . . . . .12
Using On-Screen Menus. . . . . . . . . . . . . . . . . . . . . . . . . . . . . . . . . . . . . .15
Using navigation menus. . . . . . . . . . . . . . . . . . . . . . . . . . . . . . . . . . . . . .18
Changing the player settings . . . . . . . . . . . . . . . . . . . . . . . . . . . . . . . . . .20
Troubleshooting guide . . . . . . . . . . . . . . . . . . . . . . . . . . . . . . . . . . . . . . .23
Maintenance/Specifications . . . . . . . . . . . . . . . . . . . . . . . . . . . . . . . . . . .25
Limited Warranty (ONLY FOR U.S.A.) . . . . . . . . . . . . . . . . . . . . . . . . . . .26
Limited Warranty (ONLY FOR CANADA). . . . . . . . . . . . . . . . . . . . . . . . .27
Glossary . . . . . . . . . . . . . . . . . . . . . . . . . . . . . . . . . . . . . . . . . . . . . . . . . . .27
Main feature index . . . . . . . . . . . . . . . . . . . . . . . . . . . . . . . . . . . Back cover
Connection to a television . . . . . . . . . . . . . . . . . . . . . . 6
Enjoying higher quality audio and video (HDMI connection) . . . . . . . . . . . . . . . . . 7
Enjoying multi-channel surround sound . . . . . . . . . . . . . . . . . . . . . . . . . . . . . . . . . 8
The remote control. . . . . . . . . . . . . . . . . . . . . . . . . . . . . 9
QUICK SETUP. . . . . . . . . . . . . . . . . . . . . . . . . . . . . . . . . 9
Television operation . . . . . . . . . . . . . . . . . . . . . . . . . . . 9
Operations
All Group/Program/Random play . . . . . . . . . . . . . . . . . . . . . . . . . . . . . . . . . . . . . . 11
Recalling recommended audio/video setting—AV Enhancer/
Enjoying even higher quality sound—AUDIO ONLY/
Reproducing more natural audio—Multi Re-master . . . . . . . . . . . . . . . . . . . . . . 12
Quick replay/Changing play speed/Changing soundtracks/
Adjusting picture mode/Changing subtitles . . . . . . . . . . . . . . . . . . . . . . . . . . . . . 13
Reducing noise in pictures/Zoom/Angle select/Still picture rotation/advance/
Position memory/Starting play from a selected group . . . . . . . . . . . . . . . . . . . . . 14
Main menus/Other Settings . . . . . . . . . . . . . . . . . . . . . . . . . . . . . . . . . . . . . . . . . . . 15
Playing WMA/MP3/JPEG discs . . . . . . . . . . . . . . . . . . . . . . . . . . . . . . . . . . . . . . . 18
Playing CD/Playing HighMAT™ discs/Playing RAM/DVD-RW (DVD-VR) discs . . 19
Changing the speaker setting to suit your speakers . . . . . . . . . . . . . . . . . . . . . . . . 22
Reference
3
Product Service/Table of contents
RQT8087
3
Page 4
Discs that can be played
Operations in these instructions are described mainly with formats. Icons such as [RAM] show the formats.
Discs that can be played
—
§
A process that allows play on compatible equipment.
≥ It may not be possible to play the above discs in all cases due to the type of disc or condition of the recording.
∫ Discs that cannot be played
DVD-ROM, Version 1.0 of DVD-RW, CD-ROM, CDV, CD-G, SACD, DivX Video Discs and Photo CD, DVD-RAM that cannot be
removed from their cartridges, 2.6-GB and 5.2-GB DVD-RAM, PAL discs
DVCD and SVCD that do not conform to IEC62107.
§
You can play DVD-Audio; however, still pictures may be displayed enlarged.
Note about using a DualDisc
RQT8087
The digital audio content side of a DualDisc does not meet the technical specifications of the Compact Disc Digital Audio (CD-DA)
format so play may not be possible.
4
4
DVD-RAM [RAM] [JPEG]
≥ [RAM] Recorded with devices using Version 1.1 of the Video Recording Format (a unified video
recording standard), such as DVD video recorders, DVD video cameras, personal computers, etc.
Recorded with Panasonic DVD-Video recorders using DCF (Design rule for Camera File system)
≥ [JPEG]
Standard Version 1.0. To play JPEG files, select “Play as Data Disc” (
DVD-Audio [DVD-A] [DVD-V]
Some multi-channel DVD-Audio will prevent down-mixing (
≥ [DVD-A]
of their contents if this is the manufacturer’s intention. When playing such discs, or such parts of the
disc, unless the number of connected speakers is the same as the disc’s channel specification, audio
will not be output properly (e.g. part of the audio is missing, multi-channel audio cannot be selected
and audio is played in two channels). Refer to the disc’s jacket for more information.
≥ [DVD-V] Some DVD-Audio discs contain DVD-Video content. To play DVD-Video content, select
“Play as DVD-Video” (➜ page 17, Other Menu).
DVD-Video [DVD-V]
Discs marked with labels containing the region number “1” or “ALL”
➜ page 17
➜ page 27
, Other Menu).
, Glossary) of all or part
Example:
1
DVD-R (DVD-Video)/DVD-RW (DVD-Video) [DVD-V]
Discs recorded and finalized
DVD-RW (DVD-VR) [DVD-RW[‹VR›]
Discs recorded and finalized
Video Recording Format (a unified video recording standard).
iR (Video)/iRW (Video) [DVD-V]
Discs recorded and finalized
Video CD [VCD]
Including SVCD (Conforming to IEC62107)
CD [CD] [WMA] [MP3] [JPEG] [VCD]
≥ This unit can play CD-R/RW recorded with the above formats. Close the sessions or finalize
disc after recording.
≥ [WMA] [MP3] [JPEG] This unit also plays HighMAT discs.
≥ This unit is compatible with HDCD (➜ page 27, Glossary), but does not support the Peak Extend
function (a function which expands the dynamic range of high level signals). (During HDCD play,
“HDCD” lights on the unit’s display.)
§
on DVD video recorders or DVD video cameras
§
on DVD video recorders or DVD video cameras
§
on DVD video recorders or DVD video cameras
§
and “Chaoji VCD” available on the market including CVD,
using Version 1.1 of the
ALL
§
1
2
the
∫ Tips for making WMA/MP3
and JPEG discs
(For CD-R/CD-RW)
≥ Discs must conform to ISO9660 level 1
or 2 (except for extended formats).
≥ This unit is compatible with multi-session
but if there are a lot of sessions it takes
more time for play to start. Keep the
number of sessions to a minimum to
avoid this.
≥ If groups were created away from the
root like “002 group” in the illustration
below, the eighth one onwards is
displayed on the same vertical line in the
menu screen.
≥ There may be differences in the display
order on the menu screen and computer
4
screen.
≥ This unit cannot play files recorded using
packet write.
Naming folders and files
(Files are treated as content and folders
are treated as groups on this unit.)
At the time of recording, prefix folder and
file names. This should be with numbers
that have an equal number of digits, and
should be done in the order you want to
play them (this may not work at times).
Files must have the extension:
“.WMA” or “.wma”, “.MP3” or “.mp3”,
“.JPG”, “.jpg”, “.JPEG” or “.jpeg”
e.g. [MP3]
root
001 group
001
001 track.mp3
002 track.mp3
003 track.mp3
002 group
001 track.mp3
003 group
002 track.mp3
003 track.mp3
004 track.mp3
001 track.mp3
002 track.mp3
003 track.mp3
Page 5
[WMA]
≥ You cannot play WMA files that are copy
protected.
≥ This unit is not compatible with Multiple
Bit Rate (MBR: a file that contains the
same content encoded at several
different bit rates).
[MP3]
≥ This unit is not compatible with ID3 tags.
≥ Compatible sampling rate: 8, 11.02, 12,
16, 22.05, 24, 32, 44.1, and 48 kHz
[JPEG]
≥ JPEG files taken on a digital camera that
conforms to DCF Standard Version 1.0
are displayed.
– Pictures taken using digital camera
functions not supported by DCF like
automatic picture rotation may not be
displayed.
– Files that have been altered, edited or
saved with computer picture editing
software may not be displayed.
≥This unit cannot display moving pictures,
MOTION JPEG and other such formats,
still pictures other than JPEG (e.g. TIFF)
or play pictures with attached audio.
∫ Handling precautions
≥ Do not attach labels or stickers to discs
(this may cause disc warping, rendering
it unusable).
≥ Do not write on the label side with a ball-
point pen or other writing instrument.
≥ Do not use record cleaning sprays,
benzine, thinner, static electricity
prevention liquids or any other solvent.
≥ Do not use scratch-proof protectors or
covers.
≥ Do not use the following discs:
– Discs with exposed adhesive from
removed stickers or labels (rented
discs etc).
– Discs that are badly warped or
cracked.
– Irregularly shaped discs, such as heart
shapes.
Manufactured under license from Dolby Laboratories. “Dolby” and the double-D
symbol are trademarks of Dolby Laboratories.
“DTS” and “DTS Digital Surround” are registered trademarks of Digital Theater
Systems, Inc.
Apparatus Claims of U.S. Patent Nos. 4,631,603, 4,577,216, and 4,819,098,
licensed for limited viewing uses only.
This product incorporates copyright protection technology that is protected by
method claims of certain U.S. patents and other intellectual property rights owned by
Macrovision Corporation and other rights owners. Use of this copyright protection
technology must be authorized by Macrovision Corporation, and is intended for
home and other limited viewing uses only unless otherwise authorized by
Macrovision Corporation. Reverse engineering or disassembly is prohibited.
MPEG Layer-3 audio decoding technology licensed from Fraunhofer IIS and
Thomson multimedia.
HighMAT™
registered trademarks of Microsoft Corporation in the United
States and/or other countries.
Windows Media, and the Windows logo are trademarks,
or registered trademarks of Microsoft Corporation in the
United States and/or other countries.
WMA is a compression format developed by Microsoft
Corporation. It achieves the same sound quality as MP3
with a file size that is smaller than that of MP3.
Microsonics™ are either registered trademarks or trademarks of Pacific Microsonics,
Inc. in the United States and/or other countries.
HDCD system manufactured under license from Pacific Microsonics, Inc. This
product is covered by one or more of the following: In the USA : 5,479,168,
5,638,074, 5,640,161, 5,808,574, 5,838,274, 5,854,600, 5,864,311, 5,872,531, and
in Australia: 669114, with other patents pending.
HDMI, the HDMI logo and High-Definition Multimedia Interface are trademarks or
registered trademarks of HDMI Licensing LLC.
and the HighMAT logo are either trademarks or
, HDCD®, High Definition Compatible Digital
®
and Pacific
Accessories
(On
ly for U.S.A.) To order accessories,
refer to “Accessory Purchases” on
page 26.
(Only for Canada) To order accessories,
call the dealer from whom you have
made your p
Use numbers when asking for replacement
parts. (Product numbers correct as of
February 2005. These may be subject to
change.)
∏ 1 Remote control (EUR7720KG0)
∏ 1 AC power supply cord
∏ 1 Audio/video cable
∏ 1 HDMI cable (K1HA19DA0001)
∏ 2 Remote control batteries
[Note]
The included AC power supply cord is for
use with this unit only. Do not use it with
other equipment.
urchase.
(K2CB2CB00016)
(K2KA6BA00004)
5
Discs that can be played/Accessories
RQT8087
5
Page 6
STEP 1
COMPONENT VIDEO OUT
(480p/480i)
(p )
AUDIO OUT
2ch
L
R
VIDEO
OUT
S VIDEO
OUT
Please connect
directly to TV.
OUND
FRONT L/L
FRONT R/R
O/
Y
COMPONENT VIDEO OUT
(480p/480i)
AUDIO OUT
2ch
L
P
B
Y
P
R
R
VIDEO
OUT
S VIDEO
OUT
ROUND
FRONT L/L
FRONT R/R
O/
Please connect
directly to TV.
AC IN
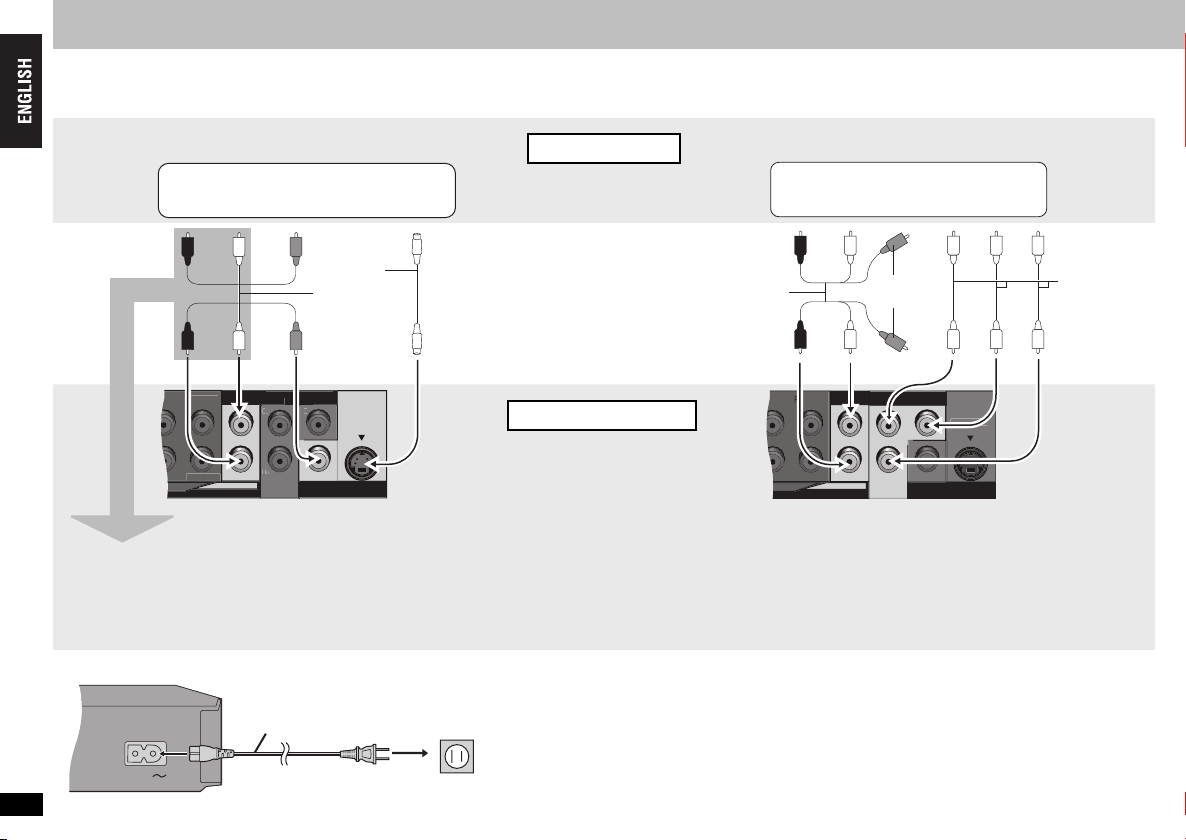
Connection to a television
≥ Do not place the unit on amplifiers or equipment that may become hot. The heat can damage the unit.
≥ Do not connect through the video cassette recorder. Due to copy guard protection, the picture may not display properly.
≥ Turn off all equipment before connection and read the appropriate operating instructions.
≥ Connect terminals of the same color.
With VIDEO IN or S VIDEO IN
Television
With COMPONENT VIDEO IN
AUDIO IN
R L
VIDEO
IN
or
S video
cable
§
Audio/
video cable
(included)
Connection to a television
§
When using this connection, the audio cable
(red and white plugs) should also be connected.
You can connect the audio cable to the 2-channel audio
input terminals of an analog amplifier or system
component to enjoy stereo sound.
∫ Connect the AC power supply cord last
AC power supply cord (included)
S VIDEO
IN
Back of the
Conserving power
This unit consumes a small amount of power even when it is turned off (1 W). To save
power when the unit is not to be used for a long time, unplug it from the household AC
outlet.
Audio/video cable
(included)
unit
Select “Darker” from the “Black Level Control” (➜ page 20, “Video” tab).
To enjoy progressive video
Connect to a progressive output compatible television.
1 Set “HDMI Video Mode” to “Off ” (➜ page 21, “HDMI” tab).
2
All Panasonic televisions with 480p input connectors are compatible.
Consult the manufacturer if you have another brand of television.
AUDIO IN
R L
COMPONENT
Not used
VIDEO IN
Video
cables
Set “Video Output Mode” to “480p”, then follow the instructions on the
menu screen
(➜ page 16, Picture Menu).
RQT8087
6
6
To household AC outlet
(AC 120 V, 60 Hz)
Page 7
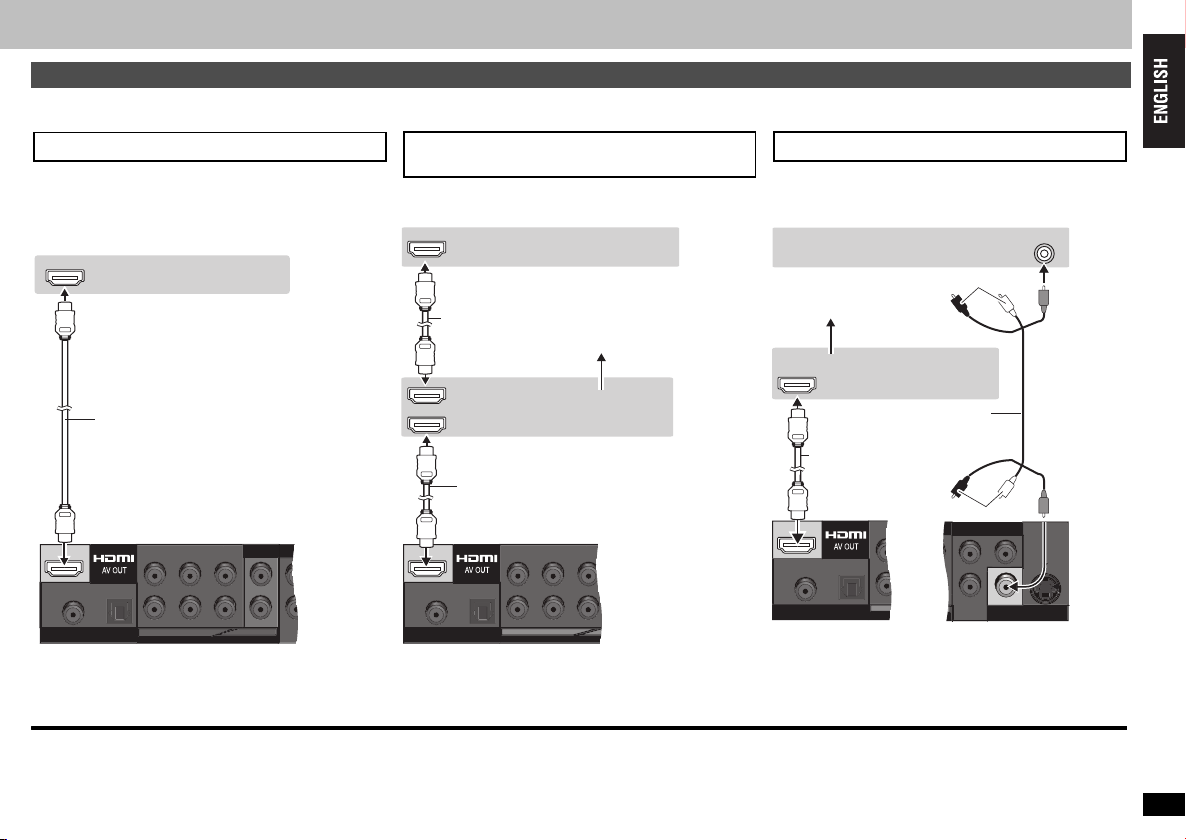
Enjoying higher quality audio and video (HDMI connection) (➜ page 27, Glossary)
COAXIAL
COMP
AUDIO O UT
5.1ch
2ch
DIGITAL AUDIO OUT
(PCM/BITSTREAM)
L
L
P
B
P
R
R
R
OPTICAL
CENTER
SURROUND
FRONT L/L
SUBWOOFER
FRONT R/R
COAXIAL
AUDIO O UT
5.1ch
DIGITAL AUDIO OUT
(PCM/BITSTREAM)
L
R
OPTICAL
CENTER
SURROUND
FRONT L/L
SUBWOOFER
FRONT R/R
COAXIAL
DIGITAL AUDIO OUT
(PCM/BITSTREAM)
OPTICAL
CENTER
SUBWOOF
COMPONENT VIDEO OUT
P
B
Y
P
R
VIDEO
OUT
S VIDEO
OUT
By connecting to an HDMI compatible high-definition television, video recordings can be converted to, and output as, high-definition video (720p,1080i). You can also enjoy multichannel surround sound by connecting to an HDMI compatible amplifier with multi-channel output terminals.
With HDMI compatible television
To enjoy digital high-definition video and high quality
audio with a single cable.
≥You can enjoy multi-channel surround sound by
connecting an amplifier with other audio terminals
(➜ page 8).
HDMI IN
Back of the unit
≥Set “HDMI Video Mode” to “On” and “HDMI Audio
Output” to “On” (➜ page 21, “HDMI” tab).
Television
HDMI cable
(included)
With HDMI compatible television
and amplifier
To enjoy digital multi-channel surround sound in addition
to digital high definition video.
HDMI IN
HDMI cable
HDMI OUT
HDMI IN
HDMI cable
(included)
Back of the unit
≥
Set “HDMI Video Mode” to “On” and “HDMI Audio Output”
➜
to “On” (
page 21, “HDMI” tab).
Television
To the multi-channel
speakers
Amplifier
With HDMI compatible amplifier
You can still enjoy multi-channel surround sound when
your television is not HDMI compatible by connecting an
HDMI compatible amplifier.
Television
To the multi-channel
speakers
HDMI IN
HDMI cable
(included)
Amplifier
Back of the unit
≥Set “HDMI Video Mode” to “Off” and “HDMI Audio
Output” to “On” (➜ page 21, “HDMI” tab).
§
You can also use the S VIDEO and COMPONENT
VIDEO terminals.
VIDEO IN
Not used
Audio/video
cable
(included)
Not used
(480p/480i)
§
§
Connection to a television
≥ To enjoy high-definition video, connect to an HDMI compatible high-definition television and set “Video Output Mode” (➜ page 16,
≥ This unit has HDMI Ver 1.1 (EDID Ver 1.3, up to 512 Bytes). It is not compatible with the HDMI Control Function (CEC).
≥ Should you connect equipment that does not support CPPM (➜ page 27, Glossary), the audio from the CPPM copy protected DVD-Audio cannot be output from HDMI AV OUT
terminal. Connect the audio cable (L, R) of the Audio/Video cable to an HDMI compatible AUDIO IN terminal.
Picture Menu
).
7
RQT8087
7
Page 8
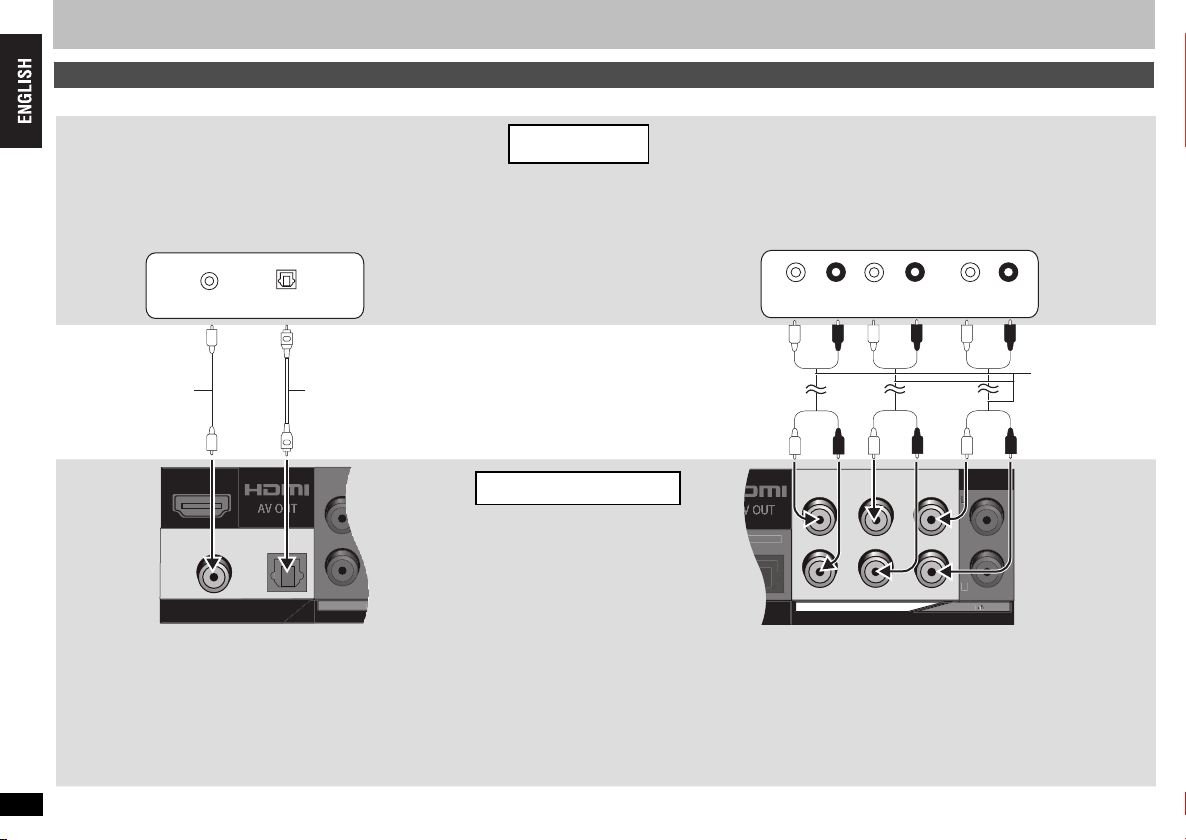
STEP 1
OPTICAL
COAXIAL
DIGITAL AUDIO OUT
(PCM/BITSTREAM)
ch
L
R
CENTER
SU
SUBWOOFER
5
.
AUDI O O UT
5.1c h
L
R
CENTER
SURROUND
FRONT L/L
SUBWOOFER
FRONT R/R
2ch
Connection to a television
Enjoying multi-channel surround sound
≥Set “HDMI Audio Output” to “Off” (➜ page 21, “HDMI” tab).
Connection to a television
WITH COAXIAL IN or OPTICAL IN
Amplifier with a built-in decoder
a decoder-amplifier combination
COAXIAL IN
Coaxial cable
≥Change “PCM Digital Output”, “Dolby Digital”,
“DTS Digital Surround” (➜ page 20, “Audio” tab).
or
OPTICAL IN
Optical digital audio cable
Do not bend sharply when connecting.
Amplifier
≥You cannot use DTS Digital Surround
decoders not suited to DVD.
≥Even if using this connection, output
will be only 2 channels when playing
DVD-Audio. To enjoy multi-channel
surround sound, connect with 5.1 ch
AUDIO OUT terminals (
➜
right) or
HDMI terminals (➜ page 7).
Back of the unit
WITH AUDIO IN 5.1ch
To obtain maximum performance of DVD-Audio multi-channel linear
PCM sound, this connection is recommended.To enjoy digital multichannel surround sound, connect to an amplifier with HDMI
terminals (➜ page 7).
COAXIAL IN
CENTER SUBWOOFER
SURROUND
(L) (R)
≥Change “Speaker Settings” (➜ page 21, “Audio” tab).
FRONT
(L) (R)
Audio cable
Connect cables to
terminals
corresponding to
the speakers you
have connected.
8
RQT8087
8
Page 9
STEP 2
DIRECT NAVIGATOR
TOP MENU
PLAY LIST
MENU
ENTER
DISPLAY
RETURN
CONTRAST
BRIGHTNESS
SHARPNESS
COLOR
SUBTITLE
AUDIO
ANGLE/PAGE
SETUP
FL SELECT
TV
TV/VIDEO
CH
VOLUME
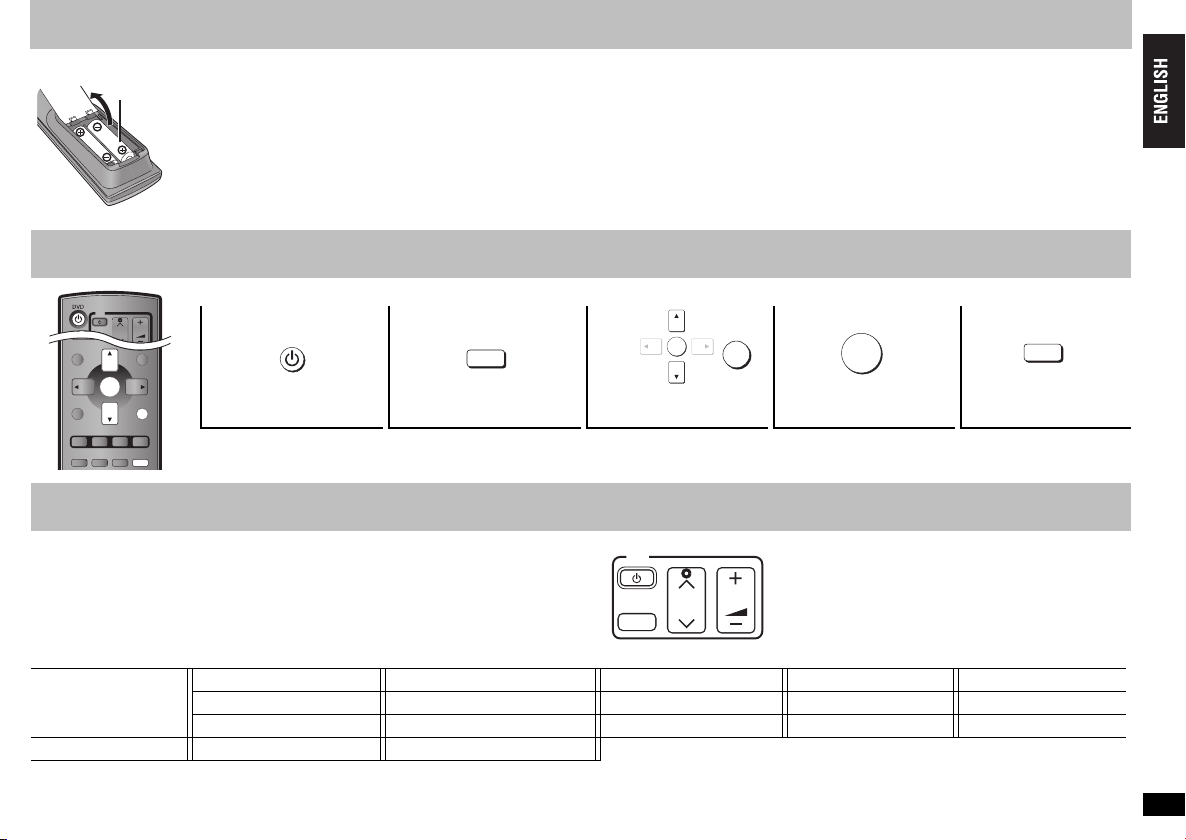
The remote control
∫ Batteries
R6/LR6, AA
STEP 3
QUICK SETUP
≥ Insert so the poles (i and j) match those in the remote control.
≥ Do not use rechargeable type batteries.
Do not:
≥ mix old and new batteries.
≥ use different types at the same time.
≥ heat or expose to flame.
≥ take apart or short circuit.
≥ attempt to recharge alkaline or manganese batteries.
use batteries if the covering has been peeled off.
≥
Turn on the television and select the appropriate video input on the television.
12 345
DVD
Power ON.
Shows QUICK SETUP
screen.
To change these settings later
Select “QUICK SETUP” (➜ page 21, “Others” tab).
STEP 4
Point the remote control at the television
While pressing [Í TV], enter the code with the numbered buttons.
e.g., 01: [0] ➡ [1]
Television operation (You can use this unit’s remote control to operate your television.)
SETUP
Mishandling of batteries can cause electrolyte leakage which can
damage items the fluid contacts and may cause a fire.
Remove if the remote control is not going to be used for a long period
of time. Store in a cool, dark place.
∫ Use
Aim at the remote control sensor (➜ page 10), avoiding obstacles, at a
maximum range of 7 m (23 feet) directly in front of the unit.
RETURN
ENTER
Follow the message
and make the settings.
TV
VOLUME
CH
TV/VIDEO
ENTER
Press to finish
QUICK SETUP.
TV operation
SETUP
Press to exit.
Manufacturer and Code No.
Panasonic GE 05 LG 15, 16, 17 RCA 05 SHARP 06, 07 THOMSON 05
National 01, 02 GOLDSTAR 15, 16, 17 MAGNAVOX 03 SAMSUNG 14, 18, 19 SONY 08 TOSHIBA 09
QUASAR HITACHI 12 MITSUBISHI 13 SANYO 10 SYLVANIA 03 ZENITH 04
FISHER 10 JVC 11 PHILIPS (RC-5) 03
Test by turning on the television and changing channels. Repeat the procedure until you find the code that allows correct operation.
≥ If your television brand is not listed or if the code listed for your television does not allow control of your television, this remote control is not compatible with your television.
9
The remote control/QUICK SETUP/Television operation
RQT8087
9
Page 10
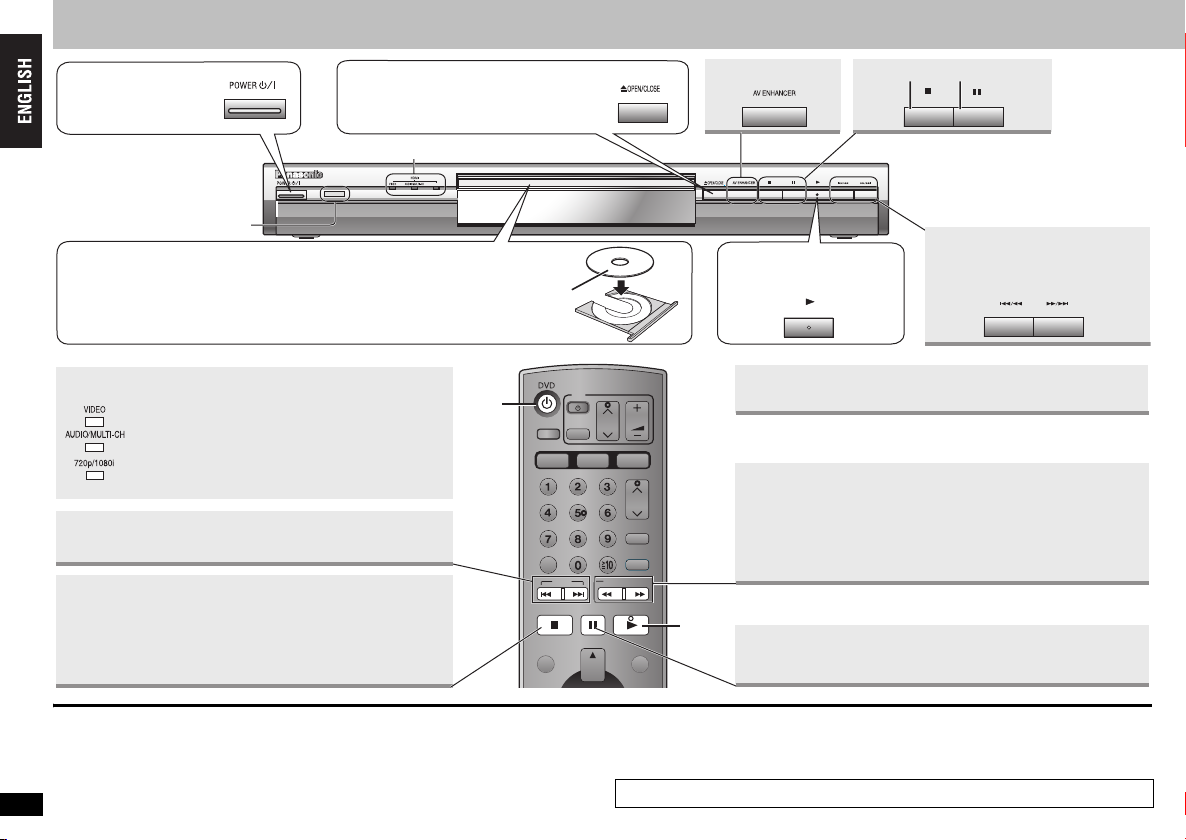
Basic play
1Power ON.
Remote control sensor
Basic play
3Load the disc.
≥
Load double-sided discs so the label for the side you want to play is facing up.
≥ [RAM] Remove discs from their cartridges before use.
HDMI indicators
With HDMI connection (➜ page 7), these indicators light when:
: Video is output.
: Audio is output (Green: 2 ch/Orange: Multi-ch).
: 720p/1080i video is output (➜ page 16, Video
Output Mode in Picture Menu).
2Open the disc tray.
HDMI indicators (➜ below)
Skip
≥ [RAM] [DVD-RW[‹VR›]
Can also skip to the markers.
Stop
The position is memorized when “!” flashes on the display.
≥ Press [1] (PLAY) to resume.
To review the previous chapters
[DVD-V]
Position memory).
≥ Press [∫] to clear the position.
(➜ page 14,
( ➜ page 12)
720p/1080i
4Start play.
Repeat play
≥ Select “Repeat” or “A-B Repeat” (➜ page 15, Play Menu).
Search (during play)
1
FL SELECT
AV ENHANCER
TV
TV/VIDEO
MULTI
RE-MASTER
CH
VOLUME
AUDIO ONLY
PLAY SPEED
Stop
Pause
Press to skip.
Press and hold to
–search (during play)
–slow-motion (during pause)
Slow-motion (during pause)
CANCEL
STOP
POSITION MEMORY
QUICK REPLAY
SKIP
SLOW/SEARCH
PLAY
PAUSE
≥ Up to 5 steps
≥ Press [1] (PLAY) to restart play.
≥ [VCD] Slow-motion, forward direction only
4
DIRECT NAVIGATOR
TOP MENU
PLAY LIST
MENU
Pause
≥ Press [1] (PLAY) to restart play.
Standby/on switch (Í/I)
Press to switch the unit from on to standby mode or vice versa. In standby mode, the
unit is still consuming a small amount of power.
“D.MIX” on the display indicates that a soundtrack with three or more channels can be
≥
RQT8087
down-mixed to two channels (
10
10
➜
page 27, Glossary).
≥ Discs continue to rotate while menus are displayed. Press [∫] when you finish to
preserve the unit’s motor and your television screen.
≥ Total title number may not be displayed properly on iR/iRW.
If you are experiencing problems, refer to troubleshooting guide (➜ page 23
–
25).
Page 11
Changing the play sequence
Choose a title and chapter.
No. Time
Title
Play
Clear
Clear all
Chapter
1
Group skip
[WMA] [MP3] [JPEG]
Frame-by-frame
(during pause)
[RAM] [DVD-RW[‹VR›]
[DVD-V] [VCD]
On-screen
item select
Enter
number
Disc
menu
Main unit display
Information screen
ENTER
123
456
789
0
10
DIRECT NAVIGATOR
TOP MENU
PLAY LIST
MENU
RETURN
≥ Does not work while paused.
ENTER
≥ [VCD] forward direction only
ENTER
Select
Return to
previous
Register
ENTER
[DVD-A] [DVD-V]
Shows a disc top menu.
[RAM] [DVD-RW[‹VR›]
Plays the programs (➜ page 19).
[DVD-V]
Shows a disc menu.
[RAM] [DVD-RW[‹VR›]
Plays a play list (➜ page 19).
[VCD] with playback control
Shows a disc menu.
FL SELECT
SUBTITLE
screen
[RAM] [DVD-RW[‹VR›] [DVD-A] [DVD-V] [VCD] [CD]
e.g. To select 12: [S10] ➜ [1] ➜ [2]
[WMA] [MP3] [JPEG]
e.g. To select 123: [1] ➜ [2] ➜ [3] ➜ [ENTER]
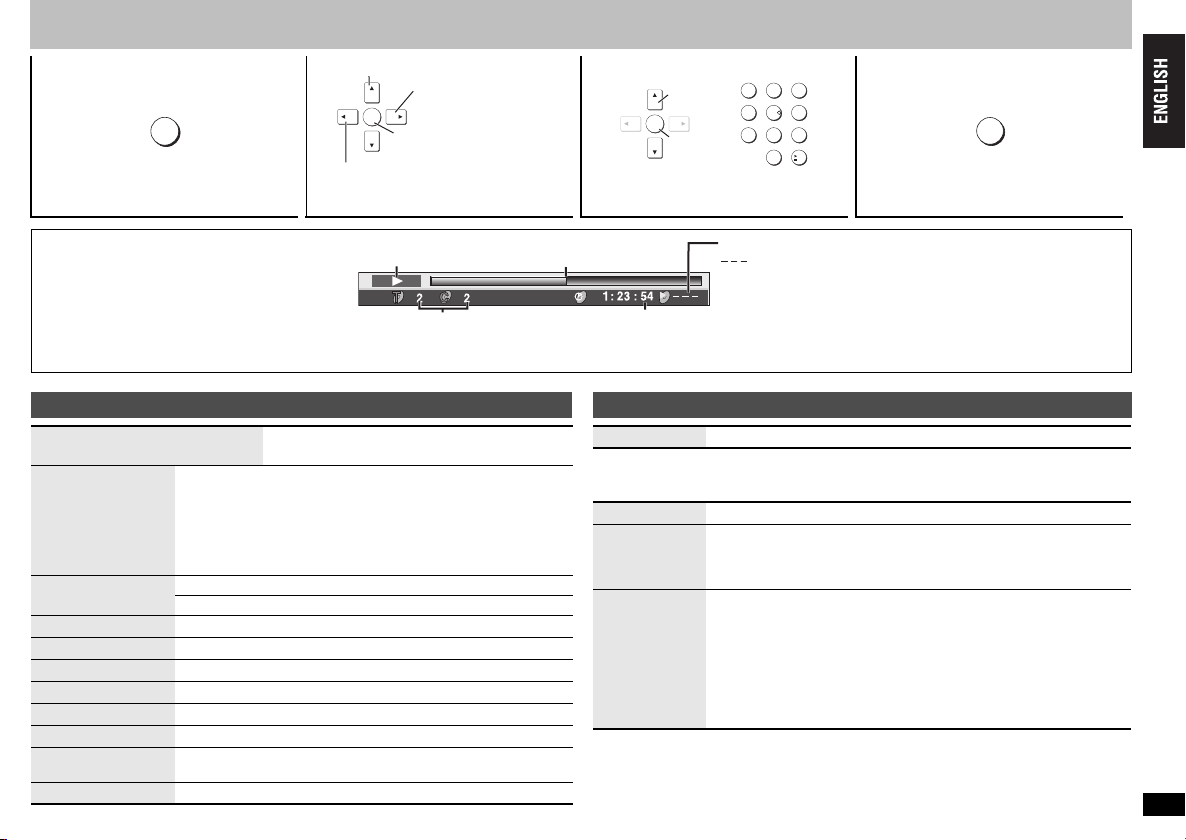
Number display ,------. Time display
[RAM] [DVD-RW[‹VR›]
Turns subtitle on/off ( ➜ page 13).
[DVD-V] [VCD] (SVCD only)
Selects the subtitle languages
( ➜ page 13).
[WMA] [MP3] [JPEG] [CD] (CD text only)
Turns the information screen on/off.
RETURN
PLAY MODE
All group/Program/Random play
[DVD-A] [DVD-V] [VCD] [CD] [WMA] [MP3] [JPEG]
While stopped, press [PLAY MODE].
All group ([DVD-A]) > Program > Random
^-------------Off (Normal play),-----------b
≥ Disable HighMAT disc play to use random and program play. Select “Play as Data
Disc” in Other Menu (➜ page 17).
∫ All Group play
All Group Playback
Press [1] (PLAY).
Press PLAY to start
∫ Program play (up to 32 items)
1 Press the numbered buttons to select the
items (➜left, Enter number).
Repeat this step to program other items.
2 Press [1] (PLAY).
Selecting all the items (on the disc or in the title or group)
Press [ENTER] and [3 4] to select “ALL”, then press
[ENTER] again to register.
Changing the program
Press [3 4] to select an item.
–To change an item, repeat step 1.
–To clear an item, press [CANCEL] (or select “Clear” and press [ENTER]).
≥ Press [ANGLE/PAGE] to skip page by page.
Clearing the whole program
Select “Clear all” and press [ENTER]. The whole program is also cleared when the unit
is turned off or the disc tray is opened.
∫ Random play
1 [DVD-A] [DVD-V] [WMA] [MP3] [JPEG] Press the
numbered buttons to select a group or a title
(➜left, Enter number).
2 Press [1] (PLAY).
To exit the all group, program or random mode
Press [PLAY MODE] several times while stopped.
e.g. [DVD-V]
1
e.g. [DVD-V]
Random Playback
Press PLAY to start
Choose a title.
Title
to select
0 ~ 9
1
to start
PLAY
11
Basic play/Changing the play sequence
RQT8087
11
Page 12
Convenient functions
Recalling recommended audio/video setting
AV ENHANCER
(Main unit)
By pressing just one button the disc type is automatically
determined and the best audio and video settings are configured.
Press [AV ENHANCER] to select “Auto”, “User1”,
“User2” or “User3”.
Off: Cancelled
Auto: The best audio and video settings are configured.
§
: Suitable for video ([DVD-V]) (factory preset).
User1
§
: Suitable for audio (factory preset).
User2
§
User3
: Suitable for video ([RAM] [DVD-RW[‹VR›]) (factory preset).
§
You can change the settings for User1–3 to your preference (➜ page 17,
“AV Enhancer” in Other Menu).
When AV Enhancer (Auto) is on, you cannot change the individual settings indicated below.
Audio settings:
Multi Re-master (➜ right)
Convenient functions
Advanced Surround/Dialogue Enhancer (➜ page 16)
Video settings:
Picture Mode (➜ page 16)
Gamma/Depth Enhancer (➜ page 16)
Contrast/Brightness/Sharpness/Color (➜ page 13)
MPEG DNR/3D-NR (➜ page 14, Reducing noise in pictures)
≥ This may not work depending on the disc’s recording.
AUDIO ONLY
You can enjoy higher quality audio by stopping the video output.
Enjoying even higher quality sound
During play, press [AUDIO ONLY].
≥AUDIO ONLY is canceled if you press [AUDIO ONLY] again or switch the unit to
standby.
≥There may be output to the screen when:
—the disc is stopped.
—performing operations such as searching.
—on screen display or the menu screen appears.
≥Audio and video will not be output from HDMI AV OUT terminal while this function is on.
RQT8087
12
12
AV Enhancer
AV Enhancer Auto
AUDIO ONLY
Menu
Reproducing more natural audio
MULTI
RE-MASTER
[RAM]
≥ During multi-channel output of these discs, this feature reproduces the frequencies
lost during recording to give you a sound closer to the original.
≥ During 2 ch output of these discs, this feature gives you a more natural sound by
adding higher frequency signals not recorded on the disc, for example, playing DVDVideo recorded with 48 kHz at 96 kHz. ( ➜ page 27, “Sampling frequency“ in
Glossary)
[WMA] [MP3]
This feature reproduces the higher frequencies lost during recording to give you a
sound closer to the original.
[RAM] [DVD-RW[‹VR›] [DVD-V] (Discs recorded with 48 kHz only)
[DVD-A] (Discs recorded with 44.1 kHz and 48 kHz only) [VCD] [CD]
[WMA] [MP3] (Disc recording is other than 8 kHz, 16 kHz, 32 kHz)
[DVD-RW[‹VR›] [DVD-A] [DVD-V] [VCD] [CD]
Multi Re-master
Press [MULTI RE-MASTER] to select “1”, “2” or “3”.
Menu
Multi Re-master 1
Setting [DVD-A] [DVD-V] [CD] (LPCM/PPCM)
1 High tempo (e.g., pop and rock) Light
2 Various tempos (e.g., jazz) Medium
3 Low tempo (e.g., classical) Strong
Off Off Off
Adjusting the Re-master level [DVD-A] [DVD-V] [CD] (LPCM/PPCM)
Press [21] to adjust the level (j6 to i6 dB).
≥ This feature may not work when connected with DIGITAL AUDIO OUT or HDMI AV
OUT terminals.
≥ This may not work depending on the disc’s recording.
Off
1 96kHz
2
3
Level
Type of music
0 dB
Output sampling
frequency
Re-master level
Other discs
Effect level
Page 13
QUICK REPLAY
Quick replay (Only when the elapsed play time can be
displayed) (Except iR/iRW)
Press [QUICK REPLAY] to skip back a few seconds.
≥ This may not work depending on the disc’s recording.
.
PLAY SPEED
Changing play speed [RAM] [DVD-RW[‹VR›] [DVD-V]
During play, press [W, PLAY SPEED] or
[X, PLAY SPEED].
–from k0.6 to k1.4 (in 0.1 units)
≥ Press [1] (PLAY) to return to the normal play.
≥ After you change the speed
–
Multi Re-master (➜page 12
work
.
– Audio output switches to 2 ch.
– 96 kHz sampling frequency is converted to 48 kHz.
≥ This may not work depending on the disc’s recording.
AUDIO
Changing soundtracks
[DVD-A] [DVD-V] (with multiple soundtracks) [RAM] [DVD-RW[‹VR›] [VCD]
) and Advanced Surround (➜page 16
Press [AUDIO] to select the soundtrack.
[RAM] [DVD-RW[‹VR›] [VCD]
You can use this button to select “L”, “R” or “LR”.
[DVD-V] (Karaoke discs)
Press [21] to select “On” or “Off” of vocals. Read the disc’s instructions for details.
Signal type/data
LPCM/PPCM/Î Digital/DTS/MPEG: Signal type
kHz (Sampling frequency)/bit/ch (Number of channels)
Example: 3
/2 .1ch
.1: Low frequency effect
(not displayed if there is no signal)
0: No surround
1: Mono surround
2: Stereo surround (left/right)
1: Center
2: Front leftiFront right
3: Front leftiFront rightiCenter
e.g. [RAM]
DVD-VR
a0.9
, Audio Menu) do not
Menu
Audio 1
CONTRAST
BRIGHTNESS
Contrast
Increases the contrast between light and dark parts of the picture.
1. Press [CONTRAST].
2. Press [21] to adjust (j7 to i7).
Brightness
Brightens the picture.
1. Press [BRIGHTNESS].
2. Press [21] to adjust (0 to i15).
Sharpness
Adjusts the sharpness of the edges of the horizontal lines.
1. Press [SHARPNESS].
2. Press [21] to adjust (j7 to i7).
Color
Adjusts the shade of the picture’s color.
1. Press [COLOR].
2. Press [21] to adjust (j7 to i7).
SUBTITLE
[DVD-V] [VCD]
Changing subtitles
[DVD-RW[‹VR›] (On/Off only with discs that contain subtitle on/off
[RAM]
information)
Press [SUBTITLE] to select the subtitle language.
≥ On iR/iRW, a subtitle number may be shown for subtitles that
are not displayed.
To clear/display the subtitles
Press [2 1] to select “On” or “Off”.
[RAM] [DVD-RW[‹VR›]
SHARPNESS
COLOR
Adjusting picture mode
Contrast
[DVD-V] (with subtitles) [VCD] (SVCD only)
0
Menu
Subtitle Off
Press [SUBTITLE] to select “On” or “Off”.
≥ Subtitle on/off information cannot be recorded using Panasonic DVD Recorders.
Convenient functions
RQT8087
13
13
Page 14
Convenient functions
DNR
MPEG DNR: Smoothes block noise and reduces the smudging that appears around
3D-NR: Reduces overall noise.
Reducing noise in pictures
contrasting sections of the picture.
1 Press [DNR] to select the item.
2 Press [21] to adjust (MPEG DNR: 0 to i3, 3D-NR: 0 to i4).
ZOOM
Convenient functions
This feature expands a letterbox picture to fit the screen.
Press [ZOOM] to select the preset aspect ratio
or “Auto”. (Just Fit Zoom)
Zoom [RAM] [DVD-RW[‹VR›] [DVD-V] [VCD]
Menu
Just Fit Zoom a1.00
Auto --. 4:3 Standard --. European Vista --. 16:9 Standard
:;
Cinemascope2 ,----- Cinemascope1 ,----- American Vista
Fine adjustments (Manual Zoom)
Press [2 1] while the menu is displayed. (Press and hold to alter faster.)
–from
k1.00 to k1.60 (in 0.01 units)
k1.60 to k2.00 (in 0.02 units)
–from
POSITION MEMORY
This position is memorized even after turning off the unit or changing the disc.
Position memory
(Only when the elapsed play time can be displayed
[JPEG] : Works with all JPEG content.)
Press [POSITION MEMORY].
Position memorized
≥ Up to 5 discs.
≥ When the sixth disc is memorized, the earliest position is replaced.
≥ It may not always be possible for parts of a disc to be stored.
When the unit is turned on or the disc is inserted, “
!” flashes on the display.
Press [1] (PLAY) to start play from that position.
(At this point, the memory is erased.)
To review the previous chapters
Press [1] (PLAY) while the following message is displayed.
Press PLAY to preview chapters
Do not press [1] (PLAY) if you want to cancel review.
To cancel
Press [∫] while “!” is flashing.
[DVD-V]
(Within a title only)
ANGLE/PAGE
Angle select [DVD-V] (with multiple angles)
Still picture rotation [JPEG] /advance [DVD-A]
Press [ANGLE/PAGE] to select the angle or rotate/
advance the still picture.
≥ [JPEG] Still picture rotation is cancelled when you open the disc
tray or switch the unit to standby.
RQT8087
14
14
e.g. [DVD-V]
Menu
Angle 1/4
GROUP
A folder on WMA/MP3 and JPEG discs is treated as a “Group”.
Starting play from a selected group
[WMA] [MP3] [JPEG]
[DVD-A]
1 While stopped, press [GROUP].
2 Press [3 4] or the numbered buttons to select a
group and press [ENTER].
≥ [DVD-A] To play all groups (➜ page 11, All Group play)
Menu
Group Search 1
Page 15
Using On-Screen Menus
1
DISPLAY
Select
2
ENTER
Go to the next
menu
Register
Press once.
(When pressed twice, the elapsed
play time indicator appears.
➜
below)
∫ Elapsed play time indicator
The items displayed will depend on the actual connection and disc.
Return to the previous menu
Select the menu. Make the settings. Press to exit.
Playback condition
Current playback number
Main menus
Program/Group/Title/Chapter/
Track/Playlist/Content
To skip incrementally or decrementally (Time Slip for play
only) (Except iR/iRW)
1. Press [ENTER] twice to show Time Slip indicator.
Time
Audio
Still Picture
Thumbnail
Subtitle
Marker (VR)
Angle
Rotate Picture
Slideshow
Other Settings
2. Press [3 4] to select the time and press [ENTER].
≥Press and hold [3 4] to alter faster.
To start from a specific time (Time Search) (Except iR/iRW)
To change remaining/elapsed time display
(➜ page 13, Changing soundtracks)
To display the current bitrate or sampling frequency
To switch still picture
To show thumbnail images
(➜ page 13, Changing subtitles)
To recall a marker recorded on DVD-Video recorders
(➜ page 14, Angle select)
(➜ page 14, Still picture rotation)
To turn on/off slideshow
To change the slideshow timing (0–30 sec)
(➜ right)
To start from a specific item
3
Current position
Elapsed play time/Remaining time
Press [3 4] to change the display.
(Shows only elapsed play time for WMA, MP3 and SVCD.)
ENTER
Select
Register
123
456
789
10
0
Play mode
: Normal Play
ALL: All Group Play [DVD-A]
PGM: Program Play
RND: Random Play
PBC: Playback control play [VCD]
Other Settings
Play Speed
∫ Play Menu
(Only when the elapsed play time can be displayed,
[JPEG]:
Repeat
A-B Repeat
Marker
Except
[RAM]
[DVD-RW[‹VR›]
(➜ page 13, Changing play speed)
The Repeat and Marker functions can be used.)
Select an item to be repeated.
To repeat a specified section
Press [ENTER] at the starting and ending points.
Press [ENTER] again to cancel.
≥ [RAM] [DVD-RW[‹VR›] (still picture part): Does not work.
To mark up to 5 positions to play again
Press [ENTER] (The unit is now ready to accept markers.)
To mark a position: [ENTER] (at the desired point)
To mark another position: [21] to select “¢”➜ [ENTER]
To recall a marker: [21] ➜ [ENTER]
To erase a marker: [21] ➜ [CANCEL]
≥ This feature doesn’t work during program and random play.
≥ Markers you add clear when you open the disc tray or switch the
unit to standby.
4
RETURN
Using On-Screen Menus
Continued on next page
RQT8087
15
15
Page 16
Using On-Screen Menus
∫ Picture Menu ∫ Audio Menu
16
Using On-Screen Menus
RQT8087
16
Picture Mode
Video Output
Mode
Transfer
Mode
HDMI Color
Space
Normal: Normal images
Cinema1: Mellows images and enhances detail in dark scenes
Cinema2: Sharpens images and enhances detail in dark scenes.
Animation: Suitable for animation
Dynamic: Enhances the contrast for powerful images.
User (Press [ENTER] to select “Picture Adjustment”) (➜ below)
Picture Adjustment
Contrast/Brightness/Sharpness/Color (➜ page 13)
Gamma (Adjusts the brightness of dark parts.)
Depth Enhancer
Reduce the rough noise in the background to give a greater feeling of depth.
MPEG DNR/3D-NR (➜ page 14, Reducing noise in pictures)
With HDMI connection (When “HDMI Video Mode” is set to
“On”) (➜ page 21, “HDMI” tab)
Video recordings will be converted to, and output as, high definition
video.The picture quality will vary depending on the connected
equipment. Choose the picture quality to your preference.
480p (progressive) 720p (progressive) 1080i (interlace)
≥“¢” will be displayed next to those video outputs possible with the
connected equipment. Selecting an item without “¢” can result in
the picture being distorted.
Should the picture be distorted, press and hold [CANCEL] until the
picture is displayed correctly.
The setting will return to “480p”.
Output from the COMPONENT VIDEO OUT terminal will be “480i”.
≥
With HDMI connection (When “HDMI Video Mode” is set to “Off”)
➜
page 21, “HDMI” tab) or other connections
(
480i (interlace) 480p (progressive)
When you select “480p”and a confirmation screen appears, select
“Yes” only if connecting to a progressive output compatible television.
If you have chosen “480p”, “720p” or “1080i” (➜ above), select the
method of conversion for video output to suit the type of material.
Auto1 (normal): Detects 24 frame-per-second film content and
Auto2: Compatible with 30 frame-per-second film content in
Video: Select when using Auto1 and Auto2, and the video content
With HDMI connection (When “HDMI Video Mode” is set to
“On”) (➜ page 21, “HDMI” tab)
The picture quality will vary depending on the connected
equipment. Choose the picture quality to your preference.
Should one of the items below not be possible with the connected
equipment it will not be displayed.
RGB YCbCr (4:4:4) YCbCr (4:2:2)
≥“HDMI RGB Range” (➜ page 21, “HDMI” tab) is available when
“RGB” is selected.
appropriately converts it.
addition to 24 frame-per-second film content.
is distorted.
.
Advanced
Surround
Dialogue
Enhancer
Multi Re-master
Digital Filter
Attenuator
[RAM] [DVD-RW[‹VR›] [DVD-V] [VCD] (2 or more channels)
Enjoy a surround-like effect when using 2 front speakers (SP) or
headphones (HP) (connect the unit to equipment that has a
headphone jack).
SP (Speaker) 1 Natural SP 2 Enhanced
HP (Headphone) 1 Natural HP 2 Enhanced Off
≥When using discs recorded with surround sound, sound seems to
come from speakers on either side of you.
≥When using headphones with the connected equipment, select
“HP 1” or “HP 2”.
≥Optimum seating position is 3 to 4 times the distance between the
front left and right speakers or the width of the television if using
the television’s speakers.
≥Do not use in combination with surround effects on other
equipment.
To make the dialogue in movies easier to hear
[DVD-V] (Dolby Digital, DTS, 3-channel or over, with the dialogue
recorded in the center channel)
On ,------. Off
(➜ page 12, Multi Re-master)
When audio is output from 2 ch or 5.1ch AUDIO OUT terminals
(➜ page 6, 8)
Normal: A clear timbre.
Slow: Gives music atmosphere, with softness and a feeling of
depth.
When audio is output from 2 ch or 5.1ch AUDIO OUT terminals
(➜ page 6, 8)
Switch on if sound is distorted.
On ,------. Off
Page 17
∫ Display Menu ∫ Other Menu
Information
Subtitle Position
Subtitle Brightness
4:3 Aspect
Just Fit Zoom
Manual Zoom
Bit Rate Display
GUI See-through
GUI Brightness
HDMI Status
To select how to show images made for 4:3 aspect screens on
a 16:9 aspect television
Normal: Laterally stretches images.
Auto: The standard setting is “Shrink”. However, this
Shrink: Images appear in the center of the screen.
Zoom: Expands to 4:3 aspect ratio.
(➜ page 14, Zoom)
(➜ page 14, Zoom)
[RAM] [DVD-RW[‹VR›] [DVD-V] [VCD]
On ,------. Off
On ,------. Off
s3 to r3
Indicates various information when connected with HDMI AV OUT
terminal (➜ below, Confirming HDMI information).
On ,------. Off
([JPEG] Off/Date/Details)
0 to s60 (in 2 units)
Auto, 0 to s7
automatically changes to “Zoom” with a letterbox picture.
Sleep
AV Enhancer
∫ Confirming HDMI information
Connection status
HDMI Status----- HDMI is connected.
HDMI Information
Audio Stream
Max Channel
Video Format
Color Space
≥All possible outputs are displayed.
≥The current output for “Audio Stream”, “Video Format” and “Color Space” will be
underlined.
≥When “Off” is selected in “HDMI Audio Output” (➜ page 21, “HDMI” tab), “– – –” will
be displayed in “Audio Stream” and “Max Channel”.
PCM/Dolby Digital/DTS
6ch
480p/720p/1080i
YCbCr(4:4:4)/YCbCr(4:2:2)/RGB
➜ page 13, Changing soundtracks
Shows the maximum
channel number o f the
connected equipment.
➜ page 16,
Video Output Mode
➜ page 16, HDMI Color Space
Setup
Play as DVD-Video
or
Play as DVD-Audio
Play as DVD-VR
Play as HighMAT
or
Play as Data Disc
Auto§,.30 min,.60 min,.90 min,.120 min
^-------------------------. Off ,------------------------J
§
Auto:
Turns the unit off 5 minutes after play finishes.
– Also works with DVDs that show a menu after play finishes.
– Does not work if you stop play or show a disc menu. It is
activated again when you restart play.
When “30 min”–“120 min” is set, the remaining time will be displayed.
≥
To preset the settings
You can preset your favorite video/audio effects onto “User1”,
“User2” and “User3”.
Preparation
Adjust the settings indicated below to your preference.
(When “Auto” is selected, this is not available.)
Audio settings:
Multi Re-master (➜ page 12)
Advanced Surround/Dialogue Enhancer (➜ page 16)
Video settings:
Picture Mode (➜ page 16)
Gamma/Depth Enhancer (➜ page 16)
Contrast/Brightness/Sharpness/Color (➜ page 13)
MPEG DNR/3D-NR (➜ page 14, Reducing noise in
pictures)
1. Select “Save Settings” and press [ENTER].
2. Press [34] to select the setting location (User1, User2 or
User3) and press [ENTER].
3. Follow the instructions on the menu screen and press
[ENTER] last.
To recall the settings
audio/video setting—AV Enhancer)
To confirm the settings
1. Press [34] to select “User1”, “User2” or “User3” and
press [ENTER].
2. Select “Save Settings” and press [ENTER] twice.
To exit the screen, select “No” and press [ENTER].
(➜ page 20, Changing the player settings)
Select “Play as DVD-Video” to play DVD-Video contents on
DVD -Audi o.
Select “Play as Data Disc” to play JPEG content on DVDRAM or to play a HighMAT disc without using the HighMAT
function.
(➜ page 12, Recalling recommended
17
Using On-Screen Menus
RQT8087
17
Page 18

Using navigation menus
TOP MENU
MENU
Playing WMA/MP3/JPEG discs [WMA] [MP3] [JPEG]
You can play JPEG content on DVD-RAM or play HighMAT discs without using the HighMAT function (➜ page 17, “Play as Data Disc” in Other Menu).
Playing items in order (Playback Menu) (except JPEG content on DVD-RAM)
While the menu is displayed
Press [3 4] to select
“All”, “Audio” or “Picture”
and press [ENTER].
≥ To display/exit the screen,
press [TOP MENU].
WMA/MP3/JPEG
WMA/MP3
JPEG
Playback Menu
All Total 434
Audio Total 7
Picture Total 427
to select and press
Playing from the selected item (Navigation Menu)
1 Press [MENU].
2 Press [3421] to select the group and press [ENTER].
Using navigation menus
3 ≥To play content in the group in order
Press [ENTER].
≥To start play from the selected content
Press [34] to select and press [ENTER].
N
avigation Menu
002 My favorite2
Perfume
001 My favorite1
002 My favorite2
001 Brazilian
002 Chinese
003 Czech
004 Hungarian
005 Japanese
006 Mexican
007 Philippine
008 Swedish
009 Piano
010 Vocal
DISPLAY
Group
005 Japanese
Group 005/023
to display the sub menu
001 Lady Starfish
001 Lady Starfish
002 Metal Glue
003 Life on Jupiter
004 Starperson
Content
5
Content 0001/0004
RETURN
≥ Press [ANGLE/PAGE] to skip page by page.
≥ To listen to WMA/MP3 while showing a JPEG image on the screen
Select a JPEG first, and then select WMA/MP3.
(The opposite order is not effective.)
≥ To exit the screen, press [MENU].
RQT8087
18
18
Group and content number currently playing
JPEG
: JPEG
: WMA/MP3
Number currently selected
to exit
ENTER
∫ Using the submenu
1 Press [MENU].
2 Press [DISPLAY].
3 Press [3 4] to select an item and press [ENTER].
Multi
List
Tree
Thumbnail
Next group
Previous group
All
Audio
Picture
Help display
Find
Groups and content
Content only
Groups only
Thumbnail images [JPEG]
To the next group
To the previous group
WMA/MP3 and JPEG
WMA/MP3 only
JPEG only
To switch between guide messages and the elapsed play time indicator
To search by a content or group title (➜ see below)
∫ Searching by a content or group title
1 Press [MENU].
≥ Press [2 1] to highlight a group title to search a group, or a content title to search
its content.
2 Press [DISPLAY].
3 Press [3 4] to select “Find” and
press [ENTER].
4 Press [3 4] to select a character and
press [ENTER].
≥ Repeat to enter another character.
≥ Lower case is also searched.
≥ Press [6 5] to skip between A, E, I, O and U.
≥ Press [2] to erase a character.
≥ Erase the asterisk (¢) to search for the titles starting with that character.
5 Press [1] to select “Find” and press [ENTER].
The search result screen appears.
6 Press [3 4] to select the content or group and press [ENTER].
¢
A
Find
Page 19

MENU
Titles appear with CD text playback.
1 Press [MENU].
2 Press [3 4] to select the
track and press [ENTER].
≥ Press [ANGLE/PAGE] to skip page by
page.
≥ To exit the screen, press [MENU].
TOP MENU
MENU
Playing CD [CD]
e.g. CD text
CD Text
Disc Title: All By Artist
Disc Artist: Pink Island
Track Title:
Long John Platinum
Track Artist: SHIPWRECKED
1.
Ashley at Prom
2.
City Penguin
Formura one
3.
4.
Soccer
Baseball
5.
Neanderthal
6.
Cartoons
7.
Trilobites
8.
White Dwarf
9.
Discovery
10.
to select and press
ENTER
Press [
DISPLAY
messages and the elapsed play time indicator.
] to switch between guide
Playing HighMATTM discs [WMA] [MP3] [JPEG]
RETURN
While the menu is displayed
Press [3421] to select then press [ENTER].
Menu:
Takes you to the next menu which
shows play lists or another menu.
≥
To return to the menu screen, press [TOP MENU] then press [RETURN] several times.
≥ To change the menu background, press [DISPLAY].
The background changes to the one recorded on the disc.
≥ To display/exit the screen, press [TOP MENU].
Play list:
Play starts.
Selecting from the list
1 During play, press [MENU].
2 Press [2] then [3 4] to switch among
“Playlist”, “Group” and “Content” lists.
3 Press [1] then [3 4] to select an item
and press [ENTER].
≥ Press [ANGLE/PAGE] to skip page by page.
≥ To exit the screen, press [MENU].
Playlist
Group
Content
Playlist
09
All By Artist
No.
1
Few times in summer
2
Less and less
3
And when I was born
4
Quatre gymnopedies
5
You've made me sad
6
I can't quit him
Evening glory
7
Wheeling spin
8
Velvet Cuppermine
9
Ziggy starfish
10
to playto select
ENTER
Content title
Pink Island
RETURN
DIRECT NAVIGATOR
PLAY LIST
Playing RAM/DVD-RW (DVD-VR) discs
[RAM] [DVD-RW[‹VR›]
≥Titles appear only if you have entered them.
≥You cannot edit play lists and titles.
201
1/23
Playing the programs
1 Press [DIRECT NAVIGATOR].
2 Press [3 4] or the numbered buttons
to exit
to select the program.
≥Press [ANGLE/PAGE] to skip page by page.
≥To select a 2-digit number
e.g. 23: [
≥Press [1] to show the contents of the
S10] ➜ [2] ➜ [3]
program.
3 Press [ENTER].
Playing a play list
(Only when the disc contains a play list)
1 Press [PLAY LIST].
2 Press [3 4] or the numbered buttons
to select the play list.
≥Press [ANGLE/PAGE] to skip page by page.
≥To select a 2-digit number
S10] ➜ [2] ➜ [3]
e.g. 23: [
3 Press [ENTER].
Direct Navigator
On
Date
No.
11/ 1(WED) 0:05 Monday featureAM
1
1/ 1 (MON) 1:05 Auto action2
2/ 2 (TUE ) 2:21 Cinema3
3/ 3 (WED) 3:37 Music4
4/10(THU) 11:05 Baseball5
to select
09
Playlist
1
DateNo. Length T itle Contents
11/1 0:00:01 City Penguin1
1/ 1 0:01:20 Ashley at Prom2
2/ 2 1:10:04 Formula one3
3/ 3 0:10:20 Soccer4
4/10 0:00:01 Baseball5
09
to select and press
Contents
Title
PM
PM
PM
AM
RETURN
to exit
Using navigation menus
2
ENTER
RETURN
to exit
Playing a scene
1 Do steps 1–2 (➜ above, Playing a play list).
2 Press [1].
3 Press [3 4] to select “Scene List” and press [ENTER].
≥Select “Contents” to show the contents of the program.
4 Press [3421] to select a scene and press [ENTER].
to exit
19
RQT8087
19
Page 20

Changing the player settings
1234 5
SETUP
Select
ENTER
Go right
Select
ENTER
Register
Select
ENTER
Register
123
456
789
10
0
SETUP
Shows Setup menu. Select the tab. Select the item. Make the settings. Press to exit.
≥ The settings remain intact even if you switch the unit to standby.
≥ Underlined items are the factory preset.
QUICK SETUP enables successive settings of the items in the shaded area.
∫ “Disc” tab
Audio
Choose the audio
language.
Subtitle
Choose the subtitle
language.
Menus
Choose the language for
disc menus.
Ratings
Set a ratings level to
limit DVD-Video play.
Changing the player settings
≥ Follow the on-screen
instructions.
∫ “Video” tab
TV Aspect
Choose the setting to
suit your television and
preference.
TV Type
Select to suit the type of
television.
Time Delay
When connected with an
AV amplifier and Plasma
display, adjust if you
RQT8087
notice the audio is out of
sync with the video.
20
20
English
Other
Automatic
Other
English French Spanish Other
≥ Changing the menu language from QUICK SETUP also
changes this setting.
Setting ratings (When level 8 is selected)
8 No Limit
0 Lock All: To prevent play of discs without ratings levels.
When setting a ratings level, a password screen is shown.
Follow the on-screen instructions.
Do not forget your password.
A message screen will be shown if a DVD-Video exceeding
the ratings level is inserted in the unit. Follow the on-screen
instructions.
4:3 Pan&Scan
The sides of the widescreen picture are cut off so
it fills the screen (unless prohibited by the disc).
4:3 Letterbox: Regular aspect television (4:3)
Widescreen picture is shown in the letterbox
style.
French Spanish Original
§2
¢¢¢¢
§3
English French Spanish
§2
¢¢¢¢
1 to 7
: Regular aspect television (4:3)
§1
¢¢¢¢
§2
16:9: Widescreen television (16:9)
Standard (Direct View TV) CRT Projector
LCD TV/Projector Projection TV
Plasma TV
0ms
80ms 100ms
20ms 40ms 60ms
Still Mode
S
pecify the type of picture
shown when paused.
Black Level Control
Change the black level of the
picture if you connected a
television through the
COMPONENT VIDEO OUT
terminals.
∫ “Audio” tab
PCM Digital Output
Check the digital input
limitations of the
equipment you connect
using COAXIAL or
OPTICAL terminal and
select the maximum
sampling frequency of
PCM digital output.
Dolby Digital
With COAXIAL,
OPTICAL or HDMI AV
OUT connections
(
➜ page 7
➜ page 7
, 8)
, 8)
DTS Digital Surround
With COAXIAL,
OPTICAL or HDMI AV
OUT connections
(
Automatic
Field:
The picture is not blurred, but picture quality is
lower.
Frame:
Overall quality is high, but the picture may appear
blurred.
: When connected through VIDEO OUT or
Lighter
Darker: When connected through COMPONENT
Off: When not connected with COAXIAL or OPTICAL
terminal.
Up to 48 kHz
Up to 96 kHz: When connected to equipment compatible
Up to 192 kHz: When connected to equipment compatible
≥Signals from copy-protected discs are converted to 48 or
44.1 kHz.
≥Some equipment cannot handle sampling frequencies of
88.2 kHz, even if they can handle 96 kHz. Read your
equipment’s operating instructions for details.
Bitstream
PCM
Bitstream
PCM
S VIDEO OUT.
VIDEO OUT.
: When connected to equipment compatible
with 44.1 or 48 kHz
with 88.2 or 96 kHz
with 176.4 or 192 kHz.
Select “Bitstream” when the equipment
can decode the bitstream (digital form of
multi-channel data). Otherwise, select
“PCM”. (If the bitstream is output to the
equipment without a decoder, high levels of
noise can be output and may damage your
speakers and hearing.)
When audio is output from HDMI AV OUT
terminal, and the connected equipment
does not support the item selected, the
actual output will depend on the
peformance of the connected epuipment.
Page 21

∫ “Audio” tab (Continued)
Dynamic Range
Compression
Audio during Search On Off
Speaker Settings
Choose the settings to
suit your audio system
and the listening
environment.
(➜ page 22, Changing
the speaker setting to suit
your speakers)
Off
On:
Adjusts for clarity even when the volume is low
through compressing the range of the lowest sound
level and the highest sound level. Convenient for late
night viewing. (Only works with Dolby Digital)
Speaker Type
Multi-channel
2-channel: when 2 speakers are connected.
Multi-channel Setting (If you select “Multi-channel”)
Speaker presence and size
: when 3 or more speakers are connected.
Delay time Channel balance
∫ “HDMI” tab
HDMI RGB Range
Set “HDMI Color Space
“RGB” (➜page 16, Picture
Menu) .
HDMI Video Mode
HDMI Audio Output
Standard
” to
Enhanced: When the black and white images are not
distinct.
: When video output is from HDMI AV OUT terminal.
On
Off: When video output is from COMPONENT VIDEO OUT
terminal (output is 480p from HDMI AV OUT terminal).
On
: When audio output is from HDMI AV OUT terminal.
Off: When audio output is not from HDMI AV OUT terminal.
∫ “Display” tab
Menu Language English Français Español
On-Screen Messages
On Off
∫ “Others” tab
FL Dimmer
Changes the brightness of
the unit’s display.
Auto Power Off On:
QUICK SETUP Ye s No
Re-initialize Setting
This returns all values in
the Setup menus to the
default settings.
Bright Dim
Auto: The display is dimmed, and brightens only when you
perform an operation.
The unit switches to standby mode after about 30 minutes in
the stop mode, irrespective of the SLEEP setting.
Off
Yes : The password screen is shown if “Ratings”
(➜ page 20) is set. Please enter the same password.
After “INIT” on the display disappears, turn the unit off
and on again.
No
§1
The original language designed on the disc is selected.
§2
Input a code number referring to the table (➜ below).
§3
If the language selected for “Audio” is not available, subtitles appear in that language
(If available on the disc).
Language code list
Abkhazian: 6566
Afar: 6565
Afrikaans: 6570
Albanian: 8381
Ameharic: 6577
Arabic: 6582
Armenian: 7289
Assamese: 6583
Ayma ra: 658 9
Azerbaijani: 6590
Bashkir: 6665
Basque: 6985
Bengali; Bangla: 6678
Bhutani: 6890
Bihari: 6672
Breton: 6682
Bulgarian: 6671
Burmese: 7789
Byelorussian: 6669
Cambodian: 7577
Catalan: 6765
Chinese: 9072
Corsican: 6779
Croatian: 7282
Czech: 6783
Danish: 6865
Dutch: 7876
English: 6978
Esperanto: 6979
Estonian: 6984
Faroese: 7079
Fiji: 7074
Finnish: 7073
French: 7082
Frisian: 7089
Galician: 7176
Georgian: 7565
German: 6869
Greek: 6976
Greenlandic: 7576
Guarani: 7178
Gujarati: 7185
Hausa: 7265
Hebrew: 7387
Hindi: 7273
Hungarian: 7285
Icelandic: 7383
Indonesian: 7378
Interlingua: 7365
Irish: 7165
Italian: 7384
Japanese: 7465
Javanese: 7487
Kannada: 7578
Kashmiri: 7583
Kazakh: 7575
Kirghiz: 7589
Korean: 7579
Kurdish: 7585
Laotian: 7679
Latin: 7665
Latvian, Lettish: 7686
Lingala: 7678
Lithuanian: 7684
Macedonian: 7775
Malagasy: 7771
Malay: 7783
Malayalam: 7776
Maltese: 7784
Maori: 7773
Marathi: 7782
Moldavian: 7779
Mongolian: 7778
Nauru: 7865
Nepali: 7869
Norwegian: 7879
Oriya: 7982
Pashto, Pushto: 8083
Persian: 7065
Polish: 8076
Portuguese: 8084
Punjabi: 8065
Quechua: 8185
Rhaeto-Romance:
Romanian: 8279
Russian: 8285
Samoan: 8377
Sanskrit: 8365
Scots Gaelic: 7168
Serbian: 8382
Serbo-Croatian: 8372
Shona: 8378
Sindhi: 8368
Singhalese: 8373
Slovak: 8375
Slovenian: 8376
Somali: 8379
Spanish: 6983
Sundanese: 8385
Swahili: 8387
Swedish: 8386
Tagalog: 8476
Tajik: 8471
Tamil: 8465
Tatar: 8484
Telugu: 8469
Thai: 8472
Tibetan: 6679
Tigrinya: 8473
Tonga: 8479
Turkish: 8482
Turkmen: 8475
Twi: 8487
Ukrainian: 8575
Urdu: 8582
Uzbek: 8590
Vietnamese: 8673
Volapük: 8679
Welsh: 6789
Wolof: 8779
Xhosa: 8872
Yiddish: 7473
Yoruba: 8979
Zulu: 9085
8277
RQT8087
21
Changing the player settings
21
Page 22

Changing the player settings
Changing the speaker setting to suit your speakers
If you select “Multi-channel” (➜ page 21, “Speaker Settings” in “Audio” tab), the following setting (a) is required. (Select settings b c to suit your preference if desirable.)
Front (L) Center Front (R)
a
Exit
Test
signal
— Surround —
(LS) (RS)
a c b c a
L
Exit
Tes t
LS
b a c
m s
0.0
0
m s
0.0
C
d B
0
d B
0
d Bd B
0
R
SW
RS
Subwoofer
a
c a
Speaker presence and size (a)
Changing the player settings
1. Press [3 4 2 1] to select an item and press [ENTER].
2. Press [3 4] to change the content and press [ENTER].
Icon examples:
Surround speaker (LS)
LS
≥ Large: Select when the speaker supports low-frequency (under 100 Hz) reproduction.
≥ Small: Select when the speaker does not support low-frequency reproduction.
If the subwoofer is set to “No”, the front speakers will automatically be set to “Large”. (In
this case, we recommend connecting a speaker that can reproduce bass below
100 Hz.)
RQT8087
22
22
LS
NoLarge Small
Delay time (b)
(Effective when playing multi-channel audio)
If either distance d or f is less than e, find the difference in the relevant table and
change to the recommended setting.
1. Press [3 4 2 1] to select an item and press [ENTER].
2. Press [3 4] to change the content and press [ENTER].
: Recommended placement
L
C
d
e
f
LS
RS
d Center speaker
Approx. 34 cm (1
Approx. 68 cm (2
R
Approx. 102 cm (3
Approx. 136 cm (4
Approx. 170 cm (5
SW
f Surround speakers
Approx. 170 cm (5
Difference Setting
1
⁄10 feet)
1
⁄5 feet)
3
⁄10 feet)
2
⁄5 feet)
1
⁄2 feet)
Difference Setting
1
⁄2 feet)
Approx. 340 cm (11 feet)
Approx. 510 cm (161⁄2 feet)
Channel balance (c)
This does not work when connected with HDMI terminals and “HDMI Audio Output”
(➜ page 21
1. Select “Test” and press [ENTER].
2. While listening to the test signal, press [3 4] to adjust the volume of the
3. Press [ENTER].
To finish the speaker setting
Press [3 4 2 1] to select “Exit” and press [ENTER].
, “HDMI” tab)
is set to “On”.
A test signal is output.
Front (L)_—)Center_—)Front (R)
:;
Surround (LS)(—————=Surround (RS)
center and surround speakers so they are the same apparent volume as the
front speakers (s6 to r6dB).
(The front speakers cannot be adjusted here.)
The test signal stops.
≥No signal is output for the subwoofer. To adjust its volume, play something, then
return to this screen to adjust to suit your taste.
1.0 ms
2.0 ms
3.0 ms
4.0 ms
5.0 ms
5.0 ms
10.0 ms
15.0 ms
Page 23

Troubleshooting guide
Before requesting service, make the following checks. If you are in doubt about some of the check points, or if the remedies indicated in the chart do not solve the problem, refer to the
“Customer Services Directory” on page 26 if you reside in the U.S.A., or refer to the “Product information” on page 3 if you reside in Canada. (Reference pages are shown in parentheses.)
Power
No power. ≥Insert the AC power supply cord securely into the household
The unit is
automatically
switched to the
standby mode.
AC outlet. (6)
≥ When “Auto Power Off” is set to “On”, the unit automatically
switches to standby after approximately 30 minutes in the
stop mode. (21)
≥The Sleep timer functioned. (17)
No operation
No response when
any buttons
pressed.
No response when
remote control
buttons pressed.
Cannot operate the
television.
No picture or
sound.
You have forgotten
your ratings
password.
Reset all the settings to
Factory Preset.
≥ This unit cannot play discs other than the ones listed in these
operating instructions. (4)
≥ The unit may not be operating properly due to lightning, static
electricity or some other external factor. Turn the unit off and
then back to ON. Alternatively, turn the unit off, disconnect
the AC power supply cord, and then reconnect it.
Condensation has formed: Wait 1 to 2 hours for it to evaporate.
≥
≥ Check that the batteries are installed correctly. (9)
≥ The batteries are depleted: Replace them with new ones. (9)
≥ Point the remote control at the remote control sensor and
operate. (10)
≥Re-enter the remote control code after you change batteries.
(9)
≥ Check the video or audio connection. (6–8)
≥ Check the power or input setting of the connected equipment.
≥ Check that the disc has something recorded on it.
≥While stopped, press and hold [D] and [;] on the unit
and then also press and hold [<OPEN/CLOSE] on the unit
until “Initialized” disappears from the television. Turn the unit
off and on again. All settings will return to the default values.
Specific operation impossible or incorrect
It takes time before play
starts. [MP3]
The program and random play
functions do not work.
Menu doesn’t appear.
[VCD] with playback control
The on-screen menu shows “2”
as a soundtrack option when
[AUDIO] is pressed, but the
audio does not change.
Play doesn’t start. [WMA] ≥This unit may not play WMA that contains still
[DVD-A]
≥
Play may take time to begin when an MP3 track has
still picture data. Even after the track starts, the correct
play time will not be displayed; however, this is normal.
≥ These functions do not work with some DVD-
[DVD-V]
Videos.
≥ Press [∫] twice and then press [1] (PLAY).
≥Even if a second soundtrack isn’t recorded, two
numbers will normally be shown.
picture data.
Play restarts from the
beginning of the track when
soundtrack is changed.
Subtitle position is wrong. ≥ Adjust the position. (“Subtitle Position” in Display
No subtitles. ≥ Display the subtitles. (13)
The subtitles overlap closed
captions recorded on discs.
In A-B repeat, point B is
automatically set.
A-B
repeat play is
automatically canceled.
Picture incorrect
Picture distorted. ≥Ensure that the unit is not connected through a video cassette
≥ Make sure that progressive output has not been selected
Picture size does n’t
fit the screen.
The television may
display incorrectly
or colors appear
faded.
Menu not displayed
correctly.
Auto zoom function
does not work well.
No picture ≥When AUDIO ONLY is on, video and audio cannot be output
≥ Change “TV Aspect” in “Video” tab. (20)
≥
≥ Change the Zoom setting. (14)
≥PAL discs cannot be played. (You can play DVD-Audio;
≥This may happen when turning AUDIO ONLY on or off, but this
≥Connect to a progressive output compatible television to enjoy
≥Picture may not be seen when more than 4 devices are
≥ Restore the zoom ratio to a1.00. (14)
≥ Set “Subtitle Position” in Display Menu to “0”. (17)
≥ Set “4:3 Aspect” in Display Menu to “Normal”. (17)
≥ Turn off TV’s zoom function.
≥
≥ Zoom function may not work well, especially in dark scenes
≥This is normal on DVD-Audio.
[DVD-A]
Menu) (17)
≥ Clear the subtitles. (13)
≥ The end of an item becomes point B when it is
reached.
≥ A-B repeat is canceled when you press [QUICK
REPLAY].
recorder. (6)
when the connected television is not progressive compatible.
Press and hold [CANCEL] until the picture displays correctly.
The settings will return to “480i”.
Use the television to change the aspect. If your television does
not have that function, change “4:3 Aspect” in Display Menu.
however, still pictures may be displayed enlarged.)
is normal. (12)
progressive video.
connected with HDMI cables. Reduce the number of
connected devices.
Use the other preset aspect ratios or manual adjustment. (14
and may not work depending on the type of disc.
from HDMI AV OUT terminal. Set this function to “Off”. (12)
Continued on next page
(17)
Troubleshooting guide
)
RQT8087
23
23
Page 24

Troubleshooting guide
Progressive video
There is ghosting
when progressive
or HDMI output is
on.
Pictures not in
progressive output.
Closed captions
not displayed.
≥This problem is caused by the editing method or material used
on DVD-Video, but should be corrected if you use interlace
output. Change “Video Output Mode” in Picture Menu to
“480i”. (16)
When connecting with HDMI AV OUT terminal, connect with the
other terminals and change the settings in the following order:
1. Set “HDMI Video Mode” to “Off”. (21)
2. Set “Video Output Mode” to “480i”. (16)
≥ If the unit is connected to the television through VIDEO OUT
or S VIDEO OUT, output will be interlace.
≥ When progressive output or HDMI output is on, closed
captions will not be displayed.
Sound incorrect
Sound distorted. ≥Set “Advanced Surround” in Audio Menu to “Off”. (16)
Troubleshooting guide
Piercing noise
comes from the
speakers.
Effects do not
work.
No sound ≥
RQT8087
24
24
Set “Attenuator” in Audio Menu to “On” if it causes distortion with
≥
2 ch or 5.1 ch AUDIO OUT connections.
≥Noise may occur when playing WMA.
≥The disc may have restrictions on the method of audio output.
With some multi-channel discs, unless the number of
connected speakers is the same as the disc’s channel
specification, audio will not be output properly. Refer to the
disc’s jacket for more information. [DVD-A]
With HDMI AV OUT connections, audio may not be output from
≥
other terminals in the way that was set.
≥
Match the speaker settings with the connected equipment.
≥When connecting to an amplifier with the HDMI cable, match
the speaker settings on this unit and the amplifier with the
presence and size of connected speakers. (22)
≥ If you have connected a digital amplifier which does not
include decoder, be sure to select “PCM” in “Dolby Digital” or
“DTS Digital Surround” in “Audio” tab. (20)
≥None of the audio effects work when the unit is outputting
bitstream signals from the DIGITAL AUDIO OUT or HDMI AV
OUT terminal. (20)
Some audio effects do not work or have less effect with some discs.
≥
≥ With HDMI AV OUT connections:
– Plays HDCD discs as normal CDs.
– AUDIO ONLY does not work.
≥ Multi Re-master and Advanced Surround do not work if you
have changed the play speed.
Audio may not be heard when more than 4 devices are connected
with HDMI cables. Reduce the number of connected devices.
≥When AUDIO ONLY is on:
– Audio may not be output depending on the type of television.
– Video and audio cannot be output from HDMI AV OUT
terminal. Set this function to “Off”. (12)
There may be a pause in sound when you change the play speed.
≥
(16)
(21)
Recording
Cannot record to
digital recording
equipment.
(Incorrect sound
recorded.)
≥ You cannot record WMA/MP3.
≥ You cannot record DVDs that have protection preventing
digital recording.
≥ You cannot record DVDs if the recording equipment cannot
handle signals with a sampling frequency of 48 kHz.
≥ Make the following settings:
– Advanced Surround: Off (16)
– PCM Digital Output: Up to 48 kHz (20)
– Dolby Digital/DTS Digital Surround: PCM (20)
Unit displays
“NOPLAY” ≥ You inserted a disc the unit cannot play; insert one it can. (4)
“U11” ≥ The disc may be dirty. (25)
“H∑∑” (∑∑ stands
for a number.)
“NODISC” ≥ You haven’t inserted a disc: Insert one.
“U70-1” ≥The connected equipment is not HDMI compatible.
“U70-∑” (∑ stands
for a number.)
The actual number
following “U70-” will
depend on the state
of this unit.
≥ You inserted a blank disc.
≥ You inserted a disc that has not been finalized. (4)
≥PAL discs cannot be played. (You can play DVD-Audio;
however, still pictures may be displayed enlarged.)
≥ Trouble may have occurred. The number following “H”
depends on the status of the unit. Turn the unit off and then
back to ON. Alternatively, turn the unit off, disconnect the AC
power supply cord, and then reconnect it.
≥ If the service numbers fail to clear, note the service numbers
and contact a qualified service person.
≥ You haven’t inserted the disc correctly: Insert it correctly. (10)
≥The HDMI connection acts unusually.
– The connected equipment is not HDMI compatible.
– The HDMI cable is too long.
– The HDMI cable is damaged.
– The cable is not HDMI compatible.
Television displays
“/” ≥ The operation is prohibited by the unit or disc.
“Cannot display
group xx, content xx”
“Check the disc” ≥ This disc may be dirty. (25)
“Due to copyright
protection, audio
cannot be output
from HDMI”
While “HDMI
Status” displayed,
any items are not
underlined.
≥ You are trying to play incompatible groups or content. (4)
≥Should you connect equipment that does not support CPPM
(➜ page 27, Glossary), the audio from the CPPM copy
protected DVD-Audio cannot be output from HDMI AV OUT
terminal. Connect the audio cable of the Audio/Video cable (L,
R) to an HDMI compatible AUDIO IN terminal. (7)
≥If you select an item without an “¢” in the “Video Output
Mode” in Picture Menu, it will not be underlined. (16)
Page 25

“This disc may not be
played in your region”
No on-screen display. ≥ Select “On” in “On-Screen Messages” in “Display” tab.
When setting “Video
Output Mode”,
not displayed next to a
video output possible
with the connected
equipment.
“¢” is
≥ You can only play DVD-Video if their region number is “1”,
“ALL” or multiple region numbers including “1”. (4)
(21)
≥If the connected equipment is compatible, selecting an
item without an “¢” will not distort the picture. (16)
Maintenance
∫ Clean this unit with a soft, dry cloth
≥ Never use alcohol, paint thinner or benzine to clean this unit.
Before using chemically treated cloth, read the instructions that came with the cloth carefully.
≥
≥ Cleaning of the lens is generally not necessary although this depends on the
operating environment.
≥ Do not use commercially available lens cleaners as they may cause malfunction.
∫ Clean discs
Wipe with a damp cloth and then wipe dry.
Specifications
Signal system: NTSC
Operating temperature range:
Operating humidity range:
Discs played [8 cm (3 z) or 12 cm (5 z)]:
Video output:
S-video output:
Component video output:
Audio output:
Audio performance:
i5 to i35 oC (i41 to i95 xF)
5 to 90 % RH (no condensation)
(1) DVD (DVD-Video, DVD-Audio)
(2) DVD-RAM (DVD-VR, JPEG
(3) DVD-R (DVD-Video)
(4) DVD-RW (DVD-Video, DVD-VR)
iR/RW (Video)
(5)
(6) CD, CD-R/RW [CD-DA, Video-CD,
Output level: 1 Vp-p (75 ≠)
Output connector: Pin jack (1 system)
Y output level: 1 Vp-p (75 ≠)
C output level: 0.286 Vp-p (75 ≠)
Output connector:
Y output level: 1 Vp-p (75 ≠)
P
P
Output connector:
Output level: 2 Vrms (1 kHz, 0 dB)
Output connector: Pin jack
Number of connectors:
(1) Frequency response:
(2) S/N ratio:
(3) Dynamic range:
(4) Total harmonic distortion:
§3
SVCD
JPEG
and Image)]
§2, 4
, MP3
§1, 2
, WMA
, HighMAT Level 2 (Audio
S terminal (1 system)
B output level: 0.7 Vp-p (75 ≠)
R output level: 0.7 Vp-p (75 ≠)
Y: green, PB: blue, PR: red
Pin jack (
(1 system)
5.1channel discrete output: 1 system
≥DVD (linear audio):
≥DVD-Audio:
≥CD Audio: 4 Hz to 20 kHz
2 channel: 1 system
4 Hz to 22 kHz (48 kHz sampling)
4 Hz to 44 kHz (96 kHz sampling)
4 Hz to 88 kHz (192 kHz sampling)
≥CD Audio: 115 dB
≥DVD (linear audio): 102 dB
≥CD Audio: 98 dB
≥CD Audio: 0.0025 %
§1, 2
§2, 5
,
(
480p/480i)
)
Digital audio output:
Optical digital output: Optical terminal
Coaxial digital output: Pin jack
HDMI AV output: 19 pin
Pickup:
Wave length: 662 nm/785 nm
Laser power:
Power supply: AC 120 V, 60 Hz
Power consumption: 17 W
[U.S.A.] CLASS IIa/CLASS I
[Canada] CLASS 2/CLASS 3A
Power consumption in standby mode
Dimensions (WkDkH):
430 mmk249 mmk52 mm
Mass: approx. 2.4 kg (5.3 lb)
(16
approx. 1 W
15
/16zk9 13/16zk2 1/16z)
[Note]
Specifications are subject to change
without notice. Mass and dimensions are
approximate.
§1
Exif Ver 2.1 JPEG Baseline files
Picture resolution: between 320k240
and 6144k4096 pixels (sub sampling
is 4:2:2 or 4:2:0)
)
§2
The total combined maximum number
of recognizable audio and picture
contents and groups: 4000 audio and
picture contents and 400 groups.
§3
Conforming to IEC62107
§4
Compatible compression rate: between
32 kbps and 320 kbps
§5
Compatible compression rate: between
48 kbps and 320 kbps
:
Troubleshooting guide/Maintenance/Specifications
RQT8087
25
25
Page 26

Limited Warranty (ONLY FOR U.S.A.)
Panasonic Consumer Electronics Company,
Division of Panasonic Corporation of North America
One Panasonic Way Secaucus, New Jersey 07094
Limited Warranty Coverage
If your product does not work properly because of a defect in materials or workmanship, Panasonic Consumer
Electronics Company or
length of the period indicated on the chart below, which starts with the date of original purchase (“Limited
Warranty period”), at its option either (a) repair your product with new or refurbished parts, or (b) replace it with
a new or a refurbished product. The decision to repair or replace will be made by the warrantor.
Product or Part Name Parts Labor
DVD Player One (1) Year Ninety (90) Days
Rechargeable Batteries
(in exchange for defective item)
During the “Labor” Limited Warranty period there will be no charge for labor. During the “Parts”
warranty period, there will be no charge for parts. You must mail-in your product during the warranty
period. If non-rechargeable batteries are included, they are not warranted. This Limited Warranty only
applies to products purchased and serviced in the United States or Puerto Rico. This Limited Warranty
is extended only to the original purchaser and only covers product purchased as new. A purchase
receipt or other proof of original purchase date is required for Limited Warranty service.
Mail-In Service
For assistance in the continental U.S.A. in obtaining repairs please ship the product to:
Panasonic Services Company
Customer Servicenter
Suite B
4900 George McVay Drive
McAllen, TX 78503
For assistance in Puerto Rico call Panasonic Puerto Rico, Inc. (787)-750-4300 or fax (787)-768-2910.
When shipping the unit carefully pack and send it prepaid, adequately insured and preferably in the
original carton. Include a letter detailing the complaint and provide a day time phone and/or email
address where you can be reached.
Limited Warranty (ONLY FOR U.S.A.)
IF REPAIR IS NEEDED DURING THE LIMITED WARRANTY PERIOD THE PURCHASER WILL BE
REQUIRED TO FURNISH A SALES RECEIPT/PROOF OF PURCHASE INDICATING DATE OF
PURCHASE, AMOUNT PAID AND PLACE OF PURCHASE. CUSTOMER WILL BE CHARGED FOR
THE REPAIR OF ANY UNIT RECEIVED WITHOUT SUCH PROOF OF PURCHASE.
Limited Warranty Limits And Exclusions
This Limited Warranty ONLY COVERS failures due to defects in materials or workmanship, and DOES NOT
COVER normal wear and tear or cosmetic damage. The Limited Warranty ALSO DOES NOT COVER
damages which occurred in shipment, or failures which are caused by products not supplied by the
warrantor, or failures which result from accidents, misuse, abuse, neglect, mishandling, misapplication,
alteration, faulty installation, set-up adjustments, misadjustment of consumer controls, improper
maintenance, power line surge, lightning damage, modification, or commercial use (such as hotel, office,
restaurant, or other business), rental use of the product, or service by anyone other than a Factory
Servicenter or other Authorized Servicer, or damage that is attributable to acts of God.
THERE ARE NO EXPRESS WARRANTIES EXCEPT AS LISTED UNDER “LIMITED WARRANTY
COVERAGE”. THE WARRANTOR IS NOT LIABLE FOR INCIDENTAL OR CONSEQUENTIAL
DAMAGES RESULTING FROM THE USE OF THIS PRODUCT, OR ARISING OUT OF ANY BREACH
OF THIS WARRANTY.
or re-install an installed unit if applicable, travel to and from the servicer, loss of or damage to media or
images, data or other recorded content. The items listed are not exclusive, but are for illustration only.)
RQT8087
ALL EXPRESS AND IMPLIED WARRANTIES, INCLUDING THE WARRANTY OF
MERCHANTABILITY, ARE LIMITED TO THE PERIOD OF THE LIMITED WARRANTY.
26
26
Panasonic Puerto Rico, Inc.
Ten (10) Days Not Applicable
(As examples, this excludes damages for lost time, cost of having someone remove
Panasonic DVD Player Limited Warranty
(collectively referred to as “the warrantor”) will, for the
Panasonic Puerto Rico, Inc.
Ave. 65 de Infantería, Km. 9.5
San Gabriel Industrial Park, Carolina, Puerto Rico 00985
Some states do not allow the exclusion or limitation of incidental or consequential damages, or
limitations on how long an implied Limited Warranty lasts, so the exclusions may not apply to you.
This Limited Warranty gives you specific legal rights and you may also have other rights which vary from
state to state. If a problem with this product develops during or after the Limited Warranty period, you
may contact your dealer or Servicenter. If the problem is not handled to your satisfaction, then write to
the warrantor’s Consumer Affairs Depar tment at the addresses listed for the warrantor.
PARTS AND SERVICE, WHICH ARE NOT COVERED BY THIS LIMITED WARRANTY, ARE YOUR
RESPONSIBILITY.
Customer Services Directory
Obtain Product Information and Operating Assistance; locate your nearest Dealer or
Servicenter; purchase Parts and Accessories; or make Customer Service and Literature
requests by visiting our Web Site at:
http://www.panasonic.com/consumersupport
or, contact us via the web at:
http://www.panasonic.com/contactinfo
You may also contact us directly at:
1-800-211-PANA (7262),
Monday-Friday 9 am-9 pm; Saturday-Sunday 10 am-7 pm, EST.
For hearing or speech impaired TTY users, TTY: 1-877-833-8855
Accessory Purchases
Purchase Parts, Accessories and Instruction Books online for all Panasonic Products by
visiting our Web Site at:
http://www.pasc.panasonic.com
or, send your request by E-mail to:
npcparts@us.panasonic.com
You may also contact us directly at:
1-800-332-5368 (Phone) 1-800-237-9080 (Fax Only) (Monday – Friday 9 am to 8 pm, EST.)
Panasonic Services Company
20421 84th Avenue South, Kent, WA 98032
(We Accept Visa, MasterCard, Discover Card, American Express, and Personal Checks)
For hearing or speech impaired TTY users, TTY : 1-866-605-1277
Service in Puerto Rico
Panasonic Puerto Rico, Inc.
Ave. 65 de Infantería, Km. 9.5, San Gabriel Industrial Park, Carolina, Puerto Rico 00985
Phone (787)750-4300, Fax (787)768-2910
F1104
Page 27

Limited Warranty (ONLY FOR CANADA)
5770 Ambler Drive, Mississauga, Ontario L4W 2T3
Panasonic Canada Inc.
PANASONIC/TECHNICS PRODUCT—LIMITED WARRANTY
Panasonic Canada Inc. warrants this product to be free from defects in material and workmanship and agrees to remedy any such defect, or at its option, replace the product for a period as stated below from
the date of original purchase.
Technics Audio Product One (1) year, parts and labour
Panasonic Audio & DVD Product One (1) year, parts and labour
Accessories including rechargeable batteries Ninety (90) days
LIMITATIONS AND EXCLUSIONS
This warranty does not apply to products purchased outside Canada or to any product which has been improperly installed, subjected to usage for which the product was not designed, misused or abused,
damaged during shipping, or which has been altered or repaired in any way that affects the reliability or detracts from the performance, nor does it cover any product which is used commercially. Dry cell
batteries are also excluded from coverage under this warranty.
This warranty is extended to the original end user purchaser only. A purchase receipt or other proof of date of original purchase is required before warranty service is performed.
THIS EXPRESS, LIMITED WARRANTY IS IN LIEU OF ALL OTHER WARRANTIES, EXPRESS OR IMPLIED, INCLUDING ANY IMPLIED WARRANTIES OF MERCHANTABILITY AND FITNESS FOR A PARTICULAR PURPOSE.
IN NO EVENT WILL PANASONIC CANADA INC. BE LIABLE FOR ANY SPECIAL, INDIRECT OR CONSEQUENTIAL DAMAGES.
In certain instances, some jurisdictions do not allow the exclusion or limitation of incidental or consequential damages, or the exclusion of implied warranties, so the above limitations and exclusions may not be applicable.
WARRANTY SERVICE
For product operation and information assistance, please contact your Dealer or our Customer Care Centre at: Telephone #: (905) 624-5505 Fax #: (905) 238-2360 Web: www.panasonic.ca
For product repairs, please contact one of the following:
≥Your Dealer who will inform you of an authorized Servicentre nearest you.
≥Our Customer Care Centre at (905) 624-5505 or www.panasonic.ca
≥A Panasonic Factory Servicentre listed below:
Richmond, Calgary, Alberta Mississauga, Ontario Lachine, Québec
British Columbia
Panasonic Canada Inc. Panasonic Canada Inc. Panasonic Canada Inc. Panasonic Canada Inc.
12111 Riverside Way 6835-8
Richmond, BC Calgary, AB Mississauga, ON Lachine, QC
V6W 1K8 T2E 7H7 L4W 2T3 H8T 1C4
Tel: (604) 278-4211 Tel: (403) 295-3955 Tel: (905) 624-8447 Tel: (514) 633-8684
Fax: (604) 278-5627 Fax: (403) 274-5493 Fax: (905) 238-2418 Fax: (514) 633-8020
Carefully pack and send prepaid, adequately insured and preferably in the original carton.
th
St. N. E. 5770 Ambler Dr. 3075, rue Louis A. Amos
IF YOU SHIP THE PRODUCT TO A SERVICENTRE
Include details of the defect claimed, and proof of date of original purchase.
Glossary
CPPM (Content Protection for Prerecorded Media)
A copy protection system used for DVD-Audio files. This unit supports CPPM.
Down-mixing
This is a process of remixing the multi-channel audio (surround sound) on some discs into
two channels. When you want to listen to the audio on a DVD with a 5.1 channel digital
surround track through your television speakers, the down-mixed audio will be output.
Some DVD-Audio prevent down-mixing of all or part of their contents. When playing
such discs, or such parts of disc, unless the number of connected speakers is the same
as the disc’s channel specification, audio will not be output properly.
HDCD (High-Definition Compatible Digital)
HDCD-encoded CDs sound better because they are encoded with 20 bits, as compared
with 16 bits for all other CDs.
HDMI (High-Definition Multimedia Interface)
HDMI is a next-generation digital interface for consumer electronic products. Unlike
conventional connections, it transmits uncompressed digital video and audio signals on a
single cable. This unit supports high-definition video output (720p,1080i) from HDMI AV OUT
terminal. To enjoy high-definition video a high definition compatible television is required.
Sampling frequency
Sampling is the process of converting the heights of sound wave (analog signal)
samples taken at set periods into digits (digital encoding). Sampling frequency is the
number of samples taken per second, so larger numbers mean more faithful
reproduction of the original sound.
27
Limited Warranty (ONLY FOR CANADA)/Glossary
RQT8087
27
Page 28

ATTENTION!
CET APPAREIL EST DOTÉ D’UN LECTEUR AU
LASER. L’UTILISATION DE COMMANDES OU LE
RECOURS À DES RÉGLAGES AUTRES QUE CEUX
INDIQUÉS DANS CE MANUEL PEUVENT
PRÉSENTER DES RISQUES D’EXPOSITION À DES
RADIATIONS.
NE PAS OUVRIR LE BOÎTIER. TOUTE RÉPARATION
DOIT ÊTRE FAITE PAR UN PERSONNEL QUALIFIÉ
ET NON PAR L’USAGER.
MISE EN GARDE:
AFIN DE PRÉVENIR TOUT RISQUE
D’INCENDIE OU DE CHOCS
ÉLECTRIQUES, AINSI QUE TOUT
DOMMAGE À L’APPAREIL, NE PAS
L’EXPOSER À LA PLUIE, À DES
ÉCLABOUSSURES OU À UNE
HUMIDITÉ EXCESSIVE. ÉVITER
ÉGALEMENT DE PLACER DES
CONTENANTS AVEC DU LIQUIDE, TEL
UN VASE, SUR L’APPAREIL.
ATTENTION
RISQUE DE CHOC ELECTRIQUE
NE PAS OUVRIR
ATTENTION: AFIN DE PRÉVENIR LE RISQUE
IMPORTANTES MISES EN GARDE
RQT8087
2
28
DE CHOCS ÉLECTRIQUES, NE
PAS RETIRER LES VIS.
TOUTE RÉPARATION DEVRAIT
ÊTRE CONFIÉE À UN
PERSONNEL QUALIFIÉ.
Le symbole de l’éclair dans un triangle
équilatéral indique la présence d’une tension
suffisamment élevée pour engendrer un risque
de chocs électriques.
Le point d’exclamation dans un triangle
équilatéral indique que le manuel d’utilisation
inclus avec l’appareil contient d’importantes
recommandations quant au fonctionnement et
à l’entretien de ce dernier.
S’assurer que la prise secteur est située près de
l’appareil dans un endroit facile d’accès. La fiche
du cordon d’alimentation doit également être
facile d’accès.
(Intérieur de l’appareil)
IMPORTANTES MISES EN GARDE
Avant d’utiliser l’appareil, lire attentivement les
instructions qui suivent. Se conformer tout
particulièrement aux avertissements inscrits sur l’appareil
et aux consignes de sécurité indiquées ci-dessous.
Conserver le présent manuel pour consultation ultérieure.
1) Lire attentivement ces instructions.
2) Conserver ces instructions.
3) Lire toutes les mises en garde.
4) Suivre toutes les instructions.
5) Ne pas utiliser cet appareil près d’une source d’eau.
6) Nettoyer qu’avec un chiffon sec.
7) Ne pas bloquer les évents d’aération. Installer
l’appareil selon les instructions du fabricant.
8) Ne pas installer l’appareil près d’un appareil de
chauffage tel qu’un radiateur, une cuisinière, un
registre de chaleur ou tout dispositif émettant de la
chaleur (y compris un amplificateur).
9) Pour des raisons de sécurité, ne pas modifier la fiche
polarisée ou celle de mise à la terre. Une fiche
polarisée est une fiche à deux lames, dont une plus
large. Une fiche de mise à la terre est une fiche à
deux lames avec une broche de masse. La lame plus
large ou la broche de masse procure une protection
accrue. Si ce genre de fiche ne peut être inséré dans
une prise de courant, communiquer avec un
électricien pour remplacer la prise.
10)S’assurer que le cordon est placé dans un endroit où
il ne risque pas d’être écrasé, piétiné ou coincé. Faire
particulièrement attention à ses extrémités de
branchement, y compris sa fiche.
11) N’utiliser que les accessoires ou périphériques
recommandés par le fabricant.
12) N’utiliser l’appareil qu’avec un
chariot, meuble, trépied, support ou
table recommandé par le fabricant ou
vendu avec l’appareil. Lors de
l’utilisation d’un chariot, le déplacer
avec le plus grand soin afin d’éviter
tout dommage.
13) Débrancher cet appareil lors d’un orage ou en cas de
non-utilisation prolongée.
14)Confier l’appareil à un technicien qualifié pour toute
réparation: cordon d’alimentation ou fiche
endommagé, liquide renversé ou objet tombé dans
l’appareil, exposition à la pluie ou à une humidité
excessive, mauvais fonctionnement ou échappement
de l’appareil.
Page 29

Service après-vente
1. En cas de dommage—
(a) lorsque le cordon d’alimentation ou l’adaptateur secteur a été endommagé;
(b) lorsqu’un objet est tombé dans l’appareil ou si ce dernier a été mouillé;
(c) lorsque l’appareil a été exposé à la pluie;
(d) lorsque l’appareil semble ne pas fonctionner normalement ou que son
rendement laisse à désirer;
(e) lorsque l’appareil a subi un choc violent ou que son coffret a été endommagé.
2. Réparation—Ne faire aucun réglage ni ajustement autres que ceux décrits dans le
présent manuel. Confier toute réparation à un centre de service Panasonic agréé.
3. Pièces de rechange—S’assurer que le technicien utilise des pièces de rechange
recommandées par le fabricant ou dont les caractéristiques sont les mêmes.
L’utilisation de pièces de rechange non autorisées peut causer un incendie, des
chocs électriques ou d’autres dangers.
4. Vérification de sécurité—Demander au technicien qui a réparé l’appareil de
soumettre ce dernier à des vérifications pour s’assurer qu’il peut être utilisé en toute
sécurité.
Demande d’informations
Pour toutes réparations, renseignements ou conseils sur le fonctionnement du produit:
Veuillez contacter le service à la clientèle de Panasonic Canada Inc. au 1-800-5615505, son site web (www.panasonic.ca) ou le centre de service agréé le plus proche.
Homologation:
DATE D’ACHAT ___________________________________________________
DÉTAILLANT _____________________________________________________
ADRESSE DU DÉTAILLANT ________________________________________
________________________________________________________________
Nº DE TÉLÉPHONE _______________________________________________
Il est recommandé de noter, dans l’espace prévu ci-dessous, le numéro de modèle et
le numéro de série inscrits à l’arrière, ou sous le fond de l’appareil, et de conserver ce
manuel pour référence ultérieure.
NUMÉRO DE MODÈLE _____________________________________________
NUMÉRO DE SÉRIE _______________________________________________
Confier l’appareil à un technicien qualifié dans les cas suivants:
DVD-S77
Cher client
Nous vo
us remercions d’avoir arrêté votre choix sur cet appareil. Avant de raccorder,
régler ou utiliser l’appareil, il est recommandé de lire attentivement le manuel d’utilisation.
Conserver ce manuel pour consultation ultérieure.
Table des matières
Mise en route
IMPORTANTES MISES EN GARDE . . . . . . . . . . . . . . . . . . . . . . . . . . . . . .2
Service après-vente. . . . . . . . . . . . . . . . . . . . . . . . . . . . . . . . . . . . . . . . . . .3
Disques compatibles. . . . . . . . . . . . . . . . . . . . . . . . . . . . . . . . . . . . . . . . . .4
Accessoires . . . . . . . . . . . . . . . . . . . . . . . . . . . . . . . . . . . . . . . . . . . . . . . . .5
ÉTAPE 1
Réglage de la qualité de l’image et du rendu sonore (avec connexion HDMI) . . . . . 7
Rendu ambiophonique multicanal. . . . . . . . . . . . . . . . . . . . . . . . . . . . . . . . . . . . . . . 8
ÉTAPE 2
ÉTAPE 3
ÉTAPE 4
Lecture de base. . . . . . . . . . . . . . . . . . . . . . . . . . . . . . . . . . . . . . . . . . . . .10
Changement de la séquence de lecture . . . . . . . . . . . . . . . . . . . . . . . . .11
Lecture de tous les groupes/programmée/aléatoire . . . . . . . . . . . . . . . . . . . . . . . . 11
Fonctions pratiques . . . . . . . . . . . . . . . . . . . . . . . . . . . . . . . . . . . . . . . . .12
Rappel des paramètres audio et vidéo recommandés—Rehausseur AV (AV Enhancer)/
Reprise rapide/Modification de la vitesse de lecture/
Réduction du bruit vidéo/Zoom/
Utilisation des menus à l’écran . . . . . . . . . . . . . . . . . . . . . . . . . . . . . . . .15
Menus principaux/Autres réglages . . . . . . . . . . . . . . . . . . . . . . . . . . . . . . . . . . . . . 15
Menus de navigation. . . . . . . . . . . . . . . . . . . . . . . . . . . . . . . . . . . . . . . . .18
Lecture de disques WMA/MP3/JPEG . . . . . . . . . . . . . . . . . . . . . . . . . . . . . . . . . . 18
Lecture de CD/Lecture de disques HighMAT™/
Modification des réglages sur l’appareil . . . . . . . . . . . . . . . . . . . . . . . . .20
Modification des paramétrages en fonction des enceintes acoustiques . . . . . . . . 22
Guide de dépannage. . . . . . . . . . . . . . . . . . . . . . . . . . . . . . . . . . . . . . . . 23
Entretien . . . . . . . . . . . . . . . . . . . . . . . . . . . . . . . . . . . . . . . . . . . . . . . . . . 25
Spécifications . . . . . . . . . . . . . . . . . . . . . . . . . . . . . . . . . . . . . . . . . . . . . 26
Certificat de garantie limitée/Glossaire . . . . . . . . . . . . . . . . . . . . . . . . . 27
Index des fonctions principales . . . . . . . . . . . . . . . . . . . . . . . . . . . Endos
Raccordement . . . . . . . . . . . . . . . . . . . . . . . . . . . . . . . 6
Télécommande. . . . . . . . . . . . . . . . . . . . . . . . . . . . . . . 9
CONFIGURATION RAPIDE . . . . . . . . . . . . . . . . . . . . . 9
Fonctionnement avec un téléviseur . . . . . . . . . . . . . . 9
Fonctions
Pour l’écoute d’un son de qualité encore plus élevée—AUDIO ONLY/
Assure un rendu sonore plus naturel—Multi remastériser . . . . . . . . . . . . . . . . . . . . .12
Changement de langue des dialogues/Réglage de l’image/
Changement de langue des sous-titres. . . . . . . . . . . . . . . . . . . . . . . . . . . . . . . . 13
Sélection d’angle/Rotation d’images fixes/Avancement d’images fixes/
Mémorisation de position/Lancement de la lecture à partir d’un groupe donné . . 14
Lecture de disques RAM/DVD-RW (DVD-VR) . . . . . . . . . . . . . . . . . . . . . . . . . . .19
Références
29
Service après-vente Table des matières
RQT8087
3
Page 30

Disques compatibles
Les opérations contenues dans le présent manuel sont décrites en fonction des supports (formats) utilisés. Les supports sont
identifiés par des icônes telles que [RAM].
—
Disques compatibles
§
La finalisation est un processus qui permet la lecture de ces disques sur un appareil compatible.
≥ Dans certaines situations, selon le type de disque ou les conditions d’enregistrement, il pourrait ne pas être possible de lire les
disques indiqués plus haut.
∫ Disques non compatibles
DVD-ROM, la version 1.0 des DVD-RW, CD-ROM, CDV, CD-G, SACD, Disque Vidéo “DivX” et CD Photo, DVD-RAM ne pouvant être
retirés de leur cartouche, DVD-RAM de 2,6 Go et de 5,2 Go, Disque PAL
dont les CVD, DVCD et SVCD non conformes à la norme IEC62107.
§
Il est possible de lire des disques DVD-Audio mais les images fixes pourraient s’afficher en format agrandi.
RQT8087
À propos de l’utilisation d’un disque hybride “DualDisc”
La piste son d’un disque hybride n’est pas conforme aux spécifications techniques du format CD-DA (Compact Disc Digital Audio).
4
Par conséquent, sa lecture pourrait être impossible.
30
DVD-RAM [RAM] [JPEG]
≥ [RAM] Enregistrement sur appareil conforme à la version 1.1 du Video Recording Format (norme
d’enregistrement vidéo unifiée),tel un enregistreur DVD-Vidéo, caméra vidéo DVD, ordinateurs, etc.
≥ [JPEG]
Enregistrement
for Camera File system) version 1.0. Pour la lecture de fichiers JPEG, sélectionner “Lecture disque
données” (
DVD-Audio [DVD-A] [DVD-V]
≥ [DVD-A]
Glossaire) d’une partie ou de la totalité de leur contenu, selon l’intention du fabricant. Lors de la lecture
d’un tel disque, ou d’une telle partie d’un disque, il est nécessaire que le nombre d’enceintes
raccordées soit le même que la spécification de canaux du disque. Sinon, le son ne sera pas
correctement émis (p. ex. absence d’une partie du signal audio, impossibilité de sélectionner l’audio
multicanal, audio sur deux canaux). Se reporter à l’emballage du disque pour plus de renseignements.
≥ [DVD-V] Certains disques DVD-Audio peuvent contenir des images DVD-Vidéo.
Pour lire un contenu DVD-Vidéo, sélectionner “Lecture DVD vidéo” (➜ page 17, Menu Autres).
DVD-Vidéo [DVD-V]
Disques identifiés par le code régional “1” ou “ALL” (tous)
DVD-R (DVD-Vidéo)/DVD-RW (DVD-Vidéo) [DVD-V]
Disques enregistrés et finalisés
DVD-RW (DVD-VR) [DVD-RW[‹VR›]
Disques enregistrés et finalisés
version 1.1 du Video Recording Format (norme d’enregistrement vidéo unifiée).
iR (Vidéo)/iRW (Vidéo) [DVD-V]
Disques enregistrés et finalisés
CD-Vidéo [VCD]
Y compris SVCD (conforme à IEC62107)
CD [CD] [WMA] [MP3] [JPEG] [VCD]
≥ Cet appareil peut prendre en charge les CD-R/RW enregistrés aux formats indiqués ci-dessus. Il
importe de clore les sessions ou de finaliser
≥ [WMA] [MP3] [JPEG] Cet appareil prend également en charge les disques HighMAT.
Cet appareil est compatible avec le codage HDCD (
≥
la fonction d’extension des crêtes (une fonction qui élargit la plage dynamique des signaux de niveau élevé).
(Lors de la lecture d’un CD au format HDCD, l’indication “HDCD” s’allume sur l’appareil.)
➜ page 17
Certains disques DVD-Audio multicanal empêchent le mélange-abaissement (
sur les enregistreurs DVD-Vidéo Panasonic
selon la norme DCF (Design rule
, Menu Autres).
Exemple:
1
§
sur enregistreur ou caméra vidéo DVD
§
sur un enregistreur DVD-Vidéo ou caméra vidéo DVD conforme à la
§
sur enregistreur DVD-Vidéo ou caméra vidéo DVD
§
le disques après l’enregistrement.
➜ page 27
§
et les disques “Chaoji VCD ” disponibles sur le marché
, Glossaire), mais ne peut pas prendre en charge
➜ page 27
ALL
∫
Conseils pour créer des
disques WMA/MP3 et
JPEG (pour CD-R/CD-RW)
≥ Les disques doivent satisfaire aux
normes ISO9660 de niveau 1 ou 2 (sauf
dans le cas des formats étendus).
≥ Le lecteur est compatible avec les
enregistrements multisession; par
,
1
2
contre, s’il y a plusieurs sessions,
l’amorce de la lecture pourrait prendre
plus de temps. Pour prévenir un tel
problème, réduire le nombre de sessions
à un strict minimum.
Dans le cas où des groupes sont créés à
≥
partir d’une racine telle que “002 groupe”
dans l’illustration ci-dessous, les groupes à
partir du huitième sont affichés sur la même
ligne verticale dans l’écran du menu.
≥ I
l se peut que l’ordre d’affichage ne soit pas le
même sur le menu que sur l’écran de
4
l’ordinateur.
≥
Cet appareil ne peut prendre en charge des
fichiers enregistrés au format de paquet.
Appellation des dossiers et des
(Les fichiers sont traités à la manière de
contenu tandis que les dossiers sont
considérés comme des groupes.)
Au moment de l’enregistrement, attribuer
un préfixe ordinal (à trois chiffres) au nom
des dossiers et des fichiers en fonction de
l’ordre dans lequel leur lecture doit se faire
(peut ne pas fonctionner).
Les fichiers doivent comporter l’extension:
“.WMA” ou “.wma”, “.MP3” ou “.mp3”,
“.JPG”, “.jpg”, “.JPEG” ou “.jpeg”
ex.: [MP3]
racine
001 groupe
001
001 plage.mp3
002 plage.mp3
003 plage.mp3
002 groupe
001 plage.mp3
003 groupe
002 plage.mp3
003 plage.mp3
004 plage.mp3
001 plage.mp3
002 plage.mp3
003 plage.mp3
Page 31

[WMA]
≥ Il n’est pas possible de lire des fichiers
WMA protégés contre le piratage.
et appareil n’est pas compatible avec le
≥ C
format débit binaire multiple (Multiple Bit
Rate) (MBR: fichier dont le même contenu
est codé selon divers débits binaires).
[MP3]
≥ Le lecteur n’est pas compatible avec les
marqueurs ID3.
Taux d’échantillonnage compatibles: 8,
≥
11,02, 12, 16, 22,05, 24, 32, 44,1 et 48 kHz
[JPEG]
≥ Les fichiers JPEG enregistrés sur un
appareil photo numérique conforme à la
norme DCF version 1.0 sont affichés.
– Les photos prises au moyen de fonctions de
prises de vues non prises en charge par la
norme DCF, telles que la rotation
automatique des photos, pourraient ne pas
être affichées.
–
Les fichiers modifiés, édités ou sauvegardés
au moyen d’un logiciel d’édition d’images
pourraient ne pas être affichés.
≥ Cet appareil ne peut prendre en charge
les images animées, les enregistrements
vidéo au format MOTION JPEG ou autre
format semblable, ni les images fixes
autres que celles au format JPEG (ex. :
TIFF) ou lire le signal sonore qui leur est
associé.
∫ Précautions à prendre
≥ Ne pas apposer d’étiquette ni de collant
sur les disques (Cela peut voiler le
disque et le rendre inutilisable).
≥ Ne pas écrire sur le côté de l’étiquette
avec un crayon à bille ou tout autre
instrument d’écriture.
Ne pas utiliser les nettoyeurs en
≥
vaporisateur, le benzène, le diluant pour
peinture, les liquides de prévention
d’électricité statique ou tout autre solvant.
≥ Ne pas utiliser les protecteurs ni les
couvercles anti-éraflures.
≥ Ne pas utiliser les disques suivants:
– Disques avec ruban adhésif exposé
d’étiquettes enlevées (disques loués, etc.).
– Disques gravement voilés ou fendillés.
– Disques de forme irrégulière, en forme
de coeur, par exemple.
Fabriqué sous licence de Dolby Laboratories.
“Dolby” et le symbole double D sont des marques de commerce de Dolby Laboratories.
“DTS” et “DTS Digital Surround” sont des marques déposées de Digital Theater
Systems, Inc.
Cet appareil incorpore une technologie anti-piratage protégée par des brevets
déposés auprès des autorités du gouvernement américain et d’autres droits de
propriété intellectuelle détenus par Macrovision Corporation et d’autres détenteurs
de droits. L’utilisation de cette technologie de protection des droits d’auteur doit être
autorisée par la société Macrovision et doit se limiter à des fins de divertissement
privé à moins d’une autorisation préalable et explicite de Macrovision Corporation.
Toute rétro-ingénierie ou tout démontage est interdit.
Technologie de décodage audio MPEG Layer 3 sous licence de Fraunhofer IIS et
Thomson multimedia.
HighMAT™ et le logotype HighMAT sont des marques de
commerce ou des marques déposées de Microsoft
Corporation aux États-Unis et(ou) dans d’autres pays.
Windows Media et le logotype Windows sont des
marques de commerce ou des marques déposées
de Microsoft Corporation aux États-Unis et(ou) dans
d’autres pays.
WMA est un format de compression développé par
Microsoft Corporation. On y retrouve la même qualité
sonore qu’avec les MP3 avec des fichiers de taille
plus petite que les MP3.
sont soit des marques déposées, soit des marques de commerce de Pacific
Microsonics, Inc. aux États-Unis et(ou) dans d’autres pays.
Système HDCD fabriqué sous licence de Pacific Microsonics, Inc. Ce produit est
couvert par les brevets suivants: États-Unis: 5,479,168, 5,638,074, 5,640,161,
5,808,574, 5,838,274, 5,854,600, 5,864,311, 5,872,531; Australie: 669114. Autres
brevets en instance.
HDMI, le logo HDMI et High Definition Multimedia Interface sont des marques de
commerce ou des marques déposées de HDMI Licensing LLC.
, HDCD®, High Definition Compatible Digital
®
et Pacific Microsonics™
Accessoires
Pour la commande d’accessoires,
contacter le magasin où l’appareil a été
acheté.
Lors de la commande de pièces de
rechange, utiliser les numéros indiqués cidessous.
(Les numéros de modèles indiqués ici
étaient à jour en f
être modifiés sans préavis.)
∏ 1 Télécommande (EUR7720KG0)
∏ 1 Cordon d’alimentation
∏ 1 Câble audio/vidéo
∏ 1 Câble HDMI (K1HA19DA0001)
∏ 2 Piles de la télécommande
[Nota]
Le cordon d’alimentation fourni ne doit être
utilisé qu’avec cet appareil. Ne pas l’utiliser
avec un autre appareil.
évrier
2005. Ils pourraient
(K2CB2CB00016)
(K2KA6BA00004)
31
Disques compatibles Accessoires
RQT8087
5
Page 32

ÉTAPE 1
COMPONENT VIDEO OUT
(480p/480i)
(p )
AUDIO OUT
2ch
L
R
VIDEO
OUT
S VIDEO
OUT
Please connect
directly to TV.
OUND
FRONT L/L
FRONT R/R
O/
Y
COMPONENT VIDEO OUT
(480p/480i)
AUDIO OUT
2ch
L
P
B
Y
P
R
R
VIDEO
OUT
S VIDEO
OUT
ROUND
FRONT L/L
FRONT R/R
O/
Please connect
directly to TV.
AC IN
≥ Ne pas mettre le lecteur sur un amplificateur ni sur tout autre appareil qui risque de chauffer. La chaleur peut endommager irrémédiablement le lecteur.
≥ Ne faire aucuns des raccordements via un magnétoscope. En effet, du fait du système antipiratage, l’image pourrait ne pas être reproduite correctement.
≥ Mettre tous les appareils hors tension avant d’effectuer le raccordement et lire leur manuel d’utilisation.
≥ Relier les prises de même couleur.
Raccordement
Avec VIDEO IN ou S VIDEO IN
AUDIO IN
R(D) L(G
)
VIDEO
IN
Câble
S-Vidéo
Câble
audio/
vidéo
(fourni)
ou
S VIDEO
§
IN
Téléviseur
Avec COMPONENT VIDEO IN
Câble
audio/
vidéo
(fourni)
AUDIO IN
R(D) L(G
)
COMPONENT
Non utilisées
VIDEO IN
Panneau arrière de l’appareil
Câbles
vidéo
§
Avec ce type de raccordement, le câble audio
(fiches rouge et blanc) devrait également être
Il est possible de raccorder un câble audio aux
prises d’entrée (2 canaux) d’un amplificateur
Raccordement
connecté.
analogique ou d’un élément de chaîne audio pour
profiter d’un rendu stéréo.
∫ Brancher le cordon d’alimentation en dernier
RQT8087
6
32
Cordon d’alimentation
(fourni)
Vers une prise secteur
(120 V c.a., 60 Hz)
Sélectionner “Plus foncé” dans “Commande de niveau du noir” (➜ page 20,
Onglet “Vidéo”).
Pour la vidéo progressive
Connecter à un téléviseur compatible avec le signal à balayage progressif.
1 Régler “Mode vidéo HDMI” à “Non” (➜ page 21, Onglet “HDMI”).
2 Régler “Mode sortie vidéo” à “480p”, puis suivre les instructions qui
s’affichent à l’écran du menu (➜ page 16, Menu Image).
Tous les téléviseurs Panasonic avec connecteurs d’entrée 480p sont compatibles. Si un téléviseur d’une autre marque est utilisé, communiquer avec
le fabricant.
Conservation de l’énergie
Cet appareil consomme une petite quantité d’énergie même lorsqu’il est hors marche
(1 W). Pour économiser l’énergie lorsque l’appareil n’est pas utilisé pendant une
période prolongée, débrancher le cordon d’alimentation.
Page 33

Réglage de la qualité de l’image et du rendu sonore (avec connexion HDMI) (➜ page 27, Glossaire)
COAXIAL
COMP
AUDIO O UT
5.1ch
2ch
DIGITAL AUDIO OUT
(PCM/BITSTREAM)
L
L
P
B
P
R
R
R
OPTICAL
CENTER
SURROUND
FRONT L/L
SUBWOOFER
FRONT R/R
COAXIAL
AUDIO O UT
5.1ch
DIGITAL AUDIO OUT
(PCM/BITSTREAM)
L
R
OPTICAL
CENTER
SURROUND
FRONT L/L
SUBWOOFER
FRONT R/R
COAXIAL
DIGITAL AUDIO OUT
(PCM/BITSTREAM)
OPTICAL
CENTER
SUBWOOF
COMPONENT VIDEO OUT
P
B
Y
P
R
VIDEO
OUT
S VIDEO
OUT
Le raccordement de cet appareil à un téléviseur haute définition compatible avec le format HDMI a pour effet de convertir et d’acheminer des enregistrements vidéo en signaux
vidéo haute définition (720p, 1080i). Il est également possible d’obtenir un rendu sonore ambiophonique multicanal en connectant un amplificateur HDMI compatible équipé de
prises de sortie multicanal.
Avec un téléviseur HDMI compatible
Pour un rendu sonore de haute qualité et un signal vidéo
numérique haute définition avec connexion d’un seul câble.
≥ Il est possible d’obtenir un rendu sonore
ambiophonique multicanal en connectant un
amplificateur à d’autres prises audio (➜ page 8).
HDMI IN
Téléviseur
Avec un téléviseur et un amplificateur
HDMI compatibles
Pour un rendu sonore ambiophonique numérique
multicanal en plus de la restitution d’une image
numérique en haute définition.
HDMI IN
Câble HDMI
Téléviseur
Aux enceintes
multicanal
Câble HDMI
(fourni)
HDMI OUT
HDMI IN
Amplificateur
Câble HDMI (fourni)
Panneau arrière de l’appareil
≥ Régler “Mode vidéo HDMI” et “Sortie audio
HDMI” à “Oui” (➜ page 21, Onglet “HDMI”).
≥ Pour obtenir une image haute définition, faire la connexion à un téléviseur haute définition compatible avec HDMI et activer “Mode sortie vidéo” (➜ page 16, Menu Image).
≥ Cet appareil est équipé de HDMI version 1.1 (EDID version 1.3, jusqu’à 512 octets). Cette version n’est pas compatible avec la fonction de contrôle HDMI (CEC).
≥ Lors du raccordement d’un équipement ne pouvant prendre en charge les fichiers protégés contre le piratage (CPPM ➜ page 27, Glossaire), le signal audio du DVD-Audio ainsi
protégé ne peut être reçu via la prise de sortie HDMI AV OUT. Connecter la fiche audio [L (G), R (D)] du câble audio/vidéo dans une prise d’entrée audio compatible avec le
format HDMI.
Panneau arrière de l’appareil
≥ Régler
“Mode
vidéo
HDMI” et
HDMI” à
“Oui”
(➜ page 21, Onglet “HDMI”).
“Sortie audio
Avec un amplificateur HDMI compatible
La connexion d’un amplificateur HDMI compatible
permet un rendu sonore ambiophonique multicanal
même si le téléviseur utilisé n’est pas compatible avec le
format HDMI.
Téléviseur
Aux enceintes multicanal
HDMI IN
Câble HDMI
(fourni)
Panneau arrière de l’appareil
≥
Régler “Mode vidéo HDMI” à “Non” et “Sortie
audio HDMI” à “Oui” (
§
Il est également possible d’utiliser les prises
S VIDEO et COMPONENT VIDEO.
Amplificateur
VIDEO IN
Non utilisées
Câble audio/
vidéo
(fourni)
Non utilisées
(480p/480i)
➜
page 21, Onglet “HDMI”).
§
§
33
Raccordement
RQT8087
7
Page 34

ÉTAPE 1
OPTICAL
COAXIAL
DIGITAL AUDIO OUT
(PCM/BITSTREAM)
ch
L
R
CENTER
SU
SUBWOOFER
5
.
AUDI O O UT
5.1c h
L
R
CENTER
SURROUND
FRONT L/L
SUBWOOFER
FRONT R/R
2ch
Raccordement
Rendu ambiophonique multicanal
≥ Régler “Sortie audio HDMI” à “Non” (➜ page 21, Onglet “HDMI”).
Raccordement
AVEC COAXIAL IN ou OPTICAL IN
Amplificateur avec décodeur
ou
combinaison amplificateurdécodeur
COAXIAL IN OPTICAL IN
Câble
coaxial
≥ Modifier “Sortie numérique PCM”, “Dolby Digital” et
“DTS Digital Surround” (➜ pages 20, 21, Onglet “Audio”).
Câble audio numérique à fibres optiques
Ne pas trop plier le câble lors du raccordement.
≥ Il n’est pas possible d’utiliser de décodeurs DTS
Digital Surround non compatibles avec DVD.
≥ Même avec cette connexion, la sor tie ne sera que
sur 2 canaux lors de la lecture de DVD-Audio.
Pour entendre le signal ambiophonique
multicanal, utiliser les prises AUDIO OUT 5.1 ch
(➜ droite) ou les prises HDMI (➜ page 7).
Amplificateur
Panneau arrière de l’appareil
AVEC AUDIO IN 5.1ch
Pour un rendement optimal avec un disque DVD-Audio
multicanal à modulation linéaire par impulsions codées, cette
connexion est recommandée. Pour profiter d’un rendu
ambiophonique multicanal, raccorder l’appareil à un
amplificateur doté de prises HDMI (➜ page 7).
COAXIAL IN
CENTER SUBWOOFER
SURROUND
[L(G)] [R(D)]
≥ Modifier “Haut-parleurs” (➜ page 21, Onglet “Audio”).
FRONT
[L(G)] [R(D)]
Câble audio
Connecter les câbles
aux prises
correspondant aux
enceintes acoustiques
qui ont été raccordées.
8
RQT8087
34
Page 35

ÉTAPE 2
DIRECT NAVIGATOR
TOP MENU
PLAY LIST
MENU
ENTER
DISPLAY
RETURN
CONTRAST
BRIGHTNESS
SHARPNESS
COLOR
SUBTITLE
AUDIO
ANGLE/PAGE
SETUP
PLAY MODE
DNR
ZOOM
GROUP
FL SELECT
TV
TV/VIDEO
CH
VOLUME
∫ Piles
R6/LR6, AA
Télécommande
≥ S’assurer de respecter la polarité (i, j).
≥ Ne pas utiliser de piles rechargeables.
Ne pas:
≥ utiliser ensemble des piles neuves et usées.
≥ utiliser ensemble des piles de types différents.
≥ exposer les piles à la chaleur ou à la flamme.
≥ démonter ou court-circuiter les piles.
≥ tenter de recharger des piles alcalines ou au manganèse.
≥ utiliser des piles dont la gaine a été enlevée ou est
endommagée.
Un traitement inapproprié des piles peut entraîner une fuite de
l’électrolyte susceptible d’endommager les objets avec lesquels elle
entrerait en contact et de provoquer un incendie.
Retirer les piles de la télécommande si celle-ci ne doit pas être utilisée
pendant une longue période. Ranger les piles dans un endroit sombre et frais.
∫ Utilisation
Orienter la télécommande directement vers le capteur de signal
(➜ page 10), en prenant soin d’éviter les obstacles, à une distance
maximum de 7 m (23 pi).
ÉTAPE 3
ÉTAPE 4
CONFIGURATION RAPIDE
Mettre le téléviseur en marche. Sélectionner le mode d’entrée vidéo sur le téléviseur selon le type de connexion effectué
12 345
DVD
Mise en marche. Affiche le menu de
Pour modifier ultérieurement les paramétrages
Sélectionner “CONFIGURATION RAPIDE” (➜ page 21, Onglet “Autres” ).
Fonctionnement avec un téléviseur
QUICK SETUP.
SETUP
Suivre les instructions
affichées et effectuer les
paramétrages requis.
(Il est possible de commander le téléviseur au moyen de la télécommande de cet appareil.)
RETURN
ENTER
Appuyer pour mettre
fin à la
RAPIDE.
.
ENTER
CONFIGURATION
Appuyer pour
quitter.
SETUP
Orienter la télécommande vers le téléviseur
Tout en appuyant sur [Í TV], entrer le code au moyen des touches numériques.
Ex.: 01: [0] ➜ [1]
TV
TV/VIDEO
CH
Touches de commande
du téléviseur
VOLUME
Fabricant et n° de code
Panasonic GE 05 LG 15, 16, 17 RCA 05 SHARP 06, 07 THOMSON 05
National 01, 02 GOLDSTAR 15, 16, 17 MAGNAVOX 03 SAMSUNG 14, 18, 19 SONY 08 TOSHIBA 09
QUASAR HITACHI 12 MITSUBISHI 13 SANYO 10 SYLVANIA 03 ZENITH 04
FISHER 10 JVC 11 PHILIPS (RC-5) 03
Faire des essais en allumant le téléviseur et en changeant de canal. Répéter la marche à suivre jusqu’à ce que vous ayez trouvé le code qui permet un fonctionnement correct.
≥ Si la marque du téléviseur n’apparaît pas dans la liste ou si le code indiqué pour le téléviseur ne permet pas de télécommander celui-ci, c’est que la télécommande n’est pas
compatible avec le téléviseur.
RQT8087
35
Télécommande/CONFIGURATION RAPIDE Fonctionnement avec un téléviseur
9
Page 36

Lecture de base
1
Mise en
2 Ouvrir le plateau du
marche.
Voyants HDMI (➜ ci-dessous)
Capteur du signal de la
télécommande
3Placer le disque sur le plateau.
≥ Avec les disques à double face, introduire le disque avec l’étiquette de la
face à lire vers le haut.
≥ [RAM]
Retirer le disque de sa cartouche avant de l’introduire dans l’appareil.
Voyants HDMI
Lors d’un raccordement HDMI (➜ page 7), ces voyants
s’allument dans les cas suivants:
: Sortie vidéo.
: Sortie audio (Vert: 2 canaux/Orange: Multicanaux).
: Sortie vidéo 720p/1080i (➜ page 16, Mode sortie
vidéo dans le Menu Image).
Saut
≥ [RAM] [DVD-RW[‹VR›] Il est également possible de repérer
les marqueurs.
Lecture de base
Arrêt
La position est mémorisée lorsque “!” clignote à l’affichage.
≥ Appuyer sur [1] (PLAY) pour poursuivre la lecture.
[DVD-V] Aperçu des chapitres précédents (➜ page 14,
Mémorisation de position).
≥ Appuyer sur [∫] pour annuler la position.
disque.
720p/1080i
1
FL SELECT
AV ENHANCER
CANCEL
SKIP
STOP
DIRECT NAVIGATOR
TOP MENU
TV
TV/VIDEO
MULTI
RE-MASTER
PAUSE
VOLUME
CH
AUDIO ONLY
PLAY SPEED
POSITION MEMORY
QUICK REPLAY
SLOW/SEARCH
PLAY
PLAY LIST
MENU
4
(➜ page 12)
4
Amorcer la
lecture.
PauseArrêt
Appuyer pour effectuer un saut.
Maintenir la pression pour
effectuer
–une recherche (pendant la
lecture)
–une lecture au ralenti
(pendant la pause)
Lecture en reprise
≥ Sélectionner “Répétition” ou “Répétition A-B” (➜ page 15, Menu
Lecture).
Recherche
(pendant la lecture)
Ralenti (pendant la pause)
≥ Jusqu’à 5 paliers
≥ Appuyer sur [1] (PLAY) pour relancer la lecture.
≥ [VCD] Ralenti, direction avant seulement
Pause
≥ Appuyer sur [1] (PLAY) pour relancer la lecture.
Interrupteur/mise en attente (Í/I)
Appuyer sur cet interrupteur pour commuter l’appareil du mode d’attente au mode de marche et
vice versa. En mode d’attente, l’appareil continue de consommer une petite quantité de courant.
RQT8087
≥
L’indicateur “D.MIX” confirme qu’une bande son avec 3 canaux ou plus peut être
mélangée-abaissée sur deux canaux
10
36
(➜ page 27, Glossaire)
.
≥
La rotation du disque continue pendant l’affichage du menu. Afin de protéger le système
d’entraînement et l’écran du téléviseur, appuyer sur [
≥
Le nombre total de titres pourrait ne pas être affiché correctement avec des disques +R/+RW.
Si un problème de fonctionnement devait survenir, se reporter au guide de
dépannage (➜ pages 23
–
25).
∫
] pour immobiliser le disque.
Page 37

Changement de la séquence de lecture
Sélection titre et chapitre
Nx Durée
Titre
Lecture
Effacer
Chapitre
1
Saut de groupe
[WMA] [MP3] [JPEG]
Image par image
(pendant la pause)
[RAM] [DVD-RW[‹VR›]
[DVD-V] [VCD]
Sélection
d’une rubrique
à l’écran
Saisie d’un
numéro
Menu du
disque
Affichage sur
le lecteur
Écran de
renseignements
ENTER
ENTER
ENTER
123
456
789
0
10
DIRECT NAVIGATOR
TOP MENU
PLAY LIST
MENU
RETURN
FL SELECT
SUBTITLE
≥ Cette fonction n’a aucun effet en mode pause.
≥ [VCD]
en sens avant seulement
Sélectionner
Enregistrer
Retour au
menu
précédent
RETURN
[RAM] [DVD-RW[‹VR›] [DVD-A] [DVD-V] [VCD] [CD]
ex.: Pour sélectionner 12: [S10] ➜ [1] ➜ [2]
ENTER
[WMA] [MP3] [JPEG]
ex.: Pour sélectionner 123:
[1] ➜ [2] ➜ [3]➜ [ENTER]
[DVD-A] [DVD-V]
Affiche le premier écran menu.
[RAM] [DVD-RW[‹VR›]
Lecture des programmes (➜ page 19).
[DVD-V]
Affiche le menu du disque.
[RAM] [DVD-RW[‹VR›]
Lecture d’une liste de lecture (➜ page 19).
[VCD] avec pilotage de la lecture
Affiche le menu du disque.
Affichage du numéro
[RAM] [DVD-RW[‹VR›]
Active ou désactive les sous-titres (➜ page 13).
[DVD-V] [VCD] (SVCD seulement)
Sélectionne la langue des sous-titres (➜
[WMA] [MP3] [JPEG] [CD] (texte CD seulement)
Affichage ou non de l’écran de renseignements.
,------. Affichage chronométrique
page 13
).
PLAY MODE
Lecture de tous les groupes/programmée/aléatoire
[DVD-A] [DVD-V] [VCD] [CD] [WMA] [MP3] [JPEG]
En mode arrêt, appuyer sur [PLAY MODE].
Lecture de tous les groupes ([DVD-A]) > Lecture programmée > Lecture aléatoire
≥ Désactiver la lecture au format HighMAT pour permettre la lecture programmée ou
aléatoire. Sélectionner “Lecture disque données” dans le Menu Autres (➜ page 17).
∫ Lecture de tous les groupes
^------------------ Non (lecture normale),-------------------------------------b
Lecture de tous les groupes
Appuyer sur [1] (PLAY).
Appuyez sur PLAY pour commencer
∫ Lecture programmée (jusqu’à 32 rubriques)
1 Appuyer sur les touches numériques pour
sélectionner des rubriques (➜ ci-contre,
Saisie d’un numéro).
Recommencer cette étape pour programmer d’autres
rubriques.
2 Appuyer sur [1] (PLAY).
Sélection de tous les éléments
(sur le disque ou dans un titre ou groupe)
Appuyer sur [ENTER] et [3 4] pour sélectionner “ALL” (tous), puis appuyer de
nouveau sur [ENTER] pour confirmer.
Modification du programme
Appuyer sur [
3 4
] pour sélectionner une rubrique.
– Pour remplacer une rubrique, répéter l’étape 1.
– Pour supprimer une rubrique, appuyer sur [CANCEL] (ou sélectionner “Effacer” et
appuyer sur [ENTER]).
≥ Appuyer sur [ANGLE/PAGE] pour sauter une page à la fois.
Suppression d’un programme au complet
Sélectionner “Effacer tout le programme”, puis appuyer sur [ENTER]. Le programme est
également effacé après la mise hors marche ou l’ouverture du plateau du disque.
∫ Lecture aléatoire
1 [DVD-A] [DVD-V] [WMA] [MP3] [JPEG] Appuyer sur les
touches numériques appropriées pour
sélectionner un groupe ou un titre
(➜ ci-contre, Saisie d’un numéro).
2 Appuyer sur [
Pour quitter le mode de lecture de tous les groupes, programmée ou aléatoire
Appuyer sur [PLAY MODE] à plusieurs reprises en mode arrêt.
1
] (PLAY).
ex.: [DVD-V]
1
ex.: [DVD-V]
Lecture aléatoire
Press PLAY to start
Choisissez un titre.
Titre
sélectionner
0 ~ 9
Effacer tout
Effacer tout
le programme
le programme
1
démarrer
PLAY
Changement de la séquence de lecture
Lecture de base
RQT8087
11
37
Page 38

Fonctions pratiques
AV ENHANCER
(Appareil principal)
Sur simple pression d’une touche, l’appareil détecte
automatiquement le type de disque et sélectionne les paramètres
audio et vidéo optimaux.
Appuyer sur [AV ENHANCER] pour sélectionner
“Auto”, “Utilisateur1”, “Utilisateur2” ou “Utilisateur3”.
Non: Annulé
Auto: Les paramètres audio et vidéo optimaux sont établis.
Utilisateur1
Utilisateur2
Utilisateur3
§
Lorsque le rehausseur AV (Auto) est activé, il n’est pas possible de modifier les
paramètres indiqués ci-dessous.
Paramétrages audio:
Multi remastériser (
Ambiophonie évoluée/Optimisation dialogues (➜page 16)
Paramétrages vidéo:
Mode image
Gamma/Amplificateur BF (➜ page 16
Contraste/Luminosité/Netteté/Couleur (➜ page 13)
Réduc. bruit num. MPEG/Réduction bruit 3D (➜ page 14, Réduction du bruit vidéo)
≥ Cette fonction pourrait ne pas pouvoir être activée selon le type d’enregistrement.
§
: Convient au vidéo ([DVD-V]) (préréglé en usine).
§
: Convient à l’audio (préréglé en usine).
§
Il est possible de modifier le paramétrage de Utilisateur 1–3 selon les préférences
(➜ page 17, “AV Enhancer” dans Menu Autres).
: Convient au vidéo ([RAM] [DVD-RW[‹VR›]) (préréglé en usine).
(
➜ page 16
Rehausseur AV (AV Enhancer)
➜ droite
)
)
)
AV Enhancer Auto
Pour l’écoute d’un son de qualité encore plus élevée
AUDIO ONLY
Rappel des paramètres audio et vidéo recommandés
Fonctions pratiques
Pour un rendu sonore optimal, désactiver la reproduction de l’image.
Pendant la lecture, appuyer sur [AUDIO ONLY].
≥ La fonction AUDIO ONLY (audio seulement) est désactivée sur une seconde pression
de la touche [AUDIO ONLY] ou lorsque l’appareil est mis dans le mode attente.
≥ Une image n’est affichée à l’écran que lorsque:
—le disque est arrêté.
—des opérations telles que la recherche sont exécutées.
—l’affichage ou le menu à l’écran est activé.
RQT8087
≥ Lorsque cette fonction est activée, aucun signal audio ni vidéo n’est transmis depuis
12
la prise HDMI AV OUT.
38
AUDIO ONLY
Menu
Assure un rendu sonore plus naturel
MULTI
RE-MASTER
[RAM] [DVD-RW[‹VR›] [DVD-A] [DVD-V] [VCD] [CD]
≥
Lors de la production d’un signal de sortie multicanal, cette fonction restaure les
fréquences perdues lors de l’enregistrement pour un rendu sonore plus près de l’original.
≥ Lors de la production d’un signal de sortie sur 2 canaux de ces disques, cette fonction
assure un rendu sonore plus réaliste en ajoutant des signaux haute fréquence non
enregistrés sur le disque, par exemple, lors de la lecture à 96 kHz d’un DVD-Vidéo
enregistré à 48 kHz. (➜ page 27, “Fréquence d’échantillonnage” dans le Glossaire.)
[WMA] [MP3]
Cette fonction restaure les fréquences perdues lors de l’enregistrement pour un rendu
sonore plus près de l’original.
[RAM] [DVD-RW[‹VR›] [DVD-V] (Disques enregistrés à 48 kHz seulement)
[DVD-A] (Disques enregistrés à une fréquence d’échantillonnage de 44,1
kHz ou 48 kHz seulement) [VCD] [CD]
[WMA] [MP3] (Enregistrement sous une fréquence d’échantillonnage autre
que 8 kHz, 16 kHz ou 32 kHz)
Multi remastériser
Appuyer sur [MULTI RE-MASTER] pour sélectionner “1”, “2” ou “3”.
Menu
Multi remastériser
Paramètr e
1
2 Divers rythmes (ex.: jazz) Moyen
3 Rythme lent (ex.: musique classique) Élevé
Non Désactivé Désactivé
Réglage du niveau de remastérisation [DVD-A] [DVD-V] [CD] (LPCM/PPCM)
Appuyer sur [21] pour régler le niveau (–6 dB à + 6 dB).
≥ Cette fonction pourrait ne pas fonctionner lorsque la connexion est faite sur les prises
DIGITAL AUDIO OUT ou HDMI AV OUT.
≥ Cette fonction pourrait ne pas pouvoir être activée selon le type d’enregistrement.
1
Non
1 96kHz
2
3
Niveau
[DVD-A] [DVD-V] [CD] (LPCM/PPCM)
Type de musique
Rythme rapide (ex.: musique pop et rock)
0dB
Fréquence d’échantillonnage
de sortie
Niveau de remastérisation
Autres disques
Niveau de l’effet
Faible
Page 39

QUICK REPLAY
Reprise rapide (Seulement pendant l’affichage du temps de
lecture écoulé) (Sauf iR/iRW)
Appuyer sur [QUICK REPLAY] pour revenir en arrière quelques
secondes.
≥
Cette fonction pourrait ne pas pouvoir être activée selon le type d’enregistrement.
PLAY SPEED
Modification de la vitesse de lecture
[RAM] [DVD-RW[‹VR›] [DVD-V]
Pendant la lecture, appuyer sur [W, PLAY SPEED] ou
[X, PLAY SPEED].
–de k0,6 à k1,4 (par incréments de 0,1)
≥ Appuyer sur [1] (PLAY) pour rétablir la lecture normale.
≥ Après avoir modifié la vitesse
–Les fonctions Multi remastériser (➜ page 12) et Ambiophonie évoluée (➜ page 16,
Menu Audio) n’ont aucun effet.
–Le son est reproduit sur 2 canaux.
–La fréquence d’échantillonnage passe de 96 kHz à 48 kHz.
≥ Cette fonction pourrait ne pas pouvoir être activée selon le type d’enregistrement.
AUDIO
Changement de langue des dialogues
[DVD-A] [DVD-V] (avec bandes son multiples) [RAM] [DVD-RW[‹VR›] [VCD]
Appuyer sur [AUDIO] pour sélectionner la piste sonore.
[RAM] [DVD-RW[‹VR›] [VCD]
Utiliser cette touche pour sélectionner “L” (G), “R” (D) ou “L R” (G D).
[DVD-V] (Disques Karaoké)
Appuyer sur [2 1] pour sélectionner “Oui” ou “Non” pour les paroles. Pour de plus
amples renseignements, lire la notice d’emploi du disque.
Type de signal/données
LPCM/PPCM/Î Digital/DTS/MPEG: Type de signal
kHz (Fréquence d’échantillonnage)/bit/ch (Nombre de canaux)
Exemple: 3
/2 .1ch
.1: Effet de basse fréquence
(n’est pas affiché en l’absence de signal)
0: Aucun effet ambiophonique
1: Effet ambiophonique monaural
2:
Effet ambiophonique stéréophonique (gauche/droit)
1: Centre
2: Avant gaucheiAvant droit
3: Avant gaucheiAvant droitiCentre
ex.: [RAM]
DVD-VR
k0.9
Menu
Audio 1
CONTRAST
BRIGHTNESS
Contraste
Accentue le contraste entre les parties claires et les parties sombres de l’image.
1. Appuyer sur [CONTRAST].
2. Appuyer sur [21] pour régler (–7 à +7).
Luminosité
Augmente la luminosité de l’image.
1. Appuyer sur [BRIGHTNESS].
2. Appuyer sur [21] pour régler (0 à +15).
Netteté
Ajuste la netteté des bords des lignes horizontales.
1. Appuyer sur [SHARPNESS].
2. Appuyer sur [21] pour régler (–7 à +7).
Couleur
Ajuste la nuance des couleurs de l’image.
1. Appuyer sur [COLOR].
2. Appuyer sur [21] pour régler (–7 à +7).
SUBTITLE
[DVD-V] [VCD]
Changement de langue des sous-titres
[DVD-V] (avec sous-titles) [VCD] (SVCD seulement)
[RAM] [DVD-RW[‹VR›] (Activé/désactivé seulement avec des disques
permettant d’activer et désactiver l’affichage de sous-titres)
Appuyer sur [SUBTITLE] pour sélectionner la langue
des sous-titres.
≥ Avec les disques iR/iRW, un numéro de sous-titre pourrait
apparaître pour les sous-titres qui ne sont pas affichés.
Affichage/suppression des sous-titres
Appuyer sur [2 1] pour sélectionner “Oui” ou “Non”.
[RAM] [DVD-RW[‹VR›]
Appuyer sur [SUBTITLE] pour sélectionner “Oui” ou “Non”.
≥ Les enregistreurs DVD Panasonic ne peuvent pas enregistrer les informations
d’activation ou de désactivation des sous-titres.
SHARPNESS
COLOR
Réglage de l’image
Contraste
0
Menu
Sous-titres
Non
Fonctions pratiques
RQT8087
13
39
Page 40

Fonctions pratiques
DNR
Réduc. bruit num. MPEG
Réduction bruit 3D : Réduit le bruit.
Réduction du bruit vidéo
: Adoucit le bruit vidéo et réduit le moirage qui apparaît autour
des parties contrastées de l’image.
1 Appuyer sur [DNR] pour sélectionner le réducteur de bruit.
2 Appuyer sur [2 1] pour effectuer le réglage (Réduc. bruit num.
MPEG : 0 à +3, Réduction bruit 3D : 0 à +4).
ZOOM
Cette fonction a pour effet d’agrandir l’image au format
boîte aux lettres de manière qu’elle s’ajuste à l’écran.
Appuyer sur [ZOOM] pour sélectionner le
format d’image prédéterminé ou “Auto”. (Plein
Zoom [RAM] [DVD-RW[‹VR›] [DVD-V] [VCD]
Menu
Plein écran k1.00
écran)
Auto --. 4/3 standard --. European Vista --. 16/9 standard
:;
Cinémascope2 ,----- Cinémascope1 ,------ American Vista
Réglages fins (Zoom manuel)
Appuyer sur [2 1] pendant l’affichage du menu. (Pour une modification rapide,
maintenir la touche enfoncée.)
k 1,00 à k 1,60 (par incréments de 0,01)
–de
–de
k 1,60 à k 2,00 (par incréments de 0,02)
Fonctions pratiques
ANGLE/PAGE
Appuyer sur [ANGLE/PAGE] pour sélectionner l’angle
ou faire pivoter une image fixe.
≥ [JPEG] La rotation des images fixes est annulée lorsque le
plateau du disque est ouvert ou que l’appareil est mis en attente.
RQT8087
14
40
Sélection d’angle [DVD-V] (avec angles multiples)
Rotation d’images fixes [JPEG]/Avancement d’images
fixes
[DVD-A]
ex.: [DVD-V]
Menu
Angle 1/4
POSITION MEMORY
Cette position demeure en mémoire même après avoir mis l’appareil hors marche ou
changé de disque.
Mémorisation de position
(Seulement pendant l’affichage du temps de lecture écoulé
[JPEG]:
Fonctionne avec tous les fichiers JPEG.)
Appuyer sur [POSITION MEMORY].
Position mémorisée
≥ Jusqu’à 5 disques.
≥ Lors de la mémorisation du sixième disque, la première position entrée en mémoire
est remplacée.
≥ Il peut arriver que certaines portions du disque ne puissent être sauvegardées.
Lorsque l’appareil est mis en marche ou qu’un disque est placé dans la
position de lecture, l’indication “!” clignote à l’affichage.
Appuyer sur [1] (PLAY) pour poursuivre la lecture à partir de cet
endroit.
(À cette étape, la mémorisation est effacée.)
Aperçu des chapitres précédents
Appuyer sur [1] (PLAY) lorsque le message suivant s’affiche.
Appuyez sur PLAY pour
prévisualiser le chapitre.
Ne pas appuyer sur [1] (PLAY) s’il n’est pas nécessaire de revoir les chapitres.
Pour annuler
Appuyer sur [
GROUP
Un dossier sur un disque au format WMA/MP3 ou JPEG est traité comme étant un
“Groupe”.
∫
] pendant le clignotement de “!”.
Lancement de la lecture à partir d’un groupe donné
[DVD-A] [WMA] [MP3] [JPEG]
1 Dans le mode arrêt, appuyer sur [GROUP].
2 Sélectionner un groupe au moyen des touches
[34] ou des touches numériques, puis appuyer sur
[ENTER].
≥ [DVD-A] Pour la lecture de tous les groupes (➜ page 11, Lecture de tous les groupes)
[DVD-V]
(Au sein d’un titre seulement)
Menu
Chercher groupe
1
Page 41

Utilisation des menus à l’écran
1
DISPLAY
2
Sélectionner
ENTER
Enregistrer
Appuyer
(Lorsque la touche est pressée deux
fois, l’indicateur de temps de lecture
écoulé s’affiche. ➜ ci-dessous)
∫ Indicateur de temps de
lecture écoulé
Les éléments qui s’affichent varient selon la connexion et le disque.
une fois.
Revenir au menu précédent
Sélectionner le menu. Faire les paramétrages. Appuyer pour quitter.
État de la lecture
Numéro en cours de lecture
Menus principaux
Programme/Groupe/Titre/
Chapitre/Piste/Liste lect./Contenu
Pour sauter des passages par incréments chronométriques (Saut dans
le temps à la lecture seulement) (Sauf iR/iRW)
1. Appuyer sur [ENTER] à deux reprises pour afficher l’indicateur de Saut
dans le temps.
2. Appuyer sur [3 4] pour entrer les données chronométriques, puis
Durée
Audio
Arrêt sur image
Miniature
Sous-titres
Repère (VR)
Angle
Rotation
Diaporama
Autres réglages
appuyer sur [ENTER].
≥
Maintenir la touche [
Pour amorcer la lecture à partir d’un repère chronométrique donné
(Chercher horloge) (Sauf iR/iRW)
Pour modifier l’affichage de la durée écoulée/restante
(➜ page 13, Changement de langue des dialogues)
Pour afficher le débit binaire ou la fréquence d’échantillonnage actuel
Pour passer à une autre image fixe
Pour afficher des imagettes
(➜ page 13, Changement de langue des sous-titres)
Pour repérer un marqueur inscrit sur un enregistrement fait sur
un enregistreur DVD-Vidéo
(➜ page 14, Sélection d’angle)
(➜ page 14, Rotation d’images fixes)
Pour activer/désactiver le diaporama
Pour modifier l’intervalle entre les images (0 à 30 s)
(➜ droite)
Pour amorcer la lecture à partir d’un élément
donné
3 4
] enfoncée pour aller plus rapidement.
Aller au menu
suivant
3
Sélectionner
ENTER
Enregistrer
Position de lecture
Temps de lecture écoulé/Temps restant
Appuyer sur [3 4]
(Seul le temps de lecture écoulé pour les WMA, MP3 et SVCD s’affiche.)
pour modifier l’affichage.
123
456
789
10
0
Mode de lecture
: Lecture normale
ALL: Lecture de tous les groupes [DVD-A]
PGM: Lecture programmée
RND: Lecture aléatoire
PBC: Menu avec pilotage de la lecture [VCD]
Autres réglages
Vitesse de lecture
(➜ page 13, Modification de la vitesse de lecture)
∫ Menu Lecture
(Seulement pendant l’affichage du temps de lecture écoulé
[JPEG]: Les fonctions de répétition et de repère peuvent être utilisées.)
Répétition
Répétition A-B
Repère
Sauf
[RAM]
[DVD-RW[‹VR›]
Sélectionner une rubrique dont la lecture doit être répétée.
Reprise de sections entre deux points spécifiques
Appuyer sur [ENTER] aux points de départ et d’arrêt.
Appuyer de nouveau sur [ENTER] pour annuler.
≥ [RAM] [DVD-RW[‹VR›] (partie des images fixes): Ne fonctionne pas.
Marquage de jusqu’à 5 positions aux fins de relecture
Appuyer sur [ENTER] (Il est maintenant possible d’inscrire des
marqueurs.)
Pour inscrire un marqueur: [ENTER]
Pour marquer une autre position: [21] pour sélectionner “¢”
Pour rappeler un marqueur: [21] ➜ [ENTER]
Pour effacer un marqueur: [21] ➜ [CANCEL]
≥ Cette fonction ne peut être utilisée pendant la lecture
programmée ou aléatoire.
≥ Les marqueurs ajoutés sont supprimés lors de l’ouverture du
plateau du disque ou lorsque l’appareil passe dans le mode
d’attente.
4
RETURN
(à l’emplacement désiré)
➜ [ENTER]
Suite à la page suivante
41
Utilisation des menus à l’écran
RQT8087
15
Page 42

Utilisation des menus à l’écran
∫ Menu Image ∫ Menu Audio
Normal: Images ordinaires
Cinéma1: Adoucit l’image et accentue la netteté des scènes sombres.
16
Utilisation des menus à l’écran
RQT8087
42
Mode
image
Mode
sortie
vidéo
Mode de
transfert
Format
HDMI
Cinéma2:
Animation: Convient à l’animation
Dynamique: Accentue le contraste pour des images à fort impact.
Utilisateur (Appuyer sur [ENTER] pour sélectionner “Réglage de l’image”)
Réglage de l’image
Contraste/Luminosité/Netteté/Couleur (➜ page 13)
Gamma (Ajuste la luminosité des zones sombres.)
Amplificateur BF
Réduit le bruit vidéo en arrière-plan pour donner plus de profondeur à l’image.
Réduc. bruit num. MPEG/Réduction bruit 3D (➜page 14, Réduction du bruit vidéo)
Avec connexion HDMI (lorsque “Mode vidéo HDMI” est réglé à “Oui”)
(➜ page 21, Onglet “HDMI”)
Les enregistrements vidéo seront convertis et acheminés en un signal haute
définition. La qualité de l’image varie selon l’équipement utilisé. Sélectionner
la qualité selon les préférences.
480p (progressif) 720p (progressif) 1080i (entrelacé)
≥
Le symbole “¢” identifie les formats de signal vidéo de sortie possibles en
fonction de l’équipement connecté. Si un choix non identifié par le symbole
¢
” devait être sélectionné, l’image pourrait subir de la distorsion.
“
Dans une telle éventualité, maintenir enfoncée la touche [CANCEL] jusqu’à ce
que l’image redevienne normale. Le paramètre “480p” est alors rétabli.
≥ Le signal de sortie à la prise de sortie vidéo composant (COMPONENT
VIDEO OUT) sera au format “480i”.
Avec connexion HDMI (lorsque
page 21
(➜
480i (entrelacé) 480p (progressif)
Lorsque “480p” est sélectionné et qu’un écran de confirmation s’affiche,
sélectionner “Oui” seulement si le téléviseur connecté est compatible avec
un signal à balayage progressif.
Lorsque “480p”, “720p” ou “1080i” a été sélectionné (➜ ci-dessus), sélectionner la méthode de conversion de manière que le signal de sortie convienne au type de matériel.
Auto1 (normal): Détecte les films avec contenu de 24 images/seconde et
Auto2: Compatible avec les films avec contenu de 30 images/seconde en
Vidéo: Sélectionner lors de la sélection de Auto1 et Auto2 et lors de
Avec connexion HDMI (lorsque “Mode vidéo HDMI” est réglé à “Oui”)
(➜ page 21, Onglet “HDMI”)
La qualité de l’image varie selon l’équipement utilisé. Sélectionner la
qualité selon les préférences. Les formats non compatibles avec
l’équipement connecté ne sont pas affichés.
RVB YCbCr (4:4:4) YCbCr (4:2:2)
≥“Plage HDMI RVB” (➜ page 21, Onglet “HDMI”) est disponible lorsque
“RVB” est sélectionné.
Accentue l’image et rehausse la netteté des scènes sombres.
(➜ ci-dessous)
, Onglet “HDMI”) ou autre connexion
effectue adéquatement la conversion.
plus de 24 images/seconde.
distorsion des images vidéo.
“Mode vidéo HDMI” est réglé à “Non”)
Ambiophonie
évoluée
Optimisation
dialogues
Multi
remastériser
Filtre
numérique
Atténuateur
]RAM\ [DVD-RW[‹VR›] [DVD-V] [VCD] (2 canaux ou plus)
Permet l’obtention d’un effet ambiophonique avec seulement 2
enceintes avant (SP) ou sur une casque d’écoute (HP) (connecter
un équipement muni d’une prise pour casque d’écoute).
SP (
Enceinte acoustique
Casque d’écoute
HP (
≥
Lors de la lecture de disques avec effets ambiophoniques, les sons
semblent provenir de chaque côté de l’auditeur.
≥ Lorsque le casque d’écoute est branché à un appareil connecté
au lecteur, sélectionner “HP 1” ou “HP 2”.
≥ La distance optimale de la position d’écoute est de 3 à 4 fois soit
la distance entre les enceintes gauche et droite avant soit la
largeur du téléviseur si les enceintes du téléviseur sont utilisées.
≥ Ne pas utiliser en même temps que les effets ambiophoniques sur
un autre appareil.
Augmente l’intelligibilité des dialogues des films
[DVD-V]
(Avec enregistrements Dolby Digital, DTS sur 3 canaux ou
plus avec dialogues sur le canal centre)
Oui ,------. Non
(➜ page 12, Assure un rendu sonore plus naturel)
Lorsque le signal audio provient de prises AUDIO OUT 2 ou 5.1
canaux (➜ page 6, 8)
Nomal : Rendu sonore de qualité normale.
Lent: Confère plus d’ambiance au rendu sonore en lui ajoutant
de la douceur et plus de profondeur.
Lorsque le signal audio provient de prises AUDIO OUT 2 ou 5.1
canaux (➜ page 6, 8)
Dans le cas où le son serait distordu, activer l’atténuateur.
Oui ,------. Non
) 1 Naturel
) 1
Naturel
SP 2 Amplifié
HP 2 Amplifié Non
Page 43

∫ Menu Affichage ∫ Menu Autres
Info
Position sous-titres
Luminosité sous-titres
Aspect 4/3
Plein écran
Zoom manuel
Affichage débit binaire
Transparence menu
écran
Luminosité menu
écran
Etat HDMI
Oui ,------. Non
([JPEG] Non/Date/Détails)
0 à –60 (par incréments de 2)
Auto, 0 à –7
Pour sélectionner comment afficher des images au
format 4:3 sur un écran 16:9
Normal: Étire les images dans le sens de la largeur.
Auto: Normalement, le paramètre “Zoom arrière” est
activé. Toutefois, lorsque l’image est au format boîte
aux lettres, le paramètre “Zoom avant” est
automatiquement activé.
Zoom arrière: L’image est rétrécie, centrée sur l’écran.
Zoom avant:
(➜ page 14, Zoom)
(➜ page 14, Zoom)
]RAM\ [DVD-RW[‹VR›] [DVD-V] [VCD]
Oui ,------. Non
Oui ,------. Non
s3 à r3
Donne divers renseignements lorsque la connexion est
faite sur la prise HDMI AV OUT (➜ ci-dessous,
Confirmation des renseignements HDMI).
L’image est agrandie et passe au format 4:3.
Veille
AV
Enhancer
∫ Confirmation des renseignements HDMI
État connexion ➜ page 13,
Etat HDMIHDMI raccordé
Information HDMI
Flux audio
Canal max.
Format vidéo
Espace couleur
≥Toutes les sorties disponibles sont affichées.
Les réglages en cours sont soulignés dans “Flux audio”, “Format vidéo” et “Espace couleur”.
≥
≥Lorsque “Non” est sélectionné sous “Sortie audio HDMI” (➜ page 21, onglet “HDMI”),
l’indication “– – –” s’affiche sous “Flux audio” et “Canal max.”.
PCM/Dolby Digital/DTS
6ch
480p/720p/1080i
YCbCr(4:4:4)/YCbCr(4:2:2)/RVB
➜ page 16, Format HDMI
Changement de langue des dialogues
Affiche le nombre
maximum de canaux
disponibles sur
l’équipement
connecté.
➜ page 16, Mode
sortie vidéo
Configuration
Lecture DVD vidéo
ou
Lecture DVD audio
Lecture DVD-VR
Lecture HighMAT
ou
Lecture
disque données
Auto§,.30 min.,.60 min.,.90 min.,.120 min.
^----------------------------
§
Auto:
Le courant se coupe sur l’appareil 5 minutes après la fin de la lecture.
–Fonctionne également avec des disques DVD qui affichent un
menu après la fin de la lecture.
– Ne peut fonctionner si la lecture est arrêtée ou un menu du
disque s’affiche; le réglage Auto fonctionnera après la reprise
de la lecture.
≥ Lorsqu’une durée entre 30 et 120 minutes est sélectionnée, le
temps restant est affiché.
Programmation des paramétrages
Il est possible de programmer ses effets audio et vidéo de
prédilection sous “Utilisateur1”, “Utilisateur2” et “Utilisateur3”.
Préparatifs
Fixer les paramètres ci-dessous selon les préférences. (Si le
mode “Auto” a été sélectionné, ces paramétrages ne sont pas
disponibles.)
Paramètres audio:
Multi remastériser (➜ page 12)
Ambiophonie évoluée/Optimisation dialogues (➜ page 16)
Paramètres vidéo:
Mode image (➜ page 16)
Gamma/Amplificateur BF (➜ page 16)
Contraste/Luminosité/Netteté/Couleur (➜ page 13)
Réduc. bruit num. MPEG/Réduction bruit 3D (➜ page 14,
Réduction du bruit vidéo)
1. Sélectionner “Enregistrer réglages”, puis appuyer sur [ENTER].
2. Appuyer sur [34] pour sélectionner la destination des
paramètres programmés (Utilisateur1,Utilisateur2 ou
Utilisateur3), puis appuyer sur [ENTER].
3. Suivre les instructions affichées dans le menu puis, pour
confirmer le tout, appuyer sur [ENTER].
Rappel des paramétrages [➜ page 12, Rappel des paramètres
audio et vidéo recommandés—Rehausseur AV (AV Enhancer)]
Confirmation des paramétrages
1. Appuyer sur [3 4] pour sélectionner “Utilisateur1”,
“Utilisateur2” ou “Utilisateur3”, puis appuyer sur [ENTER].
2. Sélectionner “Enregistrer réglages”, puis appuyer à deux
reprises sur [ENTER].
Pour quitter l’écran, sélectionner “Non”, puis appuyer sur [ENTER].
(➜ page 20, Modification des réglages sur l’appareil)
Sélectionner “Lecture DVD vidéo” pour lire le contenu au format
DVD-Vidéo sur un disque DVD-Audio.
Sélectionner “Lecture disque données” pour lire des fichiers JPEG
sur DVD-RAM ou prendre en charge un disque au format HighMAT
sans recourir à la fonction HighMAT.
.
Non ,------------------------J
43
Utilisation des menus à l’écran
RQT8087
17
Page 44

Menus de navigation
TOP MENU
MENU
Lecture de disques WMA/MP3/JPEG [WMA] [MP3] [JPEG]
Il est possible de prendre en charge des fichiers JPEG sur DVD-RAM ou des disques au format HighMAT sans pour autant utiliser la fonction HighMAT (➜ page 17, “Lecture disque
données” dans le Menu Autres).
Lecture du contenu dans l’ordre (Menu Lecture) (sauf fichiers JPEG sur DVD-RAM)
Pendant l’affichage du menu
Appuyer sur [3 4] pour
sélectionner “Tous”,
“Audio”, ou “Arrêt sur
image”, puis appuyer sur
[ENTER].
≥ Pour afficher/quitter l’écran,
appuyer sur [TOP MENU].
WMA/MP3/JPEG
WMA/MP3
JPEG
Menu Lecture
Tous Total 434
Audio Total 7
Arrêt sur image
pour sélectionner puis
Lecture à partir d’une rubrique sélectionnée (Menu Navigation)
1 Appuyer sur [MENU].
2 Appuyer sur [3421] pour sélectionner le groupe, puis appuyer
sur [ENTER].
3≥Lecture du contenu d’un groupe dans l’ordre
Appuyer sur [ENTER].
≥Pour lancer la lecture à partir d’un contenu sélectionné
Appuyer sur [34] pour effectuer la sélection, puis appuyer sur
[ENTER].
Numéro du groupe et du contenu en cours
Menu N
Menus de navigation
002 My favorite2
Perfume
001 My favorite1
002 My favorite2
001 Brazilian
002 Chinese
003 Czech
004 Hungarian
005 Japanese
006 Mexican
007 Philippine
008 Swedish
009 Piano
010 Vocal
DISPLAY
Groupe
avigation
005 Japanese
Groupe 005/023
afficher le sous-menu
001 Lady Starfish
Contenu
5
001 Lady Starfish
002 Metal Glue
003 Life on Jupiter
004 Starperson
JPEG
Contenu 0001/0004
RETURN
≥Pour sauter une page à la fois, appuyer sur [ANGLE/PAGE].
≥
Pour l’écoute d’un ficher WMA/MP3 pendant le visionnement d’une image JPEG
Sélectionner d’abord un JPEG, puis sélectionner le ficher WMA/MP3.
RQT8087
(Procéder dans l’ordre inverse ne peut être fonctionnel.)
≥ Pour quitter l’écran, appuyer sur [MENU].
18
44
de lecture
:JPEG
:WMA/MP3
Numéro actuellement sélectionné
quitter
Total 427
ENTER
∫ Utilisation du sous-menu
1 Appuyer sur [MENU].
2 Appuyer sur [DISPLAY].
3 Sélectionner une rubrique au moyen des touches [3 4], puis
appuyer sur [ENTER].
Multi
Liste
Arbre
Miniature
Groupe suivant
Groupe précédent
Tou s
Audio
Arrêt sur image
Aide
Rechercher
∫ Recherche par contenu ou titre de groupe
1 Appuyer sur [MENU].
≥ Appuyer sur [2 1] pour mettre en surbrillance le titre d’un groupe en vue de
Groupes et contenu
Contenu seulement
Groupes seulement
Imagettes [JPEG]
Passage au groupe suivant
Retour au groupe précédent
WMA/MP3 et JPEG
WMA/MP3 seulement
JPEG seulement
Pour passer des messages guides à l’indicateur chronométrique
Recherche par contenu ou titre de groupe (➜ voir ci-dessous)
repérer un groupe ou le titre de son contenu pour rechercher parmi son contenu.
2 Appuyer sur [DISPLAY].
3 Appuyer sur [3 4] pour sélectionner
“Rechercher”, puis appuyer sur
[ENTER].
4 Appuyer sur [3 4] pour sélectionner
un caractère, puis appuyer sur [ENTER].
≥Recommencer pour entrer d’autres caractères.
≥Les lettres minuscules sont incluses dans la recherche.
≥Appuyer sur [6 5] pour passer entre A, E, I, O et U.
≥Appuyer sur [2] pour supprimer un caractère.
≥Effacer l’astérisque (¢) pour la recherche des titres commençant avec ce
caractère.
¢
A
5 Appuyer sur [1] pour sélectionner “Rechercher”, puis appuyer sur
[ENTER].
L’écran des résultats de la recherche s’affiche.
6 Appuyer sur [3 4] pour sélectionner le contenu ou le groupe, puis
appuyer sur [ENTER].
Rechercher
Page 45

MENU
Les titres apparaissent lors de la lecture
d’un disque texte CD.
1 Appuyer sur [MENU].
2 Sélectionner la plage au moyen
des touches [3 4], puis
appuyer sur [ENTER].
≥ Pour sauter une page à la fois, appuyer
sur [ANGLE/PAGE].
≥ Pour quitter l’écran, appuyer sur [MENU].
TOP MENU
MENU
Pendant l’affichage du menu
Appuyer sur [3421] pour régler, puis appuyer sur [ENTER].
Menu:
Conduit au menu suivant
montrant les listes de
Lecture de CD [CD]
ex.: Texte CD
Texte CD
Disque Titre : All By Artist
Disque Artiste : Pink Island
Piste Titre
: Long John Platinum
Piste Artiste : SHIPWRECKED
1.
Ashley at Prom
2.
City Penguin
Formura one
3.
4.
Soccer
Baseball
5.
Neanderthal
6.
Cartoons
7.
Trilobites
8.
White Dwarf
9.
Discovery
10.
pour sélectionner puis
ENTER
Appuyer sur [
l’affichage des messages guides et celui de
l’indication du temps de lecture écoulé.
DISPLAY
] pour alterner entre
RETURN
Lecture de disques HighMATTM [WMA] [MP3] [JPEG]
Liste de lecture:
La lecture s’amorce.
lecture ou un autre menu.
≥ Pour rappeler le menu à l’écran, appuyer sur [TOP MENU], puis appuyer sur
[RETURN] à plusieurs reprises.
≥ Pour modifier l’arrière-plan du menu, appuyer sur [DISPLAY].
L’arrière-plan est remplacé par celui enregistré sur le disque.
≥ Pour afficher/quitter l’écran, appuyer sur [TOP MENU].
Sélection à partir des listes
1 Pendant la lecture, appuyer sur [MENU].
2 Appuyer sur [2] puis sur [3,4] pour
commuter entre les listes “Liste lect.”
(Liste de lecture), “Groupe” et “Contenu”.
3 Appuyer sur [1], puis sur [3 4] pour
sélectionner une rubrique et appuyer sur
[ENTER].
≥ Pour sauter une page à la fois, appuyer sur
[ANGLE/PAGE].
≥ Pour quitter l’écran, appuyer sur [MENU].
Liste lect.
Groupe
Contenu
Liste lect.
09
All By Artist
Nx
1
Few times in summer
2
Less and less
3
And when I was born
4
Quatre gymnopedies
5
You've made me sad
6
I can't quit him
Evening glory
7
Wheeling spin
8
Velvet Cuppermine
9
Ziggy starfish
10
lecturesélectionner
ENTER
Titre de contenu
1/23
201
quitter
Pink Island
RETURN
DIRECT NAVIGATOR
PLAY LIST
Lecture de disques RAM/DVD-RW (DVD-VR)
[RAM] [DVD-RW[‹VR›]
≥Les titres ne s’affichent que s’ils ont été créés au préalable.
≥ Il n’est pas possible de modifier les titres ni les listes de lecture.
Lecture de programmes
1 Appuyer sur [DIRECT NAVIGATOR].
2 Appuyer sur [3 4] ou sur les touches
Navigateur direct
numériques pour sélectionner le
programme.
≥Pour sauter une page à la fois, appuyer sur
[ANGLE/PAGE].
≥Sélection d’un numéro à 2 chiffres
ex.: 23: [S10] ➜ [2] ➜ [3]
≥ Appuyer sur [1] pour afficher le contenu du
programme.
Date
Nx
11/ 1(WED) 0:05 Monday featureAM
1
1/ 1 (MON) 1:05 Auto action2
2/ 2 (TUE ) 2:21 Cinema3
3/ 3 (WED) 3:37 Music4
4/10(THU) 11:05 Baseball5
09
sélectionner
D
3 Appuyer sur [ENTER].
Liste de lecture
1 Appuyer sur [PLAY LIST].
2 Appuyer sur [3 4] ou utiliser les
(Seulement lorsque le disque comporte une liste de lecture)
Liste lect.
touches numériques pour sélectionner
la liste de lecture.
≥Pour sauter une page à la fois, appuyer sur
[ANGLE/PAGE].
≥Sélection d’un numéro à 2 chiffres
ex.: 23: [S10] ➜ [2] ➜ [3]
3 Appuyer sur [ENTER].
Date Longueur T itre Contenu
Nx
11/1 0:00:01 City Penguin1
1/ 1 0:01:20 Ashley at Prom2
2/ 2 1:10:04 Formula one3
3/ 3 0:10:20 Soccer4
4/10 0:00:01 Baseball5
09
pour sélectionner puis
Lecture d’une scène
1 Suivre les étapes 1 et 2 (➜ ci-dessus, Liste de lecture).
2 Appuyer sur [
3 Appuyer sur [3 4] pour sélectionner “Liste des séquences”, puis
appuyer sur [ENTER].
quitter
≥Sélectionner “Contenu” pour afficher le contenu du programme.
4 Appuyer sur [3421] pour sélectionner une scène, puis appuyer
sur [ENTER].
1].
ébut
PM
PM
PM
AM
21
ENTER
Titre
RETURN
RETURN
Contenu
quitter
quitter
Menus de navigation
RQT8087
19
45
Page 46

Modification des réglages sur l’appareil
1234 5
SETUP
Affiche le menu de Configuration.
≥ Les paramétrages demeurent inchangés même après que l’appareil ait été mis en mode d’attente.
≥ Les rubriques soulignées sont celles par défaut.
Le menu de
rubriques dans la zone ombrée.
CONFIGURATION RAPIDE
permet de faire des réglages en succession des
Sélectionner
ENTER
Déplacer le curseur
vers la droite
Sélectionner l’onglet. Sélectionner la rubrique. Faire les réglages. Appuyer pour quitter.
∫ Onglet “Disque”
Audio (dialogues)
Choisir la langue des
dialogues.
Sous-titres
Choisir la langue des
sous-titres.
Menus du disque
Choisir la langue des
menus.
Restriction par classe
Choisir la classe de
restriction de lecture
des DVD-Vidéo.
Suivre les instructions
≥
à l’écran.
∫
Onglet “Vidéo
Format TV
Sélectionner le format
en fonction du
téléviseur utilisé et des
préférences
personnelles.
Modification des réglages sur l’appareil
Télévision
Sélectionner le
paramètre en
RQT8087
fonction du type de
20
téléviseur utilisé.
46
Anglais
Autre¢¢¢¢
Automatique
Autre¢¢¢¢
Français Espagnol Version originale
§
2
§
3
Anglais Français Espagnol
§
2
Anglais Français Espagnol Autre¢¢¢¢
≥
Le changement de la langue d’affichage dans le menu de
CONFIGURATION RAPIDE modifie également ce paramètre.
Classe de restriction (Lorsque le niveau 8 est sélectionné)
8 Autoriser tous les disques
0 Interdire tous les disques: Pour empêcher la lecture de
disques sans niveau de restriction.
Lors de l’établissement d’une classe de restriction, un écran
d’entrée de mot de passe s’affiche.
Suivre les instructions qui s’affichent.
Mémoriser le mot de passe.
Un message s’affiche si le classement du disque DVD-Vidéo
mis en place est supérieur au niveau établi. Suivre les
instructions qui s’affichent.
1 à 7
”
4:3 Pan&Scan
Téléviseur ordinaire de format (4:3)
Les côtés de l’image sont tronqués afin de
remplir l’écran (sauf si prohibé par le disque).
4:3 Letterbox
ordinaire de format (4:3)
Les images au format grand écran s’affichent en
format boîte aux lettres.
16:9: Téléviseur format grand écran (16:9)
Téléviseur
Projecteur à tube cathodique
Téléviseur/projecteur LCD Rétroprojecteur
Téléviseur à écran plasma
(Panoramique et balayage):
(Boîte aux lettres): Téléviseur
(Téléviseur à vision directe)
Sélectionner
ENTER
Enregistrer
§
1
§
2
Sélectionner
ENTER
Différé
Lorsque le lecteur est raccordé
à un amplificateur AV et à un
écran à plasma, utiliser ce
réglage si la bande son n’est
pas synchronisée avec
l’image.
Mode d’arrêt sur image
Sélectionner le type d’image
qui sera affiché lors d’une
pause en cours de lecture.
Commande de niveau du noir
Modifier le niveau du noir de
l’image si le téléviseur a été
connecté aux prises
COMPONENT VIDEO OUT.
Onglet “Audio
∫
Sortie numérique PCM
Vérifier les restrictions
concernant le signal
d’entrée numéri que de
l’équipement
raccordé à la prise
COAXIAL ou
OPTICAL et
sélectionner la
fréquence
d’échantillonnage
maximum de la sortie
numérique PCM.
”
Désactivée: Lorsque la connexion est faite sur une prise
Jusqu’à 48 kHz:
Jusqu’à 96 kHz: Raccordement à un équipement compatible
Jusqu’à 192 kHz:Raccordement à un équipement compatible
≥ La fréquence d’échantillonnage du signal de disques
protégés contre le piratage est ramenée à
48 kHz ou 44,1 kHz.
≥ Certains appareils ne peuvent prendre en charge une
fréquence d’échantillonnage de 88,2 kHz même s’ils
acceptent un signal de 96 kHz. Pour de plus amples
renseignements, se reporter à la documentation afférente à
l’appareil utilisé.
123
456
789
Enregistrer
10
0
SETUP
0ms 20ms 40ms 60ms
80ms 100ms
Automatique
Tra me : Un arrêt sur champ donne une image
Image: Un arrêt sur image donne une image floue
moins floue mais la qualité est inférieure.
bien que sa qualité soit grande.
Plus clair
Plus foncé: Avec connexion aux prises
: Avec connexion aux prises VIDEO
OUT ou S VIDEO OUT.
COMPONENT VIDEO OUT.
autre que COAXIAL ou OPTICAL.
Raccordement à un équipement compatible
avec 44,1 ou 48 kHz
avec 88,2 ou 96 kHz
avec 176,4 ou 192 kHz
Page 47

∫
Onglet “Audio
Dolby Digital
Avec des connexions aux
prises COAXIAL, OPTICAL
ou HDMI AV OUT
(
➜
pages 7, 8)
DTS Digital Surround
Avec des connexions aux
prises COAXIAL, OPTICAL
ou HDMI AV OUT
(
➜
pages 7, 8)
Compression
dynamique
” (Suite)
Bitstream
PCM
Bitstream
PCM
Non
Oui: Règle la clarté sonore même lorsque le volume est
Sélectionner “Bitstream” si l’équipement
connecté est en mesure de décoder le train
de bits (forme numérique de données
multicanal).Sinon, sélectionner “PCM”.
le train de bits est acheminé à l’équipement
sans décodeur, un haut niveau de bruit
susceptible d’endommager les hautparleurs et l’ouïe pourrait être reproduit.)
Lorsque le signal audio provient de la prise
de sortie HDMI AV OUT et que
l’équipement utilisé ne peut prendre en
charge l’élément sélectionné, le signal de
sortie effectif dépend de la capacité de
l’équipement en question.
bas en comprimant les taux le plus bas et le plus
haut du niveau sonore. Utile pour une écoute
nocturne. (Avec Dolby Digital seulement
Recherche avec son Oui Non
Haut-parleurs
Sélectionner
paramétrages les plus
appropriés à l’equipement
audio utilisé et aux
conditions d’écoute.
(➜ page 22, Modification
des paramétrages en
fonction des enceintes
acoustiques)
Type de haut-parleurs
Multicanal
2 canaux: Lorsque seulement 2 enceintes sont utilisées.
Réglage multicanal (Lorsque “Multicanal” est sélectionné)
Présence et taille des enceintes
Temps de retard Équilibre des canaux
: Lorsque 3 enceintes ou plus sont utilisées.
∫ Onglet “HDMI”
Plage HDMI RVB
Activer “Format HDMI” et
“RVB” (
➜
page 16, Menu
Image) .
Mode vidéo HDMI
Sortie audio HDMI
Standard
Amélioré: Lorsque les images en noir et blanc sont
Oui
Non: Lorsque le signal vidéo provient de la prise
Oui
Non: Lorsque le signal audio ne provient pas de la
floues.
: Lorsque le signal vidéo provient de la prise
HDMI AV OUT.
COMPONENT VIDEO OUT (le signal en
provenance de la prise HDMI AV OUT est au
format 480p).
: Lorsque le signal audio provient de la prise
HDMI AV OUT.
prise HDMI AV OUT.
∫ Onglet “Affichage”
Langues des menus English Français Español
Affichage à l’écran Oui
Non
∫ Onglet “Autres”
Variateur luminosité
Modifie la luminosité de
(Si
l’affichage sur l’appareil.
Coupure
automatique du
courant
CONFIGURATION RAPIDE
Réinitialisation du
réglage
Rétablit tous les
paramétrages par
défaut des menus de
configuration.
§
1
La langue considérée comme la langue originale du disque est sélectionnée.
§
2
Entrer un numéro de code de langue (➜ ci-dessous).
§
3
)
Si la langue sélectionnée pour “Audio (dialogues)” n’est pas disponible, les soustitres s’affichent dans cette langue (s’ils sont disponibles en cette langue sur le
disque).
Liste des codes de langue
Abhkaze: 6566
Afar: 6565
Afghan, Pachto:8083
Afrikaans: 6570
Aimara: 6589
Albanais: 8381
Allemand: 6869
Ameharic: 6577
Anglais: 6978
Arabe: 6582
Arménien: 7289
Assamais: 6583
Azéri: 6590
Bachkir: 6665
Basque: 6985
Bengali;Bangla:6678
Bhoutan: 6890
Biélorusse: 6669
Bihari: 6672
Birman: 7789
Breton: 6682
Bulgare: 6671
Cambodgien (khmer):
Catalan: 6765
Chinois: 9072
Coréen: 7579
Corse: 6779
Croate: 7282
Danois: 6865
Espagnol: 6983
Espéranto: 6979
Clair Atténué
Auto: La luminosité de l’affichage est réduite et n’augmente
que lorsque certaines fonctions sont activées.
Oui: L’appareil passe dans le mode attente après un délai de
30 minutes dans le mode arrêt, et ce, sans égard au
réglage de la minuterie-sommeil.
Non
Oui Non
Oui: L’écran d’entrée du mot de passe s’affiche si “Restriction
par classe” (➜ page 20) est établie. Entrer le même mot
de passe. Lorsque l’indication “INIT” n’est plus affichée,
couper puis rétablir le contact sur l’appareil.
Non
Estonien: 6984
Féringien: 7079
Fidjien: 7074
Finnois: 7073
Français: 7082
Frison: 7089
Gaélique d’Écosse:
Galicien: 7176
Gallois: 6789
Géorgien: 7565
Grec: 6976
Groenlandais: 7576
Guarani: 7178
Gujarati: 7185
Haoussa: 7265
Hébreu: 7387
Hindi: 7273
Hollandais: 7876
Hongrois: 7285
Indonésien: 7378
Interlangue: 7365
Irlandais: 7165
7577
Islandais: 7383
Italien: 7384
Japonais: 7465
Javanais: 7487
Kachmirî: 7583
Kannara: 7578
Kazakh: 7575
Kirghiz: 7589
Kurde: 7585
Lao: 7679
Latin: 7665
Letton: 7686
Lingala: 7678
Lithuanien: 7684
Macédonien: 7775
Malais: 7783
7168
Malayalam: 7776
Malgache: 7771
Maltais: 7784
Maori: 7773
Marathi: 7782
Moldave: 7779
Mongol: 7778
Nauru: 7865
Népalais: 7869
Norvégien: 7879
Oriya: 7982
Ourdou: 8582
Ouzbèque: 8590
Panjabi: 8065
Perse: 7065
Polonais: 8076
Portugais: 8084
Quechua: 8185
Rhéto-Roman: 8277
Roumain: 8279
Russe: 8285
Samoan: 8377
Sanscrit: 8365
Serbe: 8382
Serbo-Croate: 8372
Shona: 8378
Sindhi: 8368
Singhalais: 8373
Slovaque: 8375
Slovène: 8376
Somali: 8379
Soudanais: 8385
Suédois: 8386
Swahili: 8387
Tadjik: 8471
Tagalog: 8476
Tamoul: 8465
Tatar: 8484
Tchèque: 6783
Télougou: 8469
Thaïlandais: 8472
Tibétain: 6679
Tigrigna: 8473
Tsonga: 8479
Turc: 8482
Turkmène: 8475
Twi (akan): 8487
Ukrainien: 8575
Vietnamien: 8673
Volapük: 8679
Wolof: 8779
Xhosa: 8872
Yiddish: 7473
Yorouba: 8979
Zulu: 9085
47
Modification des réglages sur l’appareil
RQT8087
21
Page 48

Modification des réglages sur l’appareil
Modification des paramétrages en fonction des enceintes acoustiques
Si “Multicanal” (➜ page 21, “Haut-parleurs”) a été sélectionné, le paramétrage suivant (a) est requis. (Établir les paramétrages b c selon les préférences.)
Tem ps de retard (b)
(Avec des audio multicanal)
Si la distance d ou f est inférieure à e, trouver cette différence dans le tableau
correspondant et effectuer le réglage recommandé.
1. Appuyer sur [
3 4 2 1] pour sélectionner un élément, puis appuyer sur [ENTER].
2. Appuyer sur [3 4] pour modifier le contenu, puis appuyer sur [ENTER].
d Enceinte de canal centre
: Emplacement recommandé
Différence
Environ 34 cm (11⁄10 pi)
L
C
d
e
f
LS
RS
Environ 68 cm (2
R
Environ 102 cm (3
Environ 136 cm (4
Environ 170 cm (5
f Enceintes ambiophoniques
SW
Différence
Environ 170 cm (51⁄2 pi)
Environ 340 cm (11 pi) 10.0 ms
Environ 510 cm (16
Équilibre des canaux (c)
Cet effet ne peut être obtenu lors d’une connexion aux prises HDMI et lorsque “Sortie
audio HDMI” (
1. Sélectionner “Essai” puis appuyer sur [ENTER].
Un signal d’essai est émis.
Avant [L(G)]_—)Centre _—____)Avant [R(D)]
Ambiophonique [LS(G)](—————=Ambiophonique [RS(D)]
2. Pendant l’écoute du signal d’essai, appuyer sur [3 4] pour régler le volume
dans les enceintes du canal centre et ambiophoniques de manière que leur
niveau de sortie semble égal à celui sur les enceintes avant (`6 à i6dB).
(Aucun réglage n’est possible ici sur les enceintes avant.)
3. Appuyer sur [ENTER].
L’émission du signal d’essai est interrompue.
≥
Pour terminer le réglage des enceintes
Appuyer sur [3 4 2 1] pour sélectionner “Quitter”, puis appuyer sur [ENTER].
➜
page 21, Onglet “HDMI”) est réglé à “Oui”.
: ;
Aucun signal n’est acheminé à l’enceinte d’extrêmes-graves. Pour régler le niveau de
sortie sur cette enceinte, faire l’écoute d’une source, puis revenir à cet écran de
paramétrage pour effectuer les réglages voulus.
Quitter
Signal d’essai
(LS) (RS)
a c b c a
Avant [L(G)]
a
Quitter
Essai
—Ambiophonique—
LS
L
Centre
b a c
m s
0.0
m s
0
0.0
C
d B
0
d B
0
d Bd B
0
Avant [R(D)]
a
R
SW
RS
Extrêmes-graves
c a
Présence et taille des enceintes (a)
1. Appuyer sur [3 4 2 1] pour sélectionner un élément, puis appuyer sur
[ENTER].
2. Appuyer sur [3 4] pour modifier le contenu, puis appuyer sur [ENTER].
Exemple d’icônes:
Enceinte ambiophonique [LS(G])
LS
LS
≥Grande: Lorsque l’enceinte peut reproduire des basses fréquences (inférieures à 100
Hz).
≥Petite: Lorsque l’enceinte ne peut pas reproduire les basses fréquences.
Si l’enceinte d’extrêmes-graves est réglée à “Non” les enceintes avant sont
automatiquement réglées à “Grande”. (Dans ce cas-ci, il est recommandé d’utiliser une
enceinte capable de reproduire des fréquences inférieures à 100 Hz.)
Modification des réglages sur l’appareil
RQT8087
22
48
NonGrande Petite
1
⁄5 pi)
3
⁄10 pi)
2
⁄5 pi)
1
⁄2 pi)
1
⁄2 pi)
Réglage
1.0 ms
2.0 ms
3.0 ms
4.0 ms
5.0 ms
Réglage
5.0 ms
15.0 ms
Page 49

Guide de dépannage
Avant d’appeler un centre de service, faire les vérifications décrites ci-dessous. En cas de doute sur certains des points de vérification, ou si les solutions proposées dans le
tableau ne résolvent pas le problème rencontré, se reporter à la section “Demande d’informations” à la page 3. (Les pages de référence sont indiquées entre parenthèses.)
Alimentation
Absence
d’alimentation.
L’a pp ar ei l se me t
automatiquement
dans le mode attente.
Aucun fonctionnement
Les touches de
commande n’ont
aucun effet.
Aucune fonction ne
peut être
pilotée au moyen de la
télécommande.
Les fonctions de la
télévision ne peuvent
être pilotées.
Absence d’image et
de son.
Le mot de passe de
déverrouillage a été
oublié.
Rétablir les paramètres
par défaut.
≥ Introduire la fiche du cordon d’alimentation à fond dans
la prise secteur. (6)
≥ Si “Coupure automatique du courant” est réglé à “Oui”,
l’appareil passera automatiquement au mode attente
après un délai d’environ 30 minutes en mode arrêt. (21)
≥ La minuterie-sommeil s’est enclenchée. (17)
≥ L’appareil ne peut prendre en charge que les disques
identifiés dans le présent manuel. (4)
≥ Le fonctionnement de l’appareil peut être anormal à
cause d’un orage, de l’électricité statique ou d’autres
facteurs externes. Couper puis rétablir le contact sur
l’appareil. Il est aussi possible de mettre l’appareil hors
marche, de débrancher le cordon d’alimentation, puis de
le rebrancher.
≥ Il est possible qu’il y ait eu formation de condensation
dans l’appareil. Attendre environ une heure ou deux.
≥ Vérifier si les piles ont été bien installées. (9)
≥ Au besoin, remplacer les piles. (9)
≥ Orienter la télécommande vers le capteur de signal de la
télécommande du lecteur. (10)
≥ Remplacer les piles de la télécommande, puis entrer le
code de nouveau. (9)
≥ Vérifier les connexions vidéo et audio. (6–8)
≥ Vérifier l’alimentation et le mode d’entrée sur
l’équipement utilisé.
≥ S’assurer que le disque comporte un ou des fichiers.
≥ Dans le mode arrêt, maintenir une pression sur
[4] et sur la touche [;] du lecteur, puis maintenir
une pression sur la touche [<OPEN/CLOSE] du lecteur
jusqu’à ce que le message “Lecteur réinitialisé” soit
supprimé. Couper, puis rétablir le contact sur le lecteur.
Tous les paramètres sont alors validés.
Opération demandée impossible ou erronée
L’amorce de la lecture
prend plus de temps.
[MP3]
Les fonctions de
lecture programmée
et de lecture aléatoire
ne peuvent être
utilisées. [DVD-V]
Le menu ne s’affiche pas.
[VCD] avec pilotage de
la lecture
Le menu à l’écran
indique que la bande
son “2” a été
sélectionnée sur
pression de la touche
[AUDIO], mais la
bande son demeure
inchangée. [DVD-A]
La lecture ne
s’amorce pas. [WMA]
La lecture s’amorce
au début de la bande
son à la suite d’une
commutation de la
bande son. [DVD-A]
La position des soustitres est erronée.
Aucun sous-titre n’est
affiché.
Les sous-titres sont
superposés à ceux
pour malentendants.
Dans le mode de lecture
d’une séquence A-B, le
point B est
automatiquement défini.
Le lecture en reprise AB est automatiquement
désactivée.
≥ Il pourrait y avoir un délai avant l’amorce de la lecture
dans le cas où une plage MP3 comporte des images
fixes. Même après le début de la lecture de la plage, le
temps de lecture affiché ne sera pas exact; toutefois,
cela n’est le signe d’aucune anomalie.
≥ Avec certains DVD-Vidéo, ces fonctions ne peuvent être
utilisées.
≥ Appuyer à deux reprises sur [∫], puis appuyer sur
[1](PLAY).
≥ Même si le disque ne comporte pas une seconde bande
son, deux numéros seront normalement affichés.
≥ Cet appareil ne peut pas faire la lecture WMA avec des
données d’images fixes.
≥ Cela est tout à fait normal avec un disque DVD-Audio.
≥ Régler la position des sous-titres. (“Position sous-titres”
dans le Menu Affichage) (17)
≥ Afficher les sous-titres. (13)
≥ Désactiver l’affichage des sous-titres. (13)
≥ La fin d’une plage devient le point B lorsqu’elle est
atteinte.
≥ La lecture en reprise A-B est annulée lors d’une
pression sur [QUICK REPLAY].
Suite à la page suivante
49
Guide de dépannage
RQT8087
23
Page 50

Guide de dépannage
Image erronée
Distorsion de
l’image.
La taille de
l’image ne
convient pas à
l’écran.
L’image affichée
sur le téléviseur
pourrait être
anormale ou les
couleurs affadies.
Le menu ne
s’affiche pas
correctement.
La fonction de
zoom
automatique ne
fonctionne pas
adéquatement.
Absence d’image ≥
Vidéo progressive
Il y a présence
Guide de dépannage
d’une image
fantôme lorsqu’un
signal à balayage
progressif ou
HDMI est
sélectionné.
Les images ne
sont pas
acheminées par la
sortie progressive.
Les sous-titres pour
RQT8087
malentendants ne
24
s’affichent pas.
50
≥ S’assurer que l’appareil n’est pas raccordé par le truchement
d’un magnétoscope. (6)
≥ S’assurer qu’un signal de sortie à balayage progressif n’a pas
été sélectionné si le téléviseur utilisé n’est pas en mesure de
prendre en charge un tel signal. Maintenir enfoncée la touche
[CANCEL] jusqu’à ce que l’image redevienne normale. Le
paramétrage sera rétabli pour un signal “480i”.
≥ Modifier “
≥
≥ Modifier le réglage du zoom. (14)
≥ Les disques au format PAL ne peuvent être pris en charge par
≥
≥ Pour tirer profit d’une image à balayage progressif, utiliser un
≥ Il se peut que l’image ne puisse s’afficher si plus de 4 appareils
≥ Rétablir le taux d’agrandissement à a1,00. (14)
≥
≥ Régler “Aspect 4/3” au Menu Affichage à “Normal”. (17)
≥ Désactiver la fonction zoom du téléviseur.
≥ Utiliser les autres formats d’image préétablis ou procéder à un
≥ Il se peut que le zoom ne fonctionne pas bien, surtout dans le
≥
≥ Si l’appareil est raccordé au téléviseur par le truchement de la
≥ Les sous-titres pour malentendants ne seront pas affichés
Format TV
Changer le format sur le téléviseur lui-même. Si le téléviseur ne peut pas
changer de format, changer “Aspect 4/3” dans le Menu Affichage.
cet appareil. (Les signaux DVD-Audio peuvent être pris en
charge; toutefois, les images fixes pourraient ne pas être
affichées adéquatement.)
Cela peut survenir lors de l’activation/désactivation de la fonction AUDIO
ONLY (audio seulement) ; cela n’est le signe d’aucune anomalie.
téléviseur compatible avec un signal de sortie progressif.
sont connectés avec des câbles HDMI. Réduire le nombre
d’appareil ainsi connectés.
Régler “Position sous-titres” dans le Menu Affichage à “0”. (17
réglage manuel. (14)
cas de scènes sombres, ou qu’il ne fonctionne pas du tout
selon le type de disque.
Lorsque le paramètre pour signal audio seulement (AUDIO ONLY) a
été activé, les signaux audio et vidéo ne peuvent être simultanément
reçus via la prise HDMI AV OUT. Désactiver cette fonction.
Ce problème provient de la méthode d’édition et du matériel utilisé sur le
disque DVD-Vidéo, mais devrait être corrigé sur la sortie entrelacée.
Dans le Menu Image, régler “Mode sortie vidéo” à “480i”.
Lorsque la connexion est faite sur la prise HDMI AV OUT, faire la
connexion sur les autres prises et modifier les paramétrages comme suit:
1. Régler “Mode vidéo HDMI” à “Non”. (21)
2. Régler “Mode sortie vidéo” à “480i”. (16)
prise VIDEO OUT ou S VIDEO OUT, le signal de sortie sera
entrelacé.
lorsque la sortie est progressive ou HDMI.
” sous l’onglet “Vidéo”. (20)
(16)
(12)
(17)
(12)
)
Son erroné
Présence de
distorsion.
Un son strident est
produit sur les
enceintes.
Les effets ne
fonctionnent pas.
Aucun son ≥Il se peut que le son ne soit pas reproduit lorsque plus de 4
≥ Régler “Ambiophonie évoluée” dans le Menu Audio à “Non”.
(16)
≥ Régler “Atténuateur” dans le Menu Audio à “Oui” s’il y a
distorsion en raison des connexions AUDIO OUT sur 2 ou 5.1
canaux. (16)
≥ Il pourrait y avoir un bruit de fond à la lecture des fichiers au
format WMA.
≥Le disque peut comporter des restrictions sur la sortie des
signaux audio. Avec certains disques multicanal, il est
nécessaire que le nombre d’enceintes raccordées soit le
même que la spécification de canaux du disque. Sinon, le
son ne sera pas correctement émis. Se reporter à
l’emballage du disque pour plus de renseignements. [DVD-A]
≥ Lorsque les connexions sont faites à la prise HDMI AV OUT, il
se peut que le signal audio ne soit pas reçu des autres prises
malgré les paramétrages établis.
≥S’assurer que les réglages des enceintes correspondent à
l’équipement raccordé. (21)
≥Lors du raccordement à un amplificateur à l’aide d’un câble
HDMI, s’assurer que les réglages des enceintes de cet
appareil et de l’amplificateur correspondent au nombre
d’enceintes présentes et à leur taille. (22)
≥ Si un amplificateur numérique sans décodeur a été connecté,
sélectionner “PCM” sous “Dolby Digital” ou “DTS Digital
Surround” dans l’onglet “Audio”. (21)
≥ Aucun des effets audio ne peut être appliqué lorsque
l’appareil achemine des trains de données par la prise
DIGITAL AUDIO OUT ou HDMI AV OUT. (21)
≥ Avec certains disques, les effets sonores ne fonctionnent pas
ou sont moins efficaces.
≥ Lorsque la connexion est faite sur la prise HDMI AV OUT:
– Les disques HDCD sont pris en charge comme étant des
CD ordinaires.
– Le mode audio seulement (AUDIO ONLY) ne fonctionne
pas.
≥ Les fonctions Multi Remastériser et Ambiophonie évoluée
n’est aucun effet si la vitesse de lecture a été modifiée.
appareils auxiliaires sont raccordés au moyen de câbles
HDMI. Réduire le nombre d’appareils raccordé.
≥ Lorsque le mode audio seulement(AUDIO ONLY) est activé:
– Il se peut qu’aucun signal audio ne soit reçu selon le type
de téléviseur utilisé.
– Les signaux audio et vidéo ne peuvent être acheminés
simultanément depuis la prise HDMI AV OUT. Désactiver
cette fonction
≥ Il se peut que le signal audio soit temporairement bloqué lors
d’un changement de la vitesse de lecture.
.
(12)
Page 51

Enregistrement
Impossible
d’enregistrer sur un
appareil numérique
(Problème de son).
≥
Il n’est pas possible d’enregistrer des fichiers WMA/MP3.
≥
Il n’est pas possible d’enregistrer des disques DVD possédant un
système de protection empêchant l’enregistrement numérique.
≥ Il n’est pas possible d’enregistrer des disques DVD sur
un appareil ne pouvant traiter les signaux à une
fréquence d’échantillonnage de 48 kHz.
≥ Effectuer les paramétrages suivants:
– Ambiophonie évoluée: Non (16)
– Sortie numérique PCM: Jusqu’à
– Dolby Digital/DTS Digital Surround: PCM (21)
48 kHz (20)
Affichages sur l’appareil
“NOPLAY” ≥ Le disque n’est pas compatible avec le lecteur. Utiliser un
“U11” ≥ Le disque est sale. (droite)
“H∑∑” (∑∑ représente
un nombre.)
“NODISC” ≥ Il n’y a pas de disque dans le lecteur; en introduire un
“U70-1” ≥ L’équipement connecté n’est pas compatible avec HDMI.
“U70-∑” (∑ représente
un nombre.)
Le chiffre inséré après
“U70-” dépend de l’état
de l’appareil.
disque compatible. (4)
≥ Un disque vierge a été inséré.
≥ Le disque inséré n’a pas été finalisé. (4)
≥ Les disques au format PAL ne peuvent être pris en
charge par cet appareil. (Les signaux DVD-Audio peuvent
être pris en charge; toutefois, les images fixes pourraient
ne pas être affichées adéquatement.)
≥
Un problème est probablement survenu. Le nombre affiché à
la droite de la lettre “H” est fonction de l’état de l’appareil.
Couper puis rétablir le contact sur l’appareil. Il est aussi
possible de mettre l’appareil hors marche, de débrancher le
cordon d’alimentation, puis de le rebrancher.
≥ Si le code demeure affiché, le noter et communiquer avec
un technicien qualifié.
dans le logement.
≥ Le disque n’a pas été correctement mis en place; le
mettre en place correctement. (10)
≥ La connexion HDMI donne des résultats inhabituels.
– L’équipement connecté n’est pas compatible avec
HDMI.
– Le câble HDMI est trop long.
– Le câble HDMI est endommagé.
– Le câble n’est pas HDMI compatible.
Affichages sur l’écran du téléviseur
“/” ≥ L’opération demandée est interdite par le disque ou
“Affichage de groupe
xx, contenu xx
impossible”
“Vérifiez le disque.” ≥Le disque est sale. (droite)
l’appareil.
≥ Les groupes ou contenus sont incompatibles. (4)
“Copyright oblige, pas
de sortie audio via
HDMI.”
Lorsque l’indication
“Etat HDMI ” est affichée,
aucun paramètre n’est
souligné.
“Ce disque est codé
pour une autre région.
ll ne peut être lu.”
Aucun affichage à
l’écran.
Dans le menu du “Mode
sortie vidéo” , le
symbole “
affiché au côté du format
de signal de sortie vidéo
possible avec
l’équipement connecté.
¢
” n’est pas
≥ Lors du raccordement d’un équipement ne pouvant
prendre en charge les fichiers protégés contre le piratage
(CPPM ➜ page 27, Glossaire), le signal audio du DVDAudio ainsi protégé ne peut être reçu via la prise de sortie
HDMI AV OUT. Connecter la fiche audio du câble audio/
vidéo [L (G), R (D)] dans une prise AUDIO IN compatible
avec le format HDMI. (7)
≥ Si une rubrique sans l’indication “¢” est sélectionnée en
“Mode sortie vidéo” au menu Image, cette rubrique ne
sera pas soulignée. (16)
≥ Le lecteur ne peut prendre en charge que des disques
DVD-Vidéo dont le code régional est “1”, “ALL” (tous) ou
dont les codes multiples comprennent le code “1”. (4)
≥ Sélectionner “Oui” sous “Affichage à l’écran” sous l’onglet
“Affichage”. (21)
≥Si l’équipement connecté est compatible avec un format
sélectionné non identifié par le symbole “
subira pas de distorsion. (16)
¢
”, l’image ne
Entretien
∫
Nettoyer le coffret avec un linge doux et sec
≥
Ne jamais utiliser d’alcool, diluant pour peinture ni de benzène pour nettoyer l’appareil.
≥ Avant d’utiliser un chiffon traité chimiquement, lire attentivement les instructions y
afférentes.
≥ Le nettoyage de la lentille n’est pas normalement nécessaire, quoique
l’environnement d’utilisation peut avoir un effet.
≥ Ne pas utiliser de nettoyeurs disponibles dans le commerce; cela pourrait entraîner
des problèmes de fonctionnement.
∫ Nettoyage des disques
Nettoyer le disque avec un linge humide, puis essuyer.
51
Entretien
Guide de dépannage
RQT8087
25
Page 52

Spécifications
Format du signal: NTSC
Température de fonctionnement: i5 à i35 oC (i41 à i95 oF)
Hygrométrie: Humidité relative de 5 à 90 % (sans condensation)
Disques compatibles [8 cm (3 po) ou 12 cm (5 po)]:
(1) DVD (DVD-Vidéo, DVD-Audio)
(2) DVD-RAM (DVD-VR, JPEG
(3) DVD-R (DVD- Vidéo)
(4) DVD-RW (DVD-Vidéo, DVD-VR)
(5) rR/RW (Vidéo)
(6) CD, CD-R/RW [CD-DA, CD-Vidéo, SVCD
HighMAT Niveau 2 (Audio et Image)]
Sortie vidéo:
Niveau de sortie: 1 V c.-à-c. (75 ≠)
Prise de sortie: Prise à broches (1 jeu)
Sortie S-Vidéo:
Niveau de sortie Y: 1 V c.-à-c. (75 ≠)
Niveau de sortie C: 0,286 V c.-à-c. (75 ≠)
Prise de sortie: Prise S (1 jeu)
Sortie vidéo composant: (480p/480i)
Niveau de sortie Y: 1 V c.-à-c. (75 ≠)
Niveau de sortie P
Niveau de sortie P
B: 0,7 V c.-à-c. (75 ≠)
R: 0,7 V c.-à-c. (75 ≠)
Prise de sortie: Prise à broches (Y: vert, PB: bleu, PR: rouge) (1 jeu)
Sortie audio:
Niveau de sortie: 2 V eff. (1 kHz, 0 dB)
Prise de sortie: Prise à broches
Nombre de connecteurs: 2 canaux : 1 jeu
Audio:
(1) Réponse en fréquence:
Spécifications
≥DVD (audio linéaire): 4 Hz à 22 kHz (échantillonnage à 48 kHz)
≥DVD-Audio: 4 Hz à 88 kHz (échantillonnage à 192 kHz)
≥CD-Audio: 4 Hz à 20 kHz
(2) Rapport signal sur bruit:
≥CD-Audio: 115 dB
(3) Dynamique:
≥DVD (audio linéaire): 102 dB
≥CD-Audio: 98 dB
(4) Distorsion harmonique totale:
≥CD-Audio: 0,0025 %
Sortie audionumérique:
Sortie numérique optique: Prise optique
RQT8087
26
Sortie numérique coaxiale: Prise à broches
Sortie AV HDMI : 19 broches
52
§1, 2
)
§3
, MP3
§2, 4
, WMA
§2, 5
, JPEG
Sortie à 5,1 canaux indépendants : 1 jeu
4 Hz à 44 kHz (échantillonnage à 96 kHz)
§1, 2
Bloc de lecture:
Longueur d’onde: 662 nm/785 nm
Faisceau laser: CLASS 2/CLASS 3A
Source d’alimentation: 120 V c.a., 60 Hz
Consommation: 17 W
Consommation en mode attente
Dimensions (LkPkH): 430 mmk249 mmk52 mm
: environ 1 W
15
(16
/16 pok9 13/16 pok2 1/16 po)
Poids: environ 2,4 kg (5,3 lb)
,
[Nota]
Sujet à changements sans préavis. Le poids et les dimensions sont approximatifs.
§
1
Fichiers Exif Ver 2.1, système de base JPEG
Définition de l’image: entre 320k240 et 6144k4096 pixels (sous-échantillonnage à
4:2:2 ou 4:2:0)
§
2
Maximum total combiné de groupes et de fichiers audio et d’images: 4000 fichiers
audio et d’images et 400 groupes.
§
3
Conforme à la norme IEC62107
§
4
Taux de compression compatible: entre 32 kbps et 320 kbps
§
5
Taux de compression compatible: entre 48 kbps et 320 kbps
Page 53

Certificat de garantie limitée
Panasonic Canada Inc. garantit cet appareil contre tout vice de fabrication et accepte, le cas échéant, de remédier à toute défectuosité ou, à sa discrétion, de remplacer l’appareil pendant la période indiquée
ci-dessous et commençant à partir de la date d’achat original.
Appareils audio Technics —Un (1) an, pièces et main-d’œuvre
Appareils audio et DVD Panasonic —Un (1) an, pièces et main-d’œuvre
Accessoires incluant les piles rechargeables —Quatre-vingt-dix (90) jours
LIMITATIONS ET EXCLUSIONS
Cette garantie n’est valide que pour les appareils achetés au Canada et ne couvre pas les dommages résultant d’une installation incorrecte, d’un usage abusif ou impropre ainsi que ceux découlant d’un
accident en transit ou de manipulation. De plus, si l’appareil a été altéré ou transformé de façon à modifier l’usage pour lequel il a été conçu ou utilisé à des fins commerciales, cette garantie devient nulle et
sans effet. Les piles sèches ne sont pas couvertes sous cette garantie.
Cette garantie est octroyée à l’utilisateur original seulement. La facture ou autre preuve de la date d’achat original sera exigée pour toute réparation sous le couvert de cette garantie.
CETTE GARANTIE LIMITÉE ET EXPRESSE REMPLACE TOUTE AUTRE GARANTIE, EXPRESSE OU IMPLICITE, INCLUANT LES GARANTIES IMPLICITES DU CARACTÈRE
ADÉQUAT POUR LA COMMERCIALISATION ET UN USAGE PARTICULIER.
PANASONIC N’AURA D’OBLIGATION EN AUCUNE CIRCONSTANCE POUR TOUT DOMMAGE DIRECT, INDIRECT OU CONSÉCUTIF.
Certaines juridictions ne reconnaissent pas les exclusions ou limitations de dommages indirects ou consécutifs, ou les exclusions de garanties implicites. Dans de tels cas, les limitations stipulées ci-dessus
peuvent ne pas être applicables.
RÉPARATION SOUS GARANTIE
Pour de l’aide sur le fonctionnement de l’appareil ou pour toute demande d’information, veuillez contacter votre détaillant ou notre service à la clientèle au:
o
N
de téléphone: (905) 624-5505 No de télécopieur: (905) 238-2360
Site Internet: www.panasonic.ca
Pour la réparation des appareils, veuillez consulter:
≥ votre détaillant, lequel pourra vous renseigner sur le centre de service agréé le plus près de votre domicile;
≥ notre service à la clientèle au (905) 624-5505 ou www.panasonic.ca;
≥ un de nos centres de service de la liste ci-dessous:
Richmond, Calgary, Alberta Mississauga, Ontario Lachine, Québec
Colombie-Britannique
Panasonic Canada Inc. Panasonic Canada Inc. Panasonic Canada Inc. Panasonic Canada Inc.
12111 Riverside Way 6835-8
Richmond, BC Calgary, AB Mississauga, ON Lachine, QC
V6W 1K8 T2E 7H7 L4W 2T3 H8T 1C4
Tél.: (604) 278-4211 Tél.: (403) 295-3955 Tél.: (905) 624-8447 Tél.: (514) 633-8684
Téléc.: (604) 278-5627 Téléc.: (403) 274-5493 Téléc.: (905) 238-2418 Téléc.: (514) 633-8020
th
Certificat de garantie limitée Panasonic/Technics
St. N. E. 5770 Ambler Dr. 3075, rue Louis A. Amos
Emballer soigneusement l’appareil, de préférence dans le carton d’origine,
Inclure la description détaillée de la panne et la preuve de la date d’achat original.
et l’expédier port payé et assuré au centre de service.
5770 Ambler Drive, Mississauga, Ontario L4W 2T3
Panasonic Canada Inc.
Expédition de l’appareil à un centre de service
Glossaire
CPPM (Content Protection for Prerecorded Media)
CPPM est une technologie de protection pour les fichiers DVD-Audio. Cet appareil
prend en charge cette protection.
Fréquence d’échantillonnage
L’échantillonnage est un processus par lequel la hauteur des ondes sonores (signal
analogique) est échantillonnée à une fréquence déterminée et convertie en chiffres
(codage du signal). La fréquence d’échantillonnage étant le nombre d’échantillons par
seconde, un chiffre plus élevé signifie une reproduction plus fidèle à l’original.
HDCD (High-Definition Compatible Digital)
Les CD avec codage HDCD offrent un meilleur rendu sonore parce que le codage
comporte 20 bits comparativement à 16 bits sur les CD ordinaires.
HDMI (High-Definition Multimedia Interface)
HDMI représente la prochaine génération d’interface numérique pour les produits
électroniques de consommation. Contrairement aux connexions traditionnelles, celle-ci
transmet sur un seul câble des signaux audio et vidéo non compressés. Cet appareil
prend en charge les signaux de sortie vidéo haute définition (720p, 1080i) acheminés
depuis la prise HDMI AV OUT. Pour tirer pleinement profit de la vidéo haute définition, il
est recommandé d’utiliser un téléviseur compatible avec la haute définition.
Mélange-abaissement
Ceci est un procédé de remixage multicanal audio (son ambiophonique) présent sur
certains disques en deux canaux. Fonction particulièrement pratique lors de la lecture
sur les haut-parleurs du téléviseur d’enregistrements audio 5.1 canaux sur DVD.
Avec certains disques DVD-Audio, il est impossible de faire le mélange-abaissement de leur contenu
en entier ou en partie. Lors de la lecture de tels disques, si le nombre d’enceintes raccordées n’est
pas le même que celui indiqué aux spécifications du disque, la lecture audio n’est pas correcte.
53
Glossaire
Certificat de garantie limitée
RQT8087
27
Page 54

Referencia rápida en español
COMPONENT VIDEO OUT
(480p/480i)
AUDIO OUT
2ch
L
R
VIDEO
OUT
S VIDEO
OUT
OUND
FRONT L/L
FRONT R/R
FRONT R/R
Please c
ect
di
COAXIAL
AUD
5.1ch
DIGITAL AUDIO OUT
(PCM/BITSTREAM)
L
R
OPTICAL
CENTER
SURROUND
SUBWOOFER
AC IN
Conexións
∫ Conexión a un televisor ∫ Para disfrutar de audio y vídeo de alta calidad
AUDIO IN
R
Referencia rápida en español
Televisor
L
VIDEO
IN
Cable de audio/vídeo
(incluido)
Parte posterior del aparato
onn
rectly to TV.
(conexión HDMI).)
Tel evisor
HDMI IN
Cable HDMI (incluido)
Parte posterior del aparato
∫ Conecte el cable de alimentación de CA el último.
Cable de alimentación de CA
(incluido)
RQT8087
2
54
A una toma de CA
Page 55

PREPARACIÓN RÁPIDA
Encienda el televisor y seleccione la entrada de vídeo apropiada en el mismo.
ENTER
DVD
SETUP
RETURN
1
2
3
Encienda.
Muestra la pantalla QUICK SETUP.
Pulse [3 4] para seleccionar
“Español” y pulse [ENTER].
Siga el mensaje y haga los ajustes.
Búsqueda
(durante la
reproducción)
Cámara lenta
(durante la pausa)
Salto
Salto de grupo
[WMA] [MP3] [JPEG]
≥ Hasta 5 pasos
SLOW/SEARCH
SKIP
ENTER
≥ Pulse [1] (PLAY) para reiniciar la
reproducción.
≥ [VCD] Cámara lenta, en sentido de
avance solamente
≥ [RAM] [DVD-RW[‹VR›] También puede saltar
a marcadores.
≥ No funciona durante la pausa.
4
5
ENTER
SETUP
Reproducción básica
DVD
1
(
Aparato principal)
2
(
Aparato principal)
3
4
PLAY
(Aparato principal)
Parada
Pausa
Pulse para terminar PREPARACIÓN
RÁPIDA.
Pulse para salir.
Encienda.
Abra la bandeja del disco.
Introduzca el disco.
Inicie la reproducción.
STOP
PAUSE
La posición se memoriza cuando “!”
parpadea en el visualizador.
≥ Pulse [1] (PLAY) para proseguir.
≥ Pulse [∫] para borrar la posición.
≥ Pulse [1] (PLAY) para reiniciar la
reproducción.
Cuadro a cuadro
(durante la pausa)
[RAM] [DVD-RW[‹VR›]
[DVD-V] [VCD]
Selección de
elemento en
pantalla
Introducción
de números
Menú del
disco
ENTER
ENTER
123
456
789
0
10
DIRECT NAVIGATOR
TOP MENU
PLAY LIST
MENU
RETURN
≥ [VCD] Sentido de avance solamente
Seleccionar
Vuelta a la
pantalla
Registrar
ENTER
[DVD-A] [DVD-V]
Muestra un menú inicial de disco.
[RAM] [DVD-RW[‹VR›]
Reproduce los programas.
[DVD-V]
Muestra un menú del disco.
[RAM] [DVD-RW[‹VR›]
Reproduce una lista de reproducción.
[VCD] con control de reproducción
Muestra un menú del disco
anterior
[RAM] [DVD-RW[‹VR›] [DVD-A] [DVD-V]
[VCD] [CD]
Ej.: Para seleccionar 12:
[S10] ➜ [1] ➜ [2]
[WMA] [MP3] [JPEG]
Ej.: Para seleccionar 123:
[1] ➜ [2] ➜ [3] ➜ [ENTER]
RETURN
Referencia rápida en español
RQT8087
3
55
Page 56

FL SELECT
TV
TV/VIDEO
CH
VOLUME
AV ENHANCER
MULTI
RE-MASTER
AUDIO ONLY
PLAY SPEED
CANCEL
POSITION MEMORY
QUICK REPLAY
SKIP
SLOW/SEARCH
STOP
PAUSE
PLAY
DIRECT NAVIGATOR
TOP MENU
PLAY LIST
MENU
ENTER
DISPLAY
RETURN
CONTRAST
BRIGHTNESS
SHARPNESS
COLOR
SUBTITLE
AUDIO
ANGLE/PAGE
SETUP
PLAY MODE
DNR
ZOOM
GROUP
Main feature index/Index des fonctions principales
Changes the unit’s display (11)/
Change le mode d’affichage
Recalls recommended audio/video setting (12)/
Rappelle le paramétrage
audio/vidéo recommandé (12)
sur l’appareil (11)
Reproduces more natural audio
Assure un rendu sonore
plus naturel
All group/program/random play (11)/
Lecture de tous les groupes/
programmée/aléatoire (11)
(12)
Shows a disc top menu (11)/
Affiche le menu principal
du disque (11)
Shows a program list (19)/
Affiche une liste de
programmes (19)
Shows On-Screen Menus (15)/
Affiche les menus à l’écran (15)
Changes soundtracks (13)/
Change les bandes son (13)
Changes subtitles (13)/
Change les sous-titres (13)
Reduces noise in pictures (14)/
Réduit le bruit vid
éo (14)
(12)/
(Reference pages are shown in parentheses./
Les pages de référence sont indiquées entre
parenthèses.)
TV operation (9)/
Fonctionnement avec un téléviseur (9)
Enjoying even higher quality sound (12)/
Pour I’écoute d’un son de qualité encore
plus élevée (12)
Changes play speed (13)/
Modifie la vitesse de lecture (13)
Memorizes the position during play (14)/
Mémorise la position en cours de lecture
Skips back a few seconds (13)/
Retour en arrière de quelques secondes (13)
Shows a disc menu (11, 18, 19)/
Affiche le menu d’un disque
Shows a play list (19)/
Affiche une liste de lecture (19)
Adjusting picture mode (13)/
Réglage de I’image (13)
Changes angles or rotates/advances still
pictures (14)/
Change l’angle/fait tourner les images/fait
avancer les images fixes (14)
Selects groups to play (14)/
Sélectionne les groupes pour la lecture (14)
Changes the zoom ratio (14)/
Change le format d’image (14)
(11, 18, 19)
(14)
As an ENERGY STAR
§
Partner, Panasonic has
determined that this product
meets the
ENERGY STAR
guidelines for energy efficiency.
À titre de participant au
programme
Panasonic a déterminé que
cet appareil respecte les
directives
ENERGY STAR
§
For Canada only: The word “Participant” is
en matière d’économie d’énergie.
®
®
ENERGY STAR ,
®
used in place of the word “Partner”.
This manual was printed with
soy based ink.
Ce manuel a été imprimé avec de
l’encre à base de soja.
®
Panasonic Consumer Electronics Company,
Division of Panasonic Corporation of North America
One Panasonic Way Secaucus, New Jersey 07094
http://www.panasonic.com
C 2005 Matsushita Electric Industrial Co., Ltd.
Printed in China/Imprimé en Chine
Panasonic Puerto Rico, Inc.
Ave. 65 de Infantería, Km. 9.5
San Gabriel Industrial Park, Carolina, Puerto Rico 00985
Panasonic Canada Inc. pqr
5770 Ambler Drive, Mississauga, Ontario L4W 2T3
www.panasonic.ca
RQT8087-Y
F0205TH0
 Loading...