

Panasonic DVD-S53, DVD-S533 User Manual
The illustration shows DVD-S53 for the U.S.A. and Canada.
1
ALL
2
4
1
Operating Instructions
DVD/CD PLAYER
Model No.
Dear customer
Thank you for purchasing this product. Before connecting, operating or adjusting this
product, please read the instructions completely. Please keep this manual for future
reference.
If you have any questions, contact 1-800-211-PANA (7262) in the U.S.A. or
1-800-561-5505 in Canada.
For the U.S.A.: The warranty can be found on page 26.
For Canada: The warranty can be found on page 27.
La referencia rápida en español se puede encontrar en la página 28 a
31.
DVD-S53/DVD-S533
Region number
The player plays DVD-Video marked with
labels containing the region number “1” or
“ALL”.
P PC PX
Example:
MULTI-FORMAT PLAYBACK
See page 5 for details
Unless otherwise indicated, illustrations in these operating instructions
are of DVD-S53 for the U.S.A. and Canada.
For the U.S.A. and Canada
As an ENERGY STAR
Panasonic has determined that this
product meets the ENERGY STAR
1
For Canada only: The word “Participant” is used in place of
the word “Partner”.
guidelines for energy efficiency.
®
Partner1,
®
Getting startedOperationsReference
RQTC0128-2P
RQTC0128
Table of contents
Getting started
Accessories .................................................................................................2
IMPORTANT SAFETY INSTRUCTIONS ......................................................4
Product Service ...........................................................................................4
Discs that can be played .............................................................................5
Maintenance .................................................................................................6
STEP 1 Connection .....................................................................................7
STEP 2 The remote control .........................................................................9
STEP 3 QUICK SETUP .................................................................................9
Operations
Basic play ...................................................................................................10
Changing the play sequences ..................................................................12
Program play ............................................................................................................ 12
Random play ............................................................................................................
Using navigation menus ...........................................................................13
Playing audio (WMA/MP3), picture (JPEG) and video (DivX/MPEG4) discs ...........13
Playing programs/playlists ........................................................................................
Convenient functions ................................................................................14
Displaying current playback condition/Enjoying advanced surround/Repeat play/
Changing picture mode/Changing play speed/Quick replay/Changing subtitles ......
Table of contents/Accessories
Changing soundtracks/Dialogue enhancer/Skipping about one minute forward/Angle
select/Still picture rotation/Transfer mode/Zoom/Reducing noise in pictures ...........
Using On-Screen Menus ...........................................................................16
On-Screen Menu 1 ................................................................................................... 16
On-Screen Menu 2/On-Screen Menu 3 ...................................................................
On-Screen Menu 4 ...................................................................................................
Changing the player settings ...................................................................19
Reference
Troubleshooting guide ..............................................................................
About DivX VOD contents .........................................................................24
EZ SyncTM “HDAVI ControlTM” ....................................................................24
Glossary .....................................................................................................25
Specifications ............................................................................................25
Limited Warranty (ONLY FOR U.S.A.) .......................................................26
Limited Warranty (ONLY FOR CANADA) ..................................................27
Referencia rápida en español (Spanish Quick Reference) ....................28
Main feature index ......................................................................Back cover
2
Accessories
Please check and identify the supplied accessories.
Use numbers when asking for replacement parts.
(Product numbers correct as of January 2007. These may be subject to
change.)
1 Remote control (EUR7631240)
1 AC power supply cord (K2CB2CB00020)
(K2CQ2CA00006)
1 Audio/video cable (K2KA6BA00004)
2 Remote control batteries
For areas except the U.S.A. and Canada
1 Power plug adaptor (K2DA42E00001)
In the U.S.A. : To order accessories, refer to “Accessory Purchases” on page 26.
In Canada : To order accessories, call the dealer from whom you have made your
purchase.
Note
The included AC power supply cord is for use with this unit only. Do not use it with
•
12
other equipment.
Do not use an AC power supply cord from other equipment.
•
The included Canadian French language sheet corresponds to this unit's
13
English displays.
User memo:
14
DATE OF PURCHASE ________________________________________________
DEALER NAME _____________________________________________________
DEALER ADDRESS _________________________________________________
15
___________________________________________________________________
TELEPHONE NUMBER _______________________________________________
17
The model number and serial number of this product can be found on either the back
18
or the bottom of the unit. Please note them in the space provided below and keep for
future reference.
MODEL NUMBER ____________________________________________________
21
SERIAL NUMBER ____________________________________________________
-If you see this symbol-
Information on Disposal in other Countries outside the
European Union
This symbol is only valid in the European Union.
If you wish to discard this product, please contact your local
authorities or dealer and ask for the correct method of disposal.
For the U.S.A. and Canada
For others
DVD-S53/DVD-S533

RQTC0128
CAUTION!
THIS PRODUCT UTILIZES A LASER.
USE OF CONTROLS OR ADJUSTMENTS OR
PERFORMANCE OF PROCEDURES OTHER THAN
THOSE SPECIFIED HEREIN MAY RESULT IN
HAZARDOUS RADIATION EXPOSURE.
DO NOT OPEN COVERS AND DO NOT REPAIR
YOURSELF. REFER SERVICING TO QUALIFIED
PERSONNEL.
WARNING:
TO REDUCE THE RISK OF FIRE,
ELECTRIC SHOCK OR PRODUCT
DAMAGE,
DO NOT EXPOSE THIS APPARATUS
•
TO RAIN, MOISTURE, DRIPPING OR
SPLASHING AND THAT NO OBJECTS
FILLED WITH LIQUIDS, SUCH AS
VASES, SHALL BE PLACED ON THE
APPARATUS.
USE ONLY THE RECOMMENDED
•
ACCESSORIES.
DO NOT REMOVE THE COVER
•
(OR BACK); THERE ARE NO USER
SERVICEABLE PARTS INSIDE.
REFER SERVICING TO QUALIFIED
SERVICE PERSONNEL.
The socket outlet shall be installed near the equipment
and easily accessible. The mains plug of the power
supply cord shall remain readily operable. To completely
disconnect this apparatus from the AC Mains, disconnect
the power supply cord plug from AC receptacle.
Except for U.S.A. and Canada
(Back of product)
THE FOLLOWING APPLIES ONLY IN THE U.S.A.
FCC Note:
This equipment has been tested and found to comply with
the limits for a Class B digital device, pursuant to Part 15
of the FCC Rules.
These limits are designed to provide reasonable
protection against harmful interference in a residential
installation. This equipment generates, uses and can
radiate radio frequency energy and, if not installed and
used in accordance with the instructions, may cause
harmful interference to radio communications. However,
there is no guarantee that interference will not occur in
a particular installation. If this equipment does cause
harmful interference to radio or television reception, which
can be determined by turning the equipment off and on,
the user is encouraged to try to correct the interference
by one or more of the following measures:
Reorient or relocate the receiving antenna.
•
Increase the separation between the equipment and
•
receiver.
Connect the equipment into an outlet on a circuit
•
different from that to which the receiver is connected.
Consult the dealer or an experienced radio/TV
•
technician for help.
Any unauthorized changes or modifications to this
equipment would void the user’s authority to operate this
device.
This device complies with Part 15 of the FCC Rules.
Operation is subject to the following two conditions:
(1) This device may not cause harmful interference, and
(2) this device must accept any interference received,
including interference that may cause undesired
operation.
Responsible Party:
Panasonic Corporation of North America
One Panasonic Way
Secaucus, NJ 07094
Support Contact:
Panasonic Consumer Electronics Company
Telephone No.: 1-800-211-7262
(Inside of
product)
THE FOLLOWING APPLIES ONLY IN THE U.S.A. AND CANADA
CAUTION
RISK OF ELECTRIC SHOCK
DO NOT OPEN
CAUTION: TO REDUCE THE RISK OF ELECTRIC
CAUTION!
DO NOT INSTALL OR PLACE THIS UNIT IN A
BOOKCASE, BUILT-IN CABINET OR IN ANOTHER
CONFINED SPACE. ENSURE THE UNIT IS WELL
VENTILATED. TO PREVENT RISK OF ELECTRIC
SHOCK OR FIRE HAZARD DUE TO OVERHEATING,
ENSURE THAT CURTAINS AND ANY OTHER
MATERIALS DO NOT OBSTRUCT THE VENTILATION
VENTS.
CAUTION!
DO NOT INSTALL OR PLACE THIS UNIT IN A
•
BOOKCASE, BUILT-IN CABINET OR IN ANOTHER
CONFINED SPACE. ENSURE THE UNIT IS
WELL VENTILATED. TO PREVENT RISK OF
ELECTRIC SHOCK OR FIRE HAZARD DUE TO
OVERHEATING, ENSURE THAT CURTAINS AND
ANY OTHER MATERIALS DO NOT OBSTRUCT THE
VENTILATION VENTS.
•
DO NOT OBSTRUCT THE UNIT’S VENTILATION
OPENINGS WITH NEWSPAPERS, TABLECLOTHS,
CURTAINS, AND SIMILAR ITEMS.
•
DO NOT PLACE SOURCES OF NAKED FLAMES,
SUCH AS LIGHTED CANDLES, ON THE UNIT.
•
DISPOSE OF BATTERIES IN AN
ENVIRONMENTALLY FRIENDLY MANNER.
SHOCK, DO NOT REMOVE SCREWS.
NO USER-SERVICEABLE PARTS
INSIDE.
REFER SERVICING TO QUALIFIED
SERVICE PERSONNEL.
The lightning flash with arrowhead symbol,
within an equilateral triangle, is intended to
alert the user to the presence of uninsulated
“dangerous voltage” within the product’s
enclosure that may be of sufficient magnitude
to constitute a risk of electric shock to persons.
The exclamation point within an equilateral
triangle is intended to alert the user to
the presence of important operating and
maintenance (servicing) instructions in the
literature accompanying the appliance.
3

RQTC0128
IMPORTANT SAFETY INSTRUCTIONS
Read these operating instructions carefully before using the unit. Follow the safety instructions on the unit and the applicable safety instructions listed below.
Keep these operating instructions handy for future reference.
1) Read these instructions.
2) Keep these instructions.
3) Heed all warnings.
4) Follow all instructions.
5) Do not use this apparatus near water.
6) Clean only with dry cloth.
7) Do not block any ventilation openings. Install in accordance with the
manufacturer’s instructions.
8) Do not install near any heat sources such as radiators, heat registers, stoves, or
other apparatus (including amplifiers) that produce heat.
9) Do not defeat the safety purpose of the polarized or grounding-type plug. A
polarized plug has two blades with one wider than the other. A grounding-type
plug has two blades and a third grounding prong. The wide blade or the third
prong are provided for your safety. If the provided plug does not fit into your outlet,
consult an electrician for replacement of the obsolete outlet.
Product service
1. Damage requiring service—The unit should be serviced by qualified service
personnel if:
(a) The AC power supply cord or AC adaptor has been damaged; or
(b) Objects or liquids have gotten into the unit; or
(c) The unit has been exposed to rain; or
(d) The unit does not operate normally or exhibits a marked change in performance;
or
IMPORTANT SAFETY INSTRUCTIONS/Product Service
(e) The unit has been dropped or the cabinet damaged.
2. Servicing—Do not attempt to service the unit beyond that described in these
operating instructions. Refer all other servicing to authorized servicing personnel.
3. Replacement parts—When parts need replacing ensure the servicer uses parts
specified by the manufacturer or parts that have the same characteristics as the
original parts. Unauthorized substitutes may result in fire, electric shock, or other
hazards.
4. Safety check—After repairs or service, ask the servicer to perform safety checks
to confirm that the unit is in proper working condition.
4
10) Protect the power cord from being walked on or pinched particularly at plugs,
convenience receptacles, and the point where they exit from the apparatus.
11) Only use attachments/accessories specified by the manufacturer.
12) Use only with the cart, stand, tripod, bracket, or table specified
by the manufacturer, or sold with the apparatus. When a
cart is used, use caution when moving the cart/apparatus
combination to avoid injury from tip-over.
13) Unplug this apparatus during lightning storms or when unused for long periods
of time.
14) Refer all servicing to qualified service personnel. Servicing is required when the
apparatus has been damaged in any way, such as power-supply cord or plug is
damaged, liquid has been spilled or objects have fallen into the apparatus, the
apparatus has been exposed to rain or moisture, does not operate normally, or
has been dropped.
Product information
For product information or assistance with product operation:
In the U.S.A., refer to the “Customer Services Directory” on page 26.
In Canada, contact the Panasonic Canada Inc. Customer Care Centre at
1-800-561-5505, or visit the website (www.panasonic.ca), or an authorized Servicentre
closest to you.
RQTC0128
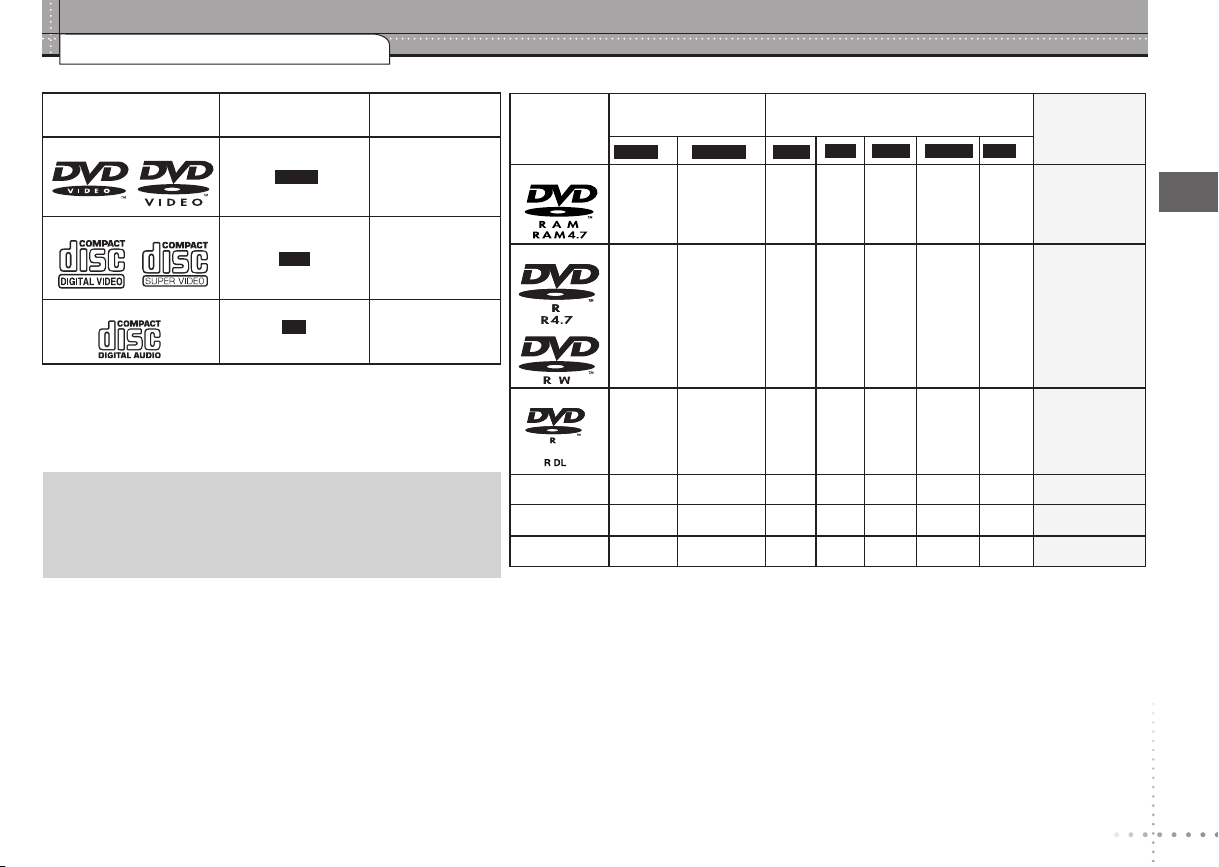
Discs that can be played
Commercial discs
Disc
Logo
DVD-Video
Video CD
Indicated in these
instructions by
DVD-V
VCD
Remarks
High quality movie
and music discs
Including SVCD
(Conforming to
IEC62107)
Recorded discs (
Disc
Logo
DVD-RAM
Recorded on a DVD
video recorder, etc.
DVD-V
−
DVD-R/RW
: Available,
2
DVD-VR
: Not available)
−
Recorded on a personal computer, etc.
4
MP3 JPEG
WMA
−
DivXMPEG4
Finalizing
5
Not necessary
6
CD
CD
Music discs
Discs that cannot be played
Blu-ray, HD DVD, DVD-Audio, Version 1.0 of DVD-RW, DVD-ROM, CDROM, CDV, CD-G, SACD, Photo CD, DVD-RAM that cannot be removed
from their cartridge, 2.6-GB and 5.2-GB DVD-RAM, PAL discs and “Chaoji
VCD” available on the market including CVD, DVCD and SVCD that do
not conform to IEC62107.
Playing DVDs and Video CDs
The producer of these discs can control how they are played so you
may not always be able to control play as described in these operating
instructions (for example if the play time is not displayed or if a Video CD
has menus).
Read the disc’s instructions carefully.
Handling precautions
Do not attach labels or stickers to discs (This may cause disc warping,
•
rendering it unusable).
Do not write on the label side with a ball-point pen or other writing
•
instrument.
Do not use record cleaning sprays, benzine, thinner, static electricity
•
prevention liquids or any other solvent.
Do not use scratch-proof protectors or covers.
•
Do not use the following discs:
•
– Discs with exposed adhesive from removed stickers or labels (rented
discs etc.).
– Discs that are badly warped or cracked.
– Irregularly shaped discs, such as heart shapes.
−
Necessary
DVD-R DL
1
()
()
− −
RW
4R/4
R DL
4
CD-R/RW
•
It may not be possible to play the above discs in all cases due to the type of discs, the condition of
the recording, the recording method and how the files were created (
− − − − − −
3
− − − − − −
3
− − − − − −
page 6, Tips for making data
Necessary
Necessary
Necessary
Necessary
discs).
1
This unit can also play CD-R/RW recorded with CD-DA or Video CD format.
2
Discs recorded on DVD video recorders or DVD video cameras using DVD-Video Format.
3
Recorded using a format different from DVD-Video Format, therefore some functions cannot be
used.
4
Discs recorded on DVD video recorders or DVD video cameras, etc. using Version 1.1 of the Video
Recording Format (a unified video recording standard).
5
Plays all versions of DivX® video (including DivX®6) with standard playback of DivX® media files.
Certified to the DivX Home Theater Profile. GMC (Global Motion Compensation) is not supported.
6
A process that allows play on compatible equipment. To play a disc that is displayed as “Necessary”
on this unit, the disc must first be finalized on the device it was recorded on.
7
Closing the session will also work.
Discs that can be played
7
5
RQTC0128
001
root
track
trac
k
trac
k
trac
k
trac
k
track
track
track
track
track
group
group
group
Discs that can be played/Maintenance
6
Discs that can be played
Tips for making data discs
Format Disc Extension Reference
You cannot play WMA files that are copy protected.
•
This unit is not compatible with Multiple Bit Rate
WMA
JPEG
MPEG4
MP3
DivX
CD-R/RW
DVD-RAM
DVD-R/RW
CD-R/RW
DVD-RAM
DVD-R/RW
CD-R/RW
DVD-RAM
DVD-R/RW
CD-R/RW
DVD-RAM
DVD-R/RW
CD-R/RW
“.WMA”
“.wma”
“.MP3”
“.mp3”
“.JPG”
“.jpg”
“.JPEG”
“.jpeg”
“.ASF”
“.asf”
“.DIVX”
“.divx”
“.AVI”
“.avi”
•
(MBR: a file that contains the same content
encoded at several different bit rates).
Sampling frequency:
•
DVD-RAM, DVD-R/RW:
11.02, 12, 22.05, 24, 44.1, and 48 kHz
CD-R/RW:
8, 11.02, 12, 16, 22.05, 24, 32, 44.1, and 48 kHz
This unit is not compatible with ID3 tags.
•
JPEG files taken on a digital camera that conforms
•
to DCF Standard Version 1.0 are displayed.
– Files that have been altered, edited or saved
with computer picture editing software may not
be displayed.
This unit cannot display moving pictures,
•
MOTION JPEG and other such formats, still
pictures other than JPEG (e.g. TIFF) or play
pictures with attached audio.
You can play MPEG4 data [conforming to SD
•
VIDEO specifications (ASF standard)/MPEG4
(Simple Profile) video system/G.726 audio
system] recorded with the Panasonic SD multi
cameras or DVD video recorders with this unit.
The recording date may differ from that of the
•
actual date.
Plays all versions of DivX video (including
•
DivX® 6) [DivX video system/MP3, Dolby Digital
or MPEG audio system] with standard playback
of DivX® media files. Functions added with DivX
Ultra are not supported.
GMC (Global Motion Compensation) is not
•
supported.
DivX files greater than 2GB or have no index may
•
not play properly on this unit.
This unit supports all resolutions up to maximum
•
of 720 x 480.
You can select up to 8 types of audio and
•
subtitles on this unit.
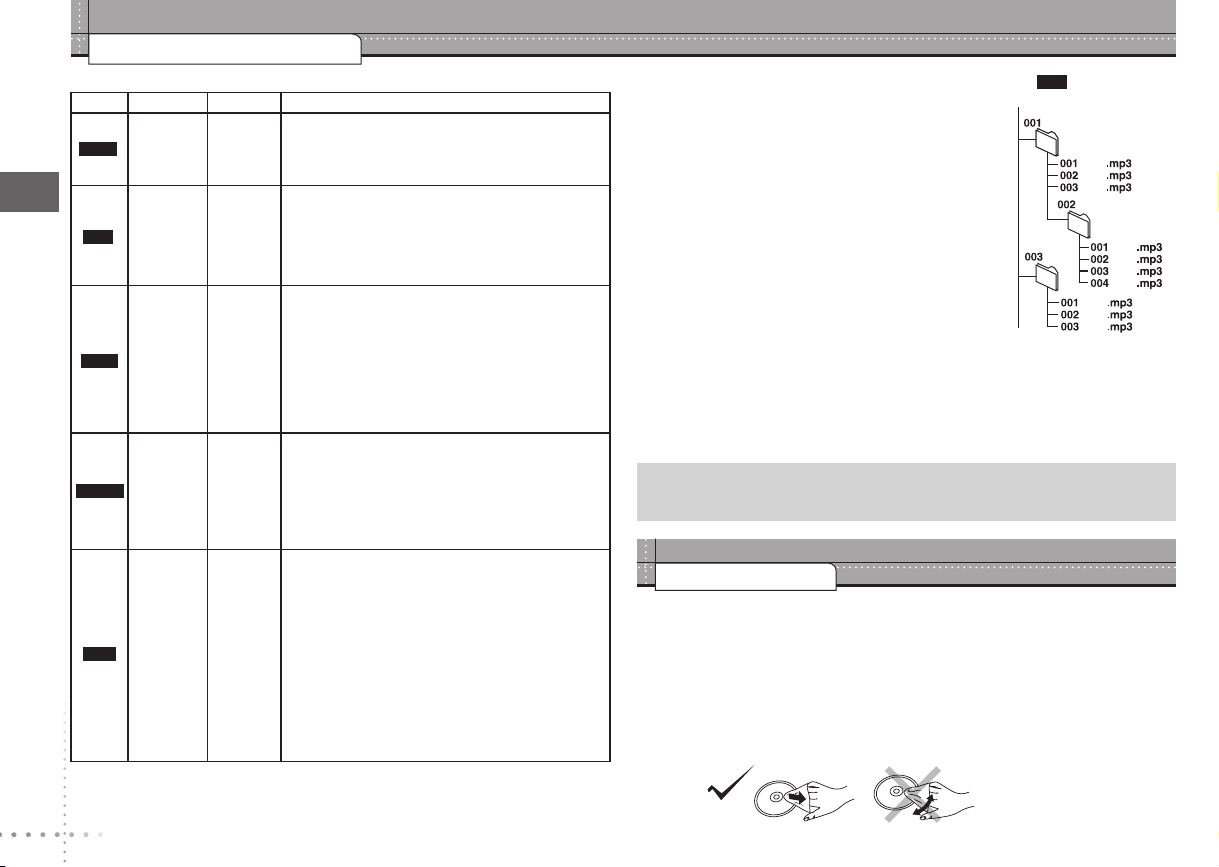
Naming folders and files
(Files are treated as content and folders are treated as
groups on this unit.)
At the time of recording, prefix folder and file names. This
should be with numbers that have an equal number of
digits, and should be done in the order you want to play
them (this may not work at times).
DVD-RAM
Discs must conform to UDF 2.0.
•
CD-R/RW
Discs must conform to ISO9660 level 1 or 2 (except for
•
extended formats).
This unit is compatible with multi-session but if there
•
are a lot of sessions it takes more time for play to start.
Keep the number of sessions to a minimum to avoid
this.
DVD-R/RW
Discs must conform to UDF bridge (UDF 1.02/ISO9660).
•
This unit is not compatible with multi-session. The default session only is played.
•
There may be differences in the display order on the menu screen and computer screen.
•
This unit cannot play files recorded using packet write.
•
e.g.
MP3
Note about using a DualDisc
The digital audio content side of a DualDisc does not meet the technical specifications
of the Compact Disc Digital Audio (CD-DA) format so play may not be possible.
Maintenance
Clean this unit with a soft, dry cloth
Never use alcohol, paint thinner or benzine to clean this unit.
•
Before using chemically treated cloth, read the instructions that came with the cloth
•
carefully.
Cleaning of the lens is generally not necessary although this depends on the
•
operating environment.
Do not use commercially available lens cleaners as they may cause malfunction.
•
Clean discs
Wipe with a damp cloth and then wipe dry.
RQTC0128
N
I
O
IDUA
L
R
T
NEN
OPM
OC
NI OEDIV
NI OIDUA
L R
OEDIV
NI
OEDIV S
N
I
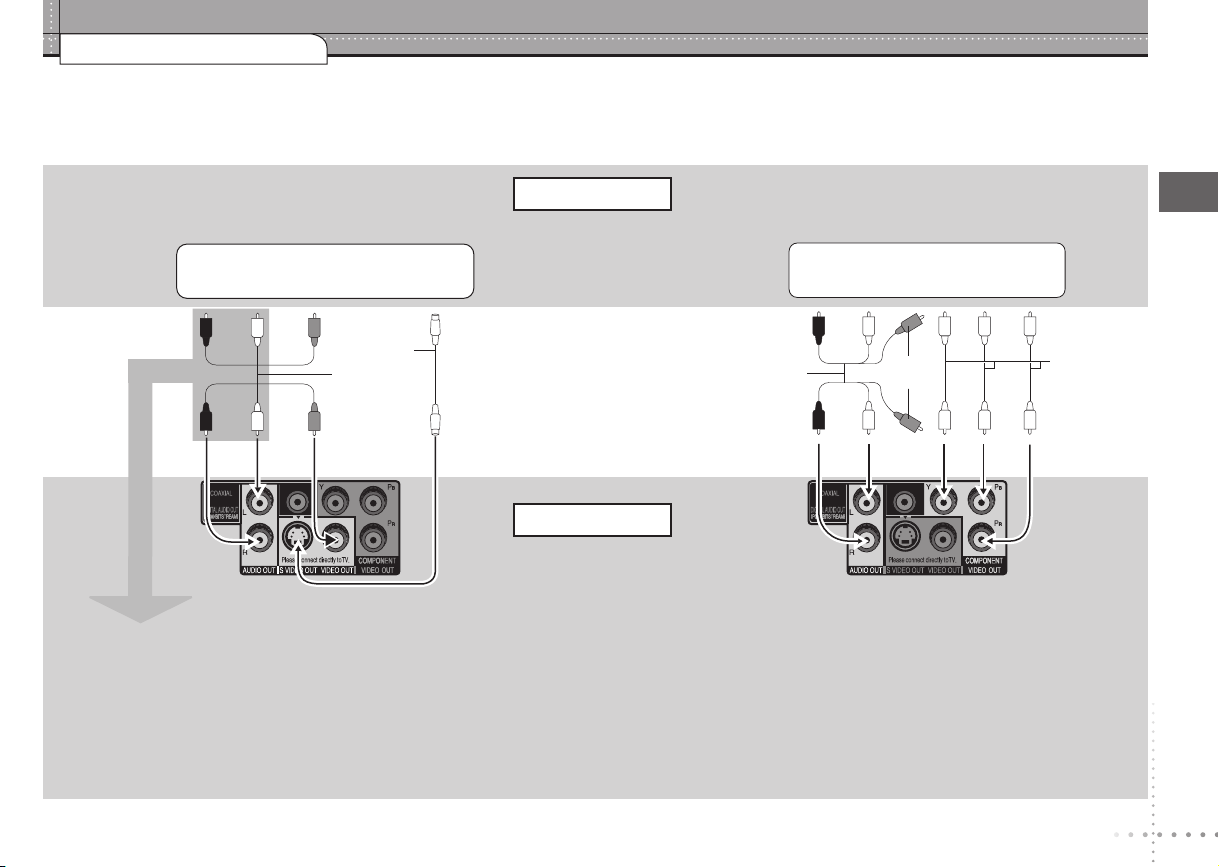
STEP 1 Connection
Connection to a television
Do not place the unit on amplifiers or equipment that may become hot. The heat can damage the unit.
•
Do not connect through the video cassette recorder. Due to copy guard protection, the picture may not display properly.
•
Turn off all equipment before connection and read the appropriate operating instructions.
•
Connect the terminals of the same color.
•
Television
With VIDEO IN or S VIDEO IN
S video cable
Audio/video
cable
(included)
Audio/video cable
Back of the unit
(included)
With COMPONENT VIDEO IN
Not used
Connection
Video cables
When using this connection, the audio cable
(red and white plugs) should also be connected.
You can connect the audio cable to the 2-channel
audio input terminals of an analog amplifier or
system component to enjoy stereo sound.
Select “DARKER” from the “BLACK LEVEL”
( page 19, “VIDEO” menu).
To enjoy progressive video
Connect to a progressive output compatible television.
•
Set “VIDEO PRIORITY” to “OFF” (
•
Set “VIDEO OUT (I/P)” to “PROGRESSIVE”, then follow the
•
instructions on the menu screen (
All Panasonic televisions with 480p input connectors are compatible.
Consult the manufacturer if you have another brand of television.
page 20, “HDMI” menu).
page 19, “VIDEO” menu).
7

RQTC0128
HDMI IN
HDMI IN
HDMI IN
HDMI OUT
HDMI IN
VIDEO IN
STEP 1 Connection
Enjoying higher quality audio and video (HDMI connection) ( Page 25, Glossary)
By connecting to an HDMI compatible high-definition television, video recordings can be converted to, and output as, high-definition video (1080p,1080i).
You can also enjoy surround sound by connecting to an HDMI compatible amplifier with multi-channel output terminals.
With HDMI compatible television
To enjoy digital high-definition video and high
quality audio with a single cable.
You can enjoy surround sound by connecting
•
an amplifier with COAXIAL terminal
( page 9).
Television
Connection
HDMI cable
With HDMI compatible television
and amplifier
To enjoy digital surround sound in addition to
digital high-definition video.
Television
HDMI cable
1
Multi-channel speakers
Amplifier
With HDMI compatible amplifier
You can still enjoy surround sound when your television is not HDMI
compatible by connecting an HDMI compatible amplifier.
Television
2
Not used
Audio/video
(included)
cable
Multi-channel speakers
Amplifier
1
Not used
HDMI cable
Back of the unit
Set “VIDEO PRIORITY” to “ON” and “AUDIO
•
OUT” to “ON” (
1
DVD-V
Audio will be output in 2 channels when output as PCM. Change “DOLBY DIGITAL” and “DTS” (
2
You can also use the S VIDEO and COMPONENT VIDEO terminals.
To enjoy high-definition video, connect to an HDMI compatible high-definition television and set “VIDEO FORMAT” ( page 18, On-Screen Menu 4).
•
For stable operation and preventing deterioration of video quality, please purchase an HDMI cable 5.0 m (16
•
It is compatible with the EZ Sync
•
page 20, “HDMI” menu).
TM
“HDAVI ControlTM” ( page 24).
Back of the unit Back of the unit
Set “AUDIO OUT” to “ON”. When you connect to a television
Set “VIDEO PRIORITY” to “ON” and “AUDIO
•
OUT” to “ON” (
page 20, “HDMI” menu).
•
through the COMPONENT VIDEO terminal only, set “VIDEO
PRIORITY” to “OFF”, too (
page 20, “AUDIO” menu).
2
/5 feet) or less in length with the HDMI logo.
8
2
HDMI cable
page 20, “HDMI” menu).
RQTC0128
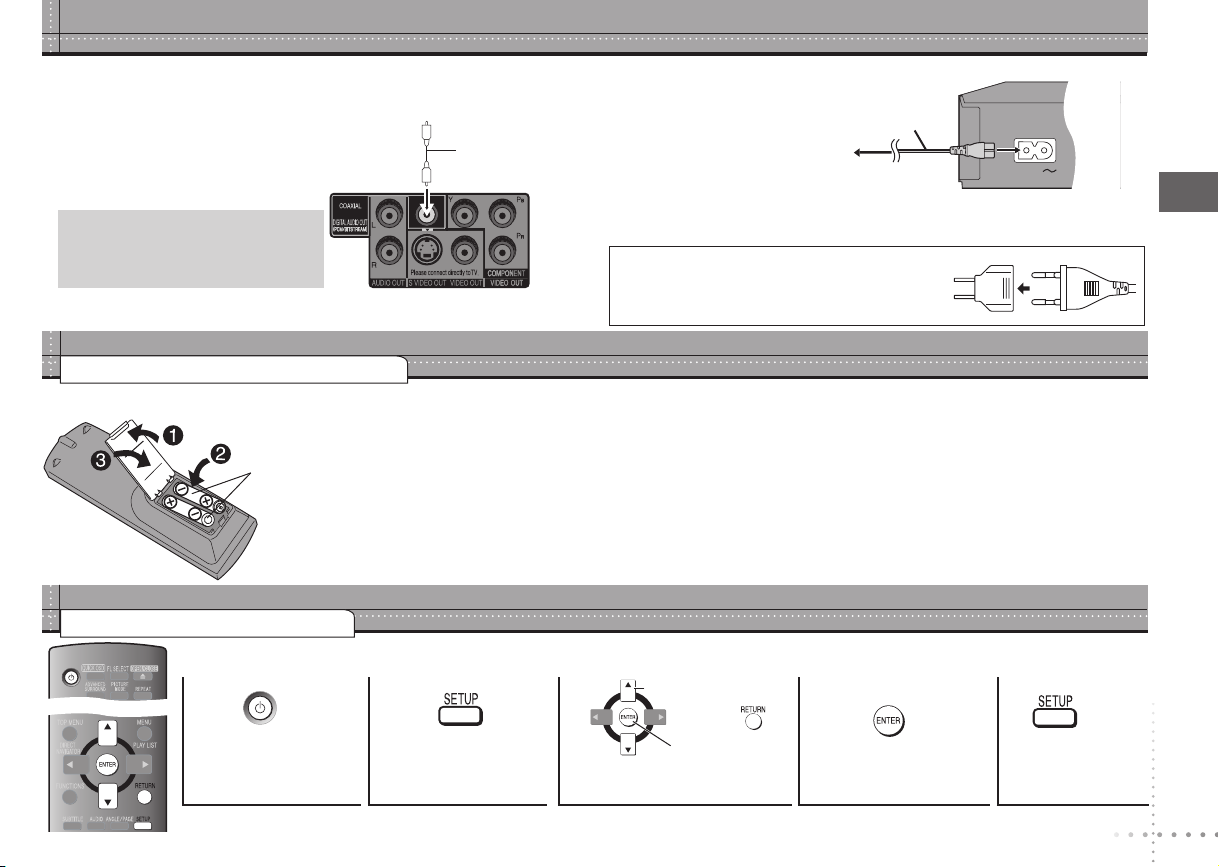
COAXIAL IN
Enjoying surround sound
AC IN
R6/LR6, AA
Connect the AC power supply cord last
Amplifier with a built-in decoder or a
decoder-amplifier combination
You cannot use DTS Digital Surround
•
decoders not suited to DVD.
Set “AUDIO OUT” to “OFF”
( page 20, “HDMI” menu), and change
“PCM OUTPUT”, “DOLBY DIGITAL” and
page 20, “AUDIO” menu).
“DTS” (
STEP 2 The remote control
Batteries
STEP 3 QUICK SETUP
Turn on the television and select the appropriate video input on the television.
1
Coaxial cable
Conserving power
This unit consumes a small amount of power, even when it is turned off (1 W). To save
power when the unit is not to be used for a long time, unplug it from the household AC
outlet.
For areas except the U.S.A. and Canada
If the power plug does not fit your AC outlet, use the
Back of the unit
Insert so the poles (4 and 3) match those in the remote
•
control.
•
Do not use rechargeable type batteries.
power plug adaptor (included). If it still doesn’t fit,
contact an electrical parts distributor for assistance.
Do not:
mix old and new batteries.
•
•
use different types at the same time.
•
heat or expose to flame.
•
take apart or short circuit.
•
attempt to recharge alkaline or manganese batteries.
•
use batteries if the covering has been peeled off.
2 3
Select
AC power supply cord (included)
To household AC outlet
Mishandling of batteries can cause electrolyte leakage which
can damage items the fluid contacts and may cause a fire.
Remove if the remote control is not going to be used for a long
period of time. Store in a cool, dark place.
Use
Aim at the remote control sensor ( page 10), avoiding
obstacles, at a maximum range of 7 m (23 feet) directly in front
of the unit.
4
5
Connection/The remote control/QUICK SETUP
Power on
Shows QUICK
SETUP screen.
To change these settings later, select “QUICK SETUP” (
Register
Follow the message and
make the settings.
page 20, “OTHERS” menu).
Press to finish
QUICK SETUP.
Press to exit.
9
RQTC0128
OPEN/CLOSE
POWER
POWER
OPEN/CLOSE
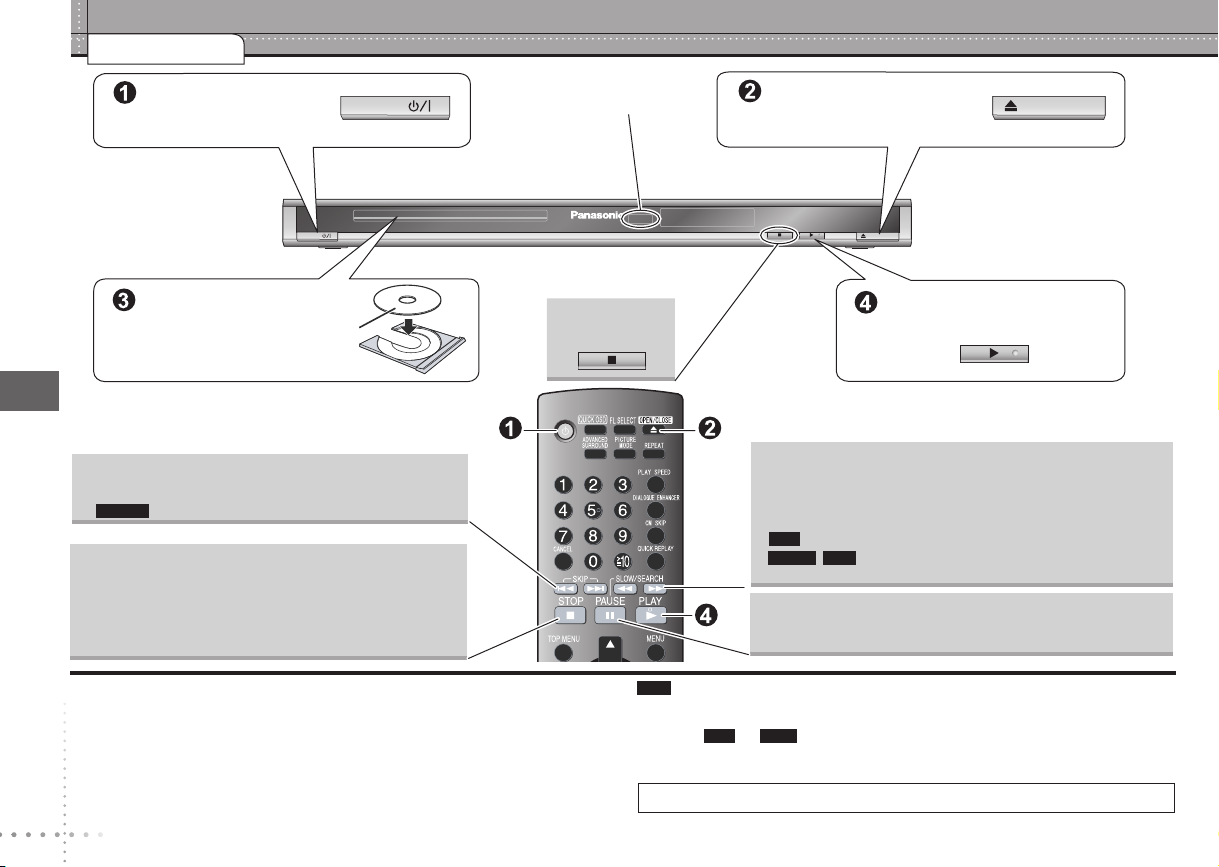
Basic play
Power ON.
Load the disc.
Load double-sided discs so the
•
label for the side you want to
play is facing up.
Skip
Press [u i] to skip titles, chapters, tracks, etc.
•
Basic play
DVD-VR
Can also skip to the markers.
•
Stop
The position is memorized when “RESUME STOP” is
displayed on your television screen.
Press [q] (PLAY) to resume. (Resume play)
•
Press [g] to clear the position.
•
Remote control sensor
Stop
Open the disc tray.
Start play.
Search
Slow-motion
Up to 5 steps
•
Press [q] (PLAY) to restart play.
•
VCD
(during play)
(during pause)
•
Slow-motion: Forward direction only.
Slow-motion: Does not work.
DivXMPEG4
Pause
Press [q] (PLAY) to restart play.•
Standby/on switch (8)
Press to switch the unit from on to standby mode or vice versa. In standby mode, the
unit is still consuming a small amount of power.
10
Note
DISCS CONTINUE TO ROTATE WHILE MENUS ARE DISPLAYED. Press [
•
when you finish to preserve the unit’s motor and your television screen.
•
•
If you are experiencing problems, refer to “Troubleshooting guide” (
MP3 JPEG
To play
( page 20, “OTHERS” menu).
Total title number may not be displayed properly on
or contents on DVD-RAM, set “DVD-VR/DATA” to “DATA”
4R/4RW.
pages 21 to 23).
g]
 Loading...