

PANASONIC DVD-LV55 User Manual

Panasonic
Portabte DVDA/ideo CD/CD Player
Operating Instructions
Model No DVD-LV75
L
L..
^jSOYINicL
fiM mrwai WA a^-<Lj »av mm'J m
DVD-LV70
DVD-LV55
w
« «
Tb» photogn^h* Sboar CMKV75
PalrnTh«at«j;^;#
VlOf o
/Mir <‘Mv/i/wier
Tb«nh you hx pufCfUMM>g tb« product
For ofMangrri poiiurrfuknc« and satoty plai»a ro«d those nsIrucFont carulully
aaicx» oortr^ckng. opttng or a^ntng t«« product. piSASc f«ad ihpoo metruct«r« owtv
hoop f* Ffienud kar liAat reiprpnia
rorUSA
Tho tcfvicpnier 1st and wwrArHy can bo found on pages 48 end 60
I
-w — In Ui6 U.S A imp //www.panaflnnic.com
i In Canada wvirw panaeon«;^
ROl5d97 Y

CAUTION!
THIS PRODUCT UTILIZES A LASER.
USE OF CONTROLS OR , ADJUST
MENTS OR PERFORMANCE OF PRO
CEDURES OTHER THAN THOSE
SPECIFIED HEREIN MAY RESULT IN
HAZARDOUS RADIATION EXPO
SURE.
DO NOT OPEN COVERS AND DO
NOT REPAIR YOURSELF. REFER
SERVICING TO QUALIFIED PER
SONNEL.
WARNING:
TO REDUCE THE RISK OF FIRE,
ELECTRIC SHOCK OR PRODUCT
DAMAGE, DO NOT EXPOSE THIS
APPLIANCE TO RAIN, SPLASH
ING, DRIPPING OR MOISTURE.
DVD-LV75 I DVD-LV55
CAUTION:
TO PREVENT ELECTRIC SHOCK
MATCH WIDE BLADE OF PLUG
TO WIDE SLOT, FULLY INSERT.
The following mark and symbols are located on
the bottom of the unit.
CAUTION
CAUTION: TO REDUCE THE RISK OF
A
RISK OF ELECTRIC SHOCK
DO ROT OPEN
ELECTRIC SHOCK, DO NOT
REMOVE SCREWS. NO USERSERVICEABLE PARTS INSIDE.
REFER SERVICING TO
QUALIFIED SERVICE
PERSONNEL.
The lightning flash with arrow
head symbol, within an equilater
al triangle, is intended to alert the
user to the presence of uninsulat
ed “dangerous voltage” within the
product’s enclosure that may be
of sufficient magnitude to consti
tute a risk of electric shock to
persons.
The exclamation point within an
equilaterai triangle is intended to
alert the user to the presence of
important operating and mainte
nance (servicing) instructions in
the iiterature accompanying the
appiiance.
A
CAUTION -VISIBLE AND INVISIBLE LASER ATTENTION -RAYONNEMENT LASER VISIBLE ET
RADIATION WHEN OPEN. INVISIBLE EN CAS D'OUVERTURE,
DO NOT STARE INTO BEAM, NE PAS REGARDER DANS LE FAISCEAU.
THE FOLLOWING APPLIES ONLY IN THE U.S.A.
CAUTION:
This equipment has been tested and found to
comply with the limits for a Class B digital de
vice, pursuant to Part 15 of the FCC Rules.
These limits are designed to provide reason
able protection against harmful interference in
a residential installation. This equipment gener
ates, uses and can radiate radio frequency
energy and, if not installed and used in ac
cordance with the instructions, may cause
harmful interference to radio communications.
However, there is no guarantee that interfer
ence will not occur in a particular installation. If
this equipment does cause harmful interfer
ence to radio or television reception, which can
be determined by turning the equipment off and
on, the user is encouraged to try to correct the
interference by one or more of the following
measures:
1ÛT5897
(Bottom of the unit)
• Reorient or relocate the receiving antenna.
• Increase the separation between the equip
ment and receiver.
•Connect the equipment into an outlet on a cir
cuit different from that to which the receiver is
connected.
•Consult the dealer or an experienced radio/
TV technician for help.
Any unauthorized changes or modifications to
this equipment would void the user's authority
to operate this device.
This device complies with Part 15 of the FCC
Rules. Operation is subject to the following two
conditions: (1) This device may not cause
harmiul idereference, and (2) this device must
accept any intereference received, including intereference that may cause undesired opera
tion.
i
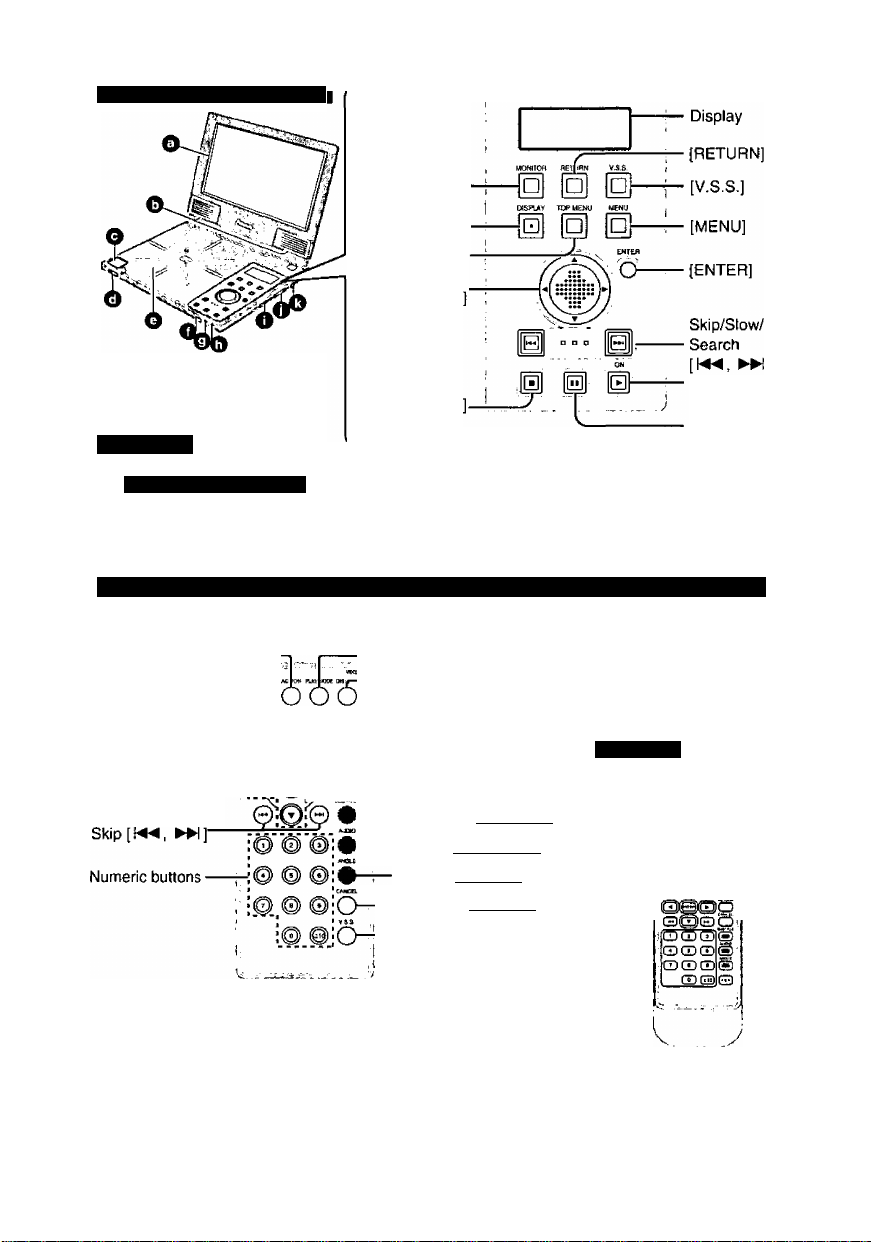
open this page while reading the Instructions so you can see where the controls are.
This figure shows DVD-LV75.
[MONITOR^
[DISPLAY!
[TOP MENU!
Cursor jockey
[A, T, ◄ , ►
Play/On [►,ON]
Stop
Pause [I I]
Main Unit
О Wide-screen LCD
DVD-LV75 I DVD-LV70
DVD-LV55
|: 5"
О Stereo speakers
О Oise iid [PUSH OPEN]
button
O Lock release
O Disc lid
O Remote control signal
sensor
0 Charge [CHG] indicator
0 Standby [(!>} indicator
O Volume [ ^ VOL] dial
O [ON/OFF, HOLD] select
switch
O Headphone[Q] jack
Remote Control * figure shows the remote contort for DVD-LV75 and DVD-LV55.
(Boxed names show positions on the remote control for DVD-LV70.)
QT5897
[ACTION]—
[(i), POWER]—
Pause [UK
Stop [■]_
Slow/Search r-
[◄◄, ►►]-*
Cursor jockey
buttons [A, ▼,
►]/[ENTER]
■ Using the cursor
On the main unit;
On the remote control: Press the cursor jockey button corresponding to the direction you want
___
-© ó ó O^íToV
0:0
Slide the cursor jockey in the direction you want to move the cursor.
... . . .
[A] up, [T] down, [◄] left, [►] right.
to move the cursor.
“[PLAY MODE]
-[DISPLAY]
Play [►]
0“^[MENU]
—[RETURN]
[SUBTITLE] |[CANCEL]|
[AUDIO] [[SUBTITLE]!
[ANGLE] |[AUDIOH
[CANCEL] [[ANGLE]]
[V.S.S.]
MENU]
DVD-LV70
(The dimensions and buttons
of the remote control for DVDLV70 are different.)
©£3c3S
CDGDQQ
[A] up, [T] down, [-4] left, [►] right.
■Si
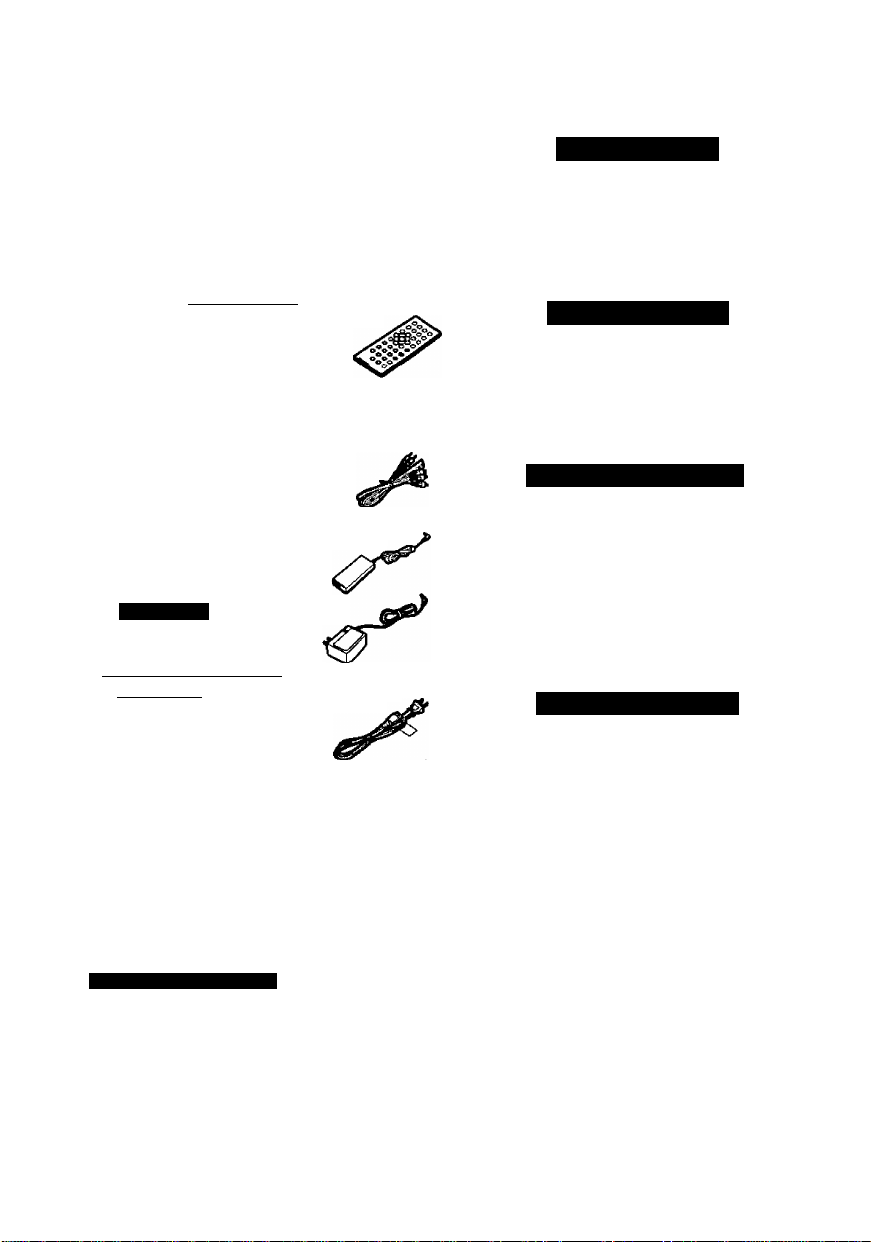
Accessories
Table of contents
Please check and identify the
supplied accessories.
(For Xi.S.A.)
To order accessories contact 1-800-332-5368
or web site (
(For Canada)
To order accessories, call the dealer from
whom you have made your purchase.
Q Remote control
fVEQ2414)
(EQsSE^I N2QAHC000007)
□ Button-type battery
http://www.panasonic.com).
...............
..............................
for remote control
(for replacement, see below)
........................i
□ Audto/video cable.................................i
(RJL3X001X15)
□ AC adaptor................................,'T
DVD-LV70
NOJZEH000001)
Q AC power supply cord............................1
( I »V*J tl I >1 RJA0065-A)
□ Battery pack
(for replacement, see below)
........................
Optional accessories:
Car adaptor (DY'DC95)
Mini optical digital audio cable (RP-CA2120)
Button type battery (CR2025)
Battery pack
ForU.S.A.: (CGP-H501A/1B)
For Canada: (CGP-H501C/1B)
Available only in U.S.A.
Carrying case (DY-CC20)
Headphones (RP-HC100 or RP-HS900)
Use numbers indicated in parentheses when
asking for replacement parts.
The included AC power supply cord and AC
adaptor are for use with this unit only. Do not use
them with other equipment.
RQT5897
VSK0578)
:<s>
.........
Getting Started:
IMPORTANT SAFETY INSTRUCTIONS... 6
Listening caution..................................... 7
Disc information
......................................
Basic Operations:
Basic play
•Stopping play
i
•Pausing play
•Skipping chapters and tracks
................................................
.....................................................
............................................
Advanced Operations:
Other play modes
1
• Program play
• Random play
..........................................
..........................................
Changing soundtracks, subtitle
languages and angles.........................17
Switching vocals ON or OFF for
karaoke discs.......................................18
For Your Reference:
Changing initial settings
•Common procedures
• 1 Disc Languages
•2 Ratings..................................................27
•3 Menu Language....................................27
•4 On-Screen Messages...........................28
•9 Other Settings.......................................28
Connecting other equipment
Using headphones
Watching video from a video
camera
.................................................
Enjoying a larger screen
•Connecting to a television
These operating instructions are
applicable to models DVD-LV75, DVD-
LV70 and DVD-LV55.
However, most of the illustrations show
model DVD-LV75.
...............................
...................................
.................................
.......................
...................
.................
8
12
13
14
14
16
16
25
26
30
31
31
32

Disc and unit handiing
precautions........................................... 9
Preparing the remote control
.................
10
Power supply
•Using the AC adaptor................................10
•Using the battery pack
..............................
11
•Slow motion
.............................................
14
• Fast forward and rewind—
SEARCH
• Frame-by-frame viewing
Changing the monitor settings
•Changing the size of the picture
•Adjusting the brightness
................................................
.........................
..............
..............
..........................
14
18
19
19
•Adjusting color intensity...........................19
Enjoying Virtual Surround Sound
(V.S.S.)
..................................................
•Selecting TV screen type
.........................
20
33
Enjoying more powerful sound
•Connection to an amplifier with
5.1 channel input terminals
_______
(Analogue connection) .. 34
•Connection to an amplifier with a built-in
decoder (or an amplifier and decoder
combination) (Digital connection) .... 35
•Connection to a 2-channel amplifier or
mini-system
(Analogue connection)............................36
•Starting play from a selected title or
track.........................................................15
• Returning to a menu
................................
14
Using On-Screen Menu Icons
• Basic operation.......................................21
• Icons for disc information
........................
• Icons for unit information.........................23
•Shuttle screen
..........................................
•Connection to a 2-channel digital
amplifier or mini-system
(Digital connection)
.................................
Speaker settings nrjiayw.1
Digital settings.........................................40
Troubleshooting Guide
...........................
Maintenance.............................................45
Glossary
Specifications
...................................................
..........................................
Servicenter List (U.S.A.)..........................48
Product Service
.......................................
Limited Warranty (U.S.A.)
.....................
.......................
15
22
24
37
38
42
46
47
49
50
The features avaiiable depend on the
model. These marks indicate features
available with the different models.
DVD-LV75
^ (DVD-LV75 only)
DVD-LV70
DVD-LV55
(DVD-LV70 only)
(DVD-LV55 only)
Open the facing page when using the opera
ting instructions.
RQT5B97

IMPORTANT SAFETY INSTRUCTIONS
Read these operating instructions carefully be
fore using the unit. Follow the safety instructions
on the unit and the applicable safety instructions
listed below. Keep these operating instructions
handy for future reference.
Read these instructions.
Keep these instructions.
Heed all warnings.
Follow all instructions.
Do not use this apparatus near water.
Clean only with dry cloth.
Do not block any ventilation openings. Install
in accordance with the instructions.
Do not install near any heat sources such as
radiators, heat registers, stoves, or other ap
paratus (including amplifiers) that produce
heat.
Do not defeat the safety purpose of the polar
9)
ized or grounding-type plug. A polarized plug
has two blades with one wider than the other.
A grounding-type plug has two blades and a
third grounding prong. The wide blade or the
third prong are provided for your safety. If the
provided plug does not fit into your outlet,
consult an electrician for replacement of the
obsolete outlet.
10) Protect the power cord from being walked on
or pinched particularly at plugs, convenience
receptacles, and the point where they exit
from the apparatus.
11) Only use attachments/accessories specified
by the manufacturer.
12) Use only with the cart,
stand, tripod, bracket, or
table specified by the manu
facturer, or sold with the ap
paratus. When a cart is
used, use caution when moving the cart/apparatus combination to avoid injury from tipover.
13) Unplug this apparatus during lightning
storms or when unused for long periods of
time.
14) Refer all servicing to qualified service per
sonnel. Servicing is required when the appa
ratus has been damaged in any way, such as
power-supply cord or plug is damaged, liquid
has been spilled or objects have fallen into
the apparatus, the apparatus has been ex
posed to rain or moisture, does not operate
normally, or has been dropped.
In the U.S.A., contact the Panasonic
Customer Call Center at 1-800-211-7262,
or e-mail consumerproducts@panasonic. com, or web site (
http://www. panasonic.com).
In Canada, contact Panasonic Canada Inc.
Customer Care Centre at 1-800-561-5505 or
web site (www.panasonic. ca), or an autho
rized Servicentre nearest you.
ROT5897

AC adaptor
This AC adaptor operates on AC between
100 V and 240 V.
But
• In the U.S.A. and Canada, the AC power
supply cord must be connected to a 120 V
AC power supply only,
•When connecting to an AC supply outside
of the U.S.A. or Canada, use a plug adap*
tor to suit the AC outlet configuration.
•When connecting to a supply of greater
than AC 125 V, ensure the cord you use is
suited to the voltage of the AC supply and
the rated current of the AC adaptor.
•Contact an electrical parts distributor for
assistance in selecting a suitable AC plug
adaptor or AC cord set.
Batteries
1. Battery pack (Lithium ion battery pack)
• Use this unit to recharge the battery pack.
• Do not use the battery pack with equip
ment other than the specified player.
•Do not use the player outside if it is snow
ing or raining. (The battery pack is not
waterproof.)
• Do not get dirt, sand, liquids, or other for
eign matter on the terminals.
• Do not touch the plug terminals (-h and
-) with metal objects.
• Do not disassemble, remodel, heat or
throw into fire.
2. Button-type battery (Lithium battery)
• Insert with poles aligned.
• Do not touch the terminals (4- and -) with
metal objects.
•Do not disassemble, remodel, heat or
throw into fire.
• Keep out of reach of children.
If any electrolyte should come into contact
with your hands or clothes, wash it off thor
oughly with water.
If any electrolyte should come into contact
with your eyes, never rub the eyes.
Rinse eyes thoroughly with water, and then
consult a doctor.
3. Disposing of the batteries
Check and follow your local regulations be
fore disposal.
Listening caution
Do not play your headphones or earphones at a
high volume. Hearing experts advise against
continuous extended play.
If you experience a ringing in your ears, reduce
volume or discontinue use.
Do not use while operating a motorized vehicle.
It may create a traffic hazard and is illegal in
many areas.
You should use extreme caution or temporarily
discontinue use in potentially hazardous situ
ations.
Even if your headphones or earphones are the
open-air type designed to let you hear outside
sounds, don’t turn up the volume so high that you
can’t hear what’s around you.
Sound can be deceiving. Over time your hearing
“comfort level” adapts to higher volumes of
sound. So what sounds “normal" can actually be
loud and harmful to your hearing.
Guard against this by setting your equipment at a
safe level BEFORE your hearing adapts.
To establish a safe level:
• Start your volume control at a low setting.
• Slowly increase the sound until you can hear it
comfortably and clearly, and without distortion.
Once you have established a comfortable sound
level;
• Set the dial and leave it there.
CAUTION:
The batteries used in this device may present
a risk of fire or chemical burn if mistreated.
Do not disassemble or incinerate the batte
ries. Do not heat the batteries above the fol
lowing temperatures.
Button-type battery
Battery pack.............................60 °C (140 “F)
Do not recharge the button-type battery.
Replace only with Panasonic part number in
dicated below:
Button-type battery (Lithium battery)
(for remote control)
Battery pack (Lithium ion battery pack)
For U.S.A.; CGP-H501A/1B
For Canada: CGP-HS01C/1B
Use of other batteries may present a risk of
fire or explosion.
.............
100 °C (212 “F)
..............................
CR2025
RQT5897
Disc information
Discs supported by
V J this unit
DVD-Video
video"
Video CD
(1JD§[@
[tKGfr«. VIOEOl
Audio CD ncoMMCT
DICTTAL AUDIO
(oJag®
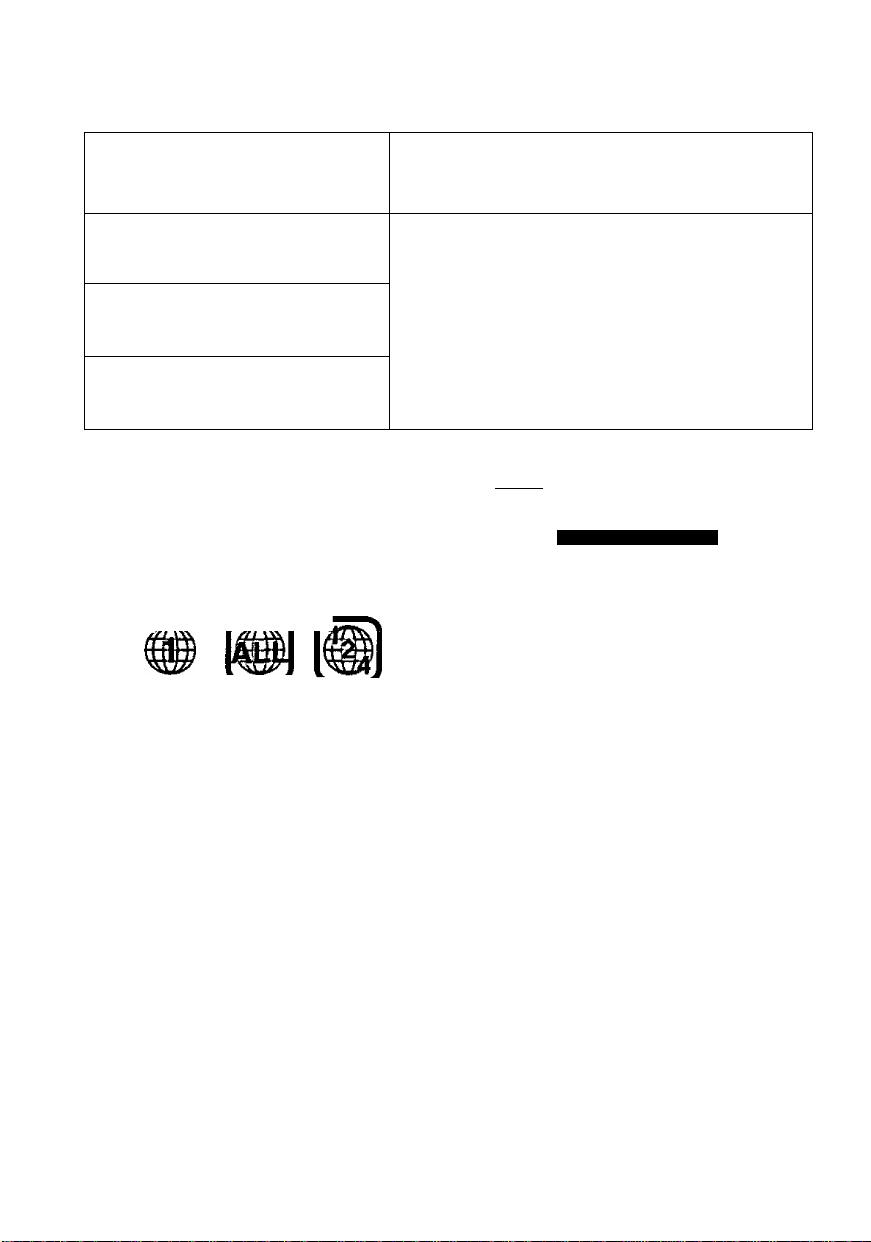
■ Region number supported by this
unit
Region numbers are allocated to DVD players
and software according to where they are sold.
•The region number of this unit is “1”.
•This unit will play DVDs marked with labels
containing the region number “1” or “ALL”.
Example:
rZSr\ r.
Read the disc's instructions carefully.
■ Playing DVDs and Video CDs
The producer of the material can control how
these discs are played. This means that you may
not be able to control play of a disc with some op
erations described in these operating instruc
tions. Read the disc’s instructions carefully.
■ How the picture appears on the LCD
The picture shown on the LCD depends on the
display mode and the aspect ratio recorded on
the disc page 19).
DVD with a region number other than “1” or “ALL”
(See below.), Photo CD, CD-RW, CDV, PAL
discs, DVD-RW, CD-G, DVD-ROM, DVD-f RW,
DVD-Audio, DVO-R, CVD, SVCD, DVD-RAM,
Divx Video Disc, SACD, CD-ROM and VSD.
Do not try to play Photo CD.
The data on the idsc may be damaged.
Discs not supported by this unit
■ DVDs that can be played
nniDOLBvl This unit has a Dolby Digtal decoder
D Mi 1T A L so you can play DVDs with this mark.
DVD-LV75 I DVD-LV55
S U tR OU S D
These models have a DTS decoder
so you can enjoy the powerful sound
effects this system can provide.
This unit does not have a DTS de
coder. Connect this unit to equip
ment that has a DTS decoder to
enjoy DVDs with this mark.
The functions depend on the disc being played. These marks indicate the functions available.
(DVD)
{Video CD) (Audio CD)
■ Playing CD-R
This unit can play CD-DA (digital audio) format
audio CD-R that has been finalized* upon com
pletion of recording.
It may not be able to play some CD-R due to the
condition of recording.
iii Finalizing is a process that enables CD-R
players to play audio CD-R.
RQT5897
Before enjoying DVO/Video CD/CD
The On-Screen menu language of your player has been factory preset to English.
You can change the menu language to French or Spanish. Refer to “3 Menu
Language” on page 27.
In these instructions, It is assumed that English has been selected as the menu lan
guage.
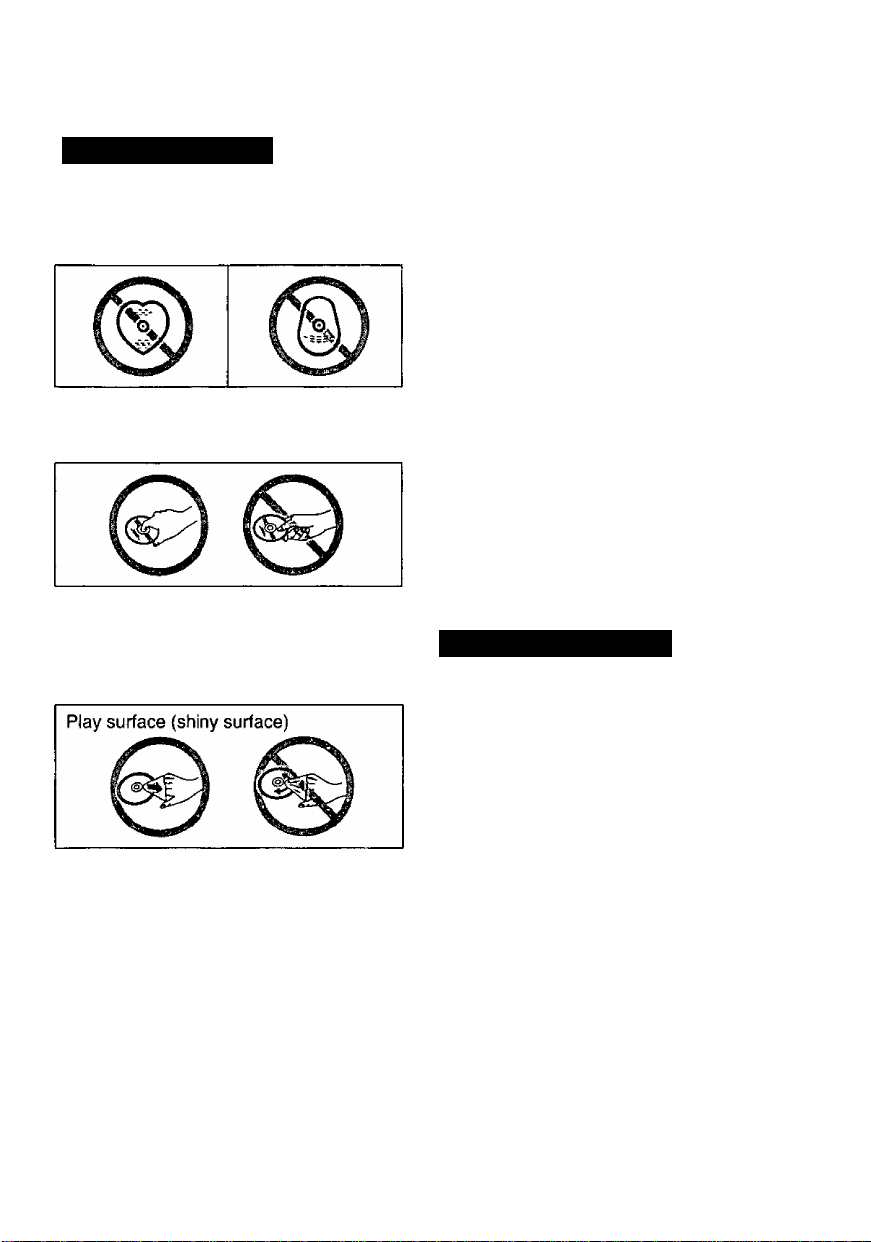
Disc and unit handling precautions
Concerning discs
Do not use irregularly shaped discs, such
as heart-shaped.
(These discs can damage the unit.)
■ Howto hold a disc
Do not touch the recorded shiny surface.
■ If the surface is dirty
Wipe it with a damp cloth and then wipe
dry. Wipe from the center toward the cir
cumference.
■ Handling precautions
• Do not write on the label side with a ball
point pen or other writing instrument.
•Do not use record cleaning sprays, ben
zine, thinner, static electricity prevention
liquids or any other solvent.
• Do not attach labels or stickers to discs.
• Do not use discs with exposed adhesive
from tape or left over peeled off stickers.
•Do not use scratch-proof protectors or
covers other than those specified for use
with this unit.
•Do not use CDs printed with label printers
available on the market.
■ Do not place or store discs in the fol
lowing places
• Locations exposed to direct sunlight
• Humid or dusty locations
• Locations directly exposed to a heat vent
or heating appliance
To prevent damage
Avoid the following:
•Spraying flammable insecticides near the
unit,
• Pressing the LCD,
•Touching the lens and other parts of the
laser pickup.
■ If the disc is brought from a cold to a
warm environment, moisture may
form on the disc
Wipe with a soft, dry, lint-free cloth before
using the disc.
Do not use the unit in the following places;
•Sandy places such as beaches,
•On top of cushions, sofas, or hot equip
ment such as amplifiers.
Do not rest the unit on your lap for a long
time white using it. The unit can become
hot and cause burns.
RQT5897
Preparing the remote
Power supply
control
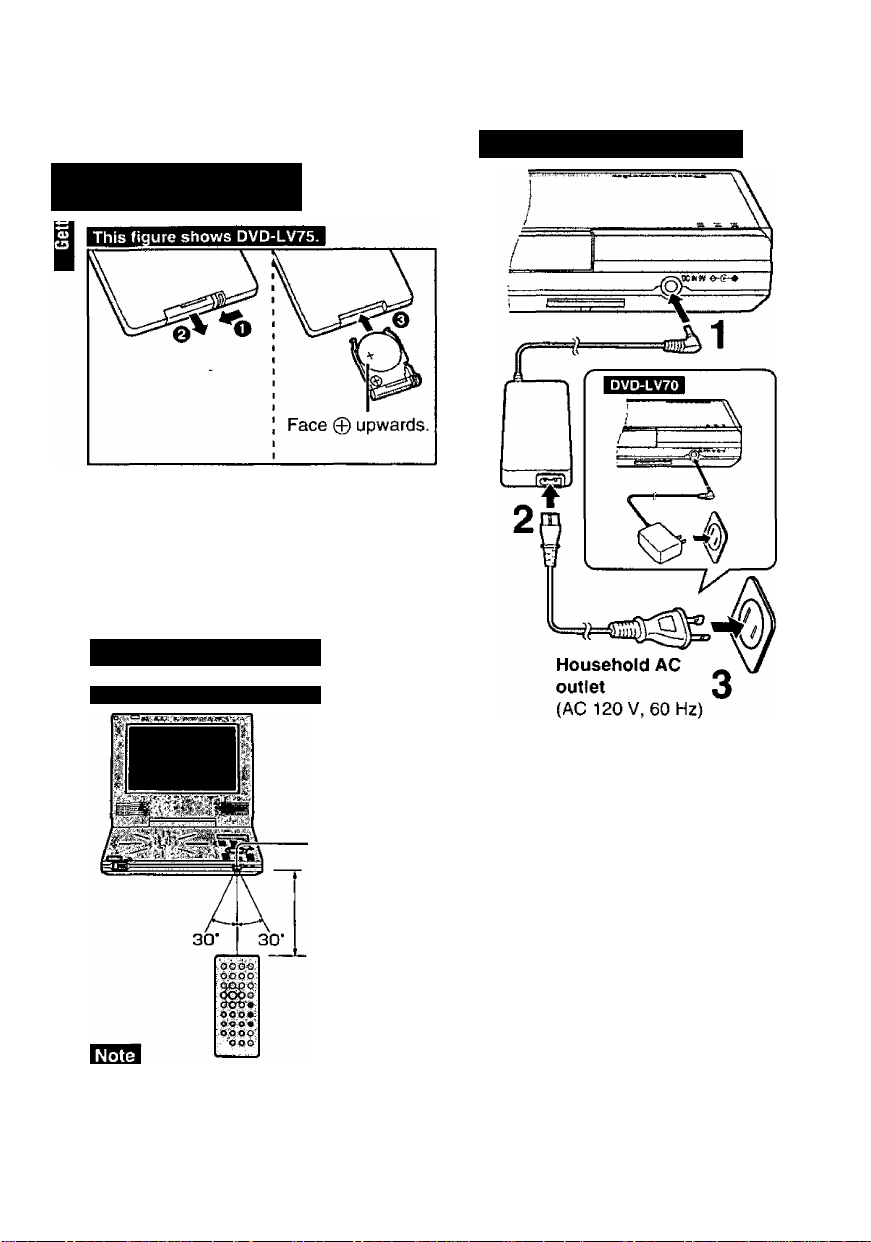
21 Insert the battery
esM (Lithium battery)
■ Replacing the button-type battery
The battery normally lasts for about a year.
Replace if the remote control fails to operate the
unit when used within the operation range.
Refer to “IMPORTANT SAFETY INSTRUC-
SIGNS” on pages 6 and 7.
Operation range
This figure shows DVD-LV75.
Using the AC adaptor
Remote control
signal sensor
About 7 m
(23 feet) in front
of the signal
sensor
• Do not expose the remote control signal sensor
to bright light.
•Do not place obstacles between the remote
control signal sensor and the remote control.
|B?|1 •Do not use another unit’s remote control at the
RQT5897 S3me time.
The [(!)] indicator lights.
Front of
this unit
Refer to “IMPORTANT SAFETY INSTRUCSIONS” on page 6.
The unit is in the standby condition (the
[Ci)] indicator lights) when the AC adap
tor is connected. The primary circuit is
always "live" as long as the AC adaptor
is connected to an electrical outlet.
■ When the unit is not going to be used
for a long time
The unit consumes 2 W when in standby
mode.
To conserve power, disconnect the AC
adaptor from the AC outlet.
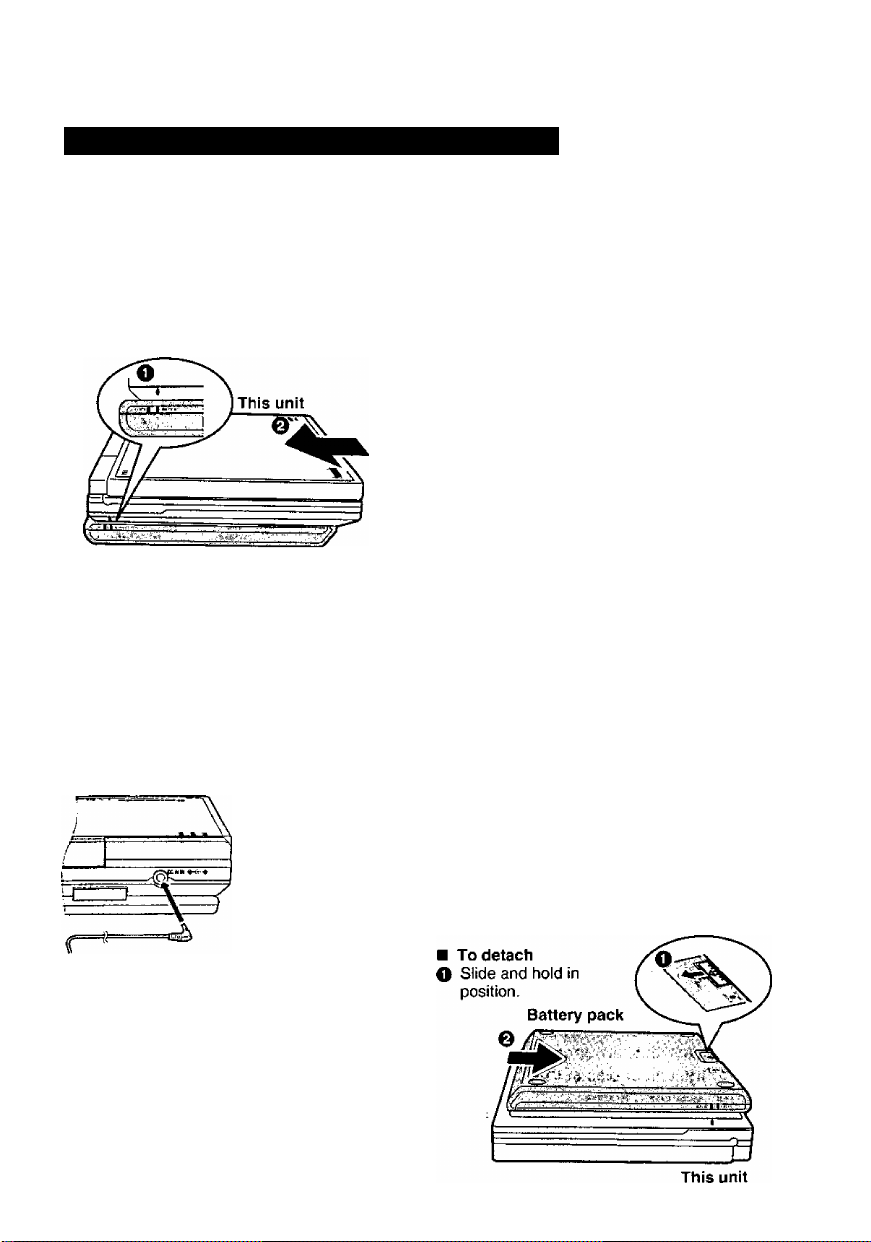
Using the battery pack (Lithium ion battery pack)
•Charge the battery pack before using it for the
first time.
•The battery pack can only be recharged when
the unit is off page 13 “To turn the unit off).
• For replacement, see page 4 “Optional acces
sories".
[at 20 “C (68 “F)]
Approx. 4 hours
1 Attach the battery pack.
O Confirm that the marks match.
•When brightness is set to the lowest level (• page 19).
•Times shown above depend on operating con
ditions.
•The charge is shown on the unit’s display dur
ing charging. Use this indicator as a guide.
Recharging and play times
Recharging
30 min.
Approx.
5 hours
Approx.
4 hours
Play time
LCD on
Approx.
6 hours*
Approx.
5 hours*
Approx.
4 hours*
LCD off
Approx.
7 hours
Approx.
0 hours
Approx.
5 hours
Battery pack
Fit the battery pack firmly so it
clicks into place. Ensure the
mark on the unit matches the
LOCK mark on the battery
pack.
ti
1
^ Recharge the battery pack.
Connect to the household AC outlet while the
battery pack is attached (■* page 10).
Front of this unit
The [CHG] and [6]
indicators light.
Refer to “IMPORTANT SAFETY INSTRUC-
SIONS" on pages 6 and 7.
Recharging is complete when [CHG] goes
out
Disconnect the AC adaptor.
Flashes-Q:- ^ Flashes"► [=]
Low Charging
complete
Confirm the battery charge on the unit’s
display
® - 0
Full
- 0
Low
Flashes a
Recharge
■ If play time dramatically reduces after
recharging
The battery pack has reached the end of its ser
vice life (it can be recharged about 300 times).
■ If the unit is not to be used for a long time
• Detach the battery pack. (Even if the unit is off,
it stilt uses some power. This can lead to over
discharging of the battery and malfunction.)
• Recharge the battery pack when you are ready
to use it again.
RQT5897
Basic play
Prepare the power supply pages 10 and 11).
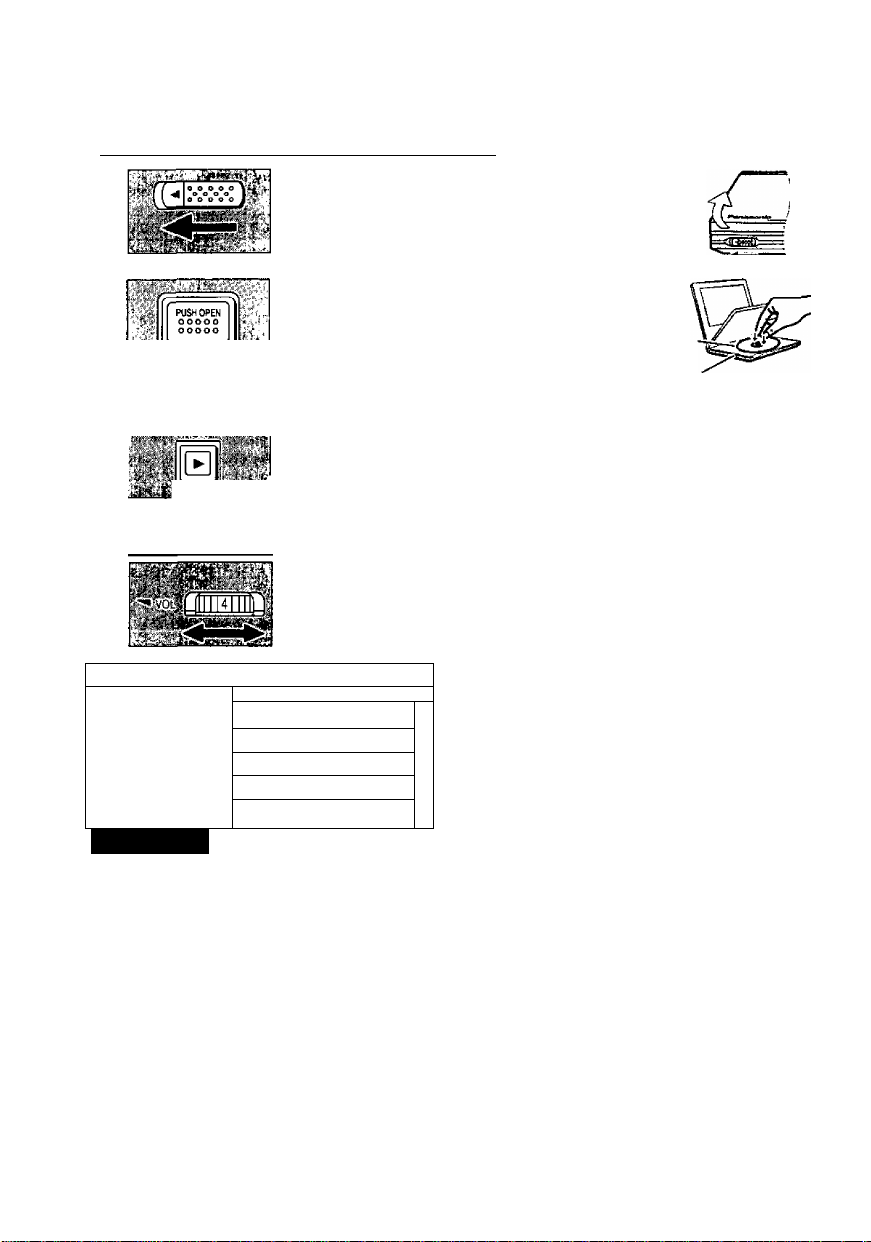
1
Slide the lock release and open the outer cover.
Press [PUSH OPEN] to open the disc lid and insert a disc with the side you want to play label up.
Close the disc lid by hand.
* * u''ONi *1 .iii
Press and hold [►, ON] to
start play. Lights^^ ^
The unit comes on automatically. ‘ ■ ’
See below if a menu appears.
Adjust the volume.
\ Using menus: Basic operations
e.g.:
I 1. EAST ASIA
1 P. SOUTH ASIA
¡3. MIDDLE EAST
1 4. AFRICA
1 5. EUROPE
DVD I VCD
Press the numeric buttons to select an
item.
Or
Use the cursor jockey [A, V, ◄, ►] to
highlight an item and press [ENTER],
Clicks
Display
----------
t , vIa^u u i-t
Chapter/track Elapsed
number playing time
■ Selecting an item numbered 10 and
over with numeric buttons
e.g. 10: [^10]^[1]^[0]
e.g.25: [^10]-^[2]^[5]
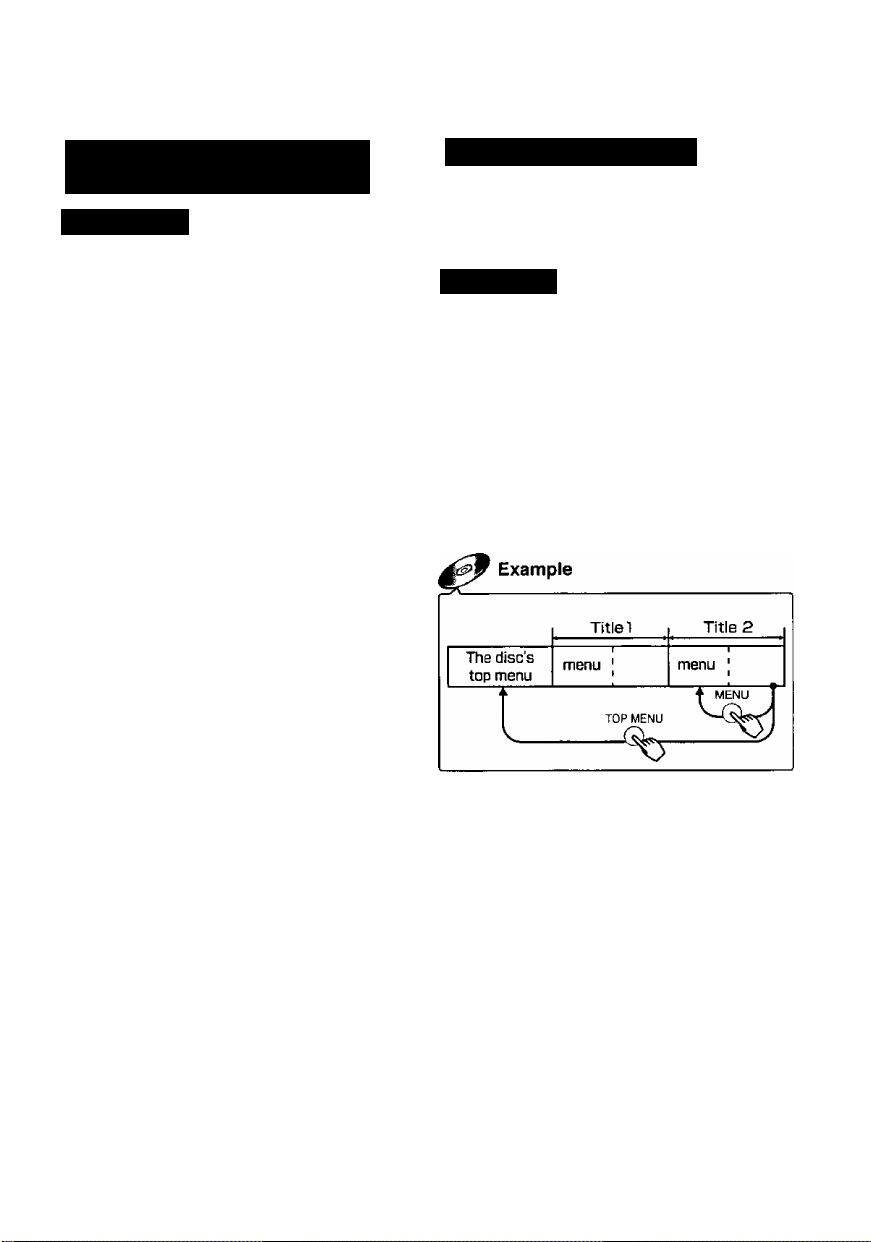
■ Other menu operations
Operation of menus differs from disc to
disc, so read the disc's instructions for de
tails.
To move to the next menu
[H^l
[TOP MENU]
[MENU]
[RETURN]
To return to the previous
menu
To return to the first menu
To show menus
To show menus
n - ri I. -| -|
__________
I
-6
■ appears on the LCD
This indicates that an operation is not al
lowed by the unit or disc at that time.
■ When the disc ends
If you have finished using the unit, turn it off
I to conserve power («* page 13, “To turn the
I
unit off”).
RQT5897
•The surface of the unit may become warm
if it is used for a long time, but this is nor
mal and not an indication of malfunction.
•The disc is still spinning while a menu is
on the LCD. Press [■] if you have finished
viewing.
OVD I VCD I CD
■ To turn the unit on
The unit can be turned on as follows.
<On the main unit>
h II TniHom Slide [ON/OFF, HOLD] to
“ON/OFF” until the display
is turned on.
<On the remote control>
0
Press [O, POWER],
The [c!)] indicator on the unit flashes to indi
cate the unit is on when the monitor’s mode
is set to “4 (Off)” page 19) or the outer
cover is closed.
■ To turn the unit off
The unit can be turned off as follows. The
[(!)] indicator lights when you are using the
AC adaptor.
<On the main unit>
c»^llU II Hil^ Slide [ON/OFF, HOLD] to
“ON/OFF” until the display
is turned off.
<On the remote control>
(V)
Press [C!), POWER],
•You cannot use the remote control to turn
the unit on when it is being powered by
the battery pack.
•The unit automatically turns off after being
stopped for 15 minutes (5 minutes when
the battery pack is being used).
(Auto power-off function)
To prevent accidental operation
T II I- » ■>! II fCLD Slide [ON/OFF, HOLD] to
“HOLD”.
In the hold mode, the unit does not respond
when you press the buttons. If you press a
button in the hold mode, “Hq ¡J” appears
on the unit’s display and the [(!)] indicator
flashes.
To release:
Slide [ON/OFF, HOLD] to “ON/OFF".
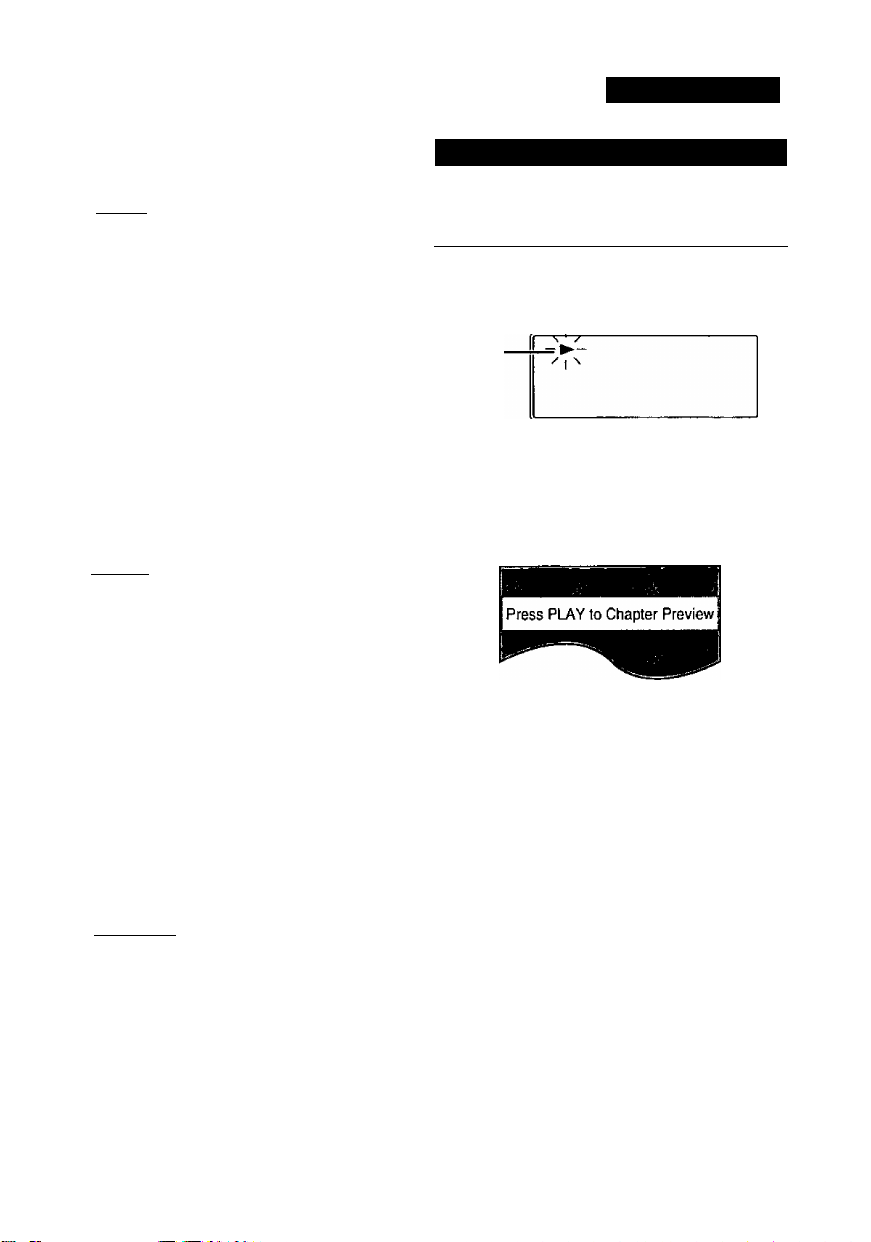
Stopping play
During play
Press [■].
The position you stopped play at is record
ed by the unit when is flashing on the
unit’s display.
Flashes
While is flashing on the unit’s display,
press [►] to start play from where you
stopped it (Resume function).
If you are playing DVDs, the following dis
play also appears.
Pressing [►] while this is displayed acti
vates the Chapter Preview feature.
If you do not press [►], the message dis
appears and play starts from where you
stopped it.
Chapter Preview:
The beginning portions of each chapter up
to the current one are played. Full play re
sumes from the point where you stopped
play. (Chapter Preview feature works only
within a title.)
■ To cancel Resume function
Press [■].
•The resume function does not work if the
disc’s play time is not displayed.
•The resume position remains in memory
even if the unit is off.
•It is cleared if you open the disc lid. j
RQT5a97

Basic play
Pausing play
DVD I VCD I CD
During play
Press [11].
»Press [►] to resume play.
Lights
------
Display
|-M ^
§1 Skipping Chapters and tracks
11 DVD I VCD I CD
While playing or paused
Press (backward) or [I
ward).
Each press increases the number of skips.
Position being played
Twice Once I Once Twice
-.jCZ
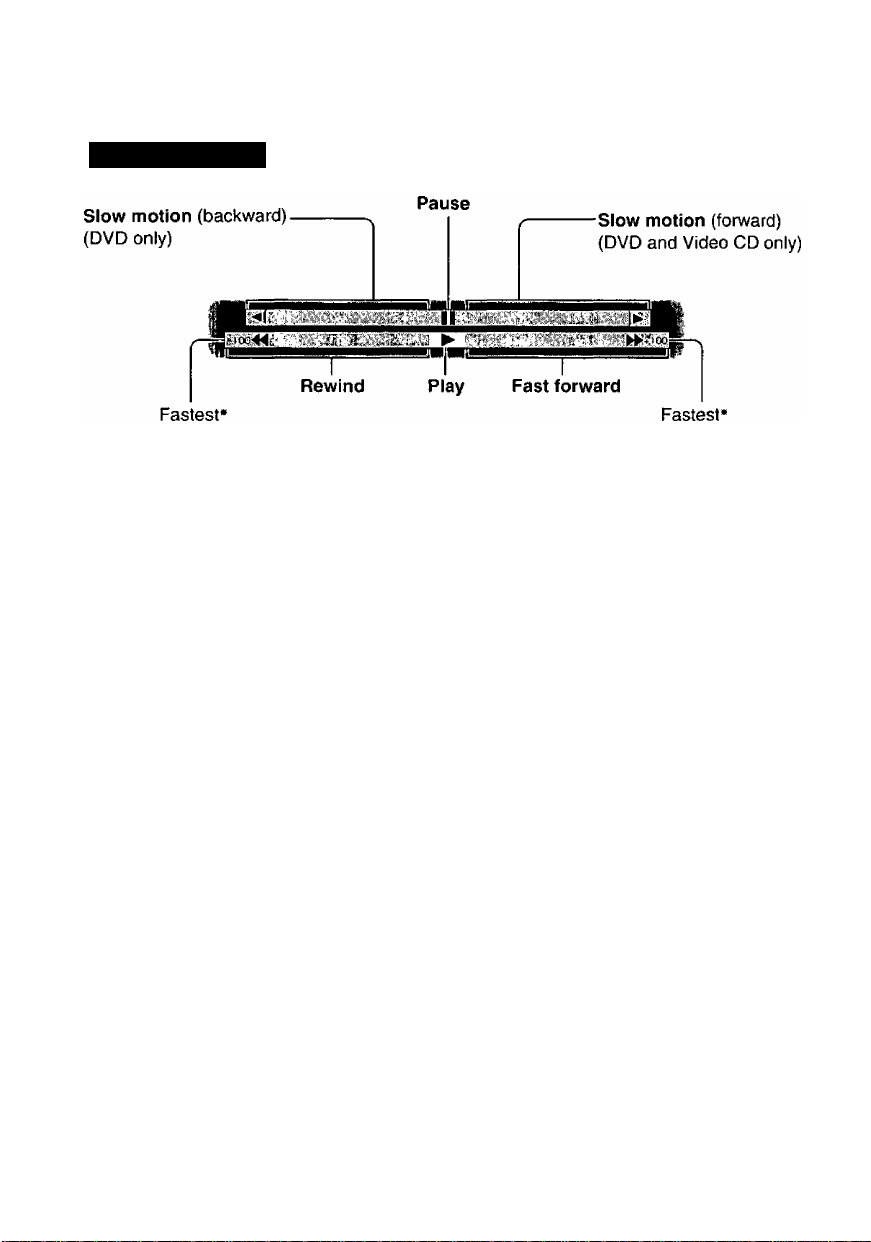
Chapter/T rack j Chapter/T rack] Chapter^ rack
Slow motion
DVD I VCD
<On the main unit>
Whiie paused
Press and hold (backward: DVD
only) or [MH] (forward).
The slow motion speed increases in
5 steps if you continue to hold the button
down.
<On the remote control>
While paused
Press (backward: DVD only) or
[►►] (forward).
Each press increases the speed of the slow
motion in 5 steps.
Dnce I Onc(
:kjChapta/Trac4ci
[!◄◄] —I— [►►!] "
] (for-
Fast forward and rewindSEARCH
DVD I VCD I CD
<On the main unit>
During play
Press and hold [h^] (backward) or
[►N] (forward).
The search speed increases in 5 steps if
you continue to hold the button down.
<On the remote control>
During play
Press (backward) or [►►] (for
ward).
Each press increases the speed of the
search in 5 steps.
• Press [►] to resume play.
• For DVDs and Video CDs, audio will be
heard at the initial scan speed (forward di
rection only). You can turn this sound off if
required (^ page 28, “9 Other Settings”).
•For DTS CDs, audio will not be heard at
any scanning speed.
Frame-by-frame viewing
DVD I VCD
While paused
Use the cursor jockey [◄] (backward:
DVD only) or [►] (forward).
• Press and hold to move the frames in suc
cession.
• Press [►] to resume play.
•You can also move fonward frame-byframe if you press [11].
• Press [►] to resume play.
If you press [ \«, ] or [◄◄, ►►] during menu play of video CDs with playback control
(“* * page 46), the unit may not perform properly.
RQT5897
starting play from a selected
title or track [ Remote control only |
DVD I VCD^
While stopped
Press the numeric buttons.
Play starts from the selected title/track.
•This also works during play if the disc is a
karaoke DVD, Video CD, or CD. (See
below if the disc has playback control.)
•This may not work with some discs.
■ *When playing Video CDs with play
back control
Before performing the above operation,
press [■] to cancel menu play.
The ” indicator on the unit’s display
goes out.
To restore menu play
While stopped
1. Press [■] to clear on the unit’s dis
play.
2. Press [►].
The “P indicator on the unit’s display
comes on.
Returning to a menu
The actual contents of menus differ from
disc to disc, so here we explain only the
basic operations.
DVD I VCD
During play
Press [MENU]. (DVD)
Press [RETURN]. (Video CD)
■ With DVDs that contain multiple
menus
Pressing [TOP MENU] also takes you to a
menu.
•The menus displayed when you press
[MENU] and [TOP MENU] may differ.
BQT5897

Other play modes
VCD I CD
While stopped
Press [PLAY MODE] to select pro
gram or random play.
If “0" appears on the LCD, press [■] to
clear on the unit’s display, then press
[PLAY MODE],
The mode changes each time you press
the button.
El To play a maximum of 32 tracks in a
programmed order (Program play)
Choose a track, then press ENTER.
' C
Press PLAY to start
m To play tracks randomly
(Random play)
— Normal piay mode
Select the screen for the mode then follow
the procedures in the next column to start
play.
■ When play finishes
The disc stops and the screen correspond
ing to the play mode reappears.
■ To restore normal play
While stopped
1. Press [■] to clear on the unit’s
display.
2. Press [PLAY MODE] to select normal
play.
3. Press [►].
nOT5897
Clear
Clear all
■rotal time
I
I
A Program play
1 Press [ENTER].
2 Use the cursor jockey [A, ▼] to
select a track and press
[ENTER].
Each time you use the cursor jockey
[A.Y],
1^2^
----------------
t
_______________
Repeat steps 1 and 2 to program other
tracks.
•Instead of perfornning steps 1 and 2
above, you can also use the numeric but
tons to highlight a track.
•‘Total time” tells you the total time of the
programmed tracks.
•After you select “AN", you can then clear
unneeded tracks (see below),
^All
t
3 Press [►].
•The contents of the program are saved in
memory until the unit is turned off or the disc lid
is opened.
[ To change the program
While stopped
1. Press [■] to re
turn to the pro
gram screen.
2. Use the cursor jockey [▲, ▼] to highlight
the track and repeat “Program play” steps 1
and 2.
•To clear tracks from the program
1. Use the cursor jockey [A, ▼, ►] to high
light the track.
2. Press (CANCEL).
• Instead of pressing [CANCEL], you can se
lect “Clear” and press [ENTER].
•To erase the whole program
Use the cursor jockey [A, ▼ , -A, ►] to highlight
“Clear air and press [ENTER],
Random play
Press [►].
Choose a track, then press ENTER.
1
2
3
A
B
B
7
a 7:12
rung
TfW*
702__J
Press PLAY to start
Clear
Clear all
Total'time
I
Changing soundtracks, subtitle languages and angles
Changing soundtracks
During play
Press [AUDIO].
The audio number changes each time you
press the button.
is displayed if sound is not recorded
on the disc.)
Switching angles
During play
Press [ANGLE].
The angle number changes each time you
press the button.
•You can also use the cursor jockey [A, ▼], or numeric buttons to change the num
ber to another soundtrack/subtitle fanguage/angle.
• If you select a soundtrack/subtitle language number that is not recorded on the disc,
“0" appears on the LCD.
•You can also use the On-Screen Menu Icons to change soundtrack/subtitle ianguage/angle numbers (■* page 22, “Audio number”, “Subtitles” and “Angle num
ber").
■ To clear the on-screen display
Press [ENTER].
The on-screen icons wiil disappear automatically if nothing is selected.
Remote control only
Changing subtitle languages
During play
Press [SUBTITLE].
The subtitle number changes each time
you press the button.
(“—is displayed if subtitles are not
recorded on the disc.)
f
■1
1
■ To turn the subtitles on and off
Use the cursor jockey [<, ►].
•The “A, V” mark around the on-screen icon is not displayed if only one soundtrack/subti
tle language/angle number is recorded.
•There may be a slight delay before subtitles are shown.
•You can also adjust language settings before play with the soundtrack/subtitle language
settings (■* page 26).
•Some discs aliow changes to soundtracks/subtitle languages/angles only by using the
disc's menus.
•You can only switch angles in scenes that have multiple angles recorded. Some discs
allow you to set angles before multi-angle scenes are played. Read the instructions that
come with the DVD.
•If the subtitles overlap closed captions recorded on discs, turn the subtitles off.
FIQT5897

Switching vocals ON
Changing the monitor settings
or OFF for karaoke
discs
DVD I VCD
(Karaoke discs)
During play
1
Press [AUDIO].
(DVD) (Video CD)
2 Use the cursor jockey [^,
(DVD)/[A, ▼] (Video CD), or press
[AUDIO] (Video CD only) to change
the audio mode.
DVD karaoke disc (Solo)
[—] : Vocal OFF (for karaoke)
[ON] ; Vocal ON
DVD karaoke disc (Duet)
[-]
[1+2]
[VI]
[V2]
VCD karaoke disc
[LR] : Vocals (Vocals seem to come from
[L] ; No Vocals (for karaoke)
[R] ; Vocals (Vocals seem to come from
■ To clear the on-screen display
Press [ENTER],
The on-screen icons will disappear auto
matically if nothing is selected.
Vocal OFF (for karaoké)
Vocal 1 and 2 ON
Vocal 1 oniy ON (for duel)
Vocal 2 onfy ON (for duet)
the right)
both left and right)
DVD I VCD
While stopped or playing
Press [MONITOR] to change the
monitor settings.
The setting mode changes each time you
press the button.
-E Changing the size of the picture
■MONITOR'
i MODE^
E Adjusting the brightness
0 Adjusting color intensity
-The setting mode is cleared.
Select the indicator for the setting you want
to change then follow the procedures on
page 19.
Turn the indicator off after you complete the
setting.
•Picture size returns to “1 (Normal)” if the
unit is turned off or [IN/OUT] (■• page 31)
is pressed.
•Brightness and color intensity settings are
saved even if the unit is turned off unless
the settings were made while the “LINEIN” mode is on.
i
-MOMTOT-
L.BRL
i
i
You cannot connect a microphone directly
to this unit. Connect the unit to an amplifier
(^ pages 34-37) that has a microphone
^CTTJjack when you want to enjoy karaoke and
■“sing along.
These changes are effective only for this
unit’s LCD.
Make changes to the television’s settings if
you have connected one.
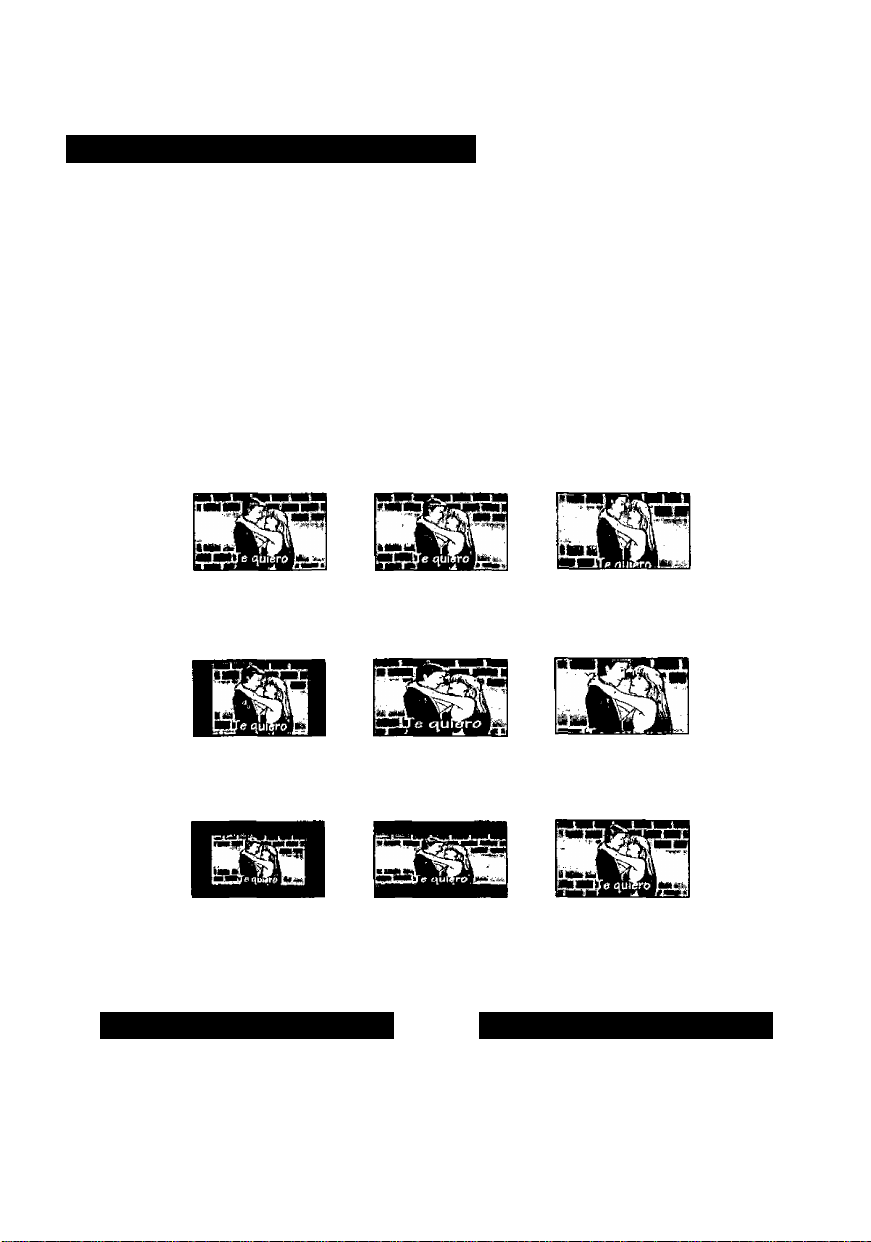
A Changing the size of the picture
Use the cursor jockey [A, T] to change the picture mode.
The mode is shown on the unit’s display as follows.
1 (Normal)*
■ The picture mode and size
The picture shown on the LCD depends on the display mode and the size recorded on the
disc.
Software
Wide
screen
>2 (Full)►4 (Off)^
Mode
-3 (Zoom)
___
1
(Normal)
Full screen
i
2
(Full)
Full screen
Top and bottom
edges are cut off.
3
(Zoom)
4
(Off)
Off
Regular
(4:3)
Regular
(4:3),
Letterbox
• If you are not using the LCD on this unit, select “4 (Off)” to conserve power.
•The LCD is turned off if you close the unit.
• Horizontal lines may appear in the picture when the mode is switched to “3 (Zoom)", but this is not an
indication of malfunction.
Screen with black
bands on the right
and left
The picture is
surrounded by a
black frame.
The “Model”
screen is horizontally
enlarged.
The “Mode 1”
screen is horizontally
enlarged.
Adjusting the brightness
Use the cursor jockey [A, T] to ad
just the brightness.
-5: dark <—^ 5: light
Power consumption increases with the
level of brightness.
Use the cursor jockey [A, T] to ad
just the color shade.
-5: dark <—> 5: light
Top and bottom edges
of the “Mode 2”
screen are cut off.
Full screen
Adjusting color intensity
Off
Off
RQT5897

Enjoying Virtual Surround Sound (V.S.S.)
(Dolby Digital, 2 or more channels)
Virtual Surround Sound
V.S.S. adds breadth to sound, allowing
you to enjoy a surround-like effect even
if you are using only 2 front speakers or
headphones.
If the disc has surround signals
recorded on it
As well as enjoying sound with more
breadth, surround sound will also seem
to come from non-existent speakers.
11 Enjoying surround effects
§.| through headphones
See page 31 for headphone connection.
During play
Press [V.S.S.] to select the V.S.S.
level.
The level changes each time you press the
button. The level is shown on the unit’s dis
play.
Enjoying surround effects
through 2 speakers
The speakers on this unit will not produce
any discernible effect. Speakers must be
connected to enjoy this feature. Ensure
surround effects on connected equipment
are off.
During play
1
Press [DISPLAY] to show the
On-Screen Menu Icons
(^ page 23) on the LCD and
highlight the V.S.S. icon with the
cursor jockey [◄, ►].
1
Select the V.S.S. mode with the
cursor jockey [A, T].
<v.s.s.>
When using
speakers
<Headphone V.S.S.>
DVD-LV75 I DVD-LV55
When using
headphones
1 (Natural effect)-^2 (Emphasized
t effect)
I
-----
OFF (Cancel)^
•You can also use the On-Screen Menu
Icons to perform this operation.
(• page 23, “V.S.S. modeA/.S.S. level”)
►On the unit’s display, “SP” is displayed
when using V.S.S. and “HP” is displayed
when using headphone V.S.S.
fV.S.S.Y
L Hp)
•V.S.S. will not work, or will have less ef
fect, with some discs.
•V.S.S. may cause distortion with some
RQT5897
discs. Turn V.S.S. off if this occurs.
Flashes, then lights
-------
•Use the appropriate setting for the con
1
nections you have made.
^DVD-LV70 does not have Headphone
V.S.S.
3 Press [V.S.S.] to select the
V.S.S. level.
To get the most from V.S.S.
I ^ Distance A I
This unit
Speaker
Listening |
position
mi
Speaker
3 or 4 times
distance A

Using On-Screen Menu Icons
On-Screen Menu Icons are long thin menus that contain information about the disc or unit.
These menus allow you to perform operations by changing this information.
■ Operations available only with On-Screen Menu Icons
Time, A-B repeat play, Repeat play. Dialogue Enhancer, Marker, V.S.S. mode
{For details, ^ pages 22 and 23)
DVD I VCD I CD
Basic operation
White stopped or playing
1
Press [DISPLAY] to select the
On-Screen Menu Icons.
The screen changes each time you
press the button.
Example: DVDs
Icons for disc information:
(« page 22)
You can change items like the track or
chapter and audio.
IQB:37 wn
Icons for unit information:
page 23)
You can start repeat play or mark parts
you want to play again.
Shuttle screen:
(• page 24)
You can fast forward, rewind, or start
slow motion play.
—On-Screen Menu Icons cleared
i
i
i
Use the cursor jockey [ A, ▼, ◄, ►] to select the item.
The item is highlighted in yellow.
Use the cursor jockey [A, ▼] to
change the setting.
•Step 3 is not necessary when using
the shuttle screen.
• If numbers are used, you can change
with the numeric buttons.
• If the change doesn’t take effect,
press [ENTER] or [►].
■ To clear the on-screen display
Press [RETURN] or [CANCEL].
• If part of the On-Screen Menu Icons is cut
off or fails to appear, go to the initial set
tings menu to change the position of OnScreen Messages. The color of the
On-Screen Menu Icons can also be
changed page 28, “4 On-Screen
Messages”).
• Items displayed depend on how the disc
is being played and the type of disc.
• Functions that can be operated depend
on how the disc is being played and the
type of disc.
• Some items can not be changed while the
disc is stopped.
•“A, V” around the on-screen icon means
that the item can be changed using the
cursor jockey [A, ▼].
RQT5697
Using On-Screen Menu Icons
Icons for disc information
Title number (DVD)
Track number (Video CD and CD)
Select a number to start play from the title/track.
Chapter number (DVD)
Select a number to start play from the chapter.
Time (DVD)
Play starts from a time you specify with the numeric buttons.
For example: To start play from 1 hour 6 minutes and 37 seconds
Time (Video CD and CD)
(Cannot be changed here.)
Each time you use the cursor jockey [A, ▼]:
Elapsed time of current track—»■Remaining time of current track
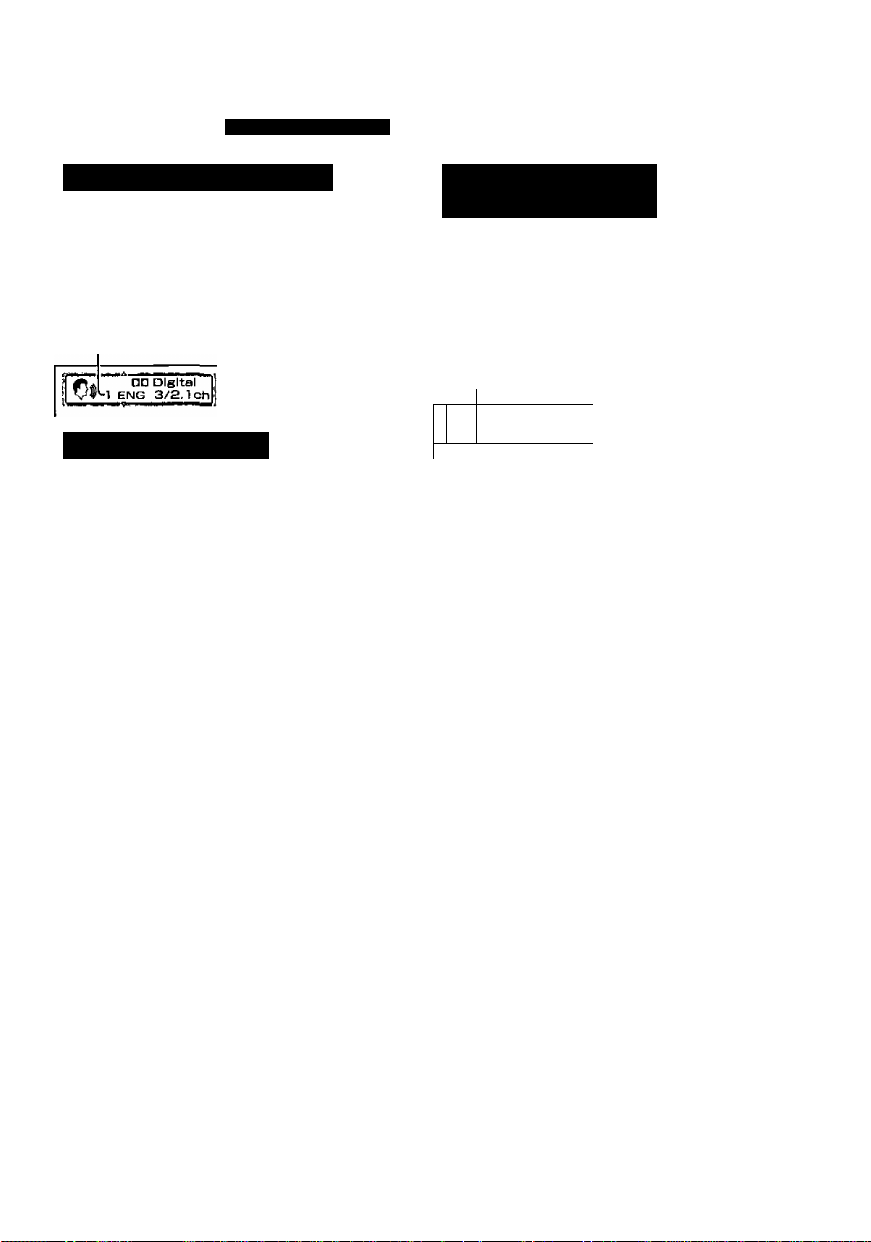
Audio number (DVD)
Specify an audio track number.
O Soundtrack language; For details, see below (©).
O Signal: For details, see below (©).
Audio mode (Video CD)
Specify an audio channel.
LR*—»L^R
t
__________
Subtitles (DVD)
Specify a subtitle number or turn the subtitles on and off.
O Subtitle language: For details, see below (O)-
# 1:06:37
1 ,ENG ,, 3/2.ictt
Hi
I L R I
m
3:37
(SI Digital
A 6
into the disc,
[1]-[0]-[6]^[3]-^[7]^[ENTER]
^
---------
»Remaining time on disc-*—
f
--------
^
| ¥T |
PBC
O Audio/Subtitle language
English
ENG
French
FRA
German JPN
DEU
Italian CHI Chinese
ITA
Spanish KOR Korean
ESP
Dutch
NLD
Swedish VIE
SVE
Norwegian THA Thai
NOR
Danish Others
DAN
nOT5897
OFF
Angle number (DVD)
Specify an angle number.
Menu play (Video CDs with playback control)
(Cannot be changed here.)
Indicates whether menu play (PBC) is on or off.
O Signal type/data
POR Portuguese
RUS
MAL Malay
Russian
Japanese
Vietnamese
LPCM/DD Digital/DTS: Signal type
k : Sampling frequency (kHz)
b : Number of bits (bit)
ch : Number of channels
Vocal : Vocals indication
•You can switch vocals ON or OFF with the
cursor jockey [▲, ▼].
—/ON ; Solo karaoke
—/V1+V2/V1/V2 : Duet karaoke

icons for unit information
A-B repeat play
Play repeats between 2 specified points.
During play
Each time you press [ENTER];
a I ABl
1*^1
(Point A)
L
•This feature works only within a title/track.
•The unit automatically determines the end of a title/track as point B
when the end of the title/track is reached.
•“A B” lights on the unit’s display during A-B repeat play.
Repeat play
Repeat play starts after you select a type of play.
(DVD) (Video CD and CD)
I^offI
lltHlOFFl
^ ;jt|
1
C (Chapter)*-^T (Title)^OFF T (Track)^A (All).
•“1 ” lights on the unit’s display during Chapter/Track repeat play.
•" ciD" tights on the unit’s display during Title/AII repeat play.
Play modes (Video CD and CD) (Cannot be changed here.)
— (Normal)/PRG (Program)/RND (Random)
Dialogue Enhancer (Only with DVDs recorded with Dolby
Digital/DTS, 3 or more channels)
•Dialogue Enhancer raises dialogue from the center channel.
Marker
Up to 5 positions can be marked.
Press [ENTER] once to highlight a marker.
Press [ENTER] at the point you want to mark.
•To select another marker, first select another marker with the cursor
jockey [►].
•All the markers are cleared when the unit is turned off or the disc lid is
opened.
■ To recall a position
Select the marker no. with the
cursor jockey [<, ►] and press
[ENTER],
V.S.S. mode/V.S.S. level {-► page 20)
(DVDs recorded with Dolby Digital, 2 or more channels)
•Select the V.S.S. mode.I
(Headphone V.S.S.)
► Select the V.S.S. level.
1 (Natural effect)^—*2 (Emphasized effect),
{Point B)
(A-B repeat play starts)
■ To clear a marker
Select the marker no. with the
cursor jockey [.4, ►] and press
[CANCEL].
DVD-LV75 ■ DVD-LV55
—.HiK
(V.S.S.)
t
_______________________________
(Normal play restored)
1_
►OFF (Cancel)
_____
EH
t
• OFF
__
i
RQT5897
Using On-Screen Menu Icons
Shuttle screen
*The numbers indicate the maximum speed and do not change when the search speed is
changed.
•There are 5 speeds of fast forward, rewind, and slow motion. The speed increases if you
hold the cursor jockey [◄, ►] in position or repeat the operation.
•You can advance frame by frame if you press [I I] while the picture is paused. (DVD and
Video CD)
ROT5897

Changing initial settings
Change the initial settings to suit your preference and to suit the unit to the circumstances
in which it is being used.
These settings are retained in memory until they are changed, even if the unit is turned off.
Screen illustrations are from DVD-LV75.
Common procedures
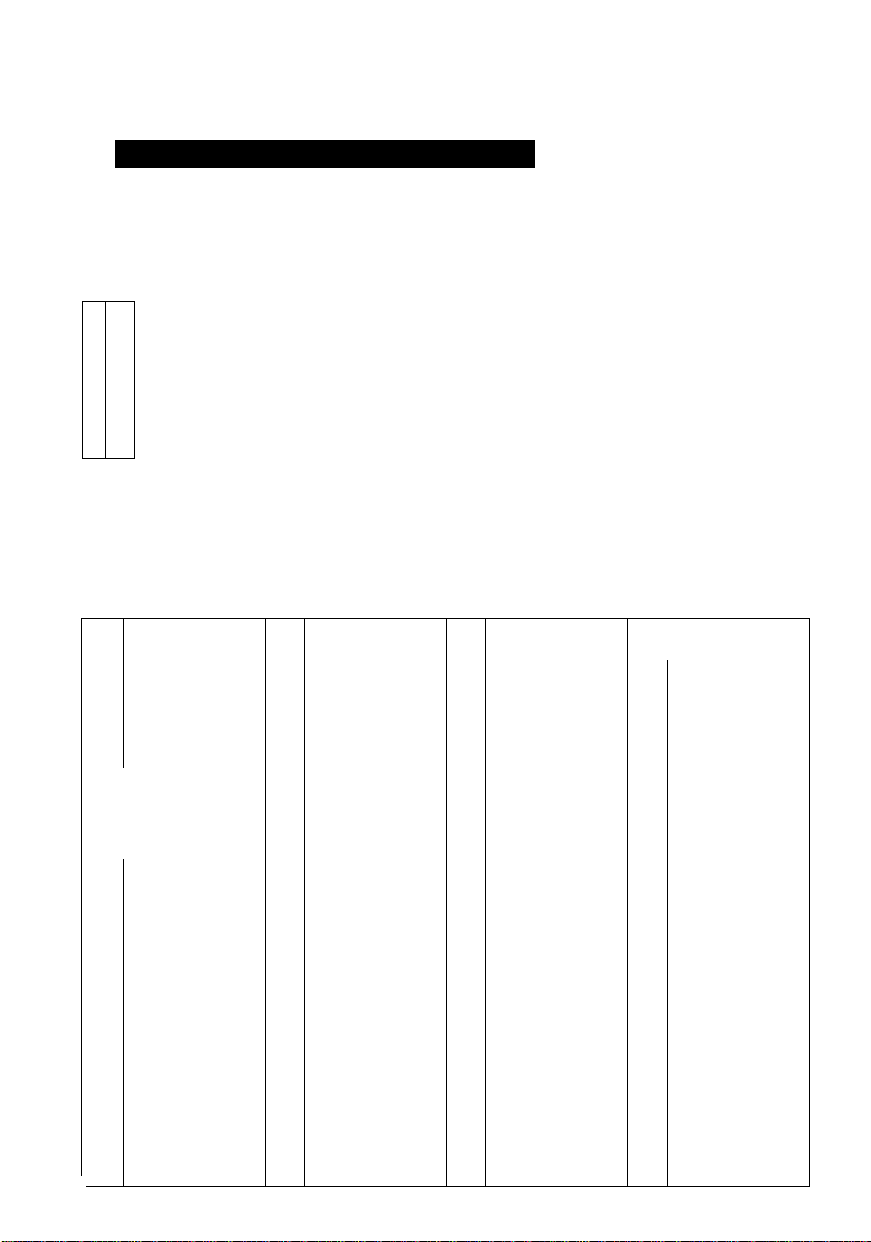
1 While stopped
Press [ACTION] or [MENU] to display the initial settings screen.
■m
0 S Ratings
M 3 Menu Language
OB 4 Qn-Scraen Messages
BL 5 TV Aspect 16:9
(S. 6 Digital Audio Output
WL 7 Speaker Setting
9 Otiier Settings
press RETURN
Use the cursor jockey [A, T] to highlight the item/setting and press
[ENTER].
The menu for the selected item is displayed.
•Some items require additional steps.
■ Items for initial settings
1 Disc Languages (•» page 26)
Change the audio soundtrack language,
subtitle language and the language used
for disc menus.
2 Ratings (» page 27)
Change the ratings level to prevent play
of discs, skip violent scenes, or replace
scenes with others.
3 Menu Language (■» page 27)
Change the language used for the on
screen displays and initial settings
menus.
4 On-Screen Messages page 28)
Choose whether “Play”, “Still” and other
displays will be displayed or not, and the
color and position of these displays as
well as On-Screen Menu Icons.
Level
En^tsh
2-charvnel
to exit
TV Aspect (» page 33)
Change the settings to suit the type of
television you have connected.
Digital Audio Output page 40)
Change the settings to suit the type of
digital equipment you have connected.
Speaker Setting page 38)
DVD-LV75
Change the settings to suit the type of
speakers you have connected.
Other Settings (•» page 28)
Choose the kind of picture mode shown
when play is paused, and various other
settings to enhance your viewing expe
rience.
■ To return to the previous menu
Press [RETURN].
■ When you are finished
Press [RETURN] as many times as necessary to clear the initial settings screen.
FIQT5897
Changing initial settings
Disc Languages (•>» page 25 for operation)
These settings allow you to choose the languages used when a DVD is played.
If the language selected Is not available on the disc, the language designated by each disc
will be selected. There are cases where the selected language is recorded but the disc des
ignates another language.
Factory Preset
04
idi:O
OB
j 2 Subtitle Automatic
OB
1 3 Menus Engtisti
m.
ta.
ta.
Press RETURN to exit
The original language of each disc will be selected.
*2 If the language selected in “Audio” is actually used during play, the subtitles will not ap
pear.
*2 Enter the language code with the numeric buttons and press [ENTER] if you select
“Other”. (See the language code list below.)
Press [CANCEL] to erase a number you entered in error.
Language code list
Abkhazian 7074 Fiji
6566
Afar
6565
6570 Afrikaans
Albanian
8381
6577 Ameharic 7176 Galician 7783 Malay
Arabic 7565
6582
Armenian 6869
7289
6583 Assamese
Aymara 7576
6588
Azerbaijani 7178 Guarani
6590
Bashkir
6665
Basque 7265
6985
Bengali; Bangla 7307 Hebrew
6678
Bhutan! 7273 Hindi
6890
Bihari
6672
Breton
6682
6671 Bulgarian 7378 Indonesian 7065 Persian
Burmese 7365 Interlingua 8076 Polish
7789
6669 Byelorussian 7165 Irish 8084 Portuguese
Cambodian
7577
Catalan
6765
9072 Chinese
Corsican
6779
Croatian
7282
Czech
6783
Danish
6865
Dutch
7876
English
6978
6979 Esperanto
Estonian
6984
RQT5897
7079 Faroese 7686 Latvian, Lettish 8368 Sindhi
7073 Finnish
7082
French 7775
7089 Frisian
Georgian 7776 Malayalam 8385 Sundanese
German
6976 Greek
Greenlandic
7185 Gujarati 7778 Mongolian 0465
Hausa 7865 Nauru
7285 Hungarian 7982
7383 Icelandic 8083
7384
Italian 8065
7465 Japanese 8185
7487
Javanese 8277 Rhaeto-Romance
7578 Kannada 8279 Romanian
7583 Kashmiri 8285 Russian
7575 Kazakh 8377 Samoan
7589 Kirghiz 0365
7579 Korean 7168 Scots Gaelic 8779 Wolof
7585 Kurdish 8382 Serbian 8872 Xhosa
Laotian 8372 Serbo-Croatian
7679
Latin
7665
Audio
1 English 2 French 3 Spanish 4 Original*^
5 Other >]<:+:
Subtitle
1 Automatic*^ 2 English 3 French 4 Spanish
5 Other >|< if: >f; *3
Menus
1 English 2 French 3 Spanish
4 Other
7678 Lingala 8373 Singhalese
7684
Lithuanian 8375
Macedonian
7771
Malagasy 8379 Somali
7784
Maltese 8387
7773 Maori 8386
7782
Marathi 8476
7779 Moldavian 0471
7869 Nepali 8469
Norwegian
7879
Oriya 6679
Pashto, Pushto
Punjabi
Quechua 8575
Sanskrit 6789
8378 Shona
8376
6983
8484 Tatar
8472
8473
8479
8482
0475
8487
8582
8590
8673
8679
7473
8979
9085
Slovak
Slovenian
Spanish
Swahili
Swedish
Tagalog
Tajik
Tamil
Telugu
Thai
Tibetan
Tigrinya
Tonga
Turkish
Turkmen
Twi
Ukrainian
Urdu
Uzbek
Vietnamese
Volapük
Welsh
Yiddish
Yoruba
Zulu
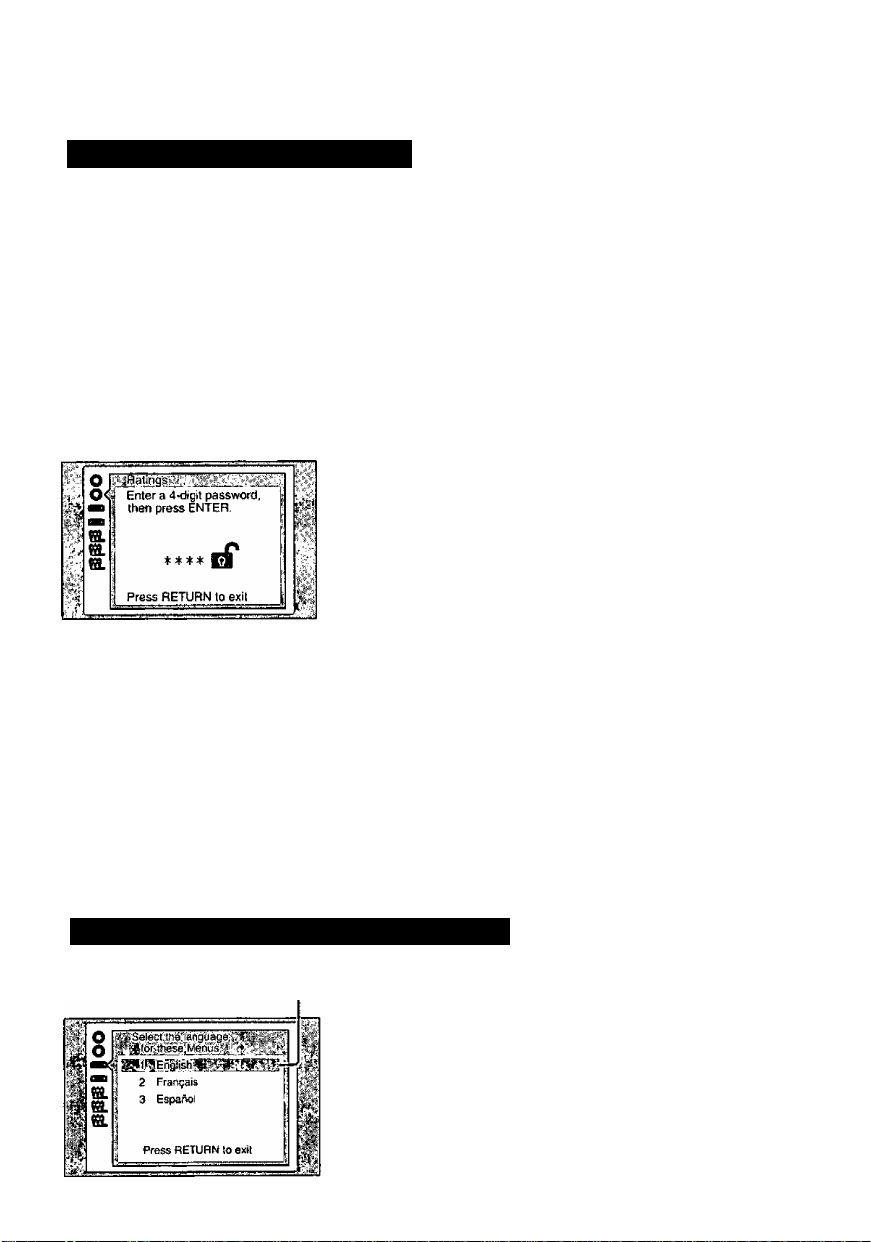
2 Ratings page 25 for operation)
You can limit play of DVDs which are unsuitable for some audiences, for example, children.
Play and changes to the settings are not possible unless a password is entered.
O Look Ail
Press RETURN to exit
When the level
is "O” to “7”
Factory Preset
Level 8 Level 7 to 1
Level 0
Enter your 4-number password and press [ENTER] if
you select level 7 or below. (This locks the unit.)
Press [CANCEL] to erase a number you entered in
error.
•When the rating is locked, the settings cannot be
changed unless the correct password is entered.
Therefore, do not forget your password.
•Select “0” to prevent play of discs that do not have
ratings recorded on them.
All DVDs can be played.
Prevents play of DVDs with ratings
recorded on them {those that contain
adult or violent scenes).
Play of all DVDs is prohibited.
■ Changing ratings (When the level is
First enter your 4-number password
2 Chang© Password
3 Chang© Leva!
ta.
4 Temporary Unlock
[ENTER].
1 Unlock Player : To unlock the unit (the rating
m
2 Change Password ; To change the password
Press RETURN to exil
3 Change Level : To change the rating level
4 Temporary Unlock: To unlock the unit temporarily
• If you select “4 Temporary Unlock", the rating is un
locked temporarily only for the current disc. The unit
is locked again when the disc lid is opened or the unit
is turned off.
3 Menu Language page 25 for operation)
You can change the language used for the on-screen display menus.
Factory Preset
1 English
2 Français
3 Españoi
0” to “7”)
and press
level returns to “8”)
RQT5897
Changing initial settings
4 On-Screen Messages (•>* page 25 for operation)
You can choose to display on-screen messages or not, and you can choose their color and
position.
Factory Preset
*
o
o
2 Color and Position
m.
i.
m.
m.
w
Press RETURN to exit
9 Other Settings page 25 for operation)
The following special settings can be made.
Factory Preset 1
2 Audio during Searcti On
3 TV Mode (4 ; 3) PanSScan
4 Oitanige Compression Off
5 Stitt Picture Display Off
Press RETURN to exit
1 On-Screen Messages
2 Color and Position
m-
* Select if the top of the screen is cut off.
'0
On/Off
1 Blue 4 Blue*
2 Violet 5 Violet*
3 Green 6 cf^k Green*
Still Mode page 29)
You can select either "Field still” or "Frame still” in
the still picture mode page 46 for the difference
between “Field still” and "Frame still”).
Audio during Search page 29)
You can choose whether audio is heard during
search {forward) at the initial scan speed or not.
(DVD and Video CD only)
TV Mode (4:3) (■* page 29)
You can choose how software made for a wide
screen television (16:9) is displayed on a conven
tional TV (4:3).
D. (Dynamic) Range Compression (^ page 29)
You can compress the dynamic range (the differ
ence between the loudest sound and the softest
sound). (Dolby Digital DVD only)
Still Picture Display (-* page 29)
You can display the picture type I, P or B in the still
picture mode. (DVD only)
•Audio is heard at any scanning speed (forward/backward) when playing CDs, regardless
of any settings at “2 Audio during Search”,
•Audio is not heard at any scanning speed (forward/backward) when playing DTS CDs, re
gardless of any settings made here.
RQT5897
<Still Mode>
1 Automatic: The unit automatically se
lects field still or frame still.
Field: The unit shows field stills.
Select this setting when jittering occurs
when “1 Automatic” is selected.
Frame: The unit shows frame stills.
Select if small text or fine patterns can
not be seen clearly when “1 Automatic”
is selected.
<Audio during Search>
1 On
2 Off:
Select if you do not want audio during
search.
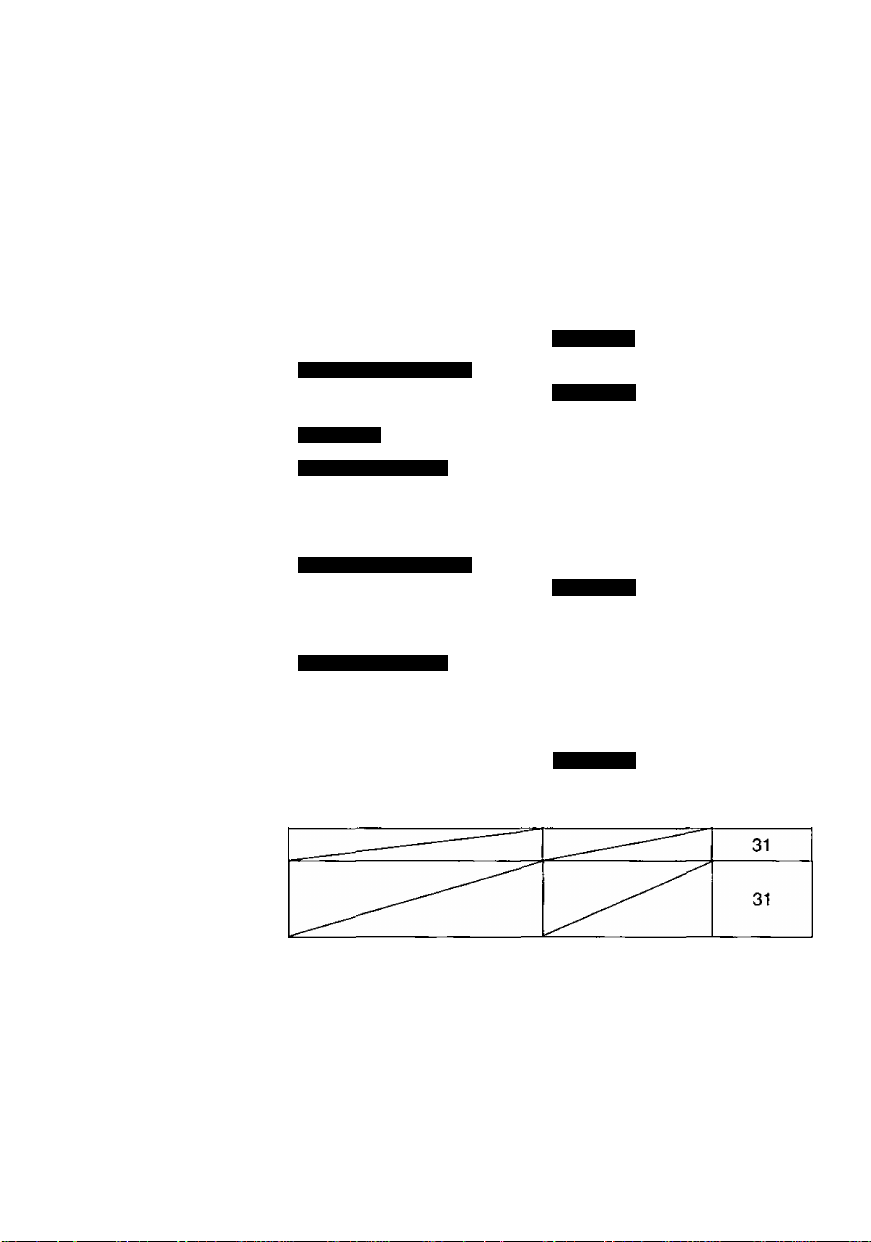
<TV Mode (4:3)>
1 Pan & Scan;
The picture is shown with either one or
both sides cut off.
2 Letterbox:
Black bands appear at the top and bot
tom of the screen.
<D. (Dynamic) Range Compression>
page 46)
1 Off 2 On:
Select when viewing discs at low vol
ume, such as late at night.
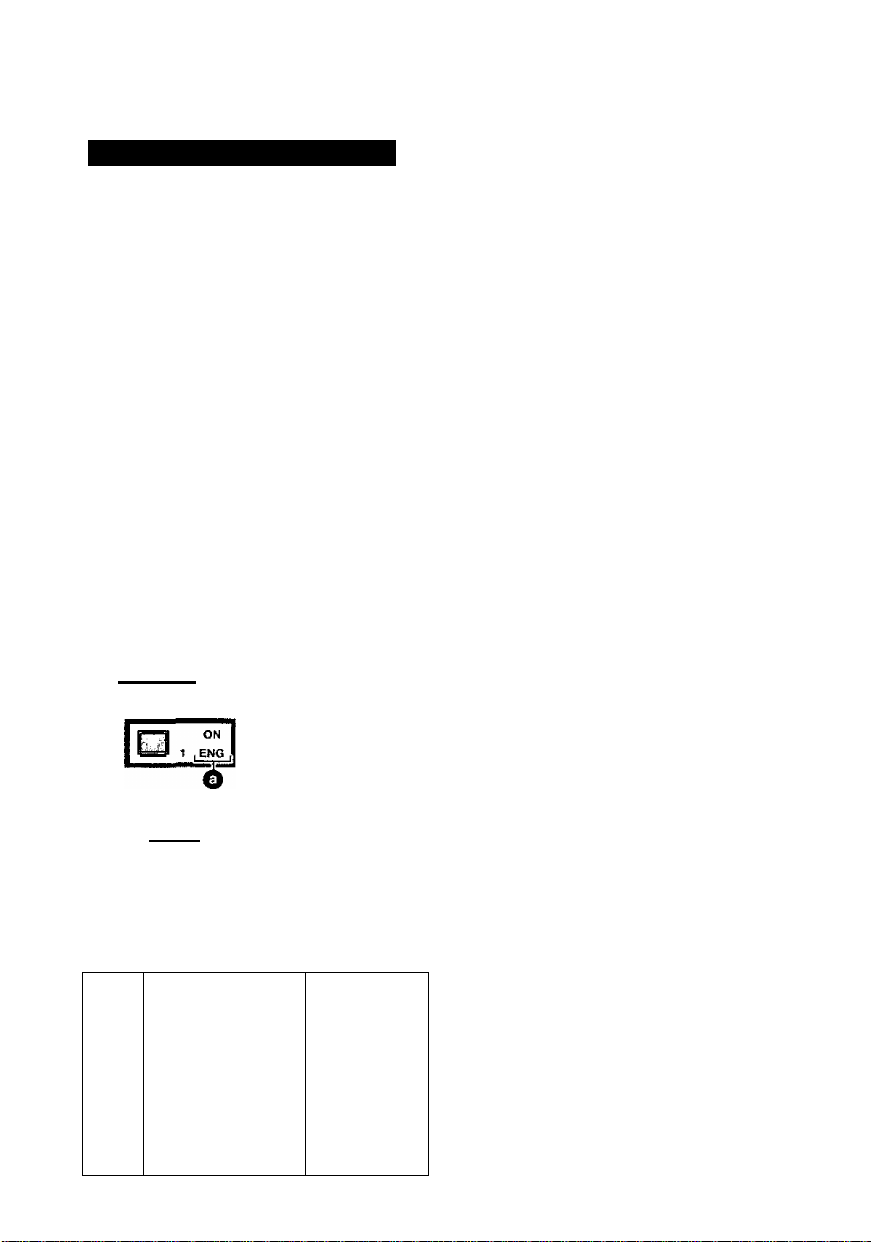
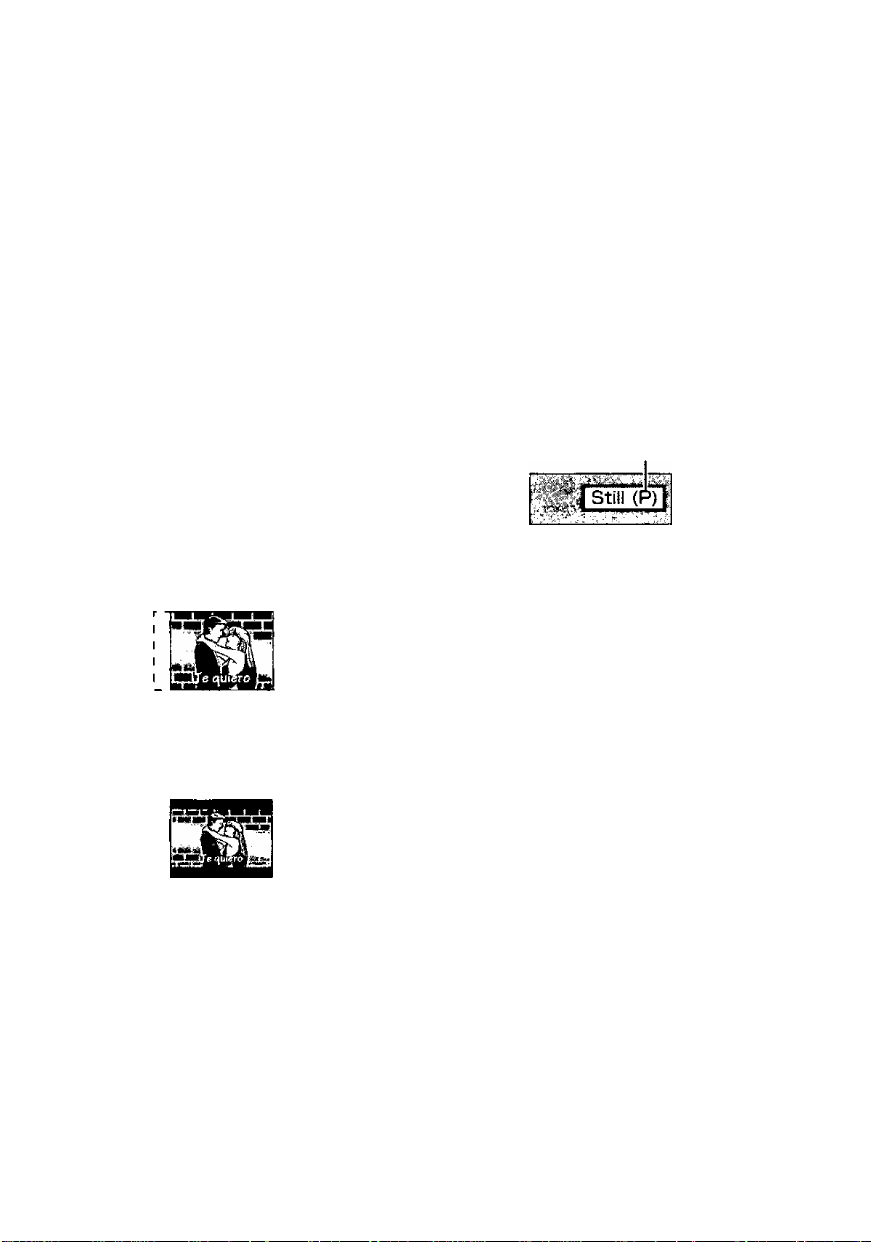
<Still Picture Display>
The picture type will be displayed as “I”, “P"
or “B" page 46).
1 Off 2 On:
Indicates the picture type in the still pic
ture mode.
Example: P-picture
The “Pan & Scan" or “Letterbox” specifica
tions on discs have priority.
ROT5897
Connecting other equipment
You can connect this unit to the following types of equipment to enhance your experience.
Refer to the relevant pages for connection. Initial settings that need to be changed are indi
cated in inverted commas {“ ”).
What you want to do
Connect to a
television to enjoy a
larger screen
Enjoy surround
sound with 3 or more
speakers
Connect 2 speakers
to enjoy stereo
Record to a cassette
or MD deck
Use headphones
View the images from
a video camera on
this unit’s LCD
How to accomplish it Initial settings
'5 TV Aspect”
7 Speaker Setting”
DVD-LV75
Analogue connection
Use the unit’s built-in decoder
‘7 Speaker Setting”
DVD-LV75
and connect to an ampiifier.
DVD-LV75
Digital connection
Connect digitally and use the
“6 Digital Audio
Output”
decoder in another piece of
equipment.
Analogue connection
Connect to a mini-system or
‘7 Speaker Setting”
DVD-LV75
amplifier (including Dolby Pro
Logic amplifiers).
Digital connection
Connect digitally to a mini
“6 Digital Audio
Output”
system or amplifier.
Analogue recording
Digital recording
‘7 Speaker Setting”
DVD-LV75
“6 Digital Audio
Output”
Reference
page
32
34
35
36
37
36
37
Peripheral equipment and cables shown on pages 31 to 37 sold separately unless other
wise indicated.
Close the LCD to conserve power when you have connected this unit to another monitor and speakers.
The LCD and speakers are off while the LCD is closed.
• Ensure that this unit and other equipment to be connected are set to the standby mode or are off, and
I disconnect the AC power supply cords, before commencing connection,
• Read through the instructions before connecting other equipment.
RQT5897
* •
 Loading...