

Page 1
Portable DVD/CD Player
Operating Instructions
Model No. DVD-LV50
CO
LO
UR
MO
NITOR
BR
IG
HT
D
C
I
N
9
V
O
P
E
N
T
O
P
M
E
N
U
M
E
N
U
R
E
T
U
R
N
D
I
S
P
L
A
Y
R
E
P
E
A
T
E
N
T
E
R
–
O
N
–
O
F
F
電
源
初
期
設
定
D
V
D
/テ
レ
ビ
/
S
D
/外
部
ア
ン
グ
ル
画
面
表
示
ト
ッ
プ
メ
ニ
ュ
ー
音
声
字
幕
ア
ド
バ
ン
ス
ド
サ
ラ
ウ
ン
ド
リ
タ
ー
ン
メ
ニ
ュ
ー
決
定
取
消
し
再
生
モ
ー
ド
D
V
D
P
L
A
Y
E
R
∫
5
6
:
9
;
1
1
3
4
6
7
9
0
8
5
2
S
1
0
A
.
S
R
D
S
E
T
U
P
E
N
T
E
R
P
L
A
Y
M
O
D
E
S
U
B
T
IT
L
E
D
IS
P
L
A
Y
T
O
P
M
E
N
U
A
U
D
I
O
A
N
G
L
E
R
E
T
U
R
N
M
E
N
U
C
A
N
C
E
L
This manual was printed with soy based ink.
The region number of this unit is “1”.
You can play DVD-Video marked “1”,
“ALL”, or with a region number including
“1”.
RQT6450-Y
F0302CM0
1 ALL
2
4
1
Example:
Dear customer
Thank you for purchasing this product.
For optimum performance and safety, please read these instructions carefully.
Before connecting, operating or adjusting this product, please read these instructions completely.
Please keep this manual for future reference.
For U.S.A. Only
The warranty can be found on pages 38 and 39.
PP
p
As an ENERGY STARRPartner, Panasonic has determined that this
product meets the
ENERGY STAR
R
guidelines for energy efficiency.
Page 2
2
RQT6450
CAUTION: TO REDUCE THE RISK OF
ELECTRIC SHOCK, DO NOT
REMOVE SCREWS. NO
USER-SERVICEABLE PARTS
INSIDE.
REFER SERVICING TO
QUALIFIED SERVICE
PERSONNEL.
WARNING:
TO REDUCE THE RISK OF FIRE,
ELECTRIC SHOCK OR PRODUCT
DAMAGE, DO NOT EXPOSE THIS
APPARATUS TO RAIN, MOISTURE,
DRIPPING OR SPLASHING AND
THAT NO OBJECTS FILLED WITH
LIQUIDS, SUCH AS VASES, SHALL
BE PLACED ON THE APPARATUS.
CAUTION!
DO NOT INSTALL, OR PLACE THIS UNIT,
IN A BOOKCASE, BUILT-IN CABINET OR
IN ANOTHER CONFINED SPACE. ENSURE THE UNIT IS WELL VENTILATED.
TO PREVENT RISK OF ELECTRIC SHOCK
OR FIRE HAZARD DUE TO OVERHEATING, ENSURE THAT CURTAINS AND ANY
OTHER MATERIALS DO NOT OBSTRUCT
THE VENTILATION VENTS.
THE FOLLOWING APPLIES ONLY IN THE U.S.A.
CAUTION:
This equipment has been tested and found to
comply with the limits for a Class B digital
device, pursuant to Part 15 of the FCC Rules.
These limits are designed to provide reasonable protection against harmful interference in
a residential installation. This equipment generates, uses and can radiate radio frequency
energy and, if not installed and used in accordance with the instructions, may cause harmful
interference to radio communications.
However, there is no guarantee that interference will not occur in a particular installation. If
this equipment does cause harmful interference to radio or television reception, which can
be determined by turning the equipment off
and on, the user is encouraged to try to correct
the interference by one or more of the following
measures:
≥Reorient or relocate the receiving antenna.
≥Increase the separation between the equip-
ment and receiver.
≥Connect the equipment into an outlet on a
circuit different from that to which the receiver
is connected.
≥Consult the dealer or an experienced
radio/TV technician for help.
Any unauthorized changes or modifications to
this equipment would void the user’s authority
to operate this device.
This device complies with Part 15 of the FCC
Rules. Operation is subject to the following two
conditions: (1) This device may not cause
harmful interference, and (2) this device must
accept any interference received, including
interference that may cause undesired
operation.
(Bottom of product)
CAUTION– VISIBLE AND INVISIBLE LASER
RADIATION WHEN OPEN.
DO NOT STARE INTO BEAM.
ATTENTION– RAYONNEMENT LASER VISIBLE ET
INVISIBLE EN CAS D’OUVERTURE.
NE PAS REGARDER DANS LE FAISCEAU.
CAUTION!
THIS PRODUCT UTILIZES A LASER.
USE OF CONTROLS OR ADJUSTMENTS
OR PERFORMANCE OF PROCEDURES
OTHER THAN THOSE SPECIFIED HEREIN
MAY RESULT IN HAZARDOUS RADIATION EXPOSURE.
DO NOT OPEN COVERS AND DO NOT
REPAIR YOURSELF. REFER SERVICING
TO QUALIFIED PERSONNEL.
RISK OF ELECTRIC SHOCK
DO NOT OPEN
CAUTION
The lightning flash with arrowhead
symbol, within an equilateral
triangle, is intended to alert the user
to the presence of uninsulated
“dangerous voltage” within the
product’s enclosure that may be of
sufficient magnitude to constitute a
risk of electric shock to persons.
The exclamation point within an
equilateral triangle is intended to
alert the user to the presence of important operating and maintenance
(servicing) instructions in the literature accompanying the appliance.
The following mark and symbols are located on
bottom of the unit.
Marking sign is located on bottom of the unit.
Page 3
3
RQT6450
CAUTION:
Use only Panasonic car adaptor
DY-DC95.
Batteries
1. Battery pack (Lithium ion battery pack)
1. ≥Use this unit to recharge the battery
pack.
1. ≥Do not use the battery pack with equip-
ment other than the specified player.
1. ≥Do not use the player outside if it is
snowing or raining. (The battery pack is
not waterproof.)
1. ≥Do not get dirt, sand, liquids, or other
foreign matter on the terminals.
1. ≥Do not touch the plug terminals (i and
j) with metal objects.
1. ≥Do not disassemble, remodel, heat or
throw into fire.
2. Button-type battery (Lithium battery)
1. ≥Insert with poles aligned.
1. ≥Do not touch the terminals (i and j)
with metal objects.
1. ≥Do not disassemble, remodel, heat or
throw into fire.
1. ≥Keep out of reach of children.
If any electrolyte should come into contact
with your hands or clothes, wash it off
thoroughly with water.
If any electrolyte should come into contact
with your eyes, never rub the eyes.
Rinse eyes thoroughly with water, and then
consult a doctor.
3. Disposing of the batteries
1. Check and follow your local regulations
before disposal.
CAUTION:
The batteries used in this device may
present a risk of fire or chemical burn if mistreated. Do not disassemble or incinerate the
batteries. Do not heat the batteries above the
following temperatures.
Button-type battery 100 oC (212 oF)
Battery pack 60 oC (140 oF)
Do not recharge the button-type battery.
Replace only with Panasonic part number
indicated below:
Button-type battery (Lithium battery)
(for remote control) CR2025
Battery pack
(Lithium ion battery pack) CGR-H603
Optional battery pack
(Lithium ion battery pack) CGR-H601
Use of other batteries may present a risk of
fire or explosion.
THE FOLLOWING APPLIES ONLY IN THE
U.S.A.
Notice:
This product has parts that contains a small
amount of mercury. It also contains lead in
some components. Disposal of these materials may be regulated in your community due
to environmental considerations. For disposal or recycling information please contact
your local authorities, or the Electronics
Industries Alliance: <http://www.eiae.org.>
A lithium ion/polymer battery that is
recyclable powers the product you have
purchased. Please call 1-800-8-BATTERY
for information on how to recycle this battery.
AC adaptor
This AC adaptor operates on AC between
100 V and 240 V.
But
≥In the U.S.A. and Canada, the AC power
supply cord must be connected to a 120 V
AC power supply only.
≥When connecting to an AC supply outside
of the U.S.A. or Canada, use a plug
adaptor to suit the AC outlet configuration.
≥When connecting to a supply of greater
than AC 125 V, ensure the cord you use is
suited to the voltage of the AC supply and
the rated current of the AC adaptor.
≥Contact an electrical parts distributor for
assistance in selecting a suitable AC plug
adaptor or AC cord set.
RBRC
TM
Li-ion
Page 4
4
RQT6450
Getting Started
Listening caution
Do not play your headphones or earphones
at a high volume. Hearing experts advise
against continuous extended play.
If you experience a ringing in your ears,
reduce volume or discontinue use.
Do not use while operating a motorized
vehicle. It may create a traffic hazard and is
illegal in many areas.
You should use extreme caution or temporarily discontinue use in potentially hazardous
situations.
Even if your headphones or earphones are
the open-air type designed to let you hear
outside sounds, don’t turn up the volume so
high that you can’t hear what’s around you.
Sound can be deceiving. Over time your
hearing “comfort level” adapts to higher
volumes of sound. So what sounds “normal”
can actually be loud and harmful to your
hearing.
Guard against this by setting your equipment
at a safe level BEFORE your hearing adapts.
To establish a safe level:
≥Start your volume control at a low setting.
≥Slowly increase the sound until you can
hear it comfortably and clearly, and without
distortion.
Once you have established a comfortable
sound level:
≥Set the dial and leave it there.
Accessories
Please check and identify the
supplied accessories.
Use numbers indicated in
parentheses when asking for
replacement parts.
(For U.S.A.)
To order accessories contact
1-800-332-5368 or web site
(http://www.panasonic.com).
(For Canada)
To order accessories, call the dealer from
whom you have made your purchase.
∏ Remote control . . . . . . . . . . . . . . . . . . . . . 1
∏ (N2QAHC000012)
∏ Button-type battery. . . . . . . . . . . . . . . . . . 1
∏ for remote control
∏ (for replacement, see below)
∏ Audio/video cable . . . . . . . . . . . . . . . . . . . 1
∏ (RJL3X001X15)
∏ AC adaptor. . . . . . . . . . . . . . . . . . . . . . . . . 1
∏ (DE-891AA)
∏ AC power supply cord . . . . . . . . . . . . . . . 1
∏ (RJA0065-A)
∏ Rechargeable battery pack . . . . . . . . . . . 1
∏ (for replacement, see below)
Optional accessories:
Button-type battery (CR2025)
Replacement rechargeable battery pack
(CGR-H603:
Available from Panasonic dealers.)
Optional rechargeable battery pack (CGR-H601)
Car stereo cassette adaptor (RP-CC20)
Car adaptor (DY-DC95)
Mini optical digital audio cable (RP-CA2120)
S video cable
(RFX4139:
Available from Panasonic dealers.)
Available only in U.S.A.
Carrying case (RP-SB220)
Headphones (RP-HC100 or RP-HC70)
Note
The included AC power supply cord and AC
adaptor are for use with this unit only. Do not use
them with other equipment.
EST. 1924
Page 5

5
RQT6450
Getting Started
Table of contents
Getting Started
Accessories . . . . . . . . . . . . . . . . . . . . . . . . . 04
IMPORTANT SAFETY INSTRUCTIONS. . . . 06
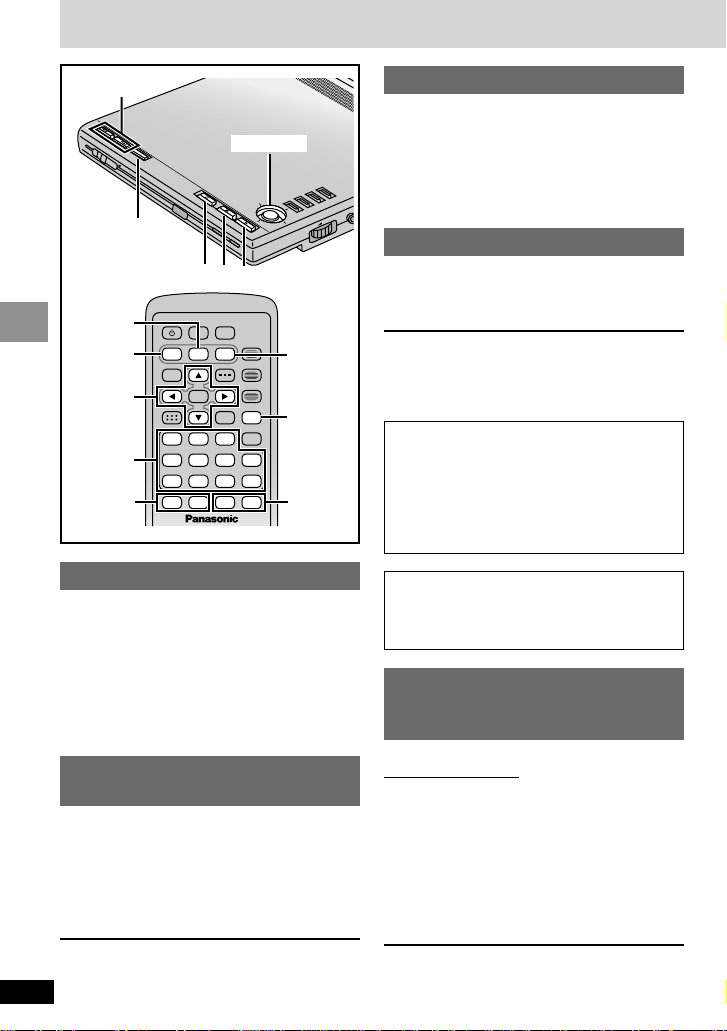
Control reference guide. . . . . . . . . . . . . . . . 07
Disc information. . . . . . . . . . . . . . . . . . . . . . 08
The remote control. . . . . . . . . . . . . . . . . . . . 09
Basic Operations
Adjusting the angle of the LCD. . . . . . . . . . 12
Basic play . . . . . . . . . . . . . . . . . . . . . . . . . . . 12
≥When a menu screen appears. . . . . . . . . . . 13
≥Resume function . . . . . . . . . . . . . . . . . . . . . 14
Selecting programs to play—
DIRECT NAVIGATOR . . . . . . . . . . . . . . . . 14
Using the play list menu . . . . . . . . . . . . . . . 15
≥Playing a play list . . . . . . . . . . . . . . . . . . . . . 15
≥Playing specific scenes . . . . . . . . . . . . . . . . 15
Convenient features. . . . . . . . . . . . . . . . . . . 16
≥Skipping items . . . . . . . . . . . . . . . . . . . . . . . 16
≥Fast forward and rewind—SEARCH . . . . . . 16
≥Slow-motion . . . . . . . . . . . . . . . . . . . . . . . . . 16
≥Frame-by-frame viewing . . . . . . . . . . . . . . . 16
Advanced Operations
Changing the monitor settings . . . . . . . . . . 22
≥Adjusting color intensity . . . . . . . . . . . . . . . . 22
≥Changing the size of the picture . . . . . . . . . 22
≥Adjusting the brightness. . . . . . . . . . . . . . . . 22
Using On-Screen Menu Icons . . . . . . . . . . . 23
≥Common procedures . . . . . . . . . . . . . . . . . . 23
≥Progress indicator . . . . . . . . . . . . . . . . . . . . 23
≥Disc information . . . . . . . . . . . . . . . . . . . . . . 24
≥Unit information . . . . . . . . . . . . . . . . . . . . . . 25
Reference
Glossary . . . . . . . . . . . . . . . . . . . . . . . . . . . . 33
Troubleshooting Guide . . . . . . . . . . . . . . . . 34
Maintenance . . . . . . . . . . . . . . . . . . . . . . . . . 37
Limited Warranty (ONLY FOR U.S.A.). . . . . 38
Power supply . . . . . . . . . . . . . . . . . . . . . . . . 10
≥AC adaptor. . . . . . . . . . . . . . . . . . . . . . . . . . 10
≥Battery pack. . . . . . . . . . . . . . . . . . . . . . . . . 10
≥Car adaptor . . . . . . . . . . . . . . . . . . . . . . . . . 11
≥Starting play from a selected program,
title, or track . . . . . . . . . . . . . . . . . . . . . . . 16
≥Repeat play . . . . . . . . . . . . . . . . . . . . . . . . . 17
≥Virtual surround with speakers and
headphones
(ADVANCED SURROUND) . . . . . . . . . . . 17
Using menus to play MP3 discs and
CD text . . . . . . . . . . . . . . . . . . . . . . . . . . . . 18
≥Menu play . . . . . . . . . . . . . . . . . . . . . . . . . . 18
≥Finding a track to play . . . . . . . . . . . . . . . . . 19
Changing the play sequence. . . . . . . . . . . . 20
≥Program play . . . . . . . . . . . . . . . . . . . . . . . . 20
≥Random play . . . . . . . . . . . . . . . . . . . . . . . . 21
Changing soundtracks, subtitle
languages and angles . . . . . . . . . . . . . . . 21
Changing settings . . . . . . . . . . . . . . . . . . . . 26
≥Common procedures . . . . . . . . . . . . . . . . . . 27
≥Entering a password . . . . . . . . . . . . . . . . . . 28
≥Digital output . . . . . . . . . . . . . . . . . . . . . . . . 28
Using this unit with other equipment. . . . . 29
≥Enjoying more powerful sound. . . . . . . . . . . 29
≥Using this unit with a television . . . . . . . . . . 30
≥Recording to digital recording equipment or
cassette tapes . . . . . . . . . . . . . . . . . . . . . . . 32
Using headphones . . . . . . . . . . . . . . . . . . . . 32
Customer Services Directory
(ONLY FOR U.S.A.) . . . . . . . . . . . . . . . . . . 39
Product Service . . . . . . . . . . . . . . . . . . . . . . 40
Language code list. . . . . . . . . . . . . . . . . . . . 40
Specifications. . . . . . . . . . . . . . . . . . . . . . . . 41
Operations in these instructions are
described mainly with the main unit, but you
can do the operations on the remote control if
the controls are the same (
➡ page 7).
Page 6

6
RQT6450
Getting Started
IMPORTANT SAFETY INSTRUCTIONS
Read these operating instructions carefully before using the unit. Follow the safety instructions on the
unit and the applicable safety instructions listed below. Keep these operating instructions handy for
future reference.
1) Read these instructions.
2) Keep these instructions.
3) Heed all warnings.
4) Follow all instructions.
5) Do not use this apparatus near water.
6) Clean only with dry cloth.
7) Do not block any ventilation openings. Install
in accordance with the manufacturer’s
instructions.
8) Do not install near any heat sources such as
radiators, heat registers, stoves, or other
apparatus (including amplifiers) that produce
heat.
9) Do not defeat the safety purpose of the
polarized or grounding-type plug. A polarized
plug has two blades with one wider than the
other. A grounding-type plug has two blades
and a third grounding prong. The wide blade
or the third prong are provided for your safety. If the provided plug does not fit into your
outlet, consult an electrician for replacement
of the obsolete outlet.
10) Protect the power cord from being walked on
or pinched particularly at plugs, convenience
receptacles, and the point where they exit
from the apparatus.
11) Only use attachments/accessories specified
by the manufacturer.
12) Use only with the cart,
stand, tripod, bracket, or
table specified by the
manufacturer, or sold with
the apparatus. When a cart
is used, use caution when moving the
cart/apparatus combination to avoid injury
from tip-over.
13) Unplug this apparatus during lightning
storms or when unused for long periods of
time.
14) Refer all servicing to qualified service personnel. Servicing is required when the apparatus has been damaged in any way, such
as power-supply cord or plug is damaged,
liquid has been spilled or objects have fallen
into the apparatus, the apparatus has been
exposed to rain or moisture, does not
operate normally, or has been dropped.
To prevent damage
Avoid the following;
≥Spraying flammable insecticides near the unit.
≥Pressing the LCD.
≥Touching the lens and other parts of the laser pickup.
Do not use the unit in the following places;
≥Where the temperature is below 5 oC (41 oF) or above 35 oC (95 oF). (Operating the unit be-
yond this range can cause the protection circuitry to function and render the unit inoperable.)
≥Sandy places such as beaches.
≥On top of cushions, sofas, or hot equipment such as amplifiers.
Do not rest the unit on your lap for a long time while using it. The unit can become hot
and cause burns.
C
O
L
O
U
R
M
O
N
I
T
O
R
B
R
I
G
H
T
T
O
P
M
E
N
U
M
E
N
U
R
E
T
U
R
N
D
IS
P
L
A
Y
–
O
N
–
O
F
F
R
E
P
E
A
T
E
NTER
V
I
D
E
O
V
O
L
A
U
D
I
O
O
P
T
O
U
T
OP
EN
CH
G
Í
TOP MENU
MENU
RETURN
DISPLAY
ENTER
–
ON
–
OFF
8
9
:
7
<
1
2
3
4
5
6
=
?
@
A
B
C
D
E
;
>
∫
56:9
;1
13
46
79
08
5
2
S10
A.SRD
SETUP
ENTER
PLAY MODE
SUBTITLE
DISPLAYTOP MENU
AUDIO
ANGLE
RETURNMENU
CANCEL
L
N
M
O
P
Q
R
G
H
A
J
K
B
C
>
?
I
@
F
Page 7
7
RQT6450
Getting Started
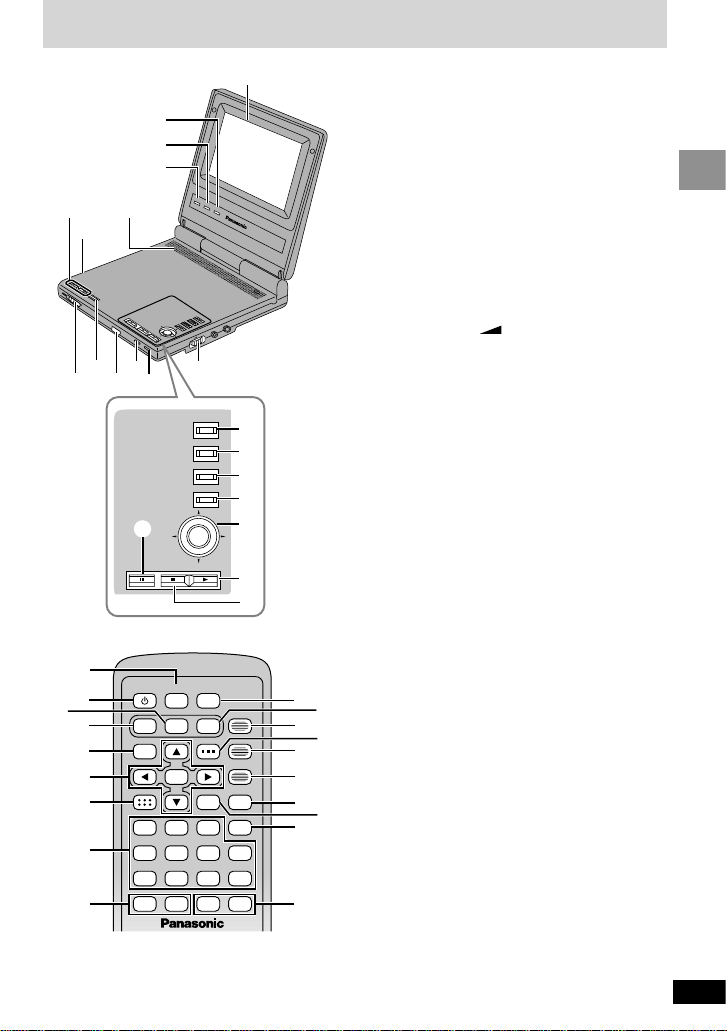
Control reference guide
C
O
L
O
U
R
M
O
N
I
T
O
R
B
R
I
G
H
T
T
O
P
M
E
N
U
M
E
N
U
R
E
T
U
R
N
D
IS
P
L
A
Y
–
O
N
–
O
F
F
R
E
P
E
A
T
E
NTER
V
I
D
E
O
V
O
L
A
U
D
I
O
O
P
T
O
U
T
OP
EN
CH
G
Í
TOP MENU
MENU
RETURN
DISPLAY
ENTER
–
ON
–
OFF
8
9
:
7
<
1
2
3
4
5
6
=
?
@
A
B
C
D
E
;
>
∫
56:9
;1
13
46
79
08
5
2
S10
A.SRD
SETUP
ENTER
PLAY MODE
SUBTITLE
DISPLAYTOP MENU
AUDIO
ANGLE
RETURNMENU
CANCEL
L
N
M
O
P
Q
R
G
H
A
J
K
B
C
>
?
I
@
F
Page
1 5-inch wide screen LCD
2 Colour button (COLOUR). . . . . . . . . . . . 22
3 Bright button (BRIGHT) . . . . . . . . . . . . . 22
4 Monitor button (MONITOR) . . . . . . . . . . 22
5 Monaural speaker
6 Headphone jack (Ë). . . . . . . . . . . . . . . . 32
7 Skip/Slow/Search buttons
(:, 9) . . . . . . . . . . . . . . . . . . . . . . . 16
8 Disc lid switch (2 OPEN) . . . . . . . . . . . 13
9 Repeat button (REPEAT) . . . . . . . . . . . . 17
: Remote control signal sensor
; Charge indicator (CHG) . . . . . . . . . . . . . 10
< Standby indicator (Í) . . . . . . . . . . . . . . 10
= Volume dial ( VOL) . . . . . . . . . . . . . 13
> Pause button (;) . . . . . . . . . . . . . . . . . . 13
? Top menu button
(TOP MENU) . . . . . . . . . . . . . . . . 13, 14, 18
@ Menu button (MENU) . . . . . . . . . 13, 15, 27
A Return button (RETURN) . . . . . . . . . . . . 14
B Display button (DISPLAY) . . . . . . . . 11, 23
C Cursor jockey (3, 4, 2, 1)/
Enter button (ENTER) . . . . . . . . . . . . . . 13
Slide the cursor jockey in the direction you
want to move the cursor.
D Play/On button (1, – ON) . . . . . . . . . . . 13
E Stop/Off button (∫, – OFF) . . . . . . . . . . 13
F Setup button (SETUP) . . . . . . . . . . . 27, 31
G Standby/on switch (Í). . . . . . . . . . . . . . 13
H Stop button (∫). . . . . . . . . . . . . . . . . . . . 13
I Numbered buttons (1–9, 0, S10). . . . . . 13
J Slow/Search buttons (6, 5) . . . . . . 16
K Play mode button (PLAY MODE) . . . . . 20
L Play button (1). . . . . . . . . . . . . . . . . . . . 13
M Angle button (ANGLE) . . . . . . . . . . . . . . 21
N Subtitle button (SUBTITLE). . . . . . . . . . 21
O Audio button (AUDIO) . . . . . . . . . . . . . . 21
P Advanced surround button
(A.SRD) . . . . . . . . . . . . . . . . . . . . . . . . . . 17
Q Cancel button (CANCEL). . . . . . . . . . . . 20
R Skip buttons (:, 9) . . . . . . . . . . . . 16
Buttons such as > function the same as the
controls on the unit.
Page 8

8
RQT6450
Getting Started
∫ Discs that cannot be played
DVD-Audio, PAL discs, DVD-RAM (2.6 GB,
TYPE 1), DVD-ROM, CD-ROM, CDV, CD-G,
iRW, DVD-RW, CVD, SVCD, SACD, Divx
Video Discs and Photo CD.
∫ DVDs that can be played
You can play discs with these
symbols.
∫ Playing DVDs and Video CDs
The producer of the material can control how
these discs are played. This means that you may
not be able to control play of a disc with some
operations described in these operating instructions. Read the disc’s instructions carefully.
∫ CD-R and CD-RW discs
This unit can play CD-R and CD-RW if they are
formatted as CD-DA (digital audio) or video CD
and finalized
§
.
∫ DVD-R discs
Panasonic DVD-R recorded and finalized§on a
Panasonic DVD video recorder are played as
DVD-Video on this unit.
§
A process that allows play on compatible
equipment.
Disc information
DVD-RAM DVD-Video DVD-R Audio CD Video CD
[RAM] [DVD-V] [CD]
§
[VCD]
Type
Capacity
Recording
format
≥Non-cartridge discs
≥Discs that can be removed
from their cartridges
(TYPE 2 and 4)
≥12 cm (5q) 9.4 GB
≥(double-sided) and
≥4.7 GB (single-sided)
≥8 cm (3q) 2.8 GB
(double-sided)
Discs recorded with DVD video
recorders, DVD video cameras,
personal computers, etc., using
Version 1.1 of the Video
Recording (VR) Format
(a unified video recording
standard).
≥Remove TYPE 2 and 4 discs from their car-
tridges before use, then return them when you
are finished. Read the instructions for the disc
carefully.
≥Some parts of the disc, for example where one
program ends and another begins, may not
play smoothly.
Note
It may not be possible to play CD-R, CD-RW,
DVD-R and DVD-RAM in all cases due to the
type of disc or condition of the recording.
1
2
3
Indication used in instructions
§
Including CD-R/RW and discs recorded with MP3.
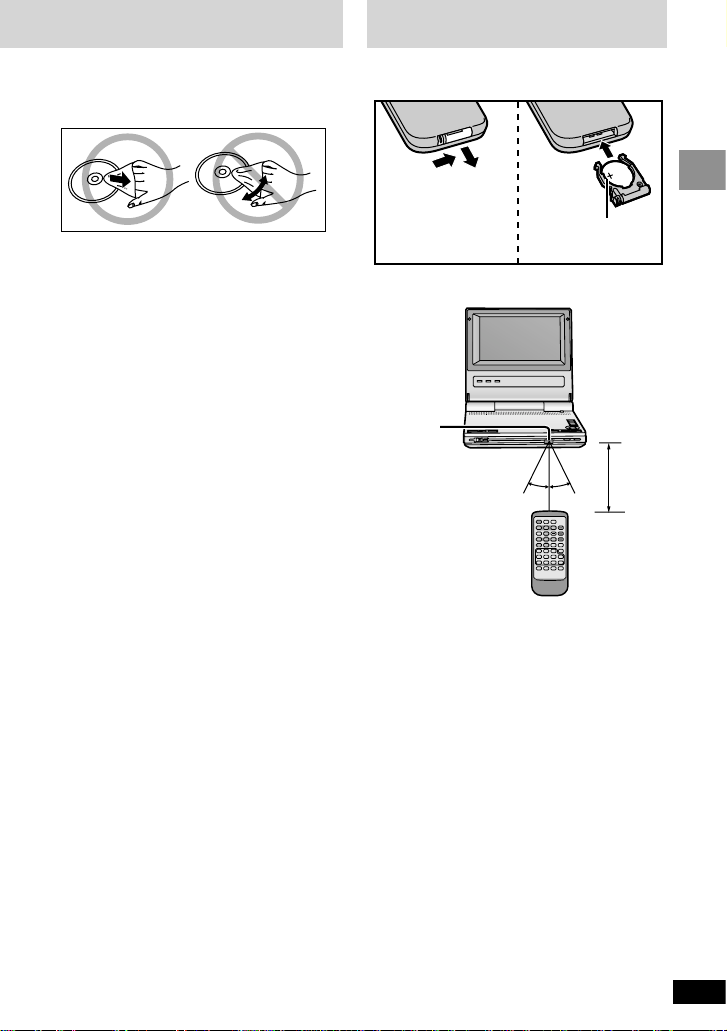
Do not use irregularly shaped discs (e.g. heart-shaped), as these can damage the unit.
∫ DVD-RAM discs
DVD-RAM discs must meet the following conditions for this unit to be able to play them.
∫ Discs that can be played
30° 30°
Page 9
9
RQT6450
Getting Started
∫ To clean discs
DVD-Video, CD, Video CD
Wipe with a damp cloth and then wipe dry.
DVD-RAM, DVD-R
≥Clean only with DVD-RAM/PD disc cleaner
available as an optional accessory, part
number LF-K200DCA1.
≥Never use cloths or cleaners for CDs, etc.
∫ Handling precautions
≥Do not write on the label side with a ball-point
pen or other writing instrument.
≥Do not use record cleaning sprays, benzine,
thinner, static electricity prevention liquids or
any other solvent.
≥Do not attach labels or stickers to discs.
≥Do not use discs with exposed adhesive from
tape or left over peeled off stickers.
≥Do not use scratch-proof protectors or covers.
≥Do not use discs printed with label printers
available on the market.
The remote control
∫ Battery (Lithium battery)
1
2
3
Face + upwards.
∫ Use
Aim at the sensor, avoiding obstacles, at a
maximum range of 7 m (23 feet) directly in front
of the unit.
30° 30°
Remote
control signal
sensor
7 m
(23 feet)
Page 10
10
RQT6450
Getting Started
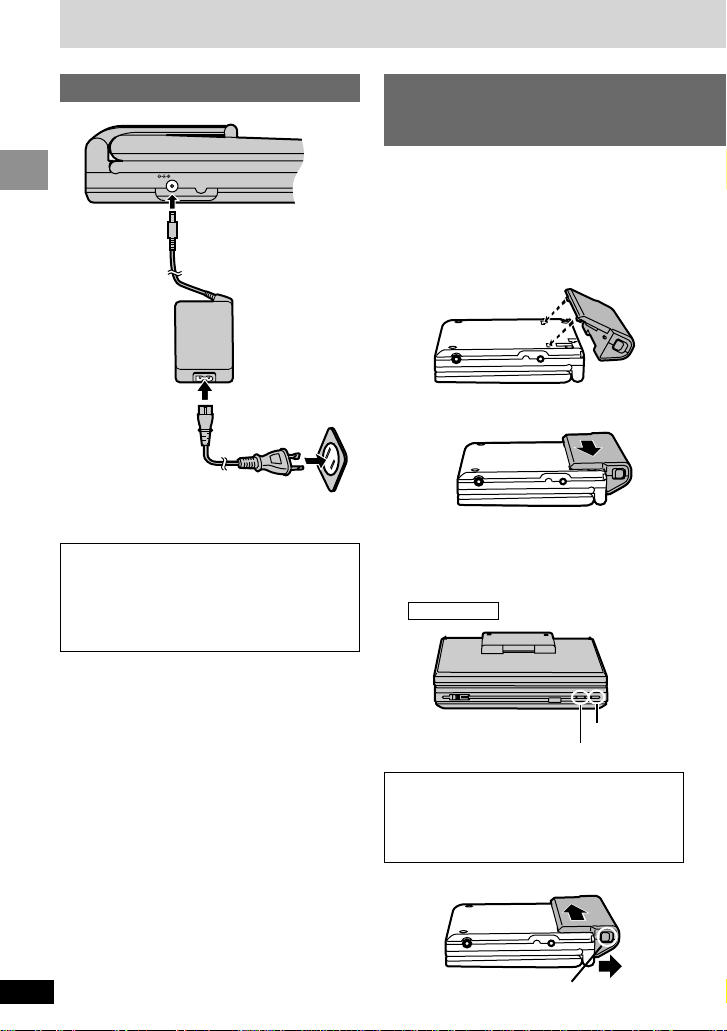
Power supply
DC IN 9V
1
2
3
Household AC outlet
(AC 120 V, 60 Hz)
% DC IN 9 V
The unit is in the standby condition (the [Í]
indicator lights) when the AC power supply
cord is connected. The primary circuit is
always “live” as long as the AC adaptor is
connected to an electrical outlet.
≥The illustrations show connection for the in-
cluded rechargeable battery pack (CGR-H603).
Connect the optional rechargeable battery pack
(CGR-H601) in the same way.
≥Charge the battery packs before using them for
the first time.
∫ To attach
Battery pack
(included and optional)
(Lithium ion battery pack)
AC adaptor
∫ When the unit is not going to be
used for a long time
The unit consumes 0.9 W when in standby
mode.
To conserve power, disconnect the AC power
supply cord from the AC outlet.
Recharging
[Í] goes out
[CHG] lights
Recharging is complete when [CHG] goes
out. ([Í] lights.)
Disconnect the AC power supply cord and
AC adaptor.
This unit
(Left side)
∫ To recharge
∫ (When the unit is off)
Connect to the household AC outlet while the
battery pack is attached (see left).
1
This unit (Bottom)
Battery pack
2 Slide the pack so it clicks and locks into
place.
∫ To detach
2
1 Slide and hold the latch in position.
DC IN 9V
DC IN 9V
T
O
P
M
E
N
U
M
E
N
U
R
E
T
U
R
N
D
IS
P
LA
Y
–
ON
–
OFF
R
E
P
E
A
T
E
N
T
E
R
VIDEO
V
OL
AUDIO
OPT O
UT
O
P
E
N
C
H
G
Í
E
N
T
E
R
RETURN
DISPLAY
Page 11
11
RQT6450
Getting Started
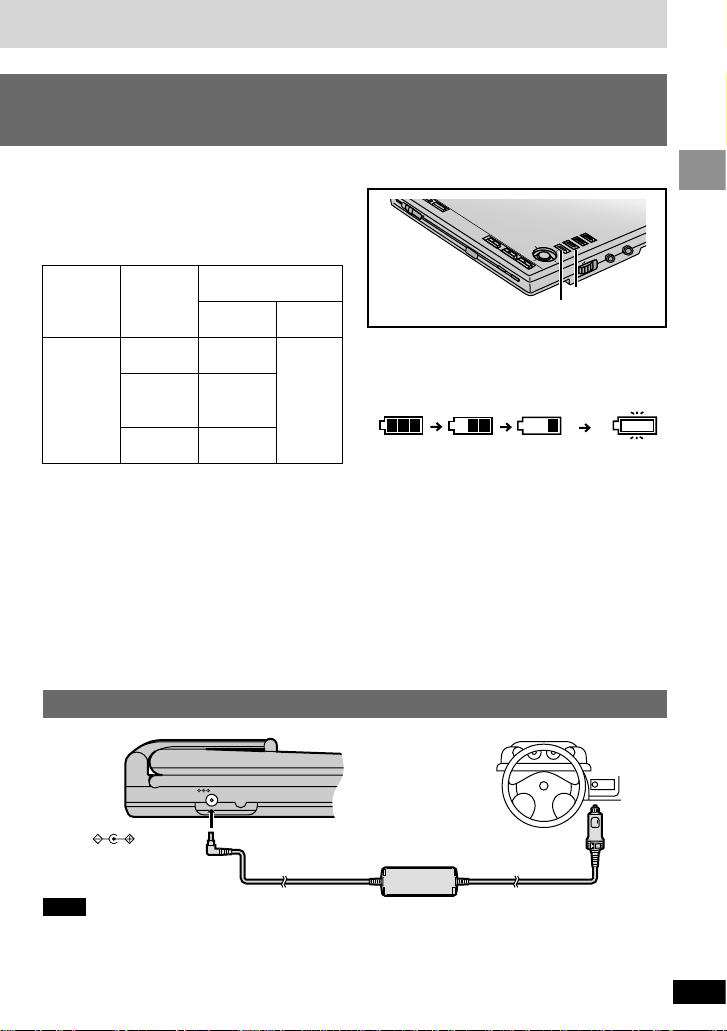
∫ To confirm the battery charge
Full
Low Recharge
∫ Approximate recharging and
play times in hours
(Actual times depend on operating conditions.
Times for the optional rechargeable battery pack
are shown in parentheses.)
Recharging
[at 20 oC
(68 oF)]
4 (6)
LCD
brightness
level
j5
0 (factory
preset)
5
LCD on
2.5 (4)
2 (3.5
)
1.5 (3)
LCD off
3 (6)
Play time
≥To change the LCD brightness (➡ page 22).
∫ If play time dramatically reduces
after recharging
The battery pack has reached the end of its service life (it can be recharged about 300 times).
Car adaptor (optional)
Note
≥Read the car adaptor’s operating instructions carefully.
≥In the interests of the traffic safety, do not perform operations on the unit or view video software while
driving a vehicle.
≥You can enjoy sound through your car audio system by connecting a car stereo cassette adaptor
(➡ page 4) to this unit’s headphone jack.
DC IN 9V
DC IN 9V
To the cigarette
lighter socket
Car adaptor
Part number DY-DC95
This unit (Left side)
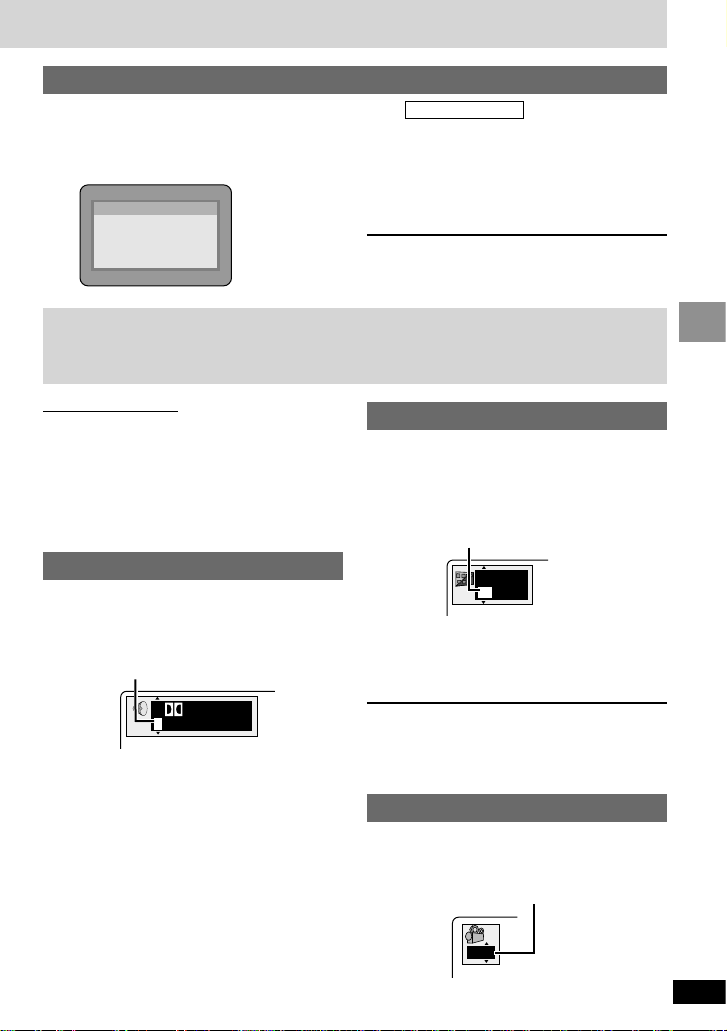
When the unit is on, press [DISPLAY].
The battery display appears on the LCD for a few
seconds to show the approximate remaining
charge.
(Appears automatically when there is
f
a few minutes of charge remaining.) ----------}
≥Press [RETURN] to clear the on-screen menu
icons.
∫ If the unit is not to be used for a
long time
≥Detach the battery pack. (Even if the unit is off,
it still uses some power. This can lead to over
discharging of the battery and malfunction.)
≥Recharge the battery pack when you are ready
to use it again.
T
O
P
M
E
N
U
M
E
N
U
R
E
T
U
R
N
D
IS
P
LA
Y
–
ON
–
OFF
R
E
P
E
A
T
E
N
T
E
R
VIDEO
V
OL
AUDIO
OPT O
UT
O
P
E
N
C
H
G
Í
E
N
T
E
R
RETURN
DISPLAY
Page 12
V
ID
E
O
VOL
A
U
D
IO
O
P
T
O
U
T
O
P
E
N
C
H
G
Í
V
ID
E
O
VOL
A
U
D
IO
O
P
T
O
U
T
E
N
T
E
R
T
O
P
M
E
N
U
M
E
N
U
R
E
T
U
R
N
D
I
S
P
L
A
Y
–
O
N
–
O
F
F
R
E
P
E
A
T
O
P
E
N
C
H
G
Í
C
O
L
O
U
R
M
O
N
IT
O
R
B
R
IG
H
T
V
ID
E
O
VOL
A
U
D
IO
O
P
T
O
U
T
E
N
T
E
R
T
O
P
M
E
N
U
M
E
N
U
R
E
T
U
R
N
D
I
S
P
L
A
Y
–
O
N
–
O
F
F
R
E
P
E
A
T
O
P
E
N
C
H
G
Í
V
ID
E
O
VO
L
A
U
D
IO
O
P
T
O
U
T
T
O
P
M
E
N
U
M
E
N
U
R
E
T
U
R
N
S
P
L
A
Y
–
O
N
–
O
F
F
R
E
P
E
A
T
O
P
E
N
C
H
G
Í
C
O
L
O
U
R
M
O
N
IT
O
R
B
R
IG
H
T
C
O
L
O
U
R
M
O
N
IT
O
R
B
R
IG
H
T
12
RQT6450
Basic Operations
Basic play
I
O
3,4,2,1,ENTER
1
2
3
TOP MENU
MENU
RETURN
DISPLAY
3,4,
2,1,
ENTER
;
∫
1
TOP MENU
MENU
DISPLAY
RETURN
∫,-OFF
;
Í
The LCD
Some of the LCD’s pixels (less than 0.01 %)
may light constantly or fail to light. This is
normal and does not indicate a malfunction.
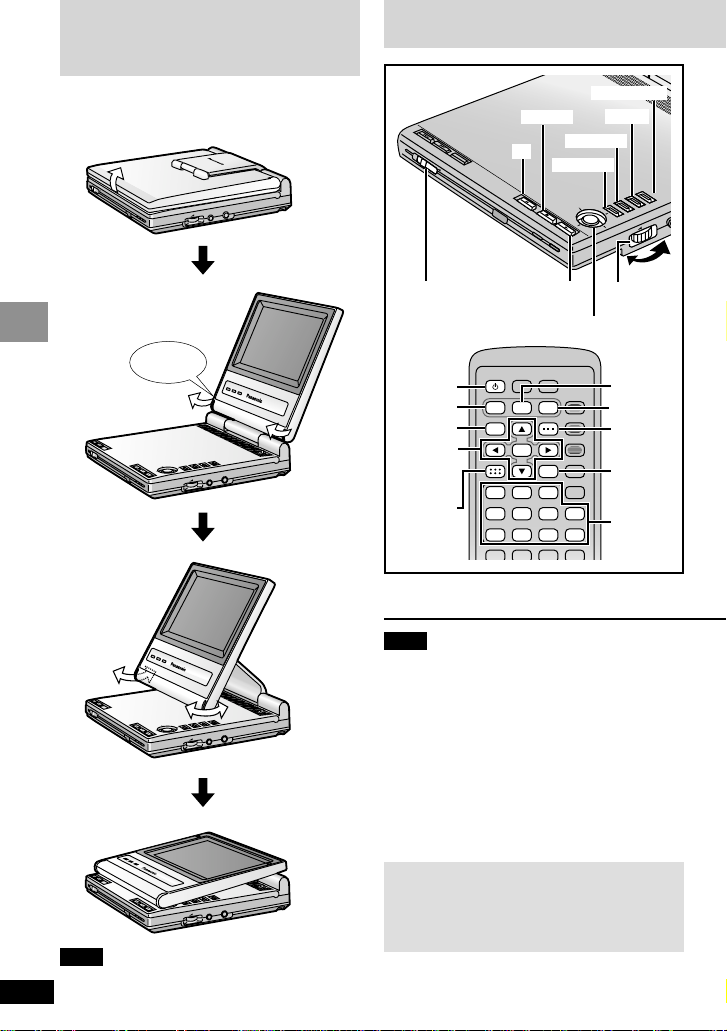
Open the LCD
Traditional Viewing
Slide
Click!
Enhanced Angle Viewing
Note
Close the LCD when carrying it.
Compact viewing
Adjusting the angle of the LCD
The LCD can be set to different angles to suit
your viewing style.
Note
≥If “$” appears on the LCD
≥The operation is prohibited by the unit or disc.
≥Discs continue to rotate while menus are
displayed even after playing an item. Press [∫]
when you finish to preserve the unit’s motor
and LCD.
≥The surface of the unit may become warm if it is
used for a long time, but this is normal and not
an indication of malfunction.
≥It takes about 30 seconds for the unit to read
DVD-RAM before play.
Numbered
buttons
REPEAT
OPEN
TO
P
M
EN
M
U
E
N
R
U
E
TU
D
R
IS
–
OFF
C
H
G
Í
N
P
L
A
Y
D
U
E
E
N
N
T
T
E
E
R
R
–
ON
A
T
P
O
L
O
V
SETUP
PLAY MODE
∫
13
46
7908
ANGLE
;1
SUBTITLE
DISPLAYTOP MENU
AUDIO
ENTER
A.SRD
RETURNMENU
CANCEL
2
S10
5
56:9
Page 13
13
RQT6450
Basic Operations
[RAM] [DVD-V] [CD] [VCD]
Preparations
Open the LCD (➡ page 12).
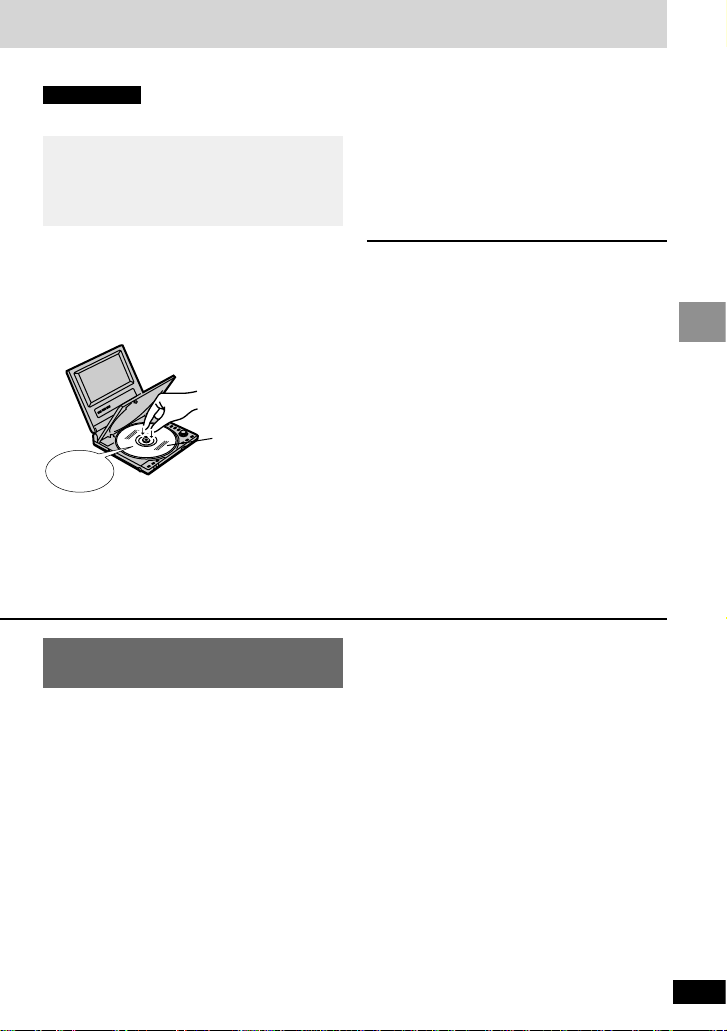
1 Slide [2 OPEN] to open the
disc lid and insert a disc.
[RAM]
Remove TYPE 2 and 4 discs from their
cartridges before use.
2 Press and hold [1, – ON] to
start play.
The unit comes on automatically.
[CD]
On-screen menu icons (➡ page 23) and
disc information (MP3 and CD text) appear
on the LCD.
3 Adjust the volume.
Using headphones (➡ page 32)
To stop play
Press [∫] (➡ page 14, Resume function).
To pause play
Press [;] during play.
Press [1] (Play) to restart play.
To turn the unit off
Press and hold [∫, – OFF] until “OFF” appears
on the LCD.
Turning the unit on and off with the remote
control
Press [Í].
≥You cannot use the remote control to turn the
unit on when powered by the battery pack.
To see the elapsed play time
Press [DISPLAY] to show the on-screen menu
icons (➡ page 23).
Auto power-off function
The unit automatically turns off after being
stopped for 15 minutes (5 minutes when the
battery pack is being used).
Clicks
The menu language is set to English, but
you can change it to French or Spanish
(➡ page 27, Display—Menu Language).
English is used in the examples.
Label up.
(With double-sided
discs, load so the
label for the side
you want to play is
facing up.)
When a menu screen
appears
[DVD-V] [VCD]
Press the numbered buttons to
select an item.
To select a 2-digit number
e.g. 25: [S10]>[2]>[5]
≥When playing DVDs, you can also use
[3, 4, 2, 1] to select items. Press [ENTER]
to confirm your selection.
≥Read the disc’s instructions for further details
about operation.
To return to the menu screen
[DVD-V]
Press [TOP MENU] or [MENU].
≥DVD can have several menus. [TOP MENU]
and [MENU] may call up different menus.
[VCD]
Press [RETURN].
Close the disc lid by hand.
Page 14
14
RQT6450
Basic Operations
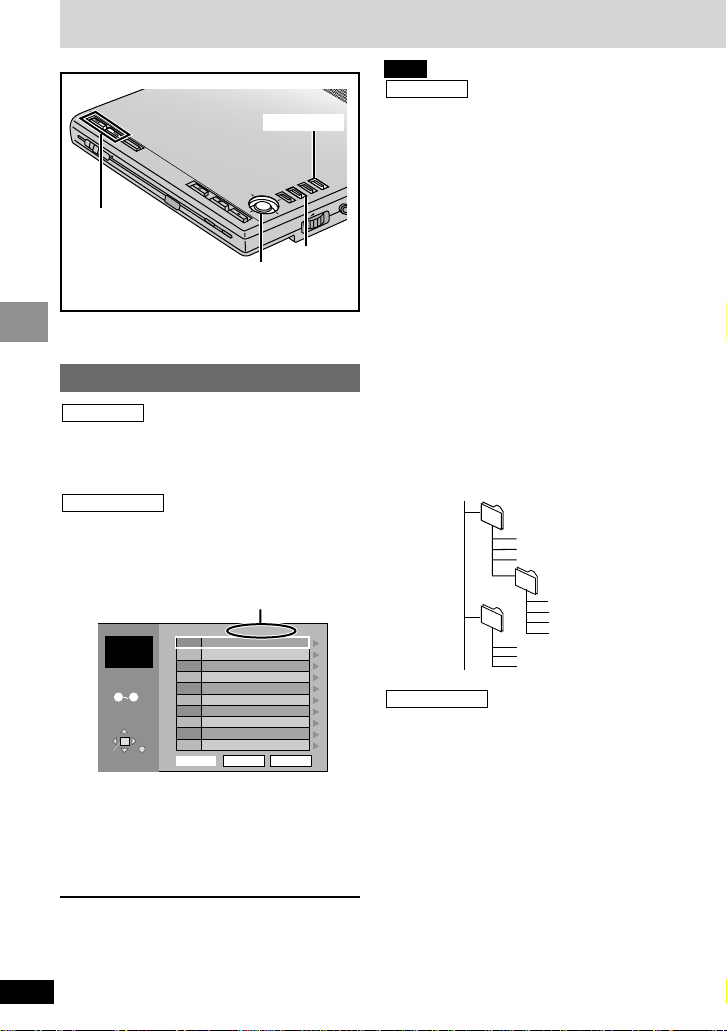
[RAM]
Use the program list to find programs to play.
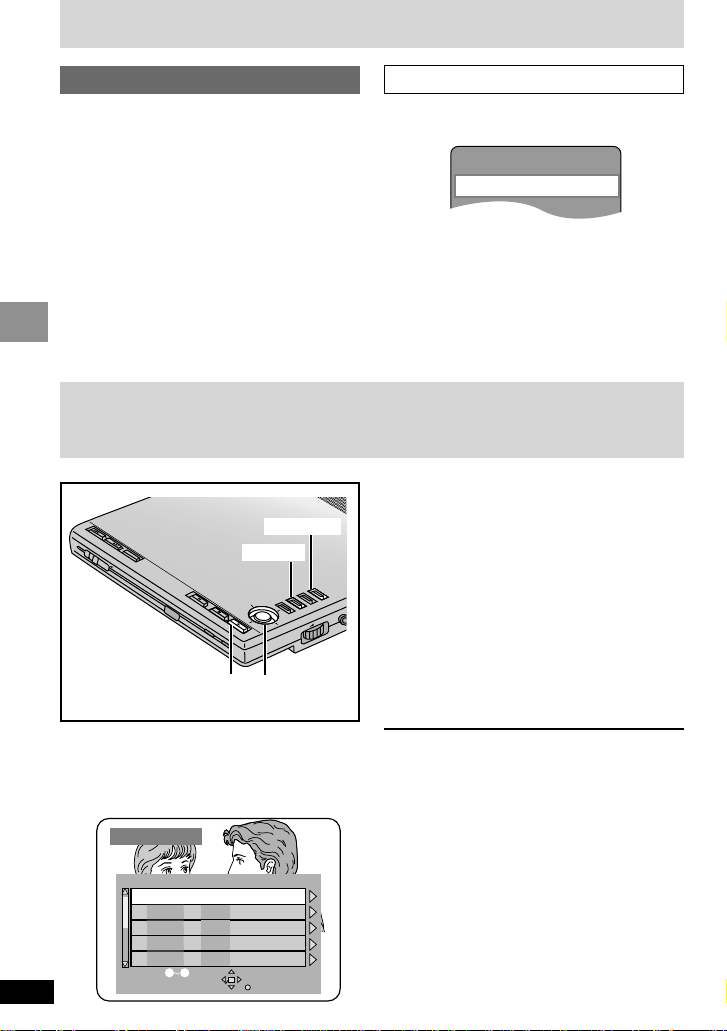
1 Press [TOP MENU].
Selecting programs to play—
DIRECT NAVIGATOR
DIRECT NAVIGA T OR
Date CH
On Contents
12/23(SAT)
12/26(TUE)
1/12(FRI)
1/24(WED)
2/20(TUE)
101
42
2
3
54
125
21:02
14:35
20:00
19:30
19:05
SELECT
ENTER
RETURN
No
SELECT
NUMBER
09
2 Use [3, 4] to select the
program.
The selected program plays in the background.
≥Move the cursor jockey [4] to show other
programs if there are more than five.
≥You can select programs with the
numbered buttons (remote control).
≥To enter a 2-digit number
≥e.g. 25: [S10]>[2]>[5].
3 Press [ENTER].
Play of the program that was playing in the
background continues.
To clear the program list
Press [TOP MENU].
(The unit returns to the condition it was in before
you called up the program list.)
To display information about a selected
program
Select the program and move the cursor jockey
[1]. (The background picture pauses.)
Use [2, 1] to show the other programs.
To return to the previous screen
Press [RETURN].
For your reference
≥Titles appear only if you have entered them.
≥You cannot change program and disc titles.
PLAYLIST
1
23
45
6
No
Date Length Title Contents
1
2
3
4
0:46:35
0:09:15
0:12:32
0:07:30
SELECT
ENTER RETURN
10/17
10/24
11/29
12/22
World
Best Hit
SELECT
NUMBER
09
PLAYLIST
1 10/17 0:46:35 028 Memory lane
23
45
6
789
NextPrev
001/004
0:00:19
World
Best Hit
SELECT
ENTER RETURN
SELECT
NUMBER
09
T
3,4,2,1,
ENTER
1
TOP MENU
RETURN
T
Chapter Preview [DVD-V]
The following message appears immediately
after you press [1] (Play).
Press [1] (Play) while the message is displayed
and the beginning portions of each chapter up to
the current one are played. Full play resumes
from the point where you stopped play.
(This feature works only within a title.)
If you do not press [1] (Play), the message disappears and play starts from where you stopped
it.
Press PLAY to Preview Chapters
Resume function
[RAM] [DVD-V] [CD] [VCD]
The position you stopped play at is recorded by
the unit when “1” flashes on the LCD.
While “1” is flashing, press [1] (Play) to start
play from where you stopped it.
([DVD-V] ➡ Chapter Preview, see right)
≥This only works if the disc’s elapsed play time
is shown in the on-screen menu icons
(➡ page 23).
≥It is cleared if you open the disc lid.
≥The unit saves the position even when you
switch the unit to standby except when playing
a play list (➡ page 15).
≥Press [∫] to clear the position.
Basic play
R
E
P
E
A
T
OPEN
–
OFF
–
ON
C
H
G
Í
TO
P
M
E
M
E
N
R
U
E
T
U
D
R
IS
N
P
L
A
Y
E
E
N
N
T
T
E
E
R
R
L
O
V
N
U
O
I
D
U
A
U
O
T
P
O
Page 15
15
RQT6450
Basic Operations
[RAM]
You can play a group of scenes, a play list,
created on other equipment such as a DVD video
recorder.
You can also specify scenes to play.
Playing a play list
1 Press [MENU].
Using the play list menu
PLAYLIST
1
23
45
6
No
Date Length Title Contents
1
2
3
4
0:46:35
0:09:15
0:12:32
0:07:30
SELECT
ENTER RETURN
10/17
10/24
11/29
12/22
World
Best Hit
SELECT
NUMBER
09
2 Use [3, 4] to select the play
list.
≥Move the cursor jockey [4] to show other
play lists if there are more than six.
≥You can select with the numbered
buttons (remote control).
≥To enter a 2-digit number
≥e.g. 25: [S10]>[2]>[5].
3 Press [ENTER] to start play.
To display information about a play list
1. Select the play list and move the cursor
jockey [1].
2. Use [3, 4] to select “Contents” and press
[ENTER].
3. Use [2, 1] to show other play lists.
To clear the play list screen
Press [MENU].
(The unit returns to the condition it was in before
you called up the play list.)
5 Use [3, 4, 2, 1] to select a
scene and press [ENTER].
The scene starts playing.
≥If there are more than 9 scenes, use
[3, 4, 2, 1] to select “Next” and press
[ENTER]. Select “Prev” to move back.
≥You can also select a page with the
numbered buttons (remote control).
≥To enter a page number
≥e.g. 25: [2]>[5]>[ENTER].
≥e.g. 111: [1]>[1]>[1]>[ENTER].
To return to the previous screen
Press [RETURN].
PLAYLIST
1 10/17 0:46:35 028 Memory lane
23
45
6
789
NextPrev
001/004
0:00:19
World
Best Hit
SELECT
ENTER RETURN
SELECT
NUMBER
09
T
Playing specific scenes
1 Press [MENU].
2 Use [3, 4] to select the play
list.
≥You can select with the numbered
buttons (remote control).
To enter a 2-digit number
e.g. 25: [S10]>[2]>[5].
3 Move the cursor jockey [1].
4 Use [3, 4] to select “Scene
List” and press [ENTER].
Page
Total pages
MENU
–
OFF
C
H
G
RETURN
E
E
–
ON
Í
TO
P
M
E
M
N
U
E
N
R
U
E
TUR
D
IS
N
P
L
A
Y
O
I
D
U
A
U
N
N
T
T
E
E
R
R
O
T
P
O
L
O
V
R
E
P
E
A
T
OPEN
3,4,2,1,
ENTER
Page 16
16
RQT6450
Basic Operations
Convenient features
Skipping items
[RAM] [DVD-V] [CD] [VCD]
You can skip chapters on DVD-Video, tracks on
CDs and Video CDs, and on DVD-RAM you can
skip to the start of a program, scene in a play list,
or to a marker.
During play or while paused
Press [:] or [9].
Each press increases the number of skips.
Fast forward and rewind—
SEARCH
[RAM] [DVD-V] [CD] [VCD]
During play
OOn the main unitN
Press and hold [:] or [9].
OOn the remote controlN
Press [6] or [5].
≥Audio will be heard during search. You can turn
this audio off if you want to (➡ page 26,
Audio—Audio during Search).
Slow-motion
[RAM] [DVD-V] [VCD]
While paused
OOn the main unitN
Press and hold [:] or [9].
OOn the remote controlN
Press [6] or [5].
Frame-by-frame viewing
[RAM] [DVD-V] [VCD]
While paused
Use [2] or [1].
≥Hold in position to move the frames in
succession.
≥Pressing [;] also activates forward frame-by-
frame.
∫
56:9
;1
13
46
7908
5
2
S10
A.SRD
SETUP
ENTER
PLAY MODE
SUBTITLE
DISPLAYTOP MENU
AUDIO
ANGLE
RETURNMENU
CANCEL
3,4,
2,1
;
∫
1
A.SRD
:,9
6,5
Notes
≥The speed of search and slow-motion
increases up to 5 steps.
≥Press [1] (Play) to restart play.
≥You cannot move backwards with Video
CD during frame-by-frame and slowmotion.
When playing Video CDs with playback
control
Pressing buttons to perform skip, search or
slow-motion may take you to a menu screen.
Starting play from a
selected program, title, or
track
[RAM] [DVD-V] [CD] [VCD]
Remote control only
Press the numbered buttons to
select the item.
Play starts from the selected item.
To select a 2-digit number
e.g. 25: [S10]>[2]>[5]
e.g. 25: [CD] (MP3 discs) [2]>[5]>[ENTER]
If the on-screen menu icons are on the LCD
(➡ page 23)
≥This works only when stopped with some discs.
C T
OFF
SP 1
SP 2
SP OFF
Numbered
buttons
:,9
;
3,4,2,1
–
OFF
C
C
H
H
G
G
Í
Í
∫
1
OPEN
REPEAT
REP
EAT
T
O
P
M
E
M
N
U
E
N
R
U
ETU
D
RN
IS
P
L
A
Y
IO
D
U
E
E
N
N
T
T
E
E
R
R
–
ON
A
U
O
T
P
O
L
O
V
Page 17

17
RQT6450
Basic Operations
Repeat play
Main unit only
[RAM] [DVD-V] [CD] [VCD]
During play
Press [REPEAT].
e.g. DVD-Video
Each time you press the button:
[RAM]
Program (PG)>Entire disc (A)>OFF
^-----------------------------------------------------}
During play list play
Scene (S)>Play list (PL)
§1
>OFF
^-------------------------------------------------}
[DVD-V]
Chapter (C)>Title (T)
§2
>OFF
^------------------------------------------}
[CD] [VCD]
Track (T)>Entire disc (A)>OFF
^-----------------------------------------------}
[CD] (MP3 discs)
Track (T)>Group (G)
§2
>OFF
^-------------------------------------------}
§1
“PL” is not displayed while playing a specific
play list scene.
§2
“All (A)” during program and random play.
If the Video CD has playback control
1. Press [∫].
2. Press the numbered buttons to select a track
to start play (➡ page 16).
3. Press [REPEAT] (➡ above).
Note
≥This only works if the disc’s elapsed play time
is shown in the on-screen menu icons
(➡ page 23).
≥You cannot use repeat play to repeat an entire
DVD-Video, an entire MP3 disc or all the play
lists on a DVD-RAM.
∫ To repeat only your favorite
tracks/chapters
Start program play (➡ page 20) and press
[REPEAT] to display “A”.
C T
OFF
Virtual surround with
speakers and headphones
(ADVANCED SURROUND)
[RAM] [DVD-V] [VCD]
Remote control only
Enjoy a surround-like effect with speakers (SP)
(on other equipment) or headphones (HP). If the
disc has surround effects, the effect is broadened and sound seems to come from virtual
speakers on either side.
SP: Dolby Digital, DTS, MPEG, LPCM,
2-channel or over only
HP: Dolby Digital, MPEG, LPCM, 2-channel or
over only
Preparation
Turn off the surround effects on the other
equipment and reduce the volume on this unit to
minimum (➡ page 13).
Press [A.SRD] to select the level.
Each time you press the button:
e.g. SP
To change the mode
1. Press [2] to select “SP” or “HP”.
2. Press [3, 4] to change the mode.
Optimum seating position
SP 1
SP 2
SP OFF
1 (Natural)>2 (Emphasized)>OFF (Cancel)
^---------------------------------------------------------}
Note
≥ADVANCED SURROUND will not work, or will
have less effect, with some discs.
≥Turn ADVANCED SURROUND off if it causes
distortion.
≥The speaker on this unit will not produce any
discernable effect.
OWhen using the
television’s
speakersN
Distance Au
Television’s width
Distance A
Television
Speaker Speaker
Seating
position
3 or 4 times
distance A
Page 18
18
RQT6450
Basic Operations
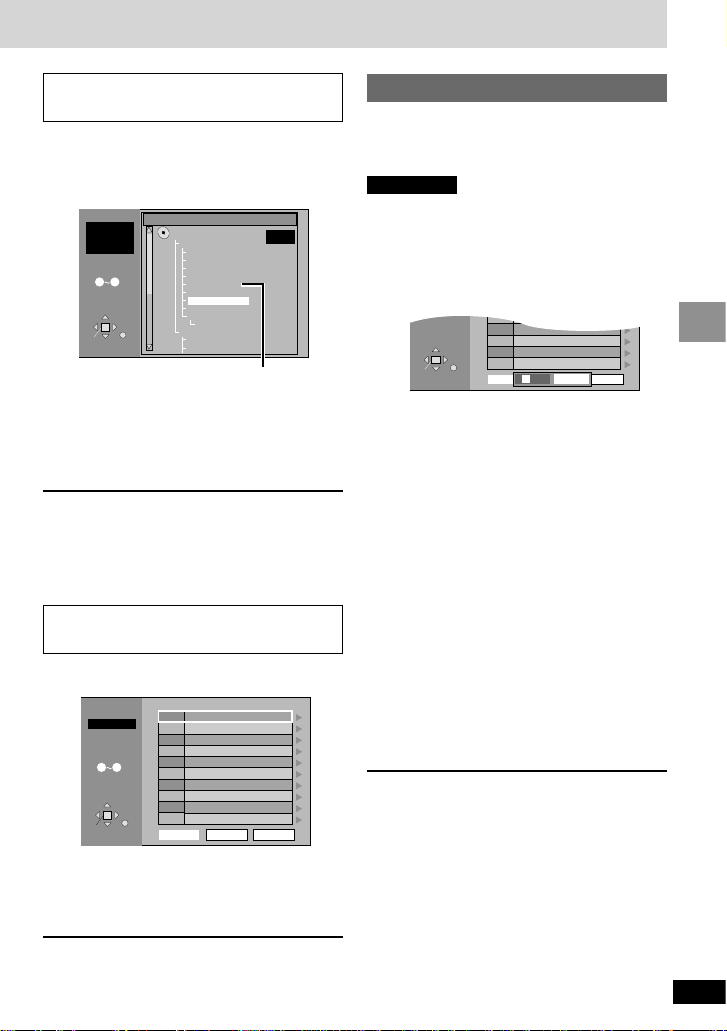
Using menus to play MP3 discs and CD text
[CD] (MP3 discs, CD text)
Menu play
This unit can play MP3 files recorded on
CD-R/RW with a computer.
Files are treated as tracks and folders are
treated as groups.
This unit reads and displays the information on
CD text discs. You can display disc titles, artist
names and track titles.
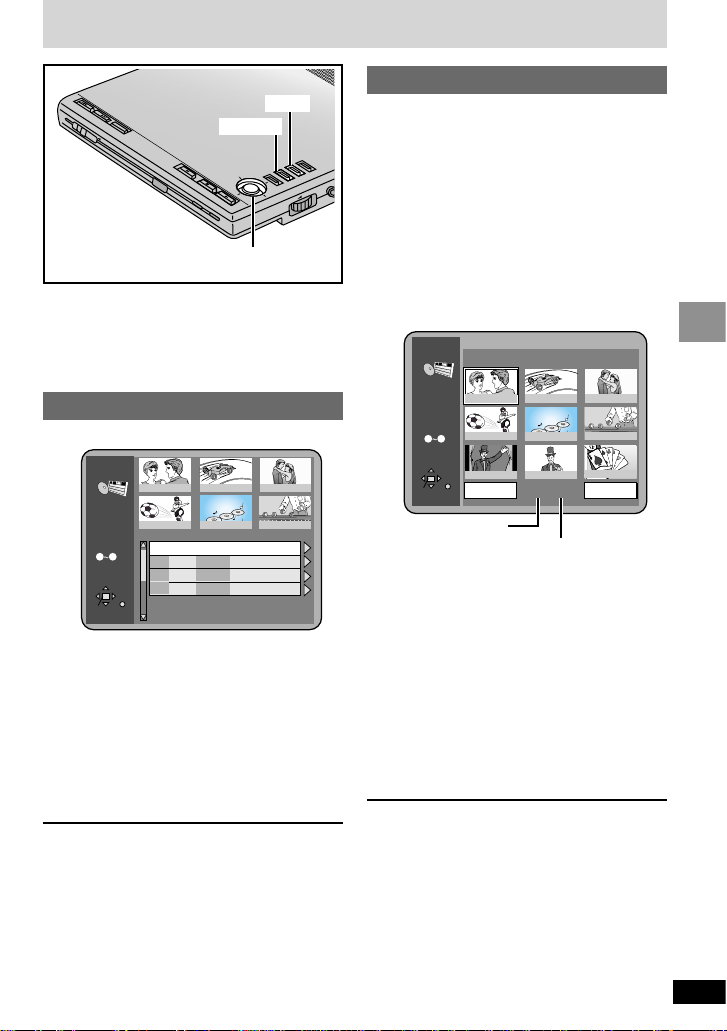
1 Press [TOP MENU].
CD text discs
MP3 discs
Group name (MP3 discs only)
2 Use [3, 4] to select the track
and press [ENTER].
Play starts and continues to the end of the
disc.
“0” indicates the track currently playing.
To show other pages
Use [3, 4, 2, 1] to select “Prev” or “Next” and
press [ENTER].
To close the list screen
Press [TOP MENU].
001 Both Ends Freezing
002 Lady Starfish
003 Life on Jupiter
004 Metal Glue
005 Paint It Yellow
006 Pyjamamama
007 Shrimps from Mars
008 Starperson
009 Velvet Cuppermine
010 Ziggy Starfish
NextFindPrev
1
2
3
4
5
6
7
8
9
10
No Group: 001 My Favorite Tree
SELECT
ENTER RETURN
G
T
Total
1
1
1
SELECT
NUMBER
09
FILE LIST
T
:,9
3,4,2,1,
ENTER
RETURN
TOP MENU
Note
≥Discs must conform to ISO9660 level 1 or 2
(except for extended formats). MP3 files must
have the extension “.MP3” or “.mp3”.
≥This unit is compatible with multi-session but if
there are a lot of sessions it takes more time for
play to start. Keep the number of sessions to a
minimum to avoid this.
≥This unit is not compatible with ID3 tags.
≥This unit is not compatible with files with a
sampling rate of 32 kHz.
≥If you play an MP3 track that includes still pic-
ture data, it will take some time before the
music itself starts playing and the elapsed time
will not be displayed during this time. Even after
the track starts, the correct play time will not be
displayed.
Naming folders and files
At the time of recording, prefix folder and file
names with 3-digit numbers in the order you want
to play them (this may not work at times).
Example:
root
MP3 discs
One Thing To Tell Y ou
Never Too Late
A Man With No Shadow
Hacker's Life
Distant Dark Moon
Another Pineapple
Board The Golden Ship
Fall In The Frozen Season
Violet Sky
Pink Island
NextFindPrev
1
2
3
4
5
6
7
8
9
10
No Contents
SELECT
ENTER RETURN
T 1/14
TEXT
SELECT
NUMBER
09
Another Pineapple
Board The Golden Ship
Fall In The Frozen Season
Violet Sky
Pink Island
NextFindPrev
6
7
8
9
10
Find
*
A
SELECT
ENTER RETURN
SELECT
NUMBER
09
When making your own CD text discs
Do not put tracks into folders.
The unit plays the tracks in the order you record
them so you do not have to prefix the titles with
numbers.
CD text discs
e.g. MP3
REPEAT
OPEN
–
OFF
–
ON
C
H
G
Í
T
O
P
M
EN
M
U
E
N
RE
U
TU
D
R
IS
N
P
L
A
Y
E
E
N
N
T
T
E
E
R
R
L
O
V
O
I
D
U
A
U
O
T
P
O
001001
003
001.mp3
002.mp3
003.mp3
002
001.mp3
002.mp3
003.mp3
001.mp3
002.mp3
003.mp3
004.mp3
Page 19
19
RQT6450
Basic Operations
Using the tree screen to find
a group (MP3 discs)
1 Use [1] (Cursor jockey) while
a track is highlighted to display
the tree screen.
1 Use [3, 4] to select a track.
One Thing To Tell Y ou
Never Too Late
A Man With No Shadow
Hacker's Life
Distant Dark Moon
Another Pineapple
Board The Golden Ship
Fall In The Frozen Season
Violet Sky
Pink Island
NextFindPrev
1
2
3
4
5
6
7
8
9
10
No Contents
SELECT
ENTER RETURN
T 1/14
TEXT
SELECT
NUMBER
09
Finding a track to play
Enter part of a track title to make a search.
Although the characters are upper case, the unit
also searches for lower case.
Preparation
Press [TOP MENU] to show the list screen.
Example: search for tracks including the
word “LOVE”.
1 Use [3, 4] to select “Find”
and press [ENTER].
2 Use [3, 4] to select “L” and
press [ENTER].
Characters change in alphanumeric order
each time you move the cursor jockey [3].
≥Press [:, 9] to skip between A, E, I,
O, and U.
≥Use [2] to erase a character.
≥Repeat this step to enter “O”, “V”, and “E”.
3 Use [1] (Cursor jockey) to
select “Find” and press
[ENTER].
The search results screen appears.
4 Use [3, 4] to select the track
and press [ENTER].
Move the cursor jockey [4] to show other
tracks if there are more than fourteen.
≥To search for the first word in a title, erase the
asterisk (¢) first.
≥You can also enter numbers with the numbered
buttons (remote control).
Another Pineapple
Board The Golden Ship
Fall In The Frozen Season
Violet Sky
Pink Island
NextFindPrev
6
7
8
9
10
Find
*
A
SELECT
ENTER RETURN
SELECT
NUMBER
09
To show the text information
for a track (CD text discs)
2 Move the cursor jockey [1].
≥Use [2, 1] to select other tracks. Press
[ENTER] to play tracks selected here.
To return to the list screen
Press [RETURN].
You cannot select groups that contain no
compatible files.
2 Use [3, 4] to select a group
and press [ENTER].
The file list for the group appears.
For your reference
Use [2, 1] to jump layers in the tree screen.
To return to the file list screen
Press [RETURN].
FILE LIST
G 8
T 14
Total 123
09
SELECT
NUMBER
SELECT
ENTER RETURN
Tree
MP3 music
001 My Favorite
001 Brazilian pops
002 Chinese pops
003 Czech pops
004 Hungarian pops
005 Liner notes
006 Japanese pops
007 Mexican pops
008 Philippine pops
009 Swedish pops
001 Momoko
002 Standard number
001 Piano solo
002 Vocal
G 8/16
Page 20
20
RQT6450
Basic Operations
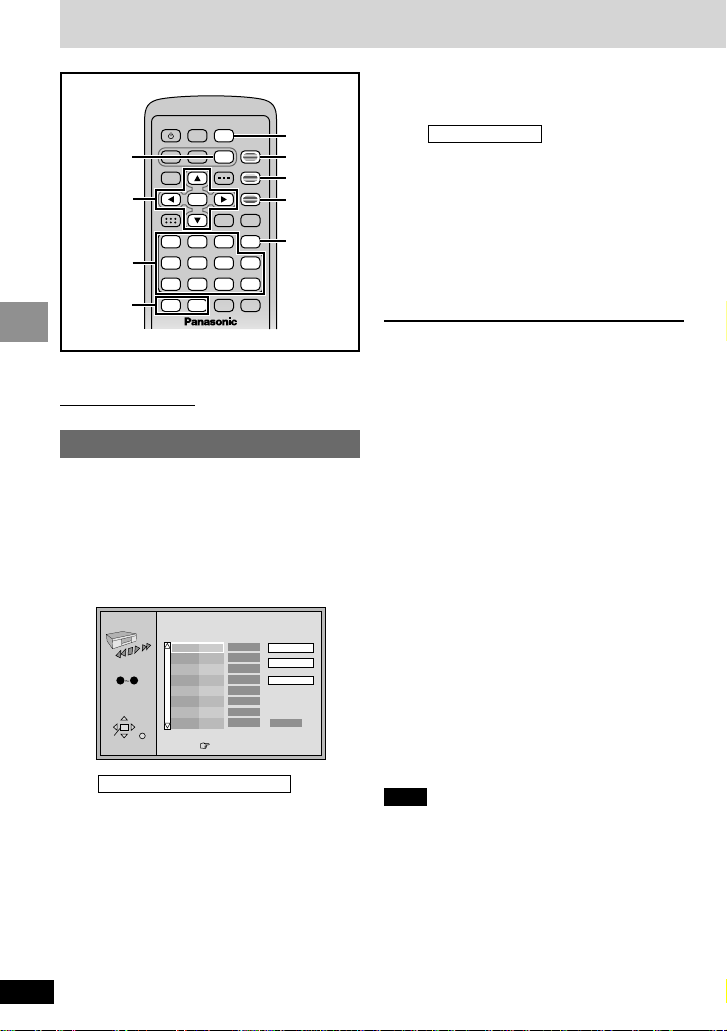
Random Playback
Press PLAY to start
3/2.1 ch
Digital
1 English
English
ON
1
2
Press the numbered buttons to
select a title (DVD-Video) or
group (MP3 discs).
≥Some items cannot be selected.
DVD-Video, MP3 discs only
Changing the play sequence
PROGRAM
Choose a track, then press ENTER.
No Time
Track
Total Time
Press PLAY to start
Play
Clear
Clear all
0:00
SELECT
ENTER RETURN
1
SELECT
NUMBER
09
3 Press the numbered buttons to
select a track (CD or VCD)
or chapter (DVD-Video)
( and press
[ENTER]).
≥Repeat steps 2 and 3 to program other
items.
≥Times are not displayed when program-
ming DVD-Video and MP3.
4 Press [1] (Play).
Play now begins in the programmed
sequence.
To add, change, or clear items
1 Press [3, 4] to select the program number
(No).
2 Do steps 2 and 3 above to add or change
items.
Press [CANCEL] to clear an item (or press
[3, 4, 2, 1] to select “Clear” and press
[ENTER]).
To move to the page before or after the one
shown
Press [6] or [5].
To clear the whole program
Move to “Clear all” with [3, 4, 2, 1] and press
[ENTER].
To exit the program mode
Press [PLAY MODE] while stopped until the
program play screen disappears.
≥The program is retained in memory.
To select an item using the cursor buttons
Press [ENTER] and [3, 4] to select an item,
then press [ENTER] again to register the number. All the items on a disc, a title or a group are
selected when you select “ALL”.
Note
≥The whole program is cleared when the unit is
turned off, or the disc lid is opened.
[DVD-V]
≥Different titles have different soundtracks and
subtitles.
≥Some items cannot be played even if you
programmed them.
MP3 discs only
[DVD-V] [CD] [VCD]
Remote control only
Program play
You can select up to 32 tracks/chapters to play in
the order you choose.
While stopped
1 Press [PLAY MODE] until the
program play screen appears.
e.g. CD
∫
56:9
;1
13
46
7908
5
2
S10
A.SRD
SETUP
ENTER
PLAY MODE
SUBTITLE
DISPLAYTOP MENU
AUDIO
ANGLE
RETURNMENU
CANCEL
3,4,
2, 1,
ENTER
1
AUDIO
CANCEL
SUBTITLE
ANGLE
PLA Y MODE
6,5
Numbered
buttons
Page 21
21
RQT6450
Basic Operations
Random Playback
Press PLAY to start
2
Press the numbered buttons to
select a title.
3 Press [1] (Play).
Play now begins in random order.
≥Some titles cannot be selected. [DVD-V]
To exit the random mode
Press [PLAY MODE] while stopped until the
random play screen disappears.
DVD-Video only
Changing soundtracks, subtitle languages and angles
Remote control only
Some DVDs have multiple soundtracks, subtitle
languages and camera angles, and you can
change these during play.
≥“–” or “––” is displayed instead of the language
number in circumstances such as when no
language is recorded on the disc.
Soundtracks
[RAM] [DVD-V]
During play
Press [AUDIO].
The number changes each time you press the
button.
≥You can also use this button to turn the
vocals on and off on karaoke discs. Read the
disc’s instructions for details.
≥Refer to [B] on page 24 for audio signal type
details.
3/2.1 ch
Digital
1 English
Subtitles
[DVD-V]: You can change the subtitle number
and turn the subtitles on and off.
[RAM]: You can turn the subtitles on and off.
During play
Press [SUBTITLE].
The number changes each time you press the
button.
≥In some cases, the subtitle language is not
changed to the selected one immediately.
≥If the subtitles overlap closed captions
recorded on discs, turn the subtitles off.
To clear/display the subtitles
1. Press [SUBTITLE].
2. Press [1]. ([DVD-V])
3. Press [3, 4] to select “ON” or “OFF”.
Angles
[DVD-V]
During play
Press [ANGLE].
The number changes each time you press the
button.
While stopped
1 Press [PLAY MODE] until the
random play screen appears.
e.g. CD
Random play
English
ON
1
1
Page 22
22
RQT6450
Advanced Operations
O
U
3,4,2,1,
ENTER
RETURN
DISPLAY
Changing the monitor settings
[RAM] [DVD-V] [VCD]
Adjusting color intensity
1 Press [COLOUR].
2 Use [2, 1] to adjust the color
shade.
j5: light()5: dark
3 Press [COLOUR] to clear the
display.
Changing the size of the
picture
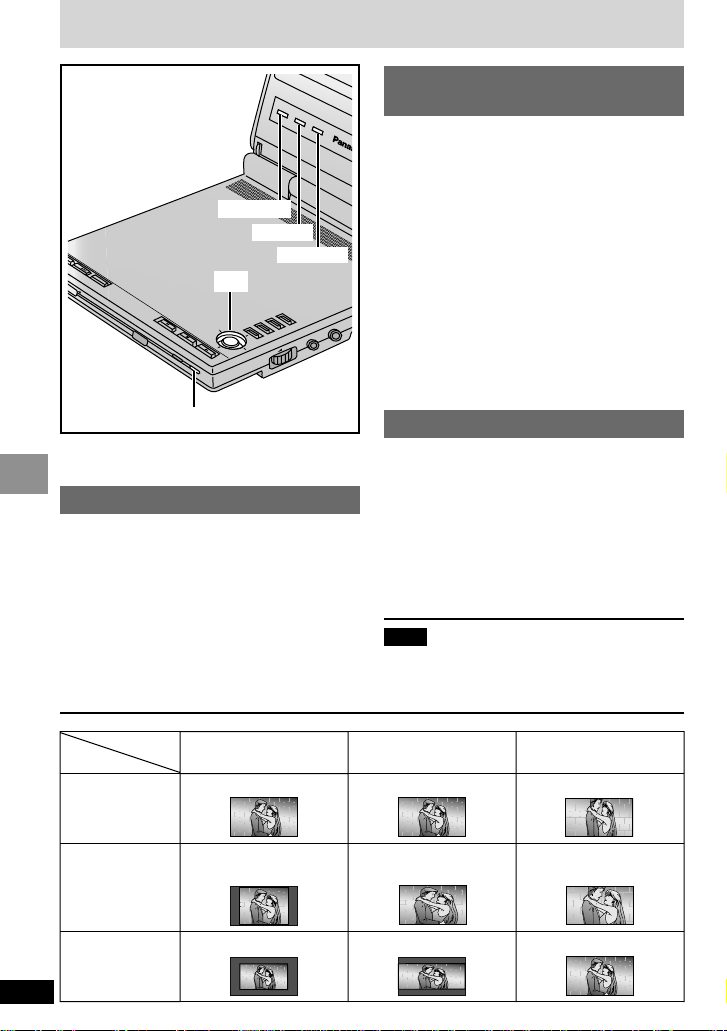
Press [MONITOR].
Each time you press the button:
NORMAL-------------)FULL ---------------]
^-OFF (no picture)<ZOOM(--}
The picture mode and size
The picture shown on the LCD depends on the
mode and the size recorded on the disc
(➡ below).
≥If you are not using the LCD on this unit, select
“OFF” (no picture) to conserve power.
≥(The [Í] indicator flashes.).
≥The LCD turns off if you close it.
≥Horizontal lines may appear in the picture
when the mode is switched to“ZOOM”, but
this is not an indication of malfunction.
Adjusting the brightness
1 Press [BRIGHT].
2 Use [2, 1] to adjust the
brightness.
j5: dark()5: light
Power consumption increases with the
level of brightness.
3 Press [BRIGHT] to clear the
display.
Note
These changes are effective only for this unit’s
LCD. Make changes to the television’s settings if
you have connected one.
2,1
COLOUR
BRIGHT
MONITOR
Te quiero
Te quiero
Te quiero
Te quiero
Te quiero
Te quiero
Te quiero
Te quiero
Te quiero
Te quiero
Mode
Software
Widescreen
4:3
4:3,
(Letterbox)
NORMAL
Full screen
Black bands on the
right and left.
Black frame.
FULL
Full screen
Stretched horizontally.
Stretched horizontally.
ZOOM
Top and bottom cut off.
Top and bottom cut off.
Full screen
Í indicator
MONITOR
BRIGHT
COLOUR
R
E
P
E
A
T
OPEN
–
OFF
–
ON
C
H
G
Í
TO
P
M
E
M
N
U
E
N
R
U
E
TU
D
R
IS
P
L
A
Y
E
E
N
N
T
T
E
E
R
R
E
D
N
I
V
O
I
D
U
T
A
U
O
T
P
O
L
O
V
O
Page 23
23
RQT6450
Advanced Operations
On-Screen menu icons contain information
about the disc or unit. These menus allow you to
perform operations by changing this information.
Common procedures
[RAM] [DVD-V] [CD] [VCD]
1 Press [DISPLAY].
Each time you press the button:
Disc information > Progress indicator
:;
Original display < Unit information
(➡ step 2)
While the leftmost icon is highlighted
2
Use [3, 4] to select the menu.
Each time you use the cursor jockey:
Play menu () Video menu
ee
uu
Display menu () Audio menu
3 Use [2, 1] to select the item.
4 Use [3, 4] to select the
setting.
≥Items with “3” or “4” above and below
can be changed by [3, 4].
≥Press [ENTER] if the setting does not
change after using [3, 4].
≥Some items require different operations.
Read the explanations on the following
pages.
Unit information only
Using On-Screen Menu Icons
For your reference
≥Depending on the condition of the unit (playing,
stopped, etc.) and the type of software, there
are some items you cannot select or change.
≥When numbers are displayed (e.g.title No.), the
numbered buttons (remote control) are also
effective for setting. After entering numbers,
press [ENTER] to register the setting.
To clear the icons
Press [RETURN] until they clear.
∫ To change the position of the icons
1. Use [2, 1] to select the rightmost
icon.
2. Use [3, 4] to move the icons.
2. (There are 5 positions.)
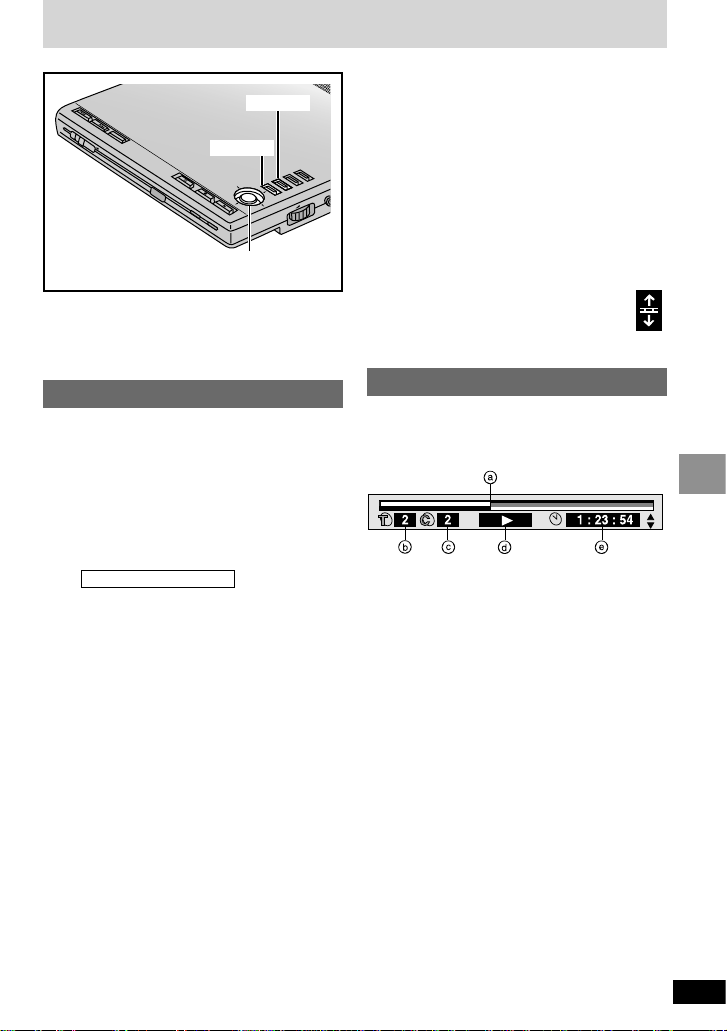
Progress indicator
Indicates how far you have played through an
item.
e.g. DVD-Video
a Current position [RAM] [DVD-V] [CD] [VCD]
b PG: Program number [RAM]
PL: Play list number [RAM]
T: Title number [DVD-V]
T: Track number [CD] [VCD]
G: Group number [CD] (MP3 discs)
c C: Chapter number [DVD-V]
T: Track number in group
T: [CD] (MP3 discs)
d Condition–play, pause, or slow/search
[RAM] [DVD-V] [CD] [VCD]
e Changing the time display
[RAM] [DVD-V] [CD] [VCD]
≥Use [3, 4] to show the elapsed play time
or remaining time for the program, track or
title (or chapter during program and random
play).
Elapsed play time [CD] (MP3 discs)
(display only, cannot be changed)
O
U
3,4,2,1,
ENTER
RETURN
DISPLAY
R
EP
E
A
T
OPEN
–
OFF
–
ON
C
H
G
Í
T
O
P M
EN
M
U
E
N
RE
U
TU
D
R
IS
N
P
L
A
Y
D
U
E
E
N
N
T
T
E
E
R
R
A
T
P
O
L
O
V
I
O
Page 24
24
RQT6450
Advanced Operations
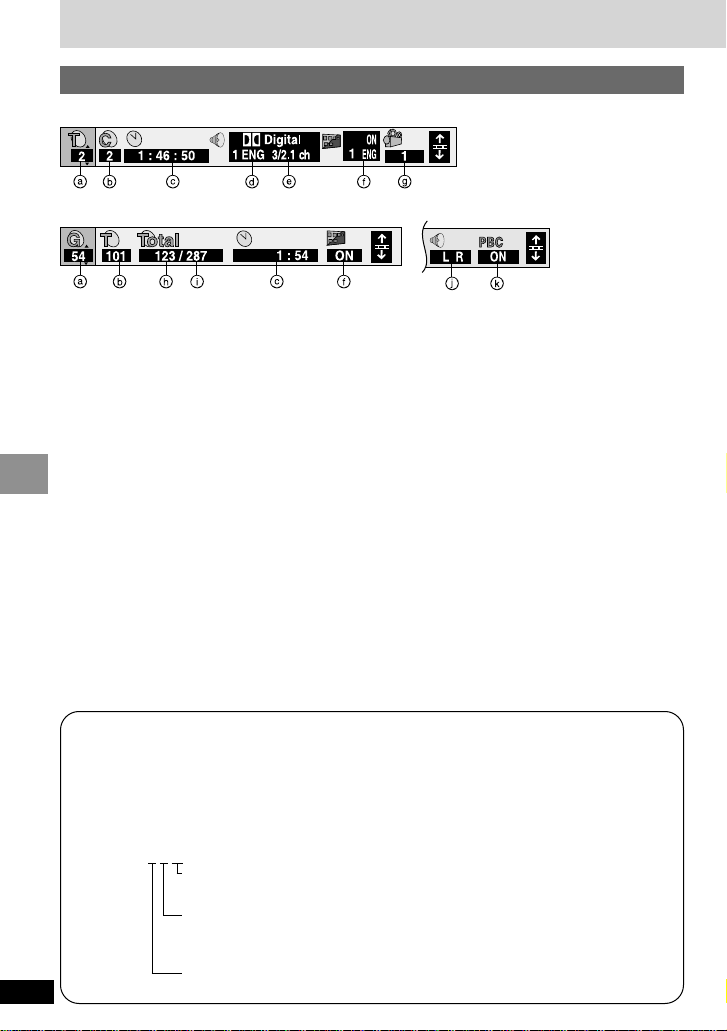
Disc information
e.g. DVD-Video
a PG: Program number [RAM]
PL: Play list number [RAM]
T: Title number [DVD-V]
T: Track number [CD] [VCD]
G: Group number [CD] (MP3 discs)
b C: Chapter number [DVD-V]
T: Track number in group
T: [CD] (MP3 discs)
c Time [RAM] [DVD-V]
≥Use [3, 4] to show the elapsed play time
or remaining time for the program or title (or
chapter during program and random play).
≥Select a position to start play by specifying
a time with the numbered buttons and
press [ENTER].
Changing the time display [CD] [VCD]
Use [3, 4] to show the elapsed play time,
remaining time for the track, or remaining
time for the disc.
Elapsed play time [CD] (MP3 discs)
(display only, cannot be changed)
d Soundtrack language [RAM] [DVD-V]
(➡ page 21)
(See [A] below for language abbreviations.)
e Audio signal type [RAM] [DVD-V]
(➡ page 21)
(See [B] below for details.)
Karaoke vocal on/off (Karaoke DVD only)
[DVD-V]
Solo: OFF or ON
Duet: OFF, 1i2, V1 or V2
f Subtitle language [DVD-V] (➡ page 21)
(See [A] below for language abbreviations.)
Subtitles on/off [RAM] [DVD-V]
ON()OFF
Track information display on/off
[CD] (MP3 discs, CD text discs)
ON()OFF
g Angle number [DVD-V] (➡ page 21)
h Track number in disc [CD] (MP3 discs)
i Total number of tracks on disc
[CD] (MP3 discs)
j Audio mode [RAM] [VCD]
LR()L()R
^---------------------J
k Menu play [VCD]
(with playback control only)
Indicates whether menu play (playback
control) is on or off.
e.g. MP3 disc e.g. Video CD
Using On-Screen Menu Icons
1−10
1 2 3 4 5 6 7 8 9 10
[A] Audio/Subtitle language
ENG: English ESP: Spanish DAN: Danish CHI: Chinese VIE: Vietnamese
FRA: French NLD: Dutch POR: Portuguese KOR: Korean THA: Thai
DEU: German SVE: Swedish RUS: Russian MAL: Malay ¢: Others
ITA: Italian NOR: Norwegian JPN: Japanese
[B] Signal type/data
LPCM/ÎDigital/DTS/MPEG: Signal type b (bit): Number of bits
k (kHz): Sampling frequency ch (channel): Number of channels
Example: 3
/2 .1ch
.1: Subwoofer signal (not displayed if there is no subwoofer signal)
.0: No surround
.1: Mono surround
.2: Stereo surround (left/right)
.1: Center
.2: Front leftiFront right
.3: Front leftiFront rightiCenter
Page 25

25
RQT6450
Advanced Operations
Unit information
Play menu
a A-B repeat [RAM] [DVD-V] [CD] [VCD]
[ENTER] (start point) ➡[ENTER] (finish point)
To cancel: [ENTER]
≥This feature works only within a program/
track/title.
≥The unit automatically determines the end
of a program/track/title as point B when the
end of the program/track/title is reached.
≥Subtitles around point A or B may fail to
appear.
b Repeat play (➡ page 17)
c Play mode display [DVD-V] [CD] [VCD]
---: Normal play
PGM: Program play
RND: Random play
d Marker
[DVD-V] [CD] [VCD]: 5 positions
[RAM]: 999 positions
If places have been marked (e.g., with a
DVD video recorder), they are displayed.
[ENTER] ➡ [1] to select “¢” (The unit is now
ready to accept markers.)
To mark a position:
[ENTER] (at the desired point)
To mark another position:
[2, 1] ➡ [ENTER]
To recall a marker: [2, 1] ➡ [ENTER]
To erase a marker: [2, 1] ➡ [CANCEL]
[RAM]
≥To mark the eleventh point and beyond
≥1. [2, 1] to select the marker pin icon
≥2. [3, 4] to select “11–20”
≥You can select the next group when the
current group is full.
≥This feature doesn’t work while using a play
list.
≥The markers are ordered by time. This
means that the marker numbers can
change when you add and erase markers.
≥You can clear existing markers, but they
are restored when you open the disc lid or
switch the unit to standby.
Digital picture mode [RAM] [DVD-V] [VCD]
Nor.: Normal mode
Cin.: Mellows images and enhances detail in
dark scenes.
Video menu
Bit-rate display [RAM] [DVD-V] [VCD]
ON()OFF
Displays the bit rate (approximate values) and
type of picture (I/P/B ➡ page 33, Glossary)
During play: Shows the average bit rate of the
video being played
While paused: Shows the data volume of the
frame
Display menu
1−10
1 2 3 4 5 6 7 8 9 10
marker
pin icon
a ADVANCED SURROUND mode
[RAM] [DVD-V] [VCD] (➡ page 17)
SP()HP
b SP/HP level [RAM] [DVD-V] [VCD] (➡ page 17)
1()2()OFF
^----------------------J
c Dialogue Enhancer [DVD-V]
(Dolby Digital/DTS, 3-channel or over only)
ON()OFF
The volume of the dialogue from the center
channel is raised when you select “ON”.
Audio menu
Page 26

26
RQT6450
Advanced Operations
This chart shows the settings for this unit. Change the settings to suit your preference and to
suit the unit to the environment in which it is being used. These settings are retained in
memory until they are changed, even the unit is turned off.
≥Underlined items are the factory presets.
Changing settings
Menus
Disc
Video
Audio
Items
Audio [DVD-V]
Choose the preferred audio language.
Subtitle [DVD-V]
Choose the preferred subtitle language.
Menus [DVD-V]
Choose the preferred language for disc
menus.
Ratings [DVD-V]
Set a ratings level to limit DVD-Video play.
≥The password screen is shown if you
≥choose levels 0 to 7 or if you choose
≥“Ratings” when levels 0 to 7 have been
≥selected (➡ page 28).
≥Select “Level 0” to prevent play of discs
that do not have ratings levels recorded
on them.
TV Aspect (➡ page 31)
Choose the setting to suit your television
and preference.
Still Mode (➡ page 33, Glossary)
Specify the type of picture shown when
paused.
PCM Down Conversion [DVD-V]
(➡ page 28)
Dolby Digital [DVD-V] (➡ page 28)
DTS Digital Surround [DVD-V] (➡ page 28)
D. Range Compression [RAM] [DVD-V]
(Dolby Digital Only) (➡ page 33, Glossary)
Change the dynamic range for late night
viewing.
Audio during Search
Choose whether to have sound during
search.
Options
English
French Spanish
Original
§1
Other ¢¢¢¢
§2
Automatic§3English French
Spanish Other ¢¢¢¢
§2
English French Spanish
Other ¢¢¢¢
§2
Setting ratings
(When level 8 is selected)
8 No Limit
1 to 7
§4
0 Lock All
Changing ratings
(When level 0–7 is selected)
Unlock Player Change Level
Change Password Temporary Unlock
4:3 Pan&Scan
4:3 Letterbox
16:9
Automatic
Field
Frame
No
Yes
Bitstream PCM
PCM Bitstream
Off
On
On Off
∫;1
132
A.SRD
SETUP
ENTER
PLAY MODE
SUBTITLE
DISPLAYTOP MENU
AUDIO
ANGLE
RETURNMENU
CANCEL
3,4,
2,1,
ENTER
SETUP
RETURN
Disc
SELECT
Audio
Subtitle
Menus
Ratings
English
English
Automatic
Level 8
SETUP
TAB
Page 27

27
RQT6450
Advanced Operations
§1
The original language of each disc will be selected.
§2
Input a code number with the numbered buttons (➡ page 40).
§3
If the language selected for “Audio” is not available, subtitles of that language will automatically
appear if available on that disc.
§4
Prohibits play of DVD-Video with corresponding ratings recorded on them.
Common procedures
Menus
Display
Others
Items
Menu Language
Choose the preferred language for these
menus and the on-screen messages.
On-Screen Messages
Choose whether to show on-screen
messages or not.
Demo
A demonstration of the unit’s on-screen
displays starts when you select “On”.
The demonstration stops and the setting
reverts to “Off” when you press a button
(except [MONITOR], [BRIGHT], and
[COLOUR]).
Options
English
Français Español
On Off
Off On
∫;1
132
A.SRD
SETUP
ENTER
PLAY MODE
SUBTITLE
DISPLAYTOP MENU
AUDIO
ANGLE
RETURNMENU
CANCEL
3,4,
2,1,
ENTER
SETUP
RETURN
1 Press [SETUP] to show the
menus.
Disc
SELECT
Audio
Subtitle
Menus
Ratings
English
English
Automatic
Level 8
SETUP
TAB
2 Press [2, 1] to select the
menu’s tab.
The screen changes to display the menu.
Disc
()
(--------------------)
Video Audio
Others Display
()
e
u
e
u
3 Press [3, 4] to select the item
and press [ENTER].
4 Press [3, 4] to select the
option and press [ENTER].
The screen now shows the menu again.
To return to the previous screen
Press [RETURN].
When you are finished
Press [SETUP].
For your reference
Press [MENU] on the main unit to access
the SETUP menus while stopped (unless a
DVD-RAM is loaded).
Page 28

28
RQT6450
Advanced Operations
Digital output
[DVD-V]
Change these settings when you have
connected digital equipment.
Bitstream (Factory preset for Dolby Digital):
Select if the equipment can decode the signal.
PCM (Factory preset for DTS Digital Surround):
Select if the equipment cannot decode the
signal.
IMPORTANT
If the equipment cannot decode the signal,
the setting must be changed to PCM. If not,
signals the equipment cannot process will be
output, causing high levels of noise which
can damage your hearing and the speakers.
PCM Down Conversion
Dolby Digital and DTS Digital
Surround
Select how to output audio with a sampling
frequency of 96 kHz.
Select “Yes” if the equipment you connect cannot
process signals with a sampling frequency of
96 kHz.
≥Select “No” if you use analogue connection,
irrespective of the type of equipment.
No (Factory preset):
Output as 96 kHz. There is no output if the disc
has copy protection. Select “Yes” in this case.
Yes:
Converted to 48 kHz for output.
Changing settings
Entering a password
Remote control only
[DVD-V]
The password screen is shown when you select
levels 0 to 7.
1. Input a 4-digit password with the numbered
buttons and press [ENTER].
1. ≥If you enter a wrong number, press
[CANCEL] to erase it before you press
[ENTER].
1. ≥The lock symbol appears closed to show the
rating is locked.
1. ≥Do not forget your password.
2. Press [ENTER] to confirm the 4 digits.
Now, when you insert a DVD-Video that
exceeds the ratings limit you set, a message
appears on the screen.
Follow the on-screen instructions.
∫
56:9
;1
13
46
7908
5
2
S10
A.SRD
SETUP
ENTER
PLAY MODE
SUBTITLE
DISPLAYTOP MENU
AUDIO
ANGLE
RETURNMENU
CANCEL
CANCEL
ENTER
Numbered
buttons
VIDEOVOL
AUDIO
OPT OUT
OPTICAL IN
LINE IN
R
L
Page 29

29
RQT6450
Advanced Operations
Using this unit with other equipment
Enjoying more powerful sound
This model can play Dolby Digital and DTS, but only in two channels. You must connect a unit with a
Dolby Digital or DTS decoder to enjoy surround sound.
Note
≥The equipment connections described are examples.
≥Peripheral equipment and optional cables sold separately unless otherwise indicated.
≥Before connection, turn off all equipment and read the appropriate operating instructions.
To enjoy stereo or Dolby Pro Logic
Connect a digital amplifier or system component.
≥Change the settings in “Digital output”
≥(➡ page 28).
Digital connection
To enjoy multi-channel surround sound
Connect an amplifier with a built-in decoder or a
decoder-amplifier combination.
≥Change the settings in “Digital output”
(➡ page 28).
Note
You cannot use DTS Digital Surround
decoders not suited to DVD.
VIDEOVOL
AUDIO
OPT OUT
OPTICAL IN
LINE IN
R
L
Amplifier
Speakers (Example)
You can enjoy surround sound
by connecting three or more
speakers.
Optical fiber cable
Do not bend sharply.
To enjoy stereo or Dolby Pro Logic
Connect an analogue amplifier or system
component.
Analogue connection
white
red
black
Stereo connection cable
This unit (Right side)
Analog amplifier or mini-system
A
B
Page 30

30
RQT6450
Advanced Operations
Disc
SELECT
Audio
Subtitle
Menus
Ratings
English
English
Automatic
Level 8
SETUP
TAB
∫;1
132
A.SRD
SETUP
ENTER
PLAY MODE
SUBTITLE
DISPLAYTOP MENU
AUDIO
ANGLE
RETURNMENU
CANCEL
3,4,
2, 1,
ENTER
SETUP
RETURN
Using this unit with other equipment
Using this unit with a television
VIDEOVOL
AUDIO
OPT OUT
AUDIO IN
L
R
VIDEO
S VIDEO
VIDEO
Television
Audio/video cable
(included)
S video cable
§
(black)(yellow)
(yellow)(white)
Either of these
(red)
This unit (Right side)
S VIDEO input terminal:
achieves a more vivid
picture than the VIDEO
input terminal.
§
S video cable is not included
§
Available from Panasonic dealers. Part number: RFX4139
Note
≥The unit’s speaker does not have magnetic shielding. Do not place the unit near televisions,
personal computers or other devices easily influenced by magnetism.
≥Volume may be lower when playing DVDs than when playing other discs or during TV broadcasts. If
you turn the volume up, reduce it again so that a sudden increase in output does not occur.
Do not connect the player through your video cassette recorder
The picture may not be played back correctly due to the copy guard.
Page 31

31
RQT6450
Advanced Operations
Preparations
Turn on your television and switch the video
input mode on the television to suit the connection for the unit.
1 Press [SETUP] to show the
menus.
Disc
SELECT
Audio
Subtitle
Menus
Ratings
English
English
Automatic
Level 8
SETUP
TAB
4 Press [3, 4] to select the item
and press [ENTER].
≥4:3 Pan & Scan
≥Regular television (to view 16:9 software
in the pan and scan style a).
≥4:3 Letterbox
≥Regular television (to view 16:9 software
in the letterbox style b).
≥16:9 (factory preset)
≥Wide-screen television.
≥Use the television’s screen modes to
change the way the picture is shown.
≥ab
5 Press [SETUP] to end the
settings.
To return to the previous menu
Press [RETURN].
Note
≥Press [MENU] on the main unit to access
the SETUP menus while stopped (unless a
DVD-RAM is loaded).
≥16:9 software prohibited from being shown in
the pan and scan style will appear in the letterbox style despite the setting here.
∫;1
132
A.SRD
SETUP
ENTER
PLAY MODE
SUBTITLE
DISPLAYTOP MENU
AUDIO
ANGLE
RETURNMENU
CANCEL
3,4,
2, 1,
ENTER
SETUP
RETURN
Selecting TV screen typeConnection
2 Press [2, 1] to select the
Video tab.
3 Press [3, 4] to select “TV
Aspect” and press [ENTER].
Page 32

32
RQT6450
Advanced Operations
Using this unit with other equipment
Recording to digital recording equipment or cassette tapes
≥Digital recording
You can record the digital signal directly to digital recording equipment.
Connect the recording equipment with an optical fiber cable (➡ [A] page 29).
Note
≥With DVD, the following conditions must be met: a the disc doesn’t have protection preventing
digital recording, and b the recording equipment can handle signals with a sampling frequency of
48 kHz.
≥You cannot record MP3.
When recording DVDs, make the following settings.
ADVANCED SURROUND: OFF (➡ page 17)
PCM Down Conversion: Yes (➡ page 28)
Dolby Digital: PCM (➡ page 28)
DTS Digital Surround: PCM (➡ page 28)
≥Analogue recording
You can record to a cassette deck or other recording equipment. Connect the recording equipment
with a stereo connection cable (➡ [B] page 29). There are no limitations on recording analogue signals
as there are with digital signals.
Using headphones
Preparations
Turn down the volume before connection, and then adjust the level.
DC IN 9V
Note
When headphones are connected, no sound will be output from the unit’s speaker.
This unit (Left side)
Headphones
3.5 mm (
1
⁄8q) stereo
Manufactured under license from Dolby
Laboratories.
“Dolby”, “Pro Logic” and the double-D
symbol are trademarks of Dolby
Laboratories.
Manufactured under license from Digital
Theater Systems, Inc. US Pat. No.
5,451,942, 5,956,674, 5,974,380, 5,978,762
and other world-wide patents issued and
pending. “DTS” and “DTS Digital Surround”
are registered trademarks of Digital Theater
Systems, Inc. C 1996, 2000 Digital Theater
Systems, Inc. All rights reserved.
Page 33

33
RQT6450
Reference
Bitstream
This is the digital form of multiple channel audio
data (e.g., 5.1 channel) before it is decoded into
its various channels.
Decoder
A decoder restores the coded audio signals on
DVDs to normal. This is called decoding.
Dolby Digital
This is a method of coding digital signals developed by Dolby Laboratories. Apart from stereo
(2-channel) audio, these signals can also be
multi-channel audio. A large amount of audio
information can be recorded on the disc using
this method.
Dolby Pro Logic
A surround system where a 4-channel audio
track is recorded as 2 channels and then is restored to 4 channels for play. The surround channel is monaural and can reproduce up to 7 kHz.
DTS (Digital Theater Systems)
This surround system is used in many movie theaters around the world. There is good separation
between the channels, so realistic sound effects
are possible.
Dynamic range
Dynamic range is the difference between the
lowest level of sound that can be heard above
the noise of the equipment and the highest level
of sound before distortion occurs.
Frame still and field still
A still is shown when you pause a moving
picture. A frame still is made up of 2 alternating
fields, so the picture may appear blurred, but
overall quality is high.
A field still is not blurred, but it has only half the
information of a frame still so picture quality is
lower.
I/P/B
MPEG 2, the video compression standard adopted for use with DVD-Video, codes frames using
these 3 picture types.
I: Intra coded picture
This picture has the best quality and is the
best to use when adjusting the picture.
P: Predictive coded picture
This picture is calculated based on past I or
P-pictures.
B: Bidirectionally-predictive coded picture
This picture is calculated by comparing past
and future I and P-pictures so it has the
lowest volume of information.
Linear PCM (pulse code modulation)
These are uncompressed digital signals, similar
to those found on CDs.
Playback control (PBC)
If a Video CD has playback control, you can
select scenes and information with menus.
Glossary
Apparatus Claims of U.S. Patent Nos. 4,631,603, 4,577,216, and 4,819,098, licensed for
limited viewing uses only.
This product incorporates copyright protection technology that is protected by method claims
of certain U.S. patents and other intellectual property rights owned by Macrovision Corporation
and other rights owners. Use of this copyright protection technology must be authorized by
Macrovision Corporation, and is intended for home and other limited viewing uses only unless
otherwise authorized by Macrovision Corporation. Reverse engineering or disassembly is
prohibited.
Page 34

34
RQT6450
Reference
Before requesting service, make the below checks. If you are in doubt about some of the check points,
or if the remedies indicated in the chart do not solve the problem:
In the U.S.A., contact the Panasonic Customer Call Center at 1-800-211-7262, or
e-mail consumerproducts@panasonic.com, or web site (http://www. panasonic.com).
In Canada, contact Panasonic Canada Inc. Customer Care Centre at 1-800-561-5505,
web site (www.panasonic.ca), or an authorized Servicentre close to you.
Reference pages are shown as black circled numbers :.
Troubleshooting Guide
Problem
No power.
Unit turns off
automatically.
Unit doesn’t work
when powered by
battery.
Cannot charge or the
[CHG] indicator fails to
light.
No response when
buttons are pressed.
Play fails to start or
stops soon after
starting.
Solution
Check connections to the AC adaptor or battery pack. :;
You cannot turn on the unit with the remote control if the unit is
powered by the battery pack.
The unit turns off after it has been stopped for about 15 minutes
(5 minutes when the unit is powered by the battery pack) to conserve
power. Turn the unit on again.
The unit and battery pack have protection circuitry that activate if they
become too hot or too cold. They will not work if this occurs. Use the
unit and battery pack between 5 oC (41 oF) and 35 oC (95 oF).
The battery pack can only be recharged when the unit is off.
The charging time increases if the battery pack is warm and charging
may not be possible under some circumstances. Wait for it to cool.
Check connection to the AC adaptor. :
Some discs prohibit certain operations.
If there is no response at all, the unit may have been affected by
lightning or static electricity. Try turning the unit off and on again.
Alternatively, turn the unit off, disconnect the power source (AC or
battery pack) reconnect the power and turn the unit on again.
Condensation may have formed in the unit.
Wait 1 or 2 hours for it to clear.
This unit cannot play discs other than those specified. 8
Clean the disc. 9
Ensure the disc is inserted correctly. =
Check that the DVD-RAM has something recorded on it.
Page 35

35
RQT6450
Reference
Solution
Check that the battery is inserted correctly. 9
Replace the battery if it is drained. 9
Aim the remote control at the remote control signal sensor. 9
This function is dependent on software availability.
Some DVDs require you to change the languages through menus.
This function is dependent on software availability.
Turn the subtitles on. E
Subtitles may fail to appear around the A and B points in A-B repeat,
and around the points you marked to play again.
This function is dependent on software availability.
There may be parts of multi-angle DVDs where different angles are
not recorded.
Do the following to reset the unit to its original factory settings. While
the unit is stopped, press and hold [;], [:] (backward), and
[1, – ON] on the main unit for about 3 seconds until the
message “Initialized” disappears from the LCD, then turn the
unit off.
Separate the unit from mobile phones.
The speaker is off if the LCD is closed or headphones are connected.
Turn up the volume. =
Check all connections and settings. L, M, N
Check input mode of the other equipment.
ADVANCED SURROUND may cause distortion with some discs.
Turn ADVANCED SURROUND off if this occurs. A
Problem
No operation with
remote control.
The audio soundtrack
or subtitle language
cannot be changed.
Subtitles not shown.
Angles cannot be
changed.
You have forgotten
your ratings password.
You want to reset the
unit to the factory
settings.
There is a lot of noise.
No sound from the
unit’s speaker.
No sound from other
speakers.
Distorted sound.
Page 36

36
RQT6450
Reference
Problem
The LCD is dark.
The picture is
disrupted during fast
forward and rewind.
No picture on the LCD
Picture doesn’t appear
on the television (or
the size of the picture
seems wrong).
LCD pixels turn black
or radiate different
colors.
Solution
Adjust the brightness. F
Some disruption is normal.
Select a picture mode other than “OFF” (no picture). F
Check connections. N
Check that the television is on.
Check that the input mode on the television is correct.
Check the settings in “Video—TV Aspect”. O
The LCD is constructed with precision technology so 99.99 % of the
pixels are active, but of the remaining of 0.01 %, there are pixels that
may be black or emit light constantly. This phenomenon is not a
malfunction.
[Í] and [CHG] indicators
The [Í] indicator
flashes rapidly.
The [Í] indicator
flashes slowly.
The [CHG] indicator
flashes rapidly.
The [CHG] indicator
flashes slowly.
The unit has malfunctioned. Consult your dealer.
The unit is on and the LCD is closed or the display mode is set to
“OFF” (no picture). Turn the unit off when you have finished. F
There is a problem with the battery pack. Turn the unit on and check
the message on the LCD. U
Battery pack charge is low. The unit will turn off automatically after a
few minutes. ;
Troubleshooting Guide
Page 37

37
RQT6450
Reference
On-Screen Menu Icons
are cut off or are not
displayed at all.
No On-Screen display.
“Check the disc.”
appears on the LCD.
ERROR ∑∑
∑∑stands for a
number.
H ∑∑
∑∑ stands for a
number.
Use [3, 4] while the rightmost icon is highlighted to move them
down. G
Go to the Display menu in the SETUP screen, and select “On” for
“On-Screen Messages”. K
Clean the disc. 9
“ ERROR 01”: A problem has occurred with the battery pack.
Consult your dealer.
“ ERROR 02”: The battery pack has been recharging for
12 hours but has failed to recharging for
some reason. Recharge again.
“ ERROR 03”: You are recharging in a location that is too hot
or too cold. Recharge at normal temperature.
Trouble has occurred. The number appearing after H depends on the
problem. Turn the unit off and on again. Alternatively, turn the unit off,
disconnect the power source (AC or battery pack) reconnect the
power and turn the unit on again.
If the service numbers fail to clear, note the service number and
contact a qualified service person.
Note
The following do not indicate malfunction.
≥Sound from the AC adaptor during recharging.
≥The battery pack warms up after recharging or during use.
Maintenance
∫ To clean this unit, wipe with a
soft, dry cloth.
≥Use eyeglass cleaner to remove stubborn dirt
from the LCD.
≥Never use alcohol, paint thinner or benzine to
clean this unit.
≥Before using chemically treated cloth, read the
instructions that came with the cloth carefully.
Displays
∫ Maintenance of the lens
≥Remove dust carefully with an air blower for
camera lenses (optional).
≥Recommended product:
≥≥Lens cleaner kit (SZZP1038C)
≥≥(Available from Panasonic dealers.)
≥Be careful not to touch the lens with your
fingers.
Page 38

38
RQT6450
Reference
Limited Warranty (ONLY FOR U.S.A.) Customer Services Directory (ONLY FOR U.S.A.)
Panasonic Consumer Electronics Company,
Division of Matsushita Electric Corporation
of America
One Panasonic Way Secaucus, New Jersey
07094
Panasonic Sales Company, Division of
Matsushita Electric of Puerto Rico, Inc.
Ave. 65 de Infantería, Km. 9.5
San Gabriel Industrial Park, Carolina, Puerto
Rico 00985
Panasonic DVD Player/Recorder
Limited Warranty
Limited Warranty Coverage
If your product does not work properly because of a defect in materials or workmanship, Panasonic Consumer
Electronics Company or Panasonic Sales Company (collectively referred to as “the warrantor”) will, for the length
of the period indicated on the chart below, which starts
with the date of original purchase (“warranty period”), at
its option either (a) repair your product with new or refurbished parts, or (b) replace it with a new or a refurbished
product. The decision to repair or replace will be made by
the warrantor.
Limited Warranty Limits And Exclusions
This warranty ONLY COVERS failures due to defects in
materials or workmanship, and DOES NOT COVER normal wear and tear or cosmetic damage. The warranty
ALSO DOES NOT COVER damages which occurred in
shipment, or failures which are caused by products not
supplied by the warrantor, or failures which result from
accidents, misuse, abuse, neglect, mishandling, misapplication, alteration, faulty installation, set-up adjustments, misadjustment of consumer controls, improper
maintenance, power line surge, lightning damage, modification, or commercial use (such as in a hotel, office,
restaurant, or other business), rental use of the product,
service by anyone other than a Factory Servicenter or
other Authorized Servicer, or damage that is attributable
to acts of God.
THERE ARE NO EXPRESS WARRANTIES EXCEPT
AS LISTED UNDER “ LIMITED WARRANTY
COVERAGE”. THE WARRANTOR IS NOT LIABLE
FOR INCIDENTAL OR CONSEQUENTIAL DAMAGES
RESULTING FROM THE USE OF THIS PRODUCT, OR
ARISING OUT OF ANY BREACH OF THIS WARRANTY. (As examples, this excludes damages for lost time,
travel to and from the servicer, loss of media or images,
data or other recorded content. The items listed are not
exclusive, but are for illustration only.) ALL EXPRESS
AND IMPLIED WARRANTIES, INCLUDING THE WARRANTY OF MERCHANTABILITY, ARE LIMITED TO
THE PERIOD OF THE LIMITED WARRANTY.
Some states do not allow the exclusion or limitation of
incidental or consequential damages, or limitations on
how long an implied warranty lasts, so the exclusions
may not apply to you.
This warranty gives you specific legal rights and you may
also have other rights which vary from state to state. If a
problem with this product develops during or after the
warranty period, you may contact your dealer or
Servicenter. If the problem is not handled to your satisfaction, then write to the warrantor’s Consumer Affairs
Department at the addresses listed for the warrantor.
PARTS AND SERVICE WHICH ARE NOT COVERED
BY THIS LIMITED WARRANTY ARE YOUR RESPONSIBILITY.
Product or
Part Name
DVD Player
DVD Recorder
Rechargeable
Batteries,
DVD-RAM Disc
(in exchange for
defective item)
Parts
One (1) Year
One (1) Year
Ten (10) Days
Labor
Ninety (90) Days
One (1) Year
Not Applicable
During the “Labor” warranty period there will be no
charge for labor. During the “Parts” warranty period,
there will be no charge for parts. You must carry-in or
mail-in your product during the warranty period. If nonrechargeable batteries are included, they are not warranted. This warranty only applies to products purchased
and serviced in the United States or Puerto Rico. This
warranty is extended only to the original purchaser of a
new product which was not sold “as is”. A purchase
receipt or other proof of the original purchase date is
required for warranty service.
Carry-In-or Mail-In Service
For Carry-In or Mail-In Service in the United States call
1-800-211-PANA (7262) or visit Panasonic Web Site:
http://www.panasonic.com
For assistance in Puerto Rico call Panasonic Sales
Company (787)-750-4300 or fax (787)-768-2910.
Page 39

39
RQT6450
Reference
For Product Information, Operating Assistance, Literature Request, Dealer
Locations, and all Customer Service inquiries please contact:
1-800-211-PANA (7262), Monday–Friday 9 am–9 pm;
Saturday–Sunday 9 am–7 pm, EST.
Web Site: http://www.panasonic.com
You can purchase parts, accessories or locate your
nearest servicenter by visiting our Web Site.
1-800-332-5368 (Customer Orders Only)
Panasonic Services Company 20421 84th Avenue South, Kent, WA 98032
(6 am to 5 pm Monday–Friday; 6 am to 10:30 am Saturday; PST)
(Visa, MasterCard, Discover Card, American Express, Check)
Service in Puerto Rico
Matsushita Electric of Puerto Rico, Inc. Panasonic Sales Company/Factory Servicenter:
Ave. 65 de Infanteria, Km. 9.5, San Gabriel Industrial Park, Carolina, Puerto Rico 00985
Phone (787) 750-4300 Fax (787) 768-2910
Accessory Purchases:
The model number and serial number of this product can be found on
either the back or the bottom of the unit.
Please note them in the space provided below and keep for future
reference.
MODEL NUMBER
DVD-LV50
SERIAL NUMBER
DATE OF PURCHASE
DEALER NAME
DEALER ADDRESS
TELEPHONE NUMBER
User memo:
Page 40

40
RQT6450
Reference
Product Service
1. Damage requiring service—The unit should be serviced by qualified service personnel if:
1. (a) The AC power supply cord or AC adaptor has been damaged; or
1. (b) Objects or liquids have gotten into the unit; or
1. (c) The unit has been exposed to rain; or
1. (d) The unit does not operate normally or exhibits a marked change in performance; or
1. (e) The unit has been dropped or the cabinet damaged.
2. Servicing—Do not attempt to service the unit beyond that described in these operating instructions. Refer all other servicing to authorized servicing personnel.
3. Replacement parts—When parts need replacing ensure the servicer uses parts specified by the
manufacturer or parts that have the same characteristics as the original parts. Unauthorized
substitutes may result in fire, electric shock, or other hazards.
4. Safety check—After repairs or service, ask the servicer to perform safety checks to confirm that
the unit is in proper working condition.
Language code list
7678: Lingala
7684: Lithuanian
7775: Macedonian
7771: Malagasy
7783: Malay
7776: Malayalam
7784: Maltese
7773: Maori
7782: Marathi
7779: Moldavian
7778: Mongolian
7865: Nauru
7869: Nepali
7879: Norwegian
7982: Oriya
8083: Pashto, Pushto
7065: Persian
8076: Polish
8084: Portuguese
8065: Punjabi
8185: Quechua
8277: Rhaeto-
Romance
8279: Romanian
8285: Russian
8377: Samoan
8365: Sanskrit
7168: Scots Gaelic
8382: Serbian
8372: Serbo-Croatian
8378: Shona
8368: Sindhi
6566: Abkhazian
6565: Afar
6570: Afrikaans
8381: Albanian
6577: Ameharic
6582: Arabic
7289: Armenian
6583: Assamese
6588: Aymara
6590: Azerbaijani
6665: Bashkir
6985: Basque
6678: Bengali;
Bangla
6890: Bhutani
6672: Bihari
6682: Breton
6671: Bulgarian
7789: Burmese
6669: Byelorussian
7577: Cambodian
6765: Catalan
9072: Chinese
6779: Corsican
7282: Croatian
6783: Czech
6865: Danish
7876: Dutch
6978: English
6979: Esperanto
6984: Estonian
7079: Faroese
7074: Fiji
7073: Finnish
7082: French
7089: Frisian
7176: Galician
7565: Georgian
6869: German
6976: Greek
7576: Greenlandic
7178: Guarani
7185: Gujarati
7265: Hausa
7387: Hebrew
7273: Hindi
7285: Hungarian
7383: Icelandic
7378: Indonesian
7365: Interlingua
7165: Irish
7384: Italian
7465: Japanese
7487: Javanese
7578: Kannada
7583: Kashmiri
7575: Kazakh
7589: Kirghiz
7579: Korean
7585: Kurdish
7679: Laotian
7665: Latin
7686: Latvian,
Lettish
8373: Singhalese
8375: Slovak
8376: Slovenian
8379: Somali
6983: Spanish
8385: Sundanese
8387: Swahili
8386: Swedish
8476: Tagalog
8471: Tajik
8465: Tamil
8484: Tatar
8469: Telugu
8472: Thai
6679: Tibetan
8473: Tigrinya
8479: Tonga
8482: Turkish
8475: Turkmen
8487: Twi
8575: Ukrainian
8582: Urdu
8590: Uzbek
8673: Vietnamese
8679: Volapük
6789: Welsh
8779: Wolof
8872: Xhosa
7473: Yiddish
8979: Yoruba
9085: Zulu
For product information or assistance with product operation:
In the U.S.A., contact the Panasonic Customer Call Center at 1-800-211-7262, or
e-mail consumerproducts@panasonic.com, or web site (http://www.panasonic.com).
In Canada, contact Panasonic Canada Inc. Customer Care Centre at 1-800-561-5505,
web site (www.panasonic.ca), or an authorized Servicentre closest to you.
Product information
Page 41

41
RQT6450
Reference
Digital audio output:
Optical digital output: Mini optical terminal
Number of terminals: 1 system
(also used for audio output)
Pickup:
Wave length: 658 nm/790 nm
Laser power: CLASS II/CLASS I
Power supply: DC 9 V (DC IN terminal)/
DC 7.2 V (Exclusive battery terminal)
Power consumption: 10 W (Unit only: 8 W)
Recharge mode 12 W
(when using included AC adaptor)
AC adaptor
Power source: AC 100–240 V, 50/60 Hz
Power consumption: 20 W
DC output: 9 V, 1400 mA
Battery pack CGR-H603 (lithium ion)
Voltage: 7.2 V
Capacity: 2000 mAh
Dimensions: 144 (W)k140 (D)k32.5
§
(H) mm
[5
21
⁄32q (W)k51⁄2q (D)k19⁄32q (H)]
(excluding protrusions)
§
28.7 mm (11⁄8q) at lowest point
Mass: 566 g (19.96 oz.)
Note
Specifications are subject to change without
notice.
Mass and dimensions are approximate.
Power consumption in standby mode: 0.9 W
(when using included AC adaptor)
Specifications
Panasonic Consumer Electronics Company,
Division of Matsushita Electric Corporation of America
One Panasonic Way Secaucus, New Jersey 07094
http://www.panasonic.com
Panasonic Sales Company, Division of Matsushita Electric of Puerto Rico, Inc. (“PSC”)
Ave. 65 de Infantería, Km. 9.5 San Gabriel Industrial Park, Carolina, Puerto Rico 00985
Panasonic Canada Inc.
5770 Ambler Drive, Mississauga, Ontario L4W 2T3
www.panasonic.ca
C 2002 Matsushita Electric Industrial Co., Ltd.
Printed in Japan
Operating temperature range:
i5 to i35 oC (i41 to i95 oF)
Operating humidity range:
5–90 % RH (no condensation)
Discs played: DVD-RAM (DVD-VR compatible)
DVD-Video
Compact disc [CD-DA
(CD-TEXT compatible), Video CD]
CD-R/CD-RW
[CD-DA (CD-TEXT compatible),
Video CD, MP3 formatted discs]
DVD-R (DVD-Video compatible)
Signal system: NTSC
LCD screen: 5q α-Si, TFT wide-screen LCD
Video output:
Output level: 1 Vp-p (75 ≠)
Output terminal: Mini-jack
Number of terminals: 1 system
S-video output:
Y output level: 1 Vp-p (75 ≠)
C output level: 0.286 Vp-p (75 ≠)
Output terminal: Mini-jack
Number of terminals: 1 system
(also used for video output)
Audio output:
Output level: 1.5 Vrms (1 kHz, 0 dB, 10 k≠)
Output terminal: Stereo mini-jack
Number of terminals: 1 system
Audio performance:
(1) Frequency response:
(1) ≥DVD (linear audio):
4 Hz–22 kHz (48 kHz sampling)
4 Hz–44 kHz (96 kHz sampling)
(1) ≥CD audio: 4 Hz–20 kHz
(2) S/N ratio:
(1) ≥CD audio: 115 dB
(3) Dynamic range:
(1) ≥DVD (linear audio): 98 dB
(1) ≥CD audio: 97 dB
(4) Total harmonic distortion:
(1) ≥CD audio: 0.008 %
Page 42

Lecteur DVD/CD portatif
Manuel d’utilisation
Modèle DVD-LV50
C
O
LO
UR
MO
NITOR
BR
IG
HT
D
C
I
N
9
V
O
P
E
N
T
O
P
M
E
N
U
M
E
N
U
R
E
T
U
R
N
D
I
S
P
L
A
Y
R
E
P
E
A
T
E
N
T
E
R
–
O
N
–
O
F
F
電
源
初
期
設
定
D
V
D
/
テ
レ
ビ
/
S
D
/
外
部
ア
ン
グ
ル
画
面
表
示
ト
ッ
プ
メ
ニ
ュ
ー
音
声
字
幕
ア
ド
バ
ン
ス
ド
サ
ラ
ウ
ン
ド
リ
タ
ー
ン
メ
ニ
ュ
ー
決
定
取
消
し
再
生
モ
ー
ド
D
V
D
P
L
A
Y
E
R
∫
5
6
:
9
;
1
1
3
4
6
7
9
0
8
5
2
S
1
0
A
.
S
R
D
S
E
T
U
P
E
N
T
E
R
P
L
A
Y
M
O
D
E
S
U
B
T
IT
L
E
D
IS
P
L
A
Y
T
O
P
M
E
N
U
A
U
D
I
O
A
N
G
L
E
R
E
T
U
R
N
M
E
N
U
C
A
N
C
E
L
Ce manuel a été imprimé avec de
l’encre à base de soja.
Le code régional de ce lecteur est “1”.
Ce lecteur accepte tous les DVD-Vidéo
auxquels est attribué le code régional “1”
ou “ALL” (tous), ou dont le code régional
inclut “1”.
RQT6450-Y
F0302CM0
1 ALL
2
4
1
Exemple:
Cher client
Nous vous remercions d’avoir arrêté votre choix sur cet appareil.
Pour en tirer un rendement optimal, il est recommandé de lire attentivement le présent manuel avant
d’utiliser l’appareil.
Conserver ce manuel.
PP
q
Page 43

2
RQT6450
ATTENTION: AFIN DE PRÉVENIR LE
RISQUE DE CHOCS
ÉLECTRIQUES, NE PAS
RETIRER LES VIS.
TOUTE RÉPARATION
DEVRAIT ÊTRE CONFIÉE À
UN PERSONNEL QUALIFIÉ.
MISE EN GARDE:
AFIN DE PRÉVENIR TOUT RISQUE
D’INCENDIE OU DE CHOCS
ÉLECTRIQUES, AINSI QUE TOUT
DOMMAGE À L’APPAREIL, NE PAS
L’EXPOSER À LA PLUIE, À DES
ÉCLABOUSSURES OU À UNE
HUMIDITÉ EXCESSIVE. ÉVITER
ÉGALEMENT DE PLACER DES
CONTENANTS AVEC DU LIQUIDE,
TEL UN VASE, SUR L’APPAREIL.
ATTENTION!
NE PAS INSTALLER CET APPAREIL
DANS UNE BIBLIOTHÈQUE, UNE
ARMOIRE OU TOUT AUTRE ESPACE
CONFINÉ. S’ASSURER QUE LA VENTILATION DE L’APPAREIL EST ADÉQUATE.
AFIN D’ÉVITER TOUT RISQUE DE CHOC
ÉLECTRIQUE OU D’INCENDIE DÛ À UN
SURCHAUFFEMENT, S’ASSURER QUE
RIDEAUX OU TOUT OBJET QUELCONQUE NE BOUCHENT LES ÉVENTS
D’AÉRATION DE L’APPAREIL.
(Dessous du lecteur)
CAUTION– VISIBLE AND INVISIBLE LASER
RADIATION WHEN OPEN.
DO NOT STARE INTO BEAM.
ATTENTION– RAYONNEMENT LASER VISIBLE ET
INVISIBLE EN CAS D’OUVERTURE.
NE PAS REGARDER DANS LE FAISCEAU.
ATTENTION!
CET APPAREIL EST DOTÉ D’UN
LECTEUR AU LASER. L’UTILISATION DE
COMMANDES OU LE RECOURS À DES
RÉGLAGES AUTRES QUE CEUX
INDIQUÉS DANS CE MANUEL PEUVENT
PRÉSENTER DES RISQUES
D’EXPOSITION À DES RADIATIONS.
NE PAS OUVRIR LE BOÎTIER. TOUTE
RÉPARATION DOIT ÊTRE FAITE PAR UN
PERSONNEL QUALIFIÉ ET NON PAR
L’USAGER.
RISQUE DE CHOC ELECTRIQUE
NE PAS OUVRIR
ATTENTION
Le symbole de l’éclair dans un triangle équilatéral indique la présence
d’une tension suffisamment élevée
pour engendrer un risque de chocs
électriques.
Le point d’exclamation dans un
triangle équilatéral indique que le
manuel d’utilisation inclus avec
l’appareil contient d’importantes
recommandations quant au
fonctionnement et à l’entretien de ce
dernier.
La marque et le symbole suivants sont situés
dessous l’appareil.
Il est recommandé de noter, dans l’espace prévu ci-dessous, le numéro
de modèle et le numéro de série inscrits à l’arrière, ou sous le fond de
l’appareil, et de conserver ce manuel pour référence ultérieure.
NUMÉRO DE MODÈLE
DVD-LV50
NUMÉRO DE SÉRIE
Homologation:
DATE D’ACHAT
DÉTAILLANT
ADRESSE DU DÉTAILLANT
Nx DE TÉLÉPHONE
Page 44

3
RQT6450
Bloc-batterie et pile
1. Bloc-batterie (Bloc-batterie aux ions de
lithium fourni)
1.
≥Utiliser cet appareil pour recharger le
bloc-batterie.
1. ≥Ne pas utiliser le bloc-batterie avec un
autre appareil que celui spécifié.
1. ≥Ne pas utiliser l’appareil à l’extérieur s’il
neige ou s’il pleut. (Le bloc-batterie n’est
pas à l’épreuve de l’eau.)
1. ≥Éviter toute poussière, sable, liquides ou
saleté sur les bornes.
1. ≥Ne pas toucher aux bornes (i et j)
avec un objet métallique.
1. ≥Ne pas tenter de démonter ou remonter
le bloc-batterie. Ne pas le jeter au feu.
2. Pile de type bouton (Pile au lithium)
1. ≥Insérer en respectant la polarité.
1. ≥Ne pas toucher aux bornes (i et j)
avec un objet métallique.
1. ≥Ne pas tenter de démonter ou remonter
la pile. Ne pas la jeter au feu.
1. ≥Tenir la pile hors de portée des enfants.
Si l’électrolyte venait à entrer en contact
avec les mains ou les vêtements, laver à
fond avec de l’eau.
Si l’électrolyte venait à entrer en contact
avec les yeux, ne jamais se frotter les yeux.
Les rincer à fond avec de l’eau et consulter
un médecin.
3. Mise au rebut du bloc-batterie et de la
pile
1. Vérifier et suivre les réglementations
locales en vigueur.
ATTENTION:
Les piles utilisées dans ce dispositif risquent
de provoquer un incendie ou des brûlures
chimiques si on les manipule inconsidéré-
ment. Ne pas démonter les piles ni les jeter
au feu. Ne pas chauffer les piles à des
températures supérieures à celles indiquées.
Pile bouton 100 oC (212 oF)
Bloc-batterie 60 oC (140 oF)
Ne pas recharger les piles de type bouton.
Ne remplacer que par les pièces Panasonic
dont les numéros sont les suivants:
Pile bouton (Pile au lithium)
(pour la télécommande) CR2025
Bloc-batterie (Bloc-batterie aux
ions de lithium fourni) CGR-H603
Bloc-batterie en option (Bloc-batterie
aux ions de lithium) CGR-H601
L’utilisation d’autres types de piles peut comporter un risque d’incendie ou d’explosion.
L’appareil que vous vous êtes procuré est
alimenté par une batterie au lithium-ion/
lithium-polymère. Pour des renseignements
sur le recyclage de la batterie, veuillez
composer le 1-800-8-BATTERY.
Adaptateur secteur
Cet adaptateur secteur fonctionne sur le
courant entre 100 V et 240 V.
Mais
≥Au Canada, le cordon d’alimentation ne
doit être branché que dans une prise de
120 V c.a.
≥Lors de l’utilisation de l’appareil dans
d’autres pays, utiliser un adaptateur
approprié.
≥Lors du raccordement à une alimentation
supérieure à 125 V c.a., s’assurer d’utiliser
un câble approprié à l’adaptateur secteur
et à l’alimentation.
≥En cas de doute, consulter un distributeur
de pièces électriques pour le choix d’un
adaptateur secteur ou d’un câble.
RBRC
TM
Li-ion
Page 45

4
RQT6450
Mise en route
Protection de l’ouïe
Éviter l’écoute à volume élevé. Les spécialistes en otologie recommandent de ne pas
prolonger l’écoute afin de ne pas endommager l’ouïe.
Si un bourdonnement se fait entendre,
réduire le volume ou cesser l’écoute.
Ne pas utiliser au volant d’un véhicule
motorisé. Cela peut être dangereux et est
interdit dans plusieurs régions.
Démontrer une grande prudence ou interrompre l’écoute dans des situations potentiellement dangereuses.
Même si le casque d’écoute ou les écouteurs sont du type ouvert devant permettre
d’entendre les bruits ambiants, ne pas trop
élever le volume.
Le son peut être trompeur. Avec le temps,
votre niveau de confort auditif s’adapte à des
volumes plus élevés. Ainsi, un niveau qui
semble normal peut en fait être trop élevé et
être nuisible à l’oreille.
Protégez-vous en réglant le volume à un
niveau sécuritaire avant que votre oreille ne
s’adapte à un volume trop élevé.
Pour déterminer un niveau d’écoute
sécuritaire:
≥Régler le volume au minimum.
≥Monter lentement le volume jusqu’au
niveau d’écoute confortable avant qu’il n’y
ait distorsion.
Après avoir identifié le niveau d’écoute
confortable:
≥Régler le volume et le laisser à ce niveau.
Accessoires
Vérifier les accessoires en les
cochant.
Lors de la commande de
pièces de rechange, utiliser
les numéros indiqués entre
parenthèses.
Pour commander des accessoires,
communiquer avec le détaillant auprès de
qui l’appareil a été acheté.
∏ Télécommande . . . . . . . . . . . . . . . . . . . . . 1
∏ (N2QAHC000012)
∏ Pile bouton. . . . . . . . . . . . . . . . . . . . . . . . . 1
∏ pour la télécommande
∏ (pour le remplacement, voir ci-dessous)
∏ Câble audio/vidéo . . . . . . . . . . . . . . . . . . . 1
∏ (RJL3X001X15)
∏ Adaptateur secteur . . . . . . . . . . . . . . . . . . 1
∏ (DE-891AA)
∏ Cordon d’alimentation . . . . . . . . . . . . . . . 1
∏ (RJA0065-A)
∏ Bloc-batterie rechargeable. . . . . . . . . . . . 1
∏ (pour le remplacement, voir ci-dessous)
Accessoires facultatifs:
Pile bouton (CR2025)
Bloc-batterie rechargeable de remplacement
(CGR-H603: Disponible auprès des détail-
lants Panasonic seulement.)
Bloc-batterie rechargeable, en option
(CGR-H601)
Adaptateur pour lecteur de cassettes de voiture
(RP-CC20)
Adaptateur pour voiture (DY-DC95)
Mini câble audio numérique optique
(RP-CA2120)
Câble S-vidéo
(RFX4139: Disponible auprès des détaillants
Panasonic seulement.)
Nota
Le cordon d’alimentation et l’adaptateur secteur
inclus ne doivent être utilisés qu’avec cet appareil. Ne pas les utiliser avec d’autre équipement.
EST. 1924
Page 46

5
RQT6450
Mise en route
Table des matières
Mise en route
Accessoires . . . . . . . . . . . . . . . . . . . . . . . . . 04
IMPORTANTES MISES EN GARDE. . . . . . . 06
Guide de référence des commandes . . . . . 07
À propos des disques . . . . . . . . . . . . . . . . . 08
Télécommande . . . . . . . . . . . . . . . . . . . . . . . 09
Opérations de base
Réglage de l’angle de l’écran à cristaux
liquides . . . . . . . . . . . . . . . . . . . . . . . . . . . 12
Lecture de base . . . . . . . . . . . . . . . . . . . . . . 12
≥Si un menu s’affiche. . . . . . . . . . . . . . . . . . . 13
≥Fonction de poursuite . . . . . . . . . . . . . . . . . 14
Utilisation de DIRECT NAVIGATOR
(navigateur direct) pour sélectionner
les programmes de lecture . . . . . . . . . . . 14
Utilisation du menu de la liste
de lecture . . . . . . . . . . . . . . . . . . . . . . . . . 15
≥Lecture d’une liste de lecture. . . . . . . . . . . . 15
≥Lecture de scènes données. . . . . . . . . . . . . 15
Caractéristiques pratiques . . . . . . . . . . . . . 16
≥Saut . . . . . . . . . . . . . . . . . . . . . . . . . . . . . . . 16
≥Avance rapide et recul—Recherche . . . . . . 16
≥Ralenti . . . . . . . . . . . . . . . . . . . . . . . . . . . . . 16
Opérations avancées
Modification des réglages de l’écran . . . . . 22
≥Réglage de la teinte. . . . . . . . . . . . . . . . . . . 22
≥Grandeur de l’image . . . . . . . . . . . . . . . . . . 22
≥Réglage de la luminosité . . . . . . . . . . . . . . . 22
Menus à icônes—utilisation . . . . . . . . . . . . 23
≥Procédures communes . . . . . . . . . . . . . . . . 23
≥Indicateur d’état . . . . . . . . . . . . . . . . . . . . . . 23
≥Renseignements sur les disques. . . . . . . . . 24
≥Renseignements sur le lecteur . . . . . . . . . . 25
Modification des réglages . . . . . . . . . . . . . . 26
≥Procédures communes . . . . . . . . . . . . . . . . 27
Référence
Glossaire. . . . . . . . . . . . . . . . . . . . . . . . . . . . 33
Guide de dépannage . . . . . . . . . . . . . . . . . . 34
Entretien . . . . . . . . . . . . . . . . . . . . . . . . . . . . 37
Alimentation . . . . . . . . . . . . . . . . . . . . . . . . . 10
≥Adaptateur secteur. . . . . . . . . . . . . . . . . . . . 10
≥Bloc-batterie. . . . . . . . . . . . . . . . . . . . . . . . . 10
≥Adaptateur pour voiture . . . . . . . . . . . . . . . . 11
≥Visionnement image par image . . . . . . . . . . 16
≥Lecture à partir d’un programme, d’un titre
ou d’une plage donné. . . . . . . . . . . . . . . . 16
≥Lecture en reprise . . . . . . . . . . . . . . . . . . . . 17
≥Ambiophonie virtuelle avancée avec
enceintes ou casque d’écoute
(AVANCED SURROUND) . . . . . . . . . . . . 17
Lecture de disques MP3 et CD texte à
partir des menus. . . . . . . . . . . . . . . . . . . . 18
≥Menus de lecture . . . . . . . . . . . . . . . . . . . . . 18
≥Recherche d’une plage . . . . . . . . . . . . . . . . 19
Modification de la séquence de lecture . . . 20
≥Lecture programmée . . . . . . . . . . . . . . . . . . 20
≥Lecture aléatoire . . . . . . . . . . . . . . . . . . . . . 21
Sélection de la bande son, de la langue
des sous-titres et de la prise de vue. . . . 21
≥Programmation du mot de passe. . . . . . . . . 28
≥Sortie numérique . . . . . . . . . . . . . . . . . . . . . 28
Raccordement de l’appareil à un appareil
auxiliaire . . . . . . . . . . . . . . . . . . . . . . . . . . 29
≥Pour un rendu sonore en puissance . . . . . . 29
≥Raccordement de l’appareil à
un téléviseur . . . . . . . . . . . . . . . . . . . . . . . . 30
≥Enregistrement sur enregistreur numérique
ou magnétophone à cassettes . . . . . . . . . 32
Branchement d’un casque d’écoute. . . . . . 32
Service après-vente . . . . . . . . . . . . . . . . . . . 38
Liste de codes de langue. . . . . . . . . . . . . . . 38
Données techniques . . . . . . . . . . . . . . . . . . 39
Les instructions du présent manuel font
référence à l’appareil. Toutefois, les fonc-
tions peuvent être activées au moyen des
touches de la télécommande identiques à
celles de l’appareil (
➡ page 7).
Page 47

6
RQT6450
Mise en route
IMPORTANTES MISES EN GARDE
Avant d’utiliser l’appareil, lire attentivement les instructions qui suivent. Se conformer tout
particulièrement aux avertissements inscrits sur l’appareil et aux consignes de sécurité indiquées
ci-dessous. Conserver le présent manuel pour consultation ultérieure.
1) Lire attentivement ces instructions.
2) Conserver ces instructions.
3) Lire toutes les mises en garde.
4) Suivre toutes les instructions.
5) Ne pas utiliser cet appareil près d’une source
d’eau.
6) Nettoyer qu’avec un chiffon sec.
7) Ne pas bloquer les évents d’aération.
Installer l’appareil selon les instructions du
fabricant.
8) Ne pas installer l’appareil près d’un appareil
de chauffage tel qu’un radiateur, une
cuisinière, un registre de chaleur ou tout
dispositif émettant de la chaleur (y compris
un amplificateur).
9) Pour des raisons de sécurité, ne pas modifier
la fiche polarisée ou celle de mise à la terre.
Une fiche polarisée est une fiche à deux
lames, dont une plus large. Une fiche de
mise à la terre est une fiche à deux lames
avec une broche de masse. La lame plus
large ou la broche de masse procure une
protection accrue. Si ce genre de fiche ne
peut être inséré dans une prise de courant,
communiquer avec un électricien pour
remplacer la prise.
10) S’assurer que le cordon est placé dans un
endroit où il ne risque pas d’être écrasé,
piétiné ou coincé. Faire particulièrement
attention à ses extrémités de branchement,
y compris sa fiche.
11) N’utiliser que les accessoires ou périphé-
riques recommandés par le fabricant.
12) N’utiliser l’appareil qu’avec
une baie, support, trépied,
gabarit d’installation, etc, recommandée par le fabricant
ou vendu avec l’appareil.
13) Débrancher cet appareil lors d’un orage ou
en cas de non-utilisation prolongée.
14) Confier l’appareil à un technicien qualifié
pour toute réparation: cordon d’alimentation
ou fiche endommagé, liquide renversé ou
objet tombé dans l’appareil, exposition à la
pluie ou à une humidité excessive, mauvais
fonctionnement ou échappement de
l’appareil.
Précautions à prendre
Afin d’éviter tout dommage, ne pas:
≥Vaporiser des insecticides inflammables près de l’appareil.
≥Appuyer sur l’écran du lecteur.
≥Toucher à la lentille ou à toute autre pièce du capteur à laser.
Ne pas utiliser l’appareil dans les endroits suivants:
≥Là où la température est inférieure à 5 oC (41 oF) ou supérieure à 35 oC (95 oF).
≥(L’utilisation de l’appareil hors de cette plage de température peut entraîner l’activation du
circuit de protection et rendre l’appareil inutilisable.)
≥Endroits où il y a du sable.
≥Sur un coussin, un divan ou un appareil émanant de la chaleur, tel un amplificateur.
Ne pas placer l’appareil sur les genoux pendant longtemps lors de l’utilisation.
Cet appareil peut chauffer et causer des brûlures.
C
O
L
O
U
R
M
O
N
IT
O
R
B
R
I
G
H
T
T
O
P
M
E
N
U
M
E
N
U
R
E
T
U
R
N
D
I
S
P
L
A
Y
–
O
N
–
O
F
F
R
E
P
E
A
T
E
NTER
V
I
D
E
O
V
O
L
A
U
D
I
O
O
P
T
O
U
T
OPE
N
CHG
Í
TOP MENU
MENU
RETURN
DISPLAY
ENTER
–
ON
–
OFF
8
9
:
7
<
1
2
3
4
5
6
=
?
@
A
B
C
D
E
;
>
∫
56:9
;1
13
46
79
08
5
2
S10
A.SRD
SETUP
ENTER
PLAY MODE
SUBTITLE
DISPLAYTOP MENU
AUDIO
ANGLE
RETURNMENU
CANCEL
L
N
M
O
P
Q
R
G
H
A
J
K
B
C
>
?
I
@
F
Page 48

7
RQT6450
Mise en route
Guide de référence des commandes
C
O
L
O
U
R
M
O
N
IT
O
R
B
R
I
G
H
T
T
O
P
M
E
N
U
M
E
N
U
R
E
T
U
R
N
D
I
S
P
L
A
Y
–
O
N
–
O
F
F
R
E
P
E
A
T
E
NTER
V
I
D
E
O
V
O
L
A
U
D
I
O
O
P
T
O
U
T
OPE
N
CHG
Í
TOP MENU
MENU
RETURN
DISPLAY
ENTER
–
ON
–
OFF
8
9
:
7
<
1
2
3
4
5
6
=
?
@
A
B
C
D
E
;
>
∫
56:9
;1
13
46
79
08
5
2
S10
A.SRD
SETUP
ENTER
PLAY MODE
SUBTITLE
DISPLAYTOP MENU
AUDIO
ANGLE
RETURNMENU
CANCEL
L
N
M
O
P
Q
R
G
H
A
J
K
B
C
>
?
I
@
F
Page
1 Grand écran à cristaux liquides de 5 po
2 Touche de couleur (COLOUR) . . . . . . . 22
3 Touche de luminosité (BRIGHT) . . . . . . 22
4 Touche de l’écran (MONITOR) . . . . . . . 22
5 Haut-parleur monaural
6 Prise de casque d’écoute (Ë) . . . . . . . . 32
7 Touches d’évitement/ralenti/recherche
(:, 9) . . . . . . . . . . . . . . . . . . . . . . . 16
8 Commutateur du couvercle du disque
(2 OPEN) . . . . . . . . . . . . . . . . . . . . . . . . 13
9 Touche de lecture en reprise
(REPEAT) . . . . . . . . . . . . . . . . . . . . . . . . 17
: Capteur du signal de télécommande
; Voyant de recharge (CHG). . . . . . . . . . . 10
< Voyant de mise en attente (Í) . . . . . . . 10
= Commande de volume ( VOL) . . . . 13
> Touche de pause (;). . . . . . . . . . . . . . . 13
? Touche de retour au menu initial
(TOP MENU) . . . . . . . . . . . . . . . . 13, 14, 18
@ Touche de menu (MENU). . . . . . 13, 15, 27
A Touche de retour (RETURN) . . . . . . . . . 14
B Touche de l’affichage
(DISPLAY) . . . . . . . . . . . . . . . . . . . . . 11, 23
C Touches du curseur (3, 4, 2, 1)/
entrée (ENTER). . . . . . . . . . . . . . . . . . . . 13
Faire glisser les touches du curseur dans la
direction désirée.
D Touche de lecture/en contact
(1, – ON). . . . . . . . . . . . . . . . . . . . . . . . . 13
E Touche d’arrêt/hors contact
(∫, – OFF) . . . . . . . . . . . . . . . . . . . . . . . . 13
F Touche de configuration
(SETUP). . . . . . . . . . . . . . . . . . . . . . . 27, 31
G Interrupteur/mise en attente (Í). . . . . . 13
H Touche d’arrêt (∫) . . . . . . . . . . . . . . . . . 13
I Touches numériques (1–9, 0, S10). . . . 13
J Touches de ralenti/recherche
(6, 5) . . . . . . . . . . . . . . . . . . . . . . . . 16
K Touche de mode de lecture
(PLAY MODE) . . . . . . . . . . . . . . . . . . . . . 20
L Touche de lecture (1) . . . . . . . . . . . . . . 13
M Touche d’angle (ANGLE). . . . . . . . . . . . 21
N Touche de sous-titres (SUBTITLE). . . . 21
O Touche d’audio (AUDIO) . . . . . . . . . . . . 21
P Touche d’ambiophonie virtuelle
avancée (A.SRD). . . . . . . . . . . . . . . . . . . 17
Q Touche d’annulation (CANCEL) . . . . . . 20
R Touches de saut (:, 9). . . . . . . . . 16
Les touches indiquées en noir comme >
fonctionnement de façon identique à celles sur
l’appareil.
Page 49

8
RQT6450
Mise en route
∫ Disques non compatibles
DVD-Audio, disques PAL, DVD-RAM (2,6 Go,
TYPE 1), DVD-ROM, CD-ROM, CDV, CD-G,
iRW, DVD-RW, CVD, SVCD, SACD, disque
vidéo “Divx” et CD photo.
∫ DVD compatibles
Il est possible de lire des disques
DVD sur lesquels est apposé ce
symbole.
∫ Lecture de disques DVD et
CD-Vidéo
Le producteur du matériel peut déterminer le
mode de lecture de ces disques. Il s’ensuit
qu’avec certains disques il pourrait ne pas être
possible de piloter toutes les fonctions de lecture
décrites dans le présent manuel. Il est donc conseillé de lire attentivement la notice d’emploi du
disque.
∫ Disques CD-R et CD-RW
Le lecteur peut pendre en charge des disques
CD-R et CD-RW formatés en CD-DA (audio
numérique) ou en CD-Vidéo dont la session
d’enregistrement a été finalisée
§
.
∫ Disques DVD-R
Les disques DVD-R Panasonic enregistrés et
finalisés
§
sur un enregistreur DVD vidéo
Panasonic sont lus comme DVD-Vidéo sur cet
appareil.
§
La finalisation est un processus qui permet
la lecture de ces disques sur un appareil
compatible.
À propos des disques
DVD-RAM DVD-Vidéo DVD-R CD-Audio CD-Vidéo
[RAM] [DVD-V] [CD]
§
[VCD]
Type
Capacité
Format
d’enregistrement
≥Disques sans cartouche
≥Disques qui peuvent être
retirés de leur cartouche
(TYPE 2 et 4)
≥12 cm (5 po), 9,4 Go (double
≥face) et 4,7 Go (simple face)
≥8 cm (3 po), 2,8 Go
(double face)
Disques enregistrés avec un
enregistreur de DVD, une
caméra vidéo DVD, un
ordinateur personnel, etc.,
avec la version 1.1 de Video
Recording (VR) Format
(une norme unifiée pour
l’enregistrement vidéo).
≥Sortir les disques de TYPE 2 et 4 de leur
cartouche avant de les utiliser; les retourner
dans leur cartouche après la lecture. Lire attentivement les instructions qui accompagnent le
disque.
≥Il se peut que la lecture de certains passages
du disque ne se fasse pas en douceur, par
exemple là où un programme se termine et où
un autre commence.
Nota
Il est possible que cet appareil ne puisse lire
certains disques CD-R, CD-RW, DVD-R et
DVD-RAM en raison du type d’encodage utilisé à
l’enregistrement.
1
2
3
Identification dans ce manuel
§
Y compris les CD-R/RW et les disques enregistrés au format MP3.
Ne pas utiliser de disques aux formes irrégulières (en forme de cœur, par exemple); ils pourraient en
effet endommager le lecteur.
∫ Disques DVD-RAM
Les disques DVD-RAM doivent remplir les conditions suivantes pour que cet appareil puisse en
faire la lecture.
∫ Disques compatibles
30° 30°
Page 50

9
RQT6450
Mise en route
Télécommande
∫ Pile (pile au lithium)
1
2
3
Face + sur dessus.
∫ Utilisation
∫ Entretien des disques
DVD-Vidéo, CD-Audio, CD-Vidéo
Nettoyer le disque avec un linge humide, puis
essuyer.
DVD-RAM, DVD-R
≥Nettoyer uniquement avec le nettoyeur pour
disque DVD-RAM/PD facultatif, numéro de
pièce LF-K200DCA1.
≥Ne jamais utiliser de tissus, nettoyeurs pour
CD, etc.
∫ Précautions pour la manipu-
lation
≥Ne pas écrire sur l’étiquette avec un crayon
bille ou tout instrument à écrire.
≥Ne pas utiliser de vaporisateurs de nettoyage
pour disques, de benzène, de diluants, de
liquides antistatiques ni d’autres solvants.
≥Ne pas apposer de collants ni d’étiquettes sur
les disques.
≥Ne pas utiliser de disques sur lesquels des
bandes adhésives ou des étiquettes se
décollent.
≥Ne pas utiliser de protecteurs contre les
rayures ou couvercles.
≥Ne pas utiliser des disques dont les étiquettes
ont été incrustées au moyen d’imprimeuses
diponibles sur le marché.
30° 30°
Orienter la télécommande directement vers le
capteur de signal, en prenant soin d’éviter les
obstacles, à une distance maximum de 7 m
(23 pi).
7 m
(23 pi)
Capteur du
signal de
télécommande
Page 51

10
RQT6450
Mise en route
Alimentation
DC IN 9V
1
2
3
Prise de courant
(120 V c.a., 60 Hz)
% DC IN 9 V
L’appareil est en mode attente lorsqu’il est
branché sur le secteur (le voyant [Í] est
allumé). Le circuit primaire est toujours sous
tension lorsque l’adaptateur secteur est
branché sur la prise de courant.
≥Les illustrations indiquent le raccordement du
bloc-batterie rechargeable fourni (CGR-H603).
Raccorder le bloc-batterie rechargeable, en
option (CGR-H601), de la même manière.
≥Charger les blocs-batteries avant leur utilisa-
tion initiale.
∫ Fixation
Bloc-batterie (fourni et
en option) (Bloc-batterie
aux ions de lithium)
Adaptateur secteur
∫ En cas de non utilisation
prolongée
L’appareil consomme 0,9 W en mode d’attente.
Pour réduire la consommation d’énergie,
débrancher l’adaptateur secteur de la prise de
courant.
Recharge
[Í] s’eteint.
[CHG] est allumé.
La recharge est terminée lorsque le voyant
de recharge [CHG] s’éteint. ([Í] est allumé.)
Débrancher le cordon d’alimentation et
l’adaptateur secteur.
Cet appareil
(côté gauche)
∫ Recharge
∫ (lorsque le contact est coupé)
Brancher l’adaptateur secteur avec le blocbatterie en place (voir ci-contre).
1
Cet appareil (dessous)
Bloc-batterie
2 Faire glisser le bloc-batterie jusqu’à ce qu’il
s’enclenche en position.
∫ Retrait
2
1 Faire glisser et maintenir le verrou
en position.
DC IN 9V
DC IN 9V
T
O
P
M
E
N
U
M
E
N
U
R
E
T
U
R
N
D
IS
P
LA
Y
–
ON
–
OFF
R
E
P
E
A
T
E
N
T
E
R
VIDEO
VOL
AUDIO
OPT O
UT
O
P
E
N
C
H
G
Í
E
N
T
E
R
RETURN
DISPLAY
Page 52

11
RQT6450
Mise en route
∫ Vérification de la charge du
bloc-batterie
∫ Durée de recharge et autonomie
de lecture en heures approxima-
tives
(Les durées varient selon les conditions de fonctionnement. Les durées pour le bloc-batterie
rechargeable en option sont indiquées entre
parenthèses.)
Recharge
[à 20 oC
(68 oF)]
4 (6)
Niveau de
luminosité
(écran)
j5
0
(par défaut)
5
Écran du
lecteur
ouvert
2,5 (4)
2 (3,5
)
1,5 (3)
Écran du
lecteur
fermé
3 (6)
Lecture
≥Pour ajuster la luminosité de l’écran
(➡ page 22).
∫ Si l’autonomie est très brève
même après la recharge
Le bloc-batterie doit être remplacé (il peut être
rechargé environ 300 fois).
Adaptateur pour voiture
(en option)
Nota
≥Lire attentivement les instructions d’utilisation de l’adaptateur pour voiture.
≥Pour des raisons de sécurité routière, ne pas effectuer de réglage sur l’appareil ou visionner un
disque vidéo pendant la conduite.
≥Il est également possible d’utiliser les haut-parleurs de l’autoradio en raccordant un adaptateur pour
lecteur de cassettes de voiture (➡ page 4) à la prise de casque d’écoute de cet appareil.
DC IN 9V
DC IN 9V
Vers la douille de
l’allume-cigare
Adaptateur pour voiture
Numéro de pièce DY-DC95
Cet appareil (côté gauche)
T
O
P
M
E
N
U
M
E
N
U
R
E
T
U
R
N
D
IS
P
LA
Y
–
ON
–
OFF
R
E
P
E
A
T
E
N
T
E
R
VIDEO
VOL
AUDIO
OPT O
UT
O
P
E
N
C
H
G
Í
E
N
T
E
R
RETURN
DISPLAY
Appuyer sur [DISPLAY] lorsque l’appareil est en
marche.
L’affichage du niveau de charge apparaît à
l’écran pendant quelques secondes pour indi-
quer la durée approximative de recharge
restante.
(Cette indication s’affiche automatiquement
f
lorsque la durée de la charge restante est ---}
de seulement quelques minutes.)
≥Appuyer sur [RETURN] pour effacer le menu à
icônes.
∫ Dans le cas de non utilisation
prolongée
≥Retirer le bloc-batterie. (Même lorsque
l’appareil est hors marche, il y a consommation
d’énergie. À terme, cela peut entraîner la décharge de la batterie et causer des problèmes
de fonctionnement.)
≥Recharger le bloc-batterie avant de le réutiliser.
Plein
Faible Recharger
Page 53

V
ID
E
O
VO
L
A
U
D
IO
O
P
T
O
U
T
O
P
E
N
C
H
G
Í
V
ID
E
O
VOL
A
U
D
IO
O
P
T
O
U
T
E
N
T
E
R
T
O
P
M
E
N
U
M
E
N
U
R
E
T
U
R
N
D
I
S
P
L
A
Y
–
O
N
–
O
F
F
R
E
P
E
A
T
O
P
E
N
C
H
G
Í
C
O
L
O
U
R
M
O
N
IT
O
R
B
R
IG
H
T
V
ID
E
O
VOL
A
U
D
IO
O
P
T
O
U
T
E
N
T
E
R
T
O
P
M
E
N
U
M
E
N
U
R
E
T
U
R
N
D
I
S
P
L
A
Y
–
O
N
–
O
F
F
R
E
P
E
A
T
O
P
E
N
C
H
G
Í
V
ID
E
O
VOL
A
U
D
IO
O
P
T
O
U
T
T
O
P
M
E
N
U
M
E
N
U
R
E
T
U
R
N
S
P
L
A
Y
–
O
N
–
O
F
F
R
E
P
E
A
T
O
P
E
N
C
H
G
Í
C
O
L
O
U
R
M
O
N
IT
O
R
B
R
IG
H
T
C
O
L
O
U
R
M
O
N
IT
O
R
B
R
IG
H
T
12
RQT6450
Opérations de base
Lecture de base
T
O
P
M
E
N
U
M
E
N
U
R
E
TU
R
N
D
IS
P
L
A
Y
–
ON
–
OFF
REPEAT
E
N
T
E
R
V
O
L
A
U
D
I
O
P
T
O
OPEN
C
H
G
Í
E
N
T
E
R
3,4,2,1,ENTER
1
2
3
TOP MENU
MENU
RETURN
DISPLAY
3,4,
2,1,
ENTER
;
∫
1
TOP MENU
MENU
DISPLAY
RETURN
∫,-OFF
;
Í
Nota
≥Si “$” apparaît à l’écran
≥Celui-ci indique que l’instruction demandée ne
peut être effectuée par le lecteur ou le disque à
ce moment précis.
≥La rotation du disque continue lors de
l’affichage d’un menu même après la fin de la
lecture d’une rubrique. Une fois terminé, appuyer sur [∫] pour préserver le moteur et l’écran à
cristaux liquides.
≥Lorsque le lecteur est utilisé pendant une
longue période, il se peut que ses surfaces
deviennent chaudes; cela est tout à fait normal
et n’est le signe d’aucun problème de fonctionnement.
Ouverture de l’écran
Faire glisser
Déclic!
Nota
Fermer l’écran à cristaux liquides lors du
transport.
Réglage de l’angle
de l’écran à
cristaux liquides
L’écran à cristaux liquides peut être positionné à
différents angles selon les préférences.
Visionnement traditionnel
Visionnement sous un meilleur angle
Visionnement compact, à plat
Touches
numériques
SETUP
PLAY MODE
∫
13
46
7908
ANGLE
;1
SUBTITLE
DISPLAYTOP MENU
AUDIO
ENTER
A.SRD
RETURNMENU
CANCEL
2
S10
5
56:9
Page 54

13
RQT6450
Opérations de base
[RAM] [DVD-V] [CD] [VCD]
Préparatifs
Ouvrir l’écran (➡ page 12).
1 Faire glisser le commutateur
[2 OPEN] pour ouvrir le
couvercle du disque et insérer
un disque.
[RAM]
Retirer les disques de TYPE 2 et 4 de leur
cartouche avant l’utilisation.
Écran à cristaux liquides
Certains des pixels de l’écran (moins de
0,01 %) pourraient s’allumer continuellement
ou ne jamais s’allumer. Ceci est normal et
n’est pas signe de malfonctionnement.
Par défaut, le menu est affiché en anglais.
Il est toutefois possible de sélectionner
l’affichage en français ou en espagnol
(➡ page 27, Affichage—Langues des
Menus).
Le français est utilisé dans les exemples
suivants.
Déclic
L’étiquette doit être
dirigée vers le haut.
(Avec les disques à
double face,
introduire le disque
avec l’étiquette de
la face devant être
lue dirigée vers le
haut.)
≥Avec un DVD, il est possible d’utiliser les
touches [3, 4, 2, 1] pour sélectionner les
rubriques. Pour confirmer une sélection,
appuyer sur [ENTER].
≥Lire les instructions incluses avec le disque
pour plus de renseignements.
Pour rappeler l’écran menu
[DVD-V]
Appuyer sur [TOP MENU] ou [MENU].
≥Les disques DVD peuvent compter plusieurs
menus. Le menu qui s’affiche sur pression de la
touche [TOP MENU] peut alors être différent de
celui appelé par la touche [MENU].
[VCD]
Appuyer sur [RETURN].
≥Le lecteur balaie le disque pendant
30 secondes avant d’amorcer la lecture d’un
disque DVD-RAM.
Si un menu s’affiche
[DVD-V] [VCD]
Sélectionner une rubrique avec les
touches numériques.
Sélection d’un numéro à 2 chiffres
ex. 25: [S10]>[2]>[5]
2 Enfoncer la touche [1, – ON]
pour amorcer la lecture.
Le lecteur se met automatiquement en
marche.
[CD]
Le menu à icônes (➡ page 23) et les
informations du disque (MP3 et CD texte)
apparaissent à l’écran.
3 Régler le niveau du volume.
Branchement d’un casque
d’écoute (➡ page 32).
Arrêt de lecture
Appuyer sur [∫] (➡ page 14, Fonction de
poursuite).
Pause
Appuyer sur [;] pendant la lecture.
Appuyer sur [1] (Lecture) pour poursuivre la
lecture.
Mise hors marche
Maintenir une pression sur [∫, – OFF] jusqu’à ce
que l’indication “OFF” apparaisse à l’écran.
Mise en/hors marche au moyen de la
télécommande
Appuyer sur [Í].
≥Le lecteur ne peut être mis en marche au
moyen de la télécommande lorsque l’appareil
fonctionne sur le bloc-batterie.
Affichage de la durée écoulée de lecture
Appuyer sur [DISPLAY] pour afficher les icônes
de menu à l’écran (➡ page 23).
Fonction de coupure automatique
Le lecteur est automatiquement mis hors marche
s’il est laissé plus de 15 minutes dans le mode
arrêt (5 minutes avec le bloc-batterie).
Refermer le couvercle manuellement.
Page 55

14
RQT6450
Opérations de base
[RAM]
La liste de programmes s’utilise pour repérer un
programme à visionner.
1 Appuyer sur [TOP MENU].
Utilisation de DIRECT NAVIGATOR (navigateur
direct) pour sélectionner les programmes de lecture
DIRECT NAVIGA T OR
Date
12/23(SAM)
12/26(MAR)
1/12(VEN)
1/24(MER)
2/20(MAR)
101
42
2
3
54
125
21:02
14:35
20:00
19:30
19:05
SELECT
ENTER
RETURN
No
Canal
En circuit
Contenu
SELECT
NUMBER
09
2 Utiliser [3, 4] pour sélection-
ner le programme.
La lecture du programme actuellement
sélectionné se fait en arrière-plan.
≥Déplacer la touche [4] du curseur pour
afficher les autres programmes s’il y en a
plus de 5.
≥Il est également possible de sélectionner
un programme à l’aide des touches
numériques (télécommande).
≥Sélection d’un numéro à 2 chiffres
≥ex. 25: [S10]>[2]>[5].
3 Appuyer sur [ENTER].
La lecture du programme en arrière-plan
continue.
Effacement de la liste des programmes
Appuyer sur [TOP MENU].
(L’appareil retourne à l’état précédant l’appel de
la liste des programmes.)
Affichage de l’information sur un programme
sélectionné
Sélectionner le programme et déplacer la touche
[1] du curseur.
(L’image en arrière-plan fait une pause.)
Utiliser [2, 1] pour afficher les autres
programmes.
Retour à l’écran précédent
Appuyer sur [RETURN].
Pour référence
≥Les titres ne s’affichent que s’ils ont été saisis.
≥Il n’est pas possible de modifier les titres de
programme et de disque.
PLAYLIST
1
23
45
6
No
Date Titre
1
2
3
4
0:46:35
0:09:15
0:12:32
0:07:30
SELECT
ENTER
RETURN
10/17
10/24
11/29
12/22
World
Best Hit
Longueur Contenu
SELECT
NUMBER
09
PLAYLIST
23
45
6
789
Préc.
001/004
0:00:19
World
Best Hit
SELECT
ENTER RETURN
1 10/17 0:46:35 028 Sentier de souvenirs
Suivante
SELECT
NUMBER
09
T
3,4,2,1, ENTER
1
TOP MENU
RETURN
R
E
P
E
A
T
Fonction de poursuite
[RAM] [DVD-V] [CD] [VCD]
La position d’arrêt de lecture est mémorisée par
l’appareil lorsque l’indication “1” clignote à
l’écran. Pendant que l’indication “1” clignote,
appuyer sur [1] (Lecture) pour lancer la lecture à
partir de la position d’arrêt.
([DVD-V] ➡ Aperçu de chapitres ci-contre)
≥Ceci fonctionne seulement si le durée écoulée
du disque est affichée sur le menu à icônes
(➡ page 23).
≥L’endroit marqué est supprimé de la mémoire si
le couvercle du disque est ouvert.
≥L’appareil sauvegarde la position même s’il est
commuté en mode d’attente, sauf lors de la
lecture d’une liste de lecture (➡ page 15).
≥Appuyer sur [∫] pour supprimer les données de
la mémoire.
Aperçu de chapitres [DVD-V]
Le message ci-dessous s’affiche immédiatement
après pression de [1] (Lecture).
Une pression sur la touche [1] (Lecture)
pendant que le message est affiché enclenche la
lecture du début de chaque chapitre jusqu’au
chapitre en cours. La lecture se poursuit à partir
du point où elle a été interrompue.
(Ceci ne fonctionne qu’à l’intérieur d’un même
titre.)
Si aucune pression n’est exercée sur la touche
[1] (Lecture), le message disparaît et la lecture
débute à l’endroit où elle avait été interrompue.
Appuyez sur PLAY pour
prévisualiser le chapitre.
Lecture de base
T
3,4,2,1,ENTER
MENU
RETURN
R
E
P
E
A
T
OPEN
–
OFF
E
E
N
N
T
T
E
E
R
R
–
ON
C
H
G
Í
T
O
P
M
E
M
N
U
E
N
R
U
E
T
U
D
R
IS
N
P
L
A
Y
O
I
D
U
A
U
O
T
P
O
L
O
V
Page 56

15
RQT6450
Opérations de base
[RAM]
Il est possible de lire un groupe de scènes ou
une liste de lecture créés sur un autre appareil tel
qu’un enregistreur de DVD.
Il est également possible de sélectionner les
scènes à lire.
Lecture d’une liste de lecture
1 Appuyer sur [MENU].
Utilisation du menu de la liste de lecture
PLAYLIST
1
23
45
6
No
Date Titre
1
2
3
4
0:46:35
0:09:15
0:12:32
0:07:30
SELECT
ENTER
RETURN
10/17
10/24
11/29
12/22
World
Best Hit
Longueur Contenu
SELECT
NUMBER
09
2 Utiliser [3, 4] pour sélec-
tionner la liste de lecture.
≥Déplacer la touche [4] du curseur pour
afficher les autres listes de lecture s’il y
en a plus de 6.
≥Il est également possible de sélectionner
une liste de lecture à l’aide des touches
numériques (télécommande).
≥Sélection d’un numéro à 2 chiffres
≥ex. 25: [S10]>[2]>[5].
3 Appuyer sur [ENTER] pour
amorcer la lecture.
Affichage de l’information sur une liste de
lecture sélectionnée
1. Sélectionner la liste de lecture et déplacer la
touche [1] du curseur.
2. Utiliser [3, 4] pour sélectionner “Contenu” et
appuyer sur [ENTER].
3. Utiliser [2, 1] pour afficher les autres listes
de lecture.
Effacement de l’écran de la liste de lecture
Appuyer sur [MENU].
(L’appareil retourne à l’état précédant l’appel de
la liste de lecture.)
5 Utiliser [3, 4, 2, 1] pour
sélectionner la scène et
appuyer sur [ENTER].
La lecture de la scène commence.
≥S’il y a plus de 9 scènes, utiliser
[3, 4, 2, 1] pour sélectionner
“Suivante” et appuyer sur [ENTER].
Sélectionner “Préc.” pour revenir en
arrière.
≥Il est également possible de sélectionner
une page au moyen des touches
numériques (télécommande).
≥Pour saisir un numéro de page
≥ex. 25: [2]>[5]>[ENTER].
≥ex. 111: [1]>[1]>[1]>[ENTER].
Retour à l’écran précédent
Appuyer sur [RETURN].
PLAYLIST
23
45
6
789
Préc.
001/004
0:00:19
World
Best Hit
SELECT
ENTER RETURN
1 10/17 0:46:35 028 Sentier de souvenirs
Suivante
SELECT
NUMBER
09
T
3,4,2,1,ENTER
MENU
RETURN
R
E
P
E
A
T
Lecture de scènes
données
1 Appuyer sur [MENU].
2 Utiliser [3, 4] pour sélection-
ner la liste de lecture.
Il est également possible de sélectionner
une liste de lecture à l’aide des touches
numériques (télécommande).
Sélection d’un numéro à 2 chiffres
ex. 25: [S10]>[2]>[5].
3 Déplacer la touche [1] du
curseur.
4 Utiliser [3, 4] pour sélection-
ner “Liste des séquences” et
appuyer sur [ENTER].
Page
Nombre total de pages
OPEN
–
OFF
–
ON
C
H
G
Í
TO
P
M
E
M
N
U
E
N
R
U
E
TU
D
R
I
N
S
P
L
A
Y
E
E
N
N
T
T
E
E
R
R
A
P
O
L
O
V
O
I
D
U
U
O
T
Page 57

16
RQT6450
Opérations de base
Caractéristiques pratiques
Saut
[RAM] [DVD-V] [CD] [VCD]
Il est possible de sauter des chapitres sur les
DVD-Vidéo, des plages sur les CD et les
CD-Vidéo, tandis que sur les DVD-RAM il est
possible de sauter au début d’un programme,
d’une scène de liste de lecture, ou à un
marqueur.
Dans le mode lecture ou pause
Appuyer sur [:] ou [9].
Le nombre de pression sur la touche correspond
au nombre de sauts.
Avance rapide et recul—
Recherche
[RAM] [DVD-V] [CD] [VCD]
Dans le mode lecture
OSur l’appareil principalN
Enfoncer la touche [:] ou [9].
OSur la télécommandeN
Appuyer sur [6] ou [5].
≥Le son est entendu pendant la recherche. Il est
possible de couper le son (➡ page 26, Audio—
Recherche avec son).
Ralenti
[RAM] [DVD-V] [VCD]
Dans le mode pause
OSur l’appareil principalN
Enfoncer la touche [:] ou [9].
OSur la télécommandeN
Appuyer sur [6] ou [5].
Visionnement image par
image
[RAM] [DVD-V] [VCD]
Dans le mode pause
Utiliser [2] ou [1].
≥Maintenir en position pour changer de trame.
≥La touche [;] permet également le vision-
nement image par image.
∫
56:9
;1
13
46
7908
5
2
S10
A.SRD
SETUP
ENTER
PLAY MODE
SUBTITLE
DISPLAYTOP MENU
AUDIO
ANGLE
RETURNMENU
CANCEL
3,4,
2,1
;
∫
1
A.SRD
:,9
6,5
Nota
≥La vitesse de la recherche et de la lecture
ralentie augmente progressivement
(jusqu’à cinq paliers de vitesse).
≥Appuyer sur [1] (Lecture) pour la lecture
en reprise.
≥Avec CD-Vidéo, il est impossible de faire
une recherche en arrière pendant une
avance image par image ou une lecture
ralentie.
CD-Vidéo avec pilotage de la lecture
La pression de touches pour effectuer un
saut, une recherche ou une lecture ralentie,
peut appeler l’affichage d’un écran menu.
Lecture à partir d’un
programme, d’un titre ou
d’une plage donné
[RAM] [DVD-V] [CD] [VCD]
Télécommande seulement
Appuyer sur les touches numéri-
ques pour sélectionner la rubrique.
La lecture s’amorce à partir de la rubrique
sélectionnée.
Sélection d’un numéro à 2 chiffres
ex. 25: [S10]>[2]>[5]
ex. 25: [CD] (disques MP3) [2]>[5]>[ENTER]
Si le menu à icônes est affiché à l’écran
(➡ page 23)
≥Avec certains disques, cette fonction n’est
opérante qu’en mode d’arrêt.
C T
OFF
SP 1
SP 2
SP OFF
Enceinte Enceinte
Téléviseur
Distance A
3 ou 4 fois
la distance A
Position
d’écoute
Touches
numériques
:,9
;
3,4,2,1
–
OFF
C
C
H
H
G
G
Í
Í
∫
1
–
ON
OPEN
REPEAT
REPEAT
TO
P M
E
M
N
U
E
N
R
U
ET
UR
D
IS
N
P
L
A
Y
O
I
D
U
E
E
N
N
T
T
E
E
R
R
A
U
O
T
P
O
L
O
V
Page 58

17
RQT6450
Opérations de base
Lecture en reprise
Appareil principal seulement
[RAM] [DVD-V] [CD] [VCD]
Pendant la lecture
Appuyer sur [REPEAT].
ex.: DVD-Vidéo
Sur chaque pression de la touche:
[RAM]
Programme (PG)>Disque au complet (A)
^---------------------OFF----------------------}
Pendant la lecture de la liste de lecture
Scène (S)>Liste de lecture (PL)
§1
>OFF
^--------------------------------------------------------------}
[DVD-V]
Chapitre (C)>Titre (T)
§2
>OFF
^--------------------------------------------}
[CD] [VCD]
Plage (T)>Disque au complet (A)>OFF
^--------------------------------------------------------------}
[CD] (disques MP3)
Plage (T)>Groupe (G)
§2
>OFF
^----------------------------------------------}
§1
“PL” ne s’affiche pas lors de la lecture d’une
scène d’une liste de lecture spécifique.
§2
“All (A)” pendant la lecture programmée et
aléatoire.
CD-Vidéo avec pilotage de la lecture
1. Appuyer sur [∫].
2. Appuyer sur les touches numériques pour
sélectionner la plage où la lecture doit
commencer (➡ page 16).
3. Appuyer sur [REPEAT] (➡ ci-dessus).
Nota
≥Ceci fonctionne seulement si le durée écoulée
du disque est affichée sur le menu à icônes
(➡ page 23).
≥La lecture en reprise n’est pas possible pour
reprendre la lecture entière d’un disque
DVD-Vidéo ou MP3 et pour la lecture de toutes
les listes d’un disque DVD-RAM.
∫ Lecture en reprise d’une
sélection de plages/chapitres
Lancer la lecture programmée (➡ page 20) et
appuyer sur [REPEAT] pour afficher “A”.
C T
OFF
Ambiophonie virtuelle
avancée avec enceintes
ou casque d’écoute
(AVANCED SURROUND)
[RAM] [DVD-V] [VCD]
Télécommande seulement
Utiliser ce mode pour obtenir un effet ambiophonique avec des enceintes (SP) (sur l’autre
appareil) ou dans un casque d’écoute (HP). Si le
disque comporte des effets ambiophoniques,
ses effets sont amplifiés et le son semble
provenir d’enceintes virtuelles.
SP: Dolby Digital, DTS, MPEG, LPCM,
2 canaux ou plus seulement
HP: Dolby Digital, MPEG, LPCM, 2 canaux ou
plus seulement
Préparatifs
Désactiver les effets ambiophoniques sur l’autre
appareil et réduire le volume au minimum sur cet
appareil (➡ page 13).
Appuyer sur [A.SRD] pour
sélectionner le niveau de l’effet
d’ambiophonie virtuelle avancée.
Sur chaque pression de la touche:
ex.: SP
Pour changer de mode
1. Appuyer sur [2] pour sélectionner “SP” ou
“HP”.
2. Appuyer sur [3, 4] pour changer de mode.
Pour un rendement optimal
SP 1
SP 2
SP OFF
1 (Naturel)>2 (Accentué)>OFF (Désactivé)
^---------------------------------------------------------}
Nota
≥L’effet ambiophonique virtuel avancé peut ne
pas fonctionner ou avoir moins d’effet avec
certains disques.
≥En présence de distorsion, désactiver l’effet
ambiophonique virtuel avancé.
≥Il n’y a pas d’effet discernable sur le haut-
parleur de cet appareil.
Enceinte Enceinte
Téléviseur
Distance A
3 ou 4 fois
la distance A
Position
d’écoute
OAvec les
haut-parleurs du
téléviseurN
Distance Au
Largeur du téléviseur
Page 59

18
RQT6450
Opérations de base
Lecture de disques MP3 et CD texte à partir des menus
[CD] (disques MP3, CD texte)
Menus de lecture
Le lecteur peut prendre en charge des fichiers
MP3 enregistrés par ordinateur sur CD-R/RW.
Les fichiers sont traités à la manière de plages
tandis que les dossiers sont considérés comme
étant des groupes de plages.
Cet appareil peut lire et afficher les informations
textuelles sur les disques CD. Il est possible
d’afficher les titres, le nom des artistes et les
titres des plages.
1 Appuyer sur [TOP MENU].
CD texte
Disques MP3
2 Utiliser [3, 4] pour sélection-
ner la plage, puis appuyer sur
[ENTER].
La lecture s’amorce et se poursuit jusqu’à
la fin du disque.
“0” indique la plage en cours.
Pour afficher d’autres pages
Utiliser [3, 4, 2, 1] pour sélectionner “Préc.”
ou “Suivante”, puis appuyer sur [ENTER].
Pour quitter l’écran de liste
Appuyer sur [TOP MENU].
001 Both Ends Freezing
002 Lady Starfish
003 Life on Jupiter
004 Metal Glue
005 Paint It Yellow
006 Pyjamamama
007 Shrimps from Mars
008 Starperson
009 Velvet Cuppermine
010 Ziggy Starfish
Suivante
Rechercher
Préc.
1
2
3
4
5
6
7
8
9
10
No Groupe : 001 My Favorite Arbre
SELECT
ENTER RETURN
G
T
Total
1
1
1
SELECT
NUMBER
09
FILE LIST
T
:,9
3,4,2,1,
ENTER
RETURN
TOP MENU
Arbre
G 8/16
MP3 music
001 My Favorite
001 Brazilian pops
002 Chinese pops
003 Czech pops
004 Hungarian pops
005 Liner notes
006 Japanese pops
007 Mexican pops
008 Philippine pops
009 Swedish pops
001 Momoko
002 Standard number
001 Piano solo
002 Vocal
SELECT
ENTER RETURN
G 8
T 14
Total 123
SELECT
NUMBER
09
FILE LIST
002
001001
001.mp3
002.mp3
003.mp3
003
001.mp3
002.mp3
003.mp3
001.mp3
002.mp3
003.mp3
004.mp3
Another Pineapple
Board The Golden Ship
Fall In The Frozen Season
Violet Sky
Pink Island
Suivante
Rechercher
Préc.
6
7
8
9
10
Rechercher
*
A
SELECT
ENTER RETURN
SELECT
NUMBER
09
Nom de groupe
(disques MP3 seulement)
Enregistrement de textes sur disques CD
Ne pas placer les plages dans des dossiers.
L’appareil lit les plages dans leur ordre
d’enregistrement donc éliminant le besoin d’y
ajouter des préfixes.
CD texte
Nota
≥Les disques doivent satisfaire aux normes
ISO9660 de niveau 1 ou 2 (sauf dans le cas
des formats étendus). Le nom des fichiers MP3
doit comporter l’extension “.MP3” ou “.mp3”.
≥Le lecteur est compatible avec les enregistre-
ments multisession; par contre, s’il y a plusieurs sessions, l’amorce de la lecture pourrait
prendre plus de temps. Pour prévenir un tel
problème, réduire le nombre de sessions à un
strict minimum.
≥Le lecteur n’est pas compatible avec les
marqueurs ID3.
≥Le lecteur n’est pas compatible avec des
fichiers avec fréquence d’échantillonnage de
32 kHz.
≥Si une plage en format MP3 contenant des
données d’image fixe est lue, le son ne sera
pas entendu immédiatement et le temps de la
durée écoulée ne sera pas affiché pendant ce
délai. Même une fois la lecture lancée, le temps
de lecture exacte ne sera pas affiché.
Appellation des dossiers et des fichiers
Au moment de l’enregistrement, attribuer un
préfixe ordinal (à trois chiffres) au nom des
dossiers et des fichiers en fonction de l’ordre
dans lequel leur lecture doit se faire. (Ceci
pourrait ne pas fonctionner.)
Exemple:
racine
Disques MP3
One Thing To Tell Y ou
Never Too Late
A Man With No Shadow
Hacker's Life
Distant Dark Moon
Another Pineapple
Board The Golden Ship
Fall In The Frozen Season
Violet Sky
Pink Island
1
2
3
4
5
6
7
8
9
10
No Contenu
Suivante
Rechercher
Préc.
SELECT
ENTER RETURN
T 1/14
TEXT
SELECT
NUMBER
09
ex.: MP3
REPEAT
OPEN
–
OFF
–
ON
C
H
G
Í
T
OP
M
E
M
N
E
N
RE
U
TU
D
RN
IS
P
L
A
Y
E
E
N
N
T
T
E
E
R
R
L
O
V
U
O
I
D
U
A
U
O
T
P
O
Page 60

19
RQT6450
Opérations de base
Repérage d’un groupe sur une
liste arborescente (disques MP3)
1 Utiliser la touche [1] du
curseur pendant qu’une plage
est en surbrillance pour
appeler l’affichage de la liste
arborescente.
Il est impossible de sélectionner un groupe
ne comportant pas de fichiers compatibles.
2 Utiliser [3, 4] pour sélection-
ner un groupe, puis appuyer
sur [ENTER].
La liste de fichiers du groupe s’affiche.
Pour référence
Utiliser [2, 1] pour sauter des niveaux dans
l’arborescence.
Retour à l’écran d’arborescence
Appuyer sur [RETURN].
Arbre
G 8/16
MP3 music
001 My Favorite
001 Brazilian pops
002 Chinese pops
003 Czech pops
004 Hungarian pops
005 Liner notes
006 Japanese pops
007 Mexican pops
008 Philippine pops
009 Swedish pops
001 Momoko
002 Standard number
001 Piano solo
002 Vocal
SELECT
ENTER RETURN
G 8
T 14
Total 123
SELECT
NUMBER
09
FILE LIST
1 Utiliser [3, 4] pour sélection-
ner une plage.
Recherche d’une plage
Entrer une portion du titre pour en effectuer une
recherche.
Bien que les caractères soient affichés en lettres
majuscules, l’appareil recherche aussi les lettres
minuscules.
Préparatifs
Appuyer sur [TOP MENU] pour afficher l’écran
de liste.
Exemple: pour rechercher toutes les plages
incluant le mot “amour”.
1 Utiliser [3, 4] pour sélection-
ner “Rechercher” et appuyer
sur [ENTER].
2 Utiliser [3, 4] pour sélec-
tionner “A” et appuyer sur
[ENTER].
Les caractères changent en ordre alphabétique sur chaque pression du
curseur [3].
≥Appuyer sur [:, 9] pour sauter
entre A, E, I, O et U.
≥Utiliser [2] pour effacer un caractère.
≥Recommencer cette étape pour entrer
“M”, “O”, “U” et “R”.
3 Utiliser la touche [1] du
curseur pour sélectionner
“Rechercher” et appuyer sur
[ENTER].
L’écran de résultats de recherche apparaît.
4 Utiliser [3, 4] pour sélec-
tionner la plage et appuyer sur
[ENTER].
Déplacer la touche [4] du curseur pour
afficher les autres plages s’il y en a plus de
14.
≥Pour rechercher le premier mot dans un titre,
effacer d’abord l’astérisque (¢).
≥Les chiffres peuvent également être entrés
avec les touches numériques (télécommande).
Another Pineapple
Board The Golden Ship
Fall In The Frozen Season
Violet Sky
Pink Island
Suivante
Rechercher
Préc.
6
7
8
9
10
Rechercher
*
A
SELECT
ENTER RETURN
SELECT
NUMBER
09
Affichage de l’information
textuelle pour une plage
(disques CD texte)
2 Déplacer la touche [1] du
curseur.
≥Utiliser [2, 1] pour sélectionner d’autres
plages. Appuyer sur [ENTER] pour effectuer la
lecture des plages sélectionnées.
Pour retourner à l’écran de liste
Appuyer sur [RETURN].
One Thing To Tell Y ou
Never Too Late
A Man With No Shadow
Hacker's Life
Distant Dark Moon
Another Pineapple
Board The Golden Ship
Fall In The Frozen Season
Violet Sky
Pink Island
1
2
3
4
5
6
7
8
9
10
No Contenu
Suivante
Rechercher
Préc.
SELECT
ENTER RETURN
T 1/14
TEXT
SELECT
NUMBER
09
Page 61

20
RQT6450
Opérations de base
Lecture aléatoire
Appuyez sur PLAY pour commencer
3/2.1 ch
Digital
1 English
English
ON
1
2
Au moyen des touches numé-
riques, sélectionner un titre
(DVD-Vidéo) ou un groupe
(disque MP3).
≥Certains éléments ne peuvent être
sélectionnées.
Disques DVD-Vidéo, MP3 seulement
Modification de la séquence de lecture
PROGRAM
6 ∫ 1
5
Choisissez une plage,
puis appuyez sur ENTER.
No Temps
Plage
Temps total
Lecture
0:00
SELECT
ENTER RETURN
1
Effacer
Effacer tout
le programme
0 Appuyez sur PLAY pour commencer
SELECT
NUMBER
09
3 Au moyen des touches numé-
riques, sélectionner une plage
(CD ou VCD) ou un chapitre
(DVD-Vidéo)
( et appuyer sur [ENTER]).
≥Recommencer les étapes 2 et 3 pour
programmer d’autres sélections.
≥Les données chronométriques ne sont
pas affichées lors de la programmation
de la lecture d’un DVD-Vidéo ou d’un
disque MP3.
4 Appuyer sur [1] (Lecture).
La lecture des plages, dans l’ordre de leur
programmation, s’amorce.
Ajout, modification ou suppression des
rubriques
1. Appuyer sur [3, 4] pour sélectionner le
numéro de programme.
2. Effectuer les étapes 2 et 3 ci-dessus pour
ajouter ou modifier les rubriques.
2. Appuyer sur [CANCEL] pour supprimer une
rubrique (ou appuyer sur [3, 4, 2, 1] pour
sélectionner “Effacer”, puis appuyer sur
[ENTER]).
Pour passer à la page suivante ou précédente
Appuyer sur [6] ou [5].
Suppression de toutes les plages
programmées
Amener le curseur sur “Effacer tout le programme” au moyen des touches [3, 4, 2, 1], puis
appuyer sur [ENTER].
Pour quitter le mode de lecture programmée
En mode arrêt, appuyer sur [PLAY MODE]
jusqu’à ce que l’écran de lecture programmée ne
soit plus affichée.
≥Les données programmées demeurent en
mémoire.
Sélection au moyen des touches du curseur
Appuyer sur [ENTER] et [3, 4] pour faire une
sélection, puis appuyer de nouveau sur [ENTER]
pour mémoriser le numéro. Le paramètre “ALL”
permet de sélectionner toutes les plages à la fois
d’un disque, d’un titre ou d’un groupe.
Nota
≥Toute la programmation est supprimée lors de
la mise hors contact de l’appareil, ou lorsque le
couvercle du disque est ouvert.
[DVD-V]
≥Différents titres ont différentes bandes son et
sous-titres.
≥Certaines plages ne pourront être lues mêmes
si elles ont été programmées.
Disques MP3 seulement
[DVD-V] [CD] [VCD]
Télécommande seulement
Lecture programmée
Il est possible de programmer une séquence de
lecture comportant jusqu’à 32 plages/chapitres,
et ce, dans l’ordre voulu.
Dans le mode arrêt
1 Appuyer sur [PLAY MODE]
jusqu’à ce que l’écran de
lecture programmée s’affiche.
ex.: CD
∫
56:9
;1
13
46
7908
5
2
S10
A.SRD
SETUP
ENTER
PLAY MODE
SUBTITLE
DISPLAYTOP MENU
AUDIO
ANGLE
RETURNMENU
CANCEL
3,4,
2, 1,
ENTER
1
AUDIO
CANCEL
SUBTITLE
ANGLE
PLA Y MODE
6,5
Touches
numériques
Page 62

21
RQT6450
Opérations de base
Lecture aléatoire
Appuyez sur PLAY pour commencer
2
Appuyer sur les touches
numériques pour sélectionner
le titre.
3 Appuyer sur [1] (Lecture).
La lecture s’amorce à partir d’une plage
sélectionnée au hasard.
≥Certains titres ne peuvent pas être sélec-
tionnés. [DVD-V]
Pour quitter le mode de lecture aléatoire
En mode arrêt, appuyer sur [PLAY MODE]
jusqu’à ce que l’écran de lecture aléatoire ne soit
plus affiché.
DVD-Vidéo seulement
Sélection de la bande son, de la langue des
sous-titres et de la prise de vue
Télécommande seulement
Certains disques DVD comportent des bandes
son et des sous-titres enregistrés dans des
langues différentes de même que diverses prises de vue; il est donc possible de les changer
pendant la lecture.
≥L’indication “–” ou “––” s’affiche en lieu et place
du numéro de la langue dans les situations où
la langue sélectionnée n’est pas enregistrée
sur le disque.
Bande son
[RAM] [DVD-V]
Pendant la lecture
Appuyer sur [AUDIO].
Le numéro change sur chaque pression de la
touche.
≥Cette même touche peut être utilisée pour
activer ou couper les voix sur les disques
comportant une fonction Karaoké. Pour plus de
détails, lire les notes d’accompagnement du
disque.
≥Se reporter à [B] à la page 24 pour de plus
amples détails sur les types de signaux audio.
3/2.1 ch
Digital
1 English
Sous-titres
[DVD-V]: Il est possible de changer le numéro de
sous-titres et d’activer ou désactiver les
sous-titres.
[RAM]: Il est possible d’activer ou désactiver les
sous-titres.
Pendant la lecture
Appuyer sur [SUBTITLE].
Le numéro change sur chaque pression de la
touche.
≥Dans certains cas, la langue des sous-titres
sélectionnée n’est pas immédiatement activée.
≥Dans le cas où les sous-titres seraient super-
posés à ceux pour malentendants, en désactiver l’affichage.
Affichage/suppression des sous-titres
1. Appuyer sur [SUBTITLE].
2. Appuyer sur [1]. ([DVD-V])
3. Appuyer sur [3, 4] pour sélectionner “ON”
ou “OFF”.
Prise de vue
[DVD-V]
Pendant la lecture
Appuyer sur [ANGLE].
Le numéro change sur chaque pression de la
touche.
Dans le mode arrêt
1 Appuyer sur [PLAY MODE]
jusqu’à ce que l’écran de
lecture aléatoire s’affiche.
ex.: CD
Lecture aléatoire
English
ON
1
1
Page 63

Mode
Support
Grand écran
4:3
4:3,
(Boîte aux
lettres)
22
RQT6450
Opérations avancées
O
U
3,4,2,1,
ENTER
RETURN
DISPLAY
Modification des réglages de l’écran
[RAM] [DVD-V] [VCD]
Réglage de la teinte
1 Appuyer sur [COLOUR].
2 Utiliser [2, 1] pour régler la
teinte.
j5: clair()5: foncé
3 Appuyer sur [COLOUR] pour
effacer l’affichage.
Grandeur de l’image
Appuyer sur [MONITOR].
À chaque pression de la touche:
NORMAL--------)FULL (Plein écran)---------]
^---OFF (pas d’image)(--ZOOM(--------}
Mode d’affichage et grandeur de l’image
La grandeur de l’image est fonction du mode
d’affichage sélectionné et du format sous lequel
l’image a été enregistrée (➡ ci-dessous).
≥Si l’écran du lecteur n’est pas utilisé, sélection-
ner “OFF” (pas d’image) pour réduire la consommation d’énergie. (Le voyant [Í] clignote.)
≥L’écran est mis hors marche lorsque le couver-
cle est fermé.
≥Des lignes horizontales peuvent apparaître
sur l’image dans le mode “ZOOM”, cela
n’est le signe d’aucun problème de
fonctionnement.
Réglage de la luminosité
1 Appuyer sur [BRIGHT].
2 Utiliser [2, 1] pour régler la
luminosité.
j5: foncé()5: clair
La consommation d’énergie augmente
avec le niveau de luminosité.
3 Appuyer sur [BRIGHT] pour
effacer l’affichage.
2,1
COLOUR
BRIGHT
MONITOR
Te quiero
Te quiero
Te quiero
Te quiero
Te quiero
Te quiero
Te quiero
Te quiero
Te quiero
Te quiero
NORMAL
Plein écran
Bande noire de
chaque côté.
L’image est entourée
d’un cadre noir.
FULL (Plein écran)
Plein écran
Agrandie dans le sens
de la largeur.
Agrandie dans le sens
de la largeur.
ZOOM
Le haut et le bas de
l’image sont tronqués.
Le haut et le bas de
l’image sont tronqués.
Plein écran
Nota
Ces changements ne concernent que l’écran du lecteur. Si un téléviseur est raccordé, effectuer les
réglages sur ce dernier.
Voyant Í
R
E
P
E
A
T
OPEN
–
OFF
–
ON
C
H
G
Í
MONITOR
BRIGHT
COLOUR
TO
P
M
E
M
N
U
E
N
R
U
E
TU
D
R
IS
N
P
L
A
Y
O
I
D
U
T
E
E
N
N
T
T
E
E
R
R
A
U
O
T
P
O
L
O
V
O
E
D
I
V
Page 64

23
RQT6450
Opérations avancées
Ces icônes consistent en des menus de dimen-
sions réduites contenant des renseignements
sur le disque ou le lecteur. Ces menus permettent d’effectuer des opérations en modifiant les
renseignements qui y sont affichés.
Procédures communes
[RAM] [DVD-V] [CD] [VCD]
1 Appuyer sur [DISPLAY].
À chaque pression de la touche:
Renseignements
sur les disques
> Indicateur d’état
:;
Affichage initial <
Renseignements sur
le lecteur (➡ étape 2)
Pendant que l’icône le plus à gauche est
en surbrillance
2
Utiliser [3, 4] pour sélection-
ner le menu.
À chaque pression de la touche:
Menu de lecture () Menu vidéo
ee
uu
Menu d’affichage () Menu audio
3 Utiliser [2, 1] pour sélection-
ner la rubrique.
4 Utiliser [3, 4] pour sélection-
ner le paramètre.
≥Seules les rubriques identifiées par le
symbole “3” ou “4” peuvent faire l’objet
d’un paramétrage.
≥Appuyer sur [ENTER] dans le cas où le
paramètre ne serait pas modifié après
avoir appuyé sur [3, 4].
≥Certaines rubriques nécessitent des
opérations différentes. Voir les détails
aux pages suivantes.
Renseignements sur le lecteur seulement
Menus à icônes—utilisation
Pour référence
≥Selon l’état de l’appareil (en cours de lecture,
en mode d’arrêt, etc.) et le type de support
utilisé, certaines options ne peuvent pas être
sélectionnées ou modifiées.
≥Si des chiffres s’affichent (ex. le no de titre), les
touches numériques (télécommande) pourront
également être utilisées pour effectuer le
paramétrage. Lors de l’utilisation des touches
numériques, appuyer sur [ENTER] pour con-
firmer le réglage.
Pour effacer les icônes
Appuyer sur [RETURN] jusqu’à ce qu’elles
disparaissent.
∫ Changement de la position des
icônes
1. Utiliser [2, 1] pour sélectionner
l’icône le plus à droite.
2. Utiliser [3, 4] pour déplacer les icônes.
(L’utilisateur a le choix parmi cinq positions.)
Indicateur d’état
Indique la progression de la lecture.
ex.: DVD-Vidéo
a Position courante [RAM] [DVD-V] [CD] [VCD]
b PG: Numéro de programme [RAM]
PL: Numéro de liste de lecture [RAM]
T: Numéro de titre [DVD-V]
T: Numéro de plage [CD] [VCD]
G: Numéro de groupe [CD] (disques MP3)
c C: Numéro de chapitre [DVD-V]
T: Numéro de plage au sein d’un groupe
[CD] (disques MP3)
d État–lecture, pause ou ralentie/repérage
[RAM] [DVD-V] [CD] [VCD]
e Changement de l’affichage du temps
[RAM] [DVD-V] [CD] [VCD]
≥Utiliser les touches [3, 4] pour indiquer le
temps écoulé ou le temps restant pour la
programmation, la plage ou le titre (ou le
chapitre durant la lecture programmée et
aléatoire).
Temps de lecture écoulé
[CD] (disques MP3)
(affichage seulement; ne peut être modifié)
O
U
3,4,2,1,
ENTER
RETURN
DISPLAY
R
E
P
E
A
T
OPEN
–
OFF
–
ON
C
H
G
Í
TO
P ME
M
N
U
E
N
R
U
ET
U
D
RN
IS
P
L
A
Y
D
U
E
E
N
N
T
T
E
E
R
R
A
T
P
O
L
O
V
I
O
Page 65

24
RQT6450
Opérations avancées
Renseignements sur les disques
ex.: DVD-Vidéo
a PG: Numéro de programme [RAM]
PL: Numéro de liste de lecture [RAM]
T: Numéro de titre [DVD-V]
T: Numéro de plage [CD] [VCD]
G: Numéro de groupe [CD] (disques MP3)
b C: Numéro de chapitre [DVD-V]
T: Numéro de plage au sein d’un groupe
[CD] (disques MP3)
c Temps [RAM] [DVD-V]
≥Utiliser les touches [3, 4] pour indiquer le
temps écoulé ou le temps restant pour la
programmation ou le titre (ou le chapitre
durant la lecture programmée et aléatoire).
≥Sélectionner une position pour amorcer la
lecture en spécifiant un temps avec les
touches numériques et appuyer sur
(ENTER).
Changement de l’affichage du temps
[CD] [VCD]
Utiliser [3, 4] pour afficher le temps de
lecture écoulé, le temps restant de la plage
ou du disque.
Temps de lecture écoulé
[CD] (disques MP3)
(affichage seulement; ne peut être modifié)
d Bande son [RAM] [DVD-V] (➡ page 21)
(Voir [A] ci-dessous pour les abréviations des
langues.)
e
Type de signal audio
[RAM] [DVD-V]
(➡page 21)
(Voir [B] ci-dessous pour plus de détails.)
Mise en circuit/coupure des voix
(DVD Karaoké seulement) [DVD-V]
Solo: OFF (Non) ou ON (Oui)
Duet: OFF (Non), 1i2, V1 ou V2
f Langue des sous-titres [DVD-V] (➡ page 21)
(Voir [A] ci-dessous pour les abréviations des
langues.)
Affichage ou non des sous-titres
[RAM] [DVD-V]
ON()OFF
Affichage ou non des renseignements
des plages
[CD] (disques MP3, CD texte)
ON()OFF
g Numéro d’angle [DVD-V] (➡ page 21)
h Numéro de plage sur le disque [CD]
(disques MP3)
i Nombre total de plages sur le disque
[CD] (disques MP3)
j Mode audio [RAM] [VCD]
LR()L()R
^---------------------J
k Lecture pilotée par menu [VCD]
(avec pilotage de la lecture seulement)
Confirme l’activation ou la désactivation du
pilotage de la lecture (PBC) par menu.
ex.: Disque MP3 ex.: CD-Vidéo
Menus à icônes—utilisation
1−10
1 2 3 4 5 6 7 8 9 10
[A] La langue de la bande son et des sous-titres
ENG: Anglais ESP: Espagnol DAN: Danois CHI: Chinois VIE: Vietnamien
FRA: Français NLD: Hollandais POR: Portugais KOR: Coréen THA: Thailandais
DEU: Allemand SVE: Suédois RUS: Russe MAL: Malais ✽: Autres
ITA: Italien NOR: Norvégien JPN: Japonais
[B] Type de signal/données
LPCM/ÎDigital/DTS/MPEG: Type de signal b (bit): Nombre de bits
k (kHz): Fréquence d’échantillonnage ch (canal): Nombre de canaux
Exemple: 3
/2 .1ch
.1: Signal des extrêmes-graves
(n’est pas affiché en l’absence de signal d’extrêmes-graves)
.0: Aucun effet ambiophonique
.1: Effet ambiophonique monaural
.2: Effet ambiophonique stéréophonique (gauche/droit)
.1: Centre
.2: Avant gaucheiAvant droit
.3: Avant gaucheiAvant droitiCentre
Page 66

25
RQT6450
Opérations avancées
Renseignements sur le lecteur
Menu de lecture
a Lecture en reprise A-B
[RAM] [DVD-V] [CD] [VCD]
[ENTER] (Début) ➡ [ENTER] (Fin)
Pour annuler: [ENTER]
≥Cette caractéristique fonctionne unique-
ment dans un programme/plage/titre.
≥La fin d’une plage, d’un titre ou d’un
programme est automatiquement identifiée
comme étant le point B lorsque la plage, le
titre ou le programme touche à sa fin.
≥Certains sous-titres enregistrés aux
alentours du point A ou B risquent de ne
pas apparaître.
b Lecture en reprise (➡ page 17)
c Affichage du mode de lecture
[DVD-V] [CD] [VCD]
---: Lecture normale
PGM: Lecture programmée
RND: Lecture aléatoire
d Marqueur
[DVD-V] [CD] [VCD]: 5 positions
[RAM]: 999 positions
Si des endroits ont été marqués (par
exemple, avec un enregistreur de DVD), ces
marqueurs s’affichent.
[ENTER] ➡ [1] pour selectionner “¢” (Il est
maintenant possible d’insérer des marqueurs.)
Pour insérer un marqueur:
[ENTER] (à l’endroit désiré)
Pour marquer une autre position:
[2, 1] ➡ [ENTER]
Pour rappeler un marqueur:
[2, 1] ➡ [ENTER]
Pour effacer un marqueur:
[2, 1] ➡ [CANCEL]
[RAM]
≥Pour marquer le onzième point et plus
≥1. [2, 1] pour sélectionner l’icône
d’épingle du marqueur.
≥2. [3, 4] pour sélectionner “11–20”
≥Il est possible de sélectionner le prochain
groupe lorsque le groupe en cours est
plein.
Mode image numérique [RAM] [DVD-V] [VCD]
Nor.: Mode normal
Cin.: Adoucit l’image et fait ressortir les détails
dans les scènes sombres.
Menu vidéo
Affichage du taux de bits [RAM] [DVD-V] [VCD]
ON()OFF
Affiche le taux de bits (valeurs approximatives) et
le type d’image (I/P/B ➡ page 33, Glossaire)
Pendant la lecture: Indique le taux de bits
moyen du vidéo en cours de lecture
En mode de pause: Indique le volume de
données de l’image
Menu d’affichage
1−10
1 2 3 4 5 6 7 8 9 10
Icône d’épingle
du marqueur
a Mode ambiophonie virtuelle avanceé
[RAM] [DVD-V] [VCD] (➡ page 17)
SP()HP
b Niveau SP/HP [RAM] [DVD-V] [VCD]
(➡ page 17)
1()2()OFF
^----------------------J
c Optimisation des dialogues [DVD-V]
(Dolby Digital/DTS, 3 canaux ou plus
seulement)
ON()OFF
Le volume des dialogues du canal central est
élevé si “ON” est sélectionné.
Menu audio
≥Cette fonction est inopérante pendant
l’utilisation d’une liste de lecture.
≥Les marqueurs sont ordonnés de manière
temporelle. Cela signifie que les numéros
de marqueur peuvent changer lors de
l’ajout et de l’effacement de marqueurs.
≥Les marqueurs existants peuvent être effa-
cés, mais ils sont rétablis lors de l’ouverture
du couvercle du disque ou de la commutation de l’appareil en mode d’attente.
Page 67

26
RQT6450
Opérations avancées
Le tableau ci-dessous décrit le paramétrage de l’appareil. Il est possible de modifier le
paramétrage en fonction de ses préférences et des caractéristiques de l’environnement dans
lequel le lecteur est utilisé. Le paramétrage demeure en mémoire jusqu’à ce qu’il soit modifié,
et ce, même après que l’appareil ait été mis hors marche.
≥Les paramètres par défaut sont soulignés.
Modification des réglages
Menus
Disque
Vidéo
Audio
Rubriques
Audio (dialogues) [DVD-V]
Choisir la langue des dialogues.
Sous-titres [DVD-V]
Choisir la langue des sous-titres.
Menus du disque [DVD-V]
Choisir la langue des menus.
Restriction par classe [DVD-V]
Choisir la classe de restriction de lecture
des DVD-Vidéo.
≥L’écran de saisie du mot de passe
≥s’affiche sur sélection d’un niveau 0 à 7
≥ou de la rubrique “Restriction par classe”
≥si un niveau entre 0 et 7 a été choisi
≥(➡ page 28)
≥Sélectionner le niveau “0” pour bloquer
la lecture des disques non classés.
Image télé (➡ page 31)
Sélectionner le format en fonction du
téléviseur et selon ses préférences.
Mode d’arrêt sur image
(➡ page 33, Glossaire)
Choisir le type d’image lors d’un arrêt sur image.
Conv.-abaissement PCM
[DVD-V]
(➡page 28)
Dolby Digital [DVD-V] (➡ page 28)
DTS Digital Surround [DVD-V] (➡ page 28)
Compression dynamique [RAM] [DVD-V]
(Dolby Digital seulement)
(➡ page 33, Glossaire)
Modification de la dynamique pour écoute
discrète.
Recherche avec son
Sélection d’une recherche avec ou sans son.
Options
Anglais
Français Espagnol
Version Originale§1Autre ¢¢¢¢
§2
Automatique§3Anglais Français
Espagnol Autre ¢¢¢¢
§2
Anglais Français Espagnol
Autre ¢¢¢¢
§2
Classe de restriction (lorsque le
niveau 8 est sélectionné)
8 Autoriser tous les disques:
1 à 7
§4
0 Interdire tous les disques:
Modification (lorsqu’un niveau 0 à 7
est sélectionné)
Déverrouiller le lecteur
Changer le code
Sélection du niveau de restriction
Déverrouillage temporaire
4:3 Pan&Scan
4:3 Letterbox
16:9
Automatique
Champ
Image
Non PCM
Bitstream PCM
PCM Bitstream
Non
Oui
Oui Non
Disque
Audio (dialogues)
Sous-titres
Menus du disque
Restriction par classe
Anglais
Anglais
Automatique
Niveau 8
SETUP
SELECT TAB
ENTER RETURN
∫;1
132
A.SRD
SETUP
ENTER
PLAY MODE
SUBTITLE
DISPLAYTOP MENU
AUDIO
ANGLE
RETURNMENU
CANCEL
3,4,
2,1,
ENTER
SETUP
RETURN
Page 68

27
RQT6450
Opérations avancées
§1
La langue originale du disque est sélectionnée.
§2
Entrer un code au moyen des touches numériques (➡ page 38).
§3
Si la langue sélectionnée pour les dialogues n’est pas disponible, les sous-titres s’affichent
automatiquement dans la langue sélectionnée (si disponible).
§4
Bloque la lecture de tout DVD-Vidéo dont la classe correspond au niveau choisi.
Procédures communes
Menus
Affichage
Autres
Rubriques
Langues des Menus
Choisir la langue de préférence pour les
menus et les affichages.
Affichage à l’écran
Choisir si les messages seront affichés ou
non.
Démonstration
Une démonstration des affichages
s’amorce lorsque “Oui” est sélectionné.
Le mode démonstration est interrompu sur
pression d’une touche et les réglages
retournent à “Non”. (sauf [MONITOR],
[BRIGHT], et [COLOUR]).
Options
English
Français Español
Oui Non
Non Oui
1 Appuyer sur [SETUP] pour
afficher les menus.
Disque
Audio (dialogues)
Sous-titres
Menus du disque
Restriction par classe
Anglais
Anglais
Automatique
Niveau 8
SETUP
SELECT TAB
ENTER RETURN
3 Appuyer sur [3, 4] pour
sélectionner la rubrique, puis
appuyer sur [ENTER].
4 Appuyer sur [3, 4] pour
sélectionner le paramètre, puis
appuyer sur [ENTER].
Le menu s’affiche à nouveau.
Retour au menu précédent
Appuyer sur [RETURN].
Après la fin des réglages
Appuyer sur [SETUP].
Pour référence
Appuyer sur la touche [MENU] sur l’appareil principal pour accéder aux menus de réglage initial
en mode arrêt (sauf si un DVD-RAM est inséré).
2 Appuyer sur [2, 1] pour
sélectionner l’onglet du menu.
Le menu sélectionné s’affiche.
Disque
()
(--------------------)
Vidéo Audio
Autres Affichage
()
e
u
e
u
∫;1
132
A.SRD
SETUP
ENTER
PLAY MODE
SUBTITLE
DISPLAYTOP MENU
AUDIO
ANGLE
RETURNMENU
CANCEL
3,4,
2,1,
ENTER
SETUP
RETURN
Page 69

28
RQT6450
Opérations avancées
Sortie numérique
[DVD-V]
Modifier ces réglages lorsque des appareils
numériques sont branchés.
Bitstream (Paramètre par défaut pour signal
Dolby Digital):
Sélectionner ce mode si l’équipement connecté
peut décoder le signal.
PCM (Paramètre par défaut pour DTS Digital
Surround):
Sélectionner ce mode dans le cas où
l’équipement connecté ne peut décoder le signal.
IMPORTANT
Si l’équipement utilisé n’est pas en mesure
de décoder le signal, le réglage doit être
modifié à PCM. Autrement, les signaux que
l’équipement est incapable de traiter seront
reproduits par le lecteur engendrant ainsi
un haut niveau de bruit susceptible
d’endommager les haut-parleurs et l’ouïe.
Conversion-abaissement
PCM
Dolby Digital et DTS Digital
Surround
Sélectionner la façon d’émettre les signaux
audio avec une fréquence d’échantillonnage de
96 kHz.
Sélectionner “PCM” si le composant ne peut pas
prendre en charge des signaux avec une
fréquence d’échantillonnage de 96 kHz.
≥Sélectionner “Non” lors du raccordement
analogique, peu importe le type d’appareil.
Non (réglage par défaut):
Sortie à 96 kHz. Aucune sortie avec un disque
avec protection des droits d’auteur. Sélectionner
“PCM” dans un tel cas.
PCM:
Conversion de la sortie audio à 48 kHz.
Modification des réglages
Programmation du mot
de passe
Télécommande seulement
[DVD-V]
L’écran de saisie du mot de passe s’affiche
lorsqu’un niveau entre 0 et 7 a été programmé.
1. Entrer un mot de passe à quatre chiffres au
moyen des touches numériques, puis
appuyer sur [ENTER].
1. ≥En cas d’erreur, appuyer sur [CANCEL]
pour l’effacer avant d’appuyer sur [ENTER].
1. ≥L’icône de verrouillage s’affiche pour
indiquer que le niveau de restriction est
verrouillé.
1. ≥Ne pas oublier le mot de passe.
2. Appuyer sur [ENTER] pour confirmer le mot
de passe saisi.
Si la classification du DVD-Vidéo mis en
place est supérieure au niveau fixé, un
message s’affiche à l’écran. Suivre les
instructions affichées.
∫
56:9
;1
13
46
7908
5
2
S10
A.SRD
SETUP
ENTER
PLAY MODE
SUBTITLE
DISPLAYTOP MENU
AUDIO
ANGLE
RETURNMENU
CANCEL
CANCEL
ENTER
Touches
numériques
VIDEOVOL
AUDIO
OPT OUT
OPTICAL IN
LINE IN
R(D)
L(G)
Page 70

29
RQT6450
Opérations avancées
Raccordement de l’appareil à un appareil auxiliaire
Pour un rendu sonore en puissance
Connexion numérique
Rendu ambiophonique, multicanal
Connecter à un amplificateur avec décodeur
intégré ou à un amplificateur et à un décodeur
séparés.
≥Modifier les réglages dans “Sortie numérique”
(➡ page 28).
Nota
Il n’est pas possible d’utiliser des décodeurs DTS
Digital Surround ne pouvant prendre les disques
DVD en charge.
Rendu stéréo ou Dolby Pro Logic
Connecter à un amplificateur ou autre appareil
numérique.
≥Modifier les réglages dans “Sortie numérique”
(➡ page 28).
VIDEOVOL
AUDIO
OPT OUT
OPTICAL IN
LINE IN
R(D)
L(G)
Amplificateur
Enceintes acoustiques
(Exemple)
Avec au moins trois enceintes,
il est possible d’obtenir un
rendu ambiophonique.
Câble à fibres optiques
Ne pas trop plier le câble.
Rendu stéréo ou Dolby Pro Logic
Connecter à un amplificateur ou autre appareil
analogique.
Connexion analogique
blanc
rouge
noir
Câble de raccordement stéréo
Amplificateur analogique ou minichaîne
Ce modèle peut prendre en charge des signaux Dolby Digital et DTS, mais sur 2 canaux seulement.
Le lecteur doit être raccordé à un appareil intégrant un décodeur Dolby Digital ou décodeur DTS pour
obtenir un véritable effet ambiophonique.
Nota
≥Les connexions décrites ci-dessus ne sont données qu’à titre d’exemples.
≥Sauf indication contraire, tous les appareils périphériques et les câbles sont vendus séparément.
≥Avant de faire les connexions, mettre tous les appareils hors tension et lire leur manuel d’utilisation.
A
B
Cet appareil (côté droit)
Page 71

30
RQT6450
Opérations avancées
Disque
Audio (dialogues)
Sous-titres
Menus du disque
Restriction par classe
Anglais
Anglais
Automatique
Niveau 8
SETUP
SELECT TAB
ENTER RETURN
∫;1
132
A.SRD
SETUP
ENTER
PLAY MODE
SUBTITLE
DISPLAYTOP MENU
AUDIO
ANGLE
RETURNMENU
CANCEL
3,4,
2, 1,
ENTER
SETUP
RETURN
Raccordement de l’appareil à un appareil auxiliaire
Raccordement de l’appareil à un téléviseur
VIDEOVOL
AUDIO
OPT OUT
AUDIO IN
L(G)
R(D)
VIDEO
S VIDEO
VIDEO
Téléviseur
Câble audio/vidéo
(inclus)
Câble S-vidéo
§
(noir)(jaune)
(jaune)(blanc)
L’un ou l’autre
(rouge)
Cet appareil (côté droit)
Prise d’entrée S-vidéo:
La prise d’entrée
S-vidéo permet une
image plus éclatante
qu’avec la prise d’entrée
vidéo.
§
Le câble S-vidéo n’est pas inclus.
§
Disponible auprès des détaillants Panasonic seulement. Numéro de pièce: RFX4139
Nota
≥Cet appareil n’est pas muni d’un blindage magnétique. Ne pas placer l’appareil près de téléviseurs,
ordinateurs ou tout autre appareil affecté par un champ magnétique.
≥Pendant la lecture d’un disque DVD, le volume peut être plus bas que lors d’une télédiffusion ou de
la lecture d’autres disques. Si le volume est monté, s’assurer de le baisser une fois terminé afin de
prévenir une hausse soudaine du niveau de sortie.
Ne pas raccorder le lecteur au magnétoscope
La fonction anti-piratage peut affecter la qualité de l’image.
Raccordement
Page 72

31
RQT6450
Opérations avancées
Préparatifs
Mettre le lecteur et le téléviseur en marche.
Mettre le mode d’entrée vidéo sur le téléviseur
selon le type de connexion effectué.
1 Appuyer sur [SETUP] pour
appeler l’affichage des menus.
Disque
Audio (dialogues)
Sous-titres
Menus du disque
Restriction par classe
Anglais
Anglais
Automatique
Niveau 8
SETUP
SELECT TAB
ENTER RETURN
4 Appuyer sur [3, 4] pour
sélectionner le format d’image,
puis appuyer sur [ENTER].
≥4:3 Pan & Scan
≥(Panoramique et balayage)
≥Téléviseur ordinaire (pour le vision-
nement 16:9 en style panoramique et
balayage a).
≥4:3 Letterbox (Boîte aux lettres)
≥Téléviseur ordinaire (pour le visionne-
ment 16:9 en style boîte aux lettres b).
≥16:9 (par défaut)
≥Téléviseur à grand écran
≥Utiliser les modes d’écran de téléviseur
pour modifier l’image affichée.
≥ab
5 Appuyer sur [SETUP] pour
quitter le mode de paramé-
trage.
Pour rappeler le menu précédent
Appuyer sur [RETURN].
Nota
≥Appuyer sur la touche [MENU] sur l’appareil
principal pour accéder aux menus de réglage
initial en mode arrêt (sauf si un DVD-RAM est
inséré).
≥Certains enregistrements au format 16:9 desti-
nés à un grand écran ne peuvent être visionnés
en format panoramique et balayage. Ils
apparaîtront alors avec un cadrage boîte aux
lettres sans égard à la sélection effectuée.
∫;1
132
A.SRD
SETUP
ENTER
PLAY MODE
SUBTITLE
DISPLAYTOP MENU
AUDIO
ANGLE
RETURNMENU
CANCEL
3,4,
2, 1,
ENTER
SETUP
RETURN
Sélection du type d’écran de télévision
2 Appuyer sur [2, 1] pour
sélectionner l’onglet des
paramètres Vidéo.
3 Appuyer sur [3, 4] pour
sélectionner “Image télé”, puis
appuyer sur [ENTER].
Page 73

32
RQT6450
Opérations avancées
DC IN 9V
Nota
Lorsque le casque d’écoute est branché, aucun son n’est émis par le haut-parleur de l’appareil.
Cet appareil (côté gauche)
Casque d’écoute
3,5 mm (
1
⁄8 po) stéréo
Raccordement de l’appareil à un appareil auxiliaire
Enregistrement sur enregistreur numérique ou magnétophone à
cassettes
≥Enregistrement numérique
Il est possible d’enregistrer le signal numérique directement sur un appareil d’enregistrement
numérique.
Raccorder l’appareil d’enregistrement avec un câble à fibre optique (➡ [A] page 29).
Nota
≥Avec un disque DVD, les conditions suivantes doivent être observées: a le disque ne doit posséder
aucune protection contre l’enregistrement numérique et b l’appareil utilisé pour l’enregistrement doit
pouvoir prendre en charge une fréquence d’échantillonnage de 48 kHz.
≥L’enregistrement MP3 est impossible.
Lors d’enregistrement de DVD, effectuer les réglages suivants.
Ambiophonie virtuelle avancée: OFF (Désactivée) (➡ page 17)
Conv.-abaissement PCM: PCM (➡ page 28)
Dolby Digital: PCM (➡ page 28)
DTS Digital Surround: PCM (➡ page 28)
≥Enregistrement analogique
Il est possible d’enregistrer sur un magnétophone à cassettes ou un autre appareil d’enregistrement.
Raccorder l’appareil d’enregistrement avec un câble stéréo (➡ [B] page 29). Il n’y a aucune restriction
avec un enregistrement analogique à l’encontre des signaux numériques.
Branchement d’un casque d’écoute
Préparatifs
Baisser le volume avant d’effectuer les raccordements, puis régler le niveau de sortie.
Fabriqué sous licence de Dolby
Laboratories.
“Dolby”, “Pro Logic” et le symbole double D
sont des marques de commerce de Dolby
Laboratories.
Fabriqué sous licence de Digital Theater
Systems, Inc. Brevets nos 5 451 942,
5 956 674, 5 974 380, 5 978 762 et autres
brevets mondiaux émis et en instance. “DTS”
et “DTS Digital Surround” sont des marques
déposées de Digital Theater Systems, Inc.
C 1996, 2000 Digital Theater Systems, Inc.
Tous droits réservés.
Page 74

33
RQT6450
Référence
Arrêt sur image et arrêt sur champ
On obtient une image fixe en interrompant le
défilement des images animées. Un arrêt sur
image est fait de deux champs en alternance, ce
qui explique que l’image soit parfois floue bien
que sa qualité soit grande.
Un arrêt sur champ donne une image moins
floue mais ne comporte que la moitié de
l’information de l’image complète.
Biststream—Train de bits
C’est la forme numérique sous laquelle se
présente les données audio multicanal (par ex.
5.1 canaux) avant d’être décodées et séparées
en divers canaux.
Décodeur
Un décodeur rétablit au mode normal les signaux
audio codés sur les disques DVD. Cette action
se nomme décodage.
Dolby Digital
Il s’agit d’une méthode de codage de signaux
numériques mise au point par la société Dolby
Laboratories. Les signaux peuvent être au format stéréophonique (2 canaux) ou multicanaux.
Les signaux subissent une forte compression, ce
qui permet d’en enregistrer une grande quantité
sur un même disque.
Dolby Pro Logic
Système ambiophonique par lequel une piste
audio 4 canaux est enregistrée sur 2 canaux
pour ensuite être rétablie sur 4 canaux. Le canal
ambiophonique est monaural et sa réponse
s’étend jusqu’à 7 kHz.
DTS (Digital Theater Systems)
Il s’agit d’une méthode de codage de signaux
numériques utilisée dans des salles de cinéma à
travers le monde. La séparation de canaux est
bonne ce qui permet de produire des effets
sonores réalistes.
Dynamique
La dynamique est la mesure de la différence
entre le plus bas niveau de son pouvant être
perçu au-dessus du seuil de bruit d’un appareil
donné et le signal le plus élevé avant la production de distorsion.
I/P/B
MPEG 2, la norme de compression des images
vidéo adoptée pour le DVD-Vidéo, code les
photogrammes avec trois types d’images:
I: Les images “Intra”
Les images “Intra” constituent les images de
référence à partir desquelles est réalisé le
décodage et offrent la meilleure qualité. Il est
recommandé d’utiliser ce type d’image lors
des réglages à l’écran.
P: Les images “Prédictives”
Les images “Prédictives” sont codées à
partir de l’image “I” ou “P” précédente (à
l’aide de vecteurs de mouvement).
B: Les images “Bidirectionnelles”
Les images “Bidirectionnelles” sont les plus
compressées. Elles sont codées à l’aide de
vecteurs de mouvement avant et arrière, par
prédiction bidirectionnelle, c’est-à-dire à partir des images voisines passées et futures;
elles comportent donc moins d’informations
que les deux autres types d’images.
LPCM (modulation linéaire par impulsions et
codage)
Signifie des signaux numériques non compressés, similaires à ceux qui se trouvent sur les CD.
Pilotage de la lecture (PBC)
Si un CD-Vidéo possède la fonction de pilotage
de la lecture, les scènes et les informations
peuvent être sélectionnées via des menus.
Glossaire
Cet appareil incorpore une technologie anti-piratage protégée par des brevets déposés auprès
des autorités du gouvernement américain et d’autres droits de propriété intellectuelle détenus par
Macrovision Corporation et d’autres détenteurs de droits. L’utilisation de cette technologie de
protection des droits d’auteur doit être autorisée par la société Macrovision et doit se limiter à des
fins de divertissement privé à moins d’une autorisation préalable et explicite de Macrovision
Corporation. Toute rétro-ingénierie ou tout démontage est interdit.
Page 75

34
RQT6450
Référence
Avant d’appeler un centre de service, faire les vérifications décrites ci-dessous. En cas de doute sur
certains des points de vérification, ou si les solutions proposées dans le tableau ne résolvent pas le
problème rencontré, veuillez contacter le service à la clientèle de Panasonic Canada Inc. au
1-800-561-5505, son site web (www.panasonic.ca) ou le centre de service agréé le plus proche.
Les pages de référence sont indiquées en chiffres blancs dans un cercle noir :.
Guide de dépannage
Problème
Absence
d’alimentation.
L’appareil se met hors
marche
automatiquement.
L’appareil ne
fonctionne pas s’il est
alimenté par le
bloc-batterie.
Impossible de faire la
charge ou l’indicateur
[CHG] ne s’allume pas.
Les touches de
commande n’ont
aucun effet.
La lecture ne peut être
lancée ou est
rapidement
interrompue.
Solution
Vérifier les raccordements à l’adaptateur secteur et au bloc-batterie.
:;
Il est impossible d’établir le contact sur l’appareil à l’aide de la
télécommande si l’appareil est alimenté par le bloc-batterie.
Le contact se coupe sur l’appareil s’il est en mode arrêt pendant
environ 15 minutes (5 minutes s’il est alimenté par le bloc-batterie)
afin d’économiser l’énergie. Établir le contact à nouveau.
L’appareil et le bloc-batterie possèdent des circuits de protection
contre une température excessive (trop chaud ou trop froid). Ils ne
fonctionnement pas si le circuit de protection est déclenché. Utiliser
l’appareil et le bloc-batterie à des températures entre 5 oC (41 oF) et
35 oC (95 oF).
Le bloc-batterie ne peut être rechargé que lorsque l’appareil est hors
contact.
Le temps de recharge augmente si le bloc-batterie est chaud, et il se
peut que la recharge soit impossible dans certaines circonstances.
Le laisser refroidir.
Vérifier le raccordement de l’adaptateur secteur. :
Avec certains disques, certaines fonctions ne peuvent être activées.
Si l’appareil ne réagit pas, il se peut qu’il ait subi un dérangement
suite à un orage ou à cause d’une accumulation d’électricité statique.
Couper, puis rétablir le contact. Sinon, couper le contact, débrancher
la source d’alimentation (adaptateur secteur ou bloc-batterie),
brancher à nouveau l’alimentation et rétablir le contact.
Il est possible qu’il y ait eu formation de condensation dans l’appareil.
Attendre environ 1 ou 2 heures.
L’appareil ne peut prendre en charge des disques autres que ceux
spécifiés. 8
Nettoyer le disque. 9
Vérifier la mise en place du disque. =
Vérifier que le DVD-RAM comporte du matériel enregistré.
Page 76

35
RQT6450
Référence
Solution
S’assurer que la pile a été correctement mise en place. 9
Au besoin, remplacer la pile. 9
Orienter la télécommande vers le capteur de signal du lecteur. 9
Cette fonction pourrait ne pas être disponible selon le type de support
utilisé.
Sur certains DVD, la sélection de la langue doit se faire dans un
menu.
Cette fonction pourrait ne pas être disponible selon le type de support
utilisé.
Activer l’affichage des sous-titres. E
Il peut arriver que les sous-titres se trouvant près des points A et B
d’une séquence de lecture en reprise A-B ou des passages marqués
ne s’affichent pas.
Cette fonction pourrait ne pas être disponible selon le type de support
utilisé. Un DVD peut comporter des passages où la sélection des
prises de vue n’est pas possible.
Procéder comme suit pour rétablir les paramètres par défaut.
Avec l’appareil en mode arrêt, maintenir une pression sur [;],
[:] (arrière), et sur [1, – ON] sur l’unité principale pendant
environ 3 secondes jusqu’à ce que les message “Initialized”
disparaisse de l’écran, puis couper le contact sur l’appareil.
Éloigner l’appareil des téléphones cellulaires.
Le haut-parleur est hors circuit si l’écran est rabattu ou si un casque
d’écoute est branché.
Monter le volume. =
Vérifier tous les raccordements et les paramètres. L, M, N
Vérifier, s’il y a lieu, le mode d’entrée sélectionné sur les autres
appareils.
Problème
Aucune fonction ne
peut être pilotée au
moyen de la
télécommande.
Il n’est pas possible de
modifier la sélection de
la langue des
dialogues ou des
sous-titres.
Aucun sous-titre n’est
affiché.
Il n’est pas possible de
modifier la sélection
des prises de vue.
Le mot de passe du
paramètre du niveau
de restriction a été
oublié.
Pour désirer rétablir
les paramètres par
défaut sur l’appareil.
Présence d’un niveau
élevé de bruit.
Aucun son n’est
entendu sur
le haut-parleur de
l’appareil.
Aucun son n’est
entendu sur les autres
enceintes.
Page 77

36
RQT6450
Référence
Problème
Présence de
distorsion.
L’écran est sombre.
À certains moments,
l’image ne peut être
visionnée pendant
l’avance rapide ou le
recul.
Aucune image à
l’écran.
Aucune image sur
l’écran du téléviseur
(ou le format de
l’image semble
incorrect).
Des pixels de l’écran à
cristaux liquides
noircissent ou
émettent des couleurs
différentes.
Solution
Avec certains disques, le mode sonorité ambiophonique virtuelle
avancée peut engendrer de la distorsion. Dans un tel cas, mettre le
mode sonorité ambiophonique virtuelle avancée hors circuit. A
Régler la luminosité. F
Une certaine interruption est normale.
Sélectionner un mode d’affichage à l’exception de “OFF”
(pas d’image). F
Vérifier les raccordements. N
S’assurer que le téléviseur est en marche.
Vérifier que le mode d’entrée du téléviseur est correct.
Vérifier les réglages sous la rubrique “Vidéo—Image télé”. O
L’écran à cristaux liquides est construit à l’aide d’une technologie de
précision de sorte que 99,99 % des pixels sont actifs, mais parmi les
0,01 % restants, il y a des pixels qui peuvent être blancs ou émettre
de la lumière de façon constante. Ce phénomène ne constitue pas
une défaillance technique.
Voyants [Í] et [CHG]
L’indicateur [Í]
clignote rapidement.
Le voyant [Í] clignote
lentement.
L’indicateur [CHG]
clignote rapidement.
Le voyant [CHG]
clignote lentement.
Mauvais fonctionnement de l’appareil. Consulter le détaillant.
L’apparail est en marche et l’écran est fermé ou le mode d’affichage
est réglé sur “OFF” (pas d’image). Mettre l’appareil hors marche
aprés avoir terminé. F
Problème avec le bloc-batterie. Établir le contact sur l’appareil et
vérifier le message à l’écran. U
La charge du bloc-batterie est faible. Le contact se coupe
automatiquement après quelques minutes. ;
Guide de dépannage
Page 78

37
RQT6450
Référence
Les icônes sont
coupées ou non
visibles.
Aucun message ne
s’affiche à l’écran de
l’appareil.
Le message “Vérifiez
le disque.” s’affiche à
l’écran.
ERROR ∑∑
∑∑suivi d’un nombre
s’affiche à l’ecran.
H ∑∑
∑∑ suivi d’un nombre
s’affiche à l’écran.
Pendant que l’icône le plus à droite est en surbrillance, utiliser [3, 4]
pour les déplacer vers le bas de l’écran. G
Sélectionner “Oui” sous “Affichage à l’écran” (consulter le menu
Affichage de l’écran SETUP). K
Nettoyer le disque. 9
“ ERROR 01”: Problème avec le bloc-batterie. Consulter le
détaillant.
“ ERROR 02”: Le bloc-batterie a été rechargé pendant
12 heures mais la recharge n’a pas fonctionné.
Recharger à nouveau.
“ ERROR 03”: La charge est effectuée dans une pièce trop
chaude ou trop froide. Effectuer la charge à la
température normale.
Un problème est survenu. Le nombre affiché à la droite de la lettre
“H” identifie la nature du problème. Couper, puis rétablir le contact.
Alternativement, couper le contact, débrancher la source
d’alimentation (adaptateur secteur ou bloc-batterie) rebrancher, puis
rétablir le contact.
Si le problème persiste, noter le numéro de code et communiquer
avec un technicien qualifié.
Nota
Les conditions suivantes ne sont le signe d’aucune anomalie.
≥L’adaptateur secteur émet un bruit pendant la recharge de la batterie.
≥Le bloc-batterie devient chaud après la recharge ou pendant son utilisation.
Entretien
∫ Pour nettoyer l’appareil, utiliser
un chiffon doux et sec.
≥Utiliser un nettoyant à lunettes pour retirer la
saleté tenace de l’écran.
≥Ne jamais utiliser d’alcool, de diluant pour pein-
ture ni de benzène pour nettoyer l’appareil.
≥Avant d’utiliser un chiffon traité chimiquement,
lire attentivement les directives sur l’emballage
du chiffon.
Affichages
∫ Entretien de la lentille
≥Si de la poussière adhère à la lentille, la retirer
délicatement à l’aide d’un soufflet pour objectif
d’appareil photo (vendu séparément).
≥Produit recommandé:
≥≥Trousse de nettoyage pour lentille
≥≥(SZZP1038C) (Disponible auprès des détail-
lants Panasonic seulement.)
≥Bien veiller à ne pas toucher la lentille avec les
doigts.
Page 79

38
RQT6450
Référence
Service après-vente
1. En cas de dommage—Confier l’appareil à un technicien qualifié dans les cas suivants:
1. (a) lorsque le cordon d’alimentation ou l’adaptateur secteur a été endommagé;
1. (b) lorsqu’un objet est tombé dans l’appareil ou si ce dernier a été mouillé;
1. (c) lorsque l’appareil a été exposé à la pluie;
1. (d) lorsque l’appareil semble ne pas fonctionner normalement ou que son rendement laisse à
désirer;
1. (e) lorsque l’appareil a subi un choc violent ou que son coffret a été endommagé.
2. Réparation—Ne faire aucun réglage ni ajustement autres que ceux décrits dans le présent
manuel. Confier toute réparation à un centre de service Panasonic agréé.
3. Pièces de rechange—S’assurer que le technicien utilise des pièces de rechange recommandées
par le fabricant ou dont les caractéristiques sont les mêmes. L’utilisation de pièces de rechange
non autorisées peut causer un incendie, des chocs électriques ou d’autres dangers.
4. Vérification de sécurité—Demander au technicien qui a réparé l’appareil de soumettre ce dernier
à des vérifications pour s’assurer qu’il peut être utilisé en toute sécurité.
Liste de codes de langue
7679: Lao
7665: Latin
7686: Letton
7678: Lingala
7684: Lithuanien
7775: Macédonien
7783: Malais
7776: Malayalam
7771: Malgache
7784: Maltais
7773: Maori
7782: Marathi
7779: Moldave
7778: Mongol
7865: Nauru
7869: Népalais
7879: Norvégien
7982: Oriya
8582: Ourdou
8590: Ouzbèque
8065: Panjabi
7065: Perse
8076: Polonais
8084: Portugais
8185: Quechua
8277: Rhéto-Roman
8279: Roumain
8285: Russe
8377: Samoan
8365: Sanscrit
8382: Serbe
6566: Abhkaze
6565: Afar
8083: Afghan, Pachto
6570: Afrikaans
6588: Aimara
8381: Albanais
6869: Allemand
6577: Ameharic
6978: Anglais
6582: Arabe
7289: Arménien
6583: Assamais
6590: Azéri
6665: Bachkir
6985: Basque
6678: Bengali
6890: Bhoutan
6669: Biélorusse
6672: Bihari
7789: Birman
6682: Breton
6671: Bulgare
7577: Cambodgien
(khmer)
6765: Catalan
9072: Chinois
7579: Coréen
6779: Corse
7282: Croate
6865: Danois
6983: Espagnol
6979: Espéranto
6984: Estonien
7079: Féringien
7074: Fidjien
7073: Finnois
7082: Français
7089: Frison
7168: Gaélique
d’Écosse
7176: Galicien
6789: Gallois
7565: Géorgien
6976: Grec
7576: Groenlandais
7178: Guarani
7185: Gujarati
7265: Haoussa
7387: Hébreu
7273: Hindi
7876: Hollandais
7285: Hongrois
7378: Indonésien
7365: Interlangue
7165: Irlandais
7383: Islandais
7384: Italien
7465: Japonais
7487: Javanais
7583: Kachmirî
7578: Kannara
7575: Kazakh
7589: Kirghiz
7585: Kurde
8372: Serbo-Croate
8378: Shona
8368: Sindhi
8373: Singhalais
8375: Slovaque
8376: Slovène
8379: Somali
8385: Soudanais
8386: Suédois
8387: Swahili
8471: Tadjik
8476: Tagalog
8465: Tamoul
8484: Tatar
6783: Tchèque
8469: Télougou
8472: Thaïlandais
6679: Tibétain
8473: Tigrigna
8479: Tsonga
8482: Turc
8475: Turkmène
8487: Twi (akan)
8575: Ukrainien
8673: Vietnamien
8679: Volapük
8779: Wolof
8872: Xhosa
7473: Yiddish
8979: Yorouba
9085: Zulu
Pour toutes réparations, renseignements ou conseils sur le fonctionnement du produit:
Veuillez contacter le service à la clientèle de Panasonic Canada Inc. au 1-800-561-5505,
son site web (www.panasonic.ca) ou le centre de service agréé le plus proche.
Demande d’informations
Page 80

39
RQT6450
Référence
Sortie audio numérique:
Sortie numérique optique:
Mini-connecteur optique
Nombre de prises: 1 système
(également utilisé pour la sortie audio)
Capteur:
Longeur d’onde: 658 nm/790 nm
Puissance de laser: CLASS II/CLASS I
Alimentation: 9 V c.c., (prise DC IN)/
7,2 V c.c.,
(connnecteur pour bloc-batterie)
Consommation:
10 W (8 W: appareil seulement)
Mode de recharge 12 W
(avec l’adaptateur secteur inclus)
Adaptateur secteur
Alimentation: 100–240 V c.a., 50/60 Hz
Consommation: 20 W
Sortie c.c.: 9 V, 1400 mA
Bloc-batterie CGR-H603 (lithium-ion)
Tension: 7,2 V
Puissance: 2000 mAh
Dimensions LtPtH:
144 mmk140 mmk32,5
§
mm
[5
21
⁄32 pok51⁄2 pok19⁄32 po]
(sans tenir compte des pièces en saillie)
§
28,7 mm (11⁄8 po) au point le plus bas
Poids: 566 g (19,96 oz)
Nota
Données sous réserve de modifications.
Le poids et les dimensions sont approximatifs.
Consommation en mode attente: 0,9 W
(avec l’adaptateur secteur inclus)
Données techniques
Panasonic Canada Inc.
5770 Ambler Drive, Mississauga, Ontario L4W 2T3
www.panasonic.ca
C 2002 Matsushita Electric Industrial Co., Ltd.
Imprimé au Japon
Plage de température:
i5 à i35 oC (i41 à i95 oF)
Plage d’humidité de fonctionnement:
Humidité relative de 5–90 %
(sans condensation)
Disques compatibles:
DVD-RAM (DVD-VR compatible)
DVD-Vidéo
Disque compact [CD-DA
(CD texte compatible), CD-Vidéo]
CD-R/CD-RW
[Disques formatés CD-DA
(CD texte compatible), CD-Vidéo, MP3]
DVD-R (DVD-Vidéo compatible)
Système de format: NTSC
Écran à cristaux liquides:
Grand écran α-Si de 5 po à cristaux liquides,
à transistor à couches minces
Sortie vidéo:
Niveau de sortie: 1 V c.-à-c. (75 ≠)
Prise de sortie: Mini-prise
Nombre de prises: 1 système
Sortie S-vidéo:
Sortie Y: 1 V c.-à-c. (75 ≠)
Sortie C: 0,286 V c.-à-c. (75 ≠)
Prise de sortie: Mini-prise
Nombre de prises: 1 système
(également utilisé pour la sortie vidéo)
Sortie audio:
Niveau de sortie:
1,5 V eff. (1 kHz, 0 dB, 10 k≠)
Prise de sortie: Mini-prise stéréo
Nombre de prises: 1 système
Caractéristiques du signal de sortie audio:
(1) Réponse en fréquence:
≥DVD (audio linéaire):
≥
4 Hz–22 kHz (échantillonnage de 48 kHz)
≥
4 Hz–44 kHz (échantillonnage de 96 kHz)
≥CD-Audio: 4 Hz–20 kHz
(2) Rapport signal sur bruit:
≥CD-Audio: 115 dB
(3) Dynamique:
≥DVD (audio linéaire) 98 dB
≥CD-Audio: 97 dB
(4) Distorsion harmonique totale:
≥CD-Audio: 0,008 %
 Loading...