

Page 1
■ . i>-.>y-;- ..S-.>»V''.v''•
DVDA/ideo CD/CD Player
Operating Instructions
Modd No,
DVD-A360A
v*- '
:\ «"sis ’.«y
?. ^ ’••:
••'i• •. ■ '''■' '"i. • > '•■>- • • •• K•'-i• '••'•'■’-'''"!■■''■ ^'"r'•'■■:-'.t-■-^V¡V'^'h ii''•'- ^
S ry-'*'-
m^M
.iS . •'• • •< ^
1^' . .li^ ■*'■ •'
y^ihi
Dear Customer
May wa taka thi& opportunity to thark you for purcha&lng this Panasonic
DVD/Vidao CD/CD Player.
Wa strortgiy racoinmend that you carofully study tha Oparaling liwlructicns before attemfiting to operate the player and that you note the listed
preoautiof^.
ICOMPACT
IMQITALV1D6DI memiLJUIDU
Before attempting to connect, operate or adjust this player, please read
these Inatrxjcttona completely. Please save this manual.
VQT8249
Page 2

Safety information
Not9
This pfayer can used only wiier« the power supply
is AC 220-240 V, 50 Hi, It canr>ot be used else
where.
CAUTION:
DVDAODEO CD/CD PLAYER IS A CLASS 1 LASER
PRaOUCT. HOWEVER THIS OVDAilDEO CtWCD
PLAYER USES A VISIBLE LASER BEAM WHICH
COULD CAUSE HAZARDOUS RADIATION EXPOSURE IF DIRECTED. BE SURE TO OPERATE THE
DVrWlDEO CD/CD PLAYER CORRECTLY AS IN
STRUCTED.
WHEN THIS DVDATIDEO CD/CD PLAYER IS
PLUGGED TO THE WALL OUTLET, DO NOT
PLACE YOUR EYES CLOSE TO THE OPENING
OF THE DISC TRAY AND OTHER OPENINGS TO
LOOK irno THE INSIDE QF THIS PLAYER.
USE OF CONTROLS OR ADJUSTTitENTS OH PER
FORMANCE OF PROCEDURES OTHER THAN
THOSE SPECIFIED HERON MAY RESULT IN
HAZARDOUS RADIATION EXPOSURE.
DO NOT OPEN COVERS AND DO NOT REPAIR
YOURSELF. REFER SERVICING TO QUALIFIED
PERSONNEL.
ЮНОТШЕИГОЕЙН.
.manON-k^rONKD^ENTL^SER Eli WS fCtkilTTlJli,
h£P,4£RE'^RCER PANS LEFAISCi4U.
'ifWSCHT ■'ASERSMtUJHG, iNtNNШШШ mmil
iWrJDEi&TfiWLB™,
EcililNDISTRlLEN.
iCVABSa -USERT BALIG uliR DEXSa SiffiS,
Sr:qfll№ElkNISTRAl£N.
-LOSTHyiNGMDEriMADELjSRaw.
____
SmbJlNISTRil£N.
ViflQl -AVATOESSA OETALTniNA 1ASEH&ATEILVLI£
AiATlJlJOTASiTESEEW
(Inside cf player)
WARNING:
TO REDUCE THE RJSK OF FJRE OR ELECTRIC
SHOCK, DO NOT EXPOSE THIS PLAYER TO
RAIN OR MOISTURE
TO REDUCE THE RISK OF FIRE OR ELECTRIC
SHOCK, AND ANNOYING INTERFERENCE, USE
THE RECOMMENDED ACCESSORIES ONLY.
THIS PLAYER IS INTENDED FC№ CONTINUOUS
OPERATION!
{Sack of player)
Page 3
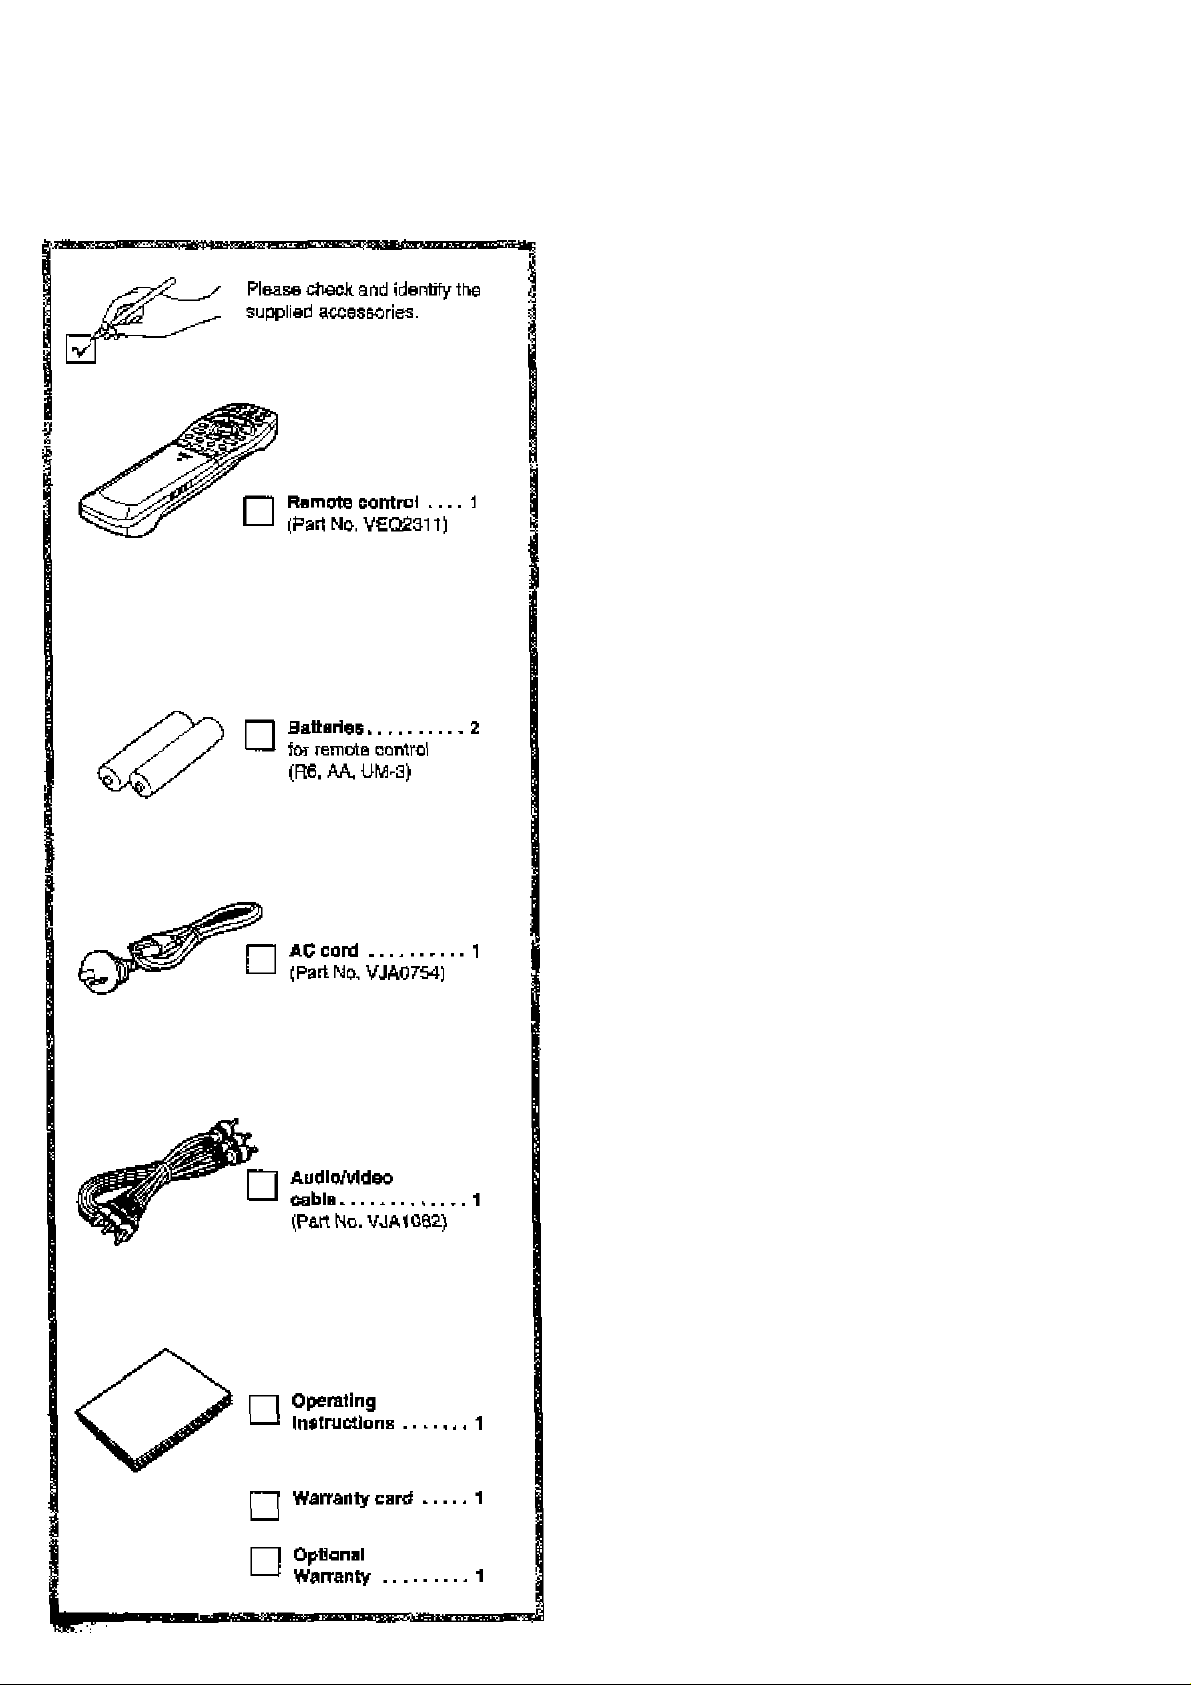
Accessories
Precautions
Please read these preoeutions before operating this player.
■ AC ^rd protection
Tq avoid rralfurxidone arid to protact against electric ahdch.
fire or personal Injury, please observe tie follo'ivirig:
«Hold the plog rimily when connecting or disoonrwcting
the AC cord.
•Do not connect or dlaconneet the AC cord with wet
hands.
•Keep the AC cord away from hasting appjiencse,
•Do not put heavy objects on ths AC cord,
•Do not attempt to repair or reccnatruct the AC cord In
any way.
•Remove duet, dirt, eti:. from the plug regularly.
•If the player has been dropped or damaged In any way,
eel the player to the etandby mode and disconnect
AC cord.
•If smoke, odors or nofsea are emitted from the player, eet
hie player to the standby mode and dfaconnect the AC
cord.
■ Pteoement
•Do not place in direct sunllghi, near radlalora, ar in cloeed
aiJtomobiles.
•Avoid high temperature (over 35 and high humidlly (over
90%),
•Avoid excessive duet.
• Do not place where it can be exposed to vlbratii^n or impacte.
•Avoid placing on an inclined surface.
■ Non-use periods
When the player Is not being used, set to etandby mode.
When left unueed lor a long period of ifme, the player should
be unplugged from the household AC ouüef.
■ No fingers or other oblecte inside
•Touching Internal parts of this player le dartgerous, and may
cause serioue damage to the player. Do not attempt to disas
semble №e player.
•Do not put any object other than discs on the disc tray.
■ Keep awsy from water and magnets,
•Keep the pfayer away from flower vases, tubs, sinks, etc. If
liquids are spilled Into the playsr, serious damage could
occur.
•Keep magnedc objects such as speakers, at a distance from
the player.
V Stacking
•Place the player in a horizontal posítlon, and do not place
anything heavy on it.
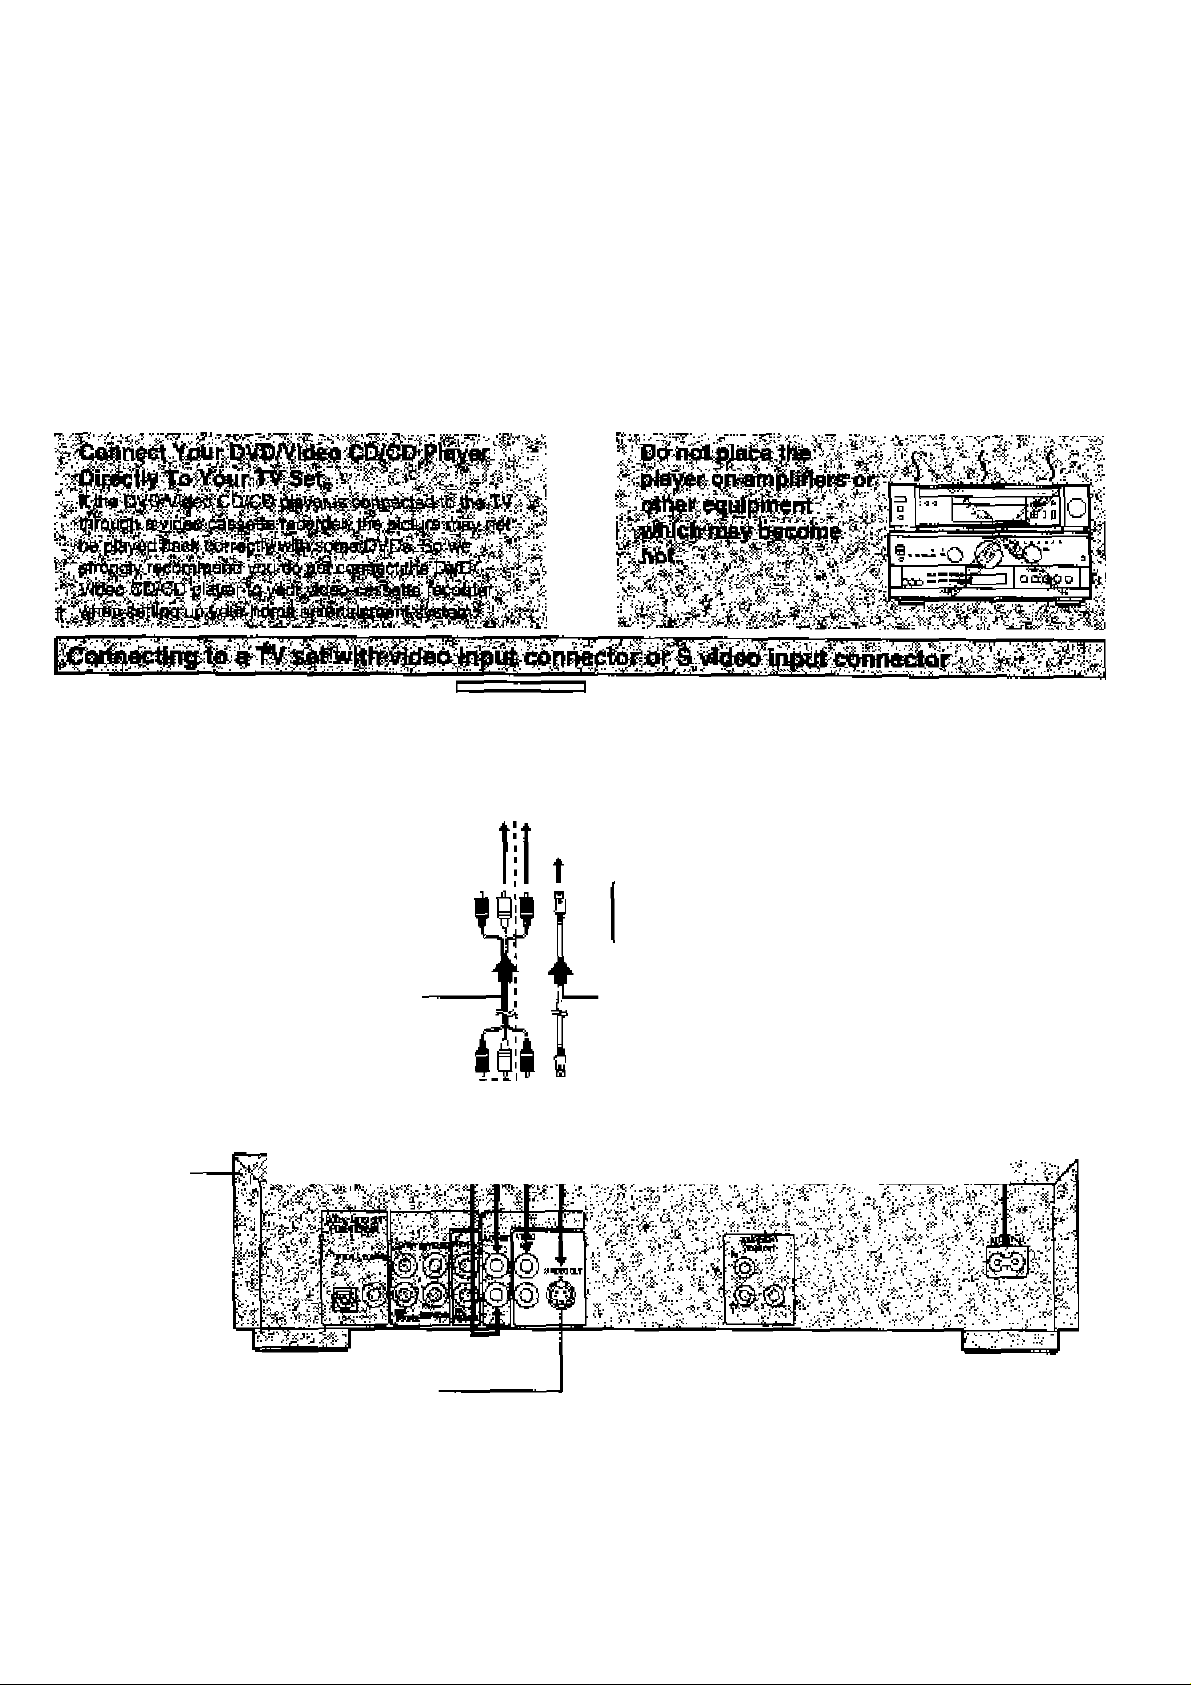
•Do not plaoe the player on ampSfiers or other equipment
which may become hot.
■ Condenaatlon
Maisture may form on tha lens in the foHowing conditions;
•Immediatsly after a heater has beer; turned on.
•In a steamy or very humid room.
•when the player is moved from a cold environment to a warm
or».
If moisture forms Inside this player, it may not operate proper
ly. In this case, turn on the power and wait about one hour for
the moisture to evaporate.
■ If there Is interterbrice on the TV while a broad-
cast Ts being received
Depending on ths reception condition of the TV, interfereneo
may occur if the player is left on. This is not a maifunctlon of
the player or the TV. To watch a TV bfoadcaet, eet the playsr
to the standby mode.
$
iS
Pi
f
s
s
Page 4

Features
■ High picture quaiity
•Í0 bit video D/A converter
Repracfucee üne images faithfully.
^Component video output
When used with a compatible monitor, a vêdeo cornectlon vie the com
poned video gulpiit [acks ot your OVDAfidao CDj'CD р^вуег егаЫег
precise colour reproduction,
•Art array of picture quality modca yielded by digital
procaaajng
Signal deisrlorallon is kept to minimum by prooeeeing the data lïgltally.
TMs feature cen be u$ed to tailor picture qusJlty tor OVD playback.
-Digital cinema mode (Soe pagee 15 and 21.)
A sIngte-Bction operation using the CtNEMA button cn the player's
frcnit panel enables the cinema mode, whidi is beat for the playback
ol movie programa, to be selected.
In addtion, uairtg (he GiUl screen, iTia picture quality beat auiled to
the type of softvi^re programs concerned csn be selected. In all,
four picture quality modes are prcvldad: normal, soft, fine and cine
mas.
4l«8t selection page .)
Using ftie GUI screen, tne oonfraat, colour hue, sqmlizer and
bri^tness can be adjuatad to suit your owrt preference,
-Monitor selector (See page ^0
Once ttw type of TV used [Standard (Direct View TV), CR.T Projec
tor, LCD Prc(ecEiy, Projeelion TV] h®e been selected when the initial
setting operations ara performed, the optimum picture quality fev the
type bf TV concerned will be automatically selected.
■ High sound quality
•99 kHzf24 bit audio D/A converter
This player onabtee 99 kMzi'^4 bit linear PQM signals, the bigheat
speclficationa In DVD star>danfe. bo be reproduced feithfully. To aup-
pon 9& kHz 3amplli>gi'24 bit sound, the sfiapirtg noise of this mulP-
level digital sigma type O/A converter ie kept flat up to 44 te-lz, thus
preventing the audio signals from being affected in any way. This
means sound te reproduced faithfully.
•Virtual bftttetv operation power supply circuit
By radically cuibng devm the amoiint of nolae from the power supply
and digitel circuits and delivering a dean supply oE power free from
undesirable signal oemponents (noise, ripple components, etc,) this
feature gives the baea ra,nga a tangible depth and yields a dear reao-
lutlcn in the midrange and treble ranges.
•Advanced Dolby Digital (AC-3)/dte (digital theater ayetama) s.leh aurround decoder (See pagaa TO and 37.)
The advanced DolEEry Digital (AC-3>>VlEa 5.loh surrour>d decoder mcbrporeted fn ibis player comee with speaker mode eetfinge which
support the low-range reproduction сареЫПЕу of the speakers, speakÈi level settfrigs, delay tirne adjusimenr, audio dynamic range eup-
preeeion, arrd other tealiuea.
’‘Delay time adjustment Is effective enlyfor Dolby Digital DVDs (cen
tre and surround channele).
e Dolby Digital (AC-3)/dla (digital theater ayatarne) digital
bulput (Saa paga 12.)
Byoennet^ing a Dolby Digrtekdie decoder oran emplifier Incorporât'
ing e Dolby DIgitslikfts decoder, you can enjoy high quality dlgiteJ sur
round sound Irom Dolby ChgltBl/dts discs.
■ Advanced Virtual Surruund Sound (VSS) function
(See pege 2S.)
Even when two front speakers are being used, simply prase the VSS
(Virtual Surround Sound) fautten during playback of a Dolby Digital
DVD (2 chenneE or ovsr) to provide a roer surround effect. Thie effect
alec vrorke while listening with heedphones. (This dees not work with
Karaoke DVDs. Th© effect depends or the kind of DVD used,)
■ hlitrker function (See page 23.)
This player с»п «tore a maximum cl 5 pbsitionB in memory ter convenim acoses.
■ Compatible with PAL DVD (Video CP) and NTSC
DVD (Video CD)
This player can play discs recorded In either PAL or NTSC format.
However, the player must be conrteoled to « PAL TV which is capable
of receiving PAL ЭЙБГвО system or Eo a MuFti-syetam TV to play both
PAL OVD (Video CD) and ffTSC DVD (Video CD),
■ Dialogue Enhancer (See pages 15 and 21.)
Duririg playtack bf Dclby Dlgltal^dte DVPe (2 channel brcver) with the
dialogue oontelned In thte centre channel, th« Eunction will bocet the
Sound level of tee cerrtre channel sc that It is easier te hear the dia
logue on mbvie sethvare.
■ Graphical User Interface (GUI) screen
(See page 18.)
BygimpTy pressing the DISPLAY button on the remote control, Inlormatlon on the DVDrVldec C[VCD player and disc can be dlepteyed on the
TV screen for easy identlflcatlon. The player's operBifon« and settlnge
can be easily accessed by operating thejoyaückcn the remete control
while monitoring the TV screen. The colour and pcsition cf the <3Ul
screen can b© changed.
Щ Versatile DVD features
•MuKLaudlo function (See page 26.)
The audio soundtrack can b© heard In up tefi lenguages,
(The number cf languages depends cn the eoftws/e.)
•Multh^ubtitle function (5m page 27.)
Subdtiee пшу be displayed in one of 32 language«.
(The number ct languages depends cn the software,)
•Multi-angle function (See pega 27,)
TTile lunctlcn allows you to chcose the camera angla ol soanes shot
from diffarerit angles. (Limlled to D'l/Ds recorded with múltipla c«mem angles,]
•Parental loch function (Sm page 31.)
This function can prevsfit pEaybeck of DVD aoftwara which rmy ba
unsultebla for soma audtences {especially for chllciren). {Limited to
DVDs erxxided with apedllc ratirig level,)
■ Disc formate supported by this player
The player can playback discs bearing any of the following marks;
пермРАсг
anmiLjHBiH]
DVD Vid0O CD
{3 cft) disef [B cm disG^
12 cm [faci 12 cm disc]
CD
[B cm Лас/
12 cm disc]
■ Discs Which cannot ba pla)^ with this player
•DVD with Flegion No, other than *4" or “ALL“
•DVD-ROM eCDV «eVD
• DVD-R/DVD-RAM *CD-G »SVCD
•CD-ROM *CD-RW »Dlwk Video Disc
•VSD •DVD-t-R'iAf etc.
•Do not try to play Photo CD or CD-H.
(Data on the disc may b© i^maged,)
■ Region Management Infcrmatlon
This player is deagr-tad to mpbnd to the Regicn Managemant Infcmretion raoorded on OVDs. The ragicn number of this player is ''4", II tbs
ragion number dssoribed on lbs DVD does not cenespond to the re-
gion numberefthh player, tbie player cannot play this disc. Tbla player
will play OVDs mads ter “ALL" regions.
This player will pLay DVDs marked with labels containing the region
number "A” or "ALL";
Example:
or
Page 5

Table of contents
Adi/anced Operations
Safety Information
.................................................
2
Accessories........................................................... 3
Precautions
..........................................................
3
Features................................................................ 4
Control rslerence guide
•Player................................................................................. 6
•RarTKite control
................................................................ 6
........................................
S
Front panel FL (Fluorescent Light)
display............................................................... 7
Basic connection
•ConnscBrtg to a TV set with video input connscior or
S vid&o Input connactor ...............
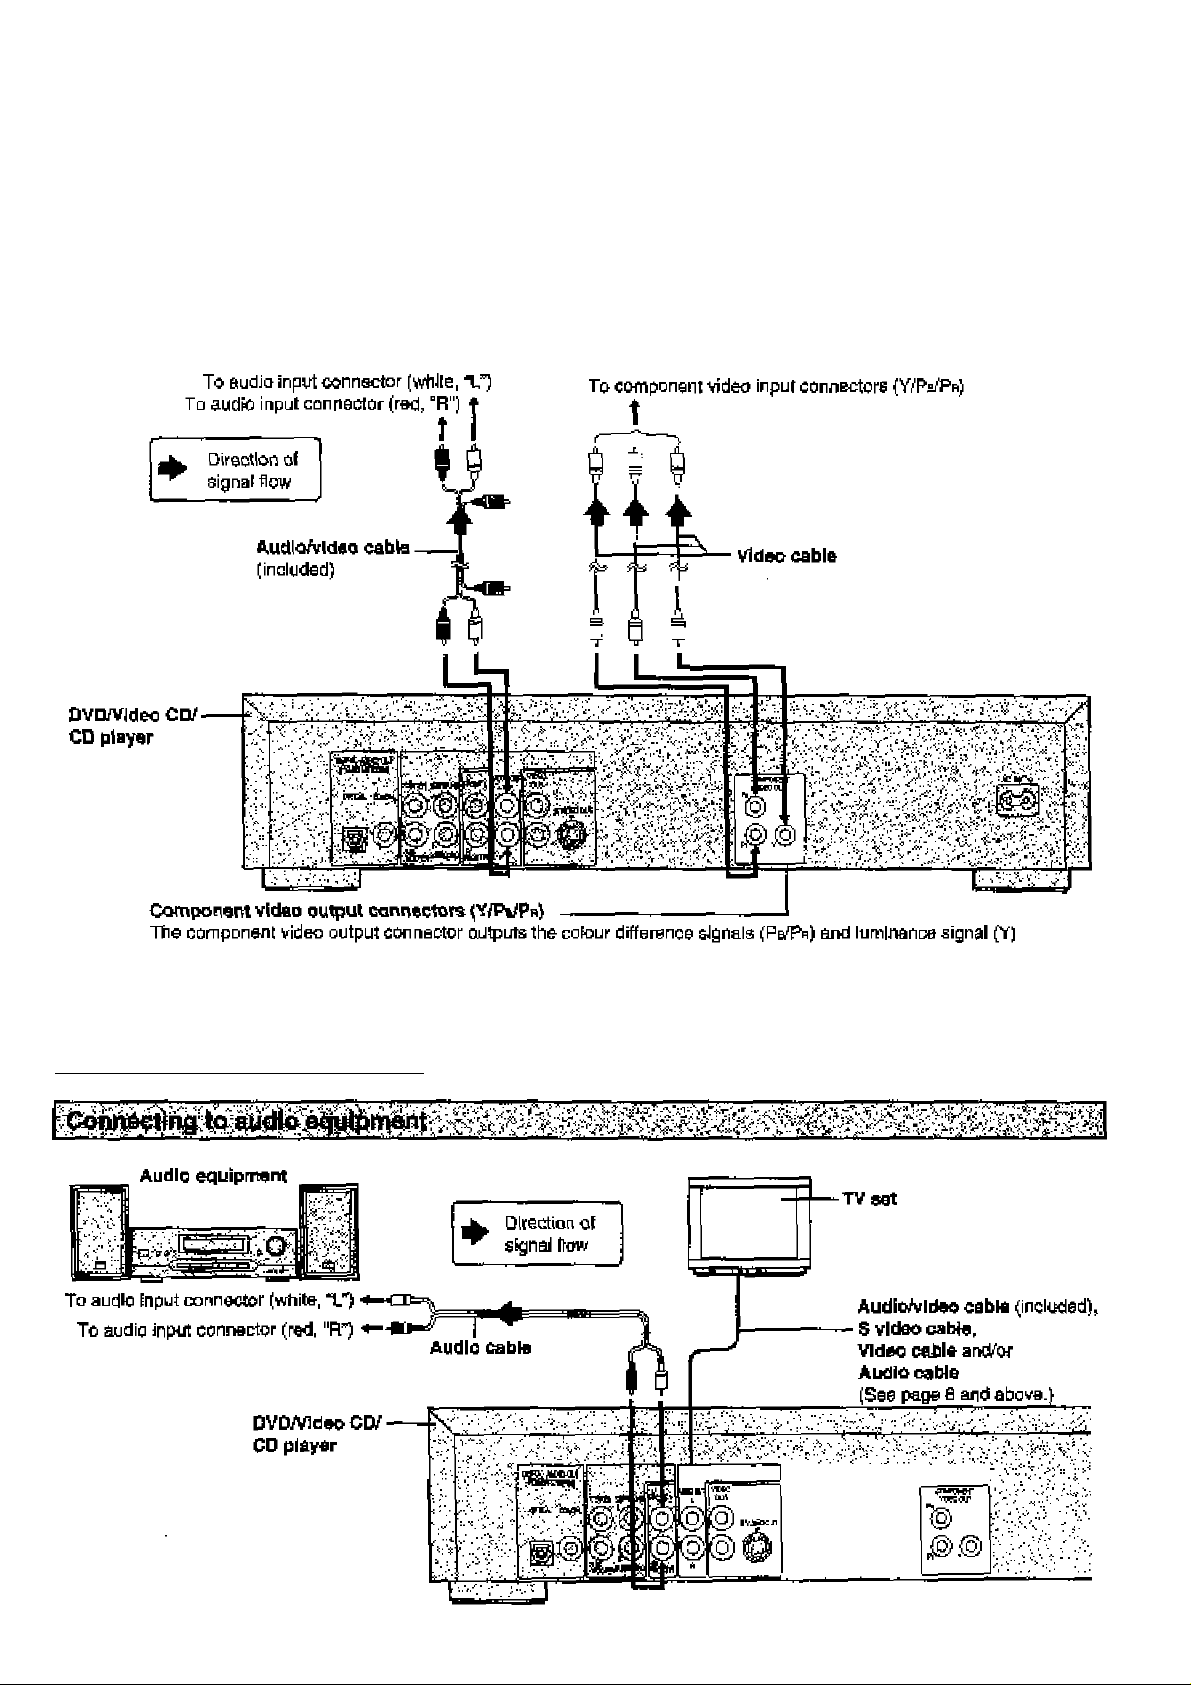
•Connaciing to a TV set or monitor witn component video
input connectors .....
Optional audio connections.
• CoTvnectlrigta audio equipmart ................................... 9
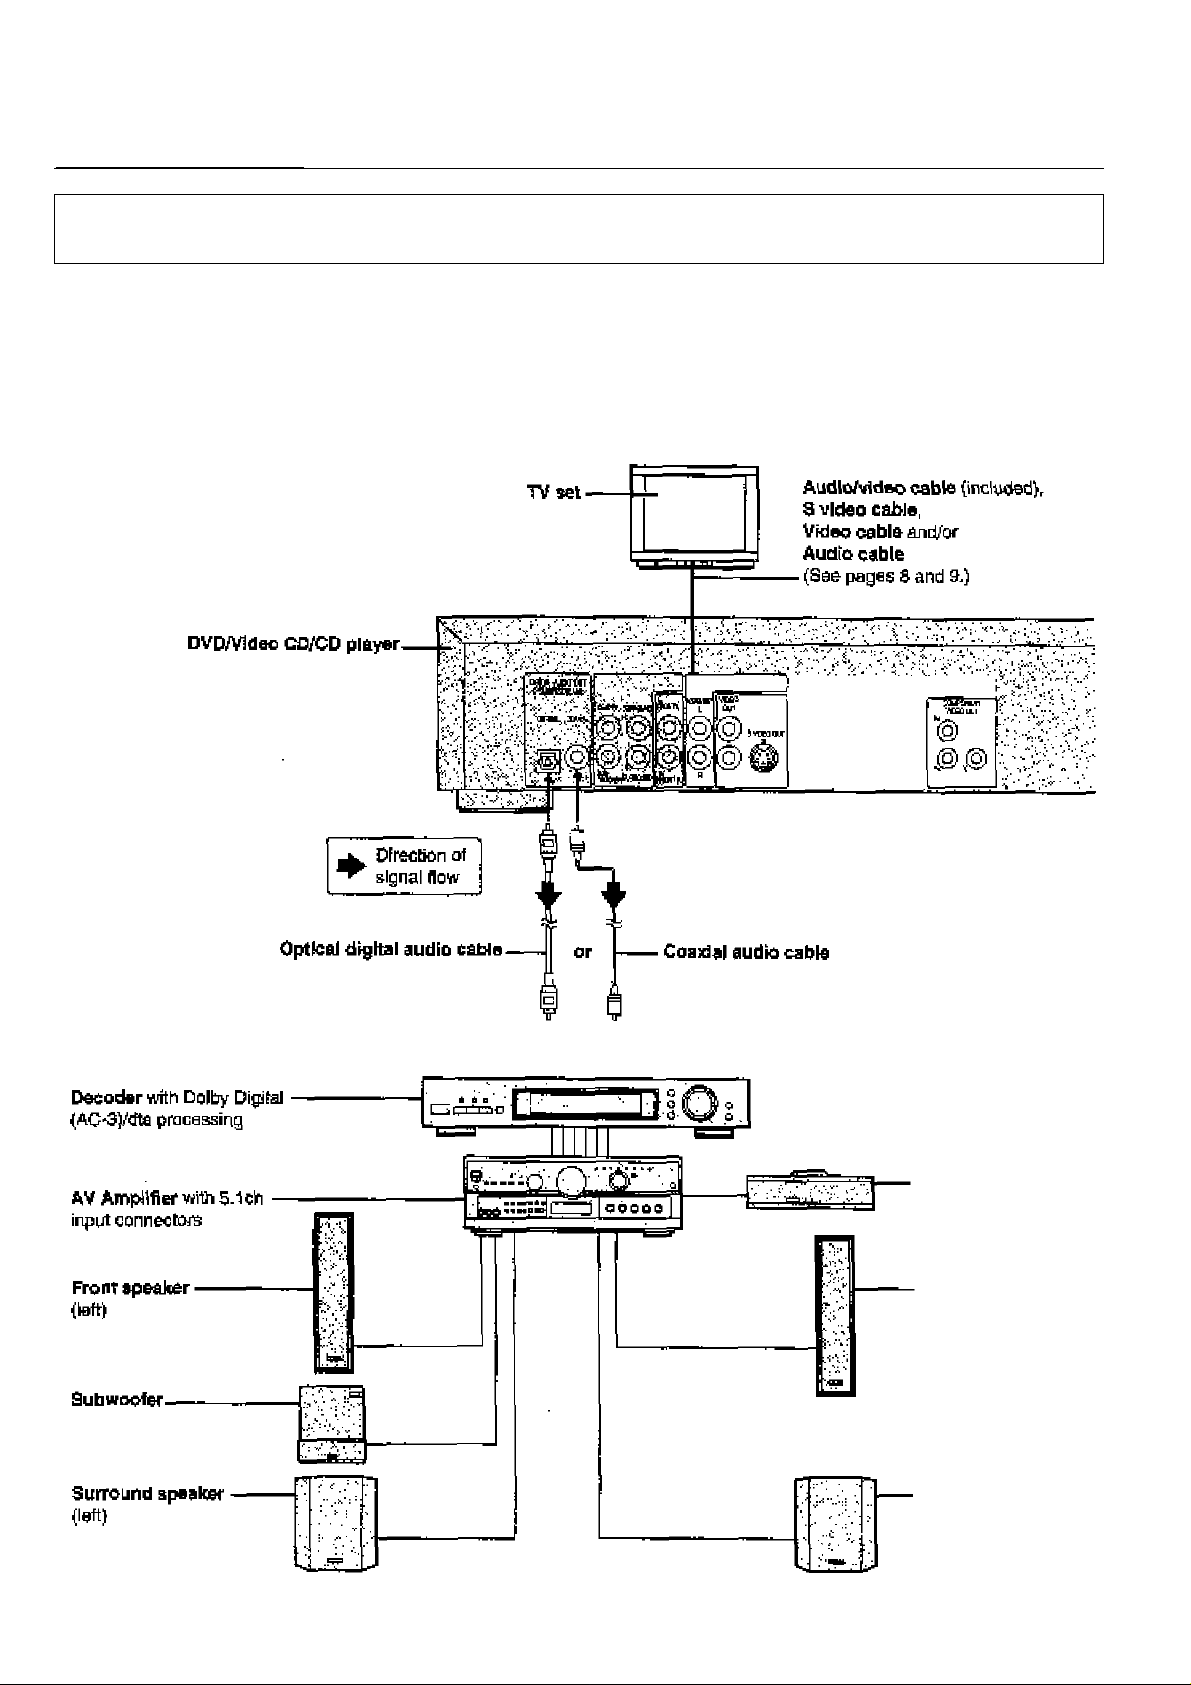
•Connecting to an AV ampNIler with 5.1ch Input connectors
supporting Dolby Digital (AC-S) ordts (digital theater
systems).......................................................................... 10
•Enjoying digital audio output from the dIgJiai audio
oulpirt connector............................................................. 11
•Connecting to a decoder with Dolby Digital (AC-3) or
dts (digital theater systems) processing ..
Remote control preparations,
•Batteiy inetaltebon ........................................................ 13
•Remols control operation range
•Coonectirtg headpiwnes {not included)
...................................................
............................... 8
..................................................
..........
....
......................
........................ 12
9
................................
........................................
.............................
8
9
13
13
13
Basic play.......................................................... 14
•Before enjoying DVD/Video CD/CD
•Baataplay..................................................................... 14
•5!opplt>g play............................................................... 15
.............................
14
Skipping cliapters or tracks.................................. 16
Still picture (Pause)
Rapid advance (Rapid reverse)
................ ..
........................
.........
....................17
16
Frame advance (Frame reverse)
[DVD/Video CD]
...........................................
17
Slow-motlon play [Dvo/video CD]........... 17
Cancelling playback control [Video cd] ..... 17
Repsat play.....................................................
•Repeat viewing (listening)
•Repeating eections between two specific points
(A-B repeat)
.
..............................................................
..............................................
22
22
23
Storing marksrs In memory to be viewed
(Nsterted to) again
•Storing a marker in the memory
•Becailihg/clearingamaikBr
Program play [Video cd/cd]
...........................................
......................................
...............................................
.....
...........................
23
23
23
24
Random play [video CD/Cdg ...............................25
Changing audio soundtrack language
[DVD]
...........................................................................
26
Switching vooala ON or OFF for Karaoke
discs [DVD/Video CD]
Changing subtitle language [dvd]
Viewing from another angle [OVDg
......................................
..........................
.......................
26
27
27
Reproducing an Advanced Virtual Surround
Sound (VSS) effect [Dolby ot^ttsi (A&a) dvd
(2 channel or over)]
Using a title menu [dvd]
Using a DVD menu [DVD]
//7/i/iî/ Settings
I nItlaJ settings
•Common procedures
•Selecting ctiec tanguagee [DVD]
•Selecting rating level [DVD]
•Selecting On-Screen Dlspley menu language ..
•Selecting On-Screen Display format
•Selecting FL dIapJey bhghtneee
•Selecting TV ecreen type ..................................
•Satecting digital output........................................
•Speaker setting...................................................
•Ciher e&ttings
.....................................................
...............................................
....................
...................
....................................
........................................
..........................................
........................
................................
...................
............
...........
28
29
29
.
Language coda list...................................
How linages appear on your TV
(aspect ratios of the screen) ......
For Your Reference
30
30
31
31
33
33
34
35
35
37
39
41
42
»
EC
&
'S
CQ
I ^
gl
u
a
O
S
Operations Using Giti Screens
General information about GUI screens.... 18
•Cornmon procedures • -...
E)etalled descriptions of each GUI icon
•Screen for disc intormatton (For DVD).............................. IS
•Screen for disc information (For Video CD/CO) 20
•Screen for player infomnatloo.......................................... 21
•Shuttle screen.................................................................. 21
..........................
1$
_________
19
Using the remote control with your TV
set
......
.....................
Troubleshooting
•Setf-dlagncsJs display function ..
Disc handling
Maintenance
Specifications
....................
......
.........................
.....
..
.................
.................
43
44
45
46
46
47
a
£
Page 6
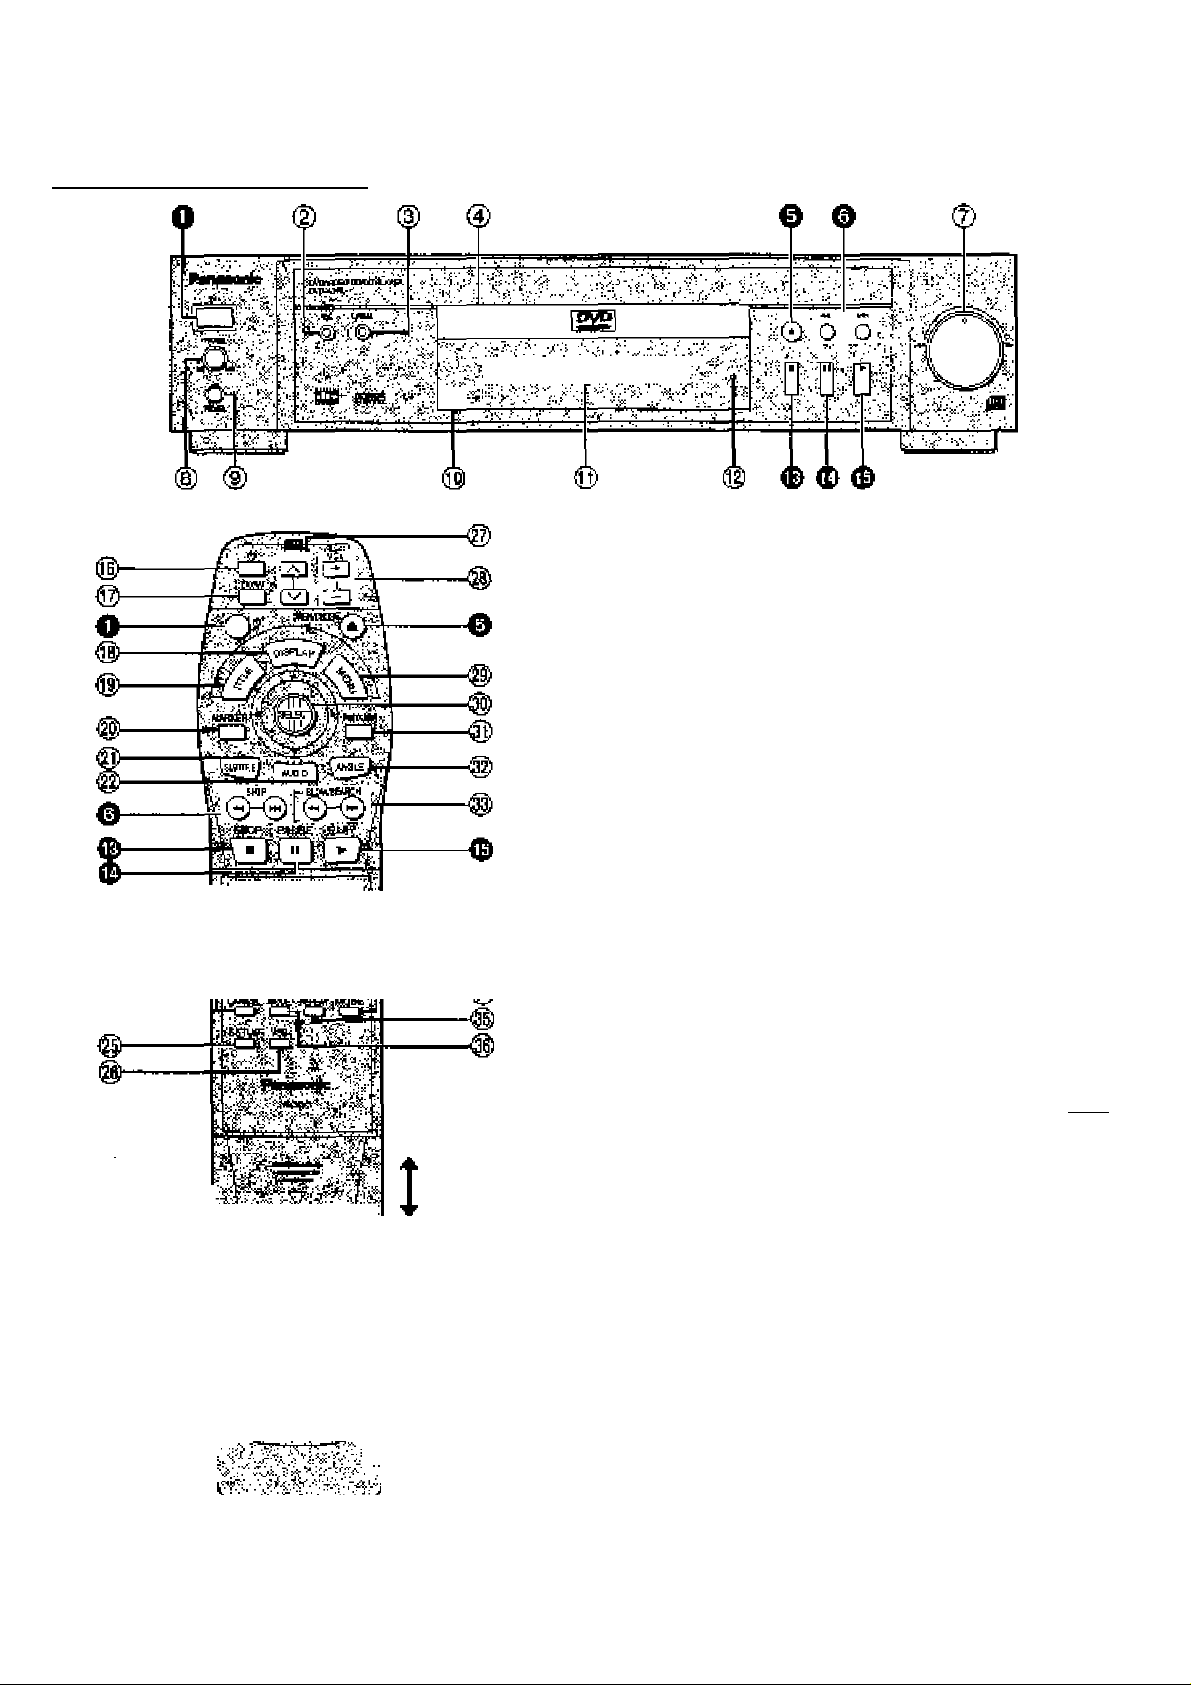
Control reference guide
Pasa
Buttons such
tho play«r.
O <D CD íft?
p O CD CD
f '■>. -'r ;:.
Í:«3D i'
ft ■••tó''Tr
,''4v^vr'‘^>í'ííí:^^'
-h
■'Ä
>/h ^ •?<
«:*• ^ ^•n •V "'* •?5?!jv OO
.Ss:
I function in exactly the sa/no 'Aray as ths Puttons on
•' ÍÍ
iüS
POWER butter M
to awftch the player ^m on to standby mode or vice yarsa. In
power.
® V5$ (Virtual Sunound Sountl) buttonArdlcate«
i|| CINEMA buRoci/indioater
@ DIeoüay
e OPEfVCLOSE button (A)............................................................ 14
9 SKIP buttons (h44, №},..,..................................................... 16
(?} SEARCH dial IT
® PHONES laval ........................................................................... 13
If PHONES iat*
@ Remote oontrol signal aeneor
O FLDIsploy..................................................................................... 7
@ STANDSY Indicator ((!))
Mien the player is connected 10 an AC ouklet, this indicator lights
up In alsniftiy rnode and goes oiJt wtien tbs plays/ Is turnad on.
STOP button <■) .................................................................. 16
PAUSE button (11^
PLAY butter (►)....................................................................... 14
...
............................................................................ 14
.......
........................................................
mode, the playor is still consuming a small amount of
.........
...............
.......................................................
..............................................................................
........................................... 13
..................................................................
14
29
t5
13
18
Paas
® IQ POWER button (di)................................................................ 43
e BITVfAV button.......................................................................... 43
0 DISPUtY button............................................................................ ia
@ TITLE butter
0 MARKER button
® SUBTITLE button ...................................................................... a?
0 AUDIO button
@ Numeric butters ..................................................................... 16
«To sslact 0 S^glt numbsr
Example: Toselscttrack^S
Prssa ^ 10", "2" ard then
® CANCEL button.................................................................... 23.25
© SETUP button...........................................
0 V55 (Virtual SuTourd Sound) button.
@ Bl chirnal buttons (A. V)
01 ia VOL buttore (+.-}
0 MENU button
0 Joysttck/8^.£CT button
0 RETURN button
® ANOLE butter............................................
0 SLOW,iSEARCH buttoni (•4'd, ..
0 PLAY MODE button...................................
0 A^ REPEAT button
0 REPEAT MODE butter
....
......................................................................
.........................................................................
.............................................................................
.............
...........
.
.................................
.............................................
..............................
.........................................
....................................
..............................
29
23
ISji
S4.
26
43
43
2»
15
30
27
17
2S
23
22
Page 7
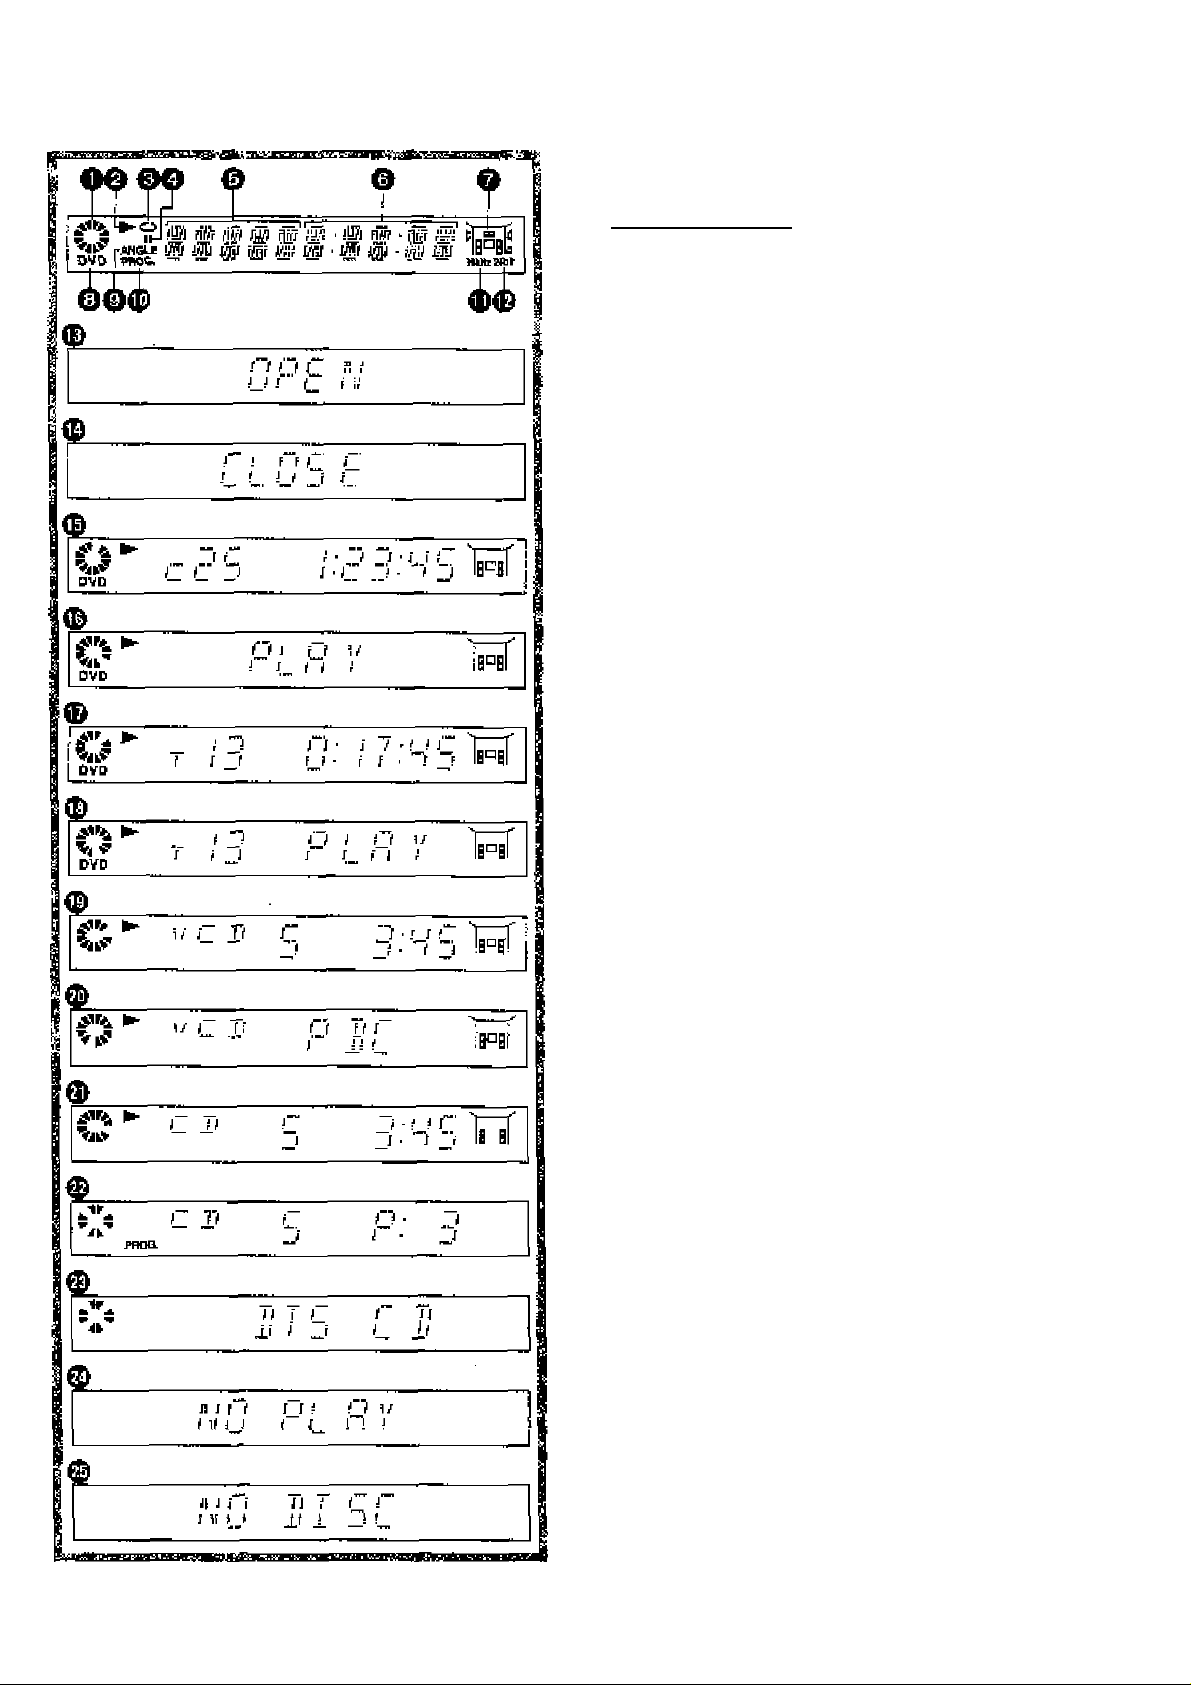
Front panel FL (Fluorescent
Light) display
O Rotated during play.
£ Rotates fast clockwisa or oountsrclockwiao
vJIlV during rapid advanca (rovsrsa). (Sas pag« 17.)
Rotates slowly clockwise or oounterolockwiaa
cKirIng slow-motlor play.
[DVDAi'Ideo CD] (Sa&page 17.)
ir
t -i
P 4
lUumlnalea in the stop tnode.
4k
Q Illuminates during playback.
Fteshas whan the RESUME function la ON.
(Ses page 15.)
O llluntinatee during repast play. {See page 22.)
_________________
O nfumlnataa in tea sll]l picture (pause) mode.
(See page 16.)
0 Title/ehsptar number [DVD]
Track number [Video CD/CD]
0 Elapsed playing time from the start of the tiueikrack
during play
0 Audio channel Information recorded in the disc being
pleyed back (e.g. 2ch or 5,1oh)
Centra
Surround (left)
front (left)
^mnnP wuiMJuiiu V
Ifl HID— Subwoofer
-------
' ^
Surround (right)
------
Front (right)
£
<D
0 A DVD fa loaded.
0 It Is poaslbla to switch the angle.
[DVDj(8ee page 27.)
0 Illuminates durtng program play. [Video CD/CD]
(See page 24.)
0 Linear PCM of 95 kHz sampling is bsing played.
0 Lirtaar PCM ot 24 bit la being played.
0 the dlac tray Is open.
0 The dlac tray Is bting closed (retracted),
0 Display during play of a DVD
0 Display during play of an Interectivs OVD"
0 Display during play of a Karaoke DVD
0 Display during play of an Interactive Kareoke DVD"
0 Display during play of a Video CD
0 Display durl ng play ot a Video CD with playback control
0 Dtaptay during play of a CD
0 Oisp4ay when selacling tracks for program plsy.
[Video CD/CD] (Ses page 25.)
0 Sorolia aftsr a dte CD is detected (total number of
tracks and total playing time dfeplayad when finished
scrolling).
0 PtaybBck te Impoaalble.
•DVD lor which playback is pnatiibitsd ty ihe Initiaf ssttings
“2 Ratinga". (See page 31.)
• DVD with Re^on No. other than “4" or "ALL".
(See page 4.)
0 No disc Is loaded.
"An interactive DVD is DVD software which includea imilti-
ple angles, multiple plot endings, etc.
Page 8
Basic connection
•ensure that this player and ether equipment to be connected are set to the stardty mode or off and discorrkect the AC cord before
oommerkCirig cannectran.
•Do not block ventNatlon holes of any of the equipment and arrange them go th^ air can circulate freely.
•Reed through the Instructiane before connecting other equipment.
•Ensure that you observe the colour coding v^on cohnecting audio and vfdec cabJes.
•Select the appropriate screen type at the initial settingTV AspeoT according to your TV ssr [4:3^16:9 and Standard (Direct View
TVJ/CFrr Pfojector/LCD Projactor/Projection TV], (See page 35,)
Note
•Peripheral equipment and cords sold separately uniess otherwise indicated.
♦During DVD play, the TV volu me may be at a lower level than during TV broadcasts, etc, If this is [he case, adjust the volume to the
deerred level.
Stereo TV set
To AC outlet
(AC 220-240 V, BO Hs)
Note
To audio input oonrtector (while, 1”) îTo video inpirt connector (yellow)
To audio input connector (red, "H“)
To S video Input oonnactor
t
^ Direction of
^ signal flow
t
AudloArldeo cable
(ir^cluded)
(See the note at the foot of this page.)
S video cable
AC cord I
(included)
’I
,1/
DVD/Vkleo CD/
CD player
S video output connector
The S (separate) video output connector seperaies the colour (C> and luminance (Y) signals before
Cransmliling them to the TV set ir> order to achieve a sharper picture.
Use tite $ video cable when connecting ^ player to a TV set equipped with an â video Input
connector for the best picture clarity passible.
Note
♦If your TV Is monaural, use a stereo-rnonauraJ audio cable instead of the supplied audli::vVideo cable. The video part of the саЫе
(yellow} can still be used if required. Audio cable
To TV audio input conrtector 05=‘=Ц'(=^^^=^
I • j_ ¿fi=[E>To player audio output cormector (white, "L")
^ To player audio output connector (red, “R”)
Page 9
TV a»f or monitor-
.9
V»
S
B
separataiy In order to achieve high fidelfty !n reproduolnfi colours.
•TTie description oi the component video input conrwctors depends on tita TV set or morrltor
[e.g. Y/Pa/Ps, Y®-YyP-V, YSCe/Cn and so onj. Raferto the tnstmcflon manual ot your TV set tor details,
Optional audio connections
Page 10
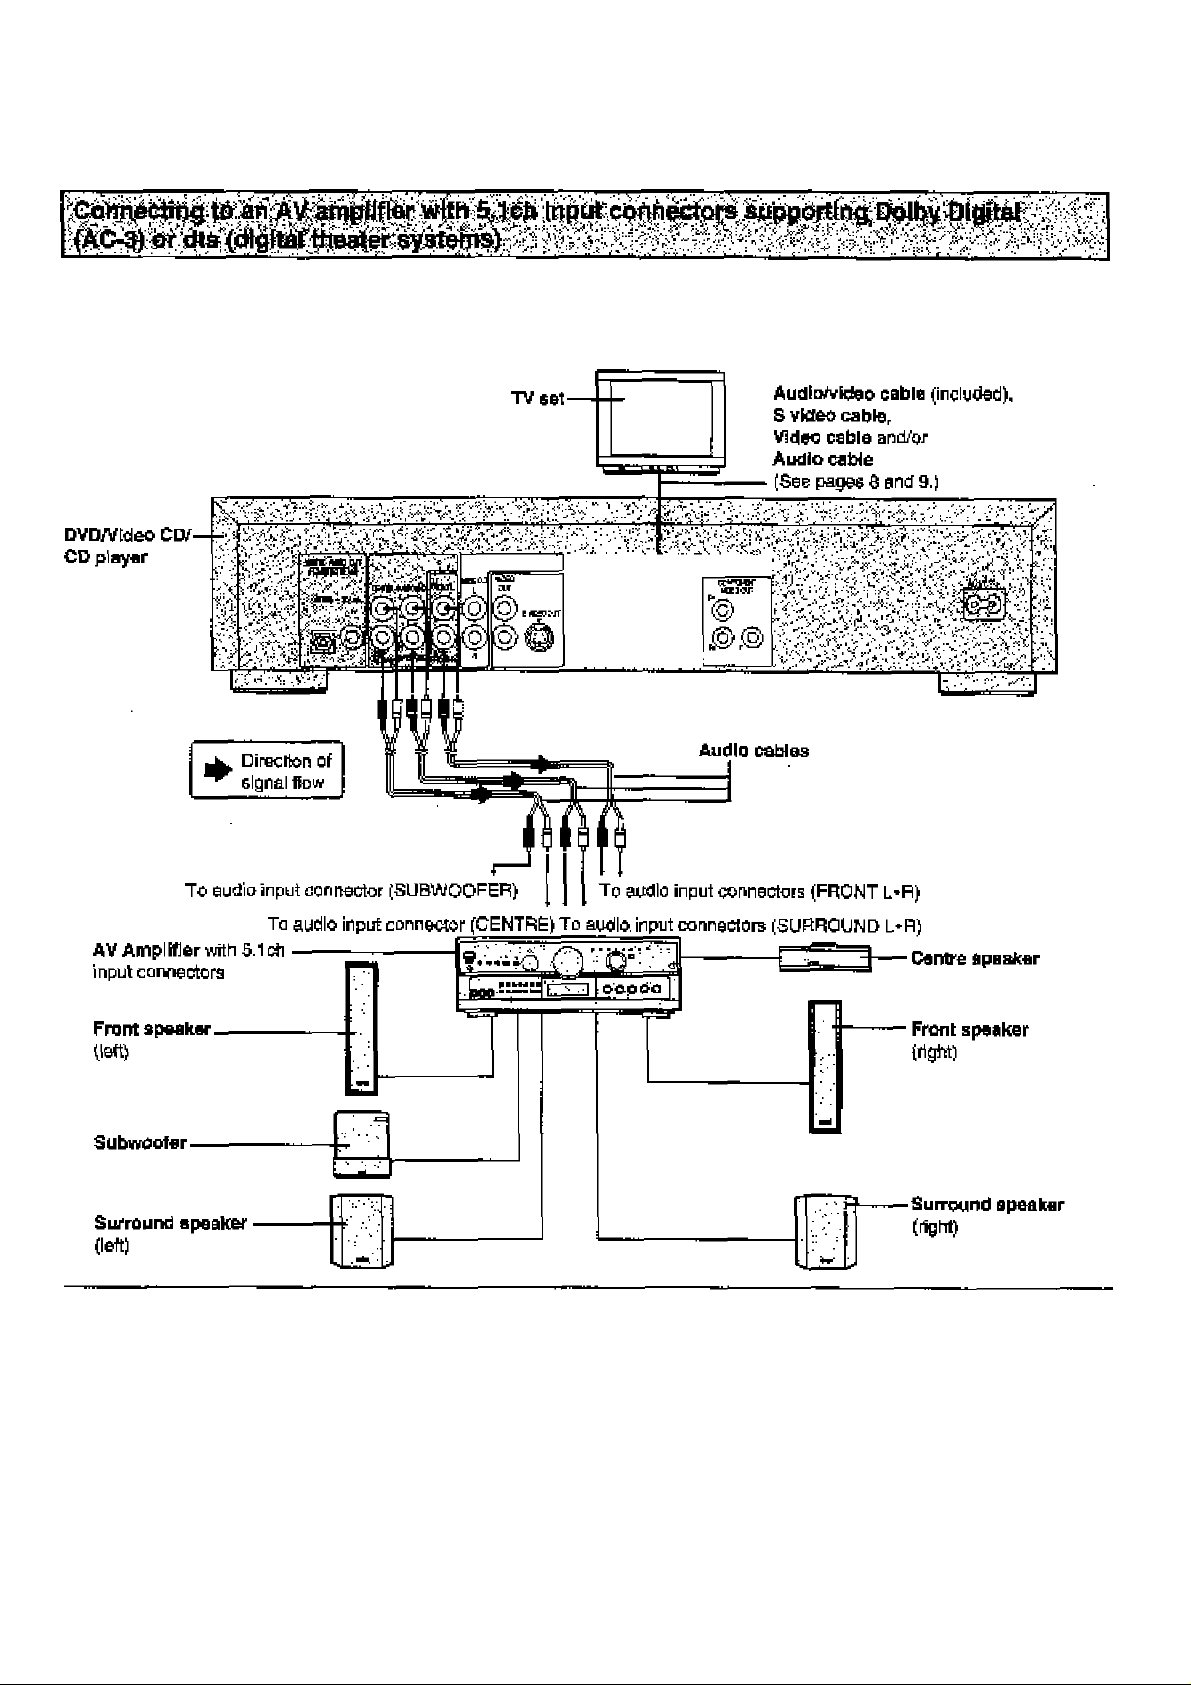
Optional audio соnsections
TTiie player contains a Dolby Digital (AC-3) decoder and dts decoder. Hi la enables playbacJc of DVDs recorded in Dolby Digital or dts
without the need for an ejctemal decoder wUh Dolby Digita] or dts processing. Wt>en the player is connected lo an AV arnplifier with
S.lch Input oonnectofSr you dsan enjoy theatre*quafl(y aiidio in your own home when playing DVDs recorded in Dolby Digital or dts.
r^e
•After oonnection is made, set the "a Speaker Setting" (suoh
as YeSitJo and Large,^rnall) according to your epealter sys
tem. {See page 37.)
•Turn Virtual Surround Sound (VSS) or Headphone VSS ofl if
you are using гтюге than Just the two front speakers (see
page 26)- Sound will only come from the front speakers If
VSS or Headphone VSS is turned on.
0
For your refarenoa:
•This player can play CDs recorded in dts. When the ptayer Ls
connected to an AV amplifier with S.lch input connectors,
you can enjoy muttl-diannat aucflo of CDs lecordsd In dts as
well as DVDs.
Page 11
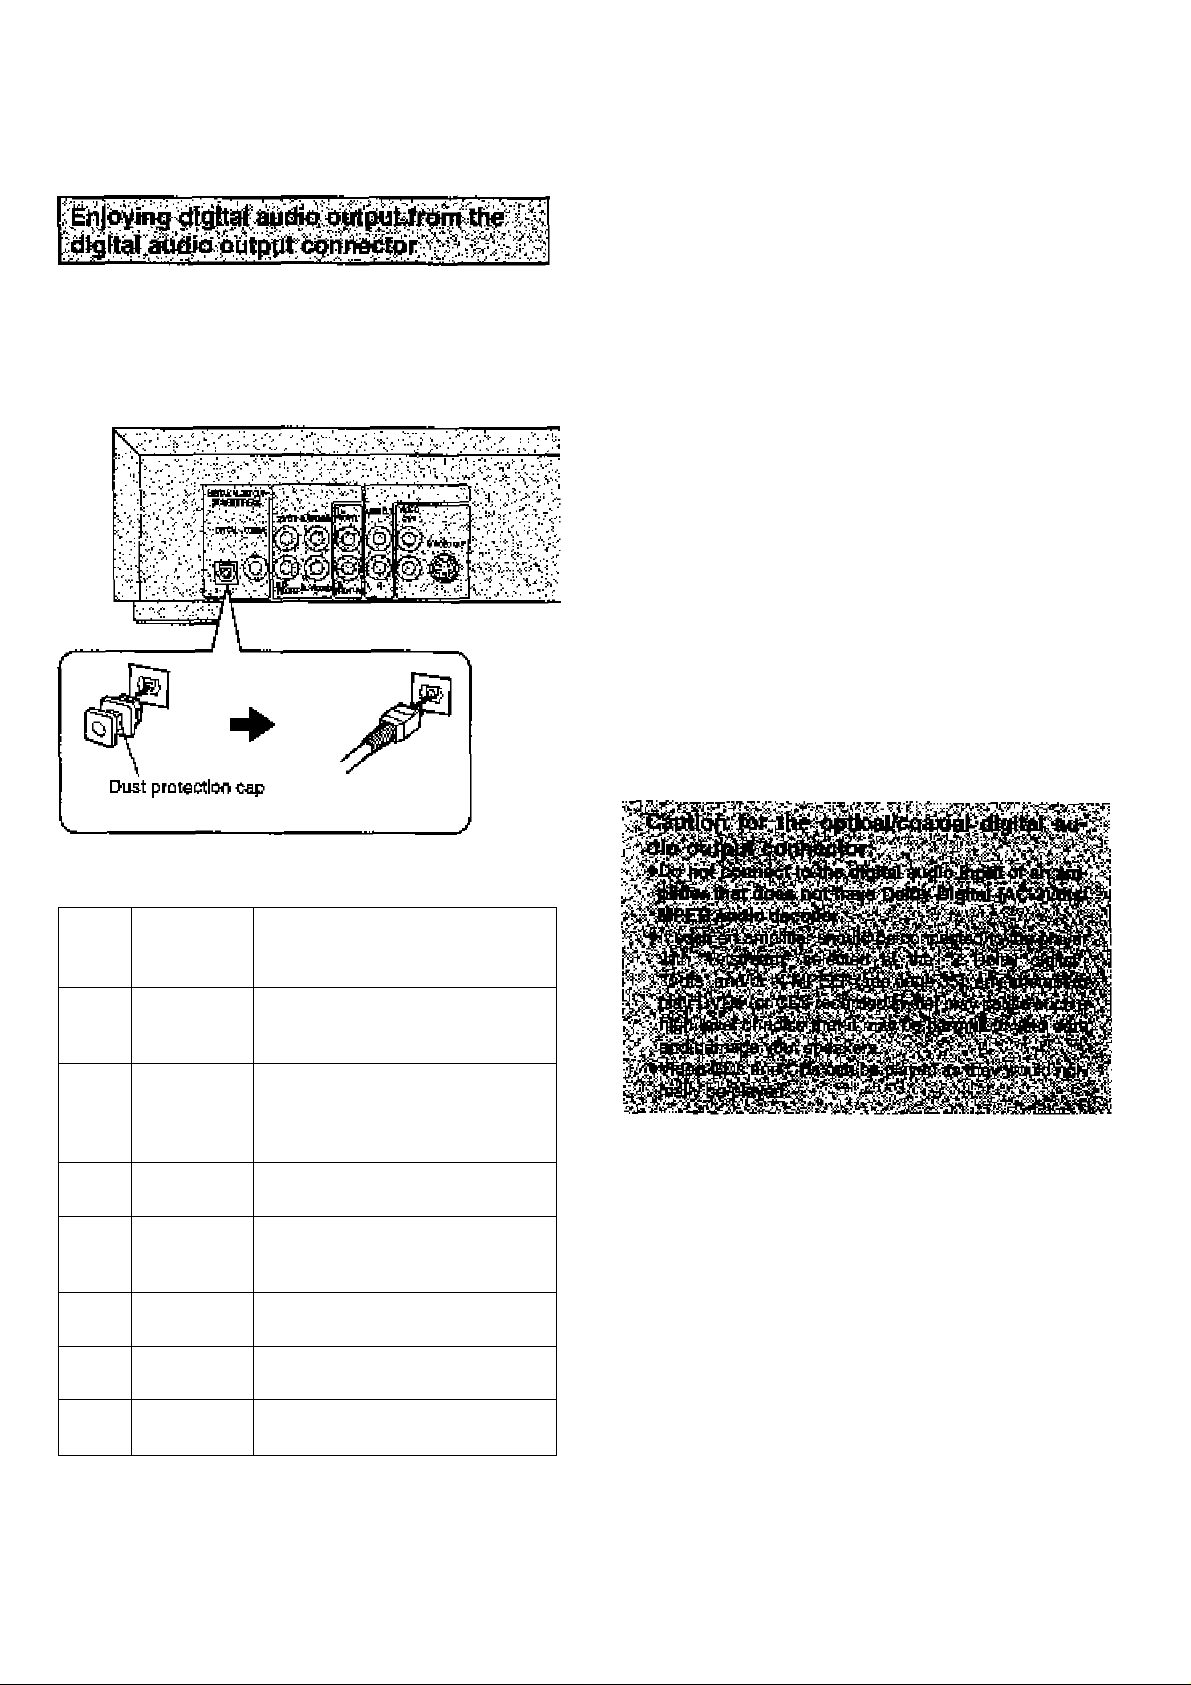
Note whon connocttng the optical digltet audio cable
e Remove the duat protection cap from the optical digital audio
output connector and ixmnect the cable lirmly so lhat the
configurations oi t>oth Itie cable and the connector match,
»Keep the dust protection cap and reattach when net using
the connector,
Mote
•Some dts decoders which do not support DVD-dts Intertace
may not work properly with the DVD/VIdeo CD/CD player.
For your reference:
•Dolby Digital (AC^) Is a digital sound coitiprassion tectv
ñique developed by the Dolby Laboratories, Inc.
Supporting 5.1-channal surround sound, as well as stereo
{2-channel} sound, this technique enables a large quantity
ot sound data to be etilclenlly recorded on a disc,
•The digital theater systems (dte) Is a 5.1-channel surround
sound System, which Is widely used In movie theatres amurwj
the world. It allows ihe bit rate to be Increasad in order to
provide good sound quality without sxceesively compreseing
the data.
•Linear PCM is a signal reoordirrg format used in a CD, While
a CD Is recorded in 44.1 kHz/16 bit, a DVD Is recorded in
4e kKz/16 bit up to 36 kHz/24 bit,
•If you have a Dolby Pro Logic Surround decoder, you will
obtain the fuli henerrt of Pro Logic frorn the same DVD mov
ies that provide full 5.1-channef Dolby Digitel soundtrack«, as
welt as from Ottes with the Dotby Surround martt,
•The digital audio output cornector {opiioal} converts elsotrical signals Into optical signals and transfers them to an am
plifier, These optical signals are Immune from electrical
Interference, and they also have mlnimat eftect cn o№er
equipment.
ё
3
vs
Concerring the audio output from the playei^a optlcafteoaxial digital audio output connector
Dtec
DVD
VideoCDMPEG 1
CD Linear PCM
SourKl
recording
format
Dolby
Digita]
(AC-3)
L'near PCM
(40/96 kHz
10/20/
24 bit)
dts PCM (2ch) [46 khEz/16 bii)^2
MPEG
audio
1
dts®3
OpUcaltooexIal digital sudio
output from connector
Dolby Digital bitsiream (1’^.loii)
or PCM {2ch) (40 kHi/le bit)'=’ "2
Linear PCM {2chj
(40 kHi aamplir>g/16 bit onty)
or no output^'’
or dts bifstream (l-5,lcJi)"’
PCM (2ch) (46 kHz/lfibit)"^
or MPEG audio bitstream
(1-7,1ch)“’
PCM (44.1 kHz sampling)"^
Linear PCM
[44.1 kHz sampling)
PCM (2ch) (44.1 khiz/10 bit)"»
or dts bitstream (1 -5.1 ch)" ’
i
Manufactured under license from Dolby Laboretorles"Dolby", "AC-3", “Pro Logic" and the double-D symbol
are trademaike of Dolby Laboratories, Confidential Un
published Works, © 1992-1937 Dolby Laboratories,
Inc. All rights reserved.
Manufactured under Hoonee from Digital Theater Sys
tems, Inc. "DTS" and "DTS Dl^l Sunrouncf are trade
marks of Digital Theater Systems, Inc, © 1996 Digitel
Theater Systems, Inc. All rights reserved.
■'The type cf audio output from the ctvtnector can be selected
by "7 Digital Audio Outpuf of the initial settings.
(See page 35.)
"“Compressed sound converted to PCM will be output,
■^^The settings and conoootioos necessary to enjoy CDs
recorded in dts are the same as tor DVDs recorded In dls.
11
Page 12
optional audio conr^ctions
m9m:&
#7
s'.-'
Whert DVDs recorded in Dolby Digrtal or dts are played, Dolby Digital bitstraam or dts bitstream Is output from tl« player's OPTICAL
digital audio output connector or COAXIAL digital audio output connector. When the player is connected to a Dolby Digital decoder or
dts decoder, you can enjoy theatre-quailty audio in your home. [An optrcaJ digital audio cable or coaxial audio cabJe Is required when an
oplsoral Dolby Digital decoder or dts decoder is used.]
•An MPEG audio decorder can also be connecled to the ptayar using the connected beiow. When DVDs reconded in MPEG audio are
played, MPEG audio bitstream is ootput from the player's OPTICAL digital audio output corrector or COAXtAC digital audio output
connectotv and you can enjoy fheade-quallty audio in your home.
y- V \\
To optical digital audio input connector To coaxial digital audio input carnector
i i
' Centre speaker
Front epeaker
(right)
' Surround speaker
(right)
Page 13
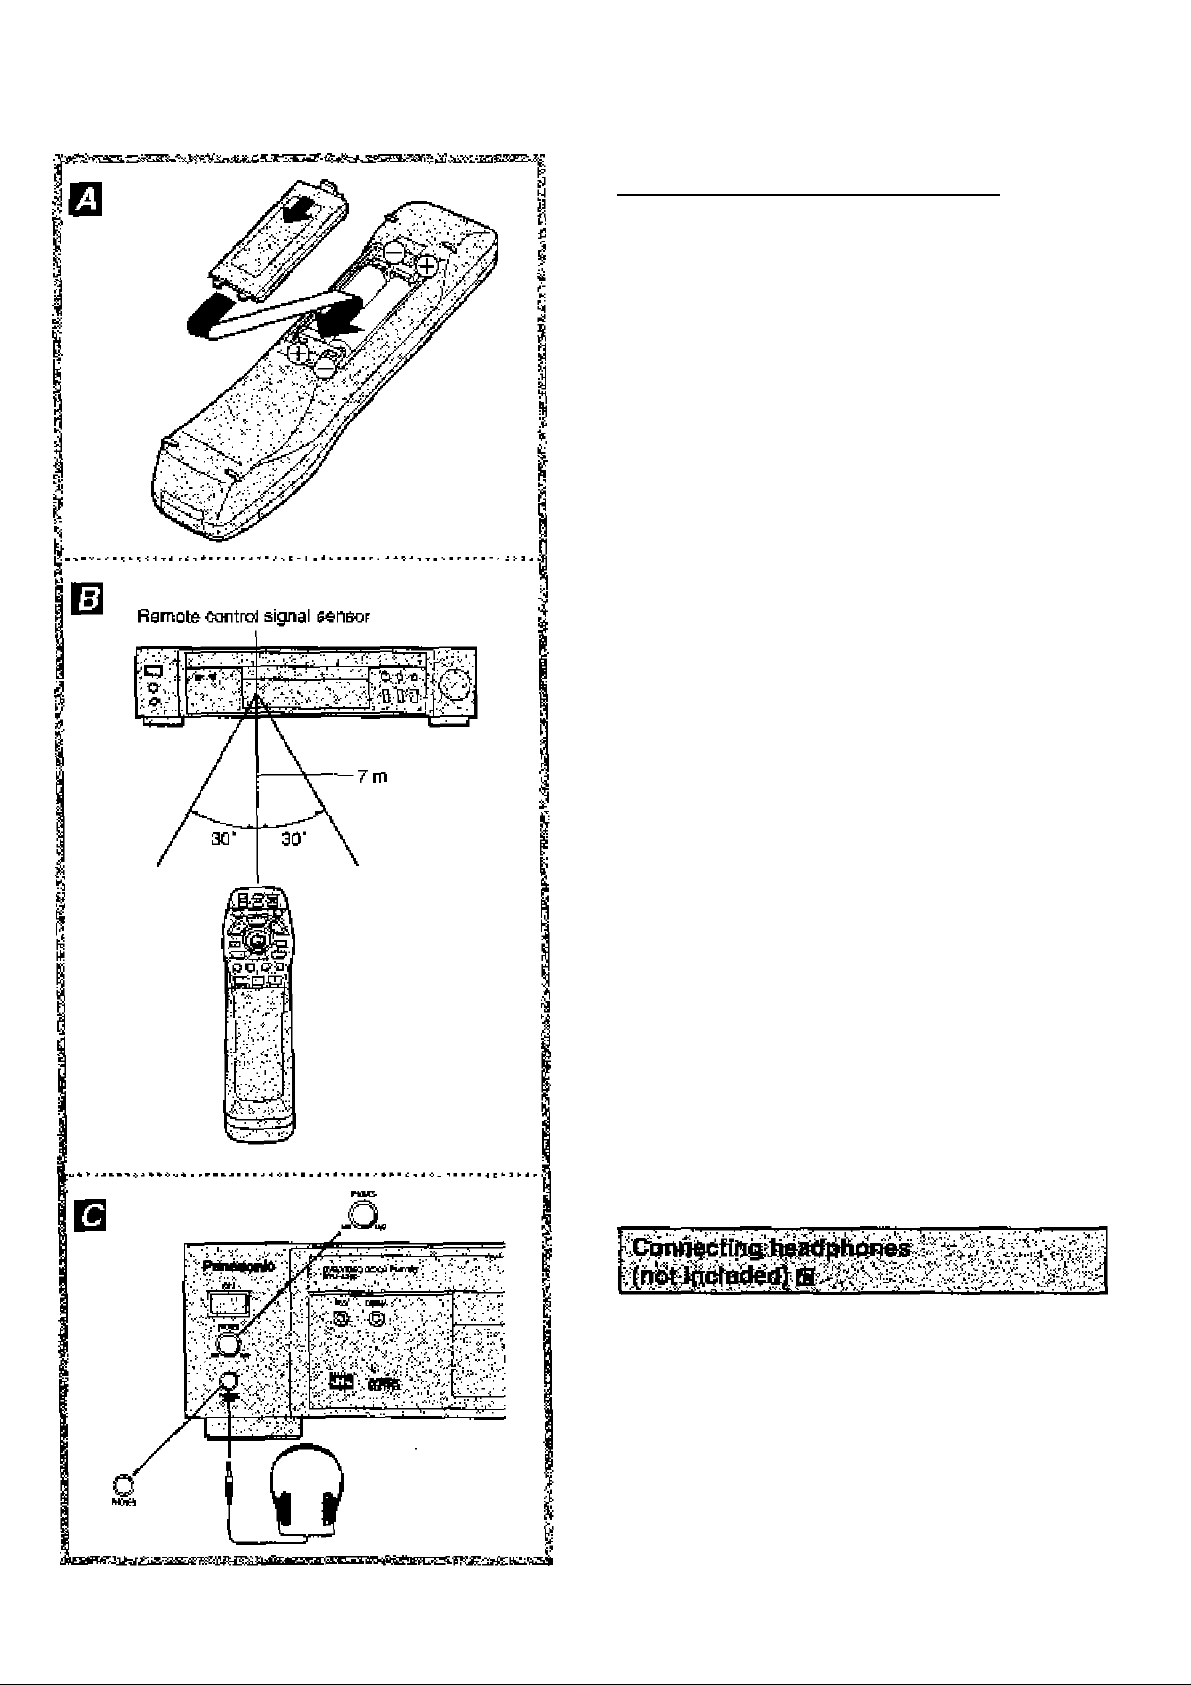
Remote controi preparations
Inwn ihe batteries while abs^rvfrig jjolarities (+ and -} aa IF-
iustrated.
Service life of batteries
*lhe batlanes normally last for about cwie yaar atthaugh this
depends on haw ofTan, and tor what dperatlons, the rernote
control is used.
* If the remóle control falFs to work, even when ft Is operated
near the player, replace Ihe batteries.
•Use size “R6, AA, UM-3" hatterlee.
Note
•Do not use rechargeable {M-Cd] batteries.
•Do not attornpi to charge, ahort-circuJl, disassemble,
heat or throw the battenes Into a fire.
•Do not drop, step on or otherwise Impact the rerrKJte
control. This may damage the parts or lead to malfunc
tion,
•Do nol mix old arid new batteries.
•If Ihe remole control is not going to he used for a long
time, remove the batteries. Otherwise, electrolyte may
teak which may lead, not only to malfunction, but also
to bums if oonitact Is made with the electrolyte.
•Wipe away any electrolyte leaking inside the remote
control, arid Install new batteries.
•ff any electrolyte should corne into contact with parts of
your body, wash Hoff thoroughly with full of water.
,s
[Л
b>
I
«
u
Use the remote control withirr 7 m of the seosor. Use it within e
6CT angle directly in front of the sensor.
•The distance varies with the brightr>ess of the room.
Note
•Do not point bright lights at the sensor.
•Do not piece oh}ects between the remote oontrc) and the
sensor.
•Do hot use this remote oontrol while operatirrg the remote
control of other equipment
/ Connect ttie headphonea.
•Headphones wld> a 6.3 mm stereo plug oen be con
nected.
2 Adjust tha volume.
Caution:
•Avoid listening to eourid at levels which may be harmiul to
your ears,
13
Page 14
Tm_E
Joystick/^
E£liC"
hM S-KIPi^
I STOP
v <T> <Xi ;
^ CL> CD CD ^
;, CD CD CD ;
CD ^,.
iGPEtUCUHS
MEMJ
reiUFH
►play
buttons
Basic play
Preparations
•Confirm lhat the TV set or №e audio equipment (if connected)
fa properly connected to the player.
• Confirm that the power for ihe TV set or the audio equipment
(if connected) Is (timed on.
•Confirm that the Input setting for the TV set or tt>e audio
equipment (if connected) is property selected.
(Example; Setect "VCfl 2" on the TV set if this pJayer has
been oonnected to TV input connactai [2],)onnected to TV input connactai [2].)
____
1 Praas POWER (6) to switch on the power.
nAtlfMII r<lul X. _.*-x_l_
_____________________
XI_______________
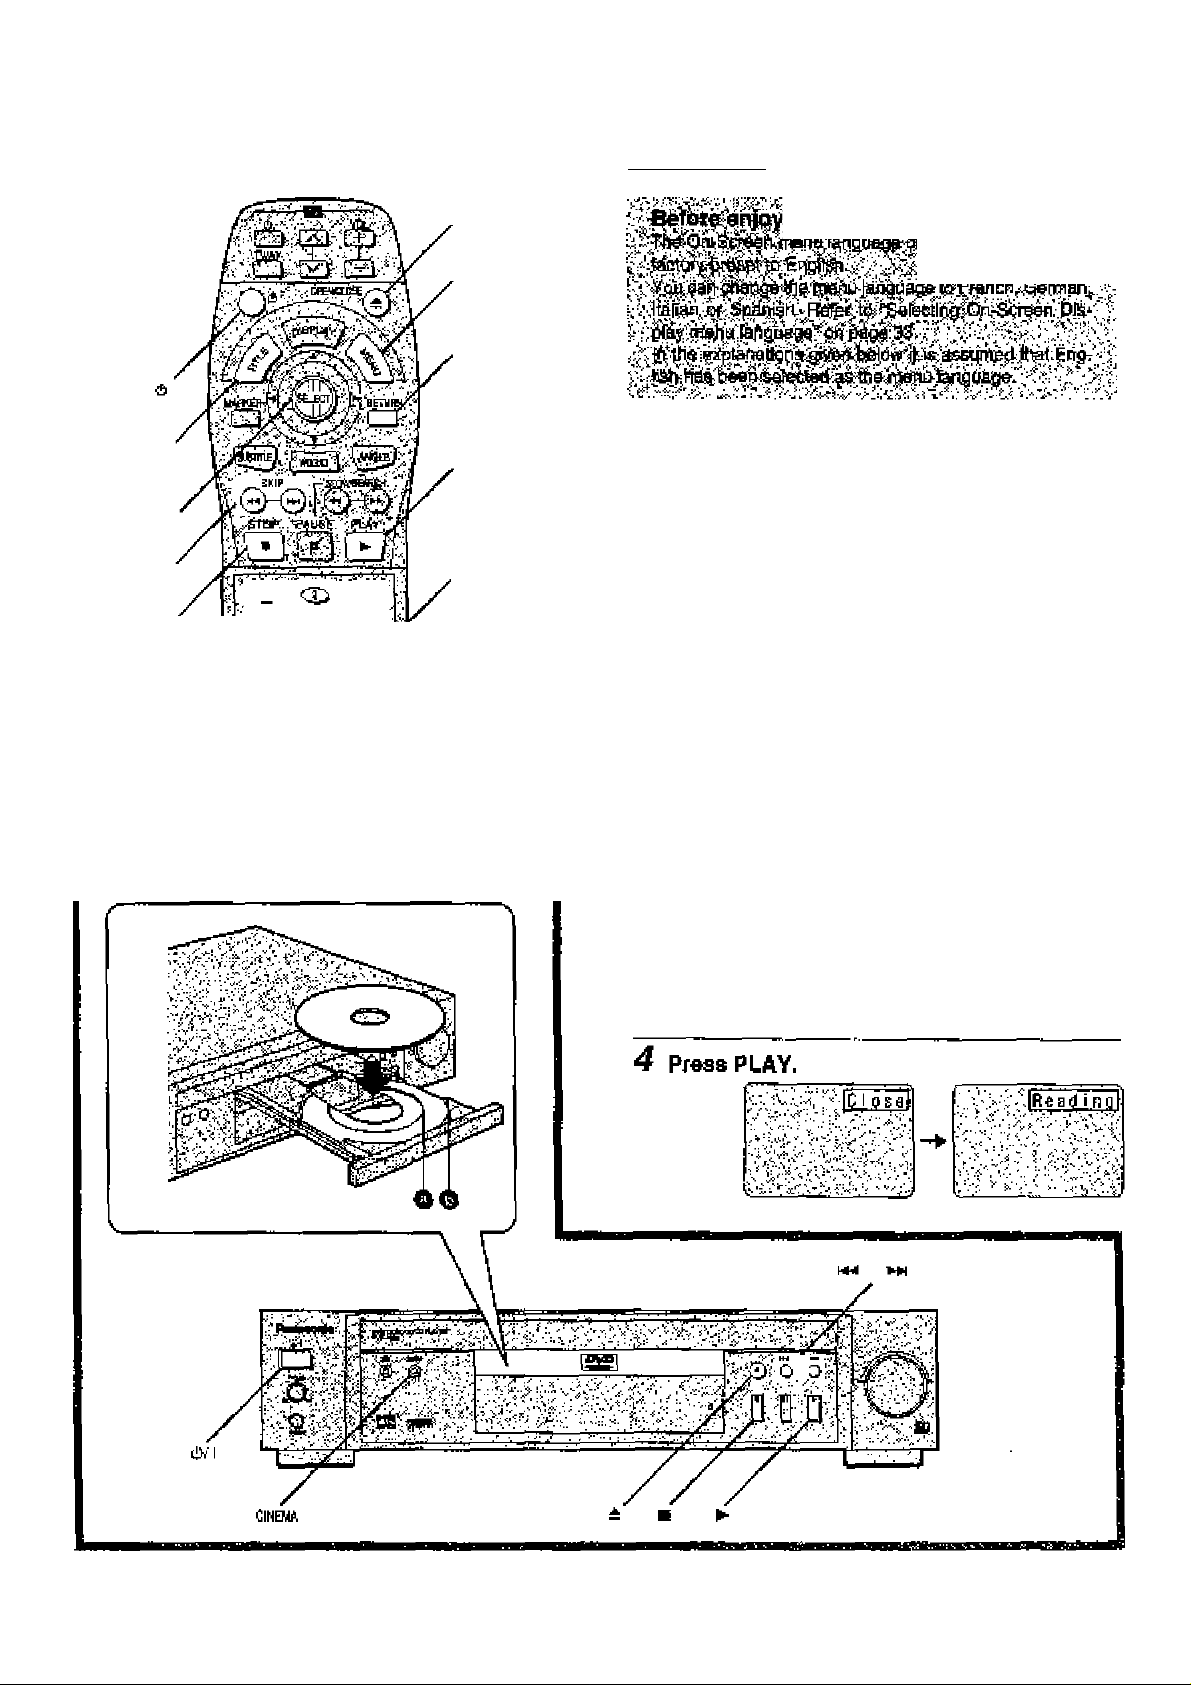
2 Press OPEN/CLOSE to
Open the disc trayr
3 Place the disc on the disc tray with the fabel
side to be played facing upwards.
(H the disc has a label)
Hold the disc without touchtng either of its surfaces, posi
tion if with the label side to be played facing upwards,
align II with the guides, and place it in positjon.
O 6 cm disc o 12 cm disc
^4
Page 15

The disc tray is autcmaticalty closed and play begins,
♦When iha disc tray is closed by pressing OPEN/CLOSE,
press PLAY (b slari play,
•When a menu screen appears on the TV monitor
In the case of many movie
DVOs, an Interactive DVD or
Video CD with playback control,
a menu screen appears or the
TV monitor. Perform step 5 to
start play,
{Eirample of DVD)
5 Tilt the joystick (A, T, M, and press
SELECT, or press the numeric buttons, to
select the item.
•The Joystick Is not effectìvs for selecting items for Video
CDs.___________________
Dogs
Play of the selected item now begins.
Castles!
..
........
Sriiij« •„*
____
^ ♦ ?...«* >.»..♦ . J
(Example)
What Is playback control?
If a Video CD has ‘playback control" written on Its disc or
jacket, it means that partfcuiar scenes or Information can
be selacted tor viewing Interactively wfth the TV rnonltor
using the menu screen.
Note
♦The disc continues to rotate while the rnenu is displayed
even after the player has finished playing a particular item.
When no further eelecttons are to be played, be sure to praea
STOP to clear the menu display.
•If the disc Is put in upside down (and it ie a single sided disc),
the FU display will Indicate “NO PLAV*.
•iiAlhen the NTSC DVDAfIdeo CD Is played, the playback pic
ture may roll up or down on some TVs; adjust this using the
V-HOLD control on the TV, TVs not equiped with a V-HOiD
ocmtrol cannot correct this condition. The playback picture
may shrink vertically and black bars may appear both orr the
top and bottom of the screen, or the picture may be in black
end white. This does not indicate a rnatfunction.
For your raferanoe:
•tfl/hen 0 appears on the TV monitor when a button is
pressed, the operation Is prohibited by the player or disc.
ttt-
«1
While watching movies
•Setting to the pldune quaJity best suited to movie
. Pressing the player's CINEMA button will select the optimum
picture quality for movie programs {this sotting gives a gen
tler feel to videos, prqducfng mors detail in darker scones
and helping to reduce rrcisa). (The button lights up in green.)
Pressing the same button again will restore the standard pic
ture quality. (Alternatively, itie plclure quality of your choice
can be eat using the GUI screen. See “Digital piclura mode'
on pegs 21.]
•Raising dialogue volume
The volume lor the dialogue oan be raised by displaying the
GUi screen (tor player Information) end setting "Dialogue
Enhancer'' to “ON''. (See page 21,)
This setting lakes effect only for discs which are recorded
wfth Dolby Digital (AC-3]/dts (2 channel or over] and wHh the
dialogue contained In the oenira channel.
When tho menu continues onto another screen
After step 4 on page 14, press SKIP ().
•To return to the pravloua menu screen
Press SKIPihM).
•Due to the ciesign of some scftware tities, SKIP (i4e, ►►!)
may not always work. For operatfon, refer also to the jacket
of the disc concerned.
Stopping play and returning to the menu
ecreen
Pro« TITLE, MENU or RETURN (for DVD), or RETURN (for
Video CD),
Play is suspended, and the menu screen Is displayed.
•The buttons may not work depending on the disc used.
After operation
When the player la not in use, remove the disc and press
POWER (6) to sel the player to the standby mode-
The player ie automatically sat to the star>dby mode after
30 minutes or so have elapeed in the stop mode.
(Auto power-off function)
Press STOP during playr
RESUME function
The player records the point whore STOP was pressed during
play. flashes on the player’s FL display when this function
is activated.
•Press PLAY again while "^" Is flashing, and play wfll reeums
from this point.
•When the tray is opened or STOP Is pressed again while
is fiaehing, the RESUME function will be cleared.
The RESUME furxrtton works only wfth titles for which the
elapsed playing Erme appears an the players FL display during
playback.
This feature remains active If the player is set to the standby
made and than turned back ON.
Chapter review function (DVD oniy)
When PLAY fs pressed while
is flashing, ttie message
shosvn on the right Is briefly dis
played.
If PLAY is pressed again while lha above message is dis
played on the screen, the first few seconds of each chapter
from the beginning of the title up to the point where operation
was stopped will be played. This makee it possible to review
previous chapters. Nomnal playback will commence from the
point where operation was stopped.
Note
•Cancelling the RESUME function will also clear the chapter
review functlw,
•The chapter review fimctton rrray not work with some Di/Ds.
Press PLAY la Chspfsr. Review
15
• * '. ^ ". ^
T^rvs:
Page 16

Joystick.
Skipping chapters or tracks
Press SKIP(h4^, ►>!) during play.
with the remote contra^ On the player
? ?
Reverse Fonward
For your reference;
•A chapter (OVDJ or a track {Video CD/CD) is skipped each
tlnie the bultoo Is prasssd,
♦When SKIP (W^l) is pressed orce midway through a chap’-
ter/track, piay ratums to the start of that chapter/hack. Where
It ja pressed again, a ohepfer/track le skipped each time the
button ia pressed.
•When SKIP (, ►>!) is pressed during menu play of Vid
eo CDs with playback control, a menu screen may some
times be recalled.
Sliil picture (Pause)
Reveres Forward
¿Sts. V:« V <• rj>.
Í i'?! 'b
i.lu^'■.¿ ^• i!''-'■ X pi¿ÍH
r.-'L' ■^.a.'J^^':-'i".'. ?■*:
Pr6ss PAUSE during play,
•DVD/VIdeo CD: The player will be placed In the still picture
mode,
♦CD: The player will be placed In the pause
mods.
♦Normal pJay Is resumed when PLAY Is pressed.
6
Page 17

Rapid advance (Rapid reverse)
Slow-motion play [DVD/VI<leoCD]
Wfth the remote control
Press SUOW/SEARCH
Raver?« Forward
■The speed of advance (reverse) is re^etively slow at first.
V№en the button is pressed again, the speed incrsasee up to
5 steps.
■thermal play is resumed when PLAV is pressed.
On the player
) during play.
7* • i' '“fi *jX". . ",
(Example)
Turn the SEARCH diet ►►) during play.
Low Low
with the remote control
Pr&as SLOW/SEARCH ►►) in the Still pic^ ture mode. (SaepageiS.)
Raveree Forward
(Example)
•The speed of slow-mofion Is slow at first. When the button is
pressed again, the speed increases up to 5 steps.
•Normal play fs rseumed when PLAY is pressed.
On the player
Turn the SEARCH dliil {MM, In the still pic
ture mode. (See page 16.)
Low Low
I
IS
B
;b
S
0
$
ii
■Normal play Is resumed when the SEARCH dial is released.
For your referenca:
•Whan SLOW/SEAflCH {-4^, ►P') or the SEARCH dial
(■4-4, is used during menu play of Video CDs with play'
bade control, a menu screen may sometimes be recalled.
•For DVDs and Video CDs, audio will be heard during ecannfng (forward direction only) at the inlbal scan speed. (See
paga 39.) For CDs, audio will be heard during scanning at
every scan speed (1 to 5). (For dte CDs, audio will r^ot he
heard at any speed.)
Frame advance (Frame reverse)
[DVCWIcleo CD]
Tilt the Joystick in the atlii picture mode.
(See page 16.)
•4: Reverse
►: Forward
•The disc Es advanced (reversed) by one frame each lime the
joystick (’<,►■) Is tilled.
•Whsrt iha joystick ('4, la kept lilted, cortsecutive frame
advance (reverse) works,
•Normal play fe reaumsd when PLAY is pressed.
___________________________
•Sb'll picture mode is resumed when the SEARCH dial le rO'
leased.
Mote
•For Video CDs, slow-motion playback in reverse direction Is
nc)t possible.
Cancelling playback control
jVldeo CDl________________________________
1. Presa STOP after the menu screen appears (after step 4 on
page 14).
("PBC’ will be cleared from Ihe player’s FL display.)
2. Press the numerlo buttons to Qelact a track:
(Ptay begins.)
•Refer to the jacket etc. of the cTisc coocefnsd for the track
. numbers.
•Prese "V to start play from beginning of the disc.
Tq return to menu play
Press STOP to stop playback stkI press MEMU,
("P5C" will light up on the player’s FL display and the menu
screen is resumed.)
Psrform step 5 on page 15.
Note
•For Video CDs, frame reverse ie not possible.
For your refarerveet
•Preselr>g PAUSE also activates frame advance.
•Whether the pictures are advanced by a ’^rame" or "Field" Is
automatic. (See page 39.)
17
Page 18

General Information about GUI
DISPLAY
Jay^ck^
BELfCT
CAWKL
:y. .jV
; -i o CD o •
O CD CD ^
O CD CD Î
^ O iS£i
FETU№
►PLAY
Mumorlc
button«
screens
This player foalures GUI (Graphical User Interface) screens
provkiing various functions. A “banner* will be displayed on the
TV twhen DISPLAY button on the remote control is pressed.
Operating the loysticW^ELECT button on the remofa control
wNI shew disc information (tltie/chapfer/trsck number, elapsed
playing time, audic/subtitle language, arid arigte) and player
Intotmation (repeat play, play rriode, marker, picture mode,
Virtual Surround Sound, master volume, afc.),
Some loons aNow the settings to be changed.
______________________
1 PreG$ DI&PLAY during pJay t>r In the stop
mode.
Each time this button la pressed, the TV monitor changes
as shown below.
r-*GUI ecreen for selecting disc information
GUf screen for selecting player infomnation
Shuttte |craen
—GUI screen is cleared
'Some functions cannot be accessed from the stop
mode.
•t
'o Y’-V-ïs- i -VV.^sV ■•I'lJ'lti.
1: . ..
.f '
•Ï s
. .
■ ' y
s A
2 Tilt the |oystiQk(^,^-) to aelTCt the Item.
*Tha currentiy selected item Is indicated by the yellow
frame on the GUI screen.
3 Tilt the joystick {At T) to select the setting.
ePor some functions, the setting will be re^stered imme'
diateiy; for others, SELECT or PLAY must be prassad.
•When numbers are displayed (e.g. tide №.), the numenc
buttons are aleo attective tor setting frestead of the joyetick (A, ▼). When numbers are entered with nurneric
buttons, prees SELECT to register tha setting.
Press RETURN or CANCEL to clear the GUI screen.
Examples of GUI screens
Sse @ and B for detailed illustration.
Tbe screens depend on the diso contents.
For your referortoet
•The GUI soreens may not be displayed when playing sorne
kinds of DVD software, or tf the televlelon's automatic picture
zoom function'is on.
tf this is the case, change the position of tbe GUI screen in “4
On-Screen Massages“. (See page 33.)
•The colour (blue, violet or green) of the GUI sorean can be
changed. (Seô page 33.)
Page 19

Detailed descriptions of each GUI icon
p THfehc?: Change №© !Hle No. with fha joystick (A, ▼) or tha numeric battona and press SELECT.
Change the cttapler No. wilti tho joystick (A, ▼) or the numeric buttons and press
SELECT.
16b Linear PCM
O" stands for kHz
20b
and V stands for
24k
bit.)
Dolby Digital (AOS)
dts
MPEG audio
DVD Karaoke
(Solo)
DVD Karaoke
(Duet)
Charge (tie tlms with (he numoric buttons and presa SELECT.
Exampie: To specify "1 hour 56 min. 37 s«c."> enter *1563r.
(This function does not work wilti some decs.)
Change the No. wilti the joystick ( A. ▼) о* the numeric buttons.
Change Itie No. With ihe joystick
(A, ▼) or the numeric buttons.
ENB: Erigllsli FOR: Portuguese
FRA; Fjench RU5: Russian
DEU: Germen JPN: Japanese
ITA: ilalian CHI: Chinese
Subtitle language
1 Hi/.";:
йЖШ1Ш1
jKThe GUI screen display indicates the number of channefa
recorttod on the disc.
Example:
3/2 4ch
U
0; No lew frequency efiect (for aubwoofer)
Л: Low Irsquericy Bffect (for subwoofer)
C: Г4о surround
T. Mono sutTOuiMi
2: Stereo surround (Ish/righf)
1; Centre
2: Front teft+Front right
3: Front left+Fïont right+Centre
ESP; Spanish XOR: Korean
WLO; Dutch MAL; Malay
SVE: Swedish VIE; Vietnamese
NOR; Hamegian THA: Ttial
DAN: Danish *; Others
Select “GN* or “OFP with tji9
joystick(Af ▼>.
OFF
SubtlUas ctearad.
ON
SilEititlqq displayed.
Audio eoundback
language
□□ Digital
Audio
attribute
Ч
____
-
■■ "--p • • -- • -''^-i^ ■
i'ij'
Change the No. with Itie joystick
(A, ▼) or Ihe numeric buttons.
ENS: Enflllsti PORrPortuguese
FRA; French flUS; Russian
D£U: German JPN; Japanese
ITA: Italian CHI: Chinese
ESP: Spanish KOR: Korean
WLD; Dutch MAL; Malay
SVE: Swedish VIE; Vietnamese
HORt Nopifeglan THA; Thai
DAN: Danr&h =k: Others
96k
LPCfyi
or
4$k
lch-3^.lch"
□TS
MPEG
Vocal
loh-3Æ.lch*
1ch-a^.1ch"
-tOFF}
ON
- (OFH
Vocal
VI+V2
VI
V2
s
2 '
в
For your rsfarencs:
•"Д V" around the loon means that the Hem can be charged wrth ihe joystick [A, T)
;гЦ-.-- •■• •■• • - •• г
E]
19
Page 20

Detall9d descriptions of each GUt icon
Not«
•Track No. and the elapsed playtng Hme are not dl«p)eyed during menu play of Video CDs with playback i:x>ntrcl.
•It Is not posaihle to tum playback controf ON or OFF uaJng the GUI scnaen.
lAe
For your referer>oe:
?0 •-A around the icon means that the Hem can be changed with the foysttck (
Hi
Page 21

r^ote
»Flépeet play and marKsr FuiKtiona do not work with an Interacdvo DVD or during momi play of a Video CD wttti playback contrct.
• A-B repeat play does not work with an intamctive D\^.
*lt ia rtot pooatble to ohangetba play mode usin^ Ifw QUI »crean.
«Ttio mastar voi ume can be sat and stored eaparately for DVD, Videa CD and CD.
I
a
a
u
Till ttiejoysticM^)-
(DVD only)
‘
- riit tt»e joyatlck (■<).
For yovr rafaraneo:
«Each time tna joystick ^ > la tilled, (ho «paed oi rapid reverse^advance and ekrn^moiion piay Incraasas up to 5 steps.
«The figures oppeartng at both ends of the Shuttle ecrasn stand for the maximum speeds of rapid ravor&o and repid advance.
{DVD: +1O£V-100.VldsoCD: ’t-40/-40, CD; -rSa.'-SCil
p 1 ”
________________________
1 Tilt the jay3ttek(T). l^Bipjè'iiàipj^ .v -;:', -'.' Tit the ioyetìqk (►).
Tit the Joystick Tin the joystick (►).
(i).
_
II .1 ‘
(DVDfVldaoCD only)
21
Page 22

Jo/dtick/
3eE!7
Repeat play
i y^-'XT->J- \'ti •' ^
Fress REPEAT MODE during play,
Each time this button is pressed, (he TV monitor changes as
shown below and the diec will repeal a chapter or title (CVD) oi
e track (Video CD/CD),
•DVD
Normal play
Repeat of chapter being played
Repeat ot tWe being played
■ .■ :;ij:
Cancel repeat mode
{Nofmal pjay)
CANCEL
»Video CD/CD
Normal play
Repeat track being played
Repeat of ertlia disc contents
Cancel repeat mode
(Normal play)
Td i^urn ID normal pJay
Press REPEAT MODE until DFP is displayed.
Note
»Repeat play may nol wadi correctly with sorne DVDs.
•Repeat play does not work with an Interactive DVD or during
rneou play of a VWeo CD with playback control.
72
Page 23

Storing markers in memory to be
To enjoy program repeat play
If REPEAT MODE Is pressed during program play {ses
page 24)r №e display changes as roNowa:
Program play
Repsar of programmed track
being played
Repeat of all programs
Cancef repeat mode
{Program play)
To return to program play
Press REPEAT MODE until OFP is dlsplayed-
viewed (iistened to) again
___ __ __ _
1 Press MARKER during play.
The marker screen appears on the TV monitor.
"*" Indicates rvo таткег has
beer> stored yet.
. -.1 • ' .
IS
2 Press SELECT during play at the starting
point to be viewed (listened to) again.
Indicates “MARKER 1" is stored
in the mernory.
(tf SELECT Is pressed where any
number Is already displayed, tr® ' v. ^ ^
previous starting point will be
replaced by the new one.)
■Tilt the Joystick (►) and press SELECT to store the next
marker,
•Up to 5 markers can be stored in the memory,
•Press MARKER to clear the display.
.S. .. .
f • "
i Praas A-B REPEAT during play the point
where repeat pJay is to etart (AJ,
2 Press A-B REPEAT at the point where re
peat play is to be concluded (B).
lOAS
Repeat play of trie section betuveerk points A and В starts.
To return to normal play
Press A-6 REPEAT Lirrfil * •' la displayed,
Note
eA-B repeat play does not work with an Interactve DVD.
eSome subtitles recordad around point A or B may fall ic ap
pear (DVD).
•A-B repeat play works only within a tide {DVD) or a track
(Video CD/CD).
For your reference:
oTTie er>d of a track or title is automatically determined as point
B.
ЕГО,’И. IHBEHB^vrjr. ., •,. <
7 Press MARKER during pisy.
2 Tilt the joystick (^, to select the marKer
to be reealted/cteered-
3 Tiitthe Joystick (A) to recall a marker.
Press CANCEL to clears marker.
Play resumes from the point oorrespcndlng to the sefecled
marker.
or
The satected marker ie cleared.
Note
eSome subtites recorded around the merker mey fall to ap
pear. (DVDJ
■These operabone do not work with an interactive DVD or dur
ing menu play of a Video CD with playback control.
For your reference:
■All the merkere are cleared when the player is set to the
standby mode or turned off, or OPENi'CLOSE Is pressed,
Page 24

Joystick^
.lE^
Program play [vrd&o cd/cd]
The player plays the traohe on the disc in an order you specify.
1 Press PLAY MODE In the stop mode.
The program playback screen appears on the TV rrtonrtor.
_
_____
- . I ^ TT-!—„... J...I . • . . .'ll
.CtiDoea AtneiL (titn OrwH 6EL5CT.','
1 7 ia
Example: a disc—
including I7lracke
S S 14
a 9 15
4 10 10
< 11 17
S 12
CMftiBit
CMr Jl
Ir;^
•s
y .1
7:
•. :i<*V
I STOP
CWCEL
►PLAY
> Numartc
button«
■To exit the screen
Frees PLAV MODE twice,
2 Tilt ths joystick (A, V, -4, to sslect tho
track.
Press SELECT.
Tha selected track is stored in the memory.
?4
»Repeat steps 2 and 3 to eelect anottier track.
»Up to IS tracks can be programmed.
4 PrsssPLAV,
Play now bagtne in the progrerrYned eequeoce.
Aftsr pisyback
Play ^ops atter the last programmed track.
Page 25

Random play [video cd/cd]
_____________
To return to normal play
1. Press STOP. (Prqgram pJay is suspervded,)
2. Press PLAY MOO£ twice,
3. Press PLAY,
Normal play begins from (be be^nniPg of the disc.
•The program is retained in the memoty.
Clearing the program
When the program piaybach screen is displayed
•To clear the laat program one by one
Move to ■’Cfear last" and press SELECT.
{Pressing CANCEL Ofi the remote control also clears the last
program.)
•To dear the whole program
Move to "Clear all'^ and press SELECT.
(The program is also cleared when the player is set to the
standby iriMle or turhed off, or 0PEN/CL08E Is pressed.)
Programming track numbers while monitoring
the player’s FL display
This fuhc^tion works with the following discs.
•CDs
•Video CDs with playback control when menu play is can
celled
(Press STOP while the mami screen is displaysdO
•Video CDs which do not support playback control (Ver 1.1)
1, Press PLAY MODE once in the step mode.
The player plays the tracks on the disc In random order,
1 Press PLAY MODE twice In the stop inode.
The random playback screen appears pn the TV monitor,
pv •it’ .r*'•; . - ^ '..'t vi
-OA-y
Rartdcm Ployback
M
Press PLAY Id start
•To exft the screen
Press PLAY MODE onoe.
to
I;
2 Press PLAY.
Play now begins in random order.
After playback
Play stope and the random playback screen is displayed.
To return to normal play
1. Frees STOP, (Random play ic suspended.)
2. Press PLAY MODE ones.
3. Frees PLAY.
Normal play begirts from ihe beginning of the disc.
In the case of a CC
€
Rashes
2. Preee the numeric buttons to select the track.
The selected track i& stored In lha memory.
Track No,
•Ftepeat step 21o eelect another track,
3 Press PLAY.
Program play starts.
Program No,
I
€
0
a.
0
1
25
Page 26

Joystick/
SELECT
Changing audio soundtrack
ianguage [dvd;_________________________
It is possible to change ths audio soun(ttrach language to a
different language from the one selected at the Initial settings if
auailabla. (See pege ai.)
This operation wori<e oniy wfth discs on which multiple audio
soundtrack languages are recorded.
1 Press AUDIO during play.
•When no audio soundtrack is recorded, will be dis
played instead of the language number,
sifejm
Wf3lE
/NumsTlc
buttona
Number of the audio
soundtrack language
being played baok
2 TMt the joystick (A, T) to ssfea the lan
guage.
Pressir^ the numenc
buttons elso changes the
audio soundtrack
language.
• Press AUDIO or S ELECT to
dear the display.
For your reference:
•Whan the prsfeaed language Is not selectad, even after tilt
ing the joystick (A, ▼] several limes, It means that language
is net available on the disc-
•When the penver is turned on, or the disc is removed, the lan
guage heard is the one selected at the initial sottlnga. If this
language la not recorded on the disc^ only the available lan
guage Oft the disc vrlil be heard.
^6
■' •sj-:;s -ji'<'.'i •...'-^ a'?vtf>-
Switching vocals ON or OFF for
Karaoke discs [dvd/vi<ioo cd)
7 Press AUDIO during play-
2 Tilt the joystick (A, T, M, ►) to select ti>e
setting.
•DVD Karaoke (Solo)
------
(0FF}'^0N
■ DVD Karaoke (Duet) (-4, ^)
-----
(OFF)^1+2 (ON)^VI (ON)-i-^V2 (ON)
t______________________________________?
•Video CD (A, T)
t t
•Prase AUDIO or SELECT to ctear the display.
Note
•This operation does not work with CDs,
____________
VdoI
1 * *—i
Page 27

Changing subtitle language [dvd] Viewing from another angle [dvd]
It is pi3«slble to change ftie subtitle language 1q a different
language frcnn the one selected at tfie initial sailings If availa
ble. (See page 31.)
This operation works only witti discs on which multiple subtitle
languages are recordad.
1 Press SUBTITLE during play.
eWhen no subtitles are recorded, ‘—" will be displayed
instead of tl» language number.
Number cf the subtitle language being played
back
LJE3
I love you
2 Tilt the joystick {A, ▼) to ssJect the lan
guage.
Pressing the numeric
buttcns also changes the
subtitle language.
Some DVDs contain soenee which have been shot simulta
neously from a number of different angles. For these discs, the
same scene oan be viewed irom thass (Cerent angles with
the ANGLE button, (The artglea depend on the disc used.)
1 Press ANGLE during play.
Number of angle being
played back
2 TNt the Joystick {At T) to select the angle.
Pressing Ihe numeric buttons
also changée the angle.
•Prose ANGLE or SELECT to dear the display.
Note
•This function only works for titles having scenas recorded at
dlflerent angles.
epress SUBTITLE cr SELECT to clsar the display.
To olear/dlsplay tho subtitles
Tilt tha joystick ('<, ►) to select ON or OFF at alep 2,
Note
•In seme cases, the subtitle language Is not changed to №e
selected one immediately.
For your reference:
■When №0 prefan-ed language Is not selected even after lilting
the joystick (A, T) several 0 mee, It ineans that (tie language
Is not available on the disc.
•When the power Is turned on or the disc Is removed, subtihes
appear in the language eelected at the Initial settings. If this
language is not racordsd on (he disc, they appear l.n the
disc's priority language.
For your refererx»:
•‘‘ANGLE’’ lights up on the player's PL display at scenes re
corded at different angles to Indicate that angle switching is
posalble,
•The angle numtjer oan be progmmmed beforehand with
some DVDs; the angle will be switched to the selected
hunger when ‘ANGLE" lights up.
I
S
9
!d
s
3L
o
#>•' •
'•..■''IVWii,'I
27
Page 28

ТГЯ£
СХ> О СР :
^ rXi CD Ср ^
i О Р CD f
Jcystfck/
«аЕст
MgUJ
► PLAY
Numeric
buttons
Reproducing an Advanced Virtual
Surround Sound (VSS) effect
[Dolby Digital (AC-3) DVD channel or over)]
ITiere are two types of Virtual Surround Sound effects avail
able w№ title player, VSS (for external speakeie) and Head
phone VSS.
•VSS
Use thia rrads Pf you only have two front speakers, The
speaKera sound further apart and sound can also appear fa
corns from the left and right of the listening positron.
•Headphone VSS
Use this mode when listenfng through headphones. Sound
appears to come from front and surround speakers,
Use the i3tJI screen (for player Infomiatian^ to selei:;t the VSS
effect (see page 2^).
Press VSS during play.
Each time this button Is pressed, the prayer's FL display
changea;
•In the ease ot VSS
VSS 1 (tlatural effect)
VSS 2 (EmphasJzed effect)
VSS isoancsiied
шйшШШшт
In the сам of Headphone VSS
Headphone VSS 1 (f^aturaJ effect)
Hea^ho^^ V
Headphone 'VSS is cancelled
^:A
шйштшшшшш
Page 29

Mole
■The virtual surround sound affect does not vi/ork with
Karaoke DVDs,
•Tha virtual surround sound efiect may nol work with same
Dolby Digital 2.1ch or 3,lch DVDs, Additionally, this effect
may not work property with some Dolby Digital DVDs other
than 2,1ch or 3,lch, dapandng on the software,
•Turn off the TV surround sound and other surround sound
effects wfien using this virtual surround sound effeot.
Using a title menu [dvd]
Some rnovie discs may have two or more tides. If the disc has
e title menu recorded on It, the Tin.E button can be used to
select the movie tide.
[The det«yfs of operaiton depend on the disc used.)
_______________
1 Press TTTLE during pray.
A list of tha frtlee on the
disc Is now displayed.
.jj^ Щ.,;?
j Lovers
(Example}
Cast i es.'
BirTTt;
For your reference:
•The VSS indicator lights up when the Dolby Dlglts.1 DVD is
played beck with the virtual sunound sound effect.
■ For optimum eflsct, it is reoommended that [fie distanoe betws^ the TV sat and ihs listening position be about 3 lo
4 limes №e distance bslw^en the right er>d left front
speakers (only in Ihe case of VSS for external speakers!.
Spaakar.!
•Lfs^lng.'-ppsldon,
eDJffsfertce between 'VSS t" and ''VSS 2"
VSS1
Dolby
Digitaf
DVD
(2ch)
Dolby
Digital
DVD
(3-5. fch)
(Sumourid
signer
recorded)
The from apeakers
sound like they are
further apart.
Sunound sound
saoms fa come from
the left and nght cf
the llsiening
position.
g, Speaker
■3tii4-W.A
VSS 2 i
TTie front Bpeakara
sound like they arc
evenfurtfier apert
than Jn VSS 1.
SurTOurkf sound
seama to come from
the left and right of
Ibd listening position
and tha front
speakers sound like
tiUy are even further
apart than in VSS 1.
•Pressing TITLE again resumes play from the eoena
when TITLE was first pressed.
2 Tilt the joystlclt(A, T, and pr»ss SE
LECT or PLAY, or press the numeric but
tons, to select the title.
^ Dogs ^Icasties
The selected title now starts playing.
Using a DVD menu [dvd]
Some DVDs have unique menus, Thess menus can be for languaoe selecdon, audio output selectfon and/or subtitle lan
guage selection, etc. Although the DVD menu's contents and
operadon differ from disc to disc, the following explains basic
Operation when iMe feature Is used.
-►
(Exempla)
______________
1 Press MENU during pEay.
The OVD menu available on the
disc is now displayed.
•3 .ANGLE
Ijg, V. ^-г-гг
{Example)
»Pressing MEWU again resumes play from Ihe scene
when MENU was first pressed.
2 Tilt the joystick (A* T, ►) end press SE
LECT, or press the numeric buttons, to se
lect the Item,
■Difference between “Headphone VSS V’ and “Head-
phorwYSS^”
Headphone vSS 1 Headphone VSS 2
Sound appears to come
from front and surround
speakers.
The effect Is broader.
a .suBTfUE
13. angle
The selected Hem ie now executed.
(Example)
When the menu continues onto another screen
flepeat step 2.
29
Page 30

Joystick/
завзт
Initial settings
Once the irnial settings have been completed, the player can
eivtraye be operated under the same oondhlons (especially
DVDs).
The settings will be retained in the memorv, until the eettinge
are changed, even after switching to standby mode.
1
Press SETUP In the stop mode.
(гшт
О CP <Х>
yrNume/lc
buttone
I Ср СР
Й Ср CD CD ,
<Х> Л
■=^'.- •■'<.■. .1- Г'-У:-> Г-РУ1-Ч-,
.Í' - '■-^ " ' ■■\-a-;iíf.
' О s.Fie^i^ ' UAvei ee'
V 3 Mofiu LaHÉ^^a^ '&ig)ish
M .4 On-eááifi Messogae'... - - .
a FL Difiptti, •.•... '.ert^f. '
tlL eTVAapvct. ' •'' . .<;a
7 ngifal Audlg Oútpul..
a
.0'Sp9Bít'e'r.$«tClng
.0':
'9 OméF&ettingsv.
О ел
Jgr¿C-4?^.-|^air^rg^^73Sy7-i^
2 Tin the Joystick {A, T) to select the Item
and press SELECT.
Each screen for setting the vakte is displayed.
1 Disc Languages (eee page 31)
2 Ratlnge(eee pag»31)
3 Menu Language (see paga 33)
4 OivScraan Mesaagea (aaa page 33}
5 FL Display (see paga 34)
6 TV Aspect (see page 3S)
7 Digital Audio Oub>ut (aee page 35}
$ Speaker Setting (see page 37)
9 Other Settings (sea page 33}
'/•-•'•7.- --í’.’^- -v --<Ж’ ••'•’
3 Tilt the foystick (A^ T) to select the setting
end press SELECT.
■Soma hems require additional siapa. (See the respec
tive page.l
Setting is finished and the initial settinga screen Is displayed.
To сапоЫ during setup operation
Ftess RETUflN or select V, (The previous screen is dfaplayed.]
To dear the Initial settings screen
Tilt ^ joystlcK (A. T) to select 47 and press SELECT,
(Pressing SETUP or RETURN also deers Itie Initial settings
screen.)
Nota
•After the player is sat to the “Lock All" salting in "2 Ratings",
nona of the inldal settings, including "S RatingsT, can be
changed If a DVD Is latt Inside ihe player, la this case, re
move the disc, and unlock the player.
For your refarenco:
•The numeric buttons can also be used instead of the joystick
(A, T) for selecting itarne or values. Pressing SELECT Is not
nocdseary.
Page 31

This Fs to «elect the audio soundtrack Eanguage, aubtillB lan
guage ar>d the language used In title menus or the DVD menus
wh Ich will always be uaed tar every dec tc be played b£№k,
T At the LnhiQl settings ecreen (on page 3ti)
Tilt tho Joystick (A, T) to select Disc
Languages” and press SELECT.
t U. -tMt ' ; s • 'i
.. By- >.та—У1»ЧУ. -,.^ h-J. ■М.'С-Л ^
2 Tilt the joystick (A, Y) to sslect ttie item
and press SELECT,
1 Audio:
To select the audio soundtrack Eangoage.
2 Subtitle:
To select the subtitle language.
3 Uanus:
To select the language used in title menus or the DVD
menus.
3 ТШ the joystick (A, T) to select the lan
guage and press SELECT.
When “1 Audio” la eelaeted
1 Engltsh: Ertglieh is selected. (Factory preset)
2 French/3 German/4 ItaitarVS Spenieh:
The language le selected.
t Original; The original language of each disc will
be selected.
7 Other Another Language can be selected.
(Refer to the language codes on
page 41. Press CAf4CEL If an incor
rect language code is entered.)
When '2 Subtitle
1 Automattc:
2 Enstish/3 French/4 German/5 Itallan/ti Spanish;
7 Other Arralhar language cart be selected.
■w ■
г //••• fry
iB selected
Subtitle language wilt automatically be
selected in accordance with the audio
souodirack language.
(Factory preset)
■II the language «elected for the
"1 Audio" te edually used during
playback, the subtitles will not ap
pear.
•If another language is used duiing
playback, the subtitles will appear In
the language selected at the setup
“1 Audio".
The language Is selected.
(Refer to the language codes on
page 41. Press CANCEL rf an Incor
rect language code is entered.)
Whan ^*2 fytenuB” Is selected
1 English; English is seleclsd. (Factory preset]
2 French/3 GermBn/4 Italian/S Spanish:
The language Is «elected.
6 Other •«*+>:: Another Janguage can be selecled.
(Refer to the language codes on
page 41, Press cancel if an incor
rect language code Is entered.)
The ecreen illustrated In step 1 Is displayed. Salecrhy with the
joystick (A, T) and pr^ss SELECT to return io the initlaJ set
tings screen.
>lote
•If the language «elected Is not available on the (£sc, the lan
guage designated by each dlec will be selected.
This la to useable the playing of serine OVDs which are unsuita
ble for some audiences, for example, children.
•Rome DVDe are encoded with a specific rating level. If the
rating level of the disc is higher than that preset In the Initial
settinge operation, playback ot the disc will be prohibited.
^ At thfl Initial «ttinge screen (on page 3Q)
Tilt the joystick (A, ▼) to select "2 Ratings" anti press SELECT.
(Continued on the next page}
31
Page 32

Joystick/
SELECT
Initial settings
2 TJIt the joystick (A, ▼) to select the lever
and press SELECT.
Levol S-. Ad DVDa can be played back.
(Factory preset)
Level 7 to 2: DVDs fargenemJ sudiences/cMIdren can be
played back.
(DVDs Iot adults ars prohibited.)
Lever 1:
Level Û:
DVD’S for children can be played bach.
(DVDs tor adulle/general audiences are pro-
hibiied.)
Playback of all DVDa Is prohiblled (e.g. to
prohibit playback of DV^ for adults which
are rK>t encoded with rating level inlonria'
don).
CD
CD CD CD
CD CD CD®
Numeric
buttons
3 When level 7 sr lower Is selected
mpvt a 4-dlgit password wtth the numeric buttons and press SELECT.
The toch eymbol
appears closed to
show the raUng h
locked.
Example; “4343"
ODr>ot forget your
password.
4 Press SELECT.
Setting le Unlshed and ths initial eetlngs screen le displayed.
eThe rating Is locked. Any discs with a higher rating than ths
eett'ng cannot be played beck unless Ihe password Is en
tered.
Wtien the player is iocked
The following screen appears when Hatings" Is selected at
the Initial settings screen.
^2
¿li
Page 33

1. Input your 4-dlg(t pas&word and press SELECT,
' Z Clsp^'Puawd
'• ' 9 CI<an'ga'Leval
; 4 TBfnpjTHrv Unlock
’ 6ед1 :
2. To unlock the player
Press "1" and tlien press SELECT.
To change the password
Press “2*, enter a new 4-digil password and press
SELECT, then press SELECT again.
To change the rating level
Press "3", select a new level with the joystlok (A, ▼), than
press SELECT.
To unlock the player temporarily
Press “4" and then press SEL£CT,
«The rating Is unlocked temporarily only ter the current
disc. The player le locked again when OPEN/CLOSE Is
pressed or the player le set ta the standby moda.
To finish settkrtg without changing the rating level
Press "0".
Setting id flnished and the Initial Settings screert Is displayed.
You can select whether “Play", "SKir and other displays will be
dsplayed or not, and the colour and positiDn of “PEay", "StllP
and other displays as well as 3UI screens.
7 At the Initial settings screen (on page 30)
Tilt the Joyetiok (Aj ▼) to select "4 OnScreen №$sagee" end press SELECT.
1 Q
^ в ц
s
t
:'2 CUeiV ertdP [^oi> >^f‘BlH •
• ■ •• ''..•■ '.• . r
i 0. вл - . ' . ‘
;•• Г. ■ ч
^ 4 -л'^гг'.
1
5
J
i
i
У
l1
S,
>
2 TTIt the loystick (A. T) to select the Item
and press SELECT.
1 On-Scrflen Mesaagee:
To select whether “PlAy", *Stitr and other displays are
displayed or not.
2 Colour and Position:
Td select the colour (BlueAfiDlet/Green) and pceHlon
(abova/slightly balow) of Tlay^, "StiN" and other dis
plays as welt as GUI Screens.
Note
«Soma discs may not t>e encoded with specific rating level
infarmatlon though its rf so jacket says tliat it le tor '^ulte".
For those discs, the ege restriction will not work.
This is to select the language to be used in the On-Screen DIs-
play menus which the player will show on the TV monitor,
7 At the Initial settings scTsan (on page 30)
Tilt the joystick {A, T) to select "3 Menu
Language" and press SELECT.
^ ■ .J - pieiilscli • • .
'•5 ЕарйПз!
['Press FIETUaNIbmnail,, ^
---
2 Tilt the joystick {A, T) to select the lan
guage and press SELECT.
^ English:
English Is selected. (Factory preset)
2 fren;a>«/3 Deutach/4 ttallano/S Eapaneh
The language isselacited.
Setting is finished artd the initial settings screen la displayed.
3 Tilt the Joystick (A, ▼) to select the setting
end press SELECT.
When'T On-Screen nABBsages" leaeleotod
1 On: “Play*, “Siill" and ether dfsplaya will always ap
pear on the TV screen, (Factory preset)
2 Oft; "Play", 'Still" and other displays will not appear
on the TV screen.
Whan “2 Colour and Position'’ le selected
The colours and posltlorva are set as (otlows:
Blue (Factory preset)
Vfolet
Green
(Continued on the next page)
.E
и
* Ч ■ я "
30
Page 34

Initial settings
ecreen illustr^d In step 1 is displayed. Select with tha
joystick {A, T) and preas SELECT to rehirr to the Initial sattinge screen.
For your reference:
•When la selected, “Play', "Sttir ardothei displays
as well as GUI screens wNl be displayed at a little lower posi
tion than the factory seoing. It is rocomrrsnded to choose
this setting If the screen is only partially displayed.
This i$ to select the brightness of Ihe player^s FL display.
f At 1MO >nh1al sstUngs acrean (on page 3D)
TIFt the joystick (
4
, ▼) to select “5 FL Dis
play ” and press SELECT.
2 Tilt the Joystick (A, ▼) to select № Item
and press SELECT.
1 Bright:
The FL cUepley will always be bright (Factory preset)
2 Dim;
The FL display will always be dimmed.
3 Dim Durlr>g DVD/VCD Play (Auto):
The FL display will be dimmed during playback of
DVDs and Video CDs.
For your reference:
•Even it “3 Dim During DWVCD Play (Auto)" Is selected, the
display resumes brlghlnees when a button for special play
such as SLOW/3E,AflCH and PAUSE le pressed.
34
Page 35

select tha TV aspect, converrtional size screen {4:3) erwide'
scr^n {16:9}, and the TV type according to your TV sat
Select the digital cuiput to i>e output from the optlcaLicoaxiai
dlgilaf audio output connector of the player,
7 At the Inlttal settln{}S acraan (on page 30)
Tilt the joystick (A, T) to select "6 TV As
pect" and pi^ss SELECT,
2 Tilt the ioyatick (A, T) to seiect the TV as
pect and press SELECT.
1 4:3:
Select whan a. corwantlonal TV eet Is connected.
(Factory preset)
2 16:9;
Select when a wlde-ecreen TV set is connected.
3 Tilt the [oystick (A. T) to select the TV type
and press SELECT.
When "4:3'' is aslected When "16:9*' Is selected
The fcllCtving TV types can be selected In both cases,
1 Standard (Direct View TV):
Select when a s^ndard TV (Direct view) Is connected.
(Factory preset)
S CRT Projector:
Select when a CRT projector Is connected,
3 LCD Prajsctor:
Select whan a LCD projector Is connected.
4 Projection TV:
Select when a projection TV Is connected.
1 At the Jnldal sattlnga screen (on page 39)
Tilt the joystick (A, T) to select “7 Digital
Audio Output” and press SELECT,
^'S> Dglt^ ngltal.
Is- dìa: - '-
in.
m
m.
f .
Bitafre am'
PCW
?CM.' • •
2 Hit the joystick (A, T) to select the item
and press SELECT.
1 LPCM g6k^48h:
To select whether digital audio converted to 4B kHz/
13 bit Is output from the opticaVooaxial digftel .audio
output conriector or no digital audio is oulpul during
playback of DVDs recorded in 96 kHz Linear PCM.
(If the DVD le recorded in 46 kHz Linear PCM, digital
audio converted to 46 khlz/16 bit is output Irrespective
of the setiing.)
2 Dolby Digital:
To select frie signal format (Brtetream or PCM) to be
output from the opilcaVooaxial digital audio output con
nector duririg playback o1 DVDs recorded In Ddby Dig
ital (AC-3).
3 cite;
To select Ihe signal forrnat (PCM or Bitstream) to be
output from the optical/ooaKlal digital audio output con
nector during playback gf DVDe recorded in dts,
4 MPEQ:
To select the signal format (PCM or Bitalraam) to be
output from the optioal/coadal digital audio output con
nector during playback of DVDs recorded in MPEG
audio.
:ìì
I
ft
Setting Is llnlehed and the initial settings screen le displayed.
For your raference:
•Far further details on the images which appear on the TV
screen (aspect ratios of the screen), see page 42.
(Continued on the next page)
33
Page 36

Initial settings
3 Tift the joystick (A, T) to select the setting
and press SELECT,
When "t LPCdA 96K->4ek" le selected
1 ho: Digital audio of 46 khlzilG bit is output dirring
playback of DVDa recorded in 4$ kHz Unear
PCM. No digits! audio is output during playback
of DVDs recorded In 96 kHz Linear PCM, Howeverr audio will be output using the orlglttal audio
recording eyatem if №e DVD has not been copyrlght-protacted. {Factory preset)
2 Yesr During playback of DVDs recorded in 46 kHz or
96 kHz Linear PCM, digital audio converted to
46 kHzr'l 6 bit Is output.
(Digital output of PCM audo is restricted to
46 KHz/16 bit or below for copyright protection.)
When "2 Dolby Digitai" is salected
1 Bltatreem^^: Dolby Digital (AC-3) bitstream {lch-
5.loti) Is output during playback of
DVDs recorded in Dolby Dlgtt^ (AC-6],
{Factory preset)
Select this setting when the player Is
connected to a Dolby Digital (AC'3) de
coder
2 PCM: Digital au<£c converted to 46 kHz/16 bit
PCM (2ch) 1$ output dudrtg playback of
DVDs recorded in Dolby Digital {AC-3).
When ■'3 dt8’'
1 PCM:
2 Bhetreani’''
When «4 MPEG'
1 PCM:
2 Bitstream^'
Digital audio converted to 48 kHz/16 bit
PCM (2ch) Is output during playback of
DVDs recorded in dts, (Facfory preset)
dis bitstream Is output during playback
of DVDs recorded In dis. Select this set
ting when the player is oonneoted to a
dts decoder.
' la selected
Digital audio converted to 48 kHz/16 bit
PCM (2ch) Is output duhrtg playback of
DVDs recordad in MP£G audio. {Facto
ry preset)
MFEG audio bitstream {lch-7.lch) Is
output during playback of DVDs record
ed In MPEG audio. Select this setting
when the player rs oonnectad to a MPEG
audo decoder,
Ì6
The screen illustrated In step 1 is displayed. Select "0" with the
loya'Sck (A, T) and press SELECT to return to the initial set
tings screen.
Page 37

Rdcommended setting ol “Digital Audio Out
put”
h>1ake settings a« shown in table below depending on Ibe kind
of equipment that Is connectod to the opticaJ/ooaiHiial digital au
dio Output Con nectar.
Type of e<tutprttei>t
to be connected
No equipment Is
connected
Dolby Digital
(AC-3) decoder
(See page 12.)
Dolby Digital
(AC-3)/dta decoder
(See page 12.)
Recomntertded setting
1 LPCM
96k^k
Yes^s
Yes'*2
2 Dolby
Digital
EUlstttELm 1 PCM
Siistream
BitstreamBitstream
1
3dts
ECM
4 MPEG
£0M j
PCM*^
PGM-3
7 At the Initial settings screen (on page 30)
Tilt the Joystick (A, T] to select "8 Speaker Setting” and press SELECT,
Centre
Laroe/Small/Mo
Centre
Delay tlme^
fO msi.
Front (L) —
Large/Small
Centra
Channel balanca 10 dB)
-------
— Front (R)
Large/Smail
^
I— Subwoofer
Yea/ble
Dolby Digital
(AC-3)/dt8/MP£G
audio decoder
page 12.)
(See
•Underlined items are factory preset.
*^1 Do not connect to the digital audeo input of an emplifier th^
does not have Dolby Digital (AC'3)/dte/MPEG audio decode
er: if such an amplifier should be cortneclad to the player
with “Bitatream" selected at the “2 Dolby Digitar, “3 dtsT
andTor “4 MPEG", any attempt to play DVDs (or CDs record
ed In dtsj may causa such a high level of noise that It may
be hannful to your ears and damage your speakers.
96 kHz LPCM eound la converted to 48 kHz 18 bit sound
when this player is connected vutth an optical digital audio
cable or coaxial audio cable.
Oo the following if you wish to take advantage of high quality
96 kHz sound.
Select "1 Mo" and connect this player's audio output connec'
tor to an amplifier's audio input connector with tha audio/
video cable {included] or an audio i:^ble (not Inci tided).
Note that LPCM, Dolby Digital, dts and MPEG signals will ell
Pa output in 2 cbannair analog form.
‘'^Only the Z front speaker channel signals will be output'
through the digital audio output connsctor vuhen an MPEG
disc recorded In more than 2 channels Is played If “PCM" le
eeloctod in '4 MPEG'', if you have set speakers other than
Ihe front speakers ae being present (Targe, Small, or Yes')
in “6 Speaker Setllrtif (see page 37). Go to "B Speaker Set-
bng" and eet epeakers other than the front 2 ae being absent
(W ).
Yes-“
BitstTflamBitsiream
Bitstream
Subwoofer
Channel
balarrce 18 dB>
Sunound(R)
' Lerge/Smatll^
Surround (L) —
Large/Smail/tlP
SumouTvd (L)
(Sim
Ь *res3 4QJiira,tfi-.anoil ' i
■ M и *■ c
Surround (R)
Channel balance fOdBIChannel balarrce
Surround (L/R)
Delay time’*
(£Lms)
• U ndsrfinod itome are factory preset.
■Delay time adjustmeni la effeclive only for DVDs recor
ded in Dolby Digital (AC-3).
2 Tift the joystick {A, W, ^4, >) to select the
Item and press SELECT.
3 Tilt the joystick (A, V) to select the setting
and press SELECT.
Speaker icons:
•If tha speaker Is connected, display the toon with the joy-
sttok (A. T) and press SELECT.
•If the speaker eupports tow-frequency (under too Hz)
reproduction, salaot the large Icon. If tha speaker does
not support Ibw-frequsncy reproduction, select the small
kon. {V^on a subwoofer is not connected, be sure to
select "Large" for the front apeakars (L/R),]
In ca^ of surround speaker (L)
No Large/Yes
Small/Yes
ta
3
• 7. •
&
(Continued on tha next page)
37
Page 38

Initial settings
D«Lay time [only for Dolby Dlgllal (AC-3) discs] (Q):
(f the surround spsakere or the centre speaker can'l be
Installed at er equal distance to the front speakers frcin
the listaning position, change the delay time to get better
surround effect,
•When D2 or D3 Is equal to or larger than D1, no setting is
necessary. Othervrfee, change the setting according to
the table below.
Speaker
Centre
speaker
(D2)
Surmiund
speakers
(D3)
To adjust the channel balarK« using the test signal
1. Select Tesf with the Joystick (A, T, ►), and then
press SELECT.
(Test signals wilt be output clockwise from each speak
er except the subwoofer consecutively.)
2. While listening to the lest signalr tilt the joystick
(A, ▼) to adjust the volume of each speaker until (he
test signal Is heard at a similar level from ^1 speakers.
3. Press SELECT. (The test signals are stopped.)
FRONT (L)-»-CEPiTRE^FRONT (R)
Difference between 01
and D2/D3
approx, 50 cm
approx. 1 DO cm
approx. 150 cm
approx, 200 cm
approx. 200 cm
approx. 400 cm
approx. 600 cm
Delay time
1.3 ms
2 6 rris
3,9 ms
5.3 ms
S,3ms
10,6 ms
15,9 ms
t 4-
SUHHOUND (L)v
Note
•Test signal le not output from the subwoofer. Subwoofer
volume should be adjusted to suit Ihe material being
l^ayed.
----
SURROUND (R)
38
t':'
4 Tilt the joystick (A, T, to Beleot
"Exit” and press SELECT.
Setting Is finished and the initiaL settir>gs screen is displayed.
Playing MPEG 2 multi-channel audio
MPEG 2 mulb-chanoel audio is output from the 5.1 channel
output connectors (
subwoofer Speakers to "/es" in "6 Speaker Setting'’, just as
with Dolby Digital and dts. If you are using 2 channel audio
output connectors (Q), the digital audio output conrtectcrs
(when PCM* Is selected in '4 MPEQ" in the digital audio
output settings on page 35) (0)i oi the phones jack, however,
then only the signals for the front speaker channels are output.
If you intend to use cne of these types of terminals, go to
“8 Speaker Setting" and set the centre, surround, and sub
woofer channels to “No".
0
) if you have set Ihe oenire, surround and
Page 39

CcirrpT^&ion of th9 scund’s dynamic mrtge and olher special
settings can be performed.
f At tti9 initial settings screen [on page 30)
Tilt the Joystick (A, ▼) to select "9 Other
Settings” and press SELECT.
♦
•'Gjii’jt
^ '2'Audli>Jlis^ff3âsrEh. .On'. .. V
r 'jTVritCidfi'tilia} •.' PantScgn^
■. 4-b,flanij9Cíim(iresacfr, {iií-. " i
séHiPichitóojsplay ;-Ofi '■■ • ?
^ ÊMTS&DbcOulgut ..^.-P«;-6Û
2 Tilt the joystick (A^ T) to select the item
and press SELECT,
1 still Modsi
Select either'Reid still" or'Frame still" to prevent jitter
ing or irnprcvc the video quality of small text or fire pattorrs in the still picture rroda.
2 Audio during Search:
To select 'Whether audio Is heard during search {ío^
ward direction} at the initial scan spaad or not.
S TV Mods (4:3):
To select whether tvlde-screen video material will be
played back In the pan and scan style or In the letter'
box style on a conventional Size TV.
4 D. (Dynamic) Range Comprsaelon:
To select the dynamic range during playback.
5 Sllll Picture Display:
To display the picture type, ], P or B in the still picture
mode.
6 NTSC Disc Output;
To select whether PAL 60 signals or mBC signals will
be output during playback of mSC discs.
3 Tilt the joy^lck (A, T) to select the setting
and prose SELECT.
When ^*1 Still Mods ' leaslsctad
1 Autoirtatic: 'Field still" and "Frame stilt" are automati
cally selected In the still picture rrrode.
(Factory preaet)
2 Field: 'Reid stíH" Is always selected.
Select this setting when jittering occurs
when '1 Automatic' is selected.
3 Frame: "Frame atJl* is always selected.
Select this setting when sma^ tent cr tine
patterns cannot be seen dearly when
"1 Automatic" is selecled.
When “2 Audio during Search" is selected
1 On: Audio will be heard during search at the Initial
scan speed. (Factory preaet)
2 Off: SeEect this setting when audio during search at
the Initial scan speed is net desired.
When "3 TV Mode (4:3)" is selected
1 Pan A Sean: Wlde'scraen video materiaf will be
played back In the pan and scan style
on a conventional size TV.
(Factory prase)]
■Video materiel net Idrrnattsd in the
pan and scan style will be played back
In the letterbox style. (Sea page 42.)
Z Letterbox: Wide-screen video materia] will be
played back In ihe letterbox style on a
conventional size TV.
When "4 D. (Dynamic) Range Dcmpreeelon" le selected
1 Off: NoTmal cOidio range is eelected. (Factory preset)
2 On: Select this setting to enjoy dynamic sound allow
va luma.
Dynamic range Is the difference in volume be
tween the quietest ar>d loudest ecunds. Dynamic
Compression limits level for listening at low vol
ume. This Is useful late at night
This iunctlon only works with Dolby Digital
(AC-3) DVD.
When “5 Still Picture Display" is selected
1 0№ The picture type (l,^P/B) will not be displayed on
the TV screen in the still picture mode.
(Faclcry preset)
2 Ort: The picture type (l,T^/9] will t>e displayed on the
TV screen in the still picture mode.
Since l-PIctura features the best picture quality,
It is recommended that the screen be frozen with
l-Picture when the picture quality ie to be ad
justed.
When “6 NTSC Disc Output" Is selected
1 PAL 6Û: During playback of NTSC discs, PAL 60 sig
nals will be output. (Factory preset)
Select this setting when the player Is con
nected to a PAL TV which 1s capable c! r^
oelvlng PAL 526/60 system,
2 NTSC: During playback of NTSC discs, NTSC sig
nals will be output.
Select this setting when the player is con
nected to a Mulll-eystem TV.
The screen Illustrated in siep 1 is dlsplaysd. Select 'O" w№ the
joystick ( A, T) and press SELECT to return to the initial set
tings screen.
W
Page 40

Initial settinga
Nota
• It is recammanded that the “1 PAL 60" is selected at the “0
NTSC Disc Output" whsn a PAL TV is connected; hov№ver,
the images shown below will appear on [he TV screen.
Black bars appear at tfie top and bolfam parts of the TV
screen, (The picture may be compressed vertically,)
• VP/B
The MPEG 2 etandard adopted for DVD uses tee felFcwIng
3 picture types for the coding ot each picture {frame) on the
TV screen.
I: l-Ptetpre (Intra coded picture)
This Is the staixiard picture type, and each picture is coded
Separately.
P: P-PIcture {Predictive coded ptcture)
This picture type is computed on the baeie of a past l-Picture
or P-Picture.
B: B-P№ture (Bldlrectionally-predlctlve coded picture)
This picture type is ccmputad by comparing tee previous and
subsequent l-PIclure or P-Prcture. It has the lowest volume of
informaton.
For your reference:
•When the “2 On" is selected at the "5 StiN Picture Display",
tfie toliowing screen Is displayed In the still picture mcde;
Example: P-Plclure
•Plaid
Half of the video Information (vkteo signal) in a frame Is
called a field, Wllh conventional TV system«, a signal frame
(a single screen) consists of two fields,
•Field still
Only one field {half of the video infomnatlcri) Is displayed cm
the TV screen, so the apparent resolution is |£m. However,
there is no blurhng on the screen,
•Frame
IndKiduaJ images in a video or on the TV are called frames.
•Frame eHll
The two tields are displayed, alternately, on the TV screen,
so the Image Is blurry. However, tee Image quality is better
than field images.
General Picture type
Predict
w
I?,'"'I
Page 41

Language code list
Enter the appropriate code number for the Inhial settings ‘"Audio", "Subtide" an^or ($ee pegs 31;
h-
>'V«5Íb‘-%
'7^
X';;
MCWIk^:
i
ÿ::-iÏÉ^Î
mmm
7-T^!y
Language
Afar Faroeae
Abkhazian
Afrikaans
Ameharic
Arabic
Assamese
Aymara
Azerbaijanl s'if Gujarad
Bashkir
Byelorussian
Bulgarian
Bihari
Bengali; Bangla
Tibetan
Breton
Catalan
Coraioar Italian Dutch
Czech
Welsh
Danish
i German
BhutanI
Greek
English
Esperarttc
Spanish
Estonian
Basque
Persian
Finnish
Fiji
m:-
Language
French
Frisian
Sools Gaelic
Galician
s
Guarani
Hausa
•'.s. Hindi
Croatian
Hungarian
Amnenlan
interlingua
Indonesian
Icelandic
Hebrew
Japanese
Yiddish
Javanese
Georgien
Kazakh
Groenlandie
Cambodian Rhaoto-Romarce
Kannada
Korean
Kashmir
Kurdish
Kirghiz Serbo-Croatian
Latin
V èTiî
:-.-k
■!ÊI
f Maltese
■ Singhalese
Language Language
LIngate
Laotian Slovenian
Lithuanian
Latvian, Lettish Shona
Malagasy
Maori
Macédonien
MaJayaiam Sundaneee
Mongolian
Mddevian
Marathi
Malay
Surmeee
Nauni
Nepali
NorviTegian
Orlya
Punjabi
Polish
Pashto, Pushto
Portuguese
Quechua
Romanian
Russian
Sanskrit
SincSti
_______
■ftr.
Slovak
Samoan
Somal
Albanian
Serblen
Swedish
Swahli
Tamil
TeEugu
Tajik
?r»
Thai
TIgrInya
i V'' Turkrrreri
Tagalog
Tor>ga
Turkish
Tatar
Ukrainian
Urdu
Uzbek
VIelnamsee
Volapük
Wc^of
Xhosa
Yofuba
Chinese
Zulu
f
«
41
Page 42

How images appear on your TV (aspect ratios of the screen)
The ima^Bs on ttv© TV scr^n depend on ths type of software and The TV aaL
TV set (Scraan mode)
4:3
Right and left edges are
cutoff,
Letterbox (with black
bands at top and
bottofnj
Full screen
15:9 (“FULL" mode) 15:9 C‘ZOOM" mode)
Full scieen
Screen borizontafly
enlarged
TDp and bottom edges
are cirt off.
Top and bottom edges
are cut off.
16:9 (“AUTO" mocie)
Full screen
FuH screen
(with black bands at
right and left)
Letterbox {with black
bards at top and
bottom]
•The Images which appear on the TV screen, and what each screen mode Is called, depend on the manutacturar of the TV set and
type of TV set. Consult the Instruction maruial provided with your TV set
For your reterenoa:
•Le^rbox
Black bards are Inserted at the top and bottom of the screen to fill In the gaps where the size of the picture Is srnaller than the screen.
•Pan and acan
Part of the wlda-screen picture [either at both eldea or one side of the screen) la automaticelly eliminated so that the picture fills the
whote screen,
Screen horizontally
enlarged (wllh black
bands at top and
bottom)
FuN screen
Screen In which the
picture at the far left
and far right srtds onty
Ib extended horizontally
[with bEack bands et top
and bottom)
Page 43

(I) /Ч VCL
TVrtV s/ -
Using the remote control with
your TV set__________________
Preparations,
Enter the two digit code for your TV {refer to the tat>le) so it can
be operated by ^e remote oontFol. There may be sorrre mod
els where operation ]s not possible.
Press an{] hold the POWER button for the play
er end press the nurneric buttons.
Try the difierent codes for the manufacturer of your TV to find
-н
one that works If there are two or rnore listed.
Code Manufacturer Code Manufacturer [
01 PANASONIC 1 11 SHARP
СГо CD CD ■.
•• ■ ><
■i
' CD CD CD ;
Л :> 7 loj*:
r«> '.-.O^i
Ш^ЙтШ
ЩрЩ^т^-
'Numeric
butume
02 PANASONIC 2 12
03 PANASONIC 3 13 NEC
04 PANASONIC 4 14 SANYO 1
05 SONY 15 GOLC STAR 1
oe TOSHIBA 16 GOLD STAR 2
07 JVC
OB HITACHI
09 MITSUBISHM 10 SUPRA STV2016
10 MITSUBISHI 2 1S SANYO 2
Note
eJhls operEUlon must be repeated when the batterfee are re
placed-
I Qperatlb^
To turn the TV On and off
17
PKIUPS
GOLD STAR
SHIVAKI
Press Ш POWER ((b).
To Bwiteh the TV'e Input between TV агк1 VIDEO
Press IQTV/AV.
To ае^ОЕЛ channele
Press 03 Л (to increase channel) or V {to de
crease channel),
To control the IVe volume
Press Щ VOL + (to increase volume) or - (to decrease volume).
I
t
I
fl
s
ХМЙ|ЖЩ
Note
■Nol ah TV models and brands can be operated with the uni
versal remote control supplied.
ъ
tp
s
s
43
Page 44

Troubleshooting
Before requesting ssAfice for №l3 player, check the chart befow for a. poseiUe cause cf the problem you ere experiencing. Some eimple
cheeks or a rninor adjustment on your part may eliminate the problerr and restore proper operaticn.
Jf you are in doubt about some of the cheek points, or ff the remedias indicated In the chart do not solve the problem, consult your
dealer for instructions.
Mo power. Insert ths AC plug securely Into the AC outlet.
The player Is automatically eet to the
standby rrtode.
•flay fails to start even when PLAY
Is pressed.
•Play starte but than stops immedlatoly.
No picture.
•No sound.
• Distorted sourKi.
Picture is distorted during rapid
advance or rapid revarso.
№ key Operation {by the player anc^
or the remote centre)) Is effective.
Mo 4:3 (16:9) picture.
To conserve power, the player is autematicatty set to the standby mede atrer
approx. 33 minutes have elapsed In the stop meda [Autc power-off function}.
Turn the power back to ON.
•Condensation has formed: wart about 1 to 2 heurs for It to evaporate.
•This player cannot play discs other than DVDs^ Video CD and CD.
•The disc may be dirty and may require cleaning.
•Ensure that the dlec is installed with ths tabei of the side to be played facmg
upwards.
•Ensure that the equipment Is connected properly.
■ Ertsure that the Input setting for the TV is Video.
•Ensure that the equipment is connected property.
•Eneure that ths input setUnge for the TV and stereo system are correct.
•Adjust the master volurne using the GUI screen tor player Information.
The picture will be somewhat distorted at times: thte fs normal.
•Some oporatlone may be prohibited by the disc.
•Press POWER (ib) to set the player to the standby mode and then back to
ON. Altemath/ety, press POWER «!;)) to eet the player to ths standby mode,
disconnect the AC cord and then reconnect It. [The player may net be
operating property due to lightning, ^tlc eiectricity or some other extemal
tactor.)
Ohooee lbs setup “6 TV Aspect' item matching the TV sei.
6
-
4
4e
14
6,9
$-12
21
—
——
35
Mo on-ecreen display.
No opsratrons can be performed with
the remote control.
TV set cannot be operated by the
remote control.
GUI screen not displayed or only
partially displayed on the TV screen.
Ths “OfT setting is selected for “1 On*Screen Messages" in "4 On-Scraan
Messages'": select hGn*.
•To conserve power, the player is automatically set to the standby mode after
approx. 30 minutes have elapsed in the stop mode (Auto power-off function).
Turn the power hack to ON.
•Check the batteries are instated with the correct polarities (+ and '■).
•The batteries are depleted: replace them wfto new ones.
•Point the remote control at tha rerrtote control sensor and operate.
•Operate Ihe remette control at a distance of not more than 7 m from the
remote control sensor.
•Hemeve the obstacles between the remote control and remote control
sensor.
Not all TV models and brands can )m operated wito ths universal remote
control supplied.
Change the position cf the GUI screen using "2 Colour and Position" in “4 OnScreen Messages" of the Initial settings.
33
13
13
13
13
13
43
33
^9' ••
Page 45

S'ft
m
Mo SLibIftles,
^Subtitles appear only with discs which contain them.
■Subtitles are cleared from the TV monitor. Display the aubtitles.
Altemativa aucQo soundtrack {or
subtitle) languages fail to be select
ed.
■An alternative language is not selected with dfecs which do not contain mors
than one language.
•In the case of some discs, the alternallve language cannot be selecled by
operating the AUDIO or SUBTITLE button. Try eelecting It from the DVD
menu tf one is available.
Angle cannot be changed. This funcllon is dependent cn software availability. Even If a disc has a
number of angles rsoorded, these angles may be recorded for specific scenes
only (when “ANGLE" lights Up on the player's FL display).
Play does not start even vrhen title Is
Confirm, the "2 Ratings" setting. ^
selected.
Audio soundtrack andr'cr subtitle
language is not the orte selected at
]f the audio soundtrack andror subirtlo language does not exist on the disc, the
language selected at the Initial settings will not bo soervheard.
the Initial settings.
The menu is ctisplayed In French
The setup "3 Menus’ of "1 Disc Languages" is sot to Frertch: select English.
(example).
NO sunourui eound. ■Choose the setting at "3 Speaker Setting" which matches your speaker
system.
•No surround sound is output when Ihe virtual surround effect Is aoUvatod
(*VSS 1", “VSS 2", “Headphone VSS r or “Headphone VSS 2"). Select
“VSS OFF' or "Haai|)hgne VSS OFF.
The password for rating level hee
been (orgottert.
Reset all the settings to Factory
Preset
While the player le In the step mode, hold the player's SKIP (i^) button and
the PAUSE button down simultaneously and then hold the OPEMfCLOSE
button down for longer than 3 seconds (until '“Initialized' disappears from the
TV mrytltor).
All initial settings wili return to the default values. If you have eelected Tock
Air in "2 Ratings", you must remove the DVD from the player before
performing this operation. {See the note at the foot of page 30.)
27
29
—
31
31
37
23
30
No m^u play.
TM6 luncticn works only for Video COe with playback control. IS
J'-.! J. •!.. s
When an error or trouble le detected duing operation, a service number appears In the PL display.
\i№en a sorvbco nurnber has appeared, check cut the details given below.
Service number
un
Hnn
D G efantfs
for a number.
Disc is dirty. wipe the disc clean.
Trouble Is likely to have occurred. The
number follo'wing IH" depending
on the status bf the player.
Player status
nemedy
Press POWER ((¡)) to eat Ihe player to the standby mode and
then back to ON. Alternatively, press POWER (6) to set the
player to the standby mode, disconnect the AC cord, and then
reconnect it.
»If trie service number fails to bs cleared evert when remedial acticn Is taken, ask a service technidan to repair the player.
'S
CE
4S
Page 46

Disc handling
Handling pr«csiitlons
•Hold the disc by the edges so the surface will not be soiled
with fingerprints, {ED
Fingerprints, dirt and scratc^s can cause skipping and dis
tortion.
■ Do nol write on the label side.
•Do not use record cleaning sprays, benzine, thinner, etadc
electricity prevention Elquide er any ether solvent.
■Be (ireful not to drop or bend the disc.
•Do not install more than 1 dlec on Ihe disc tray.
•Do not close the disc tray if the disc l6 nol installed property.
•Store the disc in its case when not in use.
If the surface Is soiled B
WipB gently with a soft, damp (water only) cloth.
When wiping discs, always wipe from the centre toward the
cuter edge.
Uf you wipe using a circular motion, circular scratches can oc
cur, which will cause noise.)
If the disc is brought from a cold to a warm en
vironment, moisture may form on the disc
Wipe with e soft, dry, llnl-free cloth before using the disc.
Improper disc storage
Vou can damage discs if you store them in the followlrtg
places:
•Areas exposed to direct sunlight
•Humid or dusty areas
•Areas Jreetty exposed to a heat outlet or heating applienoe
Discs which cannot be played with this player
•DVD with Region No. other than '*4'" or "ALL"
• DVCH=lOM
• DVD-R/DVD-RAM
• CD-ROM
•VSD
•CDV
•CD-G
•CD-RW
•DVD-I-RW
•eVD
•SVCD
•Divx Video Disc
etc.
•Do not try to play Photo CD or CO-R.
(Data on the disc may be damaged.)
Maintenance
•5a euro to press POWER (cb) to sot the player to the stancOiy
mode and disconnect the AC cord before cleaning the player.
•Wipe this player with a dry, soft cknh.
It the Surfaces are extremely dirty, wipe dean with a cloth
which has been dipped in a weah soap-and-waier solution
and wrurtg out thoroughly, end then wipe again with a dry
cloth.
•Never use alcohol, benzine, thinner, cleaning fluid or other
. chemicals. Do not use compreeaed air to remove dusL
Page 47

Specifications
ÿi- . s* :. *A *. vjs‘ •. • “S’JTf ■ " V : ubv * *
i.i Power Y output level:
requlrernents: AC 220-240 V, 50 Hz
^ Power Pn output level: 0.7V[H>(75£1)
> consumption: 19 W (approx. 3,0 W when set to i
г
ii
Signal eyetem: PAL 625/50, PAL 525/60, NTSC
Weight:
Dlmenaions: 430 (W)x2e8 (D)x94 (H) rrm
Operating temperature range;
the standby mode using either
the power button or the remote Audio output:
control unit) Output level: 2 Vrmsfl kHz,O(J0)
3,3 kg
(sMcluding protrusions)
-1-5 to H-as ‘C
Operating humidity range:
5 to 90 % RH (no oondeneatlon)
DiscB played:
(1) DVD*VIDEO disc
cm singls-elded, sln^s-layer
I2crn aingis-sidedr dual-layer
12cmdouble-5idBd, single-layer
6 cm single-sided, single-tayer
8 cm single-sided, dual-layer
3 cm doubie-sidsd, singia-laysr
(2) Compact dtec (CD-DA, VIDEO CD)
12 cm disc
8 cm disc
Video output:
Output level: 1 Vp-p (75 Cl)
Output connector; Pin jack
Number of oonnectors; 2 systems
S video output:
Y output ievel: 1 Vp-p (75 0)
C output level; 0,300 Vp-p (75 0)
Output connecter; S terminal
Number of connectors; 1 system
Component video output:
1 Vp-p (76 Û)
Pb output lavsl;
Output connector:
Output connector:
5,lch mixed output (2ch); 1 system
5,1ch discrete output (5,1 ch):
0.7VPÌ3 (75 Q)
Pin jack
(Y: green, Pa: blue, Рч:
Pin jack
1 system
Audio etgnal output characterletice:
Fre^ency response:
•DVD (linear audio); 2 hlz-r22 kH^ (48 kHz sampling)
2 Hz-44 kHz (98 kHz sampling)
•CD audio: 2 hlz-r20 kHz (ElAJ)
S/N ratio:
(2)
•CO audio: 115 dB (ElAJ)
Dynamic range:
(3)
•DVD (linear audio): 106 dB
♦CDautfio: ICO dB (ElAJ)
Total harrrtpnic distortion:
(4)
•CD audio; 0,002 % (ElAJ)
Digital audio output:
Optical digital output:
Coaxial digital output:
PHONES jack:
Output oonnaclof:
Pickup: Vi/avs length: 665 nm
Laser power CLASS 2
Specifications are sutqact to change without notice.
Weight and dimensions are appronmata.
Optical connector
PIniack
Stereo, 6-3 mm jack
47
 Loading...