

Page 1
Panasonic
DVD/VIDEO CD/CD Player
Before attempting to connect, operate or adjust this product, please read
theMMMMBlkm potTipleteiy. Please save thio manuat.
Ldigitai.vi№;9 diqum. audio
VQT7410
Page 2
Safety information
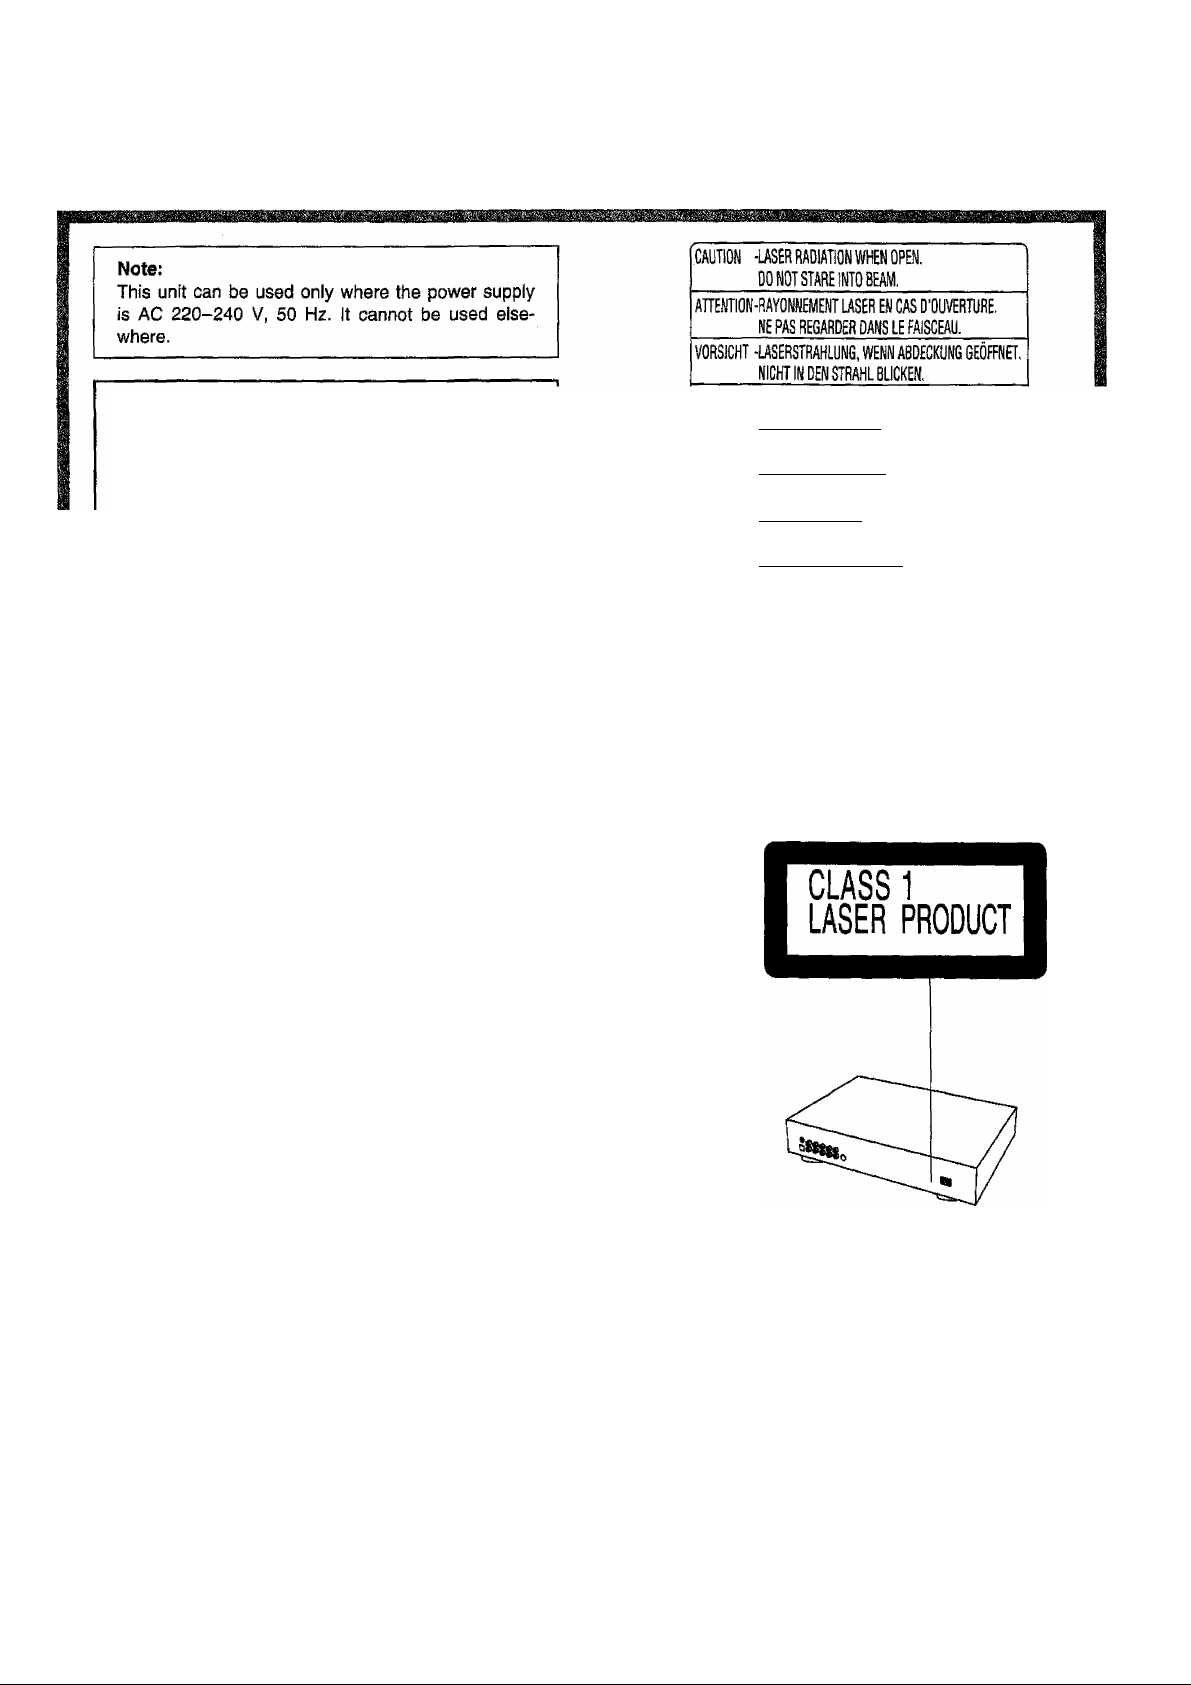
CAUTION;
DVDAilDEO CD/CD PLAYER IS A CLASS 1
LASER PRODUCT. HOWEVER THIS DVD/VIDEO
CD/CD PLAYER USES A VISIBLE LASER BEAM
WHICH COULD CAUSE HAZARDOUS RADIA
TION EXPOSURE IF DIRECTED. BE SURE TO
OPERATE THE DVD/VIDEO CD/CD PLAYER
CORRECTLY AS INSTRUCTED.
WHEN THIS DVD/VIDEO CD/CD PLAYER IS
PLUGGED TO THE WALL OUTLET, DO NOT
PLACE YOUR EYES CLOSE TO THE OPENING
OF THE DISC TRAY AND OTHER OPENINGS TO
LOOK INTO THE INSIDE OF THIS PLAYER.
USE OF CONTROLS OR ADJUSTMENTS OR
PERFORMANCE OF PROCEDURES OTHER
THAN THOSE SPECIFIED HEREIN MAY RESULT
IN HAZARDOUS RADIATION EXPOSURE.
DO NOT OPEN COVERS AND DO NOT REPAIR
YOURSELF. REFER SERVICING TO QUALIFIED
PERSONNEL.
WARNING:
TO REDUCE THE RISK OF FIRE OR ELECTRIC
SHOCK, DO NOT EXPOSE THIS EQUIPMENT TO
RAIN OR MOISTURE.
ADVARSEL -LASERSTRiiUNG VED ÄBNtNG.
SEIKKEiMOISTRÄLEM,
ADVARSEL -LASERSTRÄLlIiG fJÄR DEKSELÄPNES,
STIRRIKKEPISTRÄLEN.
_ _ _ _ _ _ _ _ _ _ _
VARYING -LASERSTRÄLNING NÄR OEHNA DEL ÄR ÖPPNAD.
stirraejihistrAlen.
_ _ _ _ _ _ _ _ _ _ _ _ _ _
VARO! -AVATTAESSA ÖLET ALTTIIHA LASERSÄTEiLYLLE.
ÄLÄTUIJOTA SÄTEESEEN.
_ _ _ _ _ _ _ _ _ _
im'
{Inside of product)
TO REDUCE THE RISK OF FIRE OR ELECTRIC
SHOCK, AND ANNOYING INTERFERENCE, USE
THE RECOMMENDED ACCESSORIES ONLY.
THIS DEVICE IS INTENDED FOR CONTINUOUS
OPERATION!
{Back of product)
Page 3

Dear Customers
May we take this opportunity to thank you for purchasing this
Panasonic DVDA/IDEO/CD player.
We strongly recommend that you carefully study the Operat
ing Instructions before attempting to operate the unit and that
you note the listed precautions.
Features
_________
_____________
■ DVD: a completely new dimension in video
entertainment
•Subtitles may be displayed in one of a maximum of 32 lan
guages*.
•The audio soundtrack can be heard in up to 8 languages®.
•The multi-angle function allows you to choose the viewing
angle of scenes which were shot from a number of different
angles. (Limited to DVD recorded with multiple camera an
gles.)
*The number of the languages recorded is dependent on the
software.
■ High quality digital audio
•TTie Dolby Digital (AC-3)/MPEG 2 audio/Linear PCM decod
er is built into the player which makes it possible to enjoy
Multi-Channel Surround sound.
•With the linear PCM sound of a 48 kHz/16 bit through
96 kHz/24 bit, audio quality exceeding that of CDs becomes
possible.
■ Many convenient features
•GUI (Graphical User Interface) screens for showing the disc
information or player information and providing access to
many major functions of this unit
•Reproducing a virtual surround effect even when only a
2-channe! stereo system is connected. [Dolby Digital (AC-3)
5.1 ch DVD only]
•Programming of up to 5 scenes in memory (markers)
•Parental lock settings to prevent play of discs unsuitable for
some audiences [DVD only]
•The remote control unit supplied has an easy-to-use joy
stick, and it can control the TV as well.
■ Compatible with PAL DVD (Video CD) and
NTSC DVD (Video CD)
•This player can play discs recorded in either PAL or NTSC
format.
However, the player must be connected to a PAL TV which
is capable of receiving PAL 525/60 system to play both PAL
DVD (Video CD) and NTSC DVD (Video CD).
■ Compatible with Video CD and CD as well as
DVD
■ Disc formats supported by this player
The unit can play back discs bearing any of the following
marks:
noOMMCr
lo]0§®
non«. AUDIO
CD
[8 cm disc/
12 cm disc]
DVD
[8 cm disc/
12 cm disc]
iMOITALWffiOl
Video CD
[8 cm disc/
12 cm disc]
Page 4
DVD-A350A Contents
Please check and identify the
supplied accessories.
^1
1-71
0
r-
o
o
...................
o
ooo
i
I—I DVD-A350A
'—' Main unit ..
rn Remote controi
'—' unit
□
I I AC mains lead
'—' (Parts No. VJA0754)
......................
(Parts No. VEQ2084)
Batteries
for remote control unit
[size “AA” (R6P)]
...................
...........
2
1
Video/audio
cord
............................ 1
(Parts No. VJA0788-D)
I I S-video cord
'—' (Parts No. VJA0658-A) '
I I Operating instructions
*—' manual
(Parts No. VQT7410)
..............
........................
1 I;
1
Page 5

Table of contents
Getting Started:
Safety information
..............................................
2
Features................................................................ 3
DVD-A350A Contents
Precautions
.......................................................
Control reference guide
..........................................
....................................
4
6
7
Front panel display.............................................. 9
Basic connection
Optional video connections
Optional audio connections
...............................................
..............................
............................
10
11
12
Remote control preparation...............................14
Connecting headphones
.....................................
14
Before enjoying DVD/Video CD/CD....................15
Basie Operatlpfn:
Basic play
•Basic play................................................................................15
•Stopping play.......................................................................... 17
•Skipping ahead or back...........................................................17
Rapid advance (Rapid reverse)
Still picture (Pause)
Frame advance [DVOA/ideo cd]
SlOW-motion play [DVO/Video CD]
............................................................15
.........................
............................................
................................
..................................
18
18
18
19
Enjoying Video CDs with playback control
without using menus [video cd only]
Operation Usfhg out $creens:
General Information about GUI screens
•Common procedures...............................................................20
Detailed descriptions of each GUI icon
•Screen for disc information.....................................................21
•Screen for player information
•Screen for slow-motion play and rapid advance
(reverse).................................................................................22
..................................................
________
_____
______
19
20
21
22
A0ahced
Program play [video cd/cd]
...................................
23
Random play [Video cd/cd]....................................24
Repeat play
• Repeat viewing (listening) ................................................25
• Repeating sections between two specific points
(A-B repeat)....................................................................26
.........................................................
25
Storing markers in memory to be viewed
(listened) again
•storing a marker in the memory..........................................27
•Recalling/clearing a marker................................................27
Changing subtitle language [Dvd only]
...............................................
................
27
28
Changing audio soundtrack language
[DVD only].................................................................. 29
Switching vocals ON or OFF for Karaoke
discs [DVD/Vtdeo CD]....................................... 29
Viewing from another angle [dvd only]...... 30
Reproducing a virtual surround effect
[Dolby Digital (AC-3) 5.1 ch DVD only]
Using a title menu [dvd only]
.....................
...............................
30
31
Using a DVD menu [dvd only]..............................31
Initiai Settings:
Initial settings
•Common procedures of initial settings
•Selecting disc languages [DVD only]
•Selecting rating level [DVD only]
•Selecting language of On-Screen Display menu....................35
•Switching the On-Screen Display ON or OFF
•Selecting the display brightness.............................................36
•Selecting TV screen type
•Selecting digital output
•Speaker setting.......................................................................39
•Other settings.........................................................................41
For Your Reterence:
....................................................
...................................
.....................................
............................................
........................
.......................................................
...........................................................
32
32
33
34
36
37
38
Operating the TV set by the remote control
unit...................................................................42
Disc handling and maintenance
Troubleshooting
.................................................
Self-diagnosis display function
Definition of terms
Specifications ....
...........................................
.............................................
.......................
........................
43
44
45
46
46
Language code list........................................... 47
Region Management
information
.....................................
Back cover
Page 6

Precautions
Please read these precautions before operating this unit.
■ Mains lead protection
To avoid any malfunctions of the unit, and to protect against
electric shock, fire or personal injury, please observe the fol
lowing.
•Hold the plug firmly when connecting or disconnecting
the AC mains lead to this unit.
•Do not connect or disconnect the AC mains lead when
your hands are wet.
•Keep the AC mains lead away from heating appliances.
•Never put any heavy object on the AC mains lead.
•Do not attempt to repair or reconstruct the AC mains
lead in any way.
•Remove dust, dirt, etc. on the plug at regular intervals.
•If the unit has been dropped or otherwise damaged,
turn off the power and disconnect the AC mains lead.
•if smoke, malodors or noises are emitted from the unit,
turn off the power and disconnect the AC mains lead.
■ Placement
Avoid placing the unit in areas of:
•direct sunlight or heating radiators, or closed automobiles
•high temperature (over SS^C) or high humidity (over 90%)
•excessive dust
•vibration, impact or where the surface is tilted
As the internal parts may be seriously damaged.
■ Non-use Periods
When the unit is not being used, switch the unit to the stand
by mode.
When left unused for a long period of time, the unit should be
unplugged from the household AC outlet.
■ No fingers or other objects inside
•Touching internal parts of this unit is dangerous, and may
cause serious damage to the unit. Do not attempt to disas
semble the unit.
•Do not put any foreign object on the disc tray.
■ Keep away from water and magnets.
•Keep the unit away from flower vases, tubs, sinks, etc. If liq
uids are spilled into the unit, serious damage could occur.
•Never bring magnetic objects such as speakers near to this
unit.
■ Stacking
•Place the unit in a horizontal position, and do not place any
thing heavy on it.
•Do not place the unit on amplifiers or other equipment which
may become hot.
■ Condensation
Moisture may form on the lens in the following conditions...
•immediately after a heater has been turned on.
•in a steamy or very humid room.
•when the unit is moved from a cold environment to a warm
one.
If moisture forms inside this unit, it may not operate properly,
in this case, turn on the power and wait about one hour for
the moisture to evaporate.
■ If there is noise Interference on the TV while a
broadcast is being received
Depending on the reception condition of the TV, interference
may appear on the TV screen while you are watching a TV
broadcast and the unit is left on. This is not a malfunction of
or the TV. To watch a TV broadcast, switch this unit
3iy
mode.
Page 7
Control reference guide
Main unit
_______________________________________________
Page
O POWER, <bn button......................................................15
Press to switch the unit from on to standby mode or vice
versa. In standby mode, the unit is still consuming a small
amount of power.
O VIRTUAL SURROUND SOUND button/indicator .... 30
O Remote control signal sensor
O Display window................................................................... 9
0 ANGLE indicator..................................................................30
0 FL SCROLL button
Press to show the audio information for the disc currently
being played on the unit’s display.
O OPEN/CLOSE button..........................................................15
...........................................
14
_______________________________________________
©SKIP buttons
0 Shuttle dial (SEARCH)..................................................18,19
0 PHONES jack.......................................................................14
© PHONES LEVEL control
0 Disc tray...............................................................................15
0 STANDBY indicator
When the unit is connected to the AC mains supply, this
indicator lights up in standby mode and goes out when the
unit is turned on.
0 STOP button
0 STILUPAUSE button...........................................................18
0 PLAY button
................................................................
....................................................
...........
............................................................17
........................................................................
Page
16,17
14
15
Page 8
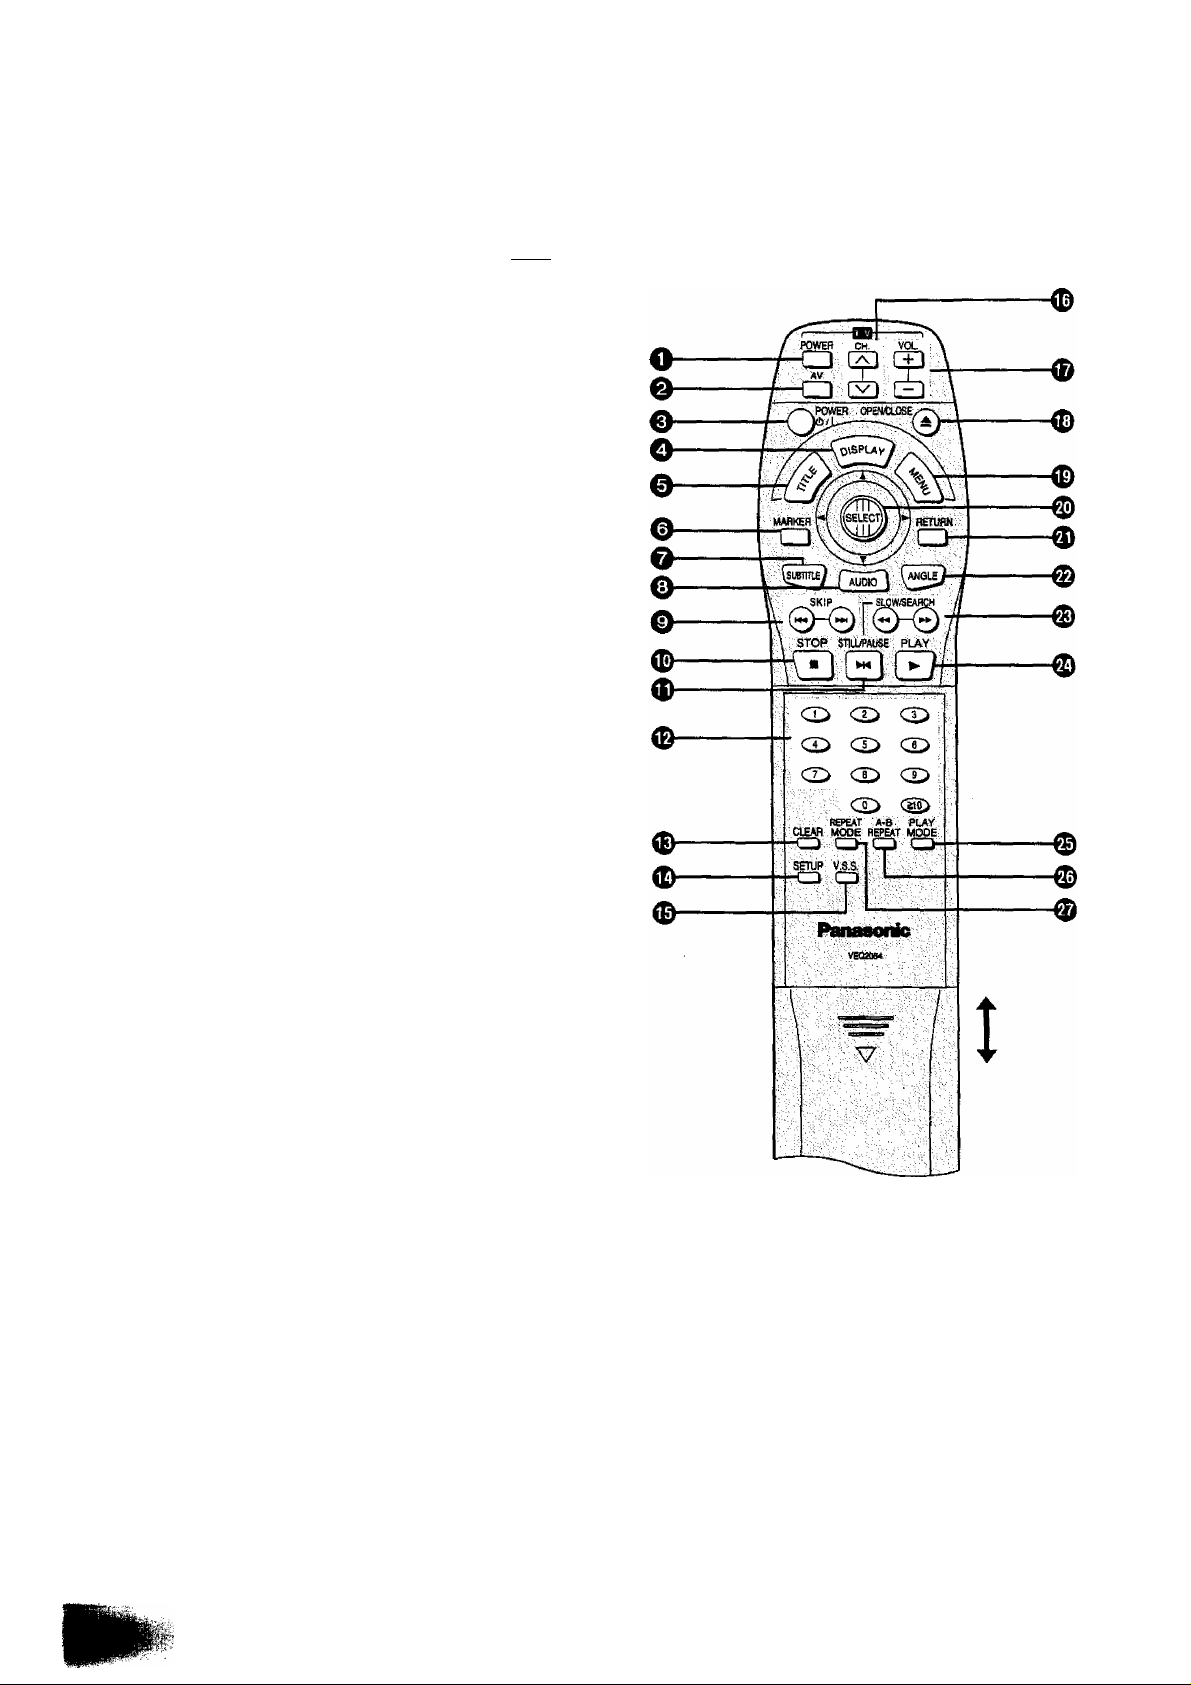
Control reference guide
Remote control unit
om POWER button
O ES|AV button
O POWER 6/1 button
(for DVDA/IDEO CD/CD player).
O DISPLAY button..............................
0 TITLE button
0 MARKER button
o SUBTITLE button
O AUDIO button
0 SKIP buttons
0 STOP button...................................
0 STILUPAUSE button
0 Numeric buttons
•To select a 2>diglt number
Example: To select track 23
Press “2" and then “3”.
0 CLEAR button
0 SETUP button
0 V.S.S. button
0 IQ CH. buttons
0 IQ VOL. buttons.
0 OPEN/CLOSE button.....................
0 MENU button
0 JoystIck/SELECT button .....
0 RETURN button
0 ANGLE button................................
0 SLOW/SEARCH buttons
0 PLAY button..............
0 PLAY MODE button
0 A-B REPEAT button
0 REPEAT MODE button
.........................
....
..........................
....................................
...........................
..........................
................. ........
..................................
....................
............................
................................
................................
....
.............................
......
.........................
.......
.....................
.............................
.............................
.....................
.......................
......................
..................
....
...............
Page
42
.
42
...15
...20
16,31
...27
... 28
...29
16,17
...17
...18
...16
20, 24, 27, 33
............
............
............
............
............
32
30
42
42
15
... 16,19, 31
.............
........
............
........
............
........
.
............
............
16
16, 20
30
18,19
15
23, 24
26
25
Page 9
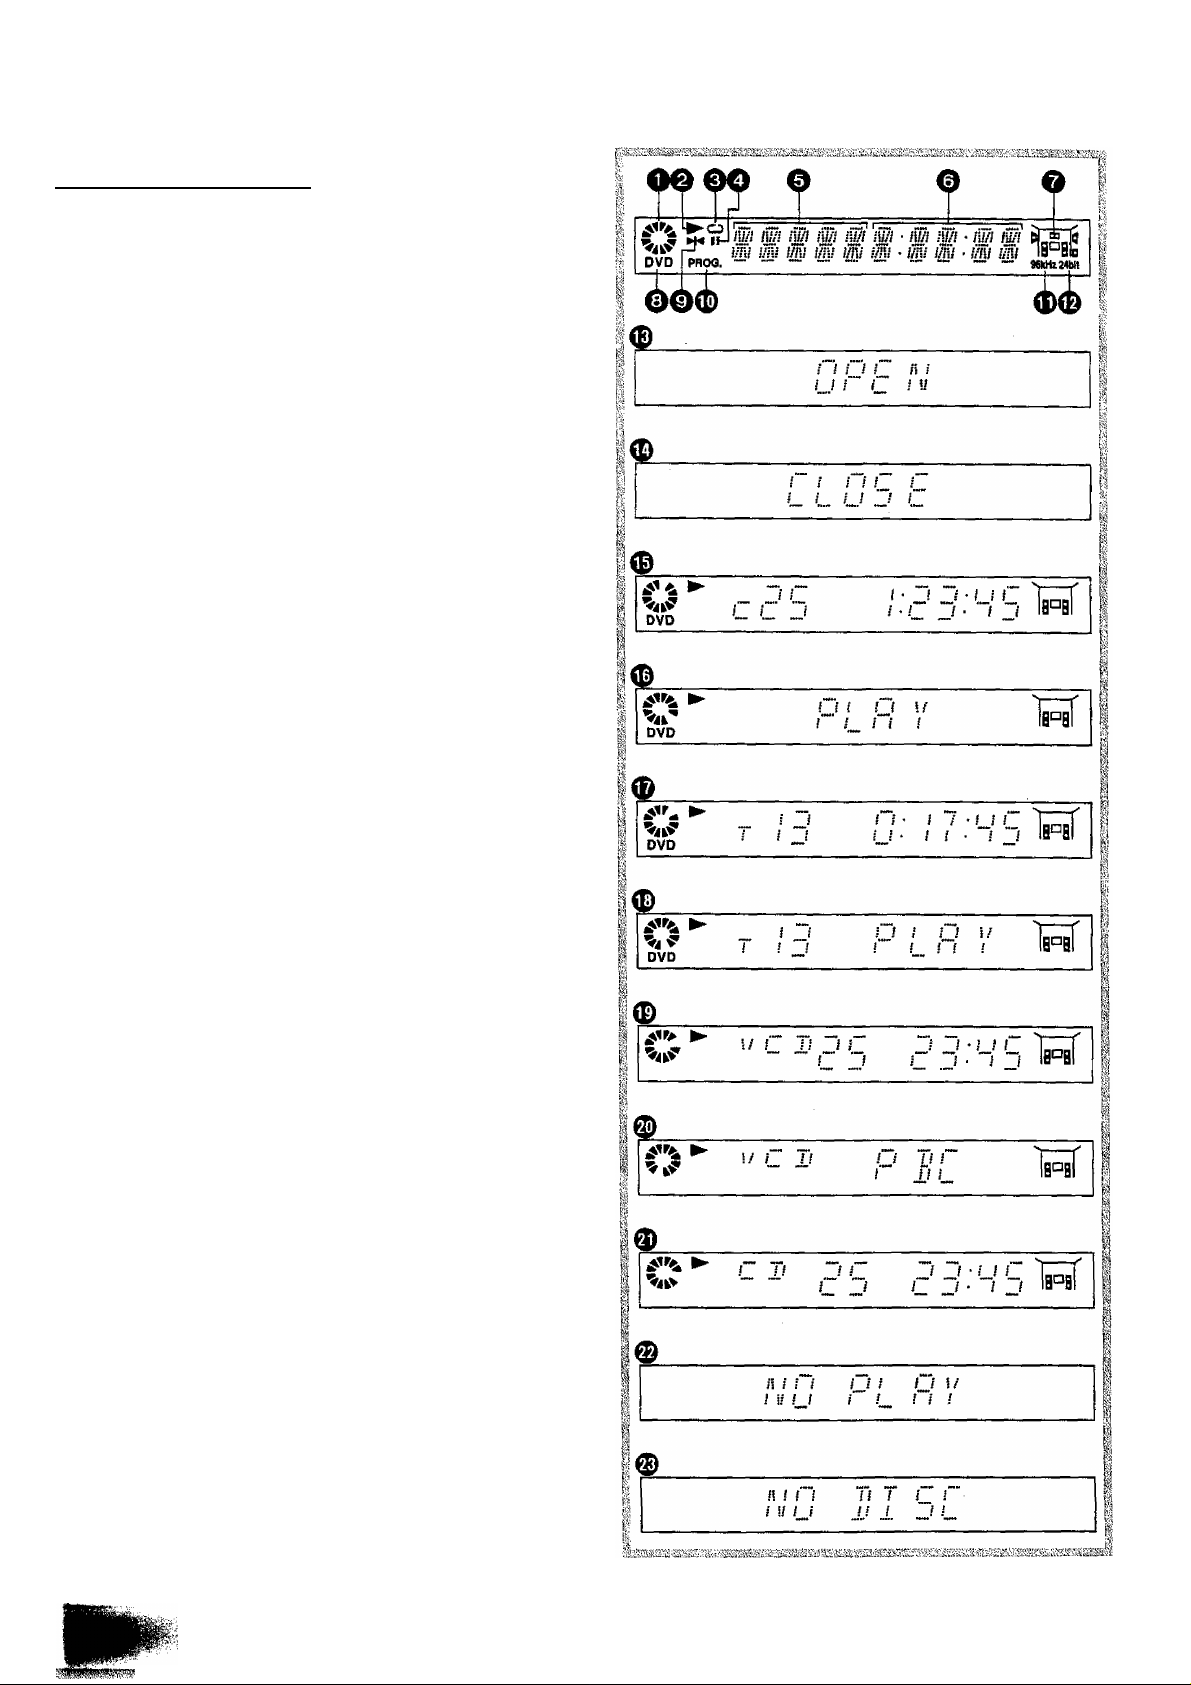
Front panel display
Rotates during play.
Rotates fast clockwise or counterclockwise
during rapid advance (reverse). (See page 18.)
Rotates slowly clockwise or counterclockwise
during slow-motion play.
[DVDA/ideo CD] (See page 19.)
Illuminates in the stop mode.
Illuminates during playback.
O
Flashes when the RESUME function is ON.
(See page 17.)
Illuminates during repeat play, (See page 25.)
O
Illuminates in the pause mode. [CD] (See page 18.)
o
Indicates the chapter number. [DVD]
0
indicates the track number. [Video CD/CD]
Indicates the total playing time when the disc tray Is
©
closed. [Video CD/CD]
Indicates the elapsed playing time from the start of the
title/track during play.
O Indicates the current audio channel information re
corded in the disc (e.g. 2ch or 5.1 ch).
O Illuminates when a DVD is loaded.
0 Illuminates In the still picture mode.
[DVD/Video CD] (See page 18.)
0 Illuminates during program play. [Video CD/CD]
(See pages 23 and 24.)
0 illuminates when Linear PCM of 96 kHz sampling is
being played.
0 Illuminates when Linear PCM of 24 bit is being played,
0 Illuminates when the disc tray is open.
0 Illuminates when the disc tray Is being closed (re
tracted).
0 Illuminates during play of a DVD.
0 Illuminates during play of an interactive DVD.
0 Illuminates during play of a Karaoke DVD.
0 Illuminates during play of an interactive Karaoke DVD.
0 Illuminates during play of a Video CD.
0 Illuminates during play of a Video CD with playback
control.
0 Illuminates during play of a CD.
0 Illuminates when playback Is Impossible.
•DVDs for which playback is prohibited by the setup “Rat
ings”. (See page 34.)
•DVDs with Region No. other than “4" or “ALL”.
(See page 43.)
0 Illuminates when no disc is loaded.
Page 10
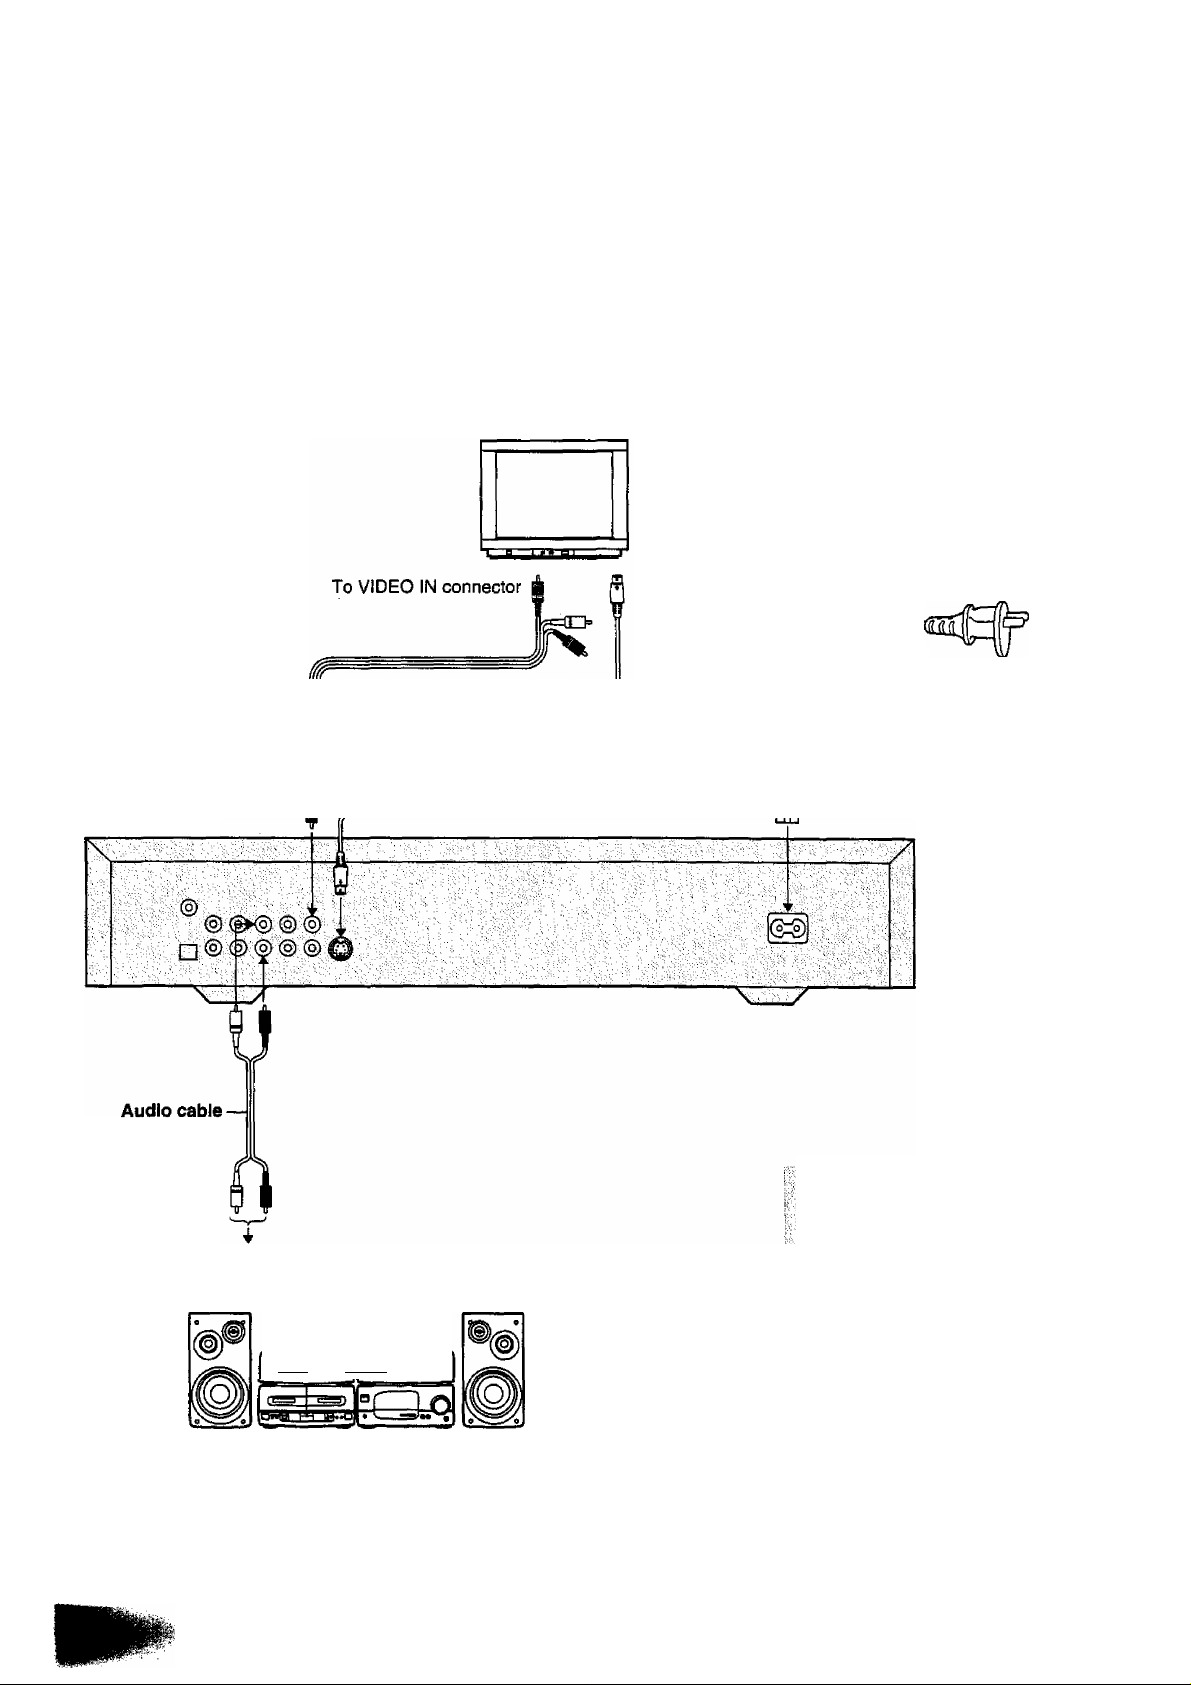
Basic connection
•Ensure that the power switch of this unit and other equipment to be connected is set to off before commencing connection.
•Do not block ventilation holes of any of the equipments and arrange them so that air can circulate freely.
•Read through the instructions before connecting other equipment.
•Ensure that you observe the colour coding when connecting audio and video cords.
Connecting to a TV set and an audio equipment
TV set (optional)
To mains supply
(AC 220-240 V, 50 Hz)
Mains lead
Video/audio cord
(supplied)
S-video cord
(supplied)
(supplied)
DVD/VIDEO CD/
CD player
(optional)
To audio input connectors
(red, white)
V c
__
Sod»
j ^|[y e—jivs
•When playing some DVD discs, TV;
::voiume:
; som® other sources, ac^ust the TV
volume to your desired level. ;v % f
•If the player Is connected to the TV ■
through a videp cassette
: the picture may not be played back
normally with some DVDs. If this is
the case, do not connect the player
■ ’ via the VCR. ;•!
Audio equipment (optional)
Page 11
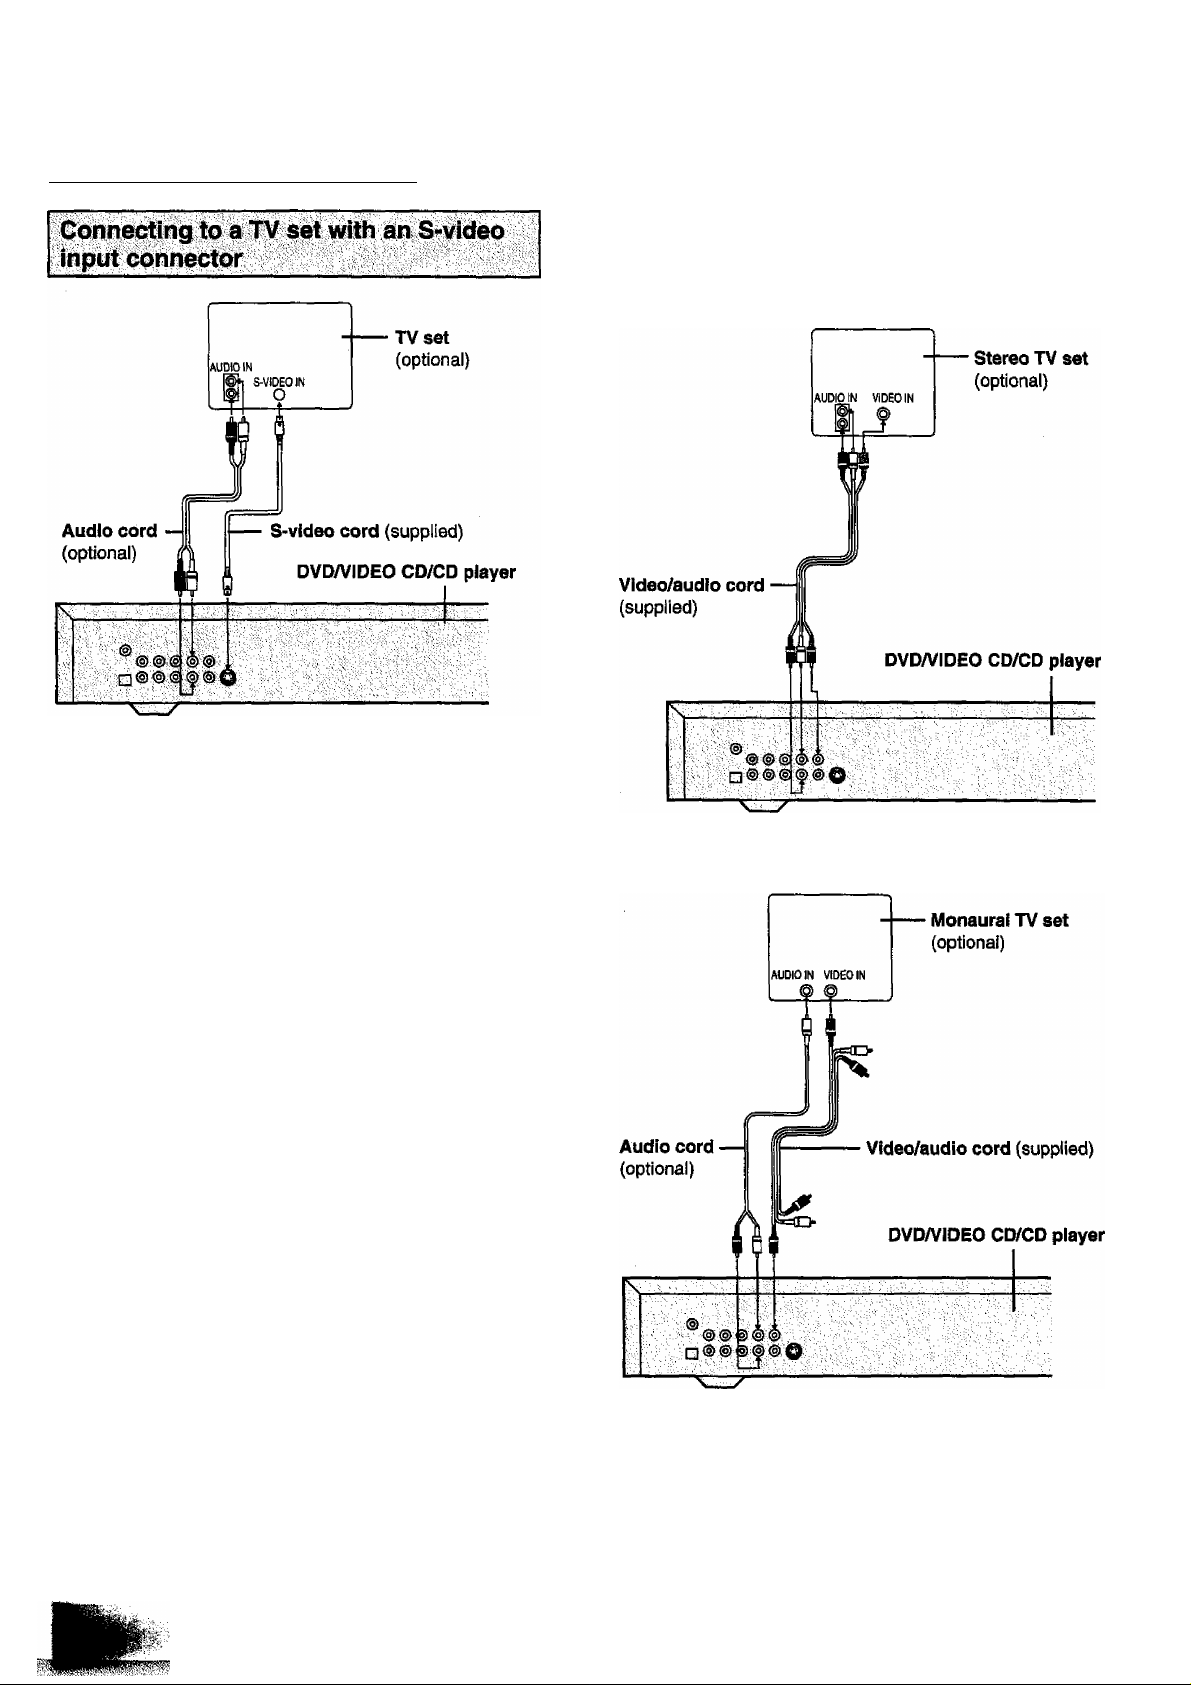
Optional video connections
Cònnéctthg tP à TV set w^h VidP<^sMdlP
■cord":^
If the TV set is stereo
S-video output connector
The S (separate) video output connector separates the color
(C) and luminance (Y) signals before transmitting them to the
TV set in order to achieve a sharper picture.
Use the S-video cord (optional) when connecting the player
to a TV set equipped with an S-video input connector for the
best possible picture quality.
If the TV set is monaural
11
Page 12
Optional audio connections
CoiHiecting to an AV amplifier with S.ich input connectors supporting Dolby Digital
This player contains a Dolby Digital (AC-3) decoder or MPEG 2 decoder. This enables the playback of DVDs recorded in Dolby
Digital, MPEG 1/2 audio or Linear PCM without the need for an external decoder with Dolby Digital, MPEG 1/2 audio or Linear PCM
processing. When the player is connected to an AV amplifier with 5,1ch input connectors, you can enjoy theater-quality audio in your
home when playing discs recorded in Dolby Digital, MPEG 1/2 audio or Linear PCM.
AV Amplifier with
S.ich input connectors
(All sold separately.)
Front speaker (Left)
Subwoofer (Left)
---------
Surround speaker (Left) —
Notes:
•After connection is made, set the “Speaker setting" (such as
Yes/No and Large/Smatl) according to your speaker sys
tem. (See page 39.)
•if the type of the speakers connected does not satisfy the
channels recorded in an MPEG 2 or Linear PCM disc, the
disc will not be played in all the channels but only in 2 chan
nels. (For example, even if the front speakers and the cen
ter speaker are connected, a disc recorded in 5 channels
will be played back only in 2 channels.)
•DVDs recorded in Linear PCM/96 kHz sampling in which
“Center Speaker” is contained will also be played back only
in 2ch.
Center speaker
— Front speaker (Right)
-----
Subwoofer (Right)
Surround speaker (Right)
• If the surround speakers or the center speaker can’t be In
stalled at an equal distance to (or further away from) the
front speakers from the listening position, then change the
delay time setting at the “Speaker setting" on page 39, to
compensate.
•Set VIRTUAL SURROUND SOUND (V.S.S.) to “VSS OFF
(Cancel) when using speakers other than the front speakers
[UR). If it is set to “VSS 1” (Natural effect) or “VSS 2" (Em
phasized effect), sound will be delivered only through the
front speakers (UR).
Page 13
Optional audio connections
Connoting to a decbder with Dolby
Digital
■prefc^^ing''"" ^ "■ ■■
When DVDs recorded in Dolby Digital or MPEG audio are played,
Dolby Digital bitstream or MPEG audio bitstream is output from the
piayer’s OPTICAL digital audio output connector or COAXIAL digital
audio output connector. When the player is connected to a Dolby Dig
ital decoder or MPEG audio decoder, you can enjoy theater-quality
audio in your home. [An optical digital cable or coaxial audio cable
(both optional) is required when an optional Dolby Digital decoder or
MPEG audio decoder is used.]
Notes when connecting the optical digital cable (optional)
•Remove the dust protection cap from the connector and connect the
cable firmly so that the configurations of both the cable and the
connector match (B).
•Keep the dust protection cap and always reattach the cap when not
using the connector to protect against dust.
Concerning the audio output from the unit’s optlcal/coaxlal digital audio output connector
Disc
DVD Dolby Digital
Video
CD
CD
*'The type of audio output from the connector can be selected by the
initial settings. (See page 3€.)
*=Sound having 96 kHz sampling is converted into 48 kHz sampling
when it is output from the unit’s optical/coaxial digital audio output
connector.
For your reference;
•Dolby Digital (AC-3) is a digital sound compression technique de
veloped by the Dolby Laboratories Licensing Corporation.
Supporting 5.1-channel surround sound, as well as stereo (2-channei) sound, this technique enables a large quantity of sound data to
be efficiently recorded on a disc.
•Linear PCM is a signal recording format used in CDs. While CDs
are recorded in 44.1 kHz/16 bit, DVDs are recorded in 48 kHz/16 bit
up to 96 kHz/24 bit.
• If you have a Dolby Pro Logic Surround decoder, you will obtain the
full benefit of Pro Logic from the same DVD movies that provide full
5.1-channel Dolby Digital soundtracks, as well as from titles with the
Dolby Surround mark.
Sound
recording
format
(AC-3)
Linear PCM
(48/96 kHz
16/20/24 bit)
MPEG 1/MPEG 2 MPEG audio bitstream or
MPEG 1 PCM (44.1 kHz sampling)
Linear PCM
Optical/coaxial digital audio
output from connector
Dolby Digital bitstream
(2-5.1 ch) or PCM (2ch)
(48 kHz/16 bit)*’
Linear PCM (2ch)
(48 kHz sampling/16 bit only)*®
or no output*’
PCM(2ch) (16 bit)*’
Linear PCM
(44.1 kHz sampling)
DVD/VIDEO CD/
CD player
Coaxial audiocable (optional)
Decoder or
Amplifier with
Dolby Digital
(AC-3)/MPEG
processing
(optional)
TV set (optional)
— Video/audio cord (supplied)
S-video cord (supplied)
(See page 11.)
or
To coaxial digital audio input
connector
Optical digital
cable (optional)
To optical digital audio input
connector
'OaMl|pn.^.fd^ :o^ca^o^fa)' audllb.'putput,'
cbirv^tb V' f-r'
H «>:i^ hbti^p pbipiibef
/at Input cdnneidbr)whjeb^^
the Dolby Digital (AC^) or MPEG audio decoder.
■•Qtlibiwi®® btiay ^se ^ch/;
;; a highlevel: of noise: fhet №v Jnhey be HamfU; to your;
j;/ ; eVs ahdbamag© /
♦Video CDs and CDs can be played as they would nor-:
ma(ty..be:ptayed.x
Manufactured under license from Dolby Laborato-
double-D symbol are trademarks of Dolby Labora
tories Licensing Corporation. Copyright 1992 Dolby
Laboratories, Inc. Ail rights reserved.
13
Page 14
Remote control preparation
Battery installation El
Insert the batteries while observing the correct {+) and {-)
polarities as illustrated at right.
Service life of batteries
•The batteries normally last for about one year although this
depends on how often and for what operations the remote
control is used.
•If the remote control unit fails to work even when it is oper
ated near the player, replace the batteries.
•Use size "AA", R6P batteries.
Notes:
•Do not use rechargeable (Ni-Cd) batteries.
•Do not attempt to recharge, short-circuit, disassem
ble, heat or throw the batteries into the fire.
•Do not drop, step on or otherwise impact the remote
control unit. This may damage the parts or lead to
malfunction.
•Do not mix old and new batteries.
•If the remote control unit is not going to be used for a
long time, remove the batteries. Otherwise, electrolyte
may teak which may lead not only to malfunctioning
but also to burns if contact is made with the electro
lyte.
•Wipe away any electrolyte leaking inside the remote
control unit, and install new batteries.
•If any electrolyte should come into contact with parts
of your body, wash it off thoroughly with water.
Remòte control operation rari^ É
Point the remote control unit no more than about 7 m from the
remote control sensor and within about 60° of the front of the
unit.
•The operating distance may vary according to the bright
ness of the room.
Notes:
•Do not point bright lights at the remote control sensor.
•Do not place objects between the remote control unit and
the remote control sensor.
•Do not use this remote control unit while simultaneously op
erating the remote control unit of any other equipment.
Connecting headphones a
________
7 Connect the headphones.
•Headphones with a stereo plug (M6) can be connected.
2 Adjust the volume.
Caution:
Avoid listening to sound at levels which may be harmful to
your ears.
Page 15
i^efdre dnjoying DVDA^iddo Cp/CO
the On-Screen menu language of your player has
, been factory pre-set to English. .
iif you wputil like to Change the menu language to
f rench,: Spanish, German or Italian^ please refer to
“Selecting language of On-Screen Display menu” bn
If the expianatioris given belovy it is assumed that: En
glish has been selected as the menu language. :
Basic play
Preparations
•Switch the TV ON and select “Video" as the TV input.
•Switch on the stereo system's power if the player has been
connected to a stereo system.
Basic play
1 Press Power to switch on the power.
2 Press OPEN/CLOSE to
open the disc tray.
3 Place a disc onto the disc tray.
Hold the disc without touching either of its surfaces, posi
tion it with the printed title side facing up, align it with the
guides, and place it in its proper position.
© 8 cm disc
(D 12 cm disc
4 Press PLAY.
: C 1 bsei iRead i nal
-►
The disc tray is automatically closed and play begins.
•When the disc tray is closed by pressing OPEN/CLOSE,
press PLAY to commence play.
•When a menu screen appears on the TV monitor
In case of DVDs with menu or Video CDs with playback
control, a menu screen appears on the TV monitor. Perform
step 5 on page 16 to commence play.
TITLE MENU"
Castles
Lovers
Birds
(Continued on the next page)
(Example of DVD)
15
Page 16

Basic play
___________
___________________
5 Tilt the joystick to the ◄/►/A/V direction
and press SELECT, or press the numeric
button(s), to select the preferred item.
•The joystick is not effective for selecting items for Video
CDs.
: vTiTLE: Jenu
Dogs Castles
Lovers B i fitS;
Play of the selected item now begins.
When the menu continues onto another screen
After step 4 on page 15, press SKIP
11 EA ST A SIA 1
12 SO UT H A SIA l i
13 MI DD L E E A ST I:
,14 AF RI CA L
15 EU RO P E L
◄
---------------
SWP
© 0
6 O CE A NI A 1
7 N OR T H AM E RI CA 1
8 C EN TR A L A M ER IC A !
►
9 S OU TH A M E RIC A 1
10 AN TA R CT IC 1
•To return to the previous menu screen
Press SKIP.
•For operation, refer also to the jacket of the disc concerned.
Stopping play and returning to the menu
screen
•DVD
Press TITLE, MENU or RETURN.
(Which button is pressed differs depending on the disc
used.)
•Video CD
Press RETURN.
•Play is suspended, and the menu screen Is displayed.
After operation
When the unit is not in use, remove the disc and press
POWER to switch the power to the standby mode.
Ttie power will automatically be switched to the standby
mode after 30 minutes or so have elapsed in the stop mode.
(Auto power-off function)
What Is playback control?
If a Video CD has “playback control” written on its disc
or jacket, it means that particular scenes or information
can be selected for viewing interactively with the TV
monitor using the menu screen.
Page 17

Basic play
Note:
•The disc continues to rotate while the menu is displayed
even after the player has finished playing a particular item.
When no further selections are to be played, be sure to
press the STOP button to clear the menu display.
•If the disc is placed in upside down (and It is a single sided
disc), the DVD display will indicate “NO DISC”.
•When the NTSC DVDA/ideo CD is played, the playback pic
ture may roll up or down on some TVs; adjust this using the
V-HOLD control on the TV. TVs not equipped with a VHOLD control cannot correct this condition. The playback
picture may shrink vertically and black bars may appear
both on the top and bottom of the screen, or the picture may
be in black and white. This does not indicate a malfunction.
For your reference:
•When appears while a button is being operated, it
means that the corresponding operation is prohibited by the
player or the disc.
_________________________________
Stopping play
Press STOP.
For your convenience:
•When play is stopped, the unit records the point where
STOP was pressed (RESUME function). (“►” flashes on
the unit’s display when this function is activated.) Press
PLAY again, and play will resume from this point. When the
tray is opened or STOP is pressed again, the RESUME
function will be cleared.
The RESUME function works only with discs for which the
elapsed playing time appears on the unit’s display during
playback.
This feature will not be cleared when the power is switched
to the standby mode and then returned to ON.
Skipping ahead or back
¡Skipping ahead!
Press SKIP »\ during play.
A chapter (DVD) or a track (Video CD/CD) is skipped each
time the button is pressed.
[Skipping back]
Press \« SKIP during play.
When the button is pressed once midway through a chapter/
track, play returns to the start of that chapter/track. When it is
pressed again, a chapter/track is skipped each time the but
ton is pressed.
For your reference:
•When SKIP is pressed during menu play of Video
CDs, a menu screen may sometimes be recalled.
17
Page 18

Rapid advance (Rapid reverse)
By the remote control unit
Press SLOW/SEARCH MM or
Reverse Forward
direction direction ^
•The speed of advance (reverse) is relatively slow at first.
When the button is pressed again, the speed becomes fast
er. (Each time the button is pressed, the speed increases
up to 5 steps.)
To return to normal play
Press PLAY.
On the main unit
Turn the shuttle dial during play.
Low Low
during play.
__
(Example)
/f \> Mi.
High
Reverse direction Forward direction
•The speed increases up to 5 steps.
•Normal play is resumed when the shuttle dial is released.
For your reference:
•When SLOW/SEARCH or the shuttle dial is used during
menu play of Video CDs, a menu screen may sometimes be
recalled.
High
Still picture (Pause)
Press STILL/PAUSE during play.
•DVDA/ideo CD:
The player will be placed in the still
picture mode.
•CD:
The player will be placed in the
pause mode.
To return to normal play
Press PLAY.
[DVDA/ideo CD]
Frame advance [pyp/video coi
_______
Press STILUPAUSE in the still picture mode.
The disc is advanced by one frame each time the button is
pressed.
•When the button is kept pressed, consecutive frame ad
vance works.
To return to normal play
Page 19

Slow-motion play [DVD/VideoCP]
By the remote control unit
Press SLOW/SEARCH -44 or ►► in the still
picture mode. (See page 18.)
Reverse Forward
direction direction
•The speed of slow-motion is slow at first. When the button is
pressed again, the speed becomes faster. (Each time the
button is pressed, the speed increases up to 5 steps.)
To return to normal play
Press PLAY.
On the main unit
Turn the shuttle dial in the still picture mode.
(See page 18.) |_q^
(Example)
High
Reverse direction Forward direction
•The speed increases up to 5 steps.
•Still picture mode is resumed when the shuttle dial is re
leased.
For your reference:
•For Video CDs, slow-motion playback in reverse direction is
not possible.
Enjoying Video CDs with
playback control without using
menus [Video CD only]____________________
1. Press STOP after the menu screen appears (after step 4
on page 15).
(“PBC" will be cleared from the unit's display.)
2. Press the numeric button(s) to select the preferred track.
(Play begins.)
•Refer to the jacket etc. of the disc concerned for the
track numbers.
•Press‘T to start play from the beginning of the disc.
To return to menu play
Press STOP to stop playback and press MENU.
(“PBC” will light up on the unit’s display and the menu screen
is resumed.)
Perform step 5 on page 16.
r. -r 7-Ï—n»-' I’iyr’
..........
1S
Page 20

General information about GUI
screens_______________________
This unit features GUI {Graphical User Interface) screens
consisting of icons showing disc information (title/chapter/
track number, elapsed playing time, audio/subtitle language,
and angle) and player information {repeat play, play mode,
marker, picture mode, Karaoke vocal ON/OFF, master vol
ume, etc.).
Some icons only show the indicated information. Other icons
allow the settings to be changed.
Common procedures M
1 Press DISPLAY during play or in the stop
mode.
Each time this button is pressed, the TV monitor chang
es as shown below.
►GUI screen for selecting disc information
GUI screen for selecting player information
GUI screen for slow-motion play and rapid advance
(reverse)
—GUI screen is cleared
•Some functions cannot be accessed from the stop
mode.
►I
y
2 Tilt the joystick to the direction to
select the preferred item.
•The currently selected item is indicated by the yellow
frame on the GUI screen.
3 Tilt the joystick to the direction to
select the preferred setting.
•When numbers are displayed (e.g. title No.), the numer
ic buttons are also effective for setting instead of the
joystick.
•For some functions, the setting will be registered imme
diately: for others, SELECT must be pressed.
Press DISPLAY, RETURN or CLEAR to clear the GUI
screen.
m
CD <X> O
CD CD CD,
CD CD CD
CD
REPEAT A-B PLAY
CLEAfI : MODE REPEAT MODE
CD a CD
CD
CD
<D v’
CD CD CD ;
'cD CD CD
CD
Example of GUI screens
(The screens may differ depending on the disc contents.)
•DVD (B)
•Video CD (B)
•CD (B)
For your reference;
•Depending on the type of DVD software and a TV with auto
matic picture zoom function enabled, the GUI screen may
not be displayed or only partially displayed on the TV
screen.
In this case, select the appropriate TV screen type by con
sulting the operation manual of the TV.
B
Page 21

Detailed descriptions of each GUI
icon
Screen for disc information
t',
O
I
No.
To show the current title No. [DVD] or
track No. [Video CD/CD] and to jump to
O
the desired title No. or track No.^’
To show the current chapter No. or to
jump to the desired chapter No. [DVD only]
o
To show the elapsed time and to directly
select scenes by the elapsed time*^
©
[DVD] or to show the elapsed time
[Video CD/CD]
To show the current audio soundtrack
language No. and to change to the
o
desired one [DVD only] {See page 29.)
To show the audio soundtrack language
O
selected using the above icon [DVD only]
To show the audio attribute (type) of the
disc currentiy being played [DVD only]
©
•LPCM (Linear PCM), MPEG (MPEG audio) or
Remarks
Changing
method
A T or
Numeric/
SELECT
A T or
Numeric/
SELECT
Numeric/
SELECT
A ▼ or
Numeric
—
—
□□ [Dolby Digital (AC-3)]
To show the audio attribute (sampling
frequency or channel No.) of the disc
currentiy being piayed [DVD only]
o
•For Linear PCM disc: 48 kHz or 96 kHz
•For Dolby Digital (AC-3) disc: Ich to 5.1ch
•For MPEG audio disc: 1ch to 5ch
To show the audio attribute (bit No.) of
the disc currentiy being piayed [DVD only]
©
•For Linear PCM disc: 16 bit to 24 bit
To show the number of recorded vocals
[DVD Karaoke only] (See page 29.)
o
• 1 vocal: ON or “
•2 vocals: VI -l-V2, VI, V2 or “
To show the current subtitles language
No. and to change to the desired one
©
[DVD only] (See page 28.)
To show the subtitle language selected
©
using the above icon [DVD only]
To display/clear subtitles [DVD only]
©
(See page 28.)
To show the current angle No. and to
change to the desired one [DVD only]
©
(See page 30.)
To select the audio mode
[Video CD only] (See page 29.)
©
• LR, LorR
To show whether Video CD menu play is
ON or OFF [Video CD with playback control
©
only] (See pages 15,16 and 19.)
•“A T" means tilting the joystick to the A/T direction and “Numeric"
means the numeric button.
'“’The track number cannot be selected during menu play of
--
” (OFF)
---
" (OFF)
A T or
Numeric
A ▼
A ▼ or
Numeric
A ▼
—
e
e
o
0
0
0
©
0
0
0
0
(El B?
0
^35
1:07:48
ft*.:: ;.№CM
fVf: .; V bRCM
FOi OAi
V : LPQJJll ,
:3fRftÍ96Ííí¿№:
3FM96lt2^
.3 FRA-№ 24b
Vocal
1 * ON
;:2-ENá
2
ENG
□ : ■ OH::
■ 2. ENG
L R
PBC
OFF
• not work with some DVDs.
21
Page 22

Detailed descriptions of each GUI tcon
For your reference;
•For the language abbreviations used for the audio sound
track and subtitle language icons, see the table Q.
________
Scredh for
No.
To start A-B repeat play (See page 26.)
0
To select the repeat play mode
(See page 25.)
!li1
•C (chapter repeat), T (title repeat) or
o
OFF (normal play) [DVD]
•T (track repeat), A (disc repeat) or
OFF (normal play) [Video CD/CD]
To show the current play mode [Video
CD/CD only]
(See pages 23 and 24.)
o
•“
------
” (normal play), PRO (program
play) or RND (random play)
To store a marker SELECT
To recall a marker ◄ ► ^A
ml
To clear a marker ◄ ►
O
(See page 27.)
To select the picture mode
[DVD/Video CD only]
0
•N (normal), S (soft) or F (fine)
To select the virtual surround sound
mode [DVD only] (See page 30.)
0
•OFF, 1 (natural effect) or 2
(emphasized effect)
To adjust the master volume to be
output from the audio output connectors
o
of the player
•0 to -127 dB or -» (minimum)
Remarks
► A T” means tilting the joystick to the di
rection.
**’This function does not work with an interactive DVD or dur
ing menu play of Video CD.
Changing
method
SELECT
A V
-^CLEAR
A ▼
A ▼
A ▼
wsmms
'll
Q
ENG English
ITA Italian
SVE Swedish
FOR Portuguese
CHI Chinese
VIE
Vietnamese
O
e
0
o
FRA
French
ESP
Spanish
NOR
Norwegian
Russian JPN Japanese
RUS
KOR
Korean MAL Malay
THA
Thai
DEU
NLD Dutch
DAN
AB
O' •■■■
*
German
Danish
Others
Spreen for sipw-mottop
advance (reverse) B
0 Still/Pause
Tilt the joystick to the A direction to select "►N”.
(D Slow-motlon play
Tilt the joystick to the <}>- direction.*
-•i: Backward [DVD only]
!►: Forward [DVDA/ideo CD only]
(D Play
Tilt the joystick to the ▼ direction to select
0 Rapid reverse/advance
Tilt the joystick to the ◄ (Backward)/^ (Forward) direc
tion."^
the joystick is tilted, the speed increases in up to
P
Page 23

Program play [video cd/cd]
The player plays the tracks in the disc in an order you spec
ify.
1 Press PLAY MODE in the stop mode.
The program playback screen appears on the TV mon-
itor.
Choose a track, then press SÉLECT
1 7
13 19
2 8
Track numbers
included in the disc
Tilt the joystick to the ◄/►/A/V direction
and press SELECT, or press the numeric
button(s), to select the preferred track
number.
The selected track is stored in the memory.
14 20
3 9
15 21
4 10
16
5 11
17
6 12
18
Clear last
Clear all
Press PLAY to start
T'vT'rr;, V'7'7..\7
Choose a track, then press SELECT
1 7 13 19
8 14 20
m¡
3 9 15 21
4 10 16
5 11 17
6 12 18
Claar last
Clear all
Press PLAY to start
•Repeat step 2 to select another track.
• Up to 18 tracks can be programmed.
Choose a track, then press SELECT
1 7 13 19
2 8 14 20
3 9 15 21
4 10 16 5
5 11 17 6
iej12 18
Clear last
Clear ail
Press PLAY to start
3 Press PLAY.
Play now begins in the programmed sequence.
2
8
3
After playback
Play is stopped and the program playback screen is dis
played.
Page 24

Program play [Vìdeo CD/CD]
Returning to normal play El
1. Press STOP. {Program play is suspended.)
2. Press PLAY MODE twice.
3. Press PLAY.
Normal play begins.
{The content of the program is stilt retained in the memory.
Clearing the program El
When the program playback screen is displayed
Choose a track, then press SELECT
1 7 13 19
2 8 14 20
3 9 15 21 3
4 10 16
5 11 17
Ili 12 IS
clear last
Clear all i
Press PLAY to start.
•To clear the last program one by one
Move to "Clear lasf and press SELECT.
{Pressing CLEAR of the remote control unit also clears the
last program.)
•To clear all the programs
Move to "Clear all” and press SELECT.
(The programs are also cleared when the power is switched
to the standby mode or the disc is removed.)
Random play [video cd/cd] b
The player plays the tracks in the disc in random order.
_____________
2
8
5
6
1 Press PLAY MODE twice in the stop mode.
The random playback screen appears on the TV monitor.
Random Playback
Press PLAY to start
2 Press PLAY.
Play now begins in the random order.
After piayback
Play is stopped and the random playback screen Is dis<
played.
Returning to normal play
1. Press STOP. (Random play is suspended.)
2. Press PLAY MODE.
3. Press PLAY.
Nonrial play begins.
Page 25

Repeat play
Repeat viewing (listening)
Press REPEAT MODE during play.
Each time this button is pressed, the TV monitor changes as
shown below and the disc will repeat a chapter or title (DVD)
or a track (Video CD/CD).
• DVD
Repeat of chapter being played
Repeat of title being played
Cancel repeat mode
(Normal play)
I " "I
•Video CD/CD
Repeat of track being played
Repeat of entire disc contents
Cancei repeat mode
(Normal play)
To return to normal play
Press REPEAT MODE several times until “CD OFF” is dis
played.
CD CD <D
CD CD
i BEpatya.B:
CtEUft MOpferREPfaT:
SETUP' V.S.S.SETUP V.S.S-
CD r~>
Note:
• Repeat play works only with discs for which the elapsed
playing time appears on the unit’s display during playback.
•Repeat play may not work correctly with some DVDs.
■■«■■''•"vr —nr,-
.....
.......................
25
Page 26

Repeat play
To enjoy program repeat play El
if REPEAT MODE is pressed during program play (see
pages 23 and 24), the display changes as follows:
Repeat of programmed track
being played
Repeat of all programs
Cancel repeat mode
(Normal program play)
Repeatip^ sections betyir^^
specific points (ArB i^peaf) @
1 Press A-B REPEAT during play at the point
where repeat play is to commence (A).
O A •
2 Press A-B REPEAT at the point where re
peat play is to be concluded (B).
Repeat play of the selection between points A and B starts.
To return to normal play
Press A-B REPEAT several times until • •" is displayed.
Note:
•A-B repeat play works only within a title [DVD] or a track
[Video CD/CDJ.
•A-B repeat play works only with discs for which the elapsed
playing time appears on the unit’s display during playback.
•Some subtitles recorded around point A or B may fail to ap
pear. [DVD]
...................
....
'•
Page 27

storing markers in memory to be viewed (listened) again
__________
Storing a mariner in tha memory E!
1 Press MARKER during pfay.
indicates no marker has —
been stored yet.
2 Press SELECT during play at the starting
point to be viewed (listened) again.
Indicates “MARKER 1” is stored —
in the memory.
(If SELECT is pressed where
any number is already displayed.
replaced by the new one.)
Up to 5 markers can be stored in the memory.
• Press MARKER to clear the display.
RecalHhg/cleaHng a n^ark^r @
1 Press MARKER during play.
2 Tilt the joystick to the ◄/► direction to se
lect the marker to be recalled/cleared.
3 Tilt the joystick to the A direction to recall
a marker.
or
Press CLEAR to clear a marker.
Play resumes from the point corresponding to the selected
marker. (The display will be cleared automatically.)
or
The selected marker is cleared. {Press MARKER to clear the
display.)
Note:
•These operations work only with discs for which the elapsed
playing time appears on the unit’s display during playback.
•Some subtitles recorded around the marker may fail to ap
pear. [DVD]
For your reference:
markers are cleared when the power is switched to
or the disc is removed.
27
Page 28

Changing subtitle language
[DVD only]
It is possible to change the subtitle language from the one se
lected at the initial settings to a different language, if avail
able. (See page 33.)
(This operation works only with discs on which multiple subti
tle languages are recorded.)
________________________________
1 Press SUBTITLE during play.
•When no subtitles are recorded will be displayed in
stead of the language number.
Number of the subtitle
language being played
back
Tilt the joystick to the A/T direction until
the preferred language is selected.
Pressing the numeric
button(s) also changes
the subtitle language.
•Press SUBTITLE or SELECT to clear the display.
To clear/display the subtitles
Tilt the joystick to the ◄/► direction to select ON or OFF at
the step 2.
Note:
•In some cases, the subtitle language is not changed imme
diately to the selected one.
For your reference:
•When the preferred language is not selected even after tilt
ing the joystick several times, it means that the language is
not available on the disc,
•When the power is turned on or the disc is removed, subti
tles appear in the language selected at the initial settings. If
this language is not recorded on the disc, they appear in the
disc’s priority language.
Page 29

Changing audio soundtrack
ianguage [dvd only] a
it is possible to change the audio soundtrack language from
the one selected at the initial settings to a different language,
if available. (See page 33.)
(This operation works only with discs on which multiple audio
soundtrack languages are recorded.)
____________________
1 Press AUDIO during play.
•When no audio soundtrack is recorded, will be dis
played instead of the language number.
Number of the audio
soundtrack language
being played back
Tilt the Joystick to the A/T direction until
the preferred language is selected.
Pressing the numeric
button(s) also changes
the audio soundtrack
language.
• Press AUDIO or SELECT to clear the display.
For your reference:
•When the preferred language is not selected even after tilt
ing the joystick several times, it means that language is not
available on the disc.
•When the power is turned on or the disc is removed, the
language heard is the one selected at the initial settings, if
this language is not recorded on the disc, only the available
language on the disc will be heard.
Switching vocals ON or OFF for Karaoke discs [Dvo/video cd] @
7 Press AUDIO during play.
1 * ON
tocaT
2 Tilt the joystick to the direction until
the preferred setting is selected.
•DVD Karaoke (1 vocal)
ON^
-----------
•DVD Karaoke (2 vocals)
•i-(.2^V1^V2->
t
__________________
(OFF)
-----------
(OFF)
I
1 * —
Vocal
•Video CD
LR->L^R
t________I
•Press AUDIO or SELECT to clear the display.
Note:
n does not work with CDs.
... .....
7T" ■
L R
2B
.......................................
Page 30

Viewing from another angie
[DVD only] B________________________________
Some DVDs may contain scenes which have been shot si
multaneously from a number of different angles. For these
discs, the same scene can be viewed from each of these dif
ferent angles using the ANGLE button. (The recorded angles
differ depending on the disc used.)
1 Press ANGLE during play.
...
Number of angle
being played back
Tilt the joystick to the A/T direction until
the preferred angle is selected.
Pressing the numeric
button(s) also changes
the angle.
•Press ANGLE or SELECT to clear the display.
Note:
•This function only works for discs having scenes recorded
at different angles.
•The ANGLE indicator on the unit lights up at scenes record
ed at different angles to indicate that angle switching is pos
sible.
The angle number can be programmed beforehand; the
angle will be switched to the selected number when the
ANGLE indicator lights up.
i
Pi /
Reproducing a virtual surround
effect
[Dolby Digital (AC-3) 5.1 ch DVD only] B
This unit can reproduce a virtual surround effect which reproduces a
sound as if heard from nonexistent rear speakers at the side even
when only a 2-channel stereo system is connected [for playback of
Dolby Digital (AC-3) S.lch DVD only].
Press V.S.S. on the remote control or VIRTUAL SURROUND SOUND on the unit during ptay.
Each time this button is pressed, the unit’s display changes
as shown below m
0
Virtual surround 1 (Natural effect)
0 Virtual surround 2 (Emphasized effect)
O Virtual surround is cancelled
Notes:
•The virtual surround effect may not work properly for some
DVD software.
•Turn off the TV surround sound and other surround effects
when using this virtual surround effect
For your reference:
•The VIRTUAL SURROUND SOUND indicator on the unit
lights up in green when the Dolby Digital (AC-3) 5.1 ch DVD
is played back with the virtual surround effect.
•For optimum effect, it is recommended that the distance
between the TV set and the listening position be about 3 or
4 times the distance between the right and left front
speakers.
___________
Page 31

Using a title menu [dvd only] e
Some discs with movies, for exampie, may be availabie with
two or more tities. if the disc has a titie menu recorded on it,
the TiTLE button can be used to seiect the movie titie.
(The detaiis of operation differ depending on the disc used.)
1 Press TITLE during play.
TITLE MENU
Dogs
A list of the tities on the disc is
now displayed.
• Pressing TiTLE again resumes piay from the scene
when TiTLE was first pressed.
Lovers Birds
Cast Ies
(Example)
Tilt the joystick to the direction
and press SELECT or PLAY, or press the
numeric button(s), to select the preferred
title.
; TITLE MENU
^ Dogs Castles
Lovers
The seiected titie now starts piaying.
Using a DVD menu [dvd only] e
Some DVDs have unique menu structures catied DVD
menus. For exampie, DVDs programmed with complex con
tents provide guide menus, and those recorded with various
ianguages provide menus for audio and subtitle language. Al
though the DVD menu’s contents and operation differ from
disc to disc, the following explains basic operation when this
feature is used.
1 Press MENU during play.
The DVD menu available on the
disc is now displayed.
•Pressing MENU again resumes play from the scene
when MENU was first pressed.
Tilt the joystick to the A /> /A /Y direction
and press SELECT, or press the numeric
button(s), to seiect the preferred Item.
The selected item is now executed.
DVD MENU
2.AUDIO
113-ANGLE
(Exampie)
DVD MENU
[1. SUBTITLE^ j:
|2.AUDIO '
|3 . ANGLE
When the menu continues onto another screen
Repeat step 2.
,» ..... p ,
.....
31
Page 32

Initial settings
Once the intial settings have been completed, the player can
always be operated under the same conditions (especially
with DVD discs).
The settings will be retained in the memory even after switch
ing the power to the standby mode until the settings are
changed.
Common procedures of initial settings
1 Press SETUP in the stop mode.
1 Disc Languages
2 Ratings Level S i'
' Language . English
: 4 dn-Scieen Messages On
FLpspiay
§S$.^^j^Oigjiii Audio Out^^
Speaker 'Serttihg'
Bright
4;3:
(-^her Settings-^
<.OExit
>HilWllW**llll*»'W
2 Tilt the joystick to the A/T direction to se
lect the preferred item and SELECT.
Each screen for setting the value is displayed.
1 Disc Languages (see page 33)
2 Ratings (see page 34)
3 Menu Language (see page 35)
4 On-Screen Messages (see page 36)
5 FL Display (see page 36)
6 TV Aspect (see page 37)
7 Digital Audio Output (see page 38)
8 Speaker Setting (see page 39)
9 Other Settings (see page 41)
3 Tift the joystick to the A/T direction to se
lect the preferred value and press SELECT.
•Some items require additional steps. (See the respec
tive page.)
Setting is finished and the initial settings screen is displayed.
To cancel during setup operation
Press RETURN or select “0”. (The previous screen is dis
played.)
To clear the initial settings screen
Tilt the joystick to the A/T direction to select “0” and press
SELECT. (Pressing SETUP or RETURN also clears the initial
settings screen.)
For your reference;
•The numeric buttons can also be used for selecting items or
values instead of the joystick; in this case, pressing
SELECT is not necessary.
.....................
- ' ■ ■■ i
-----------
..--V ■
........
Page 33

Initial settings
______________________
^electing disc languages EDVD oniyi
This is to seiect the audio soundtrack ianguage, subtitle lan
guage and the language used in title menus or DVD menus
which will always be used for every disc to be played back.
1 At the initial settings screen
Select “1 Disc Languages” by the joystick and press SELECT.
Disc Languages
,11 Audio
2 Subtitle
3 Menus
OExit
English I
Aiatomatic
English
2 Select the preferred Item (1-3) by the joy
stick and press SELECT.
When "1 Audio” Is selected
English: English is selected (Factory setting)
French/German/ltatian/Spanish:
Each language is selected.
Original: The original language of each disc will be
selected.
Other Another language can be selected.
(Refer to the language codes on
page 47. Press CLEAR if an incorrect
language code is entered.)
When “2 Subtitle” is selected
Automatic; The same language selected for the
“Audio" will be selected. (Factory setting)
•If the language selected for the “Audio” is
actually used during playback, the subti
tles will not appear.
•if another language is used during play
back, the subtitles will appear in the lan
guage selected at the setup “Audio”.
English/French/German/ltallan/SpanIsh:
Each language is selected.
Other Another language can be selected.
When “3 Menus” Is selected
English: English is selected (Factory setting)
French/German/ltalian/SpanIsh;
Each language is selected.
Other Another language can be selected.
3 Select the preferred language by the joy
stick at each screen and press SELECT.
The screen at the step 1 is displayed. Select "0” by the joy
stick and press SELECT to return to the initial settings
screen.
Note;
•If the language selected is not available on the disc, the lan
guage designated by each disc will be selected.
Aiso refer to “COrrimon.procedures of initial settings’’ on
33
Page 34

Initial settings
Selecting rating level [dvd only]
This is to disable the playing of specified DVDs which are un
suitable for children.
•Some DVDs are encoded with specific rating level. If the
rating level of the disc is higher than that preset in the setup
operation, playback of the disc will be prohibited.
1 At the Initial settings screen
Select “2 Ratings” by the joystick and press SELECT.
All DVDs can be
played back. ■
(Factory setting)
DVDs for general
audiences/children 1^
can be played back. 1^
(DVDs for adults are ^
prohibited.)
DVDs for children can be
played back. (DVDs for
adults/general audiences
are prohibited.)
Playback of all DVDs is
prohibited, {e.g. to
prohibit playback of
DVDs for adults which
are not encoded with
rating level information)
2 Select the preferred level by the joystick
and press SELECT.
When level 7 or lower is selected
Input a 4-digit password and press SE
LECT.
The lock symbol
appears closed to
show the rating is
locked.
Example: “4343”
Do not forget your
password.
Press SELECT.
Setting is finished and the initial settings screen is displayed.
•The rating is locked. Any discs whose rating is higher than
the setting cannot be played back unless the correct pass
word is entered,
Also ref|tr to “Common procedures of initial: settings" on
34
.... .
........... ■
....
Page 35

Initial settings
To change the settings Q
1, Select “2” by the
joystick at the initial
settings screen and
press SELECT,
2. Input a 4-digit pass
word and press
SELECT.
3. Select the preferred item (1-4) by the joystick and press
SELECT.
4. 1 Unlock Flayer
Press SELECT.
2 Change Password
Enter a new 4-digit password and press SELECT.
Press SELECT again.
3 Change Level
Select a level and press SELECT.
4 Temporary Unlock
(The rating is unlocked temporarily only for the current
disc.)
Press SELECT.
5. Select “0" and press SELECT to exit.
Setting is finished and the initial settings screen is displayed.
Note:
•Some discs may not be encoded with specific rating level informa
tion though its disc jacket says that it is for “adults”.
For those discs, the age restriction will not work.
Enter your;4-d^it passwoid/
then press SELECT.
j Ratings
[T Oniock PlayS^
2 Change Password
3 Change Level !
4Tamporary Urribck
0 Exit
Seteoting Mhg^g^
Display menu @
1 At the initial settings screen
Select “3 Menu Language” by the joystick and press SELECT.
Factory settings
2 Select the preferred language (1 -5) by the
joystick and press SELECT.
Setting is finished and the initial settings screen is displayed.
Also refer to “Comrrron procedures of initial settings” on
35
Page 36

Initial settings
Switching the On-Screen Display
_____________________
■dN''Or '&FF.0::' ''k
You can select whether On-Screen Display messages such
as PLAY and STOP will be displayed or not.
1 At the initial settings screen
Select “4 On-Screen Messages” by the joy
stick and press SELECT.
Factory setting
2 Select the preferred item (1 or 2) by the joy
stick and press SELECT.
Setting is finished and the initial settings screen is displayed.
Seiec^ing the 0
1 At the initial settings screen
Select “5 FL Display” by the joystick and
press SELECT.
Factory setting
2 Select the preferred item (1-3) by the joy
stick and press SELECT.
Setting is finished and the initial settings screen is displayed.
For your reference;
•Even if “3 Dim During DVD/VCD Play (Auto)" is selected,
the display resumes brightness when a button for special
play such as SLOW/SEARCH and STIL17PAUSE is
pressed.
prbcedUfek.pfjhitiaf seittirigs* on :
Page 37

Initial settings
SeleGtihg TV $créen ty^é
Select the appropriate screen type according to your TV set;
conventional size screen (4:3) or wide-screen (16:9).
1 At the initial settings screen
Select “6 TV Aspect” by the joystick and
press SELECT.
Select the preferred Item (1 or 2) by the joy
stick and press SELECT.
4:3 Select when a conventional TV set is con-
nected. (factory setting)
The video material
formatted in
the Pan & Scan style is
played back in that style
(the left and right edges
are cut off).
-----------------
S'Ì'.ìi'i.'C'iiAà'iX:;
The video material not
formatted in the Pan &
Scan style is played
back in the letterbox
style (black bands
appear at top and
bottom of screen).
16:9
Played in “FULL”
size. (Setting the
wide-screen TV to
“FULL" mode is also
necessary.)
^ Each screen shows an example when the video mate
(This setting does not affect the video material for
conventional size.)
Setting is finished and the initial settings screen is displayed.
Select when a wide-screen TV set is con
nected.
rial for a wide-screen is played.
Igrq^Mreà of;init|aU on
I
37
Page 38

Initial settings
____________
Select the digital output to be output from the optical/coaxial digital
audio output connector of the unit.
1 At the initial settings screen
Select ‘7 Digital Audio Output” by the Joy
stick and press SELECT.
11 LPCM fDVDTOff
2. Doilbÿ Dlgitïif Bitstream
O&dt
' ■ 'ix’ ;
2 Select the preferred item (1-3) by the joy
stick and press SELECT.
When “1 LPCM (DVD)” is selected
Off: Only linear PCM of 48 kHz/16 bit is output from the digital
audio output connector. During playback of the DVD re
corded in the linear PCM of 48 kHz/20 biV24 bit or
96 kHz, no digital audio is output. (Factory setting)
PCM: During playback of the OVD recorded in the linear PCM of
48 kHz/20 bit/24 bit or 96 kHz, digital audio converted to
48 kHz/16 bit is output.
(Digital output of PCM audio is restricted to 48 kHz/16 bit
or below for copyright protection.)
When ”2 Dolby Digital” Is selected
Bitstream: Dolby Digital (AC-3) bitstream (2ch-5.1ch) is out
PCM: PCM (2ch) of 48 kHz/16 bit is output.
When ”3 MPEG” Is selected
PCM: PCM of 16 bit is output. (Factory setting)
Bitstream: Bitstream is output.
put. (Factory setting)
3 Select the preferred value by the joystick at
each screen and press SELECT.
The screen at the step 1 is displayed. Select “O" by the joystick and
press SELECT to return to the initial settings screen.
For your reference:
•Make settings as shown in the table below depending on the kind of
amplifier that is connected to the optical/coaxial digital audio output
connector.
Type of amplifier
to be connected.
No amplifier is
connected
AV amplifier
including Dolby
Digital decoder
AV amplifier
including MPEG
audio and Dolby
Digital decoder
"■Audio output from the unit’s audio output connectors is converted to
48 kHz/16 bit in addition to audio from the digital audio output co-
nector.To enjoy high quality sound at 48 kHz/20 bit/24 bit or 96 kHz,
connect the amplifier or decoder directly to the audio output connec
tors, not to the digital audio output connector.
[Select “Off at the “1 LPCM (DVD)".]
Recommendable setting
1 LPCM (DVD)
Off
PCM* Bitstream
PCM*
2 Dolby Digital 3MPEG
Bitstream
Bitstream Bitstream
PCM
PCM
Page 39

Initial settings
Speakeif jsettitng É)
At the Initial settings screen
Select “8 Speaker Setting” by the joystick
and press SELECT.
Front (L) Center Center
Large/Small —i Delay time Laroe/Small/None
Front (R)
Large/Small
Subwoofer
Yes/№
Surround (L) 1 Surround (UR) Surround (R)
Large/Small/fclQnfi Delay time Laroe/Small/None
•Underlined item is a factory setting.
2 Select the preferred item by the joystick
and press SELECT.
3 Select the preferred value by the joystick
and press SELECT.
Speaker icons
• if the speaker is connected, display the icon.
Clear the icon if the speaker is not connected.
•If the speaker supports tow-frequency (under 100 Hz)
reproduction, select the larger icon. If the speaker’s
low-frequency (under 100 Hz) reproduction ability is
poor, select the smaller icon. [When the subwoofer is
not connected, be sure to select “Large” for the front
speakers (UR).]
Delay time;
If the surround speakers or the center speaker can't be
installed at an equal distance to (or further away) the
front speakers from the listening position, change the de
lay time to get better surround effect.
•When D2 or D3 is equal to or larger than D1, no setting
is necessary (@). Otherwise, change the setting ac
cording to the table below B.
Difference
Speaker
Center speaker 1.3 ms
(D2) 2.6 ms
Delay time
3.9 ms
5.3 ms approx. 200 cm
between D1 and
D2/D3
approx. 50 cm
approx. 100 cm
approx, 150 cm
Surround
speakers (D3) 10.6 ms approx. 400 cm
Channel balance;
While listening to the test signal, adjust the volume of the
center, surround (L), surround (R) speakers and the sub
woofer so that the volume is equal to that of the front
speakers.
on the next page)
5.3 ms
15.9 ms
approx. 200 cm
approx. 600 cm
39
Page 40

Initial settings
4 Select “Exit” by the joystick and press
SELECT,
SELECT,
ting is finished and the initial settings screen is displayed.
Setting is
Note:
•The "Large/Smali" setting has no effect on DVDs recorded
in MPEG 2 audio.
For your reference:
•To output the test signal
1. Select “Test" by the joystick, and then press SELECT.
(Test signals will be output consecutively from each
speaker clockwise;)
2 .
Select the appropriate volume (-6 dB through +6 dB) by
the joystick while the test signal is being output from the
speaker.
3. Press SELECT. (The test signals are stopped.)
Also refer to “Common procedures of initiaf settings” on
Page 41

Initial settings
Other settings
1 At the initial settings screen
Select “9 Other Settings” by the joystick and press SELECT.
other Settings
1 Still Mode
ZAudioduring Search
3 TV Mode (4:3)
4 D.RahgeConipFsssion
OExit
Automatic
■■On
Pan&Scan.
Off
2 Select the preferred item (1 -4) by the joy
stick and press SELECT.
When *'1 Still Mode” Is selected
Automatic : “Frame stilt” and “Field still" are automati-
caliy selected during the still mode.
(Factory setting)
Field : Select this setting when jittering occurs in
the pictures even when “Automatic" is se
lected.
When “2 Audio during Search” is selected
On; Factory setting (When noises during search are dis
agreeable, select “Off.)
Off: Select this setting if audio during search is not nec
essary.
When “3 TV Mode (4:3)” is selected
Pan & Scan: The video material for a wide-screen will
be played back in the Pan & Scan style
on a conventional size TV.
(Factory setting)
•Video material not formatted in the Pan
& Scan style will be played back in the
letterbox style. (See page 37.)
Letterbox: Select this setting to play back the video
material for a wide-screen in the letterbox
style on a conventional size TV.
When “4 D. (Dynamic) Range Compression” is se
lected
Off: Normal audio range is selected. (Factory setting)
On: Select this setting to enjoy listening to dynamic
sound even on a low volume. This is useful for latenight listening. [This function only works with Dolby
Digital (AC-3) DVDs.]
Cp CX> CD
CD. ■ CD ;' CD
REPEftT , A-« . play
-Gt£!t№'.M№E: REPEAT: MOC£
■SETUP'v,s;a'; ■
:„a Q
O' .a ' Q' O
3 Select the preferred value by the joystick at
each screen and press SELECT.
The screen at the step 1 is displayed. Select “0" by the joy
stick and press SELECT to return to the initial settings
screen.
' :. AIsd refer to “Cbmmon procedures of initial settings" on
41
Page 42

Operating the TV set by the
remote control unit
Preparations
Press the numeric buttons while pressing the
POWER button for the DVD/VIDEO CD/CD
player to enter the manufacturer’s code of
your TV set.
•Be sure to enter the manufacturer’s code in 2-digit.
Code Manufacturer
01 1 PANASONIC/
National
02
2 PANASONIC/
National
3 PANASONIC/
03
National
04
4 PANASONIC/
National
05 SONY 15 GOLDSTAR
06 TOSHIBA
07
JVC
HITACHI
08
MITSUBISHI
09
10 MITSUBISHI
Note:
•For TV sets with two manufacturer’s codes (such as
PANASONIC), try both codes to confirm which code is ef
fective.
•When the batteries of the remote control unit are replaced,
perform the above operation again.
Code Manufacturer
11 SHARP
12 PHILIPS,
SAMSUNG
13 NEC
14
SANYO
16 GOLDSTAR
17
SAMSUNG
18
SAMSUNG
19
SANYO
Operation^
Press
POWER to turn the TV set ON or
OFF.
Press EQ AV to select the TV input source.
Press ED CH. a/v to select the channel.
A: To increase the channel no.
V: To decrease the channel no.
Press ED VOL +/~ to turn the volume up or
down.
-I-; To increase the volume
To decrease the volume
Note:
•Not all TV models and brands can be operated with the uni
versal remote control supplied.
Page 43

Disc handling and maintenance
Handling precautions
•Hold the disc by the edges so the surface will not be soiled
with fingerprints. (B)
Fingerprints, dirt and scratches can cause skipping and dis
tortion.
•Do not write on the label side with a bail-point pen or other
writing utensils.
•Do not use record cleaning sprays, benzine, thinner, static
electricity prevention liquids or any other solvent.
•Be careful not to drop or bend the disc.
•Do not install more than 1 disc on the disc tray.
•Do not try to close the disc tray when the disc is not in
stalled properly. (0)
•Be sure to store the disc in its exclusive case when not in
use.
If the surface is soiled Q
Wipe gently with a soft, damp (water only) cloth.
When wiping discs, always move the cloth from the center
hole toward the outer edge.
(If you wipe the discs using a circular motion, circular scratch
es are likely to occur, which will cause noise.)
If the disc is brought from a cold to a warm en
vironment, moisture may form on the disc
Wipe this moisture off with a soft, dry, lint-free cloth before
using the disc.
Improper disc storage
You can damage discs if you store them in the following
places;
•Areas exposed to direct sunlight
•Humid or dusty areas
•Areas directly exposed to a heat outlet or heating appliance
Discs which cannot be played with this player
•DVD with Region No. other than “4" or "ALL"
•DVD-ROM
•DVD-R/DVD-RAM
•CD-ROM
•CDV
•CD-G
•Do not try to play Photo CD or CD-R.
lÀàinwancë/
•Be sure to switch the power to the standby mode and dis
connect the AC mains lead before maintaining the unit.
•Wipe this unit with a dry soft cloth.
If the surfaces are extremely dirty, wipe clean with a cloth
which has been dipped in a weak soap-and-water solution
and wrung out thoroughly, and then wipe again with a dry
cloth.
•Never use alcohol, benzine, thinner, cleaning fluid or other
chemicals. And do not use compressed air to remove dust.
43
Page 44

Troubleshooting
Before requesting service for this unit, check the chart below for a possible cause of the problem you are experiencing. Some simple
checks or a minor adjustment on your part may eliminate the problem and restore proper operation.
If you are in doubt about some of the check points, or if the remedies indicated in the chart do not solve the problem, consult your
dealer for instructions.
Symptom (Common)
No power. insert the AC mains lead securely into the power outlet.
Power is automatically switched to the
standby mode.
•Play fails to start even when PLAY is
pressed.
•Play commences but then stops
immediately.
No picture. •Ensure that the equipment is connected properly.
•No sound.
•Distorted sound.
Picture is distorted during rapid advance
or rapid reverse.
No rapid advance (or rapid reverse) play.
No 4:3 (16:9) picture.
No on-screen display. The OFF setting is selected for “On-Screen Messages": select ON.
The power is automatically switched to the standby mode after approx.
30 minutes have elapsed in the stop mode (auto power-off function). Turn the power
back on.
•Condensation has formed; wait about 1 to 2 hours to allow the player to dry out.
•This player cannot play discs other than DVDs, Video CDs and CDs.
•The disc may be dirty and may require cleaning.
•Ensure that the disc is installed with the label side up.
•Ensure that the input setting for the TV is a “Video" position.
•Ensure that the equipment is connected properly.
•Ensure that the input settings for the TV and stereo system are proper.
•Adjust the master volume using the GUI screen for player information.
The picture will be somewhat distorted at times: this is normal.
Some discs may have sections which prohibit rapid advance (or rapid reverse).
Choose the correct setup “TV Aspect” item which matches the TV set used.
Remedy
No surround sound.
No operations can be performed with the
remote control.
No key operation (by the unit and/or the
remote control) is elective.
TV set cannot be operated by the remote
control.
GUI Screen not displayed or only partially
displayed on the TV Screen.
Symptom [DVD)
Play does not commence even when title
is selected.
Choose the correct setup at the “Speaker setting” which matches your stereo
system.
•Check the batteries are installed with the correct polarities (H- and -).
•The batteries are depleted: replace them with new ones.
•Point the remote control unit at the remote control sensor and operate.
•Operate the remote control unit at a distance of not more than 7 meters from the
remote control sensor.
•Remove the obstacles between the remote control unit and remote control sensor.
Switch the power to the standby mode and then return to ON. Alternatively, switch
the power to the standby mode, disconnect the AC mains lead and then re-connect
it. (The player may not be operating properly due to lightning, static electricity or
some other external factor.)
Not all TV models and brands can be operated with the universal remote control
supplied.
Select the appropriate TV screen type by consulting the operation manual of the TV.
Ftome^
Confimn the “Ratings” setting.
Page 45

^yntptdnri ÇDVD]
Remedy
Audio soundtrack and/or subtitle
language is not the one selected at the
initial settings.
The menu is displayed in French
(example).
No subtitles.
Alternative audio soundtrack (or subtitle)
languages fail to be selected.
Angle cannot be changed.
The password for age restriction has
been forgotten.
If the audio soundtrack and/or subtitle language does not exist on the disc, the
language selected at the initial settings will not be seen/heard.
The setup “Menus” of “Disc Languages” is set to French: select English.
•Subtitles appear only with discs which contain them.
•Subtitles are cleared from the TV monitor. Perform the steps on page 28 to display
the subtitles.
•An alternative language is not selected with discs which do not contain more than
one language.
•In the case of some discs, the alternative language cannot be selected by
operating the AUDIO or SUBTITLE button. Try selecting it from the DVD menu if
one is available.
This function is dependent on software availability. Even if a disc has a number of
angles recorded, these angles may be recorded for specific scenes only (when the
ANGLE indicator on the unit lights up.)
While the unit is in the stop mode, hold the unit’s SKIP button and the STILL/
PAUSE button down simultaneously and then hold the POWER button down for
longer than 3 seconds (until “Initialized" disappears from the TV monitor). The lock
will be released and all initial settings will return to the default values.
Remedy
No menu play.
This function works only for Video CDs with playback control.
Self-diagnosis display function
When an error or trouble is detected during operation, a service number appears in the display window.
When a service number has appeared, check out the details given below.
Service number
U11
HDD
Disc is dirty.
Trouble is likely to have occurred. The
number following "H” differs depending
on the status of the player.
Player status
Wipe the disc clean.
Switch the power to the standby mode and then return to ON.
Alternatively, switch the power to the standby mode,
disconnect the AC mains lead and then re-connect it.
If the service number fails to be cleared even when the
remedial action is taken, ask for the service engineer to repair
the player.
Remedy
45
Page 46

Definition of terms
Specifications
Angle
Recorded onto some DVD discs are scenes which have been
simultaneously shot from a number of different angles (the
same scene is shot from the front, from the left side, from the
right side, etc.). With such discs, the ANGLE button can be
used to view the scene from different angles.
Chapter number
These numbers are recorded on DVD discs. A title is subdi
vided into many sections, each of which is numbered, and
specific parts of video presentations can be searched quickly
using these numbers.
DVD
This refers to a high-density optical disc on which high-quality
pictures and sound have been recorded by means of digital
signals. Incorporating a new video compression technology
(MPEG II) and high-density recording technology, DVD en
ables esthetically pleasing full-motion video to be recorded
over long periods of time (for instance, a whole movie can be
recorded).
DVD has a structure consisting of two 0.6 mm thin discs
which are adhered to each other. Since the thinner the disc,
the higher the density at which the information can be record
ed, a DVD disc has a greater capacity than a single 1.2 mm
thick disc. Since the two thin discs are adhered to each other,
there is the potential to achieve double-sided play sometime
in the future for even longer duration play.
Playback control
This is recorded on a Video CD (version 2.0). The scenes or
information to be viewed (or listened to) can be selected in
teractively with the TV monitor by looking at the menu shown
on the TV monitor.
Subtitles
These are the printed lines appearing at the bottom of the
screen which translate or transcribe the dialogue. They are
recorded on DVD discs.
Time number
This indicates the play time which has elapsed from the start
of a disc or a title. It can be used to find a specific scene
quickly. (It may not work with some discs.)
Title number
These numbers are recorded on DVD discs. When a disc
contains two or more movies, these movies are numbered as
tide 1, title 2, etc.
Track number
These numbers are assigned to the tracks which are record
ed on Video CDs and CDs. They enable specific tracks to be
located quickly.
Video CD
This contains recordings of pictures and sound whose quality
is on a par with that of videotape. This player also supports
Video CDs with playback control (version 2.0).
Power
requirements:
AC 220-240 V, 50 Hz
Power
consumption:
22 W (approx. 4 W when set to
standby mode by the power
button or the remote control)
Signal system: PAL 625/50, PAL 525/60
Weight: 3.6 kg
Dimensions: 430 (W)x290 (D)x87.5 (H) mm
(excluding protrusions)
Operating temperature range:
-t-5 to +35 *C
Operating humidity range:
5 to 90% (no condensation)
Discs played:
(1) DVD-VIDEO disc
12 cm single-sided, single-layer
12 cm single-sided, double-layer
12 cm double-sided, double-layer (one layer per side)
8 cm single-sided, single-layer
8 cm single-sided, double-layer
8 cm doubie-sided, double-layer (one layer per side)
(2) Compact disc (CD-DA, VIDEO CD)
12 cm disc
8 cm disc
S-video output (separate YC signal output):
Y output level: 1 Vp-p (75Q)
C output level; 0.300 Vp-p (75Q)
Output connector: S terminal (1 system)
Video output:
Output level; 1 Vp-p (75C)
Output connector; Pin jack (2 systems)
Audio output:
Output level: 2 Vrms (1 kHz, 0 dB)
Output connector: Pin jack
5.1ch mixed output: 1 system (2ch)
5.1ch discrete output; 1 system (5.1ch)
Audio signal output characteristics:
(1) Frequency response;
•DVD (linear audio):
2 Hz-22 kHz (48 kHz sampling)
2 Hz-44 kHz (96 kHz sampling)
•CD audio: 2 Hz-20 kHz (EIAJ)
(2) S/N ratio:
•CD audio; 115 dB (EIAJ)
(3) Dynamic range;
•DVD (linear audio): 102 dB
•CD audio; 99 dB (EIAJ)
(4) Total harmonic distortion:
•CD audio: 0.0025% (EIAJ)
Digital audio output:
Optical digital output: Optical connector
Coaxial digital output; Pin jack
PHONES jack: Stereo, M6 jack
Pickup: Wavelength: 655nm
Laser power: CLASS 2
Specifications are subject to change without notice.
Weight and dimensions are approximate.
Page 47

Language code list
Enter the appropriate code number for the initial settings “Audio”, “Subtitle" and/or “Menus” (see page 33).
Code
6565
6566
6570
6577
6582 Arabic
6583
6588
6590 Azerbaijani 7185
6665 Bashkir
6669 Byelorussian
6671 Bulgarian
6672
6678
6679 Tibetan
6682 Breton
6765 Catalan
6779
6783
6789 Welsh
6865
6869 German
6890
6976
6978
6979
6983
6984 Estonian
6985
7065
7073
7074 Fiji
Language Name
Afar 7079
Abkhazian 7082
Afrikaans 7089
Ameharic 7165
Assamese
Aymara
Bihari 7285
Bengali; Bangla
Corsican 7384 Italian
Czech
Danish
Bhutan!
Greek
English
Esperanto 7577
Spanish
Basque
Persian
Finnish
Code
7168 Scots Gaelic
7176 Galician
7178 Guarani
7265
7273
7282
7289
7365
7378
7383
7387 Hebrew
7465
7473 Yiddish
7487
7565
7575 Kazakh
7576 Greeniandic
7578
7579 Korean
7583
7585
7589
7665
Language Name
Faroese
French
Frisian
Irish
Gujarati
Hausa
Hindi
Croatian
Hungarian
Armenian
Interlingua
Indonesian 7865 Nauru
Icelandic
Japanese 7982 Oriya
Javanese
Georgian
Cambodian
Kannada
Kashmiri
Kurdish
Kirghiz
Latin 8373 Singhalese
Code
7678
7679
7684
7686 Latvian, Lettish
7771
7773 Maori
7775 Macedonian
7776
7778
7779
7782 Marathi
7783 Malay
7784
7789
7869 Nepali
7876 Dutch
7879
8065
8076 Polish
8083 Pashto, Pushto
8084 Portuguese
8185
8277 Rhaeto-Romance
8279
8285
8365
8368
8372
Language Name Code
Lingala
Laothian 8376
Lithuanian
Malagasy 8379 Somali
Malayalam
Mongolian
Moldavian 8387
Maltese 8471
Burmese
Norwegian
Panjabi
Quechua
Romanian 8679
Russian 8779 Wolof
Sanskrit 8872 Xhosa
Sindhi
Serbo-Croatian 9072
Language Name
8375 Slovak
Slovenian
8377
8378 Shona
8381
8382
8385 Sundanese
8386
8465 Tamil
8469 Teiugu
8472
8473
8475
8476 Tagalog
8479 Tonga
8482
8484 Tatar
8487
8575
8582 Urdu
8590 Uzbek
8673 Vietnamese
8979 Yoruba
9085 Zulu
Samoan
Albanian
Serbian
Swedish
Swahili
Tajik
Thai
Tigrinya
Turkmen
Turkish
Twi
Ukrainian
Volapük
Chinese
47
 Loading...