

Page 1
Operating Instructions
HDTV Photo Player
Model No.DMW-SDP1
Before connecting, operating or
adjusting this product, please read
the instructions completely.
For USA assistance, please call: 1-800-272-7033 or send e-mail to : digitalstillcam@us.panasonic.com
For Canadian assistance, please call: 1-800-561-5505 or visit us at www.panasonic.ca
PP
LSQT1098 A
Page 2
Before Use
Before Use
Dear Customer,
We would like to take this opportunity to
thank you for purchasing this Panasonic
HDTV Photo Player. Please read these
Operating Instructions carefully and keep
them handy for future reference.
Information for Your Safety
AC adaptor
This AC adaptor operates on AC between
110 V and 240 V.
But
• In the U. S. A. and Can ad a, the AC
adaptor must be connected to a 120 V
AC power supply only.
• When conn ec ting to an AC supp ly
outside of the U.S.A. or Canada, use
a plug ad aptor to sui t the AC outlet
conguration.
WARNING
TO REDUCE THE RISK OF FIRE OR
SHOCK HAZARD AND ANNOYING
INTERFERENCE, USE ONLY THE
RECOMMENDED ACCESSORIES
AND DO NOT EXPOSE THIS
EQUIPMENT TO RAIN OR
MOISTURE. DO NOT REMOVE THE
COVER (OR BACK); THERE ARE
NO USER SERVICEABLE PARTS
INSIDE. REFER SERVICING TO
QUALIFIED SERVICE PERSONNEL.
THE SOCKET OUTLET SHALL BE
INSTALLED NEAR THE EQUIPMENT
AND SHALL BE EASILY ACCESSIBLE.
CAUTION
Danger of explosion if battery is
incorrectly replaced. Replace only
with the same or equivalent type
recommended by the manufacturer.
Dispose of used batteries according to
the manufacturer’s instructions.
Be sure to use a Panasonic CR2025
battery as a replacement battery.
• Pleas e note tha t th e actual con trols
an d componen ts , menu it em s, etc.
of your HDTV Photo Player may look
somewhat different from those shown
in the illustrations in these Operating
Instructions.
• SDHC logo is a trademark.
• O t h e r nam es, c o m p a n y name s,
an d pr oduct names pri nted in the se
instructions are trademarks or registered
trademarks of the companies concerned.
-If you see this symbol-
Information on Disposal in other
Countries outside the European
Union
This symbol is only valid
in the European Union.
If you wish to discard this
product, please contact
your local authorities
or dealer and ask for
the correct method of
disposal.
2
LSQT1098
Page 3
THE FOLLOWING APPLIES ONLY IN THE
U.S.A.
FCC Note:
This equipment has bee n te sted and
found to comply with the limits for a Class
B digital device, pursuant to Part 15 of
the FCC Rules. These limits are designed
to provide reasonable protection against
ha rmful inte rferenc e in a reside ntial
installation. This equipment generates,
uses and can radiate radio frequency
energy and, if not installed a nd used
in ac co rd ance with the in st ru ctions,
may cause har mf ul in te rfe re nce to
radio communications. However, there
is no guarantee th at interference will
no t occur in a partic ular ins talla tion.
If t his equipment does caus e harmful
int erf ere nce to r adi o or te lev isi on
re ce ption, which ca n be deter mi ned
by turning the equipmen t of f an d on,
the user is encouraged to try to correct
the interference by one or more of the
following measures:
•
Reorient or relocate the receiving
antenna.
•
Increase the separation between the
equipment and receiver.
•
Connect the equipment into an outlet on
a circuit different from that to which the
receiver is connected.
•
Consult the dealer or an experienced
radio/TV technician for help.
FCC Ca ut ion: To as sure co nt in ued
c o mpli anc e, f o l low t h e a t t a ched
i nsta ll at i o n i n s tru ct io ns and u s e
on ly shiel de d interf ace cabl es when
connecting to peripheral devices.
Any ch ang es or mod ifi cat i on s n ot
e xpr es s l y a p pro ve d by t he p art y
responsible for compliance could void the
user’s authority to operate this equipment.
Before Use
This device complies with Part 15 of the
FCC Rules. Operation is subject to the
following two conditions: (1) This device
ma y no t cause har mful interf erenc e,
a nd ( 2 ) t h is d evic e m u st a c cep t
an y int erferen ce recei ve d, inclu ding
interference that may cause undesired
operation.
Declaration of Conformity
Trade Name: Panasonic
Model No.: DMW-SDP1
Responsible Party:
Panasonic Corporation of North America
One Panasonic Way
Secaucus, NJ 07094
Support Contact:
P an as o nic Co n sum er El e ctr o nic s
Company
Telephone No.: 1-800-272-7033
This Class B digital apparatus complies
with Canadian ICES-003.
Marking sign is located on bottom of the
unit.
This unit is provided with a CSA/UL
approved Class 2 limited power supply
with detachable ouput cable.
LSQT1098
3
Page 4
Before Use
MENU
SET
About illustrations in these operating instructions
Please note that the appearance of the
product, the illustration or the menu screen
are a little different from those in actual use.
Convenient or useful information for use of
this unit is described.
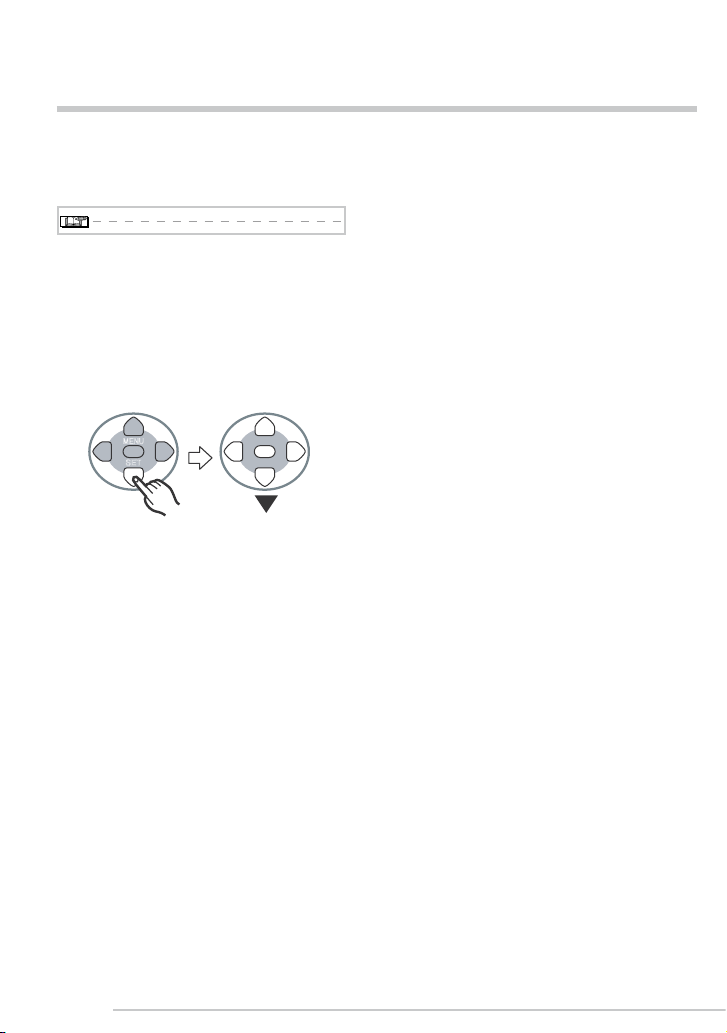
n About illustrations of the cursor
button
In those operating instructions, the
operations on the cursor button are
described as illustrated below.
For example: Pressing the r
cursor button
The cursor button of the Remote control is
illustrated above. You can use the cursor
button of the main unit in the same way.
4
LSQT1098
Page 5

Contents
Before use
Information for Your Safety ....................... 2
About illustrations in these operating
instructions ............................................. 4
Preparation
Standard Accessories ............................... 6
Names of the Components ....................... 7
The Remote Control ................................. 9
Connecting to HDTV .............................. 10
Inserting/Removing the Card (Optional) . 11
About the Card ....................................... 12
Playback/Menu
Playing Back Pictures ............................. 13
Displaying Multiple Screens
(Multi Playback) ................................... 14
Displaying pictures by recording date
(Calendar playback) ............................. 15
Using the Playback Zoom ....................... 16
Playing Back Pictures with Audio/Motion
pictures ................................................ 17
Deleting Pictures .................................... 18
Using the [PLAY] menu .......................... 20
• [SLIDE SHOW]
Playing back pictures in order for a xed
duration .............................................. 21
• [FAVORITE]
Setting your favorite pictures.............. 22
• [ROTATE DISP.]/[ROTATE]
To display the picture rotated ............. 23
• [DPOF PRINT]
Setting the Picture to be Printed and the
Number of Prints ................................ 25
• [PROTECT] ............................................
Preventing Accidental Erasure of the
Picture ................................................ 27
• [FORMAT]
Initializing a card ................................ 28
Settings ................................................... 29
Connecting to other equipment
Connecting to a PC ................................ 31
Connecting to a PictBridge-compliant
Printer .................................................. 33
Others
Message Display .................................... 37
Troubleshooting ...................................... 38
Cautions for Use ..................................... 40
Specications ......................................... 41
Limited Warranty (For USA Only) ........... 42
Customer Services Directory
(For USA Only) .................................... 44
Limited Warranty (For Canada) .............. 45
Spanish Quick Use Guide/Guía rápida en
español ................................................ 47
LSQT1098
5
Page 6
Preparation
Preparation
DISPLAY
SINGLE MULTI
CALENDAR
SLIDESHOW
MENU
SET
PLAY
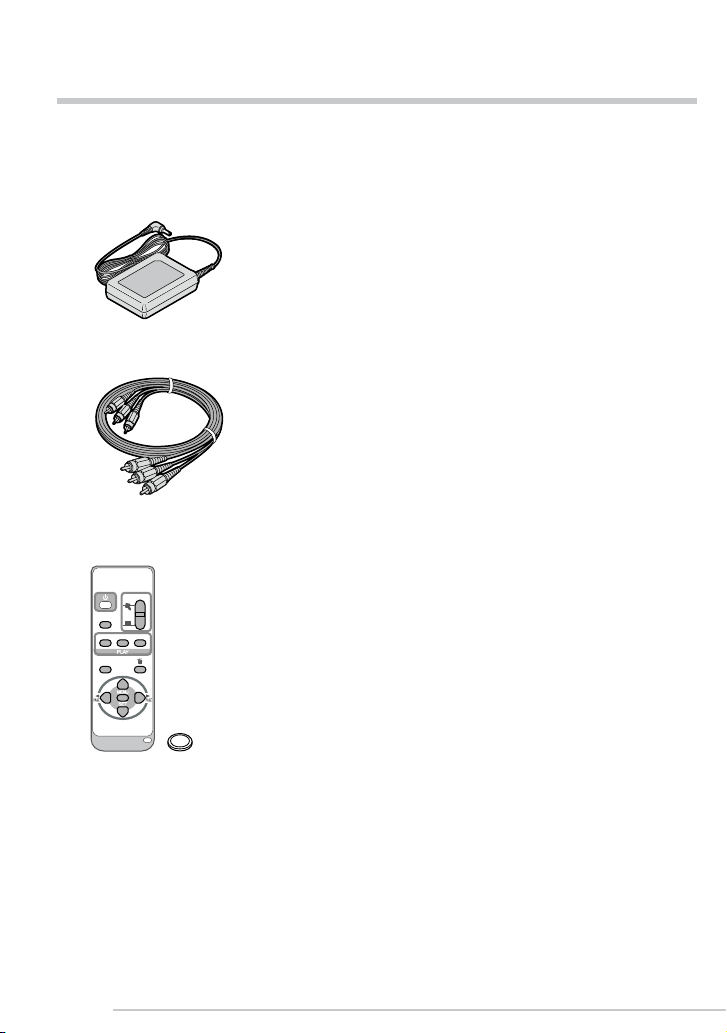
Standard Accessories
Before using your player, check the contents.
n AC adaptor
VSK0626-2
n Component video cables
K2KA6CA00004
n Remote control
N2QACC000010 and
Button-type battery
Card is optional.
•
• If any of the accessories are lost, please
contact Panasonic’s parts department at
1 800 833-9626 (For USA) or in Canada
call 1 800 561-5505 for more details on
how to obtain replacement parts.
6
LSQT1098
Page 7
Preparation
AU
D
IO OUT
DC
I
N 4.8V
USB
ANAL
O
G COM
PO
NENT
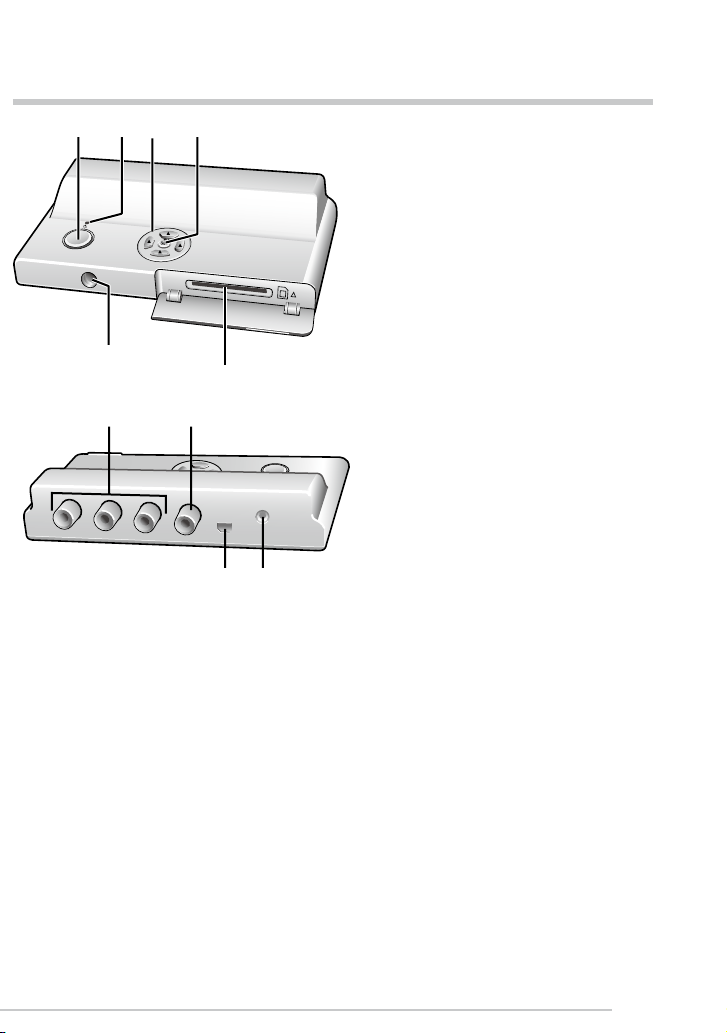
Names of the Components
1 2
5
7
3 4
Power button (P13)
1.
Operation lamp (Lights green when the
2.
unit is on, ashes when communicating
with a computer (P31))
Cursor button (P13, 20)
3.
[MENU/SET] button (P20, 29)
4.
Remote Control sensor
5.
Card slot (P11)
6.
6
8
[ANALOG COMPONENT] terminals
7.
(P10)
[AUDIO OUT] terminal (P10)
8.
[USB] terminal (P31, 33)
9.
[DC IN 4.8V] terminal (P10)
9
10
10.
•
Always use a genuine Panasonic AC
adaptor.
7
LSQT1098
Page 8
Preparation
DISPLAY
SINGLE MULTI
CALENDAR
SLIDE SHOW
MENU
SET
PLAY
11
12
13
14
Preparation
16
17
18
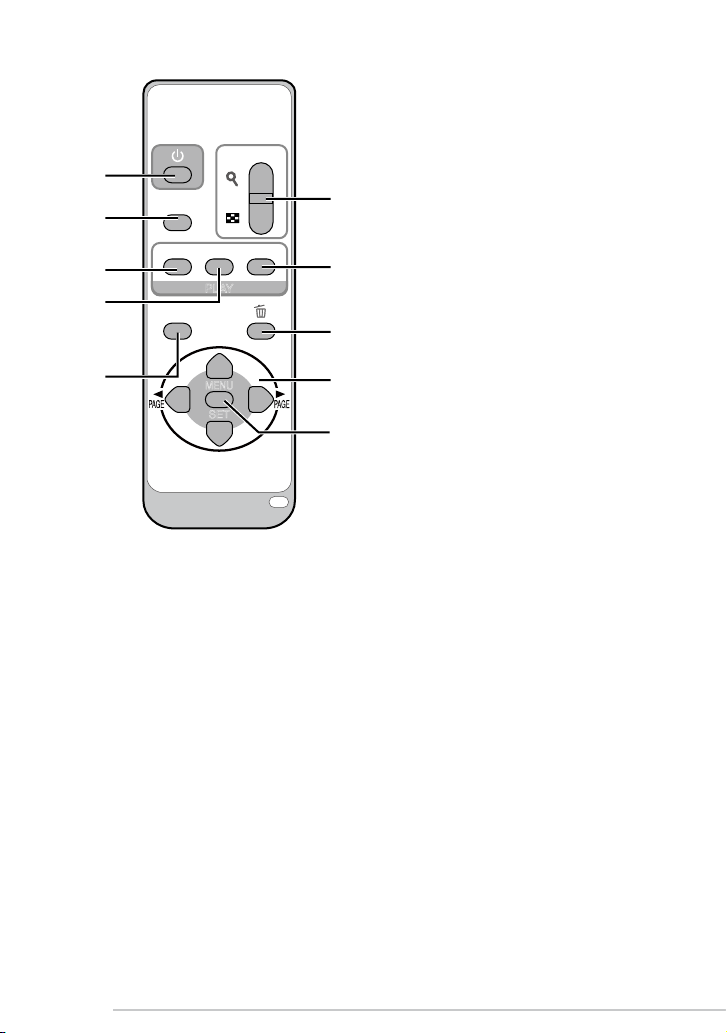
11.
POWER button (P13)
12.
[SLIDE SHOW] button (P21)
13.
[SINGLE] button (P14)
14.
[MULTI] button (P14)
15.
[DISPLAY] button (P13)
16.
Zoom button (P14, 15, 16)
17.
[CALENDAR] button (P15)
18.
Delete button (P14, 18)
19.
Cursor buttons (P13, 20)
20.
[MENU/SET] button (P20, 29)
15
19
20
8
LSQT1098
Page 9
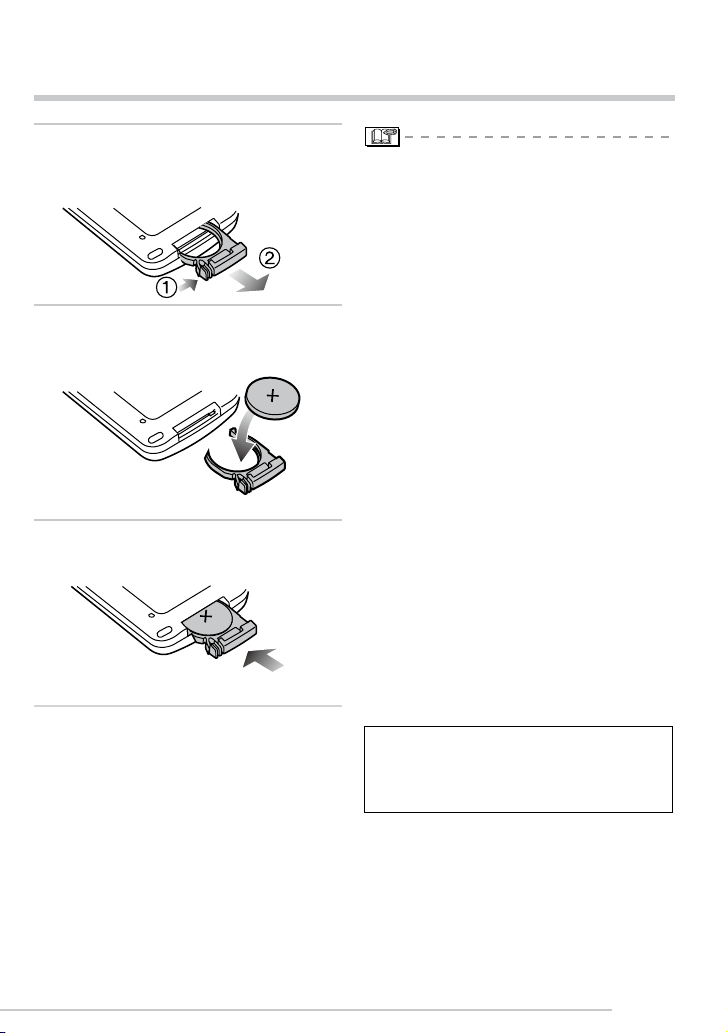
The Remote Control
Push the catch in the direction
1�
shown by arrow (1) to remove the
holder.
Insert the battery with the (+)
2�
marked side facing up.
Return the holder to its original
3�
position.
Preparation
When the battery (CR2025) has run out,
•
replace it with a new one. (The battery
lasts about one year, depending on the
frequency of use.)
If the remote control unit fails to work
even when it is operated near the remote
control sensor, the battery has run out.
Be sure to use a Panasonic CR2025
•
battery as a replacement battery.
Button-type battery (Lithium battery)
Insert with the poles aligned.
•
Do not touch the terminals (+ and -) with
•
metal objects.
Do not recharge, disassemble, remodel,
•
heat or throw into re.
Keep out of reach of children.
•
If any electrolyte should come into contact
•
with your hands or clothes, wash it off
thoroughly with water. If any electrolyte
should come into contact with your eyes,
never rub the eyes. Rinse eyes thoroughly
with water, and then consult a doctor.
Warning
Risk of re, explosion and burns. Do not
recharge, disassemble, heat above 100°C
(212°F) or incinerate.
LSQT1098
9
Page 10
Preparation
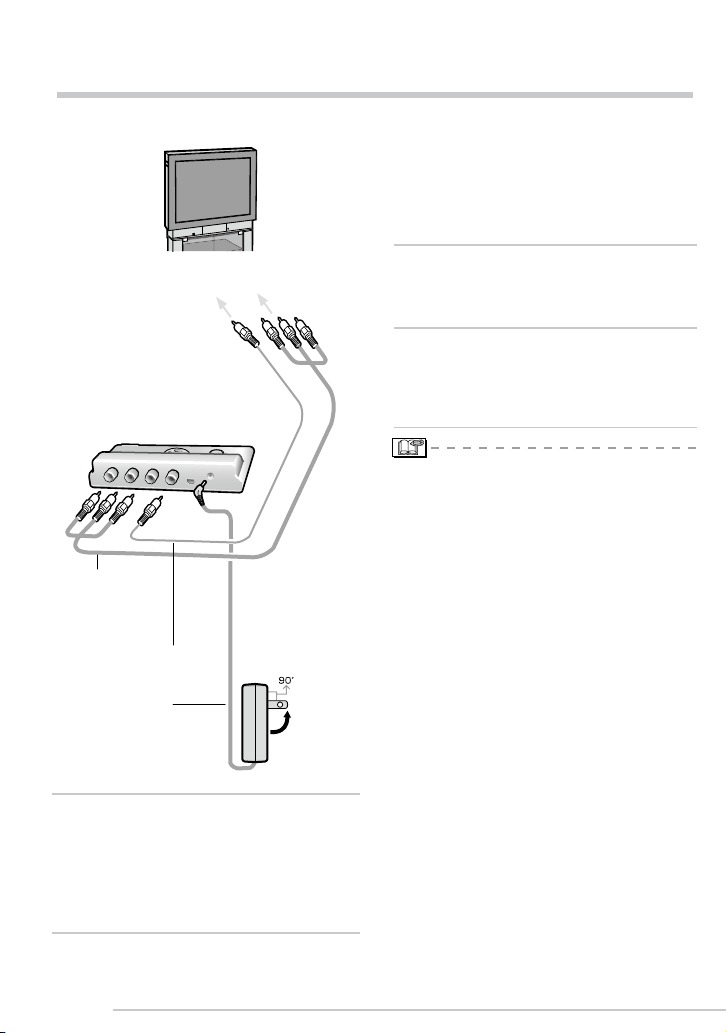
Connecting to HDTV
A
U
D
IO
O
U
T
D
C
IN
4
.8
V
U
S
B
ANALOG
CO
M
PO
NENT
2
1
3
Turn the unit and the TV off.
•
To AUDIO IN
terminal
Component
video cables
(supplied)
To enjoy sound.
Audio cable (optional)
AC adaptor
(supplied)
To COMPONENT
IN terminals
To household
AC socket
Preparation
2�
Connect the component video
cables to the COMPONENT IN
terminals of the TV.
•
To enjoy sound, connect the Monaural
sound cable (optional) as illustrated on
the left.
3�
Connect AC adaptor (supplied) to
[DC IN 4.8V] terminal and to the
household AC socket.
4�
Turn the TV on and select
the COMPONENT input
corresponding to the terminals
you have connected this unit to.
•
Do not use any other component video
cables except the supplied one.
•
Read the TV operating instructions too.
•
The top and bottom or left and right of
the picture may be cut off slightly when it
is displayed due to the characteristics of
the TV.
•
Depending on the screen mode setting
of the TV, the picture may be stretched
horizontally or vertically and the top and
bottom and or left and right of the picture
may be cut off when it is displayed. In this
case, change the screen mode setting.
•
Audio playback is in monaural.
•
Pictures might be slightly blurred if you
show them vertically on a television.
Connect the component video
1�
cables (supplied) to the [ANALOG
COMPONENT] terminals of the
unit.
•
Connect each cable (Y, Cb, Cr) to the
corresponding terminals respectively.
10
LSQT1098
n TV Aspect setting
Depending on the type of televisions
connected, setting TV Aspect may be
necessary. (P30)
Page 11
Preparation
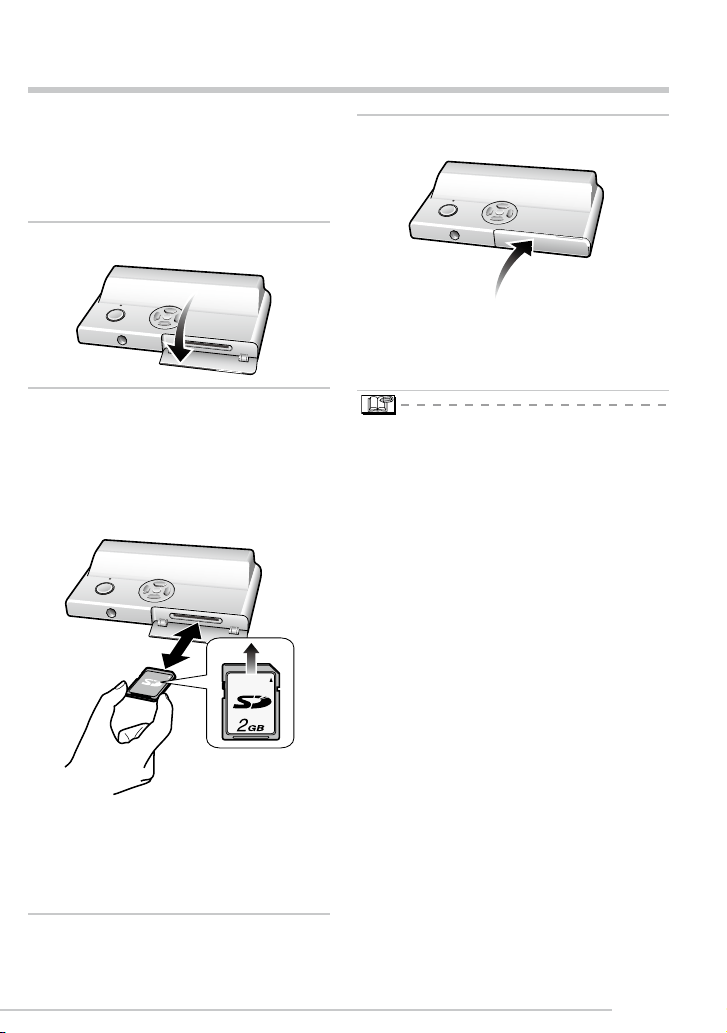
Inserting/Removing the Card (Optional)
•
Check that the unit is turned off.
•
Prepare your SD Memory Card (optional),
SDHC Memory Card (optional) or
MultiMediaCard (optional) containing
shooting data.
Open the card cover.
1�
Insert:
2�
Insert the card until it clicks and
locks.
Remove:
Push the card until it clicks, then pull
the card out upright.
Close the card cover.
3�
If the card cover cannot be completely
•
closed, remove the card, check its
direction and insert it again.
The card and the data may be
•
damaged if it is inserted or removed
while the unit is on.
We recommend using Panasonic’s SD
•
Memory Card/SDHC Memory Card.
•
Check the direction of the card.
•
Do not touch the connection terminals on
the back side of the card.
•
The card may be damaged if it is not fully
inserted.
11
LSQT1098
Page 12

About the Card
A
2
GB
Preparation
n About SD Memory Card (optional),
SDHC Memory Card (optional) and
MultiMediaCard (optional)
•
The SD Memory Card, the SDHC
Memory Card and the MultiMediaCard
are small, lightweight, removable external
memory cards.
•
The SDHC Memory Card is a memory
card standard decided by the SD
Association in 2006 for high-capacity
memory cards more than 2 GB.
•
The reading/writing speed of the SD
Memory Card and the SDHC Memory
Card is fast. The SD Memory Card and
the SDHC Memory Card are equipped
with a Write-Protect switch A that can
inhibit writing and formatting. (When the
switch is slid to the [LOCK] side, it is
not possible to write or delete data on
the card and format it. When the switch
is unlocked, these functions become
available.)
n About cards that can be used in this
unit
Yo u ca n use an SD Mem ory Card, an
SDHC Memo ry Card and a Mu lti med ia
card.
When the term card is used in these
•
operating instructions this refers to the
following types of Memory Cards.
- SD Memory Card (8 MB to 2 GB)
- SDHC Memory Card (4 GB)
- MultiMediaCard
More specific information about memory
cards that can be used with this unit.
You can only use an SDHC Memory
•
Card if using cards with a 4 GB or more
capacity.
A 4 GB Memory Card without an SDHC
•
logo is not based on the SD Standard
and will not work in this product.
SD Memory Card
Please conrm the latest information on the
following website.
http://panasonic.co.jp/pavc/global/cs
(This site is in English only.)
•
This unit supports SD Memory Cards
formatted in the FAT12 and FAT16
systems that comply with SD Memory
Card Specications. It also supports
SDHC Memory Cards formatted in the
FAT 32 system.
•
This unit (SDHC compliant equipment)
supports both SD Memory Cards and
SDHC Memory Cards. You can use
SDHC Memory Cards on equipment
that supports them. You cannot use
SDHC Memory Cards on equipment
that supports SD Memory Cards only.
(When you use SDHC Memory Cards on
other equipment, make sure to read the
equipment’s operating instructions.)
n About handling a card
Save important data in such places as your
PC (P31) as well. Electromagnetic waves,
static electricity, unit malfunctions, card
damages and other factors may destry or
erase data.
•
The reading speed of a MultiMediaCard is
slower than an SD Memory Card. When a
MultiMediaCard is used, the performance
of certain features may be slightly slower
than advertised.
•
Keep the Memory Card out of reach of
children to prevent swallowing.
12
LSQT1098
Page 13
100-0001
10:00 DEC. 1. 2006
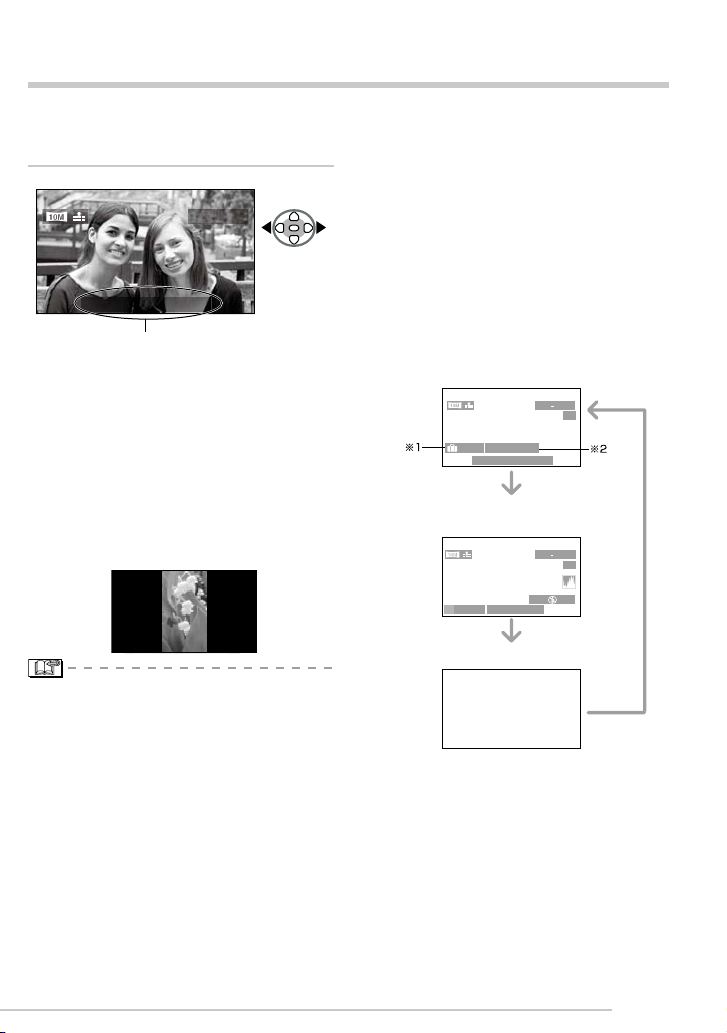
Playing Back Pictures
100 0001
1/3
100 0001
1/3
200
ISO
AUTO
F2.8 1/100
P
※
3
1ST DAY
1 month 10days
DEC. 1.2006
10:00
DEC. 1.2006 10:00
Insert the card (P11), press the
Power button and turn the unit [ON].
The image data is displayed on the TV screen.
Press w/q to select the picture.
1�
Date of shooting
: Play back the previous picture.
w
: Play back the next picture.
q
•
The picture following the last one is the rst picture.
•
Press and hold w/q and the pictures
change successively.
•
The date of shooting shown is according
to the date recorded with the image, so it
may not be the actual date of shooting.
•
When [ROTATE DISP.] (
pictures recorded by holding the camera
vertically are played back vertically.
P23
) is set to [ON],
Playback/Menu
•
When playing back a le out of standard,
the folder/le number is indicated by [−]
and the screen may turn black.
•
An interference fringe may appear on the
screen depending on the subject. This is
called moire. This is not a malfunction.
n To delete characters or icons shown
on the screen
Press [DISPLAY].
The screen changes as follows each time you
press the button. Actual displays depend on
the recording condition of the images.
Display
Display with recording
information and histogram
•
This unit is based on the DCF standards (Design
rule for Camera File system) which was established
by the Japan Electronics and Information Technology
Industries Association (JEITA).
•
The le format that can be played back with
this unit is JPEG (maximum resolution: 4224
x 3168 pixels; maximum le size: 9 MB;
minimum resolution: 160 x 120 pixels). (There
are also pictures that on some occasions
cannot be played back in JPEG format.)
•
Depending on the recording condition of the
picture, quality may deteriorate when you
play it back. (The pictures are displayed as
[THUMBNAIL IS DISPLAYED] on the screen.)
•
When changing the folder name or le name
on a PC, the pictures will not be played back.
No display
*1 If you took the picture with [TRAVEL DATE] set,
the day of the vacation you took the picture is
displayed.
*2 The baby’s age is displayed if you set the baby’s
birthday in [BABY1]/[BABY2] scene mode and
selected [WITH AGE].
*3 A histogram is a graph that displays brightness
along the horizontal axis and the number of
pixels at each brightness level on the vertical
axis. The values shown on the histogram are
approximate.
13
LSQT1098
Page 14
Playback/Menu
14
LSQT1098
MENU
1/34
CANCEL
DEC. 1.2006
CAL 1
MENU
5/34
CANCEL
DEC. 1. 2006
CAL 1
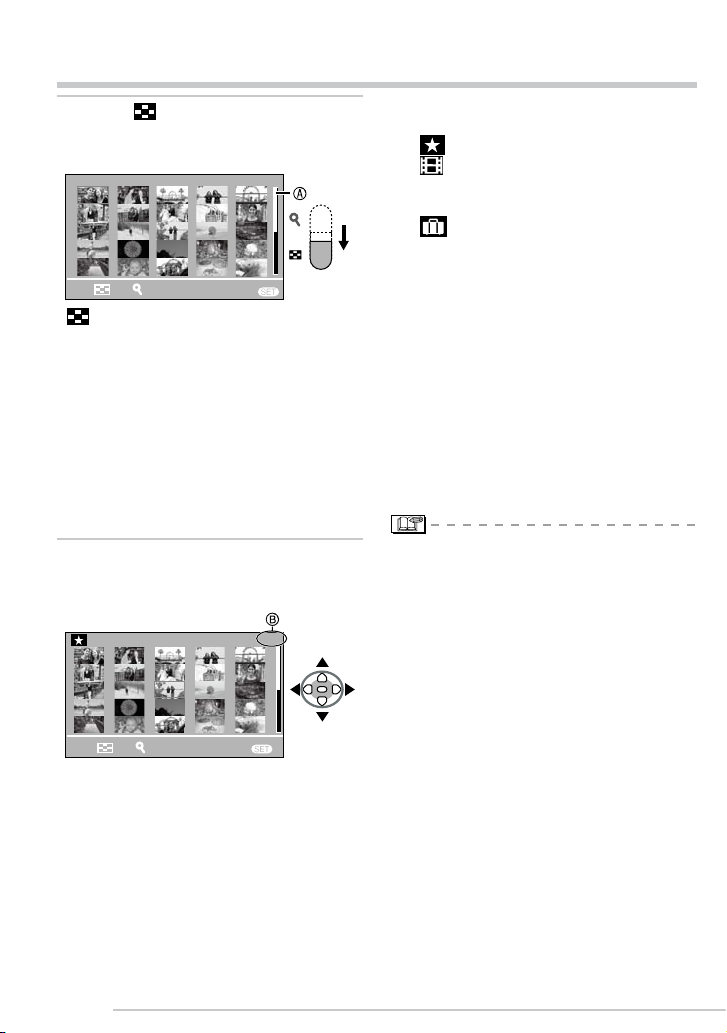
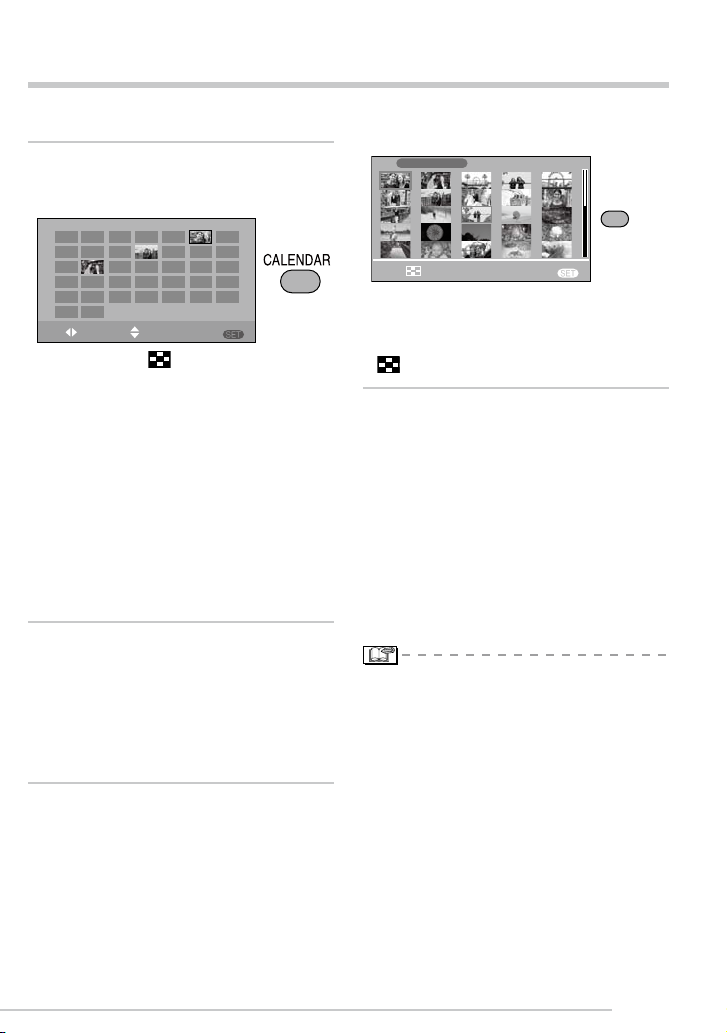
Displaying Multiple Screens
•
1�
Press [ ] side of the Zoom
button on the Remote control to
display Multiple Screens.
•
: 1 screen → 25 screens → Calendar
screen display. (
•
You can also press [MULTI] on the
Remote control to show the 25 screens.
•
Press [3] side of the Zoom button on
the Remote control to display Multiple
Screens.
•
When you select multi playback, the scroll
bar A appears so you can check the
position of the selected picture in the total
pictures.
P15
)
Depending on the recorded picture and
the setting, the following icons will appear.
− [ ](Favorites)
− [ ](Motion picture)
− [K]
− [ ](Travel date)
− [M](Flip animation)
n To return to the normal playback
Press [3] side of the Zoom button or press
[MENU/SET] or [SINGLE].
•
The picture framed in an orange box
appears.
n To delete a picture during a multi
playback
Press
1
then press [A].
Press
2
Press [MENU/SET].
3
(Multi Playback)
([BABY1]/[BABY2] in scene mode,
age in months, age in years etc.)
e/r/w/q
e
to select a picture and
to select [YES].
Press e/r/w/q to select a picture.
2�
:Number of the selected picture and the
B
total number of recorded pictures
•
The recording date and number of the
selected picture and the total number of
recorded pictures are displayed.
•
Even if the indications on the screen are
turned off in normal playback mode (P13),
the recording information etc. appears on
the screen in multi playback. If you return
to the previous screen, the indications
on the screen are displayed as in normal
playback mode.
•
Pictures will not be displayed in the
rotated direction even if [ROTATE DISP.]
is set to [ON] (P23).
Page 15
Playback/Menu
2006
12
SUN
3
10
17
24
31
TUE
5
12
19
26
THU
7
14
21
28
SAT
9
2
16
23
30
FRI
8
15
22
29
WED
13
20
27
MON
4
18
25
11
1
6
MENU
DAY
MONTH SET
MENU
1/34
CANCEL
MENU
SET
DEC. 1. 2006
CAL
Displaying pictures by recording date
You can display pictures by recording date
using the calendar playback function.
Press [CALENDAR] button on
1�
the Remote control to display
calendar screens.
•
The pictures that were recorded on the
selected date are displayed.
•
When pressing [ ] side of the Zoom
button on the Remote control, you can also
display calender screens.
•
1 screen → 25 screens → Calendar screen
display
•
The recording date of the picture selected
in the playback screen becomes the date
selected when the calendar screen is rst
displayed.
•
If there are multiple pictures with the
same recording date, the rst picture
recorded on that day is displayed.
•
The calendar is displayed monthly.
Press e/r/w/q to select the date
2�
to be played back.
: Select the date
w/q
: Select the month
e/r
•
If there were no pictures recorded
during a month, the month is not
displayed.
Press [MENU/SET] to display the
3�
pictures that were recorded on
the selected date.
To return to the calendar screens, press
[ ] side of the Zoom button.
Press e/r/w/q to select a picture
4�
and then press [MENU/SET].
•
The selected picture is displayed on the 1
screen playback screen.
To return to the 1 screen playback
n
screen.
•
When pressing [3] side of the Zoom
button, 25 screens and 1 screen are
displayed. (P14)
•
When pressing [SINGLE] on the Remote
control, you can jump to the 1 screen.
•
The pictures are displayed without being
rotated even if you set [ROTATE DISP.] to
[ON]. (P23)
•
You can display the calendar between
January 2000 and December 2099.
•
If the recording date of the picture
selected in 25 screens multi playback is
not between January 2000 and December
2099, the unit automatically displays it in
the oldest calendar date.
•
Pictures edited on a PC or processed on
the equipment other than Panasonic may
be displayed with dates different from the
actual recording dates.
(Calendar playback)
15
LSQT1098
Page 16

Playback/Menu
2X
DELETE
CANCEL
A
2X
CANCEL
DELETE
Using the Playback Zoom
1�
Press [3] side of the Zoom
button on the Remote control to
magnify the image.
�
: 1×→2×→4×→8×→16×
3
•
When pressing [ ] side of the Zoom
button after enlarging the picture, the
magnication becomes lower. When
pressing [3] side of the Zoom button, the
magnication becomes higher.
•
When you change the magnication, the
zoom position indication A appears for
about 1 second to check the position of
the section enlarged.
Press e/r/w/q to move the
2�
position.
n To stop using the playback zoom
•
Press [ ] side of the Zoom button or
press [MENU/SET].
n To delete a picture during the
playback zoom
Press [
1
Press
2
Press [MENU/SET].
3
•
Even if the indication are turned off
].
A
to select [YES].
e
in normal playback mode (P13), the
magnication and enabled operations
appear when the playback zoom is
activated. You can switch the display on
or off by pressing the [DISPLAY] button
on the Remote control.
When you set the magnication to 1×,
the indication are displayed as in normal
playback mode.
•
The more the picture is enlarged, the
more its quality deteriorates.
•
The playback zoom may not operate if
pictures have been recorded with the
equipment other than Panasonic.
•
When you move the position to be
displayed, the zoom position indication is
displayed for about 1 second.
16
LSQT1098
Page 17

Playback/Menu
30fps
VGA
10fps
VGA
30fps
QVGA
10fps
QVGA
15fps
16:9H
30fps
16:9L
10fps
16:9L
30fps
VGA
10fps
VGA
30fps
QVGA
10fps
QVGA
15fps
16:9H
30fps
16:9L
10fps
16:9L
100-0001
1/19
25S
30fps
16:9
A
PLAY MOTION PICTURE
10:00 DEC. 1. 2006
100-0001
1/19
PLAY AUDIO
10:00 DEC. 1.2006
Playing Back Pictures with Audio/Motion pictures
To enjoy sound, connecting the
Sound cable is necessary.
n Motion pictures
Press w/q to select a picture with a
motion picture icon [
[
]/[
]/[
and then press r to play back.
•
The motion picture recording time A is
displayed on the screen. After playback
starts, the motion picture recording time
disappears and the elapsed playback
time is displayed on the bottom right of
the screen.
For example, 1 hour 20 minutes and 30
seconds is displayed as [1h20m30s].
•
The cursor displayed during
playback corresponds to
•
Motion picture playback stops
and the normal playback is restored by
pressing r.
Fast forwarding/Fast rewinding
•
During motion picture playback, keep
pressing w / q.
: Fast forward
q
: Fast rewind
w
•
When releasing the button, it turns to
normal motion picture playback.
To pause
Press e during motion picture playback.
•
Press e again to cancel pause.
]/[
]/[
/ r /
e
]/[
w/q
n Pictures with audio
Press w/q to select a picture with the audio
icon [A] and then press r to play back.
Audio icon
]/
]
•
This unit can play the following QuickTime
Motion JPEG format les shot on a
Panasonic LUMIX camera.
4:3 motion pictures
:VGA (640x480)/30 fps
:VGA (640x480)/10 fps
:QVGA (320x240)/30 fps
:QVGA (320x240)/10 fps
16:9 motion pictures
:16:9H (1280x720)/15 fps
:16:9L (848x480)/30 fps
:16:9L (848x480)/10 fps
.
•
Some QuickTime Motion JPEG les
recorded by a PC or the equipment other
than Panasonic may not be played back
with this unit.
•
When playing back motion pictures that
have been recorded with the equipment
other than Panasonic, the quality of
pictures may be deteriorated or it may not
be possible to play them back.
•
When using a high capacity card, it is
possible that fast rewinding may be
slower than usual.
•
You cannot use the following functions with
motion pictures and pictures with audio.
- Playback zoom (While playing back
or pausing motion pictures and while
playing audio)
- [ROTATE DISP.]/[ROTATE] (Motion
Pictures only)
17
LSQT1098
Page 18

Deleting Pictures
100-0001
1/19
10:00 DEC. 1. 2006
MENU
SELECT CANCELSET
MULTI DELETE
ALL DELETE
MULTI/ALL DELETE
MENU
SET
MENU
SELECT
SET MULTI/ALL
NO
YES
DELETE SINGLE
MENU
SET
Playback/Menu
n To delete a single picture
1�
Select the picture with w/q.
: Play back the previous picture.
w
: Play back the next picture.
q
2�
Press [A] on the remote control.
3�
Press e to select [YES] and then
press [MENU/SET].
•
While deleting the picture, [A] appears
on the screen.
n To delete [MULTI DELETE]/[ALL
DELETE]
1�
Press [A] on the remote control
twice.
2�
Press e/r to select [MULTI
DELETE] or [ALL DELETE] and
then press [MENU/SET].
•
If you select [MULTI DELETE], perform
steps 3 onwards.
•
If you select [ALL DELETE], perform
steps 5 onwards.
•
When [FAVORITE] (P22) is set to [ON],
[ALL DELETE EXCEPT ] appears. If you
select [ALL DELETE EXCEPT ], perform
steps 5 onwards. (However, if none of the
pictures have [ ] displayed, you cannot
select [ALL DELETE EXCEPT ] even if
[FAVORITE] is set to [ON].)
18
LSQT1098
Page 19

3�
MENU
MULTI DELETE
SELECT
MARK/UNMARK
EXIT
DELETE
1 2 3 4
5 6 7 8
9 10 11 12
1 2 3 4
5 6 7 8
9 10 11 12
MENU
MULTI DELETE
SELECT SET
DELETE THE PICTURES
YOU MARKED?
NO
YES
MENU
SET
Press w/q to select the picture
and then press r to set.
(Only when selecting [MULTI DELETE])
•
Repeat the above procedure.
•
The selected pictures appear with [A].
When r is pressed again, the setting is
canceled.
•
The icon [c] blinks red if the selected
picture cannot be deleted. Cancel the
protect setting. (P27)
4�
Press [A] on the remote control.
5�
Press e to select [YES] and then
press [MENU/SET] to set.
(Screen when selecting [MULTI
DELETE])
Playback/Menu
•
Once deleted, pictures cannot be
recovered. Please double-check before
deleting pictures.
•
Do not turn off the camera while deleting.
•
It is possible to delete up to 50 pictures at
one time using [MULTI DELETE].
•
The more pictures there are to delete, the
more time it takes.
•
In the following cases, pictures are not
deleted even if [ALL DELETE] or [ALL
DELETE EXCEPT ] is selected.
- When the Write-protect switch of the
SD Memory Card or SDHC Memory
Card is set to the [LOCK] side (P12)
- When les do not conform to the DCF
(P13)
- When pictures are protected [c]
(P27)
•
[DELETE ALL PICTURES IN THE
MEMORY CARD ?] is displayed when
using [ALL DELETE], and [DELETE ALL
EXCEPT ?] is displayed when using
[ALL DELETE EXCEPT ].
•
If you press [MENU/SET] while deleting
pictures using [ALL DELETE] or [ALL
DELETE EXCEPT ], the deleting will
stop halfway.
19
LSQT1098
Page 20

Using the [PLAY] menu
1
/
2
OFF
ON
SELECT
A
SLIDE SHOW
PRINT
PLAY
ROTATE
ROTATE DISP.
FAVORITE
MENU
EXIT
2
/
2
MENU
PLAY
SELECT
SET
PROTECT
FORMAT
DPOF PRINT
SINGLE
MULTI
CANCEL
OFF
1
/
2
MENU
PLAY
SLIDE SHOW
FAVORITE
ROTATE DISP.
ROTATE
PRINT
SELECT
EXIT
2
/
2
MENU
PLAY
SELECT
DPOF PRINT
PROTECT
FORMAT
EXIT
Playback/Menu
You can use various functions to rotate
pictures, set protection for them etc.
•
Refer to P21 to 28 for each menu item.
Press [MENU/SET].
1�
Press e/r to select the menu
2�
item.
•
Press r at A to switch to the next menu
screen.
Press q.
3�
•
After selecting a menu item in step 3,
refer to the description of the menu
item in the operating instructions and
then set it.
n About the menu screen items
•
There are 2 menu screens (1/2 and 2/2).
•
You can switch menu screens from any
menu item by rotating the zoom button.
20
LSQT1098
Page 21

MENU
SET
[SLIDE SHOW]
1
/
2
MENU
PLAY
SELECT SET
SLIDE SHOW ALL
FAVORITE
ROTATE DISP.
ROTATE
PRINT
OFF
ON
MENU
SET
MENU
OFF
OFF
ALL SLIDE SHOW
SELECT
DURATION
EFFECT
START
AUDIO
2SEC.
CANCEL
SET
MENU
SET
A B C
a
Playing back pictures in order for
a xed duration
Press [
menu and select the item to set. (P20)
] to display the [PLAY] mode
You can skip unwanted pictures if
[FAVORITE] (P22) has been set.
1�
Press e/r to select [ALL] or [ ]
and then press [MENU/SET].
ALL For playing back all pictures
For showing pictures in your
favorites list (P22)
•
The screen shown in step 1 appears
when [FAVORITE] is set to [ON].
When [FAVORITE] is set to [OFF],
perform step 2 onwards.
•
You can also display the [PLAY] menu
when pressing [SLIDE SHOW] button on
the Remote control.
When [FAVORITE] is set to [ON], select
[ALL] or [FAVORITE], and then perform
step 2 onwords.
•
If none of the pictures have [ ] displayed,
you cannot select [ ] even if [FAVORITE]
is set to [ON].
Press e to select [START] and
2�
then press [MENU/SET].
(Screen when [ALL] is selected)
Playback/Menu
•
The cursor displayed during a slide show
or while a slide show is paused B or
A
during [MANUAL] slide show C is the
same as e/r/w/q.
•
Press e to pause the slide show. Press e
again to cancel pause.
•
Press w/q while paused to display the
previous or next picture.
By pressing the r, the Slide
3�
Show stops.
n About playback duration, effect and
audio settings
Select [DURATION], [EFFECT] or [AUDIO]
for setting on the screen displayed in step 2.
DURATION Select intervals of 1, 2, 3,
5 seconds or MANUAL.
EFFECT You can select slide show
effects.
OFF: No effect is set
:
Pictures slide
sideways and switch
: The picture fades
out while the next
picture fades in
: New pictures spread
from the center and
replace
: Pictures switch in
random ways
•
When you select
[MANUAL] (manual
setting), the set effect is
canceled.
AUDIO By setting it to [ON],
the audio from pictures
recorded with audio can
be played back during
Slide Show.
21
LSQT1098
Page 22

•
MENU
SET
1
/
2
MENU
PLAY
SELECT SET
SLIDE SHOW
FAVORITE
ROTATE DISP.
ROTATE
PRINT
OFF
ON
CANCEL
MENU
SET
Playback intervals are estimates. Actual
playback intervals vary according to
pictures you play back and the card you
are using.
•
You can select [MANUAL] if you have
selected [ ] in step 1 or [FAVORITE]
using [SLIDE SHOW] button on the
remote control.
•
Press w/q to display the previous or next
picture when [MANUAL] is selected.
•
When you set [AUDIO] to [ON] and then
play back a picture with audio, the picture
changes when the audio nishes.
•
You cannot play back motion pictures and
use power save in a slide show.
Playback/Menu
[FAVORITE]
Setting your favorite pictures
Press [
] to display the [PLAY] menu and
selectand em to set. (P20)
You can do the following if a mark has been
added to pictures and they have been set
as favorites.
•
Delete all the pictures not set as favorites.
([ALL DELETE EXCEPT ]) (P18)
•
Play back the pictures set as favorites
only as a slide show. (P21)
•
Print only the pictures set as favorites.
(P34)
Press r to select [ON] and then
1�
press [MENU/SET].
•
You cannot set pictures as favorites if
[FAVORITE] is set to [OFF]. Also the
favorites icon [ ] will not appear when
[FAVORITE] is set to [OFF] even if it was
previously set to [ON].
•
You cannot select [CANCEL] if none of
the pictures have [ ] displayed.
Press [MENU/SET] to close the
2�
menu.
22
LSQT1098
Press w/q to select the picture
3�
then press e.
Page 23

MENU
SET
•
A
100-0001
1/19
10:00 DEC.1.2006
100-0001
MENU
SELECT EXITSET
ROTATE
1/19
1
/
2
MENU
OFF
OFF
ON
PLAY
SELECT SET
SLIDE SHOW
FAVORITE
ROTATE DISP.
ROTATE
PRINT
MENU
SET
Repeat the above procedure.
•
If e is pressed while the [ ] favorites icon
is displayed, [ ] is cleared, and the
A
favorites setting is canceled.
•
You can place up to 999 pictures in your
favorites list.
n Canceling all favourites
Select [CANCEL] on the screen shown
1
in step 1 and then press [MENU/SET].
Press e to select [YES] and then press
2
[MENU/SET].
Press [MENU/SET] to close the menu.
3
•
When printing pictures at a photo printing
store, [ALL DELETE EXCEPT ] (P18) is
useful so only the pictures you want to be
printed remain on the card.
•
You may not be able to put pictures you
have shot on the equipment other than
Panasonic into your favorites list.
Playback/Menu
[ROTATE DISP.]/[ROTATE]
j
To display the picture rotated
b
Press [
] to display the [PLAY] mode
menu and select the item to set. (P20)
This mode allows you to automatically
display pictures vertically if they were
recorded holding the camera vertically or
rotate pictures manually in 90° steps.
n Rotate display
(The picture is automatically rotated
and displayed.)
Press r to select [ON] and then
1�
press [MENU/SET].
•
When you select [OFF], the pictures are
displayed without being rotated.
•
Refer to P13 for how to play back pictures.
Press [MENU/SET] to close the
2�
menu.
n Rotate
(The picture is rotated manually.)
Press w/q to select the picture
1�
and then press r.
•
When [ROTATE DISP.] is set to [OFF],
[ROTATE] function is disabled.
23
LSQT1098
Page 24

•
MENU
SELECT SET
ROTATE
CANCEL
MENU
SET
Motion pictures and protected pictures
cannot be rotated.
Press e/r to select the direction
2�
to rotate the picture and then
press [MENU/SET].
The picture rotates clockwise in steps of
a
90°.
The picture rotates counter-clockwise in
b
steps of 90°.
3�
Press [MENU/SET] twice to close
the menu.
Playback/Menu
n Example
When rotating clockwise (a)
Original
picture
•
When you play the picture on a PC, you
cannot play rotated pictures without an
OS or a software compatible with Exif.
Exif is the le format for still pictures, to
which recording information and other can
be added, established by JEITA [Japan
Electronics and Information Technology
Industries Association].
•
When playing back rotated pictures in
multi playback, pictures appear in original
orientation.
•
You may not be able to rotate images shot
on the equipment other than Panasonic .
24
LSQT1098
Page 25

Playback/Menu
MENU
SET
PLAY
2
/
2
MENU
SELECT SET
PROTECT
FORMAT
MENU
SET
DPOF PRINT
SINGLE
MULTI
CANCEL
1/19
1
DISPLAY
1
MENU
DPOF SET THIS
COUNT DATE
EXIT
SELECT
100-0001
MENU
SELECT EXIT
DPOF SET MULTI
1 2 3 4
5 6 7 8
9 10 11 12
1
1
DISPLAY
COUNT DATE
[DPOF PRINT]
Setting the Picture to be Printed
l
and the Number of Prints
Press [
] to display the [PLAY] mode
menu and select the item to set.(P20)
DPOF (Digital Print Order Format) is a
system that allows the user to select which
pictures to print, how many copies of each
picture to print and whether or not to print
the recording date on the pictures when
using a DPOF compatible photo printer or
photo printing store. For details, ask at your
photo printing store.
For more information please visit:
http://panasonic.jp/dc/dpof_110/white_e.
htm
Press e/r to select [SINGLE], [MULTI]
or [CANCEL] and then press [MENU/
SET].
•
You cannot select [CANCEL] if there are
no prints that have been set in the DPOF
print settings.
n Single setting
Press w/q to select the picture to
1�
print and then press e/r to set
the number of prints.
•
The number of prints icon [d] appears.
•
The number of prints can be set from 0 to
999. When the number of prints is set to
“0”, DPOF print setting is canceled.
Press [MENU/SET] twice to close
2�
the menu.
n Multi setting
Press w/q to select the picture to
1�
print and then press e/r to set
the number of prints.
•
Repeat the above procedure. (You cannot
set all the pictures at one time.)
•
The number of prints icon [d] appears.
•
The number of prints can be set from 0 to
999. When the number of prints is set to
“0”, DPOF print setting is canceled.
Press [MENU/SET] twice to close
2�
the menu.
LSQT1098
25
Page 26

n To cancel all settings
MENU
CANCEL ALL DPOF
CANCEL ALL DPOF
PRINT SETTINGS?
NO
YES
SELECT SET
MENU
SET
1
MEN U
DPOF SET THIS
SELECT EXIT
DATE
100-0001
1/19
1
DISPLAY
COUNT DATE
Press e to select [YES] and then
1�
press [MENU/SET].
Press [MENU/SET] to close the
2�
menu.
n To print the date
You can set/cancel the printing with the
recorded date each press of the [DISPLAY]
button when setting the number of prints.
•
The date print icon [L] appears.
•
When you go to a photo studio for digital
printing, be sure to order the printing of
the date additionally if required.
•
The date may not be printed depending
on photo studios or printers even
if you set the date print. For further
information, ask the photo studio
for details or refer to the operating
instructions of the printer.
Playback/Menu
•
DPOF is an abbreviation of [Digital Print
Order Format]. This feature allows you to
write print information to media and then
use the information on a DPOF-compliant
system.
•
DPOF print setting is a convenient
function when you print pictures with
printers supporting PictBridge. (P33)
•
The date printing setting on the printer
may take priority over the date printing
setting on this unit. Check the date
printing setting on the printer also. (P33)
•
When setting the DPOF print, delete any
previous DPOF print settings made by the
equipment other than Panasonic.
•
If the le is not based on the DCF
standard, the DPOF print setting cannot
be set. DCF is an abbreviation of [Design
rule for Camera File system], stipulated by
JEITA [Japan Electronics and Information
Technology Industries Association].
•
When setting the DPOF print with this
unit, DPOF auto-print le is set in the
MISC folder with the xed date 2006/1/1.
26
LSQT1098
Page 27

MENU
SET
[PROTECT]
PLAY
2
/
2
MENU
SELECT SET
DPOF PRINT
FORMAT
MENU
SET
PROTECT SINGLE
MULTI
CANCEL
100 - 0001
1/19
MEN U
SET/CANCEL
SELECT
EXIT
PROTECT THIS
A
Preventing Accidental Erasure of
g
the Picture
Press [
] to display the [PLAY] mode
menu and select the item to set. (P20)
You can set protection for the pictures you
do not want to delete to prevent them from
accidental erasure.
Press e/r to select [SINGLE],
[MULTI] or [CANCEL] and then
press [MENU/SET].
n Single setting
Press w/q to select the picture
1�
and then press r to set/cancel.
Playback/Menu
n Multi setting/To cancel all settings
Perform the same operation as in [[DPOF
PRINT] Setting the Picture to be Printed
and the Number of Prints]. (P25 and 26)
•
The protect setting may not be effective in
the equipment other than Panasonic.
•
If you want to delete protected pictures,
cancel the protect setting rst.
•
While this feature protects the pictures
from accidental erasure, formatting the
card will permanently delete all data.
(P28)
•
Sliding the Write-Protect switch A of the
SD Memory Card or the SDHC Memory
Card to [LOCK] prevents pictures from
deletion even if protection is not set.
•
The following functions cannot be used
with protected pictures.
−[ROTATE]
SET The protect icon [c] appears.
CANCEL
Press [MENU/SET] twice to close
2�
The protect icon [c] disappears.
the menu.
27
LSQT1098
Page 28

MENU
SET
[FORMAT]
MENU
DELETE ALL DATA
ON THE MEMORY CARD?
YES
NO
FORMAT
SELECT SET
MENU
SET
0
Initializing a card
Press [
] to display the [PLAY] mode
menu and select the item to set. (P20)
Usually, it is not necessary to format
the card. Format it when the message
[MEMORY CARD ERROR] appears.
Press e to select [YES] and then press
[MENU/SET].
•
Once the card is formatted, all data
including protected images are
irretrievably erased. Please conrm that
all data is transferred to your PC before
proceeding with format function.
•
During formatting, do not turn the unit off.
•
Sliding the Write-Protect switch of the SD
Memory Card or the SDHC Memory Card
to [LOCK] prevents formatting.
•
If the card cannot be formatted, consult
your nearest servicenter.
Playback/Menu
For USA assistance, please call: 1-800-272-7033 or
send e-mail to : digitalstillcam@us.panasonic.com
For Canadian assistance, please call:
1-800-561-5505 or visit us at www.panasonic.ca
28
LSQT1098
Page 29

Settings
1
/
2
PLAY
SELECT
SLIDE SHOW
FAVORITE
ROTATE DISP.
ROTATE
PRINT
ON
ON
MENU
SET
MENU
EXIT
MENU
1
/
1
TV ASPECT
LANGUAGE
SETUP
SELECT EXIT
ENG
MENU
1
/
1
TV ASPECT
LANGUAGE
ENG
SETUP
SELECT EXIT
MENU
SET
TV ASPECT
SELECT
MENU
SET
•
Change the settings if necessary.
Press [MENU/SET] and then
1�
press w.
Press r to select the [SETUP]
2�
menu icon [ ] and then press q.
Press e/r to select the menu
3�
item.
Playback/Menu
Press q, press e/r to select the
4�
setting and then press [MENU/
SET].
(When you have selected “TV
ASPECT”)
•
See next page for more detailed settings.
Press [MENU/SET] to close the
5�
menu.
29
LSQT1098
Page 30

Playback/Menu
Menu Functions
TV ASPECT [
]: Select if your television has a 16:9 aspect ratio.
j
•
This mode is best for showing [
j
] aspect ratio
images on a 16:9 aspect ratio television. Pictures shot
in the [h] or [i] aspect ratio have black bands
added to either side.
[
]: Select if your television has a 4:3 aspect ratio.
h
•
When the aspect ratio is set to [h], pictures taken in
the aspect ratios of [
] and [i] appear with black
j
bands above and below on a 4:3 ratio television.
LANGUAGE Set to the language on the menu screen from the following 7
{
languages.
Set to the desired language with e / r and determine it with [MENU/
SET].
[ENGLISH]: English [DEUTSCH]: German
[FRANÇAIS]: French [ESPAÑOL]: Spanish
[ITALIANO]: Italian [ ]: Chinese (Traditional)
[ ]: Japanese
•
When you set to other language by mistake, select [{] from the
menu icons to set the desired language.
30
LSQT1098
Page 31

Connecting to other equipment
A
U
D
IO
O
U
T
D
C
I
N
4
.8
V
U
S
B
ANALOG
CO
M
P
O
NENT
B
A
Connecting to a PC
•
By connecting the unit to a computer, you
can upload your pictures.
To connect
■
: Check the facing of the connector and
A
push straight in.
: USB connection cable (not supplied)
B
Turn on the unit and the PC.
1�
Connect the unit to a PC via the USB
2�
connection cable B (not supplied).
•
Connect the USB cable to the
corresponding terminals whose shape
matches the USB cable.
•
Insert or pull out the USB cable straight.
(Do not force to insert the connector in
backwards or sideways. This may cause
deformation of the terminal and malfunction
of the unit and the equipment other than
Panasonic connected to this unit.)
•
“PLEASE TURN OFF THE PRINTER OR
PC FOR PHOTO PLAYBACK ON TV”
appears on the TV.
•
The operation indicator blinks during
transmission. Do not disconnect the USB
cable while this indicator is blinking.
[Windows]
The [Removable Disk] appears on the [My
Computer] folder.
•
Some cards may appear as something
other than “Removable drive.”
•
If it is the rst time you are connecting
the unit to a PC, the required driver is
installed automatically so that the unit can
be recognized by the Windows Plug and
Play, then [Removable Disk] appears on
the [My Computer] folder.
•
This unit is Windows ME/2000/XP
compatible.
To upload pictures
Double click on the “Removable drive” in
1
[My Computer].
Double click on the “DCIM” folder.
2
Select the pictures you want to upload,
3
copy and paste them to a folder on your
computer.
To safely disconnect the USB cable
Double click on the icon in the
1
notication area of the task bar at the
bottom right of the computer screen.
•
The “Safely remove hardware” dialog
appears.
Select “USB Mass Storage Device” and
2
click “Stop”.
Make sure “USB Mass Storage Device”
3
is selected and click “OK.
Click “Close”.
4
•
You can now safely disconnect the
USB cable.
Disconnect the USB cable.
5
31
LSQT1098
Page 32

Connecting to other equipment
DC IM
MI SC
PRIVATE1
100_PANA
101_PANA
999_PANA
P1000001.JPG
P1000002.JPG
P1000999.JPG
100_PANA
1
2 3
[Macintosh]
The drive is displayed on the screen.
•
The drive is not displayed when you
connect the unit with no card inserted.
•
The drive is displayed as [NO NAME] or
[Untitled] when you connect the unit with
a card inserted.
•
This unit is Mac OS 9 compatible.
To upload ipictures from an SDHC
memory card when using Mac OS X
version 10.2 or later, set the card’s writeprotect switch to [LOCK]. (P12)
To upload pictures
Double click on the folder called “NO
1
NAME” on the destop.
Double click on the “DCIM” folder.
2
Select the pictures you want to upload,
3
copy and paste them to a folder on your
computer.
To safely disconnect the USB cable
Put the folder named [NO NAME] into
1
the trash can.
Disconnect the USB cable.
2
If “Removable drive” or“NO NAME”
n
doesn’t appear
•
Turn off the computer and this unit,
disconnect the USB cable, then reconnect
and try again.
•
If your computer has more than one USB
terminal, try connecting to another one.
•
Connection may not be possible if you
use a USB hub or USB extension cable.
Folder Composition
n
Folders appear as follows. (Actual folder
names depend on the camera they were
created with. The following is an example
when created with a Panasonic LUMIX.)
Card
Folder number
1
File number
2
JPG : Pictures
3
MOV : Motion pictures
RAW : RAW format les
The contents of each folder are:
DCIM 100_PANA to 999_PANA
100_PANA to
999_PANA
Pictures/Motion pictures/
Pictures in RAW les
MISC File with DPOF setting
PRIVATE1 Flip animation les
•
When connecting the unit to a
Windows 2000 OS PC with the USB
connection cable, do not replace the
card while the camera and the PC are
connected. The information on the card
may be damaged. Disconnect the USB
connection cable before replacing the
card.
•
Pictures edited or rotated with a PC may
be displayed in black in playback mode
(P13), multi playback (P14) and calendar
playback (P15).
•
Refer to the operating instructions of the
PC, too.
32
LSQT1098
Page 33

Connecting to other equipment
A
A
U
D
IO
O
U
T
D
C
I
N
4.
8
V
U
S
B
ANALO
G
CO
M
PO
NENT
B
A
1
/
2
MENU
PLAY
SELECT EXIT
SLIDE SHOW
FAVORITE
ROTATE DISP.
ROTATE
PRINT
ON
ON
Connecting to a PictBridge-compliant Printer
By connecting the camera directly to a
printer supporting PictBridge via the USB
connection cable (not supplied), you can
select the pictures to be printed or start
printing on the TV screen.
Before turning on the printer,
1�
select [PRINT] in the Playback
menu and press q.
•
“PLEASE CONNECT TO THE
PRINTER AND TURN ON THE
PRINTER” appears.
•
To cancel, press [A].
Connect the unit to the printer
2�
with a USB cable (not included).
•
Connect the USB connection cable
so it matches the shape of the USB
terminal.
•
Insert or pull out the USB cable
straight. (Do not try to insert the
connector in backwards or sideways.
This may damage the terminal and the
unit and other equipment connected to
this unit.)
Turn the printer on.
3�
n To connect
: Check the facing of the connector and
A
push straight in.
: USB connection cable (not supplied)
B
•
Make the necessary settings on your
printer. (Read your printer’s operating
instructions.)
•
If you connect the printer and turn it
on before selecting [PRINT] in the
Playback menu, “PLEASE TURN OFF
THE PRINTER OR PC FOR PHOTO
PLAYBACK ON TV” appears.If this
happens, turn the printer off, reselect
[PRINT] in the Playback menu, then turn
the printer back on.
LSQT1098
33
Page 34

n Printing the selected picture (making
MENU
1/19
100-0001
PictBridge
PLEASE SELECT
THE PICTURE TO PRINT
SELECT
MULTI PRINT
PRINT
CANCEL
MENU
SINGLE SELECT
PRINT WITH DATE
NUM. OF PRINTS
PAPER SIZE
PAGE LAYOUT
SELECT
SET
1
PRINT START
MENU
SET
CANCEL
MENU
PictBridge
SELECT
MULTI SELECT
SELECT ALL
DPOF
FAVORITE
SET
MENU
SET
CANCEL
a single print)
Press w/q to select the picture
1�
and then press [MENU/SET].
•
A message displays for about 2 seconds.
•
To cancel, press [A].
Press e/r to select [PRINT
2�
START] and then press [MENU/
SET].
•
Press [MENU/SET] to cancel printing.
When you are nished printing,
3�
press [A] then turn the printer
off.
34
LSQT1098
Connecting to other equipment
n Selecting multiple pictures for
printing
Press e.
1�
Press [A] to return to the original screen.
Press e/r to select an item and
2�
then press [MENU/SET].
Item Setting contents
MULTI
SELECT
SELECT ALL All pictures in the card are
DPOF Pictures in the [DPOF
FAVORITE Pictures set as favorites
Multiple pictures are
selected at once for
printing.
[Operation]
On the plural pictures screen,
press w/q to select pictures.
When you press r, [ ] is
displayed with the picture you
selected for printing. (When
you press r once more, the
print setting is canceled.)
Press [MENU/SET] when
you nish selection.
printed.
PRINT] setting (P25) are
printed.
(P22) are printed.
•
This item appears only
when favorite setting
(P22) is [ON].
•
You can not select any
picture when [FAVORITE]
is set to [ON], but no
picture is marked with [ ].
Page 35

3�
MENU
MULTI SELECT
PRINT WITH DATE
NUM. OF PRINTS
PAPER SIZE
PAGE LAYOUT
SELECT
SET
1
PRINT START
CANCEL
MENU
SET
MENU
SINGLE SELECT
PRINT WITH DATE
NUM. OF PRINTS
PAPER SIZE
PAGE LAYOUT
CANCEL
SET
1
PRINT START
SELECT
Press e/r to select [PRINT
START] and then press [MENU/
SET].
•
In DPOF setting, [PRINT WITH DATE]
and [NUM. OF PRINTS] are not displayed.
•
When you select [DPOF PICTURE],
[DPOF SET] is selectable. When you
select [DPOF SET], refer to P25 and
make DPOF setting.
•
Press [MENU/SET] when you wish to
cancel printing halfway.
•
When you select [MULTI SELECT],
[SELECT ALL] or [FAVORITE], the print
conrmation screen appears. Select [YES]
and perform printing.
•
When the number of prints exceeds 1,000,
[PRINTING --- PICTURES. DO YOU
WANT TO PROCEED?] appears on the
print conrmation screen.
When you are nished printing,
4�
press [A] then turn the printer
off.
n Setting date printing, the number of
prints, the paper size and the page
layout
Select an item to set on the screen for step
2 in “Printing the selected picture (making
a single print)” (P34) or on the screen for
step 3 in “Selecting multiple pictures for
printing” (P34).
Connecting to other equipment
•
The items which are not supported by the
printer are displayed in gray and cannot
be selected.
•
When you want to print pictures in
a paper size or a layout which is not
supported by this unit, set [PAPER SIZE]
and [PAGE LAYOUT] to [F] and then
set the paper size or the layout on the
printer. (For details, refer to the operating
instructions of the printer.)
•
[PRINT WITH DATE]
F
OFF Date is not printed.
ON Date is printed.
•
If the printer does not support date
printing, the date cannot be printed on
the picture.
•
[NUM. OF PRINTS]
Set the number of prints.
•
You can set up to 999 prints.
•
[PAPER SIZE]
(Possible paper sizes on the camera)
The items are listed on 1/2 and 2/2.
Press r to select the desired item.
1/2
F
L/3.5˝×5˝ 89 mm×127 mm
2L/5˝×7˝ 127 mm×178 mm
POSTCARD 100 mm×148 mm
A4 210 mm×297 mm
Settings on the printer are
prioritized.
Settings on the printer are
prioritized.
35
LSQT1098
Page 36

Connecting to other equipment
2/2*
CARD SIZE 54 mm×85.6 mm
10×15cm 100 mm×150 mm
4˝×6˝ 101.6 mm×152.4 mm
8˝×10˝ 203.2 mm×254 mm
LETTER 216 mm×279.4 mm
*These items cannot be displayed when the
printer does not support the paper sizes.
•
[PAGE LAYOUT]
(Possible layouts on the camera)
Settings on the printer are
F
prioritized
1 page with no frame print
G
1 page with frame print.
H
2 pages print
I
4 pages print
J
•
An item cannot be selected if the printer
does not support the page layout.
n Layout printing
•
When printing a picture several times
on 1 sheet of paper
For example, if you want to print a picture
4 times on 1 sheet of paper, set [PAGE
LAYOUT] to [
] and then set the
J
number of prints to 4 for the picture on
[NUM. OF PRINTS].
•
When printing different pictures on 1
sheet of paper
For example, if you want to print 4
different pictures on 1 sheet of paper,
set [PAGE LAYOUT] to 4-picture printing
[J] and then set [NUM. OF PRINTS]
for the pictures to 1 in [MULTI SELECT]
(P34).
•
Do not disconnect the USB connection
cable when the cable disconnection
warning icon [K] is indicated. (Depending
on the printer, the icon may not be
displayed.)
•
The unit is receiving an error message
from the printer when the [*] indication
lights orange during printing. After
nishing printing, make sure there are no
problems with the printer.
•
If the total number of ordered prints or the
number of pictures set for print is large,
printing is performed at intervals. In such
cases, the number of remaining prints
shown on the display will differ from the
number of prints you set. The discrepancy,
however, does not indicate an error.
•
Date print, paper size and page layout
settings on the printer may have priority
over the same settings on the unit. Check
these settings on the printer as well.
•
If printing did not work, try turning off the
printer and start the procedure again
from the beginning. (P33)
36
LSQT1098
Page 37

Others
Message Display
Conrmation messages or error messages will be displayed on the screen in some cases.
The major messages are described below as examples.
[THIS MEMORY CARD IS PROTECTED]
Cancel the card lock. (P12)
[NO VALID PICTURE TO PLAY]
Play back after recording or after inserting a
card with a recorded picture.
[THIS PICTURE IS PROTECTED]
After canceling the protect setting (P27),
you can delete or overwrite the picture.
[THIS PICTURE CANNOT BE DELETED]/
[SOME PICTURES CANNOT BE
DELETED]
The pictures not based on the DCF
standard cannot be deleted.
[NO ADDITIONAL DELETE SELECTIONS
CAN BE MADE]
You have exceeded the number of pictures
that can be set at once with multi-delete
setting.
You have placed more than 999 pictures in
your favorites list.
[CANNOT BE SET ON THIS PICTURE]/
[CANNOT BE SET ON SOME PICTURES]
If the pictures are not based on the DCF
standard, the DPOF print cannot be set.
[MEMORY CARD ERROR PLEASE
CHECK THE CARD]
Failed access to the card.
Insert the card again.
[READ ERROR PLEASE CHECK THE
CARD]
Data reading error.
Insert the card again. Make sure the card is
inserted properly and then play back again.
[PLEASE TURN OFF THE PRINTER]
Printing has nished or was canceled. Turn
the printer off. (P34, 35)
[PLEASE CONNECT TO THE PRINTER
AND TURN ON THE PRINTER]
The unit is in the print mode. Connect the
printer and turn it on. (P33)
[PLEASE TURN OFF THE PRINTER OR
PC FOR PHOTO PLAYBACK ON TV]
If you want to print, rst turn off the
•
printer, then start the procedure again
from the beginning. (P33)
The unit is connected to a PC. (P31)
•
For playback on a television, turn off
•
your printer or PC to deactivate the USB
connection.
37
LSQT1098
Page 38

Others
38
LSQT1098
Others
Troubleshooting
If you put the menu back to the settings at the time of purchase, the conditions may be
improved.
n Playback
Conditions Causes
Pictures rotate
unexpectedly.
The picture is not played
back.
Folder or le name
appears as [–] and the
display goes black.
The picture is displayed
with a date different from
the actual recording date
in calendar playback.
Picture quality of images
in multi screen view is
poor.
This unit has Image Rotating Display function utilizing
information recorded in the Exif le.
Set [ROTATE DISP.] (P23) to [OFF] so that the unit does
•
not rotate these kinds of pictures for you.
You can use [ROTATE] (P23) to rotate the pictures when
•
necessary.
Is there a picture on the card?
The picture may have been changed on a computer or taken
on a different manufacturer’s camera.
You will need to reformat the card to delete this type of
•
picture. (P28) (Remember that all data will be irretrievably
erased when you format the card, so save your data and
check the card before proceeding.)
Pictures edited or rotated with a PC may be displayed
•
in black in playback mode, multi playback and calendar
playback.
Was the picture edited with a PC or recorded with a digital
camera from another manufacturer?
This kind of picture may be displayed with a date different
from the actual recording date in calendar playback. (P15)
Is the clock in the camera used to take a picture set properly?
For example, if the clock setting on the camera used to take
a picture is different from the date and time set on the PC
and you acquire pictures recorded with the camera to the PC
and then write them back to the card, the pictures may be
displayed with dates different from the actual recording dates
in calendar playback etc.
The images in multi screen views are thumbnails, not the
original images. This means the image resolution is lower.
Thumbnail data is created automatically at the time of
shooting and is attached to the JPEG data for the specic
purpose of display in these multi view selection screens.
Page 39

Others
n Connecting to a TV, computer or printer
Conditions Causes
The picture does not
appear on the television.
Is the unit connected to the TV correctly?
Check it.
Set the TV to video input mode to suit the connection you
have made.
Cannot upload pictures
to your computer.
Check the connections.
Check that the computer has correctly recognized the
unit.(P31)
The pictures cannot be
printed with printers.
Does the printer support PictBridge? You cannot print
pictures with printers which do not support PictBridge. (P33)
Select [PRINT] on the Playback menu. (P33)
The sides of printed
images are cut off.
If your printer has trimming and border settings, change
•
the settings so that there is no trimming and no border.
(Read your printer’s operating instructions.)
Some photograhpy shops can handle pictures shot in
•
the [j] aspect ratio. Enquire before sending them for
printing.
The picture size does
Check the [TV ASPECT] setting on this unit. (P30)
not t the TV screen.
n Others
Conditions Causes
Unreadable language
was selected by mistake.
The remote control
cannot be used.
Press [MENU/SET], select the [SETUP] menu icon [ ] and
then select the [{] icon to set the desired language. (P30)
When the Remote control does not work even when used
close to the unit, the battery has run out. Replace the old
battery with a new one. (P9)
39
LSQT1098
Page 40

Others
40
LSQT1098
Others
Cautions for Use
Make sure to use the supplied cords
and cables.
Do not extend the cords and the cables.
Do not spray insecticides or volatile
chemicals onto the unit.
If the unit is sprayed with such chemicals,
•
the unit body may be damaged and the
surface nish may peel off.
Do not keep rubber or plastic products in
•
contact with the unit for a long period of
time.
Do not use benzine, thinner or alcohol
for cleaning the camera.
Before cleaning the unit, disconnect the
•
AC adaptor from the electrical outlet.
The unit body may be deformed and the
•
surface nish may peel off.
Wipe the dust or ngerprints with a soft,
•
dry cloth. To remove stubborn stains,
soak a dry cloth in water and then use it
to wipe the dirt. Then wipe again with a
dry cloth.
Do not use a kitchen detergent or a
•
chemically treated cloth.
In case rain or other sources of water
•
splash onto the unit, wet a soft cloth
with tap water, wring it well, and use it to
wipe the unit body carefully. Then wipe it
again with a dry cloth.
Store the card in the card case or the
•
storage bag after use and when you
store or carry the card.
Do not allow dirt, dust or water to enter the
terminals on the back of the card and do
not touch the terminals with your ngers.
n Card
Do not leave the card in places where
there is high temperature or direct
sunlight, or where electromagnetic
waves or static electricity are easily
generated.
Do not bend or drop the card.
The card may be damaged or the
•
recorded content may be damaged or
erased.
Page 41

Others
Specications
HDTV Photo Player: Information for your safety
Power Source: DC 4.8 V
Power Consumption: 2.0 W
Playback Media: SD Memory Card/SDHC Memory Card/MultiMediaCard (Still
pictures only)
Playing le format
Still Picture: JPEG (Design rule for Camera File system, based on Exif 2.2
standard), DPOF
Picture with audio: JPEG (Design rule for Camera File system, based on Exif 2.2
Motion pictures: QuickTime Motion JPEG (motion pictures with audio)
Playback output picture: HD output (1080i)
Interface
USB: USB 2.0 (Full Speed)
Video: Y, Cb, Cr component output
Audio: Audio line output (monaural)
Terminal
USB: Mini B jack
VIDEO OUT: RCA pin jack
AUDIO OUT: RCA pin jack
DC IN: Type 2 jack
Dimensions: 4 1/2”(W) × 1 1/8”(H) × 2 3/8”(D)
(113 mm (W) × 27 mm (H) × 60.5 mm (D))
(excluding the projection part)
Weight: Approx. 2.8 oz/80 g
Operating Temperature: 0 °C to 40 °C (32°F to 104 °F)
Operating Humidity: 10 % to 80 %
AC adaptor: Information for your safety
standard)+640×480 pixels QuickTime (picture with audio)
Rated Output:
Rated Input:
Input Capacity:
Remote control:
Voltage: DC 3.0 V (button-type battery)
Wireless Transmission
Method:
DC4.8 V, 1.0A
AC 110 to 240 V, 50/60 Hz
0.12A
Information for your safety
IR (Infrared Rays) Method
41
LSQT1098
Page 42

Others
42
LSQT1098
Others
HDTV Photo Player
Limited Warranty
Limited Warranty Coverage
If your product does not work properly because of a defect in materials or
workmanship, Panasonic Consumer Electronics Company or Panasonic Puerto
Rico, Inc. (collectively referred to as “the warrantor”) will, for the length of the
period indicated on the chart below, which starts with the date of original
purchase (“warranty period”), at its option either (a) repair your product with new
or refurbished parts, or (b) replace it with a new or refurbished product. The
decision to repair or replace will be made by the warrantor.
During the “Labor” warranty period there will be no charge for labor. During the
“Parts” warranty period, there will be no charge for parts. You must carry-in or
mail-in your product during the warranty period. If non-rechargeable batteries are
included, they are not warranted. This warranty only applies to products
purchased and serviced in the United States or Puerto Rico. This warranty is
extended only to the original purchaser of a new product which was not sold “as
is”. A purchase receipt or other proof of the original purchase date is required for
warranty service.
PANASONIC CONSUMER ELECTRONICS COMPANY, DIVISION OF
PANASONIC CORPORATION OF NORTH AMERICA
One Panasonic Way, Secaucus, New Jersey 07094
PANASONIC PUERTO RICO, INC.
Ave. 65 de Infantería, Km. 9.5, San Gabriel Industrial Park, Carolina, Puerto
Rico 00985
PRODUCT OR PART NAME PARTS LABOR
HDTV PHOTO PLAYER 90 (NINETY) DAYS NOT APPLICABLE
Limited Warranty
(For USA Only)
Page 43

Others
Carry-In or Mail-In Service
For Carry-In or Mail-In Service in the United States call
1-800-272-7033.
For assistance in Puerto Rico call Panasonic Puerto Rico, Inc.
(787)-750-4300 or fax (787)-768-2910.
This warranty ONLY COVERS failures due to defects in materials or
workmanship, and DOES NOT COVER normal wear and tear or cosmetic
damage. The warranty ALSO DOES NOT COVER damages which occurred in
shipment, or failures which are caused by products not supplied by the warrantor,
or failures which result from accidents, misuse, abuse, neglect, mishandling,
misapplication, alteration, faulty installation, set-up adjustments, misadjustment
of consumer controls, improper maintenance, power line surge, lightning
damage, modification, or commercial use (such as in a hotel, office, restaurant,
or other business), rental use of the product, service by anyone other than a
Factory Servicenter or other Authorized Servicer, or damage that is attributable
to acts of God.
THERE ARE NO EXPRESS WARRANTIES EXCEPT AS LISTED UNDER
“LIMITED WARRANTY COVERAGE”. THE WARRANTOR IS NOT LIABLE
FOR INCIDENTAL OR CONSEQUENTIAL DAMAGES RESULTING FROM THE
USE OF THIS PRODUCT, OR ARISING OUT OF ANY BREACH OF THIS
WARRANTY. (As examples, this excludes damages for lost time, travel to and
from the servicer, loss of media or images, data or other memory content. The
items listed are not exclusive, but are for illustration only.) ALL EXPRESS AND
IMPLIED WARRANTIES, INCLUDING THE WARRANTY OF
MERCHANTABILITY, ARE LIMITED TO THE PERIOD OF THE LIMITED
WARRANTY.
Some states do not allow the exclusion or limitation of incidental or consequential
damages, or limitations on how long an implied warranty lasts, so the exclusions
may not apply to you.
This warranty gives you specific legal rights and you may also have other rights
which vary from state to state. If a problem with this product develops during or
after the warranty period, you may contact your dealer or Servicenter. If the
problem is not handled to your satisfaction, then write to the warrantor’s
Consumer Affairs Department at the addresses listed for the warrantor.
PARTS AND SERVICE WHICH ARE NOT COVERED BY THIS LIMITED
WARRANTY ARE YOUR RESPONSIBILITY.
43
LSQT1098
Page 44

Others
44
LSQT1098
Others
Others
Customer Services Directory (For USA Only)
For Product Information, Operating Assistance, Literature Request, Dealer
Locations, and all Customer Service inquiries please contact:
1-800-272-7033, Monday-Friday 8:30am-8pm EST.
Web Site: http://www.panasonic.com/consumersupport
You can purchase parts, accessories or locate your nearest
servicenter by visiting our Web Site.
Accessory Purchases
Purchase Parts, Accessories and Instruction Books online for all Panasonic
Products by visiting our Web Site at:
http://www.pasc.panasonic.com
or, send your request by E-mail to:
npcparts@us.panasonic.com
You may also contact us directly at:
1-800-332-5368 (Phone) 1-800-237-9080 (Fax Only)
(Monday - Friday 9 am to 9 pm, EST.)
Panasonic Services Company 20421 84th Avenue South, Kent, WA 98032
(We Accept Visa, MasterCard, Discover Card, American Express,
and Personal Checks)
Product Repairs
Centralized Factory Servicenter
Panasonic Services Company
20421 84th Avenue South
Kent, WA 98032
Attention: HDTV Photo Player Repair
Please carefully pack and ship, prepaid and insured, to the Elgin Centralized
Factory Servicenter.
Customer’s in Puerto Rico, please ship or carry in to location below (“Service
in Puerto Rico”).
Service in Puerto Rico
Panasonic Puerto Rico, Inc.:
Ave. 65 de Infantería, Km. 9.5, San Gabriel Industrial Park,
Carolina, Puerto Rico 00985
Phone (787) 750-4300 Fax (787) 768-2910
MAIL TO :
Customer Services Directory
(For USA Only)
Page 45

Others
Limited Warranty
(For Canada)
Panasonic Canada Inc.
PANASONIC PRODUCT – LIMITED WARRANTY
Panasonic Canada Inc. warrants this product to be free from defects in material and
workmanship and agrees to remedy any such defect for a period as stated below from the
date of original purchase.
HDTV Photoplayer One (1) year, parts and labour
LIMITATIONS AND EXCLUSIONS
This warranty does not apply to products purchased outside Canada or to any product which has been
improperly installed, subjected to usage for which the product was not designed, misused or abused,
damaged during shipping, or which has been altered or repaired in any way that affects the reliability
or detracts from the performance, nor does it cover any product which is used commercially. Dry cell
batteries are also excluded from coverage under this warranty.
This warranty is extended to the original end user purchaser only. A purchase receipt or other proof of
date of original purchase is required before warranty service is performed.
THIS EXPRESS, LIMITED WARRANTY IS IN LIEU OF ALL OTHER WARRANTIES,
EXPRESS OR IMPLIED, INCLUDING ANY IMPLIED WARRANTIES OF
MERCHANTABILITY AND FITNESS FOR A PARTICULAR PURPOSE.
IN NO EVENT WILL PANASONIC CANADA INC. BE LIABLE FOR ANY SPECIAL,
INDIRECT OR CONSEQUENTIAL DAMAGES.
In certain instances, some jurisdictions do not allow the exclusion or limitation of incidental or
consequential damages, or the exclusion of implied warranties, so the above limitations and exclusions
may not be applicable.
WARRANTY SERVICE
FOR PRODUCT OPERATION ASSISTANCE, please contact:
Our Customer Care Centre: Telephone #: (905) 624-5505
1-800 #: 1-800-561-5505
Fax #: (905) 238-2360
Email link: “Contact Us” on
FOR PRODUCT REPAIRS, please locate your nearest Authorized Servicentre at www.panasonic.ca :
Link : “Servicentres
TM
locator” under “Customer support”
IF YOU SHIP THE PRODUCT TO A SERVICENTRE
Carefully pack and send prepaid, adequately insured and preferably in the original carton.
Include details of the defect claimed, and proof of date of original purchase.
www.panasonic.ca
45
LSQT1098
Page 46

Others
46
LSQT1098
Others
Memo
Page 47

Others
A
U
D
IO
O
U
T
D
C
IN
4
.8
V
U
S
B
ANAL
O
G
C
O
M
PO
NENT
100-0001
10:00 DEC. 1. 2006
Spanish Quick Use Guide/Guía rápida en
español
Conexión a HDTV (televisión de
1�
alta denición)
Inserte la tarjeta (opcional) hasta
2�
que haga clic y quede ja.
Para terminal
AUDIO IN
Cables
de video
componente
(incluidos)
Para contar con sonido.
Cable de audio (opcional)
•
Apague la unidad y la televisión.
•
Para contar con sonido, conecte el
Adaptador
CA (incluido)
Para terminales
COMPONENT IN
cable de sonido monoaural (opcional).
A toma de
corriente
doméstica
(CA)
Para extraerla:
Presione la tarjeta hasta hacer clic y
luego retírela rectamente hacia
afuera.
Encienda la televisión y seleccione
3�
la entrada COMPONENT
correspondiente a las terminales
que ha conectado a la unidad.
Oprima w/q para seleccionar la
4�
imagen.
Fecha de lmación
47
LSQT1098
Page 48

Panasonic Consumer Electronics Company,
Division of Panasonic Corporation of North America
One Panasonic Way, Secaucus, NJ 07094
Panasonic Puerto Rico, Inc.
Ave. 65 de Infanter’a, Km. 9.5, San Gabriel Industrial Park, Carolina,
Puerto Rico 00985
Panasonic Canada Inc.
5770 Ambler Drive, Mississauga, Ontario, L4W 2T3
© 2006 Matsushita Electric Industrial Co., Ltd.
P
LSQT1098 A
H0908HM0
C
QuickTime and the QuickTime logo are trademarks or registered
trademarks of Apple Computer, Inc., used under license.
 Loading...